
Shadows: Price for Our Sins: Chapter Eight: The Last Game Piece
Help Dylan save her friends with our Shadows: Price for Our Sins Walkthrough. The Lord of Darkness Samhain has exacted his revenge by enslaving the souls of Dylan's friends. Now, it's up to you to help her set things right and free them from their bonds with a little help from our detailed instructions, custom screenshots, and hints and solutions to the many challenges you'll face along the way.
General Info and Tips
Chapter One: Getting to the party
Chapter Two: Missing Friends and Locked Doors
Chapter Three: First Game Piece - The Groom
Chapter Four: Second Game Piece - The Nanny
Chapter Five: Third Game Piece - The Priest
Chapter Six: Fourth Game Piece - The Blacksmith
Chapter Seven: Fifth Game Piece
Chapter Eight: The Last Game Piece
Ask for help in the comments below!
Part I: The Miller
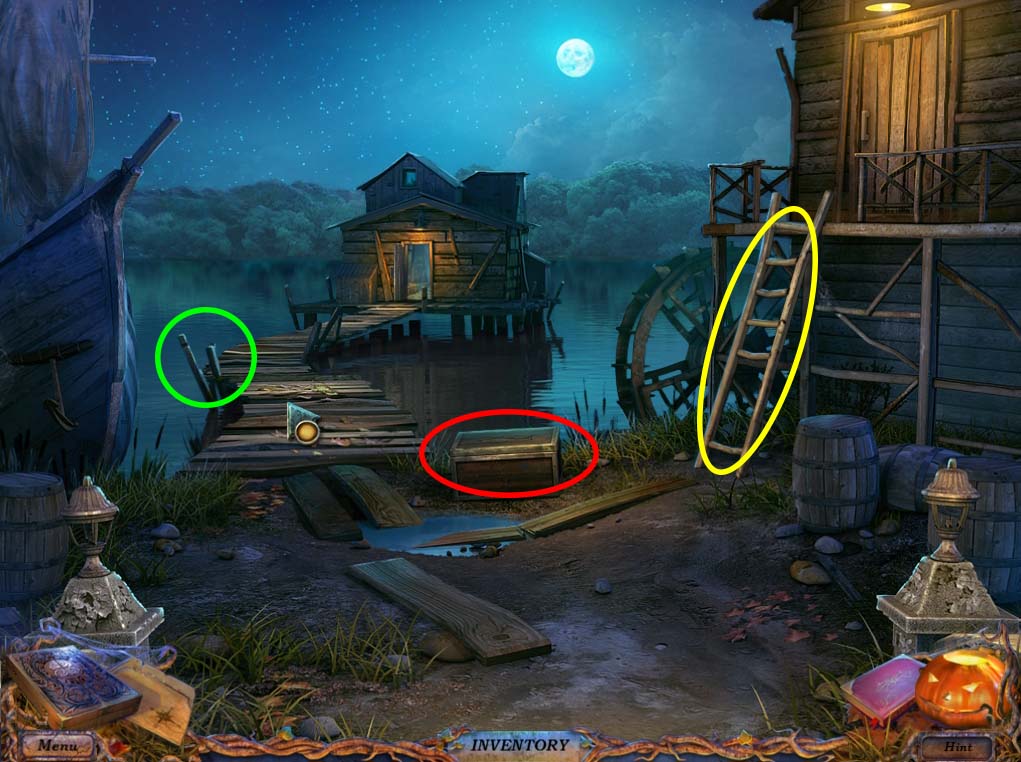
- With one final piece of the board game missing, head to the river BANK.
- Check the area that is circled in green below, and then use the SAW in your inventory on the wood poles to get wooden RUNGS.
- Inspect the BROKEN LADDER (circled in yellow) and use the RUNGS on it to be able to climb up the WATERMILL.
- Once inside, speak to the MILLER’S GHOST.
- When he disappears, inspect the TABLE (circled in green below) to find a few notes and a STAR PATTERN.
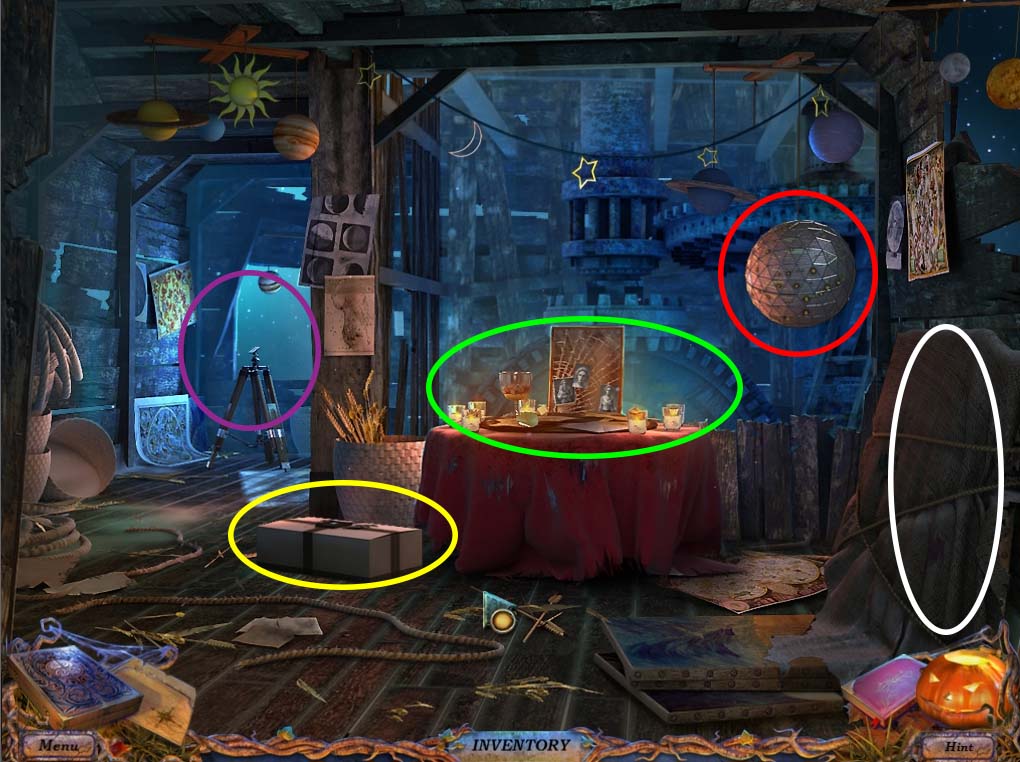
- Investigate the STAR GLOBE (circled in red above) and use the pattern you saw from the table to unlock it.
- Once it’s open, you’ll find a LOCK OF HAIR for your inventory.
- Use your SCISSORS on the COVERED PAINTING (circled in white in WATERMILL image above) to get a piece of CLOTH and reveal a mini game.
PAINTING MINIGAME
- The object of this game is to arrange and use the various items in the painting properly.
- The solution to this puzzle is shown step by step below.
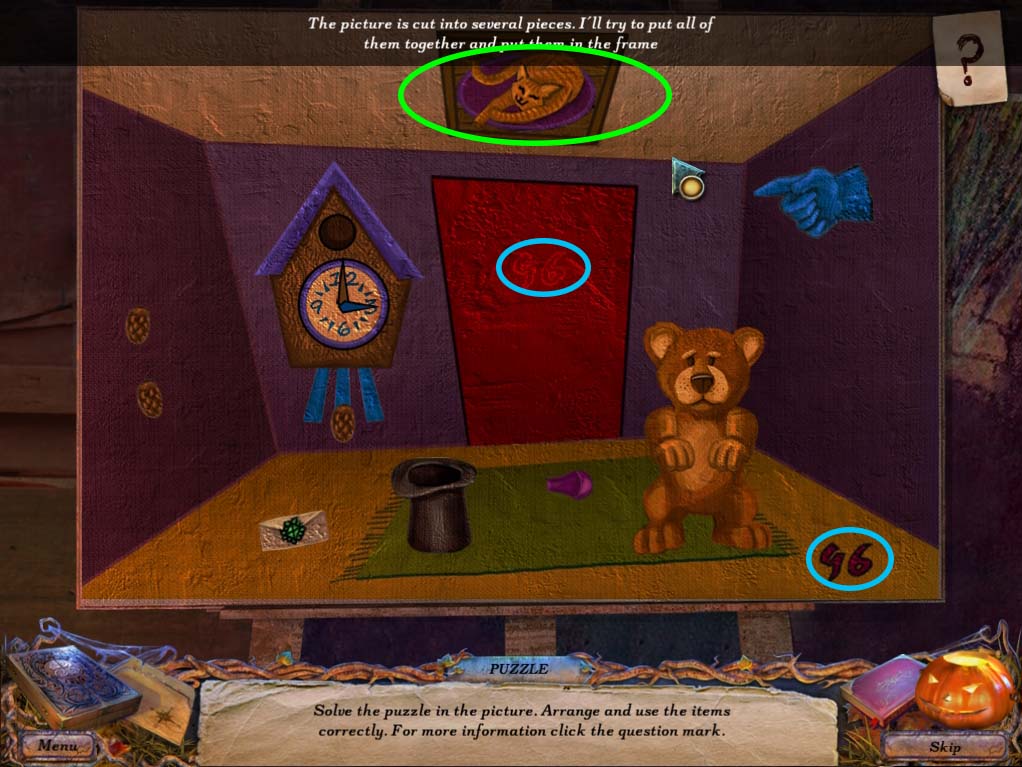
- Assemble the scattered pieces of the cat picture (circled in green above) and place the number 96 on the door (circled in blue above)
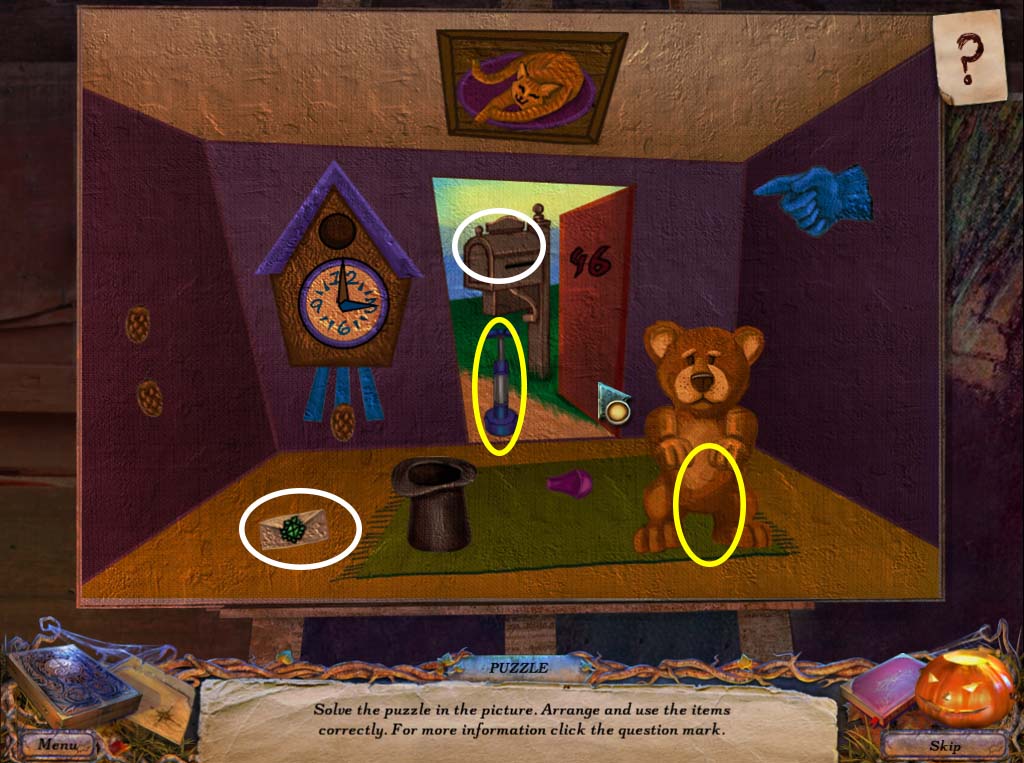
- Place the mail inside the mailbox (circled in white above) and take the pump and give it to the bear (circled in yellow above)
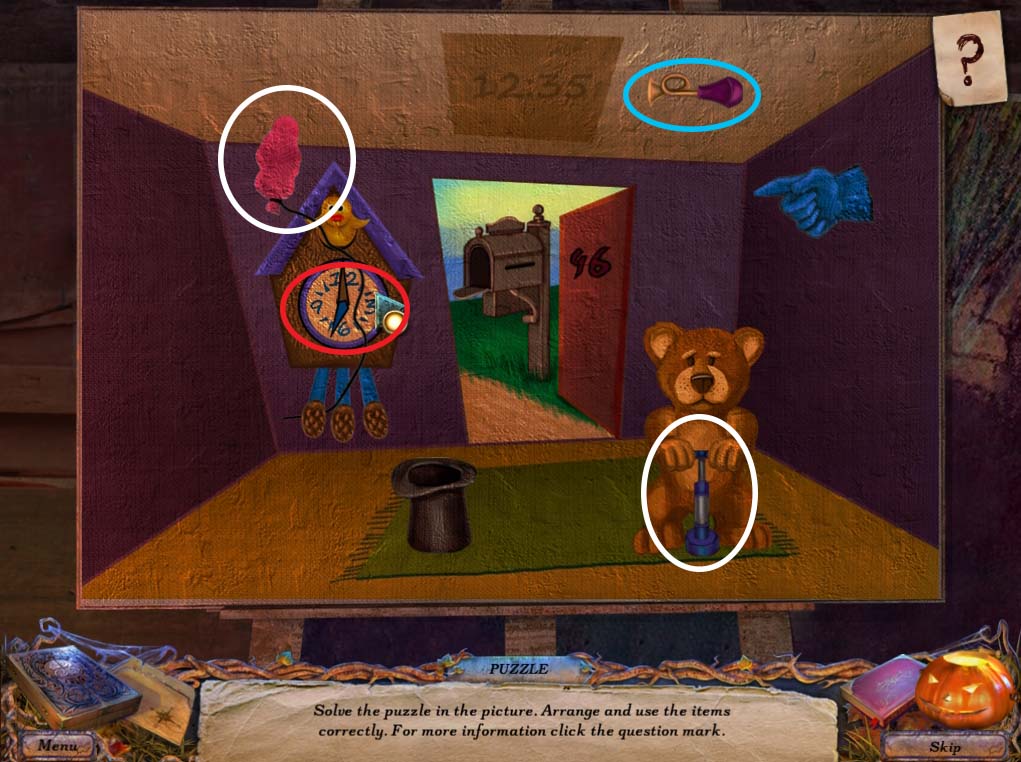
- The mailbox will reveal half a horn, take it and combine it with the other half and then use it on the cat painting (circled in blue above).
- This will reveal the time you need to adjust the cuckoo clock (circled in red) which will then reveal a cuckoo bird holding a balloon.
- Take the balloon and attach it to the pump (circled in white).
- The bear will start pumping until the balloon turns into a wand. Use it on the top hat (circled in green above) and it will reveal a FISH symbol for your inventory.
- Take the FISH symbol outside to the box on the BANK (circled in red on the river BANK image above) and use it to open the box.
- Inside, you’ll find another piece of DICE (3 of 4) and a DOUBLOON.
- Head back to the FISHERMAN’S HOUSE and investigate the TREASURE CHEST (circled in green below).
- Use the can of CLEANING POWDER and the CLOTH to reveal a coin slot.
- Drop the DOUBLOON in to open the chest.
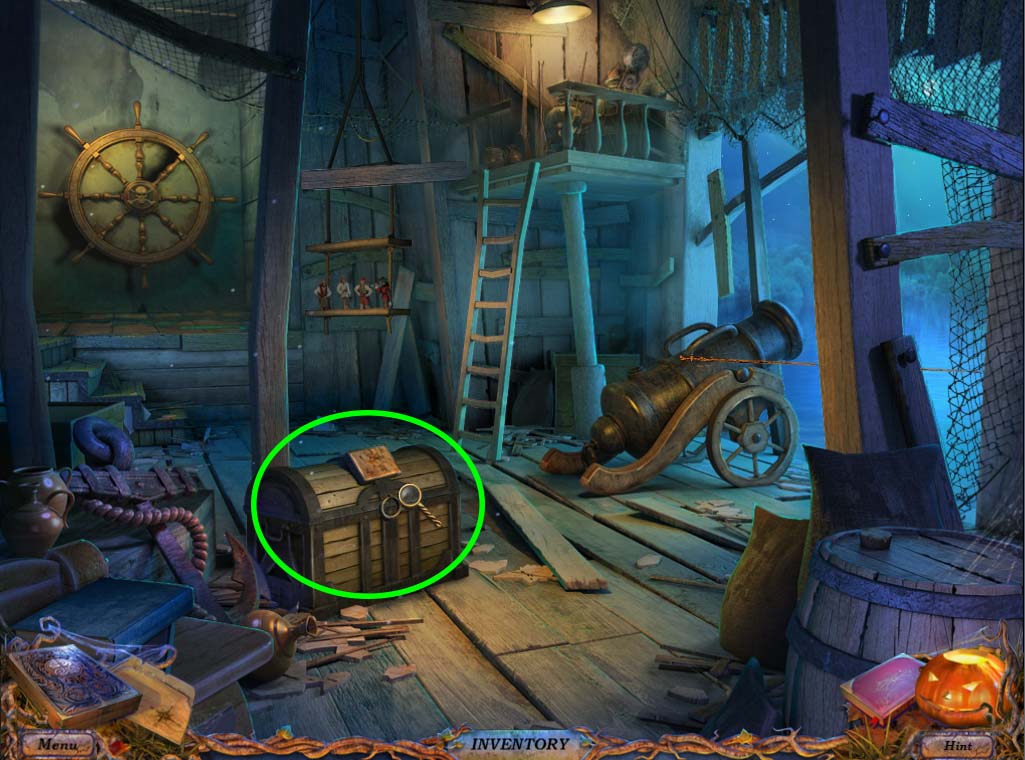
- Inside you’ll find a note, a STAMP and a POCKET WATCH for your inventory.
- Head back to the WATERMILL. Inspect the box which is circled in yellow in the WATERMILL image above.
- Use your STAMP to start another mini game.
STAMP MINI GAME
- The object of this puzzle is to arrange the tiles so that each vertical column matches the images on the first row.
- The tiles don’t need to be in any particular order as long as they match colors with the first row.
- Below is an image of the puzzle one move shy of being solved:
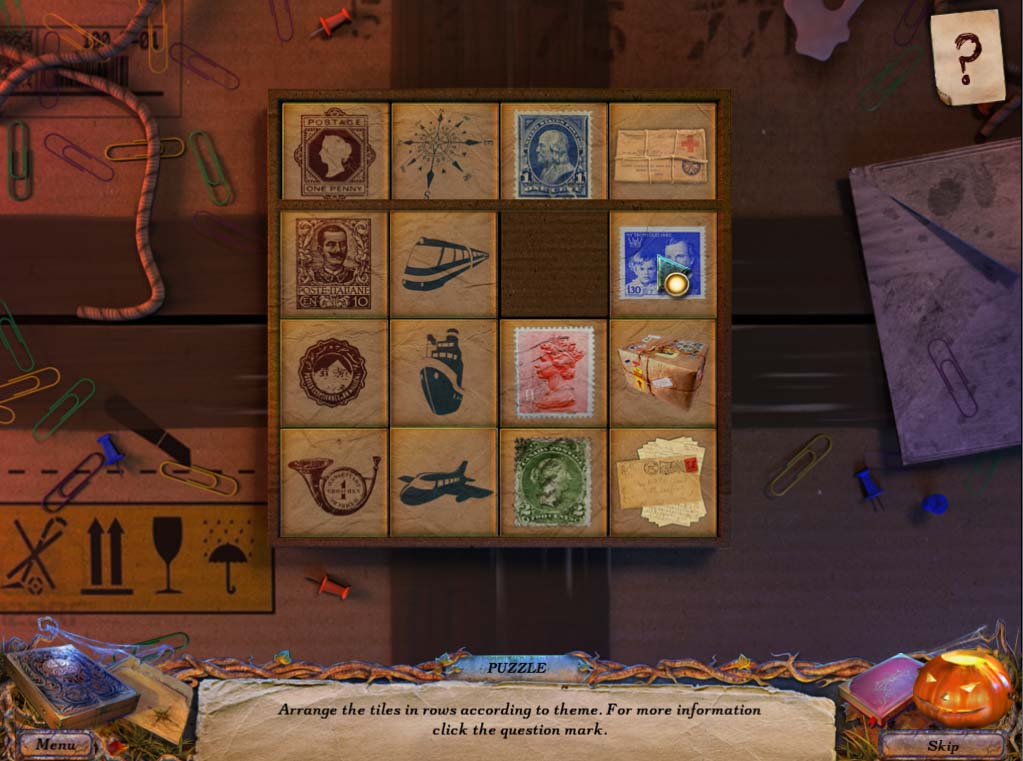
- Solving the puzzle will give you a SPYGLASS which you can use at the area marked by a violet circle in the WATERMILL image above.
- Doing so will start a cutscene which reveals the full scale of TALUTA’S treachery.
- After this is over, the MILLER hands you an AMULET HALF.
- You now have the key that will bring you to the heart of this darkness.
Part II: The Final Move
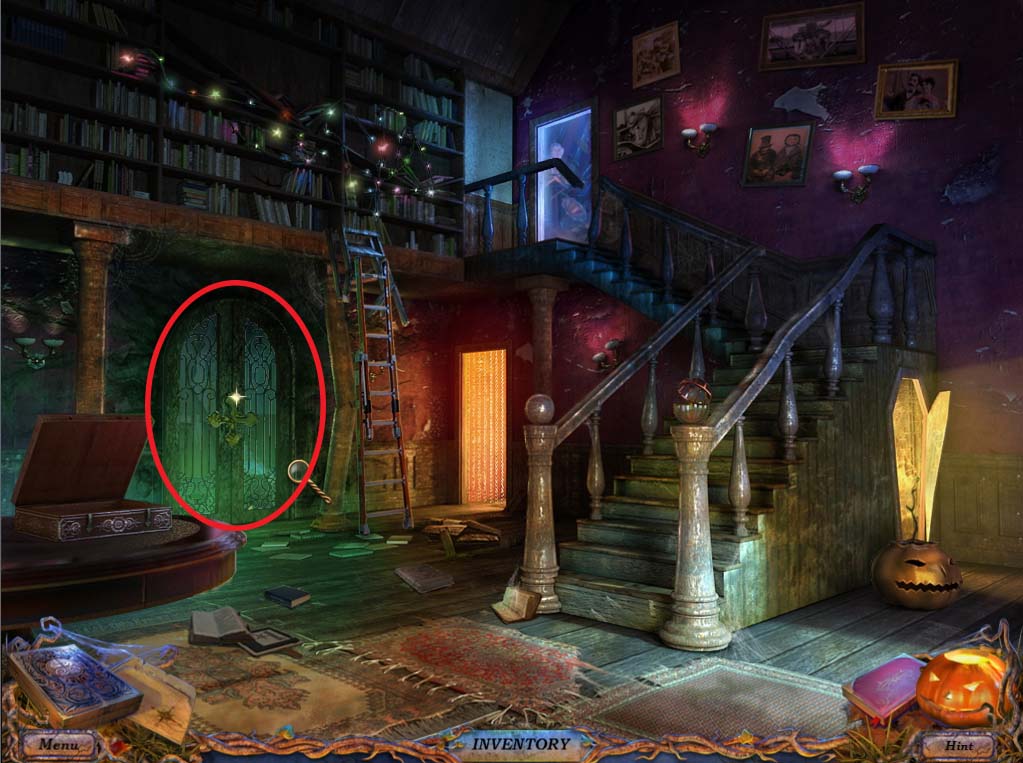
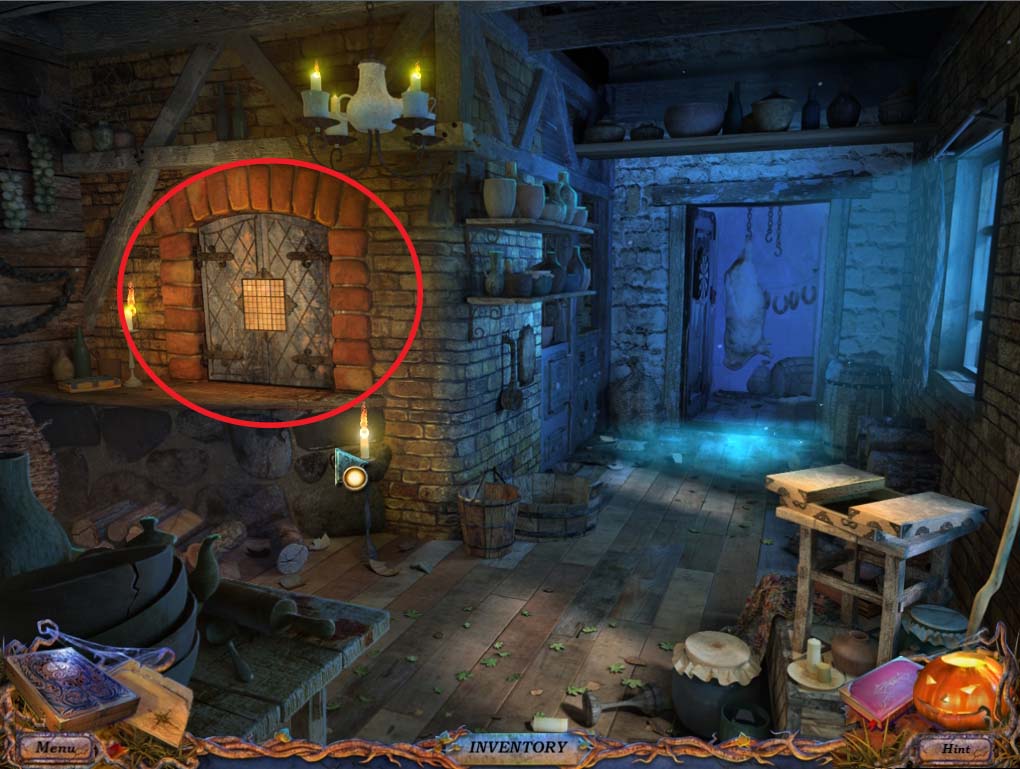
- With the AMULET HALF in your possession, head back to the house and onto the SECOND FLOOR area.
- Investigate the door (circled in red below) and use the AMULET HALF.
- With the final locked door open, prepare to enter this forbidding room.
- Before doing anything, inspect the area that is circled in green below.
- Pick up the last piece of DICE (4 of 4) and head back to the BAKERY.
- Inside the bakery, inspect the OVEN (circled in red below) to initiate one of the hardest puzzles in the game.
OVEN SUDOKU
- The object of this puzzle is to arrange the different dice so that no similar image exists horizontally, vertically or in a three by three square of each image.
- This is basically Sudoku, but instead of numbers it uses pictures, making it much harder.
- A solution for the puzzle is shown below:
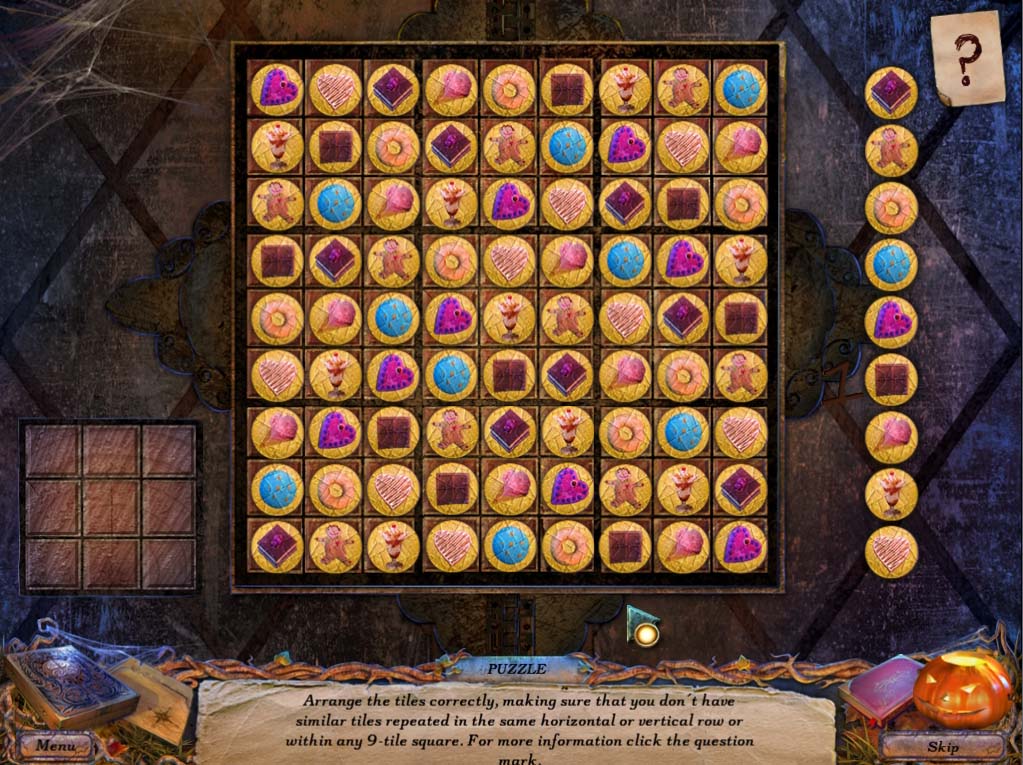
- With the puzzle solved, check inside the now open OVEN and grab the HEART and the GAME PIECE HALF.
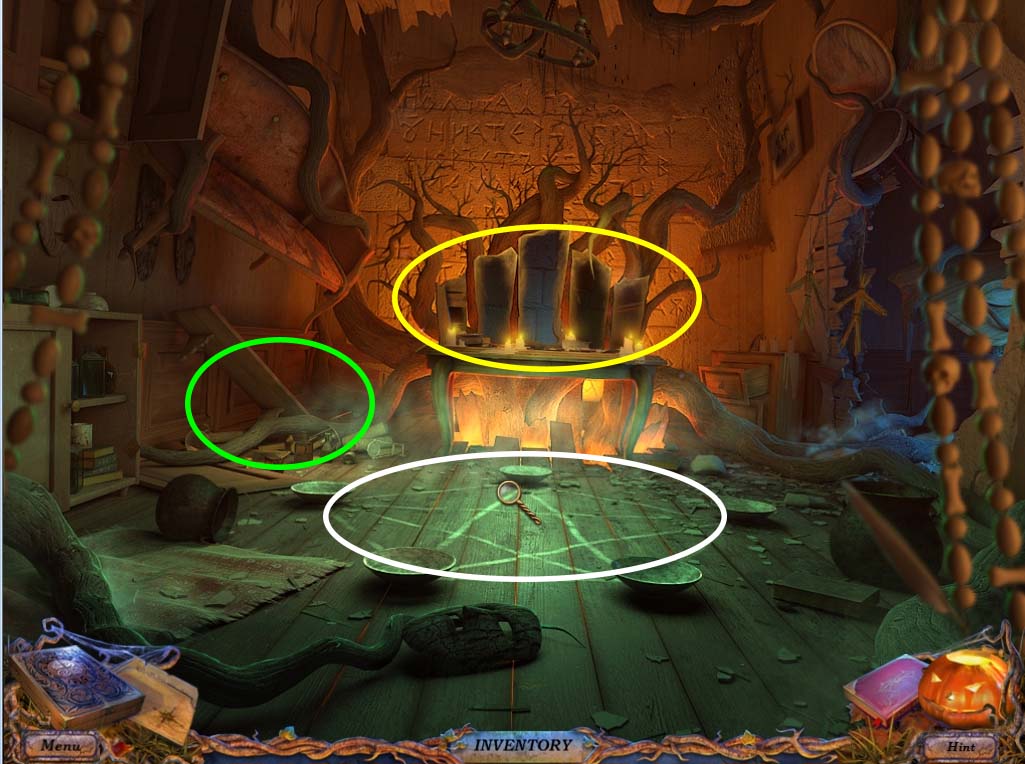
- Head back to the WITCH’S ROOM to perform the final ritual for the last missing game piece.
- Check the TABLE (circled in yellow in WITCH’S ROOM image above) to find TALUTA’S BROOCH and a few notes.
- Finally inspect the PENTAGRAM (circled in white in WITCH’S ROOM image above) to initiate tha final ritual.
-
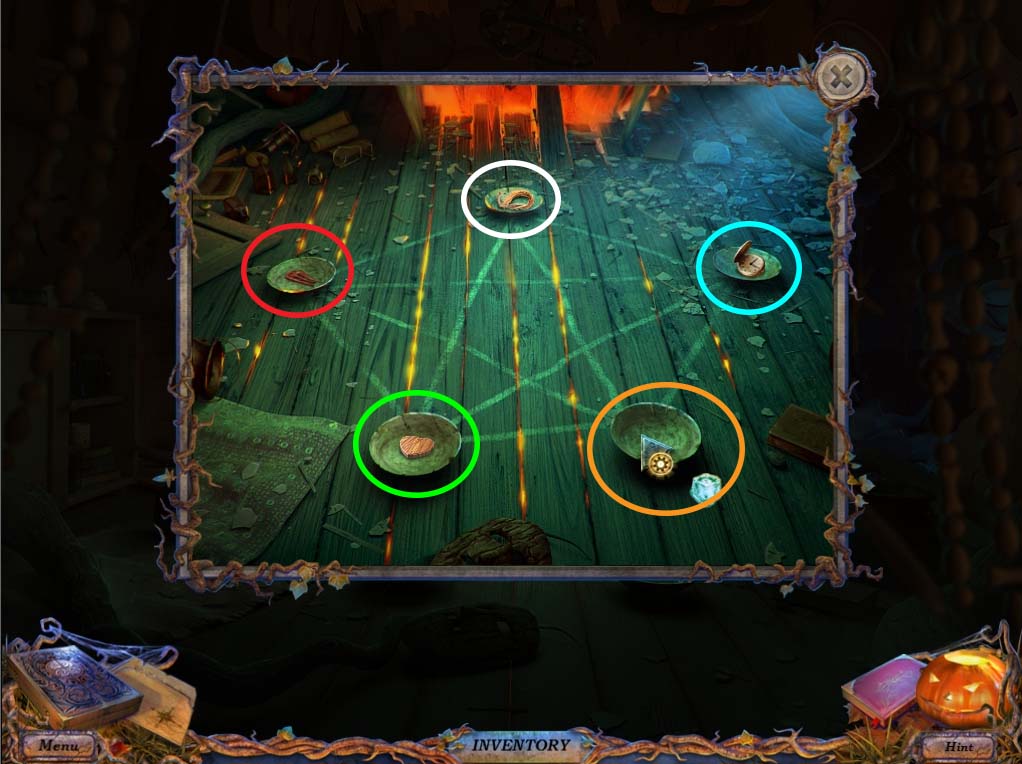
Assemble the various items you have left in the different containers as marked by circles:
- The BROOCH in the container circled in red
- The LOCK OF HAIR in the container circled in white
- The HEART in the container circled in green
- The ICE in the container circled in orange
- And the POCKET WATCH in the container circled in blue
- With the Final ritual done, a great glow emanates from the PENTAGRAM. After the flash subsides, you find some notes and a VOODO DOLL in the center of the ritual.
- Take the VODOO DOLL and JACK along with the NANNY once again appear before you.
- They give you their most sincere thanks, and then ask you to give them the doll. Do so.
- With this the final GAME PIECE HALF is now in your possession.
- Assemble it on the last empty slot.
- With this, the final puzzle is now before you.
- Assemble the different game pieces according to where you met them first.
- A guide to the final puzzle’s solution is below:

- As you place the last board game piece in its proper place, the last cutscene of the game begins.
- Finally this long dark night has come to an end.
The End. Congratulations! You've completed Shadows: The Price for Our Sins!
General Info and Tips
Chapter One: Getting to the party
Chapter Two: Missing Friends and Locked Doors
Chapter Three: First Game Piece - The Groom
Chapter Four: Second Game Piece - The Nanny
Chapter Five: Third Game Piece - The Priest
Chapter Six: Fourth Game Piece - The Blacksmith
Chapter Seven: Fifth Game Piece
Chapter Eight: The Last Game Piece
Ask for help in the comments below!
Chapter One: Getting to the party
Chapter Two: Missing Friends and Locked Doors
Chapter Three: First Game Piece - The Groom
Chapter Four: Second Game Piece - The Nanny
Chapter Five: Third Game Piece - The Priest
Chapter Six: Fourth Game Piece - The Blacksmith
Chapter Seven: Fifth Game Piece
Chapter Eight: The Last Game Piece
Ask for help in the comments below!