
Shadows: Price for Our Sins: Chapter Seven: Fifth Game Piece
Help Dylan save her friends with our Shadows: Price for Our Sins Walkthrough. The Lord of Darkness Samhain has exacted his revenge by enslaving the souls of Dylan's friends. Now, it's up to you to help her set things right and free them from their bonds with a little help from our detailed instructions, custom screenshots, and hints and solutions to the many challenges you'll face along the way.
Chapter One: Getting to the party
Chapter Two: Missing Friends and Locked Doors
Chapter Three: First Game Piece - The Groom
Chapter Four: Second Game Piece - The Nanny
Chapter Five: Third Game Piece - The Priest
Chapter Six: Fourth Game Piece - The Blacksmith
Chapter Seven: Fifth Game Piece
Chapter Eight: The Last Game Piece
Ask for help in the comments below!
Part I: The Gardener
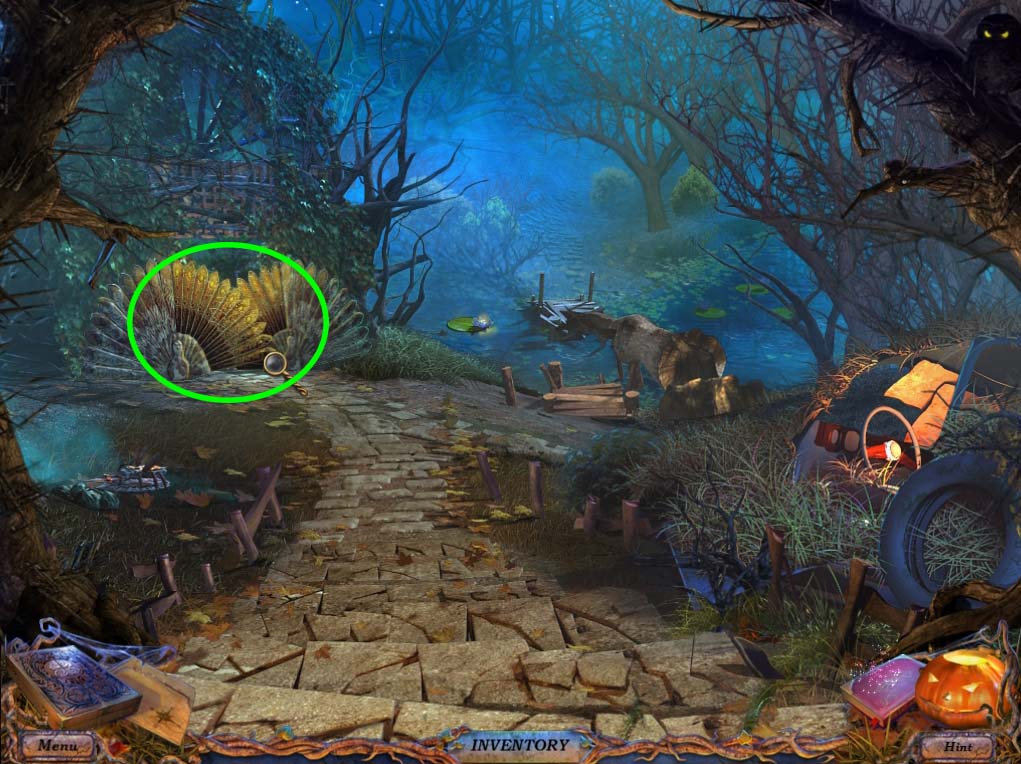
- With the soul of the Blacksmith released, and with three rubies now in your possession, head to the GARDEN area once again and investigate the entrance to the GREENHOUSE (circled green below).
- Use the RUBIES on the empty sockets to open the gate.
- Once inside, talk to the ghost of the GARDENER and then investigate the GEISHA MANNEQUIN (circled in yellow below).
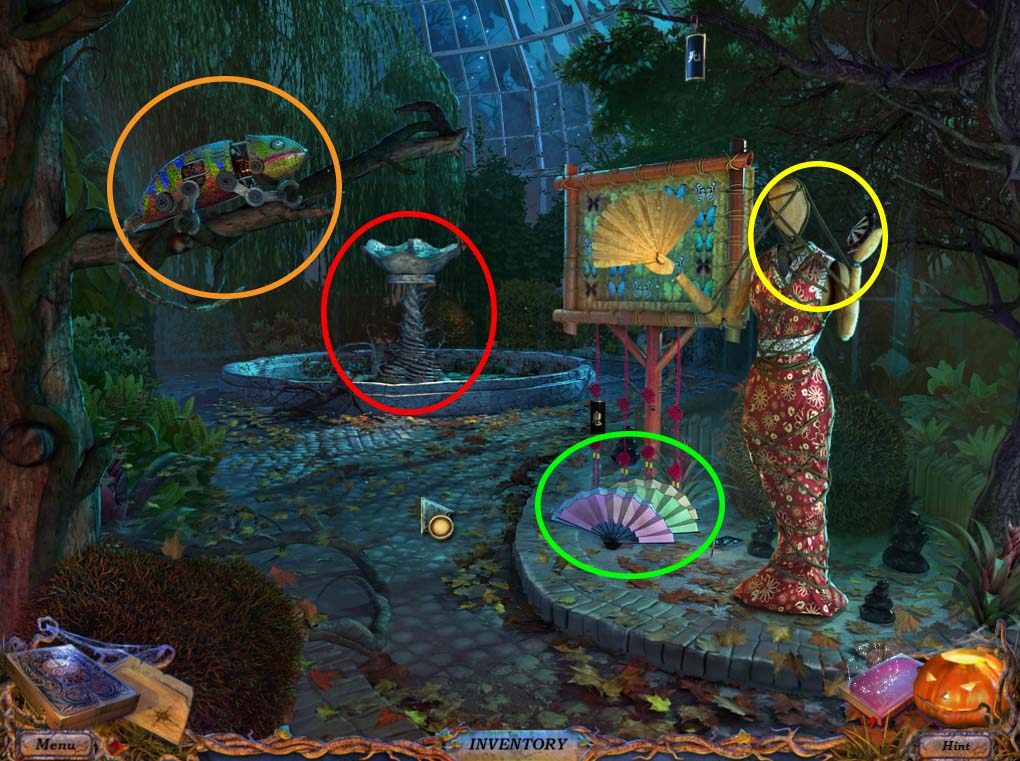
- Take the piece of dartboard on its hand (it goes to the scrapbook with the rest) and then use the FAN from your inventory on the mannequin.
- It will reveal a simple puzzle behind it.
GREENHOUSE PUZZLE
- The object of this puzzle is to arrange the butterflies so that they match the color of the arrows above them.
- Whenever you match a vertical row of butterflies they disappear, so you don’t have to match all of them at the same time.
- You can move the butterflies either horizontally or vertically by using the arrows on the side of the puzzle.
- A sample of the puzzle progress is shown below:

- Finishing this puzzle will give you a TICKET. Head all the way back to the house until you reach the HALL (or better yet, use the MAP to travel there instantly).
- Investigate the TICKET COLLECTOR and use the TICKET.
- You will now be able to enter the MOVIE THEATER.
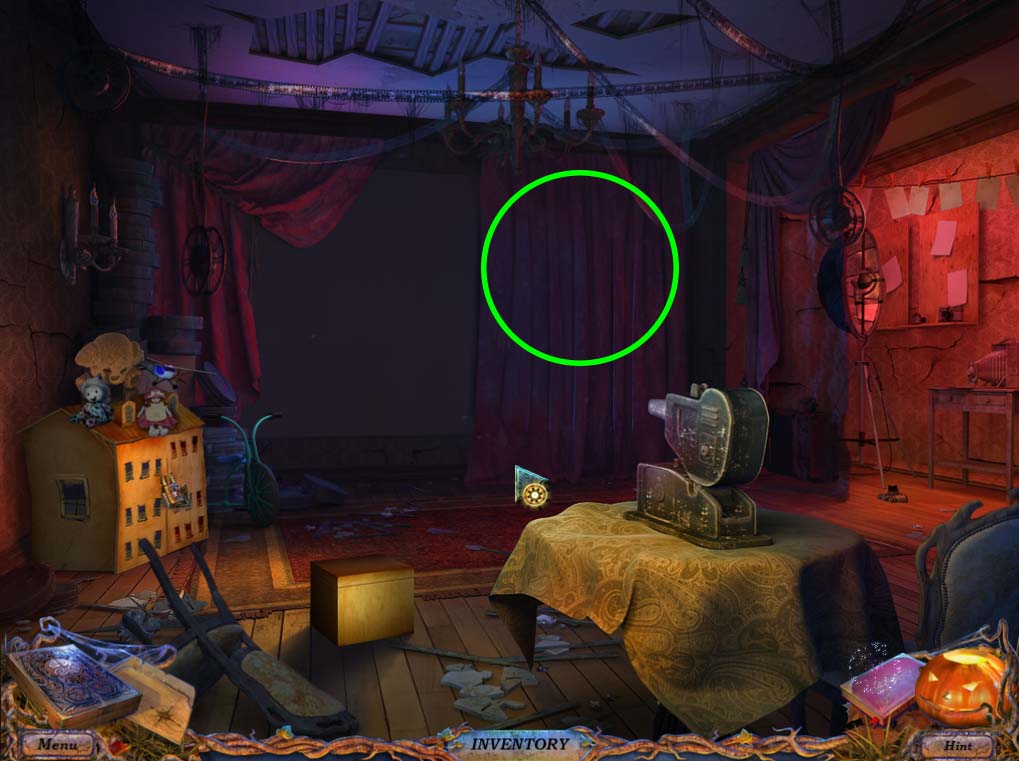
- Use the CHORD in your inventory to part the CURTAINS (circled in green above) and get the NET from behind it.
- Return to the GREENHOUSE and investigate the FOUNTAIN (circled in red on the GREENHOUSE image) and use your NET to fish out a SUN symbol.
- Head back to the PAVILLION area and check the STATUE once again (circled in green below) put the SUN symbol inside the box that the statue is holding and close it. It will transform into a STAR symbol, and the PAVILLION PUZZLE should once again be activated

PAVILLION PUZZLE TWO
Black objects
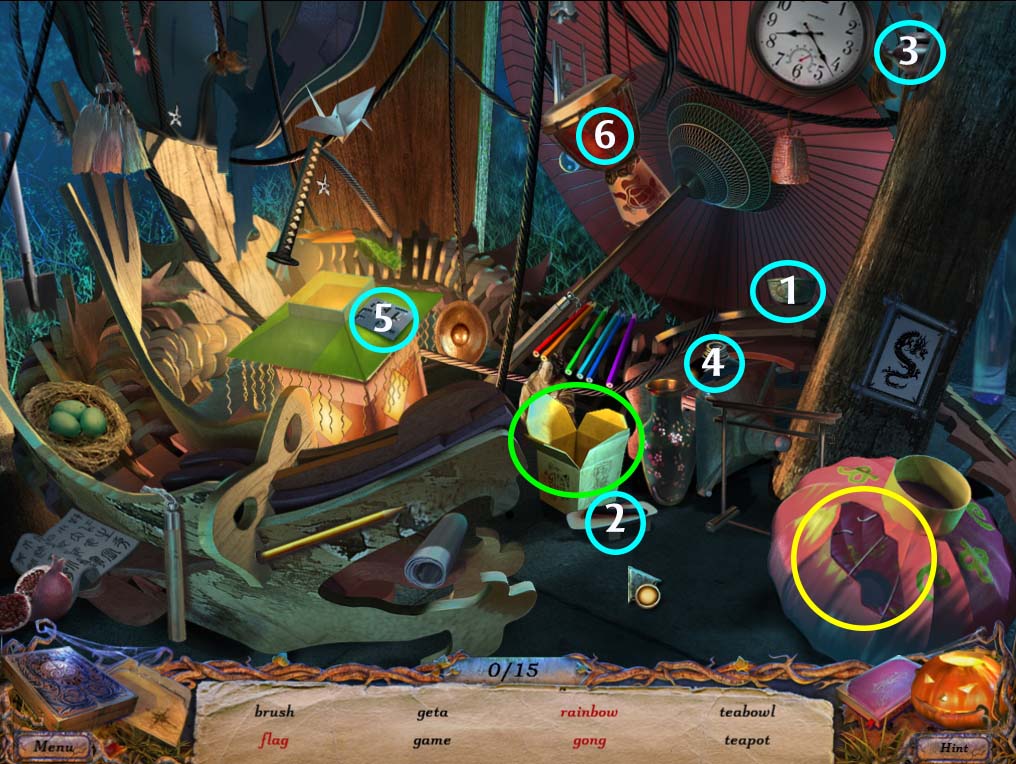
- 1. Teabowl
- 2. Geta
- 3. Teapot
- 4. Ink
- 5. Game
- 6. Drum
- Check the bento box (circled in green) to find the Samurai and bamboo
- Check the lantern (circled in yellow) to find the brush and comb
Red objects
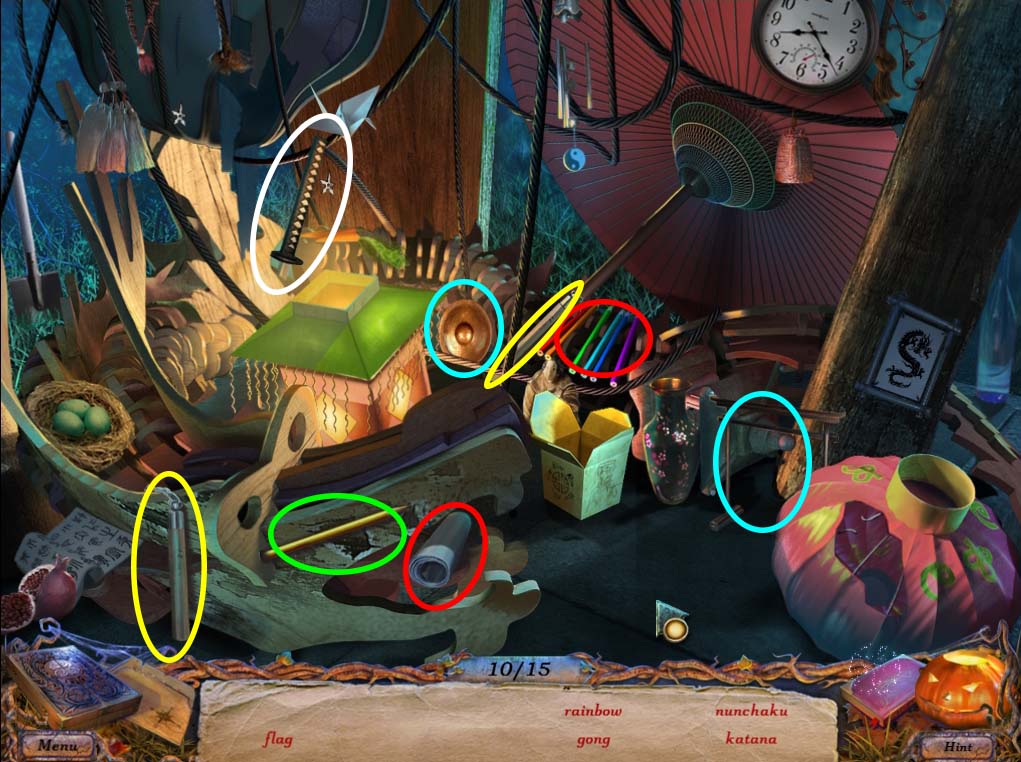
- Combine the colored pencils (circled in green) to get the rainbow
- Unfurl the flag (circled in red)
- Fix the gong (circled in blue)
- Fix the nunchaku (circled in yellow)
- Draw the Katana (circled in white)
- Finishing this puzzle will give you a BRUSH and INK bottle
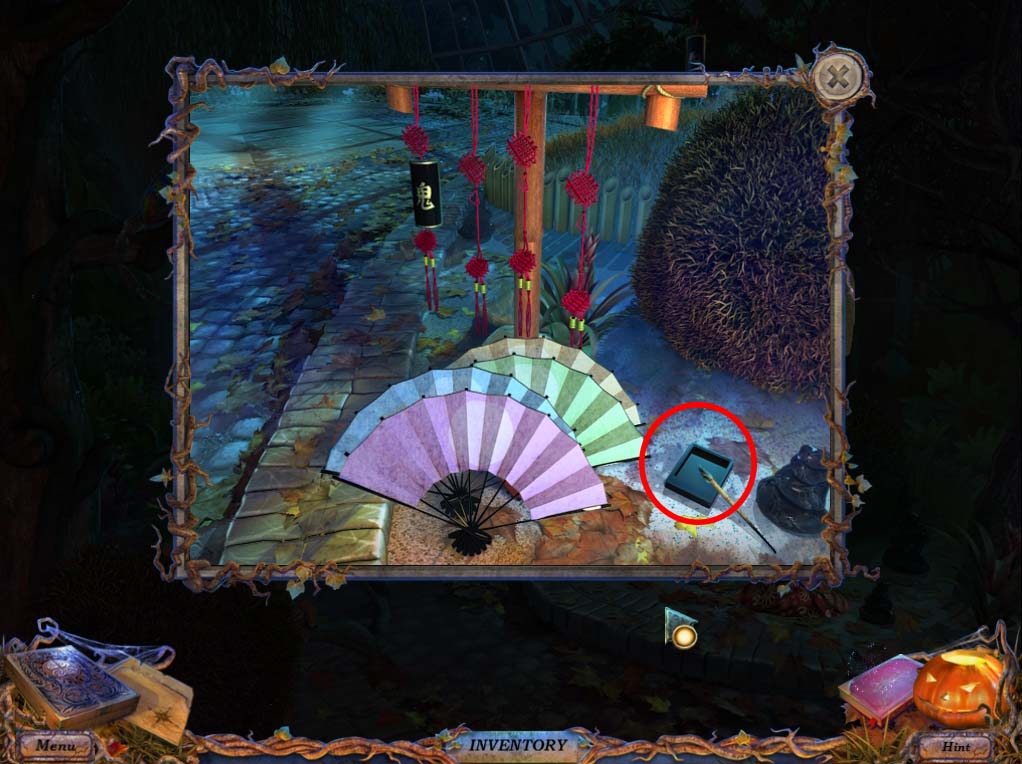
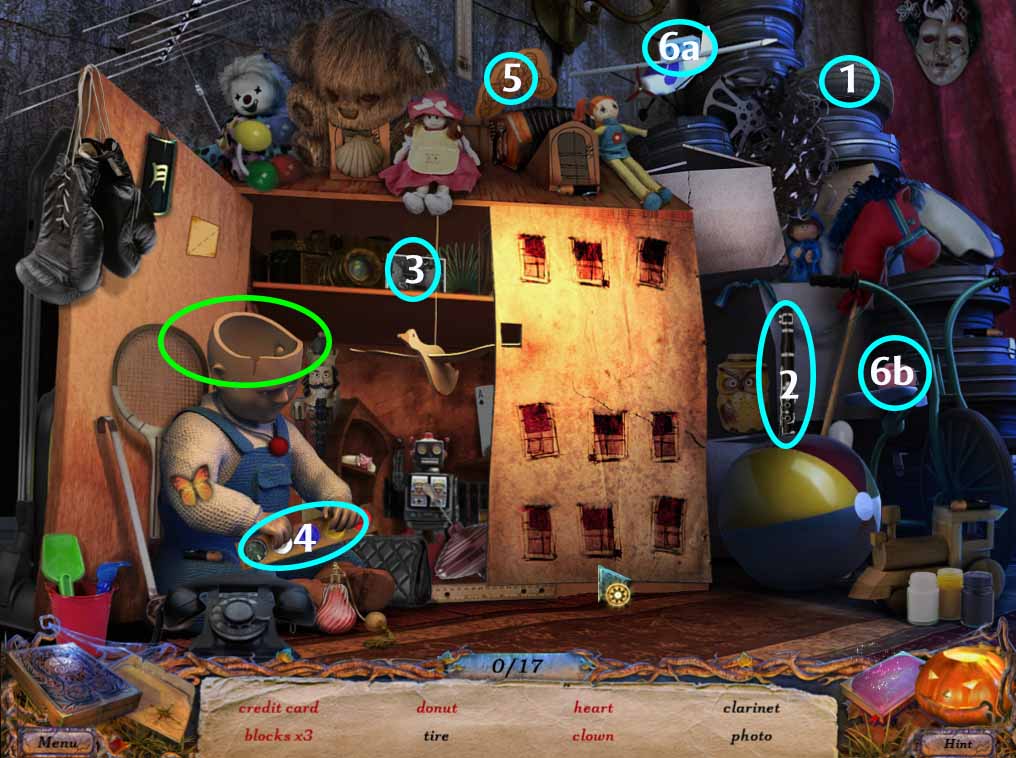
- Head back to the GREENHOUSE and check the FANS (circled in green on the GREENHOUSE image above), use the INK bottle on the INK STONE (circled in red below) and another GAME PIECE HALF will be revealed.
- Head back to the MOVIE THEATER and check the area circled in white below.
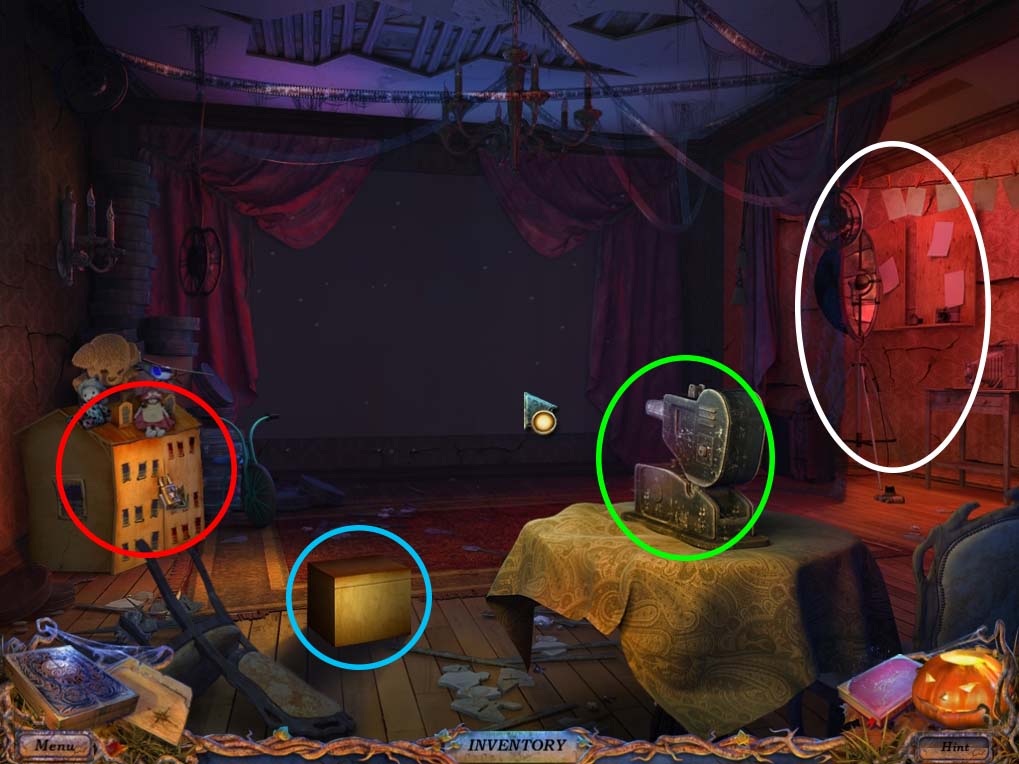
- You will see several mutilated images, and if you browse through them by clicking, you’ll eventually reveal another GAME PIECE HALF.
- Combine them on the BOARD GAME as shown below:
- You will get some DARTS after putting the GAME PIECE back on the board.
- Investigate the DOLL HOUSE (circled in red on the MOVIE THEATER image above), take the third dartboard note, and use the STAR symbol to open the padlock.
- This will activate the MOVIE THEATER HIDDEN OBJECT PUZZLE.
MOVIE THEATER HIDDEN OBJECT PUZZLE
Black objects
- 1. Tire
- 2. Clarinet
- 3. Photo
- 4. Palette
- 5. Smoke
- 6. Blocks x 2 (6a, 6b)
- Check inside the doll’s head (circled in green) to find the bulb
Red objects
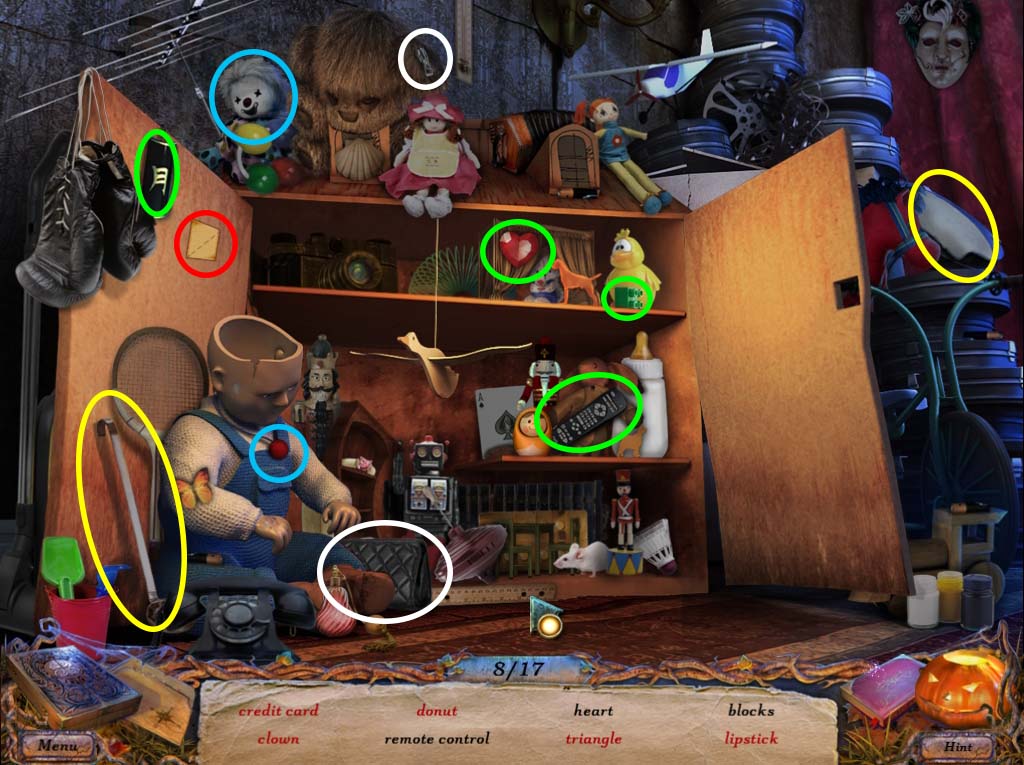
- Open the dollhouse to find the block, the Japanese character, the heart and the remote control (circled in green)
- Fold the piece of paper (circled in red) to make a triangle
- Use the mold on the dough (circled in yellow) to make a doughnut
- Put the clown nose on the clown (circled in blue)
- Put the zipper on the purse (circled in white) to find the credit card and lipstick inside
- The Puzzle will reward you with a JAPANESE CHARACTER and a PALLETE. With these in your inventory, head back to the GREENHOUSE.
- Investigate the CHAMELEON (circled in orange on the GREENHOUSE image above) and place the BRUSH and PALLETE on the tree trunk. This will start another mini game
CHAMELEON MINI GAME
- The object of this mini-game is to color in the chameleon using a combination of colors. The solution below describes the appropriate combinations for each.
- All green areas – Blue + yellow + yellow
- Pink areas = Red + white
- Light blue areas = blue + white
- Violet areas = red + blue
- Dark blue areas = blue
- Dark red areas = red
- The image below shows the puzzle almost solved with one violet area left to color in:
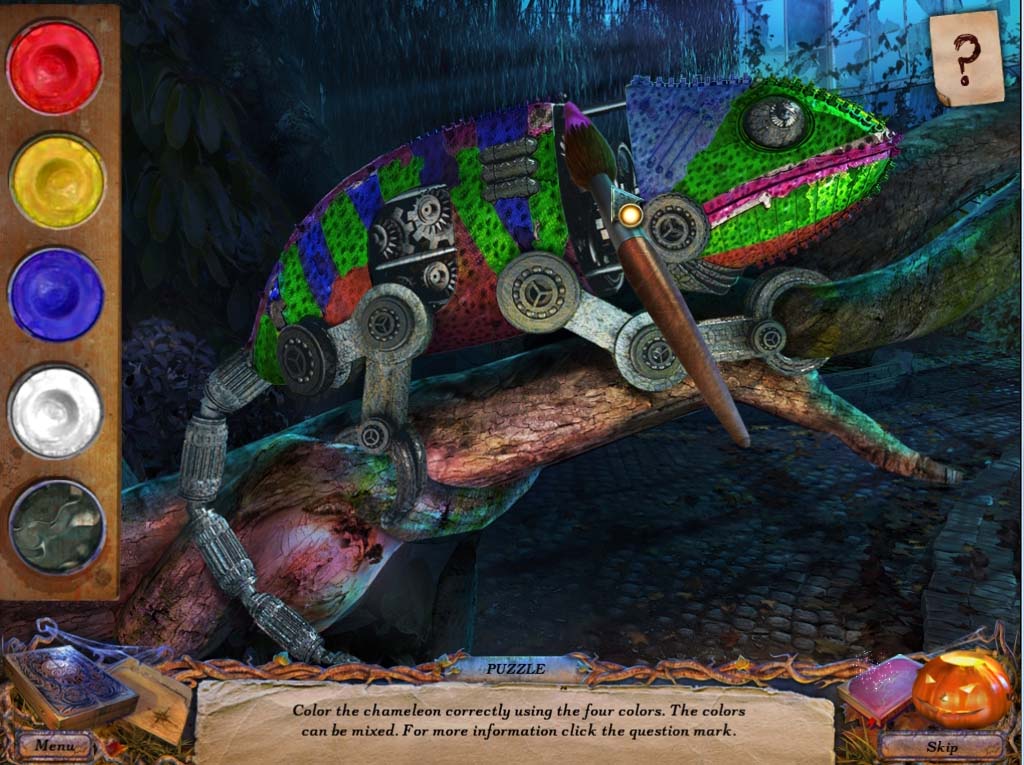
- Once finished, the chameleon will grab the JAPANESE CHARACTER from the other tree and allow you to put it in the inventory.
- Check the FANS again and use the two JAPANESE CHARACTERS on your inventory.
- This will reveal a fourth JAPANESE CHARACTER you can use to finish this puzzle.
- Read the note and take the HYPNOTIC RECIPE to see another cutscene.
- Afterwards, give the HYPNOTIC RECIPE to the GARDENER to free her soul and receive a BELL.
Part II: The Baker
- Go back to the MOVIE THEATER and investigate the box (circled in blue in MOVIE THEATER image above) use the BELL from your inventory to start another mini-game
- JACK IN THE BOX PUZZLE
- The object of this puzzle is to arrange the bells to the appropriate side of the hat. This is a rather hard puzzle, and to solve it follow the moves below by moving the colored bell (violet, blue, yellow, green or red) to the given direction (left, right, up, down, up right, up left, down right or down left).
- Violet right / Green down / Violet up / Red left / Green right / Violet down right / Blue down / Red up / Green left / Violet up right / Yellow right / Blue left / Red down / Green up / Yellow up / Blue right / Red left
- By this time you should end up with something like this:
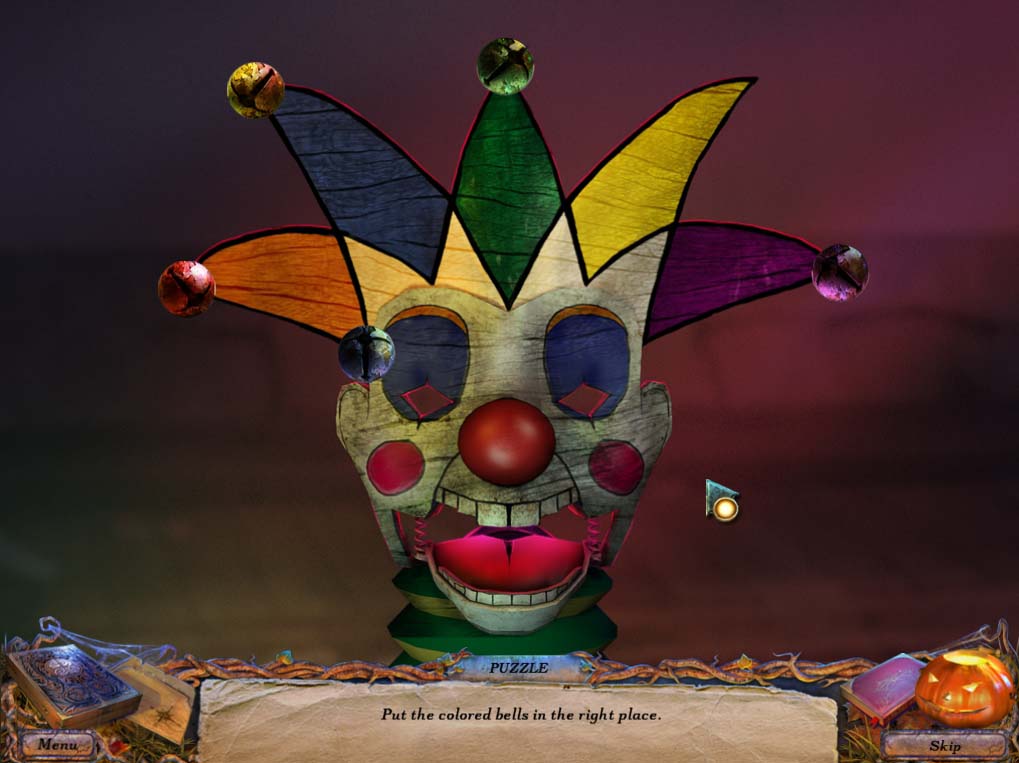
- Continue by doing: Yellow right / Yellow right / Blue up and the puzzle should be solved. The jack in the box will open its mouth and give you a LENS. Investigate the CAMERA (circled in green in MOVIE THEATER image above) and use the SLIDES and the LENS. Click on the CAMER several times to see the connection between your friend SAMANTHA and the servant TALUTA and find the key to the FAN PUZZLE in the STABLE (it will be recorded in your SCRAPBOOK).
- Head back to the STABLE and investigate the FAN PUZZLE. Move the RED LANCER to the CAT and the BLUE LANCER to the BUTTERFLY to solve the puzzle.
- Once this is done, it will reveal a hidden object puzzle
STABLE HIDDEN OBJECT PUZZLE
Black objects
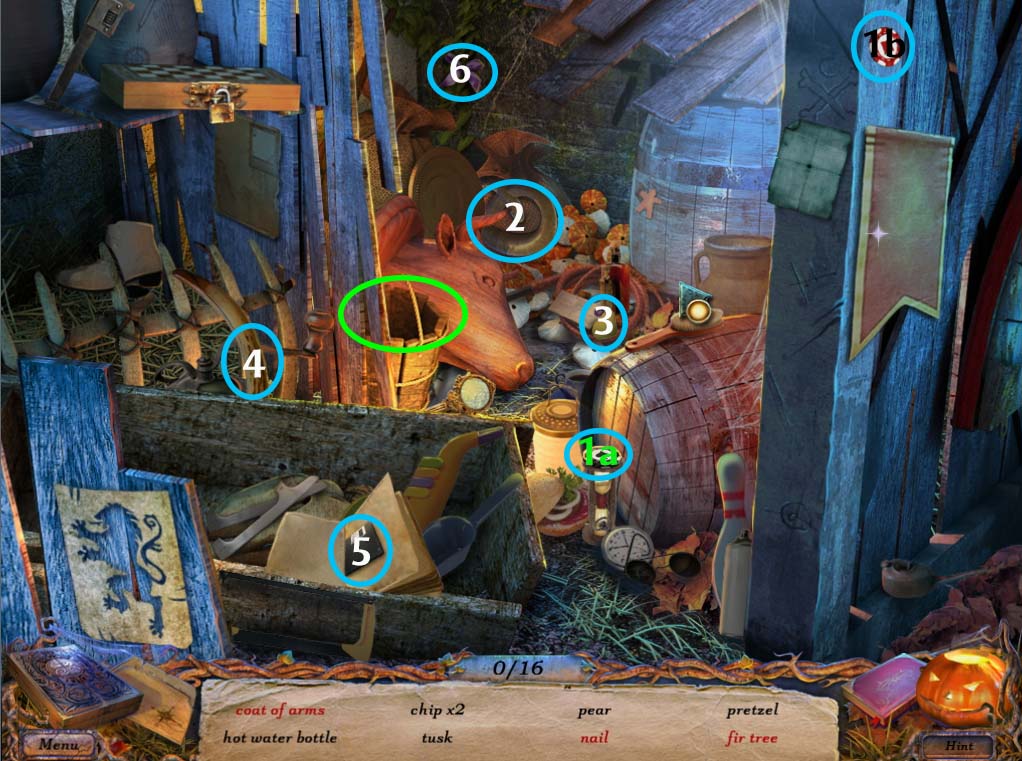
- 1. Chips x 2 (1a, 1b)
- 2. Pretzel
- 3. Pear
- 4. Tusk
- 5. Floppy disc
- 6. Ribbon
- Check inside the bucket (circled in green) to find the ghost shaped salt shaker and the hot water bottle
Red objects
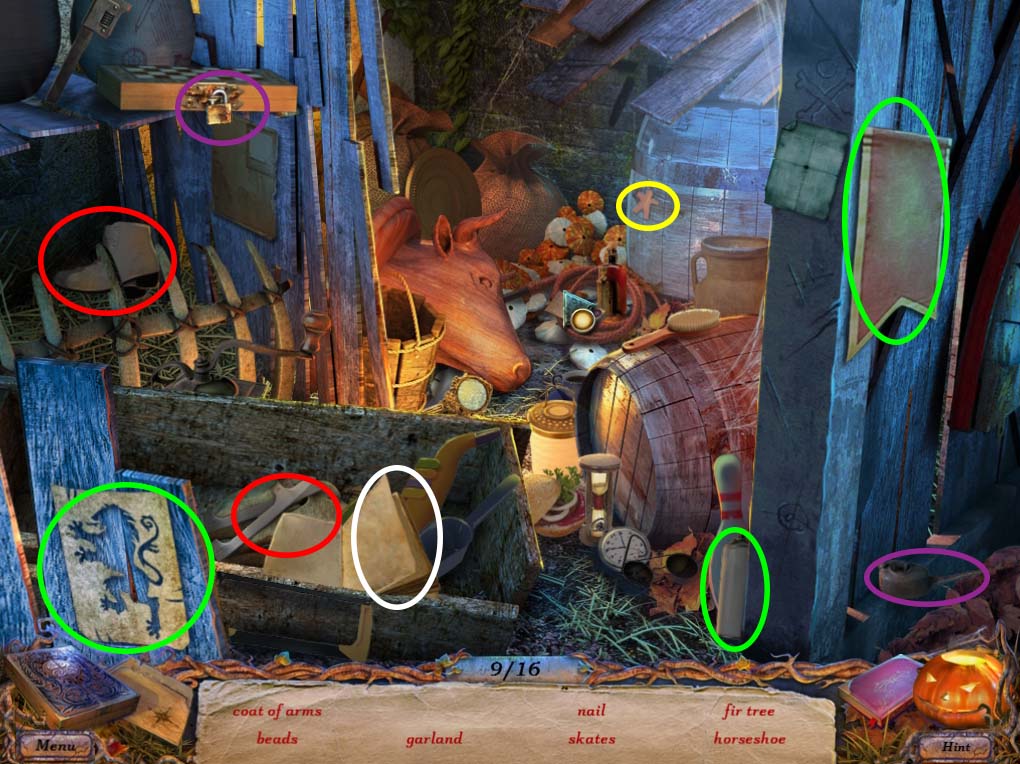
- Take the stencil and the can of paint, combine it with the flag (circled in green) to get a coat of arms. Also, take the fir tree underneath
- Fix the skates (circled in red)
- Reveal the garland (circled in yellow)
- Turn the pages (circled in white) to find the beads
- Use the oil can on the lock (circled in violet) to reveal the nail and the horseshoe.
- Finishing the puzzle will reward you with a SALT SHAKER (1 of 2) and a PRETZEL.
- With these on hand, head back to the FIELD area.
- Check the SIGNBOARD and use the PRETZEL on it. This should open the door to the BAKERY.
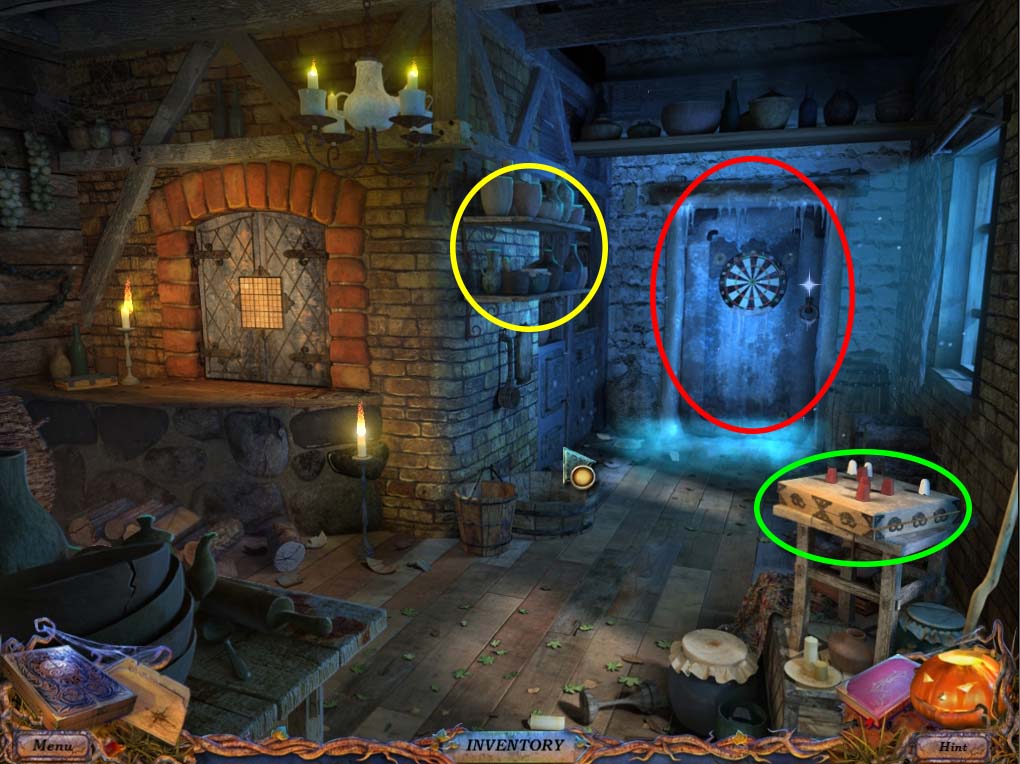
- Use the DARTS on the DARTBOARD (circled in red above) to reveal the BAKERY HIDDEN PUZZLE
BAKERY HIDDEN PUZZLE
Black objects
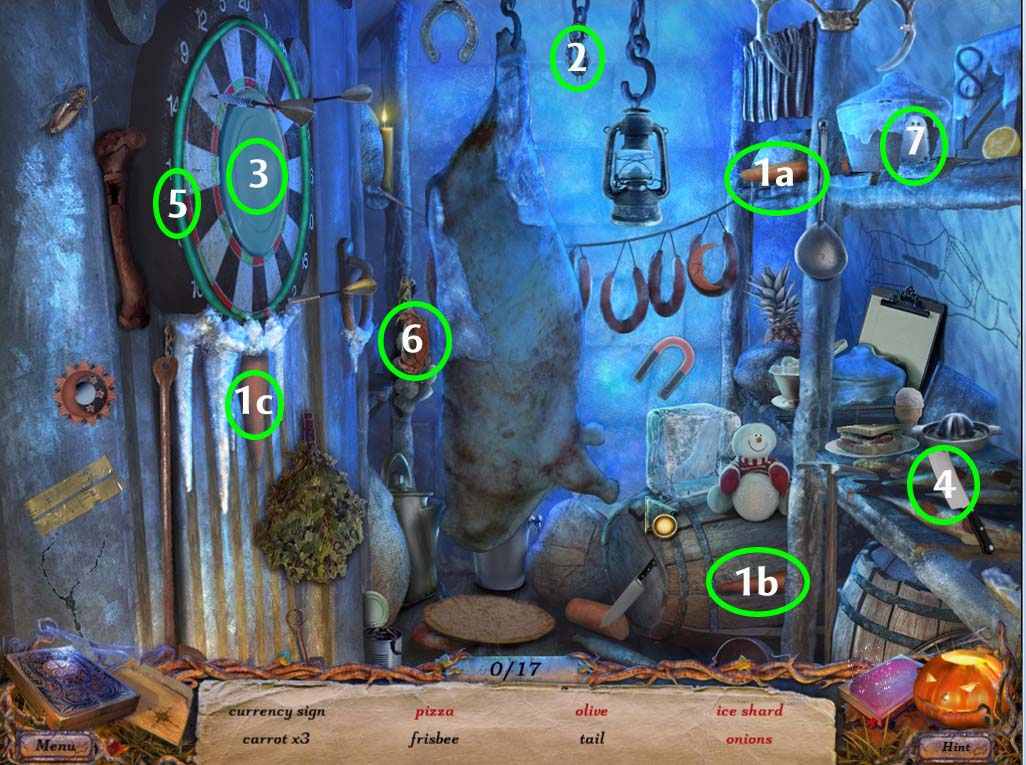
- 1. Carrot x 3 (1a, 1b, 1c)
- 2. Currency sign
- 3. Frisbee
- 4. Tail
- 5. Hula hoop
- 6. Crab
- 7. Salt shaker
Red objects

- Slice the pepperoni and place it on the dough (circled in green) to make a pizza
- Combine the symbols circled in red to make night and day
- Turn symbol on its side (circled in white) to get infinity symbol
- Take the lemon and put it in juicer (circled in orange) to get lemon juice
- Use the pick on the ice block (circled in yellow) to get ice shard
- Move the pig (circled in pink) to find the onions behind it
- Finally, use the candle on the pot lid (circled in violet) and look inside to find an egg and an olive
- After the puzzle is solved, you will get a SALT SHAKER (2 of 2) and an ICE CUBE
- Investigate the PUZZLE BOARD (circled in green on BAKERY image above) and use the SALT SHAKERS to start another puzzle
SALT SHAKER PUZZLE
- The object of this game is to place either ghost or devil salt shakers corresponding to the color and numbers adjacent to the square, kind of like reverse minesweeper.
- A solution to the puzzle is shown below, with the last GHOST SALT SHAKER to be placed:
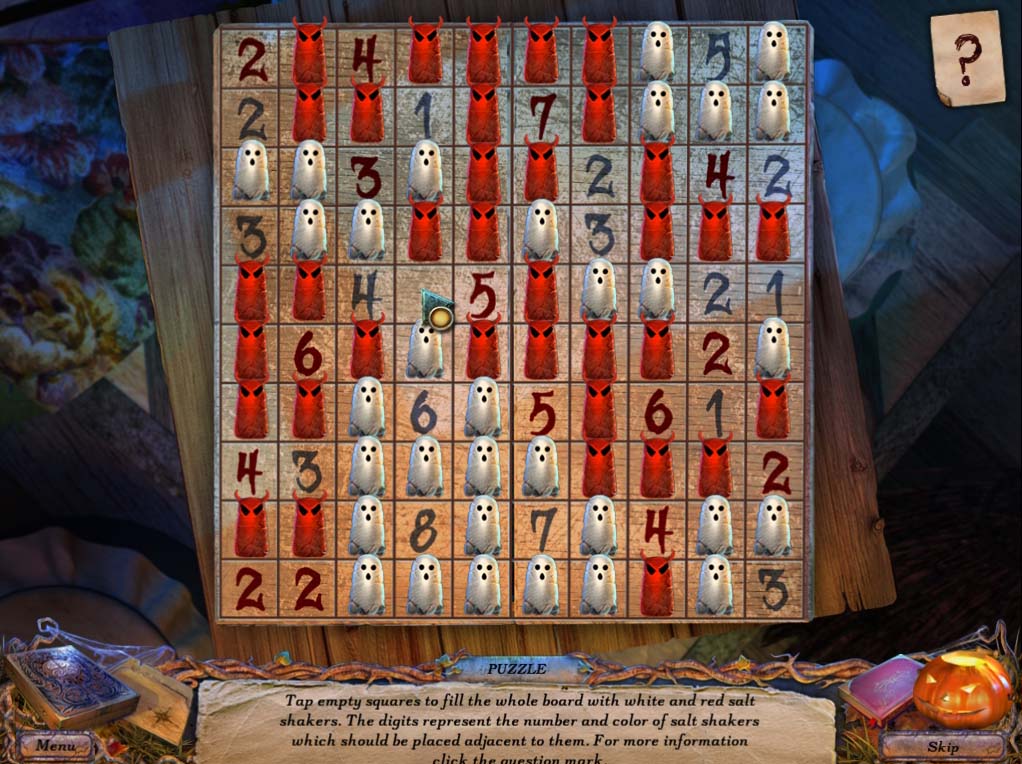
- Solving this puzzle opens the puzzle board revealing a note (and another cutscene).
- You will find a bottle of HYPNOTIC and a WOODEN BOLT inside as well.
- Talk to the BAKER once more and give her the HYPNOTIC.
- She’ll thank you for freeing her by giving you a ROD. Before you leave, check the shelves (circled in yellow in BAKERY image above) and move the jars away to reveal a DIECE piece (1 of 4).
Part III: The Fisherman
- Head to the FORGE and use the ROD on the area circled in blue below.
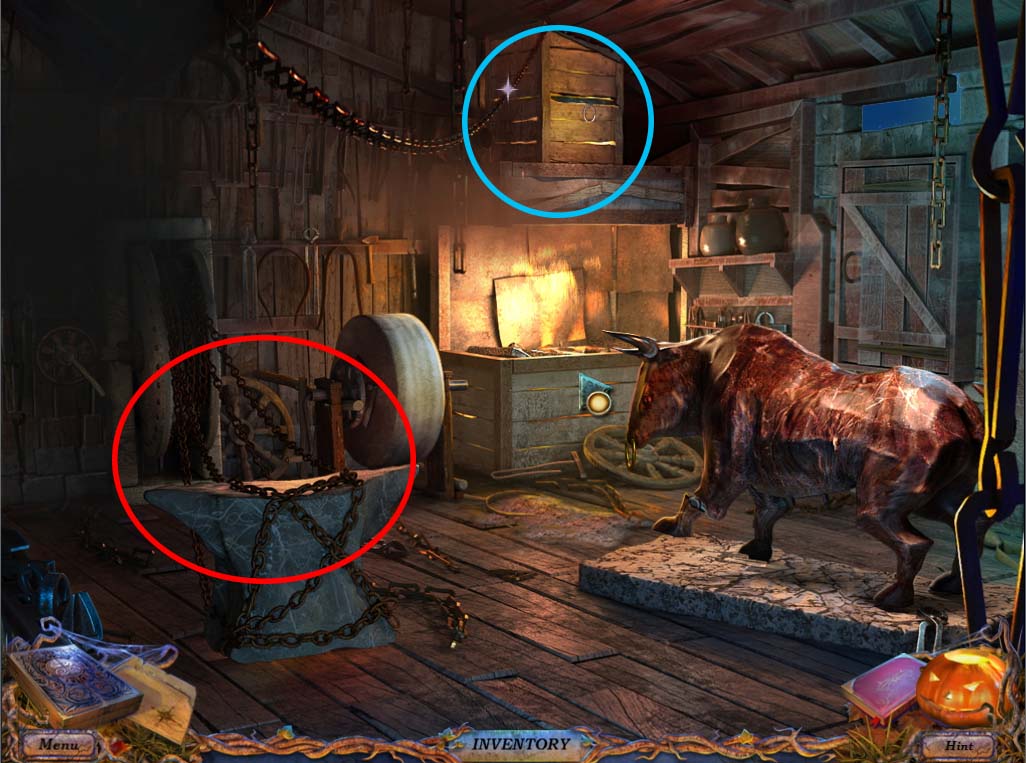
- Doing this will clear the smoke and allow you to reveal the CHAIN PUZZLE in the area circled in red above.
CHAIN PUZZLE
- The object of this puzzle is to move the unlinked chains in exactly 6 moves so as to build a continuous chain.
- The solution to this puzzle is given below.
- Click each chain and move it to each place in numerical order from 1 to 6:
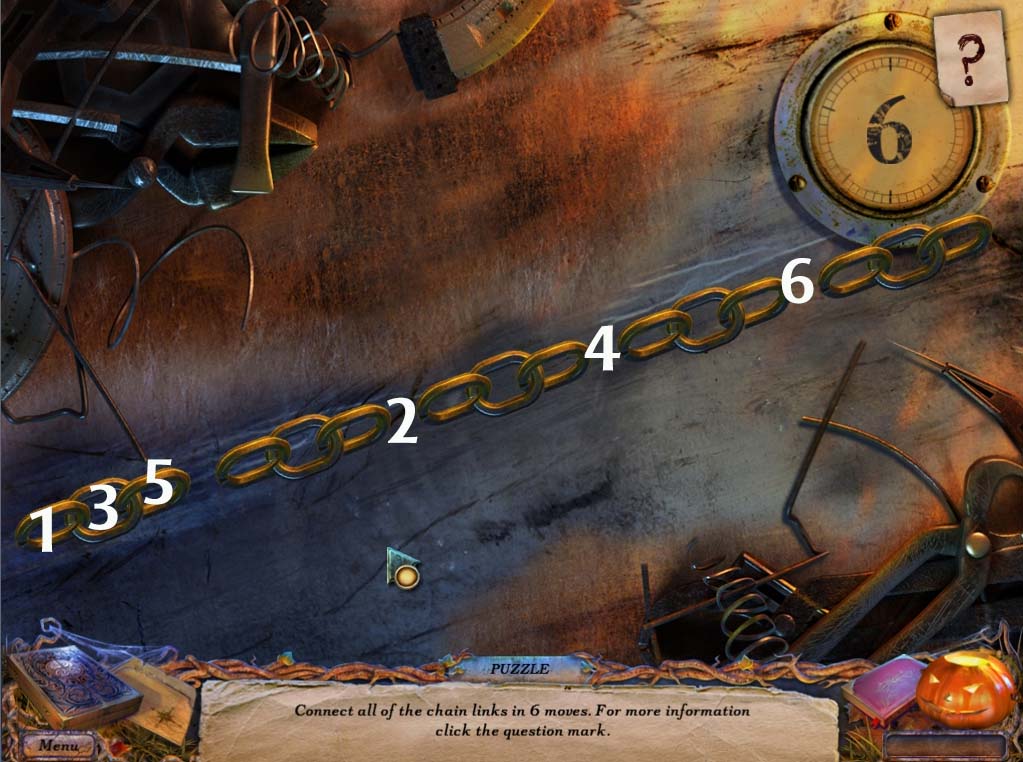
- Solving this puzzle will allow you to click the chains and move the anvil aside, revealing a HAMMER and a piece of DICE (2 of 4)
- With the WOODEN BOLT and a HAMMER in your possession, you can finally help the CHAINED MAN in the CARRIAGE.
- Head to the BRIDGE area and reattach the BROKEN WHEEL, use the WOODEN BOLT and HAMMER it in place.
- With the carriage now gone, check the floor of the bridge to find a piece of CHALK (marked as CHECK in the game).
- The way is now clear to head to the river BANK.
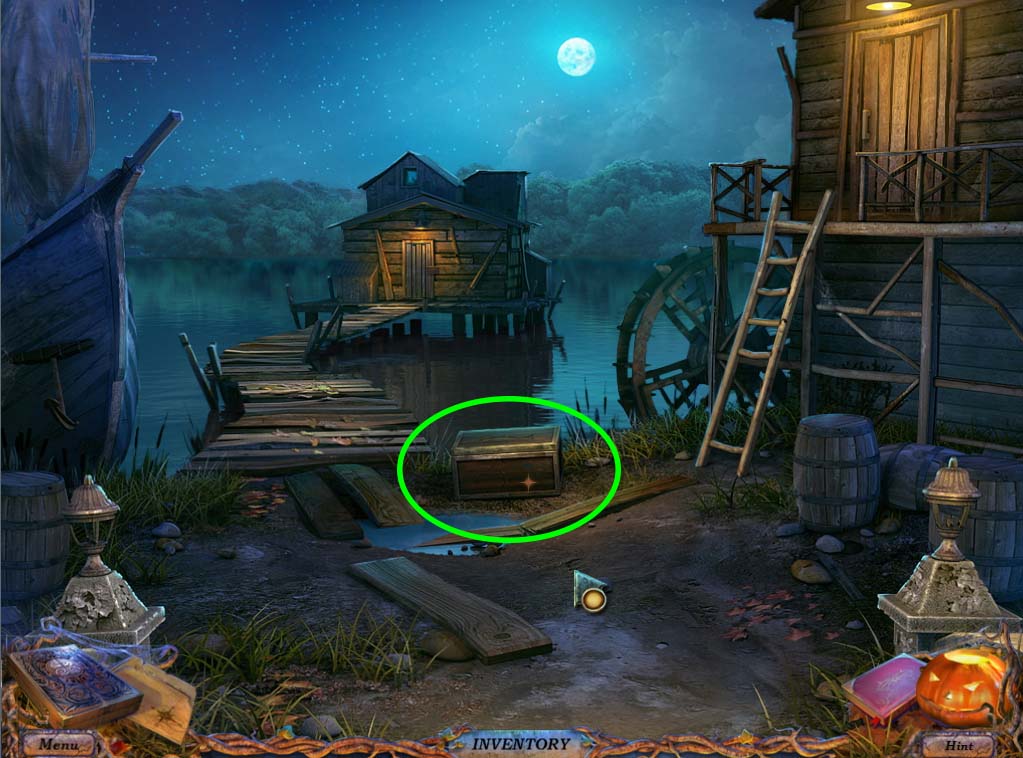
- Talk to the ghost of the FISHERMAN and investigate the WOODEN BOX (circled in green below).
- You will find a GAME PIECE HALF on top of it. Grab it then head to the FISHERMAN’S HOUSE.
- Once you get there, you will find a board filled with pictures of boats and fish.
- This is a mini game.
- Use the CHALK (CHECK) in your inventory to start it.
BOATS AND FISH MINI GAME
- The object of this game is to connect each fish and boat to the pictures surrounding it depending on the number of connections that are shown in each image (if a fish or boat has a number 2 on it, it has 2 connections, three if it has number three, and so on).
- There are several ways to solve this puzzle, but a simple solution is given in the question mark:

- Once it’s solved, the door will open and you can head inside.
- Before we do anything else, we might as well get the hidden puzzle out of the way. Investigate the area circled in green below to start the puzzle
FISHERMAN’S HOUSE HIDDEN OBJECT PUZZLE
Black objects
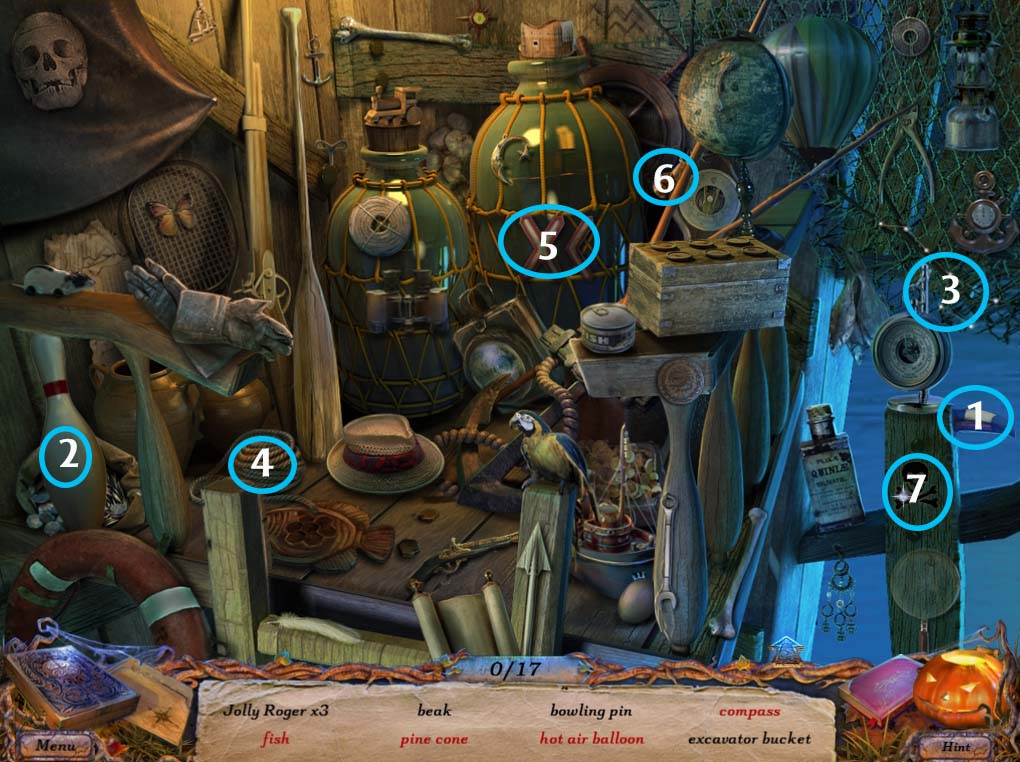
- 1. Beak
- 2. Bowling pin
- 3. Excavator bucket
- 4. Rope
- 5. Railway sign
- 6. Snail
- 7. Jolly Roger
Red objects
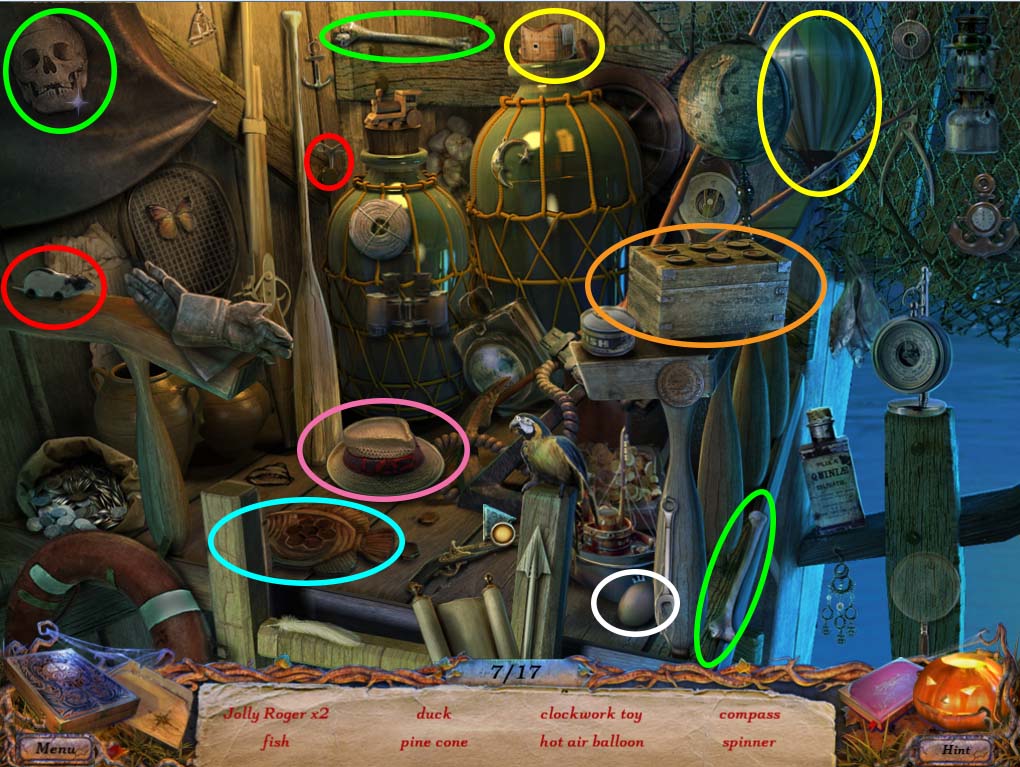
- Assemble the Jolly Roger (circled in green)
- Fix the clockwork toy (circled in red)
- Assemble the hot air balloon (circled in yellow)
- Break the egg (circled in white) to find the duck
- Move the hat aside (circled in violet) to find the pine cone and tomato
- Investigate the fish puzzle (circled in blue) to find the Jolly Roger.
- Solving the fish puzzle via image below gives you the fish

- Check the box (circled in orange in red object list above) and click on the following buttons:
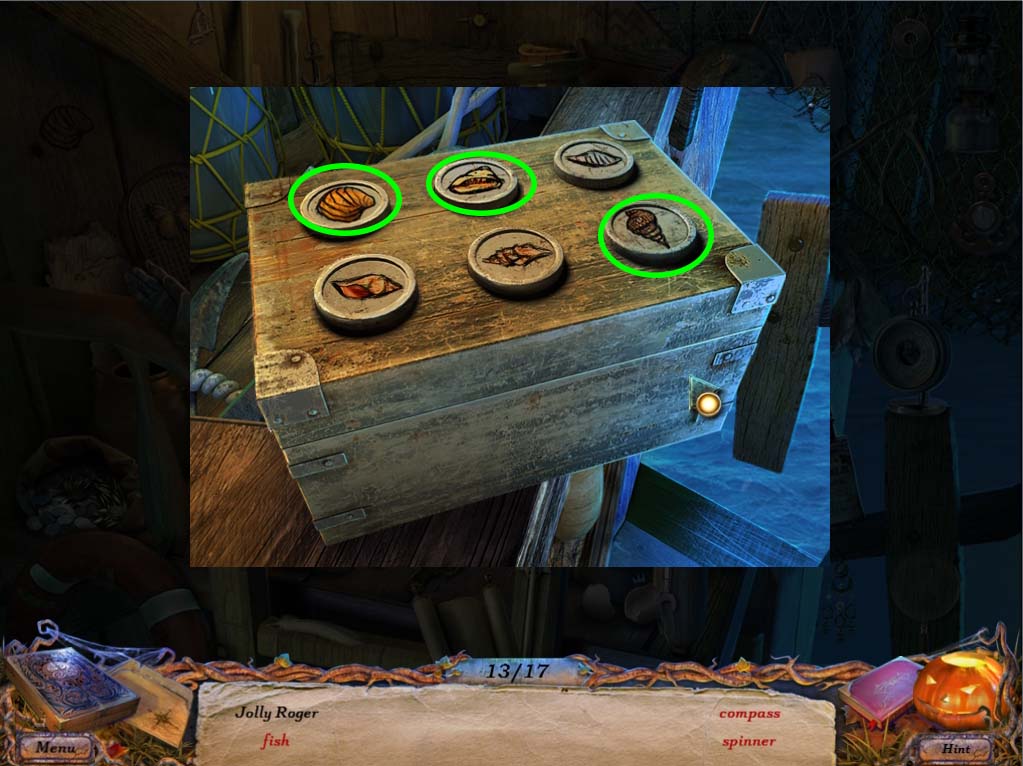
- This will open it and reveal the compass and spinner (bait)
- Finishing this puzzle will give you some ROPE and a JOLLY ROGER symbol.
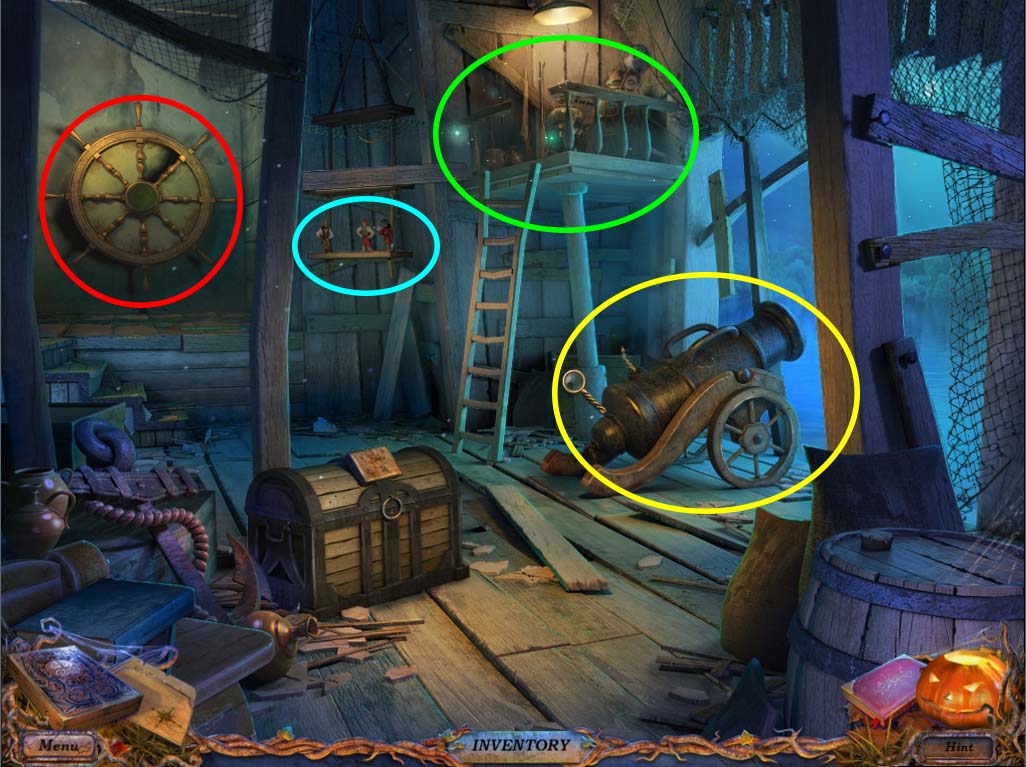
- Inspect the SHIP WHEEL (circled in red on fisherman’s house image above) and use the JOLLY ROGER symbol. Give the wheel a few turns to first find some SILICON and then some SCISSORS.
- Inspect the area circled in blue in the fisherman’s house image above and use the PIRATE image in your inventory. This should reveal a GAME PIECE HALF and a can of CLEANING POWDER.
- Combine the two GAME PIECE HALVES as shown in the image below:

- This will give you a HOOK ON A ROPE for your inventory.
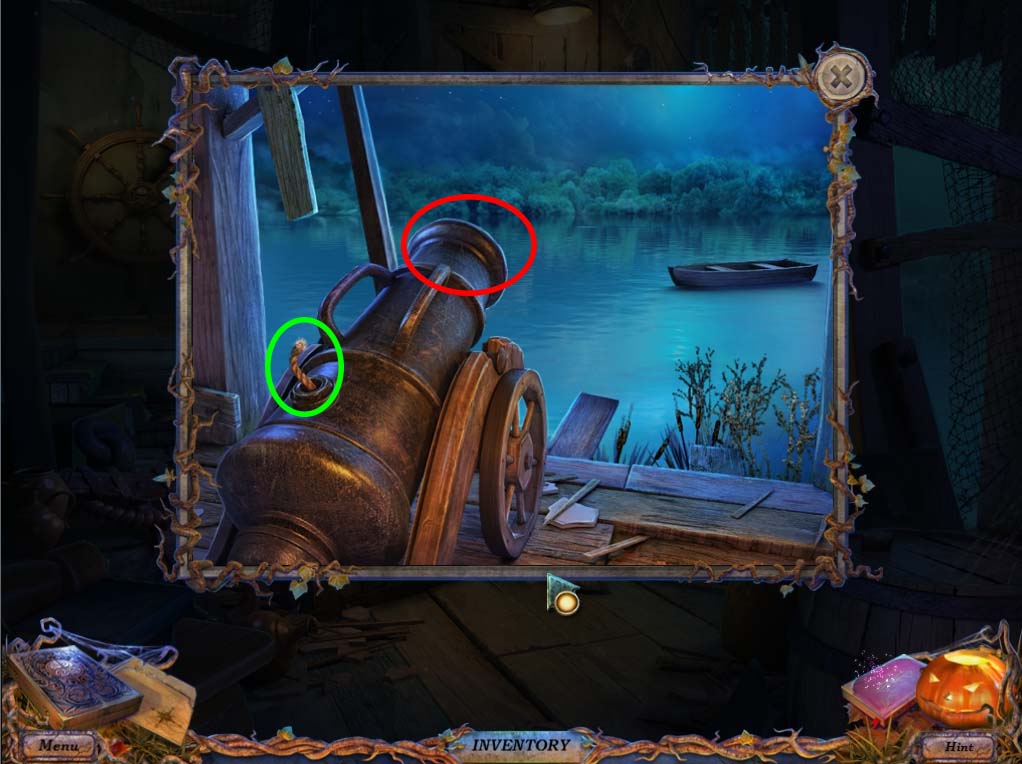
- Inspect the CANNON (circled in yellow in FISHERMAN’S HOUSE image above) and use the HOOK ON A ROPE in the area marked in a red circle below. Afterwards use your SILICON to light the fuse (circled in green below) to catch the FISHING BOAT. Reel in the FISHING BOAT and inspect it. Another cutscene will begin.
- After the cutscene is over, talk to the ghost of the FISHERMAN one last time. He will give you his regards and a SAW before disappearing into the night.
- With one last game piece left to complete, the end of this horrible ordeal is finally within reach.
End of Chapter VII
Chapter One: Getting to the party
Chapter Two: Missing Friends and Locked Doors
Chapter Three: First Game Piece - The Groom
Chapter Four: Second Game Piece - The Nanny
Chapter Five: Third Game Piece - The Priest
Chapter Six: Fourth Game Piece - The Blacksmith
Chapter Seven: Fifth Game Piece
Chapter Eight: The Last Game Piece
Ask for help in the comments below!