
Shadows: Price for Our Sins: Chapter Six: Fourth Game Piece - The Blacksmith
Help Dylan save her friends with our Shadows: Price for Our Sins Walkthrough. The Lord of Darkness Samhain has exacted his revenge by enslaving the souls of Dylan's friends. Now, it's up to you to help her set things right and free them from their bonds with a little help from our detailed instructions, custom screenshots, and hints and solutions to the many challenges you'll face along the way.
Chapter One: Getting to the party
Chapter Two: Missing Friends and Locked Doors
Chapter Three: First Game Piece - The Groom
Chapter Four: Second Game Piece - The Nanny
Chapter Five: Third Game Piece - The Priest
Chapter Six: Fourth Game Piece - The Blacksmith
Chapter Seven: Fifth Game Piece
Chapter Eight: The Last Game Piece
Ask for help in the comments below!
- With three of the lost souls now laid to rest, and two more pieces of the board left to find, head to the FIELD.
- Use your SICKLE on the STRAW (circled in blue) and then investigate the SIGNBOARD (circled in red)
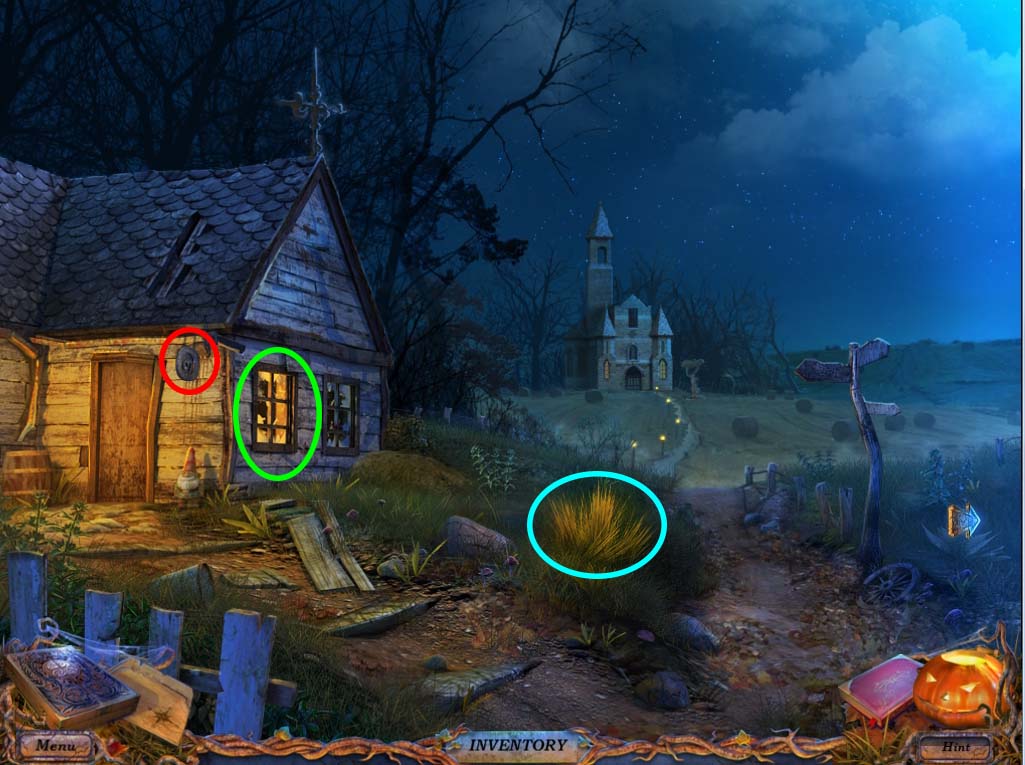
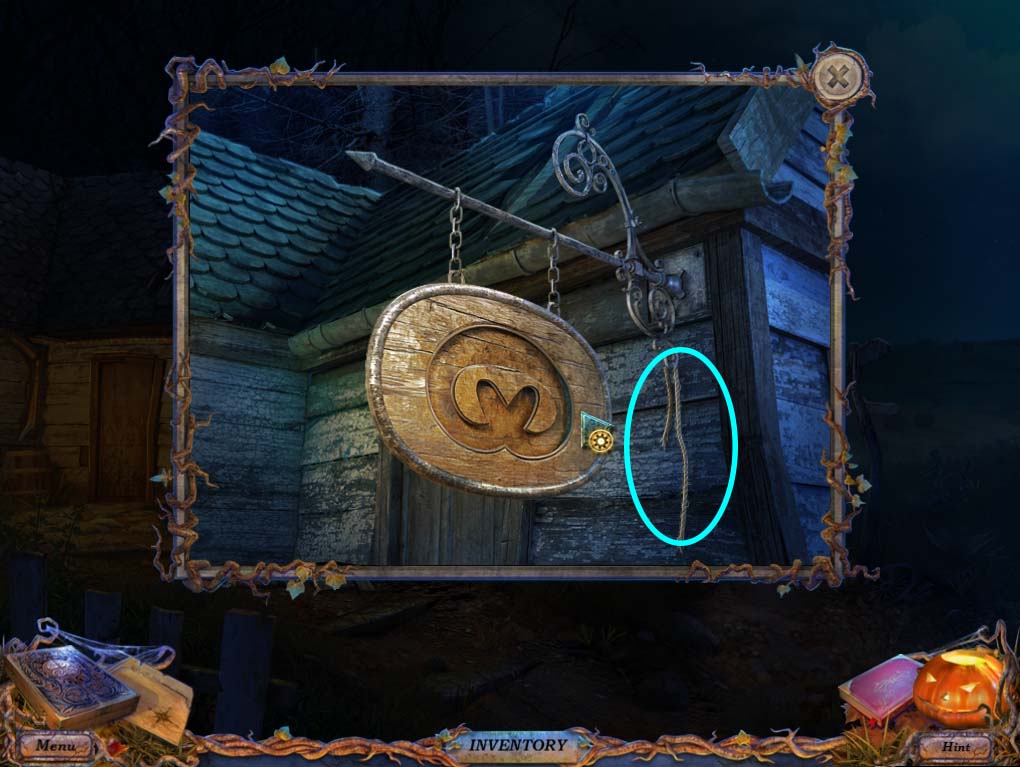
- At the SIGNBOARD, grab the LACE (circled in blue below) and then investigate the WINDOW (circled in green above).
- There you’ll find a SLINGSHOT on the windowsill. Once you have it, head back to the BARN.
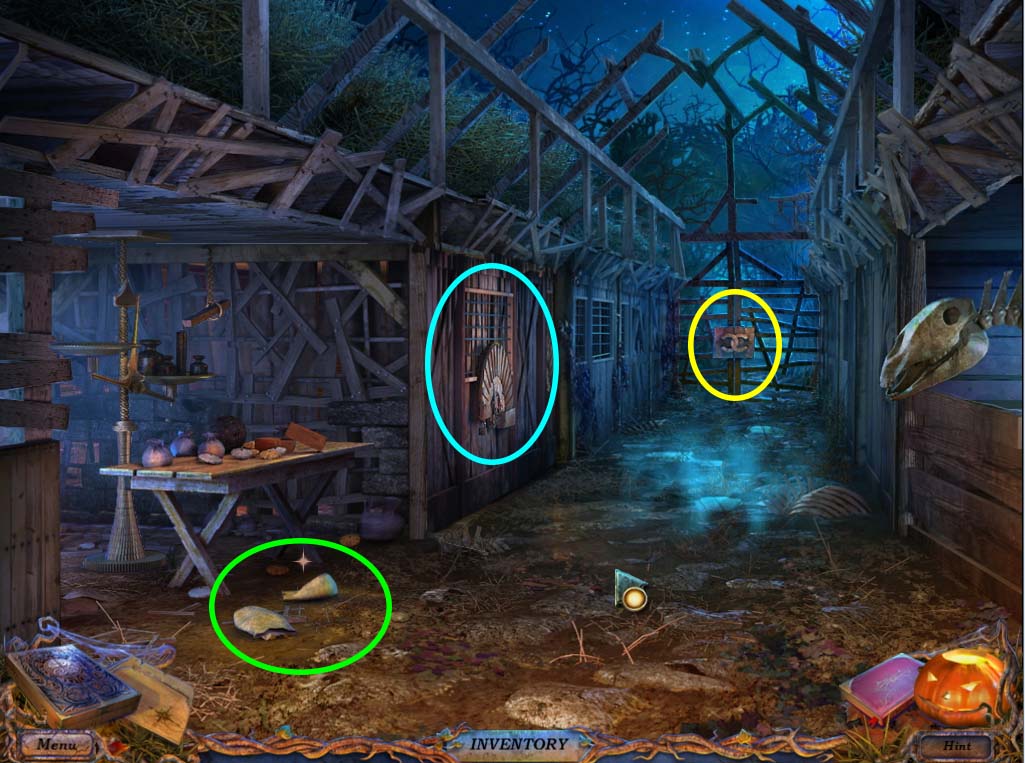
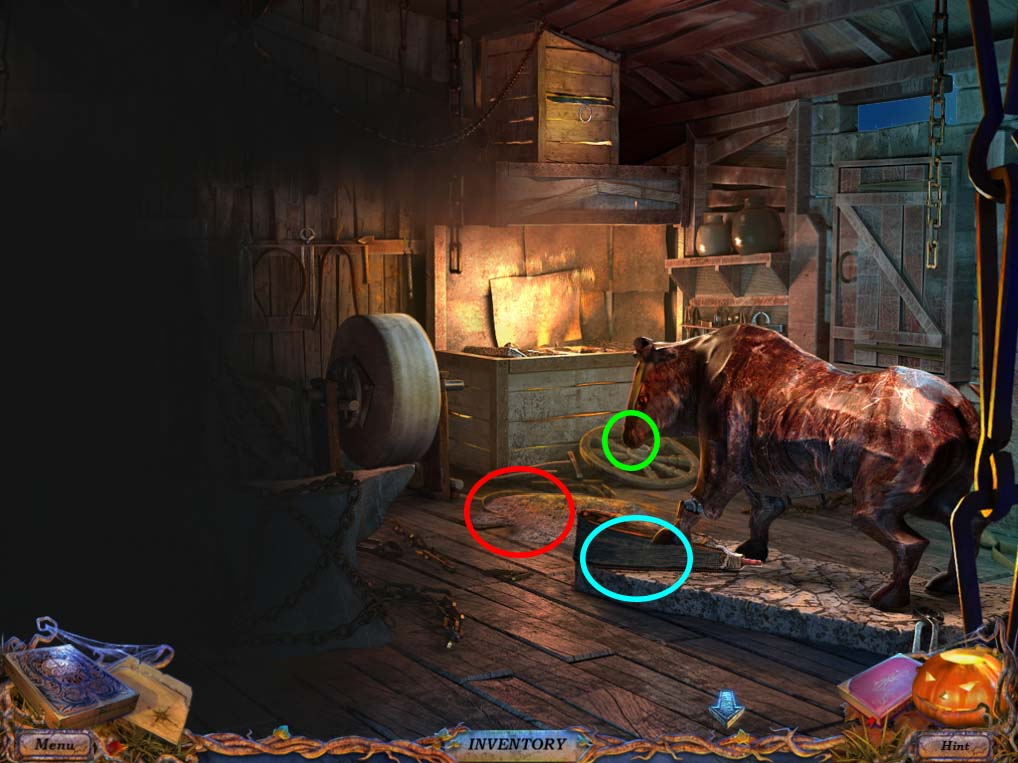
- At the barn, use your CROWBAR on the NAIL (circled in red below) then investigate the WAGON (circled in green below) and grab the SHIRT that is lying on top.
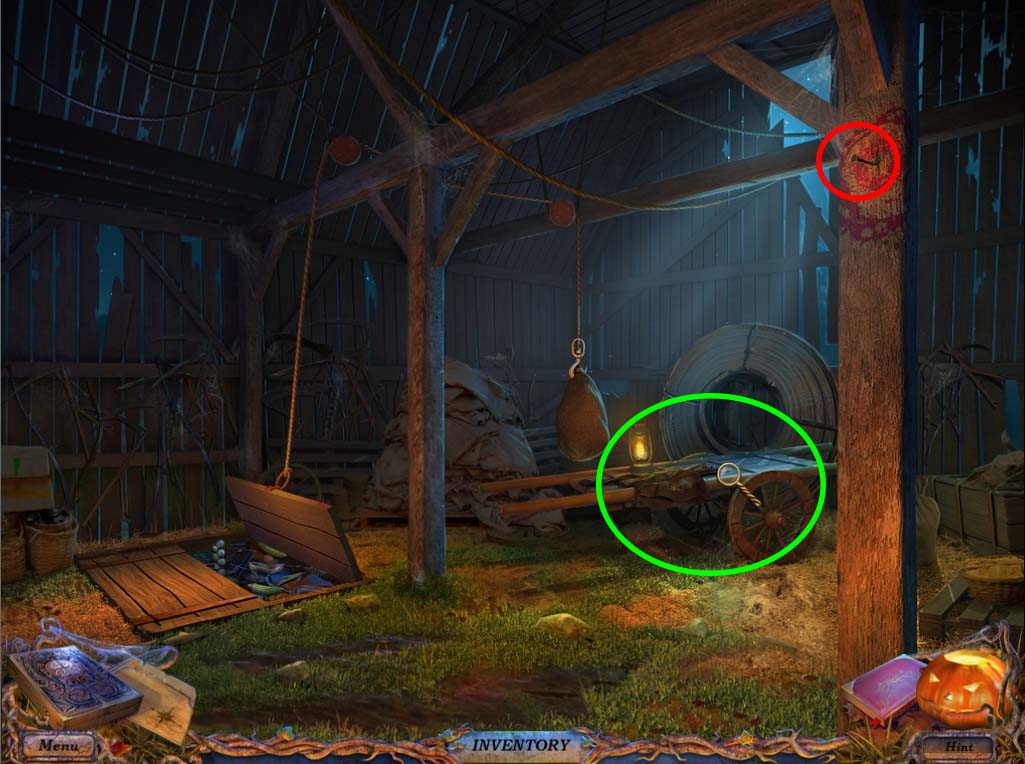
- Place the following items from your inventory on top of the wagon: NEEDLE AND THREAD, BUTTON, LACE and STRAW, once you do so, you’ll get a scarecrow HEAD.
- Head to the front of the barn at the SCARECROW area, and use the SLINGSHOT on the CROW. Take the HAT and assemble the SCARECROW by following these directions:
- Take the BROOM and place it on the pole.
- Take the NAIL and place it on the top of the BROOM and use the HAMMER on it.
- Place the SHIRT on the pole
- Place the HEAD on the pole
- Place the HAT on the pole
- This will cause the shovel below the SCARECROW to move. Investigate it and take the VAULT KEY that you will find there. Head to the GRAVEYARD, and you will discover that the OPEN GRAVE once again can be investigated for another hidden object puzzle.
GRAVEYARD HIDDEN OBJECT PUZZLE TWO
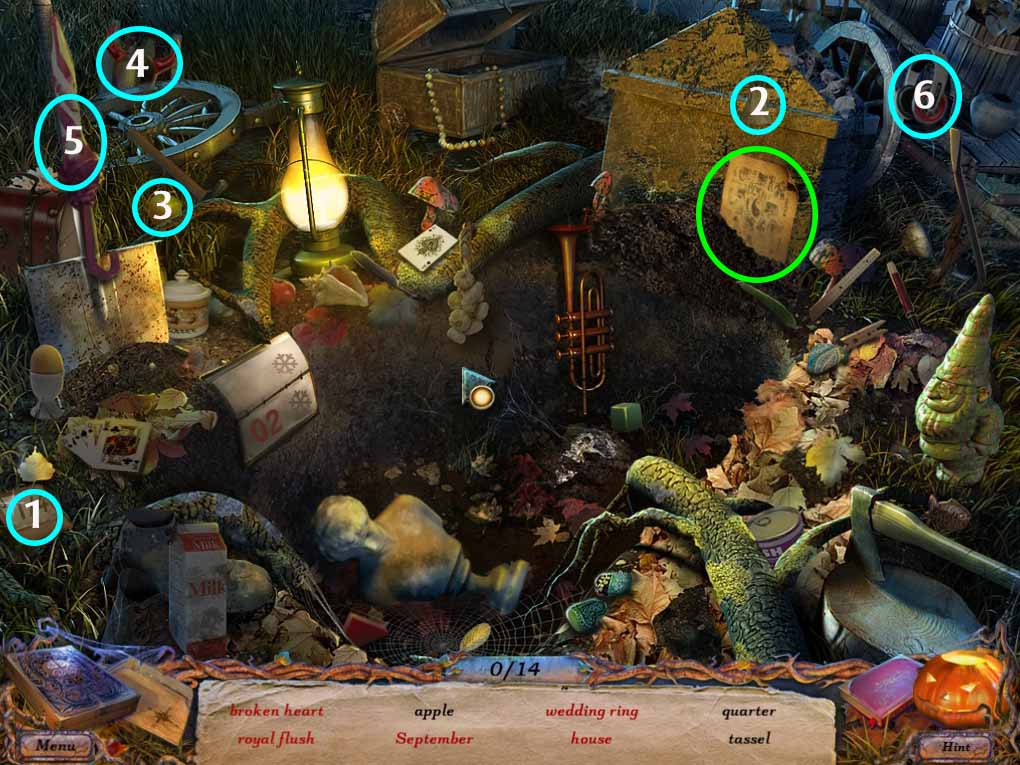
Black Objects
- 1. Quarter
- 2. Tassel
- 3. Apple
- 4. Horns
- 5. Umbrella
- 6. Headphones
- Investigate the paper sheet (circled in green) to find the eye, and use the arrow on the heart to get the broken heart
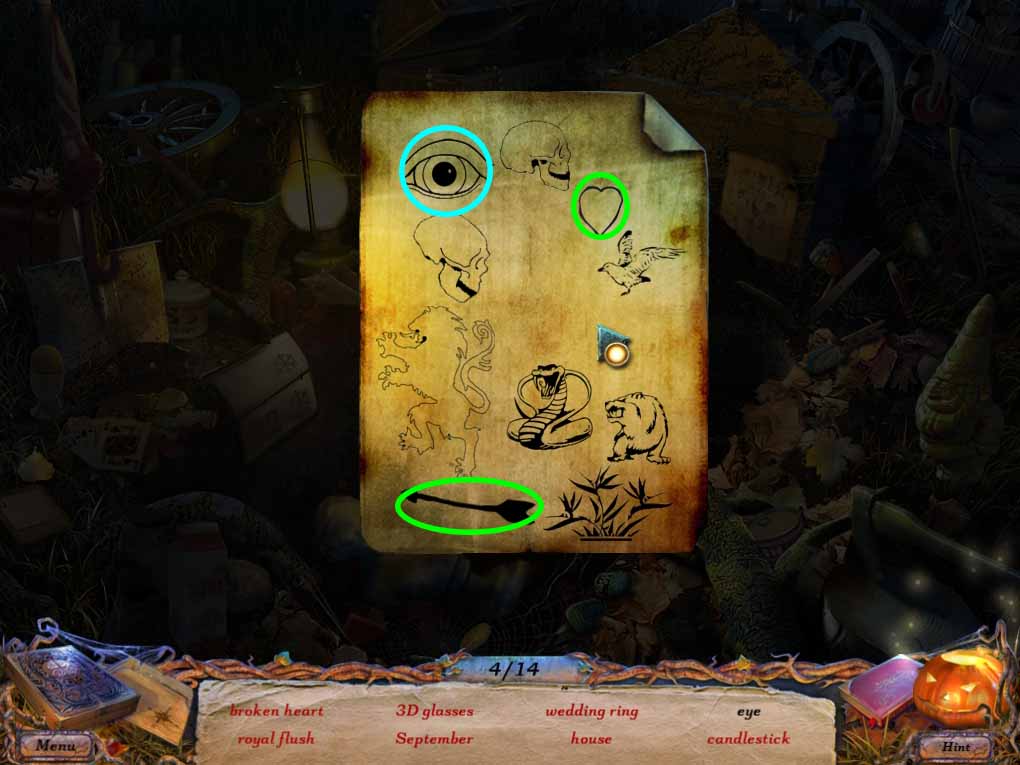
Red objects
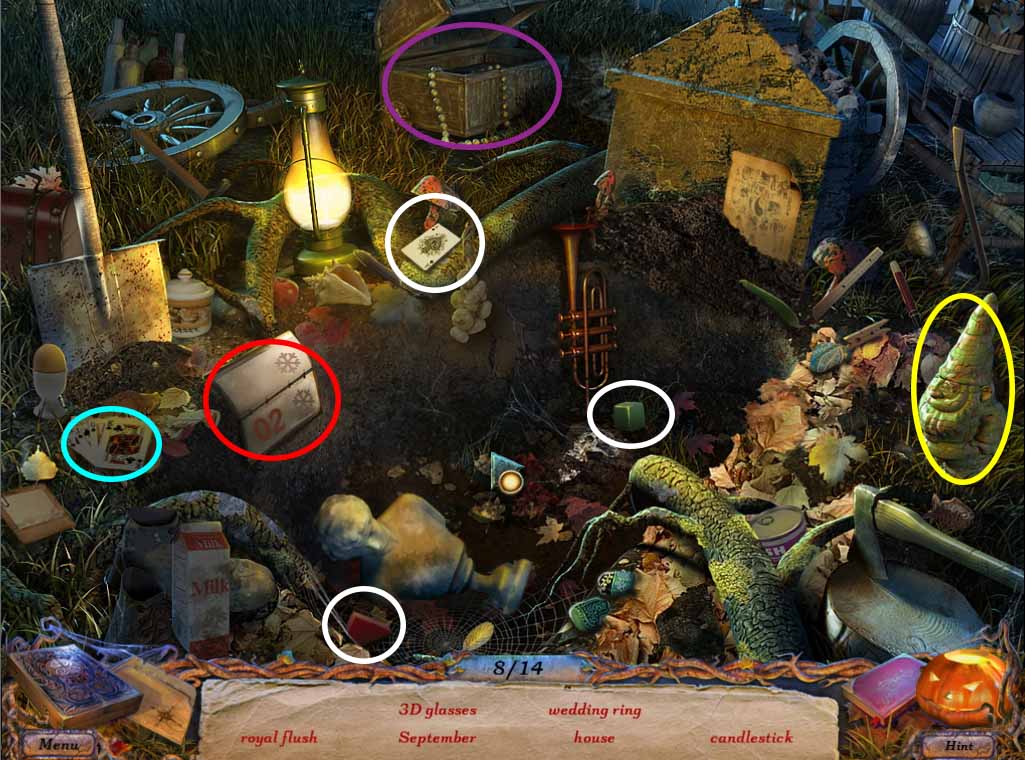
- Complete the Royal Flush (circled in blue)
- Turn the calendar (circled in red) to find 09 to get September
- Move the gnome (circled in yellow) to find the candlestick behind it
- Combine the blocks (circled in white) to form the house
- Check the treasure chest (circled in violet)
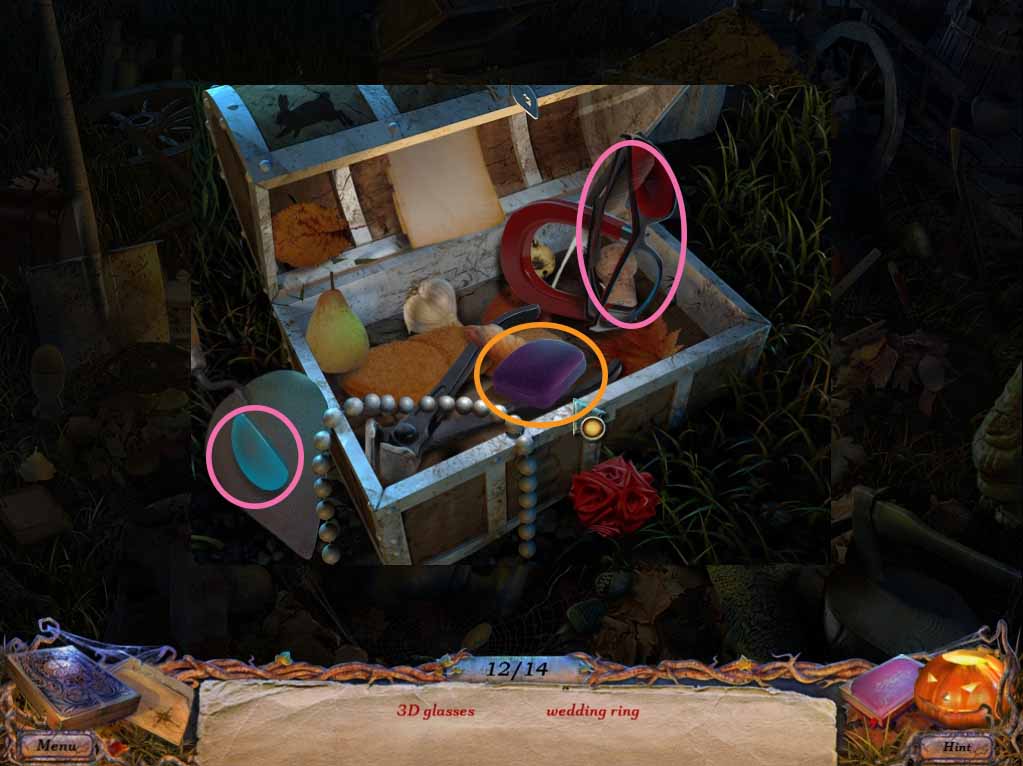
- Finally, fix the 3D glasses (circled in pink) and open the ring case (circled in orange) to finish the puzzle. You will be given a CORD and a WEDDING RING for your inventory.
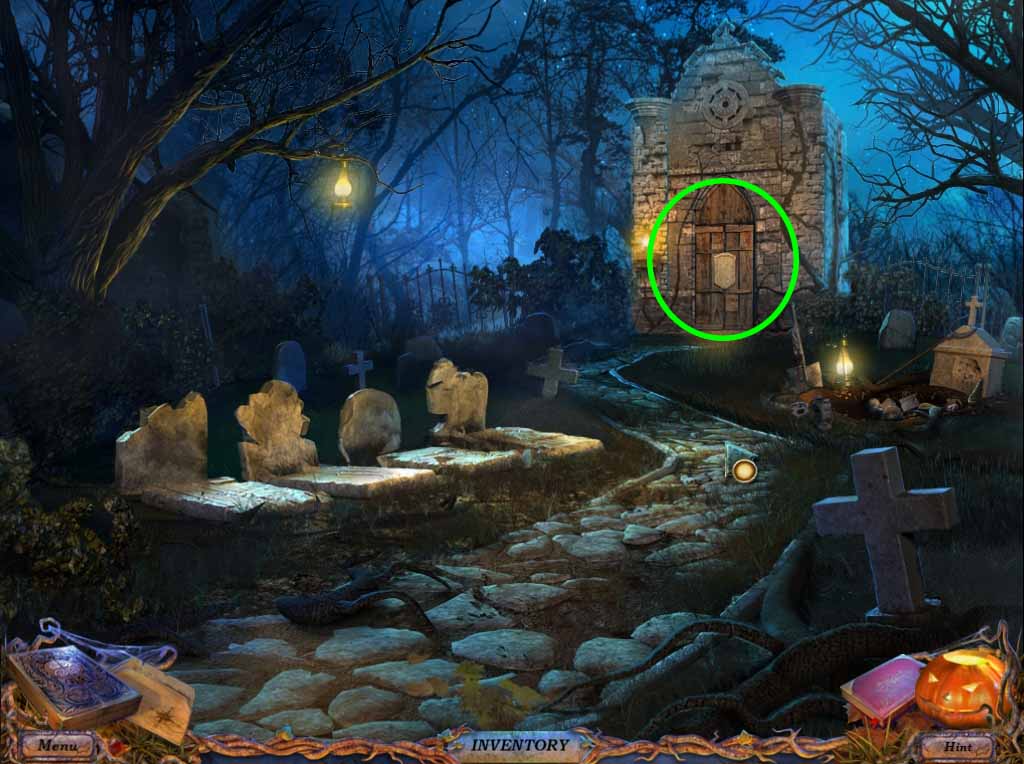
- Investigate the VAULT at the back of the GRAVEYARD (circled in green) and use the VAULT KEY on the lock. You will see a statue inside. Use the WEDDING RING on its ring finger, and it will start to shed tears, use the BOTTLE in your inventory to collect them and you’ll receive HOLY WATER for your inventory.
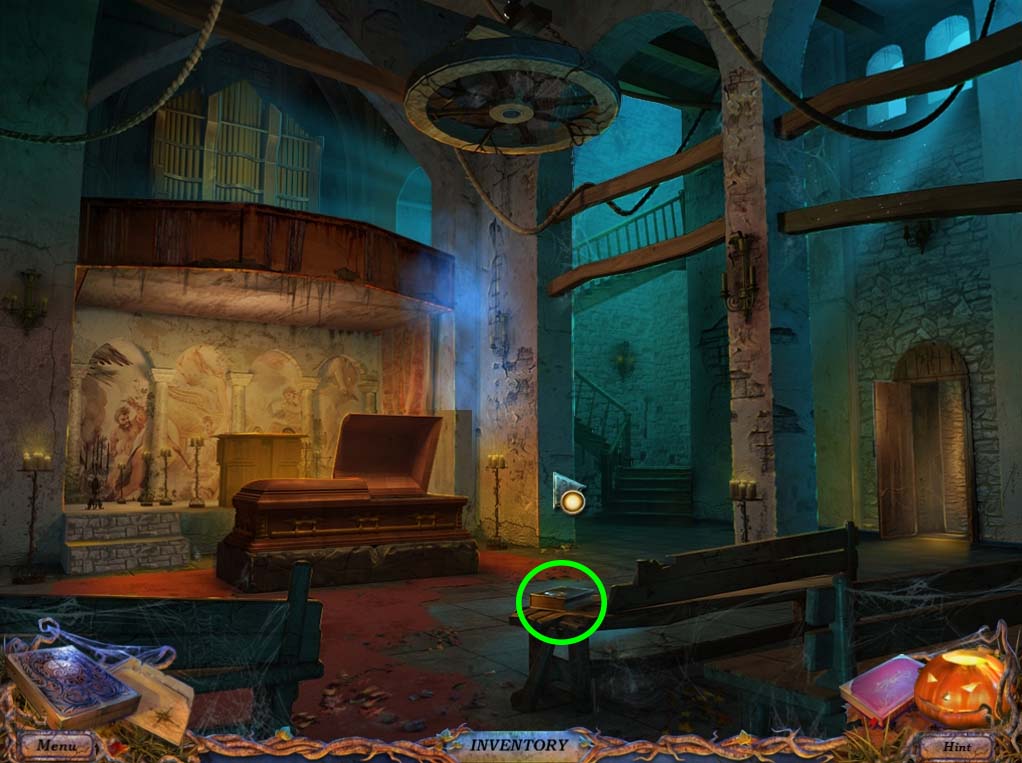
- Head back inside the CHURCH and investigate the BOOK (circled in green). Pour the HOLY WATER in the drain to get the WATER SYMBOL.
- Head to the CHURCH ENTRANCE and use the WATER SYMBOL on the slot circled green and the SEED SYMBOL on the slot circled blue on the strange fountain.
- This will start a quick mini game.
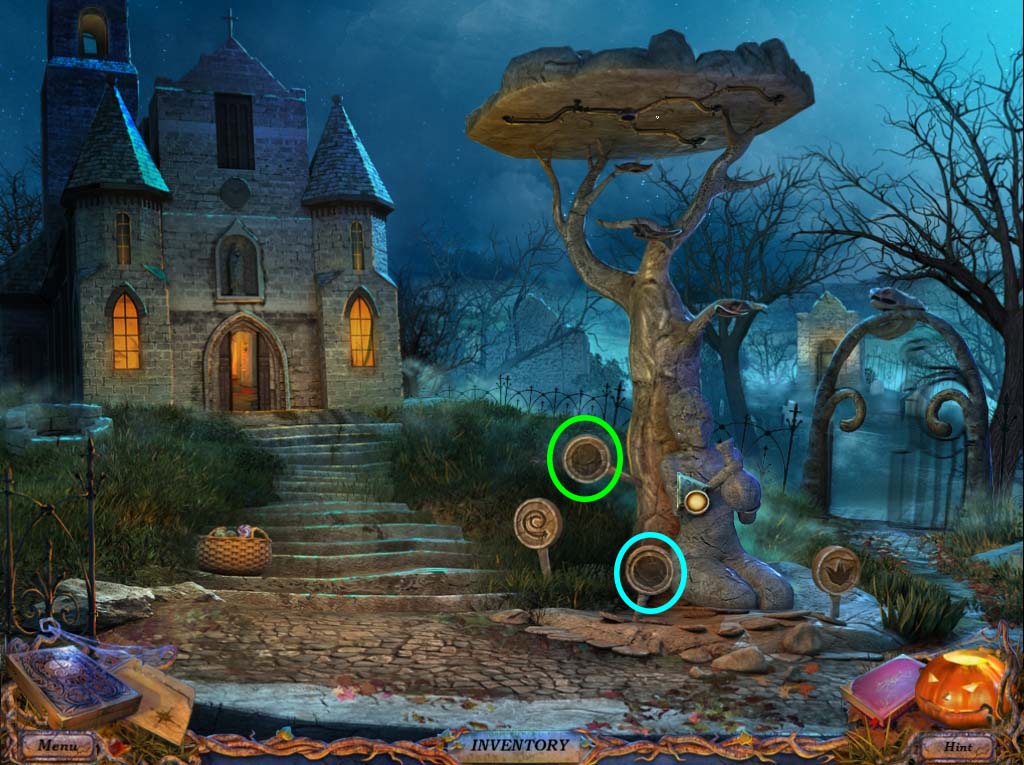
CHURCH ENTRANCE FOUNTAIN PUZZLE
- The object of this puzzle is to make a flower bloom underneath the fountain. Press the following symbols in this order to do so.
- SEED + SPIRAL + WAVE + FLOWER
- Once the flower blooms, investigate it to gain a stone ROSE for your inventory.
- Head to the RIVER area by using the MAP, check the side GATE (circled in green below) to reveal the lock. Use the ANVIL and the ROSE in your inventory to unlock the GATE.
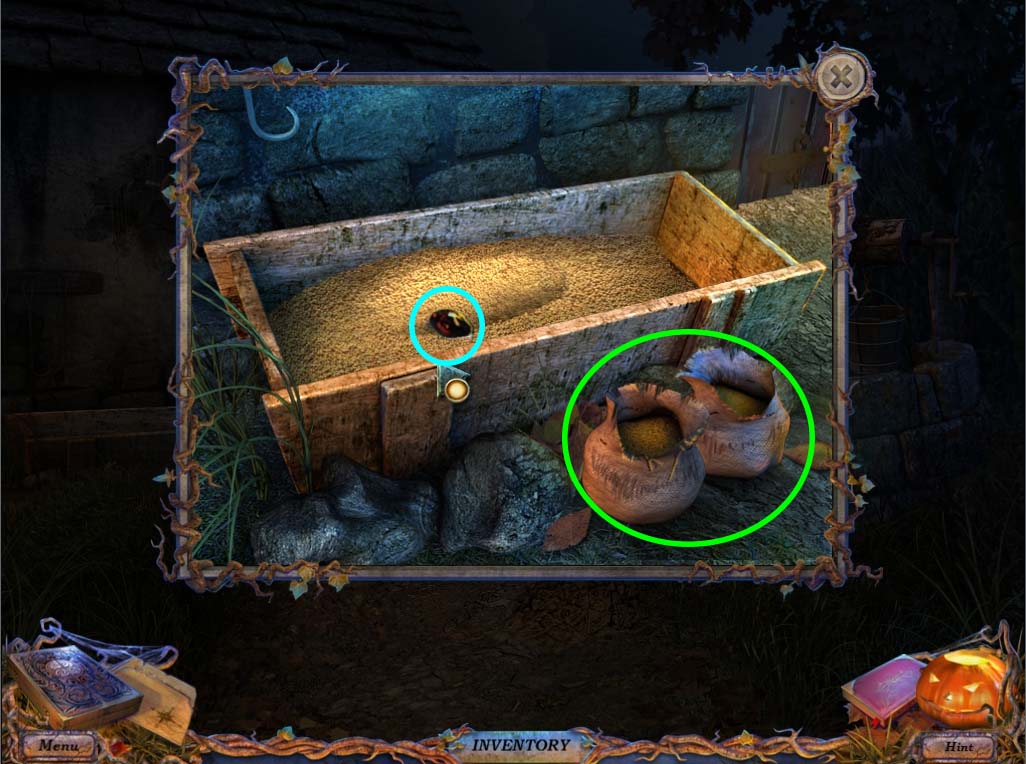
- With the GATE open, head straight to the STABLE area and grab the BUCKET hanging from the dead horse’s mouth and the SACKS on the ground (circled in green below).
- From there, head to the WELL area and investigate the WELL itself.
- Use the BUCKET from your inventory and give the HANDLE two clicks.
- The bucket should come up with a KEY inside.
- Grab it and head back to the STABLE.
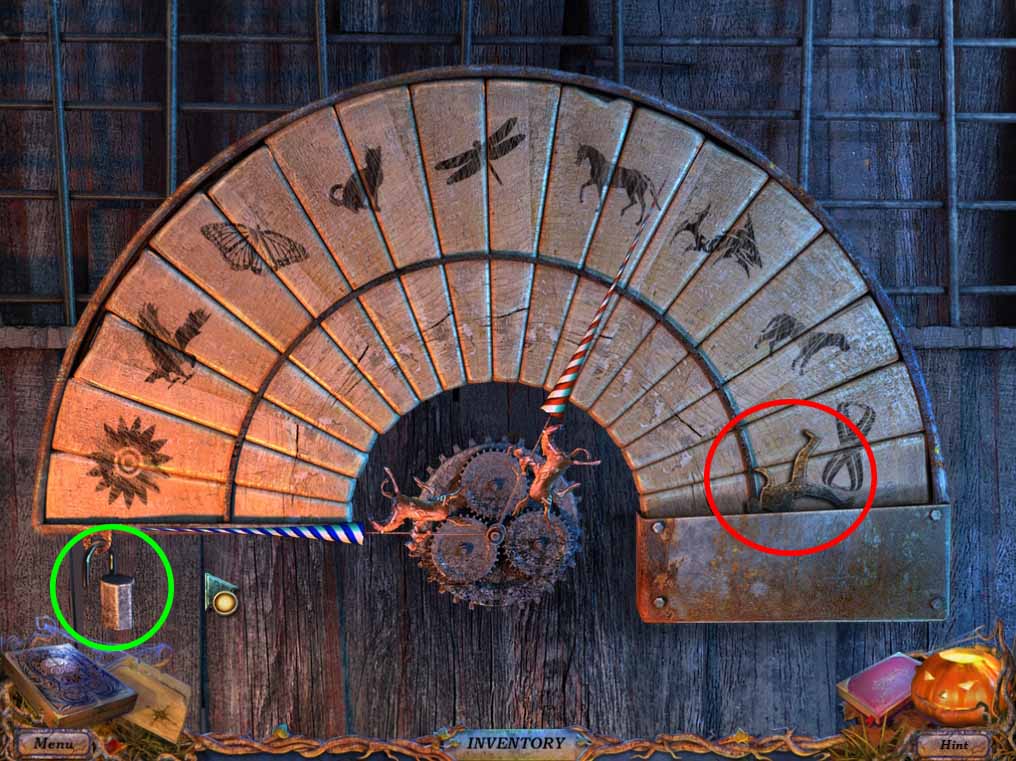
- Once there, investigate the strange FAN PUZZLE (circled in blue above) and use the KEY on the PADLOCK (circled in green below).
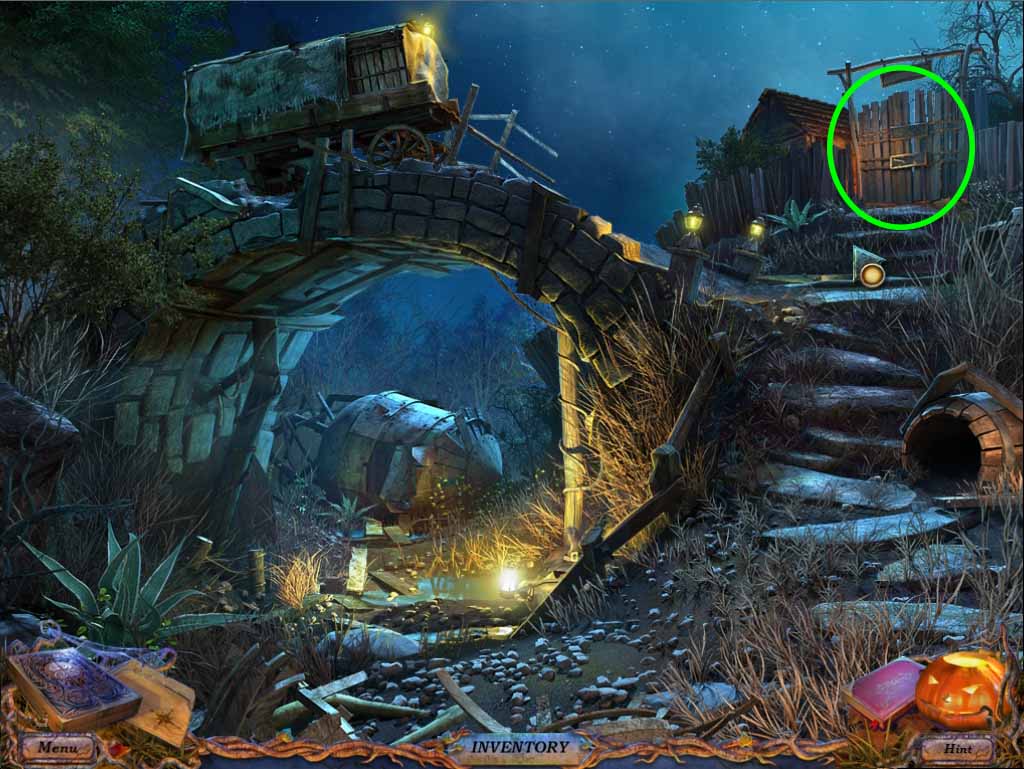
- Grab the COWBOY piece (circled in red below) and head to the GARDEN GATE (circled in yellow above).
- Use the COWBOY on the left lock and it should open automatically.
- Head forward into the GARDEN area, and investigate the pond (circled in red below).
- Click the lily petals a few times to reveal a BEETLE machine for your inventory.
- Investigate the VENUS FLYTRAP (circled in green below) and put the BEETLE on metal leaf stand.
- Give the BEETLE a click to kill the Venus flytraps and click on the note.
- This will reveal a PICK for your inventory.

- Before you head back, check the hidden object puzzle to the right (circled in blue)
GARDEN HIDDEN OBJECT PUZZLE
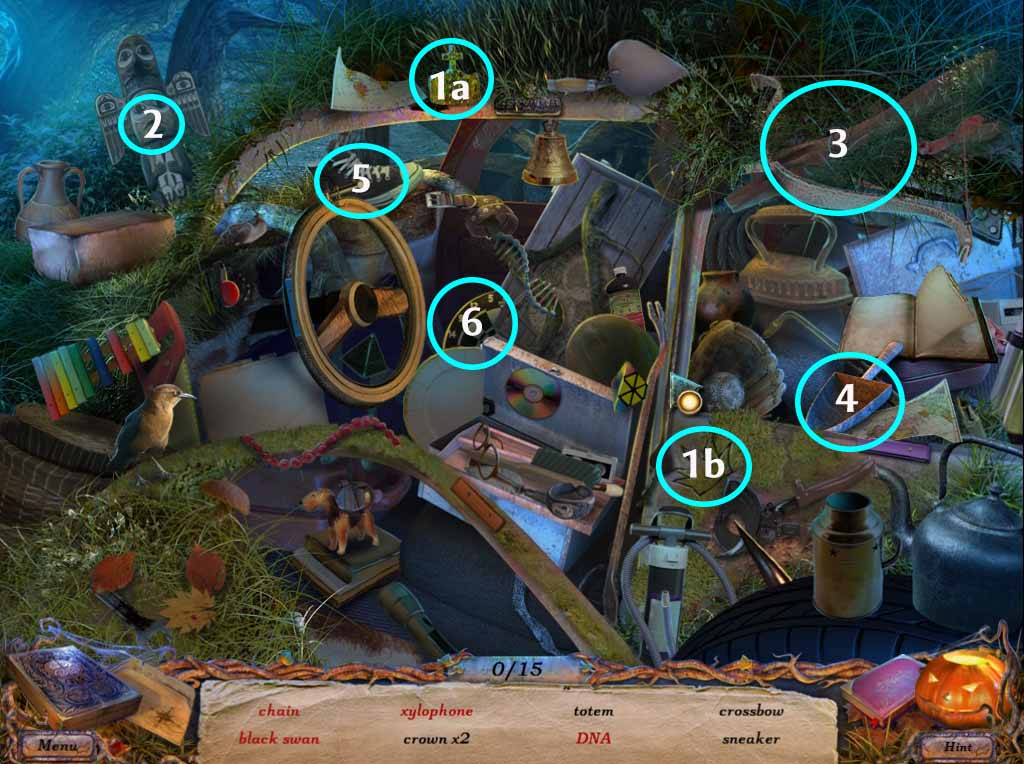
Black objects
- 1. Crown x 2
- 2. Totem
- 3. Crossbow
- 4. Measuring ladle
- 5. Sneaker
- 6. Darts
Red Objects
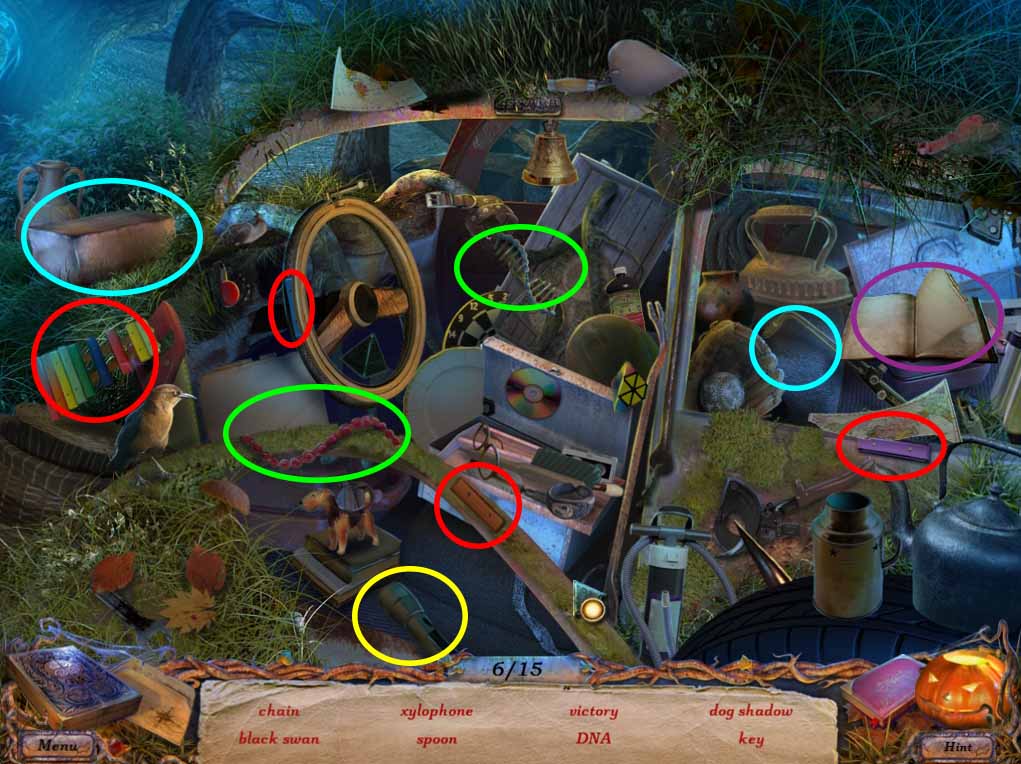
- Rebuild the xylophone (circled in red)
- Combine the DNA (circled in green)
- Turn on the flashlight (circled in yellow) to see the dog’s shadow
- Investigate the book, and use the pencil on the TIC TAC Toe and the swan to get victory and black swan
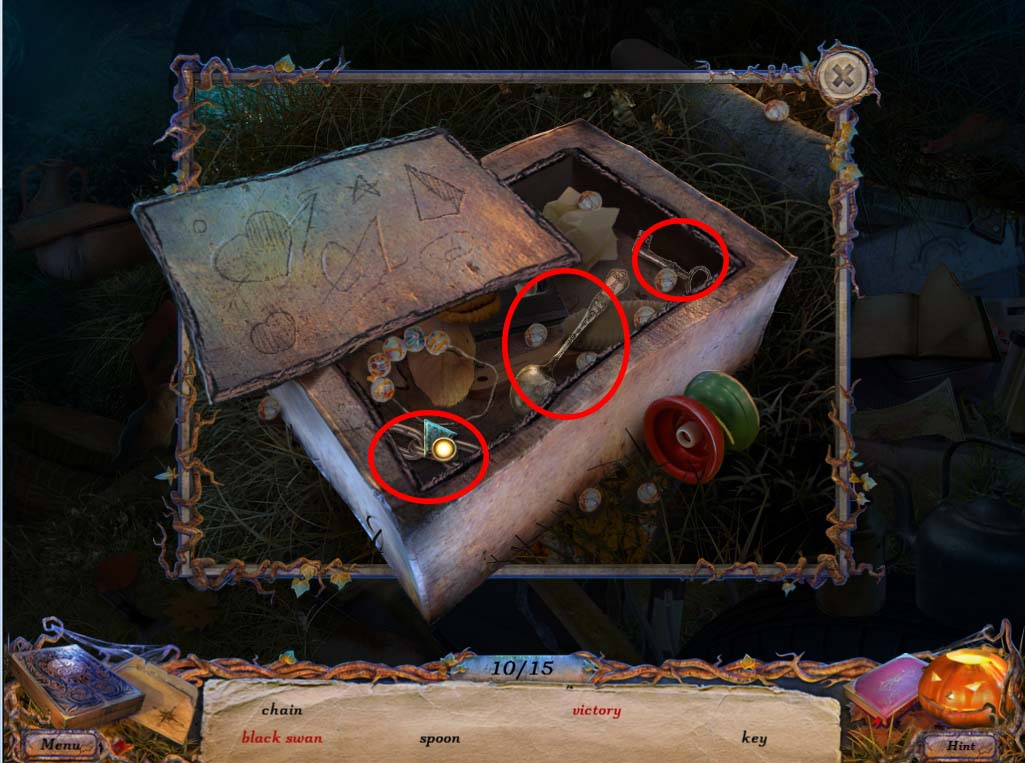
- Finally, use the blow torch on the steel box (circled in blue) to find the spoon, the chain and the key
- Finishing this puzzle will reward you with a MEASURING SCOOP and part of a LOADED CROSSBOW
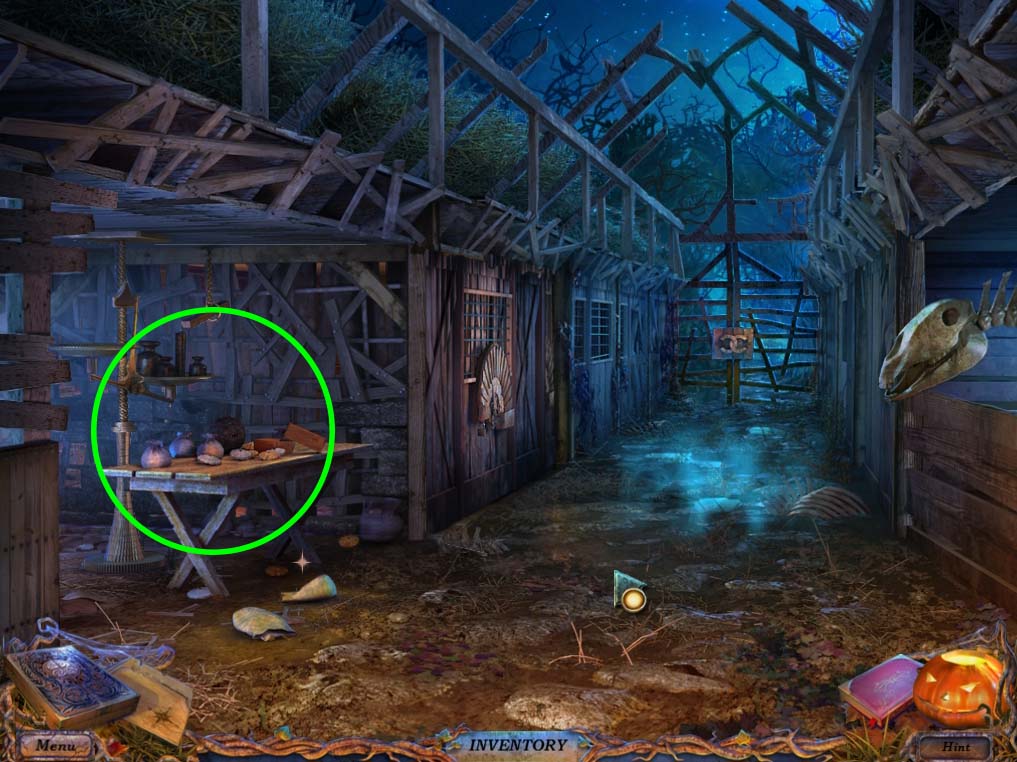
- Head back to the WELL area and investigate the FEEDING THROUGH.
- Place the EMPTY SACKS on the side of the through (as you see in the image below) and fill them with grain using the MEASURING SCOOP.
- Doing this will uncover a RUBY (1 of 3) and will give you SACKS full of grain.
- Return to the STABLE area and investigate the WEIGHTS PUZZLE (circled in green below) and place the SACKS on the table to activate the mini game
WEIGHTS MINI GAME
- The object of this mini game is to place six items so that the right scale will tip the ring off the wooden beam.
- To accomplish this puzzle, place two sacks, one brick, one sphere weight and two smaller disc weights, as seen on the image below
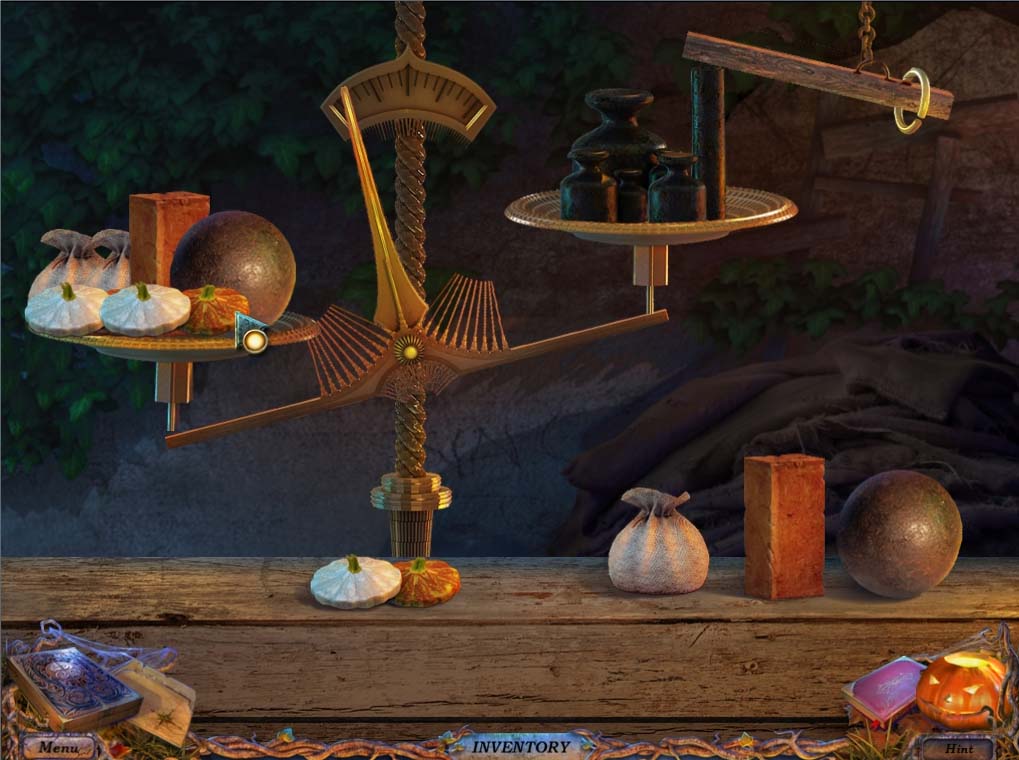
- This should cause the RING to drop to the floor of the STABLE. Pick it up and head back to the WELL area.
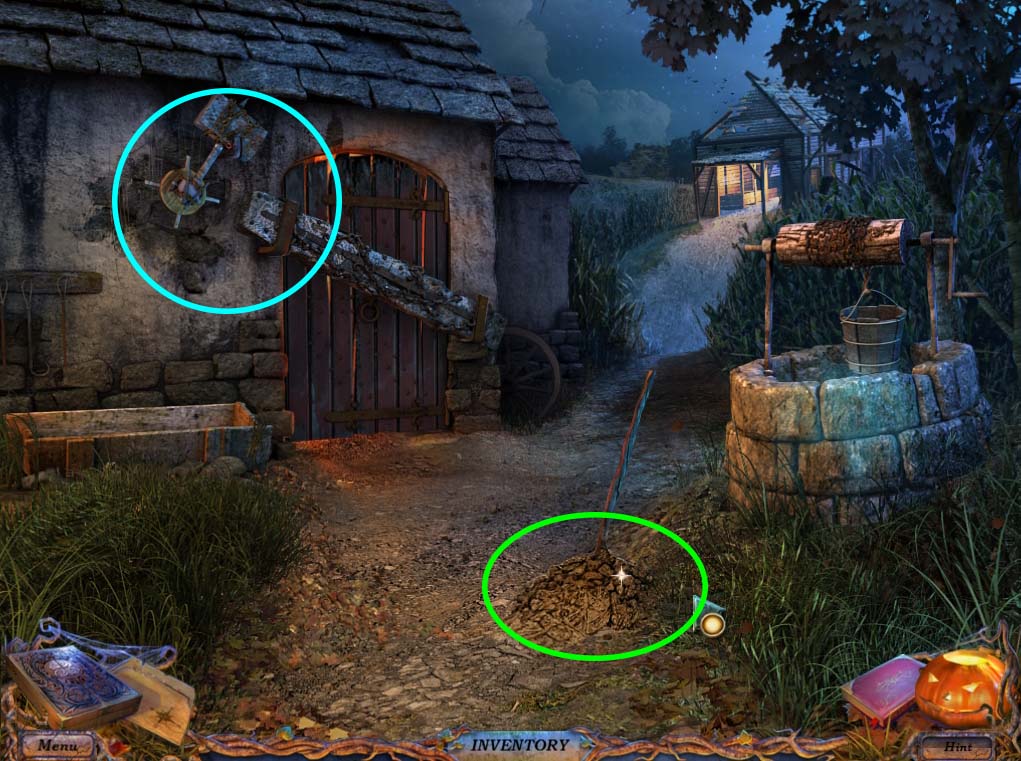
- Investigate the object stuck on the ground (circled in green below) and use the PICK in your inventory to free the OVEN FORK.
- Check the lock on the FORGE DOOR (circled in blue below), and use the OVEN FORK on the lock to open it.
- Enter the FORGE and talk to the ghost of the Black smith.
- After he disappears, use the RING in your inventory on the METAL BULL’s nose (circled in green).
- It will raise its foot allowing you to grab the BELLOWS (circled in blue).
- Once you have it, use the BELLOWS on the pile of ash (circled in red) to reveal an AXE for your inventory.
- Head back to the GARDEN AREA.
- At the GARDEN AREA, you will see that the hidden object puzzle is available again. Investigate it.
GARDEN HIDDEN OBJECT PUZZLE TWO

Black objects
- 1. Vase
- 2. Pyramid x 2 (2a, 2b)
- 3. Horn
- 4. Pesticide
- 5. Disc
- 6. Tambour
- 7. Plate
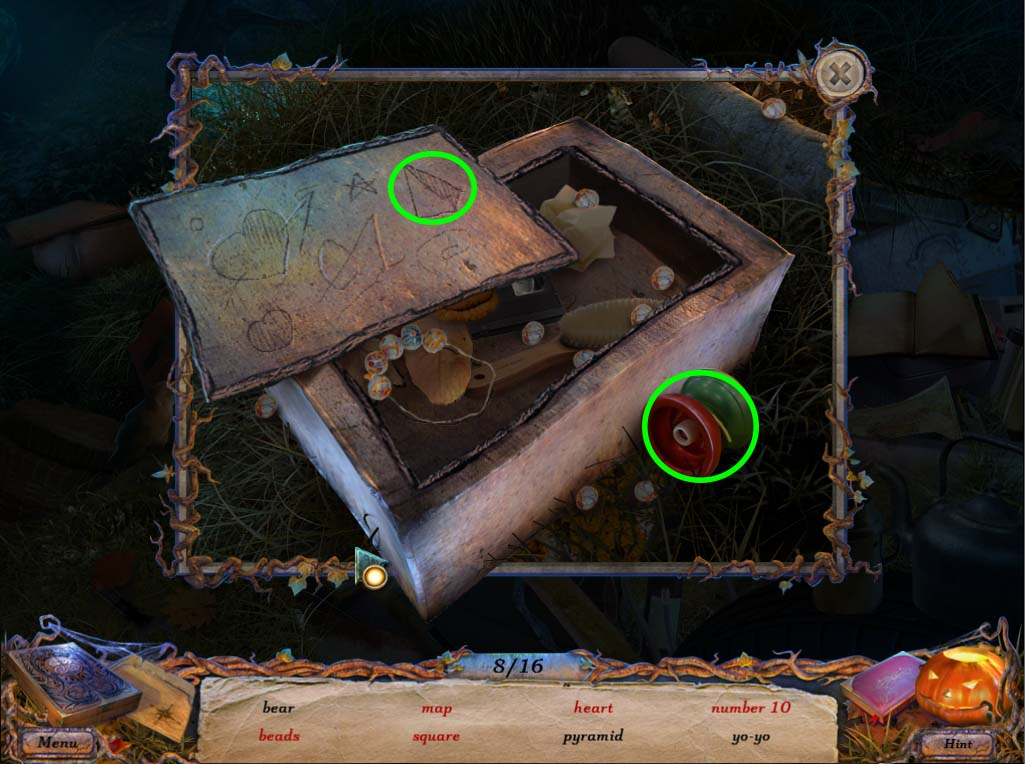
- Investigate the book (circled in yellow) to find the bear, and look inside the box (circled in green) to find a pyramid and a yo-yo
Red Objects
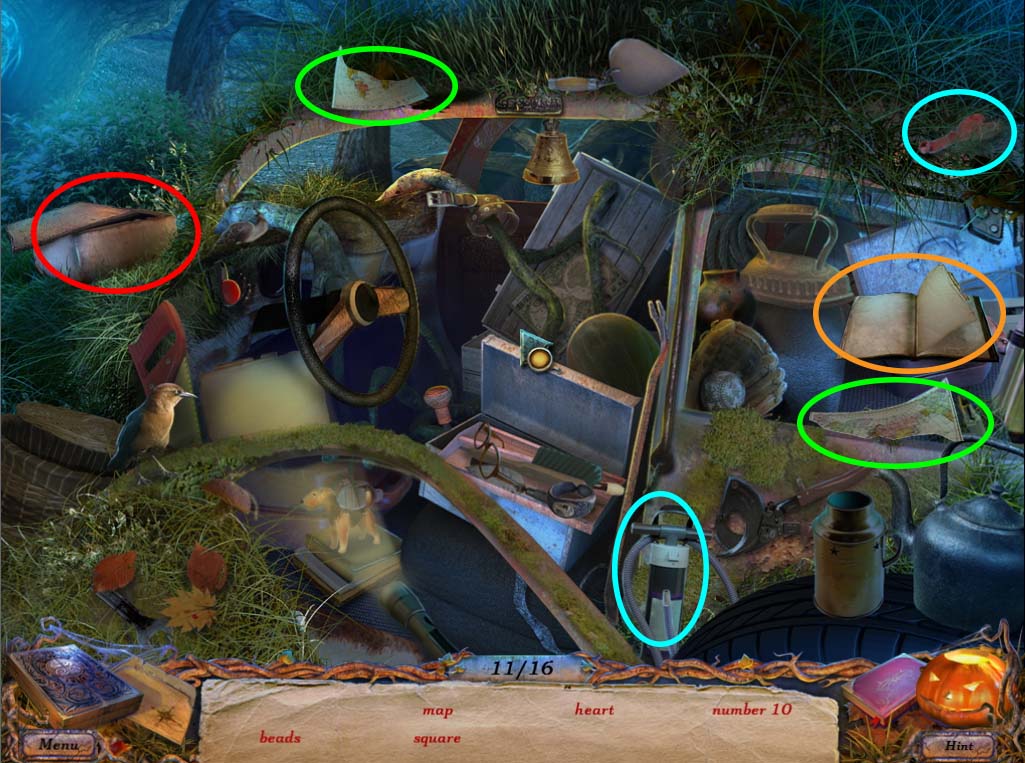
- Fix the map (circled in green)
- Fill up the balloon (circled in blue) to find the heart
- Check the book (circled in orange) and use the pencil on the 7 and 3 to get 10, and erase the TIC TAC TOE grids to get the square
- Finally, check the box (circled in red) and fix the beads as shown below:
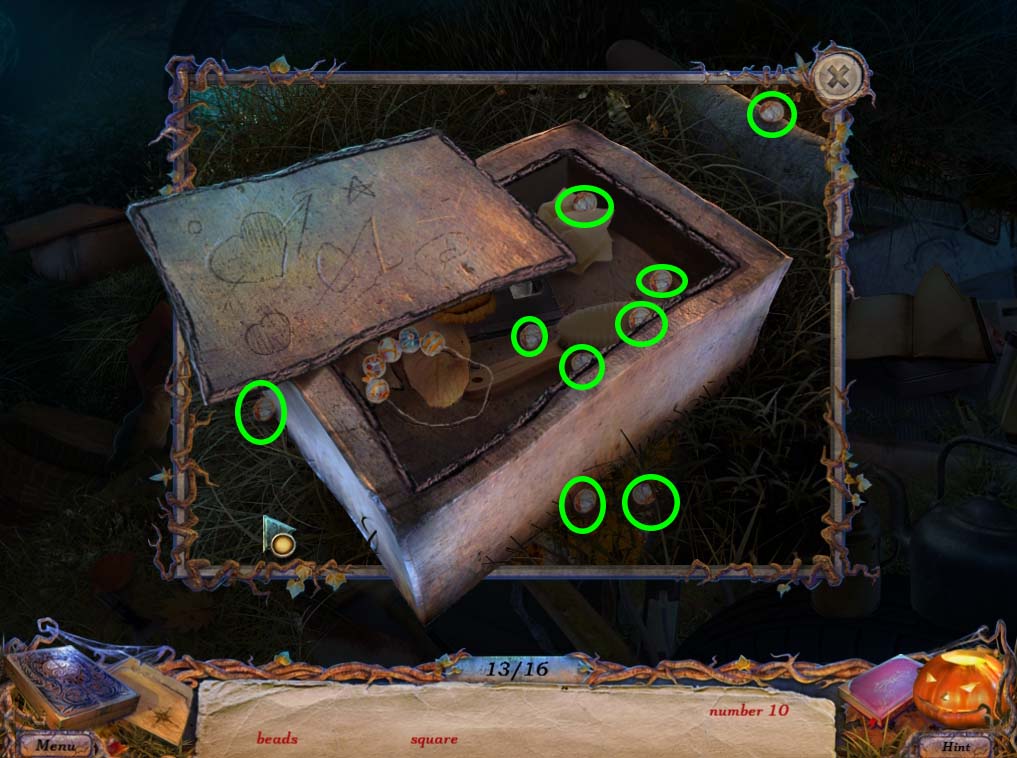
- Finishing the puzzle will reward you with HORNS (1 of 2) and PESTICIDE
- Check the DEAD TREE near the pond and use your AXE to chop it down. Head through to the PAVILLION area.
- Once there, check the statue (circled in blue below) and look at the box it is holding. Afterwards, check the wind chime (circled in green below) and use the PESTICIDE to kill the ants surrounding it. Fix the wind chime by clicking it several times, and a BLUNT ARROW will drop to the ground.
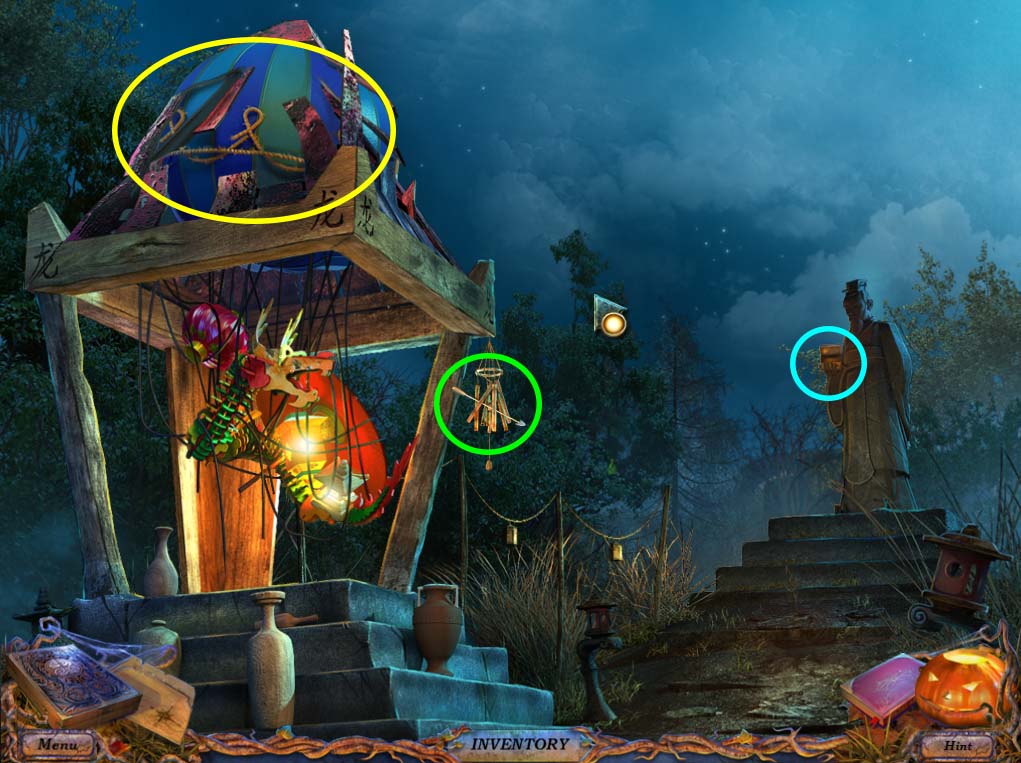
- Pick up the BLUNT ARROW, head back to the FORGE area and use the BLUNT ARROW on the GRINDWHEEL to sharpen it. Once it’s sharpened, head back to the PAVILION area.
- Use the LOADED CROSSBOW on the BALOON (circled in yellow) to reveal the PAVILION hidden puzzle.
PAVILLION HIDDEN OBJECT PUZZLE
Black objects

- 1. Daruma doll
- 2. Cat
- 3. Ruby
- 4. Claw
- 5. Geisha
- 6. Blowfish
- 7. Horn
- 8. Fan
Red Objects
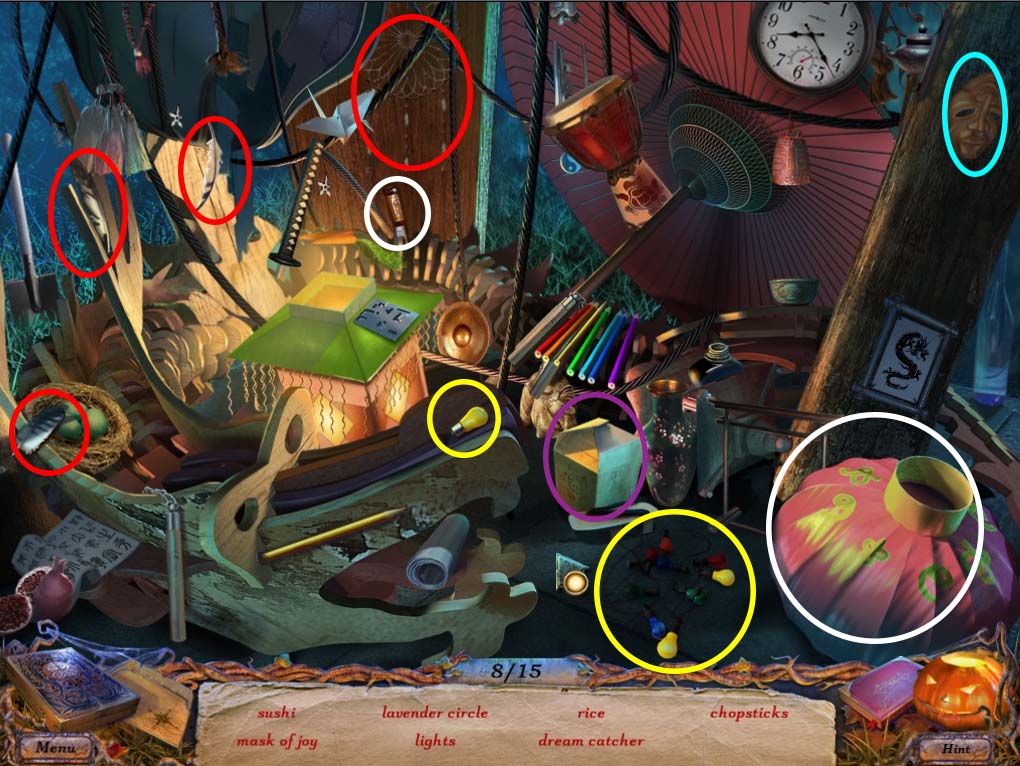
- Bring the feathers back to the dream-catcher (circled in red)
- Click the mask to find the mask of joy (circled in blue)
- Fix the broken lights (circled in yellow)
- Use the knife on the lantern (circled in white) to reveal the chopsticks and the rice
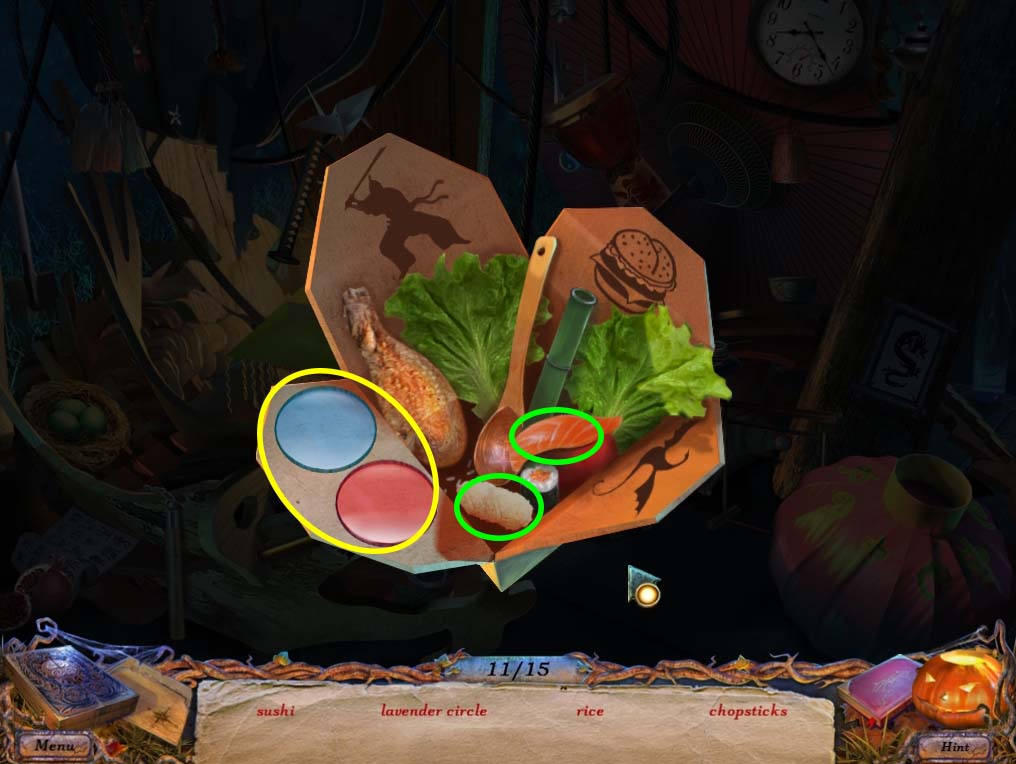
- Open the bento box (circled in violet above) and combine the fish and rice (circled in green below) to get sushi. Combine the two pieces of glass to get lavender circle (circled in yellow below)
- Finishing this puzzle will give you a RUBY (2 of 3) and a HORN (2 of 2).
- Head back to the FORGE.
- Use the HORNS on the METAL BULL and its side will open. Investigate the note to see another cutscene, and take the FAKE SWORD.
- The ghost of the Blacksmith will ask you for this sword, and as a reward fro freeing his soul will give you a RUBY (3 of 3)
End of Chapter VI
Chapter One: Getting to the party
Chapter Two: Missing Friends and Locked Doors
Chapter Three: First Game Piece - The Groom
Chapter Four: Second Game Piece - The Nanny
Chapter Five: Third Game Piece - The Priest
Chapter Six: Fourth Game Piece - The Blacksmith
Chapter Seven: Fifth Game Piece
Chapter Eight: The Last Game Piece
Ask for help in the comments below!