
Shadows: Price for Our Sins: Chapter Four: Second Game Piece - The Nanny
Help Dylan save her friends with our Shadows: Price for Our Sins Walkthrough. The Lord of Darkness Samhain has exacted his revenge by enslaving the souls of Dylan's friends. Now, it's up to you to help her set things right and free them from their bonds with a little help from our detailed instructions, custom screenshots, and hints and solutions to the many challenges you'll face along the way.
Chapter One: Getting to the party
Chapter Two: Missing Friends and Locked Doors
Chapter Three: First Game Piece - The Groom
Chapter Four: Second Game Piece - The Nanny
Chapter Five: Third Game Piece - The Priest
Chapter Six: Fourth Game Piece - The Blacksmith
Chapter Seven: Fifth Game Piece
Chapter Eight: The Last Game Piece
Ask for help in the comments below!
- With the board game now in your possession and the first GAME PIECE in its proper place, it’s time to hunt down the other missing pieces so that you can free your friends from their gruesome fate.
- You should have one half of the next game piece in your inventory, so we’ll start from there.
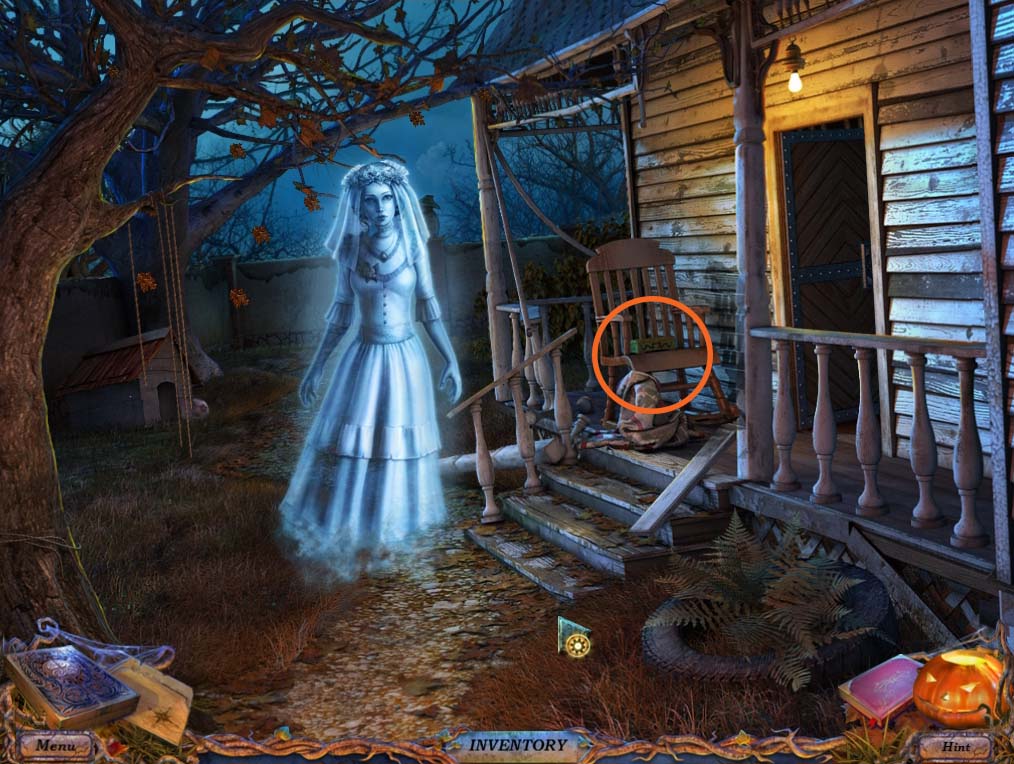
- Step back outside, and you’ll be surprised to find that the crying child is gone and in her place is the ghost of a woman named Mary.
- She’ll disappear after you click on her, but she’ll leave a note as she does so.
- Pick it up and you’ll find a small thank you note and another DRAGON piece.
- Investigate the small green box on top of the ROCKING CHAIR (circled in orange above), and you’ll find that the two pieces that you have are a perfect fit. Place them on the box and open it.
- Inside you’ll find a HANDLE. Take it and go back inside the LIVING ROOM.
- Investigate the cupboard (circled in green below) and place your newly acquired HANDLE on the door.
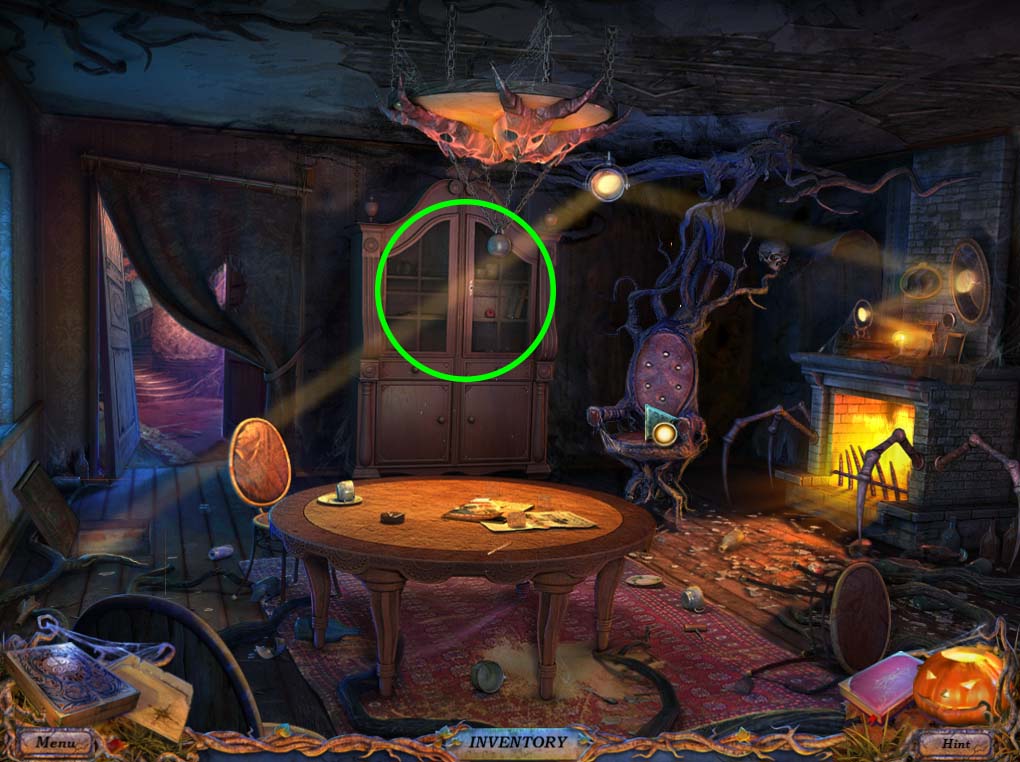
- You’ll find a small spider BOX BUTTON in the cupboard, and clicking it will place it in your inventory.
- Now head forward to the HALL, we have a short puzzle to solve.
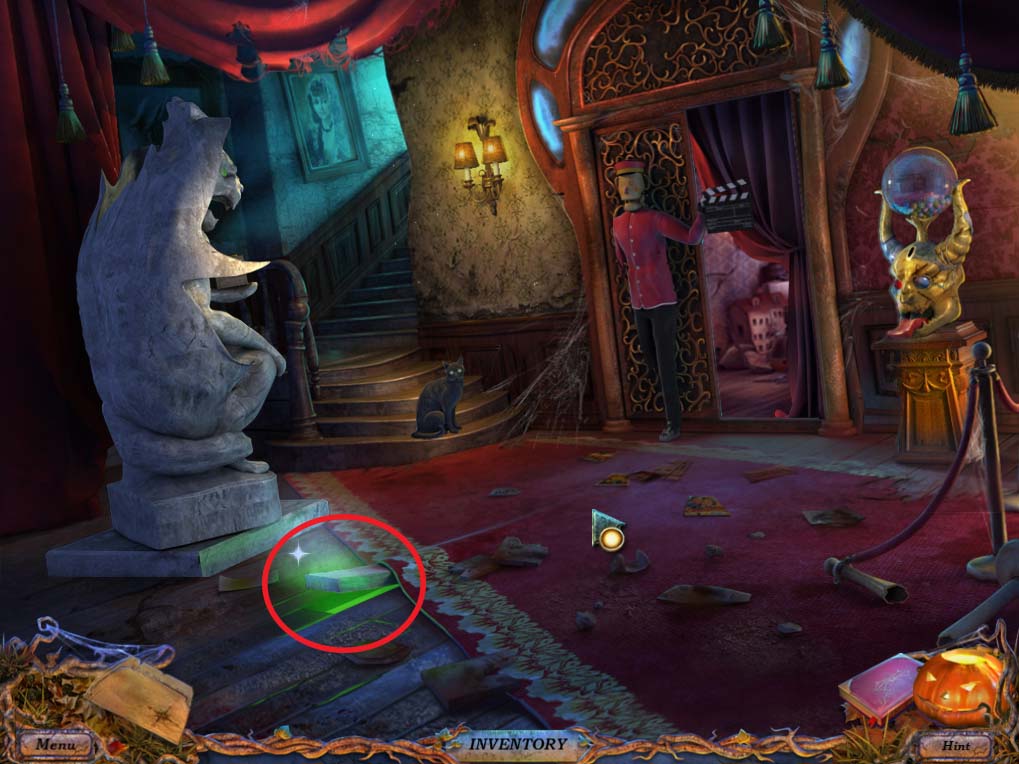
- You’ll find a floorboard sticking out with green light emanating from it (circled in red above).
- Use the WEIGHT in your inventory and place it on the floorboard.
- This will cause the gargoyle statue to turn, revealing a box that is being help in its hand. Investigate this box and you’ll see several buttons, with one missing.
- Take the BOX BUTTON from your inventory and place it on the box.
- This should start a small mini game after you do so.
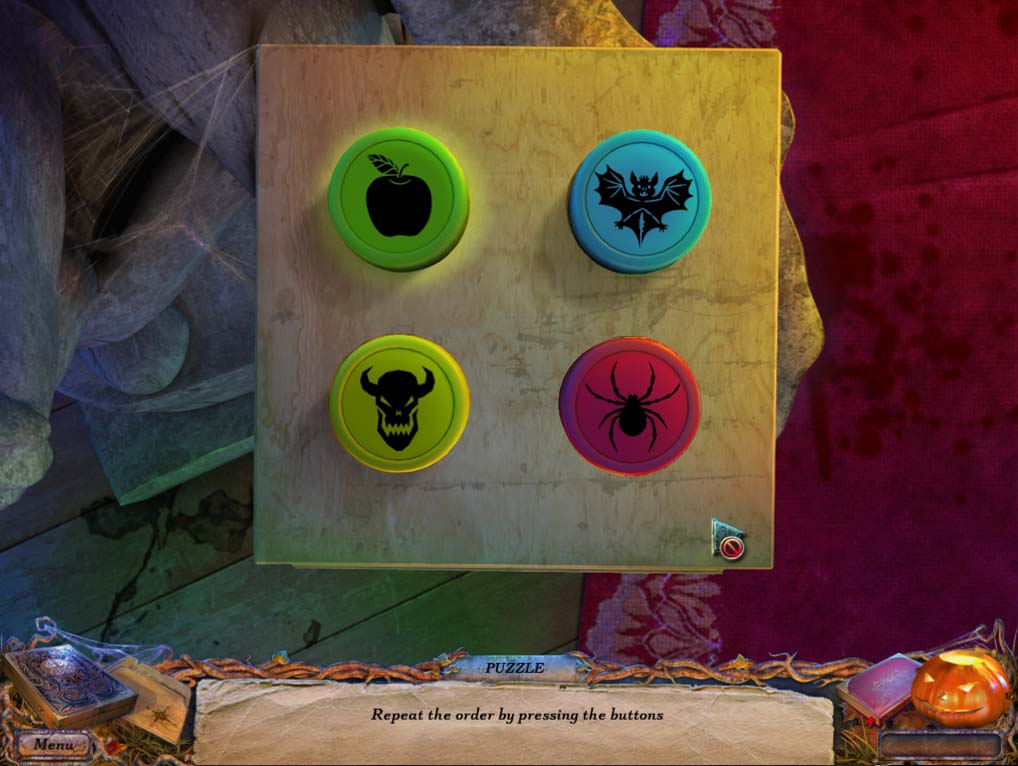
FOLLOW THE PATTERN MINI GAME
-
The object of this mini game is to push the buttons in the sequence that they light up. If you fail to follow the proper order, the current step will reset, but you won’t have to start from the very beginning. You can easily solve this game if you want, or follow the pattern as they’re listed below:
- Green – Yellow – Blue – Red
- Blue – Yellow – Green – Red – Blue
- Yellow – Red – Yellow – Blue – Green – Red
- Once you finish the puzzle, the box will open revealing a toy MOUSE.
- If you’ve tried to go upstairs before this, you’ll find that the CAT will not let you through.
- Use the MOUSE to distract it and then head upstairs to the SECOND FLOOR.
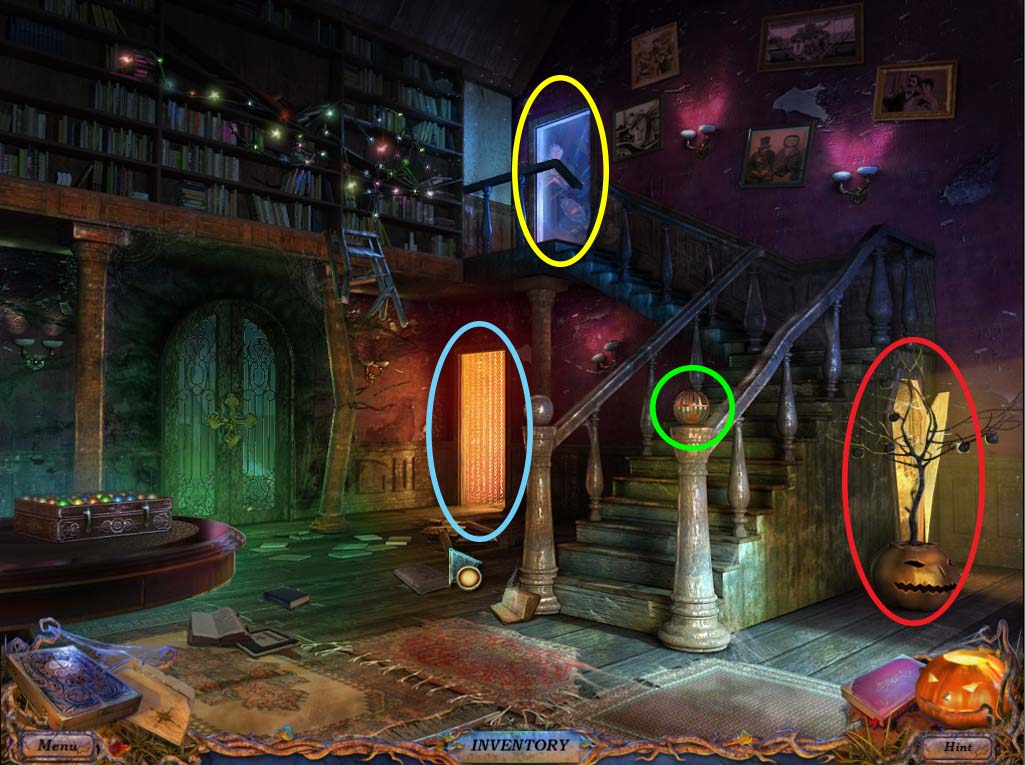
- Head inside the NANNY’S ROOM, (circled in blue above) and speak to the NANNY’s ghost.
- She’ll tell you a bit of background about herself and will point you in the direction of the table (circled in green below).
- You can also open the windows (circled in blue below) to let a bit of light in before you check the table.
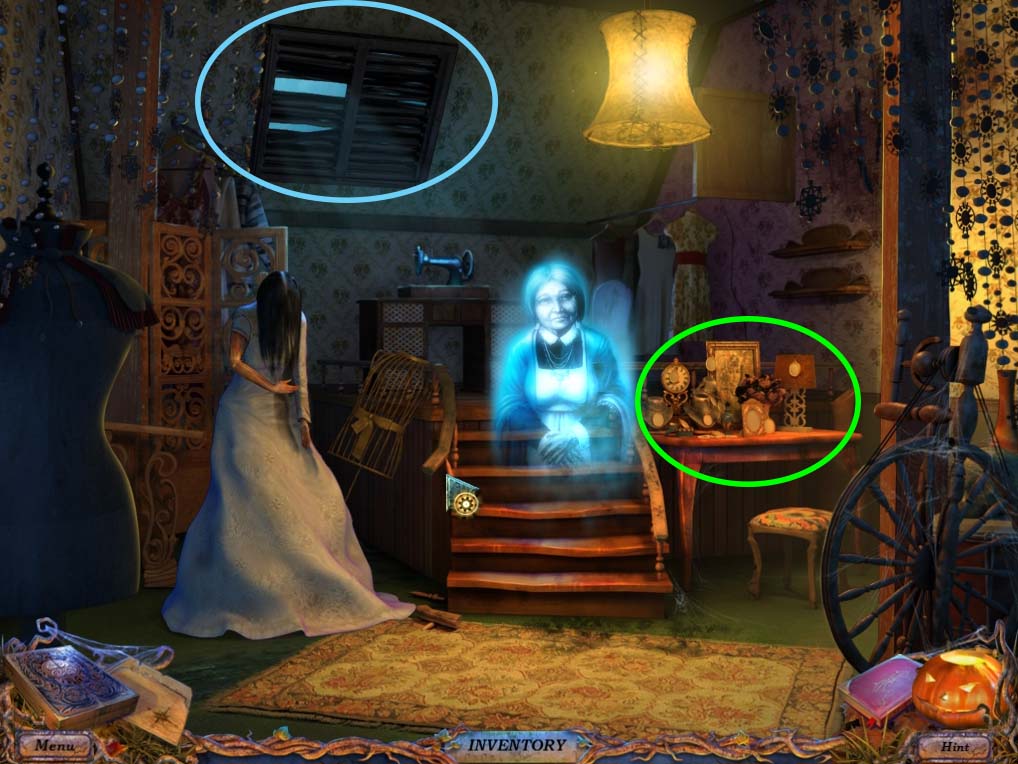
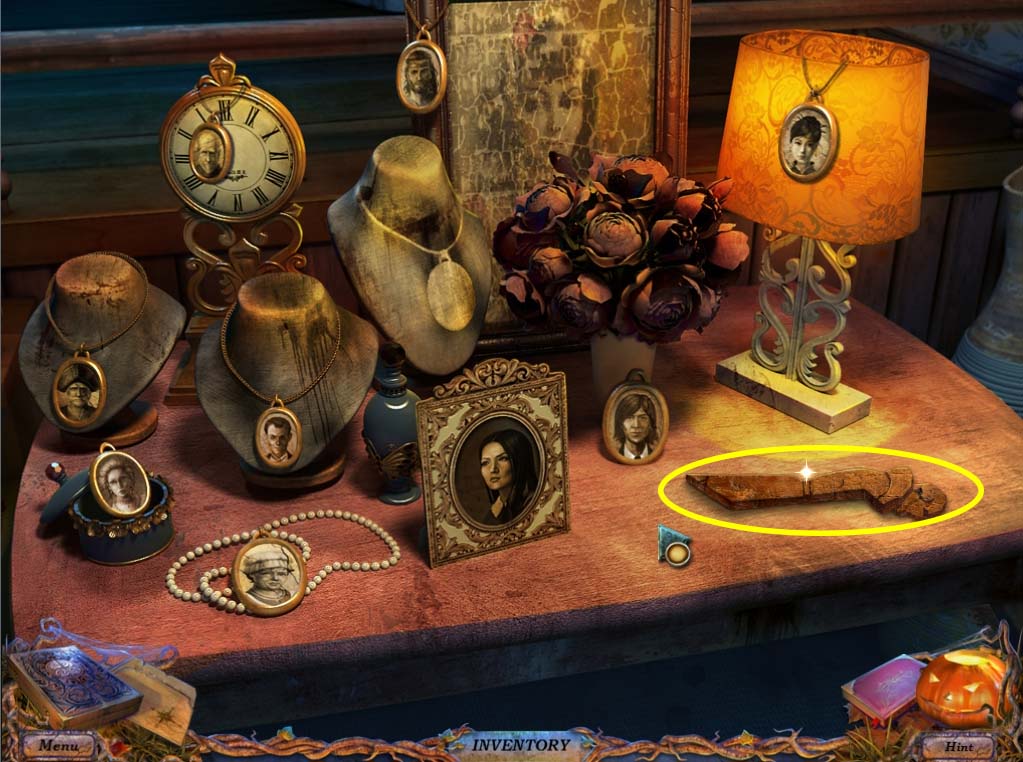
- On top of the table are several lockets with pictures that show the past residents of the house, except one, the Nanny herself.
- She has asked you to help her find the missing picture, and it would be a good idea to oblige.
- You can click each picture to get an idea of who they are, otherwise, grab the GAME PIECE HALF (circled in yellow below) lying on top of the table and go back to the SECOND FLOOR area.
- Now back at the SECOND FLOOR, investigate the ball on the bottom of the stairs (circled in green on the SECOND FLOOR image above).
- Inside you will find the second GAME PIECE HALF for the Nanny.
- Place both pieces on the BOARD GAME as shown below and take the item (an APPLE).
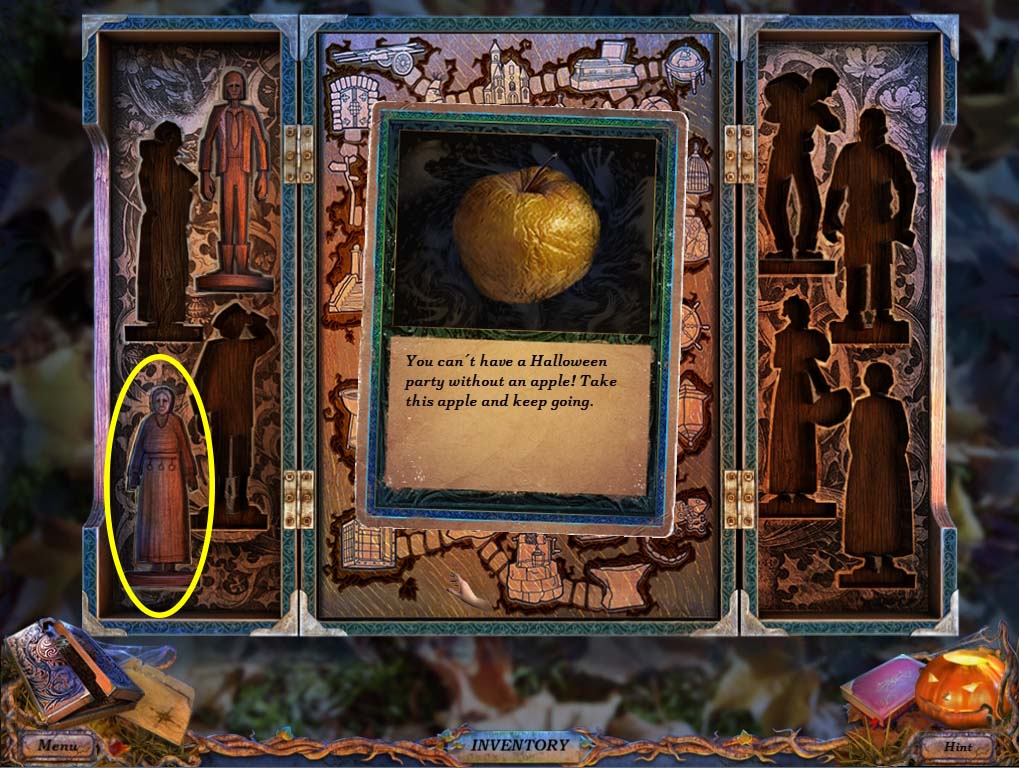
- With the APPLE in your possession, investigate the TREE (circled in red on the SECOND FLOOR image above) and use it. The APPLE TREE will revert to a sapling and looking further will start the SECOND FLOOR HIDDEN OBJECTS puzzle.
SECOND FLOOR HIDDEN OBJECTS
Black Objects
- 1. Pipe
- 2. Ladle
- 3. Hat
- 4. Mushrooms
- 5. America
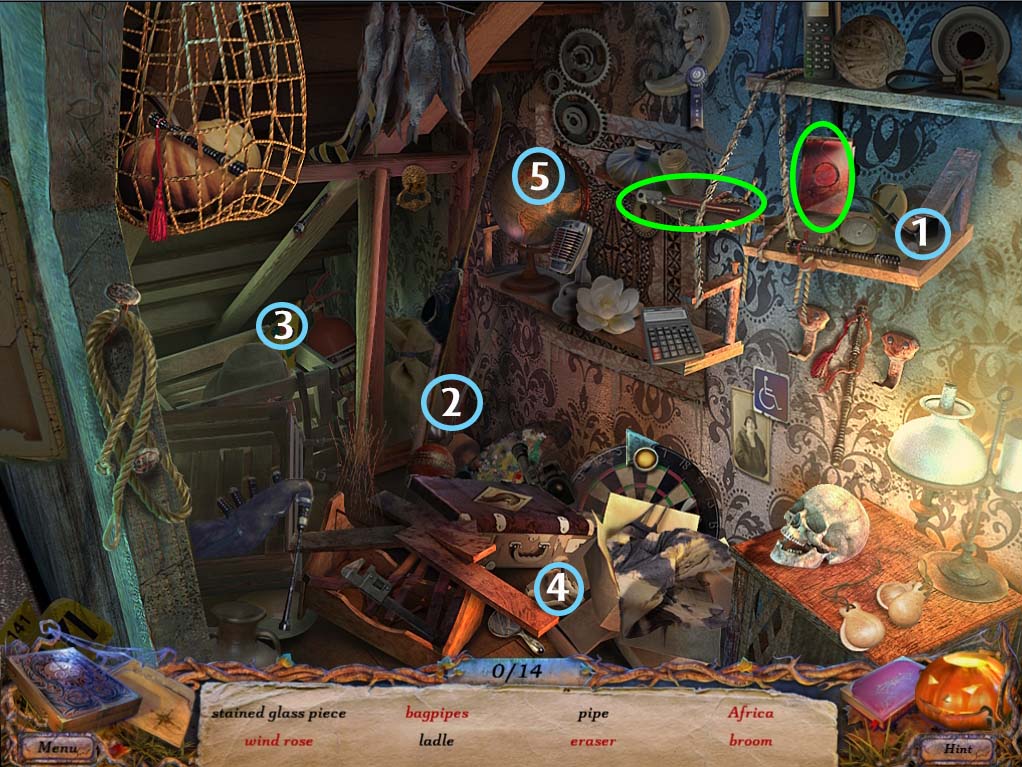
- Then use the glass cutter on the stained glass (circled in green) to get the Stained Glass Piece

Red objects
- Turn the globe (circled in orange) until you find Africa
- Use the rope to fix the broom (circled in green)
- Collect the pieces to fix the bagpipe (circled in yellow)
- Click the calculator (circled in red) and type in 153
- Move the skull (circled in blue) to get the eraser under it
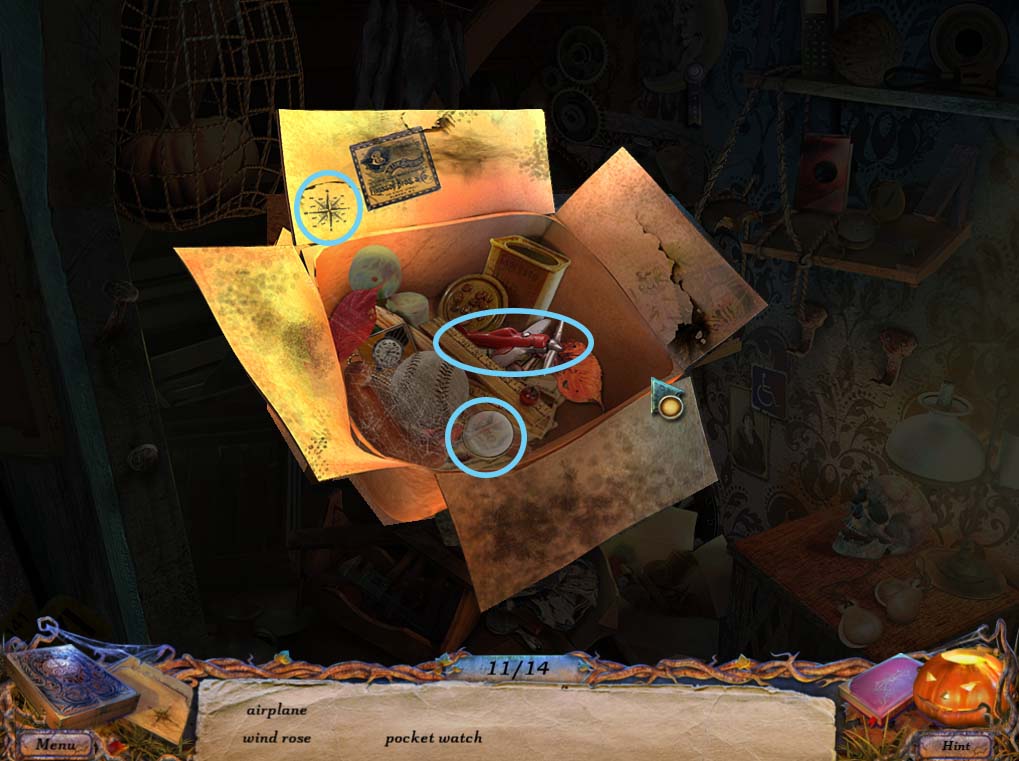
- And finally, move the cloth over the box (circled in white) and investigate further to find the airplane, wind rose and pocket watch
- This puzzle will reward you with a BROOM and a STAINED GLASS PIECE (1 of 3) for your inventory.
- Once you have the items in your inventory, head upstairs to the attic.
- Investigate the BLUE CHEST on the right side of the room (circled in blue below) and it will start another HIDDEN OBJECT PUZZLE
ATTIC HIDDEN OBJECT PUZZLE
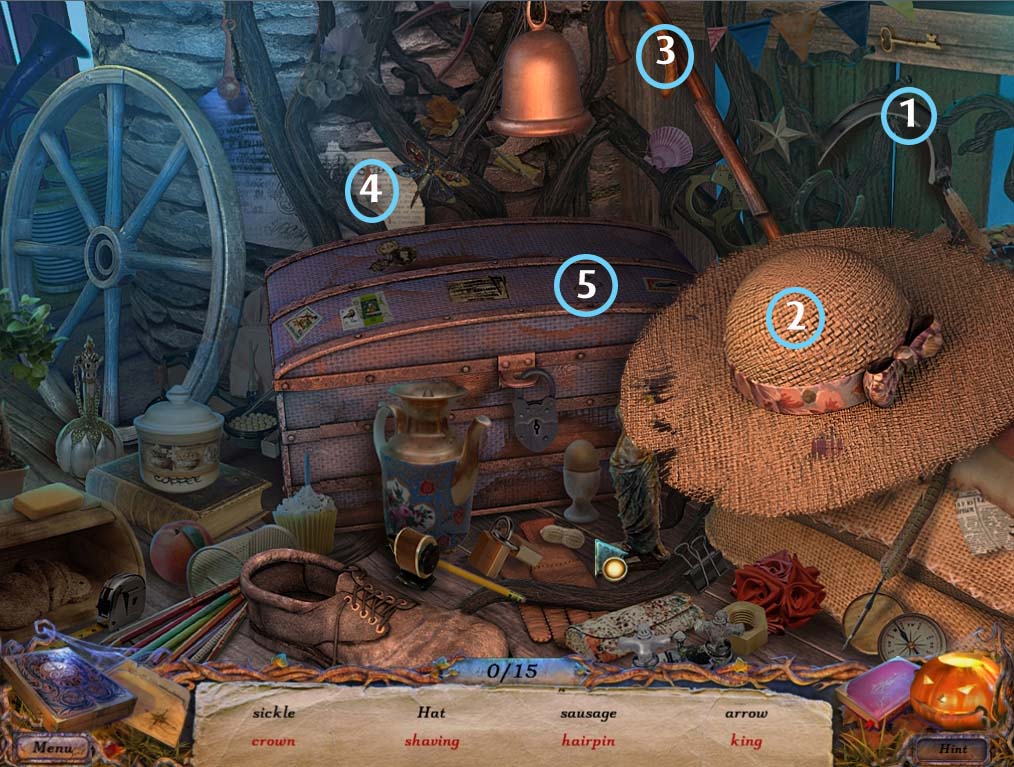
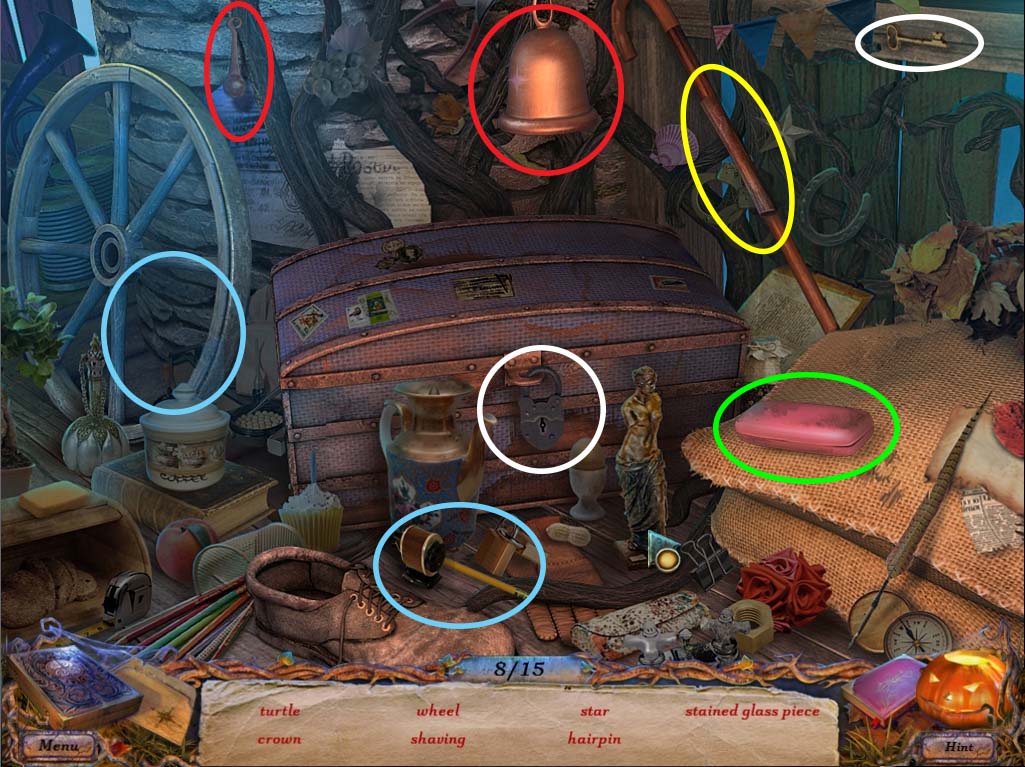
Black objects
- 1. Sickle
- 2. Hat
- 3. Sausage
- 4. Arrow
- 5. Number 17
- 6. King
- 7. Collar
- 8. Dragonfly
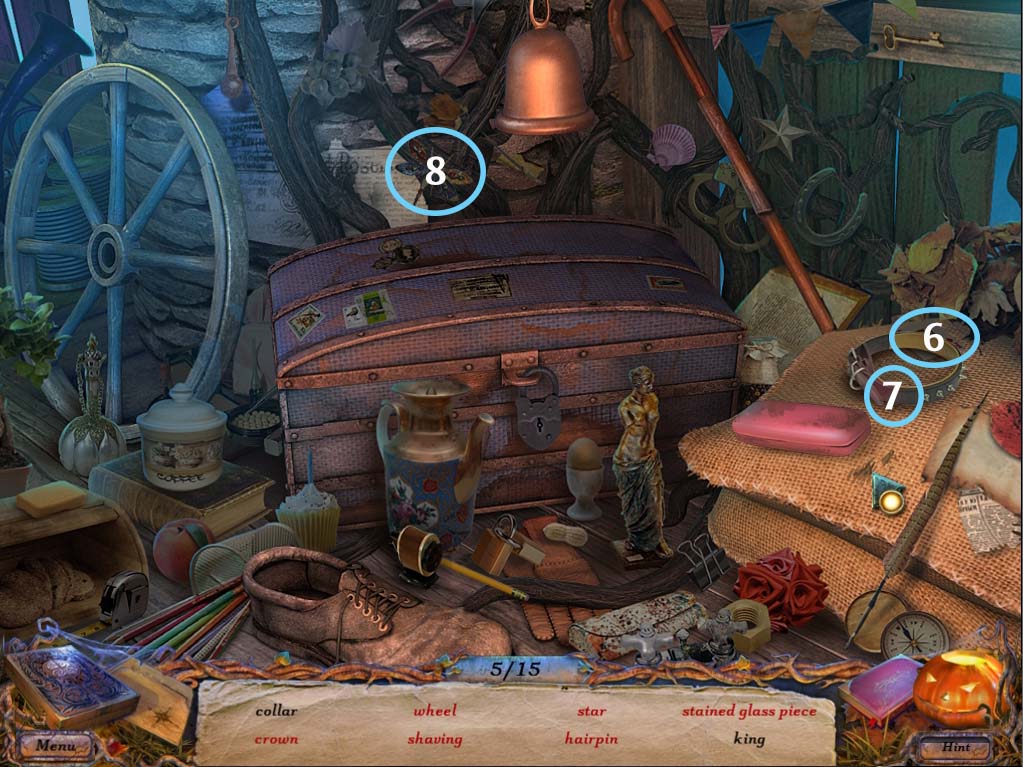
Red Objects
- Open the eyeglass case (circled in green) to get the hairpin and the stained glass piece
- Take the wheel piece and put it back into the wheel (circled in yellow)
- Click the pencil sharpener to get the shaving (circled in blue)
- Repair the bell (circled in red) and when you ring it, a star will drop
- Finally, use the key on the padlock (circled in white) to find the crown and the turtle.
- Solving this puzzle will reward you with a SICKLE and a STAINED GLASS PIECE (2 of 3)
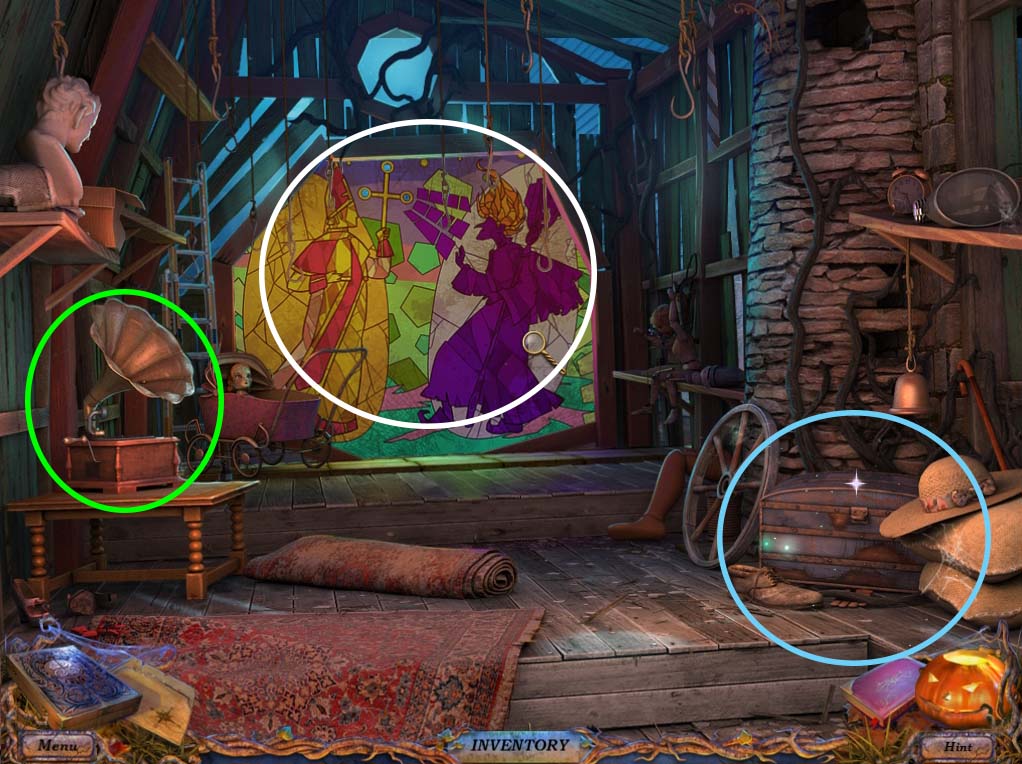
- With the puzzle out of the way, investigate the RECORD PLAYER (circled in green on ATTIC image above), and clear away the broken record on the top of it. You’ll reveal another GAME PIECE HALF which you can now place in the BOARD GAME
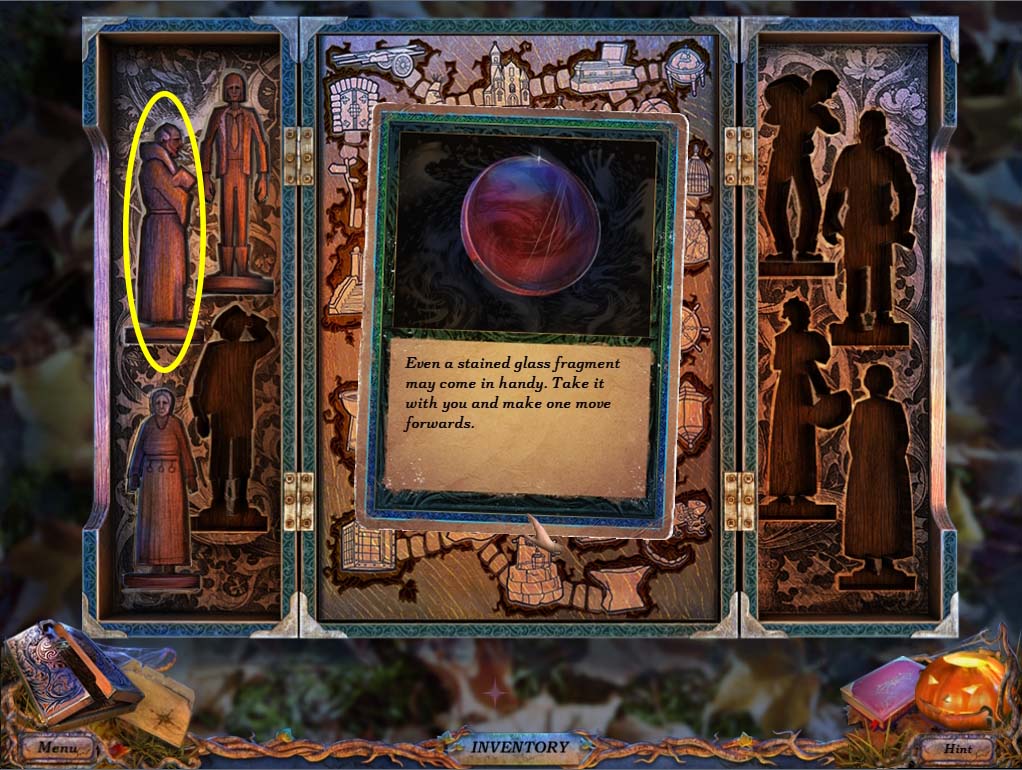
- This will provide you with the third STAINED GLASS PIECE you need. Investigate the STAINED GLASS MURAL (circled in white on the ATTIC image above) and use the three STAINED GLASS PIECES on it.
- With the glass shattered, you can now move forward to the BALCONY area

- Investigate the BIRDCAGE (circled in green) and take the EYE from its beak.
- Afterwards, investigate the DOLL SHOW (circled in yellow) to start the BALCONY HIDDEN OBJECT PUZZLE
BALCONY HIDDEN OBJECT PUZZLE
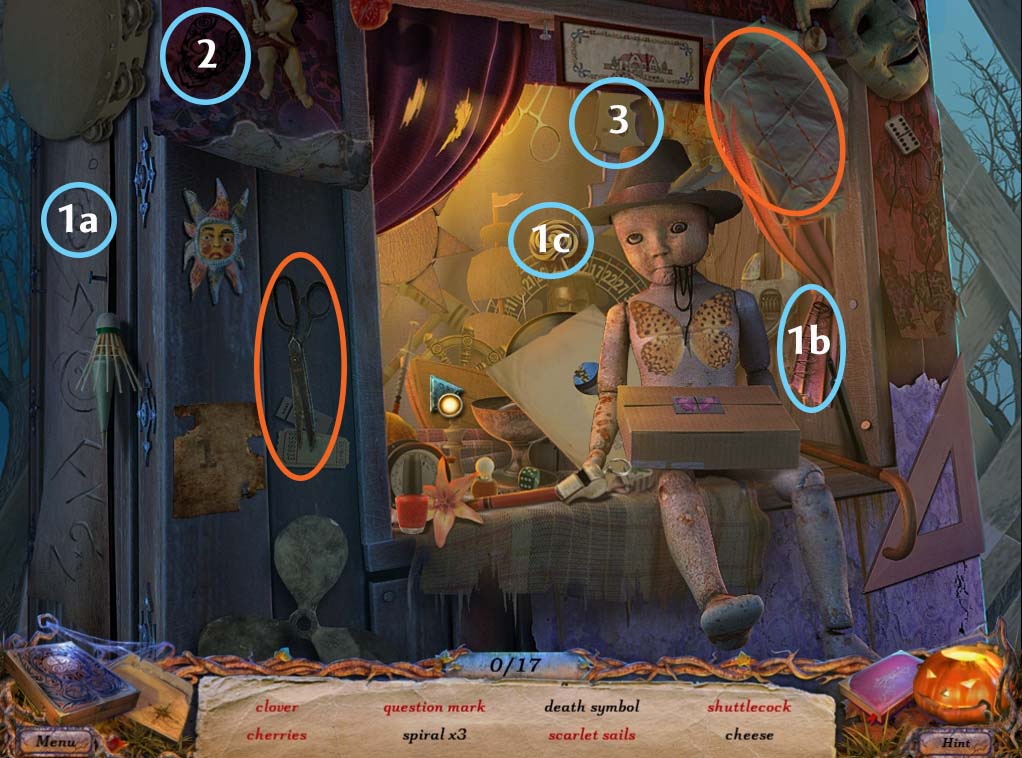
Black objects
- 1. Spiral x 3 (1a, 1b, 1c)
- 2. Death Symbol
- 3. Cheese
- Take the scissors and cut the cloth to get the Scrap
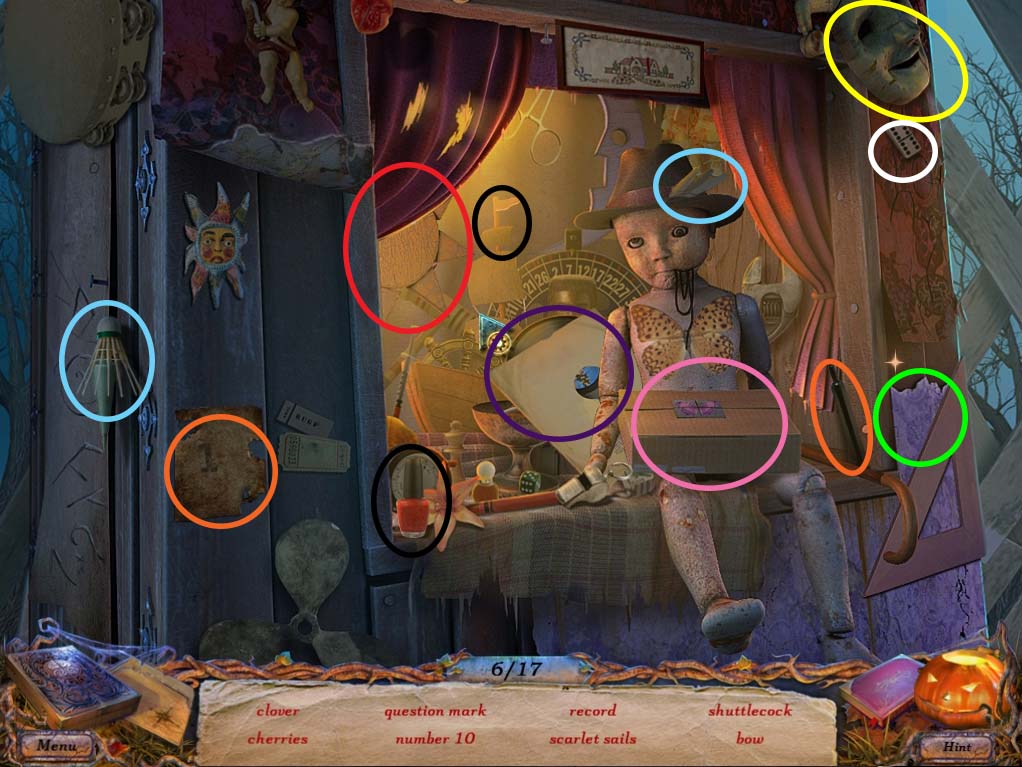
Red Objects
- Move the paper on the area circled in green to find the question mark
- Bring the feathers back to the shuttlecock (circled in blue) so it can be selected
- Move the mask (circled in yellow) to find the cherries underneath
- The domino is in plain sight (circled in white)
- Move the sun (circled in red) to find the fish behind it
- Take the Marker (circled in orange) and complete the number 10
- Take the nail polish and color the sails (circled in black) to get scarlet sails
- Open the record cover (circled in violet) to find the record inside
- Finally, investigate the box (circled in pink) and click on the butterflies until it opens to find the jingle bell, the clover and the bow
- Solving this puzzle will reward you with a RAG and a RECORD

- Go back to the ATTIC area and investigate the DOLL (circled in green above) and give it the EYE in your inventory. This will give you a COIN, and will also free up the LADDER behind it (circled in red). Take the LADDER and investigate the RECORD PLAYER (circled in yellow) before you go. Place the RECORD from your inventory, lower the needle and turn the handle. The RECORD PLAYER will spit out a DRUMSTICK. Take it and go back to the BALCONY AREA.
- Check the MONKEY DRUMMER on the right side of the BALCONY. Give him the DRUMSTICK and he will play until his drum breaks. Inside it you will find a MARBLE (3 of 4). Take it and head back down the SECOND FLOOR area.
- At the SECOND FLOOR, use the LADDER as shown in the image below (circled in blue).
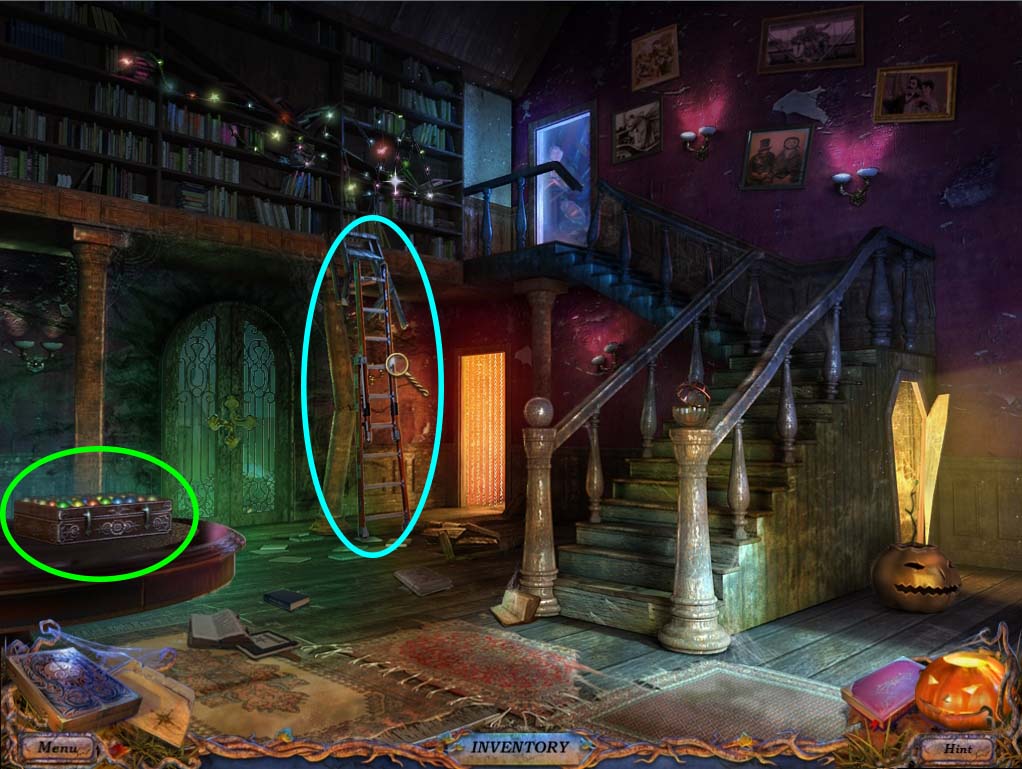
- Investigate it and you will find several lights that you can brush aside to reveal another GAME PIECE HALF. Take this and head down to the HALL
- At the HALL area, investigate the CANDY MACHINE (circled in blue below).
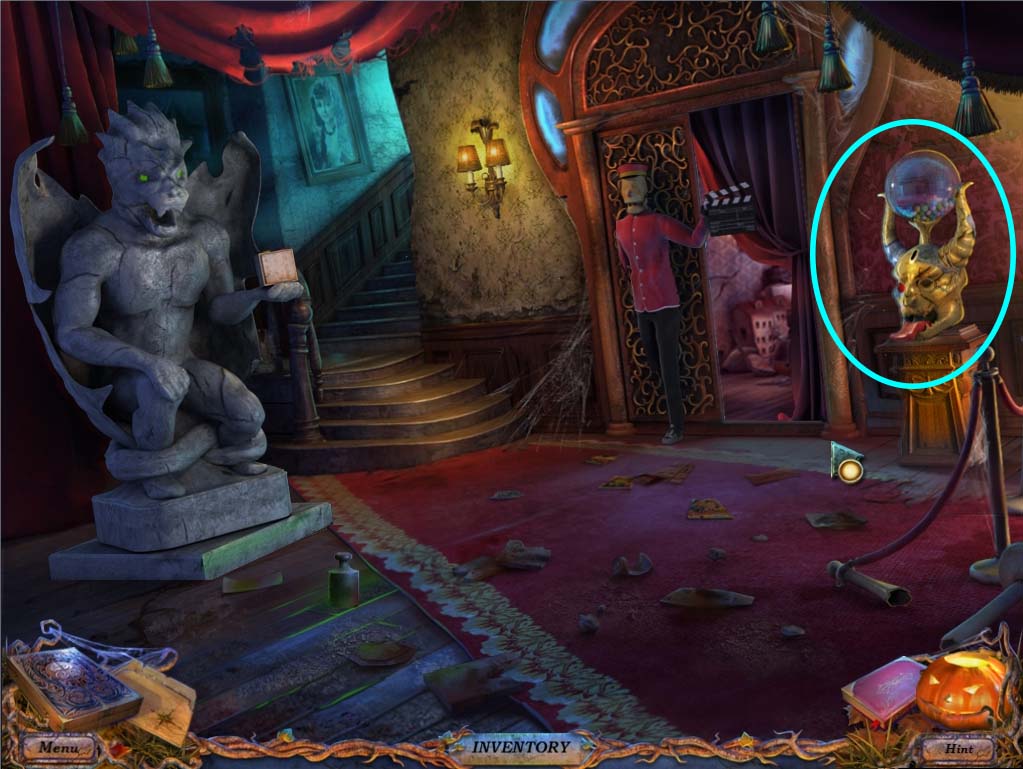
- Use the COIN in your inventory and place it in the slot on the CANDY MACHINE’S head.
- It will give you a MARBLE (4 or 4) for your inventory. Take it and head back to the SECOND FLOOR.
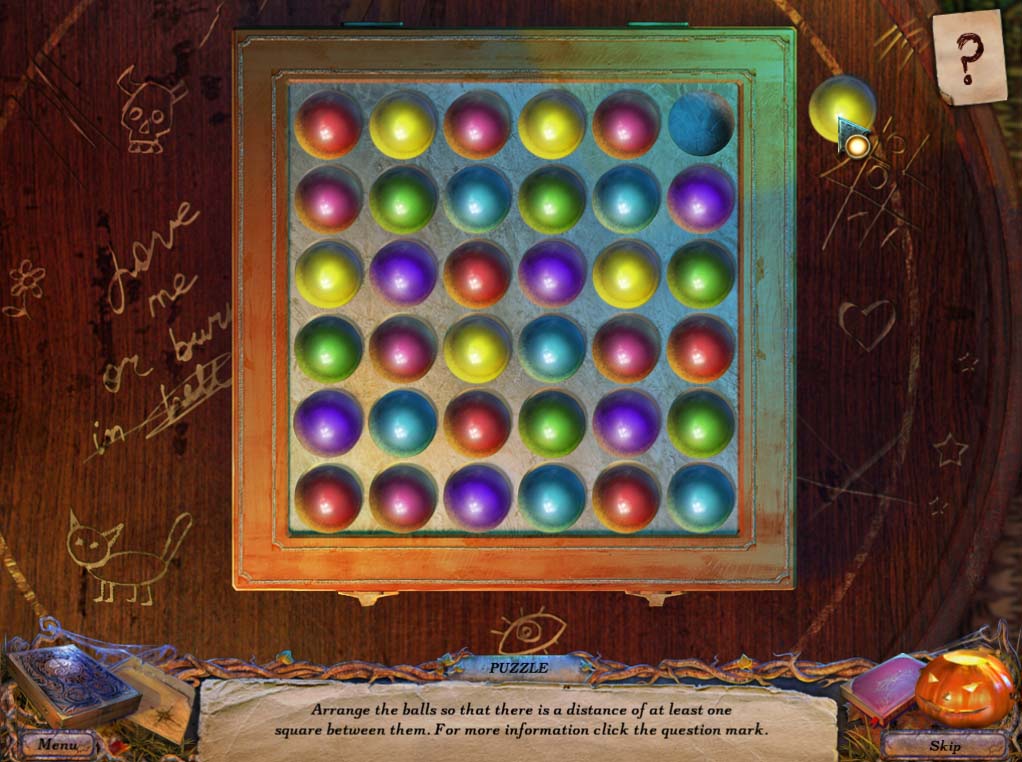
- Investigate the MARBLE PUZZLE (circled in green in SECOND FLOOR image above) to start a mini game
MARBLES MINI GAME
- The objective of this game is to arrange the marbles so that no 2 similarly colored marbles touch each other either horizontally, vertically or diagonally.
- The easiest way to solve this puzzle is to work your way from the bottom corners and move up, making sure that by the end you’re left with differently colored marbles.
- A half solved puzzle is shown below:
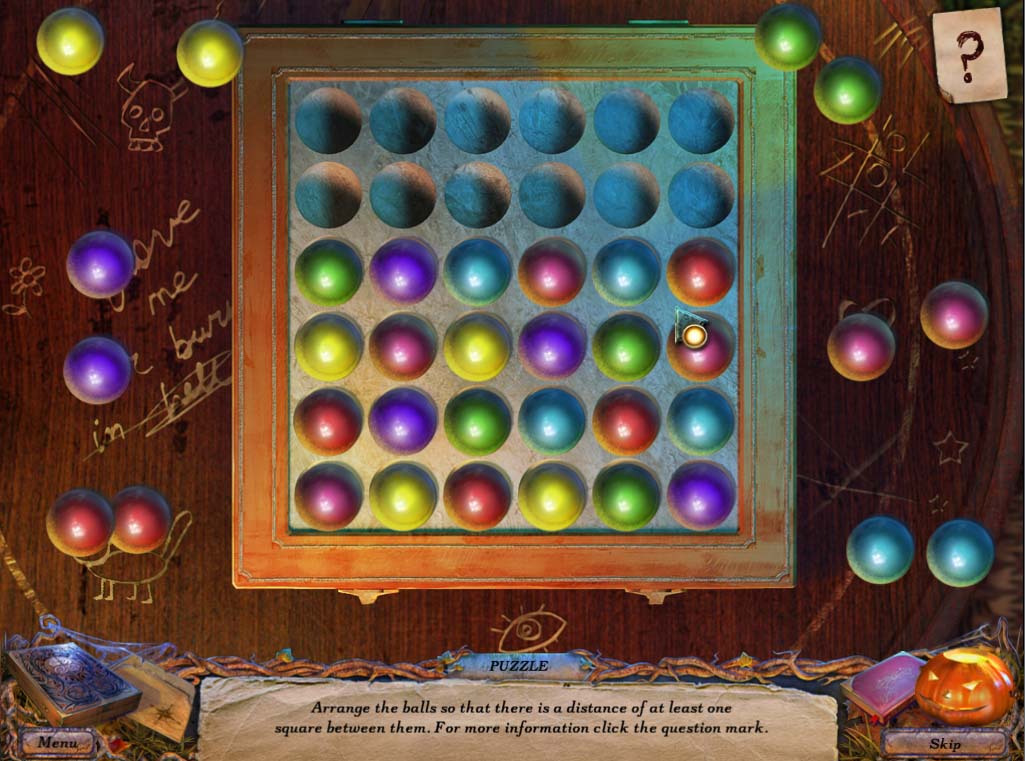
- There are several solutions for this puzzle, and two of the possible ones are shown below:
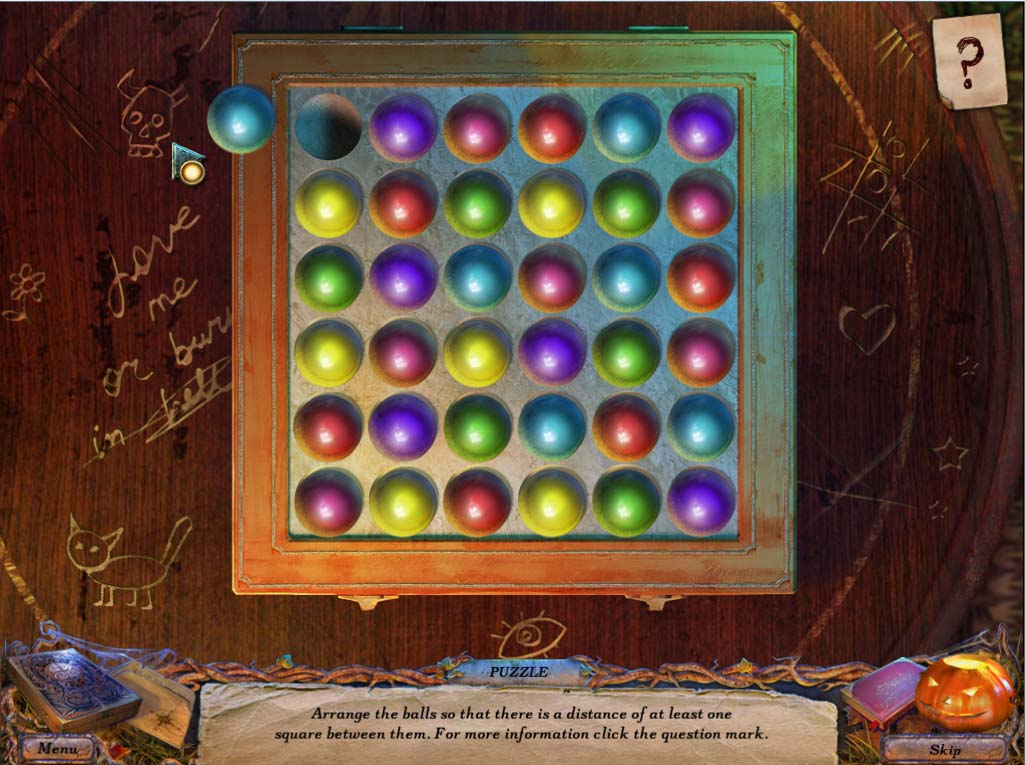
- After solving this puzzle, you’ll find a sewing machine PART inside. Head back into the NANNY’S ROOM and put the PART back in the SEWING MACHINE. Take the RAG from your inventory and place it on the SEWING MACHINE as well. Give the handle of the SEWING MACHINE a few turns and you’ll be given a SLEEVE.
- Use the SLEEVE on the MANNEQUIN with the dress and its dress will lift up slightly revealing a basket full of threads. Move the threads aside and you’ll find a FLAG under them. Take it and head back to the FRONT GATE.
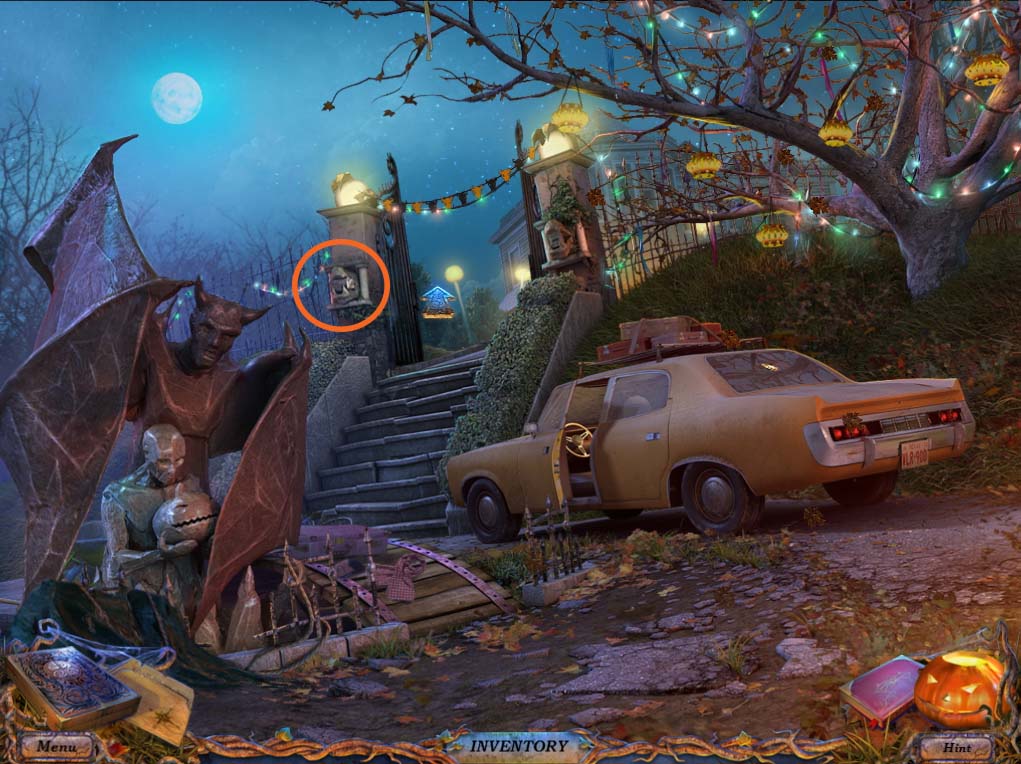
- At the gate take a quick look at the MAILBOX (circled in orange above) and place the FLAG back on it.
- Open the MAILBOX and you’ll find a LOCKET inside it.
- Take this locket and go back to the NANNY’S ROOM.
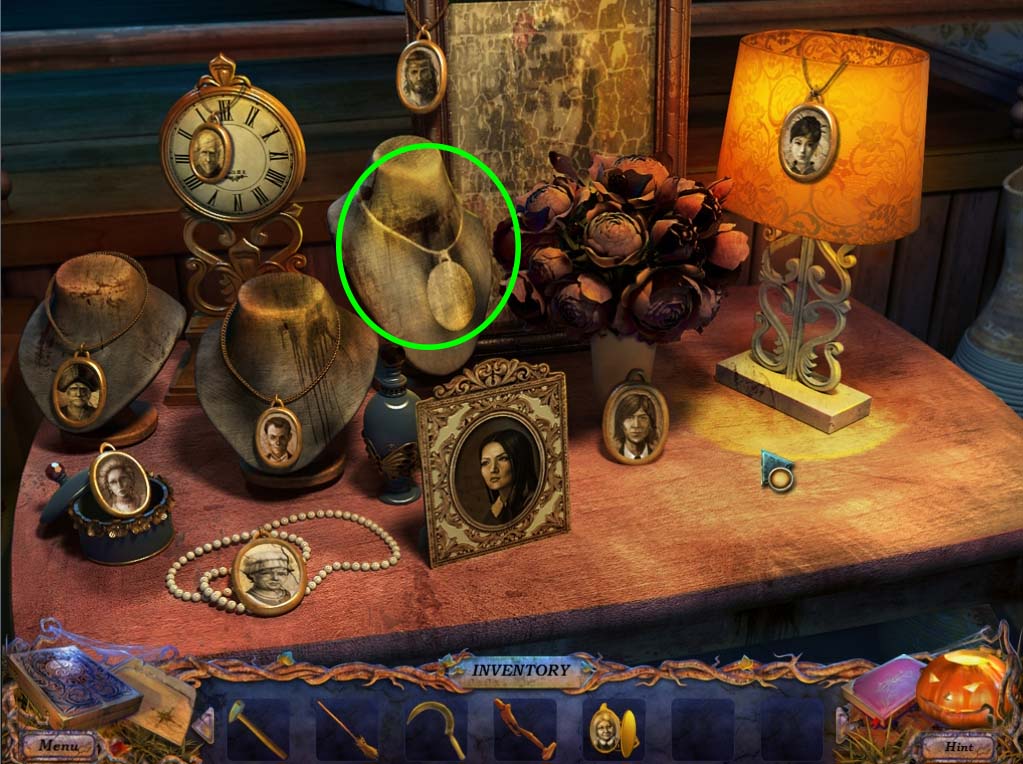
- In the NANNY’S ROOM investigate the table full of lockets once more.
- There should be a bust with a locket missing (circled in green below) place the LOCKET that you found on it.
- This will start another mini game where you will be asked to match each locket to different portraits. The solution for this puzzle is below:
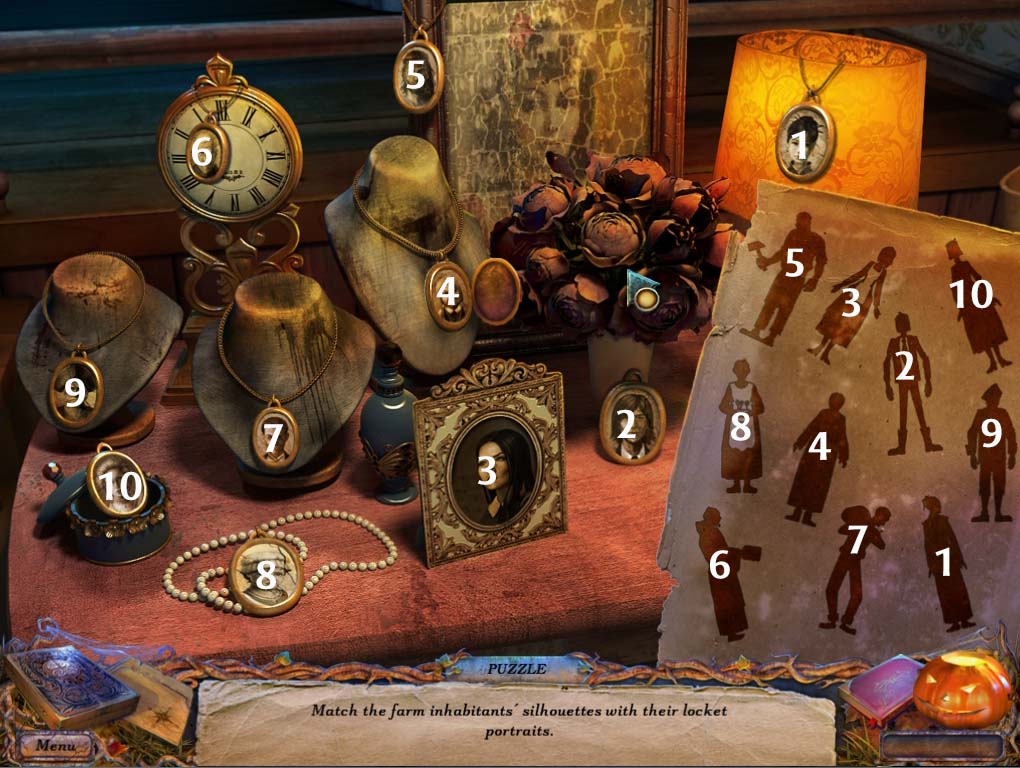
- Solving this puzzle will cause a small cutscene to play and you will find a note on the table afterwards. The ghost of the NANNY will thank you for your help and will give you a LANTERN as a reward.
End of Chapter IV
Chapter One: Getting to the party
Chapter Two: Missing Friends and Locked Doors
Chapter Three: First Game Piece - The Groom
Chapter Four: Second Game Piece - The Nanny
Chapter Five: Third Game Piece - The Priest
Chapter Six: Fourth Game Piece - The Blacksmith
Chapter Seven: Fifth Game Piece
Chapter Eight: The Last Game Piece
Ask for help in the comments below!