
Shadows: Price for Our Sins: Chapter Two: Missing Friends and Locked Doors
Help Dylan save her friends with our Shadows: Price for Our Sins Walkthrough. The Lord of Darkness Samhain has exacted his revenge by enslaving the souls of Dylan's friends. Now, it's up to you to help her set things right and free them from their bonds with a little help from our detailed instructions, custom screenshots, and hints and solutions to the many challenges you'll face along the way.
Chapter One: Getting to the party
Chapter Two: Missing Friends and Locked Doors
Chapter Three: First Game Piece - The Groom
Chapter Four: Second Game Piece - The Nanny
Chapter Five: Third Game Piece - The Priest
Chapter Six: Fourth Game Piece - The Blacksmith
Chapter Seven: Fifth Game Piece
Chapter Eight: The Last Game Piece
Ask for help in the comments below!
Part I: The Crying Girl
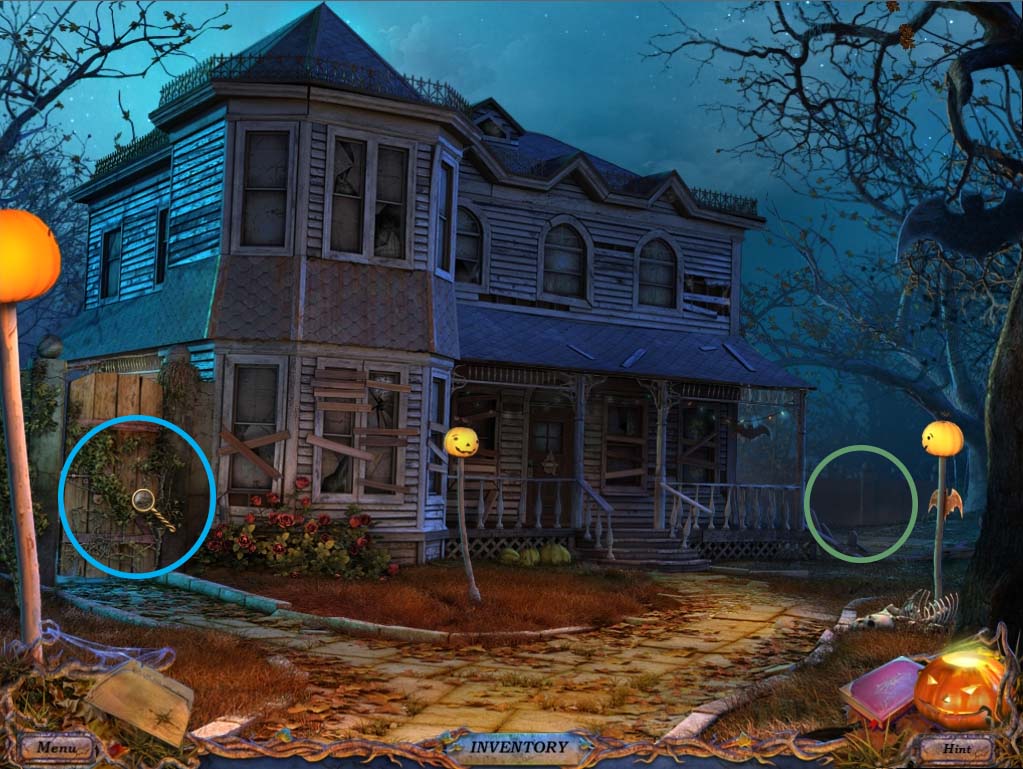
- With the events of the first chapter now behind you, head back t the FRONT YARD of the house. You will hear a child crying somewhere nearby, and it’s your job to investigate.
- Head to the gate indicated above in a blue circle, and you’ll notice weeds that have overgrown the lock.
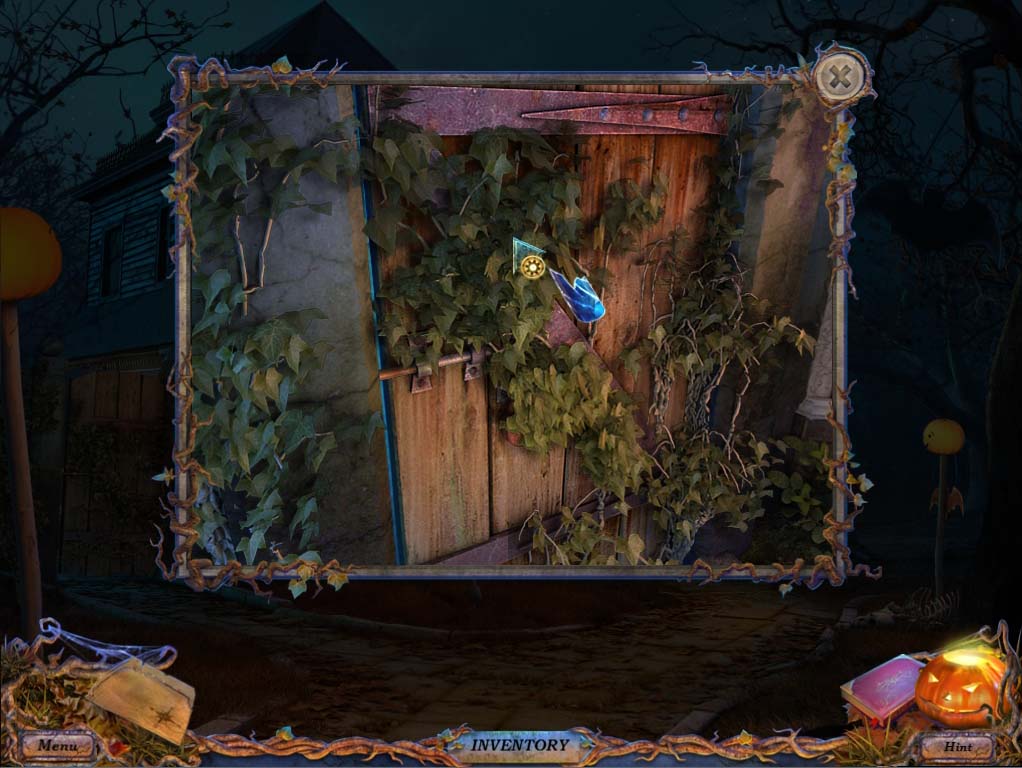
- Use the GLASS FRAGMENT to cut down the vines and then use the KEY you found underneath the barbecue grill cover to open the lock. Once the lock has been opened, go inside the BACKYARD.
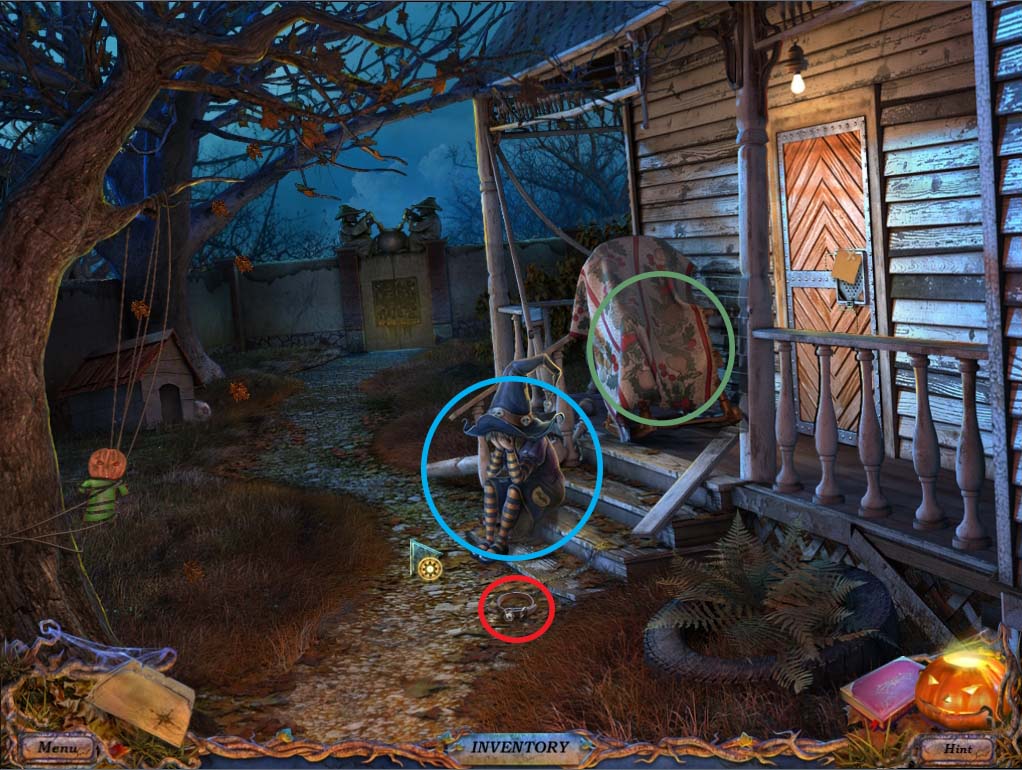
- Once inside, you’ll immediately find a girl crying on the backdoor steps (circled in blue).
- Talk to her by clicking her.
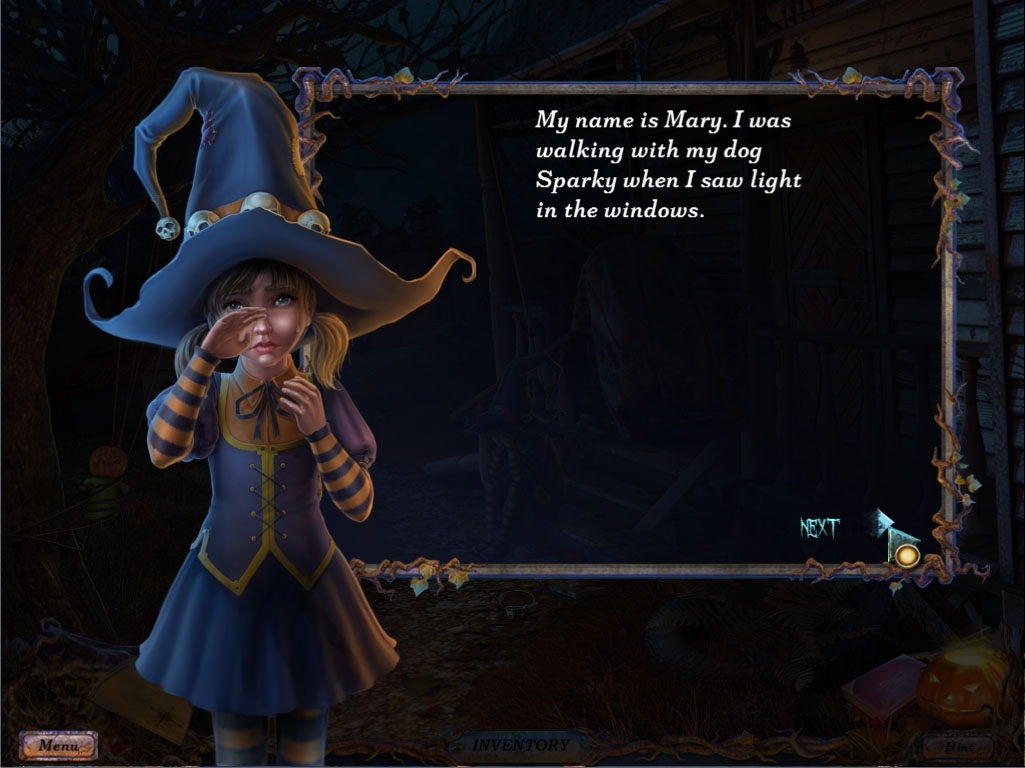
- She’ll tell you about how she also saw the shadow that took your friends and about her dog that ran away during the commotion.
- She’ll ask your help in finding her dog, and if you click her further, she’ll hint that she has a way of getting back into the house, and will give it to you in exchange for getting her dog back (you can move the conversation forward by clicking the arrow beside the word NEXT, as indicated in the image below).
- Before you head off to search for the missing dog, take a closer look at the ROCKING CHAIR (circled in green) that is behind the crying girl.
- Underneath its legs you’ll find a GAME PIECE HALF (circled in green in the image below), which you can pick up.
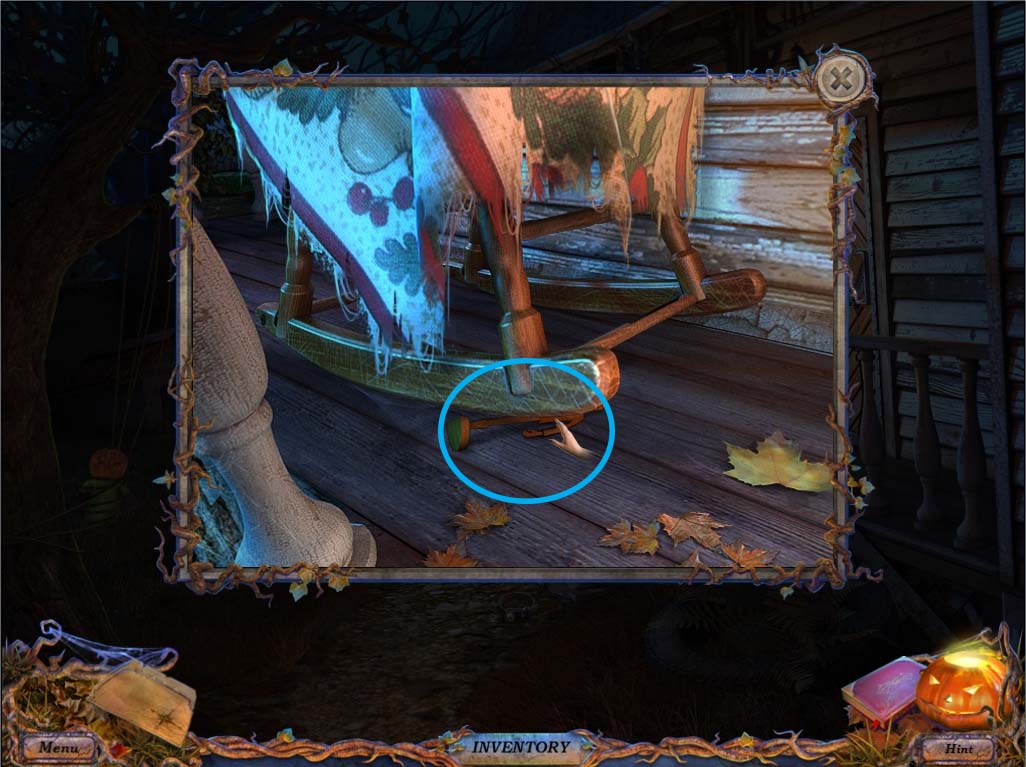
- You can also further click the ROCKING CHAIR to reveal a SEALED BOX, but there isn’t anything you can do with it now.
- Just keep it in mind.
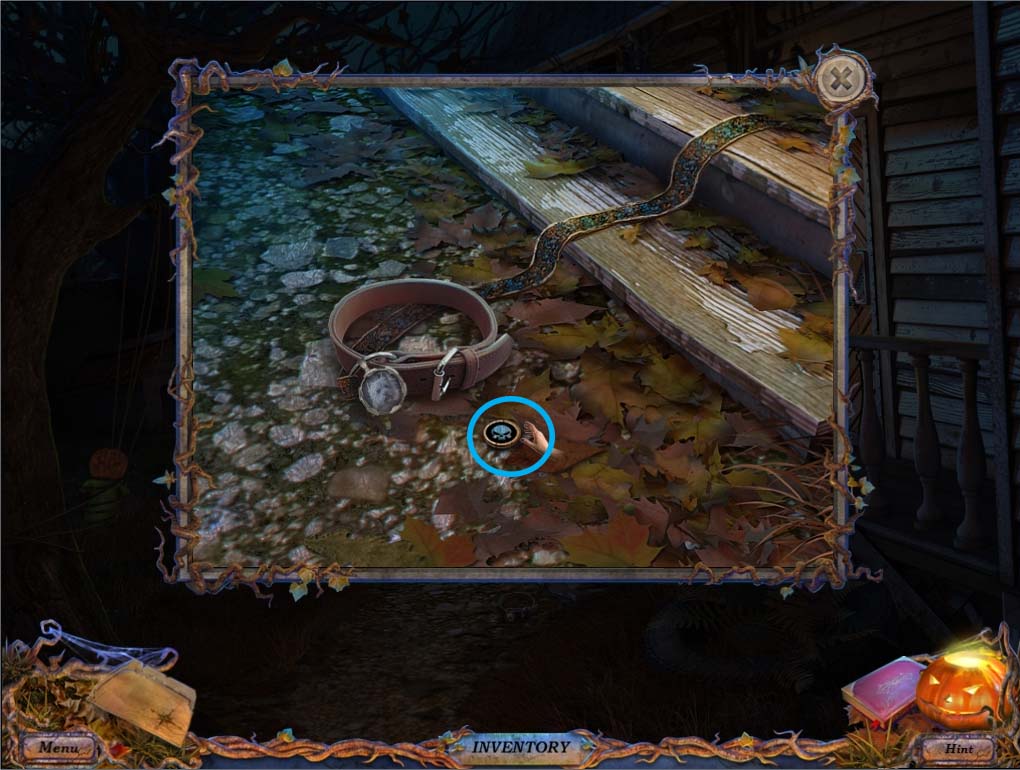
- Finally, investigate the DOG LEASH (circled in red in the 1st image) and pick up the SKULL token lying near it (circled in blue in image above).
- If you click the leash, you’ll see a picture of the dog and a hint that you heard it barking near the BARBECUE area. With this, you’ve taken all that you need in this area for now.
- Head to the BARBECUE area by either going to the FRONT YARD then clicking the entrance to the BARBECUE, or by using the MAP.
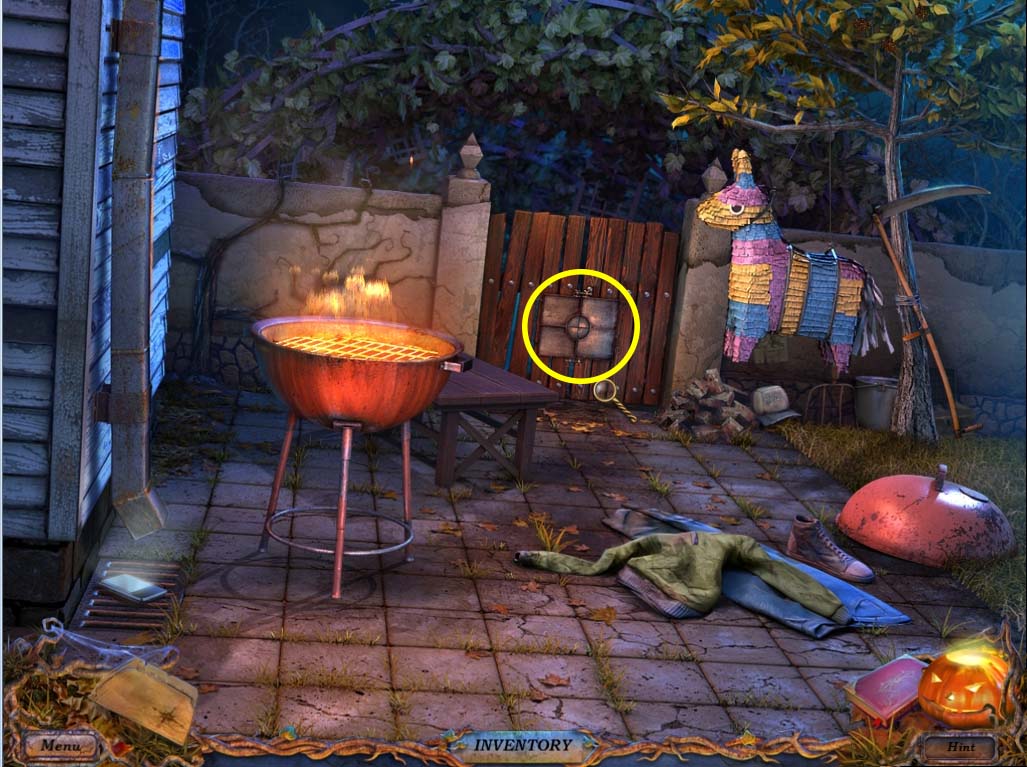
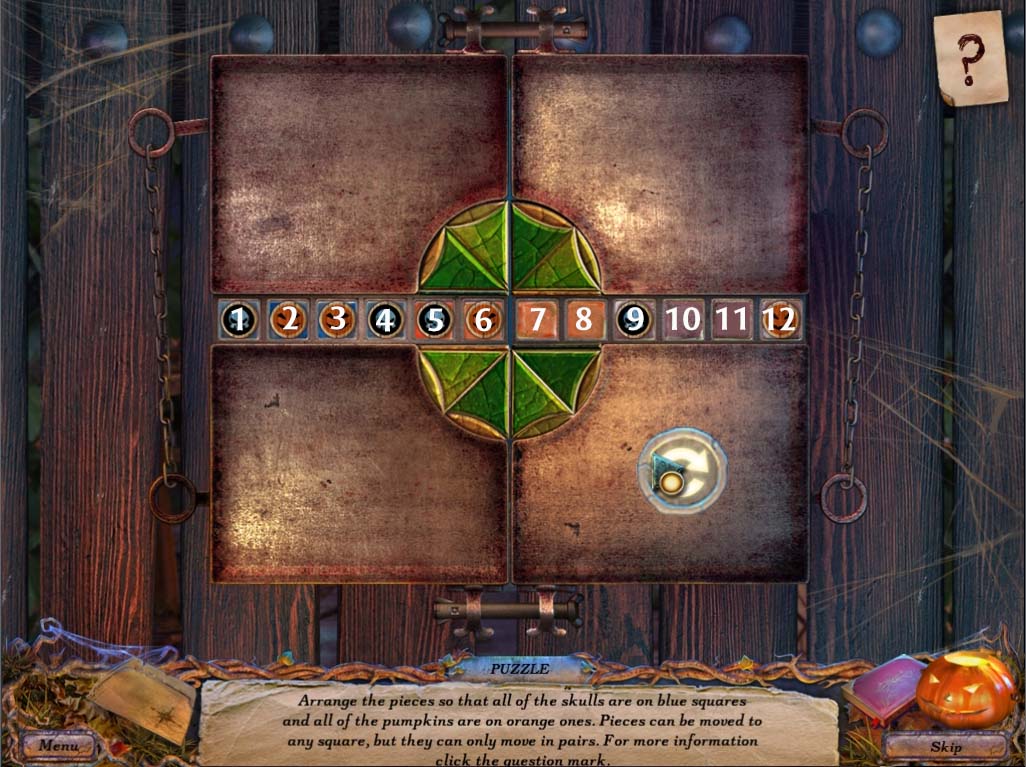
- Once in the BARBECUE area, investigate the GATE PUZZLE (circled in yellow) and choose the SKULL token from your inventory. Once you do so a mini-game will begin in which you’ll need to move skull and pumpkin tokens to their correct order.
SKULL AND JACK-O-LANTERNS MINI-GAME:
- This involves moving the various tokens until all the SKULLS are in BLUE squares and all the JACK-O-LANTERNS are in ORANGE squares. Note however that tokens can only be moved in groups of two, and a single token can’t be moved by itself.
- You can skip the following hints if you wish to solve the puzzle on your own, but if you don’t then here are the step by step instructions:
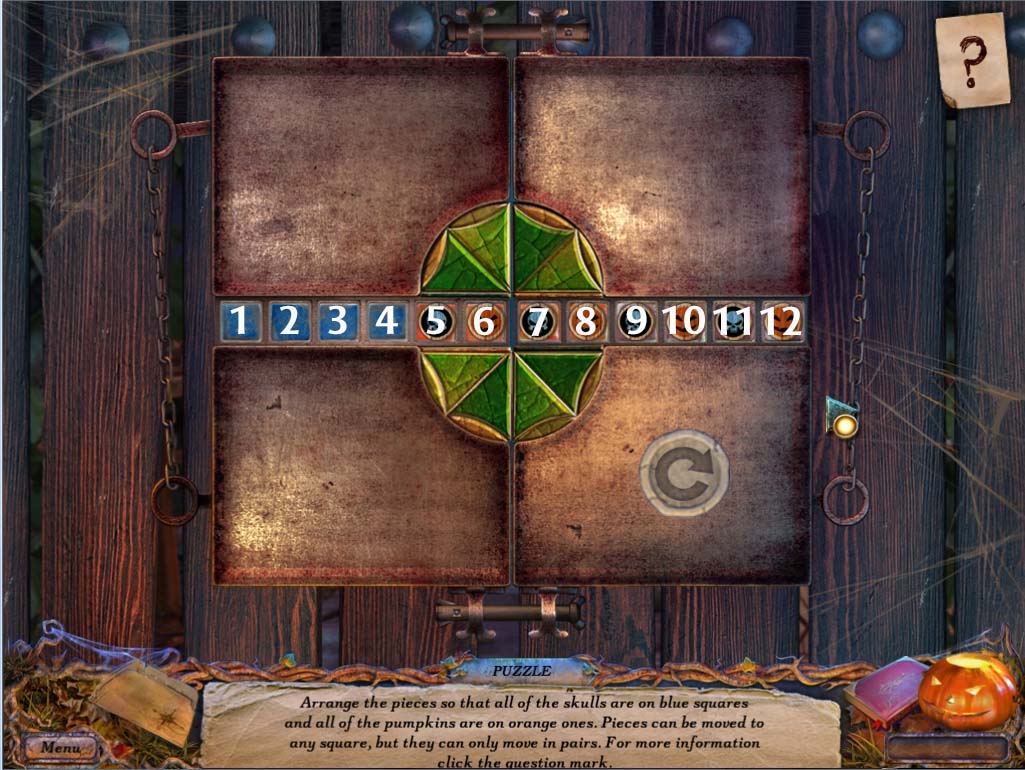
- In the image above, each square is marked by a number from 1 through 12. Pick the tokens indicated in the following steps:
- Move squares 10 & 11 to squares 3 & 4
- Move squares 7 & 8 to squares 1 & 2
- If you followed the steps correctly you should end up with something like this:
- If your puzzle looks different than the image, you can use the restart button (indicated by the cursor) to start from the beginning.
- Now move the tokens that are now in 2 & 3 to squares 7 & 8
- Move the tokens in squares 4 & 5 to squares 2 & 3
- Move the tokens in squares 6 & 7 to squares 10 & 11
- You should now have something that looks like this:
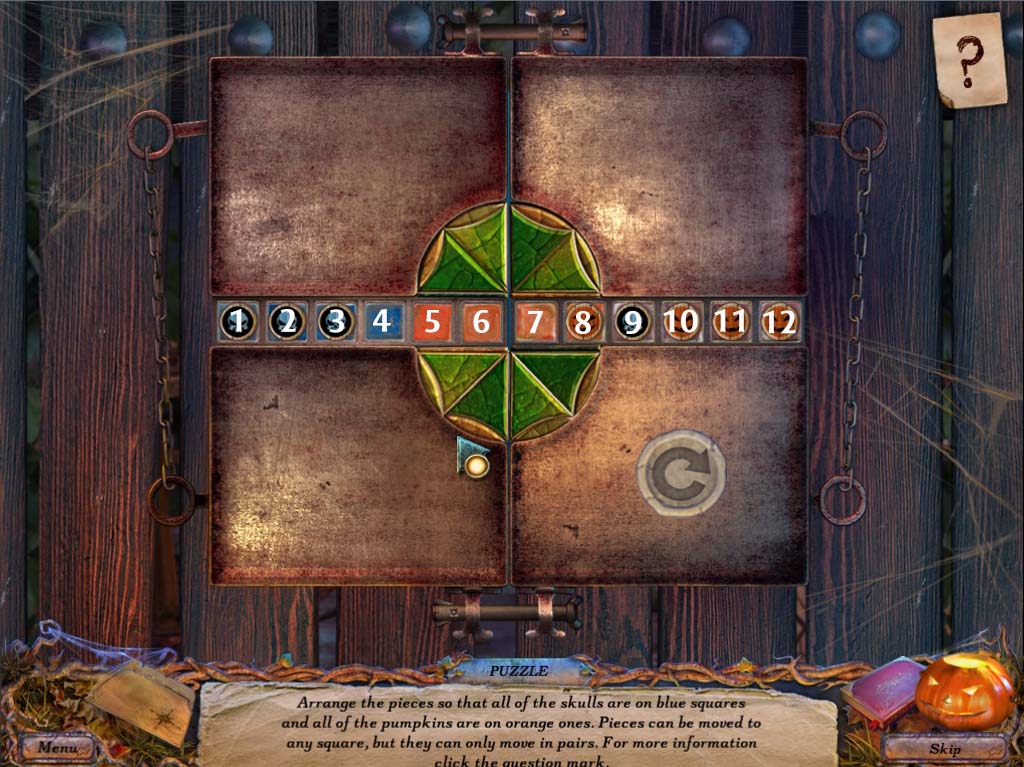
- The last moves that you’ll need to do are these:
- Move tokens currently in squares 9 & 10 to squares 4 & 5
- And finally, move the tokens in squares 11 & 12 to squares 6 & 7
- Once you finish the puzzle, the gate will automatically open. Enter the gate to find yourself in the VINEYARD.
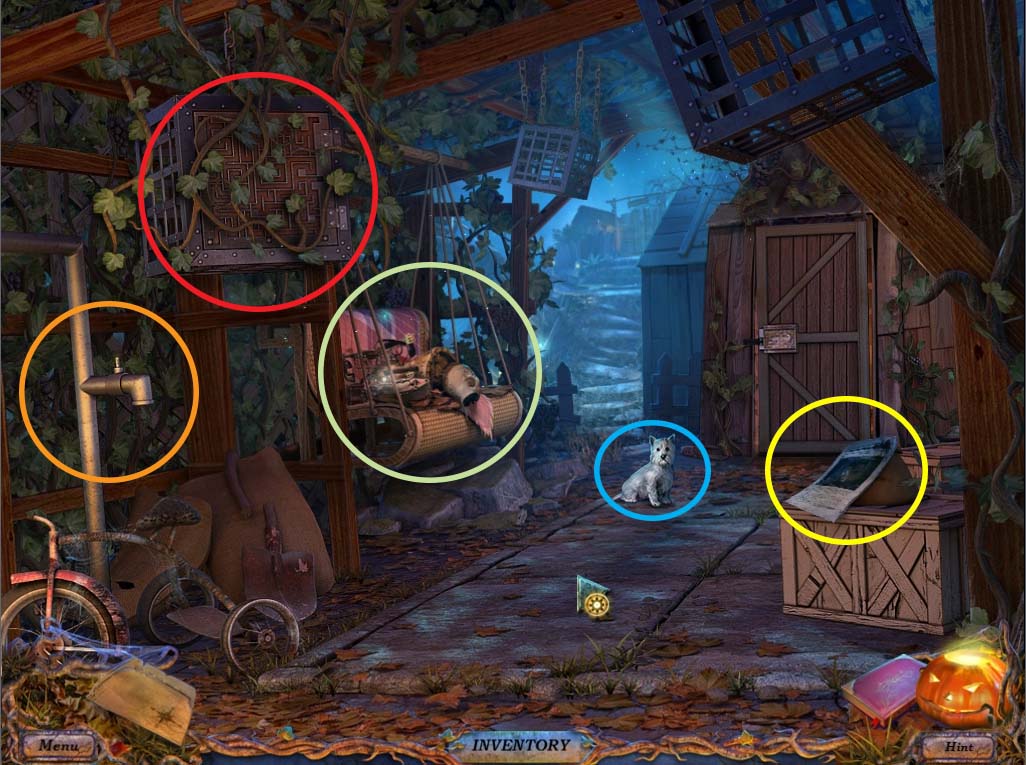
- You’ll immediately see the DOG that you’re looking for (circled in blue), although clicking on him will just cause him to run away (you can’t really catch him right now, so just let him run). Don’t follow him yet, as we have a few things in here that we need to do.
- Clear the IVY on the PUZZLE BOARD (circled in red) by clicking on it. The puzzle will play a part later, so just keep it in mind.
- Click on the NEWSPAPER (circled in yellow) to get a bit of background about a certain ghost in the area, and also uncover a bag which you will need to open later.
- Finally, investigate the HANGING CHAIR (circled in green) to play the VINEYARD HIDDEN OBJECT GAME.
VINEYARD HIDDEN OBJECT GAME
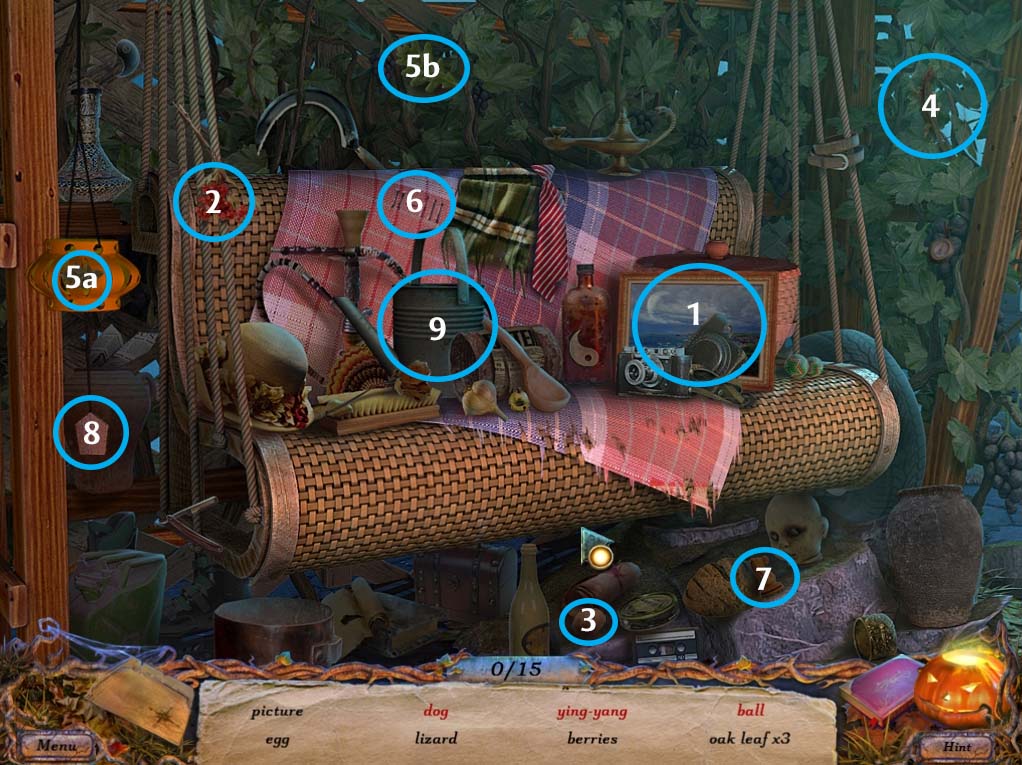
Black objects
- 1. Picture
- 2. Berries
- 3. Egg
- 4. Lizard
- 5. Oak leaf x 2 (5a, 5b)
- 6. Number 5
- 7. Knight
- 8. Peace Symbol
- 9. Watering Can

Red Objects
- Dog: Click the cloth (circled in green) to reveal the image of the dog underneath
- Ying –Yang: Pick up half of the Ying-Yang symbol (circled in red) to complete the whole ying-yang symbol.
- Pick up the shears (circled in yellow) and cut the tape which is sealing the basket, then look inside.
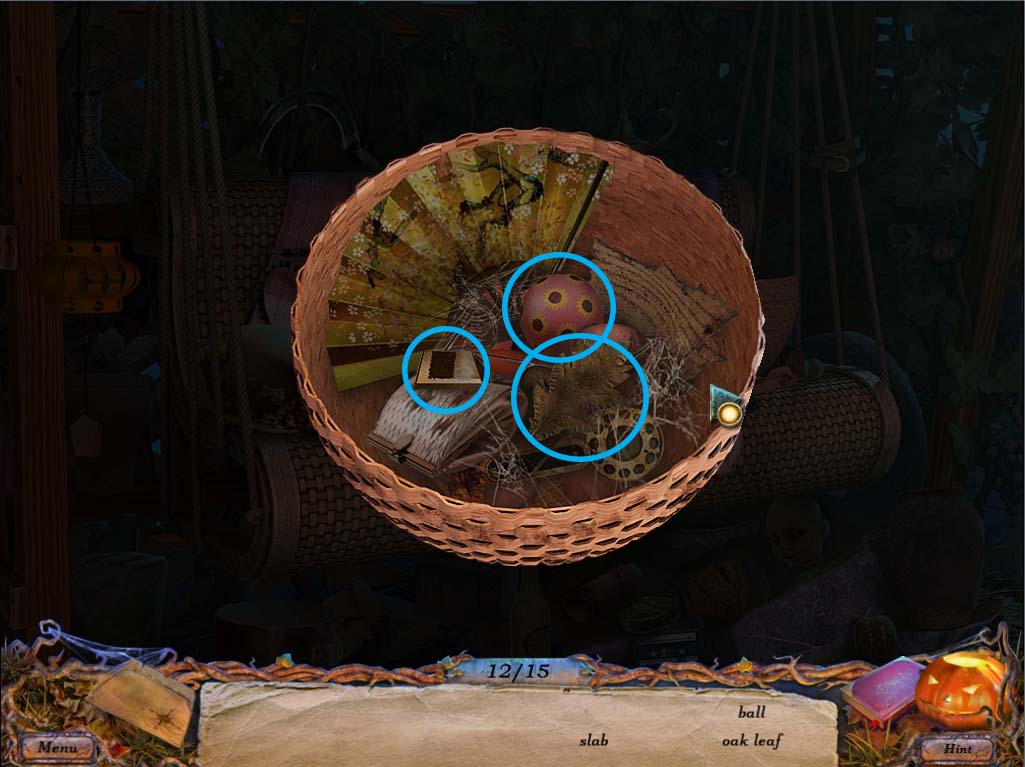
- Pick up the Ball, Slab and Oak leaf as circled in the image above to complete the search.
- You’ll be rewarded with an EMPTY WATERING CAN and a TILE which will automatically go to your inventory.
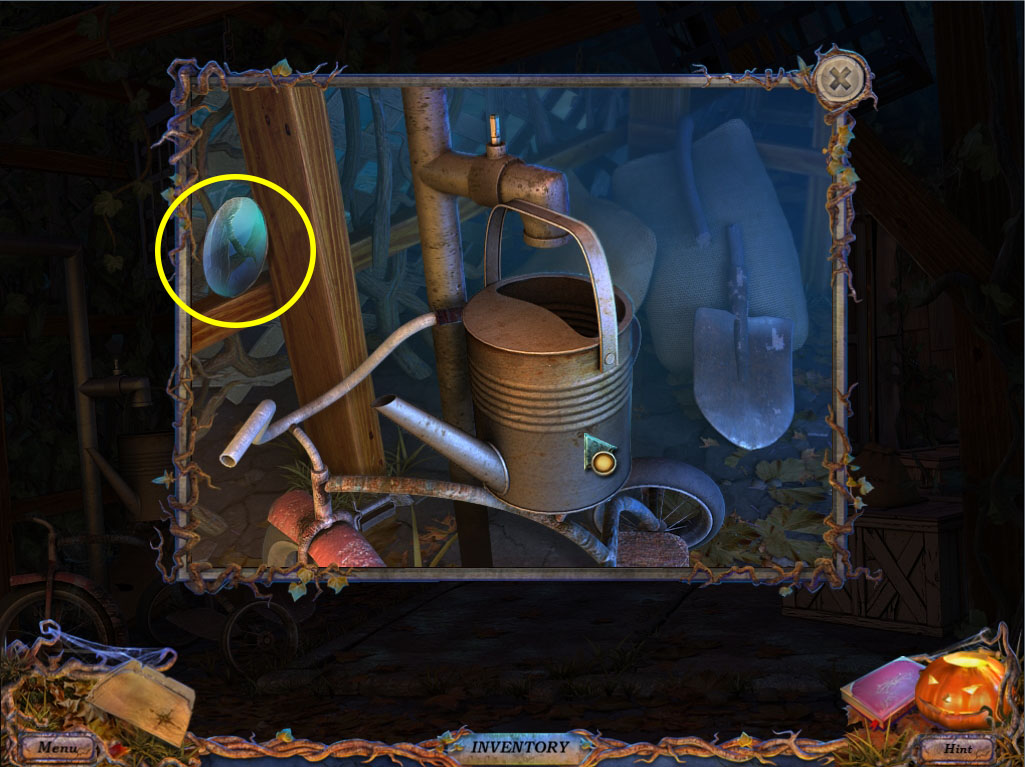
- Before you do anything else, click the FAUCET (circled in orange in the VINEYARD picture above) and place the EMPTY WATERING CAN underneath it, as shown in the picture below. Also, don’t forget to grab the MIRROR (circled in yellow) before you exit this area and chase after the dog.
Part II: The Chained Men
- From the VINEYARD, head forward to get to the RIVER area (or use the MAP to do so).

- Our heroine once again finds the DOG (circled in blue) that she was chasing, but as before, clicking on it will just cause it to duck away inside the barrel.
- We can’t do anything about it right now, so investigate the area circled in red to find several Halloween clothes lying on the ground.
- It seems that someone else has become a victim of the shadow.

- Move the WITCH HAT away (circled in blue) to reveal a patch of ground where something has been buried in, and then click and investigate the BAG (circled in red) to play a MATCHING MINI GAME.
MATCHING MINI-GAME
- The object of this game is to match similar sweets together to reveal what’s underneath the bag. The sweets that you need to match aren’t exactly alike, but instead belong to the same category, for example, fruits, cookies, cakes, etc.
- The solution to the puzzle is shown in the image below:
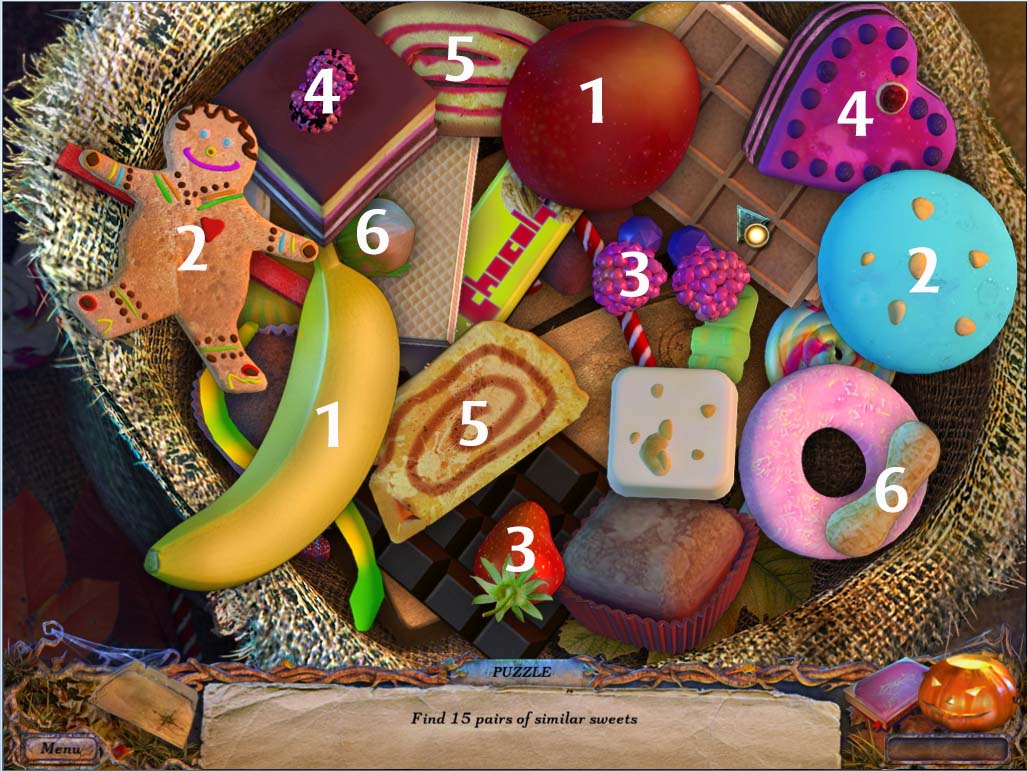
- 1. Fruits
- 2. Cookies
- 3. Berries
- 4. Cakes
- 5. Rolls
- 6. Nuts
- After matching the items above, you should end up with a bag that looks like this:
-
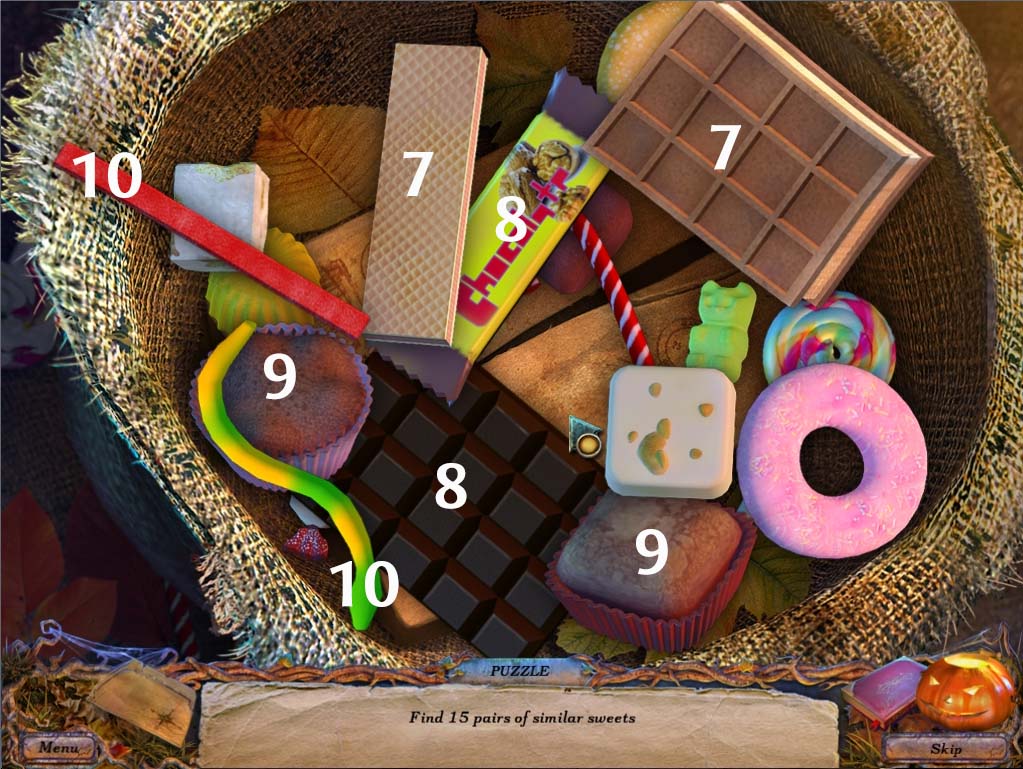
Continuing from where we left off, the pairs are:
- 7. Wafers
- 8. Chocolates
- 9. Cupcakes
- 10. Licorice
- With those items gone, the final pairs will be as indicated in the image below:

- 11. Nougat
- 12. Doughnuts
- 13. Mints
- 14. Jellies
- 15. Lollipops
- With the game completed, you’ll get a GUTTER that automatically goes to your inventory.
- Return to the RIVER area and check the BARREL (circled in green in RIVER image above) where the dog ran into. He’ll refuse still refuse to go with you, but you’ll find a TILE (circled in blue in image below) that you can use for another upcoming puzzle.

- You can investigate the ghost of the chained man (circled in yellow in RIVER image above) to find out the true story of his captivity.
- He’ll ask for help in breaking the spell that holds him prisoner.
- You’ll find the ghost of another chained man inside a carriage on the BRIDGE area just above (circled in orange in the RIVER image above) who shares the same fate as the one you talked to earlier.
- You really can’t do anything to help them right now, but you do have two tiles for a puzzle in the VINEYARD area, so head there now.

- Once there, investigate the door lock (circled in blue above) and use the TILE from your inventory to activate another mini-game.
ROTATING TILES MINI-GAME
- The object of this mini-game is to rotate each tile to its correct position so as to reform the original picture.
- This puzzle is relatively easy, and tiles only move in a clockwise direction.
- The simplest way to finish the puzzle is to start with the outer areas, then finish the rest of the picture. (The outer areas are marked with a white border and can be easily put in the correct position).
- Once you’ve got the tiles arranged, it should look something like this:
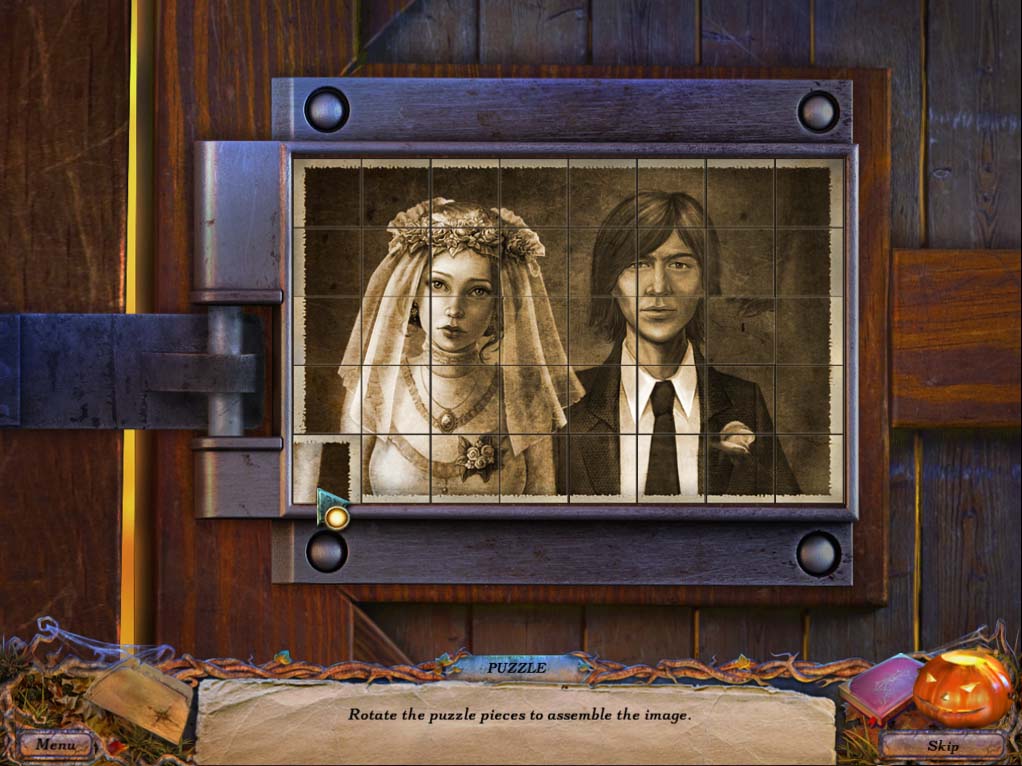
- Completing the puzzle gets you inside the WINERY
Part III: Freeing the Chained Man
- Once inside the WINERY, turn the WINE PRESS (circled in blue in image below) a few times and investigate. You’ll find a NOTE (goes to your SCRAPBOOK) and a VALVE (goes to your inventory) inside.
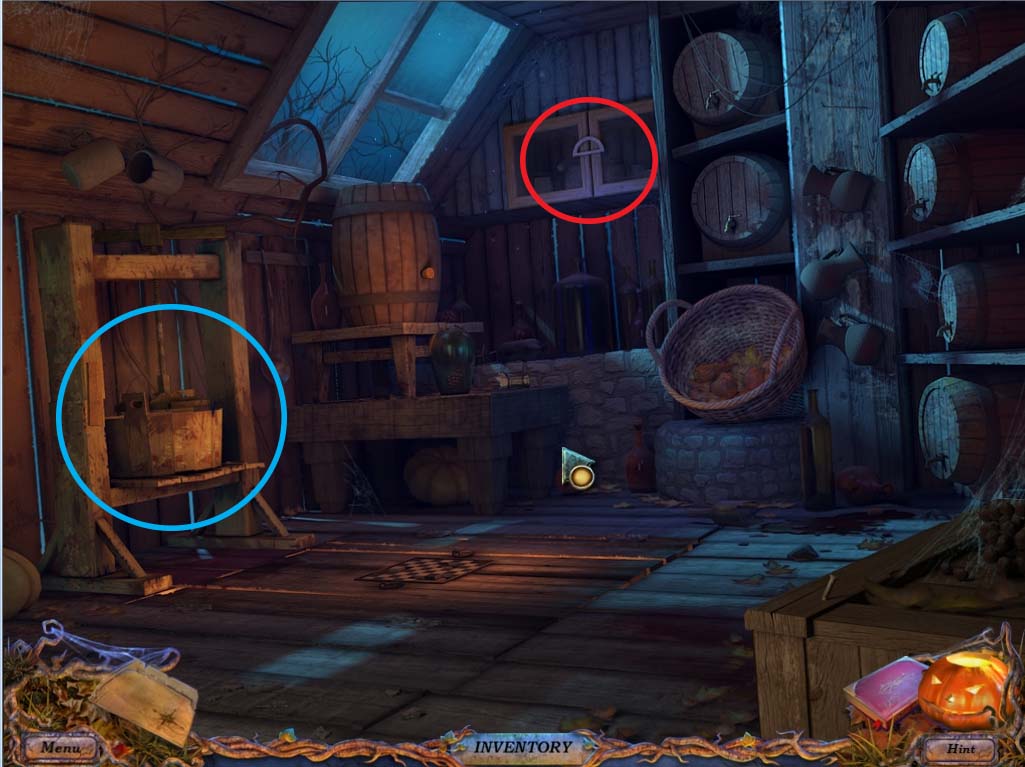
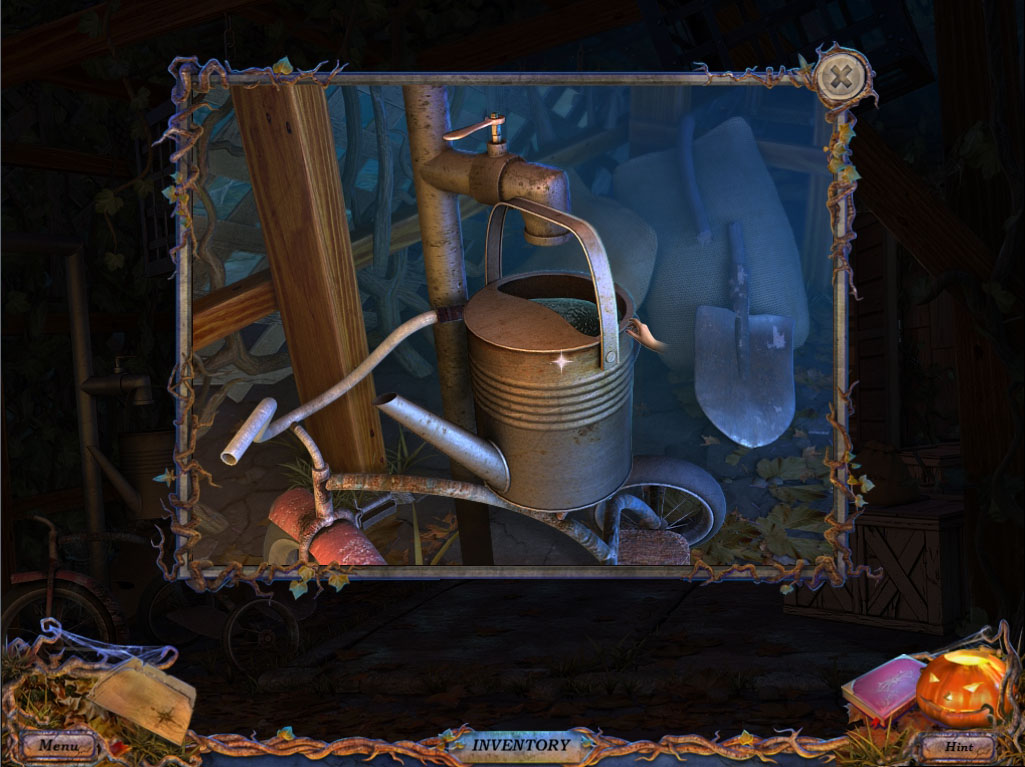
- With the VALVE in hand, head back to the FAUCET located at the VINEYARD. Place the VALVE on the faucet’s handle. You can now turn the faucet on to get water as shown in the image below.
- Take the FULL WATERING CAN, and head back to the BARBECUE area.
- Once there, check the BARBECUE GRILL, and you’ll find an item in the middle of the hot coals. Take your FULL WATERING CAN and douse the flames. You should be able to easily take the WREATH HALF now.
- Head back to the WINERY and check the CUPBOARD (circled in red in the WINERY image above). You’ll find that the WREATH HALF fits perfectly here. Give it a quick twist, and it will open.
- Check the cupboard again to start the WINERY HIDDEN OBJECT PUZZLE
WINERY HIDDEN OBJECT PUZZLE
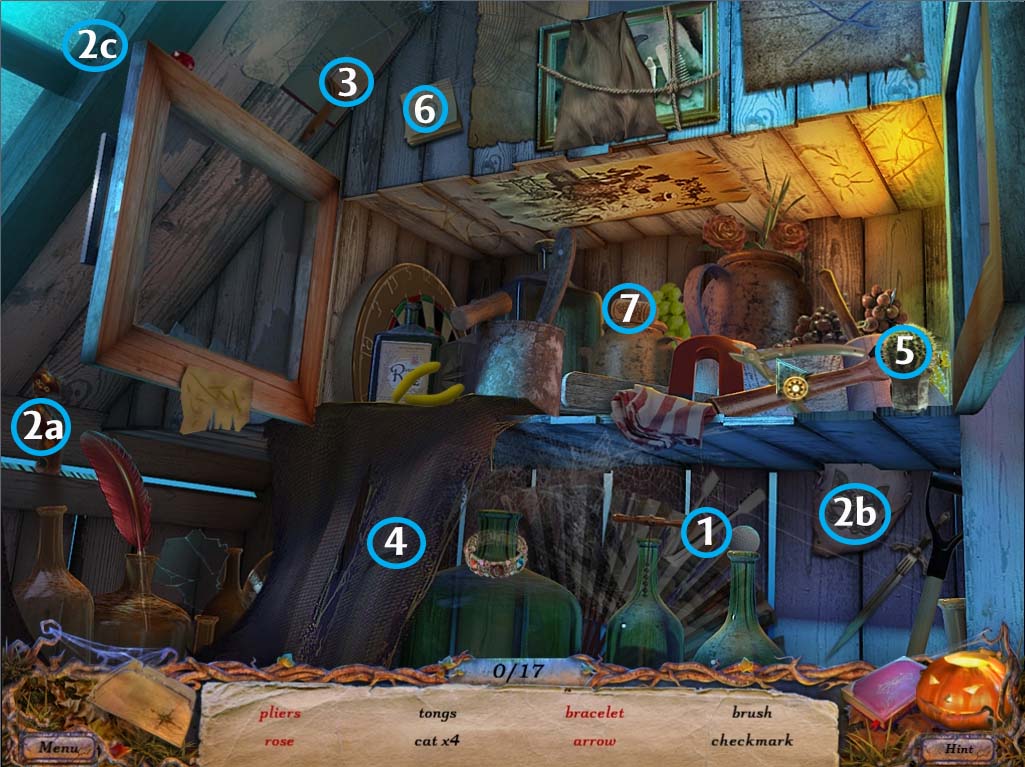
Black objects
- 1. Tongs
- 2. Cat x 3
- 3. Brush
- 4. Checkmark
- 5. Cactus
- 6. Number 8
- 7. Cork
Red Objects
- Pliers: take rubber handles (circled in blue) and put them on pliers
- Bracelet: take the gem on the top of the cupboard door (circled in red) and place it back in the bracelet
- Leaf: Turn the can (circled in green) to reveal the leaf
- Arrow: Move the cupboard door to reveal the arrow behind it
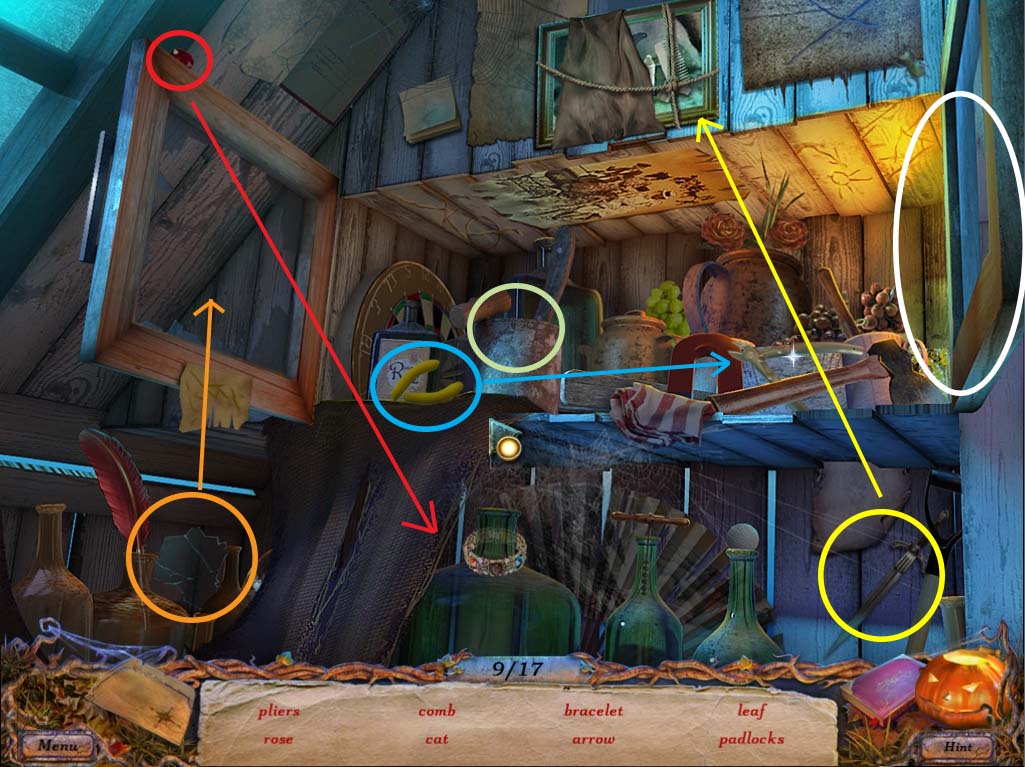
- Take the knife (circled in yellow) and cut the ropes that cover the picture. Then take a closer look to find the comb, cat and padlocks
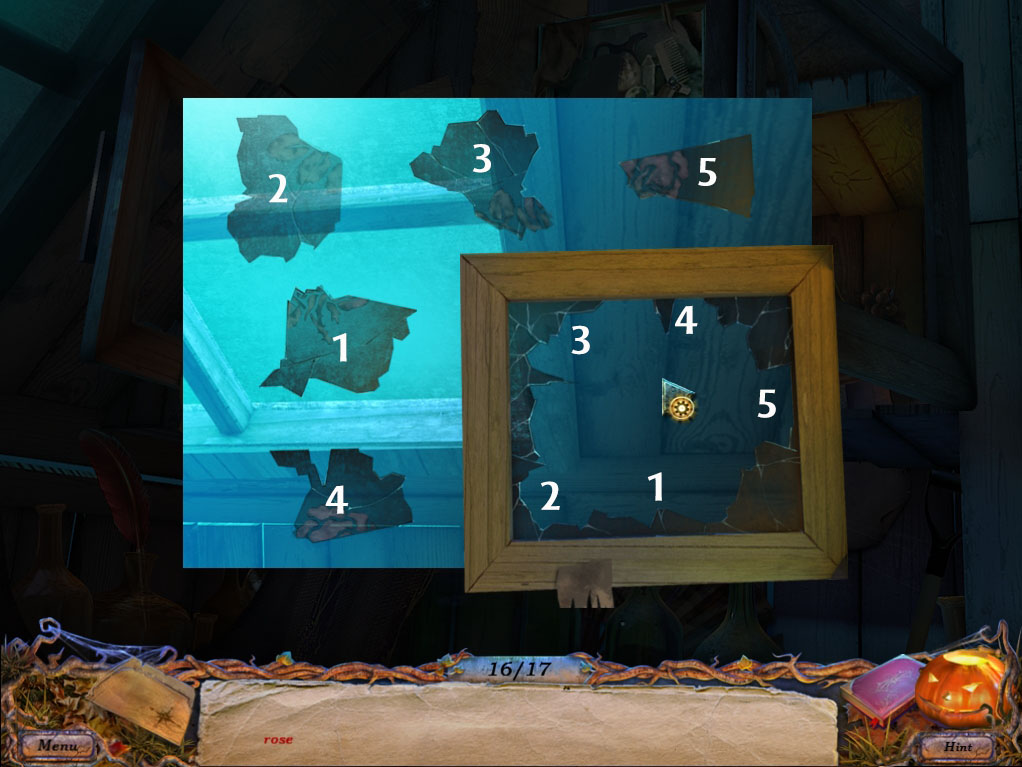
- Take the broken glass piece (circled in orange) and return it to the cupboard door. Another mini puzzle will start where you have to reassemble the broken glass. The solution to the puzzle is shown below (drag each numbered piece to the appropriate numbered area in the broken door)
- This will allow you to find the Rose and finish the puzzle.
- You’ll be rewarded with TONGS and WIRE CUTTERS to place in your inventory.
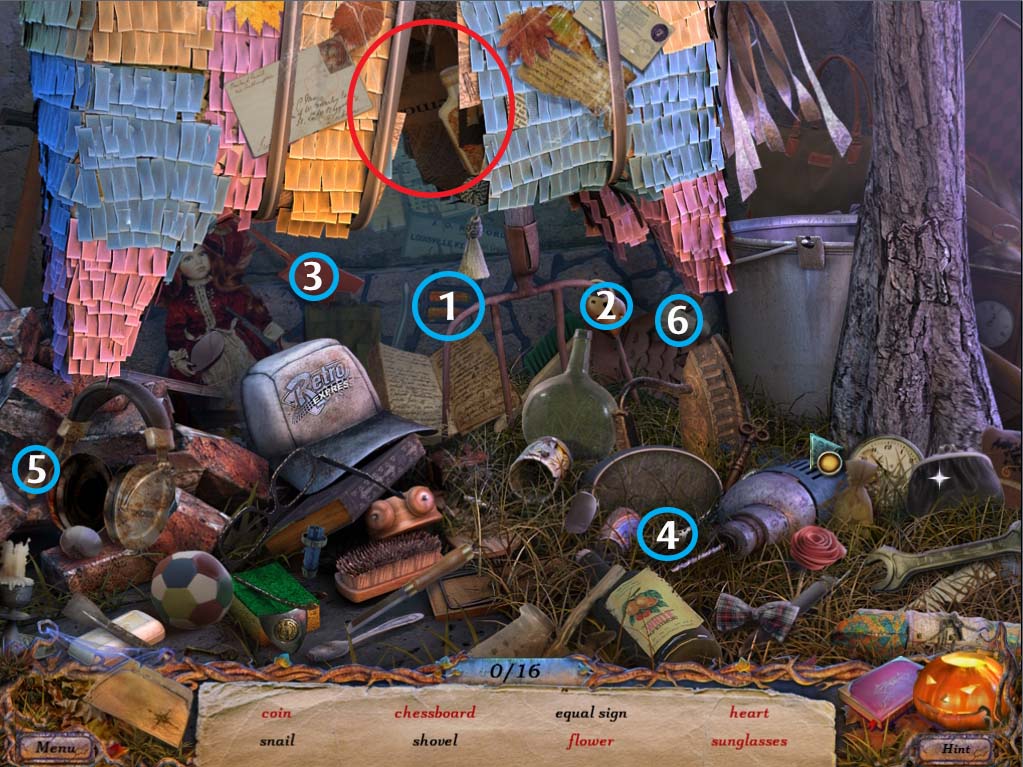
- From here, head to the BARBECUE area and look at the grate (circled in blue in image below), pick up the CHESSBOARD piece (1 of 4) with your TONGS
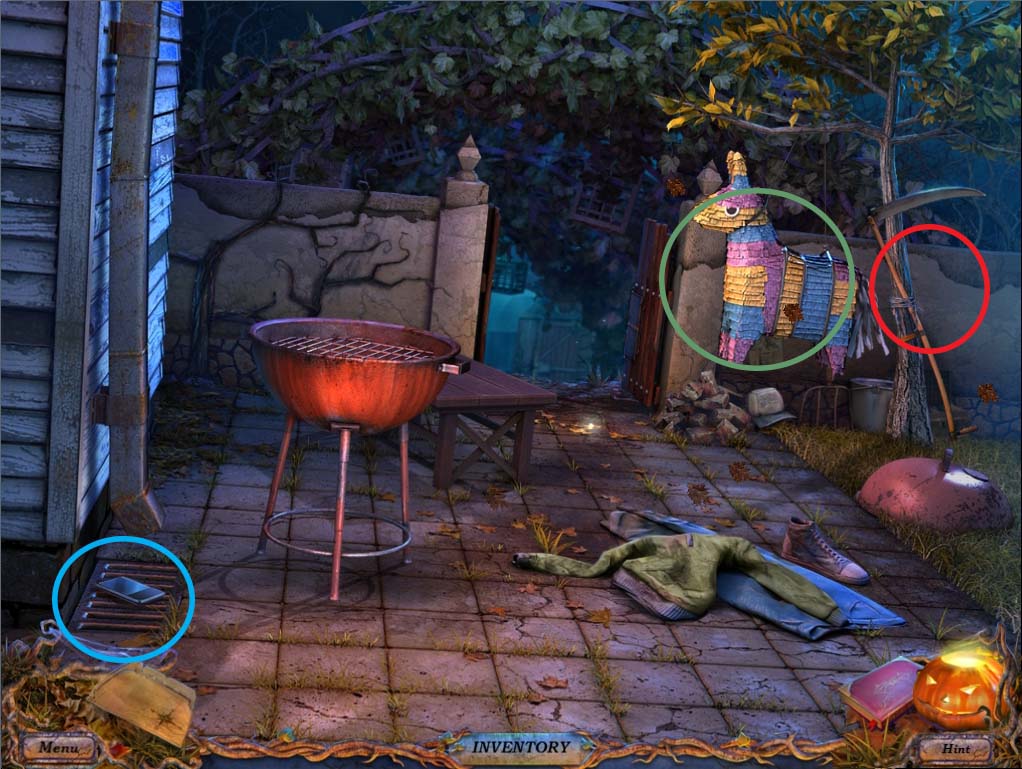
- Check the tree (circled in red) and it will show you a SCYTHE tied to a tree by wire. Use the WIRE CUTTERS to get the SCYTHE
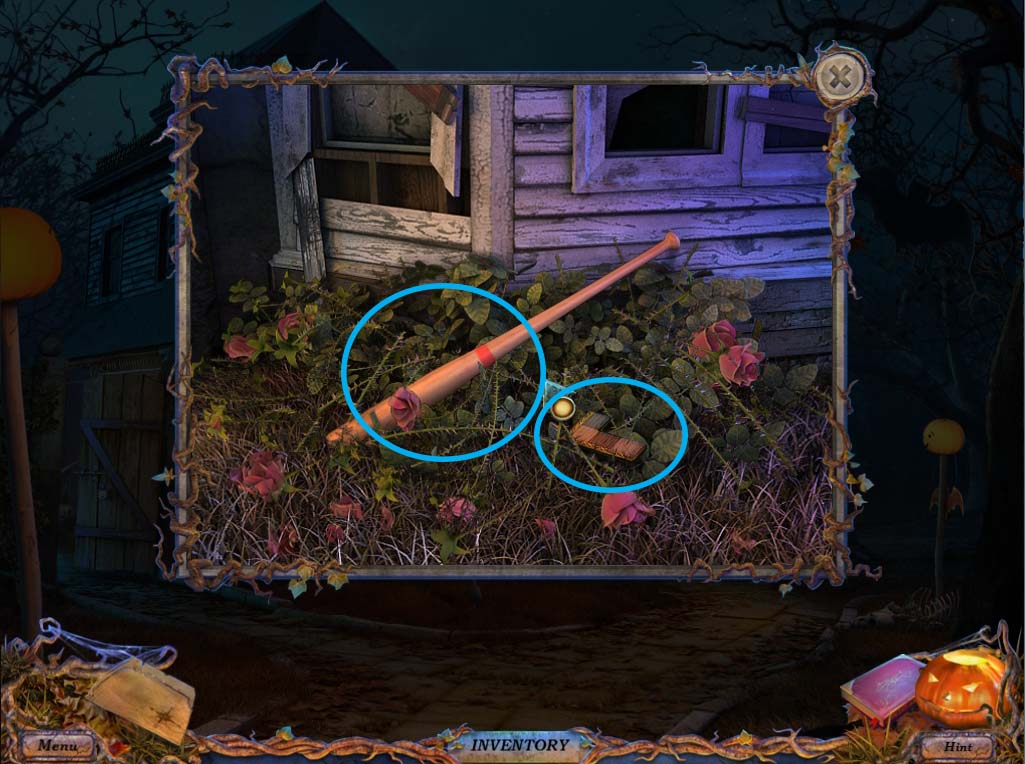
- From here, head to the FRONT YARD and investigate the ROSE BUSH. Use the SCYTHE on ROSE BUSH to free the BAT and a CHESSBOARD piece.
- Pick up the CHESSBOARD piece (2 of 4) and the BAT (both circled in blue below). Both will go to your inventory.
- Head back to the BARBECUE area and give the PINATA a few good whacks with your BAT
- Investigate the broken PINATA to start another hidden object puzzle
PINATA HIDDEN OBJECT PUZZLE
Black objects
- 1. Equal sign
- 2. Padlock
- 3. Shovel
- 4. Fork
- 5. Clothespin
- 6. Shuttlecock
- Investigate the belly of the piñata (circled in red) to find
- 7. Snail
- 8. Fork
- 9. Fish
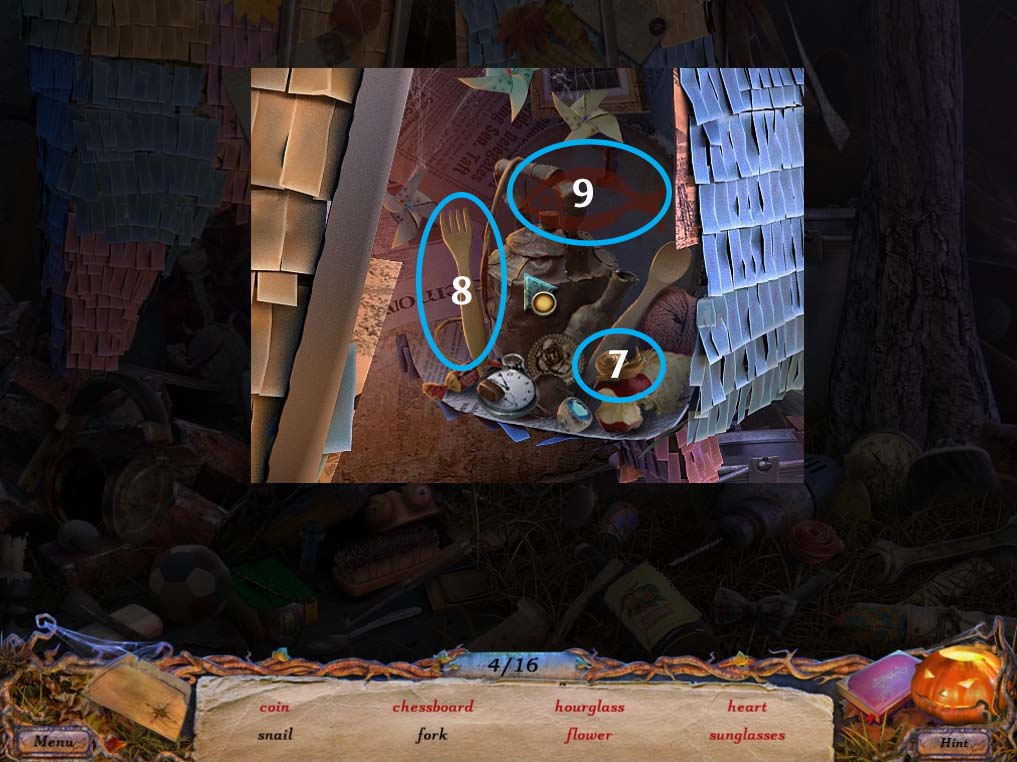
Red Objects
- Open the wallet (circled in blue) to find the lipstick and the coin.
- Assemble the lenses (circled in red) with the frame to get the sunglasses
- Use the chisel on the tree trunk (circled in yellow) to find the heart
- Move the bucket (circled in green) to find the hourglass behind it
- And finally, peel off layers of the piñata (circled in orange) to find the chessboard and the flower
- This puzzle will reward you with a CHESSBOARD piece (3 of 4) and a SPADE for your inventory.
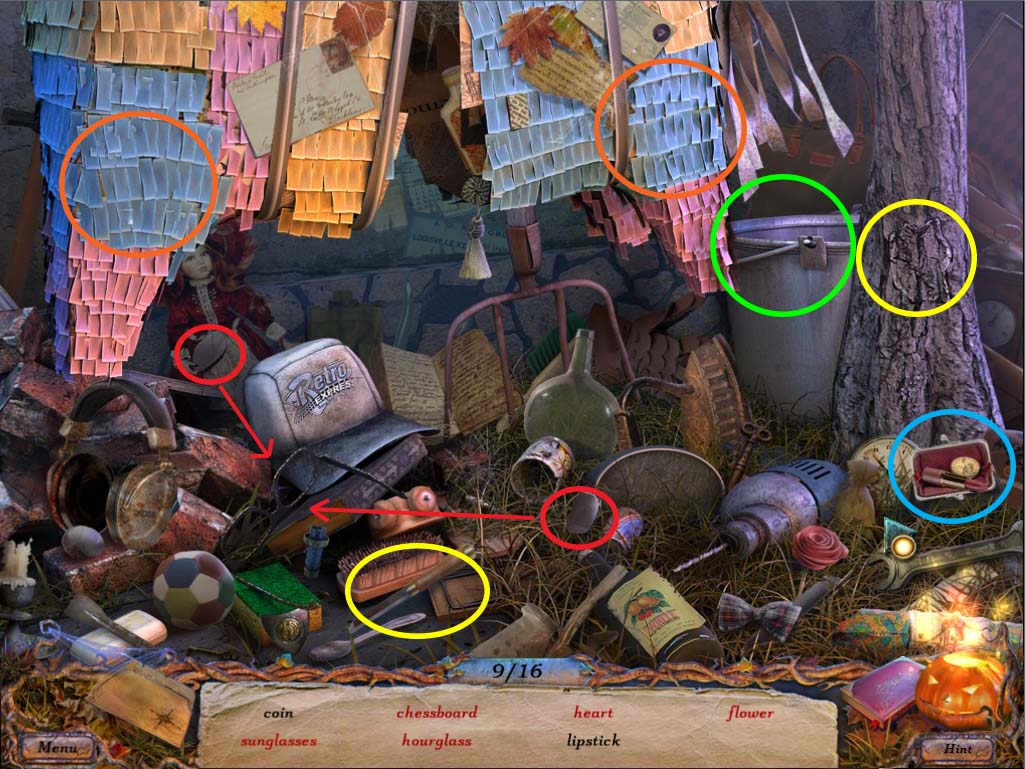
- Head back to the RIVER area and investigate the ground near the WITCH’S HAT again.
- Use your SPADE to dig on the ground where you will find a PENKNIFE for your inventory.
- Go back to the VINEYARD area and cut open the BAG that was under the NEWSPAPER you read earlier.
- This will give you a BUNCH OF KEYS. From the looks of things, this set of keys can free the CHAINED MAN in the RIVER. Head there now so you can talk to him. Select the BUNCH OF KEYS from your inventory and click on the CHAINED MAN; this will start another mini game.
UNLOCKING THE SHACKLES MINI GAME
- The object of this game is to match the correct key to a specific lock. There are several locks you have to open, and each one needs a different key. The easiest way to solve this is to look at the image in the lock and find which pattern is missing. The right side of the lock should be a reflection of its left side, so if a pattern is missing, select the key with that pattern.
- This is the right key for this lock:
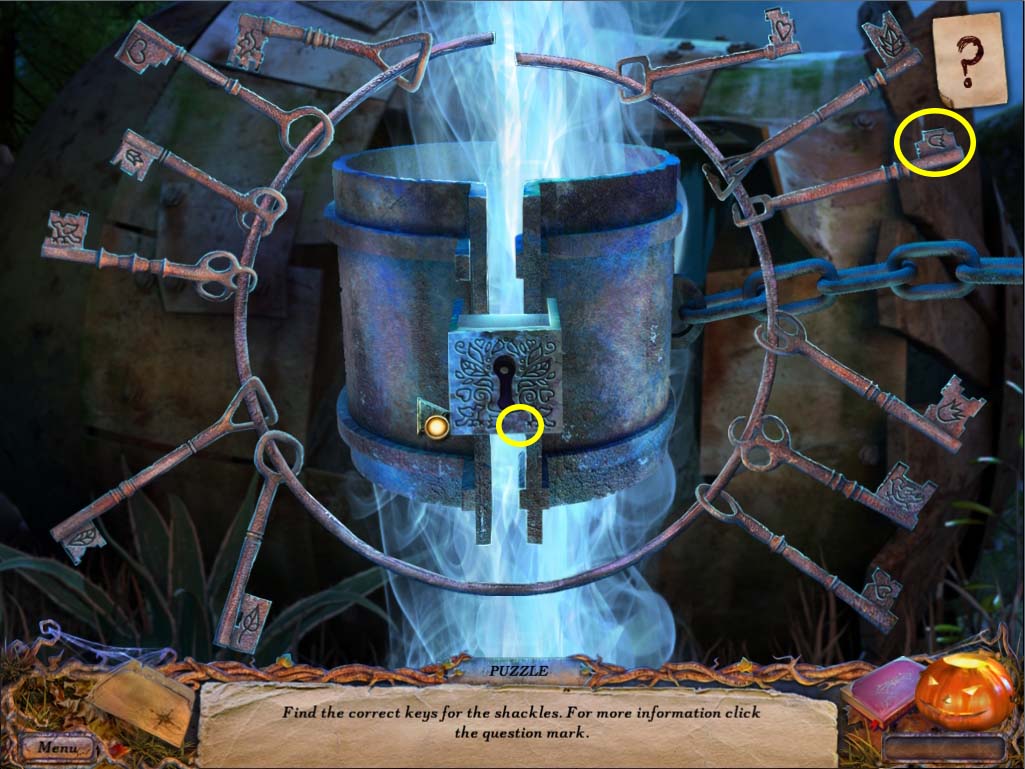
- This is the right key for this lock:

- And so on and so forth.
- Once all the shackles are opened, the ghost thanks you for your help, gives you a bit of a warning and disappears. Inside the barrel that he has left behind is a CARRIAGE LANTERN that you should pick up. We are now closer to getting back inside the house.
End of Chapter II
Chapter One: Getting to the party
Chapter Two: Missing Friends and Locked Doors
Chapter Three: First Game Piece - The Groom
Chapter Four: Second Game Piece - The Nanny
Chapter Five: Third Game Piece - The Priest
Chapter Six: Fourth Game Piece - The Blacksmith
Chapter Seven: Fifth Game Piece
Chapter Eight: The Last Game Piece
Ask for help in the comments below!