
Shadows: Price for Our Sins: Chapter Five: Third Game Piece - The Priest
Help Dylan save her friends with our Shadows: Price for Our Sins Walkthrough. The Lord of Darkness Samhain has exacted his revenge by enslaving the souls of Dylan's friends. Now, it's up to you to help her set things right and free them from their bonds with a little help from our detailed instructions, custom screenshots, and hints and solutions to the many challenges you'll face along the way.
Chapter One: Getting to the party
Chapter Two: Missing Friends and Locked Doors
Chapter Three: First Game Piece - The Groom
Chapter Four: Second Game Piece - The Nanny
Chapter Five: Third Game Piece - The Priest
Chapter Six: Fourth Game Piece - The Blacksmith
Chapter Seven: Fifth Game Piece
Chapter Eight: The Last Game Piece
Ask for help in the comments below!

- With the LANTERN on hand, head to the BACKYARD area.
- Investigate the GATE at the back (circled in green above) and use the LANTERN you just found to start another mini game.
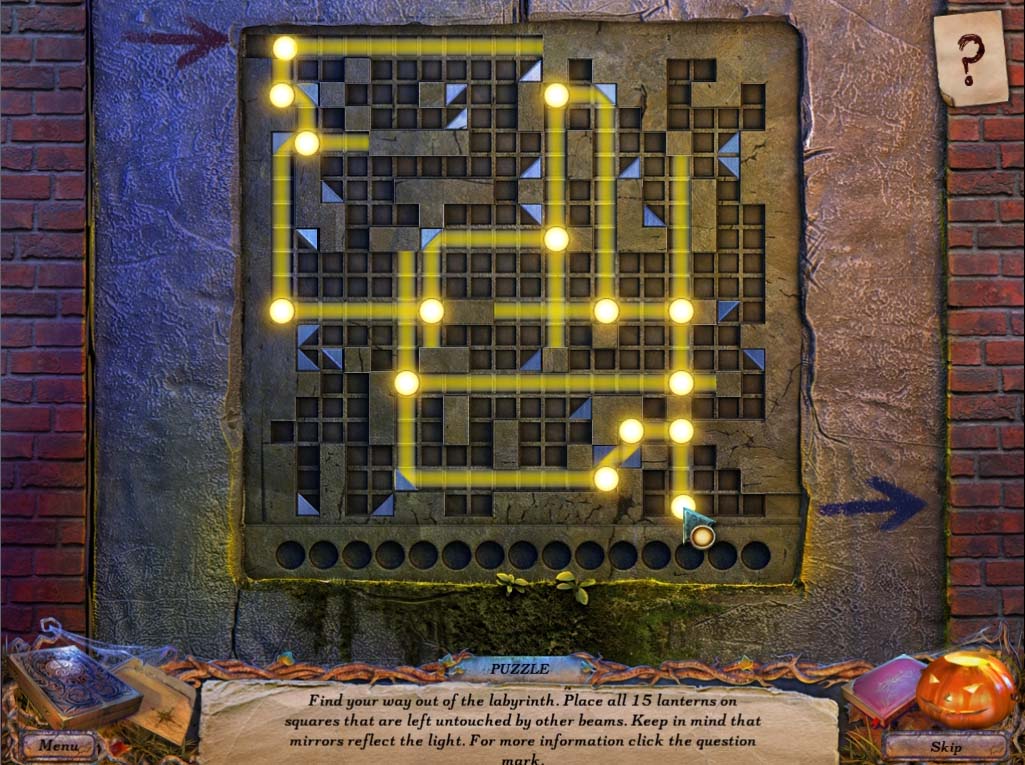
THE LANTERN MINI GAME
- The object of this game is to use the 15 lanterns to bring the beam of light from one end of the puzzle to the next.
- You can only place lanterns on the end of each beam of light, and mirrors will cause the beam to bounce.
- You need to use ALL 15 lanterns to solve the puzzle.
- The solution to this is shown below:
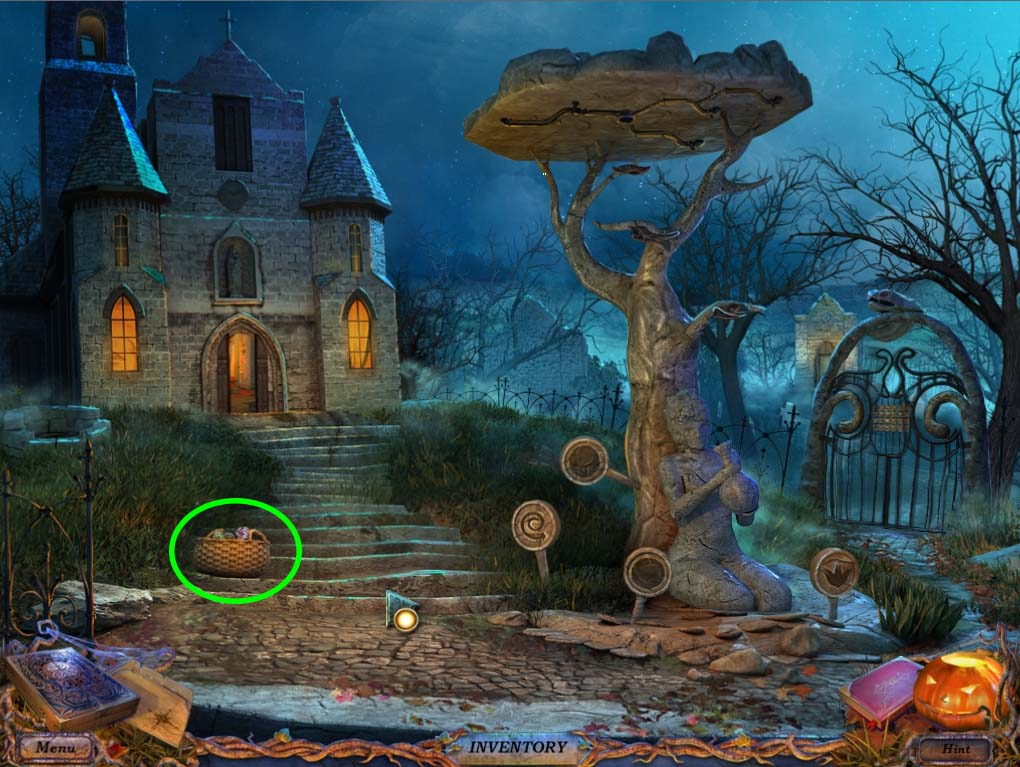
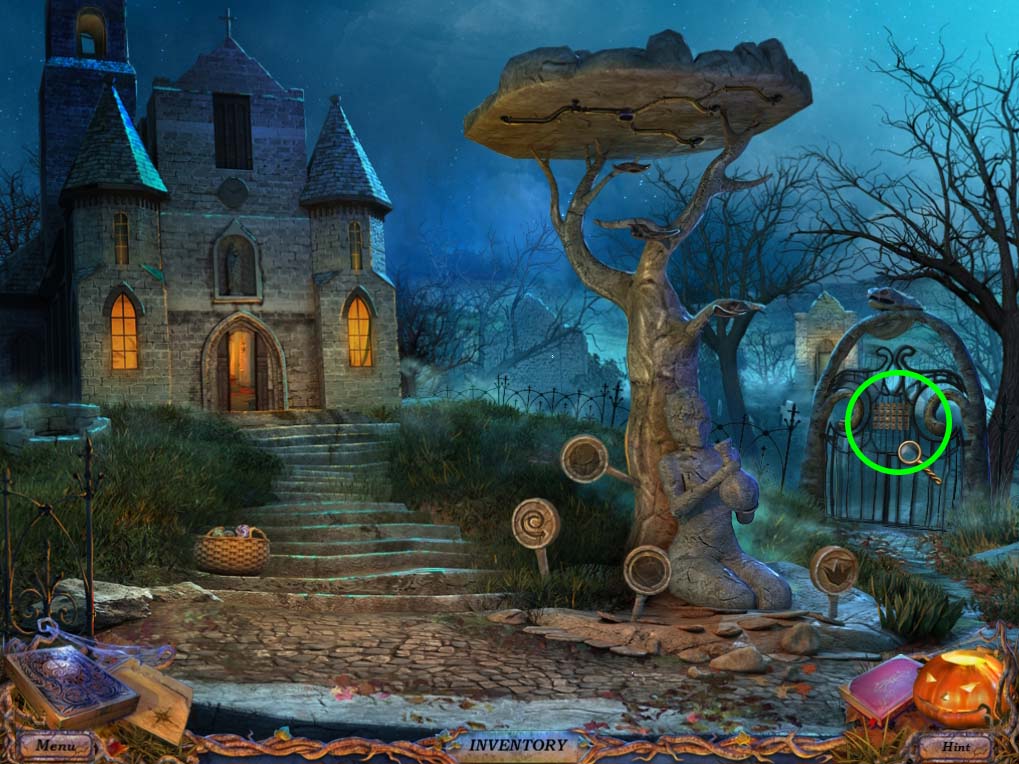
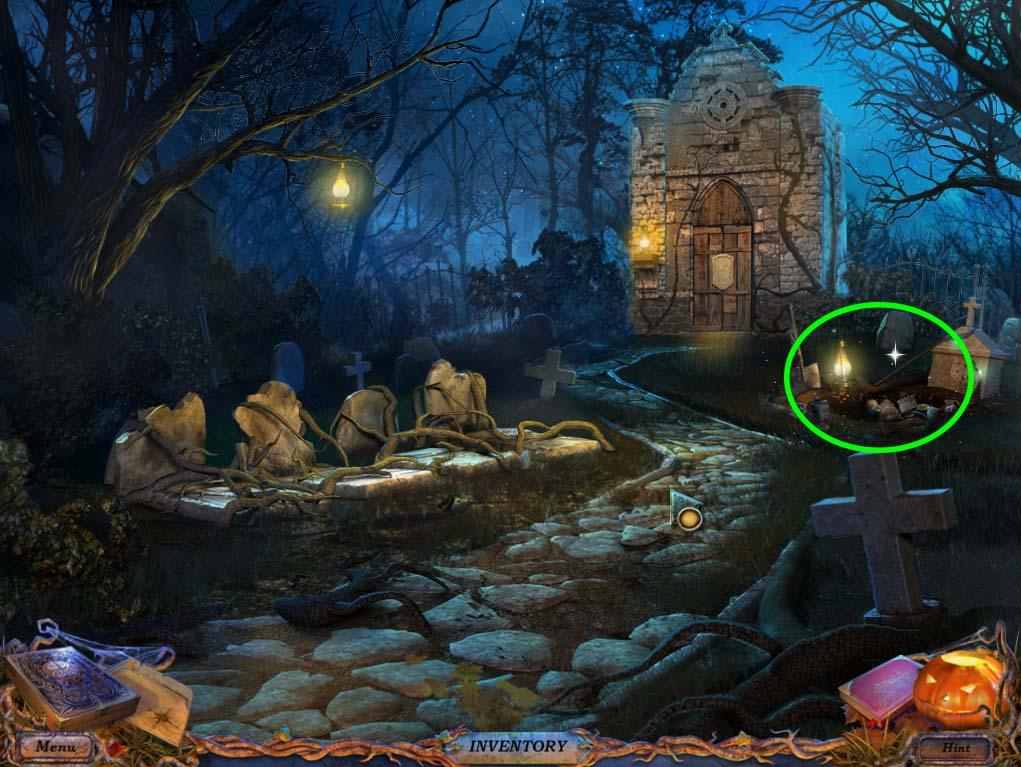
- Ignore the other areas for now and head straight to the CHURCH.
- At the CHURCH ENTRANCE, you’ll come across a BASKET on the steps (circled in green below).
- Investigate it and brush aside the contents of the basket until you find another GAME PIECE HALF.
- With the GAME PIECE HALF in your inventory, head inside the church to find the ghost of the PRIEST waiting for you inside.
- Talking to him will start another cutscene telling more about the story of what happened to the former inhabitants of this cursed place.
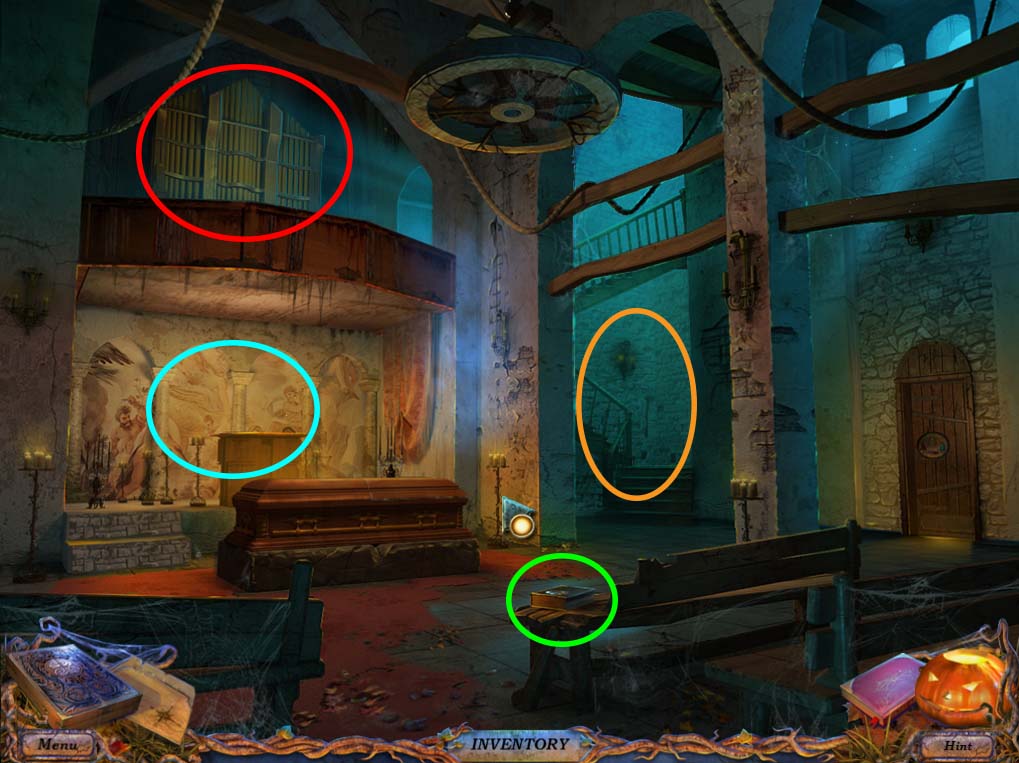
- Once the priest disappears, investigate the BOOK (circled in green above) to find a GAME PIECE HALF, and check on the ALTAR (circled in blue) to start another hidden object puzzle.
CHURCH HIDDEN OBJECT PUZZLE
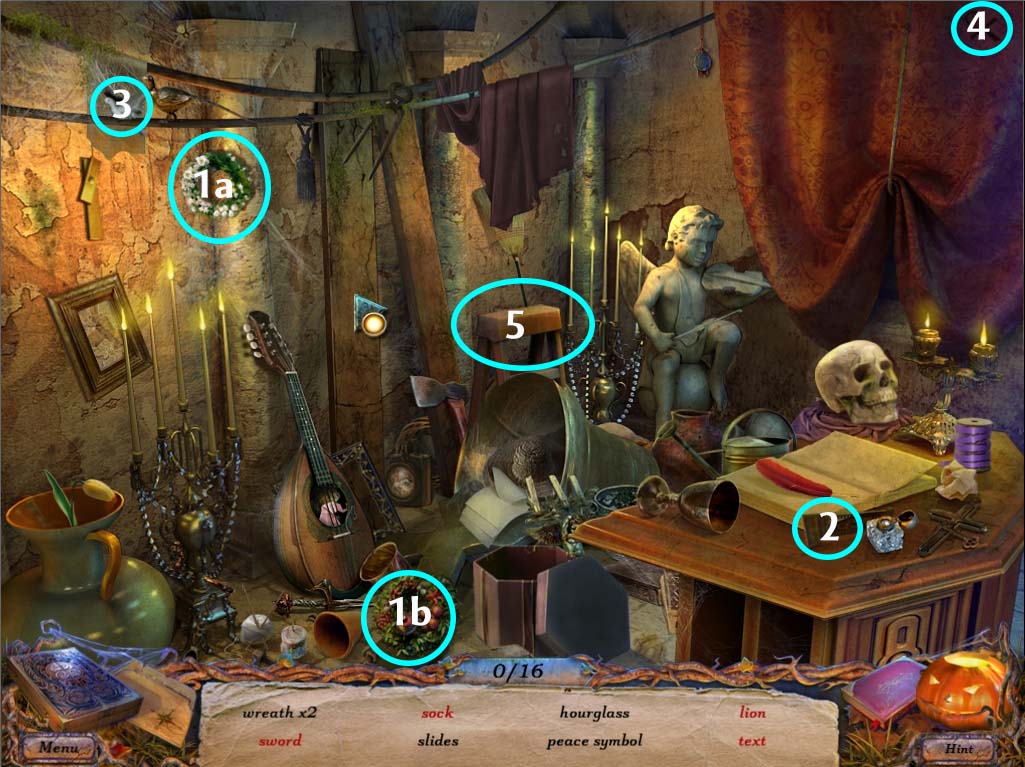
Black objects
- 1. Wreath x 2 (1a, 1b)
- 2. Slides
- 3. Peace Symbol
- 4. Ankh
- 5. Stepladder
- Click on the bell (circled in green) to look further and find these objects
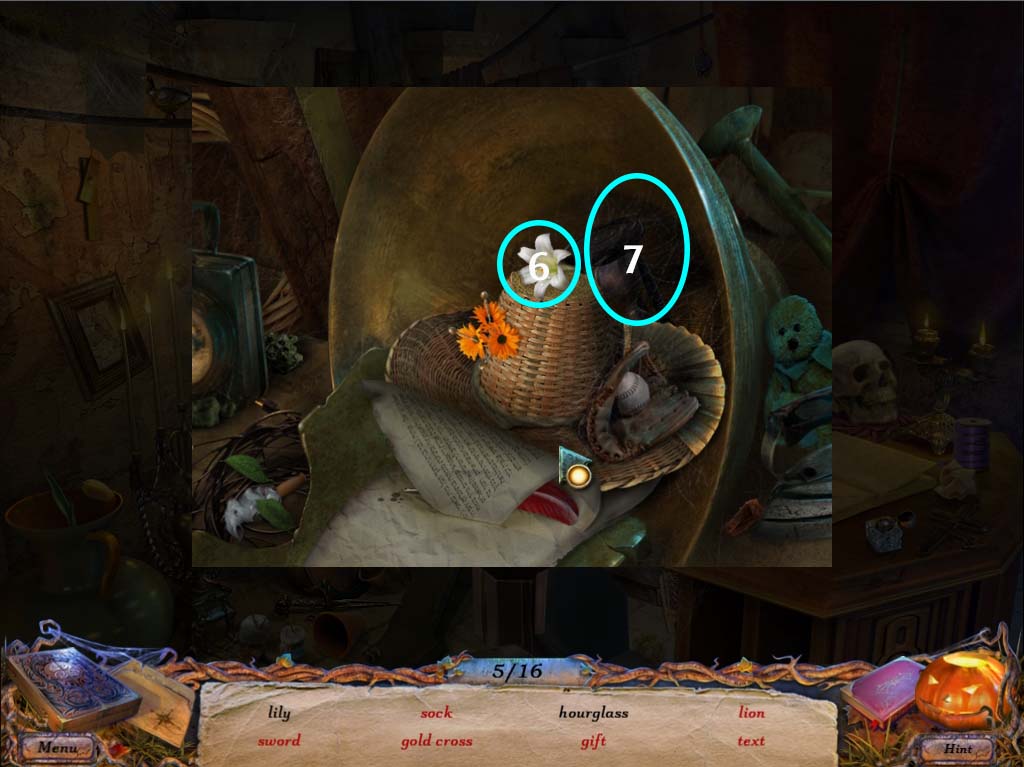
- 6. Lily
- 7. Hourglass
Red Objects
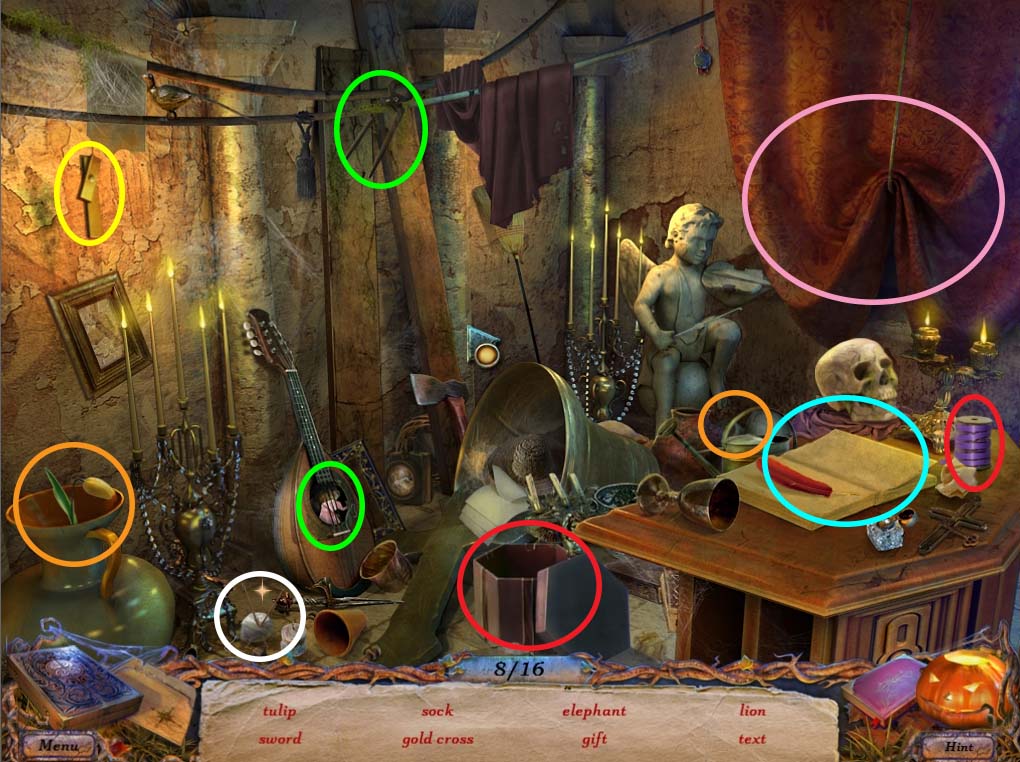
- Take the feather (circled in blue) and write on the page to find text
- Take the ribbon and place it on the box (circled in red) to get the gift
- Click on the broken cross (circled in yellow) to get the gold cross
- Use the yarn and knitting needles (circled in white) to get the sock
- Use the watering can on the wilted flower (circled in orange) to get the tulip
- Raise the curtain (circled in pink) to get the sword behind it
- Take the clippers and cut the banjo strings (circled in green) to and investigate further. You’ll find a folded elephant and a lion without a mane. Take the mane at the lion’s feet and put it on its head to finish the puzzle.
- Once completed the puzzle will reward you with a STEPLADDER and some SLIDES
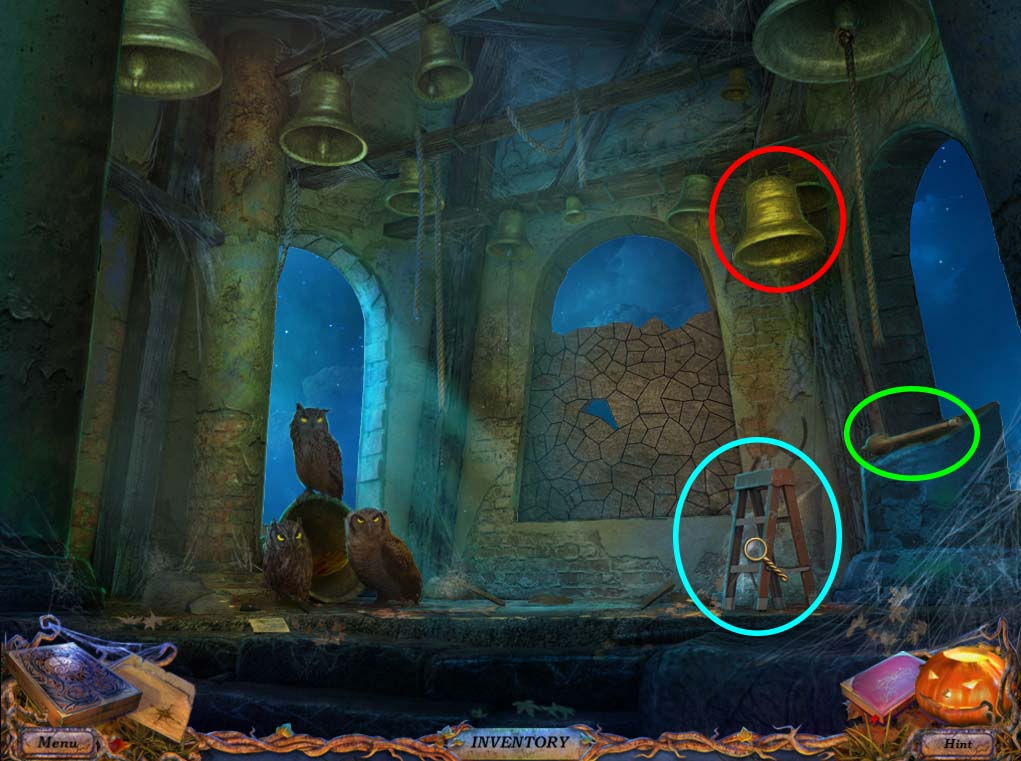
- Head upstairs to the BELL TOWER (circled in orange in CHURCH image above) and you’ll see several owls that are preventing you from taking several items inside a ruined bell. Place the STEPLADDER as shown below (circled in blue) and take the BELL CLAPPER. Investigate the BELL (circled in red) and use the BELL CLAPPER. This will drive away the owls and allow you to investigate the fallen bell. Inside you’ll find a FAN and another GAME PIECE HALF.
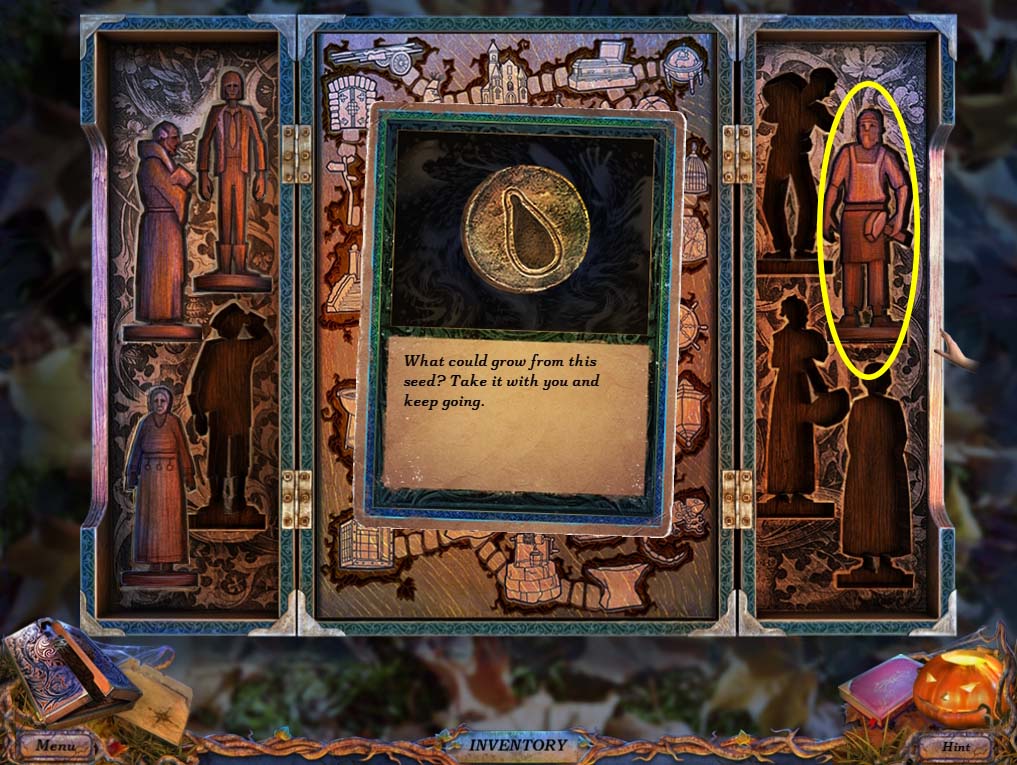
- With four GAME PIECE HALVES now in your possession, it’s time to put them on the BOARD GAME if you haven’t already.
- The First two pieces go here and reward you with a SEED SYMBOL:
 >
>
- The next two go here and reward you with a MUSIC NOTE:
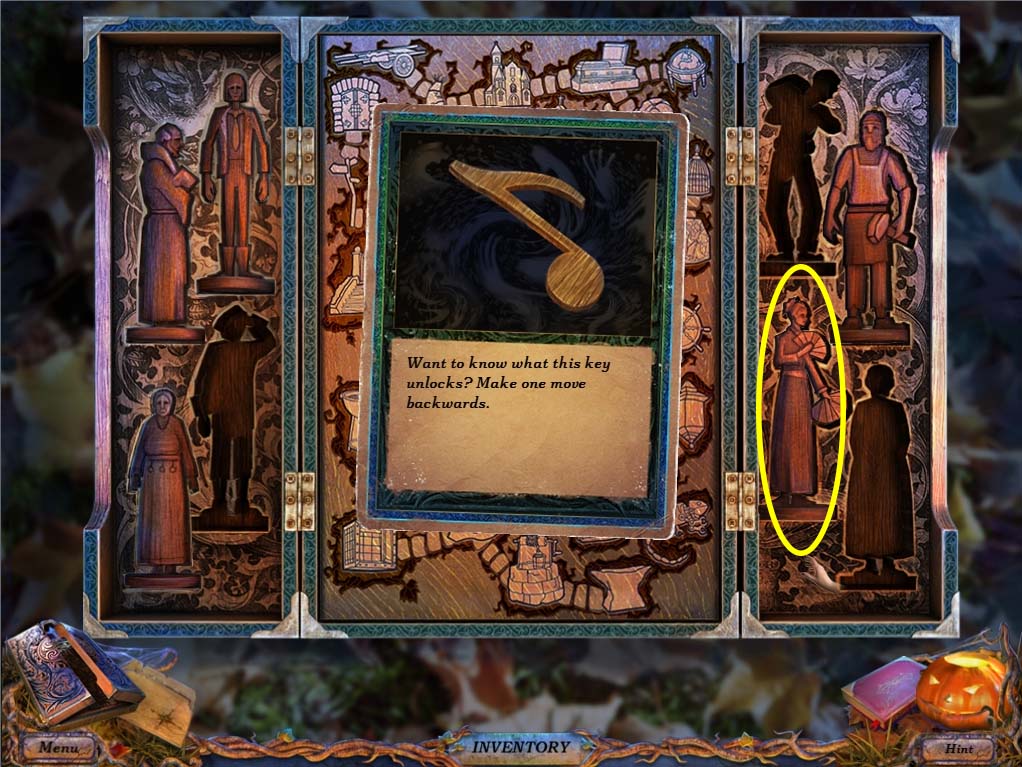
- With these items in your inventory, check the ORGAN (circled in red on church image above) on top of the church altar.
- Take the MUSIC SHEETS (1 of 2, circled in blue below) and investigate the ORGAN.
- Place the MUSIC NOTE on the ORGAN and take the HATCH RING that comes out.
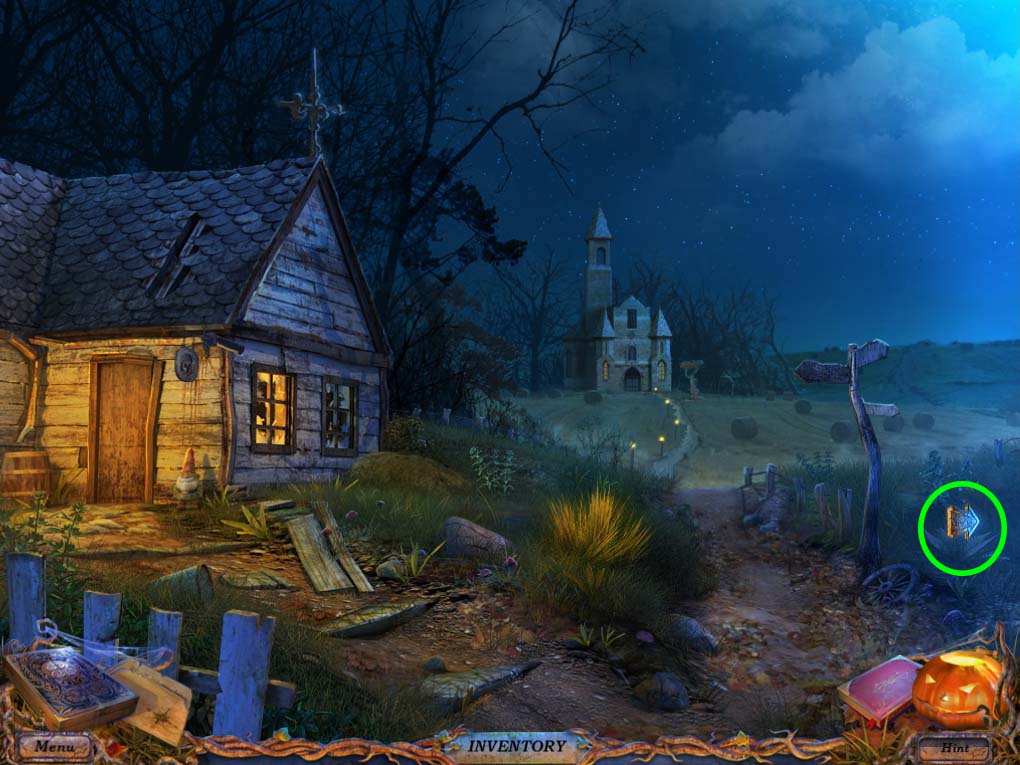
- Head back to the FIELD area and then head right (circled in green in the following two images) to enter the BARN.

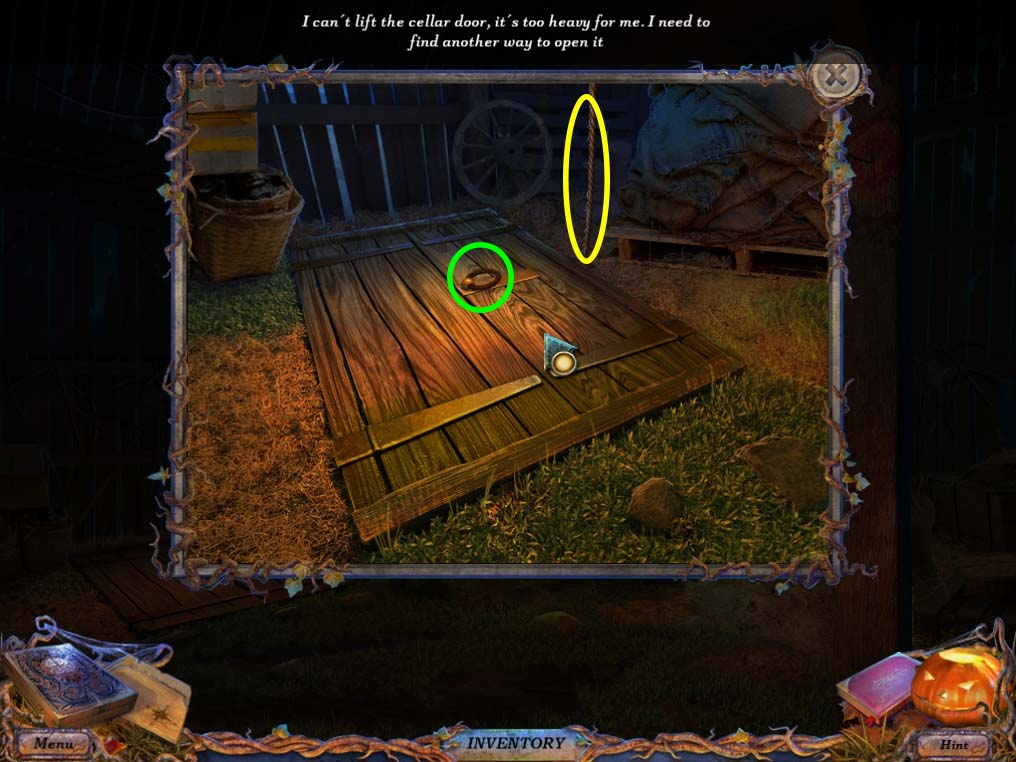
- Once inside investigate the BARN HATCH (circled in green below) and use the HATCH RING from your inventory.
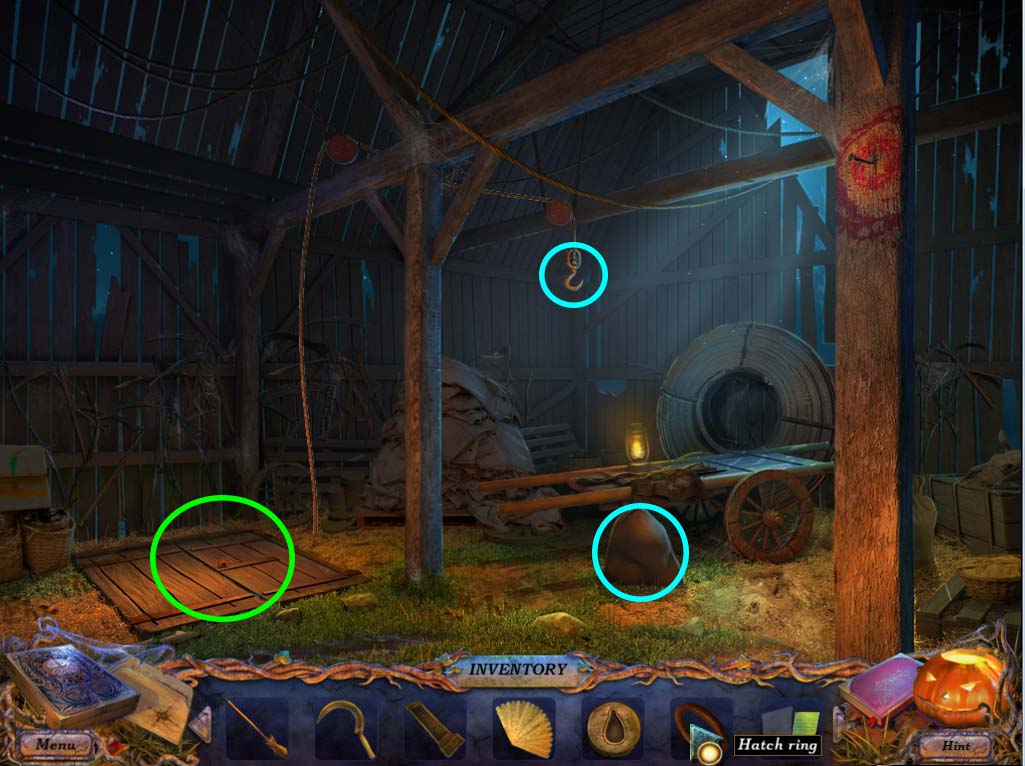
- Once the HATCH RING is placed, use the ROPE (circled in yellow below) to tie it to the door.
- With the hatch now tied, use the sack and tie it to the rope (circled in blue in the barn image at the top), this will open the hatch doors and reveal another hidden object puzzle
BARN HIDDEN OBJECT PUZZLE

Black objects
- 1. Paper plane
- 2. Knife
- 3. Feather
- 4. Mask x 3
- 5. Razor Blade
- 6. Crowbar
- Move the pumpkin circled in green to find the whistle underneath
- Click the barrel (circled in red) to find a mask, and assemble the daisy by clicking the 20 scattered petals circled in blue in the image below.

Red Objects
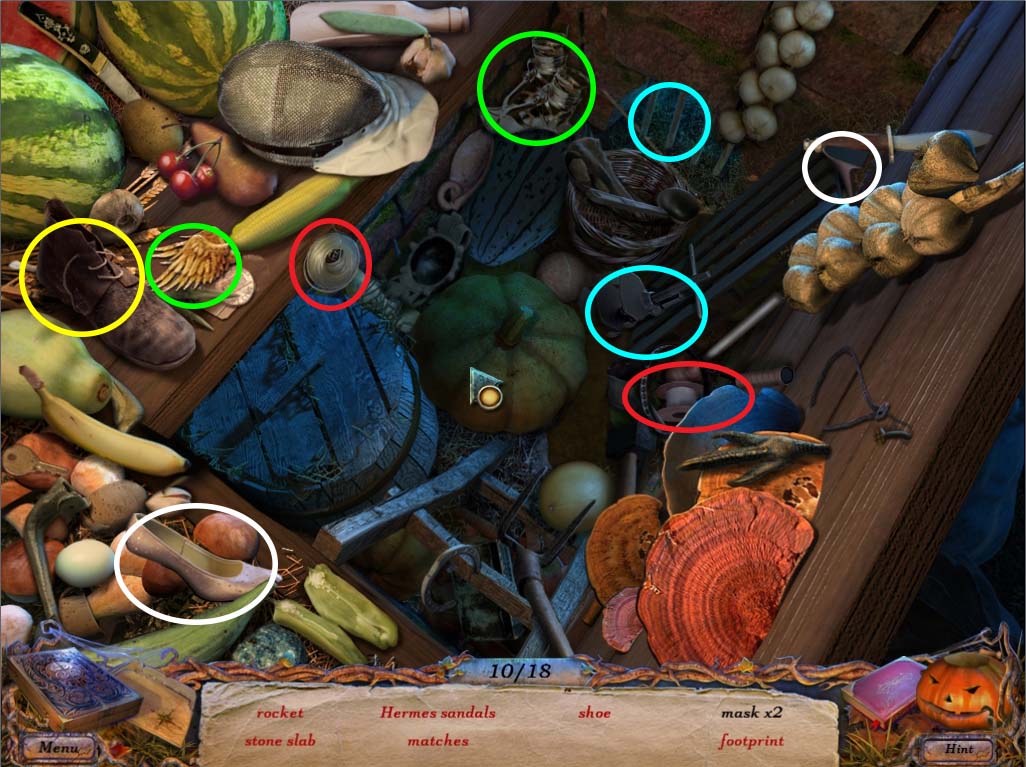
- Use the wings on the sandals (circled in green) to get the Hermes sandals
- Use the string on the broken racket (circled in red)
- Move the shoe (circled in yellow) to find the footprint underneath
- Combine the heel with the broken shoe (circled in white)
- Finally, Use the wedge on the grills (circled in blue) to find matches, a stone slab and one mask (circled in blue in image below)
- With the puzzle complete, you will be rewarded with a STONE SLAB and a CROWBAR for your inventory.
- Head back to the Church entrance and investigate the gate (circled in green in image below) and use the STONE SLAB to complete the puzzle lock.
- This will start another mini game.
HALLOWEEN MATCHING MINI GAME
- The object of this puzzle is to match related images together in a sort of modified memory game.
- For example, the muse matches with a cat, the broom matches with the witch’s hat, and so on.
- The solution for this puzzle is detailed in the image below.
- Just match the similar numbers, marked from left to right from top to down.
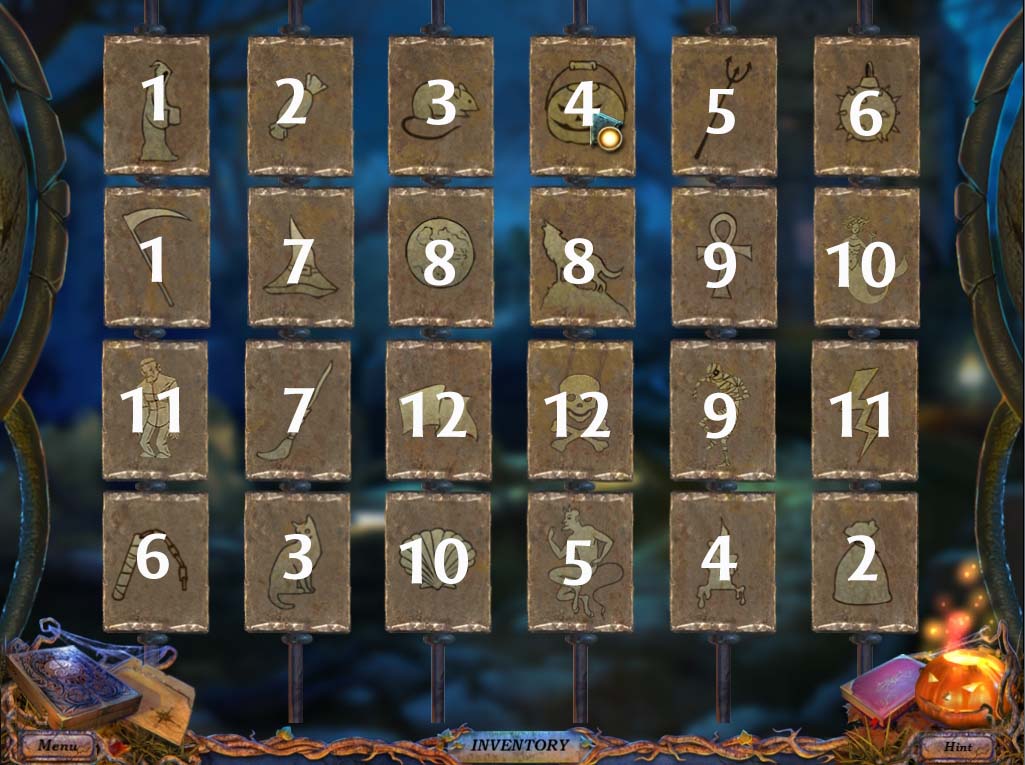
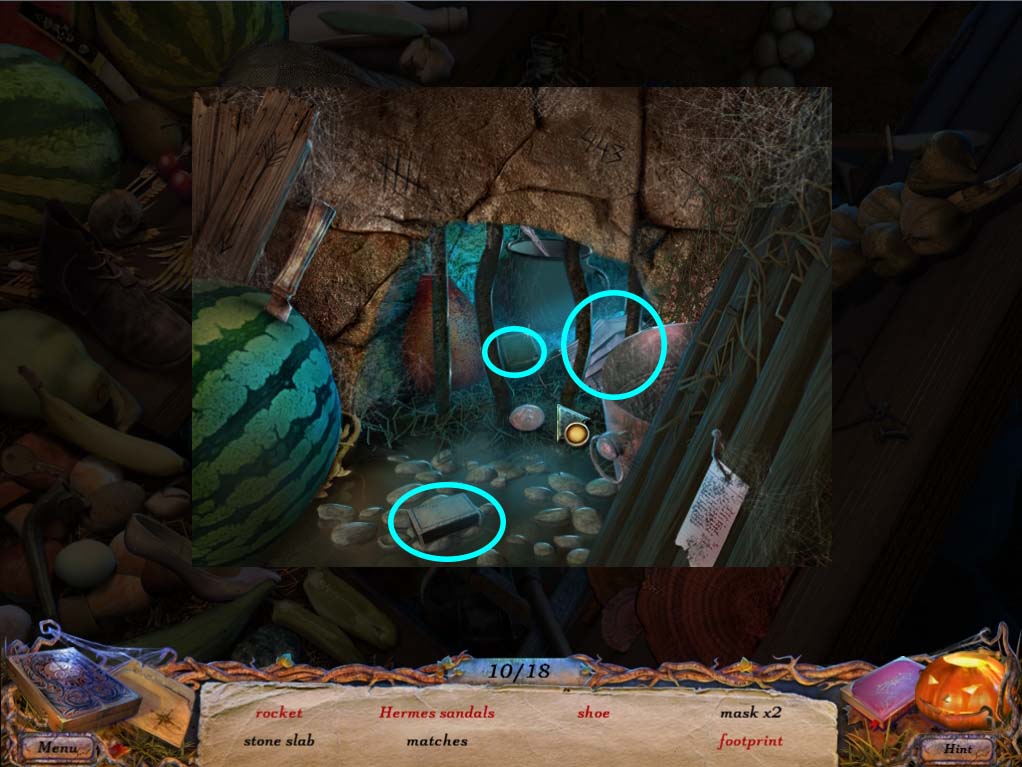
- After finishing the puzzle, the gates will open, allowing you to enter the graveyard. Investigate the open grave (circled in green below) to start the hidden object puzzle.
GRAVEYARD HIDDEN OBJECT PUZZLE
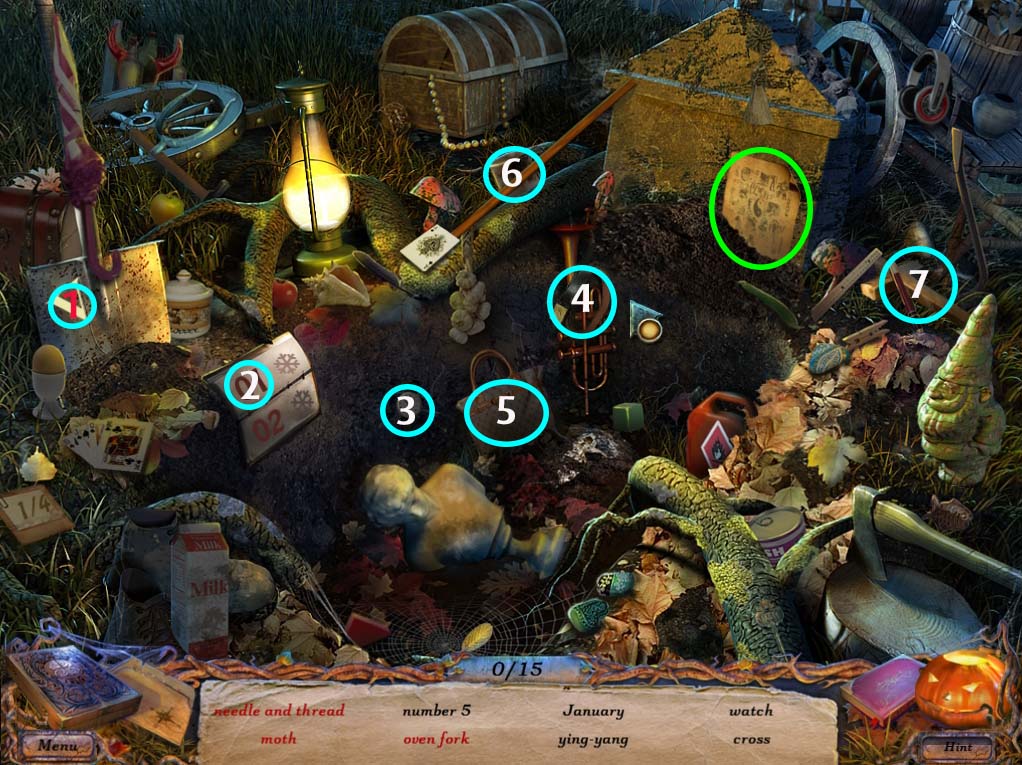
Black objects
- 1. Number 5
- 2. January
- 3. Watch
- 4. Belt
- 5. Purse
- 6. Mug
- 7. Cross
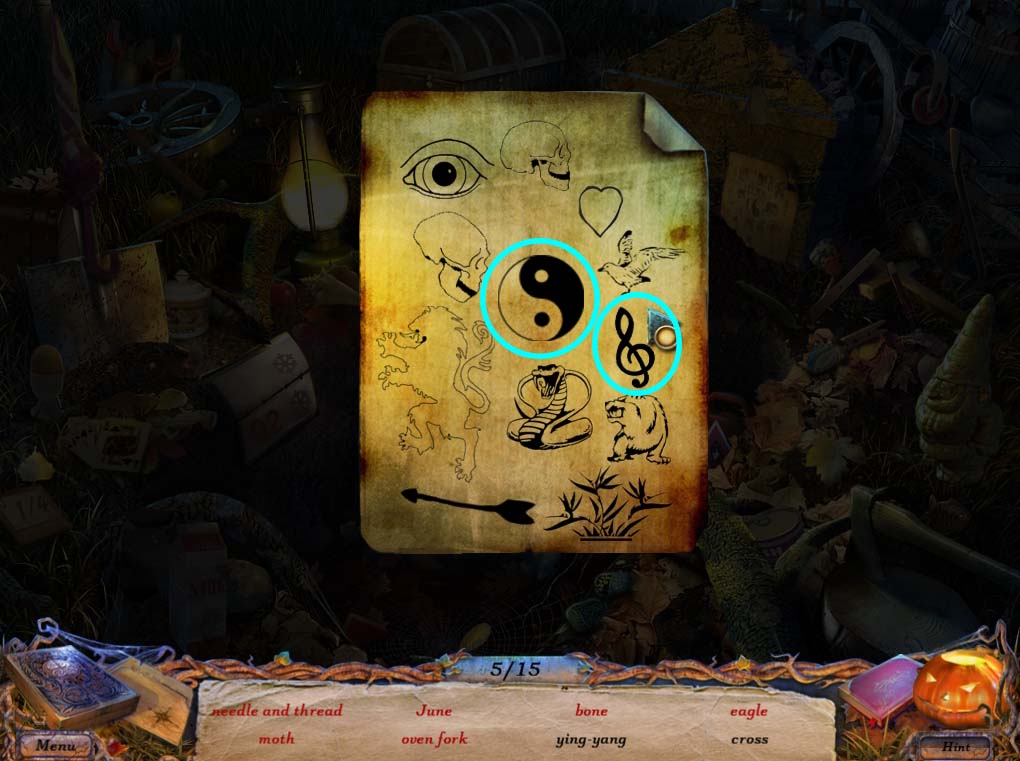
- Check the sheet of paper (circled in green) to find the ying-yang and clef symbol.
Red objects
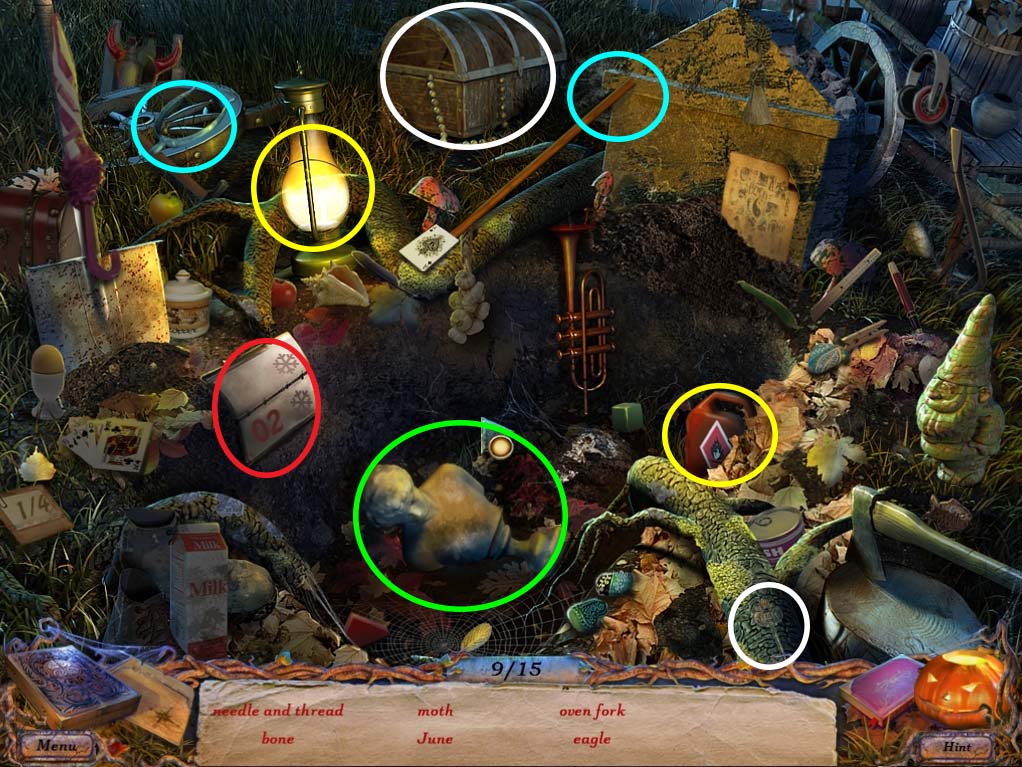
- Combine the broken pieces of the oven fork (circled in blue)
- Move the calendar (circled in red) several times until you get to 06 to find June
- Move the statue (circled in green) to find the bone underneath
- Use the gas on the lantern (circled in yellow) to attract the moth
- Use the key on the chest (circled in white) to find the eagle and combine the needle and thread.
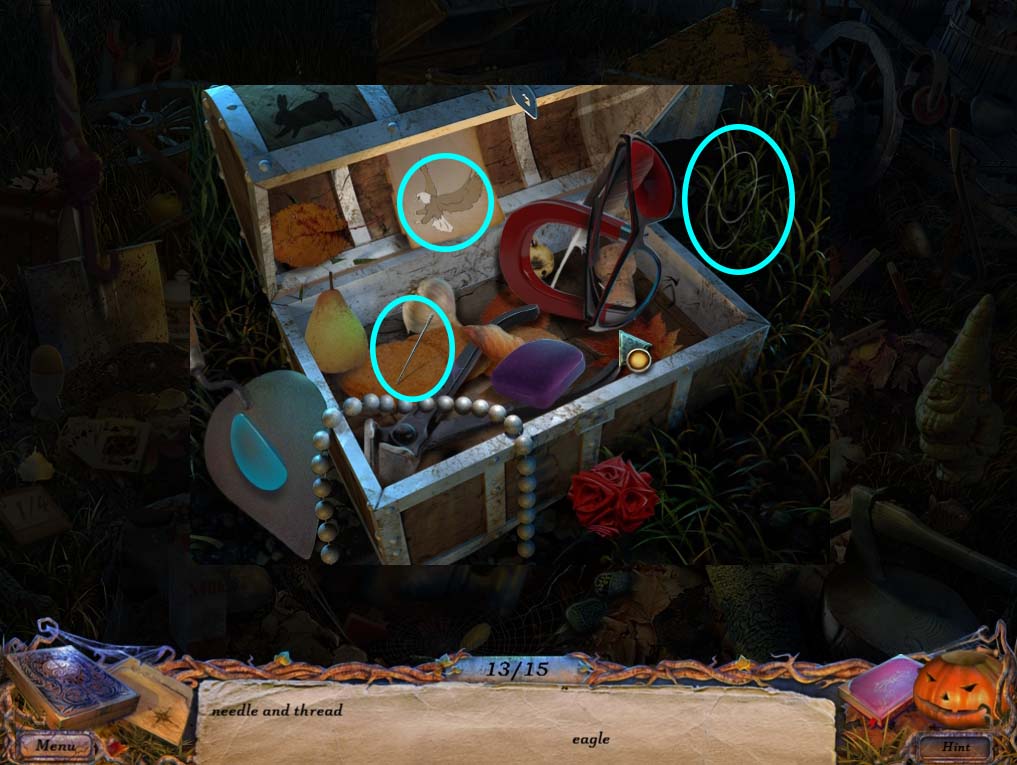
- Finishing this puzzle will reward you with a NEEDLE AND THREAD and a CROSS.
- Head back inside the CHURCH and inspect the COFFIN.
- Use the CROSS to start another puzzle.
COFFIN PUZZLE
- The object of this puzzle is to guide the cross to the coffin without hitting the devil symbols.
- A solution to this puzzle is detailed below:
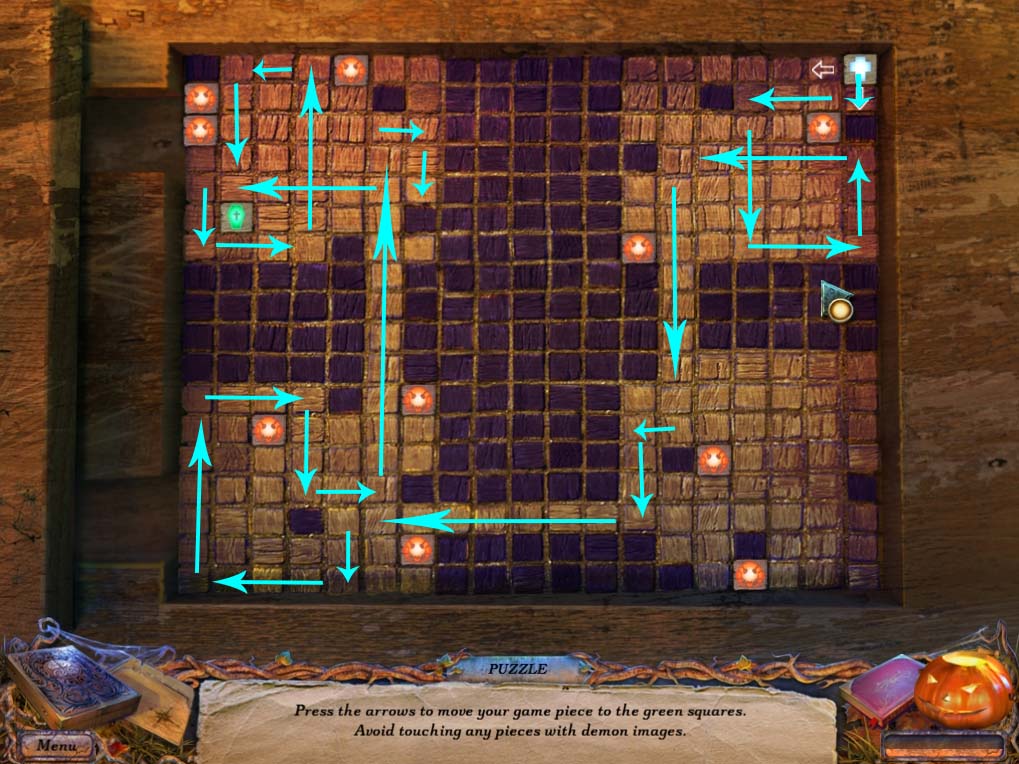
- Solving this puzzle will open the coffin and reveal a MUSIC SHEET (2 of 2) and a BUTTON for your inventory.
- Go to the ORGAN at the above the ALTAR and place the MUSIC SHEETS above the keyboards.
- This will reveal a RED GEM for your inventory. Take the gem and head back to CHURCH ENTRANCE, there, investigate the GRAVEYARD GATE (circled in red below) and place the RED GEM on the eye of the snake.
- It will open its mouth and reveal an ANGEL.
- Take it for your inventory.

- Head back into the CHURCH and investigate the DOOR to the right.
- There you will find a picture with a missing ANGEL.
- Take the ANGEL from your inventory and place it on the picture.
- The door will then open into the church CELL area.
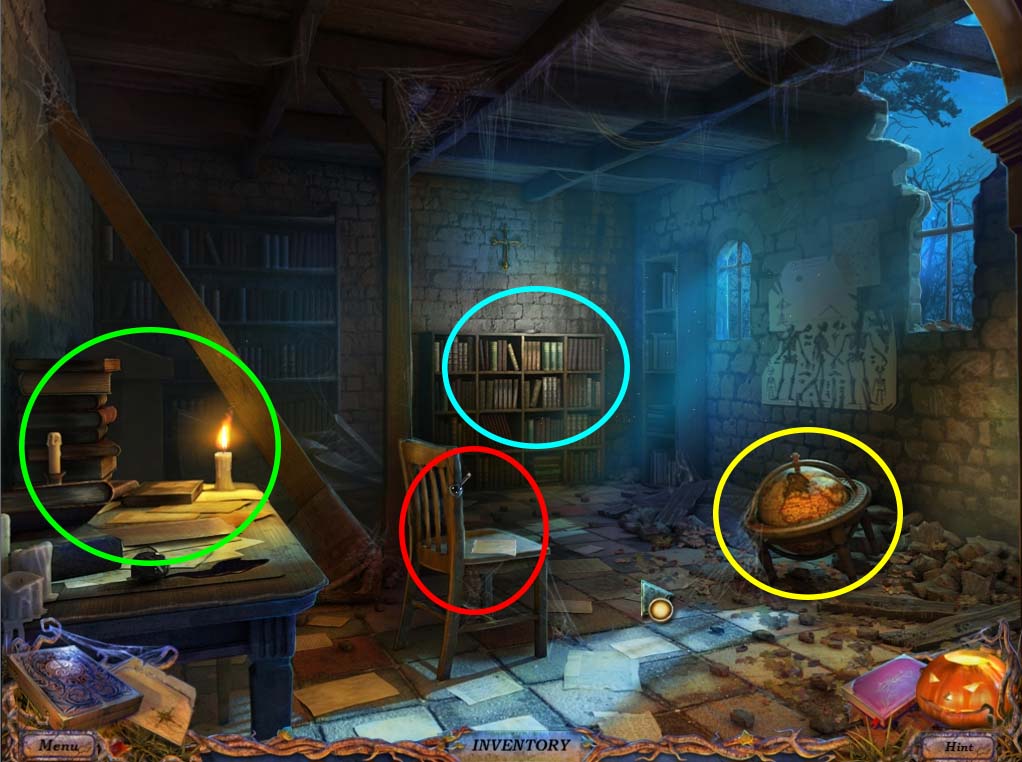
- Inside the CELL, investigate the CHAIR (circled in red) and take the BOTTLE. Afterwards, investigate the DESK (circled in green) and investigate the note on top. You will then find a DOVE underneath it for your inventory.
- Head upstairs to the BELL TOWER and use the DOVE on the PUZZLE WINDOW. This will start a new mini game.
- BELL TOWER MATCHING MINI GAME
- The aim of this puzzle is to match similar images to each other. Don’t mind the instruction about similar sizes and color. As long as the pictures are similar they will match. This puzzle is pretty straightforward and doesn’t really need any special solution to complete. Once the puzzle is done, you will find a MACHETE on the windowsill. Take it and head into the GRAVEYARD.
- Use the MACHETE on the overgrown VINES on top of the graves then head back up the BELL TOWER take a look at the window and you will see that the graves spell the word VITA
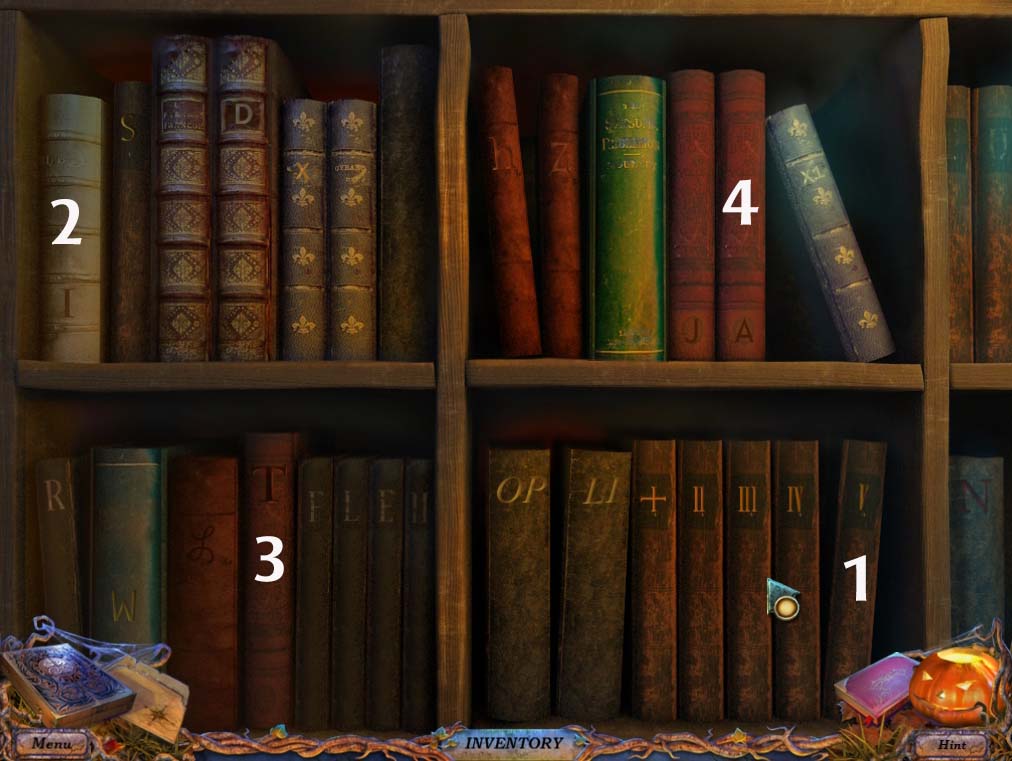
- Head back to the CELL and investigate the BOOKCASE (circled in blue above), and click on 4 books in the following order as shown in the image below:
- Once this is done, a hidden book will be revealed, and clicking this will start a cutscene that will reveal further details of this house’s mysteries.
- Once the cutscene is over, take the book and the priest’s ghost will ask you to give it to him.
- Lay the priest’s soul to rest and he will give you a CONTINENT piece for your trouble.
- Use it on the GLOBE (circled in yellow on the CELL image above) and take the ANVIL and the PIRATE.
End of Chapter V
Chapter One: Getting to the party
Chapter Two: Missing Friends and Locked Doors
Chapter Three: First Game Piece - The Groom
Chapter Four: Second Game Piece - The Nanny
Chapter Five: Third Game Piece - The Priest
Chapter Six: Fourth Game Piece - The Blacksmith
Chapter Seven: Fifth Game Piece
Chapter Eight: The Last Game Piece
Ask for help in the comments below!