
Empress of the Deep 3: Legacy of the Phoenix: Chapter Six: The Last Relic
Rely on our Empress of the Deep 3 Legacy of the Phoenix Walkthrough, with its detailed, chapter-by-chapter instructions, beautifully marked custom screenshots, and easy-to-understand puzzle solutions to help you find the ingredients to revive the Phoenix and stop the evil colossus from awakening. Help Empress Anna save her lost people from the fate her twin sister has tried to set in motion in this stunning hidden object adventure game.
Chapter One: Fall of the Sky Palace
Chapter Two: The Mysteries of the Scroll Temple
Chapter Three: The First Relic
Chapter Four: The Second Relic
Chapter Five: The Third Relic
Chapter Six: The Last Relic
Chapter Seven: Silencing the Colossus
Chapter Eight: That Which Was Lost
Bonus Chapter
Ask for help in the comments below!
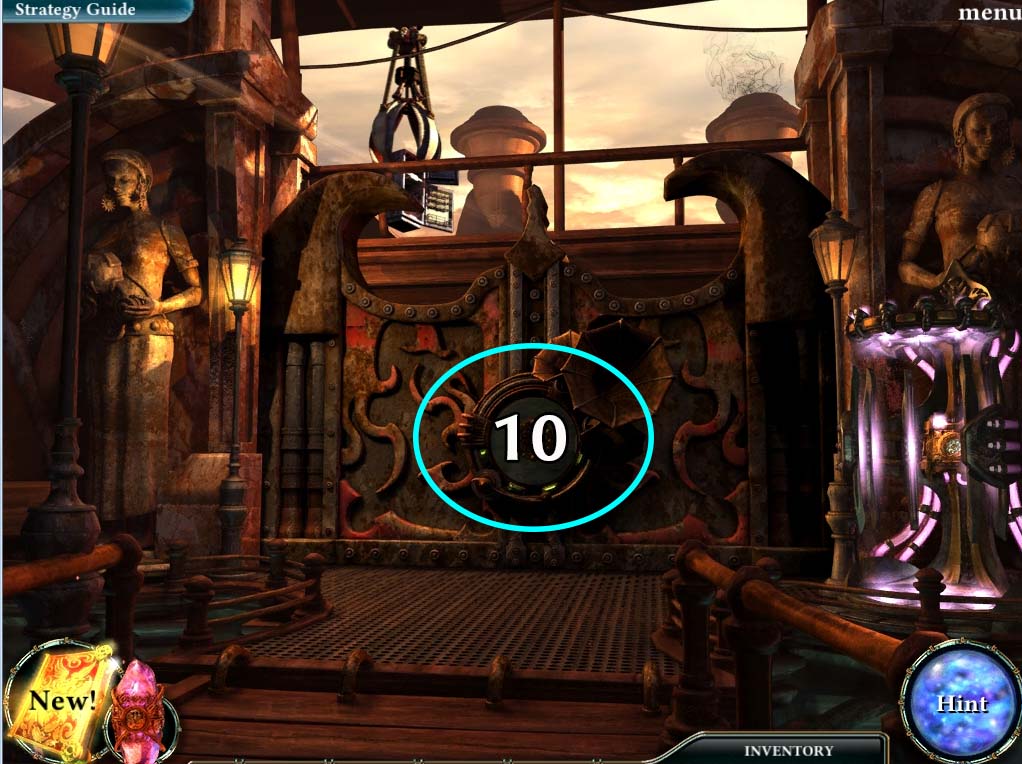
Three of the four relics have been recovered and only the PHOENIX FEATHER is left to be claimed. You’ve received a CRYSTAL GYROSCOPE from the SPIRIT CODEX and it has told you that it has no knowledge of where the feather can be found. There is still much of the island left to explore though, so head back to the SNAKE SHRINE INTERSECTION to proceed.
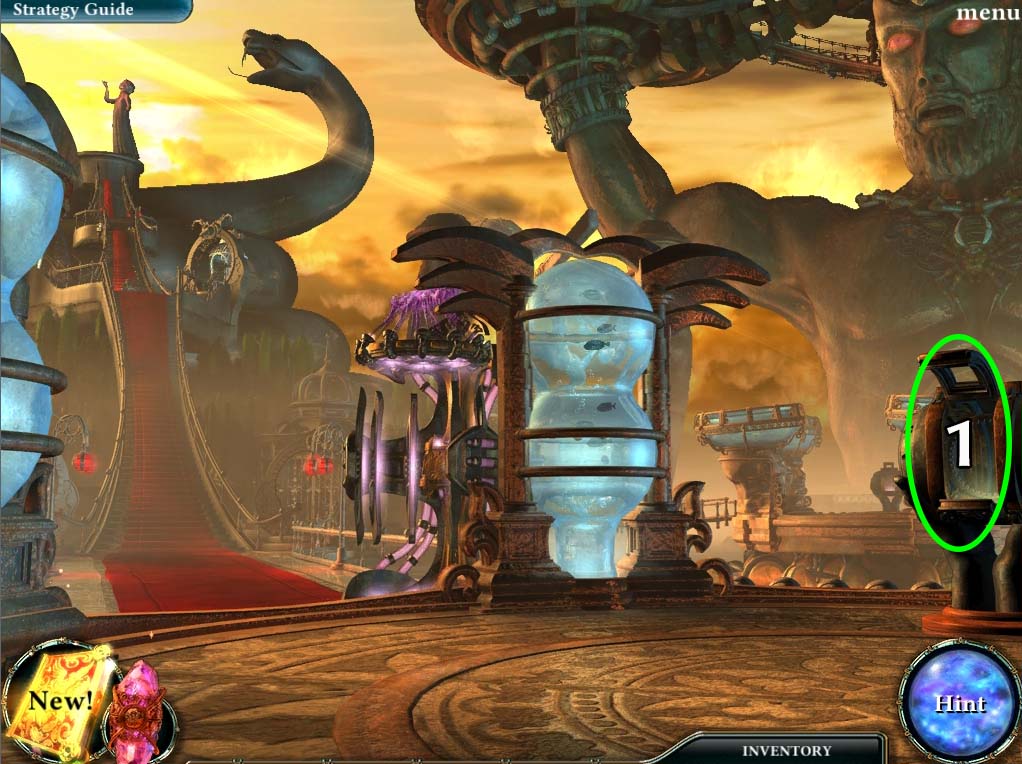
- 1. Place the CRYSTAL GYROSCOPE in the machine as indicated above.
- Cross the bridge once it materializes.
- This will lead you to the COLOSSUS INTERSECTION.
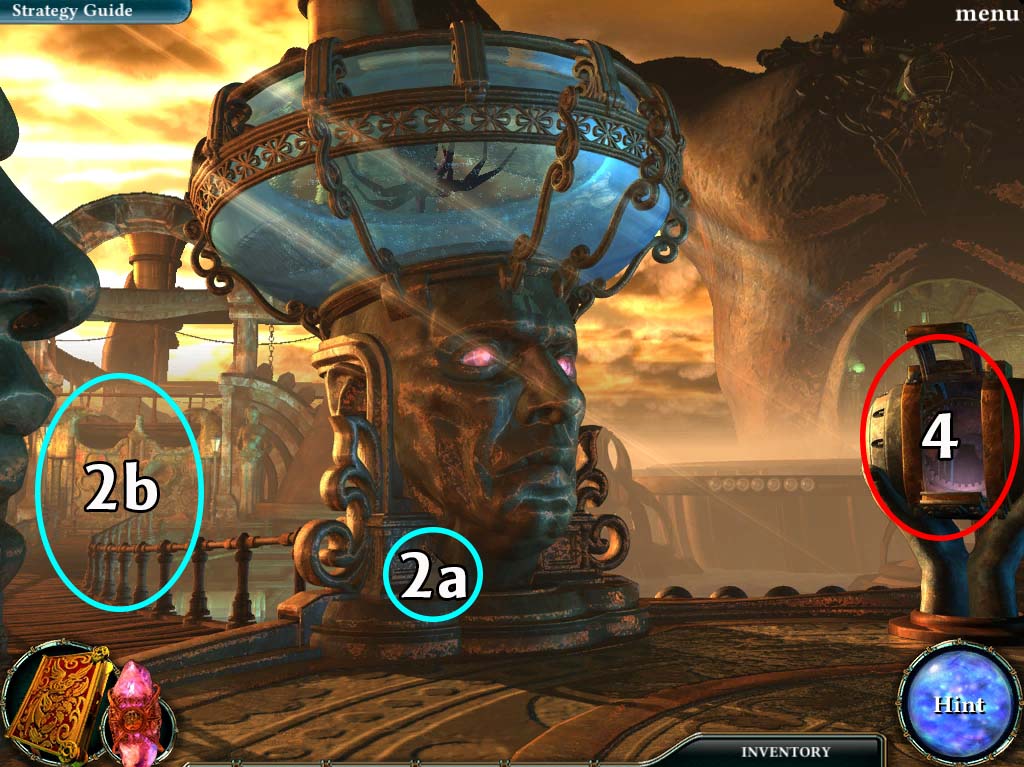
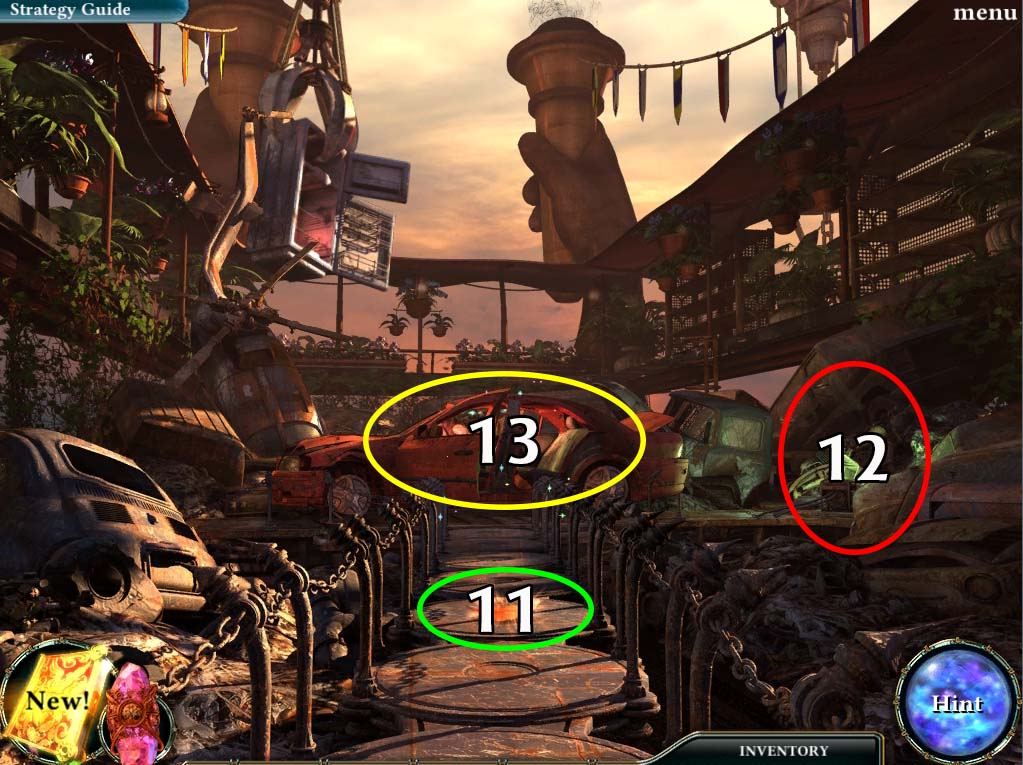
- 2. Take the DISK FRAGMENT (3 of 6) that you can find at the bottom of the octopus tank then head to the BARGE ENTRANCE (both circled in blue in image above).
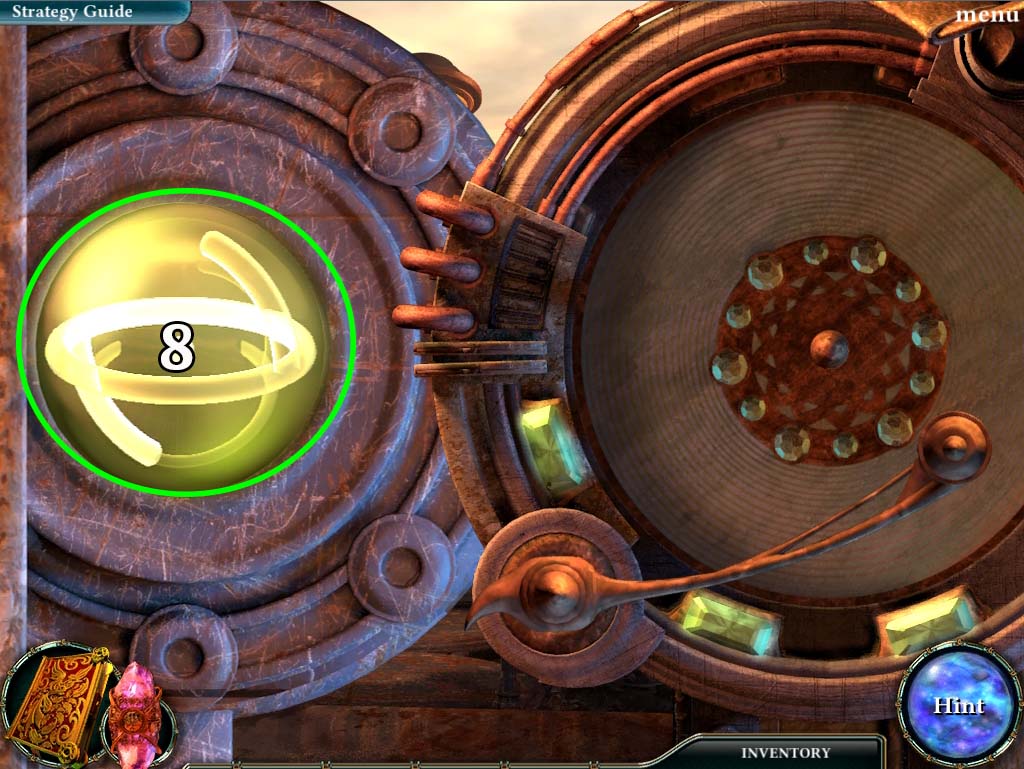
- 3. Take the DISK FRAGMENT (4 of 6) on the hands of the statue and then take a closer look at TELEPORTER on the right side of the BARGE ENTRANCE (both circled in yellow above).
- You’ll find another CRYSTAL GYROSCOPE in the middle of it.
- Take the CRYSTAL GYROSCOPE for your inventory and return to the COLOSSUS INTERSECTION.
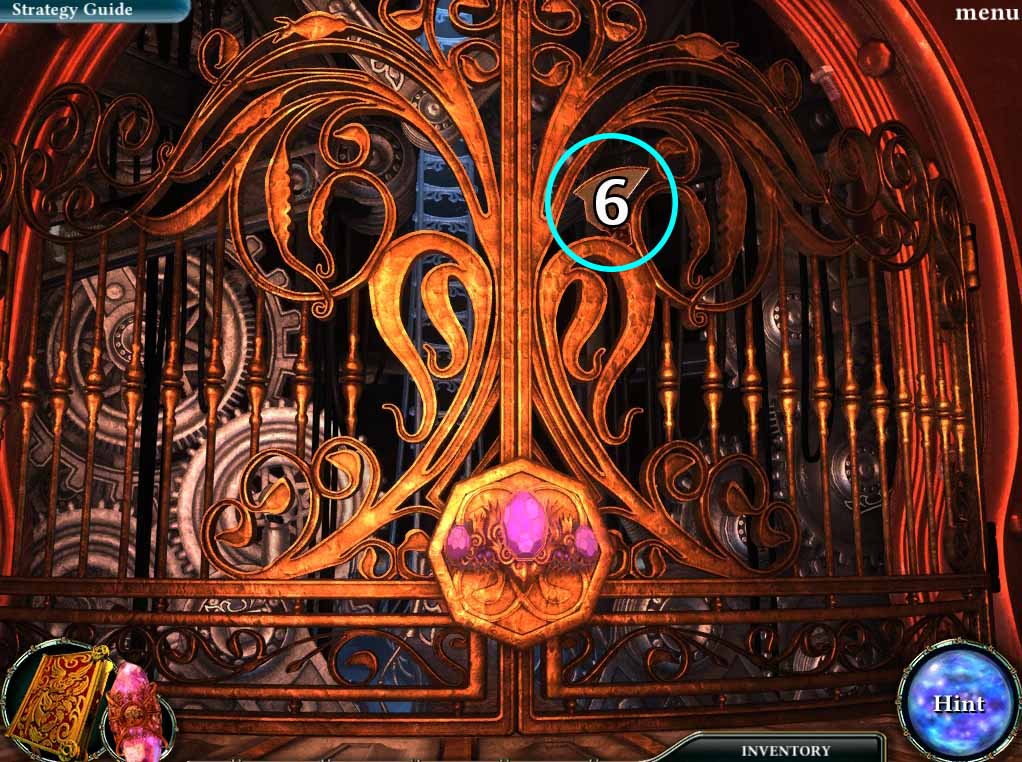
- 4. Use the CRYSTAL GYROSCOPE on the device circled in red at the COLOSSUS INTERSECTION image above.
- Cross the bridge once it materializes.
- You’ll find yourself face to face with the COLOSSUS.
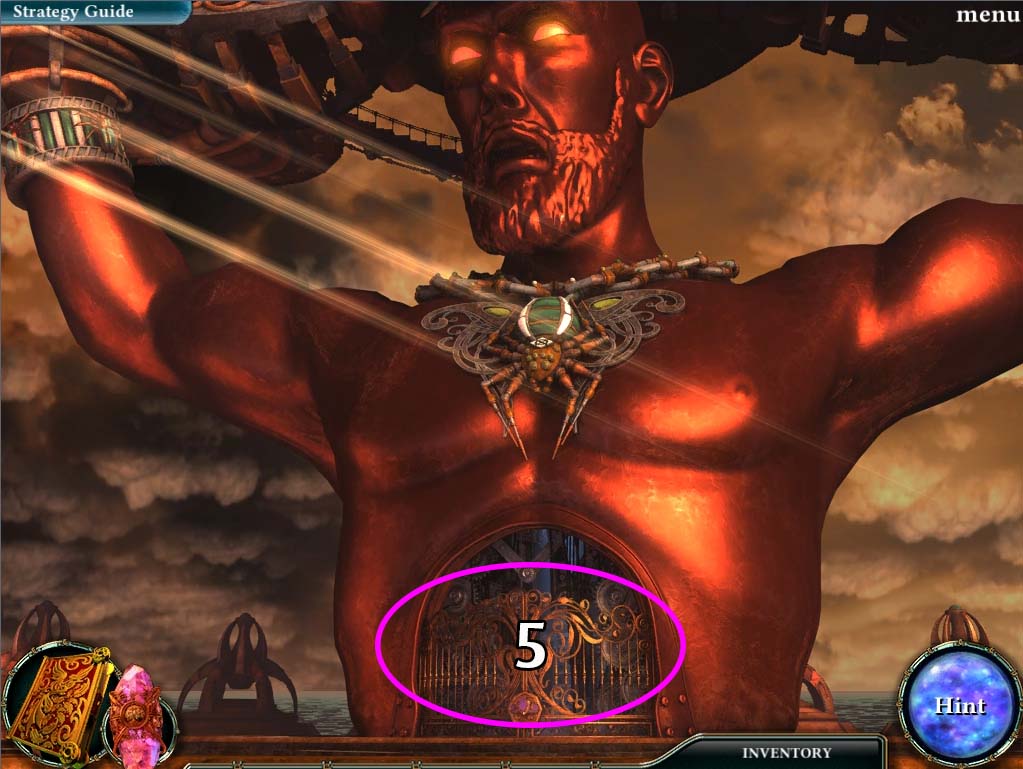
- 5. It may not seem to be a good idea to get so close to the COLOSSUS with it threatening to wake up and destroy your people, but put your worries aside for now and investigate the area circled in violet above.
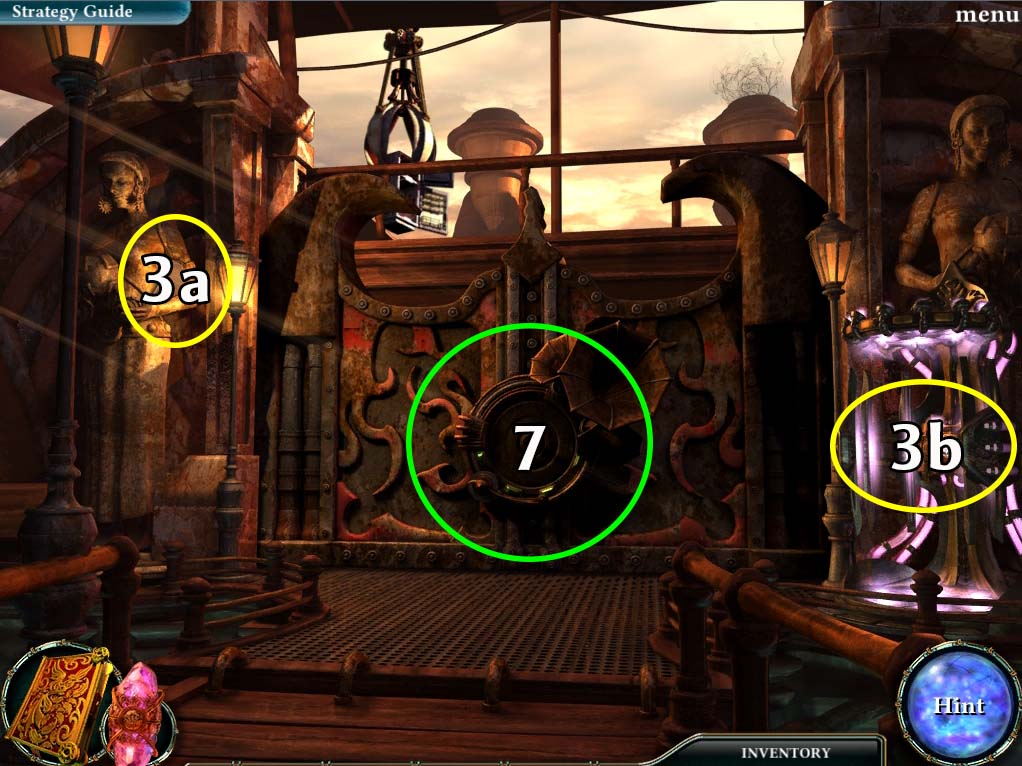
- 6. The final DISK FRAGMENT (6 of 6) and head back to the BARGE ENTRANCE AREA.
- 7. Investigate the BARGE ENTRANCE GATE (circled in green in the BARGE ENTRANCE image above) and then use the DISK FRAGMENTS to form a whole record. This will cause the gate to open partially.
- New Quest: Collect the Disk Fragments
- Quest: Collect the Disk Fragments: Complete
- 8. There will be a YELLOW MARBLE (3 of 3) behind the gate (circled in green above). Grab it for your inventory and ANNA will record several symbols that are in the back of the compartment. Head back to the SCROLL TEMPLE ROOF. You’ll need to unlock JACOB’s next message (you can use the TELEPORTER at the SNAKE SHRINE INTERSECTION.
New Quest: Unlock Jacob’s next message
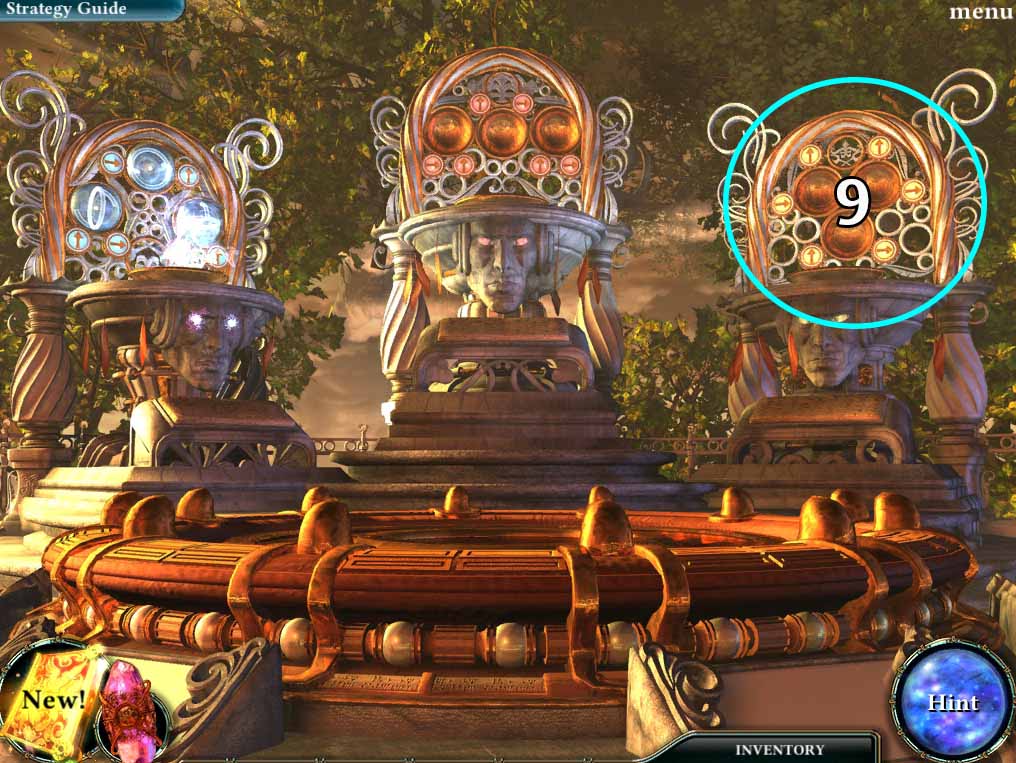
- 9. Use the YELLOW MARBLES on the statue circled in blue in the image above.
- As with the first statue, you’ll unlock a puzzle when you do so.
YELLOW MARBLE PUZZLE:
- The solution to the puzzle is shown below.
- Push the buttons labeled in the image below in order from 1 to 4.
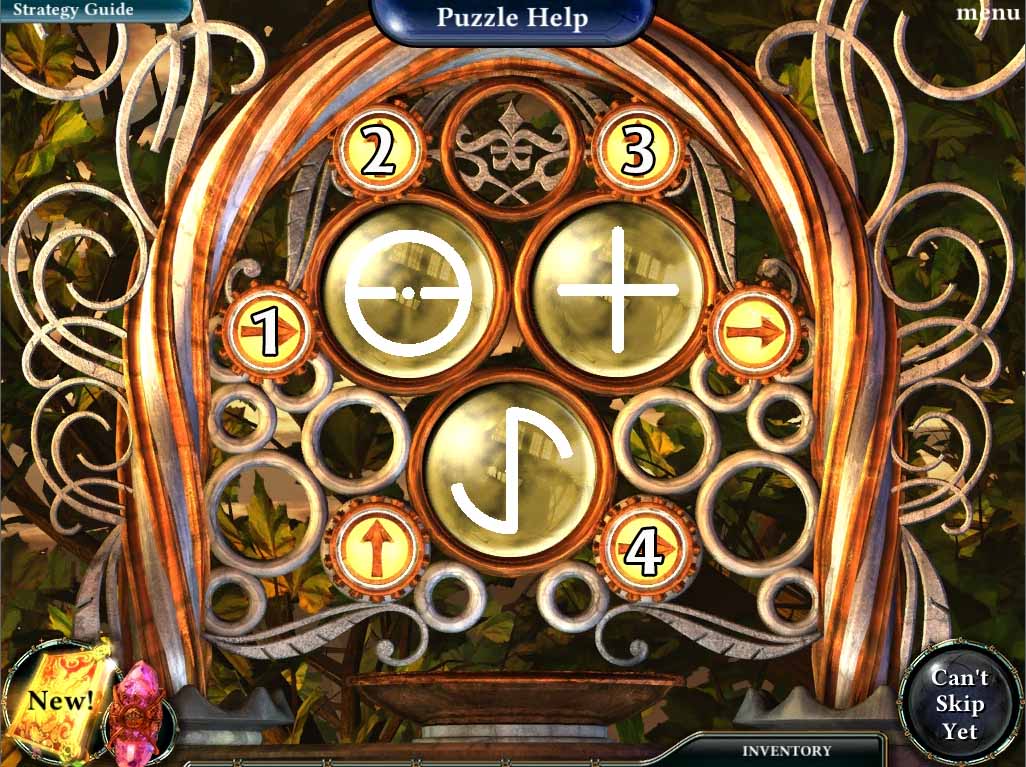
- If you followed the instructions correctly your puzzle should look like this:

- After solving the puzzle JACOB once again appears and tells you a rather startling secret. It seems that you have been deceived from the very beginning! As important as this new information is, JACOB tells you to keep it to yourself for the time being. He hands you a GOLDEN DISC. Head back to the BARGE ENTRANCE.
- Quest: Unlock Jacob’s next message: Complete
New Quest: Fully open the strange door
- 10. Use the GOLDEN DISK on the BARGE ENTRANCE GATE (circled in blue above).
- This will cause it to open fully so you can safely head inside.
- Quest: Fully open the strange door: Complete
- 11. At the BARGE FRONT you find the PHOENIX FEATHER lying on the floor (circled in green above)!
- When you go to pick it up however, the COLOSSUS’ stirring causes it to fly into an area that is out of reach.
- We’ll need to get it back.
New Quest: Retrieve the feather
- 12. Before we head further into the JUNKYARD BARGE, check the area circled in red above.
- It will start a HIDDEN DETAILS PUZZLE that will give you an item that you will need later.
BARGE HIDDEN DETAILS PUZZLE
- The solution to this puzzle is shown in the image below:
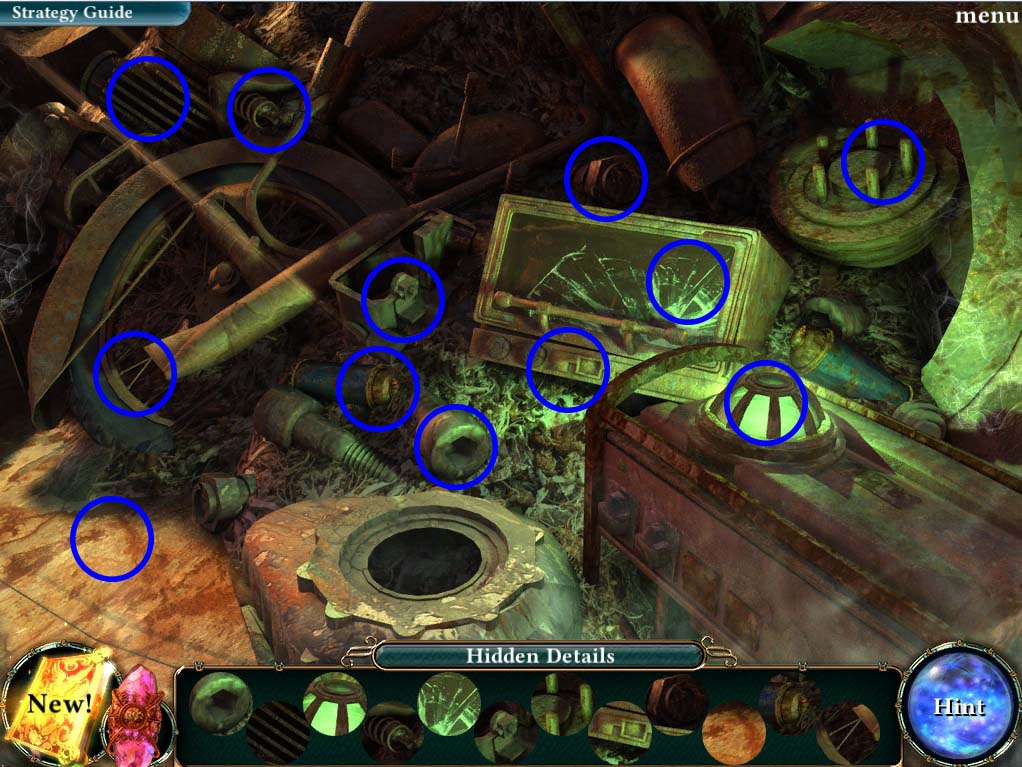
- Once the puzzle is solved a container will open.
- Take the item inside.
- It is a HEAVY LEVER that will be useful later.
- 13. Investigate the wrecked car (circled in red in the BARGE FRONT image above).
- This will start a HIDDEN RELICS PUZZLE.
BARGE HIDDEN RELIC PUZZLE 1
- **Note: The objects listed as hidden can change on each playthrough.
- Possible items have been listed below
- White Objects are circled in blue above and are labeled as follows:
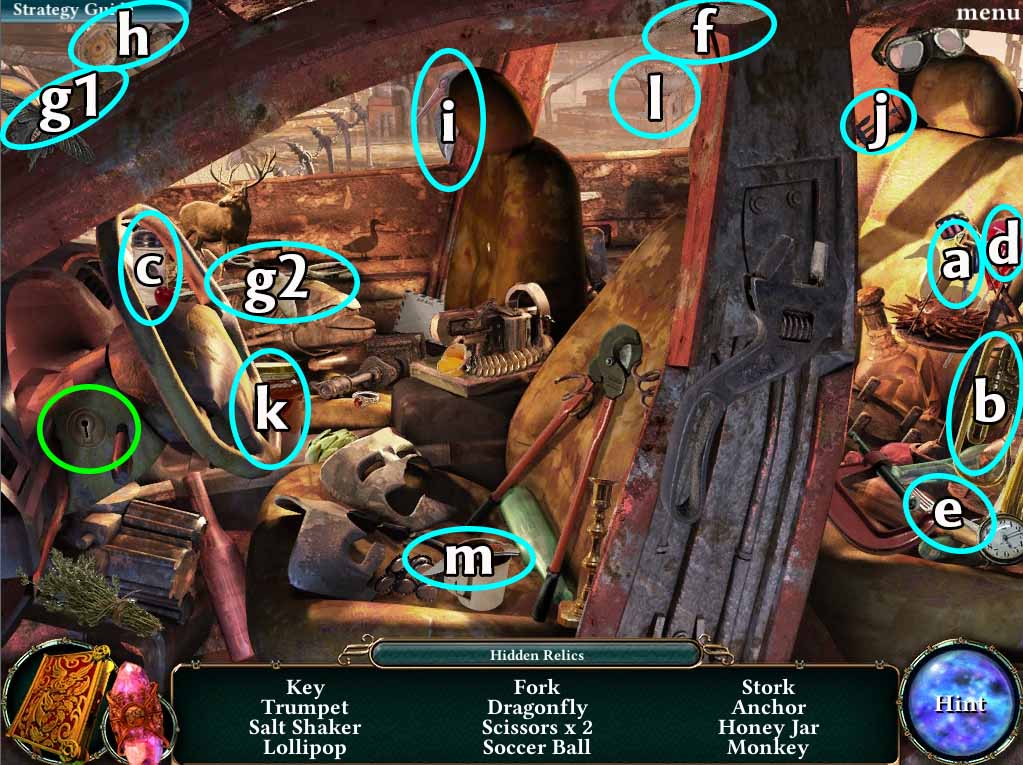
- a. Key
- b. Trumpet
- c. Salt Shaker
- d. Lollipop
- e. Fork
- f. Dragonfly
- g. Scissors x 2
- h. Soccer Ball
- i. Stork
- j. Anchor
- k. Honey Jar
- l. Monkey
- m. Knife
- Solving this puzzle will give you a KEY.
- Use it on the CAR IGNITION (circled in green in the image above) to move the car out of your way.
- With your path clear head further into the JUNKYARD BARGE.
- 14. Click on the cat and pick up the CAT COIN that it leaves behind.
- After this check the SHELF (both circled in red above) to start another HIDDEN RELIC PUZZLE
BARGE HIDDEN RELIC PUZZLE 2
- **Note: The objects listed as hidden can change on each playthrough.
- Possible items have been listed below
- White Objects are circled in blue above and are labeled as follows:
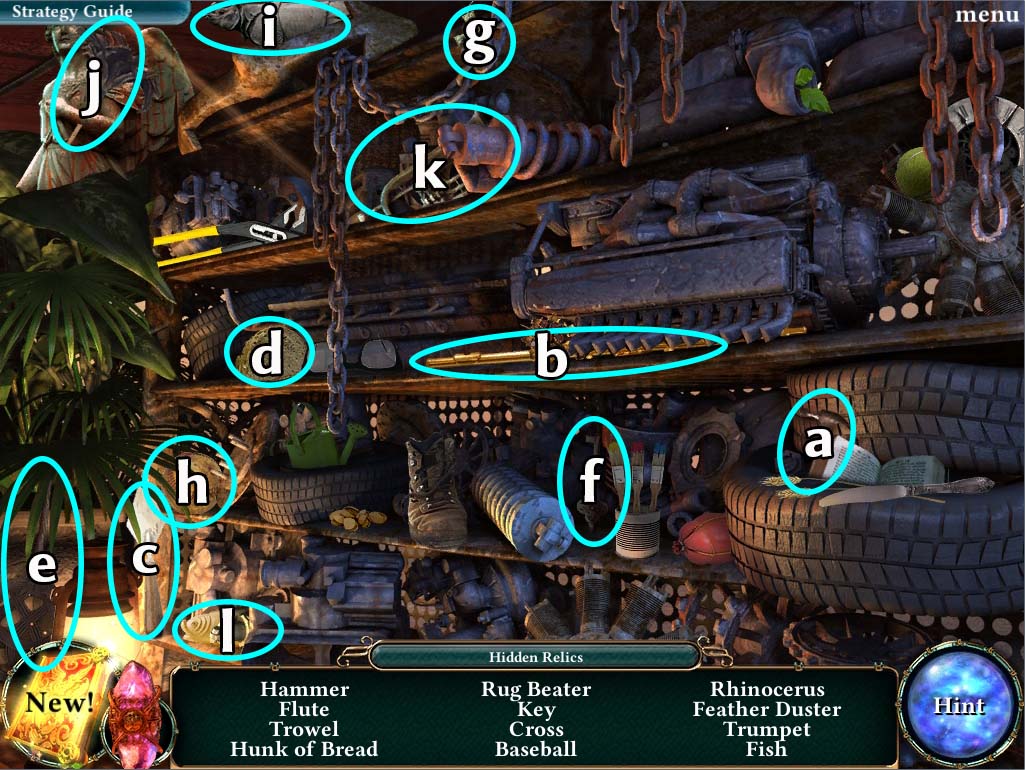
- a. Hammer
- b. Flute
- c. Trowel
- d. Hunk of Bread
- e. Rug Beater
- f. Key
- g. Cross
- h. Baseball
- i. Rhinoceros
- j. Feather Duster
- k. Trumpet
- l. Fish
- After solving this puzzle three FAIRIES of different colors will appear and show you a code.
- Anna will take note of this in her book.
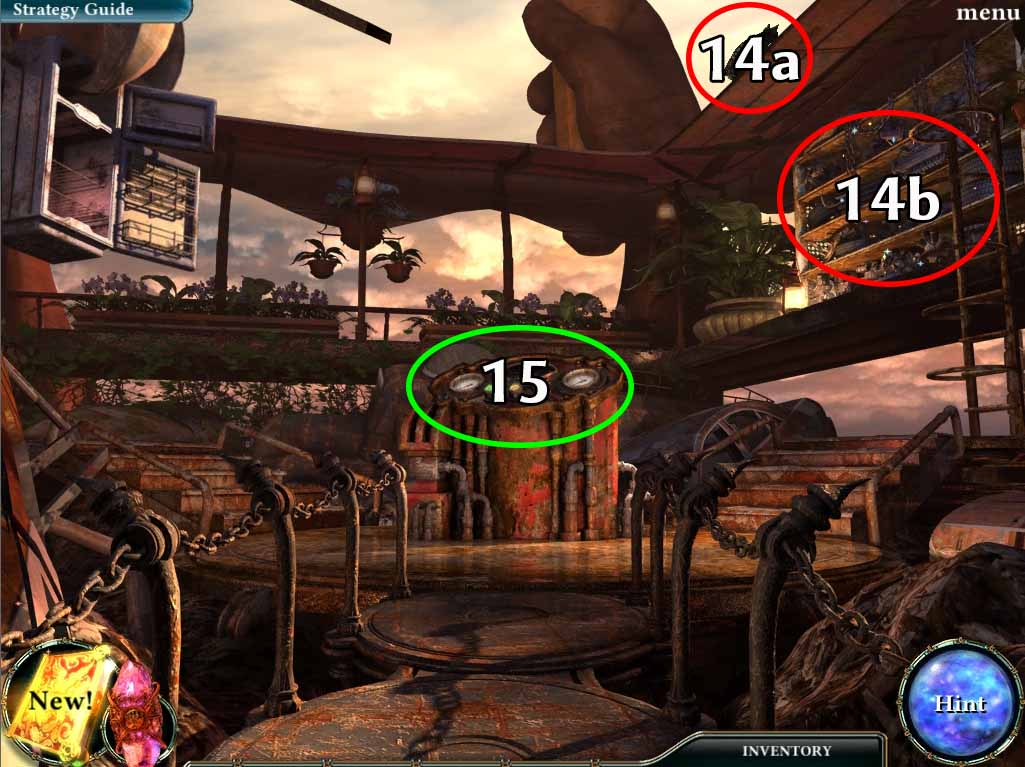
- 15. Check the CONTROL PANEL circled in red in the BARGE BACK image above.

- 16. Insert the HEAVY LEVER in the slot circled in blue above.
- Push the following buttons after you do so: Green – Yellow – Red – Yellow – Green – Red – Green – Yellow – Red.
- After you’re done the machine will start.
- Pull the lever and the crane holding the container that has the PHOENIX FEATHER will let it go.
- Head to the back of the barge.
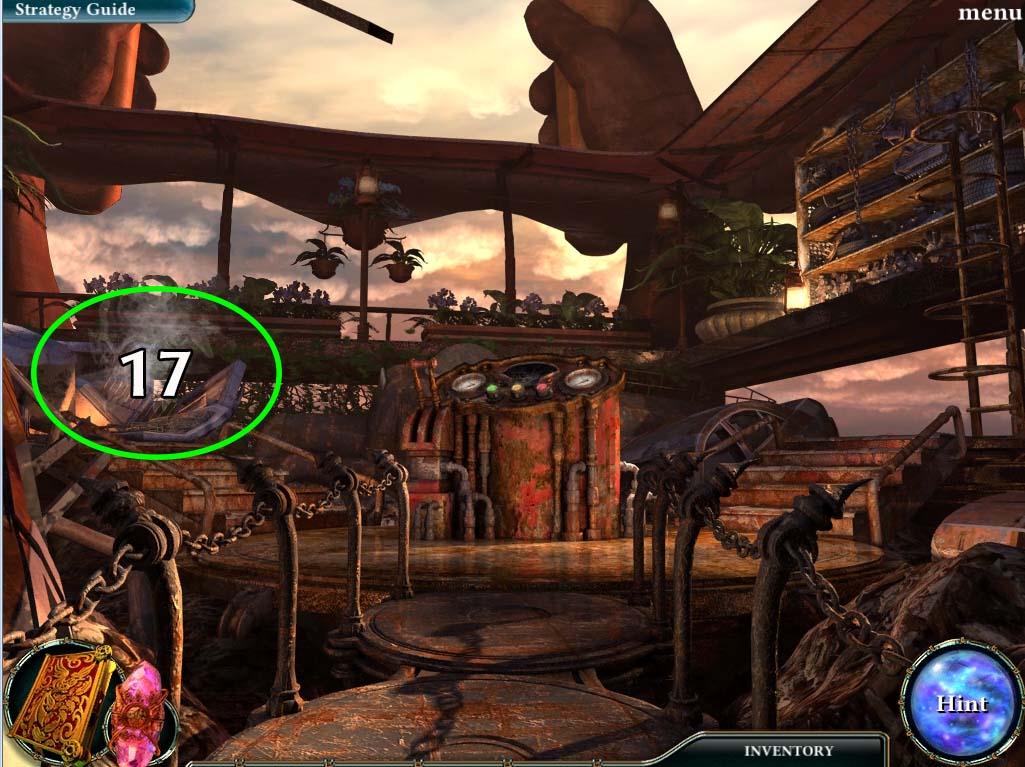
- 17. Investigate the area circled in green above.
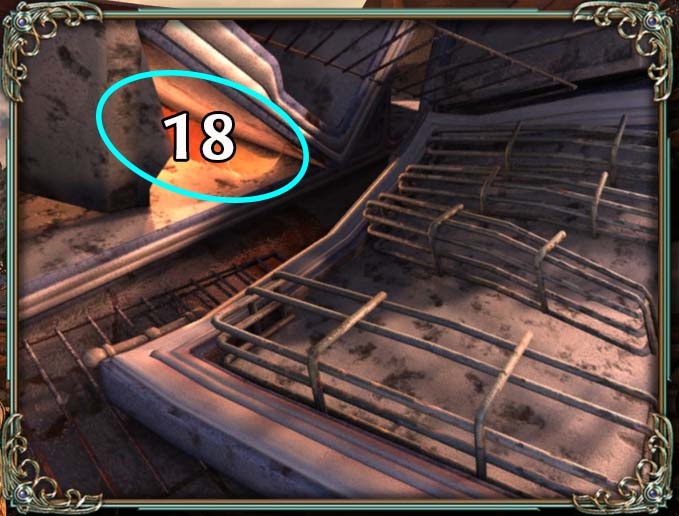
- 18. Grab the PHOENIX FEATHER. You now have the final relic! It’s time to head back to the SCROLL TEMPLE and begin the final ritual.
- Quest: Retrieve the Feather: Complete
New Quest: Return to the Scroll Temple
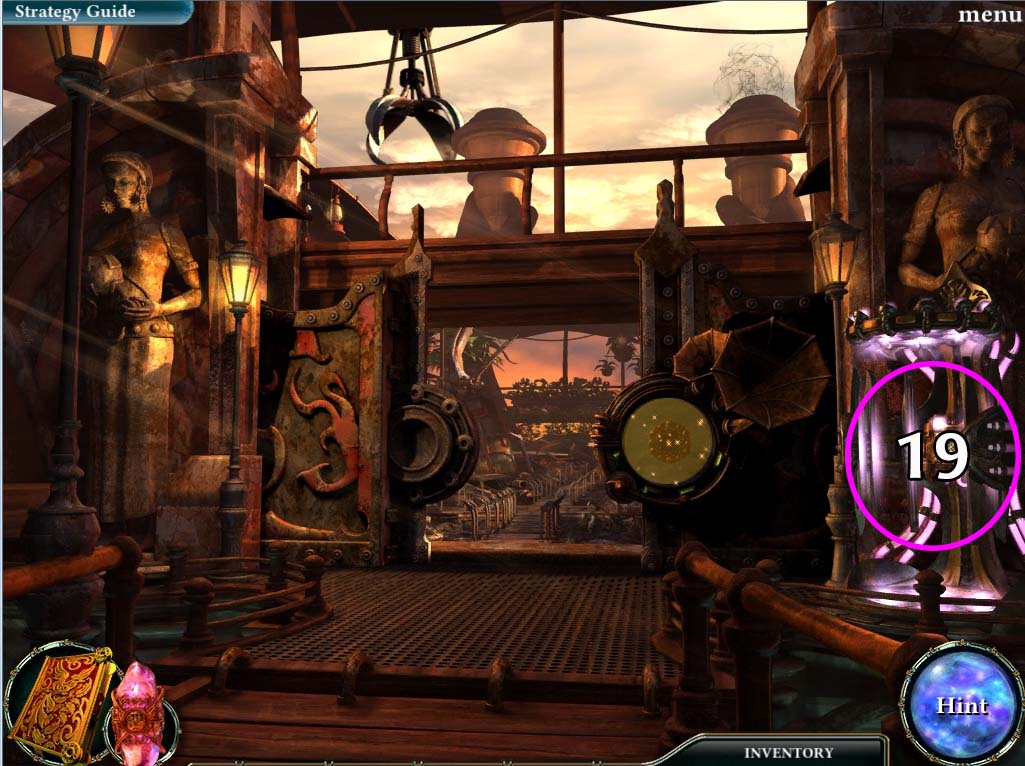
- 19. Use the CAT COIN on the TELEPORTER and use it to get back to the SCROLL TEMPLE and head back to the Key Master.
- When you get to his seat however you discover him missing!
- The ritual cannot be completed without him.
- We must find clues of what happened!
- Quest Complete: Return to the Scroll Temple
New Quest: Find a clue in the Scroll Temple
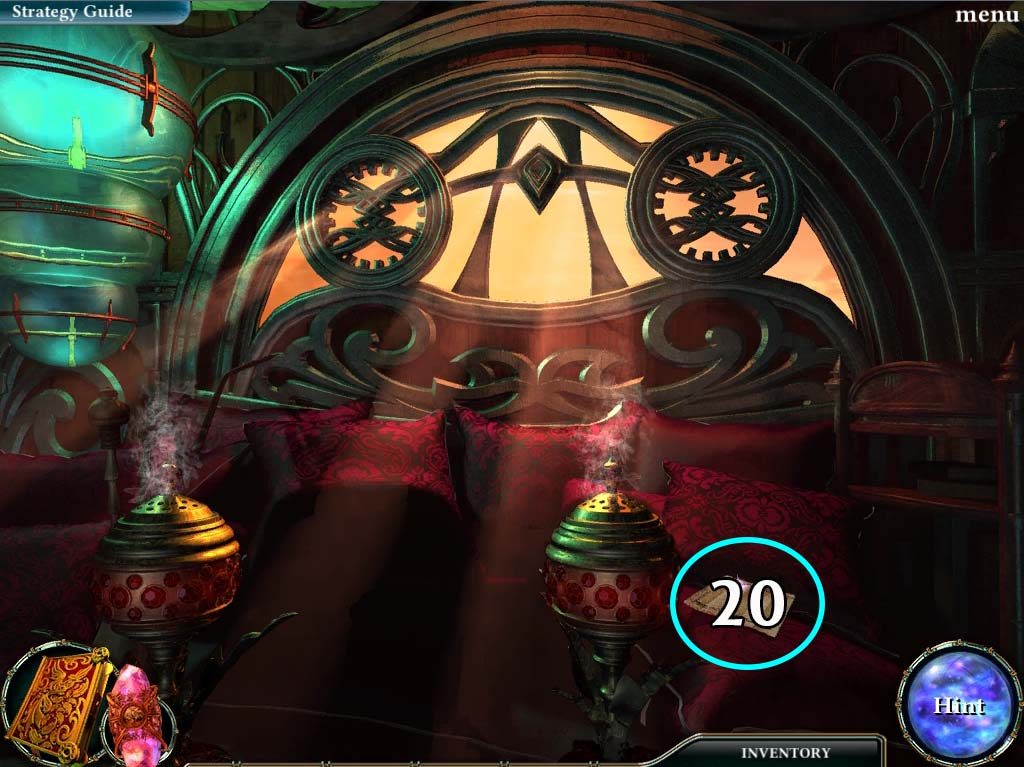
- 20. Pick up the LETTER (circled in blue in the image above).
- This will give you the location of three RED MARBLES that you can use to activate the last statue in the SCROLL TEMPLE ROOF.
- Quest: Find a clue in the Scroll Temple: Complete
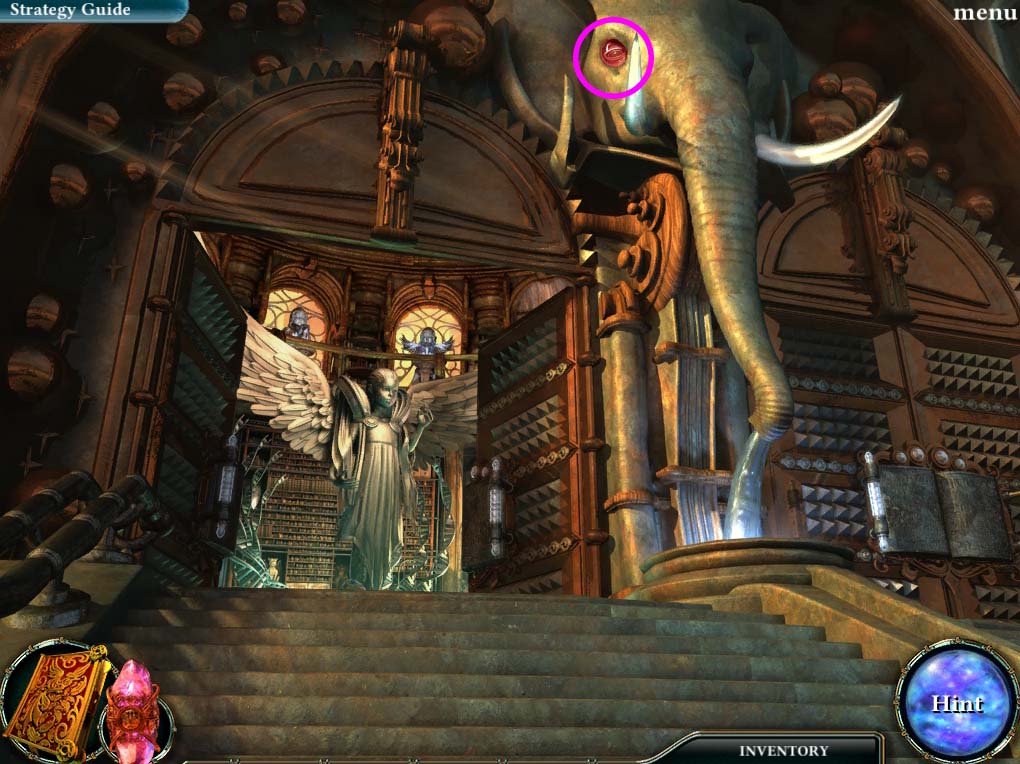
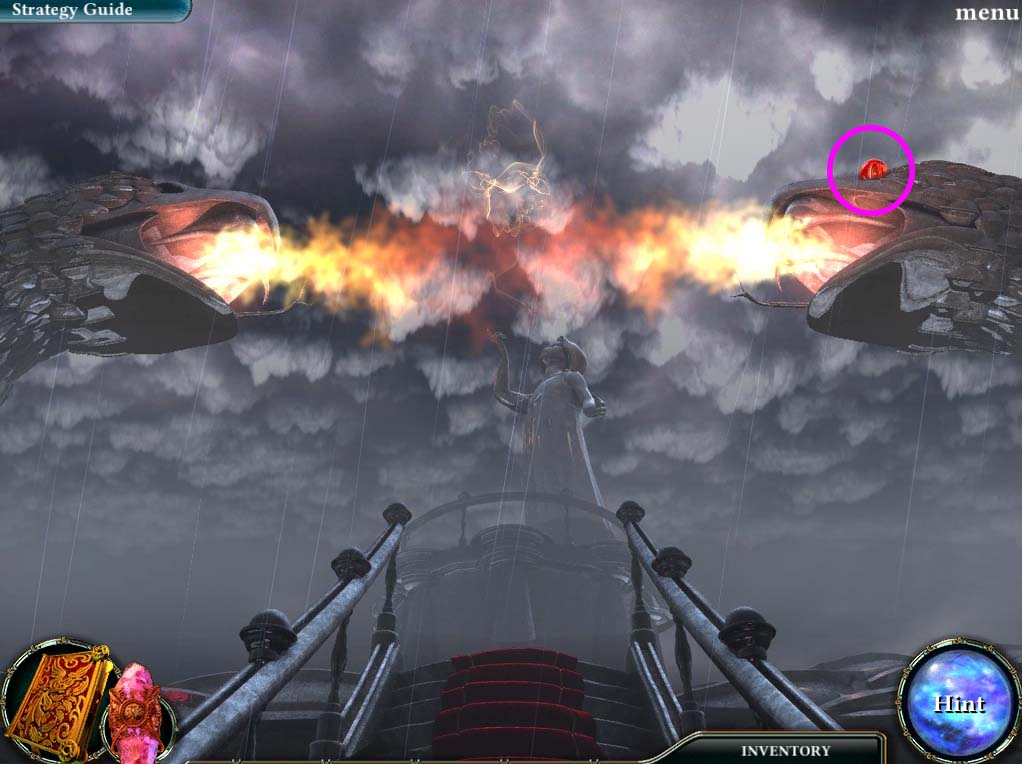
New Quest: Solve the curious riddle
- The locations of the RED MARBLES are as follows (all circled in violet in the images below):
- The eye of the ELEPHANT in the LIBRARY ENTRANCE:
- The eye of the SNAKE on the TOP OF THE SNAKE SHRINE:
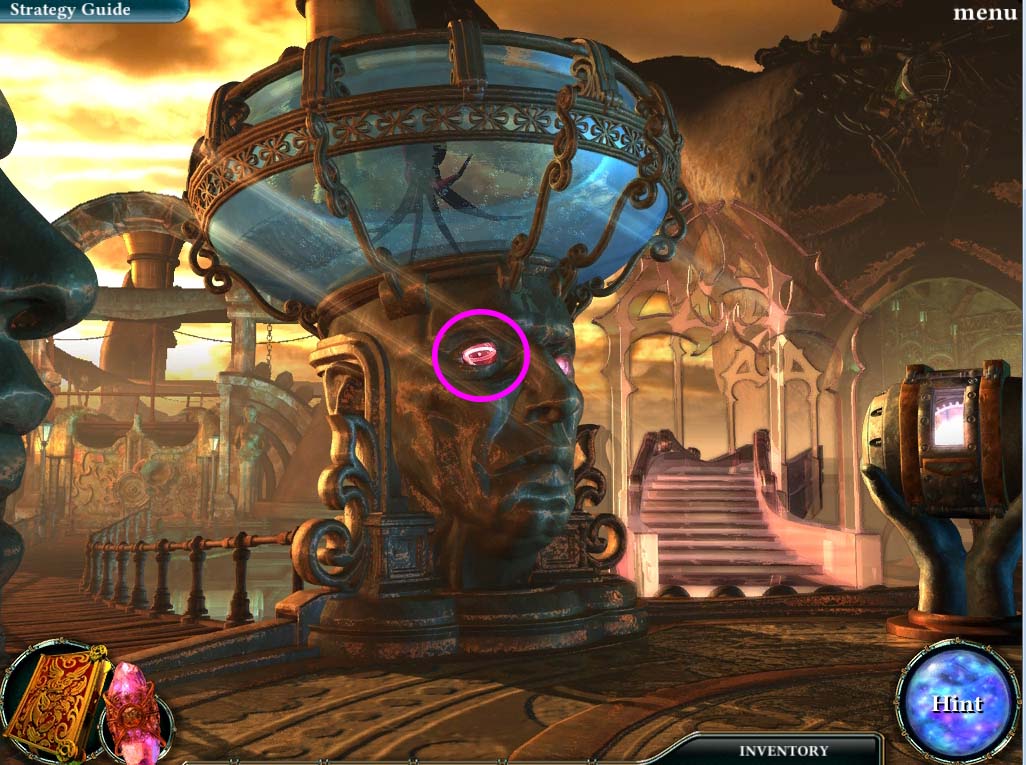
- The eye of the OCTOPUS TANK STATUE at the COLOSSUS INTERSECTION:
- With all the RED MARBLES in your possession, head back to the SCROLL TEMPLE ROOF (there’s a TELEPORTER located just ahead at the BARGE ENTRANCE).
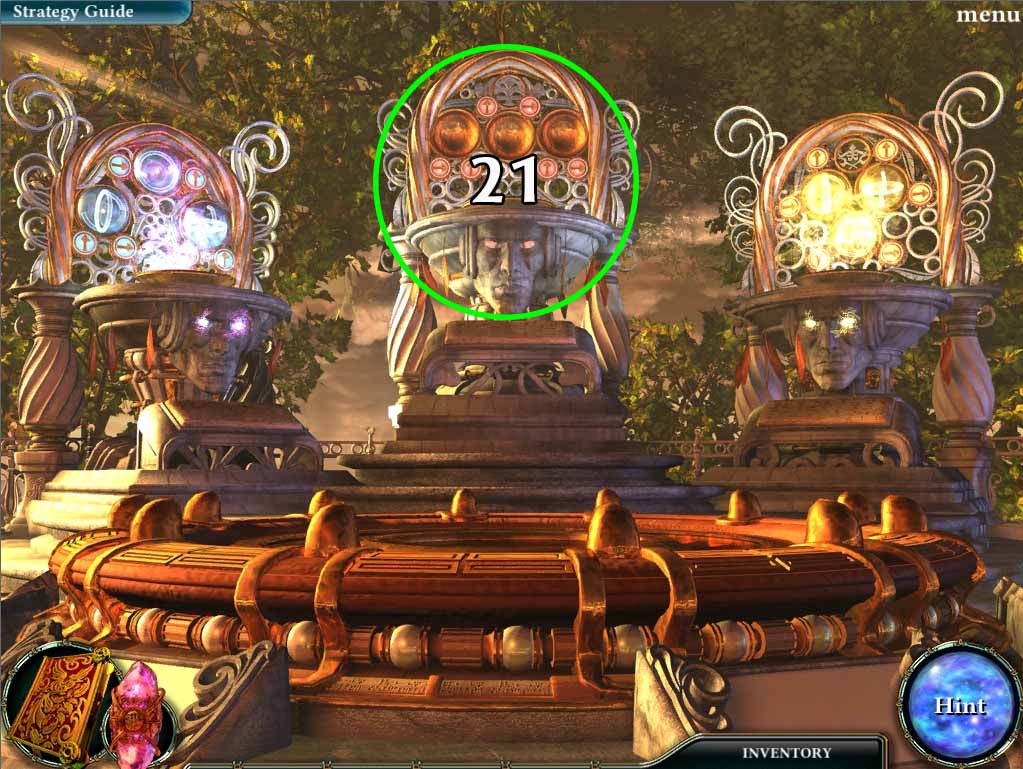
- 21. Place the RED MARBLES in the statue circled in green above.
- This will start the RED MARBLES PUZZLE.
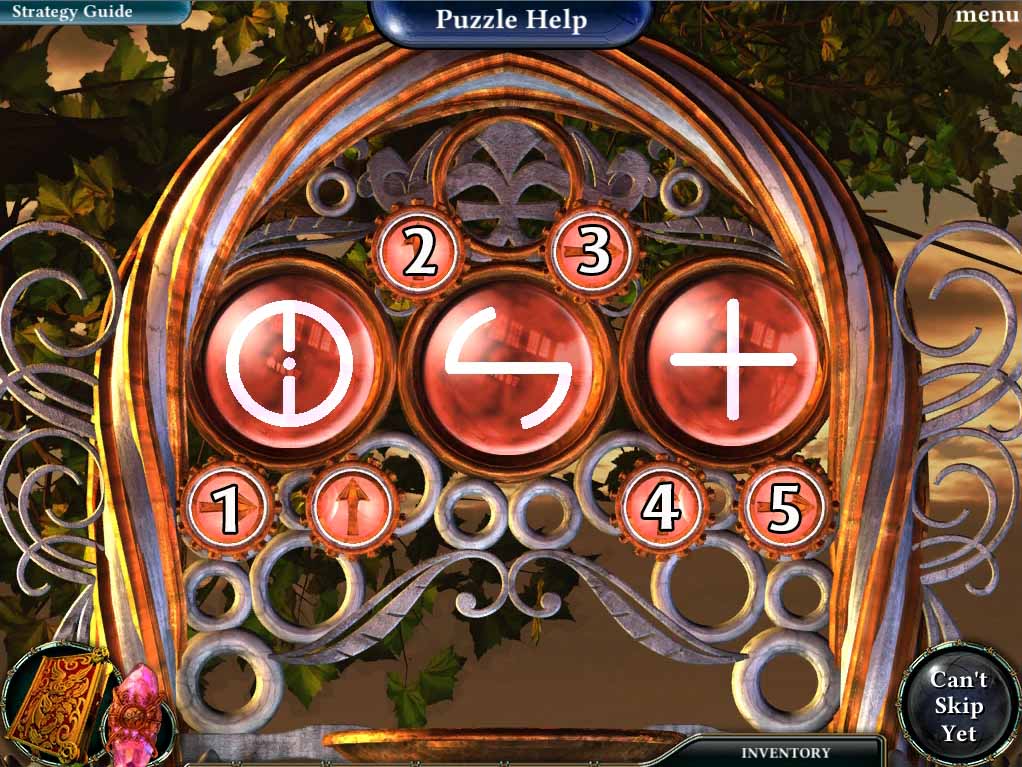
RED MARBLES PUZZLE
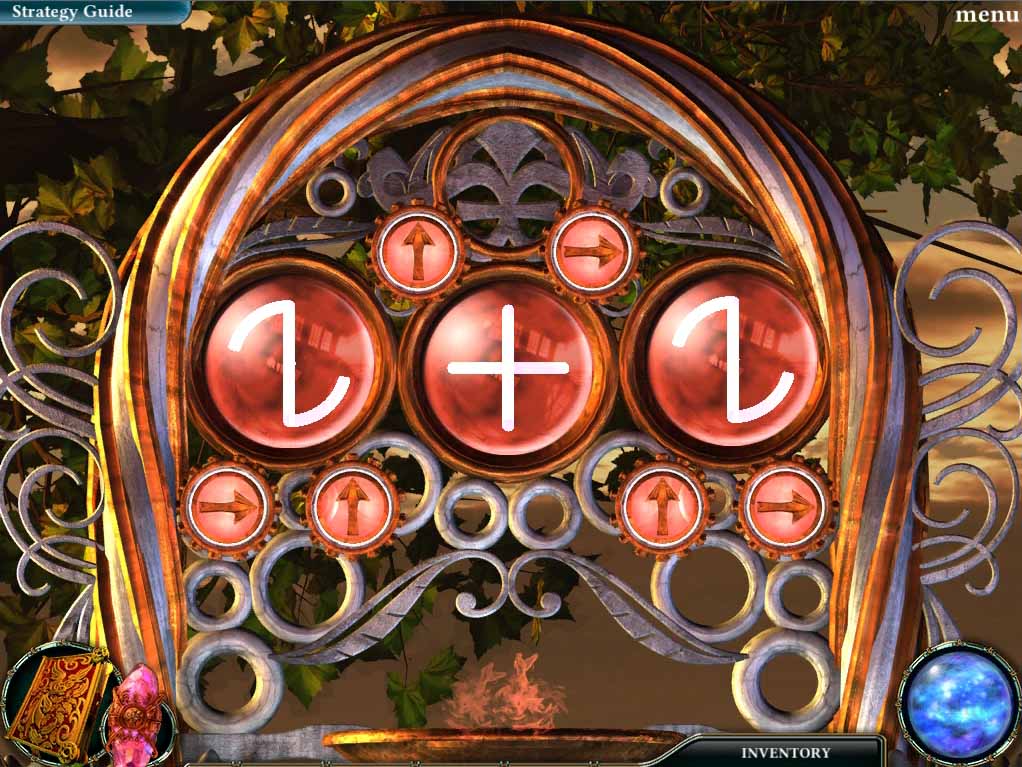
- The solution to the puzzle is shown below.
- Push the buttons labeled in the image below in order from 1 to 5.
- If you followed the instructions correctly your puzzle should look like this:
- With the puzzle solved, JACOB once again speaks to you.
- PANDORA has escaped to a VOLCANO FORTRESS and has activated the COLOSSUS.
- The following cutscene makes it all too evident that you are quickly running out of time.
- JACOB hands you the IMPERIAL TIARA, your only hope in stopping the COLOSSUS and foiling PANDORA’S evil plans!
- Quest: Solve the curious leader: Complete
New Quest: Find the Magic Path
End of Chapter VI
Chapter One: Fall of the Sky Palace
Chapter Two: The Mysteries of the Scroll Temple
Chapter Three: The First Relic
Chapter Four: The Second Relic
Chapter Five: The Third Relic
Chapter Six: The Last Relic
Chapter Seven: Silencing the Colossus
Chapter Eight: That Which Was Lost
Bonus Chapter
Ask for help in the comments below!