
Empress of the Deep 3: Legacy of the Phoenix: Chapter Two: The Mysteries of the Scroll Temple
Rely on our Empress of the Deep 3 Legacy of the Phoenix Walkthrough, with its detailed, chapter-by-chapter instructions, beautifully marked custom screenshots, and easy-to-understand puzzle solutions to help you find the ingredients to revive the Phoenix and stop the evil colossus from awakening. Help Empress Anna save her lost people from the fate her twin sister has tried to set in motion in this stunning hidden object adventure game.
Chapter One: Fall of the Sky Palace
Chapter Two: The Mysteries of the Scroll Temple
Chapter Three: The First Relic
Chapter Four: The Second Relic
Chapter Five: The Third Relic
Chapter Six: The Last Relic
Chapter Seven: Silencing the Colossus
Chapter Eight: That Which Was Lost
Bonus Chapter
Ask for help in the comments below!
After your recent flight, you find yourself underwater. A ladder of some sort is visible just within reach. Grab it and Anna will automatically climb up. She finds herself at the end of a rather lonely jetty. The Blue Whale suddenly emerges from the deep to briefly greet Anna, if only to reassure her that she is not completely on her own.
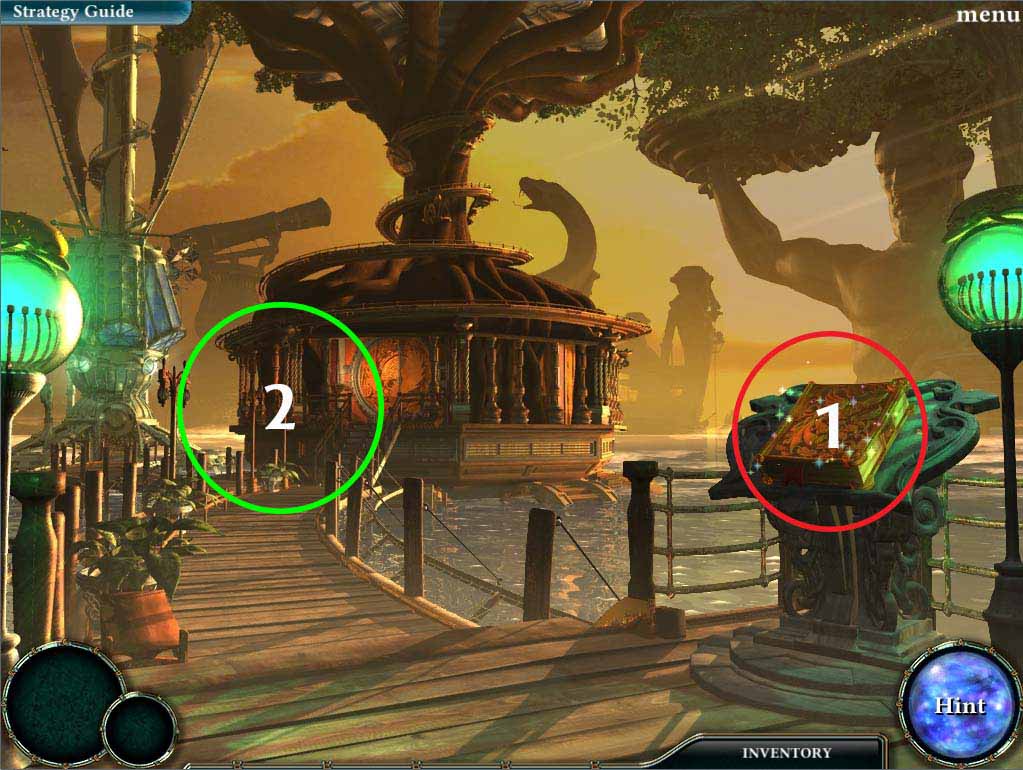
- 1. Take THE PHOENIX JOURNAL from the pedestal (circled in red above). It will now be placed in your menu and will record vital information as you play. The game will instruct you on how to use the journal, including the JOURNAL tab, the MAP tab and the AMULET tab. Once you’ve familiarized yourself with how to use the PHOENIX JURNAL, close it and continue on your adventure.
- 2. Head towards the area circled in green above. We might as well take a look around this mysterious floating island while we’re here.
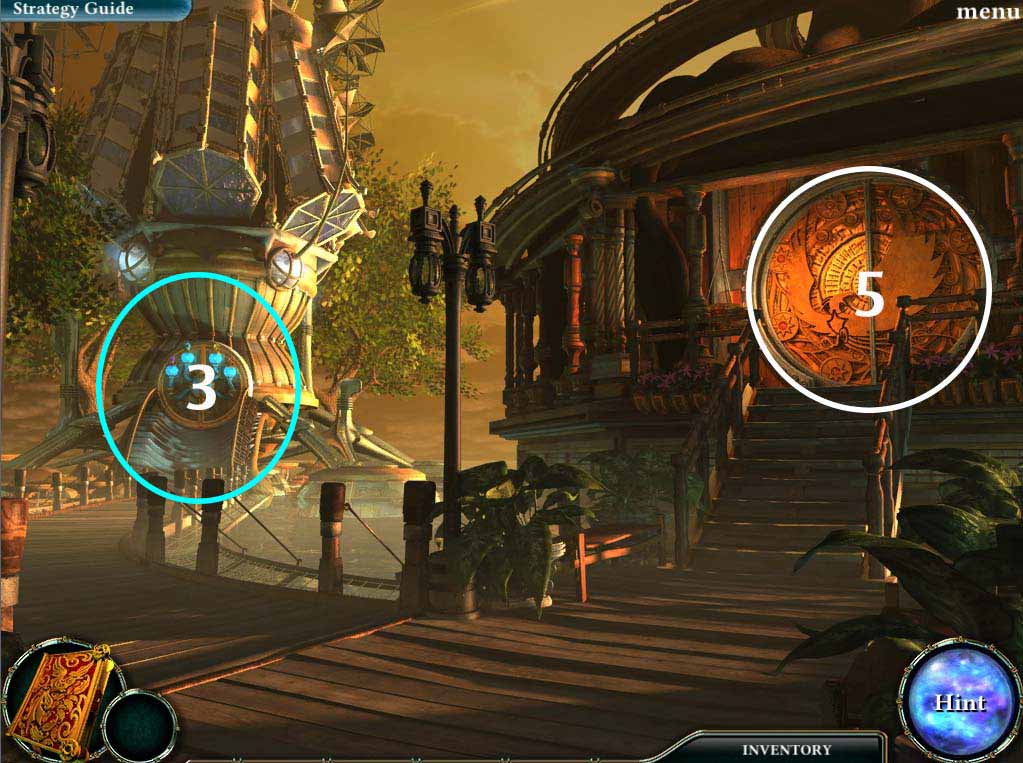
- 3. You’ll find yourself in front of the SCROLL TOWER, but before you head inside, investigate the area circled in blue above. We need to pick up an important item before we continue on.
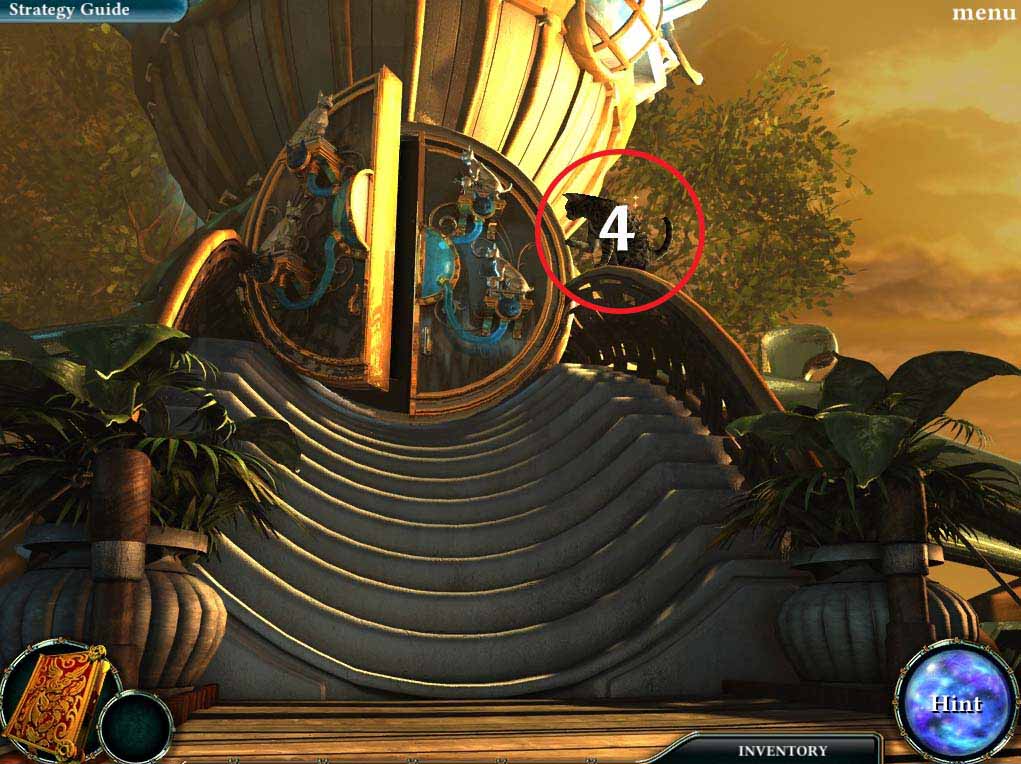
- 4. Continuing on from the SCROLL TOWER, you’ll find yourself in front of the TOWER OF ZEM. Click the CAT and it will leave a CAT COIN for your inventory. You can investigate this area further if you wish, but this place can only be unlocked if you have the COLLECTOR’S EDITION of the game, and even then only after you finish the game itself. Head back to the SCROLL TOWER ENTRANCE.
- 5. At the front of the SCROLL TOWER, inspect the gate (circled in white on the SCROLL TOWER ENTRANCE image above). This will start a HIDDEN DETAILS PUZZLE
SCROLL TOWER GATE HIDDEN DETAILS PUZZLE
The object of this puzzle is to find the part of the image that matches the small circles in the tray at the bottom of the screen. You can drag the circles to their corresponding matches or click on the image itself. The solution to the puzzle is shown below: (click on the circles marked in blue or drag the circles on the tray to the matching images)
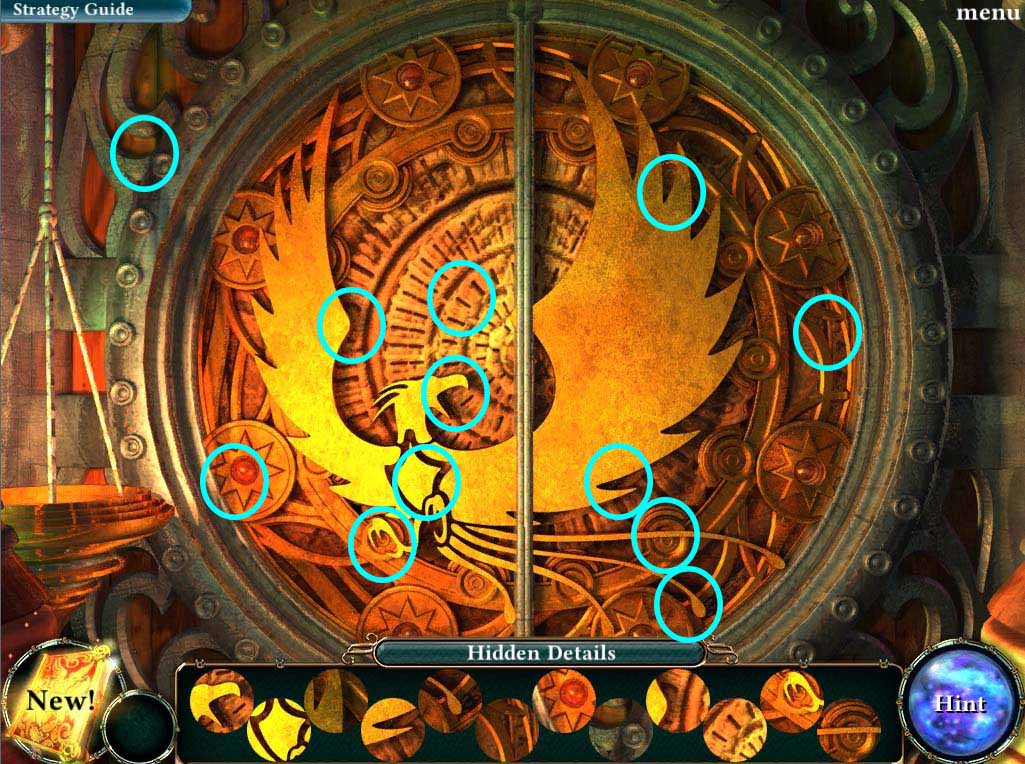
- Solving the puzzle opens the locks on the door. Head inside the SCROLL TOWER INTERIOR.
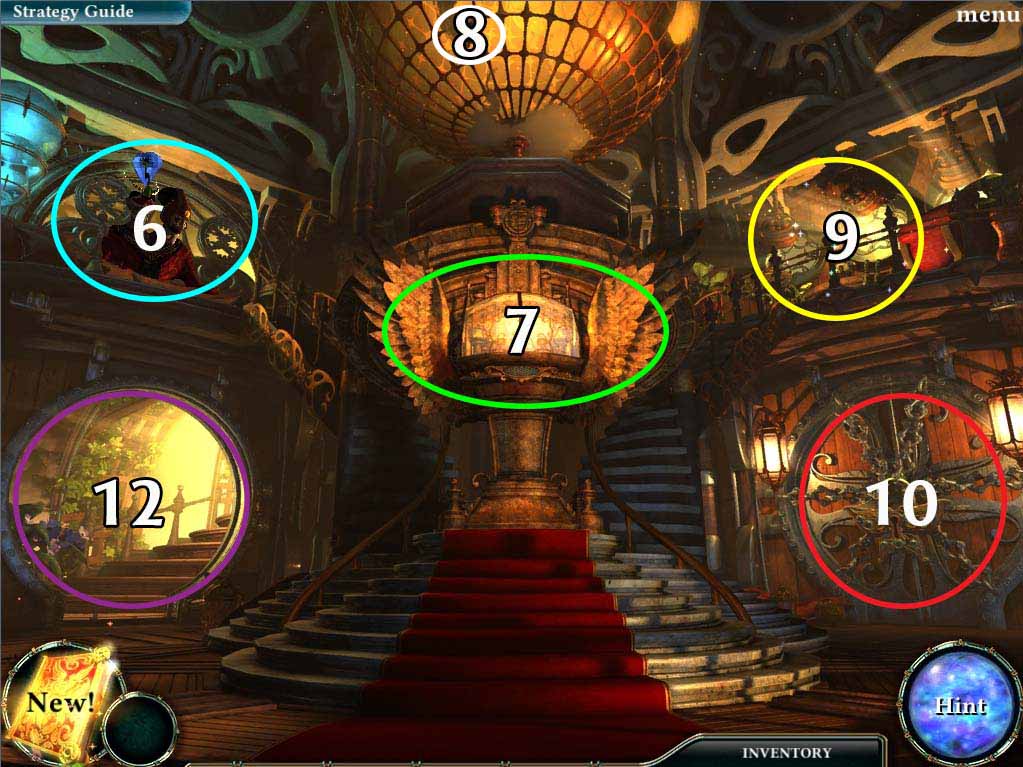
- 6. When you arrive inside the SCROLL TOWER, you’ll be greeted by an old man who then beckons you to come closer. This is the KEY MASTER (circled in blue above), a representative of your lost people.
- 7. The KEY MASTER tells you to investigate the SPIRIT CODEX, which is a scroll placed in the middle of the room (circled in green above). Do so. It will ask for a password which you currently do not have. We’re going to have to find it.
- NEW QUEST: Find the password
- 8. Investigate the area circled in white above. You’ll find a BLUE AND GOLD TILE for your inventory.
- 9. Check the area circled in yellow above to start the SCROLL TEMPLE ENTRANCE HIDDEN RELICS PUZZLE.
SCROLL TOWER HIDDEN RELICS PUZZLE
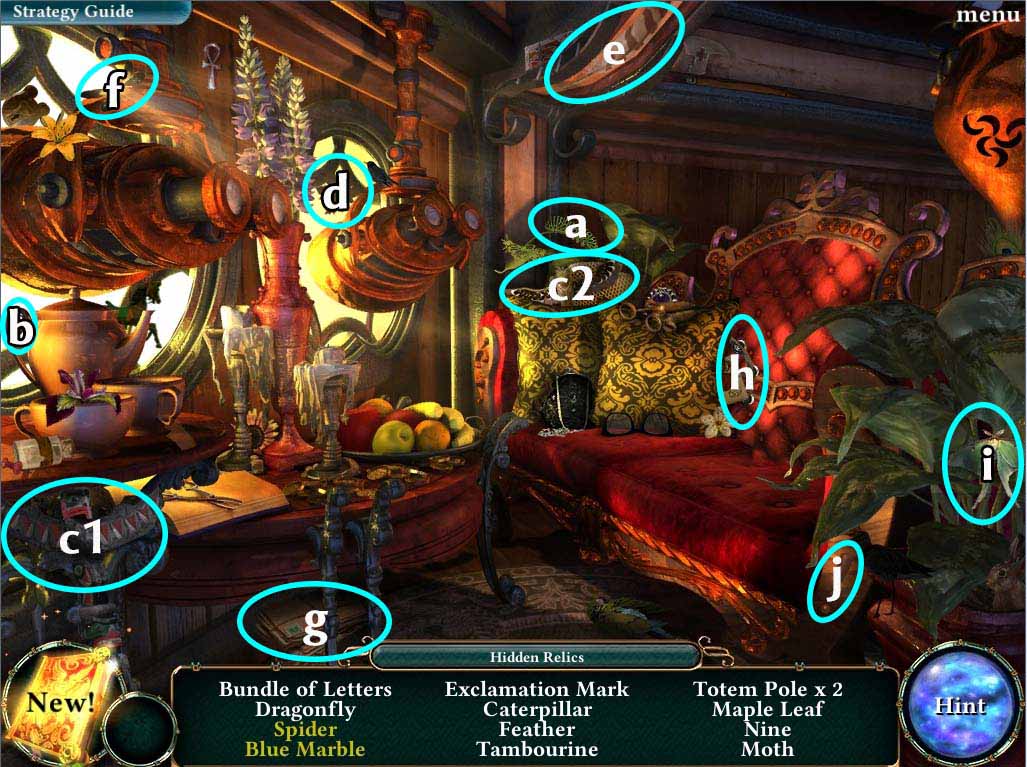
- *Note: Required objects can change depending on each play-through. The most common objects are listed below:
-
White objects are circled in blue above and are labeled as follows:
- a. Caterpillar
- b. Nine
- c. Totem Pole (x2)
- d. Maple Leaf
- e. Feather
- f. Dragonfly
- g. Bundle of Letters
- h. Tambourine
- i. Moth
- j. Exclamation Mark
- Yellow objects can be obtained by doing the following:
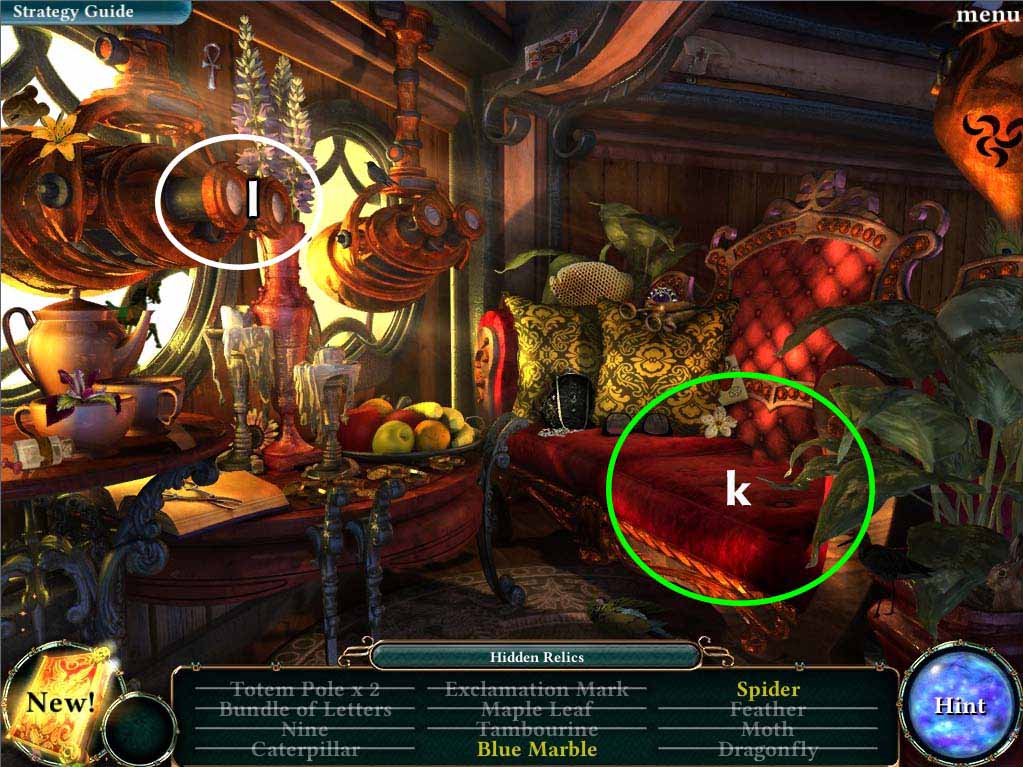
- k. Blue marble: Remove the SOFA CUSHION (circled in green above) to get the BLUE MARBLE hidden underneath
- l. Spider: Look at the BINOCULARS (circled in white above) and you’ll see an image of the Sky Palace sinking. You will be prompted to look at the other pair of binoculars and when you do, you will find the spider crawling along the lens.
- Solving this puzzle rewards you with a BLUE MARBLE for your inventory.
- 10. Look at the door to the right of the SCROLL TEMPLE INTERIOR (circled in red in SCROLL TEMPLE INTERIOR image above).
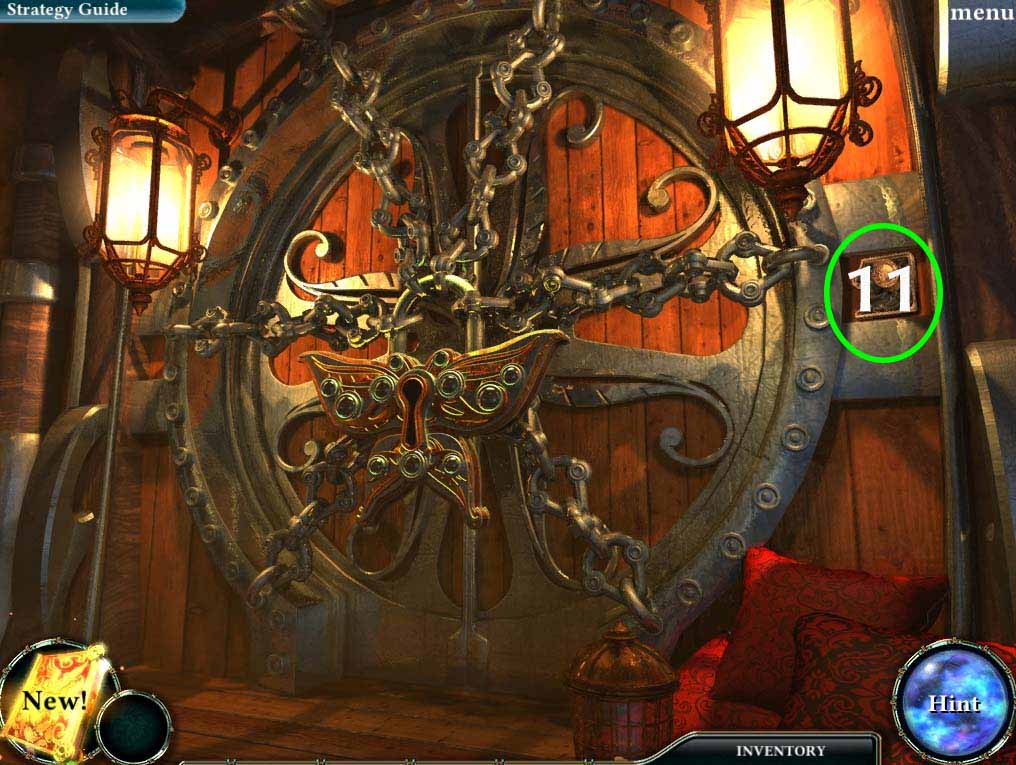
- 11. Take the BLUE AND GOLD TILE (2nd) that is tucked on the side of the door.
- 12. Head upstairs by taking the doorway circled in violet on the SCROLL TEMPLE INTERIOR image above. This will lead you to the TEMPLE STAIRS area.
- 13. Take both the CRYSTAL GYROSCOPE and the BLUE AND GOLD TILE (3rd) which are both circled in blue above.
- 14. Investigate the RAPID TRANSIT SYSTEM DEVICE (circled in green above) and use the CAT COIN in your inventory to activate it. You can travel quickly in between the RAPID TRANSIT SYSTEMS provided that you’ve unlocked the area which you wish to travel to.
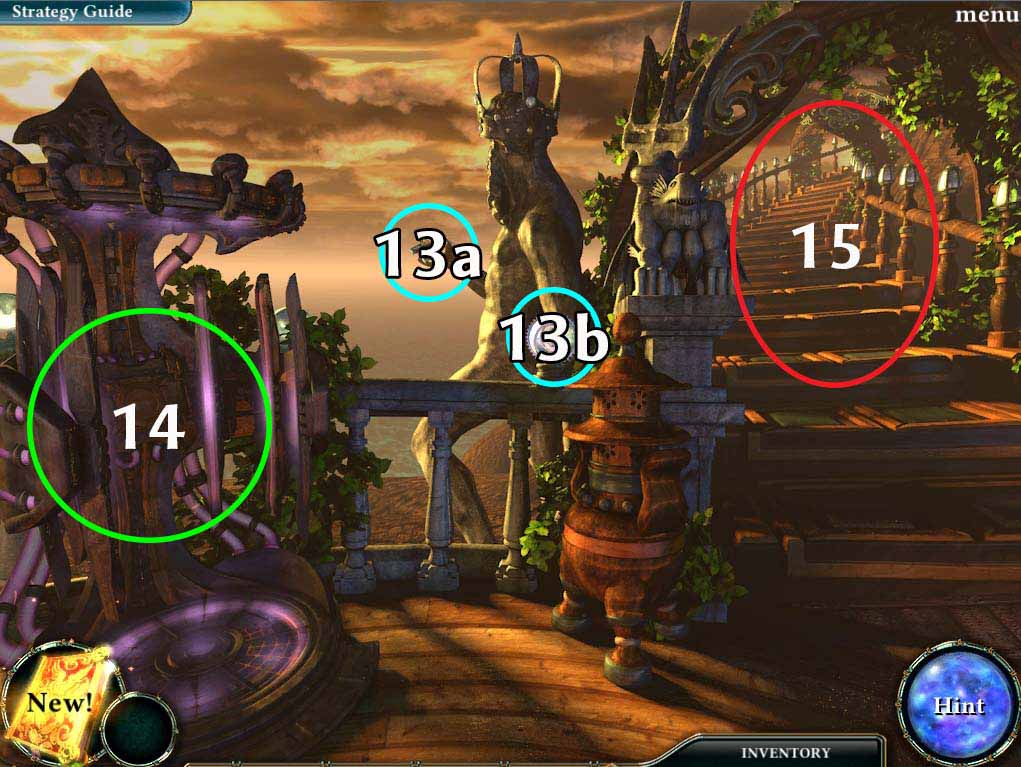
- 15. Head upstairs to continue (circled in red above), and you’ll find yourself in the SCROLL TOWER PATIO area.

- 16. Take the GAME PIECE lying on the side of the fountain (circled in red above).
- 17. Investigate the FOUNTAIN (circled in green in the image above) to start the PATIO HIDDEN RELIC PUZZLE
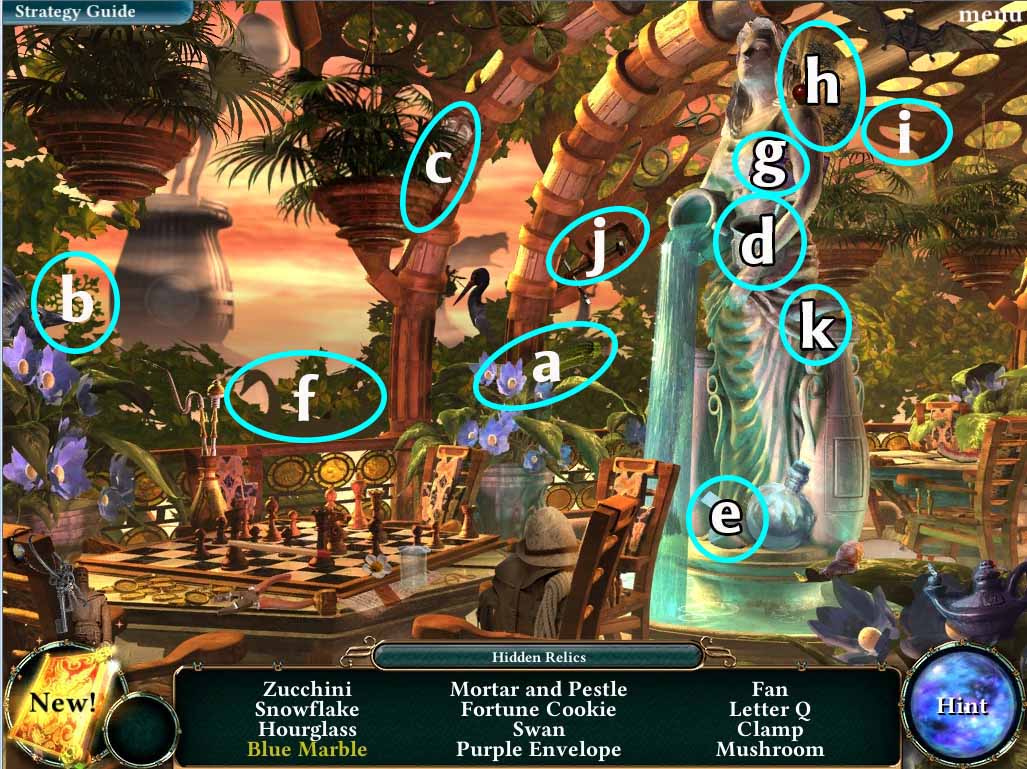
PATIO HIDDEN RELIC PUZZLE
- *Note: Required objects can change depending on each play-through. The most common objects are listed below:
-
White objects are circled in blue above and are labeled as follows:
- a. Zucchini
- b. Snowflake
- c. Hourglass
- d. Mortar and Pestle
- e. Fortune Cookie
- f. Swan
- g. Purple Envelope
- h. Fan
- i. Letter Q
- j. Clamp
- k. Mushroom
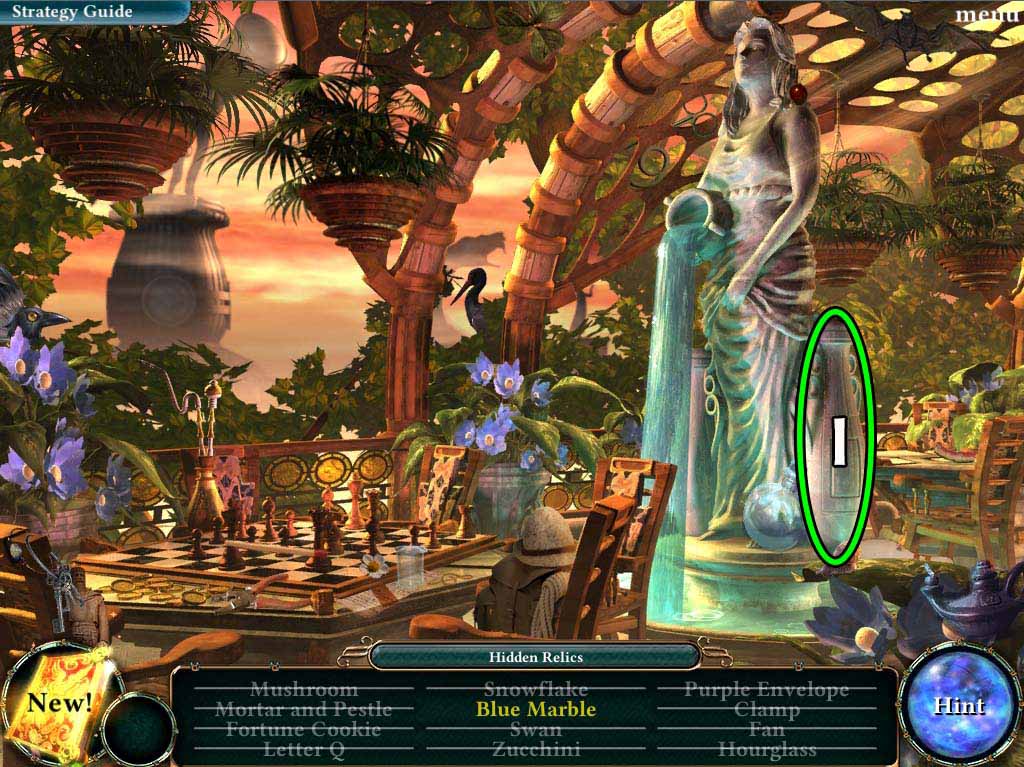
- The yellow object can be obtained by doing the following:
- l. Blue Marble: There is a latch on the vase near the statue (circled in green above) click on it to reveal the Blue Marble inside.
- Solving the puzzle gives you a 2nd BLUE MARBLE and a PIECE OF LETTER from your sister PANDORA.
- 18. Climb up the stairs to the TOWER ROOF (circled in white on the TOWER PATIO image above).
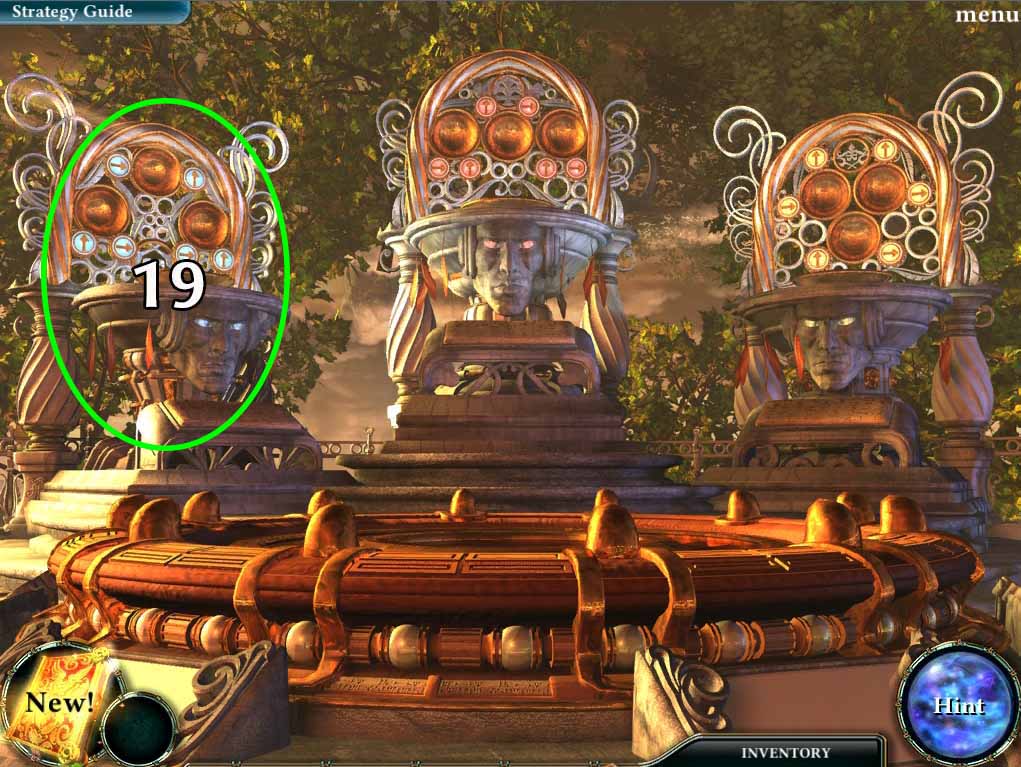
- 19. Investigate the BLUE STATUE (circled in green in the image above).
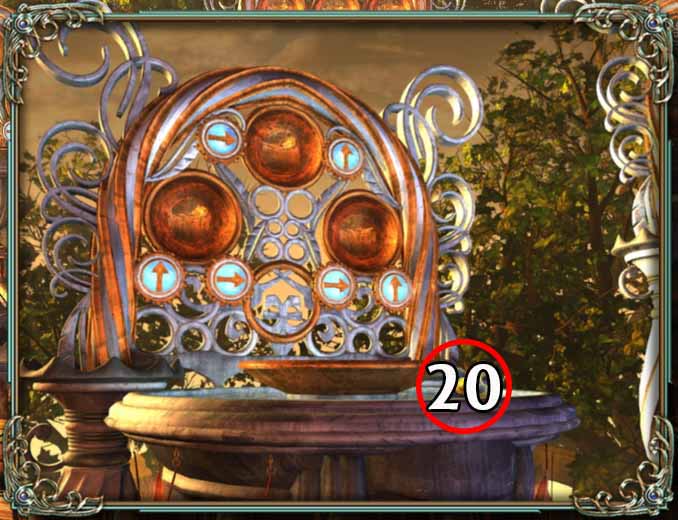
- 20. Take the 4th BLUE AND GOLD TILE (circled in red in the image above).
- 21. Return to the PATIO area and investigate the area circled in violet. Use the BLUE AND GOLD TILES to complete the image as shown below. This will start the TILE MATCHING PUZZLE
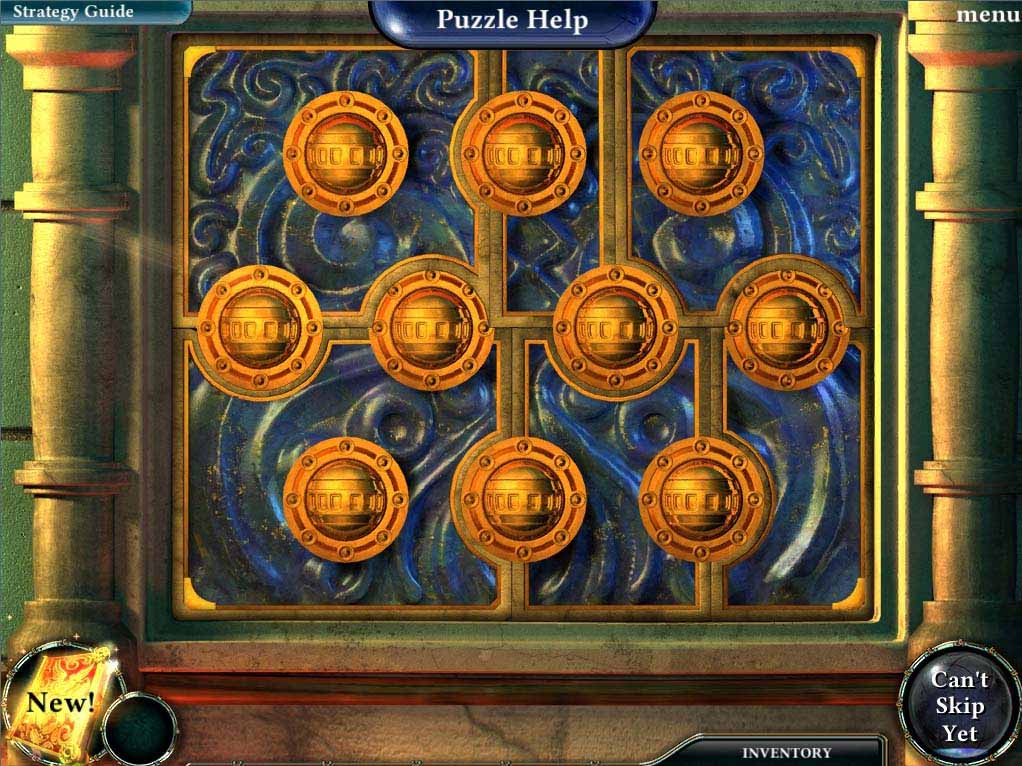
TILE MATCHING PUZZLE
The object of the puzzle is to match similar hidden gems with each other. This puzzle is pretty straightforward, and a solution is shown below.
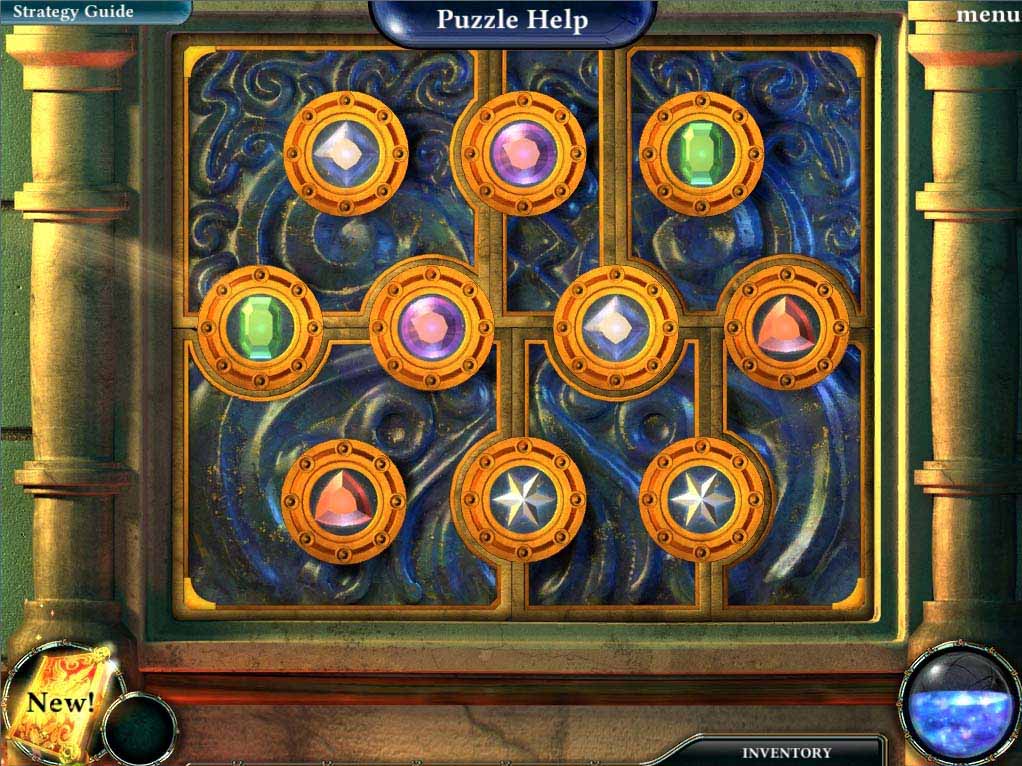
- Solving this puzzle gives you a 3rd BLUE MARBLE and shows you some symbols that Anna automatically records in her book. Return to the ROOF and investigate the BLUE STATUE again. Use the BLUE MARBLES on each hole in the statue.
- This will start the MARBLE PUZZLE.
MARBLE PUZZLE
The object of this puzzle is to manipulate the symbols inside the BLUE MARBLES to match the symbols that you found in the last puzzle. An image of how the final symbols should look is below.
- Once you solve the puzzle, JACOB once again appears and gives you a short message, along with the password to open the scroll.
- Quest: Find the password: Complete
- New Quest: Open the Spirit Codex scroll
- Head back down to where the KEY MASTER is and investigate the SPIRIT CODEX once again. Anna should be able to open the scroll. After this happens, the SPIRIT AMETHYST goes to your inventory. An earthquake occurs and releases FAIRIES from the scroll.
- Quest: Open the Spirit Codex scroll: Complete
- New Quest: Collect all the fairies
- You’ll find FAIRIES floating around the previous areas you’ve been in. You’ll need them to power up your amethyst.
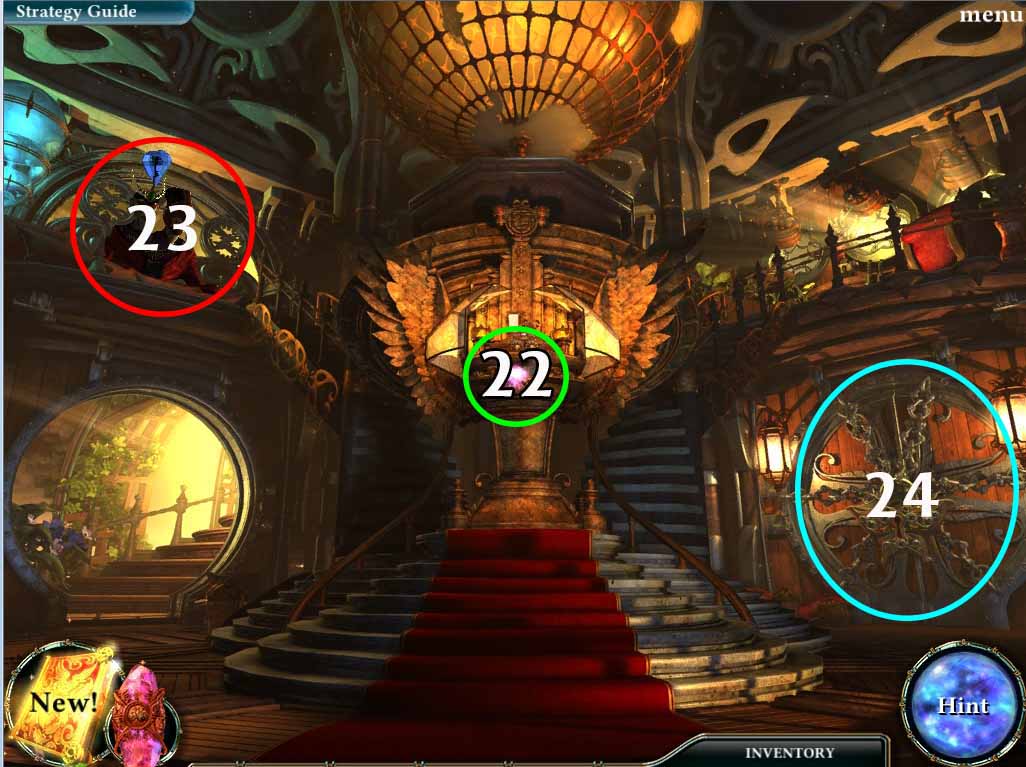
- 22. Take the single FAIRY floating around in the room you’re in (circled in green above) and collect the others on the TOWER STAIRS, the PATIO, the ROOF, the JETTY and the ZEM TOWER ENTRANCE.
- Quest: Collect all the fairies: Complete
- 23. Once you have all the FAIRIES, return to the KEY MASTER. The SPIRIT AMETHYST will fix the KEY MASTER’s crown and give you the MAGIC KEY#1 to open the locked door in the room
- New Quest: Escape the Scroll Temple
- 24. Head to the CLOSED DOOR (circled in blue above) and use the MAGIC KEY #1. Step outside. A new part of the island has just opened up for our hero to explore!
- Quest: Escape the Scroll Temple: Complete
- New Quest: Find the Sacred Greenhouse
End of Chapter II
Chapter One: Fall of the Sky Palace
Chapter Two: The Mysteries of the Scroll Temple
Chapter Three: The First Relic
Chapter Four: The Second Relic
Chapter Five: The Third Relic
Chapter Six: The Last Relic
Chapter Seven: Silencing the Colossus
Chapter Eight: That Which Was Lost
Bonus Chapter
Ask for help in the comments below!