
Tales of Terror: Crimson Dawn: Chapter One
Our Tales of Terror Crimson Dawn Walkthrough comes fully equipped and ready to help you combat what goes bump in the night in this spooky hidden object game. Filled with custom screenshots, marked clearly so you can see all the key items and locations you need to investigate, as well as detailed instructions on how you can save your brother, Jason, this Tales of Terror Walkthrough is a must have companion as you brave the terrors of the night.
General Info and Tips
Chapter One
Chapter Two
Chapter Three
Chapter Four
Chapter Five
Chapter Six
Ask for help in the comments below!
Chapter One
Chapter Two
Chapter Three
Chapter Four
Chapter Five
Chapter Six
Ask for help in the comments below!
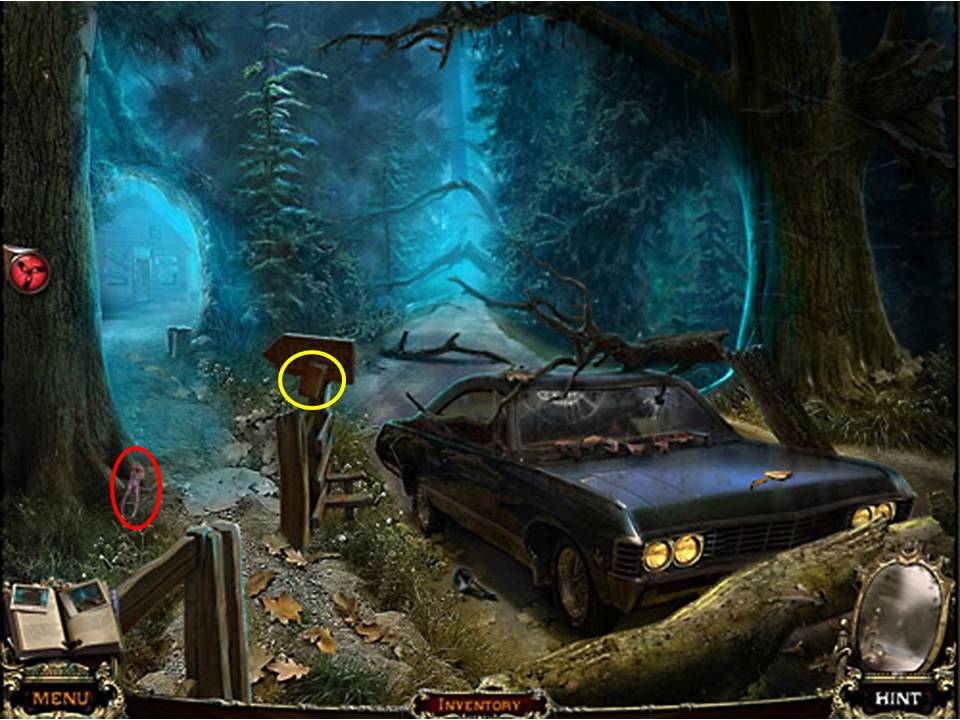
- Take the PLIERS.
- Open the hood.
- Zoom inside.
- Loosen two bolts with the PLIERS.
- Take the BATTERY WITH ACID.
- Zoom into the sign.
-
Click the case to initiate a puzzle.
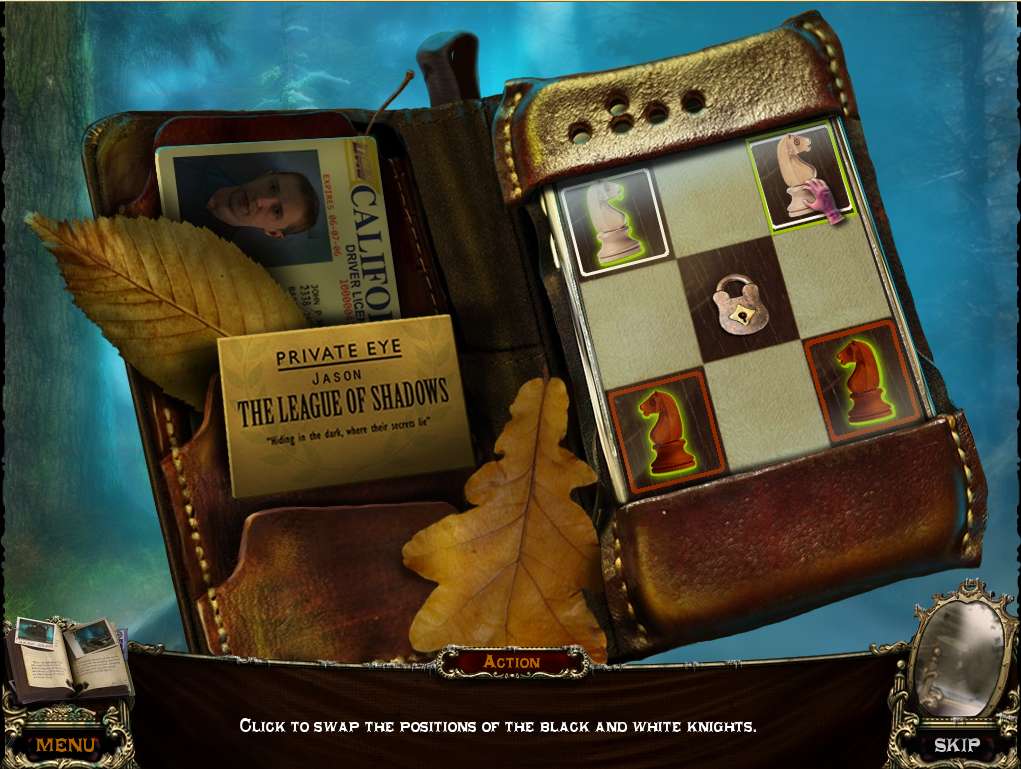
- The object is to switch the positions of the black and white knights – this is a classic chess puzzle.
- Assuming that the squares are labeled 1 to 8 (the center square isn’t numbered as you can’t use it), move the pieces in this order: 8 – 4, 3 – 7, 4 – 3, 1 – 5, 6 – 2, 5 – 6, 2 – 8, 7 – 1, 1 – 5, 6 – 2, 5 – 6, 8 – 4, 2 – 8, 3 – 7, 7 – 1, and finally 4 - 3.
- Listen to the recordings.
- Take the SYMBOL.
-
Walk ahead down the path and to the left.
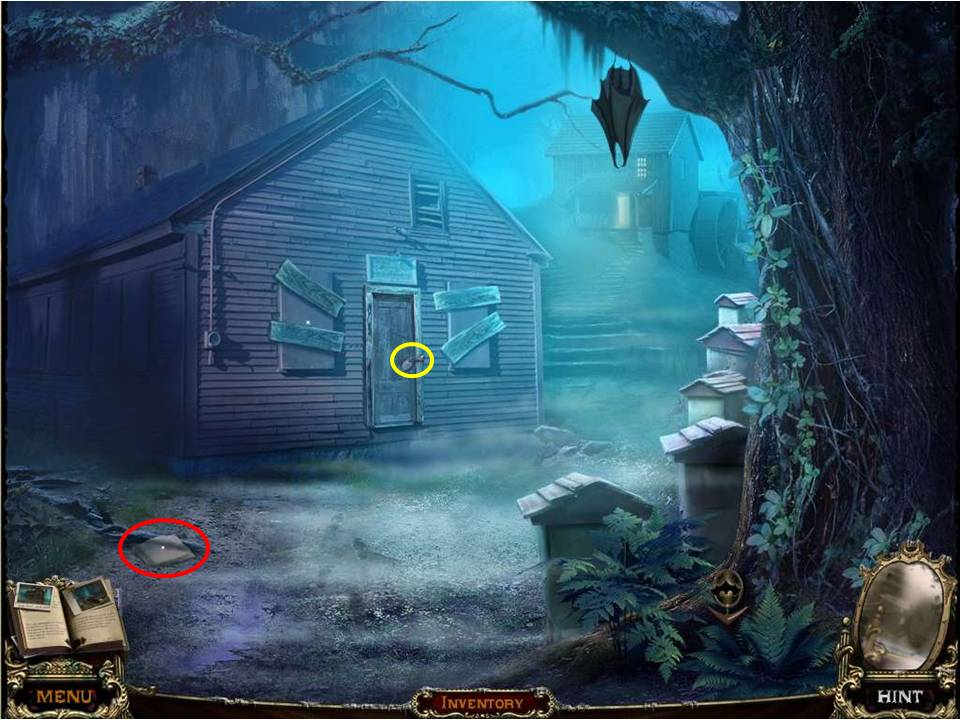
- Note the path leading to the building in the background.
- Take the RAG from the ground at front left.
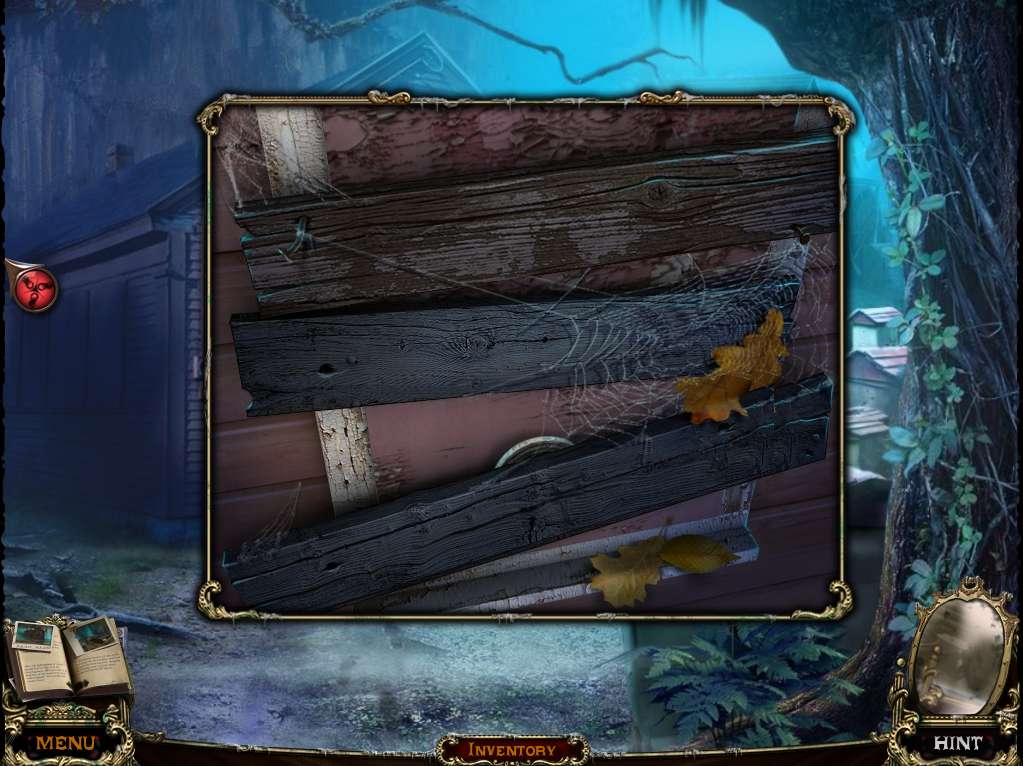
- Zoom into the door.
- Dissolve the lock with the BATTERY WITH ACID (exactly how many days are you supposed to wait for the acid to take effect – this is battery acid, not alien-blood!).
-
Click down.

- Return to the car and use the RAG to retrieve the MIRROR SHARDS.
-
Return to the building.
- Zoom into the window.
- Use the MIRROR SHARD to loosen, then take the second SYMBOL.
-
Enter the shed.
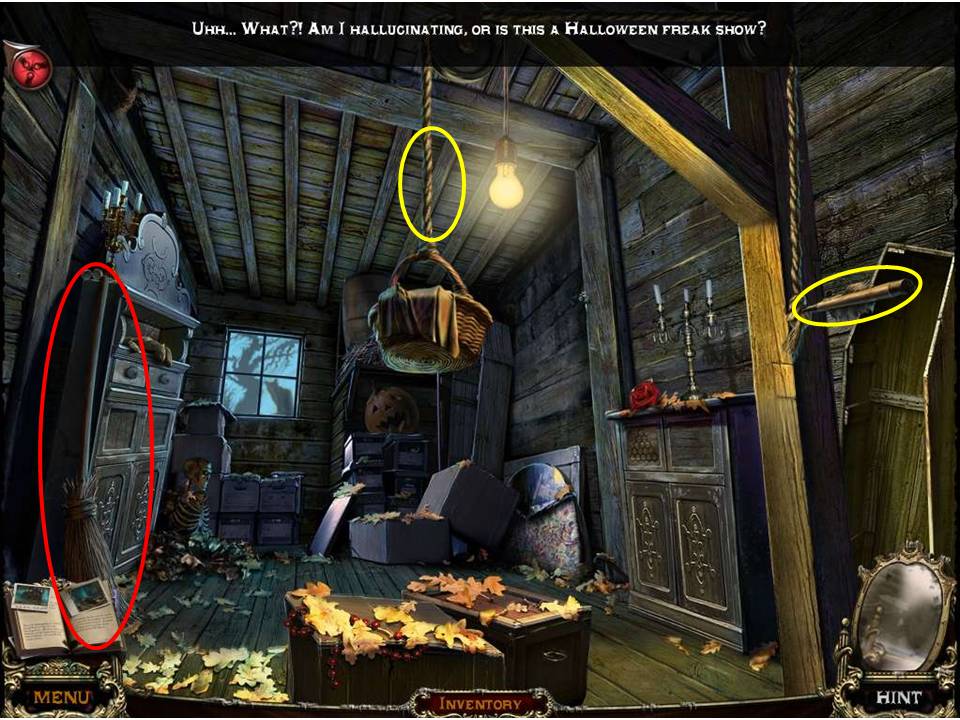
- Take the BROOM.
- Zoom in and use the PLIERS on the crossbow bolt.
- Zoom into the basket.
- Take the TORCH.
- Cut the rope with the MIRROR SHARD.
- Take the ROPE WITH BOLT.
- Return back outside.
-
Go forward on the path at right.
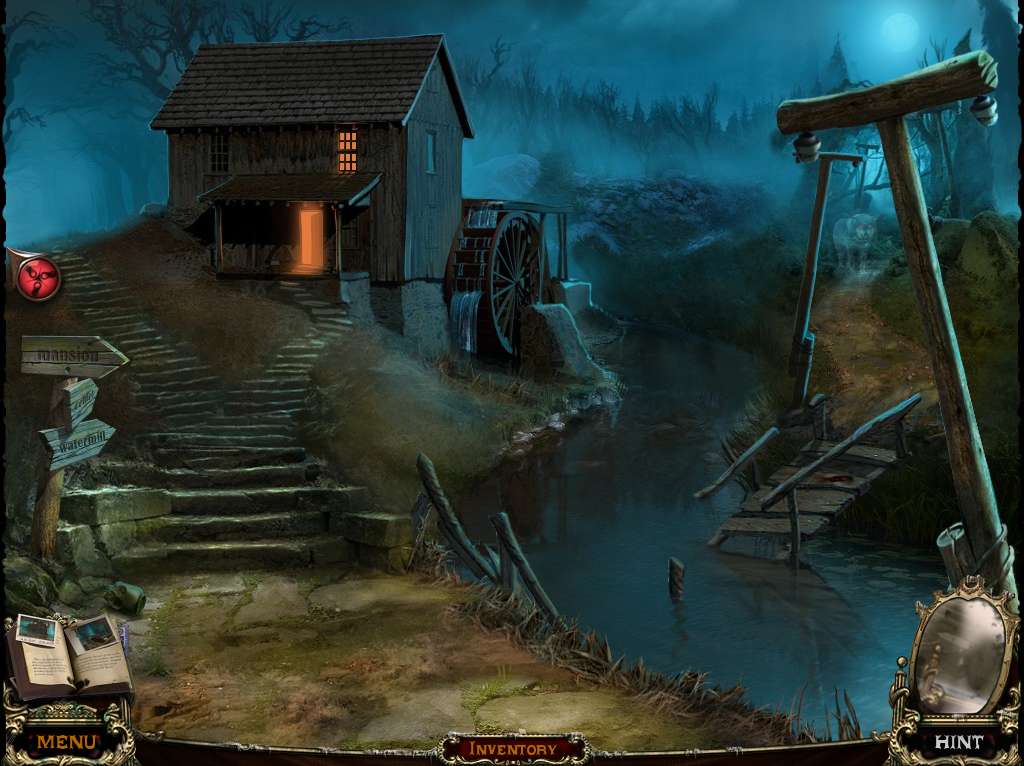
- Click the swirling leaves to make them vanish.
- Try to cross the bridge only to watch it disappear in a flash of lightning – where’s this set, Florida?
-
Note the entrance to the watermill – enter inside.
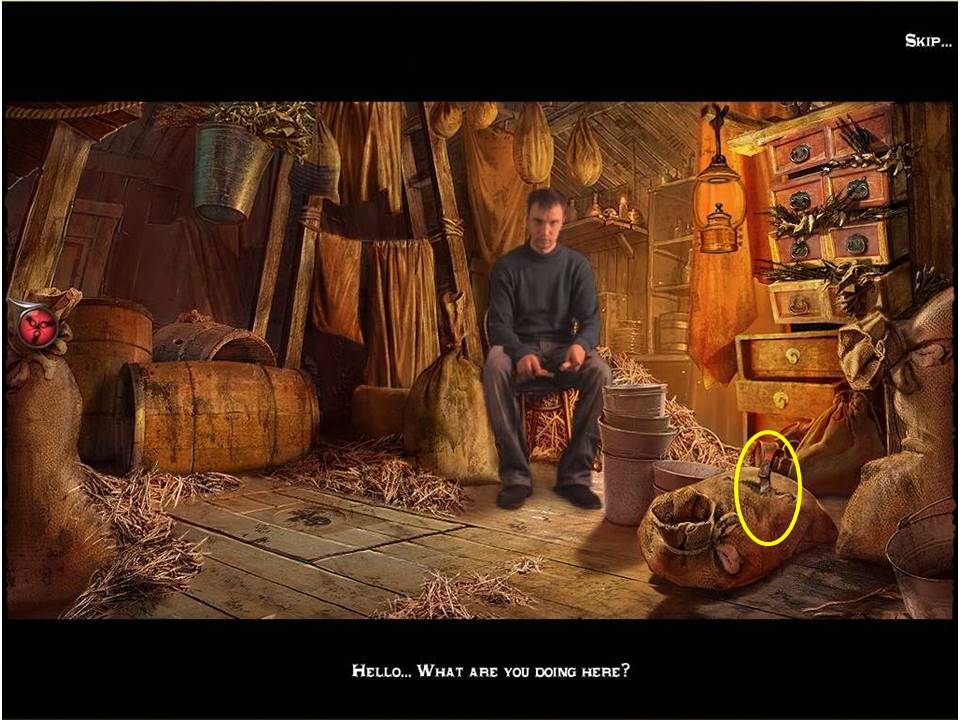
- Talk to the man.
- Zoom into the sack.
- Cut the seam with the MIRROR SHARD.
- Use the ROPE WITH BOLT on it to retrieve the CROSSBOW.
-
Return outside.

- Shoot the CROSSBOW at the pole.
- Pull the pole down and walk across to where the devil dog awaits – if it’s an apparition surely its ghost teeth can’t do any damage, right?
- Dare we take the risk?
- Okay, so we’re chickening out and not putting the theory to the test.
- Take the LAMP FRAGMENT instead that’s sitting on the pole the left.
- Return back over the creek.
-
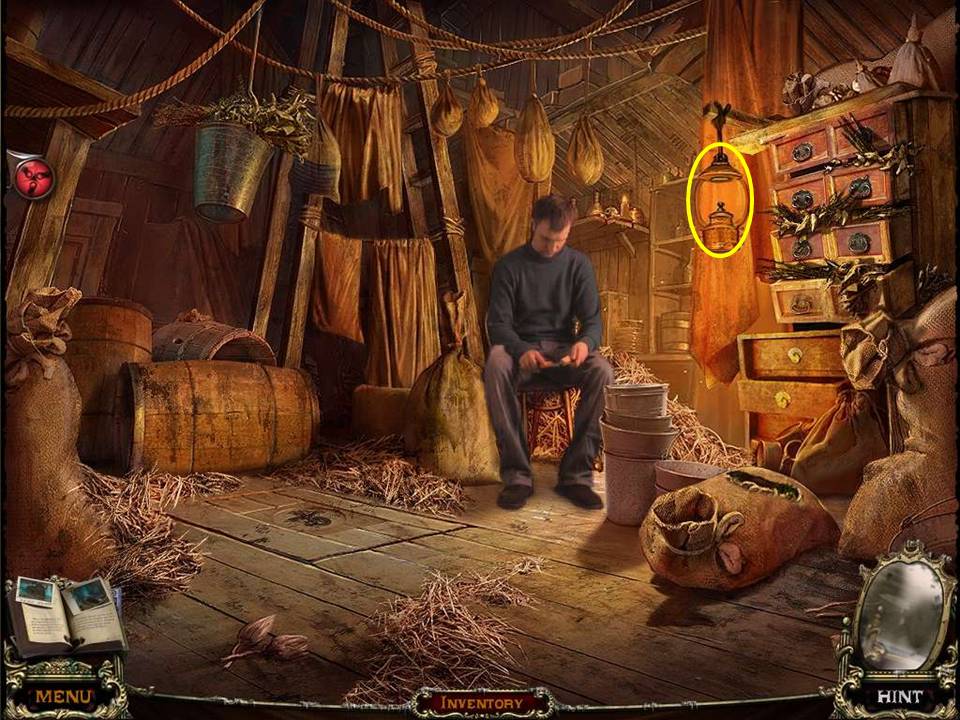
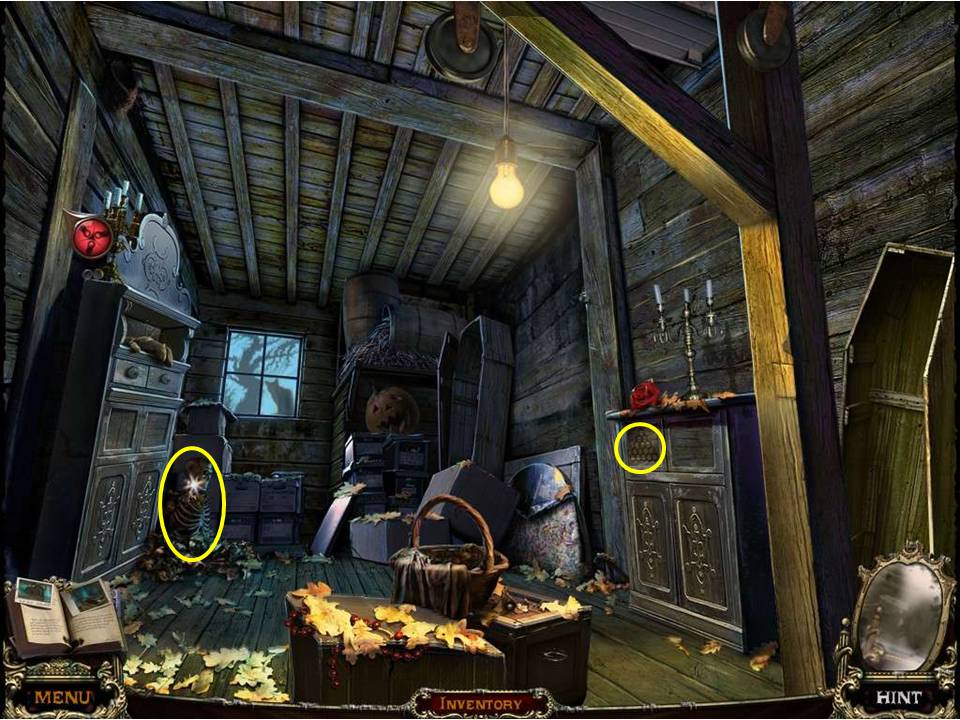
Take the path up and to the left of the mill, where you’ll find the first Hidden Object Area (HOA) by the gate.
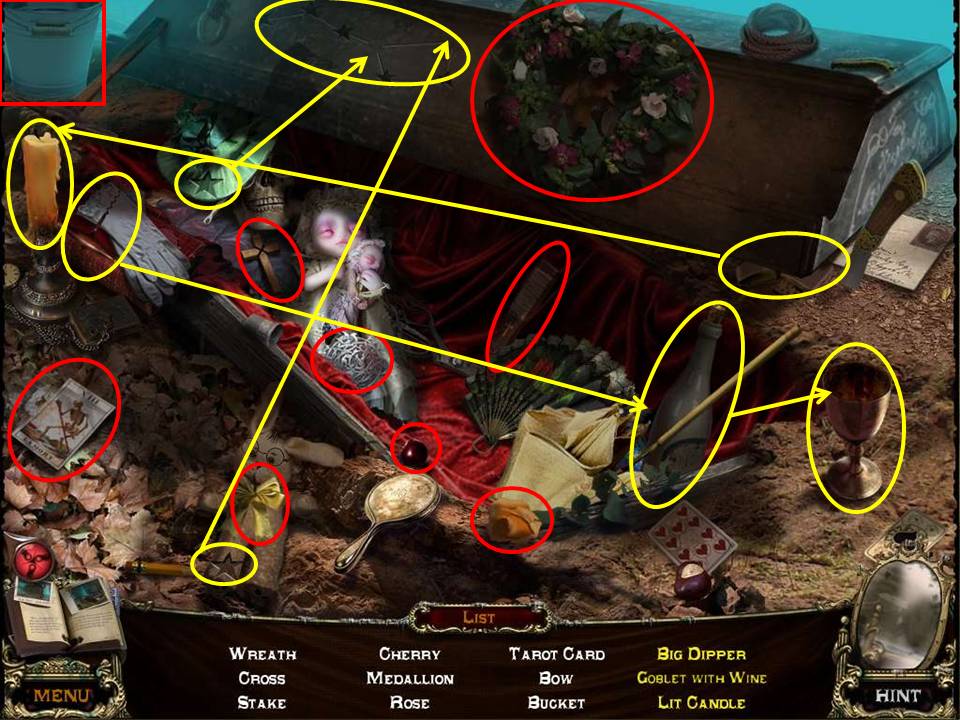
- Find the items listed, noting that items circled in yellow require multiple actions to acquire.
- Move the two stars to complete the Big Dipper.
- Open the bottle with the corkscrew, pour the wine to get the Goblet with Wine.
- Use the lighter to get the Lit Candle.
-
Receive the BUCKET.
- Return to the creek and place the BUCKET in the creek to receive a BUCKET WITH WATER.
- Enter the watermill.
-
Zoom into the lamp and place the LAMP FRAGMENT in the middle to initiate a puzzle.
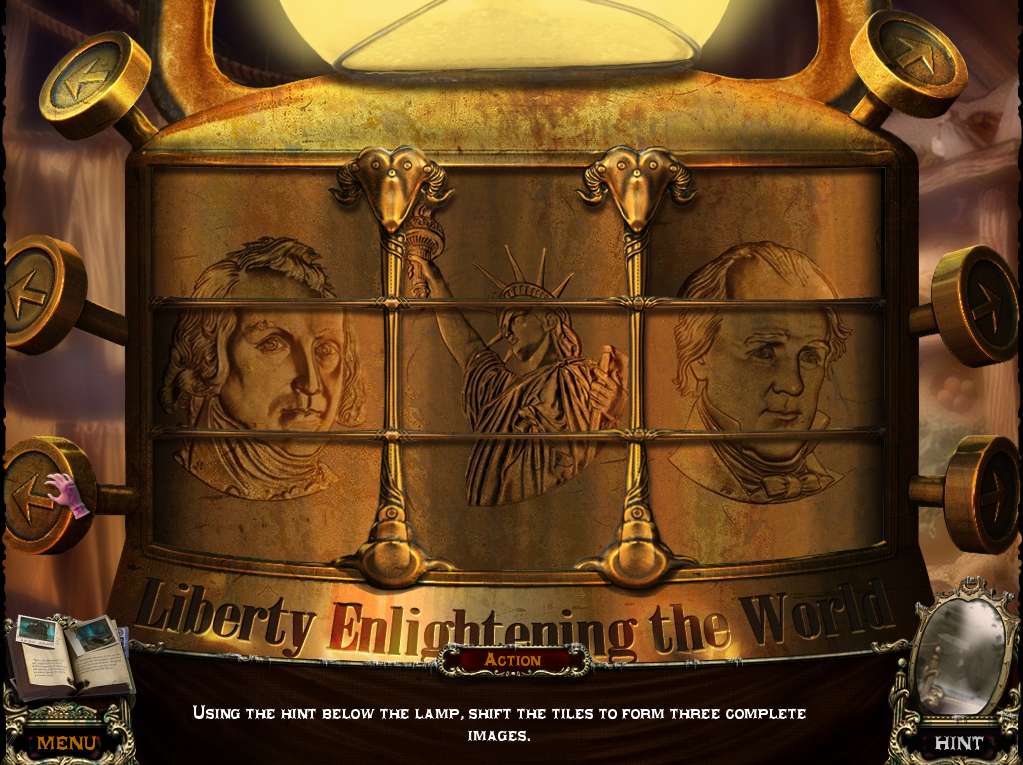
- The object of the puzzle is to assemble a picture.
- Press the buttons to move the tiles to achieve the image shown in the screenshot.
- Use the TORCH on the lamp to get the LIT TORCH.
-
Exit and head across the creek.
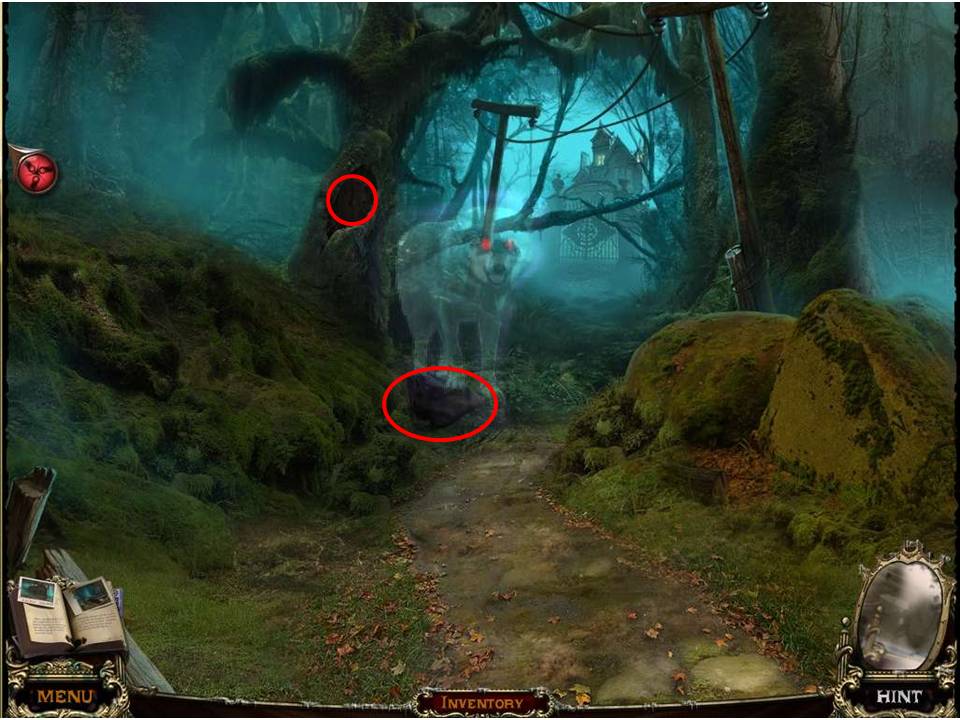
- Scare the ghost wolf with the LIT TORCH – what a wuss!
- Yeah, really scary supernatural entity! Give me Linda Blair crawling backwards down the stairs any day – now THAT was freaky!
- Take the BAG.
- Zoom into the tree hollow and take the HONEYCOMB PIECE.
-
Walk forward.
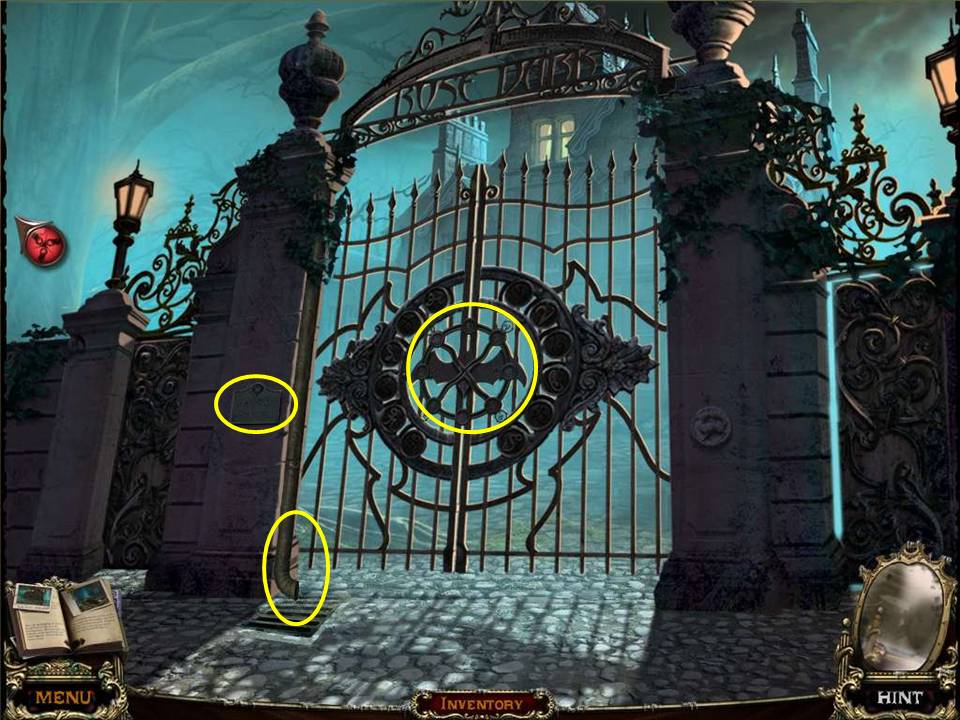
- Zoom in on the center of the gate and note the mini-game.
- Read the plaque to the left.
- Zoom into the drain.
- Pour the BUCKET WITH WATER.
- Take the HAND – do I have to – ugh!
-
Return to the shed.
- Zoom into the skeleton.
- Restore the HAND to the arm.
- Take the PATTERNED KEY.
- Zoom into the cabinet and place the HONEYCOMB PIECE on the board to initiate a puzzle.
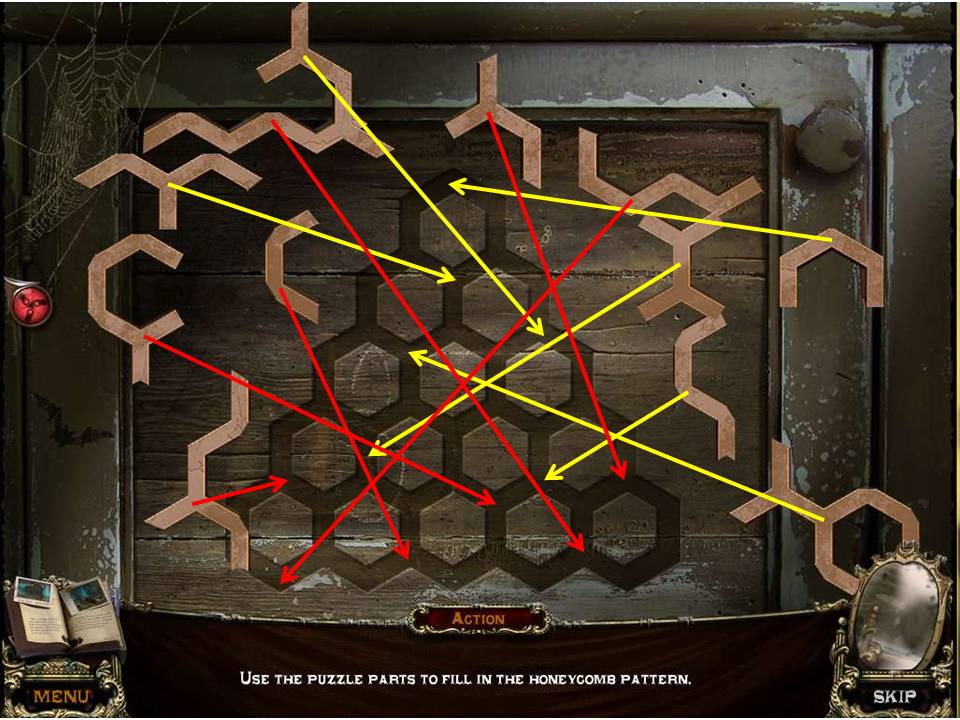
- The object of the puzzle is to complete the honeycomb pattern.
- See screenshot for solution.
- Note that the beginning of each arrow is exactly at the point on each piece where you have to drop it on the corresponding position indicated by the point of the arrow.
- When finished, take the FERMENTED JUICE and the LETTER PIECE.
-
Exit and return to the mill.
- Give the BAG to the man.
- Receive the first SKULL in return.
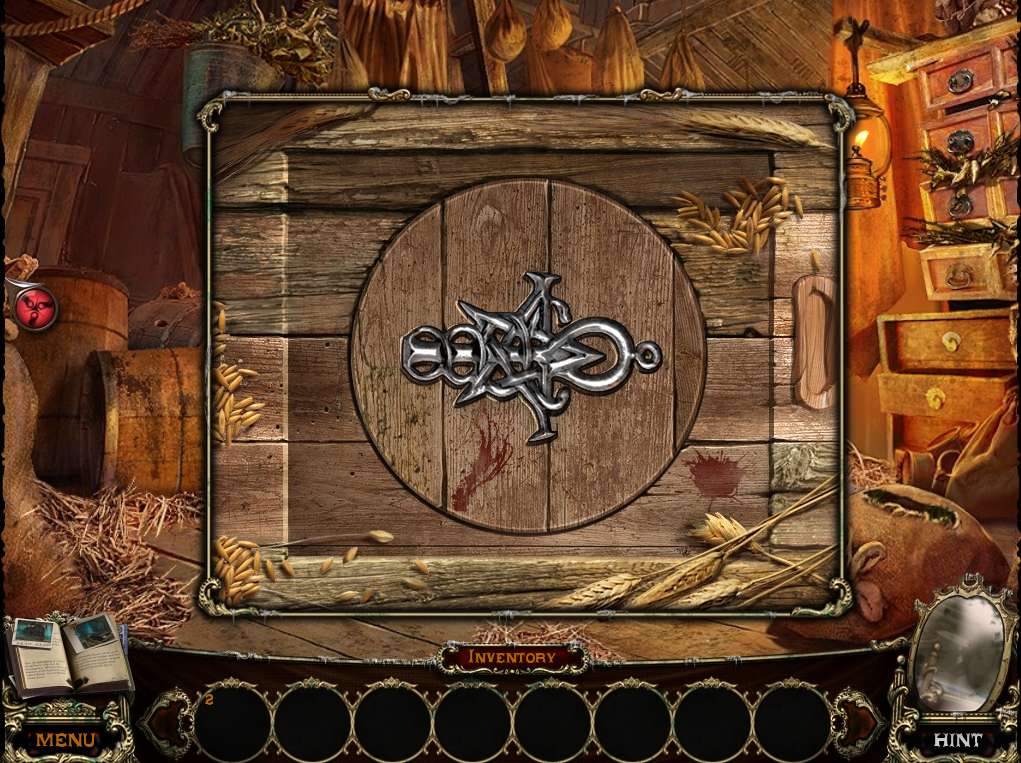
- Zoom into the trapdoor.
- Insert the PATTERNED KEY into the niche.
-
Enter the trapdoor.
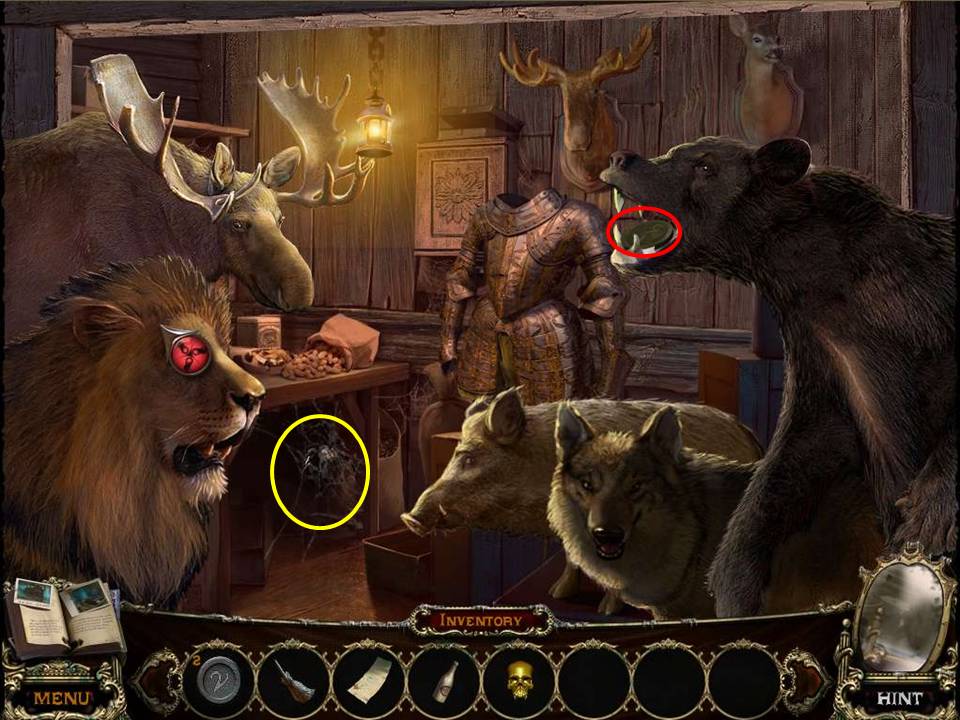
- Place the animal heads on the correct bodies.
- You may place one head on the armor during the swapping process – gives the armour a unique look.
- When finished, take the third SYMBOL from the bear’s mouth.
- Zoom into the area under the table.
- Sweep the cobwebs with the BROOM.
- Take the first WOLF COIN.
- Exit and head back across the creek.
-
Play the HOA by the rocks at the right.
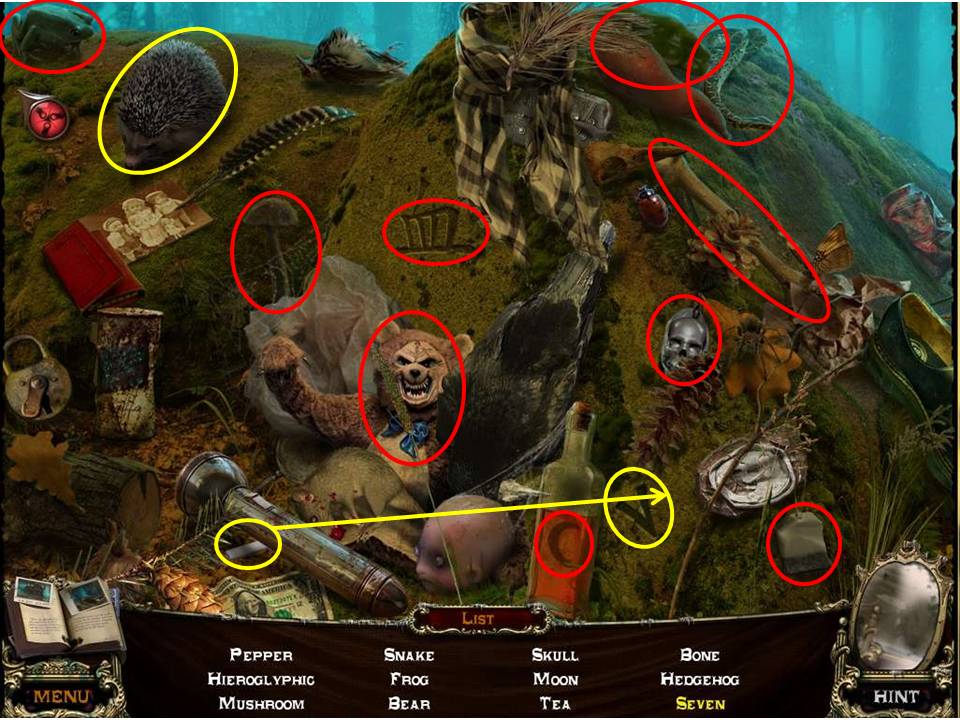
- Find the items listed.
- The items circled in yellow requires multiple moves to acquire.
- Add two marks to the “V” with the chalk to get the Seven.
- Move the hat to get the Hedgehog.
- Receive the second SKULL.
- Walk forward and zoom into the gate.
-
Place the three SYMBOLS on the circle to initiate a puzzle.
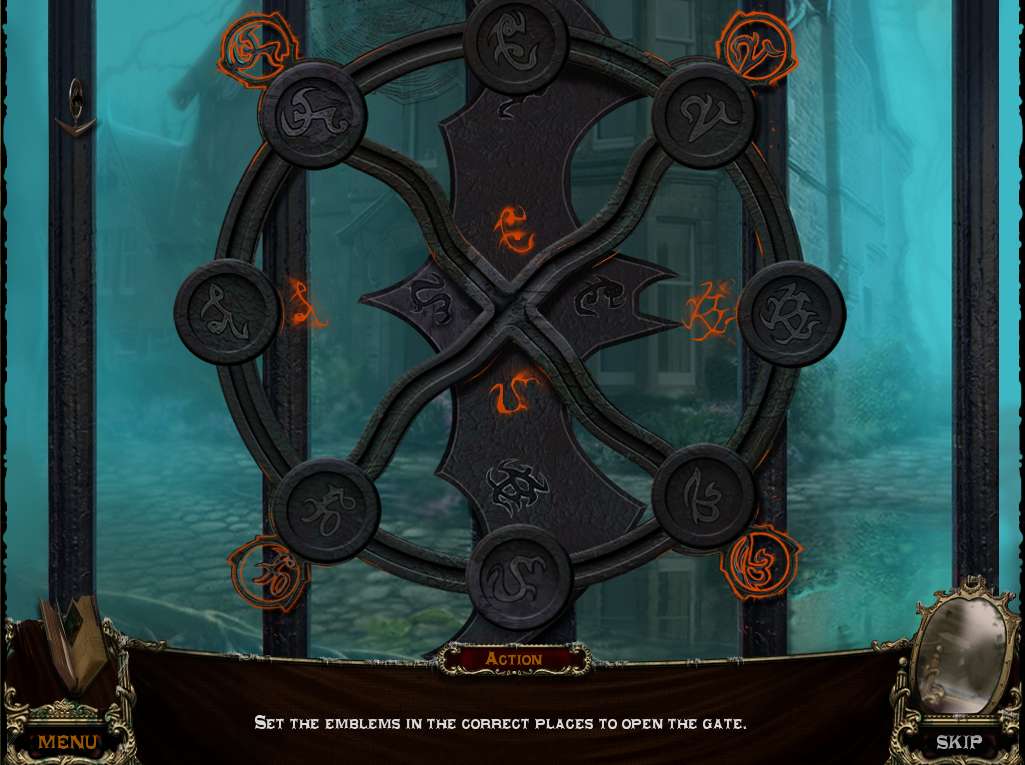
- The object of the puzzle is to slide the symbols to the position with a matching image.
- It’s actually fairly simple if you note that there’s only four symbols that can’t be moved towards the center.
- Given that the center has to be the axis of the solution, the key is to use it constantly to hold pieces while you slide others around the edges to get them where they need to be.
- You’ll find the easiest method is to work in triangles, starting from the left, and you should have it done in a dozen moves or so – this is nowhere near as complex as the chess puzzle earlier.
- Note that rhe symbols illuminate when the disks are in the correct position.
- Once done the gate will unlock and swing open invitingly – do you dare enter!?
General Info and Tips
Chapter One
Chapter Two
Chapter Three
Chapter Four
Chapter Five
Chapter Six
Ask for help in the comments below!
Chapter One
Chapter Two
Chapter Three
Chapter Four
Chapter Five
Chapter Six
Ask for help in the comments below!