
Grim Facade: The Cost of Jealousy: Chapter Six: The Station
Our Grim Facade: Cost of Jealousy Walkthrough will help you unravel this elaborate mystery brimming with intrigue, deceit, and betrayal. Rely on our trusty tips, puzzle solutions, and in-depth instructions to weave your way to the truth in this exciting whodunit hidden object adventure game.
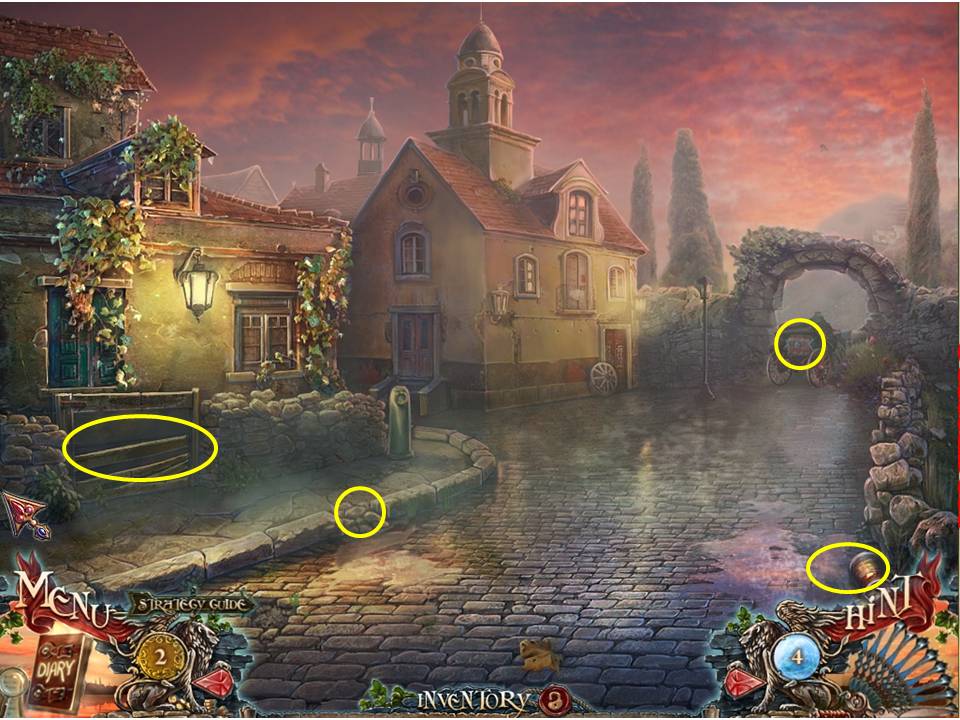
- Note the gate on the left.
- Click on it and take the PLANK.
- Take a look at the vase in the bottom right corner and take the gold coin and the OILER.
- Next zoom in on the curb to the right and use the PLANK to prize up the stone – take the SCREWDRIVER concealed underneath it.
- Finally zoom in on the cart in the background, place the STAR on it, then use the OILER on the rusty screws, together with the SCREWDRIVER to unscrew them.
- Take the fan inside, as well as the PIECE OF CHALK.
- A scene will now play out where you’ll be trapped inside a cellar.
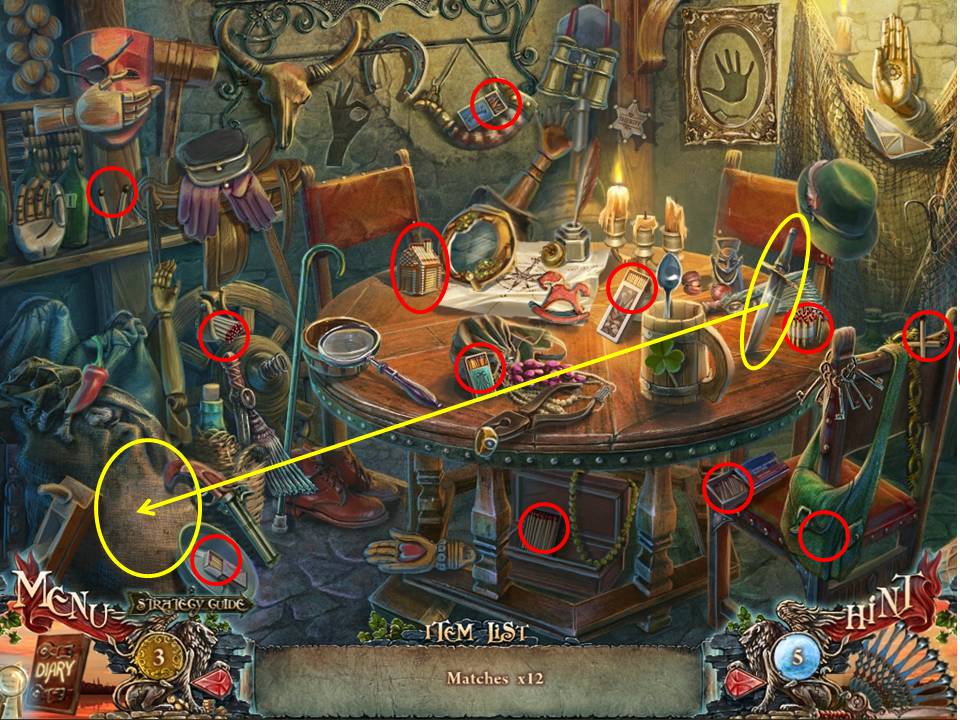
- In the background is a HOA puzzle – click on it to initiate it.
- Collect the fans, use the dagger to cut open the bag and retrieve the matches inside.
- Collect the other 11 matches circled in red on the screenshot.
- On completion you’ll receive the MATCHES.
- Exit, note the grinder and the gas burner to the right, as well as the bats hanging around on the left.
- Collect the BROOM and head through the doorway to the left.
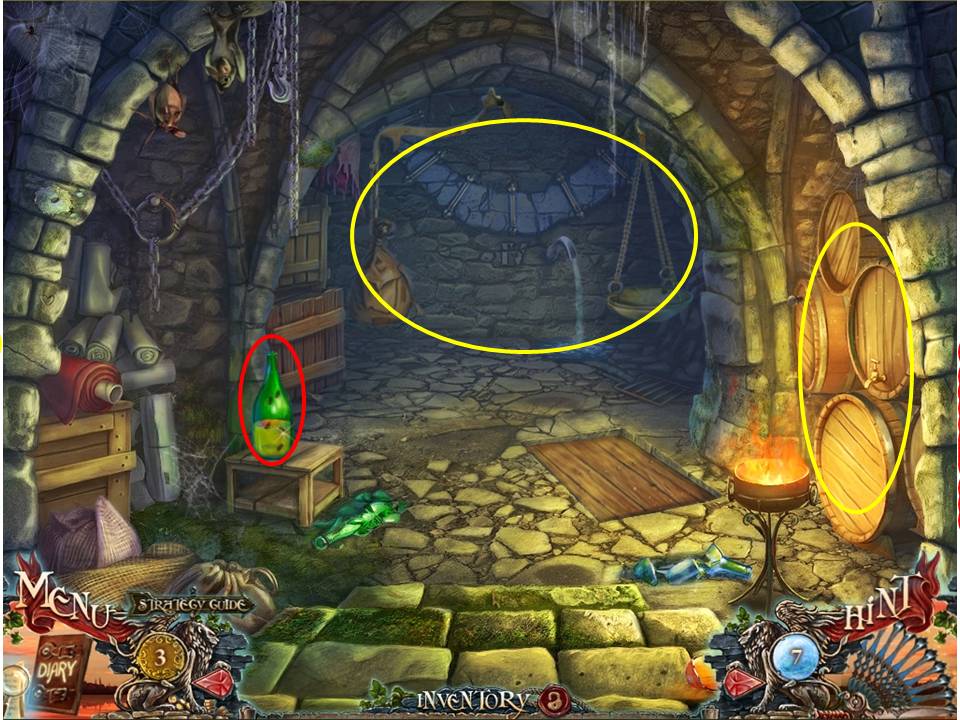
- Click on the barrels to the right and take the SOLUTION and the SICKLE HANDLE.
- Note the water scale in the background and the bottle with the roaches climbing all over it – charming!
- Use the BROOM to shoo them away and take the BOTTLE OF KEROSENE.
- Return to the previous room.
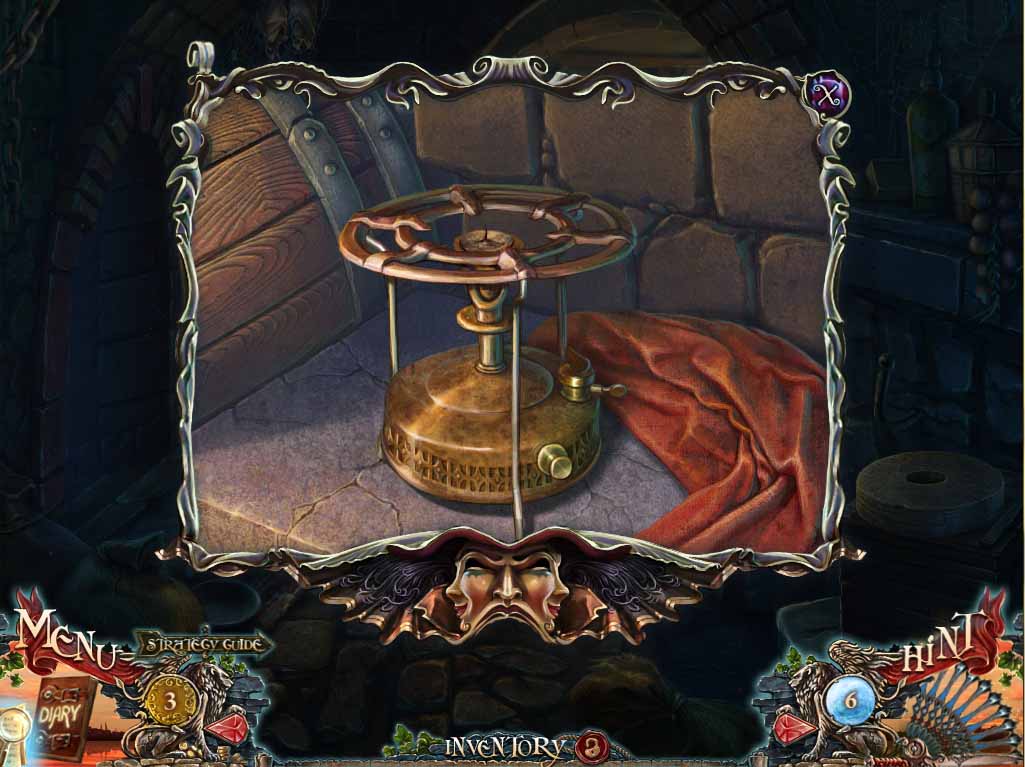
- Zero back in on the bats and use the matches to light the torch – the bats will fly away.
- Take the BOTTLE OF WATER.
- Take the bottle of kerosene and fill the gas burner – take the EMPTY BOTTLE and light the burner.
- Place the BOTTLE OF WATER on the gas burner, and when it has boiled away the contents put it back in inventory and return to the room on the left.
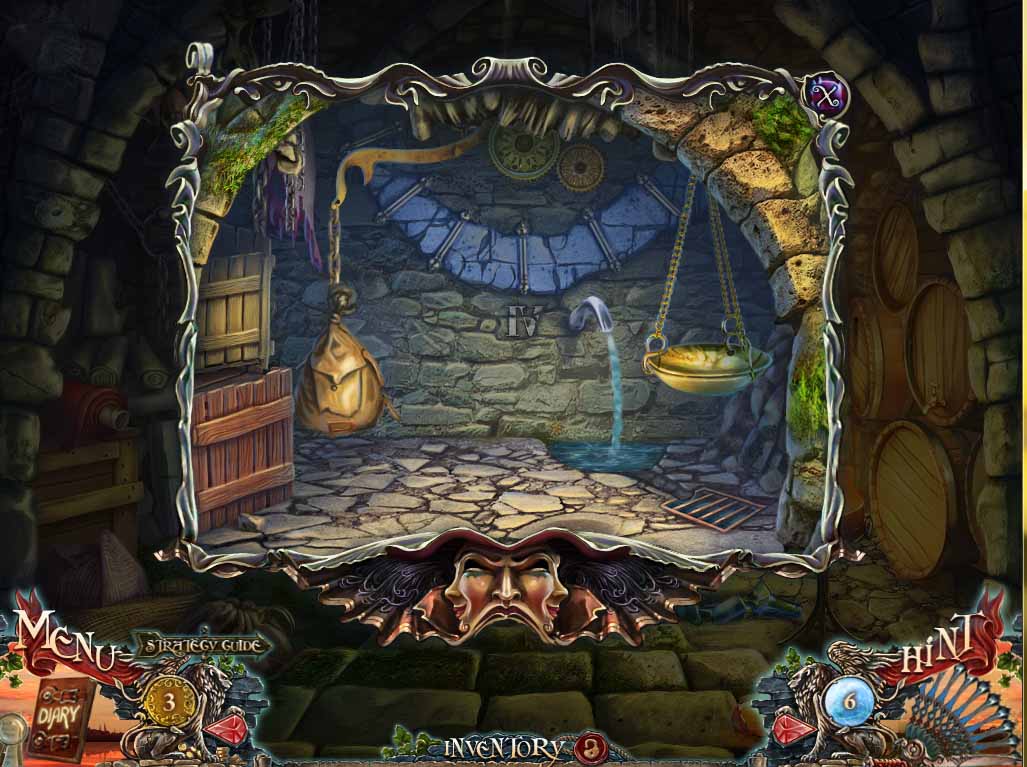
- Zoom in on the water scale in the background, and place both empty bottles on it to initiate the next puzzle.
- The aim is to use both bottles to somehow get four liters of water and place it on the scale to the right to balance the mechanism out.
-
Here’s the solution -
- - Fill the blue bottle up and use it to fill the green bottle
- - Empty the green bottle down the drain
- - Empty the two liters of water remaining in the blue bottle into the green bottle
- - Fill the blue bottle again
- - Pour 1 liter from the blue bottle into the green bottle to top it up
- - Finish by placing the blue bottle on the scale. The trap door in the floor will open. Exit down.
- Place the SICKLE HANDLE on the blade embedded in the post on the right – take the BLUNT SICKLE.
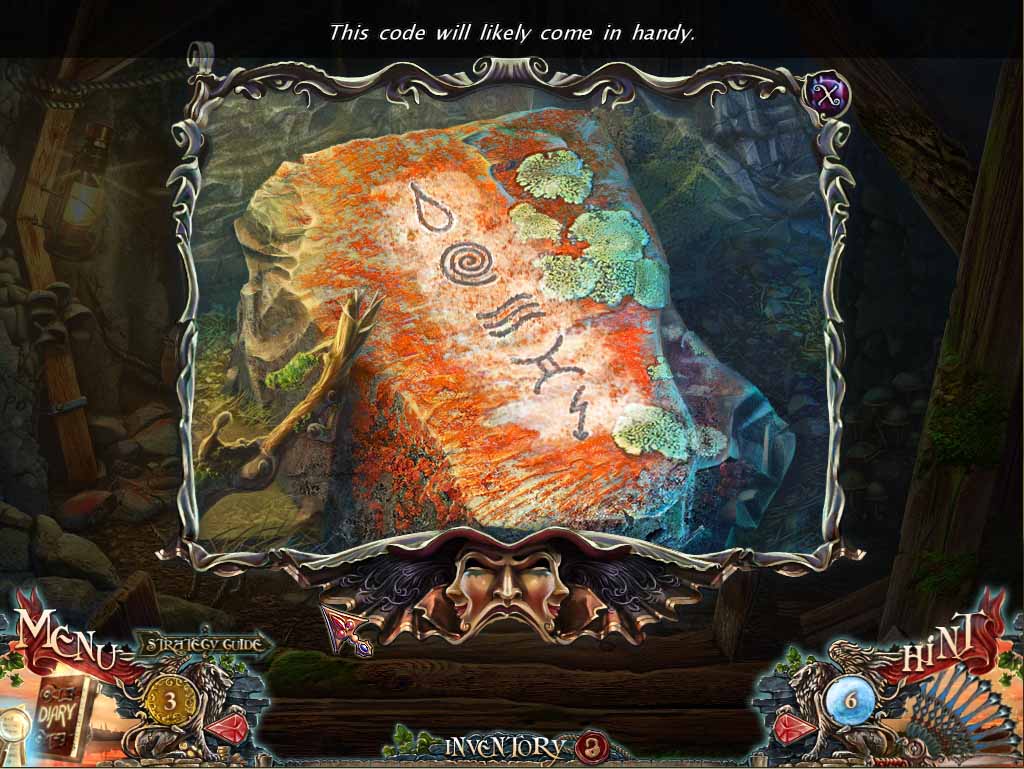
- Click on the rock to the left to pick up a BOLT and use the PIECE OF CHALK to reveal a clue.
- Next zoom in on the crate in the background and note the missing piece, as well as the fact that this must be the puzzle you acquired the solution to earlier.
- Return back upstairs and to the first room you were tossed into.
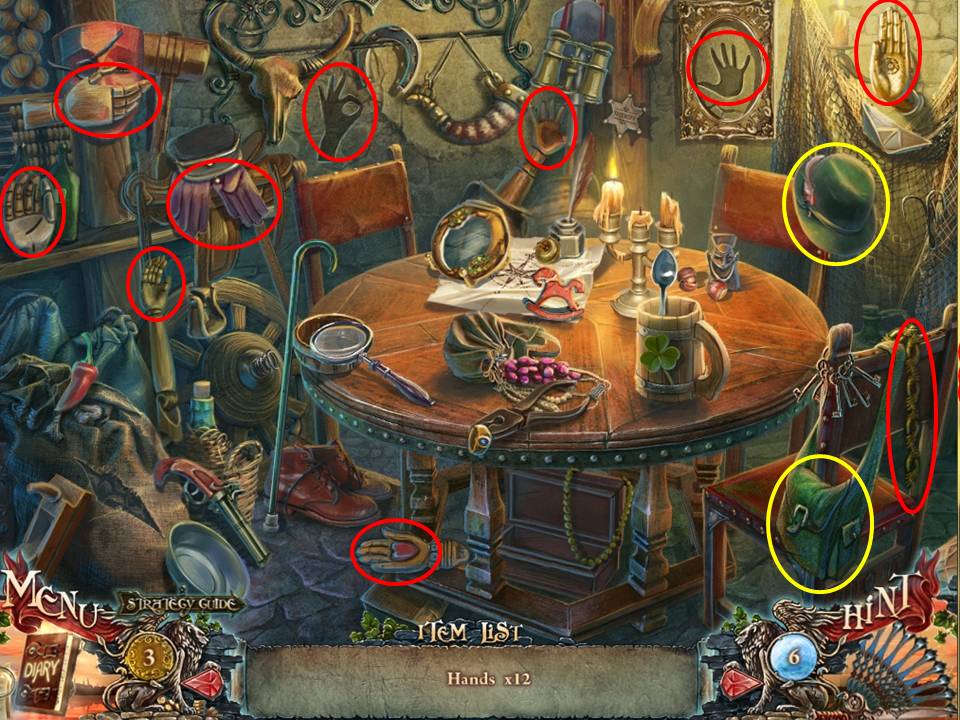
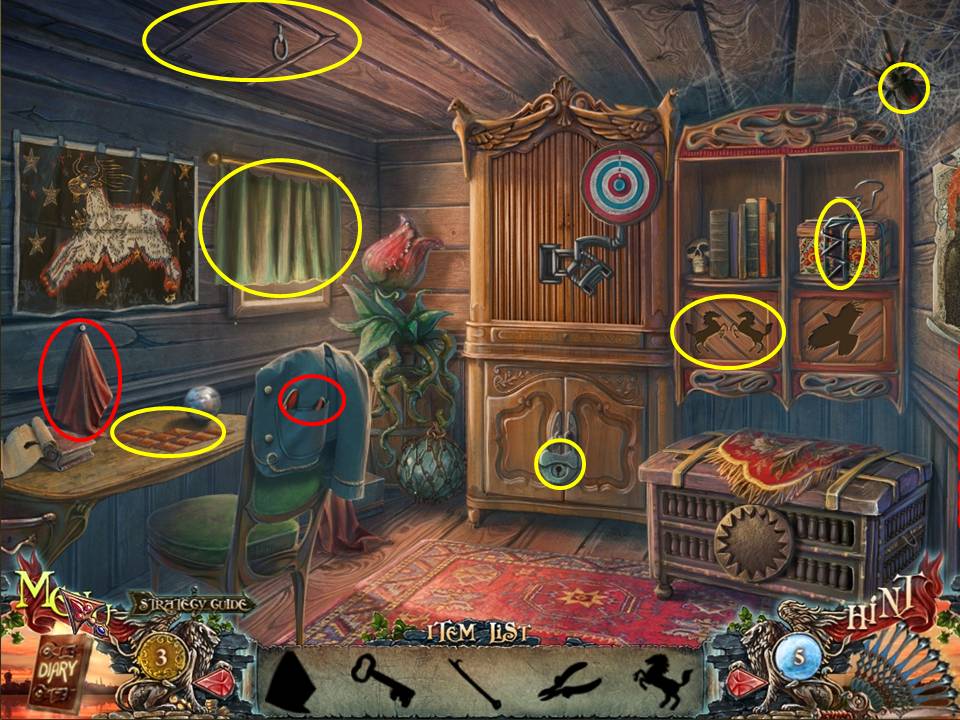
- Click on the HOA in the background to initiate it.
- This time around you need to collect 11 hands – how gruesome!
- One is concealed under the hat, while another is in the purse.
- The remaining ten are marked on the screenshot.
- Also pick up the chain draped over the chair.
- When complete take the CHAIN and exit.
- Go the grinding stone and use it to give yourself a SHARP SICKLE.
- Return to the room on the left and descend to the basement again.
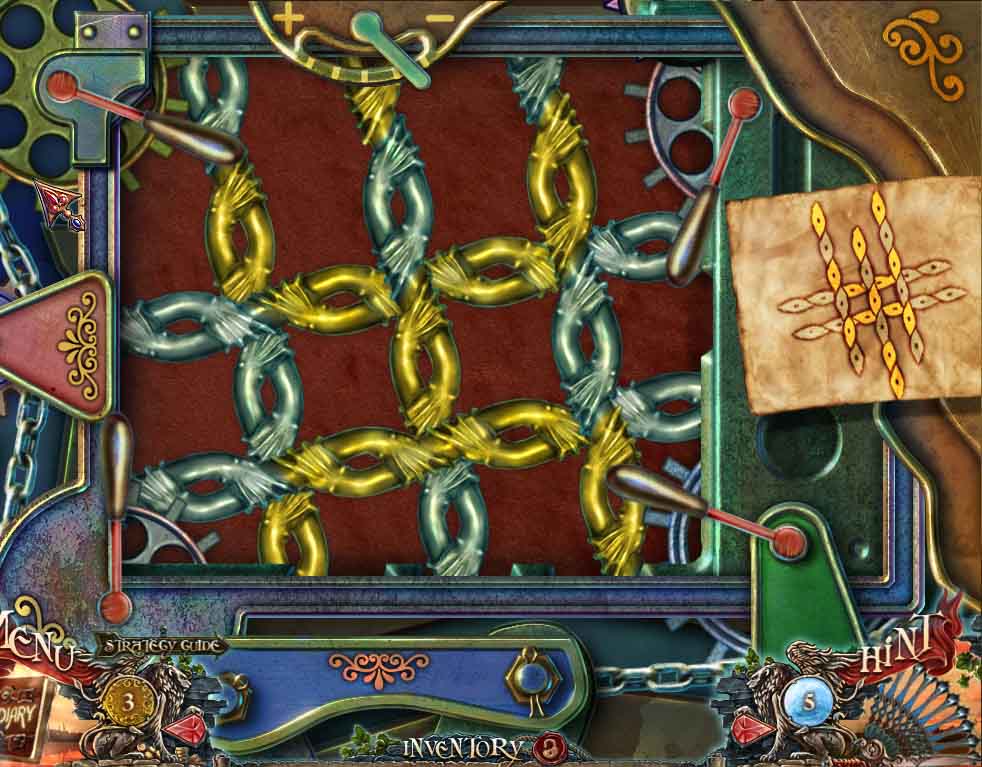
- Zoom in on the box and place the CHAIN and solution on it to initiate the puzzle.
- The aim is to make the chains match the pattern on the solution.
- There’s nothing really complicated about this other than figuring out which levers control each individual chain.
- Just keep moving each individual chain until it matches the appearance on the solution.
- Keep working each chain until the match is perfect.
- When done the cabinet in the background will slide apart and reveal some vines obstructing the way – use the SHARP SICKLE to hack your way through.

- Okay, pretty gruesome, right?
- Click on the raven perched on the skeleton, ands when it flies away note the direction the hand is pointing in.
- The trick to getting out of here is to follow the rune sequence mapped out in chalk on the rock earlier.
- If done correctly, you’ll find yourself in a field near a man sitting against a barrel.
- Talk to the gypsy, and he’ll ask you to grease his palm in return for some fortune-telling.
- Coins don’t seem to work on him so give him ESMERALDA’S EARINGS.
- You’ll be given a ‘vision’, after which he’ll proffer another BOLT to add to your collection.
- A bolt for a valuable set of earrings – seems like a trade on the same level as buying Manhattan island for a collection of cheap jewelry! Oh well.
- Next, click on the wagon in the background to initiate the next HOA puzzle.
-
This is a sequential HOA puzzle, so take the following steps, noting the accompanying screenshot –
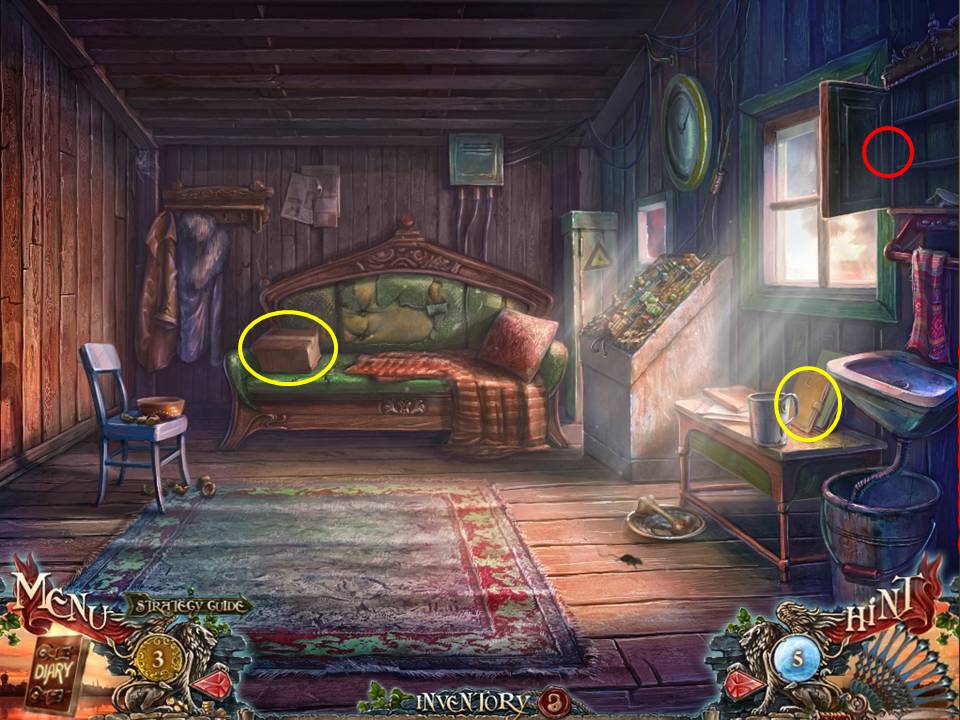
- - Collect the red rag hanging on the wall to the left, above the desk
- - Take the nippers from the pocket of the jacket draped over the seat
- - Open the curtain and use the rag to clean the window
- - When the fly comes in and gets entangled in the web, drawing the spider over, take the key
- - Use the key on the lock attached to the cabinet – take the hook
- - Use the hook to open the hatch in the ceiling above – take the horse right
- - Use the nippers on the wire surrounding the box on the right shelf – take the horse left
- - Place the two horses in the slots on the left cabinet door – take the taro
- - Place the Taro on the desk – you’ll be required to play another hidden pairs card game, the variation in this instance being that you have to find the matching pair being shown in the crystal ball. If you miss, you’ll be given an entirely different pair to locate, so it keeps you on your toes!
- When complete, take the WRENCH and exit.
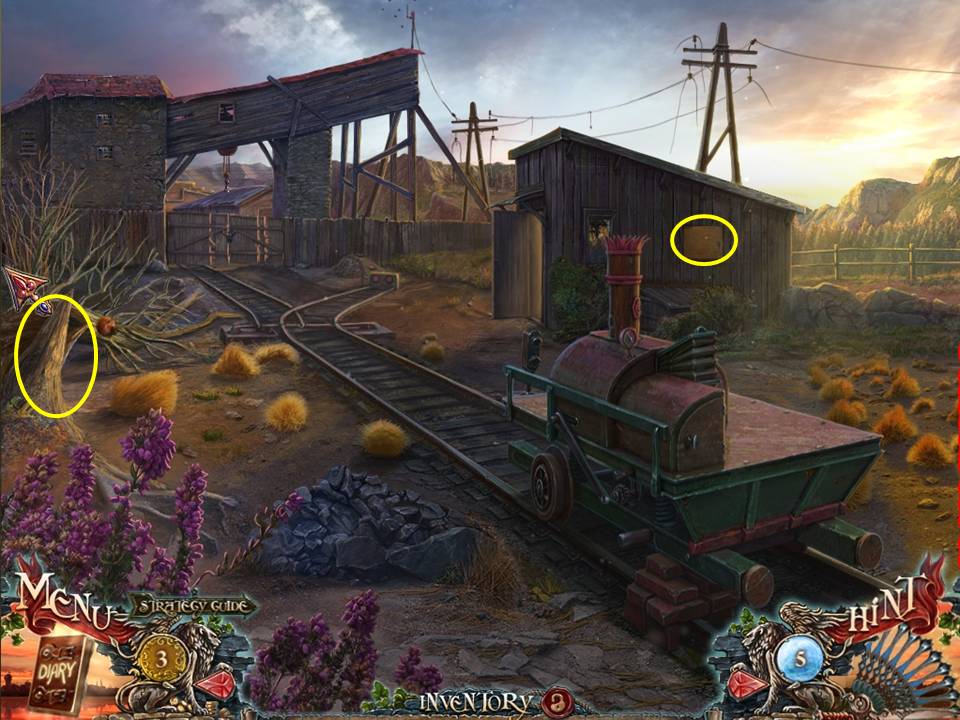
- Head down the path, where you’ll find a broken-down choo choo at what looks like a little siding.
- Click on the locomotive at various points, which will show that you obviously need to locate a number of items to fully repair it.
- Leave it for the time being, and zoom in on the side of the shed behind it – use the WRENCH to take the third bolt and reveal the fuse box behind the piece of wood.
- Take the RAILROAD SWITCH and note that you’ll need to get some fuses to make the wiring work.
- Note the tree stump to the left and click on it – say hi to the squirrel and take the second RAILROAD SWITCH.
- Next enter the shed.
- Look at the cabinet on the right – take the third BOLT.
- Zoom in on the books sitting on the small table on the right and take the KNIFE and FUSE.
- Zoom in on the package sitting on the sofa and use the KNIFE to open it – take the fan, RAKE and the gold coin.
- Exit, and go back to the gypsy
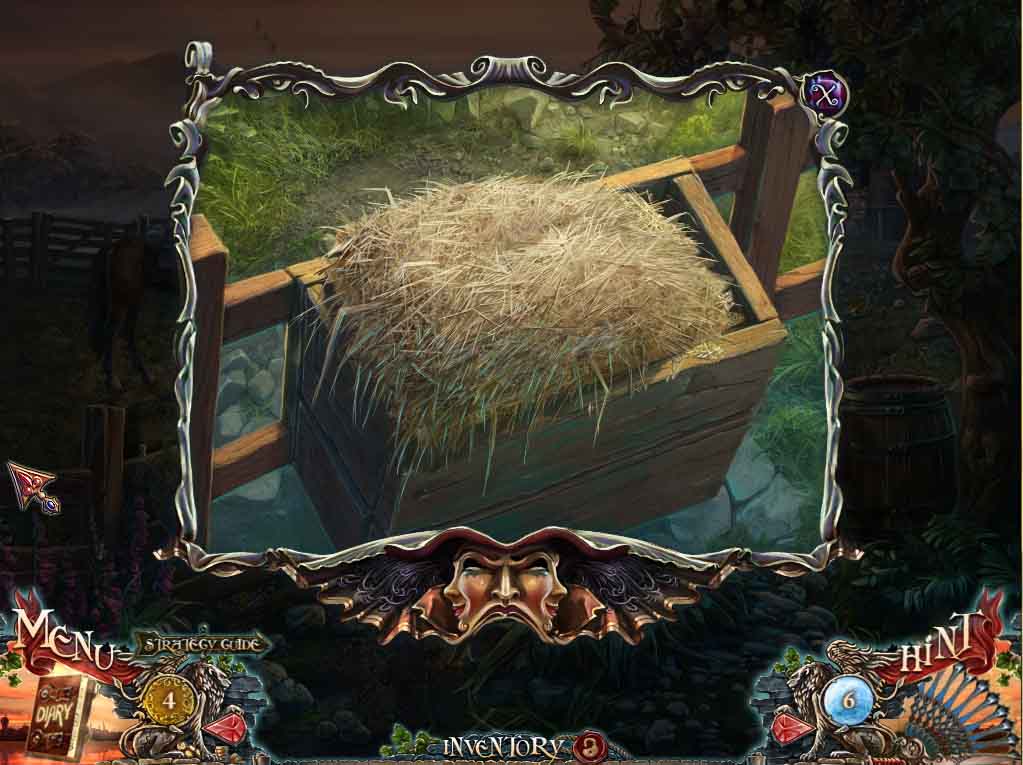
- Click on the hay feeder by the yard fence and use the RAKE on it – remove the GEAR and the second fuse.
- Click on the wagon again for the next HOA puzzle.
-
As before, this is a sequential HOA puzzle. Here’s the steps –
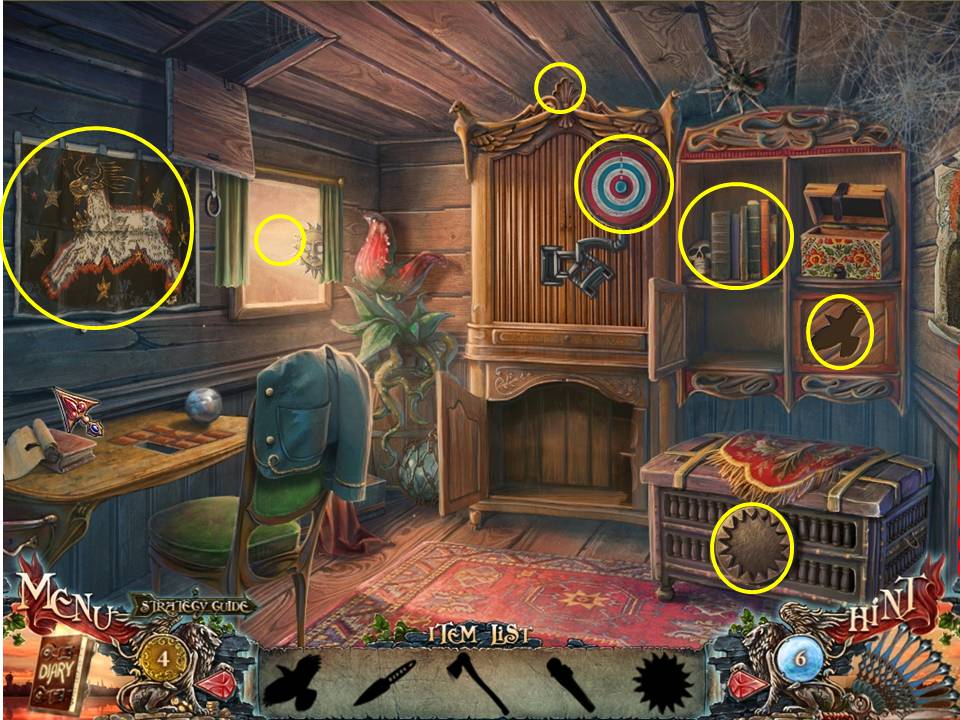
- - Look behind the books on the shelf – take the raven
- - Insert the raven in the matching insert on the right cabinet door – take the knife
- - Use the knife on the target – when the jarring opens the right door, take the axe.
- - Click on the peak of the cabinet where the arched wings meet and take the glass cutter that will be revealed.
- - Use the glass cutter on the window to obtain the Sun
- - Insert the sun into the matching recess on the chest – take the puzzle part
- - Remove the picture above the desk and use the axe on the nailed planks – click on the picture that will be revealed. Insert the puzzle part to initiate a picture puzzle
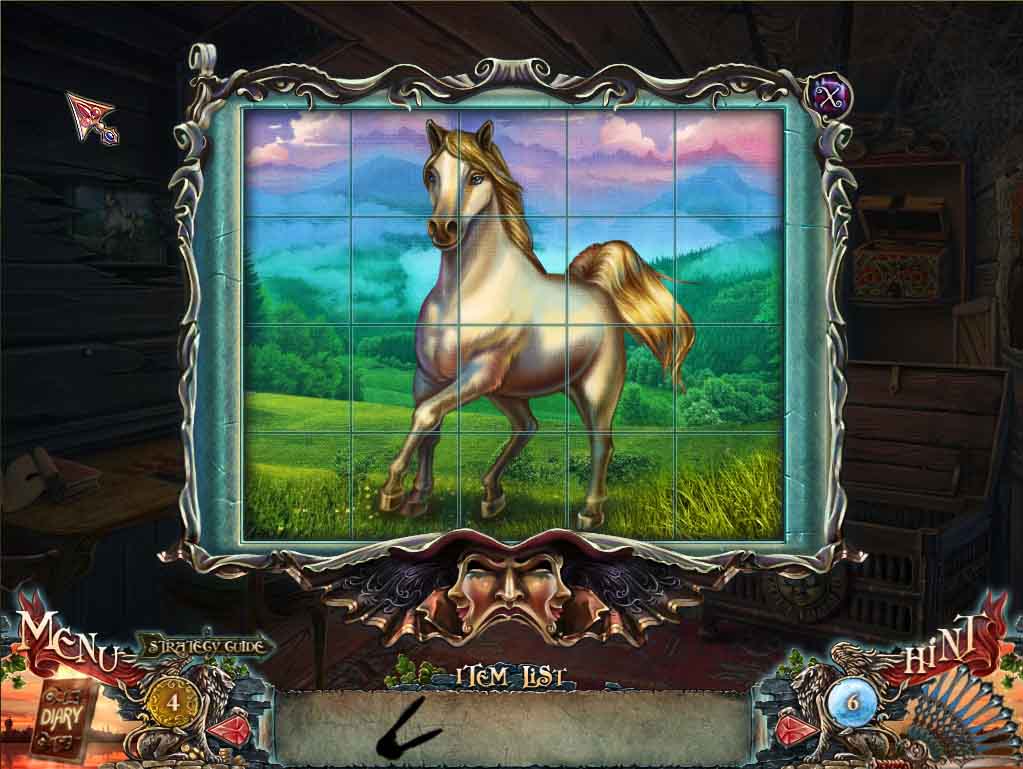
- This a puzzle that requires simply rotating pieces to their correct orientation.
- Note the screenshot for the solution.
- When complete, take the NUTCRACKER, exit back outside, and return down the path to the shed.
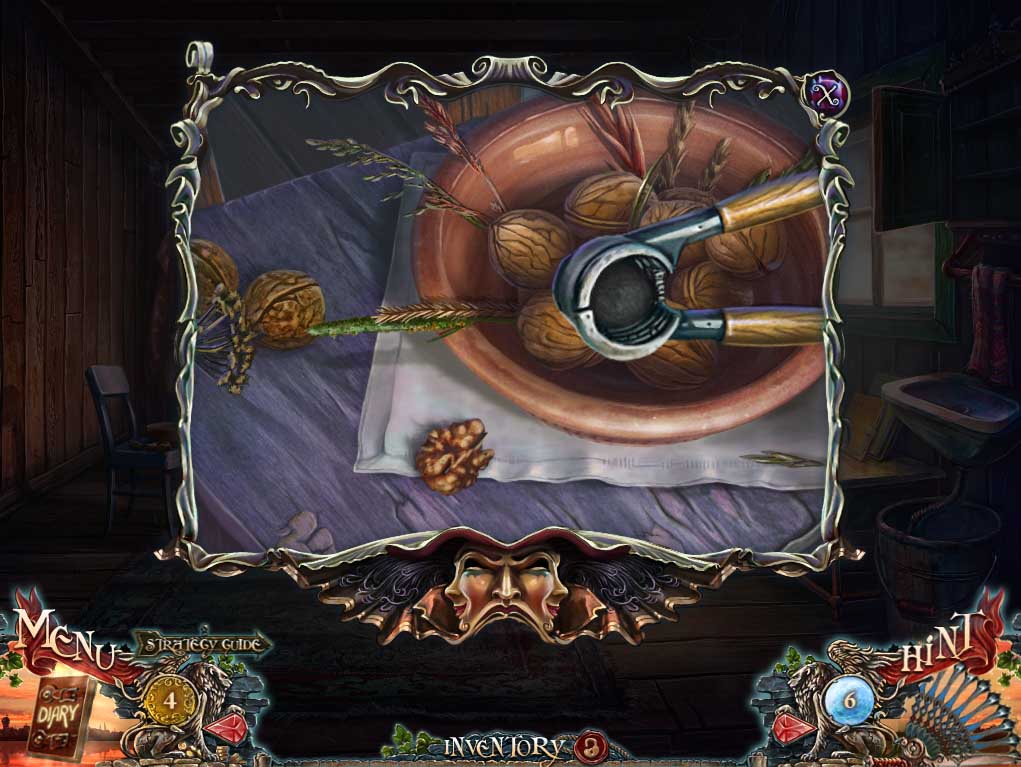
- Zero back in on the walnuts and use the NUTCRACKER to crack one open and take the NUT.
- Return back outside.
- Go back outside and Say hi to the squirrel again and give the little guy the NUT, at which point he’ll say thanks by giving you an APPLE.
- Return to the gypsy and put the APPLE in the feeding trough.
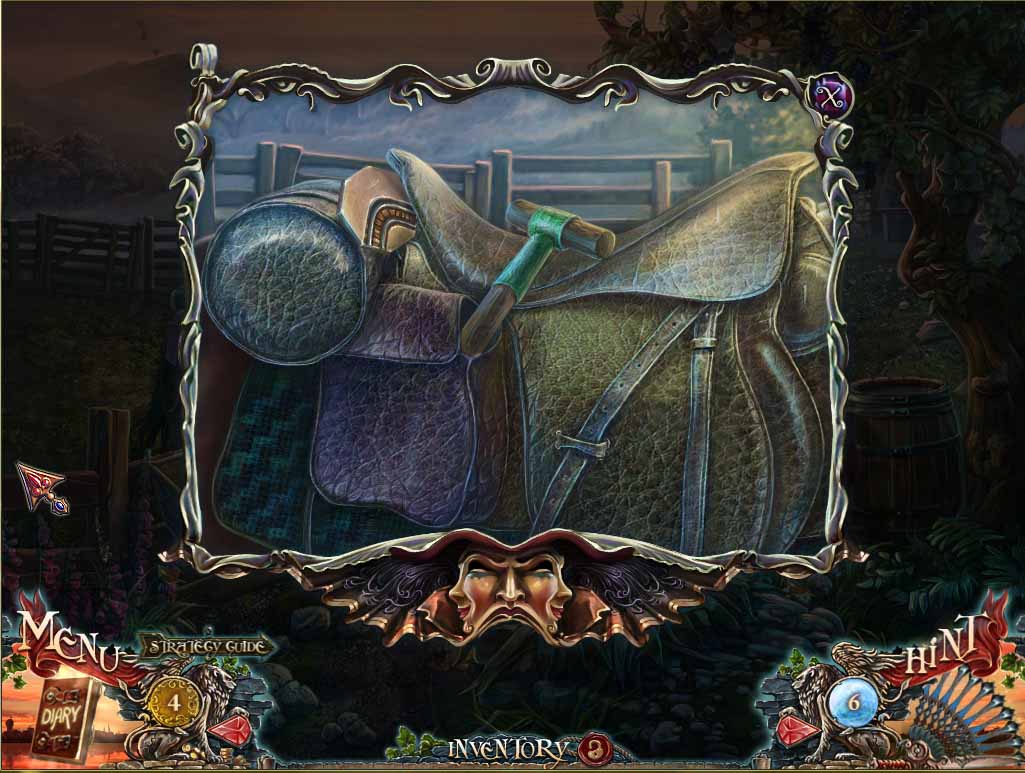
- When the horse wanders over, take a close look at the saddle-bags.
- Take the LEVER and the third RAILROAD SWITCH.
- Head back down the path.
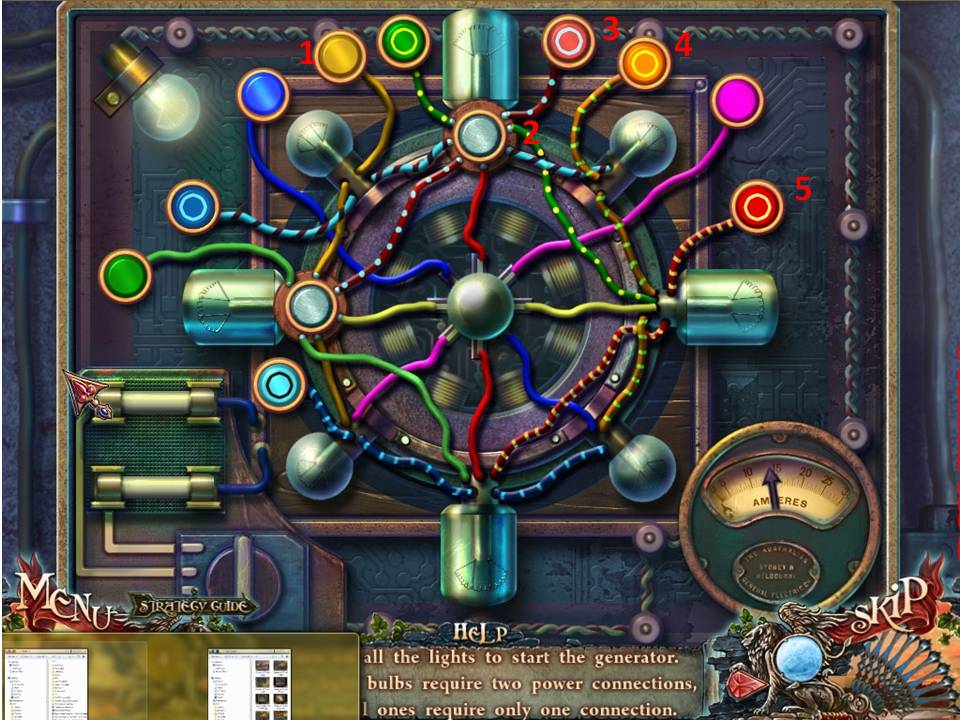
- Zoom into the fuse box again and insert the two FUSES to activate the puzzle.
- The aim is to turn on all nine lights (the four large ones and the five smaller bulbs) by pressing on the numerous switches, bearing in mind that the larger bulbs need two switches to fully power up, while the smaller bulbs need only one switch.
- The trick to the puzzle is that you can blow the bulbs if you direct too much power to them, at which point you need to start from scratch.
- Look at the screen shot for one of the possible solutions.
- Now return back inside the shed.

- Zoom in on the railway model and place the 3 switches down on it to initiate the next puzzle.
- The aim of the puzzle is to set the full set of switches so that the train situated on the depot at bottom left can travel all the way to the train station.
- When one exit back outside.

- You now have the green light to proceed, so it’s time to repair the locomotive.
-
Zoom in on it to start the work –
- - Retrieve the wheel, set it in place, get the BOLTS from inventory, and use the WRENCH to tighten them up.
- - Pick up the tap lying near the rails on the left and put it in place on the stack
- - Pick up the missing section of the stack and set it in place
- - Take the GEAR from inventory and place it on the side of the locomotive
- - Add the LEVER to the locomotive from inventory
- - Grab the pick and use it to break up the coal.
- - Open up the furnace and throw some coal in – close the door.
- - Pull down on the lever, turn the tap on the stack, yell ‘Casey Jones’ and off you go!