The Mirror Mysteries: Forgotten Kingdoms: Chapter Four: Castle of the Monkey King
Our The Mirror Mysteries: Forgotten Kingdoms Walkthrough will be your guide as you travel through worlds in your quest to defeat the evil magic mirror. When a woman approaches you and asks for you to help save her brother from an evil mirror, your first response is to suggest she seek a more mental kind of help. But when your curiously forces you to take the case you soon discover that the powerful mirror is indeed real, and it’s not just Tommy that’s in danger of being destroyed. Use our helpful hints, insider tips, and custom screenshots to travel through the looking glass and into new and amazing worlds as you race to defeat the magic mirror.
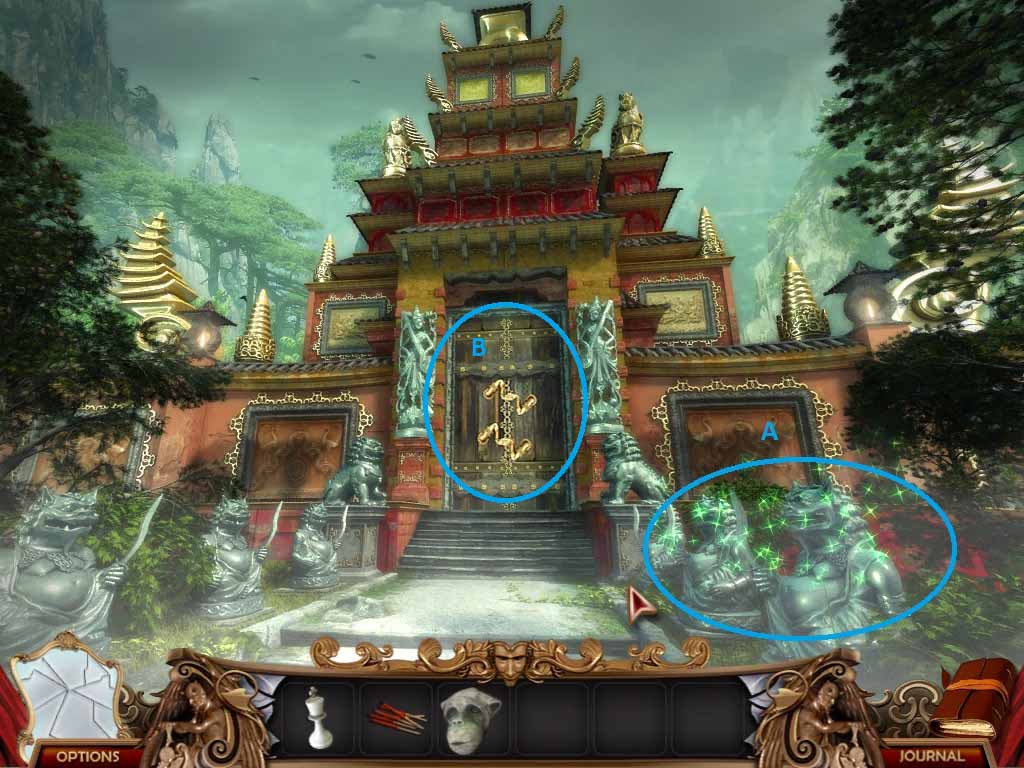
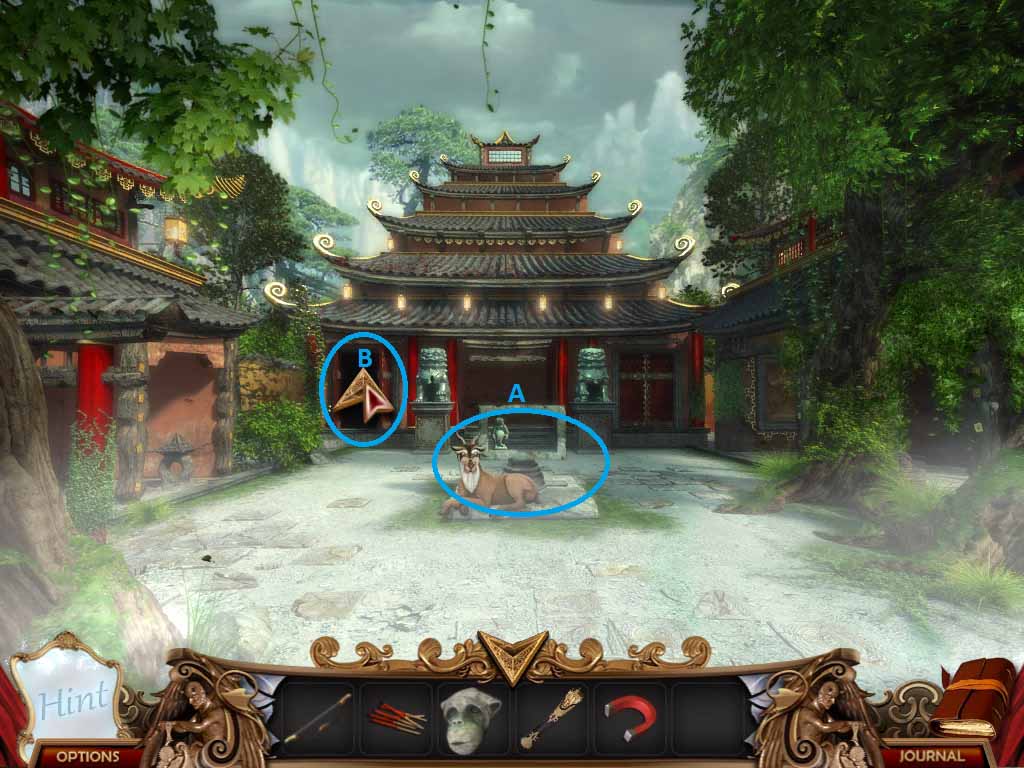
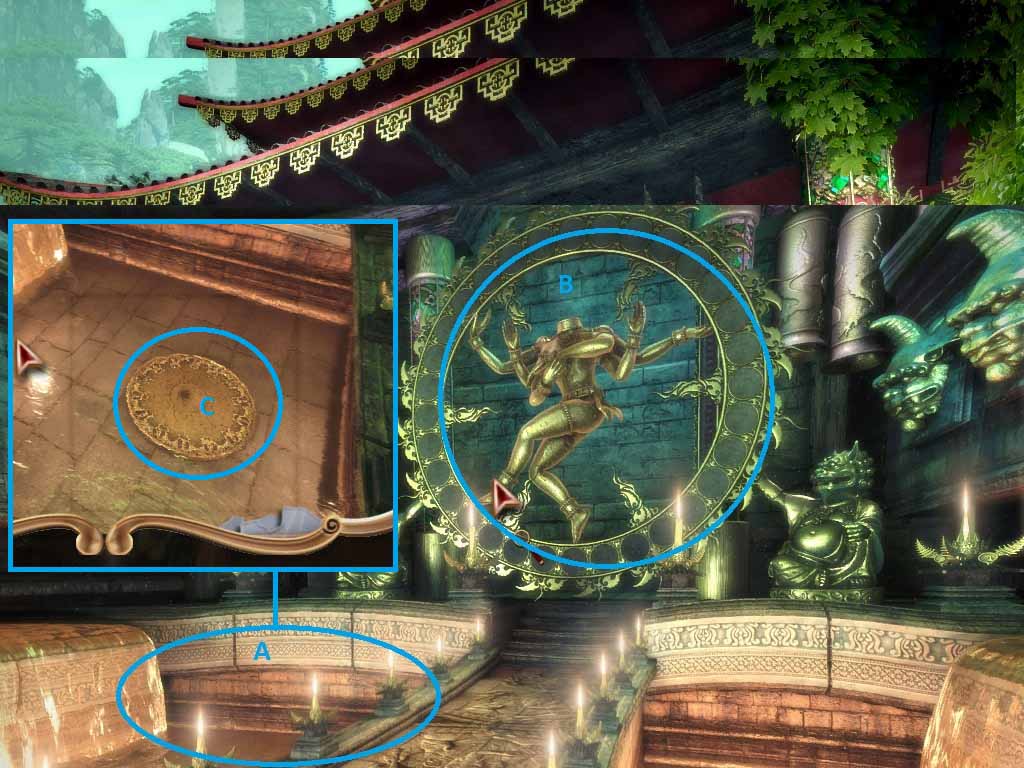
- The final showdown with the magic mirror approaches! You exit the mirror looking at an Asian-style gate with some freaky statues in front of it. It looks like one of them is breathing.
- Right off the bat, you’re confronted with a HOS.
- At B, is the puzzle that will unlock the door – work on the HOS at A first.
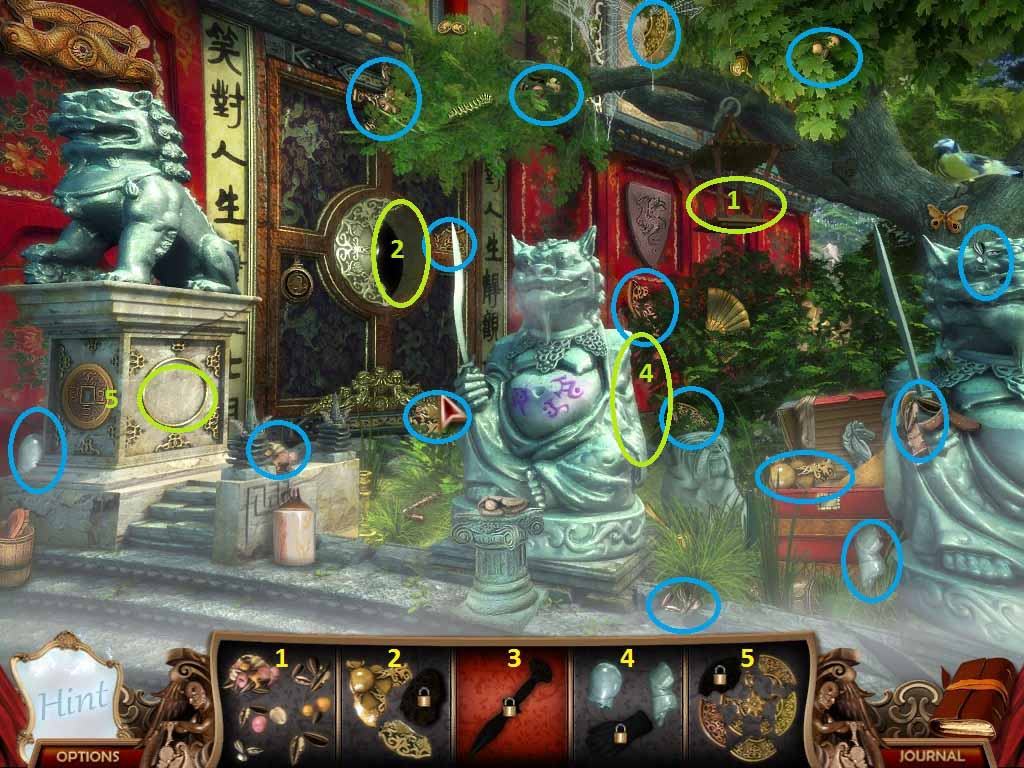
- 1 – Bird Feed; 2 – Half Emblem; 3 – Dagger; 4 – Statue Arm; 5 – Full Emblem
- This one’s honestly a little tricky – good thing you have this guide, right?
- Start with the bird food, as it’s the only one you can complete right off the bat.
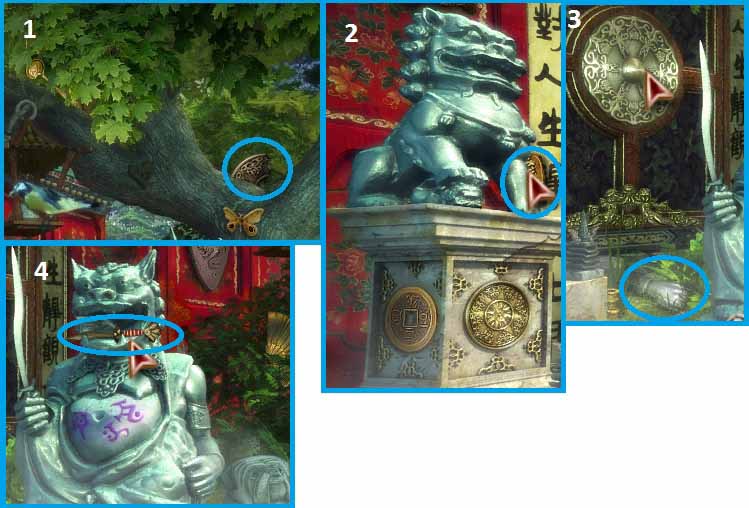
- Putting the feed in the bird feeder will cause the bird to fly over and eat before flying away.
- One the bird takes wing, take the last piece of the full emblem to use on the base of that dog-thing statue.
- Placing the first emblem on the statue will cause it to twist around, letting you take the last piece of the second emblem.
- Putting the half-emblem in place will, somewhat redundantly, cause THAT emblem to spin around, dropping the stone hand that will let you finish the statue.
- Once you add the statue’s missing arm, its mouth will pod open, revealing the dagger.
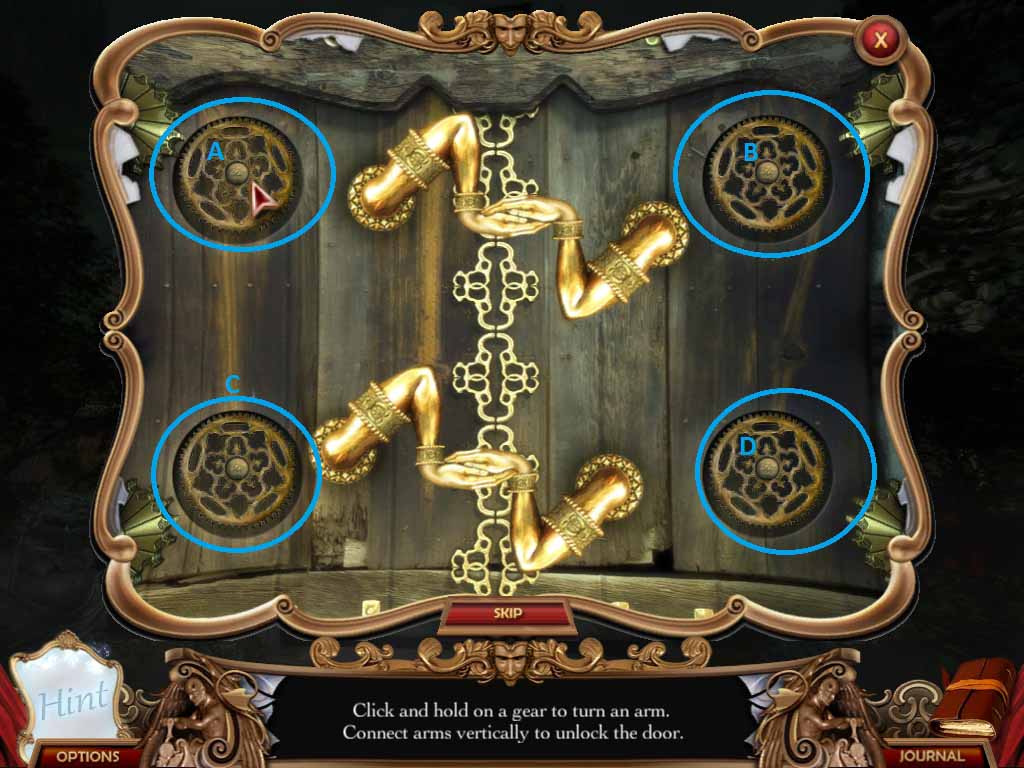
- Twist one of the top handles (A or B) to start them turning.
- Once they pass the halfway point, let go and press on the corresponding bottom handles (C or D, respectively) and they should link up in the middle.
- Do both sides.
- The doors should open now.
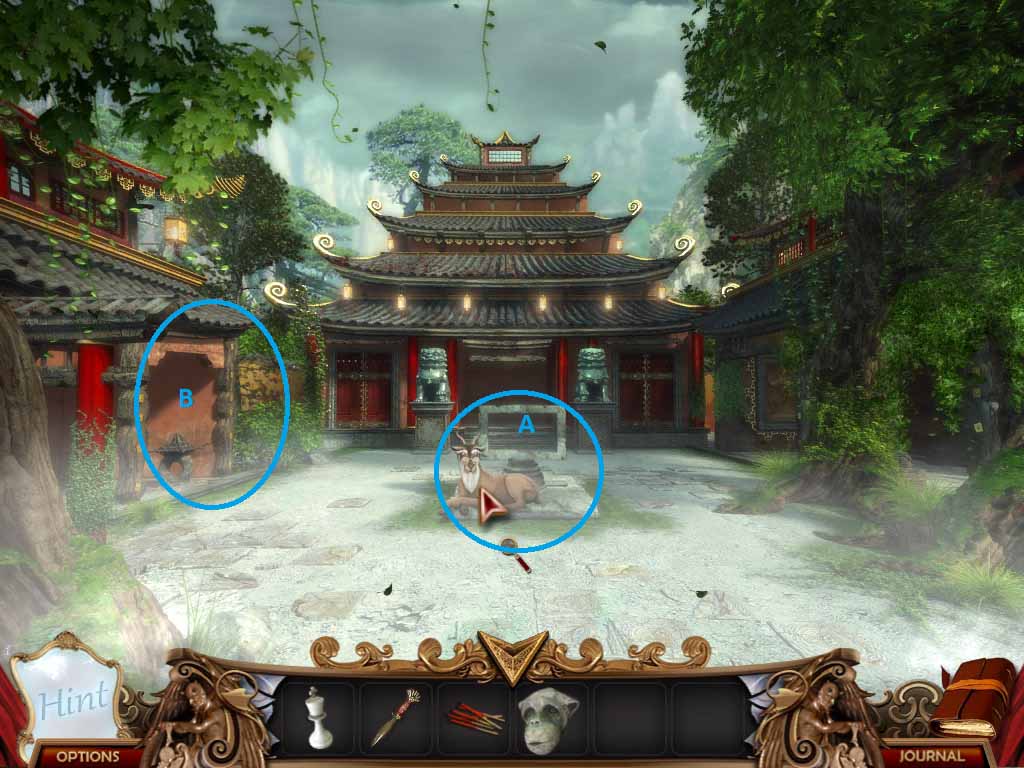
- Enter the shrine’s courtyard and a deer will start talking to you and offer to help, which is pretty nice, considering it hardly knows you.
- If you check by the deer at A, you’ll see what it’s talking about, you need 3 statues in order to proceed.
- Go to B to move on.
- I mainly included this picture because it’s pretty nice-looking.
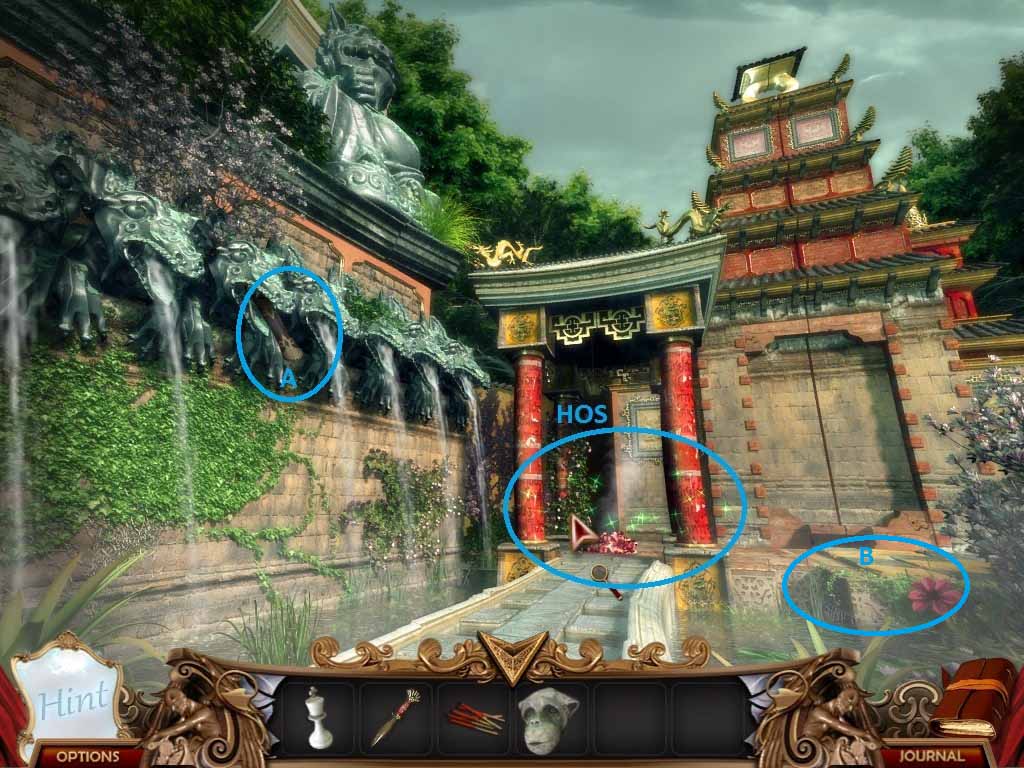
- Click to start the next HOS.
- Remember where A and B are, though, because we’ll be going back there in a second.

- 1 – Bucket; 2 – Origami Bird; 3 – Bow; 4 – Fishing Pole; 5 Coconut
- Collect the bucket first and use it to douse the fire.
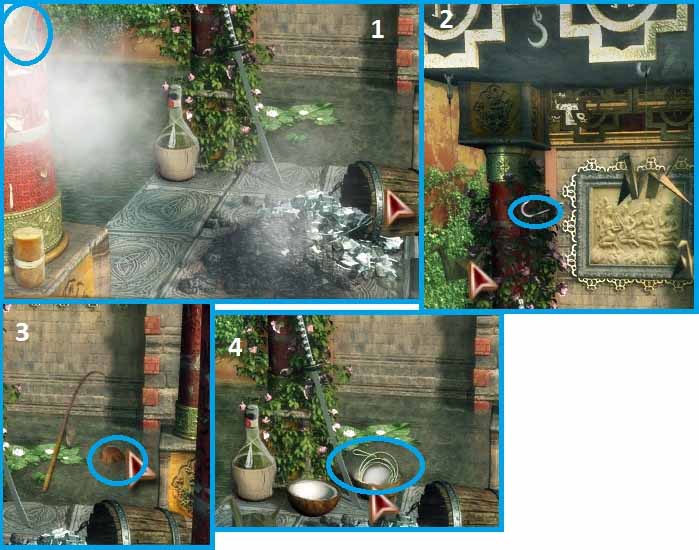
- This one had me looking around for a second… the steam from the fire actually peels back some of the wrapping on one of the columns, revealing the last piece of the bird.
- Place the finished origami on the mobile and it will cause one of the birds to fall off, revealing a fish hook.
- Finish the fishing pole and then use it to fish out the coconut.
- Slice the coconut open to find that a bowstring has randomly grown inside of it…
- Take your bow and go back to the A. Use your dagger on the dragon’s mouth and you can pry out a quiver of arrows.
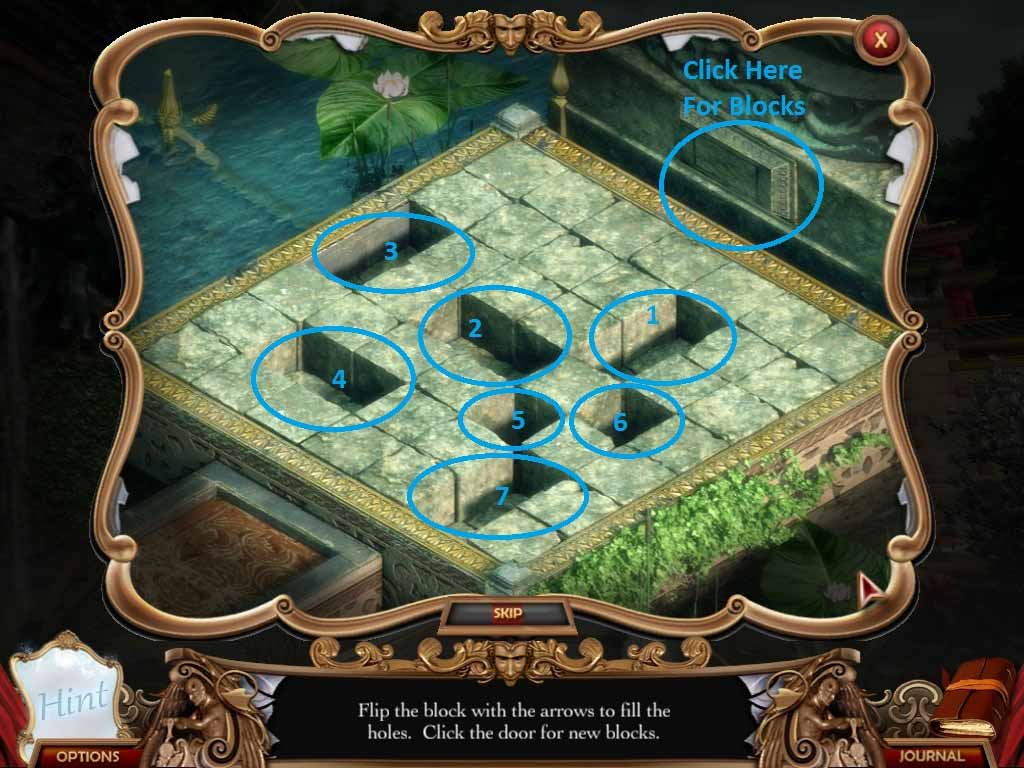
- This is hands-down my favorite puzzle of the game. I put the order I normally solve it in on the picture above.
- You click the slot to get a new stone block, then use the arrows to ‘turn’ the blocks in the direction.
- There are 4 directions, NE, NW, SE, and SW
- Solutions: 1 – SE, then SW; 2 – SW x3; 3 – SW, NW, SW, NW; 4 – SW x2, SE, SW, NW, SW, NW; 5 – SW x4, SE; 6 –SE, SW, SE, SW; 7 – SW, SE, SW, SE, SW x2

- When the block puzzle is complete, the wall will slide open and allow you into the chess garden.
- Once inside, you can jump straight into the next HOS (A), or take a moment to preview B, your next puzzle.
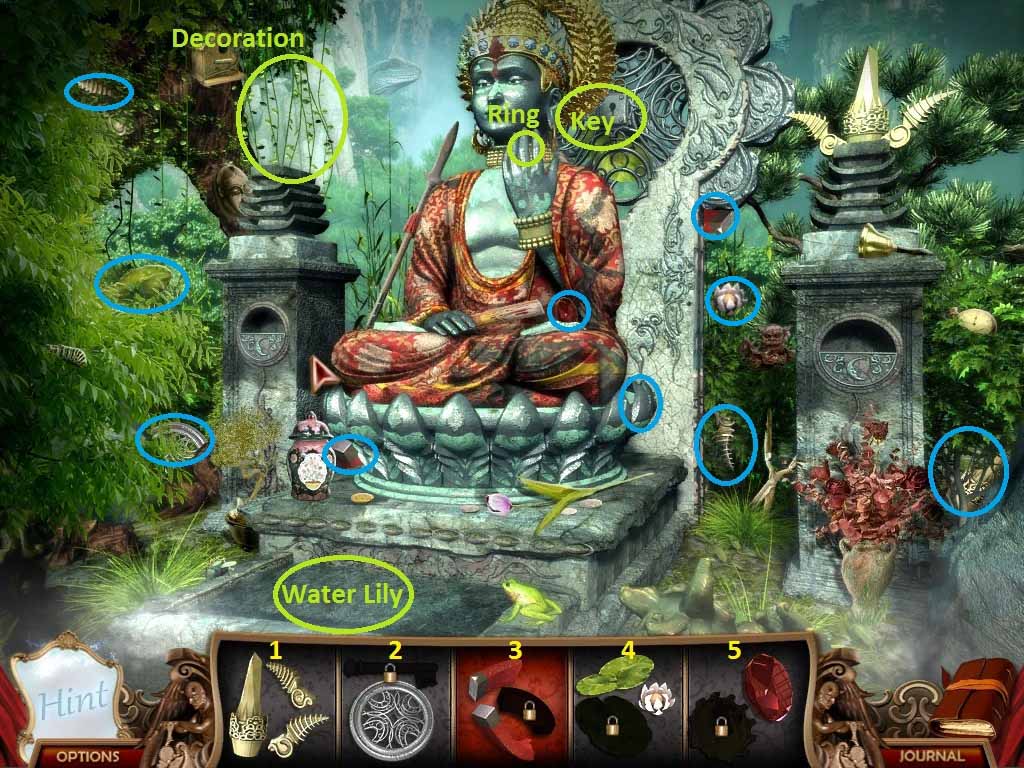
- 1 – Decoration; 2 – Key; 3 – Magnet; 4 – Water Lily; 5 – Ruby Ring
- This HOS is pretty quick because it doesn’t have a lot of individual pieces.
- Start with the decoration and place it on top of the bare column to the left.
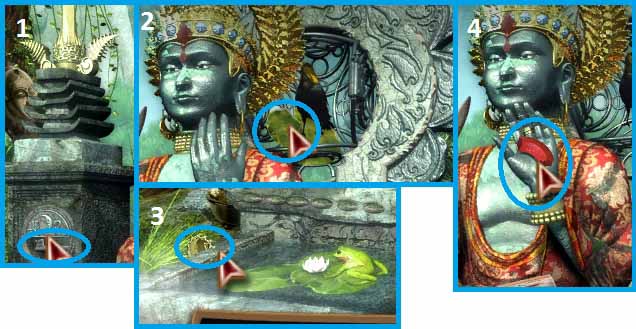
- When you place the ornamentation on the column, a slot will open underneath, letting you finish the key.
- Using the key to unlock the birdcage will allow you to finish the water lily.
- Use the lily pad on the pond to unlock the last part of the ring.
- Place the ring on Buddha’s hand and it will twist around, revealing the last part of the magnet.
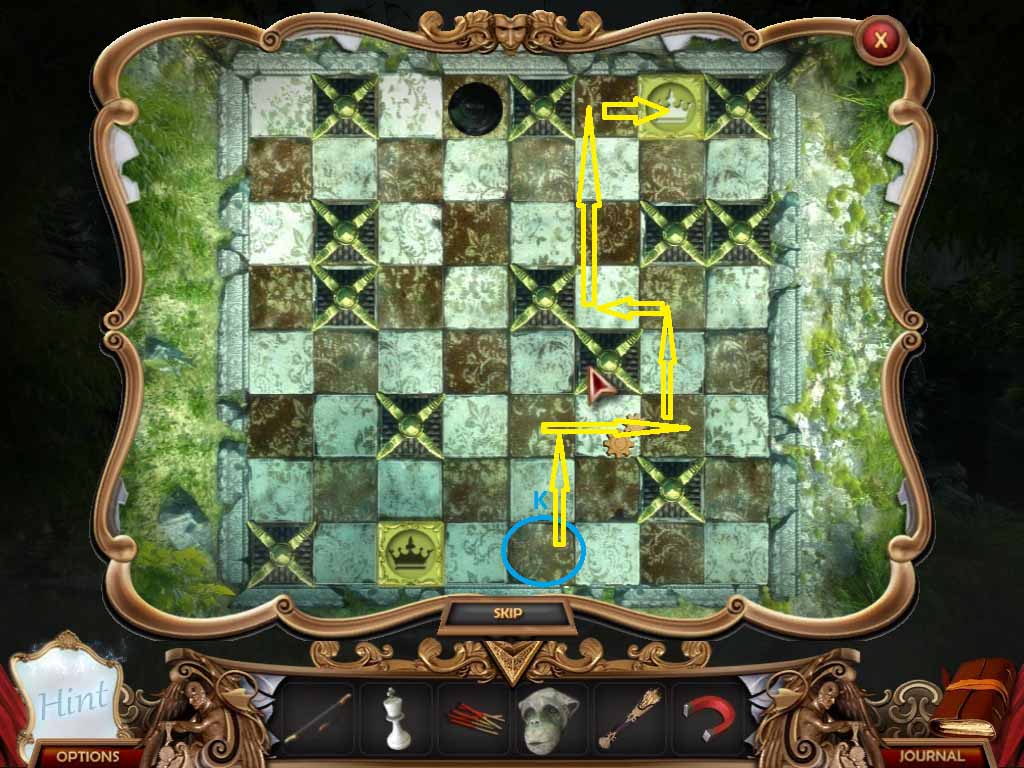
- This one, on the other hand, is a little brutal. You need to get both kings to their ending locations at the same time.
- Use your white king on the chess board to start the puzzle, then follow the course on the map to complete the puzzle.
- Your reward for all this is the first monkey statue, so take it and run (well, click) back to the shrine.
- Place the statue in its slot at A.
- Head through the open door at B.

-
This is just like the chess garden in that you have a HOS at A, and a hint at a puzzle involving the zodiac is at B.
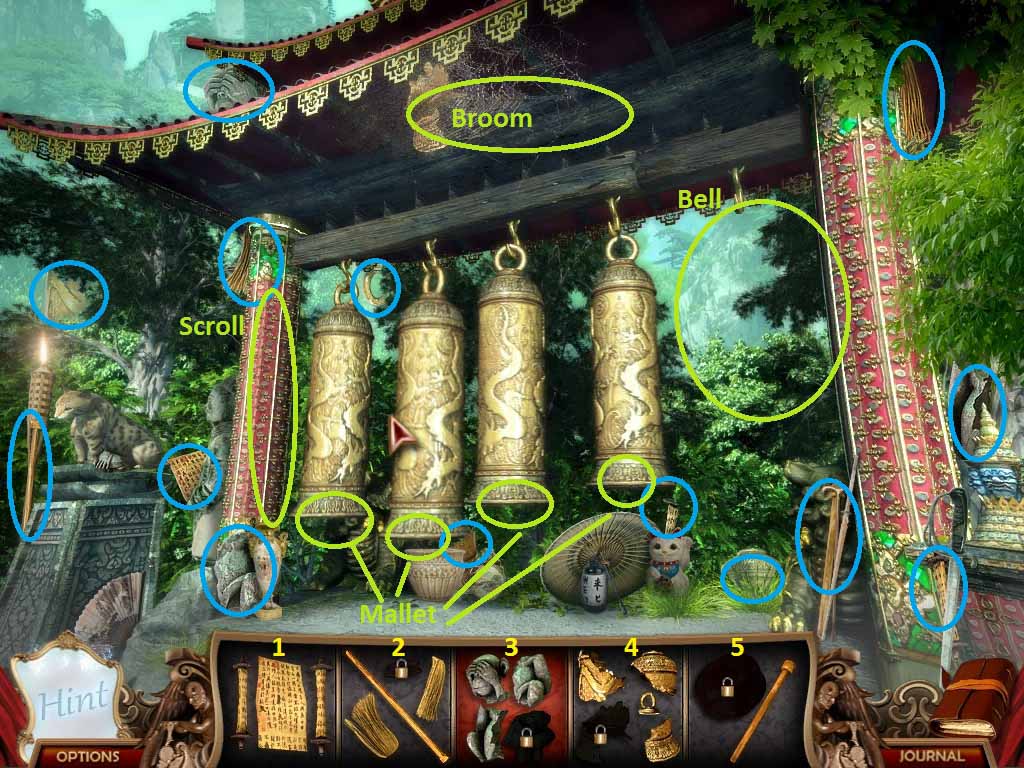
- 1 – Scroll; 2 – Broom; 3 – Monkey Statue; 4 – Bell; 5 – Mallet
- Start off by collecting the scroll and then nail it to the post.
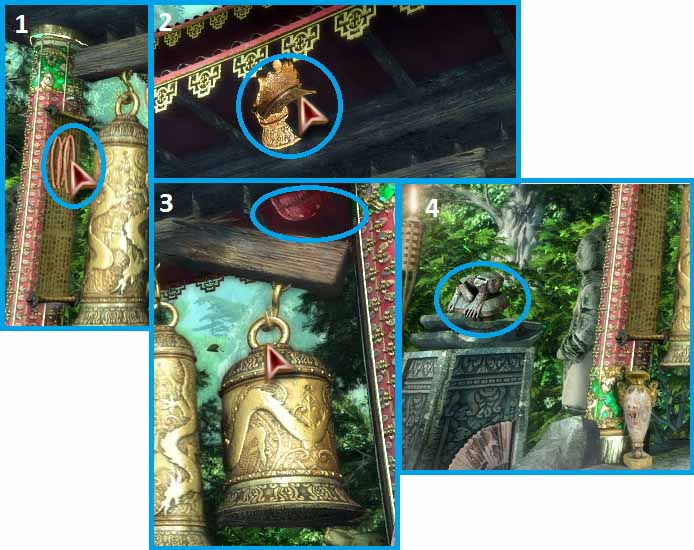
- The last piece of the broom will reveal when the scroll unravels. Use the assembled broom to sweep away the cobwebs and finish the last bell.
- Add the fat bell to the chimes and the last piece of the mallet will appear.
- Playing the chimes with the mallet will scare away the cat, revealing the last piece of the monkey.
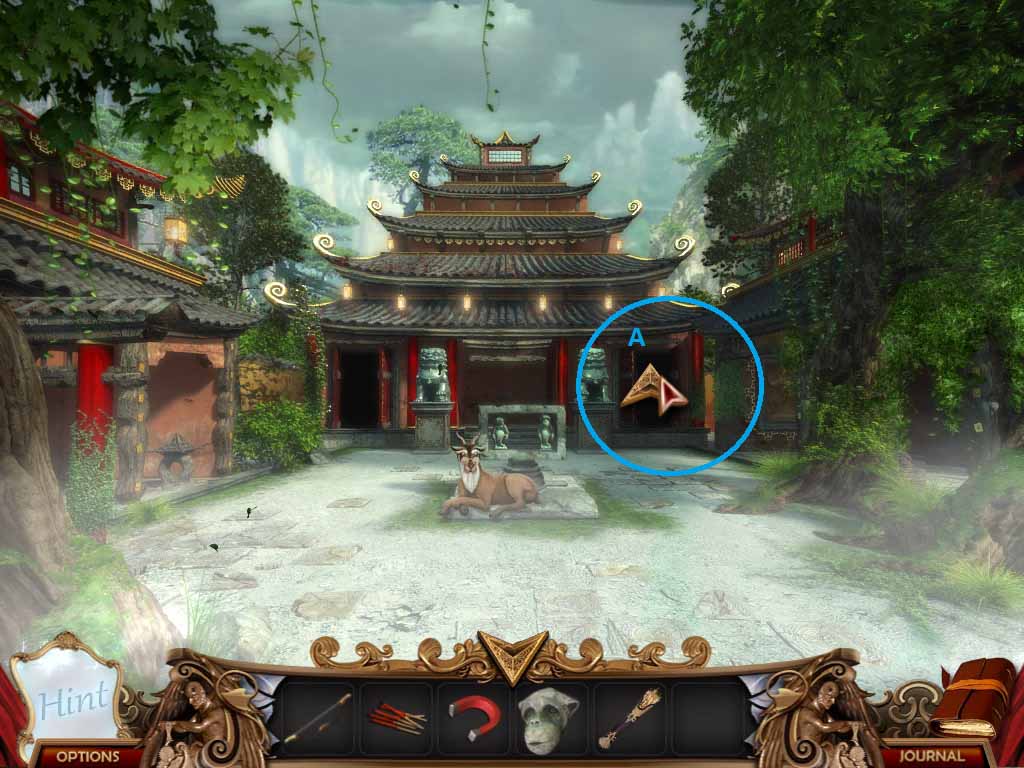
- Take the finished statue and head back to the courtyard and place it in the altar.
- The next door will open at A.
- You have to grab something from the next room before you move onto the zodiac puzzle.
- All you need to do right now in the next room is look at A, then use your magnet to attract the object in the fountain (C) to you.
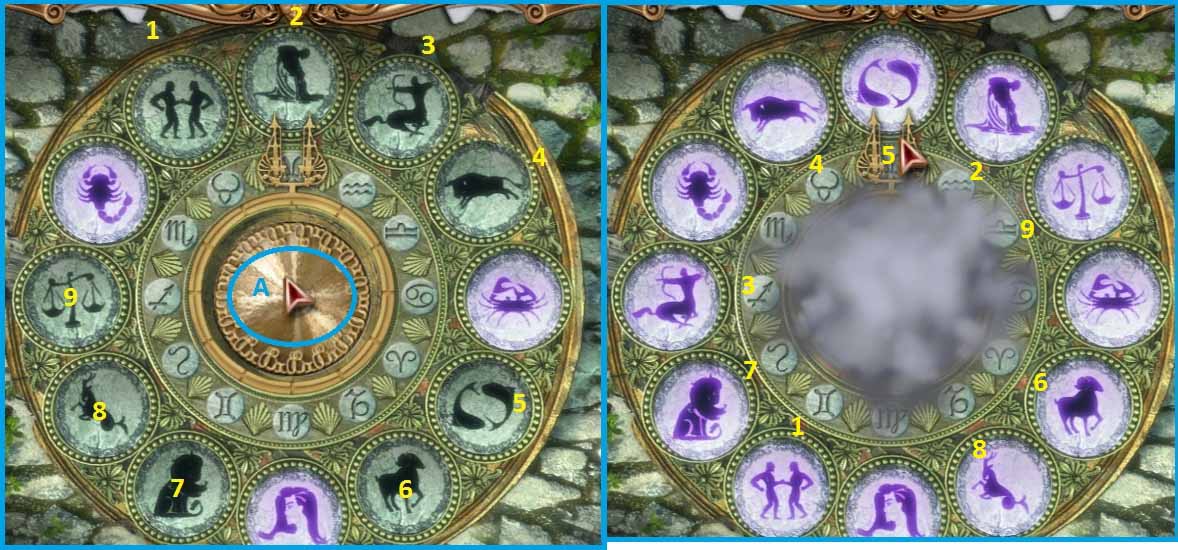
- Head back to the bells and zoom into the puzzle on the ground (B from before).
- Place the circular plate in the center of the puzzle, at A.
- Select one of the 9 open zodiac tiles (the glowing purple ones are locked into place) and begin moving them to match the pattern.
- This nets you the an idol head. Now where could that be useful…
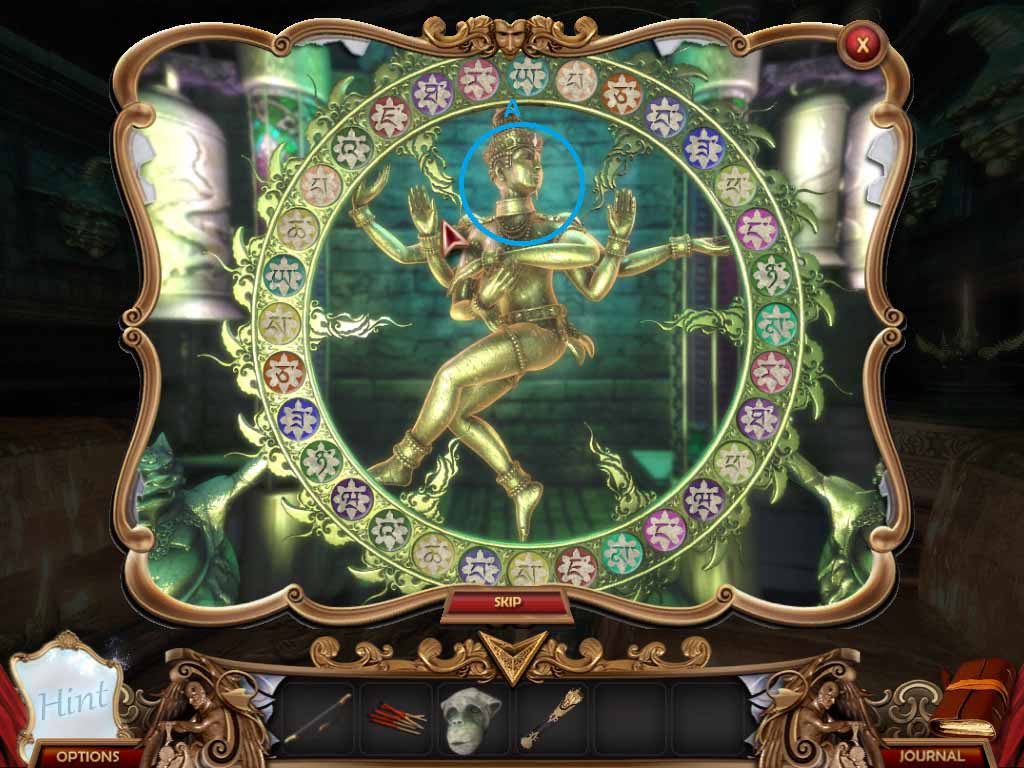
- Head back to the last room you unlocked with the head and zoom into the giant circle in the middle of the room.
- Place the head back in position at A and you’ll start a matching game.
- You can click on the idol at any point to reveal half the tiles for a few seconds, but that honestly isn’t as helpful as you’d think. It tends to border on information overload and not really help.
- The pattern is fixed, however, so feel free to use the picture as a guide.

- Go back to where the deer (goat?) is and use the last monkey statue to almost finish the statue.
- You’ll notice that it’s missing its head, which is thankfully something you can correct.
- Once the statues are finished, the deer-goat will give you a frame and new mirror will rise into view.
- Use the frame at A to open the portal to the final stage.
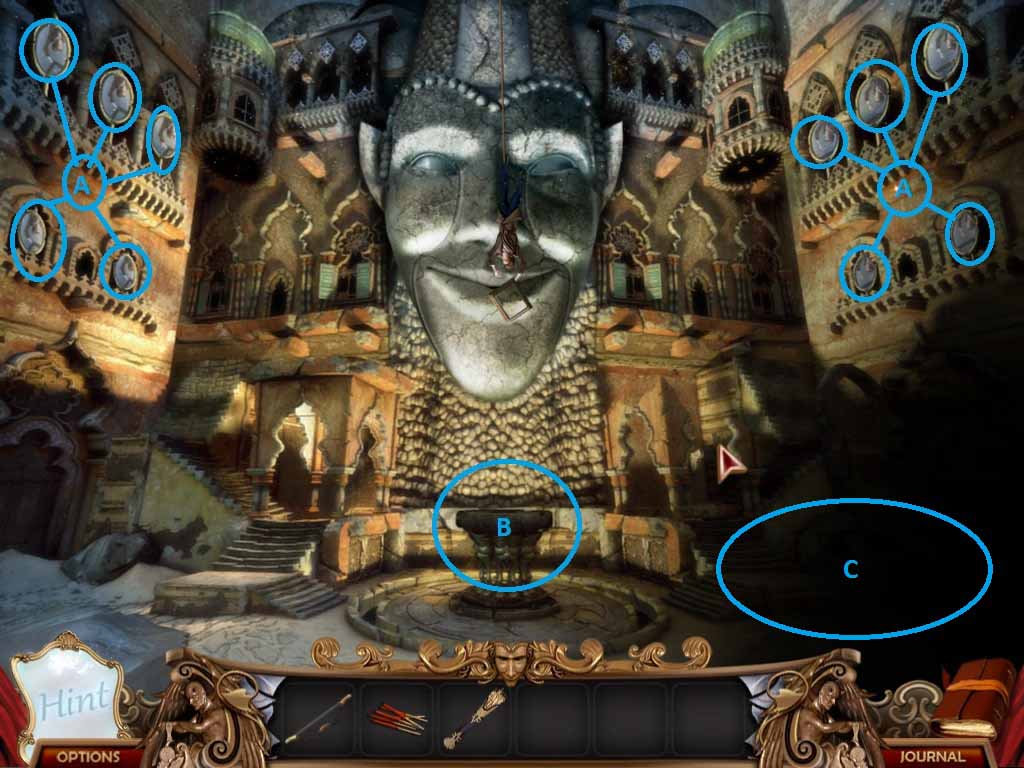
- So, once you pop out of the purple wormhole, you’ll notice it looks like the mirror is about to sacrifice Tommy to itself. It now becomes your job to stop that.
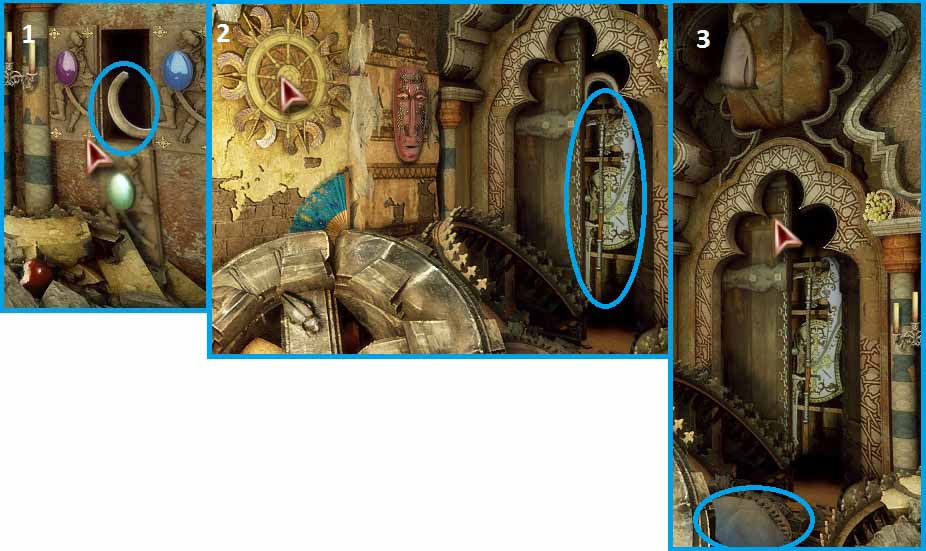
- The way to do that (apparently) is to first shoot all the mirrors marked A in the picture above.
- Use your long bow on the mirrors to shatter them all.
- The statue will begin crying oil-blood tears.
- Go to B to get a look at the altar.
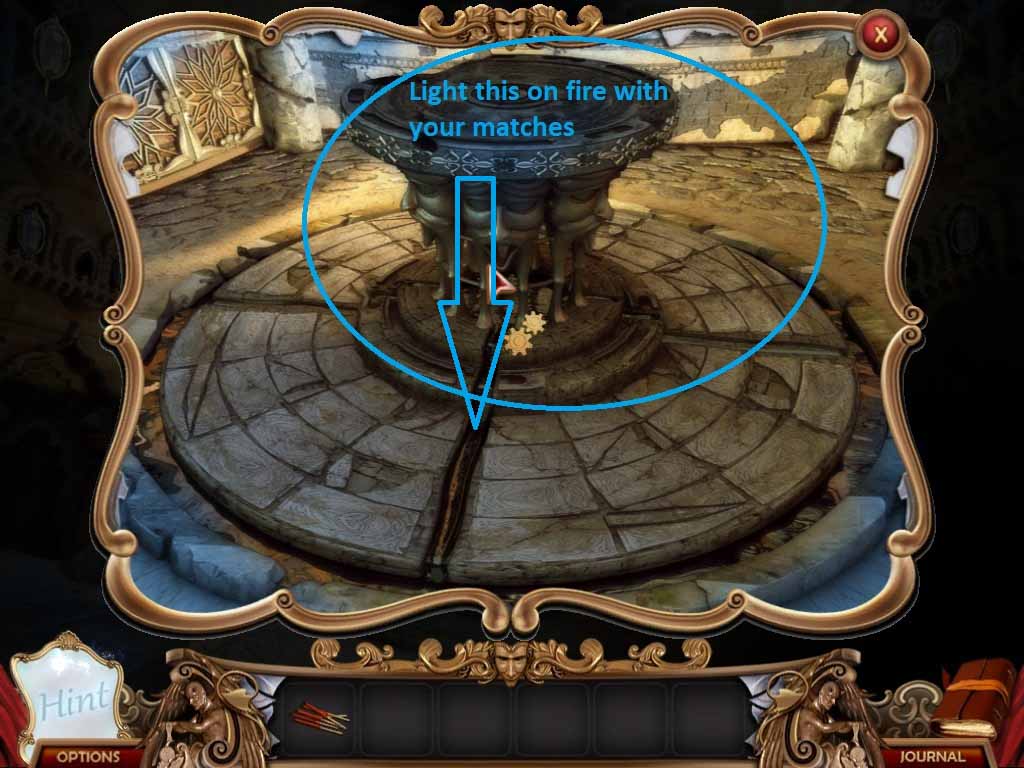
- Follow instructions, light the oil on fire.
- By the way, if Tommy’s annoying you by whining at you while you’re trying to save his life, you’re not alone. I purposefully went and made a sandwich to see if he falls. He won’t.
- Once you’re finished, a new HOS will be visible to the right of the altar (at about C in the last picture).

- 1 – Dragon; 2 – Spear; 3 – Sand; 4 – Wheel; 5 - Shields
- Well… this starts out simply enough.
- Collect the 3 dragons and use them on the jug to light up the rest of the screen.

- This scene really makes me wish I had a magical fire dragon lamp in my house.
- Anyway, now that you can REALLY begin this HOS, collect the shields and use them on the wall.
- One of the shield panels will slide down and allow you to complete the wheel.
- Use the wheel on the wall to unlock the door into the armory so you can grab the last spear piece.
- Stab the hanging bag and the sand will pour out of it.
- Grab the sand then hurry (or don’t hurry) back to the altar.
- Pour the sand into the altar, and guess what…
- You just won the game!
- Now all you need to do is enjoy the last cut-scene of your escape with Tommy while glass shatters and the house vaporizes.