The Mirror Mysteries: Forgotten Kingdoms: Chapter Three: The Magical Forest
Our The Mirror Mysteries: Forgotten Kingdoms Walkthrough will be your guide as you travel through worlds in your quest to defeat the evil magic mirror. When a woman approaches you and asks for you to help save her brother from an evil mirror, your first response is to suggest she seek a more mental kind of help. But when your curiously forces you to take the case you soon discover that the powerful mirror is indeed real, and it’s not just Tommy that’s in danger of being destroyed. Use our helpful hints, insider tips, and custom screenshots to travel through the looking glass and into new and amazing worlds as you race to defeat the magic mirror.
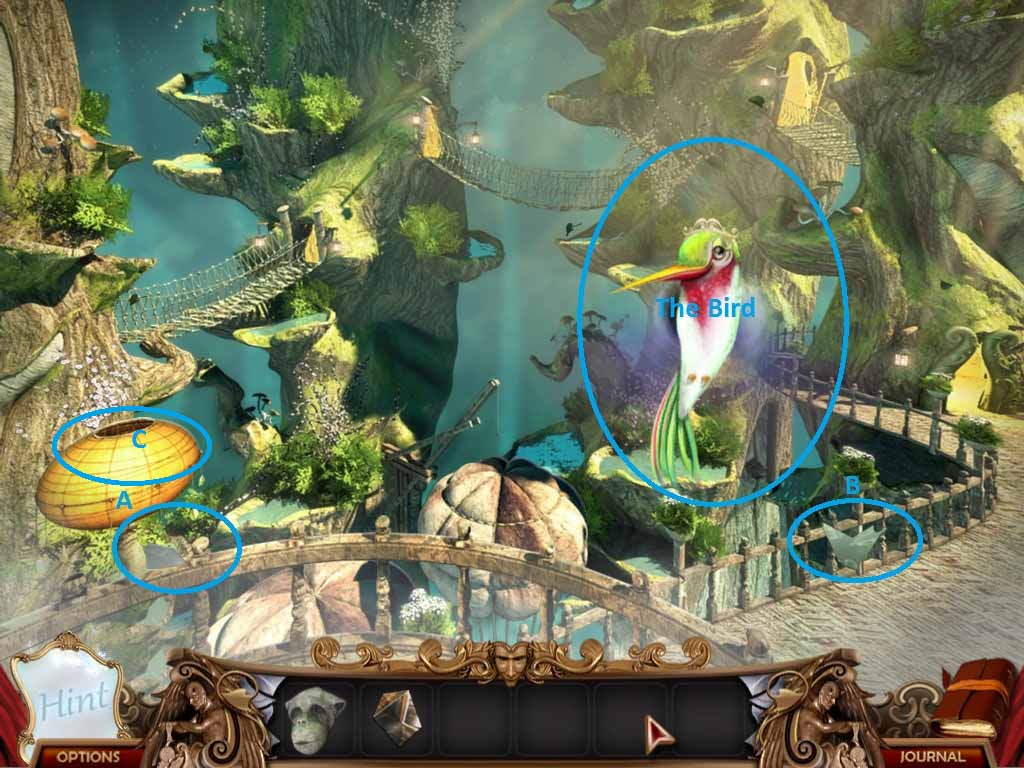
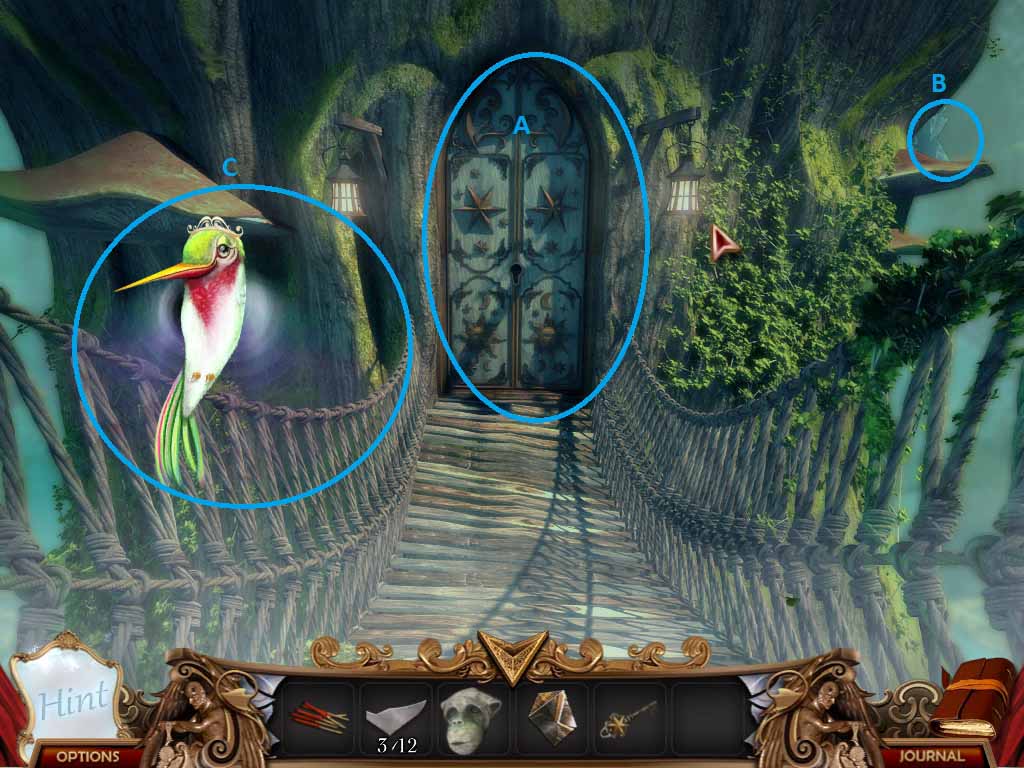
- Wow. That is a big hummingbird! And it talks, and laughs at you when you fall down.
- So, after a few seconds of extremely forced exposition, you find out that this bird needs your help. I’m not sure how this bird expects you to help it, though, considering you just fell from an unknown height and could have any number of serious injuries. What part of almost plummeting to your death makes the bird say “Oh, this guy can save the magical forest!”
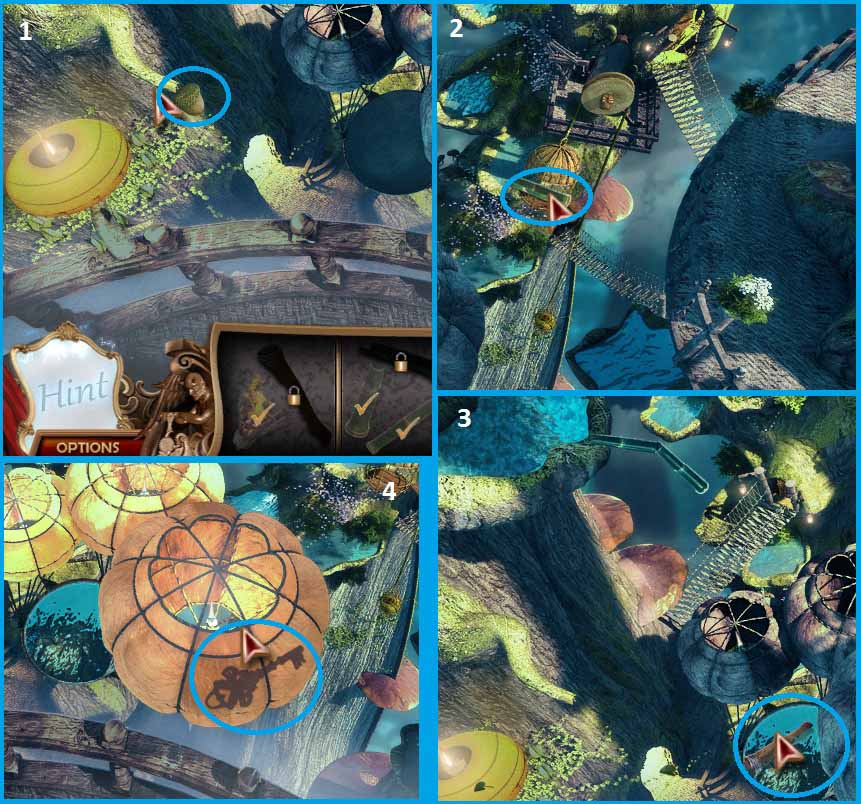
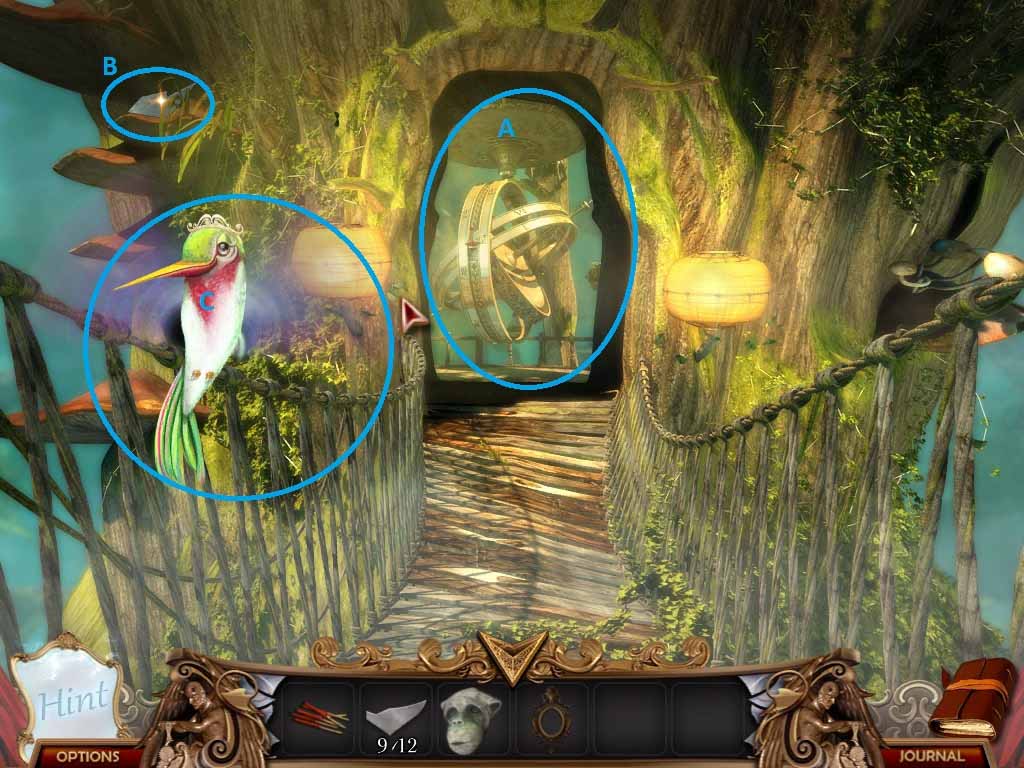
- ANYWAY – Pick up the two shards at A and B first and then check out C if you’d like. It’s a paper lantern that appears not to be lit.
- Since you can’t do anything more at the moment, continue up the path to the right.
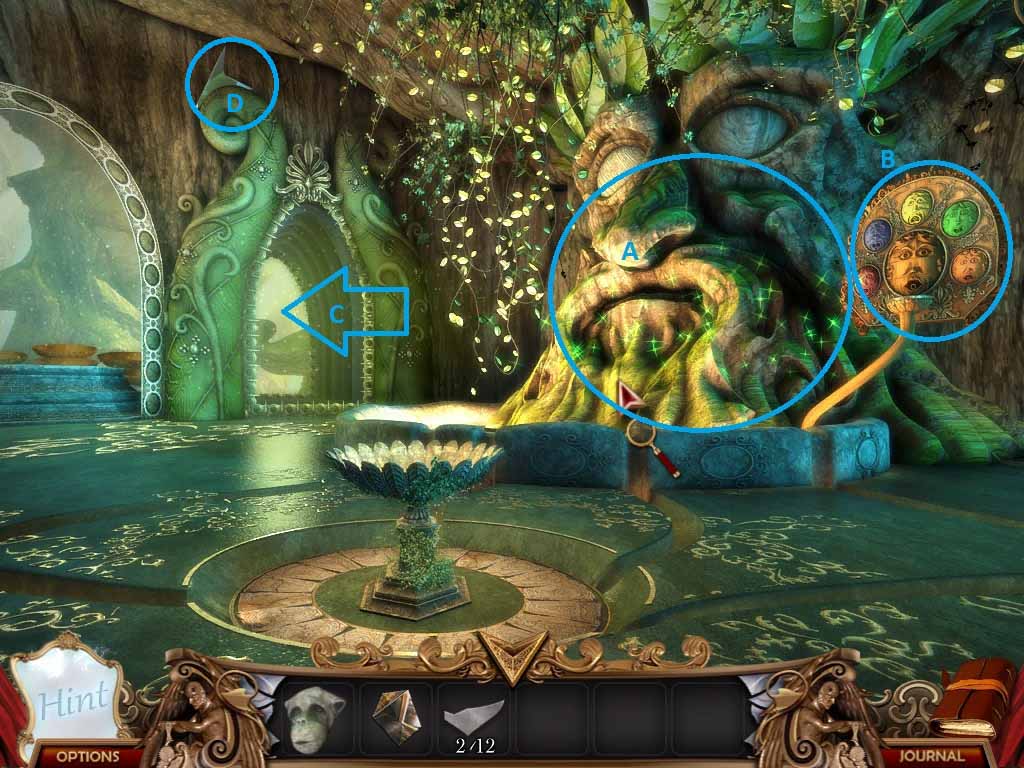
- The next room you arrive in houses a massive glowing tree (A) that is the site of the next HOS.
- B is a puzzle involving goblets that you’ll work on after the HOS, and if you take the arrow at C you can check out a rope bridge and stare at a locked door. You’ll get the key soon enough.
- Remember to keep your eyes peeled though, a shard is hidden at D.
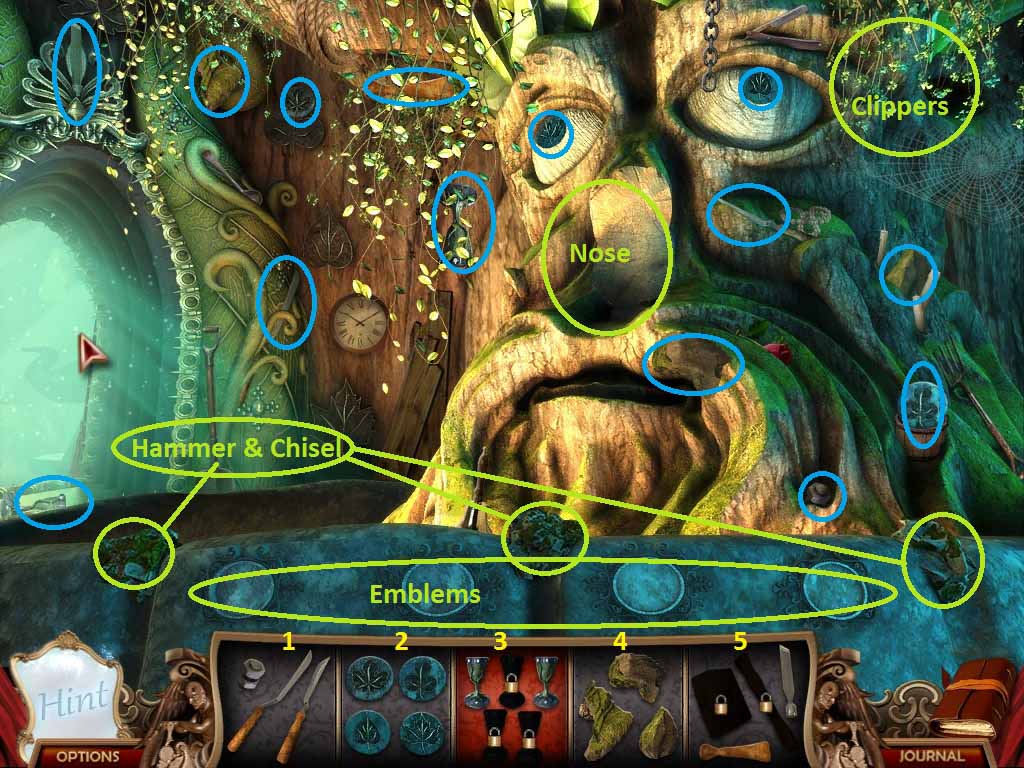
- 1 – Clippers; 2 – Emblems; 3 – Goblets; 4 – Nose; 5 – Hammer & Chisel
- The order on this one isn’t as strict as the last couple have been.
- If you start with the nose, then you can unlock a piece of the hammer & chisel.
- Using the clippers unlocks the other hammer & chisel piece.
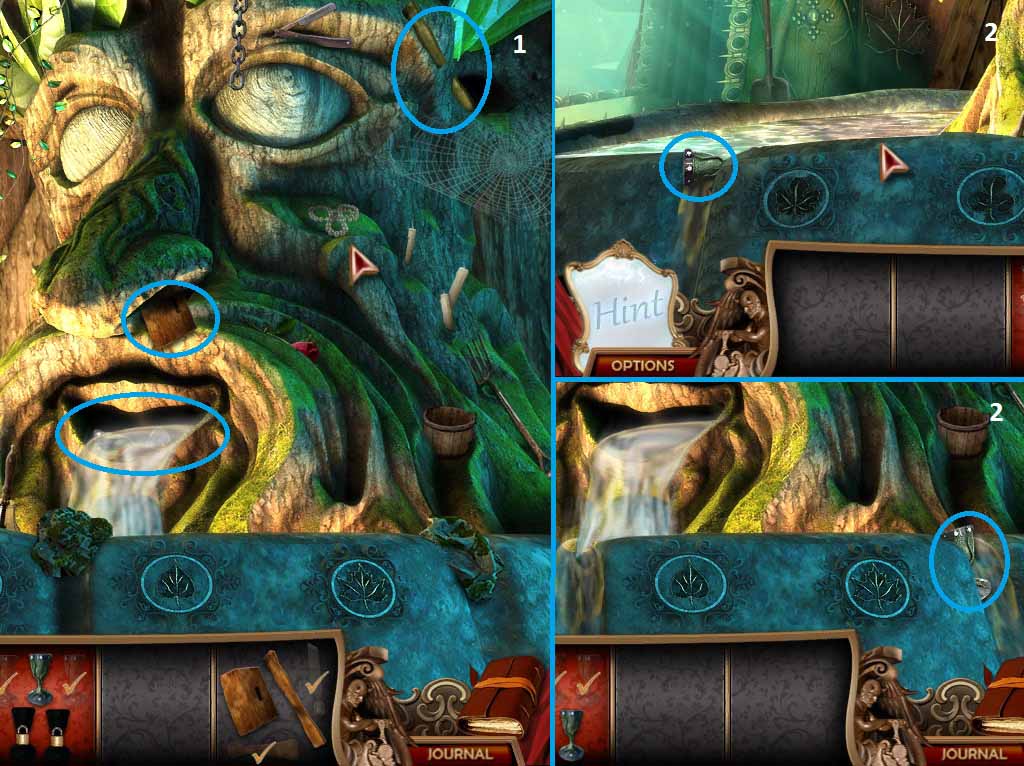
- Using the emblems will start the water flowing and reveals a third goblet.
- Using the hammer to break up the rocks will free up the last two.
- Now it’s time to check out the next puzzle.
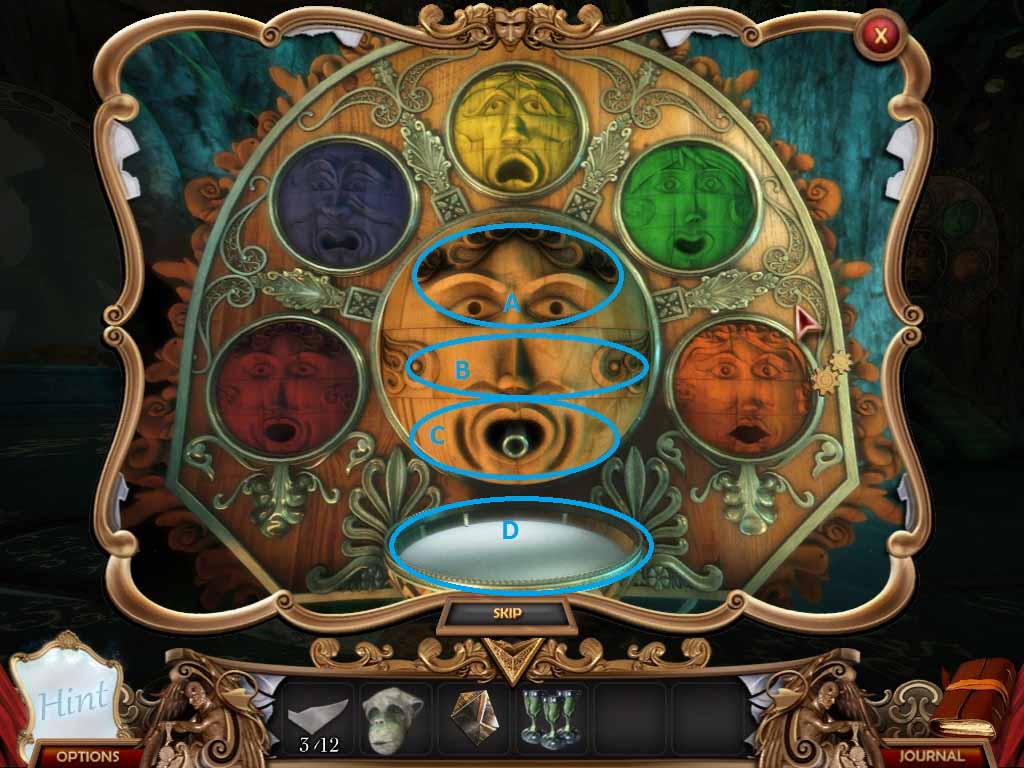
- Zoom into the faces (B from before). Use the goblets on the middle face to start the puzzle.
- This puzzle is REALLY easy – You just have to match the faces of each colored plaque with the changeable face in the middle.
- The middle face has 3 sections, A, B, and C. Twist B, the nose, until the water runs out red, then click any goblet and click the fountain (D) to get a red goblet.
- Click A, B, and C, and the face will have rotated to match the blue face. You can now get a blue goblet.
- Rinse and repeat, no pun intended.
- Once you’re finished, you should have five colored goblets.
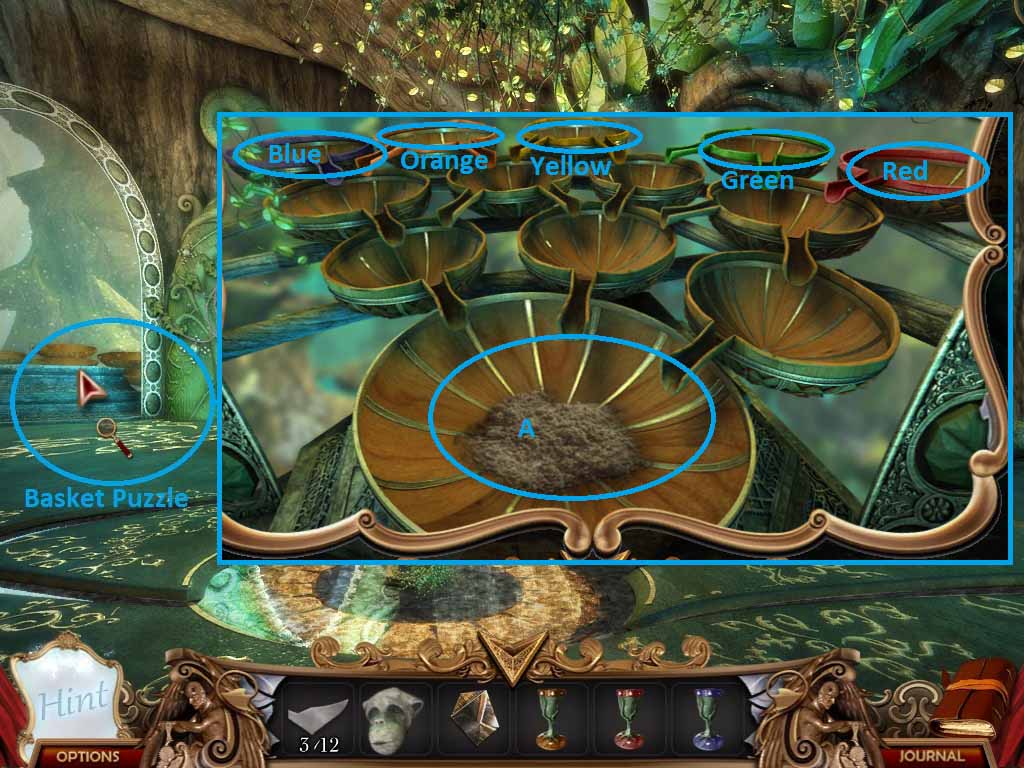
- Click where it says “Basket Puzzle”. This will bring up a new window.
- Hmmm, you have five colored goblets, and five colored bowls… Anyone see where this one’s going?
- Use each goblet on its matching bowl and the matches will appear out of the ashes at A.
- Chapter-3-007-PaperLantern
- Head back to the start and click on the paper lantern again, C from the first screen of this level.
- Use the matches at D to light the lantern.
- A new HOS should activate right next to the lantern. Click to start.
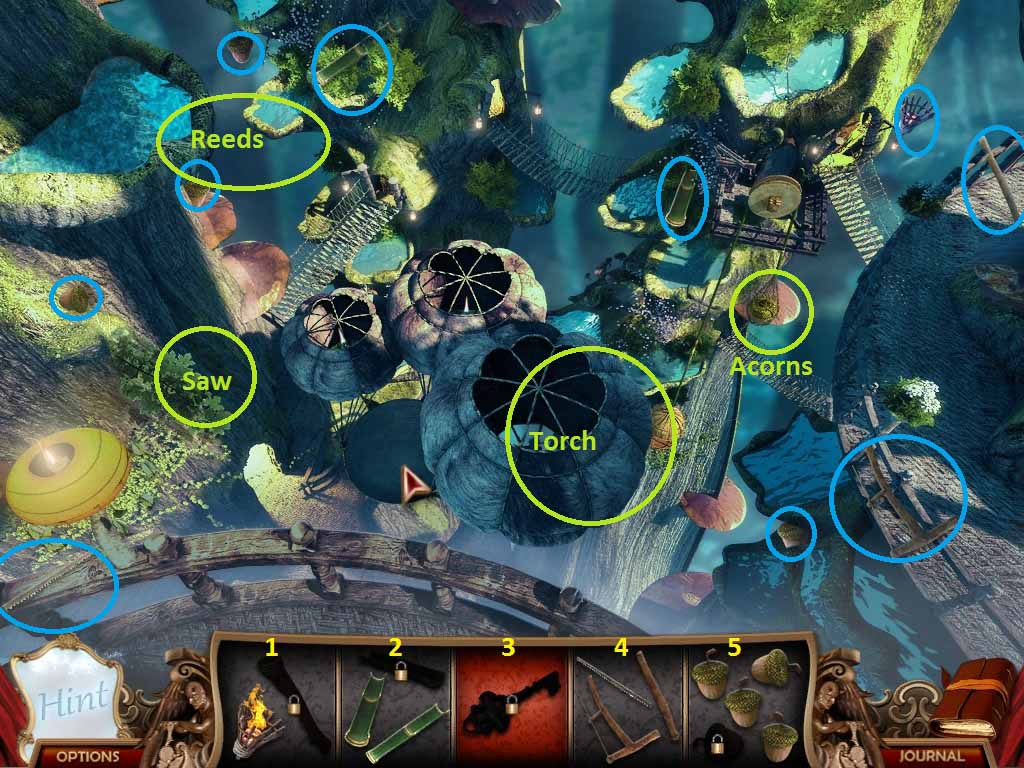
- 1 – Torch; 2 – Reeds; 3 – Key; 4 – Hacksaw; 5 – Acorns
- Start the level off by collecting the saw and using it to cut through the branches on the left-hand side. Once that brush is cleared, you can grab the last of the acorns.
- Use the acorns to weigh down the baskets, causing the last piece of reed piping to rise.
- Grab that piece and you’ll form a little makeshift trough to funnel the water from the pond into a large bowl on the ledge below.
- The last piece of the torch will float to the surface of the bowl – grab it and light the large paper lantern. You’ll illuminate the silhouette of a very large key. Grab it and go.
- Head through the Tree Room to the bridge now.
- Use the key at A to move onto the next area. Just remember to grab the mirror fragment at B.
- If you’re really so inclined, you can check out C, to hear some more of the worst voice acting in history. When he talks about his flittering… I don’t know, but I don’t want to be any part of him it.
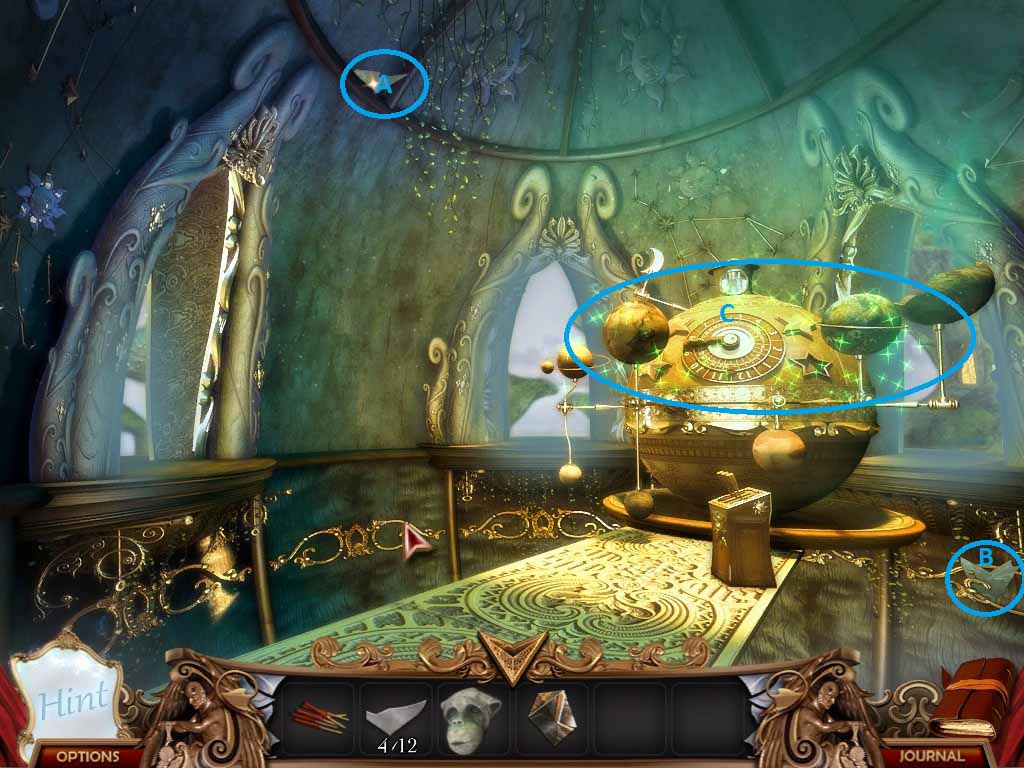
- The first part of this room is very straightforward: grab the two shards (A & B) and start the HOS at C.
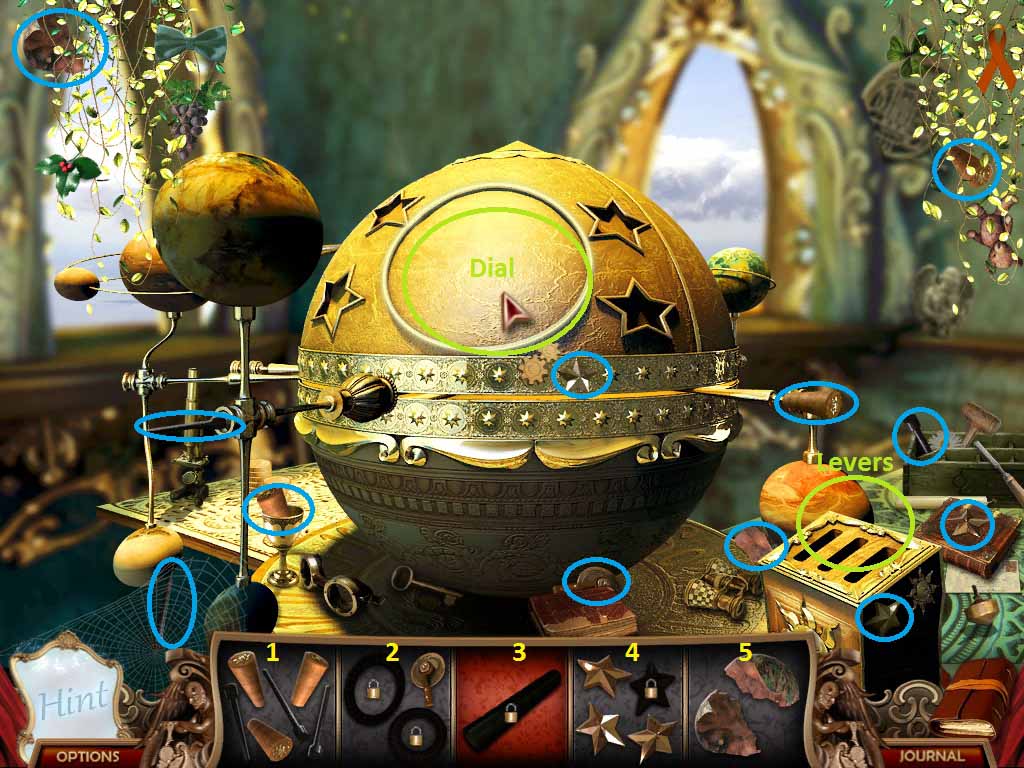
- 1 – Levers; 2 – Dial; 3 – Flute; 4 – Stars; 5 – Half of a Planet
- Collect everything you can, of course, but focus on getting all the levers first. Fit them into the gearbox to start the device rotating.
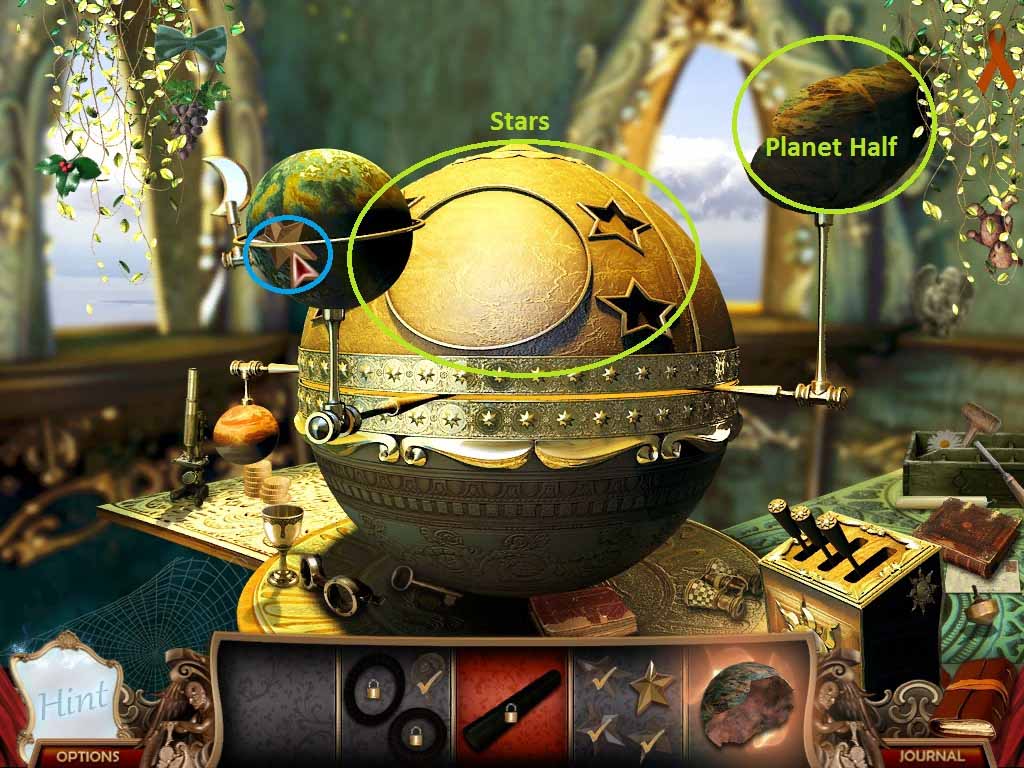
- Once the contraption stops spinning, you should be able to grab the last star, then to use both the stars and the planet piece to reveal the hidden pieces of the dial.
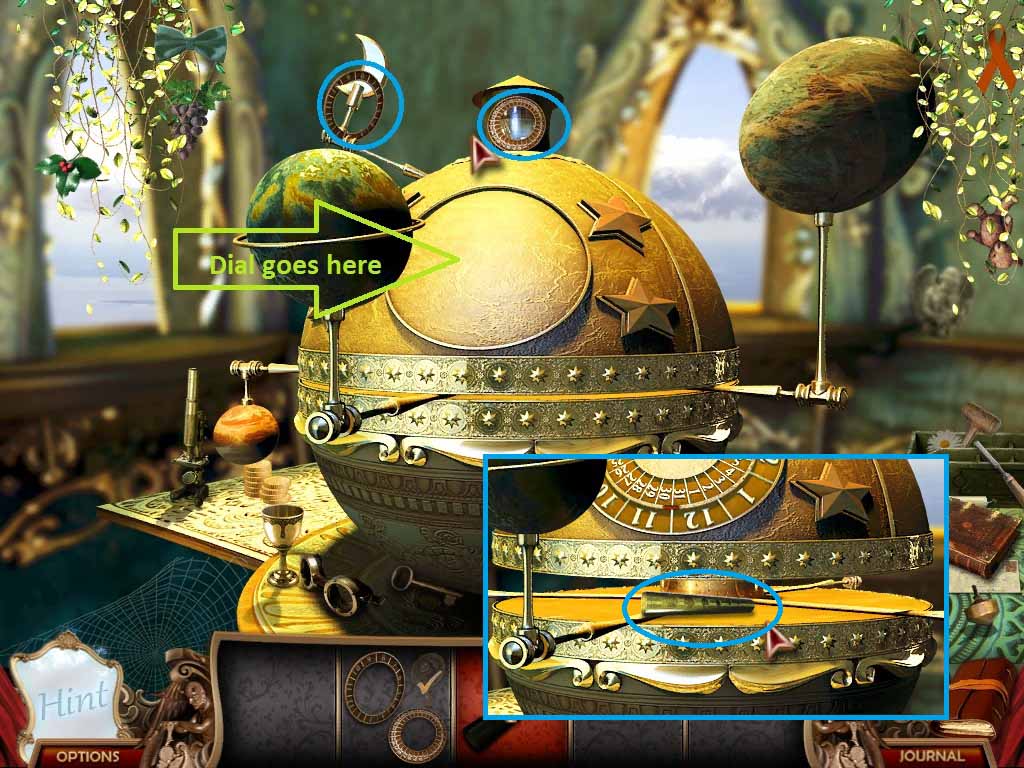
- Take the last 2 pieces of the dial when they appear and use the finished product on the middle of the sun. The whole device should open up to reveal the flute.

- Click on A to examine the wall in front of the projector – using the prism on B will start the next game.

- The next game can be a little annoying at times; it involves dragging large stars into their correct place on the wall so that the proper constellation will be traced out. When you’re dragging a star, it will begin to fade from red into a bright white as you get closer to its correct location. In theory, it’s very simple game.
- In practice, however, each star is connected to a SPECIFC point, not to any of them. So if you’re moving a star around an area where it should be getting lighter, but it’s not, try a different area, because you might have picked up the wrong star for the spot you’re in.
- The stars tend to fall into place so that’s good.
- Once you’ve traced out the shark (1), the squirrel (2), and the tree (3), you’ll be finished.
- Take the exit that will open to your left.
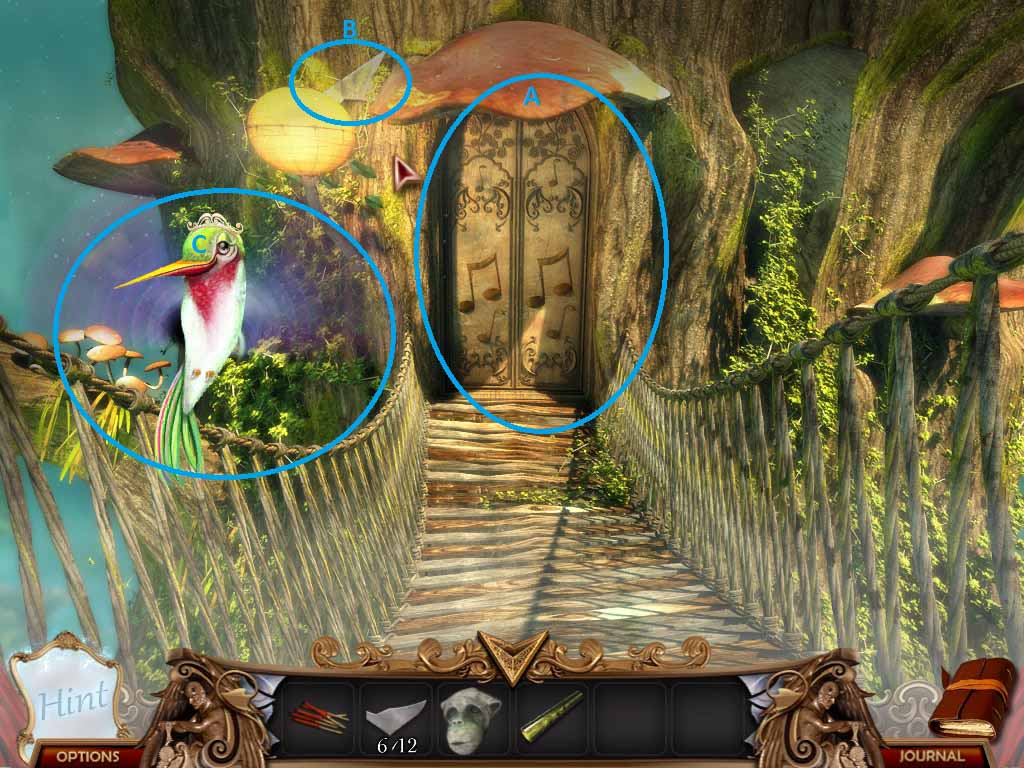
- Once again, that hummingbird follows you, (C), piping something about how if you don’t save the flows, his kind will go extinct.
- Resist the temptation to not save his species and collect the shard at B.
- Go through the door at A to the next room.
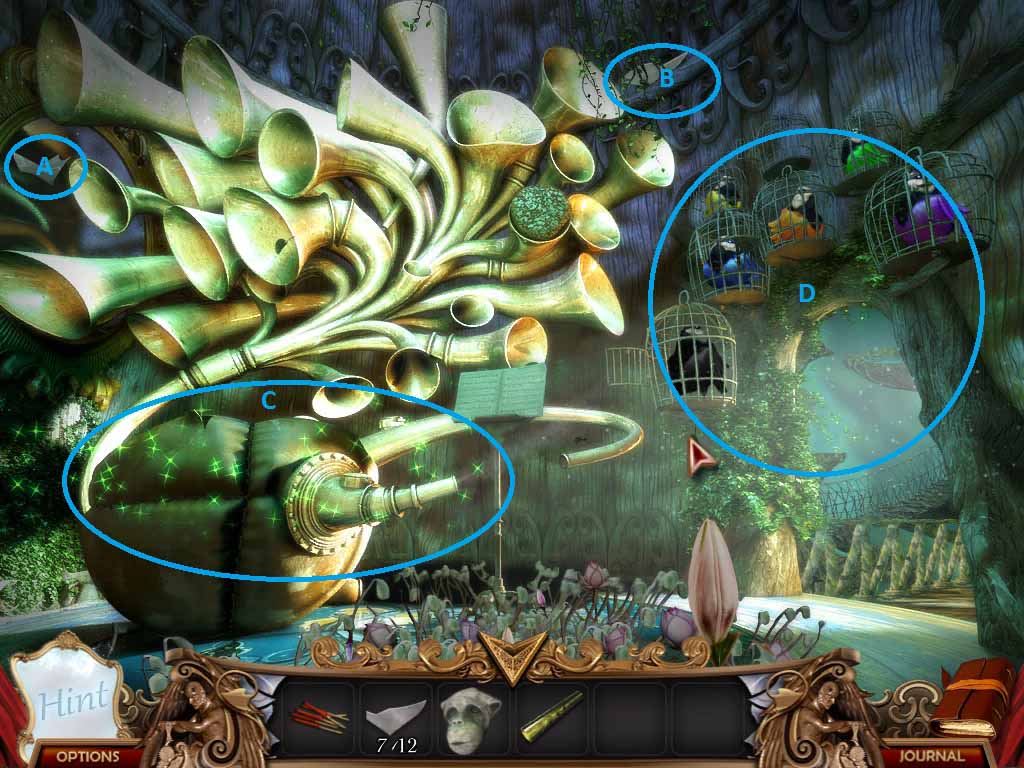
- Once in the Music Room, you can grab the two shards at A and B, and, if you feel like it, check out the bird cages at D.
- When you’re ready, click C to start the next HOS.
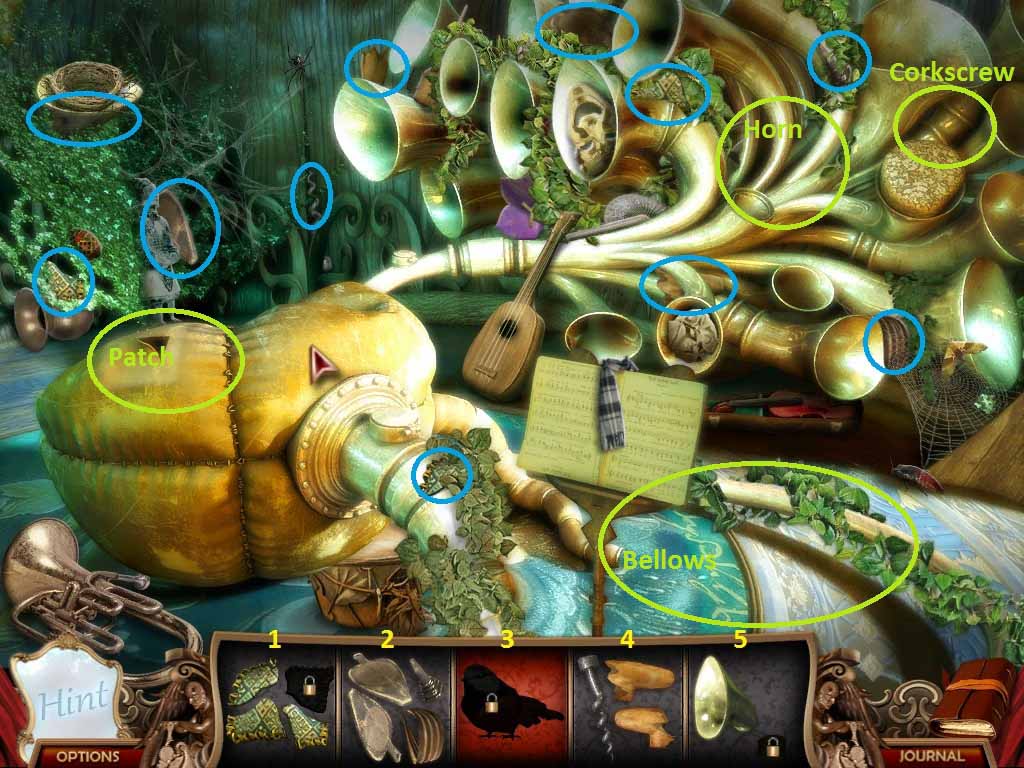
- 1 – Patch; 2 – Bellows; 3 – Red Bird; 4 – Corkscrew; 5 – Horn Bell
- You can collect the bellows, but without the patch, the air sac won’t be able to inflate.
- Collect and use the corkscrew to unblock the horn and you’ll collect the last piece of the patch.
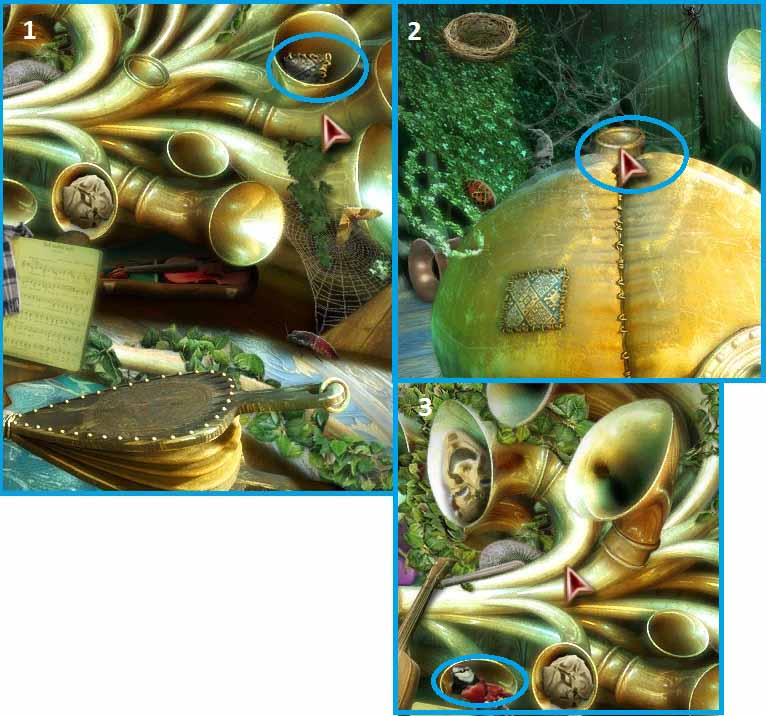
- Patch the air bag and it will inflate, revealing the last piece of the horn.
- Use the horn and the poor bird will pop out of the instrument.
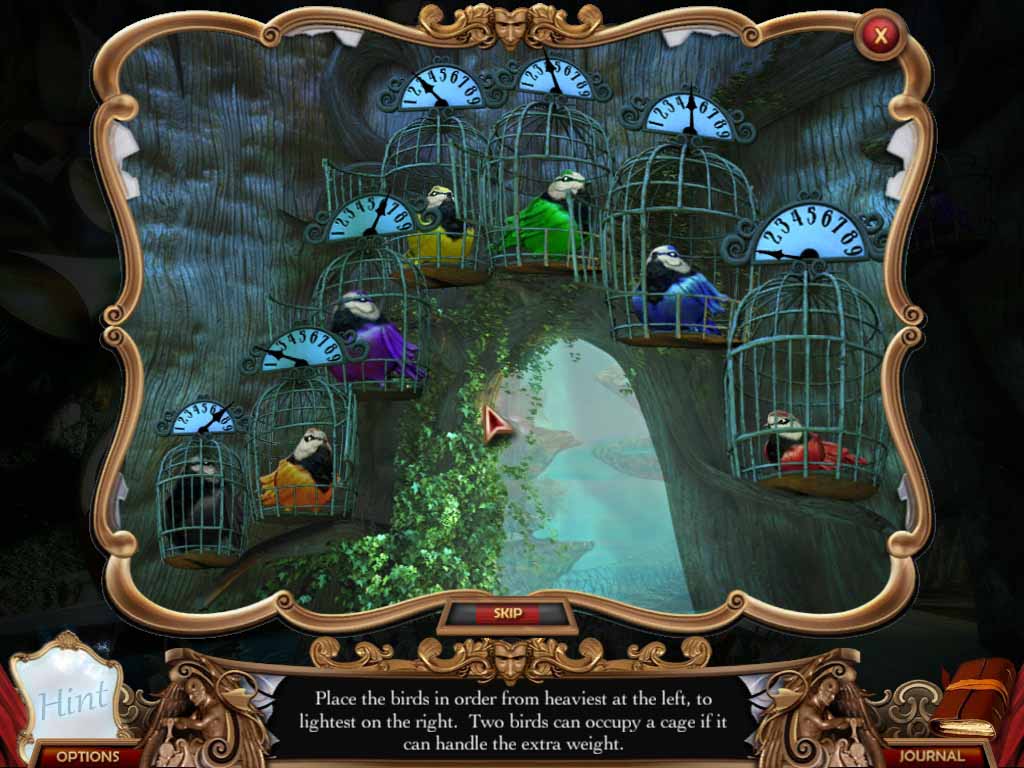
- Once you’re back in the Music Room, click on the bird cages again and place the red bird in the one empty cage.
- The puzzle will start and will look like above.

- Make it look like this. Just keep in mind that you can’t put two fat birds in the same cage at the same time. Now, considering that this isn’t a timed puzzle, that fact really doesn’t make it any harder, it just means you need to make an extra move or two.
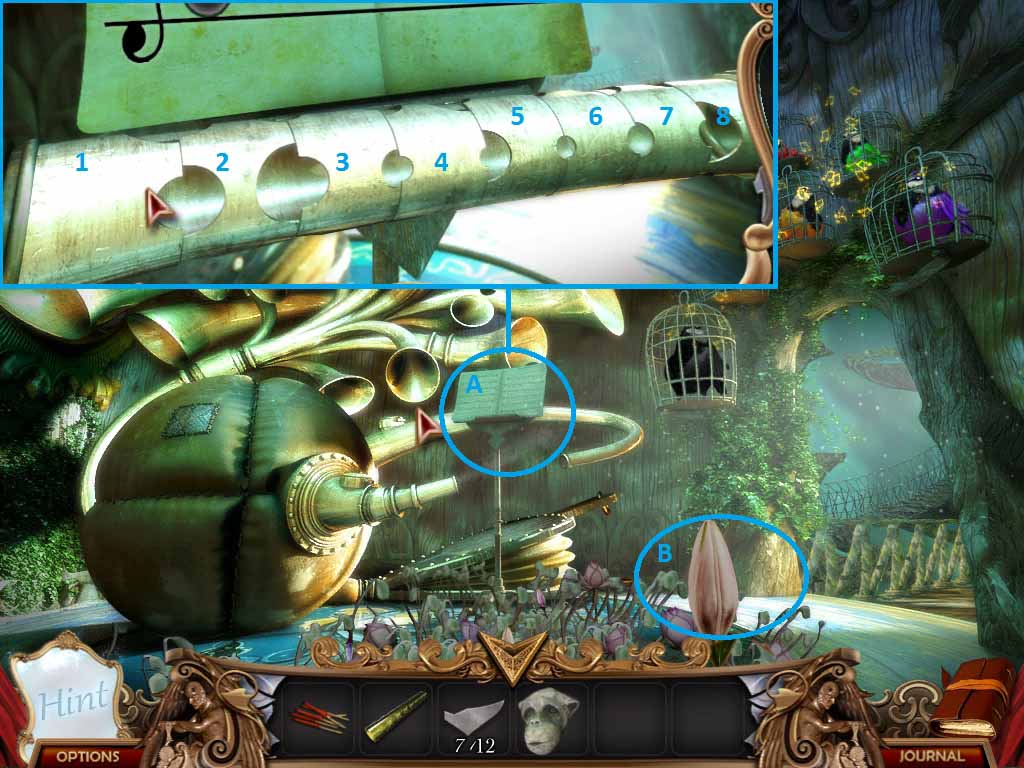
- Click on the music stand (A) and use the flute right below the sheet music to start the next puzzle. This time you have 8 sections (1 through 8 as above) of flute that you need to rotate until they fit largest to smallest.
- It’s pretty simple, just click each segment until it lines up with the next. Around segment 4, they’ll throw you a curveball. The segment will size up correctly, but then get LARGER. Oh no, no, no Mirror Mysteries, we’re not going to fall for that treachery… Click two more times and it’ll be fine.
- Once the flute is fixed, you’ll play a little melody and all the flowers will bloom.
- A magical frame to help you get out of here will be waiting at B.
- Your object lies across the bridge, in the Gyro Room at A. Make sure to grab the tenth shard at B before you go.
- Our little flying friend with the tiara will say his goodbyes here and give you coordinates to put in your journal for calibrating the gyroscope.

- The last two shards are waiting at A and B. Click on the gyroscope at C to pull up the last puzzle of the chapter – it’s a pretty simple one if you’ve read the note the hummingbird gave you.
- Start at D, since the gyroscope itself is swinging too wildly to calibrate.
- From the top to the bottom, twist each ring until it reads 2-2-1-4.
- If you’re hazy on your roman numerals, it should read II – II – I – IV.
- That will stabilize the gyroscope and allow you to lock in the bottom pieces.
- Rotate the bottom until it reads 3 (III) on the left, and 6 (VI) on the right.
- Your reward for completing the puzzle will be a White King chess piece.
- The gyroscope will flip over and drop into the floor. Place the magic picture frame in the area of F to activate the portal back to the Hall of Mirrors.
- Once you jump out of the mirror back in the hallway, the evil mirror will threaten you more. Take it in stride.
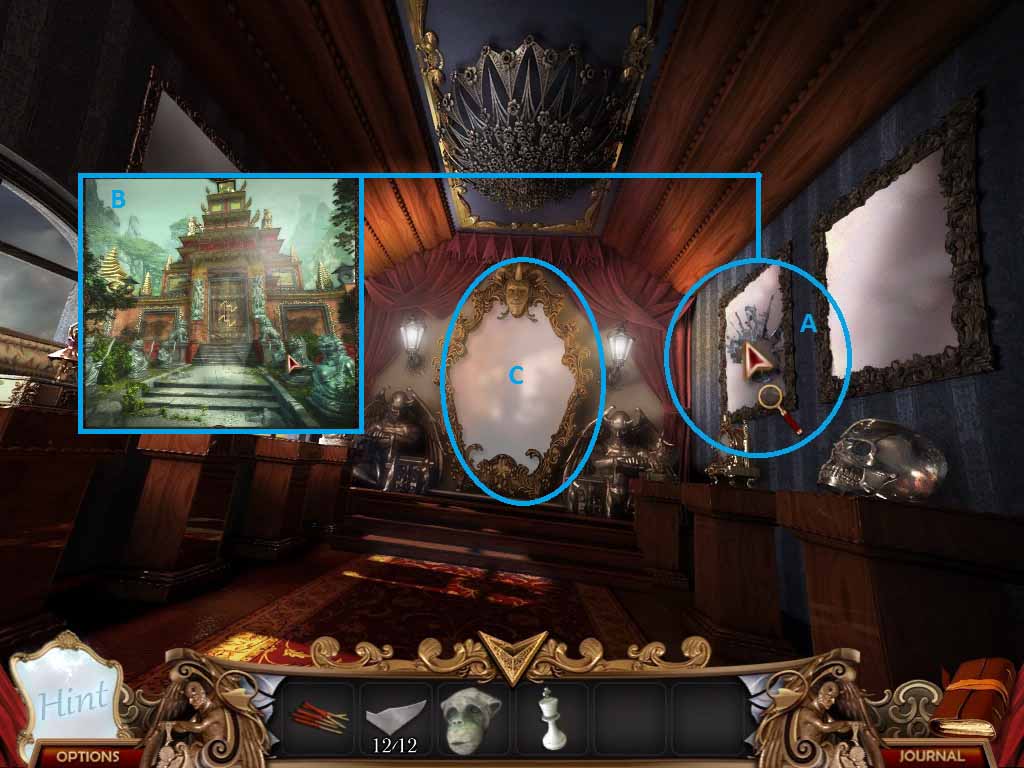
- Click on the broken mirror at A to start fixing another portal. This one is a little trickier, because the pieces are a smaller. Use the picture as a guide. It’s supposed to look like B when you’re done.
- Once you’re finished, go through the portal at C to enter the final chapter!