
The Mirror Mysteries: Forgotten Kingdoms: Chapter One: Through The Looking Glass
Our The Mirror Mysteries: Forgotten Kingdoms Walkthrough will be your guide as you travel through worlds in your quest to defeat the evil magic mirror. When a woman approaches you and asks for you to help save her brother from an evil mirror, your first response is to suggest she seek a more mental kind of help. But when your curiously forces you to take the case you soon discover that the powerful mirror is indeed real, and it’s not just Tommy that’s in danger of being destroyed. Use our helpful hints, insider tips, and custom screenshots to travel through the looking glass and into new and amazing worlds as you race to defeat the magic mirror.
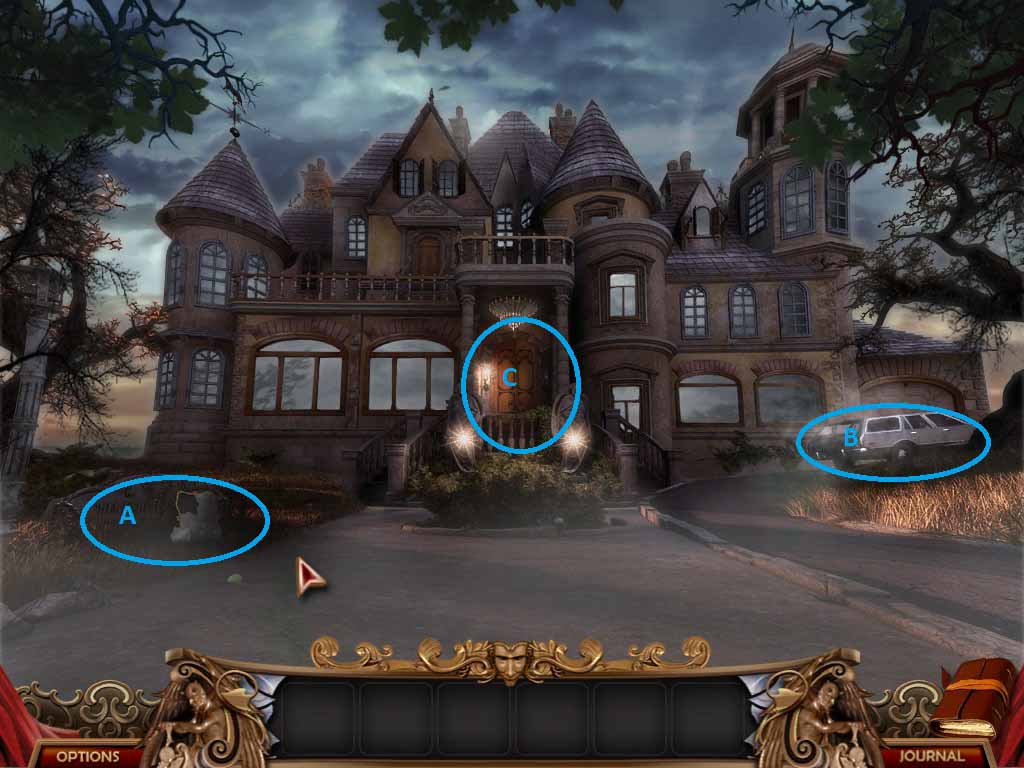
- After the introductory cinematic, first go to A, the house marker.
- Pick up the shard of mirror.
- Go back into A and repair the mirror and it will disappear.
- Tommy’s phone will ring at this point. Go to B and it will stop.
- Back up and go to C, the front porch.
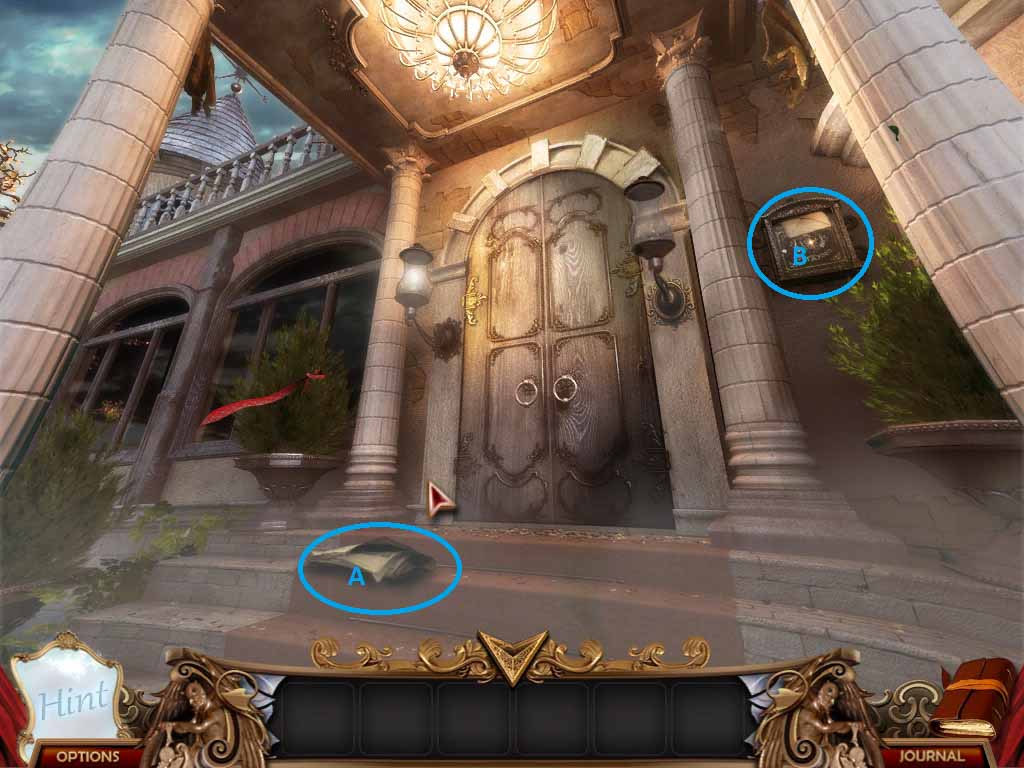
- Click on A to get a newspaper clipping for your journal. The car keys will fall out of the paper.
- Pick up the car keys.
- Go to B to get a weird note from the artifact society, which will also go in your journal.
- The front door won’t open yet, so don’t bother with it. Back up and return to the car.
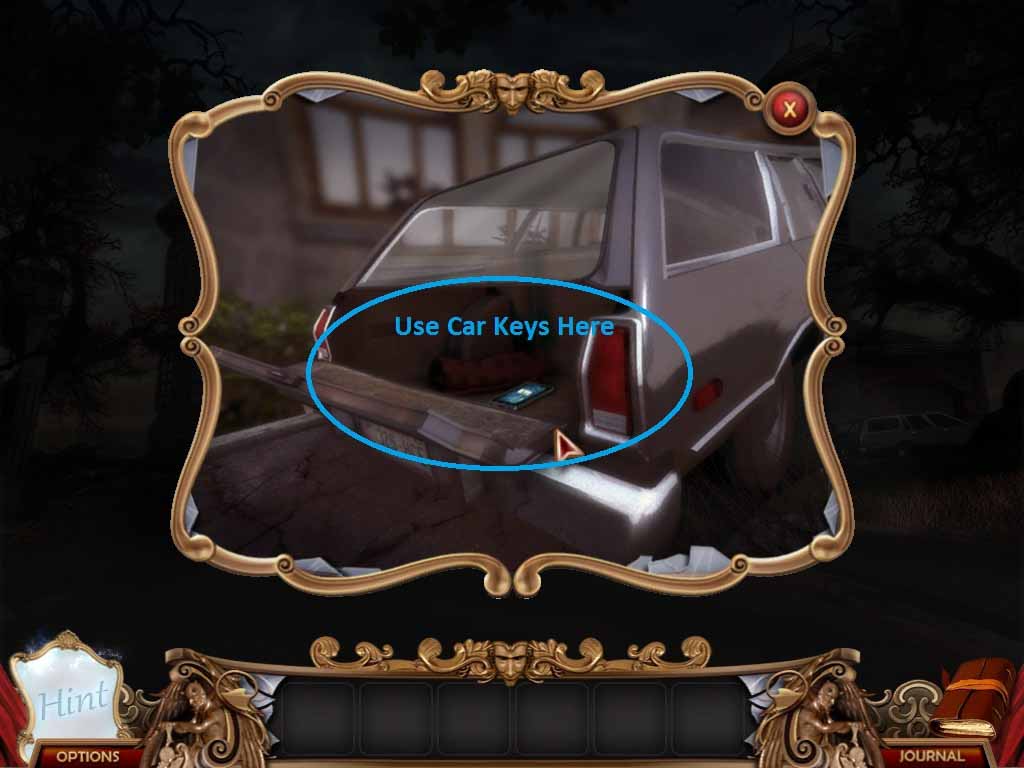
- Use the car keys on the truck as shown and the trunk will open.
- Take Tommy’s cell phone and another scene will start.
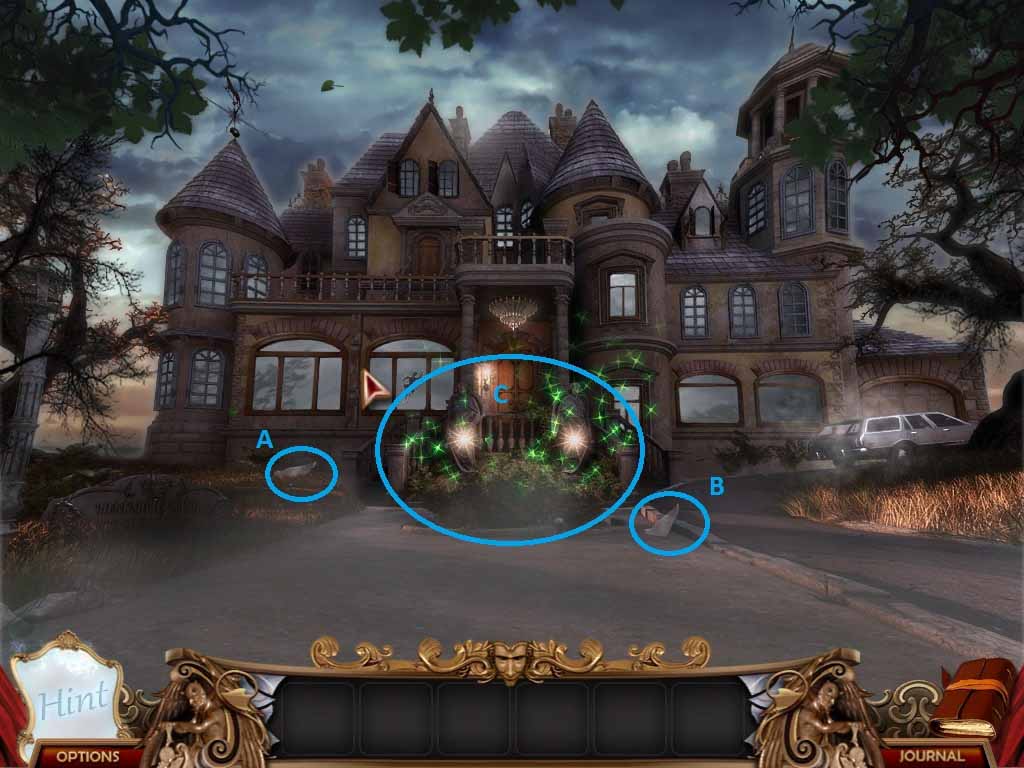
- After the cut-scene, the house will look like above. Pick up the 2 mirror shards at A and B.
- Clicking on the giant glowing bunch of bushes (subtle, right) that I’ve marked C, in case you miss it, will start your first HOS.
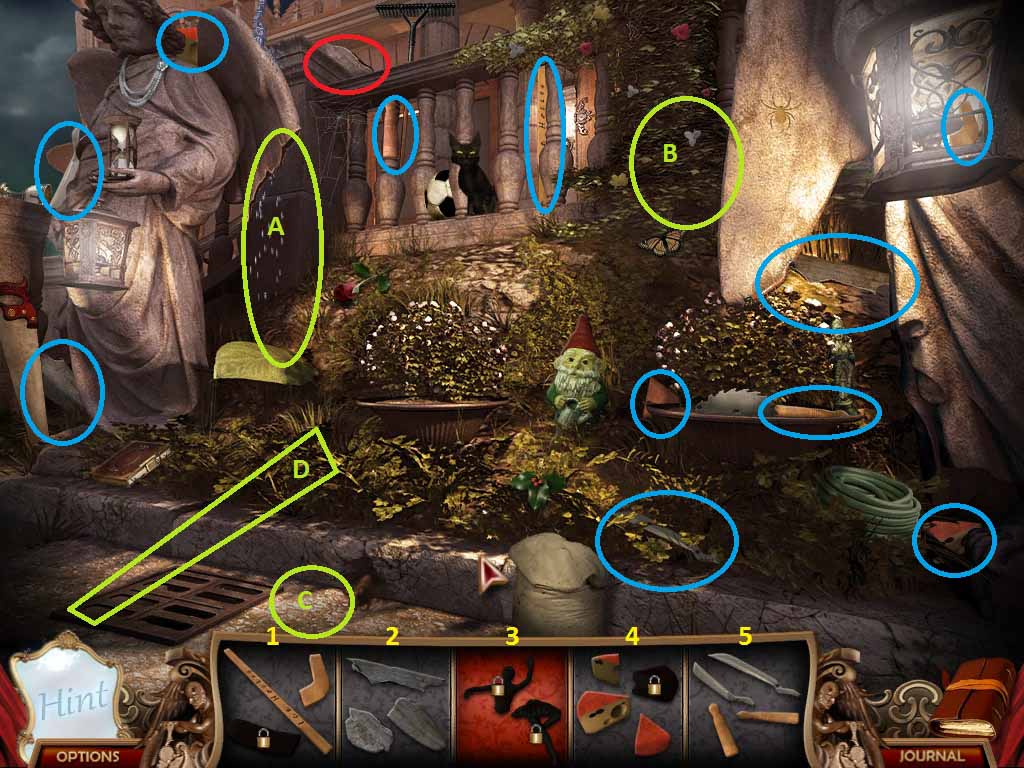
- To solve the HOS, you have to find the items hidden in the picture that match the pictures on the bottom, numbered 1 through 5.
- The tools you need to create are: 1 – Hockey Stick; 2 – Angel’s Wing; 3 – Ballerina; 4 – Cheese Wheel; 5 – Hedge Clippers
- Once a specific tool is assembled, you can use it to unlock other parts that may be blocked off at the beginning.
- Start by collecting the angel’s wing and the hedge clippers and using where indicated.
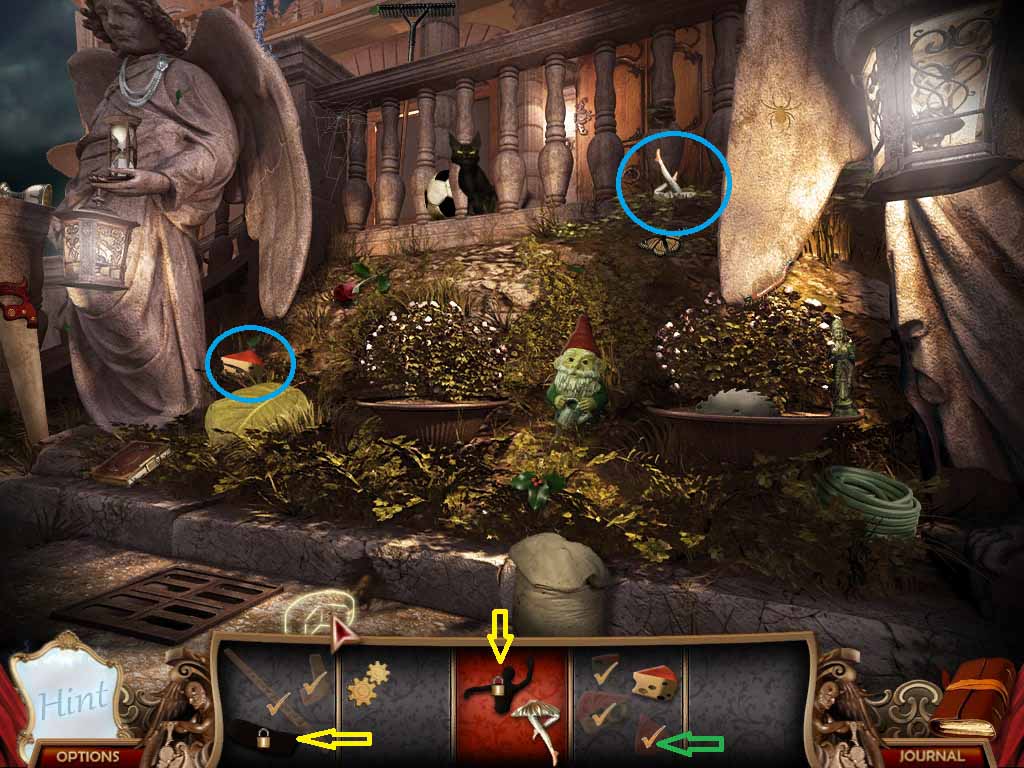
- Collect the cheese wedge and the first part of the ballerina.
- Notice the arrows at the bottom of the picture, the locked sign on an items means that the object is not yet accessible. The check mark means that it has already been collected.
- Use the cheese at the rat to lure it out and cause the cat to pounce.
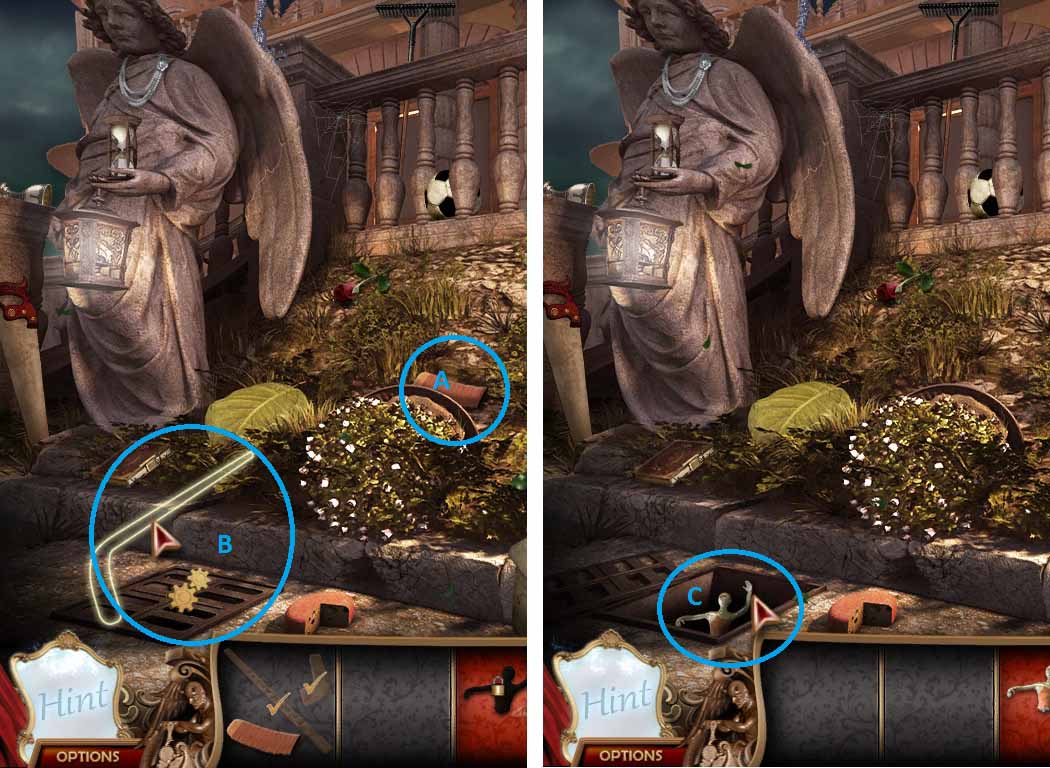
- Collect the last piece of the hockey stick at A and use the completed stick at B to remove the sewer grate.
- Collect the last piece of the ballerina to finish your first HOS.
- Once finished, go back to the porch for the next step.
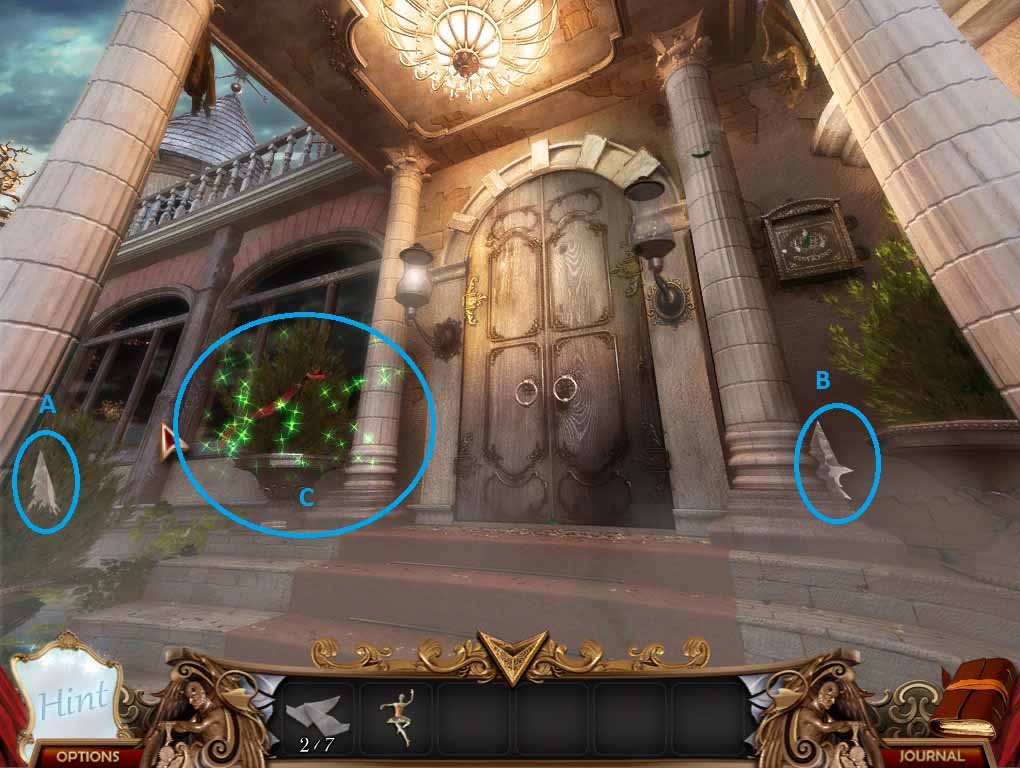
- Once again, collect the two mirror shards located at A & B.
- Click on the glowing bush at C to start the next HOS.
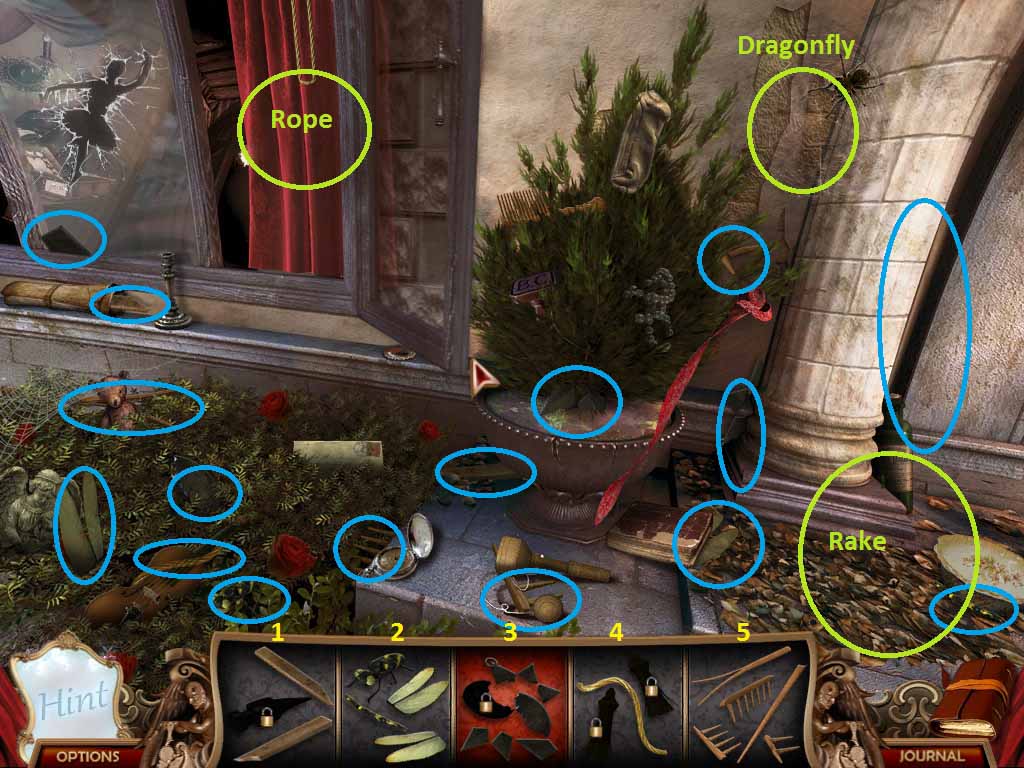
- From 1 to 5, your items this time are: 1 – Hammer; 2 – Dragonfly; 3 – Sun Weight (?); 4 – Rope w/ Tassels; 5 – Rake
- Start by focusing on the dragonfly and the rake. Once these two are completed, use them on the spider web and on the leaves, respectively.
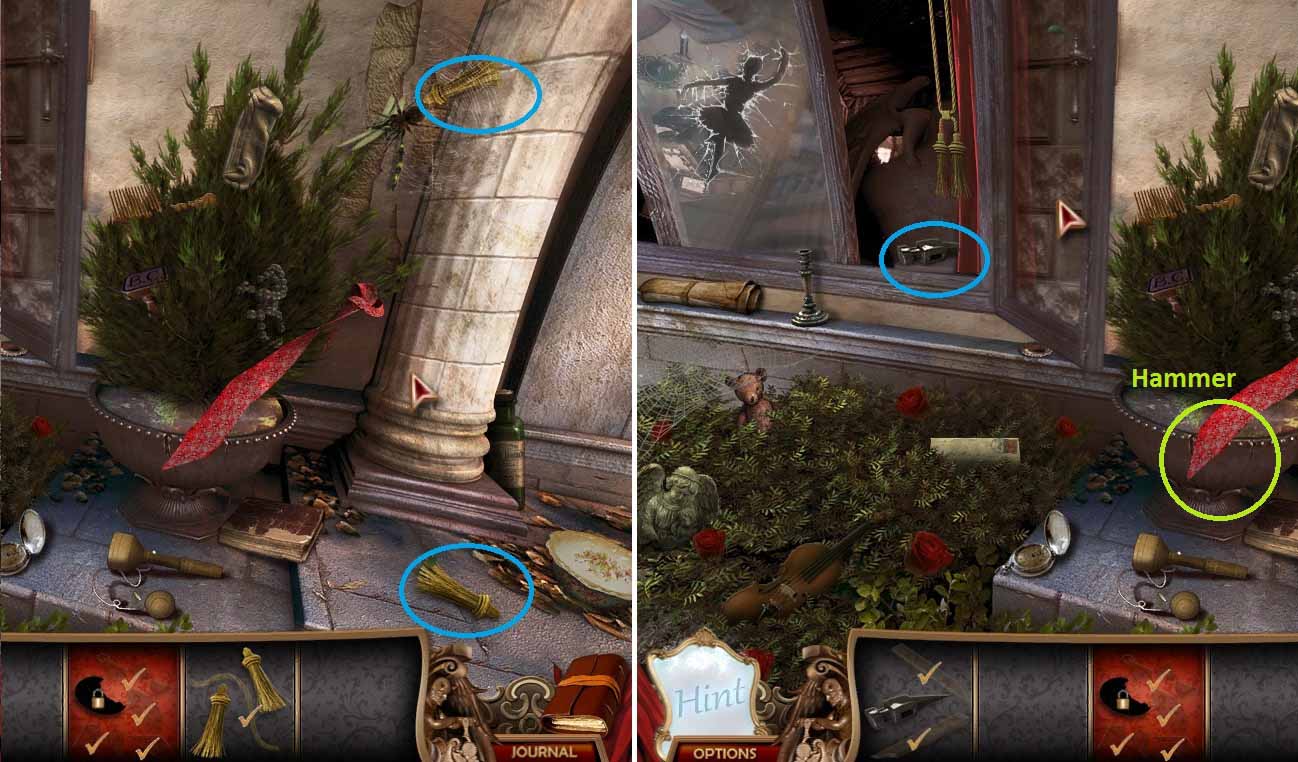
- Once that’s done, the last two pieces for the curtain rope will appear.
- Use the rope on the curtain and you’ll get the last piece for the hammer.
- Break the pot open with the hammer to continue.
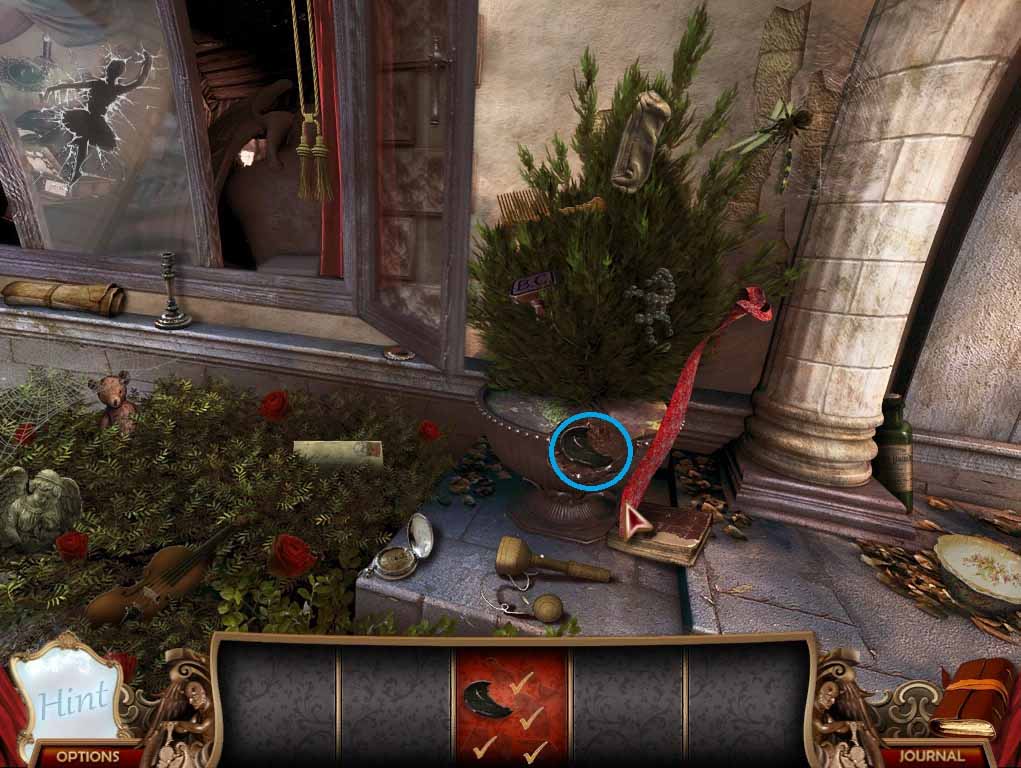
- Once you’ve vandalized the property, you’re free to pick up the last piece and move on.
- When you exit, you’ll notice the door is now open. Go inside to continue the adventure.
- Upon entering, a cut-scene will trigger, where the mirror will taunt you.
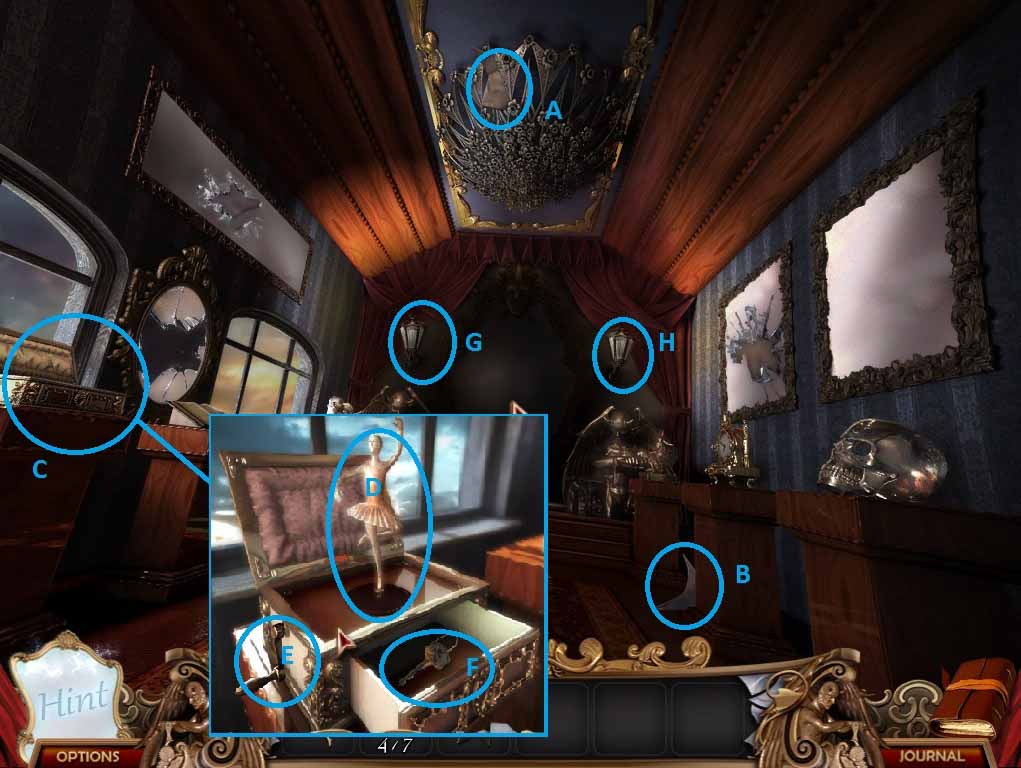
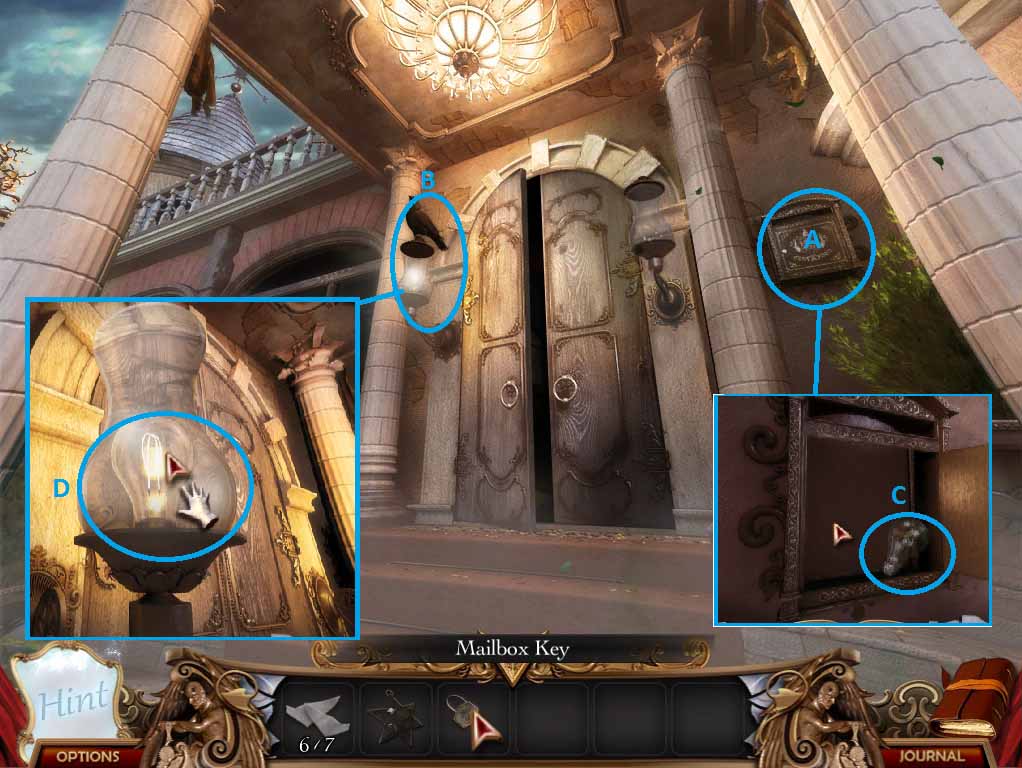
- Collect the mirror shards at A & B, then take a closer look at the music box at C.
- Place the ballerina statue at D, then turn the handle at E to play the music box.
- The drawer of the music box will open, revealing a key to the mailbox (F). Take it.
- Before you leave, note the light fixtures at G and H. We’ll be coming right back, so remember them.
- You’ll notice that the lights are now on to the house. Is this a good thing?
- Check the mailbox (A) and open it up using the key. Take the first light bulb at C.
- Scare the raven away and check the sconce at B for another light bulb (D). You should now have 2 of 2.
- Go back into the hallway and, after more gratuitous taunting by the mirror, use 1 light bulb at each of the fixtures that you noted earlier (G & H from the last picture).
- Adding the two light bulbs will cause another HOS to open up. Click on the green firefly lights to start it.
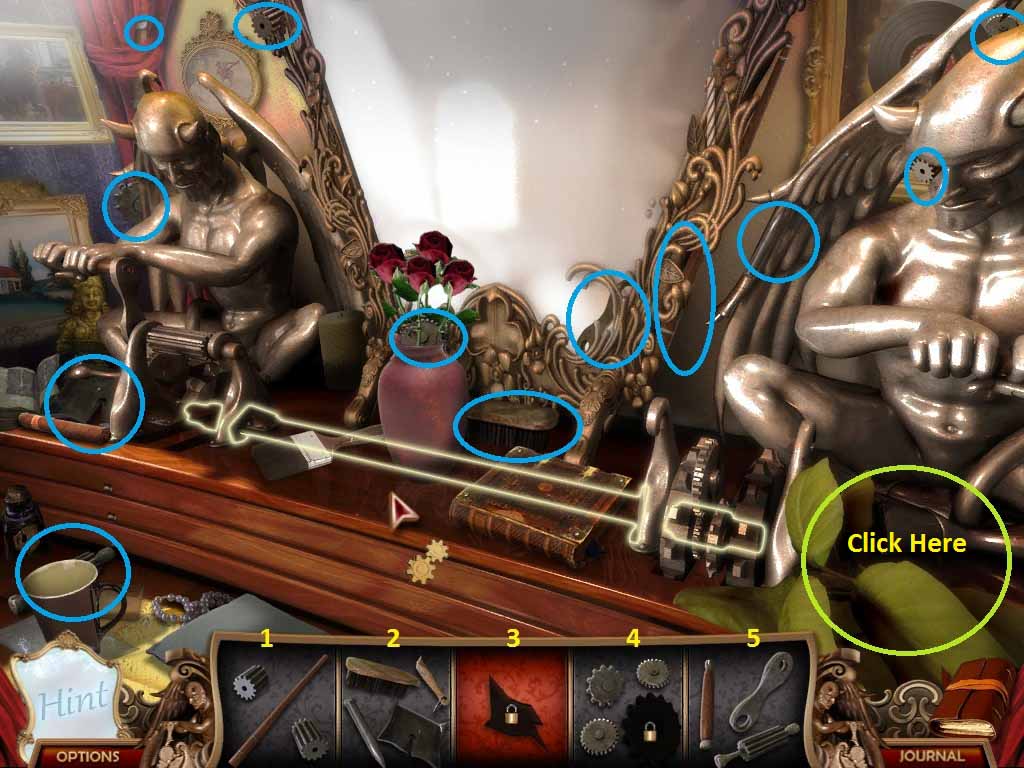
- 1 – Gear Shaft; 2 – Dust Pan & Brush; 3 – Mirror Shard; 4 – Mechanism; 5 – Crank
- Worry about the brush first, because the gear shaft, mechanism, and crank are all used in conjunction to unlock the last shard.
- Click on the plant to straighten it and reveal the last piece of brush (this doesn’t show up as locked because you don’t need another tool to reveal it.
- Use the dust pan on the dirt to reveal a gear for the mechanism.
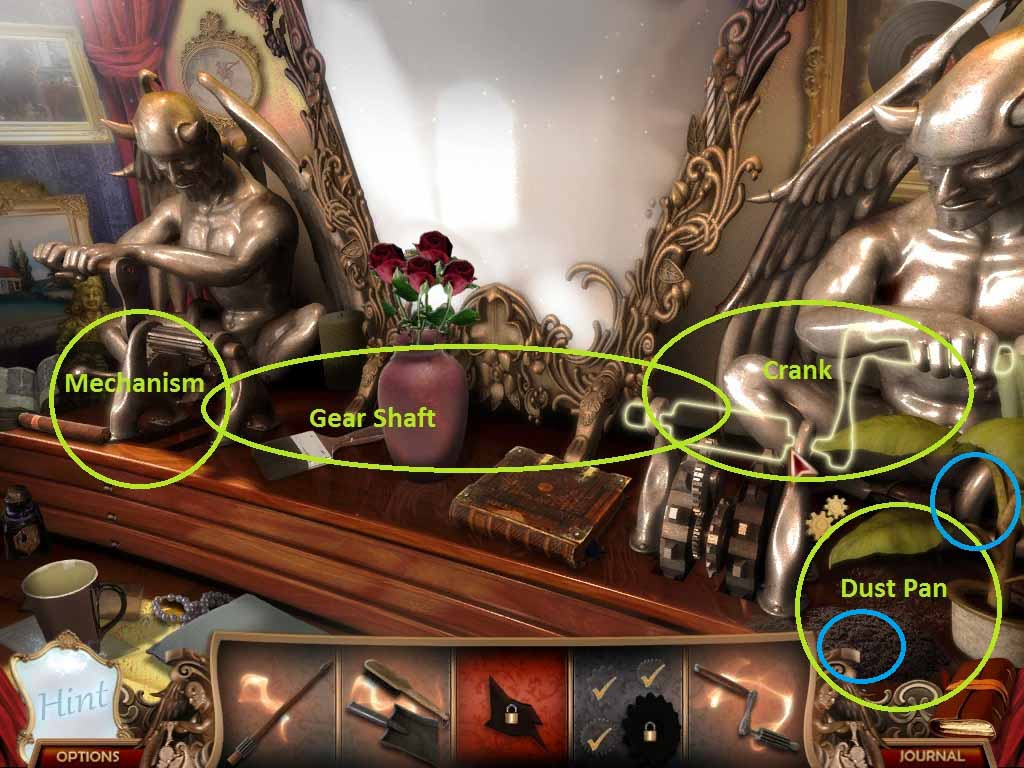
- Once you pick up the last gear part and complete the 3 tools, assemble them as shown so that the little stone gargoyles can do what they do best. Apparently, what they do best is rotate their arms.
- Once the desk top is rolled out, pick up the last shard.

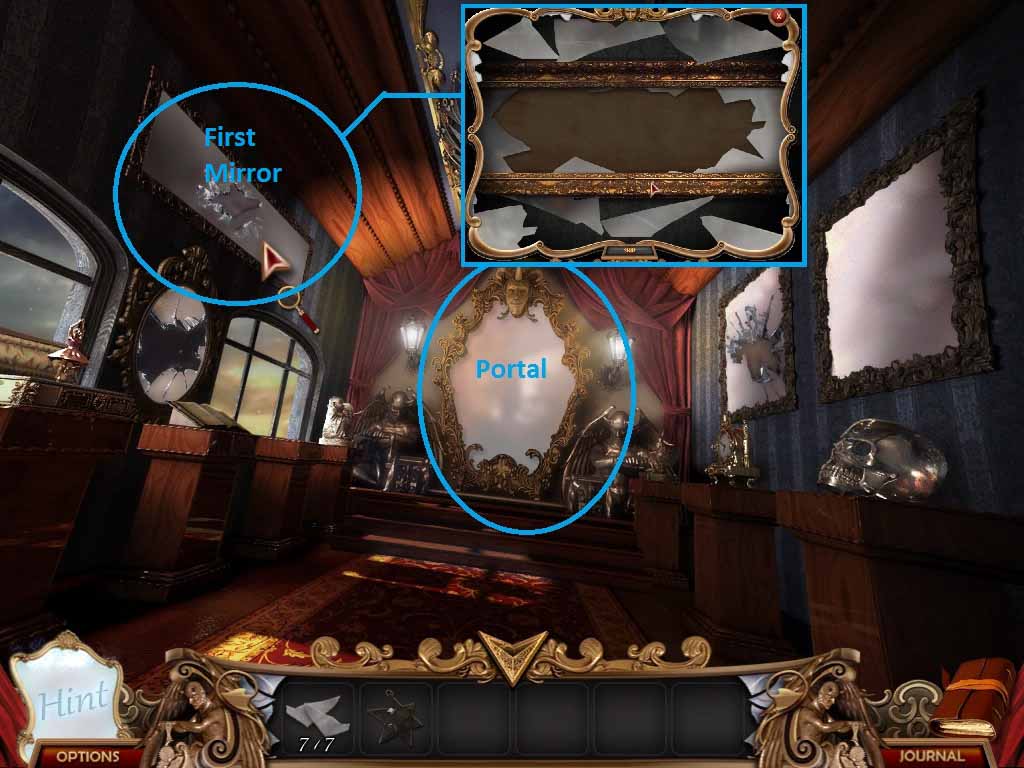
- Now it’s time to fix your first mirror – go to where it says ‘First Mirror’.
- Use the mirror shards on the broken mirror. This puzzle isn’t that difficult, not if you use the edges of the mirror as a guide for where the pieces go. They tend to snap into place when you drop them, but if you’re stuck you can always skip it.
- Once you’re finished the mirror will make some more vague threats and begin to glow.
- Step through the mirror and fall through the cartoon-style wormhole into the next chapter.