
Spirits of Mystery: The Dark Minotaur: Chapter Six: Labyrinth
Our Spirits of Mystery The Dark Minotaur Walkthrough will help you in your search-and-rescue mission to find the princess's missing magical animal friends. An evil witch Mortis and her henchman Isa wish to harness the animals' extraordinary powers to summon a dark beast to the land. Equipped with the detailed instructions, custom screenshots, and puzzle solutions found in our Spirits of Mystery Walkthrough, you'll have no problem thwarting their devious plans.
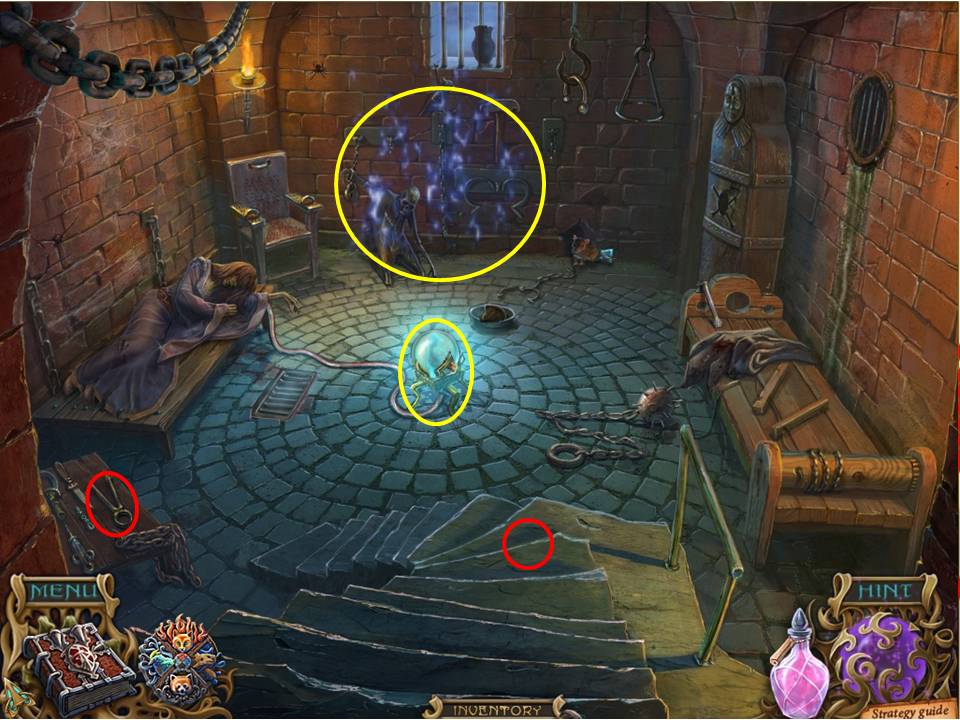
- Look at the bench to the left – take the PLIERS.
- Note the sphere in the centre of the room.
- Use the PLIERS to release it, and take the RING left on the steps nearby.
-
Click on the area at the back of the room to initiate the next sequential HOA puzzle.
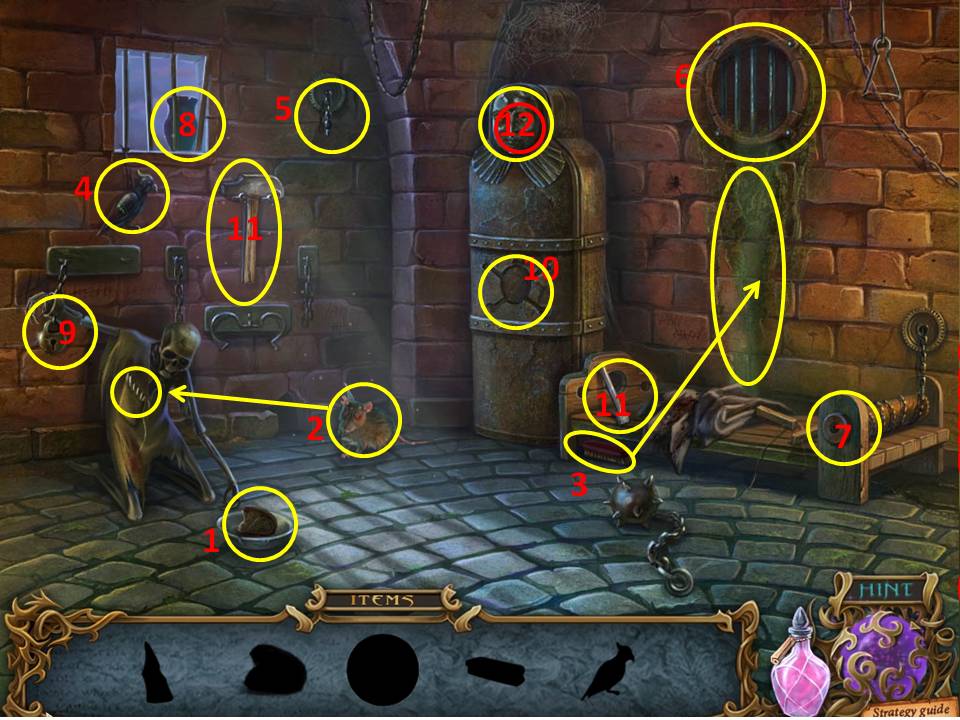
- Pick up the bread and give it to the rat
- Pick up the shard of broken glass behind it and use it on the skeleton’s pocket. Take the coin inside
- Pick up the brush under the bed and use it to clean away the slime on the wall
- Grab the parrot on the wall and place it in the matching niche to the right
- Take the hook on chain inside and place it on the chain to the right of the barred window
- Use the coin to undo the screws on the circular cover to the right. Odd screws in this neck of the wood – they unscrew in a clockwise direction! Take the handle inside the hole.
- Use the handle on the chain winch to the right, which will pull the bars away from the window.
- Knock the jar down from the window sill and take the key inside.
- Use the key to release the skeleton – take the skull and bones behind it.
- Place the skull and bones on the sarcophagus to the right
- Collect the hammer and chisel, and use them to free the tooth from the skull in the sarcophagus
- When finished, you now have a TOOTH to add to your collection.
-
Exit to the area just outside.

- Zero in on the Minotaur carving on the wall to the left, and use the ACID to clear away the growth on it.
- You then need to complete the carving by putting in place three missing items from inventory – the TOOTH, the HORN, and the RING.
-
When done the face will open to reveal the next puzzle.
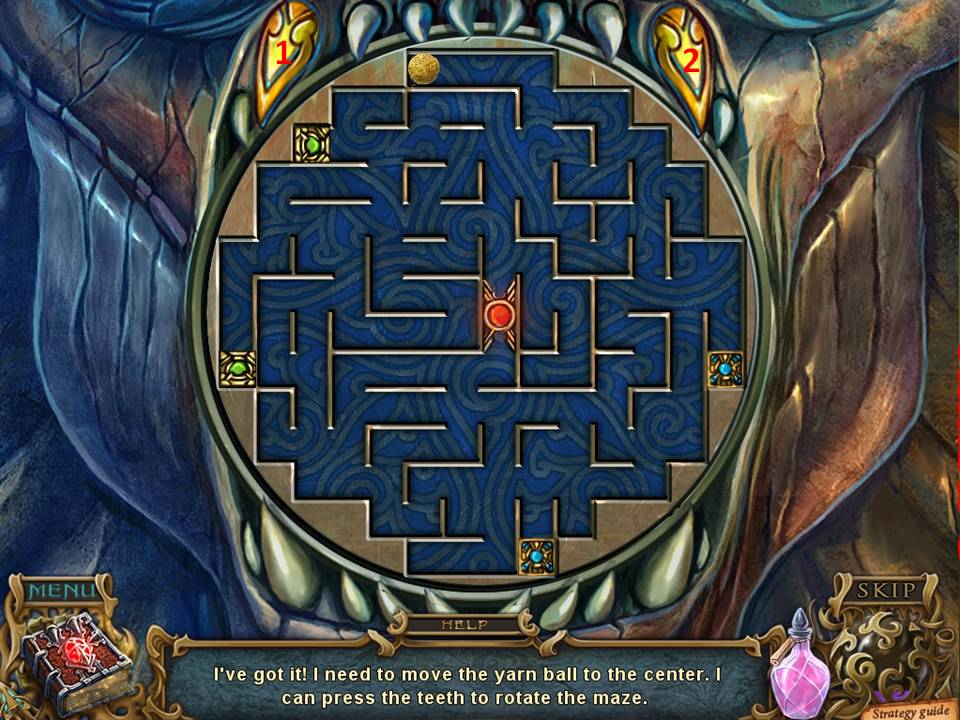
- Place ISA’s YARN BALL on the puzzle to initiate it.
- Use the following instructions to complete it.
- Note that there’s a little cheat involved – the four patterned cubes in the maze are actually portals that take you to other points in the labyrinth.
- Numbering the left arrow as 1, and the right one as 2, here’s the sequence – 2, 1, 2, 1, 2, 2, 1, 1, 2, 1, 2, 2, 1, 2, 2, 1, 2, 2, 1, 1, 2.
-
When complete, take the scroll, note the clue, and head forward.
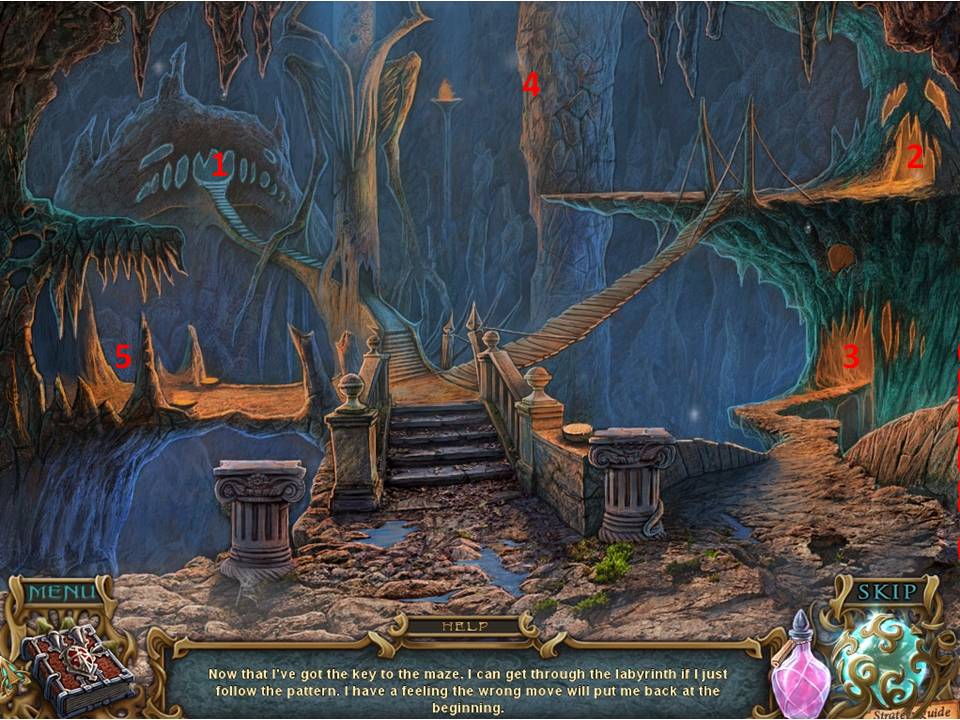
- You are now officially in the labyrinth. Look at the clue.
- The five caves are numbered 1 through to 5 in a clockwise direction, so the clue gives you the sequence through which you must enter each one – 2, 4, 5, 3, 1.
- If you mess up you’ll end up back at the very beginning.
-
If done correctly, you’ll end up in a room with a very annoyed Mortis and Isa.
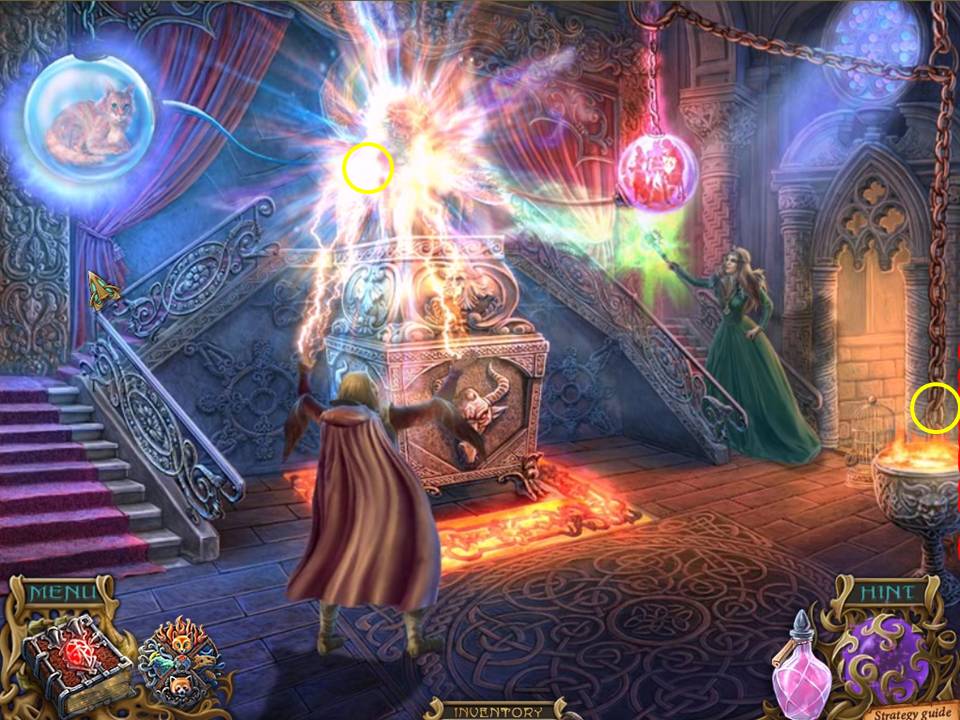
- Remember that they can’t see you, so time to have some fun.
- Use the ACID on the chain to the right, just above the fiery cauldron.
- After the sphere with muffin crashes down, zoom in on the minotaur and use the PLIERS to cut the tube.
- Click on Muffin to add her to the menagerie, then click on the amulet to feed her the MILK, after which she will give you the FIRE MEDALLION.
- Pick up the CHAIN lying on the floor to the right.
-
Place the FIRE MEDALLION on the minotaur, and when it collapses into the pit proceed through the doorway at the back.
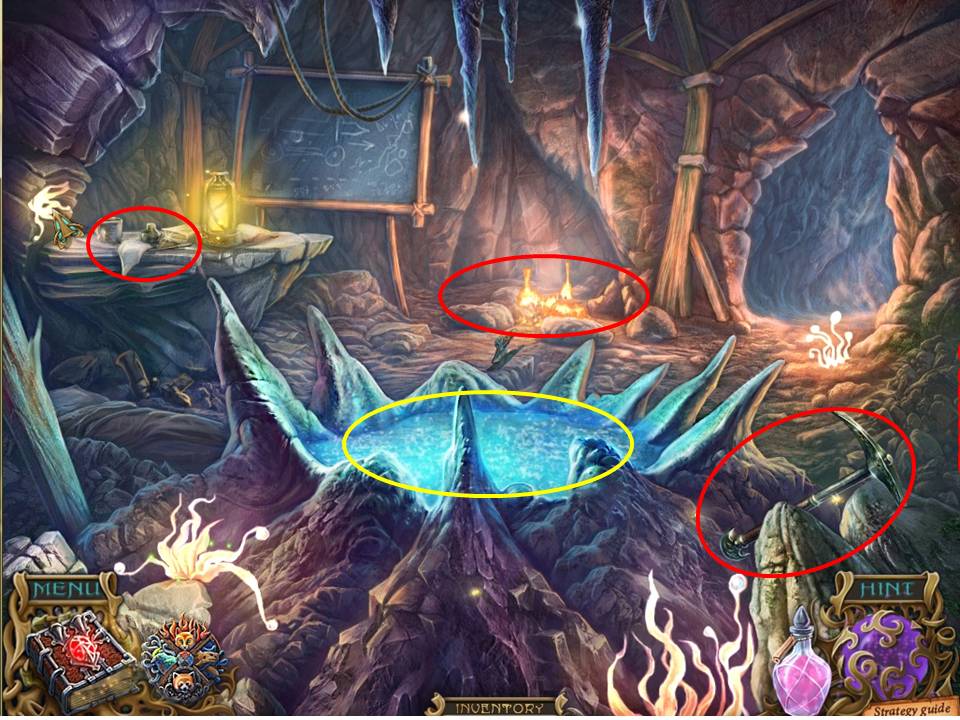
- Pick up the PICK (I love saying that) nearby, grab the AXE and WHEEL lying by the fire, and zoom in on the table to acquire the FLASK, FILE and scroll.
- Use the flask on the water to get CLAY FLASK WITH WATER.
-
Head out through the exit on the right.
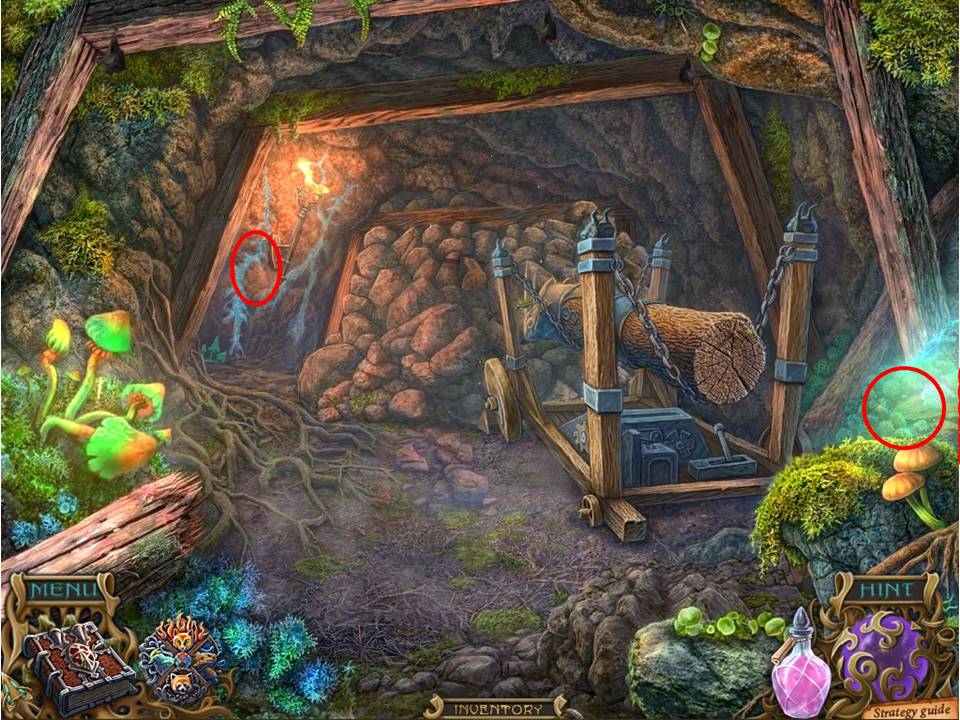
- Grab the LUMINOUS MOSS to the left.
- Use the PICK on the vein of silver to the left to obtain a SILVER NUGGET.
-
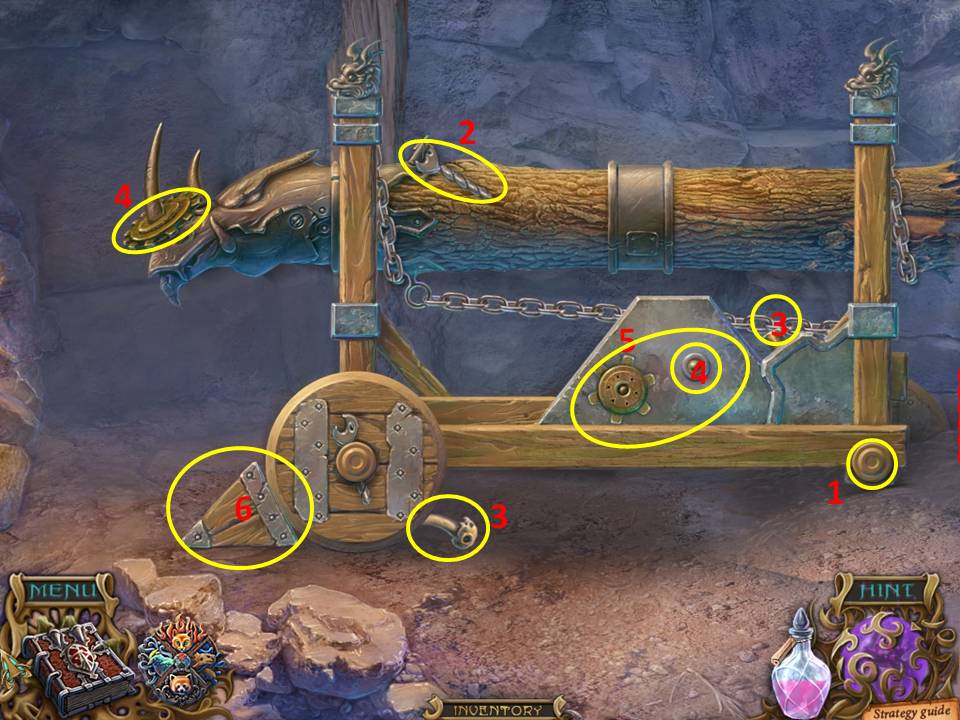
Now it’s time to click on that mechanism to repair it – best guess is that if we break through where going to come out near the rock fall near Hanna’s place, right?
-
So here’s the repair work, noting that the puzzle will clue you up when you put a piece near where it belongs by lighting up a silhouette –
- Put the wheel in place on the right.
- Take the pin sitting up on the ram to the left and use it to lock the wheel in place
- Put the lever in place above and to the left of the rear wheel
- Take the cog off the horn at front and put it in place behind the other cog
- Put the CHAIN in place around the cogs
- Use the AXE to knock the chock out of the way
- Pull the lever, watch the ram go to work, and exit out near Hanna’s place
- Note that Hanna isn’t home, so head back to the front entrance of the castle.
-
Walk through the courtyard, enter inside, and click on the HOA puzzle in the background to initiate it.
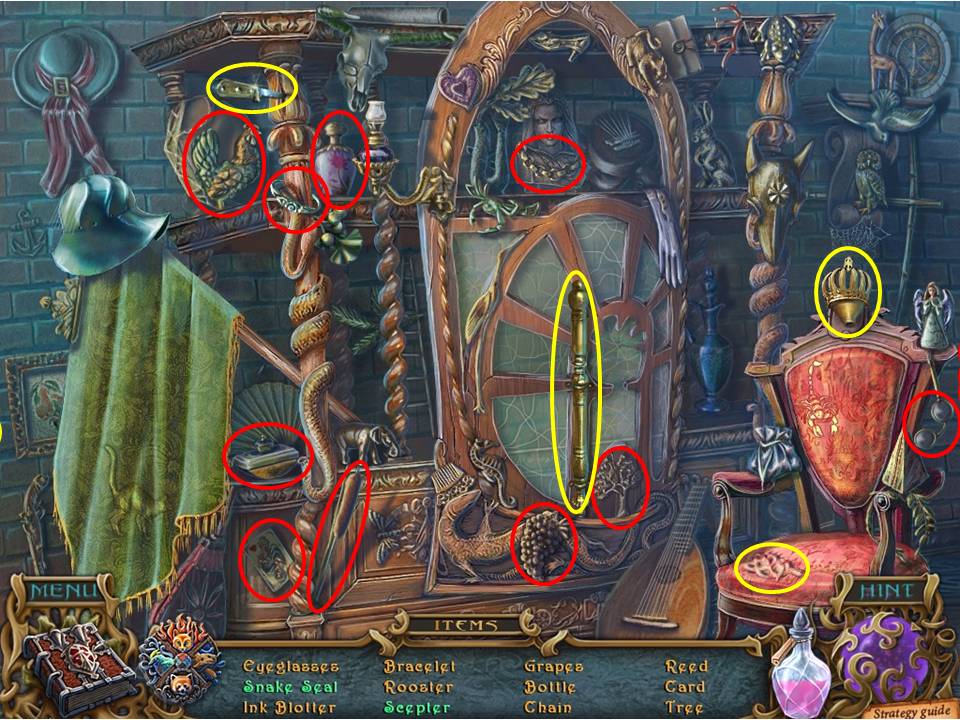
- Collect the items circled in red, and note the items circled in yellow that require multiple moves.
- Place the scepter handle with its crown to the right.
- Use the knife to the left to cut open the chair and retrieve the SEAL inside.
-
When finished, take the SEAL and head through the central door.
- Zoom in on the vice at the back of the room and place the SILVER NUGGET in it.
-
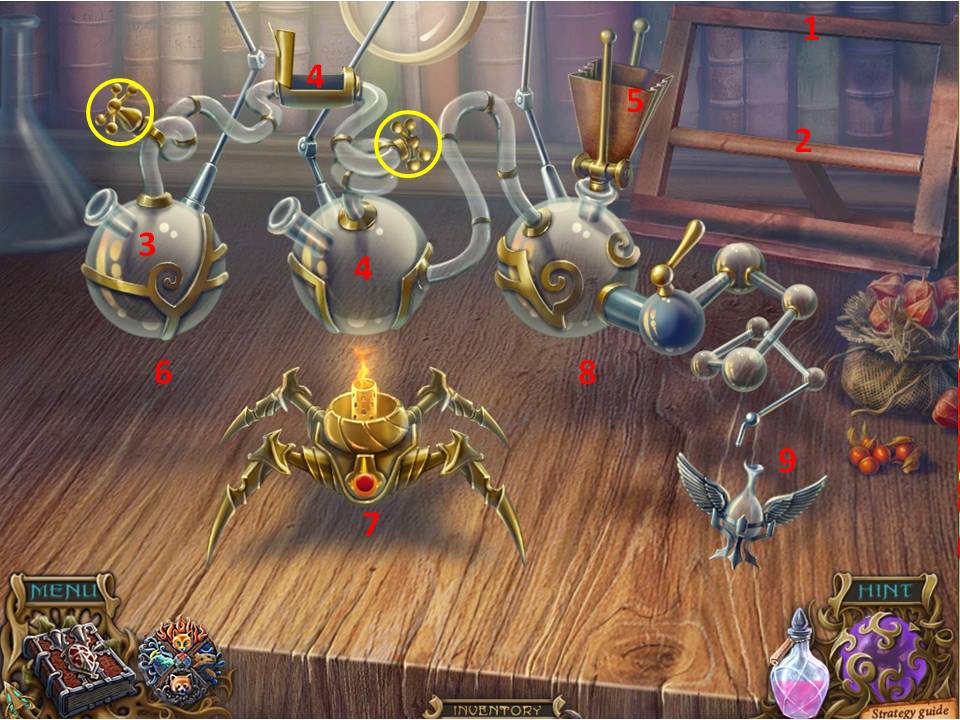
Apply the FILE to grind it down – take the pile of SILVER and head over to the desk. – Now for the work –
- Place the BOOK on the holder to the right at back – note that you can turn the pages.
- Place the SEAL on it to open the book
- Empty the CLAY FALSK OF WATER into the beaker on the right
- Place the LUMNIOUS MOSS in the receptacle above, and the SILVER in the middle beaker.
- Place the GRAPES in the copper-colored receptacle on the right.
- Move the burner across to the left and set it on low to boil the water – as it does so the two taps will become active – turn them on to let the steam across to the central beaker
- Move the burner across to the central beaker and bump up the heat until it boils up the mixture of water, silver, and moss.
- Move the burner across to the right, bump up the heat again, and click on the grapes to squeeze them into the mixture. As it begins to boil, turn on the tap to the right to let the contents drain into the little flying flask.
-
Take the GROWTH POTION and head out of the room and to the castle courtyard.
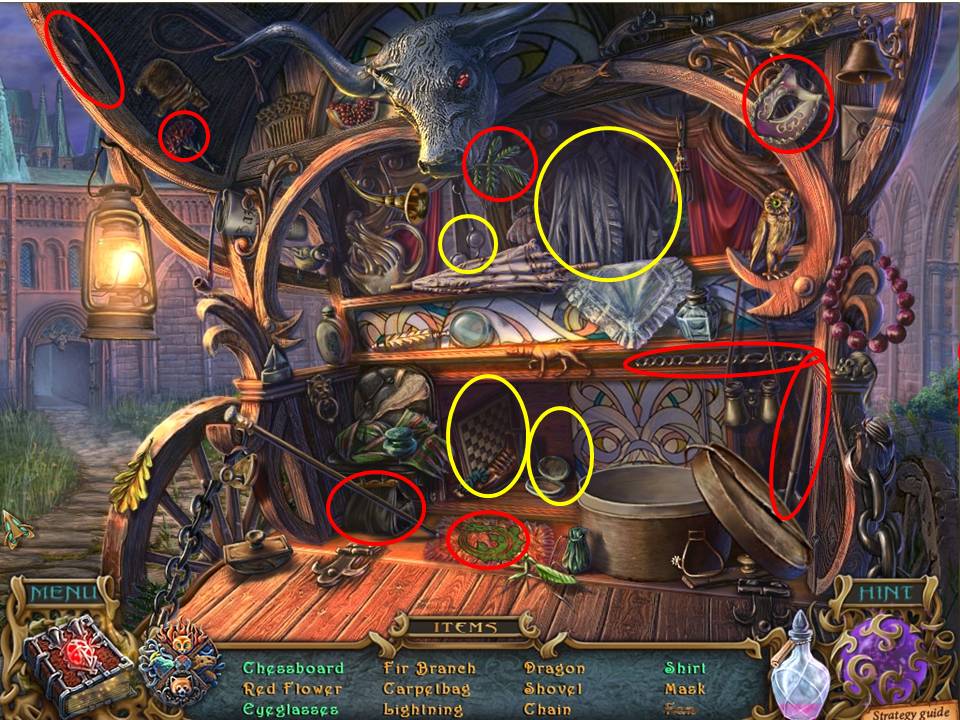
- Click on the wagon to initiate the next HOA puzzle.
- Pick up all the items circled in red and note the items circled in yellow that require multiple moves.
- Move the curtain aside and open the screen.
-
When complete, take the SHOVEL and head forward past the wagon.
-
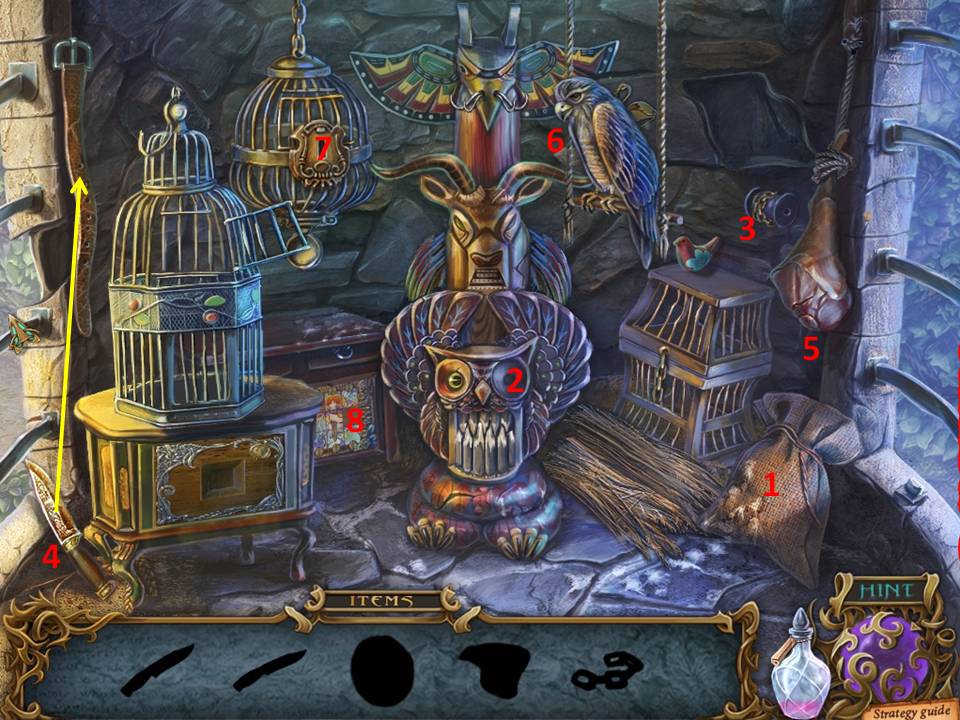
Click on the cage the initiate the next sequential HOA. Perform the following actions –
- Move the bag and take the totem eye
- Place the totem eye on the carved owl’s eye and take the chain when the jaws open
- Connect the chain to the one hanging over the cage to the right, and when it opens take the chip inside
- Pick up the dull knife on the left next to the window and use the nearby belt to sharpen it into a sharp knife
- Use the sharp knife to slice off a piece of raw meat from the leg hanging by the window on the right – with a million flies buzzing around it no doubt!
- Hand the raw meat to the bird of prey, who will drop a key on the ground below
- Use the key on the cage hanging from the ceiling, and take the second chip inside.
-
Zoom in on the cabinet in the background on the left and place both chips on it to initiate the next puzzle.
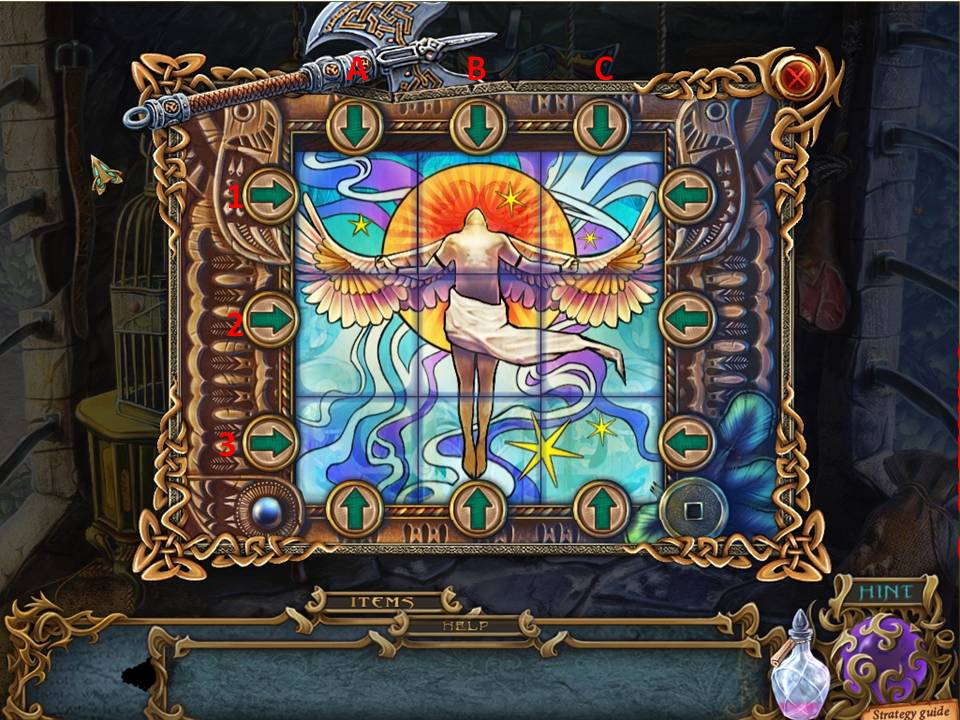
- The aim of the puzzle is of course to orientate the chips to their correct positions to complete the picture.
- Note the screenshot of the completed puzzle, and move the numbered and lettered rows in the following directions –row 3 left, row A up, row A up, row 1 left, row 3 left, row 3 left, row A up, row 3 left.
-
Upon completion take the GRAIN and exit out.
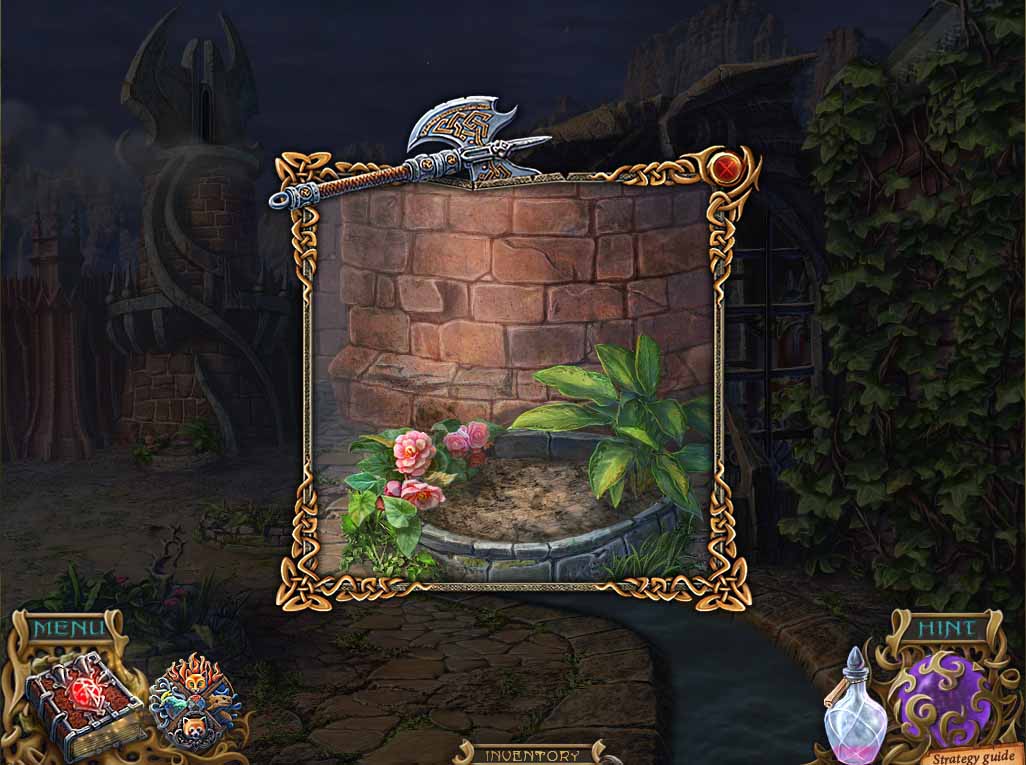
- Zoom in on the flowerbed, and use the SHOVEL to dig it up.
- Take the LOCK KEY and the PUZZLE PART 1/2, then plant the SEED and use the GROWTH POTION on it.
- Wow, talk about a beanstalk! Isn’t this plagiarism?
- At this point the invisibility potion will wear off.
-
Climb the super sunflower into the tower above.
- Use the KEY to release Jewel from the cage.
- Click on the amulet to access the menagerie and give the bird the GRAIN to eat. In return you’ll receive the second PUZZLE PIECE.
-
Now click on the picture to the right to access the final puzzle.
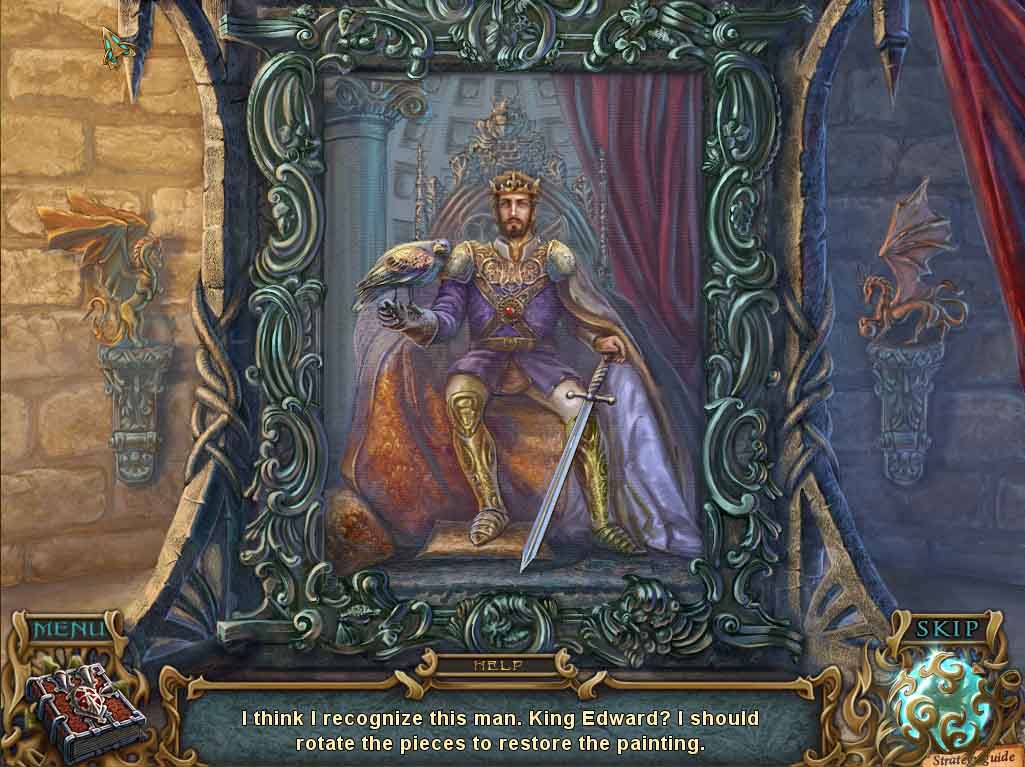
- The idea is to simply turn each piece so that it’s correctly orientated.
- Look at the screenshot for guidance.
- The easiest way is to simply work the left side, given that you have the straight line of the column as guidance, then steadily work your way across the rest of the picture.
- When complete, head through the newly discovered doorway.
- Watch the scene involving Mortis as she gets riled up at you, then flees into the sunset in her flying wagon upon her defeat. You beat her!
- Congratulations! If you still want to keep playing, access the bonus section for fresh adventures involving Mortis, who doubtless will try and stay true to her word to return and avenge herself...