
Secrets of the Dark: Mystery of the Ancestral Estate: Chapter Two: The Library
Rely on our Secrets of the Dark: Mystery of the Ancestral Estate Walkthrough to shed some light on your investigation as you explore a vast ancient mansion in search of family secrets that might explain the unusual disturbances of late. Use our custom screenshots, detailed instructions, and comprehensive puzzle solutions to help make your way through the darkness.
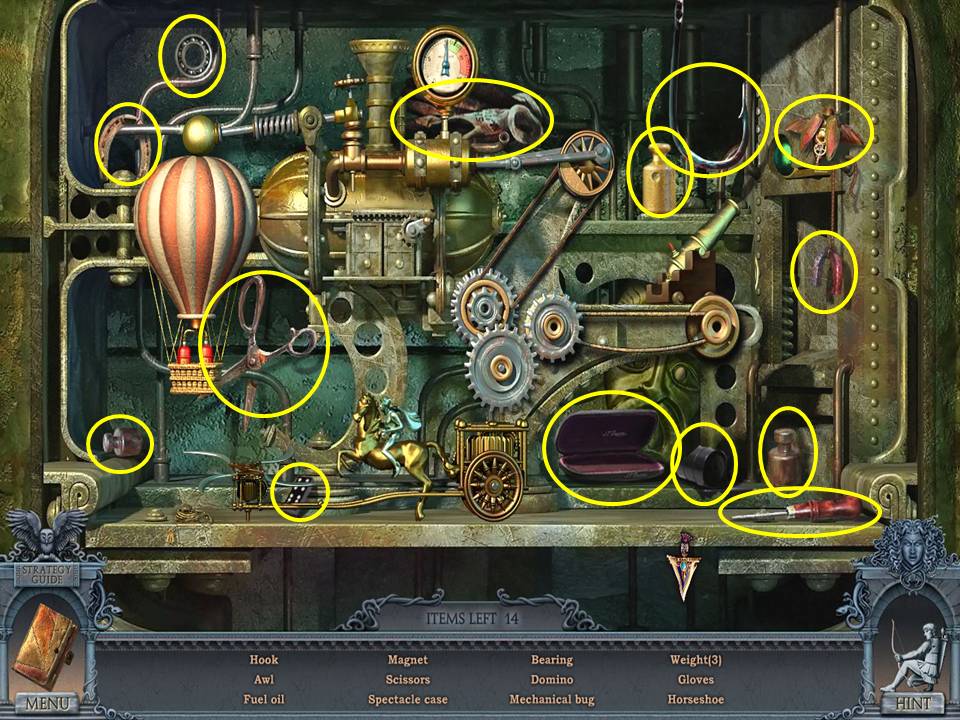
- Zoom into the alcove to play a HOA.
- Find the items listed.
- Receive the GREEK MASK.
- Go upstairs.
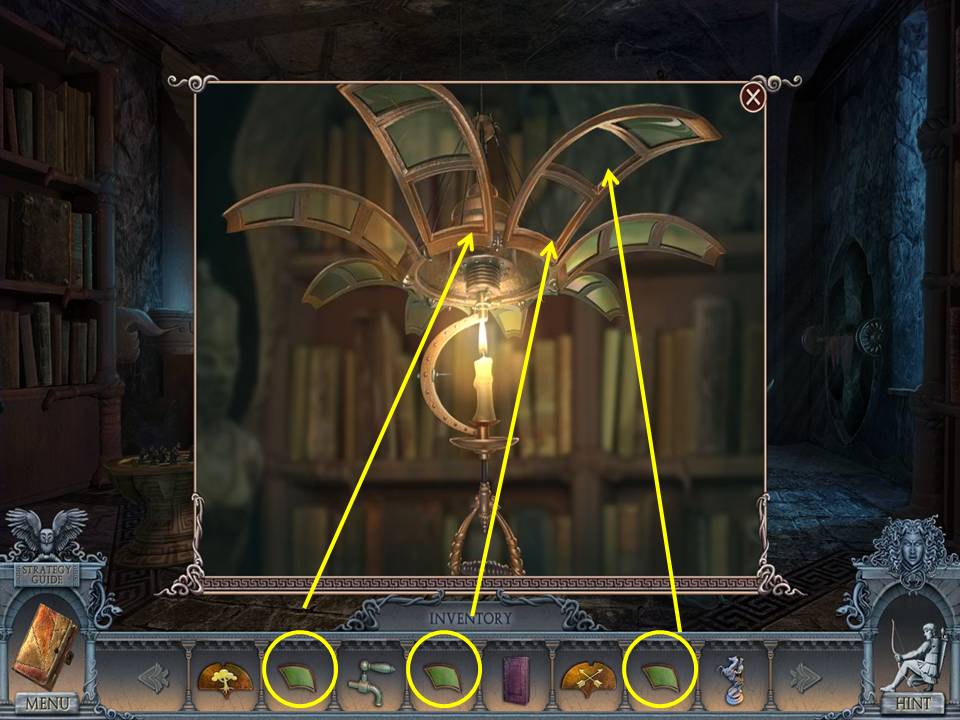
- Change the lighting.
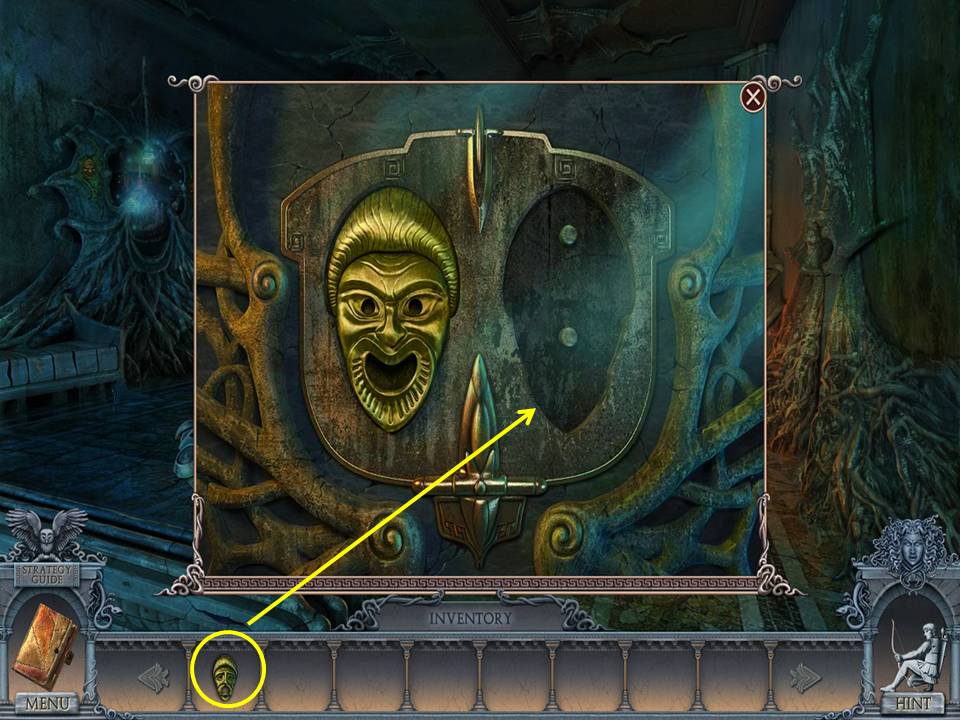
- Zoom into the top of the roots on the right and place the GREEK MASK in the slot.
- Take the CHEST BUTTON.
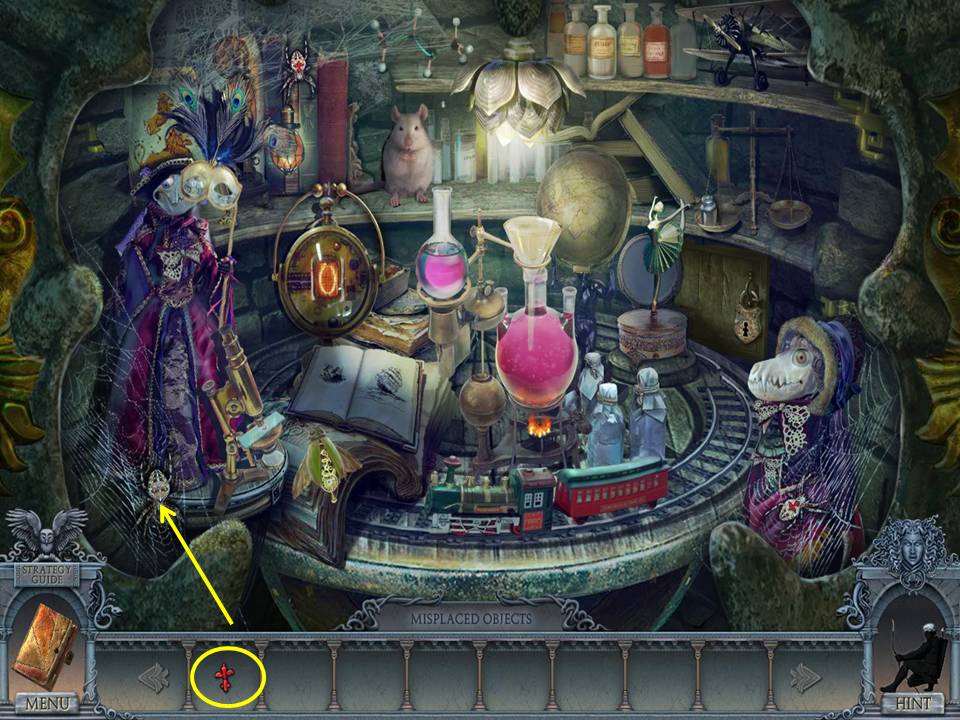
- Zoom into the left alcove to play an HOA.
- In this HOA game, you place the items along the bottom into the scene where they belong.
- Give the mouse the cheese.
- Pour the test tube into the beaker.
- See screenshots for placements and final move.
- Receive a KNIFE.
- Change the lighting and go right to the bedroom.
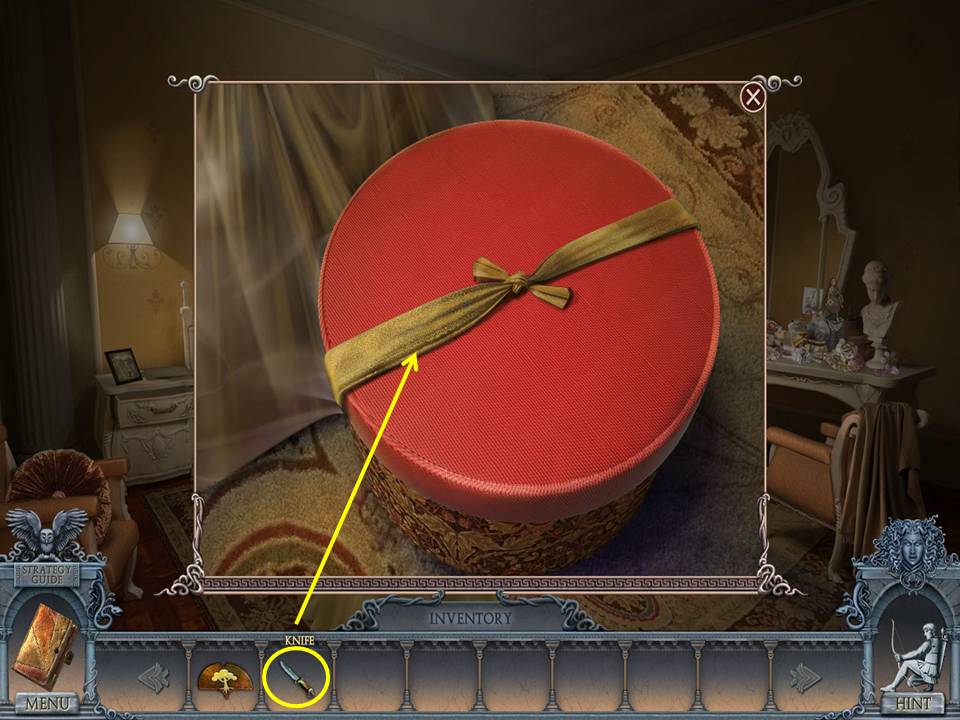
- Zoom into the box.
- Cut the ribbon with the KNIFE.
- Take the LENS and DOOR HANDLE.
- Zoom into the dresser to play an HOA.
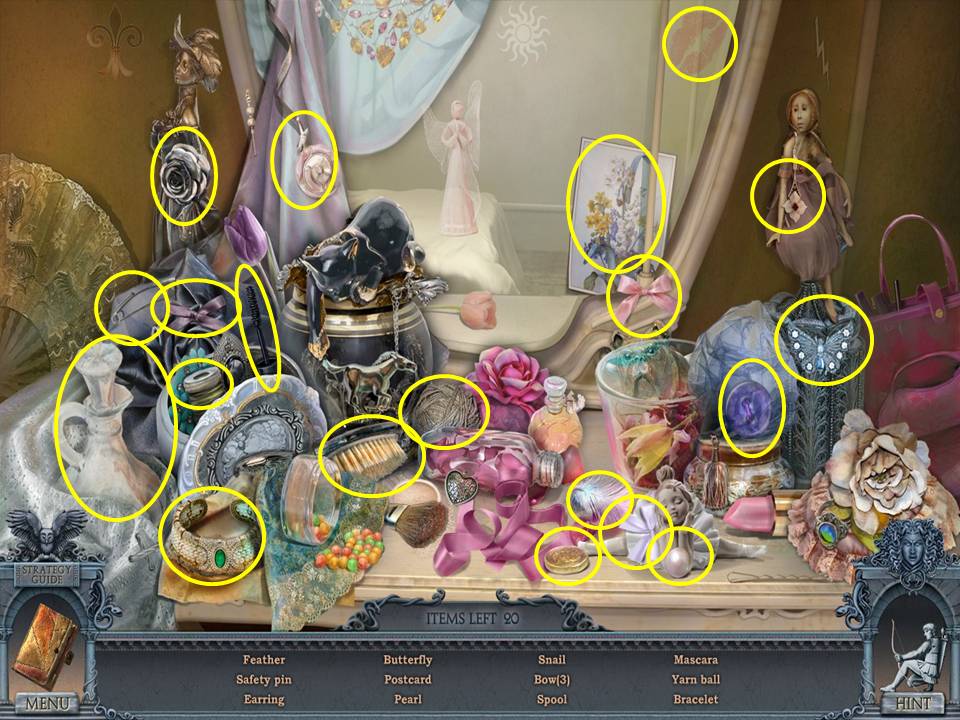
- Find the items listed. R
- eceive a POWDER WITH BRUSH.
- Click down twice.
- Zoom into the door to the right of the steps.
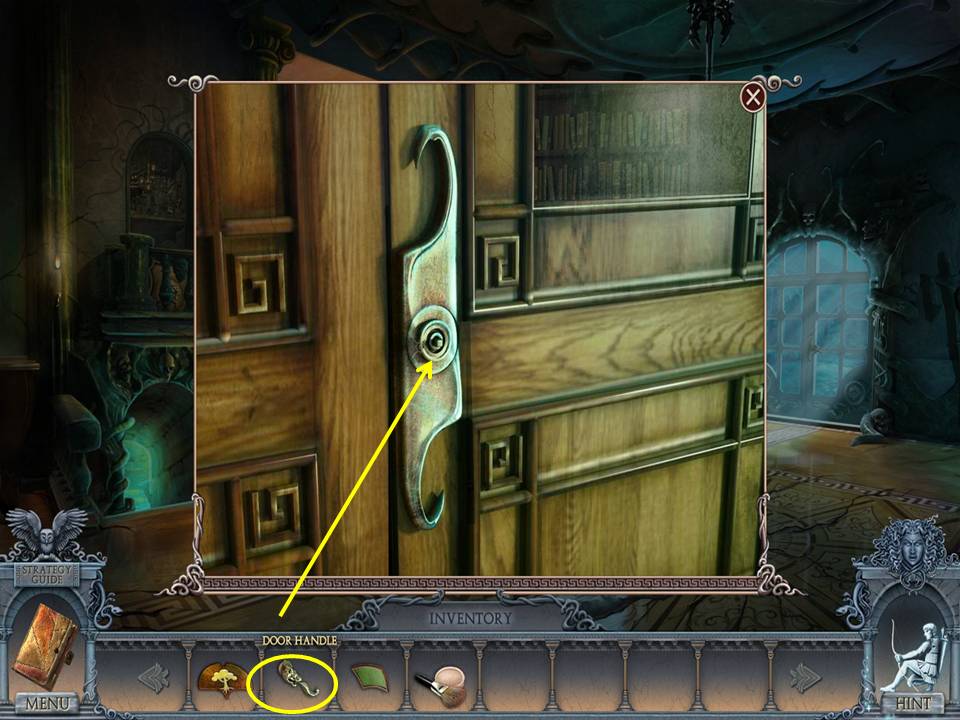
- Place the DOOR HANDLE on it.
- Go through the door to the library.
- Take the TAP.
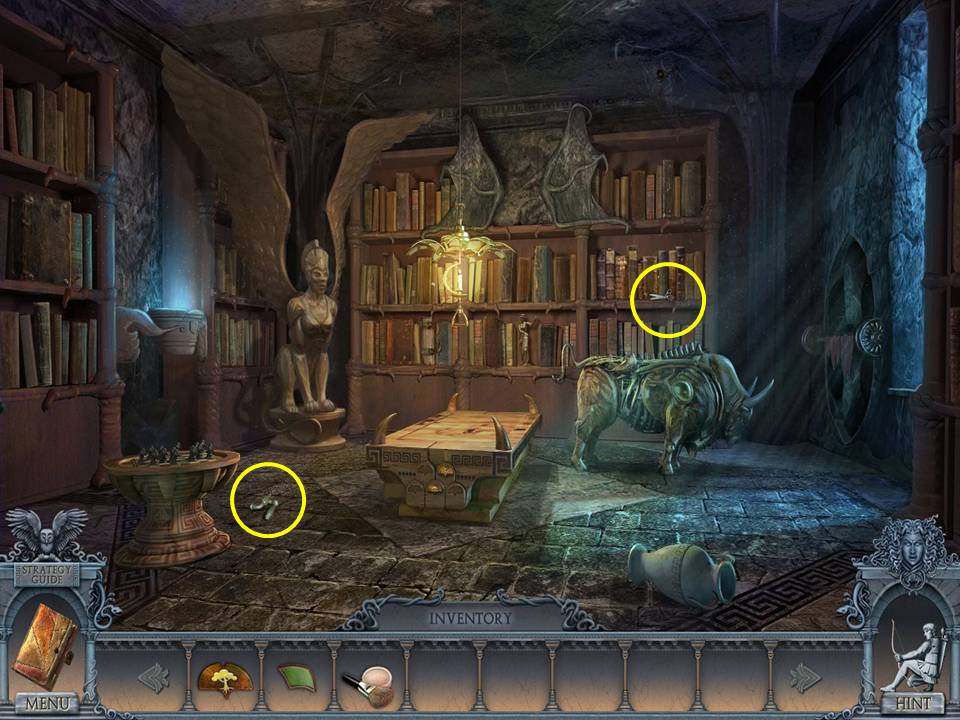
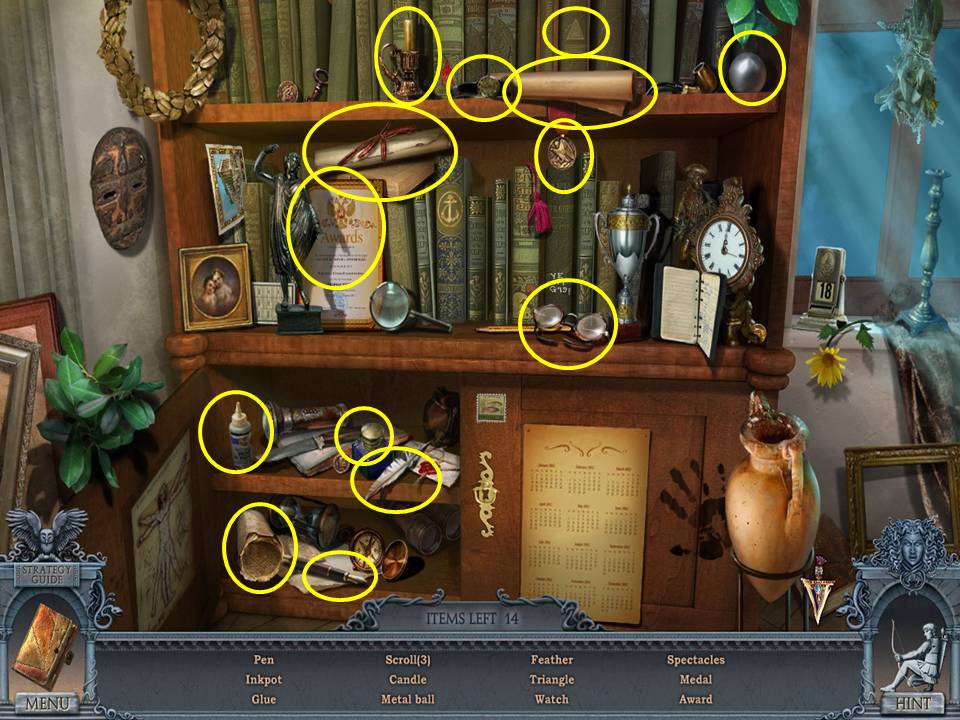
- Zoom into the bookshelf.
- Take the SCISSORS.
- Read the note.
- Click down.
- Go upstairs and right to the bedroom.
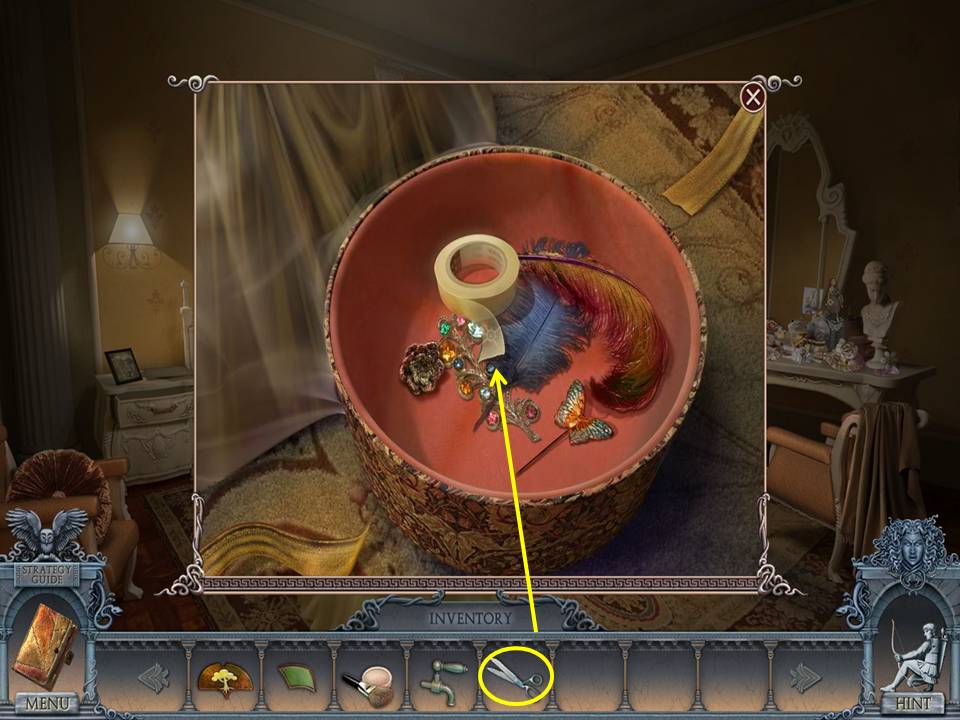
- Zoom into the box.
- Cut the tape with the SCISSORS.
- Take the TAPE.
- Click down.
- Go left.
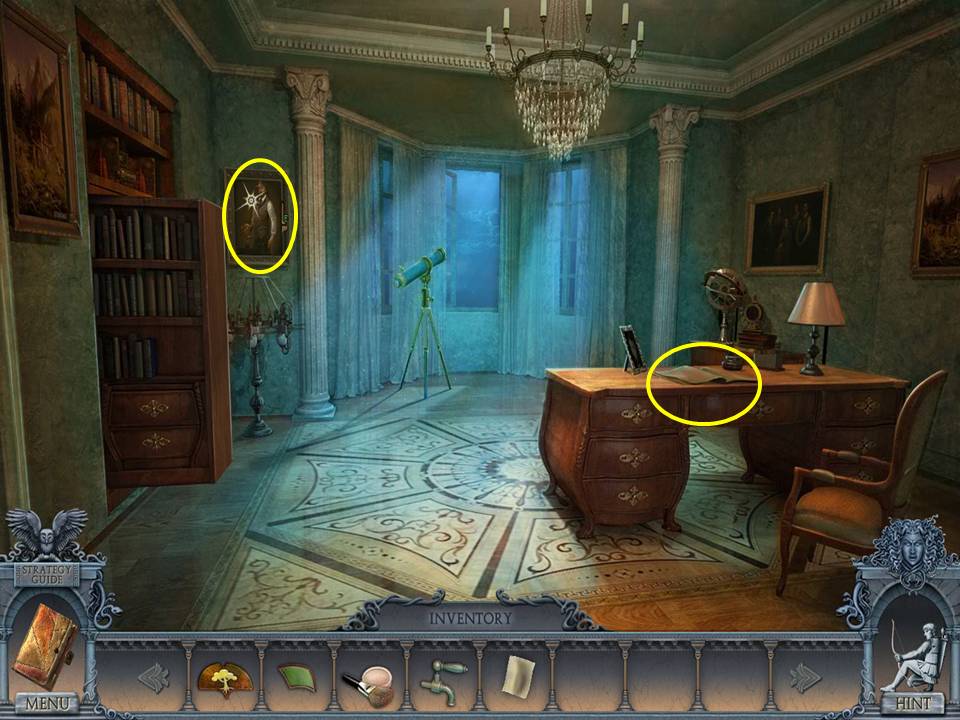
- Zoom into the desktop.
- Click the newspaper pages to read the articles.
- Lift the fingerprint with the POWDER WITH BRUSH and TAPE.
- Take the FINGERPRINT.
- Zoom into the portrait.
- Use the FINGERPRINT on the green button.
- Read the scroll.
- Take the SEED.
- Click down twice.
- Go to the library.
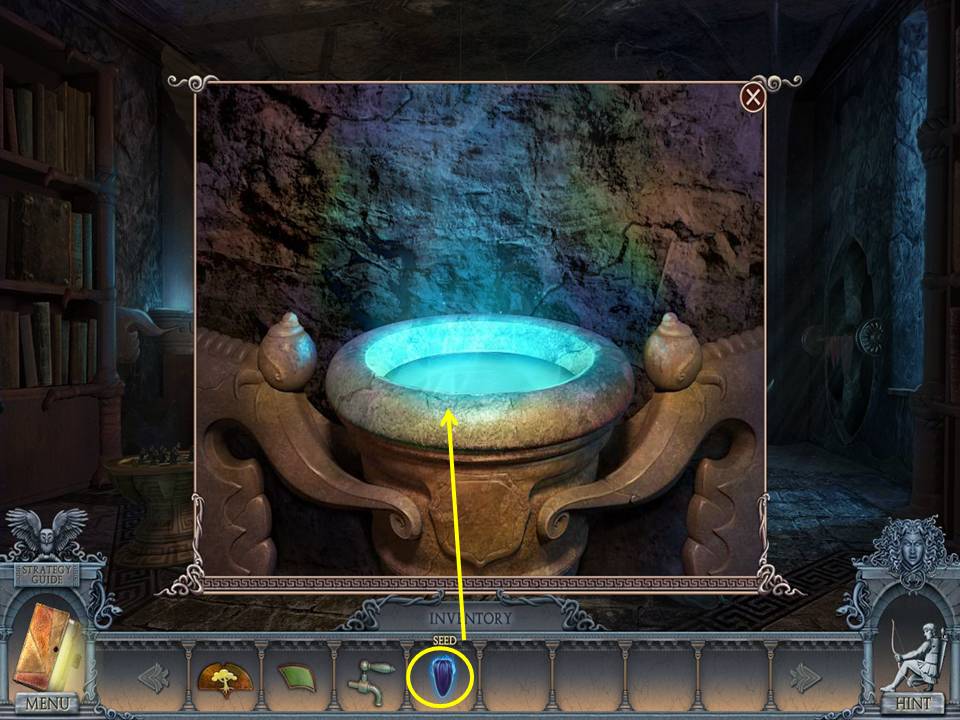
- Zoom into the magic pot.
- Plant the SEED in it.
- Take the FIRE FLOWER.
- Click down.
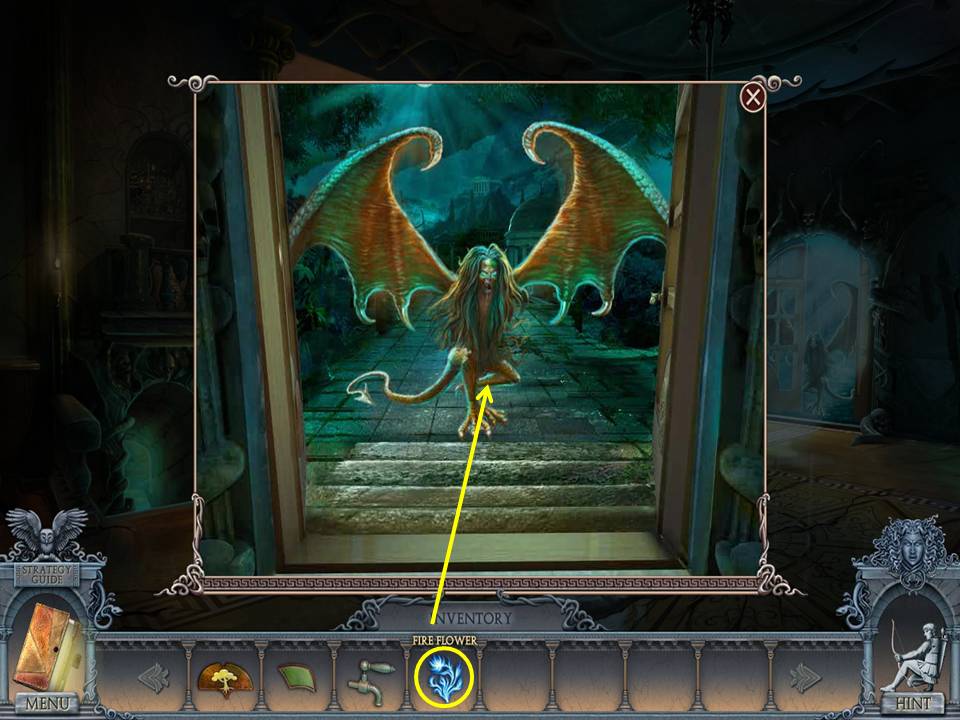
- Zoom into the glass doors.
- Open the doors.
- Use the FIREFLOWER on the Harpy.
- Go through the door.
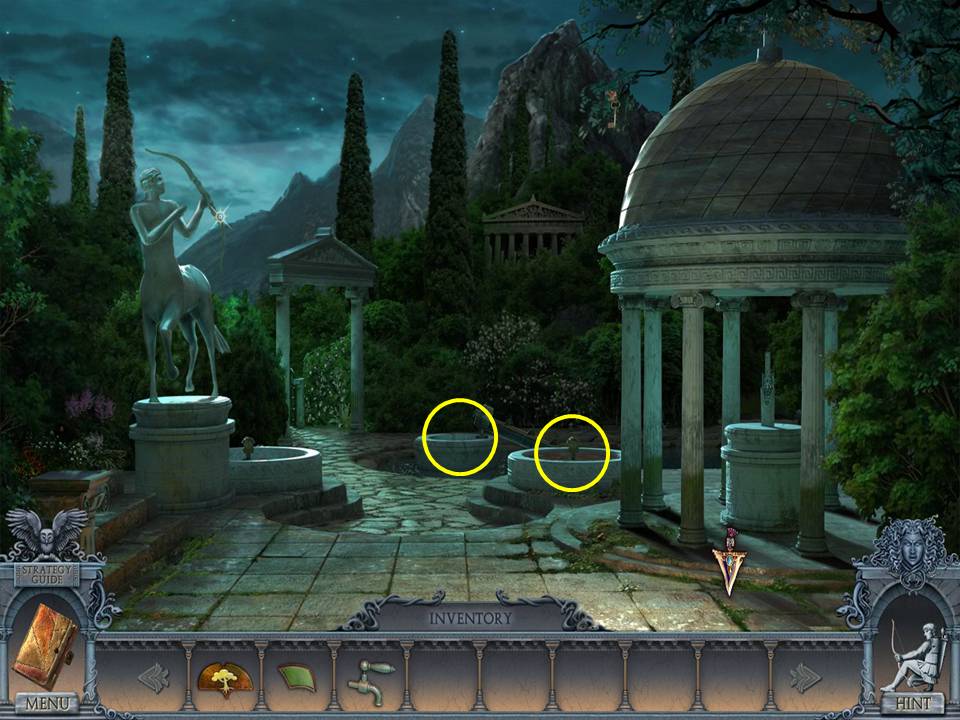
- Zoom into the center fountain.
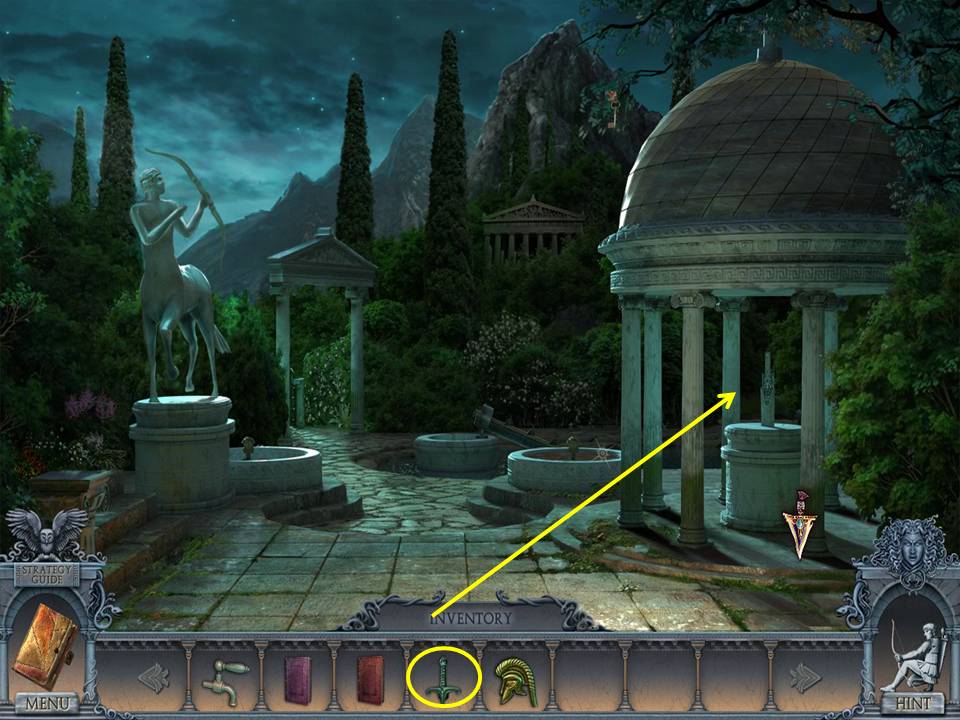
- Take the CANE.
- Zoom into the right fountain.
- Take the second LENS.
- Go left through the arch.

- Give the CANE to the topiary shaped like a man.
- Take the BOOK and the second CHEST BUTTON.
- Zoom into the gate.
- Take the third LENS.
- Take the KNIGHT.
- Click down twice.
- Go to the library.
- Zoom into the lamp and place the three LENSES on it.
- Change the lighting.
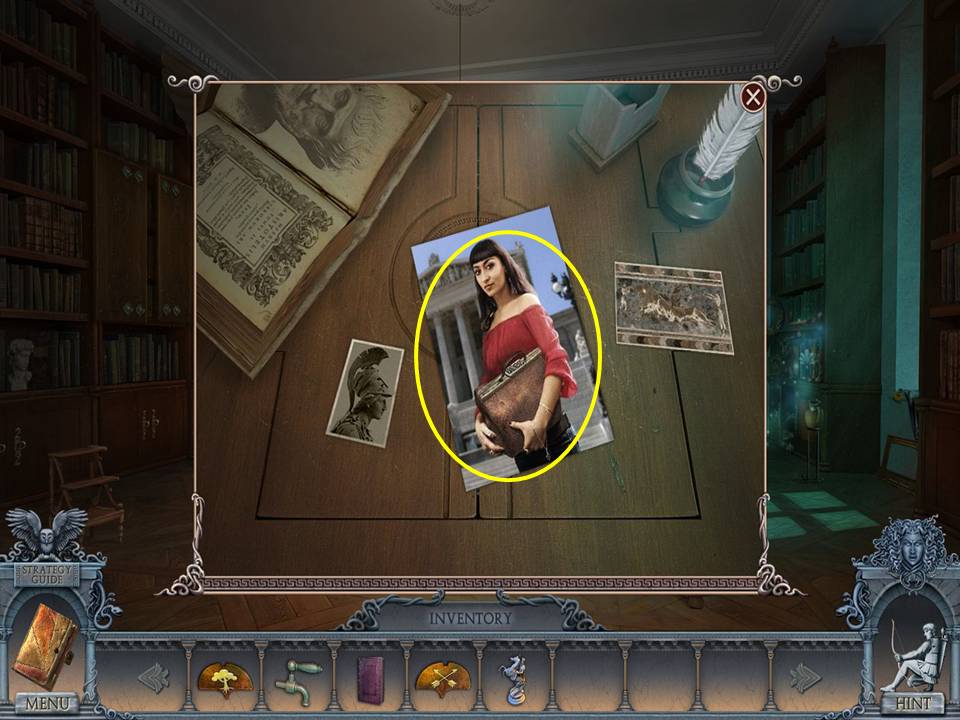
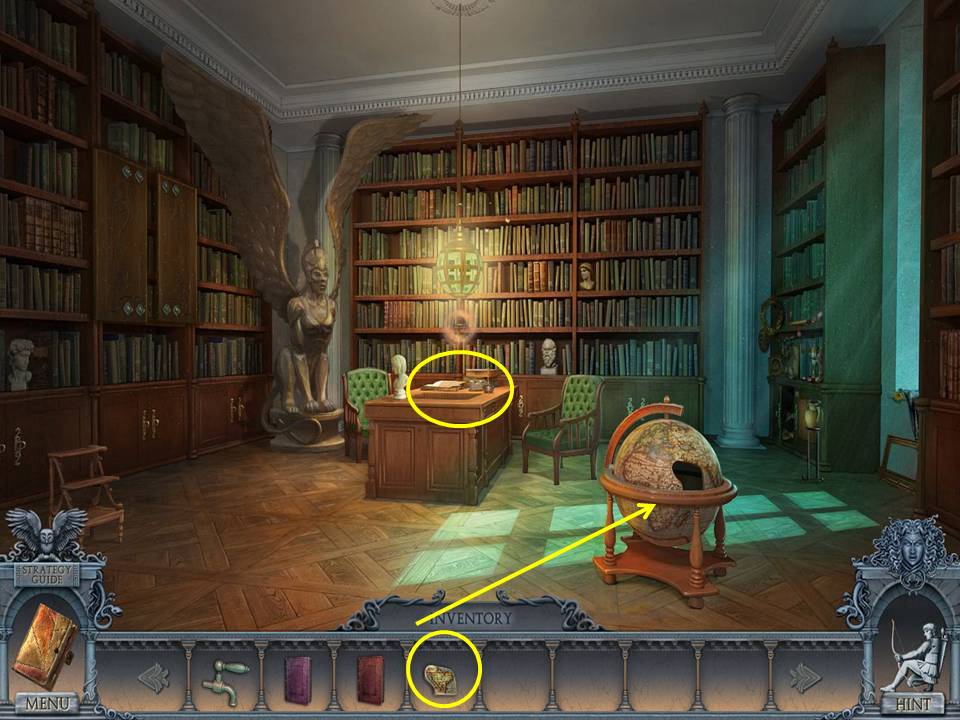
- Zoom into the desk.
- Click the picture to get the code from her bag entered into the journal.
- Zoom into the right bookcase to play a HOA.
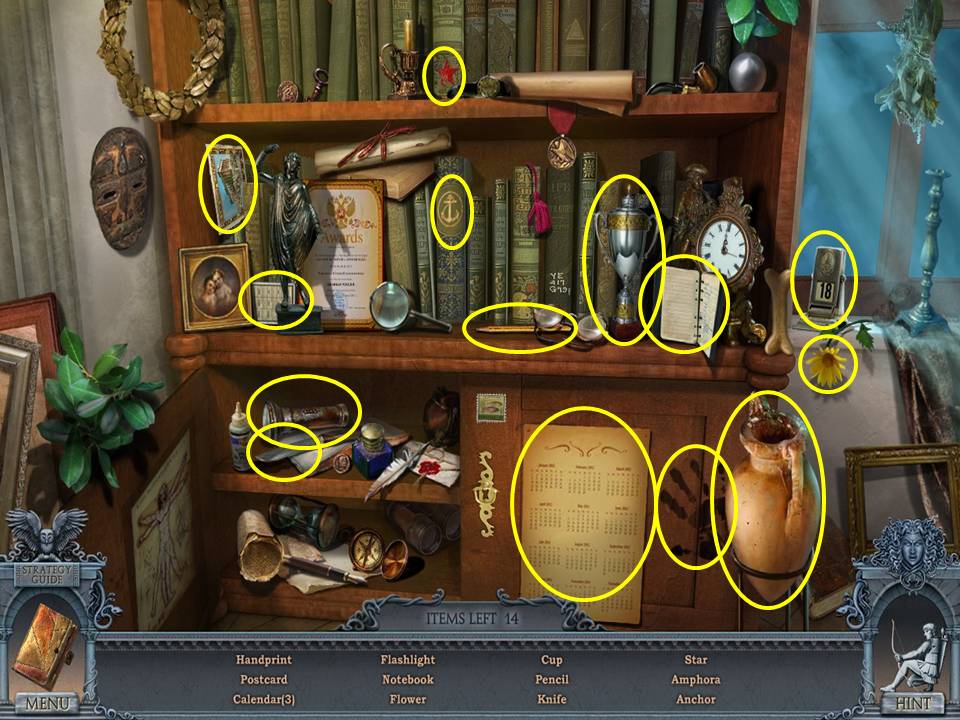
- Find the items listed.
- Receive a BONE.
- Change the lighting in the room to darkness.
- Click down.
- Go right and then left through the arch.

- Give the topiary shaped like a dog the BONE.
- Take the third CHEST BUTTON.
- Click down twice.
- Go upstairs to the bedroom.
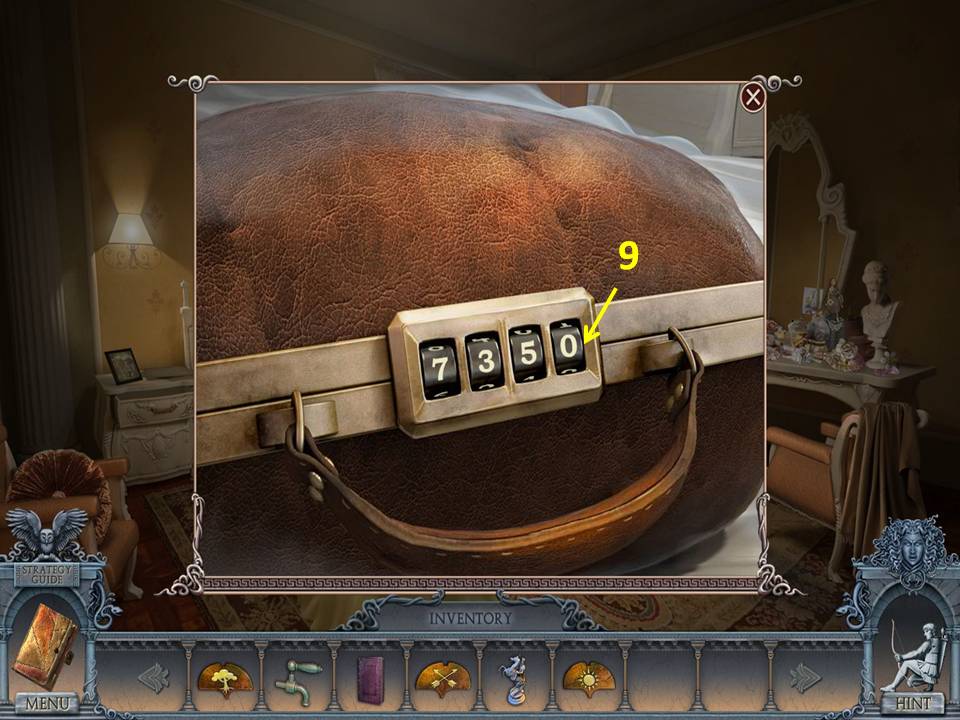
- Zoom into the bag and use the code from the picture that is now in your journal (7359).
- Take the second BOOK and second KNIGHT.
- Read the note.
- Click down twice.
- Go to the library.
- Zoom into the chest.
- Place the three CHEST BUTTONS in their appropriate spaces.
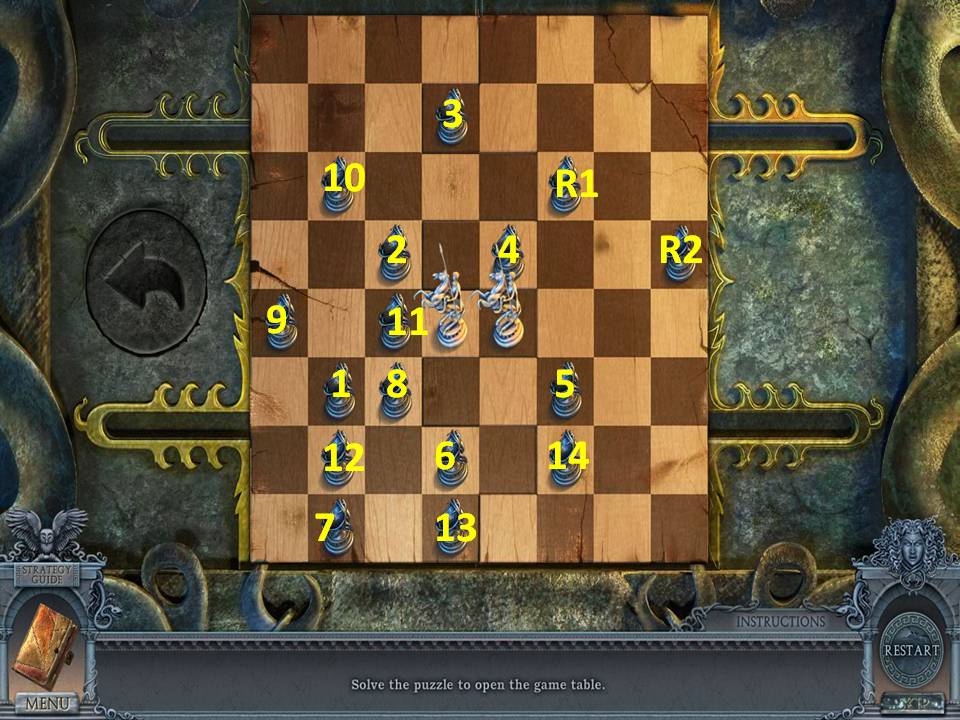
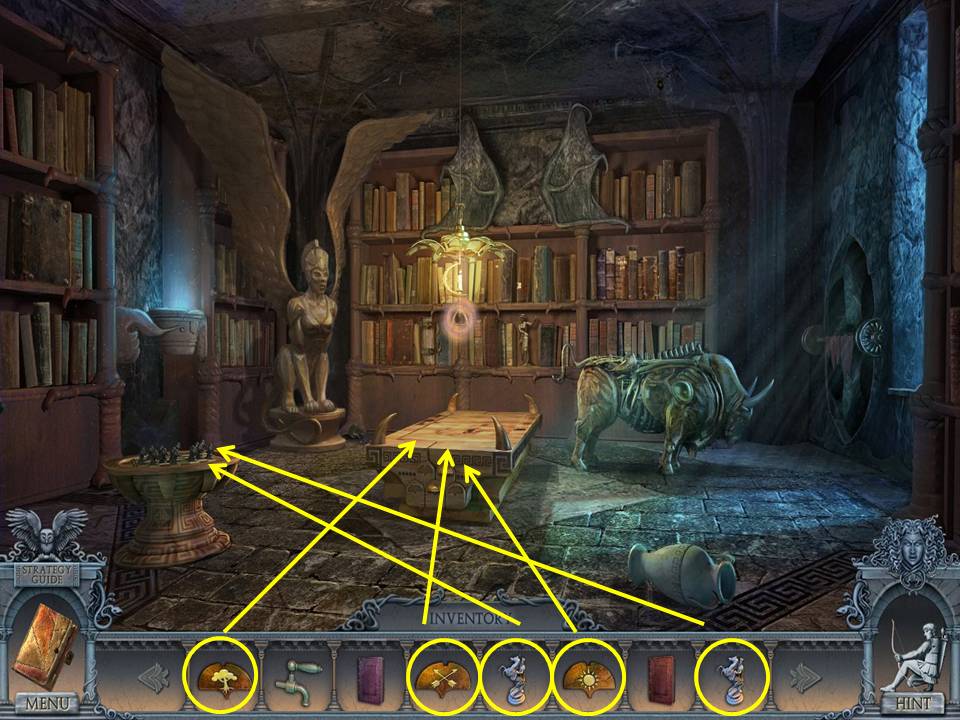
- Zoom into the chess board.
- Place the two KNIGHTS on it to initiate a puzzle.
- The object of the puzzle is to move the knights to remove all the pawns.
- The knight on the right only removes two pawns (marked R1 and R2). All others are removed by the left knight.
- See screenshot for solution.
- Take the GLOBE PART.
- Change the lighting in the room.
- Place the GLOBE PART on the globe.
- Take the SWORD HANDLE.
- Zoom into the desk.
- Take the HELMET.
- Click down and go right through the door.
- Place the SWORD HANDLE on the blade.
- The sword will rise, exposing a mechanism.
- Zoom into the mechanism.
- Click the chain to remove it.
- Take the second HELMET, which is on top of the now lowered dome.
- Go left through the arch.
- Zoom into the gate.
- Place the two HELMETS on it.
- Go ahead to the shore.
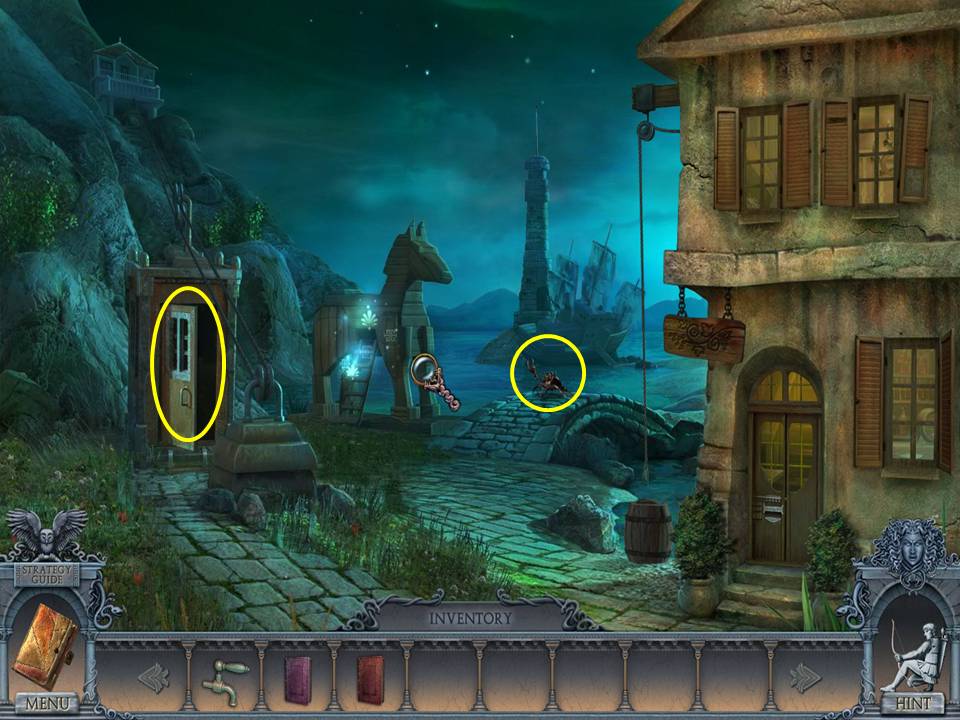
- Zoom into the crab.
- Take the CRANK.
- Enter the cable car.
- Take the BOWSTRING.
- Click down.
- Zoom into the Trojan horse to play an HOA.
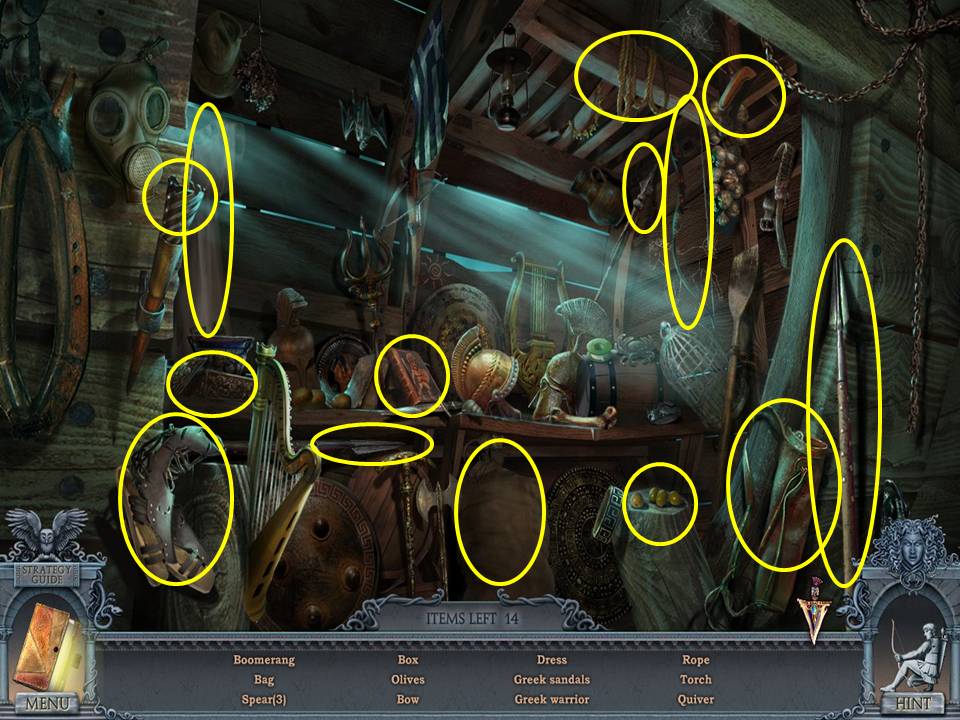
- Find the items listed.
- Receive the PLUMBER'S TAPE.
- Click down twice.
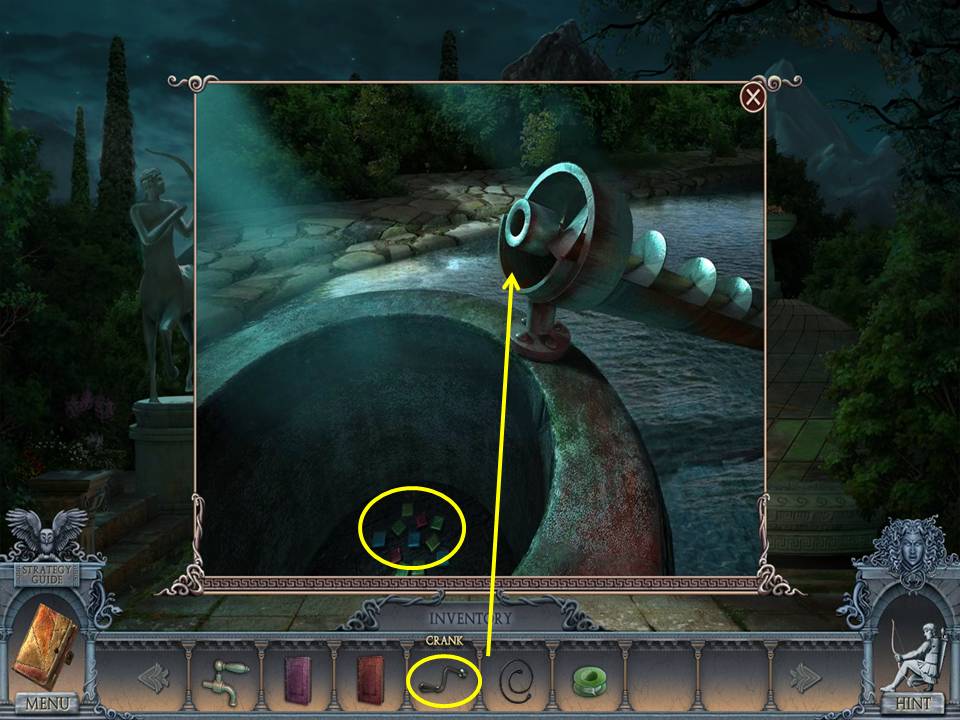
- Zoom into the center fountain.
- Place the CRANK on the mechanism.
- Take the TILES.
- Go back inside the cable car.
- Zoom into the box.
- Place the TILES on it to initiate a puzzle.
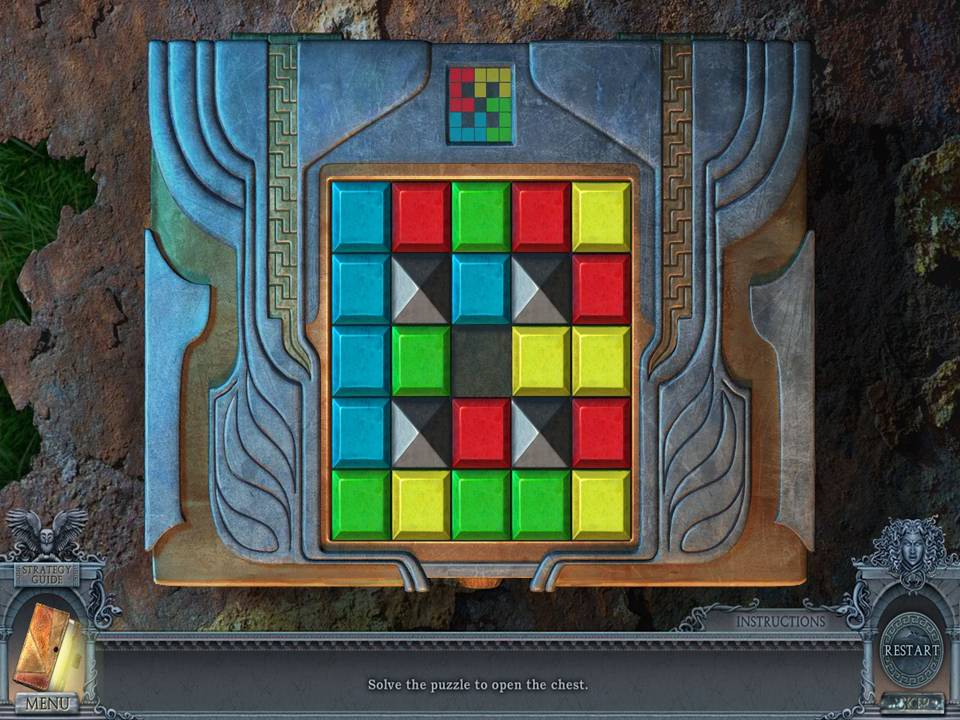
- The object of the puzzle is to slide the tiles to match the pattern in the inset above.
- The puzzle has several solution variations.
- Concentrate on moving the colors to their areas and then arranging to match the pattern.
- Take the CUTTING PLIERS and the WIRE.
- Click down.
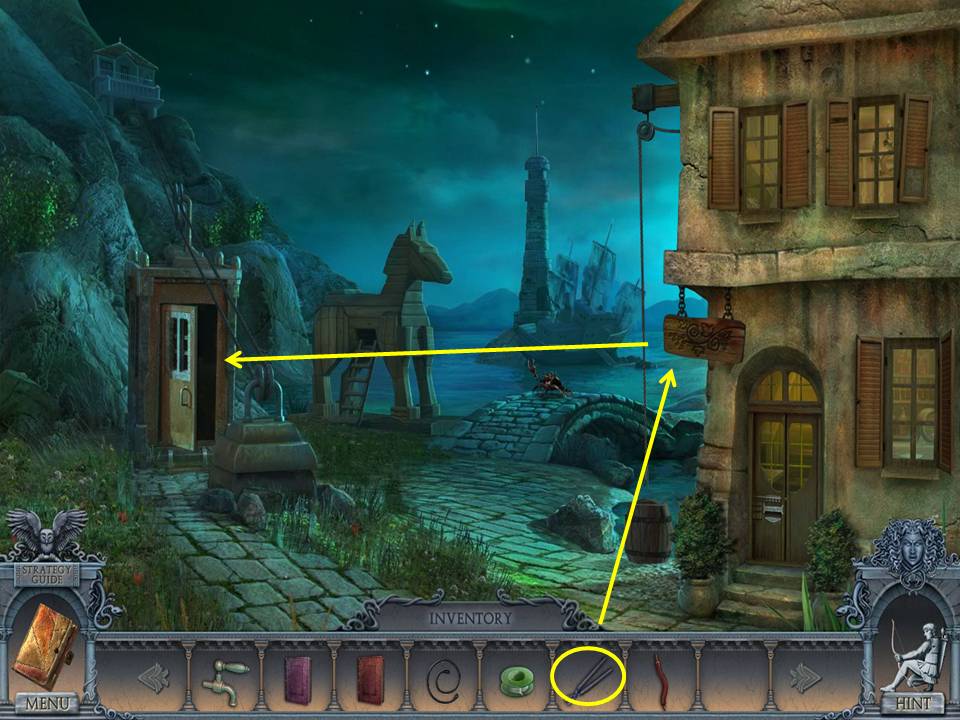
- Release the sign with the CUTTING PLIERS.
- Take the SIGNBOARD.
- Enter the cable car. Cover the gap with the SIGNBOARD.
- Move the lever.
- Zoom into the control panel.
- Take the third BOOK and remove the broken transistors.
- Go to the library.
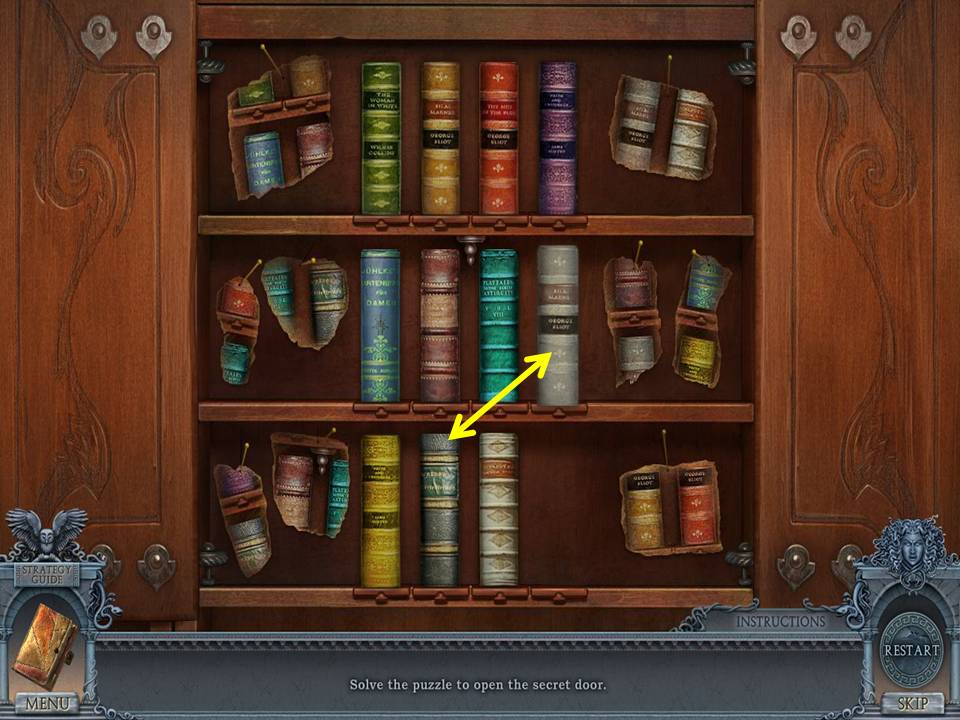
- Zoom into the bookcase.
- Place the three BOOKS on the shelves to initiate a puzzle.
- The object of the puzzle is to arrange the books based on the clues.
- The screenshot shows the final move.
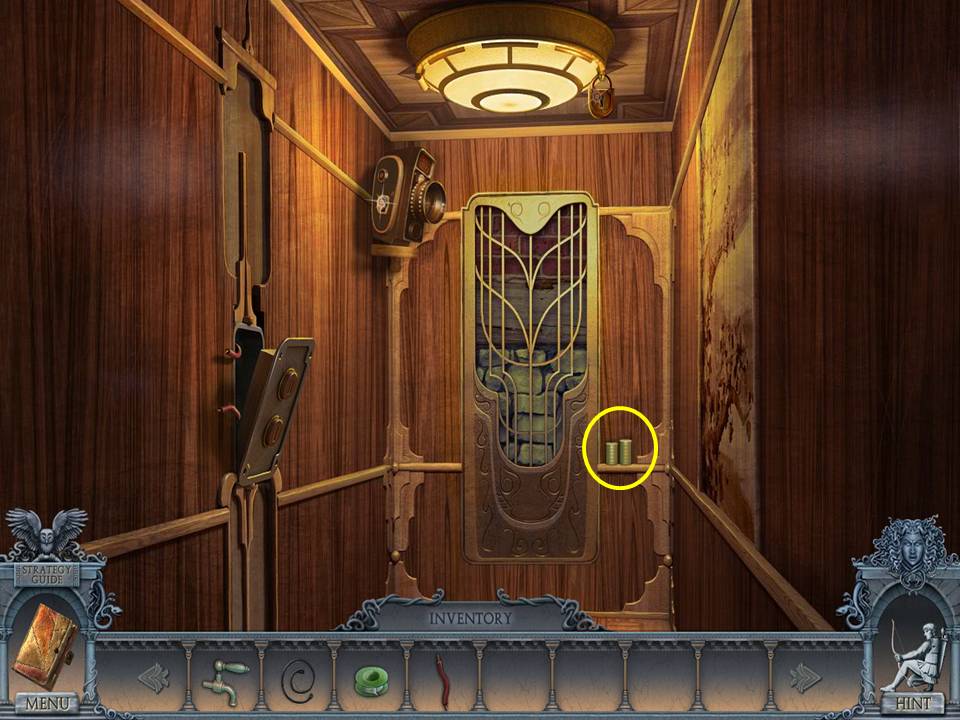
- Go left through the door to the elevator.
- Take the DOWELS.
- Go to the shore.
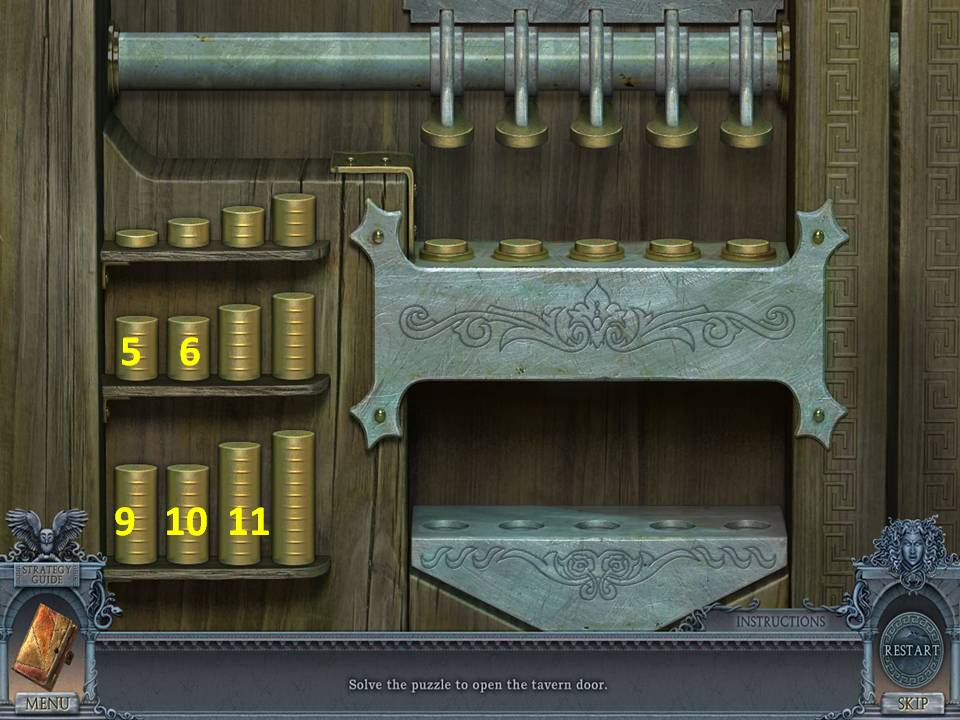
- Zoom into the door and place the DOWELS on the lock to initiate a puzzle.
- The object of the puzzle is to place the correct dowels in the proper slots.
- Assuming the dowels are numbered one to 12 from left to right and top to bottom, place these dowels along the bottom from left to right: 6, 10, 11, 9, 5.
- When finished, enter the building.
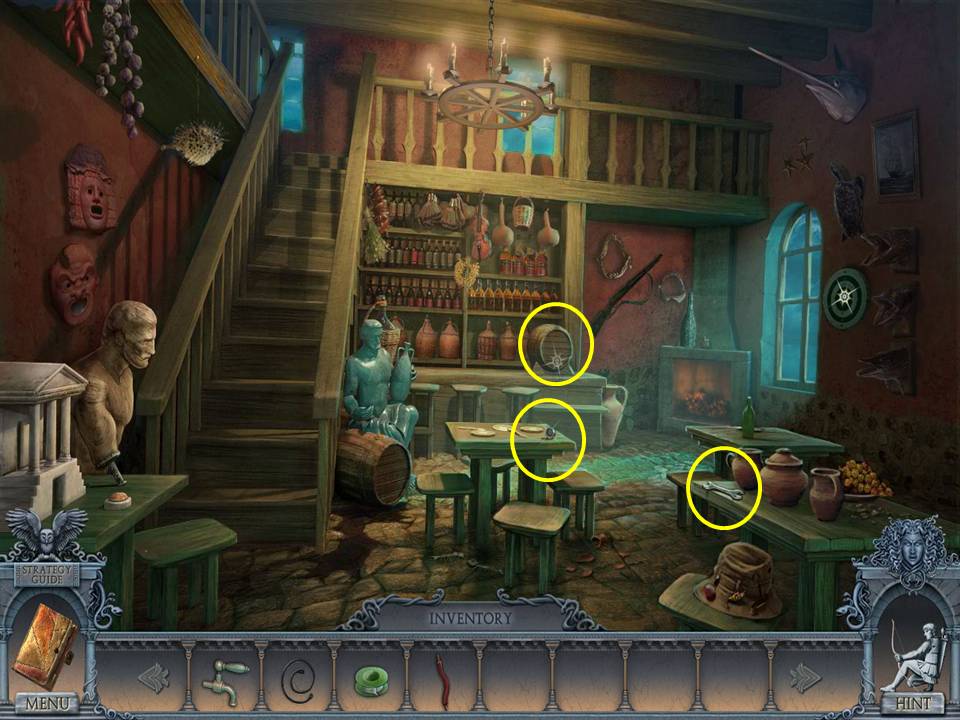
- Take the METAL BALL and the WRENCH.
- Zoom into the barrel at the back.
- Take the ELECTRICAL TAPE.
- Go upstairs.

- Take the RESISTOR.
- Use the WRENCH on the claw.
- Take the MECHANICAL CLAW.
- Click down twice.
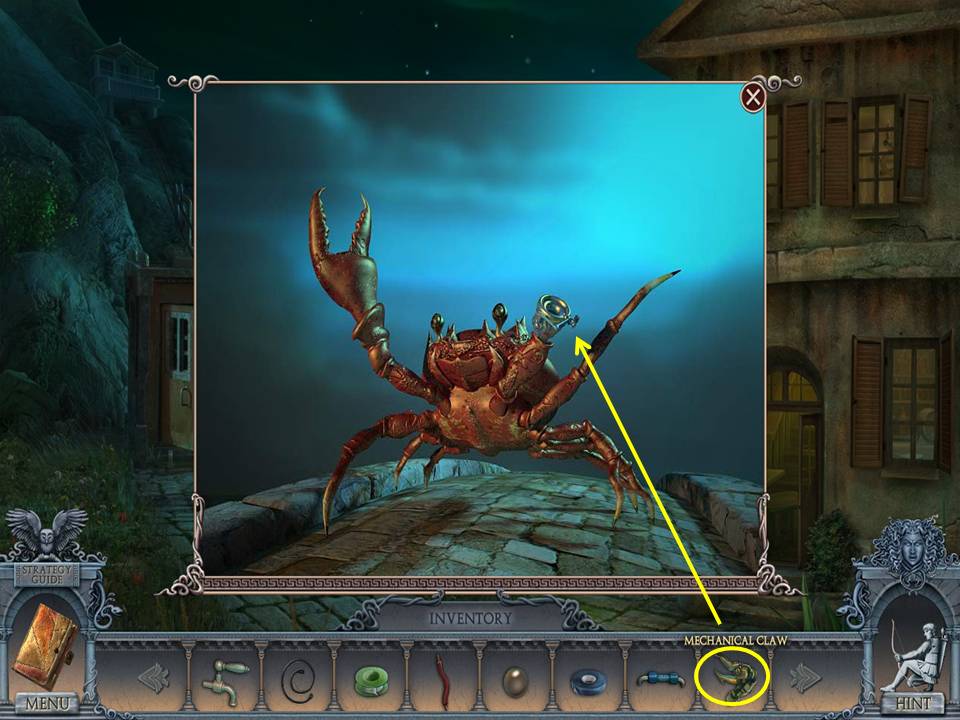
- Zoom into the crab.
- Place the MECHANICAL CLAW on it.
- Cross the bridge.
- Take the HOOK and ARROW.
- Click down.
- Place the HOOK on the rope to hook the barrel.
- Click down twice.
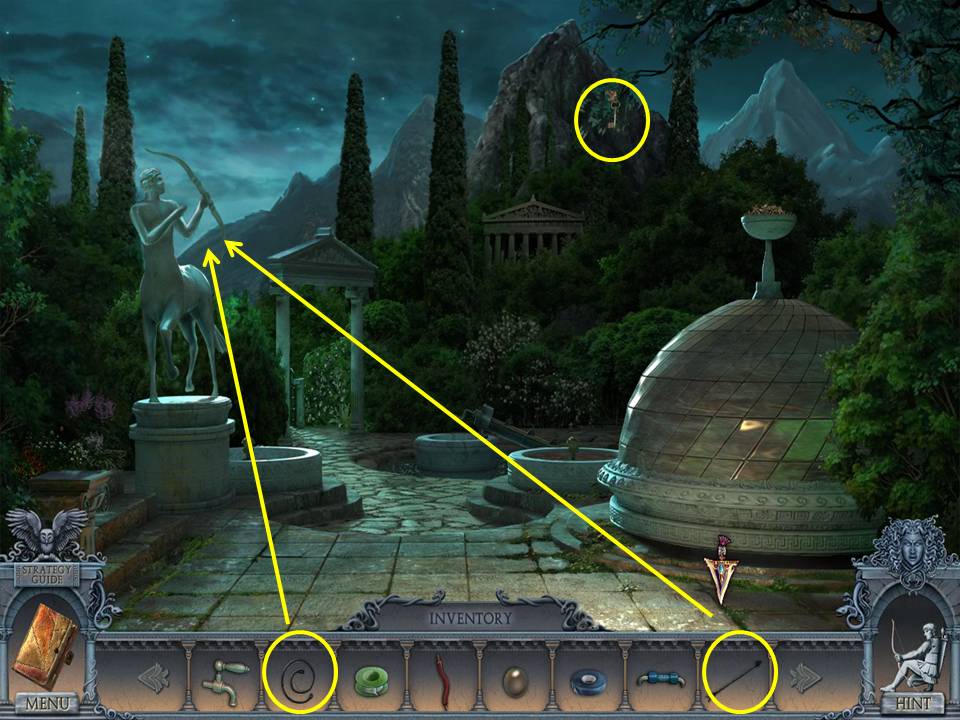
- Place the BOWSTRING and ARROW on the archer.
- Take the KEY.
- Return to the cable car.
- Open the first aid kit with the KEY.
- Take the REAGENT and second METAL BALL.
- Return to the elevator through the library.
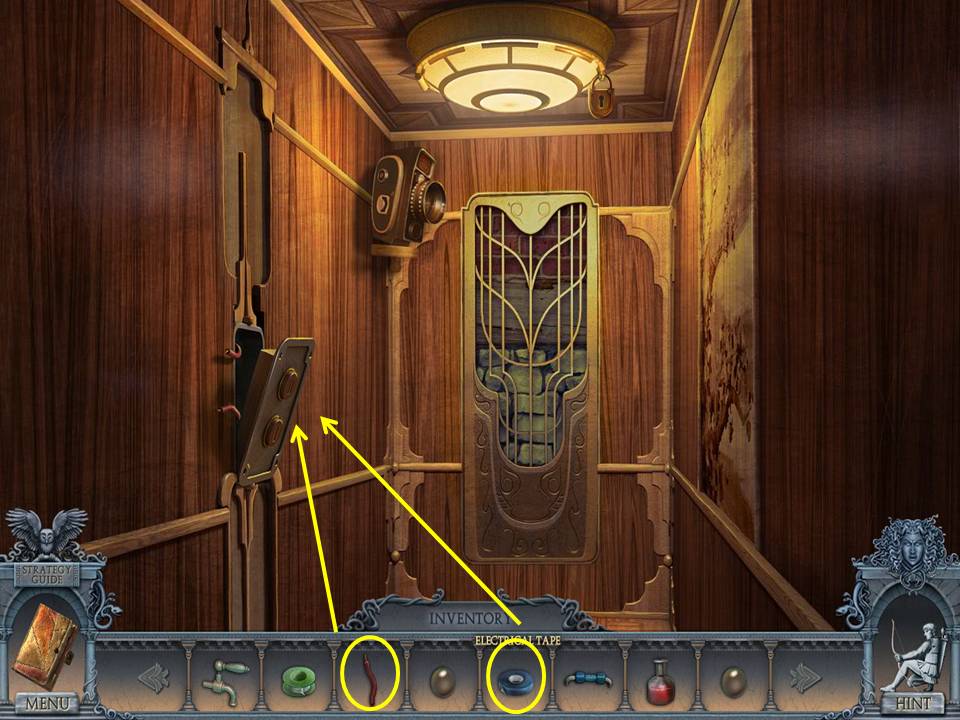
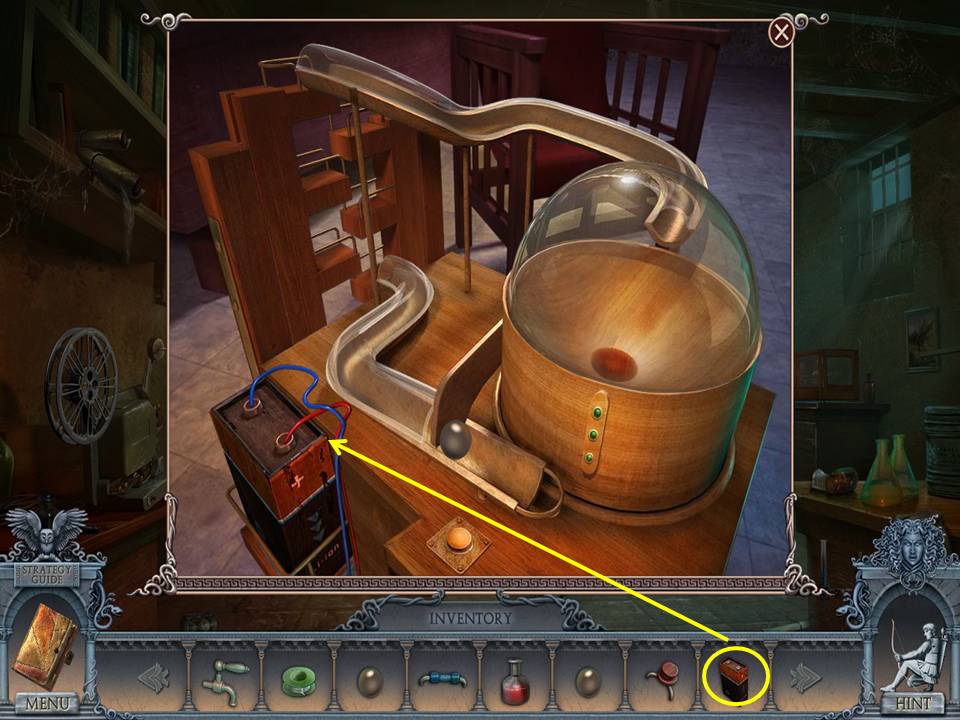
- Place the WIRE and ELECTRICAL TAPE on the back of the button panel.
- Click the button.
- You will be taken to a secret room.
- Take the TRANSISTOR from the desk at right.
- Click down to return to the elevator.
- Click the up button.
- Zoom into the right bookshelf to play an HOA.
 Find the items listed.
- Receive a PADLOCK KEY.
- Enter the elevator.
- Unlock the padlock with the PADLOCK KEY.
- Lower the light cover.
- Take the BATTERY.
- Click the down elevator button.
- Zoom into the device.
- Click the button.
- Remove the dead battery.
- Place the BATTERY in the holder.
- Place a METAL BALL in the chute.
- Click the button.
- Repeat with METAL BALL 2.
- Take the MAGIC BALL.
- Click down.
- Click the up elevator button.
- Use the MAGIC BALL on the statue in the corner of the library.
- Zoom into the statue.
- Take the MAP PART.
- Go to the shore.
- Enter the tavern.
- Go upstairs.
- Zoom into the map.
- Place the MAP PART on it to initiate a puzzle.
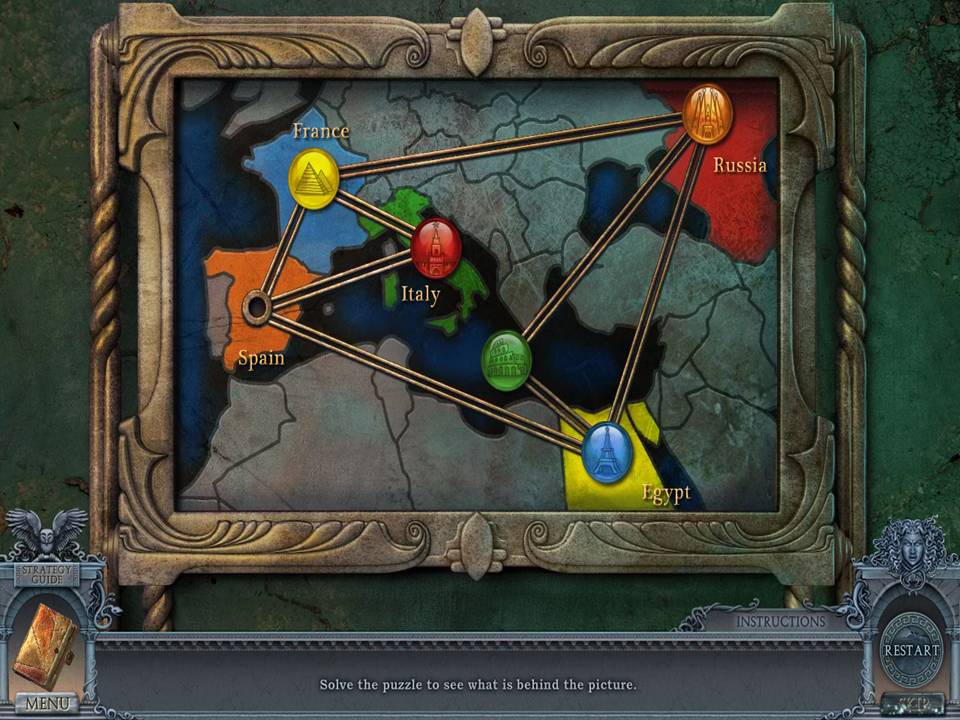
- The object of the puzzle is to move the circles to their matching colored locations.
- Click the locations in this order: Italy, France, Russia, Mediterranean Sea, Egypt, Spain, Italy, France, Russia, Mediterranean Sea.
- When finished, take the PLATE.
- Click down twice. Cross the bridge.
- Place the PLATE in the tree hollow.
- Take the DOVE.
- Return to the library.
- Zoom into the statue.
- Place the DOVE in its hands.
- Take the BULB.
- Return to the crypt.
- Zoom into the lamp.
- Insert the BULB in a slot.
- Click anywhere in the scene to receive a SECRET KEY. Return to the cable car.