
Haunted Halls: Revenge of Doctor Blackmore: Chapter Three: Chernobyl
Our Haunted Halls Revenge of Dr. Blackmore Walkthrough takes you deep inside the bizarre world of Dr. Blackmore where anything can and probably will happen. Armed with our easy to understand instructions and detailed screenshots found in this Haunted Halls Walkthrough, you'll be ready to face whatever weird and frightening things Dr. Blackmore will throw in your path in his attempt to enact some twisted form of revenge on you and your fiance.
General Info and Tips
Chapter One: Trapped
Chapter Two: Chicago
Chapter Three: Chernobyl
Chapter Four: Pompeii
Chapter Five: Alaska
Ask for help in the comments below!
Chapter One: Trapped
Chapter Two: Chicago
Chapter Three: Chernobyl
Chapter Four: Pompeii
Chapter Five: Alaska
Ask for help in the comments below!

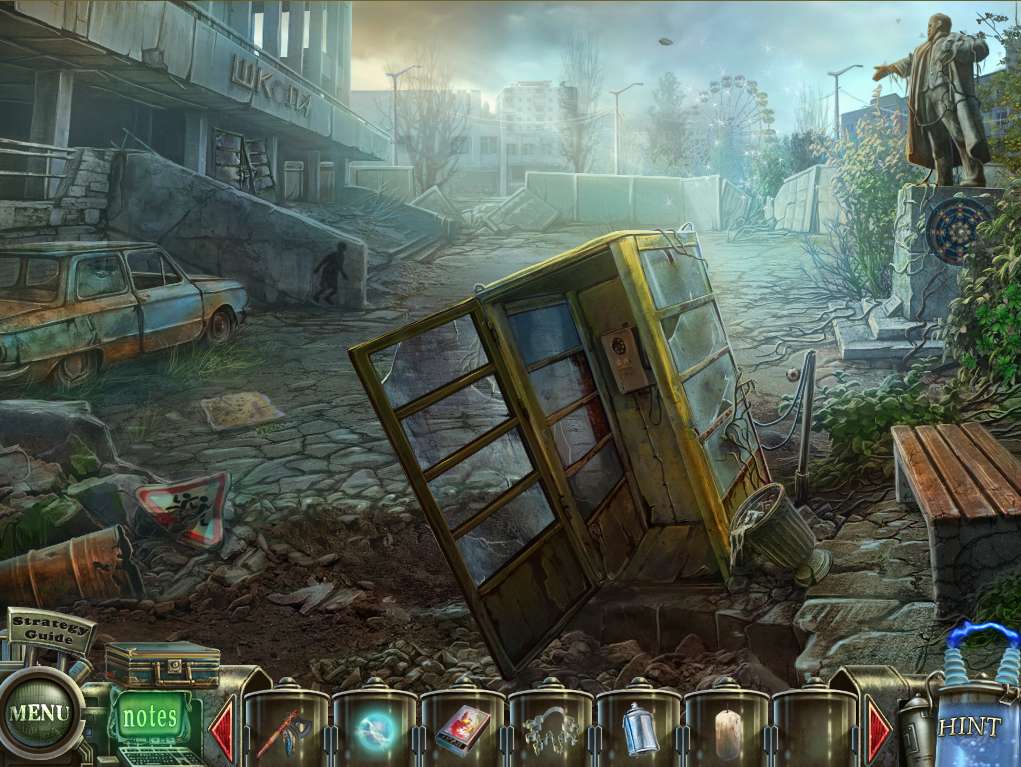
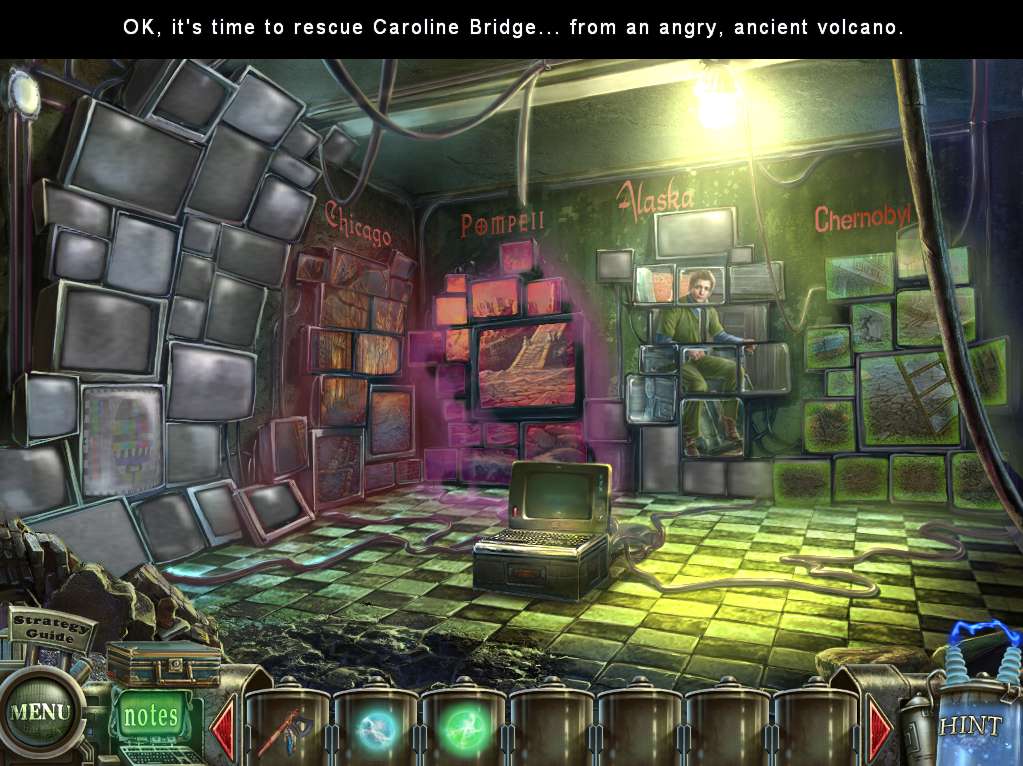
- Okay, so now we’re in radiation city – do we start glowing green after a while, or just grow another head?
- And what is that in the background – calamari waiting to happen?
- Zoom in on the newspaper lying on the ground nearby and note the number (268-47) written on it.
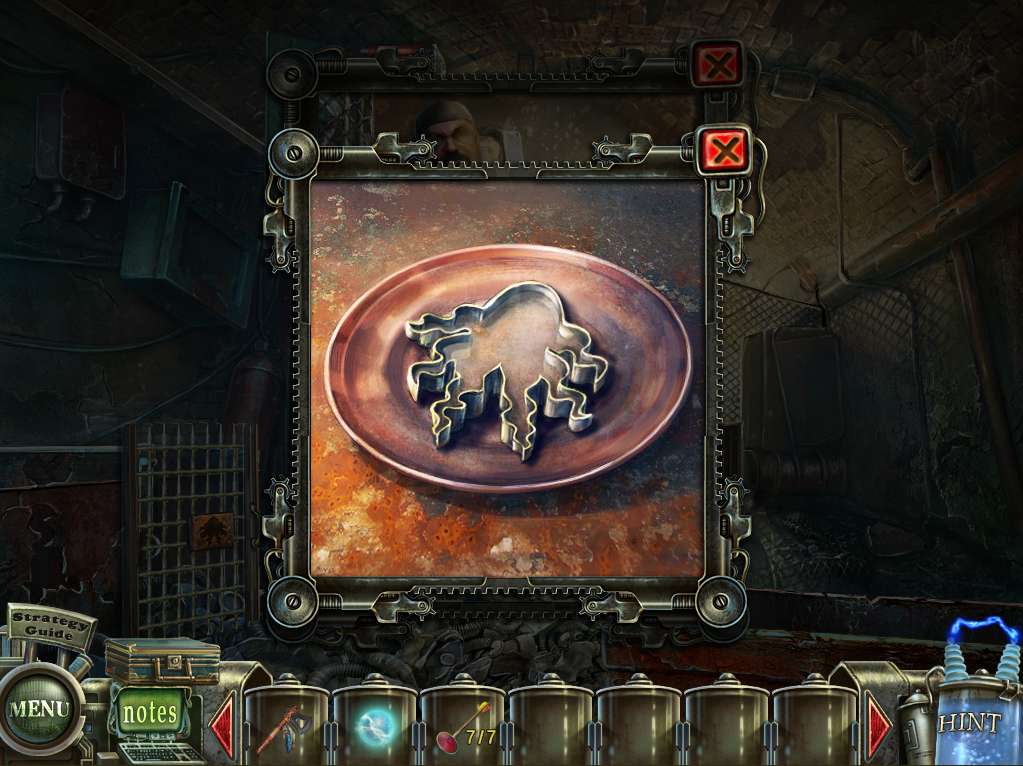
- Next, take a closer look at the bushes in front of the statue’s pedestal and use the TOMAHAWK to clear them away and reveal a puzzle.
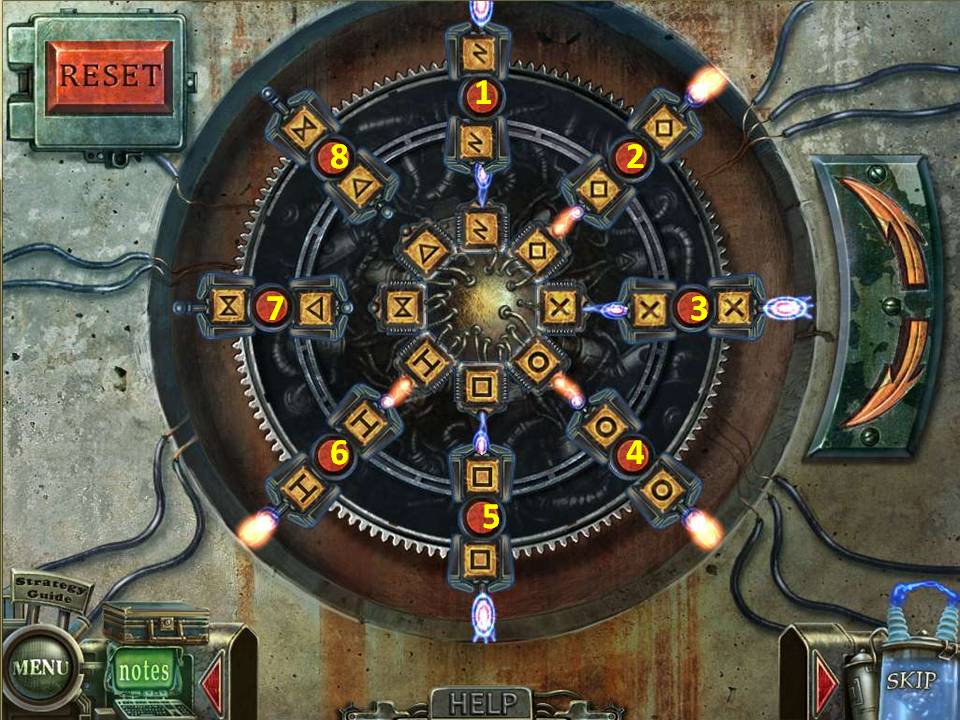
- The basic idea is that you have to line up the three rings so that the eight different symbols on each line up with each other – when correct, a line of electricity will run through each row of three.
- The inner circle doesn’t move, so obviously everything else gets set according to the position of each symbol on this ring. The second ring doesn’t rotate either, but you can swap individual symbols to the outer ring by pressing the red buttons. The outer ring is the one that can move symbols completely around, where they can then be swapped into the second ring as required.
- There are numerous ways to approach the puzzle, but here’s the most basic, which you can approach from any position.
- Firstly, use the swapping mechanism and the outer ring to get all the symbols in their correct position on the second ring – this shouldn’t be too hard so specific directions aren’t necessary.
- Once done, all you have to do is get the symbols on the other ring in place - here’s the trick.
- Rotate the outer ring until you light up at least one row of three symbols – start with the Z-shaped symbols at the 12:00 o’clock position as your first row.
- The aim now is to work clockwise, completing the next row of three, then the next, until you’ve worked your way completely round the ‘clock’.
- There’s two steps, and once you’ve got the hang of it it’s pretty easy. First step – look on the outer ring for the symbol you’ll need to complete the row next to the one you’ve just completed. If you’ve started by completing the Z-shaped row of symbols as suggested, the next row to tackle will be the diamond shapes.
- Doesn’t matter where on the outer ring the diamond symbol is, you’ll need to go and ‘grab it’ to bring it back to its correct position, next to the Z-shaped row.
- So here’s what you do – temporarily swap the diamond symbol to the 2nd ring, then rotate the outer ring until the z-shaped symbol is one stop short of the row where the diamond symbol is.
- Next, swap the diamond symbol from the 2nd ring back to the outer ring – it should now be sitting in the adjacent position to the z-symbol.
- Start moving the ring in a counter-clockwise direction to return the z-symbol back to the 12:00 o’clock position – if you’ve done all this correctly, you’ll now have two rows complete – the row of z-symbols, and the row of diamond symbols.
- So what’s next in line to complete? The X-symbol rows of course. Get the hang of it?
- One point to remember though. Because you temporarily stored the diamond symbol in the second row, you also displaced the correctly placed symbol that was there to the outer row, so it will have to be returned back to it where it belongs. It’s easily done.
-
As you’re moving the z-symbol on the outer ring back to the 12:00 o’clock position, note when the displaced symbol is over its appropriate row. Stop temporarily, swap the symbol back to its position in the middle row, then keep going until the Z-symbol is back at 12. Now repeat the entire process –
- 1) Note the next row of symbols to complete and locate where the missing symbol is on the outer ring
- 2) Swap this symbol to the middle ring
- 3) Turn the outer ring until you’re in the correct position to swap out the required symbol so that it will be sitting adjacent to the symbol from the last row you completed.
- 4) Return the outer ring back to its start position, pausing to put the displaced 2nd row symbol back in position. On completion, you should have added another ‘electrified’ row to the collection.
- 5) Proceed to complete the next row, and the next, until you’ve worked your way round the clock.
- When finished, the doors to the building on the left will open – oh joy, what is it, the reactor room at the plant?
- Enter the building.
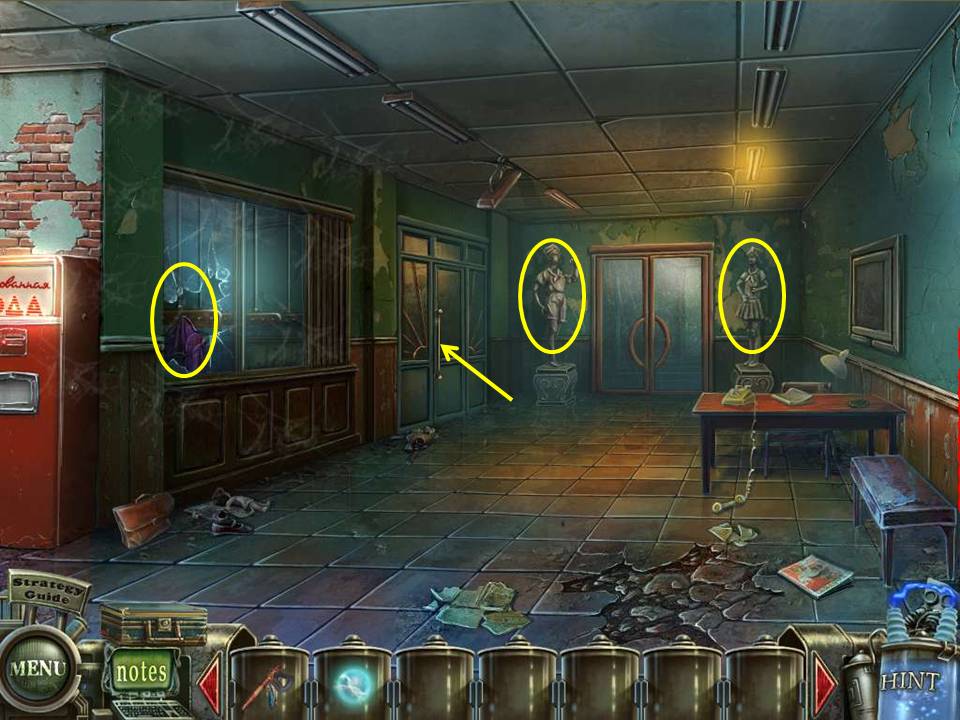
- Click on the drink dispenser to the left – need money again! Note the statues at the back of the room and their apparent need of musical instruments. Note the broken window on the left, and zoom in on the coat inside. A pair of DRUMSTICKS will appear – add them to your collection. Now open the door at the back of the room on the left.
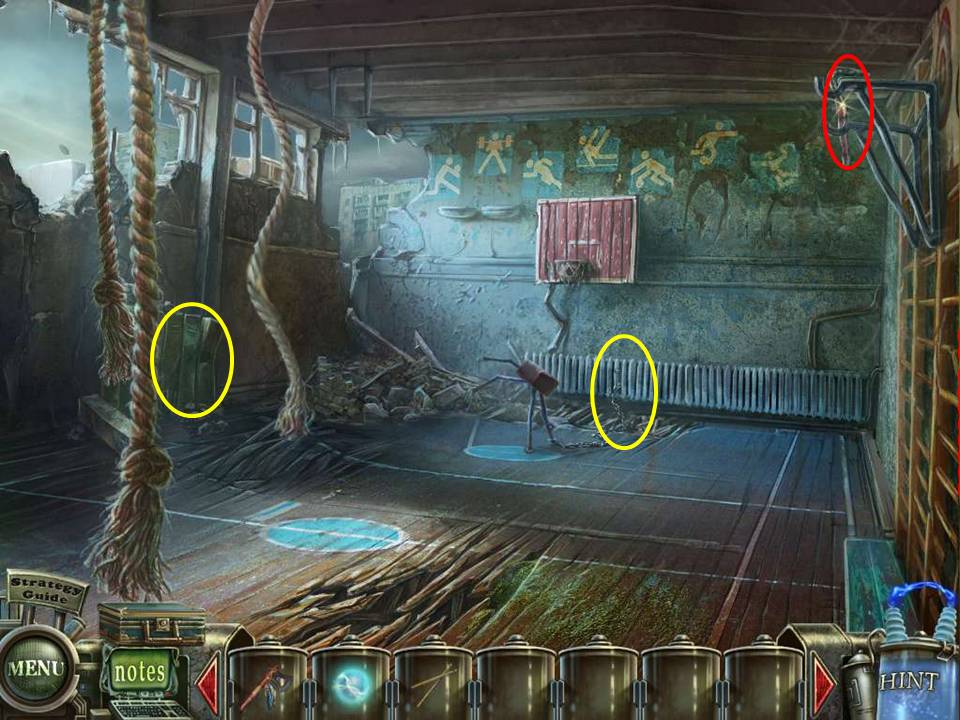
- Okay, this is weird – so this is what happens via radiation, eh? A piece of vaulting equipment apparently worshipping the sky? Grab the CROWBAR hanging from the hooks on the upper right, then use it on the lockers to the left (obscured by the dangling ropes). Inside the locker you’ll find some AMMO – add it to inventory. Finally, use the CROWBAR on the radiator at the back of the room to snap a chain, which will release the crazed vault to freedom and leave behind a BALL for you to collect. Head back to the plaza.
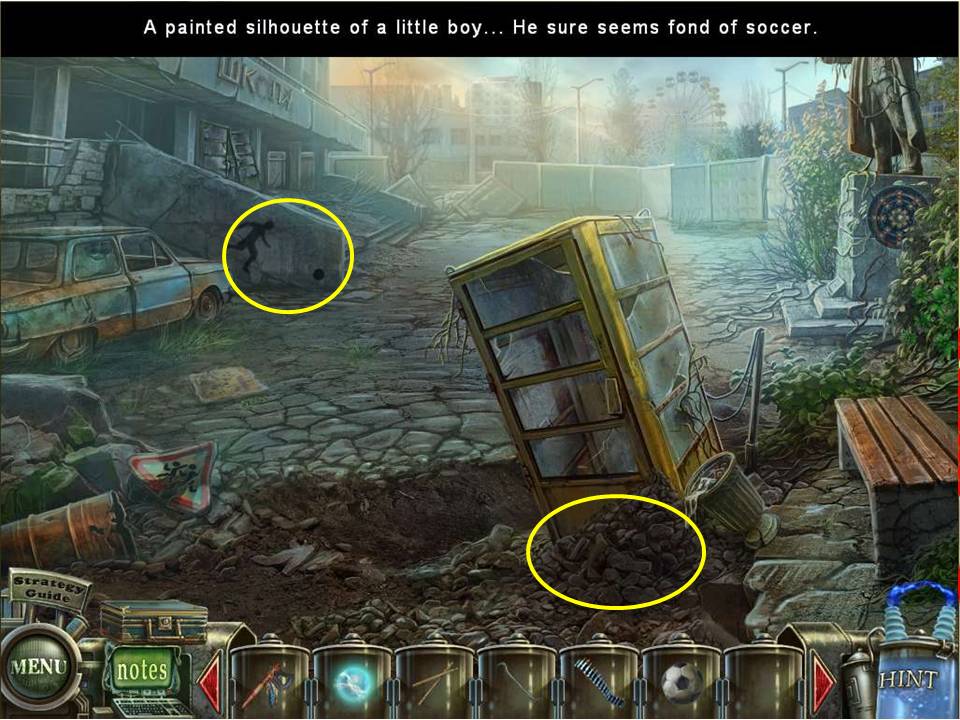
- Give the soccer BALL to the silhouette of the boy in the background and watch him kick it – wow, talk about a chain reaction!
- Next, use the CROWBAR to clear away the chunks of asphalt around the phone booth, then open the door and enter.
- Remember the number on the newspaper outside? Zoom in on the phone and key in 268-47 and take the COIN that drops down into the coin return.
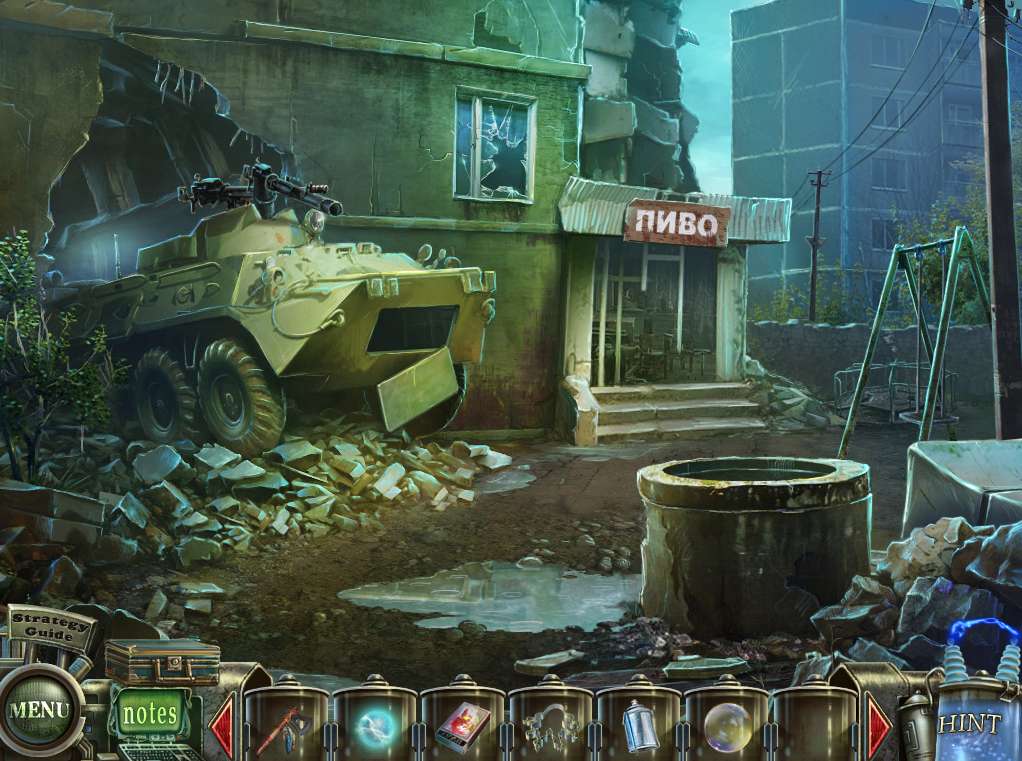
- Head over to the gap in the wall in the distance.
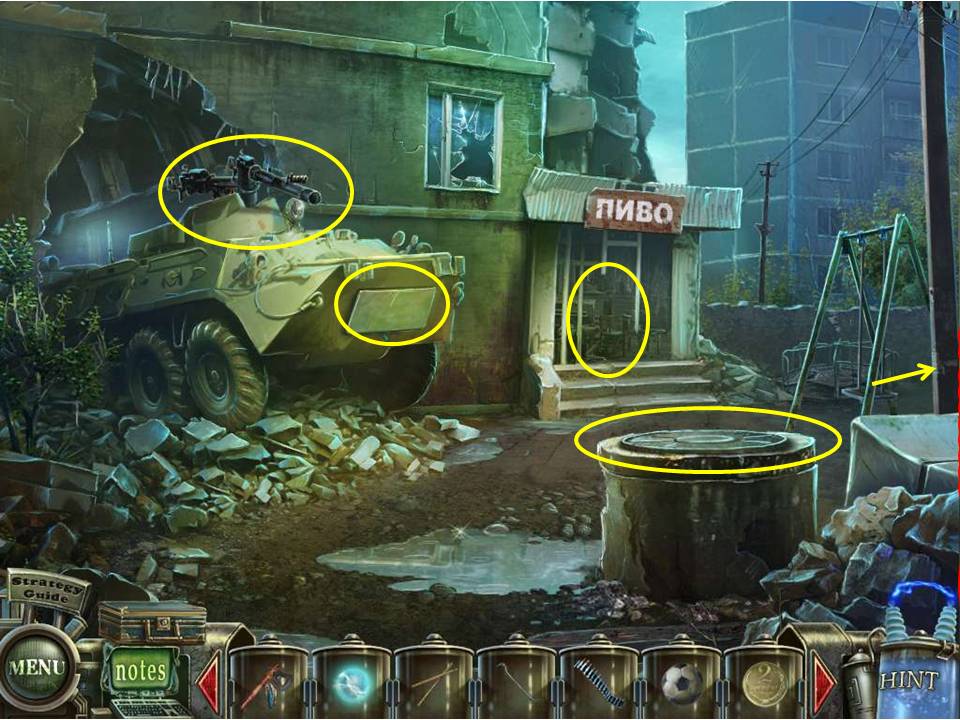
- Zoom in on the gun atop the armored carrier, drop the AMMO into the clip, and watch it blow the lid off the nearby well! Note the puzzle inside the well that’s missing a piece.
- Next, zoom in on the doorway in the background (bet you didn’t know the sign says ‘beer’) and pick up the CLEAN GLASS and the MATCHES.
- Zoom in on the panel on the front of the armored carrier and use the CROWBAR to pull it away - take the FUNNEL and the DRUM inside.
- Finally, zoom in on the playset to the right and pick up the OCTOPUS CUTTER in the sandpit.

- Now for the puzzle in the well. Add the FUNNEL to trigger it, noting that there are 12 squares to work with, each of which will light up when you pass the cursor over it.
- Clicking on the square rotates the piece it contains.
- Turn the pipes so that all the components are correctly configured, noting the connections on the walls.
- When completed correctly, take the TRUMPET, then return to the lobby of the building.
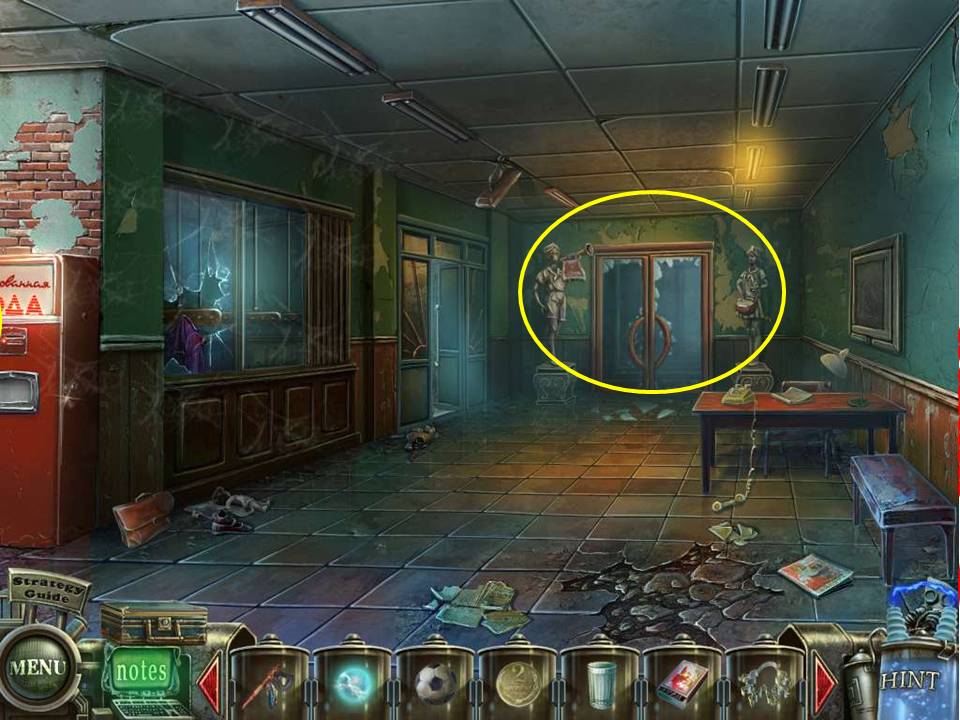
- Zoom in on the statues at the back of the lobby and hand them their respective instruments from inventory, at which point the two figures will proceed to play out loud and shatter to glass doors.
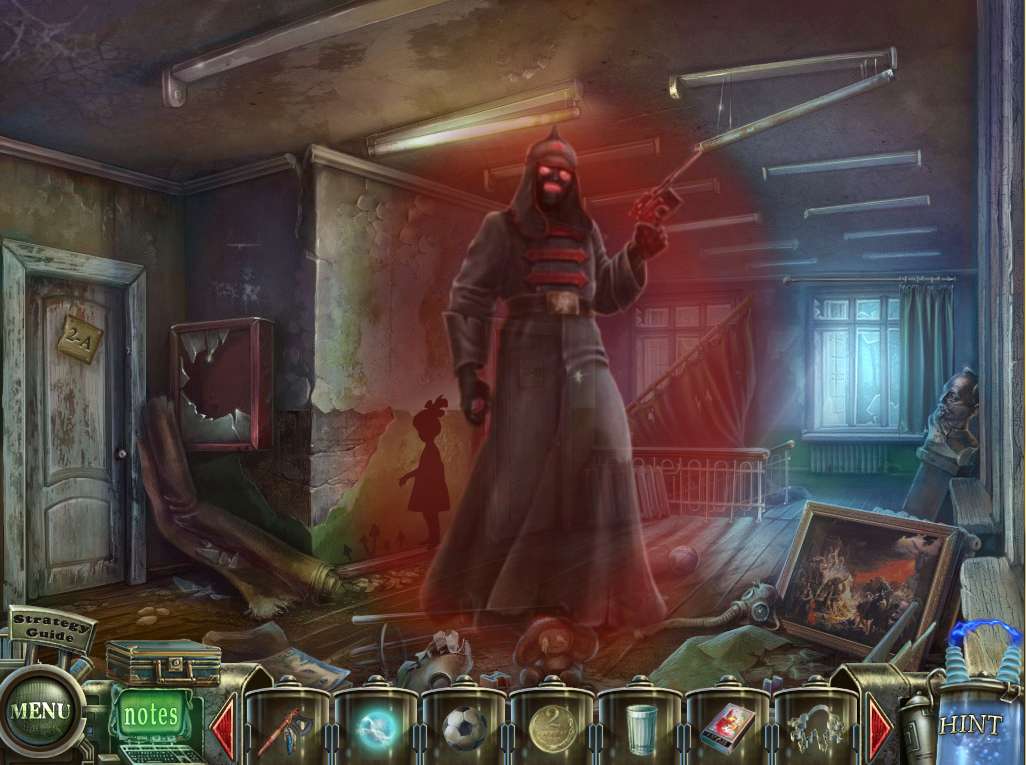
- Enter the new area, and watch the gruesome one taunt you yet again, after which you’ll be subjected to another hallucination.
- Nothing seems to work at the moment, so head back into the lobby.
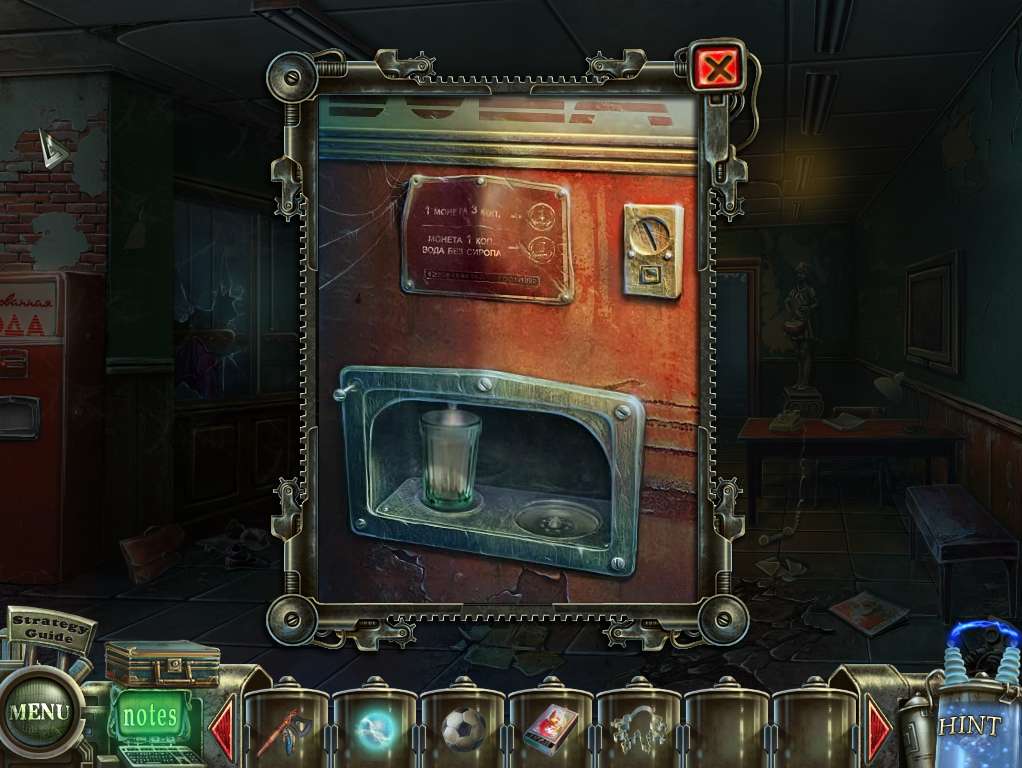
- Zero in on the vending machine, insert the CLEAN GLASS in the cavity, and toss the COIN into the slot.
- Add the FIZZY WATER to inventory.
- Head outside.
- Proceed over the breach in the wall zapped earlier by the statue, and zero in on the HOA puzzle to initiate it.
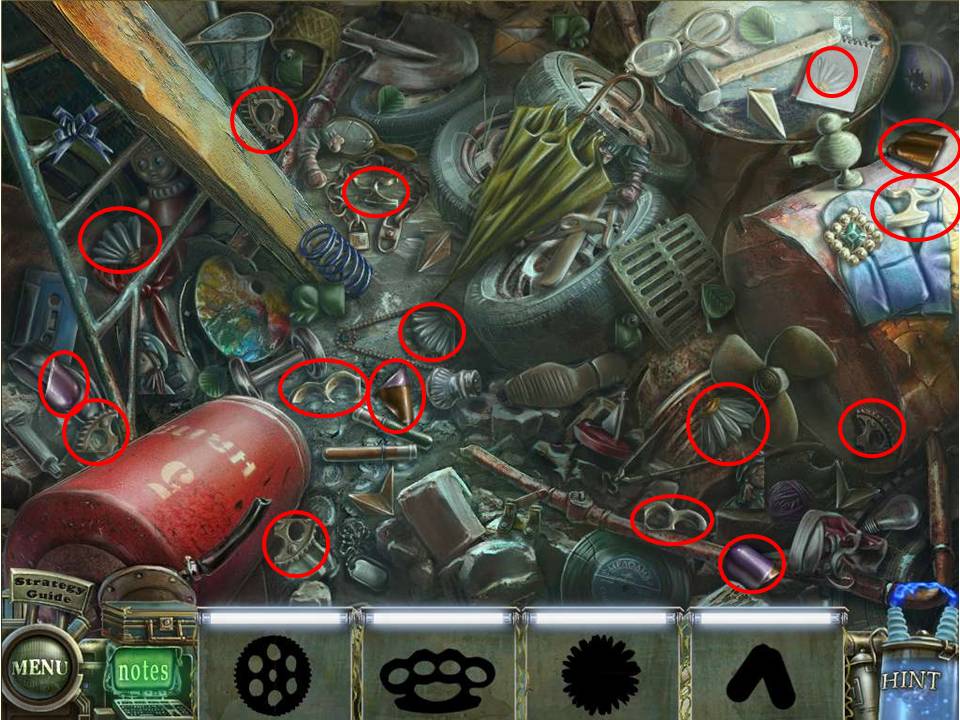
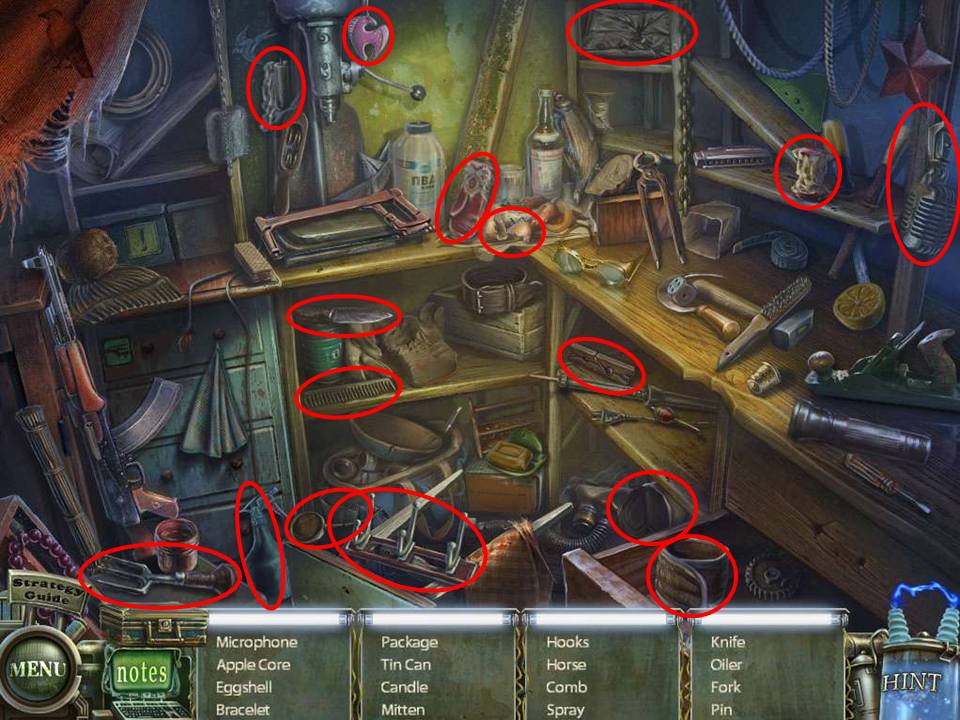
- Find all the items circled in red, noting that there might be some slight variation in the objects to find due to random selection by the game.
- When complete, take the PILLS, which will be added to your portable lab.
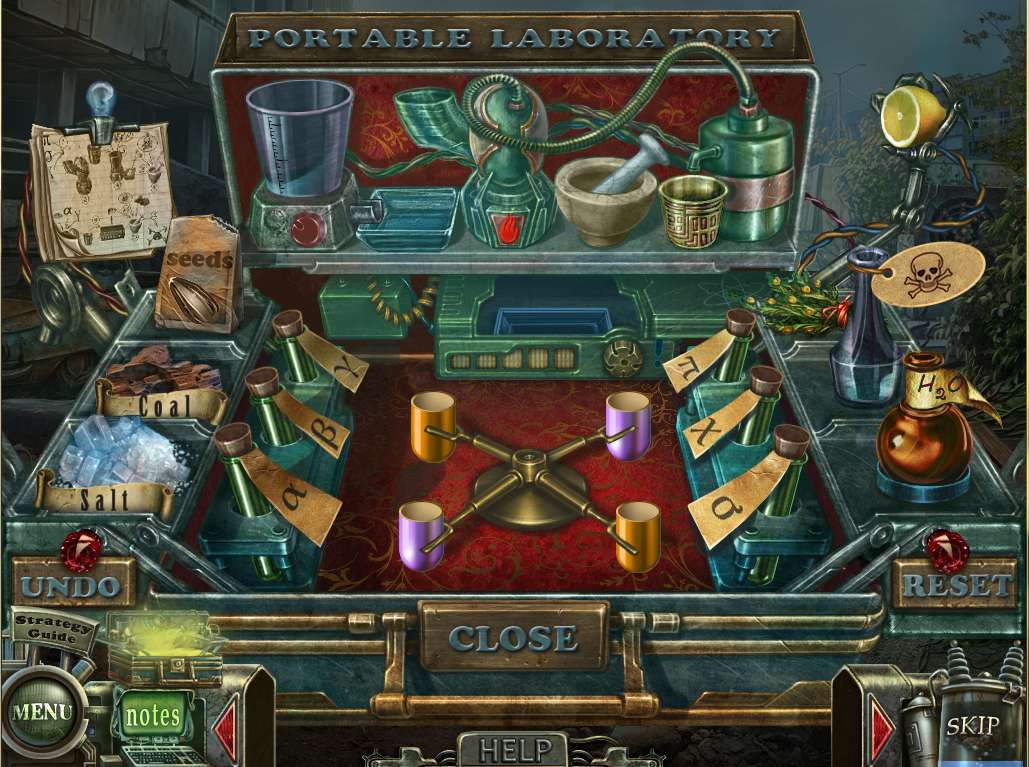
- Take the tubes with the Greek letters ‘?’?‘?’?and ‘?’ marked on them and run the contents through the liquefier.
- Place the results in the grinder, add salt and water (H2O), and blend the contents.
- Place the resulting powder in the mortar together with some poison (nice! This must be Lucrezia Borgia’s recipe) and use the pestle to reduce the mix to a fine powder.
- Next, take the powder and place it back in the liquefier, together with the contents from the tube marked with the Greek letters ‘?’ and?‘?’, and blend together.
- When finished, put the contents into the solidifier at the back (under the little shelf) which will produce crystals.
- Place the crystals in the mortar, together with more poison and some coal, and use the pestle to grind the contents down to a fine powder again.
- Complete the process by placing the fine powder in the capsules to create the PILLS that will be added to your inventory.
- Now head back to the school room.
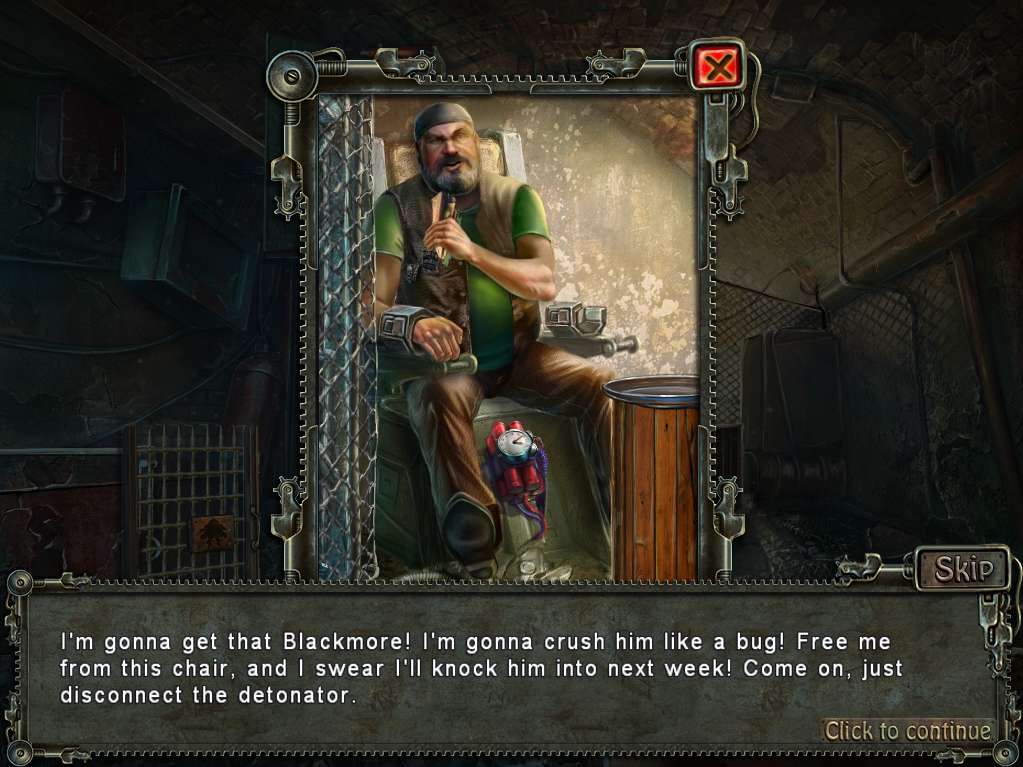
- Okay, let me get this right. I just went through all that to give a hallucination genuine poison pills? Shouldn’t they be imaginary pills? Or couldn’t I just call in Scooby Doo and friends to scare the ghoul away?
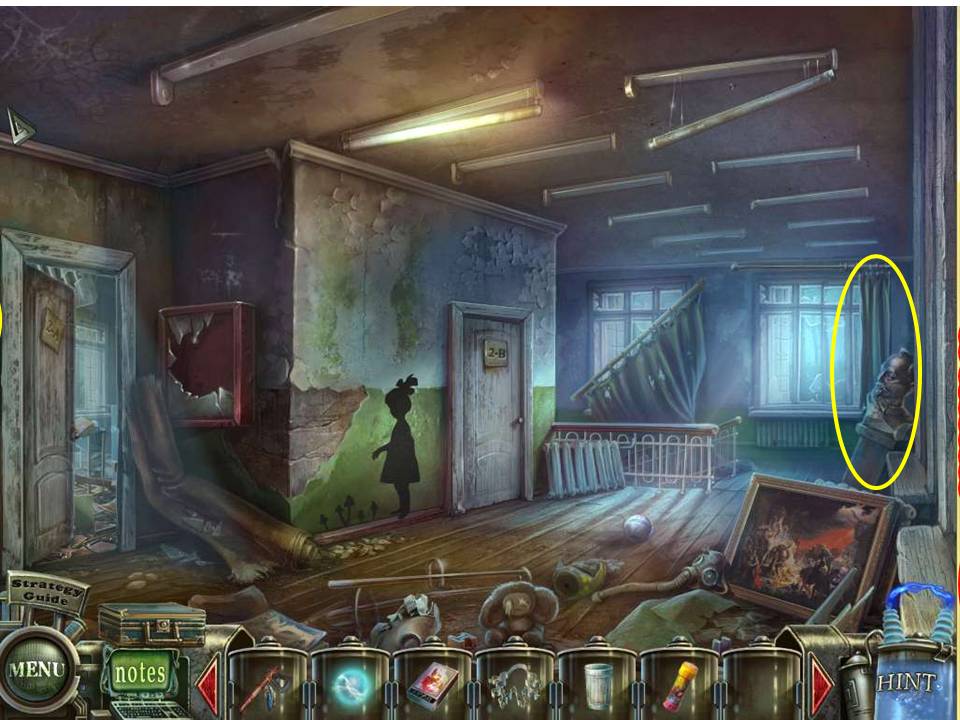
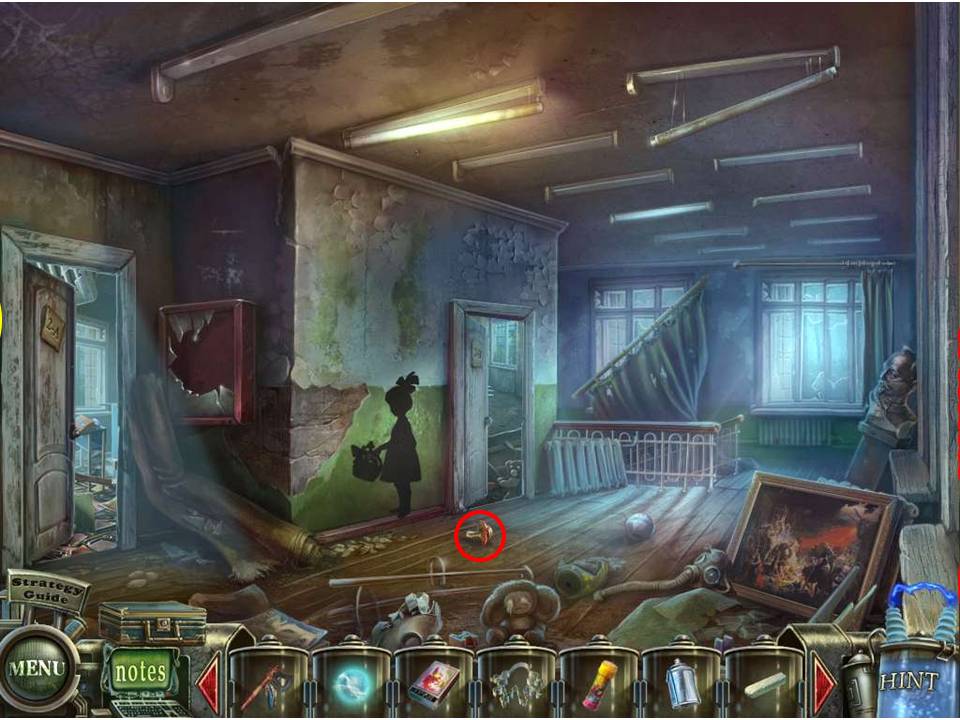
- Ah well, just give the dope the PILLS and watch him dissipate away.
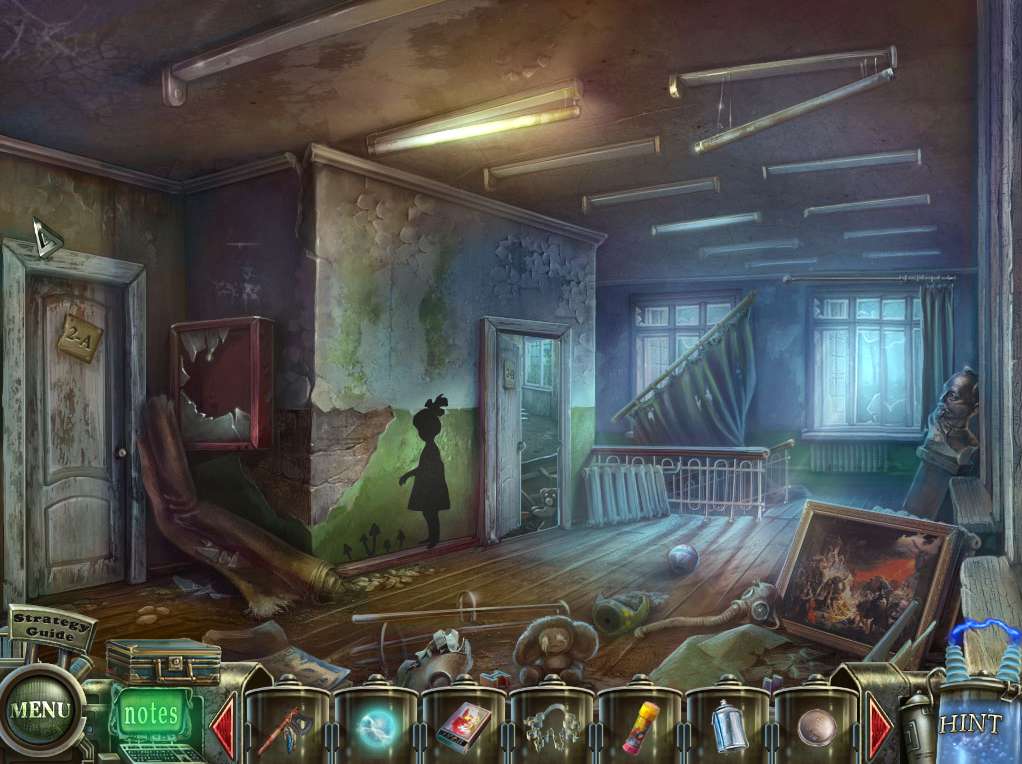
- Note the little girl’s silhouette, the locked door to the right (2-B) and the fallen bust to the right.
- Zoom in on the latter, note the curtains, and draw them aside to collect some BUBBLES
- Now head through the door to the left (2A).
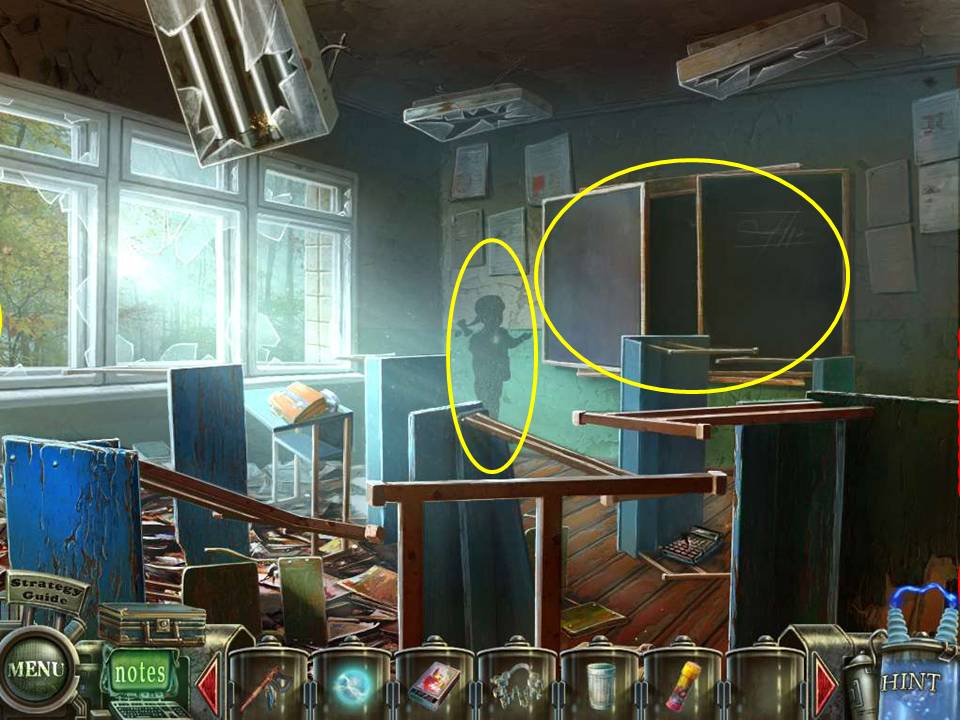
- Zero in on the shadow of the girl at the back – apparently she’s ‘drier’ that the other silhouettes and needs a drink – give her the FIZZY WATER in response to which she pops a BOOBY PIN for you to acquire.
- Now zoom in on the case on the wall, open it, and look at the blackboard – pick up the SPONGE.
- Now look at the drawing and the comment about wiping it – a dry sponge will only smudge it.
- Guess you have to wet the sponge – remember where there’s some water?
- Exit the building and head through the gap in the wall where the armored carrier is located.
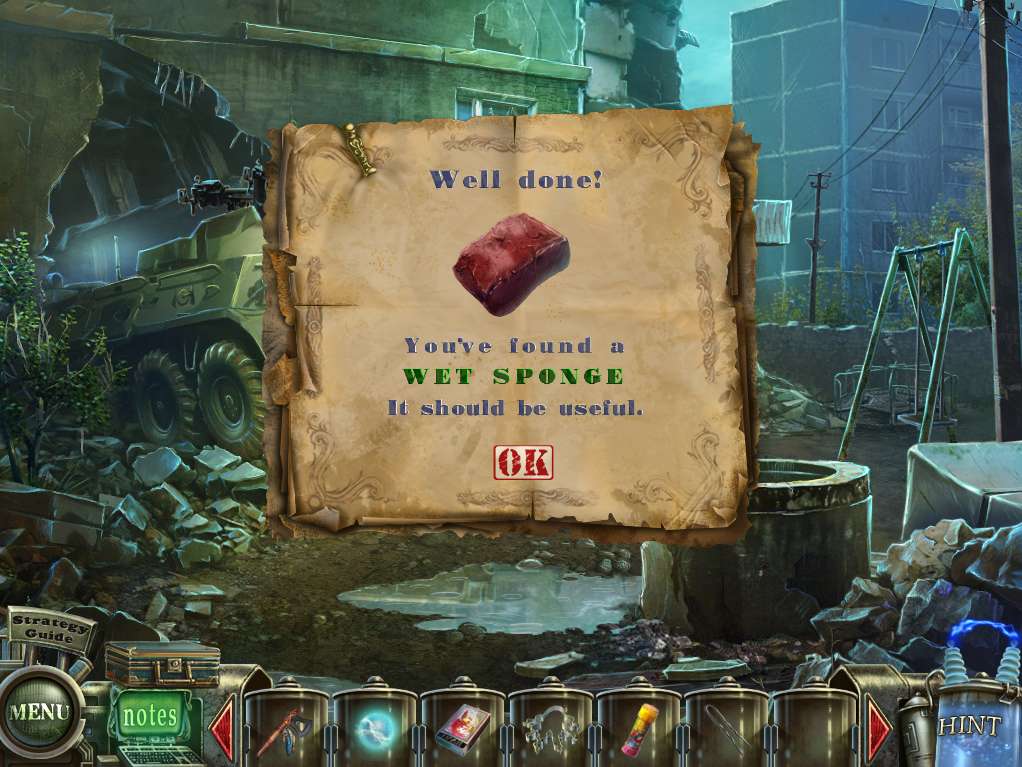
- On the ground is a puddle – use the water to give you a WET SPONGE – back to the classroom!
- Okay, zoom back in on the backboard and clean it with the WET SPONGE – it’s now ready to draw upon – but no chalk!
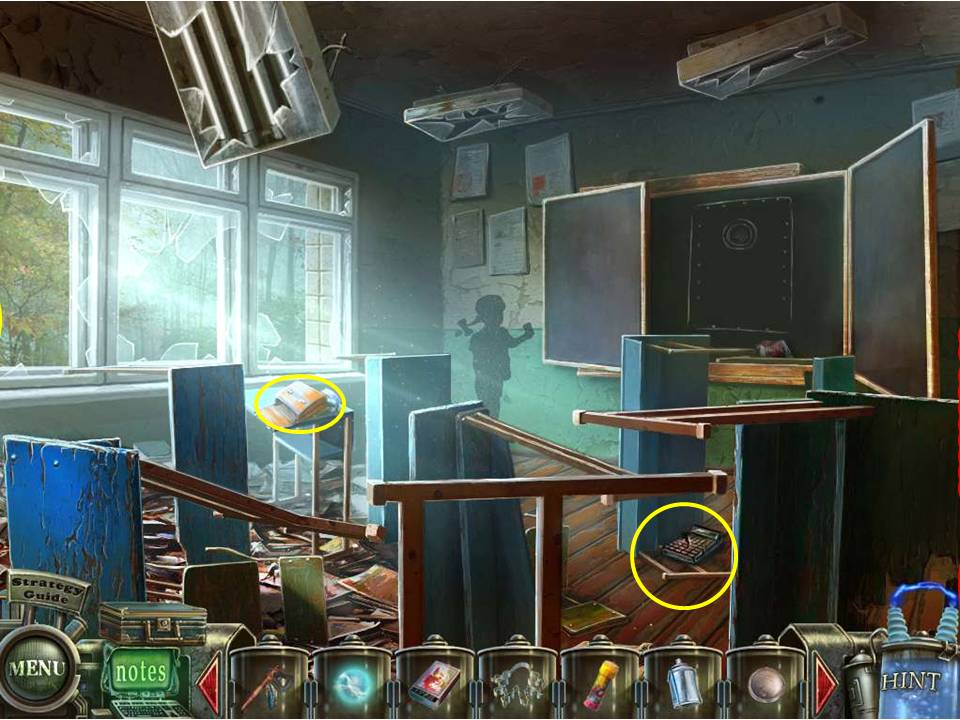
- Guess you’ll have to wait. Next zero in on the bag sitting on the desk to the left, click on it to open it, and grab the GOLD PAINT inside (okay, so this kid is a graffiti artist?)
- Lastly, zoom in on the calculator lying on the floor and pick up the BATTERY lying next to it.
- Head back out of the room.
- Now to put your burglary skills to good use.
- Take the BOBBY PIN from inventory and use it to pick the lock on the door to room 2-B.
- Once done, enter the room.
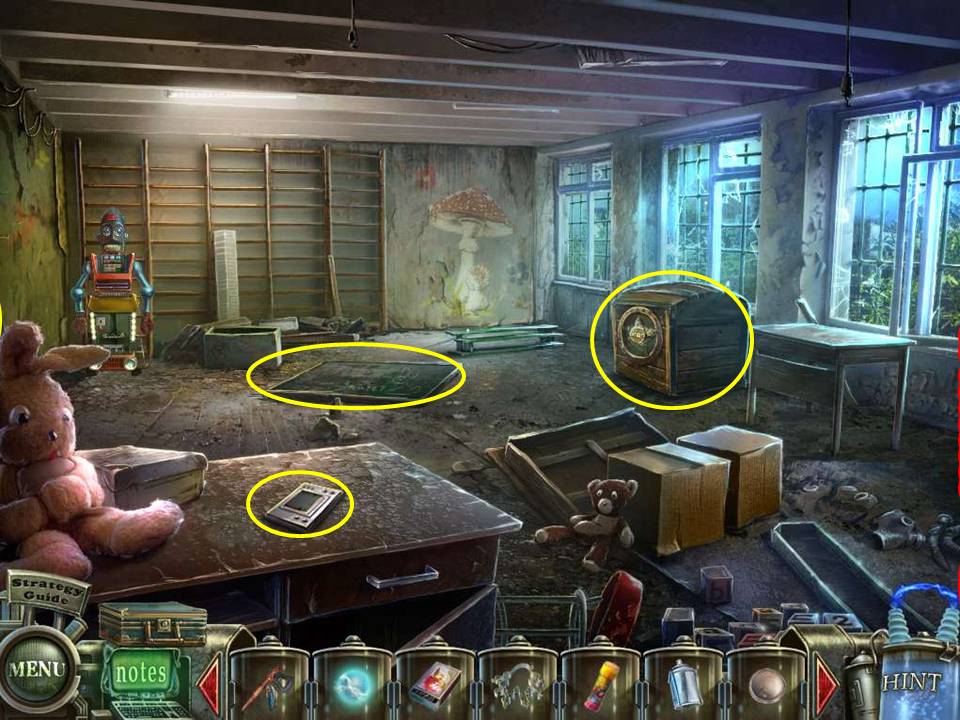
- Start off by clicking on the chest to the right, and watch as the star crumbles away – you need to replace it. Next, take a closer look at the chalkboard lying on the floor – hallelujah!
- You found some CHALK!
- The next step is to pick up the electronic game on the desk nearby.
- Pop the BATTERY in the initiate the next puzzle.
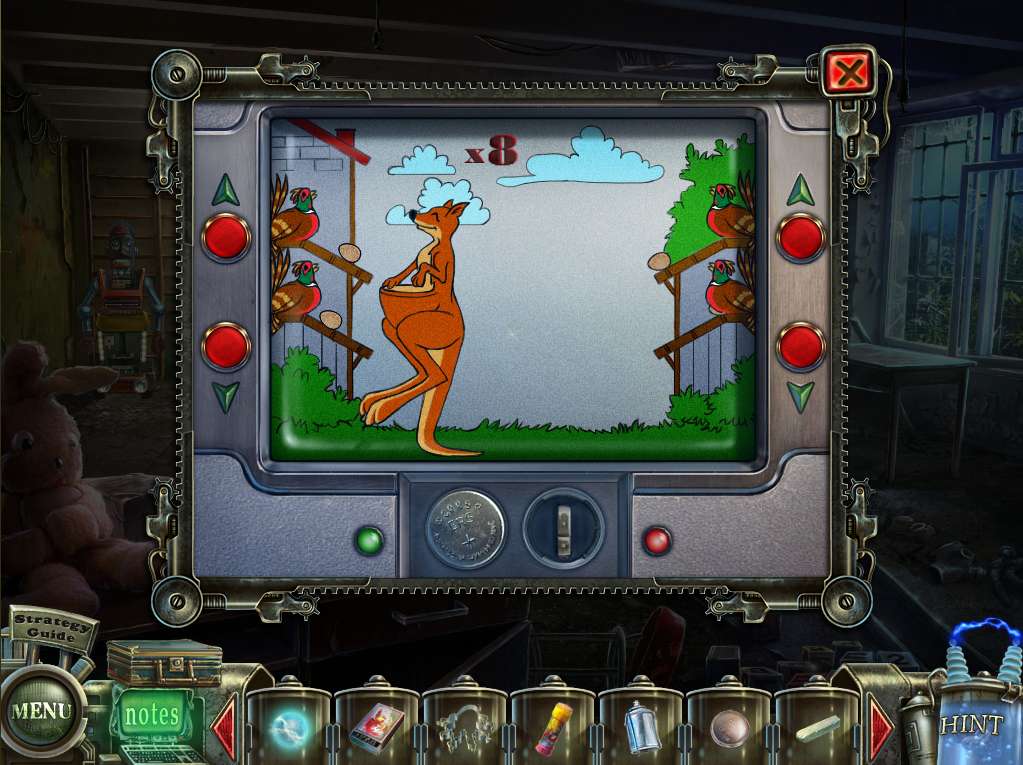
- The aim of the game is to catch 8 eggs in the kangaroo’s pouch without letting any drop to the ground – if a single one splatters you’re back to square one!
- You use the four red buttons to stay one step ahead visually by noting which egg is next in line to fall off the edge of its ramp. You’re not even constrained on time with this one, as the eggs stop moving after you ‘pouch’ each one and wait for you to press the next button, which is what makes it so simple.
- When finished you’ll receive a BASKET. Head back to room 2A.
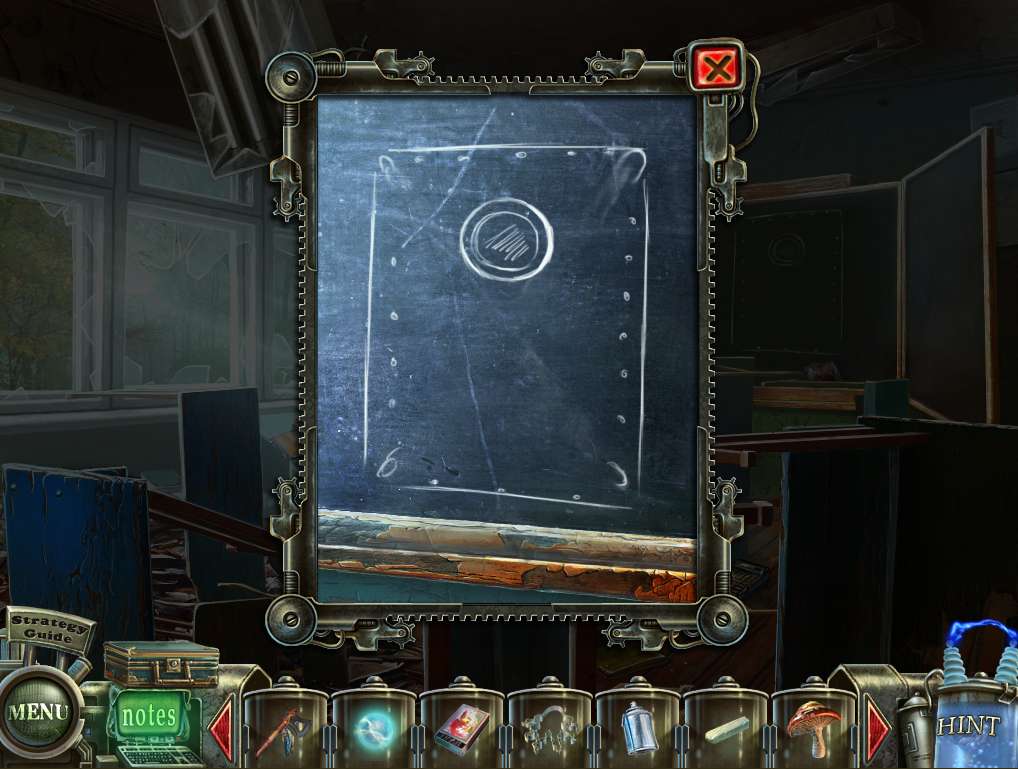
- Zoom back in on the blackboard and use the CHALK on it to draw a handle on the door.
- Exit to the hall outside.
- Exit to the hallway outside the two classrooms and hand the basket to the silhouette of the little girl on the wall.
- Watch the cut scene as she picks the mushrooms, then take the one she leaves behind on the floor as a thank you.
- Head down the stairs at the end of the room.
- Okay, the silhouette of the girl seems to need something – aha! The bubbles!
- Click on the BUBBLES in inventory, give it to the girl, and watch her blow a big BUBBLE into the room.
- Take it, and insert it into the eye socket of the painting on the wall.
- Now head to the door down the end of the corridor, through which you’ll now be able to exit thanks to your blackboard artistry!
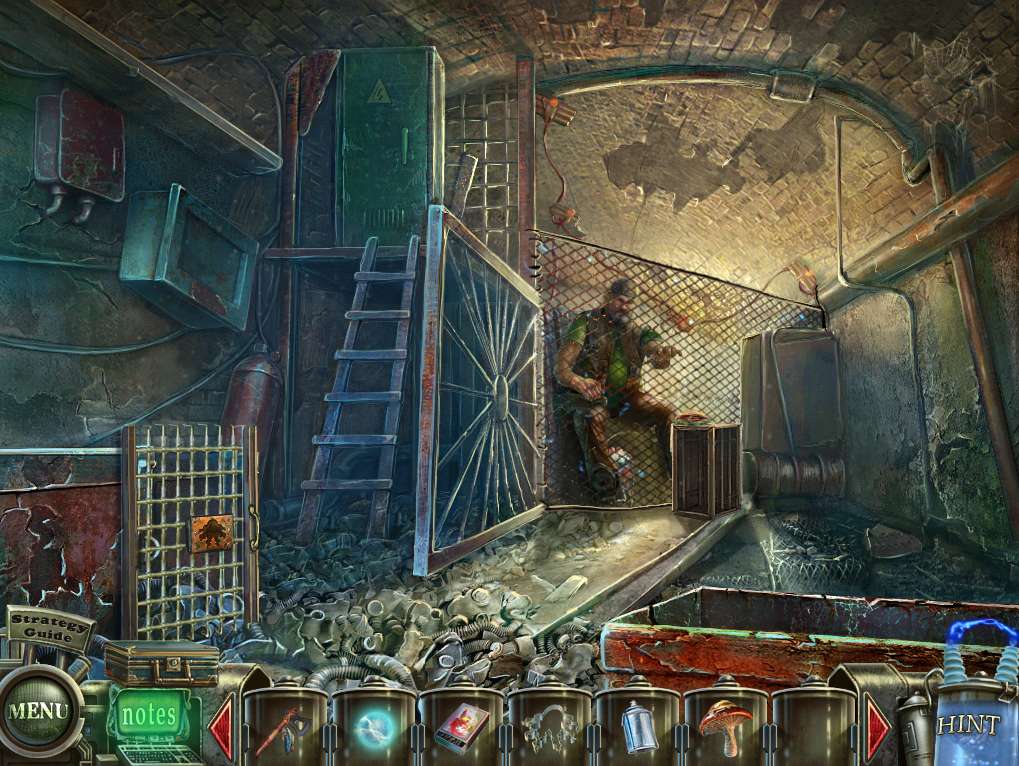
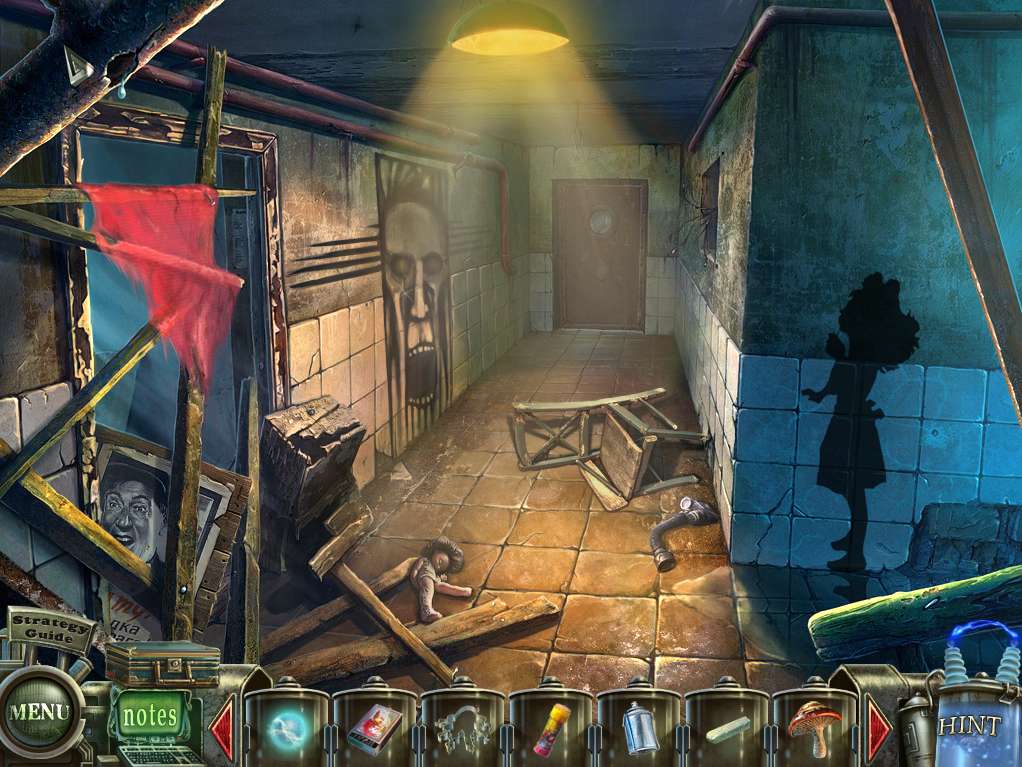
- So, we find Billy imprisoned here behind an electrified fence. How to get him out?
- Zoom in on the panel at the top of the ladder.
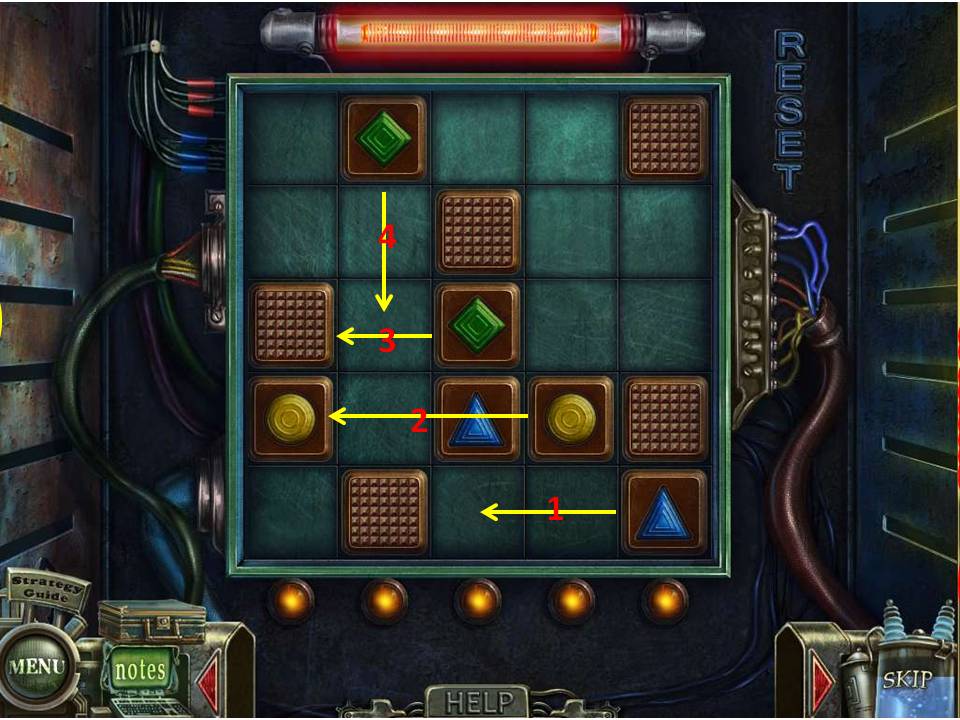
- The aim is pretty simple – move the pieces so that identical squares rest against each other, the key being that you have to match up the pairs in five moves or less.
- Also note that when you click on a square to move it in a particular direction, it will keep on going until it either hits the sides or another piece – so don’t bank on it stopping right next to its ‘twin’ just because they touch.
- This is a key point when considering the last frame – there are three of them to work through before you finally solve the puzzle. It’s really not that hard, but refer to the screen shots if you went to get through them as painlessly as possible.
- When done, the electricity will be shut off, but you still need to cut your way through the wire.
- Exit for now, and head back out of the building and down through the gap in the wall.
- Zoom in on the playground, and feed the MUSHROOM from inventory to the broken mock mushroom in the background (hang on, isn’t this cannibalism?) then catch the BUBBLE that floats by after the munching finishes.
- Head back to the basement.
- Place the other BUBBLE on the remaining eye socket, at which point the face will slide away and reveal a door.
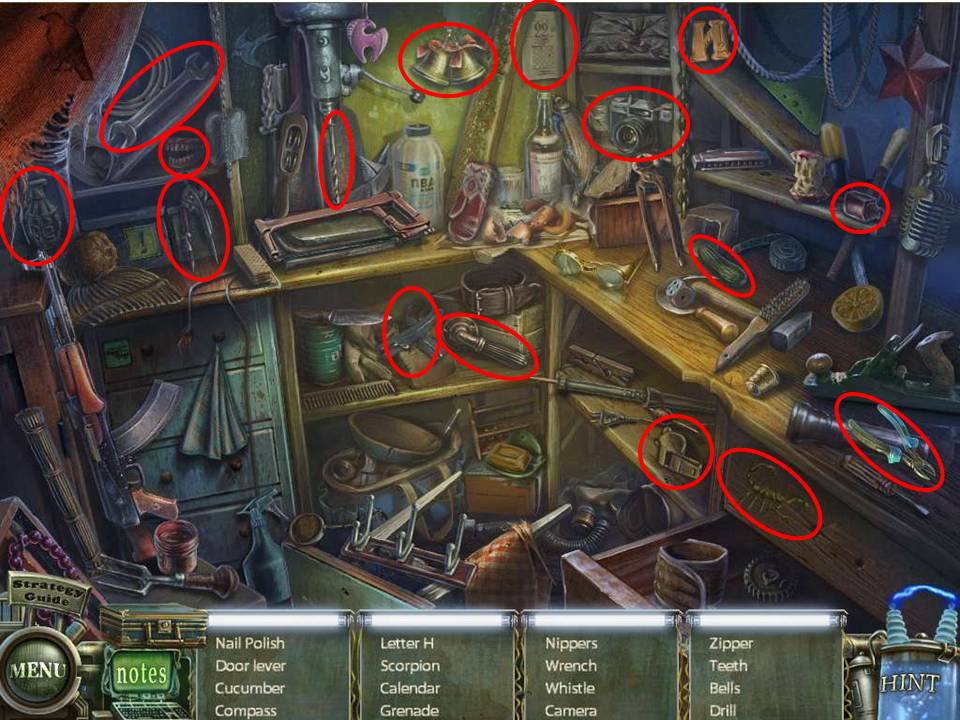
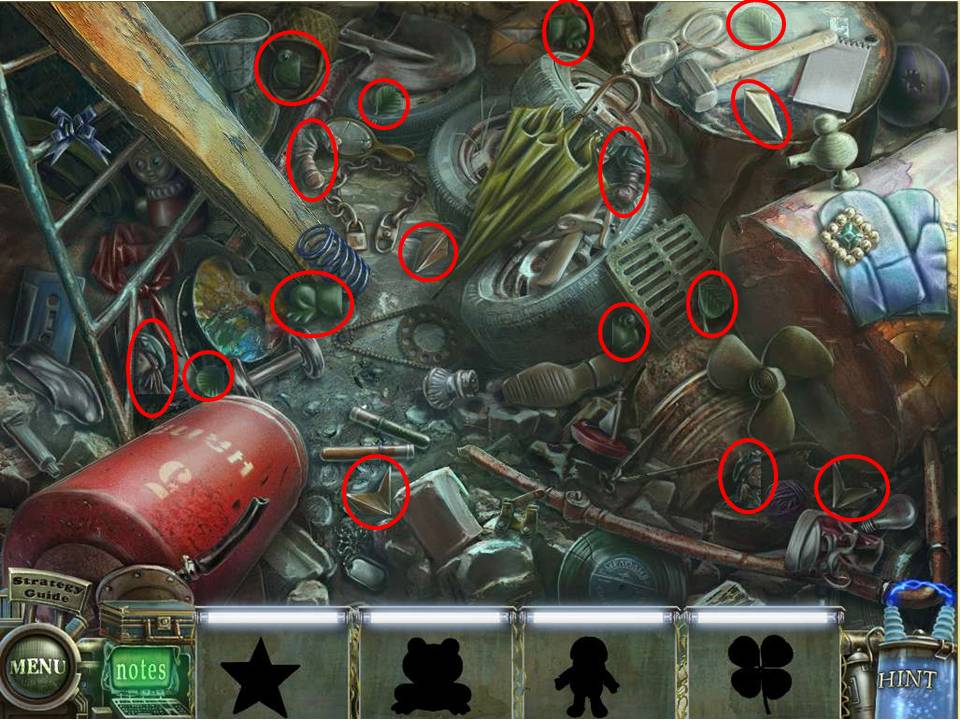
- Open it to reveal the next HOA puzzle.
- Find all the items circled in red, noting that there might be some slight variation in the objects to find due to random selection by the game.
- When complete, take the NIPPERS and return to the basement cell.
- Zero in on the wire, and use the NIPPERS to slice through and free Billy, who will promptly devour the nearby sandwich.
- Exit for now, and head out to the corridor, where you will find that the nearby doorway has another HOA waiting for you – didn’t you just leave this place???
- Open it to reveal the next HOA puzzle.
- Find all the items circled in red, noting that there might be some slight variation in the objects to find due to random selection by the game.
- When complete, take the CANDLE and head up and out of the building.
- Note the gap to the right in the background, where you’ll find the next HOA puzzle – okay, what is this, penance for something done in a previous life?
- Find all the items circled in red, noting that there might be some slight variation in the objects to find due to random selection by the game. When complete, take the STAR and head back into the building.
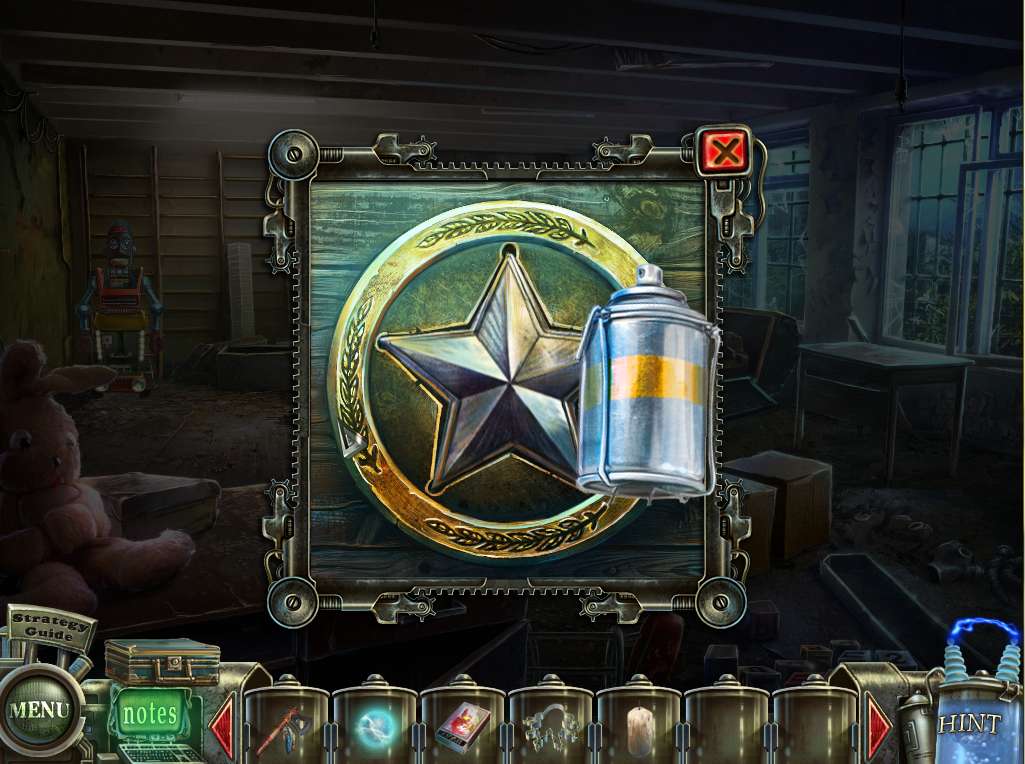
- Enter room 2-B and zoom in on the chest to the right.
- Put the STAR in place, then paint it with the GOLD PAINT.
- The chest will fall open and reveal the next puzzle to tackle.

- The basic idea is to rearrange the pieces to create a totem pole, at which point the cowboys and Indians will start firing at each other.
- Collect all the little SUCTION CUPS and head back the basement cell.
- Zero in on Billy, who’s still plowing through his sandwich (must have denture issues) and zoom in on his empty place. Place the OCTOPUS CUTTER on it, then the candle, then take the MATCHES and light the latter. When the candle has completely melted down take the OCTOPUS.
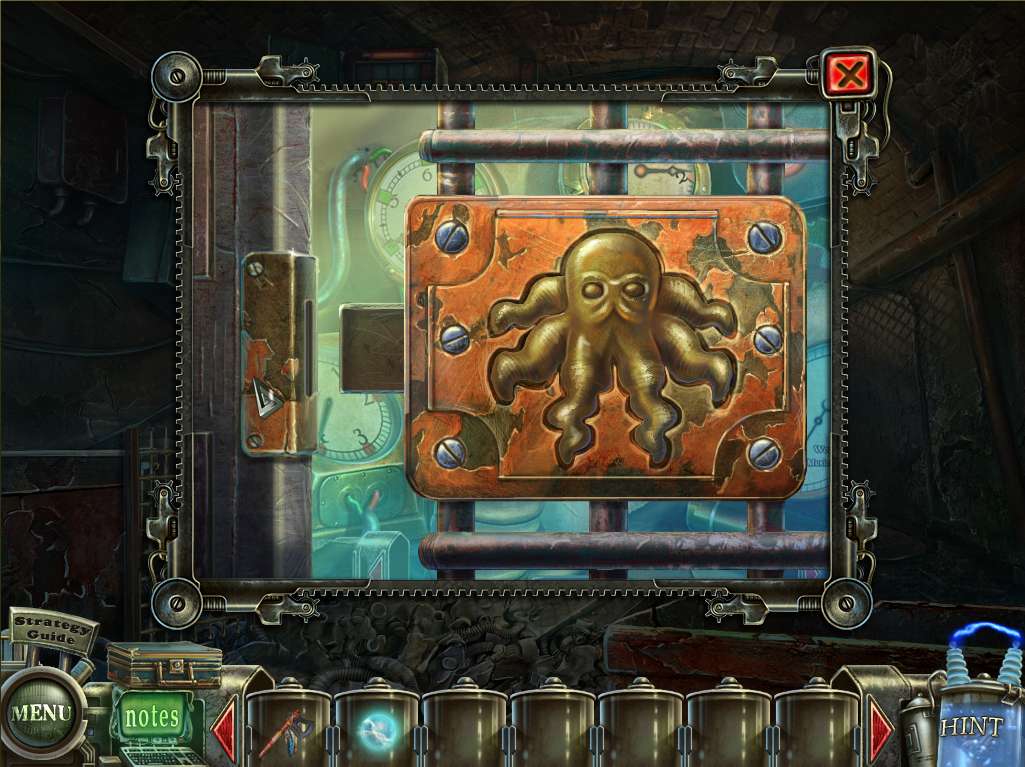
- Now zoom in on the grate door to the left.
- Place the seven SUCTION CUPS on the plate, then add the OCTOPUS, which will result in the door unlocking.
- Zoom in on the now open doorway to initiate the next puzzle.
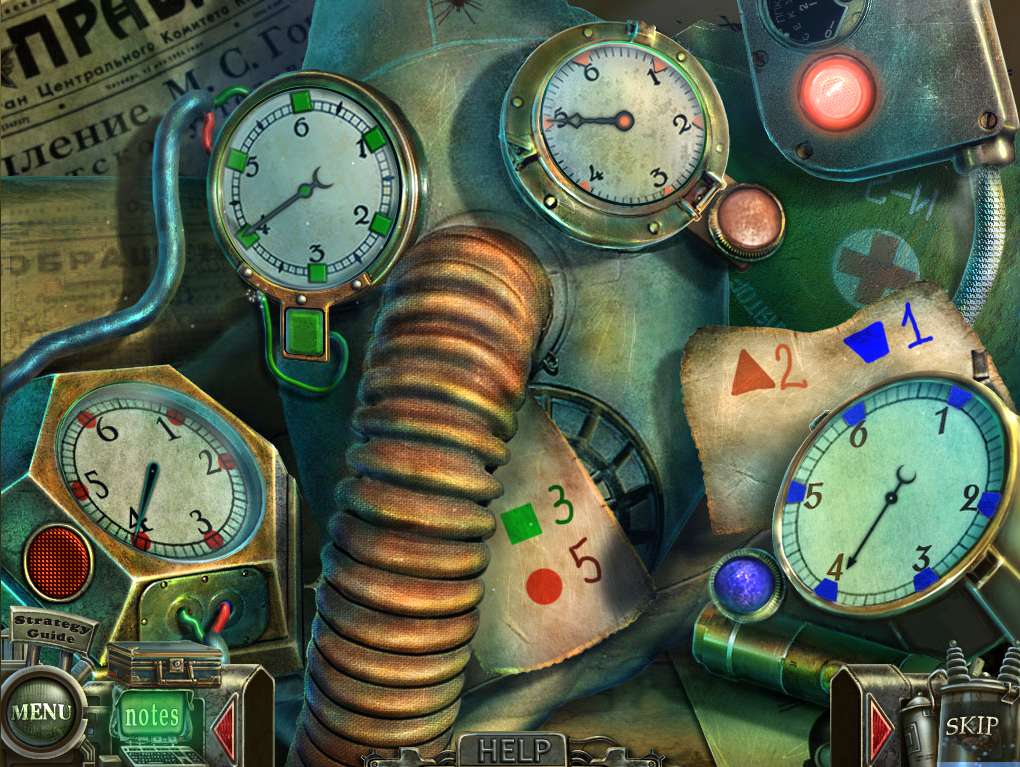
- This is one of those puzzles where different buttons have different effects on each of the gauges. The idea is to set each gauge to the numbers shown on the notes. You can play around with it, but as there’s no reset you’ll be on your own once you start, so here’s the basic steps to get through – press the pink button once, the blue button once, the green button three times, then press the red button.
- When done Billy will be set free. Chat with him, then as he leaves click on the SCREEN sitting on his chair and the GREEN ENERGY ORB left behind by Billy.
- Head back to classroom 2-B.
- Say hi to Rosy the Robot in the back corner, scream “Jane, get me off this crazy thing” (no, not part of the game but what the hell?) and click on her again to zoom right in her panel.
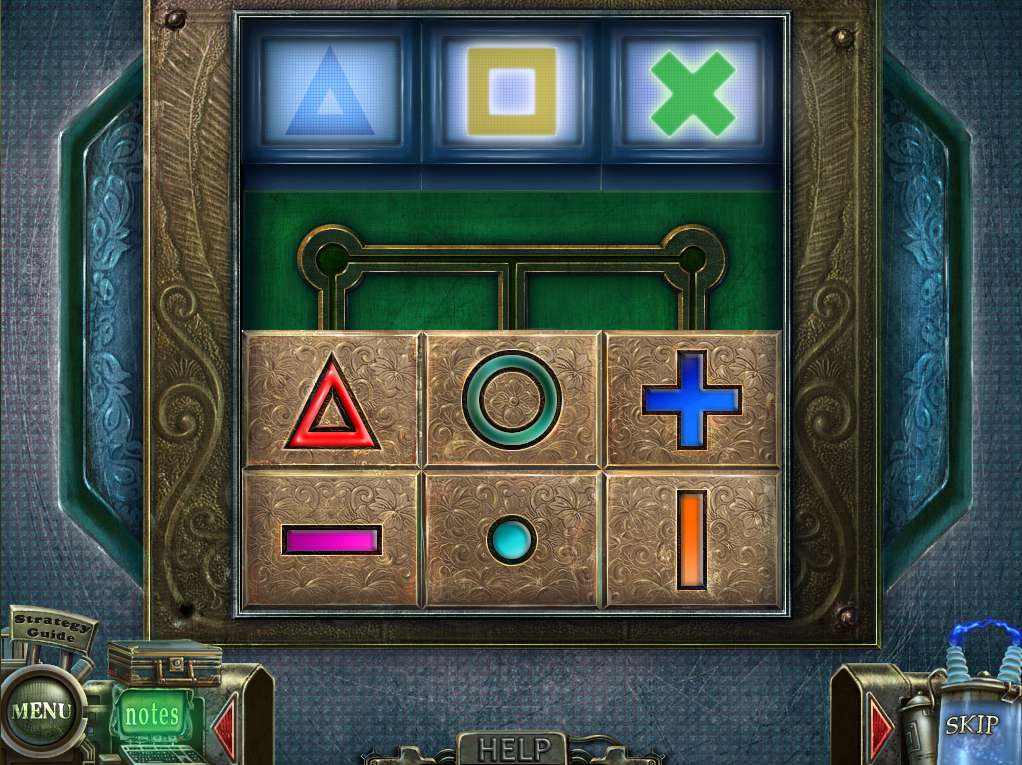
- Insert the SCREEN to insert the final puzzle for this segment. It’s a pretty easy one – you’ll note that in amongst the 8 pieces with various symbols there are three that match the screens at top – a triangle, a square, and a cross.
- All you have to do is slide the pieces around so that each appropriate piece gets placed underneath its appropriate screen, at which point it will slide up into place. As each one slots into place the puzzle becomes increasingly easier, because more empty spaces open up.
- The screenshot shows the final piece, the red triangle, ready to move up next to its matching screen.
- When complete, Rosy will hand you the POMPEII DISK, signifying that your job in Chernobyl is done and that it’s time to move on – to another disaster zone!
- Retrace your steps all the way back to the computer room (just keep hitting the back arrow on the screen) listen to the evil one have his say, then zoom in on the computer on the floor again and slot in the POMPEII DISK.
- Then off to the Pompeii portal with you!
- Don’t forget your toga!
General Info and Tips
Chapter One: Trapped
Chapter Two: Chicago
Chapter Three: Chernobyl
Chapter Four: Pompeii
Chapter Five: Alaska
Ask for help in the comments below!
Chapter One: Trapped
Chapter Two: Chicago
Chapter Three: Chernobyl
Chapter Four: Pompeii
Chapter Five: Alaska
Ask for help in the comments below!