
Haunted Halls: Revenge of Doctor Blackmore: Chapter Four: Pompeii
Our Haunted Halls Revenge of Dr. Blackmore Walkthrough takes you deep inside the bizarre world of Dr. Blackmore where anything can and probably will happen. Armed with our easy to understand instructions and detailed screenshots found in this Haunted Halls Walkthrough, you'll be ready to face whatever weird and frightening things Dr. Blackmore will throw in your path in his attempt to enact some twisted form of revenge on you and your fiance.
General Info and Tips
Chapter One: Trapped
Chapter Two: Chicago
Chapter Three: Chernobyl
Chapter Four: Pompeii
Chapter Five: Alaska
Ask for help in the comments below!
Chapter One: Trapped
Chapter Two: Chicago
Chapter Three: Chernobyl
Chapter Four: Pompeii
Chapter Five: Alaska
Ask for help in the comments below!
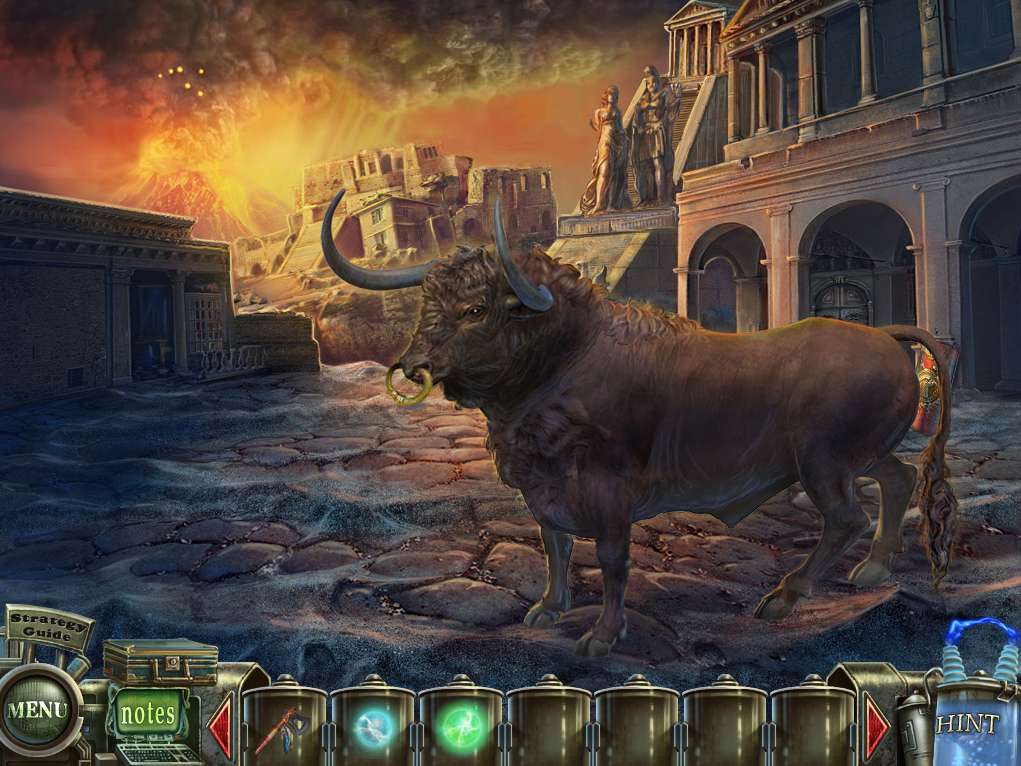
- Okay, there’s a big and rather mean-looking bull blocking the way, so head left for now.
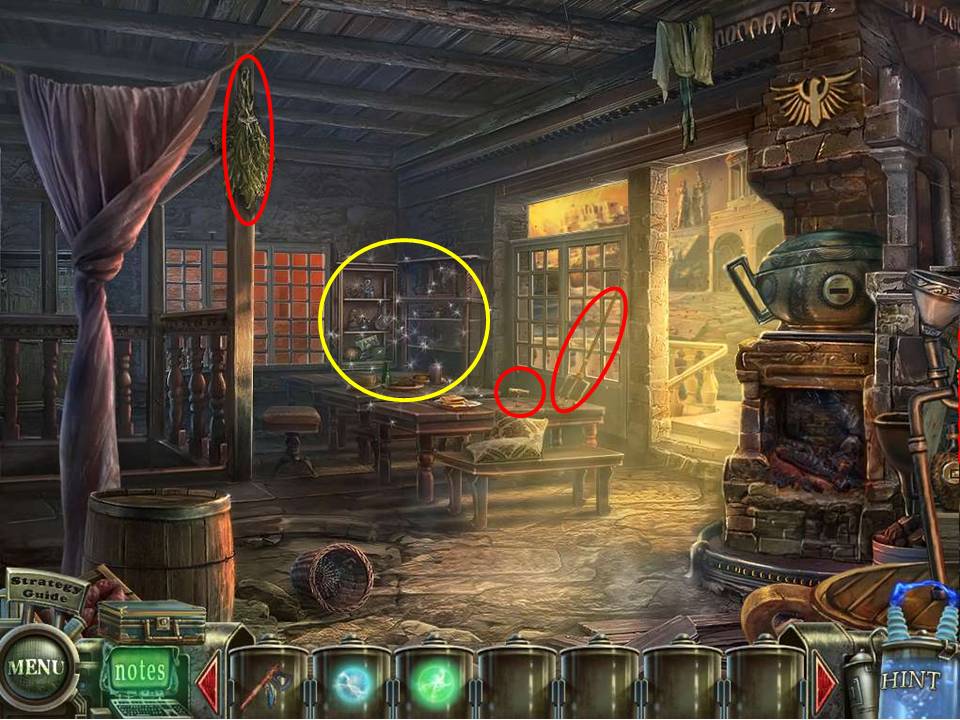
- Zoom in on the table in the foreground and pick up the TRIDENT and the CORKSCREW.
- Then zero in on the HERBS hanging next to the drapes and place them in inventory.
- Now zoom in on the HOA puzzle in the background to initiate it.
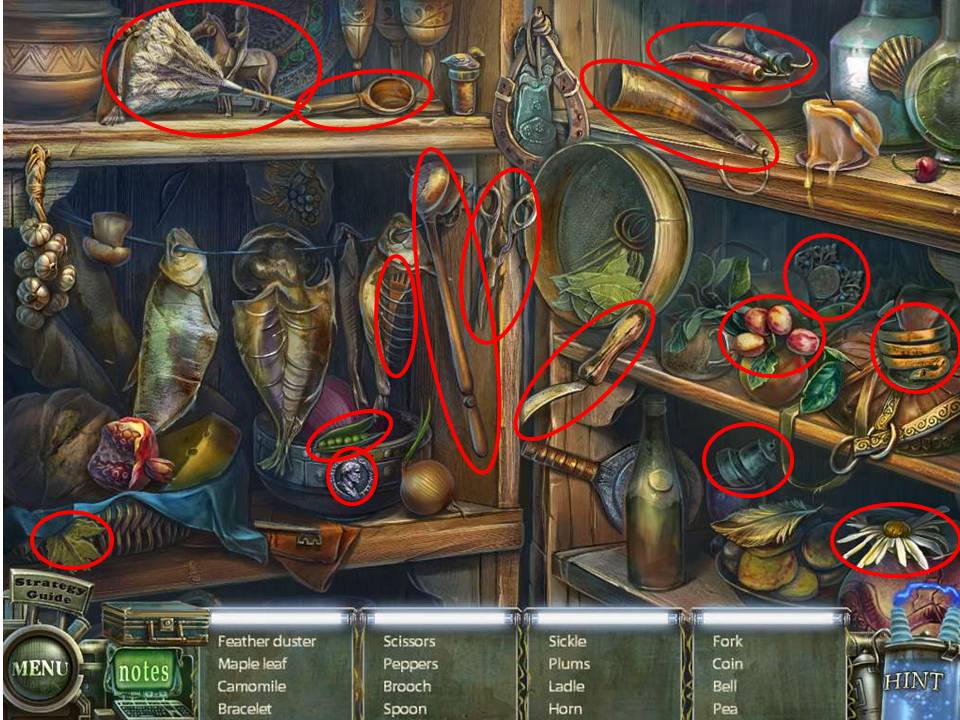
- Find all the items circled in red, noting that there might be some slight variation in the objects to find due to random selection by the game.
- When complete, take the DUSTER and return back outside to the courtyard.
- Hand the HERBS to the hungry bull, and when it moves to the side zoom in on the hatch on the ground, using the DUSTER to sweep the area.
- Take the FEATHER, use it to tickle the bull’s nose, and pick up the RING (yuck) that he sneezes off on to the ground, and acquire the SHIELD leaning against the pillar in the background.
- Zoom in again on the hatch, use the RING to open it, and pick up the OIL and the SWORD inside.
- Next, head over to the beckoning doors in the background and enter in.
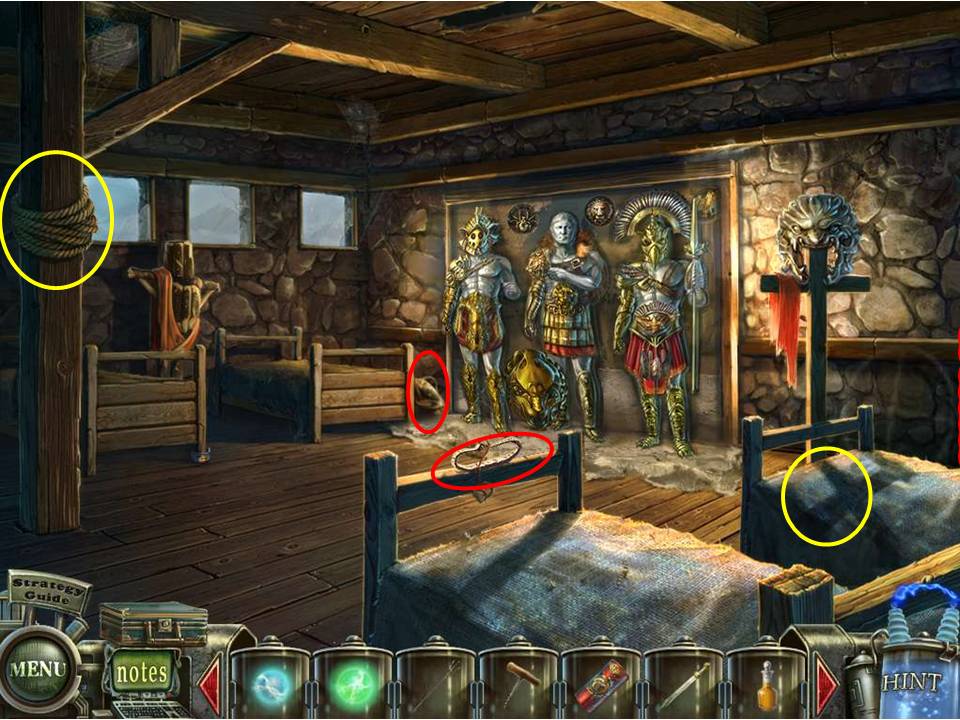
- Pick up the HELMET and the FLINT, then zoom in on the beam to the left and use the TOMAHAWK to cut away and acquire the ROPE.
- Note that the bed to the right seems to have a lump under the blanket (rather obvious way to hide something of value, yes?).
- Pull back the blanket to reveal a small chest, which you cannot open at the present time.
- Now zoom in on the three figures standing in the background and place the TRIDENT, SWORD, HELMET and SHIELD in place on them.
- Now exit the room, head back to the dining area, and proceed down the steps behind the barrel to the cellar.
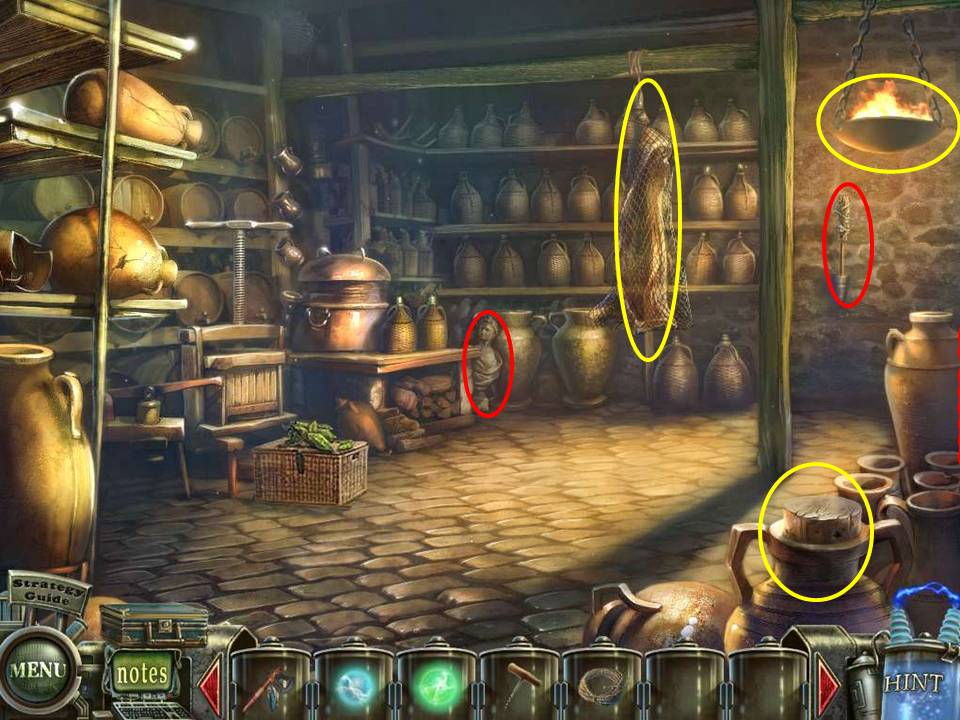
- Place the OIL in the dish hanging to the right, then use the FLINT to light it.
- Just below the dish, on the far wall, is a TORCH – grab it and use the oil burner to turn it into a BURNING TORCH.
- Next, zoom in on the corked jar on the bottom right and use the CORKSCREW to open it up.
- Next, use the TOMAHAWK to cut away the netting round the hanging meat and grab the COOKING FAT inside – grab the NET sitting on the floor as well.
- Over by the pile of wood on the floor stands a BUST OF CAESAR – place it in inventory.
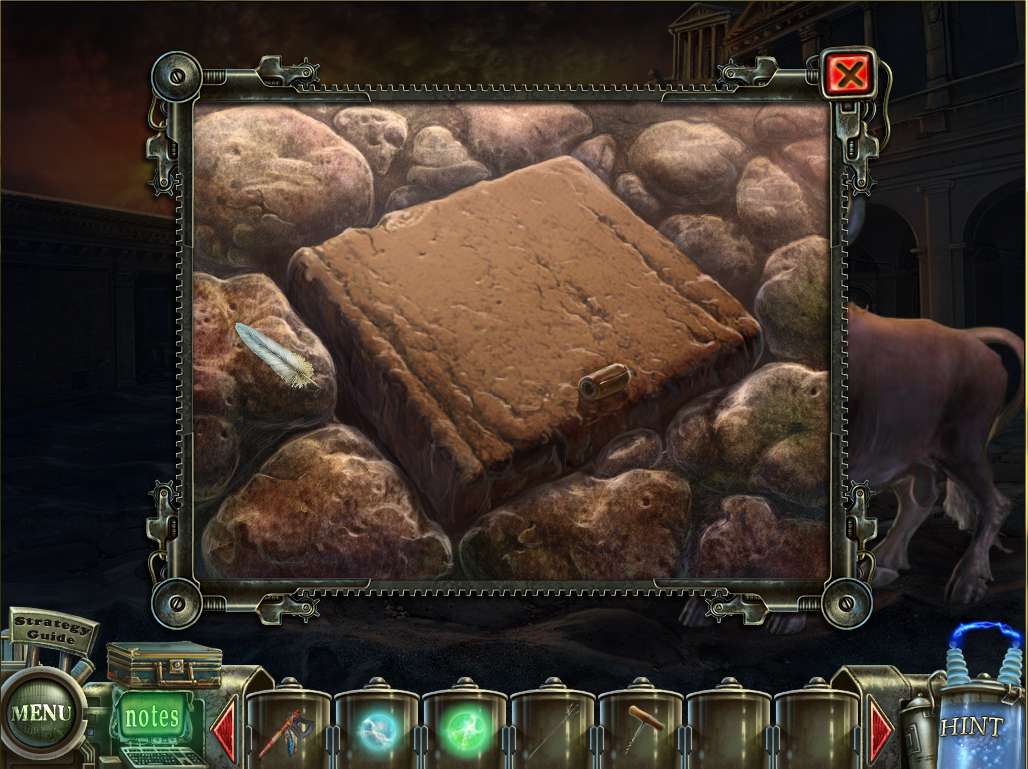
- Note the wreath sitting on the basket, and the mysterious object hidden under the press to the left on the floor, then return back upstairs to the dining area and zoom in on the HOA puzzle in the far corner.
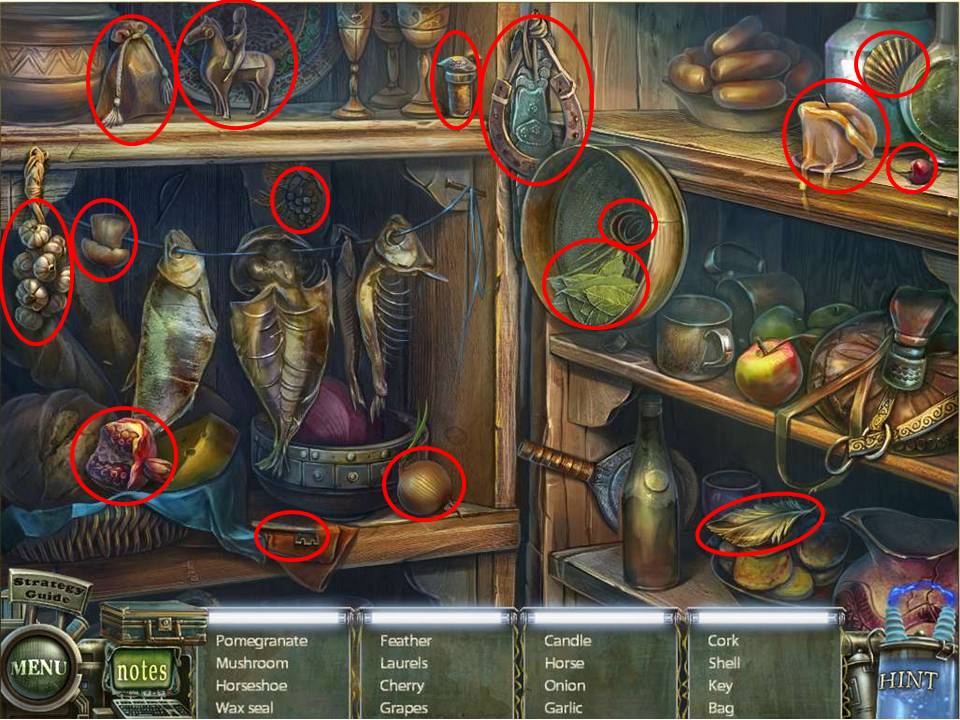
- Find all the items circled in red, noting that there might be some slight variation in the objects to find due to random selection by the game.
- When complete, take the LAUREL LEAVES.
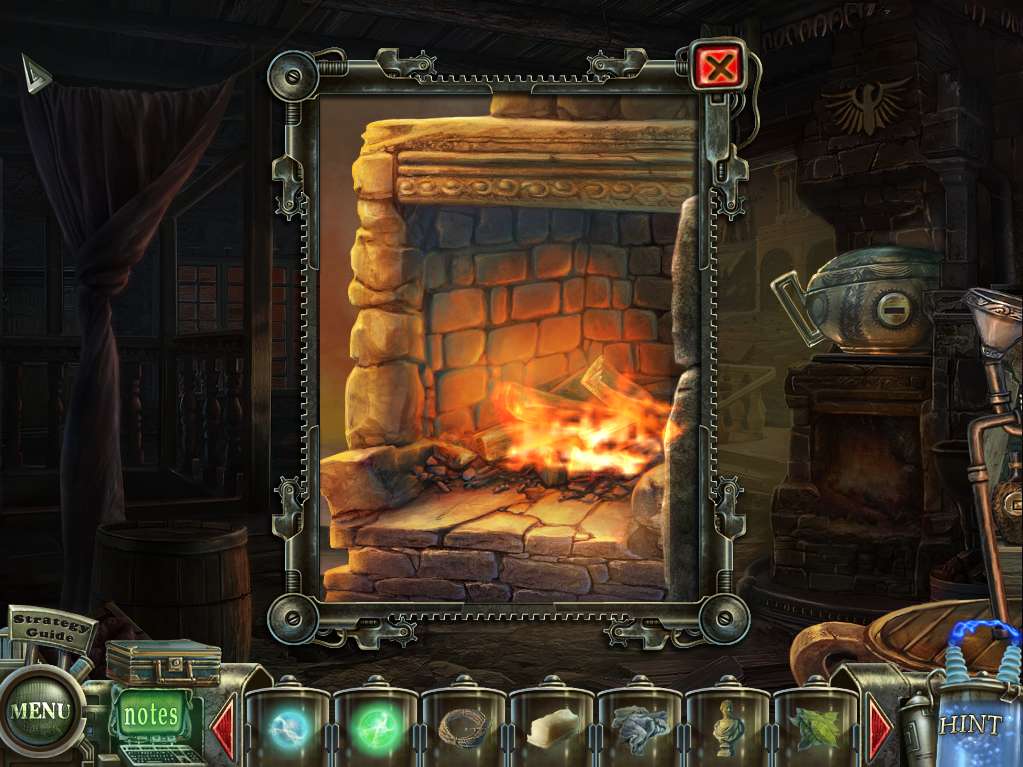
- Zero in on the wood stove to the right and use the BURNING TORCH to set it alight.
- Note the puzzle by the fire, then proceed down to the cellar again.
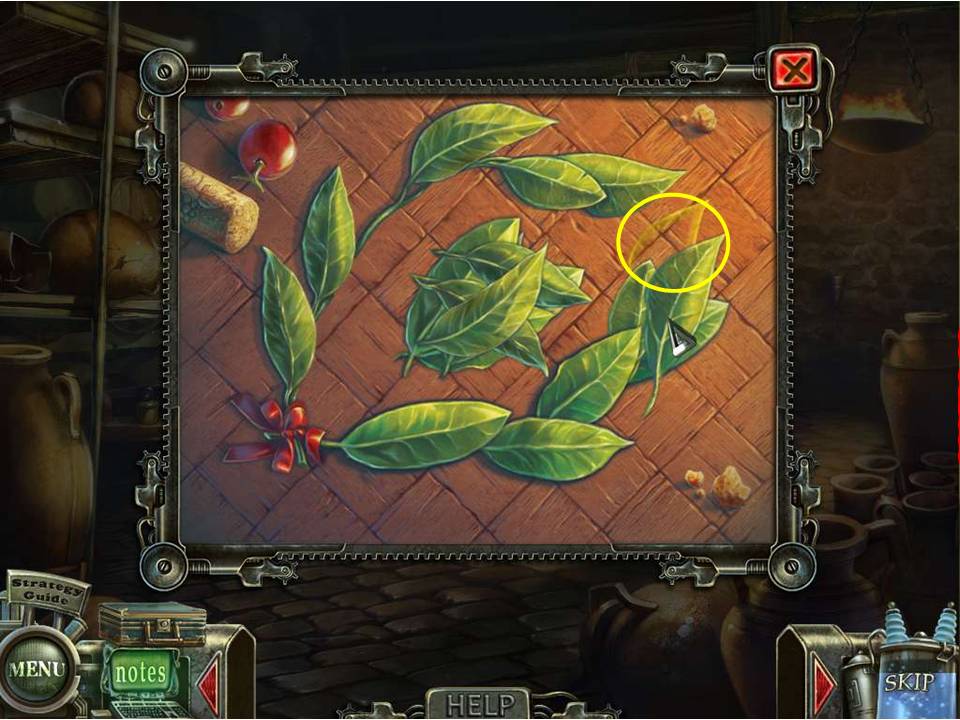
- Zoom in on the basket and place the LAUREL LEAVES on it to initiate the next puzzle.
- The aim is to take the pile of laurel leaves and place them around the wreath to complete it.
- It’s actually very simple, because all you have to do is pick up one of the leaves with the curser and move it around the wreath until it’s in the correct position.
- How will you know? Because once you’re over the correct spot, the area will light up in a yellow outline of the actual leaf – note the screen shot.
- So basically just take each leaf and move it around on the wreath until you get the indication that you’ve hit pay dirt, than just lay it down.
- When complete, take the LAUREL WREATH and head back upstairs and over to the hostel.
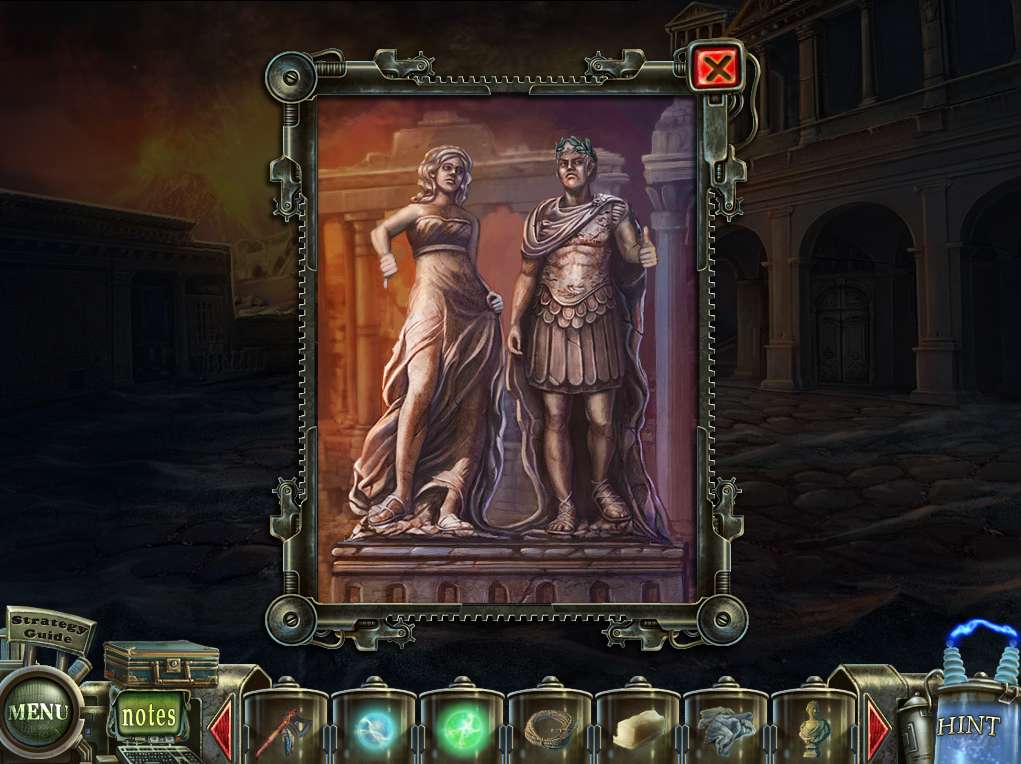
- Zoom back in on the two statues and place the LAUREL WREATH on the figure of Caesar – kind of cute the way he gives you the thumbs up in gratitude!
- Next head on in to the hostel.
- Throw the ROPE you collected earlier over the support beam to the left, then zoom in on the bed to attach one end to one of the legs.
- Next attach the BUST OF CAESAR as a counterweight so you can retrieve the lotion container, which will get added to your handy dandy tool set in the portable lab.
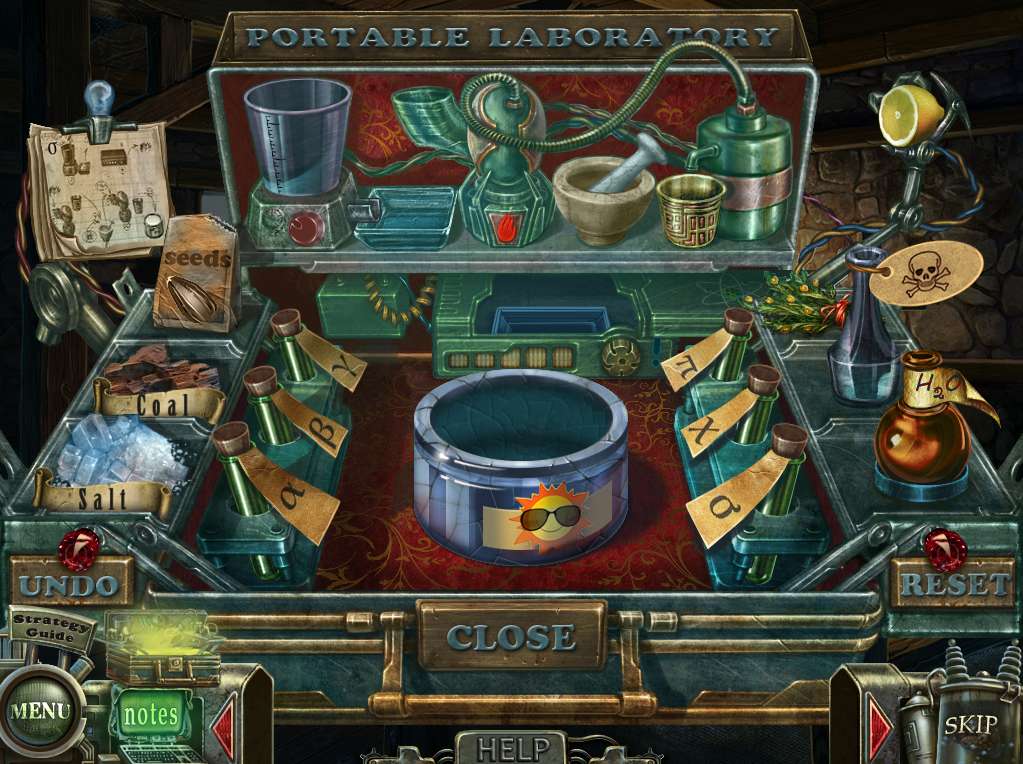
- Time to do the mad scientist routine again.
-
Click on the lab suitcase and proceed with the following instructions –
- Empty the contents of the vial marked ‘σ’, together with some salt and lemon, into the grinder and mix.
- Take the contents and place them in the solidifier, then run the resulting crystals through the liquefier.
- Pour the contents into the mortar, together with some poison, and use the pestle to grind then down further.
- Toss the powder, together with some water, back into the liquefier and mix, then take the resulting mix and pour it into the lotion container.
- Place the resulting OINTMENT container in inventory.
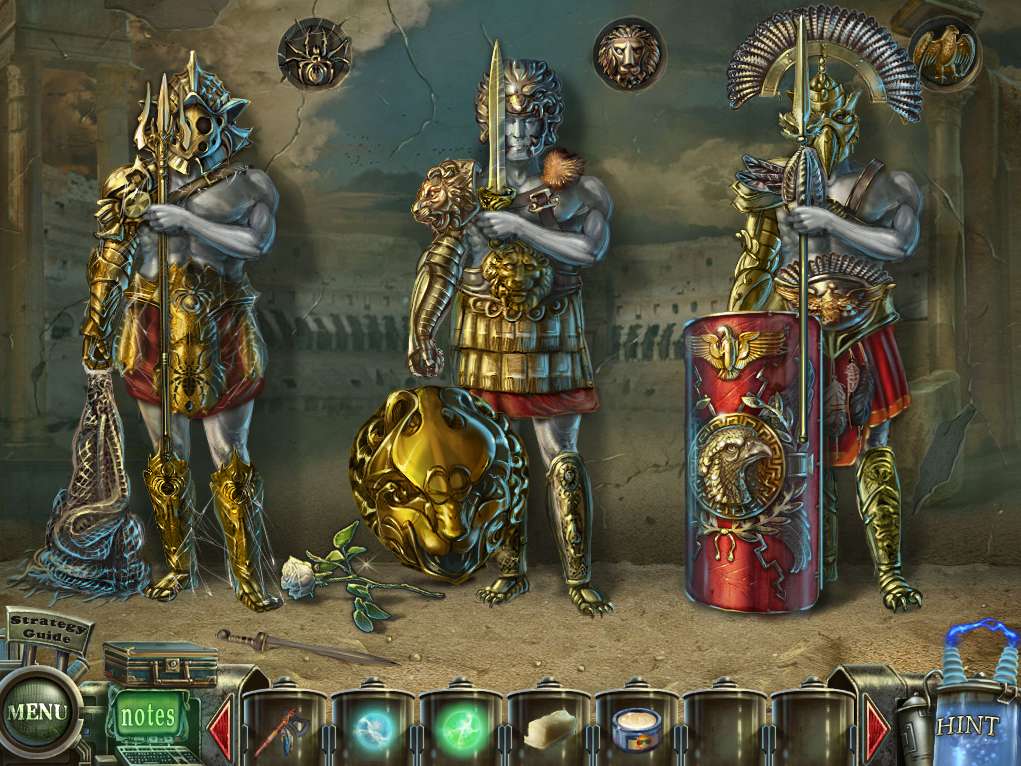
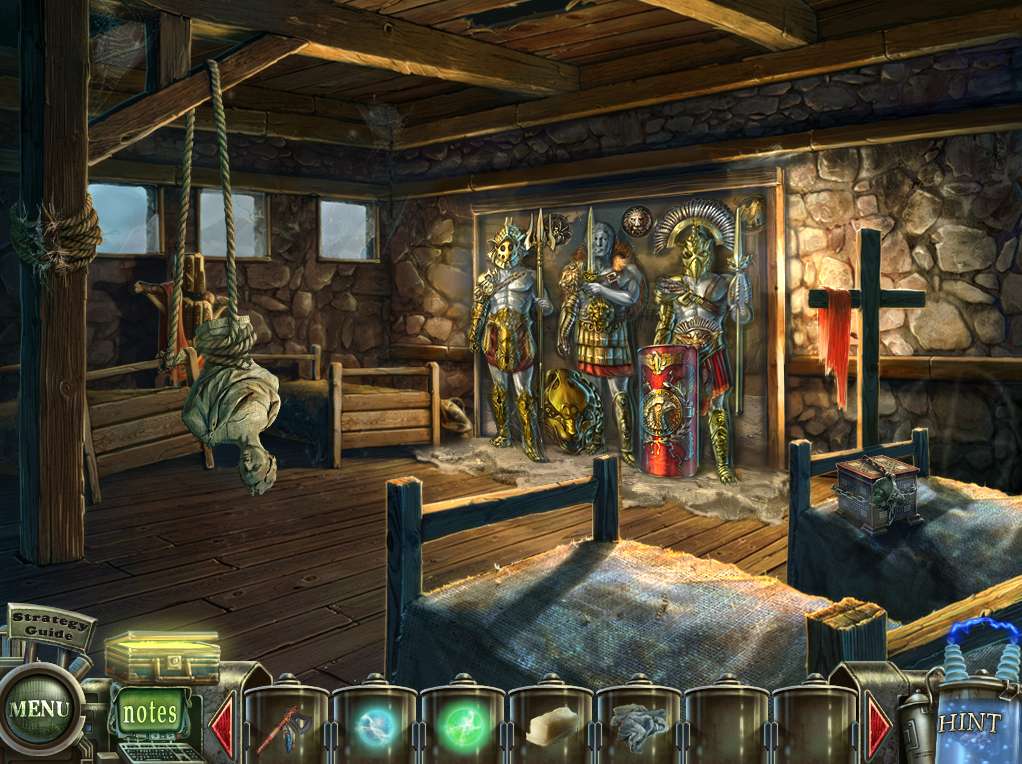
- Zoom back in on the three armed figures and place the final piece, the NET, on the figures to initiate the next puzzle.
- The aim of it is to orientate each figure so that the weaponry matches the symbol behind it. Example?
- The figure to the left would have the net in its hand (web) the middle figure would have the shield with the lion motif on it, and the figure to the right would retain the shield with the eagle symbol on the front.
- See the screenshot for the solution.
- When done, take the WHITE ROSE and exit to the dining area.
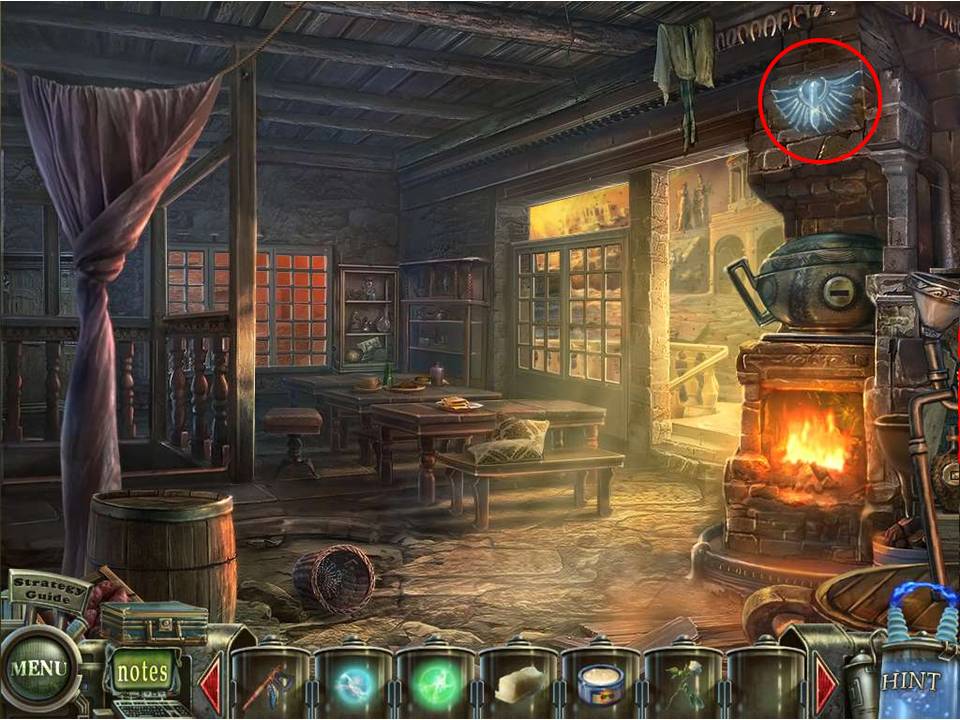
- Click on the AQUILA above the fireplace and put it in inventory, then proceed down to the cellar.
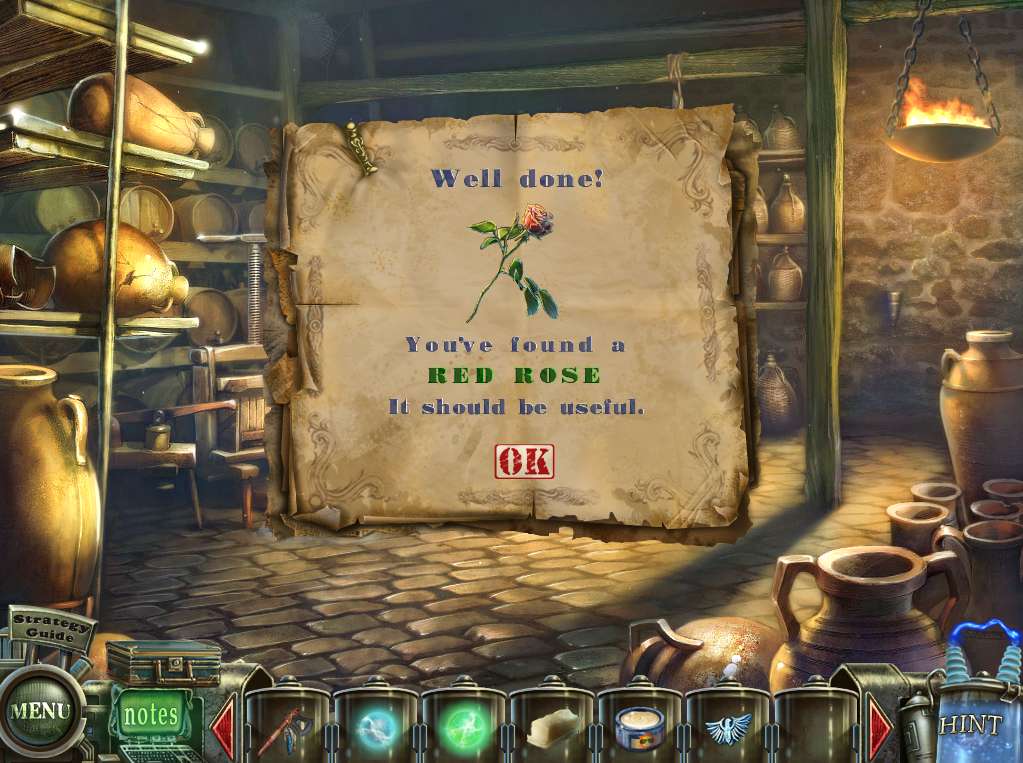
- Take the WHITE ROSE, zoom in on the jar of red paint, and dunk it in to give yourself a RED ROSE.
- Then head back to the courtyard.
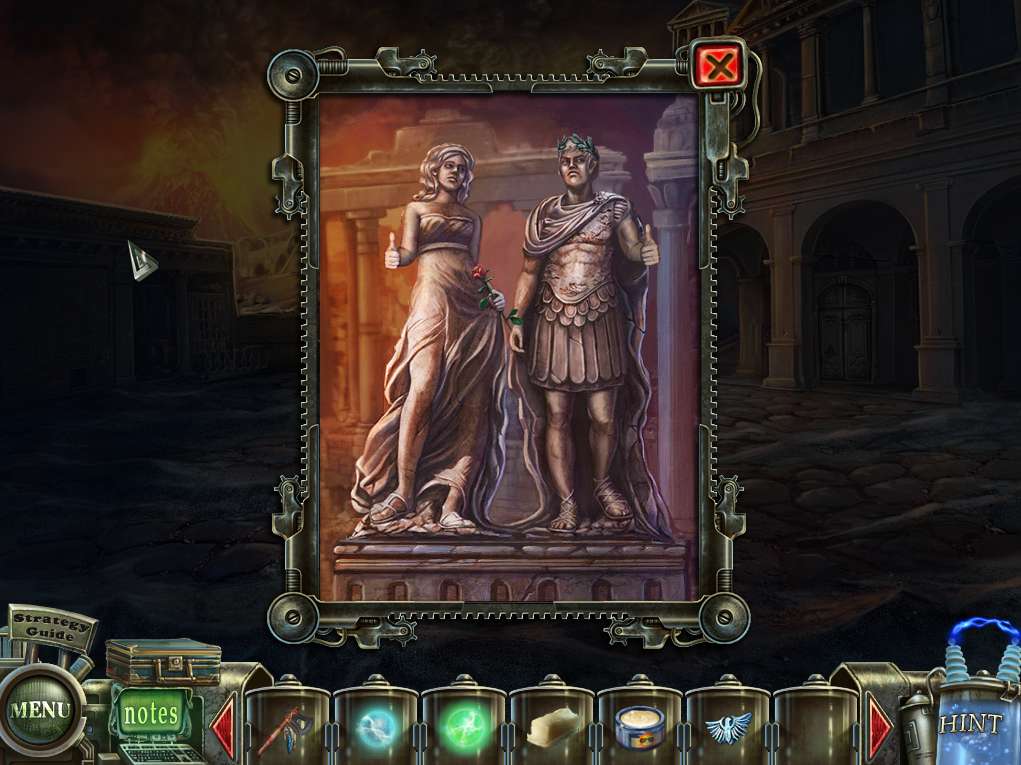
- Zoom in on the two statues again, and hand Caesar’s lady friend the RED ROSE.
- This will cause the two statues to move aside and reveal a stairway – proceed upstairs.
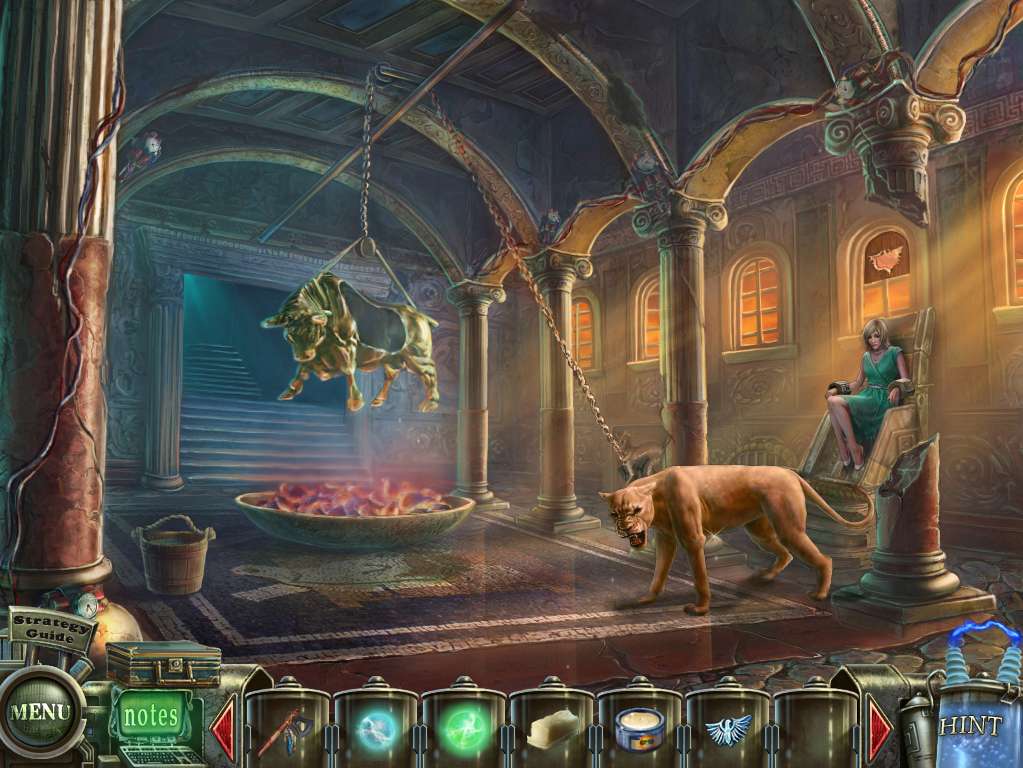
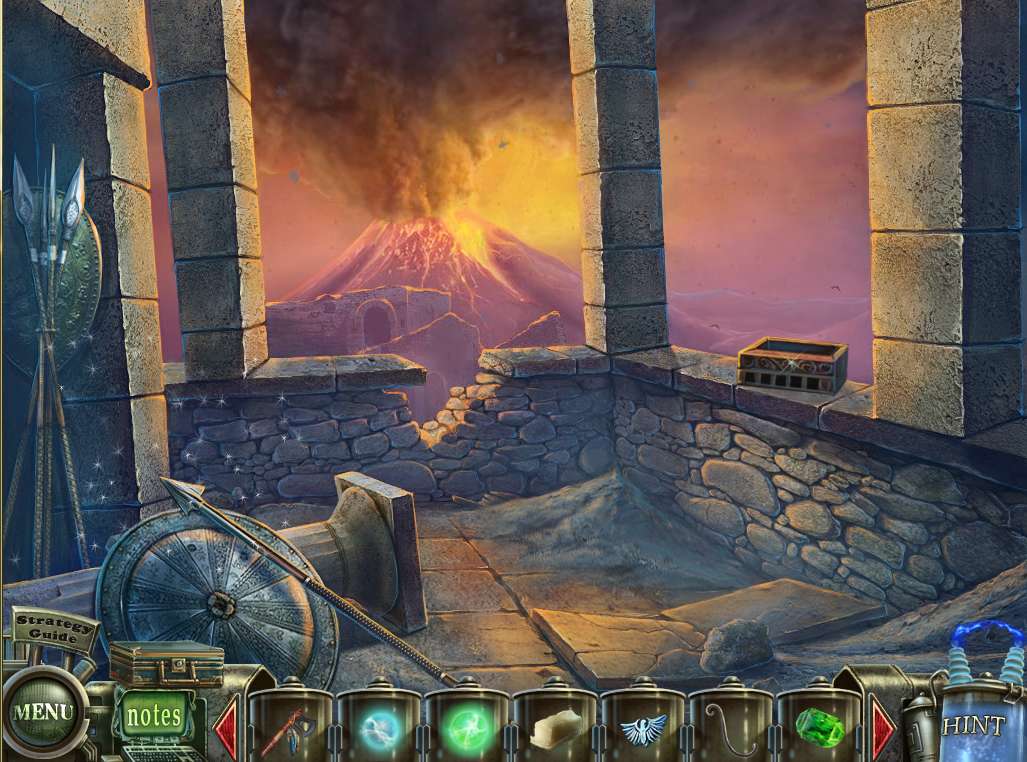
- Okay, weird scene, not least the seemingly empty cow hanging over the firepit – and how is the roof staying up over the missing pillar? Those Romans sure knew how to build things!
- Note all the explosives are set up and ready to go off.
- Also note where the Aquila needs to go on the window behind Caroline.
- Collect the BUCKET with the water and use it to douse the coals on the firepit, then proceed up the stairs at the back of the room.
- Note the cute lion cub, which is certainly why momma downstairs is so snarly.
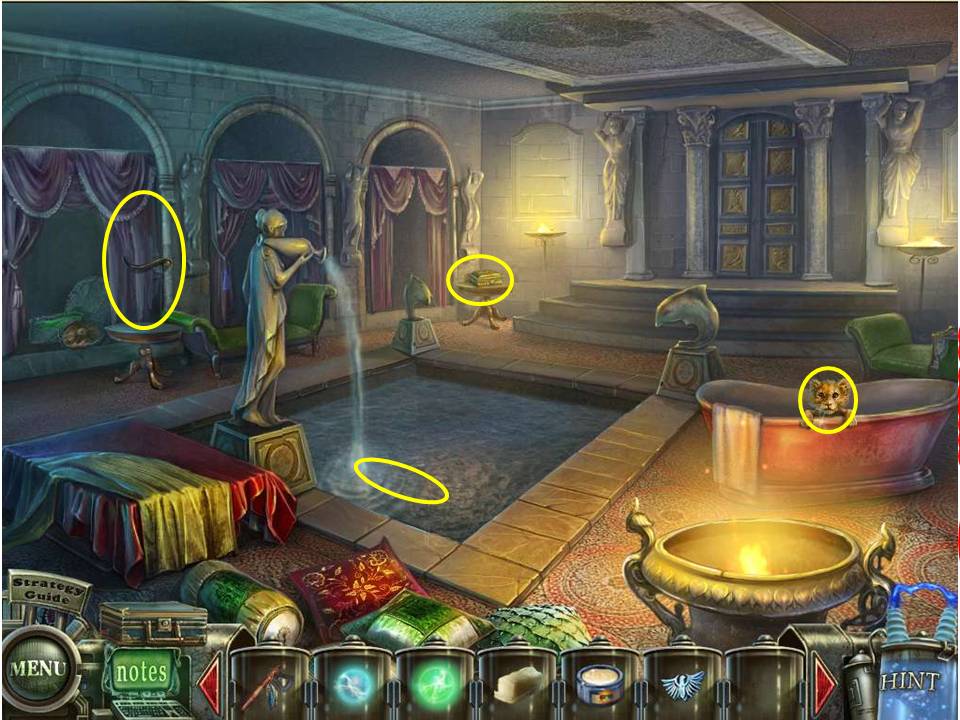
- Take a close look at the curtains to the left and use the TOMAHAWK to loosen the CURTAIN HOLDER and add it to inventory.
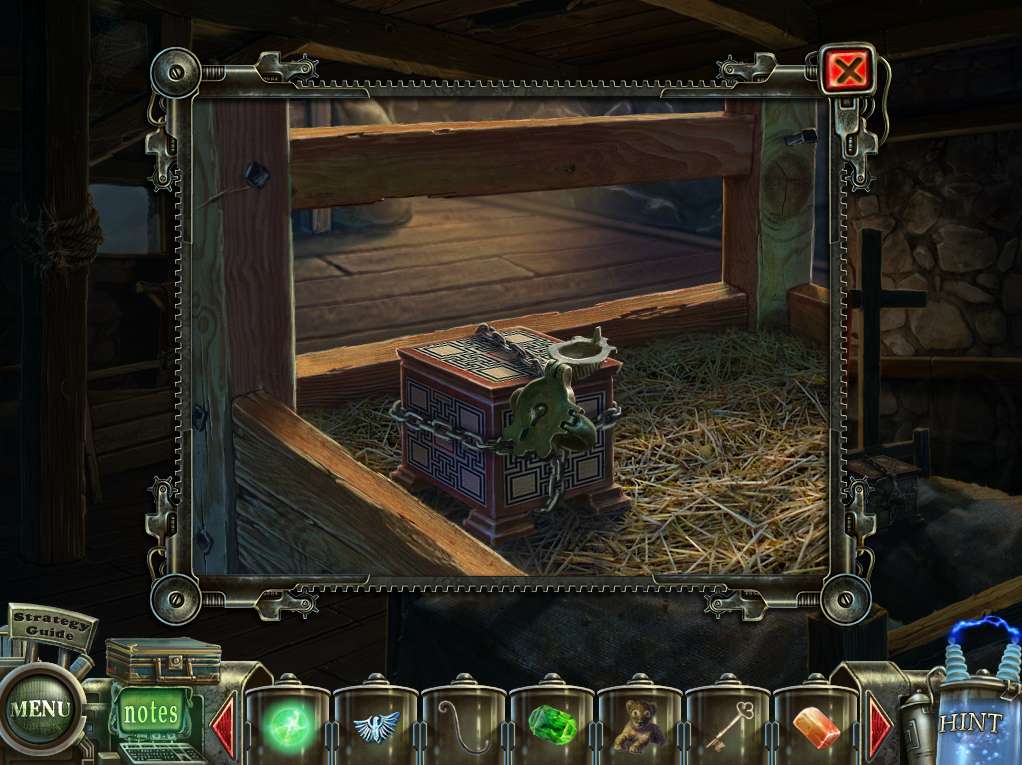
- Next zero in on the fountain and collect the SIGNET RING at the bottom of the pool, then zoom in on the box sitting on the table in the back corner and use the SIGNET RING to open it.
- Take the EMERALD inside, and go through the nearby doors on to the balcony.
- Okay, you know who who’s waiting for you! When he’s gone, use the OINTMENT on the apparition to make it go away, then collect the SOAP DISH sitting on the edge nearby.
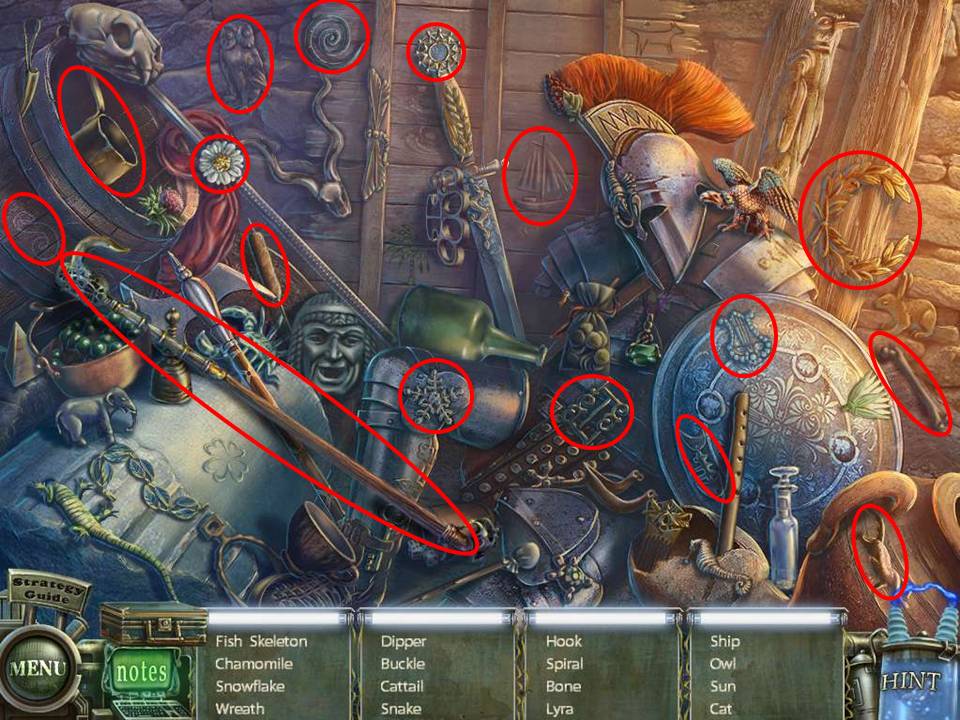
- Note the pile of ashes lying on the ground in the corner, then click on the HOA puzzle tot left to initiate it.
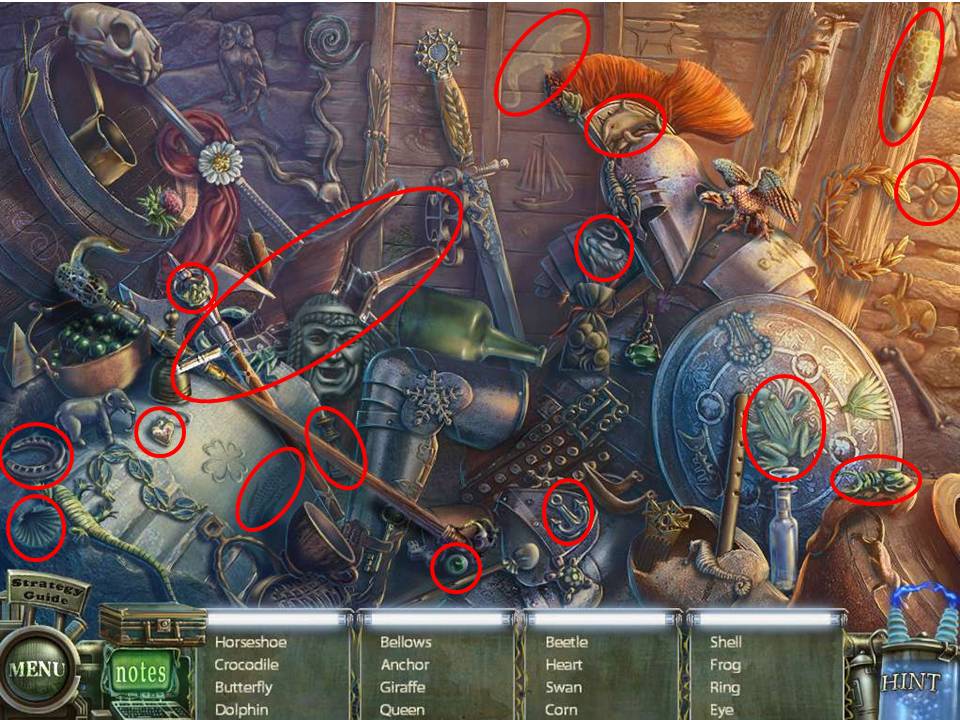
- Find all the items circled in red, noting that there might be some slight variation in the objects to find due to random selection by the game.
- When complete, take the BELLOWS and use them to clear away the ashes and collect the BOARD hidden underneath.
- Return to the baths.
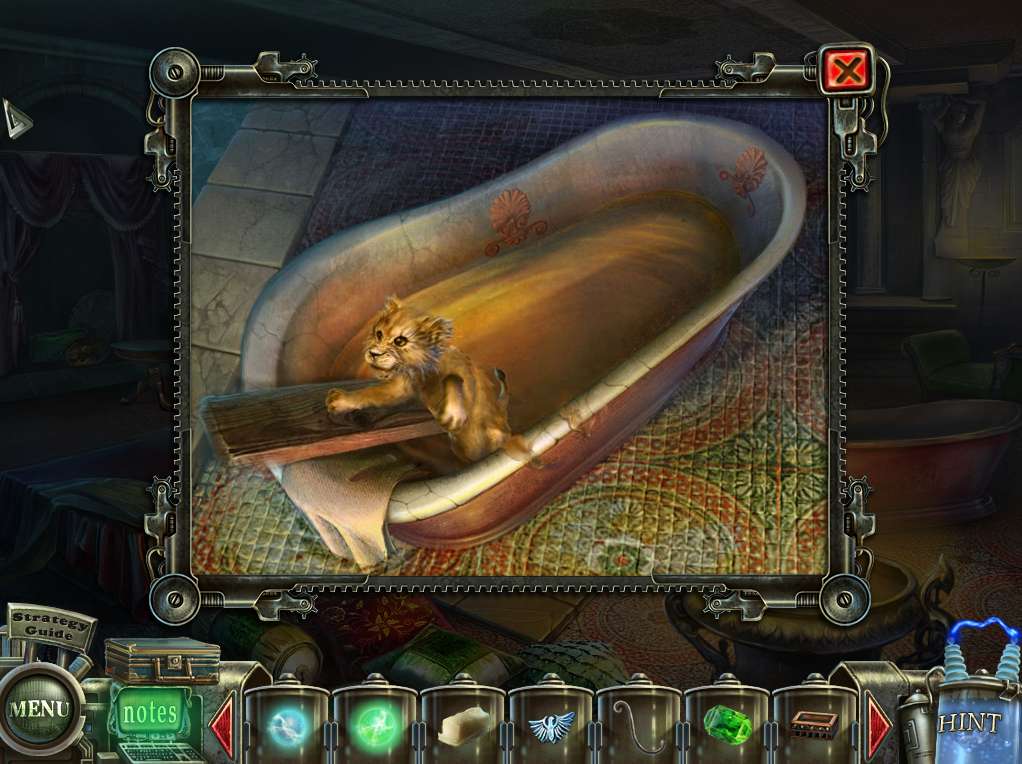
- Zoom back in on the lion cub and place the BOARD in the tub to let the little guy get out.
- Follow the cub out to the balcony, pick him up to add him to inventory, and initiate the HOA puzzle to the left for another round.
- Find all the items circled in red, noting that there might be some slight variation in the objects to find due to random selection by the game.
- When complete, take the HOOK and proceed back to the cellar.
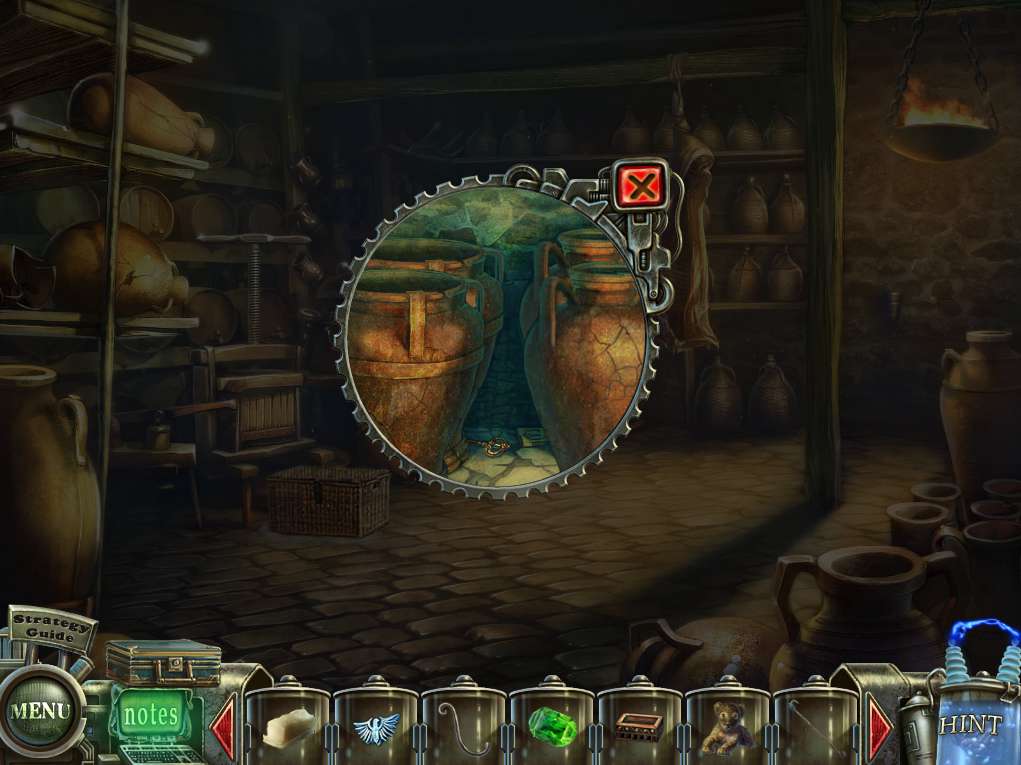
- Zoom in on the space under the press on the left and use the HOOK to retrieve the KEY.
- Return upstairs to the dining area.
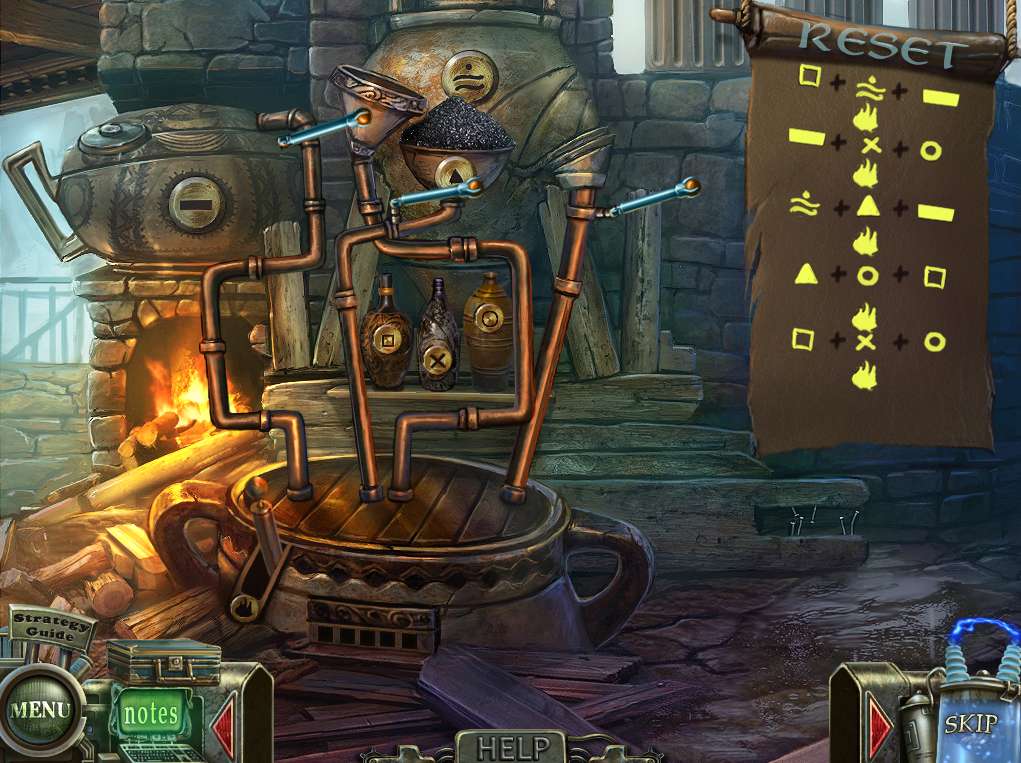
- Zoom in on the area to the right of the fireplace and place the SOAP DISH and COOKING FAT in the area to initiate the next puzzle.
- The first order of business is to set the pipes in the correct order. As with the earlier puzzle, finding the position of each pipe is easy enough, because each time you place a piece in its appropriate position a matching silhouette will appear.
- Next order of business is to use the ‘recipe’ guide on the right to mix the ingredients. There are seven areas to consider. Firstly, there are three levers across the top that drop specific materials into the cauldron below – number them 1, 2 and 3 from left to right. Then there are the three bottles, which we’ll mark A, B, and C. Then there’s the ‘fire’ lever at bottom left which presumably cooks everything. Finally, there are five stages of ‘cooking’ to work through, and as each one is completed successfully the menu on the right will highlight your success. If you goof, you simply start again from the beginning of the stage you’re currently working on.
-
So here’s the recipe –
- 1) A, 3, 1, Fire
- 2) 1, B, C, Fire
- 3) 3, 2, 1, Fire
- 4) 2, C, A, Fire
- 5) A, B, C, Fire
- When finished, take the SOAP and return over to the hostel.
- Zoom in on the chest on the bed, use the KEY to open it, and remove the other EMERALD inside.
- Head over to the baths.
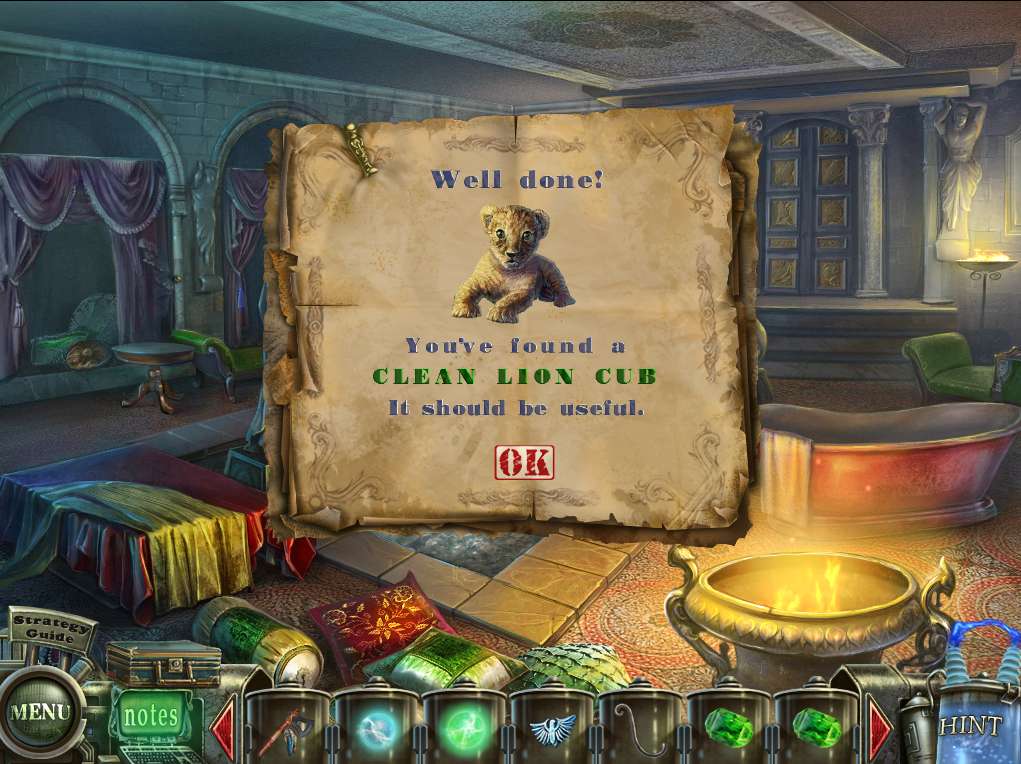
- Zero in on the pool, place the DIRTY LION CUB inside, then use the SOAP to give him a good scrub – presto, CLEAN LION CUB!
- Return to the neighboring hall, and give the CLEAN LION CUB to its proud mother.
- After she leaves with the cub in its mouth, talk to Caroline, who of course begs you to free her.
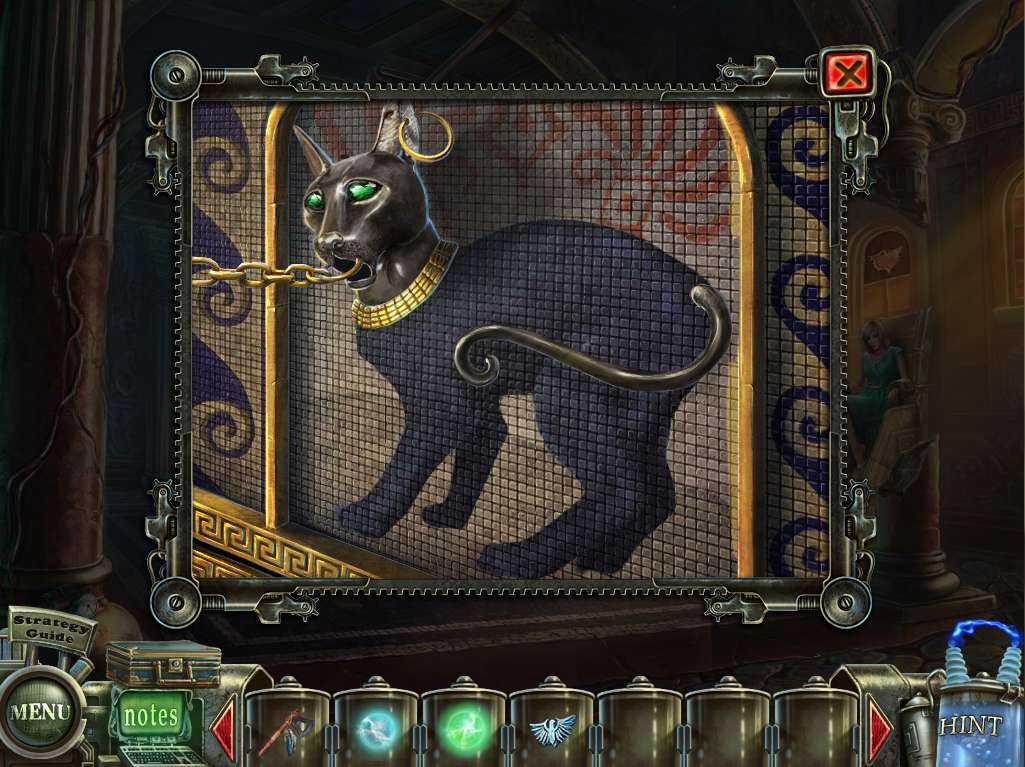
- Next, take a look at the cat ceramic on the wall where the chain is anchored, place the CURTAIN HOLDER in place as a replacement tail, and insert each EMERALD into the eye sockets.
- Clicking on the tail will now lower the chain, allowing you to inspect the inside of the golden bull.
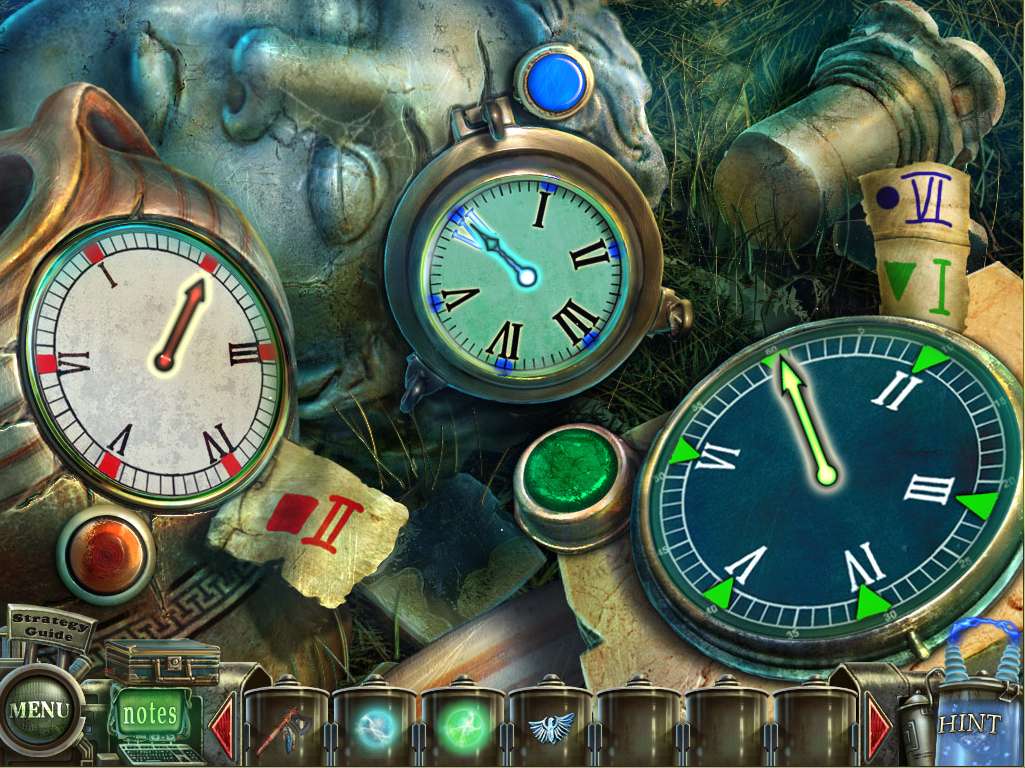
- This is similar to the earlier gauge puzzle, where each dial has to be set in accordance with the scraps of paper, and with each button having multiple effects – Green moves at one increment on its own, but moves the other gauges two increments.
- Blue moves all three by one increment.
- Red moves only the red gauge by one increment at a time.
- The solution therefore? Click on the blue button once, and the red button twice.

- When complete, the woman will be freed.
- Have a final chat with her, then collect the YELLOW ENERGY BALL as she departs the scene.
- Place the AQUILA in the slot above the window, then note where the ray of light hits the ground.
- Zoom in, remove the stones, and retrieve the ALASKA DISK.
- Backtrack to the computer room.
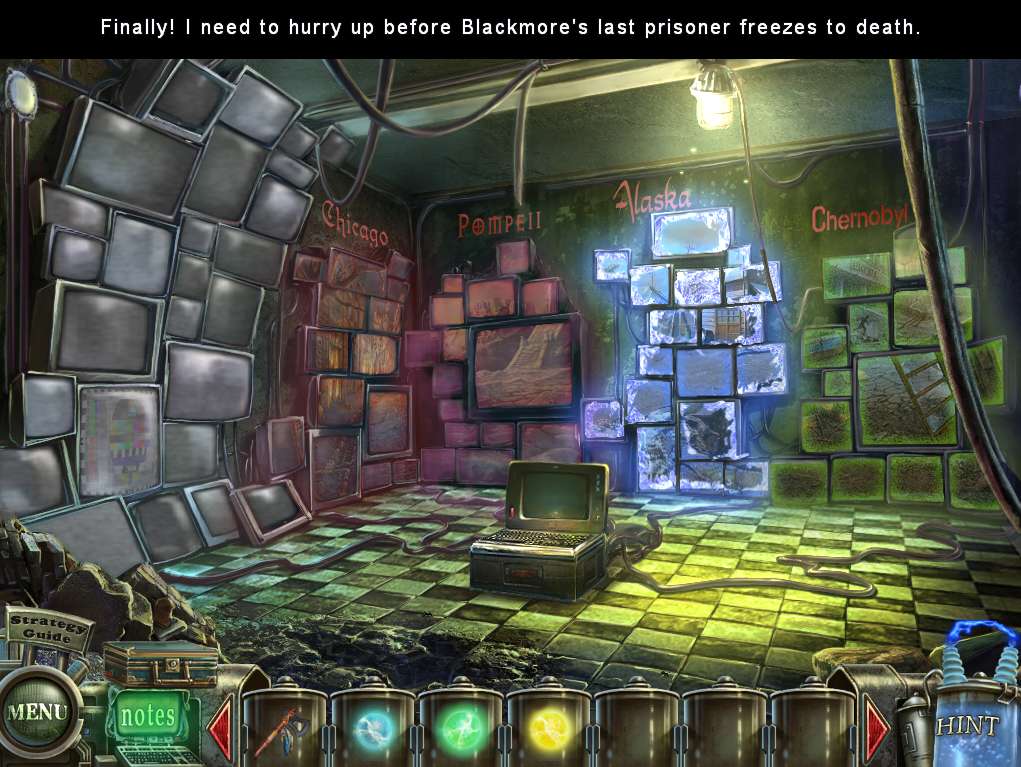
- Listen to brainhead’s rant again, then zoom in on the computer, insert the ALASKA DISK, and proceed through the appropriate portal to the next leg of your adventure in the cold north.
General Info and Tips
Chapter One: Trapped
Chapter Two: Chicago
Chapter Three: Chernobyl
Chapter Four: Pompeii
Chapter Five: Alaska
Ask for help in the comments below!
Chapter One: Trapped
Chapter Two: Chicago
Chapter Three: Chernobyl
Chapter Four: Pompeii
Chapter Five: Alaska
Ask for help in the comments below!