
Mysteries of the Mind: Coma: Dream Two: Your Grandpa
Our Mysteries of the Mind Coma Walkthrough will help you delve deep into the most painful memories of your past as you attempt to right the wrongs you once committed in order to free yourself from your coma. With detailed instructions for each memory paired with custom screenshots and solutions to all puzzles, you'll have no problem tracking down the ghosts of your past and righting the wrongs in this hauntingly tragic hidden object game.
General Info and Tips
Dream One: Your Mother
Dream Two: Your Grandpa
Dream Three: Your Soul
Ask for help in the comments below!
Dream One: Your Mother
Dream Two: Your Grandpa
Dream Three: Your Soul
Ask for help in the comments below!
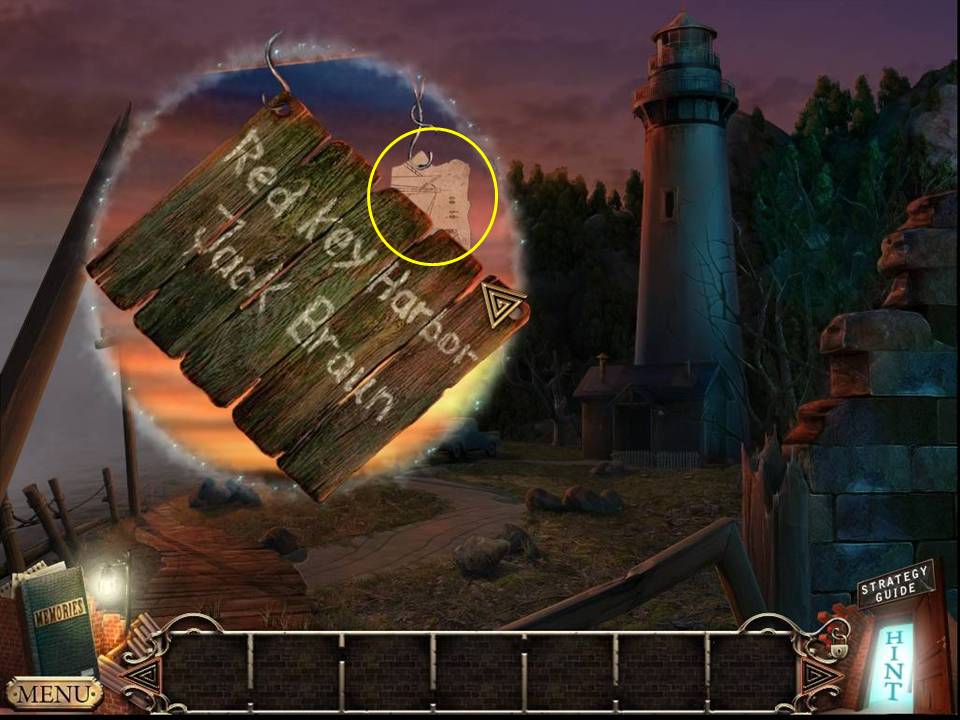
- Zoom into the sign.
- Take the BLUEPRINT PIECE.
- Go left.
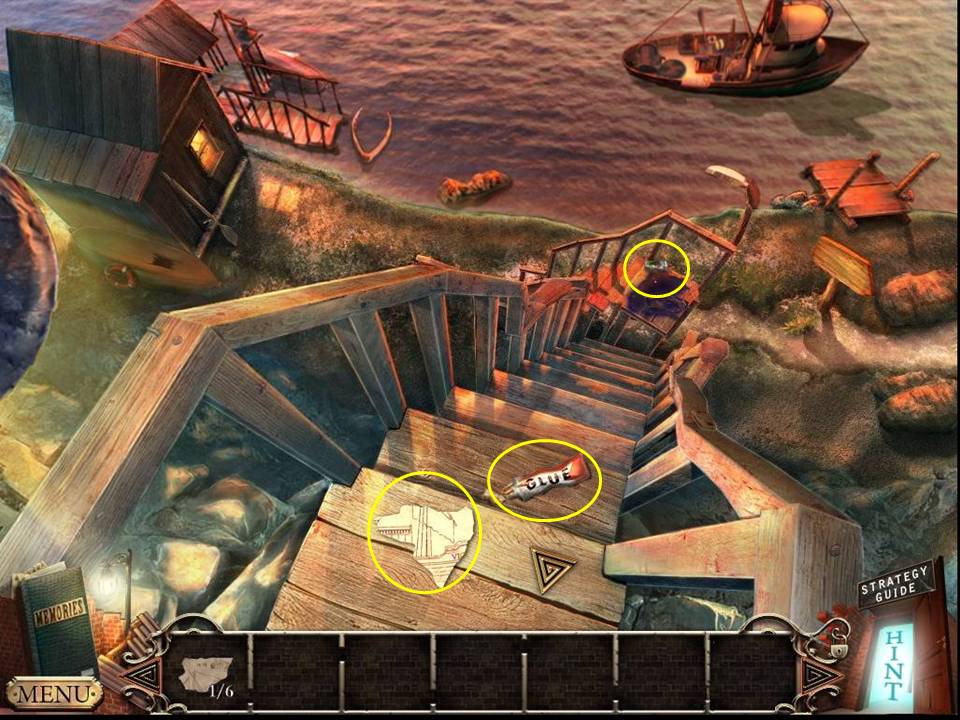
- Take the GLUE and another BLUEPRINT PIECE.
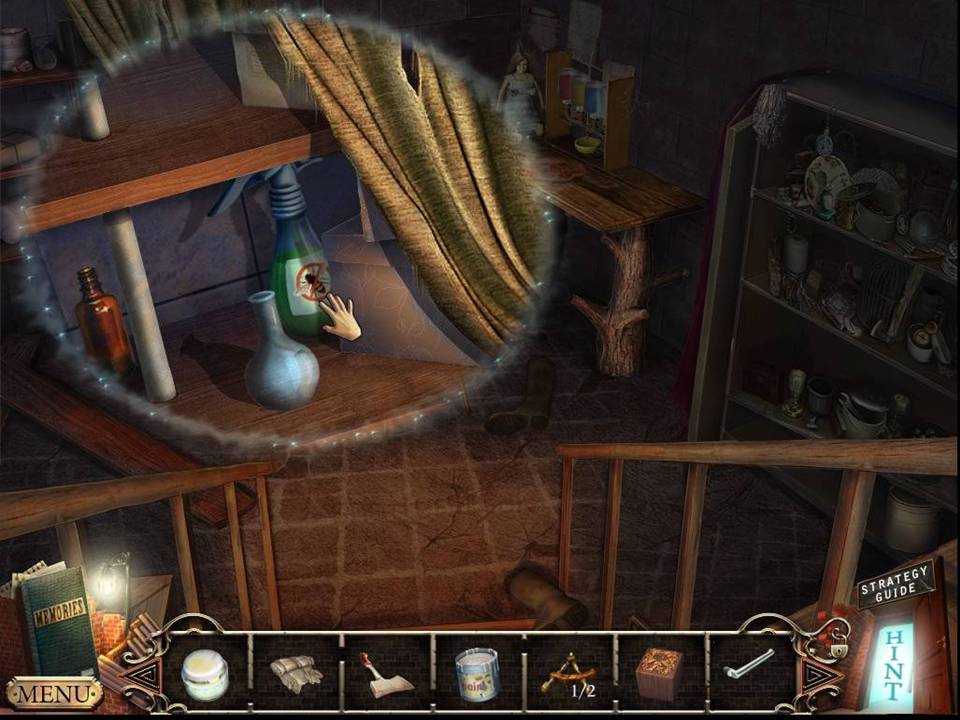
- Zoom into the landing.
- Take the CLEANSER.
- Return to the first scene.
- Go to the lighthouse door.
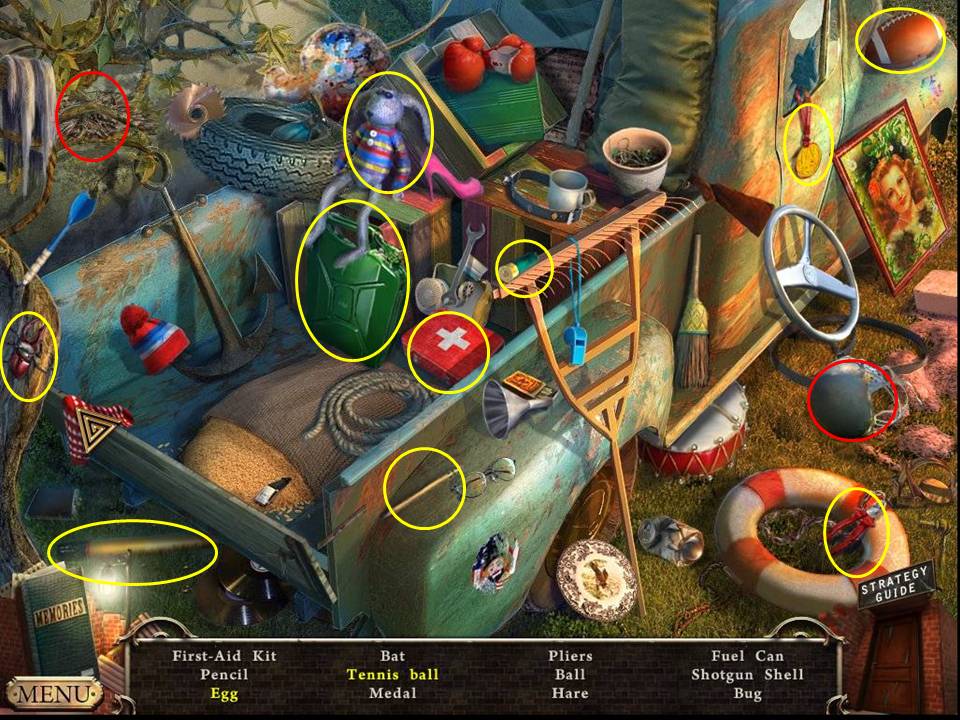
- Play the HOA by the barrel at left.
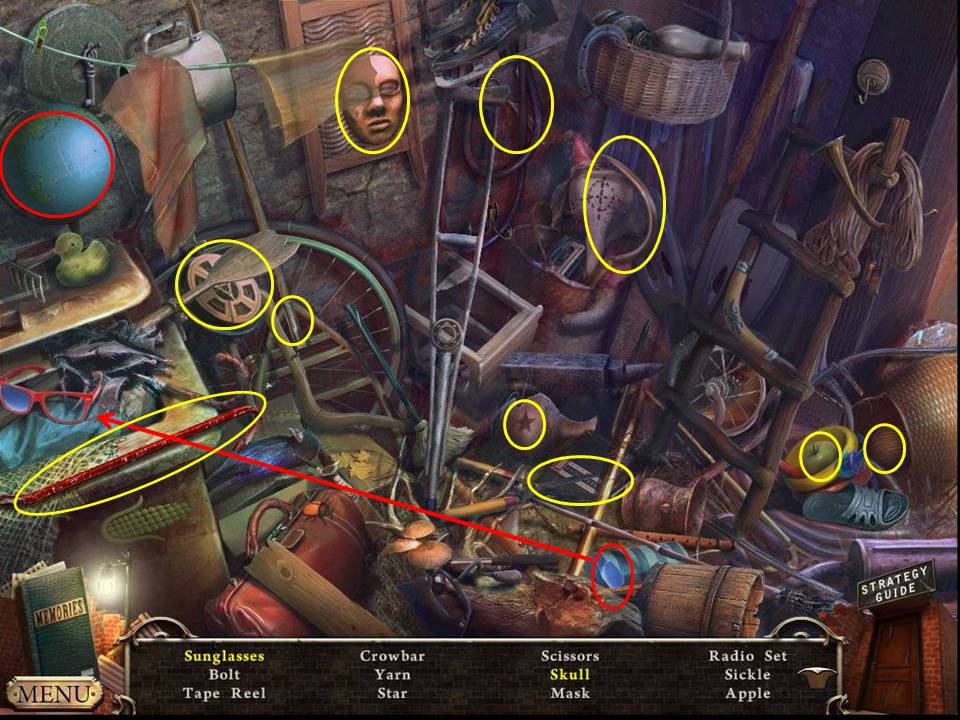
- Find the items listed.
- Spin the globe to get the skull. Insert the lens in the sunglasses.
- Receive the CROWBAR.
- Return to the first scene.
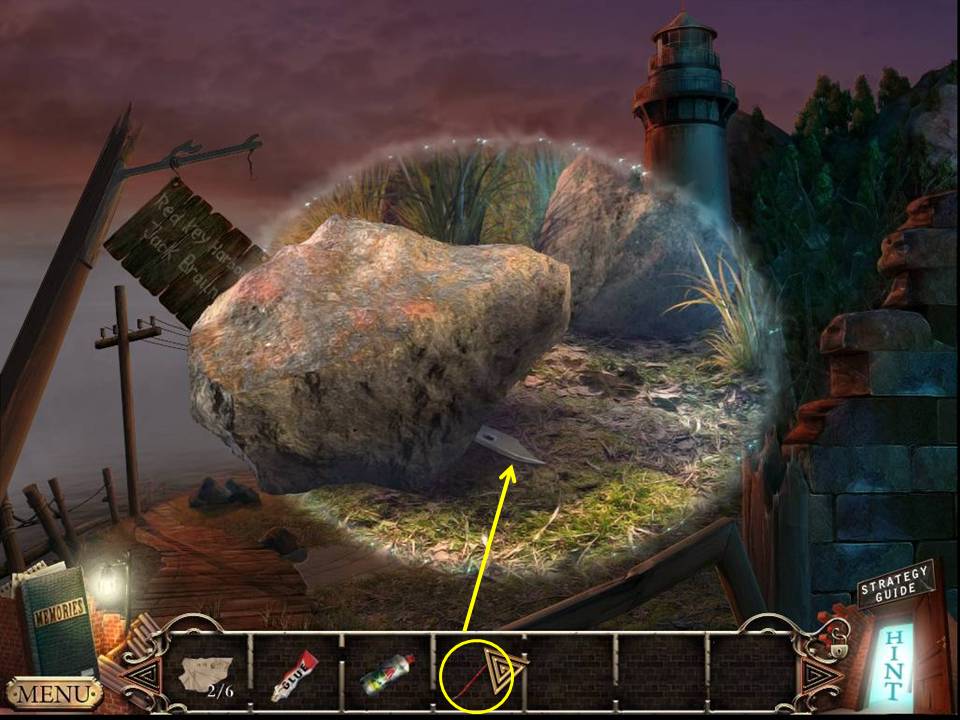
- Zoom into the stone.
- CROWBAR the stone.
- Receive the KNIFE.
- Return to the lighthouse door.
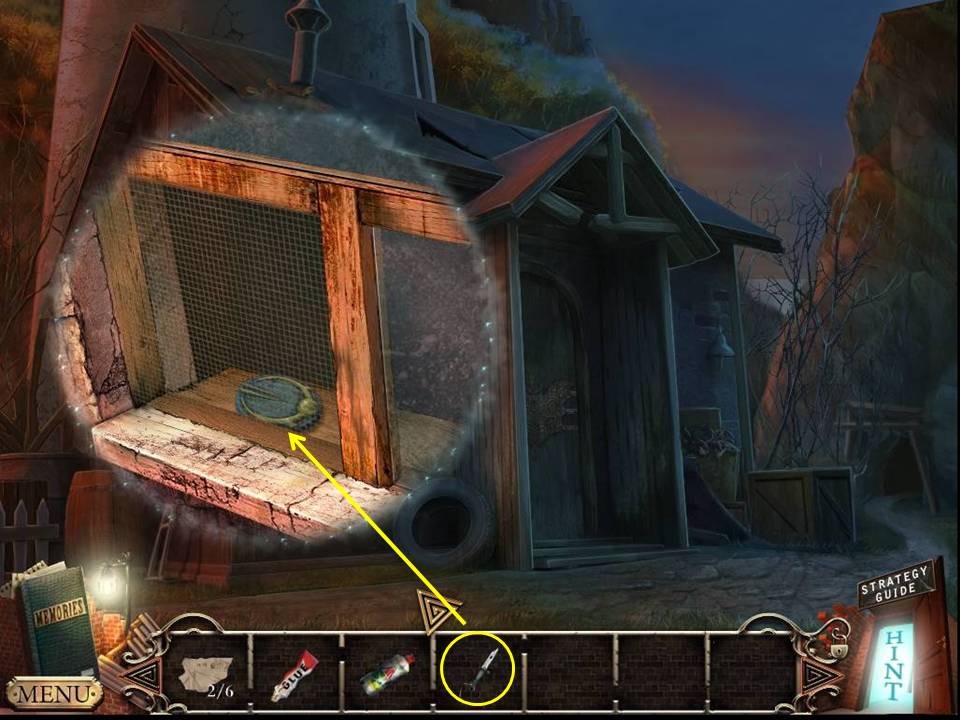
- Zoom into the window.
- Cut the screen with the KNIFE.
- Take the PUZZLE PIECE.
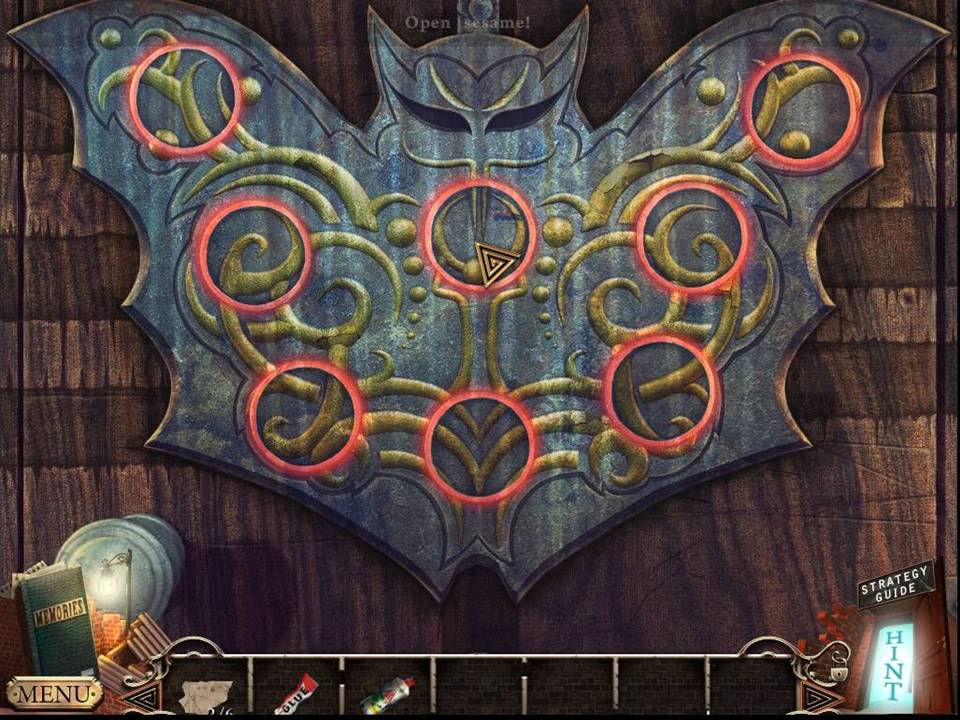
- Zoom into the door.
- Insert the PUZZLE PIECE into the slot to initiate a puzzle.
- The object of the puzzle is to arrange the disk as shown.
- Right click the disks to rotate them.
- See screenshot for solution.
- When finished, enter the lighthouse.
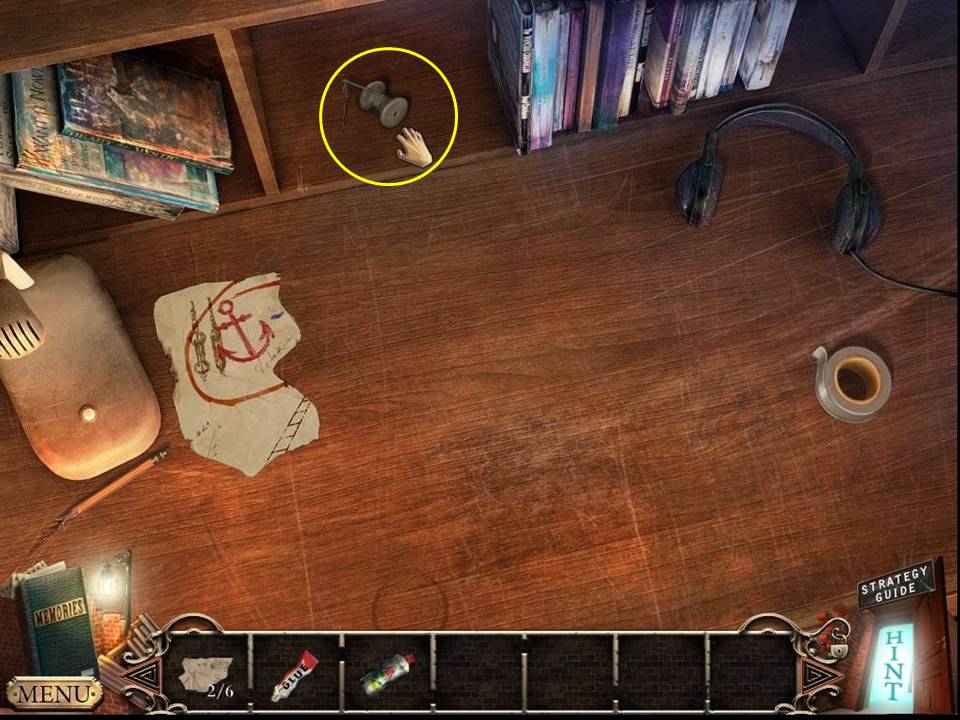
- Zoom into the desk.
- Take the NEEDLE AND THREAD.
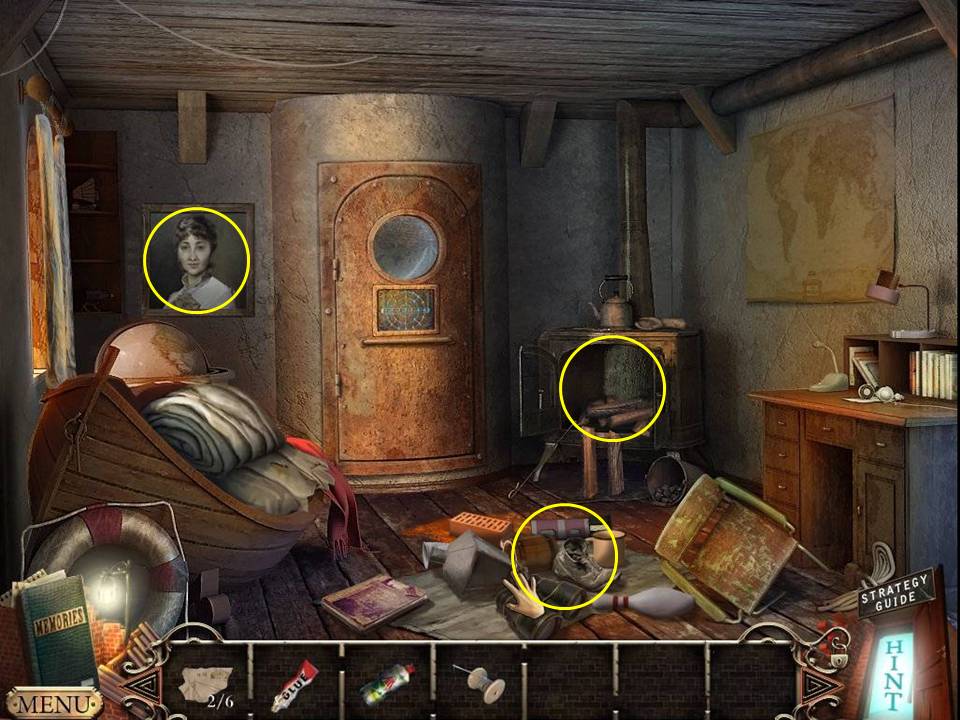
- Move the items on the floor.
- Take a third BLUEPRINT PIECE.
- Zoom into the painting.
- Zoom into the stove.
- Move the wood.
- Take the WRENCH.
- Take the WORK GLOVE.
- Exit the lighthouse and click down once.
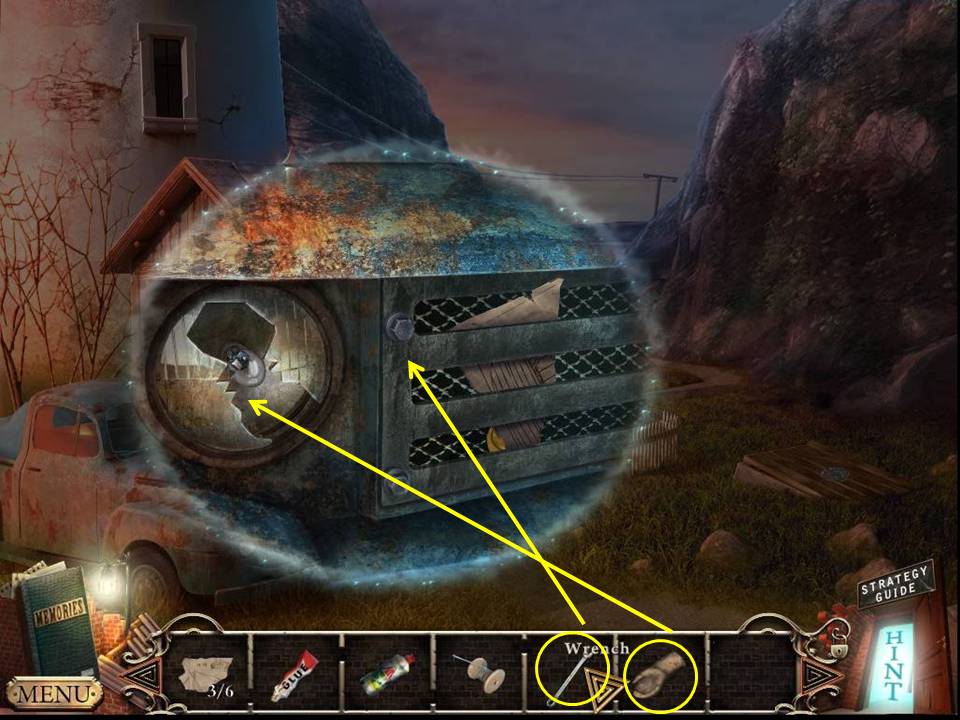
- Zoom into the front of the truck.
- Remove the grill with the WRENCH.
- Take the fourth BLUEPRINT PIECE and PUZZLE PIECE.
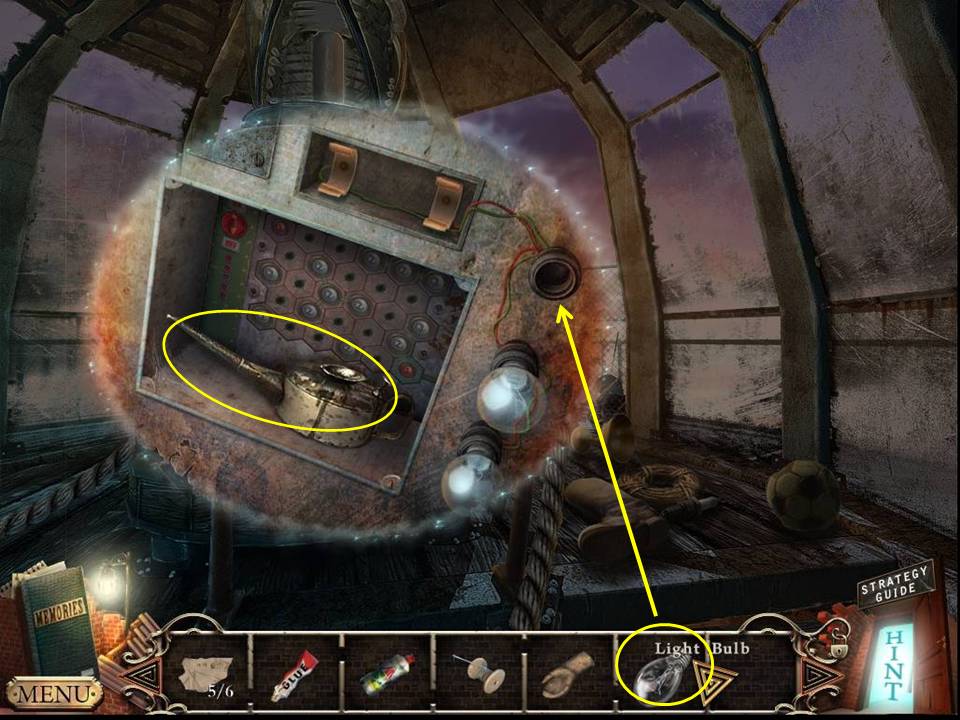
- Remove the LIGHT BULB with the WORK GLOVE.
- Return to the lighthouse.
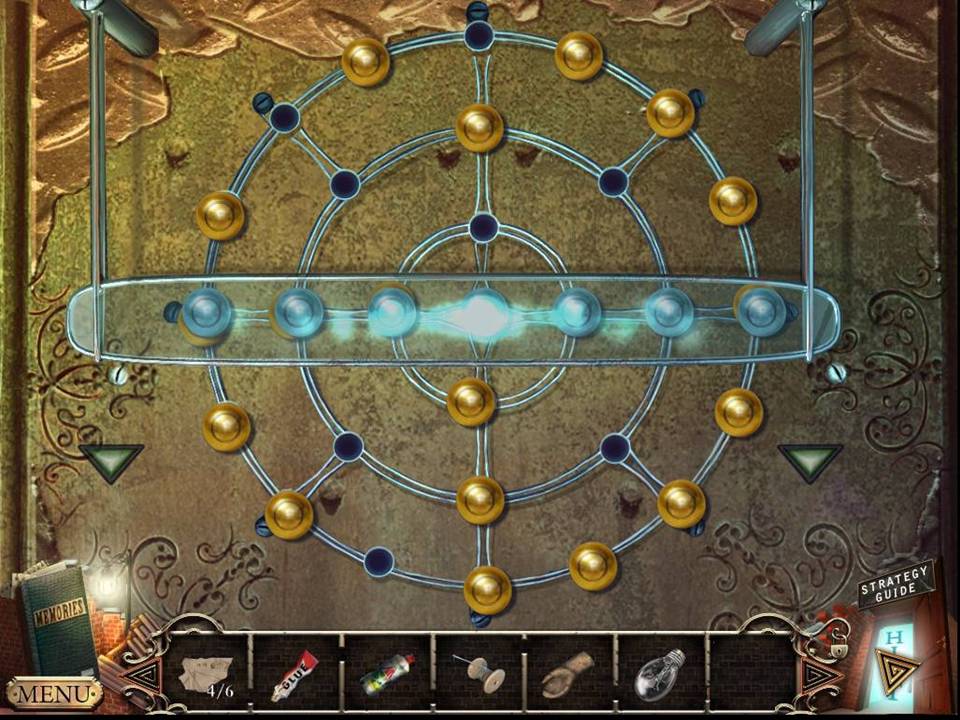
- Zoom into the door lock.
- Insert the PUZZLE PIECE into the lock to initiate a puzzle.
- Use the arrows to rotate the rings.
- You can move the marbles from ring to ring along the eight access points.
- Rotate the rings until a yellow marble can be moved from the outer ring into the middle ring along one of the access points. The middle ring does not rotate and is a good place to place the yellow marbles.
- Rotate the rings until you can move one of the yellow marbles out of the middle line.
- Try to remove all of the yellow marbles, replacing them with blue ones from the center out.
- Remain focused on your center line. You may have to swap your marbles several times until you have them in the correct line.
- When finished, enter the stairwell.
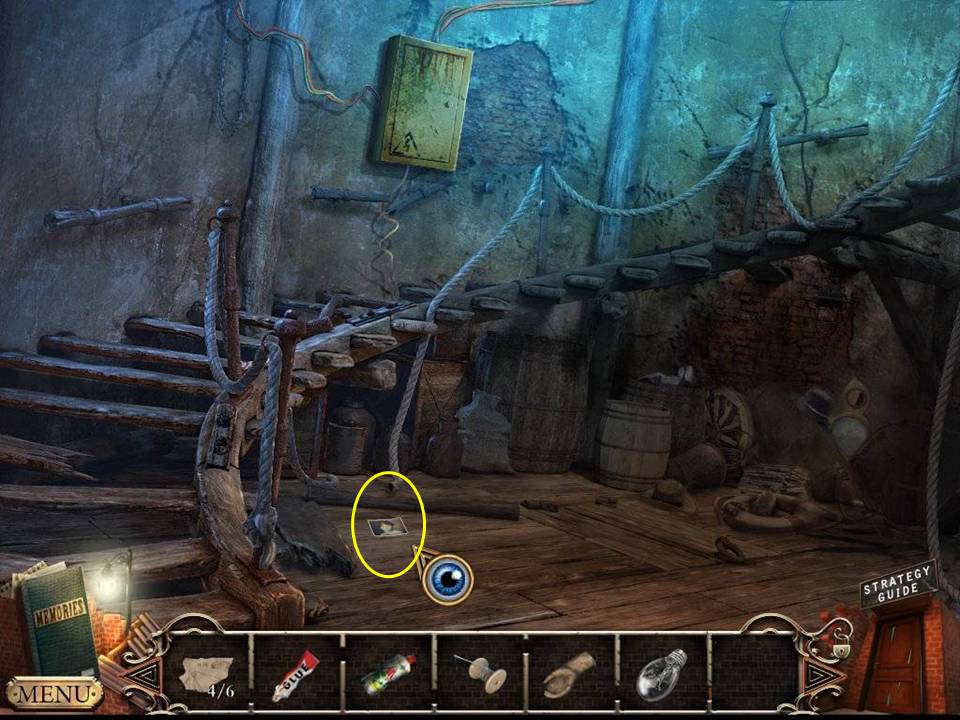
- Take the phone.
- Go upstairs to the lens room.
- Move the items on the floor.
- Take a fifth BLUEPRINT PIECE.
- Zoom into the panel.
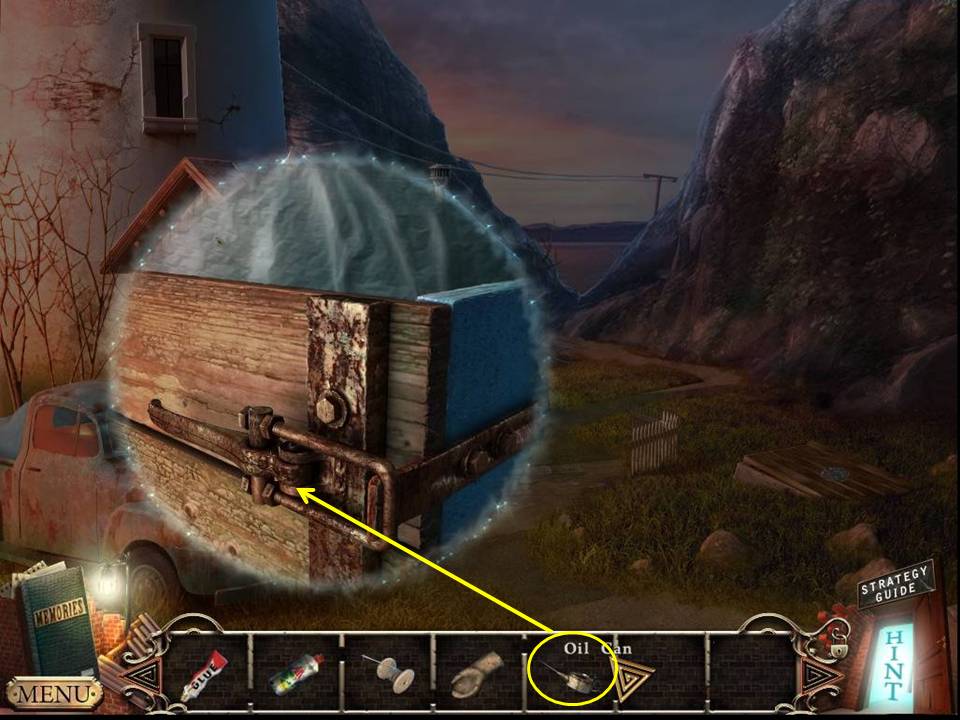
- Take the OIL CAN.
- Insert the LIGHT BULB in the light.
- Return to the first floor.
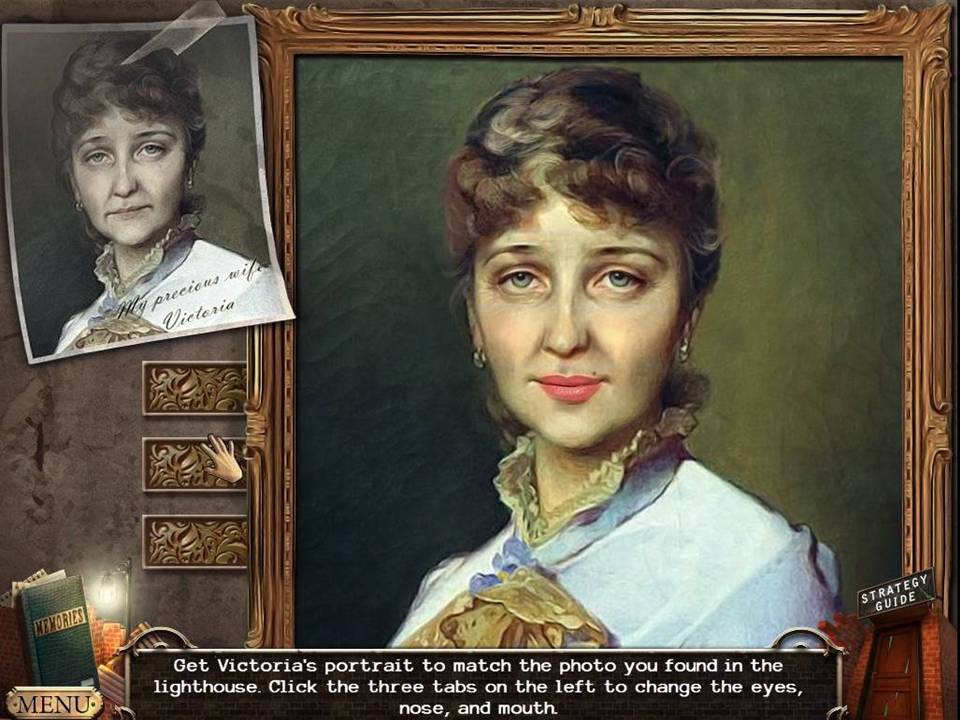
- Zoom into the painting.
- Press the levers on left to change the eyes, nose and lips to match the screenshot.
- Take the sixth BLUEPRINT PIECE.
- Zoom into the desk.
- Place all the BLUEPRINT PIECES on the surface and arrange to match the screenshot.
- Exit the lighthouse and click down once.
- Zoom into the back of the truck.
- OIL CAN the latch.
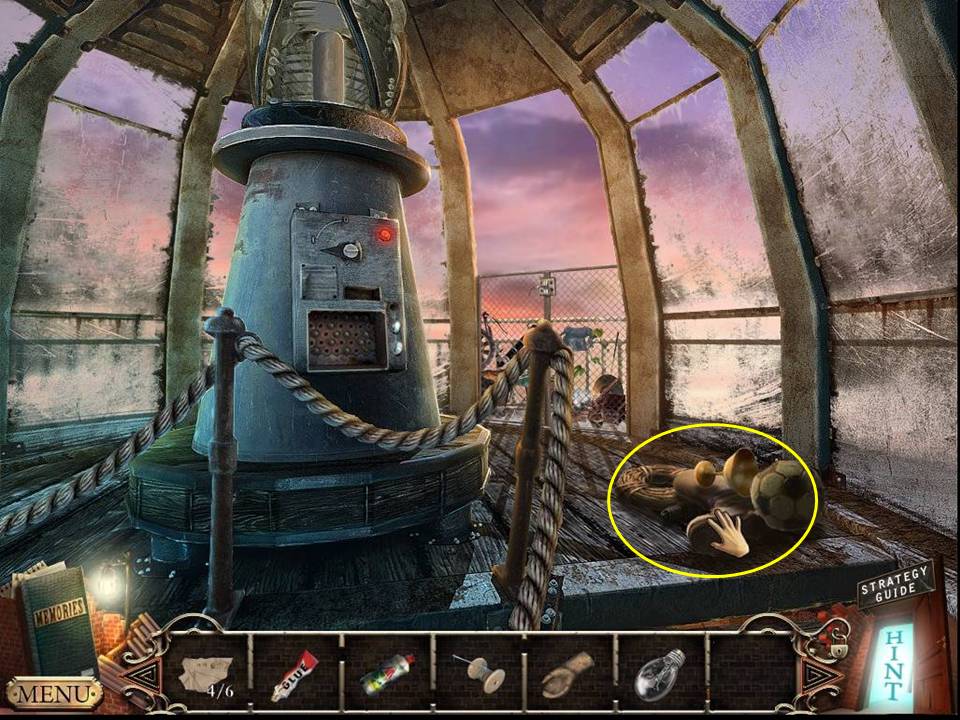
- Play the HOA.
- Find the items listed.
- Click the helmet to get the tennis ball.
- Find the egg in the nest.
- Receive the PLIERS.
- Return to the lighthouse's lens room.

- Zoom into the chain link gate.
- Remove the wire with the PLIERS.
- Play the HOA.
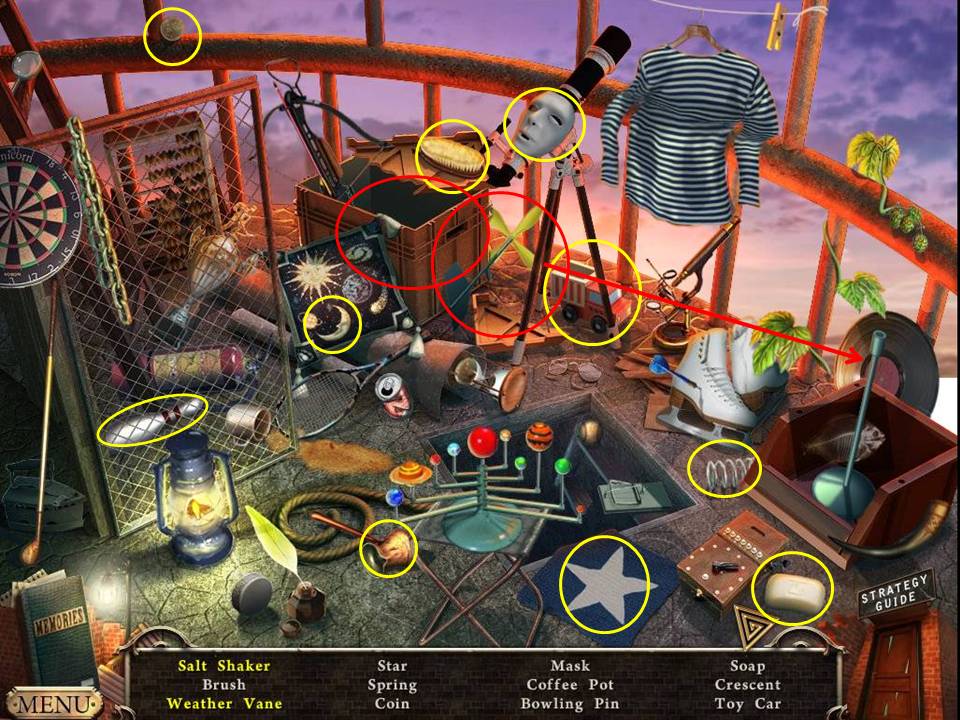
- Find the items listed.
- Look in the crate to get the salt shaker.
- Reassemble the weather vane.
- Receive the BRUSH.
- Depart the lighthouse.
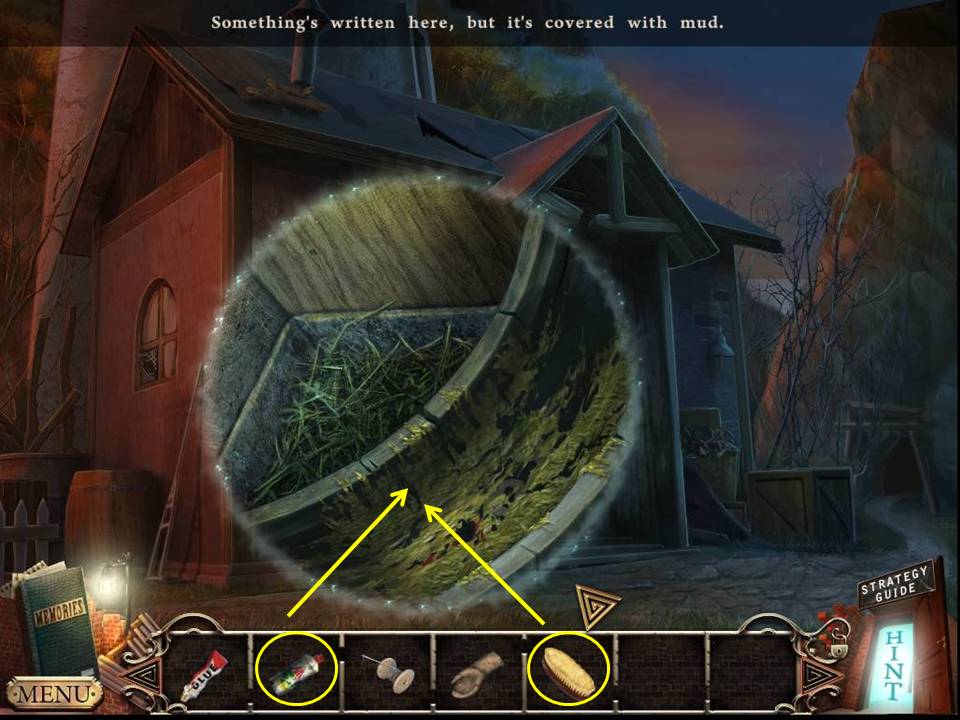
- Zoom into the tire.
- Clean the tire with the CLEANSER and BRUSH to get a code.
- Return to the lighthouse.
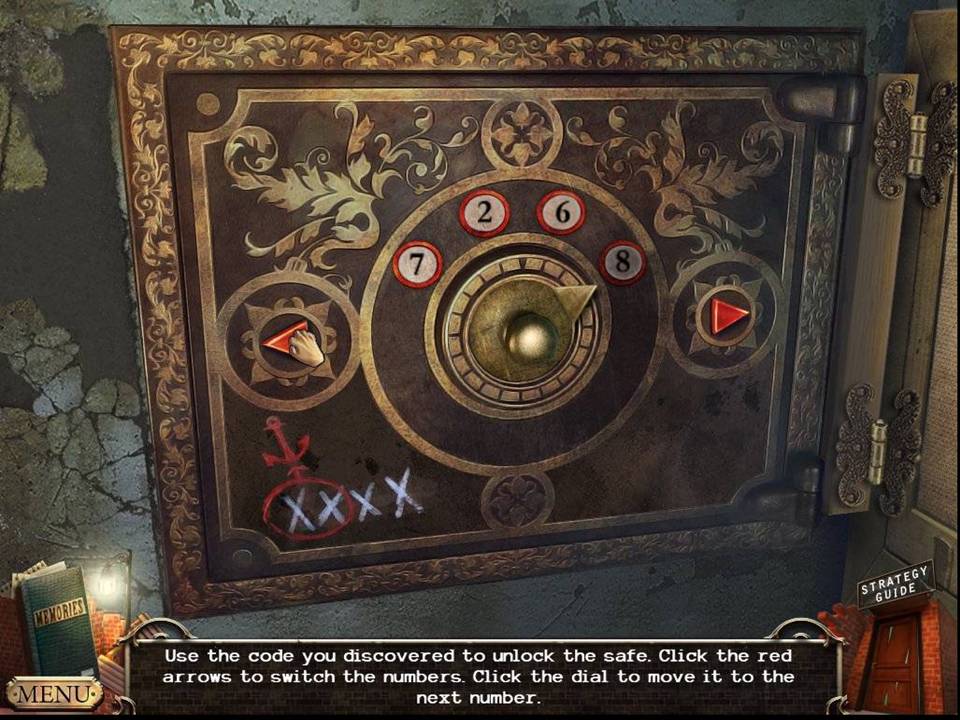
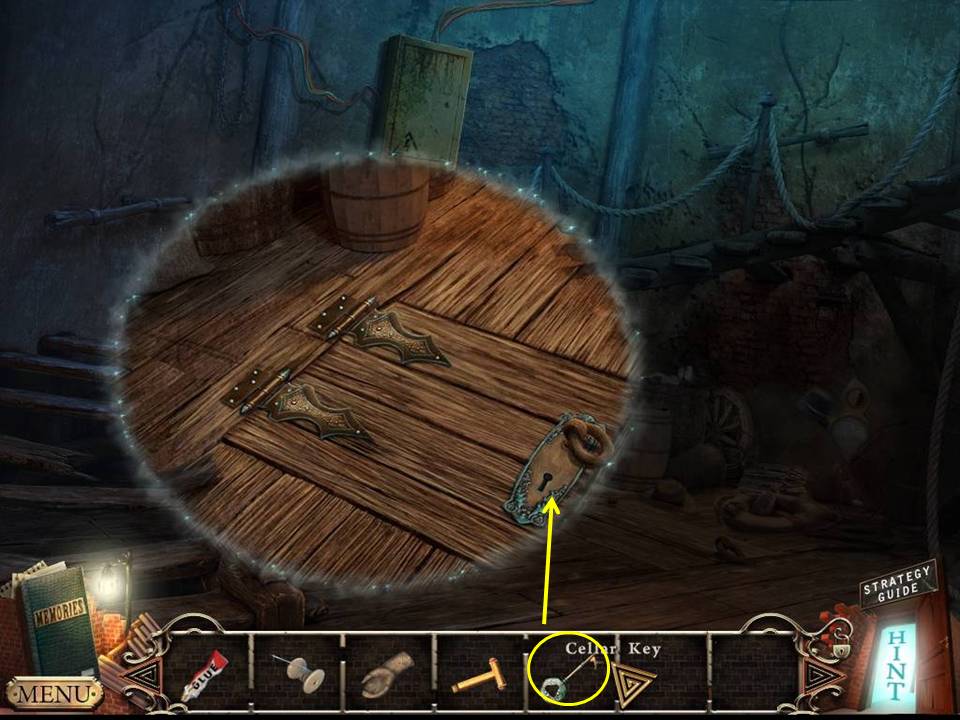
- Zoom into the wall safe and input the code 7268.
- Open the safe.
- Take the note, CELLAR KEY and LEVER.
- Go to the stairwell.
- Zoom into the cellar.
- Unlock with the CELLAR KEY.
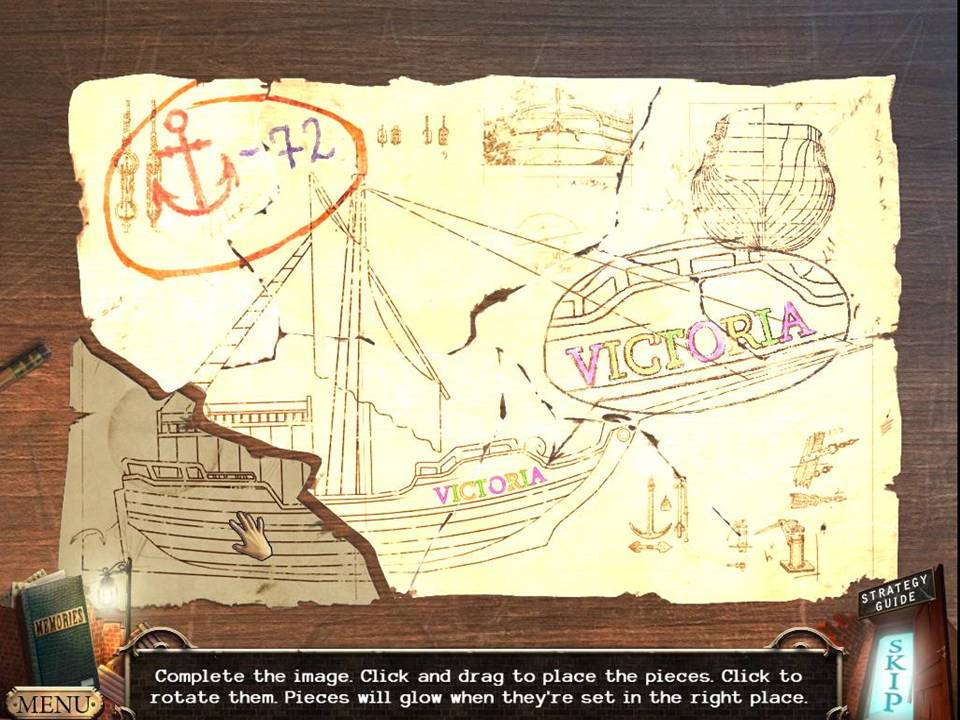
- Take the PHOSPHORESCENT POWDER and CANVAS.
- Click down once.

- Zoom into the boat.
- Place the CANVAS on the SAIL.
- Patch it with the NEEDLE AND THREAD.
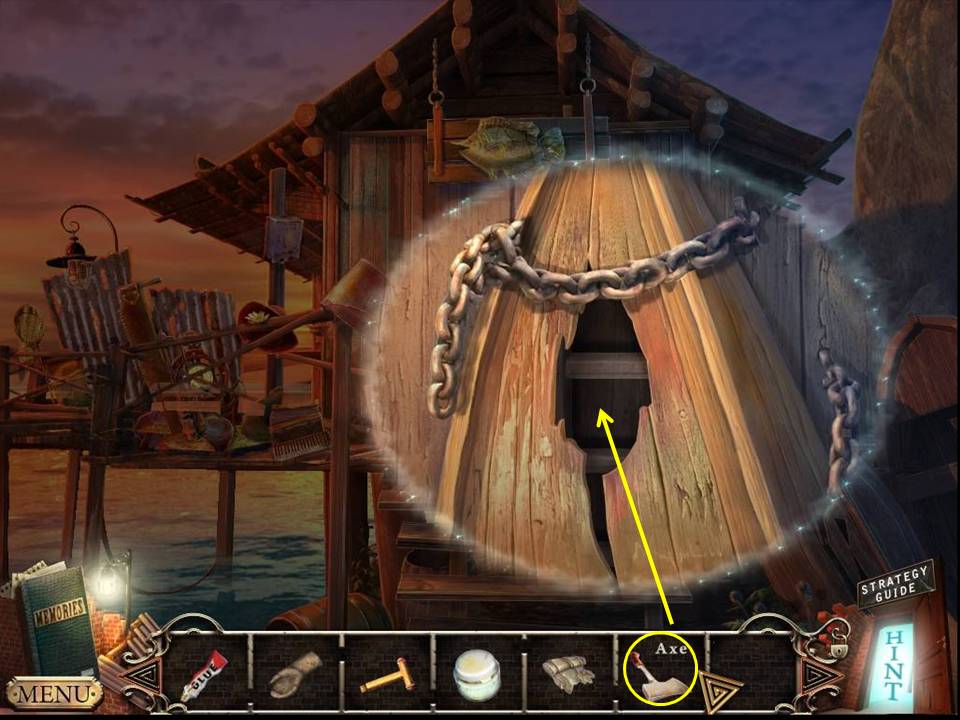
- Take the SAIL.
- Take the AXE.
- Depart the lighthouse and go right to the mine entrance.
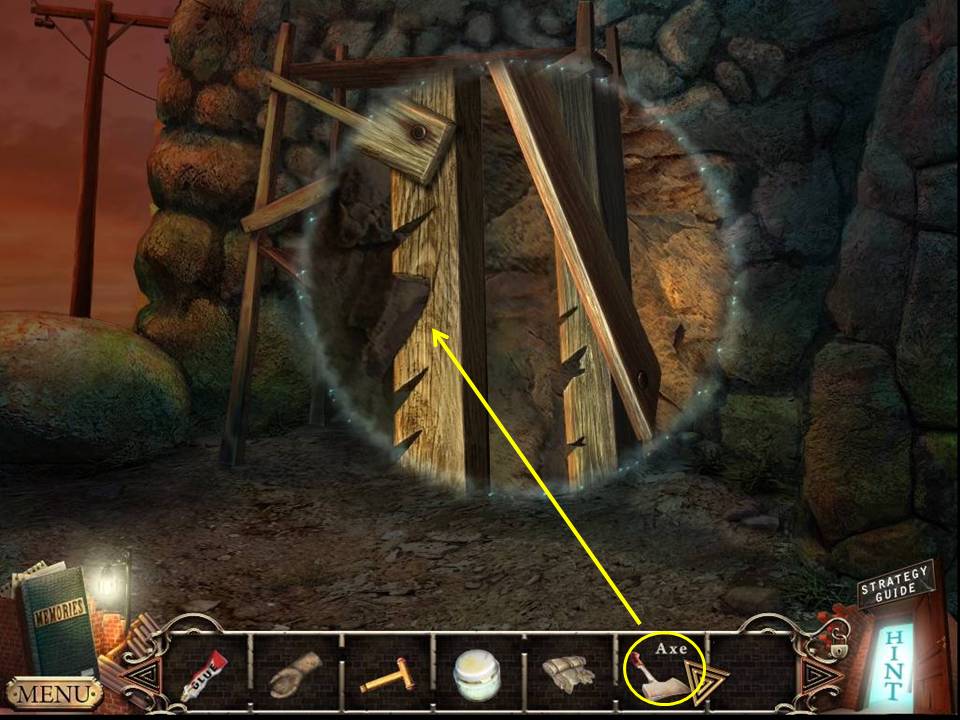
- Zoom into the scaffolding.
- Chop the scaffolding with the AXE.
- Play the HOA.
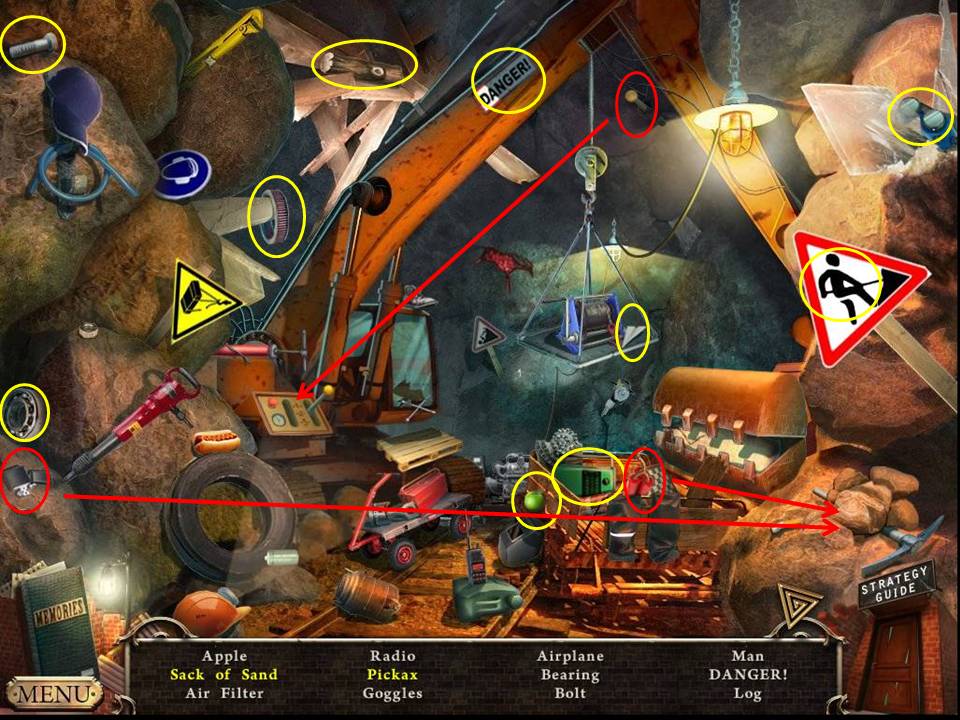
- Find the items listed.
- Place the dynamite next to the pickaxe.
- Light the dynamite with the lighter.
- Insert the lever in the panel and click it to get the sack of sand.
- Receive the SANDBAG.
- Return to the first scene and take the path to the left.
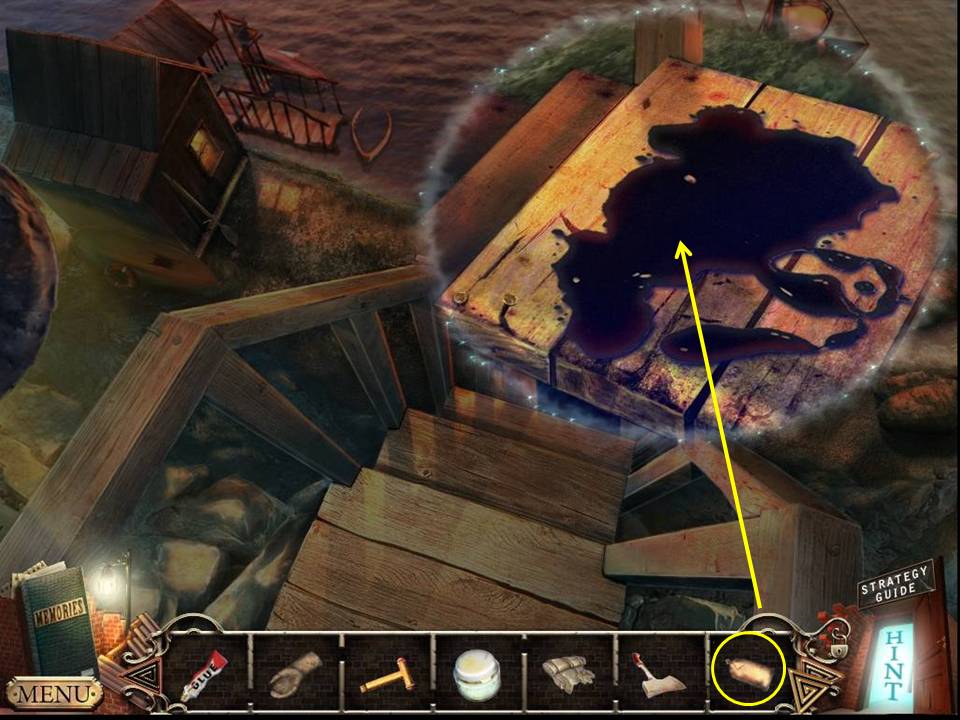
- Zoom into the landing.
- Cover the oil with the sand from the SANDBAG.
- Go down the stairs to the fisherman's hut.
- Zoom into the boat.
- Chop the bottom with the AXE.
- Take the LADDER.
- Click down once and move right to the ship.

- Zoom into the ship.
- Take the DRIED PAINT.
- Go back to the lighthouse door.
- Prop the LADDER against the wall.

- Zoom into the roof.
- Take the STEERING WHEEL SECTION.
- Click down once.
- Zoom into the storm cellar hatch.
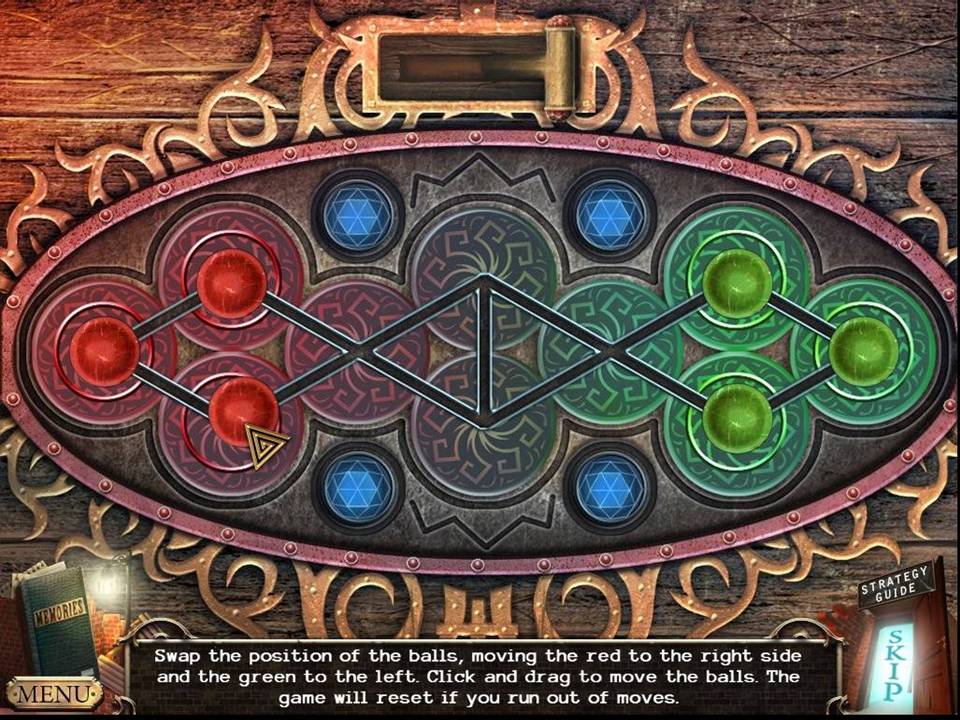
- Insert the LEVER to initiate a puzzle.
- The object of the puzzle is to move all the green balls to the right and all the red balls to the left.
- When finished, enter the storm cellar and play the HOA.
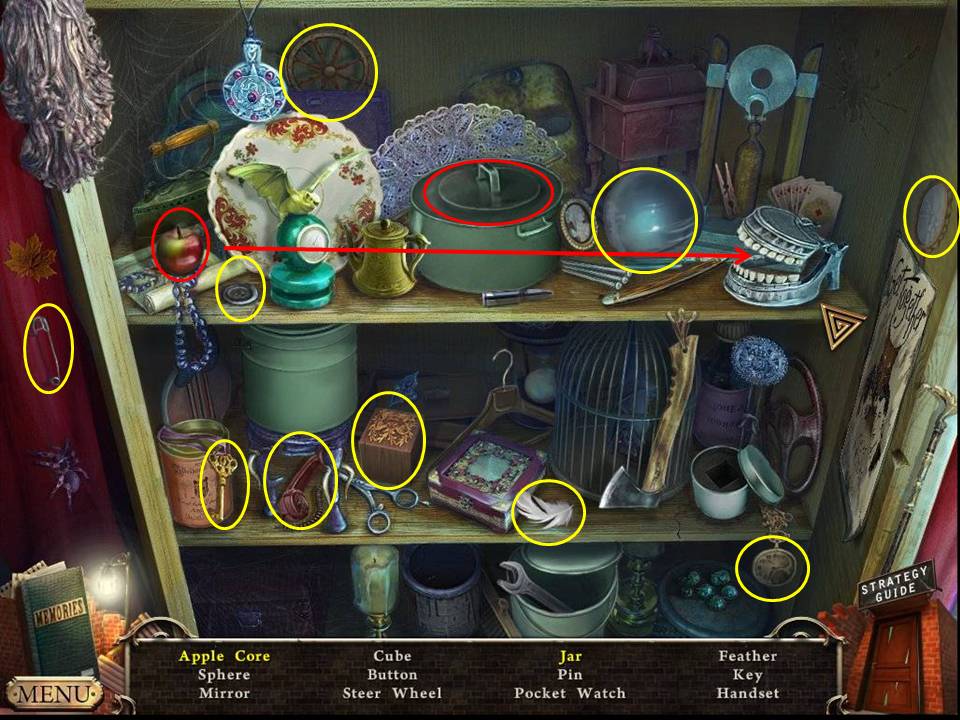
- Find the items listed.
- Have the teeth bite the apple to get the apple core.
- Uncover the pan to get the jar.
- Receive the CUBE.
- Zoom into the desk.
- Take the letter and the HANDLE from underneath.
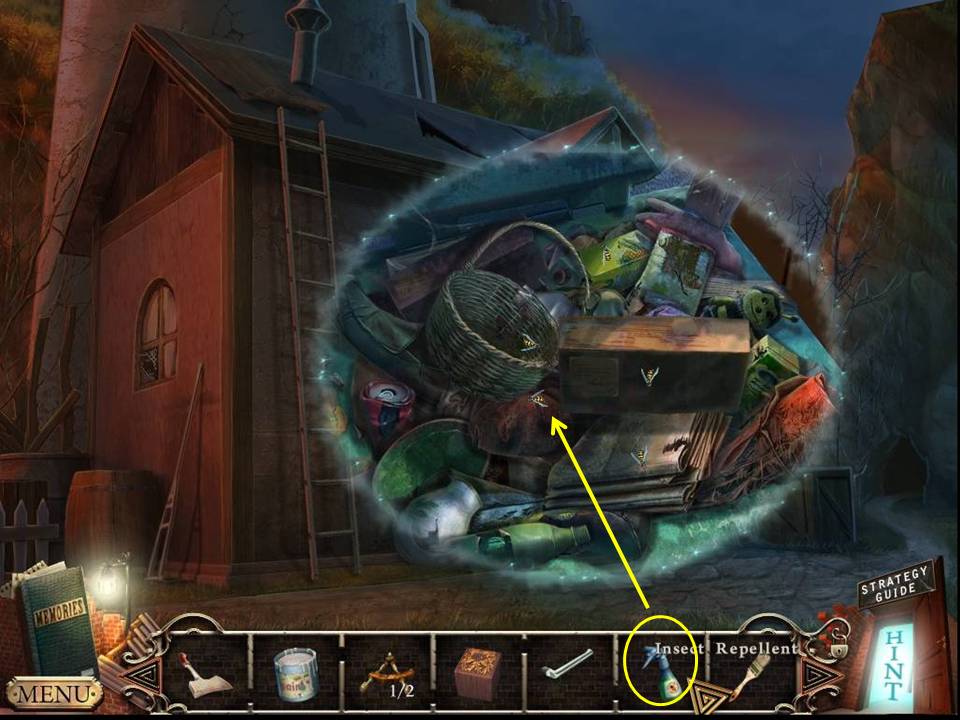
- Zoom into the shelf.
- Take the INSECT REPELLANT.

- Zoom into the radio.
- Take the BRUSH.
- Return to the lighthouse door.
- Zoom into the crate.
- Spray the INSECT REPELLANT on it.
- Use the WORK GLOVE to move items.
- Take the SOLVENT.
- Return to the fisherman's hut.

- Zoom into the panel.
- Put the HANDLE on the door.
- Take the NAILS.
- Click the switch.
- Play the HOA.
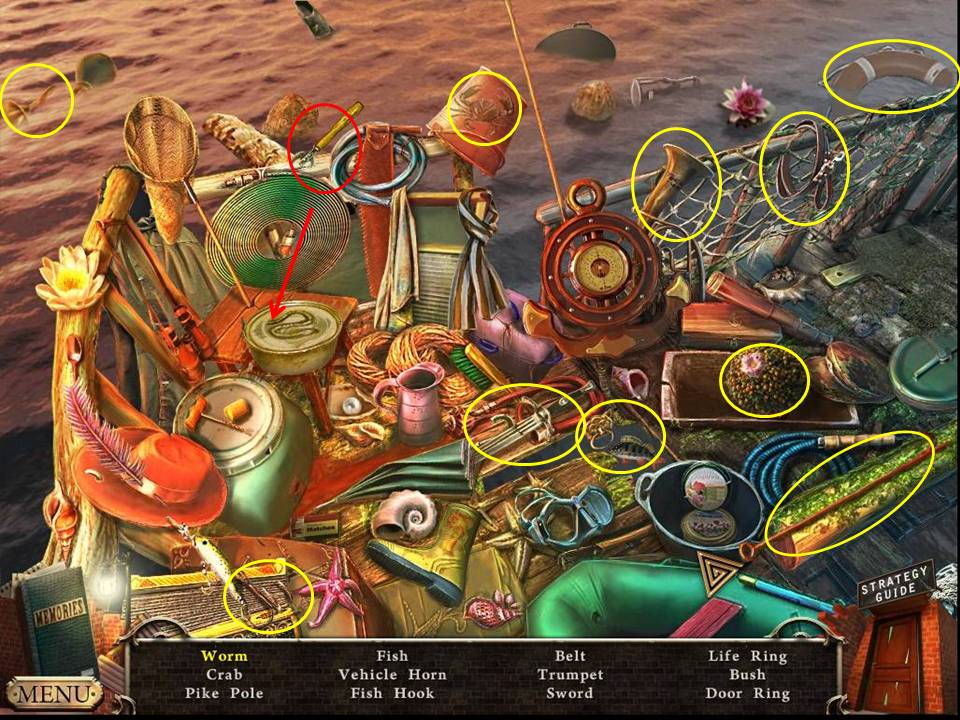
- Find the items listed.
- Use the can opener to open the can and get the worm.
- Receive the PIKE POLE.
- Click down once and move right to the ship.
- Zoom into the water.
- Fish out a second STEERING WHEEL SECTION and FISHERMAN'S HUT KEY with the PIKE POLE.
- Zoom into the ship.
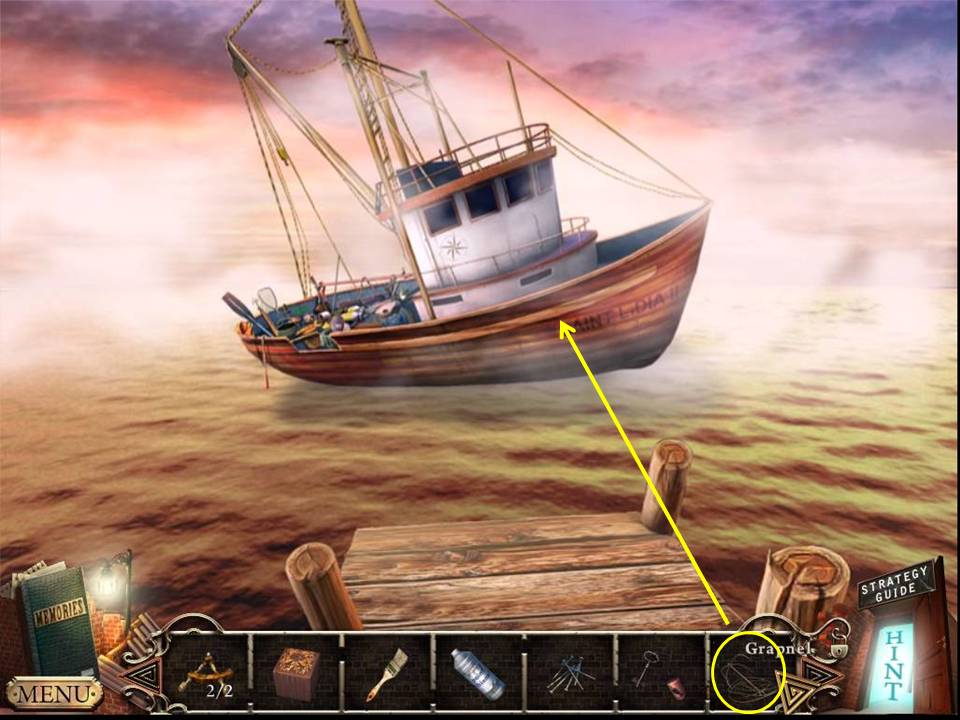
- Take the GRAPNEL.
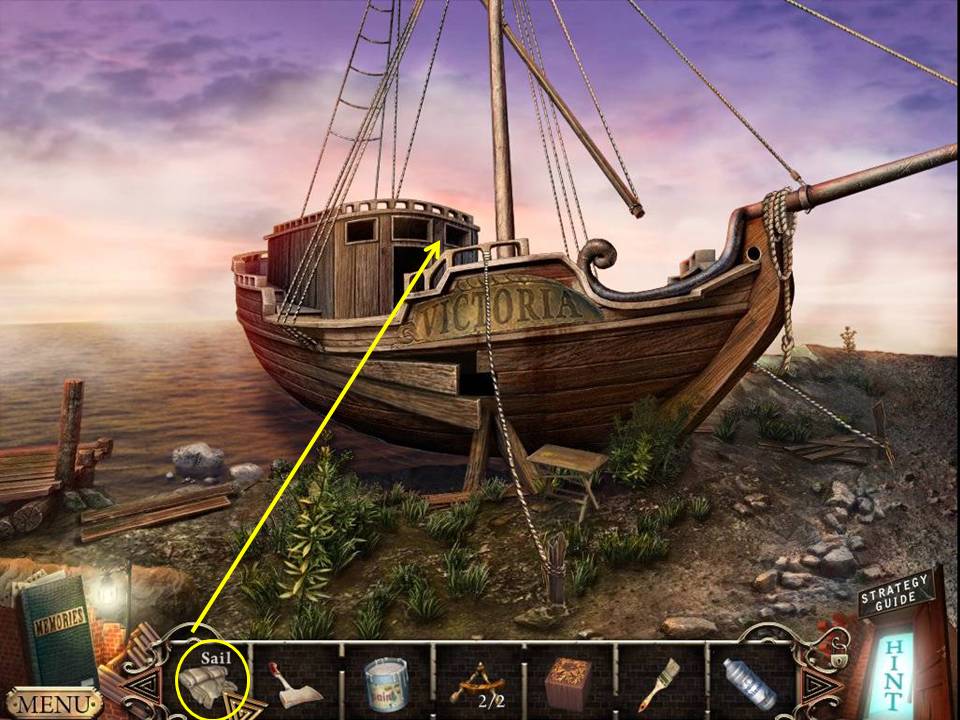
- Place the SAIL on the boat.
- Click down once.
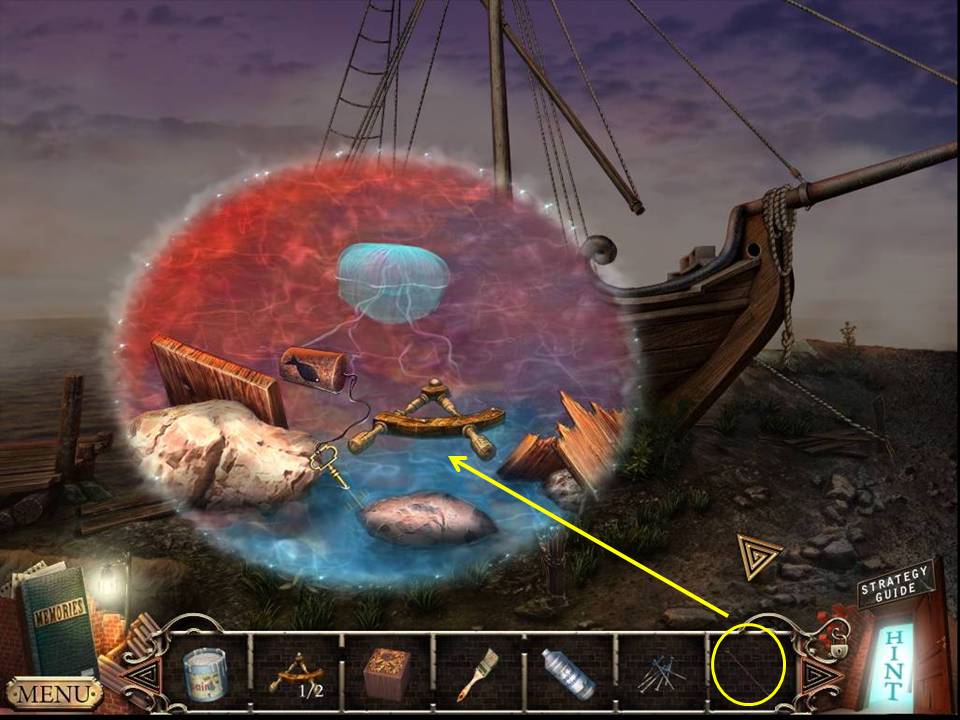
- Zoom into the tug boat.
- Pull the boat in with the GRAPNEL.
- Play the HOA.
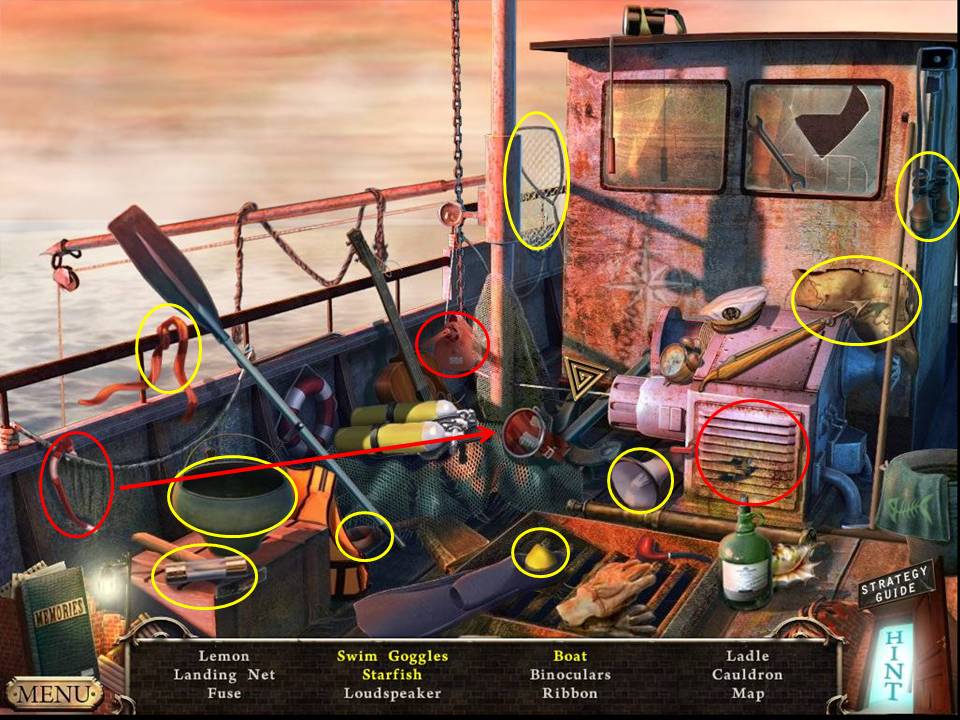
- Find the items listed.
- Spin the crane handle to raise the net from the side of the boat.
- Take the toy boat.
- Place the snorkel on the swim goggles.
- Click the vent to get the starfish.
- Receive the FUSE.
- Return to the fisherman's hut.
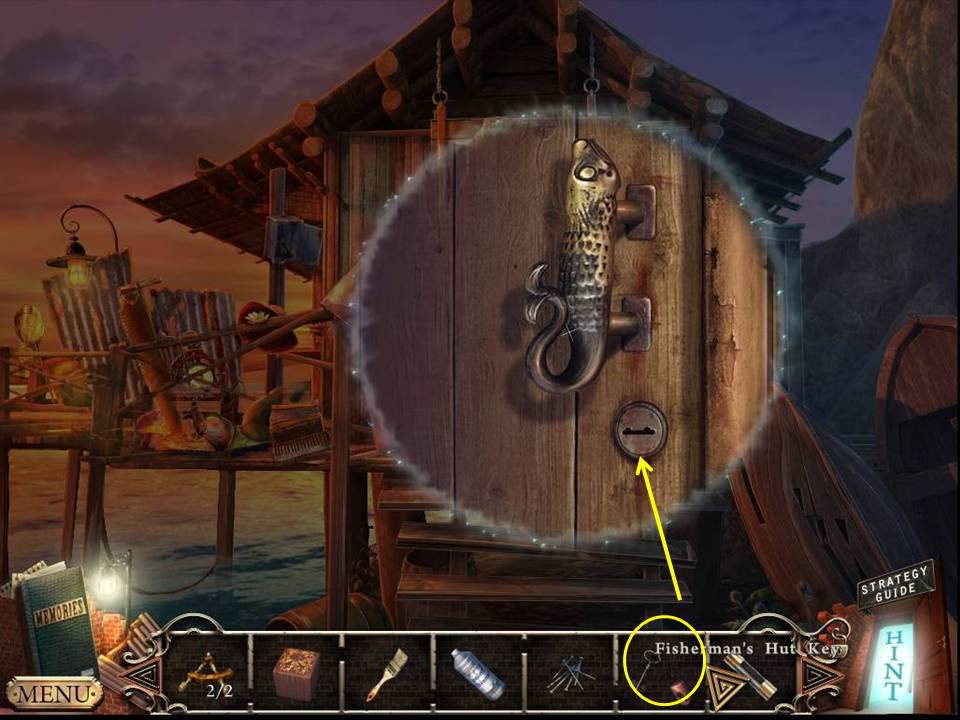
- Zoom into the door and unlock it with the FISHERMAN'S HUT KEY.
- Enter the hut.
- Play the HOA.
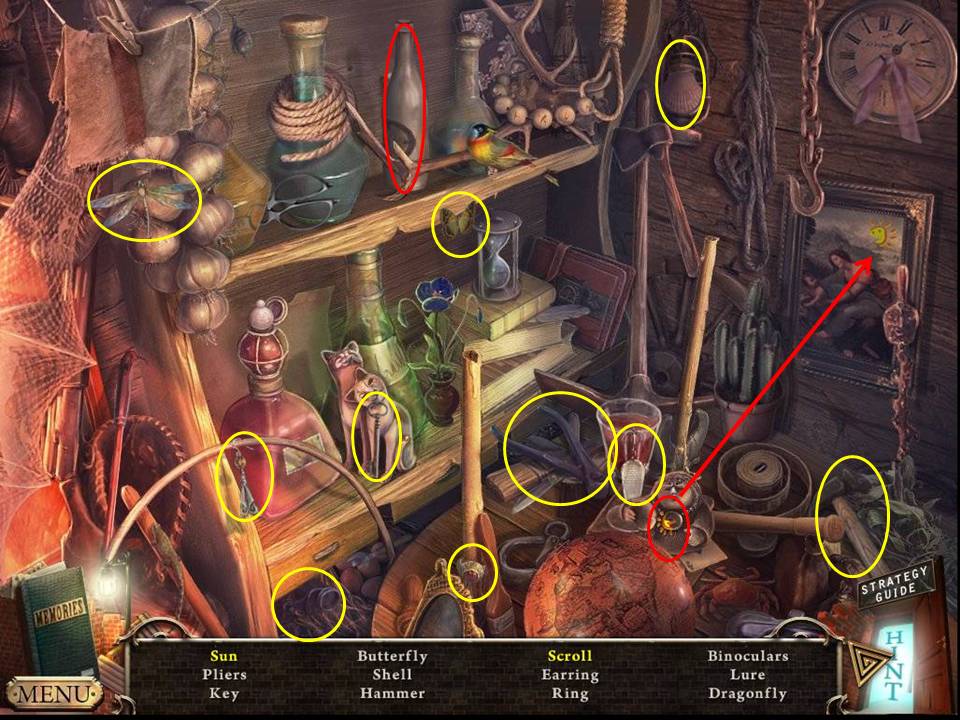
- Find the items listed.
- Move the bottle to get the scroll.
- Reassemble the sun.
- Receive the HAMMER.
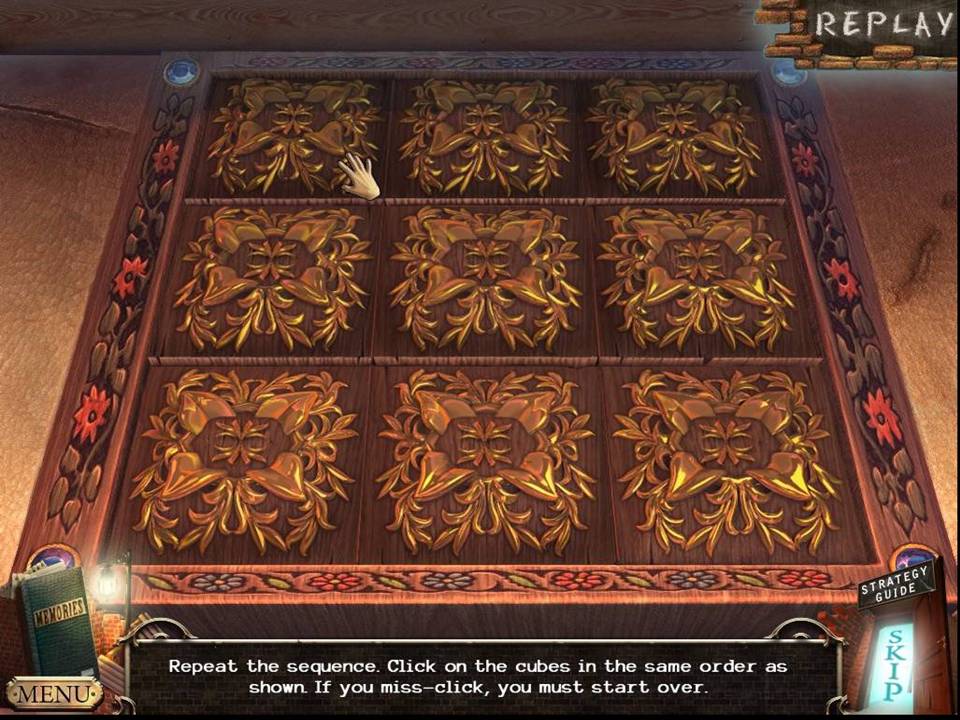
- Zoom into the chest and place the CUBE in the space to initiate a puzzle.
- The object of the puzzle is to watch the sequence pressed.
- Repeat the pattern.
- The puzzle may be random.
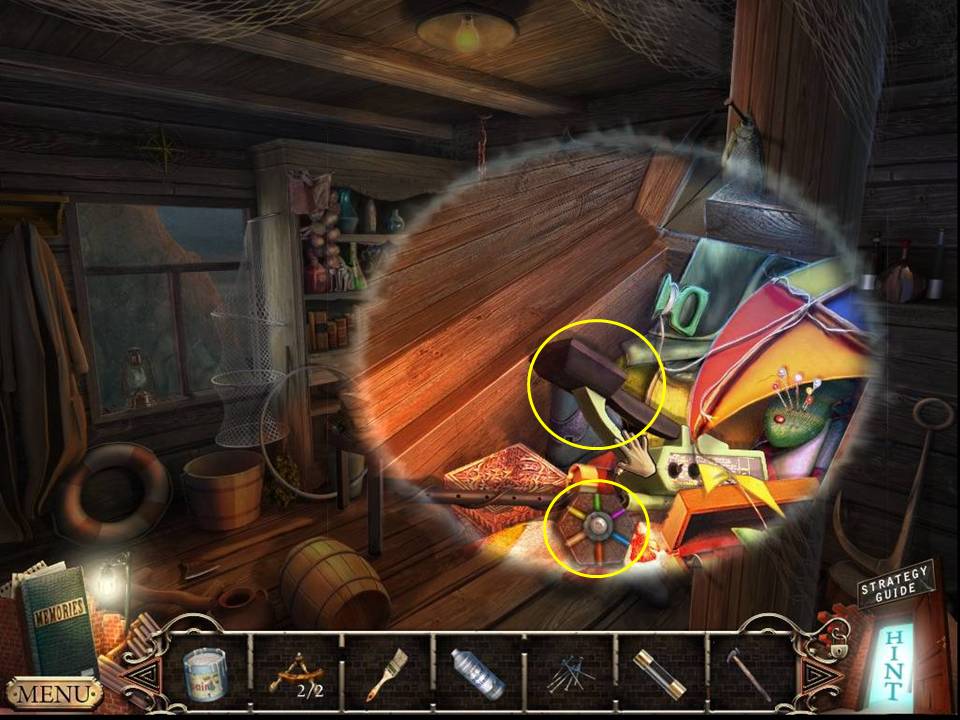
- Zoom into the chest.
- Take the METAL DETECTOR and TRANSISTOR.
- Return to the lighthouse lens room.
- Zoom into the panel.
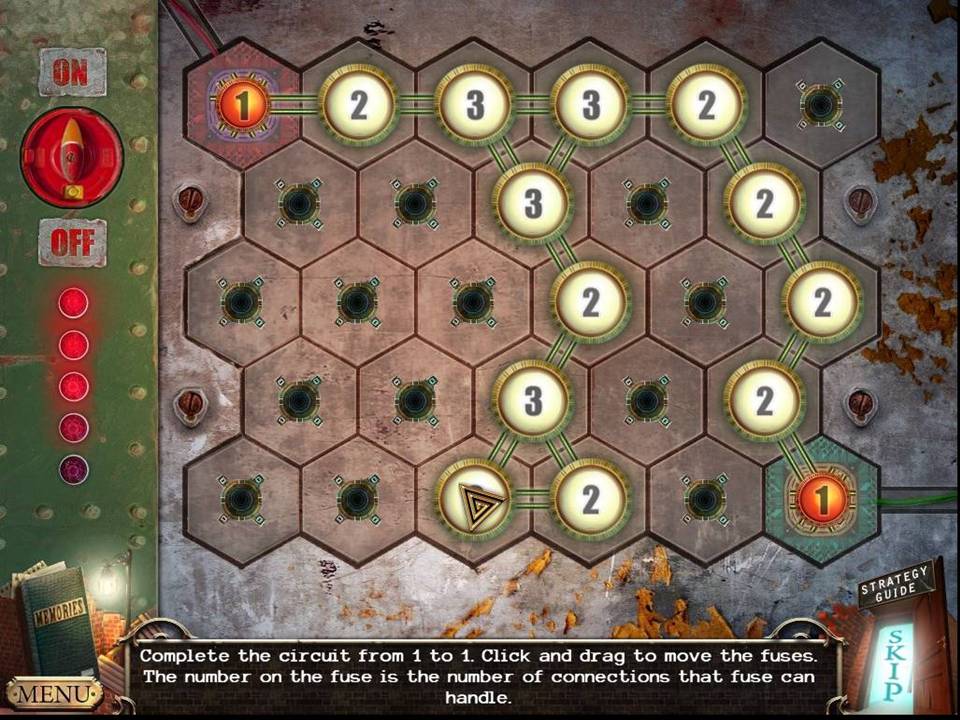
- Insert the FUSE to initiate a puzzle.
- See screenshot for solution.
- Return to the stairs.
- Zoom into the panel.
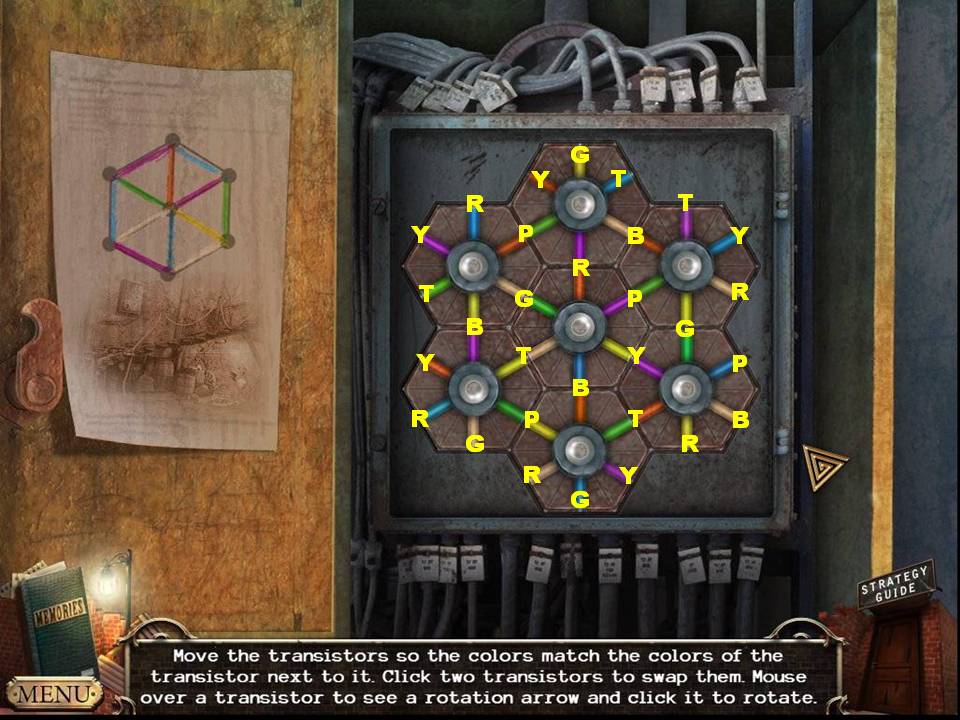
- Place the TRANSISTOR into the space to initiate a puzzle.
- Arrange the disks by swapping or rotating to match the positions shown in the screenshot.
- The code is as follows: R = red, Y= yellow, B = blue, P = purple, G = green and T = tan.
- When finished, play the HOA.
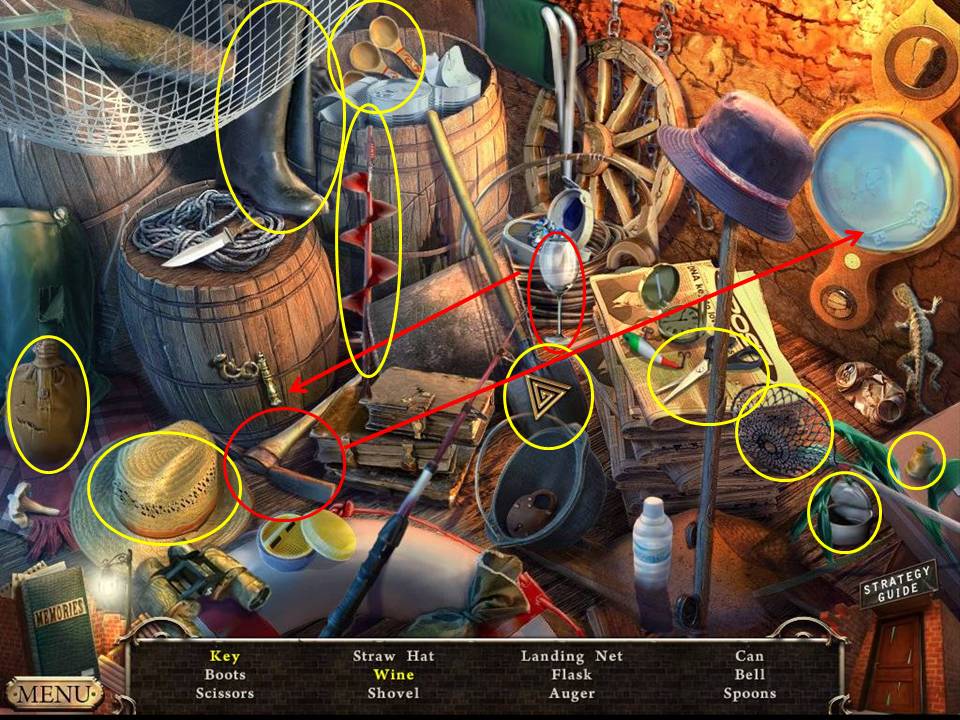
- Find the items listed.
- Put the wine glass under the spigot to get the wine.
- Pickaxe the glass to get the key.
- Receive the SHOVEL.
- Return to the cellar.
- Zoom into the desk.
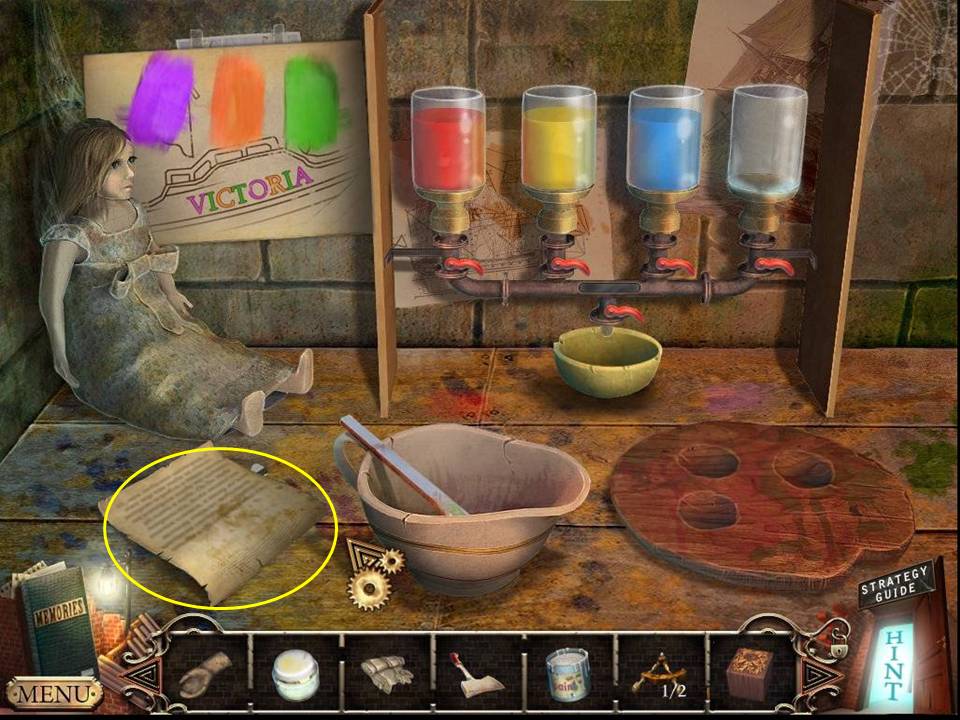
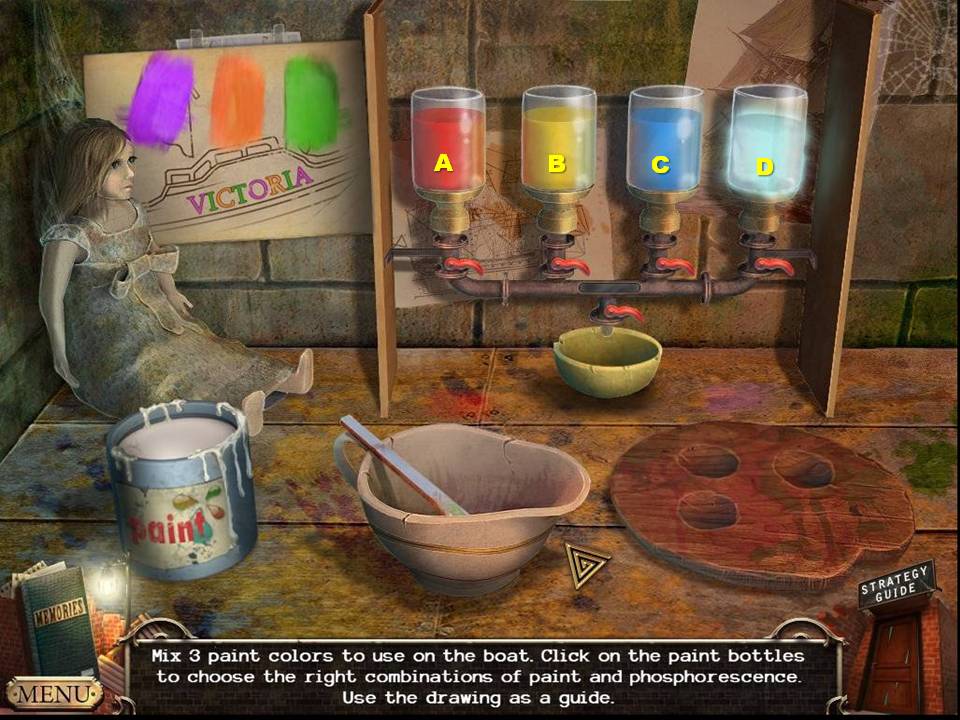
- Place the DRIED PAINT, SOLVENT and PHOSPHORESCENT POWDER on the surface.
- Assuming the bottles with the powders are labeled A-D, mix A, C, and D to get purple.
- Mix A, B, and D to get orange.
- Mix B, C, and D to get the green.
- Receive the PAINT.
- Return to the mine entrance.
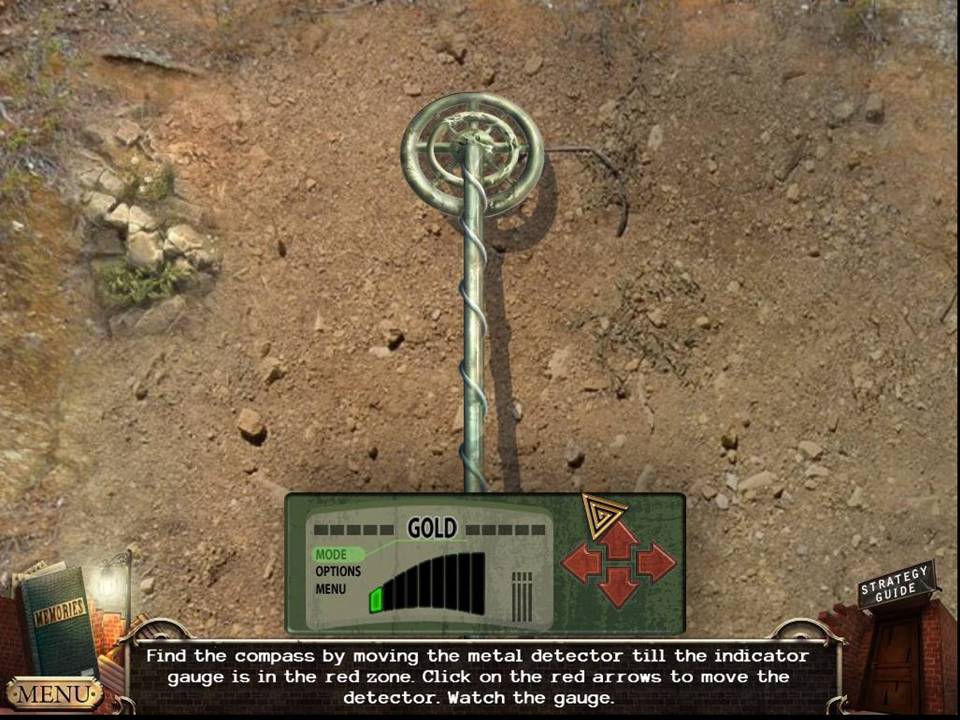
- Put the METAL DETECTOR in the scene.
- Move it down and to the right.
- Move up three times, left nine times and up three times.
- SHOVEL the dirt at the spot.
- Take the compass.
- Return to the fisherman's hut.
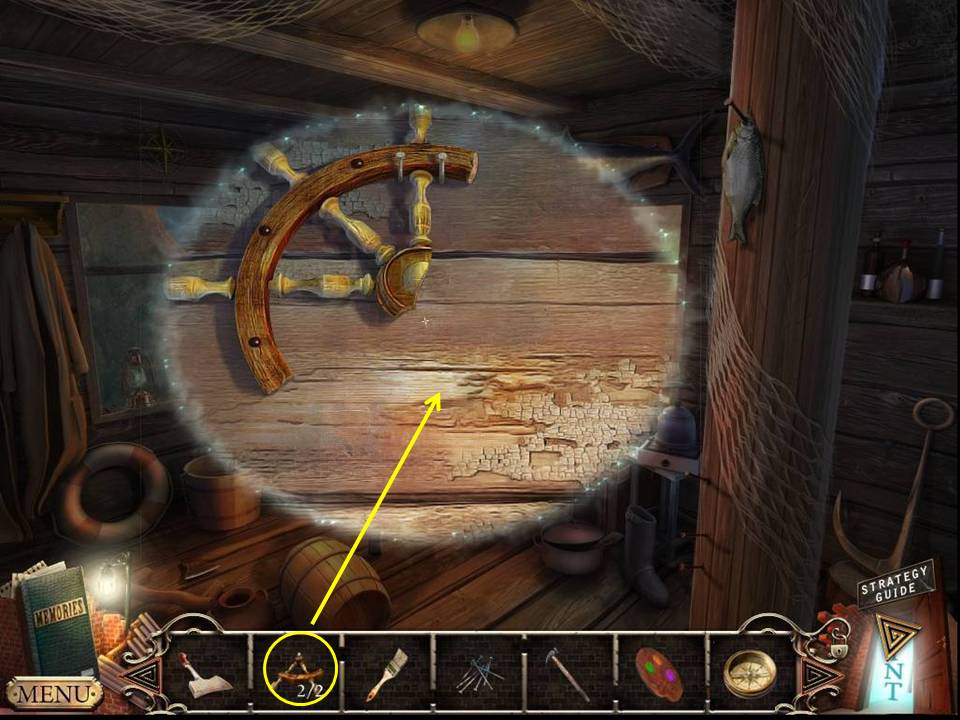
- Zoom into the steering wheel part.
- GLUE the two STEERING WHEEL SECTIONS on it.
- Take the STEERING WHEEL.
- Return to the ship.

- Zoom into the ship's side.
- Put the PAINT and BRUSH on the shelf.
- Put the NAILS on the board.
- HAMMER the nails.
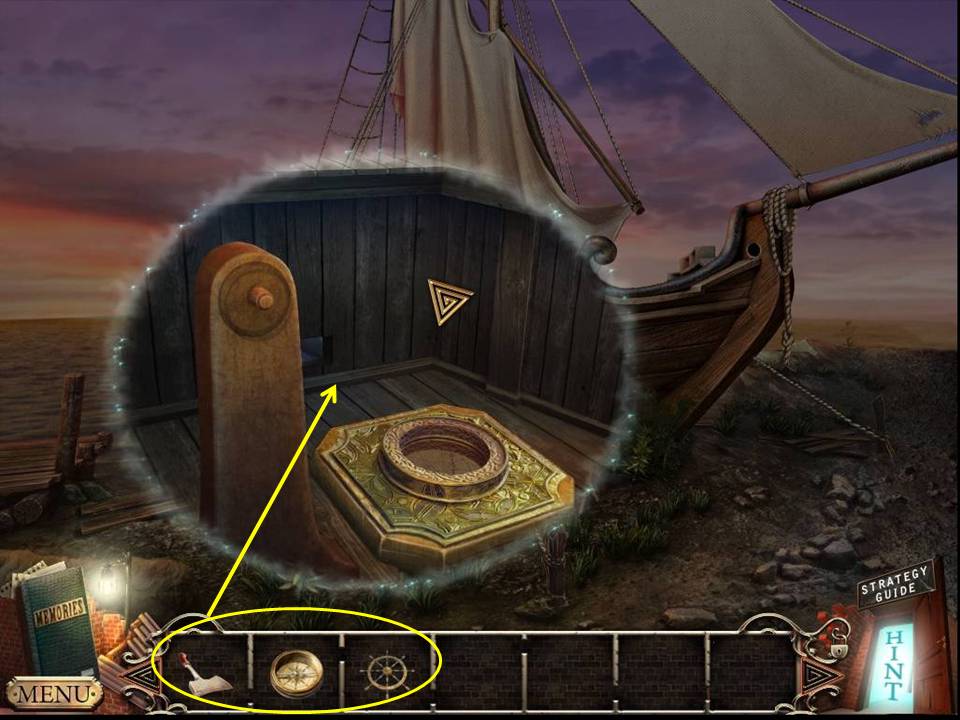
- Zoom into the ship.
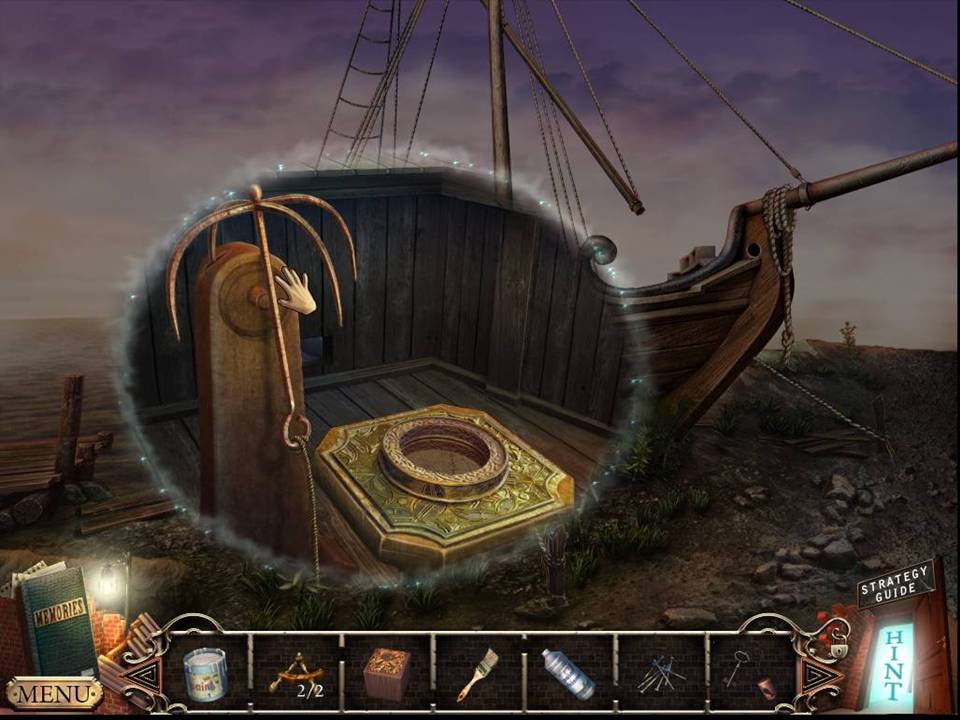
- Put the COMPASS and STEERING WHEEL in place.
- Chop the ropes with the AXE.
General Info and Tips
Dream One: Your Mother
Dream Two: Your Grandpa
Dream Three: Your Soul
Ask for help in the comments below!
Dream One: Your Mother
Dream Two: Your Grandpa
Dream Three: Your Soul
Ask for help in the comments below!