
Awakening: The Sunhook Spire: Chapter Three: The Spell of the Enchantress
Our Awakening: The Sunhook Spire Walkthrough is a tell-all guide to helping Sophia find the enchantress who may have the power to break the spell holding her parents in their magical slumber. Trust our beautiful custom marked screenshots, our step-by-step instructions, and our simple puzzle solutions to help Sophia scale the heights of the Sunhook Spire and discover the mysteries that await her in this enchanting hidden object adventure game.
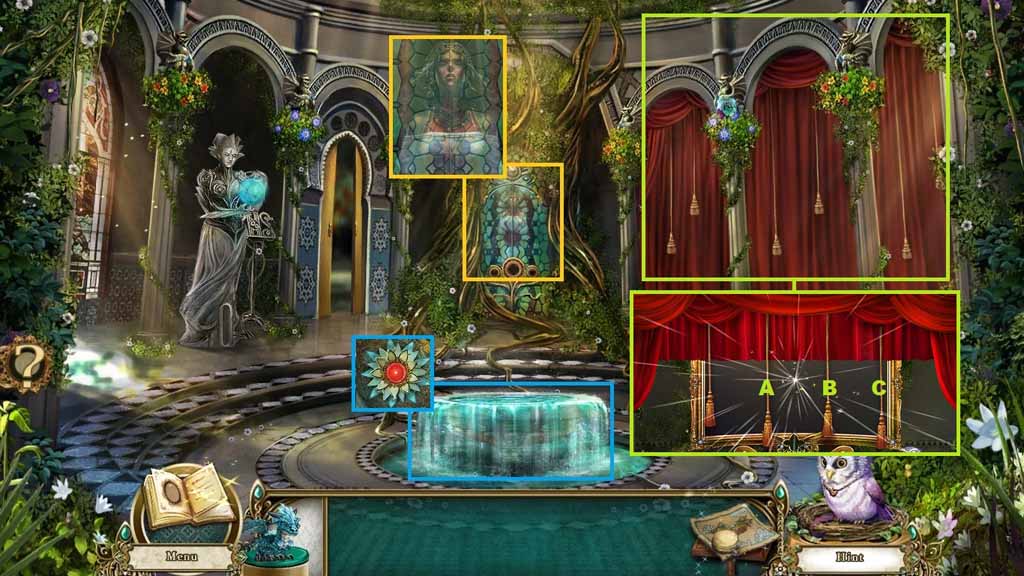
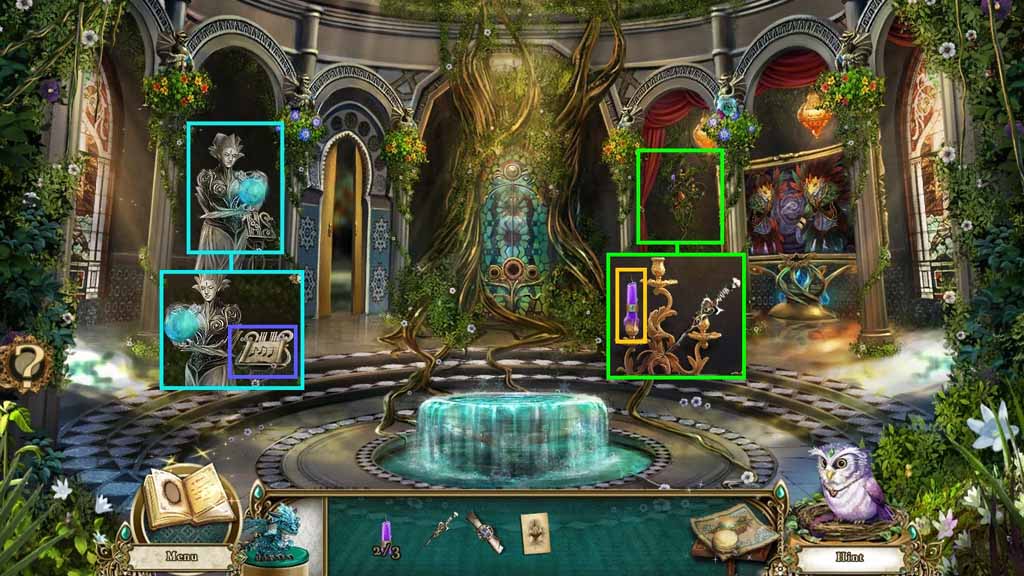
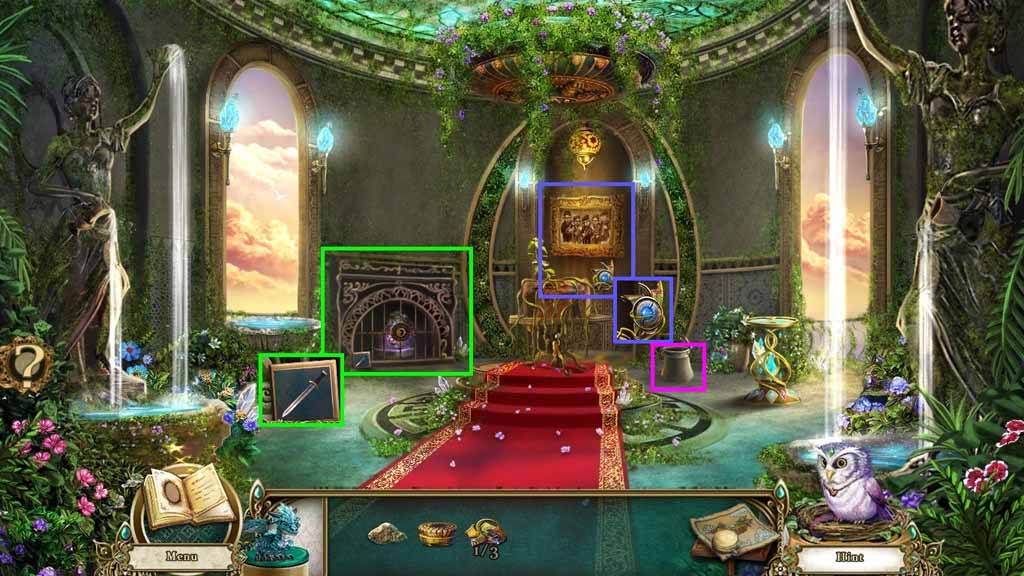
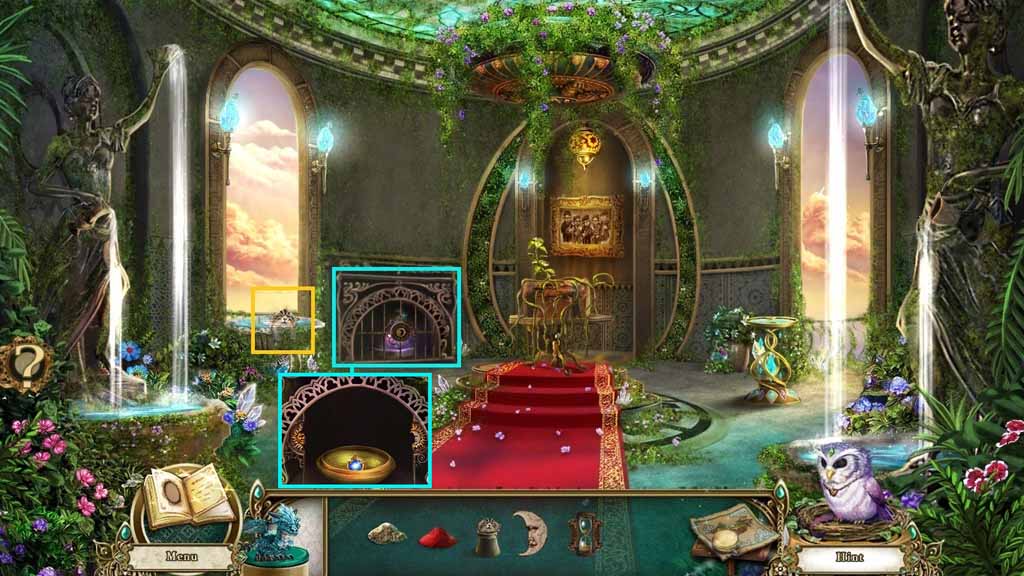
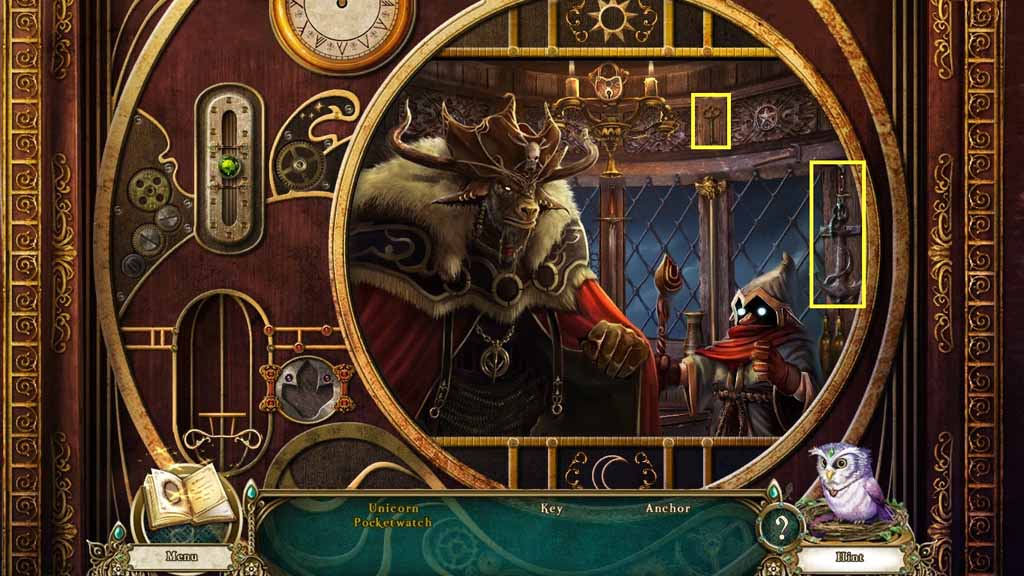
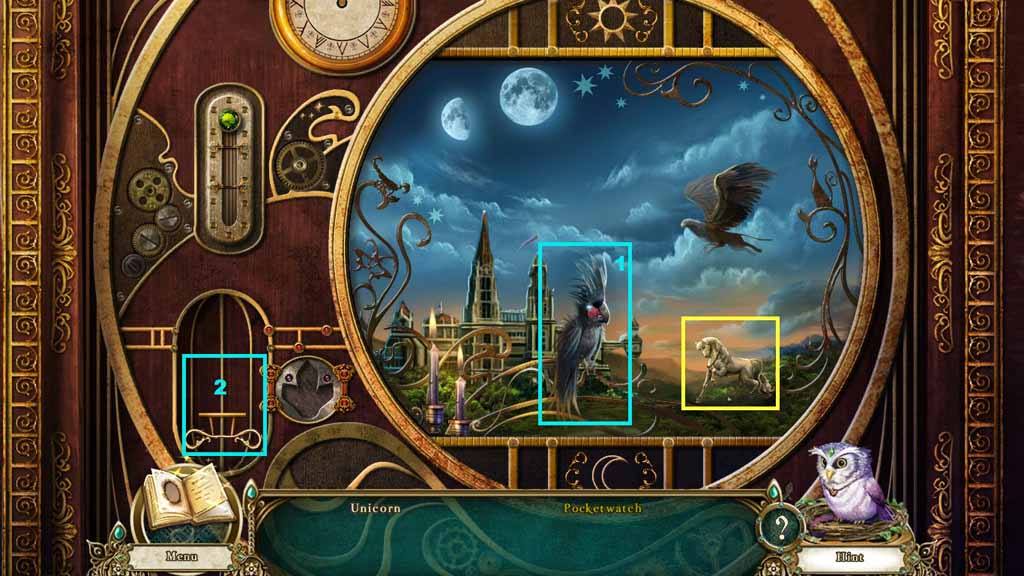
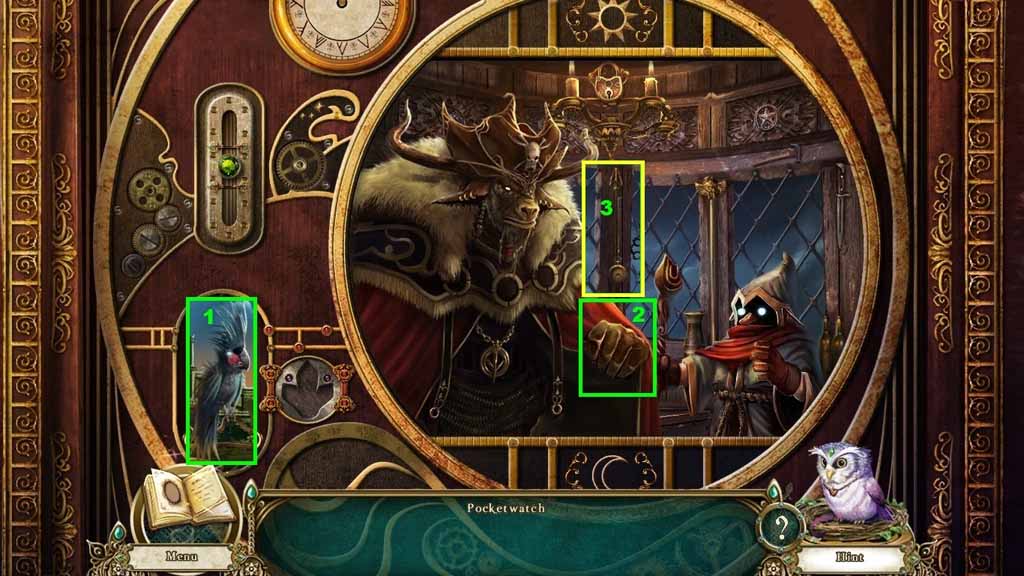
- Zoom into the enchantress.
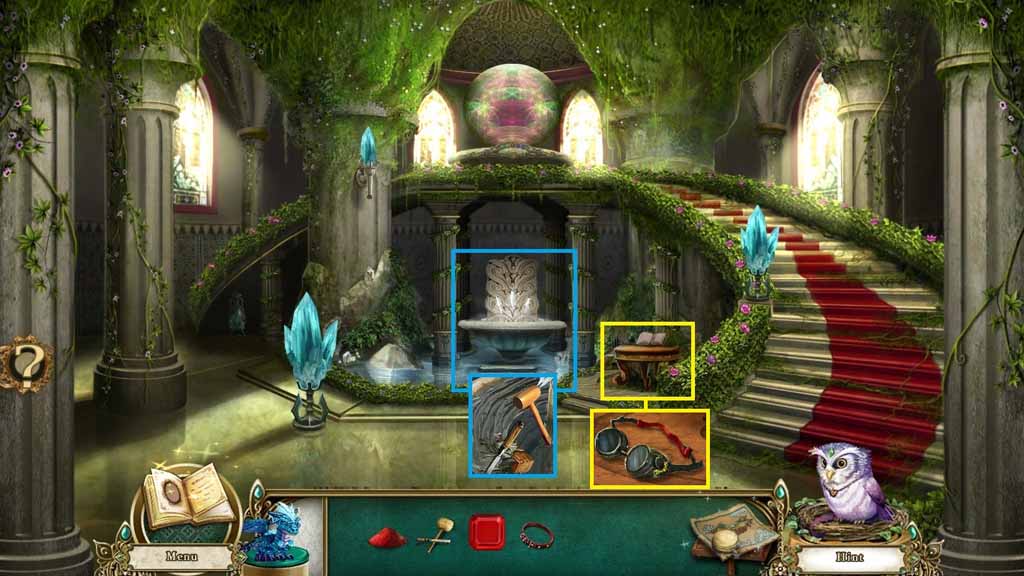
- Zoom into the water fountain; collect the 1 / 3 candle.
- Zoom into the curtain to trigger a mini-game.
- Solve the game by pulling the curtain cords in the correct order.
- Click the cords in ABC order.
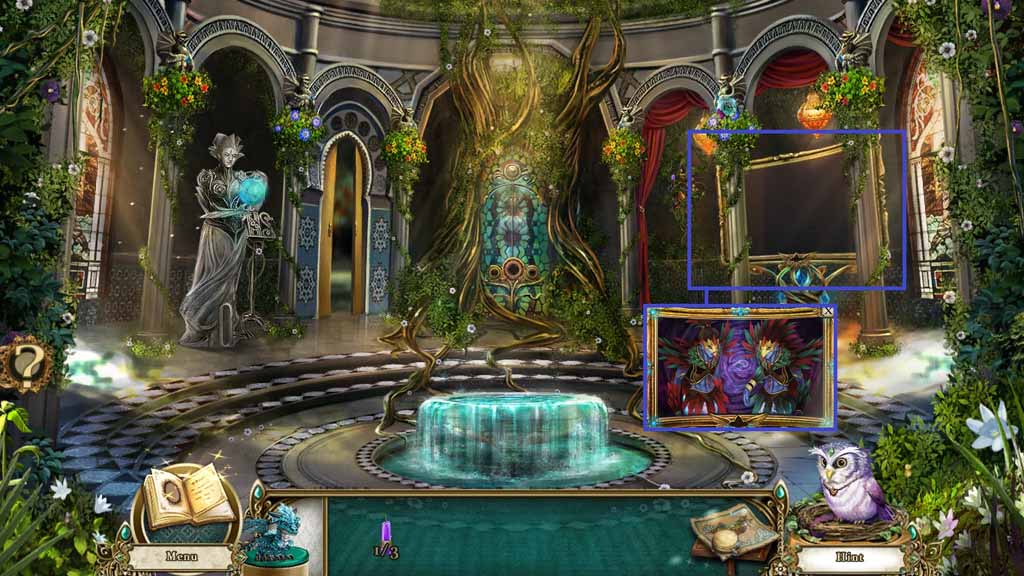
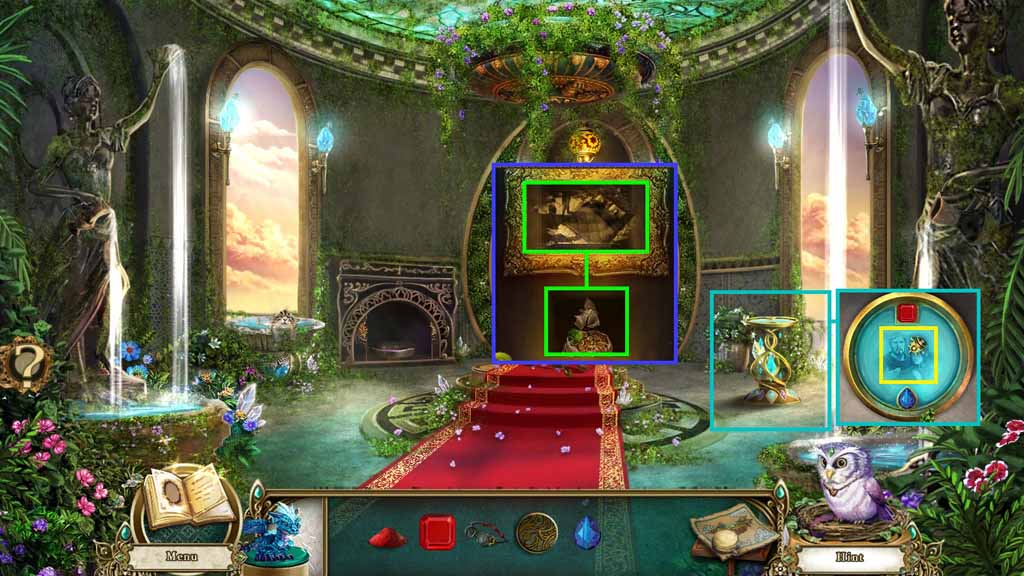
- Zoom into the mirror.
- Speak to the Djinn.
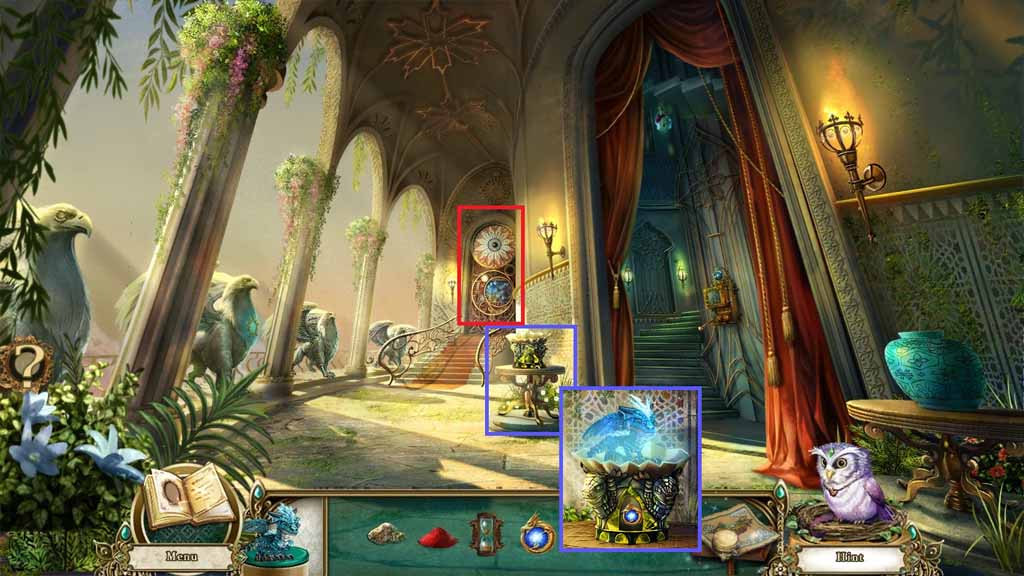
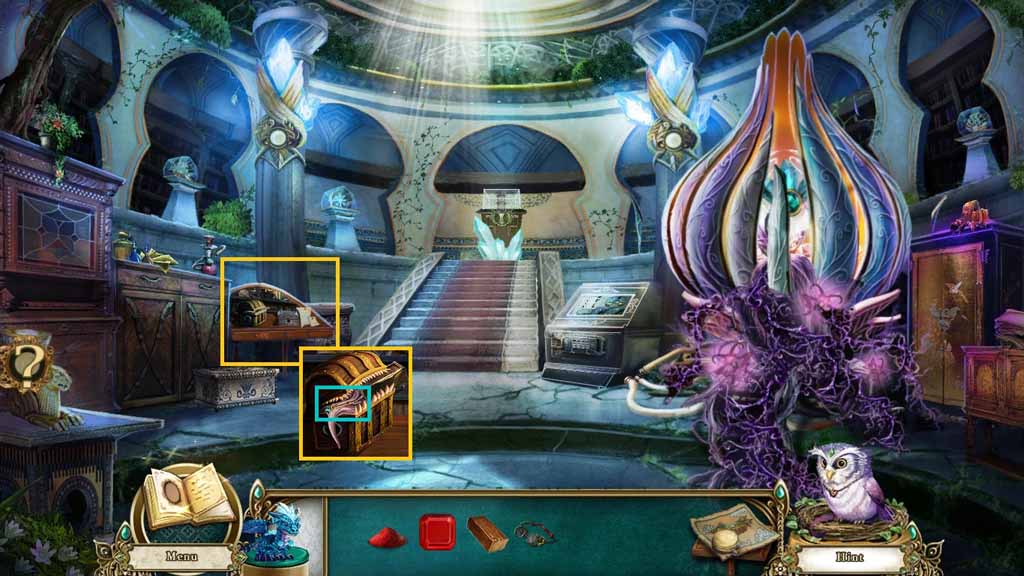
- Move to the left into the Curio Chamber.
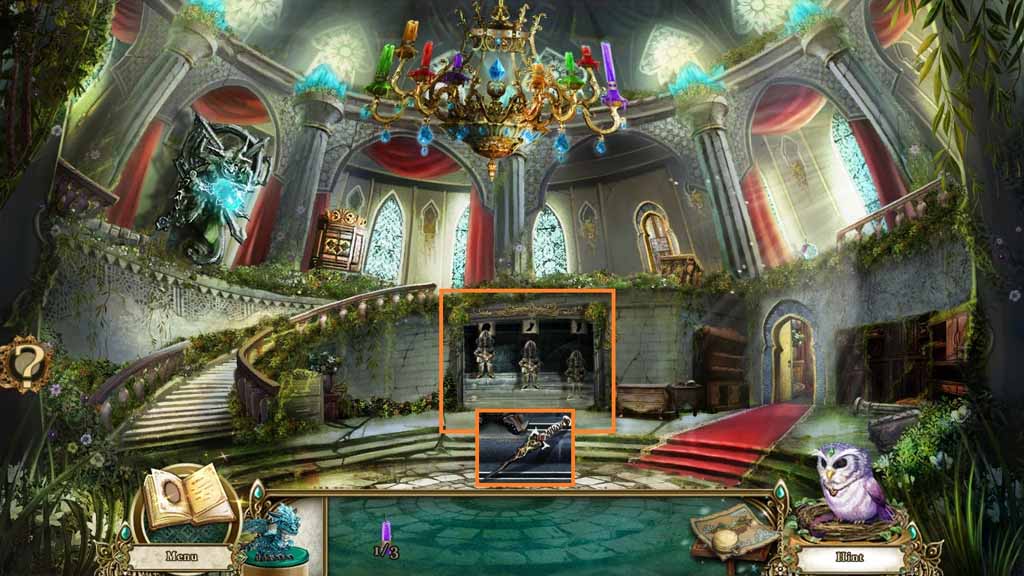
- Zoom into the knights’ armor; collect the dagger.
- Move to the right to the Enchantress Chamber
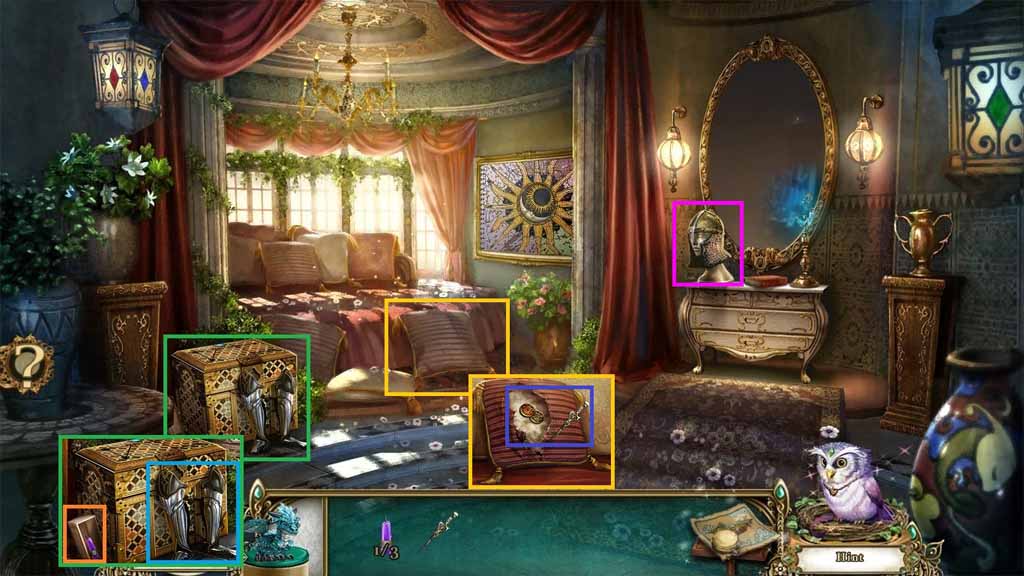
- Zoom into the box; collect the greaves.
- Click the box and collect the 2/3 candles.
- Select the dagger and use it to slice the pillow; collect the display button.
- Collect the knights’ helm.
- Move down once.
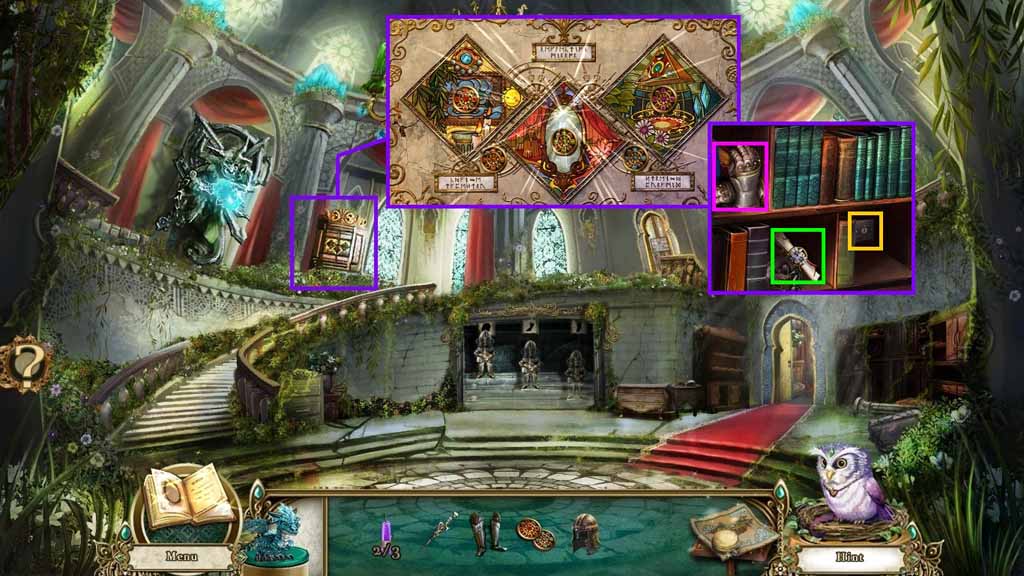
- Zoom into the display cabinet.
- Insert the display buttons to trigger a mini-game.
- Solve the game by clicking the buttons to move the tiles to restore the images.
- Collect the gauntlets and the nature hymn.
- Click the books away and click the switch.
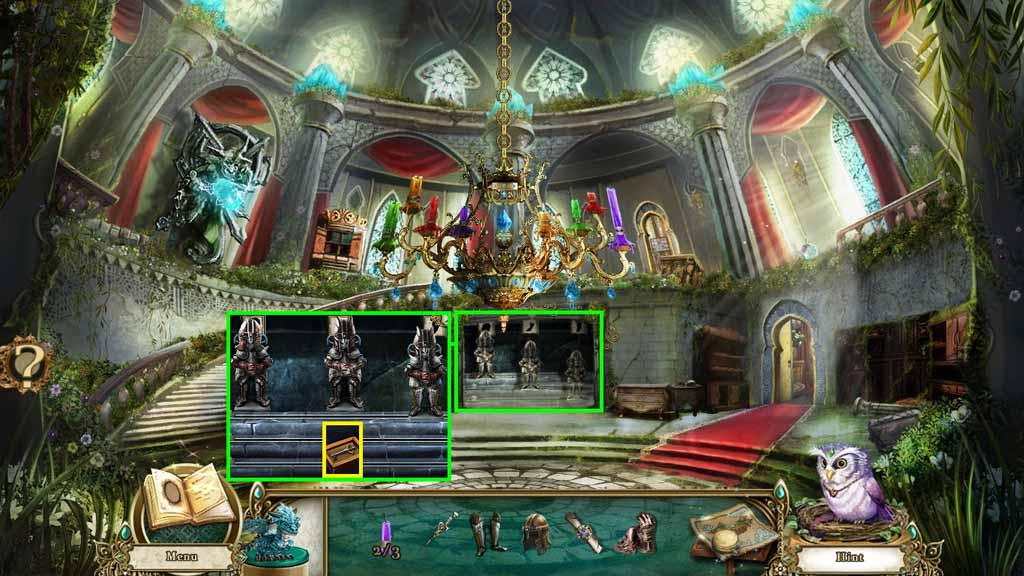
- Zoom into the knights’ armor.
- Place the greaves onto the figure on the left.
- Place the helm onto the figure in the middle.
- Place the gauntlets onto the figure on the right.
- Align the figures under the sign of the items they just received.
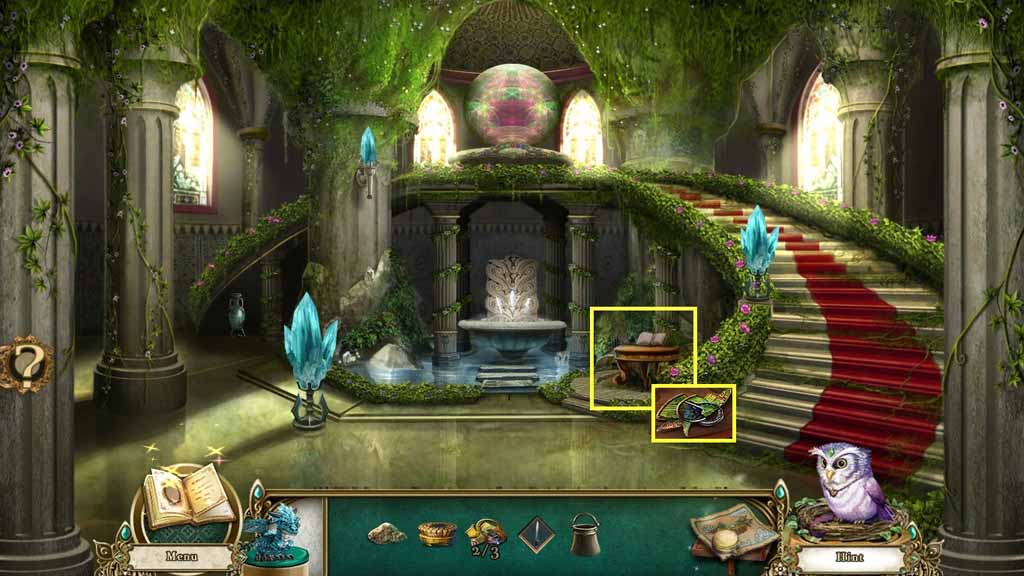
- Click the box; collect the journal key.
- Move to the right.
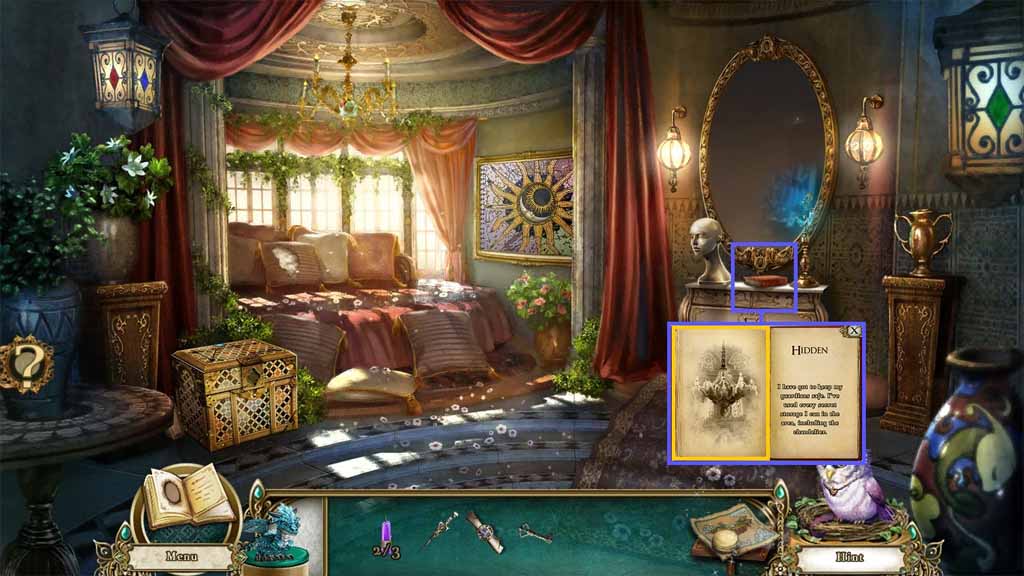
- Zoom into the journal and insert the journal key.
- Collect the chandelier scroll.
- Move down 2 times.
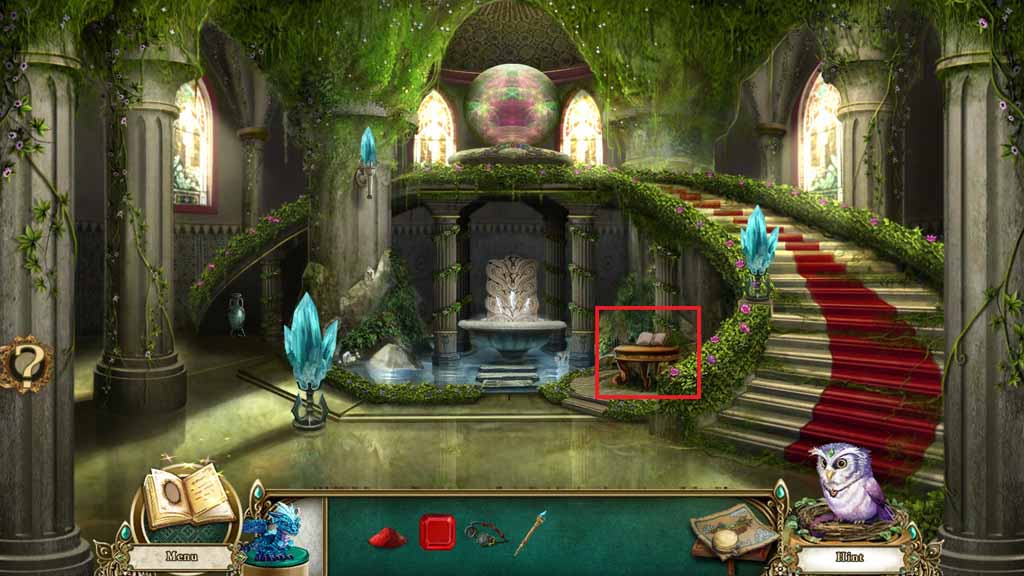
- Zoom into the stand.
- Select the natures hymn and place it onto the stand.
- Zoom into the candelabra.
- Select the dagger and use it on the plants; collect the 3 / 3 candles.
- Move left.
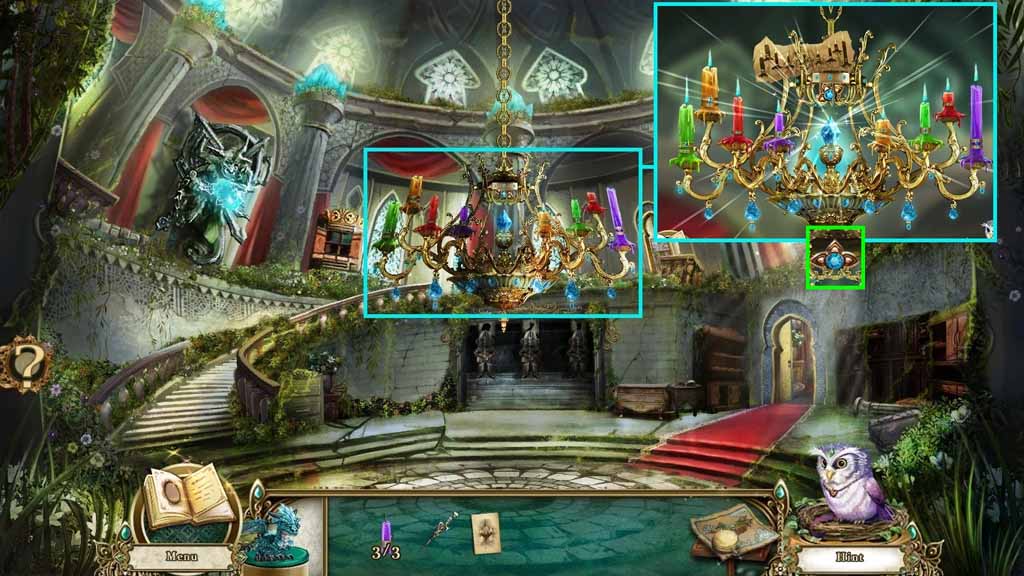
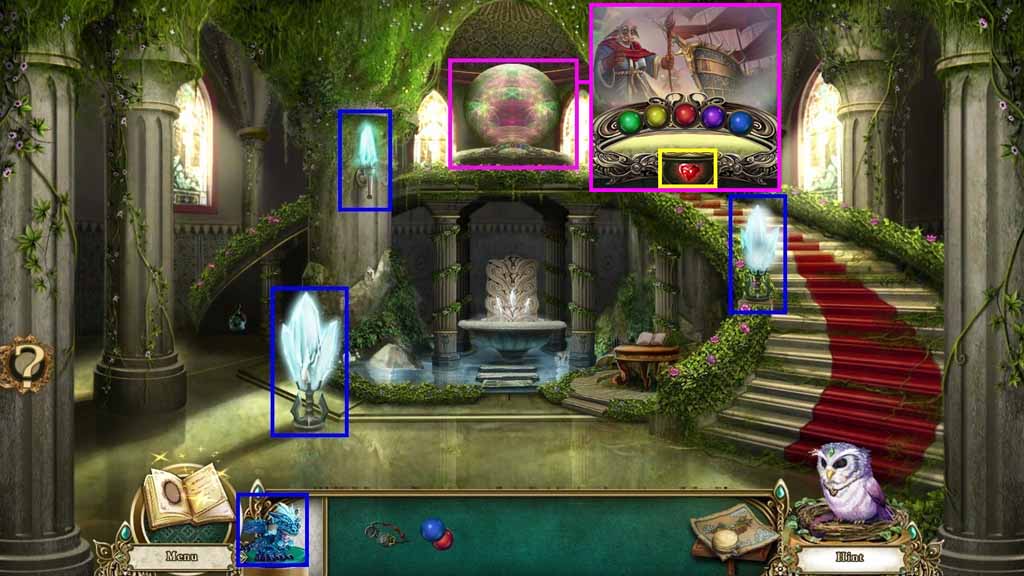
- Zoom into the chandelier.
- Insert the 3 candles and the chandelier scroll to trigger a mini-game.
- Switch the candles as shown in the diagram to solve the mini-game.
- Collect the illusory talisman.
- Move down once.
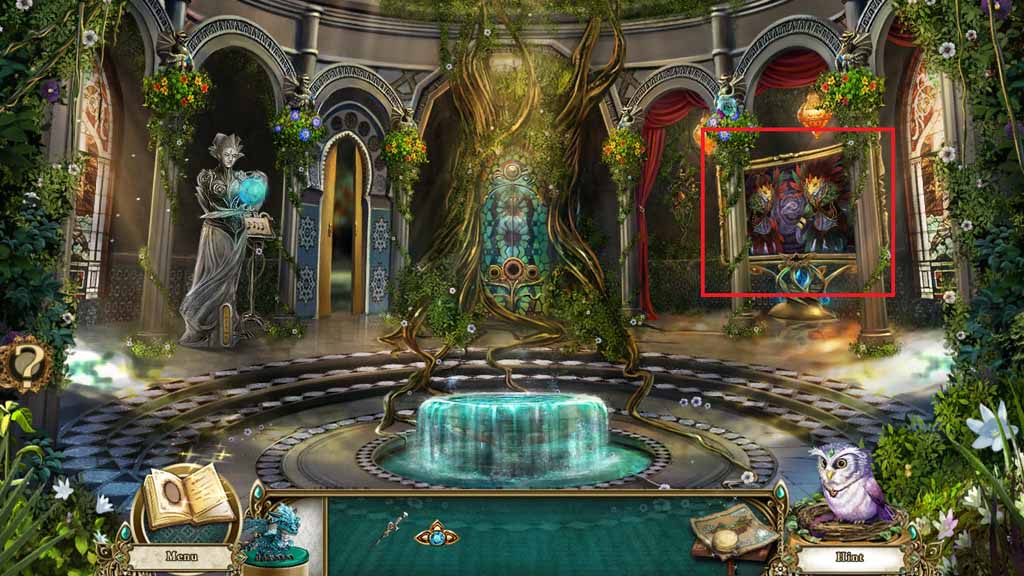
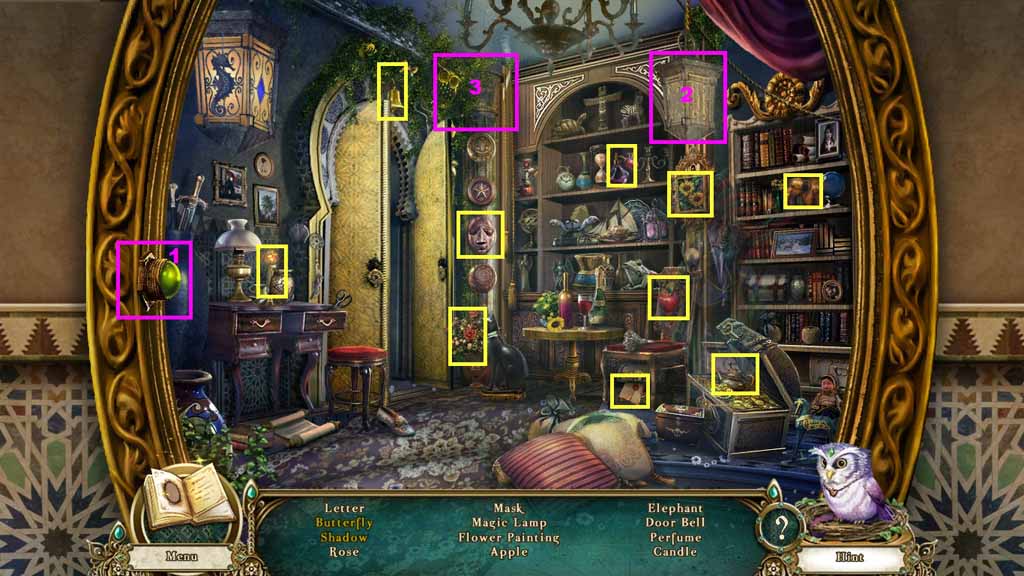
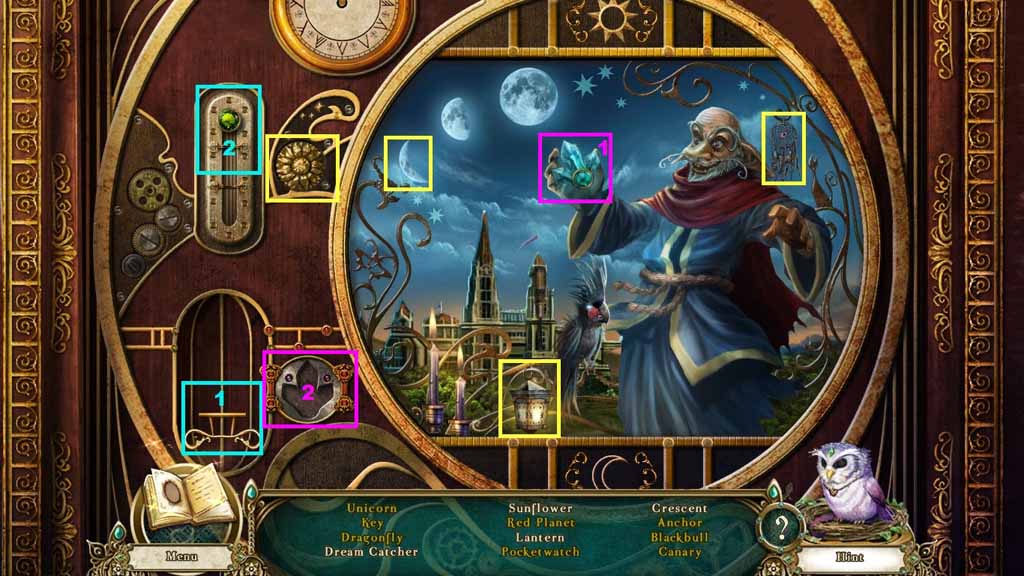
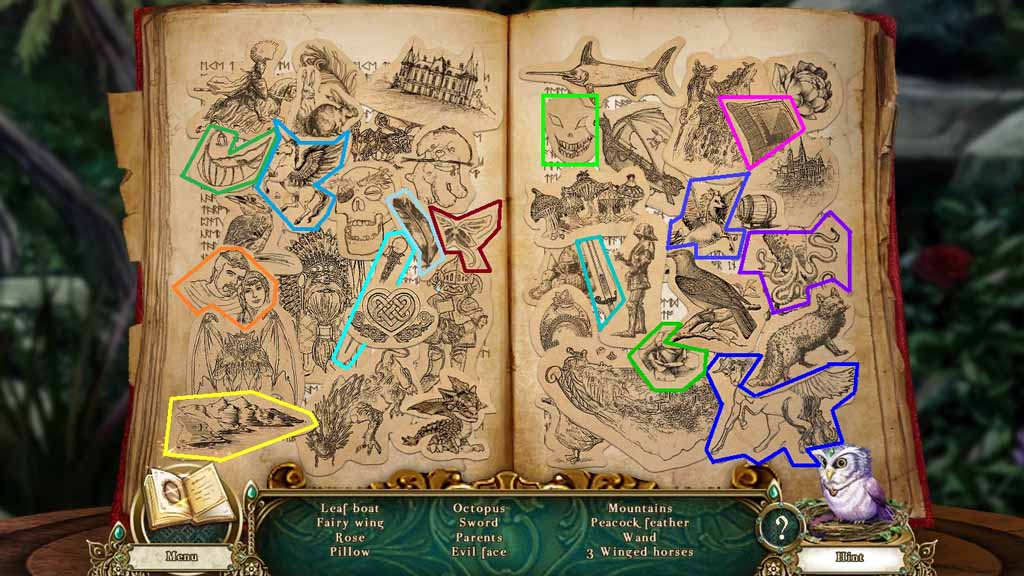
- Insert the illusionary talisman into the mirror frame to trigger a hidden objects area.
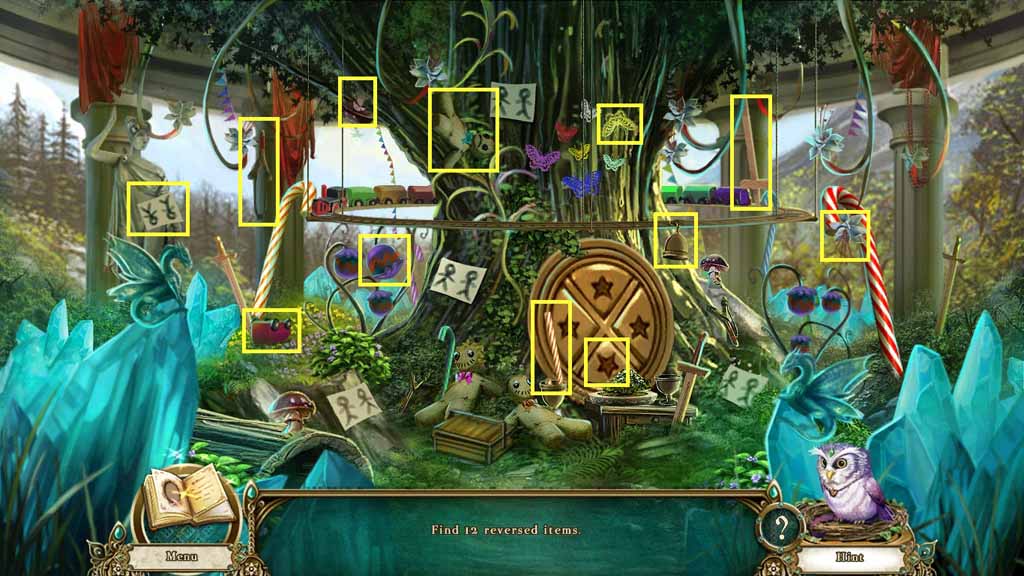
- Find the upside down and backwards items.
- Collect the glass rose.
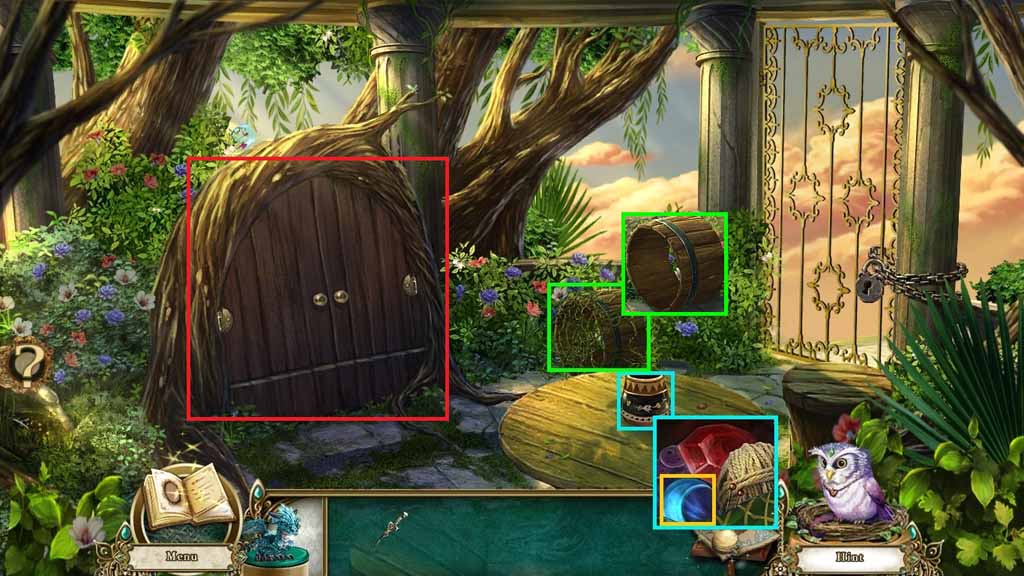
- Move to the left.
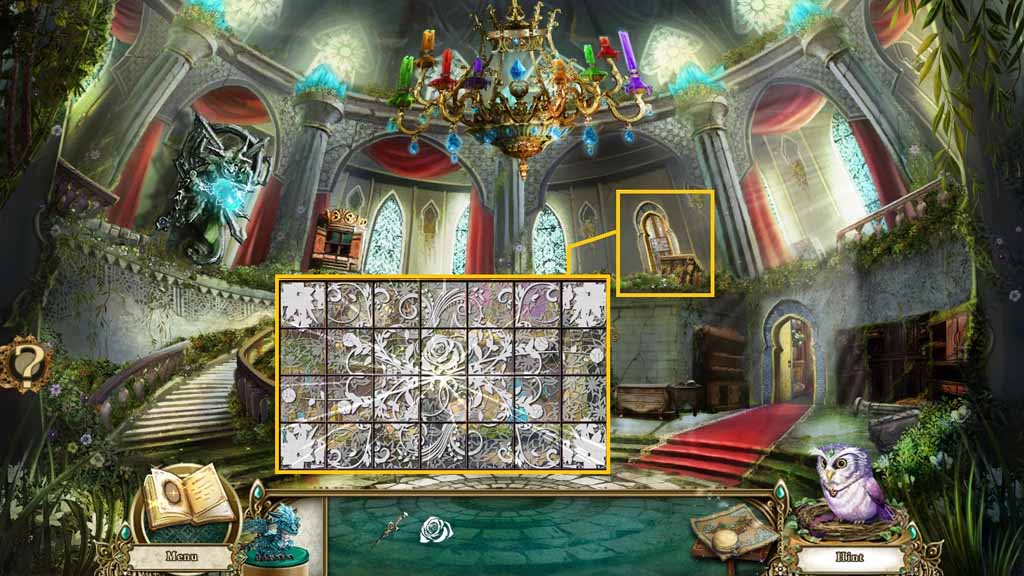
- Zoom into the door; insert the glass rose to trigger a mini-game.
- Move the tiles to complete the pattern and solve the game.
- Enter into the doorway.
- Collect the mural tile.
- Collect the lamp crystal.
- Move down once and go to the right.
- Zoom into the mural and insert the mural tile.
- Collect the griffon head.
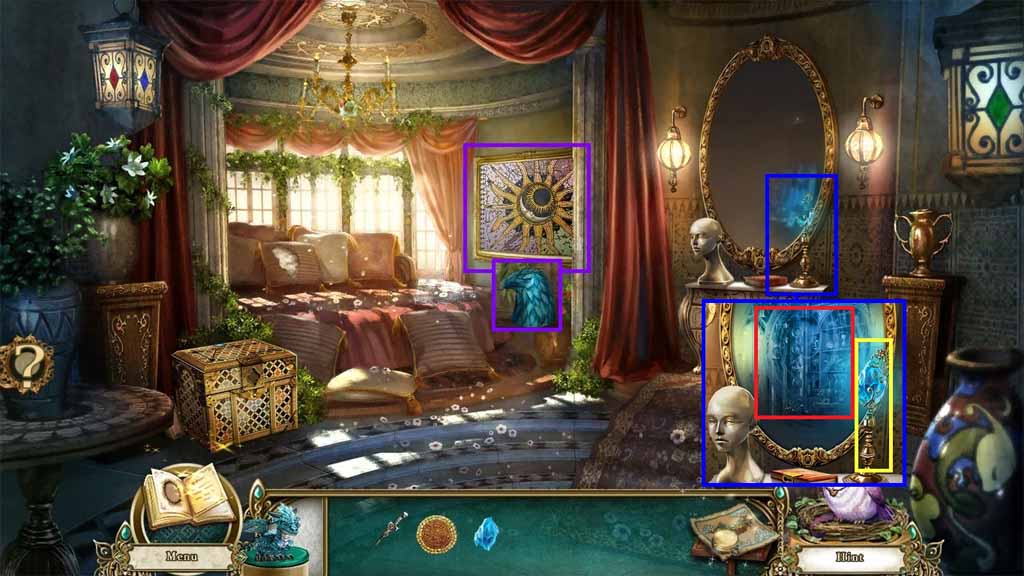
- Zoom into the mirror.
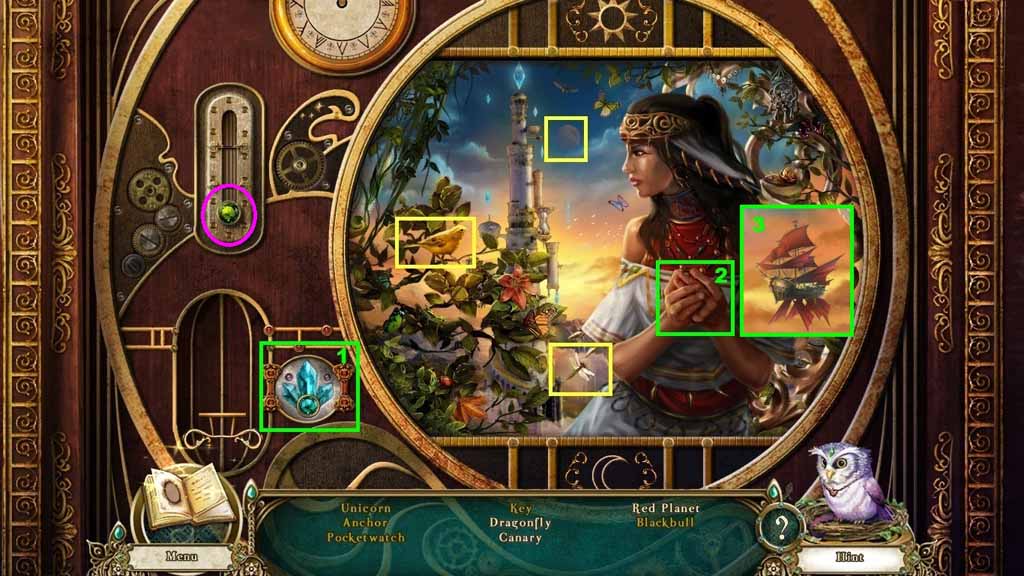
- Insert the lamp crystal into the lamp to trigger a hidden objects area.
- Find the listed items.
- Click the button; collect the butterfly and the shadow.
- Collect the song of mountains.
- Move down once and move through the upper door.

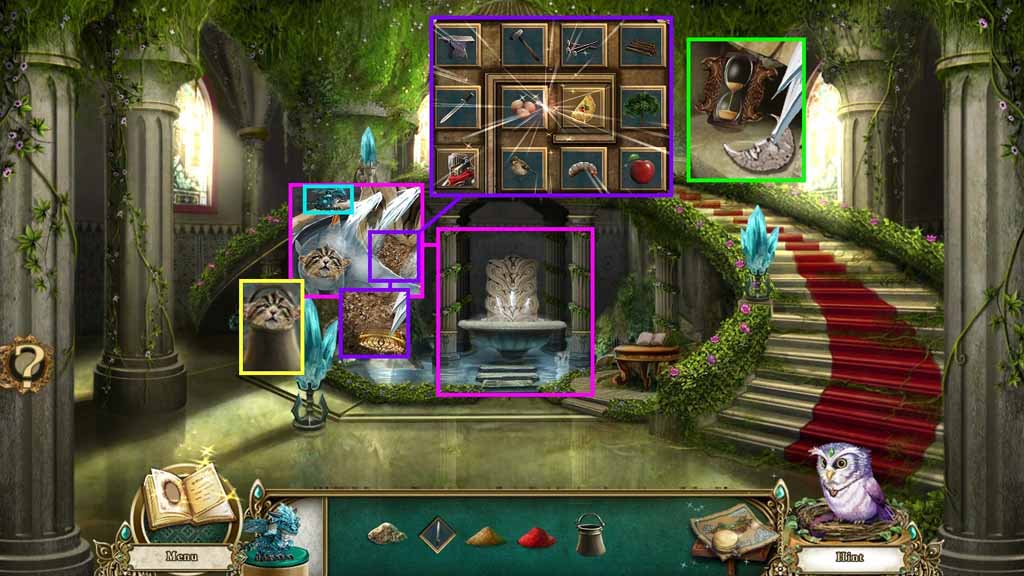
- Zoom into the statue of strength.
- Insert the song of the mountains.
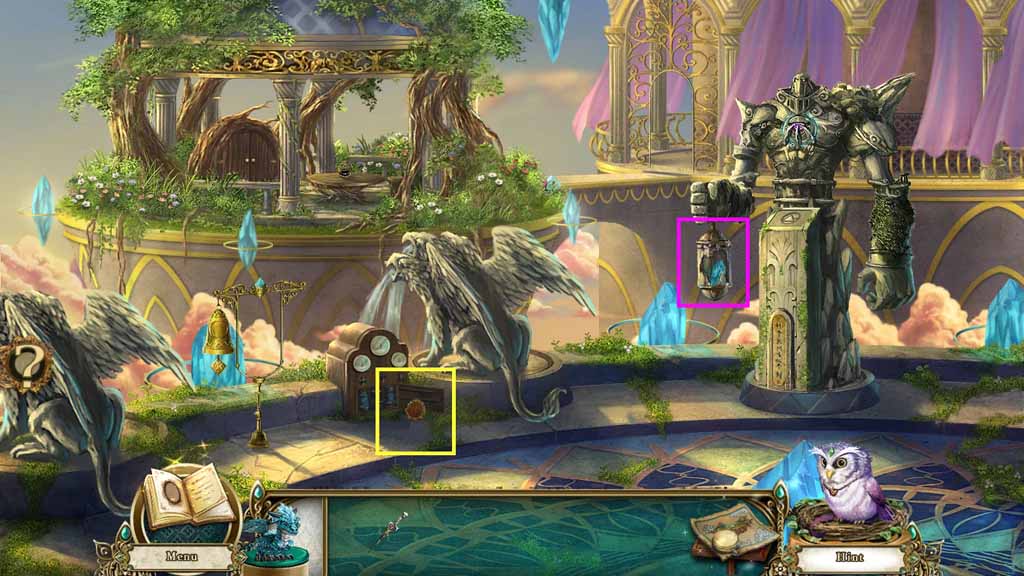
- Zoom into the water controls.
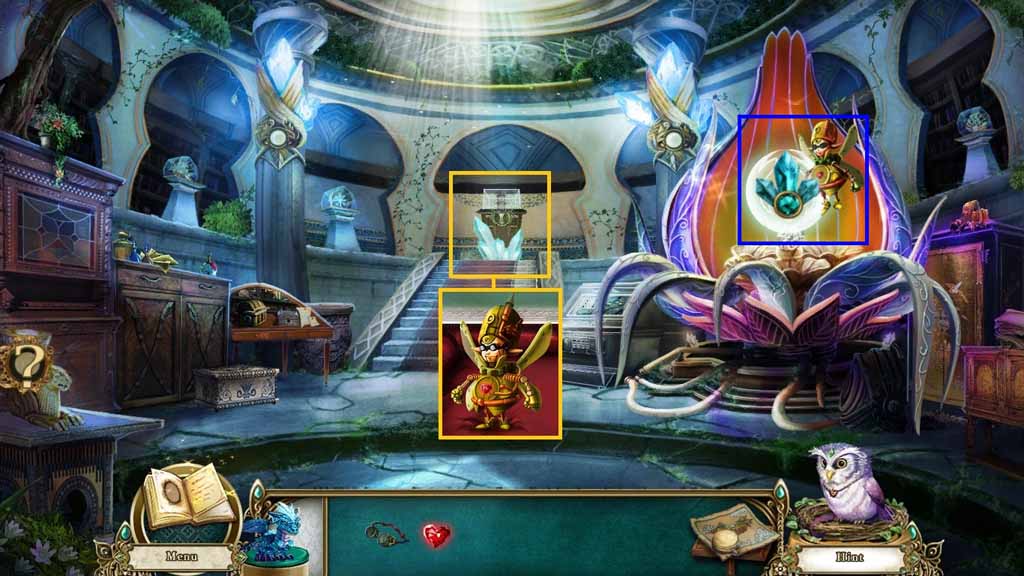
- Place the griffon head onto the pedestal to trigger a mini-game.
- Solve the game by creating a path that move through every tile.

- Select the ice dragon.
- Use him to freeze the stream; cross the ice bridge.
- Zoom into the decorative pot; collect the memory prism.
- Select the dagger.
- Use it 3 times to cut through the thorns and collect the bottomless barrel.
- Click the cupboard and zoom in to trigger a hidden objects area.
- Find the items that do not belong.
- Collect the chest key.
- Move down 2 times and move to the right.
- Zoom into the mural and insert the memory prism.
- Collect the melody of time.
- Zoom into the chest and insert the chest key to trigger a mini-game.
- Solve the game by moving the crystals to the correct bases.
- Move the pieces in the following combinations to solve the game.
- (1,6) (5,1) (4,5) (6,2) (7,4) (2,3) (3,6) (6,7) (1,6) (4,1) (6,3) (3,2) (2,3) (3,4)
- Collect the color glass key.
- Move down once.
- Zoom into the statue of time; insert the melody of time.
- Move down once.
- Zoom into the water fountain.
- Select the bottomless barrel and place it into the middle of the fountain.
- Select the ice dragon to use on the water.
- Collect the bells.
- Move to the Outdoor Towers.
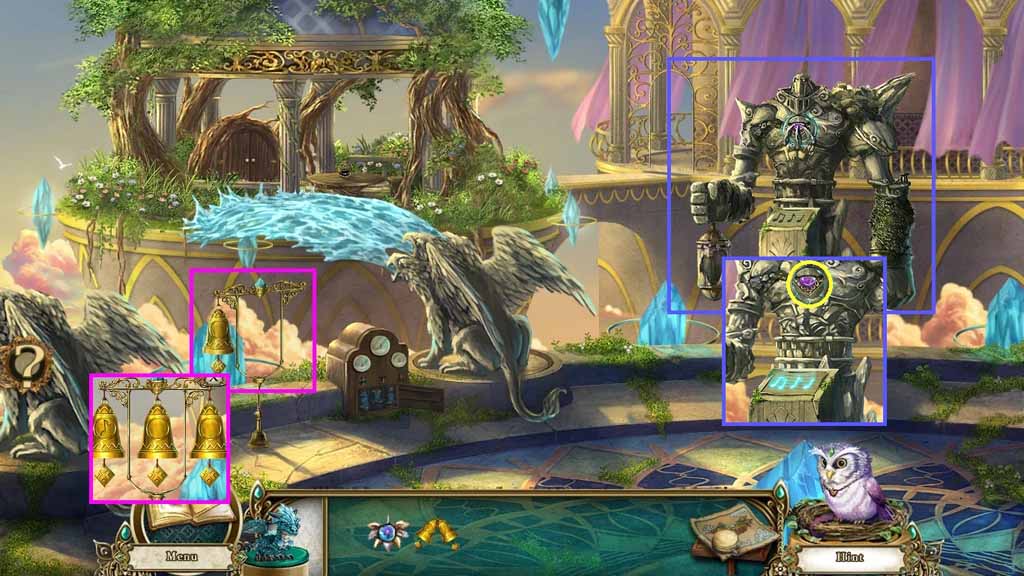
- Zoom into the frame and hang the bells; collect the 3 bells.
- Zoom into the statue of strength.
- Click the bells in the order shown in the melody.
- Insert the 2nd bell, the 3rd bell and the 1st bell; collect the 1/ 2 color glass key.
- Move down once.
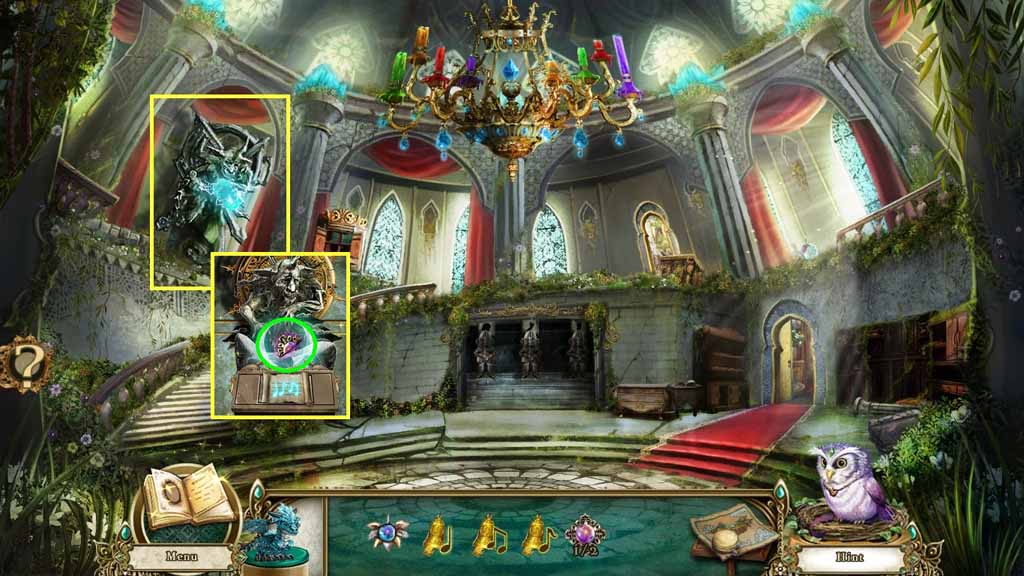
- Zoom into the statue of time.
- Click the bells in the order shown in the melody.
- Insert the 1st bell, 3rd bell and the 2nd bell; collect the 2 / 2 color glass keys.
- Move down once.
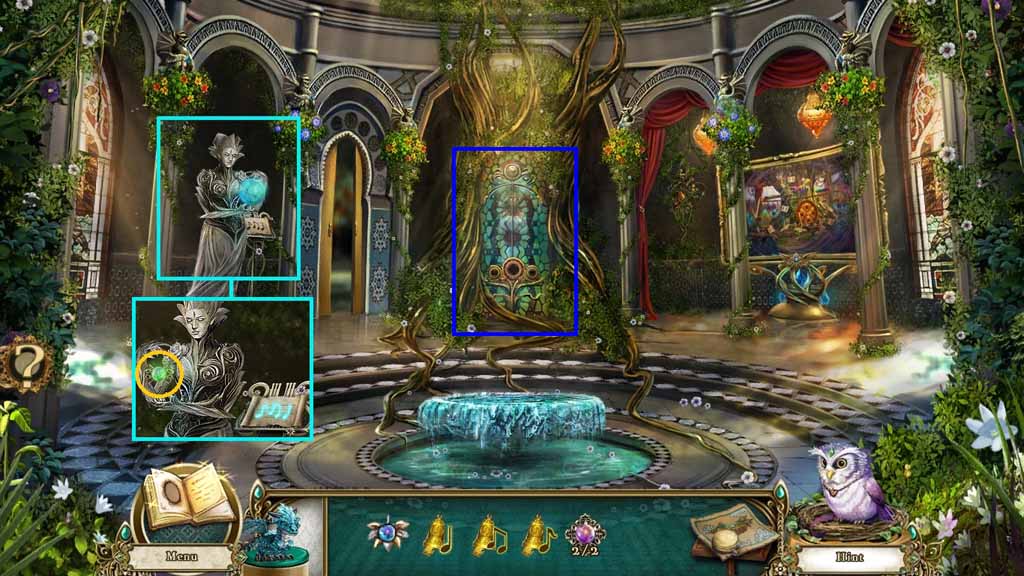
- Zoom into the statue of change.
- Click the bells in the order shown in the melody.
- Insert the 3rd bell, 2nd bell and the 1st bell; collect the color glass key.
- Zoom into the color glass.
- Insert the green color glass key into the left circle.
- Insert the purple color glass key into the middle circle.
- Insert the blue color glass into the right circle.
- Collect the key to the Outer Towers.
- Move to the Enchantress Haven.

- Zoom into the lock.
- Insert the key to the Outer Tower.
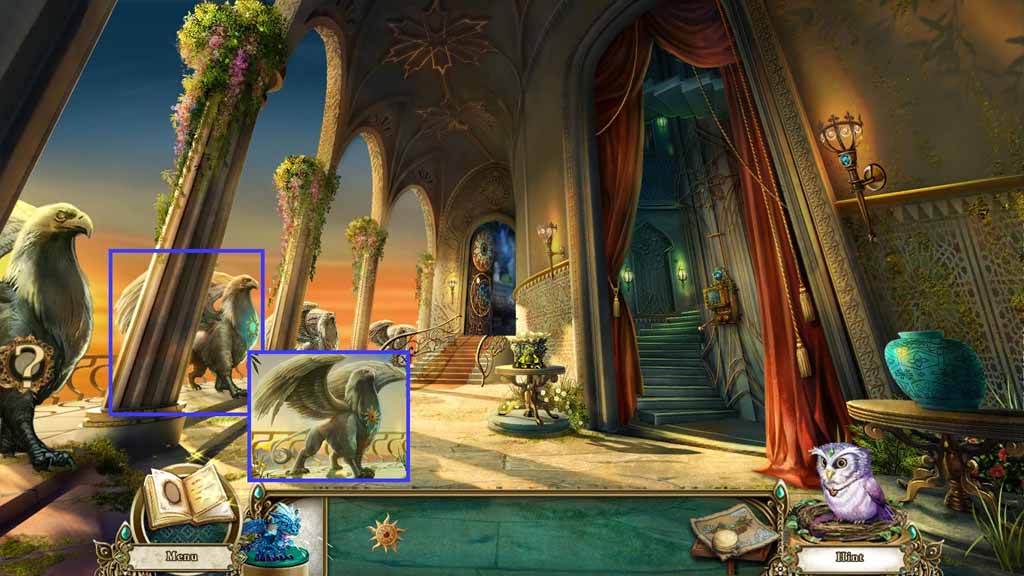
- Move ahead to the Breezy Passage.
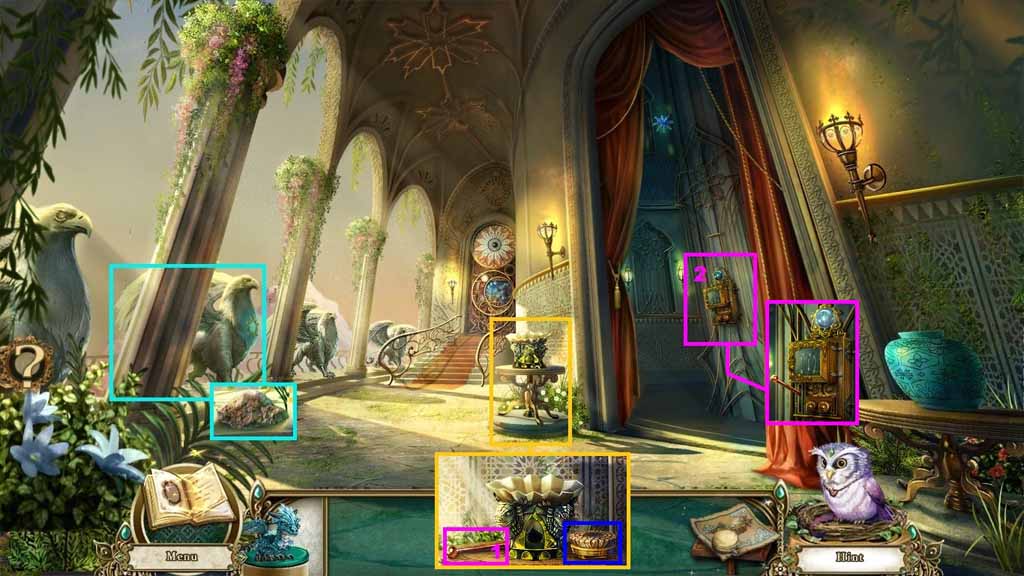
- Zoom into the griffin statue; collect the sandstone.
- Collect the lever handle and the polish brush.
- Insert the lever handle into the control and click it.
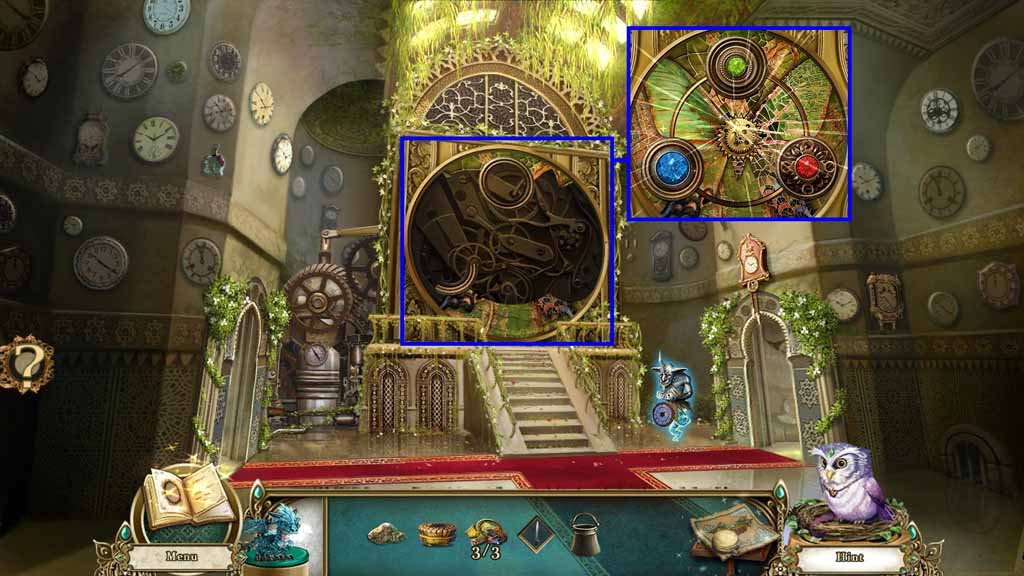
- Move up the stairs.

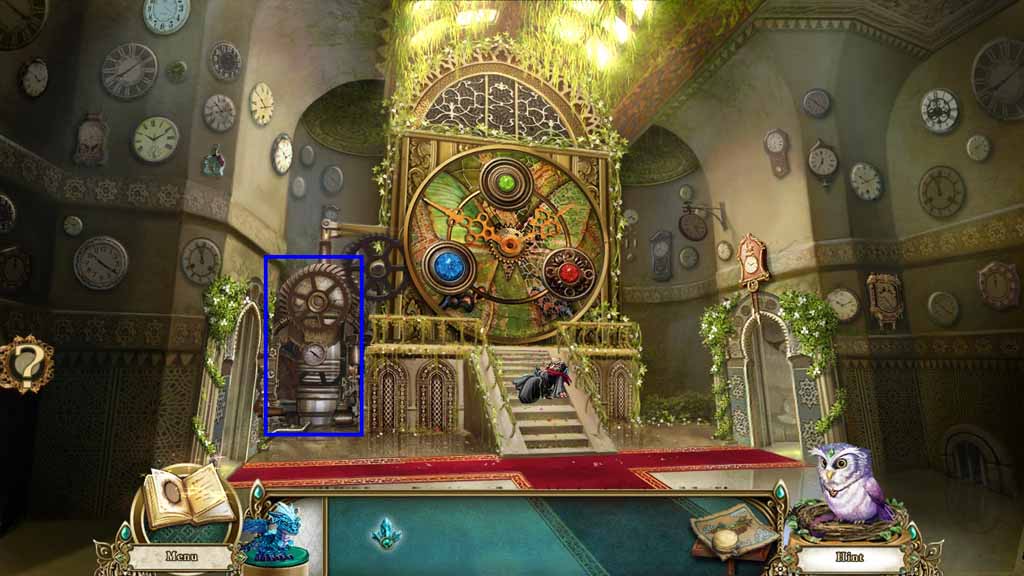
- Zoom into the cogs and pistons; collect the 1 / 3 clock pieces.
- Notice the pathway to the Vision Crystal Room.
- Move to the left into the Dome Overlook.
- Zoom into the cage; collect the stone slab.
- Zoom into the painting; collect the clock piece.
- Collect the bucket.
- Move down once and go to the right.
- Zoom into the table; collect the 3 / 3 clock piece.
- Move down once.
- Zoom into the Artifact of Time; insert the 3 clock pieces to trigger a mini-game.
- Insert the pieces into the frame and restore the mosaic.
- Collect the Sand of Slow and the Sand of Haste.
- Move to the right.
- Zoom into the fountain.
- Select the ice dragon to freeze the water.
- Select the bucket to collect the cat fish.
- Select the polish brush to scrub the dirt away.
- Insert the stone slab into the grid to trigger a mini-game.
- Switch the tiles so that the tiles relate to the ones next to it.
- Select the sand of slow to pour into the hourglass.
- Collect the hour glass of slow and the silver handle.
- Move down and go to the left.
- Zoom into the basin and place the cat fish in it.
- Attach the silver handle onto the grate.
- Select the ice dragon to quench the flame; collect the energy crest.
- Move down 2 times.
- Zoom into the altar and insert the energy crest.
- Place the ice dragon onto the altar; collect the energy dragon.
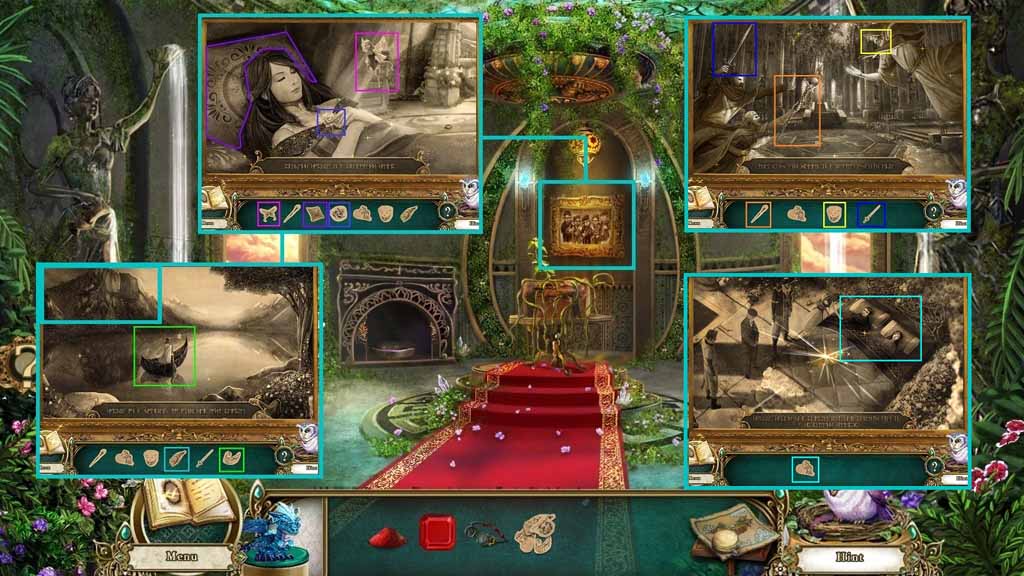
- Select the hourglass of slow to use on the timepiece door to trigger a hidden objects area.
- Find the listed items.
- Click and drag the crystal and insert it into the groove.
- Click the bird stand and click the green button.
- Put the crystal into the hands of the Enchantress.
- Find the listed items.
- Click the green button.
- Find the listed items.
- Click the green button.
- Find the listed items.
- Click and drag the bird to the bird stand.
- Click the green button 2 times.
- Put the bird onto Captain Iron hoof.
- Find the listed item.
- Move ahead and left to the Dark Room.

- Select the energy dragon to use on the 2 crystals.
- Zoom into the desk.
- Click the drawer open; collect the tweezers.
- Select the sandstone to use on the rusty latch.
- Click the chest; collect the chisel and hammer.
- Notice the Hourglass Display.
- Move down and go up the staircase on the right.

- Zoom into the cuckoo clock.
- Select the tweezers to use on the gears; collect the prism and the bird.
- Move to the left.

- Select the bird and give it to the catfish; collect the collar.
- Move down once and go to the right.
- Zoom into the fountain.
- Select the chisel and the hammer to collect the brisk.
- Zoom into the table.
- Select the collar to repair the goggles.
- Move to the Dark Room.
- Zoom into the desk.
- Select the brick to use on the giggle box; collect the pencil.
- Move to the Vision Crystal Room.
- Zoom into the table.
- Select the pencil and place it onto the book to trigger a hidden objects area.
- Find the listed items.
- Collect the magical cutouts.
- Move down once and move to the left.
- Zoom into the frame; insert the magical cutouts to trigger a mini-game.
- Solve the game by inserting the cutouts to recreate the scenes.
- Click the peeling canvas.
- Click the bag; collect the copper piece and the memory prism.
- Zoom into the memory fountain; insert the memory prism into the bottom groove and the prism into the upper groove.
- Collect the energy fuse.
- Move to the Dark Room.

- Zoom into the mechanical seal control; insert the energy fuse.
- Select the energy dragon to use on the fuses.
- Click the energy links to trigger a mini-game.
- Solve the game by moving the beams to attach the upper and lower beams.
- Notice the Gem of Power.
- Examine the Hourglass Display to trigger a mini-game.
- Insert the copper piece.
- Click buttons to move the copper pieces into patterns.
- Insert the sand of haste into the hourglass; collect the hourglass of haste.
- Move to the Dome Overlook.

- Zoom into the plant.
- Select the hourglass of haste to use on the tree; collect the colored orbs.
- Move down once and to the right.
- Select the energy dragons to use on the 3 crystals.
- Click the vision crystal and insert the colored orb to trigger a mini-game.
- Click the buttons to bring the picture into focus to solve the game.
- Collect the Clockwork Heart.
- Move to the Dark Room.
- Zoom into the Hourglass Display; insert the clockwork heart.
- Select the energy dragon to use on the fairy.
- Put the goggles onto the fairy; collect the fairy.
- Use the clockwork fairy to collect the gem of power.
- Move down once then move to the Chamber of Time.
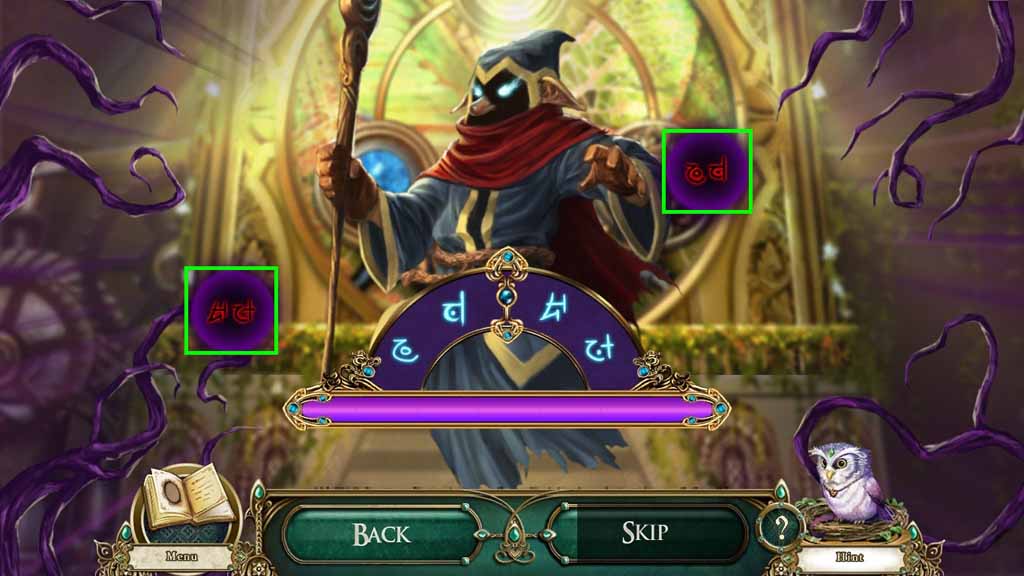
- A mini-game will automatically trigger.
- Solve the game by finding the discs that contain the 4 icons.
- Zoom into the piston.
- Insert the gem of power.
- Speak to the Enchantress; collect the griffons’ pendant.
- Move down once.
- Zoom into the griffon.
- Place the griffons’ pendant into his chest.