
Margrave: The Blacksmith's Daughter: Act Five, Chapter 17: Spirit
Our Margrave the Blacksmith's Daughter Walkthrough will be your tour guide to the Cyclops City, where you'll join Edwina on a hunt to find her boyfriend Tom and escape the city before the sun sets and the city disappears for another 300 years. This Margrave Walkthrough contains tons of custom screenshots clearly marked with key locations, detailed instructions, and solutions to all the many puzzles and hidden object scenes you'll find in this exciting hidden object adventure game.
General Info and Tips
Introduction: Fisherman’s Village
Act One, Chapter 1: Lady Seer’s Lovers
Act One, Chapter 2: Rudo Helps Out
Act Two, Chapter 3: Liberating the Monster
Act Two, Chapter 4: Gotto’s Butterfly
Act Two, Chapter 5: Stars
Act Two, Chapter 6: Shrine Secrets
Act Three, Chapter 7: Cargan’s Ultimatum
Act Three, Chapter 8: Sun Tower
Act Three, Chapter 9: The Nose
Act Three, Chapter 10: Revitalize the Sun
Act Three, Chapter 11: Shell
Act Three, Chapter 12: Piping
Act Three, Chapter 13: Wedding Bells
Act Four, Chapter 14: Rudo's Body
Act Four, Chapter 15: Wedding Ceremony
Act Four, Chapter 16: Showdown
Act Five, Chapter 17: Spirit
Act Five, Chapter 18: Locks
Act Five, Chapter 19: Seraphim
Strawberry Book
Ask for help in the comments below!
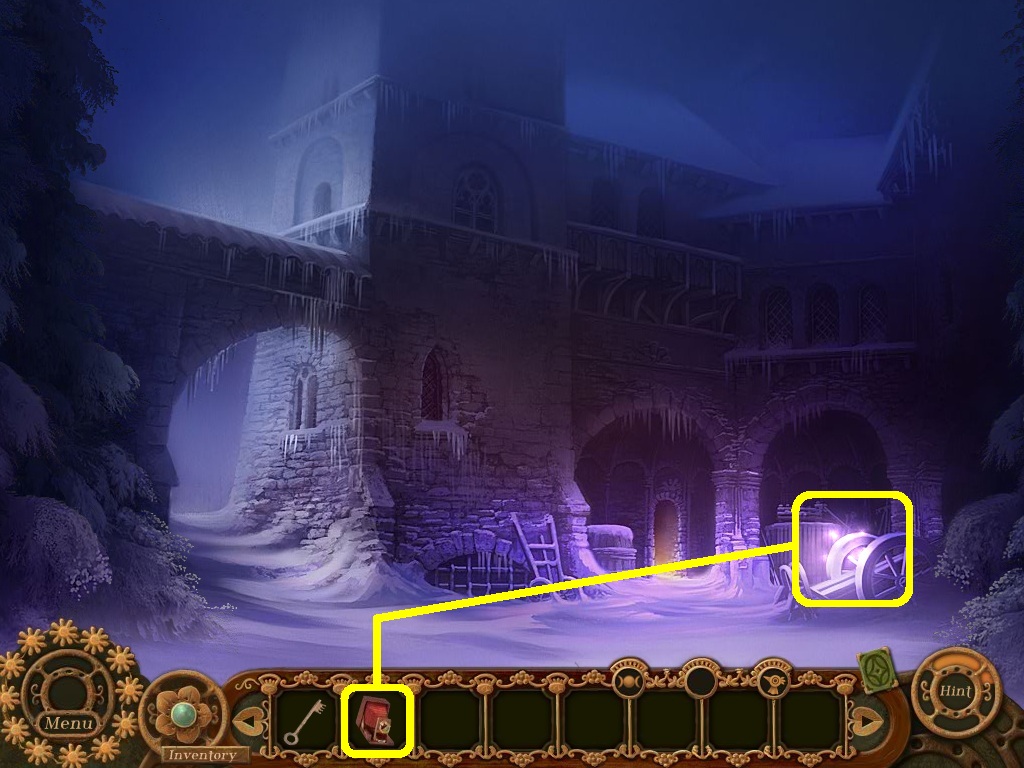
- Pick the spirit camera (yellow square); take a picture of the orbs.
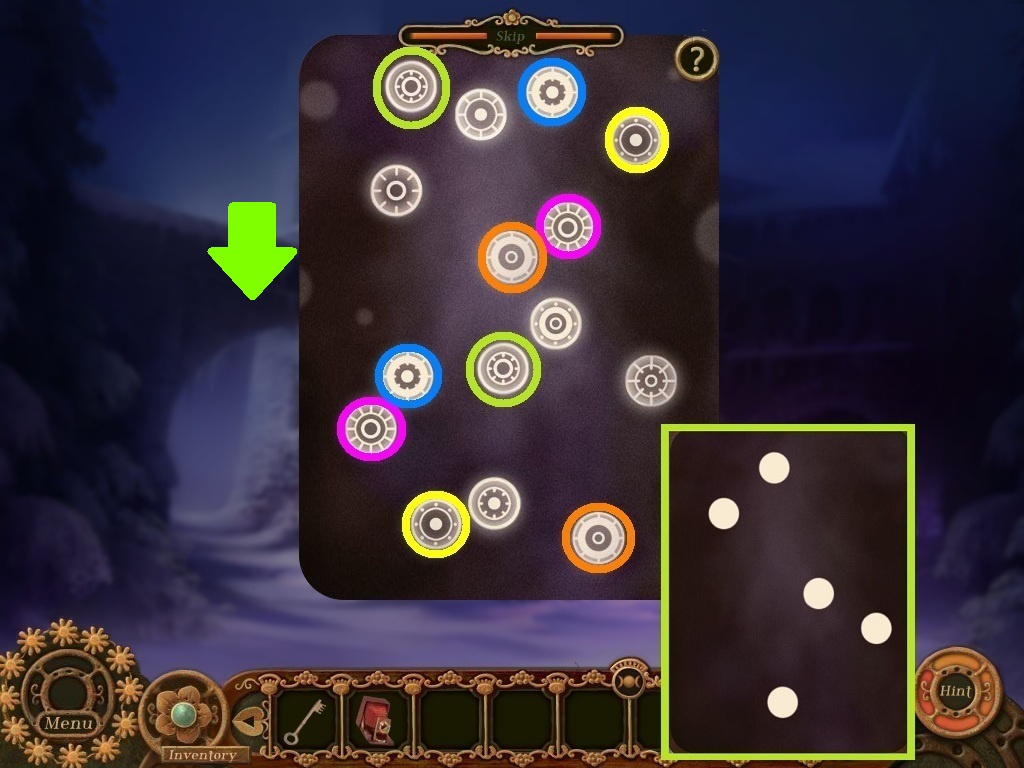
- Click the matching pairs of orbs.
- Go under the arch (green arrow).
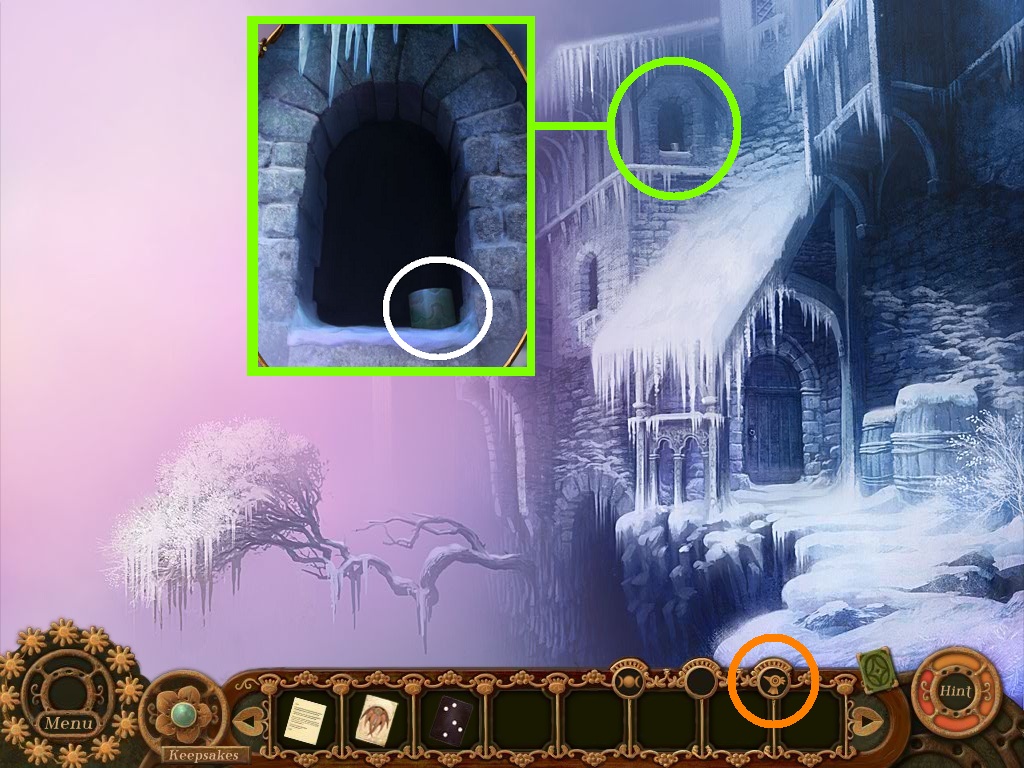
- Click Afi (orange circle).
- Send him to the window (green circle); collect the box (white circle).
- Go to the courtyard and into the wine cellar.
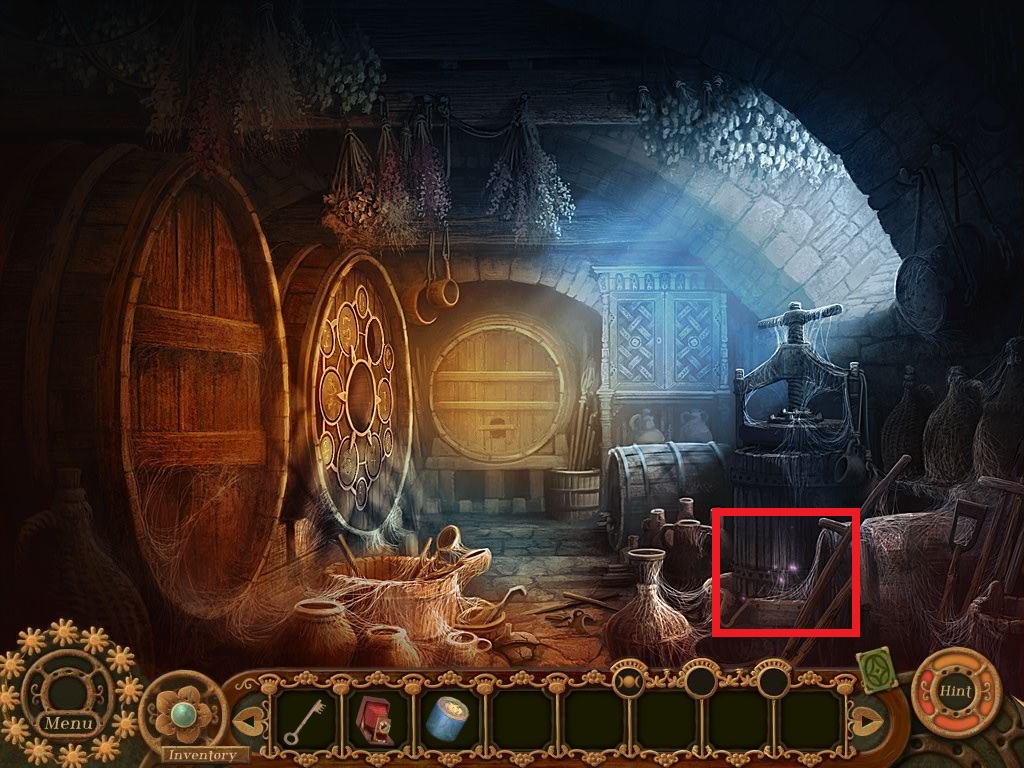
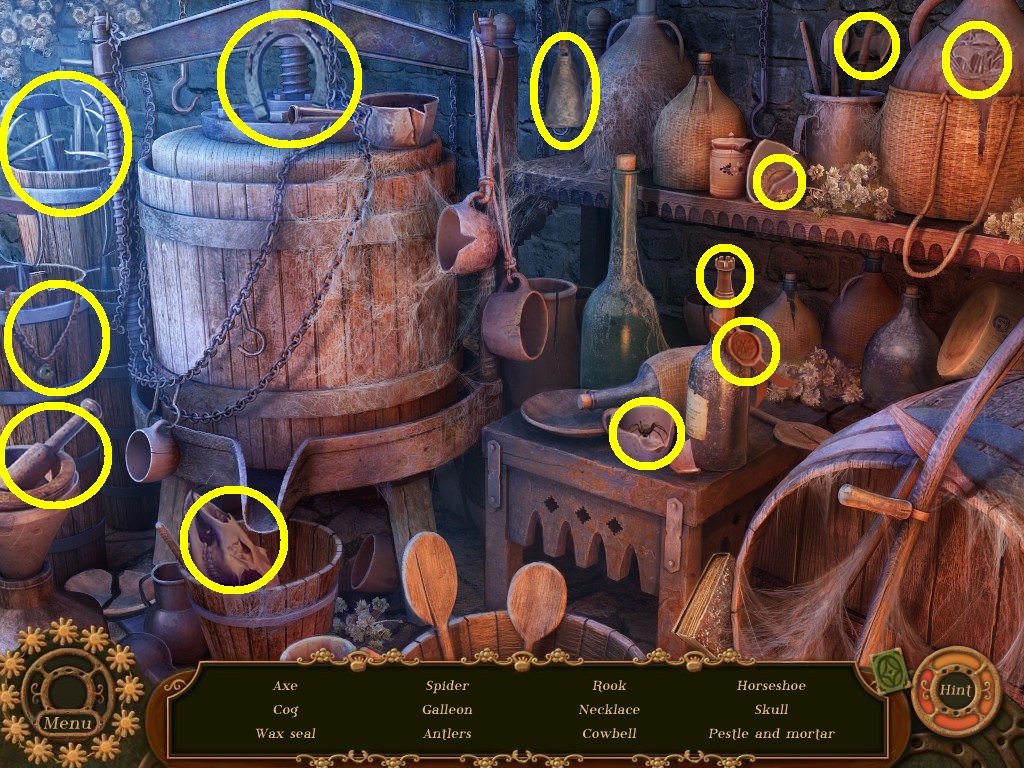
- Zoom into the hidden object area (red rectangle).
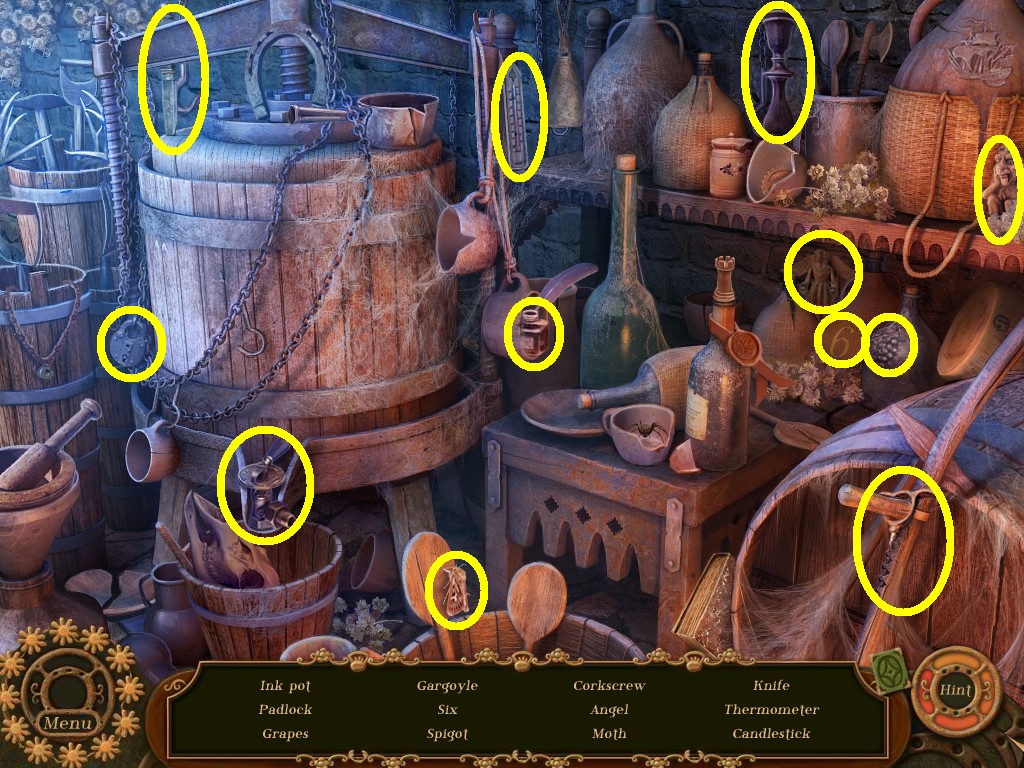
- Find all the listed items (yellow circles).
- Collect the wooden 6 disc.
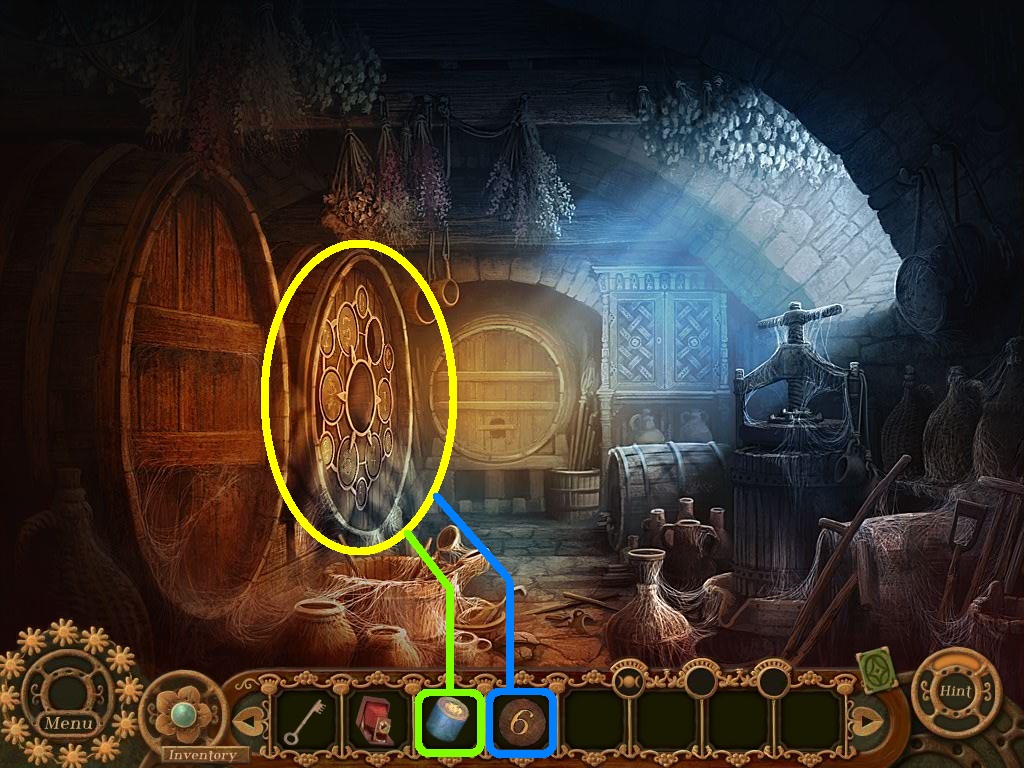
- Zoom into the barrel head (yellow circle).
- Pick the puzzle box (green square) and insert it into the barrel head.
- Pick the wooden 6 disc (blue square) from the inventory; add it to the barrel head to trigger a puzzle.

- Solve the puzzle as shown above.
- Collect the rose eye (white circle).
- Go to the precipice.
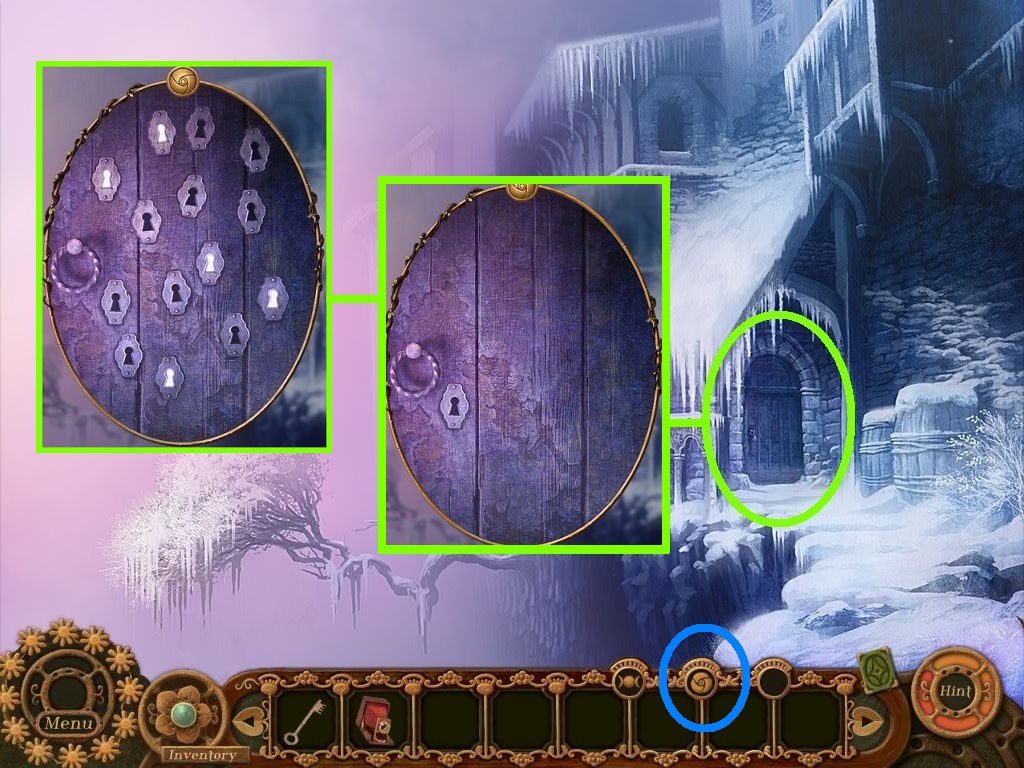
- Zoom into the monastery door (green circle).
- Select the rose eye (blue circle); use it to reveal the keyholes.
- Refer to the spirit photo for a guide of the correct key holes to unlock.
- Solve as shown above.
- Go into the monastery.
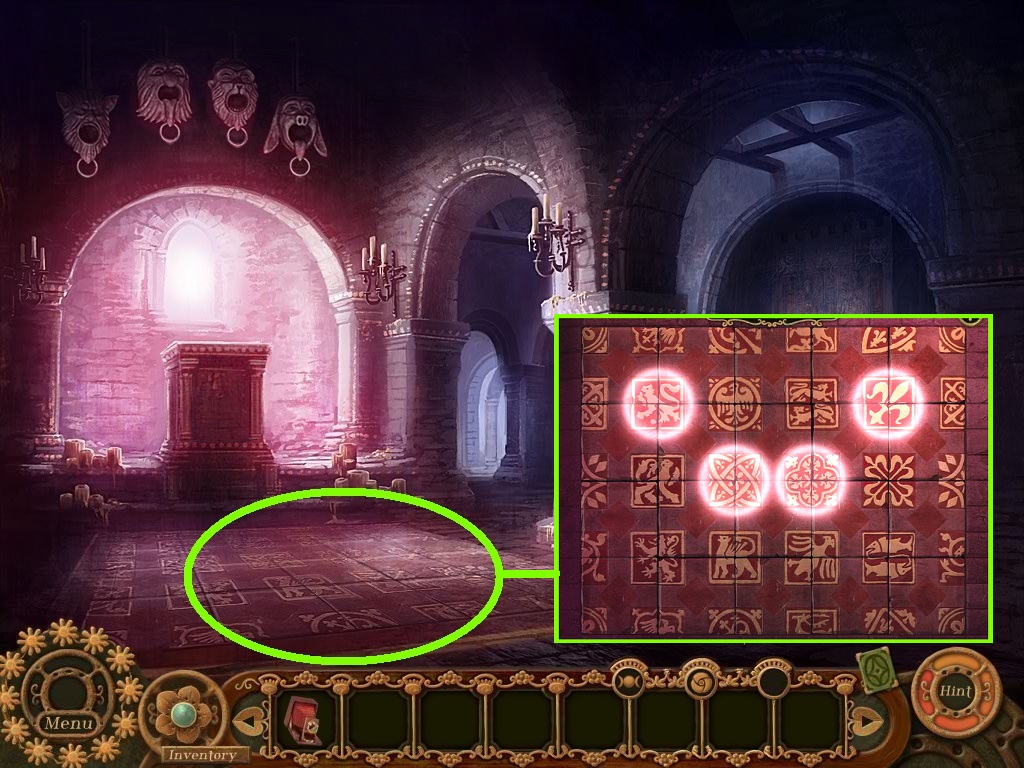
- Zoom into the floor tiles (green circle).
- Click on the tiles to rearrange.
- Solve as shown.
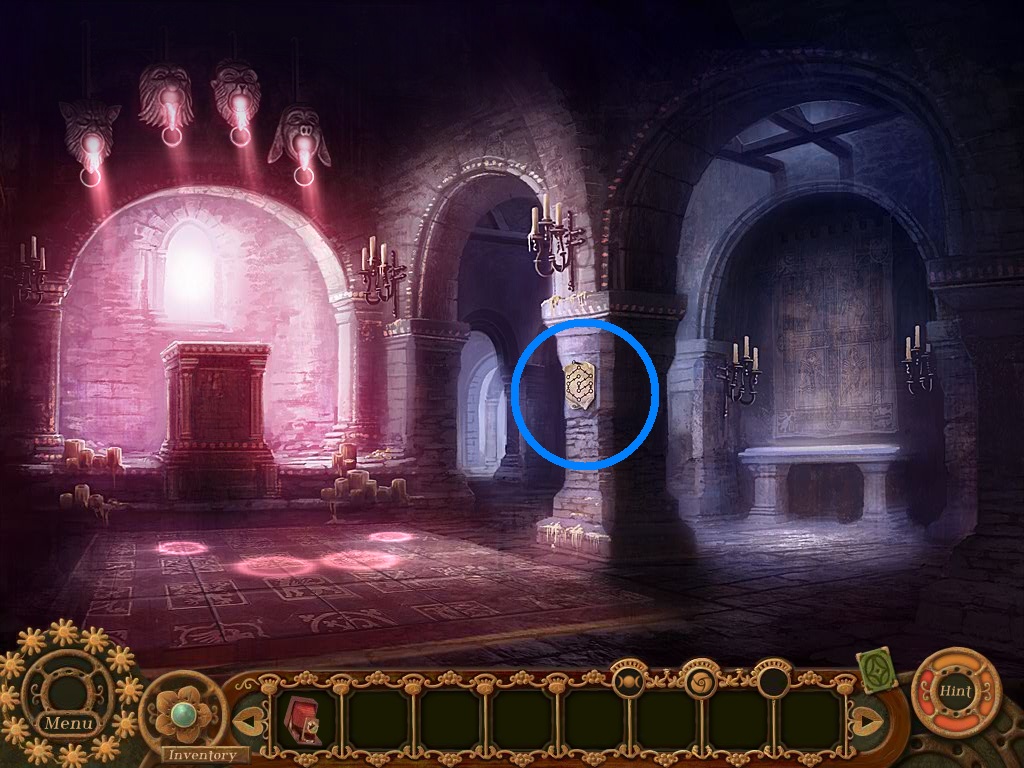
- Collect the pattern from the pillar (blue circle).
- Go to the scriptorium.
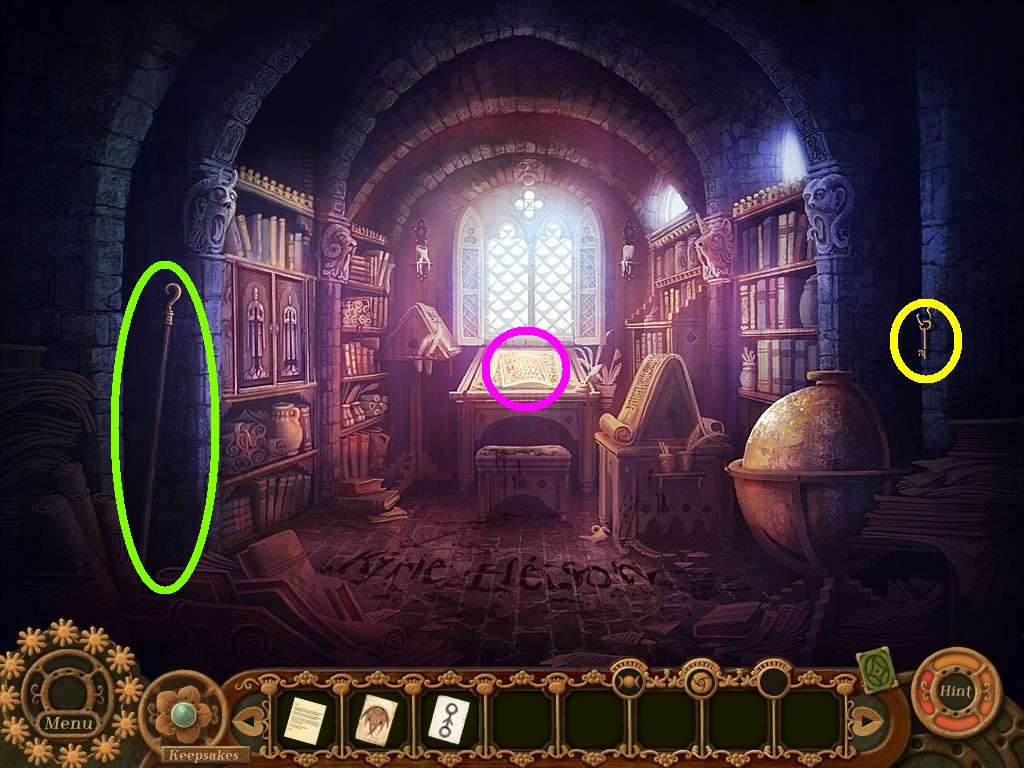
- Collect the pole hook (green circle).
- Collect the small key (yellow circle) from the hook on the wall.
- Collect the manuscript (pink circle) from the desk.
- Go to the chapel.
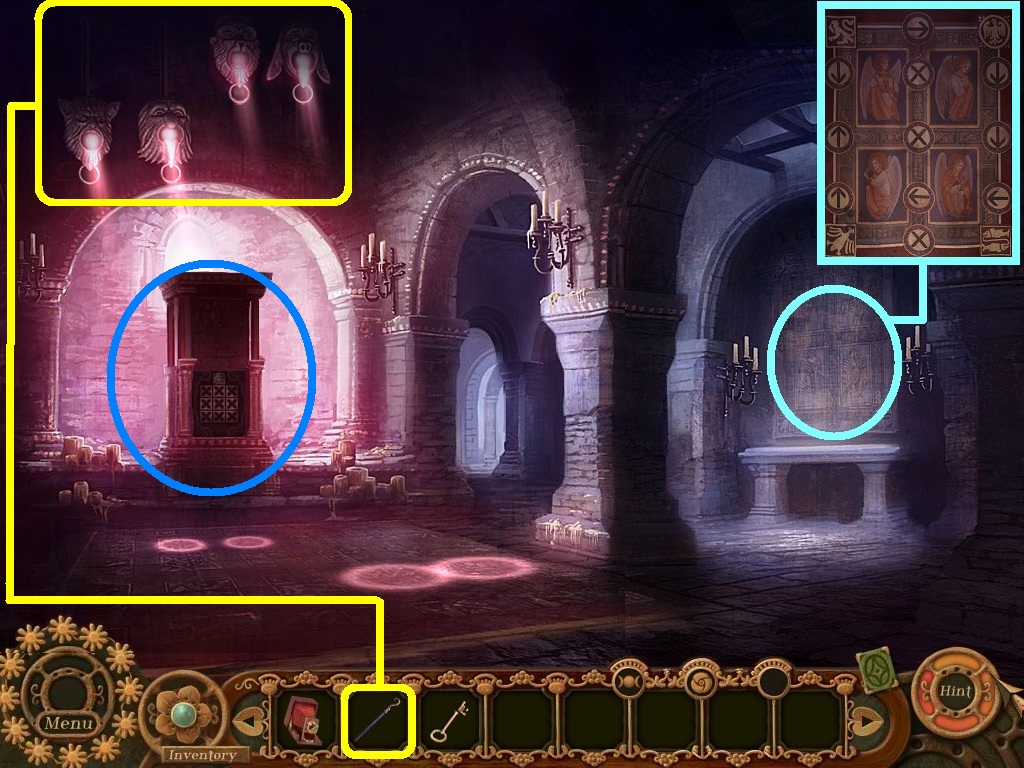
- Zoom into the wall tapestry (aqua circle).
- Locate the matching four symbols on the tile floor.
- Arrange the light on the symbols; pick the pole hook (yellow square) to arrange the lighting.
- Zoom into the altar panel (blue circle).

- Refer to the chapel pattern for the correct sequence pattern.
- Once the puzzle is completed as shown above; collect the wooden sword.
- Go to the courtyard and go into the wine cellar.
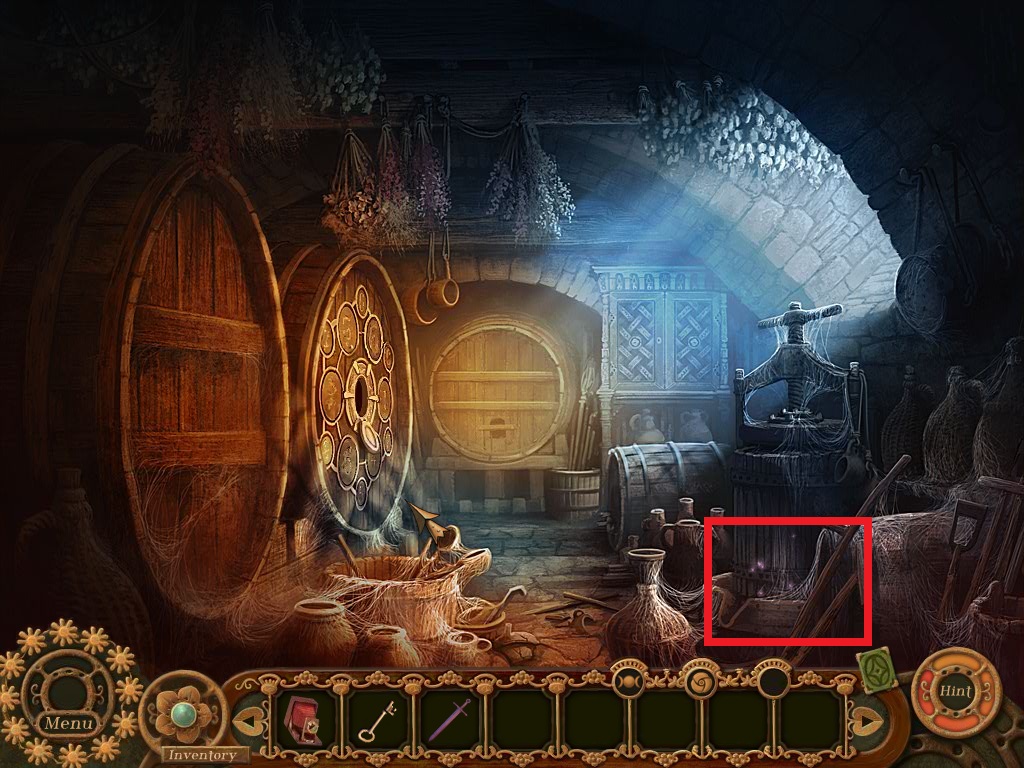
- Zoom into the hidden objects area (red rectangle).
- Find all of the listed items (yellow circles).
- Collect the wooden axe.
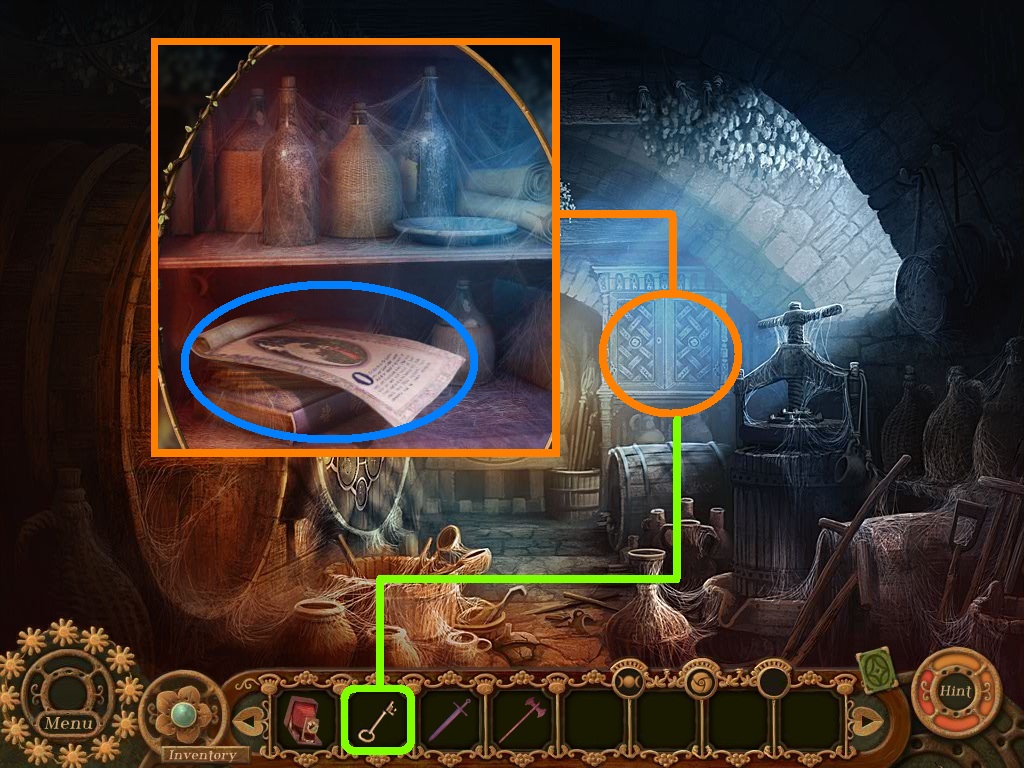
- Zoom into the cabinet (orange circle).
- Pick the small key (green square) and use it to unlock the cabinet.
- Collect the manuscript (blue circle).
- Go to the scriptorium.
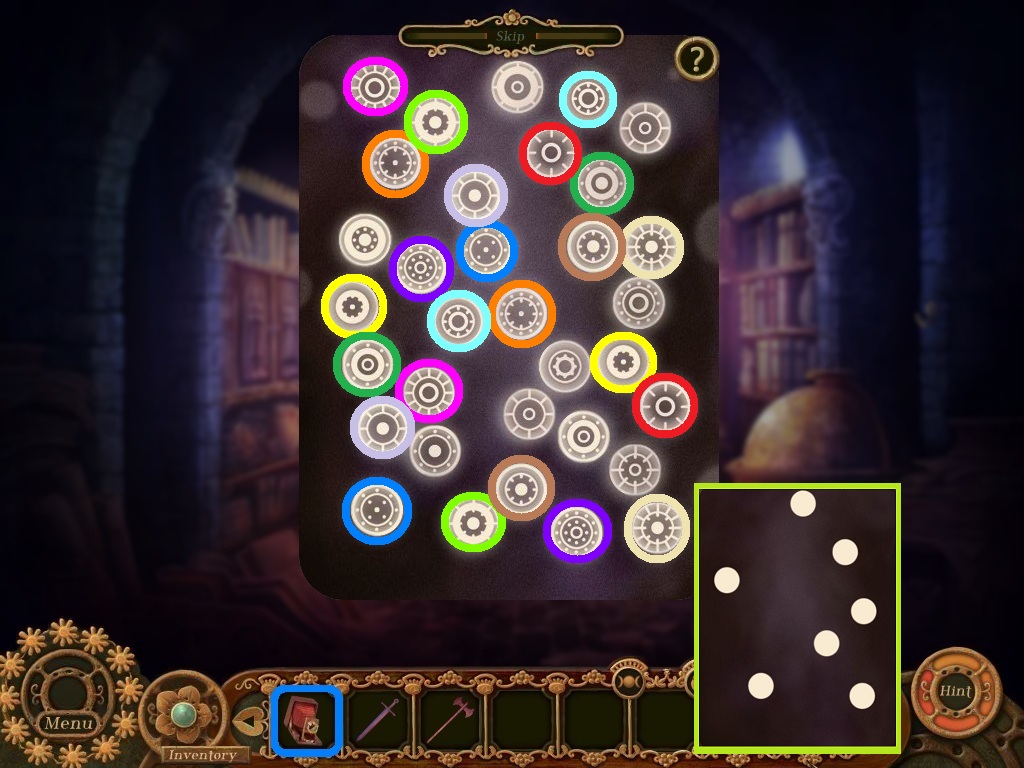
- Select the spirit camera (blue square) use it to take a picture of the orbs.
- Pick the matching pairs of orbs.
- Collect the second orb photo.
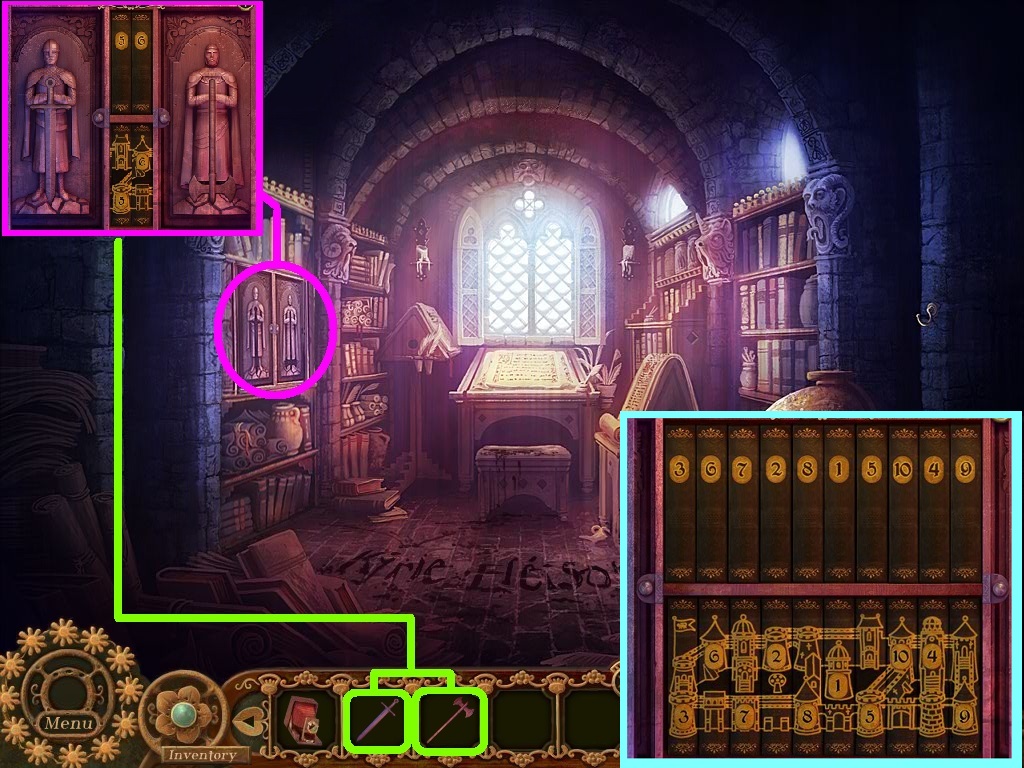
- Zoom into the bookcase (pink circle).
- Pick the wooden axe and wooden sword (green squares); insert them into their matching spaces.
- Move the books around to reveal a picture of a town.
- Solve as shown above.
- Go through the door to the loom chamber.
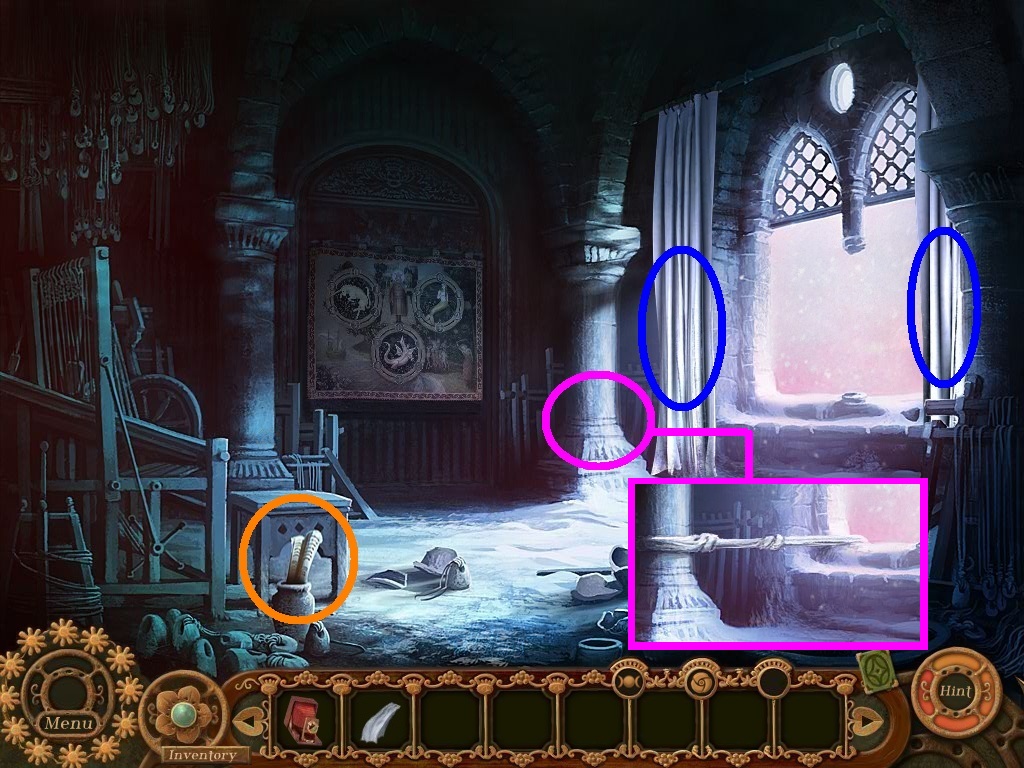
- Click the curtains (blue circles).
- Place the curtain (pink circle) on the column.
- Place the curtain (aqua circle) on the end of the last curtain.
- Collect the manuscript (orange circle).
- Exit through the window.
- Go into the monk’s cell.
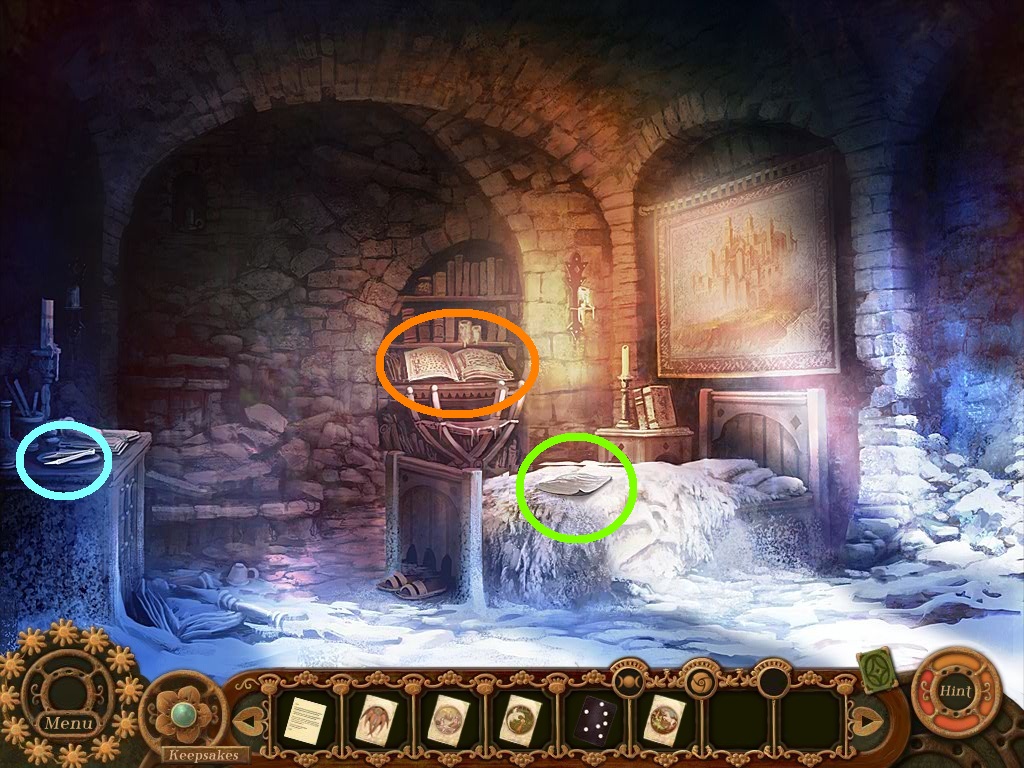
- Collect the journal page (green circle).
- Collect the manuscript (orange circle).
- Collect the tweezers (aqua circle).
- Climb back to the loom chamber.
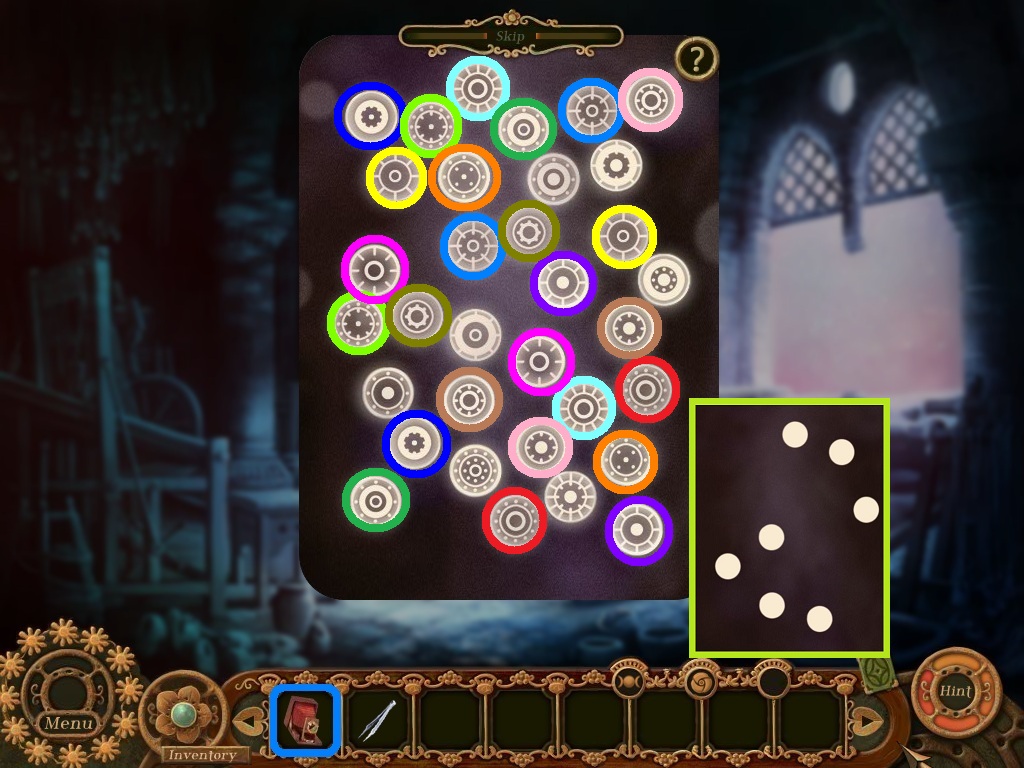
- Pick the spirit camera (blue square) to take a picture of the orbs.
- Pair off the matching orbs; collect the orb photo.
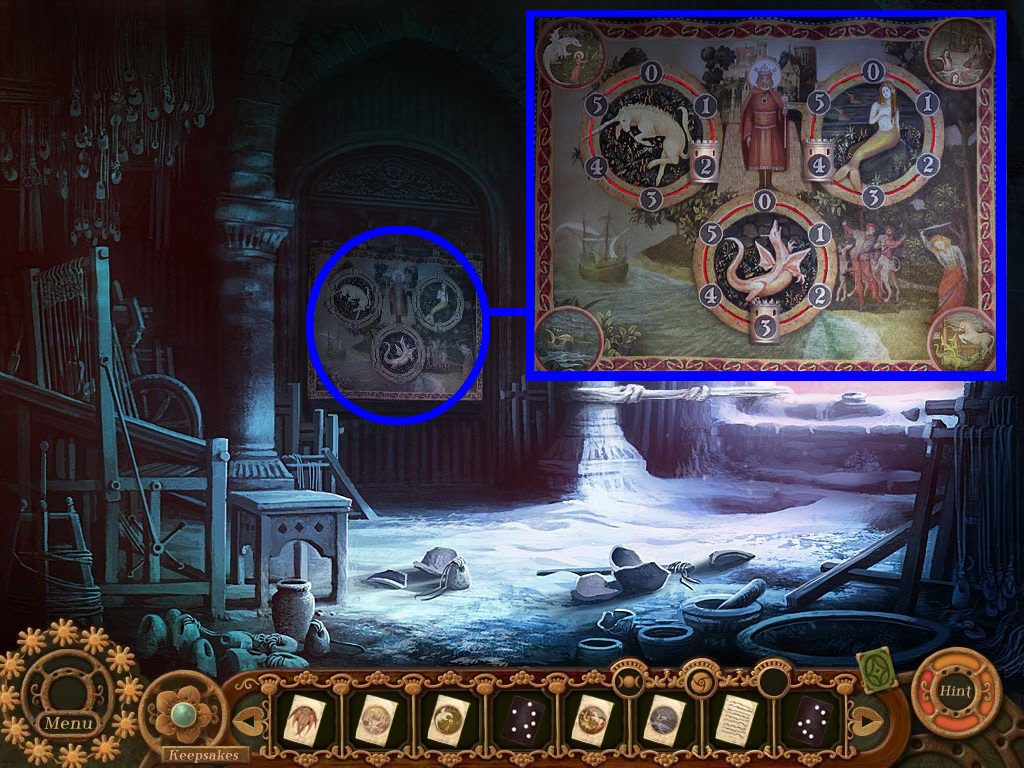
- Zoom into the tapestry (blue circle).
- A puzzle will trigger.
- Solve the puzzle as shown above.
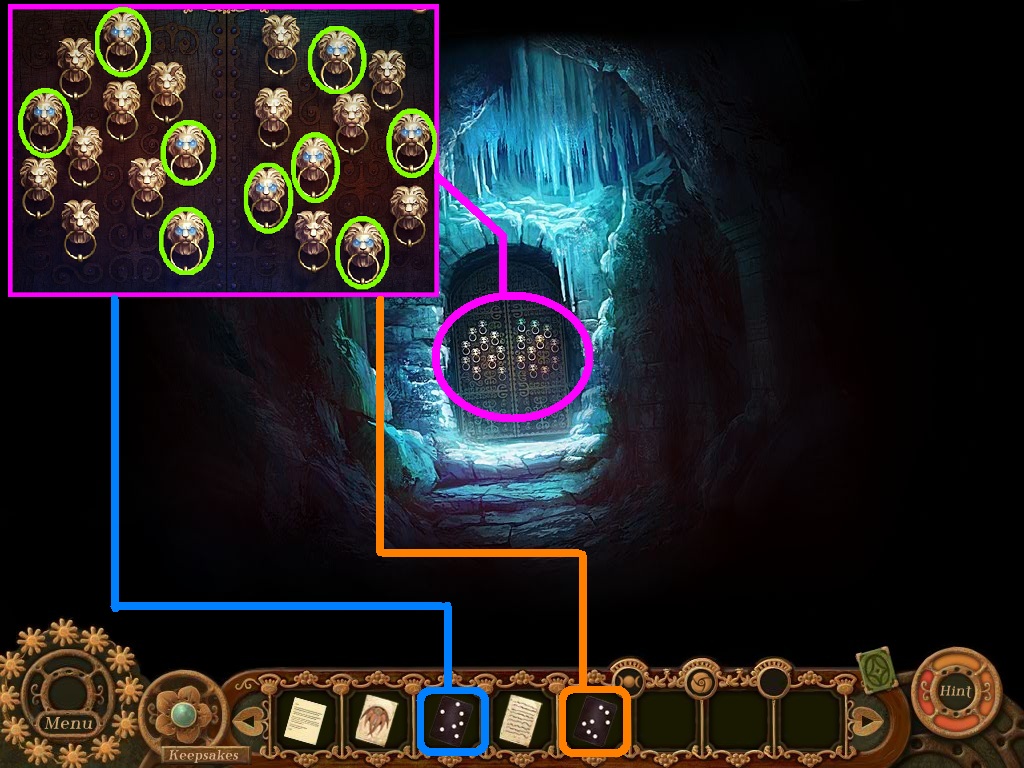
- Zoom into the studded wooden doors (pink circle).
- Pick the orb photos and match the patterns to the door knockers (green circles).
- Go into the tunnel to the mountain top.

- Zoom into the glyphs (pink circle) on the wall.
- Collect the sketch.
- Go into the snow forest.
General Info and Tips
Introduction: Fisherman’s Village
Act One, Chapter 1: Lady Seer’s Lovers
Act One, Chapter 2: Rudo Helps Out
Act Two, Chapter 3: Liberating the Monster
Act Two, Chapter 4: Gotto’s Butterfly
Act Two, Chapter 5: Stars
Act Two, Chapter 6: Shrine Secrets
Act Three, Chapter 7: Cargan’s Ultimatum
Act Three, Chapter 8: Sun Tower
Act Three, Chapter 9: The Nose
Act Three, Chapter 10: Revitalize the Sun
Act Three, Chapter 11: Shell
Act Three, Chapter 12: Piping
Act Three, Chapter 13: Wedding Bells
Act Four, Chapter 14: Rudo's Body
Act Four, Chapter 15: Wedding Ceremony
Act Four, Chapter 16: Showdown
Act Five, Chapter 17: Spirit
Act Five, Chapter 18: Locks
Act Five, Chapter 19: Seraphim
Strawberry Book
Ask for help in the comments below!
Introduction: Fisherman’s Village
Act One, Chapter 1: Lady Seer’s Lovers
Act One, Chapter 2: Rudo Helps Out
Act Two, Chapter 3: Liberating the Monster
Act Two, Chapter 4: Gotto’s Butterfly
Act Two, Chapter 5: Stars
Act Two, Chapter 6: Shrine Secrets
Act Three, Chapter 7: Cargan’s Ultimatum
Act Three, Chapter 8: Sun Tower
Act Three, Chapter 9: The Nose
Act Three, Chapter 10: Revitalize the Sun
Act Three, Chapter 11: Shell
Act Three, Chapter 12: Piping
Act Three, Chapter 13: Wedding Bells
Act Four, Chapter 14: Rudo's Body
Act Four, Chapter 15: Wedding Ceremony
Act Four, Chapter 16: Showdown
Act Five, Chapter 17: Spirit
Act Five, Chapter 18: Locks
Act Five, Chapter 19: Seraphim
Strawberry Book
Ask for help in the comments below!