
GENERAL TIPS:
- There are 2 modes in the game; timed an "untimed". The game will start your profile in timed mode unless "untimed" mode is selected before playing the game. Start a new profile should you change your mind and want to play in "untimed" mode. Make the "untimed" selection in the Create a New Player/Start a New Game screen.
- Should you play the timed mode and the hidden objects haven't been found and the quests completed; you'll have to start that chapter over from the beginning.
- There are 3 types of hints included in the game.
- Hints included in the characters' conversations throughout the game.
- Magnifying glass icon hint gives you a highlighted circle area in which a hidden object is located.
- Wrench icon hint gives 1 hint at a time for a quest. You can have 2-3 different hints per quest.
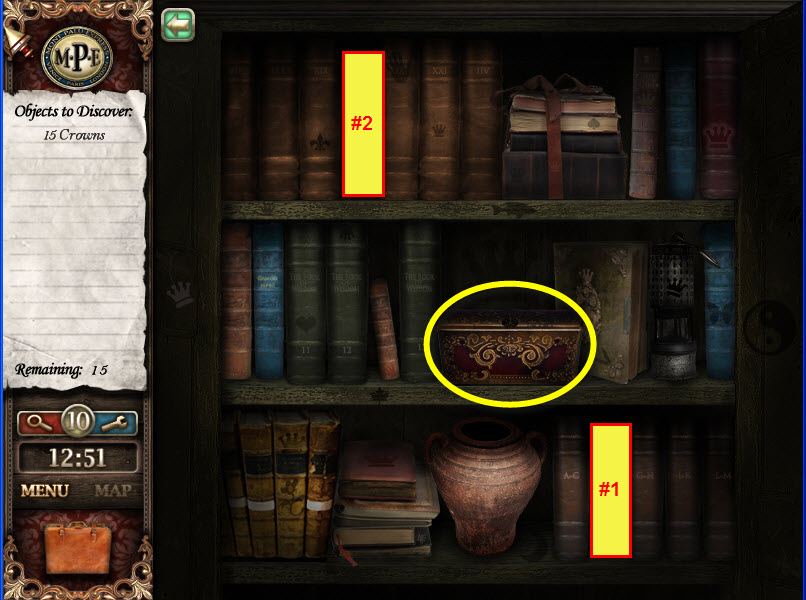
- You can accumulate additional hints by locating the Suspect Items that are hidden in scenes. I highly recommend locating the suspect items. The suspect items are never listed on find hidden objects lists. See suspects' items locations below.
- You can incur a time penalty should you have about 20 selections consecutively that are incorrect.
- New locations will open up after locating hidden objects and/or when quests have been completed.
- You can visit opened locations as many times as you'd prefer unless all hidden objects and quests have been completed in that location...select the map button on the lower left side on the scene.
- Mini games and puzzles can be skipped incurring a 20 minute penalty to your total game time.
- Most scenes have 1 or more areas that will be highlighted/hot spots when your curser moves over them. These areas require additional actions to be taken.
- Use the flashlight often as many scenes have dark areas in which a flashlight can be used.
- Hidden object scenes have random items on the lists with the exception of inventory and quest items.
INVENTORY ITEMS:
- Inventory Items are used to locate other Hidden Objects or to complete quests.
- Most Hidden Object scenes have 1 or more items that will go into inventory/briefcase in the lower left of the screen.
SUSPECT ITEMS AND LOCATIONS:
- The Suspect card is in your inventory.
- Each suspect has a "favorite item" that can be located in the hidden object scenes that ARE NOT included in the lists.
- For each suspect item/favorite item you find, you'll receive 3 additional hints.
- When all the suspect items/favorite items have been located for each suspect, you'll receive extra time to complete the chapter you're playing.
- The text in the game spells the names of the suspects slightly differently.
1-Victor Jasili (6-cigars) in Cabin No. 2:
- Victor Jasili's Cabin No.2: On round dining table next to the cereal on the lower left of the scene.
- Paul's Antique Shop: Inside a green container on the lower center of the scene.
- Budapest Market: Between the pumpkins and watermelons on lower right side of the scene in front of the crates.
- Car Garage: On the left side of the car bumper..
- Bar Cart : On the left side of the shelves by the glasses.
- Victor Jasili's Cabin #2 Bathroom: On the top right of the sink.
2-Yue Lan Run (8 Fortune Cookies) in Cabin No. 3:
- Yue Lan Run's Cabin No.3 (2cookies): On the large chair in the center of the room. Inside the suitcase; on the left side of the suitcase above the abacus.
- Café: On ceiling in the center.
- Old Music Store: On the shelves in the music store on the top left side.
- Bathroom in Victor Jasili's Cabin #2 Bathroom: Under the faucet.
- The Prater: In the tree branches on the top right corner.
- Belvedere Garden: Bench on left side of the scene in front of the avocado.
- Clock Tower: Bottom middle of the scene on the table.
3-S. Carlo Siro (12 Green Gambling/Poker Chips) in Cabin No. 8:
- Luggage Cart: Lower right of the scene.
- Carlo Siro's Cabin No. 8: On the roulette wheel on the lower right side.
- Karel's Taxi: On the dashboard on the top right side.
- Ancient Museum: Under the horse painting slightly right of the middle of the scene.
- The Magician (4 chips): Outside: Slightly right of the door on the right of the scene. On the lower right of the scene at the bottom of the stairs. Inside: On the top of the bookshelf above the zebra. On the barrel on the lower left of the scene.
- The Book Store (2 chips): Top of the scene in the middle between pitch fork and guitar. Lower right of the scene under the green gloves.
- Tattoo Shop: On the sign on the lower right side.
- Clock Tower: By the green book on the lower right of the scene.
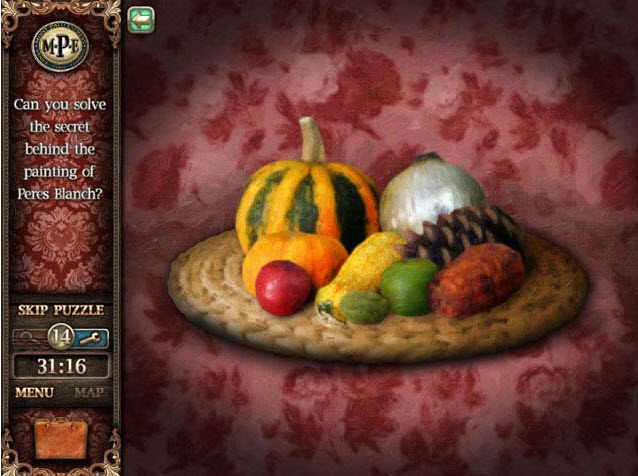
4-M. Peres (sometimes spelled Perez) Blanch (7 paintbrushes) in Cabin No.12:
- Eiffel Tower: On the Souvenir Counter Post slightly left and under the Souvenir Sign.
- Rue Vineuse: On the roof of the building under the long tree branch.
- Rue De Bourgogne: In the man's hand that is sitting on the horse.
- Champs Elysees: Top left of the scene on the top of the frame of the daisy painting.
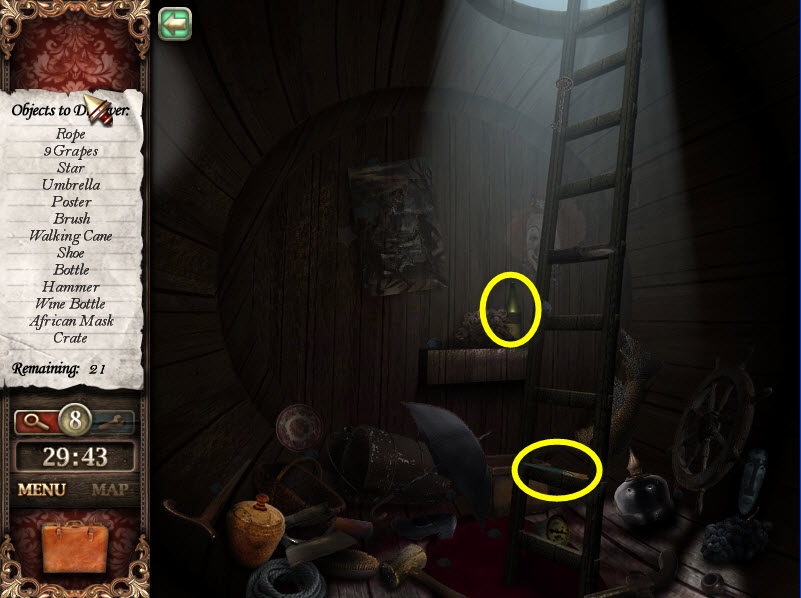
- Winery Blanch (2 brushes): Outside: Lower right corner of the scene. Inside: On the second to the last of the bottom rungs of the ladder.
- Park De Monceau (2 brushes): Left of the middle column on the bottom of the wall. Monument – On the lamp post on the left side of the scene.
5-Lord Penroy (telescopes) in Cabin 10:
- Lord Penroy's Cabin No. 10 (2 brushes): Top shelf on the bookshelves on the right of the scene. On the round table on the lower left of the scene.
- Cabin 12 suitcase: Inside the suitcase scene on the left side of the top of the suitcase.
- Hyde Park: On the old fashioned red mailbox on the right side of the scene.
- Phone Booth: On top of the suitcase in bottom middle of the scene.
- Junkyard: On the bottom of the right side bottom front window of the bus.
- Hotel: On the front of the coffee table in the middle of the scene.
- Tower of London: Lower left side of the scene between the vase and scroll.
Suspect Items: Victor Jasili: Cigar- Rue Lan Run: Fortune Cookie- S. Carlo Sire: Gambling Chips- M. Perez Blanch: Paintbrush- Lord Penroy: Telescope-
Prologue-Venice Italy:
Hotel Room:
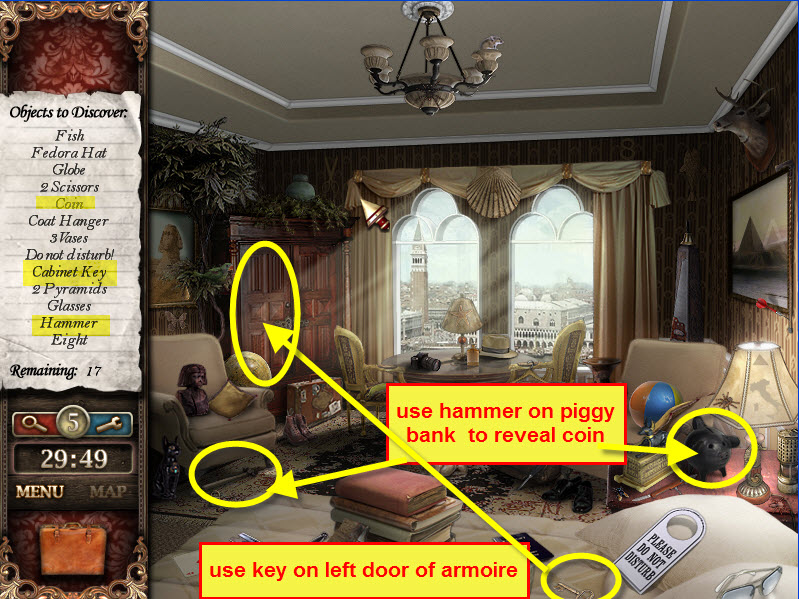
- Use hammer on piggy bank to reveal coin. Select the coin; the coin will go into the inventory briefcase. Make sure piggy bank is highlighted when hammer is on curser...clicking hammer on piggy bank without it being highlighted will result in a penalty selection...to many penalty selections will give you a time penalty.
- Use key on left door of armoire to locate 12 hidden objects. Flashlight and batteries will go into briefcase. Put battery in flashlight.

- Put batteries in flashlight and leave flashlight in your inventory.
Train Station
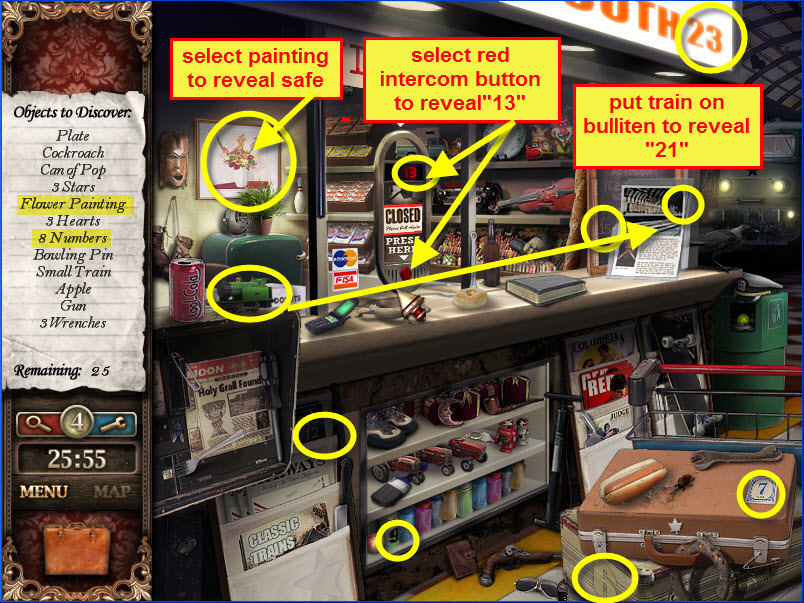
- Put small train on newspaper to reveal the number 21 for the safe code.
- Select the red intercom button to reveal the number 13 safe code.
- Select flower painting to reveal the safe.
- After all hidden numbers are located you'll have the safe code in inventory.
- Use the safe code to open the safe and to receive the train ticket for the Mont Palu Express.
Chapter 1- Heading for Budapest:
Dining Cart:
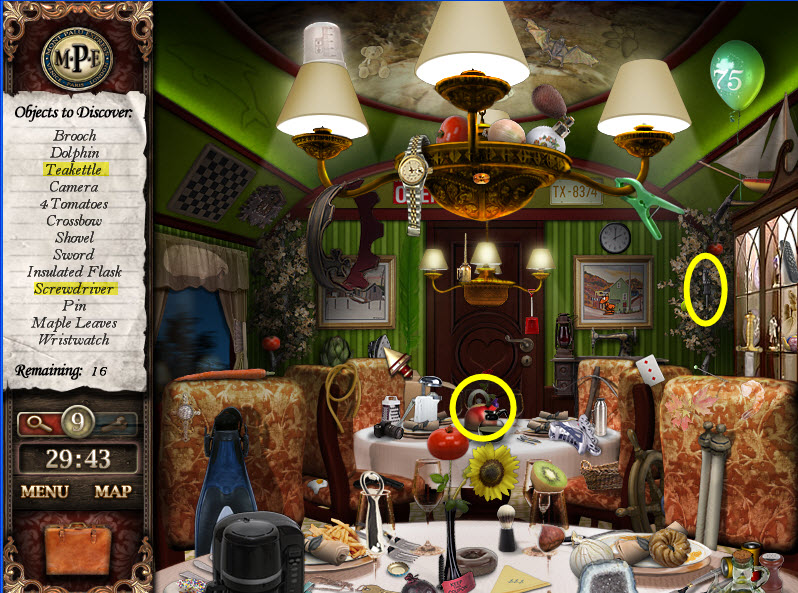
- Locate the screwdriver for inventory.
- Locate the teapot for inventory.
Cabin 7 - Yours:
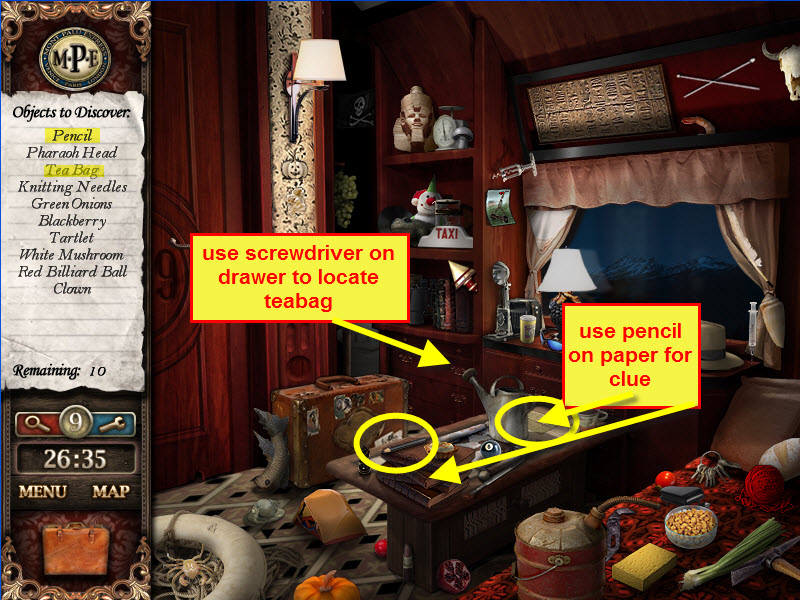
- Locate pencil on coffee table
- Use screwdriver from inventory on top drawer under bookshelves to locate teabag.
- Use pencil on paper to reveal a clue for inventory and to open Cabin 2.
Cabin 2 – Victor Jasili:
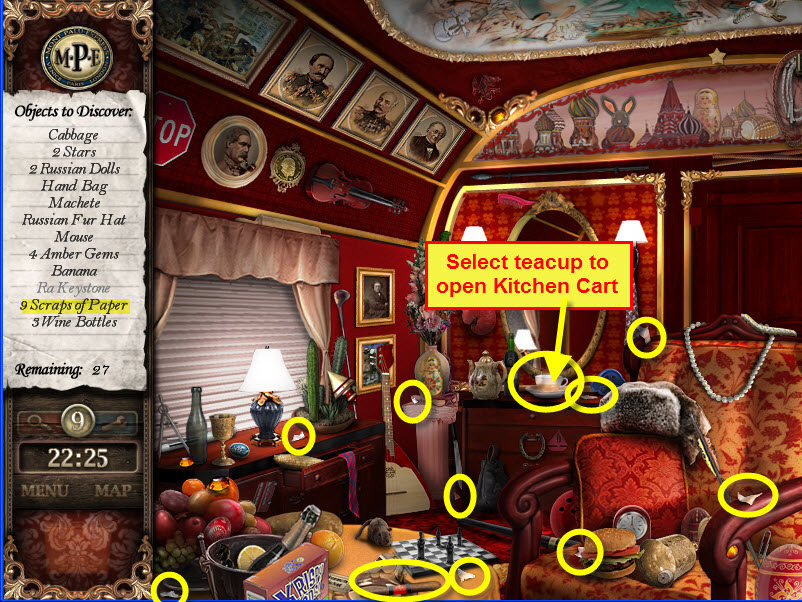
- Find Victor Jasili's cigar on dining table for extra time or hints depending on mode of play. (The cigar is not included on the hidden object list).
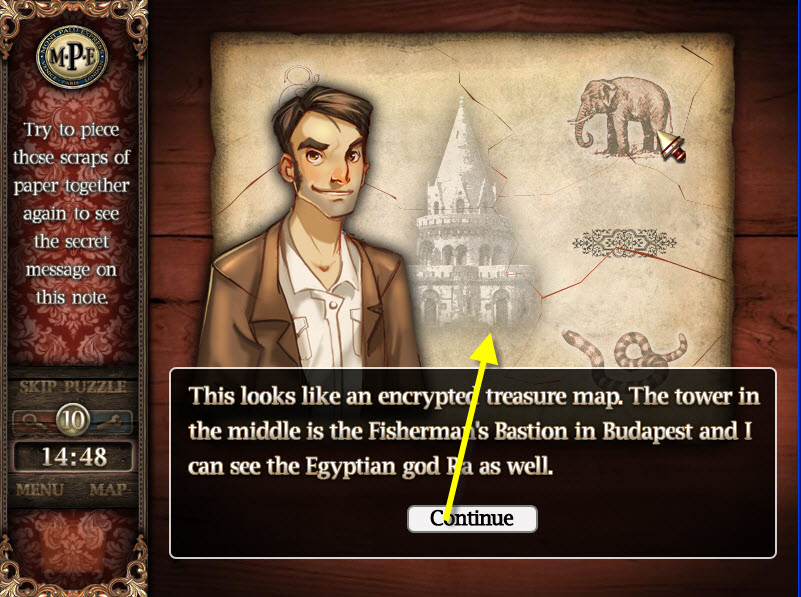
- Collect 9 scraps of paper to reveal a mini puzzle.
- Put scrap pieces of paper together to receive Budapest hint.
- Select the teacup on vanity to open the Kitchen Cart.
- Return to cabin after you have hot water in the teapot to locate Ra Keystone.
- Go to map then the Kitchen Cart.
Kitchen Cart:
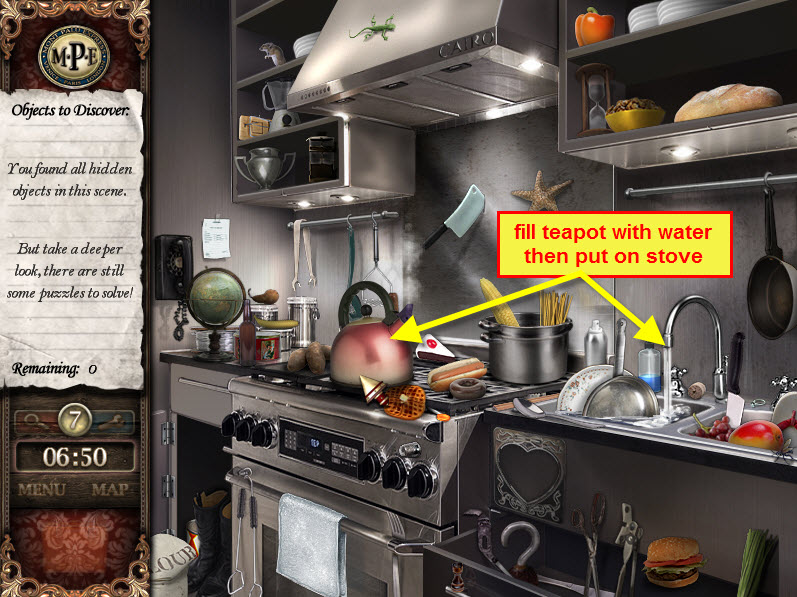
- Locate Hidden objects.
- Fill teapot with water from the kitchen sink faucet.
- Put teapot on stove burner to heat water.
- Return to Victor Jasili's/Cabin 2.
Cabin 2 return-Ra Keystone:
- Put teabag from inventory into teacup on vanity.
- Take teapot with hot water from inventory and pour into teacup to reveal safe behind mirror.
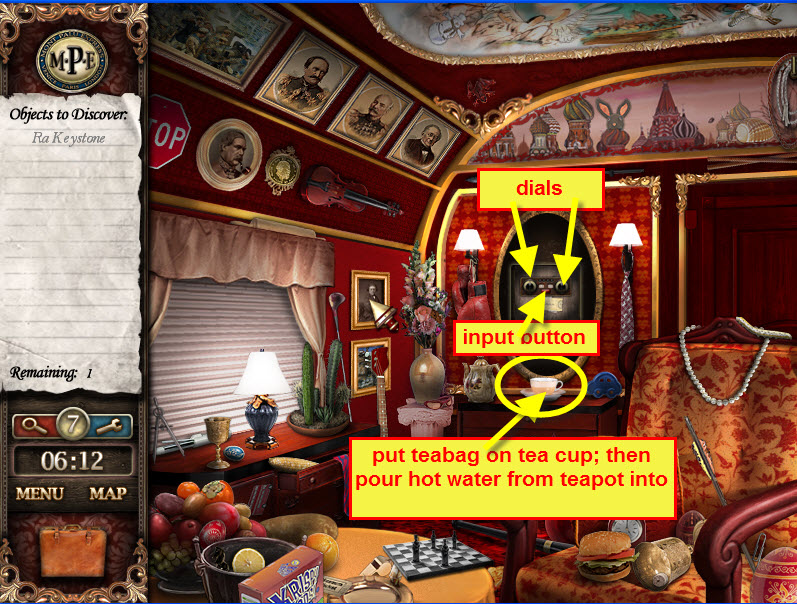
- Safe Mini Puzzle: The combination is 20, 46, 13, 16; to get those numbers add 2 numbers together that equal the combination numbers by selecting the dials on the left and right of the safe. Press the red unlock button to input each addition equation. A green light will appear at the top of the safe when the equation is inputted correctly. Example – Left dial 8; right dial 12; then select red unlock button. Solution: 8+12, 39+7, 5+8, and 36+20.
- Select the Ra Keystone for an inventory item.
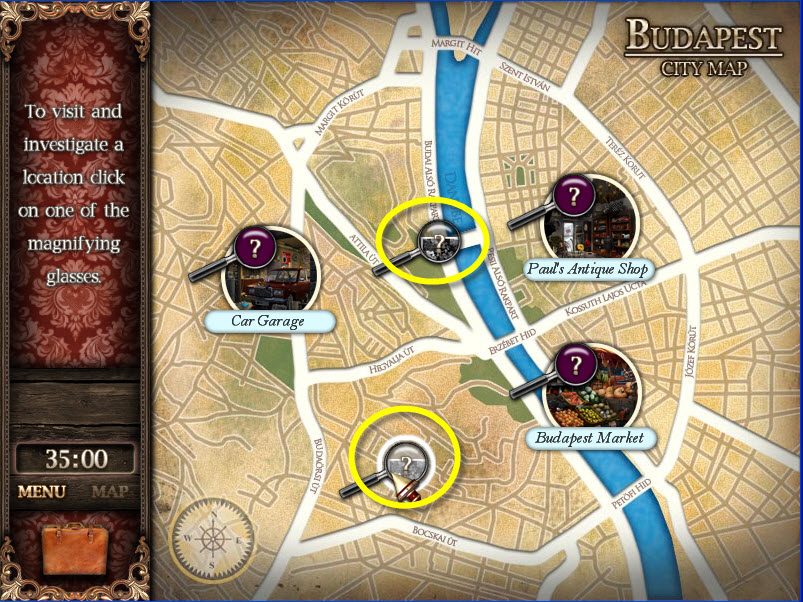
Chapter 2 Budapest:
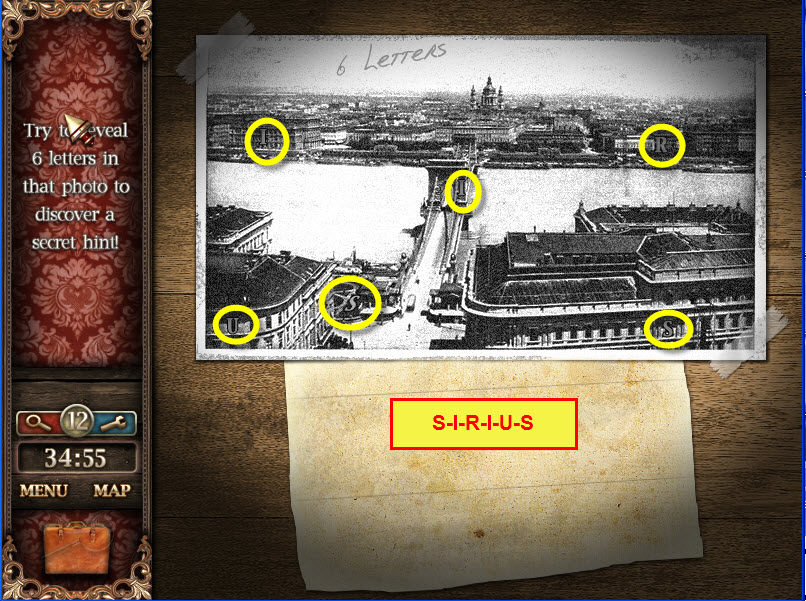
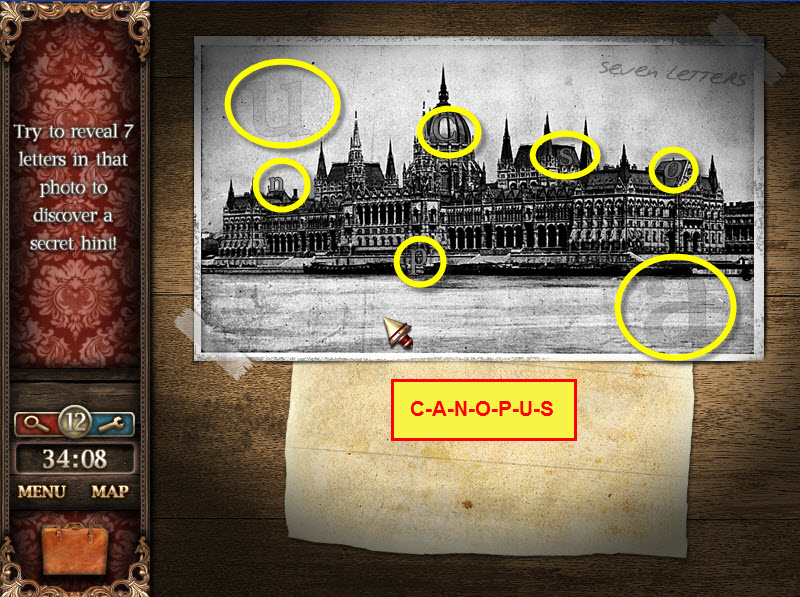
- Use the magnifying glass on the 2 middle locations to reveal pictures with hidden letters to find.
- Find the letters in the top picture to spell S-I-R-I-U-S.
- Find the letters in the bottom picture to spell C-A-N-O-P-U-S.
- Select the Budapest Market location.
Budapest Market:
- Locate all items on the list except those listed in gray. Collect the knob in inventory.
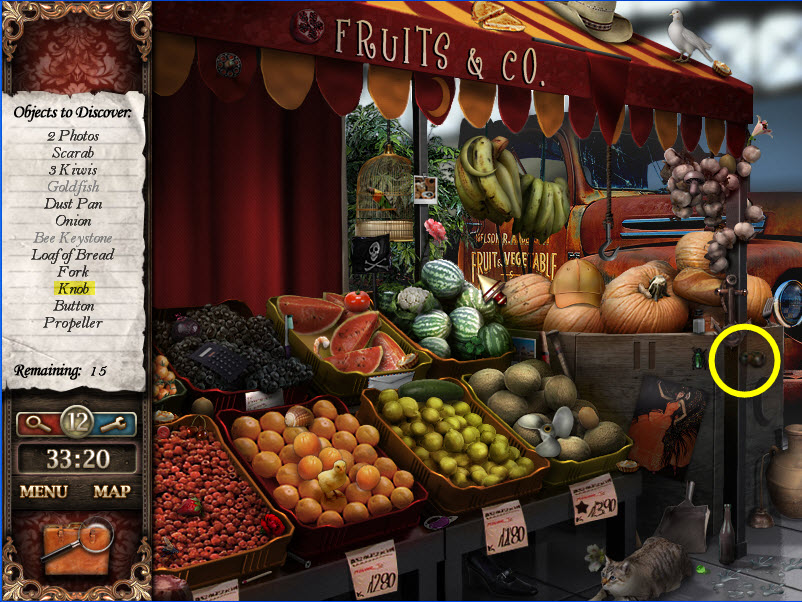
- Go to map then select the Car Garage Location.
Car Garage:
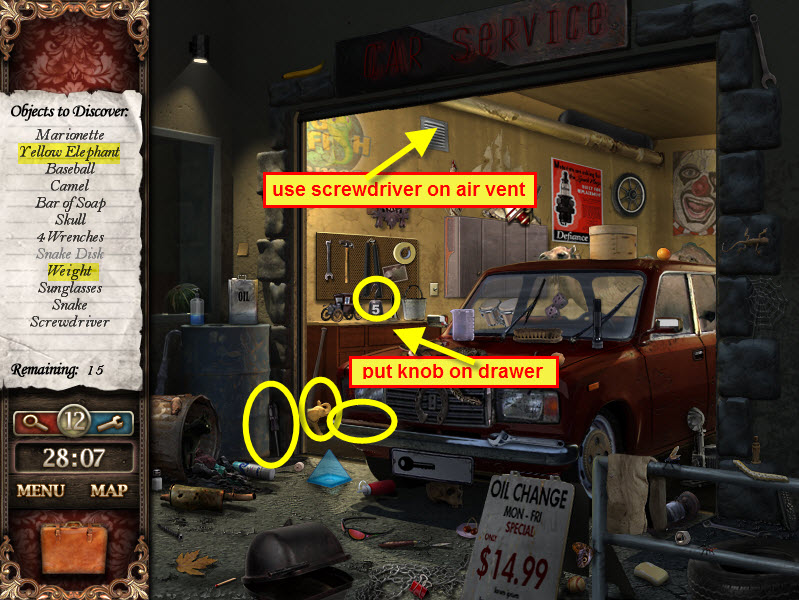
- Locate and collect the yellow elephant, screwdriver and weight for inventory.
- Locate other random items on list.
- Collect the cigar suspect item on car bumper.
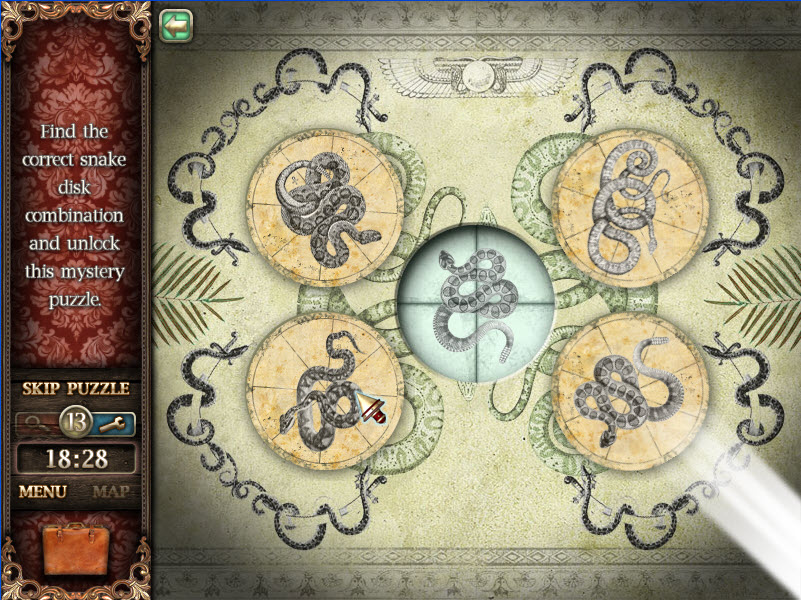
- Use screwdriver on air vent to collect the snake disk for inventory.
- Put knob on top drawer of work bench then open drawer to reveal a snake mini-puzzle.
- Snake Mini-Puzzle: Put snake disk in empty hole. Each snake disk controls a portion of the middle disk. Move the disks to make a complete picture of one of the snakes on one of the disks. When the middle disk matches one of the snake disks...a light will shine on that disk. Match the center disk with each of the 4 snake disks.
- Go to map and select Paul's Antique Shop.
Paul's Antique Shop:
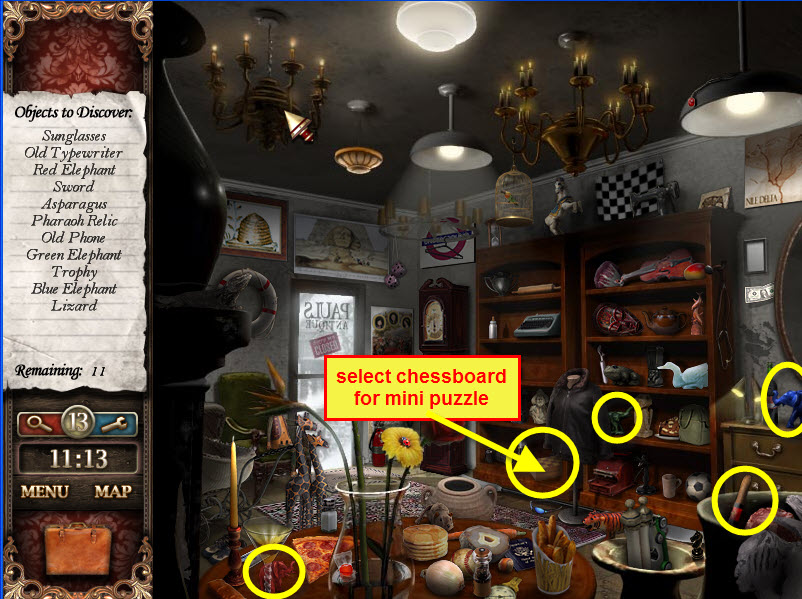
- Locate hidden objects and collect blue elephant, green elephant and red elephant for inventory.
- Collect cigar suspect item for additional hints.
- Select chessboard on bottom bookshelf for mini puzzle.
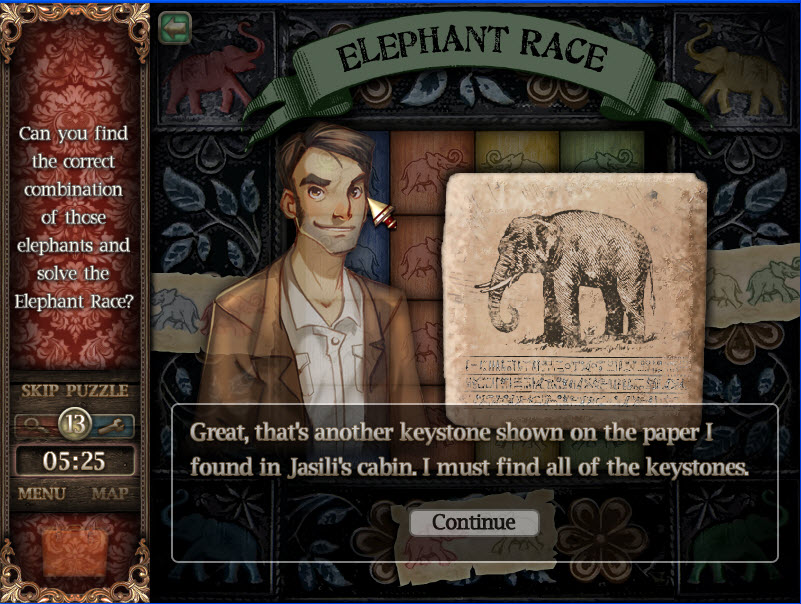
- Elephant Mini Puzzle: Put elephants from inventory into puzzle to start puzzle. Select 2 pieces of the puzzle to have them swap places. Make 4 columns of the same colored elephants by using the clues on the edges of the puzzle. Solution order from left to right: blue, red, yellow and green. When puzzle is completed you'll receive an elephant keystone for inventory.
- Go to map then select Budapest Market.
Budapest Market Return:
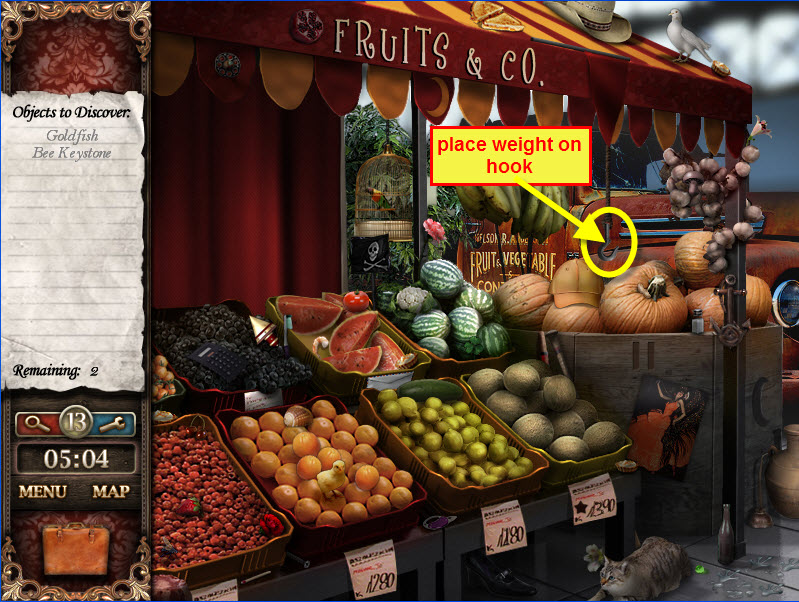
- Place weight from inventory on hook to open curtain to locate items listed in gray on the list and to locate/collect the bee keystone for inventory.
- When all items are located you'll be transported to Fisherman's Bastion.
Fisherman's Bastion:
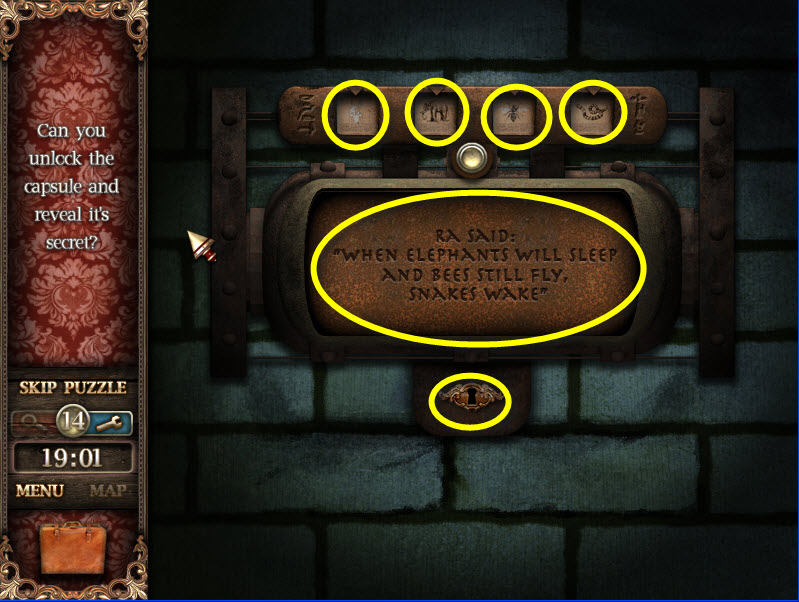
- Use flashlight from inventory to aid in locating hidden objects, collect time capsule key for inventory.

- Select highlighted back wall after hidden objects are found.
- Time Capsule Puzzle: Insert keystones on top squares in order from left to right- Ra Keystone, Elephant Keystone, Bee Keystone and Snake Keystone. Use the capsule key from inventory to unlock time capsule.
Chapter 3 – Heading for Vienna:
Dining Cart:
- Locate hidden objects and collect the batteries and Suitcase key #3 for inventory.
Bar Cart:
- Locate hidden objects and collect the Drain Lever and Match for inventory.
Cabin 3 – Yue Lan Run:

- Locate hidden objects and Suspect Hidden Item (fortune cookie).
- Put batteries from inventory on lion statue by door to collect suitcase key #3 from its mouth.
- Put match from inventory to light candle to open access to Cabin 2.
- Select map and go to Cabin 2.
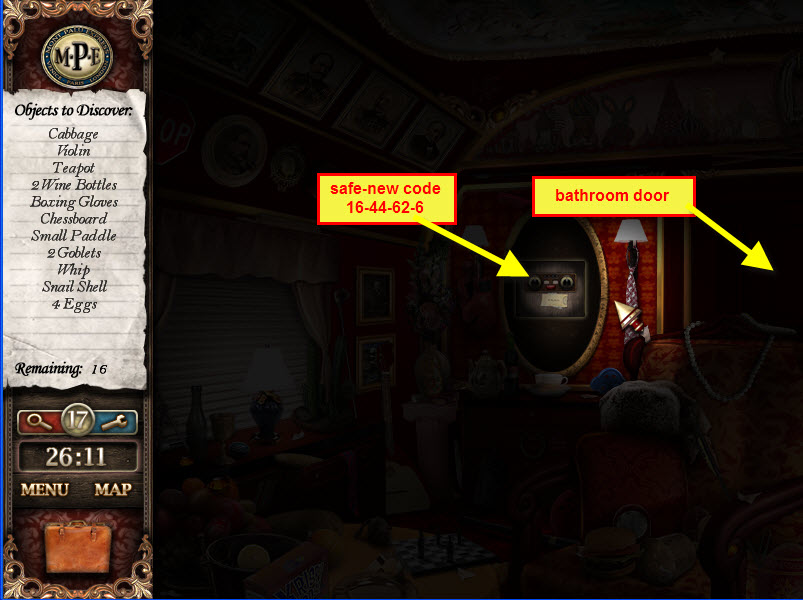
Cabin 2 – Victor Jasili (use flashlight to locate items):
- Locate items on list to access Bathroom door in the back of the room.
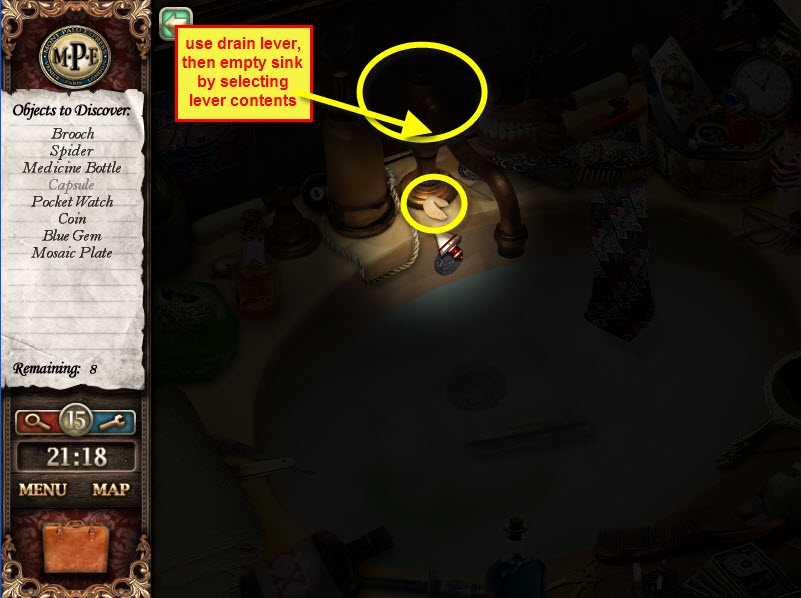
- Select bathroom door to locate items and to collect the capsule for the new safe code. Use drain lever on top of bathroom sink faucet, then pull lever to drain sink...collect capsule with safe code.
- Exit bathroom and select the safe at the back of the cabin. Solve puzzle as done previously with new combination 16-44-62-6: 8+8=16; 36+8=44; 39+23=62; 2+4=6.
- Return to Cabin 3.
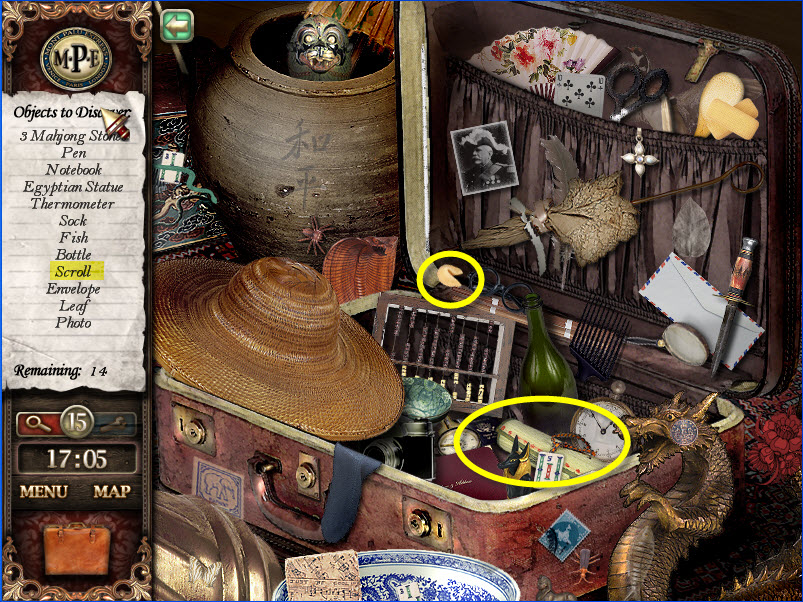
Cabin 3 – Yue Lan Run return:
- Select suitcase key #2 from melted candle.
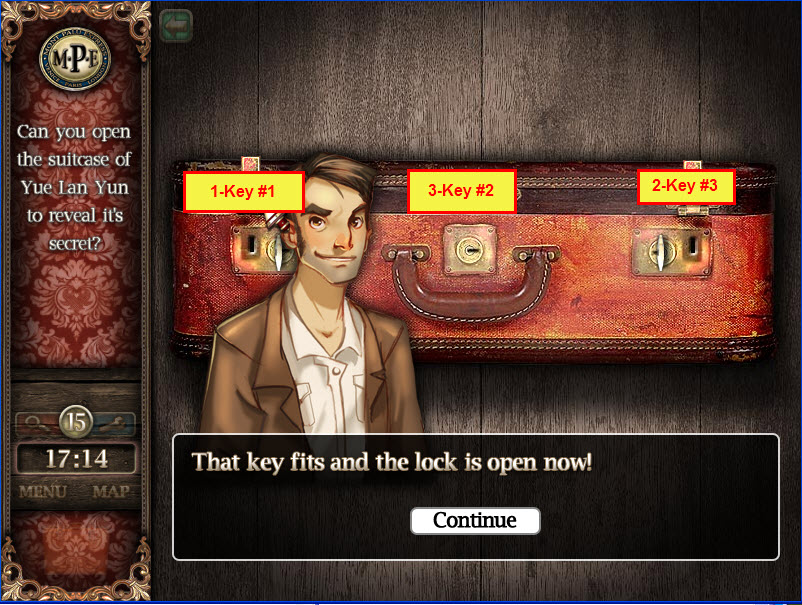
- Select suitcase in bottom middle of room to solve suitcase puzzle.
- Suitcase puzzle: Put keys from inventory in suitcase locks from left to right 1-2-3...but there's a catch... put in key #1; then key #3; then key #2.
- Locate items in suitcase and collect the scroll for inventory.
Chapter 4-Vienna:
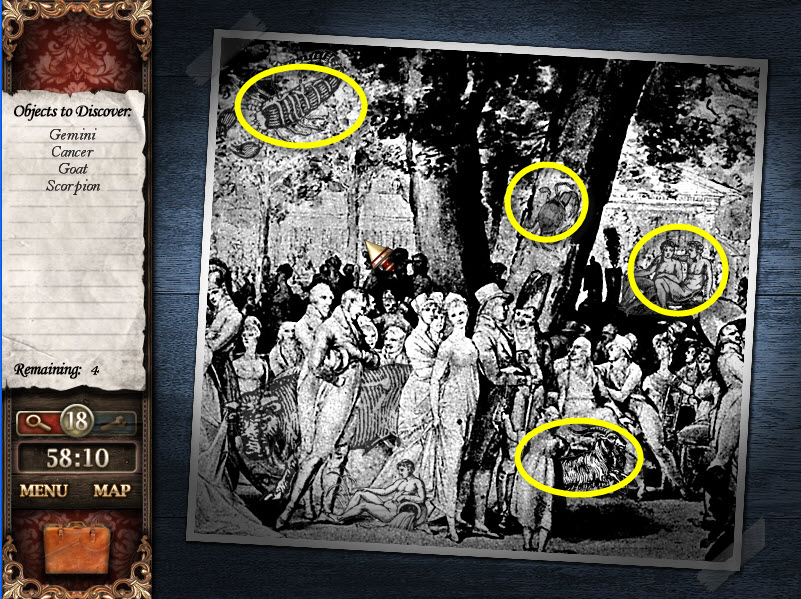
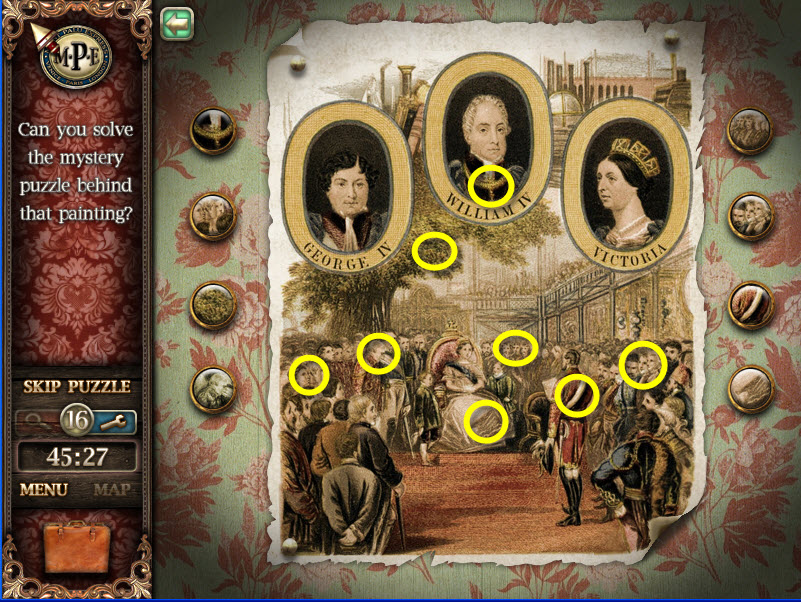
- Use magnifying glass on top picture on map to locate 5 (the game states 6 signs) zodiac signs.
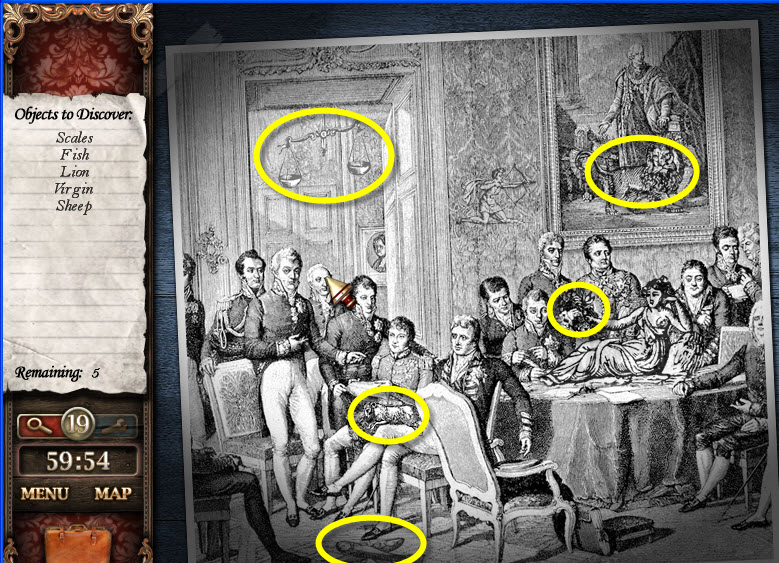
- Use magnifying glass on lower picture on map to locate 4 zodiac signs in picture
Clock Store:
- Locate hidden objects on list. To locate/collect organ pipe #2, select the grandfather clock to the right of the stairs to reveal a puzzle.
- Clock puzzle (do steps in following order):
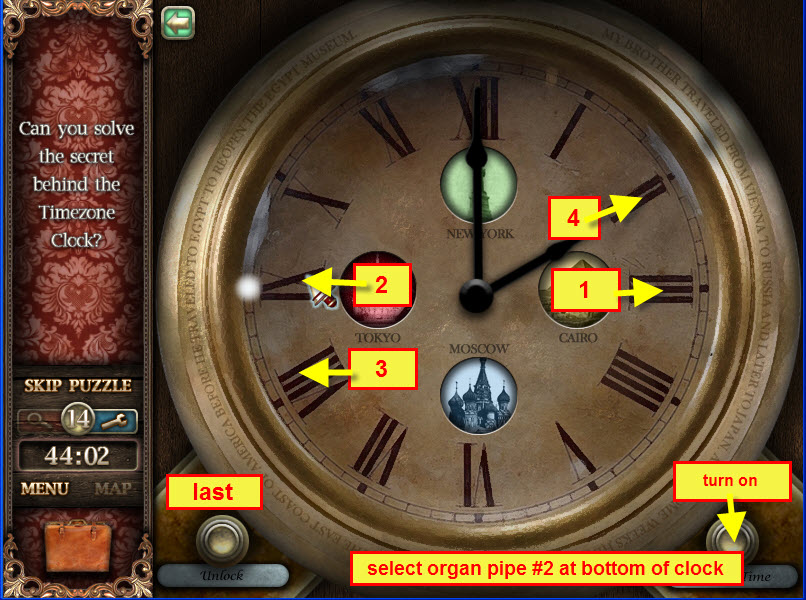
- Select button on bottom right to turn puzzle on.
- Select Roman Numeral 3
- Select Roman Numeral 9
- Select Roman Numeral 8
- Select Roman Numeral 2
- Select unlock button on bottom left of the puzzle.
- Collect organ pipe #2 on exposed bottom drawer of clock.
- Select the map and go to the Prater location.
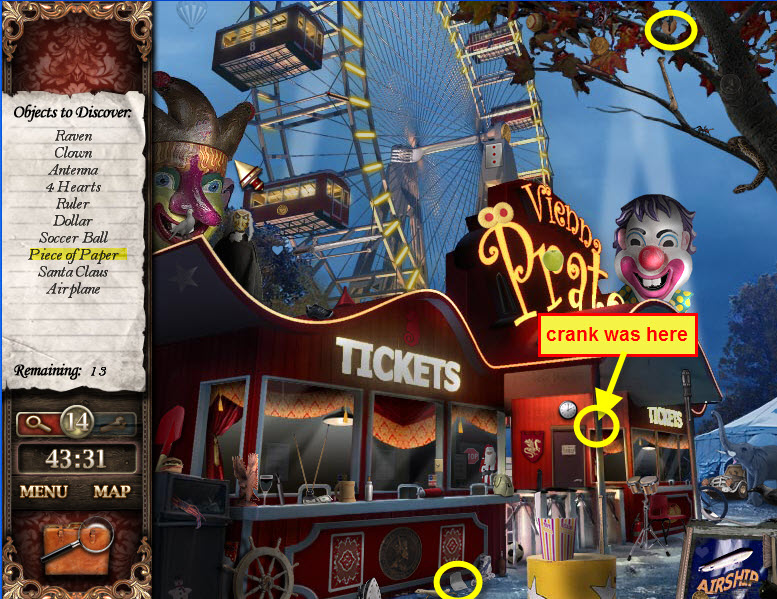
The Prater:
- Locate hidden objects and collect the crank and a piece of paper for inventory. Oh, and a fortune cookie.
- Select the map and go to the Café location.
Café:
- Locate hidden items and collect Organ Pipe #1 for inventory and a fortune cookie.

- Select the map and go to the Old Music Store location.
Old Music Store:
- Locate hidden items; there are quite a few objects you won't be able to locate until you can open the store.
- Pipe Organ Puzzle:
- Select Pipe Organ to open puzzle
- Put Organ Pipes #1 and #2 into organ.
- The code is on the bottom right of the puzzle.
- Select 2 pipes to have them switch places.
- Put pipes in order from left to right: C1-D-E-G-A-C2.
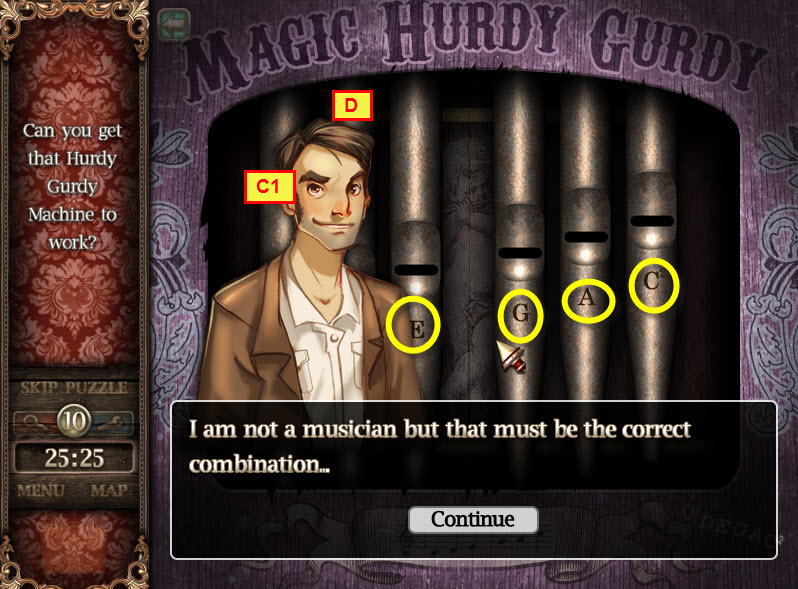
- Take crank from inventory and place on pipe organ.
- The lights in the store will turn on and you'll be able to locate the "grayed" items on the list. There is a fortune cookie on the middle shelf next to the amplifier.
- Select map and select Belvedere Garden.
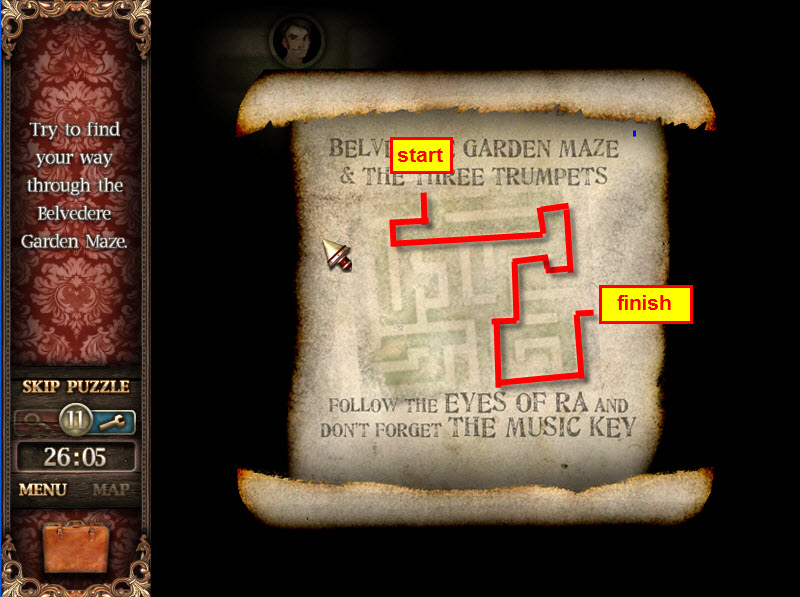
Belvedere Garden:
- Make your way through the maze by selecting an arrow...you're on the right track when you encounter the eyes of Isis on your journey. The maze is very forgiving...go the wrong direction you can back up. Use the map from your inventory as a guide.
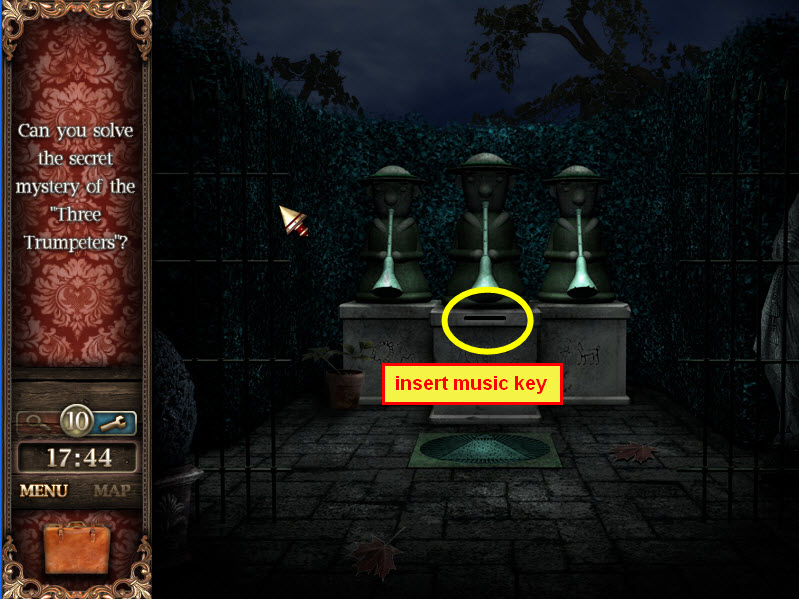
- Enter Garden to locate items which will open up the next part of the Garden.
- There's a fortune cookie on the park bench on the left front of the scene.
- Enter the next part of the garden and put the music key from inventory into the slot...that's it...well, you'll hear some music and receive an amulet.
Chapter 5: Heading to Praque:
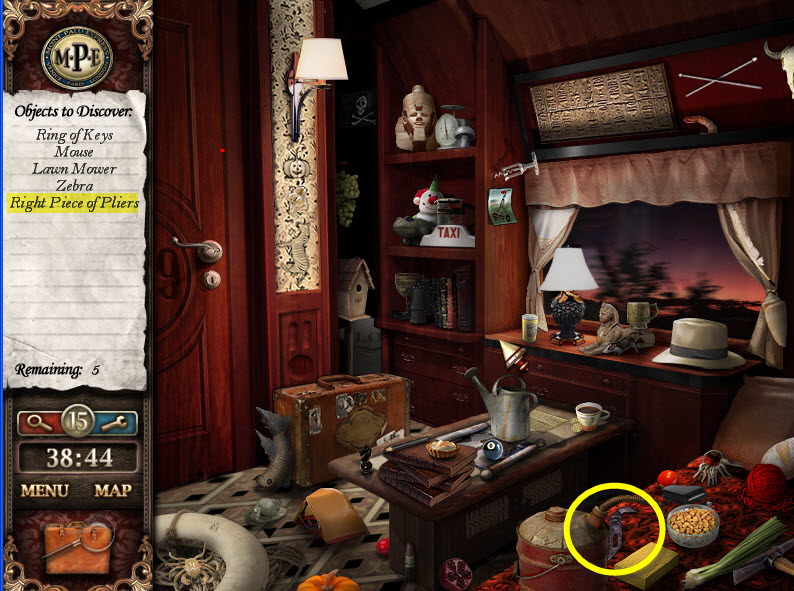
Cabin 7 – Yours:
- You'll be automatically transferred to your cabin and receive a gift...might as well locate hidden items and collect the Right Piece of Pliers for inventory. You'll return later.
- Go to Kitchen Cart.
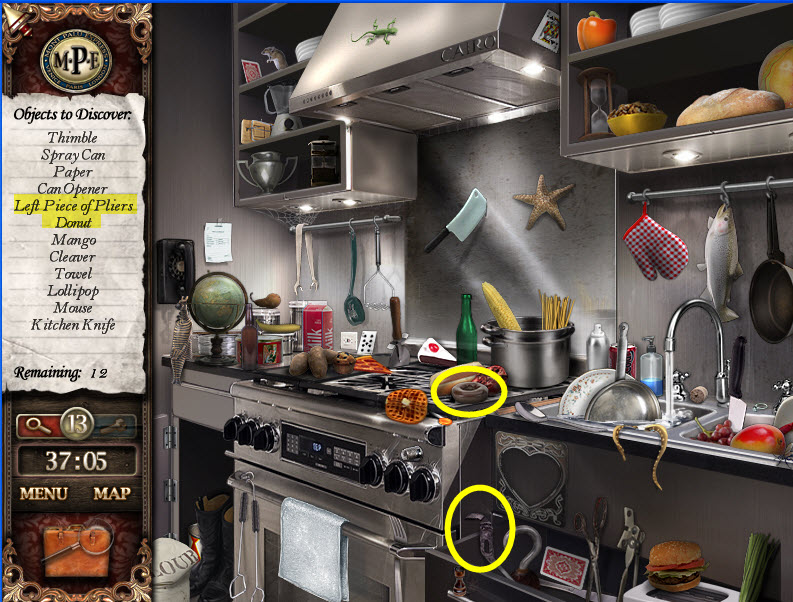
Kitchen Cart:
- Locate hidden objects and collect the Left Piece of Pliers and a donut for inventory.
- Go to the Luggage Cart
Luggage Cart:
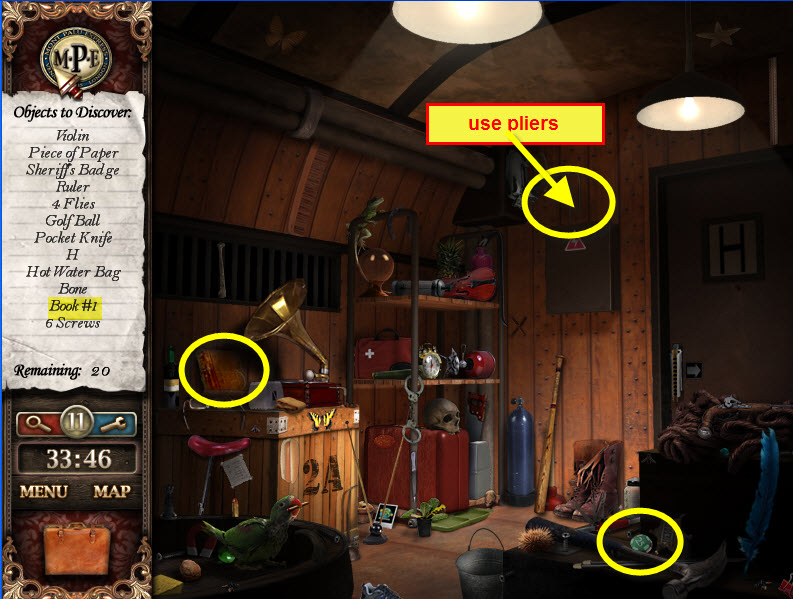
- Select record from inventory and place on the Gramophone...locate hidden objects and collect Book #1 for inventory.
- Put the 2 pieces of pliers together from inventory and use on exposed wires near the top middle of the scene to cut a piece of wire for inventory.
Cabin 7 return:
- Use piece of wire from inventory on door in the cabin.
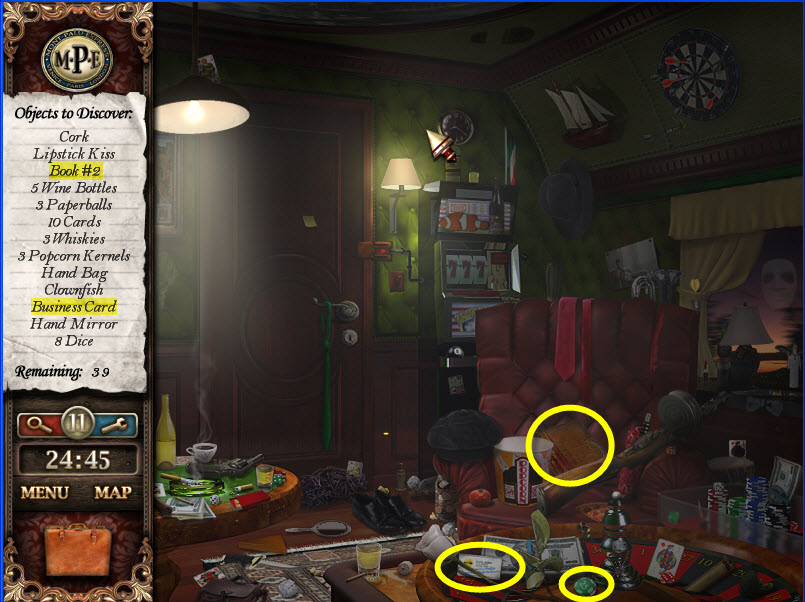
Cabin 8 – S. Carlo Siro:
- Locate items and collect 10 Playing cards for a puzzle. Collect Book #2 and a Business Card for inventory.
- Card Puzzle: Place cards in the following order from left to right:
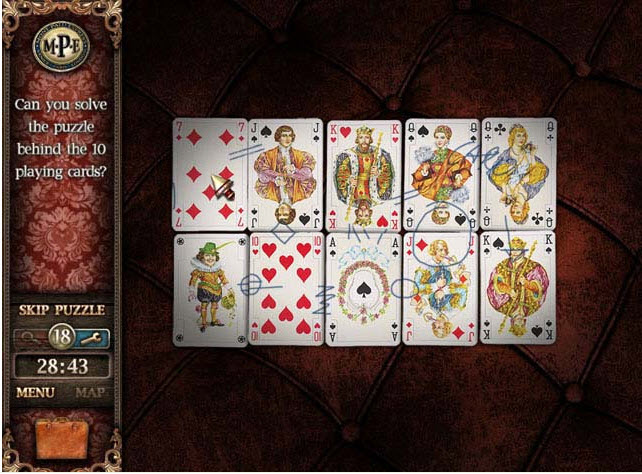
- Top Row: 7 of Diamonds; Jack of Spades; King of Hearts, Queen of Diamonds; Queen of Clubs
- Bottom Row: Joker; 10 of Diamonds; Ace of Spades; Jack of Diamonds; King of Spades
- Select each card to reveal a map which will be put into inventory..
- Select the Slot Machine to the right of the door...there will be a story scenario...go back to cabin 8.
- Slot Machine puzzle:
- Select the go button to start the slot machine.
- Press each stop button when you have the following item order from left to right: Carrot-Cherry-Broccoli. (May take a little practice-observe what item/s are on each slot wheel before the aforementioned items to be prepared to press each stop button as the wheels move pretty fast...make a mistake...just press all the stop buttons...then start over)
- When combination is correct the door to the left of the slot machine will unlock...enter door.
Library:
- Locate the list items and place books from inventory on shelves. Place Book 1 in empty book slot on the bottom shelf. Put Book 2 in empty book slot on top shelf.
Chapter 6-Prague:
Karel's Taxi:
- Locate all the hidden coins.

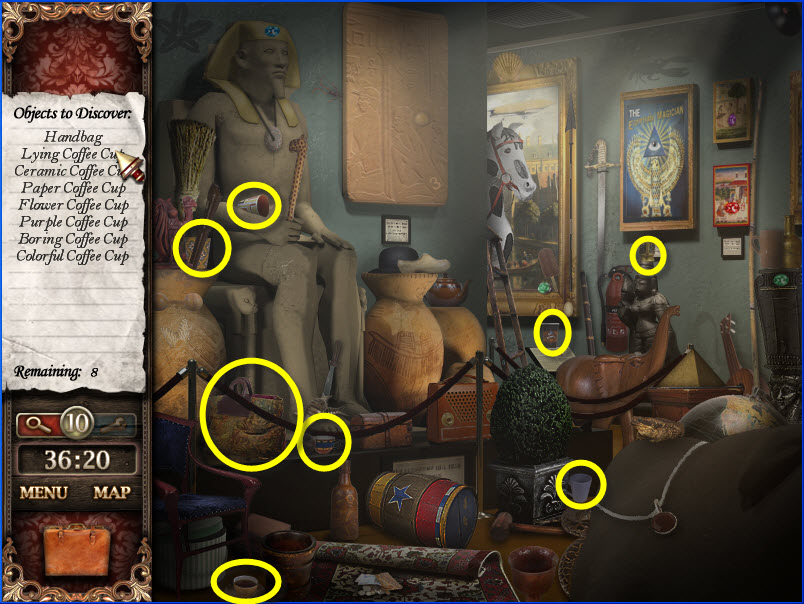
Ancient Museum:
- Locate the Handbag (inventory) and coffee cups.
Karel's Taxi Return:
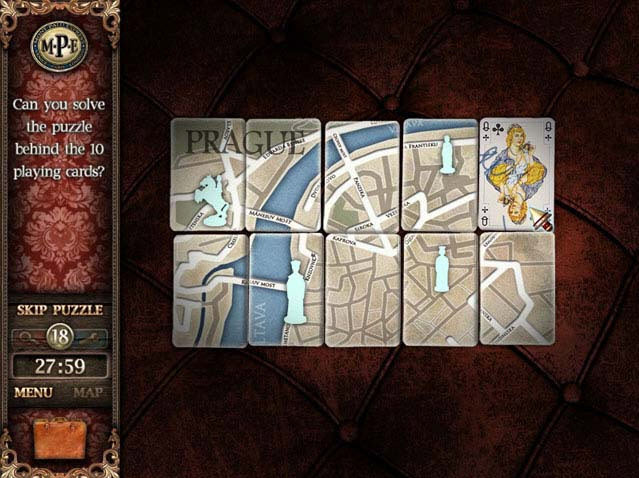
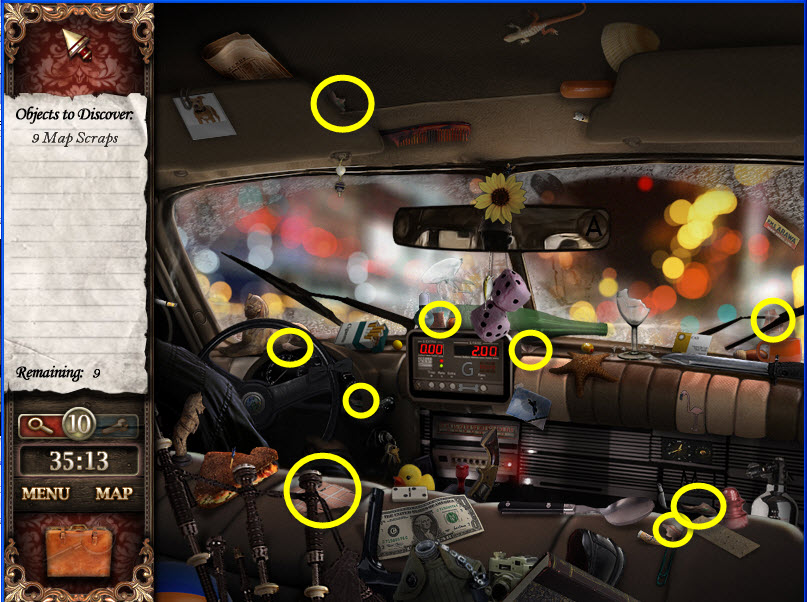
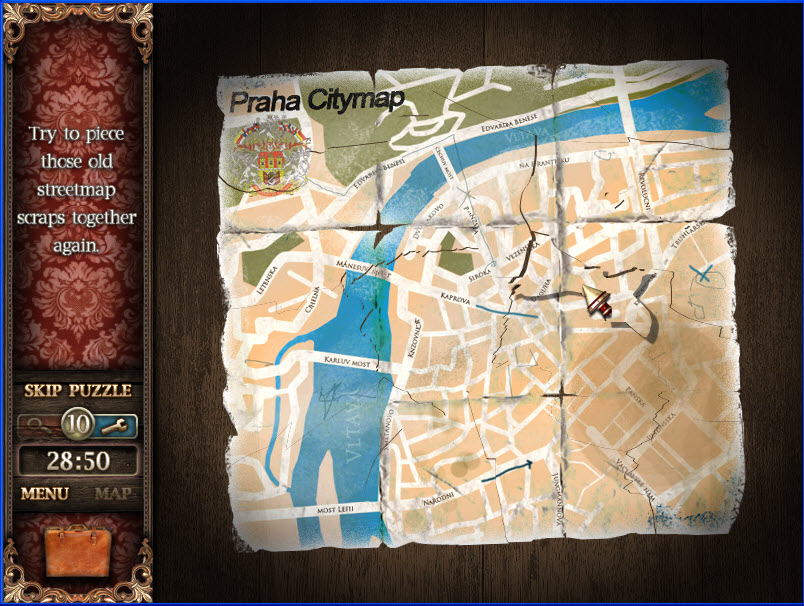
- Collect the 9 map scraps.
- Map Puzzle: put the pieces of the map together. See screenshot.
- Go to The Magician.
The Magician:
- Locate items...there are 2 poker chips in the scene.
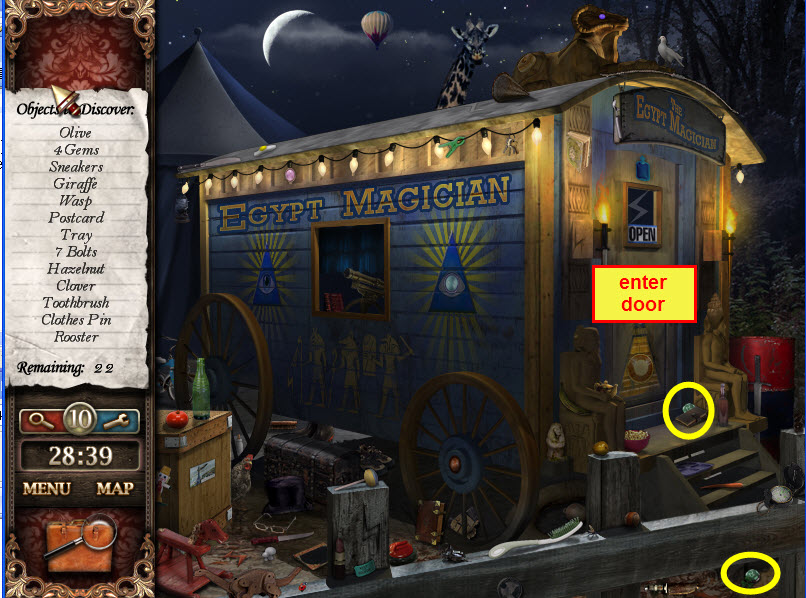
- Select the door of the Egyptian Magician trailer to enter trailer and to locate items.
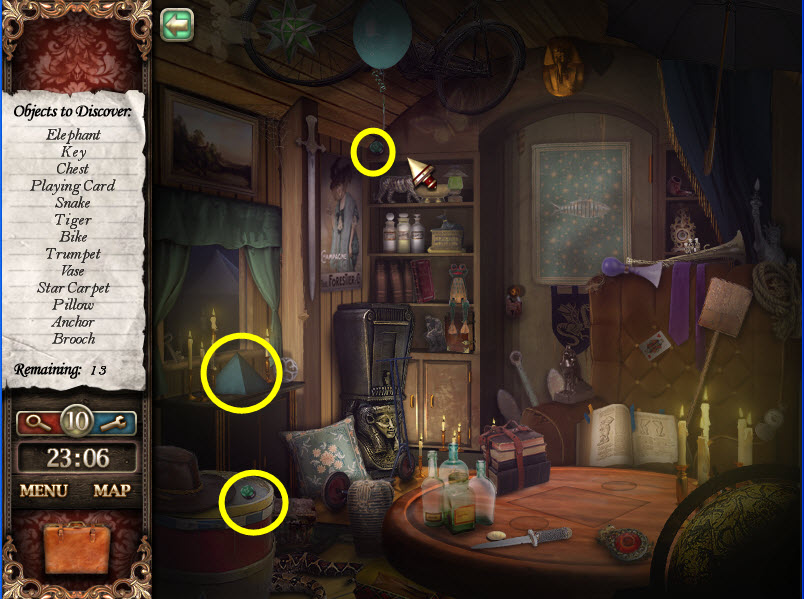
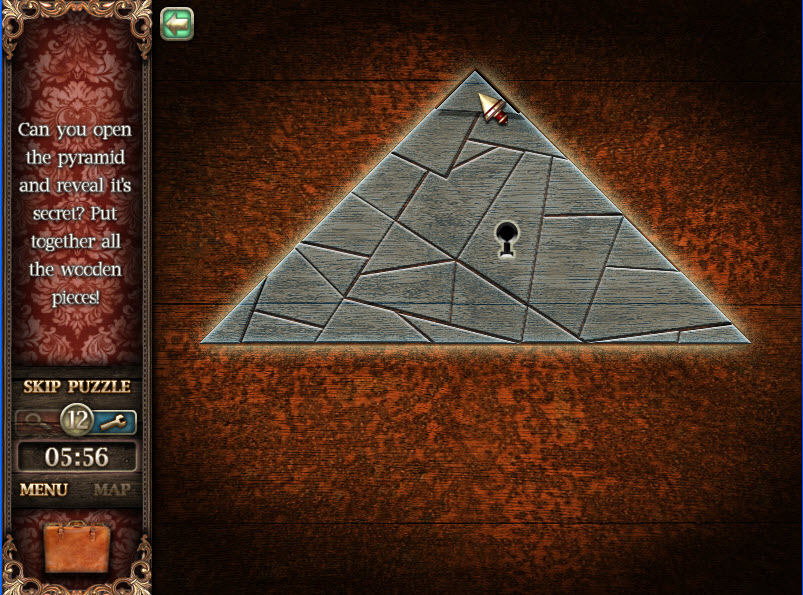
- Select green pyramid under window to reveal the Pyramid Puzzle.
- Pyramid Puzzle: Place the puzzle pieces into the pyramid. Return later to put the key into the pyramid.

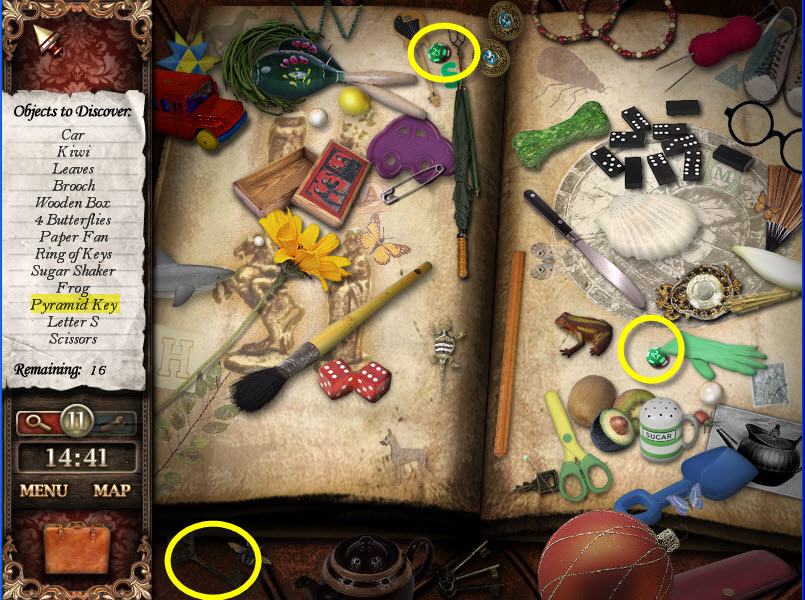
- Go to the map; then the book store.
Book Store:
- Locate items and collect the pyramid key for inventory.
- Return to the Magicians Trailer and insert the key into the Pyramid Puzzle to collect half of a Golden Ring.
- Go to the Ancient Museum.
Ancient Museum Return:
- Locate hidden objects.
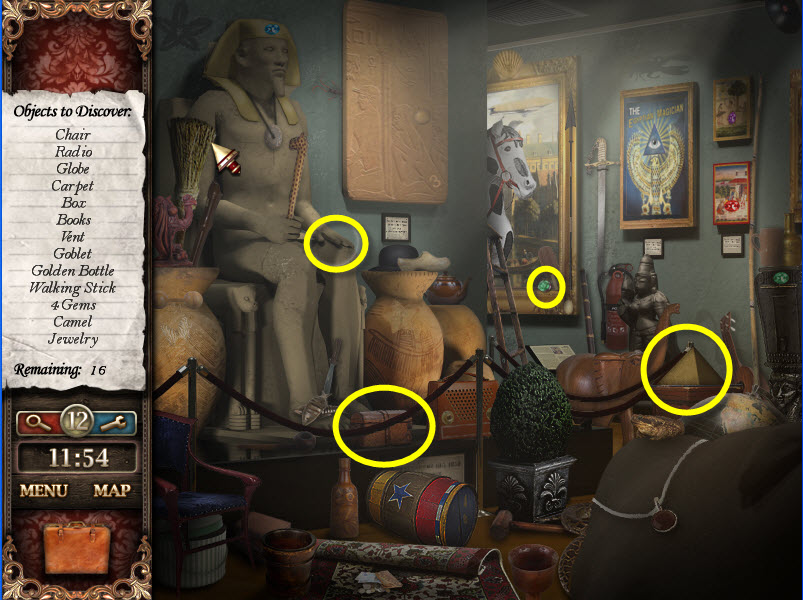
- Select the green pyramid on the right of the scene.
- Another Pyramid Puzzle. Solve puzzle in the same fashion as before. Place key in key hole when puzzle is completed to receive the second half of the golden ring.
- Connect the 2 halves of the Golden Ring together in inventory; then place the ring in large statue's left hand. You'll receive a statue.
- Return to Karel's Taxi Cab.
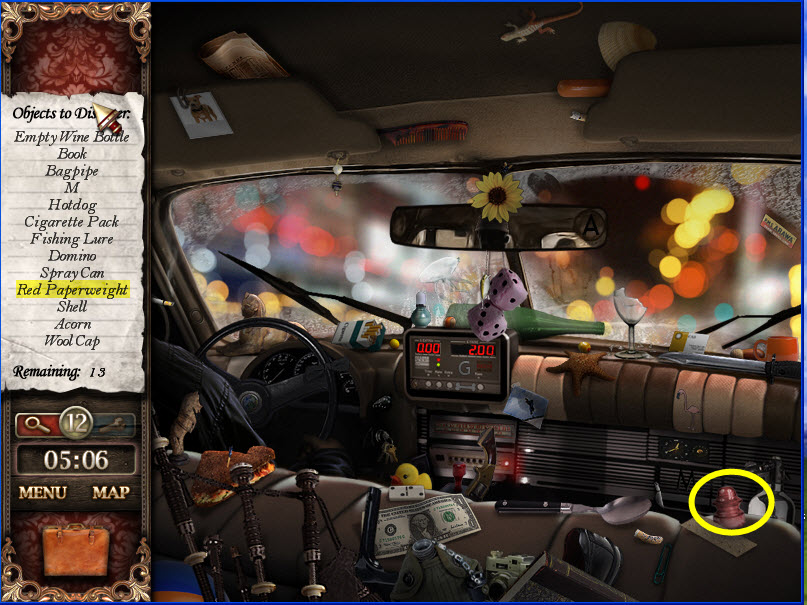
Karel's Taxi Cab return (yes; again):
- Locate hidden objects and collect the Red Paperweight for inventory.
- Go to the Tattoo Shop.
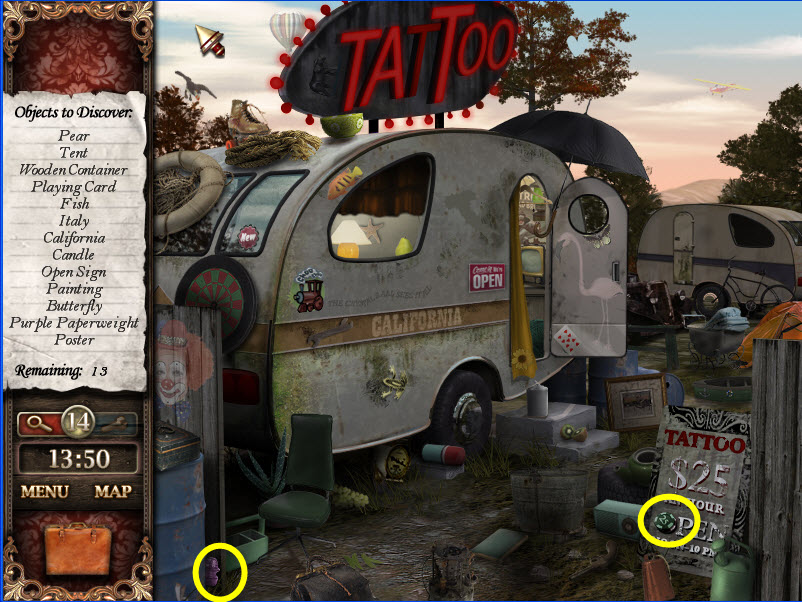
Tattoo Shop:
- Locate hidden objects and collect the Purple Paperweight for inventory.
- Return to the Magicians Trailer.
Magician's Trailer Room:
- Go inside the trailer.
- Place the red paperweight on the highlighted circle on the table...place the purple paperweight on the bottom highlighted circle on the table...a slot in the table will open up...collect a golden statue by selecting opening.
Clock Tower:
- Locate items on list; you can use the flashlight to locate items easier. There are some chips in the scene.
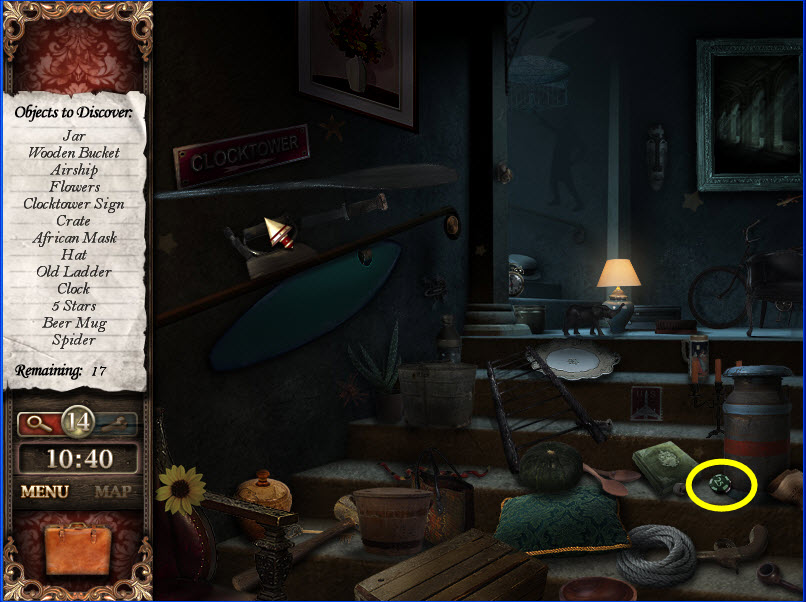
- You'll be transported behind the clock.
- Clock Tower Puzzle: Place the correct weight from the front of the puzzle on the right side of the scale to balance the statue placed on the left side of the scale:
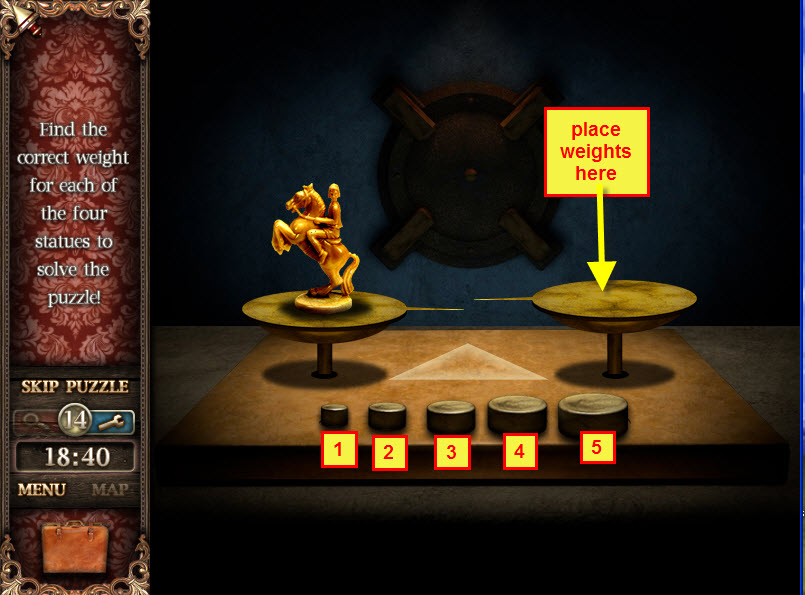
- First Statue – Third weight from the left.
- Second Statue – Second weight from the left along with the third weight from the left.
- Third Statue – First weight from the left along with the Fifth weight from the left.
- Fourth Statue – First weight along Third weight along with the Fifth weight.
Chapter 7-Heading to Paris:
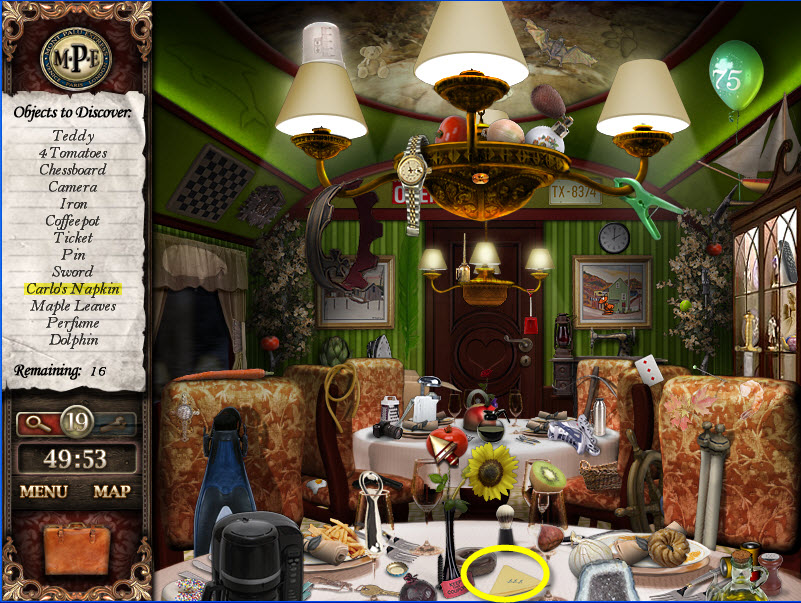
Dining Cart:
- Locate items and collect Carlo's Napkin for inventory.
Bar Cart:
- Locate items and collect a small key for inventory.
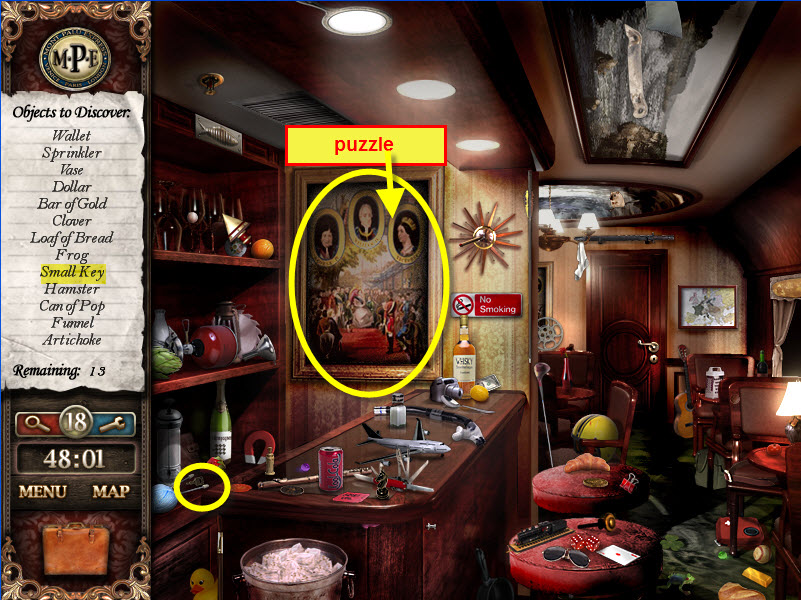
- Select the picture hanging on the wall behind the bar for a puzzle.
- Bar picture puzzle: Locate the locations in the picture that match the buttons on the sides of the puzzle. See Screenshot for locations.
- Enter door that opened up in the back of the scene after the puzzle was solved.
Bar Storage Room:
- Locate items on list; collect the hammer for inventory.

- Go to Cabin 8.
Cabin 8 – S. Carlo Siro:
- Locate items on list; nothing to collect for inventory.
- Play the slot machine again to access the Library. Slot Puzzle Solution: 3 $ signs.
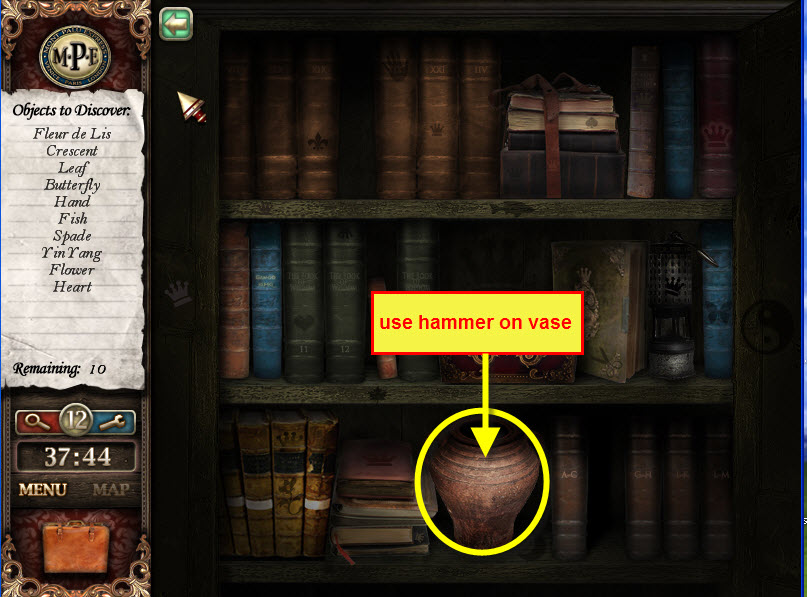
Carlo Siro's Secret Library:
- Locate the items on the list.
- Use your hammer from inventory to break the vase on the bottom shelf to recover an amulet.
- Go to the Luggage Cart.
Luggage Cart:
- Locate the hidden items and collect the bucket for inventory.
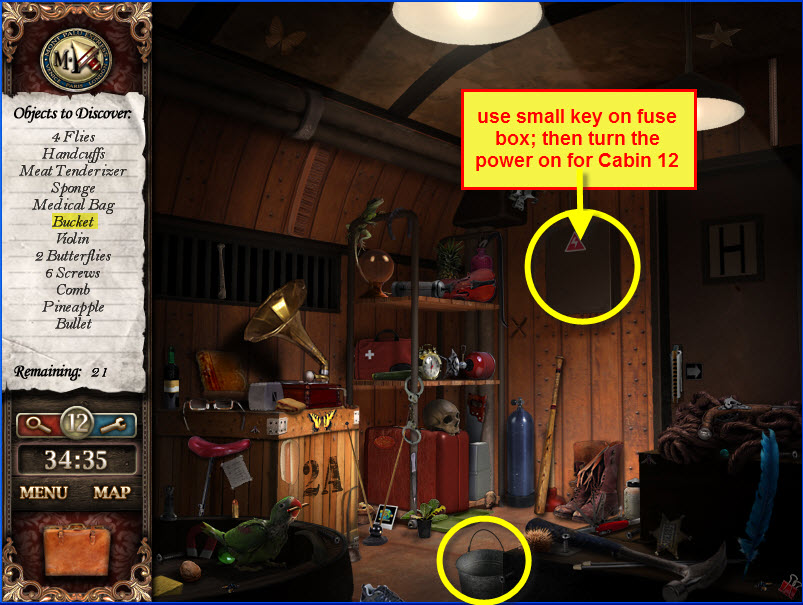
- Select the small key from inventory and use on the fuse box to the left of the door.
- Turn the power on for Cabin 12.
- Go to the Kitchen Cart.
Kitchen Cart:
- Locate the hidden objects.
- Take the bucket from inventory and fill with water from the sink faucet.
- Go to Cabin 12.
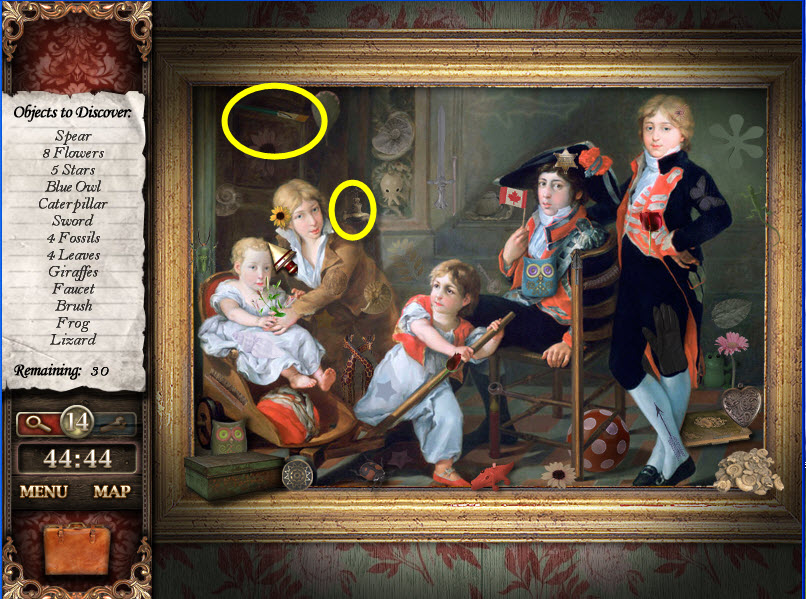
Cabin 12 – M. Peres Blanch:
- Locate hidden objects.
- Take the bucket of water from inventory and put out the fire in the fireplace.
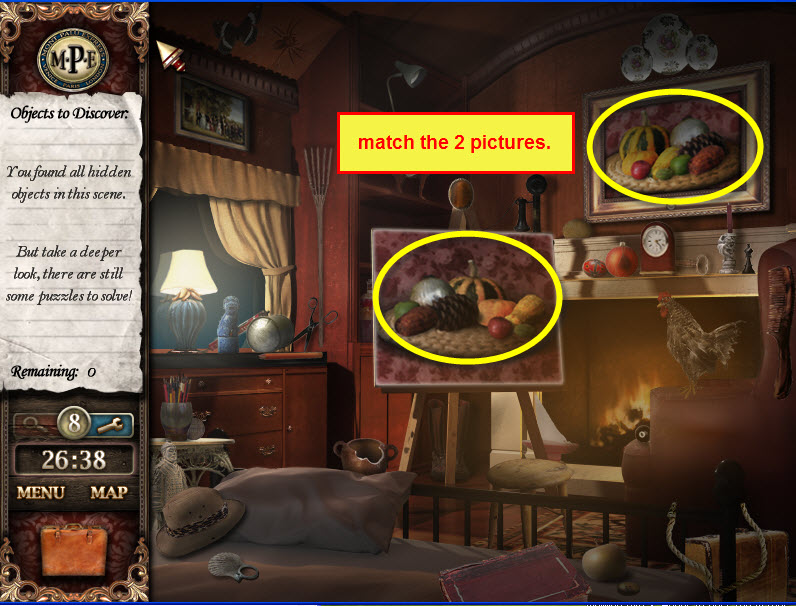
- Select the button on the picture frame above the fireplace.
- Select the painting on the easel and rearrange the painting until it is arrange like the painting above the fireplace. The items will snap into place when they are in the correct location.
- The fire will go out...you'll receive a book for inventory.
Chapter 8 – Paris:
Eiffel Tower:
- Locate hidden objects and collect a coin for inventory.
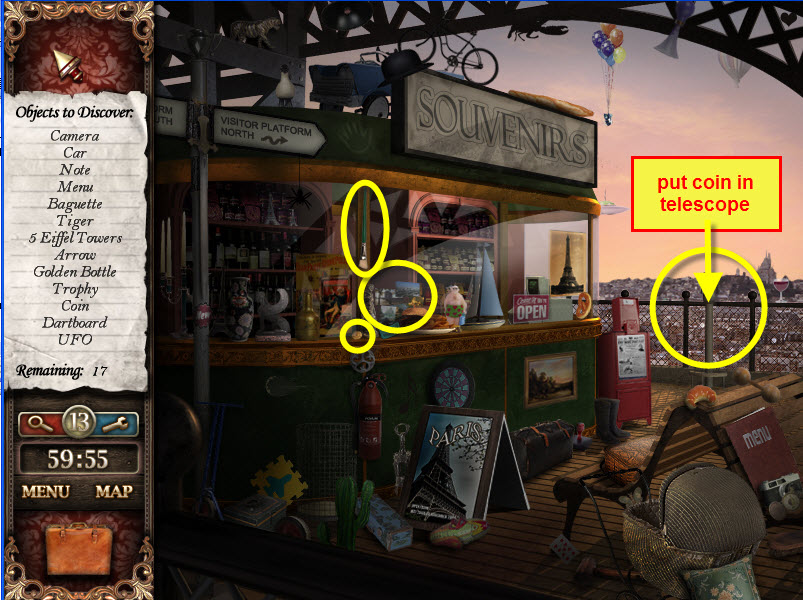
- Select the postcards that are highlighted when your curser runs over them.
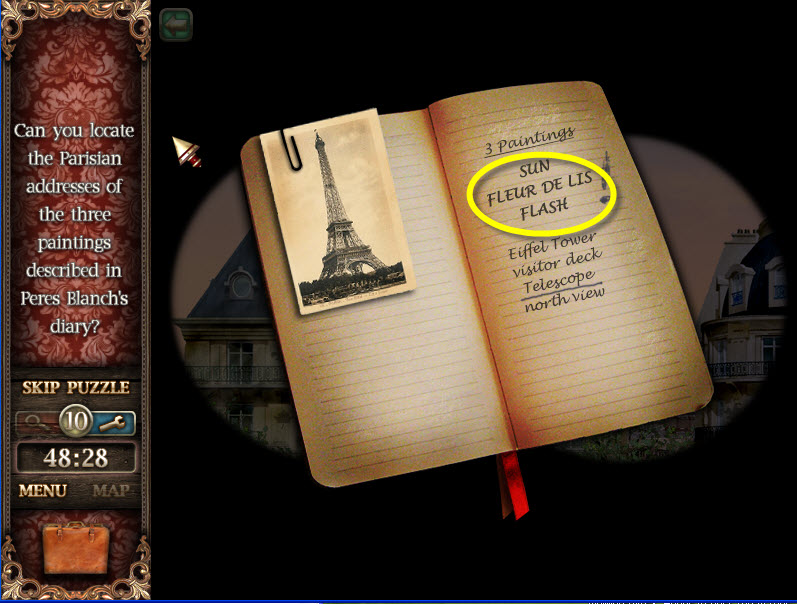
- Select the diary from inventory use the magnifying glass for a closer look...remember the 3 items listed under the "3 Paintings" heading on the right page. I don't think these items are random...played the game 3 times with the same items.
- Put the coin received above into the telescope.
- Look through the telescope moving it as far to the left and right as it will go. Find the items on the buildings listed on the diary page; Sun, Fleur De Lis and Flash (lightning). There are about 5 of each item to locate; the puzzle will give you an address after you've located enough of each item. One house will have the Fleur De Lis...one house will have the sun...and one house will have the flash.

- Go to Rue Vineuse.
Rue Vineuse:
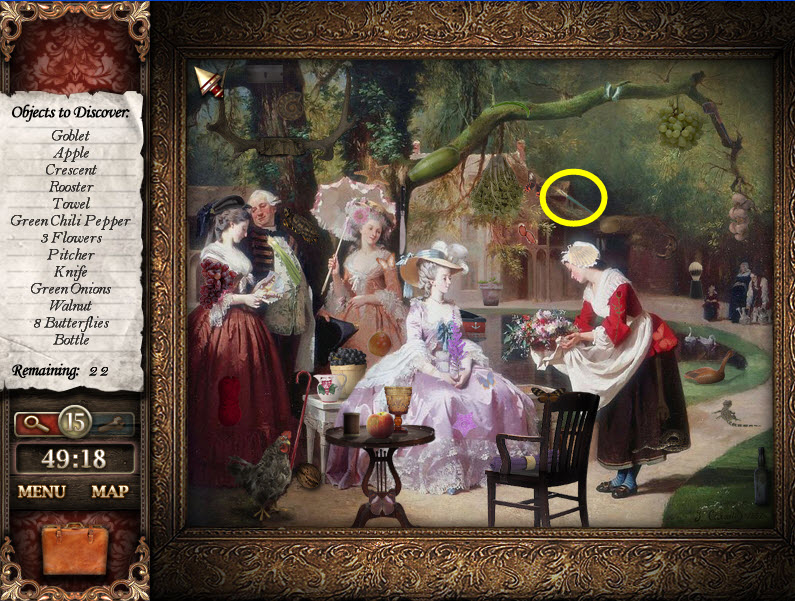
- Locate the hidden object items...that's all...there is a M. Peres Blanch paintbrush in the picture.
- Go to Souvenirs.
Souvenirs:
- Just a puzzle...match the correct postcard with the correct stamp. When the correct stamp is on the postcard the missing part of the picture will appear. See screenshot for solution.
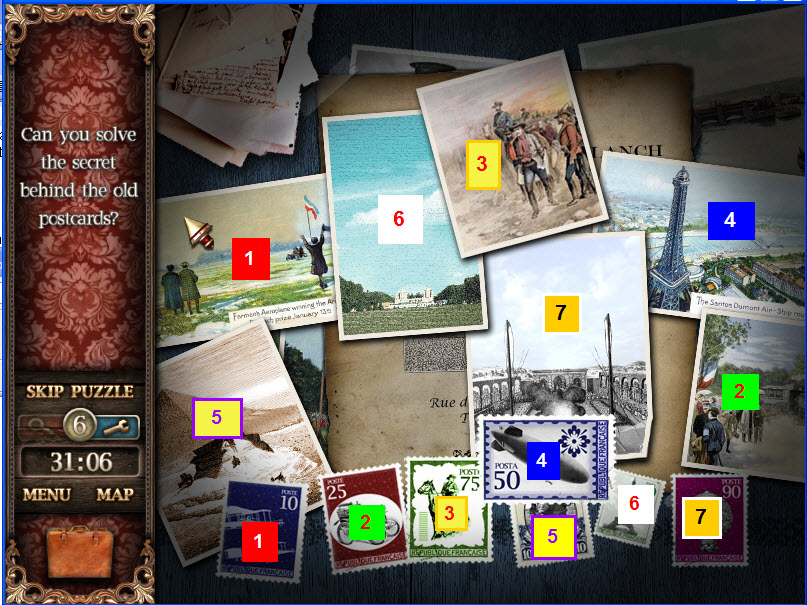
Champ Elysees:
- Locate the hidden objects, collect a faucet for inventory and...oh and of course the suspect paintbrushes.
Rue de Bourgogne:
- You know the drill. Locate items...that's all.
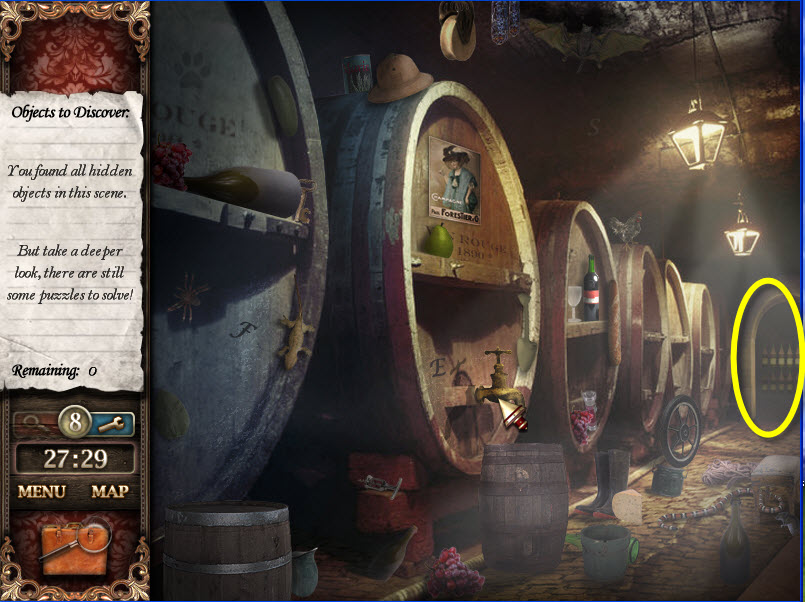
Winery Blanch:
- Locate hidden items.
- Do the following steps in this order:
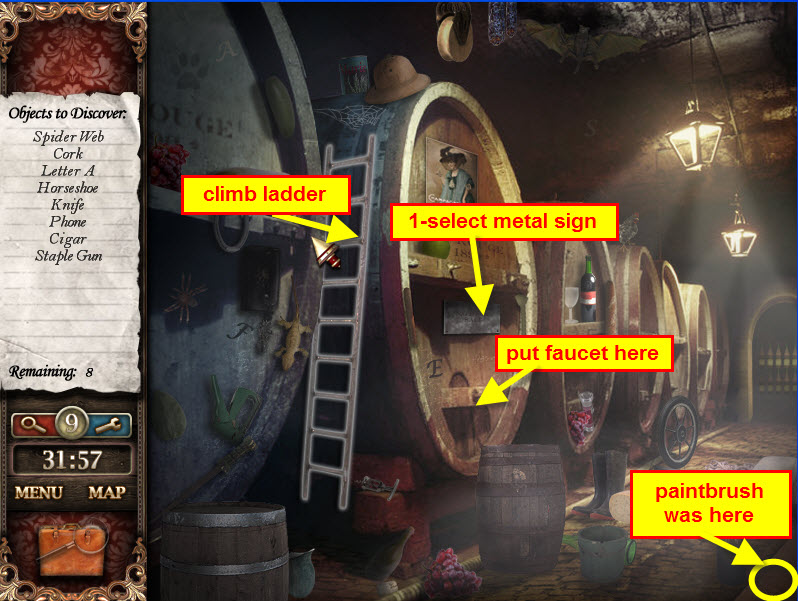
- Select metal sign...it will disappear.
- Put faucet from inventory onto bottom drawer on second barrel.
- Select the faucet to expel the wine from the barrel.
- Climb the ladder to enter the wine barrel.
Inside the Wine Barrel:
- Locate hidden items and collect the Wine Bottle.
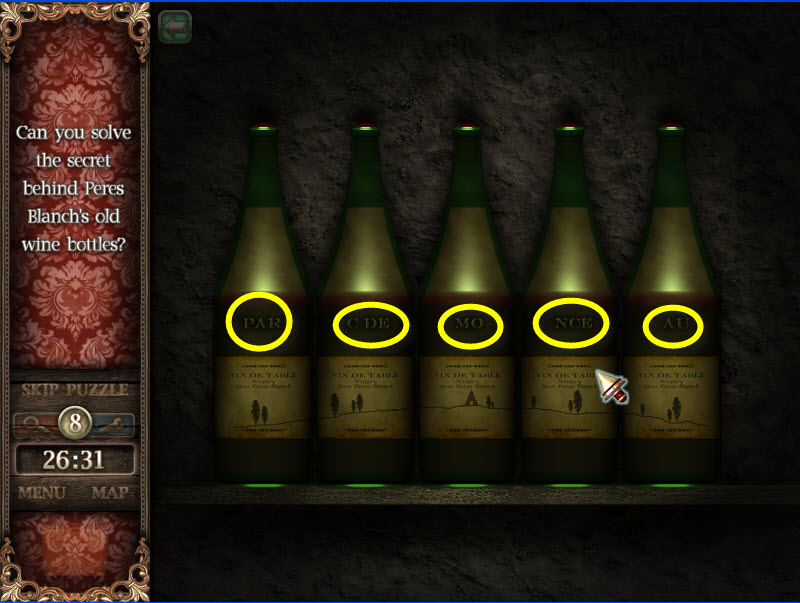
Winery Blanch Puzzle:
- Select the door at the back of the scene.
- Put collected wine bottle in puzzle.
- Select 2 wine bottles and they will switch places.
- There are 2 or 3 letters above the labels on the bottles. Put the bottles in order so the letters spell "Parc de Monceau".
Parc de Monceau:
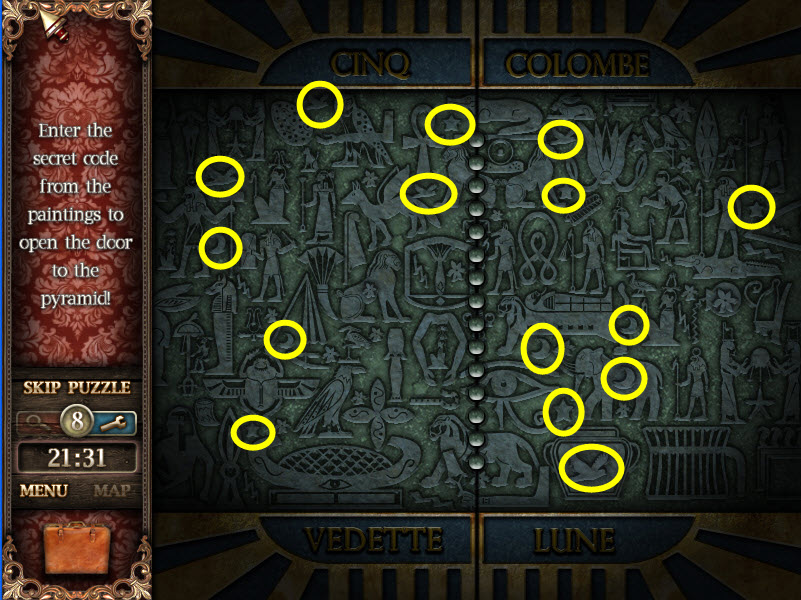
- Locate the hidden objects to get to the next scene.
- Locate the items in the next scene...then enter the pyramid.
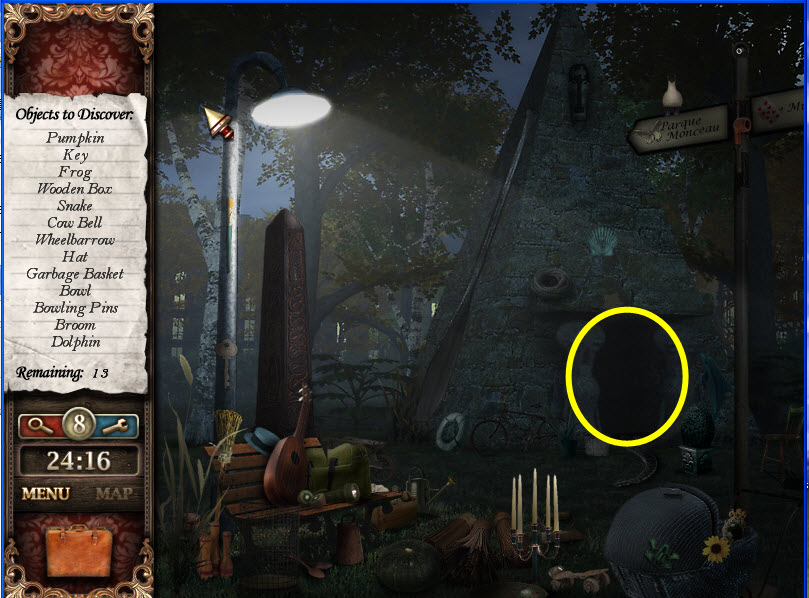
- Hieroglyphic Puzzle: Locate all the Doves, Moons and Stars according to the paper in your inventory.
Chapter 9 – Heading to London:
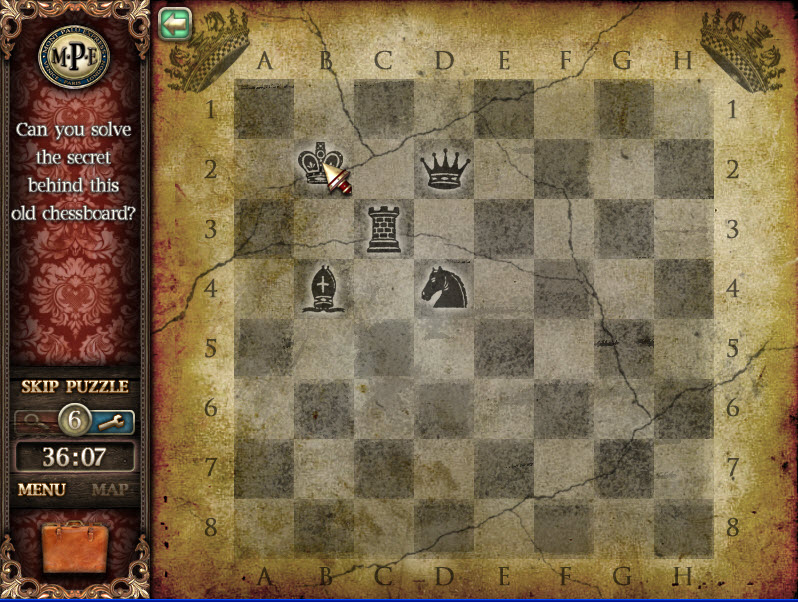
Cabin 10 – Lord Penroy:
- Locate hidden items and collect the king chess piece in inventory.
- Select the telescope to speak with Lord Penroy.
- Select the strange framed picture on the back wall several times...you'll be expelled from the cabin. Re-enter the cabin and select the strange picture for an astrology puzzle (which you can't do yet).
- Select the chessboard on the floor.
- The other cabins will now open for exploration.
- You can go to the following cabins in a different order to collect the chess pieces.
Cabin 8 – Carlo Siro:
- Locate items and collect the Queen Chess piece for inventory.
Cabin 3 – You Lan Run:
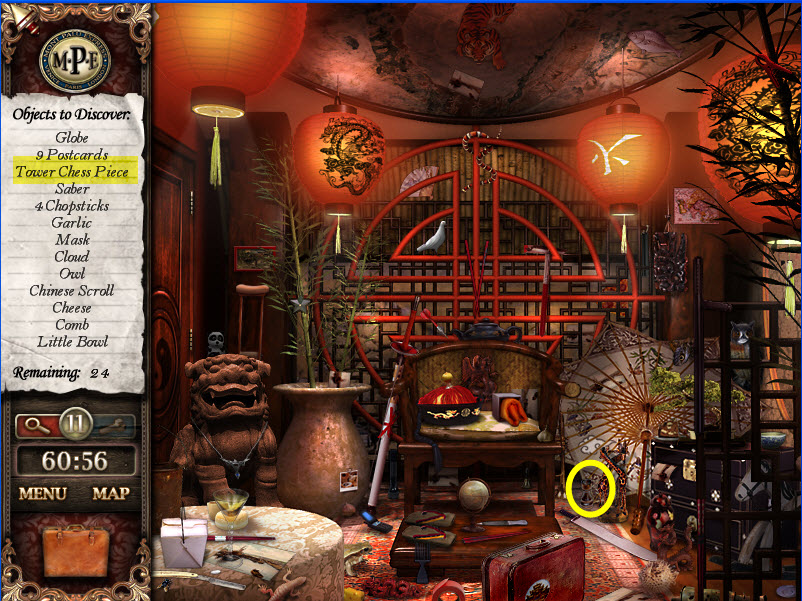
- Locate hidden items and collect the Tower Chess piece for inventory.
Cabin 2 – Viktor Jasili:
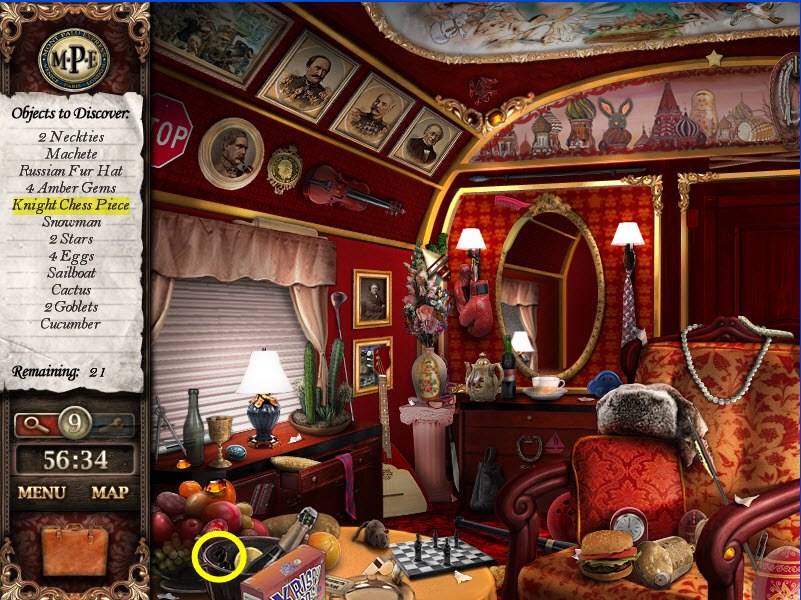
- Locate hidden items and collect the Knight Chess piece for inventory.
Cabin 12 – Peres Blanch:
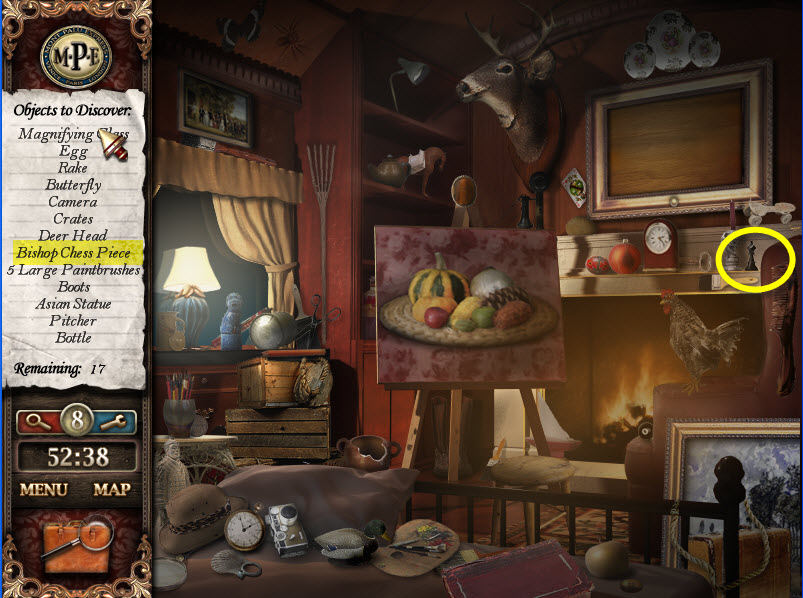
- Locate items on the list and collect the Bishop Chess piece for inventory.
- Select the suitcase to locate hidden items and collect zodiac map sign.

Cabin 10 – Lord Penroy:
- Select the large telescope to view the Zodiac sign. Capricorn, Sagittarius, Scorpio and Libra are visible. You'll need to know this for the next puzzle.
- Select the strange framed picture to view part of the puzzle/safe.
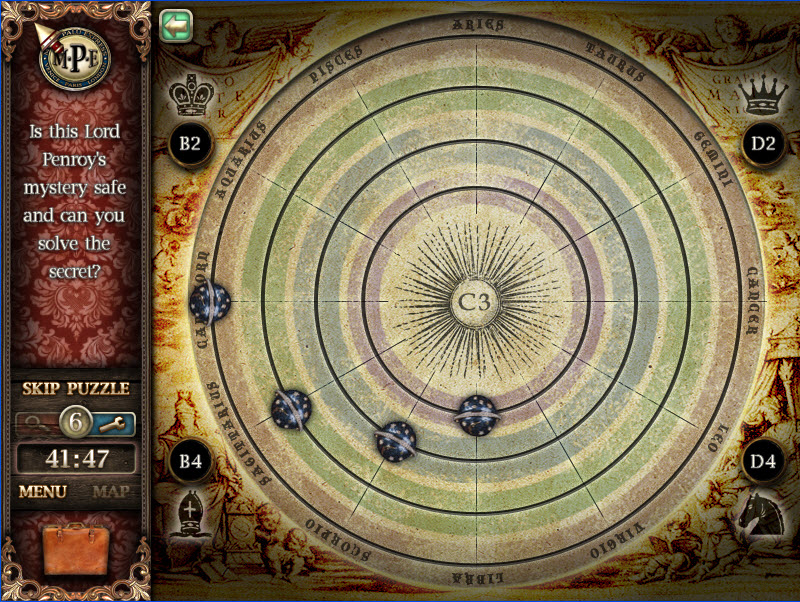
- Select the Queen's Chess Piece (top left). Move the planet to B2.
- Select the King Chess Piece (top right). Move the planet to D2.
- Select the Bishop Chess Piece (bottom left). Move the planet to B4.
- Select the Knight Chess Piece (bottom right). Move the planet to D4.
- Select the chessboard on the floor.
- Take chess pieces from inventory and place them on the board in the above positions. Put the tower piece on C3. You should receive a map of London when completed correctly.
Chapter 10 – London:
Hyde Park:
- Locate hidden items and collect 7 scraps of paper and a green gem for inventory.
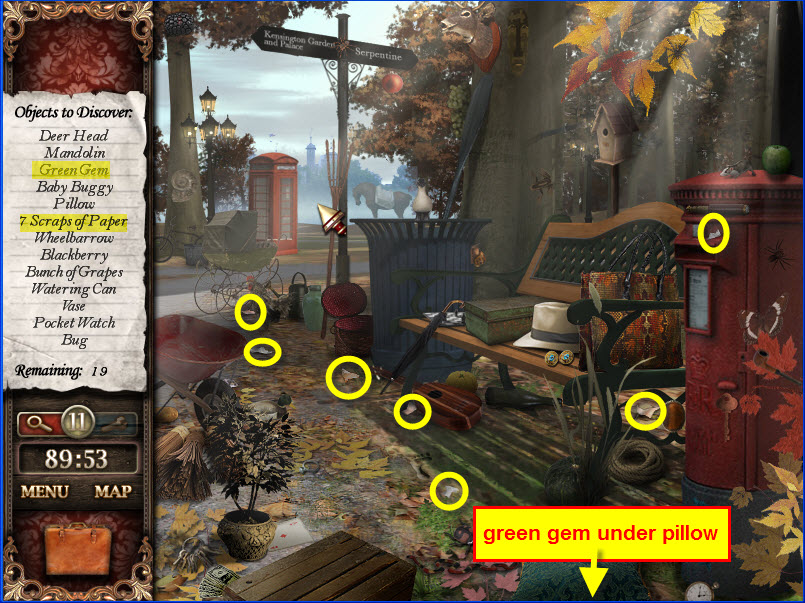
- When you collect all 7 scraps of paper you'll receive a puzzle depicting the 4 elements.
Hotel:
- Locate hidden items and collect a Red Gem and Coin for inventory.
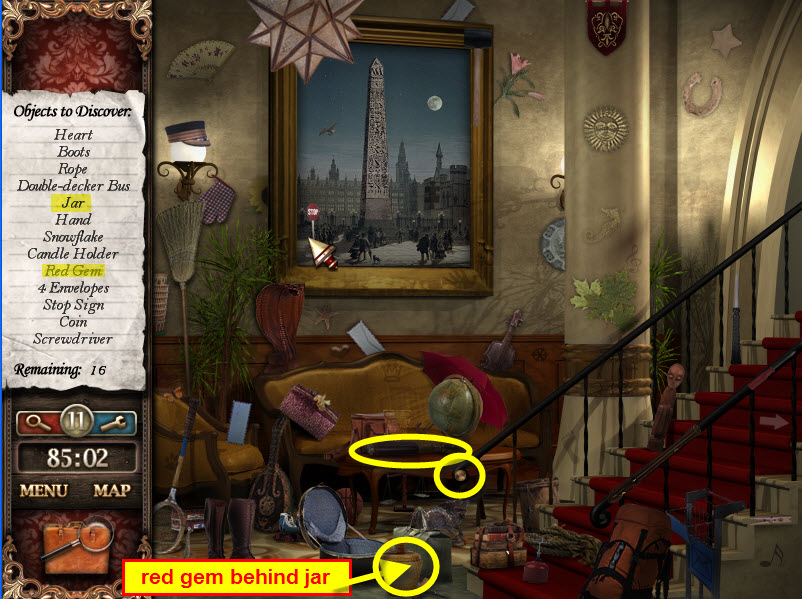
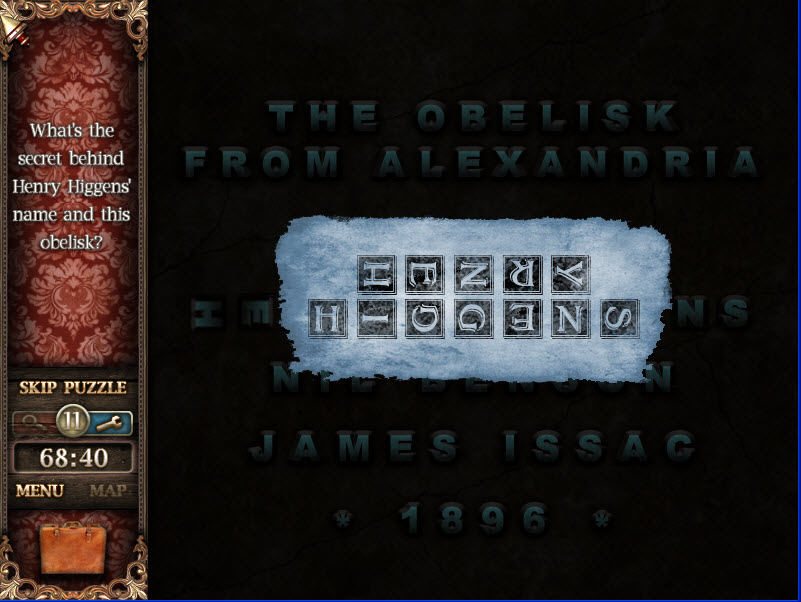
- Select the obelisk in the painting/"Cleopatra's Needle" on the back wall. You'll receive the name Henry Higgens with the letters facing different directions and an inventory entry.
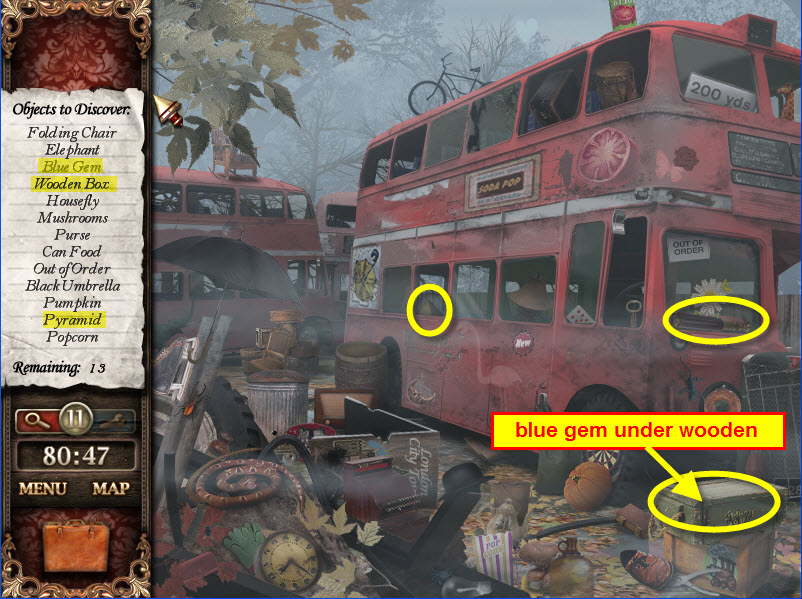
Junkyard:
- Locate items and collect the Blue Gem and the Pyramid for inventory.
Phone Booth:
- Locate hidden objects.
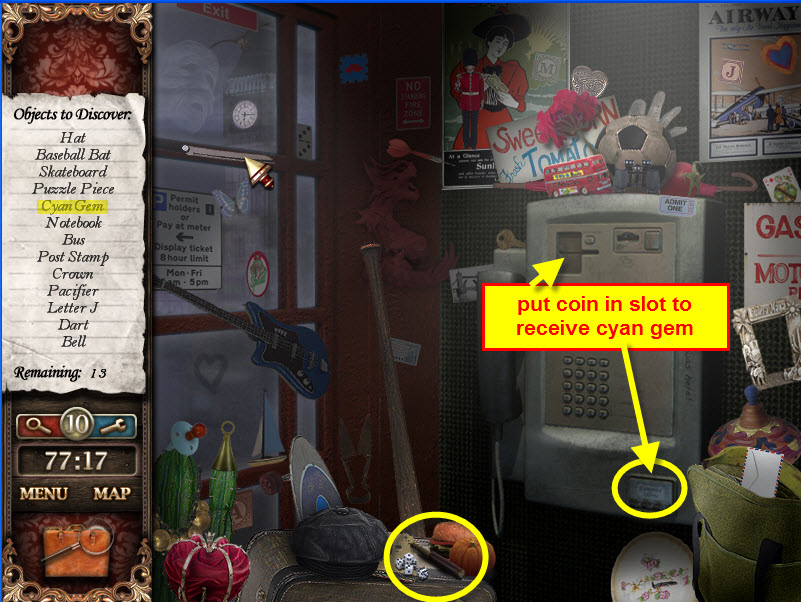
- Place coin in phone booth to receive the Cyan Gem.
Tower of London:
- Locate items.
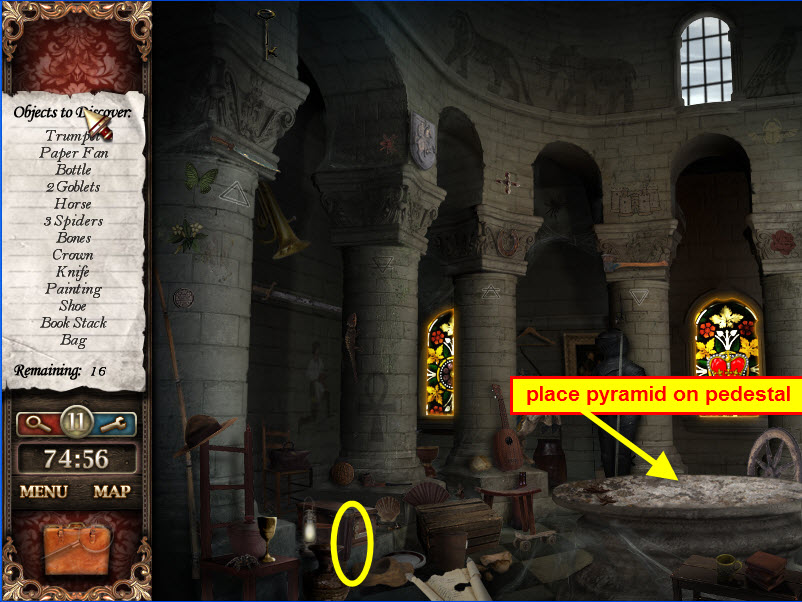
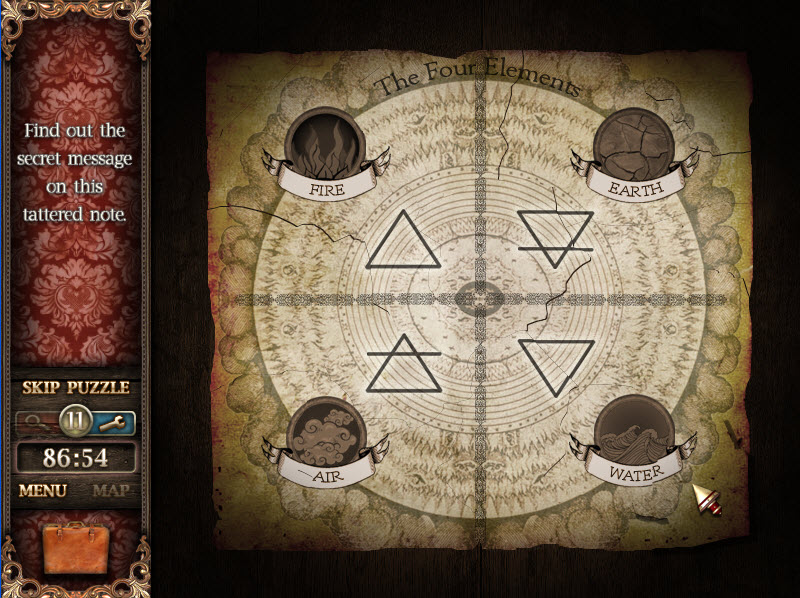
- Place pyramid on large pedestal in center of scene. Place the gems on pyramid one at a time to receive numbers on the columns to solve the 4 elements puzzle.
- Green Gem – 71
- Red Gem – 345
- Blue Gem – 154
- Cyan Gem – 218
Cleopatra's Needle
- Select the Obelisk to read the inscription.
- Select the letters and turn them in the same direction as you inventory entry.
- Select the Four Elements Puzzle (box on the left of the scene):
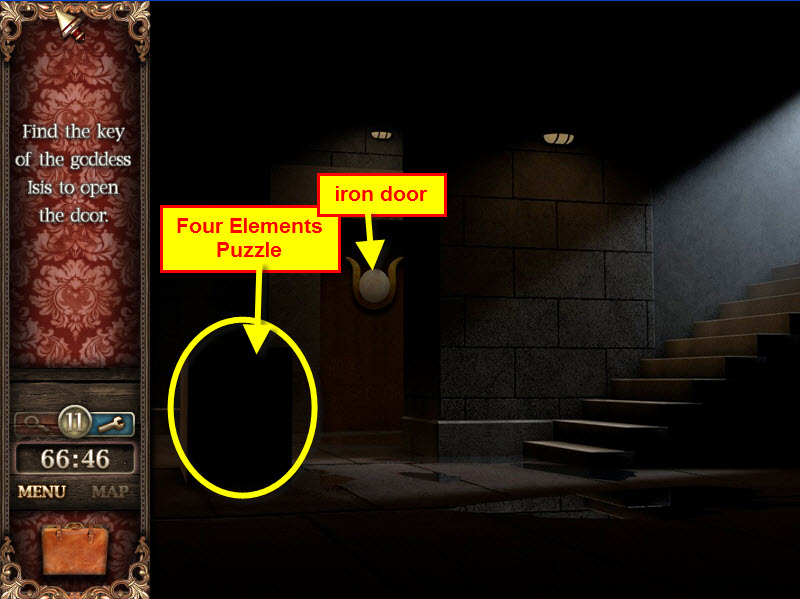
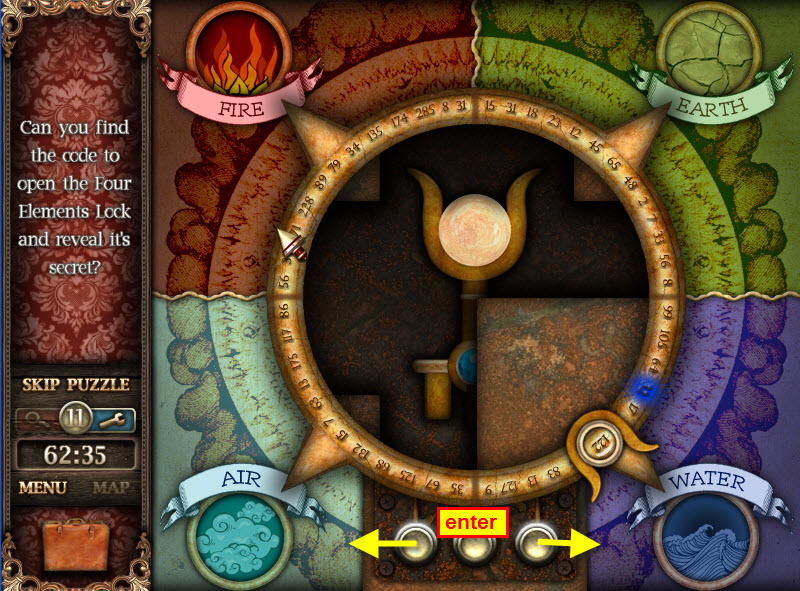
- Select 2 numbers when added together equal the numbers on the columns in the Tower of London.
- The bottom white left button moves the numbers counter-clockwise.
- The bottom white right button moves the numbers clockwise.
- The center white button inputs your solution into the puzzle.
- Enter 2 numbers for each element. (Make a mistake and you'll have to start over. They are done in this order:)
- Fire: 171 +174
- Earth: 15 + 56
- Water: 86 + 132
- Wind: 32 + 122
- You'll receive a key to the iron door when completed correctly.
- Go through iron door.
Content(s) of this game guide may not be copied or
published on any other site without permission from Casual Game Guides.
©CasualGameGuides.com 2006 - 2021