Death at Fairing Point: A Dana Knightstone Novel
The Death at Fairing Point – A Dana Knightstone Novel Walkthrough has step by step instructions for the entire game and includes solutions to all the puzzles with screenshots. Try to solve a 19th century mystery. Was it really a suicide or was it murder!
DEATH AT FAIRING POINT - A DANA KNIGHTSTONE NOVEL
HAND: allows you to pick up items
MAGNIFYING GLASS: Lets you know something needs to be examined
PUZZLES: Puzzles can be skipped if they get to tough, but you must wait for the skip button to fill. Some puzzles are random, so you may solve them differently than I did, but the end result is always the same.
JOURNAL: Found in the lower left corner. This continually updates with needed clues and goals. Check this often to solve puzzles.
HINT: Found in lower right corner. Unlimited hints, but needs to be recharged before each use.
INVENTORY: Found bottom center of screen. Some tasks require more than one item to complete. The inventory will let you know how many you have and how many more you need to find.
CHAPTER 1 - HALWARD MANOR
* Speak to the concierge
* Click on table to zoom in, pick up passport
* Click on journal in lower left corner, take note of the phone number
* Click on safe on back wall to zoom in
* Key in last four digits of phone number from journal (6134) to open safe
* From inventory, put passport in safe, click on newspaper in safe to zoom in
* Newpaper article added to journal
* Click on open window to zoom in
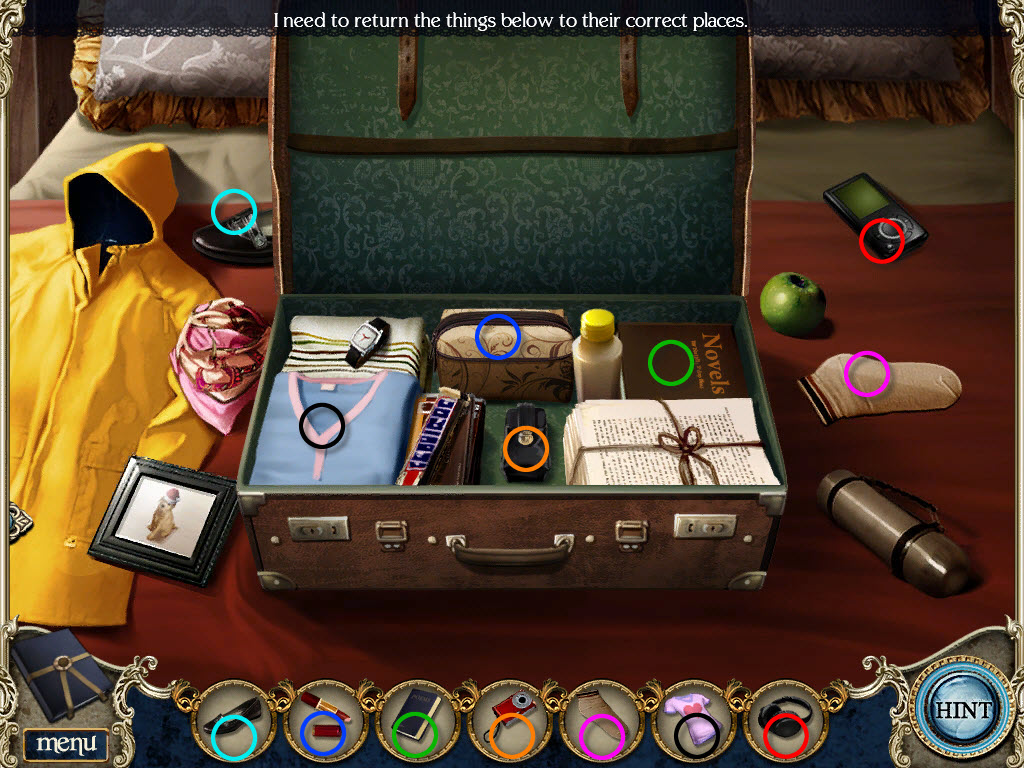
* Click on bed to open puzzle
* Put items back in their correct places, Click on umbrella to add to inventory
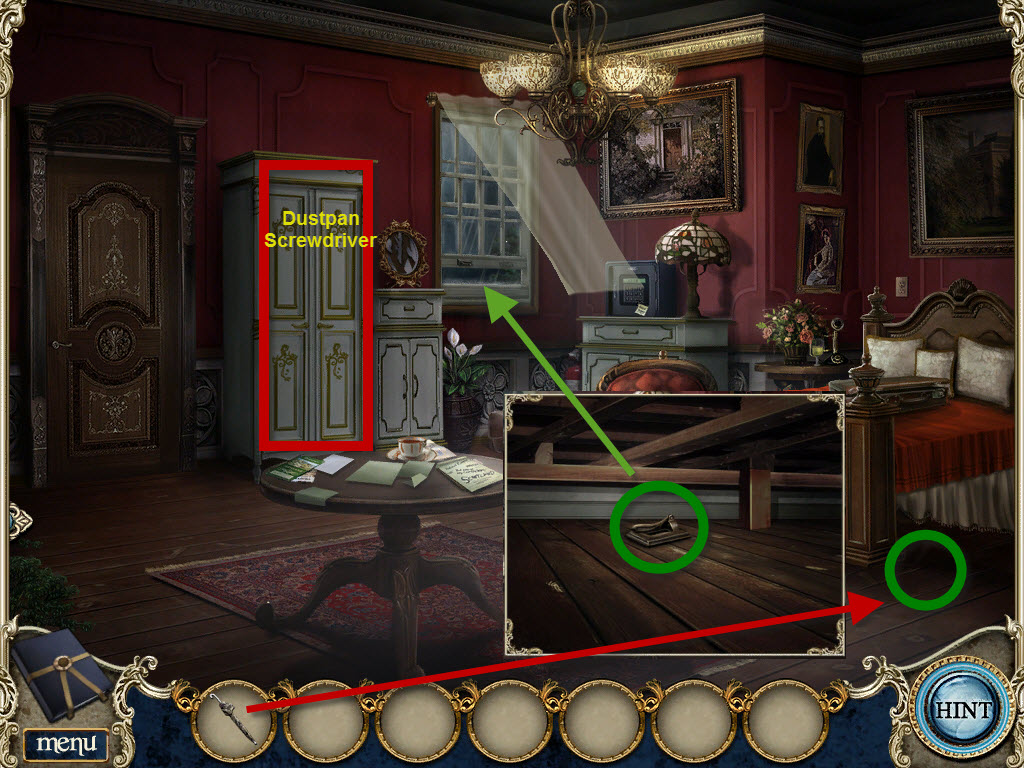
* Click on floor by bed to zoom in, from inventory, use umbrella to pick up hinge
* Click on tall cupboard by window to open, pick up dustpan and screwdriver
* Click on window to zoom in, place hinge on window, from inventory, use screwdriver to fix, close window
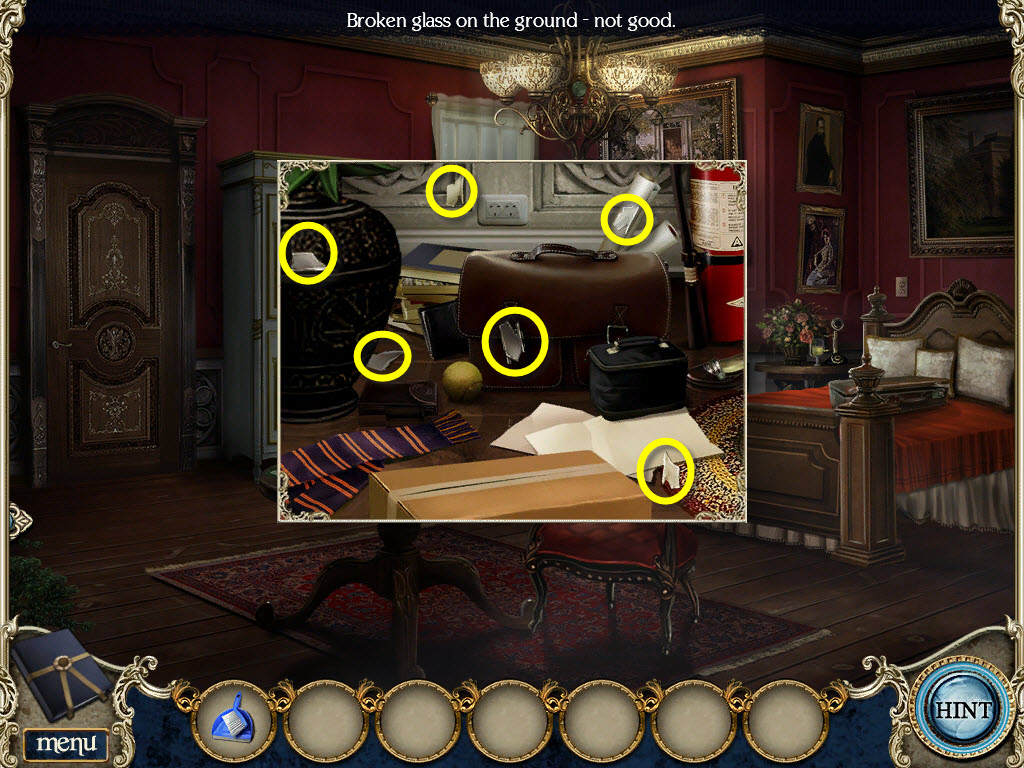
* Click on bag below window to zoom in
* From inventory, use broom to pick up 6 pieces of glass
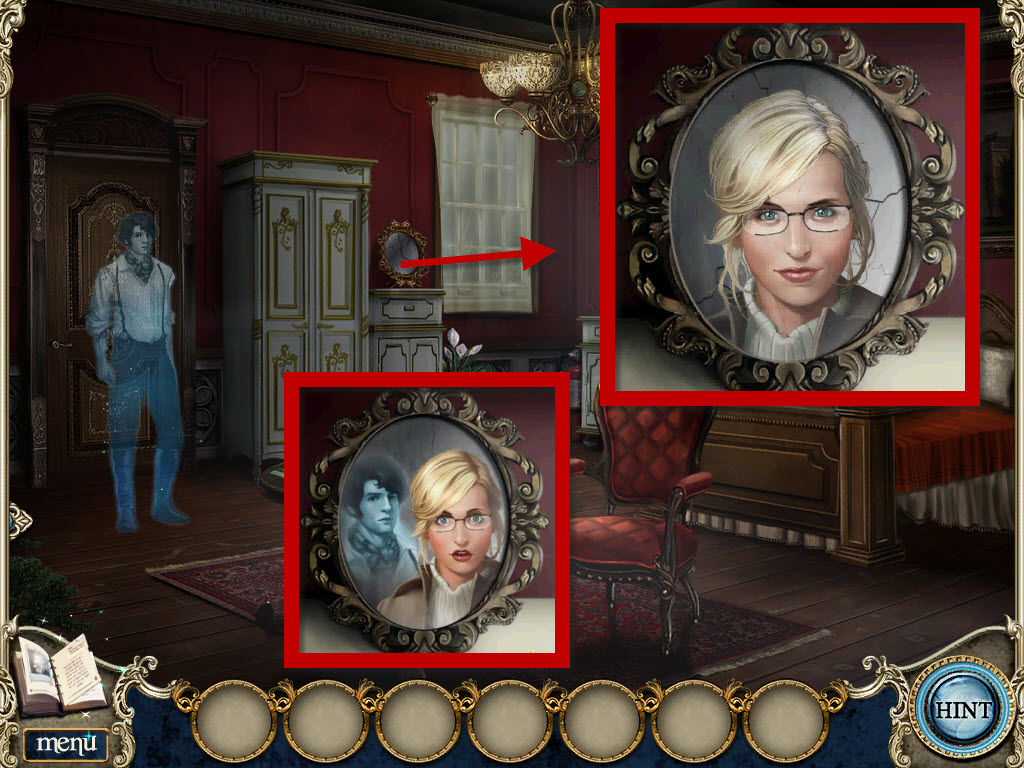
* From inventory, drag glass to mirror on bureau to open puzzle
* Rearrange the pieces of the mirror.
* Drag the pieces to the correct areas and click on a piece to rotate it.
* Each time a piece is put in the correct place part of your reflection will appear
* Photo added to journal
* Click on ghost, doorway unlocked to second floor
* Click on door to go through
* Talk to concierge
* Click on desk on back wall to zoom in, pick up matches out of drawer
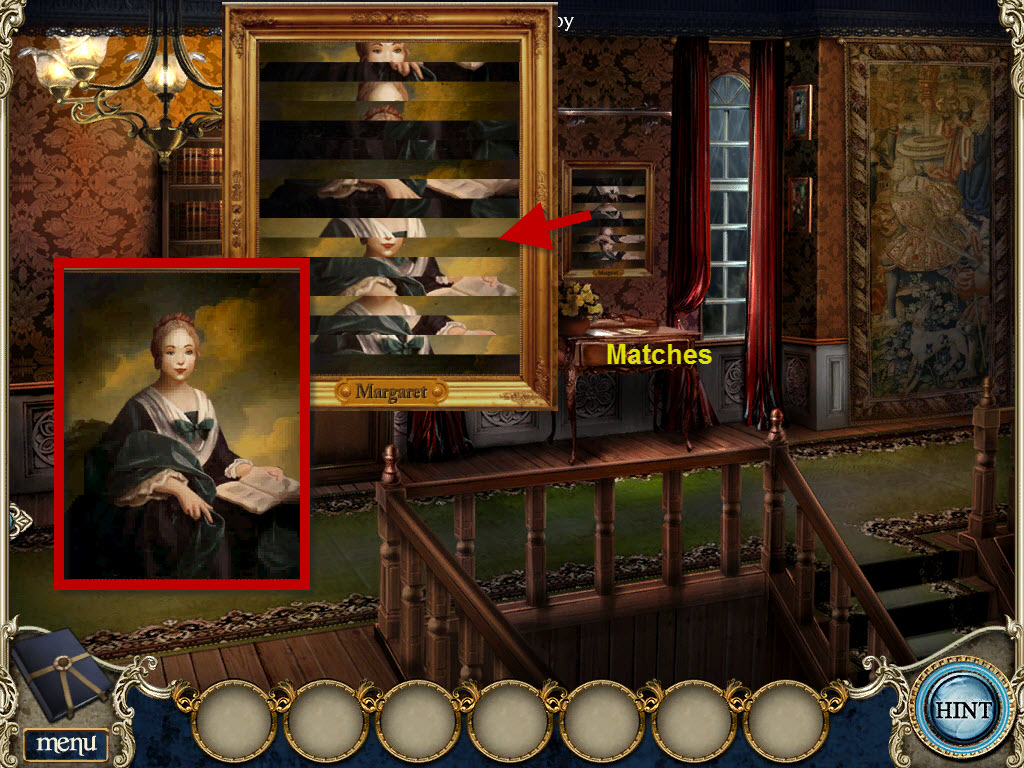
* Click on painting above desk to open puzzle
* Click on strips to swap out positions until picture is restored
* Picture added to journal
* Go downstairs to lobby
* Click on ghost, he will point to parlor door
* Go through parlor door
* Click on ghost, he points above fireplace and at the fireplace
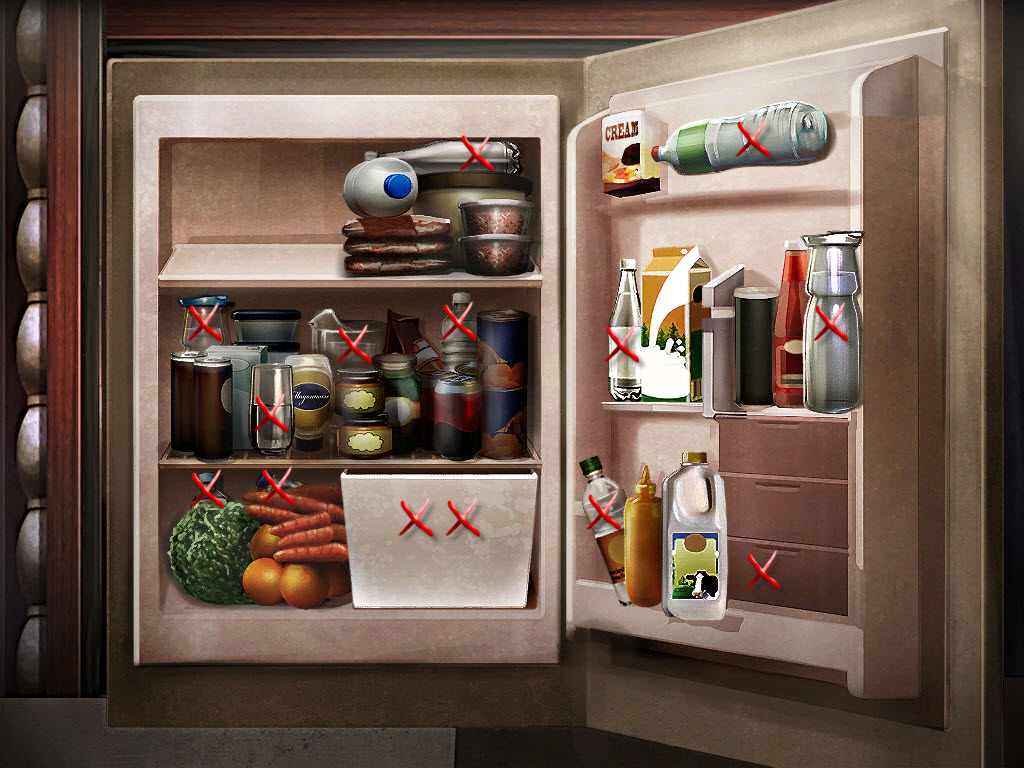
* Click on fridge on right wall to open puzzle
* Find 13 sources of water
* Click on white drawer to open and fine 2 bottles of water
* click on brown drawer to open and find 1 bottle of water
* Water bottles added to inventory
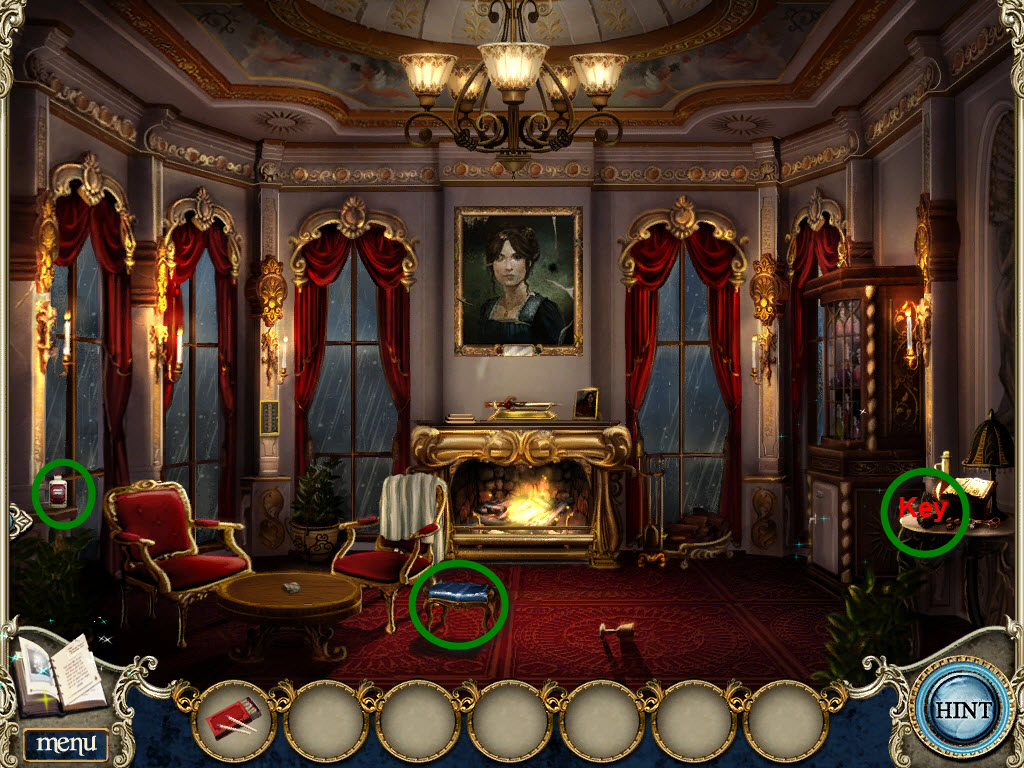
* Pick up glue bottle off side table on left wall
* Click on table on right wall to zoom in, pick up key
* Click on blue footstool in front of fire to add to inventory
* Click down 1x to enter lobby
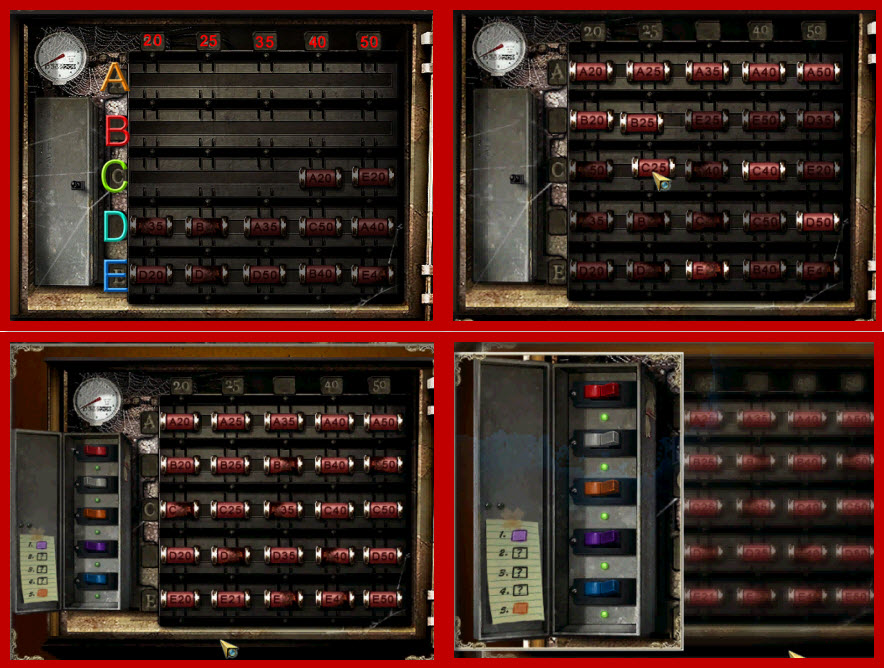
* Click on fusebox on left wall by stairs to open puzzle
* Put all the fuses in the correct order
* Click on a fuse to switch places with another fuse
* Click on colored switches to zoom in, click on switches in correct order to turn on lights
* Purple, Gray, Red, Blue, Orange
* Go left into atrium
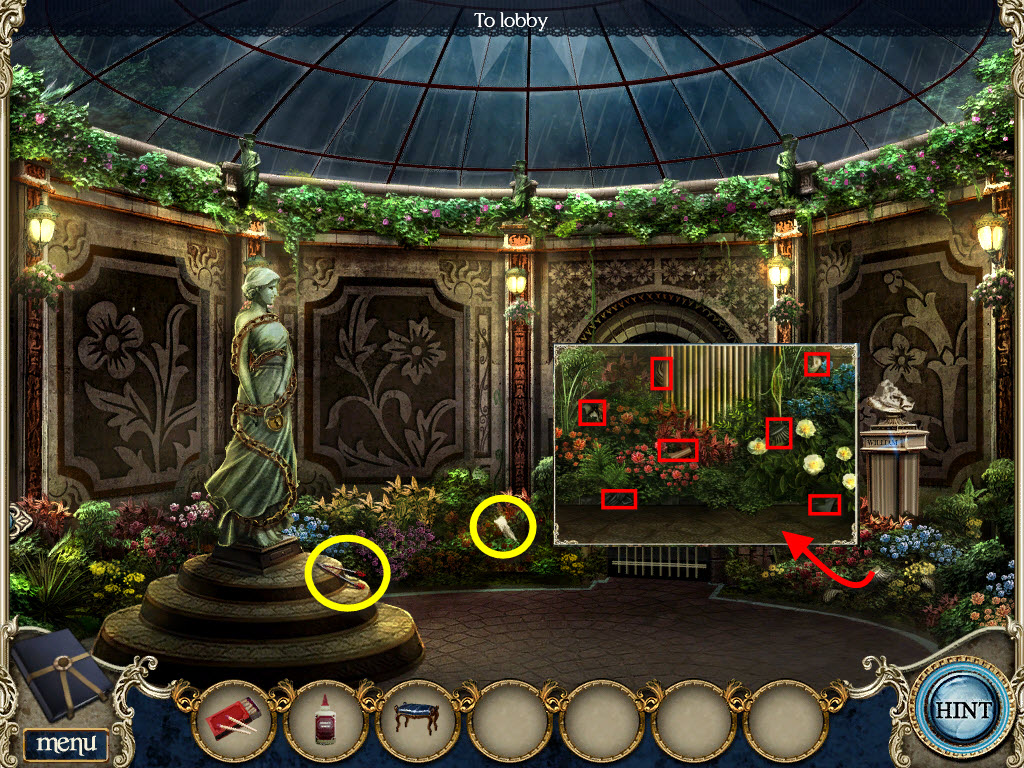
* Zoom in on plants close to the gate, and pick up candle
* Pick up tongs off steps of statue
* Click on the plants below the broken bust and pick up the stone pieces
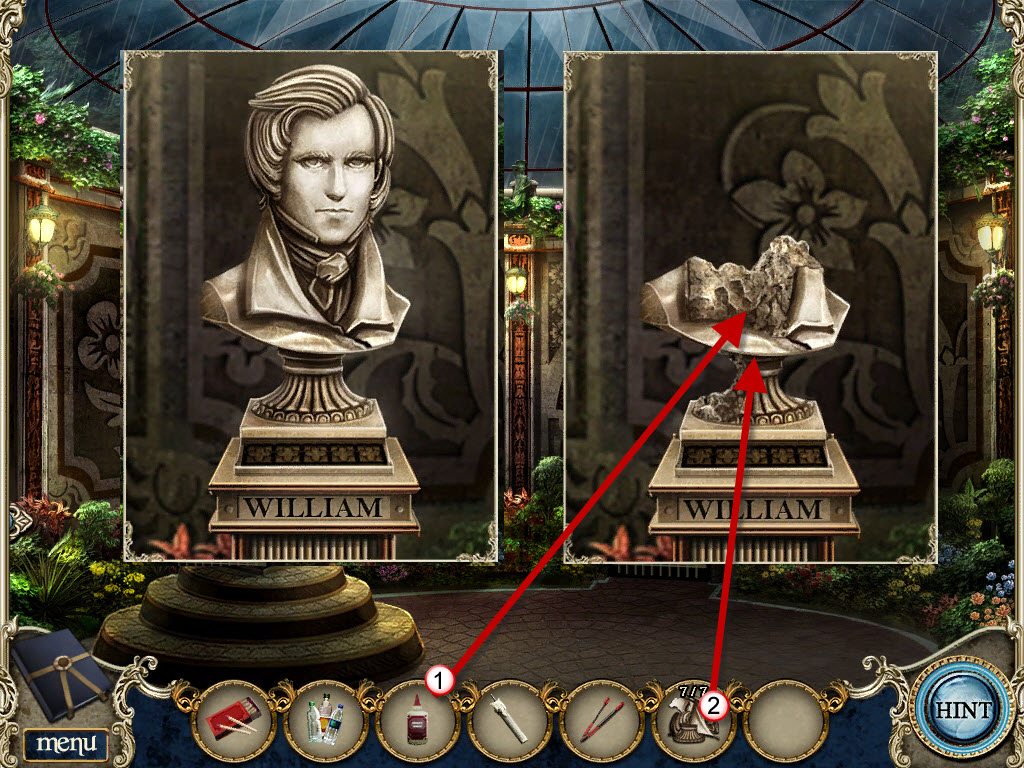
* Click on the bust to zoom in
* From inventory drag glue to bust and stones to bust to repair
* click down 1x to parlor, go upstairs to 2nd floor
* From inventory, drag stool to below picture, click on fire poker to zoom in and pick up fire poker
* Go down 1x, go into parlor
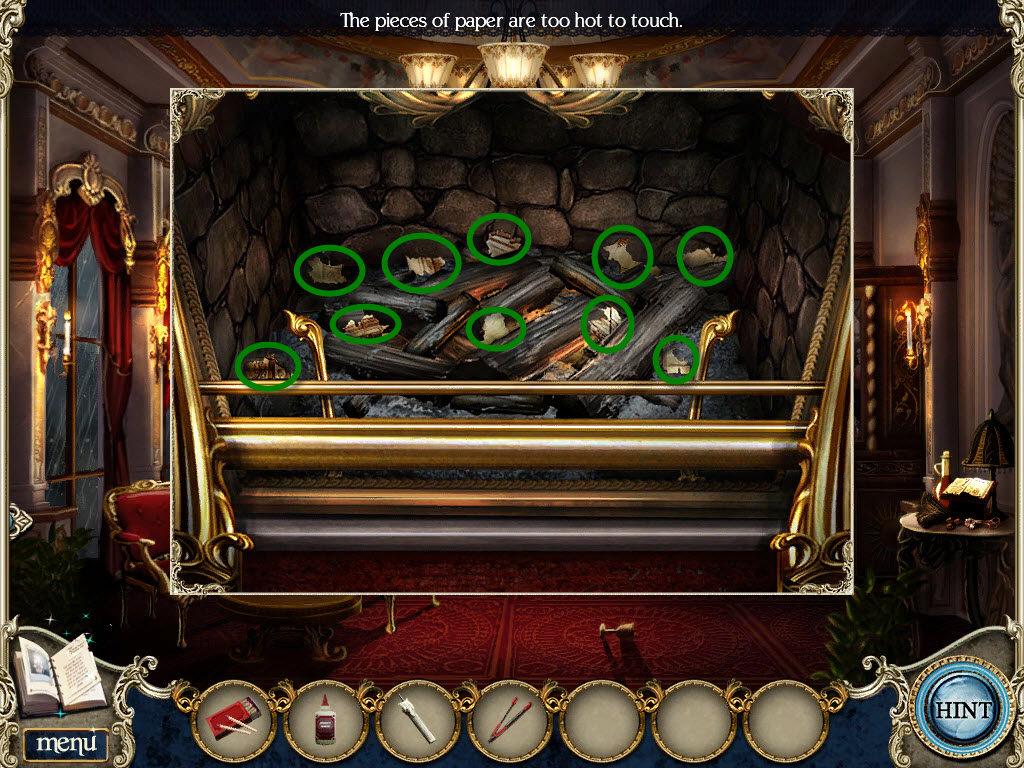
* From inventory, use water bottles to douse the fire
* From inventory, use fire poker on ashes to zoom in
* Use tongs to pick up 10 pieces of paper
* Click on the table on the in front of chairs to zoom in
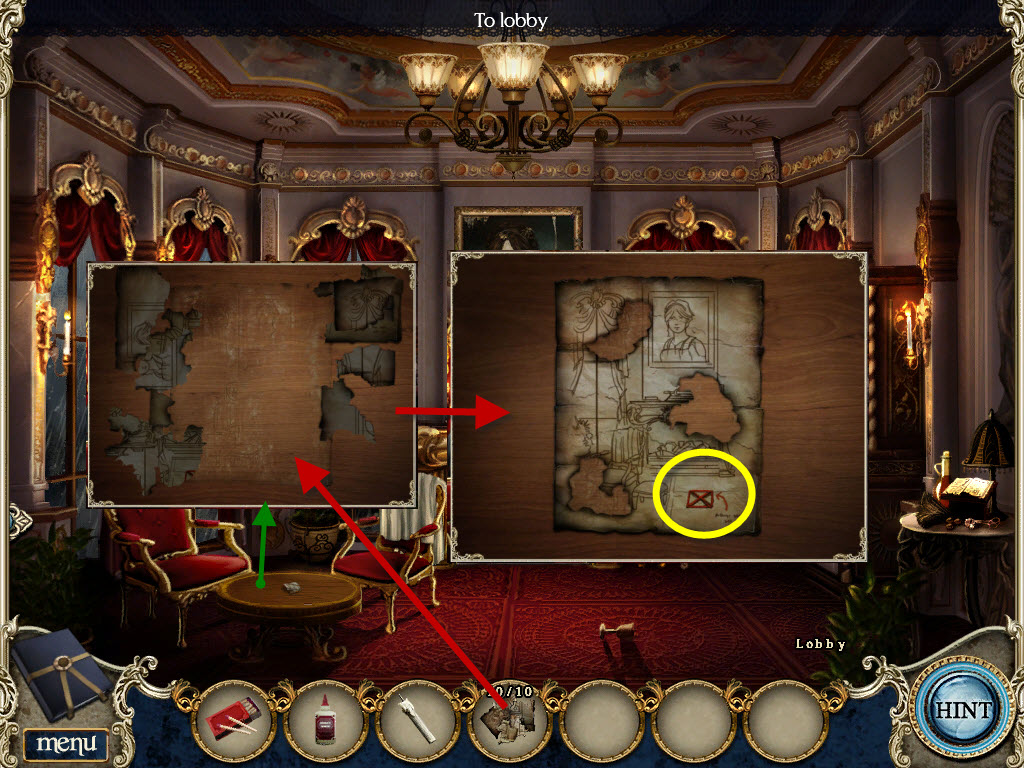
* From inventory, drag papers to table to open puzzle
* Assemble the papers to form a picture clue, click on papers to rotate pieces
* Take note of the x mark in front of the fireplace
* Click on the area where the footstool had sat to zoom in
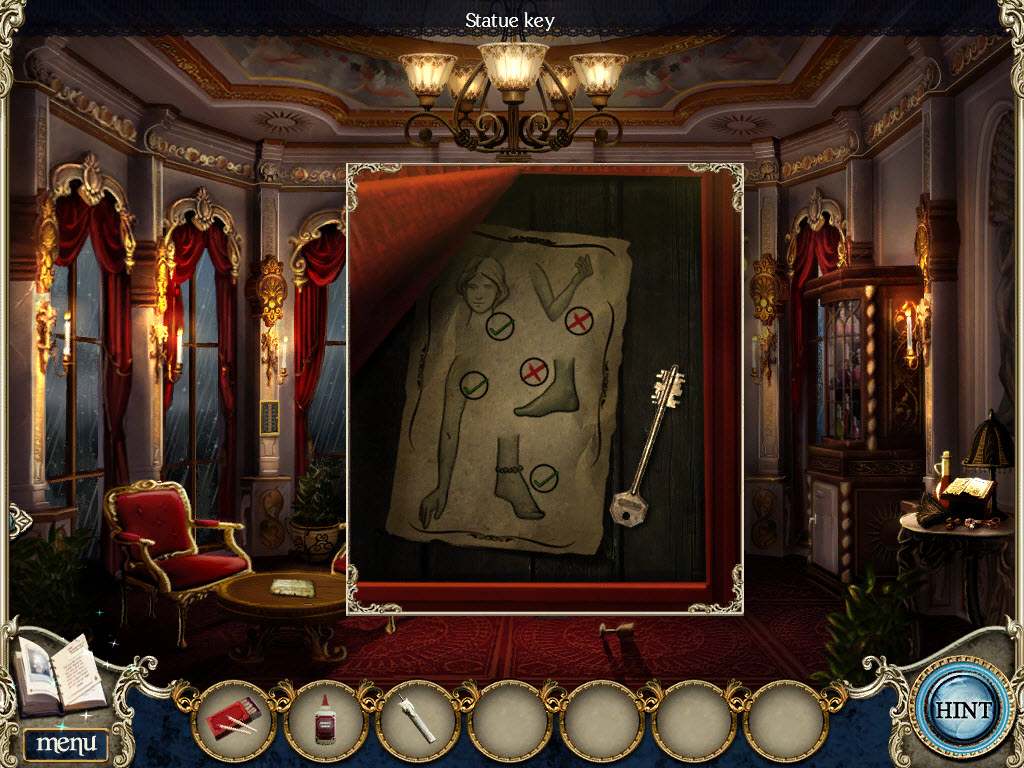
* Take note of the picture of the statue parts, pick up key
* Click down 1x to lobby, click left 1x to atrium
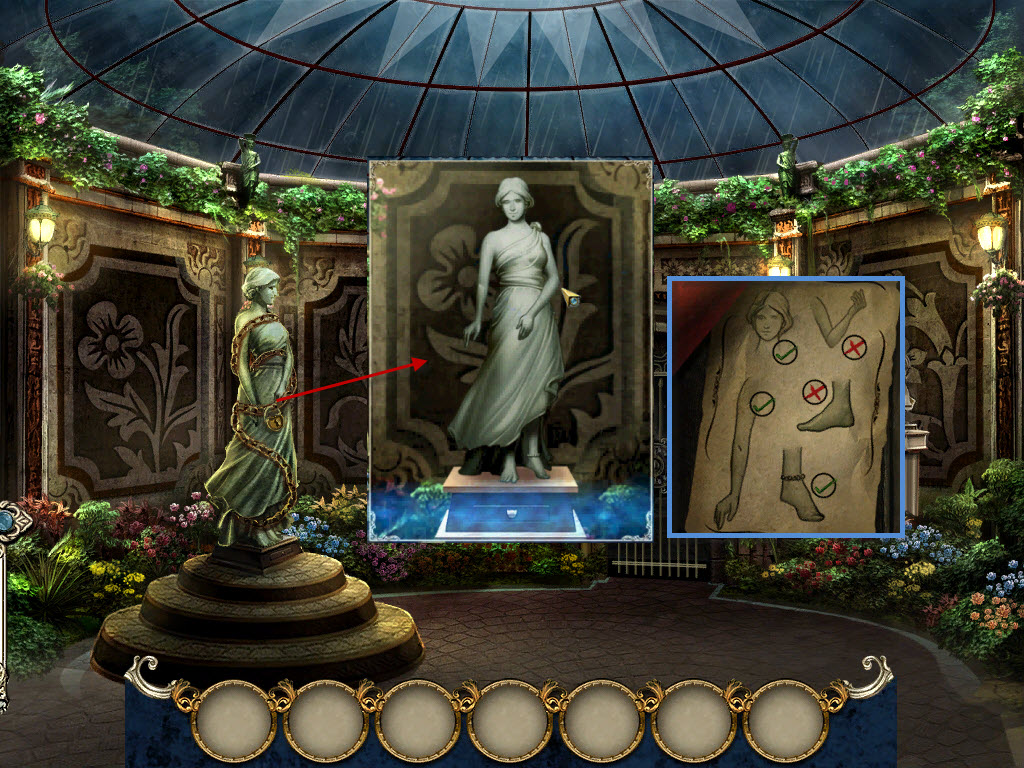
* From inventory, use key on lock on statue
* Using the clues from the journal, reposition the statue's limbs
* Pick up the lever and the slide
* Click down 1x to lobby
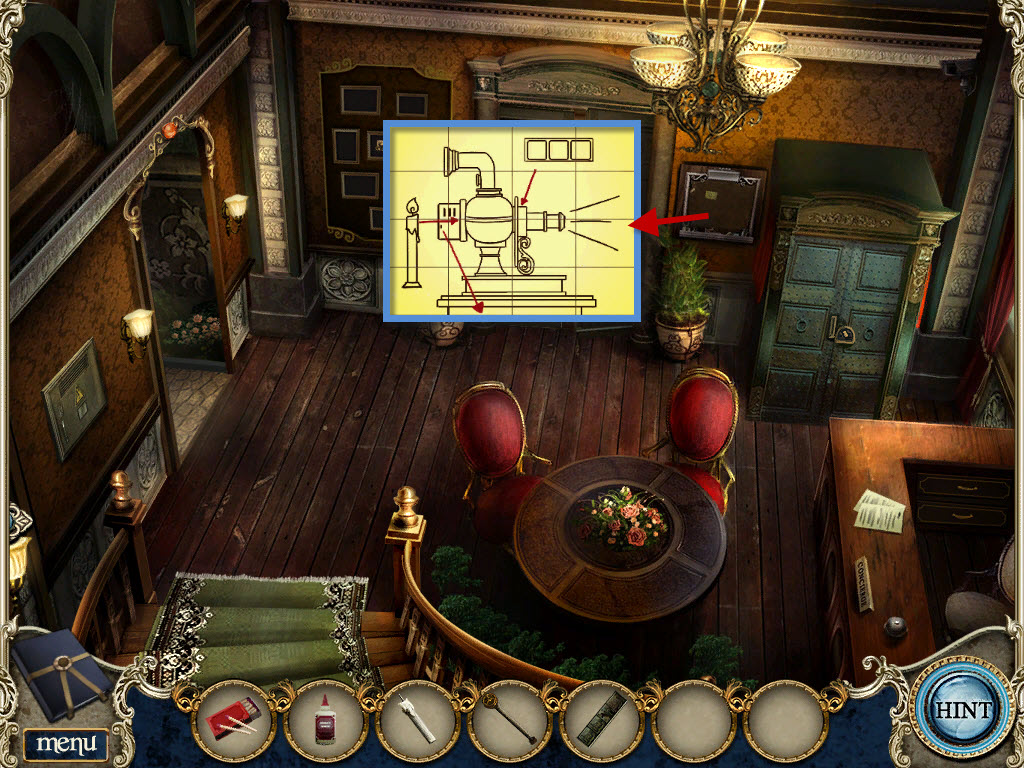
* Click on magic lantern booth along back right wall to zoom in
* From inventory, put lever on door to open
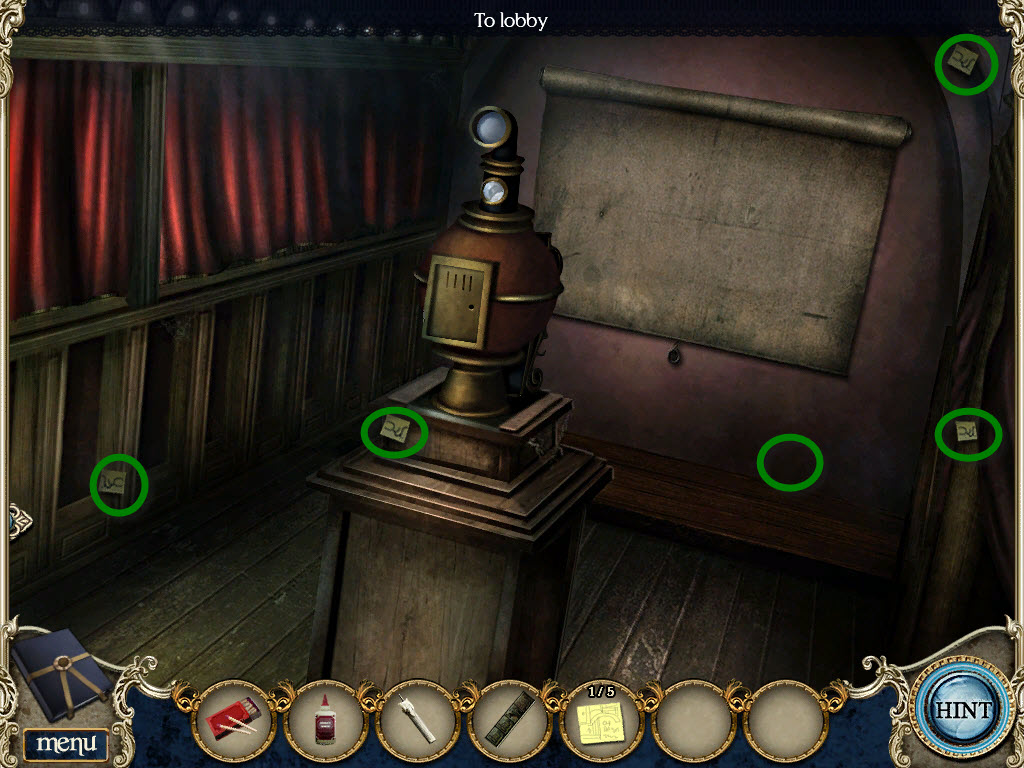
* Go inside magic lantern booth
* Pick up the 5 sticky notes
* Click on bulletin board to left of magic lantern booth to zoom in
* From inventory, place sticky notes on board to open puzzle
* Rearrange the sticky notes to form a picture
* Click on sticky notes to swap places
* Pick up red knob at bottom of picture
* Go inside magic lantern booth
* From inventory, drag red knob to hole in projector door
* Click on compartment to open
* From inventory, put candle in compartment
* From inventory, use matches to light candle, click on projector to zoom in
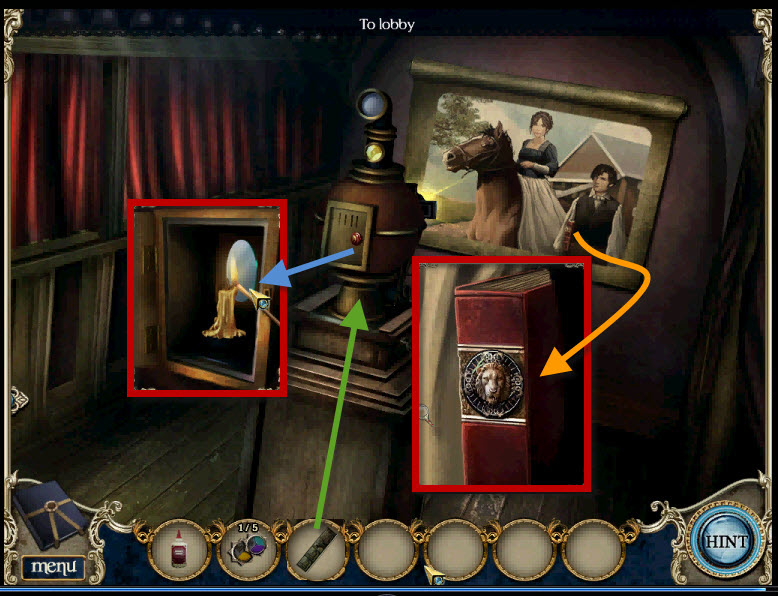
* From inventory, drag slide to projector, click through pictures
* Click on book in mans hand to zoom in, take note of lions head
* Go upstairs to second floor
* Click on book shelf to zoom in
* Click on last book on right with lions head to zoom in
* Picture added to journal, take not of symbols
* Click on lions emblem to add to inventory
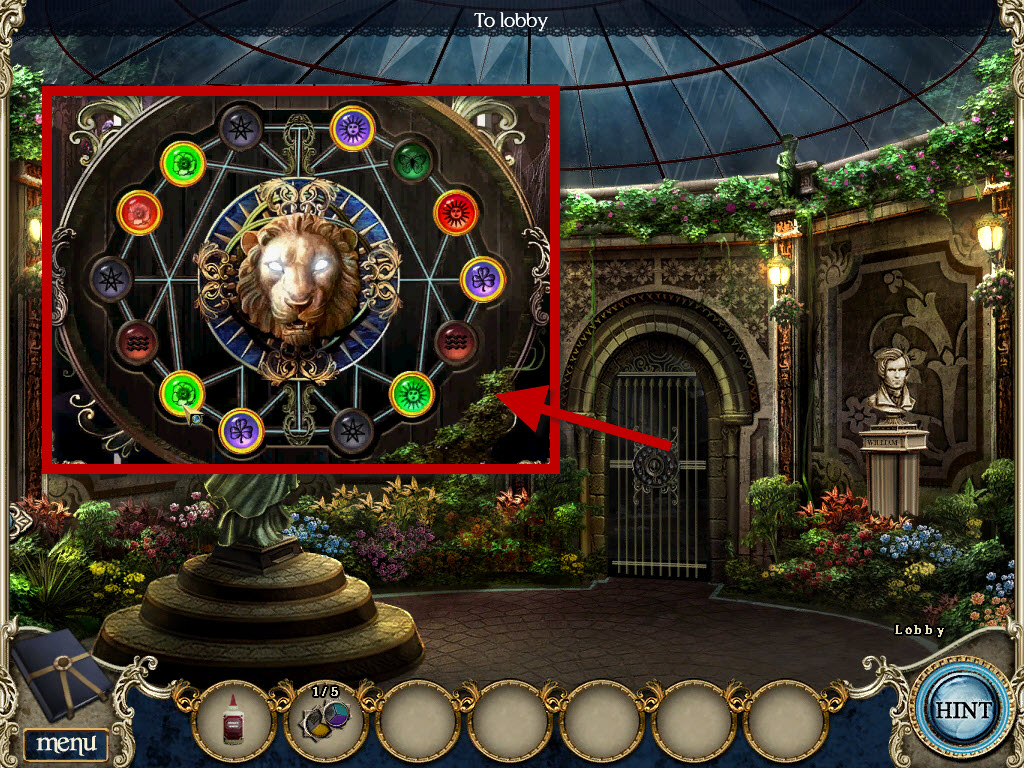
* Click down 1x, go left into atrium
* Click on gate to zoom in
* From inventory, drag lion emblem to gate to open puzzle
* Use the picture from the 2nd floor hallway to turn on the correct symbols
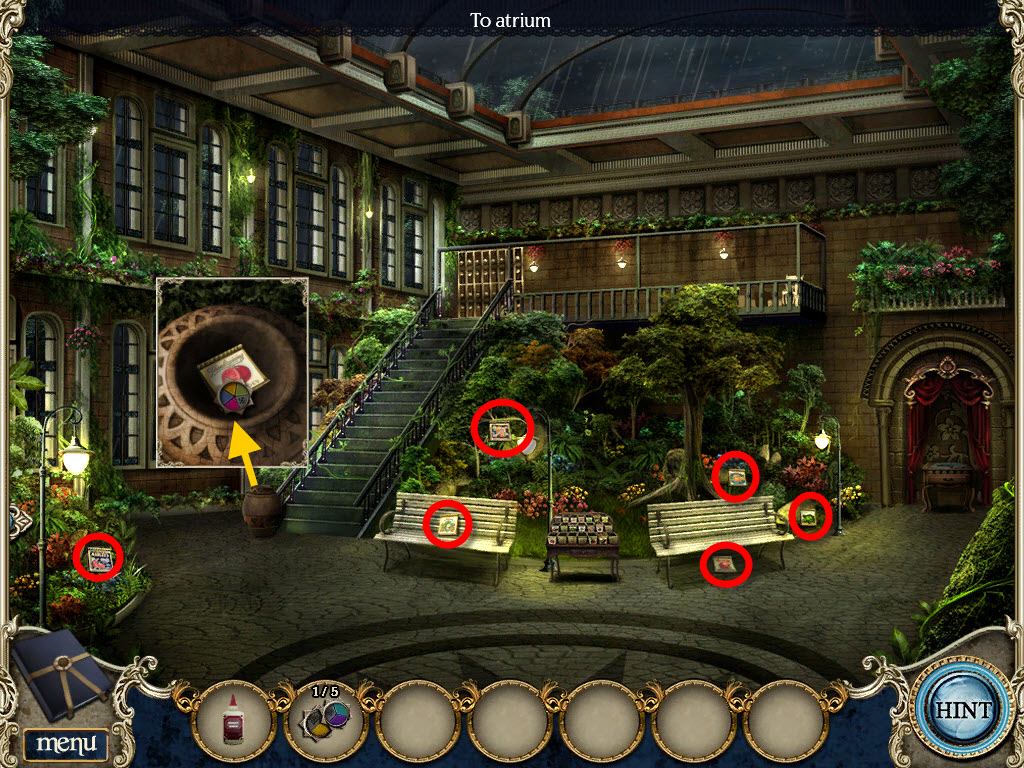
* Go into conservatory
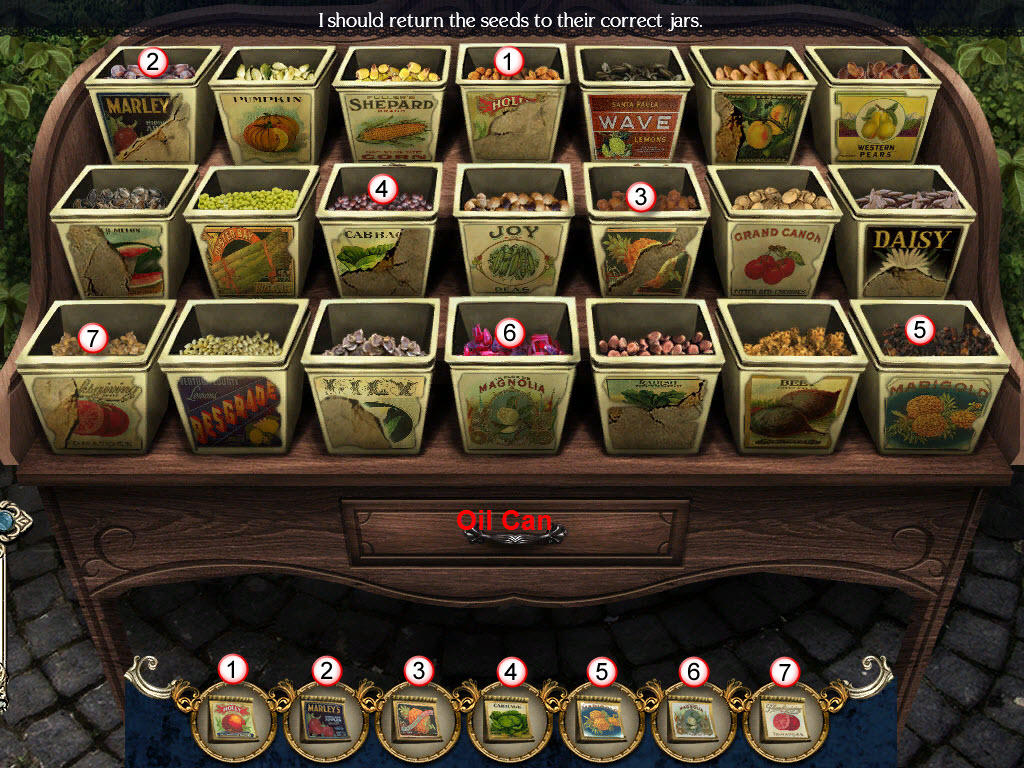
* Pick up the 6 seed packets
* Click on urn at base of steps to zoom in, pick up seed packet and star
* Click on seed stand between benches
* Put the seed packets in their correct places
* Click on oil can to add to inventory
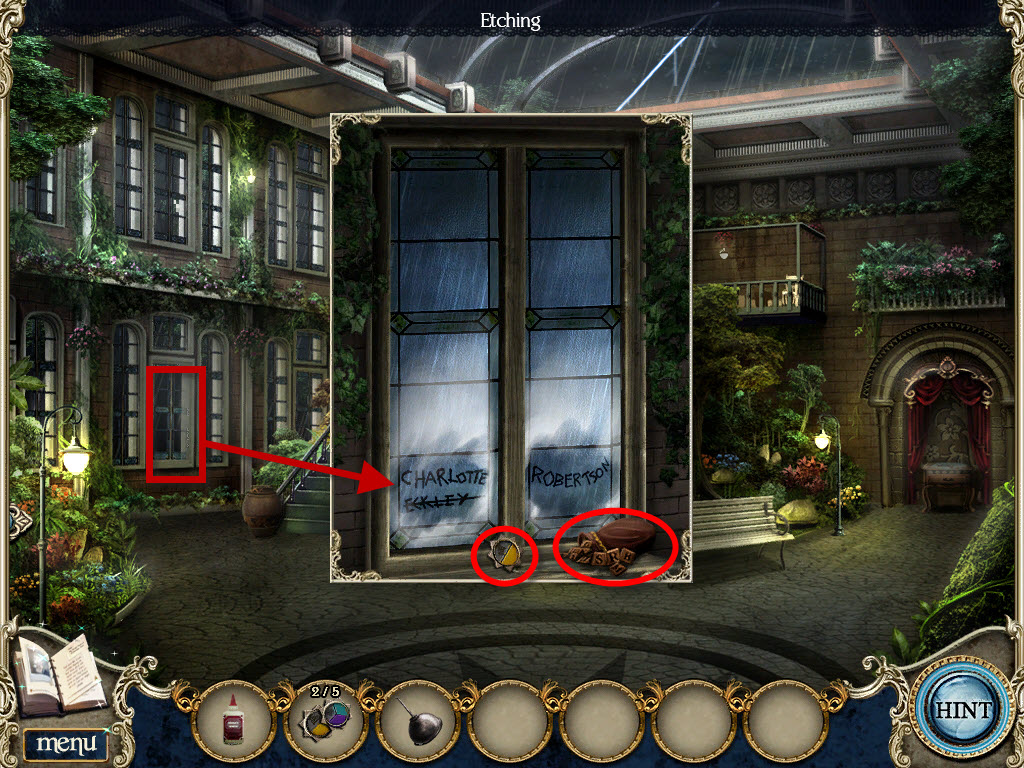
* Click on window lower left side to zoom in, take not of names (Charlotte Robertson & Eckley)
* Pick up star and pouch of letters
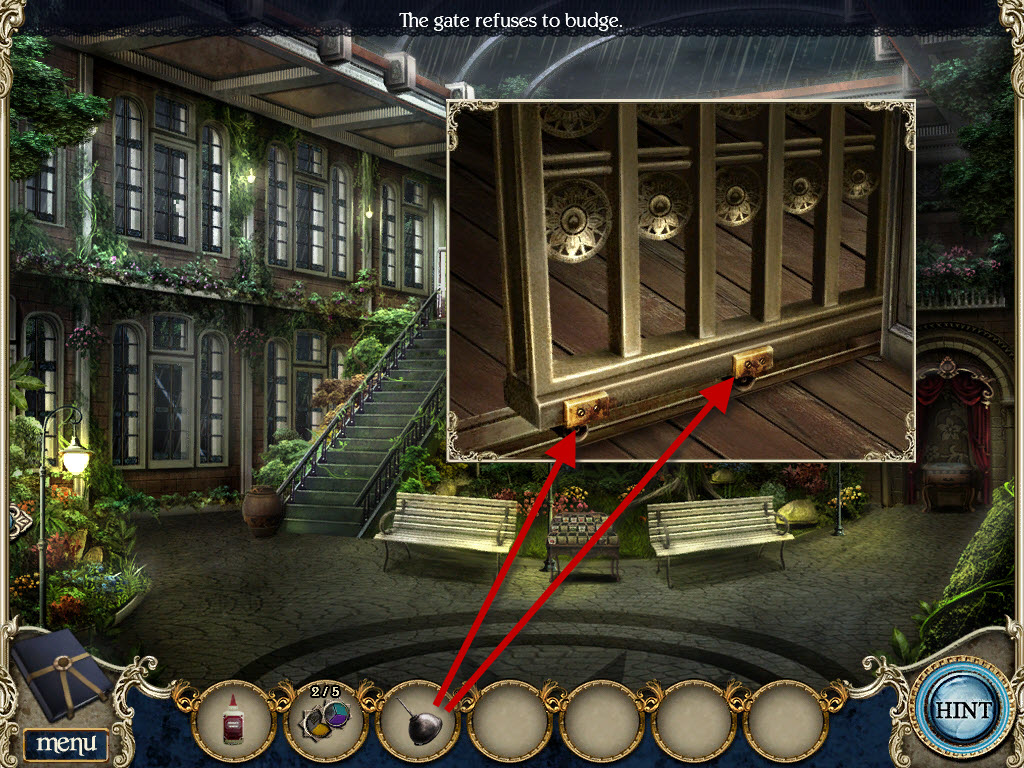
* Click on gate at top of steps to zoom in
* From inventory, use oil can on hinges
* Go up to balcony
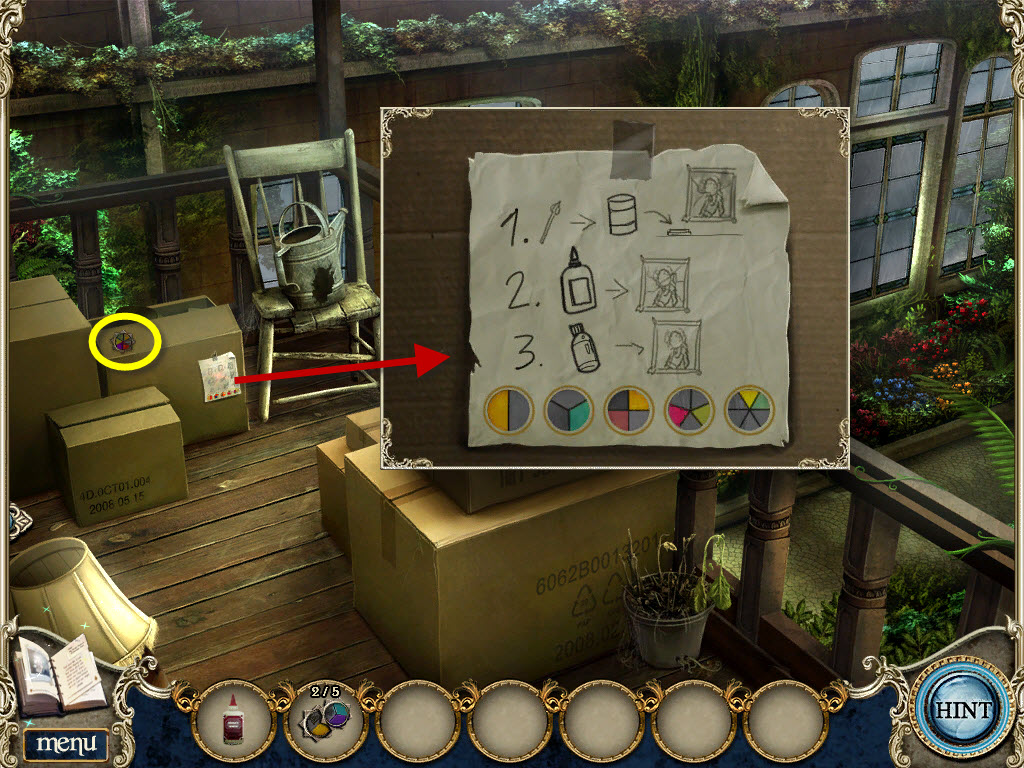
* Click on box with label to zoom in, take note of colors
* Pick up star of box
* Click down 3x, go into parlor
* Click on area between 2nd and 3rd windows on left side to zoom in
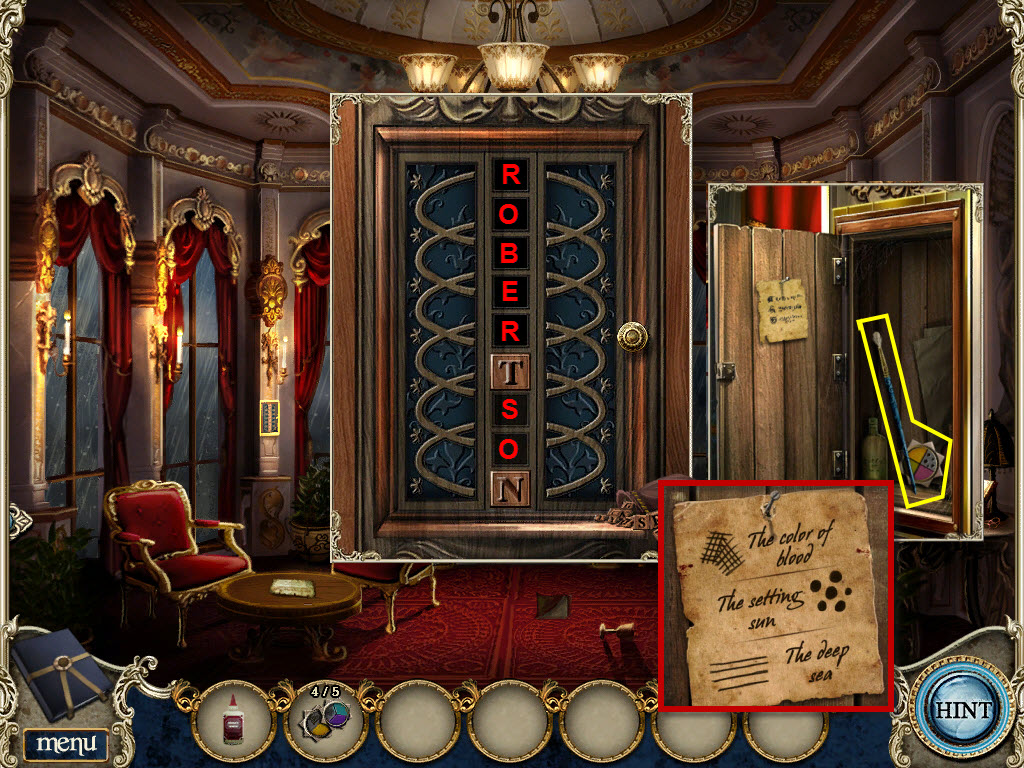
* From inventory, drag pouch of letters to box to open puzzle
* Arrange the letters to spell "ROBERTSON" by clicking on them until correct letter appears
* Pick up paintbrush and star
* Click on paper on door to zoom in, take note of words
* Click down 1x, go left to Atrium, go up 1x to conservatory
* Click on alcove at back right to zoom in
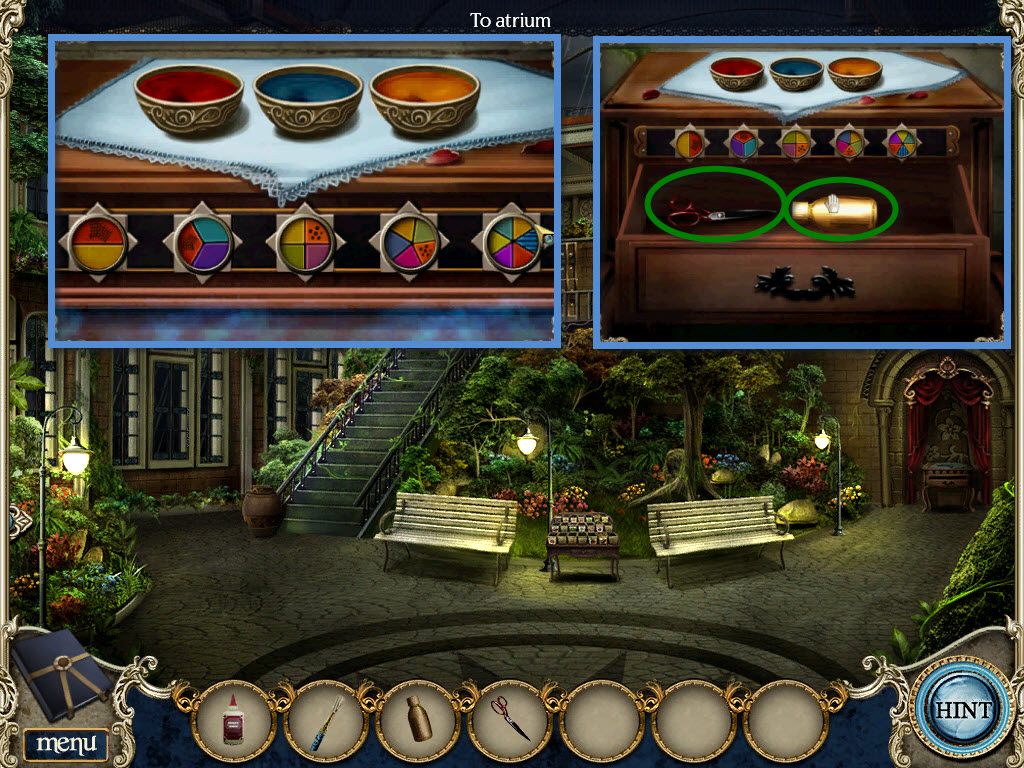
* From inventory, drag stars to slots to open puzzle
* Click on the paint bowls with mouse and drag color to stars
* Use the sketch found in the parlor to correctly color the stars
* Rotate the stars into the correct positions, using the paper clue found on the balcony box
* Pick up Scissors and Varnish
* Go up to the balcony
* From inventory drag scissors to box marked "art supplies"
* Pick up solvent
* Click down 3x, go into parlor
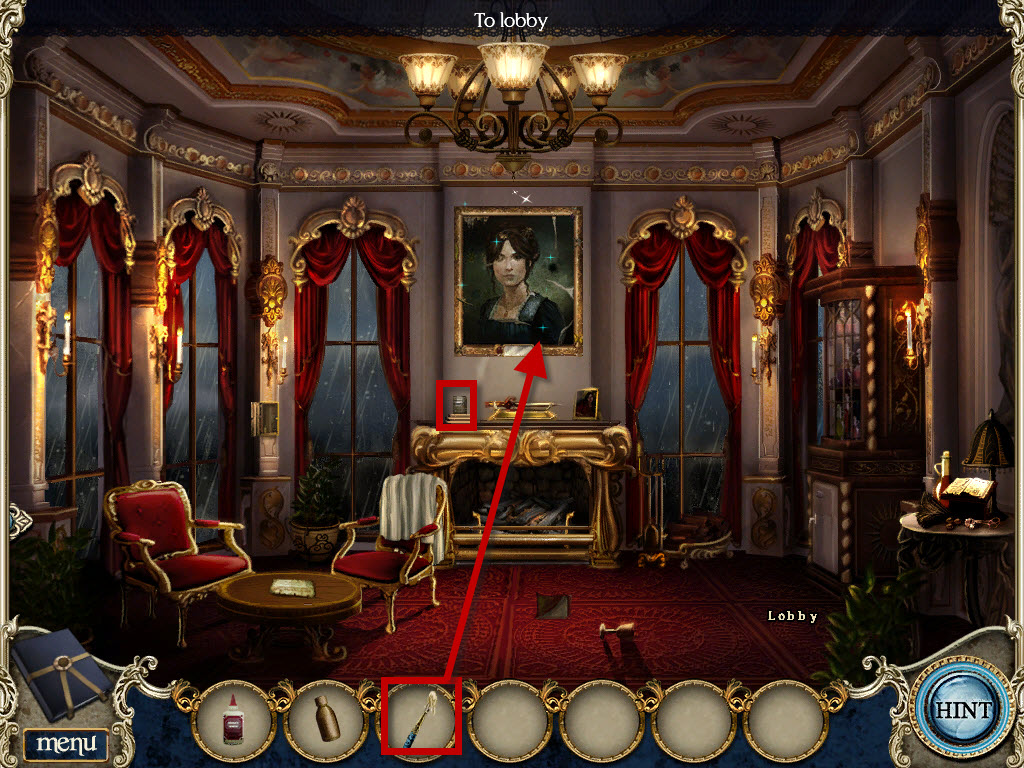
* From inventory, place solvent on left side of mantle
* From inventory dip the brush into the solvent
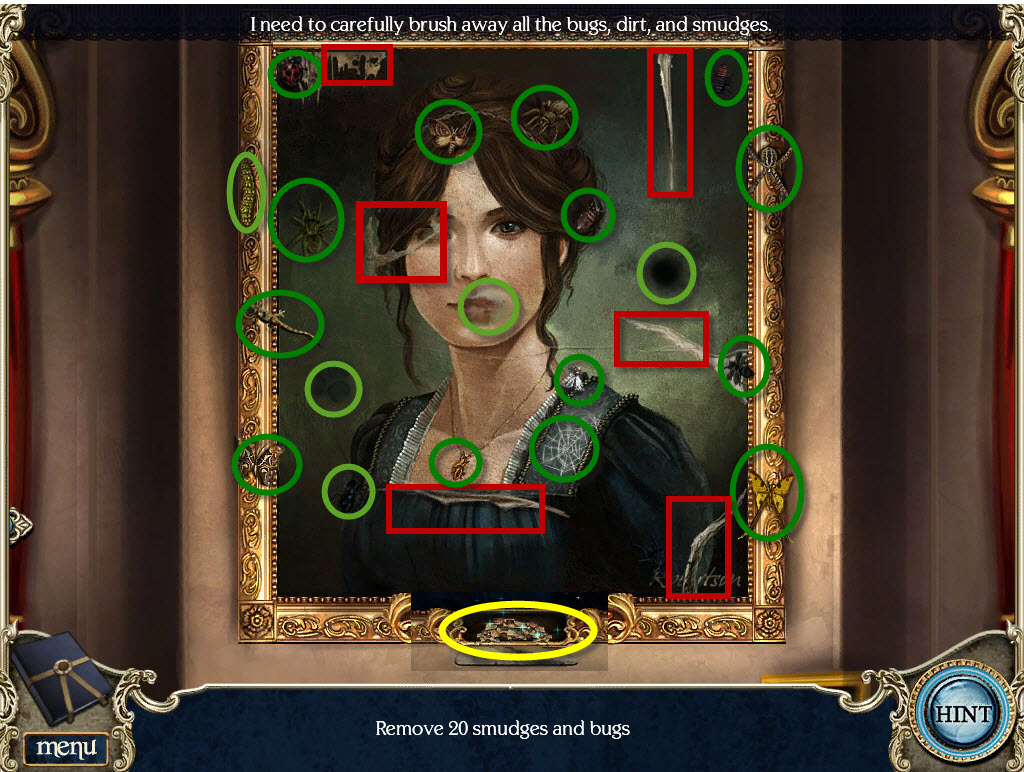
* From inventory, use brush with solvent on painting above fireplace to open puzzle
* Remove 20 bugs and smudges (shown in green)
* From inventory, use glue to repair 6 tears (show in red)
* From inventory, use varnish on painting to fully restore
* Pick up torn photo from below painting
* Click down 1x to lobby
* Click on photo frames on left back wall to zoom in
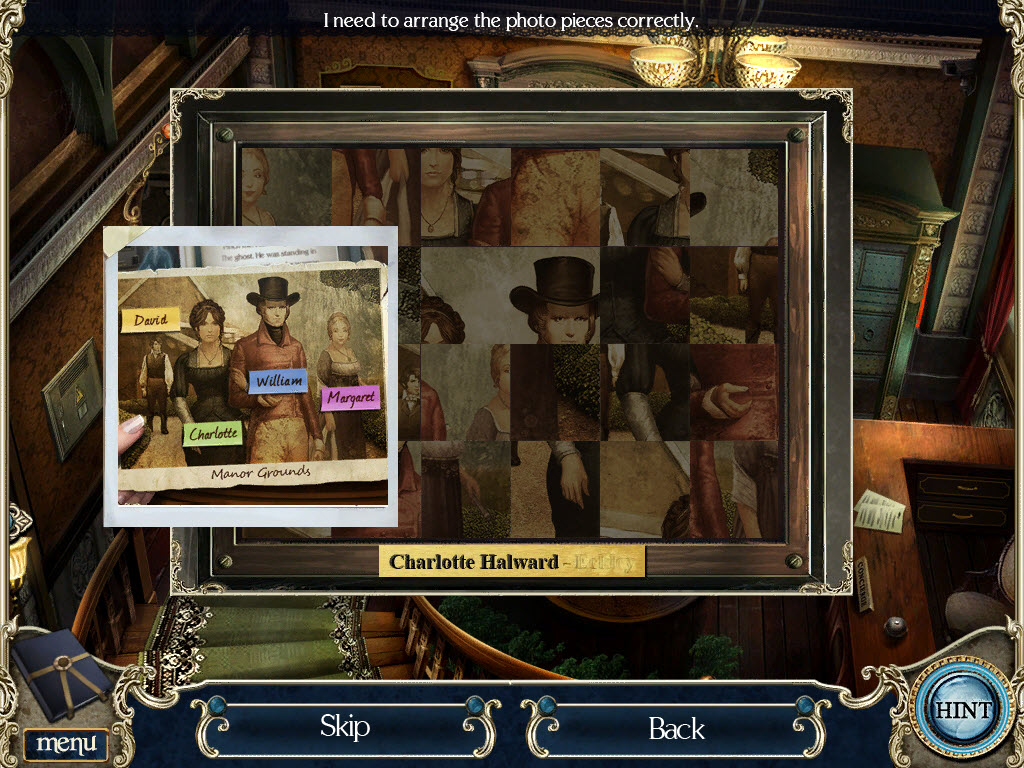
* From inventory, place torn photo on picture to open puzzle
* Click pieces to swap positions
* Drag the names to their proper positions "DAVID, CHARLOTTE, WILLIAM, MARGARET"
* Photograph added to inventory
* Click on David's ghost, this will end the chapter
*
CHAPTER2 - THE MANOR GROUNDS
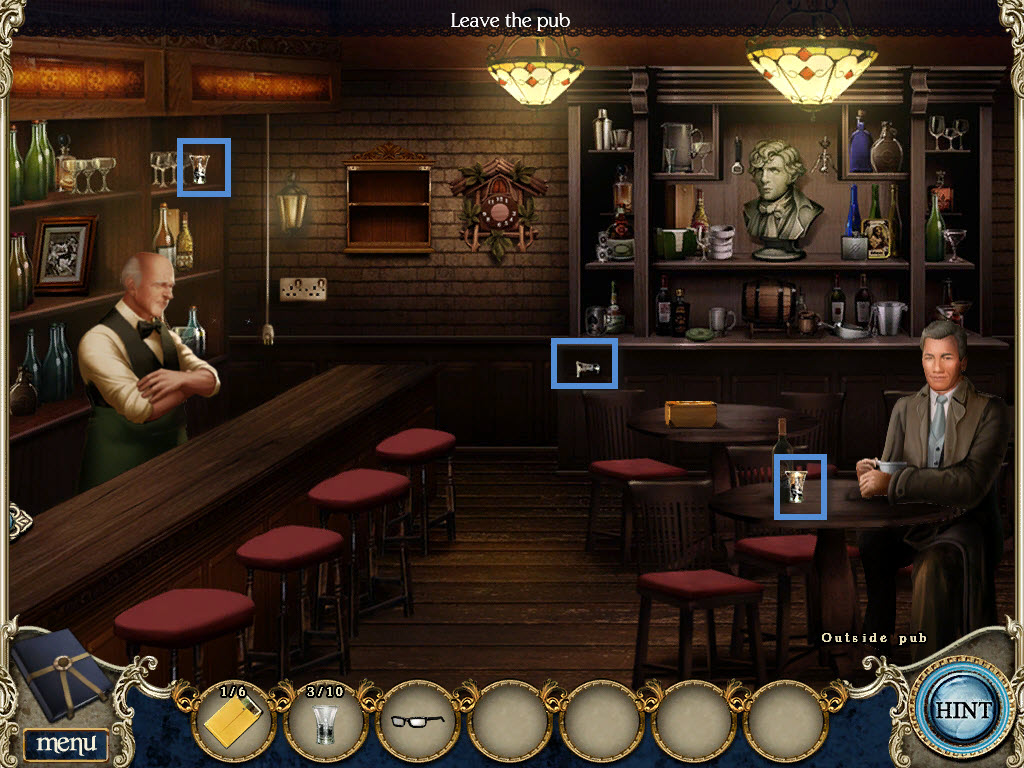
* Pick up 2 shot glasses
* Go into pub, talk to concierge
* Talk to pub owner
* Click on back wall to open puzzle
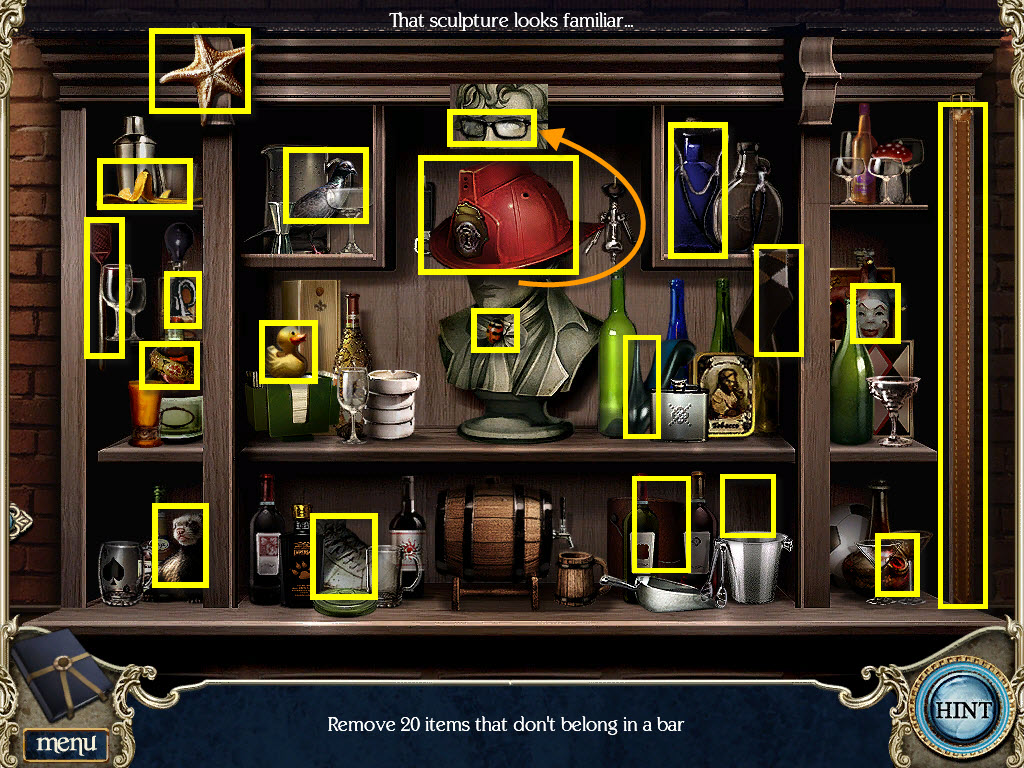
* Remove 20 items that don't belong in a pub
* Eyeglasses under fireman's hat added to inventory
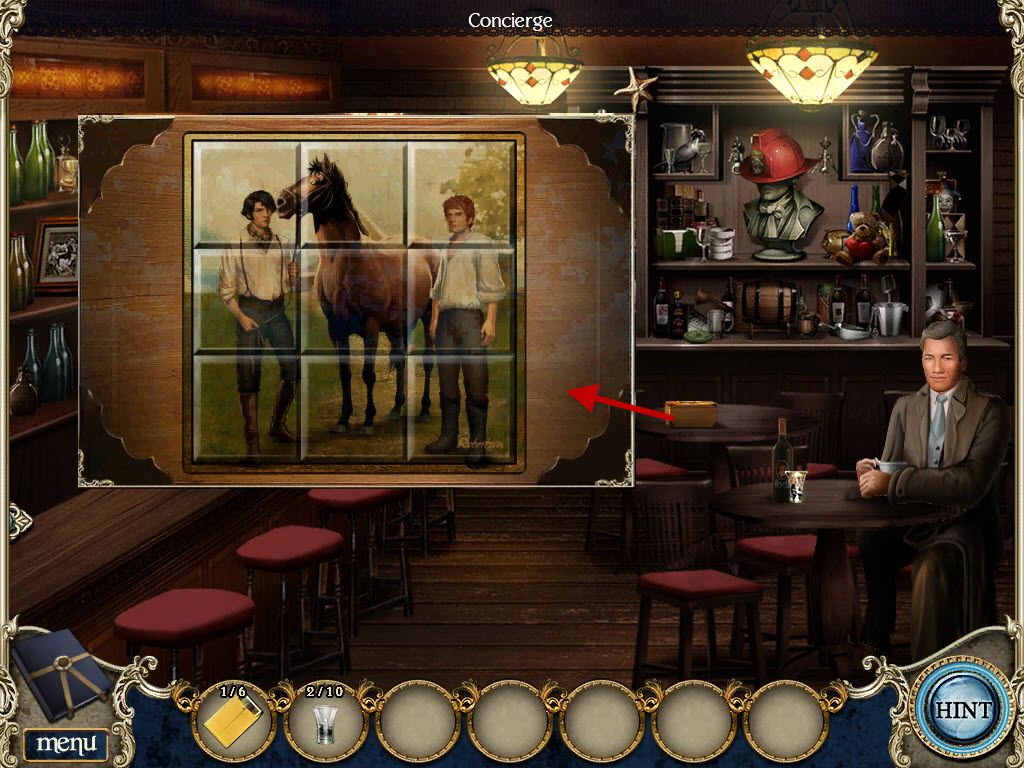
* Click on the box on the back table to open puzzle
* Click on pictures to swap places
* Pick up shot glass
* Pick up 3 shot glasses
* From inventory, give reading glasses to pub owner
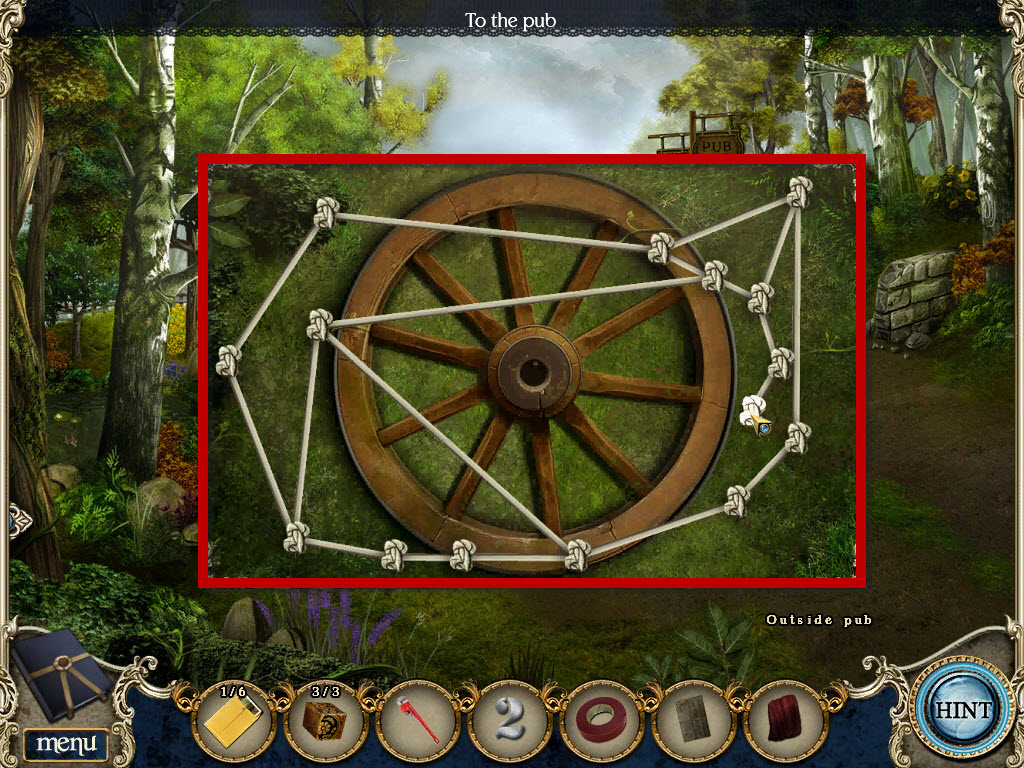
* Click down 1x to outside, go up 1x to road
* Pick up 2 shot glasses (blue)
* Click on wheel to the left to open puzzle
* Pull apart the knots to untangle the ropes
* White means the ropes are untangled, gray means the rope is tangled
* This puzzle is random. see video for an idea on how to solve it.
* 1 Wheel added to inventory
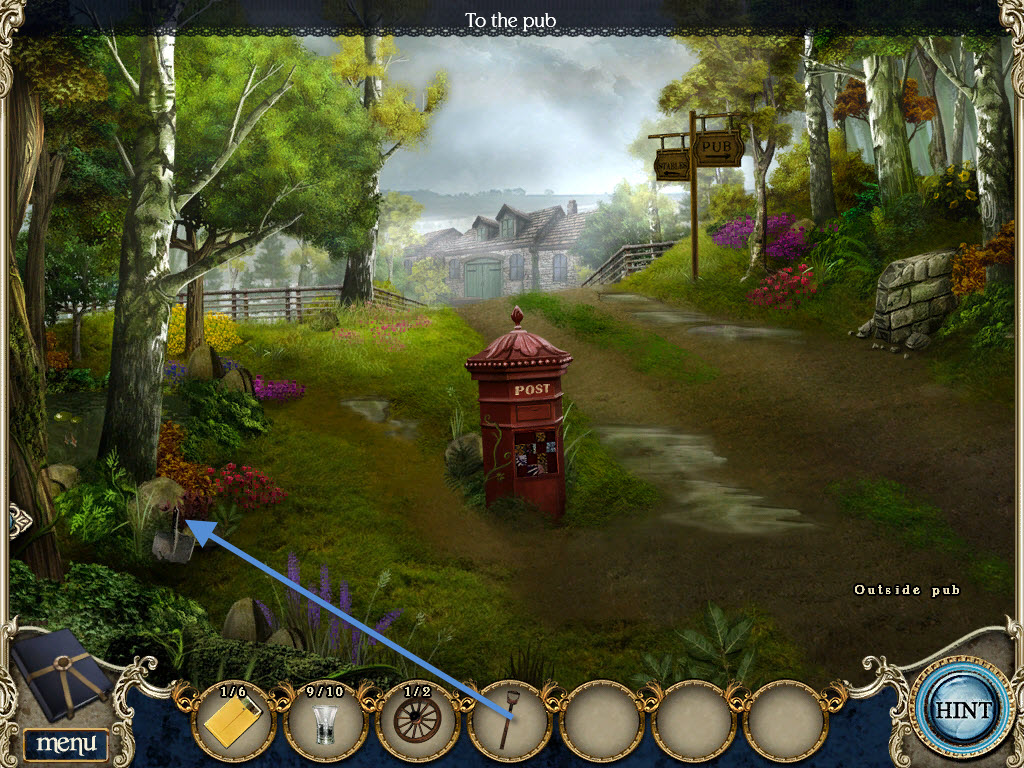
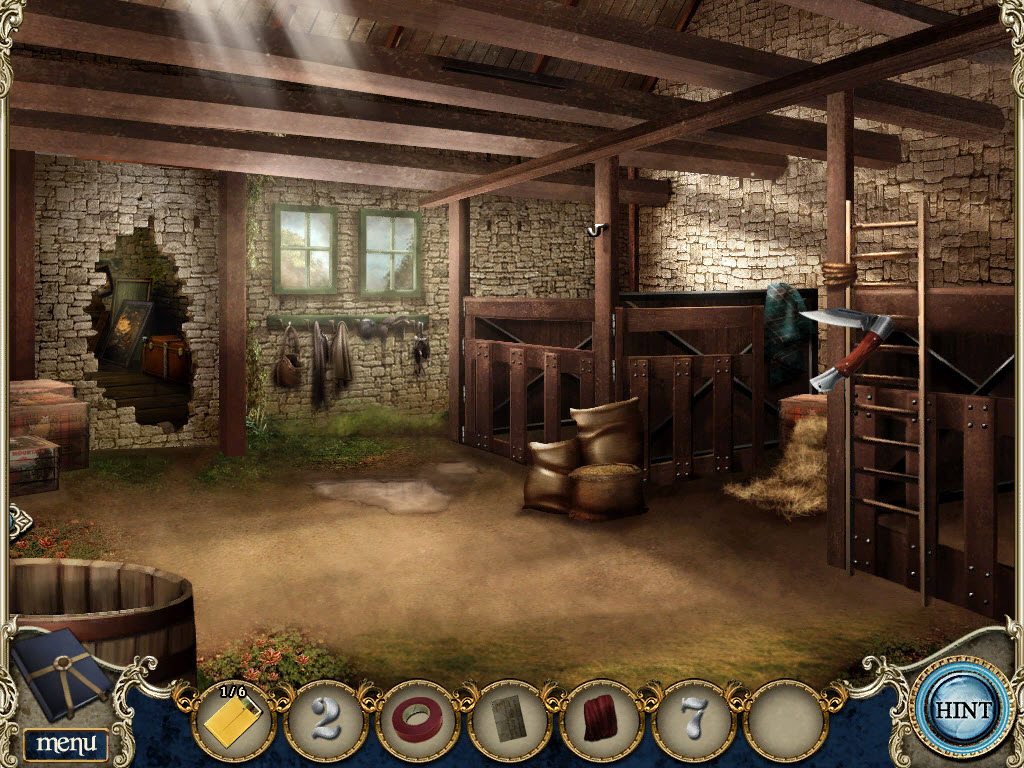
* Click up 1x to Outside Stables
* Click on window top left to zoom in, pick up shot glass (blue)
* Pick up 4 spokes (red)
* From inventory, put the 4 spokes on wheel next to house, pick up wheel (yellow)
* Pick up the handle stuck in ground (green)
* Click down 1x to road
* From inventory, put handle on shovel head lower left in bushes, pick up the shovel
* Click up 1x to Outside Stables
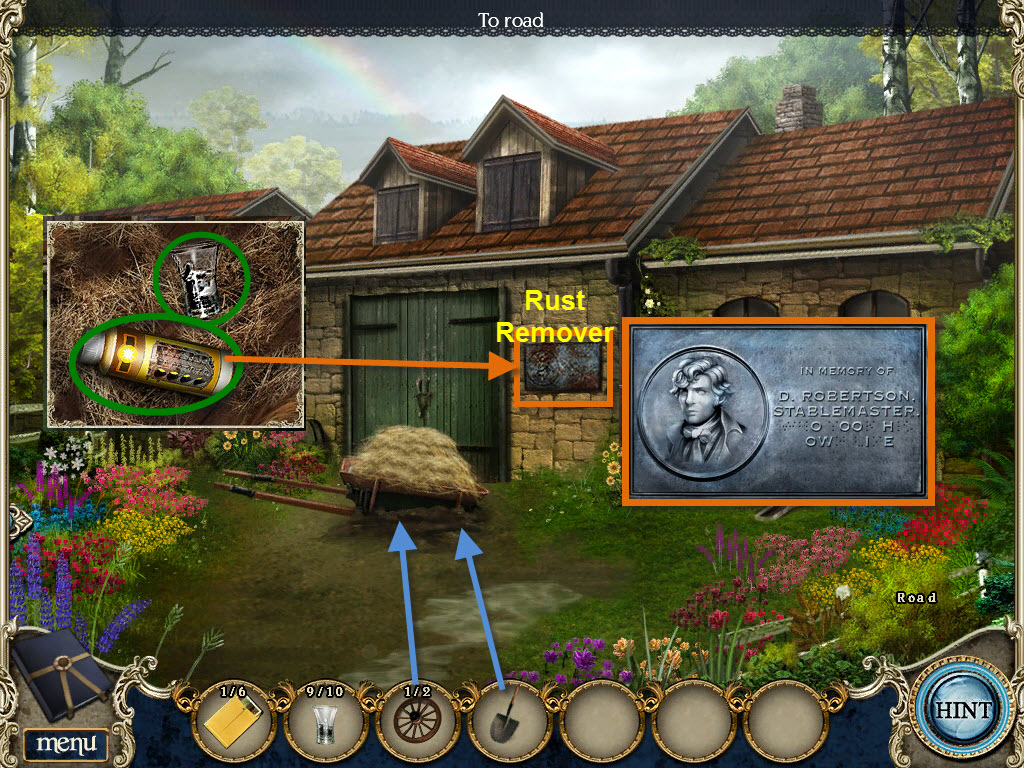
* From inventory, put shovel in mud beneath wheelbarrow
* From inventory, put the 2 wheels on wheelbarrow, click on wheelbarrow
* Click on ghost, note added to journal
* Click on wheelbarrow, pick up rust remover and the 10th shot glass
* From inventory, use rust remover to right of stable door
* Click down 2x to pub, go inside
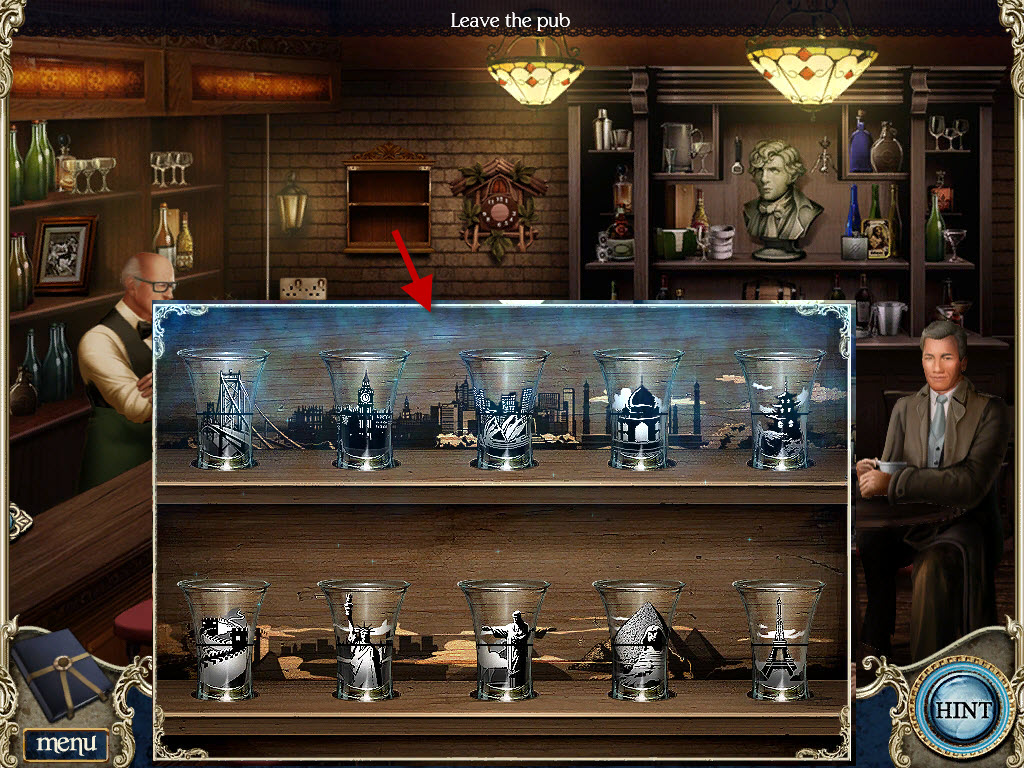
* From inventory, put the 10 shot glasses on shelf on back left wall to open puzzle
* Move the glasses until they match with the background images
* Click on the top or bottom of a glass to switch its place with another glass
* The glass will turn white when in the correct spot
* Pick up valve
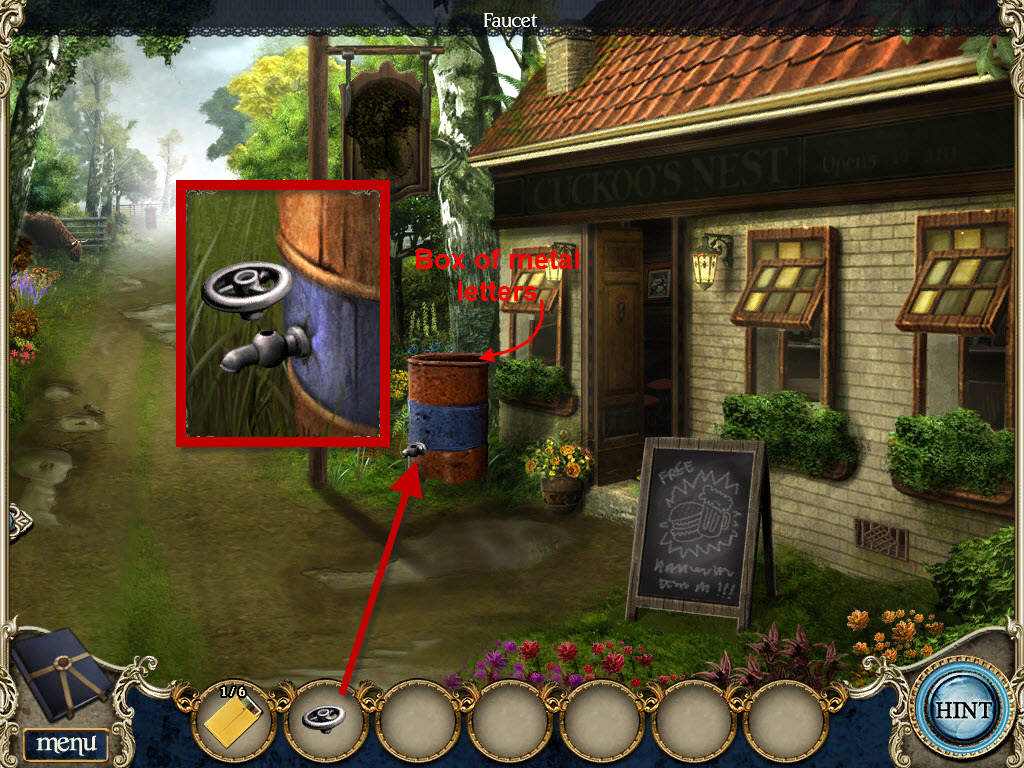
* Click down 1x to leave pub
* Click on barrel by door to zoom in
* From inventory, put valve on spigot, click on valve
* Click on top of barrel to zoom in, take box of metal letters
* Click up 2x to Outside Stable
* Click on plaque on wall to zoom in
* From inventory, place box of letters on plaque to open puzzle
* Place the letters in the correct spots to finish the statement "WHO TOOK HIS OWN LIFE"
* Pick up the bolt cutters
* Click on front stable door to zoom in
* From inventory, use bolt cutters to cut chains
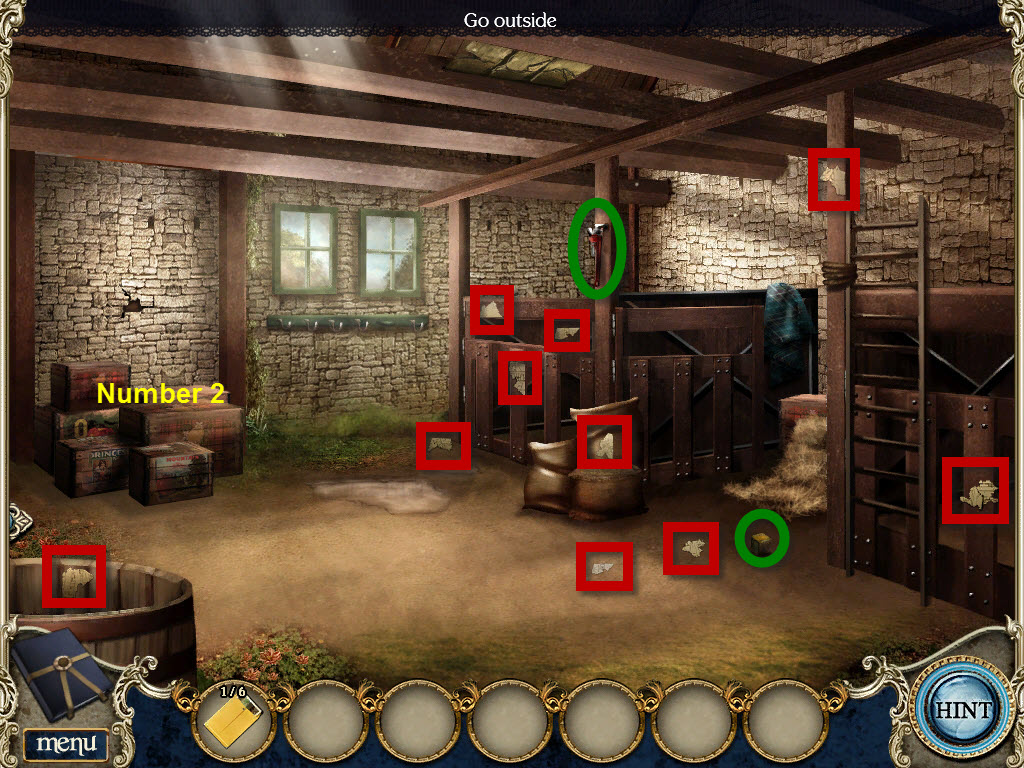
* Go inside
* Pick up metal cube on ground
* Pick up 10 sketch pieces (red)
* Pick up wrench off the wood beam
* Click on crates to zoom in, pick up Number 2
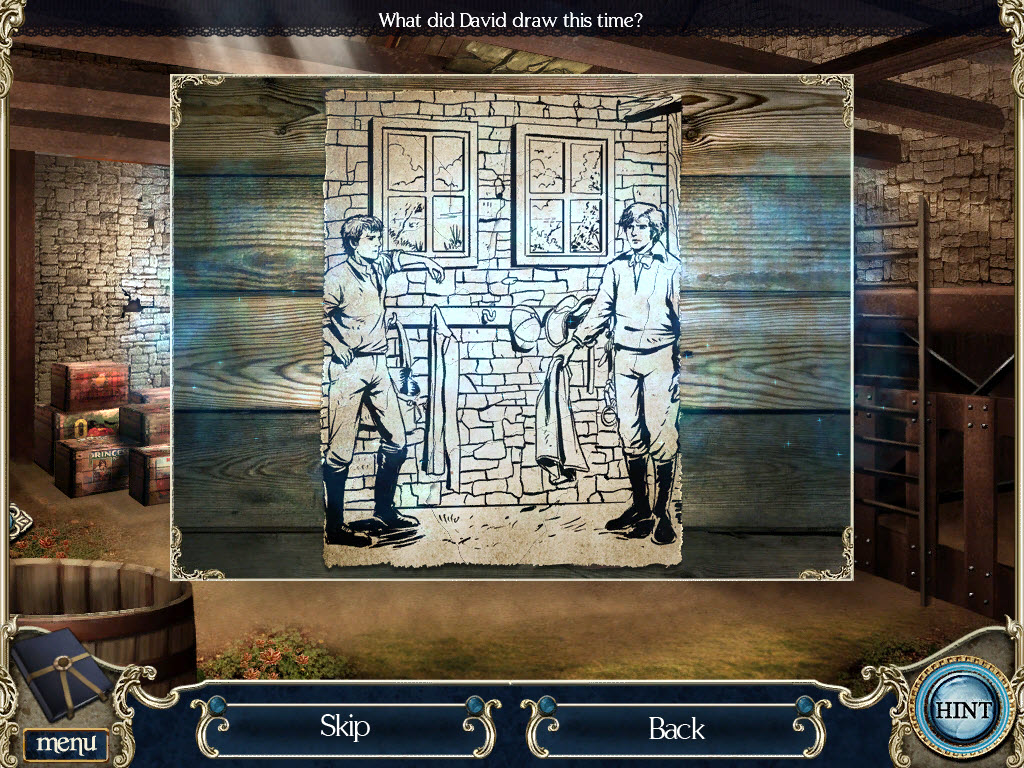
* From inventory, put the sketch pieces on crate to open puzzle
* Click on pieces to rotate them, each time a piece is put in the correct spot it will lock in place
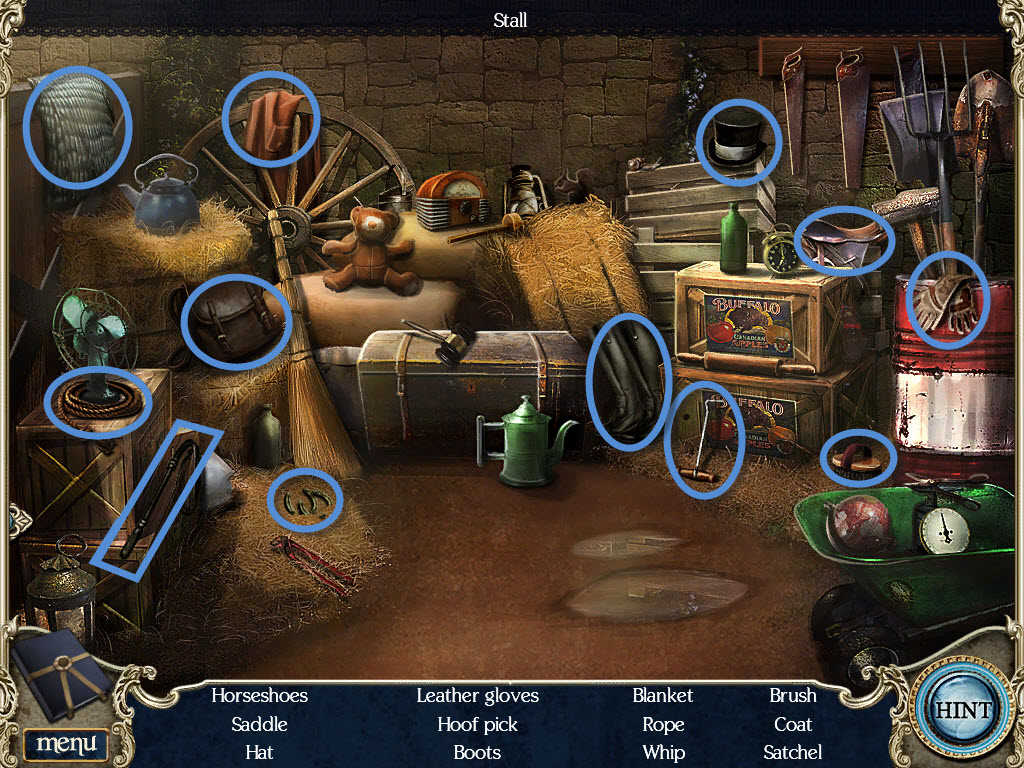
* Click on stall to right to open puzzle
* Find the hidden items
* Stable gear added to inventory
* From inventory, put stable gear on back wall hooks to zoom in
* Click on left bag, pick up hammer and chisel
* Click on ghost
* From inventory, use hammer and chisel on wall above crates to reveal David's workshop
* Go through wall to David's workshop
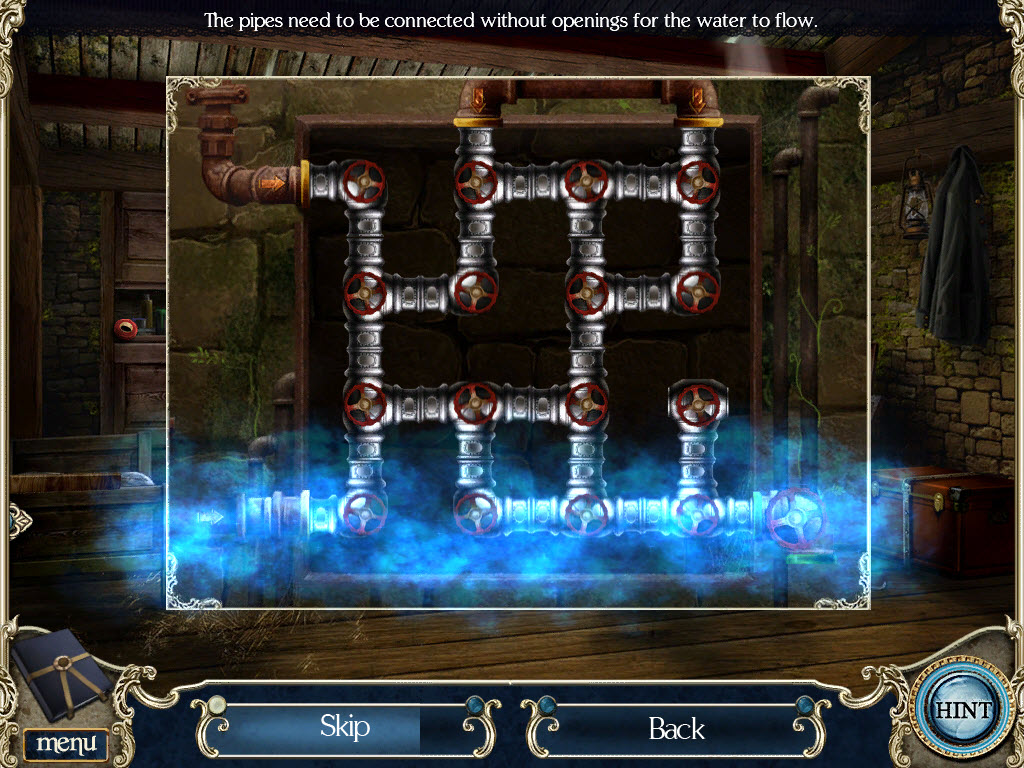
* Click on pipes on back wall to open puzzle
* Click on pipes to rotate until all pipes are connected to create water flow to outside
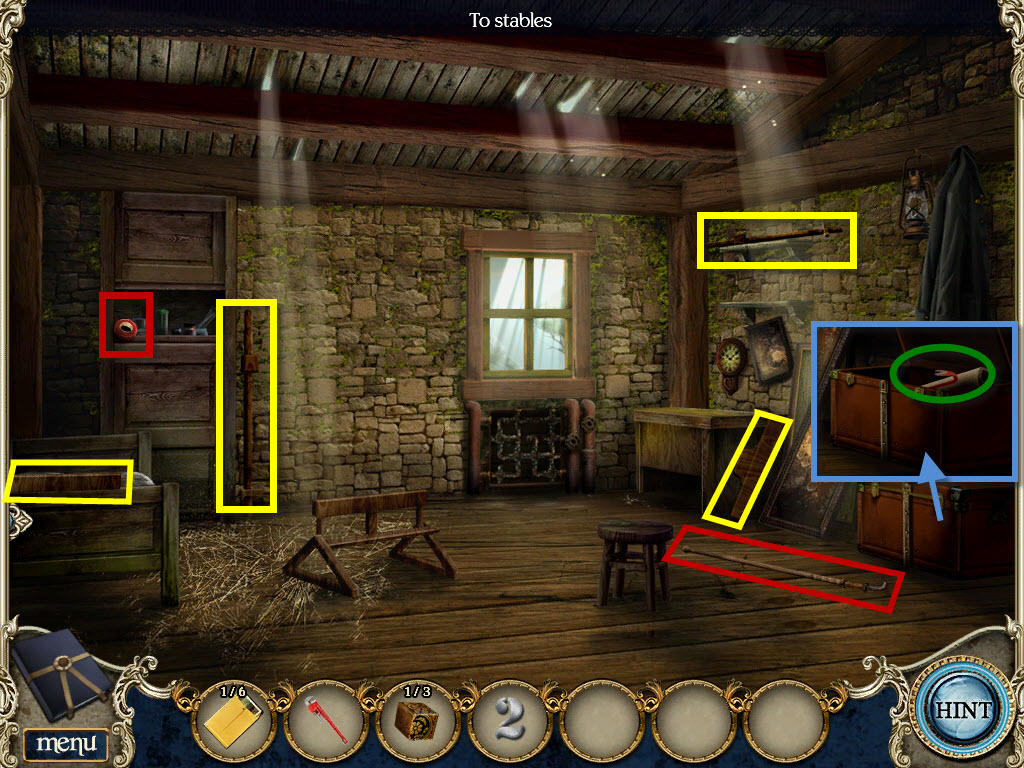
* Pick up Long stick
* Pick up Electrical tape
* Pick up 4 Easel parts (yellow)
* Click on trunk in right corner to zoom in, click on latches
* Pick up old canvas and crowbar
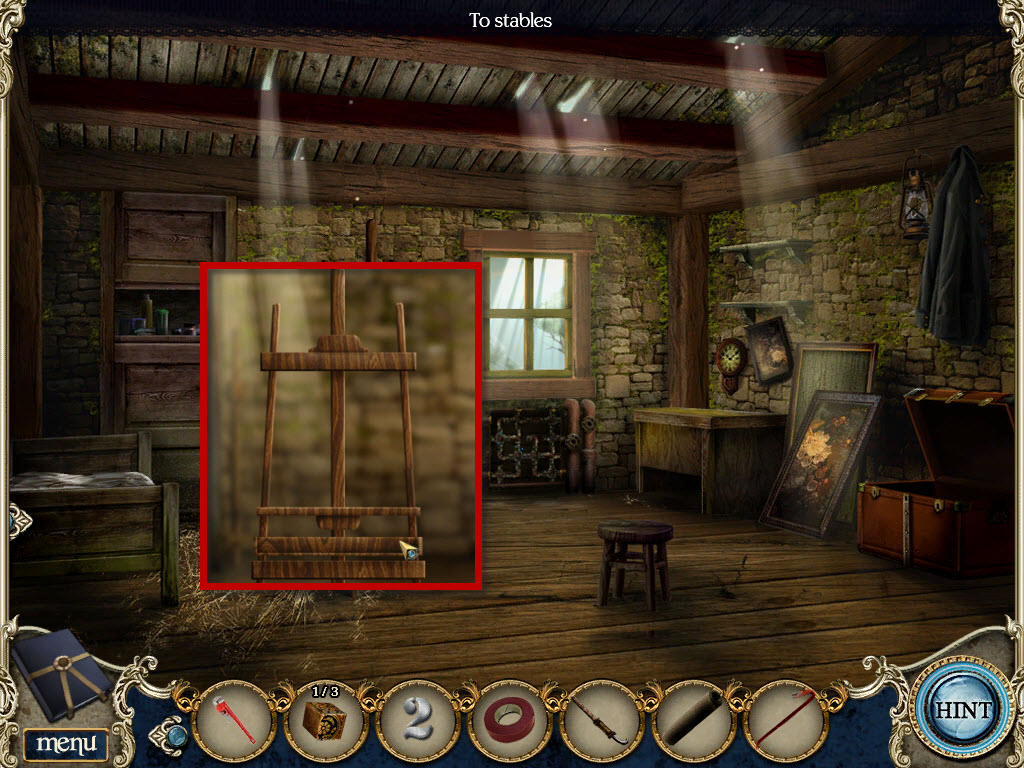
* From inventory, drag the easel parts to the wooden easel to open puzzle
* Click on each piece to rotate it and put in place on the easel
* Click down 1x
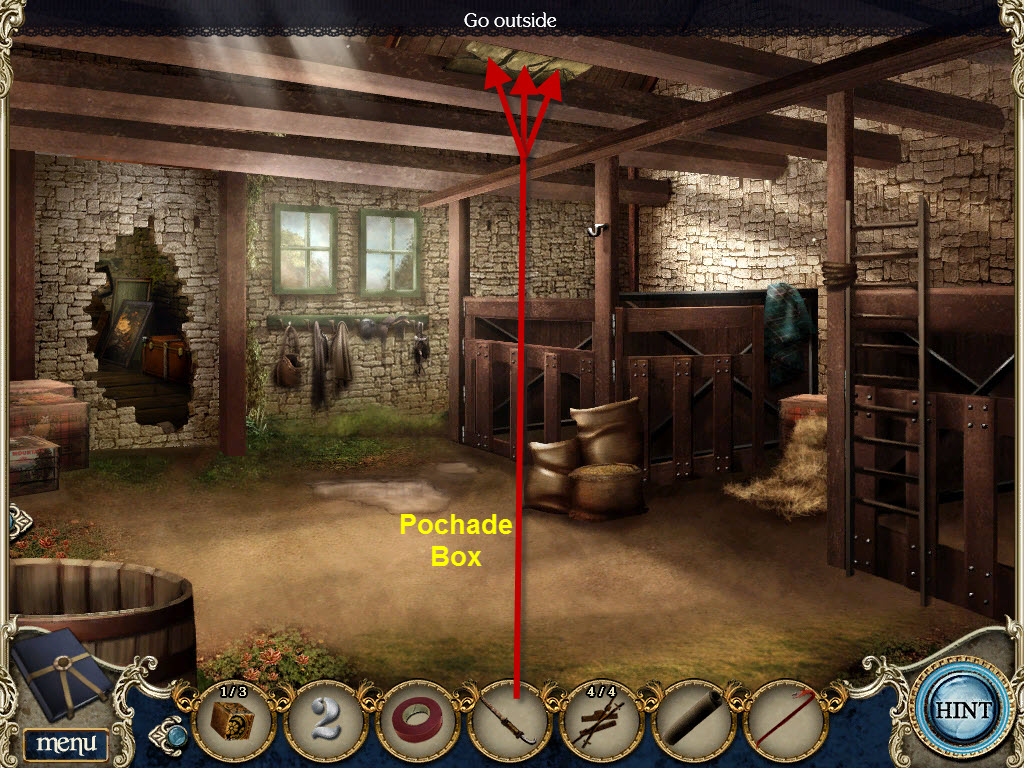
* From inventory, touch ceiling with long stick 3x (make sure the middle of the stick is touching the boards not the tip)
* Pick up Pochade box and Metal box from floor
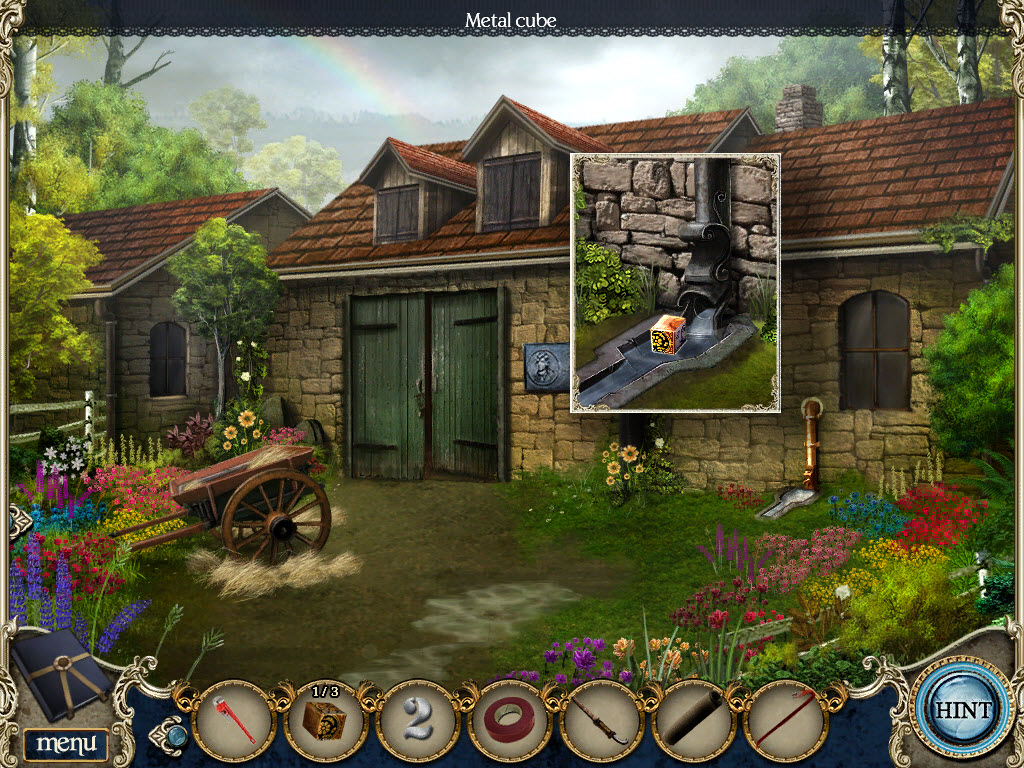
* Click down 1x to outside stable, click on faucet to zoom in, pick up metal box
* Click up 2x to workshop
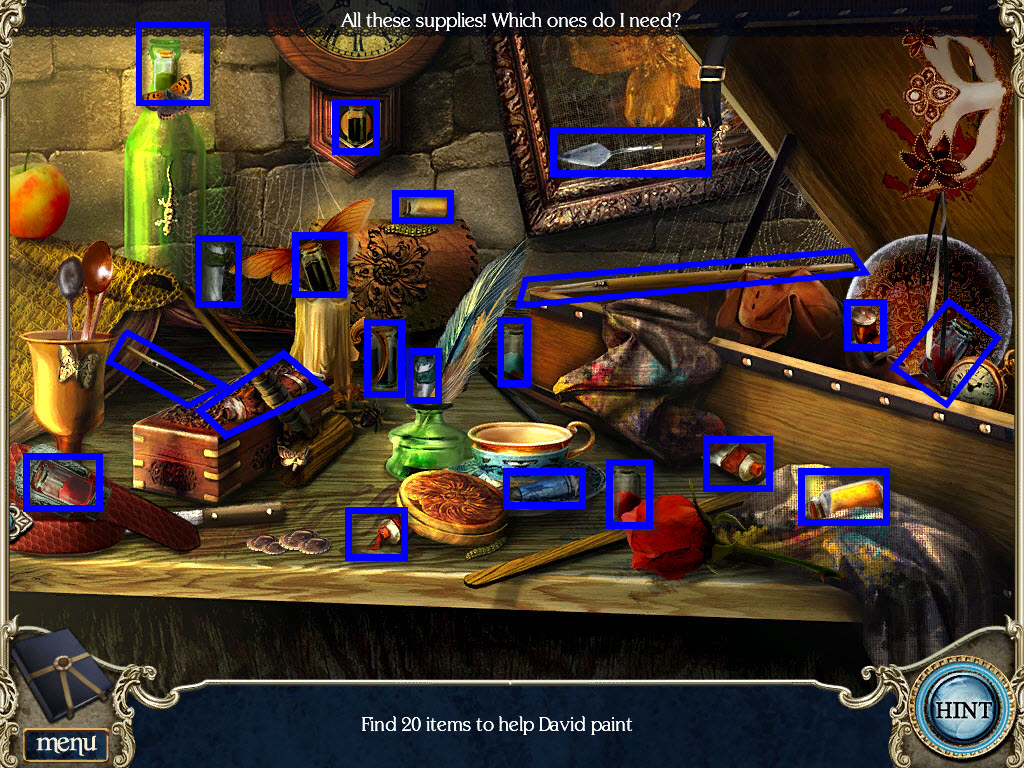
* From inventory, put pochade box on desk on the right back wall to open puzzle
* Find the 20 paint items
* Art supplies added to inventory
* From inventory, put old canvas on easel
* From inventory, put art supplies on easel to open puzzle
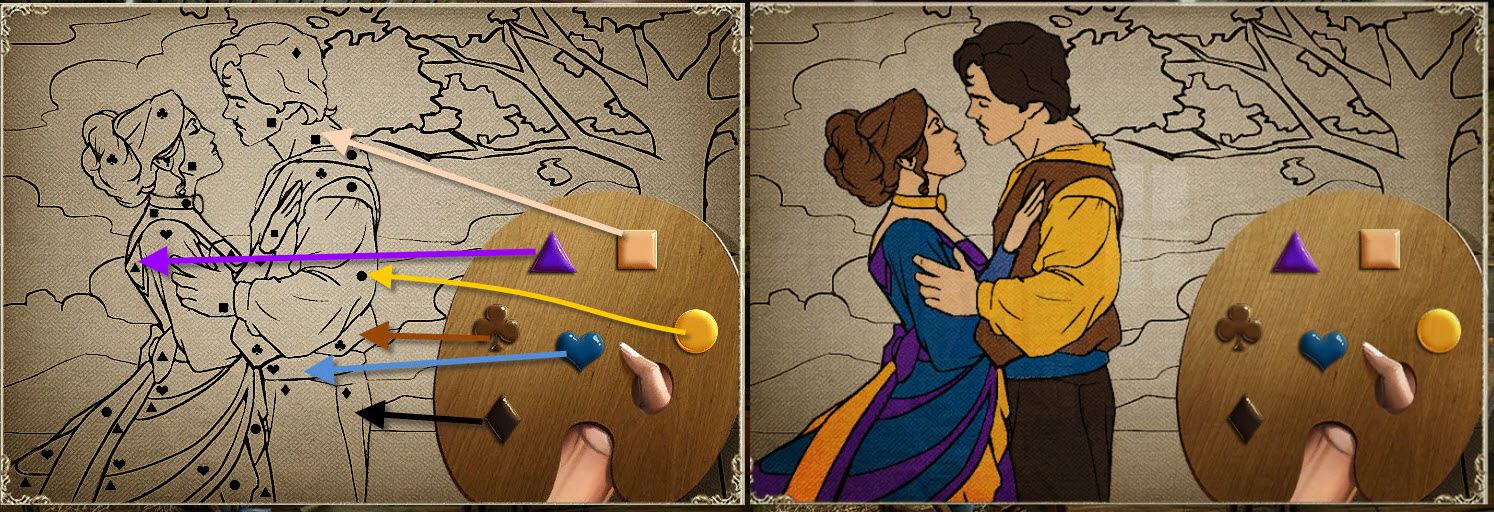
* This is a "color by number" type puzzle.
* Match the shapes on the canvas with the color by the same shape on the pallet to complete the painting
* Click on ghost
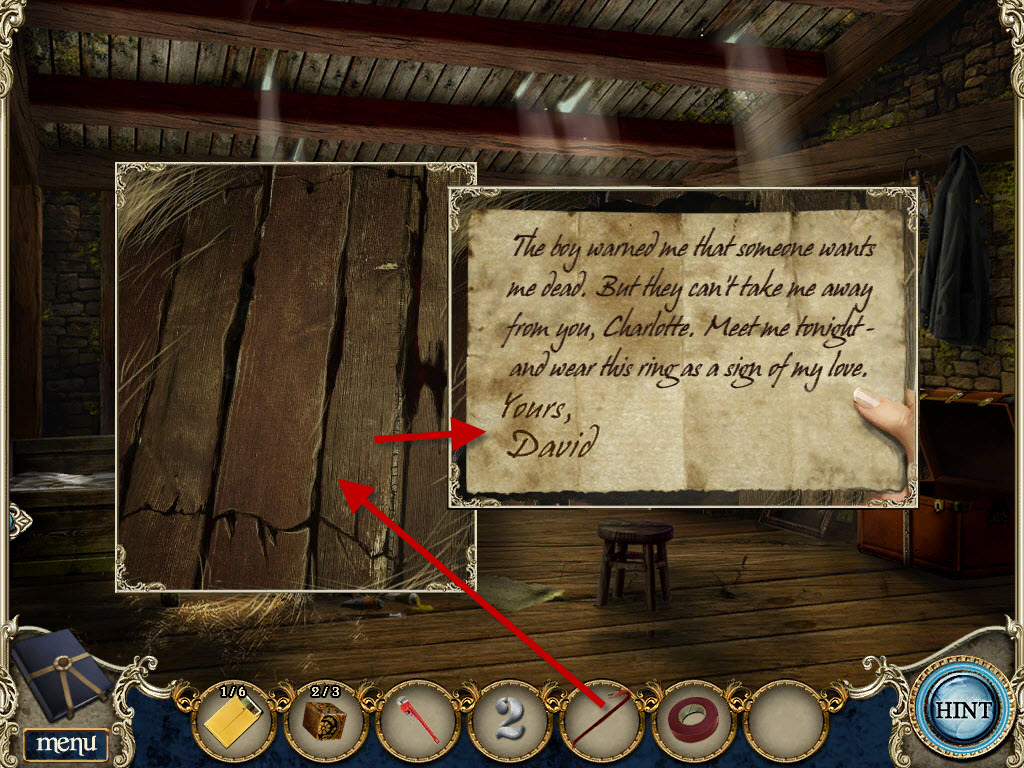
* Click on floorboards to left of easel to zoom in
* From inventory, use crow bar on floor, click on note
* David's note added to inventory
* Pick up dry rag
* Click down 2x to outside
* Click on faucet at back wall to zoom in
* From inventory, put dry rag in water
* Wet rag added to inventory
* Click down 1x to road
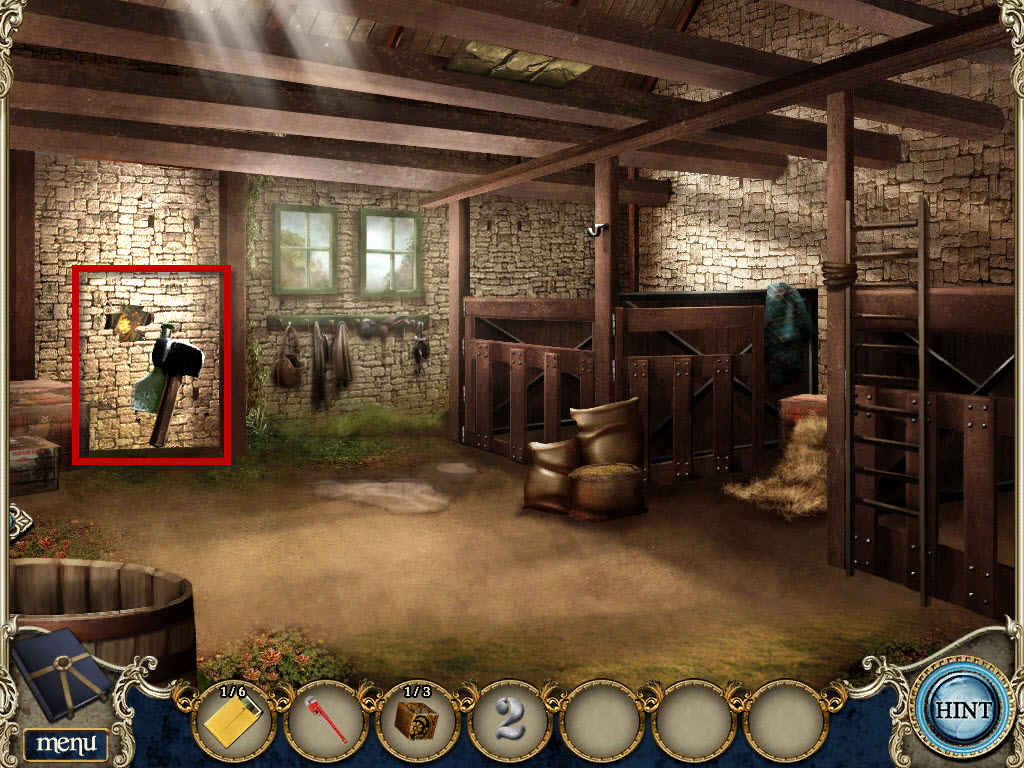
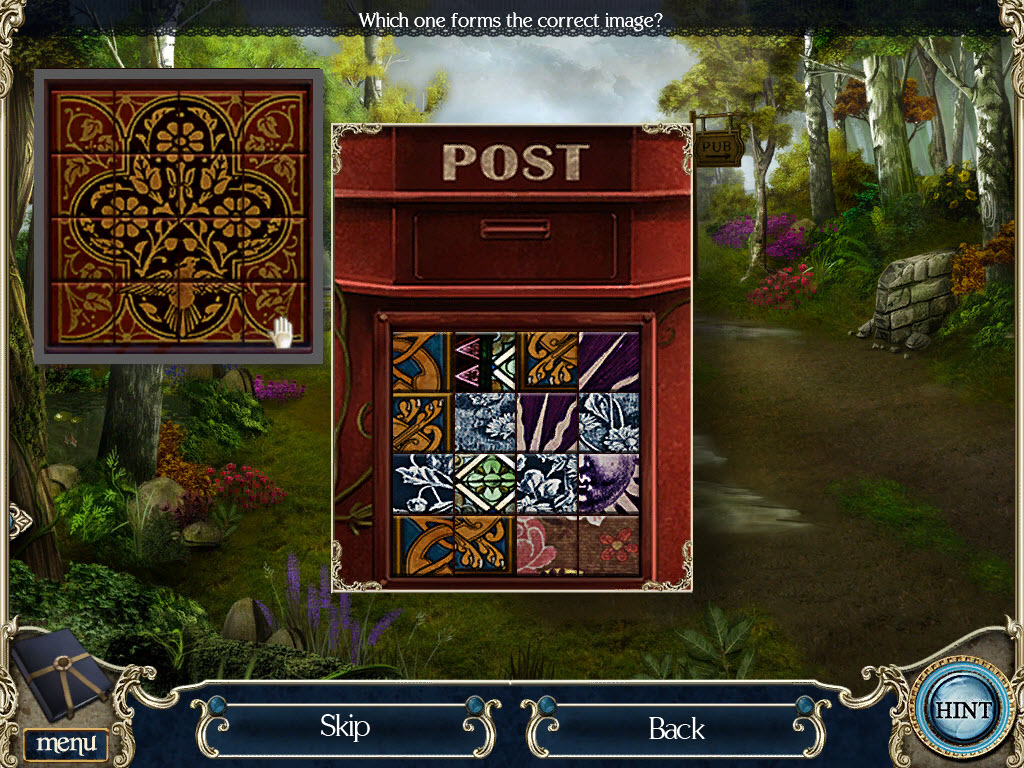
* Click on mailbox to zoom in
* From inventory, put 3 metal cubes on mailbox to open puzzle
* Click on a cube to change it until a complete image is formed
* Pick up number 7
* Click down 1x to pub
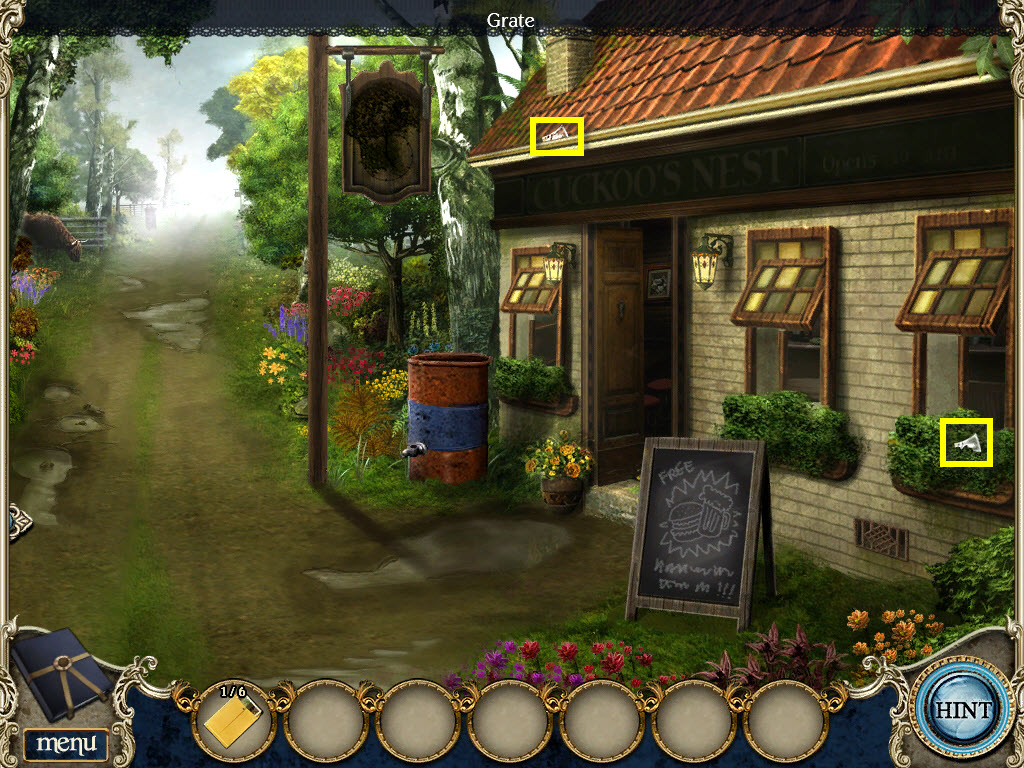
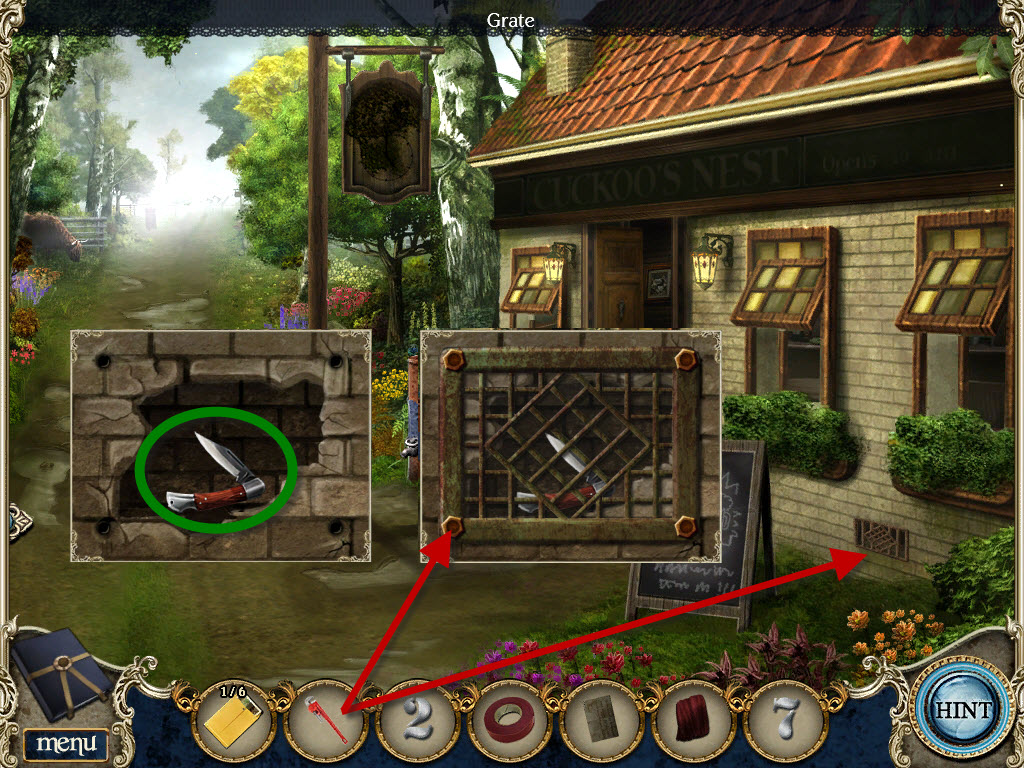
* Click on grate on right side of pub wall to zoom in
* From inventory, use wrench to remove bolts
* Pick up pocket knife
* Click up 2x to stables
* Go inside
* From inventory, use pocket knife to cut rope on ladder
* Pick up ladder
* Click down 3x to pub
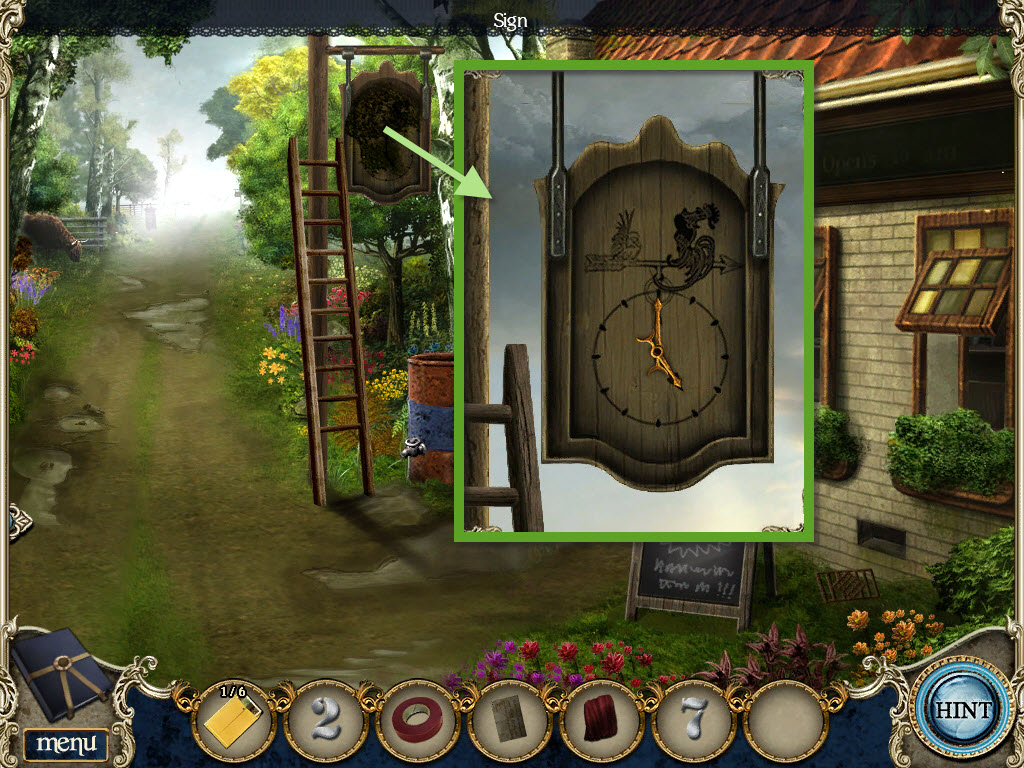
* From inventory, put ladder against sign post, click on sign to zoom in
* From inventory, use wet rag to clean off sign, pick up hour hand and minute hand
* Note the clock time (5:00)
* Go inside pub
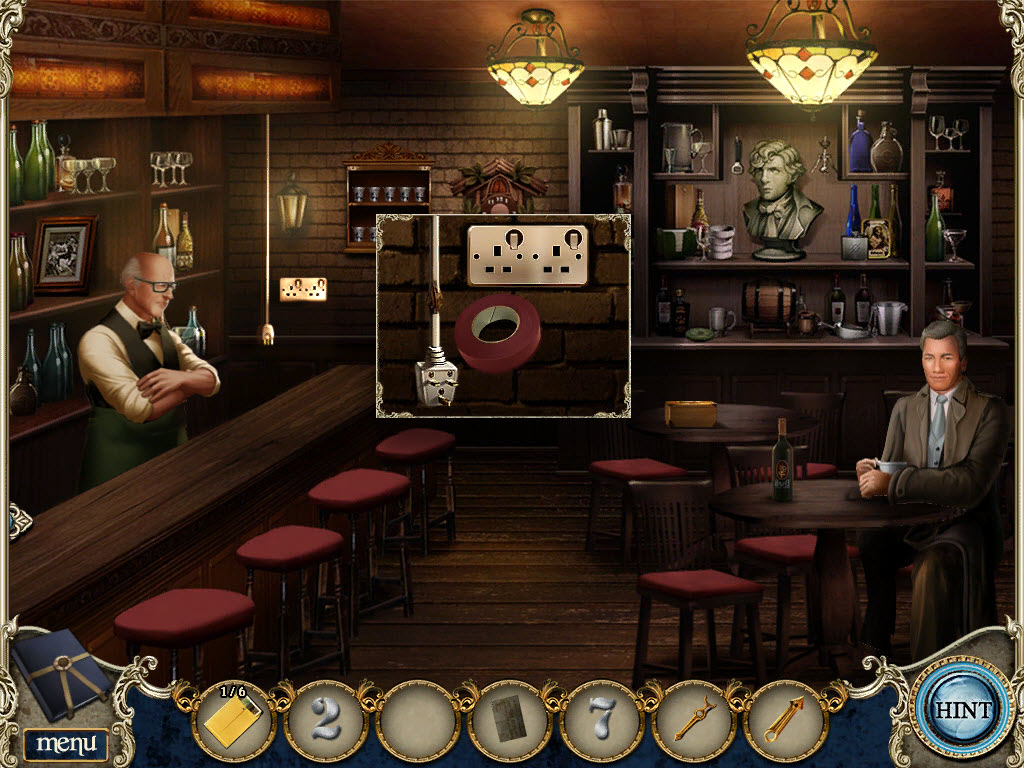
* From inventory, put electrical tape on sparking wire, back left wall
* Click on the plug to turn on neon sign on outside pub wall
* Go outside the pub
* Sign reads "open 10 am", pick up the 10
* Go back inside the pub
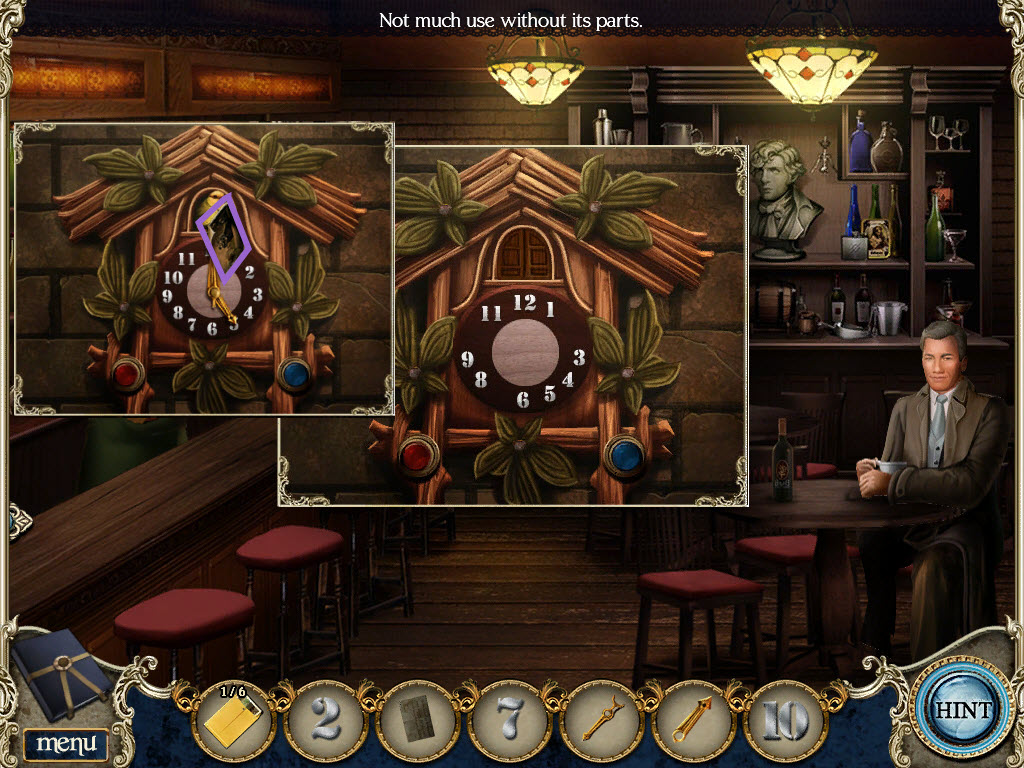
* Click on cuckoo clock to zoom in
* From inventory, put Hour Hand, Minute Hand, Numbers 2,7,10 on the clock
* Click on the red button and blue button to set clock time to 5:00
* Pick up the photograph
CHAPTER 3 - BALTOUN VILLAGE
* Go inside the town hall
* Talk to the receptionist
* Pick up the 4 sheets of paper (red)
* Pick up the feather duster off left hand table
* Go outside
* Click right 1x to Town Square, click up 1x to bridge
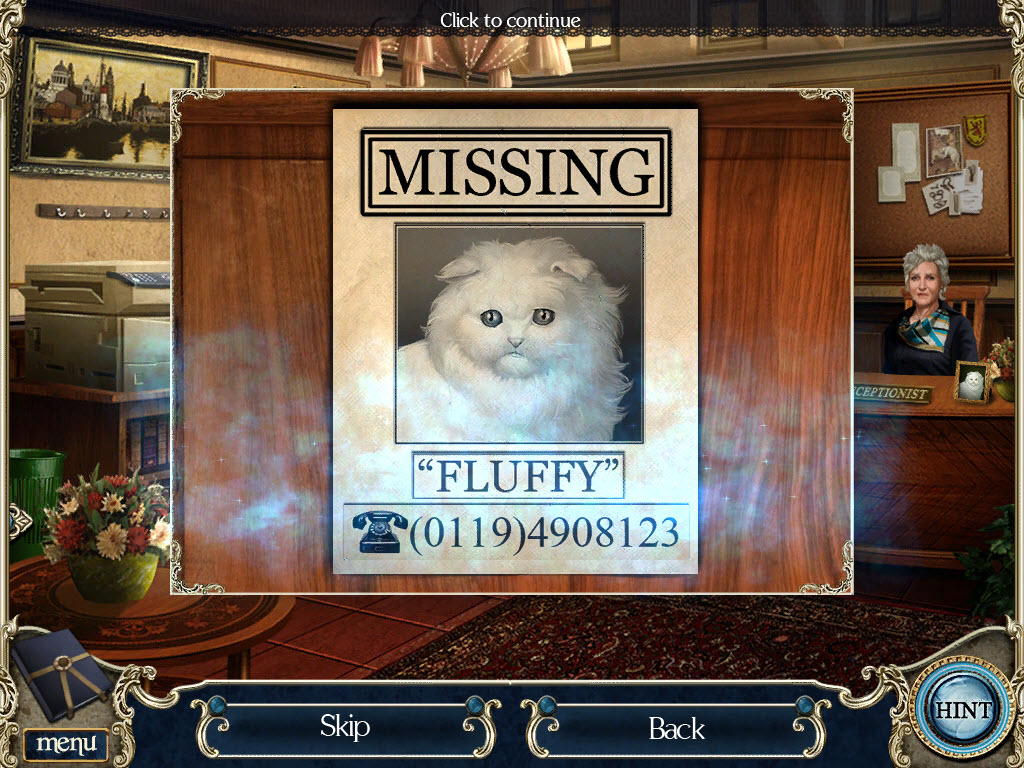
* Pick up the torn cat poster lower left corner of bridge
* Click down 2x to town hall
* From inventory, give poster to receptionist to open puzzle
* Reassemble the cat poster
* Click on each piece to rotate it and drag to proper area until the picture is completed
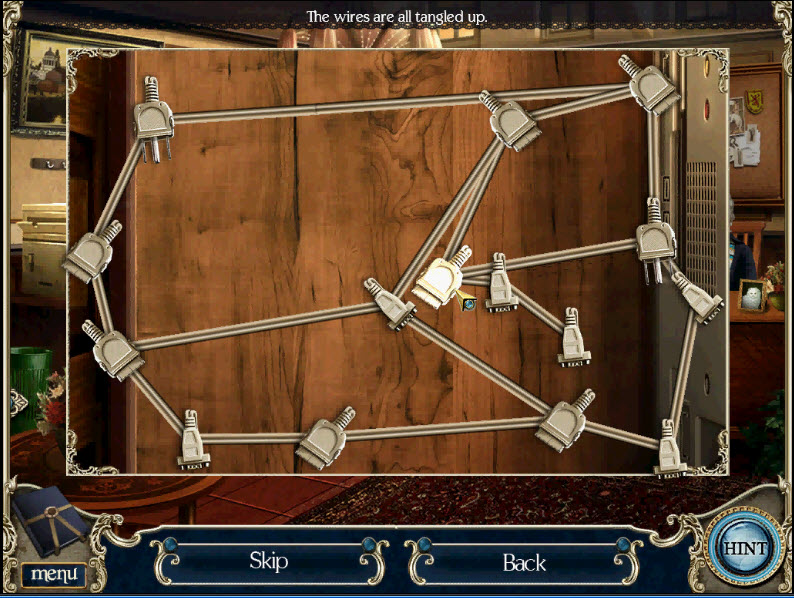
* Click on photocopier on left to zoom in to open puzzle
* Click on wires to untangle them, white is untangled, gray is tangled
* Puzzle is random
* Talk to receptionist
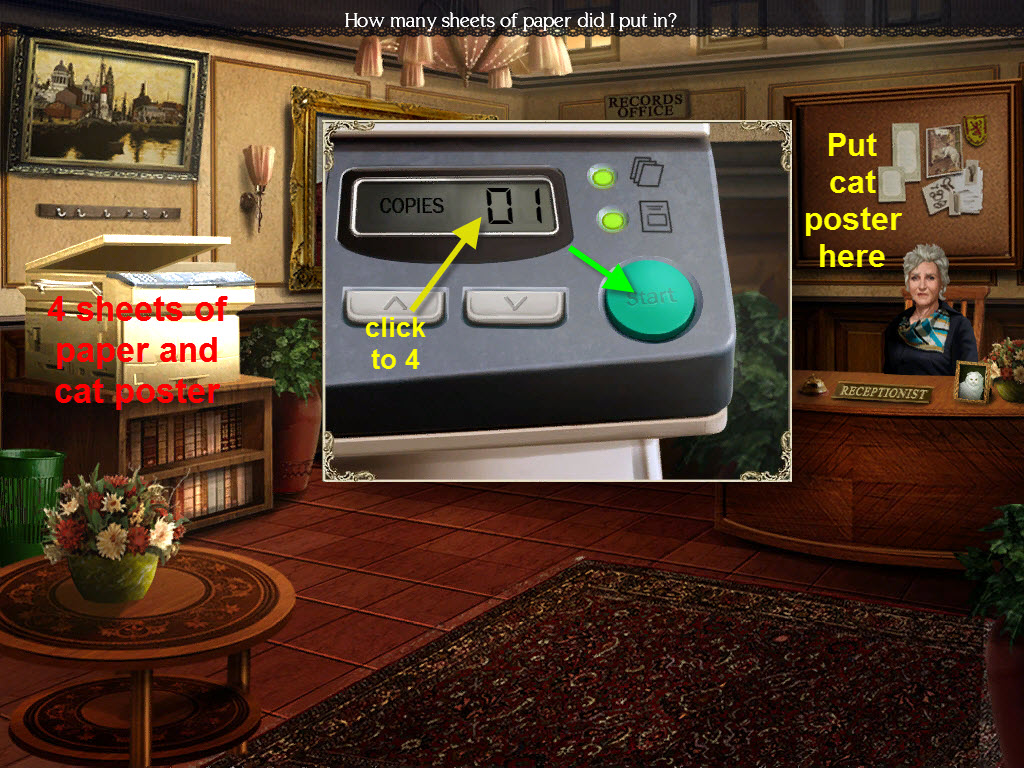
* From inventory, put 4 pieces of paper in copier
* From inventory, put cat poster in copier to open puzzle
* Click up arrow to show 4 copies, click green button to start
* 4 cat posters added to inventory
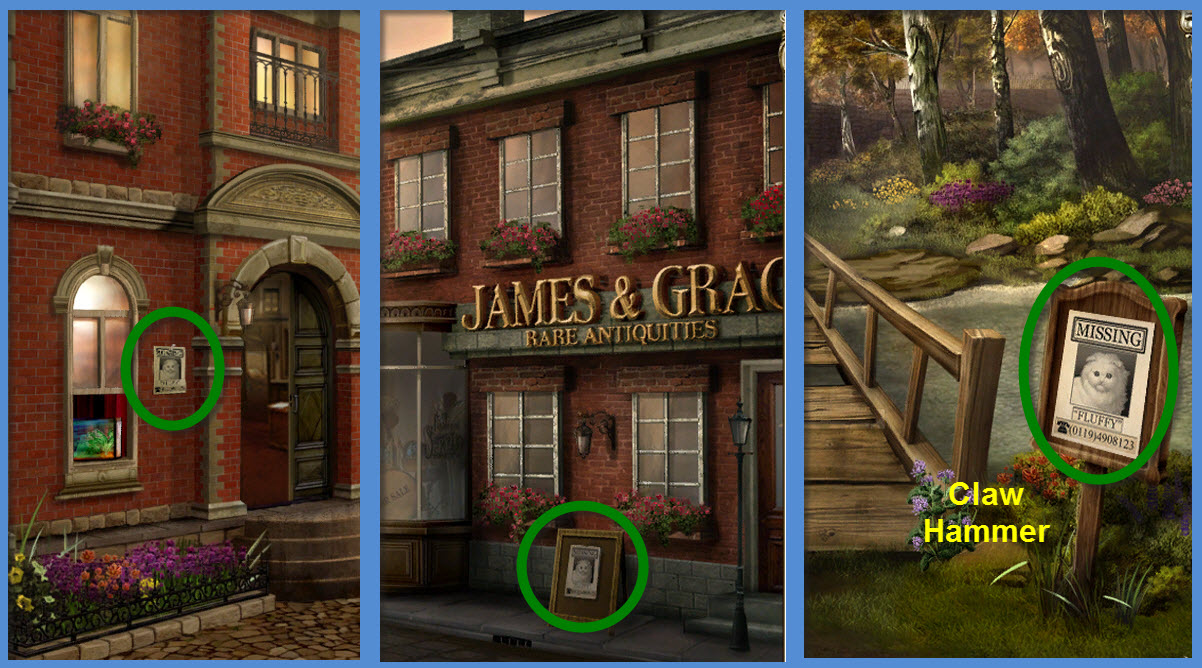
* From inventory, put 1 cat poster on bulletin board
* Go outside
* From inventory, place another poster on building wall
* Click right 1x to town square
* From inventory, place 3rd poster on board in front of store
* Click up 1x to bridge, place 4th cat poster on bridge
* Pick up claw hammer
* Click down 2x to town hall
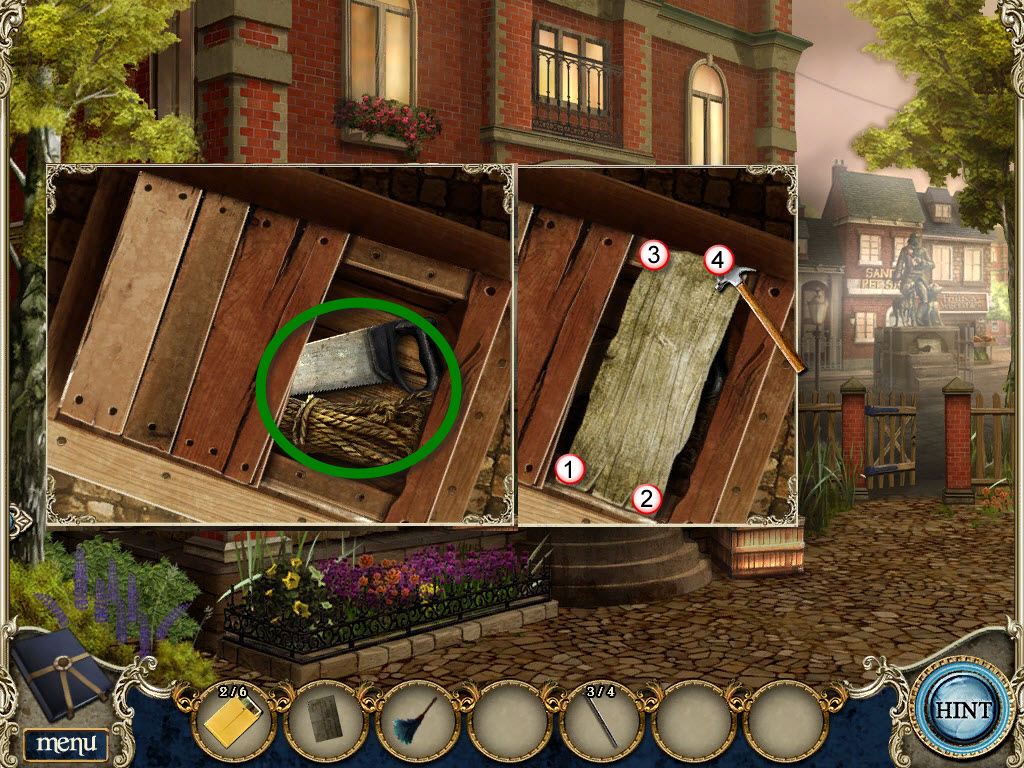
* Click on crates to right of door to zoom in
* From inventory, use claw hammer to remove nails, pick up wood plank
* Pick up hand saw and rope
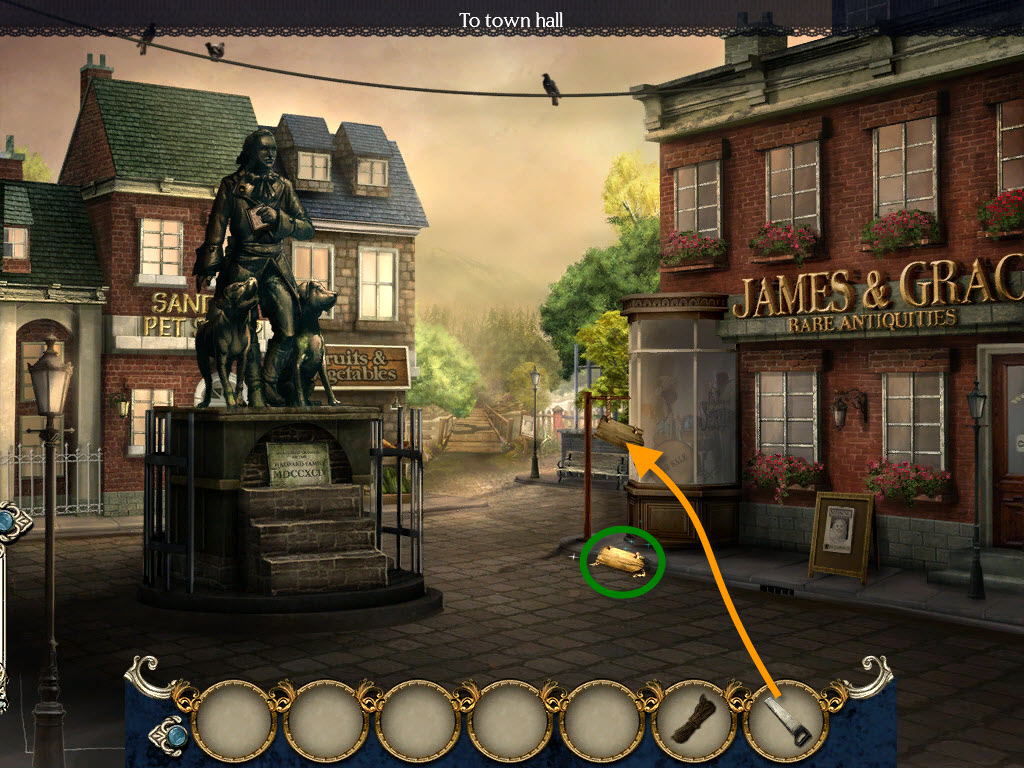
* Click up 1x to town square
* From inventory, use hand saw on broken sign
* Pick up 2nd wood plank
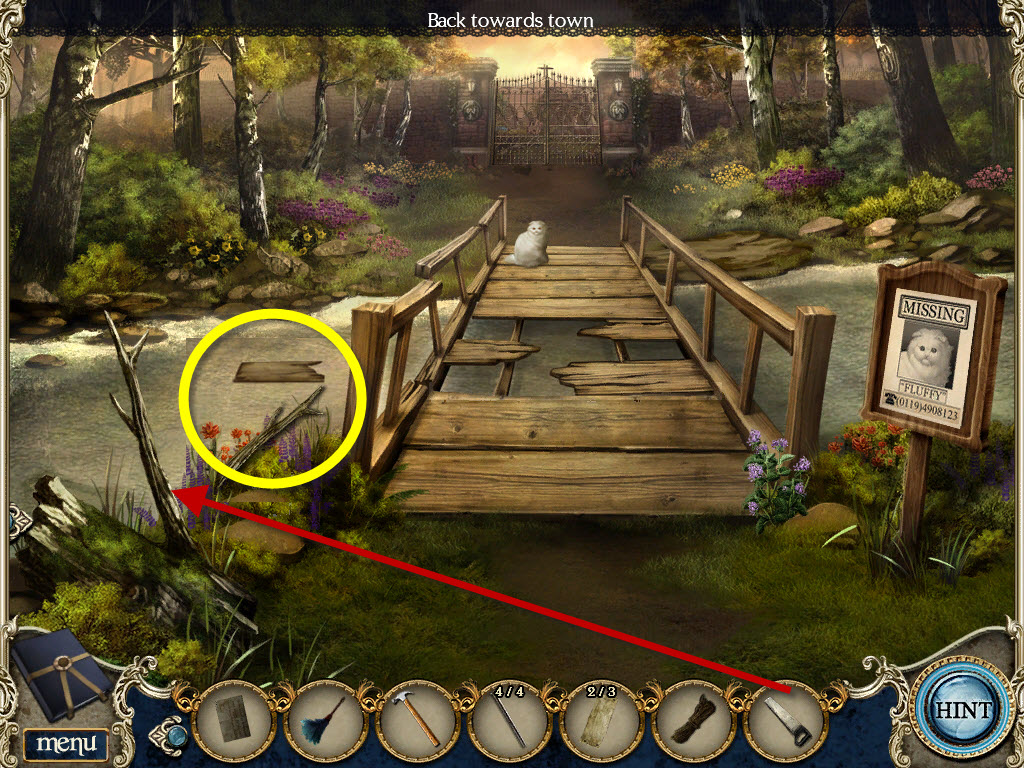
* Click up 1x to bridge
* From inventory, use hand saw on branch to left of bridge, click on branch
* From inventory, use branch to reach plank floating in water to left of bridge
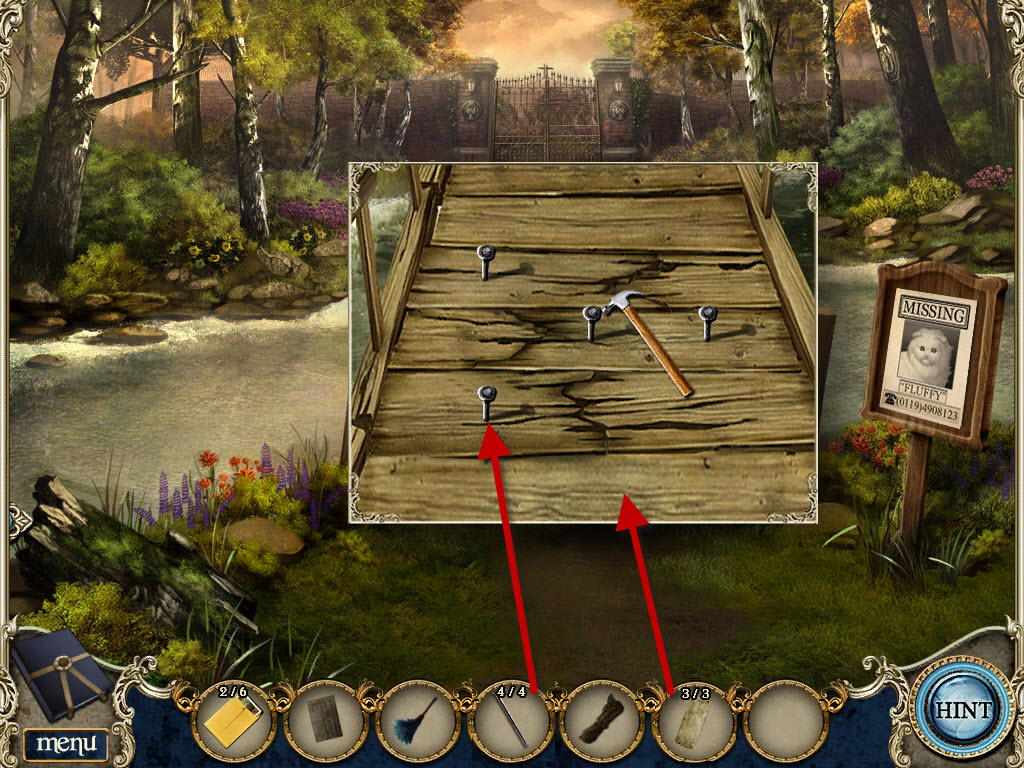
* From inventory, put wood planks on bridge
* From inventory, put nails on bridge and use hammer to pound in nails
* Click on fluffy
* Click up 1x to graveyard, click on ghost
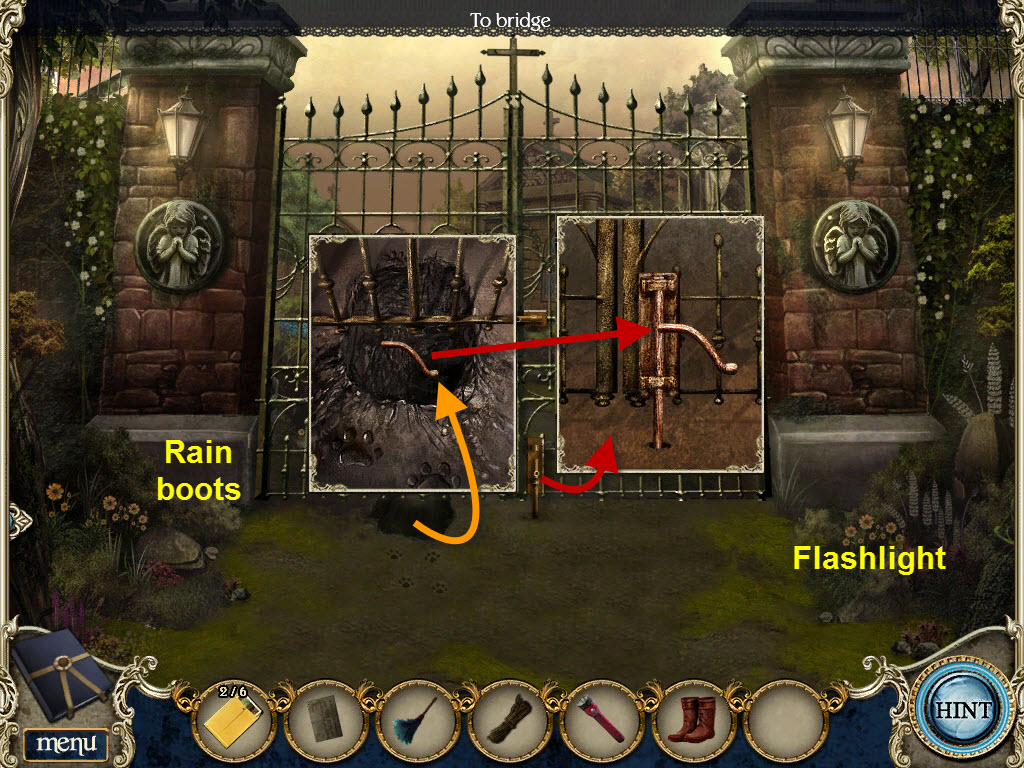
* Pick up red flashlight lower right corner
* Pick up rain boots just to the left of gate
* Click on hole below gate to zoom in, pick up Rod handle
* Put rod handle on lower gate lock
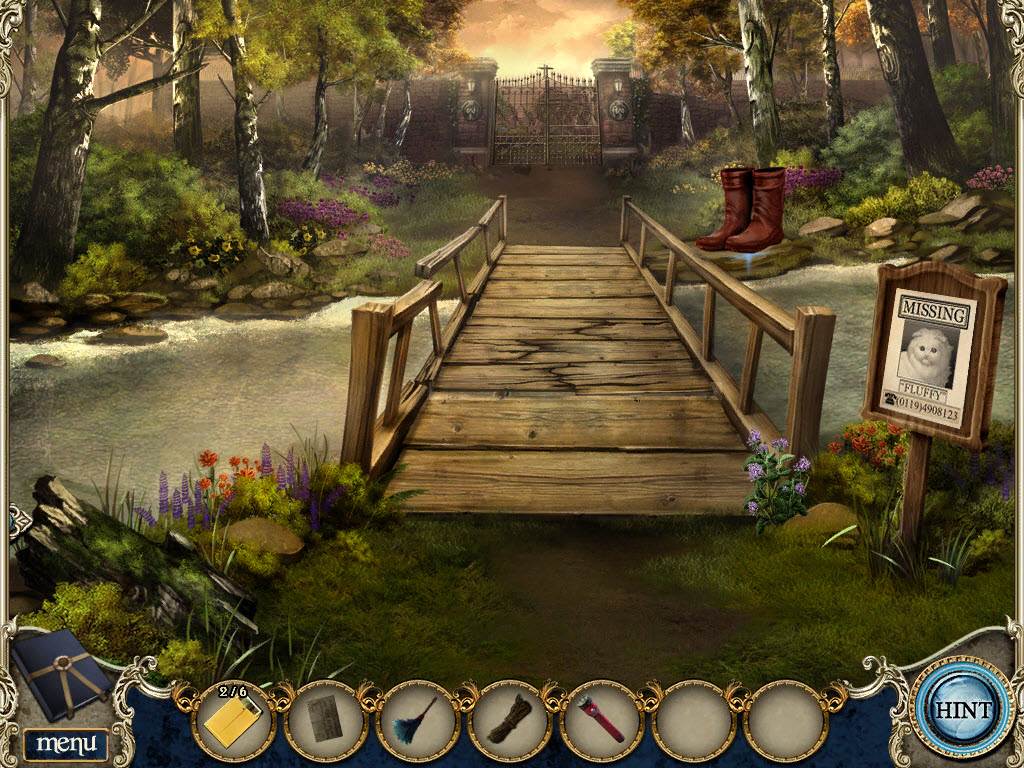
* Click down 1x to bridge
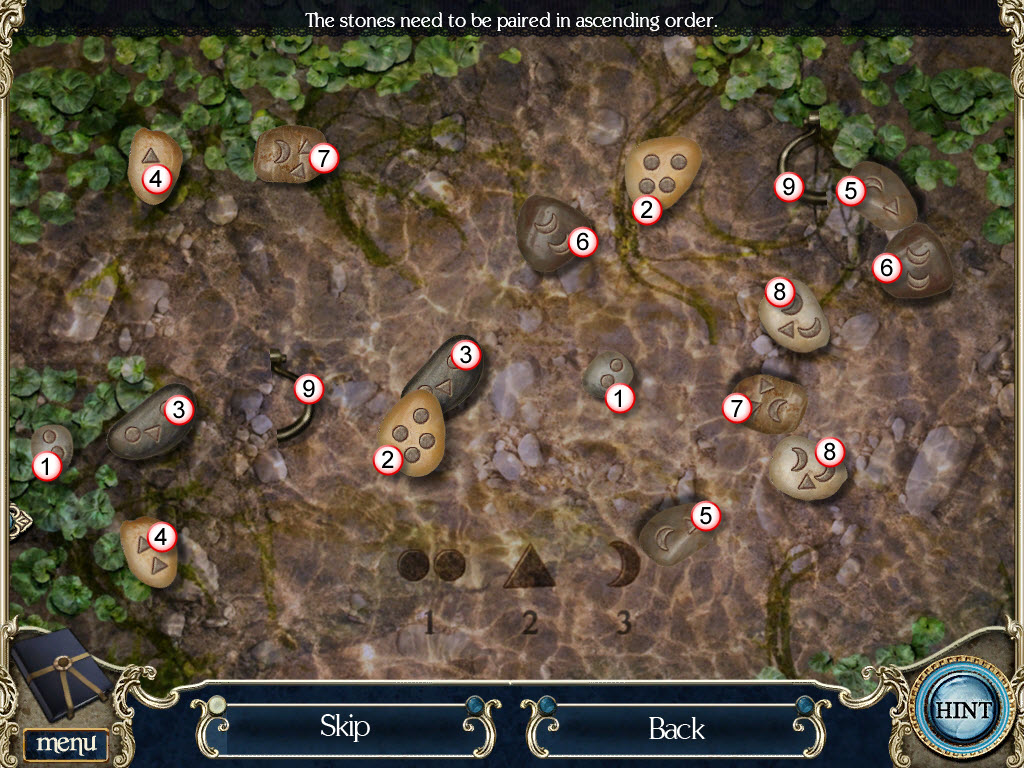
* From inventory, put boots in mud to upper right of bridge to open puzzle
* Click on stones to eliminate them using the clue at the bottom of the puzzle
* Puzzle is random for each player, see solution for clue how to choose stones
* Ring handle added to inventory
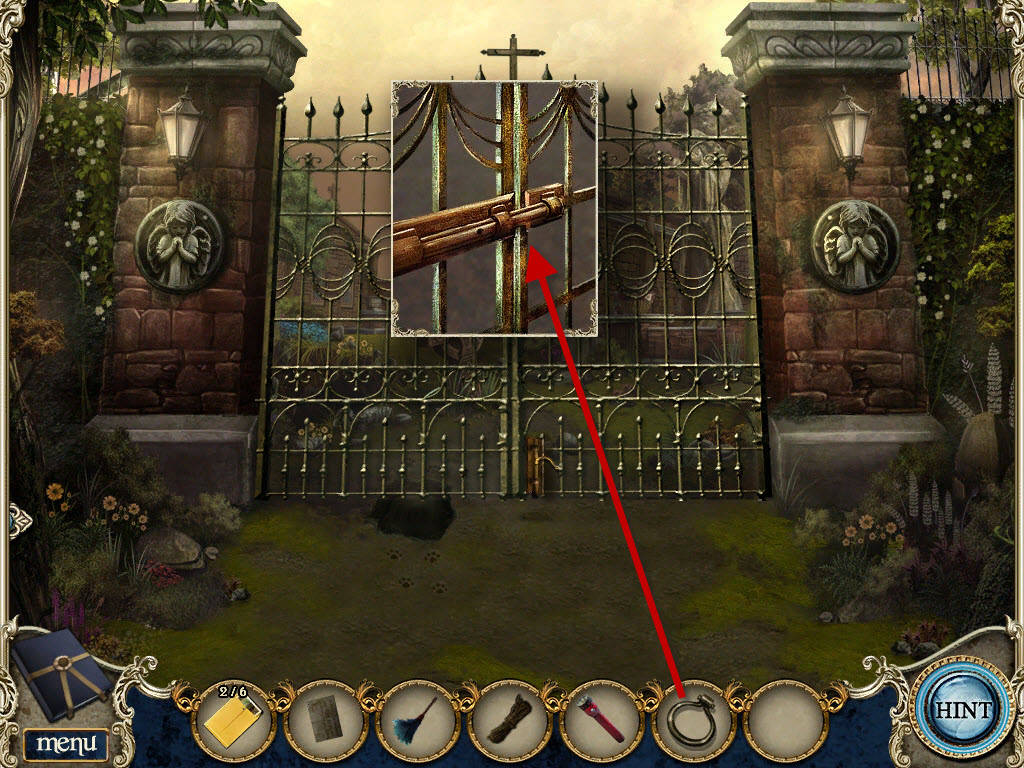
* Click up 1x to bridge
* Click on upper gate latch to zoom in
* From inventory, put ring handle on gate
* Click on ring handle to open gate
* Go inside graveyard
* Pick up 2 gravestone pieces (red)
* Click on plant below statue to zoom in, click on plant, pick up gravestone piece (red)
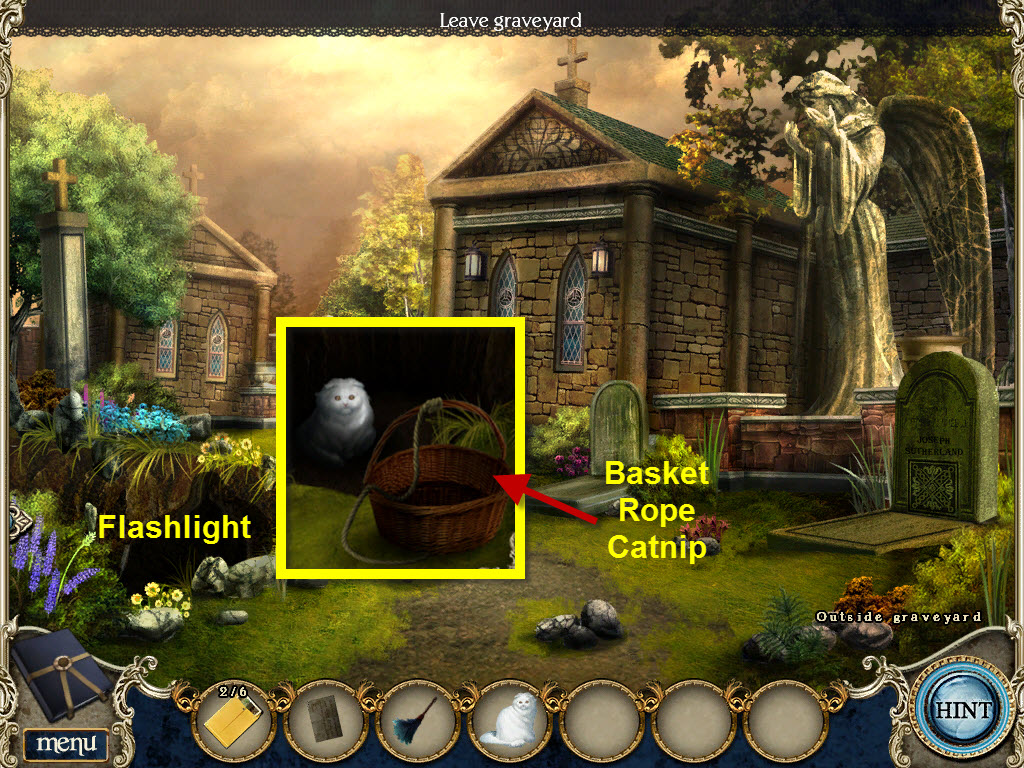
* Click on basket to add to inventory
* Pick up shears below statue on grave (green)
* From inventory, drag 3 gravestone pieces to broken gravestone to open puzzle
* Click on pieces to rotate and drag into correct place
*
*Click down 2x to bridge
* From inventory, use shears on catnip
* Click up 2x to graveyard
* From inventory, use flashlight on hole in ground on left to see fluffy (1)
* From inventory put basket and rope next to fluffy
* From inventory, put catnip in basket
* Click on basket
* Click on basket after fluffy is inside
* Fluffy added to inventory
* Click down 4x to town hall, go inside
* From inventory, give Fluffy to receptionist
* Go into Records Room
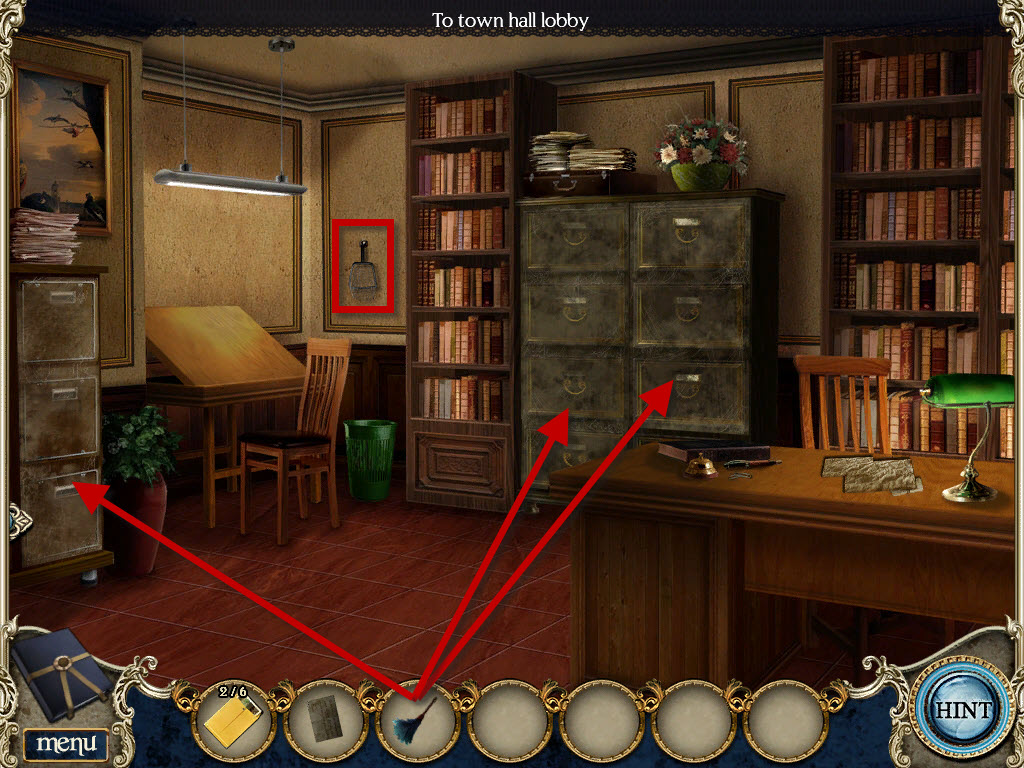
* From inventory, use feather duster on 3 filing cabinets
* Pick up aquarium net off back wall
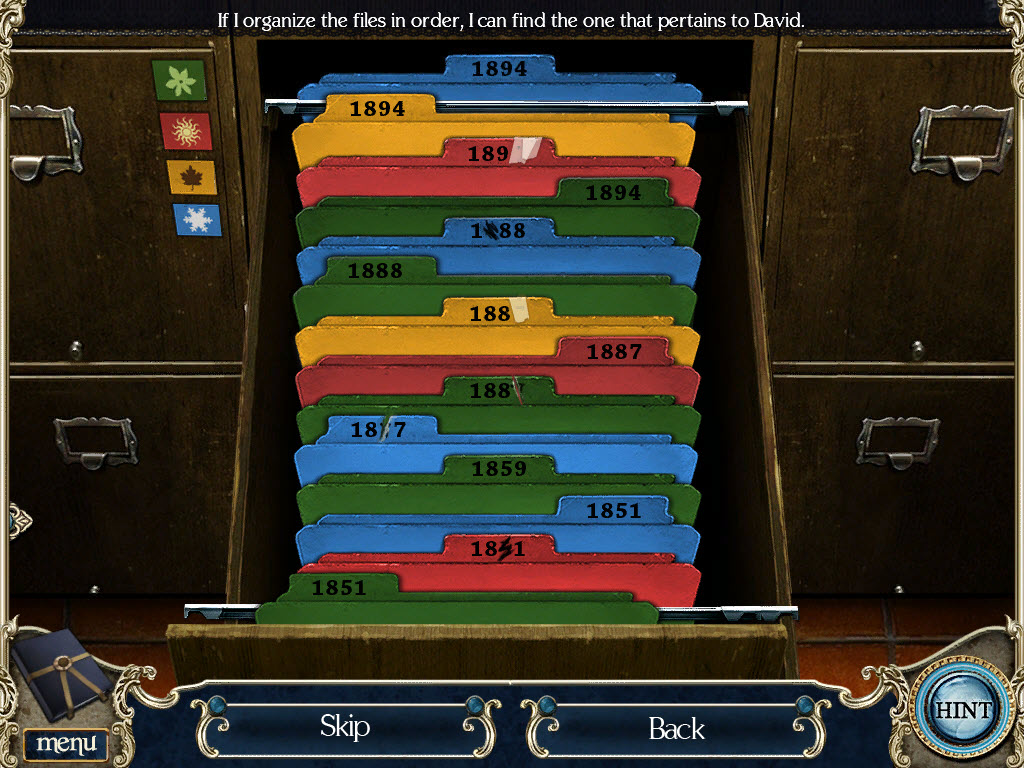
* Click on center filing cabinet to open puzzle
* Rearrange the files using the symbols in the upper right of the puzzle
* Click on a file to switch its place with another file
* 1887 file added to inventory
* From inventory, put 1887 file on drafting desk on left wall to open puzzle
* Find the hidden items
* Suicide note added to inventory
* Click on desk to right
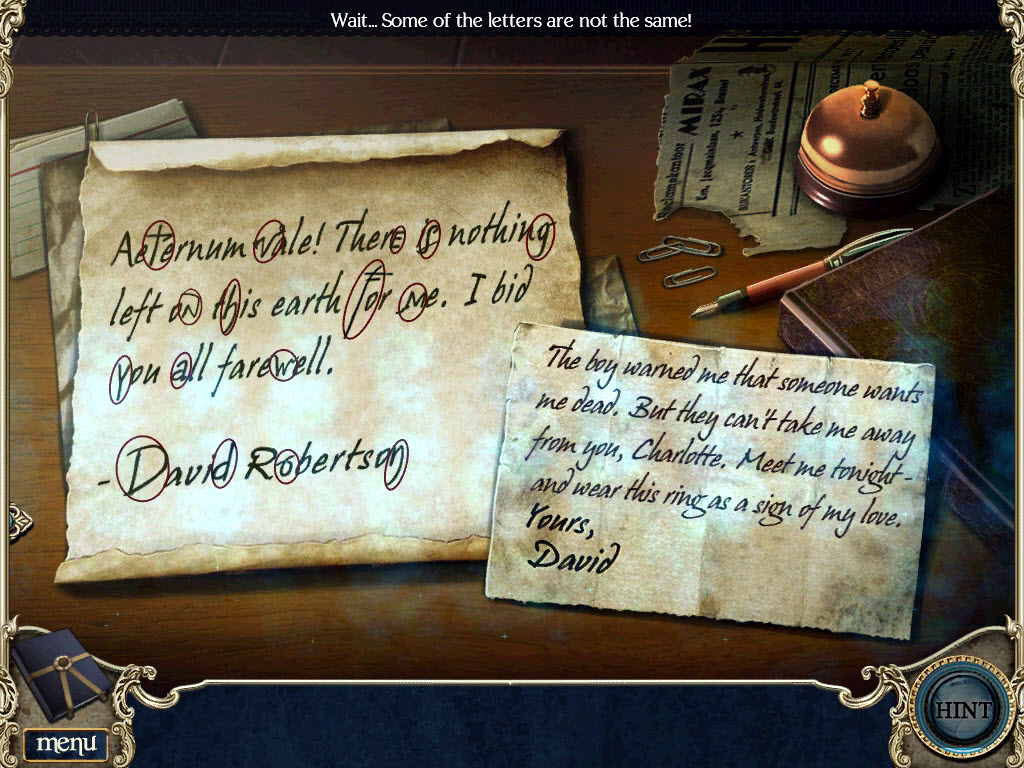
* From inventory, put the two notes on desk to open puzzle
* Find the 16 tampered letters
* Forged Suicide note added to inventory
* Click on ghost
* Click down 2x to go outside
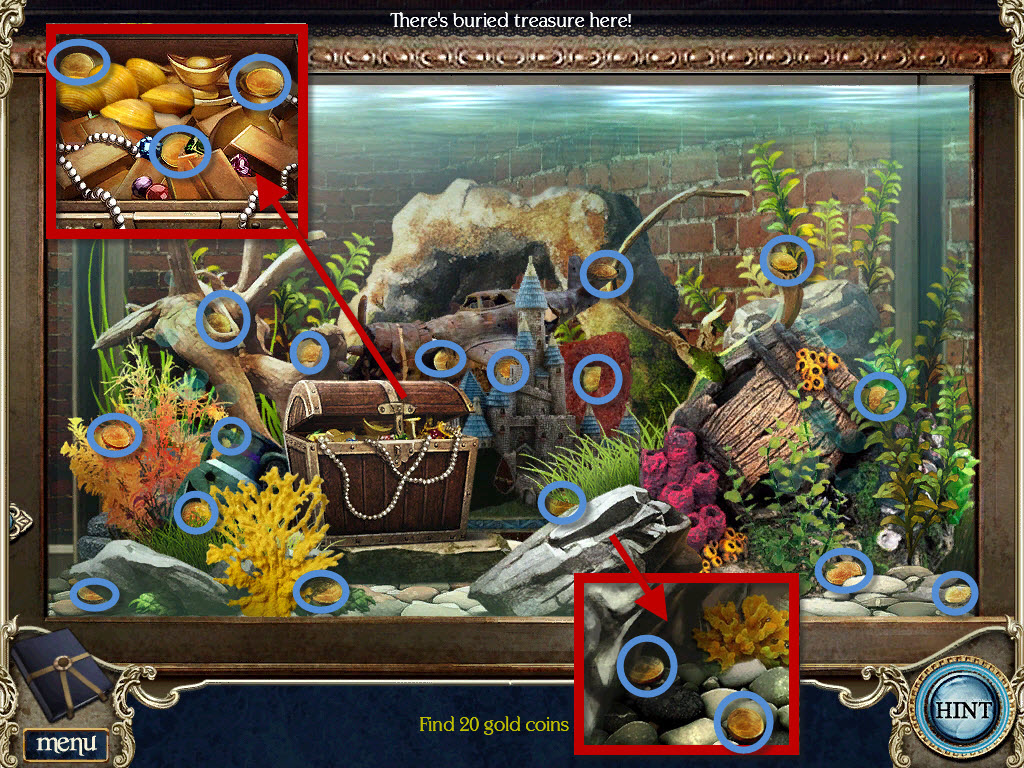
* From inventory, put aquarium net on aquarium in window to open puzzle
* Find 20 gold coins
* Bag of treasure added to inventory
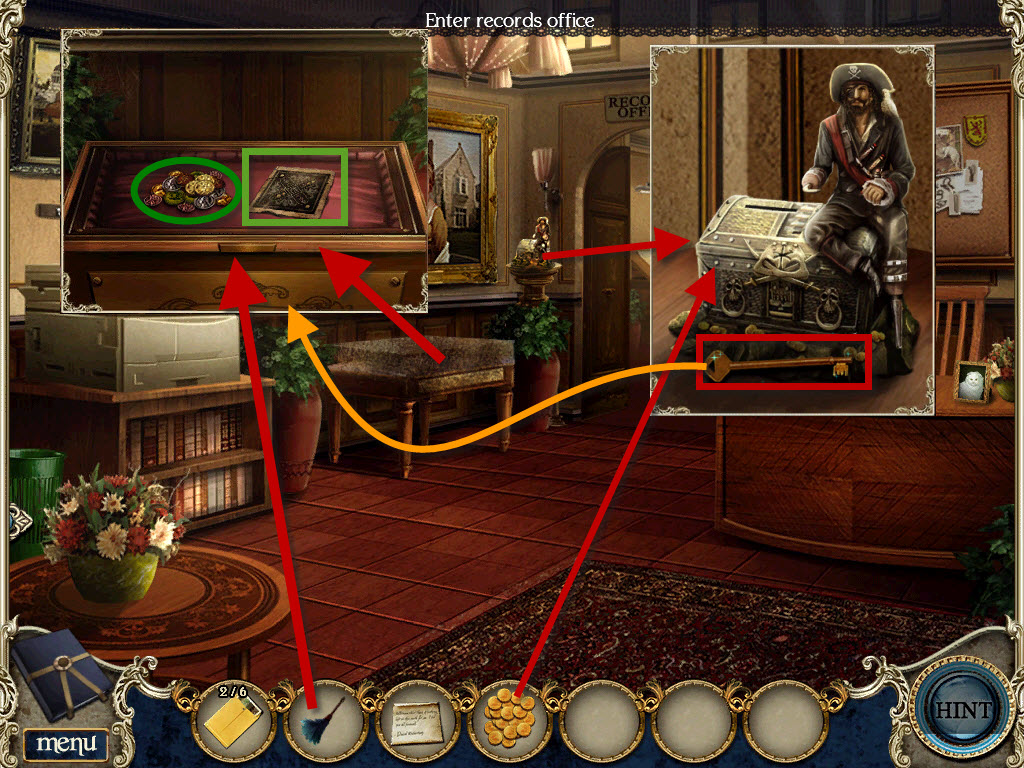
* Go back in side town hall
* Click on pirate figurine
* From inventory, put bag of treasure in chest
* Pick up key
* Click on display case below picture on left wall
* From inventory, use feather duster and key to open case
* Pick up vintage coins
* Click on diagram to view
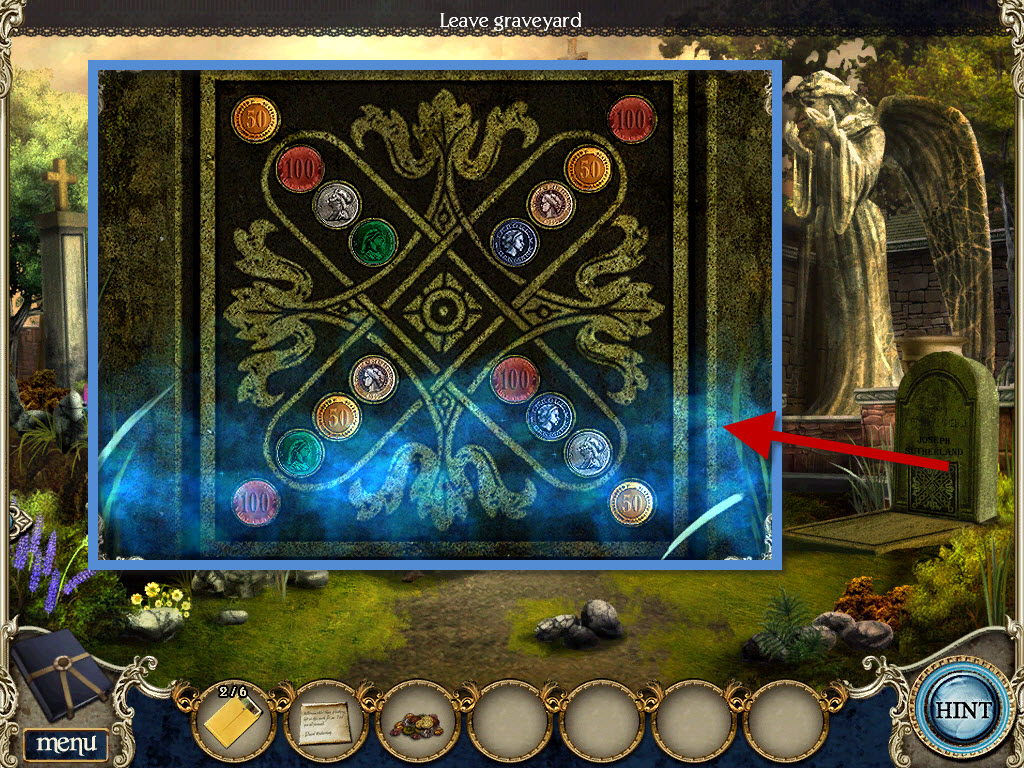
* Click down 1x, click up 4x to graveyard
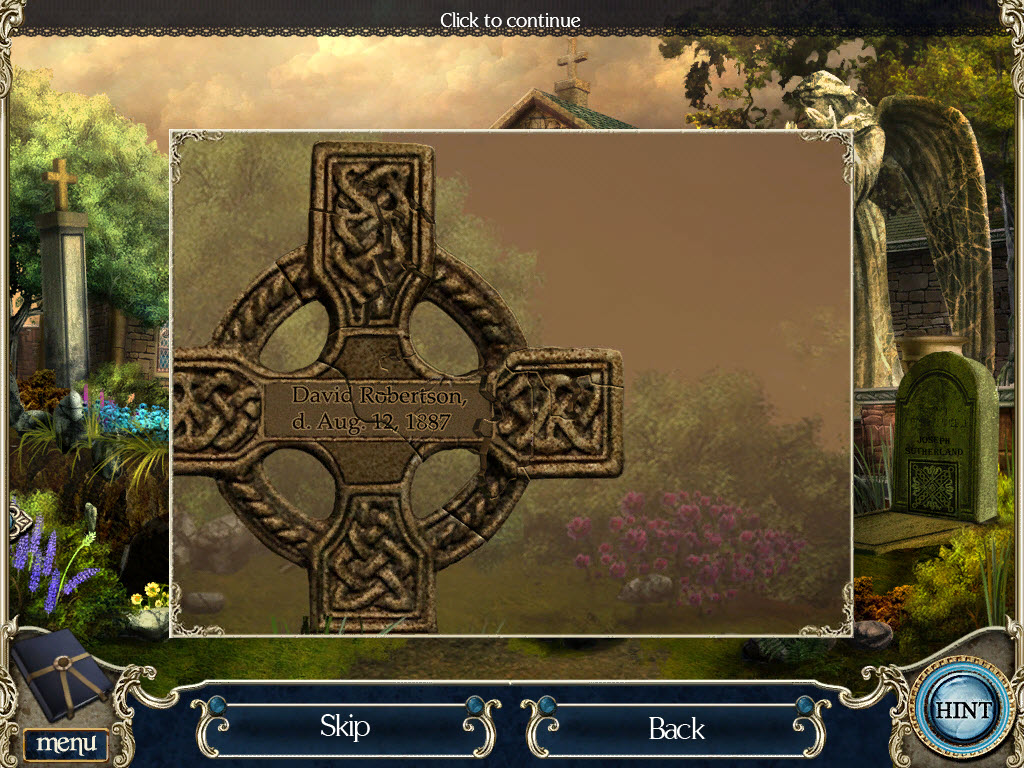
* Click on gravestone on right to zoom in
* From inventory, drag vintage coins to stone to open puzzle
* Click on coins to switch them until they match the diagram from the display case
* Pick up special screwdriver
* Click down 4x, go inside town hall
* Click on plaque below portrait on left wall
* From inventory, use special screwdriver to remove 2 screws
* Pick up ink remover
* Go into records room
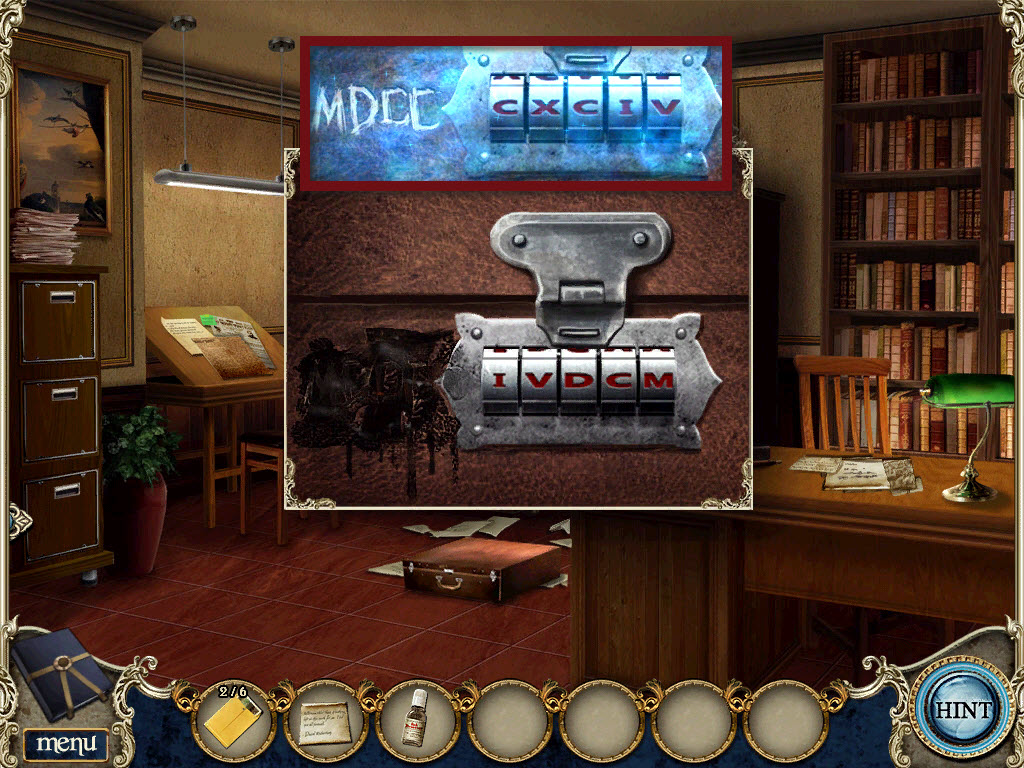
* Click on briefcase to zoom in
* From inventory, use ink remover to remove ink stain to open puzzle
* Using the roman numerals from the plaque below the painting, finish the code to open briefcase
* Pick up medical report and badge
* Click down 2x, click up 1x to town square
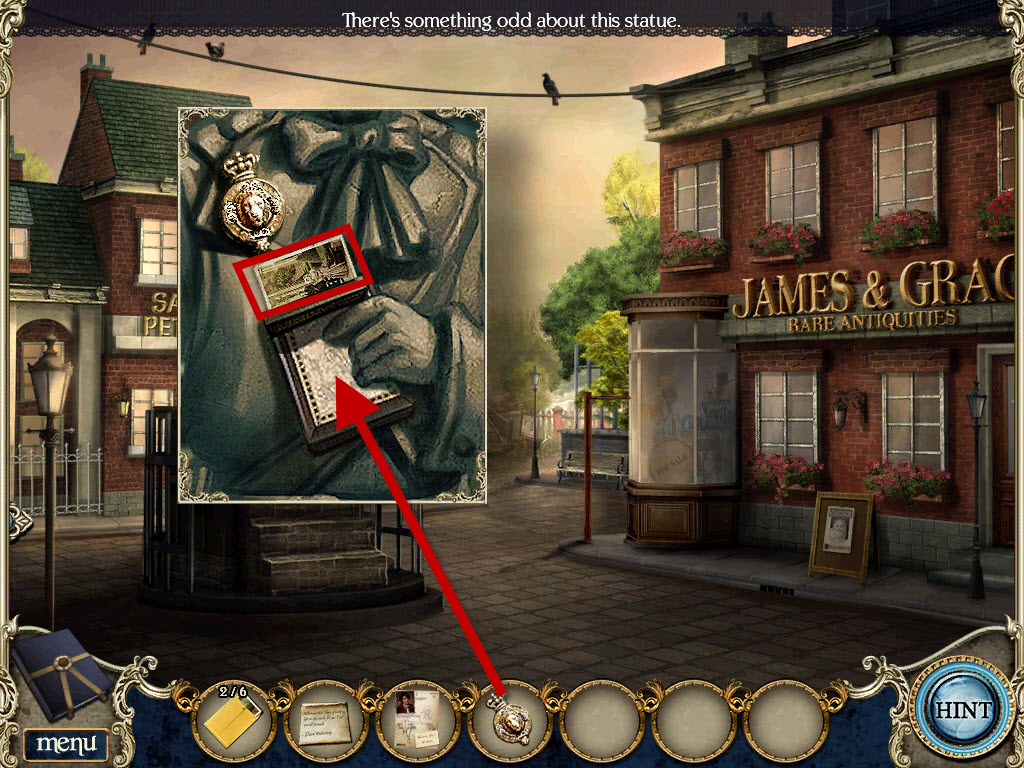
* Click on statue to zoom in
* From inventory, place badge on statue
* Click on photograph to zoom in, pick up photograph
CHAPTER 4 - ENGLAND
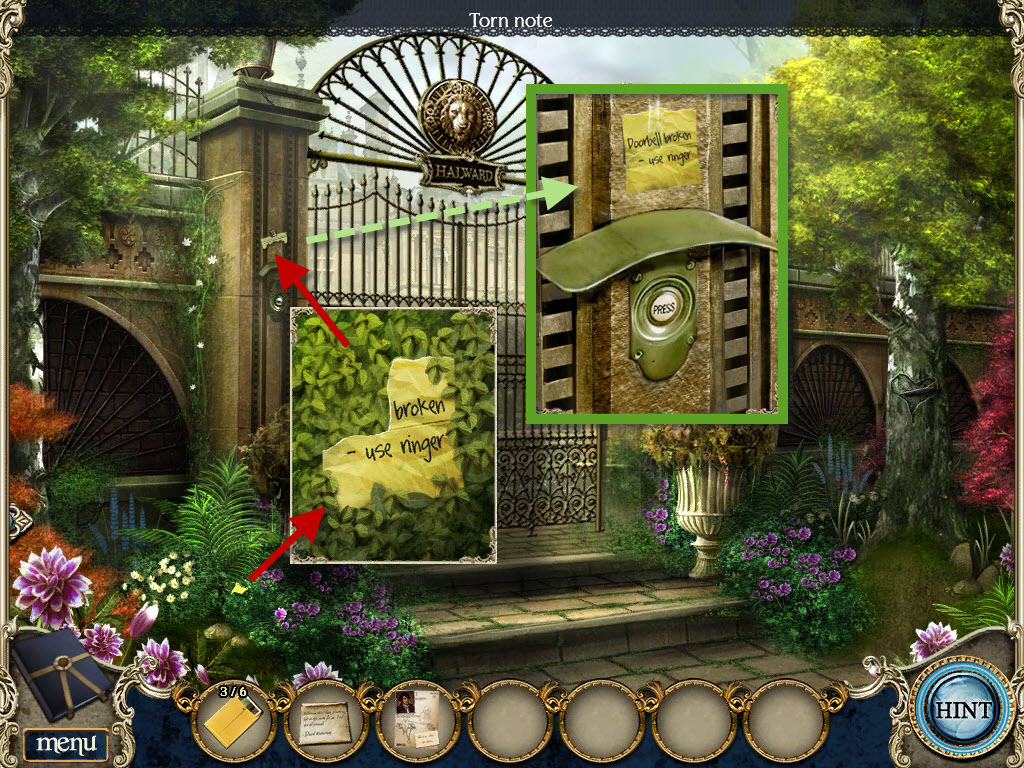
* Click on yellow paper on ground to the left to zoom in
* Pick up paper
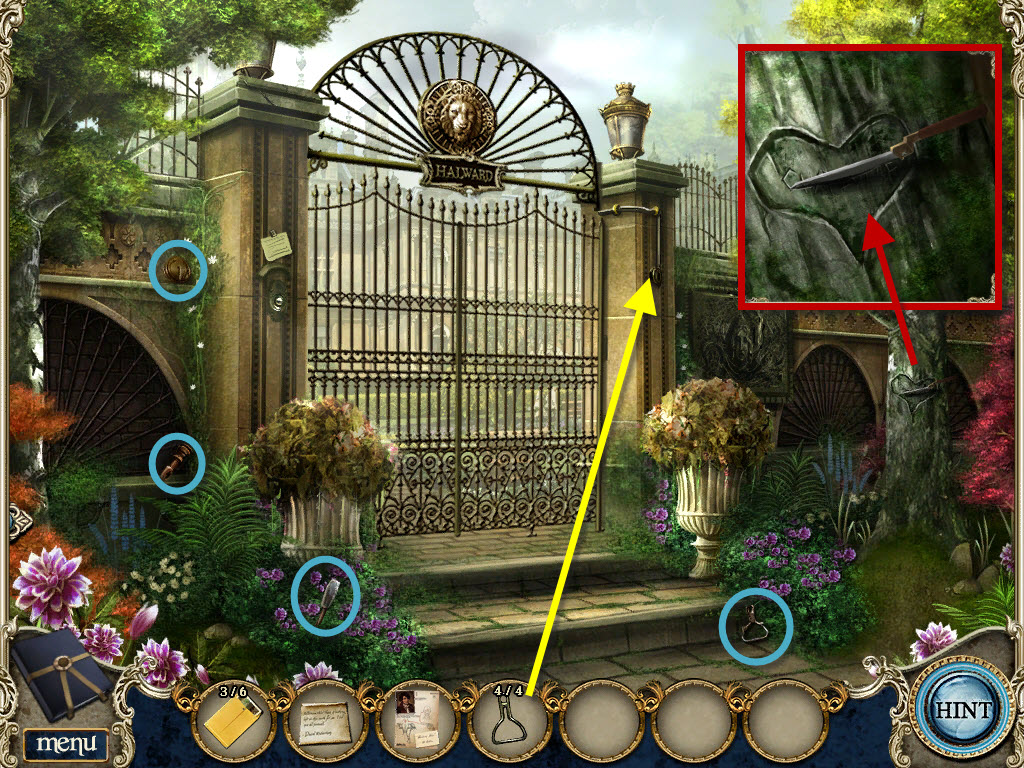
* Click on doorbell to left of gate to zoom in
* From inventory, place torn note on other torn note
* Click on carving on tree to right to zoom in, pick up shear half
* Pick up 4 bell ringer pieces (blue)
* From inventory, put 4 ringer parts on ringer, right side of gate
* Ring bell
* Click on Charlotte's ghost 2x to open gate
* Go through gate opening
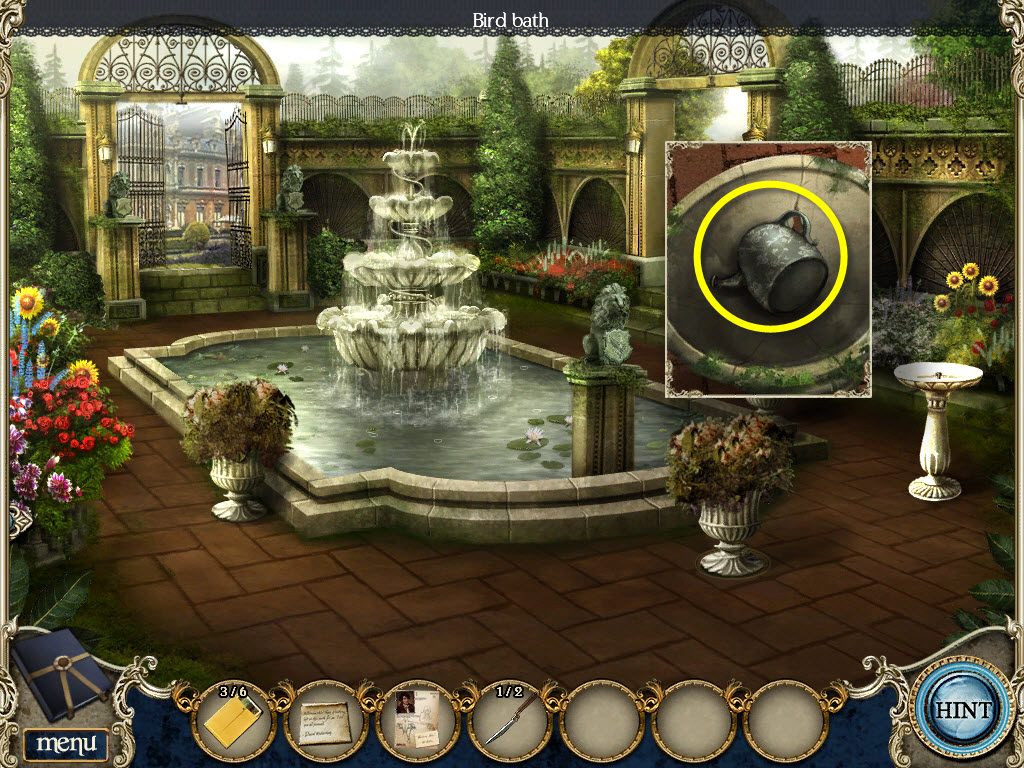
* Click on birdbath to the right, pick up watering can
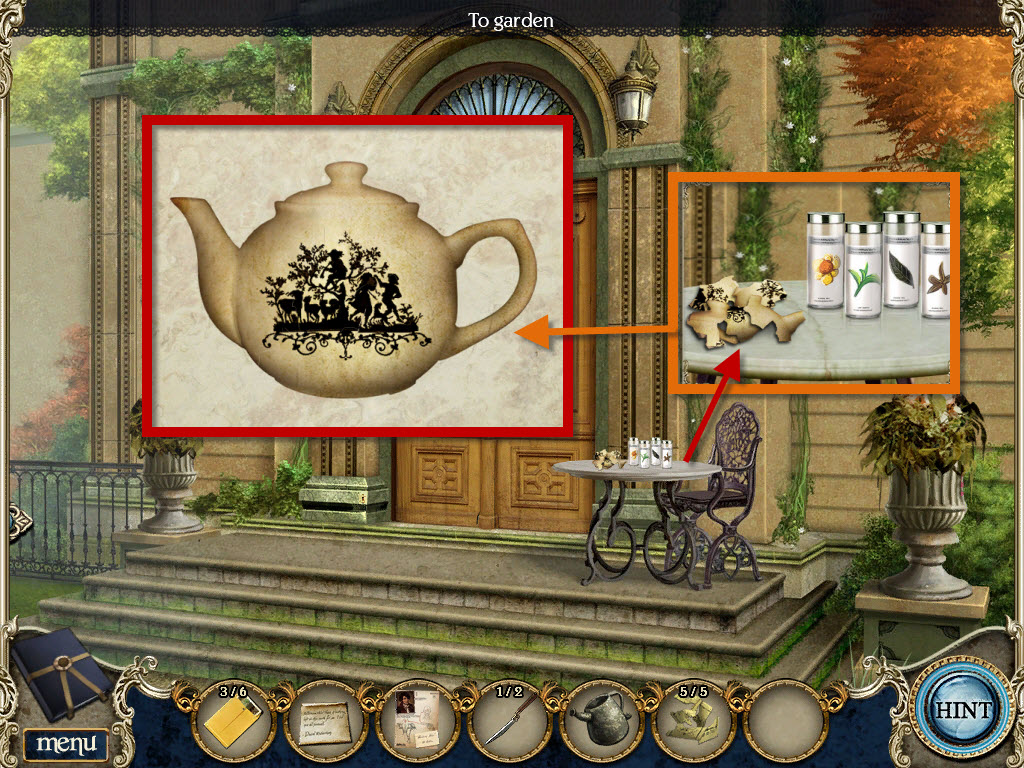
* Go through gate toward Halward Manor
* Pick up 5 pieces of list of chores (blue)
* Click on table to right to zoom in and open puzzle
* Reassemble the teapot
* Teapot added to inventory
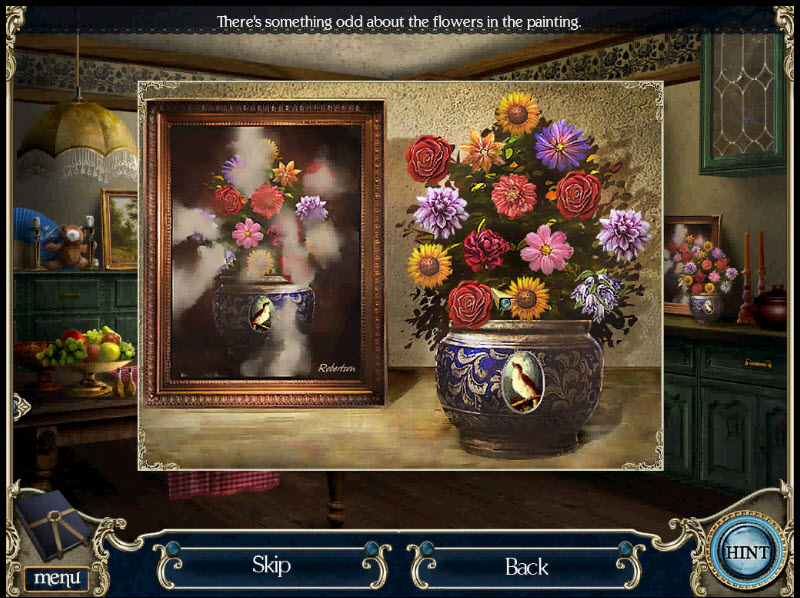
* Click on tea canisters to add pic to journal
* Click on door to speak with butler
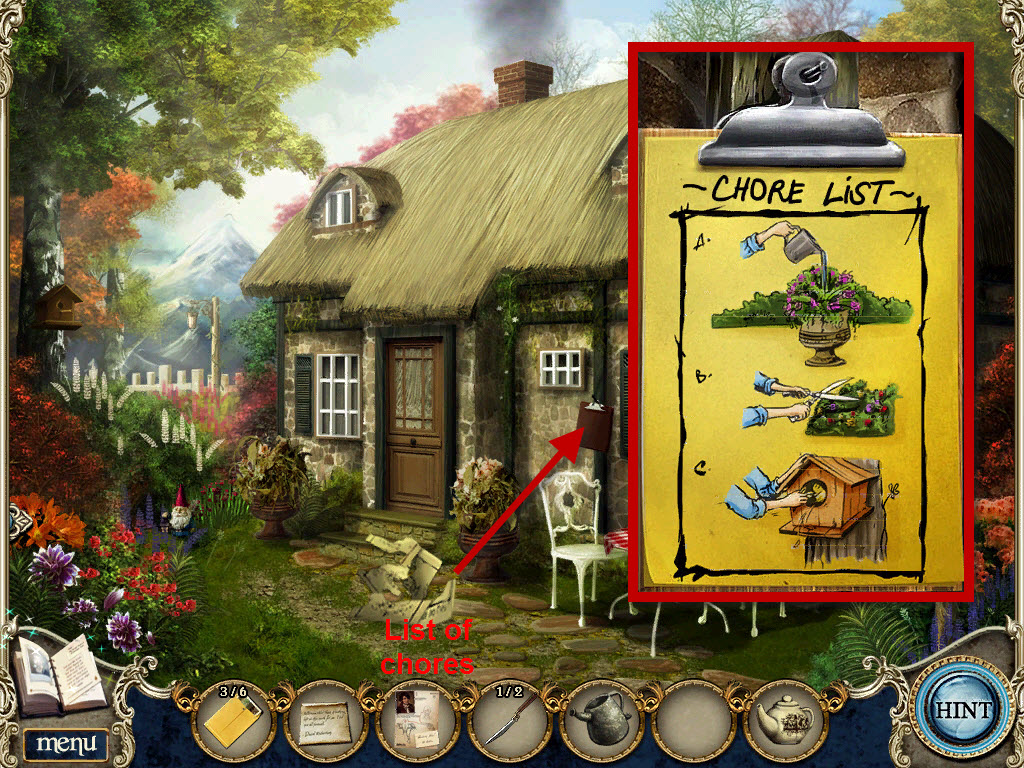
* Click down 1x, then go left toward outside cottage
* Click on front door to speak with housekeeper
* From inventory, drag list of chores to clipboard on side of cottage to open puzzle
* Switch the pictures around to form completed list
* Click on front door to speak with housekeeper
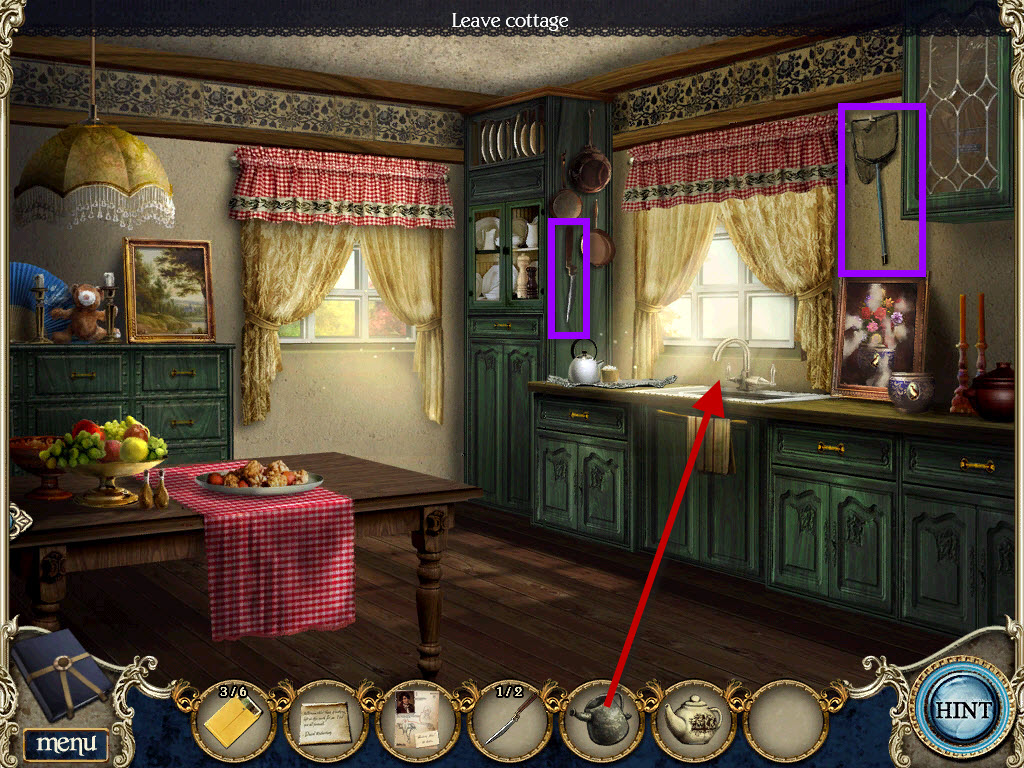
* Go inside cottage
* Pick up shears half on wall left of sink
* Pick up pool net to right of sink window
* From inventory, fill watering can at sink faucet
* Go outside
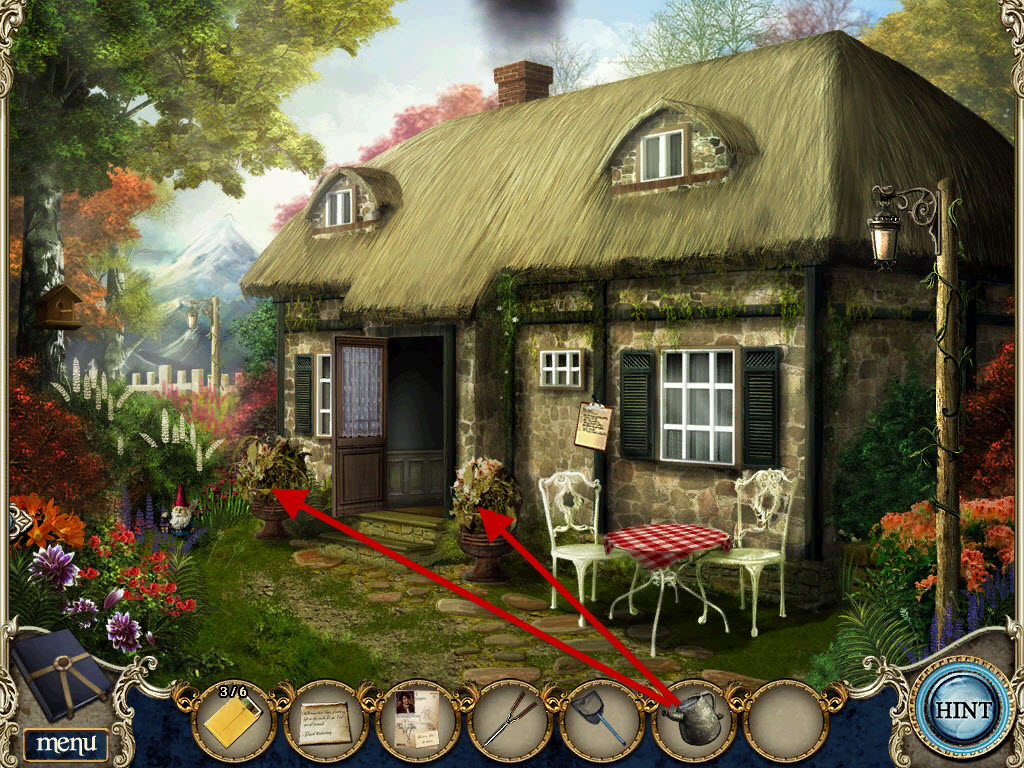
* From inventory, use watering can to water 2 plants on each side of door
* Click down 1x to garden
* From inventory, use watering can on 3 plants in urns
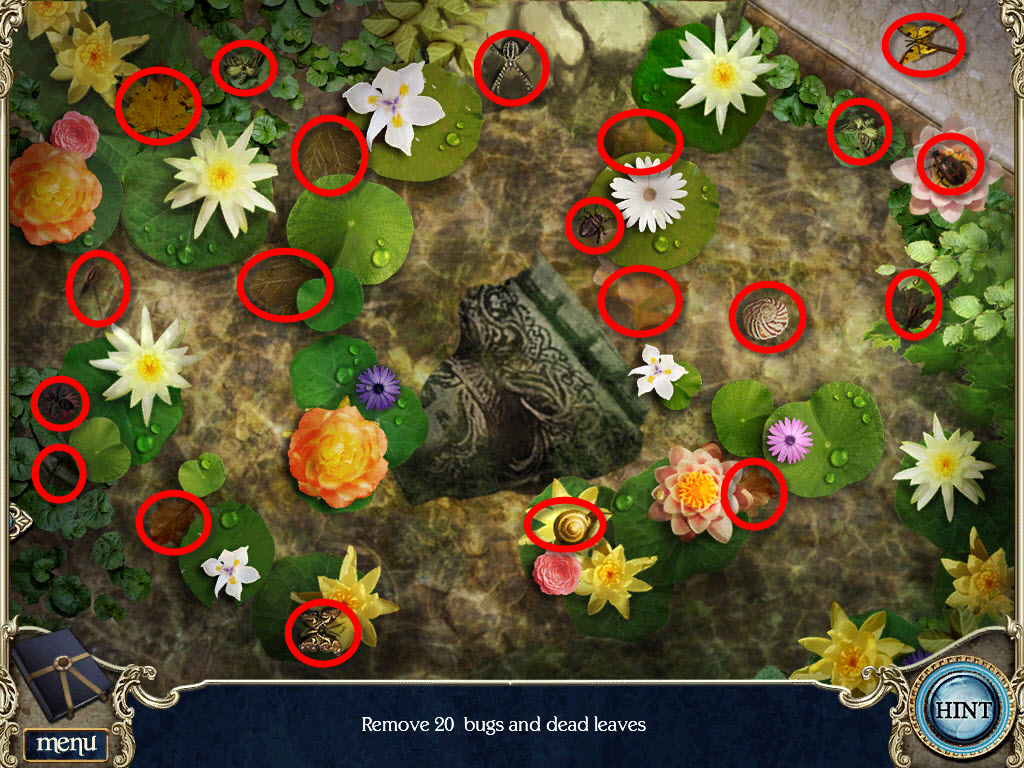
* From inventory, use pool net on fountain to open puzzle
* Find the 20 bugs and leaves to remove them
* Carving piece added to inventory
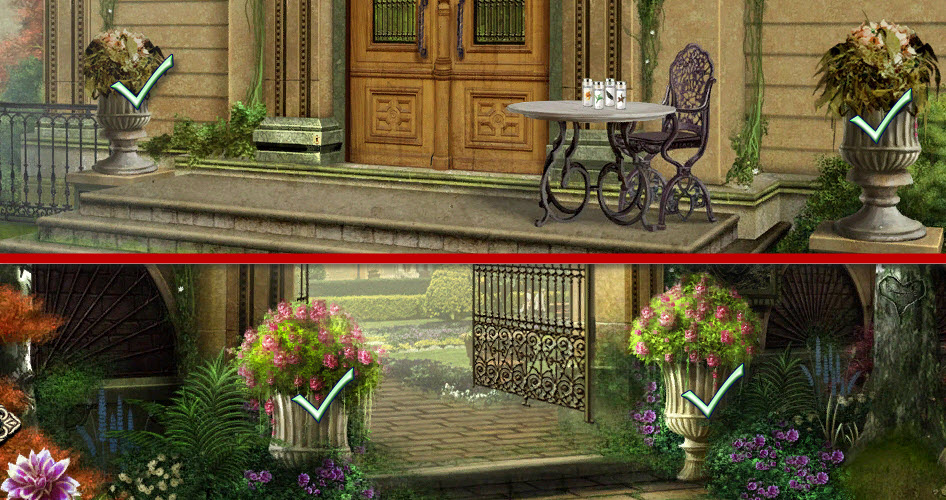
* Click up 1x to Halward Manor
* Water 2 plants in urns to left and right of door
* Click down 2x to gate
* From inventory, use watering can on flower urns to right and left of gate
* Click on broken wall to right of gate to zoom in
* From inventory, drag carving piece to broken area
* Pick up sealant
* Click up 1x to garden
* Click on birdbath to zoom in
* From inventory, use sealant on crack
* From inventory, use water can to fill up birdbath
* Bird will fly to bath from nesting house
* From inventory, place shears on flowerbed to left of fountain to open puzzle
* Find the flowers
* Flowers added to inventory
* Click right 1x to outside cottage
* Click on nesting house to zoom in
* Click on nesting house to clean out, pick up orange crown and dirty spoon
* Go inside cottage
* From inventory, put flowers in vase on counter to open puzzle
* Rearrange the flowers in the vase to match the flowers to the left
* Click on flowers to switch places
* Click on ghost of Charlotte
* Click on painting on counter to zoom in
* Click on signature in lower right corner
* Pick up key and click on note
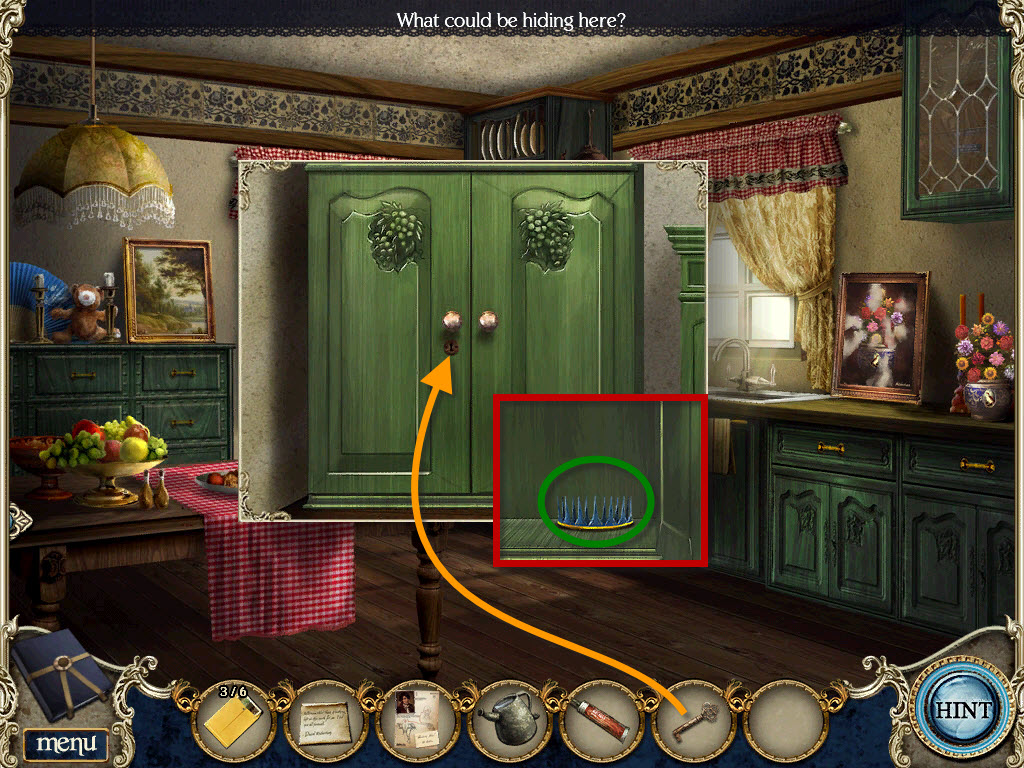
* Click on cabinet, lower left of sink to zoom in
* From inventory, use cabinet key to open
* Pick up blue crown
* Go outside of cottage
* Housekeeper speaks to you
* Go back inside cottage to make tea
* Click on housekeeper, she will give you tea guide
* From inventory, drag dirty spoon to sink, clean spoon added to inventory
* Click on tea tray to left of sink
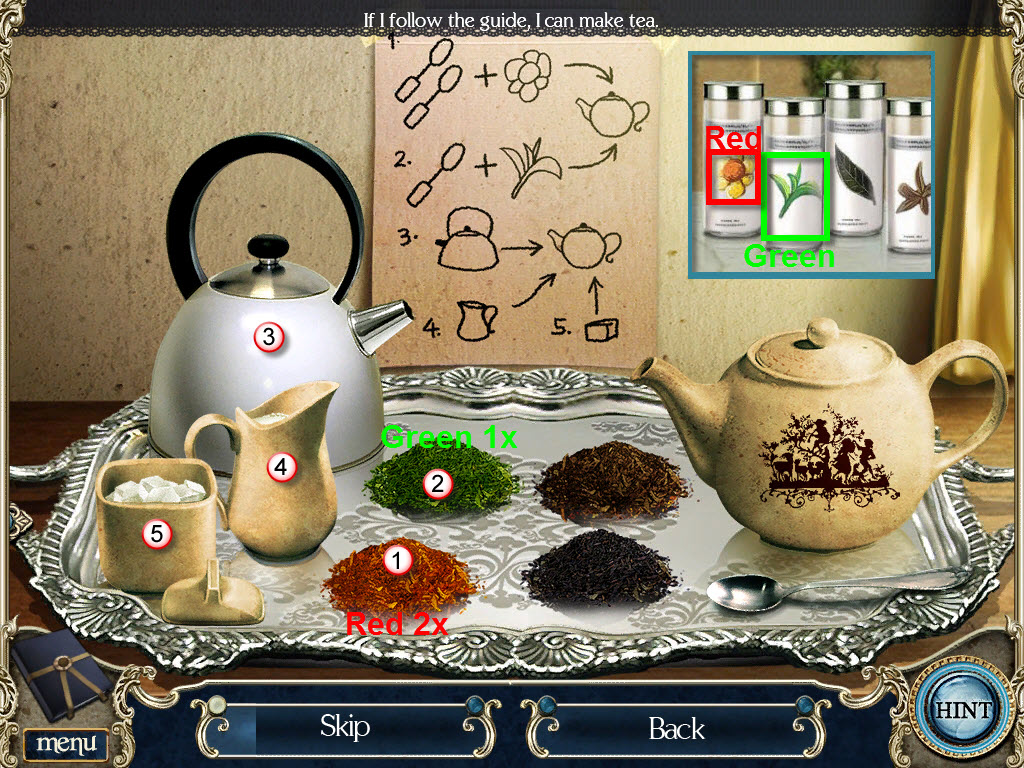
* From inventory, drag teapot and clean spoon and tea guide to tray to open puzzle
* Inside the journal, use the pic of teas found on front porch of manor to help you follow instructions to make tea
1. Click on spoon, click on red tea, drag to pot (do this 2x)
2. Click on spoon, click on green tea, drag to pot (do this 1x)
3. Click on hot water, drag to pot
4. Click on cream jug, drag to pot
5. Click on sugar cubes, drag to pot
* Tea tray added to inventory
* Click down 2x, click up 1x to manor
* Click on door to hear Butler speak
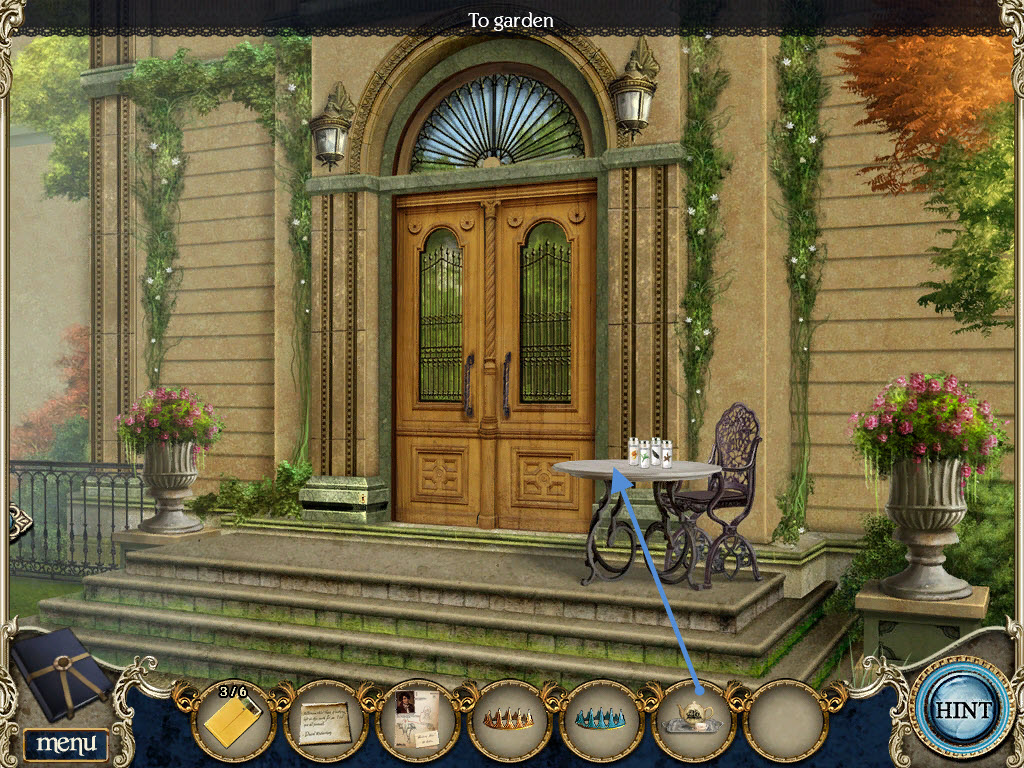
* Click on table to zoom in
* From inventory, put tea tray on table, butler will speak to you
* Click down 1x to garden
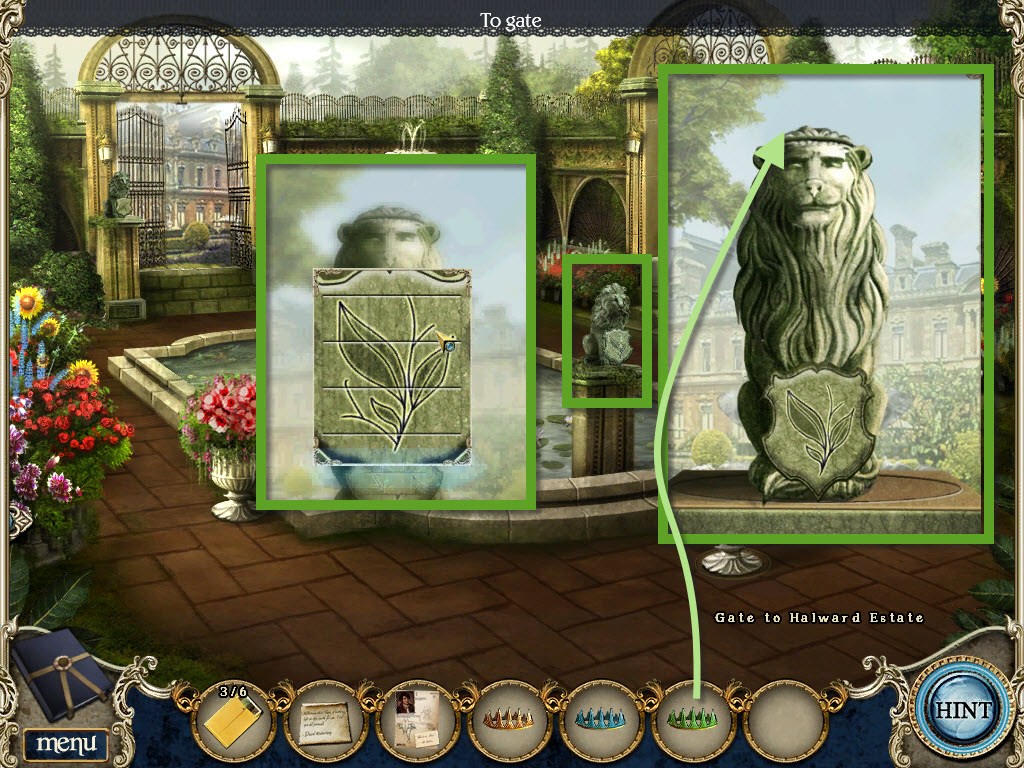
* Click on lion at end of pool to zoom in (red)
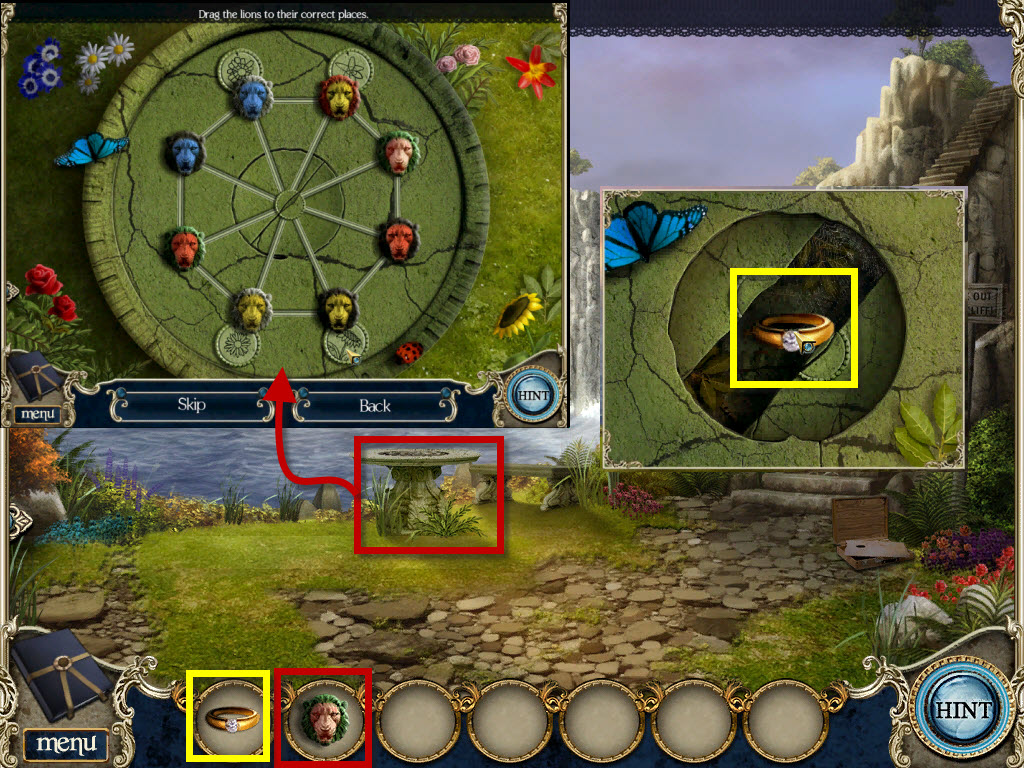
* Click on plaque at feet of lion to open puzzle
* Click on squares to rotate and switch squares until picture is completed
* From inventory, place green crown on lions head
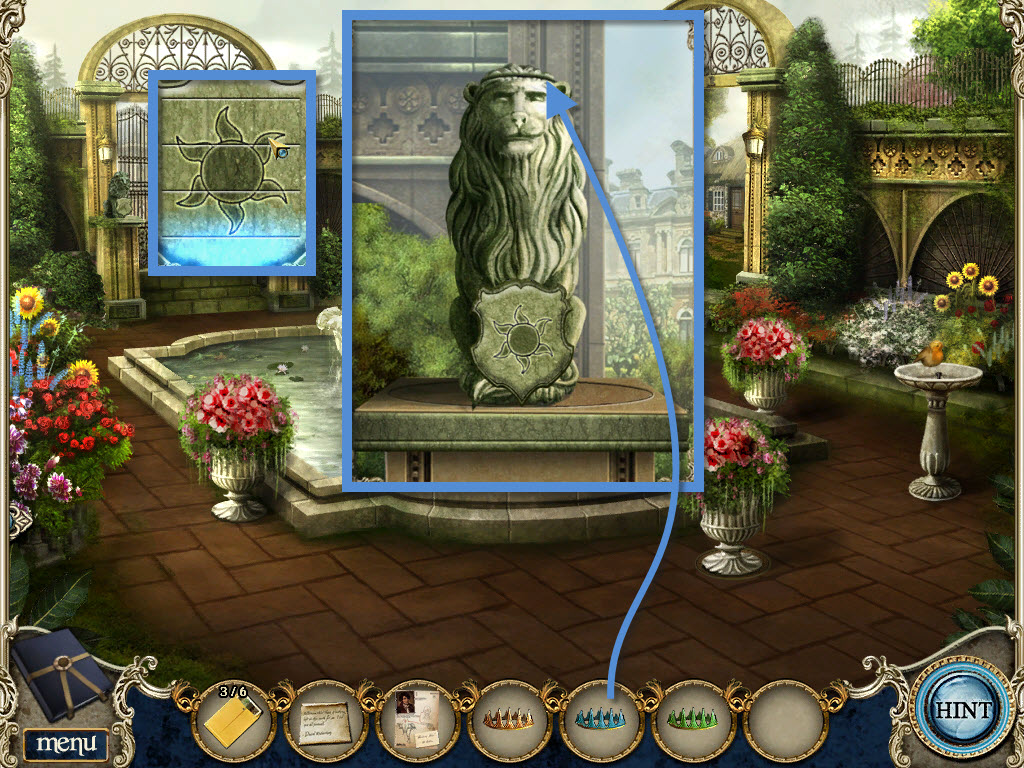
* Click on lion to left of manor gate to zoom in
* Click on plaque at feet of lion to open puzzle
* Click on squares to rotate and switch squares until picture is completed
* From inventory, place blue crown on lions head
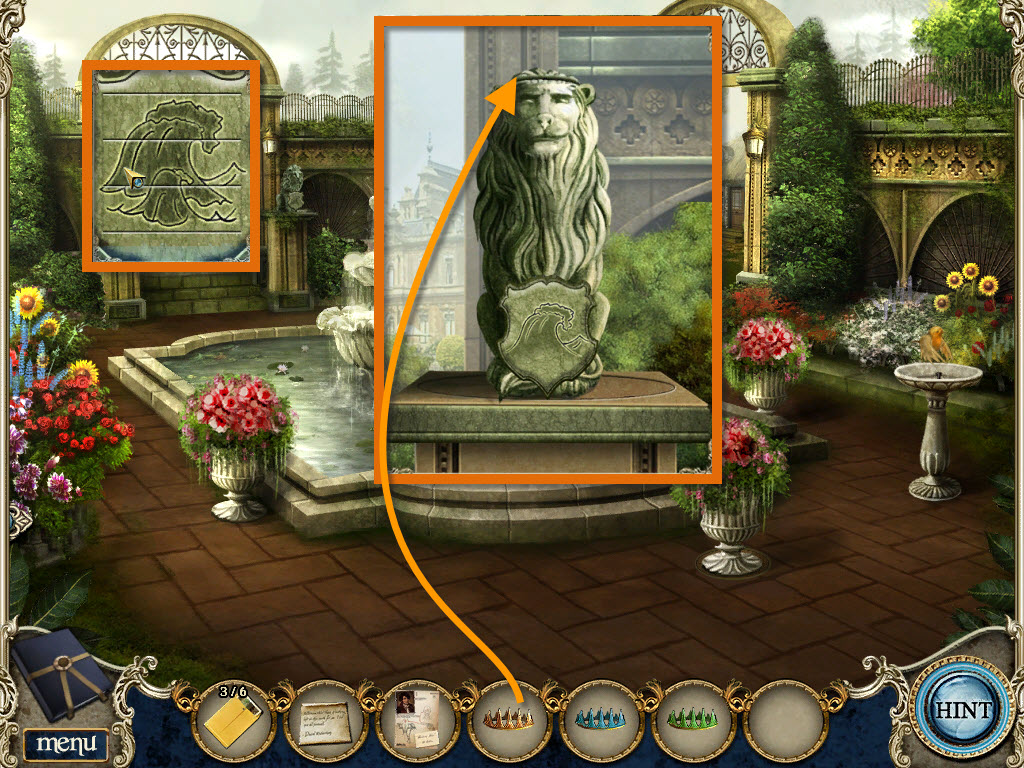
* Click on lion to right of manor gate to zoom in
* Click on plaque at feet of lion to open puzzle
* Click on squares to rotate and switch squares until picture is completed
* From inventory, place orange crown on lions head
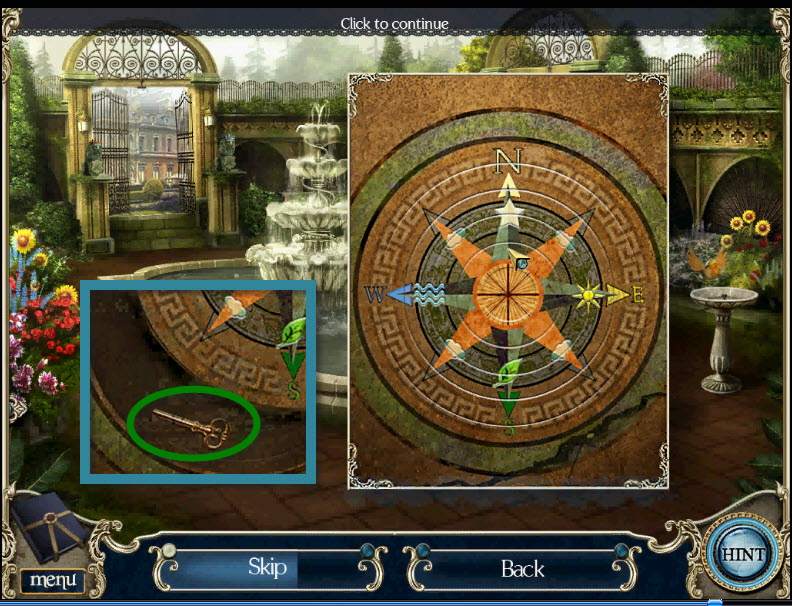
* Click on compass on ground to zoom in
* Pick up William's note to add to inventory and open puzzle
* Click on rings to rotate until all rings are turned to correctly complete the picture
* Pick up key
* Click up 1x to manor
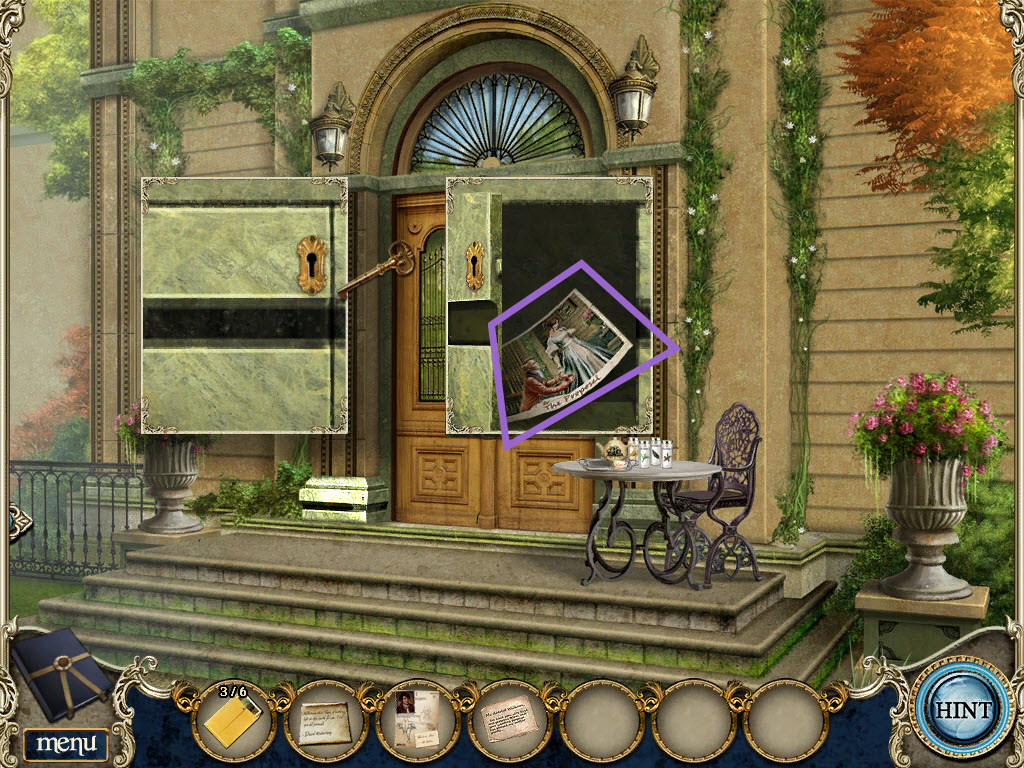
* Click on compartment to left of door to zoom in
* From inventory, use key to unlock
* Click on photograph to add to inventory
* Click on front door. This will start a new chapter.
CHAPTER 5 - THE HALWARD ESTATE
* Click on butler to speak to him
* Click on ghost
* Click on angel on first red wall candelabra (red)
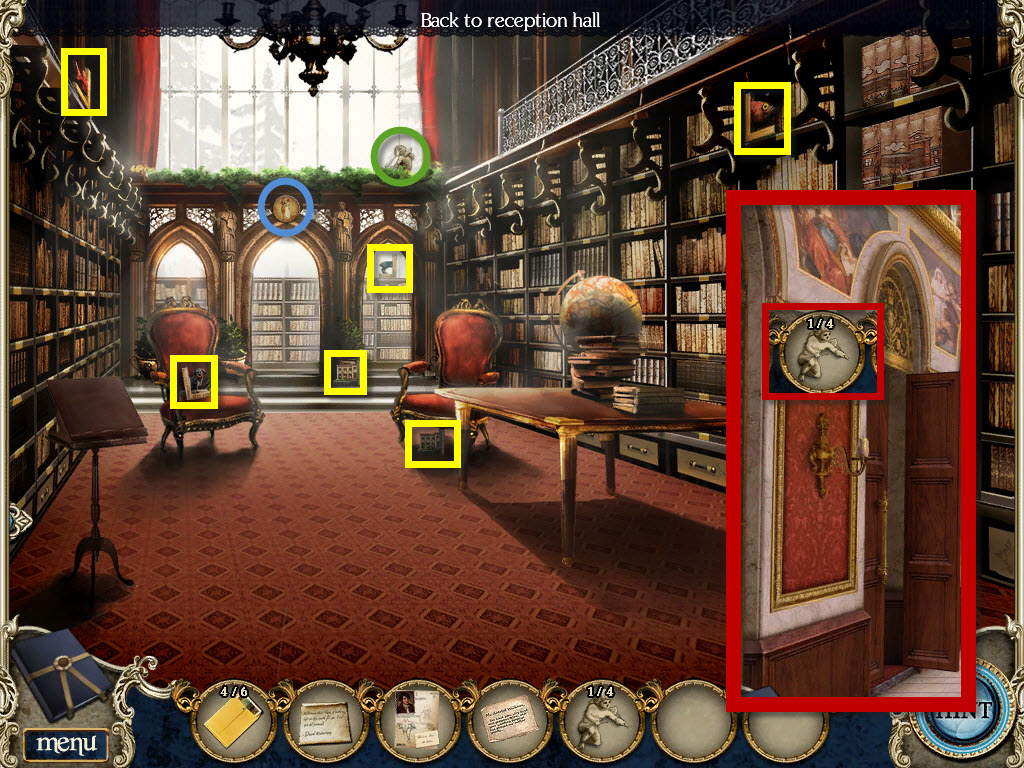
* Go through library door on left
* Pick up 6 bookends (yellow)
* Pick up disc above middle opening (blue)
* Pick up angel upper left of openings (green)
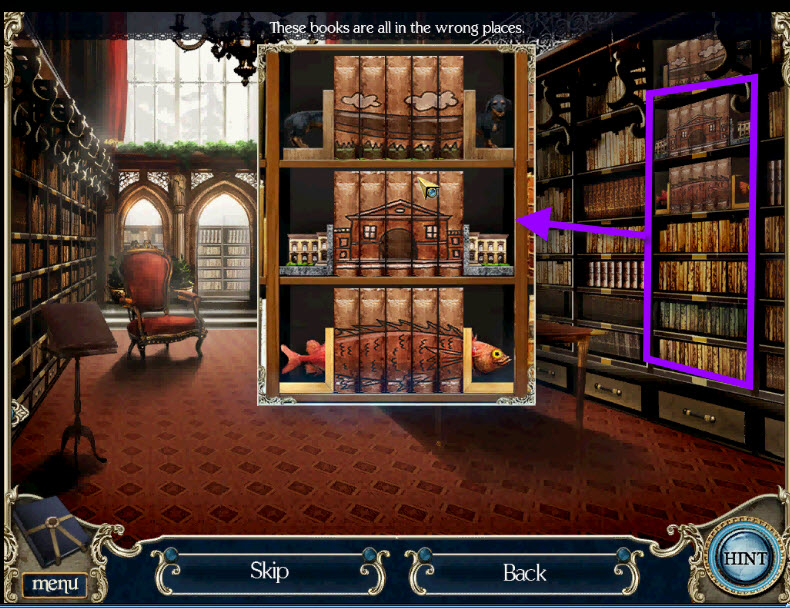
* From inventory, drag bookends to right hand bookcase to open puzzle
* Click on books to switch places to complete pictures
* Book added to inventory
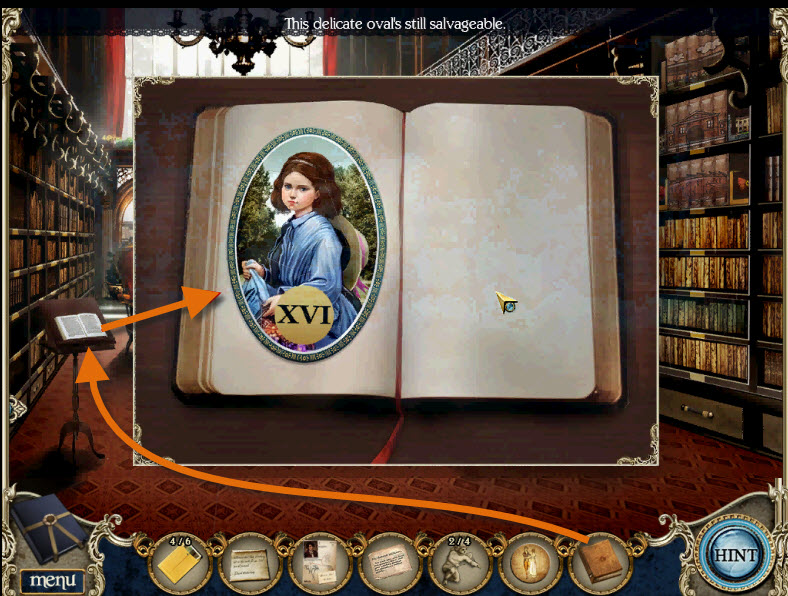
* From inventory, drag book to book stand to open puzzle
* Click on pieces to rotate and drag to complete picture
* Oval added to inventory
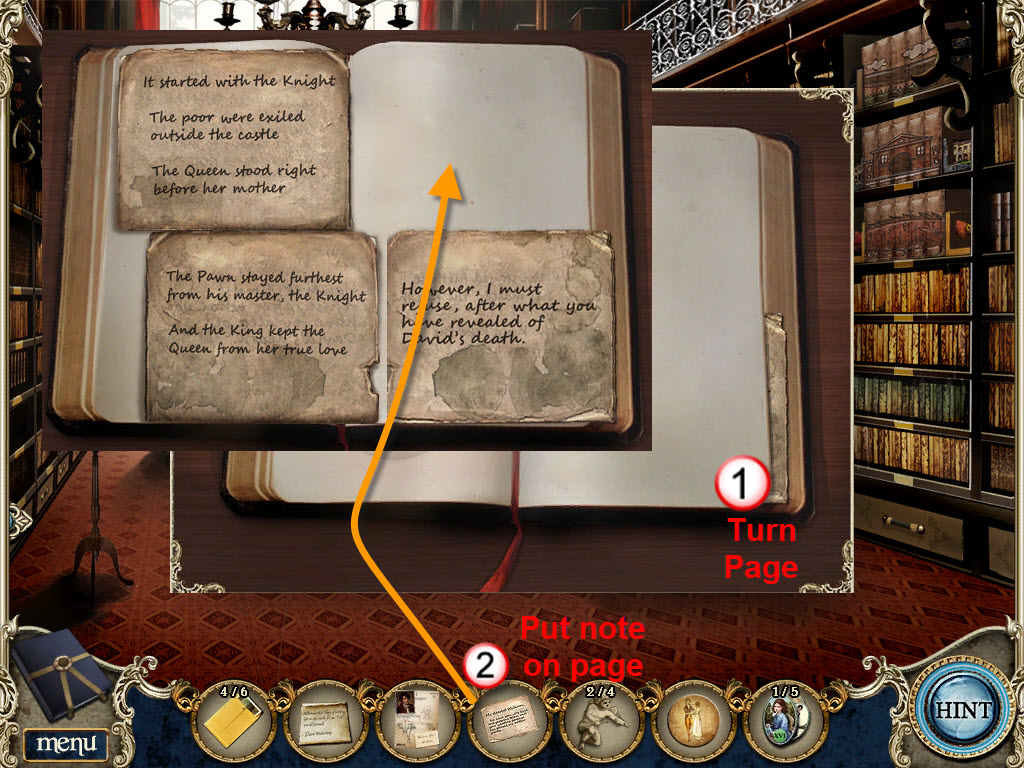
* Click on right page to turn it
* From inventory, drag Charlotte's letter half to page
* Click on letters to reveal a riddle and add to journal
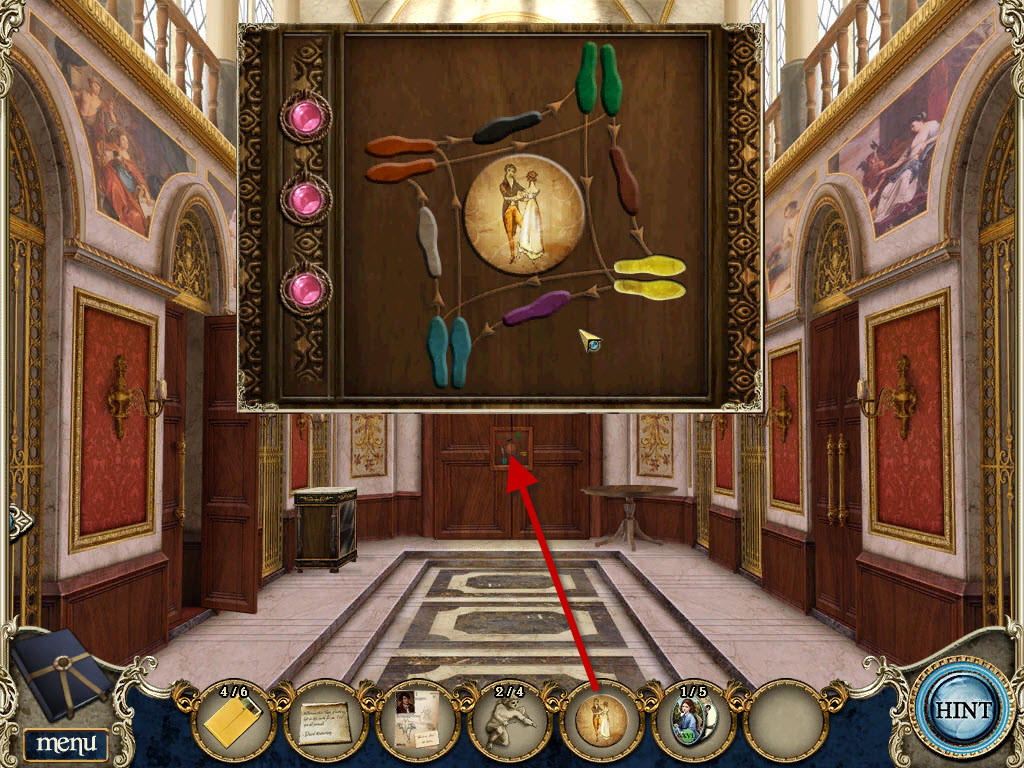
* Click down 1x to hall
* From inventory, drag disc to back door to open puzzle (this puzzle is random)
* Matching puzzle: Watch which footprints light up, then click on feet in same order. You will do this 3x.
* Go into ballroom
* Click on painting on left wall
* Click on 4 latches to open puzzle
* Match the animals to complete the puzzle by rotating squares
* Pick up 2 angels (green)
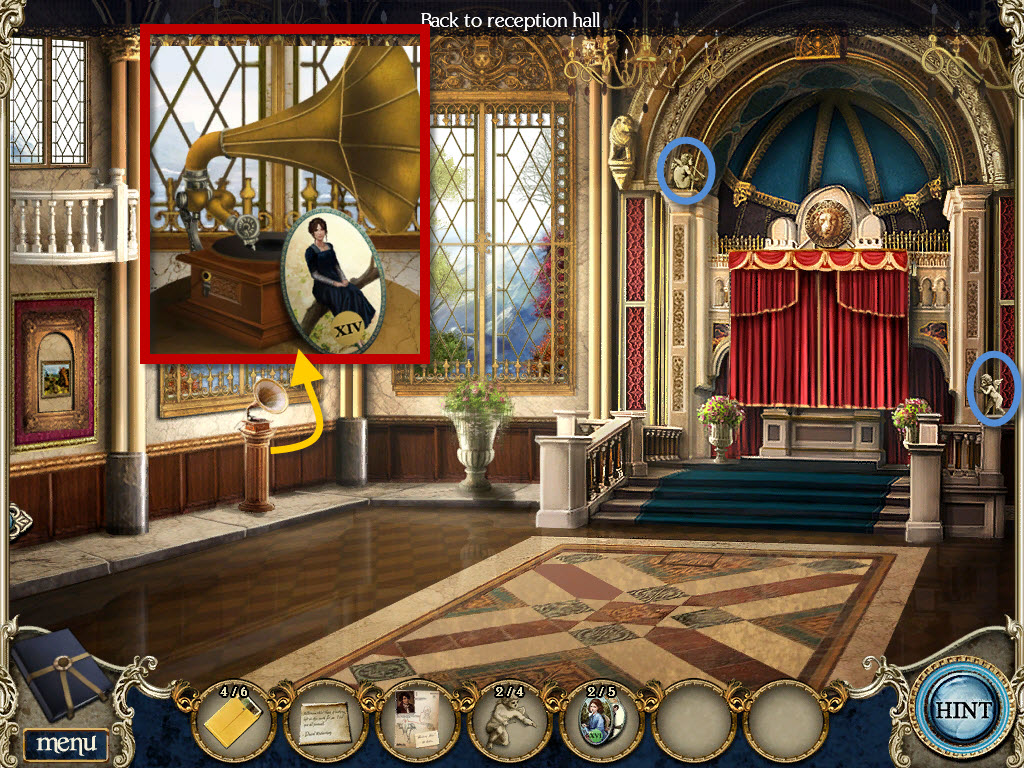
* Click on gramophone to zoom in, pick up oval
* Click down 1x to hall
* Click on right hand door to zoom in
* From inventory, place 4 angels on door to open puzzle
* Click on angels heads at the top to align each with its own reflection
* Go through right doorway to patio
* Click on armoire on left side of patio to open puzzle
* Click on the knobs to rotate circles to align the designs
* Oval added to inventory
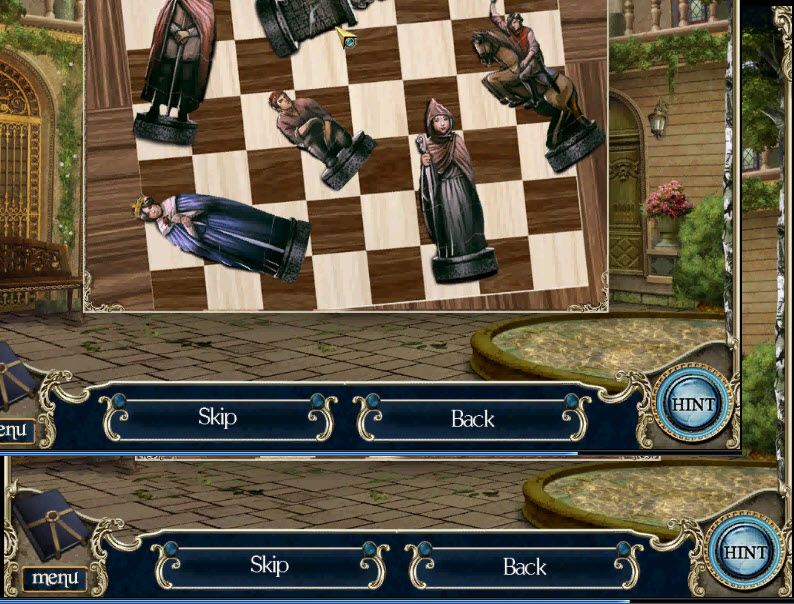
* Click on table and chairs to right of armoire to zoom in
* Click on chess set to open puzzle
* Rotate pieces and drag to correct chess piece to complete the picture
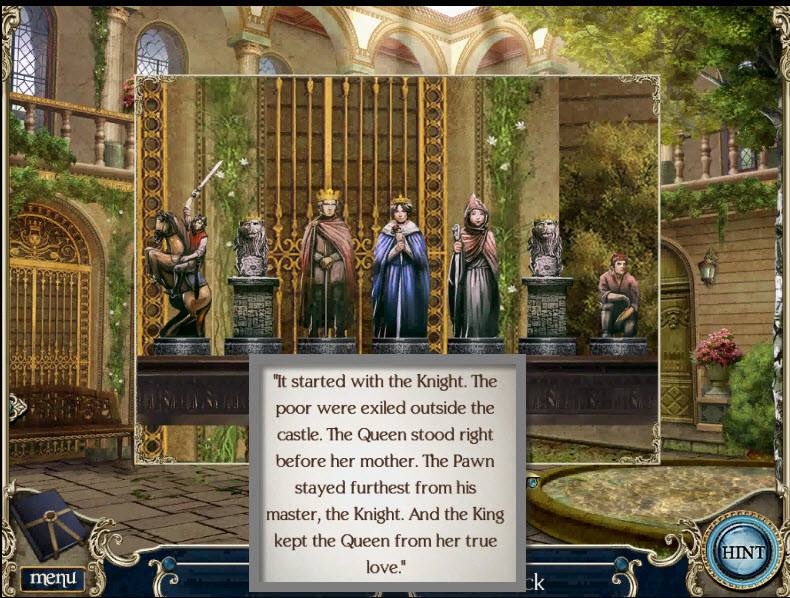
* Put figures in correct order using the riddle found in the library in the journal
KNIGHT, LION, KING, QUEEN, WOMAN, LION, PAWN
* Pick up the jewel key
* Click down 1x to hall
* From inventory, use jewel key on case to right of library door
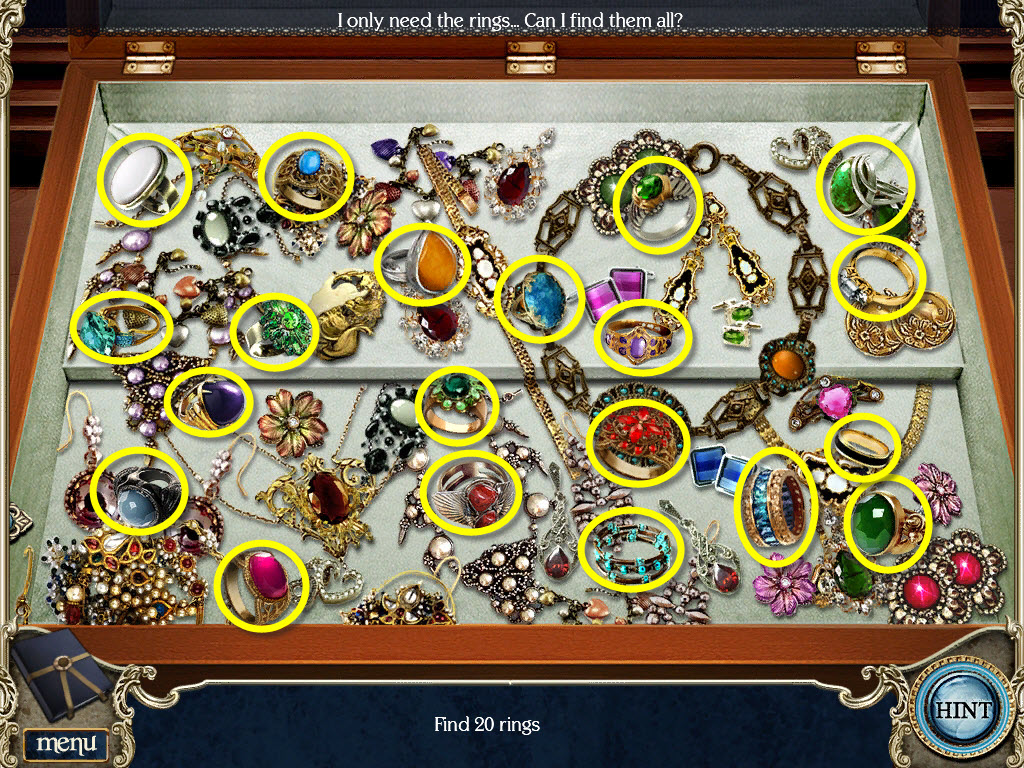
* Click on top jewel case to open puzzle
* Find 20 rings
* Rings added to inventory
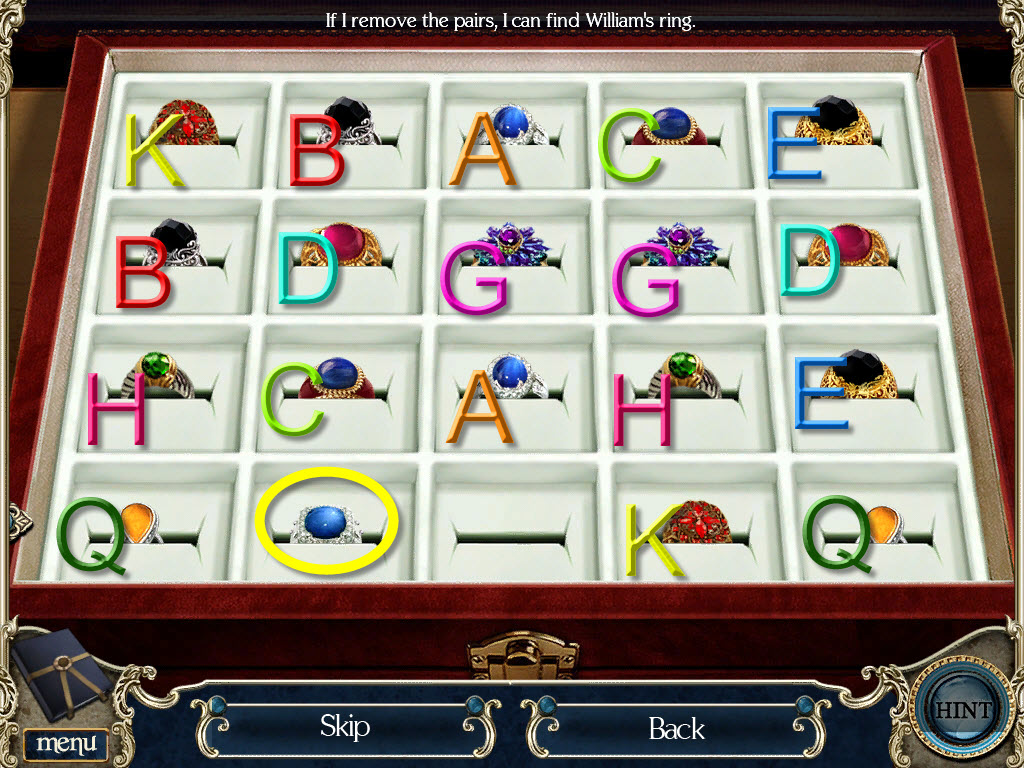
* From inventory, drag rings to bottom jewelry box to open puzzle
* Match the pairs to find William's ring (puzzle is random, your solution may be different from mine)
* William's ring added to inventory
* Go right onto patio
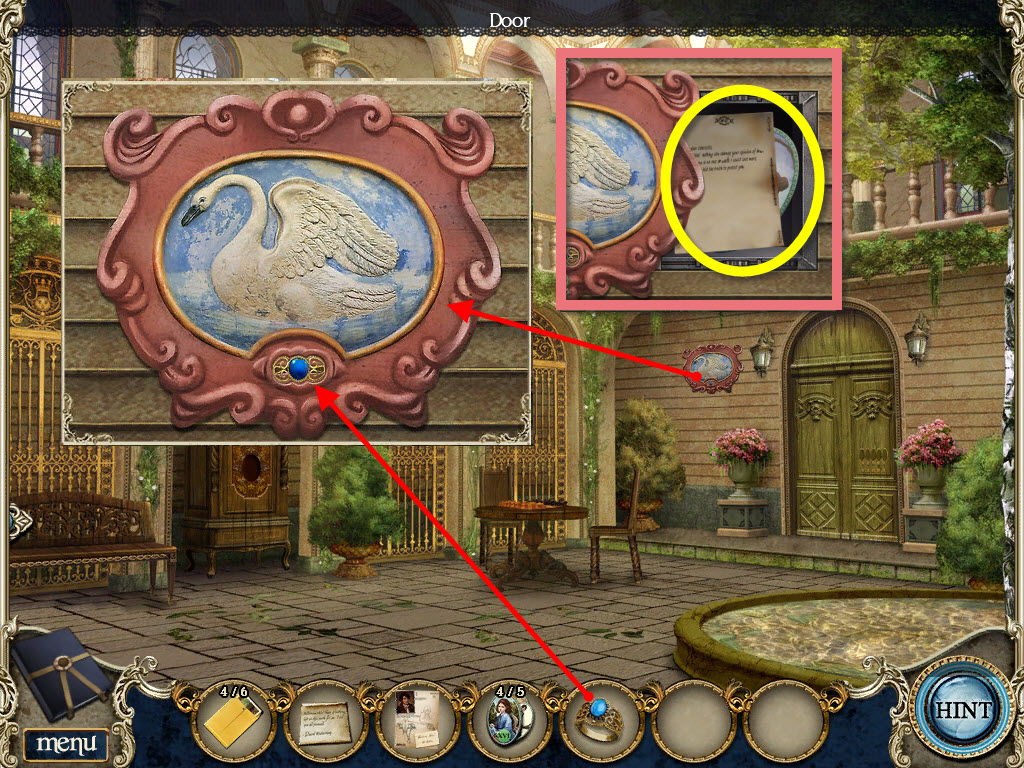
* Click on swan oval, far right wall, to left of closed doors
* From inventory, drag William's ring to small opening below swan oval
* Click on oval to reveal hidden compartment
* Click on William's letter to added to inventory
* Click on 5th oval to add to inventory
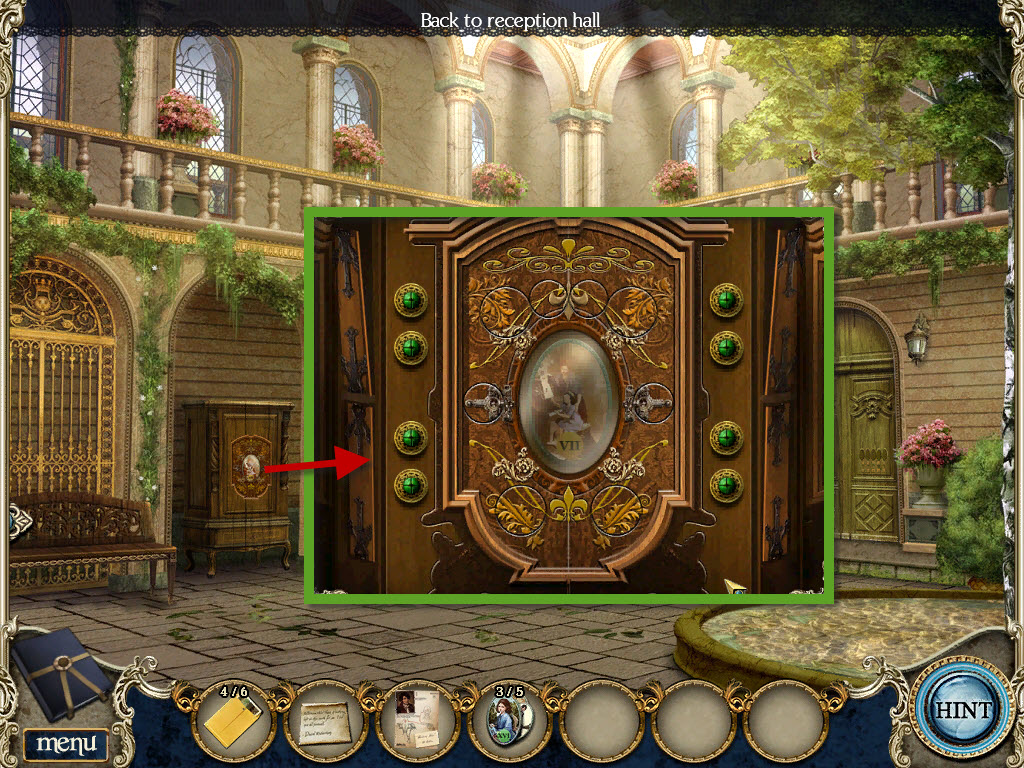
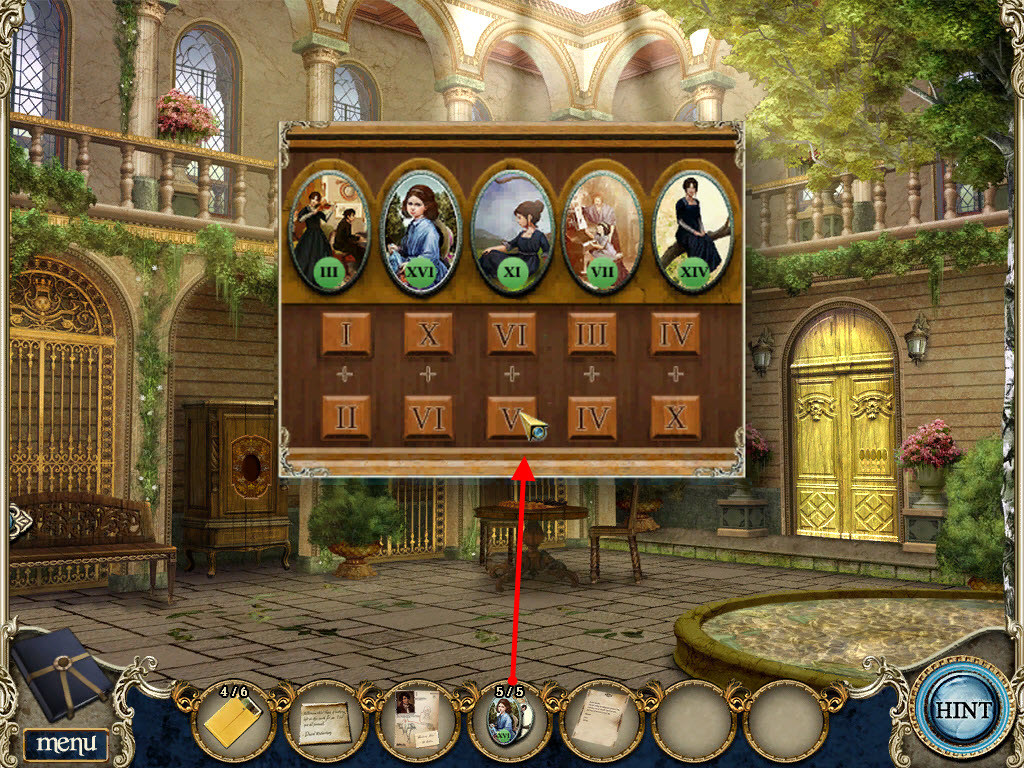
* Click on closed doors on right wall to zoom in
* From inventory, drag ovals to door to open puzzle
* Click on ovals to switch places until Roman numeral sums match the Roman numeral problems
III, XVI, XI, VII, XIV
* Go through open doorway
* Find 5 piano keys (green)
* Click down 2x, then go left into library
* Click on desk to zoom in
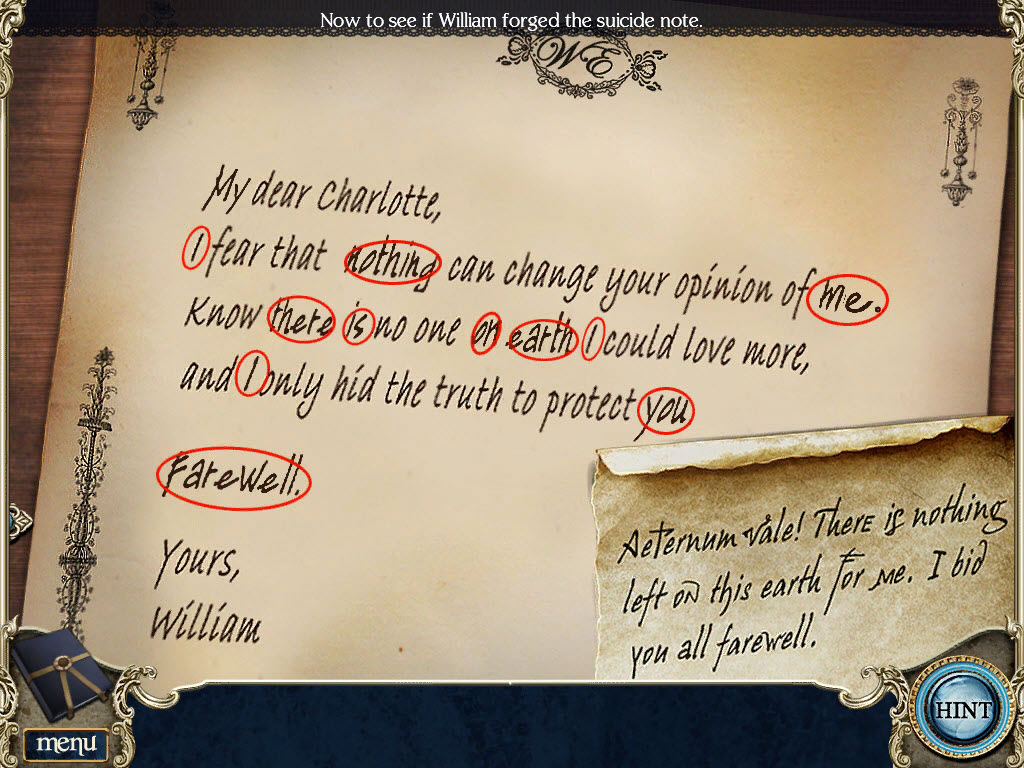
* From inventory, drag both letters to desk to open puzzle
* Find the 11 words used in both letters
* Unmatched note added to journal
* Butler comes to speak to you
* Click down 1x to reception hall
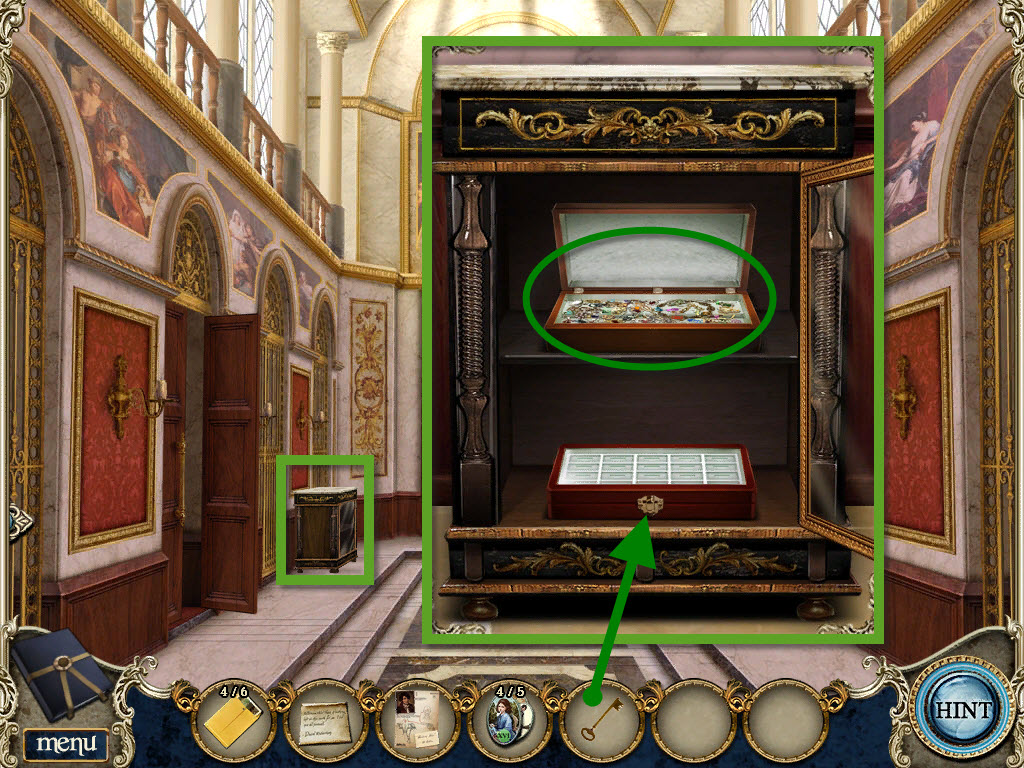
* Click on box on table in back right corner to open puzzle
* Click on squares to rotate into correct position to complete the picture
* Pick up key and music sheet
* Go right 2x to music room
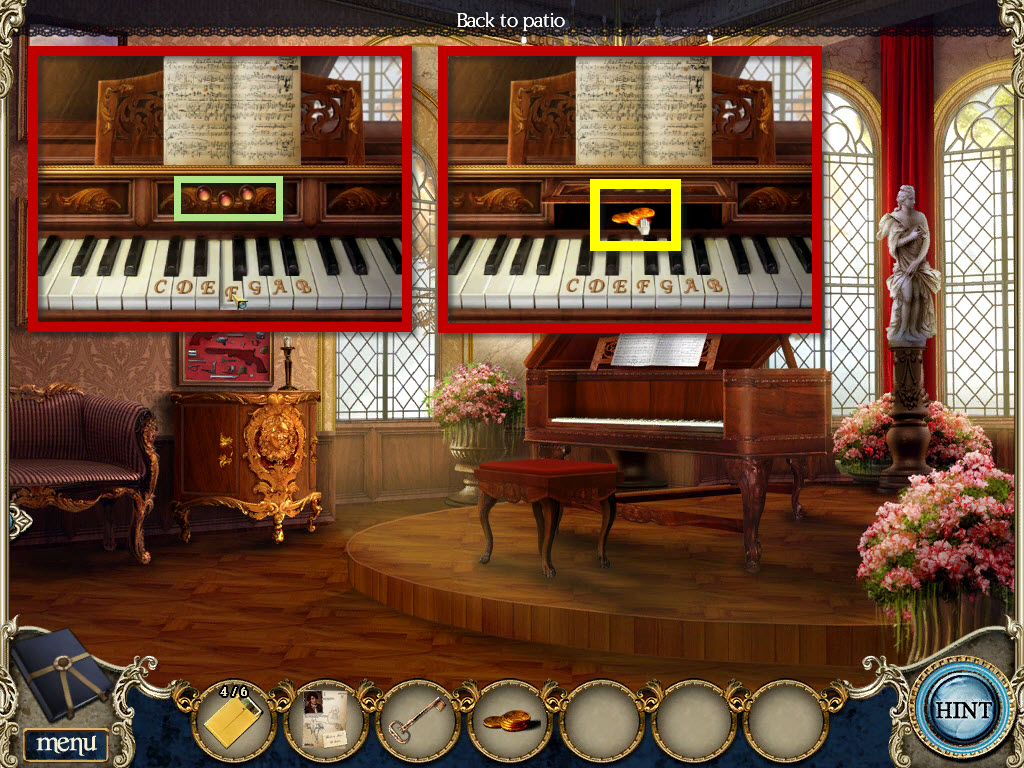
* From inventory,drag 5 piano keys and sheet music to piano to open puzzle
* Watch what order the keys are pressed, then copy by clicking on keys in same order until all three lights are lit up above keys
* Pick up coins
* Click on gun case on left wall to zoom in
* From inventory, use key to unlock gun case and open puzzle
* Click pieces to rotate and drag to reassemble the guns
* From inventory, place medical report on top of guns, click on report
* Click on ghost who knocks down gun case, click on broken case to zoom in
* Pick up dagger
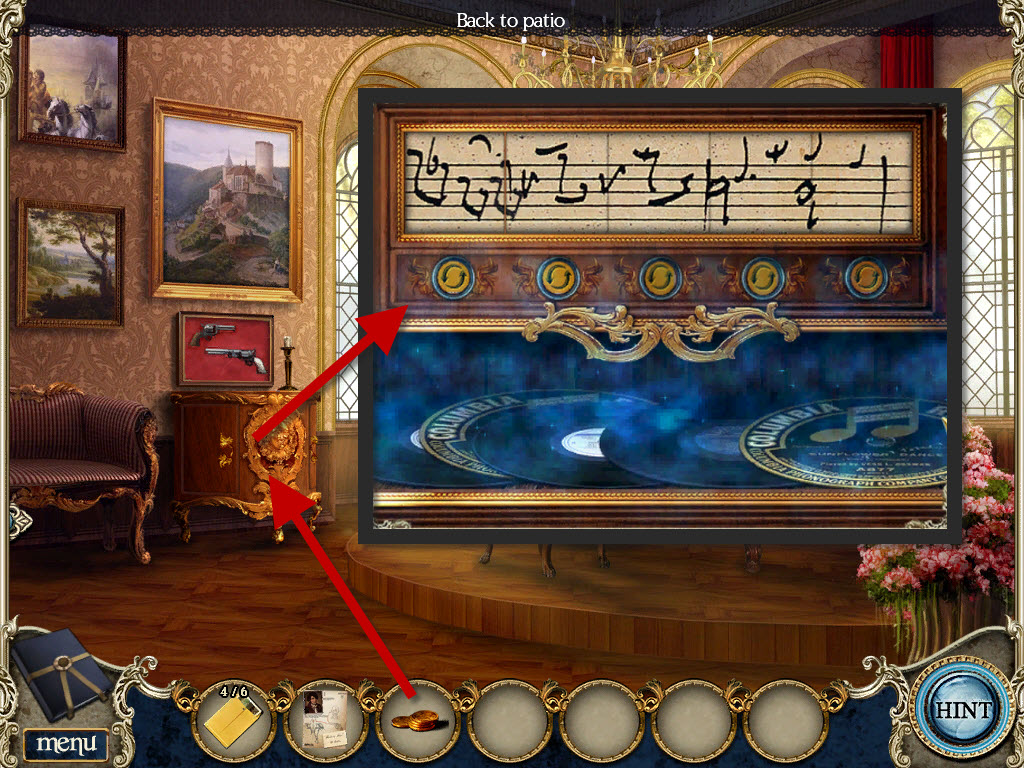
* From inventory, drag coins to coin operated record box below gun case to open puzzle
* Click on buttons below music notes to turn each square until correct notes are pieced together (puzzle is random)
* Record added to inventory
* Click down 2x, click up 1x to ballroom
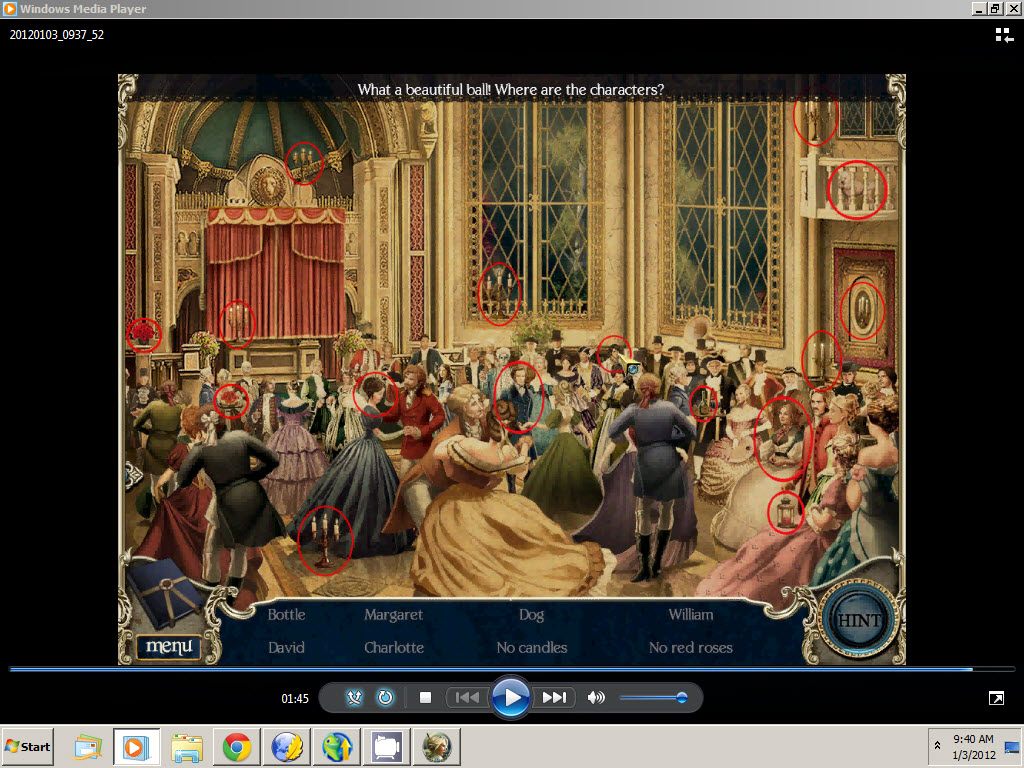
* From inventory, use dagger to cut red curtains at back of room
* Click on painting to open puzzle
* Find all the characters
* Click on ghost
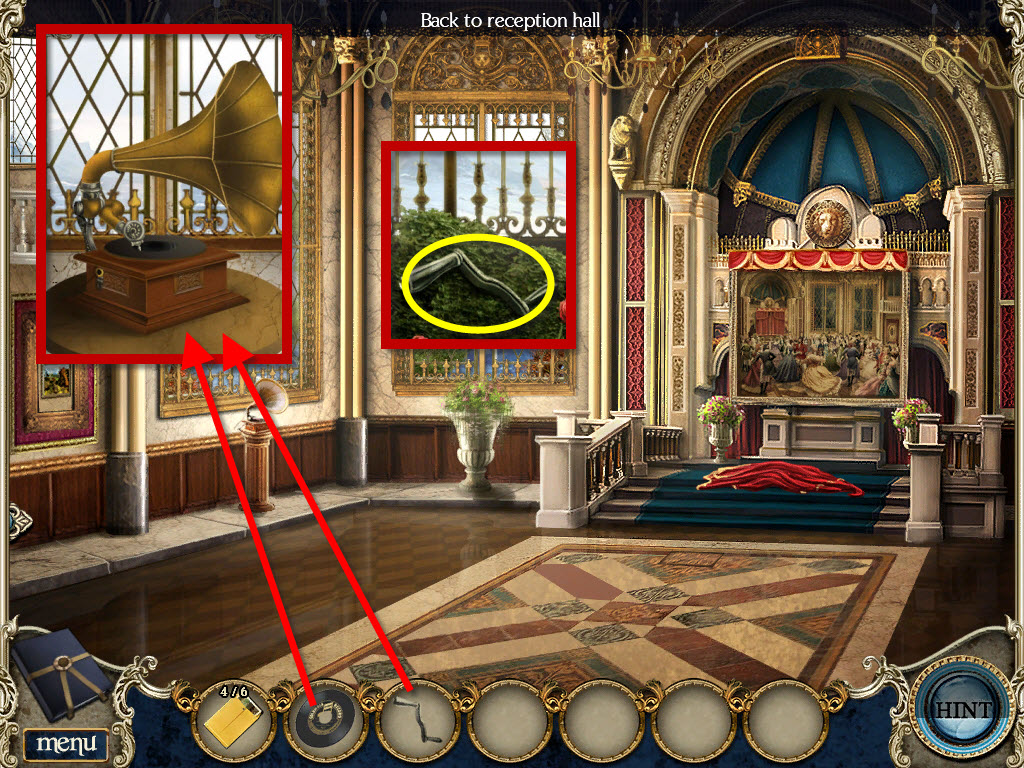
* Click on urn to left of stairs to zoom in, pick up crank
* Click on gramophone to zoom in
* From inventory, place crank and record on gramophone
* Click on crank to get Charlotte to dance
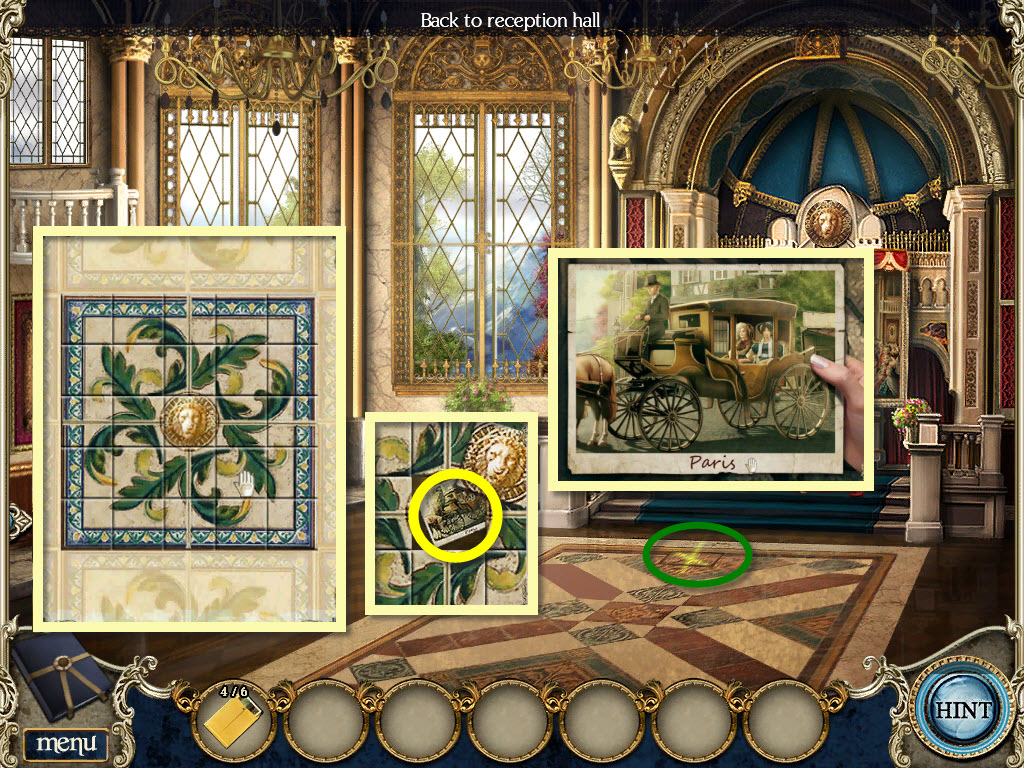
* Click on square on floor in front of steps to zoom in
* Click on squares to rotate until picture is complete
* Click on photgraph to zoom in
* Photograph added to inventory
* Butler and housekeeper will speak to you and start a new chapter
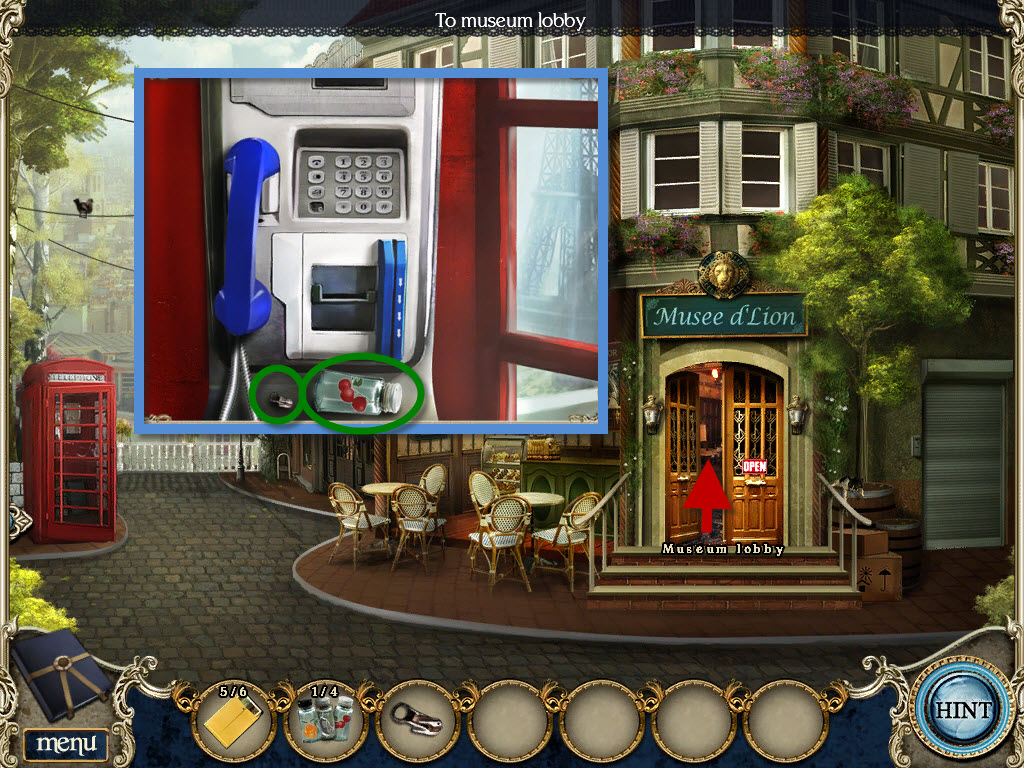
CHAPTER 6 - FRANCE
* Click on phone booth to zoom in
* Pick up salt shaker and small zipper
* Go through doors to museum lobby
* Click on Charlotte's ghost
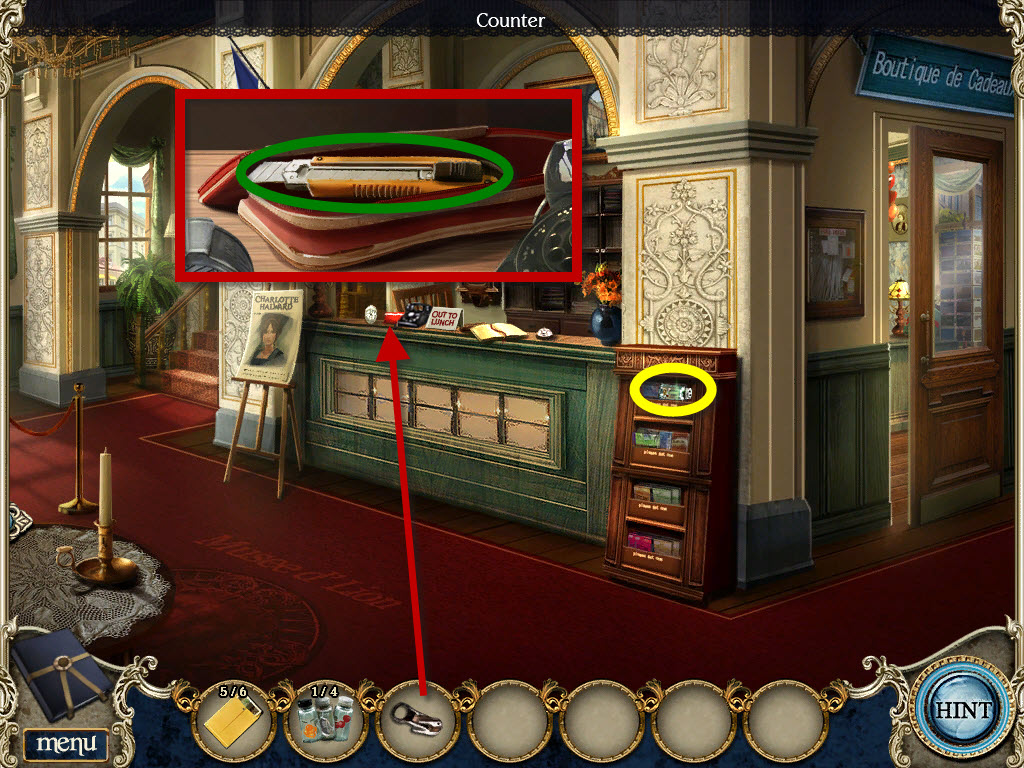
* Click on red bag on counter to zoom in
* From inventory, place zipper on bag, click on zipper
* Pick up cutter
* Pick up salter shaker (yellow)
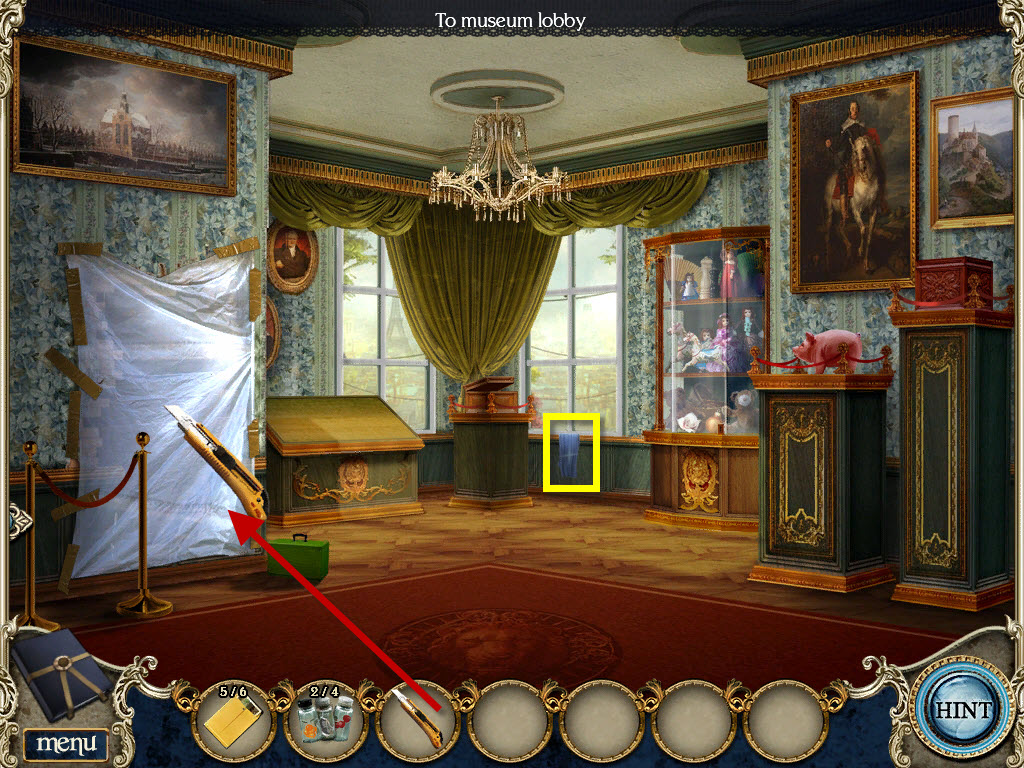
* Go through exhibit room door on left
* Click on ghost
* Pick up towel beneath window at back of room (yellow)
* From inventory, use towel to wipe off plastic on left wall
* From inventory, use cutter to cut plastic
* Click on plastic, go through to gallery
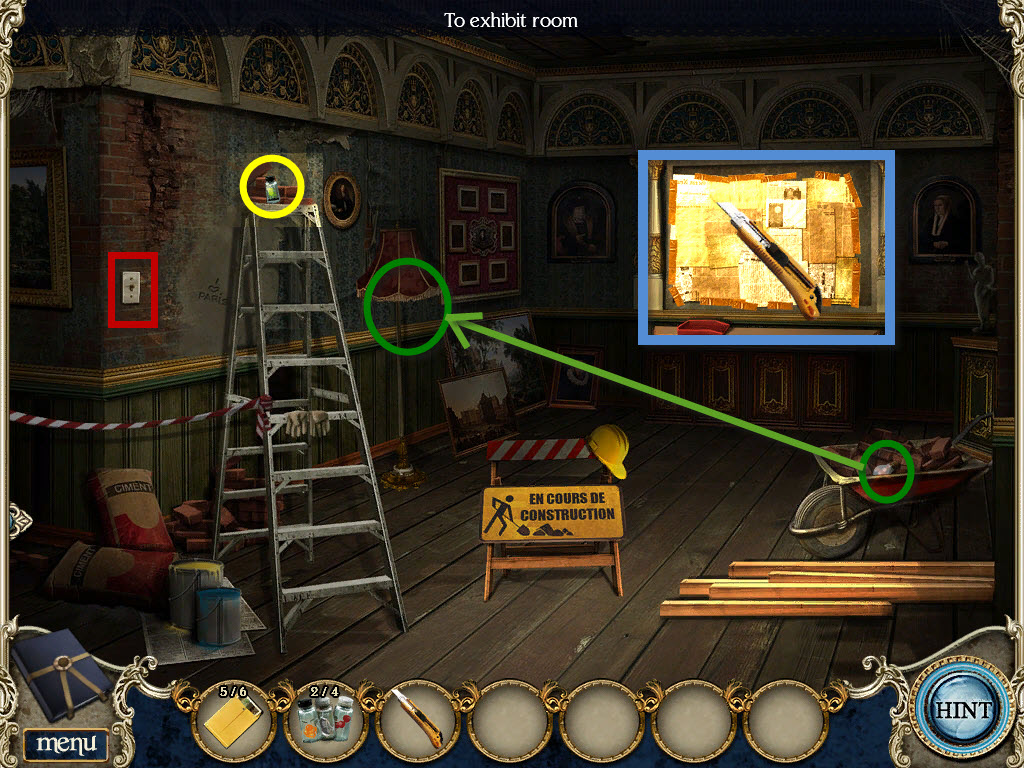
* Pick up light bulb out of wheelbarrow on right
* From inventory, place light bulb in lamp to right of ladder (green)
* Click on switch on wall to left of ladder (red)
* Pick up salt shaker on top of ladder (yellow)
* From inventory, use cutter on newspaper on back wall to reveal painting
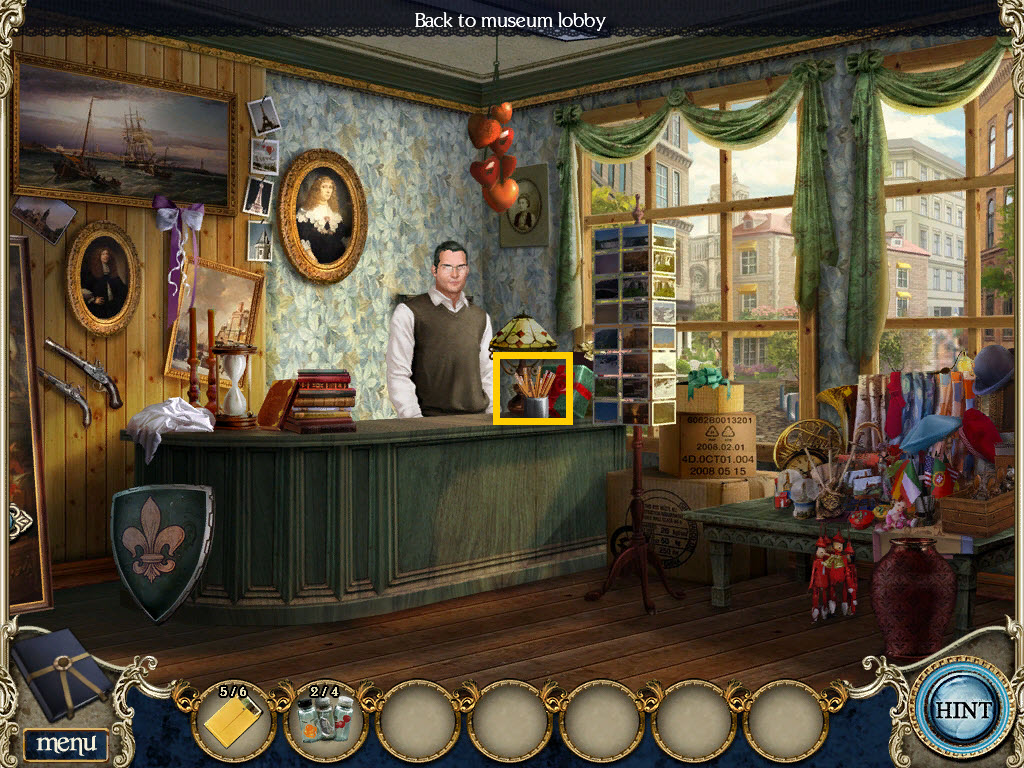
* Click down 2x, go through door on right into gift shop
* Click on store clerk to speak to
* Pick up unsharpened pencil on counter to right of clerk
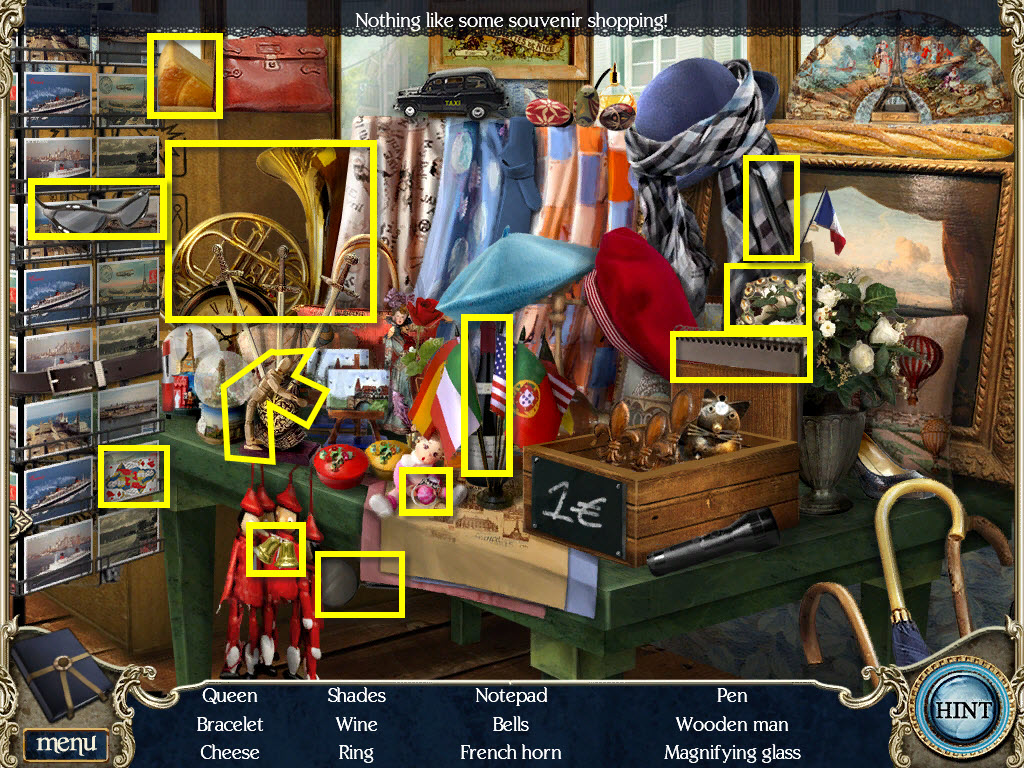
* Click on shop display on right to open puzzle
* Find hidden items
* Magnifying glass added to inventory
* You cannot leave the shop until you pay for the magnifying glass
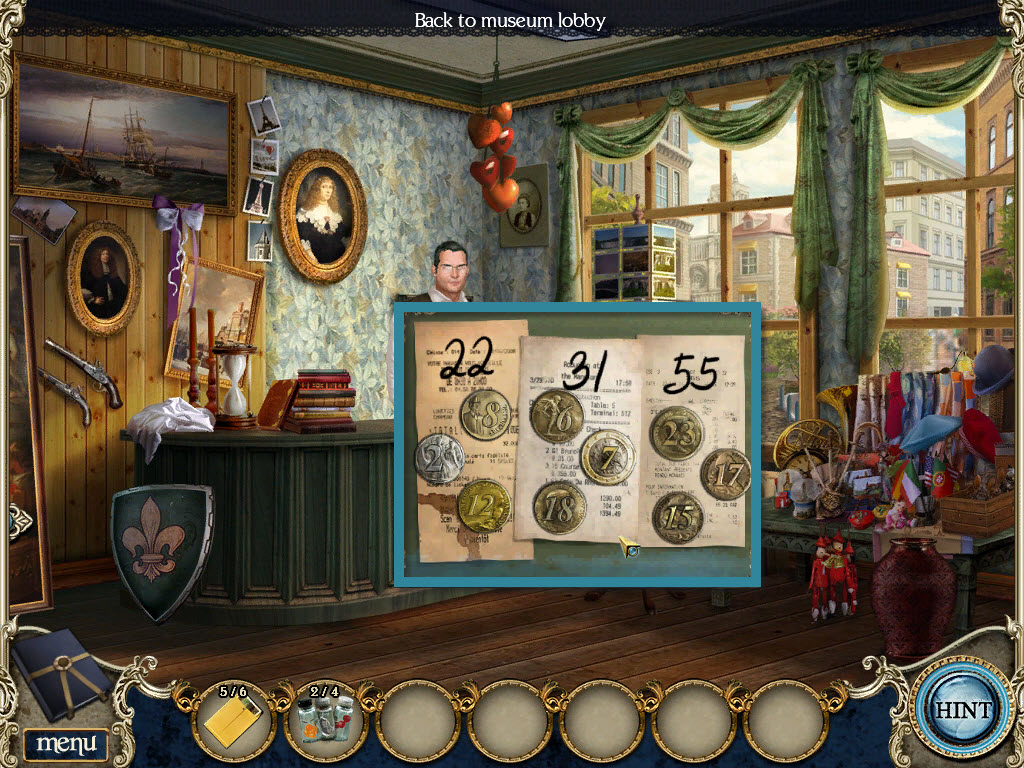
* From inventory, place magnifying glass on counter to open puzzle
* Click on coins to switch places until coins match the amount on the receipts
(22 = 8, 2, 12) (31 = 6, 7, 18) (55 = 23, 17, 15)
* Magnifying glass and loose change added to inventory
* Click down 1x to lobby
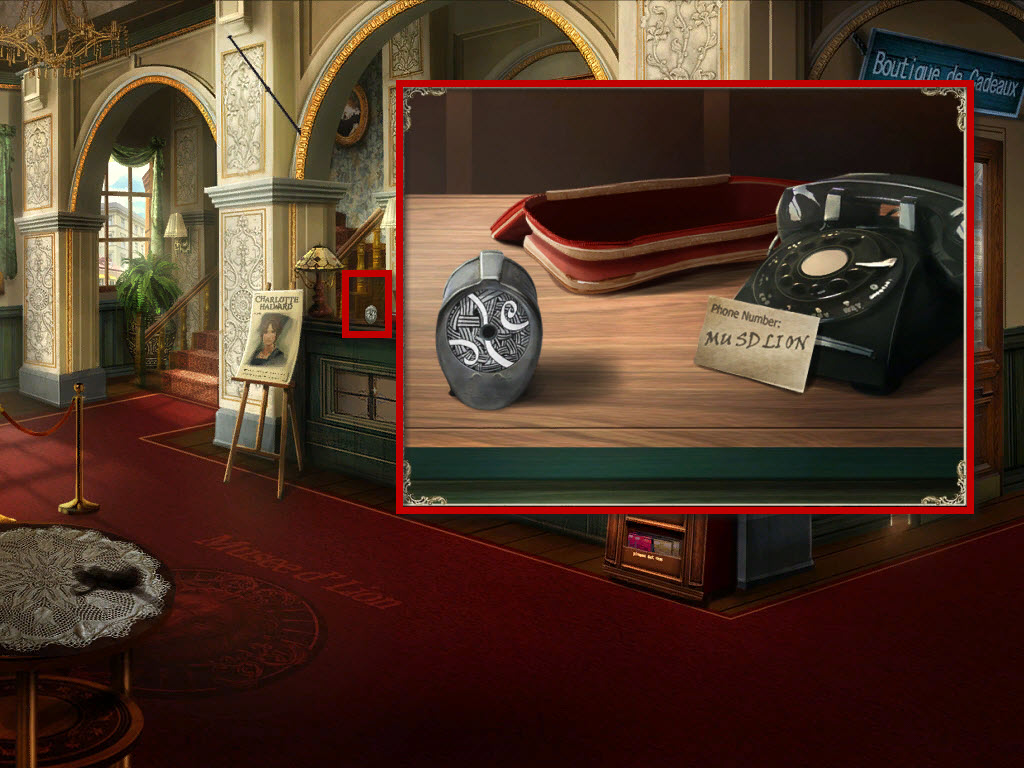
* Click on counter to zoom in
* Click on pencil sharpener to open puzzle
* Click on rings to rotate them until picture is completed
* From inventory, drag pencil to sharpener, sharpened pencil added to inventory
* From inventory, place sharpened pencil on paper against phone to get number: MU SD LI ON
* Go back to exhibit
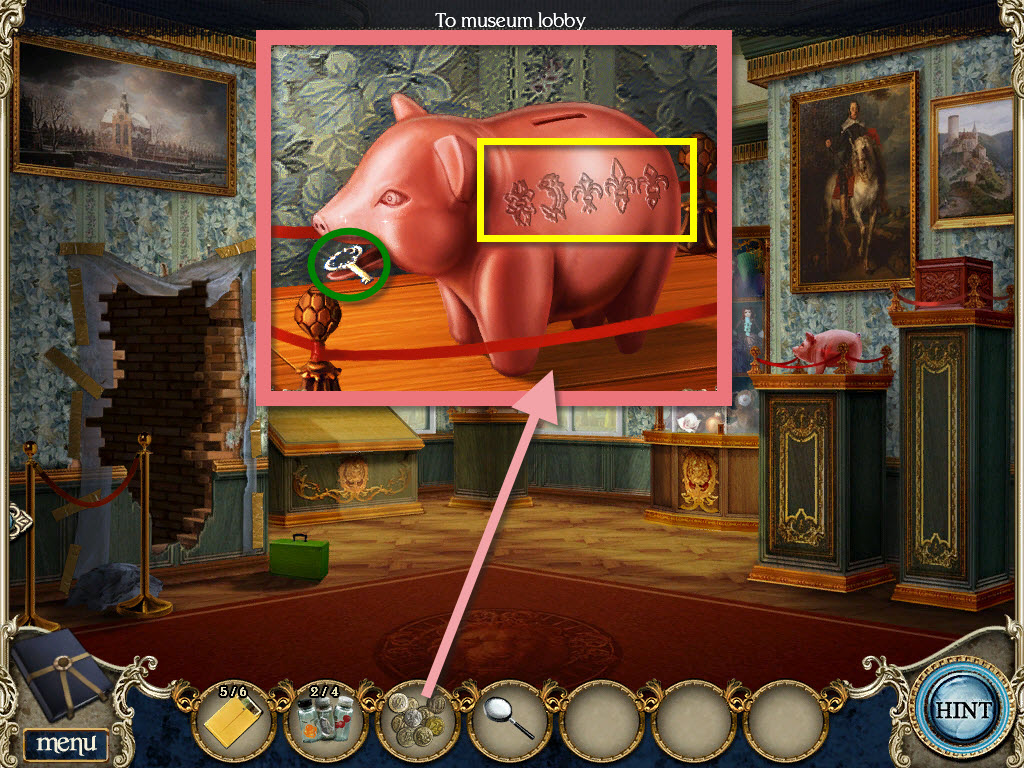
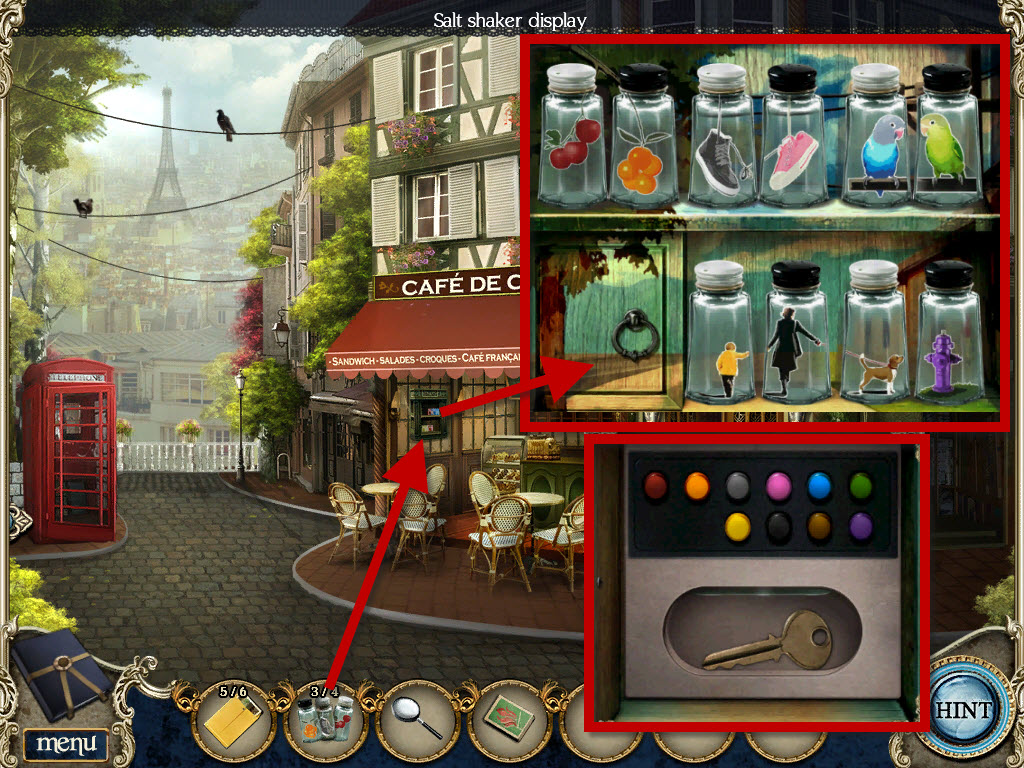
* Click on pink piggy bank on right to zoom in
* From inventory, drag coins to bank, pick up small key from piggy bank mouth
* Remember the symbols on the side of the piggy
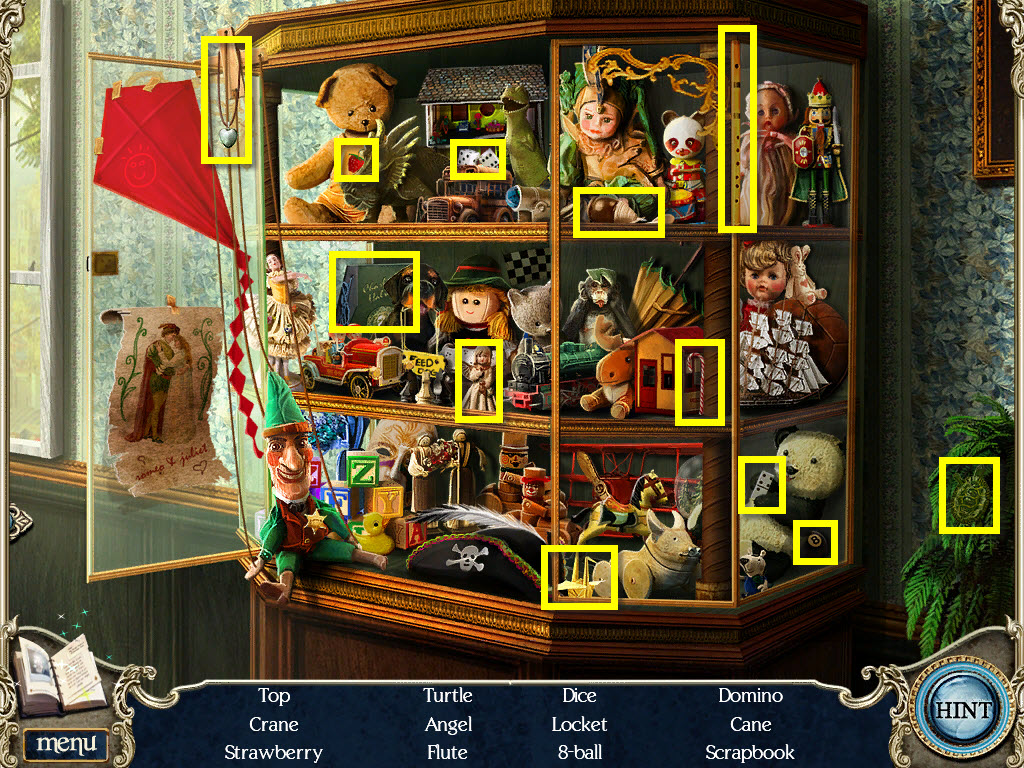
* From inventory, use small key to open toy display on back wall to left of piggy bank
* Find hidden items
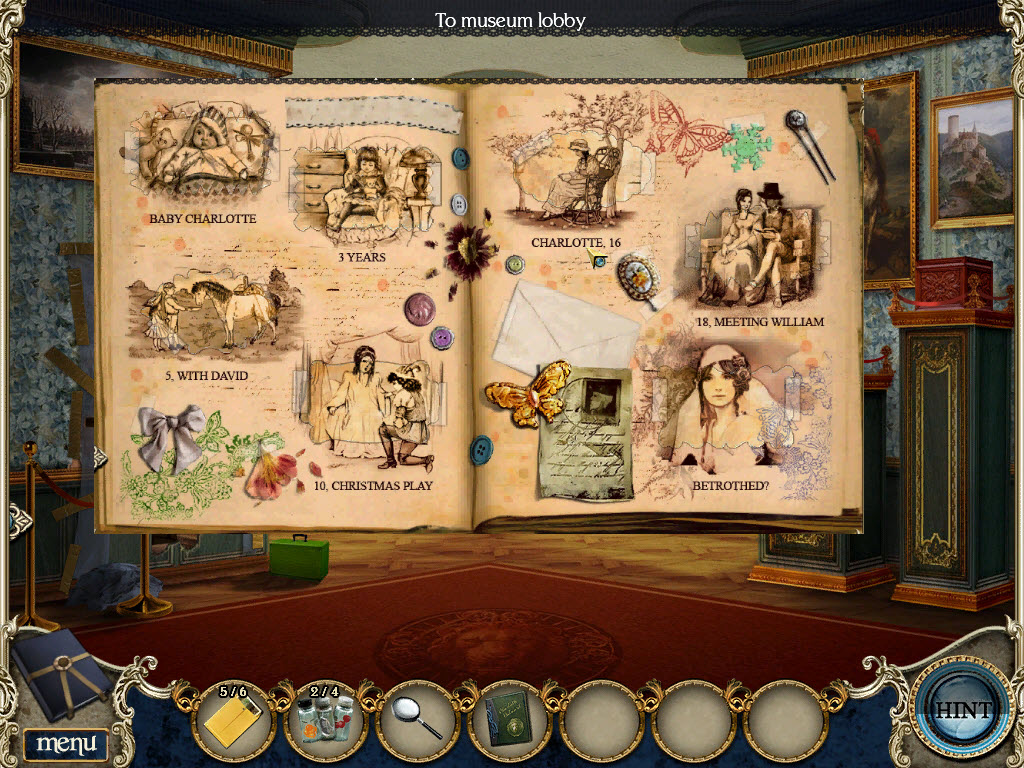
* Scrapbook added to inventory
* From inventory, take scrapbook and place on stand by window to open puzzle
* Click on pictures to switch places until all pictures match the captions
* Pick up the phone card
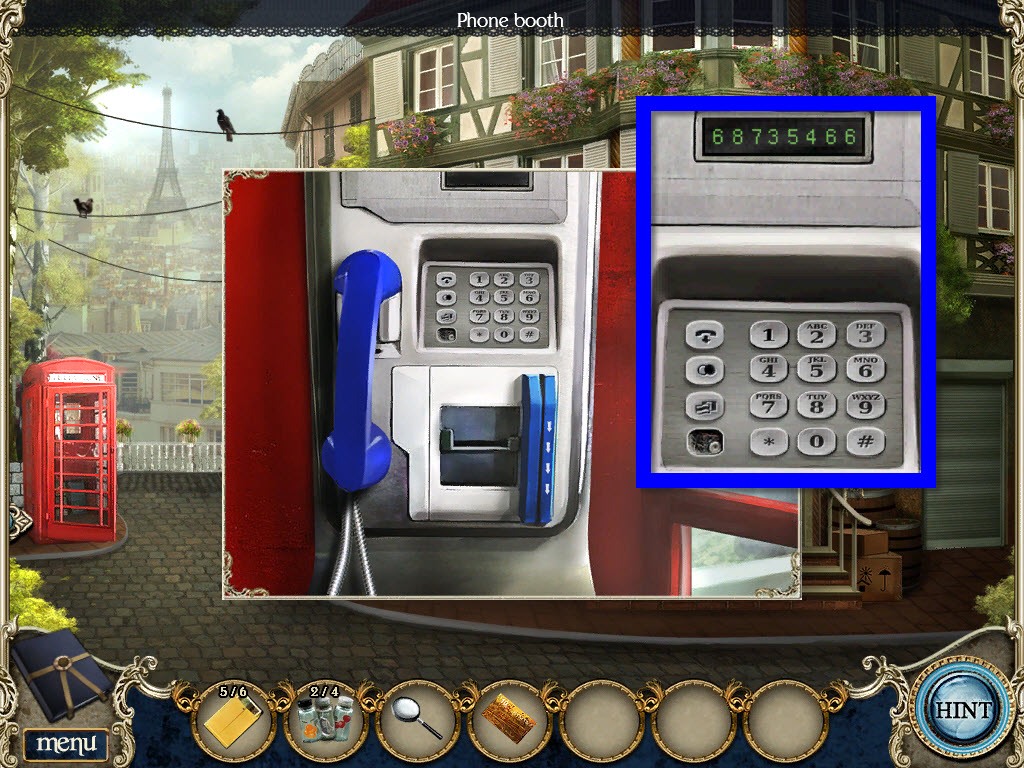
* Click down 2x to phone booth
* Click on phone booth to zoom in
* From inventory, use phone card on phone
* Using the number found at the lobby desk solve the puzzle
* Click on the phone buttons: 6 8 7 3 5 4 6 6
* You have just called the museum phone
* Go back inside museum lobby
* Click on phone, store clerk appears
* Click on store clerk
* Go into gift shop
* Pick up key card off off bulletin board behind counter
* Click down 2x
* From inventory, use key card on metal back room door to right of museum
* Using the symbols found on the piggy bank, solve the puzzle to open the door
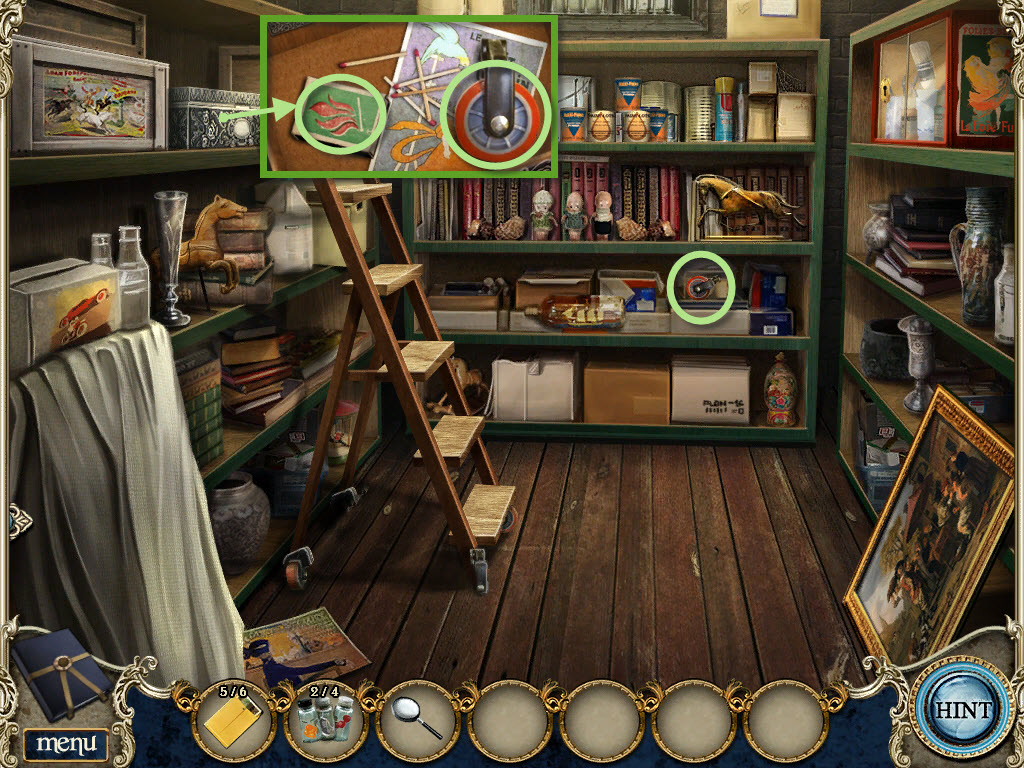
* Go into storage room
* Click on box to left of ladder on top shelf
* Pick up matches and wheel
* Pick up wheel on lower shelf at back of room (green)
* From inventory, drag wheels to ladder
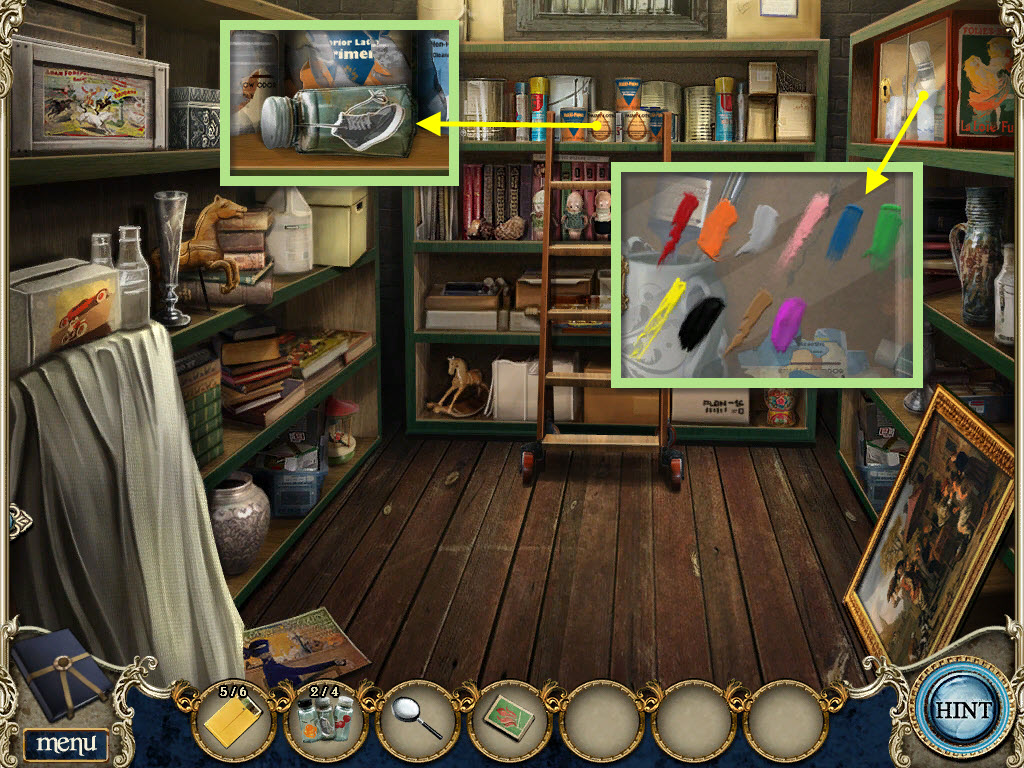
* Click on ladder to move it to shelves on back wall
* Click on top shelf to zoom in
* Pick up 4th salt shaker
* Click on ladder to move it to shelves on right wall
* Remember the paint splatters
* Click down to go back outside
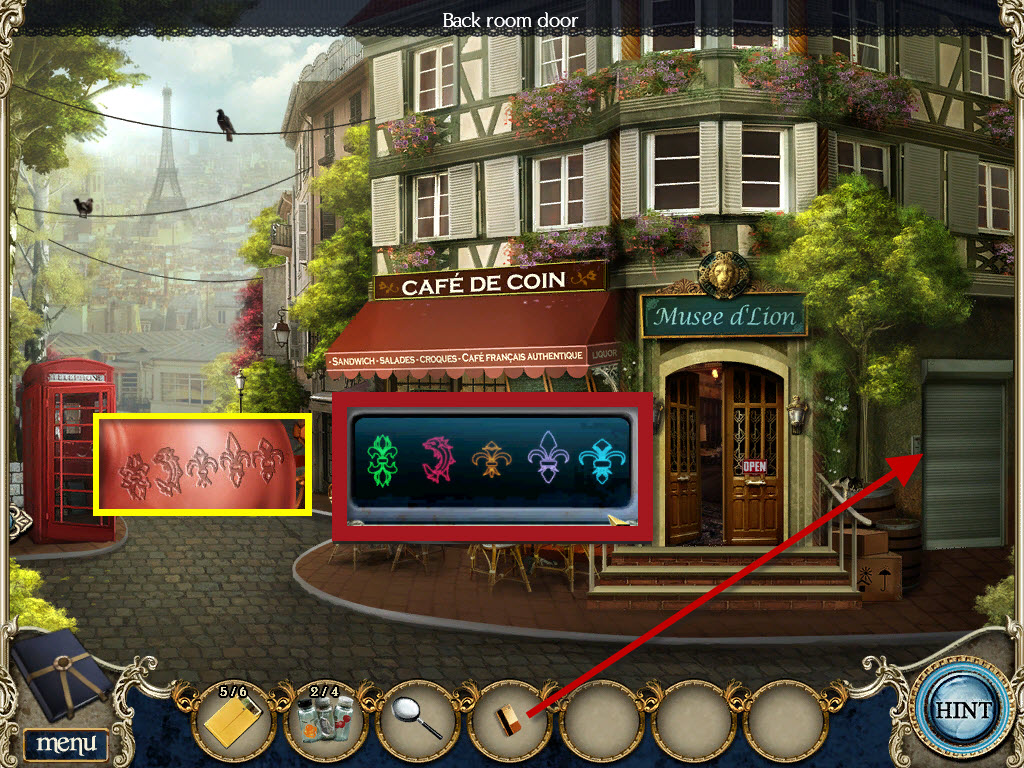
* From inventory, drag salt shakers to display in cafe (under red awning)
* Click on display to open puzzle
* Rearrange the salt shakers so each is with its correct mate
* Using paint splatters found in storage room as a guide,click on buttons until correct colors light up
Top Buttons: RED, ORANGE, GRAY, PINK, BLUE, GREEN
Bottom Buttons: YELLOW, BLACK, BROWN, PURPLE
* Pick up Shelf key
* Go back into storage room
* Click ladder to right hand shelf
* Click on glass cabinet
* From inventory, use shelf key to open cabinet
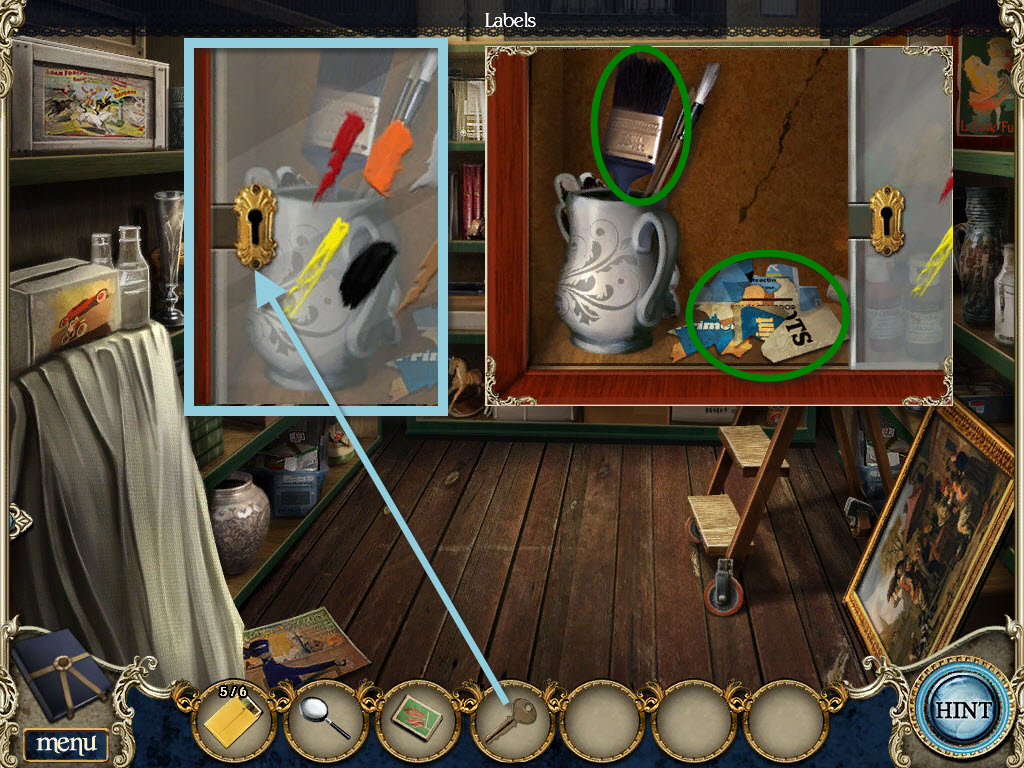
* Pick up labels and paintbrush
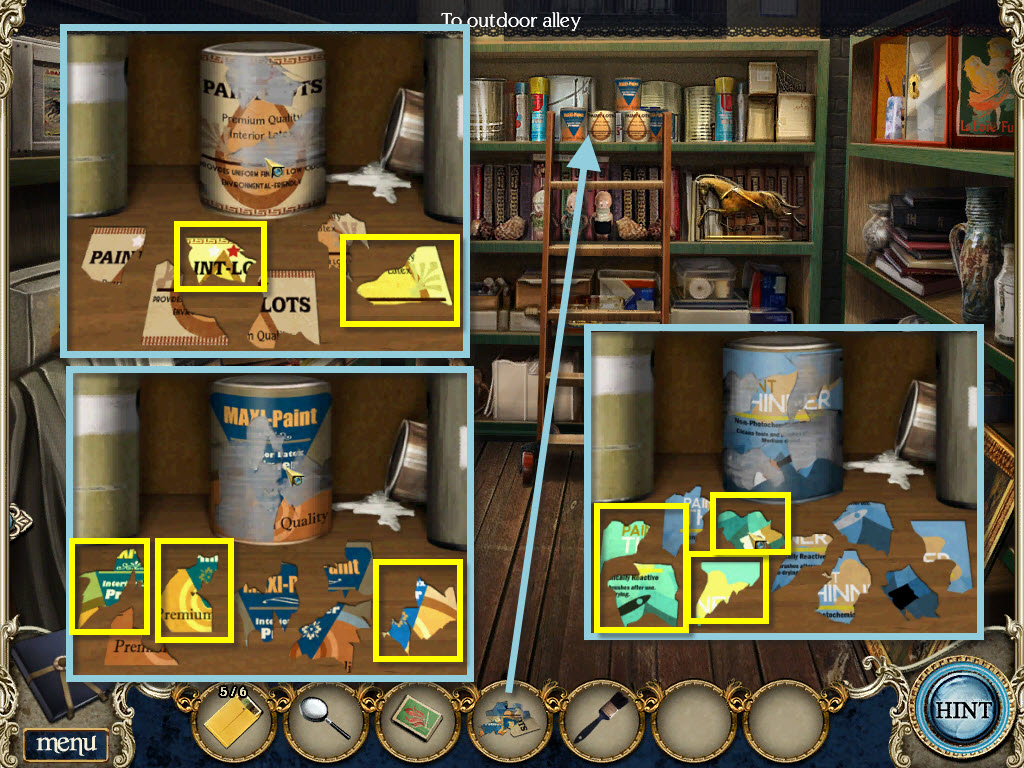
* Click on ladder to move it to back shelf, click on paint cans to zoom in
* From inventory, put labels on cans to open puzzle
* Click only on the label pieces that will fit on the blank spaces on can
* Once the correct labels are highlighted, click on can to move on to next puzzle (3 puzzles)
* Paint thinner added to inventory
* Click down 1x, Go into museum lobby, click up stairs to exhibit, go through hole into gallery
* From inventory, use the magnifying glass on painting on back wall to open puzzle
* Find 25 errors
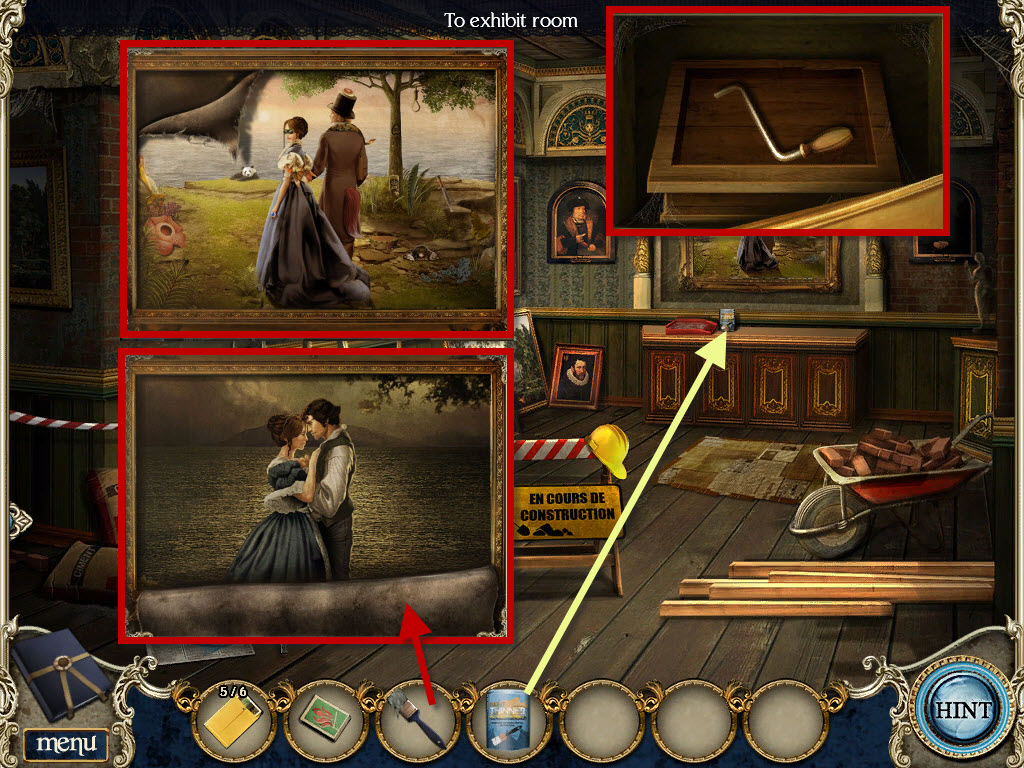
* From inventory, put paint thinner can on shelf below painting
* From inventory, dip paint brush in thinner, dipped brush added to inventory
* From inventory, use dipped brush on painting, click 2x until painting peals down
* Click on main scene to leave painting, click on Charlotte's ghost, she will move the painting
* Click on moved painting to zoom in, pick up winder
* Click down 1x
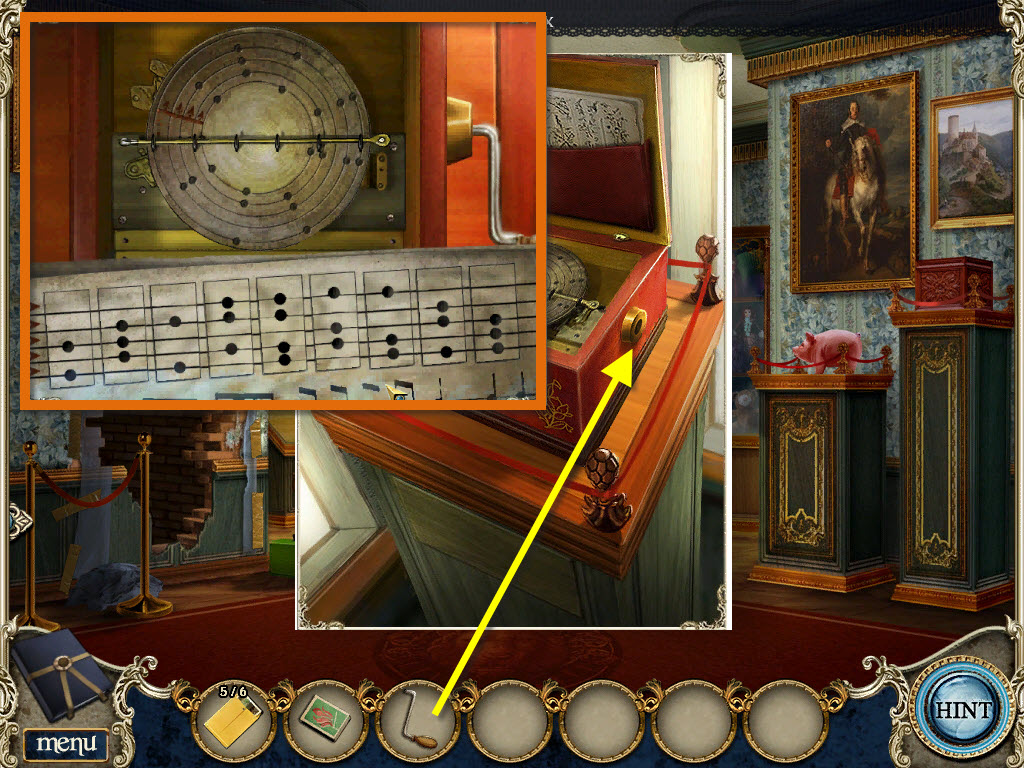
* Click on music box in back corner between windows
* From inventory, place winder on box to open puzzle
* Click on music parts on bottom to swap them to match the spinning pattern on top
* Pick up the picture to add to inventory
* Go through hole into gallery
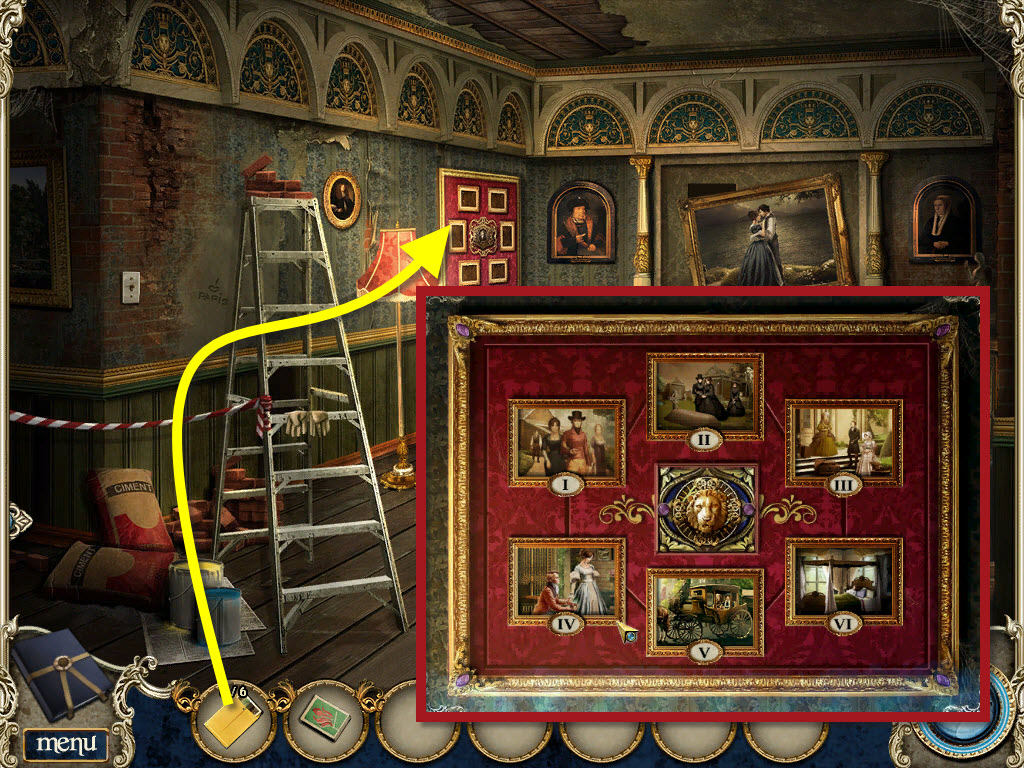
* From inventory, put the pictures on the frames to open puzzle
* Rearrange the photos in order of Charlotte's life
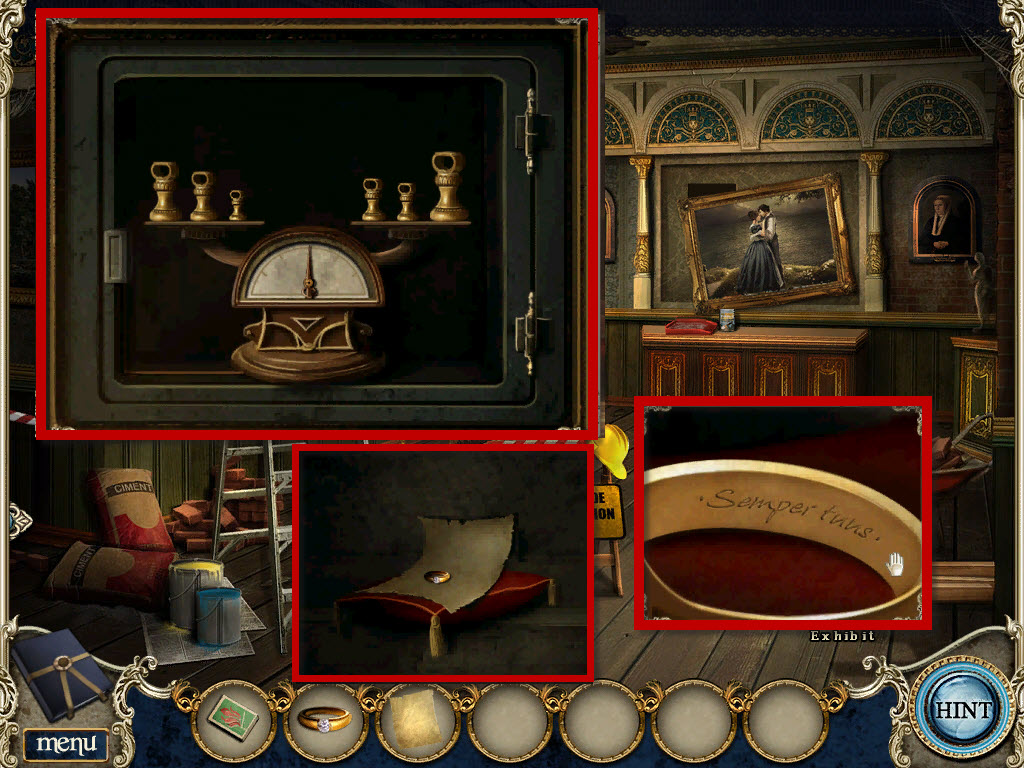
* Click on scale to open puzzle
* Rearrange the weights to balance scale
* Click on ring to zoom in, click on ring
* Ring added to inventory
* Pick up blank letter
* Click down 2x to lobby
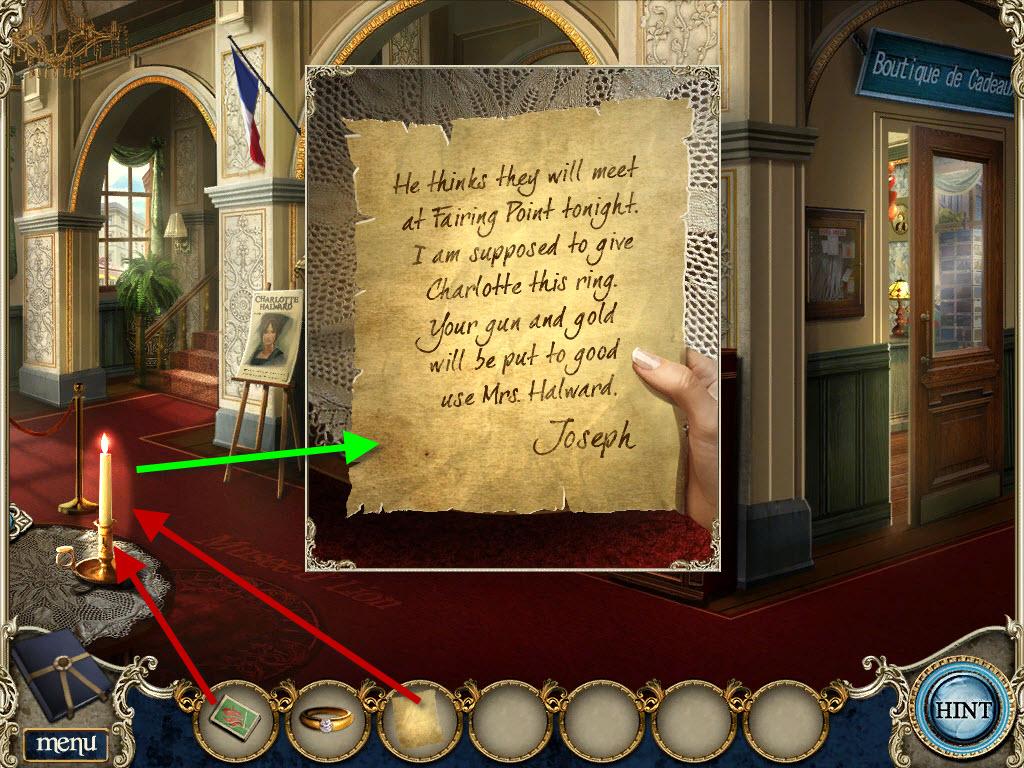
* From inventory, drag matches to candle
* From inventory, click blank letter over candle to zoom in
* Invisible ink letter added to inventory
CHAPTER 7 - FAIRING POINT
* Click on concierge to speak to him
* Pick up purple cloth on ground, lower left of screen
* Pick up half painted canvas off bench at back of screen
* Pick up easel behind bench
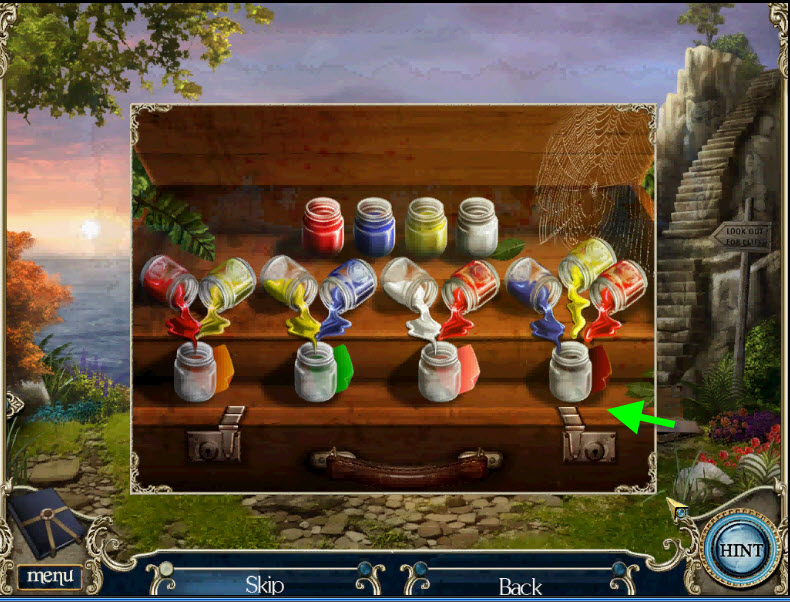
* Click on pochade box on ground to the right to open puzzle
* Click on a color from the back row and put it in an empty jar next to a spilled color, so when the two mix they create the color on the swatch
RED/YELLOW - RED/BLUE - WHITE/RED - BLUE/YELLOW/RED
* Paint jars added to inventory
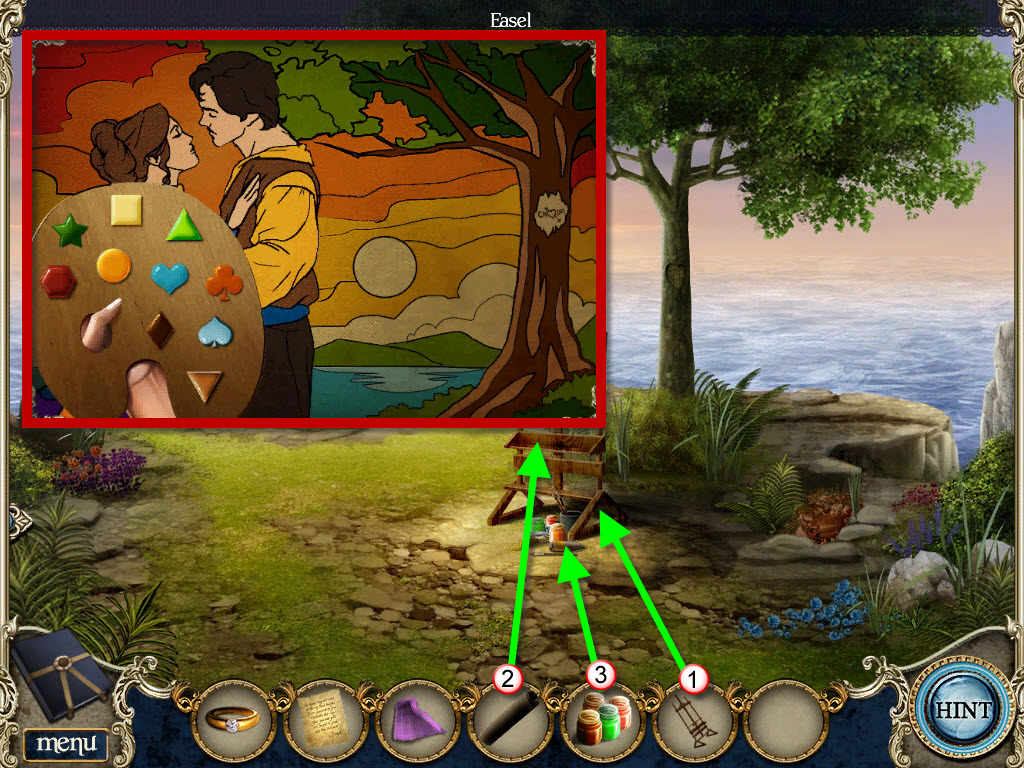
* Click up 1x to cliff top
* From inventory, put easel on flat area
* From inventory, put canvas and paints on easel
* Click on easel to open puzzle
* This is a "paint by number" type puzzle, click on shapes next to paint then click on like shapes on canvas
* Reference is made to the carving on the tree
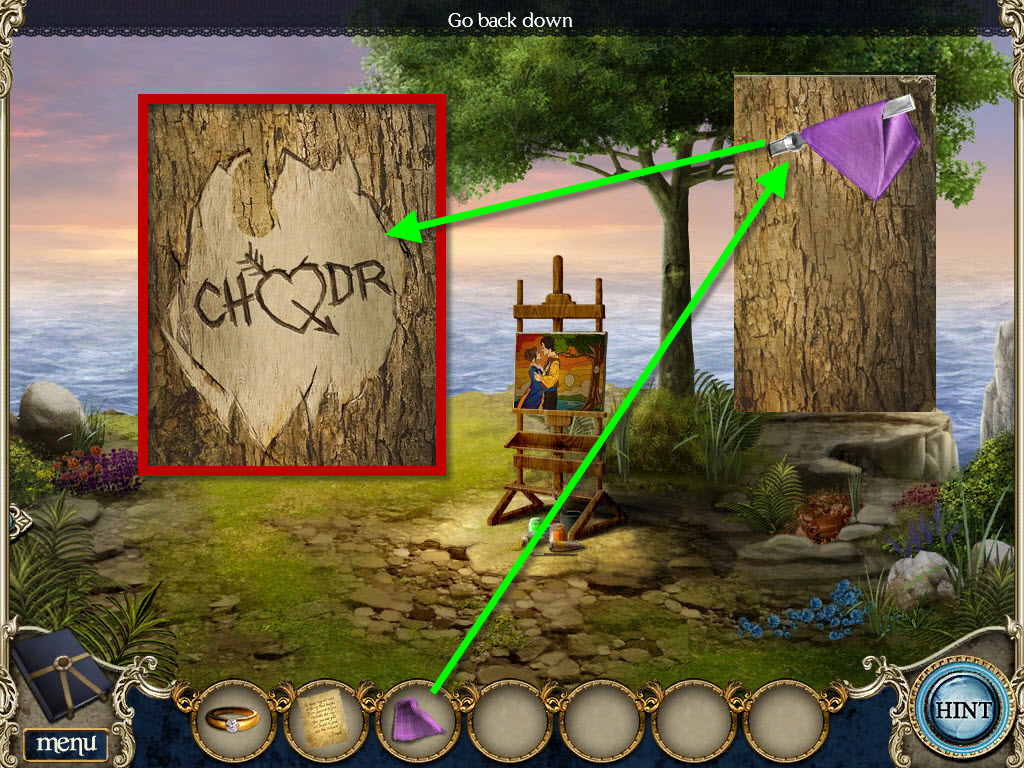
* Click on main scene to leave painting
* Click on tree to zoom in
* From inventory, put cloth on knife
* Click on carving knife with cloth to add to inventory
* From inventory, click carving knife on tree 7x until words are shown
* Click on main scene to leave tree
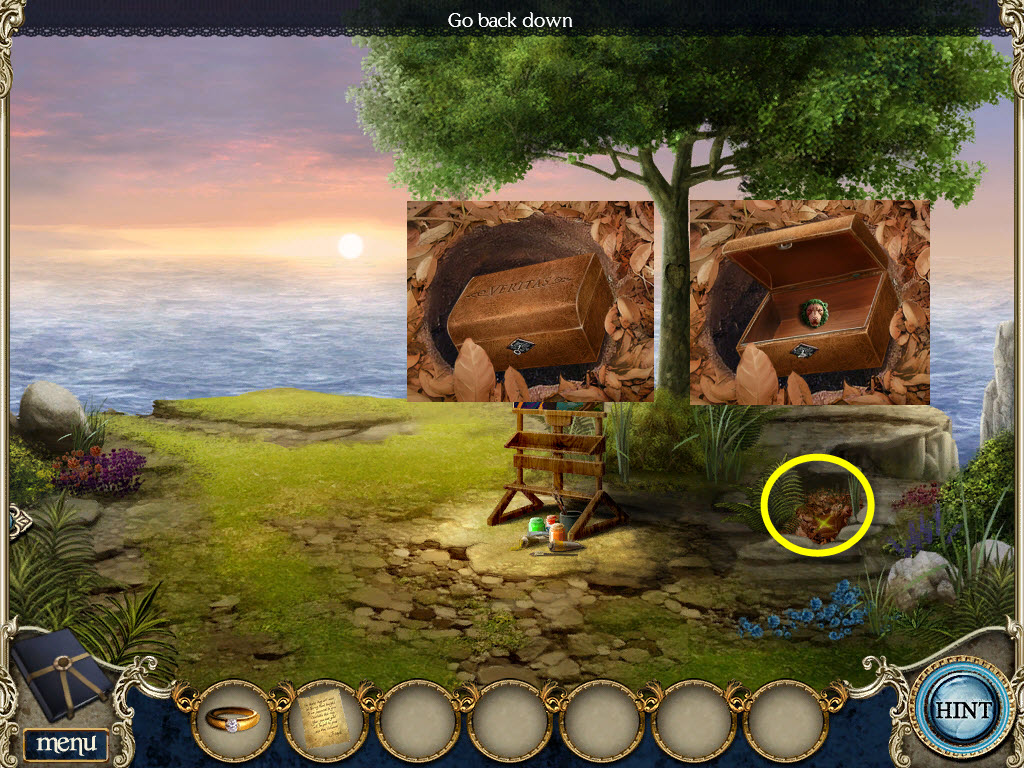
* Click on leafy area to right of tree to zoom in
* Click on leaves to clear them away
* Click on box
* From inventory, place confession letter on box
* Click main scene to exit box
* Click on David's ghost
* Click on box, pick up lion emblem
* Click down 1x
* Click on the sundial
* From inventory, put lion emblem on sundial to open puzzle
* Each etched flower matches a real flower, match the lion emblem with the correct colors to the correct etched flower
* Click up 1x to cliff
* Click on Charlotte
Congratulations! You have completed the game!
HAND: allows you to pick up items
MAGNIFYING GLASS: Lets you know something needs to be examined
PUZZLES: Puzzles can be skipped if they get to tough, but you must wait for the skip button to fill. Some puzzles are random, so you may solve them differently than I did, but the end result is always the same.
JOURNAL: Found in the lower left corner. This continually updates with needed clues and goals. Check this often to solve puzzles.
HINT: Found in lower right corner. Unlimited hints, but needs to be recharged before each use.
INVENTORY: Found bottom center of screen. Some tasks require more than one item to complete. The inventory will let you know how many you have and how many more you need to find.
CHAPTER 1 - HALWARD MANOR
* Speak to the concierge
* Click on table to zoom in, pick up passport
* Click on journal in lower left corner, take note of the phone number
* Click on safe on back wall to zoom in
* Key in last four digits of phone number from journal (6134) to open safe
* From inventory, put passport in safe, click on newspaper in safe to zoom in
* Newpaper article added to journal
* Click on open window to zoom in
* Click on bed to open puzzle
* Put items back in their correct places, Click on umbrella to add to inventory
* Click on floor by bed to zoom in, from inventory, use umbrella to pick up hinge
* Click on tall cupboard by window to open, pick up dustpan and screwdriver
* Click on window to zoom in, place hinge on window, from inventory, use screwdriver to fix, close window
* Click on bag below window to zoom in
* From inventory, use broom to pick up 6 pieces of glass
* From inventory, drag glass to mirror on bureau to open puzzle
* Rearrange the pieces of the mirror.
* Drag the pieces to the correct areas and click on a piece to rotate it.
* Each time a piece is put in the correct place part of your reflection will appear
* Photo added to journal
* Click on ghost, doorway unlocked to second floor
* Click on door to go through
* Talk to concierge
* Click on desk on back wall to zoom in, pick up matches out of drawer
* Click on painting above desk to open puzzle
* Click on strips to swap out positions until picture is restored
* Picture added to journal
* Go downstairs to lobby
* Click on ghost, he will point to parlor door
* Go through parlor door
* Click on ghost, he points above fireplace and at the fireplace
* Click on fridge on right wall to open puzzle
* Find 13 sources of water
* Click on white drawer to open and fine 2 bottles of water
* click on brown drawer to open and find 1 bottle of water
* Water bottles added to inventory
* Pick up glue bottle off side table on left wall
* Click on table on right wall to zoom in, pick up key
* Click on blue footstool in front of fire to add to inventory
* Click down 1x to enter lobby
* Click on fusebox on left wall by stairs to open puzzle
* Put all the fuses in the correct order
* Click on a fuse to switch places with another fuse
* Click on colored switches to zoom in, click on switches in correct order to turn on lights
* Purple, Gray, Red, Blue, Orange
* Go left into atrium
* Zoom in on plants close to the gate, and pick up candle
* Pick up tongs off steps of statue
* Click on the plants below the broken bust and pick up the stone pieces
* Click on the bust to zoom in
* From inventory drag glue to bust and stones to bust to repair
* click down 1x to parlor, go upstairs to 2nd floor
* From inventory, drag stool to below picture, click on fire poker to zoom in and pick up fire poker
* Go down 1x, go into parlor
* From inventory, use water bottles to douse the fire
* From inventory, use fire poker on ashes to zoom in
* Use tongs to pick up 10 pieces of paper
* Click on the table on the in front of chairs to zoom in
* From inventory, drag papers to table to open puzzle
* Assemble the papers to form a picture clue, click on papers to rotate pieces
* Take note of the x mark in front of the fireplace
* Click on the area where the footstool had sat to zoom in
* Take note of the picture of the statue parts, pick up key
* Click down 1x to lobby, click left 1x to atrium
* From inventory, use key on lock on statue
* Using the clues from the journal, reposition the statue's limbs
* Pick up the lever and the slide
* Click down 1x to lobby
* Click on magic lantern booth along back right wall to zoom in
* From inventory, put lever on door to open
* Go inside magic lantern booth
* Pick up the 5 sticky notes
* Click on bulletin board to left of magic lantern booth to zoom in
* From inventory, place sticky notes on board to open puzzle
* Rearrange the sticky notes to form a picture
* Click on sticky notes to swap places
* Pick up red knob at bottom of picture
* Go inside magic lantern booth
* From inventory, drag red knob to hole in projector door
* Click on compartment to open
* From inventory, put candle in compartment
* From inventory, use matches to light candle, click on projector to zoom in
* From inventory, drag slide to projector, click through pictures
* Click on book in mans hand to zoom in, take note of lions head
* Go upstairs to second floor
* Click on book shelf to zoom in
* Click on last book on right with lions head to zoom in
* Picture added to journal, take not of symbols
* Click on lions emblem to add to inventory
* Click down 1x, go left into atrium
* Click on gate to zoom in
* From inventory, drag lion emblem to gate to open puzzle
* Use the picture from the 2nd floor hallway to turn on the correct symbols
* Go into conservatory
* Pick up the 6 seed packets
* Click on urn at base of steps to zoom in, pick up seed packet and star
* Click on seed stand between benches
* Put the seed packets in their correct places
* Click on oil can to add to inventory
* Click on window lower left side to zoom in, take not of names (Charlotte Robertson & Eckley)
* Pick up star and pouch of letters
* Click on gate at top of steps to zoom in
* From inventory, use oil can on hinges
* Go up to balcony
* Click on box with label to zoom in, take note of colors
* Pick up star of box
* Click down 3x, go into parlor
* Click on area between 2nd and 3rd windows on left side to zoom in
* From inventory, drag pouch of letters to box to open puzzle
* Arrange the letters to spell "ROBERTSON" by clicking on them until correct letter appears
* Pick up paintbrush and star
* Click on paper on door to zoom in, take note of words
* Click down 1x, go left to Atrium, go up 1x to conservatory
* Click on alcove at back right to zoom in
* From inventory, drag stars to slots to open puzzle
* Click on the paint bowls with mouse and drag color to stars
* Use the sketch found in the parlor to correctly color the stars
* Rotate the stars into the correct positions, using the paper clue found on the balcony box
* Pick up Scissors and Varnish
* Go up to the balcony
* From inventory drag scissors to box marked "art supplies"
* Pick up solvent
* Click down 3x, go into parlor
* From inventory, place solvent on left side of mantle
* From inventory dip the brush into the solvent
* From inventory, use brush with solvent on painting above fireplace to open puzzle
* Remove 20 bugs and smudges (shown in green)
* From inventory, use glue to repair 6 tears (show in red)
* From inventory, use varnish on painting to fully restore
* Pick up torn photo from below painting
* Click down 1x to lobby
* Click on photo frames on left back wall to zoom in
* From inventory, place torn photo on picture to open puzzle
* Click pieces to swap positions
* Drag the names to their proper positions "DAVID, CHARLOTTE, WILLIAM, MARGARET"
* Photograph added to inventory
* Click on David's ghost, this will end the chapter
*
CHAPTER2 - THE MANOR GROUNDS
* Pick up 2 shot glasses
* Go into pub, talk to concierge
* Talk to pub owner
* Click on back wall to open puzzle
* Remove 20 items that don't belong in a pub
* Eyeglasses under fireman's hat added to inventory
* Click on the box on the back table to open puzzle
* Click on pictures to swap places
* Pick up shot glass
* Pick up 3 shot glasses
* From inventory, give reading glasses to pub owner
* Click down 1x to outside, go up 1x to road
* Pick up 2 shot glasses (blue)
* Click on wheel to the left to open puzzle
* Pull apart the knots to untangle the ropes
* White means the ropes are untangled, gray means the rope is tangled
* This puzzle is random. see video for an idea on how to solve it.
* 1 Wheel added to inventory
* Click up 1x to Outside Stables
* Click on window top left to zoom in, pick up shot glass (blue)
* Pick up 4 spokes (red)
* From inventory, put the 4 spokes on wheel next to house, pick up wheel (yellow)
* Pick up the handle stuck in ground (green)

* Click down 1x to road
* From inventory, put handle on shovel head lower left in bushes, pick up the shovel
* Click up 1x to Outside Stables
* From inventory, put shovel in mud beneath wheelbarrow
* From inventory, put the 2 wheels on wheelbarrow, click on wheelbarrow
* Click on ghost, note added to journal
* Click on wheelbarrow, pick up rust remover and the 10th shot glass
* From inventory, use rust remover to right of stable door
* Click down 2x to pub, go inside
* From inventory, put the 10 shot glasses on shelf on back left wall to open puzzle
* Move the glasses until they match with the background images
* Click on the top or bottom of a glass to switch its place with another glass
* The glass will turn white when in the correct spot
* Pick up valve
* Click down 1x to leave pub
* Click on barrel by door to zoom in
* From inventory, put valve on spigot, click on valve
* Click on top of barrel to zoom in, take box of metal letters
* Click up 2x to Outside Stable
* Click on plaque on wall to zoom in
* From inventory, place box of letters on plaque to open puzzle
* Place the letters in the correct spots to finish the statement "WHO TOOK HIS OWN LIFE"
* Pick up the bolt cutters

* Click on front stable door to zoom in
* From inventory, use bolt cutters to cut chains
* Go inside
* Pick up metal cube on ground
* Pick up 10 sketch pieces (red)
* Pick up wrench off the wood beam
* Click on crates to zoom in, pick up Number 2
* From inventory, put the sketch pieces on crate to open puzzle
* Click on pieces to rotate them, each time a piece is put in the correct spot it will lock in place
* Click on stall to right to open puzzle
* Find the hidden items
* Stable gear added to inventory
* From inventory, put stable gear on back wall hooks to zoom in
* Click on left bag, pick up hammer and chisel
* Click on ghost
* From inventory, use hammer and chisel on wall above crates to reveal David's workshop
* Go through wall to David's workshop
* Click on pipes on back wall to open puzzle
* Click on pipes to rotate until all pipes are connected to create water flow to outside
* Pick up Long stick
* Pick up Electrical tape
* Pick up 4 Easel parts (yellow)
* Click on trunk in right corner to zoom in, click on latches
* Pick up old canvas and crowbar
* From inventory, drag the easel parts to the wooden easel to open puzzle
* Click on each piece to rotate it and put in place on the easel
* Click down 1x
* From inventory, touch ceiling with long stick 3x (make sure the middle of the stick is touching the boards not the tip)
* Pick up Pochade box and Metal box from floor
* Click down 1x to outside stable, click on faucet to zoom in, pick up metal box
* Click up 2x to workshop
* From inventory, put pochade box on desk on the right back wall to open puzzle
* Find the 20 paint items
* Art supplies added to inventory
* From inventory, put old canvas on easel
* From inventory, put art supplies on easel to open puzzle
* This is a "color by number" type puzzle.
* Match the shapes on the canvas with the color by the same shape on the pallet to complete the painting
* Click on ghost
* Click on floorboards to left of easel to zoom in
* From inventory, use crow bar on floor, click on note
* David's note added to inventory
* Pick up dry rag
* Click down 2x to outside
* Click on faucet at back wall to zoom in
* From inventory, put dry rag in water
* Wet rag added to inventory
* Click down 1x to road
* Click on mailbox to zoom in
* From inventory, put 3 metal cubes on mailbox to open puzzle
* Click on a cube to change it until a complete image is formed
* Pick up number 7
* Click down 1x to pub
* Click on grate on right side of pub wall to zoom in
* From inventory, use wrench to remove bolts
* Pick up pocket knife
* Click up 2x to stables
* Go inside
* From inventory, use pocket knife to cut rope on ladder
* Pick up ladder
* Click down 3x to pub
* From inventory, put ladder against sign post, click on sign to zoom in
* From inventory, use wet rag to clean off sign, pick up hour hand and minute hand
* Note the clock time (5:00)
* Go inside pub
* From inventory, put electrical tape on sparking wire, back left wall
* Click on the plug to turn on neon sign on outside pub wall
* Go outside the pub
* Sign reads "open 10 am", pick up the 10
* Go back inside the pub
* Click on cuckoo clock to zoom in
* From inventory, put Hour Hand, Minute Hand, Numbers 2,7,10 on the clock
* Click on the red button and blue button to set clock time to 5:00
* Pick up the photograph
CHAPTER 3 - BALTOUN VILLAGE
* Go inside the town hall
* Talk to the receptionist
* Pick up the 4 sheets of paper (red)
* Pick up the feather duster off left hand table
* Go outside
* Click right 1x to Town Square, click up 1x to bridge
* Pick up the torn cat poster lower left corner of bridge
* Click down 2x to town hall
* From inventory, give poster to receptionist to open puzzle
* Reassemble the cat poster
* Click on each piece to rotate it and drag to proper area until the picture is completed
* Click on photocopier on left to zoom in to open puzzle
* Click on wires to untangle them, white is untangled, gray is tangled
* Puzzle is random
* Talk to receptionist
* From inventory, put 4 pieces of paper in copier
* From inventory, put cat poster in copier to open puzzle
* Click up arrow to show 4 copies, click green button to start
* 4 cat posters added to inventory
* From inventory, put 1 cat poster on bulletin board
* Go outside
* From inventory, place another poster on building wall
* Click right 1x to town square
* From inventory, place 3rd poster on board in front of store
* Click up 1x to bridge, place 4th cat poster on bridge
* Pick up claw hammer
* Click down 2x to town hall
* Click on crates to right of door to zoom in
* From inventory, use claw hammer to remove nails, pick up wood plank
* Pick up hand saw and rope
* Click up 1x to town square
* From inventory, use hand saw on broken sign
* Pick up 2nd wood plank
* Click up 1x to bridge
* From inventory, use hand saw on branch to left of bridge, click on branch
* From inventory, use branch to reach plank floating in water to left of bridge
* From inventory, put wood planks on bridge
* From inventory, put nails on bridge and use hammer to pound in nails
* Click on fluffy
* Click up 1x to graveyard, click on ghost
* Pick up red flashlight lower right corner
* Pick up rain boots just to the left of gate
* Click on hole below gate to zoom in, pick up Rod handle
* Put rod handle on lower gate lock
* Click down 1x to bridge
* From inventory, put boots in mud to upper right of bridge to open puzzle
* Click on stones to eliminate them using the clue at the bottom of the puzzle
* Puzzle is random for each player, see solution for clue how to choose stones
* Ring handle added to inventory
* Click up 1x to bridge
* Click on upper gate latch to zoom in
* From inventory, put ring handle on gate
* Click on ring handle to open gate
* Go inside graveyard
* Pick up 2 gravestone pieces (red)
* Click on plant below statue to zoom in, click on plant, pick up gravestone piece (red)
* Click on basket to add to inventory
* Pick up shears below statue on grave (green)

* From inventory, drag 3 gravestone pieces to broken gravestone to open puzzle
* Click on pieces to rotate and drag into correct place
*
*Click down 2x to bridge
* From inventory, use shears on catnip

* Click up 2x to graveyard
* From inventory, use flashlight on hole in ground on left to see fluffy (1)
* From inventory put basket and rope next to fluffy
* From inventory, put catnip in basket
* Click on basket
* Click on basket after fluffy is inside
* Fluffy added to inventory
* Click down 4x to town hall, go inside
* From inventory, give Fluffy to receptionist
* Go into Records Room
* From inventory, use feather duster on 3 filing cabinets
* Pick up aquarium net off back wall
* Click on center filing cabinet to open puzzle
* Rearrange the files using the symbols in the upper right of the puzzle
* Click on a file to switch its place with another file
* 1887 file added to inventory
* From inventory, put 1887 file on drafting desk on left wall to open puzzle
* Find the hidden items
* Suicide note added to inventory
* Click on desk to right
* From inventory, put the two notes on desk to open puzzle
* Find the 16 tampered letters
* Forged Suicide note added to inventory
* Click on ghost
* Click down 2x to go outside
* From inventory, put aquarium net on aquarium in window to open puzzle
* Find 20 gold coins
* Bag of treasure added to inventory
* Go back in side town hall
* Click on pirate figurine
* From inventory, put bag of treasure in chest
* Pick up key
* Click on display case below picture on left wall
* From inventory, use feather duster and key to open case
* Pick up vintage coins
* Click on diagram to view
* Click down 1x, click up 4x to graveyard
* Click on gravestone on right to zoom in
* From inventory, drag vintage coins to stone to open puzzle
* Click on coins to switch them until they match the diagram from the display case
* Pick up special screwdriver
* Click down 4x, go inside town hall
* Click on plaque below portrait on left wall
* From inventory, use special screwdriver to remove 2 screws
* Pick up ink remover
* Go into records room
* Click on briefcase to zoom in
* From inventory, use ink remover to remove ink stain to open puzzle
* Using the roman numerals from the plaque below the painting, finish the code to open briefcase
* Pick up medical report and badge
* Click down 2x, click up 1x to town square
* Click on statue to zoom in
* From inventory, place badge on statue
* Click on photograph to zoom in, pick up photograph
CHAPTER 4 - ENGLAND
* Click on yellow paper on ground to the left to zoom in
* Pick up paper
* Click on doorbell to left of gate to zoom in
* From inventory, place torn note on other torn note
* Click on carving on tree to right to zoom in, pick up shear half
* Pick up 4 bell ringer pieces (blue)
* From inventory, put 4 ringer parts on ringer, right side of gate
* Ring bell
* Click on Charlotte's ghost 2x to open gate
* Go through gate opening
* Click on birdbath to the right, pick up watering can
* Go through gate toward Halward Manor
* Pick up 5 pieces of list of chores (blue)

* Click on table to right to zoom in and open puzzle
* Reassemble the teapot
* Teapot added to inventory
* Click on tea canisters to add pic to journal
* Click on door to speak with butler
* Click down 1x, then go left toward outside cottage
* Click on front door to speak with housekeeper
* From inventory, drag list of chores to clipboard on side of cottage to open puzzle
* Switch the pictures around to form completed list
* Click on front door to speak with housekeeper
* Go inside cottage
* Pick up shears half on wall left of sink
* Pick up pool net to right of sink window
* From inventory, fill watering can at sink faucet
* Go outside
* From inventory, use watering can to water 2 plants on each side of door
* Click down 1x to garden
* From inventory, use watering can on 3 plants in urns
* From inventory, use pool net on fountain to open puzzle
* Find the 20 bugs and leaves to remove them
* Carving piece added to inventory
* Click up 1x to Halward Manor
* Water 2 plants in urns to left and right of door
* Click down 2x to gate
* From inventory, use watering can on flower urns to right and left of gate
* Click on broken wall to right of gate to zoom in
* From inventory, drag carving piece to broken area
* Pick up sealant
* Click up 1x to garden
* Click on birdbath to zoom in
* From inventory, use sealant on crack
* From inventory, use water can to fill up birdbath
* Bird will fly to bath from nesting house
* From inventory, place shears on flowerbed to left of fountain to open puzzle
* Find the flowers
* Flowers added to inventory
* Click right 1x to outside cottage
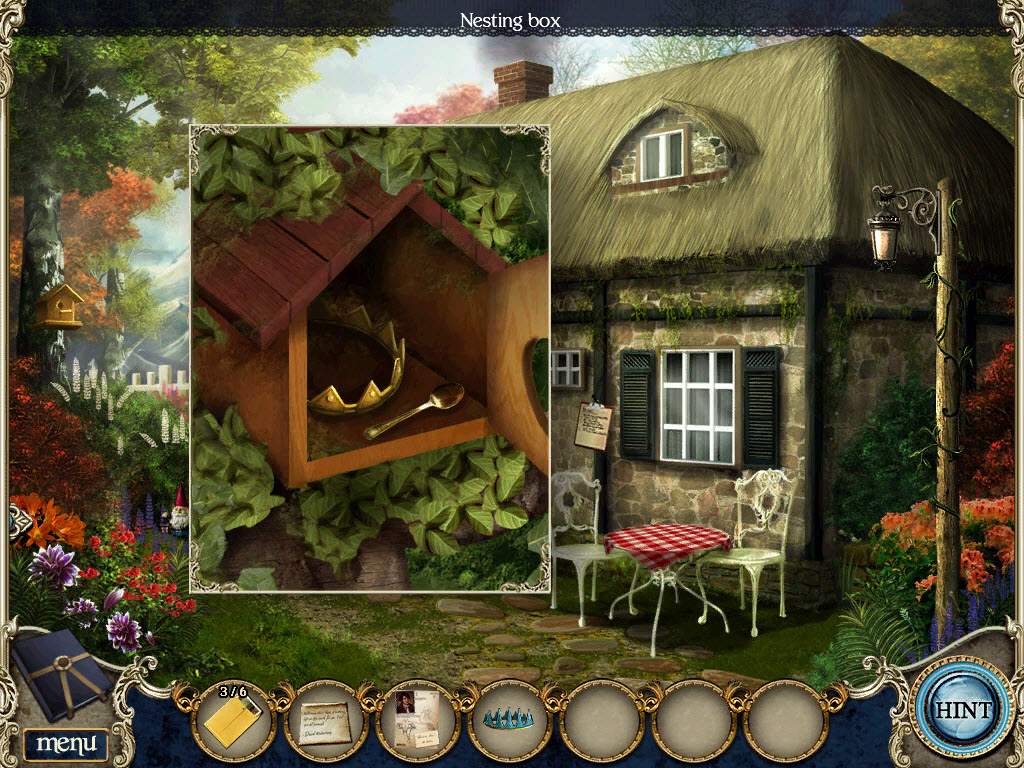
* Click on nesting house to zoom in
* Click on nesting house to clean out, pick up orange crown and dirty spoon
* Go inside cottage
* From inventory, put flowers in vase on counter to open puzzle
* Rearrange the flowers in the vase to match the flowers to the left
* Click on flowers to switch places
* Click on ghost of Charlotte
* Click on painting on counter to zoom in
* Click on signature in lower right corner
* Pick up key and click on note
* Click on cabinet, lower left of sink to zoom in
* From inventory, use cabinet key to open
* Pick up blue crown
* Go outside of cottage
* Housekeeper speaks to you
* Go back inside cottage to make tea
* Click on housekeeper, she will give you tea guide
* From inventory, drag dirty spoon to sink, clean spoon added to inventory
* Click on tea tray to left of sink
* From inventory, drag teapot and clean spoon and tea guide to tray to open puzzle
* Inside the journal, use the pic of teas found on front porch of manor to help you follow instructions to make tea
1. Click on spoon, click on red tea, drag to pot (do this 2x)
2. Click on spoon, click on green tea, drag to pot (do this 1x)
3. Click on hot water, drag to pot
4. Click on cream jug, drag to pot
5. Click on sugar cubes, drag to pot
* Tea tray added to inventory
* Click down 2x, click up 1x to manor
* Click on door to hear Butler speak
* Click on table to zoom in
* From inventory, put tea tray on table, butler will speak to you
* Click down 1x to garden
* Click on lion at end of pool to zoom in (red)
* Click on plaque at feet of lion to open puzzle
* Click on squares to rotate and switch squares until picture is completed
* From inventory, place green crown on lions head
* Click on lion to left of manor gate to zoom in
* Click on plaque at feet of lion to open puzzle
* Click on squares to rotate and switch squares until picture is completed
* From inventory, place blue crown on lions head
* Click on lion to right of manor gate to zoom in
* Click on plaque at feet of lion to open puzzle
* Click on squares to rotate and switch squares until picture is completed
* From inventory, place orange crown on lions head
* Click on compass on ground to zoom in
* Pick up William's note to add to inventory and open puzzle
* Click on rings to rotate until all rings are turned to correctly complete the picture
* Pick up key
* Click up 1x to manor
* Click on compartment to left of door to zoom in
* From inventory, use key to unlock
* Click on photograph to add to inventory
* Click on front door. This will start a new chapter.
CHAPTER 5 - THE HALWARD ESTATE
* Click on butler to speak to him
* Click on ghost
* Click on angel on first red wall candelabra (red)
* Go through library door on left
* Pick up 6 bookends (yellow)
* Pick up disc above middle opening (blue)
* Pick up angel upper left of openings (green)
* From inventory, drag bookends to right hand bookcase to open puzzle
* Click on books to switch places to complete pictures
* Book added to inventory
* From inventory, drag book to book stand to open puzzle
* Click on pieces to rotate and drag to complete picture
* Oval added to inventory
* Click on right page to turn it
* From inventory, drag Charlotte's letter half to page
* Click on letters to reveal a riddle and add to journal
* Click down 1x to hall
* From inventory, drag disc to back door to open puzzle (this puzzle is random)
* Matching puzzle: Watch which footprints light up, then click on feet in same order. You will do this 3x.
* Go into ballroom
* Click on painting on left wall
* Click on 4 latches to open puzzle
* Match the animals to complete the puzzle by rotating squares

* Pick up 2 angels (green)
* Click on gramophone to zoom in, pick up oval
* Click down 1x to hall
* Click on right hand door to zoom in
* From inventory, place 4 angels on door to open puzzle
* Click on angels heads at the top to align each with its own reflection

* Go through right doorway to patio
* Click on armoire on left side of patio to open puzzle
* Click on the knobs to rotate circles to align the designs
* Oval added to inventory
* Click on table and chairs to right of armoire to zoom in
* Click on chess set to open puzzle
* Rotate pieces and drag to correct chess piece to complete the picture
* Put figures in correct order using the riddle found in the library in the journal
KNIGHT, LION, KING, QUEEN, WOMAN, LION, PAWN
* Pick up the jewel key
* Click down 1x to hall
* From inventory, use jewel key on case to right of library door
* Click on top jewel case to open puzzle
* Find 20 rings
* Rings added to inventory
* From inventory, drag rings to bottom jewelry box to open puzzle
* Match the pairs to find William's ring (puzzle is random, your solution may be different from mine)
* William's ring added to inventory
* Go right onto patio
* Click on swan oval, far right wall, to left of closed doors
* From inventory, drag William's ring to small opening below swan oval
* Click on oval to reveal hidden compartment
* Click on William's letter to added to inventory
* Click on 5th oval to add to inventory
* Click on closed doors on right wall to zoom in
* From inventory, drag ovals to door to open puzzle
* Click on ovals to switch places until Roman numeral sums match the Roman numeral problems
III, XVI, XI, VII, XIV
* Go through open doorway
* Find 5 piano keys (green)
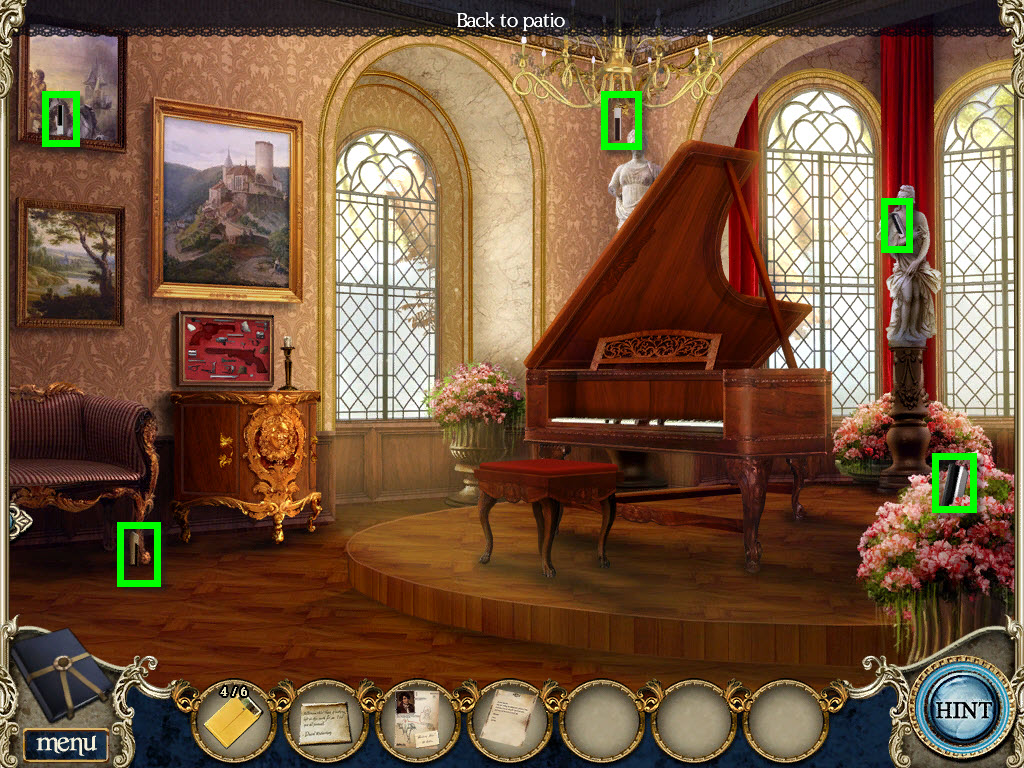
* Click down 2x, then go left into library
* Click on desk to zoom in
* From inventory, drag both letters to desk to open puzzle
* Find the 11 words used in both letters
* Unmatched note added to journal
* Butler comes to speak to you
* Click down 1x to reception hall
* Click on box on table in back right corner to open puzzle
* Click on squares to rotate into correct position to complete the picture
* Pick up key and music sheet
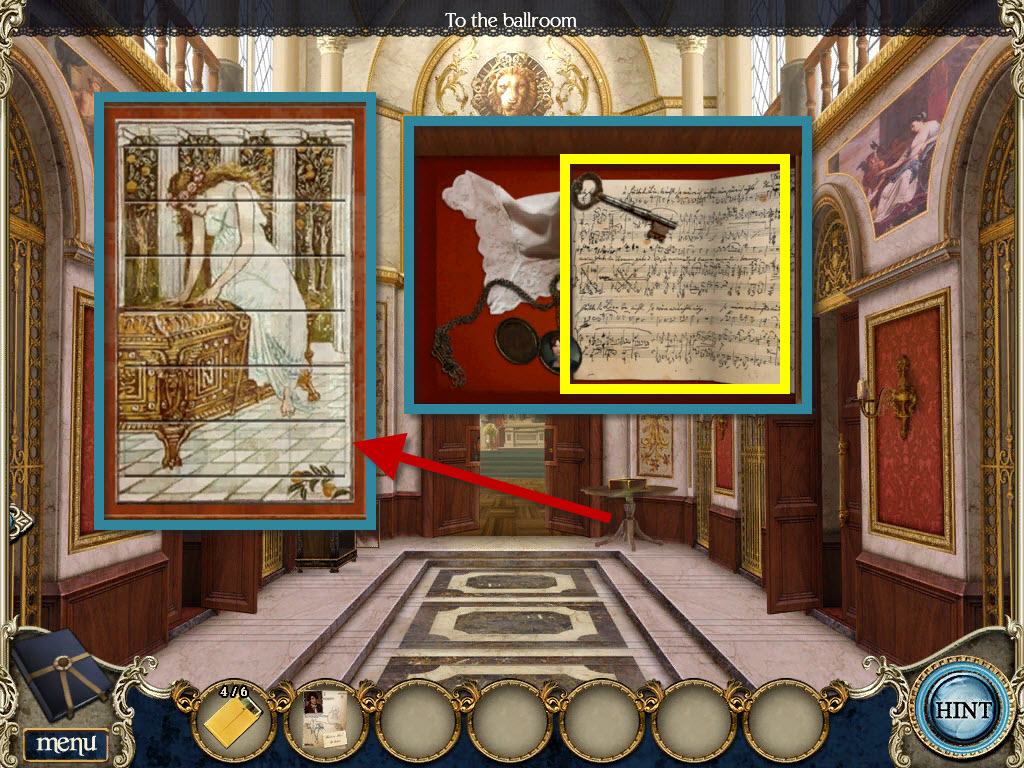
* Go right 2x to music room
* From inventory,drag 5 piano keys and sheet music to piano to open puzzle
* Watch what order the keys are pressed, then copy by clicking on keys in same order until all three lights are lit up above keys
* Pick up coins
* Click on gun case on left wall to zoom in
* From inventory, use key to unlock gun case and open puzzle
* Click pieces to rotate and drag to reassemble the guns
* From inventory, place medical report on top of guns, click on report
* Click on ghost who knocks down gun case, click on broken case to zoom in
* Pick up dagger

* From inventory, drag coins to coin operated record box below gun case to open puzzle
* Click on buttons below music notes to turn each square until correct notes are pieced together (puzzle is random)
* Record added to inventory
* Click down 2x, click up 1x to ballroom
* From inventory, use dagger to cut red curtains at back of room
* Click on painting to open puzzle
* Find all the characters
* Click on ghost
* Click on urn to left of stairs to zoom in, pick up crank
* Click on gramophone to zoom in
* From inventory, place crank and record on gramophone
* Click on crank to get Charlotte to dance
* Click on square on floor in front of steps to zoom in
* Click on squares to rotate until picture is complete
* Click on photgraph to zoom in
* Photograph added to inventory
* Butler and housekeeper will speak to you and start a new chapter
CHAPTER 6 - FRANCE
* Click on phone booth to zoom in
* Pick up salt shaker and small zipper
* Go through doors to museum lobby
* Click on Charlotte's ghost
* Click on red bag on counter to zoom in
* From inventory, place zipper on bag, click on zipper
* Pick up cutter
* Pick up salter shaker (yellow)
* Go through exhibit room door on left
* Click on ghost
* Pick up towel beneath window at back of room (yellow)
* From inventory, use towel to wipe off plastic on left wall
* From inventory, use cutter to cut plastic
* Click on plastic, go through to gallery
* Pick up light bulb out of wheelbarrow on right
* From inventory, place light bulb in lamp to right of ladder (green)
* Click on switch on wall to left of ladder (red)
* Pick up salt shaker on top of ladder (yellow)
* From inventory, use cutter on newspaper on back wall to reveal painting
* Click down 2x, go through door on right into gift shop
* Click on store clerk to speak to
* Pick up unsharpened pencil on counter to right of clerk
* Click on shop display on right to open puzzle
* Find hidden items
* Magnifying glass added to inventory
* You cannot leave the shop until you pay for the magnifying glass
* From inventory, place magnifying glass on counter to open puzzle
* Click on coins to switch places until coins match the amount on the receipts
(22 = 8, 2, 12) (31 = 6, 7, 18) (55 = 23, 17, 15)
* Magnifying glass and loose change added to inventory
* Click down 1x to lobby
* Click on counter to zoom in
* Click on pencil sharpener to open puzzle
* Click on rings to rotate them until picture is completed
* From inventory, drag pencil to sharpener, sharpened pencil added to inventory
* From inventory, place sharpened pencil on paper against phone to get number: MU SD LI ON
* Go back to exhibit
* Click on pink piggy bank on right to zoom in
* From inventory, drag coins to bank, pick up small key from piggy bank mouth
* Remember the symbols on the side of the piggy
* From inventory, use small key to open toy display on back wall to left of piggy bank
* Find hidden items
* Scrapbook added to inventory
* From inventory, take scrapbook and place on stand by window to open puzzle
* Click on pictures to switch places until all pictures match the captions
* Pick up the phone card
* Click down 2x to phone booth
* Click on phone booth to zoom in
* From inventory, use phone card on phone
* Using the number found at the lobby desk solve the puzzle
* Click on the phone buttons: 6 8 7 3 5 4 6 6
* You have just called the museum phone
* Go back inside museum lobby
* Click on phone, store clerk appears
* Click on store clerk
* Go into gift shop
* Pick up key card off off bulletin board behind counter

* Click down 2x
* From inventory, use key card on metal back room door to right of museum
* Using the symbols found on the piggy bank, solve the puzzle to open the door
* Go into storage room
* Click on box to left of ladder on top shelf
* Pick up matches and wheel
* Pick up wheel on lower shelf at back of room (green)
* From inventory, drag wheels to ladder
* Click on ladder to move it to shelves on back wall
* Click on top shelf to zoom in
* Pick up 4th salt shaker
* Click on ladder to move it to shelves on right wall
* Remember the paint splatters
* Click down to go back outside
* From inventory, drag salt shakers to display in cafe (under red awning)
* Click on display to open puzzle
* Rearrange the salt shakers so each is with its correct mate
* Using paint splatters found in storage room as a guide,click on buttons until correct colors light up
Top Buttons: RED, ORANGE, GRAY, PINK, BLUE, GREEN
Bottom Buttons: YELLOW, BLACK, BROWN, PURPLE
* Pick up Shelf key
* Go back into storage room
* Click ladder to right hand shelf
* Click on glass cabinet
* From inventory, use shelf key to open cabinet
* Pick up labels and paintbrush
* Click on ladder to move it to back shelf, click on paint cans to zoom in
* From inventory, put labels on cans to open puzzle
* Click only on the label pieces that will fit on the blank spaces on can
* Once the correct labels are highlighted, click on can to move on to next puzzle (3 puzzles)
* Paint thinner added to inventory
* Click down 1x, Go into museum lobby, click up stairs to exhibit, go through hole into gallery
* From inventory, use the magnifying glass on painting on back wall to open puzzle
* Find 25 errors

* From inventory, put paint thinner can on shelf below painting
* From inventory, dip paint brush in thinner, dipped brush added to inventory
* From inventory, use dipped brush on painting, click 2x until painting peals down
* Click on main scene to leave painting, click on Charlotte's ghost, she will move the painting
* Click on moved painting to zoom in, pick up winder
* Click down 1x
* Click on music box in back corner between windows
* From inventory, place winder on box to open puzzle
* Click on music parts on bottom to swap them to match the spinning pattern on top
* Pick up the picture to add to inventory
* Go through hole into gallery
* From inventory, put the pictures on the frames to open puzzle
* Rearrange the photos in order of Charlotte's life
* Click on scale to open puzzle
* Rearrange the weights to balance scale
* Click on ring to zoom in, click on ring
* Ring added to inventory
* Pick up blank letter
* Click down 2x to lobby
* From inventory, drag matches to candle
* From inventory, click blank letter over candle to zoom in
* Invisible ink letter added to inventory
CHAPTER 7 - FAIRING POINT
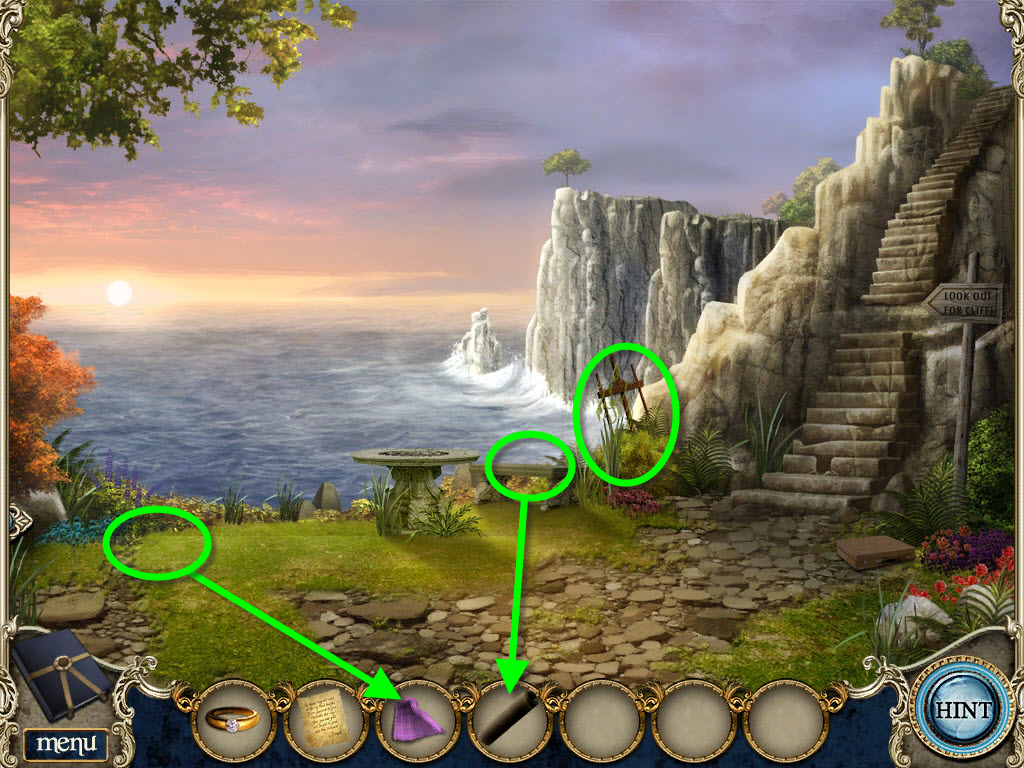
* Click on concierge to speak to him
* Pick up purple cloth on ground, lower left of screen
* Pick up half painted canvas off bench at back of screen
* Pick up easel behind bench
* Click on pochade box on ground to the right to open puzzle
* Click on a color from the back row and put it in an empty jar next to a spilled color, so when the two mix they create the color on the swatch
RED/YELLOW - RED/BLUE - WHITE/RED - BLUE/YELLOW/RED
* Paint jars added to inventory
* Click up 1x to cliff top
* From inventory, put easel on flat area
* From inventory, put canvas and paints on easel
* Click on easel to open puzzle
* This is a "paint by number" type puzzle, click on shapes next to paint then click on like shapes on canvas
* Reference is made to the carving on the tree
* Click on main scene to leave painting
* Click on tree to zoom in
* From inventory, put cloth on knife
* Click on carving knife with cloth to add to inventory
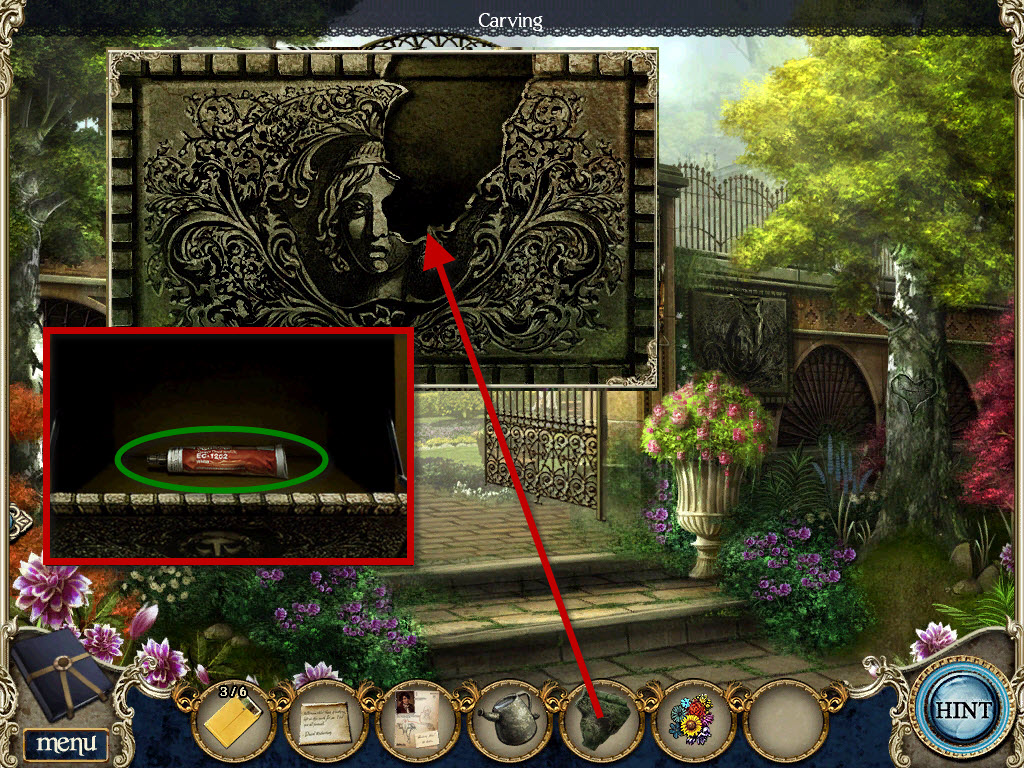
* From inventory, click carving knife on tree 7x until words are shown
* Click on main scene to leave tree
* Click on leafy area to right of tree to zoom in
* Click on leaves to clear them away
* Click on box
* From inventory, place confession letter on box
* Click main scene to exit box
* Click on David's ghost
* Click on box, pick up lion emblem
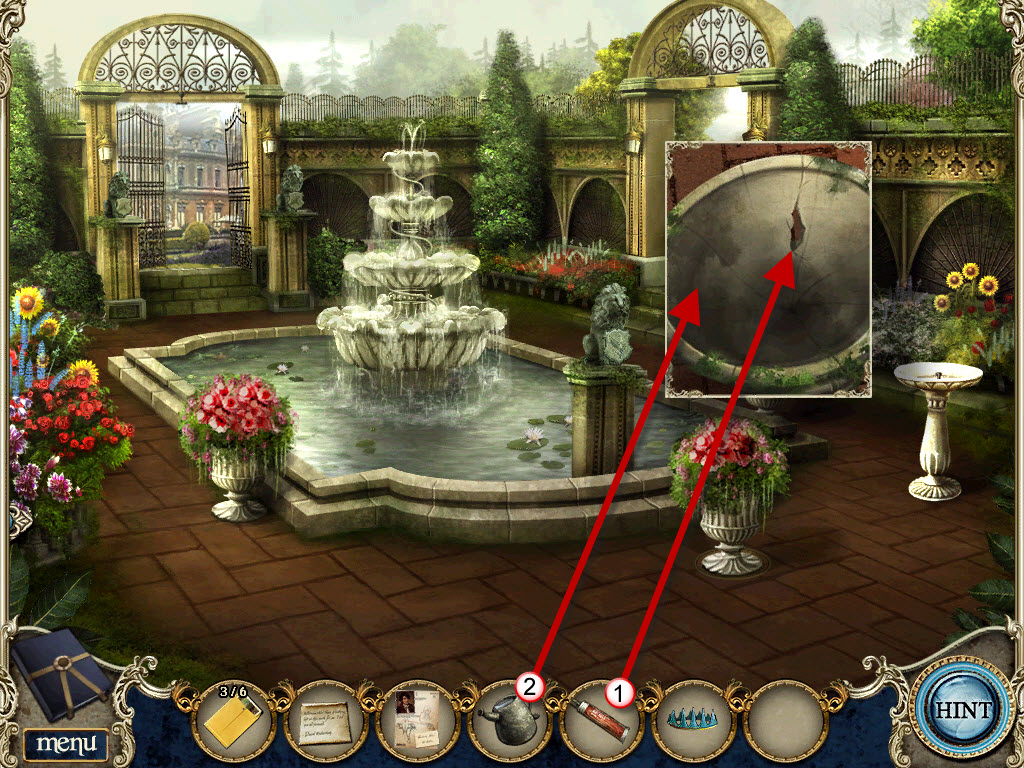
* Click down 1x
* Click on the sundial
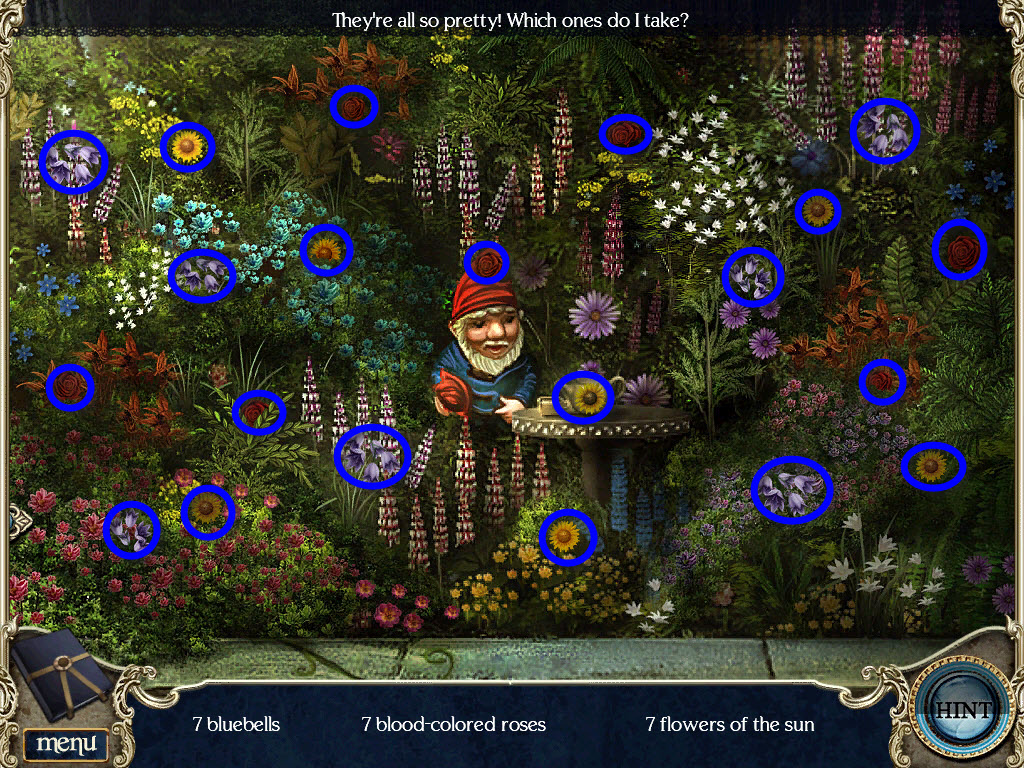
* From inventory, put lion emblem on sundial to open puzzle
* Each etched flower matches a real flower, match the lion emblem with the correct colors to the correct etched flower
* Click up 1x to cliff
* Click on Charlotte
Congratulations! You have completed the game!
Content(s) of this game guide may not be copied or
published on any other site without permission from Casual Game Guides.
©CasualGameGuides.com 2006 - 2021