Mystery Trackers: Raincliff
The Mystery Trackers - Raincliff walkthrough provides video solutions to most puzzles in the game and a step-by-steo guide to keep you on the path to discovering what happened to the students and how to rescue them.
The Mystery Trackers - Raincliff Walkthrough
provides a step-by-step walkthrough with solutions (including videos)
for all puzzles and locations of all items, including frogs.
Enjoy playing this wonderful game with help as you need it.
The Walkthrough
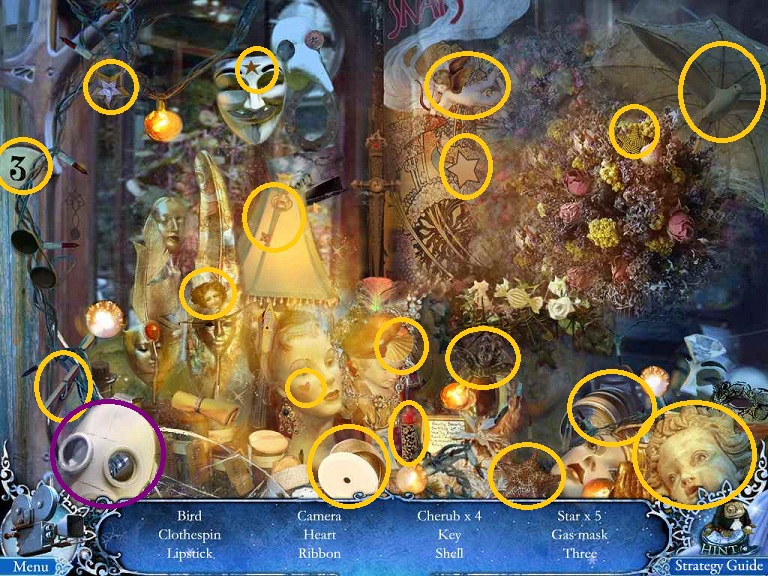
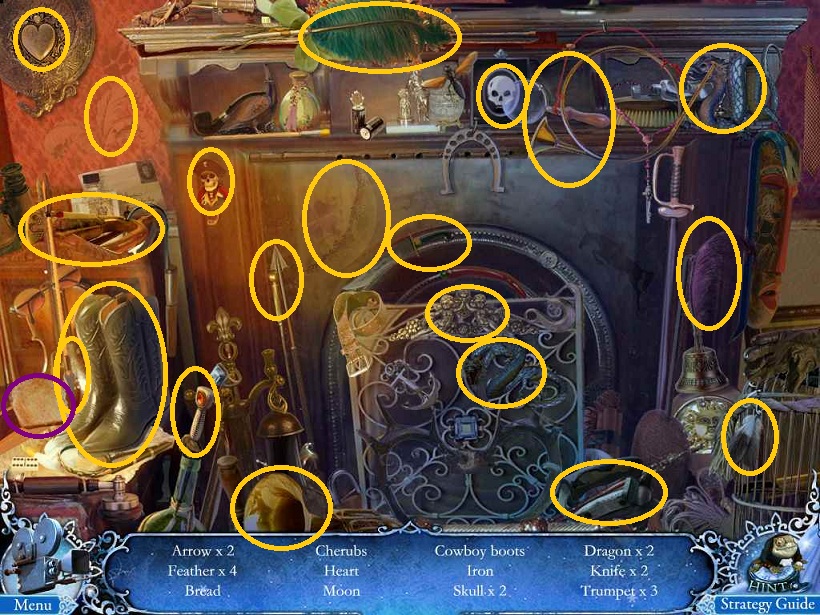
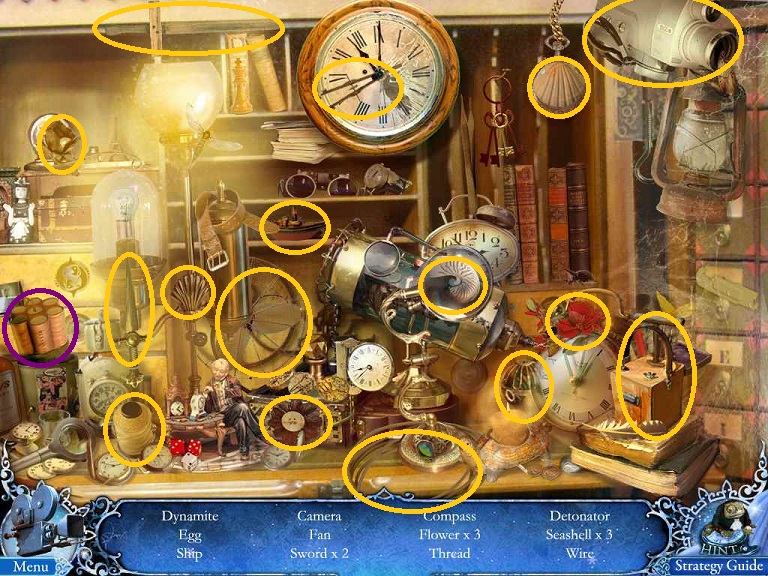
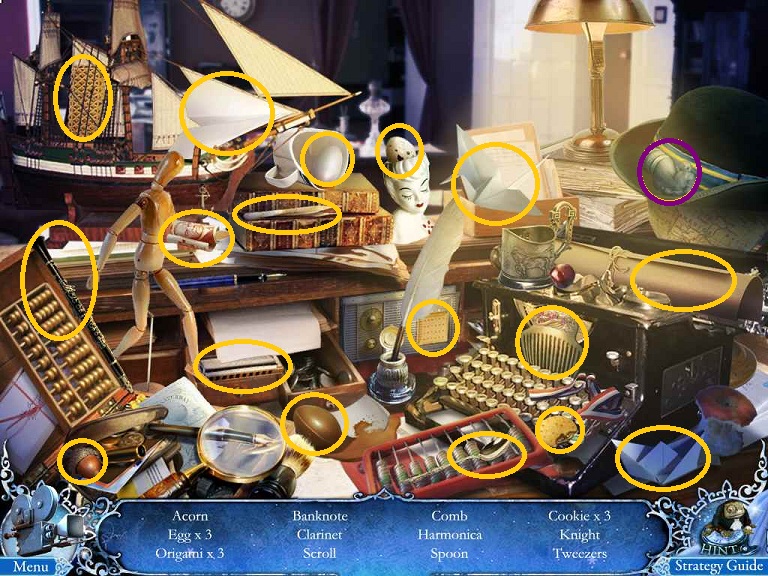
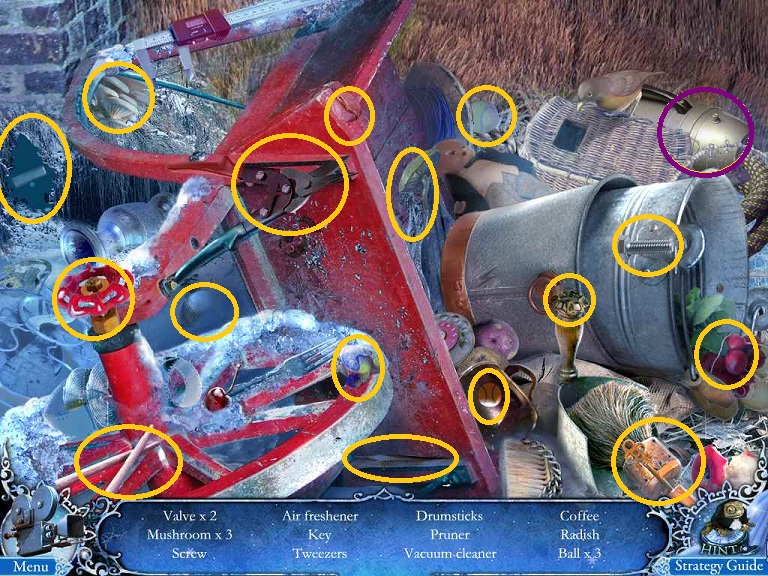
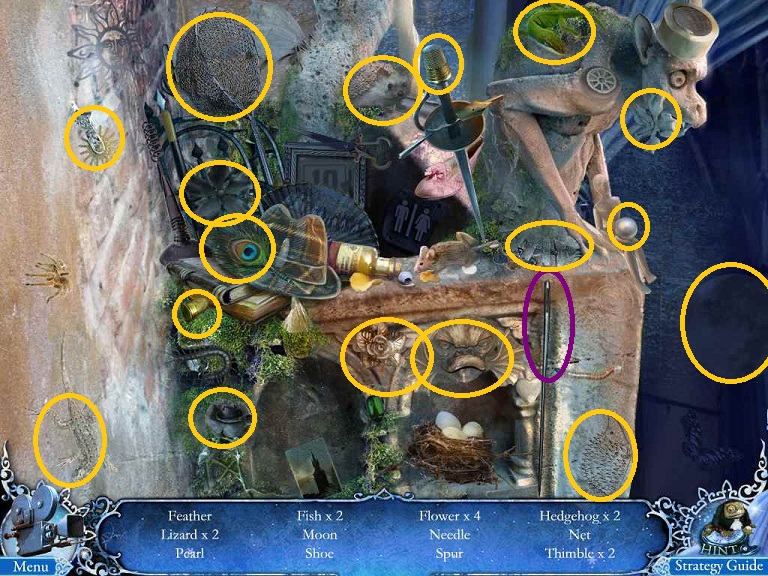
Throughout the screenshots items are circled as followed:
White - Frogs
Yellow - Hidden objects
Purple - Items that will go into the inventory
In addition to the normal progression through the game there are quite a few achievements that you can earn. Due to the speed needed to do some of the hidden object scenes you might want to replay the entire game at some point if getting these achievements are what you want. Don't forget that there is one achievement for taking over 10 minutes to do a hidden object scene so take your time on one of them!
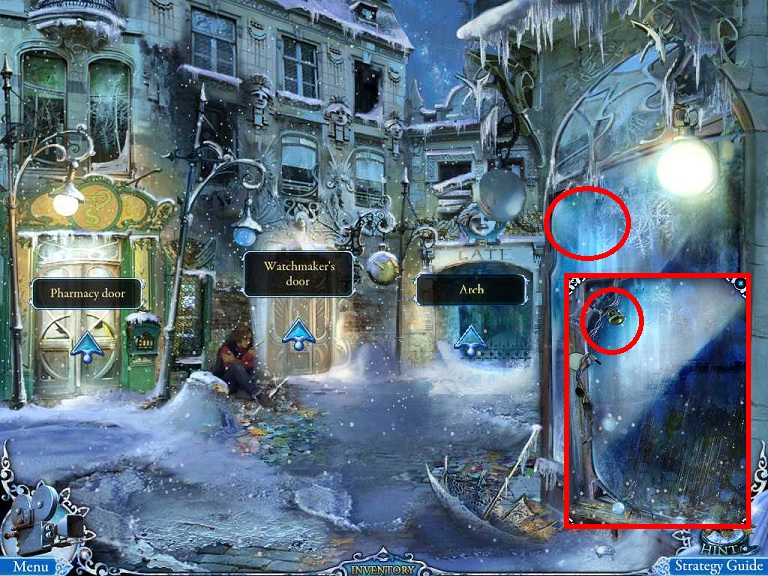
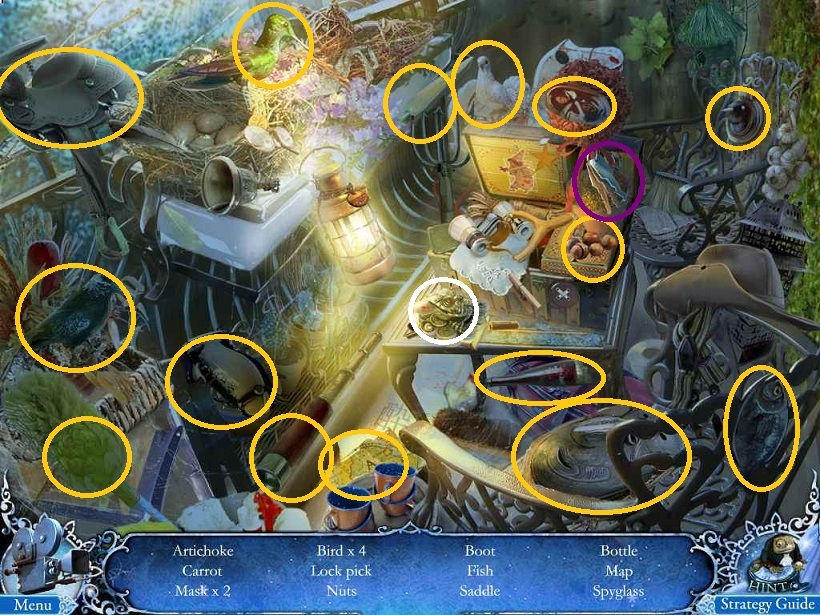
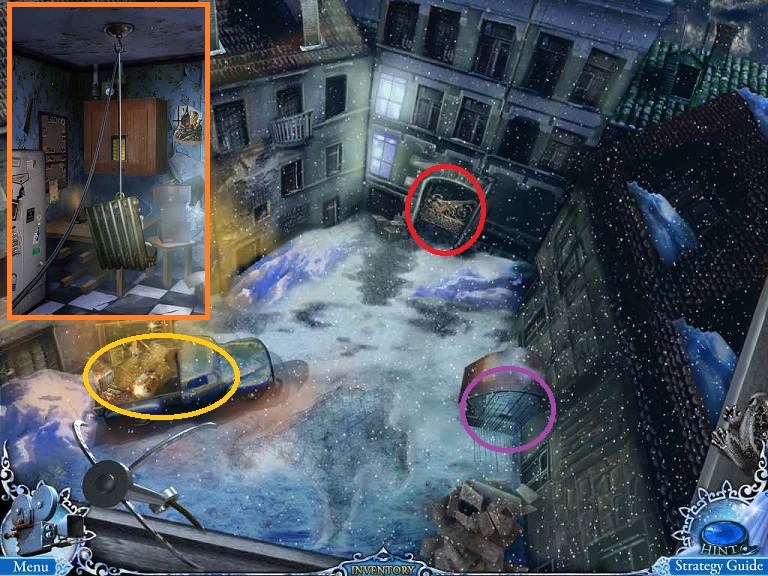
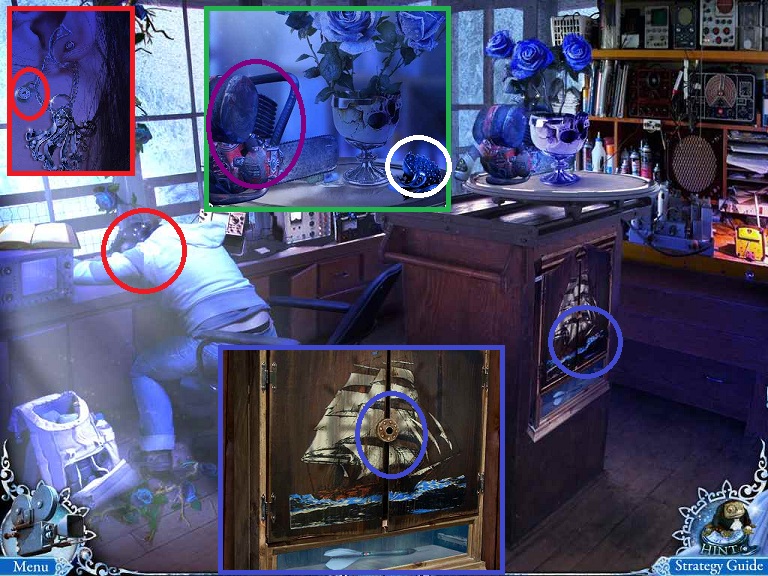
Entrance to the City
The Walkthrough
Throughout the screenshots items are circled as followed:
White - Frogs
Yellow - Hidden objects
Purple - Items that will go into the inventory
In addition to the normal progression through the game there are quite a few achievements that you can earn. Due to the speed needed to do some of the hidden object scenes you might want to replay the entire game at some point if getting these achievements are what you want. Don't forget that there is one achievement for taking over 10 minutes to do a hidden object scene so take your time on one of them!
Entrance to the City
- Examine the trunk of the car
- Click on the keys
- Click on the trunk
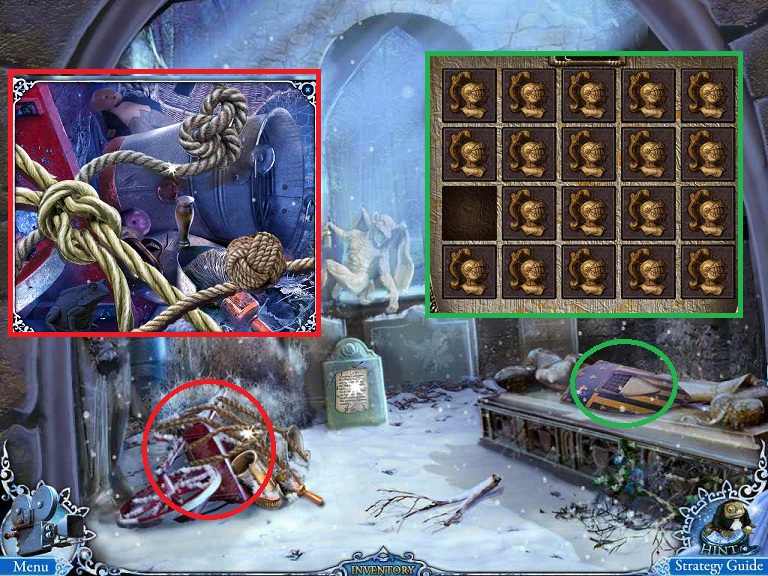
- Find the hidden objects and receive a DISK SAW
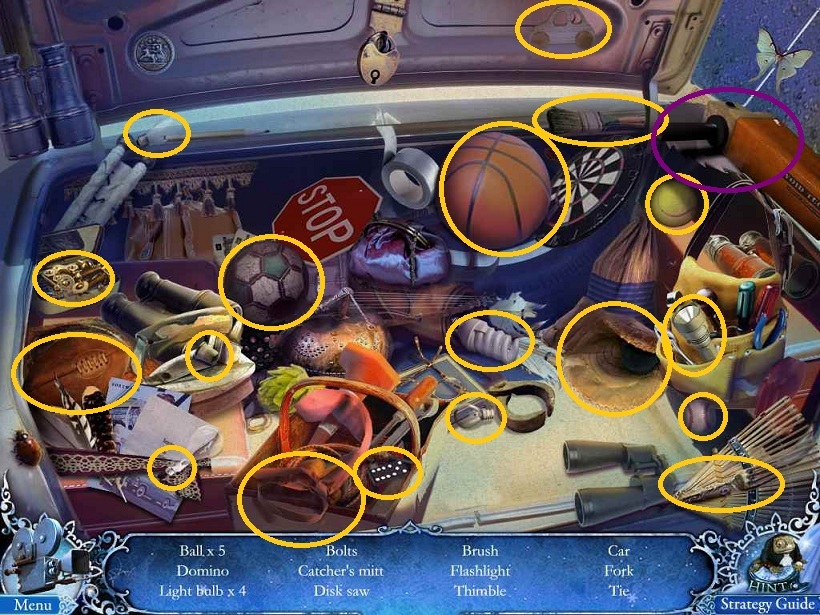
- Examine the gas tank door and note you might be able to get some gas if you can find a CAN and HOSE
- Examine the fire hydrant; you need a WRENCH to remove the HOSE
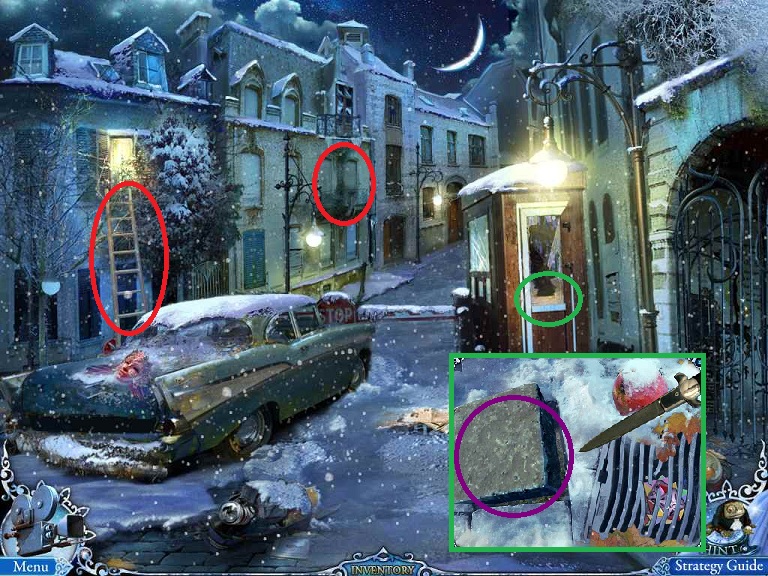
- Examine the tollbooth window; you need a rock to retrieve the FIRE HOOK
- There is a window to the left for which you need to find a LADDER
- Examine the fire LADDER; you need something to hook it
with.
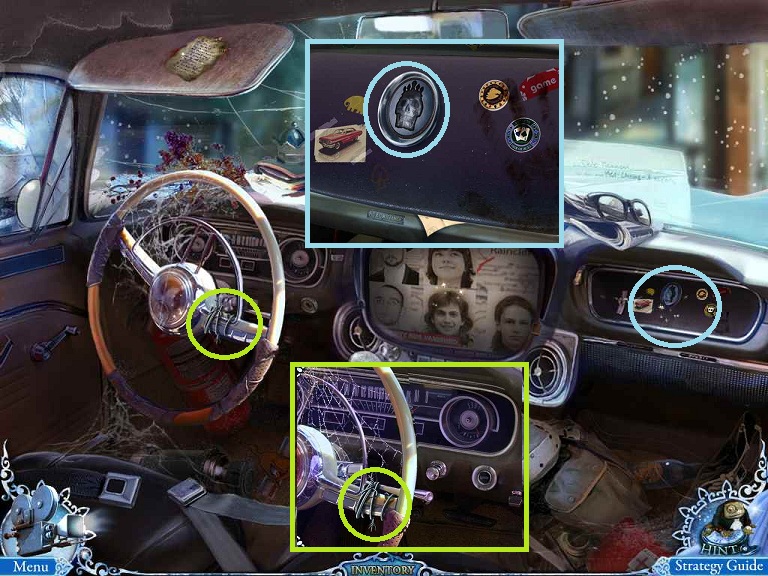
- Examine the inside of the car
- Note the glove box is locked with a special skull seal
- Note the STEERING WHEEL has been wired on and that you need
WIRE
CUTTERS
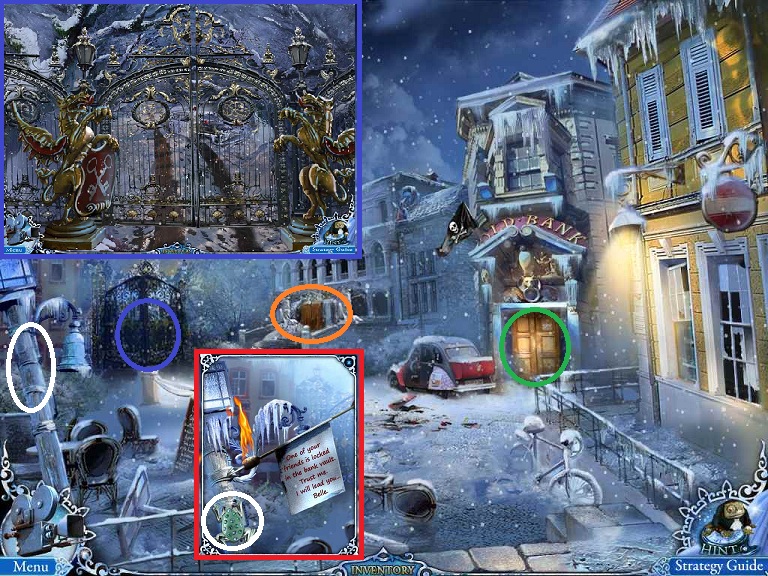
- Examine the gate to the right
- Use the DISK SAW on the chain
- Go forward.
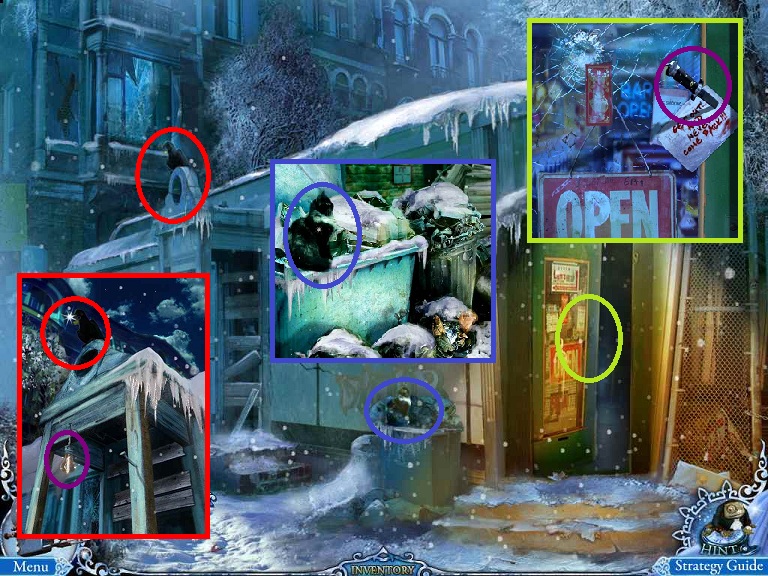
- Examine the cat; you need a pet carrier.
- Examine the raven on the roof; it has a key in its beak and you need to find it some food.
- Pick up the hanging LIGHT BULB
- Enter the Cafe; you will be chased out.
- Retrieve the KNIFE from the door
- Click on the Cafe Door; note you need something big and
loud to get
back in.
- Back up once to the City Entrance and go forward
- Examine the window to the right
- Place the LIGHT BULB (from where the Diner door) in the store window
- Find the hidden objects and receive a GAS
MASK
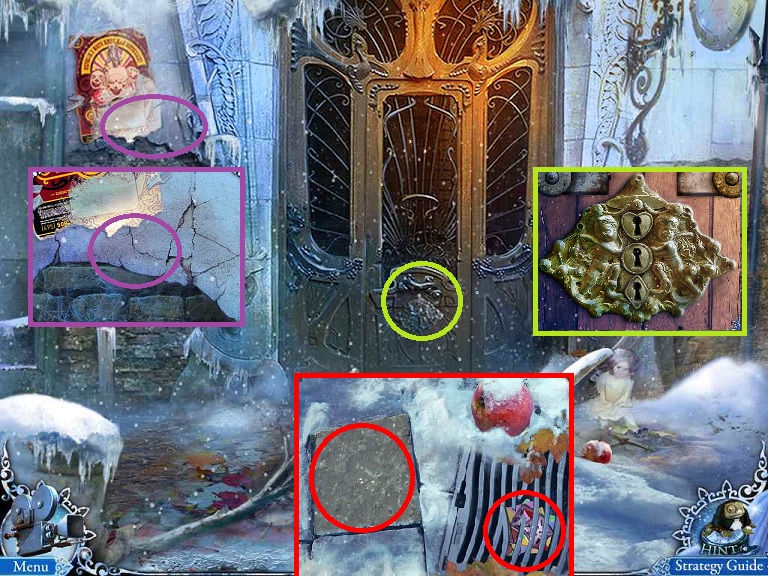
- Head to the right door, the Watchmaker's Door and touch the man who runs away
- Examine the ground to the right of the door; you need something to pry up the stone and there is something stuck in the grate
- Use the KNIFE on the STONE and pick it up.
- Examine the poster to the left of the door; you need something to break away the plaster (like a crowbar?)
- Examine the door; you need to find 3 keys to get
in.
- Back up once and examine the door to the left, the Pharmacy Door
- Examine the drinking fountain which is missing the faucet and has something frozen in it.
- Examine the mailbox to the right; there is a piece missing to the puzzle which has the a key in it.
- Note the locked door; you need a LOCK
PICK
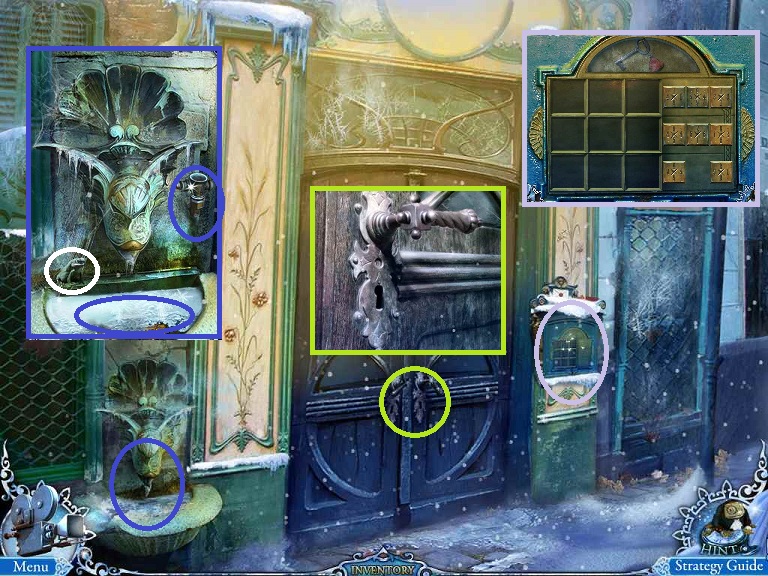
- Back up once and head into the Arch
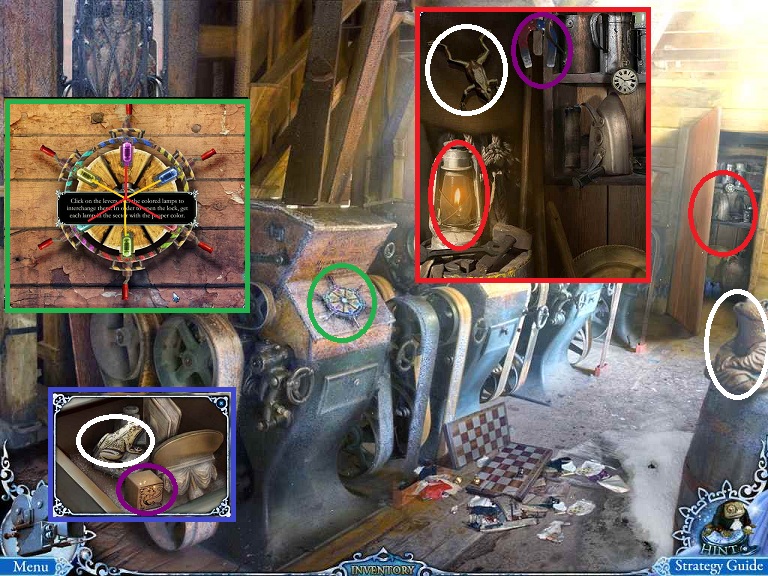
- Examine the light; there is a bronze ball that needs to be retrieved.
- Examine the lion head; you need a ring for its nose.
- The gate is shut tight
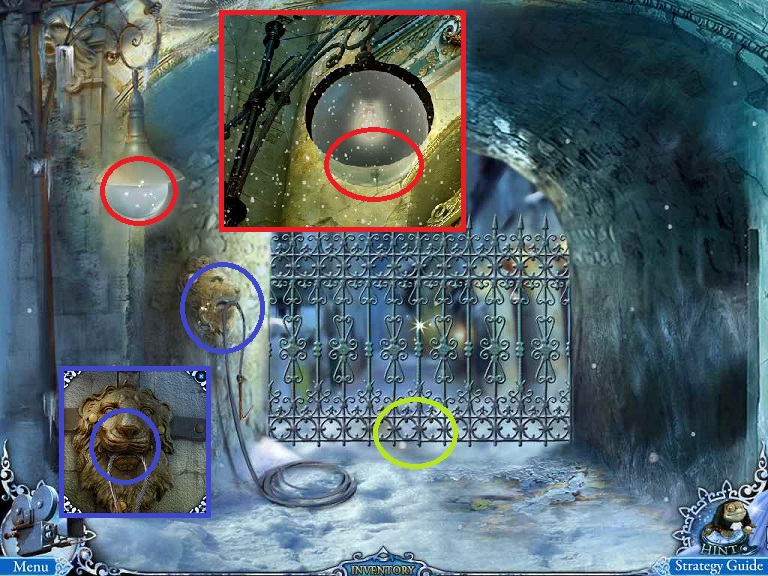
- Return to the City Entrance
- Use the STONE on the tollbooth window
- Pick up the FIRE HOOK
- Use the FIRE HOOK to retrieve the LADDER
- Use the LADDER at the window to the
left
- Enter the Sheriff's Room
- Note the you need something to extinguish the fire
- Examine the picture over the fire; you need pieces to assemble it (were those the pieces under the grate?)
- Examine the pirate in the corner; it is missing a hand and has a cool peg leg.
- Pick up the TONGS.
- Examine the gun safe; it needs a sheriff's badge to open it.
- The jewelry box on the chair needs a jewel to open it.
- Pick up the CARTRIDGE

- Return to the Watchmaker's Door
- Use the TONGS on the grate in the ground to the right of the door and pick up the puzzle pieces.
- Return to the Sheriff's Room
- Place the puzzle pieces on the picture.
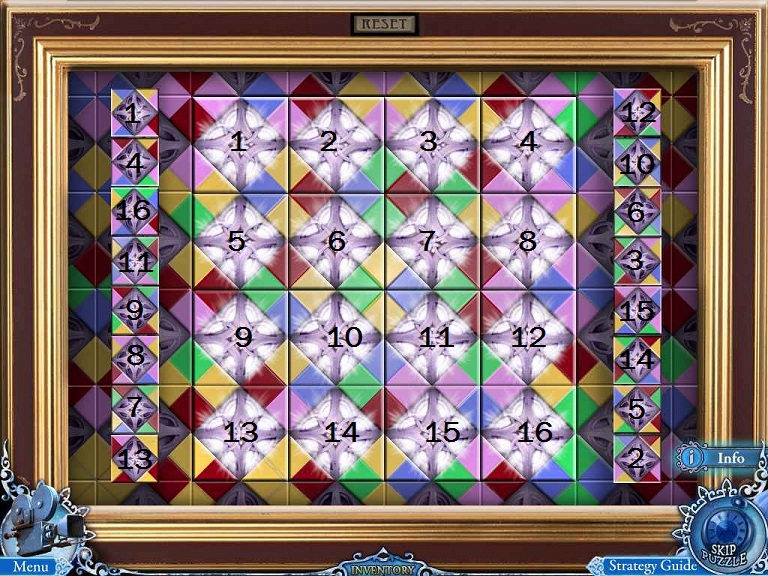
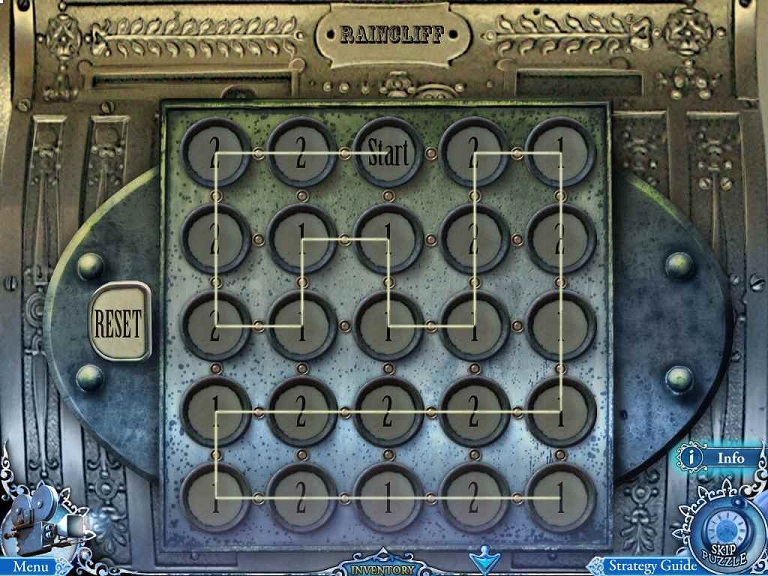
- Solve the puzzle by placing the squares and rotating them so that the colored triangles match to make squares.
- There are several squares to go in each spot so it is a process of trial and error.
- The solution is here.
- Pick up the SHOTGUN and the CASH REGISTER LEVER
- The SHOTGUN will automatically load if you have the CANISTER already (next to the jewelry box on the chair)
- Return to the Cafe
- Use the SHOTGUN on the Cafe Door
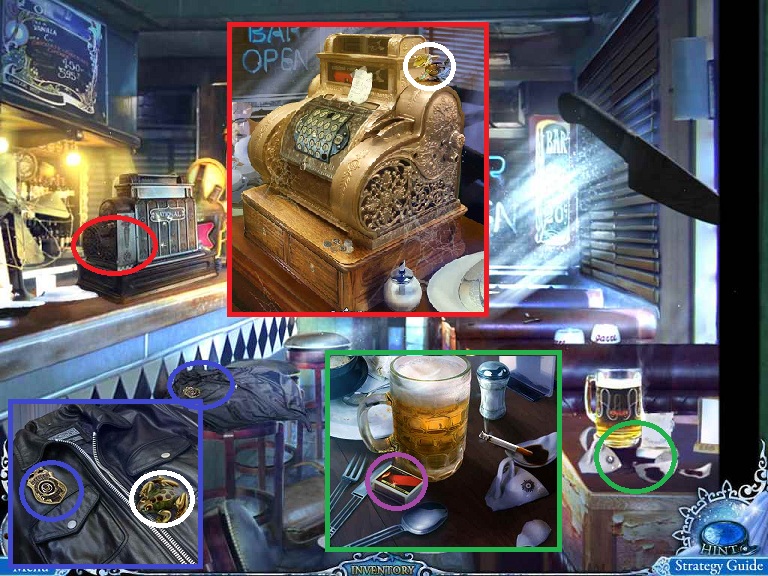
- Examine the table to the right.
- Pick up the MATCHES
- Examine the jacket on the counter; note you need something sharp to cut off the badge
- Examine the cash register
- Place the HANDLE and click on it
- Pick up the PUZZLE PIECE from the drawer
- Note you need 2 buttons for the cash
register
- Examine the back of the diner.
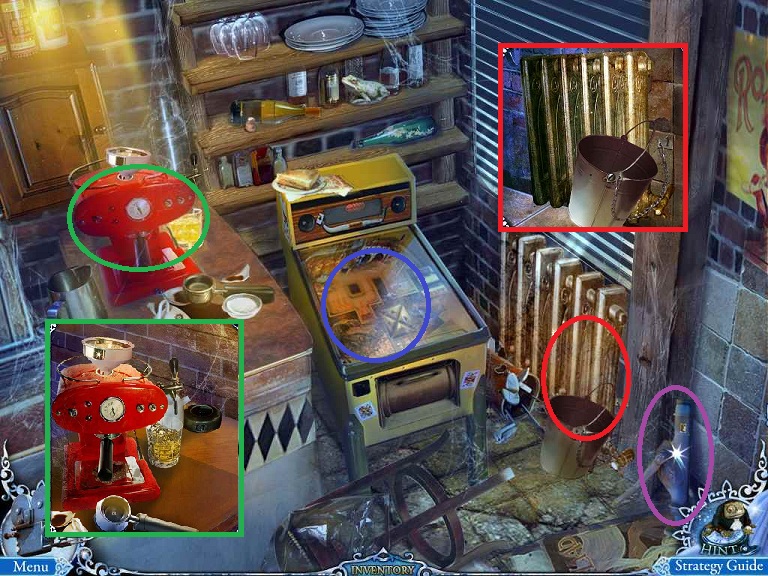
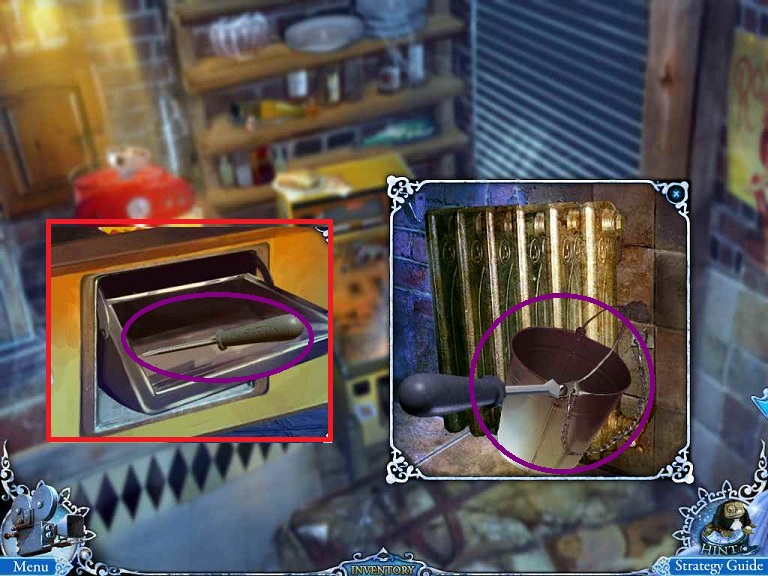
- Pick up the HOISTING JACK next to the radiator
- Note the bucket is chained to the radiator and you need a screwdriver
- Note that the radiator is heavy (hmmm)
- Examine the coffee maker; you need coffee, water, and probably something to put it in.
- Examine the pinball machine; it is missing a
ball
- Return to the Pharmacy Door
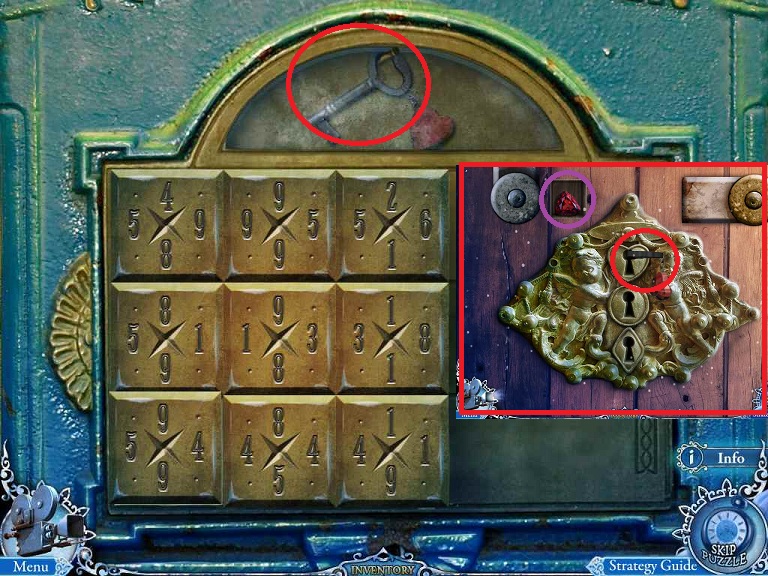
- Examine the mailbox to the right of the door
- Place the puzzle piece into the puzzle
- Solve the puzzle by matching the numbers on each side of the squares
- Receive the RED HEART KEY
- Go next door to the right and use the first of the three keys
- Pick up the RED GEM
- Return to the room
- Place the jewel on the jewelry box
- Pick up the RAZOR
- Return to the CAFE and use the RAZOR on the SHERIFF'S BADGE.
- Return to the Sheriff's Room and use the BADGE on the gun safe
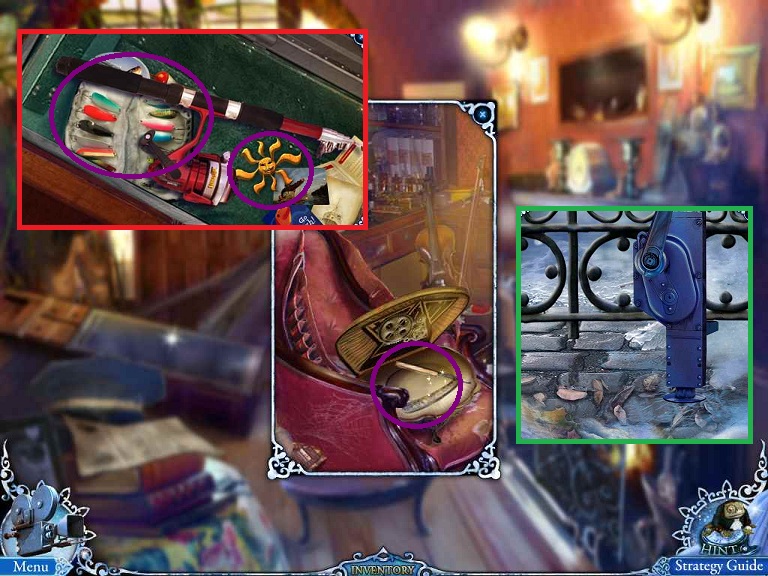
- Pick up the FISHING POLE and SUN AMULET
- Head to the Minor Square and into the Arch
- Examine the gate
- Use the HOISTING JACK to open the gate and go through
- Examine the building to the left
- Note the door needs a magnetic card
- Examine the balcony
- Use the SUN (from the gun
safe)
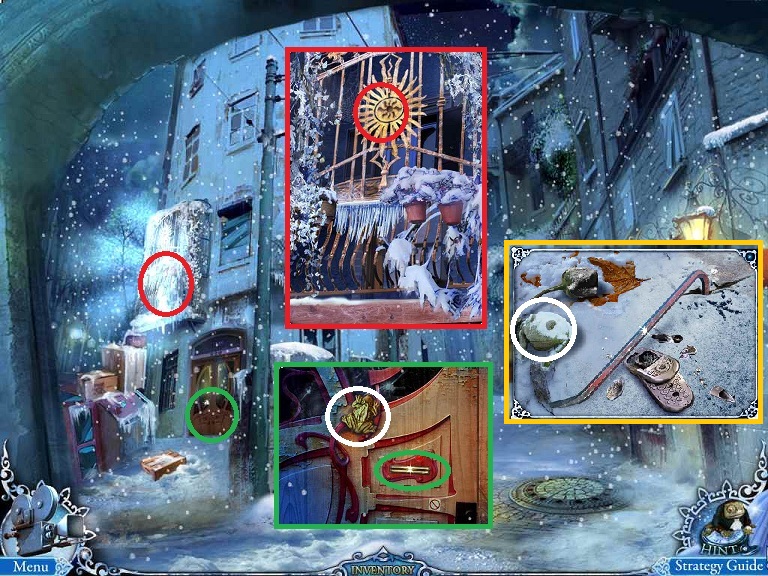
- Find the hidden objects
- Receive the LOCK PICK
- Return to the left door
- Use the LOCK PICK on the door lock
- Enter
- Examine the cage in the back of the room
- Pick up the BASKET FOR THE CAT
- Pick up the VIAL
- Examine the skeleton's head; you need something to get the eye out (forceps?)
- Examine the bowel on the floor; what animal likes warm milk?
- Examine the puzzle box on the desk; it needs a special figure.
- Use the GAS MASK (from the Minor Square) on the counter to
the right
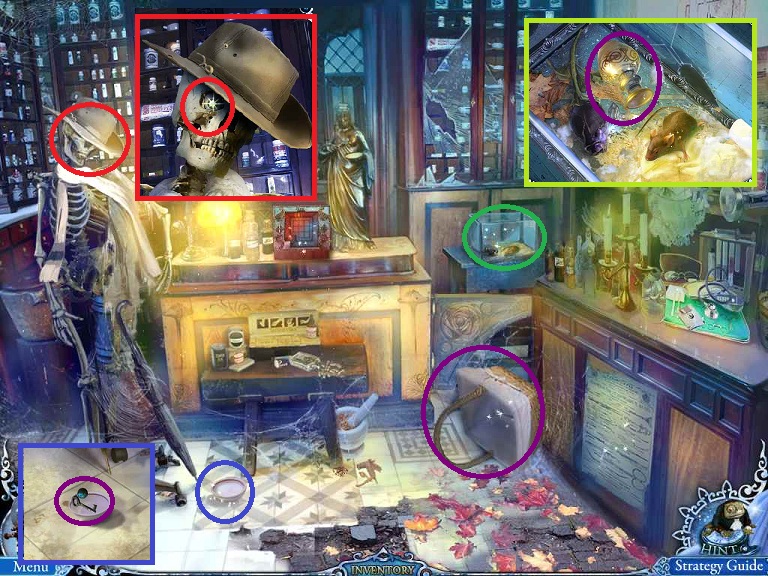
- Find the hidden objects and receive a
FORK
- Return to the Cafe
- Examine the cat
- Use the BASKET on the cat
- Pick up the CAT in the BASKET
- Return to the Pharmacy
- Place the CAT on the floor by the milk
- Pick up the BLUE KEY
- Return to the Watchmaker's Door
- Use the BLUE KEY
- Pick up the SIGNET RING
- Return to the City Entrance
- Use the SIGNET RING on the glove box of the car
- Pick up the SLINGSHOT and EMPTY
BOTTLE
- Go to the Arch
- Examine the lamp
- Use the SLINGSHOT on the lamp
- Receive a BALL
- Return to the back of the Cafe
- Place the BALL in the pinball machine puzzle
- Pick up the SCREWDRIVER
- Use the SCREWDRIVER on the BUCKET attached to the
radiator
- Go forward to the Lane
- Examine the sparking switch; you need a glove
- Examine the padlocked door; you need a drill
- Examine the base of the lamp post; you need something that can be inserted into 4 holes (a fork?)
- Examine the store window; there is a brass disk you can oil and unscrew it.
- You also need something to cut open a window
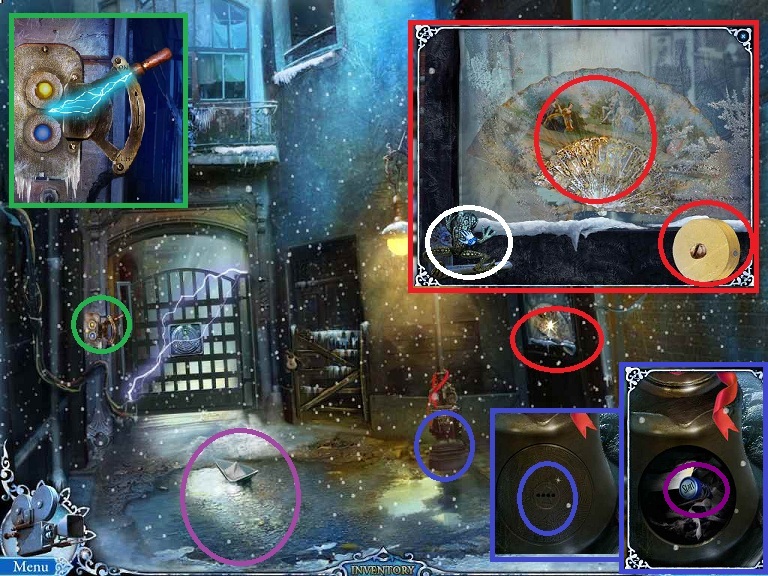
- Examine the puddle
- Use the FISHING ROD on the paper boat to get the ANGEL
- Use the BUCKET on the
puddle
- Return to the Sheriff's Room
- Use the BUCKET on the fire
- Find the hidden objects and receive
BREAD
- Return to the cafe
- Examine the raven
- Use the BREAD on the raven
- Pick up the KEY that was dropped onto the nail on the post
- Also pick up the LIGHT BULB hanging below the raven (if you haven't already done so)
- Use the final KEY (from the raven) on the Watchmaker's Door and enter
- The boy needs something to calm him down; maybe a cup of coffee
- Examine the desk and pick up the CONTAINER and the #1
BUTTON
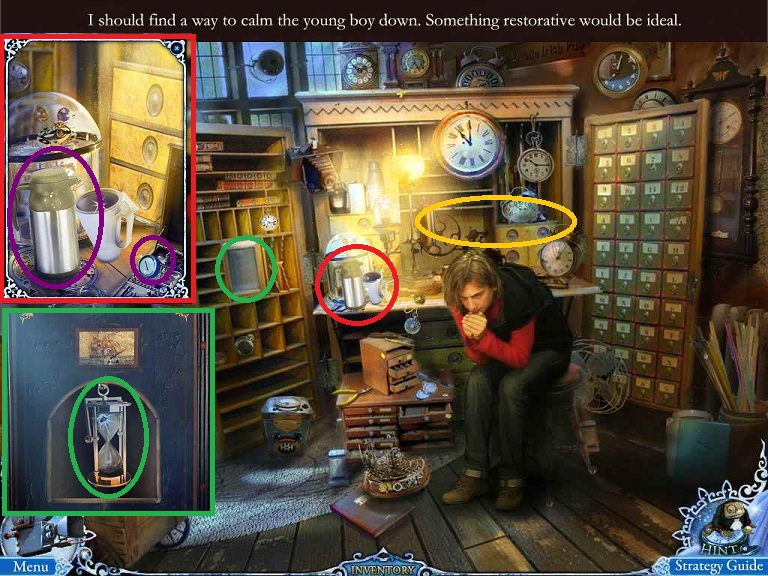
- Place the ANGEL (from the Lane) onto the puzzle box
- Solve the puzzle
- Pick up the COFFEE
- Return to the Lane
- Use the FORK on the lamppost base
- Pick up the BUTTON
- Return to Cafe and examine the cash register
- Place the 2 BUTTONS (From the lamppost base and Watchmaker's desk)onto the puzzle
- See puzzle solution
- Pick up the FAUCET HANDLE from the now open
drawer
- Examine the fountain
- Place the FAUCET
- Use the EMPTY BOTTLE on the faucet
- Receive a BOTTLE WITH WATER
- Return to the Diner
- Examine the coffee maker
- Place the COFFEE and WATER into the funnel at the top
- Place the CONTAINER off to the left
- Pick up the COFFEE
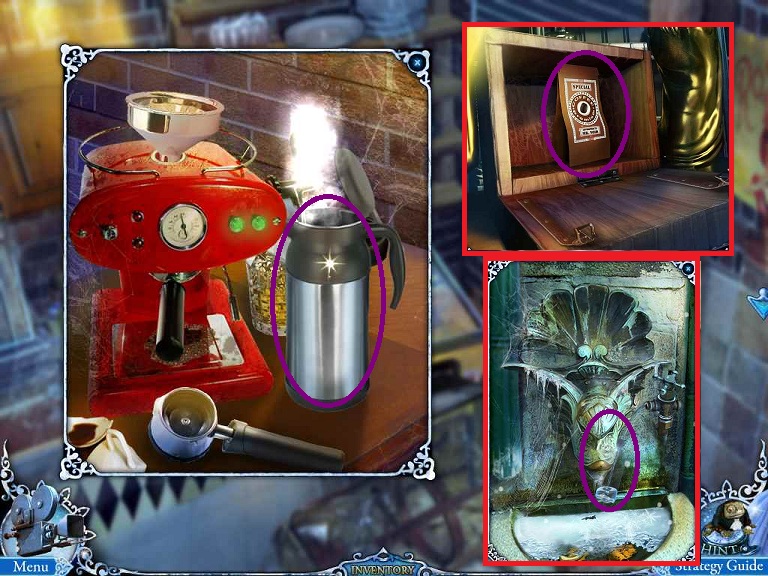
- Use the CONTAINER WITH COFFEE on the coffee cup
- Give the COFFEE to the boy
- He is hauled away and now the gate is closed to the Crossroads
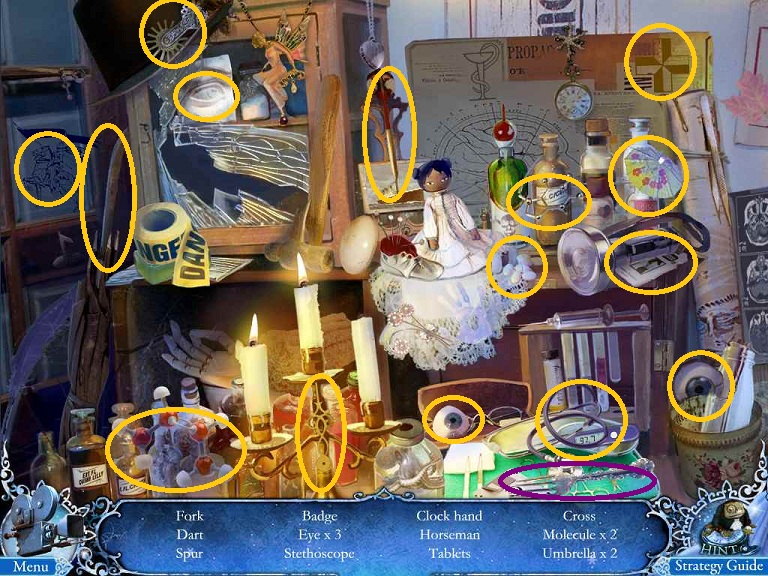
- Return to Watchmaker
- Examine the cover on the floor; it needs 2 EYES
- Examine the left side door and note the broken hourglass; it needs sand
- Examine the workbench
- Find the hidden objects and receive
DYNAMITE
- Go to the Arch
- Place the DYNAMITE on the gate
- Press the plunger
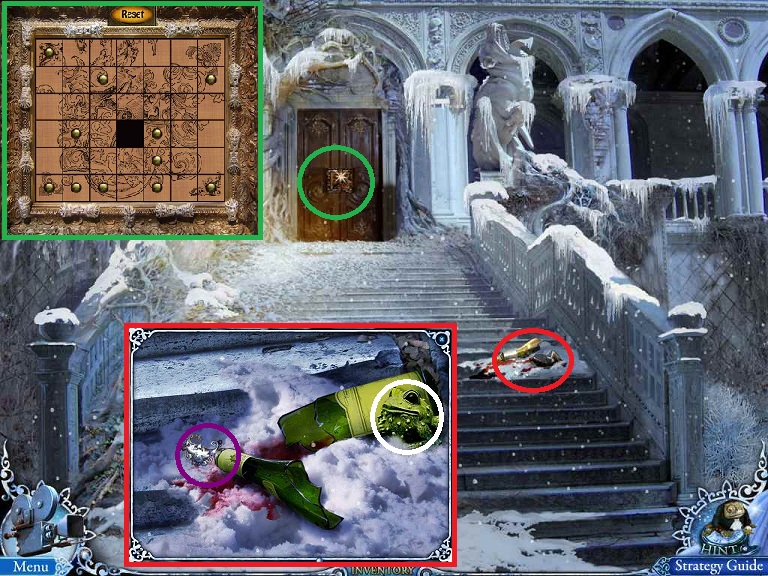
- Examine the ground at the Crossroads and note the CROWBAR stuck in the ground and the broken cellphone
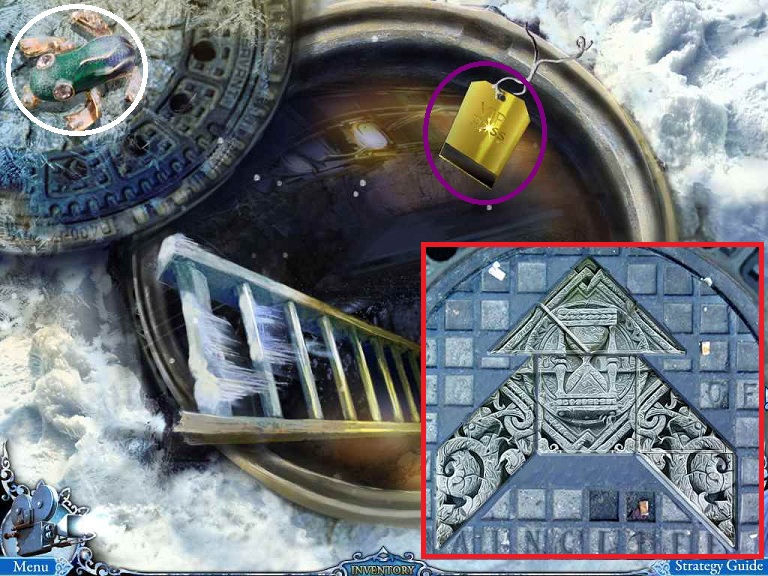
- Examine the manhole cover
- Solve the puzzle
- Pick up the KEY CARD hanging from the
hole
- Head
down the ladder and note you need something to dig out the protection
suit and something to throw to get the glove hanging from the
ceiling
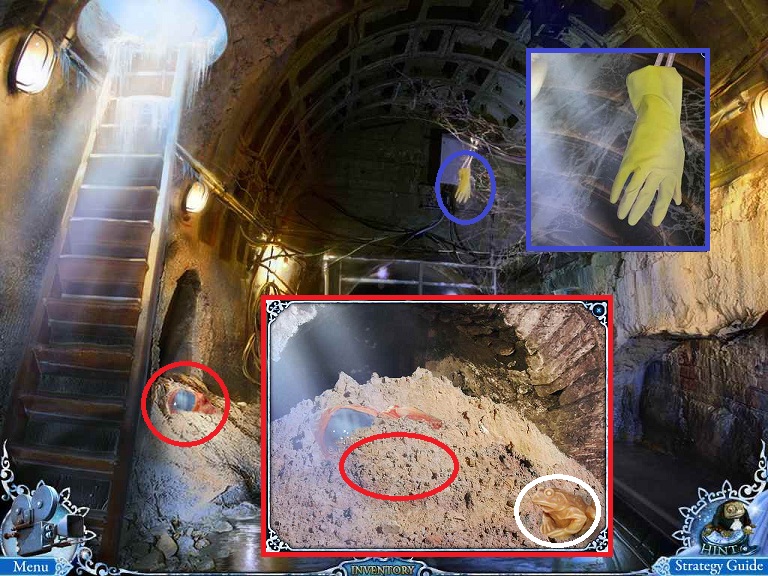
- Use the KEY CARD on the door to the right
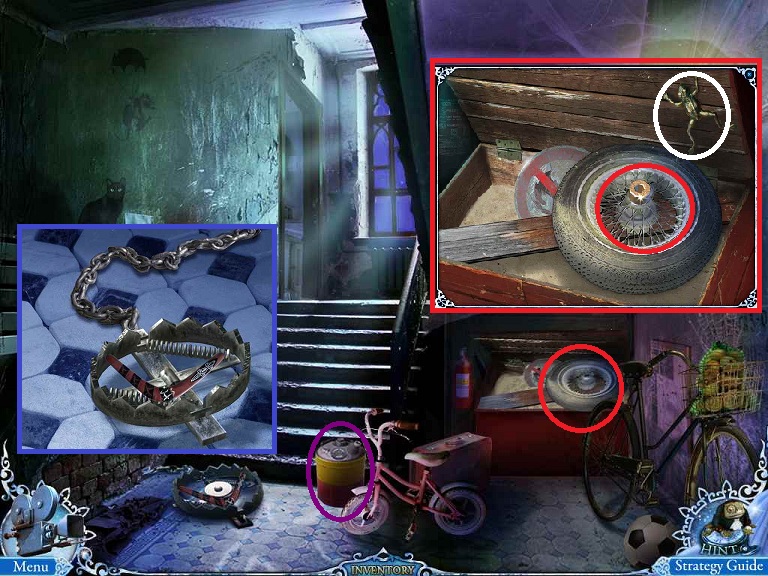
- Enter the Stairwell
- Pick up the GAS CAN
- Examine the wheel in the back; you need an Allen wrench
- Examine the boomerang in the trap; you need a leg (maybe
from the
pirate?)
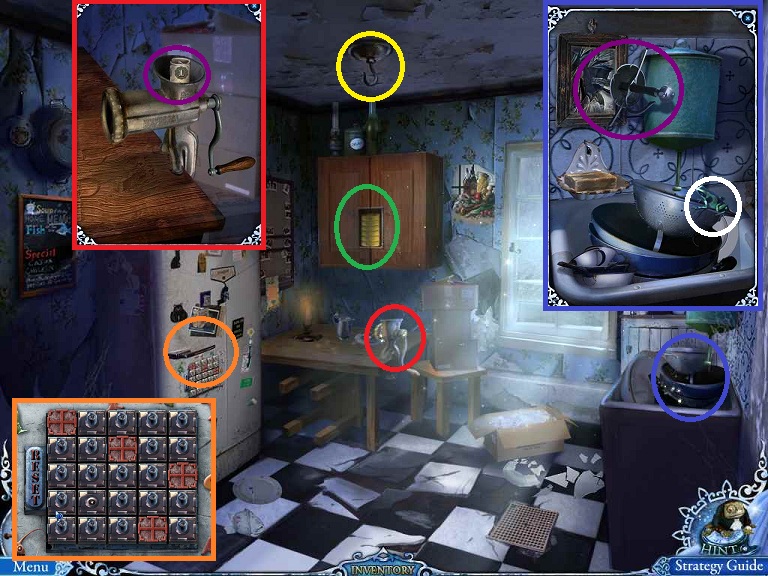
- Enter the kitchen
- Examine the refrigerator; you need a lamp to open it
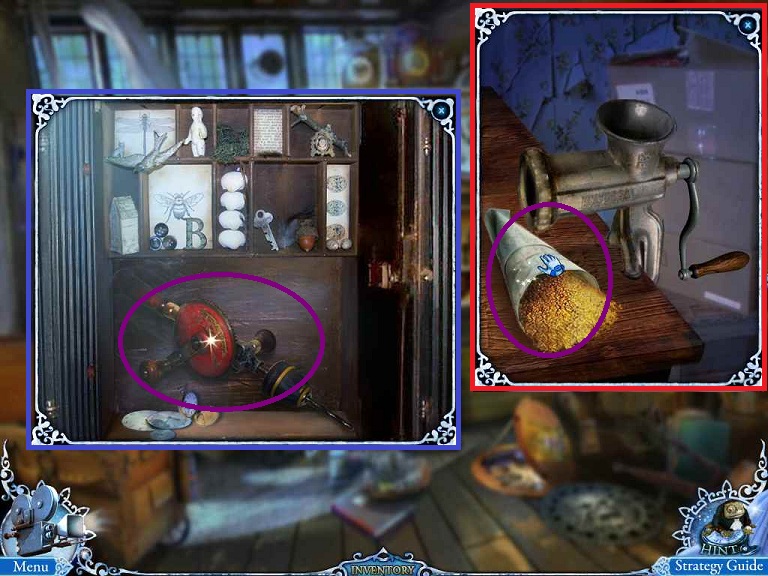
- Examine the meat grinder; you can make sand in it.
- Pick up the DOLLAR
- Examine the cabinet above the table; you need another disk and you've seen it in the Lane.
- Examine the sink to the right.
- Pick up the SWORD HILT
- Examine the hook in the ceiling; you can hang a rope from
it.
- Return to the Crossroads
- Use the SWORD HILT on the CROWBAR to pick it up
- Return to Watchmaker's Door
- Use the CROWBAR on the cracked plaster beneath the poster to the left
- Pick up the WRENCH
- Return to the Cafe
- Use the CROWBAR on the RADIATOR to pick it up
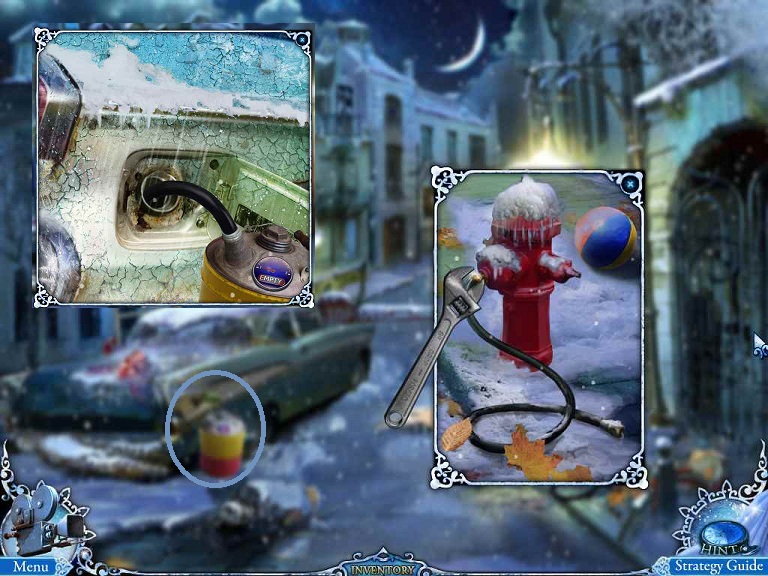
- Return to City Entrance
- Examine the fire hydrant
- Use the WRENCH on the hose
- Pick up the HOSE
- Click on the gas tank
- Place the GAS CAN and then HOSE
- Pick up the GAS
- Return to Pharmacy Door
- Examine the fountain
- Use the GAS and then MATCHES on the frozen water
- Pick up the LION RING
- Click on the lion and place the LION RING on the nose
- Pick up the METAL CABLE
- Return to Old Kitchen
- Use the METAL CABLE on the hook in the ceiling
- Use the RADIATOR on the cable
- Try to drop into the Bedroom Hideout and note you need some protection
- Look out the window to the
Backyard
- Examine the truck to the left
- Find the hidden objects and pick up the
SHOVEL

- Examine the gate to the right; note you need 2 chess pieces
- Examine the ground to the left of this gate and note you
need something
to cut the string

- Examine the gate to the back
- Examine the lock; you need 4 puzzle pieces
- Examine the gate corner; you need something to blow the airplane of the gate
- Examine the ground behind the gate; you need a
magnet.
- Return to the Sewer
- Use the SHOVEL on the rubble to the left
- Pick up the PROTECTION SUIT
- Return to the Bedroom Hideout
- Use the PROTECTION SUIT
- Examine the man's hand
- Pick up the SCISSORS
- Examine under the bed; you need some light (maybe from a cellphone?)
- Examine the dresser at the foot of the bed; you need a
brooch to open
the castle
- Return through the window to the Basement Entrance and examine the ground to the left
- Use the SCISSORS on the string
- Pick up the LIGHT BULB and the GRENADE
- Return to the Old Kitchen
- Examine the refrigerator
- Use the LIGHT BULB
- Pick up the GLUE and BUTTER
- Return to the crossroads
- Examine the ground
- Use the GLUE on the broken cellphone
- Pick up the CELLPHONE
- Go down the Lane
- Examine the window to the right
- Use the BUTTER and SCREWDRIVER on the DISK
- Return to the Old Kitchen
- Examine the cabinet
- Place the disk on the puzzle
- Solve the puzzle
- Pick up the EYE and 1 of 4 PUZZLE PIECES (for the lock in
the Backyard)
- Examine underneath the bed
- Use the CELL PHONE
- Find the hidden objects and pick up the DIAMOND RING
- Return to the LANE
- Examine the window again
- Use the DIAMOND RING on the window
- Pick up the FAN
- Return to the Backyard (through the Kitchen)
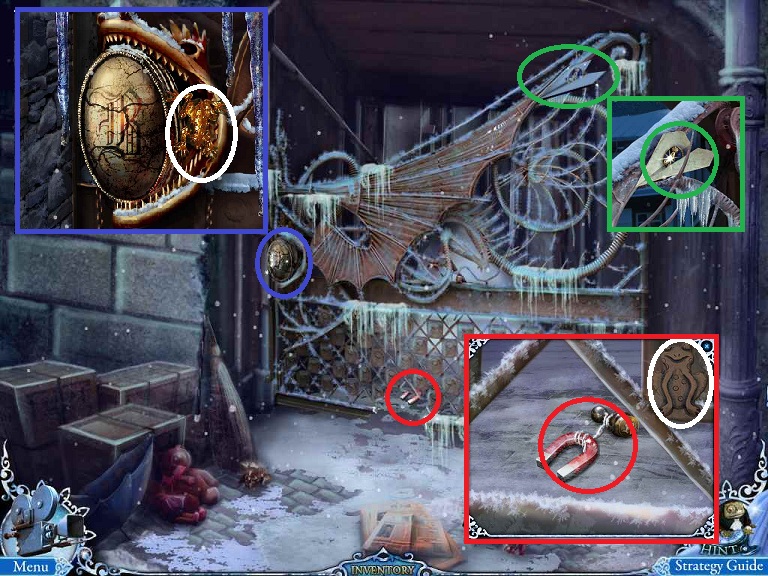
- Examine the Dragon Gate and then examine the paper airplane
- Use the FAN
- Examine the plane on the ground
- Pick up the BROOCH and PAPER AIRPLANE
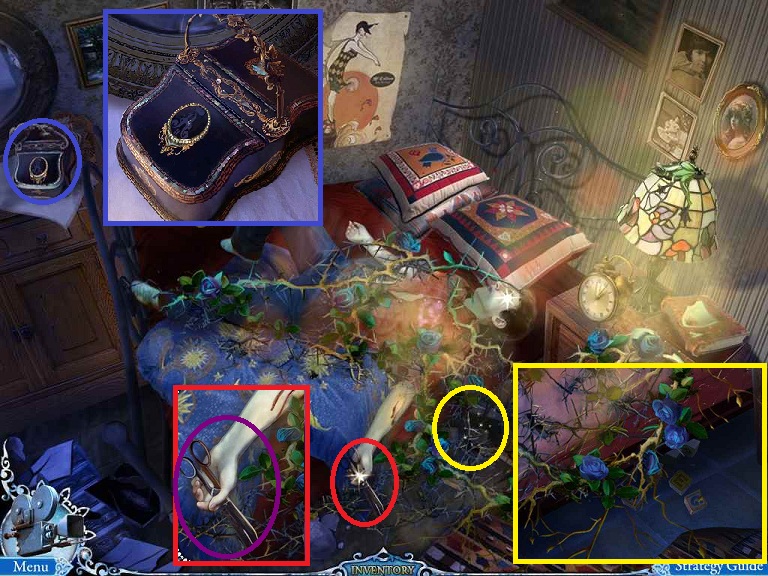
- Return to the Bedroom Hideout
- Examine the casket at the end of the bed
- Use the BROOCH
- Pick up the TWEEZERS
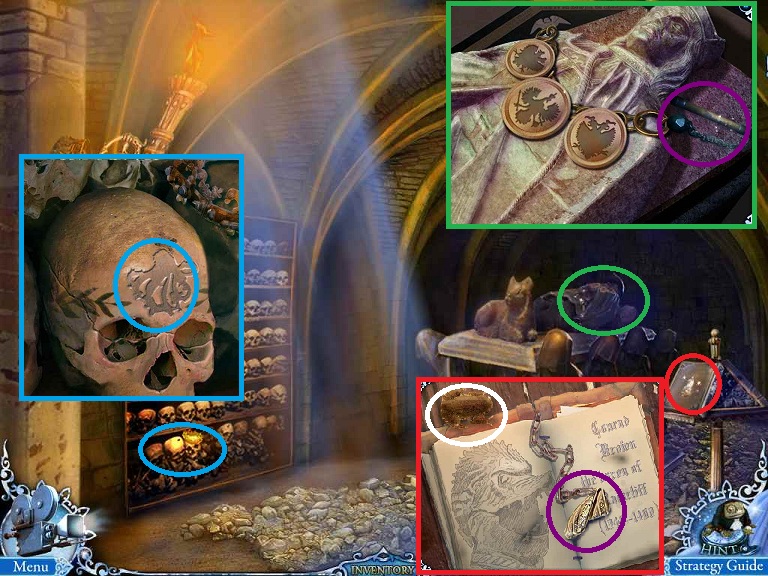
- Return to the Pharmacy and examine the skull
- Use the TWEEZERS on the EYE to pick it up
- Return to the Watchmaker and examine the circular hatch
- Place the 2 EYES in the sockets
- This is just a paint by shapes
puzzle
- Find the hidden objects and receive the PIRATE
HAND
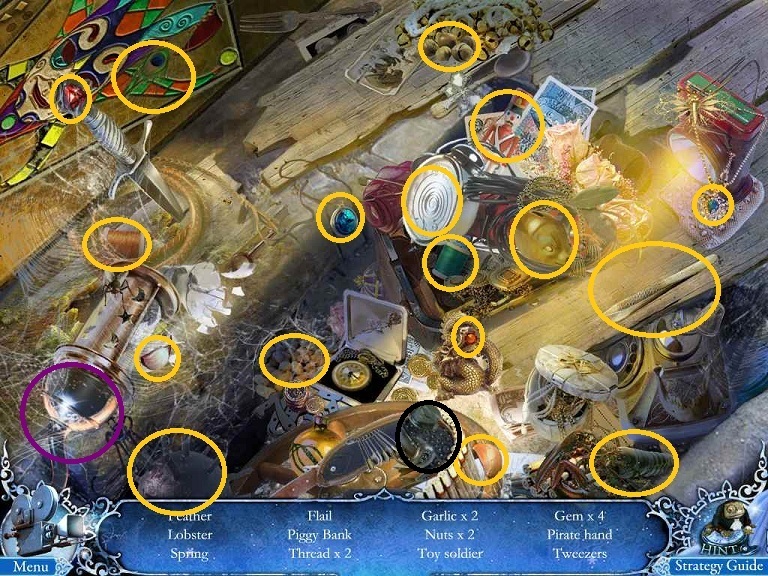
- Return to the Sheriff's Office
- Examine the pirate
- Place the PIRATE HAND and pick up the PIRATE LEG
- Return to the Stairwell
- Examine the trap
- Use the PIRATE LEG in the trap
- Pick up the BOOMERANG
- Return to the Sewer
- Use the BOOMERANG on the yellow glove
- Pick up the GLOVE
- Go up to the Lane
- Use the GLOVE on the sparking lever
- Examine the door and solve the puzzle
- The ring with the balls will move two steps for each step of the inner ring
- Click the outside ring once
- Click the inside ring until the brown edge is facing up
- Click the outside ring, the brown ball will drop in, and click the outside ring again
- Click the inside until the blue edge is up and the
outside ring to
finish the puzzle
- Go forward into the Narrow Street
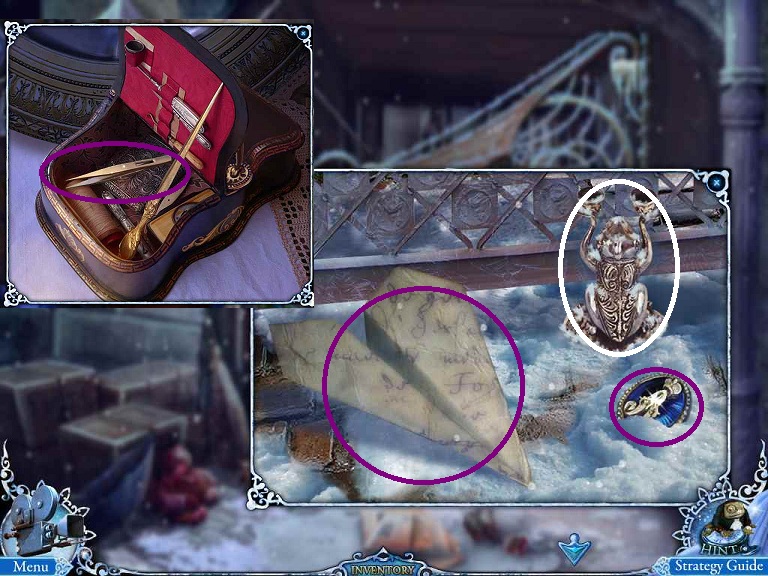
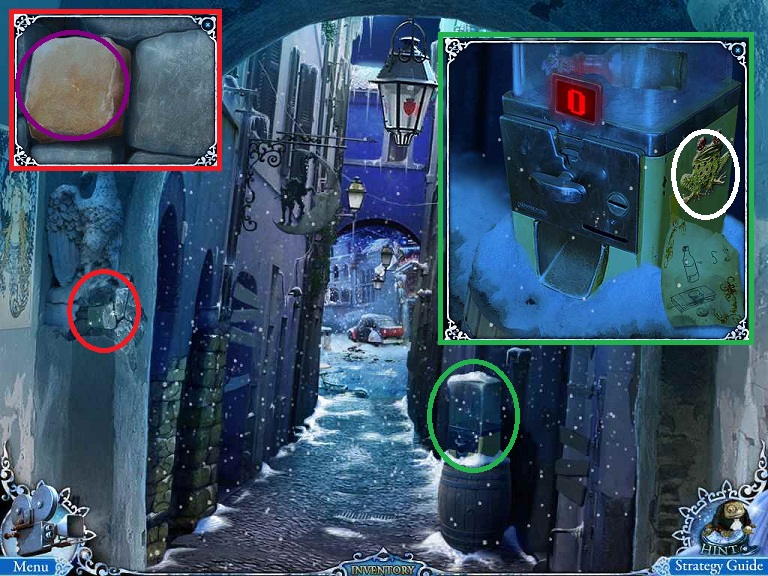
- Examine underneath the eagle on the left; pick up the SANDSTONE
- Examine the vending machine to the right; note you need 5
DOLLARS to
get the bottle out
- Enter the Major Square
- Examine the note
- Examine the Oak Alley Gate; you need a
shield
- Examine the Palace Door; you need a square wood puzzle piece
- Examine the steps; pick up the MOON
CORK
- Back out
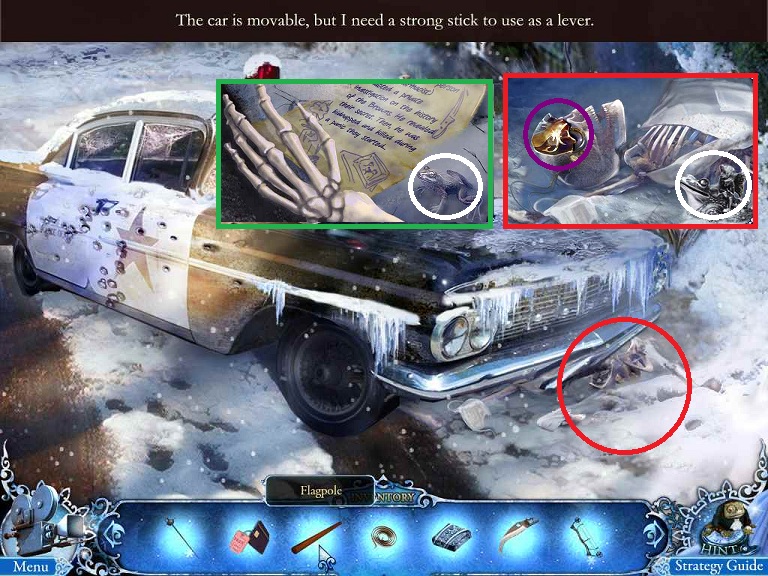
- Examine the Bank Entrance
- Examine above the door; pick up the DOLLAR COIN
- Examine the flag pole; cut it and it would make a nice strong stick
- Examine the night safe; you need a plaque
- Click on the doors
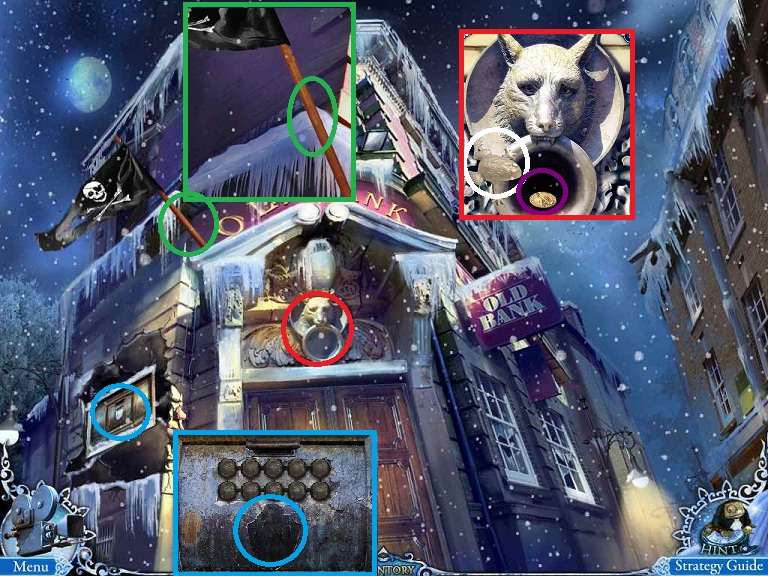
- Enter the Bank Hall
- Examine the safe door; you need a key
- Pick up the BLUE RADIO TUBE
- Examine the book to the left of the polar bear; you need an amber button
- Examine the polar bear's mouth; you need 2 pieces of a
trinket
- Find the hidden objects and receive a KNIGHT (chess
piece)
- Return to the Old Kitchen
- Use the SANDSTONE in the grinder
- Use the PAPER AIRPLANE on the SAND
- Return to the Watchmaker
- Click on the hourglass
- Use the SAND on the hourglass
- Pick up the DRILL
- Return to the Lane
- Examine the padlocked door
- Use the DRILL on the lock
- Enter the Abandoned Studio
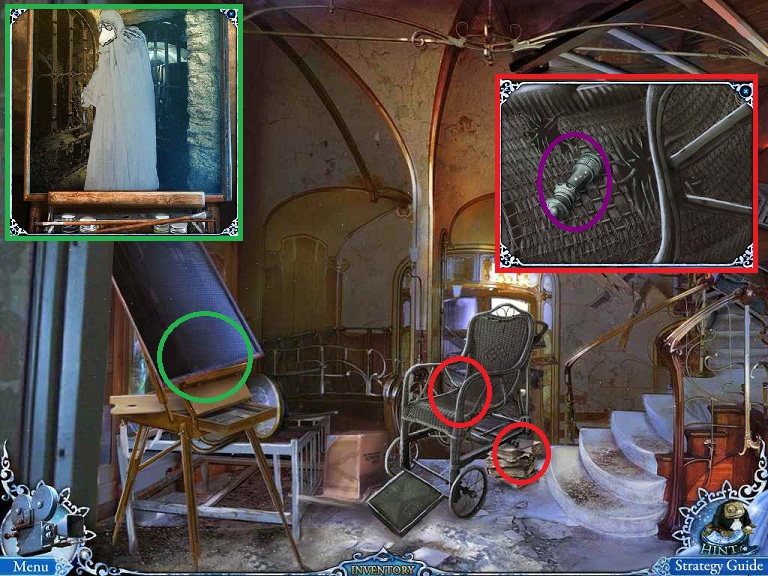
- Examine the wheelchair; note it is missing a wheel
- Pick up the QUEEN (chess piece)
- Examine the easel; you need black paint and white
paint
- Return to the Basement Door
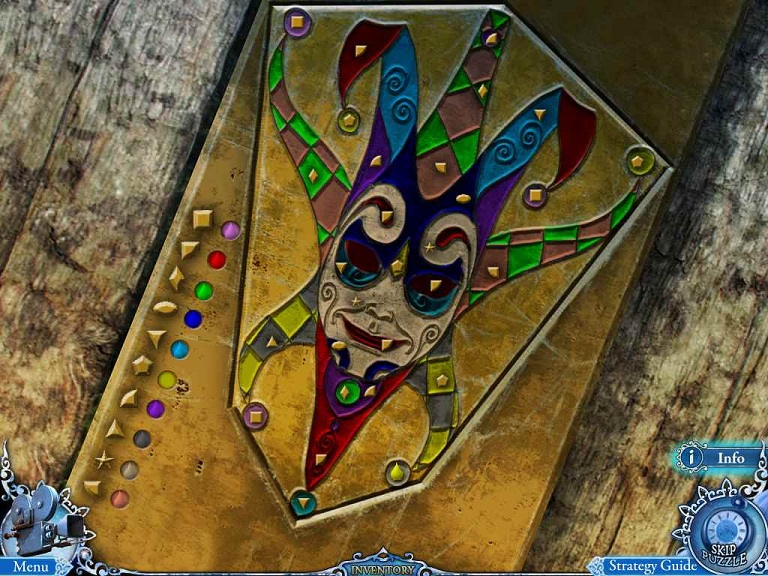
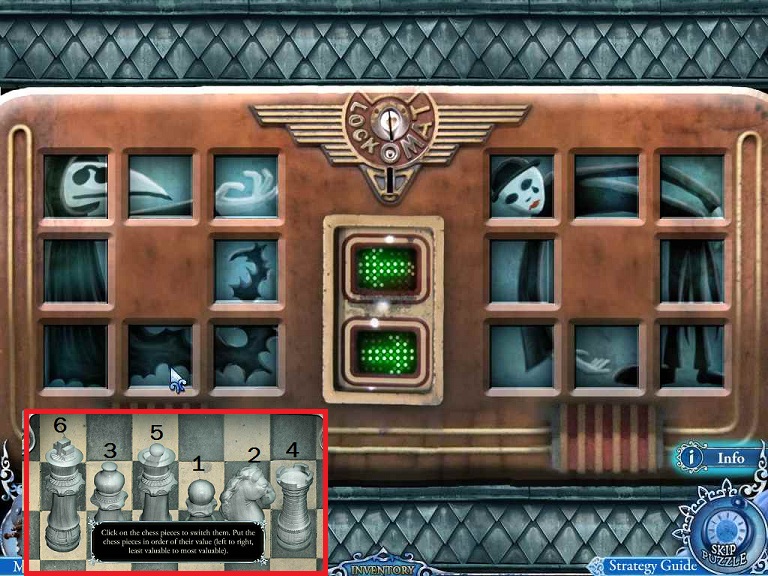
- Place the KNIGHT (from the bank) and QUEEN (from the Abandoned Studio)on the board
- Order the chess pieces from the pawn, knight, bishop, rook, queen, king by switching adjacent pieces
- Solve the next puzzle by switching adjacent tiles to make a
picture
(see solution)
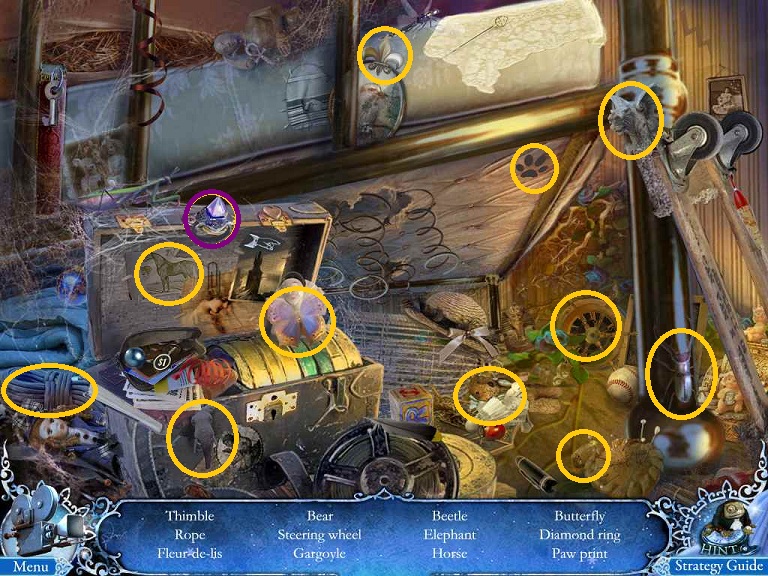
- Enter the Garage
- Examine the cabinet to the left; you need 3
corks
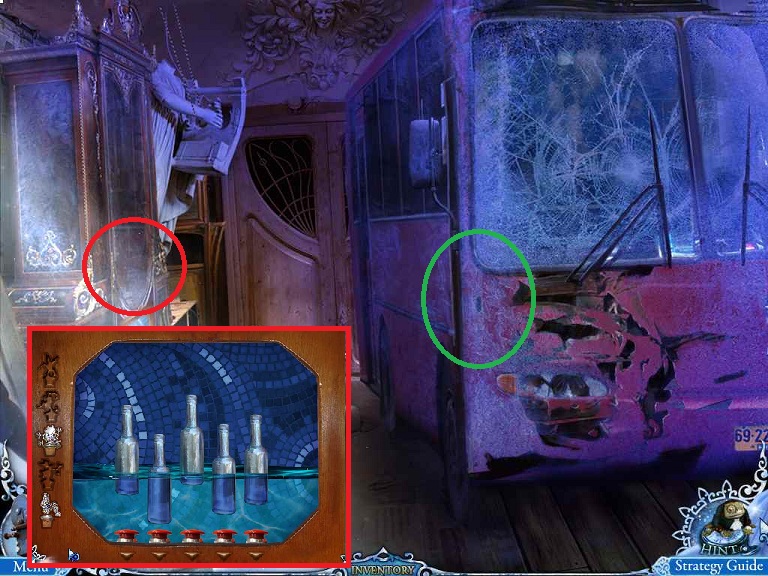
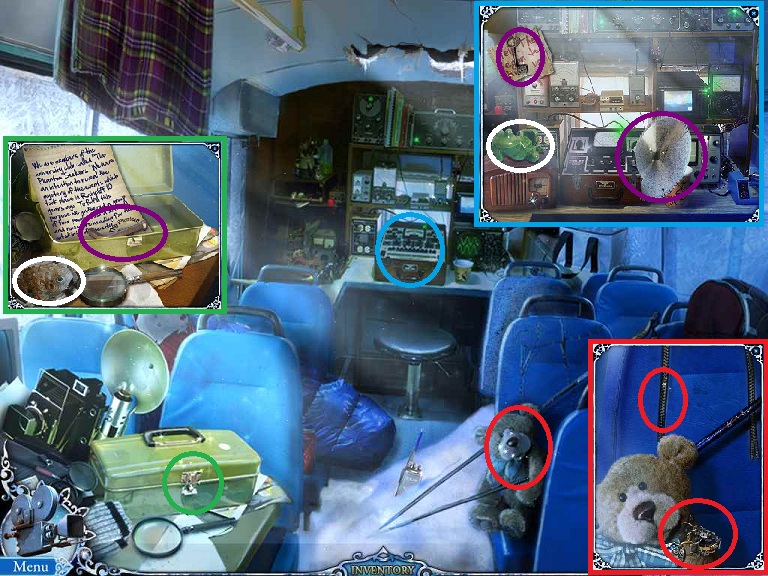
- Enter the Bus
- Examine the teddy bear; note you need a slider for the zipper and a coil spring for the lock
- Examine the tool box and open it
- Pick up the ALLEN WRENCH
- Examine the equipment at the back
- Pick up the KEY and the saw blade which will go onto the
DISK SAW
- Return to the Stairwell
- Examine the wheel
- Use the ALLEN WRENCH
- Pick up the WHEEL
- Return to the Bank
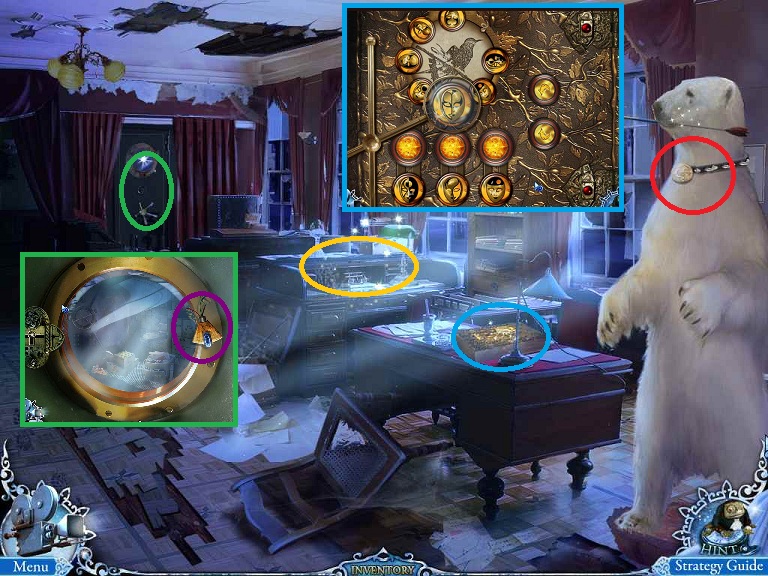
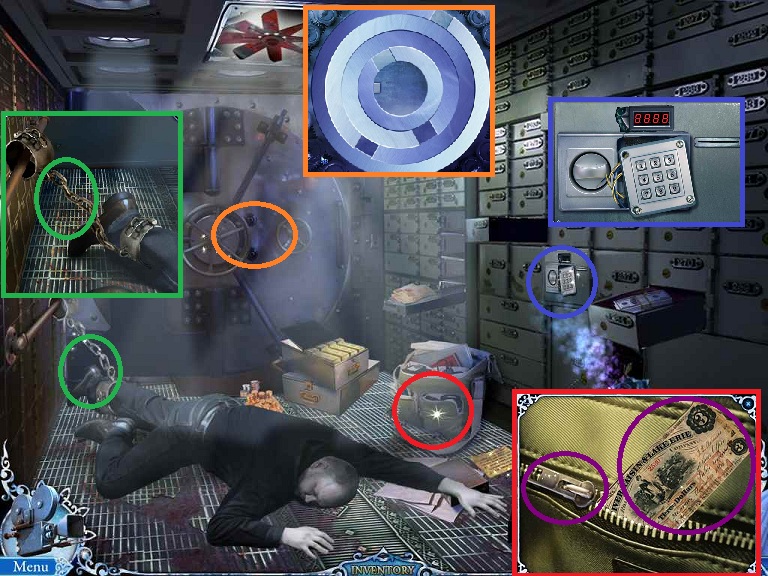
- Use the KEY on the safe lock
- Enter the Safe
- Note the safe deposit lock; it needs a key card
- Examine the backpack; pick up the 3 DOLLAR BILL and SLIDER
- Examine the shackle on the man's foot
- Use the DISK SAW
- Pick up the SHACKLES
- Examine the safe; you need a door
valve
- Return through the Kitchen to the Basement Garage and into the Bus
- Examine the bear
- Place the SLIDER on the zipper
- Pick up the PANEL WITH DATE
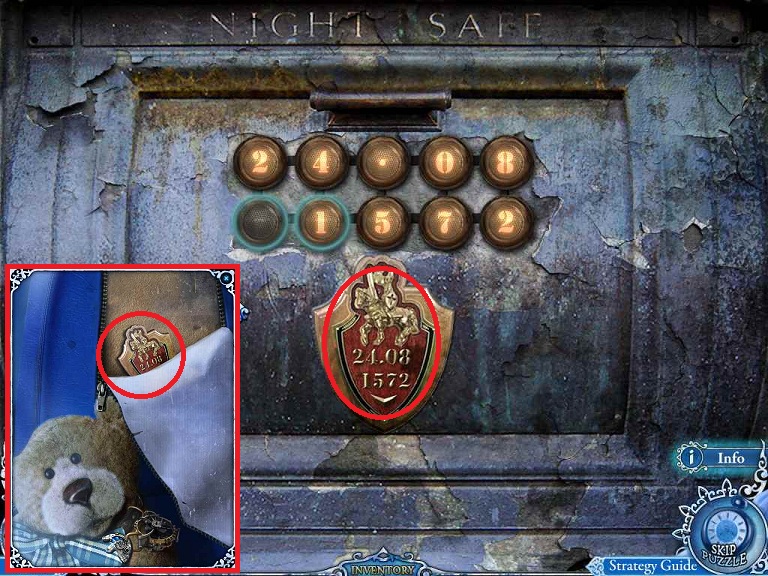
- Return to the Bank Entrance
- Examine the Night Safe
- Place the PANEL WITH DATE
- Match the numbers to the date with the space in front of the year
- Pick up the WHITE EAGLE MEDAL and BIRD
CORK
- Return to the Narrow Street
- Place the DOLLAR COIN (from above the bank door), the DOLLAR BILL (from the kitchen grinder), and the 3 DOLLAR BILL (form the bank safe)
- Pick up the ANGEL CORK
- Return to the Garage
- Examine the cabinet to the left
- Place the 3 CORKS (Night Safe, Narrow Street, and Palace Entrance) on the side
- Angel, Bird, Chicken, Moon, Frog
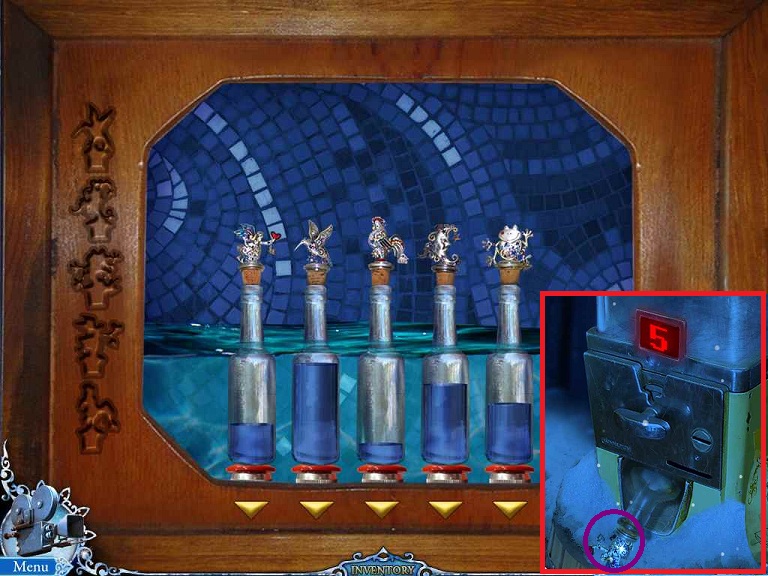
- Find the hidden objects and obtain the
SHIELD

- Go through the Major Square to the Oak Alley Gate
- Place the SHIELD on the right griffin
- Enter Oak Alley
- Examine the police car
- Place the wheel from the stairwell of the house
- You now need a strong
stick
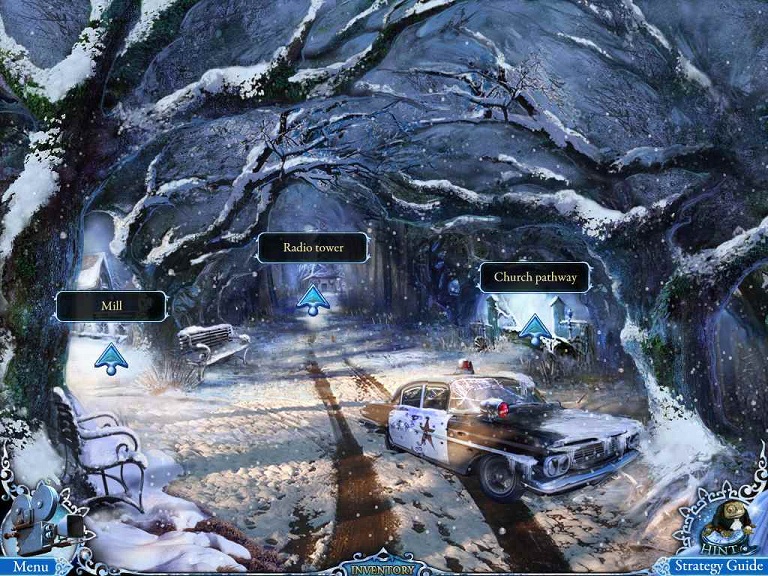
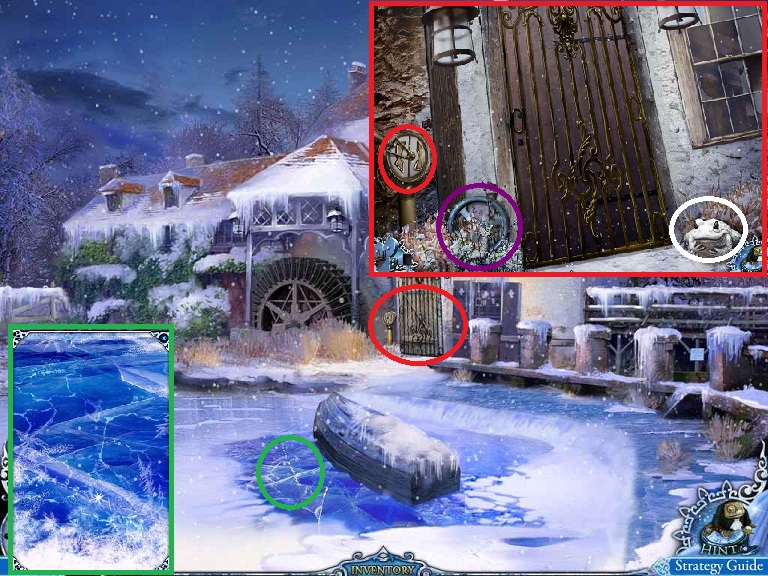
- Head left to the Mill
- Examine the ice; you need an ICE DRILL
- Go forward to the Mill Entrance
- Pick up the VALVE
- Return to the Bank Safe
- Examine the lock
- Place the VALVE
- Solve the puzzle
- Match the first (from the inside ring) to the groove using the first ring
- Match the 2nd ring to the groove by turning the 3rd ring
- Match the 4th ring using the 4th ring
- Match the 3rd ring using the 2nd ring
- Match the 1st and 2nd ring using the 1st ring
- Examine the open vault
- Pick up the ICE DRILL (mark the frog)
- Return to the Mill
- Examine the ice
- Use the ICE DRILL and then the GRENADE (from outside the Basement Door)
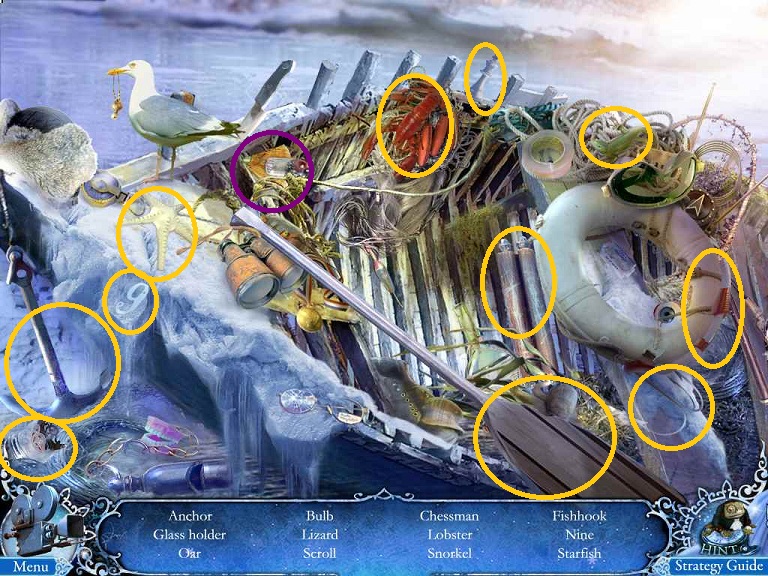
- Examine the overturned boat
- Find the hidden objects and receive a RED RADIO
TUBE
- Go forward to the Mill Entrance
- Use the handle to the left
- Open the door
- Enter the Mill
- Open the door in the back
- Examine that room
- Use the MATCHES on the lamp
- Pick up the MAGNET
- Examine the first machine on the left
- Place the 2 RADIO TUBES (from the Mill pond and Bank Hall)
- This is easy to do if you come here first, but if you're here you probably have already messed up.
- Note that clicking on one spot will flip the 2 lights diagonal to it and flip the colored bar.
- For example, clicking on the green light at the bottom will flip the dark blue and yellow light AND move the dark blue and red bars.
- So, find the light that will move one light to its appropriate spot.
- Find the light that will move another light to its appropriate spot.
- Hopefully these 2 lights will be opposite each other.
- Then click on those 2 lights and you should be good.
- From the starting point, click on the red light to move the purple light into its correct spot.
- Click on the green light to move the yellow light into its spot
- Then click on the yellow and purple lights to finish.
- Examine the drawer that opens underneath
- Pick up the BLOCK
- Return to Oak Alley and go forward to the Radio Tower
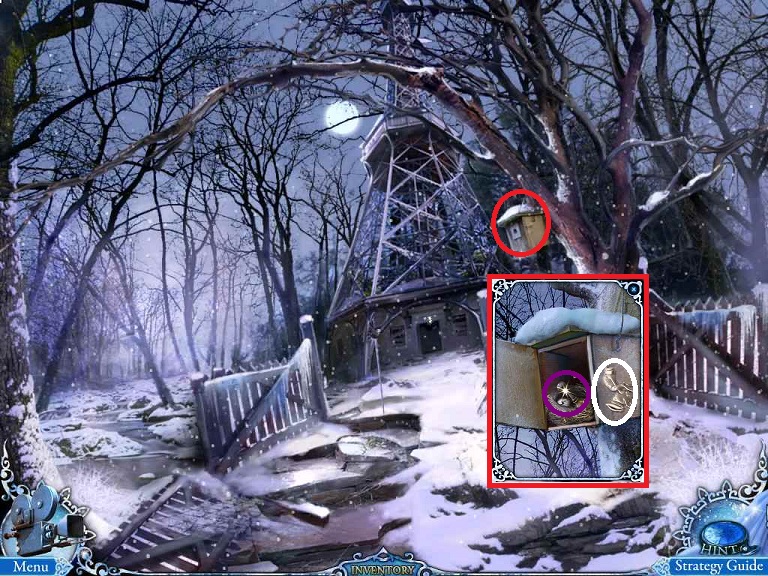
- Examine the bird house on the tree
- Open it and pick up a SHIELD STAMP
- Attempt to head forward but you are blocked and need a
weapon
- Return to the Dragon Gate (through the house)
- Use the MAGNET and pick up the LETTER STAMP
- Return to the Palace Entrance
- Examine the door
- Place the BLOCK into the door
- Enter the Palace
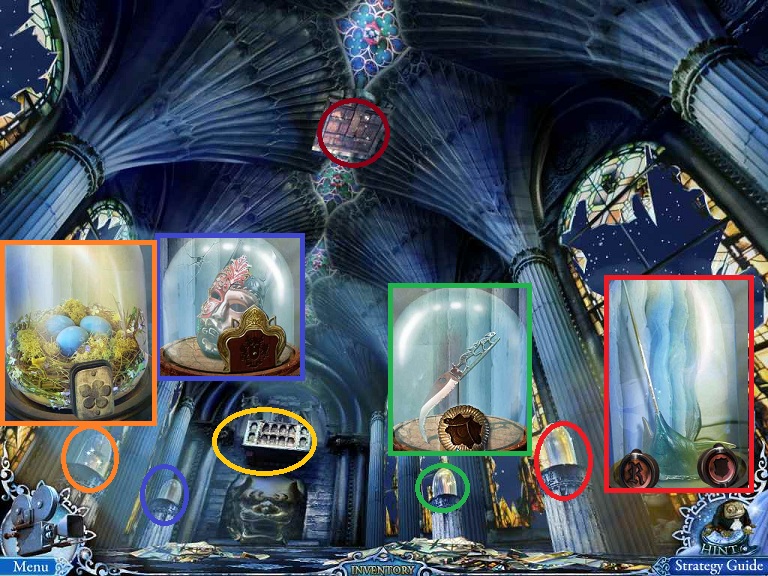
- Examine the first pedestal to the right.
- Place the LETTER STAMP AND SHIELD STAMP
- Pick up the blade and you now have a SWORD
- Examine the 3 other pedestals and note that you need a variety of different items to access them.
- You need 3 parts of a butterfly trinket
- You need a coat-of-arms plate
- You need a flower-shaped piece
- Examine the ceiling and note you need to reload your shotgun
- Examine the balcony in the back; you need a rope and a
throwing device
- Return to the Radio Tower
- Use the SWORD on the other sword to fight
- Enter the Elevator (grab the frog on the right door edge)
- Examine the hole to the left
- Use the SHACKLES (from the Bank Safe) on the device
- Click on the buttons to the right.
- Pick up the DRAGONFLY PIECE
- Don't worry that it looks broken; just press the
button
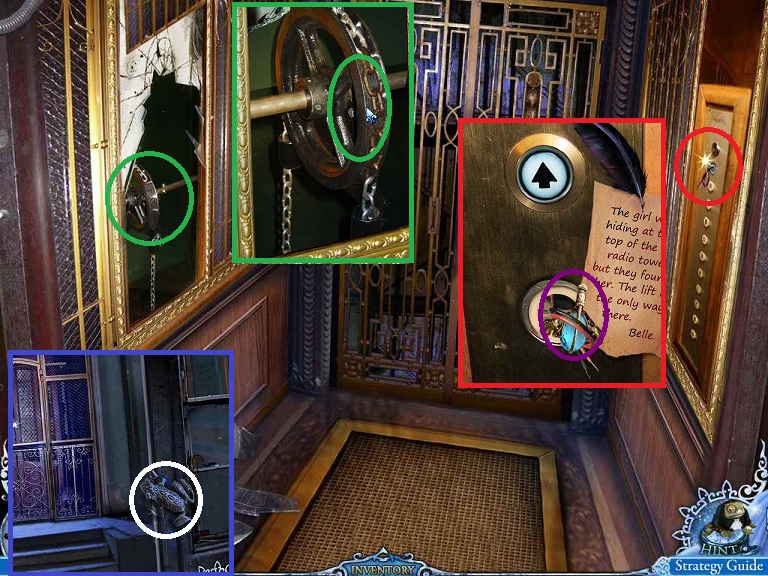
- Enter the Radio Room
- Examine the woman's head; you need a tiny tool (like a needle?)
- Examine the cabinet; it needs a wheel
- Examine the top of the cabinet
- Pick up the CHAIN SAW
- Return to Oak Alley
- Head to the right up the Church Pathway
- Examine the owl statue to the right
- Pick up the TRINKET PIECE
- Examine the note, pick up the frog
- Examine the log
- Use the CHAIN SAW on the log
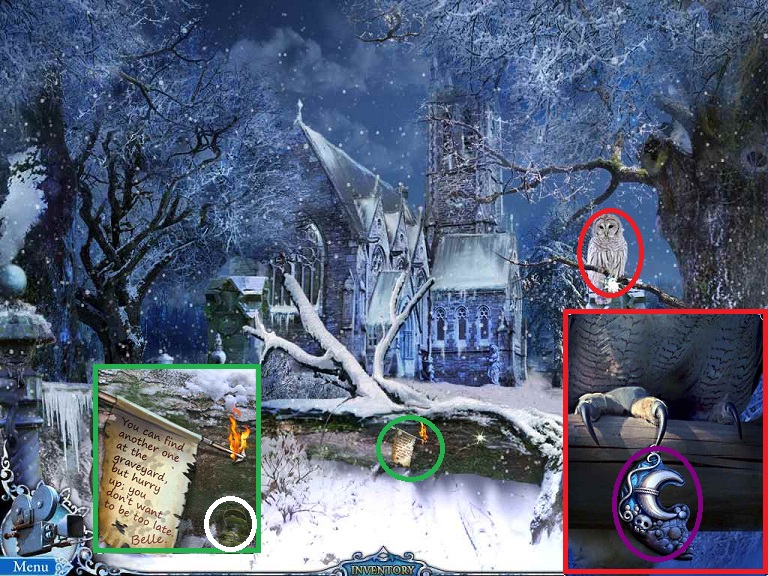
- Head forward to the Church Entrance
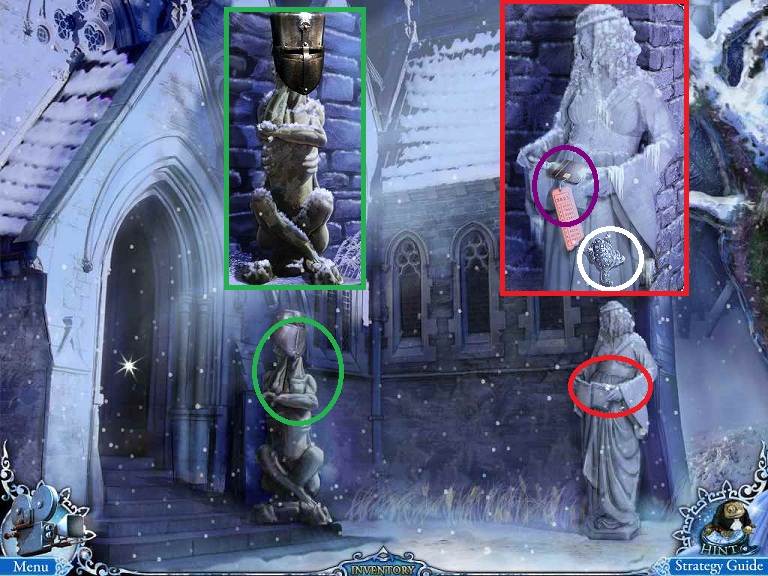
- Examine the statue to the right
- Pick up the CARD KEY (frog)
- Examine the left statue; you need a medieval
weapon
- Head into the Church and then left into the Church
Garden
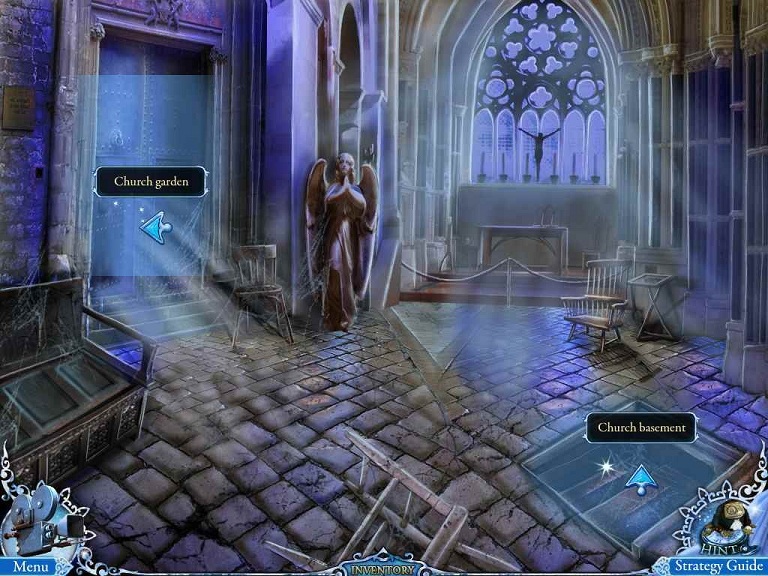
- Examine the pile to the left; note you need a serrated knife
- Examine the shield to the right: You need a
puzzle piece.
- Back up once
- Go to the right and down to the Church Basement
- Examine the book to the right; pick up the DRAGONFLY BROOCH (frog)
- Examine the top of the coffin; you need 3 medals
- Pick up the MACE
- Examine the skulls to the left; you need something that you
will fit in
the depression on the skull
- Return to the Church Entrance
- Examine the left statue
- Use the MACE
- Pick up the AMBER BUTTON
- Return to the Bank Entrance
- Examine the flag pole
- Use the CHAIN SAW and receive a FLAGPOLE
- Enter the Bank
- Examine the book to the left of the bear
- Place the AMBER BUTTON
- Choose just one arrow button and click it until you get a matching mask
- Press the yellow button ABOVE the matching mask and not the mask itself
- Pick up the BRONZE FLOWER and the CARTRIDGE
- You now have a loaded SHOTGUN
- Return to the Palace
- Examine the first left pedestal
- Place the BRONZE FLOWER
- Crack the 3 eggs
- Pick up the COIL SPRING, DRAGONFLY BROOCH, and WOODEN FRAGMENT
- Examine the 2nd right pedestal
- Place the 3 DRAGONFLY BROOCH pieces (from here, Radio Tower Lift, and Church Basement)
- Pick the KNIFE
- Return to the BUS (through the house)
- Examine the teddy bear
- Place the SPRING
- Pick up the TRINKET PIECE
- Return to the Bank
- Examine the polar bear
- Place the 2 TRINKET PIECES (from the Bus and Church Pathway)
- Receive the ARROW
- Head in the Bank Safe
- Examine the safe deposit box
- Use the KEY CARD (from the Church Entrance)
- From the starting point, press 1112 and this will bring the sequence so that it will start on the 4th number
- From there you will press 6771.
- If you are here after getting complete lost, you can get back to the start point by starting with #1, checking to see if it is at the start point and if it is not, then press it 3 times and then another button once (preferably after checking the other button as you don't want to press it if it is at the start point)
- Look at the video to get some ideas about getting back to a starting point.
- Pick up the RUBY EAGLE MEDAL
- Return to Oak Alley
- Examine the police car
- Use the FLAGPOLE
- Examine the skeleton
- Pick up the PUZZLE PIECE
- Examine the trunk; you need a hood
ornament
- Return to the Church Garden
- Examine the pile to the left
- Use the KNIFE on the ropes
- Click on it again
- Find the hidden items and receive VACUUM
CLEANER
- Return to the Palace
- Examine the ceiling
- Use the SHOTGUN
- Head up to the roof
- Pick up the BOW to the left
- The ARROW and BOW will be combined
- Examine the chimney
- Use the VACUUM CLEANER
- Pick up the BLACK EAGLE MEDAL and DUST
BAG

- Return back into the Palace
- Examine the back wall
- Use the BOW AND ARROW
- Examine the balcony
- Find the hidden objects and receive the
NEEDLE
- Go the Radio Room
- Examine the woman's head
- Insert the NEEDLE in the tiny lock
- Receive the EARRING
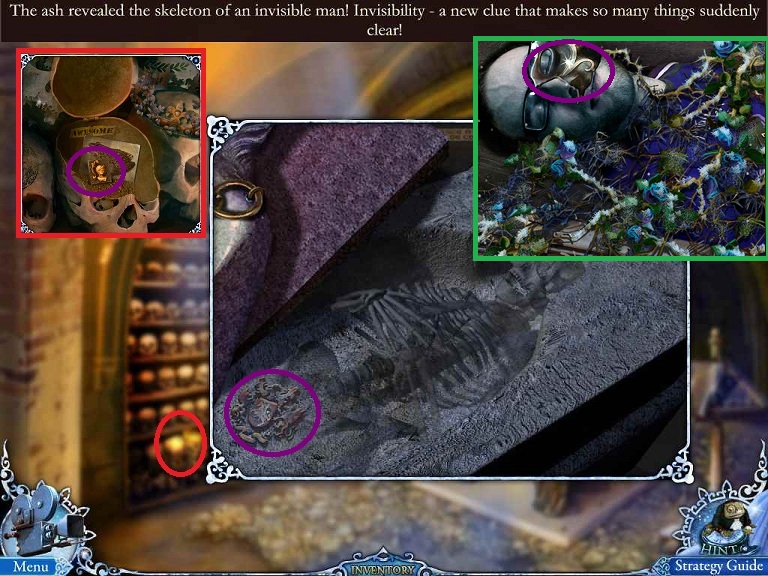
- Examine the skulls
- Place the EARRING on the skull
- Pick up the PUZZLE PIECE
- Examine the coffin
- Place the 3 EAGLE MEDALS (from Palace Roof, Bank Safe, and Bank Entrance)
- Use the DUST BAG in the coffin
- Pick up the COAT OF ARMS
- Examine the shield
- Place the PUZZLE PIECE
- Do the puzzle
- Examine the man
- Pick up the PUZZLE PIECE
- Go the Palace
- Examine the 2nd pedestal on the left
- Insert COAT OF ARMS
- Solve the puzzle by matching the movable parts to the coat of arms located on the doors
- Clicking on one piece will affect 3 or 4 other pieces.
- Center 3x, Bottom x2 Top x6 left x1, bottom x1, top x4
- Pick up the last PUZZLE PIECE
- Return to the Dragon Gate
- Place the 4 PUZZLES PIECES (from the Palace, the Church Garden, Oak Alley, and Old Kitchen)
- Pick up the REVOLVER
- Head forward
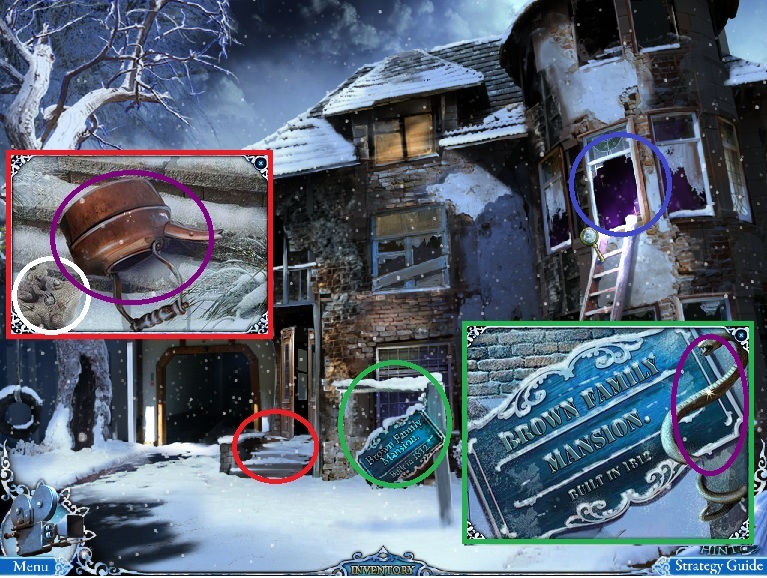
- Examine the sign and pick up the SNAKE
- Try to enter the front door
- Pick up the KETTLE from the front step
- Enter the house through the
window
- Head right into the Bathroom
- Examine the tub
- Use the KETTLE on the tub to fill it
up
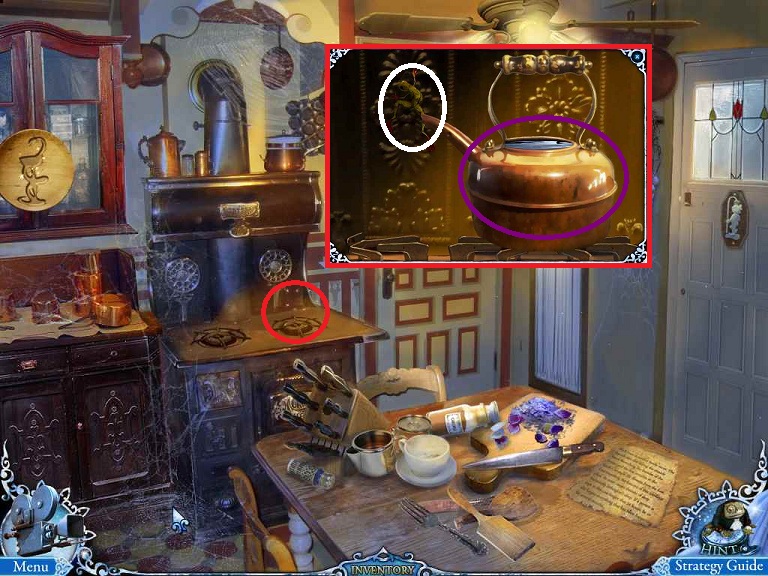
- Return to the Kitchen
- Examine the stove
- Place the KETTLE on the stove
- Use the MATCHES
- Pick up the KETTLE WITH HOT
WATER
- Return outside
- Head to the left into the Garage
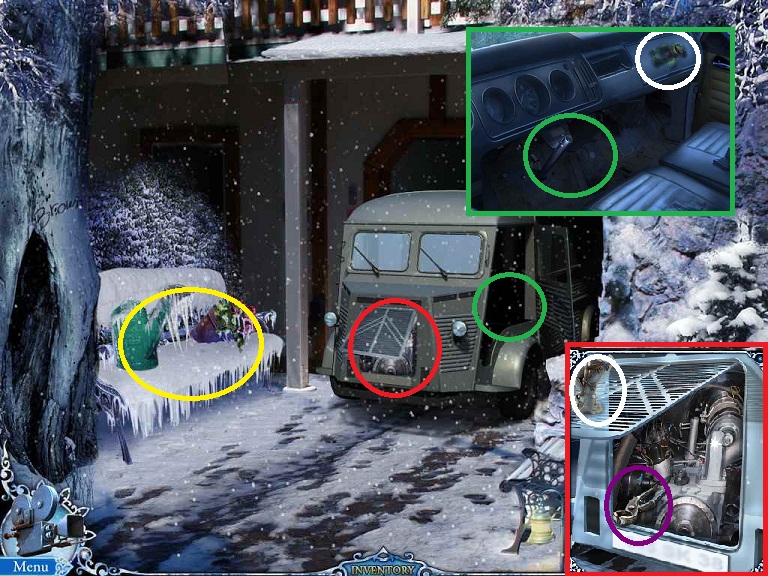
- Examine the bench to the left
- Pour the HOT WATER on the bench
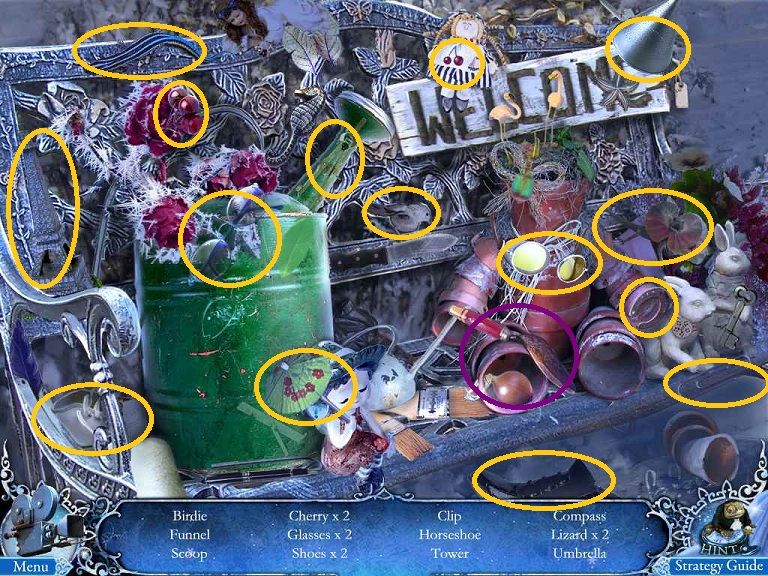
- Find the hidden objects and the
SCOOP
- Examine the engine compartment of the van
- Pick up the WIRE CUTTER
- You need a transmission belt (from another vehicle)
- Examine the inside of the car; you need a steering wheel
(remember you
saw one at the beginning?)
- Return to the Bathroom (through the Kitchen)
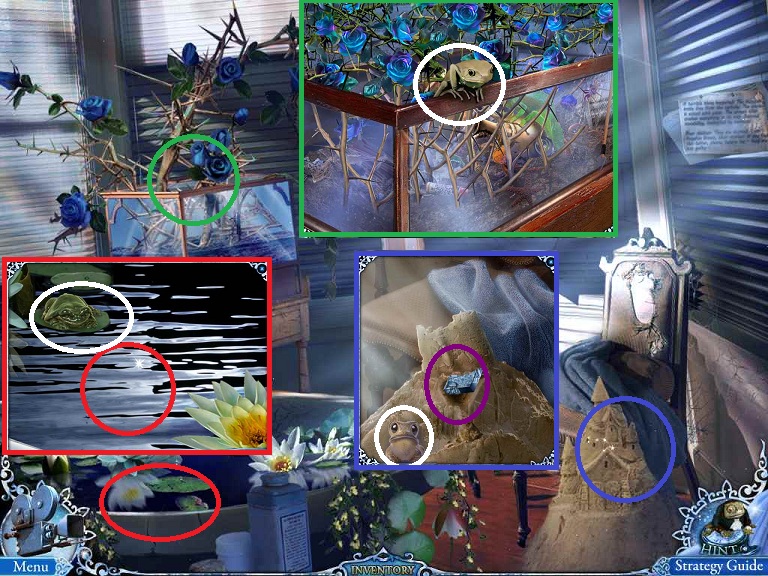
- Examine the sand castle
- Use the SCOOP
- Pick up the WOODEN FRAGMENT
- Examine the aquarium; you need something to get rid of the plants
- Return to the Kitchen and head into the Hall
- Examine the 3 portraits over the fireplace
- Pick up a WOODEN WHEEL (from the left)
- Pick up a WOODEN FRAGMENT (from the center)
- pick up BLACK PAINT (from the right)
- Examine the portrait to the right
- Use the SWORD on it
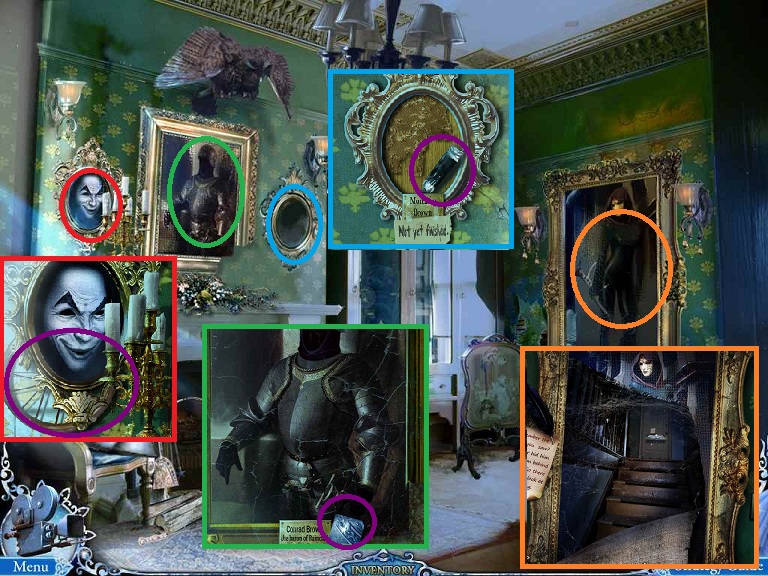
- Examine the door
- Place the 3 WOODEN FRAGMENTS on the puzzles
- Note that you will need to put blank tiles in the back and
that this is
a 3-D puzzle
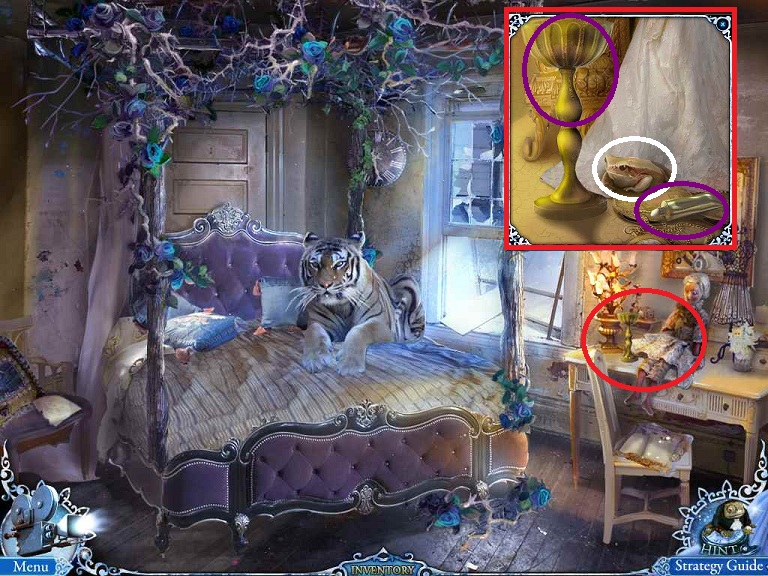
- Enter the Bedroom
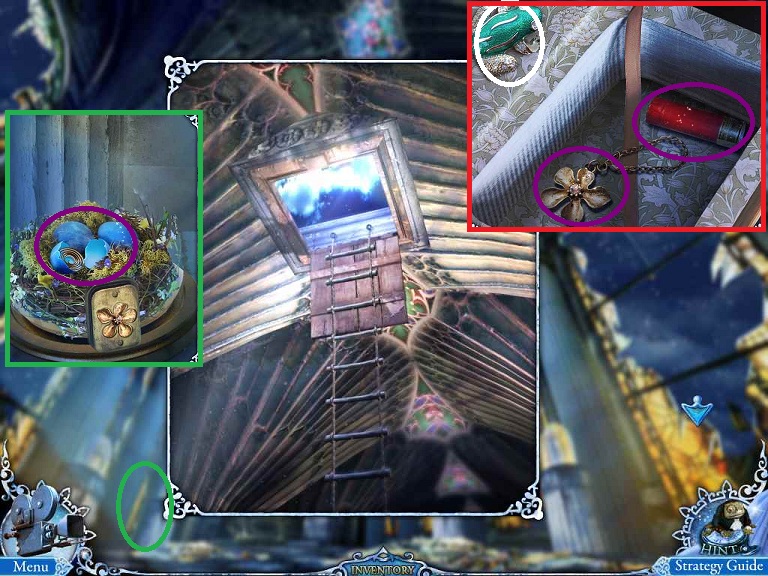
- Examine the desk to the right
- Pick up the WHITE PAINT and the BRONZE
CUP
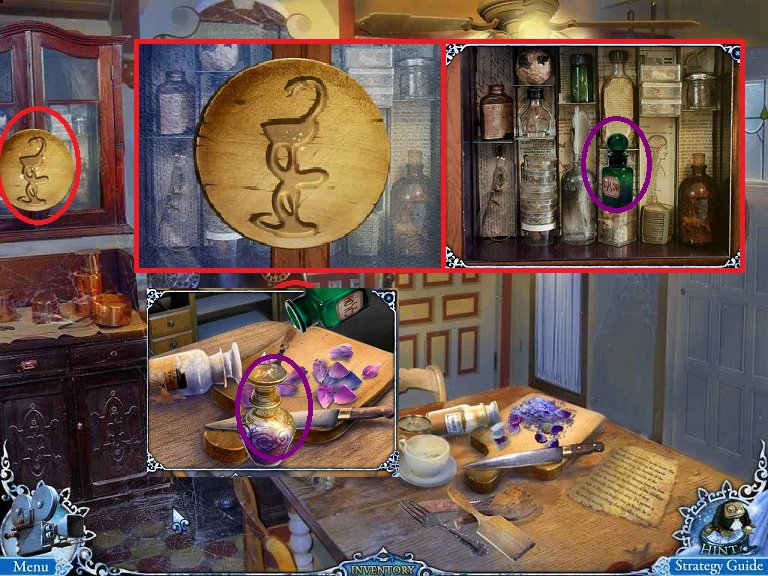
- Return to the Kitchen
- Examine the cabinet to the left
- Place the BRONZE CUP (from the bedroom) and the SNAKE (from the front of the house)
- Examine the puzzle
- Pick up the ACID BOTTLE
- Examine the kitchen table
- Place the VIAL on the table
- Use the ACID BOTTLE
- Pick up the VIAL WITH HYPNOTIC
FLUID
- Return to the Bedroom
- Give the VIAL to the tiger.
- Examine the man attached to the ceiling
- Return to the City Entrance
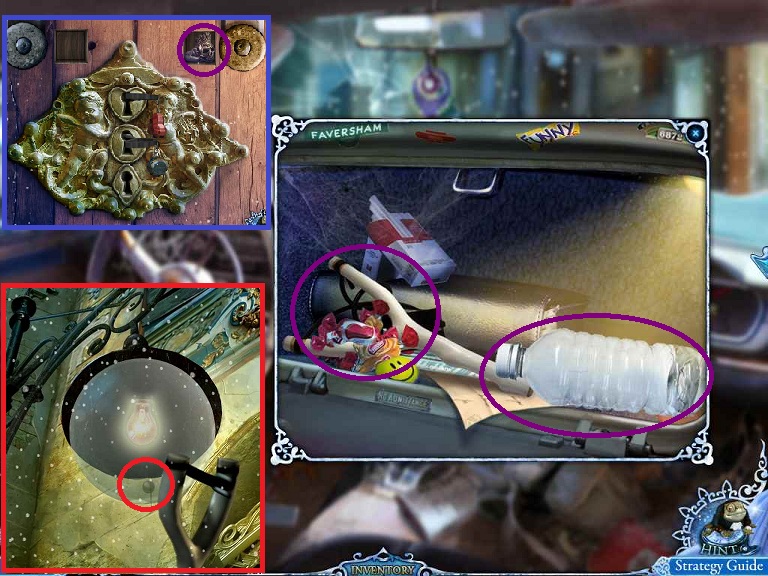
- Examine the inside of the car
- Use the WIRE CUTTER on the wire on the wheel
- Pick up the STEERING WHEEL
- Examine the easel
- Place the BLACK PAINT (from the Hall) and WHITE PAINT (from the bedroom)
- Solve the picture puzzle
- Pick up the SCYTHE
- Examine the wheelchair
- Use the WOODEN WHEEL
- Pick up the WHEELCHAIR
- Return to the Mansion and enter the Bathroom
- Examine the aquarium
- Use the SCYTHE
- Find the hidden items and receive POISON
SPRAY

- Go to the Bedroom
- Examine the ceiling
- Use the POISON SPRAY
- Examine the window sill
- Pick up the HOOD ORNAMENT
- Pick up the man
- Go to Oak Alley
- Examine the police car
- Click on the hood
- Place the HOOD ORNAMENT
- Pick up the FAN BELT
- Return to the Brown Mansion and the Garage
- Examine the engine
- Place the FAN BELT
- Examine the interior
- Place the STEERING WHEEL
- After the van drives off, examine the note to the right
- Return to Oak Alley
- Examine the van and then the note
- Click on the door handle
- Place the man in the van.
- Go collect the other four people, one at a time.
- In the Radio Tower Room.
- In the Church Garden
- In the Bedroom Hideout (by way of the Old Kitchen)
- In the Bank Safe.
- In every instance use the POISON SPRAY
- For the man in the Bank Safe, you will need to use the WHEELCHAIR
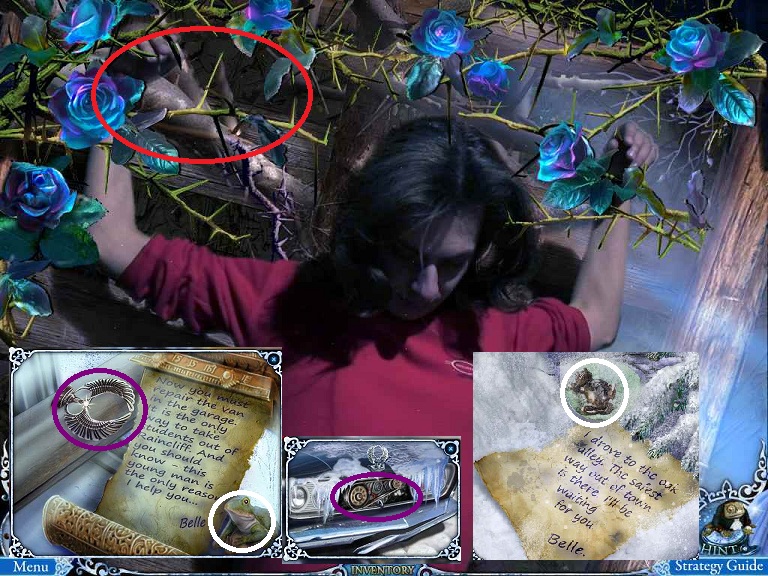
- Upon rescuing the fifth person, Belle will leave you a note.
- Read the note and pick up the BULLET
- You will now have a LOADED GUN
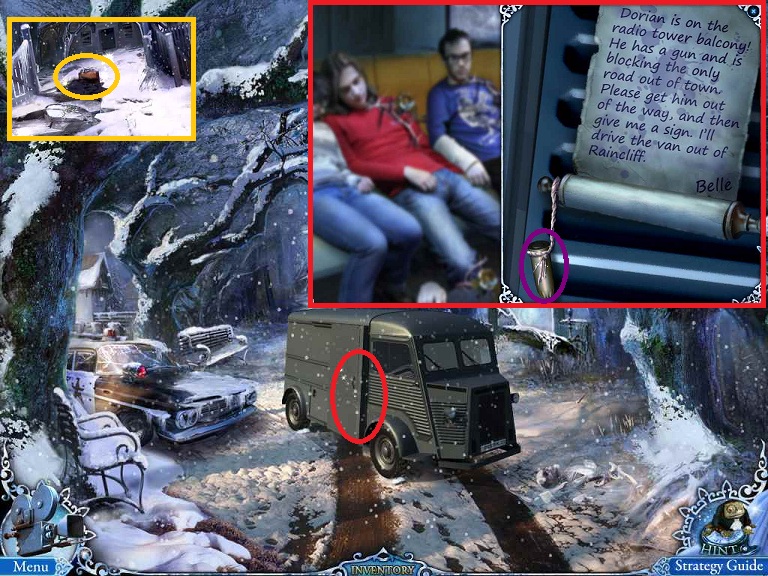
- Head towards the Radio Tower
- Use the GUN to scare off one of the men
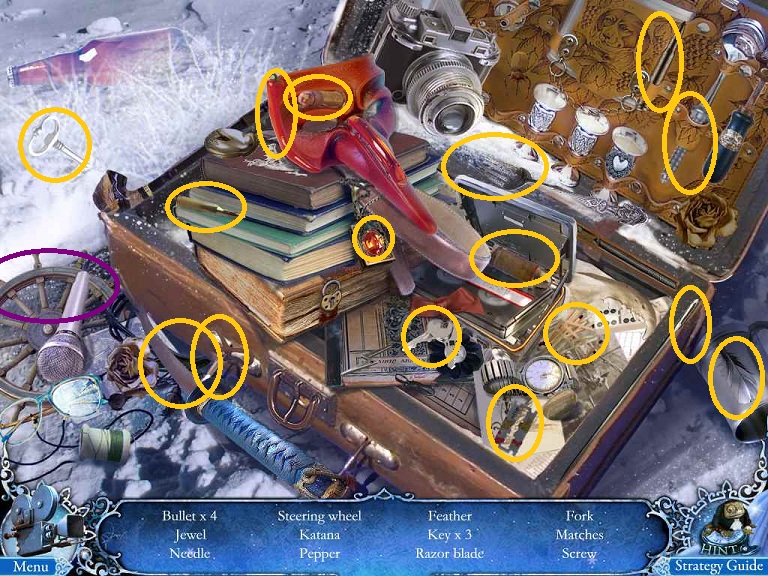
- Examine the suitcase
- Find the hidden objects and the STEERING
WHEEL
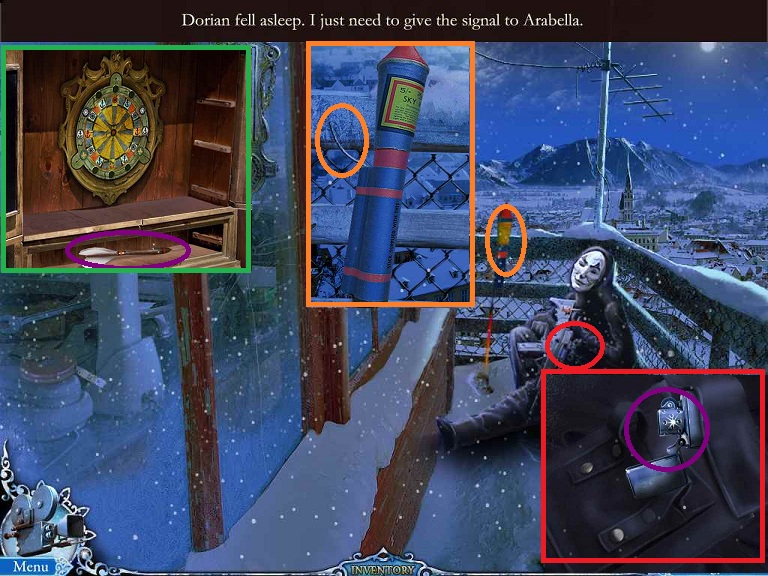
- Head up into the Radio Room
- Examine the cabinet and use the STEERING WHEEL
- Pick up the DART
- It will automatically be dipped in the tranquilizer
- Head out the door to the Balcony
- Use the DART on Dorian
- Examine Dorian
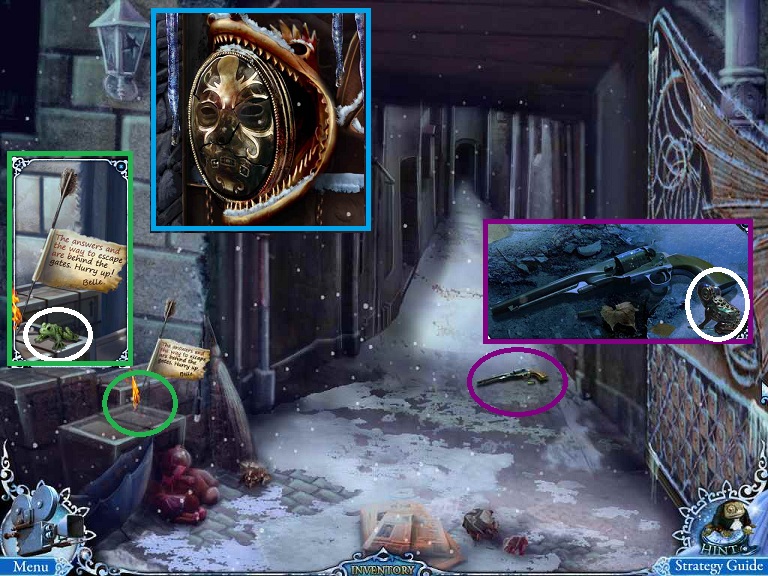
- Pick up the LIGHTER
- Examine the flare
- Light the FLARE
- Finis
Content(s) of this game guide may not be copied or
published on any other site without permission from Casual Game Guides.
©CasualGameGuides.com 2006 - 2021