
Haunted Manor: Queen of Death
Haunted Manor: Queen of Death Walkthrough includes step-by-step instructions on how to beat the game, complete with more than 100 detailed screenshots with every hidden object marked. Can you save your sister and break the curse from this ancient evil?
Opening Story:
A messenger brings a young woman, Christie, a letter from her twin sister, Stella. The letter informs Christie that she and her sister are now orphans. Christie must leave school in London to return to the family manor house. Due to an unnamed malady, Stella remained at the family home and didn’t join Christie at school. The letter implies that something may be wrong at the house and that Christie is to come quickly. Christie departs immediately, but is unprepared for the horrors that await her.
General Tips:
Following this game guide exactly is not necessary. However, some actions must be performed to complete a certain scene before progressing.
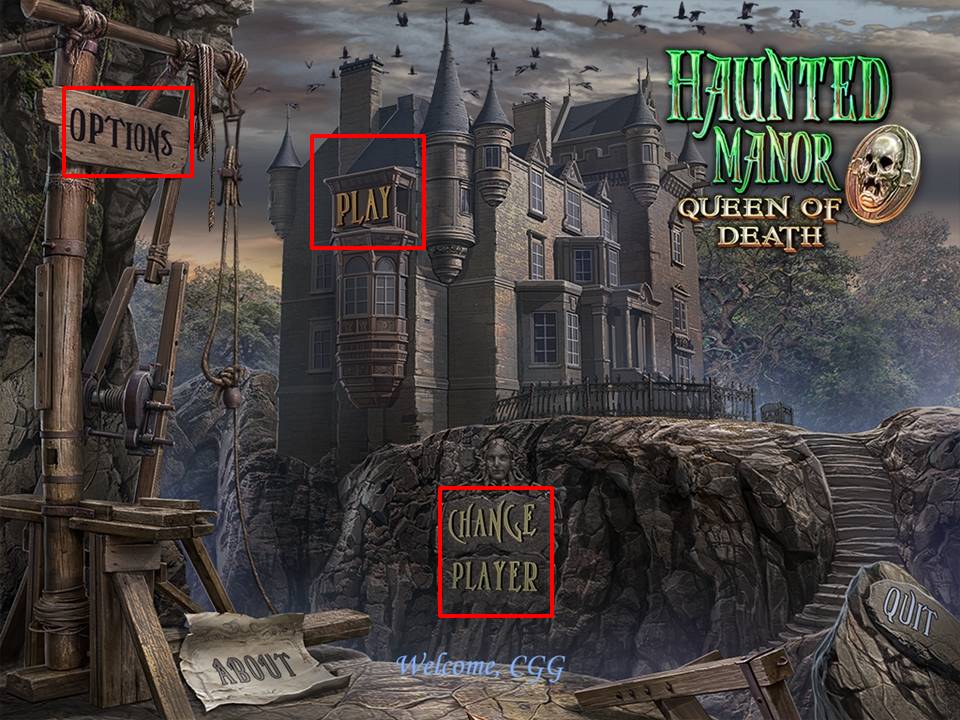
Use the OPTIONS button to customize the screen size, music, sound, and cursor.
Click PLAY to begin your adventure.
You may CHANGE PLAYER to manage your activities within the game.
Hidden Object Areas sparkle. Zoom into these sparkling areas to initiate that activity. Both Hidden Objects and some puzzles within the game are random. Use this game guide as an example only.
You may proceed through the introduction to the story by using the NEXT button or skip with the SKIP ALL button.
Chapter 1: Obtaining the Fresco
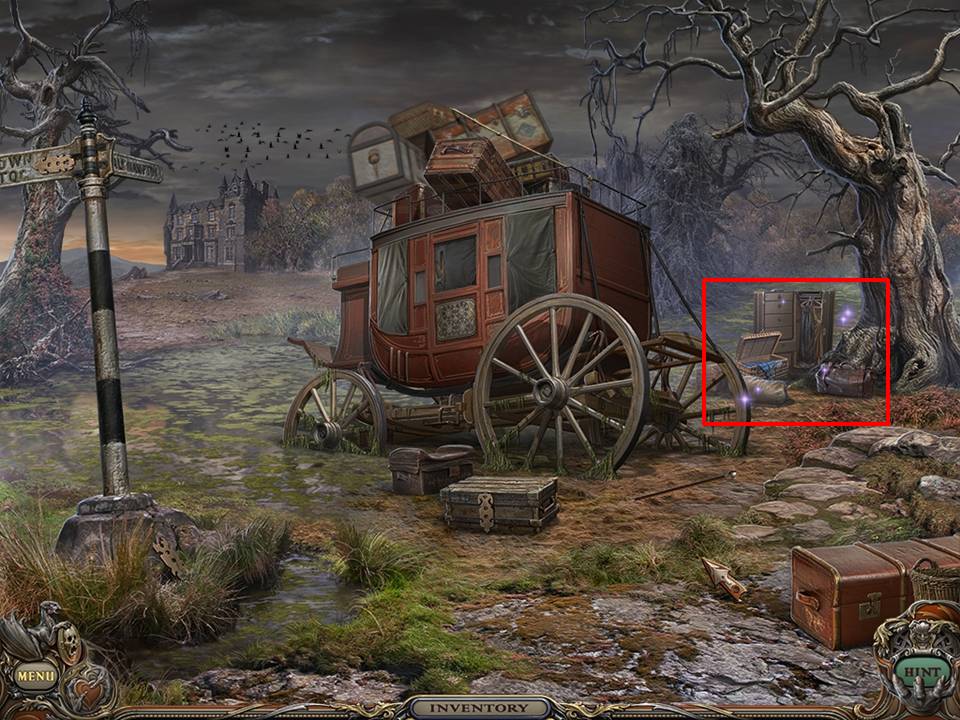
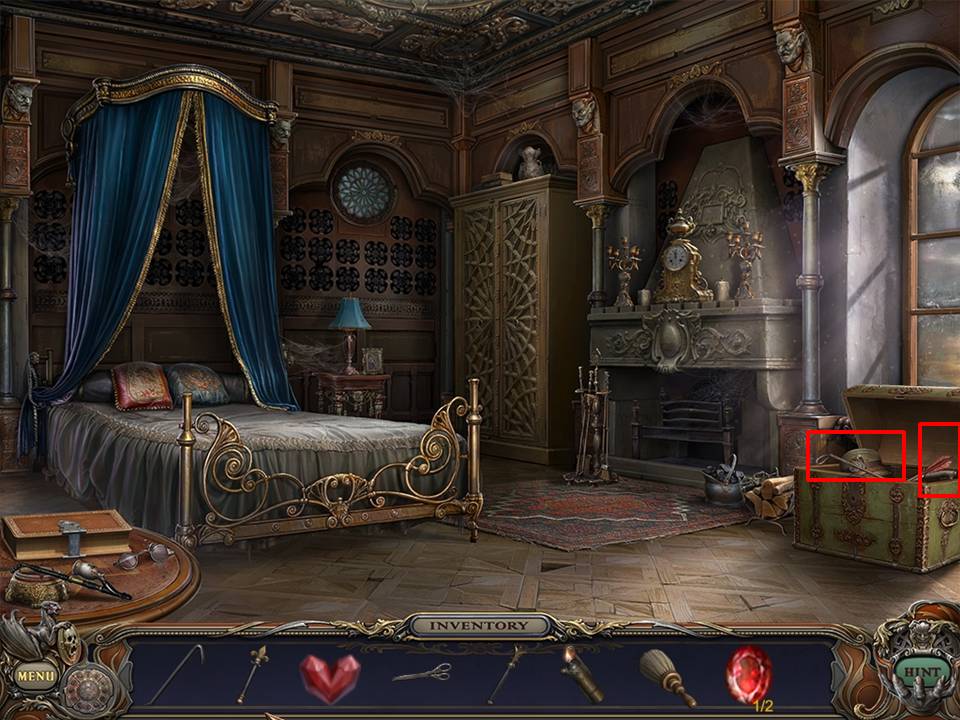
The scene you are in is called the Swamp. Begin by playing the Hidden Object Area. Access by clicking on the trunks and baggage under the tree on the right of the screen.
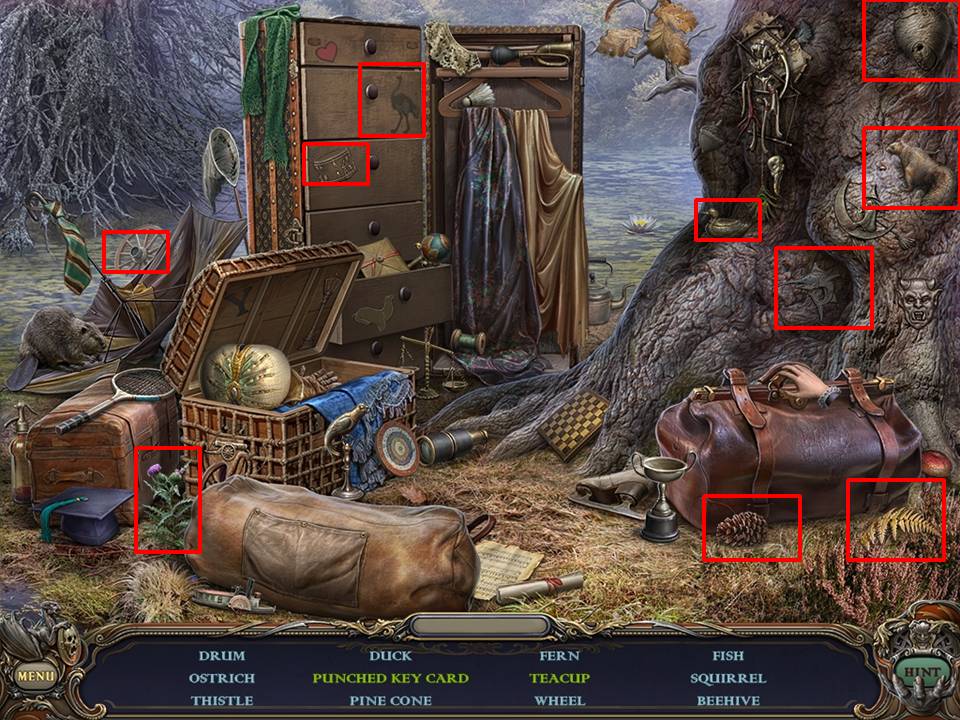
Find the objects listed. Objects change and the ones indicated on this screen are those used for the sample game.
Open the bag to reveal the punched key card.
Move the panel to reveal the 6.
Move the leaves on the branch at upper right to reveal the teacup.
You will receive a PUNCHED KEY CARD.
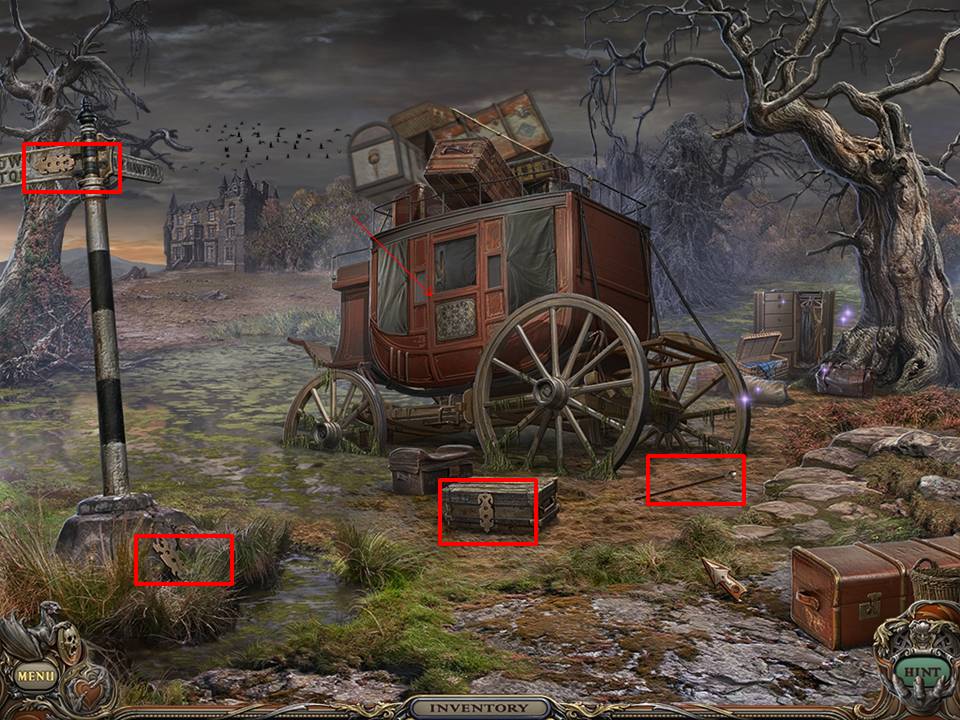
Pick up the three (3) remaining PUNCHED KEY CARDS and CANE.
Zoom in on carriage door.
Place the PUNCHED KEY CARDS over the lock.
Rotate the disks and place the PUNCHED KEY CARDS as shown.
This enables you to enter the carriage.
Pick up the LIGHTER, LADDER, and FLASHLIGHT.
Use CANE to break the window.
Pick up SPLINTER.
Depart carriage.
Place the LADDER on the rear of the carriage. An owl will fly in and perch on top of the carriage.
Drop the LAMP over the owl.
Scale the LADDER and cut the rope with the SPLINTER.
Scramble over fallen luggage to leave the Swamp and enter the Yard.
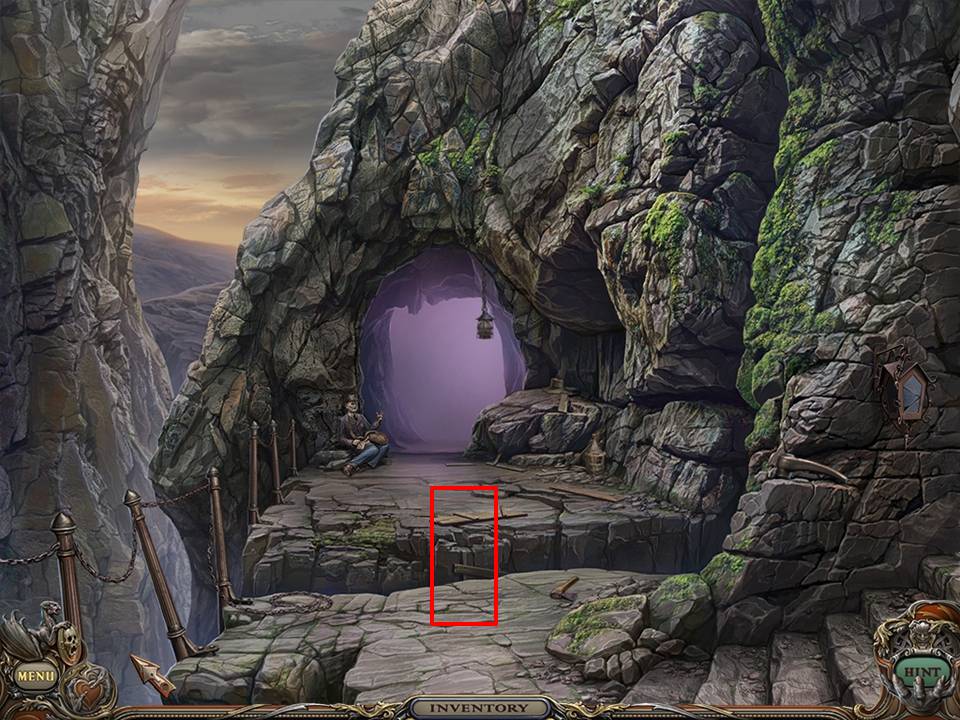
Move to the left toward the Mine Entrance.
Pick up the HANDLE and the AXE.
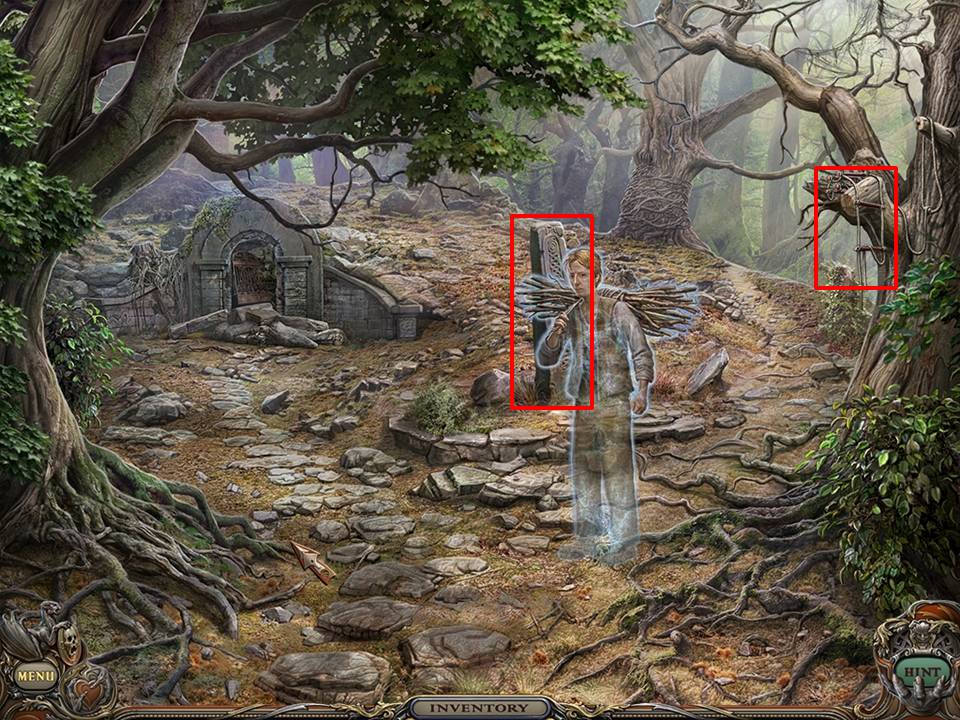
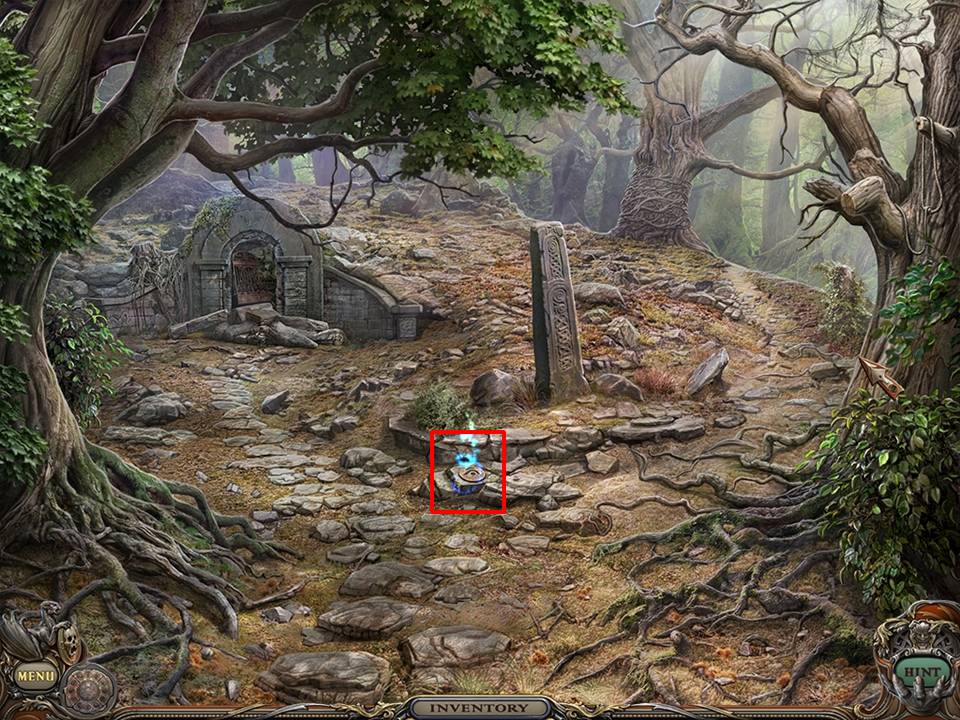
Return to the Yard and move to the right to enter the Woods.
Pick up the ROPE LADDER.
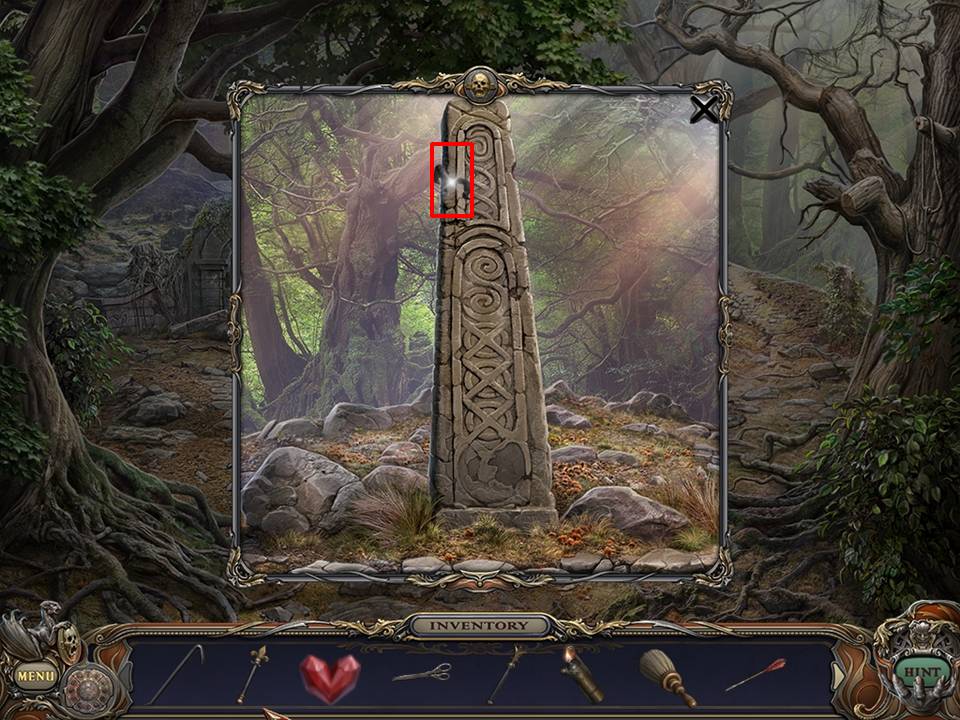
Zoom into the stone pillar.
Click on the SNAKE.
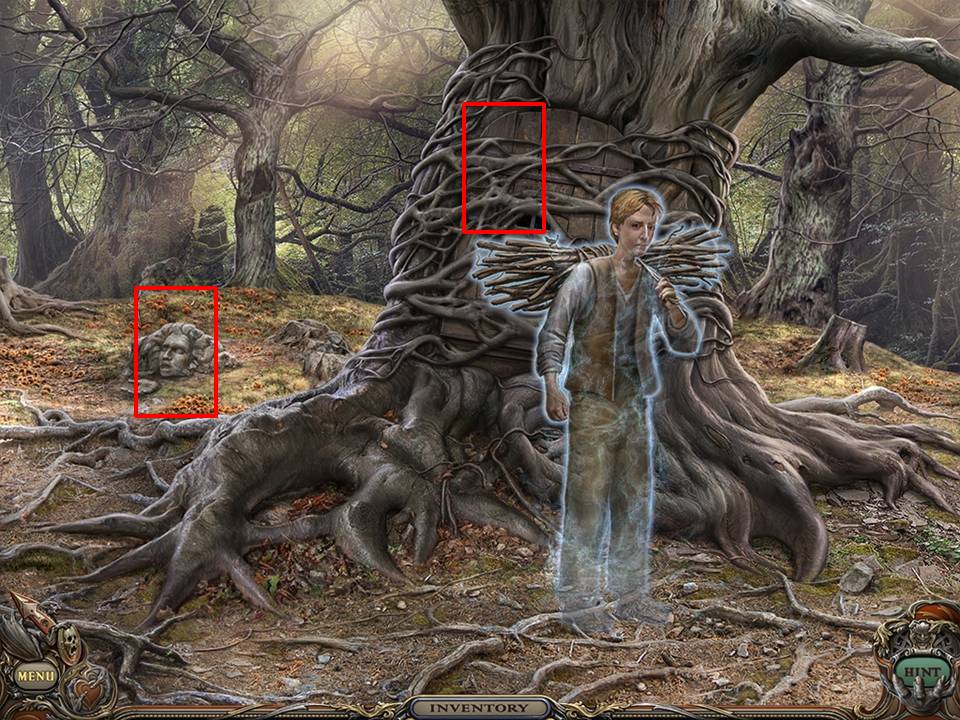
Go to Tree House.
Use AXE to chop the vines. AXE will return to inventory renamed as AXE BLUNT.
Zoom into the door.
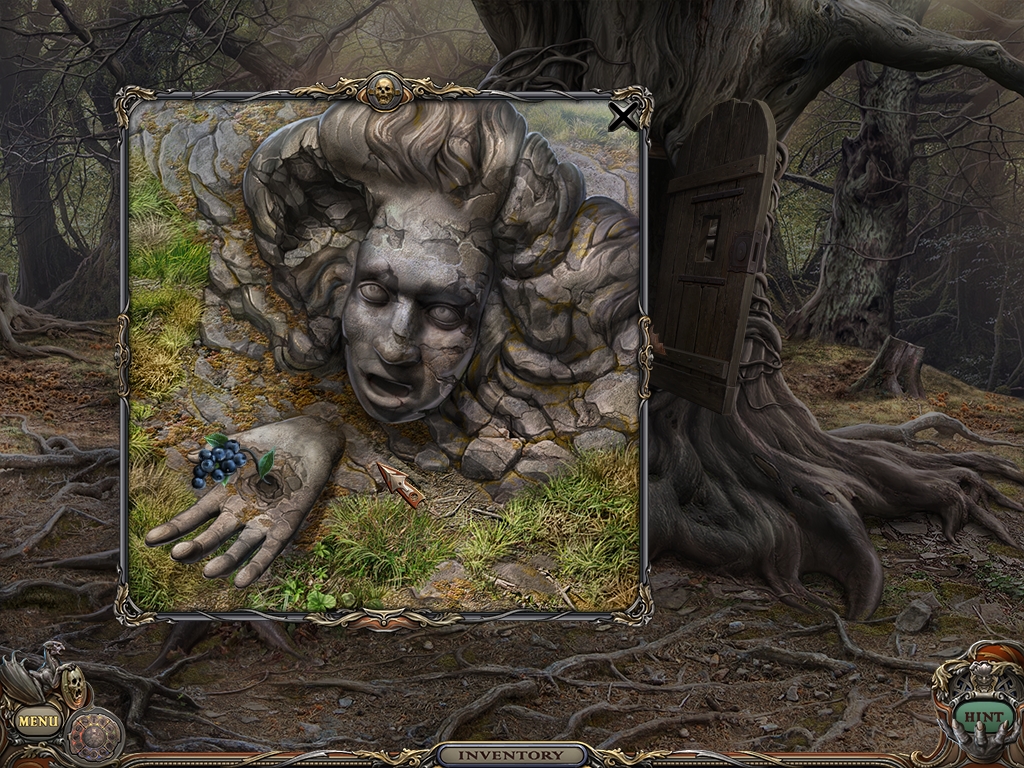
Zoom into the stone face.
Pick up the CAMEO.
Return to Woods scene.
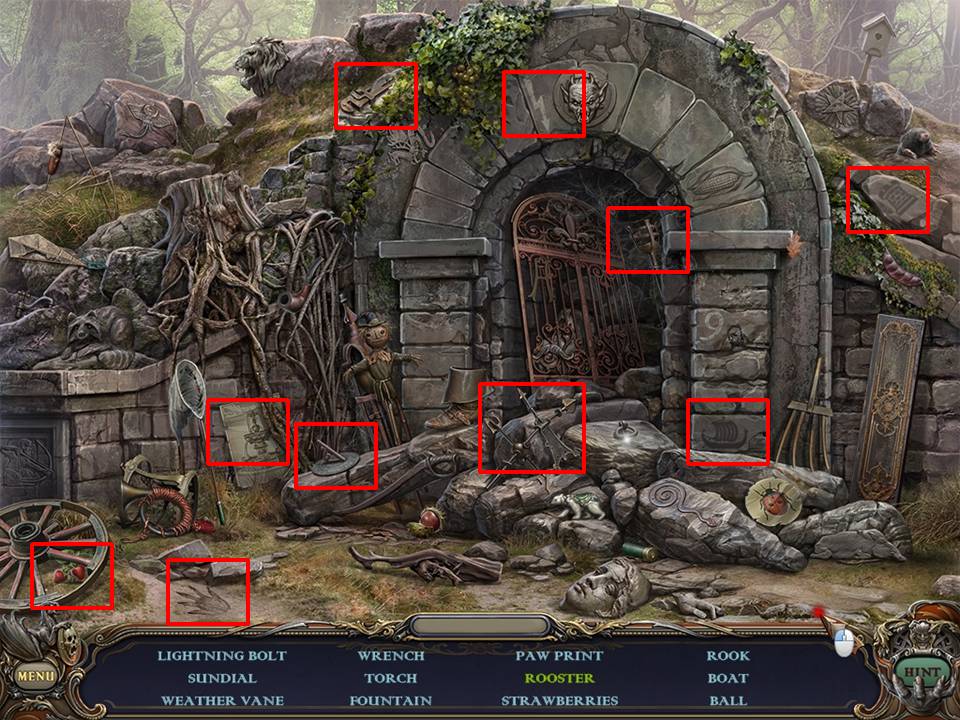
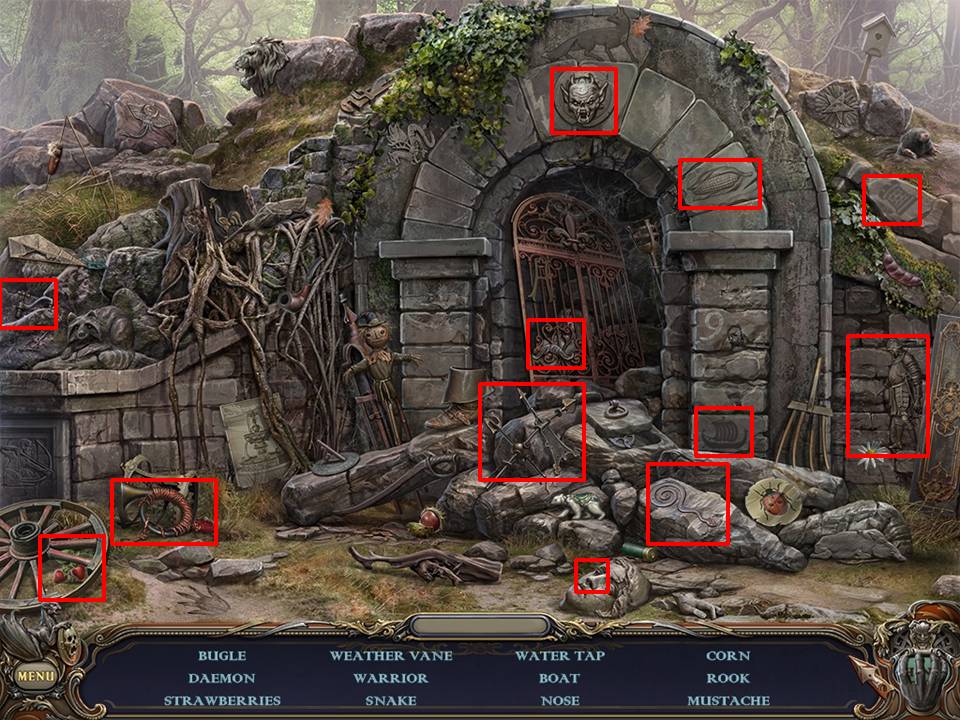
Play the Hidden Object Area located at the back left of the screen.
Move the plaque to reveal the warrior.
Move the tree trunk to the top right of the archway to reveal rooster.
Receive the BALL.
Return to the Tree House entrance.
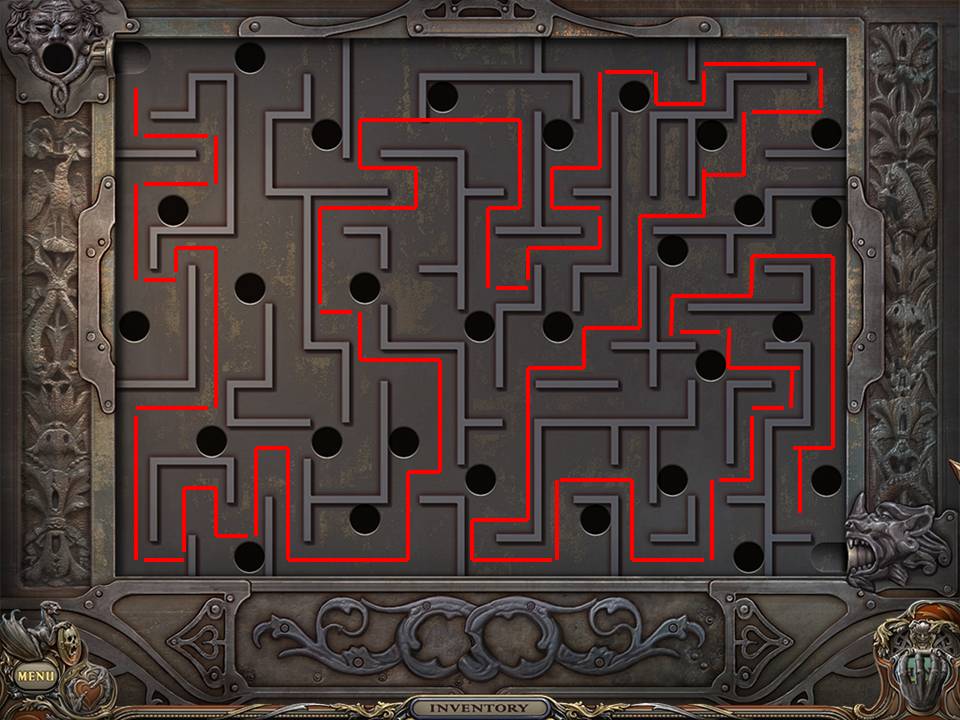
Zoom back into the door.
Maze visual will be revealed.
Place the ball in the hole of the mouth of the figure on the top left corner on the maze.
Follow the path as displayed to move the BALL to the exit.
Enter the Tree House.
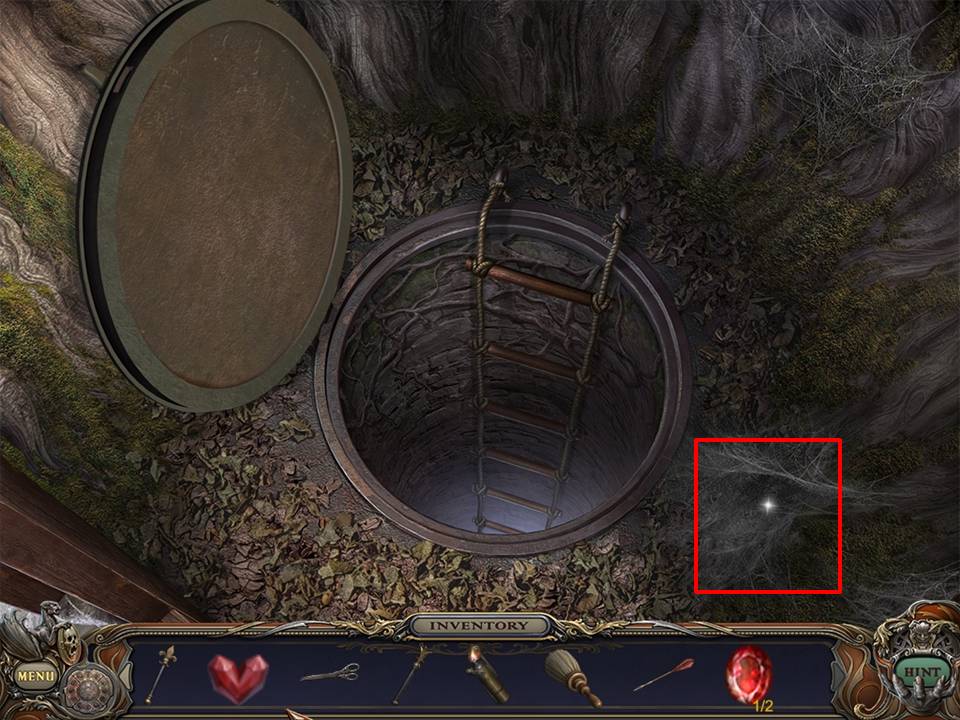
Put the HANDLE on the hatch and open.
Once the hatch is opened, place the ROPE LADDER down the hole.
Enter the Crypt.
Light the lamp with the LIGHTER.
Pick up the FRESCO BACKGROUND.
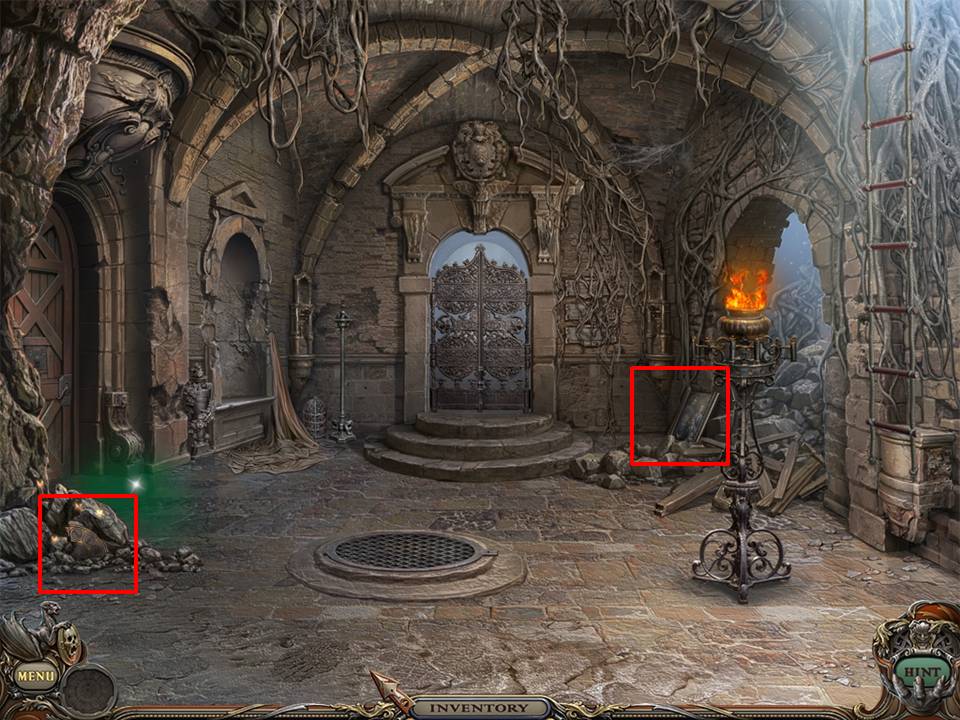
Play the Hidden Object Area located to the left of the center doorway along the back wall.
Flame is behind loose tile on the left.
Find the KEY by moving the cage.
Receive the KEY.
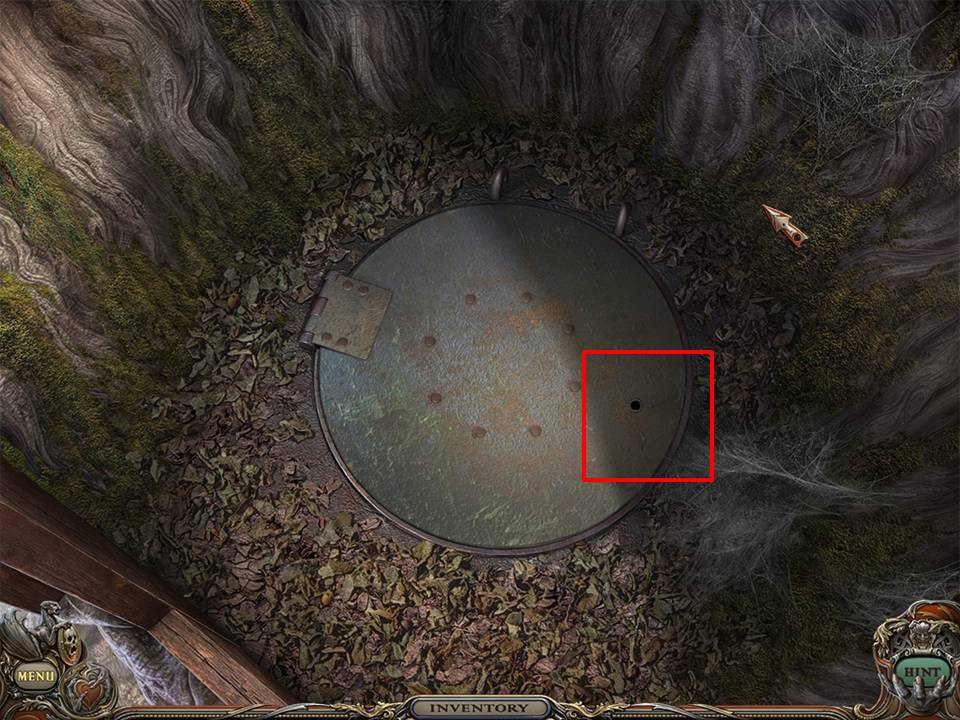
Zoom into the manhole.
Insert KEY into the keyhole and open the door.
Beetle scene will be revealed.
Match identically colored beetles. Screen shot is for illustration only. Beetle placement may differ depending on your unique game play.
Pick up the CAMEO.
Zoom into the family portrait.
Pick up the candles.
Pick up the FRESCO PIECE.
Return to the Woods.
Zoom back into the stone pillar.
Pick up the FRESCO PIECE.
Return to the Yard.
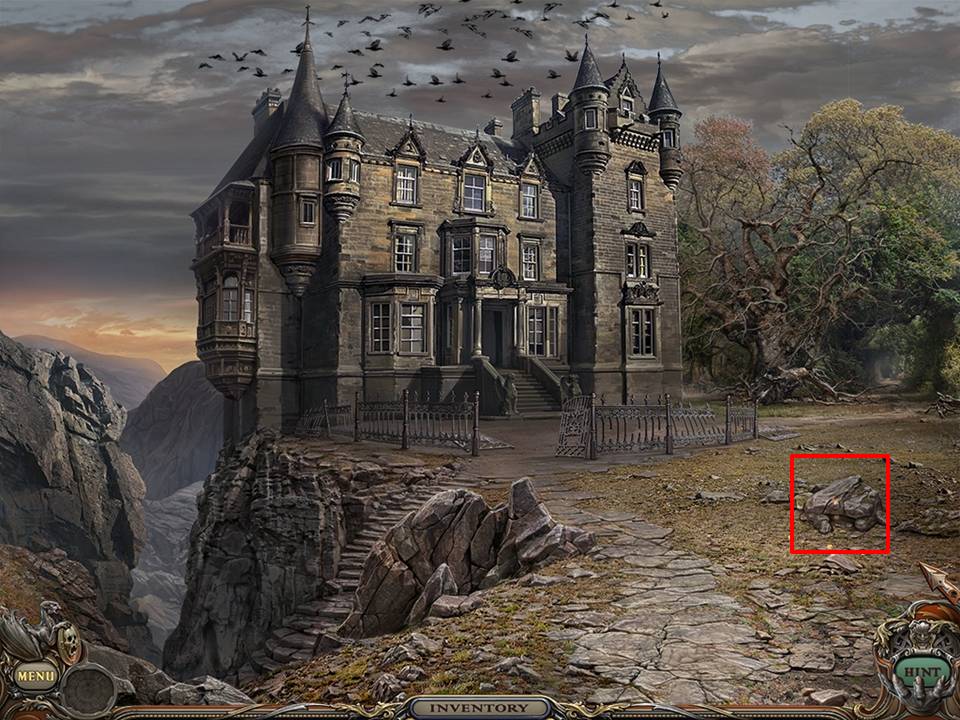
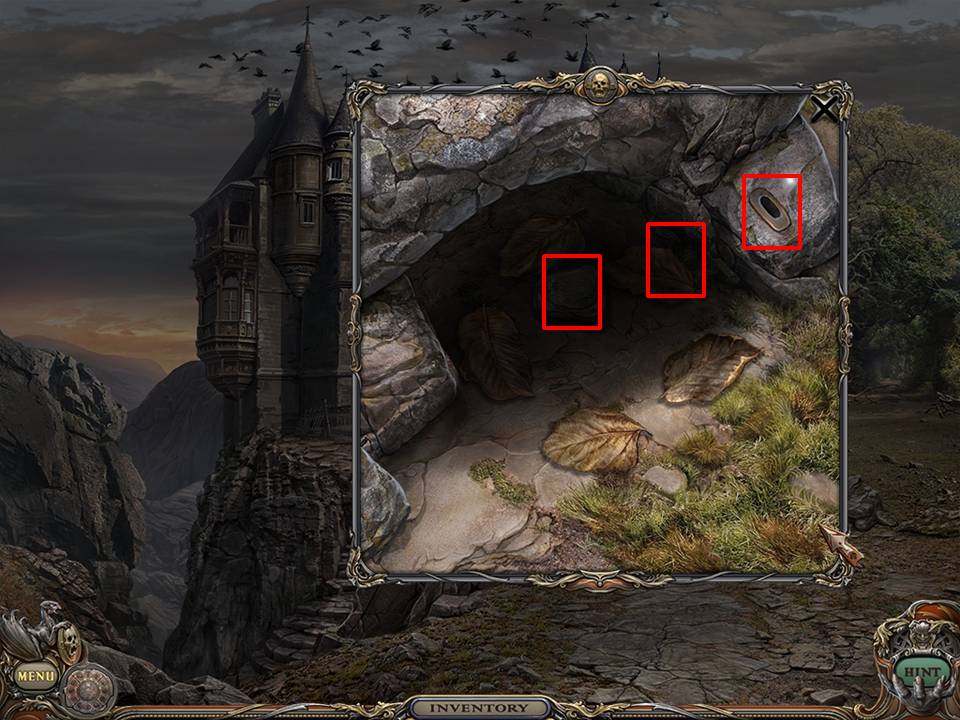
Zoom into the stone.
Move the rock.
Pick up the FRESCO PIECE.
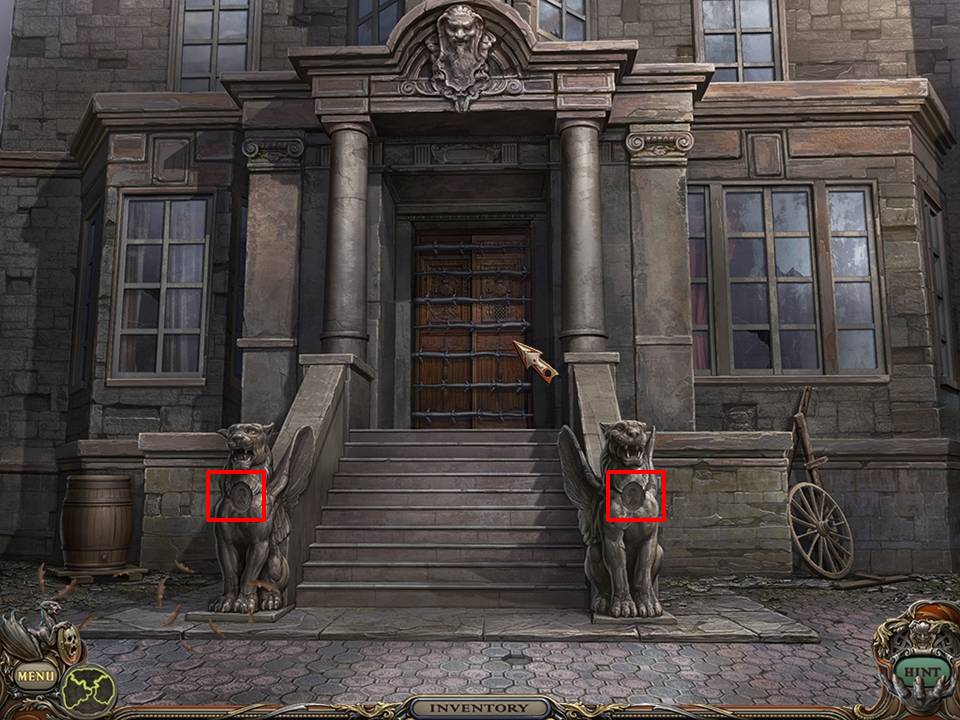
Move to the front door of the house.
Place the right-facing CAMEO around the neck of the lion on the left and the left-facing cameo on the opposite lion.
Bars on front door will slide away. Enter the house and proceed to the Hallway.
Move the pillow.
Pick up the BALL.
Pick up the CANDELABRA and place it on the table.
Insert the CANDLES into the CANDELABRA and light with the LIGHTER.
Zoom into the frame located behind the CANDELABRA.
The following is a memory puzzle.
Place the BALL in the hole at top center of frame.
A picture of a demon head will be shown in the hole at the top center.
Click on circles within the frame. Random heads will be revealed. Match the demon head showing at the top center with another head within the frame. A new demon head will be revealed. Continue matching until all heads have been revealed and matched.
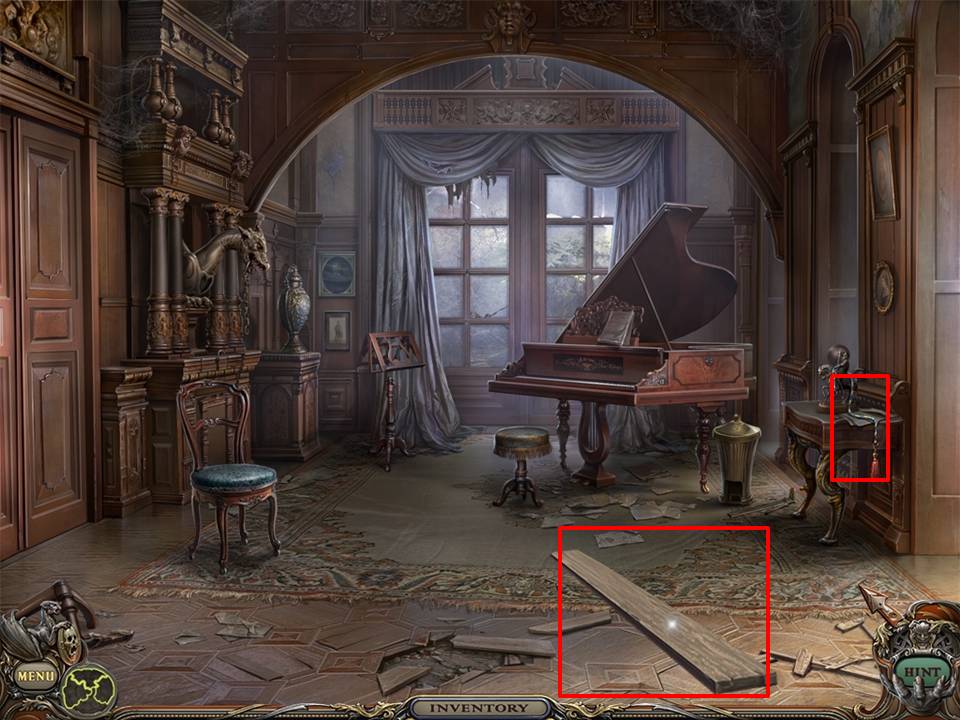
The door is now open and you can proceed into the Parlor and through the door to the Music Room.
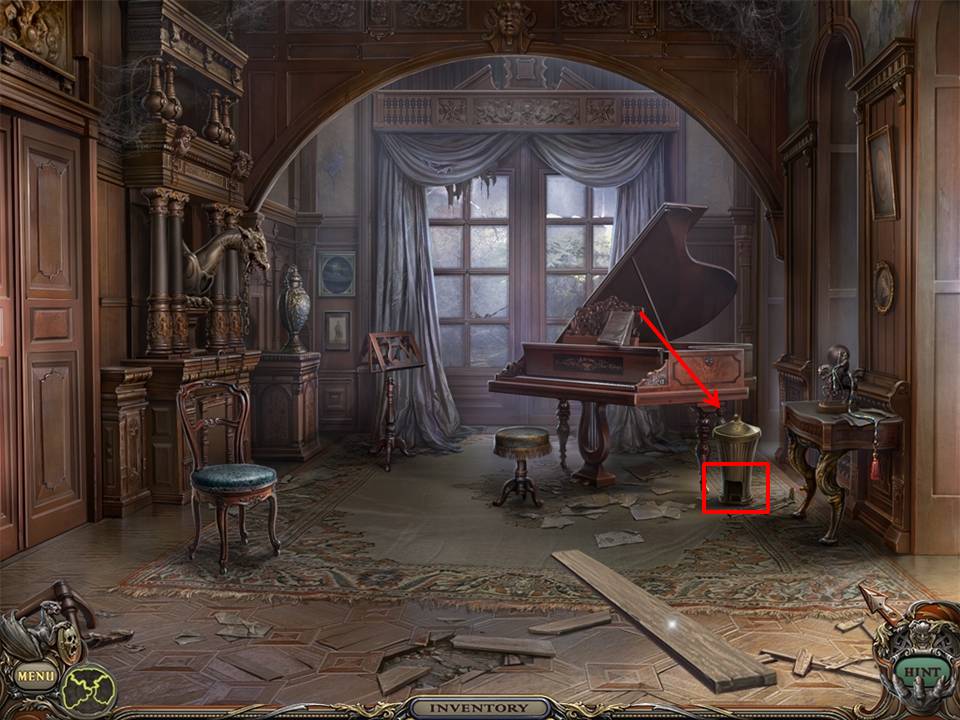
Pick up the BOARD and the PULL CORD.
Return to the Parlor.
Attach the PULL CORD to the lamp.
Turn on the lamp.
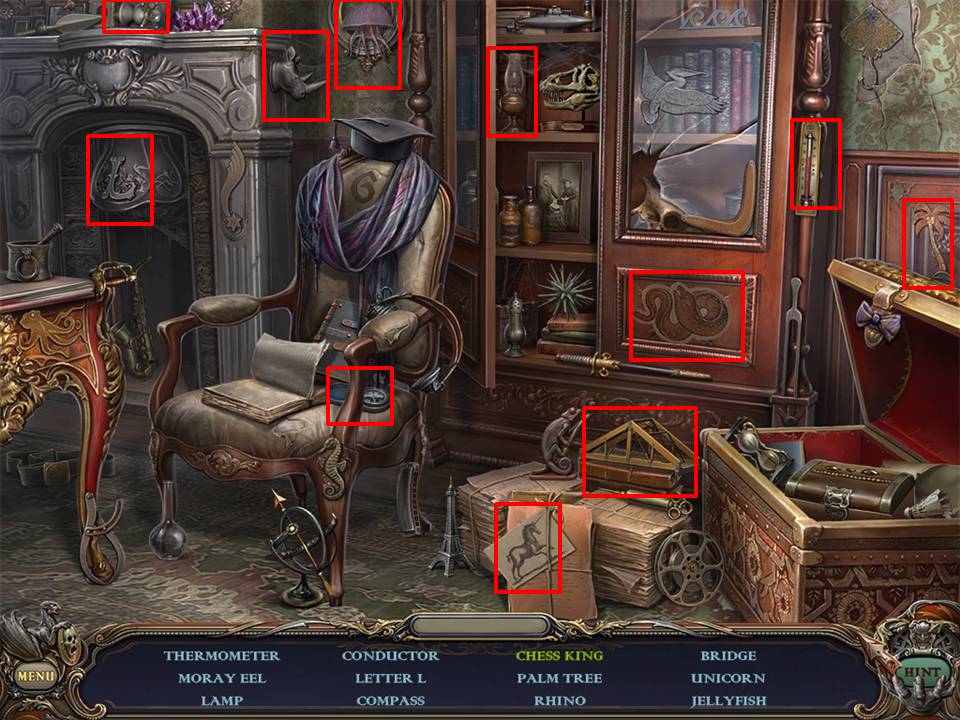
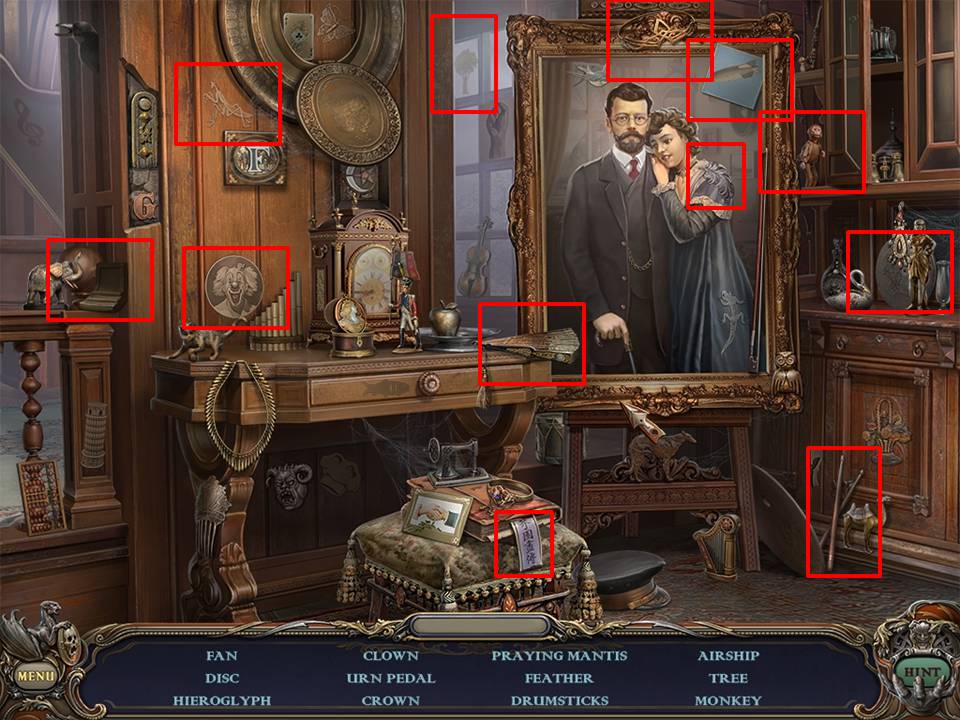
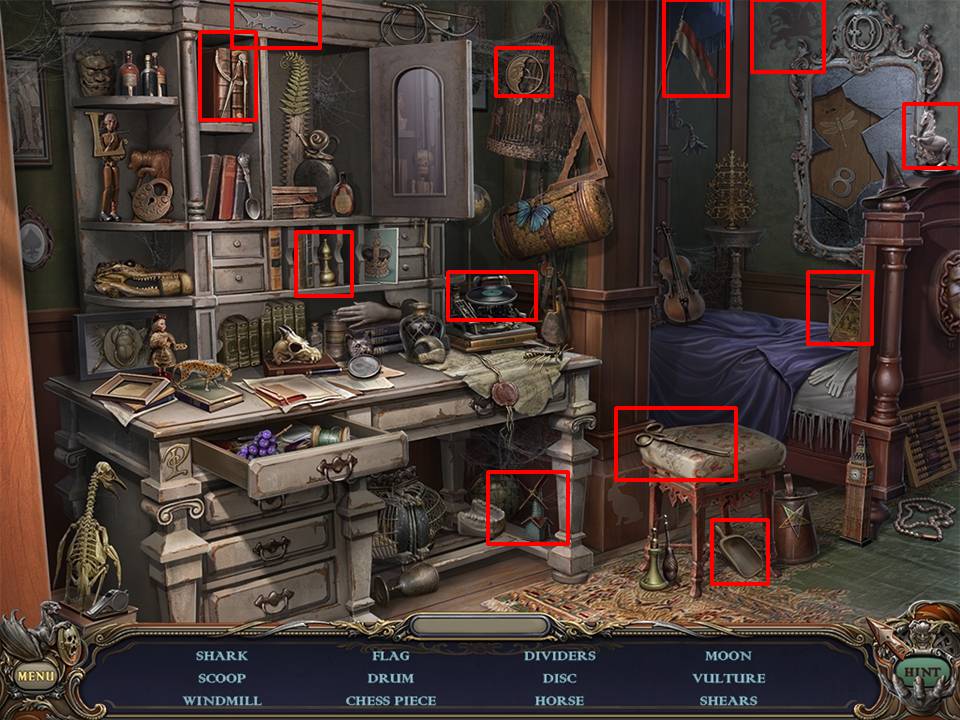
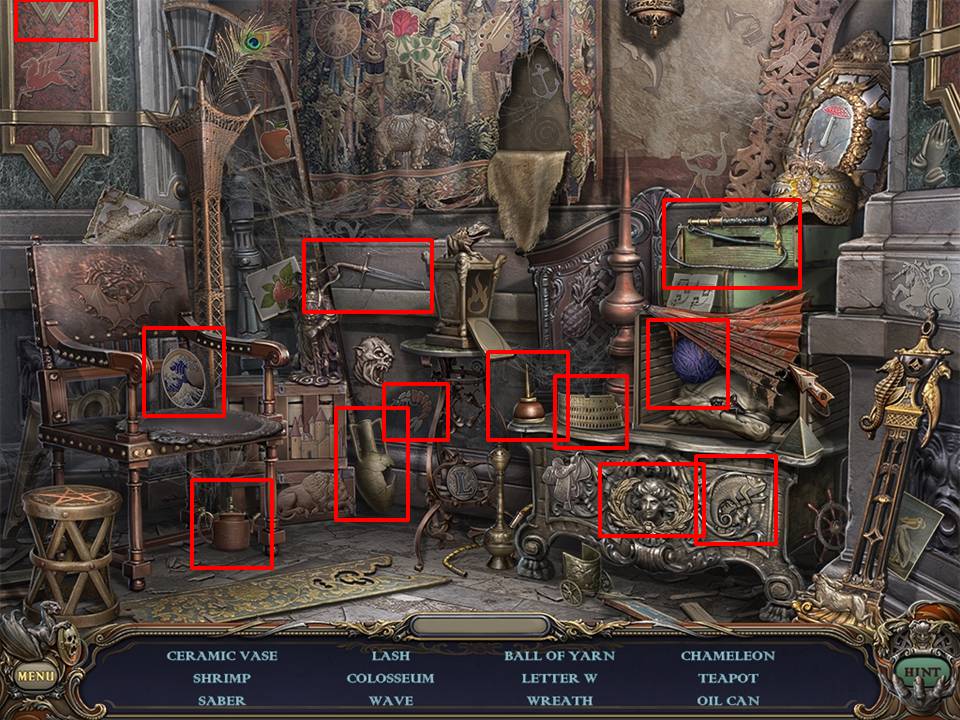
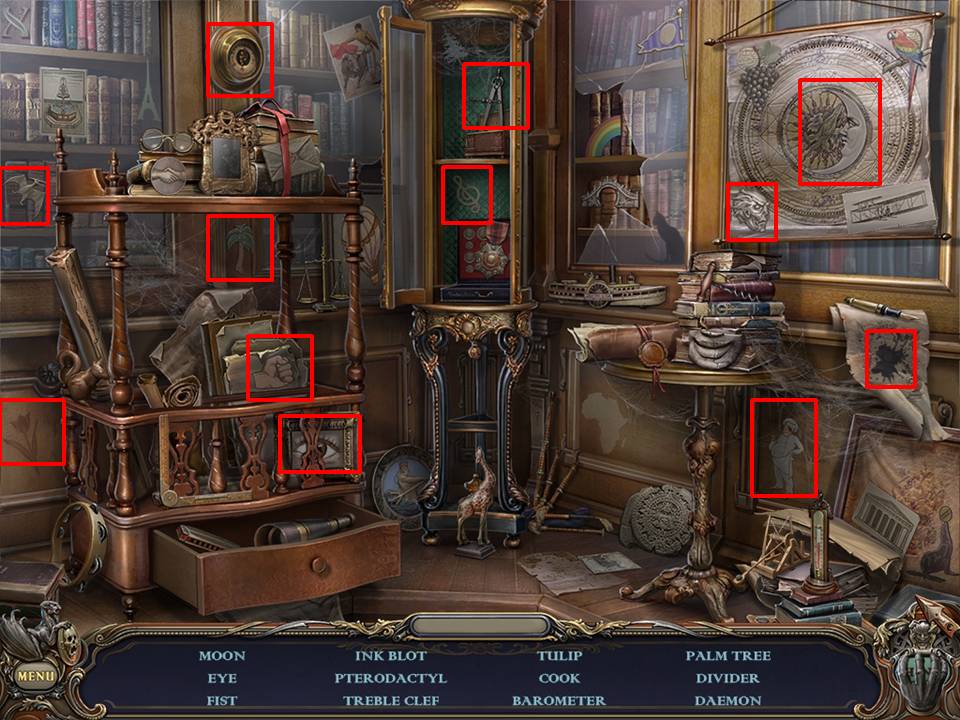
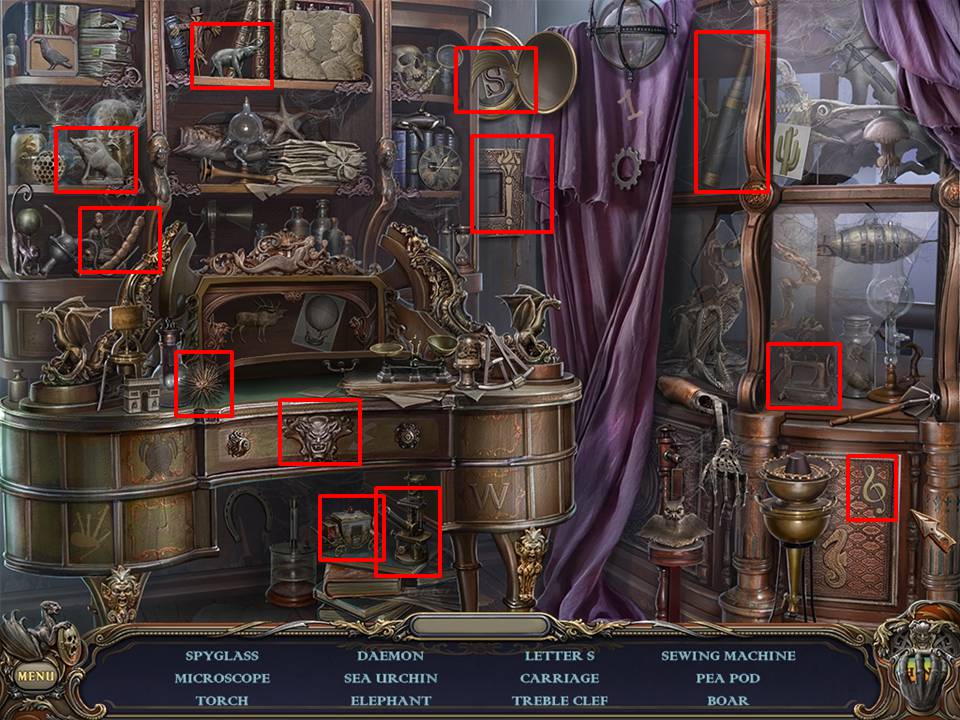
Play the Hidden Object Area located near the picture frame.
Open cabinet at top right to reveal the camera and tobacco pipes.
Move the clock to reveal the clown and the reed pipes.
Open the cabinet to reveal opera glasses.
Move the artist’s palette to reveal the number seven and to obtain the CROWBAR.
Return to the Mine Entrance.
Use BOARD to bridge the gap.
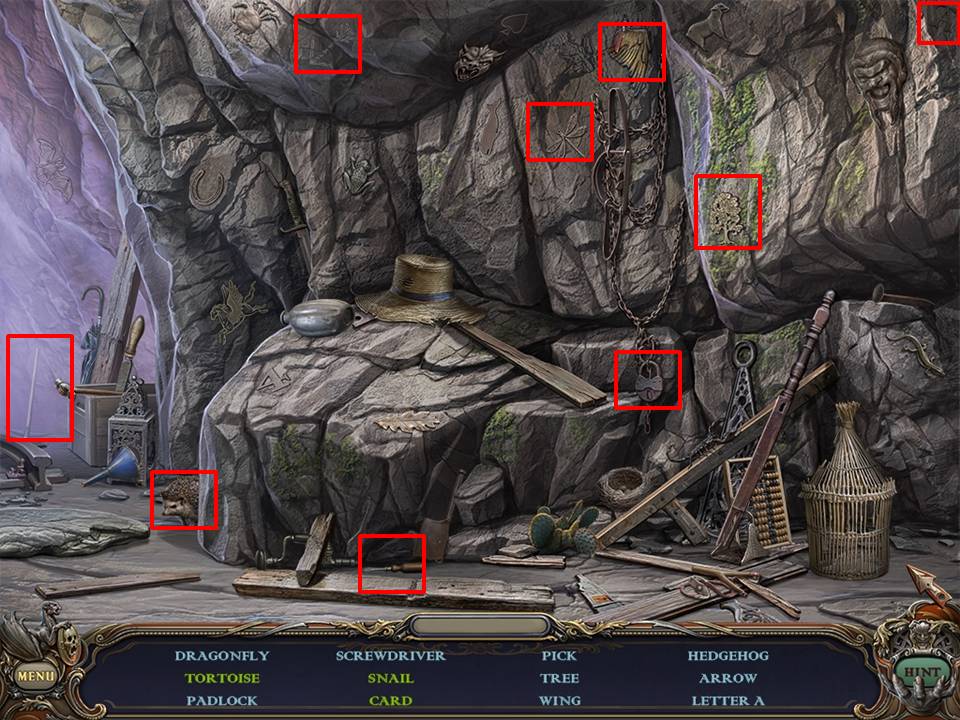
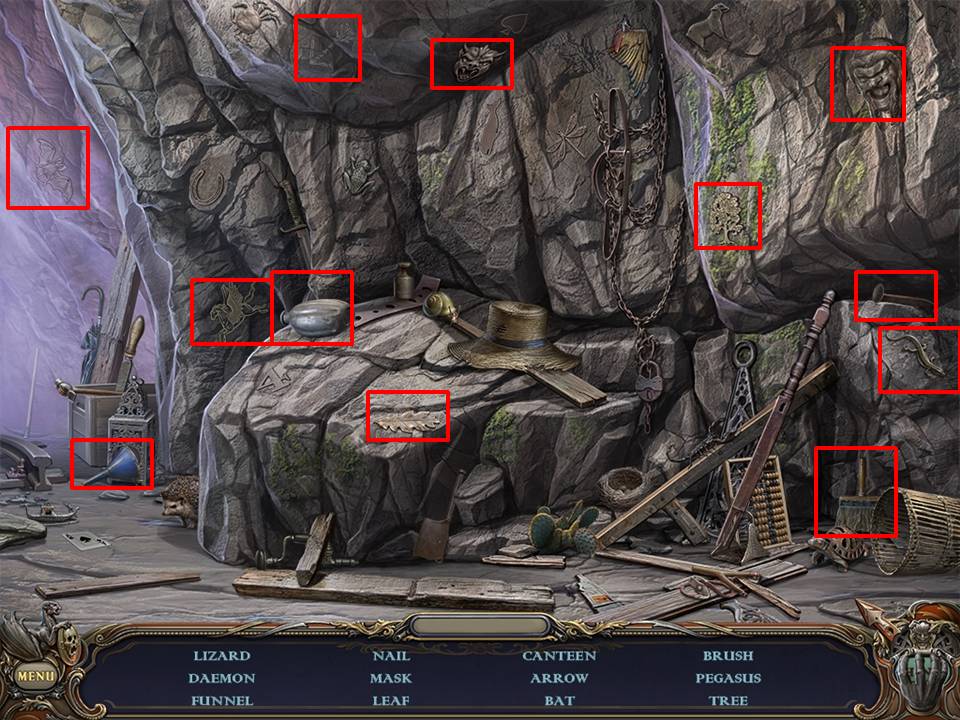
Play the Hidden Object Area located to the right of the mine entrance.
Move the wicker cage to reveal the brush and tortoise.
Move the hat to reveal the weight and snail.
Move stone at bottom left to reveal playing card.
Receive the SCREWDRIVER.
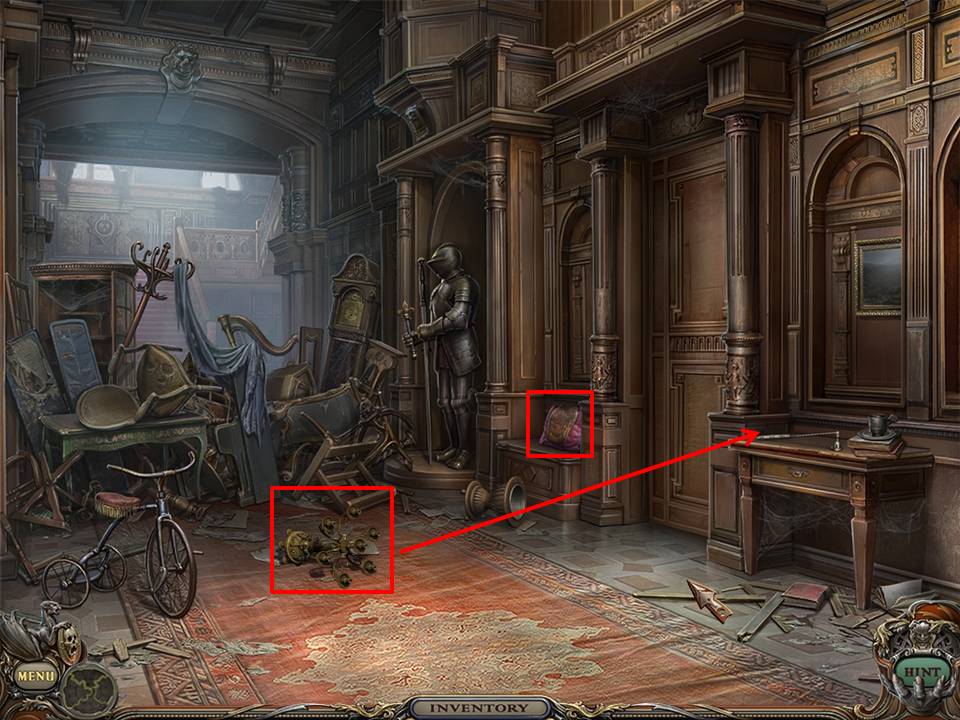
Return to the Hallway.
Zoom into the bicycle.
Use SCREWDRIVER to remove the HANDLE.
Return to the Music Room.
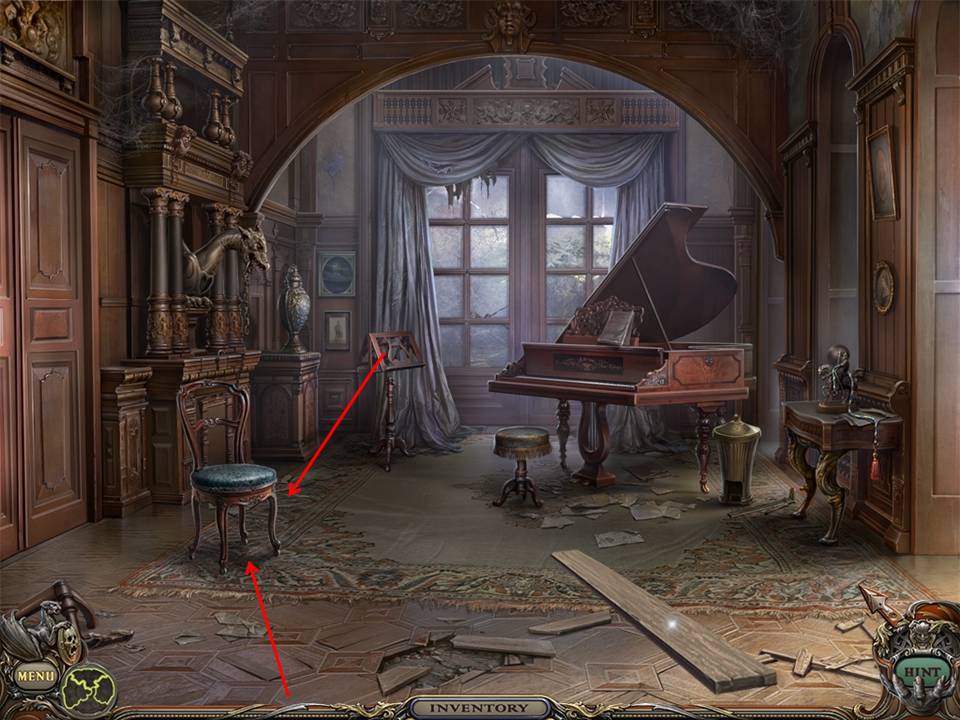
Move the chair. Flip the corner of the rug back to reveal a covered passageway.
Use CROWBAR to remove the cover.
Zoom in.
Place the HANDLE on the lock and turn.
Play Hidden Object Area in Cabinet by clicking on space between fireplace and cabinet.
Move the wallpaper to reveal envelope.
Move the photograph inside the cabinet to reveal the chess piece.
Receive the CONDUCTOR.
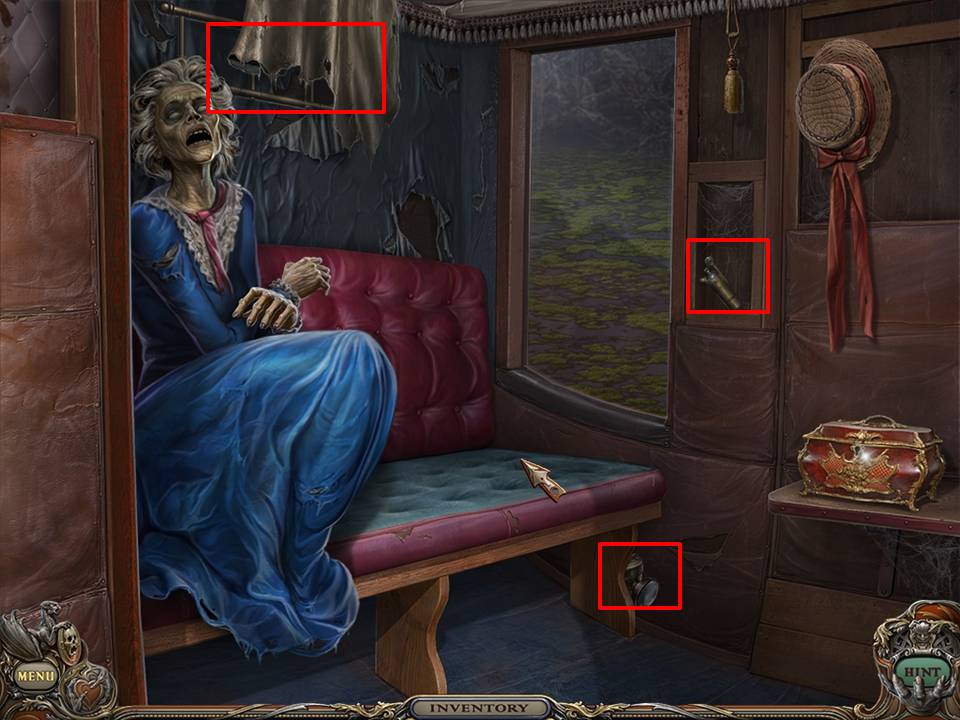
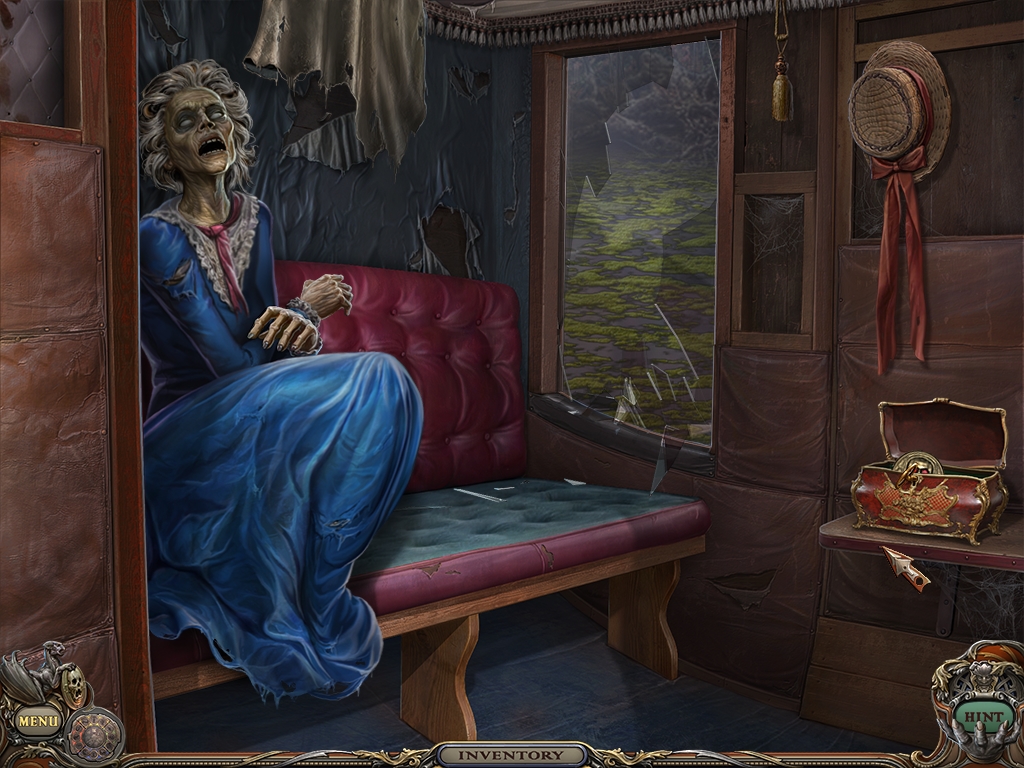
Open the canister that is sitting on the chair to the right of the old lady.
Pick up the TELESCOPE.
Return to the Mine Entrance
Zoom into the mailman on the left side of the Mine Entrance.
Zoom into the paper.
Move away from the mailman.
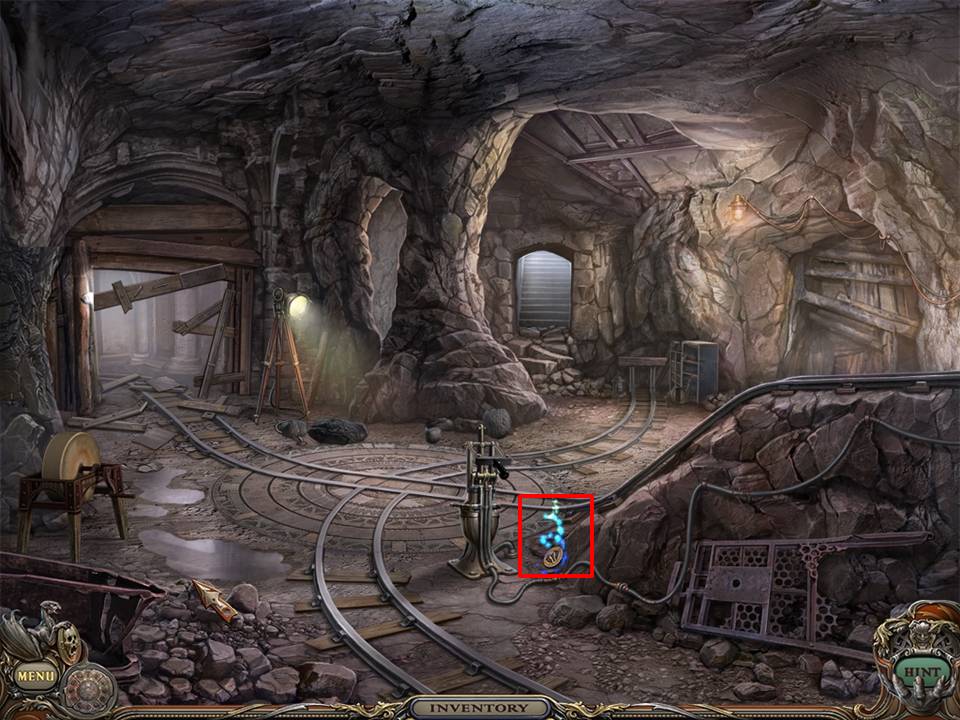
Enter the mine.
Open panel and zoom in.
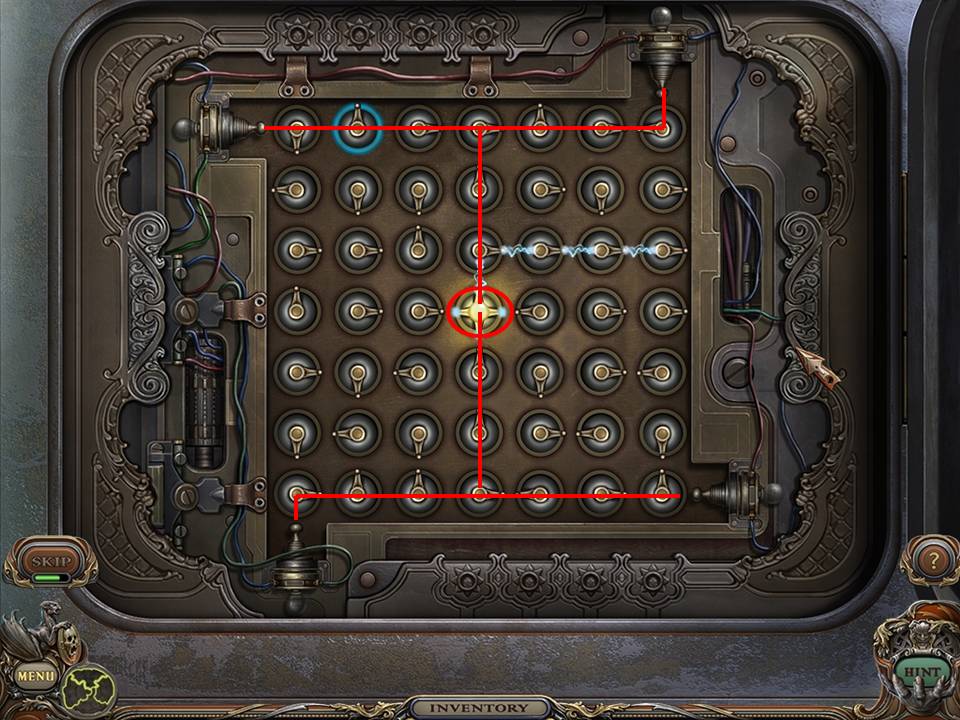
Place the CONDUCTOR into the center opening.
Solve puzzle to turn on all of the lights. To do this, connect the circuits as shown in the image. Please note: Every time you spin a circuit, the last one (indicated with a blue ring) will spin in the same direction as the one you are spinning.
Gather the last FRESCO PIECE when the lights come on.
Zoom into the FRESCO BACKGROUND which is adjacent to the Menu button.
Assemble all of the FRESCO PIECES.
In the next chapter, you will begin to amass the ingredients to place into the FRESCO. When directed to place an object into the FRESCO, open the FRESCO and place the item into the matching space.
Chapter 2: The First Four Ingredients
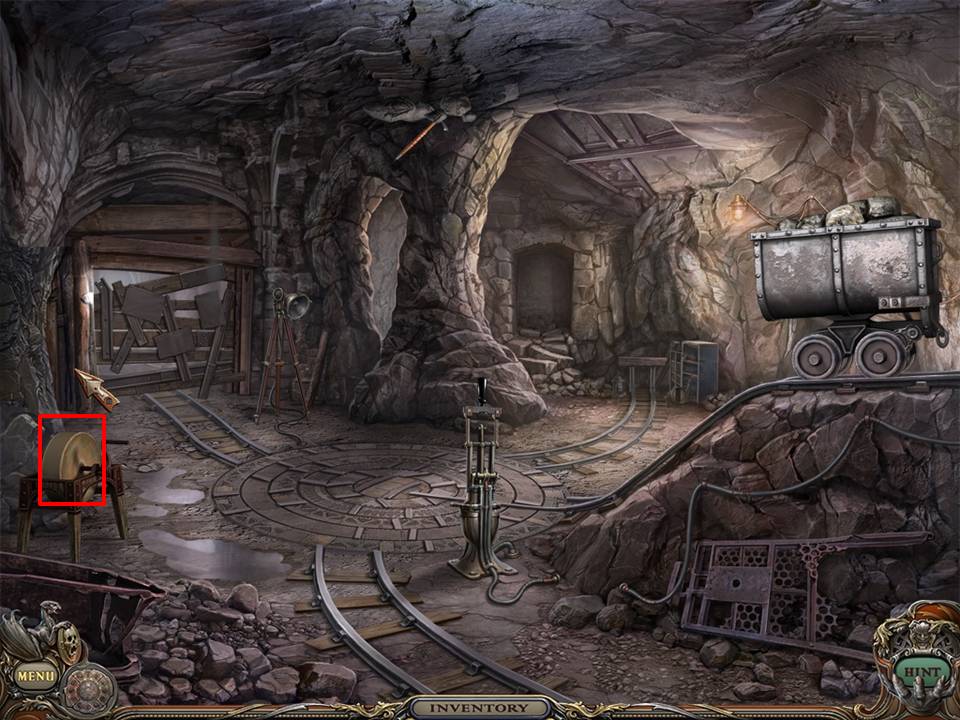
Move to the Mine Junction.
Take the AXE BLUNT from inventory and use grinding wheel to sharpen.
AXE BLUNT will transform to SHARP AXE.
Return to the Crypt which is under the Tree House Entrance.
Zoom into the vines located on the back wall.
Use the SHARP AXE to remove them.
Removal of the vines reveal plaques.
Click on the plaques in this order middle, top, and then bottom.
Enter the Mausoleum
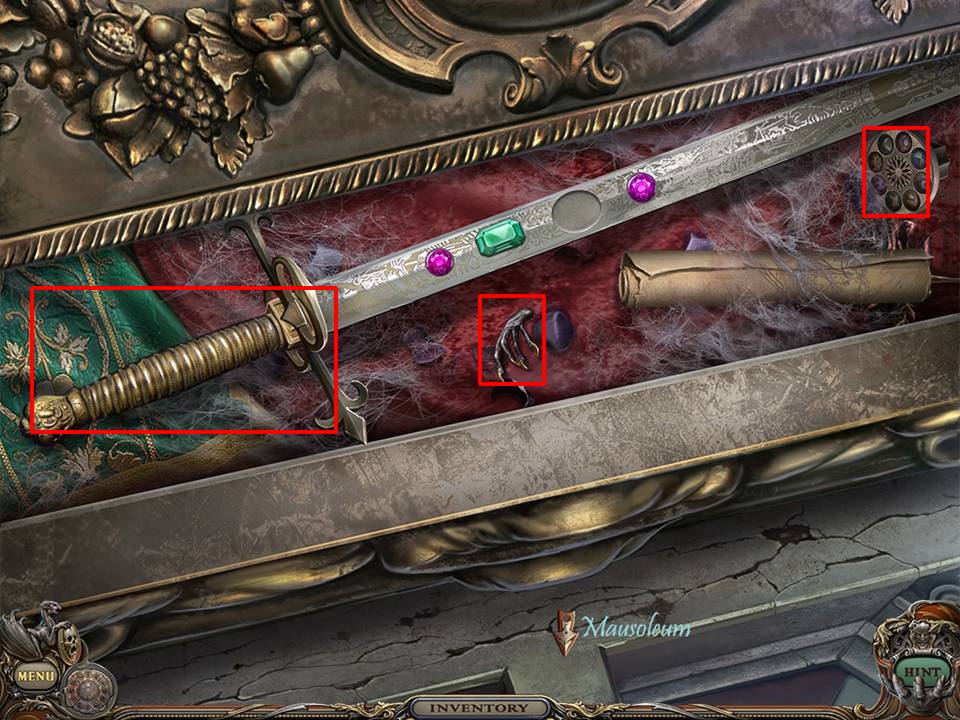
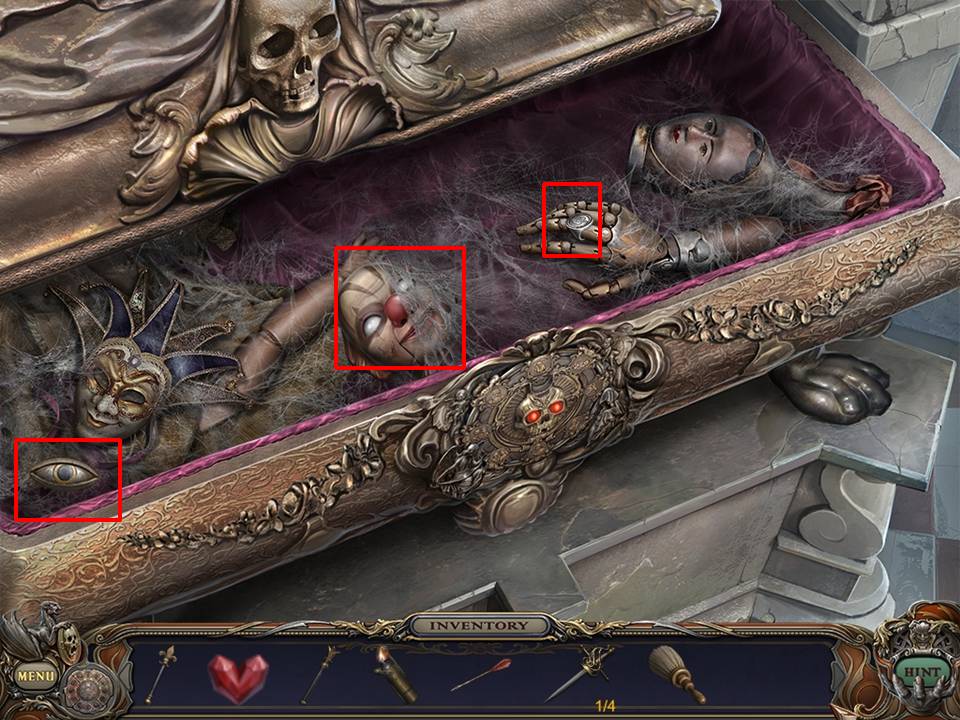
Zoom into the casket on the left.
Open the casket lid.
Gather the SWORD HILT, SPHERE DISC, and BIRD FOOT.
Place the BIRD FOOT into the FRESCO.
Return to the Hallway.
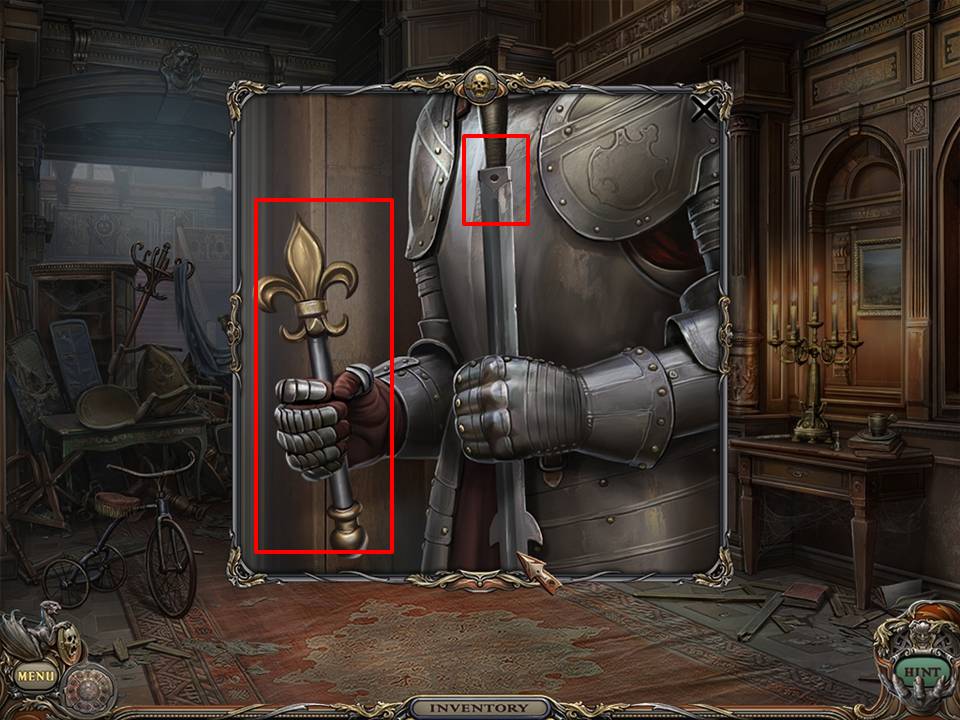
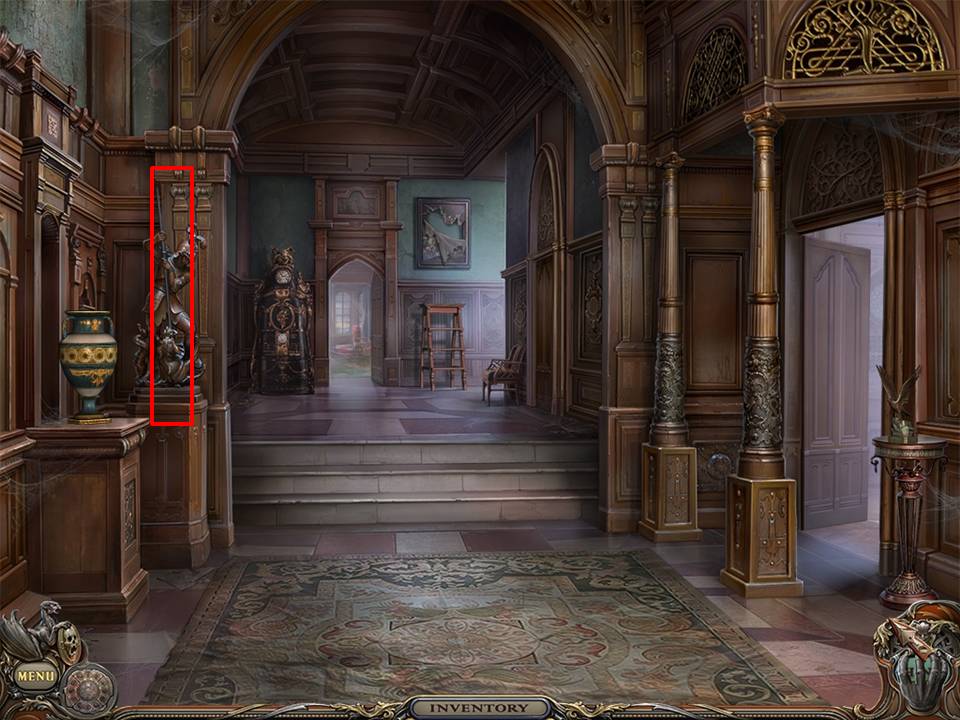
Zoom into the suit of armor.
Place the SWORD HILT on the sword held by the suit of armor.
Pick up the SCEPTRE.
Proceed through the Music Room to the Cabinet.
Zoom into the door on the left behind the woman.
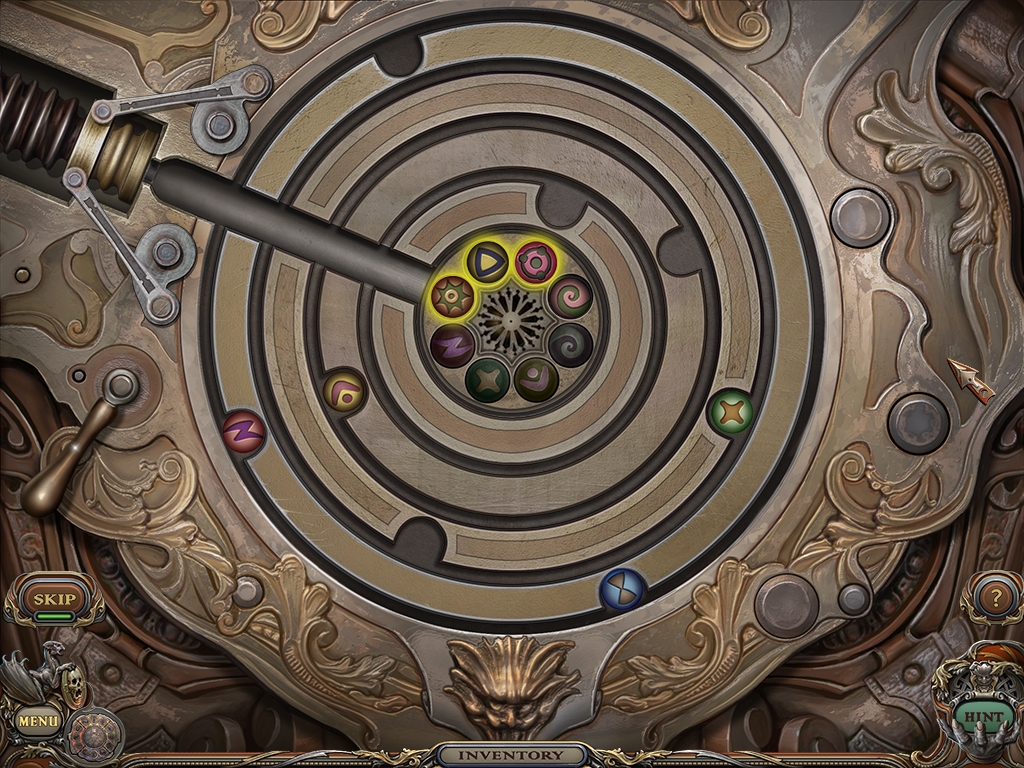
This puzzle has several solution variations and many random starting positions.
Place the SPHERE DISC in the middle of the lock. Locate the center symbol positioned at the chute. Find the corresponding ball and move its ring toward the chute. Pull the handle to drop the ball in the plunger. Move the rings by clicking to create free passage for that ball to move into its properly marked position in the SPHERE DISC. When the ball is located in the plunger at the top of a totally free chute, pull the handle to drop the ball into its slot. Repeat this process for each center symbol moving counterclockwise and corresponding ball. When a ball is positioned properly, it will glow yellow.
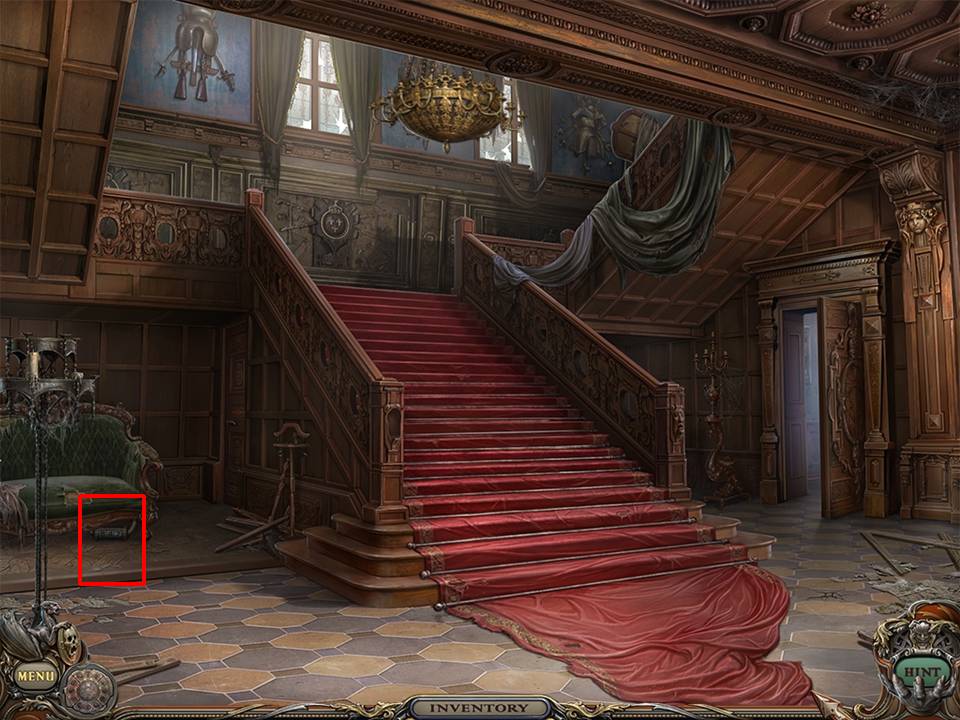
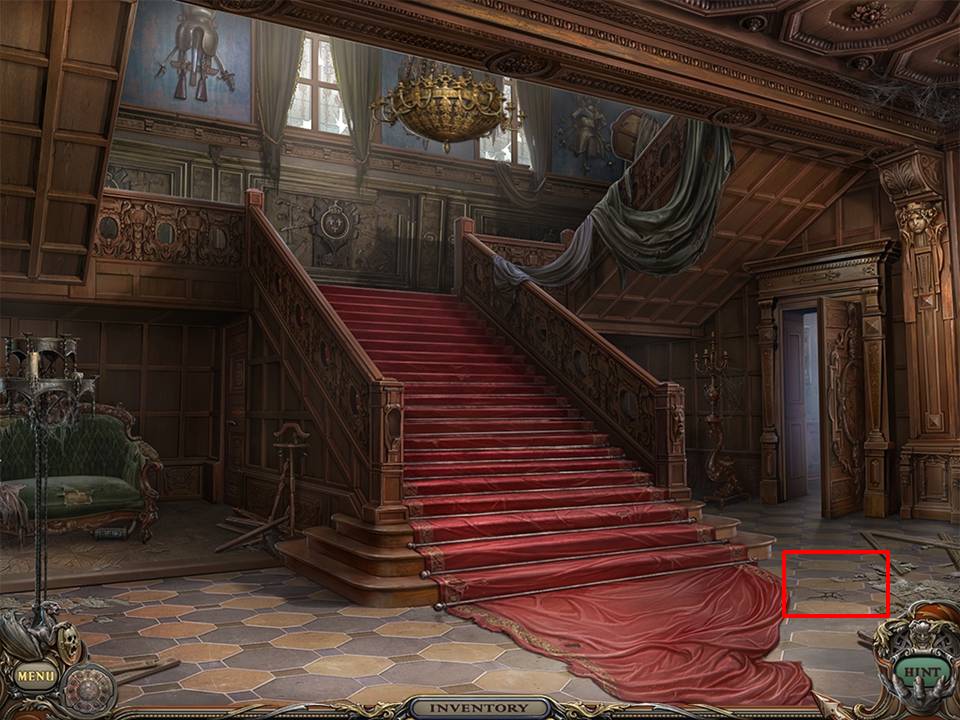
Proceed to the Lower Stairs. Pick up TUMBLER LOCK beneath the green sofa on the left.
Return to the Parlor.
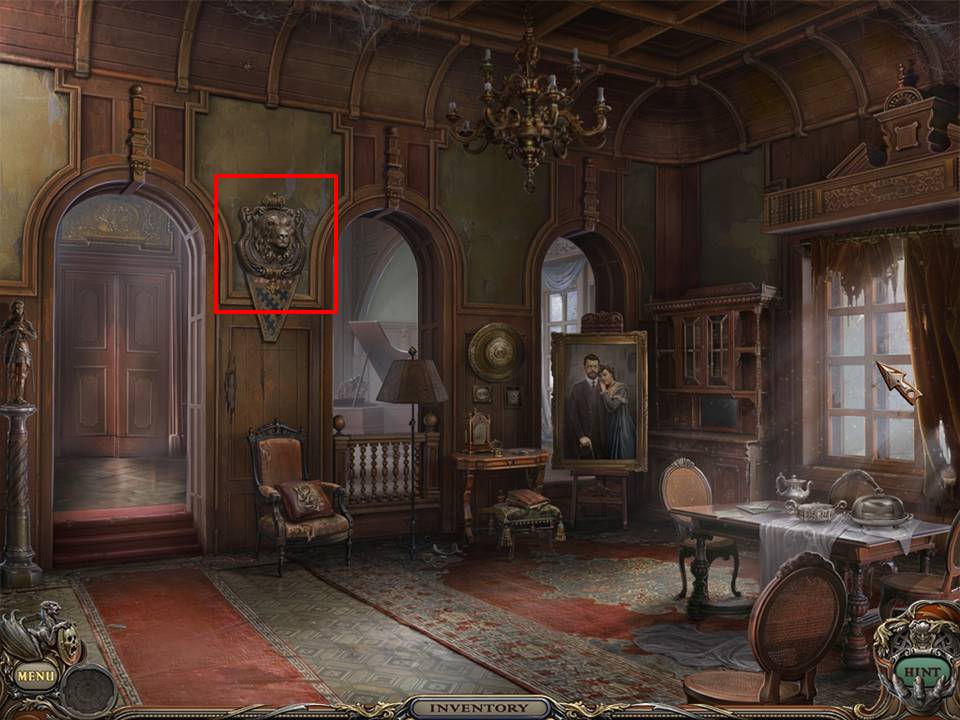
Zoom into the lion’s head on wall between the first and second archways.
Insert TUMBLER LOCK into the lion’s nose.
Zoom out from the lion’s head and play the Picture Frame Hidden Object Area again.
Move the artist’s palette to reveal the drumsticks.
Receive the URN PEDAL.
Return to the Music Room.
Place the URN PEDAL in spot indicated.
Pick up the SCISSORS inside the urn.
Return to the Parlor.
Use scissors to snip open the pillow.
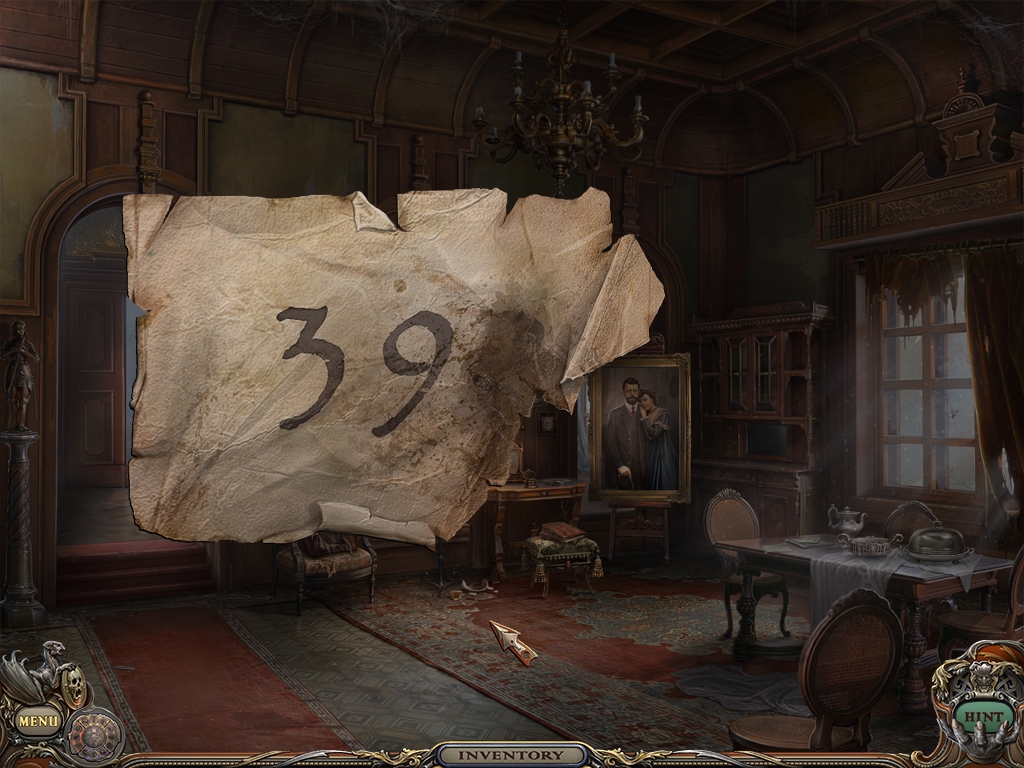
Receive the code (39).
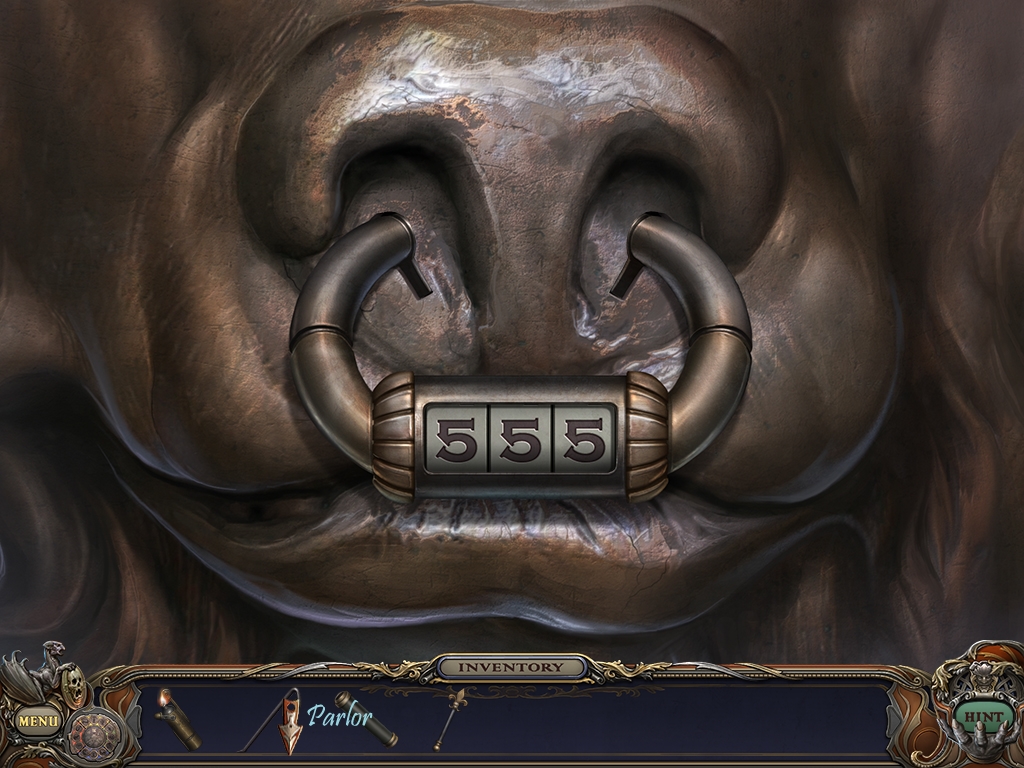
Zoom back to the lion’s head. Use the numbers 3 and 9 as the first two for the TUMBLER LOCK code. You will then need to rotate through the numbers for the final tumbler until the lock opens. Please note: The dials do not rotate continuously. The code begins at 555. You must move the cursor above the number and click to move through the numbers below five and put the cursor beneath the number and click to move through the numbers above five.
Pick up the DRAGON HEART.
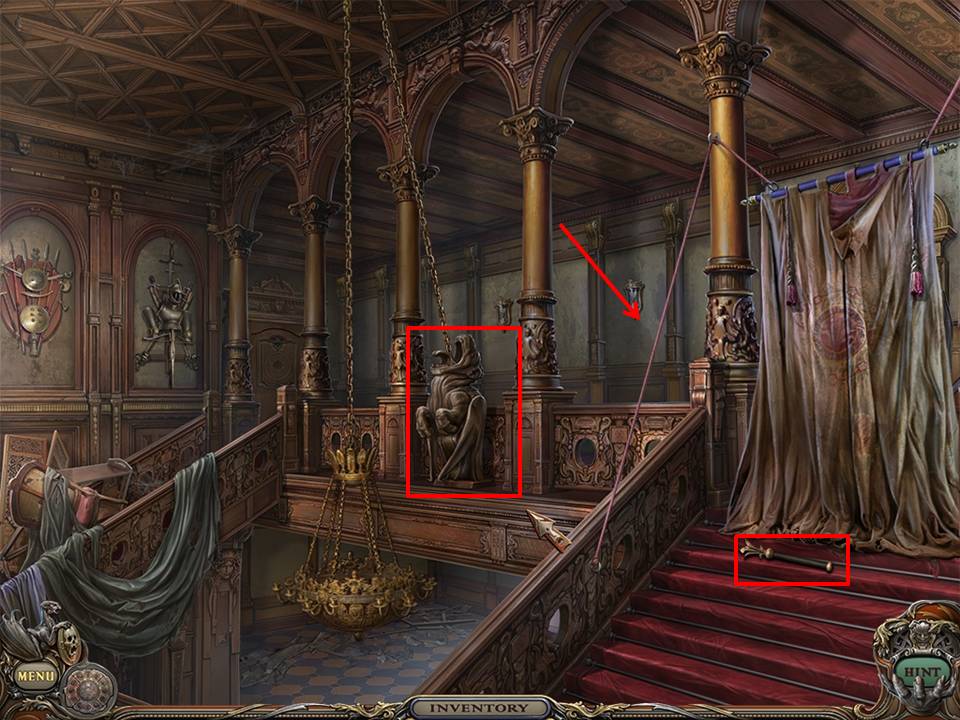
Go to the Upper Stairs via the Lower Stairs.
Use scissors to cut the cord.
Try to pick up the SCEPTRE.
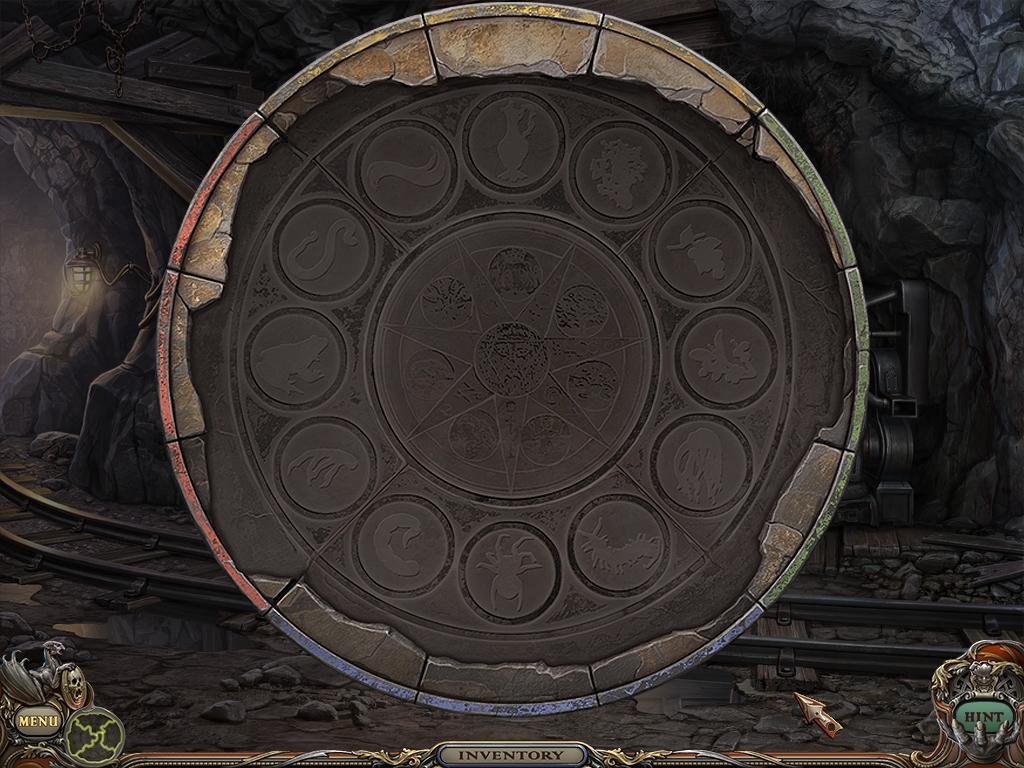
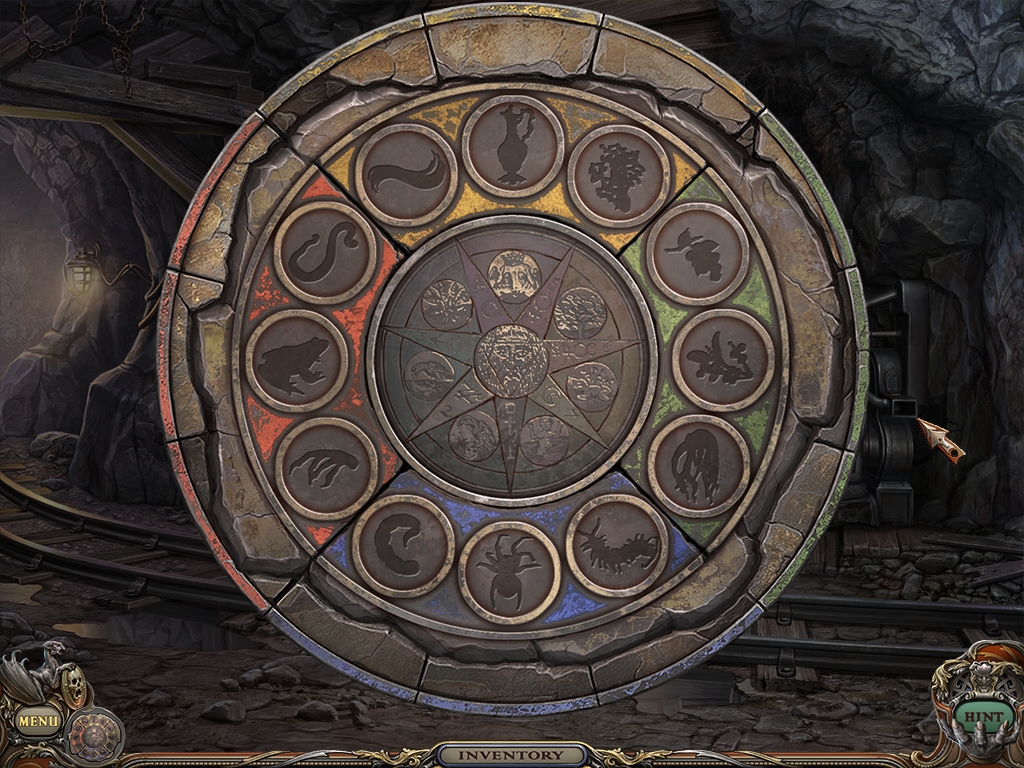
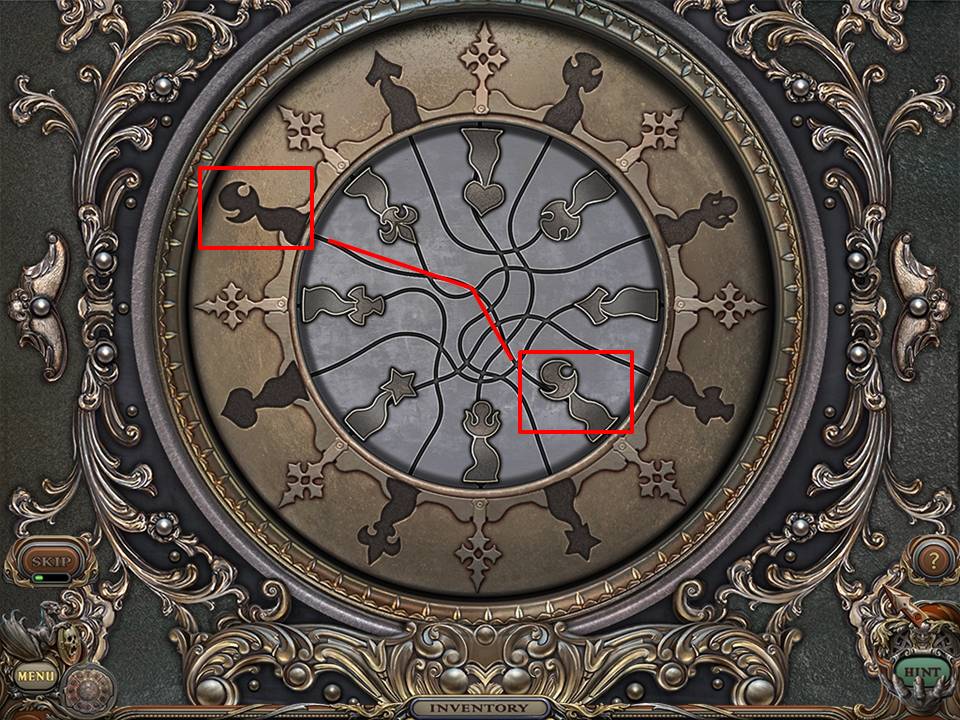
Zoom into the animal statue positioned just above the chandelier.
The object of this puzzle is to move the light gray insignias ringing the inner circle through the curving paths to their appropriate “matched” slot in the outer circle. It’s best to simply begin with an insignia at the top and visually follow the path to see if the insignia will move into its proper place. If so, click on the insignia and it will move automatically. Repeat this procedure with each insignia. You may find that only one or two will move at any given time. If that you have exhausted all possibilities. Click on the outer ring to spin it once and repeat the procedure of following the visual path for each remaining insignia.
Pick up the SCEPTRE and move into the Hallway.
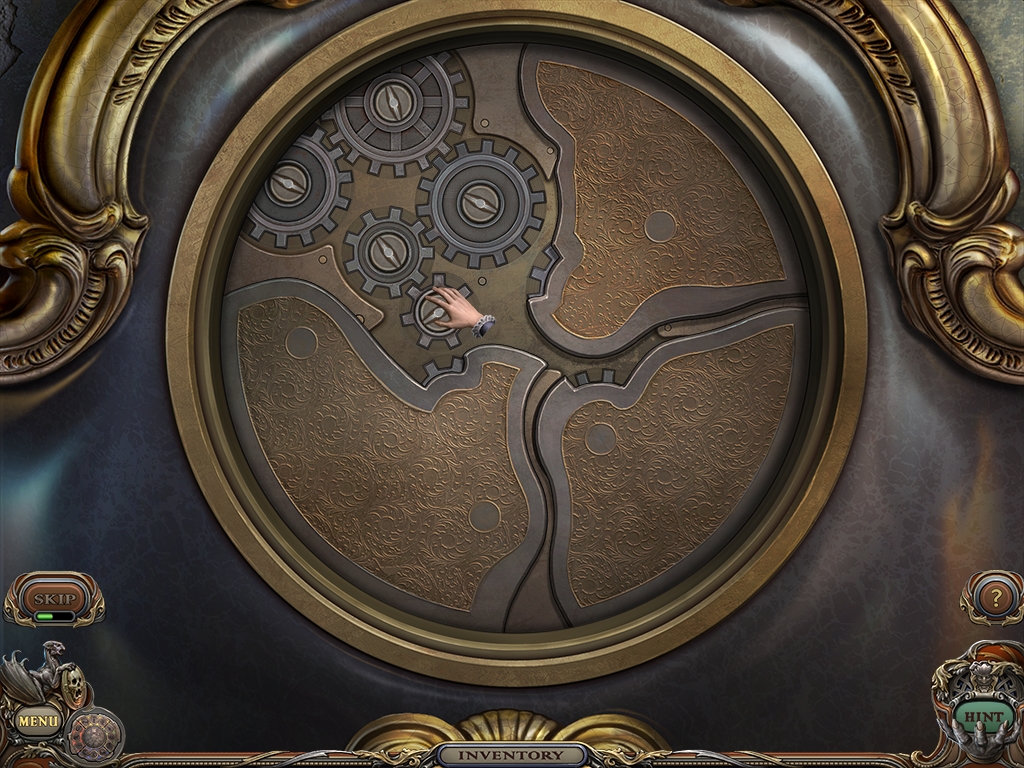
Zoom into the cabinet located at the end of the Hallway to the left of the door.
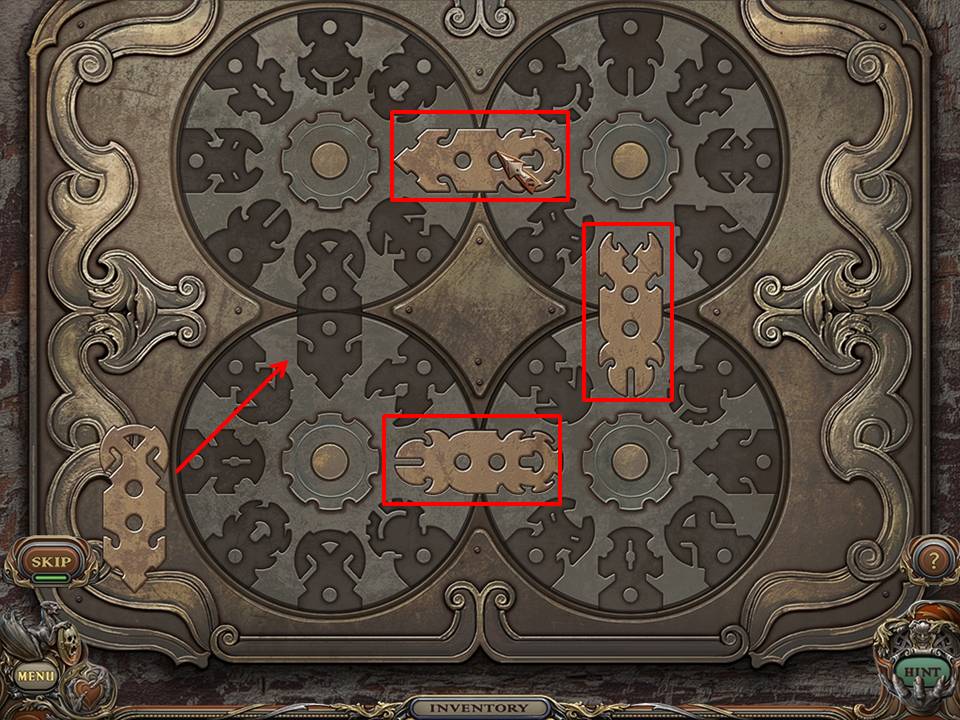
This puzzle has several solution variants. This description is the one used in this game play. Click on the one exposed gear to reveal the first panel. Begin with the gear with the hand. Click its adjacent gear to get it moving in the opposite direction. For example, if the first gear is moving clockwise, click its adjacent gear to move counterclockwise. Then, the gear adjacent to that one should move clockwise. Proceed in this fashion until the gears are moving properly and the next panel is exposed. Repeat the process until all the panels have opened and all the gears are moving properly. If your chosen puzzle is different, please ensure that as you click, each gear rotates in the opposite direction of the adjacent gear.
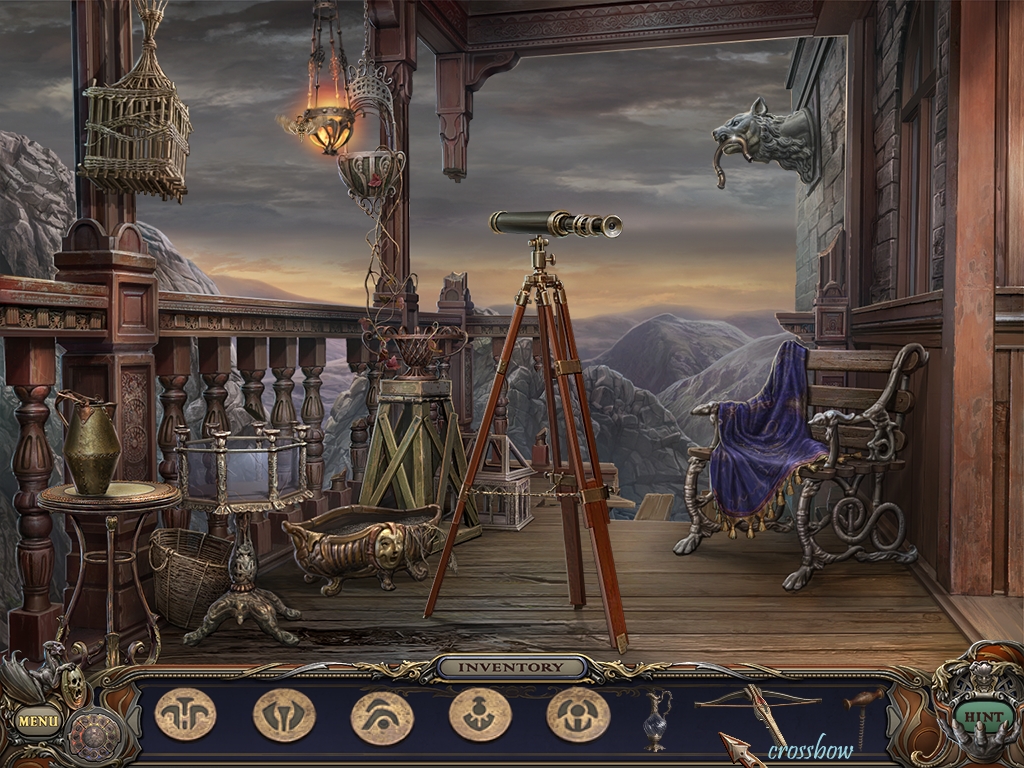
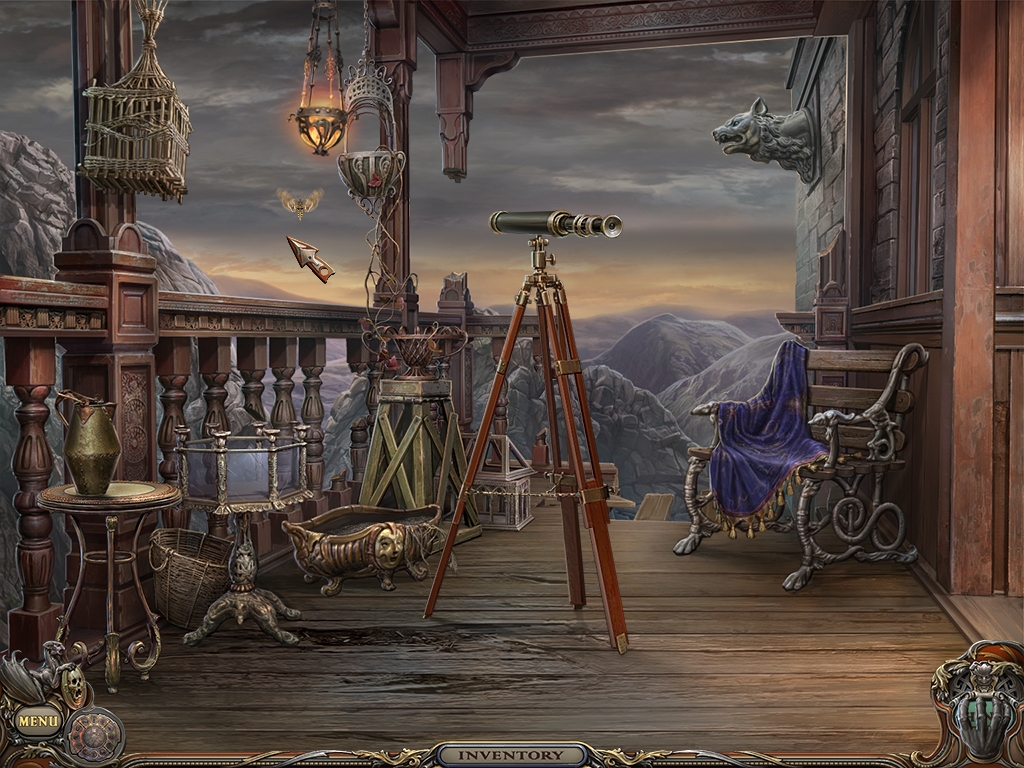
Move to the back of the Hallway at right to reach balcony.
Place the TELESCOPE where indicated.
Use lighter to light the lamp.
Proceed to the Nursery via the Hallway.
Move the wheelchair and the rug.
Pick up the BRUSH.
Return to Hallway.
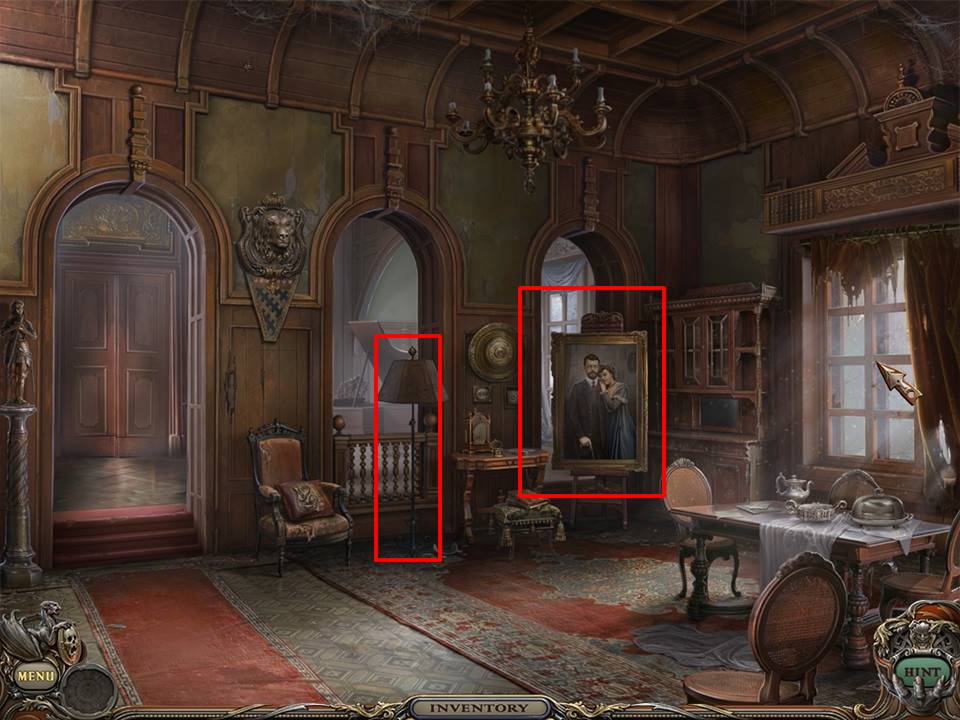
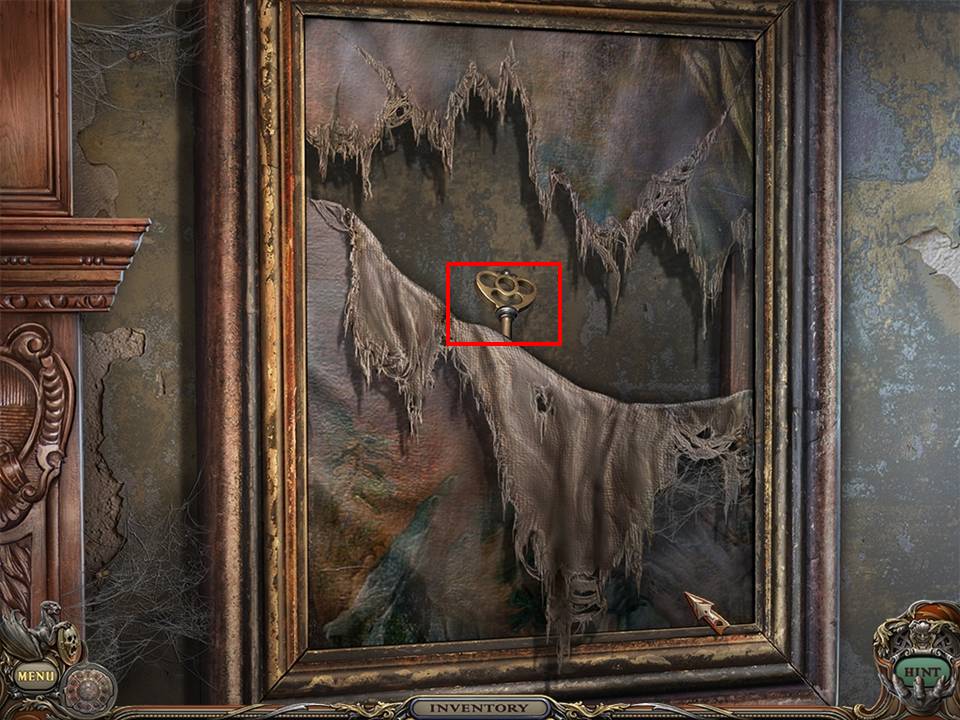
Zoom into the painting.
Brush away cobwebs with the BRUSH obtained in the Nursery.
Pick up the CHEST KEY.
Return to Upper Stairs.
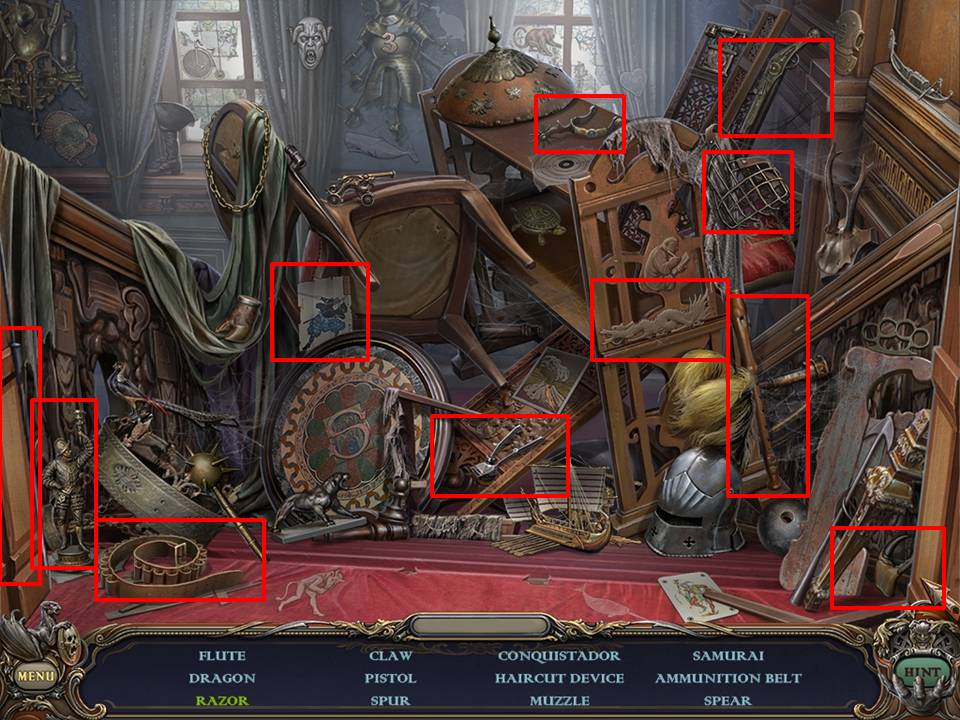
Play Hidden Object Area located on the left staircase.
Move the bottom of the chair to reveal the hieroglyph and razor.
Reveal zebra by moving curtain.
Receive the SPEAR.
Place SPEAR on the statue.
Enter the Parent’s Bedroom.
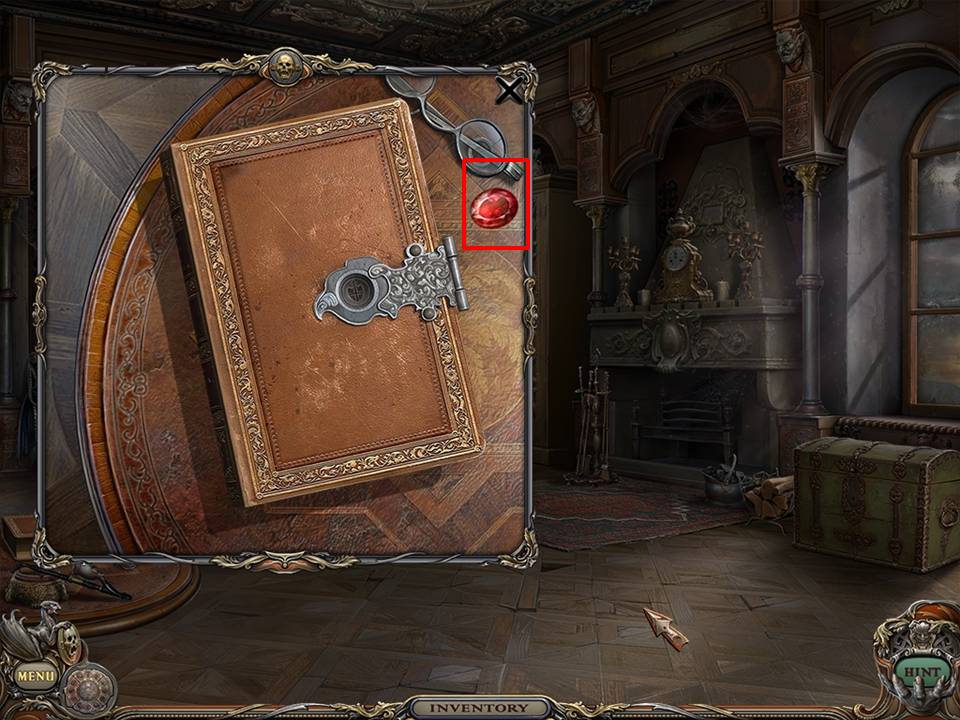
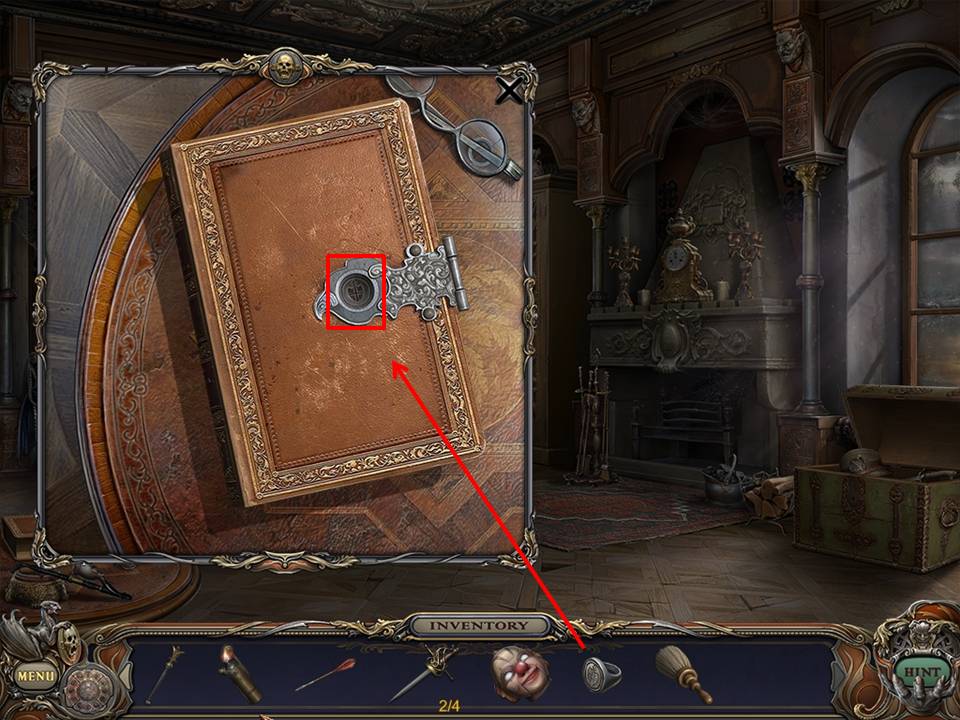
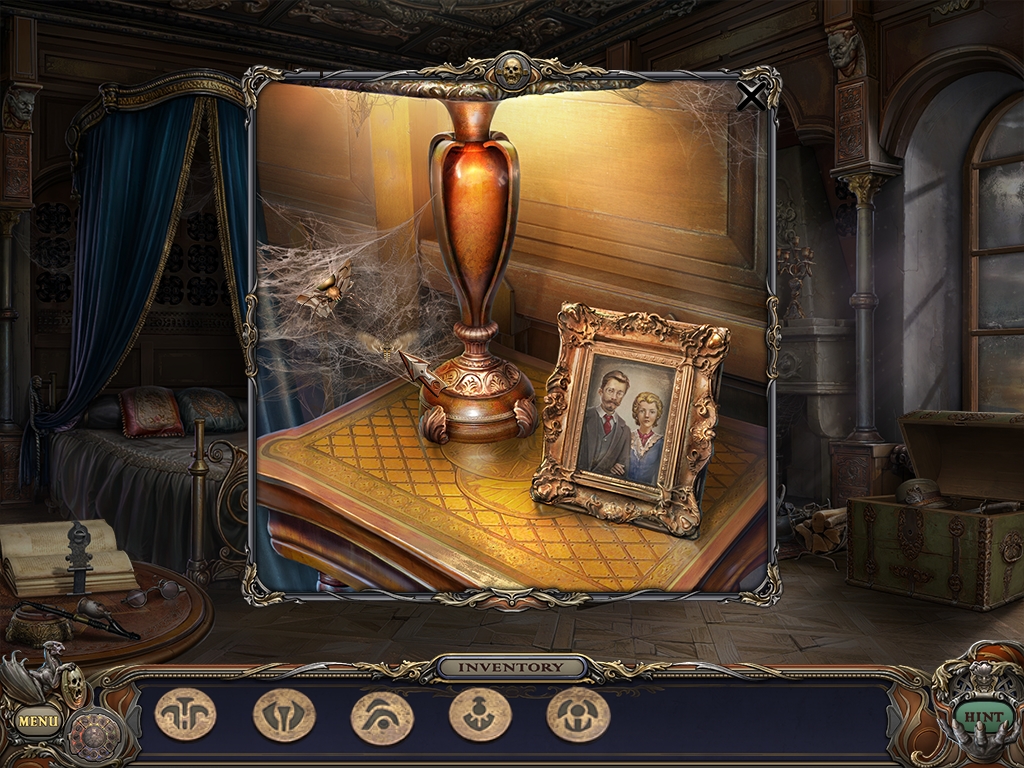
Zoom into the book.
Pick up the RUBY.
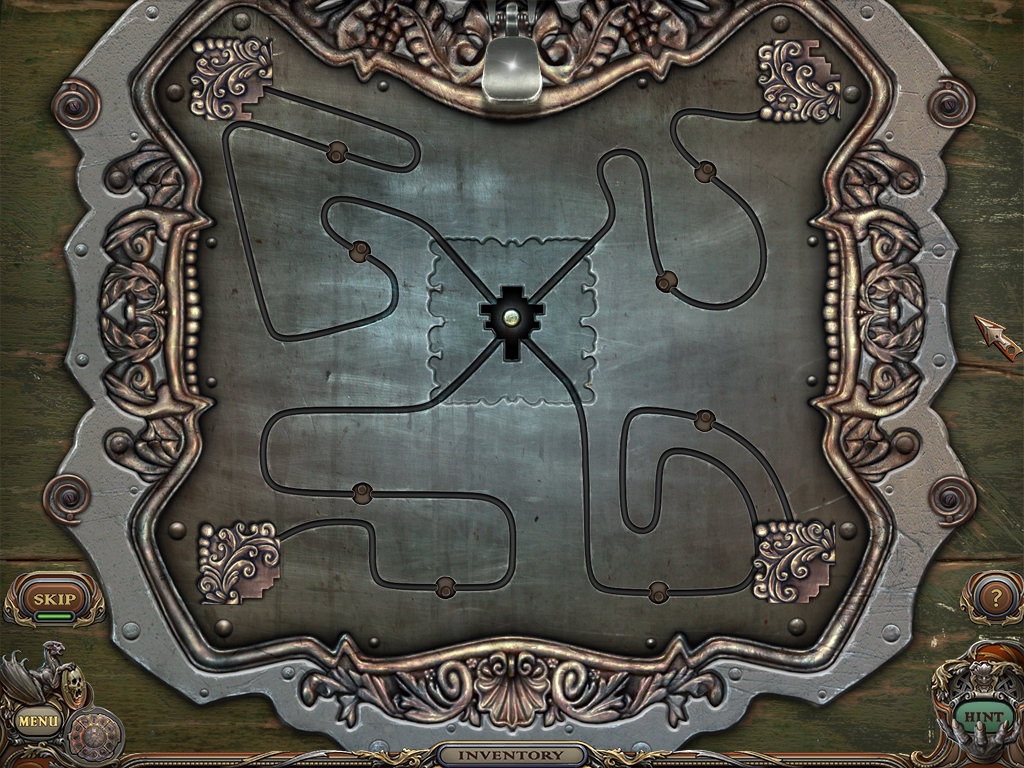
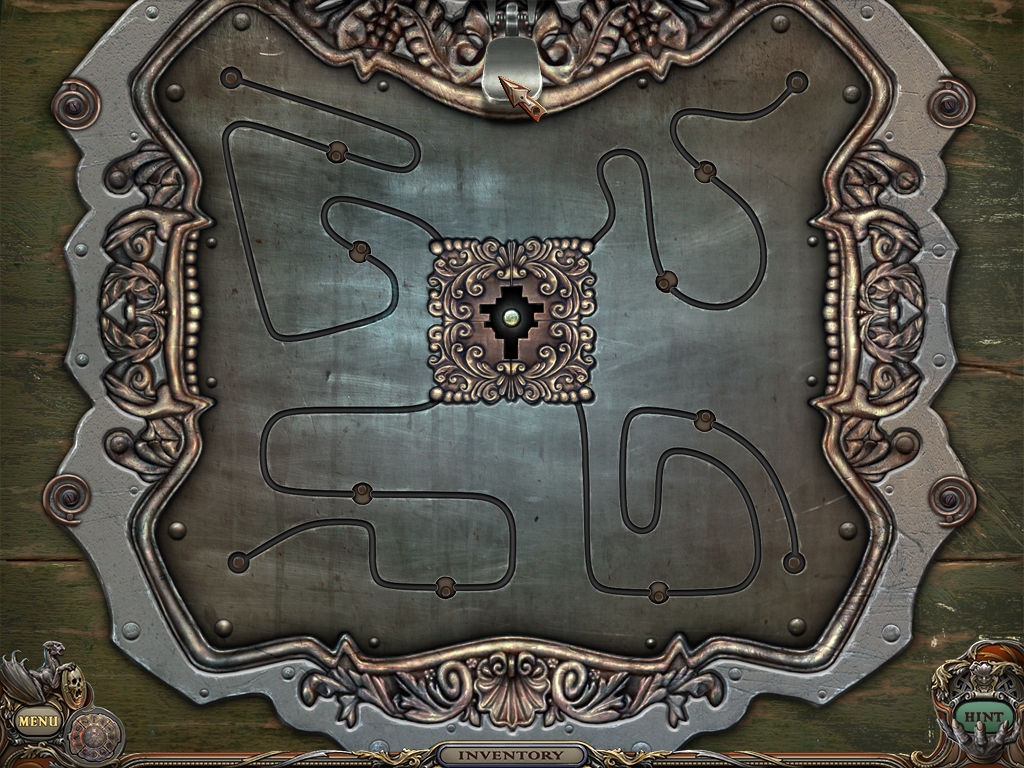
Zoom into the chest.
Place keyhole pieces as shown in first visual.
Push the button. Keyhole pieces will move into position along the curving lines as shown in second visual.
Insert CHEST KEY in keyhole.
Turn the CHEST KEY.
Pick up the ARROW and SNAKE CATCHER STICK.
Return to the Woods.
Zoom back into the stone pillar and pick up the SNAKE with the SNAKE CATCHER STICK.
Place the SNAKE into the FRESCO.
Return to the Tree House and enter.
Brush away the cobwebs.
Pick up the RAPIER
Enter the Mausoleum through the Crypt.
Open the casket on the right.
Pick up the RUBY.
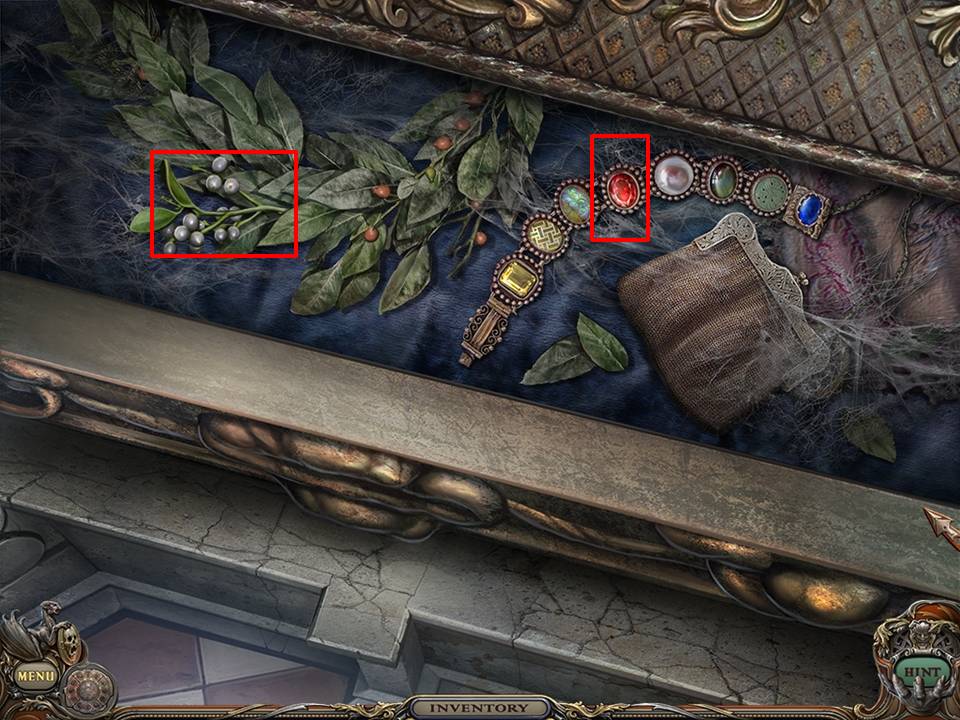
Cut the MISTLETOE with the SCISSORS. The MISTLETOE is the piece with the white berries on the left.
Place the MISTLETOE into the FRESCO.
Zoom into the lock on the middle casket.
Use the two RUBIES as eyes for the skull.
Move the coins into position, showing the life cycle of man from birth to death. See visual. The gap above the skull is what you will use to move coins. Click on the outer ring on the left side of the skull to move the ring left and on the right side of the skull to move the ring right. Click to move the “gap” to the coin showing the infant. Click on the infant coin to insert it into the gap. Then click on the outer ring to position the gap at the top of the ring. When you have, click on the coin to move the coin into its position. Continue to move clockwise around the ring with these coins: rocking horse, graduation, conquistador, wedding, family with child, old man. If you position a coin correctly, a blue highlight will appear. The game adds death automatically upon puzzle completion. If a coin is already in a position that you need to use, you will need to follow these procedures to insert the coin into the gap and then move the ring to an empty space to place this coin. Once you have solve this puzzle, the casket will slide open to reveal the contents.
Pick up the MASK EYE.
Pick up the CLOWN HEAD.
Pick up the CRYPT SIGNET.
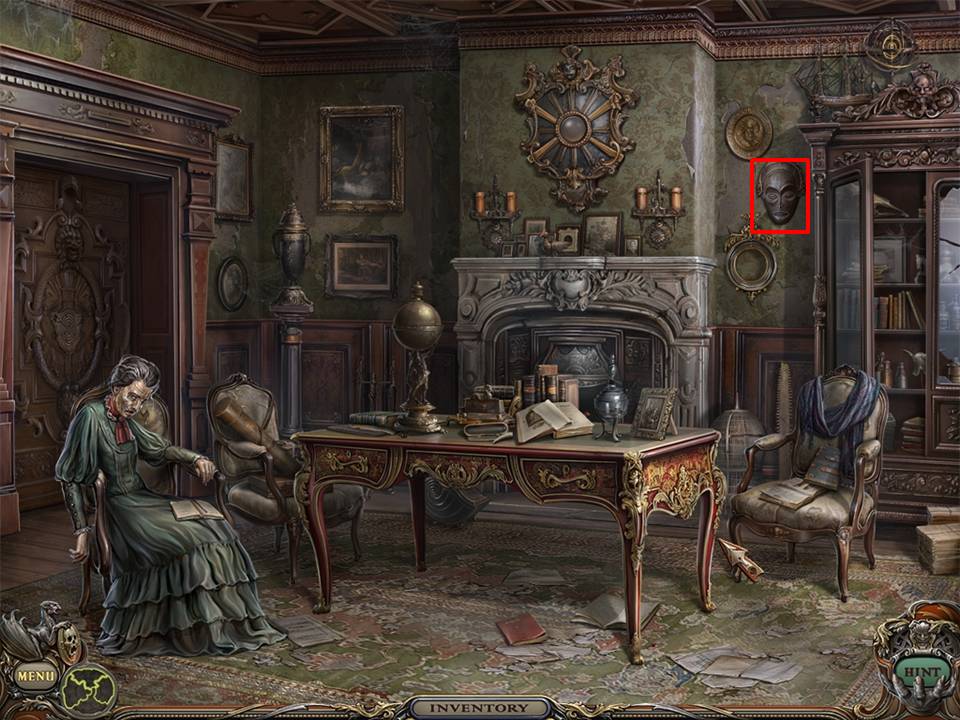
Return to the Cabinet.
Zoom into the mask and insert the MASK EYE in the forehead. Mask will slide open to reveal the DRAGON HOOK.
Pick up the DRAGON HOOK.
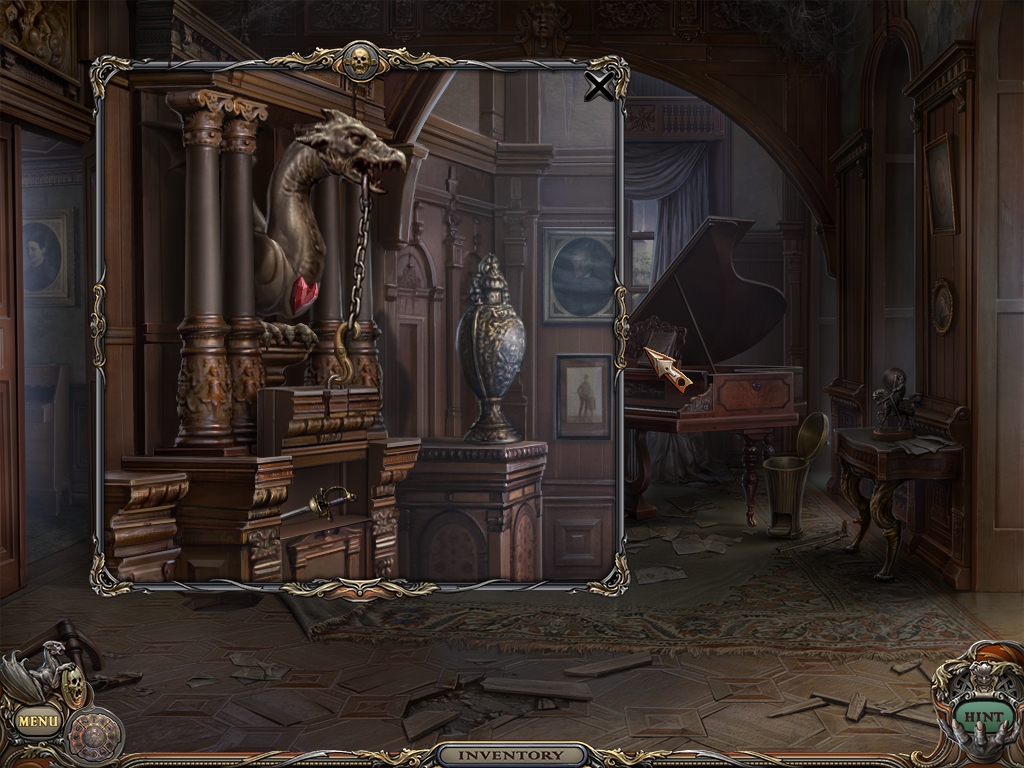
Return to the Music Room.
Zoom into the dragon and put DRAGON HEART and DRAGON HOOK into place.
Click on the Dragon to raise the panel and reveal the RAPIER.
Take RAPIER.
Go to Parent’s Bedroom
Zoom into the book.
Attach CRYPT SIGNET as shown and turn it.
Rifle through book pages and find KEY PART.
Pick up KEY PART.
Go to the Nursery.
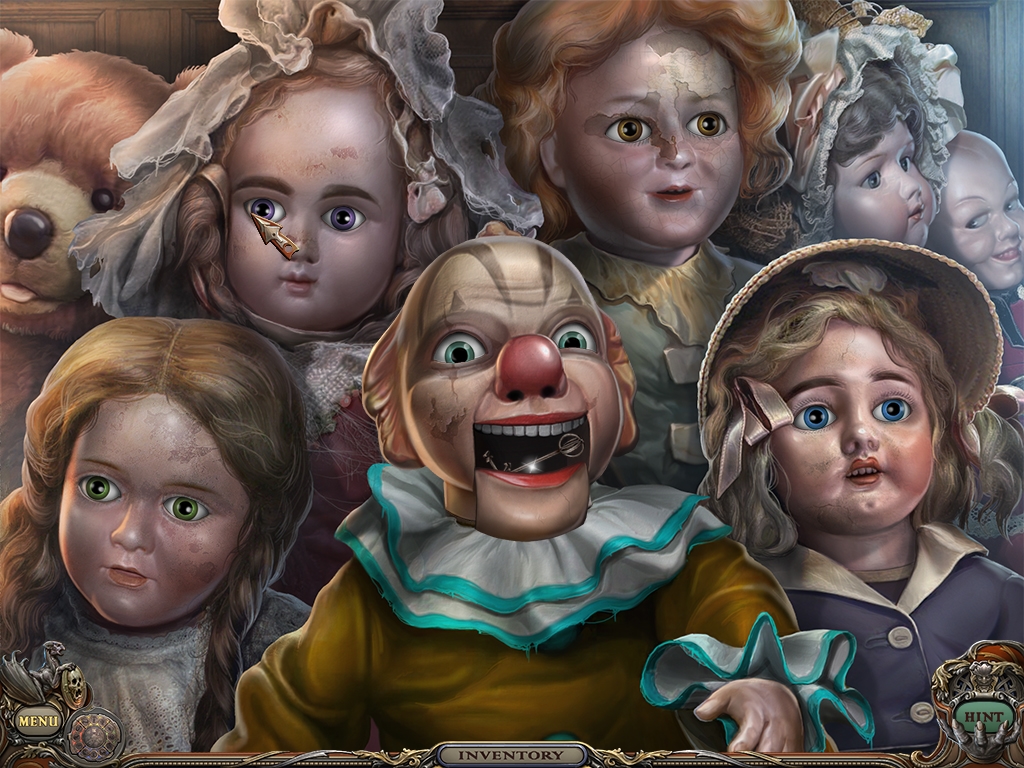
Zoom into the doll collection.
Add CLOWN HEAD to doll collection as indicated.
Solve puzzle of which there are several solution variants.
One solution is to click doll eyes in the following order.
1. Doll to the bottom left of the screen.
2. Doll to the top right of the clown.
3. Doll to the top left of the clown.
4. Doll to the bottom left of the screen (second time).
When puzzle is solved, clown’s mouth will open to reveal the LANTERN KEY.
Pick up the LANTERN KEY.
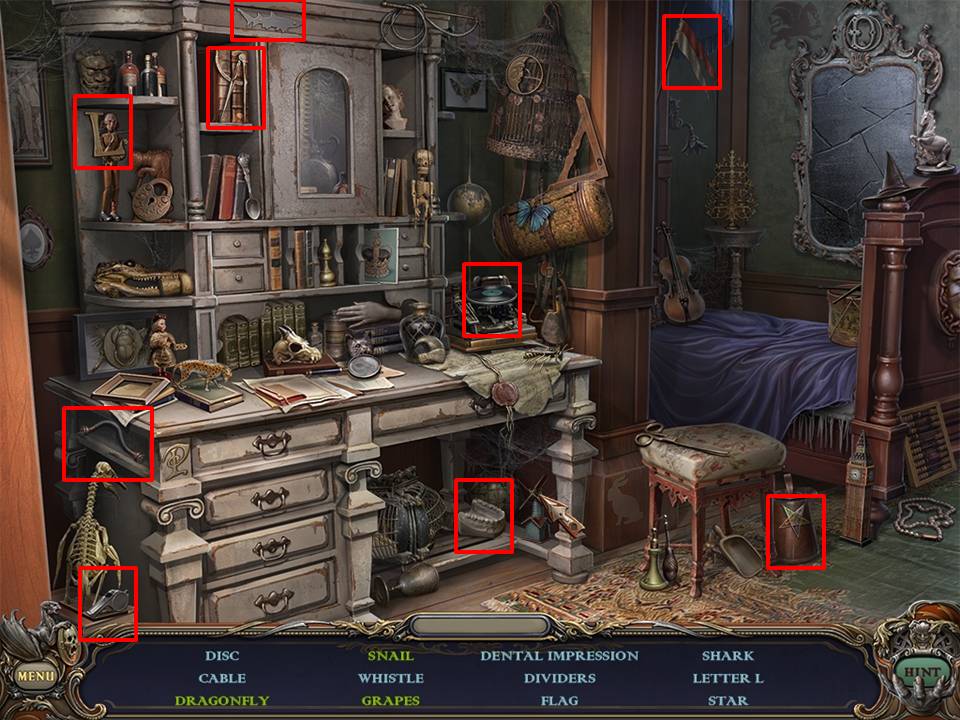
Play the Hidden Object Area in the Nursery in the cabinet on the right just past the bed.
Move the mirror piece to reveal the eight and the dragonfly.
Open the upper door in the cabinet to reveal the snail.
Open the drawer to reveal the grapes and spool.
Receive the CABLE.
Proceed to the Mine Entrance.
Insert the LANTERN KEY into the keyhole.
Turn the LANTERN KEY.
Pick up the REFLECTOR.
Return to the Yard.
Zoom back into the rock.
Place the REFLECTOR in the slot at the top right of the screen.
Pick up the ANTITOXIN.
Pick up the COBBLE.
A centipede is hiding under a leaf. Use COBBLE to smash the leaf and kill the centipede.
Pick up the dead CENTIPEDE and place it in the FRESCO.
Chapter 3: Ingredients Five through Eight
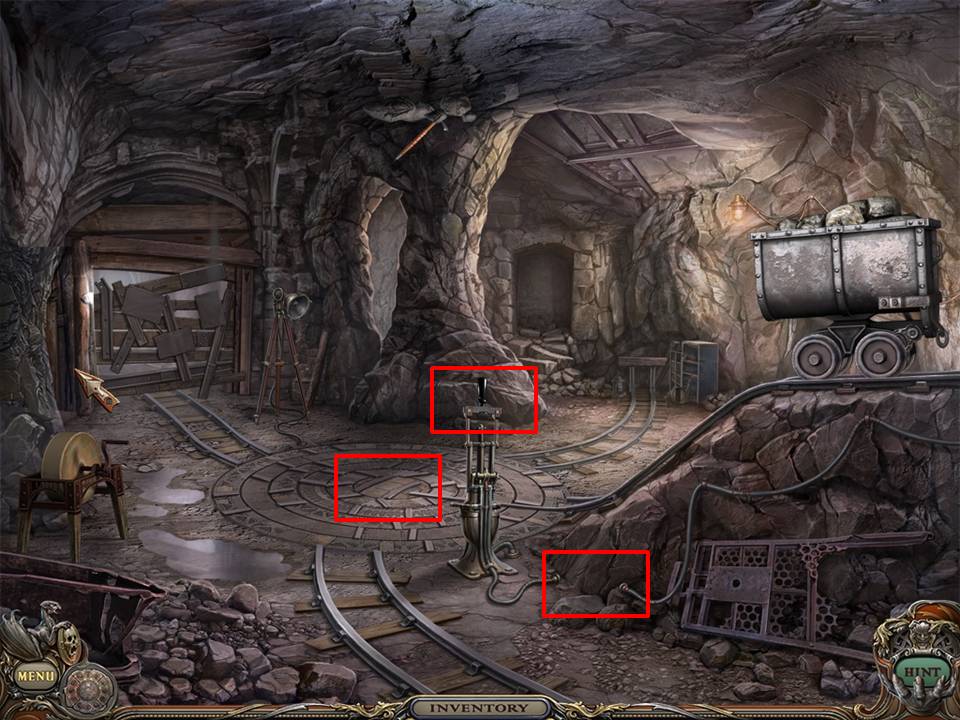
Return to Mine Junction.
Place the CABLE.
Pull the switch.
Zoom into the floor.
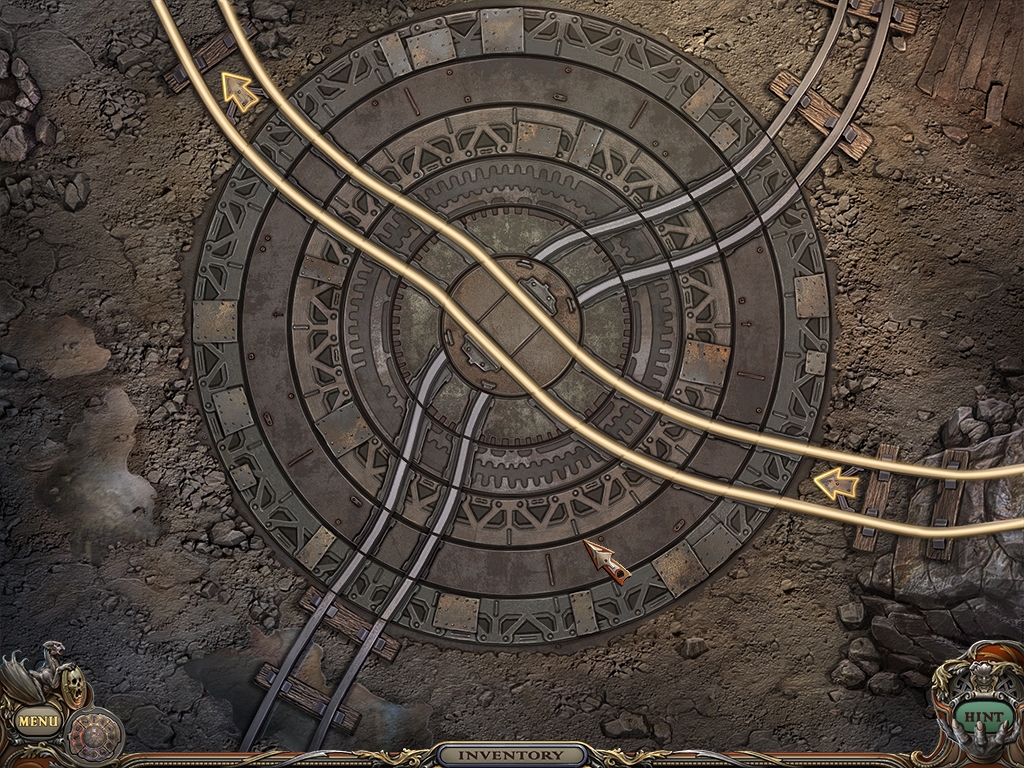
The object of this puzzle is to spin the rings until the track lines up as shown in the visual. The track should provide free rail passage on the track that moves from the bottom right of the screen to the top left. This puzzle has several solution variants, so it may require some trial and error. The best way to proceed is to set the outer ring first and move inward. If clicking an inner ring moves one of your properly placed outer rings return and reset.
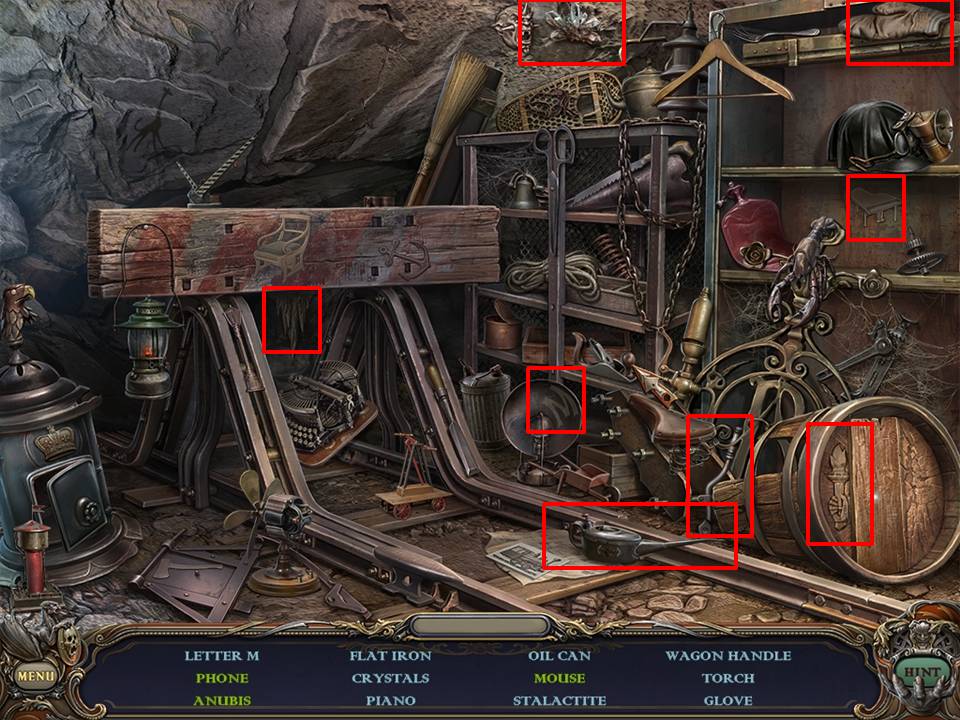
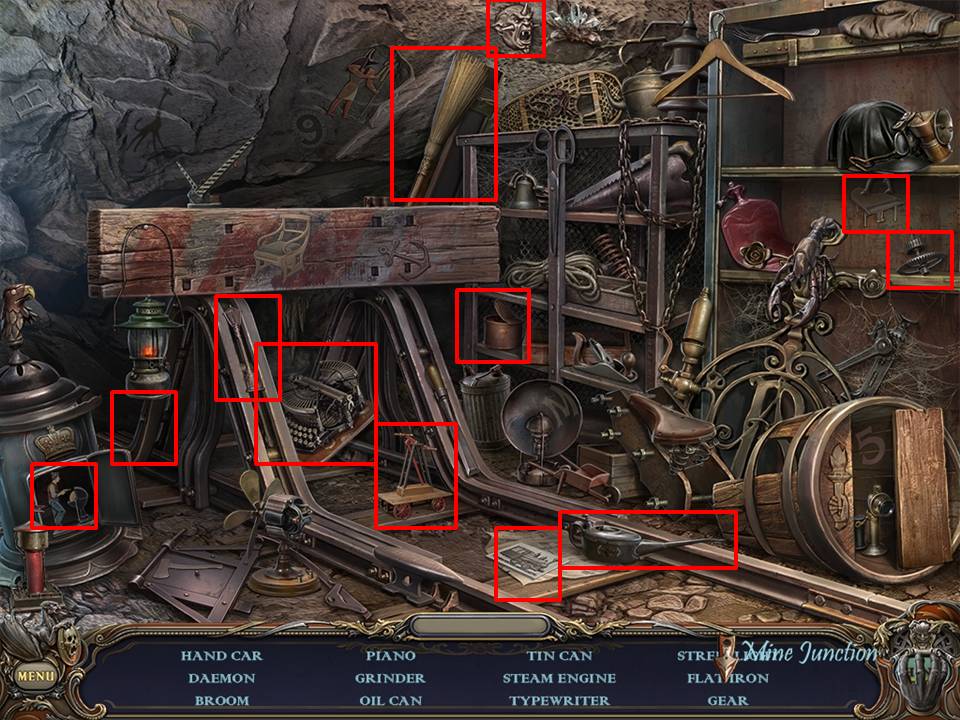
Play the Hidden Object Area located just to the left of the mine car.
Light the lantern to reveal the flatiron and the mouse.
Move barrel bottom to reveal phone.
Move the rocks to reveal Anubis.
Receive the WAGON HANDLE.
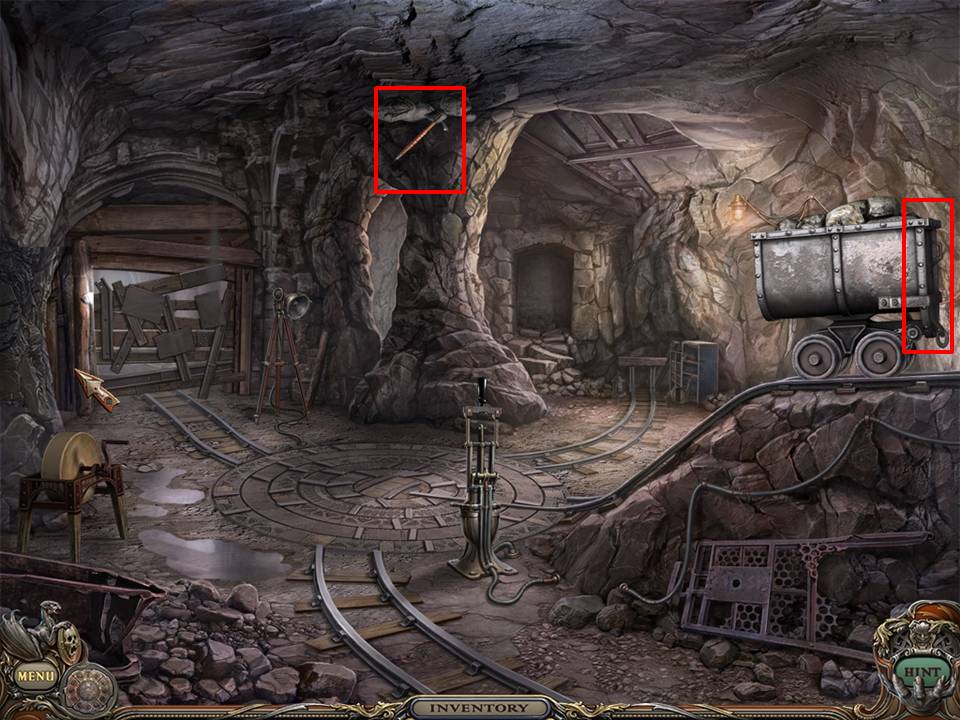
Insert WAGON HANDLE on the wagon (mine car) to pull. Wagon will move along the rails. As it moves the pickaxe on the ceiling will fall.
Pick up the fallen PICKAXE.
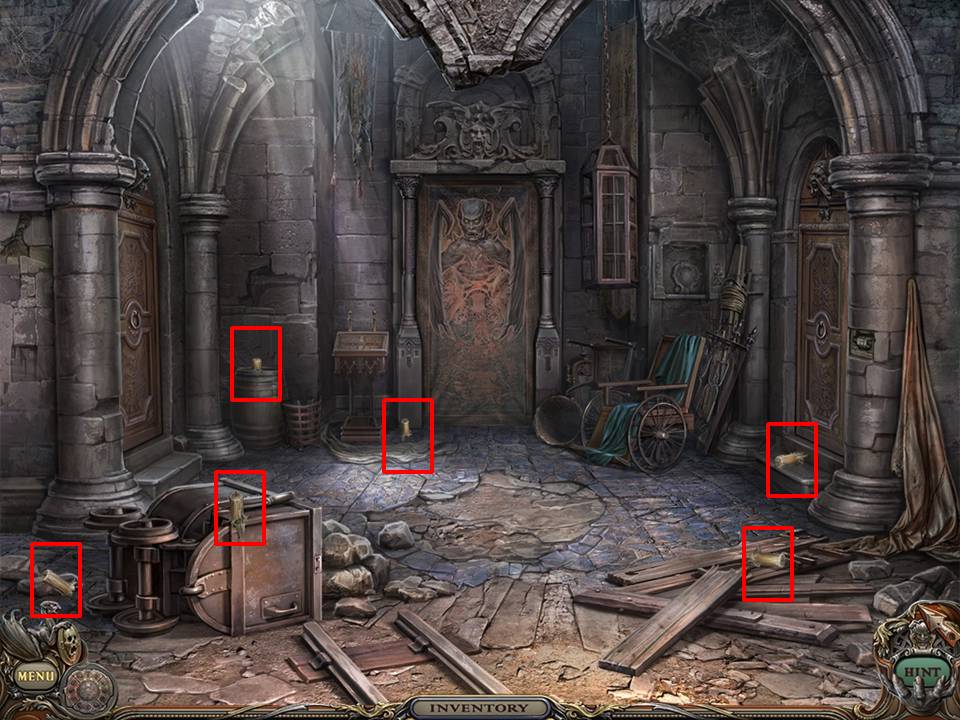
Enter Stella’s Hall located in the passageway through which the wagon has rolled.
Pick up six CANDLES located throughout the scene.
Zoom into lamp hanging from a chain near the top right of the visual.
Place the candles into the lamp and light with the LIGHTER.
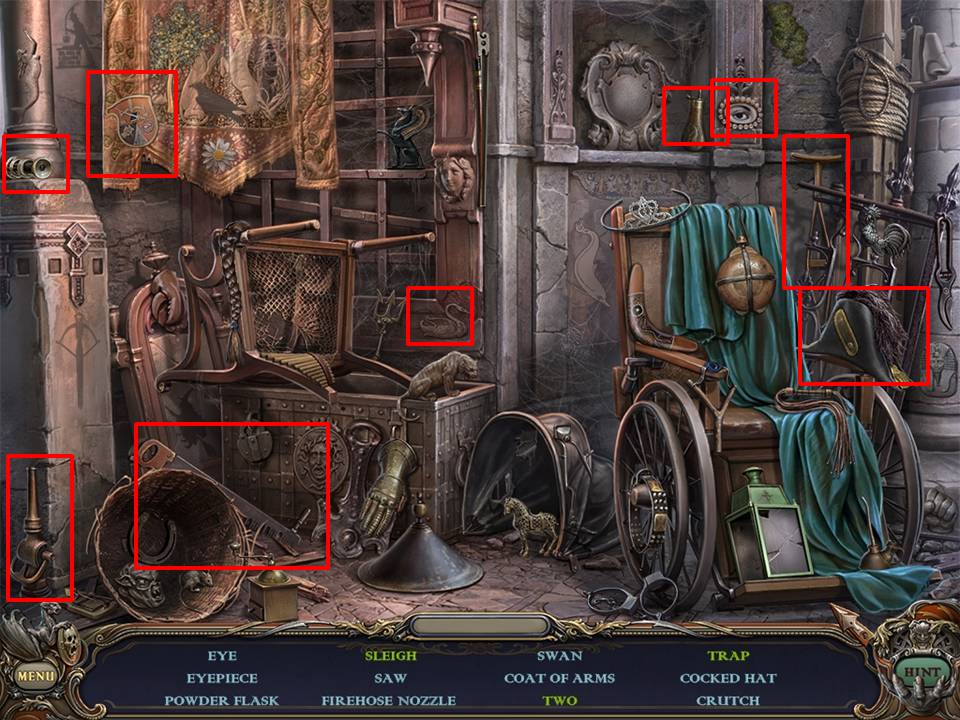
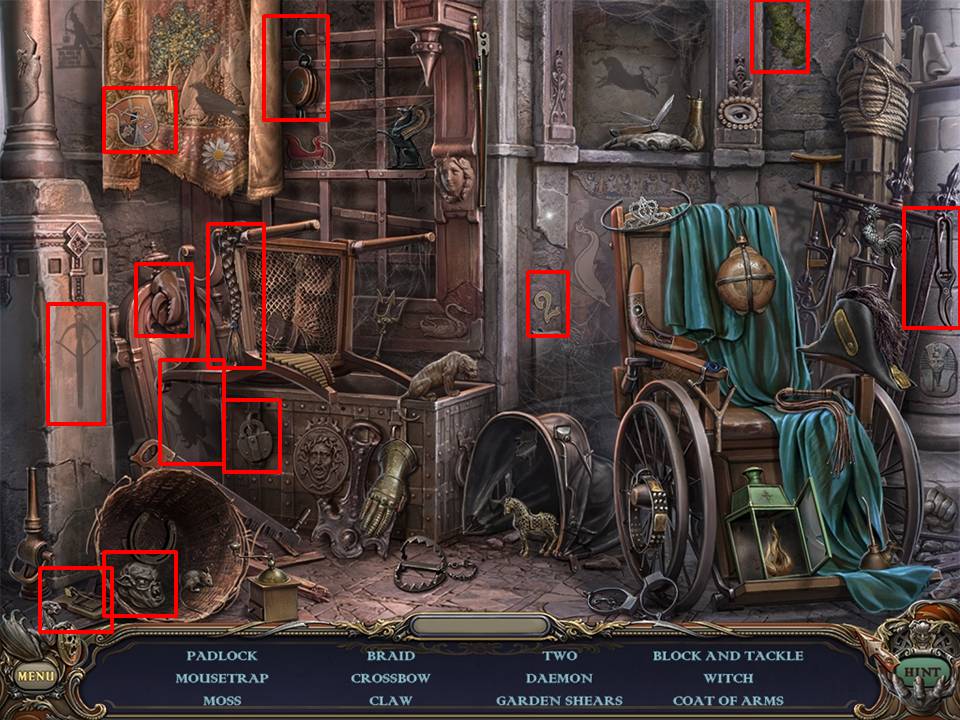
Play Hidden Object Area near wheelchair.
Move the bell to reveal the trap.
Move the tapestry to reveal the sleigh.
Move the rocks to reveal the “two.”
Receive the EYEPIECE.
Return to the Tree House.
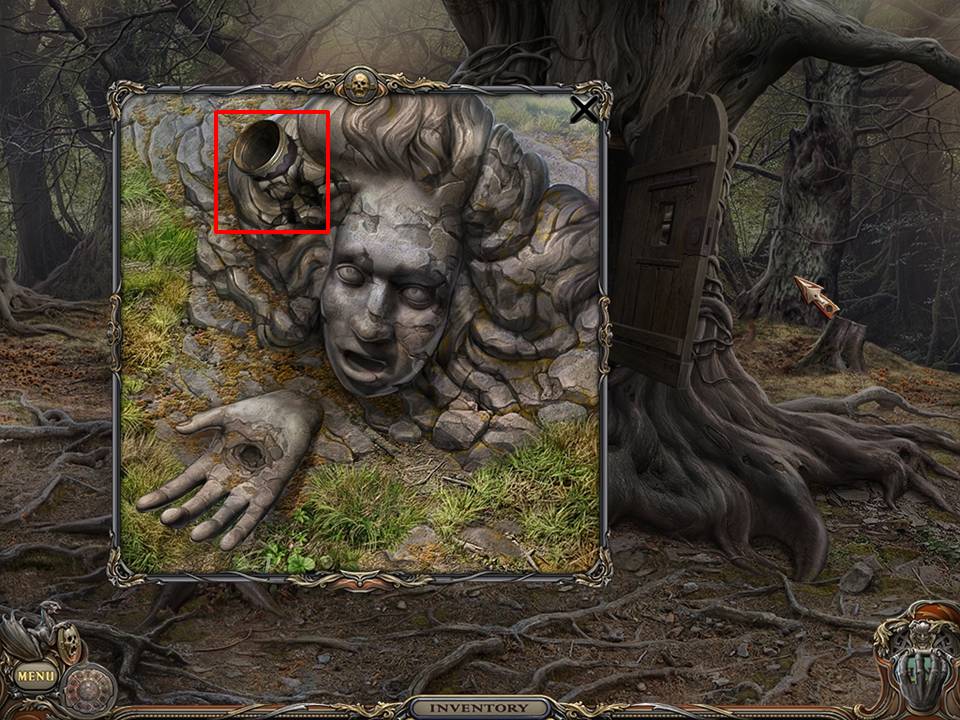
Zoom into the stone face.
Remove the GOBLET using the PICKAXE.
Pick up the GOBLET.
Return to the Lower Stairs.
Use PICKAXE to open the crack in the floor.
Pick up the MEDUSA FRAGMENT.
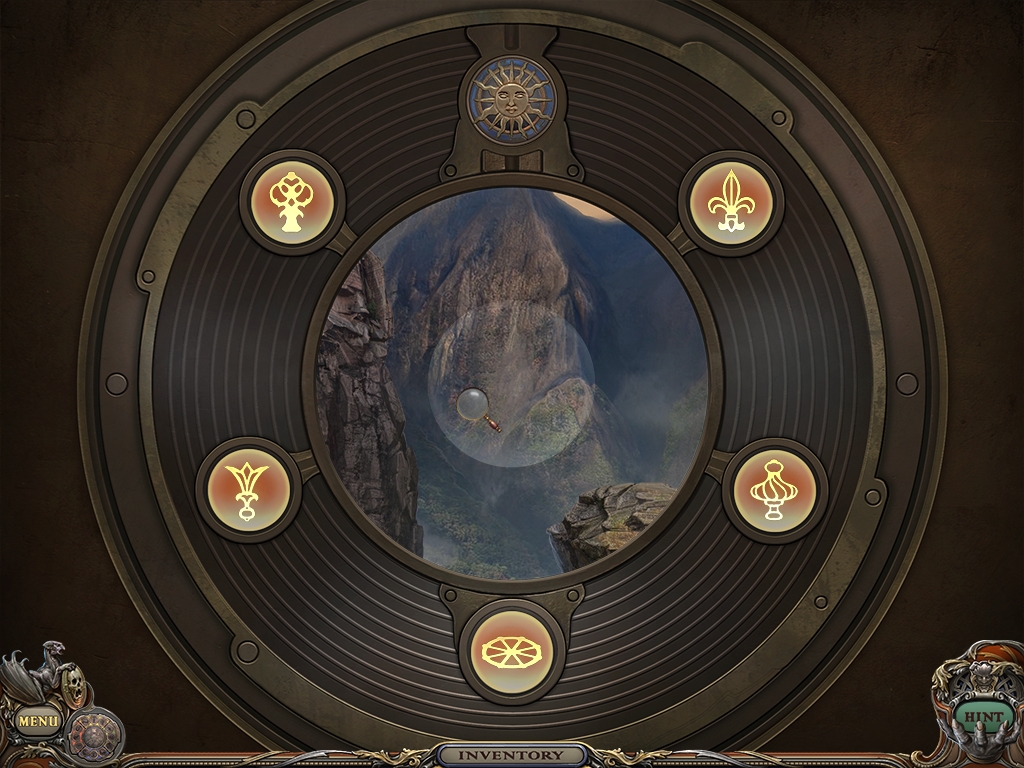
Proceed to the Balcony.
Place the EYE PIECE on the telescope.
Zoom in.
Locate five symbols hidden in the landscape you will see through the telescope. Click on the lens to move the view around. You will know that you located a hidden symbol when the view in the lens begins to glow.
You can pick up the CHARGED SUN KEY, which is the disk at the top of the circle, when you have located all the symbols.
Proceed to the Nursery.
Place the MEDUSA FRAGMENT where indicated on the footboard of the bed. When in place, the Medusa head will open to reveal the VALVE.
Pick up the VALVE.
Proceed to the Lower Stairs.
Zoom into the door under the stairs.
Put the CHARGED SUN KEY into place at the top left corner of the screen opposite the moon on the right.
Perform the following functions in the scene:
Open the doors and gate.
Raise the flag and sails on the boat.
Turn on the fountain and Ferris wheel.
Raise hot air balloon and turn on windmill.
The lighthouse should remain off.
These actions open the sun side of the lock.
Close or turn off everything except leave the lighthouse on, which should open the moon side of the lock. When these actions are performed correctly, you are given access to the Basement Stairs.
Proceed to the Basement Stairs.
Use LIGHTER to light the candle.
BRUSH away the cobwebs.
Pick up RAPIER.
Pick up SCEPTRE.
Proceed down the Basement Stairs to the Basement.
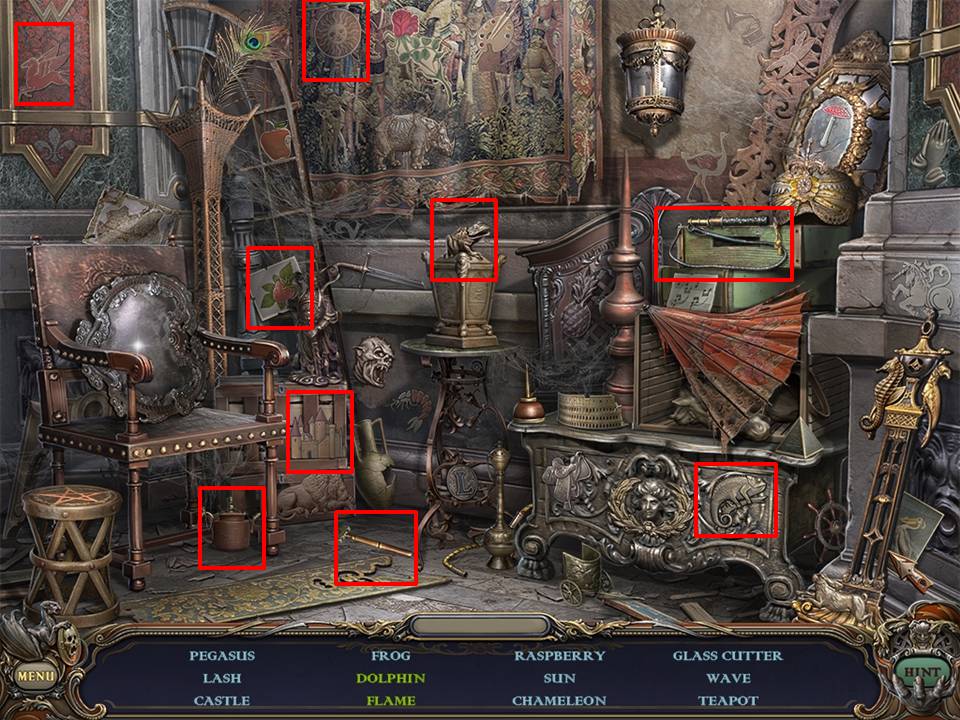
Play the Hidden Object Area to the right of the center.
Move the tray on the chair to reveal the bat and the wave.
Move the wall sconce to reveal the dolphin.
Move the lantern on the table to open a door that reveals the flame.
Receive the GLASS CUTTER.
Proceed to the Nursery and play the Hidden Object Area to the right of the wheelchair.
Move the sheet to reveal the gloves.
Open the cabinet to reveal the fern.
Receive the SCOOP.
Return to the Balcony.
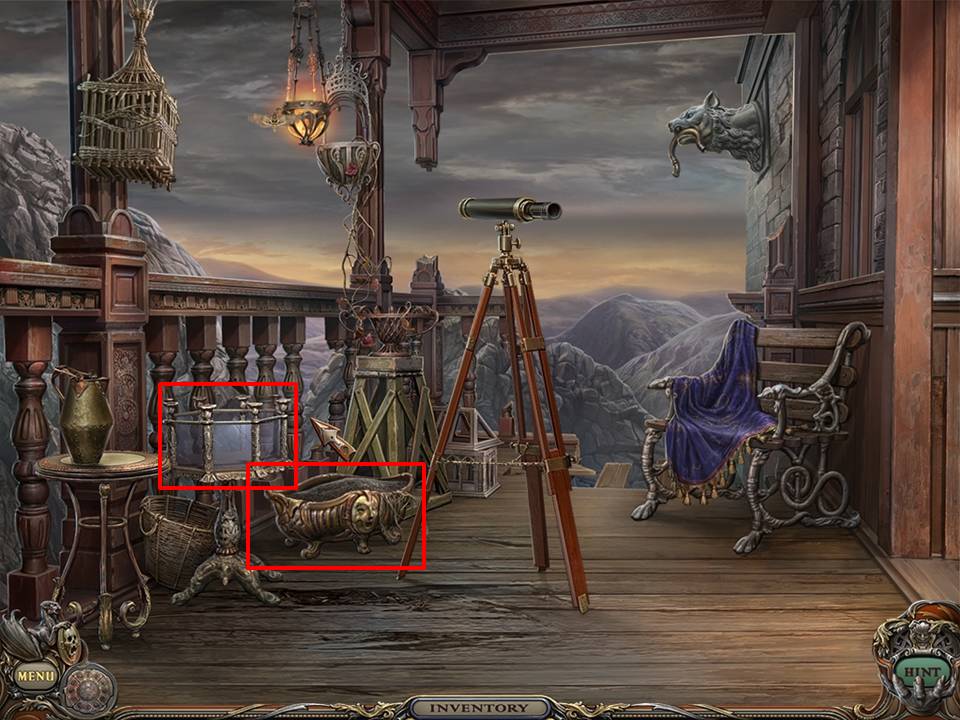
Zoom into the glass case on legs located to the left of the telescope.
Use GLASS CUTTER to cut the glass.
Pick up the TOAD and place it in the FRESCO.
Use the SCOOP to dig out the planter and pick up the ROOT.
Place ROOT in the FRESCO.
Return to the Cabinet.
Play the Hidden Object Area to the right of the fireplace.
Move the wallpaper to reveal the envelope.
Receive the RAPIER.
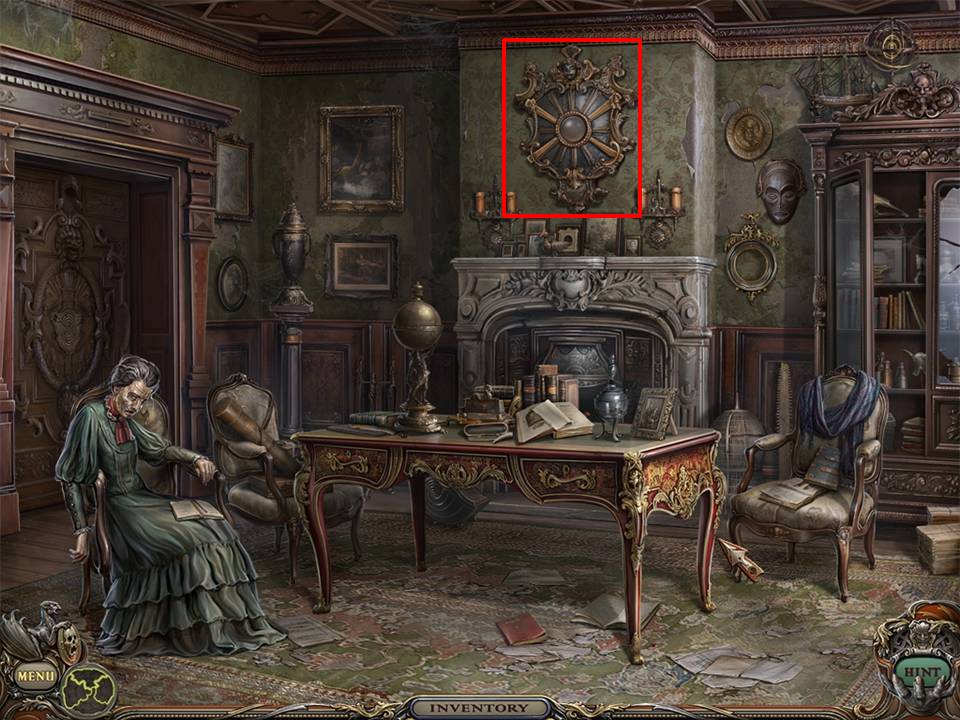
Zoom into the shield located above the fireplace in the Parlor.
Place one RAPIER on each corner in a crisscross pattern for a total of four.
When the RAPIERS are in place, the center of the shield will glow and illuminate a globe on the table. The globe will open to reveal a KEY PART.
Pick up the KEY PART.
Return to the Basement.
Play the Hidden Object Area.
Move the tray to reveal the bat.
Receive the OIL CAN.
Return to the Crypt.
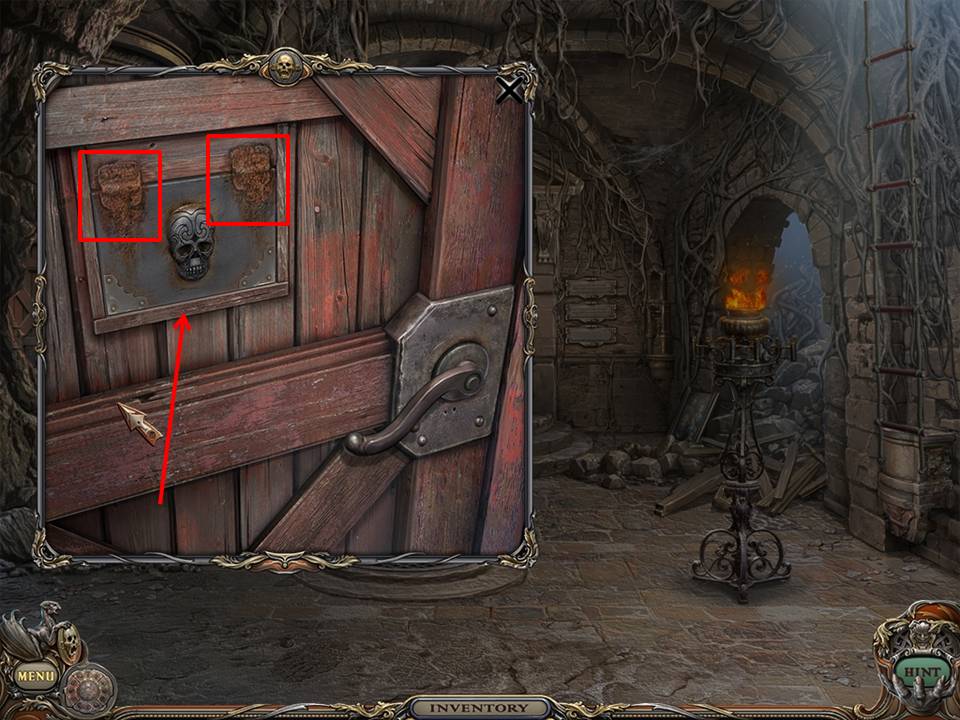
On the left side of the screen, you will see a door.
Zoom into panel on door to see rusty hinges.
Oil both hinges with OIL CAN.
Place the ANTITOXIN through the flap.
Turn the handle. Door to Laboratory will open.
Enter the Laboratory.
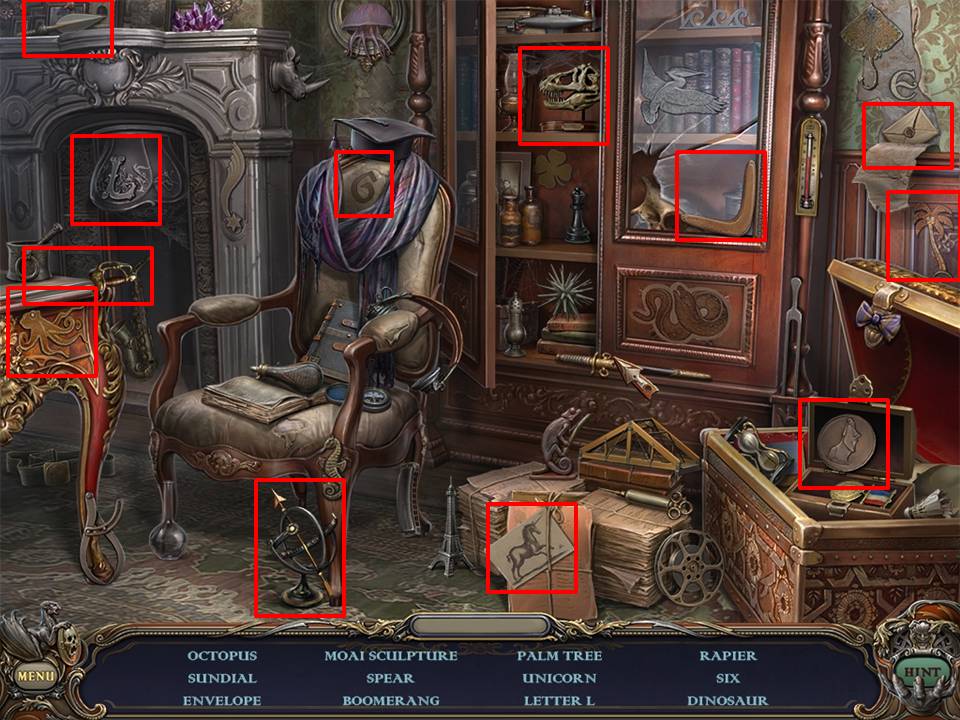
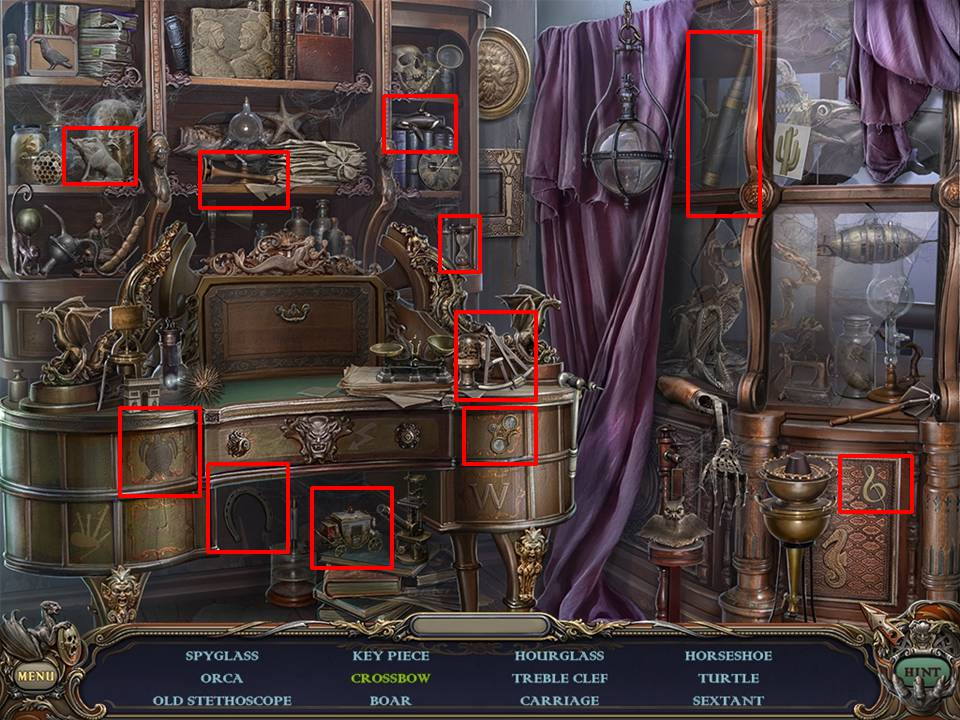
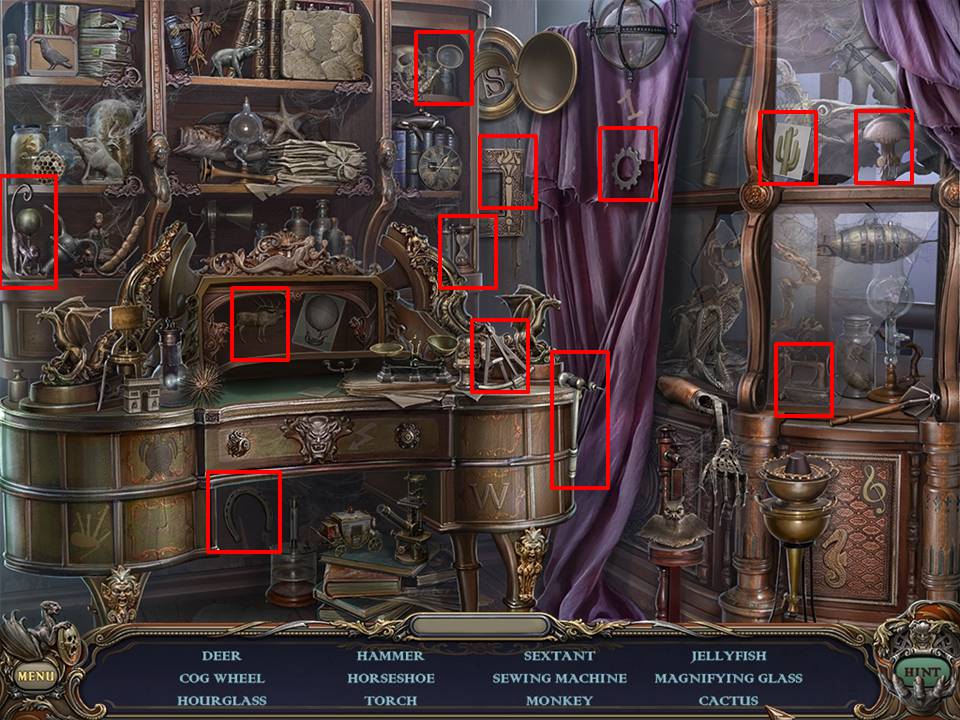
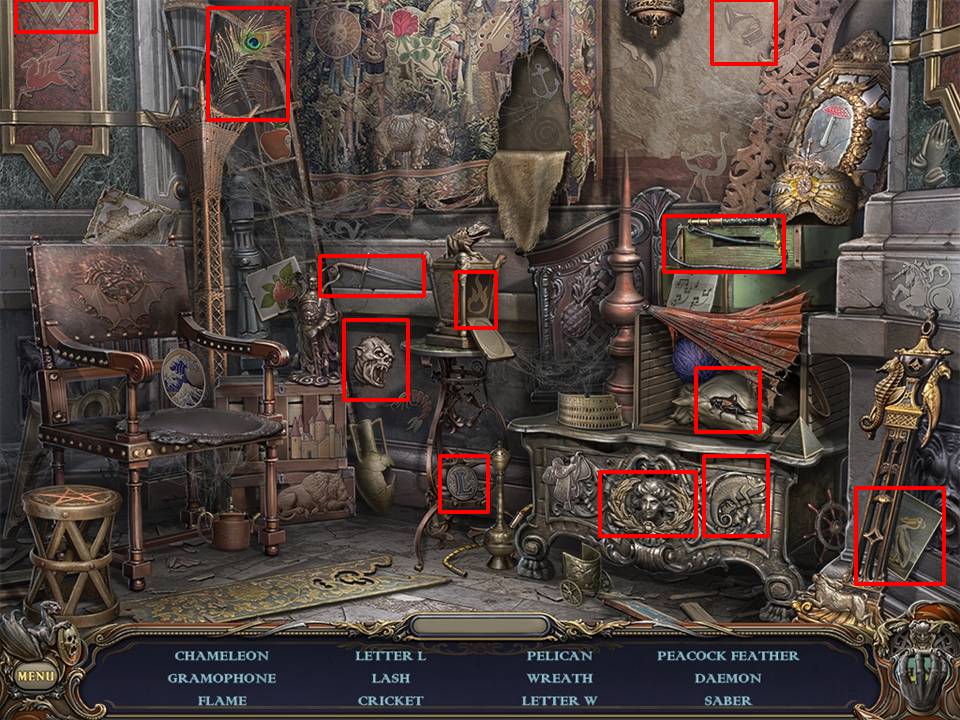
Play the Hidden Object Area by the purple drapery.
Open the door to reveal the deer.
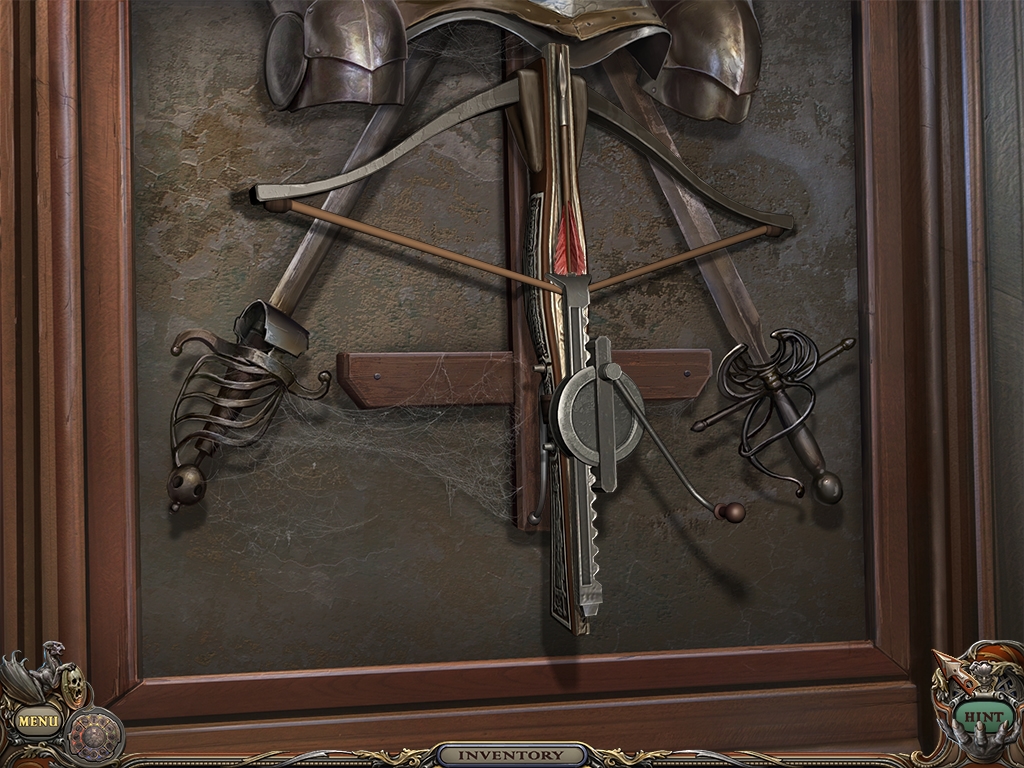
Move the curtain to reveal the crossbow and jellyfish.
Receive the KEY PART.
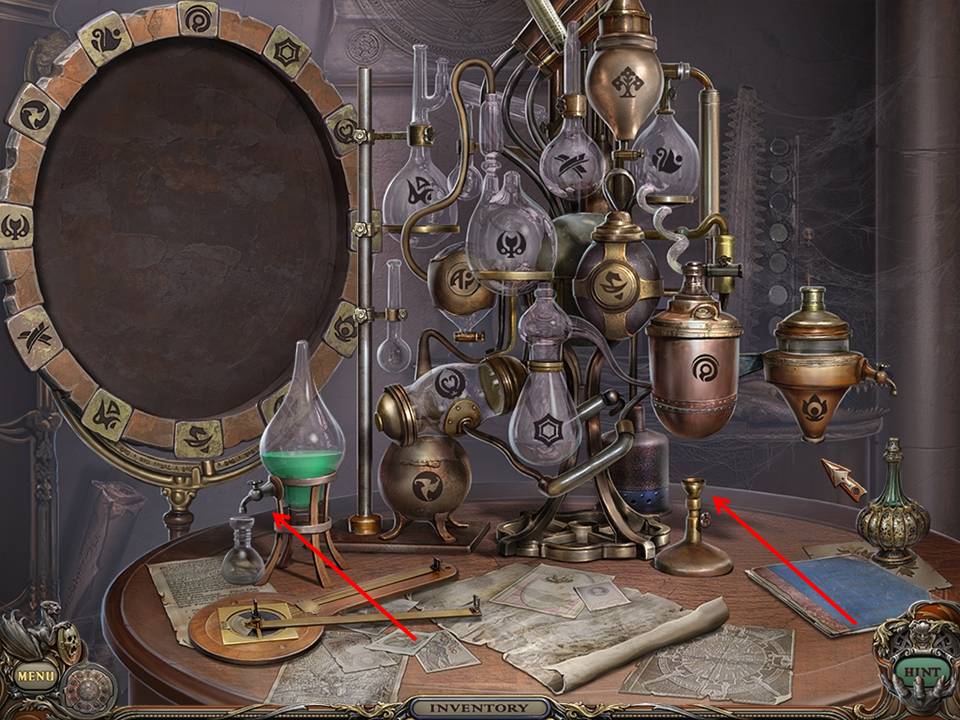
Zoom into the table in the Laboratory.
Use LIGHTER to light the burner.
Turn the handle on the carafe with green liquid (ACID). The beaker will fill with ACID.
Pick up the ACID.
Return to Upper Stairs.
Zoom into the door.
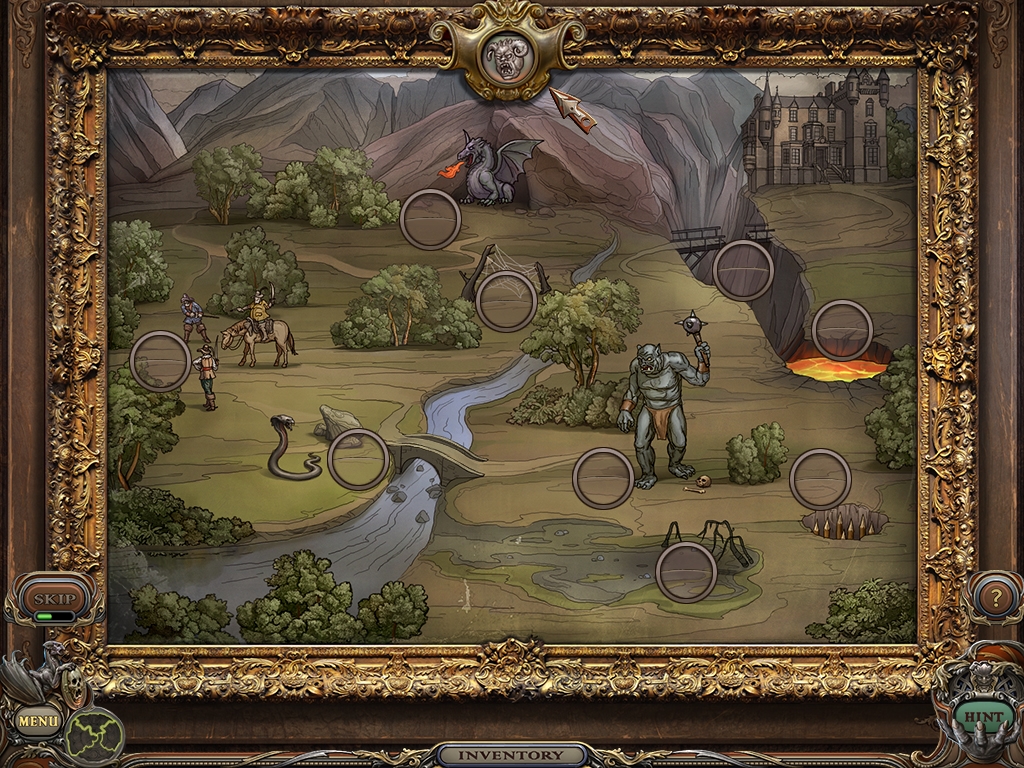
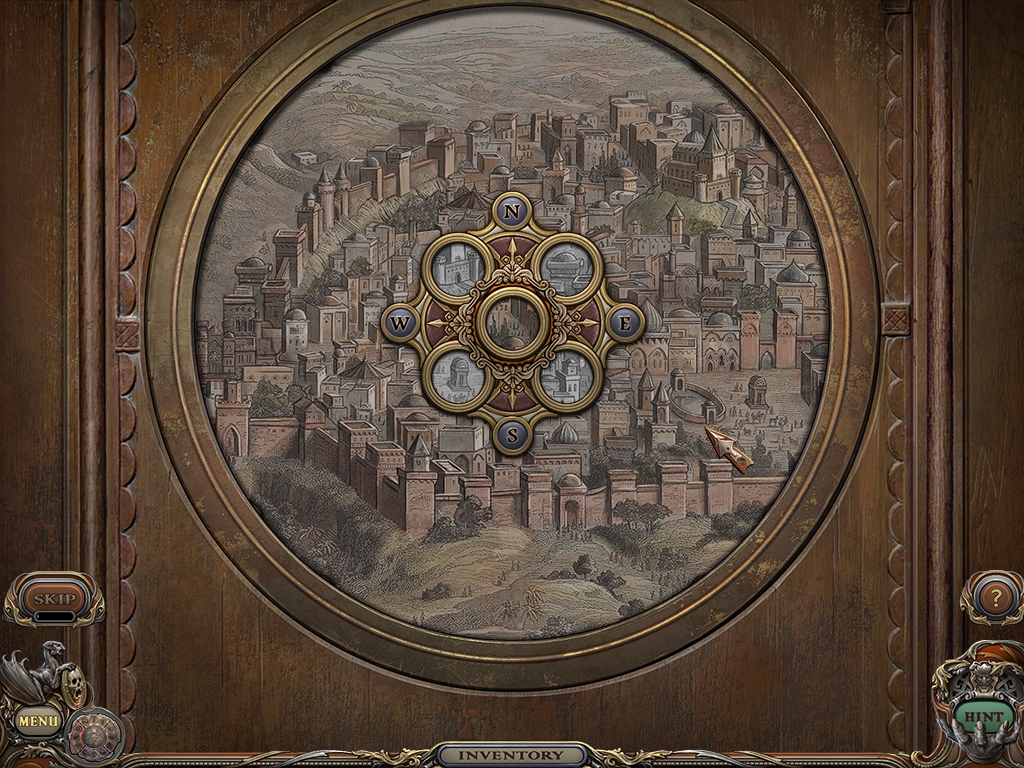
Use visual for placement of KEY PARTS. When the KEY PARTS are in place, a map visual will be revealed. Move the circular lens of the center piece to find and match the four scenes within the circles to identical spots on the map visual.
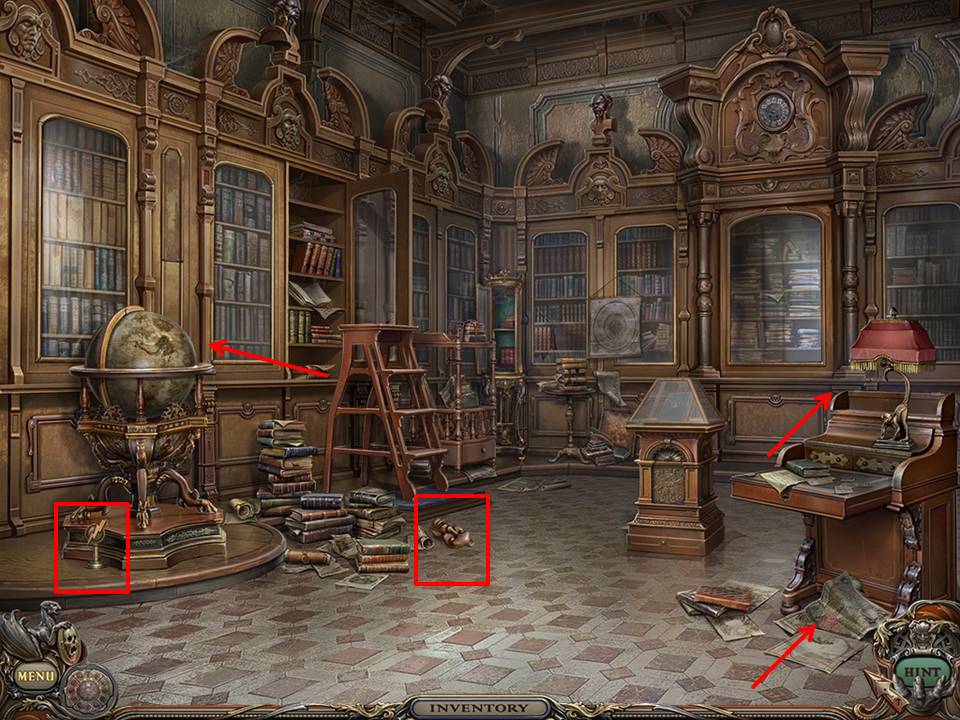
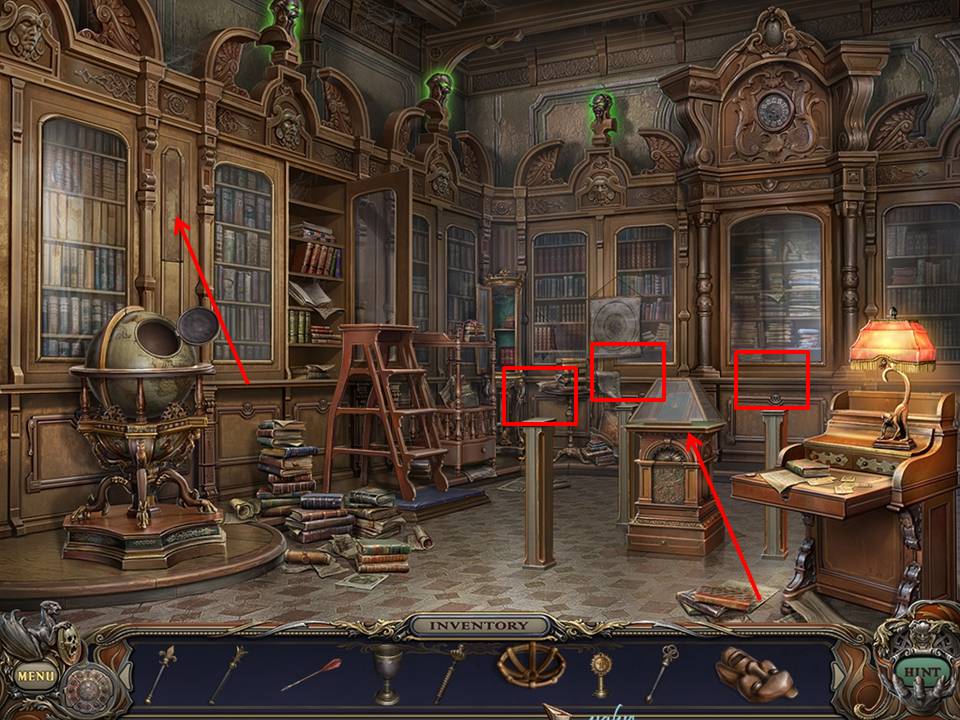
Enter the Library.
Move the paper to reveal and pick up one STATUETTE.
Pick up another STATUETTE and the BAS-RELIEF SCULPTURE.
Turn on light.
Spin the globe to locate a hatch.
Open the hatch.
Pick up a third STATUETTE.
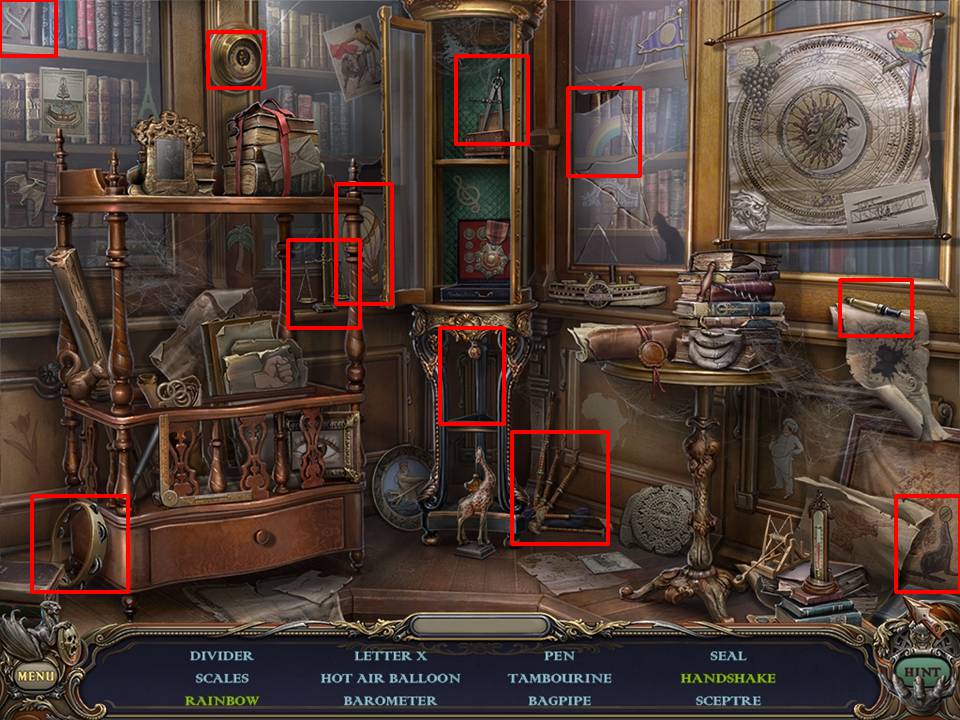
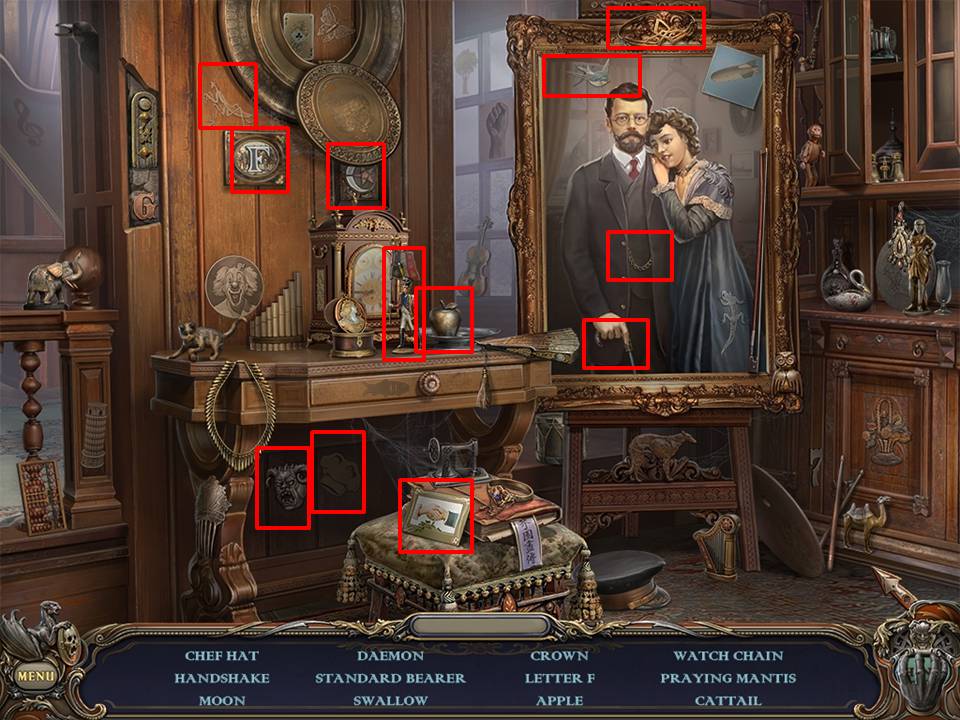
Play the Hidden Object Area located directly in the back corner of the library.
Move the cracked glass pane to get to the rainbow.
Move picture frame to reveal handshake.
Receive the Sceptre.
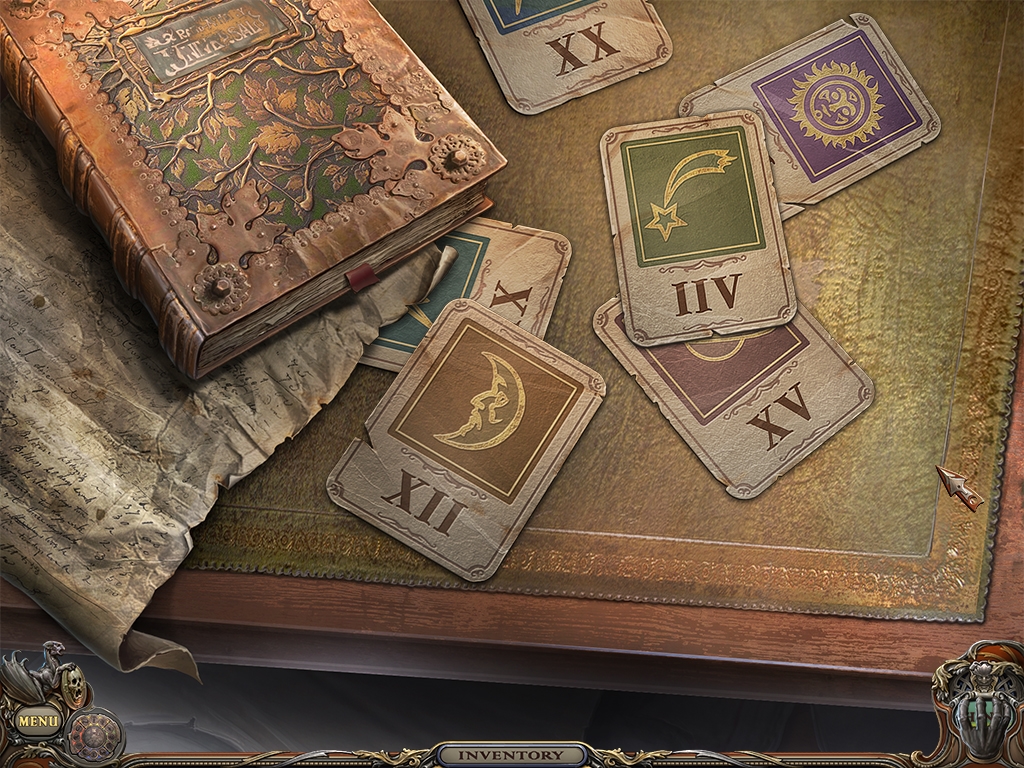
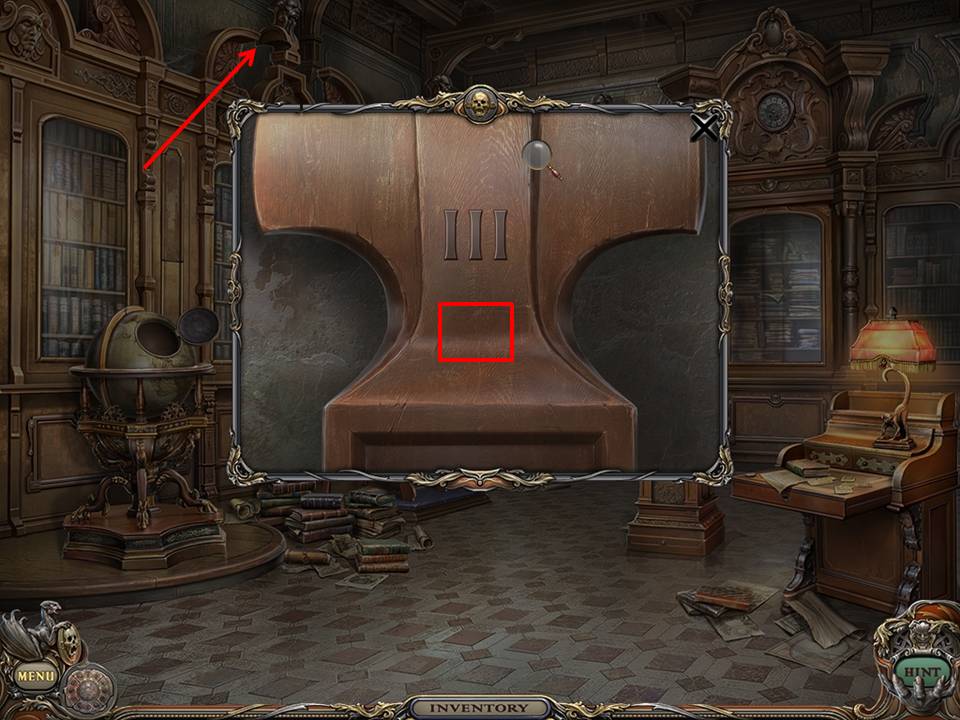
Leave the Hidden Object Area in the back corner of the Library and zoom into the desk with the monkey lamp located at the right of the scene.
Pick up the three CARDS with the Roman numerals XV, III, and IX.
Return to the Library and zoom into the three busts located along the top of the library cases.
Place the CARDS into the bases of the busts showing matching Roman numerals. They are from left to right III, IX, and XV.
Locate three pillars in the center of the room.
Place one STATUETTE on each pillar. When the STATUETTES are in place, a panel in the wall on the left will slide open to reveal a lever.
Pull the lever. The glass case in the center of the pillars will open to reveal a BOOK.
Pick up the BOOK.
Return to the Lower Stairs.
Place the BAS-RELIEF SCULPTURE on the front of the banister.
Pick up the GEM on the top of the banister.
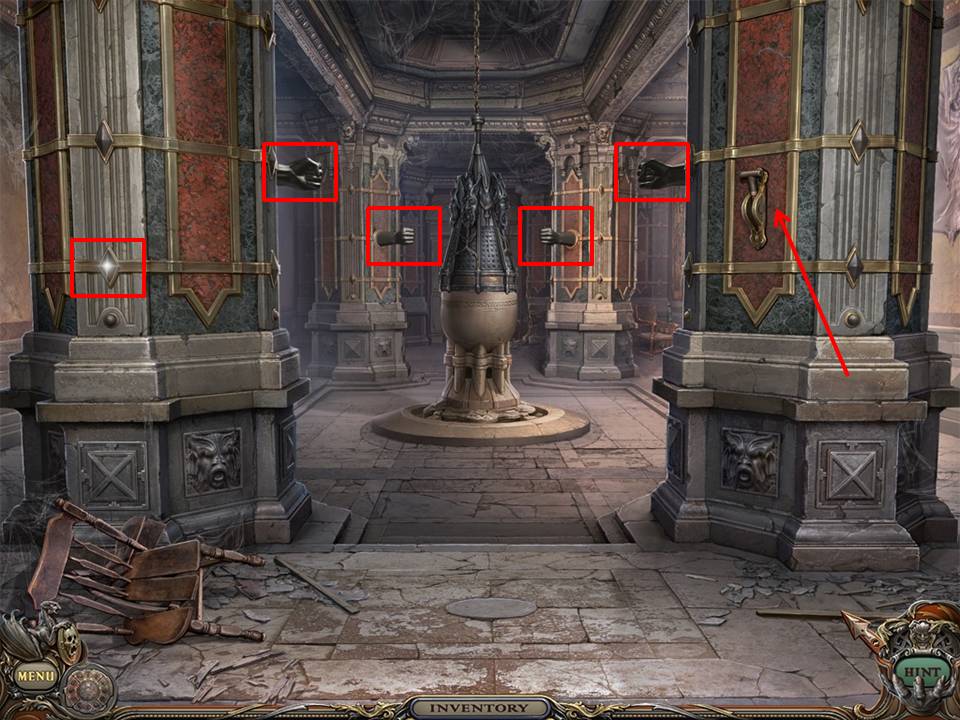
Proceed to the Basement.
Place the four SCEPTRES into the fists where indicated.
Pull the switch. The top of the fountain will raise to reveal an inner section.
Zoom into the fountain.
Place the valve on the top of the fountain and turn.
Use GOBLET to collect some water.
GOBLET will be renamed FILLED GOBLET.
Place the diamond-shaped GEM where indicated. When it is in position a panel will slide to expose a GOLDEN KEY.
Pick up the GOLDEN KEY.
A passage is revealed in the front of the fountain. It is an alternative way into the Mine Junction.
Proceed to Stella’s Hall. Do this by entering the Mine Junction from the Basement.
Zoom into the bookstand.
Place the BOOK.
Pick up the RUNE.
Retreat one scene and pick up the RUNE.
Return to Mine Junction.
Pick up the RUNE.
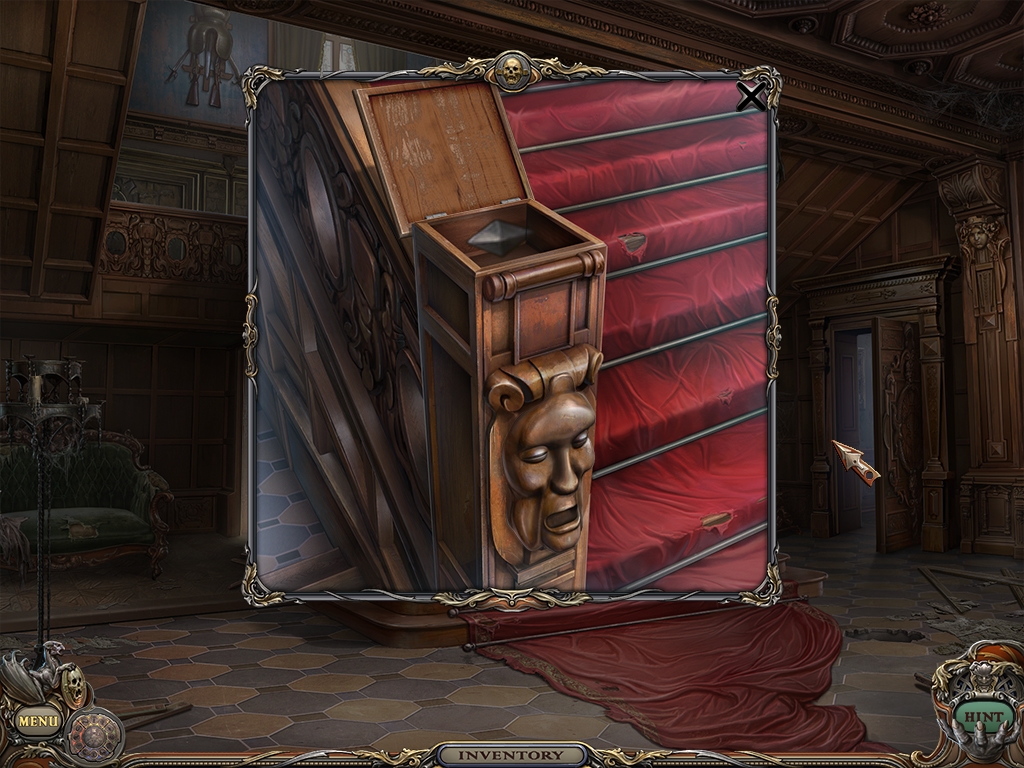
Return to Swamp.
Enter the carriage.
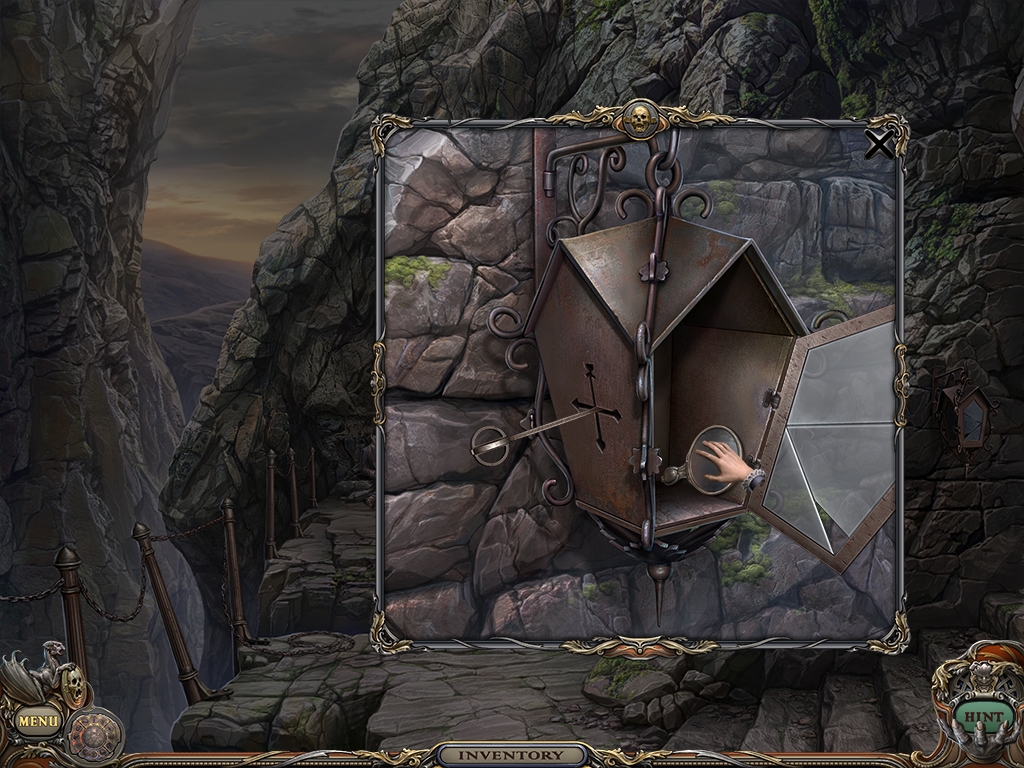
Use GOLDEN KEY to open the box.
Pick up the SKULL COIN.
Return to the Woods.
Pick up the RUNE.
Proceed to Tree House.
Zoom back into the stone face.
Pour the water from the FILLED GOBLET into the mouth on the stone face.
Pick up BLUEBERRIES and place them in the FRESCO.
Chapter 4: The Last Four Ingredients
Return to Stella’s Hall. You will see a door on both the left wall and the right wall. Both doors have stone pillars on either side. Zoom into the lock located on the right pillar of the right hand door.
Place the SKULL COIN on the middle nut. The object of the game is to get the three symbols on the nuts to line up. If you choose, you may set the middle nut to the placement you desire and then proceed to solve the puzzle by moving the first or last nut all the way to the end.
When positioned at the far ends, the nuts will spin freely, allowing you to change their positions on the bolt, but this only occurs when the snake’s eyes glow red. Rotate the nut several times, then spin it back toward the middle nut. In the event it doesn’t match, repeat the procedure until it does.
You should be able to solve the puzzle without use of the middle nut. You can spin the first to the right, then an additional seven times. Spin it back to the middle nut and it should match. Spin the last nut to the right and then an additional 10 times.
Proceed to Stella’s Bedroom.
Zoom into the sink and pick up the TWEEZERS.
Zoom into the bed and pick up the KEY.
Use TWEEZERS to pick up HAIR.
Place HAIR in the FRESCO.
Move the screen to reveal a Hidden Object Area.
Pick up the RUNE
Play the Hidden Object Area located in the dollhouse behind the screen.
Move the curtain to reveal the conquistador.
Move the wing to reveal the match.
Move the picture in the picture frame to reveal the clown.
Receive the EMPTY PITCHER.
Return to the Basement.
Pick up the RUNE.
Return to the Hallway at the top of the stairs and zoom into the door.
Insert KEY into the keyhole and turn it four times.
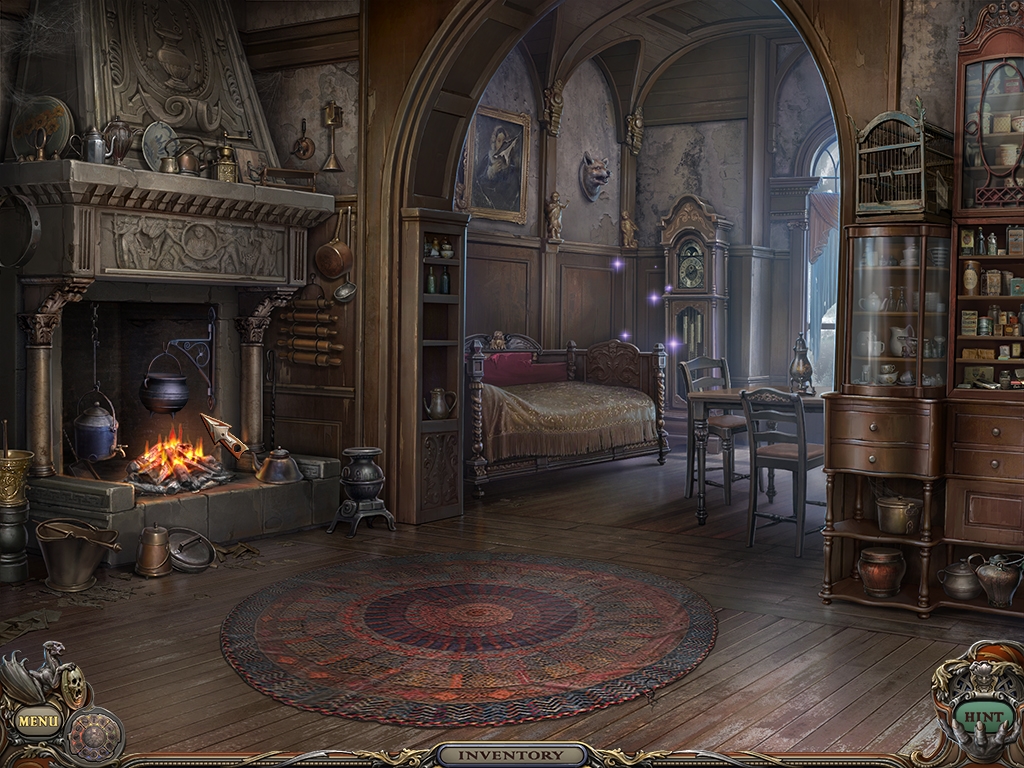
Pull the handle to enter the Maid’s Room.
Turn over the rug to pick up the TENSION MECHANISM.
Pick up the PIECE OF PIANO PLATE located along the fireplace mantelpiece.
Use LIGHTER to light the fire.
Zoom into the cabinet shelf on the far right of the screen.
Open the tin and pour ACID inside. The ACID dissolves the contents of the tin to expose the SCORPIONS TAIL.
Pick up the SCORPIONS TAIL and place it in the FRESCO.
Pick up the CORKSCREW.
Return to the Upper Stairs and zoom into the wall on the left side of the screen.
Put the TENSION MECHANISM in place and crank the handle.
Place the ARROW and pick up the loaded CROSSBOW.
Return to the Balcony and shoot the CROSSBOW at the animal head on the right wall. The tube in the animal’s mouth will drop out of sight.
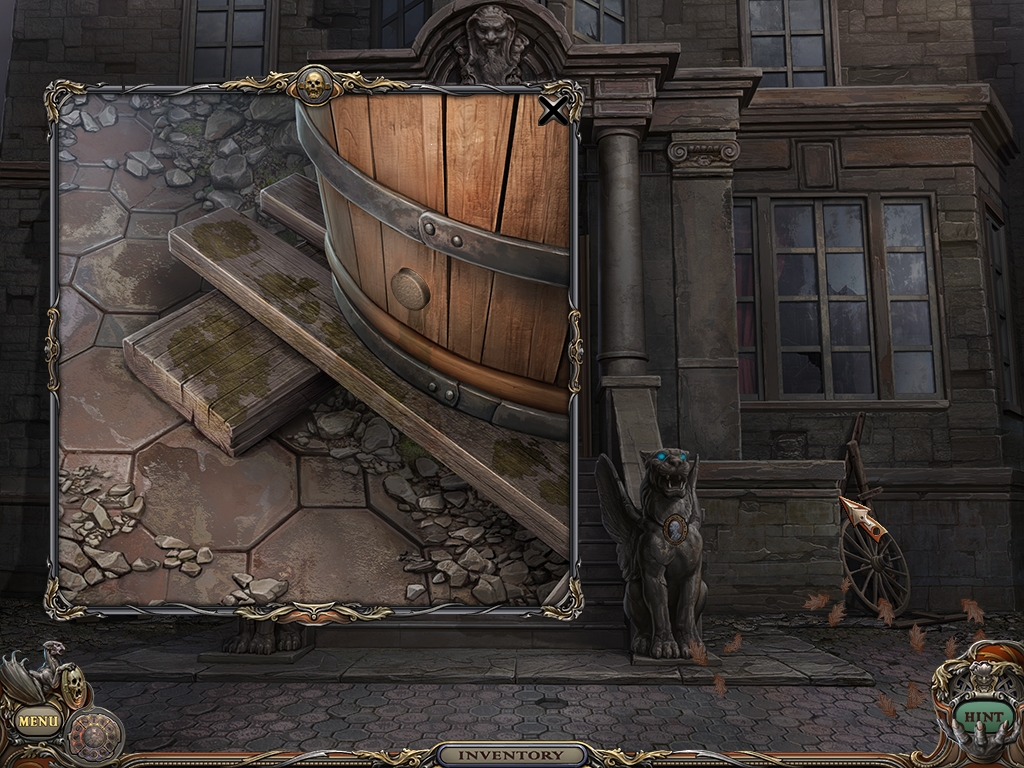
Return to the House Entrance and zoom to look at the bottom (front) of the barrel on the left of the entry stairs. You will see a cork on the front of the barrel near the bottom.
Remove the cork with the CORKSCREW.
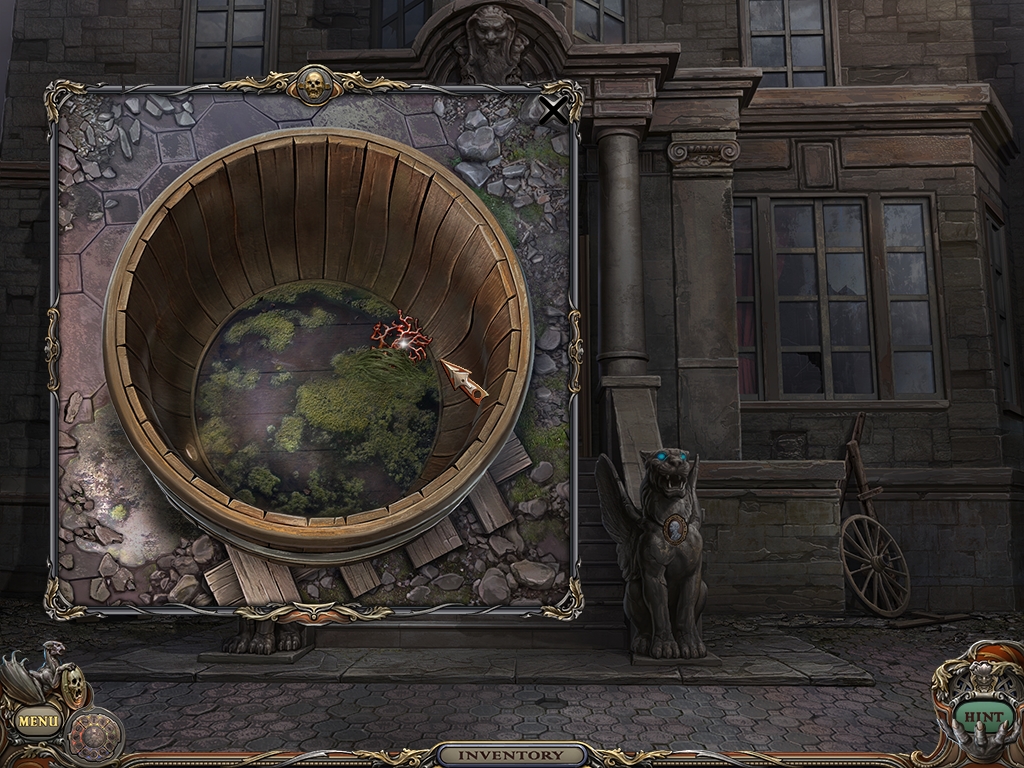
Close this inset screen and then zoom in to the top of the barrel. Use CROWBAR to pry open the top.
Pick up the CORAL on the inside of the barrel and place it in the FRESCO.
Return to the Music Room and zoom into the piano.
Place the PIECE OF PIANO PLATE as indicated. The resulting puzzle involves pressing a series of piano keys and has several solution variants. The one described here corresponds to this game play.
One solution is to play the keys in the numerical order indicated.
Pick up the PURE SILVER.
Return to Maid’s Room and put the PURE SILVER in the pot to the right of the fireplace. Pot will then swing to cook over the fire.
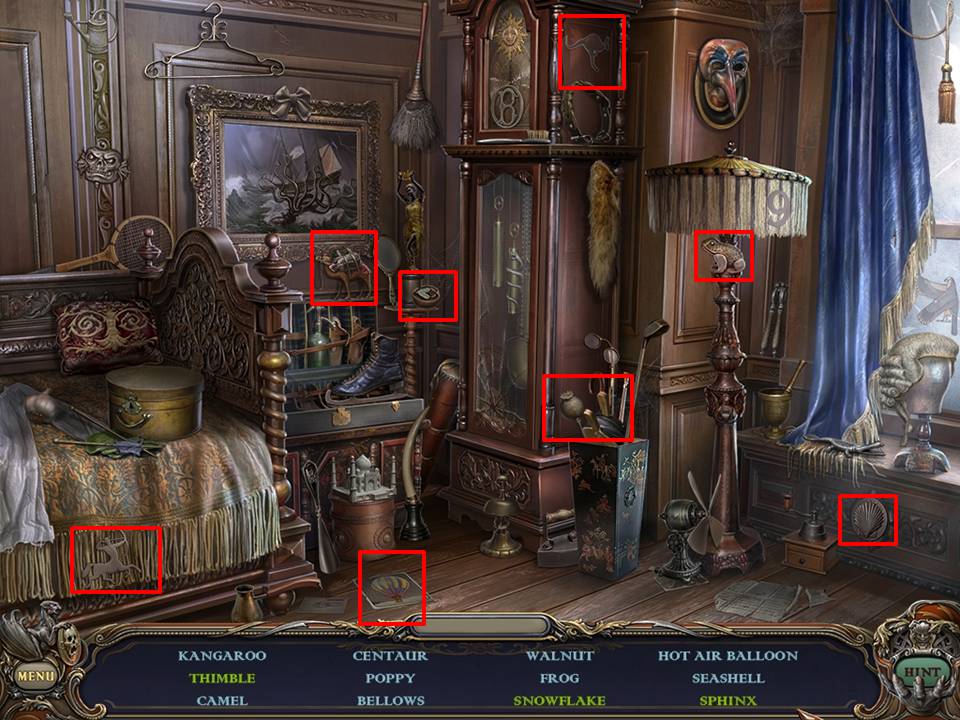
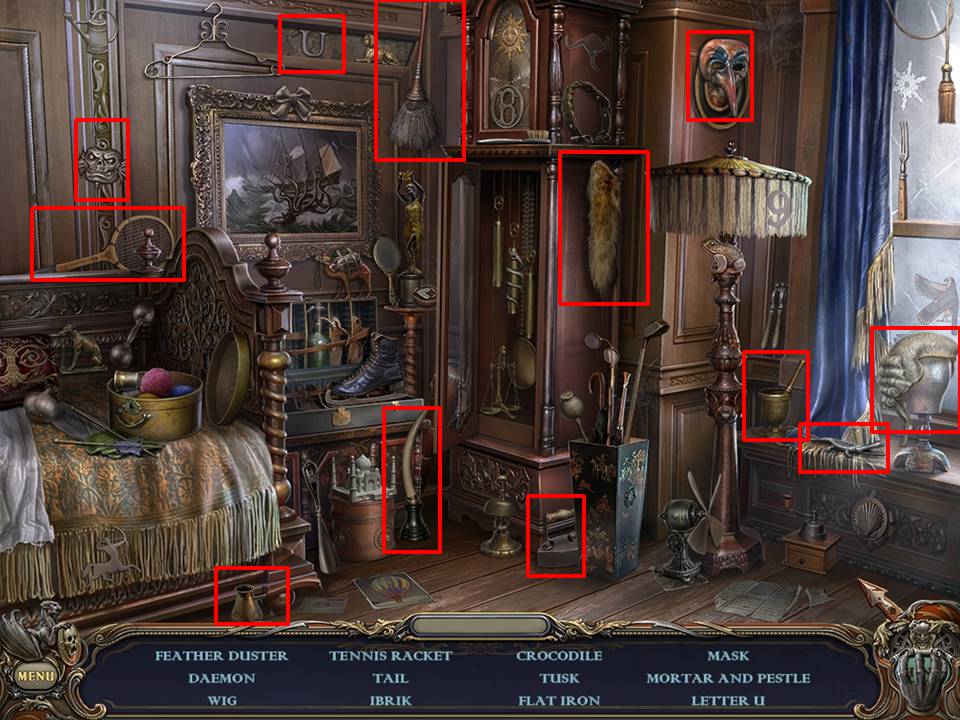
Play the Hidden Object Area located through the archway of the Maid’s Room near the grandfather clock.
Move the curtain to reveal the snowflake.
Open the hatbox on the bed to reveal the thimble.
Move the wooden panel above the painting to reveal the letter “U” and the sphinx.
Uncover the dumbbell, by moving the pillow.
Receive the BELLOWS.
Return to main area of Maid’s Room and use the BELLOWS on the fire.
Place the EMPTY PITCHER under the pot to receive the ALCHEMICAL PITCHER.
Place the ALCHEMICAL PITCHER in the FRESCO.
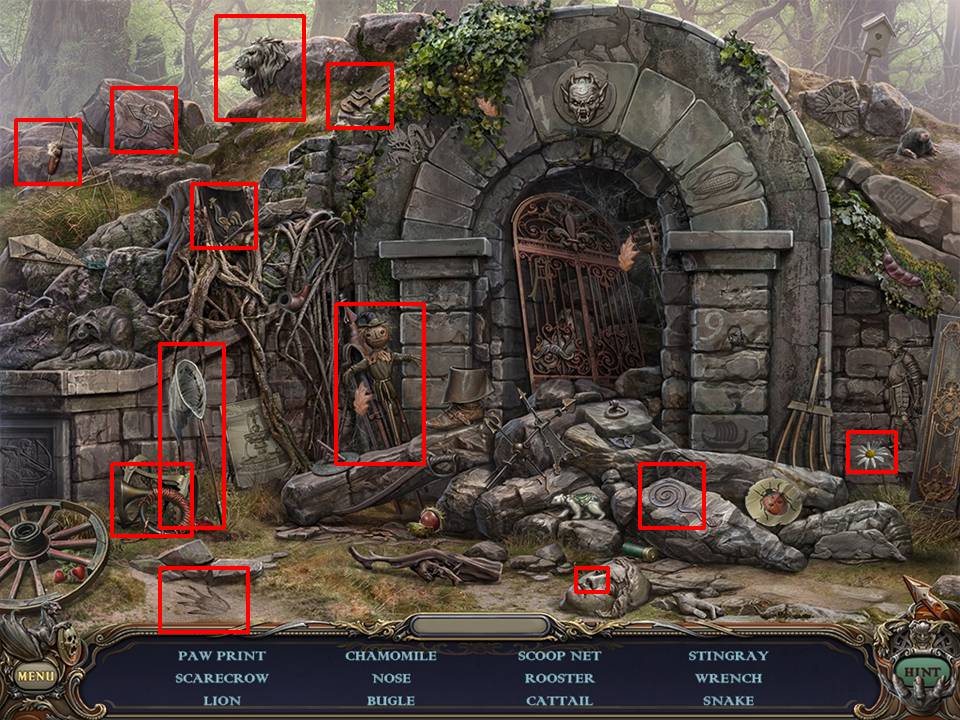
Return to the Woods and play the Hidden Object Area.
Move the stone to reveal the gear.
Move the panel to reveal the warrior and chamomile.
Receive the INSECT NET.
Return to the Balcony.
Use INSECT NET to catch the MOTH.
Return to the Parent’s Room.
Turn on the lamp.
Zoom into the nightstand on which the lamp is sitting.
Place the MOTH in the web and pick up the SPIDER.
The SPIDER completes the FRESCO. Put it in its proper space. Now that you have a completed FRESCO, you will head to the Laboratory to make the elixir.
Return to the Mine Entrance
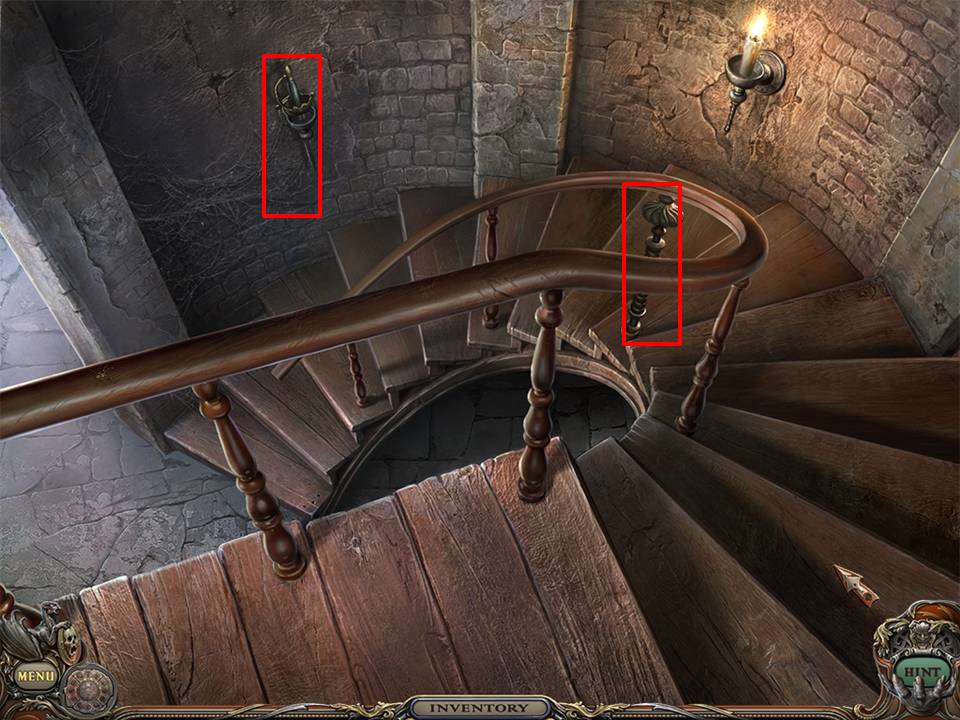
Pick up the TUBE on the left side of the walkway hanging on the handrail chain. Pick up the RUNE.
Proceed to the Laboratory (go through the Woods to the Treehouse to the Crypt).
Zoom to the table in the laboratory.
Click on the FRESCO to place it into the scene.
Place the TUBE.
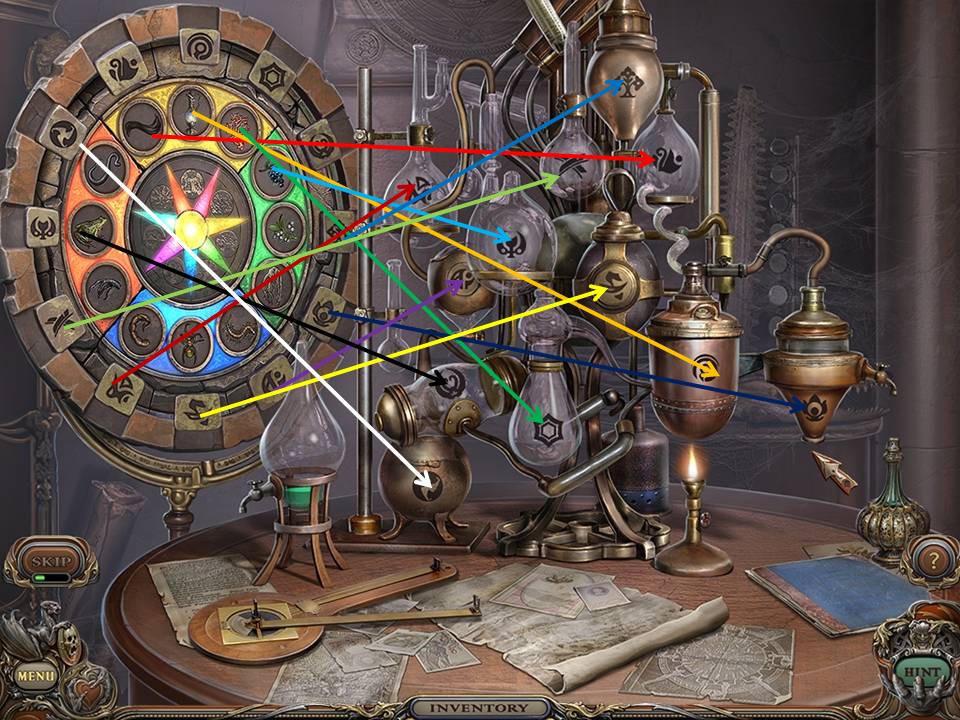
Solve the puzzle on the wheel to the left by clicking on an ingredient and then clicking on a beaker with the corresponding symbol.
Pick up the ELIXIR.
Play the Hidden Object Area located by the purple drapery.
Open the drawer to reveal the deer.
Move the curtain to reveal the jellyfish.
Receive the HAMMER.
Return to Stella’s Bedroom and zoom into the sink.
Use HAMMER to break the mirror.
Pick up the dagger.
Move back to Stella’s Hall and zoom into the bookstand.
Place the DAGGER and all six RUNES as indicated in the visual. When the RUNES are properly placed, the DAGGER will glow blue and transform into a MAGICAL DAGGER.
Pick up the MAGICAL DAGGER and use it cut the tapestry covering the door leading to the secret room.
Chapter 5: Free the Souls
Enter the Secret Room and zoom into the circular piece above the red throne.
This chapter involves playing all the Hidden Object Areas in the game and receiving a DAEMON after each one. Once all the DAEMONS have been collected, you will place them in this circular piece to finish the game.
Return to Stella’s Hall and play the Hidden Object Area by the wheelchair.
Move the shield to reveal the bull.
Receive a DAEMON.
Return to the Mine Junction and play the Hidden Object Area.
Open the door to reveal the grinder.
Move the board to reveal the number 5.
Move the helmet to reveal the hot air balloon.
Receive a DAEMON.
Return to the Basement and play the HOS.
Move the platter to reveal the bat and the wave.
Open the lamp to reveal the flame.
Reveal the spiral by tearing the tapestry.
Receive a DAEMON.
Return to the Upper Stairs and play the HOS.
Move the curtain to reveal the zebra.
Receive a DAEMON.
Return to the Library and play the Hidden Object Area located in the back corner of the room.
Move the glass to get to the bridge.
Receive a DAEMON.
Return to the Maid’s Room and play the Hidden Object Area located through the archway near the grandfather clock.
Move the wooden panel to reveal the sphinx and the letter “U.”
Open the pillow to reveal the dumbbell.
Receive a DAEMON.
Return to the Parlor and play the Hidden Object Area by the large framed picture.
Move the wood panel to reveal the shoulder strap.
Receive a DAEMON.
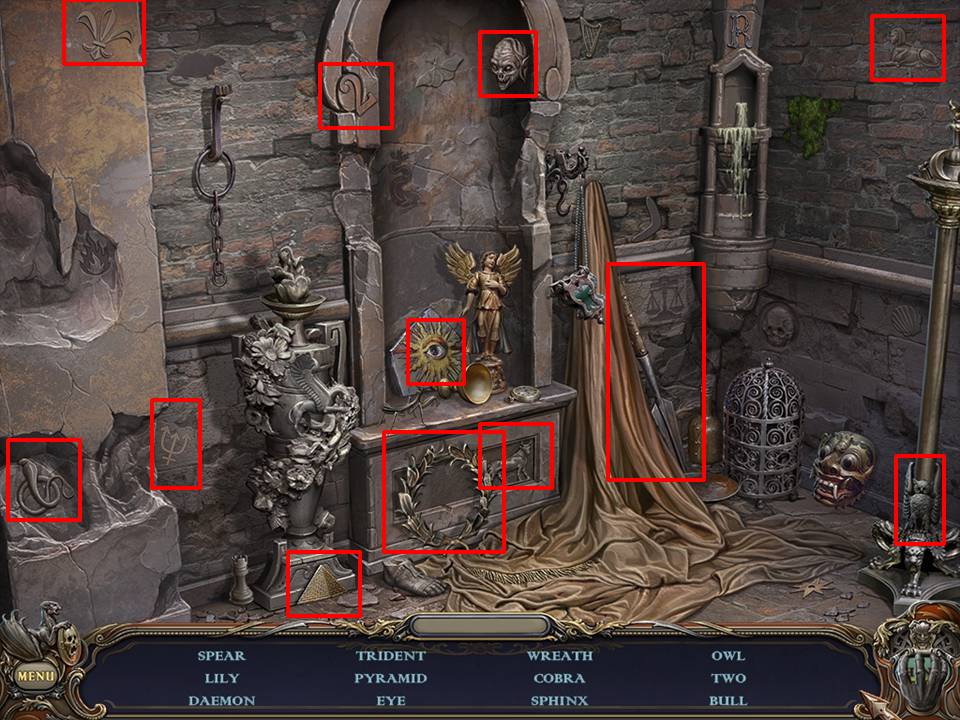
Return to the Woods and play the Hidden Object Area located in the stone ruins.
Move the panel to reveal the warrior.
Reveal the rooster by opening the tree stump.
Receive a DAEMON.
Return to the Crypt and play the Hidden Object Area.
Move the curtain to reveal the star.
Receive a DAEMON.
Return to the Laboratory and play the Hidden Object Area.
Move the tile to reveal the elephant.
Receive a DAEMON.
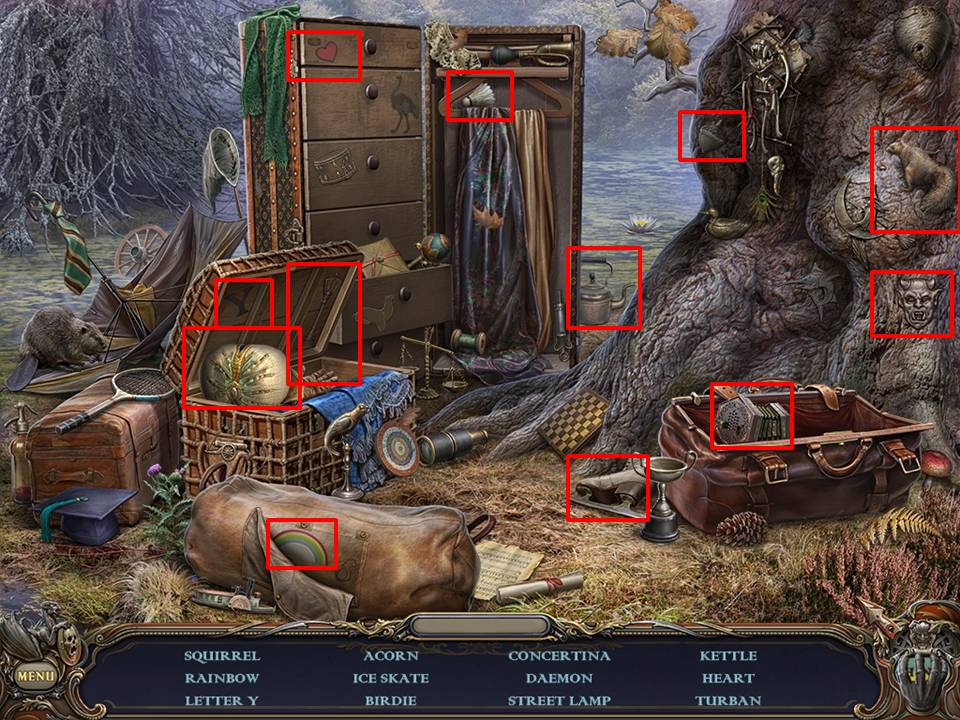
Return to the Swamp and play the Hidden Object Area located at the baggage beneath the tree.
Move the panel to reveal the rainbow.
Open the bag to obtain the punched key card.
Receive a DAEMON.
Return to the Mine Entrance and play the Hidden Object Area to the right of the entryway.
Move the wicker cage to reveal the tortoise.
Receive a DAEMON.
Return to the Secret Room and zoom into the circular piece above the red throne.
Place all the DAEMONS in the piece as shown in the visual.
Give the ELIXIR to Stella.
Congratulations!
A messenger brings a young woman, Christie, a letter from her twin sister, Stella. The letter informs Christie that she and her sister are now orphans. Christie must leave school in London to return to the family manor house. Due to an unnamed malady, Stella remained at the family home and didn’t join Christie at school. The letter implies that something may be wrong at the house and that Christie is to come quickly. Christie departs immediately, but is unprepared for the horrors that await her.
General Tips:
Following this game guide exactly is not necessary. However, some actions must be performed to complete a certain scene before progressing.
Use the OPTIONS button to customize the screen size, music, sound, and cursor.
Click PLAY to begin your adventure.
You may CHANGE PLAYER to manage your activities within the game.
Hidden Object Areas sparkle. Zoom into these sparkling areas to initiate that activity. Both Hidden Objects and some puzzles within the game are random. Use this game guide as an example only.
You may proceed through the introduction to the story by using the NEXT button or skip with the SKIP ALL button.
Chapter 1: Obtaining the Fresco
The scene you are in is called the Swamp. Begin by playing the Hidden Object Area. Access by clicking on the trunks and baggage under the tree on the right of the screen.
Find the objects listed. Objects change and the ones indicated on this screen are those used for the sample game.
Open the bag to reveal the punched key card.
Move the panel to reveal the 6.
Move the leaves on the branch at upper right to reveal the teacup.
You will receive a PUNCHED KEY CARD.
Pick up the three (3) remaining PUNCHED KEY CARDS and CANE.
Zoom in on carriage door.
Place the PUNCHED KEY CARDS over the lock.
Rotate the disks and place the PUNCHED KEY CARDS as shown.
This enables you to enter the carriage.
Pick up the LIGHTER, LADDER, and FLASHLIGHT.
Use CANE to break the window.
Pick up SPLINTER.
Depart carriage.

Place the LADDER on the rear of the carriage. An owl will fly in and perch on top of the carriage.
Drop the LAMP over the owl.
Scale the LADDER and cut the rope with the SPLINTER.
Scramble over fallen luggage to leave the Swamp and enter the Yard.
Move to the left toward the Mine Entrance.
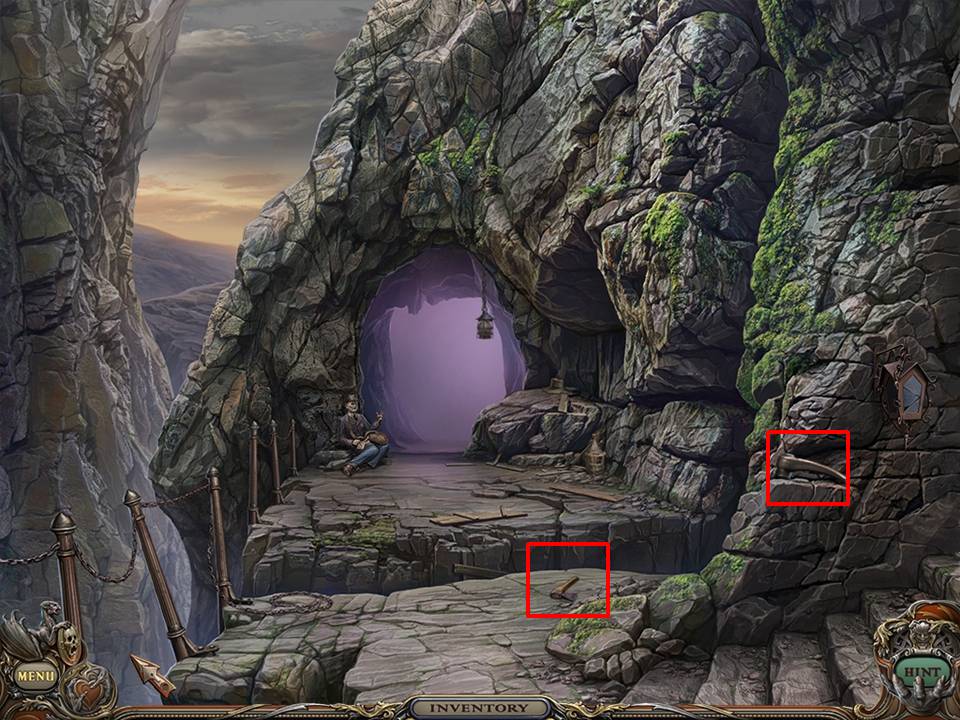
Pick up the HANDLE and the AXE.
Return to the Yard and move to the right to enter the Woods.
Pick up the ROPE LADDER.
Zoom into the stone pillar.
Click on the SNAKE.
Go to Tree House.
Use AXE to chop the vines. AXE will return to inventory renamed as AXE BLUNT.
Zoom into the door.
Zoom into the stone face.
Pick up the CAMEO.
Return to Woods scene.
Play the Hidden Object Area located at the back left of the screen.
Move the plaque to reveal the warrior.
Move the tree trunk to the top right of the archway to reveal rooster.
Receive the BALL.
Return to the Tree House entrance.
Zoom back into the door.
Maze visual will be revealed.
Place the ball in the hole of the mouth of the figure on the top left corner on the maze.
Follow the path as displayed to move the BALL to the exit.
Enter the Tree House.
Put the HANDLE on the hatch and open.
Once the hatch is opened, place the ROPE LADDER down the hole.
Enter the Crypt.
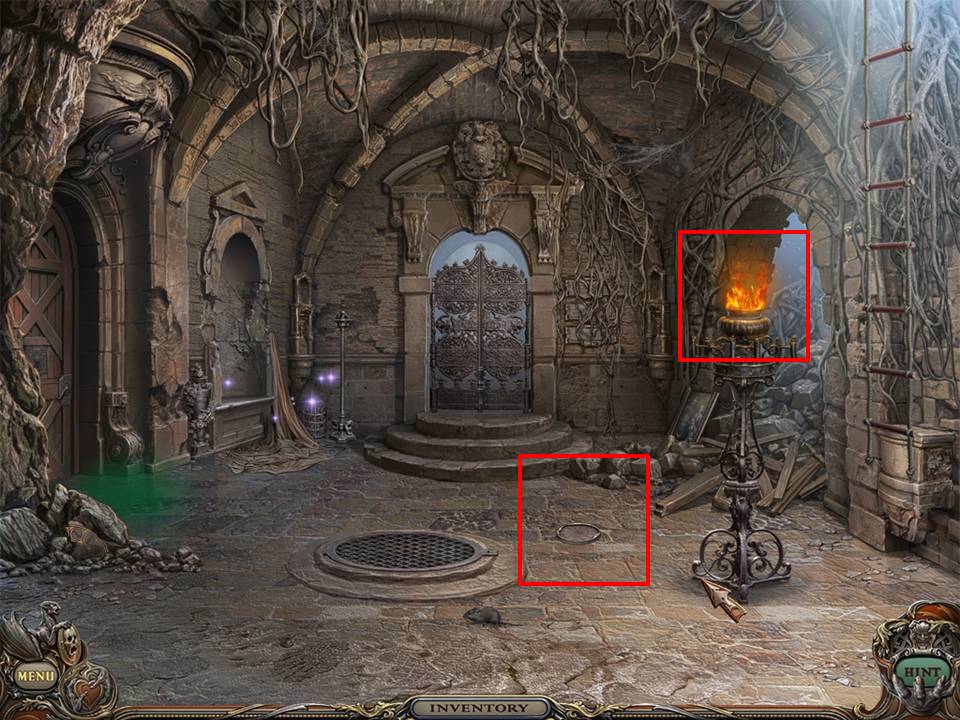
Light the lamp with the LIGHTER.
Pick up the FRESCO BACKGROUND.

Play the Hidden Object Area located to the left of the center doorway along the back wall.
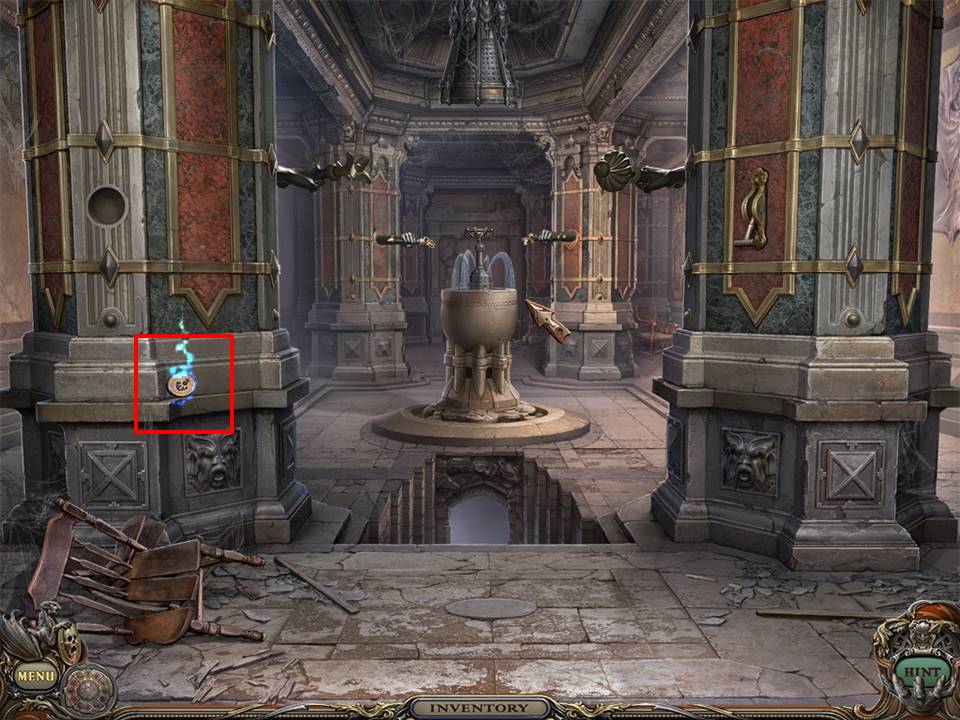
Flame is behind loose tile on the left.
Find the KEY by moving the cage.
Receive the KEY.

Zoom into the manhole.
Insert KEY into the keyhole and open the door.
Beetle scene will be revealed.
Match identically colored beetles. Screen shot is for illustration only. Beetle placement may differ depending on your unique game play.
Pick up the CAMEO.
Zoom into the family portrait.
Pick up the candles.
Pick up the FRESCO PIECE.
Return to the Woods.
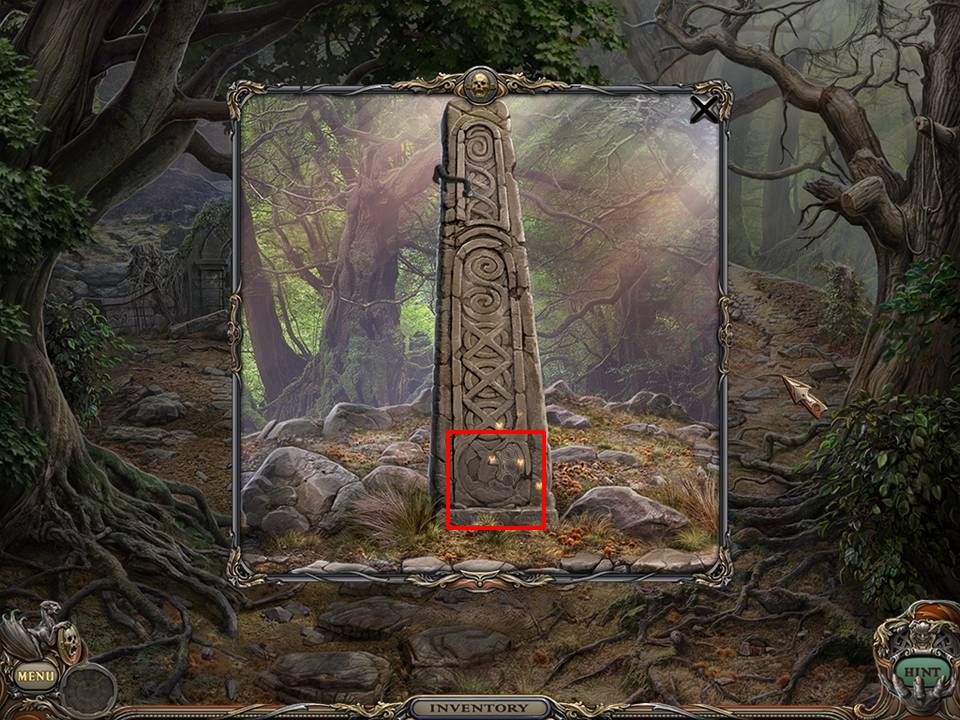
Zoom back into the stone pillar.
Pick up the FRESCO PIECE.
Return to the Yard.
Zoom into the stone.
Move the rock.
Pick up the FRESCO PIECE.
Move to the front door of the house.
Place the right-facing CAMEO around the neck of the lion on the left and the left-facing cameo on the opposite lion.
Bars on front door will slide away. Enter the house and proceed to the Hallway.
Move the pillow.
Pick up the BALL.
Pick up the CANDELABRA and place it on the table.
Insert the CANDLES into the CANDELABRA and light with the LIGHTER.
Zoom into the frame located behind the CANDELABRA.
The following is a memory puzzle.
Place the BALL in the hole at top center of frame.
A picture of a demon head will be shown in the hole at the top center.
Click on circles within the frame. Random heads will be revealed. Match the demon head showing at the top center with another head within the frame. A new demon head will be revealed. Continue matching until all heads have been revealed and matched.
The door is now open and you can proceed into the Parlor and through the door to the Music Room.
Pick up the BOARD and the PULL CORD.
Return to the Parlor.
Attach the PULL CORD to the lamp.
Turn on the lamp.

Play the Hidden Object Area located near the picture frame.
Open cabinet at top right to reveal the camera and tobacco pipes.
Move the clock to reveal the clown and the reed pipes.
Open the cabinet to reveal opera glasses.
Move the artist’s palette to reveal the number seven and to obtain the CROWBAR.
Return to the Mine Entrance.
Use BOARD to bridge the gap.
Play the Hidden Object Area located to the right of the mine entrance.
Move the wicker cage to reveal the brush and tortoise.
Move the hat to reveal the weight and snail.
Move stone at bottom left to reveal playing card.
Receive the SCREWDRIVER.
Return to the Hallway.
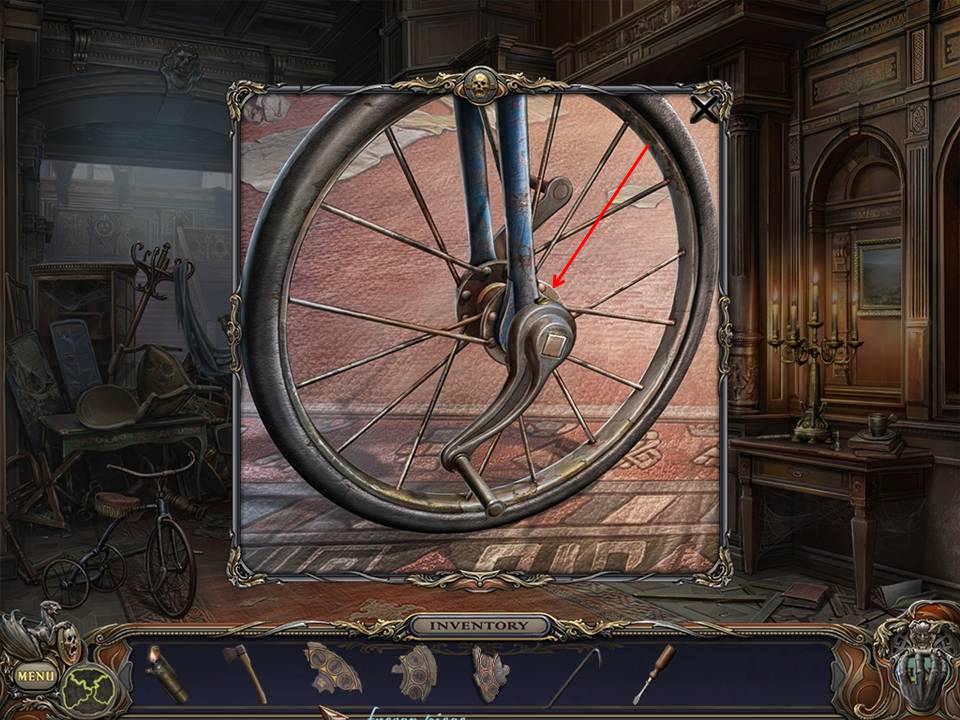
Zoom into the bicycle.
Use SCREWDRIVER to remove the HANDLE.
Return to the Music Room.
Move the chair. Flip the corner of the rug back to reveal a covered passageway.
Use CROWBAR to remove the cover.
Zoom in.
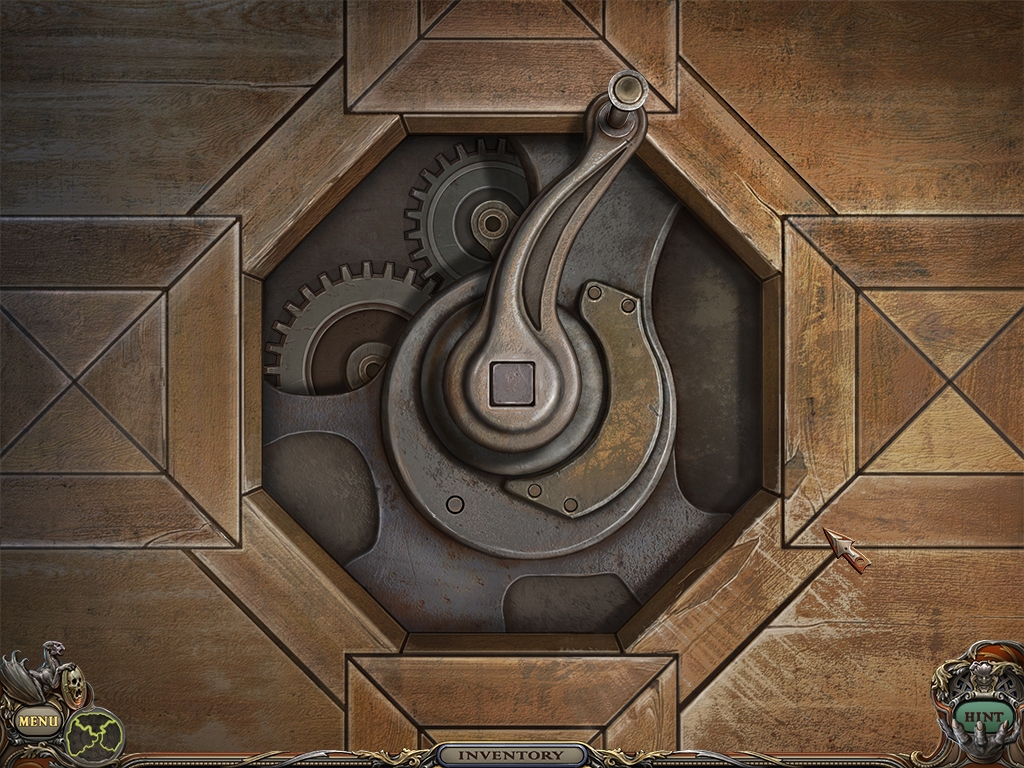
Place the HANDLE on the lock and turn.
Play Hidden Object Area in Cabinet by clicking on space between fireplace and cabinet.
Move the wallpaper to reveal envelope.
Move the photograph inside the cabinet to reveal the chess piece.
Receive the CONDUCTOR.
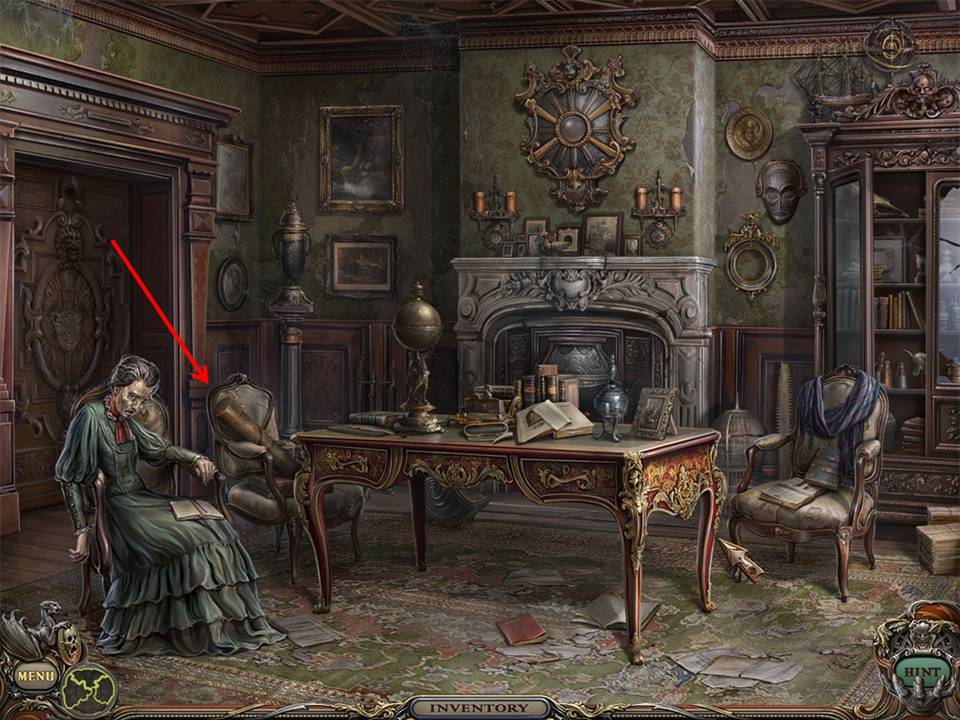
Open the canister that is sitting on the chair to the right of the old lady.
Pick up the TELESCOPE.
Return to the Mine Entrance
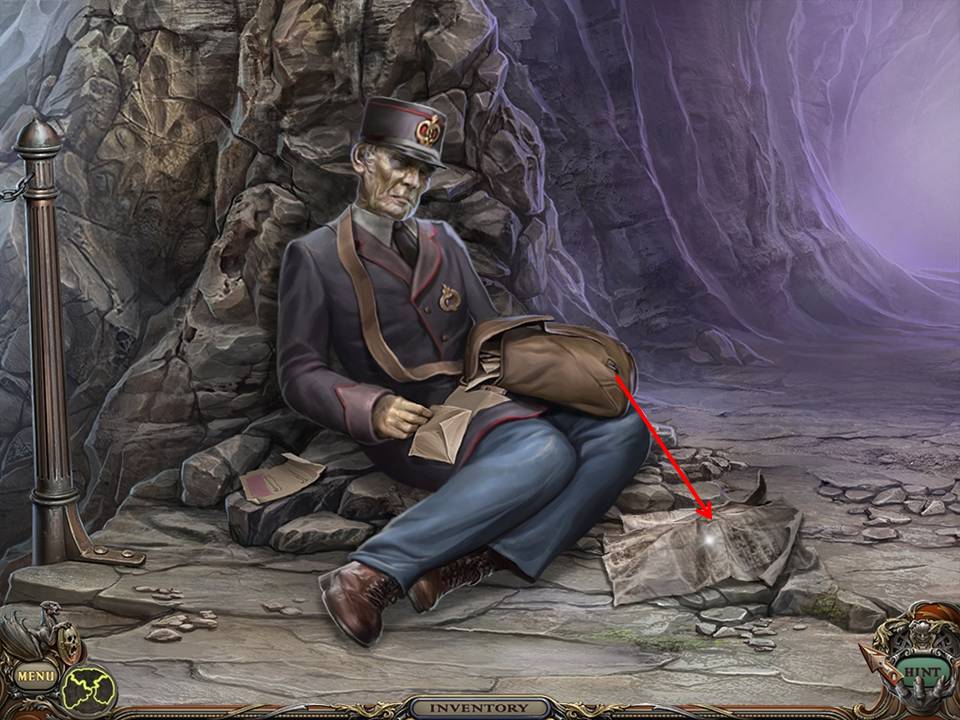
Zoom into the mailman on the left side of the Mine Entrance.
Zoom into the paper.
Move away from the mailman.
Enter the mine.
Open panel and zoom in.
Place the CONDUCTOR into the center opening.
Solve puzzle to turn on all of the lights. To do this, connect the circuits as shown in the image. Please note: Every time you spin a circuit, the last one (indicated with a blue ring) will spin in the same direction as the one you are spinning.
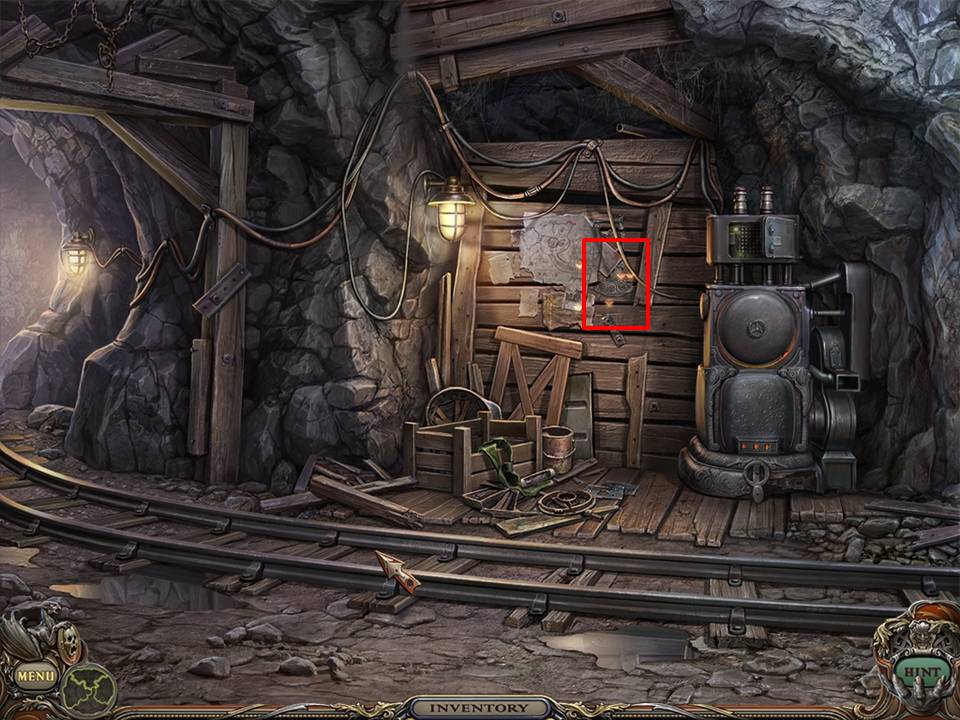
Gather the last FRESCO PIECE when the lights come on.
Zoom into the FRESCO BACKGROUND which is adjacent to the Menu button.
Assemble all of the FRESCO PIECES.
In the next chapter, you will begin to amass the ingredients to place into the FRESCO. When directed to place an object into the FRESCO, open the FRESCO and place the item into the matching space.
Chapter 2: The First Four Ingredients
Move to the Mine Junction.
Take the AXE BLUNT from inventory and use grinding wheel to sharpen.
AXE BLUNT will transform to SHARP AXE.
Return to the Crypt which is under the Tree House Entrance.
Zoom into the vines located on the back wall.
Use the SHARP AXE to remove them.
Removal of the vines reveal plaques.
Click on the plaques in this order middle, top, and then bottom.
Enter the Mausoleum
Zoom into the casket on the left.
Open the casket lid.
Gather the SWORD HILT, SPHERE DISC, and BIRD FOOT.
Place the BIRD FOOT into the FRESCO.
Return to the Hallway.
Zoom into the suit of armor.
Place the SWORD HILT on the sword held by the suit of armor.
Pick up the SCEPTRE.
Proceed through the Music Room to the Cabinet.
Zoom into the door on the left behind the woman.
This puzzle has several solution variations and many random starting positions.
Place the SPHERE DISC in the middle of the lock. Locate the center symbol positioned at the chute. Find the corresponding ball and move its ring toward the chute. Pull the handle to drop the ball in the plunger. Move the rings by clicking to create free passage for that ball to move into its properly marked position in the SPHERE DISC. When the ball is located in the plunger at the top of a totally free chute, pull the handle to drop the ball into its slot. Repeat this process for each center symbol moving counterclockwise and corresponding ball. When a ball is positioned properly, it will glow yellow.
Proceed to the Lower Stairs. Pick up TUMBLER LOCK beneath the green sofa on the left.
Return to the Parlor.
Zoom into the lion’s head on wall between the first and second archways.
Insert TUMBLER LOCK into the lion’s nose.
Zoom out from the lion’s head and play the Picture Frame Hidden Object Area again.
Move the artist’s palette to reveal the drumsticks.
Receive the URN PEDAL.
Return to the Music Room.
Place the URN PEDAL in spot indicated.
Pick up the SCISSORS inside the urn.
Return to the Parlor.
Use scissors to snip open the pillow.
Receive the code (39).
Zoom back to the lion’s head. Use the numbers 3 and 9 as the first two for the TUMBLER LOCK code. You will then need to rotate through the numbers for the final tumbler until the lock opens. Please note: The dials do not rotate continuously. The code begins at 555. You must move the cursor above the number and click to move through the numbers below five and put the cursor beneath the number and click to move through the numbers above five.
Pick up the DRAGON HEART.
Go to the Upper Stairs via the Lower Stairs.
Use scissors to cut the cord.
Try to pick up the SCEPTRE.
Zoom into the animal statue positioned just above the chandelier.
The object of this puzzle is to move the light gray insignias ringing the inner circle through the curving paths to their appropriate “matched” slot in the outer circle. It’s best to simply begin with an insignia at the top and visually follow the path to see if the insignia will move into its proper place. If so, click on the insignia and it will move automatically. Repeat this procedure with each insignia. You may find that only one or two will move at any given time. If that you have exhausted all possibilities. Click on the outer ring to spin it once and repeat the procedure of following the visual path for each remaining insignia.
Pick up the SCEPTRE and move into the Hallway.
Zoom into the cabinet located at the end of the Hallway to the left of the door.
This puzzle has several solution variants. This description is the one used in this game play. Click on the one exposed gear to reveal the first panel. Begin with the gear with the hand. Click its adjacent gear to get it moving in the opposite direction. For example, if the first gear is moving clockwise, click its adjacent gear to move counterclockwise. Then, the gear adjacent to that one should move clockwise. Proceed in this fashion until the gears are moving properly and the next panel is exposed. Repeat the process until all the panels have opened and all the gears are moving properly. If your chosen puzzle is different, please ensure that as you click, each gear rotates in the opposite direction of the adjacent gear.
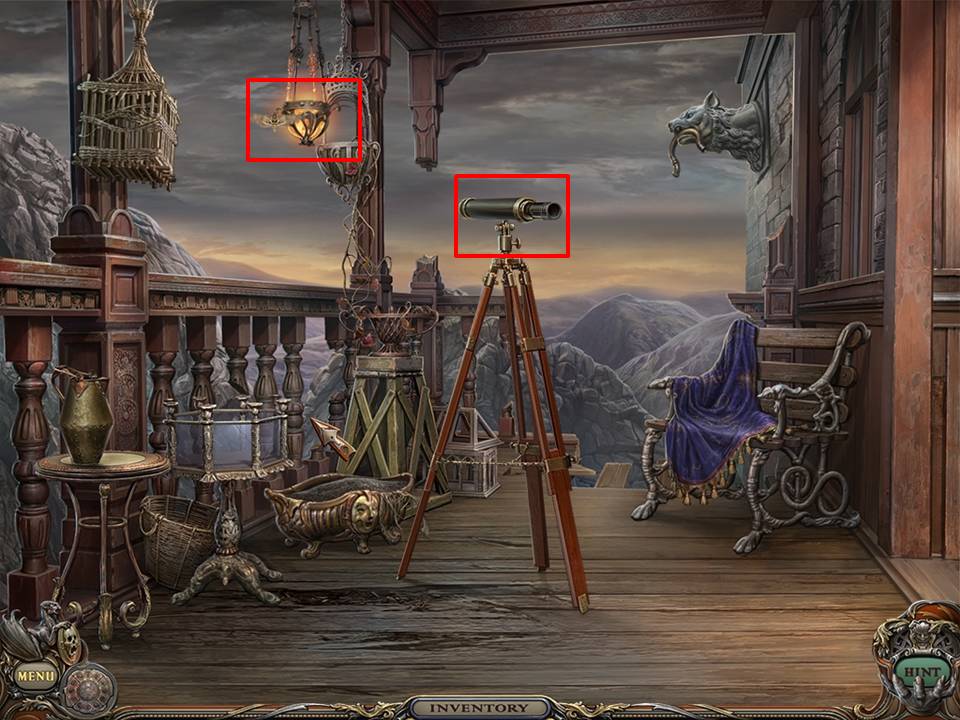
Move to the back of the Hallway at right to reach balcony.
Place the TELESCOPE where indicated.
Use lighter to light the lamp.
Proceed to the Nursery via the Hallway.
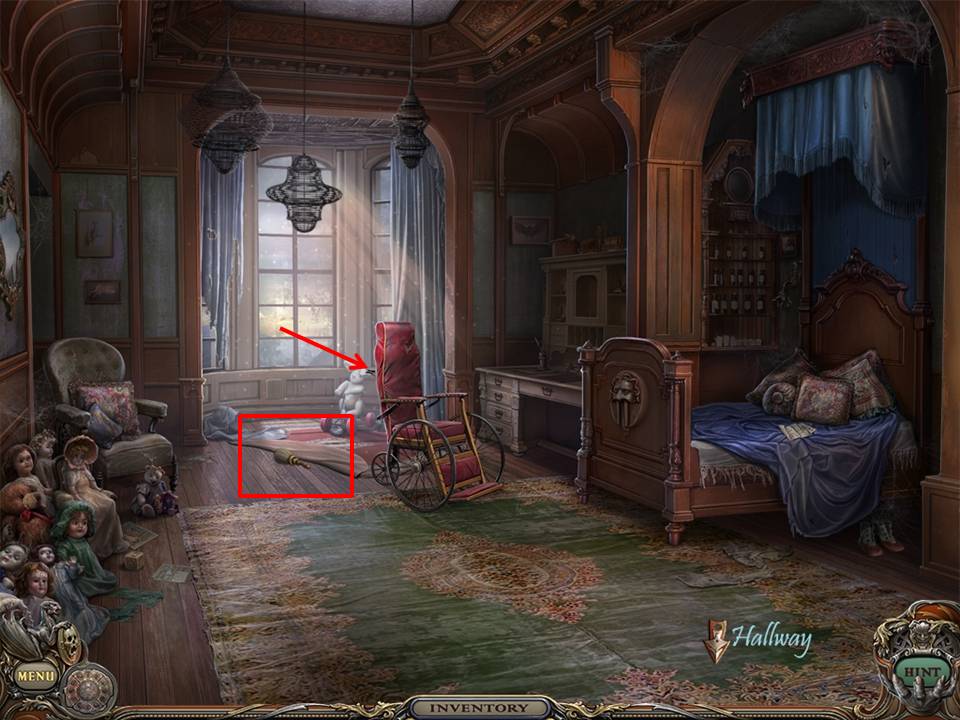
Move the wheelchair and the rug.
Pick up the BRUSH.
Return to Hallway.
Zoom into the painting.
Brush away cobwebs with the BRUSH obtained in the Nursery.
Pick up the CHEST KEY.
Return to Upper Stairs.
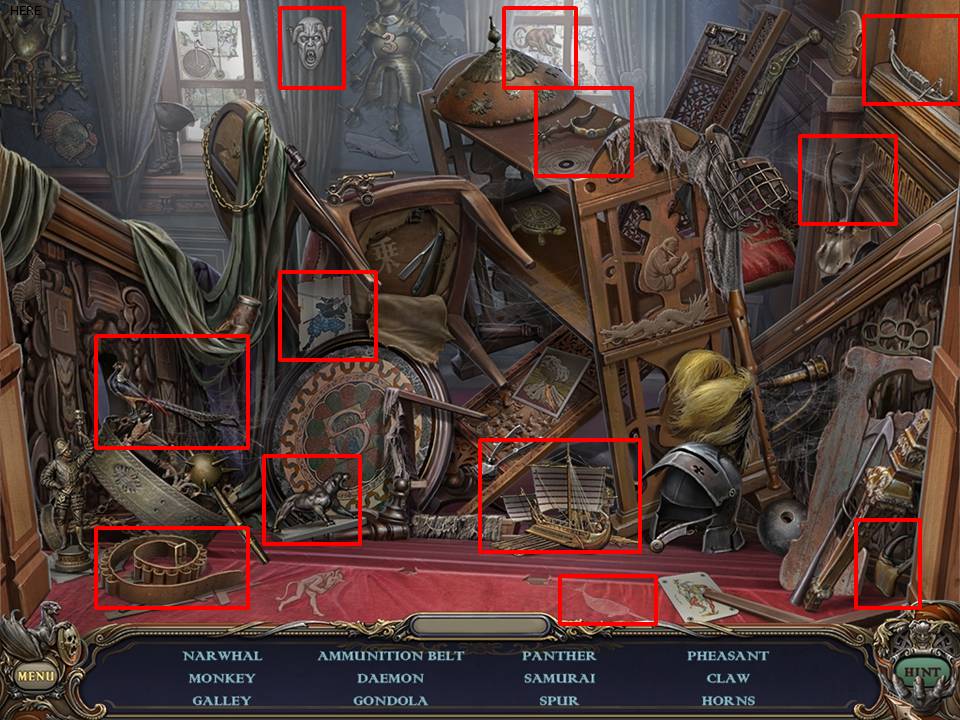
Play Hidden Object Area located on the left staircase.
Move the bottom of the chair to reveal the hieroglyph and razor.
Reveal zebra by moving curtain.
Receive the SPEAR.
Place SPEAR on the statue.
Enter the Parent’s Bedroom.
Zoom into the book.
Pick up the RUBY.
Zoom into the chest.
Place keyhole pieces as shown in first visual.
Push the button. Keyhole pieces will move into position along the curving lines as shown in second visual.
Insert CHEST KEY in keyhole.
Turn the CHEST KEY.
Pick up the ARROW and SNAKE CATCHER STICK.
Return to the Woods.
Zoom back into the stone pillar and pick up the SNAKE with the SNAKE CATCHER STICK.
Place the SNAKE into the FRESCO.
Return to the Tree House and enter.
Brush away the cobwebs.
Pick up the RAPIER
Enter the Mausoleum through the Crypt.
Open the casket on the right.
Pick up the RUBY.
Cut the MISTLETOE with the SCISSORS. The MISTLETOE is the piece with the white berries on the left.
Place the MISTLETOE into the FRESCO.
Zoom into the lock on the middle casket.
Use the two RUBIES as eyes for the skull.
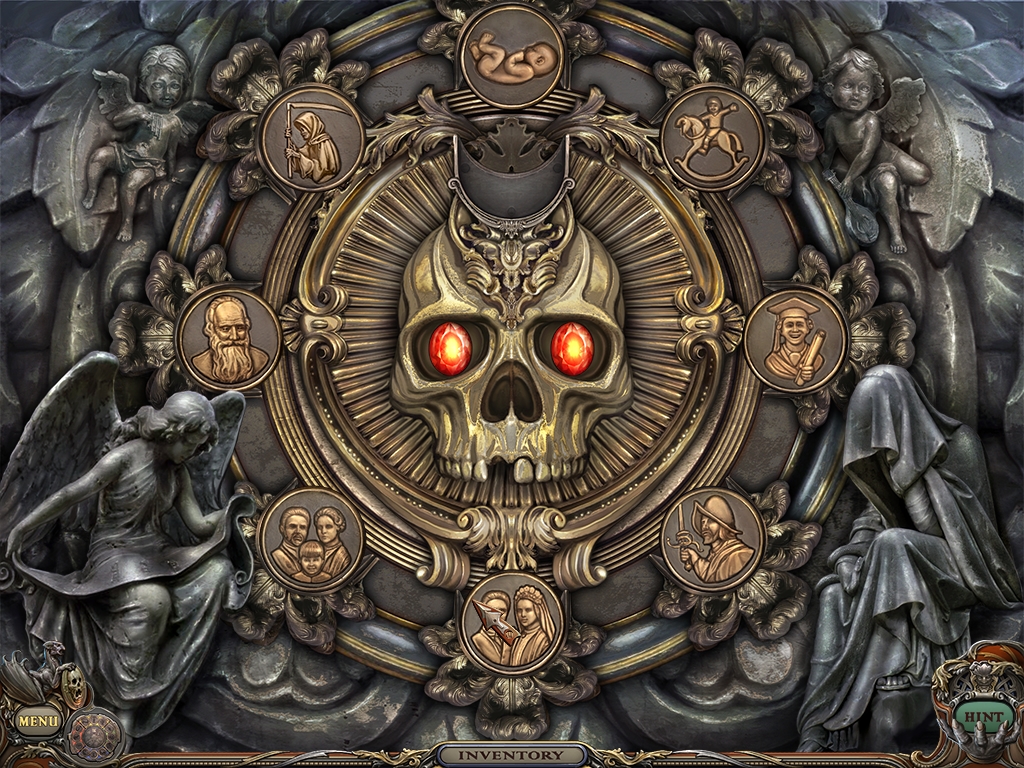
Move the coins into position, showing the life cycle of man from birth to death. See visual. The gap above the skull is what you will use to move coins. Click on the outer ring on the left side of the skull to move the ring left and on the right side of the skull to move the ring right. Click to move the “gap” to the coin showing the infant. Click on the infant coin to insert it into the gap. Then click on the outer ring to position the gap at the top of the ring. When you have, click on the coin to move the coin into its position. Continue to move clockwise around the ring with these coins: rocking horse, graduation, conquistador, wedding, family with child, old man. If you position a coin correctly, a blue highlight will appear. The game adds death automatically upon puzzle completion. If a coin is already in a position that you need to use, you will need to follow these procedures to insert the coin into the gap and then move the ring to an empty space to place this coin. Once you have solve this puzzle, the casket will slide open to reveal the contents.
Pick up the MASK EYE.
Pick up the CLOWN HEAD.
Pick up the CRYPT SIGNET.
Return to the Cabinet.
Zoom into the mask and insert the MASK EYE in the forehead. Mask will slide open to reveal the DRAGON HOOK.
Pick up the DRAGON HOOK.
Return to the Music Room.
Zoom into the dragon and put DRAGON HEART and DRAGON HOOK into place.
Click on the Dragon to raise the panel and reveal the RAPIER.
Take RAPIER.
Go to Parent’s Bedroom
Zoom into the book.
Attach CRYPT SIGNET as shown and turn it.
Rifle through book pages and find KEY PART.
Pick up KEY PART.
Go to the Nursery.
Zoom into the doll collection.
Add CLOWN HEAD to doll collection as indicated.
Solve puzzle of which there are several solution variants.
One solution is to click doll eyes in the following order.
1. Doll to the bottom left of the screen.
2. Doll to the top right of the clown.
3. Doll to the top left of the clown.
4. Doll to the bottom left of the screen (second time).
When puzzle is solved, clown’s mouth will open to reveal the LANTERN KEY.
Pick up the LANTERN KEY.
Play the Hidden Object Area in the Nursery in the cabinet on the right just past the bed.
Move the mirror piece to reveal the eight and the dragonfly.
Open the upper door in the cabinet to reveal the snail.
Open the drawer to reveal the grapes and spool.
Receive the CABLE.
Proceed to the Mine Entrance.
Insert the LANTERN KEY into the keyhole.
Turn the LANTERN KEY.
Pick up the REFLECTOR.
Return to the Yard.
Zoom back into the rock.
Place the REFLECTOR in the slot at the top right of the screen.
Pick up the ANTITOXIN.
Pick up the COBBLE.
A centipede is hiding under a leaf. Use COBBLE to smash the leaf and kill the centipede.
Pick up the dead CENTIPEDE and place it in the FRESCO.
Chapter 3: Ingredients Five through Eight
Return to Mine Junction.
Place the CABLE.
Pull the switch.
Zoom into the floor.
The object of this puzzle is to spin the rings until the track lines up as shown in the visual. The track should provide free rail passage on the track that moves from the bottom right of the screen to the top left. This puzzle has several solution variants, so it may require some trial and error. The best way to proceed is to set the outer ring first and move inward. If clicking an inner ring moves one of your properly placed outer rings return and reset.
Play the Hidden Object Area located just to the left of the mine car.
Light the lantern to reveal the flatiron and the mouse.
Move barrel bottom to reveal phone.
Move the rocks to reveal Anubis.
Receive the WAGON HANDLE.
Insert WAGON HANDLE on the wagon (mine car) to pull. Wagon will move along the rails. As it moves the pickaxe on the ceiling will fall.
Pick up the fallen PICKAXE.
Enter Stella’s Hall located in the passageway through which the wagon has rolled.
Pick up six CANDLES located throughout the scene.
Zoom into lamp hanging from a chain near the top right of the visual.
Place the candles into the lamp and light with the LIGHTER.
Play Hidden Object Area near wheelchair.
Move the bell to reveal the trap.
Move the tapestry to reveal the sleigh.
Move the rocks to reveal the “two.”
Receive the EYEPIECE.
Return to the Tree House.
Zoom into the stone face.
Remove the GOBLET using the PICKAXE.
Pick up the GOBLET.
Return to the Lower Stairs.
Use PICKAXE to open the crack in the floor.
Pick up the MEDUSA FRAGMENT.
Proceed to the Balcony.
Place the EYE PIECE on the telescope.
Zoom in.
Locate five symbols hidden in the landscape you will see through the telescope. Click on the lens to move the view around. You will know that you located a hidden symbol when the view in the lens begins to glow.
You can pick up the CHARGED SUN KEY, which is the disk at the top of the circle, when you have located all the symbols.

Proceed to the Nursery.
Place the MEDUSA FRAGMENT where indicated on the footboard of the bed. When in place, the Medusa head will open to reveal the VALVE.
Pick up the VALVE.

Proceed to the Lower Stairs.
Zoom into the door under the stairs.
Put the CHARGED SUN KEY into place at the top left corner of the screen opposite the moon on the right.
Perform the following functions in the scene:
Open the doors and gate.
Raise the flag and sails on the boat.
Turn on the fountain and Ferris wheel.
Raise hot air balloon and turn on windmill.
The lighthouse should remain off.
These actions open the sun side of the lock.
Close or turn off everything except leave the lighthouse on, which should open the moon side of the lock. When these actions are performed correctly, you are given access to the Basement Stairs.
Proceed to the Basement Stairs.
Use LIGHTER to light the candle.
BRUSH away the cobwebs.
Pick up RAPIER.
Pick up SCEPTRE.
Proceed down the Basement Stairs to the Basement.
Play the Hidden Object Area to the right of the center.
Move the tray on the chair to reveal the bat and the wave.
Move the wall sconce to reveal the dolphin.
Move the lantern on the table to open a door that reveals the flame.
Receive the GLASS CUTTER.
Proceed to the Nursery and play the Hidden Object Area to the right of the wheelchair.
Move the sheet to reveal the gloves.
Open the cabinet to reveal the fern.
Receive the SCOOP.
Return to the Balcony.
Zoom into the glass case on legs located to the left of the telescope.
Use GLASS CUTTER to cut the glass.
Pick up the TOAD and place it in the FRESCO.
Use the SCOOP to dig out the planter and pick up the ROOT.
Place ROOT in the FRESCO.
Return to the Cabinet.
Play the Hidden Object Area to the right of the fireplace.
Move the wallpaper to reveal the envelope.
Receive the RAPIER.
Zoom into the shield located above the fireplace in the Parlor.
Place one RAPIER on each corner in a crisscross pattern for a total of four.
When the RAPIERS are in place, the center of the shield will glow and illuminate a globe on the table. The globe will open to reveal a KEY PART.
Pick up the KEY PART.
Return to the Basement.
Play the Hidden Object Area.
Move the tray to reveal the bat.
Receive the OIL CAN.
Return to the Crypt.
On the left side of the screen, you will see a door.
Zoom into panel on door to see rusty hinges.
Oil both hinges with OIL CAN.
Place the ANTITOXIN through the flap.
Turn the handle. Door to Laboratory will open.
Enter the Laboratory.
Play the Hidden Object Area by the purple drapery.
Open the door to reveal the deer.
Move the curtain to reveal the crossbow and jellyfish.
Receive the KEY PART.
Zoom into the table in the Laboratory.
Use LIGHTER to light the burner.
Turn the handle on the carafe with green liquid (ACID). The beaker will fill with ACID.
Pick up the ACID.
Return to Upper Stairs.
Zoom into the door.
Use visual for placement of KEY PARTS. When the KEY PARTS are in place, a map visual will be revealed. Move the circular lens of the center piece to find and match the four scenes within the circles to identical spots on the map visual.
Enter the Library.
Move the paper to reveal and pick up one STATUETTE.
Pick up another STATUETTE and the BAS-RELIEF SCULPTURE.
Turn on light.
Spin the globe to locate a hatch.
Open the hatch.
Pick up a third STATUETTE.
Play the Hidden Object Area located directly in the back corner of the library.
Move the cracked glass pane to get to the rainbow.
Move picture frame to reveal handshake.
Receive the Sceptre.
Leave the Hidden Object Area in the back corner of the Library and zoom into the desk with the monkey lamp located at the right of the scene.
Pick up the three CARDS with the Roman numerals XV, III, and IX.
Return to the Library and zoom into the three busts located along the top of the library cases.
Place the CARDS into the bases of the busts showing matching Roman numerals. They are from left to right III, IX, and XV.
Locate three pillars in the center of the room.
Place one STATUETTE on each pillar. When the STATUETTES are in place, a panel in the wall on the left will slide open to reveal a lever.
Pull the lever. The glass case in the center of the pillars will open to reveal a BOOK.
Pick up the BOOK.
Return to the Lower Stairs.
Place the BAS-RELIEF SCULPTURE on the front of the banister.
Pick up the GEM on the top of the banister.
Proceed to the Basement.
Place the four SCEPTRES into the fists where indicated.
Pull the switch. The top of the fountain will raise to reveal an inner section.
Zoom into the fountain.
Place the valve on the top of the fountain and turn.
Use GOBLET to collect some water.
GOBLET will be renamed FILLED GOBLET.
Place the diamond-shaped GEM where indicated. When it is in position a panel will slide to expose a GOLDEN KEY.
Pick up the GOLDEN KEY.
A passage is revealed in the front of the fountain. It is an alternative way into the Mine Junction.

Proceed to Stella’s Hall. Do this by entering the Mine Junction from the Basement.
Zoom into the bookstand.
Place the BOOK.
Pick up the RUNE.
Retreat one scene and pick up the RUNE.
Return to Mine Junction.
Pick up the RUNE.
Return to Swamp.
Enter the carriage.
Use GOLDEN KEY to open the box.
Pick up the SKULL COIN.
Return to the Woods.
Pick up the RUNE.
Proceed to Tree House.
Zoom back into the stone face.
Pour the water from the FILLED GOBLET into the mouth on the stone face.
Pick up BLUEBERRIES and place them in the FRESCO.
Chapter 4: The Last Four Ingredients
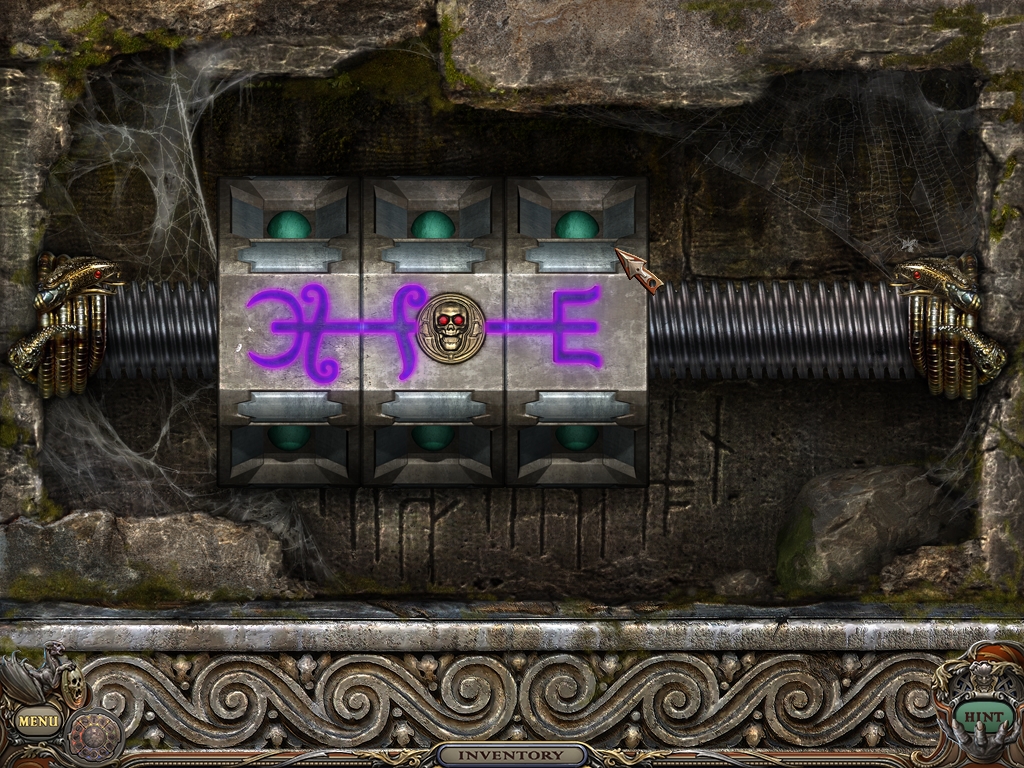
Return to Stella’s Hall. You will see a door on both the left wall and the right wall. Both doors have stone pillars on either side. Zoom into the lock located on the right pillar of the right hand door.
Place the SKULL COIN on the middle nut. The object of the game is to get the three symbols on the nuts to line up. If you choose, you may set the middle nut to the placement you desire and then proceed to solve the puzzle by moving the first or last nut all the way to the end.
When positioned at the far ends, the nuts will spin freely, allowing you to change their positions on the bolt, but this only occurs when the snake’s eyes glow red. Rotate the nut several times, then spin it back toward the middle nut. In the event it doesn’t match, repeat the procedure until it does.
You should be able to solve the puzzle without use of the middle nut. You can spin the first to the right, then an additional seven times. Spin it back to the middle nut and it should match. Spin the last nut to the right and then an additional 10 times.

Proceed to Stella’s Bedroom.
Zoom into the sink and pick up the TWEEZERS.
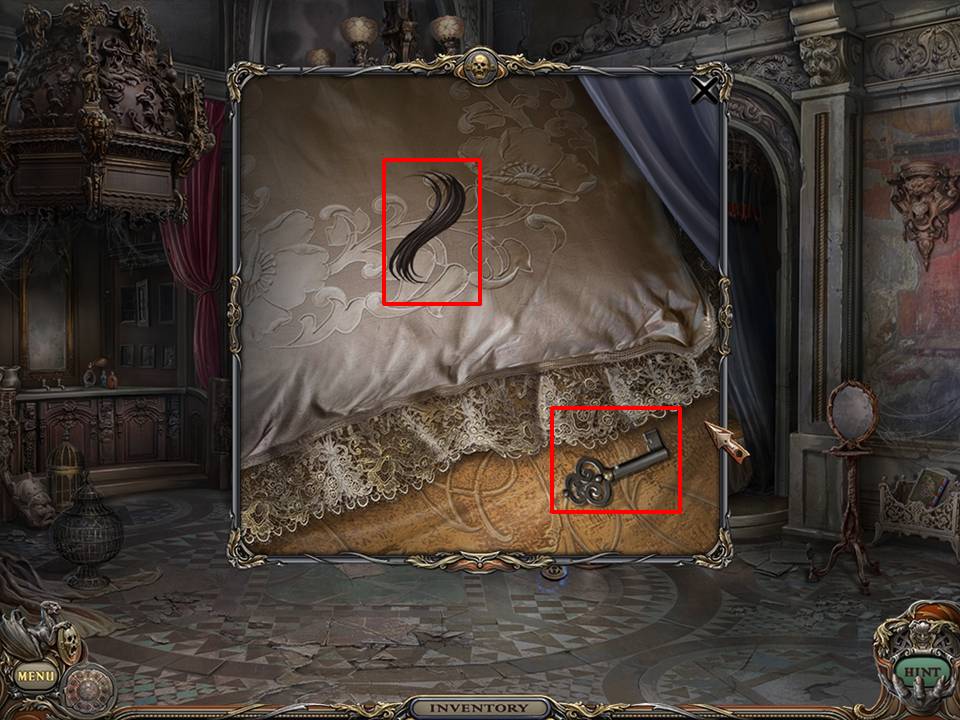
Zoom into the bed and pick up the KEY.
Use TWEEZERS to pick up HAIR.
Place HAIR in the FRESCO.
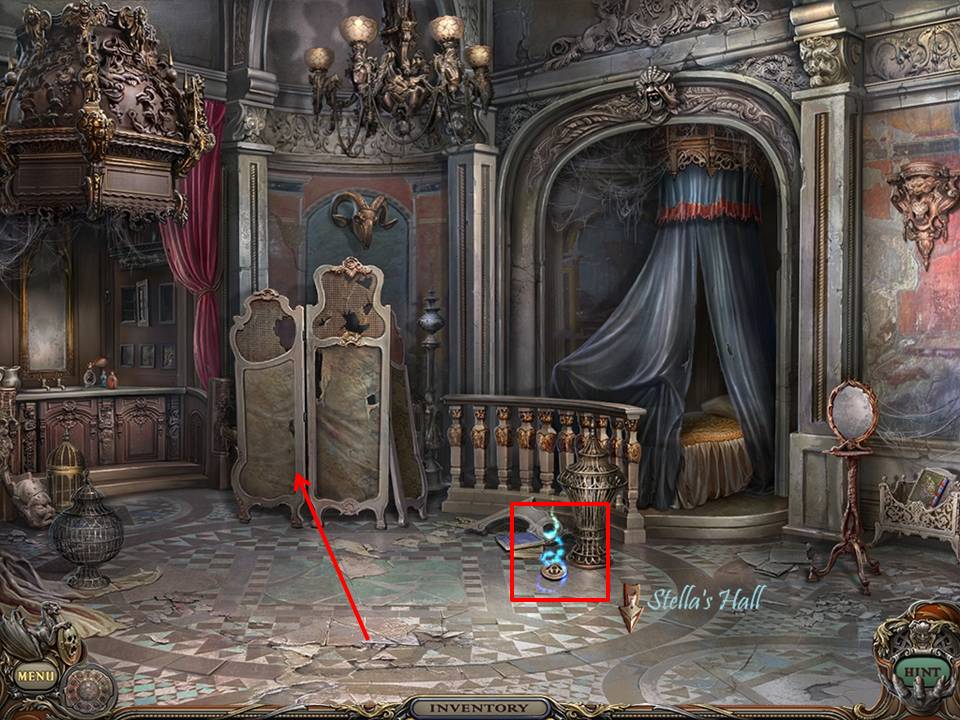
Move the screen to reveal a Hidden Object Area.
Pick up the RUNE
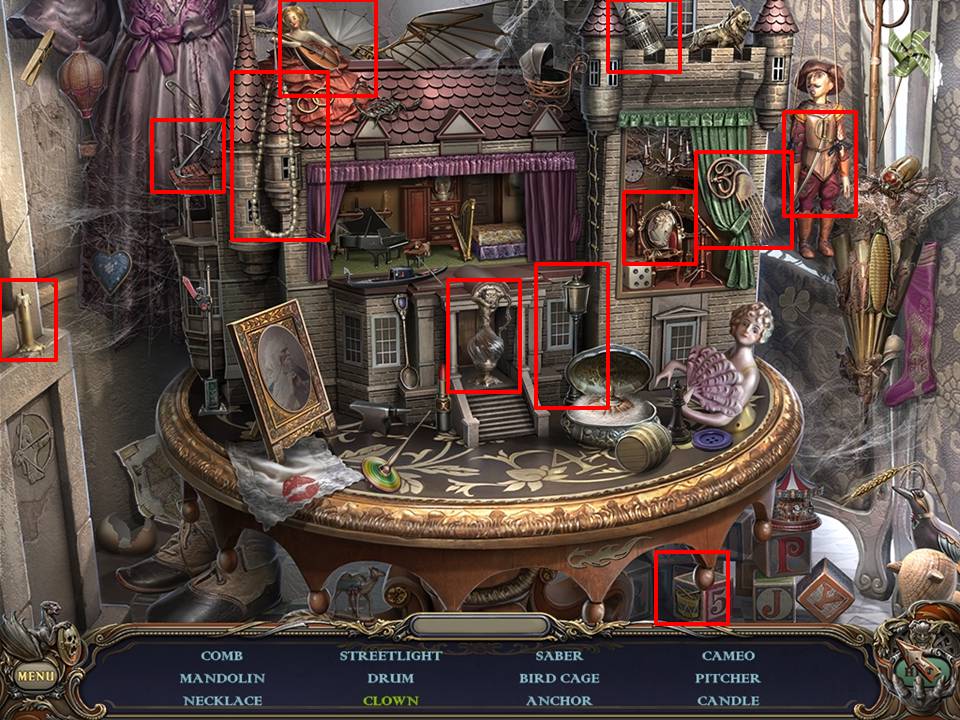
Play the Hidden Object Area located in the dollhouse behind the screen.
Move the curtain to reveal the conquistador.
Move the wing to reveal the match.
Move the picture in the picture frame to reveal the clown.
Receive the EMPTY PITCHER.
Return to the Basement.
Pick up the RUNE.
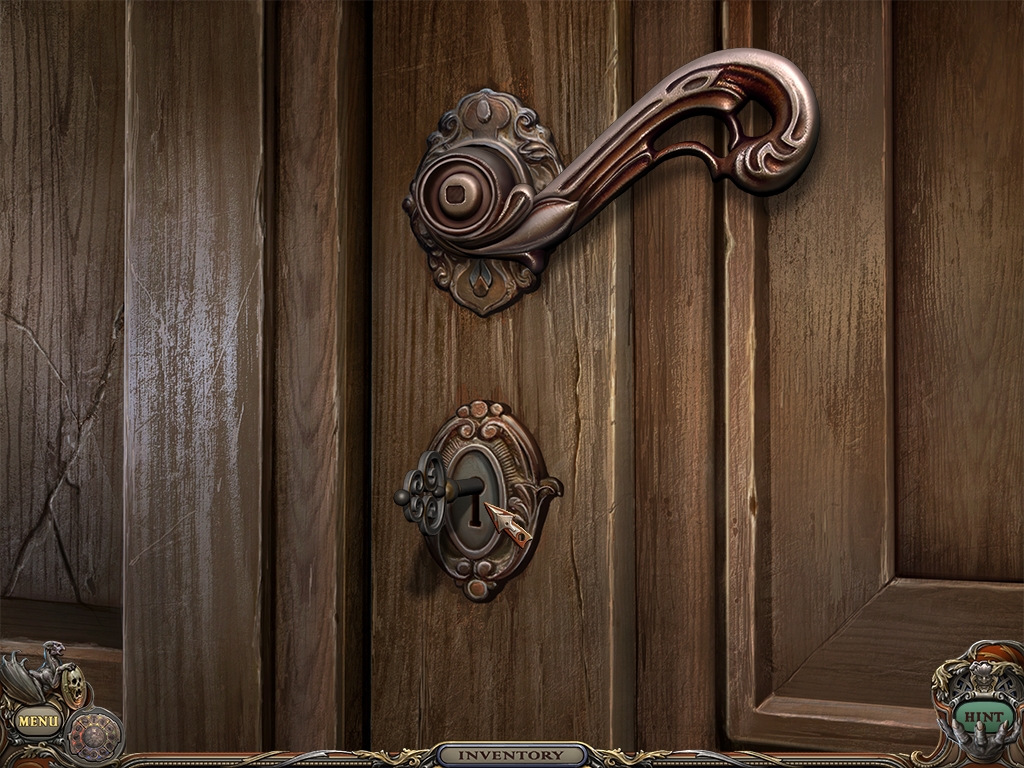
Return to the Hallway at the top of the stairs and zoom into the door.
Insert KEY into the keyhole and turn it four times.
Pull the handle to enter the Maid’s Room.
Turn over the rug to pick up the TENSION MECHANISM.
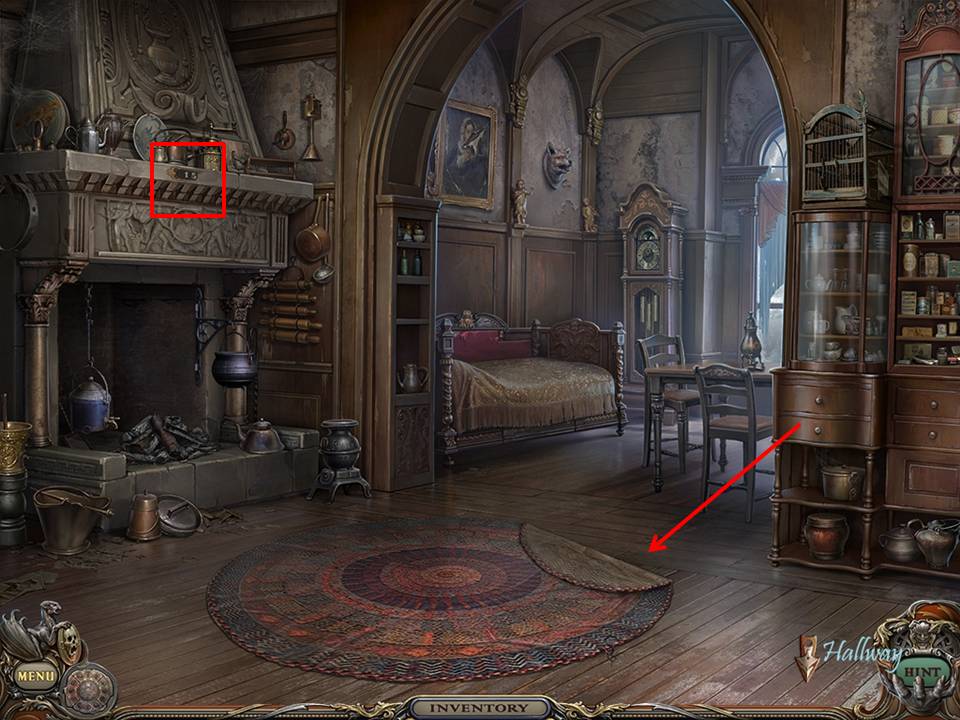
Pick up the PIECE OF PIANO PLATE located along the fireplace mantelpiece.
Use LIGHTER to light the fire.
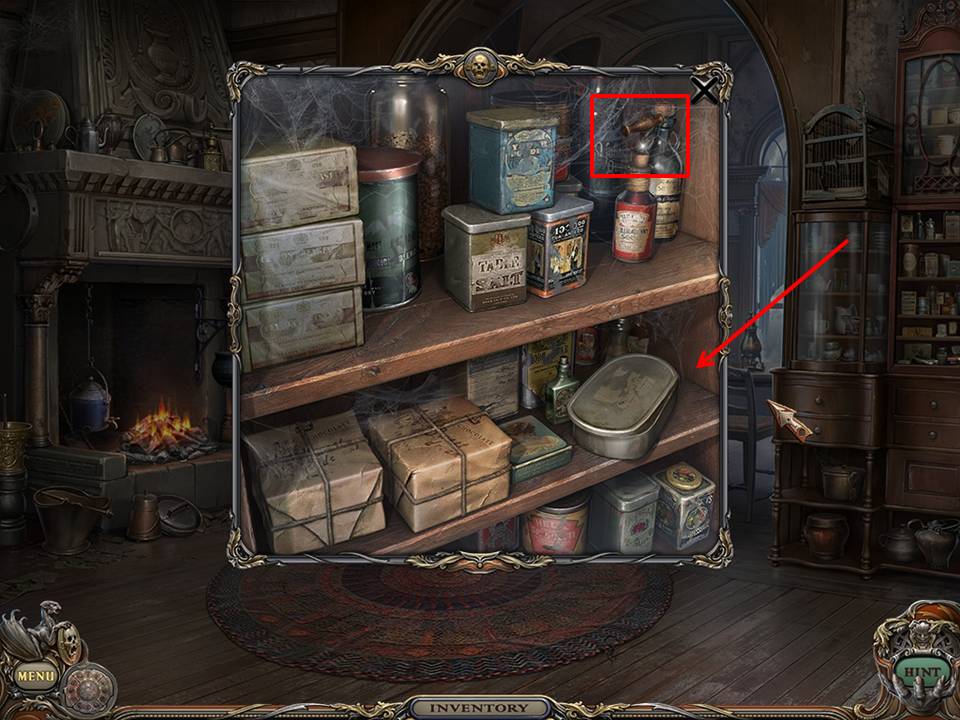
Zoom into the cabinet shelf on the far right of the screen.
Open the tin and pour ACID inside. The ACID dissolves the contents of the tin to expose the SCORPIONS TAIL.
Pick up the SCORPIONS TAIL and place it in the FRESCO.
Pick up the CORKSCREW.
Return to the Upper Stairs and zoom into the wall on the left side of the screen.
Put the TENSION MECHANISM in place and crank the handle.
Place the ARROW and pick up the loaded CROSSBOW.
Return to the Balcony and shoot the CROSSBOW at the animal head on the right wall. The tube in the animal’s mouth will drop out of sight.
Return to the House Entrance and zoom to look at the bottom (front) of the barrel on the left of the entry stairs. You will see a cork on the front of the barrel near the bottom.
Remove the cork with the CORKSCREW.
Close this inset screen and then zoom in to the top of the barrel. Use CROWBAR to pry open the top.
Pick up the CORAL on the inside of the barrel and place it in the FRESCO.
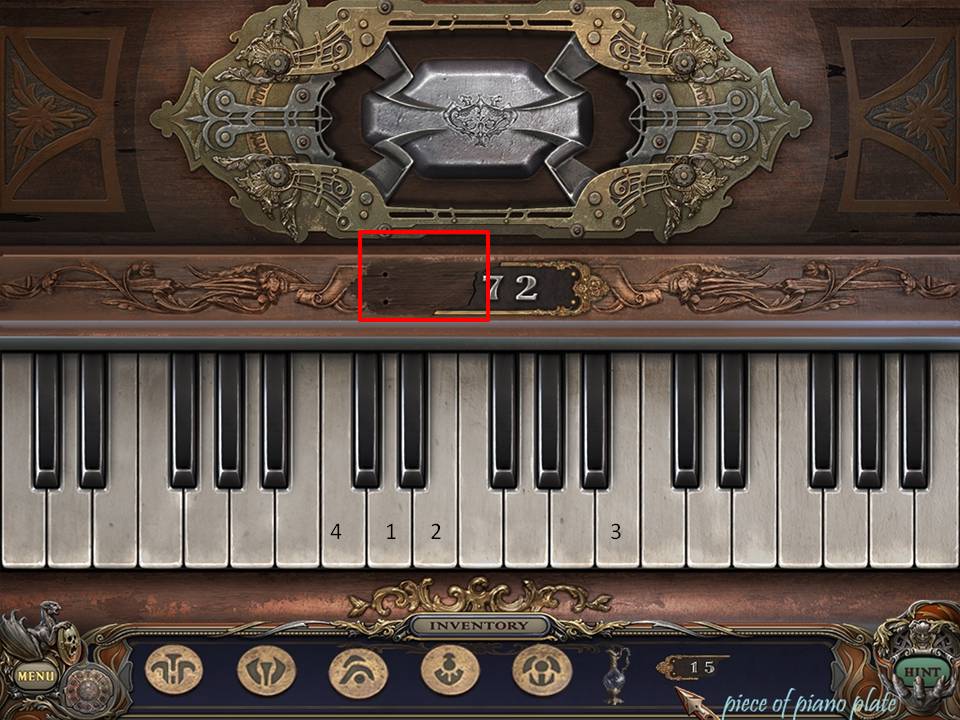
Return to the Music Room and zoom into the piano.
Place the PIECE OF PIANO PLATE as indicated. The resulting puzzle involves pressing a series of piano keys and has several solution variants. The one described here corresponds to this game play.
One solution is to play the keys in the numerical order indicated.
Pick up the PURE SILVER.
Return to Maid’s Room and put the PURE SILVER in the pot to the right of the fireplace. Pot will then swing to cook over the fire.
Play the Hidden Object Area located through the archway of the Maid’s Room near the grandfather clock.
Move the curtain to reveal the snowflake.
Open the hatbox on the bed to reveal the thimble.
Move the wooden panel above the painting to reveal the letter “U” and the sphinx.
Uncover the dumbbell, by moving the pillow.
Receive the BELLOWS.
Return to main area of Maid’s Room and use the BELLOWS on the fire.
Place the EMPTY PITCHER under the pot to receive the ALCHEMICAL PITCHER.
Place the ALCHEMICAL PITCHER in the FRESCO.
Return to the Woods and play the Hidden Object Area.
Move the stone to reveal the gear.
Move the panel to reveal the warrior and chamomile.
Receive the INSECT NET.
Return to the Balcony.
Use INSECT NET to catch the MOTH.
Return to the Parent’s Room.
Turn on the lamp.
Zoom into the nightstand on which the lamp is sitting.
Place the MOTH in the web and pick up the SPIDER.
The SPIDER completes the FRESCO. Put it in its proper space. Now that you have a completed FRESCO, you will head to the Laboratory to make the elixir.
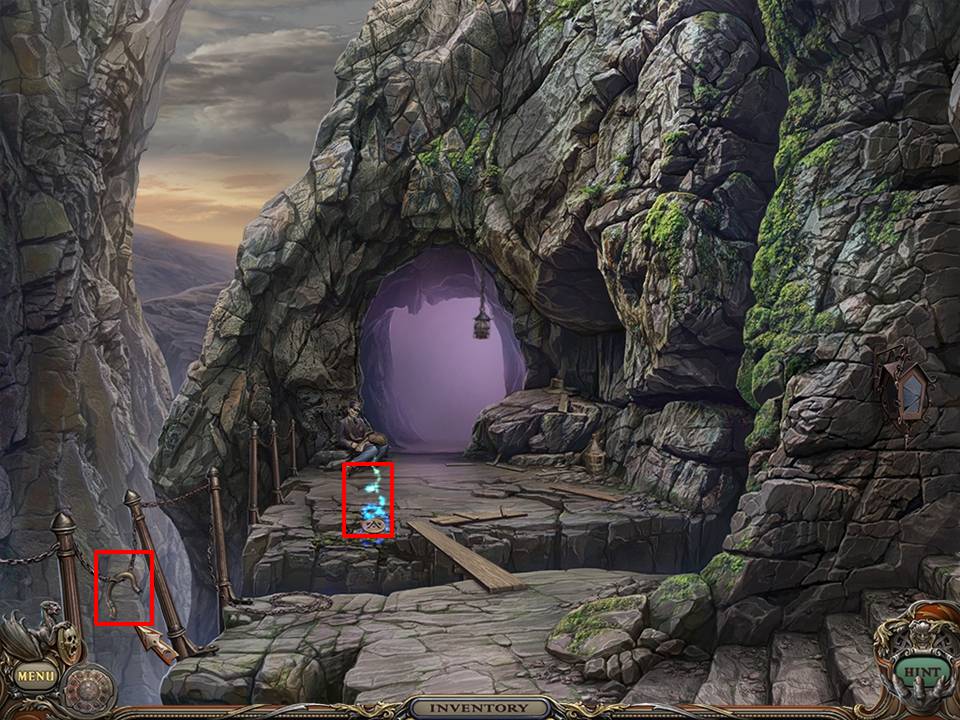
Return to the Mine Entrance
Pick up the TUBE on the left side of the walkway hanging on the handrail chain. Pick up the RUNE.
Proceed to the Laboratory (go through the Woods to the Treehouse to the Crypt).
Zoom to the table in the laboratory.
Click on the FRESCO to place it into the scene.
Place the TUBE.
Solve the puzzle on the wheel to the left by clicking on an ingredient and then clicking on a beaker with the corresponding symbol.
Pick up the ELIXIR.
Play the Hidden Object Area located by the purple drapery.
Open the drawer to reveal the deer.
Move the curtain to reveal the jellyfish.
Receive the HAMMER.
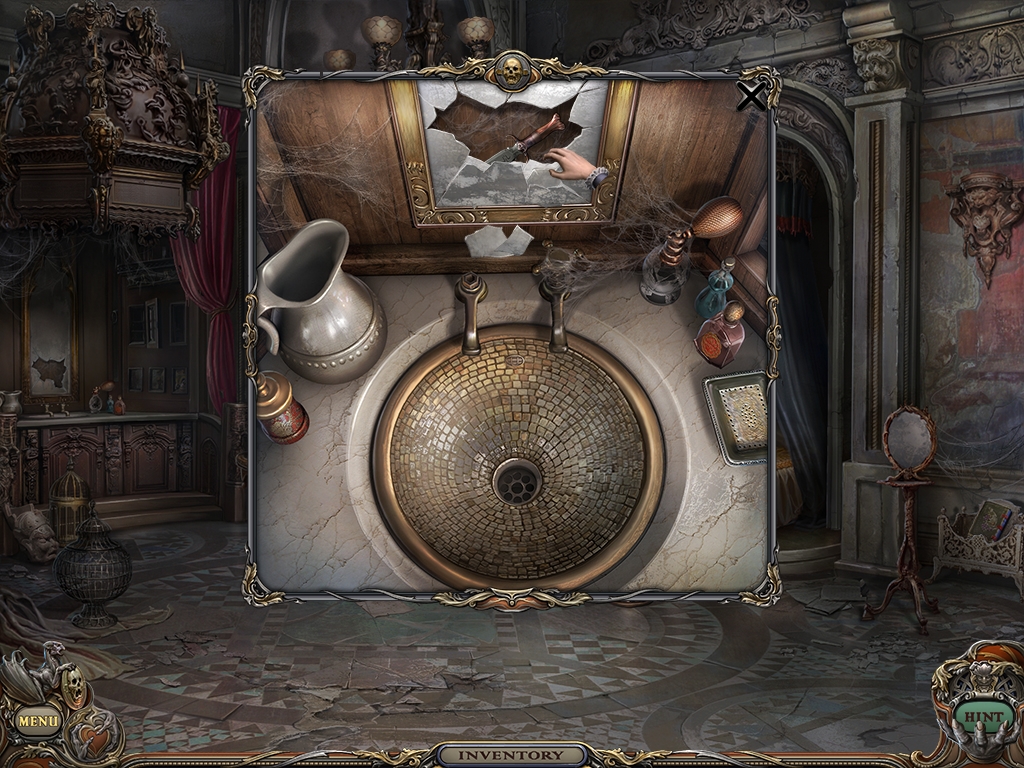
Return to Stella’s Bedroom and zoom into the sink.
Use HAMMER to break the mirror.
Pick up the dagger.
Move back to Stella’s Hall and zoom into the bookstand.
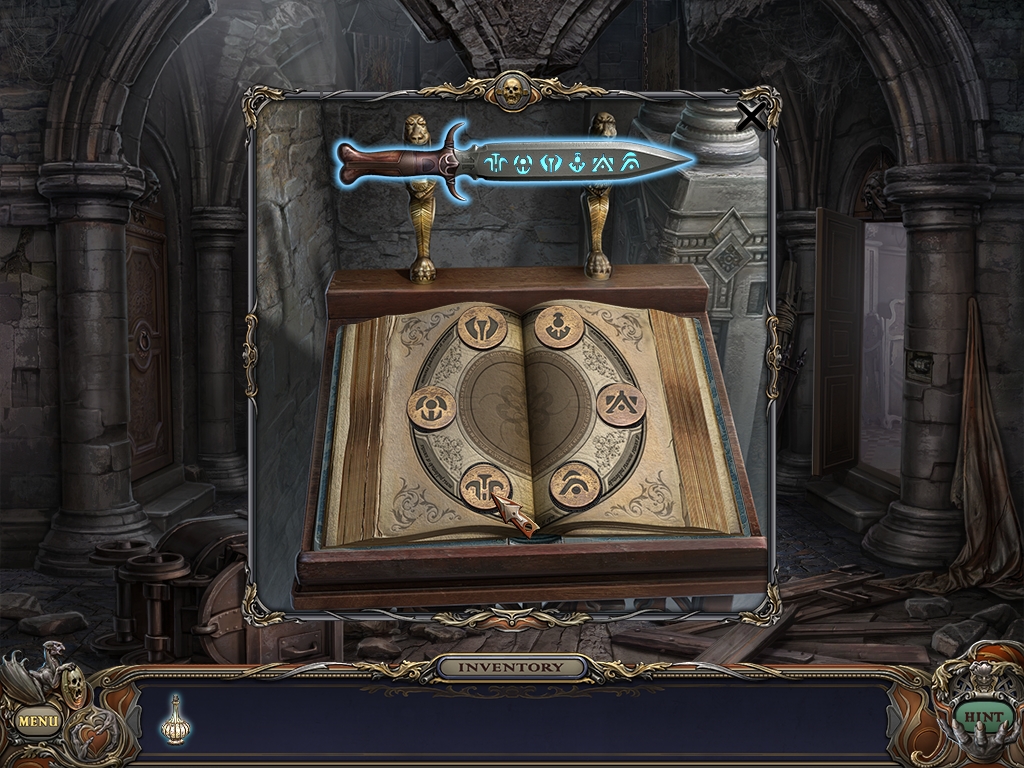
Place the DAGGER and all six RUNES as indicated in the visual. When the RUNES are properly placed, the DAGGER will glow blue and transform into a MAGICAL DAGGER.
Pick up the MAGICAL DAGGER and use it cut the tapestry covering the door leading to the secret room.
Chapter 5: Free the Souls
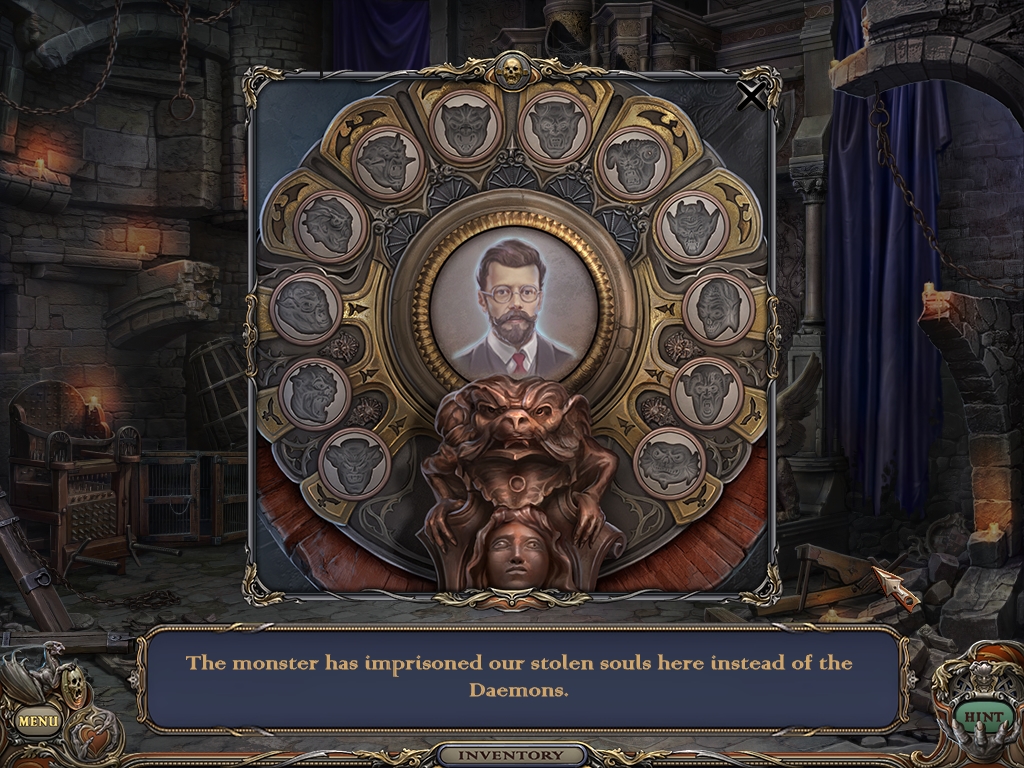
Enter the Secret Room and zoom into the circular piece above the red throne.
This chapter involves playing all the Hidden Object Areas in the game and receiving a DAEMON after each one. Once all the DAEMONS have been collected, you will place them in this circular piece to finish the game.
Return to Stella’s Hall and play the Hidden Object Area by the wheelchair.
Move the shield to reveal the bull.
Receive a DAEMON.
Return to the Mine Junction and play the Hidden Object Area.
Open the door to reveal the grinder.
Move the board to reveal the number 5.
Move the helmet to reveal the hot air balloon.
Receive a DAEMON.
Return to the Basement and play the HOS.
Move the platter to reveal the bat and the wave.
Open the lamp to reveal the flame.
Reveal the spiral by tearing the tapestry.
Receive a DAEMON.
Return to the Upper Stairs and play the HOS.
Move the curtain to reveal the zebra.
Receive a DAEMON.
Return to the Library and play the Hidden Object Area located in the back corner of the room.
Move the glass to get to the bridge.
Receive a DAEMON.
Return to the Maid’s Room and play the Hidden Object Area located through the archway near the grandfather clock.
Move the wooden panel to reveal the sphinx and the letter “U.”
Open the pillow to reveal the dumbbell.
Receive a DAEMON.
Return to the Parlor and play the Hidden Object Area by the large framed picture.
Move the wood panel to reveal the shoulder strap.
Receive a DAEMON.
Return to the Woods and play the Hidden Object Area located in the stone ruins.
Move the panel to reveal the warrior.
Reveal the rooster by opening the tree stump.
Receive a DAEMON.
Return to the Crypt and play the Hidden Object Area.
Move the curtain to reveal the star.
Receive a DAEMON.
Return to the Laboratory and play the Hidden Object Area.
Move the tile to reveal the elephant.
Receive a DAEMON.
Return to the Swamp and play the Hidden Object Area located at the baggage beneath the tree.
Move the panel to reveal the rainbow.
Open the bag to obtain the punched key card.
Receive a DAEMON.
Return to the Mine Entrance and play the Hidden Object Area to the right of the entryway.
Move the wicker cage to reveal the tortoise.
Receive a DAEMON.
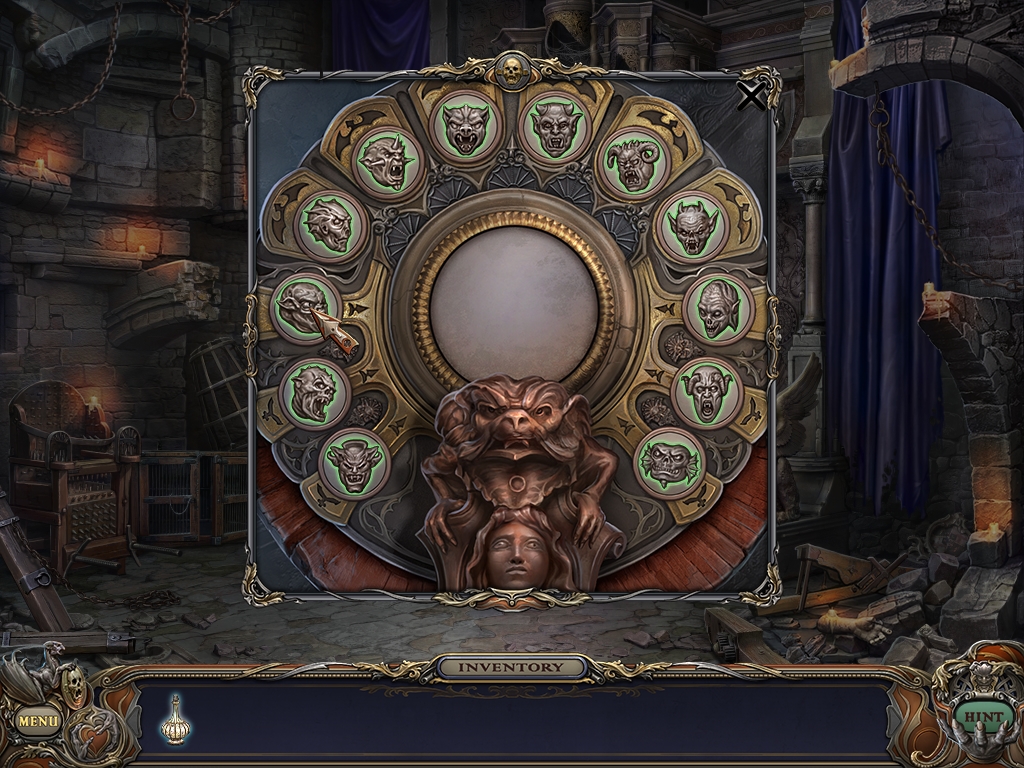
Return to the Secret Room and zoom into the circular piece above the red throne.
Place all the DAEMONS in the piece as shown in the visual.
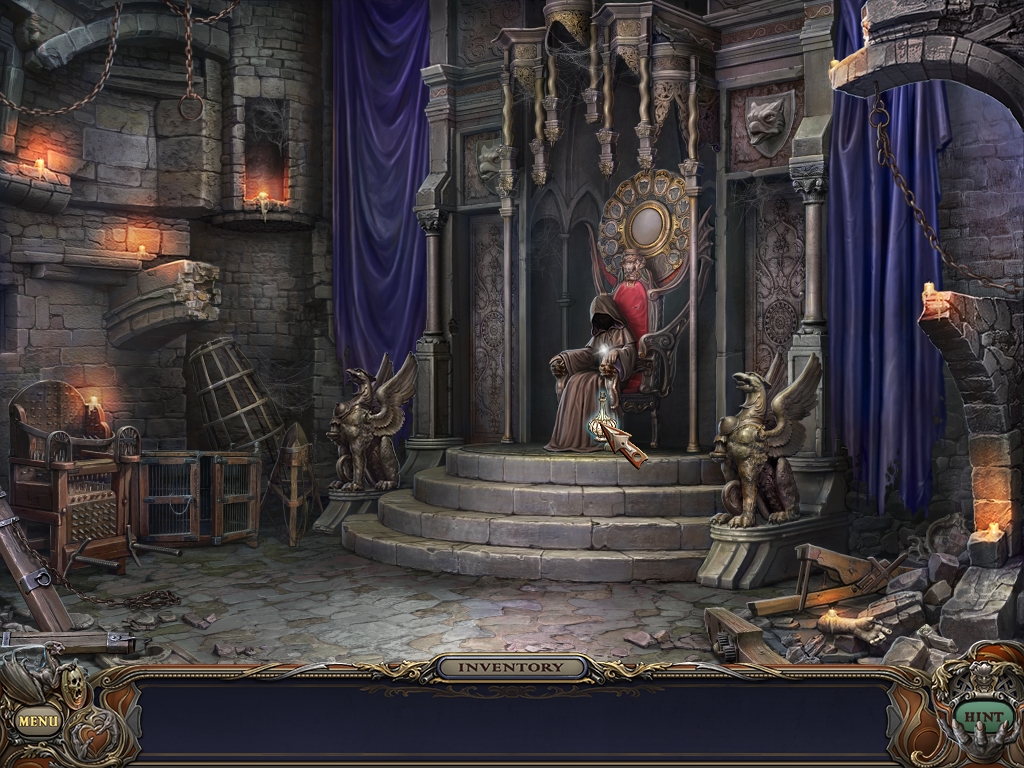
Give the ELIXIR to Stella.
Congratulations!
Content(s) of this game guide may not be copied or
published on any other site without permission from Casual Game Guides.
©CasualGameGuides.com 2006 - 2021