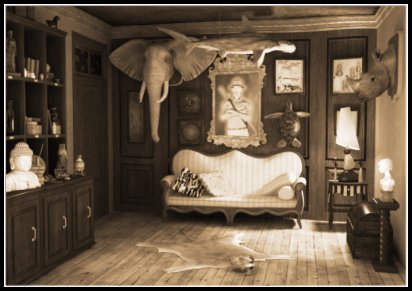
Overview: Ancient Magic is the exciting sequel to Azada, a game that's part puzzle, part hidden object. Once again, Titus needs your help and transports you to his Uncle's library. There you must go through the library helping to free others with Titus to guide you along the way. You are called upon... Puzzle Master!
Click images to view them larger.
Gameplay:
-
Interact with the characters in the books, solving puzzles along the way.
-
You will need to browse the pages of the books to find helpful objects.
-
To free a character you must find his/her card and show it to them.
-
Using an object incorrectly will take away from your time!
-
The puzzles are all random, meaning each time you play you will get a different on, therefore the only pictures provided are examples of solutions.
-
You can replay a puzzle at anytime by clicking on the books you've finished.
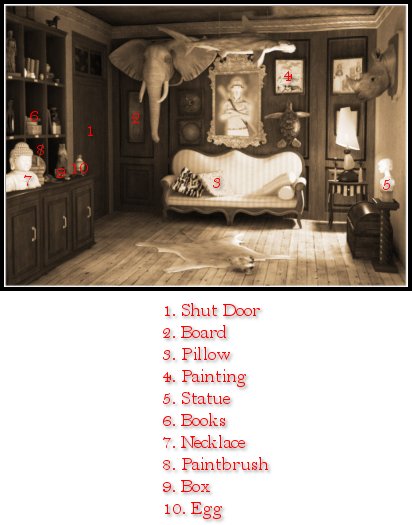
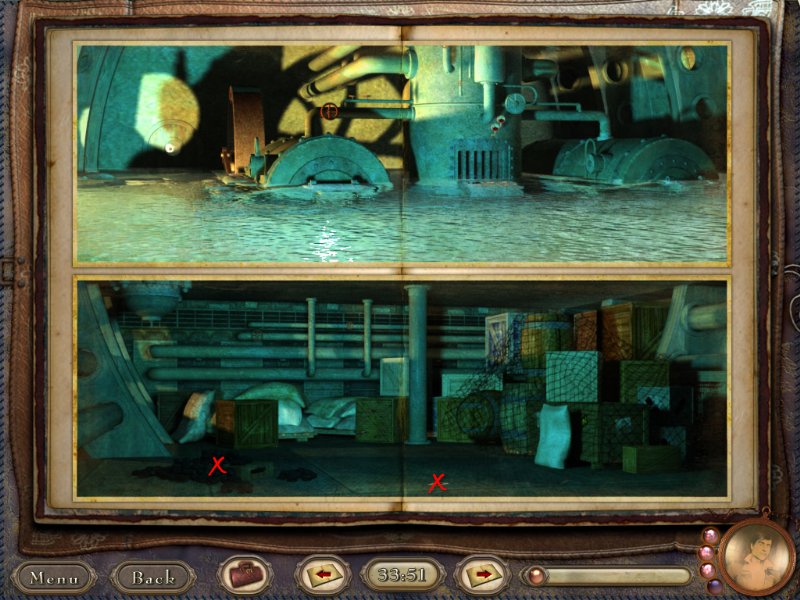
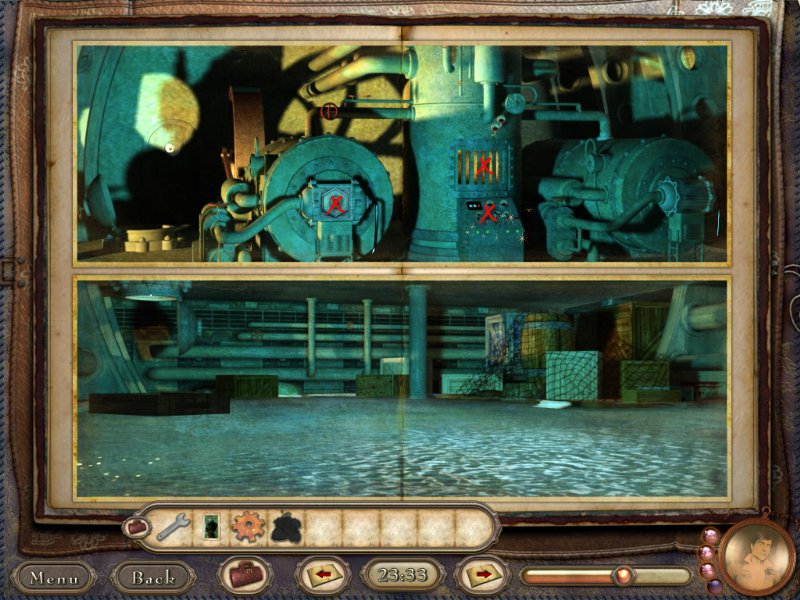
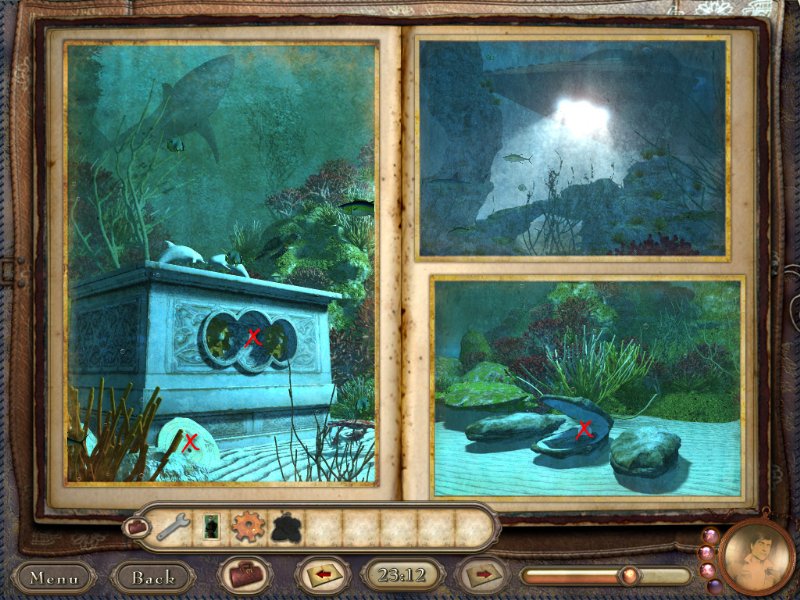
Sparkling Objects: these are important objects needed to solve the puzzles, click on them. I have placed red x's on these items.
Briefcase: This item is located next to the right arrow and holds items you find along the way. Click on it to view your inventory, some items will need to be combined. I've put inventory items in red in the guide below.
Arrows: The arrows at the bottom of the screen will allow you flip through the books.
Timer: In between the arrows is a timer, puzzles are timed and there is no option to turn this off.
Meter: The meter is next to the medallion and shows your progress through the game.
Magical Orbs: Magical orbs are attached to the medallion, you can use them to skip a puzzle, but use wisely, they are not unlimited.
Hints & Instructions: Click on the medallion in the lower, right corner to contact Titus for help. This will also say "page completed" when you have finished a page.
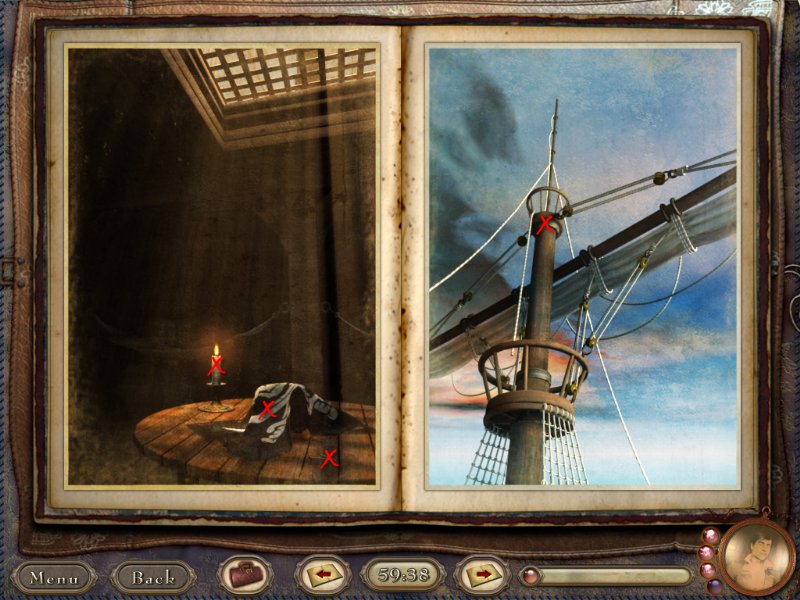
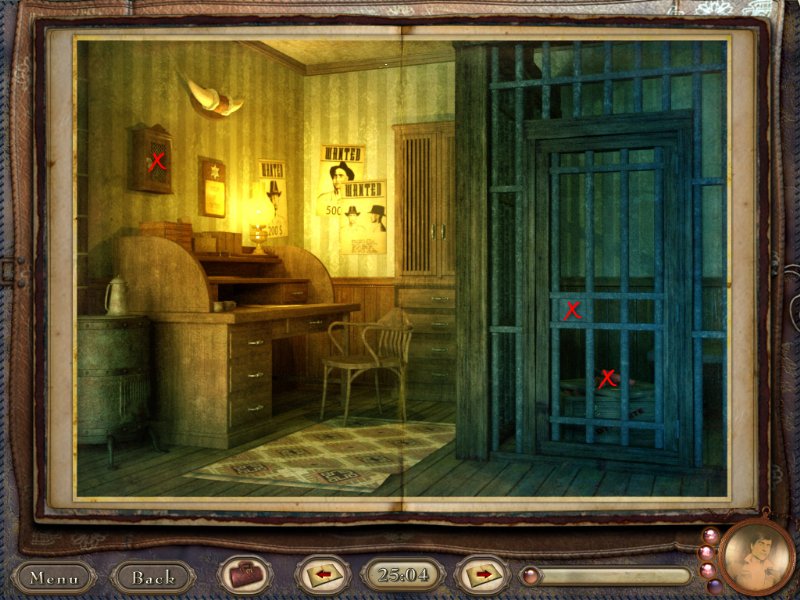
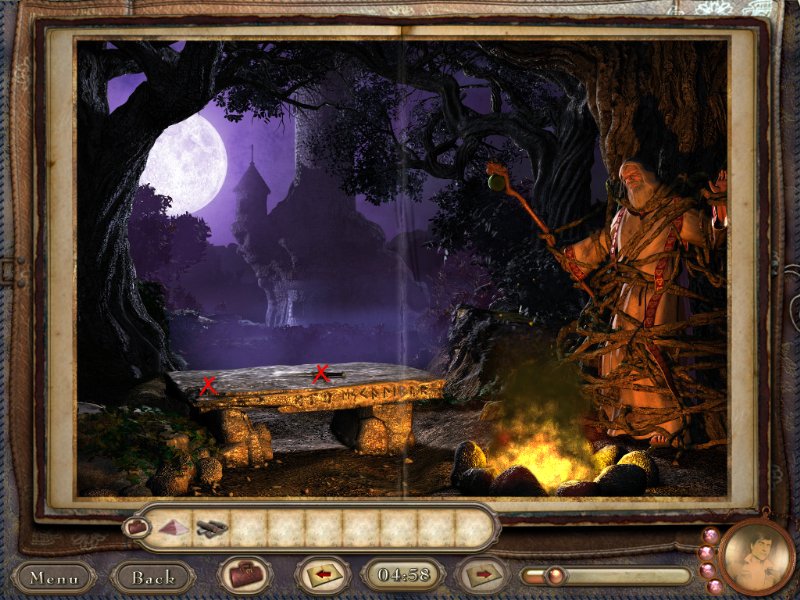
Book 1: The Fairytale
Page One: Rapunzel, Rapunzel, Let Down Your Hair
-
talk to Rapunzel, she's stuck.
-
take the Shutter next to her.
-
go through the following pages and then return to this section.
-
drag both Ladders to the tower.
-
woo hoo, she's free, now show her the Card!
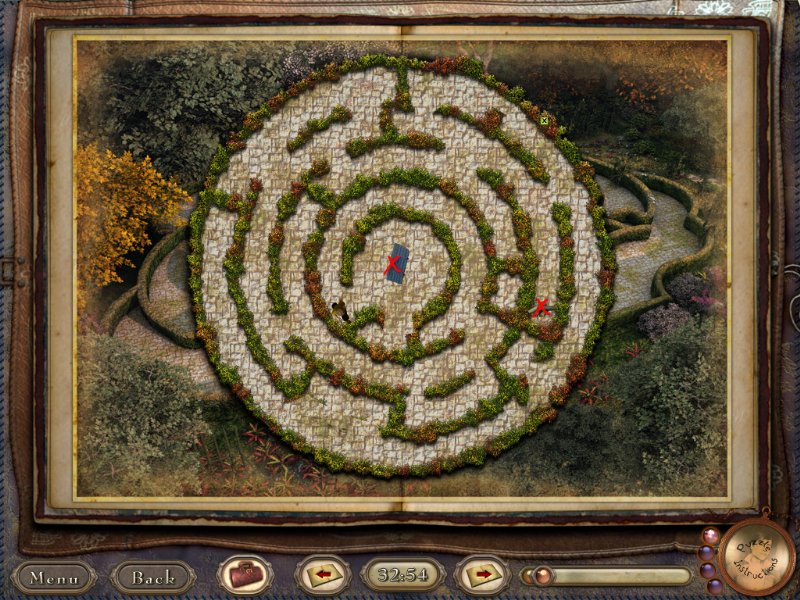
Page Two: Hansel and the Maze
-
drag Hansel (with an attitude) through the labyrinth with your mouse, guiding him through the maze to reach the various objects.
-
the hedges will appear as you move Hansel along the paths.
-
take Wood and Shutter.
-
go Page Three.
Page Three: The Big Bad Wolf
-
click on the Big Bad Wolf, uh oh, he wants to eat the little pig!
-
click on the window and talk to the Pig, awww, he's scared!
-
take the Wood from your inventory and place it in the Pigs fireplace, let's smoke out that Big Bad Wolf!
-
now we need something to light it with.
-
go to Page Four and then return to this section.
- use Lit Candle on the fireplace, woo hoo that Big Bad Wolf is outta there and so is the Pig.
-
take Ladder, Key and Cupcake.
-
go to Page Four.
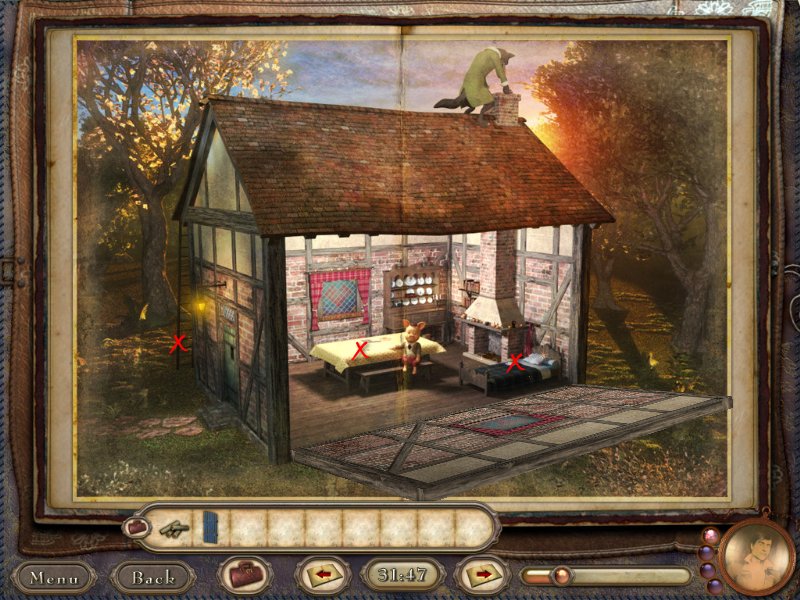
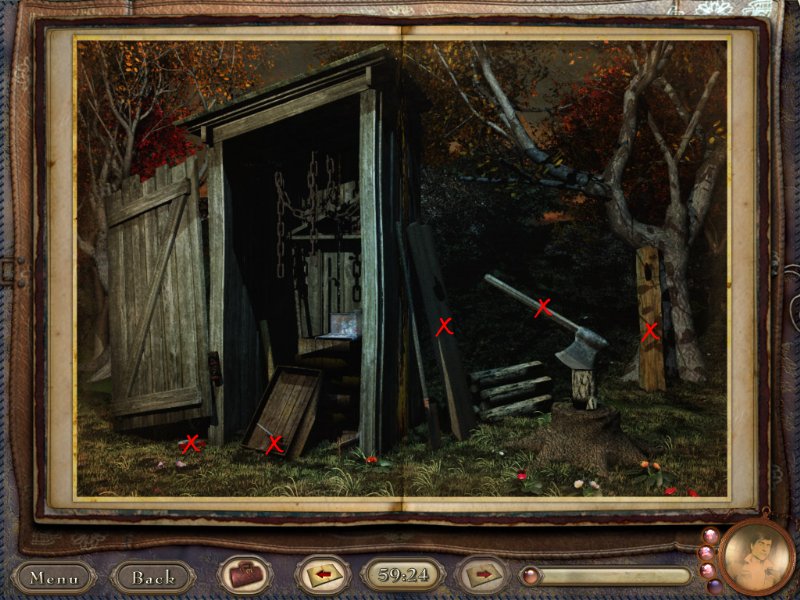
Page Four: Ladders, Candles, and Cupboards, Oh My!
-
on the Left Side of the page(s), you'll see a window that needs shutters, we have two so place the Shutters from your inventory onto it.
-
open the window and take the Ladder.
-
on the Right Side of the page(s), you'll find a Lit Candle, excellent, take it!
-
the cupboard is locked, we'll come back to that later.
-
go to Page Three and then return to this section.
- oh no, the Big Bad Wolf is back and this time he wants Little Red Riding Hood, since he's hungry, give him the Cupcake from inventory.
-
use the Key on the cupboard and take the Card.
-
go to Page One.
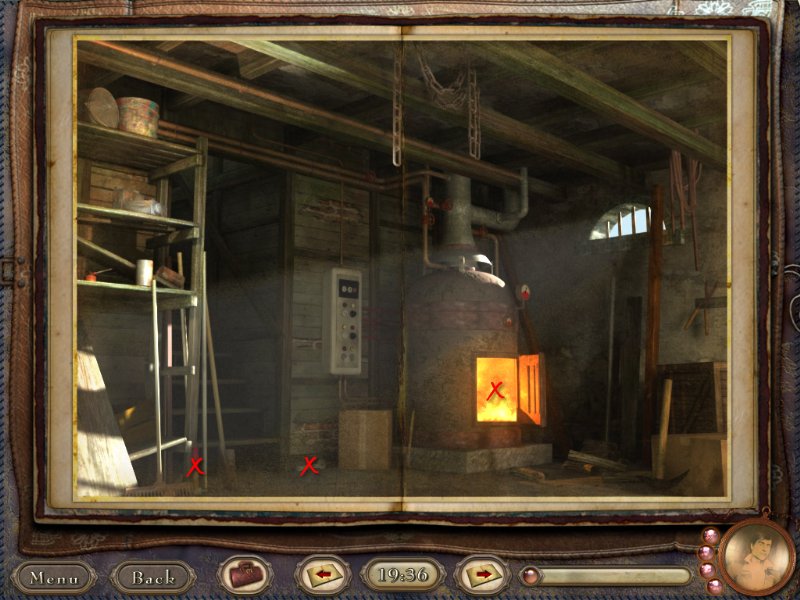
Fuse Board Puzzle
-
in order to fix the machine you have to drag the fuses around until each column contains and even number of fuses or no fuses at all.
-
all lights will turn green when the board is fixed.
-
there are always two fuses that cannot be moved but need to be counted as one.
-
this is a random puzzle therefore I have no solution for you.
-
it's not as hard as it seems, just make sure you only have two or four fuses in a spot, both up and down, and be sure to count the ones that do not move.
Book 2: The Ghost
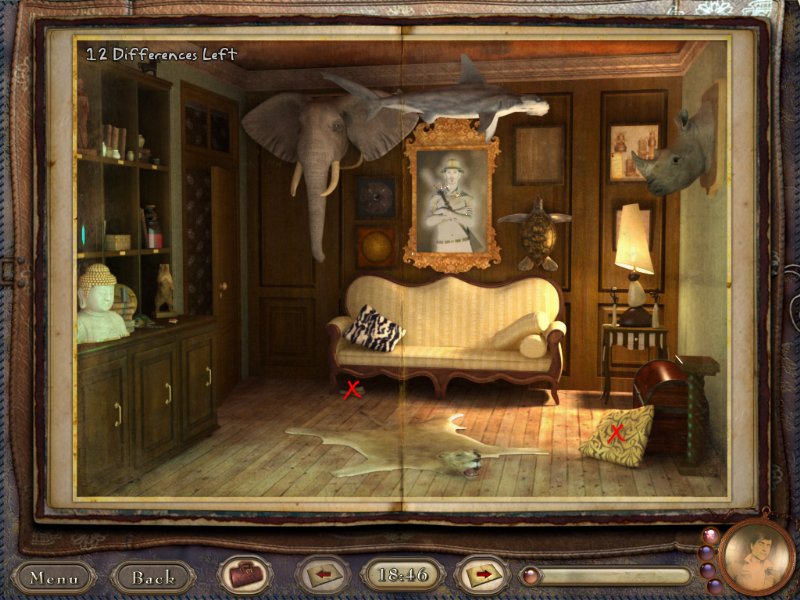
Page 1: Mirror, Mirror on the Wall
-
someone is trapped in the mirror and the only way to free them is to put the room back the way it was.
-
in other words, you have to compare the black and white picture (which you can see again by clicking on the ghost in the mirror) to the current picture and click on the differences.
- click on the Books underneath the sofa.
-
get the Pillow in front of the chest.
-
go through the following pages and then return back to this section.
-
let's put the room back the way it was, see picture.
-
the ghost is free, wait can a ghost really be free...oh well, give him the Card anyway!
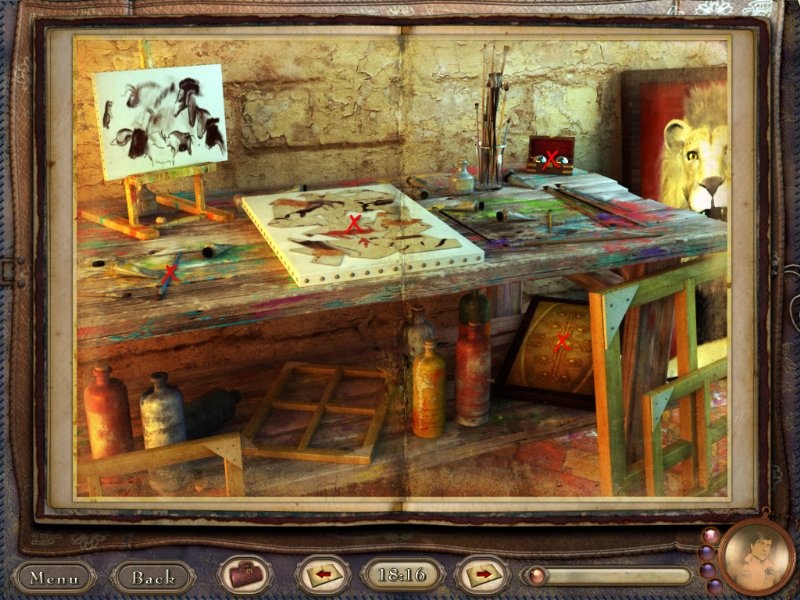
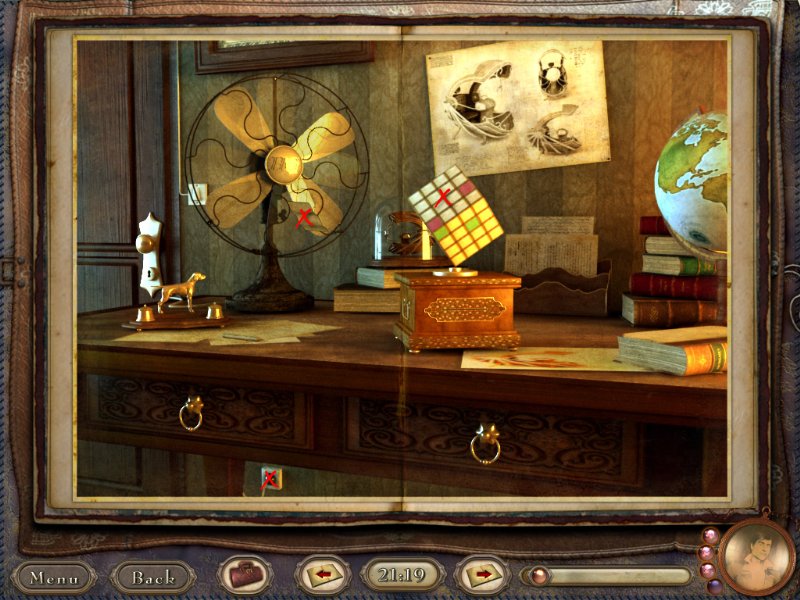
Page 2: The Art Room
-
click on the painting on the table.
-
restore it by dragging the pieces onto the canvas and putting them together like a jigsaw puzzle and get Painting.
-
click on the Board by the paints on the shelf below and place in inventory.
-
click on Box (with silver balls) on the top, right corner of the table and put in inventory.
-
get the Paintbrush from the left side of the table.
-
go to Page Three.
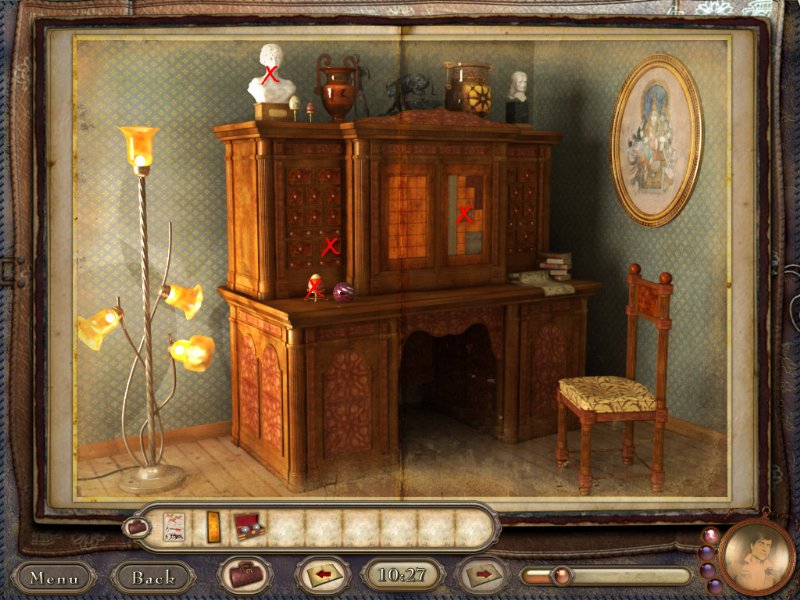
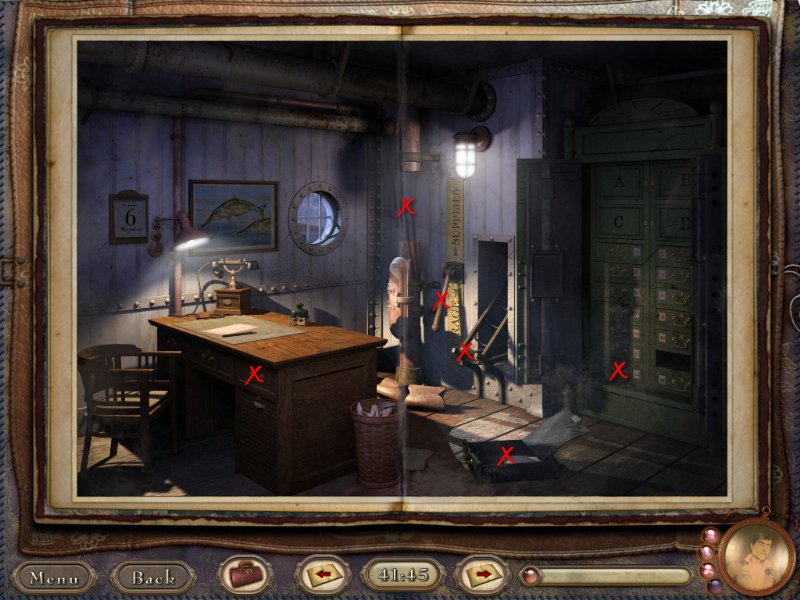
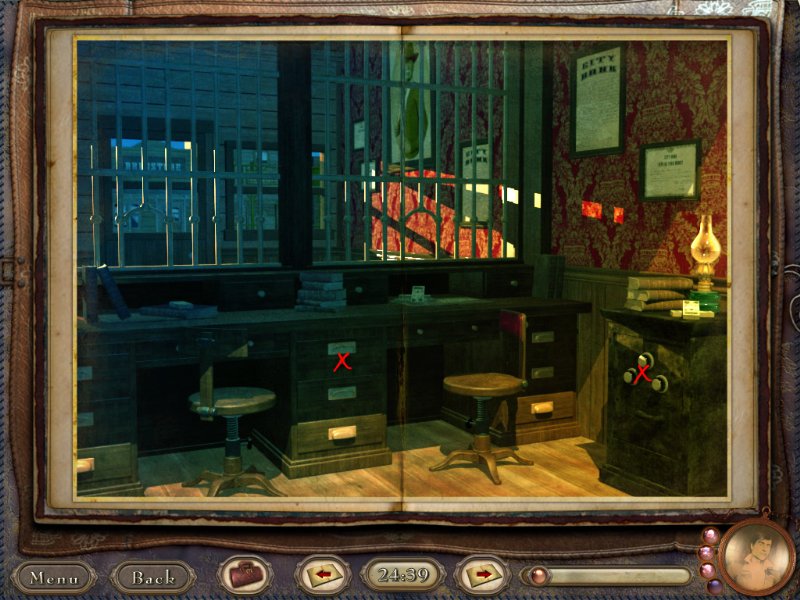
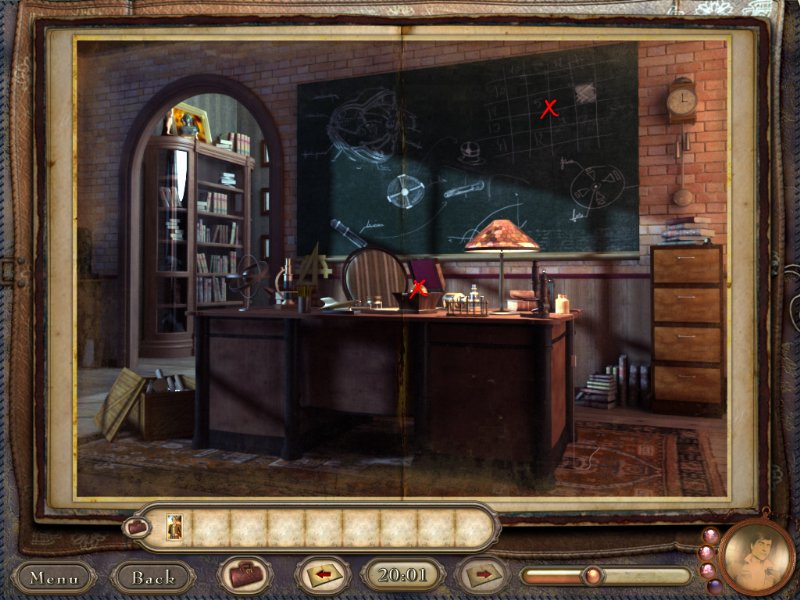
Page 3: The Office
-
click on Egg on the lower, left side of desk.
-
take Statue from top, left side of desk.
-
click on right door of desk to open up a puzzle.
-
this puzzle is somewhat like Tetris, put the shapes together to fill in the space .
-
hey, a little drawer opened, take the Necklace and Card out of the drawer.
-
return to Page One.
Fit Puzzle Video
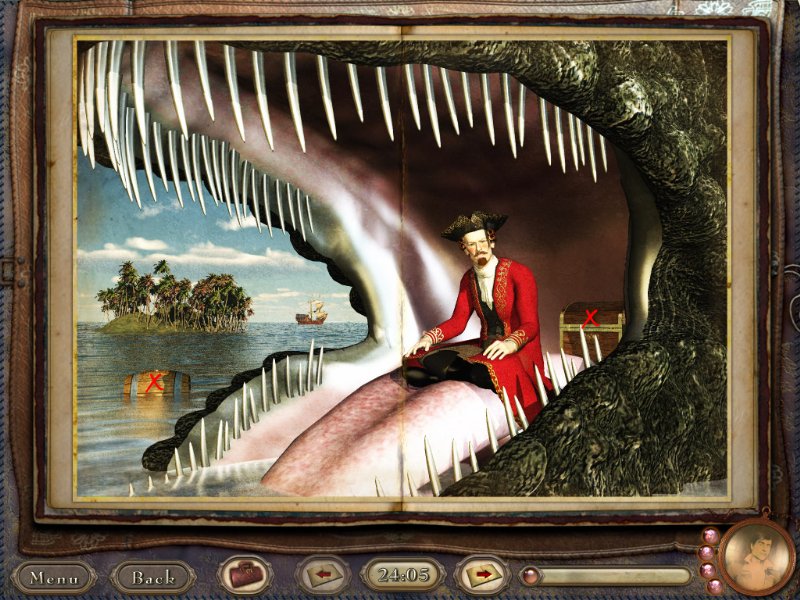
Book 3: The Castaway
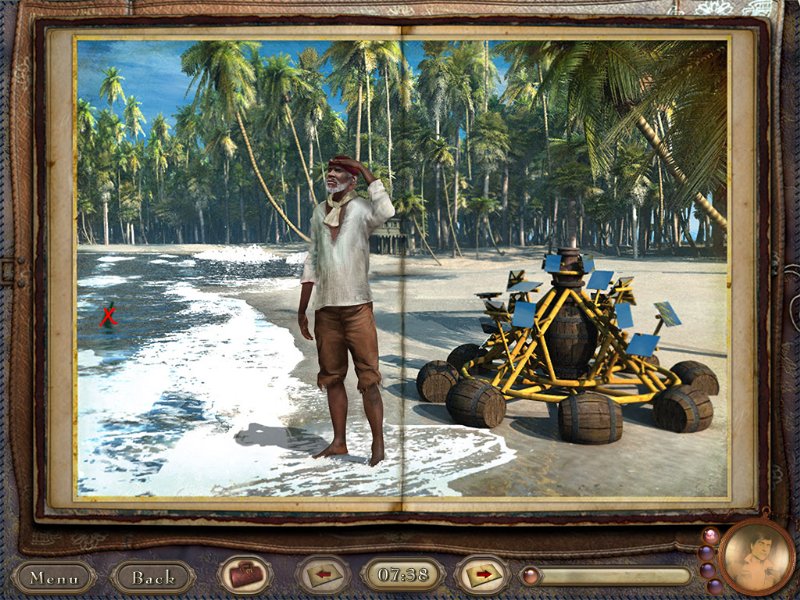
Page 1: Robinson Crusoe
-
how exciting, Crusoe needs our help finding a very important crystal!
-
complete the following pages and then return to this section.
-
use Fishing Rod to get Bottle.
-
use Rock on Bottle and get Card.
-
use the Crystal on his machine.
-
click on the machine to open up another puzzle.
-
you need to drag the mirrors so the light beams hit all the targets.
-
now let's give our castaway his Card !
Mirror Puzzle Video
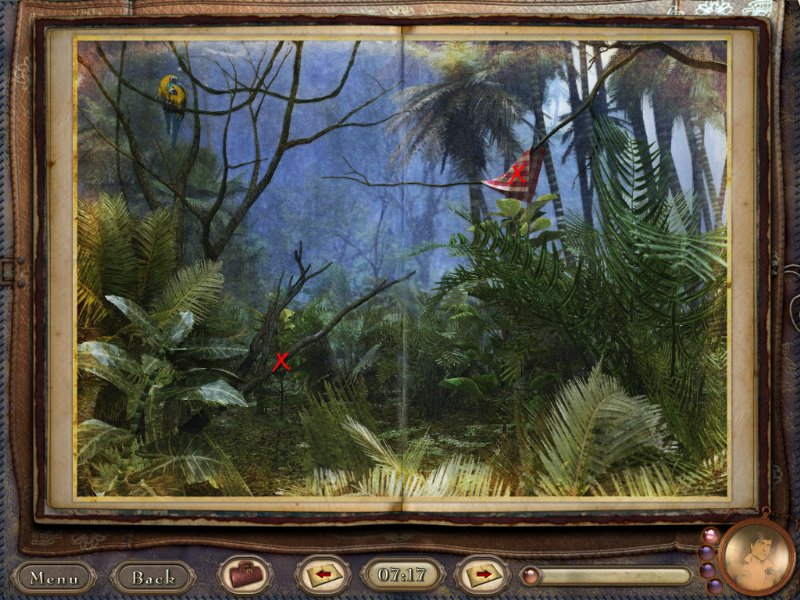
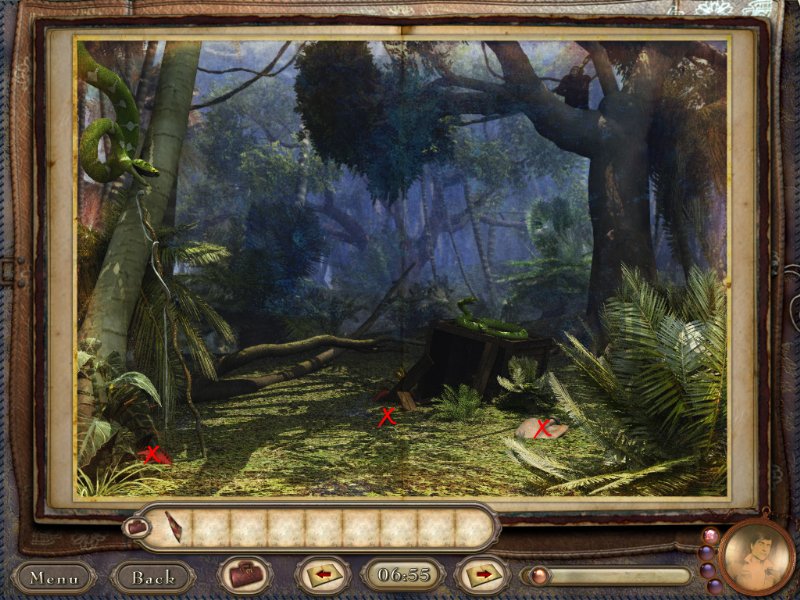
Page 2: The Jungle
-
get Handkerchief from branch.
-
see Page Three and Four and then return to this section.
-
use Machete on tree and get Tree Branch.
-
combine Hankie, Shovel Head, and Branch.
-
go to Page Three.
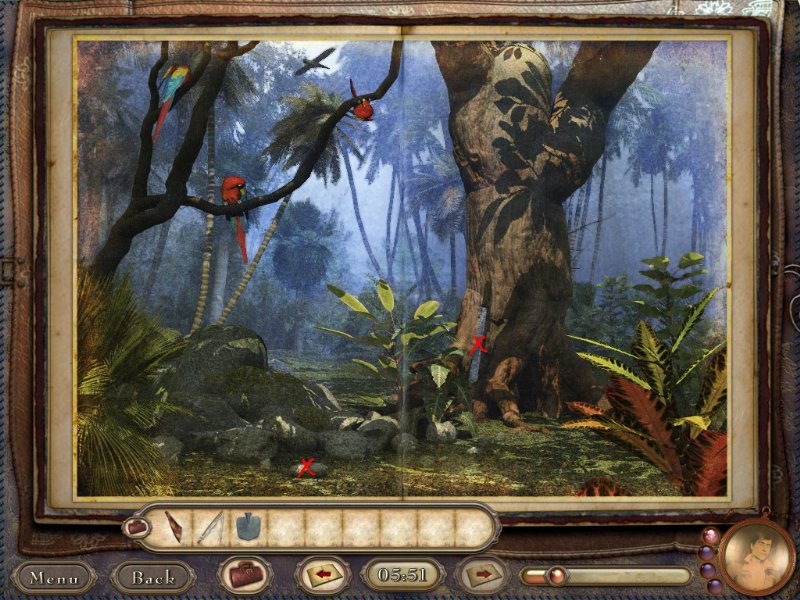
Page 3: More Jungle
-
oh no, the animals are spooked by something below!
-
get the Fishing Pole on the left side near the red feather.
-
pick up the Shovel Head near the stump.
-
see Page Four and then return to this section.
-
use Shovel on soft ground and get Crystal.
-
return to Page One.
Page 4: Are We Lost?
-
get the Machete leaning up against the tree.
-
get the Rock at the base of the boulder.
-
return to Page Two.
Card Puzzle:
-
use the blue and purple lenses to scan the cards for seven symbols.
-
each card will have multiple symbols.
-
next you must arrange the symbols to match a pattern (see picture for examples).
-
now use the yellow lens to fine the lone symbol on one of the characters and the suspect! Note: the suspect will not be the same for everyone.

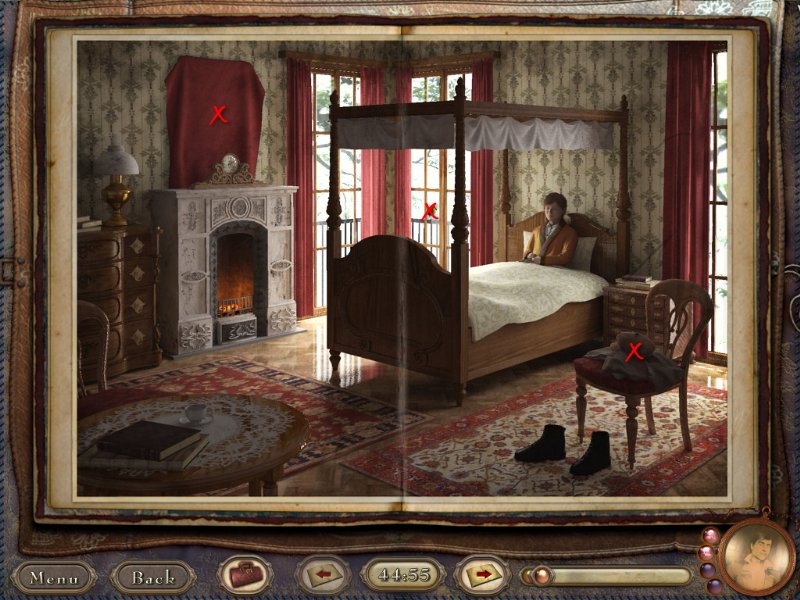
Book 4: The Secret Garden
Page One: Colin
-
it seems Colin's father is away and his mother is gone, let's help him find her Secret Garden.
-
it's awfully dark in the room, let's open the curtains .
-
take Colin's Clothes off the chair.
-
give Colin his Clothes.
-
go through the following pages and then return to this section.
-
give the Apple to Colin.
-
now we can safely uncover his mothers picture, wiggle it and take the Card that falls out.
-
go to Page Four.
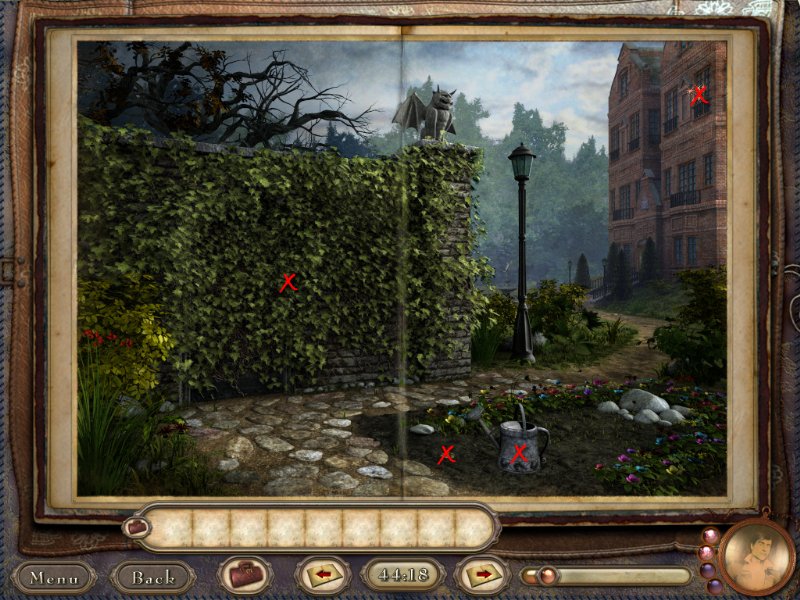
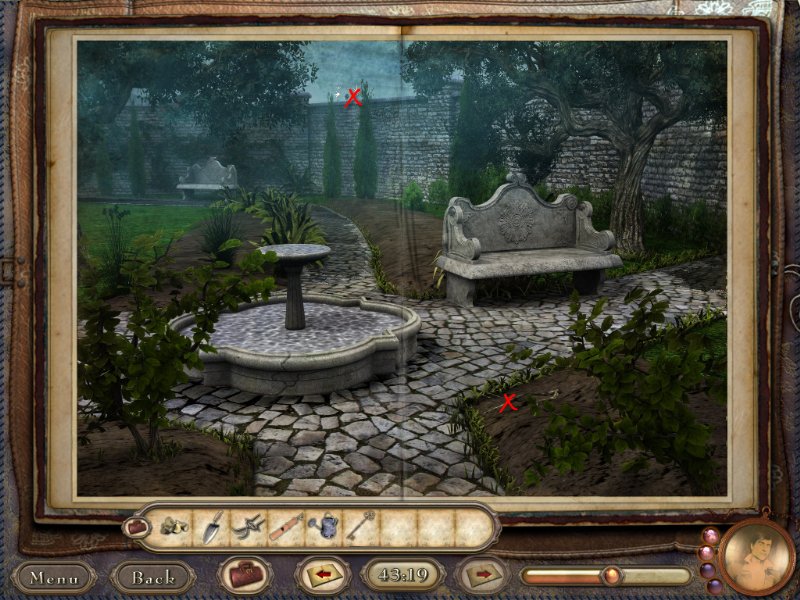
Page Two: Outside the House
-
either that window is very clean or we need to click it, the poor robin is hungry, we'll come back to him later.
-
pick up the Watering Can and the Seeds on the garden.
-
there is a worm under the watering can but we can't do anything with that yet.
-
go to Page Three and then return to this section.
-
use the Pruning Shears on the hedge to find a door, but it's locked, darn it.
-
use the Whistle on the Robin and he'll get the worm, what's that in the dirt?
-
use the Trowel on the dirt and get the Key.
-
use the Key on the door.
-
go to Page Four.
Page Three: The Water Pump
-
grab the Trowel in the sand, Pruning Shears on the base of the pump, and Whistle in the grass.
-
put the Watering Can under the pump, click on the pump and get a Full Can of Water.
-
return to Page Two.

Page Four: The Secret Garden
-
this garden looks pretty bad, let's use the Trowel on it to clean it up a bit.
-
the Robin is back sitting on the wall, use the Whistle on it again and it will fly to the tree.
-
the flower beds are empty, before we can plant anything, we need to clean up some more so pick up the Twig in the dirt on the right hand side.
-
give the Twig on the Robin so it can make a nest.
-
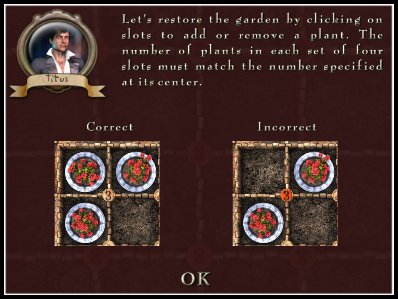
in the same place where the twig was, place the Seeds and use the Watering Can on them which opens up a puzzle.
-
you need to click on the plants in order to add or remove them.
-
the number of plants in the slots must match the number in the center.
-
when it's correct, the number turns from red to brown, if the number is still red, you need to change something.
-
you restored the garden, before you leave, take the Apple.
-
return to Page One and then return to this section.
-
give the Card to Colin before his father returns.
Flower Puzzle Video
Book 5: The Timeline
Page One: The Voyager
-
the Voyager has lost some things through time (maybe he's related to the Clumsy's), let's help him find them so he can return to his time.
-
take the Coat of Arms.
-
go through the following pages and then return to this section.
-
use the Shovel to dig a hole in the softer part of the ground and then bury the Wine Jar.
-
now use the Shovel again to put dirt back on top of it.
-
go to Page Two and Four and then return to this section.
-
give the Card to our weary voyager so he can get home in time for dinner, men, they're all alike!
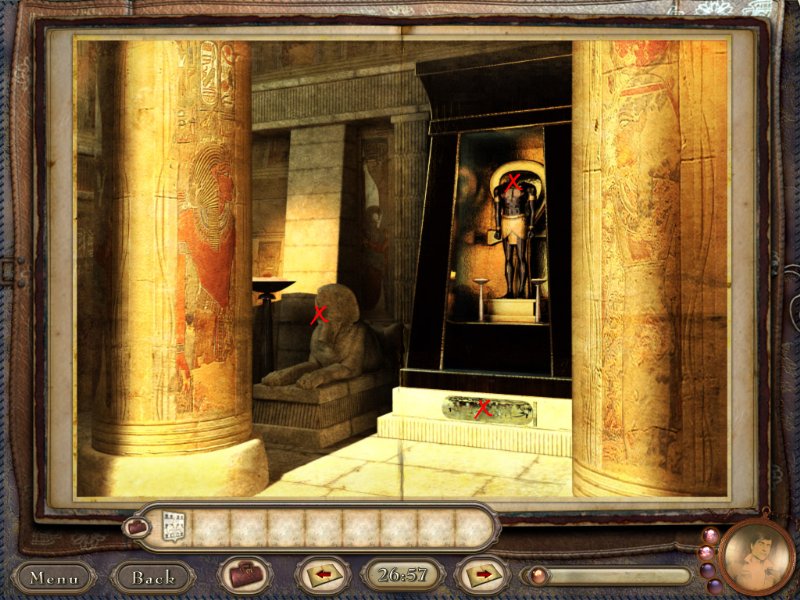
Page Two: Ancient Egypt
-
click on the symbol, in the center, and see that it's dirty, we have nothing to clean it with right now so we'll have to come back.
-
click on the statue in the background and see that something is missing, we'll have to come back to this too.
-
go to Page Three, Four, and One and then return to this section.
-
put the Head of Horus back on the statue, interesting his eyes light up but we don't know what to do yet.
-
go to Page Four and then return to this section.
-
use Vinegar to clean up the symbol.
-
a code, click on the statue and click his eyes to match the code: left, right, left, right.
-
the mouth of the statue on the left opens, take the Card.
-
go to Page One.
Page Three: The Castle
-
click on the boulder in front of the caste door and open up a puzzle.
-
you need to click the floor tiles to raise and lower them in order to get the rock to it's destination.
-
click on the Guard and take his Wine Jar.
-
now look up, it looks like a Coat of Arms is missing, let's put it back.
-
go to Page Four.
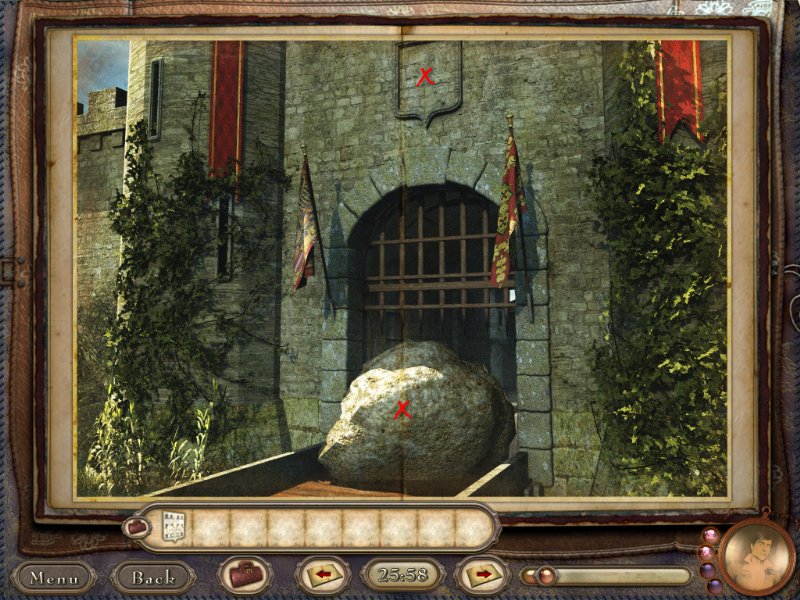
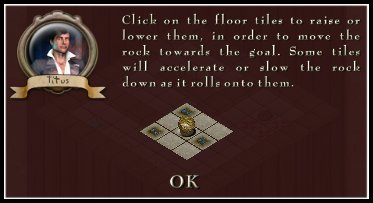
Rock Puzzle Video
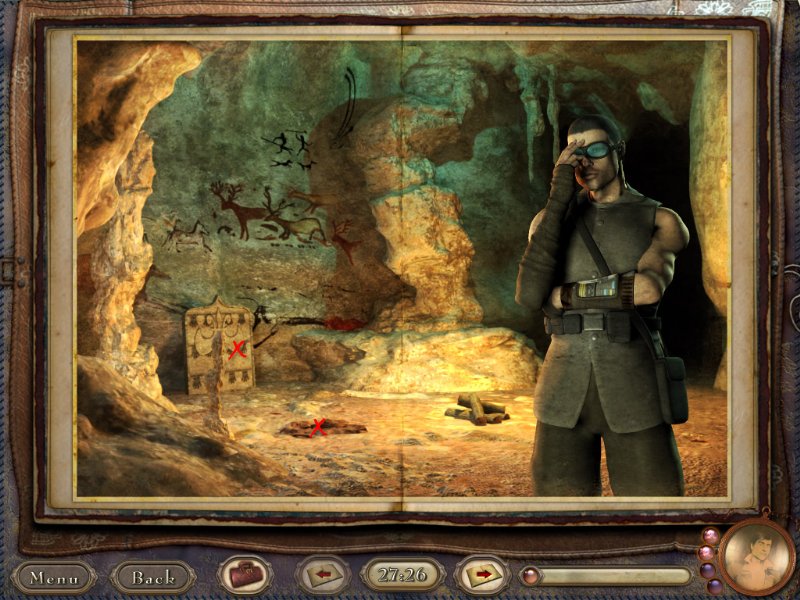
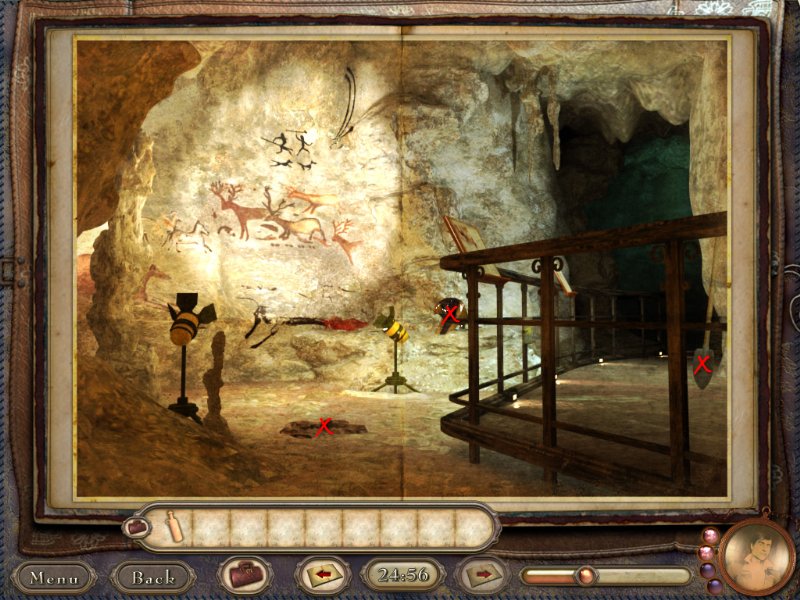
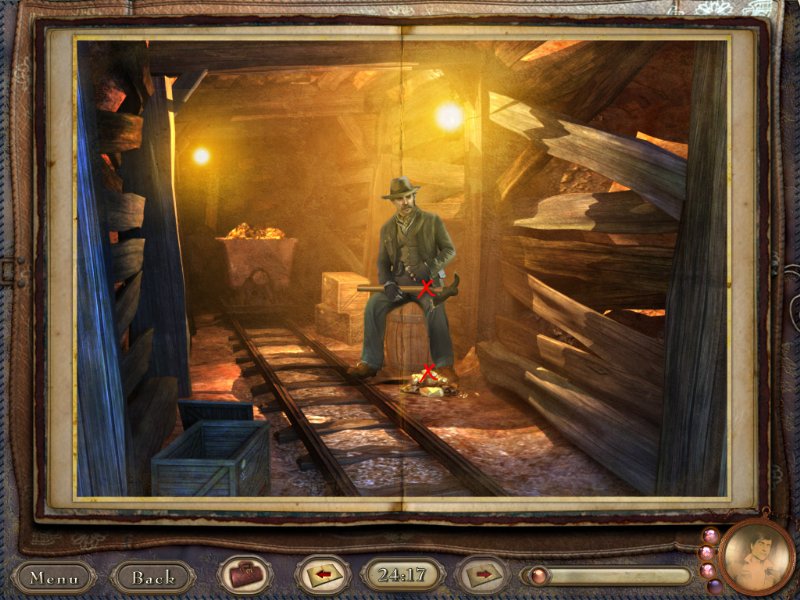
Page Four: Cave Days
-
take the Shovel on the right side and the Head of Horus near the center of the screen.
-
there is a place in the ground that is softer than the rest, let's use the Shovel to dig their.
-
hmm, the hole is empty but we need to bury or dig up something there, we'll have to come back.
-
go to Page One and Two and then return to this section.
-
let's dig up that hole again, fascinating, it now contains the same wine jar as before but... it's turned to Vinegar !
-
go to Page Two.
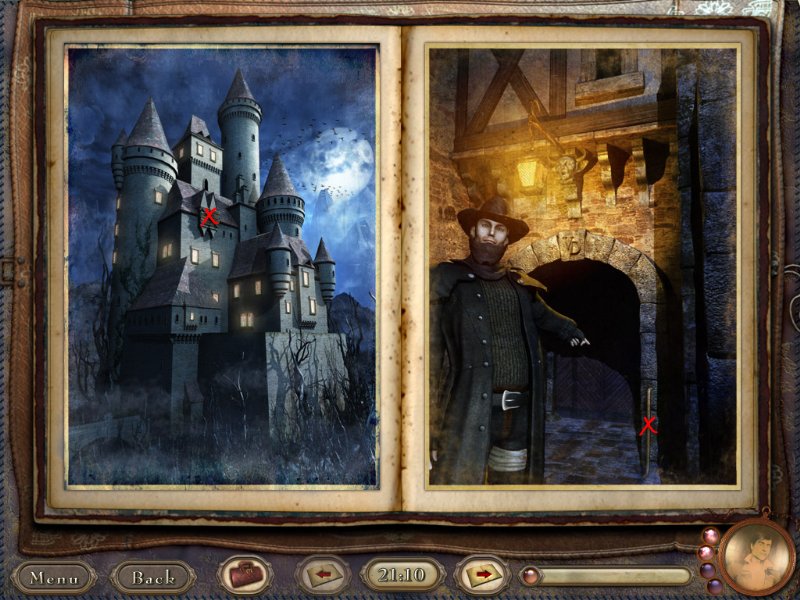
Book 6: The Vampire
Page One: Jonathan and Mr. Dracula
-
Jonathan is being held against his will by Mr. Dracula, let's help him escape before he loses... well you know.
-
there is a Crowbar on the Left Side near the locked door, pick it up.
-
now use the Crowbar on the boarded up window on the Right Side and tear down those boards.
-
go through the following pages and then return to this section.
-
use the Key on the door.
-
give the Card to Jonathan so he can leave this place!
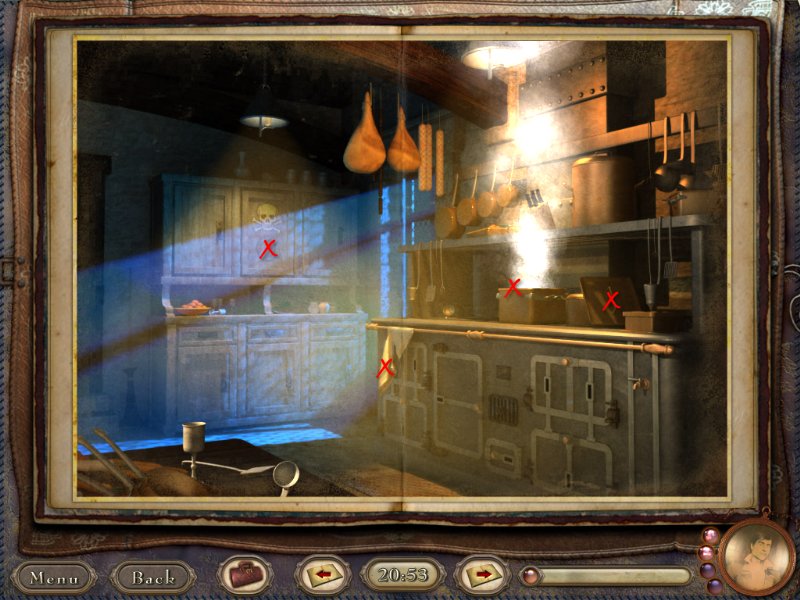
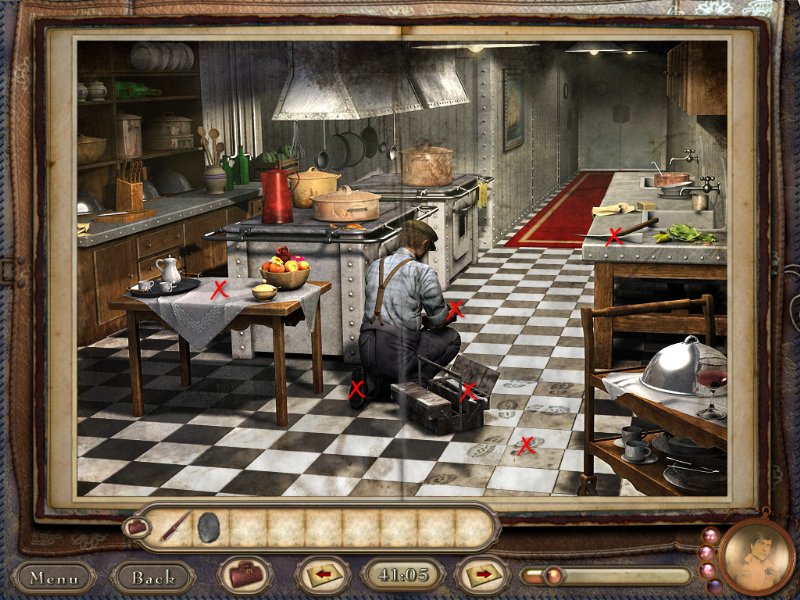
Page Two: The Kitchen
-
take the Rag hanging off the left side of the stove.
-
take the Lid near the steaming pot.
-
combine the Rag and the Lid and place it on the steaming pot.
-
now that the smoke has cleared you can take a Knife.
-
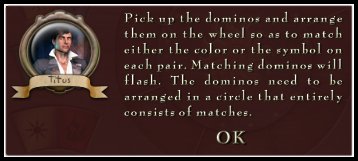
on the cupboard door is a circle underneath the skull, click on it to open up a puzzle.
-
you must place the dominoes on the circle so that the ends match either the color of the symbol.
-
take the Garlic, I think we'll be needing that!
-
go to Page Three.
Domino Puzzle Video
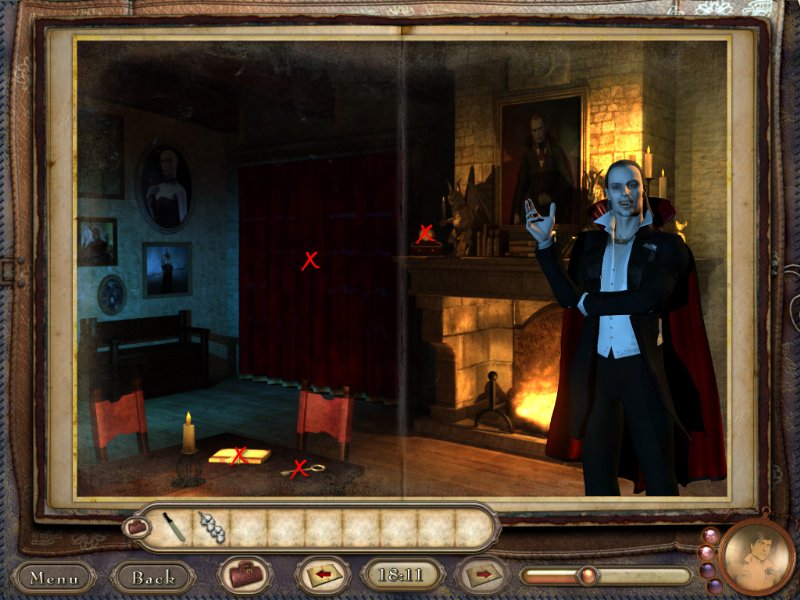
Page Three: Mr. Dracula
-
Dracula himself, he claims to be letting Jonathan fret a bit and will then set him free, my motto, never trust a vampire.
-
use the Garlic on Dracula, he'll move to the other side of the room.
-
now open the curtains and let a little... darkness in?
-
click on the clock on the left side of the mantel and let's turn the little hand to 12:00.
-
Dracula will remember an urgent errand, sure...
-
use the Knife on the notebook and get the Card.
-
grab the Key.
-
go to Page One.
Book 7: The Treasures
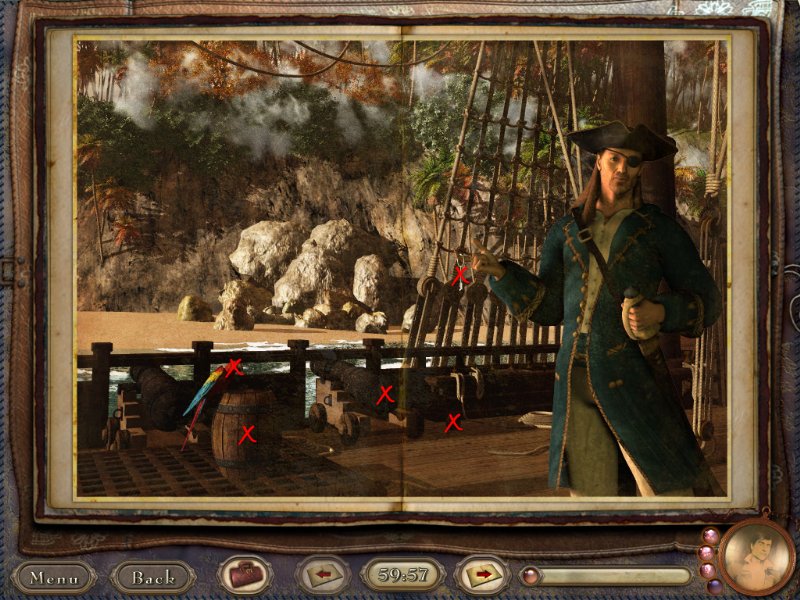
Page One: Long John Silver
- that Long John Silver is kind of cute, I think we should help him find his flag!
- grab the Canon Ball on the right side of the canon.
- go to Page Two and then return to this section.
- John is happy the flag is raise, he offers you his Key, take it from his finger.
- go to Page Two and then return to this section.
- show the Pieces O' Eight to the parrot, he likes shiny things!
- click the barrel the parrot was perched on and get Gun Powder.
- put Gun Powder in cannon on the right.
- use a Match on the cannon and shoot at the rocks, it looks like we found a cave!
- go to Page Four.
Page Two: The Ship
-
on the Left Side take the Pirate Flag that's draped over the chest, hmm, the chest is locked, we'll come back to that later.
-
get the Matches on table.
-
use the Matches on the lit candle.
-
use the Pirate Flag on the Right Side and hoist of the sail.
-
go to Page One and then return to this section.
-
use the Key to unlock the chest and get Pieces O' Eight.
-
go to Page One.
Page Three: Long John Silver Lost
-
give the Map to Long John Silver, shiver me timbers the treasure is buried right here!
-
see the big red x, okay how could you miss it, let's use the Shovel there.
-
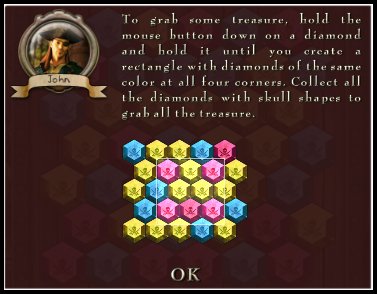
another puzzle, you want to get the diamonds that are the same color in four corners (making a rectangle) and drag your mouse over the area to capture them.
-
you need to collect all the diamonds with skulls on it to get all the loot.
-
now give him his Card and we'll sail out of there!
Diamond Puzzle Video
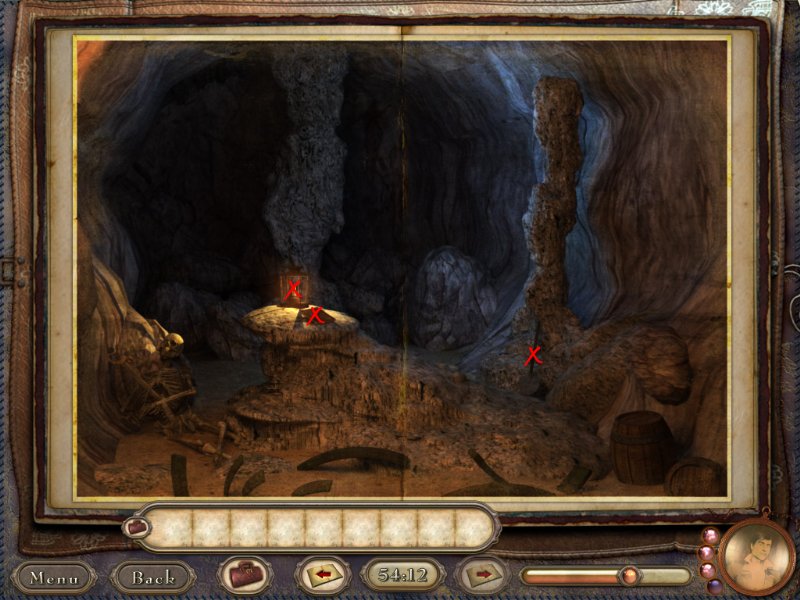
Page Four: Rocky Mountain High
-
use the remaining Match on the lantern which is on a rock near the center on the left page.
-
great now we can see, let's take the Shovel leaning on the right side of the cave.
-
before we leave, open up the book by the lantern and take the Map and Card.
-
go to Page Three.
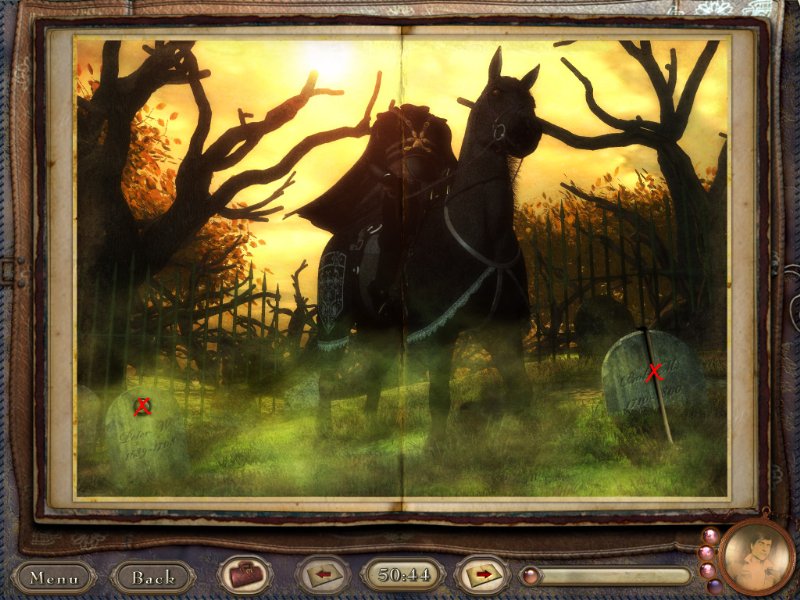
Book 8: The Headless Horseman
Page One: Headless Horseman
-
the poor guy lost his head (probably over a woman), I guess we should help him get it back.
-
take the Crowbar leaning against the tombstone on the right.
-
there is a moon on the tombstone but the crowbar won't get it out, let's come back to that.
-
go to Page Two and then return to this section.
-
use the Shovel on the tombstone to get the Moon.
-
go to Page Three and then return to this section.
-
give the Skull to the Headless Horseman, I had hoped he'd be cuter.
-
give him his Card so he can gallop out of there!
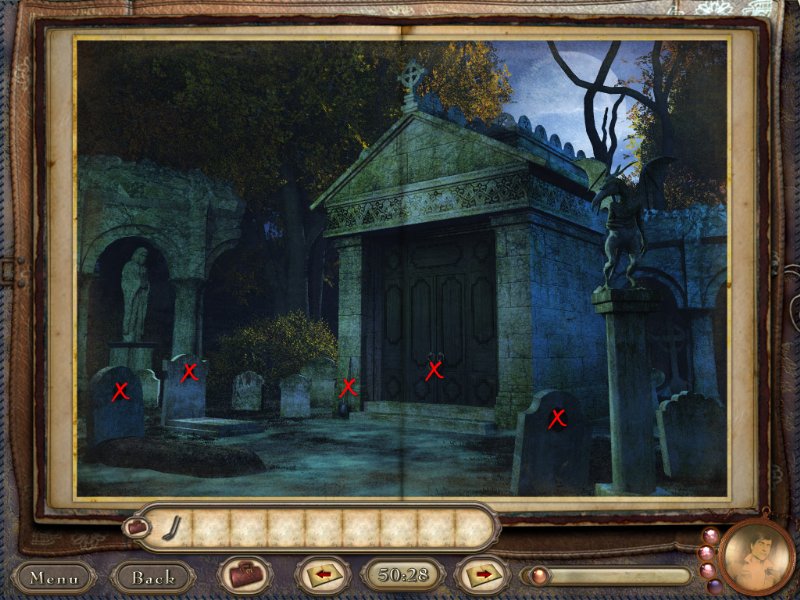
Page Two: The Graveyard
-
hmm, interesting there are spots on the tombstones that light up when you press them, click them until they are all lit and reveal the Card.
-
click on the Crypt, it's chained shut, use the Crowbar on the chain to open it.
-
go to Page One.
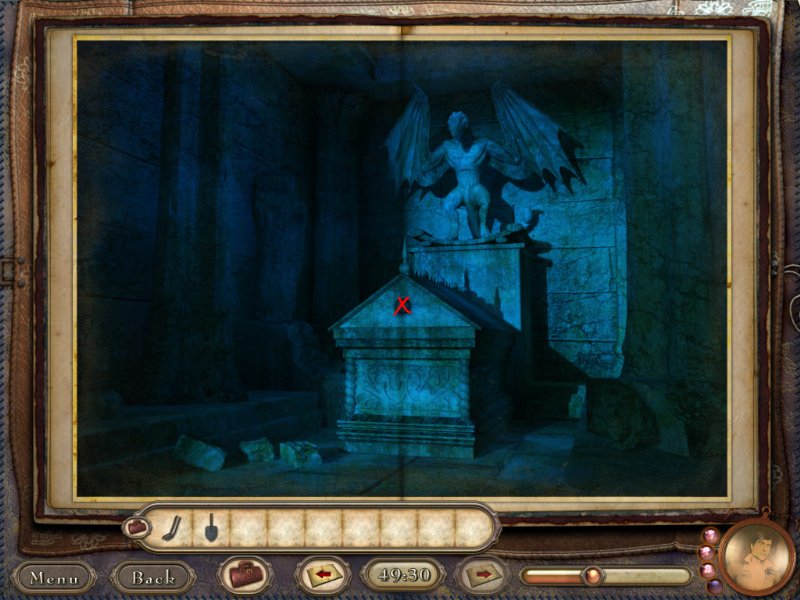
Page Three: The Crypt
-
place the Moon in the circle on the tomb.
-
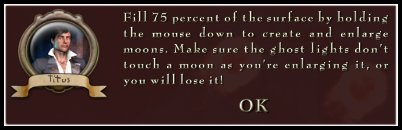
a new puzzle opens up, we have to create large moons by clicking on open space and holding down the mouse button.
-
they will keep growing bigger and bigger but be careful, if a fireball hits one you'll lose the moon.
-
you have to cover 75% of the area with moons and you have only 7 tries, don't worry, you can keep trying!
-
click on the crypt and take out the Skull, ewww.
-
go to Page One.
Moons Puzzle Video
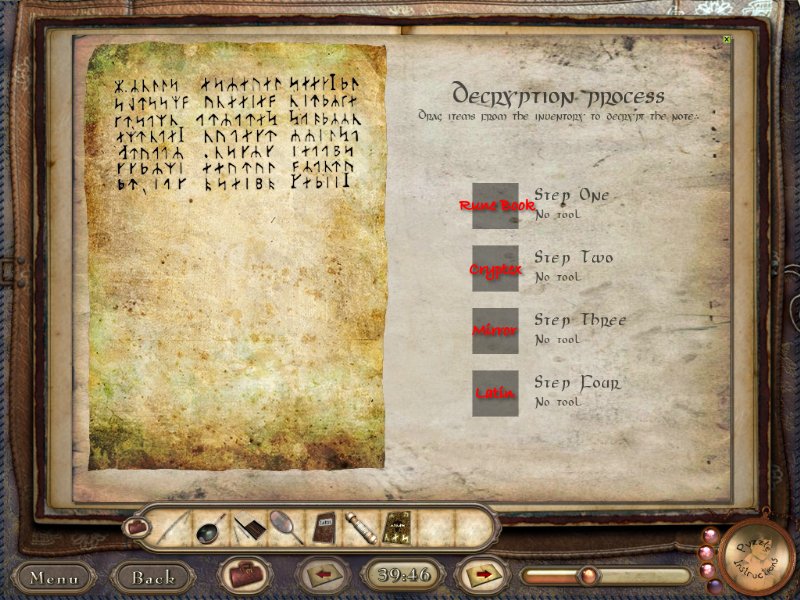
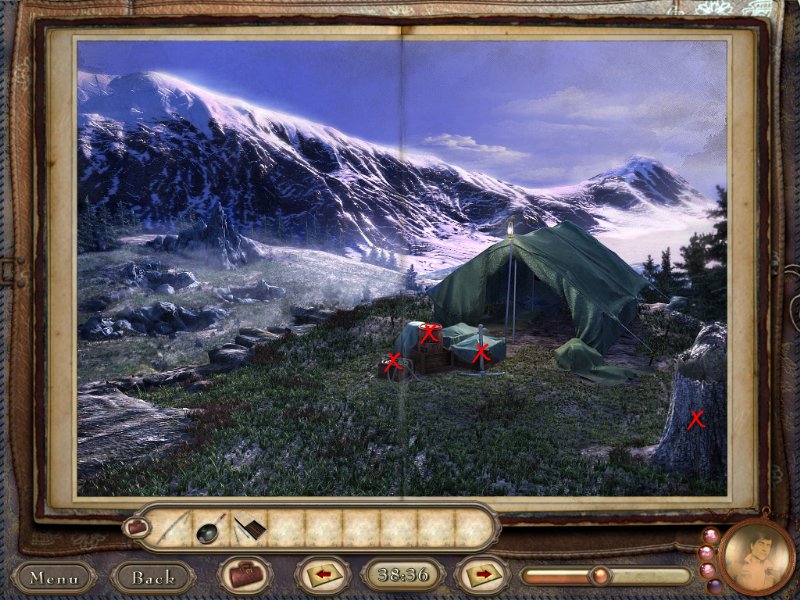
Book 9: The Descent
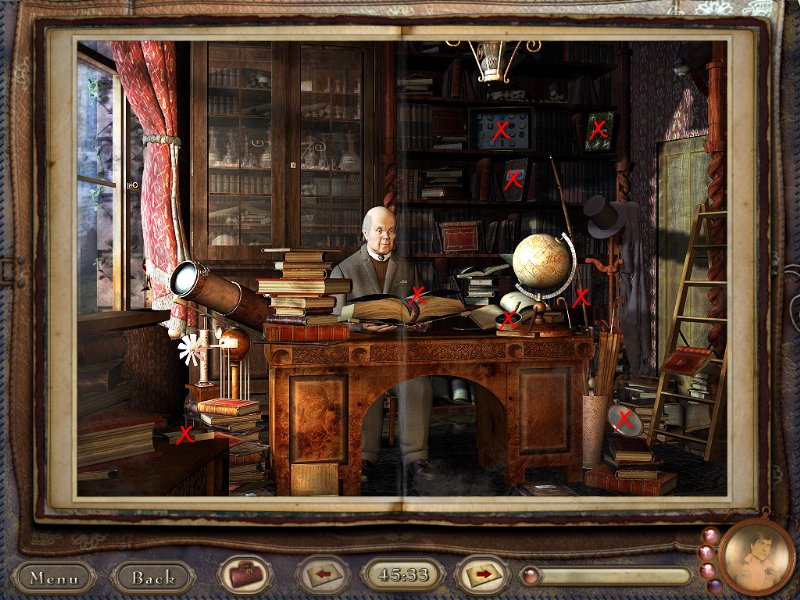
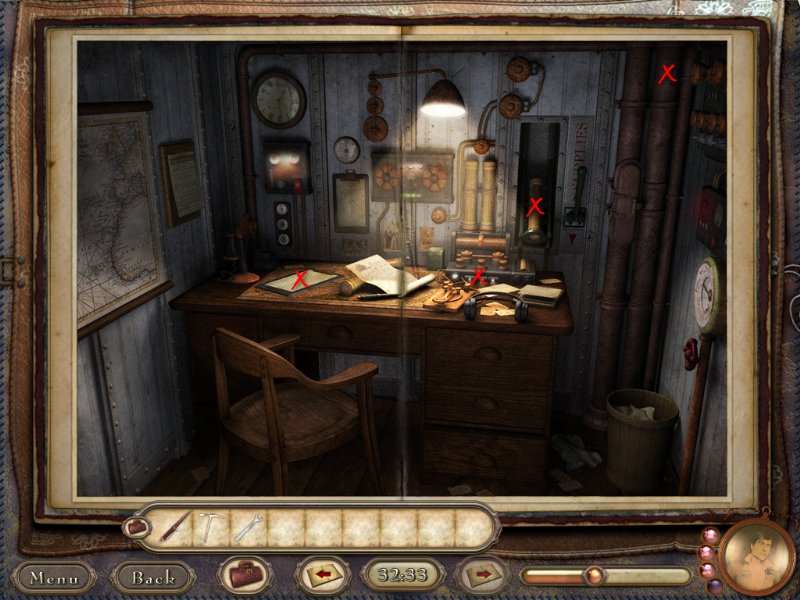
Page One: The Professor
-
the professor is trying to find a great secret, let's help him, I love secrets!
-
there are quite a few things to find in this room, a Fishing Pole, Magnifying Glass, Mirror, Rune Book, Latin Dictionary and Matchsticks.
-
there are some stones on the back shelf, click on them to get a puzzle
-
this puzzle is very simple, just find the two matching rocks in each set.
-
once you've complete it, the Professor will give you a Cryptex.
-
click on the big book in his hands and a secret note will fall out, use the Magnifying Glass on the note.
-
you'll get a cryptic puzzle, use the various items from inventory and place them in the boxes on the right side in the correct order to solve the puzzle.
-
if it's in the correct spot the square will stay gray, if it's wrong it will be red.
-
once your receive the Secret Note, give it to the Professor.
-
go to Page Two.
Page Two: The Mountains
-
how pretty, now pick up the Rope, Gun Powder and Pickaxe.
-
use the Pickaxe on the old rotted stump and get Grubs, ewww.
-
go to Page Three.
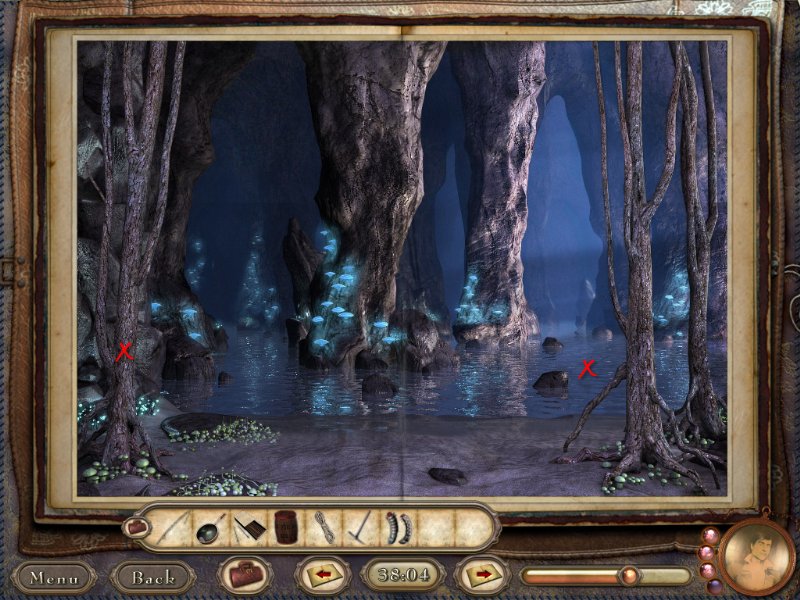
Page Three: The Swamp
-
use the Pickaxe on the strange trees to cut them into logs.
-
use the Rope on the logs to get a raft.
-
see that fish jumping in and out, combine the Grubs and the Fishing Pole and toss it in there to get Strange Fish.
-
go to Page Four.
Page Four: The Center of the Earth
-
use the Strange Fish on the Dinosaur (wow) and he'll leave.
-
use the Gun Powder on the rocks and light it with the Matches.
-
a camera will appear, take a picture of the Professor to get his Card.
-
give him his Card so we can leave this journey to the center of the earth.
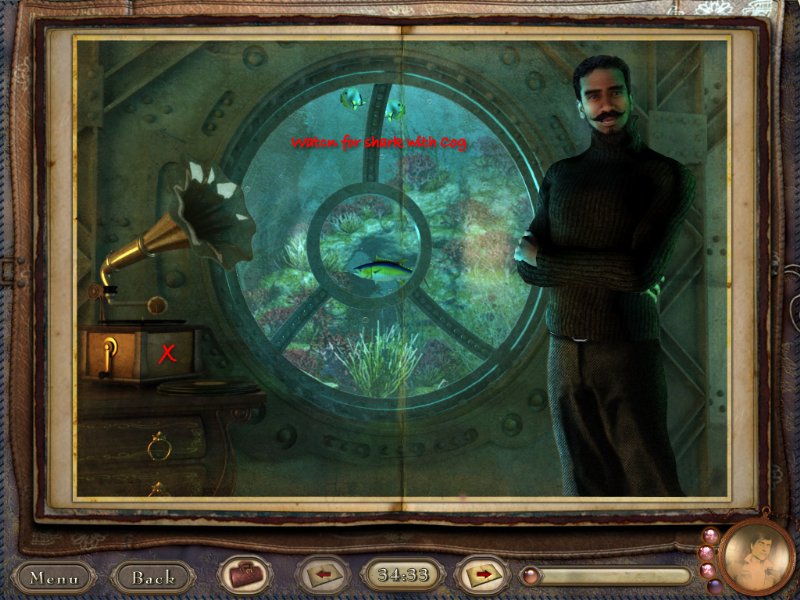
Book 10: The Dive
Page One: Nemo
-
Nemo needs our help to dive into Atlantis and get him an artifact for his collection, cool!
-
click on the phonograph, nothing is playing right now, we'll come back to that later.
-
watch for a shark to swim buy with a sparkly teeth, oh wait that's a cog, let's grab that Cog !
-
go through the following pages and then return to this section.
-
put the Stone Disc on the phonograph and hear 2... 1... 4... 3... let's apply these numbers to the statue from left to right.
-
go toe Page Three and then return to this section.
-
give the Medallion to Nemo .
-
give Nemo his Card so we can leave this beautiful underwater world.
Page Two: Water Above, Land Below
-
pick up the Dry Coal on the Bottom Page which uncovers a box, move the box and get the Wrench.
-
use the Wrench on the hatch emptying the water from the top page to the bottom page.
-
oh look, a card is floating on top of the water, take the Card.
-
on the Top Page click on the furnace and open the door, now zoom in on the coal inside it, it's wet, take the wet coal out and put the Dry Coal in.
-
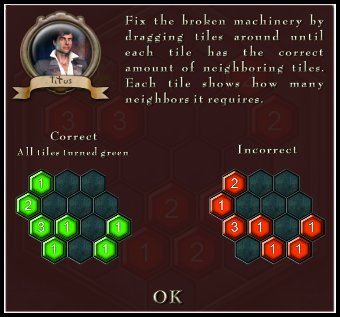
click the red power button on the tank and get a puzzle.
-
you need to drag the tiles around until each tile has the correct amount of neighboring tiles.
-
now click the control panel and pull down the lever.
-
go to Page Three.
Number Puzzle Video
Page Three: Under The Sea
-
on the Left Side pick up the Stone Disc laying in the sand.
-
notice that there are pieces missing from and old statue, put the Cog in the front of the statue.
-
a panel rises with different sea creatures on it, we need to find out what they do.
-
on the Right Side, Bottom grab the Pearls from each of the clams as they open their shells.
-
go to Page One and then return to this section.
-
from left to right, click the sea creatures on the statue in this order, 2... 1... 4... 3...
-
wow, an old artifact from Atlantis appears, but Nemo won't want it broken, let's fix it by putting a Pearl in the artifact and get a Medallion.
-
go to Page One.
Book 11: The World of Oz
Page One: Dorothy
-
how cute is Dorothy, let's help her find her ruby slippers.
-
go through the following pages and then return to this section.
-
give the Ruby Slippers to Dorothy .
-
now give her the Card so she can finally leave Oz.
Page Two: The Tin Man
-
the poor Tin Man thinks he could be useful in our quest but he's stuck that way, I think he could use some oil.
-
go to Page Three and then return to this section.
-
use the Oil on the Tin Man, there that should loosen him up.
-
a puzzle opens up, you have to use your mouse to guide the Tin Man through the maze to retrieve the Card and Ruby Slippers .
-
you will have to use objects in your inventory to help get through it.
-
the wood or board can go across the brown patches and water, the axe will cut down trees, and the magnet will help him turn the way you want him to go.
-
once and item is used, you may need to pick it up again and use it later.
-
go to Page One .
Page Three: The Shed
-
there are a lot of useful items here, grab the Axe, Wood, Board, Oil and Magnet .
-
go to Page Two .
Book 12: The Witch
Page One: Hansel & Gretel
-
Hansel has been locked in a cage by a wicked witch, his sister needs our help to get him out.
-
grab the Bread Paddle up against the stove before turning the page.
-
go through the following pages and then return to this section.
-
use the Bucket on the witches well .
-
go to Page Two and then return to this section.
-
fill the Bucket again at the witches well .
-
go to Page Two and then return to this section.
-
remember the story of Hansel and Gretel, give Hansel the Bone .
-
remember to fill up your Bucket at the witches well again and then head back to Page Two .
-
the bone tricked the witch, she thinks he's skin and bones, fire up that oven.
-
put the Bread in the oven and use the Bread Paddle on the bread .
-
the witch is mad now, she called you a ninny, now smack that nasty old witch with the Bread Paddle !
-
use the Key to unlock Hansel and take the Bread Crumbs .
-
go to Page Three .
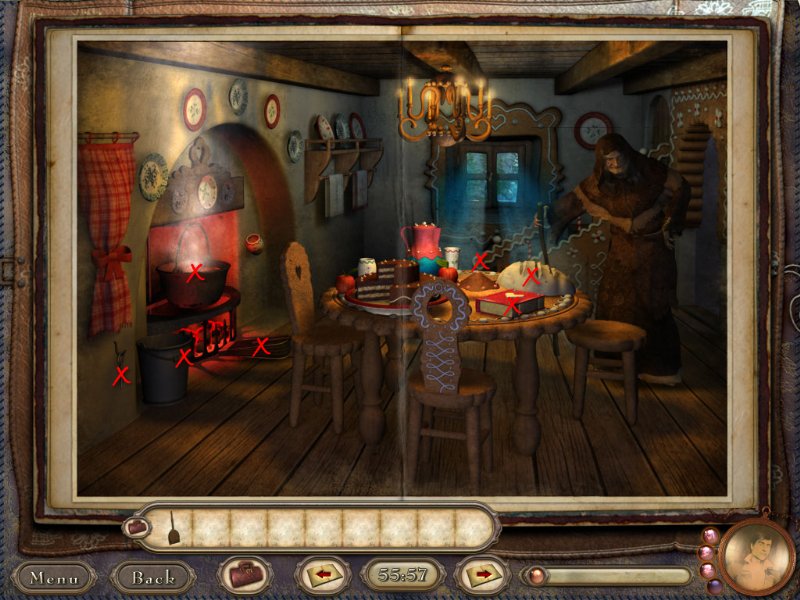
Page Two: The Witch
-
the witch has the notion that we are on her side and wants us to get a chicken to fatten up the boy.
-
before you go searching for the chicken, you might as well grab the Bucket .
-
go to Page Three and then return to this section.
-
give the Chicken to the witch, hmmm, the pot still needs something.
-
go to Page One and then return to this section.
-
put the Bucket of water into the pot and then stoke the fire.
-
uh oh, where did the witch go?
-
since she's gone, we can grab the Key and the Bread Dough .
-
oh no, she's back and steaming mad, lets get back to Page One .
-
use the Bucket on the pot again and this time open the book and grab the Card, if you have time get the Bone from the chicken on the far side of the table, if not go back to the well and do this again.
-
go to Page One and then return to this section.
-
use the Bucket on the pot yet again and the witch will go outside to check on Hansel.
-
go to Page One .
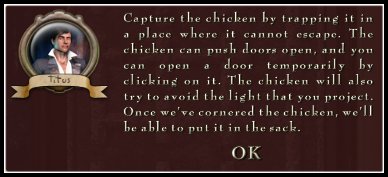
Page Three: Swan Song
-
on the Right Side click on the door and a puzzle opens.
-
we need to capture the chicken by forcing it somewhere it cannot escape
-
both you and the chicken can push doors open.
-
the chicken will try and avoid light.
-
your goal is to get the chicken in the very middle which is easily done but following it around with your cursor, it will go the opposite direction of the light.
-
once the chicken is cornered, capture it with the Burlap sack .
-
go to Page Two and return to this section later.
-
use the Bread Crumbs on the swan on the Left Side .
-
show Gretel the Card so the swan can take them home.
Book 13: The Detective
Page One: Elementary, My Dear
- wow, I finally get work with Sherlock Holmes to solve a real mystery!
- the door is locked, let's go to Page Two and Three and then return to this section.
- give the Fingerprint and Footprint evidence to Sherlock.
- now we can go through that locked door, go to Page Four.
- give the Necklace to Sherlock and he'll give you a Numbered Key.
- go to Page Two and then return to this section.
- give the Card to Sherlock so we can solve this mystery!
Page Two: Mail Room
- open the desk drawer and get the Pen.
- click on the box on the floor and get some Fingerprints, Sherlock congratulates you, way to go!
- the mail system seems to be sabotaged, we'll have to come back to that later.
- go through the following pages and then return to this section.
- put the Pipe Section between the two pipes on the left side.
- now put the Mail Container in the mail slot and pull the lever.
- go to Page Three and One and then return to this section.
- use the Numbered Key on the bottom, left drawer and get the Card.
- go to Page One.
Page Three: The Kitchen
- the engineer is less than helpful, but we need that wrench.
- while you are here, grab the Ice pick and the Footprints.
- now let's compare the footprint to the Engineer, drag the Footprint to this boot.
- he turns around and now we can see his hands, drag the Fingerprint to his hands, hmm, looks like we have suspect!
- now that he's gone, you can grab the Wrench.
- go to Page One and return to this section later.
- hmmm, a huge and ice cube has appeared, let's use the Ice pick on that.
- we recovered the Necklace!
- go to Page One.
Page Four: Radio Room
- click on the radio and get a puzzle.
- it's a basic Cryptogram, you have to figure out what letter stands for a different letter to decrypt the message.
- Answer: Package On Ice Retrieve At Port
- click on the mail slot and take out the Mail Container.
- click on the left side of the desk and see the requisition form, use the Pen to make a check mark in one of the boxes down the side
- it will automatically go into the mail container.
- use the Wrench on the pipe in the upper, right corner.
- go to Page Two.
Book 14: The Gold Rush
Page One: Buffalo Bill
- howdy all, we've traveled back to the old west to help Buffalo Bill fix his wagon, gee I hope there are no gun fights!
- go through the following pages and then return to this section.
- give Bill his two pieces of Gold and show him his Card so he can be on his way.
Page Two: The Sheriff
- everything is locked here, we'll need to come back later.
- go to Page Three and Four and then return to this section.
- use the Pickaxe on the padlocked box on the wall and get Keys.
- use the Keys to open the jail cell and take the Dynamite (huh).
- go to Page Three.
Page Three: The Bank
- everything is locked here also, let's go on to Page Four and return to this section later.
- use the Dynamite on the safe and kaboom, you can now get the Card and a Small Key.
- use Small Key on middle desk drawer and take the Deed.
- go to Page Four.
Page Four: Gold Mine
- click on the miner and he'll put down his Pickaxe, quick grab it!
- go to Page Two and Three and then return to this section.
- give the miner his Deed and he'll give you one piece of Gold.
- he wants to play a game with him for another piece of gold.
- you need to click on one of the small (very small) weight on the left side and hold down your mouse.
- as you hold down your mouse button the scale will grow, keep it growing until you think it matches the right side and will be balanced.
- this is actually a very simple puzzle, just keep playing with one or two of the weights and it will balance out pretty fast.
- now get your second piece of Gold.
- go to Page One.
Book 15: The Traveler
Page One: The Absent Minded Professor
-
another time traveler, only this one is a tad absent minded and needs our help.
-
the time machine needs a five digit code to unlock it, lets come back to that when we find out what it is.
-
go to through the following pages and then return to this section.
-
go to the time machine and put in the code: 8 8 3 2 1
-
click on the time machine and put in the Sphere and attached the Handle.
-
pull the Handle.
-
give the traveler his card and we'll get back to the future!
Page Two: Puzzling
-
underneath the fan on the wall is an outlet, click on it and unplug the fan.
-
now that the fan has stopped, click on the piece of paper stuck to it, hey a five digit code, let's write that down: 8 8 3 2 1
-
click on the Rubbish Cube like puzzle in the middle of the desk.
-
you have to connect squares of the same color by clicking them and then painting the empty squares between them with that color.
-
this won't always be a straight line, you might have to go around other colors.
-
go to Page Three.
Block Puzzle Video
Page Three: The Laboratory
-
on the desk is a small box with an orange Sphere in it, take it.
-
now click on the numbered grid on the blackboard and get a math puzzle (oy).
-
this puzzle isn't that hard actually, all you need to do is make sure the numbers across and down equal the numbers on the side and bottoms.
-
by clicking numbers, you will in essence subtract them from the rest of the numbers and it will reflect on the right/bottom.
-
keep doing this until they match the solution number.
-
see the picture for an example.
-
a drawer will open, take the Handle.
-
go to Page One.

Book 16: The Strange Case
Page One: Jekyll and Hyde
-
Jekyll needs help getting the ingredients to help him rid himself of Hyde.
-
on the windowsill in the back take the Switch Potion.
-
give the Switch Potion to Jekyll and vise versa whenever you want to switch characters.
-
go through the following pages and then return here.
-
use the Switch Potion on Hyde.
-
now that you are back to the Left Side, use the Pen on the papers.
-
Jekyll is too weak to sign his own signature, hold down the mouse button and trace over the letters.
-
once you've mastered this, it may take a few tries, you get the Prescription.
-
go to Page Two and return to this section later.
-
use the Switch Potion on Jekyll and then go back to Page Three.
-
use the Switch Potion on Hyde and go back to Page Three.
-
use the Switch Potion on Jekyll and then go to Page Two.
-
use the Switch Potion on Hyde.
-
click on the strange machine in front of Jekyll.
-
put the Phosphorous , Snapdragon, and Salt into the three different funnels and get another puzzle.
-
draw shapes with your mouse by holding the button down and releasing it to drop them.
-
you want to match the same colors.
-
do not let it touch the sides, obstacles, or other colors.
-
the object is to create large shapes and build them up so that the drops have something to rest on, then when drops fall will continue to build up the drop.
-
give the Reflux Potion to Jekyll, yeah Hyde is gone!
-
show the good doctor his Card so he can leave that wretched lab!


Reflux Puzzle Video
Page Two: The Pharmacy
-
now that the Right Side is visible, take the Crowbar.
-
use the Crowbar on the box and get Phosphorous .
-
go to Page Three and return to this section later.
-
give the Prescription to the pharmacist and get Snapdragon.
-
go to Page Three and return to this section later.
-
use the Key on the locked drawer and get the Card.
-
go to Page One.

Page Three: The Hotel
-
while we are still on the Right Side, talk to the hotel clerk.
-
take the Pen from the right side of the desk.
-
go to Page One and return to this section later.
-
use the Pen on the papers lying on the bedside table and get the Dinner Form.
-
use the Pen on the papers again and get a Laundry Form.
-
go to Page One and then return to this section.
-
give both the Dinner Form and Laundry Form to the hotel clerk.
-
go back to Page One and then return to this section.
-
click on the food tray and take the Salt.
-
now click on the suit jacket and take the Key.
-
go to Page One.


Book 17: The Voyage
Page One: Phileas Fogg
-
Phileas Fogg, from Around the World in 80 Days, a favorite story of mine, needs our help to get off the ground.
-
before going to the next page, take the three Weights from the balloon and the Bell in the grass.
-
go through the following pages and then return to this section.
-
give the Watch to Phileas, but we still need to ignite the balloon.
-
click on the balloon and use the lit Newspaper on it.
-
now give him his Card so he can fly off to make history.

Page Two: Gentlemen's Club
-
the rude valet won't let us in, let's go to Page Three.
-
grab the Watch off the side table before the valet returns, if he does come back, go back to page three and ring the doorbell again.
-
next click the puzzle in the back, right corner.
-
the object is to pop all the balloons and you'll get two coins, no one has beaten it, ha we'll show him!
-
it looks easy but you only get five shots!
-
the one balloon has marks on it, if you shoot it red lines will appear, shoot them to get three shots at once.
-
by shooting up and at an angle you can get an entire line of balloons.
-
shoot high and to the left and the ball will curve and hit the four balloons behind the wall.
-
get the two Coins and go back to Page Three.
-
use one of the Newspapers on the fireplace.
-
go to Page One.

Page Three: Outside the Club
-
at the top of the blue door on the right side is a hanger, place the Bell there.
-
now ring the doorbell and quick run back to Page Two.
-
give a Coin to the newsboy and get Newspaper, now give him the other Coin and get another Newspaper and he'll leave.
-
the soapbox turned over, take the Card.
-
ring the bell again and go back to Page Two.

Book 18: The Invisible Man
Page One: Can You See Me?
-
well I can't really see why he wants to be visible again, think of all the places you could sneak into, but... if that's what he wants.
-
open up the journal and take a peek at the ingredients he needs, strange.
-
next to the journal is a piece of Bread let's snatch that.
-
go through the following pages and then return to this section.
-
put all the ingredients into the Potions Flask and give it to the invisible man.
-
it worked, now let's give his his Card so he can finally leave the inn.

Page Two: The Inn
-
the innkeeper thinks we need to be guests to touch anything, we'll have to come back here later.
-
go to Page Three and return to this section later.
-
take Salt, Boiled Egg, Meat Grinder and Card.
-
go to Page Three.

Page Three: The Livery
-
this is just like the last book, only this time we knock (I have man hands!) and then run back to Page Two to take stuff, um, borrow.
-
you'll have to go back and forth several times.
-
combine the Meat Grinder and Bread to get Breadcrumbs .
-
put the Breadcrumbs in the bird feeder and wait for the crow.
-
pick up the Crow's Feather.
-
go to Page Four and then return to this section.
-
now that you have the Knife use it on the tree to get Tree Bark.
-
go to Page One.

Page Four: The Laboratory
-
click on what looks like a wire cage by the window and get a puzzle.
-
it's a maze, you need to get the ball to the center by moving the maze around.
-
you can only move the maze in circles, you may need to play around with it until you get the hang of it.
-
take the Potions Flask.
-
on the covered chair is a Knife, grab it.
-
go to Page Three.

Book 19: The Baron
Chapter One: Baron Munchausen
-
poor Baron, he's trapped by a sea monster and needs our help.
-
go through the following pages and then return to this section.
-
click on the chest behind the the Baron, in the middle is a hole, place the Hearing Aid there.
-
now turn the buttons on each side stopping when you see click appear.
-
take the Portrait .
-
go to Page Three and then return to this section.
-
click on the barrel and see there is a hole, stick the Mirror in it.
-
now click on the mirror until it faces the Baron and the sea monster.
-
go to Page Two and then return to this section.
-
give the Baron his Card so he might resume his adventures.
Chapter Two: The Moon
-
a floating head called Slenite tells us that the machine in front of him is broken, I guess we'll have to fix it.
-
click on the strange device and get a gear puzzle.
-
you have to drag and drop gears so that they all turn in the right direction, which is the direction of the arrow on the gear.
-
now that the laser machine is fixed, let's take the Hearing Aid of the right side of Selenite's head.
-
go to Page One and return to this section later.
-
see that sparkle on Earth, shoot the laser at it, hmm, Selenite is not very bright.
-
go to Page One .
Page Three: The Vulcan
-
on the floor is a bunch of broken mirrors, the Vulcan must have some temper, take the Mirror Frame.
-
combine the Portrait with the Frame and then switch it with the Vulcan's Mirror, boy is he vain!
-
now grab the Card and perhaps we should leave now, he looks pretty angry.
-
go to Page One.
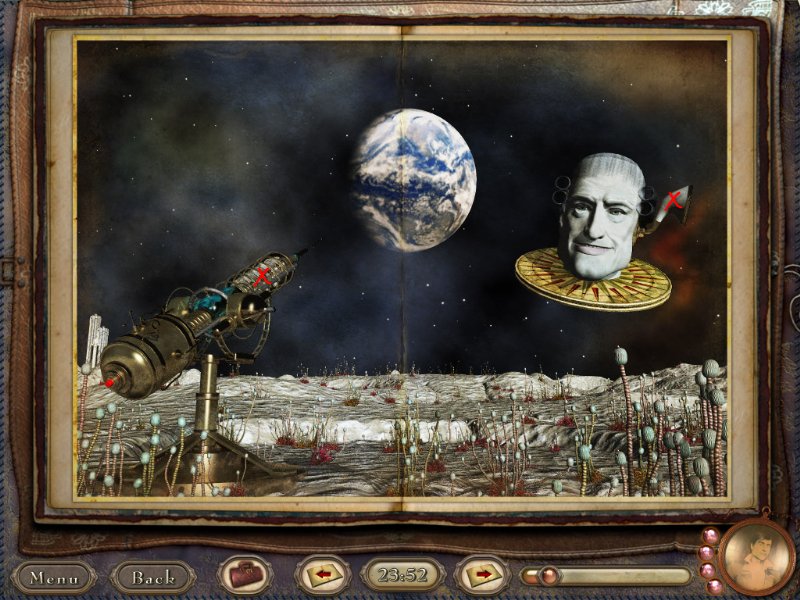
Book 20: The Legend
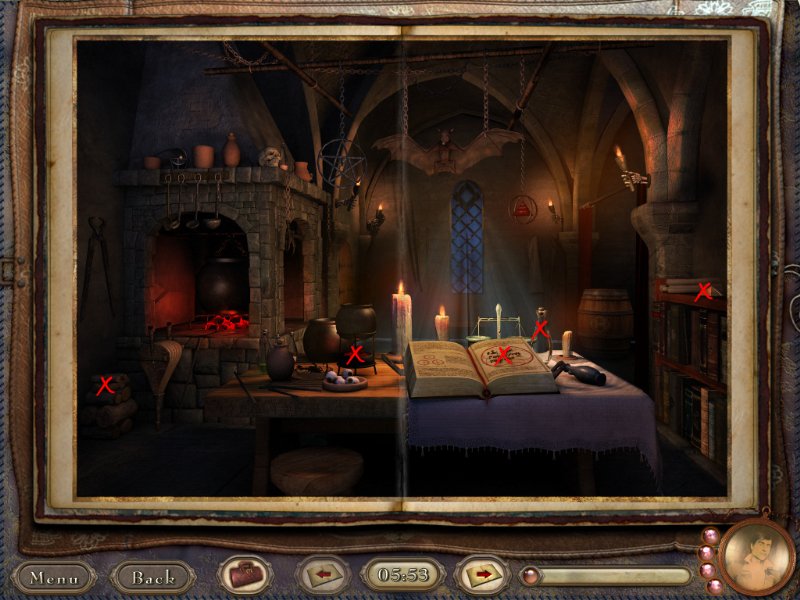
Page One: Merlin's Magic
-
King Arthur needs our help to find Merlin and Excalibur!
-
click on the spell book to see what ingredients we need.
-
grab the Prism from the bookshelf on the right side.
-
take some Wood from the woodpile.
-
take the Vial from behind the magic book.
-
go through the following pages and then return to this section.
-
place the Wood under the cauldron and then place the Sprig of Rue and Magical Water into it.
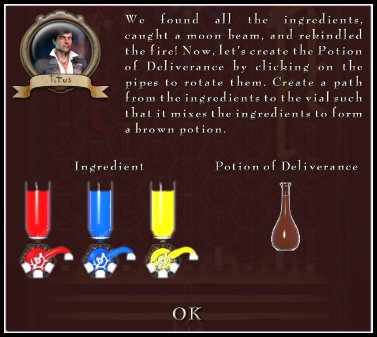
-
a puzzle opens, this is like most pipe puzzles, you must combine all the pipes in order to flow into the flask and form a brown potion.
-
get the Deliverance Potion.
-
go to Page Three.
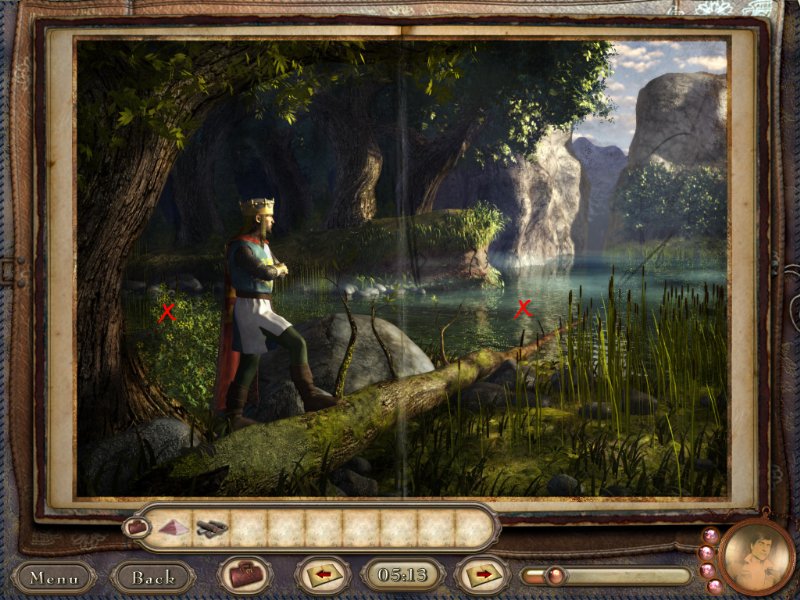
Page Two: Lady of the Lake
-
once again we find King Arthur, waiting patiently for Merlin.
-
use the Vial to take some magical water from the lake.
-
go to Page Three and then return to this section.
-
use the Dagger to cut some Sprig of Rue which is behind Arthur.
-
go to Page One and return to this section later.
-
give Merlin his Staff and he summons the Lady of the Lake.
-
she is holding Excalibur, take it!
-
give Excalibur to Arthur and then show him his Card so he may go forth into battle.
Page Three: Merlin's Trapped
-
we need to free Merlin quickly, grab the Dagger from the bench.
-
put the Prism on the bench to catch the moon beams.
-
go to Page Two and return to this section later.
-
give the Deliverance Potion to Merlin.
-
before you leave, take Merlin's Staff which is lying against the tree.
-
go to Page Two.
Book 21: The Genie
Page One: Evil Genie
-
we need to find three puzzle deices to banish this evil genie once and for all!
-
as long he is here, we can't do anything, go to Page Two.
-
use the Lit Rag on the genie as many times as needed to grab several objects, Compass, First Piece, and Box.
-
go to Page Two and return to this section later.
-
now the all the pieces are together, give it to the genie, he's gone!
Page Two: The Maze
-
as you can see there is part of a puzzle but we cannot do anything with it yet.
-
go to Page Three and return to this section later.
-
place the Compass in the circle at the bottom of the page.
-
now we need to move the little blue dot around the maze to find something.
-
the compass will point the direction you need to go.
-
you will get the Second Piece.
-
go to Page Four.
Page Three: The Boiler Room
-
here we need to take the Wrench lying up against the wall to the right of the steps.
-
also take the Hammer to the left of the steps.
-
go to Page Four and then return to this section.
-
use the Oily Rag on the furnace and get a Lit Rag.
-
go to Page One.
Page Four: The Freezer
-
creepy room, let's take the Oily Rag from the door to the right.
-
now open the door to the left.
-
use the Wrench on the control box by the freezer and get another puzzle
-
this is another pipe puzzle, we need to connect the pipes to it makes a continuous line.
-
you need to connect them through the black holes so that they light up blue, once all the holes turn blue the puzzle will end the freezer is fixed.
-
close the freezer door.
-
go to Page Three and return to this section later.
-
open the freezer door and place the Box inside.
-
the lock is frozen, use the Hammer on the lock and get the Third Piece.
-
go to Page One.
Titus Portrait - In case you have been wondering, you can click on the Portrait of Titus and get a puzzle. You need to put in a special code, the code that Titus gave you at the end of the first game. Still need the answer? Answer: MAGICBOOK
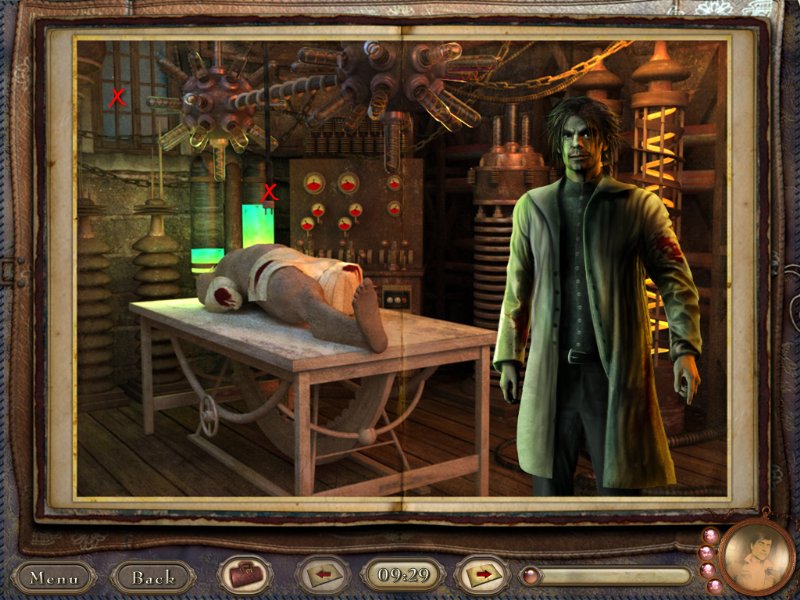
Bonus Book: The Creature
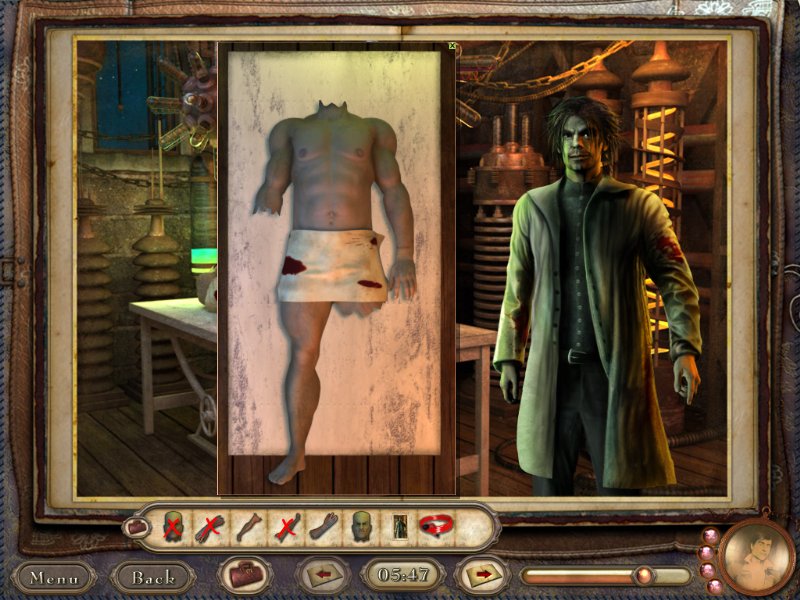
Page One: Frankenstein
-
that guy on the table doesn't look too good!
-
open the window on the left side and see a plug.
-
go to Page Two and then return to this section.
-
click on the guy one the table and start putting body parts on.
-
attach the Electric Cord to the plug dangling in the window.
-
now drag the Cord to the plug dangling over the body.
-
go to Page Two and then return to this section.
-
give Frankenstein his Card and try to dwell too much on the beast you just unleashed on society.
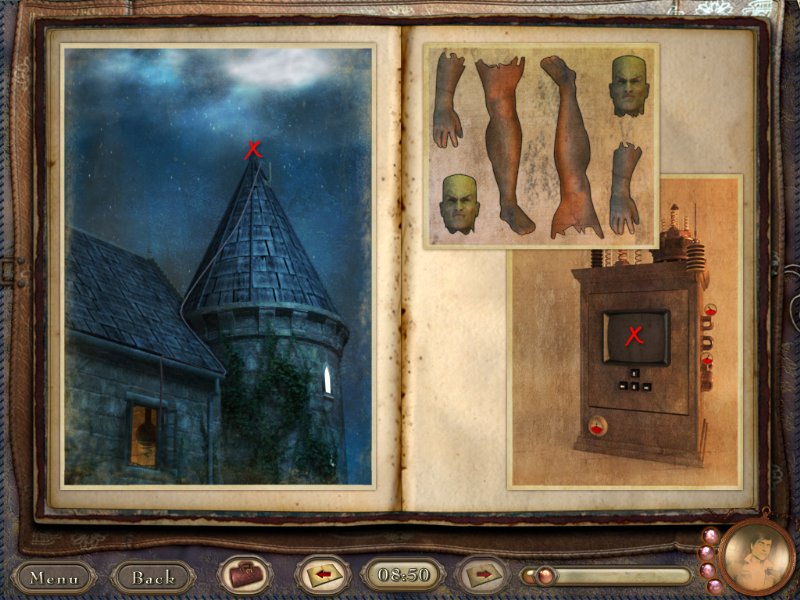
Page Two:
-
we can't do anything on the left side yet but on the Right Side you can pick up all those Body Parts, ewww.
-
now click on the primitive computer and get a puzzle.
-
you need move the blocks around so all blocks of the same color are connected.
-
make sure you get the blue inside the red blocks before closing them.
-
take the Card, Lightning Rod, and Electric Cord.
-
on the Left Side put the Lightning Rod on the rooftop (pointy part).
-
go to Page One and then return to this section.
-
wow what a lightning bolt, go back to Page One.
Content(s) of this game guide may not be copied or
published on any other site without permission from Casual Game Guides.
©CasualGameGuides.com 2006 - 2021