


Aveyond: The Darkthorp Prophecy appears like it "might" be
the last of the Aveyond series. Mel has gone into hiding after she
discovers she can use magic. To make matters worse, wicked creatures
called Darklings keep popping up, convinced that Mel is the prophesied
one who will build a dark empire for them. Edward, her best friend,
eventually finds her hiding in the village of Harakauna and has brought
help. The Aveyond: The Darkthrop Prophecy Walkthrough provides very detailed maps and
information to complete this specific game.
General Hints:
WALKTHROUGH
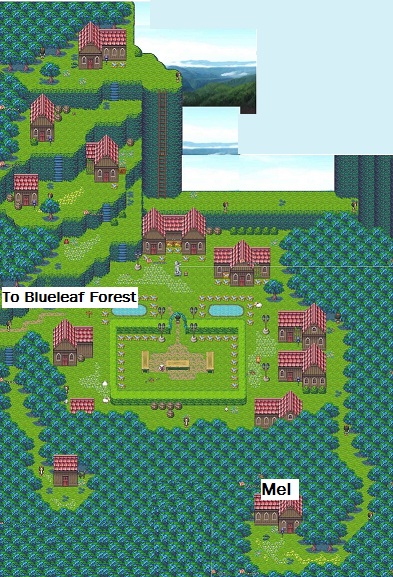
Harakauna
Play as Mel
When you wake up, you are told to fine 5 flies in the Blueleaf Forest
You can explore the town, but there is no real point to it
Go west to Blueleaf Forest
Blueleaf Forest
Pick up items from the chests and corpses and gold from bags and corpses
Be sure to equip yourself when you get the Rusty Dagger
Flies are circled in purple
When you get to the farthest fly, you will be taken away to Shadwood Academy
Veldarah
You can explore the town as you like
Don't pick up anything as Mel as you will need it later when you are playing as someone else
Head northwest to Shadwood Academy
Shadwood Academy
Talk to the headmaster
Head right twice (through door A) and talk to Professor Yavara
Go to room 231, open the chest, and get your robes
Talk to Professor Yavara again
Go to the Hall of Magic by returning to the Atrium and through (B) and sign up for classes (suggestion: don't choose Heal as you usually have a healer with you)
Return to Yavara
Go to the Dining Hall (C) and read the rules on the far wall
Note that purple flags signify Magicians Quarters and orange flags signify Fighters Quarters
Return to Yavara and then your room
In the morning, go to the Intro to Magic class
After class, you will end up in your bed 3 months later
Three months later:
Talk to Yavara
Go to the Inn and talk to the Innkeeper
Go upstairs and fight 2 wisps, using magic.
Fight the hive first and ignore the newly arriving wisps; when the hive is gone, fight the wisps
Return to Innkeeper to receive your reward
Attempt to return to Shadwood Academy to discover a battle
Head into the school.
Restore yourself with bread and covey balm
Fight 2 monsters
Try to go to your room
Return to the atrium and talk to the professors
Go to fighters quarters (to the left) to room 193 to talk to Edward
Return to your room and read the note
Go to bed
In the morning, head out of the city and talk to the guard.
Almirk Jungle
Thornkeep Well
Riven Forest
Thais
General Hints:
- We are assuming that you are not new to this type of game or even this series, so detailed information on battling and the game interface is not provided. If you need this type of general assistance, please read the beginning of Aveyond: Lord of Twilight Walkthrough for general assistance.
- In this game you will play as 2 separate groups of characters with two separate inventories, which will add an interesting twist. There is only one character who will spend any amount of time in both groups and that is Yemite.
- There are several side quests that can be done at any time and doing more of them will possibly make the end of the game more enjoyable. They are not entirely necessary and will be marked as side quests in the walkthrough.
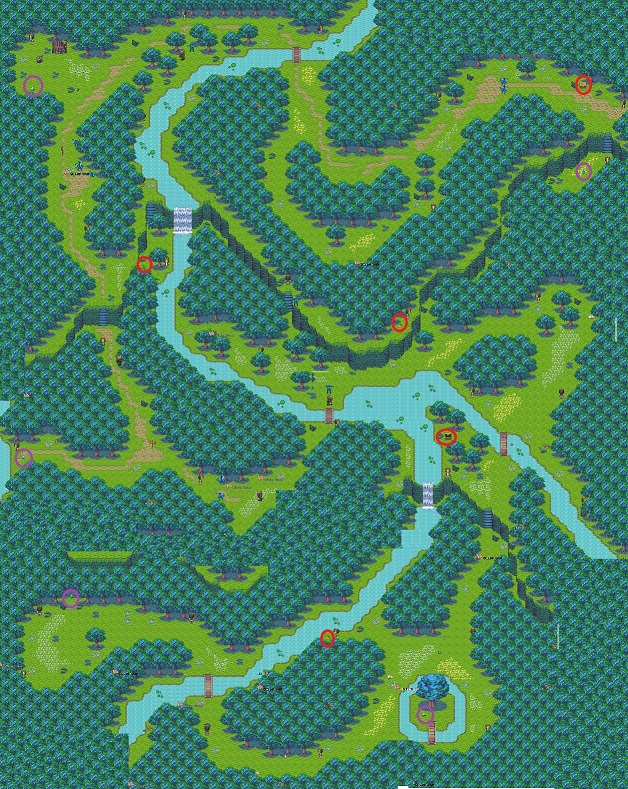
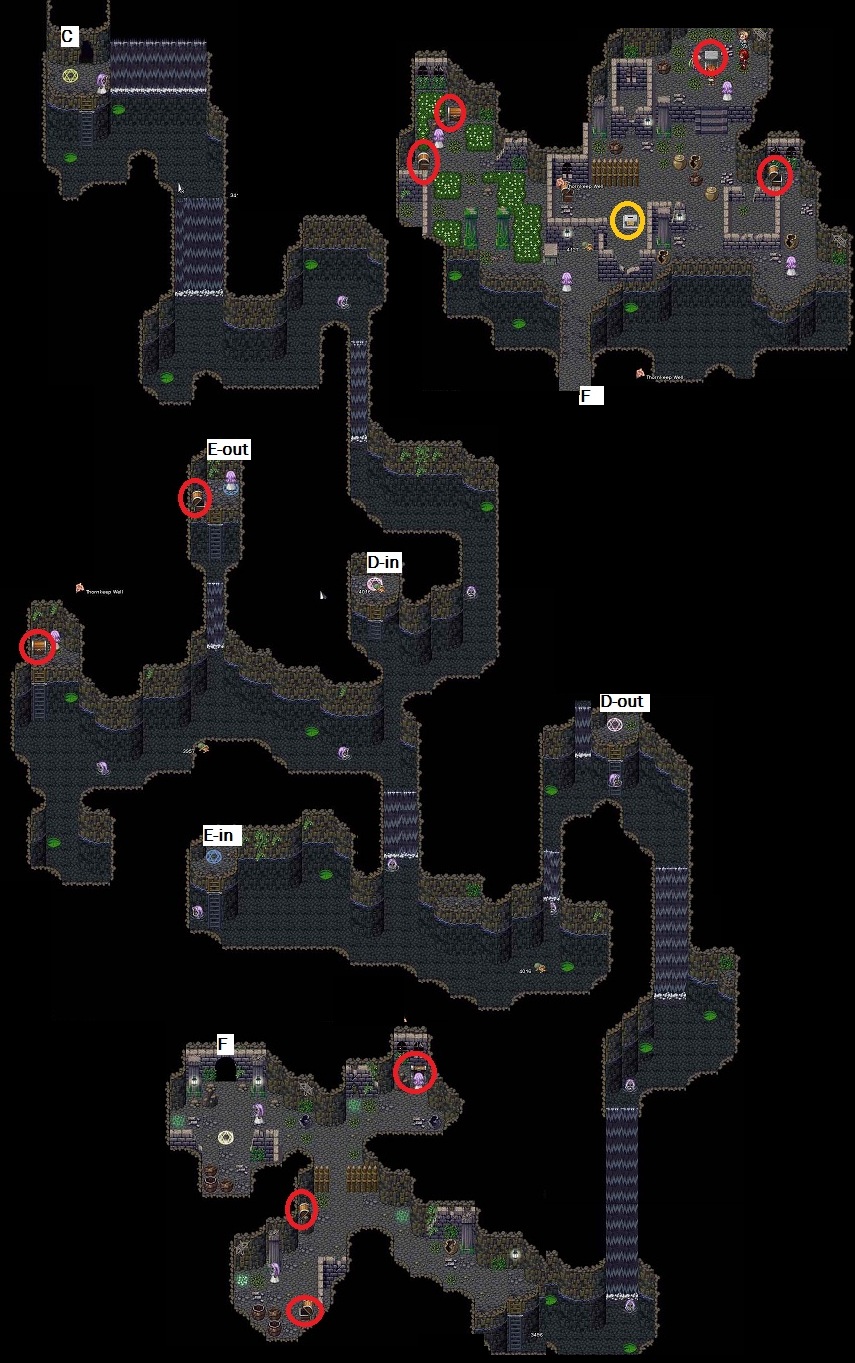
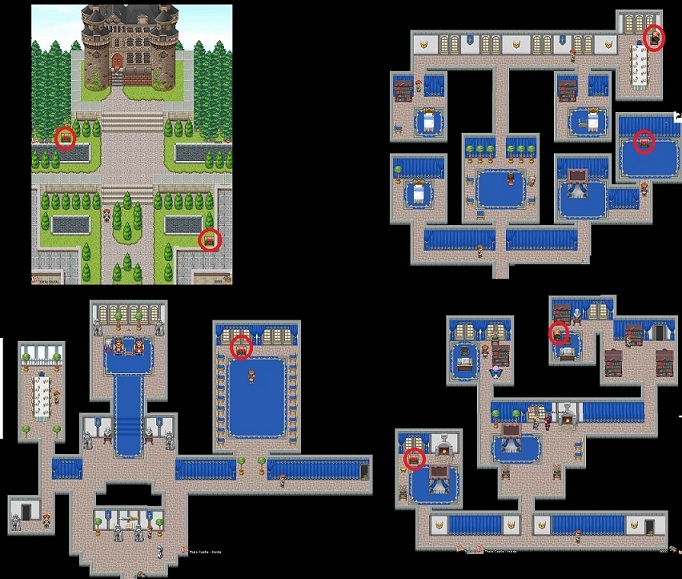
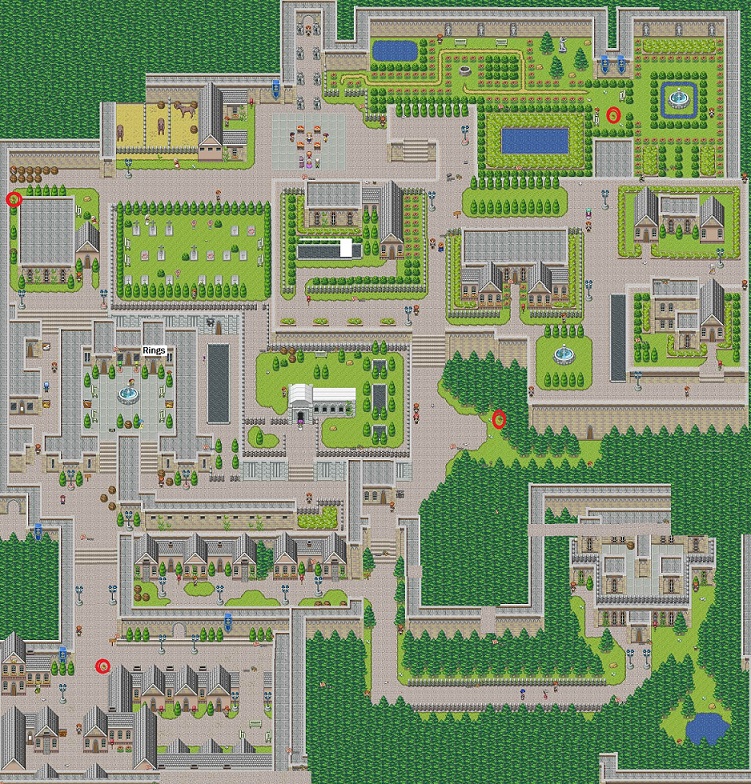
- Maps are included for each area. In general, red circles mark chests, bags, and the like for you to pick up. White circle are Goodies Caves. Yellow circles are Sword Stations. Most doors have been marked with letters to show entrances and exits. More often than not, following them in alphabetical order is the most efficient way.
- Goodies Caves are available for both parties. You can use these or not. If you having trouble with fighting be sure to visit these. They are available in Almirk Jungle (level up), Riven Forest (weapons), Thieves Caves (gold), Dire Woods (equipment), Shadow Aveyond (level up), Sheian Lyr (weapons), Demon Plains (equipment), and Demon Caves (gold). All have been noted with a white circle on the maps.
WALKTHROUGH
Harakauna
Play as Mel
When you wake up, you are told to fine 5 flies in the Blueleaf Forest
You can explore the town, but there is no real point to it
Go west to Blueleaf Forest
Blueleaf Forest
Pick up items from the chests and corpses and gold from bags and corpses
Be sure to equip yourself when you get the Rusty Dagger
Flies are circled in purple
When you get to the farthest fly, you will be taken away to Shadwood Academy
Veldarah
You can explore the town as you like
Don't pick up anything as Mel as you will need it later when you are playing as someone else
Head northwest to Shadwood Academy
Shadwood Academy
Talk to the headmaster
Head right twice (through door A) and talk to Professor Yavara
Go to room 231, open the chest, and get your robes
Talk to Professor Yavara again
Go to the Hall of Magic by returning to the Atrium and through (B) and sign up for classes (suggestion: don't choose Heal as you usually have a healer with you)
Return to Yavara
Go to the Dining Hall (C) and read the rules on the far wall
Note that purple flags signify Magicians Quarters and orange flags signify Fighters Quarters
Return to Yavara and then your room
In the morning, go to the Intro to Magic class
After class, you will end up in your bed 3 months later
Three months later:
Talk to Yavara
Go to the Inn and talk to the Innkeeper
Go upstairs and fight 2 wisps, using magic.
Fight the hive first and ignore the newly arriving wisps; when the hive is gone, fight the wisps
Return to Innkeeper to receive your reward
Attempt to return to Shadwood Academy to discover a battle
Head into the school.
Restore yourself with bread and covey balm
Fight 2 monsters
Try to go to your room
Return to the atrium and talk to the professors
Go to fighters quarters (to the left) to room 193 to talk to Edward
Return to your room and read the note
Go to bed
In the morning, head out of the city and talk to the guard.
Almirk Jungle
- You might want to pick up a Marsh Tea from the store just in case
- Make your way to the Hunter's Cabin in the west.
- Do this as quickly as possible and don't pick up any items other than items received from fighting and try to avoid fighting if at all possible
- Follow black line on the map
- Enter the cabin and read through a large cut scene
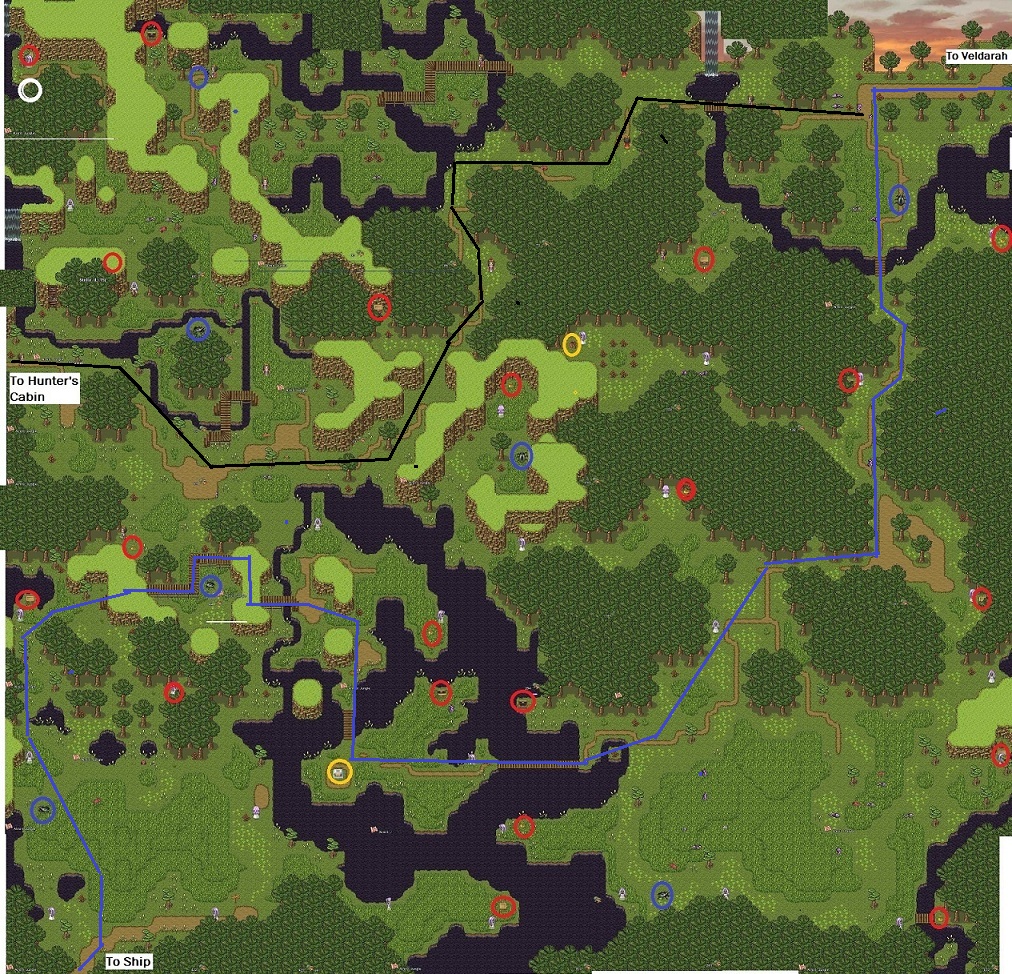
- You will now play as Stella who is in Edward's dorm
- You will need to work your way through Almirk Jungle to the ship in the south.
- To start, you will have no resources, so collect these on the way.
- Explore Veldarah and find anything you can
- You might want to stop by Yari's in Veldarah as he will offer to pay you 15 gold per bug you catch
- If you don't do this, the bugs will get in your way but you can wait for them to move out of the way
- Stella has a Cure magic that will cure poison, so don't worry too much about Marsh Tea
- I recommend working your way to the Goodies Cave (white circle) in the northwest while fighting and picking up items on the way
- In the Goodies Cave, use the level up lever 20 times or so (don't be greedy or the game will lose any challenge) and pick up the Hypericum Tinctura to use later
- Return to Veldarah. You should have a good amount of gold.
- You can always sell the Hypericum Tinctura (if you accessed the Goodies Cave) for 500 gold
- You will need to buy the Wizard's Staff (34 gold) , Shard (48 gold) , and shovel (60 gold) from the Junk Dealer. Be sure to equip the staff and shard.
- Go to the Inn to restore your health
- Return now and head south.
- The way is kind of convoluted, but go ahead and fight everything and pick up everything on the way.
- Follow the blue line on the map
- Upgrade Edward's Shard at the Sword Station.
- When ready head out the southwest exit.
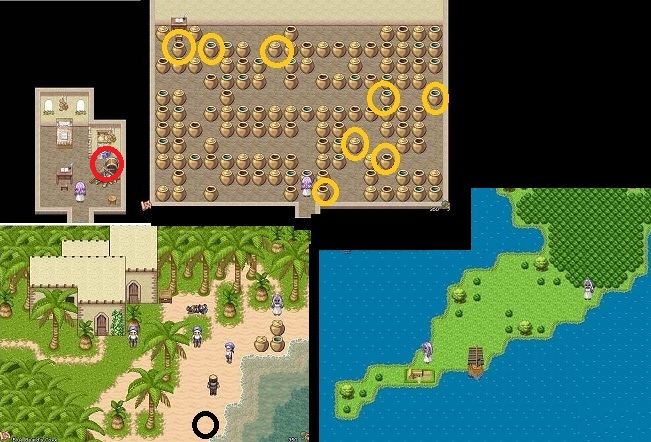
- You will discover you can't take the ship, so head west to Bluebeard's Cove
- Go into the left door of the house and read the note. There is also a chest to open.
- Go to the southern tree and move to the right 3 paces. Press the space bar to dig.
- If you do not yet have a shovel, return to Veldarah and buy one at the Junk Dealer.
- You will receive the key to the right door in the house.
- Push the jars to make a path by pressing the space bar. The jars to move are circled in yellow.
- Once you get the will, return outside to the Judge.
- Another Edward ends up with the ship.
- Enter the left door of the house and talk to the other
Edward.
He will sell you the ship for 150 gold.
- Head due west to Riven Forest dock
- Enter Riven Forest through the small hole in the woods
- Work your way northwest to Sedona while retrieving items from the ground and enemies
- Note the squirrels blowing up the bridge to the east.
- Use the Goodies Cave here if you like. You will
instantly
upgrade the Shard for Edward completely and Stella will learn all
spells. You will also pick up maximum weapons for other
characters.
- Enter Sedona
- Read the notice on the wall about the gem thief
- Increase you Shard attack at the Sword Station--cost 100 gold
- Head to Galahad & Te'ijal's house (see map)
- After talking to them, go to the castle to talk to the king
- If you need to rejuvenate, the inn costs 60 gold
- Talk to the King in the castle.
- Read the note in Lady Anara's house
- Talk to Isabelle who is missing her ring
- Return to the gem dealer who has the ring for 210 gold coins
- If you do not have enough gold, go fight some monsters in Riven Forest.
- Give the ring to Isabella; she will give you a fan
- Return to the gem dealer to find out the Lady Anara sold him the ring
- Go to Lady Anara's house; she will pay you to deliver a package to the thieves in Riven Forest
- Pick up the Mandrake at the junk dealer; you will need it for Edward sooner or later
- There are multiple side quests within Sedona, none of which will stop forward motion in the game, but might be necessary to complete depending on the end of the game satisfactorily
- Take the fan you receive from Isabelle to Lilian
- Pick up the quill from Lilian's chest and give it to the writer.
- Talk to the beggar outside the castle

- Before heading to the forest go to the store to buy what you need; how much will depend on whether you accessed the goodies cave in Almirk and Riven Forest.
- Head to the Thieves Cave by traveling to the southeast of Riven Forest.
- Note on your way that you cannot cross a bridge because it has been destroyed by squirrels.
- Wind your way around to the cave (blue line on the map)
- Learn Blessing for Stella from the old lady outside the
cave (if you
didn't access the Riven Forest Goodies cave)
- Head into the cave
- Flip the switch to enter
- Fight your way in
- There is a goodies cave (white circle) with 400,000 gold
- Flip switches and step on 4 colored floor buttons; you can go in alphabetical order through the doors on the map
- Solve the 9 box puzzle (numbered on the map)
- 4 7 1
- 9 2 3
- 5 6 8
- The goal is to hold all the boxes open and if you make a mistake it will reset. You will receive a cave key.
- There is a Sword Station after using the cave key
- Talk to the Thief Lord; you will need to bribe him 300 gold coins
- Don't forget to return to the crate room to access the southern chests.
- When done you can use a Blue Warp Egg to return to the cave
entrance
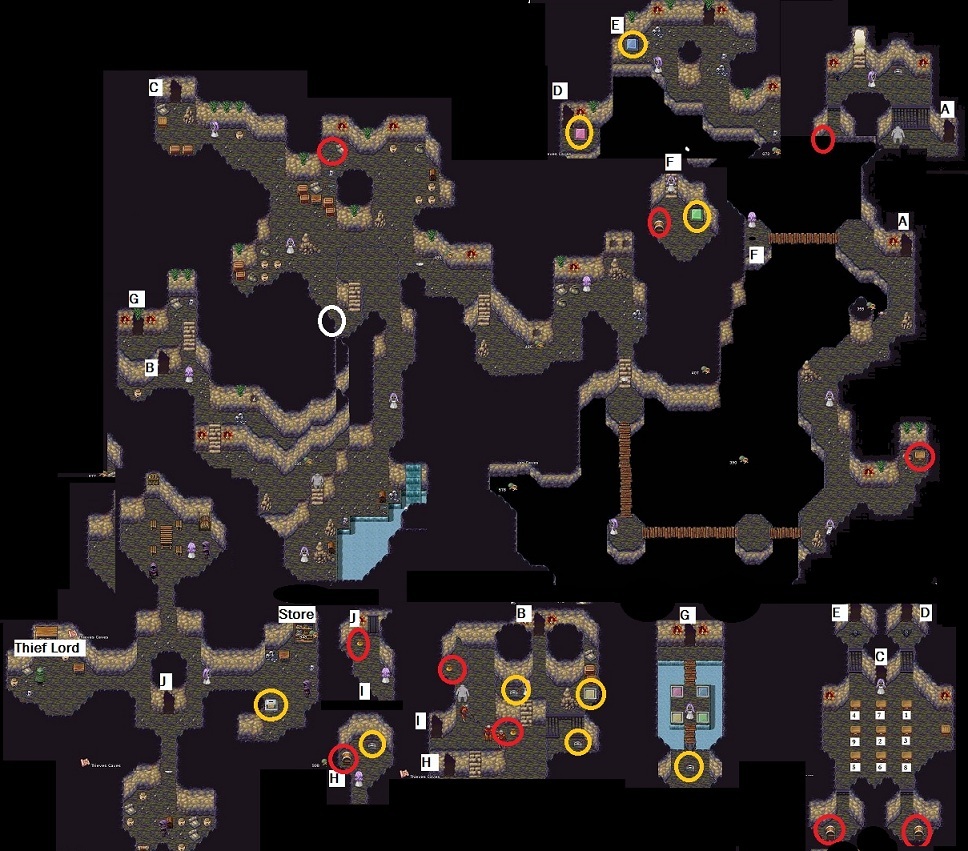
- Return to Veldarah
- It's faster to go to the dock at the Hunter's Cabin; you can also access the goodies cave again if you want/need to level up more.
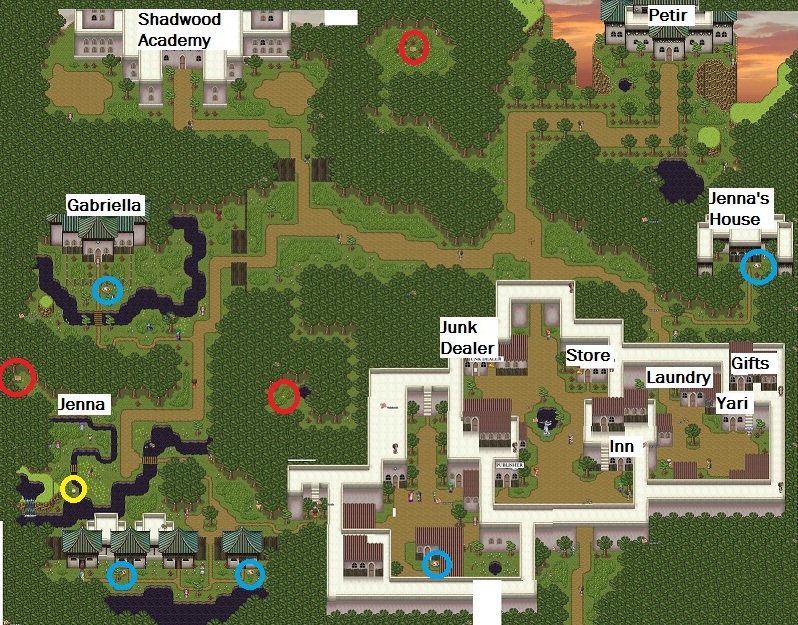
- Go to Gabriella's house
- Go upstairs and talk to Katie (bottom left room); she has a special medallion
- When you leave the house, Katie is called back inside.
- Go inside and talk to Katie; Gabriella has taken her medallion
- Talk to Gabriella and buy back the medallion for 100 gold coins; it looks like it is from Sedona
- Side quests:
- Talk to Jenna in the southern field where the kids are playing
- Get a caramel apple for Jenna out of the paper lunch bag
- Visit Laundry; agree to work; you will need to collect 5 baskets of laundry (blue circles) earlier for money--but not much (completely optional)
- Go into Jenna's house (after giving her a caramel apple); you will be invited to her birthday party
- She wants a kitten for a gift.
- Go to the gift store and buy a kitten
- Visit Jenna's house again; given Jenna her present
- Talk to her mom and pick up a cupcake
- Return to the King in Sedona to tell them about their daughter
- Return to Galahad &Te'ijal; they join the party
- Side quests::
- Check on the writer to see about his book; he will ask you to deliver it to the book publisher in Veldara
- Go to the hunter's cabin by boat
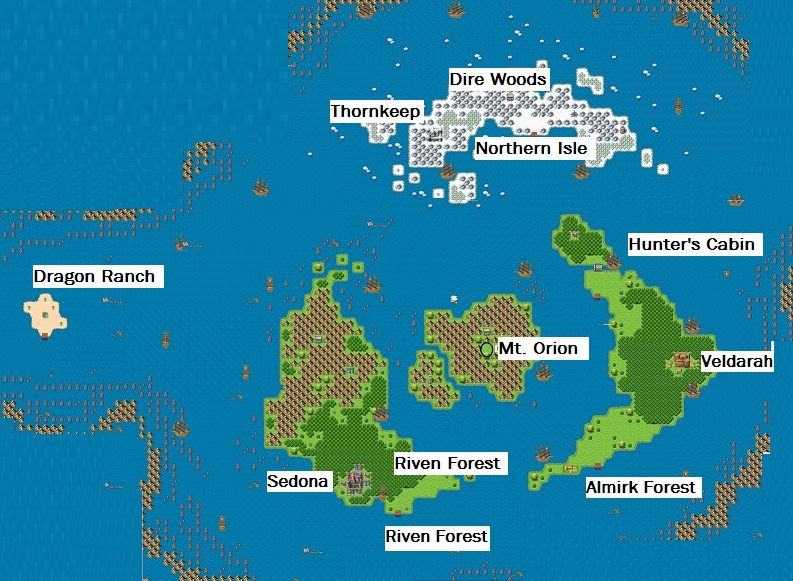
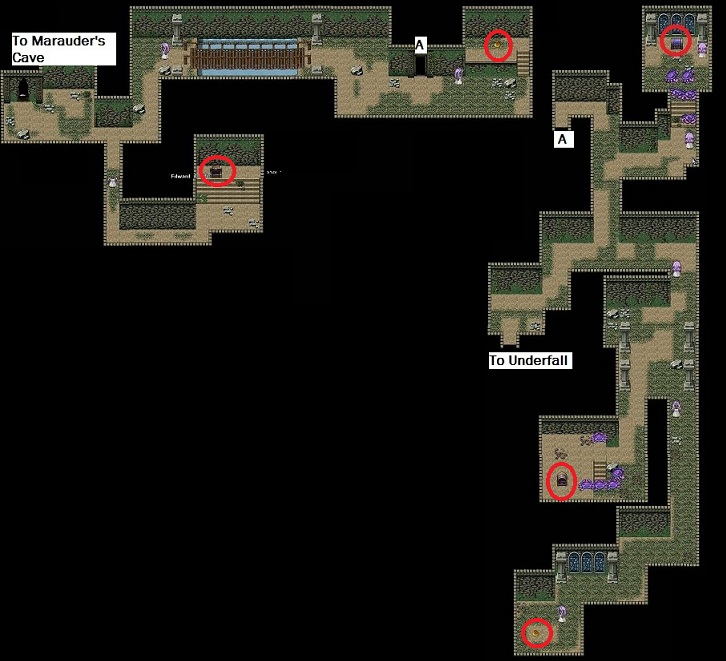
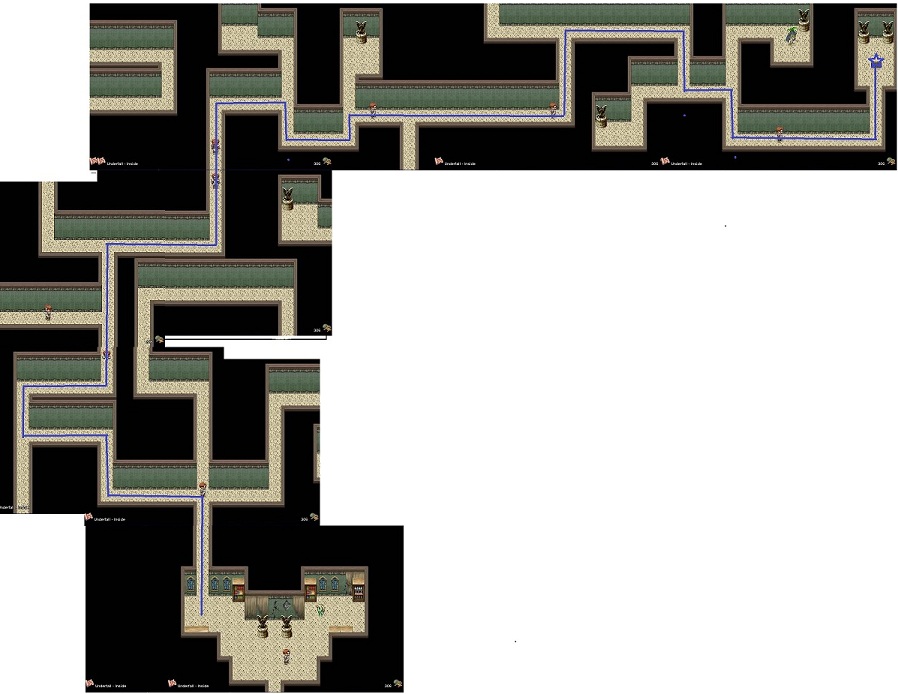
- You need to go to the Northern Isle to find a cave to Underfall, but head into Veldarah first
- Go to Petir's castle and talk to everyone
- You can now go downstairs
- Pick up the treasure key from the chest and open the other chests throughout the rest of the game
- Side quests:
- Give the book to the publisher
- See above with Jenna if you haven't finished it.
- Return to Sedona and talk to the writer
- Give the lute to the beggar outside the castle
- Talk to the Chancellor in the castle to get the reward.
- Go downstairs to open the chests
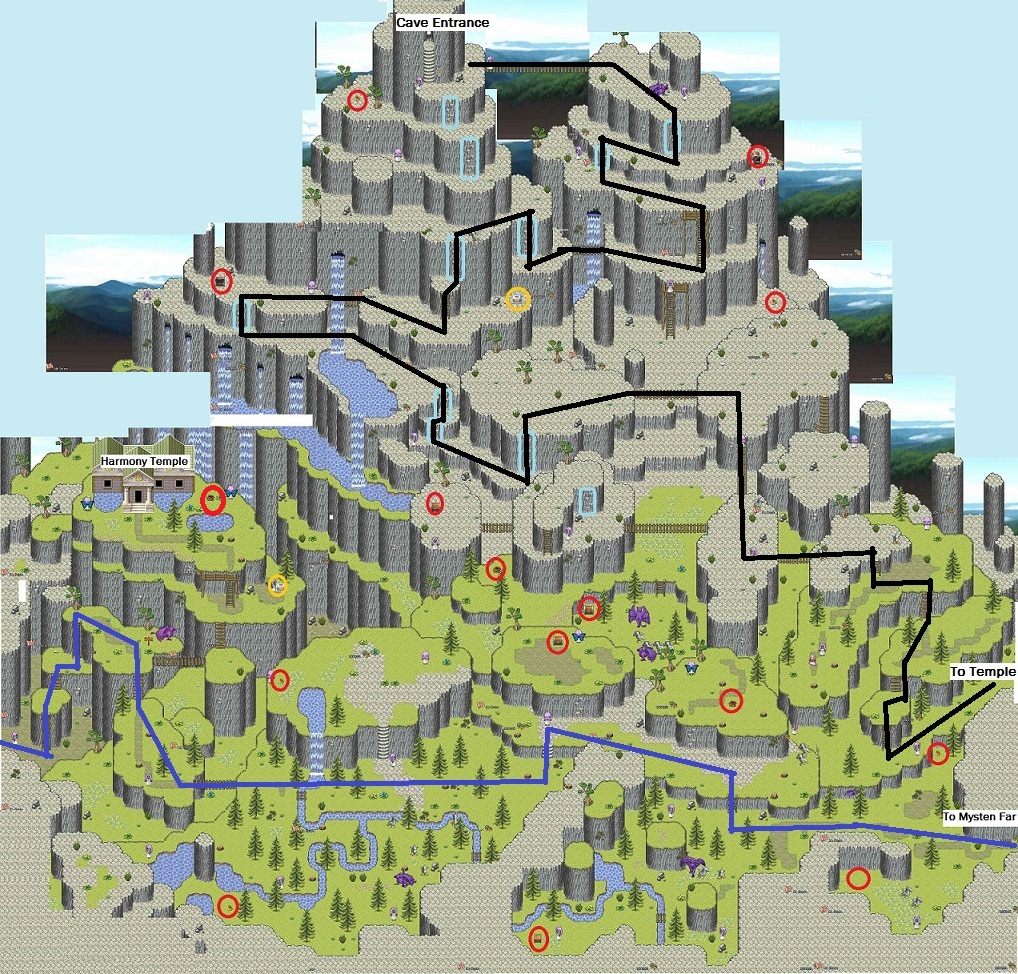
- Go to the Northern Isle and enter the Dire Woods
- Your way has not been marked on the map as it is pretty easy to see even if it is a bit convoluted.
- The old lady is back to teach you a new spell (black circle)
- Near the Merchant there is a goodies cave with lots of equipment
- Work your way to Thornkeep up to the northwest first to ultimately get a torch (black line)
- Save your game before you enter Thornkeep as you won't be
able to leave.
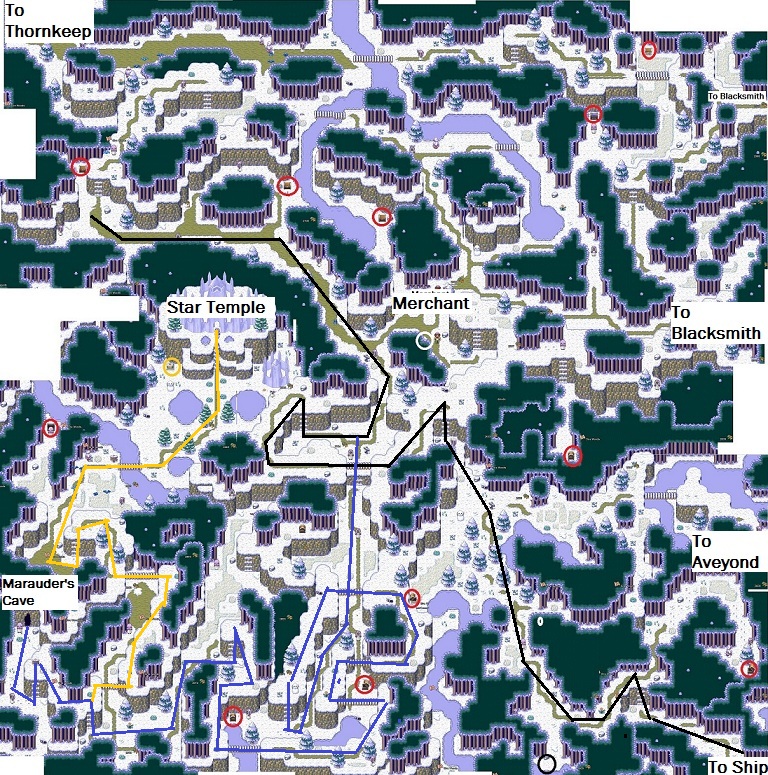
- On the way into Thornkeep there is a merchant
- Check the buildings; most have a chest you can open
- Go to the Inn; head upstairs even though the innkeeper says it is full
- Talk to the Innkeeper; he says you can sleep but don't leave before morning
- You end up going outside
- Fight the Soul Eaters

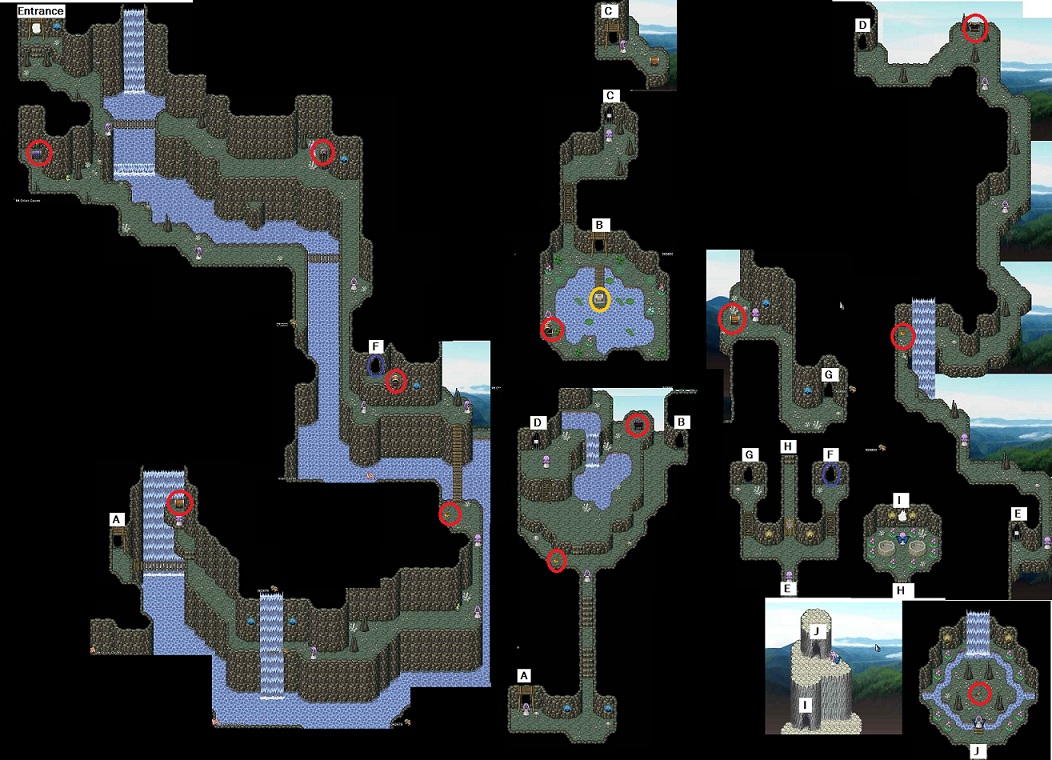
Thornkeep Well
- Go into the well
- Use the sword station
- Be sure to use Yemite in your party
- You will need to swim
- After using the 2nd sword station; Edward will have magic
in him; use
any Mandrakes you have to
give him mana points
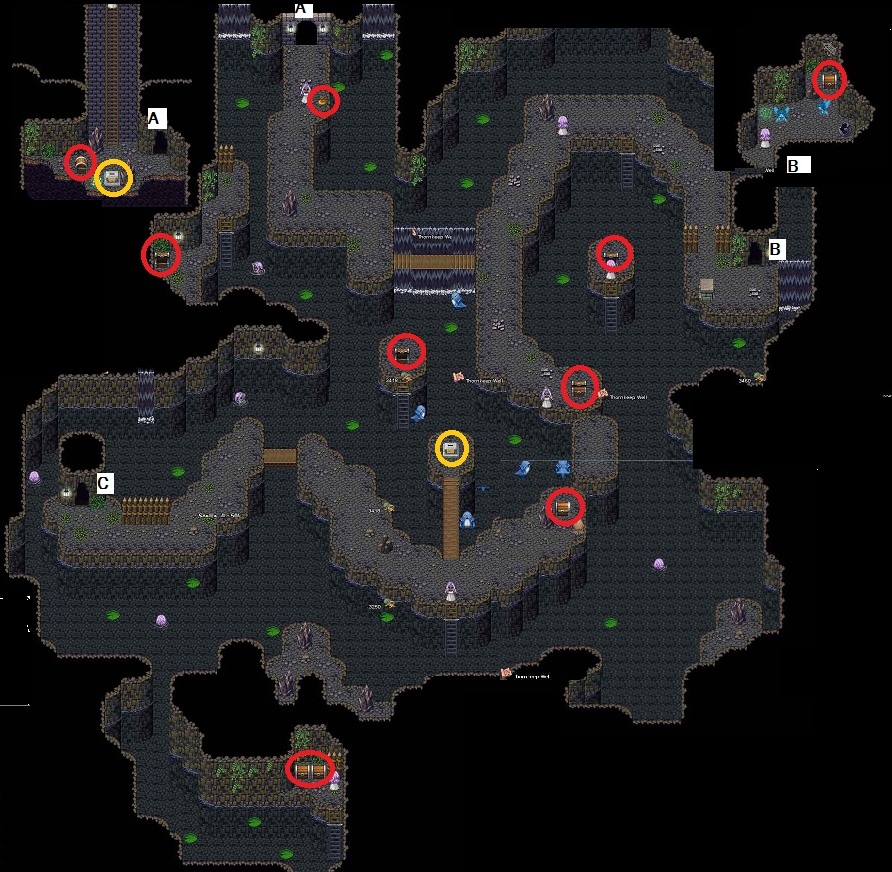
- Work your way down into the well; follow the letters on the map
- The colored markings on the ground are one way teleports
- Jump in the water and head down (look at the maps)
- Be sure to open all chests; there are some good items within
- After getting to the red cursed item you can use a blue
warp egg to get
out
if you have opened all the boxes
- At daylight, you will find a torch on the ground right in front of you; pick it up
- Talk to Varah; you need to find her daughter Sarah (who is in the house just west of the well)
- You will receive a Ghost Doll (this is not optional)
- Head to Marauder's Cave; blue line on the map
- Side quest:
- If you want to upgrade Edward's shard at the Star Temple sword station, you will need to find spelled ice and take it to the blacksmith.
- Fight bad guys until you pick up 2 topaz and 2 opals
- Find the fellow that will make you an ice pick
- Use Ice Pick on the Ice to get an Ice Cube
- Go to the Blacksmith in the northeast and give him the Ice Cube
- Return to the sword station and upgrade Edward's sword
- Return to Marauder's Cave and go through Ashera's Tomb.
- Go through this section of Ashera's Tomb to get to
Underfall
- Explore Underfall
- Go to the Cathedral and talk to the Skeleton; he needs his arm bone
- Find the Ghoul Mother's house
- Give the Ghoul Child the Ghost Doll
- Pick up the Tomb Key at the back of their house
- Check out Darkling Hall; you need a costume to get into the party
- Before going into the tomb, buy restorative items at the store.
- Check out the Junk Dealer (what would you want a snail for?)
- Sleep at the Inn
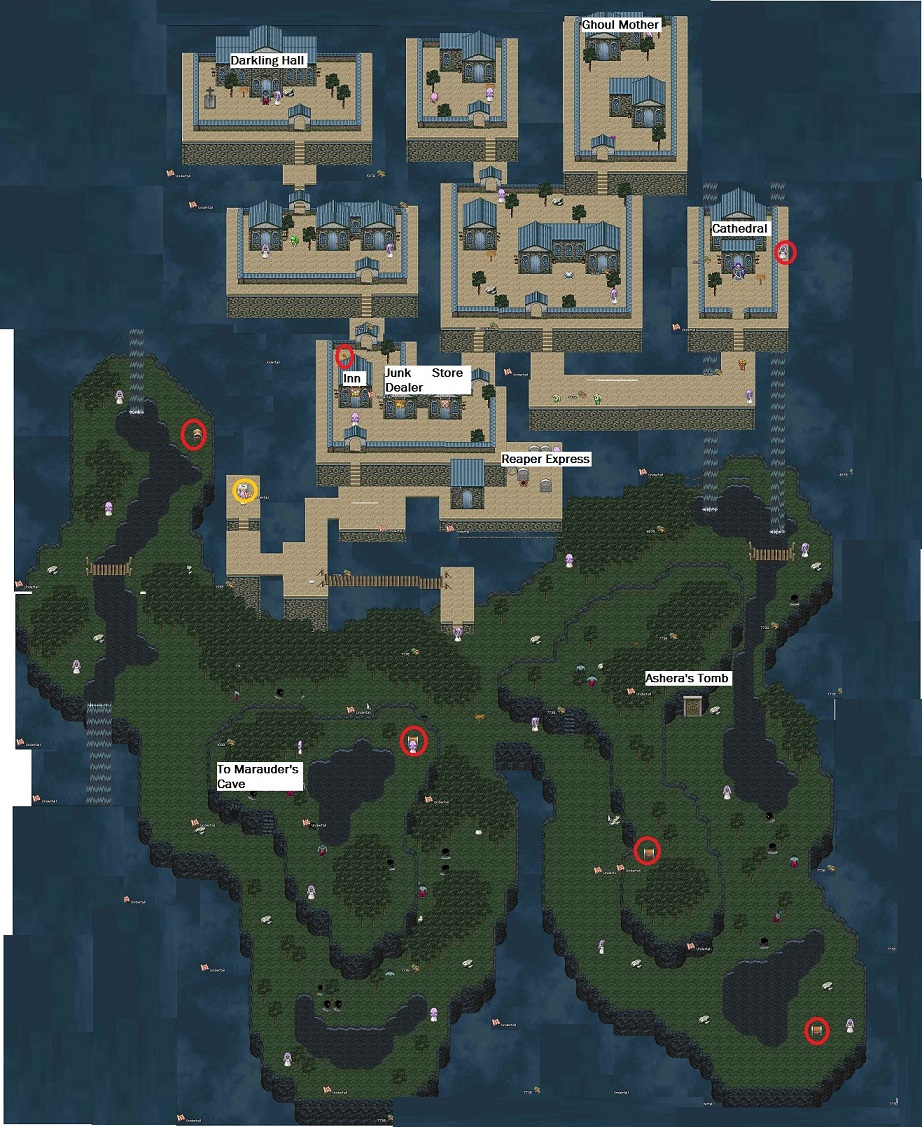
- Head into the tomb and pick up items.
- Work your way north until you find a bone
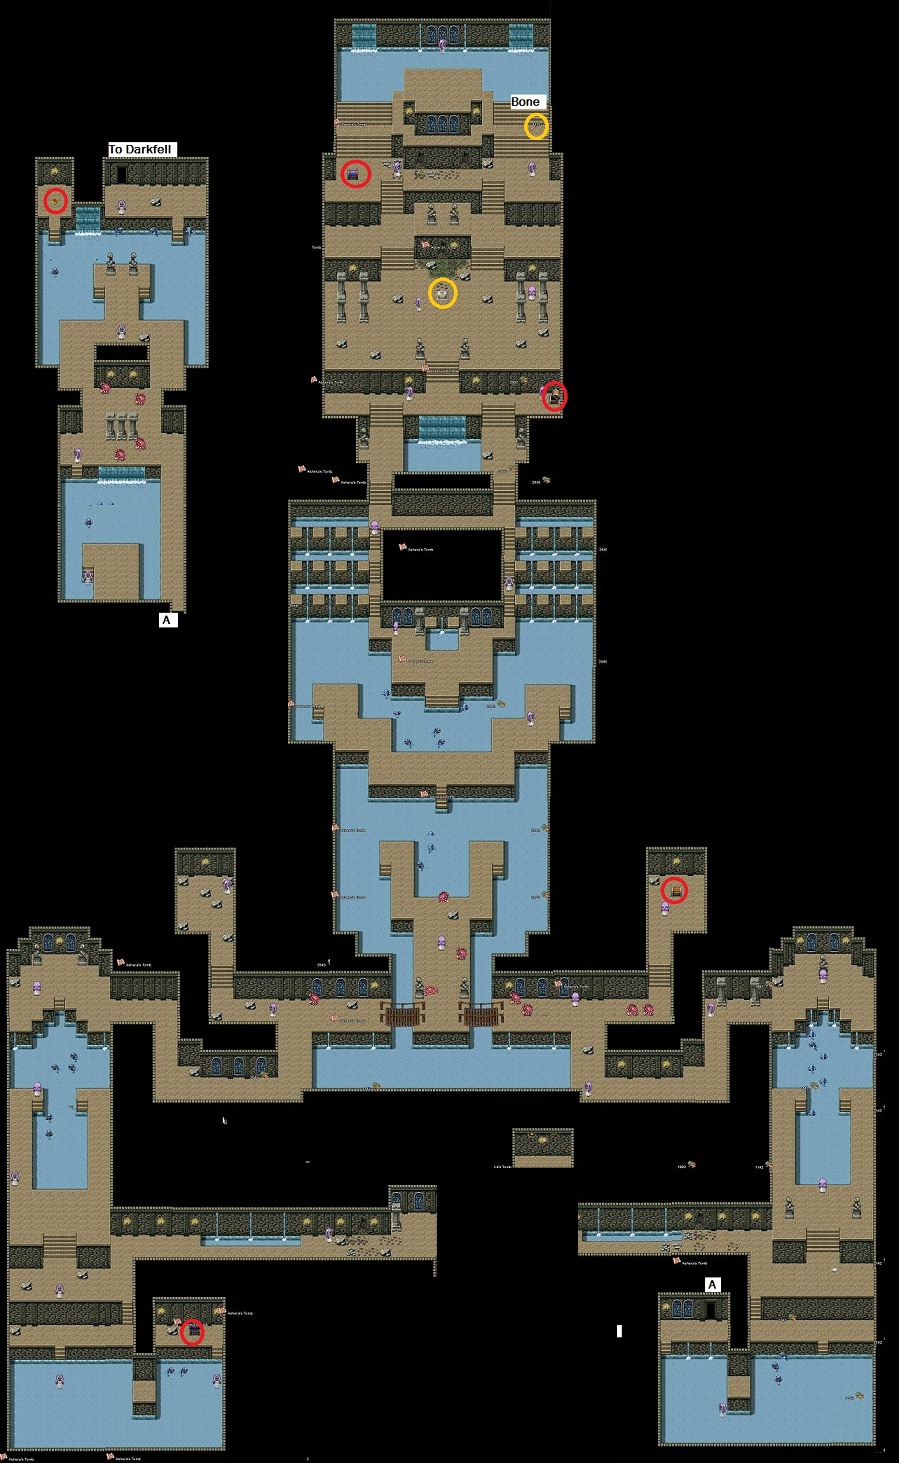
- Return to Cathedral and give the Skeleton his bone
- Enter the cathedral
- Yemite will join Mel
- You need to get into Ghed'ahre; go to the graveyard into the Reaper Express.
- Explore Ghed'ahre
- Don't talk to Beatrice until you are done exploring
- Buy a mask at the Trick or Treat shop
- Talk to Beatrice who will bite Galahad.
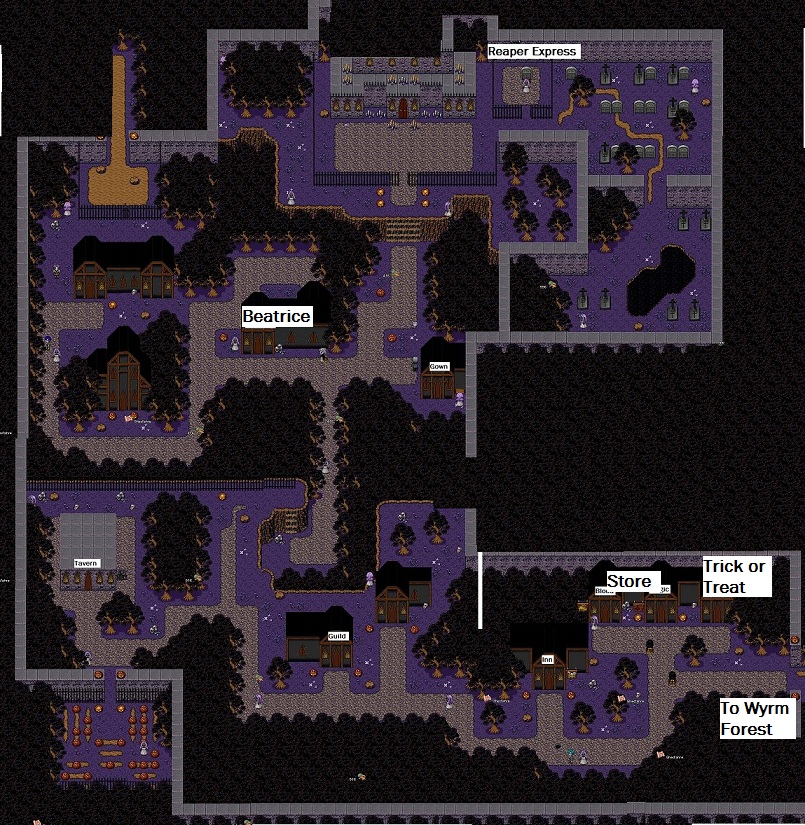
- Explore the Forest if you like.
- There is a Sword Station and Tinctura Hypericum to find.
- There are also bad guys to fight if you need
money.
- You are now playing Mel who is joined by Nox and Uma
- You have no money and low level
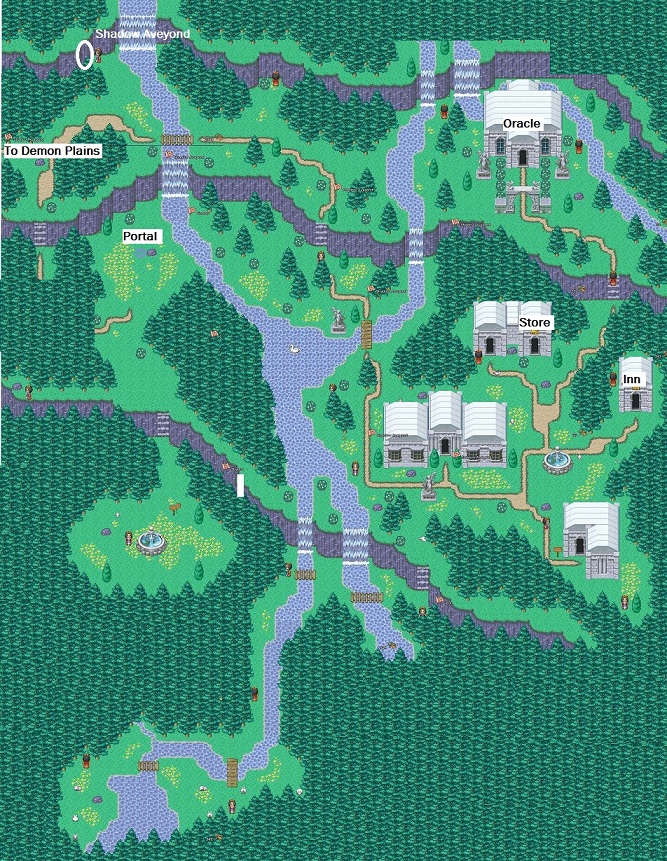
- Head southeast to Shadow Aveyond

- There is a Goodies Cave just north of your entry point in Shadow Aveyon
- You can level up there and pick up a Tinctura Hypericum
- Head into town
- Follow the black-cloaked figure
- Talk to the old lady who will increase your level by 7
- Restore health at the Inn
- Head north to talk to the Oracle
- You need to obtain the Staff of Destiny
- The oracle will give you the Orb Rod; you need to dip it in 3 Wyvern Flames to increase its power.
- Buy some restorative items in the store; if you need more money you can always sell the Tinctura Hypericum from the goodies cave or fight some monsters.
- If you haven't used the Goodies Cave you might want to consider buying Magic Amulets for everyone
- Head back into Demon Plains
- Work your way to the west to the cave opening to
Sheian Lyr
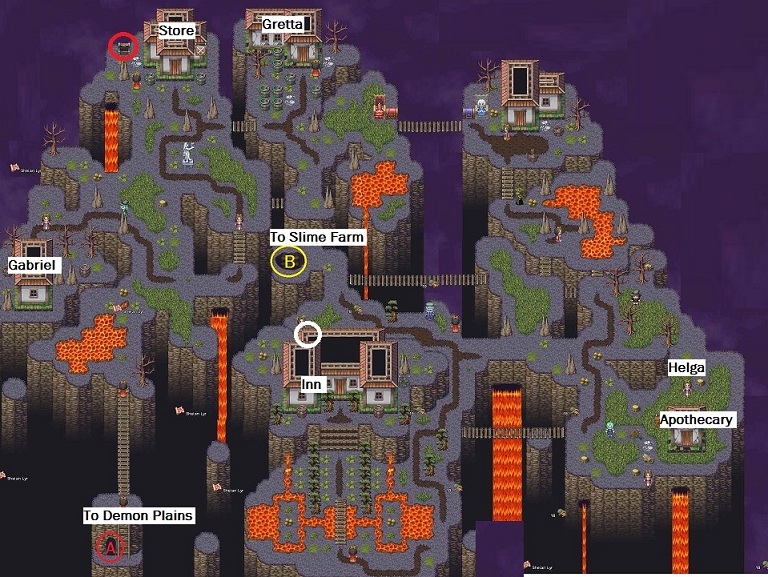
- Enter Sheian Lyr
- Visit Gabrel to discover he needs medicine
- Buy items in the store
- Visit Gretta; she has shrunken Helga's house
- Talk to the Red Queen/White Queen
- You will be given a rope to get to Maudran's Diadem
- Talk to Helga; her house has disappeared
- Return to Gretta and take the house back to Helga
- Pick up the red gel
- Go to the Apothecary to discover you need to bring back a Wyrd vegetable
- If you want you can go behind the Inn and access the weapons Goodies Cave
- Sleep in the Inn if necessary
- You can head back into Demon Plains through the slime farm
if you'd
like; just pull the switch to open the door
- I highly recommend opening the maps in separate windows as you will be going back and forth between both maps. Right click on the thumbnail and select open in separate window or save target so you can save it to your computer to use
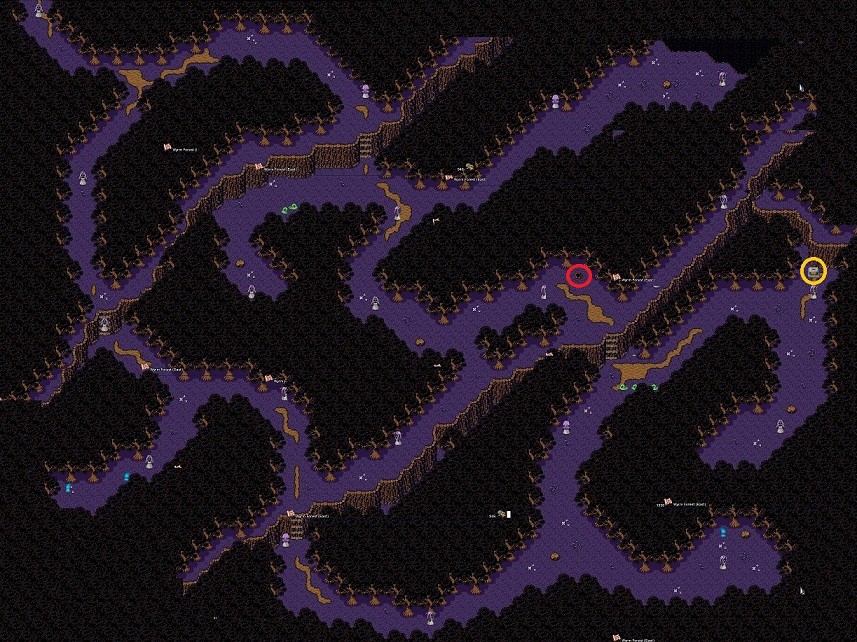
- Head west to the #1 Wyvern flame
- Return to the slime farm door and head north
- As you try to enter the cave, Yemite will join your party
- Head through the caves
- There is a goodies cave, if you want, right before the next exit (D)
- Exit out of the cave and head north and then west (under a bridge)
- Pick up a Wyrd vegetable
- Return to the Apothecary at Sheian Lyr and get poison for Gabrel
- Give the poison to Gabrel and you will get the key to open the cave door
- Give the red gel to the farmer in the slime
- After using cave key, you will actually head outside.
- Take a look at the maps to find the ins and outs of the
caves and
plains as they are intertwined.
- The diadem is available by tying the rope to the posts on the ground just after you leave the cave the first time (see green star)
- You don't need to return with the diadem right away; in fact wait at least 15 minutes from helping at the slime farm so you can pick up red slime at the same time
- Return to the slime farm. You can pick up red slime now.
- Pick up the shovel and you can now dig up holes.
- Return to Sheian Lyr and choose your favorite queen. If you choose the white queen (blue) you will get a myrica infusion and the red queen gives you a level egg.
- Pick up the bag of sand left in place of the queen
- Seriously consider picking up fire amulets for everyone
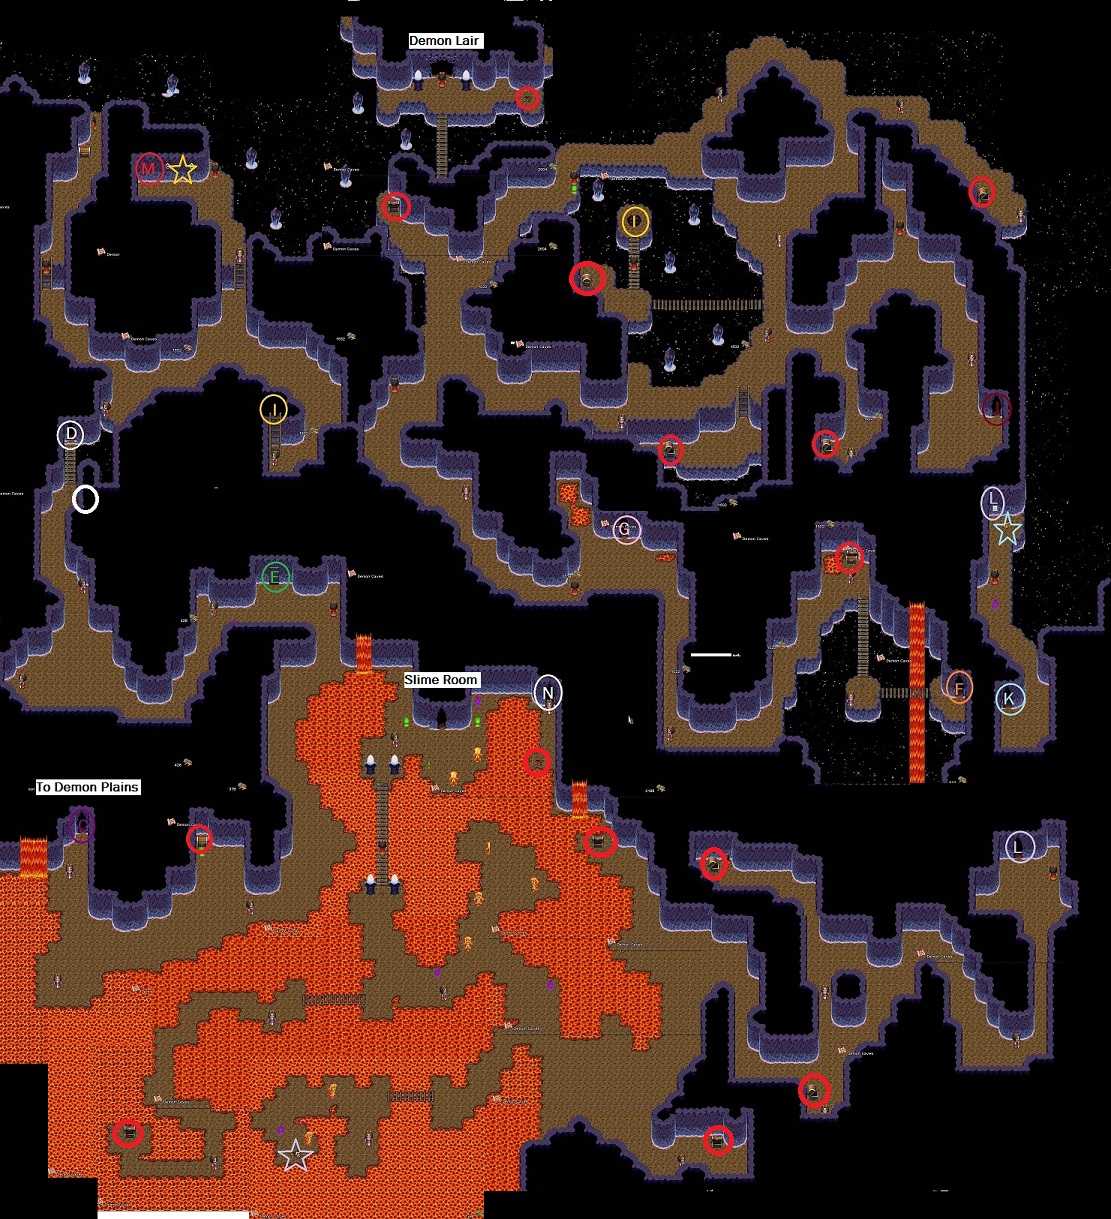
- Return to the Demon Caves and continue down the path from the diadem location
- Use the next Wyvern flame before going back into the cave (F)
- After door I, you will find a wall with a missing scary mask
- Exit out door J on the map at the far east and head north outside to door K
- Place the bag of dust on the scales (light blue star) to open door L
- Pick up the scary mask in the lava pools (white star)
- Return back to door I and place the scary mask on the wall
- Head left first
- Get the last Wyvern flame
- Go the other direction and pop into the cave (N) for a Tinctura
- Return back to the giant lava pool (where you found the mask)
- Enter the slime room
- Place red slime on the table where the yellow and blue slime is
- Pull the switch
- Herd the slimes by turning them with your body. Put the same colors in the same pen. You can close the door of the pen as you chase down the next one.
- When finished another door will open leading into the demon lair
- Galahad will rejoin the party; add him onto your battle team and fight the demon.
- You will get the Staff of Destiny
- Uma and Nox leave
- Have Yemite rejoin your battle group if you inactivated her
- Return to Shadow Aveyond and talk to the Oracle
- The portal is repaired and you end up in the cathedral.
- You are now playing as Stella with Edward and Te'ijal
- You need to head back to the real Aveyond, but before leaving why not go to that party at Darkling Hall.
- Edward will get in because he has a scary mask (from the Trick or Treat store in Ghed'ahre); you need to work your way through the maze to get the Northern Star
- This maze seems never ending and you will loop around all over the place
- There is a fairly straight shot in (see map)
- Return to Dire Woods through Ashera's Tomb and Marauder's
Cave
- Go talk to the Oracle in Aveyond to the far east of the Dire Woods
- You need to go to Mysten Far by dragon
- You can get a dragon from Dragon Ranch but you need a
bridle first
- You can get a dragon bridle from the Star Temple in the Dire Woods (follow black path until you get to the blue path and then follow the yellow path when you get to it)
- Place the North Star in the slot at the Star Temple
- Take the bridle from the back of the temple
- Buy your dragon and use your bridle
- Fly to Mt. Orion to discover you need to go back to Riven
Forest to
find a golden arrow
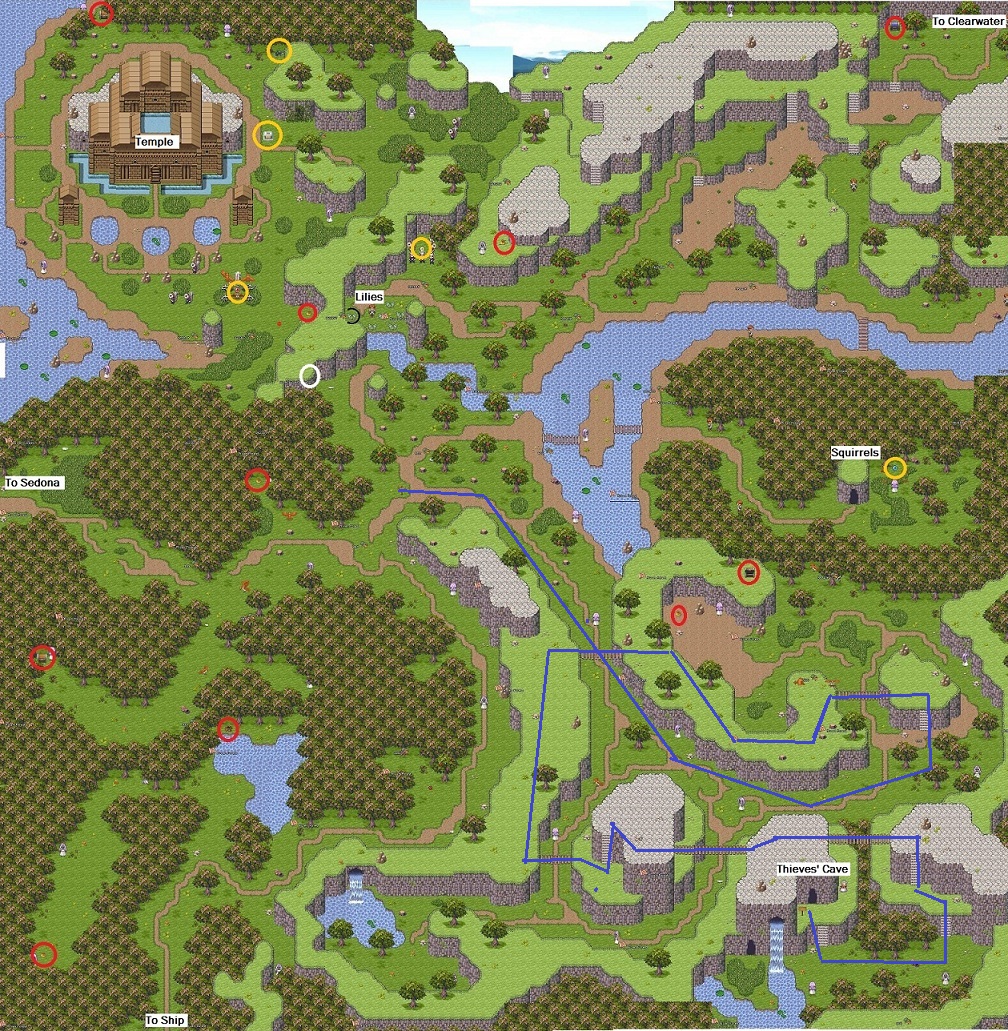
Riven Forest
- Side quest:
- If you have already given the lute to the beggar, enter the castle in Sedona and the beggar will give you a love song
- Head across the bridge, which needed repair earlier. If the squirrels blow it up just now, just head into Sedona and come back to get an intact bridge.
- Visit with the Squirrels; General Beal wants a Temple Map
- Go ahead and grab the squirrel-guarded Starcrystals as you come across them
- Head to Clearwater in the northeast
- Find William near the statue; he wants lilies for his wife
- Go to the florist; she has none but will make a bouquet if you find some
- Head west out of Clearwater to pick some lilies along the edge of the river
- Return to the florist who will make a bouquet.
- Return to William who will give you a hat
- Head south and give the hat to Jebb; he will fall asleep
- You can access the chest now and pick up the temple map
- Side quest:
- Before leaving you can visit Yemina (William's wife); she
is allergic
to the flowers and will give you a bouquet

- Return to the squirrels and give the general the map
- Open the chest and pick up the pipe piece
- Follow the squirrels to watch them blow up a rock to open the way to the temple
- Work your way northwest
- Note the cave entrance covered with vines; you need some clippers.
- Pick up the 2nd pipe piece north of this.
- Return to Clearwater and pick up the shears on the ground (see yellow circle for location on the Clearwater map)
- Return to the cave entrance and use the shears
- Enter the cave and flip the lever
- Watch the water and then flip the lever again
- Place the pipes and flip the lever again
- Go outside and into the temple
- You need 3 Starcrystals (the 3 orbs); get those if you haven't already done so
- Place the Starcrystals
- Pick up the Golden Arrow
- Return to Mt. Orion
- Place the Golden Arrow on the statue
- You can now enter the Mt. Orion area
- Work you way to the east and enter Mysten Far (blue line)
- Side quests:
- Talk to Diona about needing a new mirror
- Pick up the comb in the south (white circle)
- Before entering the temple, be sure to equip Stella as best you can.
- Unequip Edward of the shard so you can upgrade it while Stella is alone.
- Do not enter the temple until you are ready for Stella to go it alone
- Stella will be escorted out alone to begin the Trials of
Citrelium

- Work your way to the very top (black line)
- Read the poem at the bottom of the ladder to the cave entrance.
- You will encounter questions along the way and the answers will be the words in all capitals. (Hope, Peace, Love, Joy)
-
The most difficult one is the first(Hope); the others are obvious
- Enter the caves and work your way through When you reach the end, Stella will get her wings back
- Exit out the hole in the back and head up to pick up the Hunter's Horn
-
Head out and you will fly down to the bottom
- Return into Mysten Far just to leave again
- Head to the Harmony Temple in the southwest
- Place the Horn on the statue in the back
- Pick up the Orb of Dreams from the pedestal
- Return to Mysten Far
- Take the Orb of Dreams into the Dreamland cave
- Place the Orb on the statue
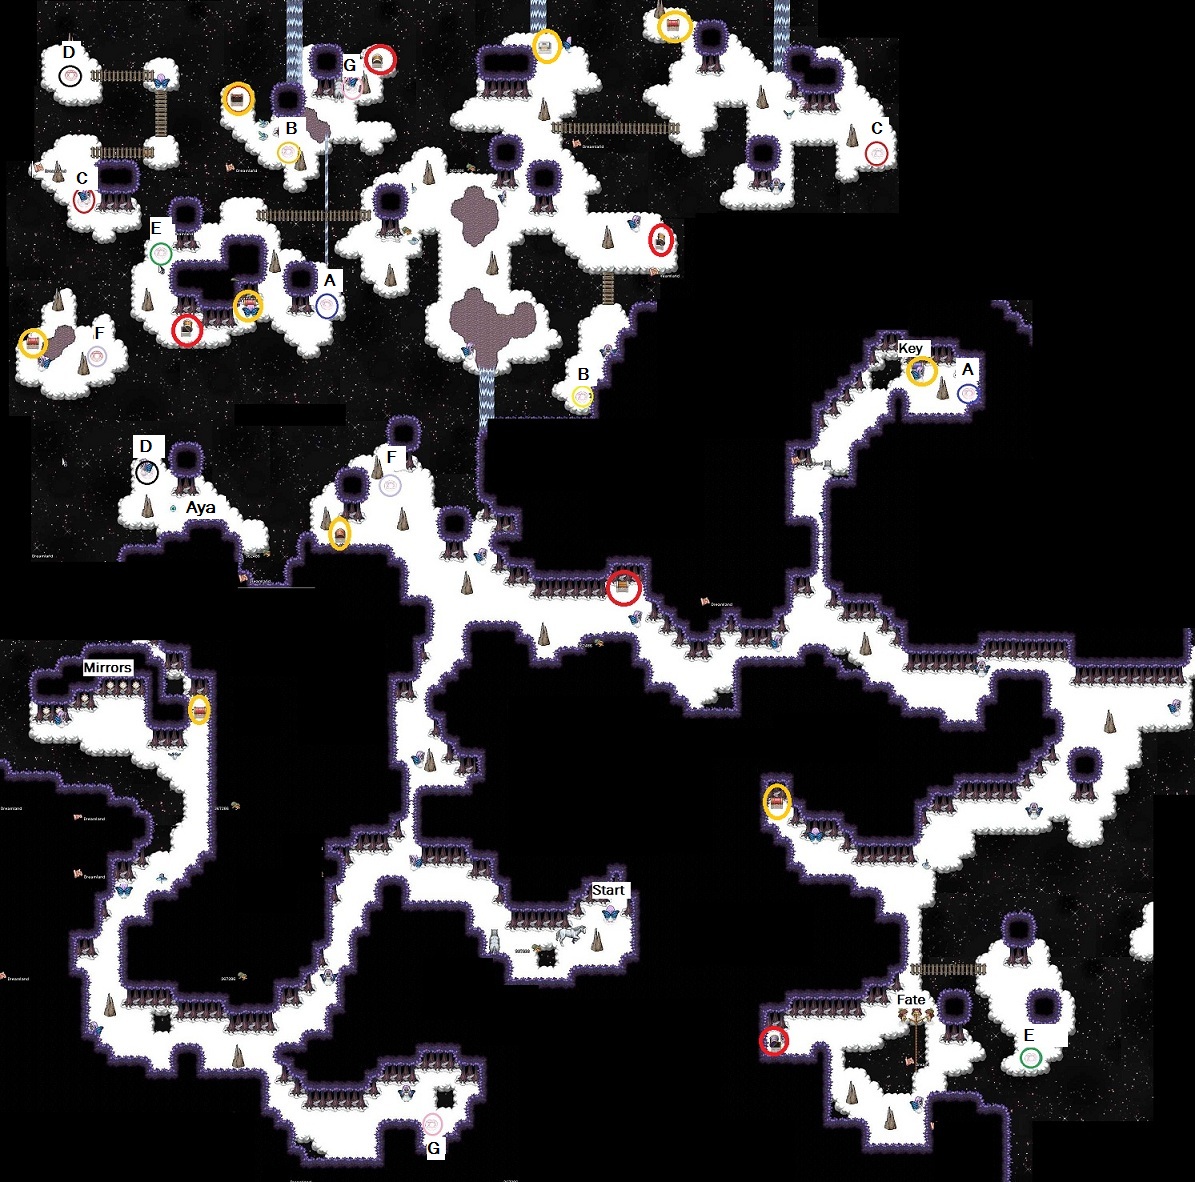
- Click on the statue to enter Dreamland
- There is a key in one of the chests that will allow you to open the locked red chests
- Head north east to pick up the key and start popping through the portals until you get to the Stone of Aya
- Side quests:
- You can find a Truth Mirror for Diona in the west; be sure to get the one that tells the truth
- Talk to the Fates; they need Magic Thread (you can get this from Diona
when she gives you the mirror). When you return with the
Thread you will get a Nightmare Bow.
- Return to Underfall (through Northern Isle, Dire Woods, Marauders Cave, Ashera's Tomb)
- Before going to the cathedral, max out everything you have and sleep in the Inn
- Go to the Cathedral
- You will have a big battle against Mel, Galahad, and Yemite
- You want to target Yemite first because she can heal the other characters
- You will now have another big battle; target the 2 Grimm Reapers as they can do minor healing
Thais
- You need to propose to either Stella, Mel, or Lydia (who is incarcerated)
- Talk to your choice to find out what ring to get
- Collect 8000 gold and buy the ring (you will need to find all the chests in the castle plus a few bags around town)
- Give your chosen lady gifts until she accepts your proposal
-
Talk to the queen and have a wedding.
Content(s) of this game guide may not be copied or
published on any other site without permission from Casual Game Guides.
©CasualGameGuides.com 2006 - 2021