
Walkthrough Information
IntroductionWell, what can I say? You are embarking on a fun, challenging, time-consuming game! I wrote this walkthrough to try to add something that other walkthroughs don't have. In the process, I discovered a ton about the game that I had missed the first time through. While you don't have to take advantage of all the complexities of the game, understanding how it works might make the game more enjoyable. In addition, I took lots of screenshots while playing the game and put together a map for each level. Besides helping you guys out, it allowed me to take a super close look at each level before starting the game.
If you're still reading and haven't just jumped in yet, I would highly recommend reading through the General Tips. There are no spoilers in this section, just very useful information.
Spoilers--This walkthrough is full of spoilers because after all it is a walkthrough! However, the General Tips section does not have any spoilers so go ahead and start there first. Each quest is hidden until you select it. A huge part of the game is actually finding the items or places that are hidden, usually in plain sight. Therefore there is a map available to open at the end of each area of the walkthrough. When you open it, you will see a bunch of colored circles and shapes. Hopefully it won't mean much to you unless you have read the walkthrough to know what shape to look for to help you. If you are super sensitive about spoilers, you are going to need to go to the map and just concentrate on the items that you are looking for.
Save your game often. I know it's a pain because it isn't instant, but it's worth it. Be sure to do so before you walk into a big battle or drop a magic bean or anything major. That way if you mess up, you can try again utilizing a different strategy. There is nothing worse than having your one of your necessary soldiers die or finding out that you purchased the wrong upgrade in the store and now have to wait to earn more XPs. I've got to admit that this is one of my serious gaming flaws and it's just because I don't want to stop playing the game for 1 minute. But do it!
Final walkthrough hint--Don't get ahead of yourself. It doesn't do any good to start doing something in this game because you read the walkthrough and know it's coming up. If you haven't triggered a quest, then don't start working toward it. Also don't just go picking stuff up that has been dropped by a bad guy or animal that you don't recognize; by this I mean non-food stuff from animals and non-gold from bad guys. At some point, you will probably need these in quests, and you will save yourself a ton of time. Don't overbuild your kingdom early on because all kingdoms have a quest that include getting to enough Villagers.
General Tips
Show/Hide
Gameplay
Show/Hide
Character Movement
Show/Hide
Camera Movement
Show/Hide
Understand the icons and buttons on the screen.
Show/Hide
 Character Selection
Show/Hide
Fighting tips
Show/Hide
Characters
Show/Hide
Supplies:
Show/Hide
Buildings
Show/Hide
Experience Points--XPs
Show/Hide
Suggested Order for Unlocking Buildings and Upgrades
Show/Hide
Kingdom One
Show/Hide
If you are an experienced Westward player, the controls are exactly the same.
There are a few changes, such as experience points though.
If you are not familiar with the Westward series, just follow the tutorial and read below for extra tips.
READ THE HELP SECTION--This is only accessible from the opening page.
READ THE HELP SECTION--This is only accessible from the opening page.
Show/Hide
You don't have to click and drag your character's flag to where you want to go.
A suggestion would be to only use the click and drag technique when you have to be sure you have selected an action.
Just select your character (by left-clicking or using one of the other quick selection methods below)
Then move the camera (see below) to get the correct area in view and right click either:
- The spot to where you want to move and a flag will be dropped.
- An item you want to pick up. The item will be highlighted if it is available to pick up but you will see no sign that you actually selected it properly.
- An area you want to work. If it is not a building it will work the same as an item.
- A building you want to be employed at. You will see one of the hammers filled in when you highlight the building.
It's a good idea to go back in a bit to make sure your character did what you want because the cursor will not change to let you know that you are able to do the desired action.
An employed villager or soldier will return to their jobs as soon as they have done their assigned task. This is good if they are just picking something up or mining a pile of gold; however, be sure to unemploy a worker if you want them to stay in the area you send them.
Show/Hide
- Move your cursor in that direction.
- Use the arrow keys.
- Use the ASDF keys.
- Click on the map and camera will go directly to that spot.
- Drag the white box on the map and you can see the areas in between.
TIP: You can turn the camera angle by holding down the space bar and turning using the mouse. You cannot click on anything, but sometimes it is handy to find hard to see objects.
Show/Hide
Show/Hide
1. Left-click on the character
2. Use one of the selection buttons at the bottom right of the screen. (see screenshot)
3. F1 will select your hero and move the camera.
4. F2 will cycle through all of your solders (including your wizard)
5. F3 will cycle through the Unemployed Workers
6. F4 will cycle through Damaged Buildings.
You will know which character is selected when you can see their information at the bottom.
Selecting Multiple Characters at one time:
1. Double click on a character and all characters of the same type (villagers vs. soldiers) will be selected that are on the same screen. If you can't see them you won't be selecting them.
2. Make groups. This is especially helpful for combat units.
- You can put multiple characters in a group by holding down shift as you select multiple characters.
- You can assign a keyboard shortcut for any building or character or group of characters after selecting it by pressing Ctrl-#.
Then by just pressing on the # itself, you will select that character (s) or building without moving the camera.
In addition to being extremely helpful for mounting an offense or defense, it is useful for quickly purchasing items, such as potions.
- To add a soldier to a combat unit, locate the soldier on the screen. Press the shortcut # to select the other group members, hold down shift and select the new soldier, and then press Ctrl-# to enter the new group.
- Combat units are not only helpful for moving a group of soldiers to an enemy but also when you select one, you will be able to see icons of each soldier and be able to administer potions or move a soldier away from the melee if need be by clicking on the icon and doing the desired action.
Show/Hide
Your hero always recovers after being knocked out so you can use this to your advantage when setting off to fight barbarians and other bad characters.
Send your hero in first. There is always a slight chance he can win on his own.
Then gather your soldiers nearby and have them join the fight when your hero stands up. Apparently the bad guys always concentrate on the hero first.
Cull a bad guy from the herd by leading them out of their area.
A few bad guys will stay behind usually and you can concentrate on killing fewer, or hopefully just one, at a time.
Dead soldiers will be repopulated with new soldiers coming out of the barracks after time.
Consider holding back any higher level fighters until you reach your soldier quantities in Kingdom 2.
Also consider holding back an Archer so you always have one.
Make combat units (see above)
Give your hero upgraded armor and weapons, along with the rest of your soldiers (see Blacksmith in building section)
Show/Hide
Hero
Show/Hide
Peasants
Show/Hide
Craftsmen
Show/Hide
Scholars
Show/Hide
Soldiers
Show/Hide
Show/Hide
It does not matter which hero you choose. It's just a personal choice.
Your hero is immortal. After your hero "dies," he/she will pop back up.
Your hero can:
- Pick up supplies
- Kill animals (except for birds)
- Fight bad guys
- Chop up wood stumps and logs
- Break apart stone
- Mine small piles of gold or rock
- Pick berries and fish
- Carry items
- Build basic buildings
Your hero cannot:
- Work at any building
- Build advanced buildings
- Plant trees or use blight scrolls
- Open cages or scholar chests
Show/Hide
A Peasant can:
- Be employed at production buildings (farm, lumber camp, mine, quarry)
- Pick up supplies
- Chop up wood stumps and logs
- Break apart stone
- Mine small piles of gold or rock
- Pick berries and fish
- Carry items
- Plant trees
- Provide a production bonus when above Level 1 at farms and lumber camps
- Build basic buildings
A Peasant cannot:
- Work at an advanced building
- Use blight scrolls
- Build advanced buildings
- Open cages or scholar chests
- Fight or hunt
Peasants will go through the following levelling up sequence.
Level 1 Peasants--Almost always your empty housing will be populated by a Level 1 Peasant.
to
Level 2 Peasants--All peasants will level up to Level 2. Production at farms and lumber camps will be increased +1 when Level 2 Peasants are employed.
to
Level 3 Peasants or Level 1 Craftsman--A Level 2 Peasant will be given the option to level up to Level 3 or become a Level 1 Craftsman.
to
Level 3 Peasants--Production at lumber camps and farms will be increased +3.
to
Level 4 Peasants--Production at lumber camps and farms will be increased +5
Show/Hide
A Craftsman can:
- Be employed at production buildings (farm, lumber camp, mine, quarry)
- Pick up things laying around, dig up holes, and open up crates and chests (except for Scholar's Chests)
- Chop up wood stumps and logs
- Break apart stone
- Mine small piles of gold or rock
- Pick berries and fish
- Carry items
- Plant trees
- Provide a production bonus at gold mines and stone quarries
- Provide special bonuses when employed at certain buildings (see Buildings section) - Work at an advanced building
- Build advanced buildings
- Open cages and repair special quest structures
A Craftsman cannot:
- Use blight scrolls
- Open scholar chests
- Fight or hunt
Craftsmen will go through the following levelling up sequence.
From a Level 2 Peasant
To
Level 1 Craftsmen--Production at gold mines and stone quarries will be increased +1
To
Level 2 Craftsmen-- Production at gold mines and stone quarries will be increased +2
To
Level 3 Craftsmen or Scholar--A Level 2 Craftsmen can level up to Level 3 or become a Scholar. Production at gold mines and stone quarries will be increased +3.
To
Level 4 Craftsmen-- Production at gold mines and stone quarries will be increased +4.
Show/Hide
A Scholar can:
- Pick up supplies that are lying around
- Carry items
- Plant trees
- Use blight scrolls
- Build advanced buildings
- Open Scholar's chest
- Work at the Library, Alchemist, or Castle as a tax collector
A Scholar cannot:
- Work at production buildings or other advanced buildings
- Pick berries, chop wood, mine stone or gold.
- Fight or hunt
- Level up
Scholars are made from levelling up a Level 2 Craftsman
Show/Hide
The following is a list of what a Soldier, Archer, or Knight can do
- Fight
- Hunt
- Pick up loose supplies
- Chop vines (not Archers)
- Work at a Tower or Armory (not Archers)
- Die and be replaced by a new Level 1 soldier.
- Smash up old cages and barbarian camp buildings.
A soldier/archer/knight/ cannot:
- Work at any building except the Tower, Armory, and Archery Camp.
- Fish, pick berries, chop wood, mine stone or gold.
- Carry things
A soldier/knight cannot:
- Hunt birds
- Kill the giant flower plants.
- Train at an Archery Camp
In addition, an archer can:
- Hunt birds
- Hunt other animals to get by products, such as hides and tusks.
- Kill the giant flower plants
- Train at an Archery Camp
- An Archer cannot chop vines.
Leveling up for soldiers:
Level 2 Soldiers can choose to become Level 3 Soldiers or Level 1 Archers
Level 3 Soldiers can choose to become Level 4 Soldiers or Level 1 Knights
Archers and Knights continue on through Level 1 to Level 3
A Level 3 Knight will become mounted on a horse and will not be able to pick up stuff anymore from the ground (because he is on a horse, dunh!)
Wizard--You will not encounter the wizard until the middle of Kingdom 2.
After that you will either hire a Wizard at a Wizard's Hut or employ a wizard from within the game.
Wizards are necessary for removing the funky blue stones and for making and using blight scrolls.
They are also a pretty interesting combat unit, but they can be killed. However, you can replace a dead Wizard by recruiting a new one.
Show/Hide
Food
Show/Hide
Wood
Show/Hide
Gold
Show/Hide
Stone
Show/Hide
Show/Hide
Each person (villager and soldier) consumes 1 food per cycle. Your Hero does not consume food.
Villagers will stop working if they are hungry and will eventually leave.
Soldiers will work at reduced strength but won't leave.
Farming:
Farm Products:
Cabbage +3 food
Turnips +4 food
Potatoes +5 food
Second worker bonus +2 food
Production Bonus:
Level 1 Peasants 0 food
Craftsmen 0 food
Level 2 Peasant +1 food
Level 3 Peasant +3 food
Level 4 Peasant +5 food
So a farm growing potatoes (+5) with a Craftsman (+0) and Level 3 Peasant (+2 and +3) will provide 10 food.
1st 2 Windmills gives +2 bonus each
3rd Windmill gives +1 and 4th windmill takes away -1
Food to pick up:
Berry bushes will get you a total of 25 Food spread out over a period of time
Carrots and pumpkins are laying around to pick up and are worth 3 to 5 food; however, they are sometimes needed for quests, so only pick them up if your town is starving.
Fish produces about 7 food
Food to kill:
Rabbit, deer, boar, bird egg, frog-- all provide around 2 to 4 food when killed by a soldier or hero.
An archer will add another __ to the pick up plus provide a skin or other by product.
Show/Hide
Lumber Camp +12
Upgraded Lumber Camp +2 (for total of +14)
Production Bonus:
Level 1 Peasant +0
Craftsman +0
Level 2 Peasant +1
Level 3 Peasant +3
Level 4 Peasant +5
2nd worker +4
3rd Worker +6
Axe Upgrades:
1st worker +3
2nd worker +2
3rd worker +1
So an Upgraded Lumber Camp (+14) with 3 workers (+4 and +6) with axes upgrades (+1 +2 +3) with 1 worker who is Level 1 peasant (+0), 1 Level 2 Peasant (+1), and 1 Level 3 Peasant (+3) will give you a total 34 in wood production
Stumps and wood piles provide between 11 and 15 wood
Log provides around 25
Show/Hide
Gold Mine +15
2nd worker +5
3rd worker +5
Production bonus:
Peasant +0
Level 1 Craftsman +1
Level 2 Craftsman +2
Level 3 Craftsman +3
Level 4 Craftsman +4
Additional Bonuses:
Employed Blacksmith bonus +2 (also need a craftsman working at the Mine)
Pickaxe Upgrade +3
Gold pile provides around 100
Piles of gold plus nonfood items like crowns, skins, tusks.
Show/Hide
Stone quarry +12
2nd worker +5
3rd worker +6
Peasant +0
Level 1 Craftsman +1
Level 2 Craftsman +2
Level 3 Craftsman +3
Level 4 Craftsman +4
Pickaxe Upgrade +3
Employed Masonry bonus +2(also need a craftsman working at the Quarry)
2nd worker +5
3rd worker +6
Peasant +0
Level 1 Craftsman +1
Level 2 Craftsman +2
Level 3 Craftsman +3
Level 4 Craftsman +4
Pickaxe Upgrade +3
Employed Masonry bonus +2(also need a craftsman working at the Quarry)
Show/Hide
General Information
Show/Hide
Housing
Show/Hide
Food Production Buildings
Show/Hide
Other Production Buildings
Show/Hide
Other Basic Buildings
Show/Hide
Advanced Buildings
Show/Hide
Show/Hide
There are many buildings your Villagers and Hero can build.
You can only build buildings that are unlocked.
To unlock a building or upgrade, you will go to the Store page.
You will need both supplies and Hero experience points (See Experience Point section)
Basic Buildings--Any Villager and Hero can build these buildings.
Advanced Buildings--Only Craftsmen can build the advanced buildings on the second page of the building control.
Demolishing Buildings--You can destroy a building by clicking on the little "mace" button just to the right of the name of the building in the control panel.
A destroyed building will leave behind some supplies to pick up.
If you try to destroy a building and specifically a bridge and you don't see the destroy button, it is because you don't control it.
For a bridge check carefully that there is not any animal (live or dead) on the bridge, and also try just walking over the bridge and back.
Also you cannot destroy a bridge of someone is the process of going from one spot to another and will need to use the bridge on their way.
Show/Hide
You must provide housing for your Villagers and Soldiers. If your Villagers don't have housing, they will leave. If you build more housing than you have people, a new person will arrive.
Hut
Show/Hide
Barracks
Show/Hide
Hut
Show/Hide
The hut is the basic starter house for your Villagers (50 gold, 70 wood).
It will house a single Villager
Hut Upgrade will be available to unlock at the store at the beginning of the game.
To upgrade your Hut to house 2 Villagers, just click on the upgrade button (35 gold, 50 wood).
Cottage upgrade will become available after you get the Lumber Camp upgrade. This will house a 3rd Villager.
Besides allowing more housing in a smaller footprint, there is supposedly a small chance that your new Villager will be a Craftsman. However, if you look at the cost (80 gold, 50 wood, 50 stone) you may decide not to bother upgrading to a Cottage. One thing that is obvious is this is not a high priority upgrade to purchase from the store.
Show/Hide
The Barracks is the basic housing for 2 Soldiers (80 gold, 70 wood, 100 stone)
Barracks Upgrade will be available to unlock at the store after unlocking the Masonry and Armory.
Upgrading your Barracks will allow you to house one more soldier (80 gold, 50 wood, 150 stone). Again, this is not the greatest deal, so you can wait on buying the upgrade until you get everything else.
Show/Hide
Well
Show/Hide
Farm
Show/Hide
Wood Towers
Show/Hide
Windmill
Show/Hide
Show/Hide
A Well is necessary for farms to produce food. (50 gold, 30 wood)
You can get about 8 farms around one well if you plan carefully.
Unlike other Westward games, water is not a commodity that you need to worry about.
Remember to build wells close to other buildings to quickly put out fires. This is especially important for an outlying production building.
You can get about 8 farms around one well if you plan carefully.
Unlike other Westward games, water is not a commodity that you need to worry about.
Remember to build wells close to other buildings to quickly put out fires. This is especially important for an outlying production building.
Show/Hide
Each farm has 2 employee slots (50 gold, 20 wood).
Very early on in the game, you will get Potatoes as a farming option.
Be sure to change all of your farms over to potatoes as soon as possible.
There is no advantage to having variety until you have all 6 crops and are going for a trophy.
It does not cost anything to switch out crops.
Very early on in the game, you will get Potatoes as a farming option.
Be sure to change all of your farms over to potatoes as soon as possible.
There is no advantage to having variety until you have all 6 crops and are going for a trophy.
It does not cost anything to switch out crops.
Show/Hide
Wood towers (50 gold, 80 wood)do double duty.
They are the only storage area for food and provide +8 food storage.
They are also a place to employ soldiers so they can get +2 XPs.
Stone Towers upgrade will be available after you unlock the Masonry (100 gold, 50 stone)
An upgraded Stone Tower stores +10 food. This is another upgrade you can wait for until the game requires you to get it.
Show/Hide
Windmills(100 gold, 50 stones) boost all of your farm production by +2 for the first two windmills built.
The 3rd windmill will add 1+ food, but the 4th windmill will decrease your food production by -1 so don't get greedy.
The 3rd windmill will add 1+ food, but the 4th windmill will decrease your food production by -1 so don't get greedy.
Show/Hide
Lumber Camp
Show/Hide
Gold Mine
Show/Hide
Stone Quarry
Show/Hide
Show/Hide
A Lumber Camp(60 gold, 20 wood)will employ 2 villagers.
Lumber Camp Upgrade (80 gold, 70 wood) will become available after building a Blacksmith.
The Lumber Camp Upgrade expands the harvest zone and adds a 3rd Villager.
Axe Upgrade is available after you unlock the Lumber Camp Upgrade and build a Blacksmith.
The Axe Upgrade is free once you have unlocked it but you do need to actually do the upgrade at the camp.
Tree Planting will be available to unlock after defeating the Green Giant in Kingdom 2.
You can buy saplings at an employed Upgrade Lumber Camp for 80 gold.
TIP: You will never run out of trees if you remember to always have a few tree saplings on hand to replant when you run out of trees.
You cannot buy saplings from an unemployed camp and you cannot employ a camp that has no trees, so just remember to buy a couple whenever you use them.
Also remember to unemploy a lumber camp before you chop down the last trees; this will allow you to come back and get saplings later (specifically for a quest in Kingdom 3)
Show/Hide
A Gold Mine(50 gold, 80 wood) will employ 3 Villagers.
The Pickaxe Upgrade is available with a one-time purchase at the store. This will give you a production bonus for each Craftsman employed.
While not an upgrade, you will get a bonus when you have a Craftsman employed at the Gold Mine and the Blacksmith.
The Pickaxe Upgrade is available with a one-time purchase at the store. This will give you a production bonus for each Craftsman employed.
While not an upgrade, you will get a bonus when you have a Craftsman employed at the Gold Mine and the Blacksmith.
Show/Hide
A Stone Quarry (60 gold, 50 wood) will employ 3 Villagers.
The Pickaxe Upgrade is available with a one-time purchase at the store.
While not an upgrade, you will get a bonus when you have a Craftsman employed at the Quarry and the Masonry
The Pickaxe Upgrade is available with a one-time purchase at the store.
While not an upgrade, you will get a bonus when you have a Craftsman employed at the Quarry and the Masonry
Show/Hide
Wooden Bridge
Show/Hide
Stone Bridge
Show/Hide
Stone Road
Show/Hide
Show/Hide
To build a Wooden Bridge (100 gold, 100 wood) you need to have both a blacksmith and upgraded lumber camp. They do not need to be employed though.
Show/Hide
To build a Stone Bridge (100 gold, 120 stone) you need to have a Masonry.
The Stone Bridge is used to cross over larger expanses of river.
You will not be able to build a stone bridge the first time through in Kingdom 1. Be patient and it will come in Kingdom 2.
The Stone Bridge is used to cross over larger expanses of river.
You will not be able to build a stone bridge the first time through in Kingdom 1. Be patient and it will come in Kingdom 2.
Show/Hide
The Stone Road (50 gold, 20 stone) is not needed for the game and you will only need to build one piece for the optional Highness Bathrobe trophy where you need to build all buildings in one kingdom.
Show/Hide
Blacksmith
Show/Hide
Bakery
Show/Hide
Library
Show/Hide
Archery Camp
Show/Hide
Tavern
Show/Hide
Masonry
Show/Hide
Armory
Show/Hide
Alchemist
Show/Hide
Marketplace
Show/Hide
Wizard's Hut
Show/Hide
Castle Upgrades
Show/Hide
Show/Hide
You need to build a Blacksmith (150 gold, 90 wood, 125 stone) in order to upgrade your lumber camp and to get Armor and Weapon upgrades. It will be unlockable early on in Kingdom 1 as part of the bridge building quest.
The Armor Upgrade (150 gold, 120 wood) is available at the beginning of the game. After unlocking it, you will simply use the upgrade in the Blacksmith control panel.
The Weapon Upgrade (150 gold, 100 wood, 200 stone) is available to unlock after unlocking the Armory and the Armor Upgrade. You can only do the Weapon Upgrade after you do the Armor Upgrade.
As long as your Blacksmith is staffed, weapons and armor will be made. You do not need to do anything beyond waiting to get them.
You will see a message about needing to staff the Blacksmith to make weapons and armor, but if it is staffed they will come automatically.
Armor and Weapons do take awhile to make and you will only be able to have 10 items on the rack.
To use the items, just take your soldier to the rack and they will put them on.
You can tell if your solder has the armor or weapons by clicking on the ? flag and it will tell you.
Blacksmith Boost of +2 at Gold Mines is given if the Blacksmith and Mine are both staffed with Craftsmen.
Show/Hide
To build a Bakery (150 gold, 100 wood, 110 stone) you need to build a Windmill and have unlocked potatoes and turnips.
When staffed you can make up to 17 gold per cycle if you are growing all 3 crops; however, it will cost you 3 food per cycle.
When staffed you can make up to 17 gold per cycle if you are growing all 3 crops; however, it will cost you 3 food per cycle.
Show/Hide
You need to build a Library (120 gold, 80 wood, 150 stone)before you can upgrade a Level 2 Craftsman into a Scholar.
You can employ 2 Scholars at a Library. For each Scholar you will receive 2 gold for 1 wood.
A staffed Library will also provide Knowledge Books that you can use for XPs.
You can employ 2 Scholars at a Library. For each Scholar you will receive 2 gold for 1 wood.
A staffed Library will also provide Knowledge Books that you can use for XPs.
Show/Hide
You need to build an Archery Camp (100 gold, 150 wood, 100 stone) to upgrade a Level 2 Soldier into an Archer.
You can then employ your Archers at the camp to gain +2 XP.
You can then employ your Archers at the camp to gain +2 XP.
Show/Hide
Staffing a Tavern (100 gold, 100 wood, 100 stone) will only give you rewards once you have unlocked the Mystery crops.
Show/Hide
To build a Masonry(250 gold, 120 wood, 120 stone) you will need to recover the lost Masonry Scrolls during a quest in Kingdom 2.
You will need a Stone Quarry to build the Masonry.
A staffed Masonry will give you +5 stone for 1 gold for each worker.
Fortify Buildings Upgrade can be purchased for 120 gold, 100 wood, 100 stone. b You will do this once for each location.
When you build a new building after upgrading it will be automatically fortified but it happens over a period of time.
The Axe Upgrade is free once you have unlocked it, but you do need to actually do the upgrade at the Masonry.
Masonry Boost of +2 at Stone Quarries is given if the Masonry and Quarry are both staffed with Craftsmen.
Show/Hide
To build an Armory (180 gold, 50 wood, 250 stone) you need to build a Masonry first.
The Armory will employ 2 Soldiers or Knights and will give them +8 XP.
The Armory will employ 2 Soldiers or Knights and will give them +8 XP.
Show/Hide
To build an Alchemist (150 gold, 80 wood, 150 stone) you need a Masonry and Library first.
A Scholar needs to staff the Alchemist.
A Staffed Alchemist will allow you to turn 10 food into 15 gold, 20 wood into 15 gold, and 20 stone into 15 gold.
Once you have unlocked the Health Potion upgrade, a staffed Alchemist will make Health Potions to purchase.
Two Scholars at the Alchemist will just make potions that much faster. However, you can only keep 10 potions on the shelf.
Show/Hide
Building and staffing a Marketplace (180 gold, 140 wood, 110 stone) will allow you to buy 10 food for 20 gold, buy 20 wood for 25 gold, or buy 20 stone for 25 gold.
Show/Hide
The Wizard's Hut (280 gold, 100 wood, 200 stone) will be unlockable after you get the Wizard's Scroll. This quest will be trigged in Kingdom 2.
The Wizard's Hut provides housing for a Wizard.
You can recruit a Wizard for 120 gold.
A staffed Wizard's Hut will produce Blight Scrolls after that quest is Kingdom 3.
The Wizard's Hut provides housing for a Wizard.
You can recruit a Wizard for 120 gold.
A staffed Wizard's Hut will produce Blight Scrolls after that quest is Kingdom 3.
Show/Hide
Of course a Castle is already built for you, but you can upgrade it.
The first Castle Upgrade is available after the Stone Mason's Quest in Kingdom 1.
You need to upgrade your castle to increase your total population past 20.
You can also employ a Scholar and select to tax your citizens 1 gold per person.
Grand Castle Upgrade is available after you have a Masonry and the first Castle Upgrade.
A Grand Castle will allow you to increase your population past 35 and employ a 2nd Scholar to increase the taxes to 2 gold per person.
Show/Hide
XPs are familiar to Westward players because you have always needed them to purchase upgrades in the store.
Those types of XPs work the same way in this game.
They are visible in the top right hand corner of the screen.
Each time you finish a quest, do something for the first time, or level up a citizen you will get experience points for upgrades.
New to this game is Experience Points and levelling up your characters.
It is absolutely necessary to level up characters and there are some ways to do it more quickly.
One way NOT to gain any XPs is to NOT employ your character anywhere.
Employed characters earn XPs every cycle.
To gain XPs for any character have them do stuff such as pick berries +10, mine a gold or stone pile +15, read a book +25, pick up stuff lying around +1 to +1, build a building +15, catch a fish +10, kill a frog +2, kill a rabbit +4, kill a deer +6, kill a boar +10, open a chest +15, kill a bad guy +40, use a training dummy+25 . These are just examples and the list is not complete.
So to level up quickly employ the person you want to level up at the high level building there is available.
This would be anything but a farm for a peasant, an advanced building for a Craftsman, an Armory for a Soldier or Knight, and an Archery Camp for an Archer.
Then you are going to concentrate on that person and have them do all of the odd jobs.
In other versions of Westward it was handy to have the Hero do the odd jobs because he couldn't work, but in this game you want the character you want to level up doing as much work as possible.
Show/Hide
The XPs you need to upgrade are limited in the beginning of the game so you don't want to go crazy buying stuff in the store. Many things are required to be unlocked in a quest, so you will want to keep some about 25 XPs on hand for those unexpected purchases. The following are things that I, personally, would buy when I can afford them. I am not including things that will be required to finish a quest.
Kingdom 1
- Potatoes - Hut Upgrade
- Archery Camp, when you get close to being able to level up a Level 2 Soldier into an Archer
- Library, when you get close to being able to level up a Level 2 Craftsman into a Scholar.
- Castle Upgrade, when you are ready to bring your population past 20.
- Axe Upgrade
- Armor Upgrade
Kingdom 2
- Tree Planting, when it becomes available (so it may come after the others here) - Armory, after the Masonry is built
- Fortification
- Pickaxes
- Weapon Upgrade
Remember to only buy stuff if you have extra XPs because timing is important. You might want to save your game before you buy an optional upgrade in the store. That way if you find out that you really needed those XPs for something else, you can go back to your save point and not upgrade.
Show/Hide
Kings Request
Show/Hide
Soldier Rescue
Show/Hide
Wicked Weeds
Show/Hide
Damsel in Distress
Show/Hide
Ale Run
Show/Hide
Key to the Kingdom
Show/Hide
Kingdom Repair
Show/Hide
Caged Villagers
Show/Hide
Pilfered Potatoes
Show/Hide
Kingdom Restore
Show/Hide
Bridge Rescue
Show/Hide
Kingdom 1 Map

King's Feast
Show/Hide
Traveling Bard
Show/Hide
Merchant Trade 1
Show/Hide
Boar Poachers
Show/Hide
King's Crown
Show/Hide
King's Heirloom
Show/Hide
Stone Mason
Show/Hide
Lost Marbles
Show/Hide
Barbarian Invasion
Show/Hide
Tower Defense
Show/Hide
Ancient Drawbridge
Show/Hide
Injured Giant
Show/Hide
Royal Letter
Show/Hide
Hidden Quests
Show/Hide
Show/Hide
Walk over and speak to the King to find out why he is out here
Collect 25 food for the king.
Build a wooden tower to increase the total food the kingdom can store.
You will need to rescue the Trapped Damsel to help you get the wood to build the wooden tower.
Collect 25 food for the king.
Build a wooden tower to increase the total food the kingdom can store.
You will need to rescue the Trapped Damsel to help you get the wood to build the wooden tower.
Show/Hide
Talk to the soldier and collect 25 wood to rescue the him.
Your hero will be able to pick wood that is lying around.
Your hero will be able to pick wood that is lying around.
Show/Hide
Talk to the farmer
Send your soldier to remove the 6 vines around the farm.
Your farmer will then automatically work at the farm.
Send your soldier to remove the 6 vines around the farm.
Your farmer will then automatically work at the farm.
Show/Hide
To rescue the damsel, first you need to talk to her.
Then you need to talk to the merchant.
Buy a magic bean, pick it up, and drop it next to the tower.
Build a new hut for the peasant girl you rescued. (She will then automatically work at the lumber camp)
Then you need to talk to the merchant.
Buy a magic bean, pick it up, and drop it next to the tower.
Build a new hut for the peasant girl you rescued. (She will then automatically work at the lumber camp)
Show/Hide
Go talk to the wagon owner just north of the farm.
Clear the piles of stone rubble from the road for the wagon owner (send Hero and Peasant)
Besides getting the stone on the road, you will also get 50 stone as a reward.
Clear the piles of stone rubble from the road for the wagon owner (send Hero and Peasant)
Besides getting the stone on the road, you will also get 50 stone as a reward.
Show/Hide
Find the gate key that is buried somewhere.
The key is buried near the lumber camp (black circle on map).
After finding the key move to the gate to open it.
Build a barracks to recruit the additional soldier needed. Complete Ale Run to get the stone needed.
While waiting for your soldier to arrive, use your soldier to get the resources that are attainable.
Your soldier can only get items that are lying around, but he can get this stuff, dig up dirt piles, and kill animals.
You can also build another cottage if you want.
Move your soldiers and your hero to the barbarians to defeat them.
Show/Hide
Clear the 3 stone rubble piles around the king's castle, using yourself and 2 villagers.
Build a well near the fires before you can put the fires out.
Put out the fires by dragging characters to them (use soldiers--unfortunately they don't put out fires when the buildings are on fire)
Build a well near the fires before you can put the fires out.
Put out the fires by dragging characters to them (use soldiers--unfortunately they don't put out fires when the buildings are on fire)
Show/Hide
Head to the northeast to the 3 wood cages.
Rescue the kingdom's villagers that are locked in cages.
Choose 1 peasant to level up to a craftsman.
Use that one to do picking up jobs and to read the blue books to gain points.
Once he is a craftsman, he can go to the cages and open them.
Two villagers will be available to work but they need homes, and one wants his potatoes back.
Show/Hide
Recover the 4 stolen seed bags. (see the 4 red squares on the map)
Switch the farms to potatoes for +2 food.
Switch the farms to potatoes for +2 food.
Show/Hide
Refill the kingdom's treasury of 4000 gold.
Rebuild the kingdom's army population to 10.
Build up the citizen population of the kingdom to 20.
You will need to upgrade the castle
Needless to say, this will be a long, ongoing quest
Rebuild the kingdom's army population to 10.
Build up the citizen population of the kingdom to 20.
You will need to upgrade the castle
Needless to say, this will be a long, ongoing quest
Show/Hide
Trigger this quest by heading over to her island due west of the castle (black arrow)
Rescue the stranded citizen by building a bridge to the island she is on.
To unlock the bridge building, you'll need to build a blacksmith first (to upgrade the lumber camp.
You will need a craftsman to build the blacksmith. You do not need to staff the blacksmith though.
Upgrade the lumber camp by clicking on the building and clicking on the upgrade button.
Go to the store page, upgrades section, and buy the lumber camp upgrade and while you are at it get the hut upgrade. An upgraded hut costs less than building a new one.
Build a bridge to rescue the stranded citizen, who is actually already a craftsman.
Kingdom 1 Map
King's Feast
Show/Hide
Provide the king with 30 food for his grand feast.
Hunt for rabbit and collect 8 rabbit chops.
Hunt deer and collect 6 deer flanks.
Hunting tip: If you can't find the animal you are looking for, just hunt the others to depopulate the area so the desired animal can come back.
Catch 5 fish for the king. Fishing works just like hunting except a villager has to do it. Soldiers won't fish. Also you will need to pick up the fish when you catch it. Fish will come back to the same area after a bit.
After you get all the food, talk to the king again.
He will then want some boar meat, which will then trigger the Boar Poacher quest.
Show/Hide
A traveling bard has arrived in town looking for an adventure to write about
Place 1000 gold in your caste's treasury to lure out the Great Barbarian and fight him
Be sure you have enough soldiers to fight off 4 barbarians, who will come from the east.
Be sure to save before you deposit the gold, and consider un-employing your soldiers and move them to the castle.
Place 1000 gold in your caste's treasury to lure out the Great Barbarian and fight him
Be sure you have enough soldiers to fight off 4 barbarians, who will come from the east.
Be sure to save before you deposit the gold, and consider un-employing your soldiers and move them to the castle.
Show/Hide
Merchant Trade is triggered when you come near to the "store." (white arrow)
You will have to build a bridge to the south.
Complete the Traveling Merchant's tasks and he will reward you with items from his shop.
Collect 5 carrots for the merchant trader and he'll sell health potions (75 gold) to you. Anyone can pick them up; just look in the grassy areas.
Hunt deer and collect 6 pieces of meat in exchange for straw bundles.
Catch 8 fish to unlock magic beans.
Collect 8 bird feathers, which are dropped when an archer shoots down birds, to unlock training dummies.
Collect 3 barbarian helmets to get a chest for a scholar to open.
It's best to just not pick up items that look interesting until there is a call for them. If you don't, you might already have the helmets just lying around.
You will have to build a bridge to the south.
Complete the Traveling Merchant's tasks and he will reward you with items from his shop.
Collect 5 carrots for the merchant trader and he'll sell health potions (75 gold) to you. Anyone can pick them up; just look in the grassy areas.
Hunt deer and collect 6 pieces of meat in exchange for straw bundles.
Catch 8 fish to unlock magic beans.
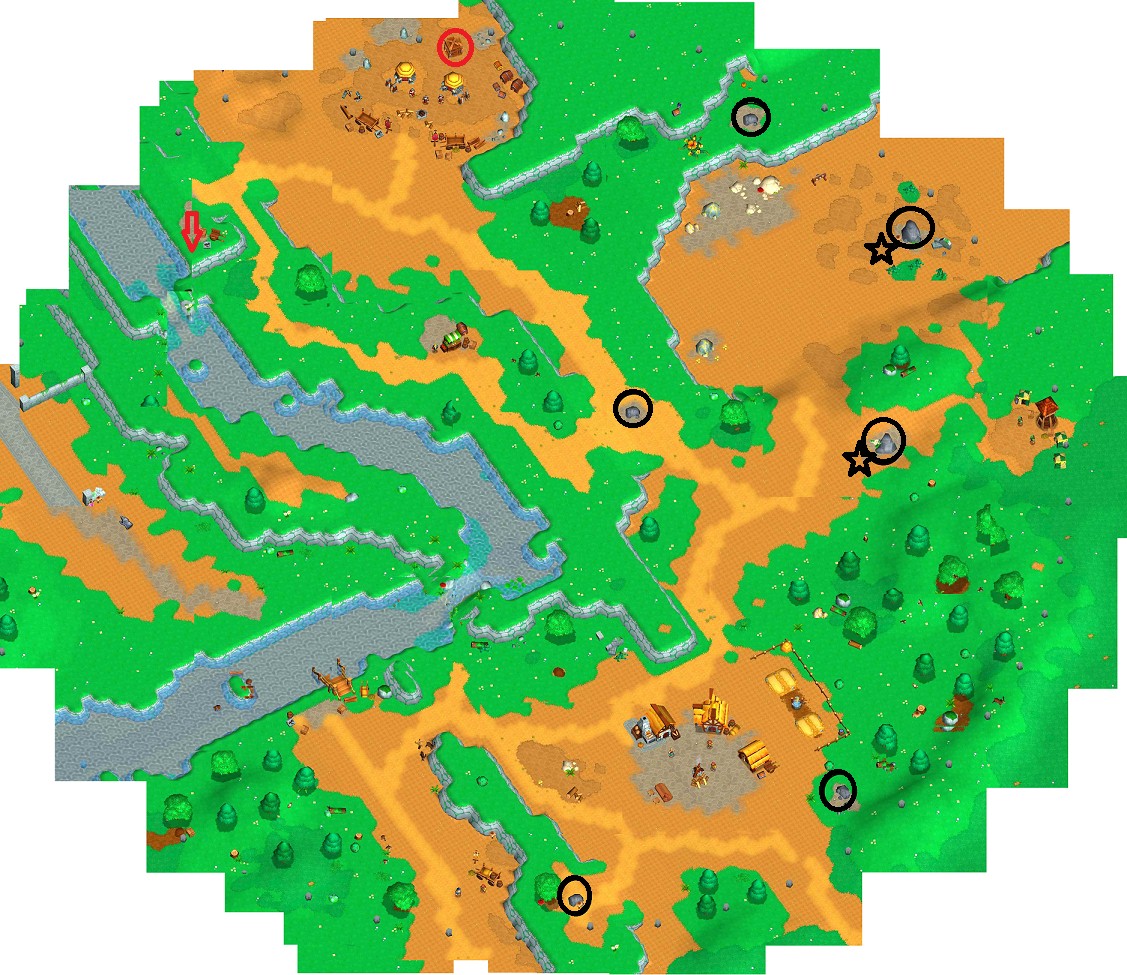
Collect 8 bird feathers, which are dropped when an archer shoots down birds, to unlock training dummies.
Collect 3 barbarian helmets to get a chest for a scholar to open.
It's best to just not pick up items that look interesting until there is a call for them. If you don't, you might already have the helmets just lying around.
Show/Hide
Boar Poachers quest will be triggered after you have gathered the food for the King's Feast and then spoken to the King.
He will ask for boar meat.
Just south of the merchant, you will see a giant plant blocking the way to the right(red arrow).
Use your archer to kill the plant.
Use an Archer to find and investigate the 3 dead boars
Finish the deer hunting portion of the Merchant's Trade, if you haven't done so already.
Find the 5 traps and drop straw bales in them. (See black +'s on the map)
Show/Hide
Recover the king's crown from the barbarian camp. This quest will be triggered when you get to 6 soldiers.
It is a good idea to not do this quest with more than 6 soldiers as you will have to feed them. Build the cage that will trap the barbarian. You will be instructed when and where to build the trap, but it is to the west of the merchant. Just bring a Villager or your Hero over to the pile of wood and they will build it.
Trap a barbarian to learn the secret location of their camp. You can do so by engaging the enemy and then running back to the cage where he will get caught. You will have to do this twice. You can find enemies to the south.
You will then be offered the opportunity to do a side quest of King's Heirloom. You will want to do this before you get too many soldiers so they won't get too hungry.
King's Heirloom quest is listed below.
Show/Hide
Save before you start. Don't forget to make combat units for this level. It makes it a lot easier.
You will need to find your own food in this level. There are 3 Wooden Towers that you can get control of to get the food in them. One is blocked by vines and the other 2 you just need to get to.
You will also need to pick up food and hunt a bit.
You will find lots of locked gates. You will receive a hint to where it is located when you first approach the gate because it will tell you what the picture is on the gate and the game will tell you what color key you need. You will then find the key in area that has something to do with the gate picture.
If you are having any trouble look at the map. You will see circles with the location of the key and the gate they go to.
You will also be rescuing 1 Soldier and 1 Archer.
You will need the Archer to get one of the keys by shooting the birds that are circled in Purple. Be sure to take this opportunity to get XPs for your soldiers. If you get the opportunity to level up a Level 2 Soldier you might want to wait until you get back to build an Archery Camp.
Once you have opened all the chests available, you will need to defeat the Dark Knight and his group to get a chest with the crown. You can return at this point or pick up more gold and treasure before returning.
King's Crown Sidequest Map
Show/Hide
This quest is triggered after you build a bridge to the west and walk toward the poor fellow in the stocks.
Send a Craftsman to let him out.
You now need to get to the special stone in the South that is being blocked by a Giant. First build housing for the mason so he won't To open the gate to where the Giant is, you will need to buy a Magic Bean from the Merchant and to do so you will need to complete the fish catching quest. Once you have a Magic Bean you will carry it over to the gate to drop it and knock the block up top onto the pressure plate (see green square)
Enter the gate and defeat the Giant.
Send a Scholar to open and thus remove the chests.
Build a Quarry by the rocks, and the Cottage upgrade will be unlocked.
Show/Hide
This quest is triggered the first time you pick up a marble and is completely optional. It just goes toward earning a trophy.
There are 13 marbles and you can find them circled in blue on the map.
You will NOT be able to finish this quest until you have unlocked that Masonry and Stone Bridges in Kingdom 2
There is one marble in the water that you will not be able to get to unless you destroy bridges.
There are 13 marbles and you can find them circled in blue on the map.
You will NOT be able to finish this quest until you have unlocked that Masonry and Stone Bridges in Kingdom 2
There is one marble in the water that you will not be able to get to unless you destroy bridges.
Show/Hide
After you finish the King's Crown quest, the Barbarian Invasion will occur.
You will be attacked from different edges of the Kingdom (see red triangles)
You will need to destroy the 5 sets of Barbarians and their catapults.
You will be attacked from different edges of the Kingdom (see red triangles)
You will need to destroy the 5 sets of Barbarians and their catapults.
Show/Hide
After the Barbarian Invasion is complete, the King will want you to build 3 towers.
He tells you where to put them but if you can't figure it out, look at the red stars on the map.
He tells you where to put them but if you can't figure it out, look at the red stars on the map.
Show/Hide
Quest is trigger by approaching giant flower in west that is blocking the way to the Drawbridge ruin.
Send an archer to remove the flower.
Send soldiers to remove the vines
Send a scholar to the ruin.
Bring 3 wall pieces to the ruin (see yellow triangles on map)
You will then need to find the Drawbridge Scrolls, which are located in the ancient library ruins in the south (see yellow square). You will need to remove the stone after you get past the vines and flower to uncover a chest, which requires a Scholar to open it
Click on the ruins to upgrade them.
You will then need to find the 4 Drawbridge Pegs (see yellow stars)
You will then need to send a higher level character to open the drawbridge
Show/Hide
After retrieving a Drawbridge Peg, this quest will be triggered.
An earthquake will happen that is actually a Giant.
Send someone to talk to him.
He needs a Blacksmith to remove a thorn from his foot
He then needs new shoes, which will require 2 vines, 3 straw bundles, and 4 deer hides (deer hunted with Archer).
The Giant will then help you get the Drawbridge Peg that is up high.
Send someone to talk to him.
He needs a Blacksmith to remove a thorn from his foot
He then needs new shoes, which will require 2 vines, 3 straw bundles, and 4 deer hides (deer hunted with Archer).
The Giant will then help you get the Drawbridge Peg that is up high.
Show/Hide
After you have completed the Tower Defense and Ancient Drawbridge quests, you will be asked to take a Royal Letter to the next kingdom.
Go to the King and pick up the letter and cross over the drawbridge to the north.
After completing the River Crossing quest, you will arrive in Kingdom 2.
After awhile you will be sent back to Kingdom 1 with a pie, where you will then drop the pie at the King's feet.
Go to the King and pick up the letter and cross over the drawbridge to the north.
After completing the River Crossing quest, you will arrive in Kingdom 2.
After awhile you will be sent back to Kingdom 1 with a pie, where you will then drop the pie at the King's feet.
Hidden Quests
Show/Hide
King's Sword Trophy
Show/Hide
Statue Ruins
Show/Hide
Dark Mojo Trophy
Show/Hide
Show/Hide
Your goal is to pull the sword out of the stone.
My recommendation is to just send everyone over there who is level 3 or higher (except for Peasants). I was successful with a high level Craftsman. There is information all over the place as to what will work; but the best thing to do is just let everyone have a whack at it.
Show/Hide
Wait to do this until after you have retrieved the Wizard's hat as you will need the same stone bridge.
You will need to build a Wizard's Hut and employ a Wizard.
Have the Wizard remove the 2 blue stones by the ruins.
Have a soldier remove the vines covering the ruins.
Have a Craftsman repair the ruins.
You will need to build a Wizard's Hut and employ a Wizard.
Have the Wizard remove the 2 blue stones by the ruins.
Have a soldier remove the vines covering the ruins.
Have a Craftsman repair the ruins.
Show/Hide
There are only 2 Blue Stones in Kingdom 1 (see blue triangles)
River Crossing
Show/Hide
It's a good idea to go ahead and start leveling up your villagers as soon as you are able. You will want at least one craftsman.
Several subquests require wood resources, so build a lumber camp and staff it as soon as you are able.
At one point you will need to collect bird eggs and bird feathers. As soon as you have an archer, you can start shooting birds, but don't pick up the eggs or feathers until you are asked for them.
You will also be asked to trade 25 food for something, so build a tower as soon as you are able.
Having more peasants than are initially present will make collecting items far more convenient and efficient later on.
The Captured Soldier quest is not required. You can get past the fishing village by building an archery and leveling up your own soldiers if you prefer.
River Crossing Map
Cross the River
Show/Hide
Captured Soldier
Show/Hide
Dam the River
Show/Hide
Stone Bridge
Show/Hide
Several subquests require wood resources, so build a lumber camp and staff it as soon as you are able.
At one point you will need to collect bird eggs and bird feathers. As soon as you have an archer, you can start shooting birds, but don't pick up the eggs or feathers until you are asked for them.
You will also be asked to trade 25 food for something, so build a tower as soon as you are able.
Having more peasants than are initially present will make collecting items far more convenient and efficient later on.
The Captured Soldier quest is not required. You can get past the fishing village by building an archery and leveling up your own soldiers if you prefer.
River Crossing Map
Cross the River
Show/Hide
Move hero into the main village to unlock Slow the River Current
Move hero to the archers in the east. Talking to them unlocks Captured Soldier.
Move hero to the merchant and talk to him to unlock Dam the River.
Move hero to the archers in the east. Talking to them unlocks Captured Soldier.
Move hero to the merchant and talk to him to unlock Dam the River.
Show/Hide
Defeat the group of barbarians in the north. You do not need to build Barracks. Just send the Hero to the Barbarian Camp and then walk away to cull out the leader to fight him alone.
The Hero may die a few times, but will be able to win this battle.
Then attack the two other Barbarians.
Send a Craftsman to free the Archer trapped in the cage. (red circle)
Completing this quest adds the two archers in the east to your army.
The Hero may die a few times, but will be able to win this battle.
Then attack the two other Barbarians.
Send a Craftsman to free the Archer trapped in the cage. (red circle)
Completing this quest adds the two archers in the east to your army.
Show/Hide
Buy Stone Dam Design--Talk to the merchant to get him to offer you a stone dam design for 25 food. Build a Wooden Tower to save up enough food.
Find Location for Dam by moving the hero to the narrowest part of the river. (see red arrow on map)
Mine the stone blocks needed for the dam. See the black circles. You will need to build 2 quarries where the stars are, but the rest can just be hacked away at.
Place Stone Blocks where the red arrow is.
Build the Stone Dam.
Show/Hide
Collect bird eggs and feathers for the trader. After you purchase the plans, you can unlock the bridge in the store menu, then you can build the bridge and head to Kingdom Two.
Build Stone Bridge
Move to the North to travel to Kingdom 2.
Build Stone Bridge
Move to the North to travel to Kingdom 2.
Kingdom Two
Show/Hide
Drawbridge Entrance
Show/Hide
Find 2 drawbridge pegs (see pink stars).
The one on the left needs to have someone break through the stone.
Open the drawbridge.
The one on the left needs to have someone break through the stone.
Open the drawbridge.
Show/Hide
Deliver letter to the Countess
Collect the ingredients for the Pumpkin Spice Pie the King wants. There is not a huge rush to do this because you have plenty of stuff to do.
8 Pumpkins--There are plenty of pumpkins lying around.
3 Eggs--There are several ways to get eggs, you can be patient and level up an Archer, you can free the Archer in the #4 cage, or you can find them on the ground near #8 and #2.
2 Fire Spice Herbs (see red stars)
You might want to wait until you trigger the Mason Key quest so that you only have to go back to Kingdom 1 once.
Return to Kingdom 1, pick up the pie, and drop it at the King's feet.
Show/Hide
Rescue 10 villagers. When you do rescue a Villager, if you want to keep him you will need to build housing for him.
1) Clear the log blocking cage #1 and that will release a Craftsman to help you.
2) Once you have built an upgraded Lumber Camp, build a bridge to the south. Clear the vine blocking cage #2 and you will trigger the Merchant 2 quest.
3) Build a stone quarry to remove the stone blocking #3.
4) Plant a magic bean a bit to the left of Cage #4 just below the wheel to release an Archer. You can get one from the Merchant once it is unlocked or you might get one after you release the Villager in cage #3.
5) Cage #5 is blocked by a dragon. Walk toward the dragon to trigger the Sleeping Potion quest. Once you have the sleeping potion you can give it to the dragon and then send a Craftsman to open the cage.
6) Use Soldiers and your Hero to get rid of the Giant near cage #6 and then send a Craftsman.
7) Mine the stone behind where the Giant was (see yellow circle). Carry the stone block to the pressure plate near cage #7 to release the captive.
8) Use Soldiers and your Hero to get rid of the Barbarians near cage #8 and then send a Craftsman.
9) Use a Craftsman to open cage #9
10) An Archer can remove the flower plant. You will need to destroy the bridge to get a Craftsman to cage #10 to release the captive.
Show/Hide
You need to build an army of 6 Soldiers, 4 Archers, and 3 Knights.
See Soldiers under General Tips--Characters to see specifics on levelling up your soldiers.
You might want to wait to get the last soldier until you are ready to trigger the Giant Attack quest.
See Soldiers under General Tips--Characters to see specifics on levelling up your soldiers.
You might want to wait to get the last soldier until you are ready to trigger the Giant Attack quest.
Show/Hide
This quest is triggered by finishing Sword and Arrows.
Giants will start attacking you from 4 directions.
You will need to chop down their magic bean stalks to keep them from coming in. See green triangles.
Set a soldier on the stalk to chop it down, after you kill the Giants obviously.
Giants will start attacking you from 4 directions.
You will need to chop down their magic bean stalks to keep them from coming in. See green triangles.
Set a soldier on the stalk to chop it down, after you kill the Giants obviously.
Show/Hide
There are 13 Lost Tiaras to find in this optional quest.(see yellow stars)
There are 2 hidden in the flooded area. One will be uncovered when you remove the water. You will need to destroy the Stone Tower in that area to get the tiara.
There are 2 hidden in the flooded area. One will be uncovered when you remove the water. You will need to destroy the Stone Tower in that area to get the tiara.
Show/Hide
This quest is triggered when you approach the locked gate that hold the Mason Scrolls. (see yellow square)
You will need to return to Kingdom 1 and pick up the key, which is marked by the purple diamond.
You will approach this spot from the north side of the drawbridge.
You will need to return to Kingdom 1 and pick up the key, which is marked by the purple diamond.
You will approach this spot from the north side of the drawbridge.
Kingdom 2 Map
 Sleeping Dragon
Show/Hide
This is triggered by approaching the dragon. You need to make him go to sleep to rescue the Villager.
You will need to talk to an Alchemist about a potion. To do this, you will need to have a Scholar and an Alchemist shop built. See General Tips--Characters and Buildings.
To actually trigger the Alchemist conversation, you just need to click on the Alchemist himself.
You will then need to harvest a magic plant with a Scholar. This is the plant that everyone states they don't know what to do with when they try to pick it up. It is a purple leaved plant. There should be one on the Merchant's island in the west.
You will now need to speak to a Baker, so build a Bakery and employ a Craftsman. Click on the Baker to find out that you need ingredients for a pie.
Collect 7 boar meat and 8 eggs.
Click on the Baker again and he will drop a pie.
Pick up the pie and drop it in front of the dragon. He will now fall asleep.
Show/Hide
The Merchant is locked in cage #2 so send a Soldier to remove the vine blocking his cage.
Hunt 7 rabbit's feet to unlock Healing Potions for purchase. Use Archers to hunt.
Hunt 6 deer skins to unlock Mystery Seeds. Use Archers to hung.
Hunt 8 frog legs to unlock Magic Beans.
Pick up 3 Giant's clubs to unlock Knowledge Tomes, the blue books that give you +25 XP.
Pick up 2 Dragon Scales to unlock Gold Rings. There are only 2 so don't pick them up until you need them. You will have to fight the Dragon in the northeast. See blue circles.
Show/Hide
At some point, a bard will show up wanting another adventure to write about.
You will need to find and cut down the Giant Tree. See blue square.
The problem here is that no one is strong enough to do this.
You will need a Level 4 Craftsman and an Axe Upgrade at the Lumber Camp (see General Tips--Characters and Buildings). Just drag that Craftsman to the tree like it was a tree stump.
Once the tree is cut down the Giant will show up nearby. He will only kill 1 Soldier before he decides he's not a killer and leaves behind a tree sapling.
Pick up the tree sapling and you will now be able to unlock them in the store and purchase them from a staffed Lumber Camp. Keep tree saplings in stock so that you will never have to build another Lumber Camp.
Show/Hide
This is an optional quest.
1) Collect 60 food.
2) Upgrade your huts to 3 person cottages (see General Tips--Buildings)
3) Have at least 2 Scholars (not necessarily at the Library though)
4) Upgrade the Castle.
1) Collect 60 food.
2) Upgrade your huts to 3 person cottages (see General Tips--Buildings)
3) Have at least 2 Scholars (not necessarily at the Library though)
4) Upgrade the Castle.
Show/Hide
The kingdom will become cursed and your poor Villagers will turn into frogs temporarily.
Talk to an Alchemist (remember.…build the Alchemist building and employ a Scholar there).
You will need to return to Kingdom 1 for Wizard's Help quest to bring back a Wizard.
Build a Wizard's Hut and employ the Wizard.
You now need him to destroy 3 blue crystals. Do this by dragging the Wizard over to them.
Show/Hide
You will need the Mason Scrolls and an unlocked Masonry to complete this quest so do those first.
Return to Kingdom 1 and talk to the Wizard who is hanging out with the King.
He'll help you if you find his hat. See blue square.
You will need to build a Stone Bridge to get to the Hat.
The two of you can now return to Kingdom 2.
Return to Kingdom 1 and talk to the Wizard who is hanging out with the King.
He'll help you if you find his hat. See blue square.
You will need to build a Stone Bridge to get to the Hat.
The two of you can now return to Kingdom 2.
Show/Hide
The Countess wants a Love Potion.
Talk to an Alchemist.
You will need to collect 4 Frog Legs, 4 Boar Tusks (hunt boar with Archers), 4 Carrots, Sap of Spruce (4 tree stumps)
Click on the Alchemist when done.
Pick up the potion and drop it at the Countess' feet.
Talk to an Alchemist.
You will need to collect 4 Frog Legs, 4 Boar Tusks (hunt boar with Archers), 4 Carrots, Sap of Spruce (4 tree stumps)
Click on the Alchemist when done.
Pick up the potion and drop it at the Countess' feet.
Show/Hide
This is an optional quest but is required for trophies.
To access the ruins of the Ancient Cathedral (see blue square), remove the Blue Stone, then the monster plant, and then fight the bad guys. To get through the gate, break up everything and dig up the fire pit. Drop the straw bundle on the trap blocking the gate.
Defeat the Black Knight.
Send a Mason (a Craftsman who works at a Masonry) to inspect the ruins.
You will need to find 4 missing stone fragments in the flooded area.
You will need to destroy the 3 towers surrounding the flooded area.
The one closest to the Cathedral ruins is blocked by vines, so send a soldier to hack them up. You will now have control of the tower and can demolish it.
The second two are on the other side. The northern one is blocked by a log so send someone to chop it up and then destroy it.
The third one has a key to it up at the top. Plant a Magic Bean to have the bean stalk knock the key down. Pick up the key and destroy the tower.
The flood will now be gone and you can get to the 4 stones now. See blue stars. First shoot the monster flower to get in.
1) Pick up first stone and take it back to the ruins.
2) Break through the rock rubble and cut the vines to get to the red key to unlock the gate to the stone tower and get the stone outside.
3) Break through the rock rubble to get to the stone on the right.
4) Pick up the rock that you used on the pressure plate to release the caged villager and drop it on the pressure plate to get the last stone.
Send a Mason to the ruins to repair it.
Show/Hide
Send a Level 3 Knight (on a horse) to the Countess.
Show/Hide
The Knight wants a ring for his love.
He gives you a key to the locked gate blocking the way to the dragon in the northeast.
You need to defeat the dragon to get a diamond.
Pick up an egg to draw the dragon out and drop it when he arrives so you can fight along with the soldiers.
The dragon will drop a diamond when defeated.
Now you will have to wait to pick up the dragon scales for the Merchant to get the gold rings. If you are not at that point in his requests go fill the prior ones.
Buy a gold ring.
Click on the blacksmith who will make a ring.
Now the Hero has to go pick up the ring and bring it to the Countess.
Show/Hide
You will need to build a stone bridge to get to your travel point. You will return to Kingdom 2 later to finish a quest.
Hidden Quests
Show/Hide
Magic Mirror Trophy
Show/Hide
Garden Ruins
Show/Hide
Dark Mojo
Show/Hide
Show/Hide
To get this trophy, you need to find the secret of the Cathedral.
You can either log every bit of forest and then mine every bit of stone on the level or...
Build a Lumber Camp where the black square is on the map.
Upgrade it and staff it with high level Peasants to chop down that lone tree.
Once the tree is down, chop up the stump, and build a Stone Quarry to remove the stone just past the tree.
Staff the Stone Quarry with high level Craftsmen.
When the rock is gone, pick up the Cathedral window and drop it at the Cathedral.
Dig up the dirt hole that will show up after you deliver the window.
Show/Hide
There is a ruin up to the north.
Send a Wizard to place a Blight Scroll on the stone area to the left of the ruins (see green square)
Build a Stone Tower on that spot (upgraded Wooden Tower)
Send a Craftsman to repair it.
Send a Wizard to place a Blight Scroll on the stone area to the left of the ruins (see green square)
Build a Stone Tower on that spot (upgraded Wooden Tower)
Send a Craftsman to repair it.
Show/Hide
There are 6 blue stones for a Wizard to remove in Kingdom 2 (see blue triangles)
Kingdom Three
Show/Hide
Meet the Duke
Show/Hide
Help the Villagers
Show/Hide
Fight the Blight
Show/Hide
Merchant Trade 3
Show/Hide
Forgotten Outpost
Show/Hide
Ancient Tower
Show/Hide
Scrying Stone
Show/Hide
Ancient Ritual
Show/Hide
Haunted Woods
Show/Hide
Traveling Bard 3
Show/Hide
Lost Bottles
Show/Hide
Hidden quests and items
Show/Hide
Kingdom 3 Map
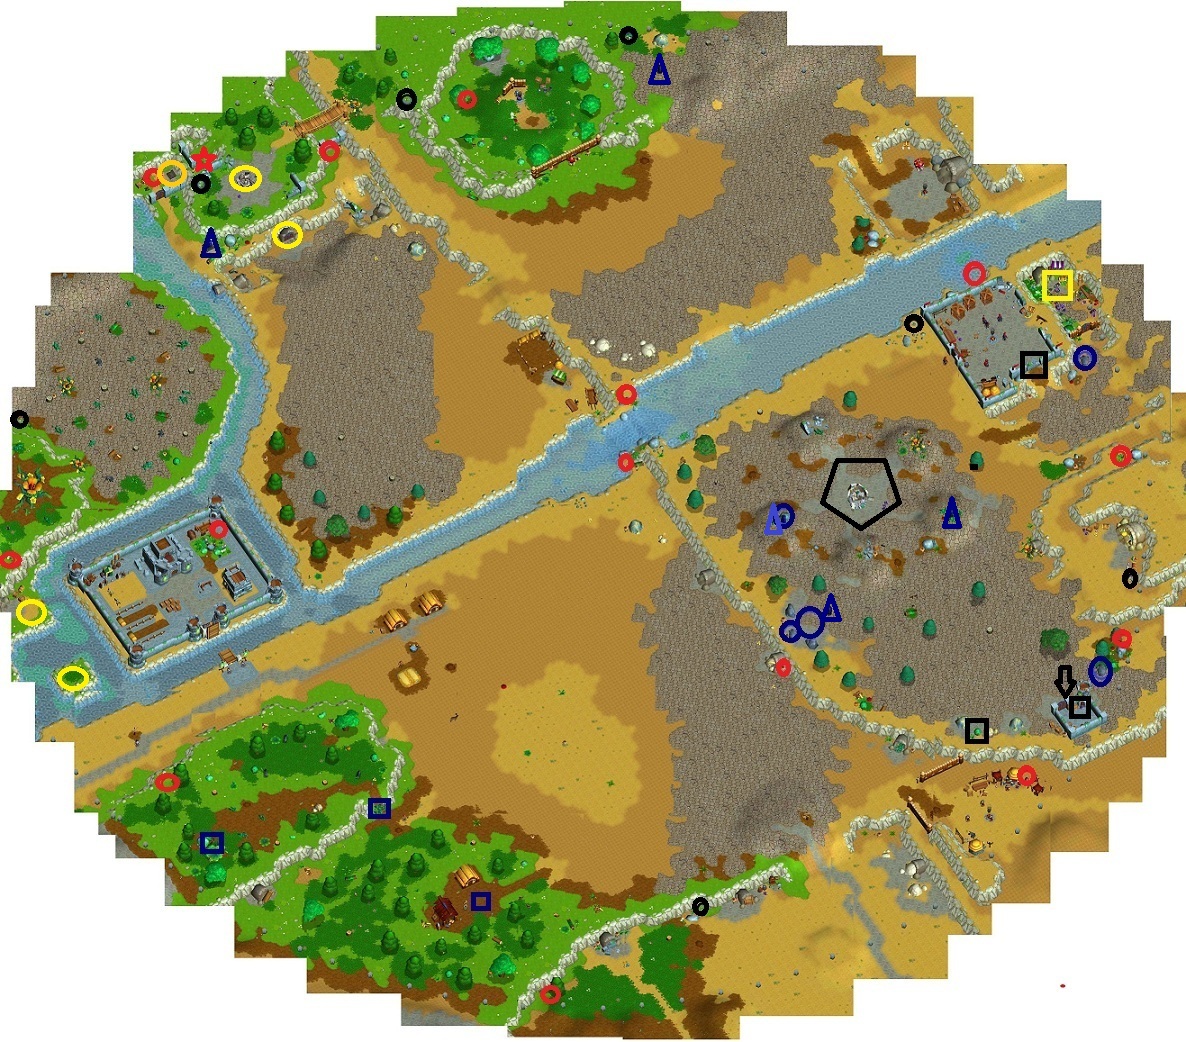
Show/Hide
Talk to the Soldiers guarding the bridge to the castle.
You will need to find the Duke.
Go ahead and do the Help the Villagers quest to get production going.
There are 4 caves that the duke could be hiding in.
One is blocked by a log and you can send your Lumberjack to remove that log.
Another is blocked by a big rock. Build a Stone Quarry and put someone to work there.
Next is one blocked by a box and then there is one blocked by a stone wall.
When you finally find the Duke you will need to send 2 Soldiers to escort him back to his castle.
When he returns, you will get the soldiers at the bridge and the Fight the Blight quest will be triggered.
Show/Hide
You will need to help 3 Villagers.
The Farmer wants you to find his manifesto.
The Miner south of the farm wants you to find his gold.
The Lumberjack in the woods wants you to find the key to the Lumber Camp which was eaten by a boar.
The manifesto is buried near the Lumber Camp. (See blue square)
The other 2 items are up on the plateau in the west that is blocked by vines (see blue square)
You will need to build a Barracks because you need Soldiers to chop the vines.
Go to the plateau to find the hidden gold (see blue square)
Start killing boars until you get the key. Wait until you build some wood towers before you pick up all that meat.
Build a goldmine for the miner.
Show/Hide
You need to talk to the Wizard who is in the grove to the north.
You will need to build a wood bridge to get across the river and then go to the Wizard.
He wants:
5 frog legs (check in the eastern section of the river)
4 bird eggs (need Archers)
2 fire herbs (there are usually some by the ruins that are blocked by the monster plant just west of the Wizard)
Talk to the Wizard again.
You will now to defeat the 3 Giants to the east. Use the fighting tips.
Once you get the scroll, you will also get control of the Wizard.
Pick a spot to use the Blight Scroll; you might as well use it where you need it to build something.
Show/Hide
Merchant Trade is not necessary to the game after you unlock the Magic Beans. You might even be able to find a Magic Bean dropped by a Giant, but why risk it?
6 Berry Bushes to unlock Mystery Seeds.
5 Boar Tusks to unlock Magic Beans (use Archer)
4 Black Knight Helms to unlock Meat Pies. The helms have red feathers and are dropped sometimes after defeating black knights.
2 Crowns to unlock Training Dummies. These are dropped by enemies in fights (such as dragons) and in locked chests.
1 Dragon's Horn to unlock Tomes of Knowledge. The horns are dropped after killing a dragon.
Show/Hide
After completing Fight the Blight or on approaching the fort (see black arrow), you will be asked to investigate the Forgotten Outpost.
The key is under a Berry Bush near the outpost (see black square)
After unlocking the Outpost you will then need to lock down the scroll by planting a magic bean (see black square)
Pick it up and find out you need to find the Black Knight's Lair.
Defeat the Knight at the gate and then break down the rock on the side (see black square)
You can then free the caged Villagers with a Craftsman. If you want them to stay, you will need to building housing for them
Show/Hide
You will need to approach the ruins (see inverted black pentagon)
Send a Mason (Craftsman employed at Masonry) to inspect the ruins
You need:
1000 stone (click on the ruins speech bubble to commit the stone)
8 cornerstones. You will need to mine black stone (see blue circles). 4 stones will be mined individually and you need to build a Stone Quarry to get the other 4 stones (see large blue circle). You will need to bring the corner stones to the ruins.
20 Villagers. This does not include the soldiers. You will need to upgrade the castle.
Once you have everything, you will need to send the Wizard to investigate.
You now need:
The Scrying Stone from Kingdom 2 (see Scrying Stone quest)
7 Tower stones (see black circles)
Once you have everything, be prepared to be attacked.
Show/Hide
Return to Kingdom 2 when ready.
Talk to the Countess.
Use a blight scroll on the ground outside the area with the Scrying Stone (see black circle)
Build a lumber camp to remove the tree blocking the way in.
Check out the Hidden Quests in Kingdom 2 while you are waiting. You might as well do something!
Chop up the stump and pick up the stone and take it back to Kingdom 3 when you are ready.
Show/Hide
You will need to build 5 Stone Towers on the small hills surrounding the ruins (see points of black pentagon)
You will need to clear the hills with a variety of methods and then build Wooden Towers and upgrade them to stone.
Light each Stone Tower with 50 wood.
A cave will open to the north where you can go when you have your army ready for the final battle, Storm the Tower.
You will need to clear the hills with a variety of methods and then build Wooden Towers and upgrade them to stone.
Light each Stone Tower with 50 wood.
A cave will open to the north where you can go when you have your army ready for the final battle, Storm the Tower.
Show/Hide
This is an optional quest that is triggered after you build a stone bridge over to the northwest and go to pick up one of the Tower Stones needed for the Ancient Tower quest.
You will need to send someone over to check out the area to figure out why the blight is so bad over there.
Go close to the monster plant and discover you need to destroy the plant.
Send TWO Archers over to remove the plant.
You now need to replant the forest. Do this by using 4 Blight Scrolls and planting 4 tree saplings
If your lumber camp is out of wood and you don't have enough tree saplings, build another lumber camp and employ it to get the tree saplings after a bit. If you did not complete the Traveling Bard 2 quest, you will not be able to complete this quest until you go back to do it.
Show/Hide
At some point (if you are lucky), another Traveling Bard will show up.
To attract the Ruby Dragon, you will first need to build 5 Windmills.
You then need to trap an animal that the dragon would like to eat. You have two options:
1) Do as suggested and use meat pies. This may take several tries. You will eventually discover you will need to trap a boar.
2) Use your Hero to get a boar to follow you to the trap in a similar fashion that you did in Kingdom 1 to trap the barbarians. Attack it and then lead it to the cage to trap it.
Once the boar is trapped the Ruby Dragon will attack so ready your army and kill it.
Show/Hide
Pick up 14 Lost Bottles (see red circles on map)
There is 1 bottle in the north that is behind a locked gate.
Plant a Magic Bean from the outside to knock the stone block off the wall inside to land on the pressure plate (see red star); see Fountain Ruins quest below to get info on how to get in there.
There is 1 bottle in the north that is behind a locked gate.
Plant a Magic Bean from the outside to knock the stone block off the wall inside to land on the pressure plate (see red star); see Fountain Ruins quest below to get info on how to get in there.
Hidden quests and items
Show/Hide
Herman the Rotten
Show/Hide
Fountain Ruins
Show/Hide
Dark Mojo
Show/Hide
Show/Hide
You can completely harass the fellow to the north of the Black Knight's Lair (see yellow box).
This will take lots and lots of clicks on him but after a few comments he will finally leave, providing you with a ton of stuff he left behind. This will take LOTS of clicks but it's worth it.
This will take lots and lots of clicks on him but after a few comments he will finally leave, providing you with a ton of stuff he left behind. This will take LOTS of clicks but it's worth it.
Show/Hide
Find a key by mining the stones around the ruins in the north (see yellow circles)
Use the key to open the gate that is just south of the ruins.
Send a Wizard to remove the blue stone from the pressure plate (see blue triangle)
To get there you will have to build 2 bridges to the west and destroy the bridge to the Haunted Woods.
Build a wood bridge to the small island in the west (see yellow circles in west) and then a stone bridge to where the ramp into the water is.
Remove the blue stone on the pressure plate to flood the area.
Send a Craftsman to repair the ruins.
Show/Hide
There are 5 blue crystals in Kingdom 3. (See blue triangles)
Kingdom 3 Map
Storm the Castle
Show/Hide
You don't need to do this quest right away; you may want to build up your army and make them healthy with armor and weapon upgrades. Your whole army will travel with you. You won't need to worry about food on this quest.
Save your game before you start.
Be sure to destroy barbarian huts because some of them have soldiers being held captive in them.
Approach the drawbridge.
Find 4 Drawbridge Pegs (see black circles)
Cross the bridge and kill the 2 black knights.
Figure out a way to open the gate; maybe that catapult to the southeast (yellow circle)
Kill the barbarians in the camp and approach the catapult.
You now have a hole in the wall. As you go through you will be attacked.
You won't be able to get to the Dark Knight because there is a magic shield.
Once you start beating up one of the towers, you will find out that you need to destroy all five over them.
The eastern most tower has a pressure plate on the inside. You will need to find a magic bean to drop under the stone so it will drop on the pressure plate.
One gate has a key (see blue circles)
Rescue the Giant beyond the monster flower for another team member.
The western most tower will have a magic bean in the rubble, as signified by the bean stalks planted around it.
Once you have destroyed all 5 towers, you can head to the center to defeat the Dark Knight; once you do the Tower will crumble down and you will be able to return to Kingdom 3.
Storm the Castle Map
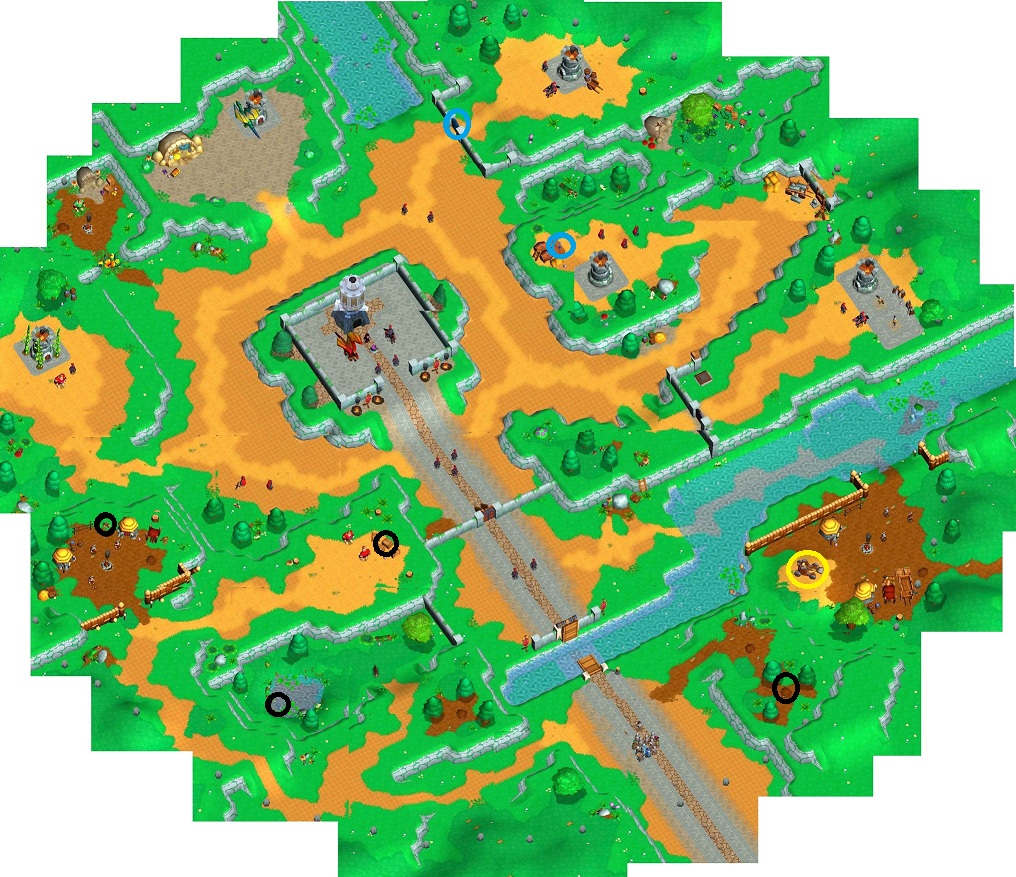
Mystery Buildings and Mystery Crops
Show/Hide
Dragon Hatchery
Show/Hide
King's Statue
Show/Hide
Sunflowers
Show/Hide
Eggplant
Show/Hide
Dragon's Fruit
Show/Hide
Show/Hide
Unlock the Dragon's Hatchery by building 4 Libraries and staffing all 4 with Scholars.
Show/Hide
The King's Statue will be unlocked once you have earned the Wise Wizard Hat trophy, which is the one for repairing the ruins in all 3 kingdoms.
Show/Hide
Employ 2 Level 4 Peasants or Craftsmen at the same farm field.
An employed Tavern will generate +4 gold when you have a field growing sunflowers.
An employed Tavern will generate +4 gold when you have a field growing sunflowers.
Show/Hide
If you do not just come across a Mystery Seed that grows into an Eggplant, start buying Mystery Seeds from the Merchant and planting them.
Pick up anything you don't recognize and hope you get an eggplant after a bit. It may take awhile.
You will then be able to unlock the Eggplant in the store.
An employed Tavern will generate +4 gold when you have a field growing Eggplant.
Pick up anything you don't recognize and hope you get an eggplant after a bit. It may take awhile.
You will then be able to unlock the Eggplant in the store.
An employed Tavern will generate +4 gold when you have a field growing Eggplant.
Show/Hide
Build a Dragon Hatchery.
Pick up a dragon's egg; there are plenty in Kingdom 2 near the dragon lair in the northeast.
Deliver the dragon's egg to the hatchery.
Staff the hatchery with a Scholar.
Once a Dragon hatches, send it to a farm growing Eggplant.
The Dragon will destroy the Eggplants and you will be able to pick up Dragon Fruit.
Unlock the Dragon Fruit in the store to be able to grow it on a farm.
An employed Tavern will generate +5 gold when you have a field growing Dragon Fruit.
Trophies
Show/Hide
Armor Set
- Barbarian Rumble--Defeat 50 Barbarians
- Giant Throw Down--Defeat 20 Giants
- Dragon Taming--Defeat 10 Dragons
- Knight Duel--Defeat 25 Black Knights
Throne Room
- Souvenir Goblet--Complete the tutorial
- Stately Scepter--Reach a total kingdom population of 50
- Highness Bathrobe--Build all buildings in one kingdom--this will include the mystery buildings. If you have built everything, you may need to go see if all of your housing is upgraded and build a hut and barracks. Don't forget to build a stone road.
- Royal Crown--Complete the game.
Treasure Room
- Farberge Egg--Recover the king's Family Heirloom.
- Lost Treasure--Recover the kingdom rulers lost treasures (complete the Lost Marbles quest in Kingdom 1, Lost Tiara quest in kingdom 2 and Lost Bottles quest in Kingdom 3)
- Magic Mirror--Uncover the hidden secret in the cathedral (see The Cathedrals Secret spoiler in kingdom 2)
- Wizard's Gold--Relight the torch light on the ancient mage tower.
Library Set
- Erudite Novel--Have 5 wizards present in your kingdom
- Scholarly Inkwell--Have 10 scholars studying in your kingdom
- Traveler's Globe--Grow all 6 crop types (unlock the mystery crops and have fields growing all 6 at one time)
- Time Keeper's Hourglass--Defend all 10 villages in Village Defense (available from the castles in Kingdom 12 and 3)
Chess Board
- Mighty King--Upgrade all character classes to their highest level (Level 4 Peasant, Level 4 Craftsmen, Level 4 Soldier, Level 3 Archer, Level 3 Knight, Wizard, and Scholar)
- Devout Bishop--Reach a population of 30 combat characters
- Humble Pawn--Reach a population of 30 town citizens
- Noble Knight--Reach a population of 8 Mounted Knights (Level 3 knights)
- Honored Rook--Upgrade 5 soldiers with new armor and weapons
Wizard's Set
- King's Sword--Pull the sword from the stone (see Sword in Stone in Kingdom 1)
- Ancient Dragon--Hatch a dragon (see Mystery Buildings and Mystery crops)
- Dark Mojo--Destroy all dark sources of magic in all 3 kingdoms (these are the blue stone the wizard removes)
- Wise Wizard Hat--Fully repair all the ancient ruins (Statue in Kingdom 1, Ancient Cathedral in Kingdom 2, and Fountain Ruins in Kingdom 3--see those quests under Hidden Quests under each Kingdom.)