

Lost Souls: Enchanted Paintings
The Lost Souls: Enchanted Paintings Walkthrough has step by step instructions for every chapter, including the location of every hidden object item and where to find every coin. It also includes detailed instructions and screenshots for puzzles. Save your son by saving the worlds in the enchanted paintings.
Images©
Fenomen Games
Overview:
You receive a mysterious package, a painting which you hang in your
sons room. During the night, he is captured by the painting and
disappears. A fortune teller will send you on the path to finding him.
Coins: Collect coins to earn rewards.
Hints: These are unlimited but must refill.
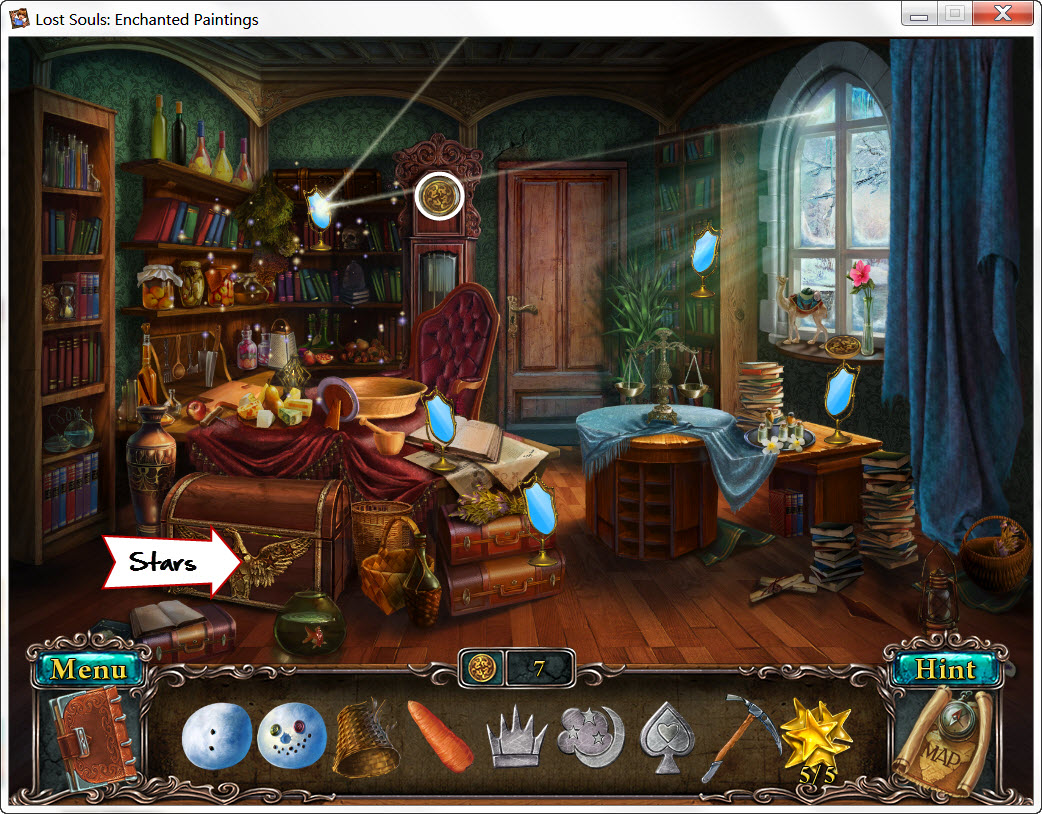
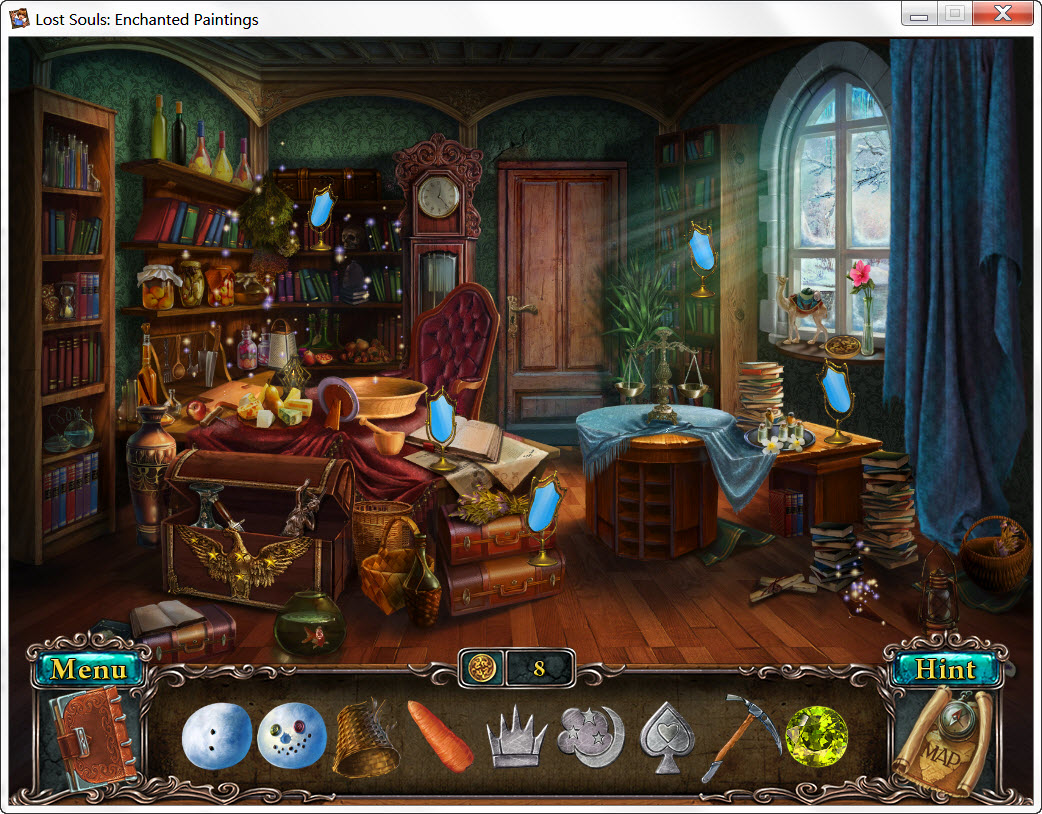
Areas: Each area/locale on the map has a number next to it, which shows the number of things that must be finished to complete each scene.
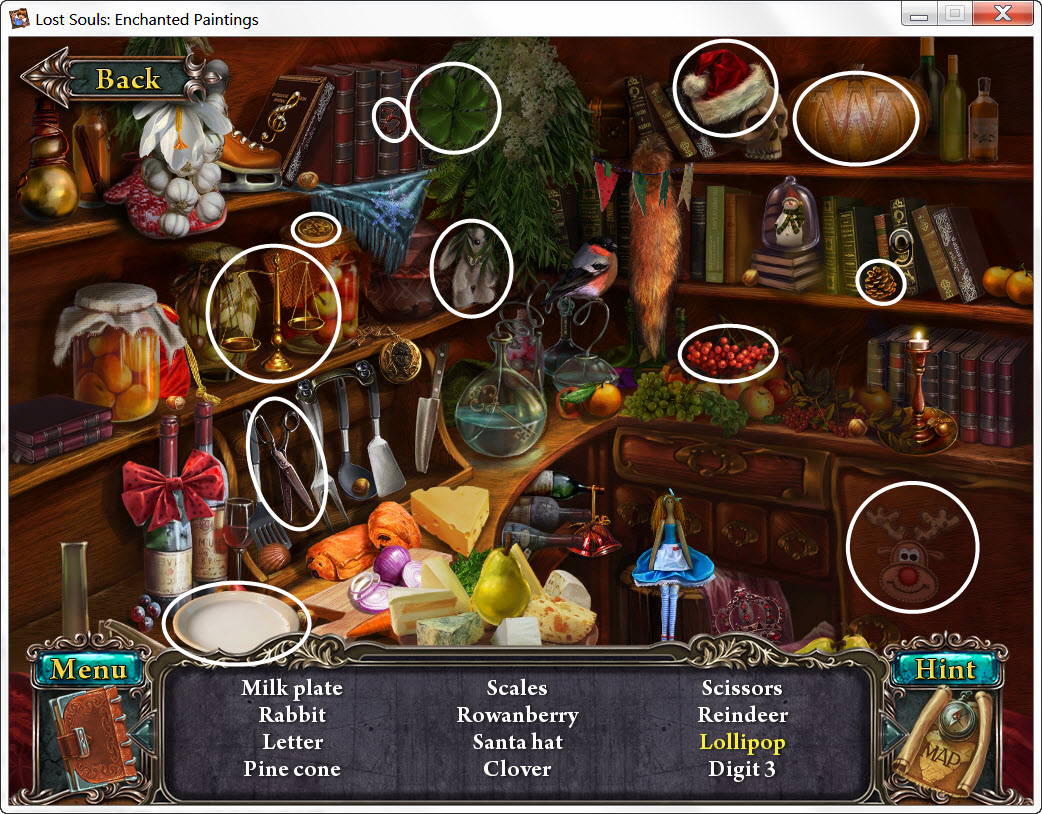
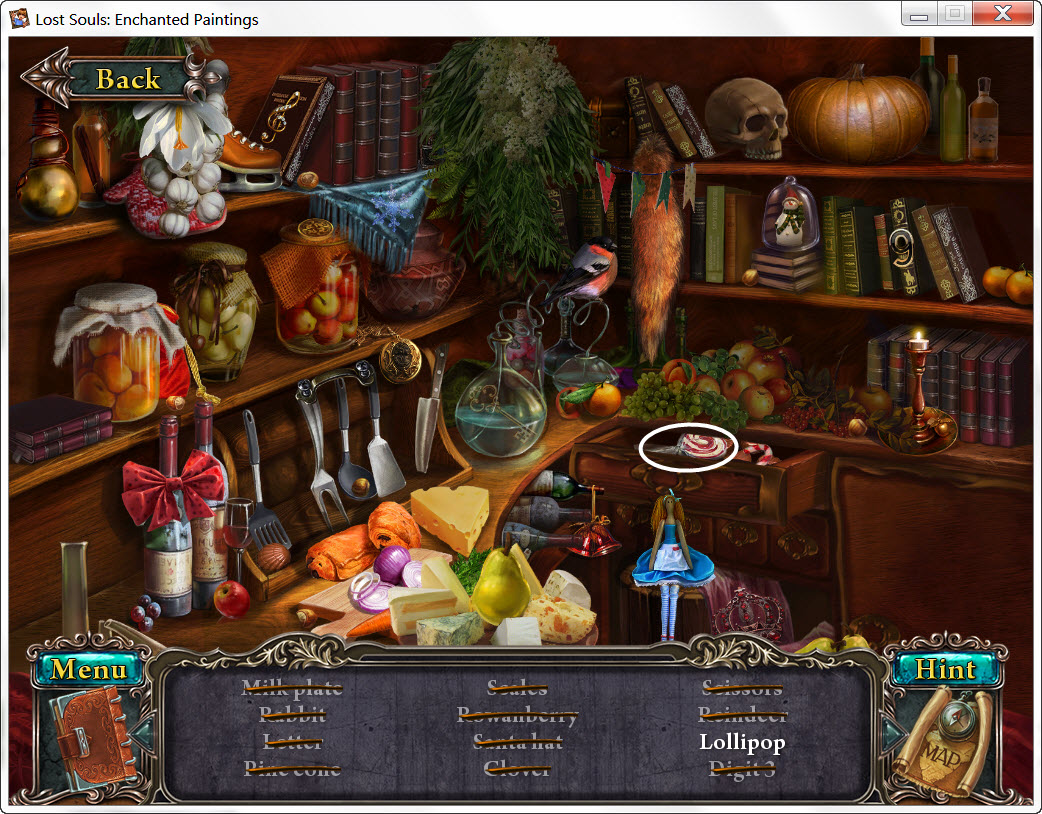
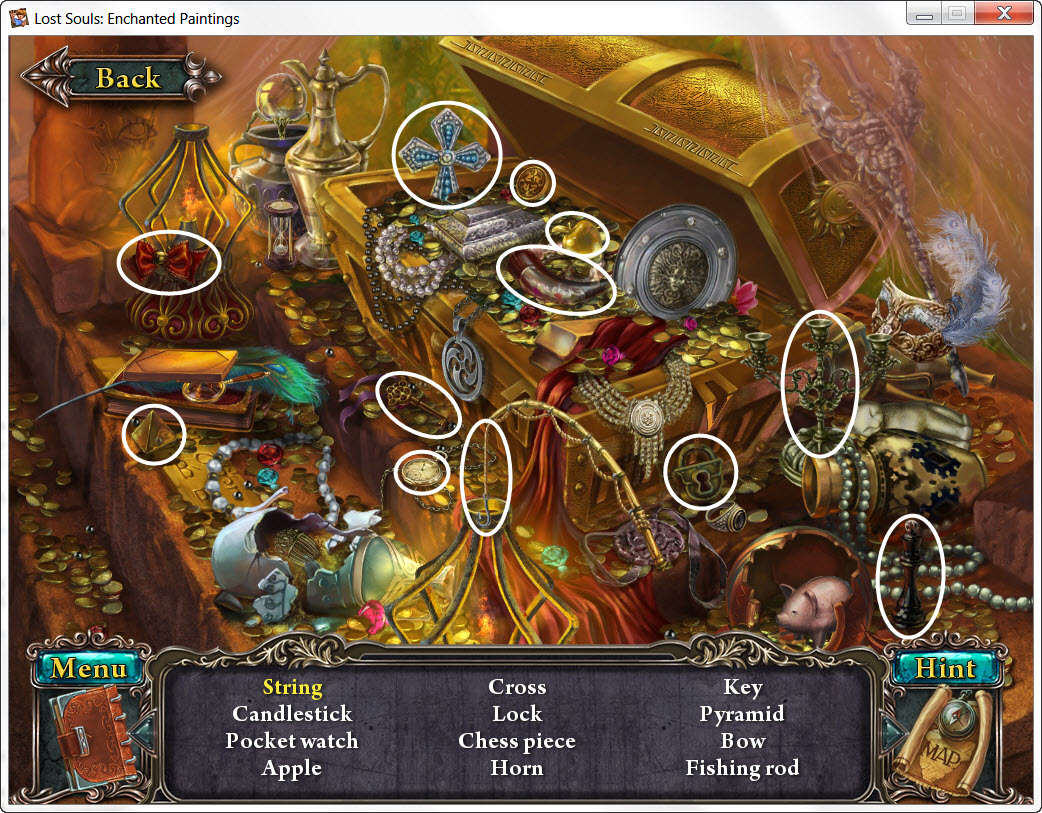
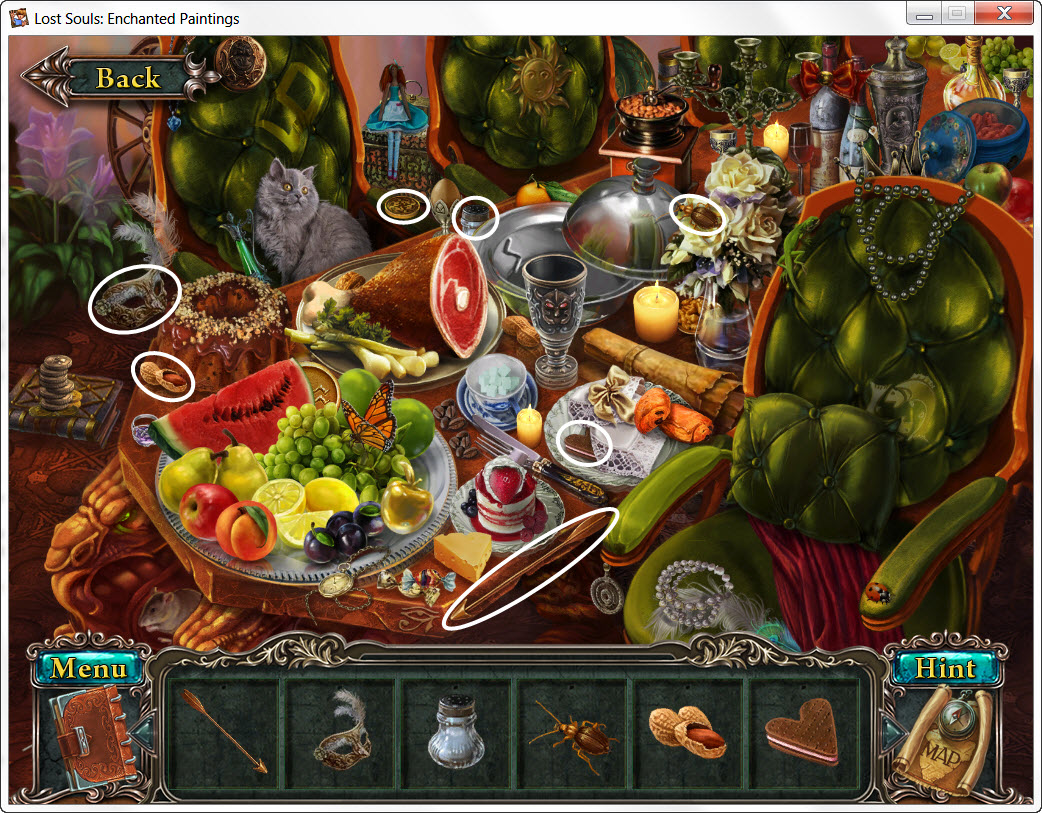
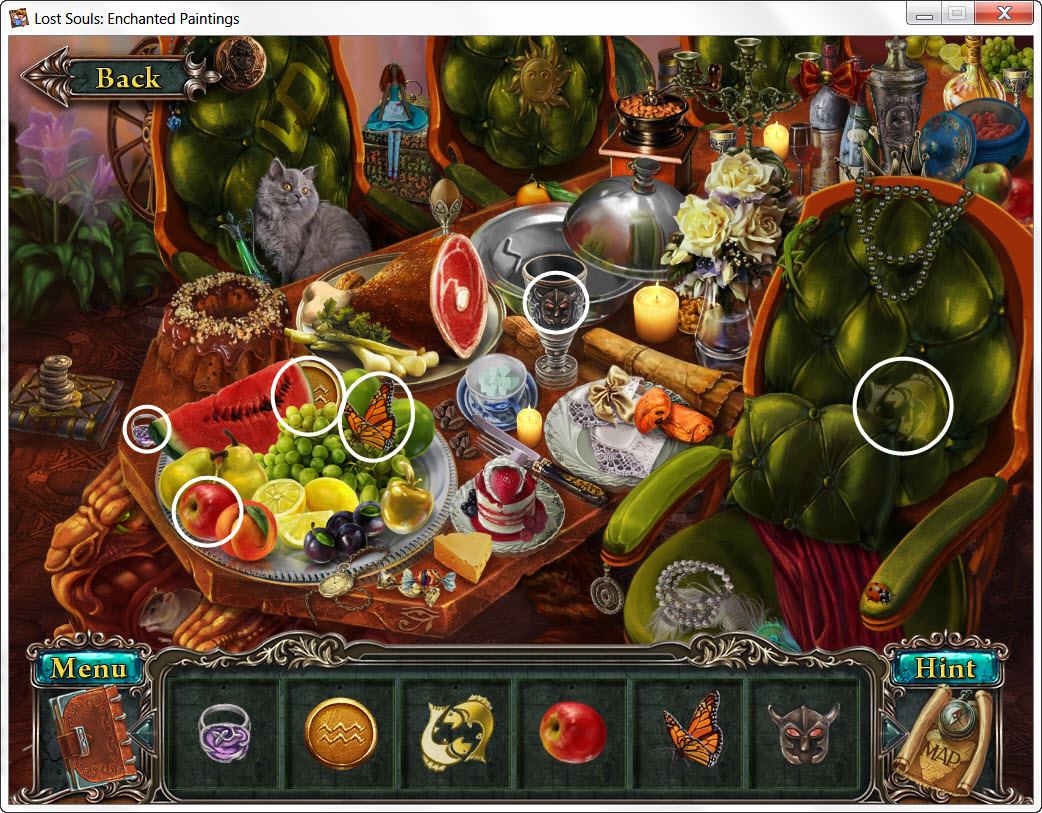
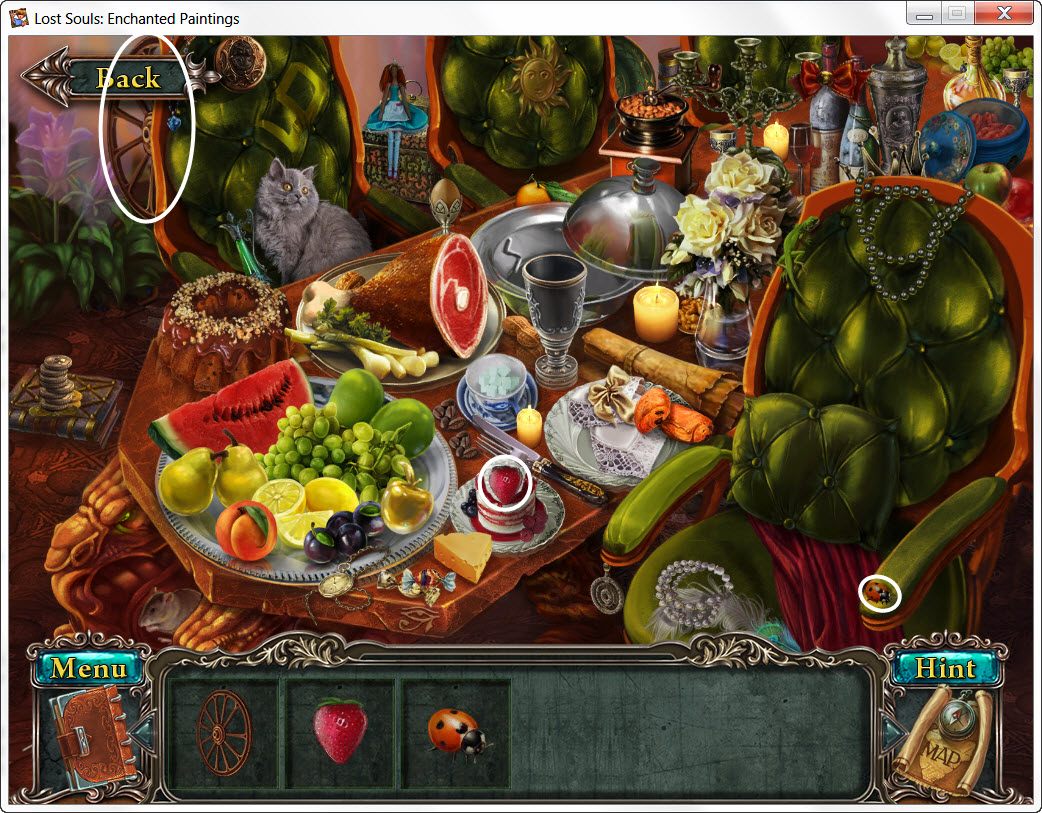
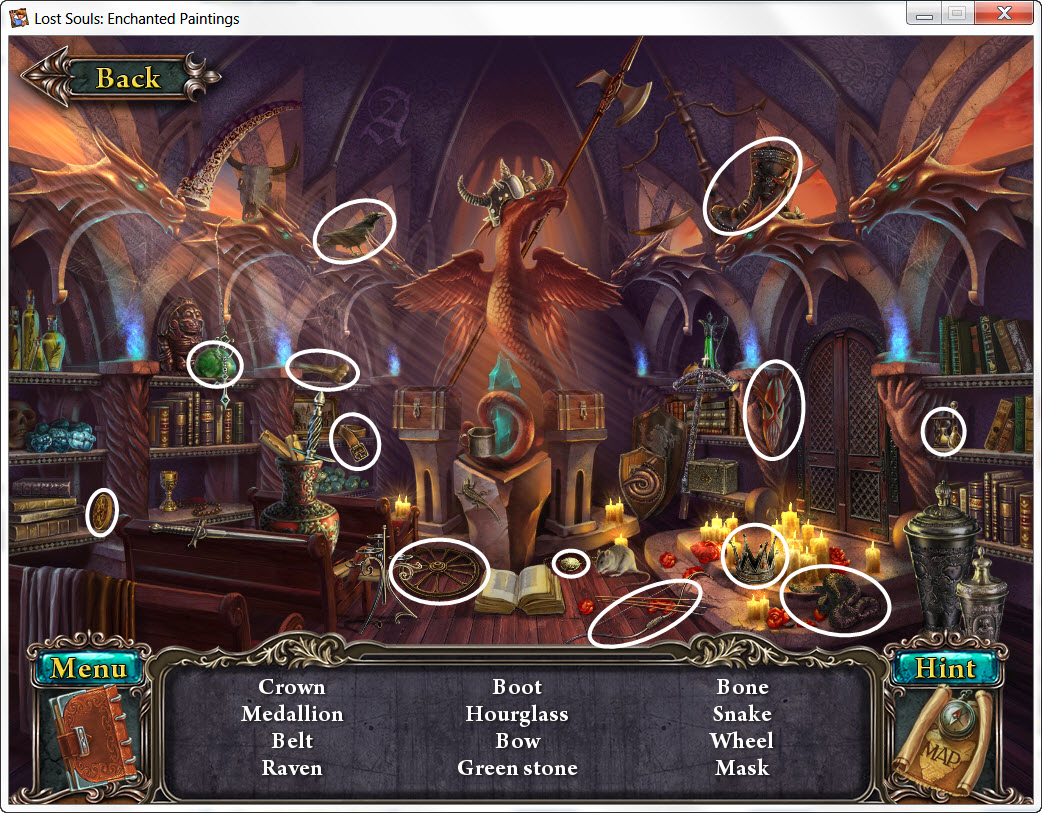
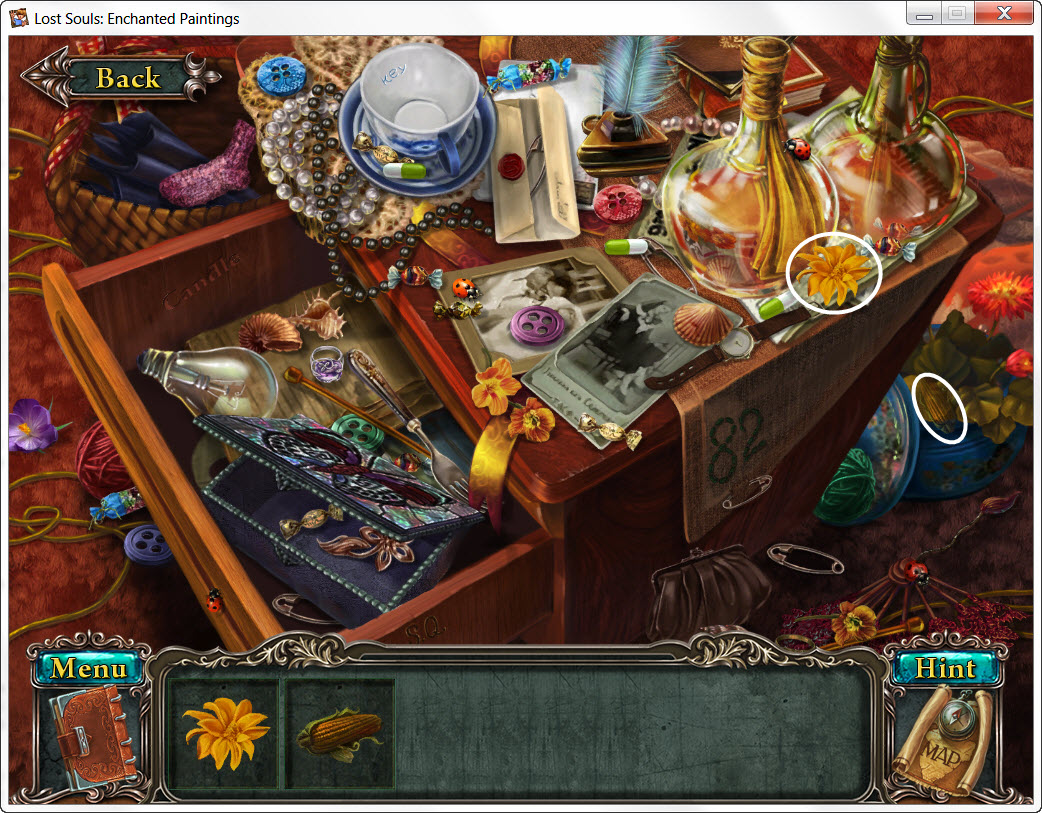
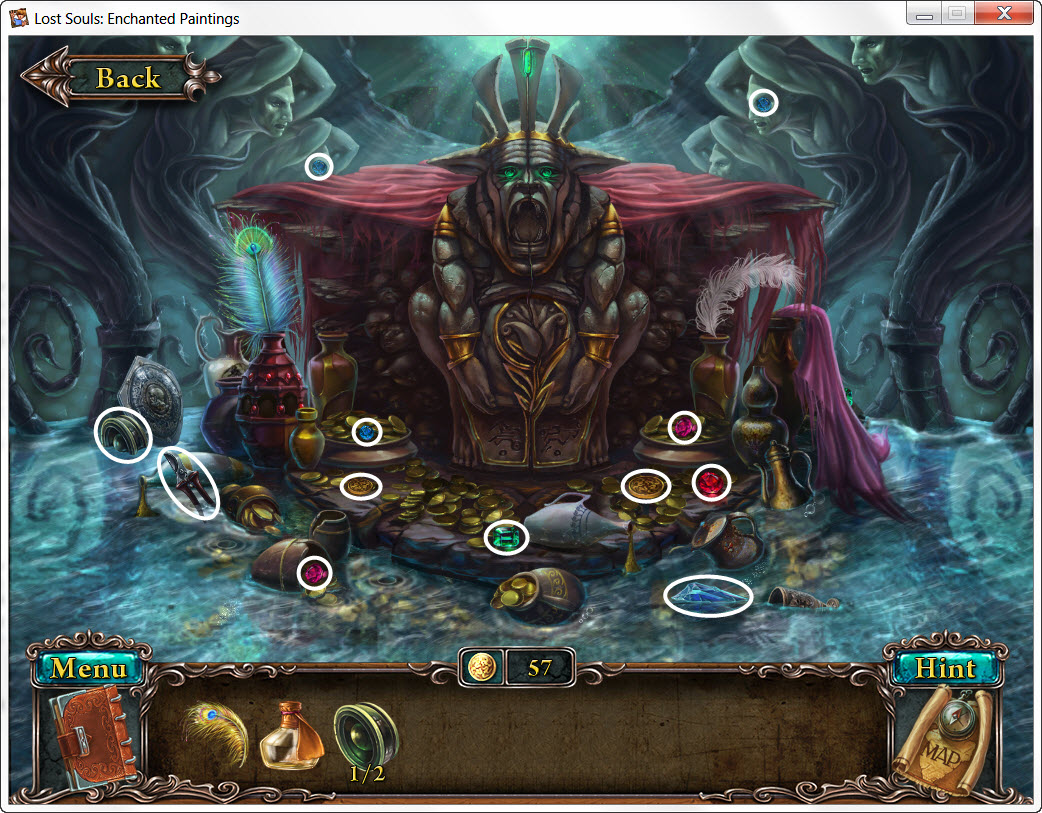
Hidden Object Scenes: The items in each scene are the same for everyone. Therefore, every item will be circled. The items in yellow mean you need to open/move something to find them.
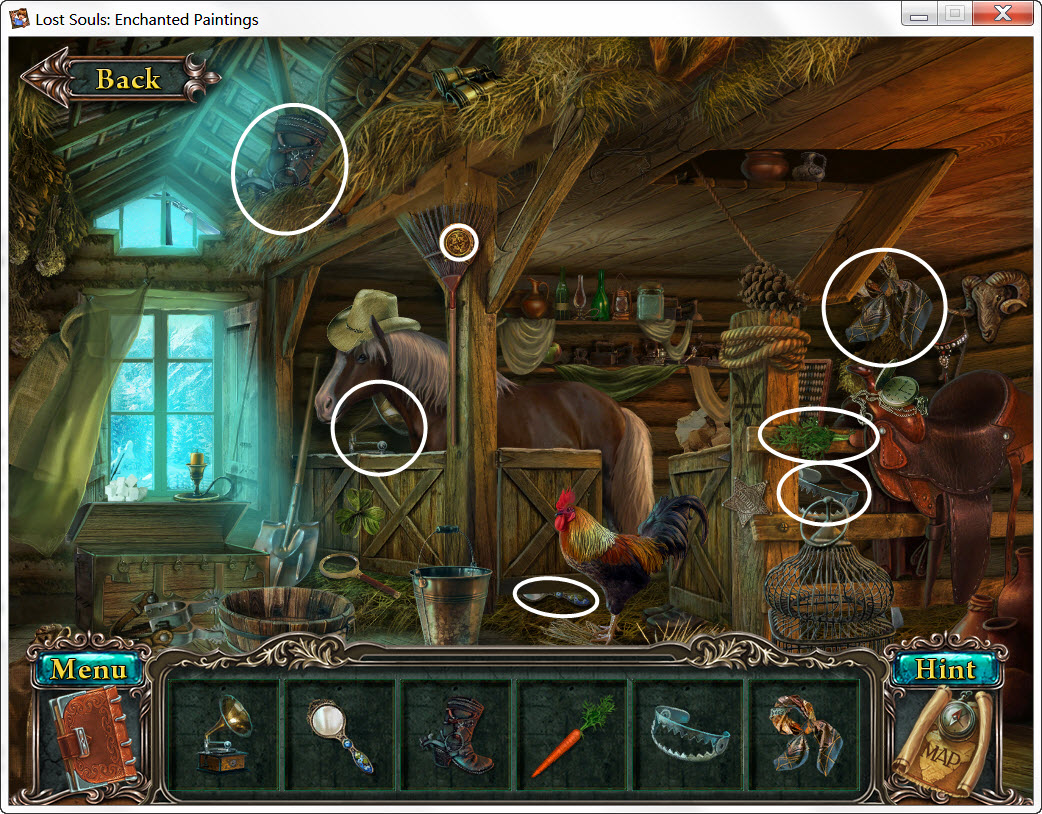
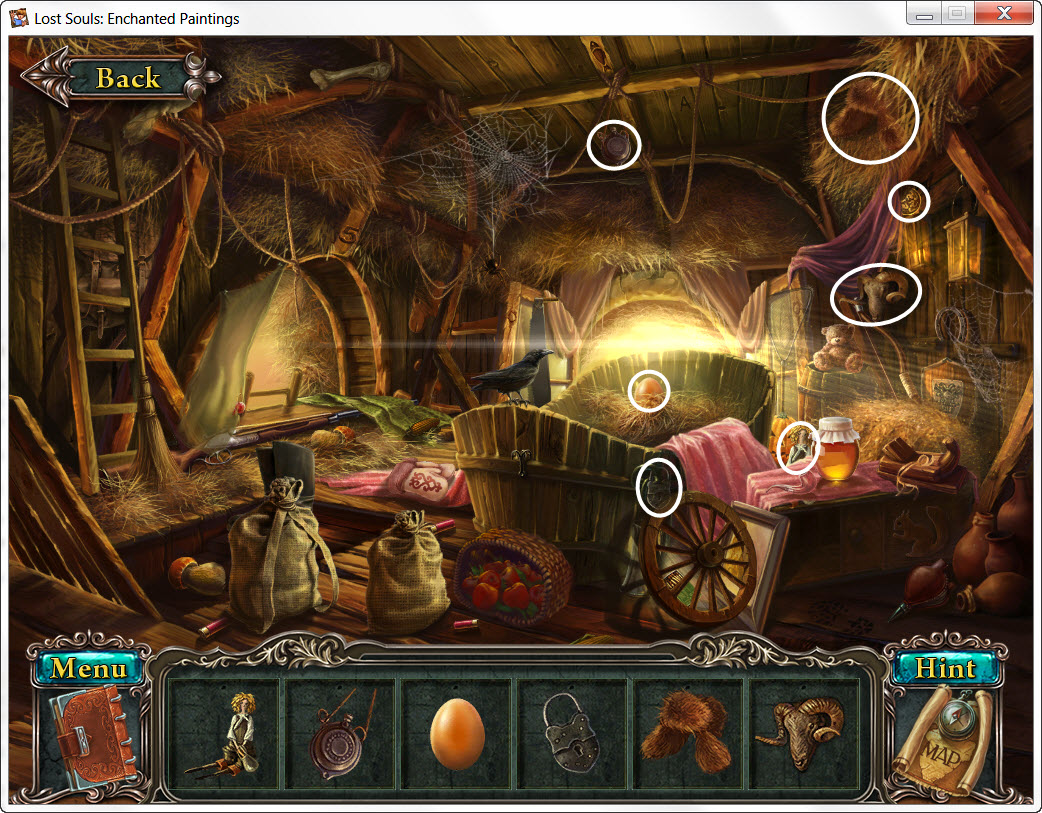
Paintings
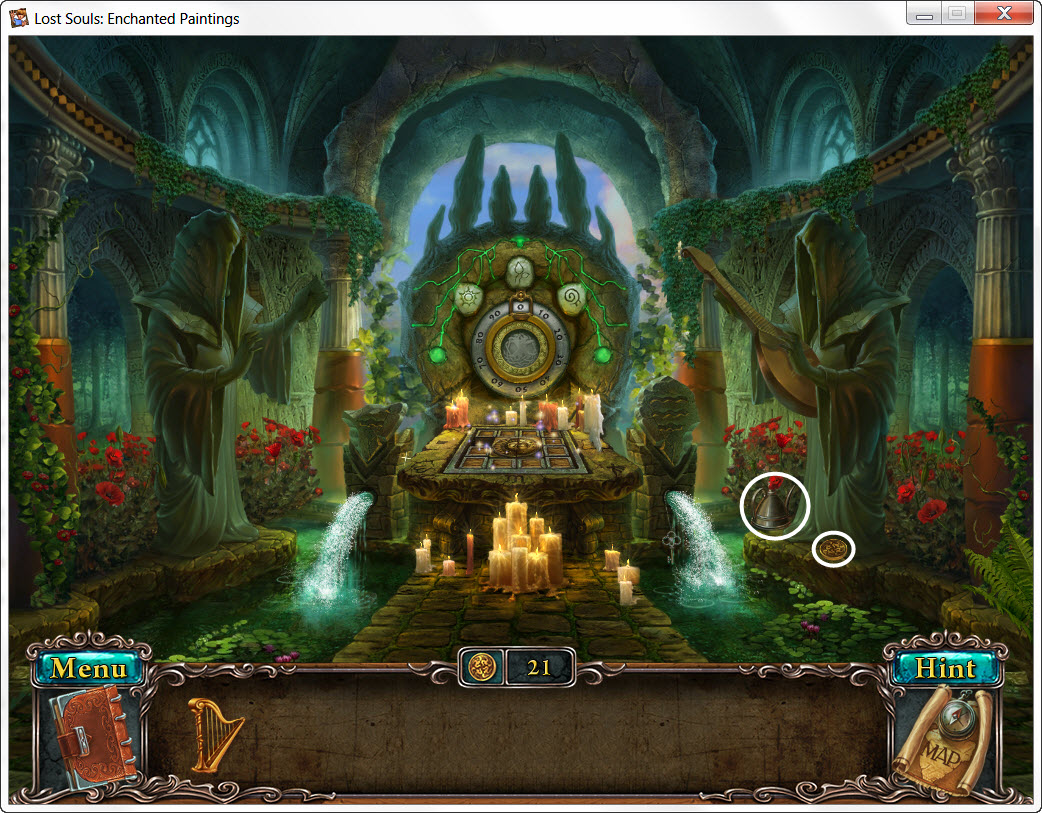
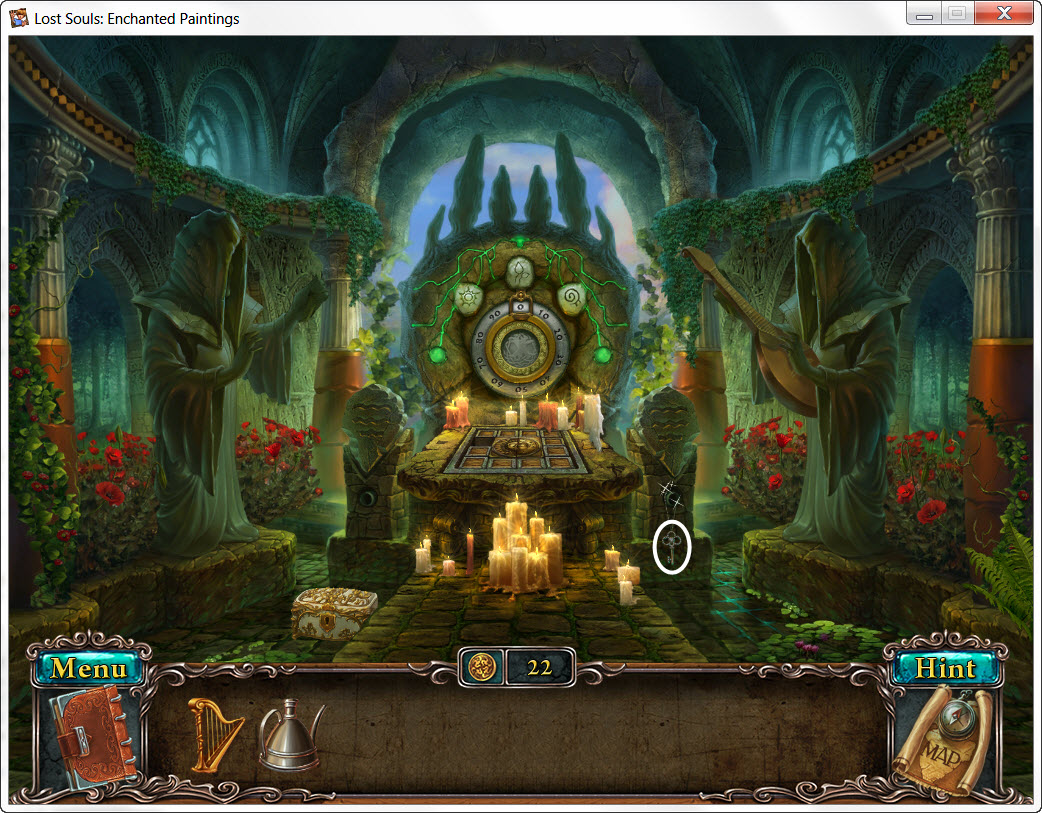
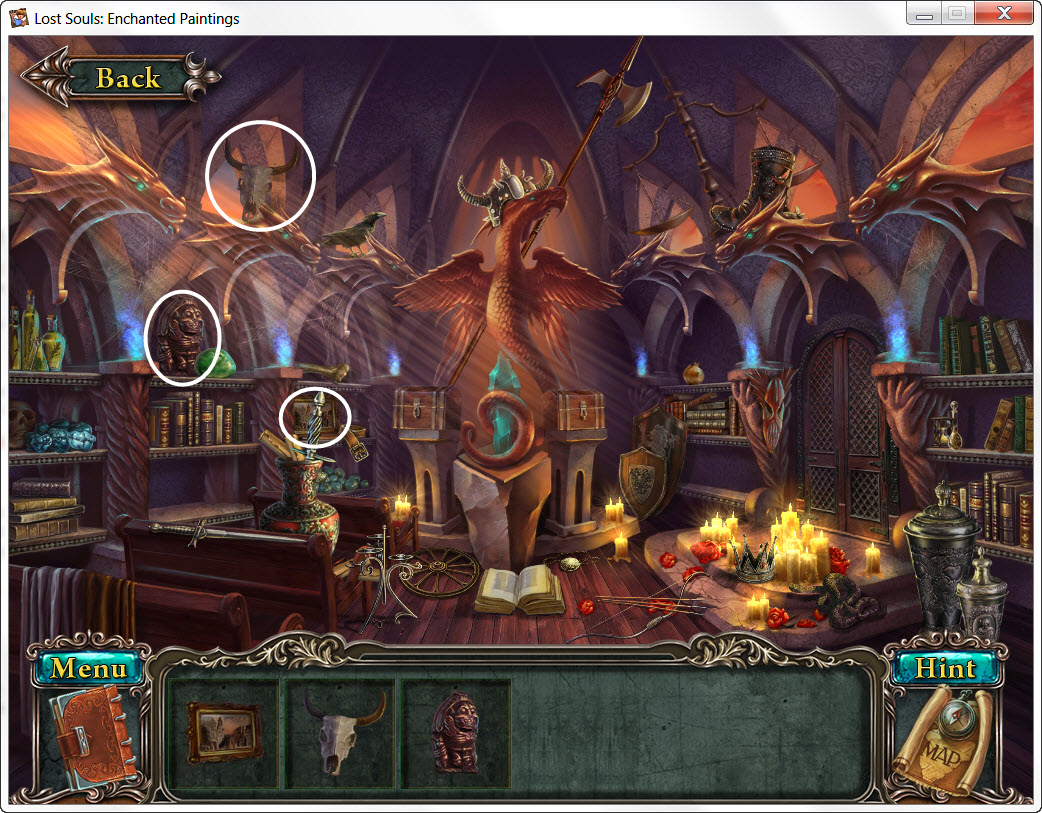
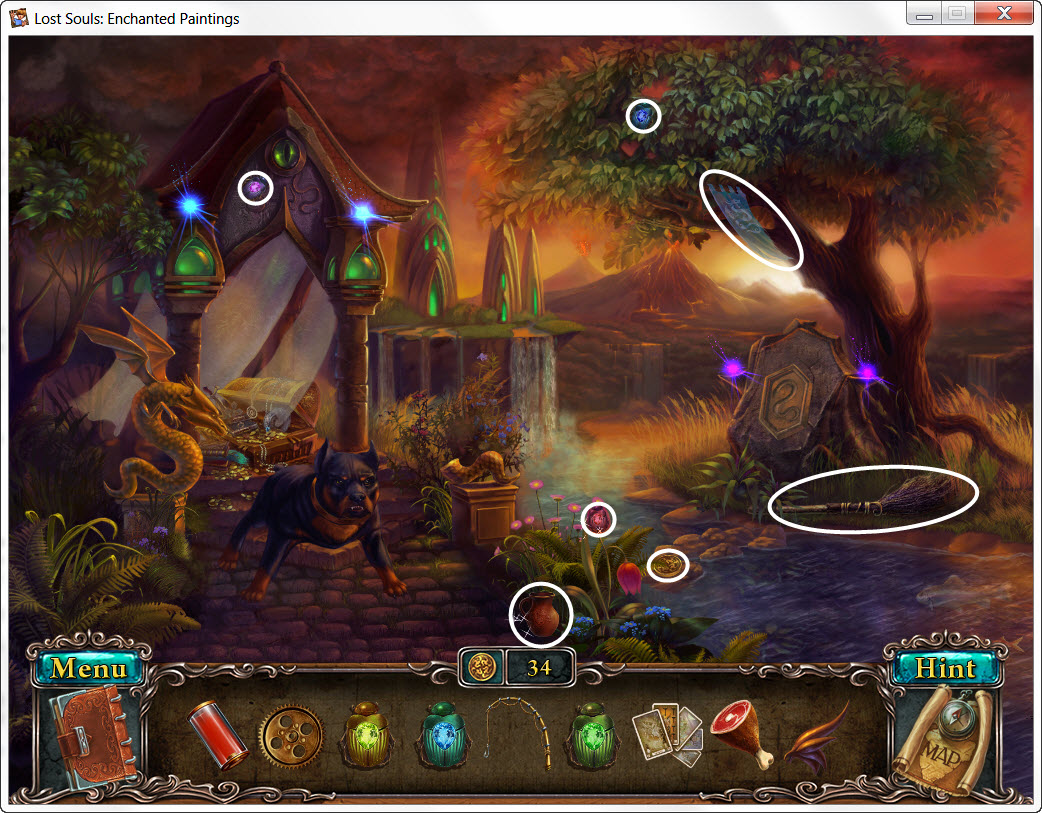
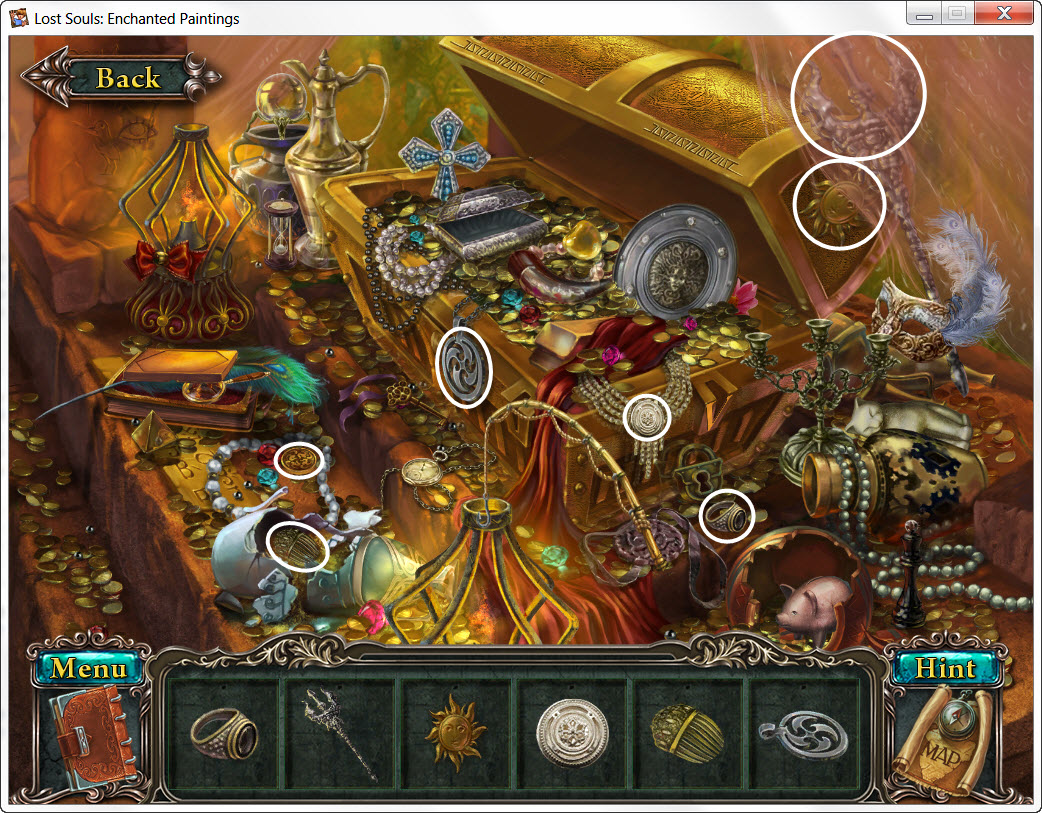
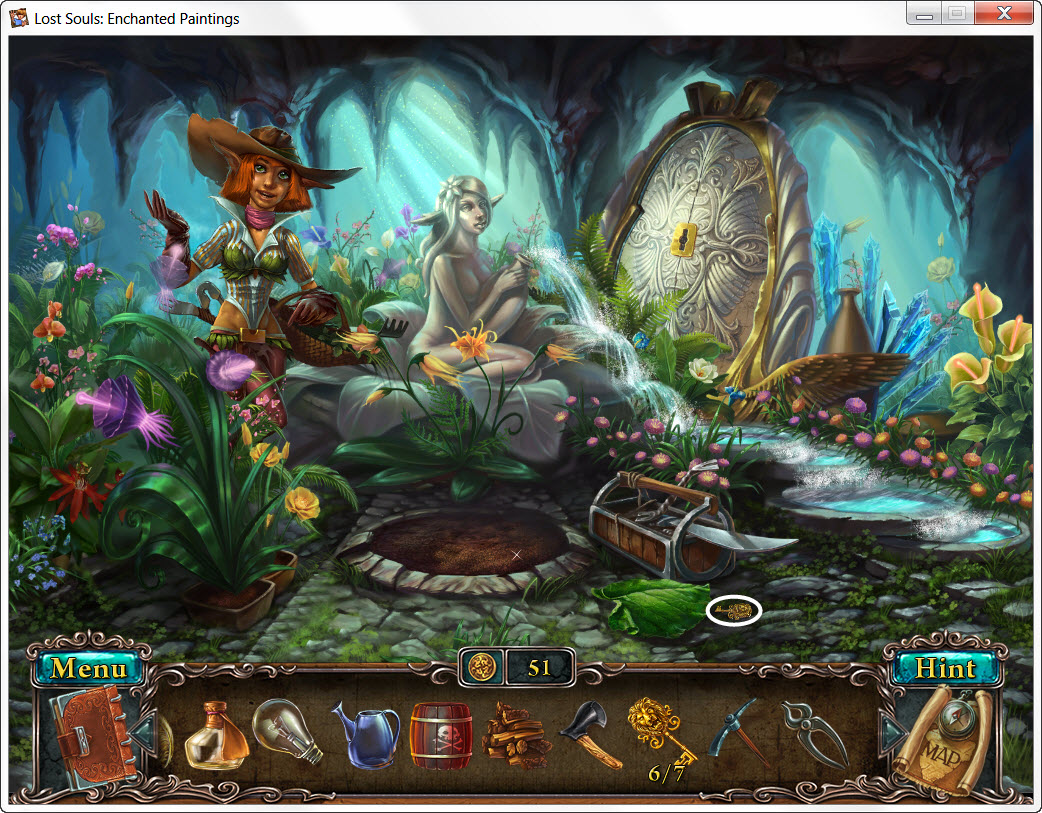
Magic Altar
Coins - 2
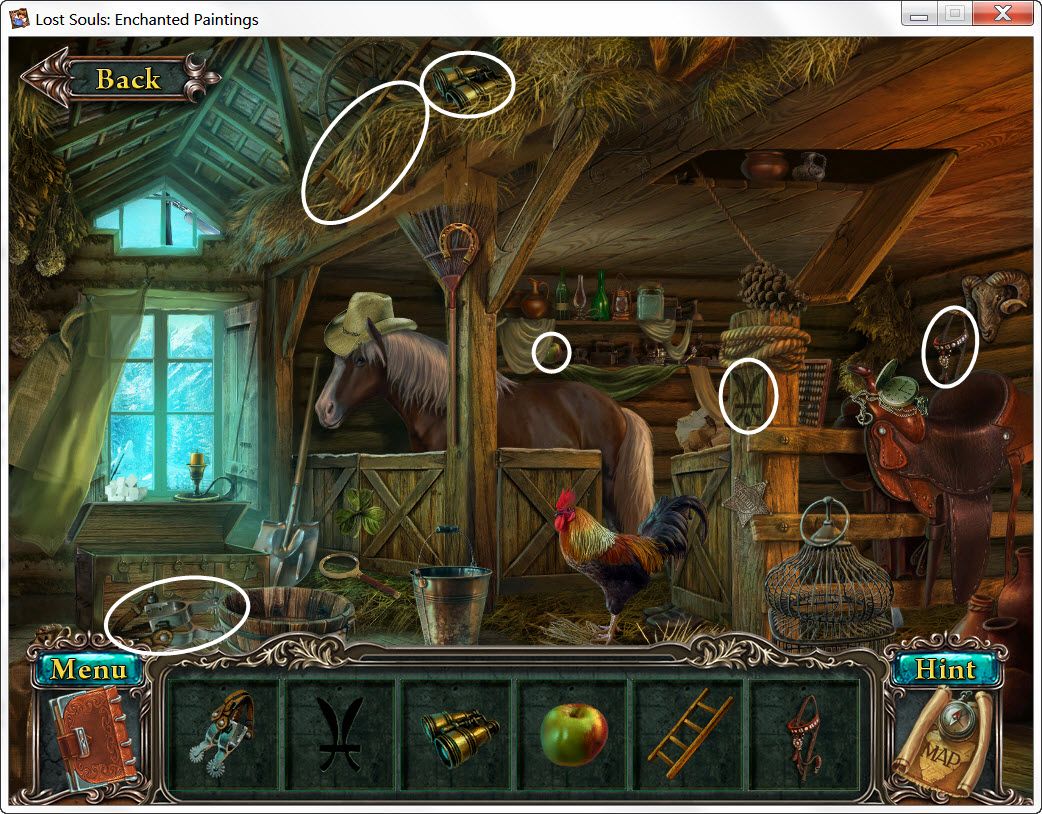
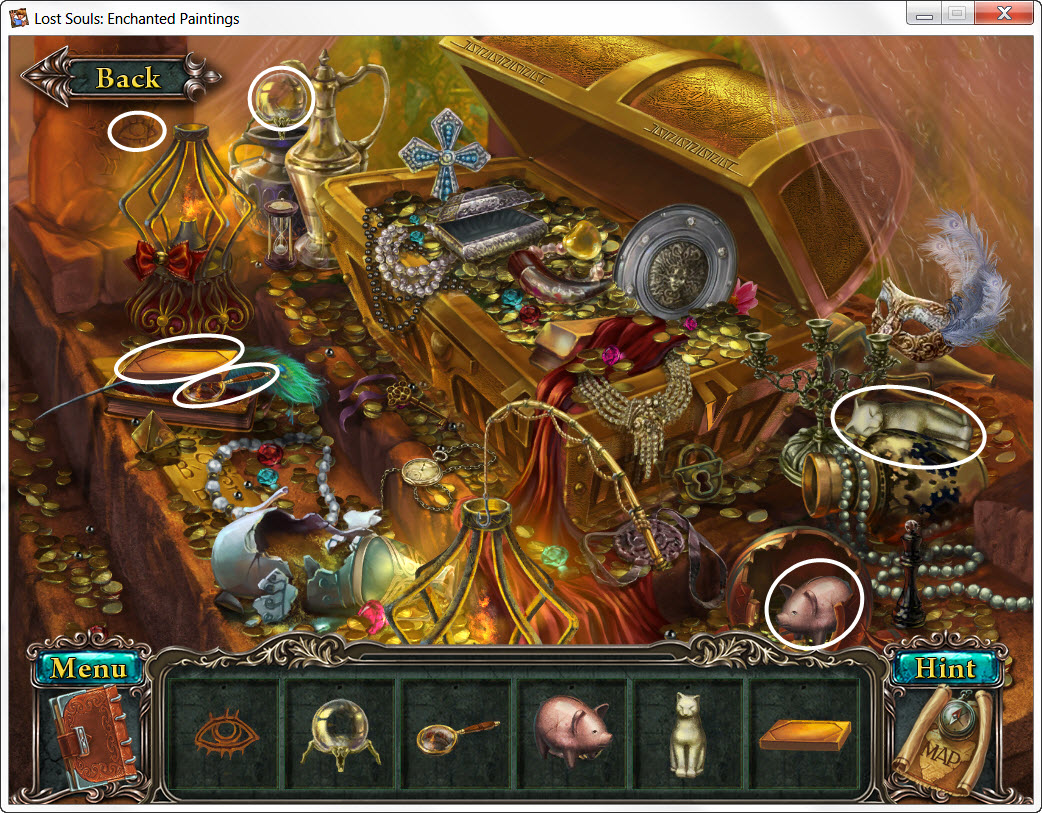
Small Hall
Coins - 2
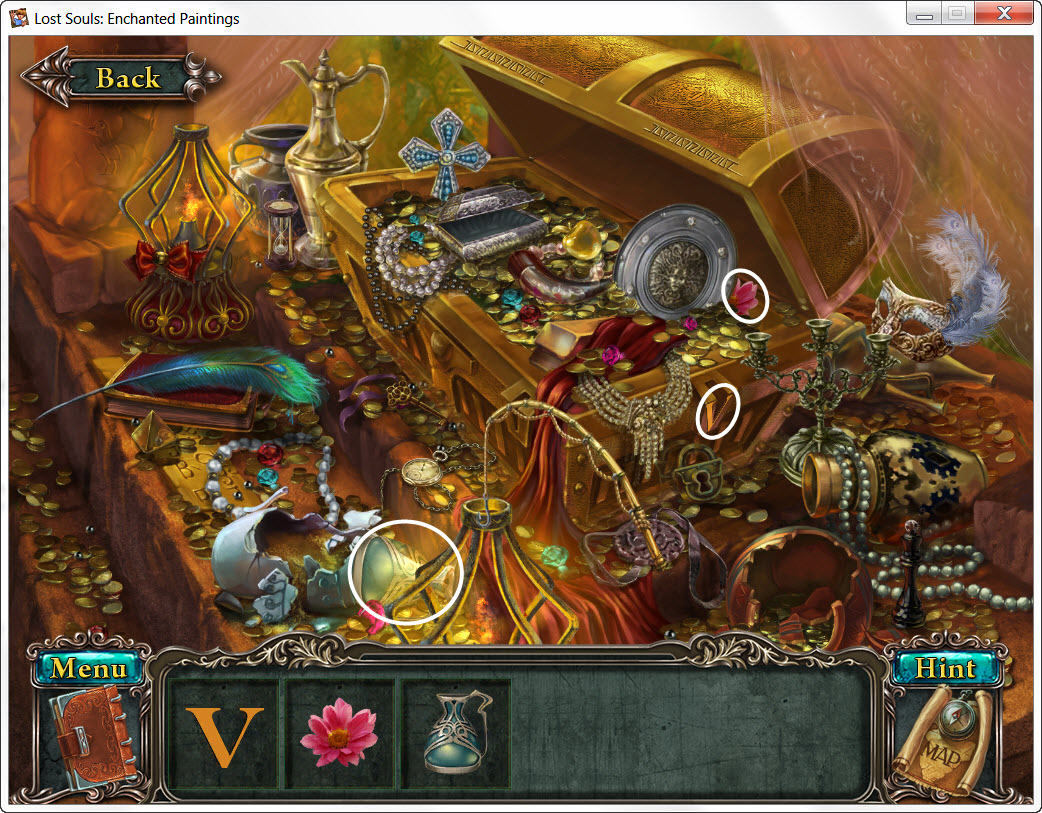
Coins - 2
Coins - 2
Coins - 2
Coin - 1
Coins - 1
Small Hall
Coins - 1
Coin - 1
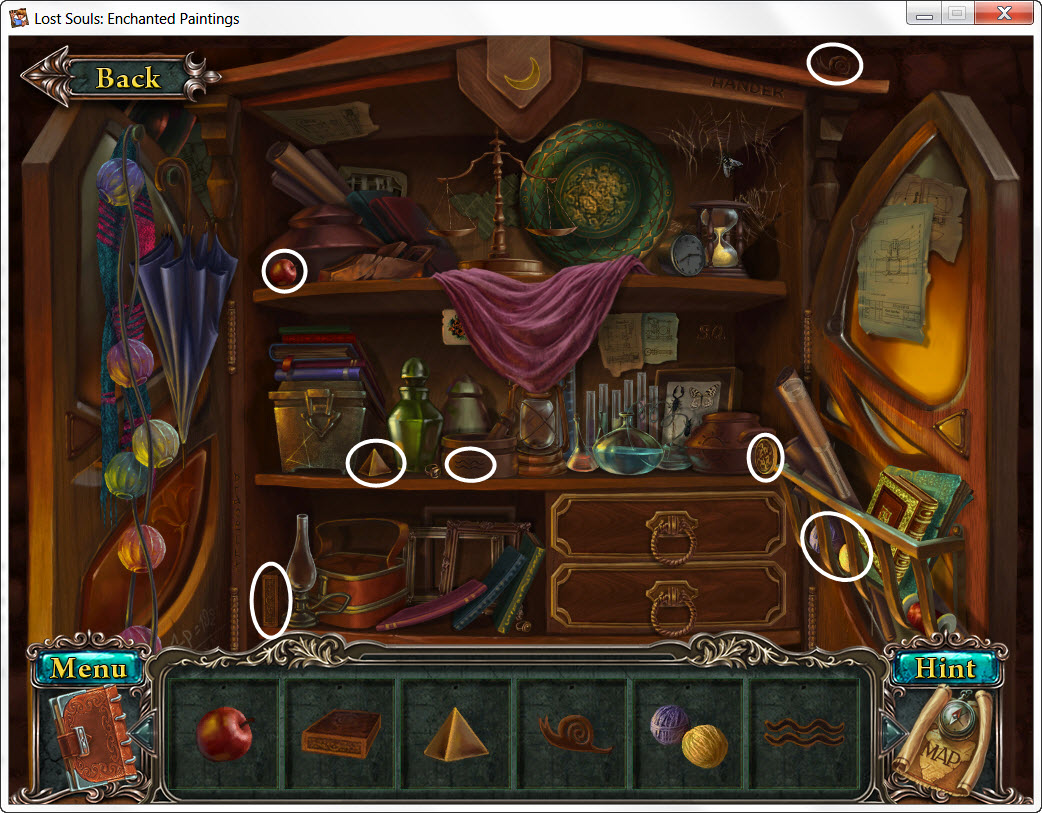
Cabinet
Paintings
The Magical Well
Coins - 1
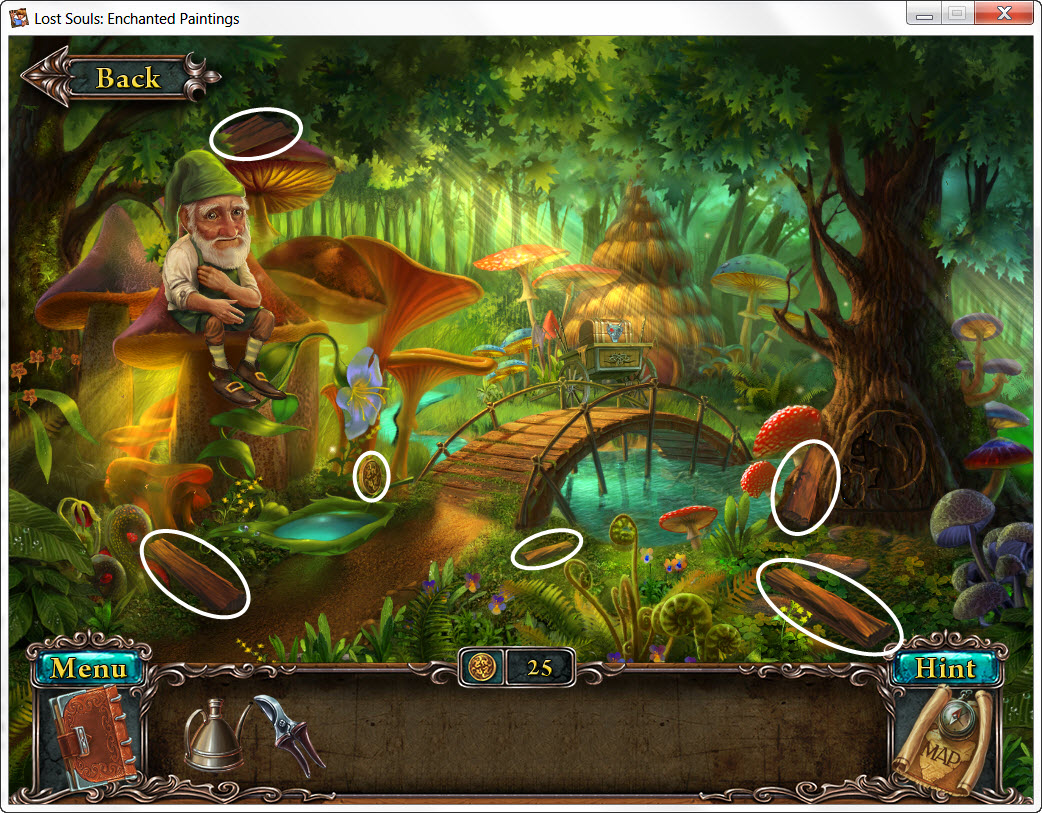
Forest Hut
Coins - 6
Coins - 2
Fairy Meadow
Coins - 2
Coins - 1
Fairy Meadow
Coins - 1
Coins - 1
Fairy Meadow
Paintings
Altar
Coins - 2
Coins - 2
Coins - 2
Coins - 2
Coins - 4
Coins - 1
Coins - 1
Coins - 2
Treasury
Coins - 1
Paintings
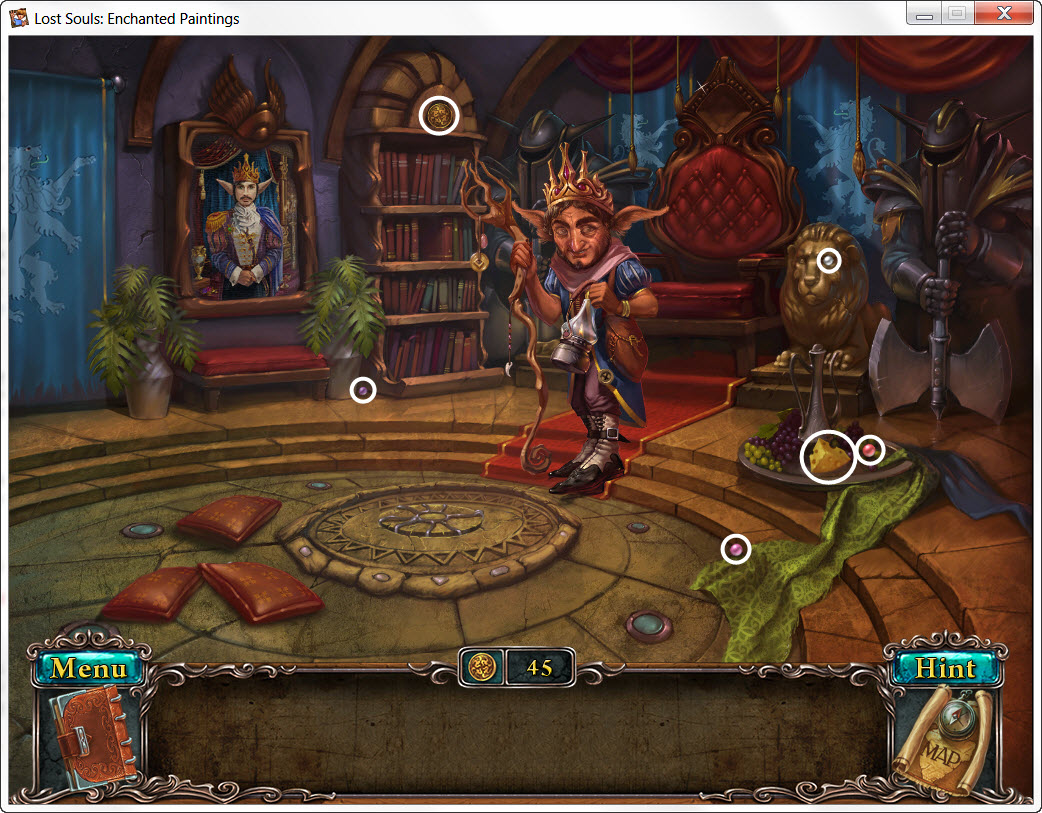
Throne Room
Coins -1
Coins - 3
Coins - 2
Coins - 1
Coins - 2
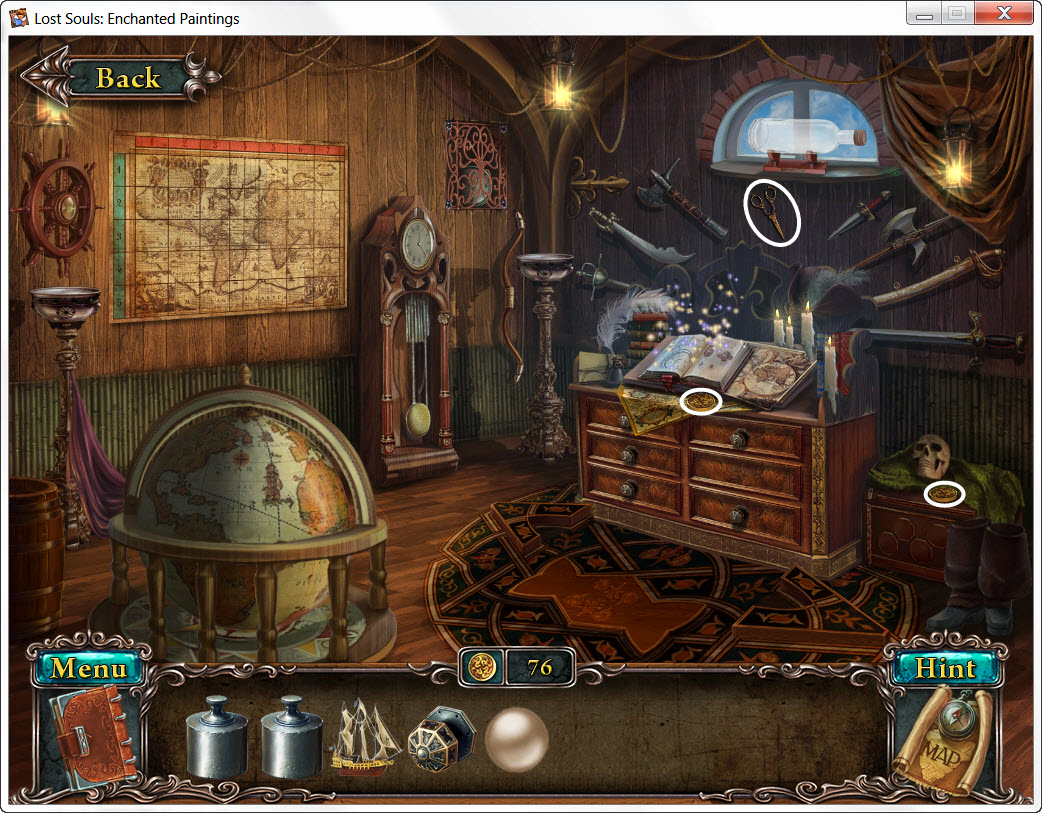
Workshop
Coins - 1
Coins -1
Coins - 1
Coins - 3
Mine
Coins - 1
Coins - 1
Coins - 1
Coins - 1
Paintings
Ship
Coins - 5
Coins - 1
Coins - 3
Coins - 3
Coins - 3
Coins - 2
Coins - 1
Coins: Collect coins to earn rewards.
Hints: These are unlimited but must refill.
Areas: Each area/locale on the map has a number next to it, which shows the number of things that must be finished to complete each scene.
Hidden Object Scenes: The items in each scene are the same for everyone. Therefore, every item will be circled. The items in yellow mean you need to open/move something to find them.
Paintings
- click the large painting of your son in the middle
- click the sparkling painting
- brush off the painting
Magic Altar
- click the baby robin
- place the baby robin back in it's nest
- use the shovel where indicated
- pick up the Stable Key
- click the map icon under the hint button on the right
Coins - 2
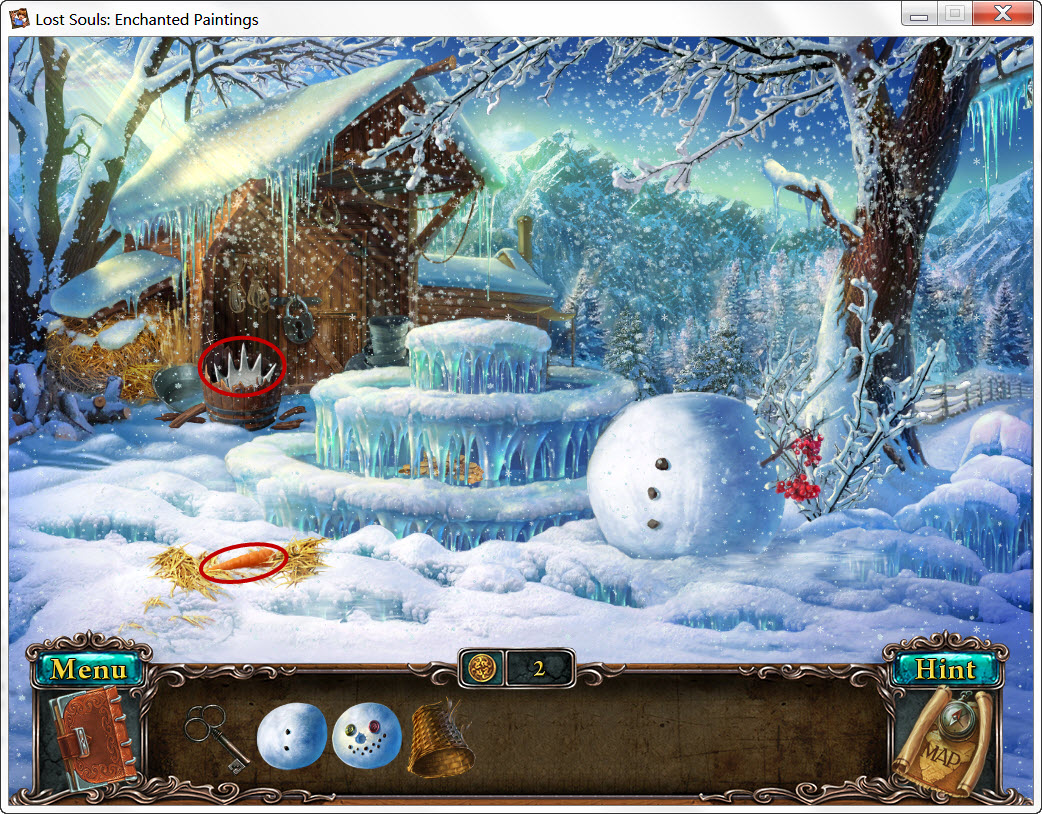
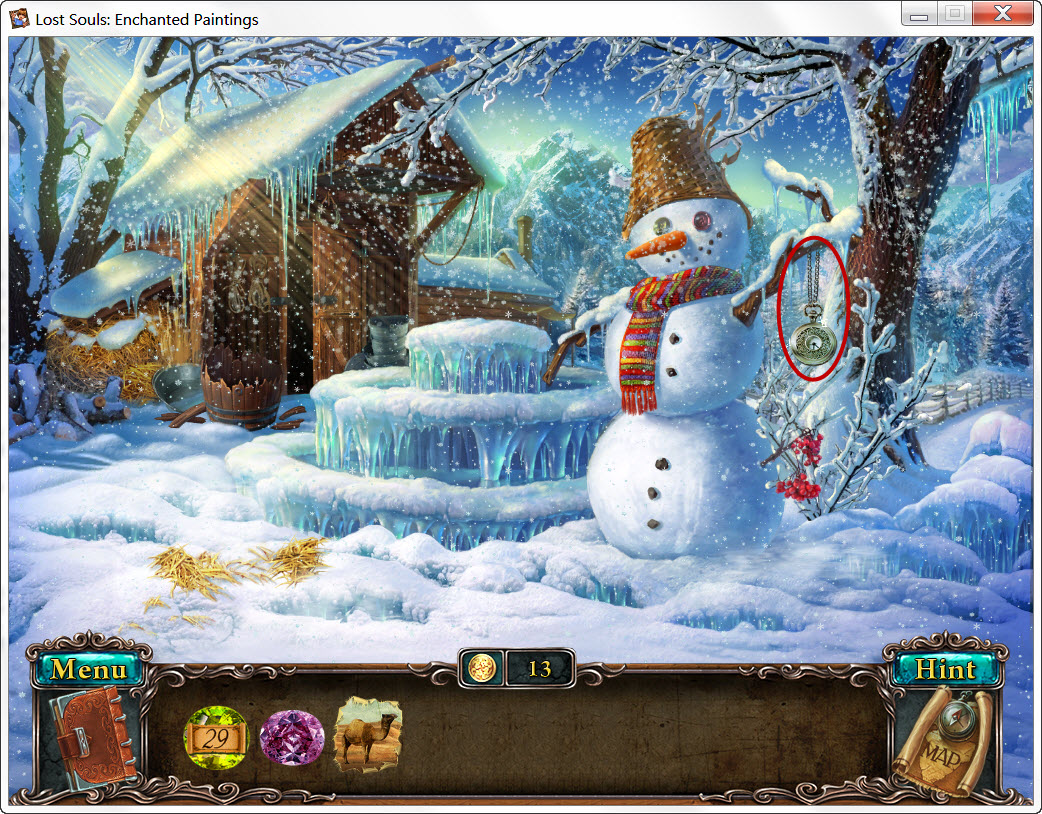
- pick up the snowman's head, body and hat (Snowman's Parts)
- take the Axe from the tree
- move the hay on the ground and pick up the Carrot
- use the Axe on the barrel
- take the Colorless Symbol (Crown)
- examine the lock on the stable door
- use the Key to open the lock and turn it twice
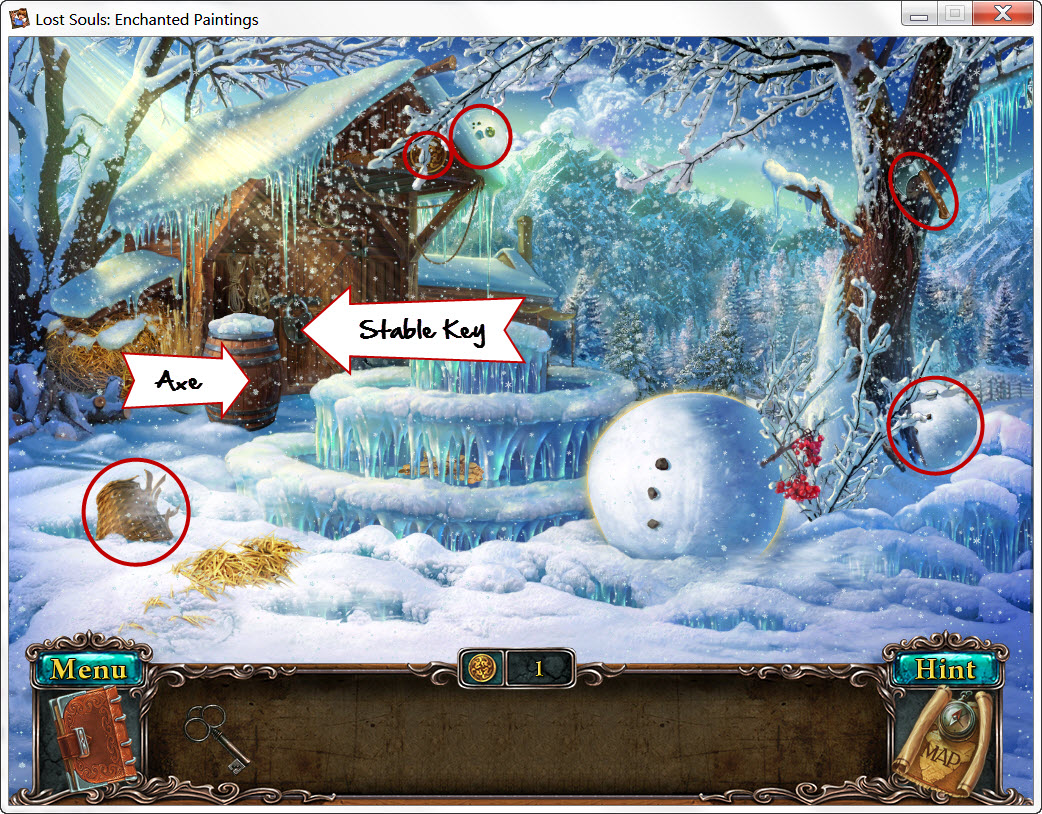
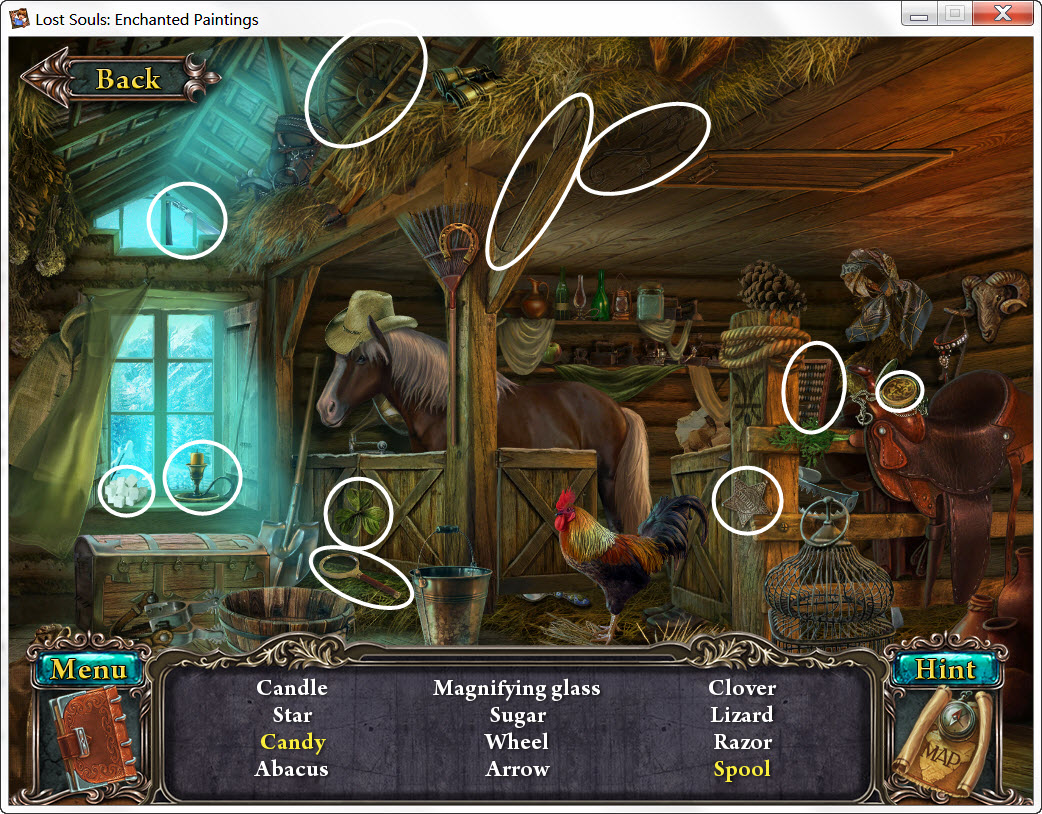
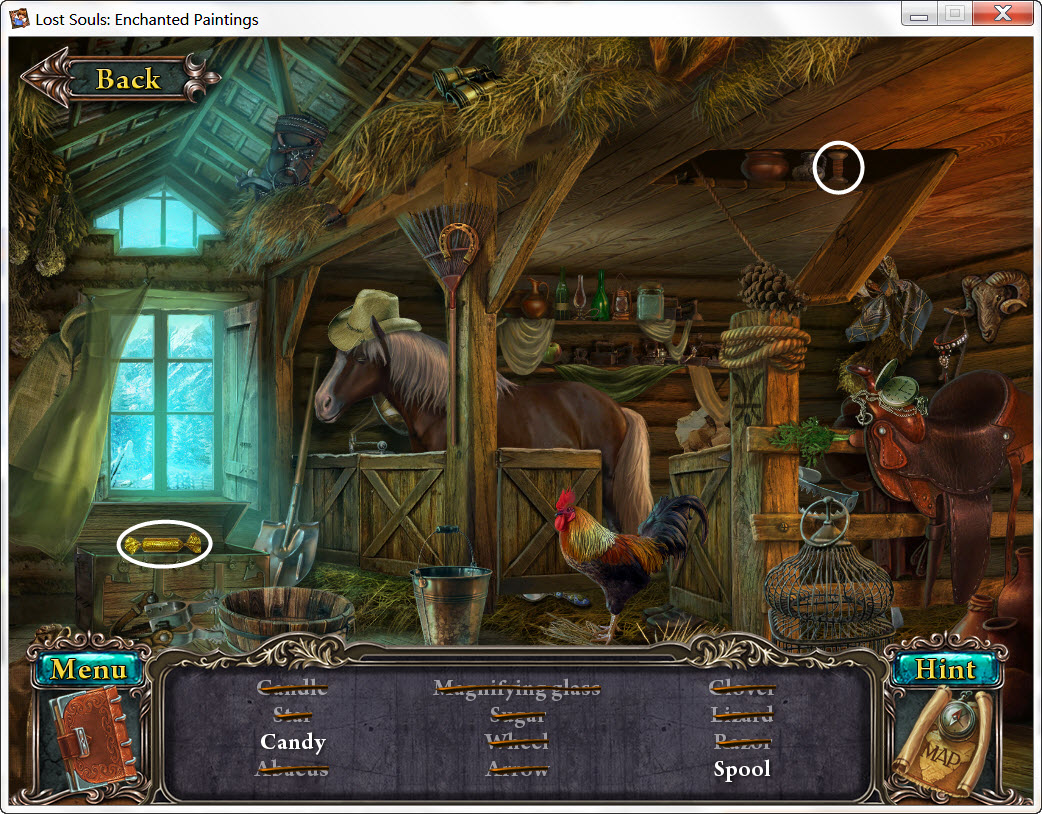
- enter the stables
- take the Candle
- return to the map
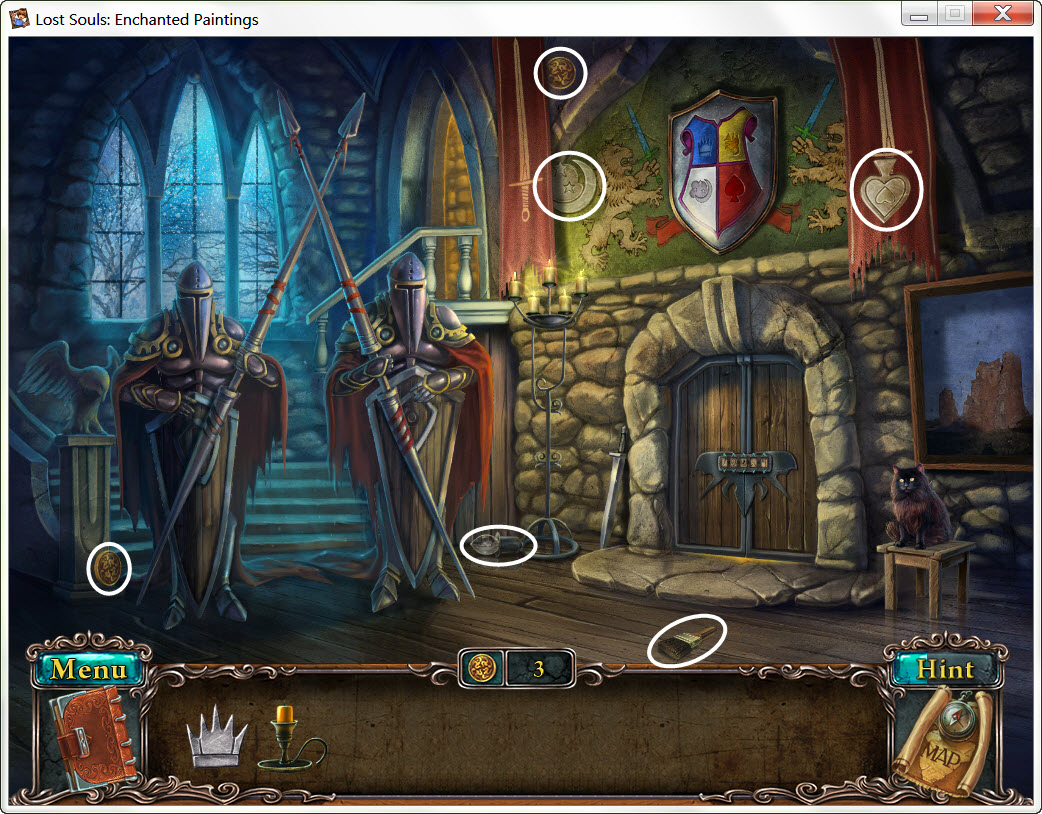
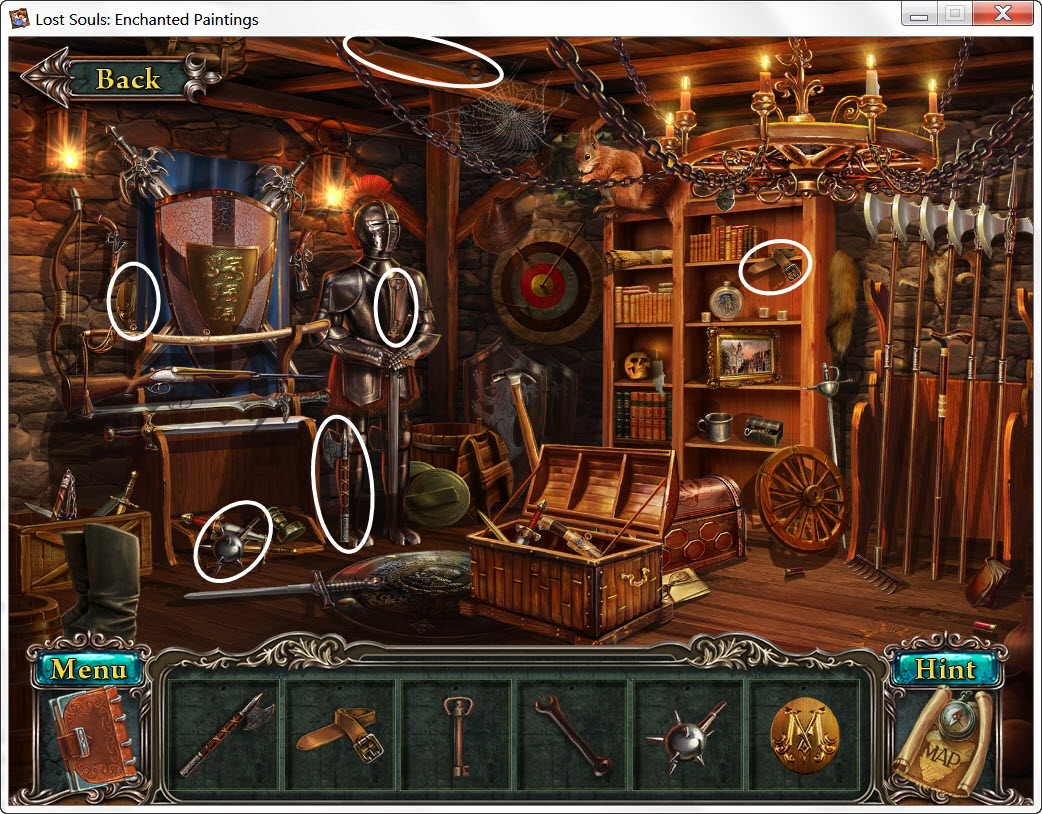
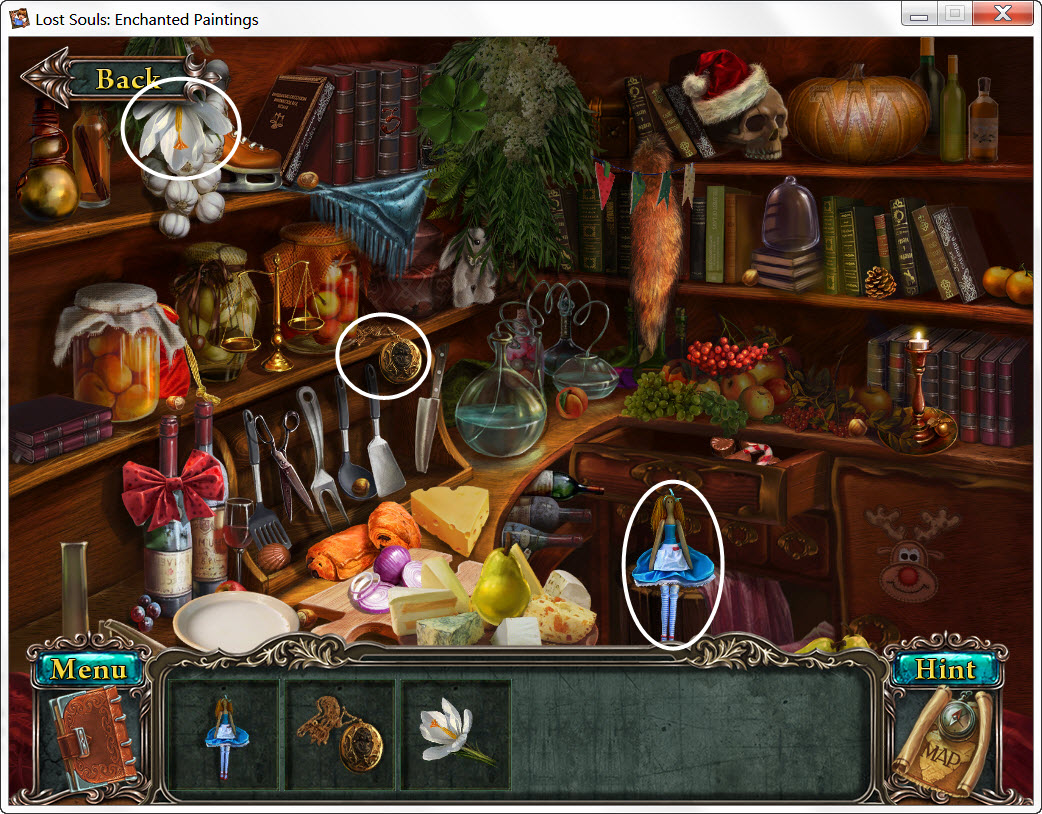
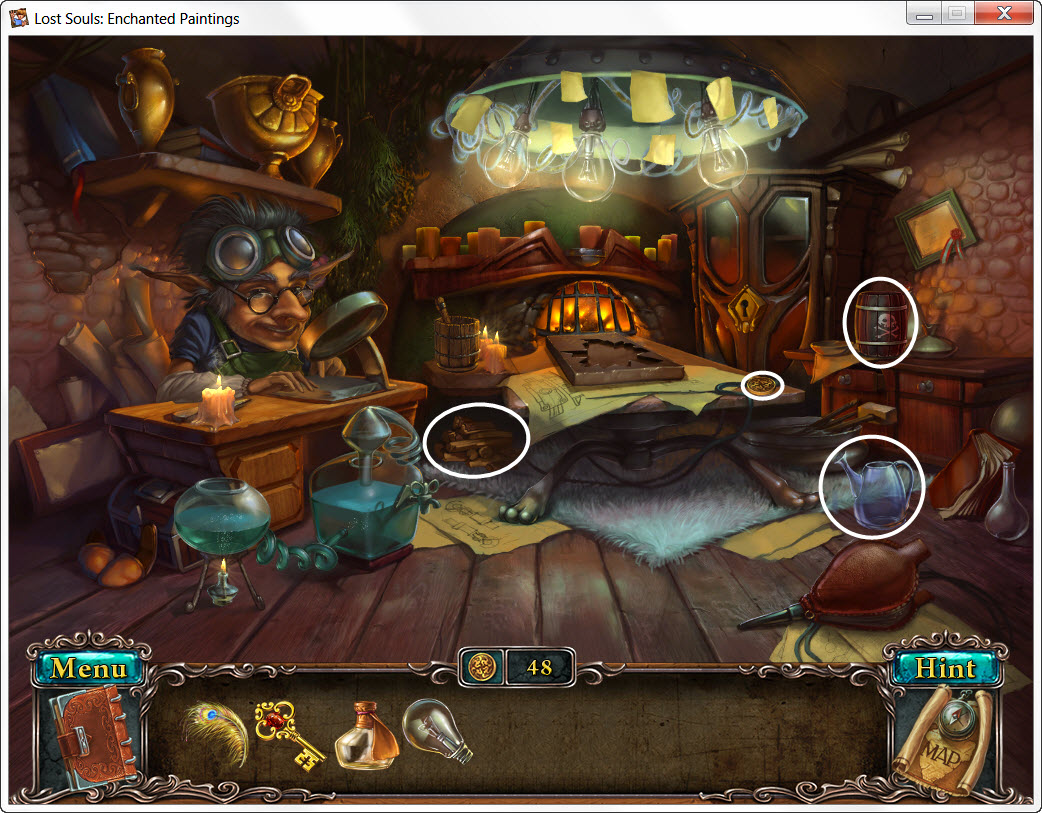
Small Hall
Coins - 2
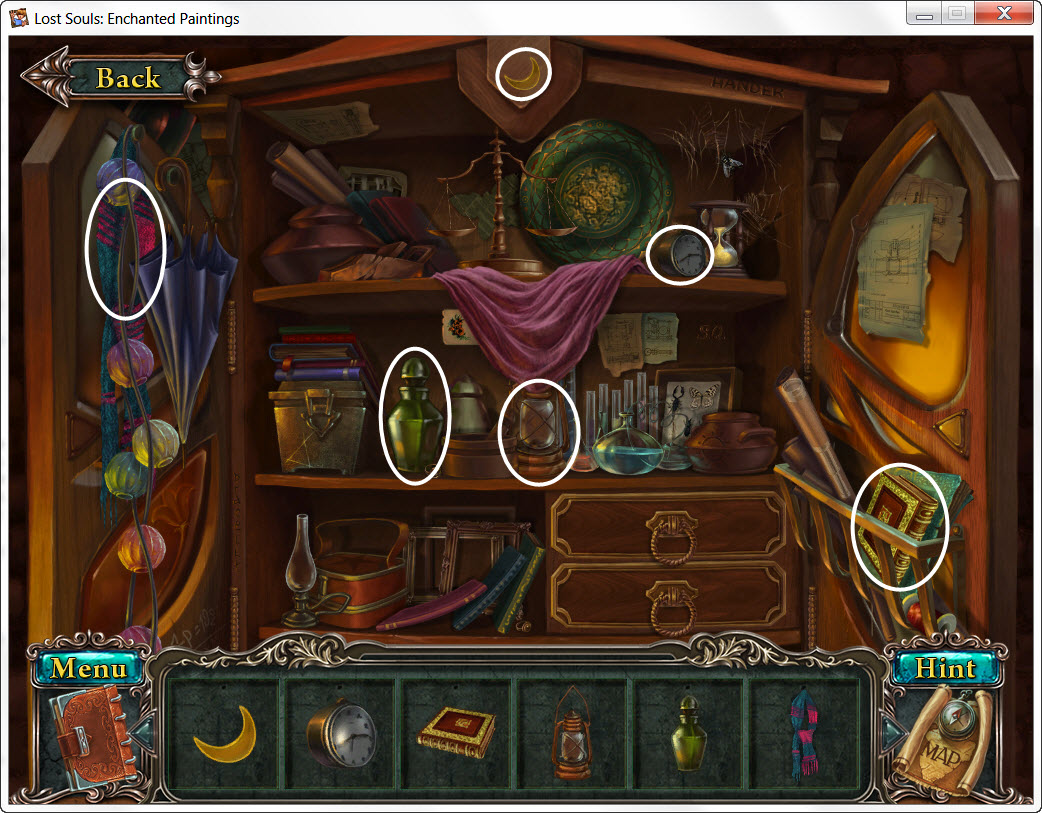
- pick up the Brush
- pick up the Light Bulb
- take both Colorless Symbols (Moon and Spade)
- light the Candle on the candelabra
- examine the doorway
- return to the map
- examine the frozen fountain
- use the Candle to melt the icicles
- take the Coins
- return to the map
- give Coins to guards
- go up the stairs
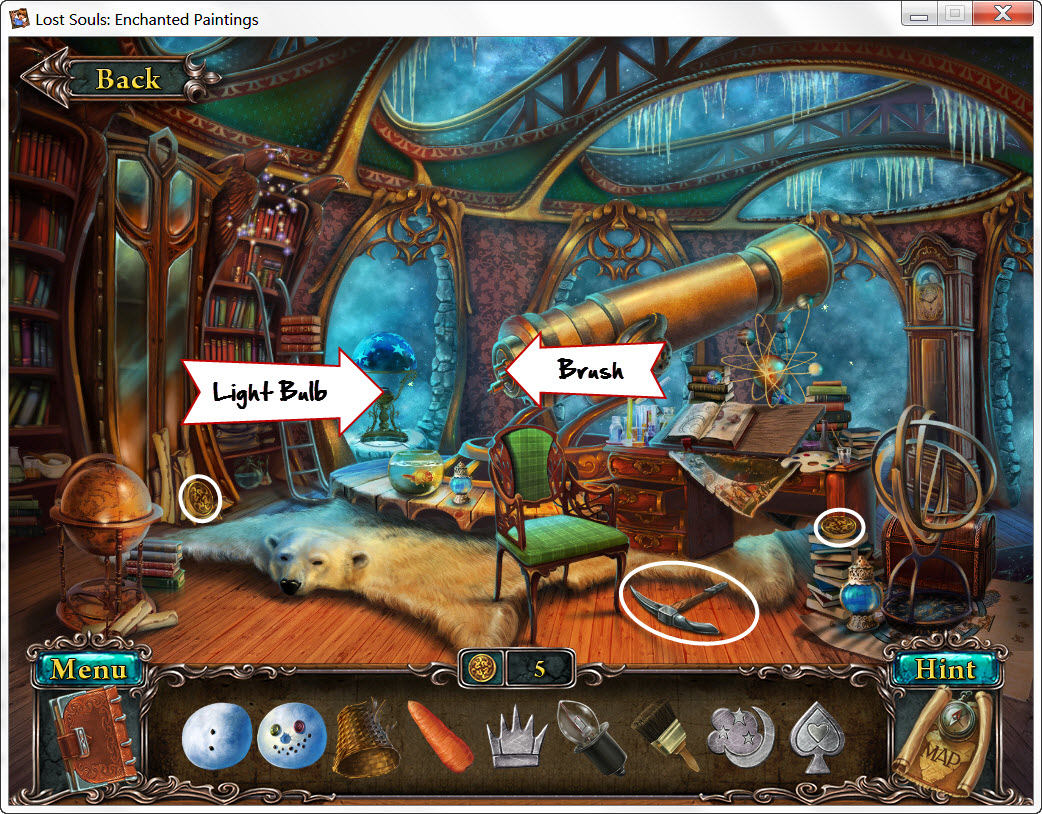
Coins - 2
- pick up the Ice Pick
- place the Light Bulb in the lamp
- take the stars that appear
- examine the telescope
- use the Brush to clean off the lens
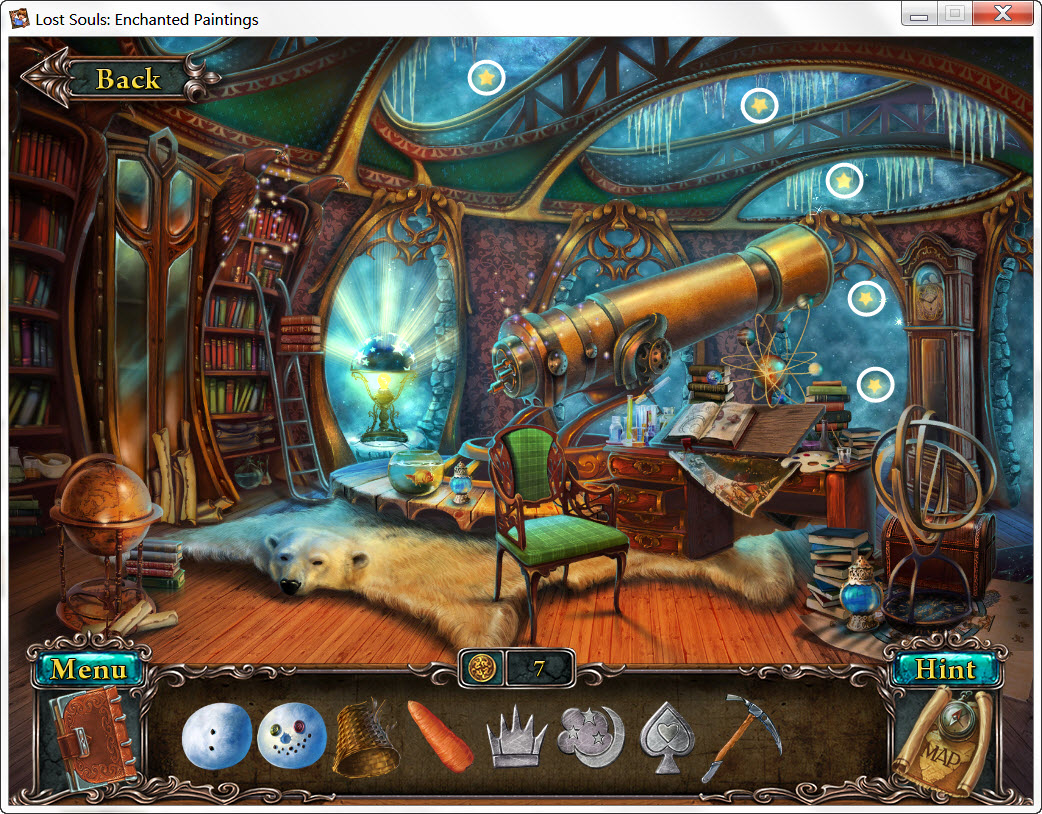
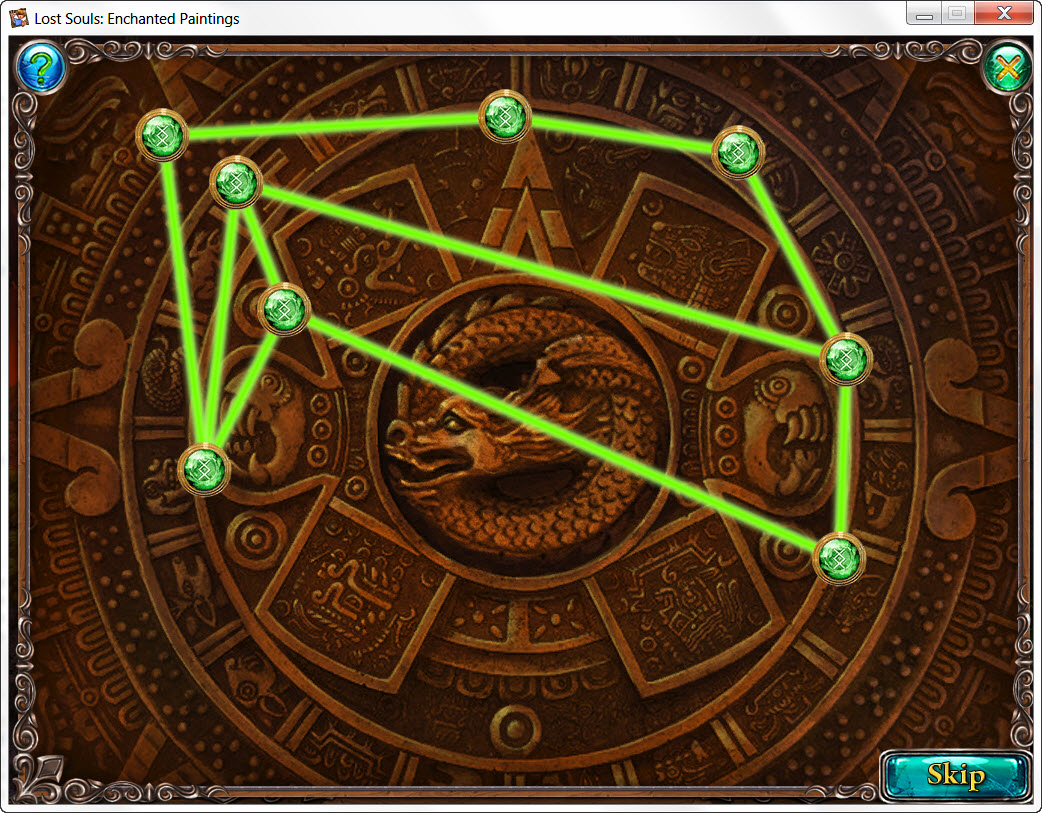
- Telescope Puzzle
- starting with the brightest star connect the dots to match the picture in the corner
- see screenshots for solutions
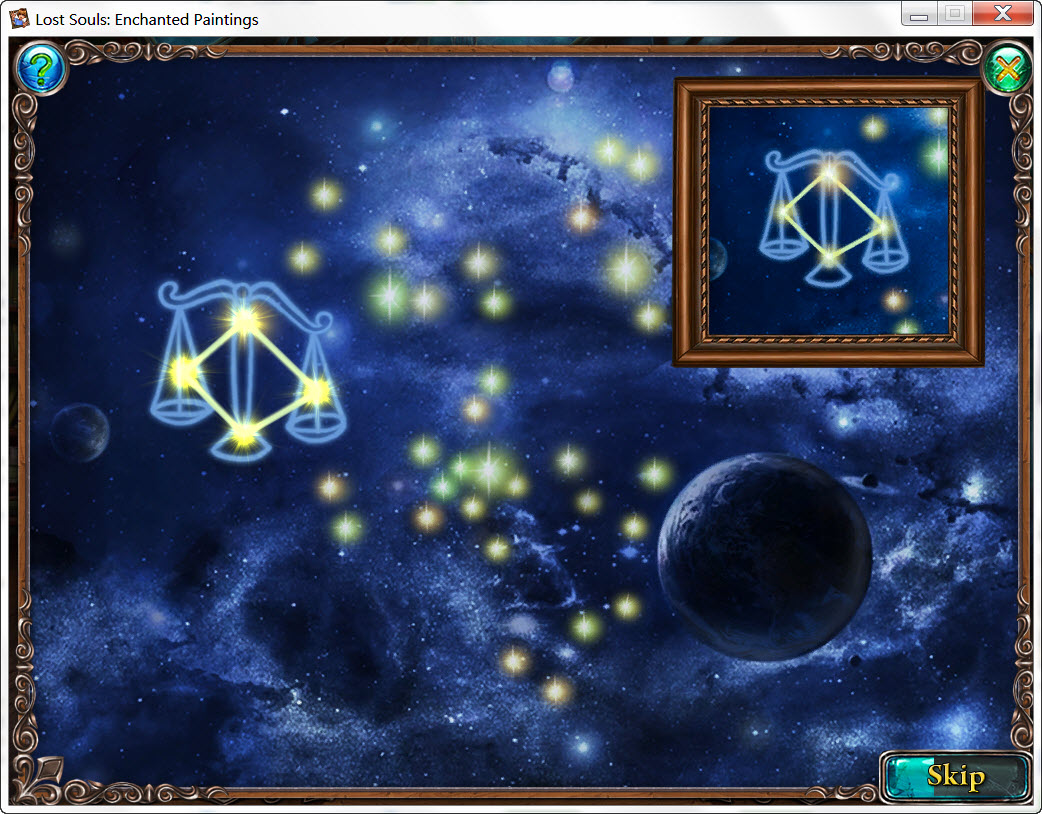
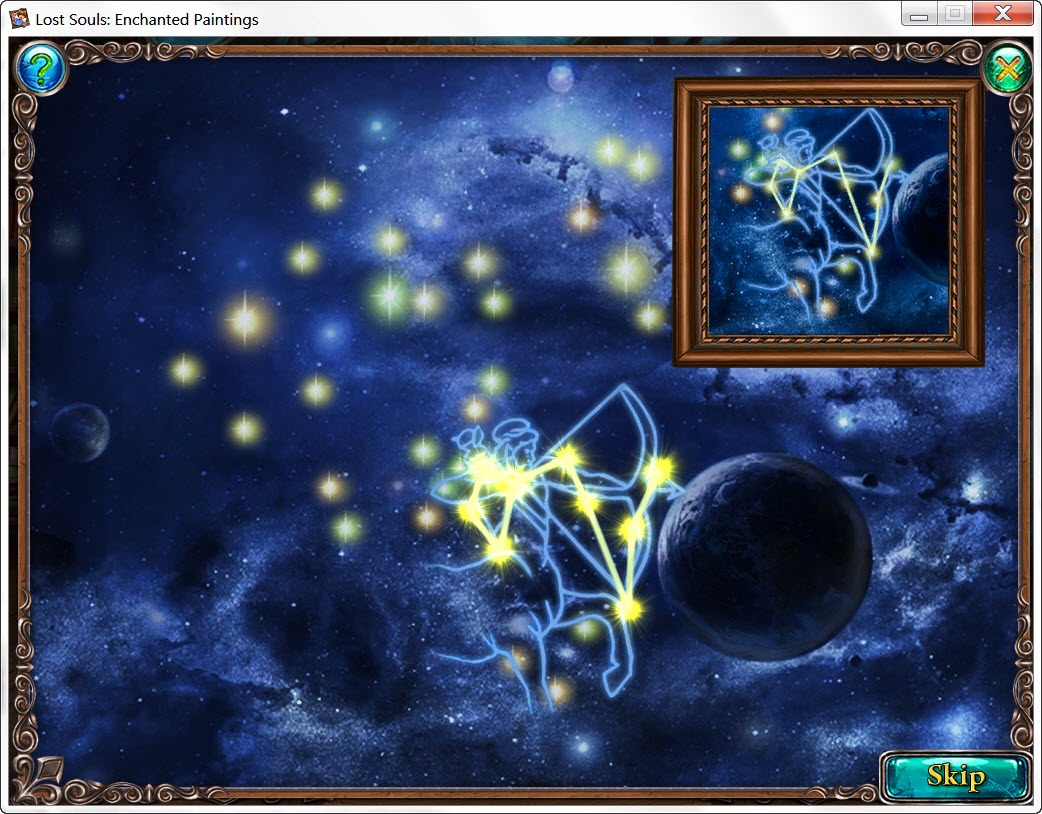
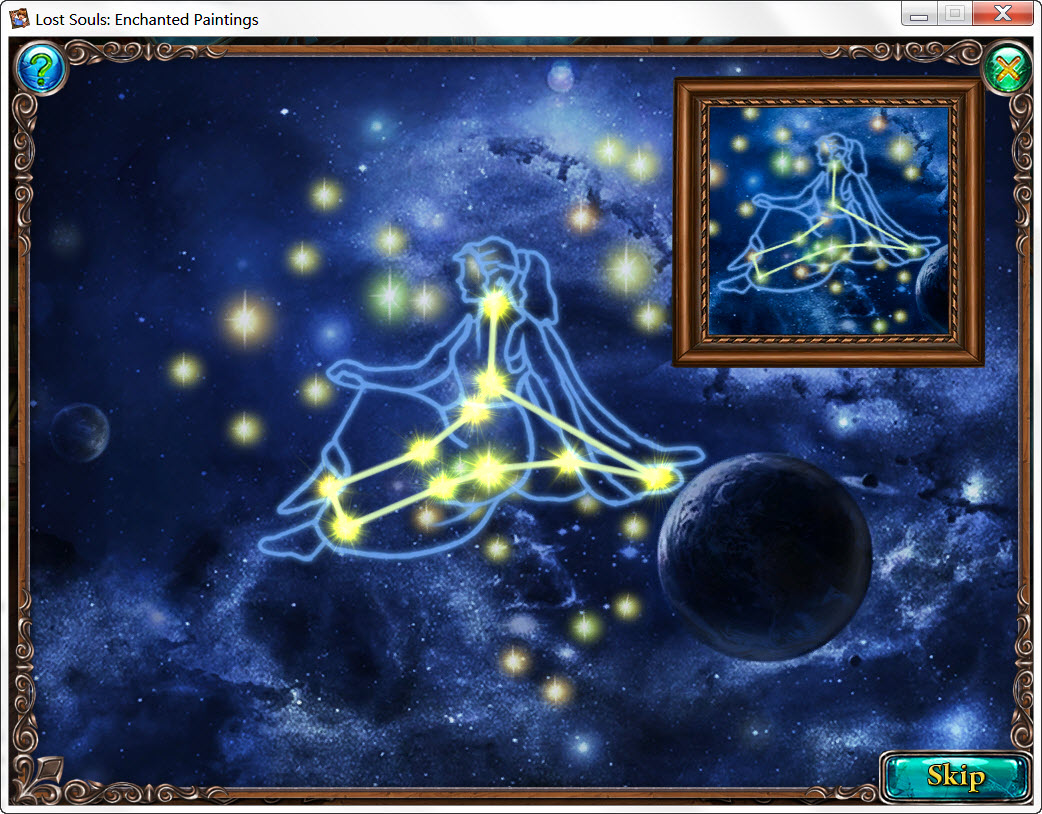
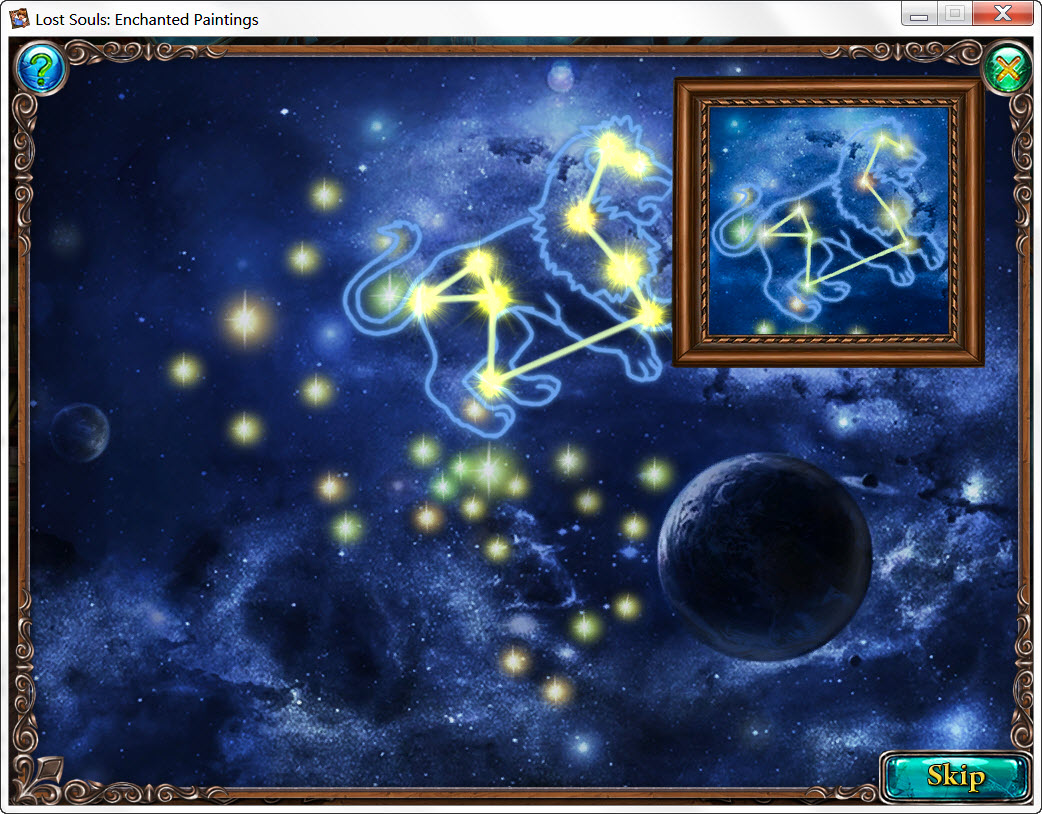
- receive code
- examine the bookshelf
- Bookshelf Puzzle
- take the books from the right to the left so they all fit
- see screenshot for solution
- receive Page
- examine the book on the desk
- place the Page in the book - wee need one more symbol
- return to the map
Coins - 2
- examine the trunk with the eagle emblem
- place the five Stars into the front around the eagle
- take the Gem
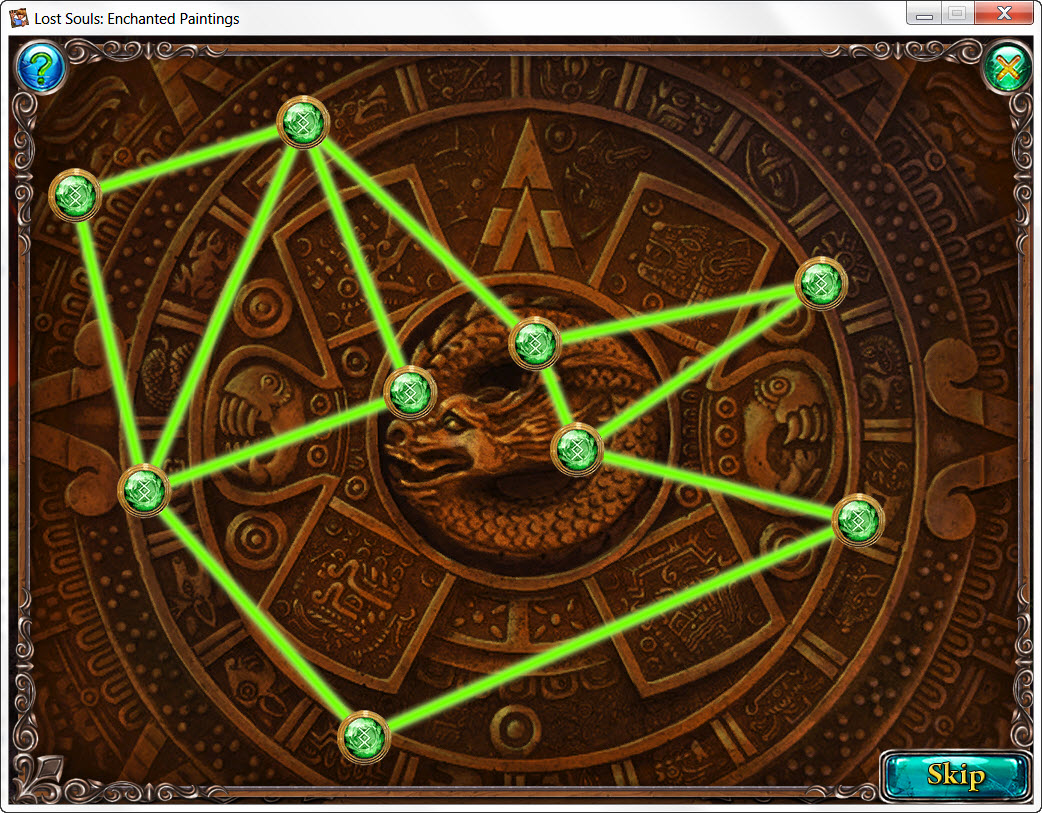
- Mirror Puzzle
- move the mirrors so the light bounces off each of them and burn a hole in the floor
- see screenshot for mirror placement
- examine the bookshelf
- take the Plate of Milk
- examine the hole in the floor (made by the mirrors)
- take the Library Key
- examine the scales on the desk
- Scale Puzzle
- place the Gem (green) on either side
- now try the various weights to see which one levels the scale
- solution: 20, 5, 3 and 1
- examine the door
- use the Library Key on the lock and pull the lever
- enter the library
Coins - 2
- talk to the girl - she needs a pocket watch
- return to the map

Coin - 1
- use the Ice Pick on the ice covering the doorway three times
- examine the lock
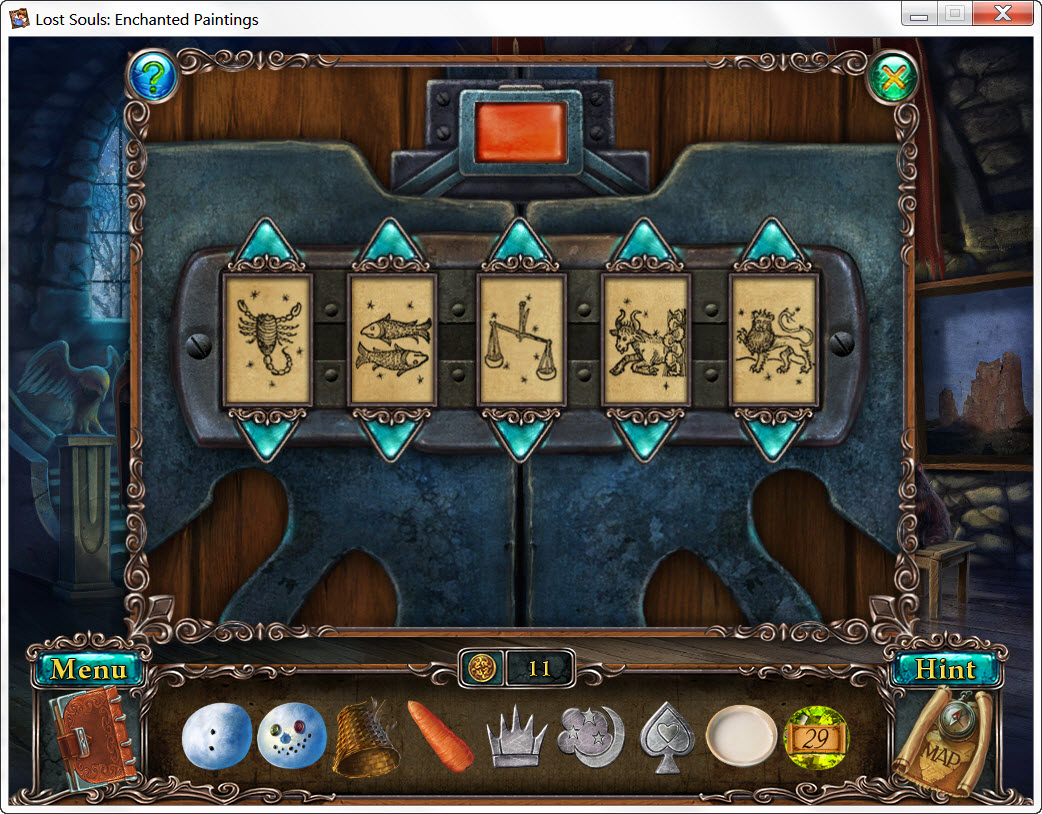
- Small Hall Lock Puzzle
- look at the code in your journal
- set the first two and last two then turn the middle one until you find the scales
- push the orange button
- see screenshot for solution
- enter the room
- take the Rake
- give the Plate of Milk to the cat
- take the Colorless Symbol (Flower) it was hiding
- go upstairs
- examine the desk with the book again
- Paint Puzzle
- place a Colorless Symbol on the right side
- use the paintbrush to paint it the same colors as shown in the book
- the water on the right will clear the brush and the left dish
- the left dish allows you to either 1. mix colors (see below) or erase paint if you make a mistake
- red + yellow = orange; red + blue = purple; blue + yellow = green; red + white = pink
- go down
- examine the crest above the door
- place the Symbols in the correct places
- take the Gem
- return to the map
Coins - 1
- examine the hay pile
- use the Rake three times and take the Scarf
- go into the stable
- take the Piece of Canvas (Camel)

- rebuild the snowman
- take the Pocket Watch
- return to the map - location complete
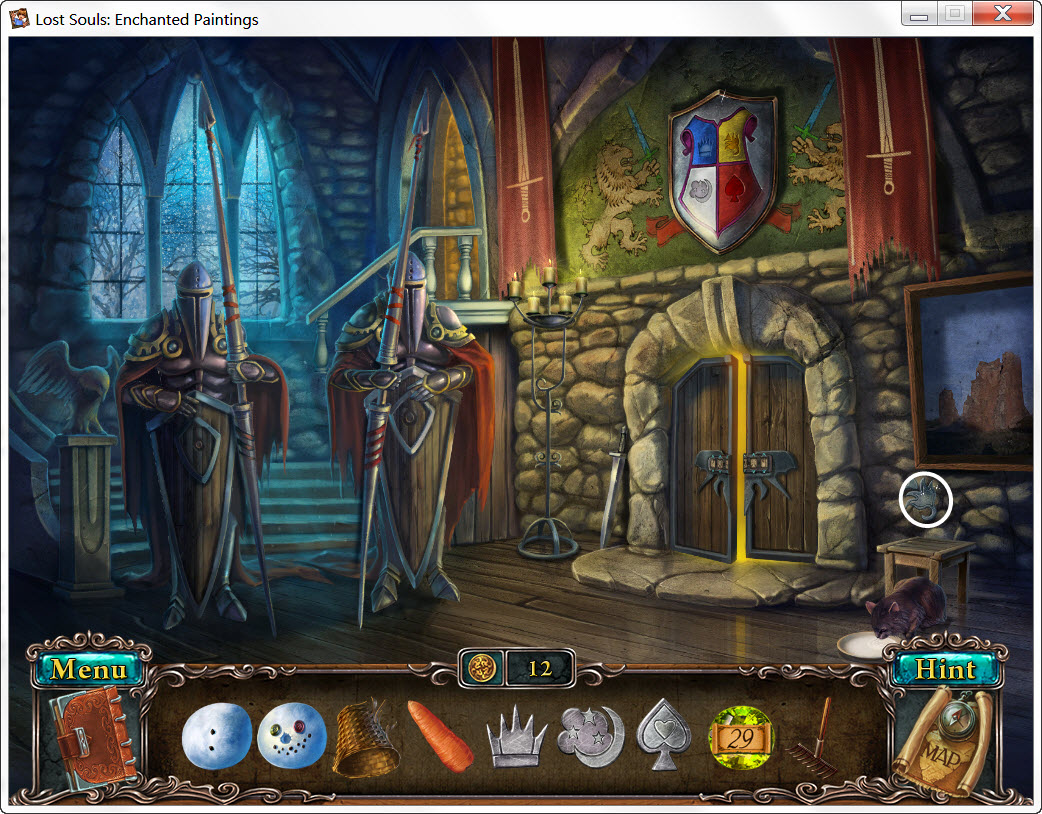
Small Hall
Coins - 1
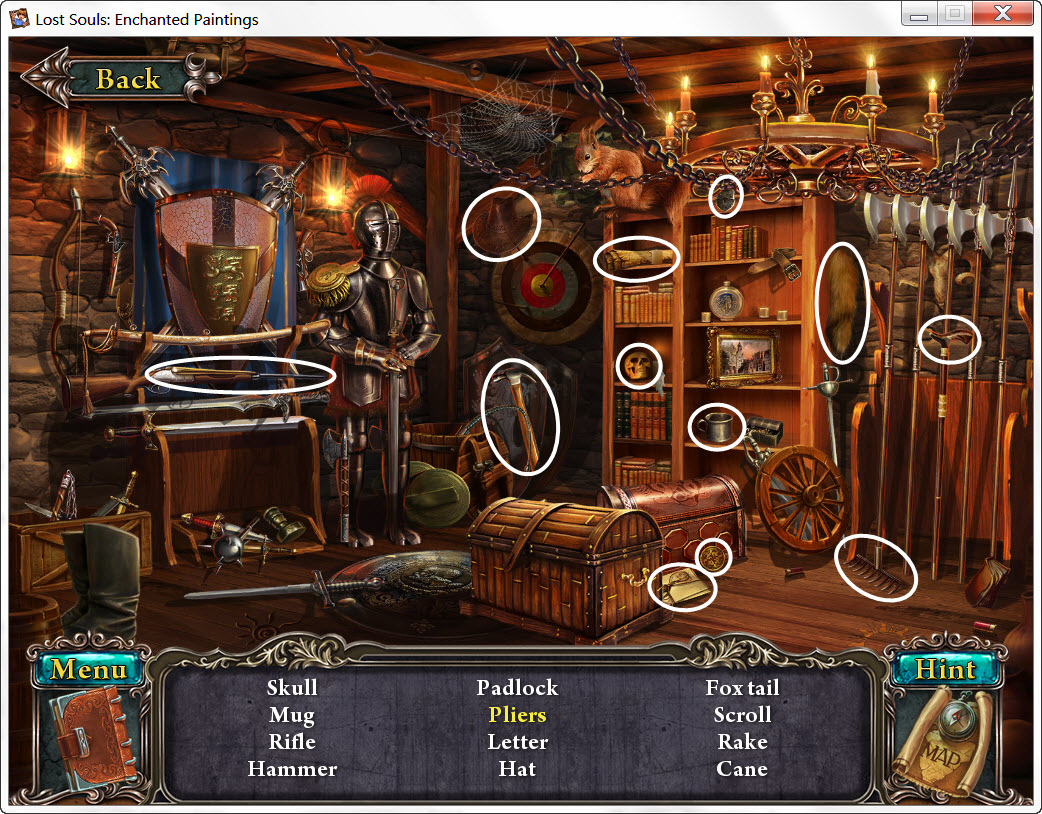
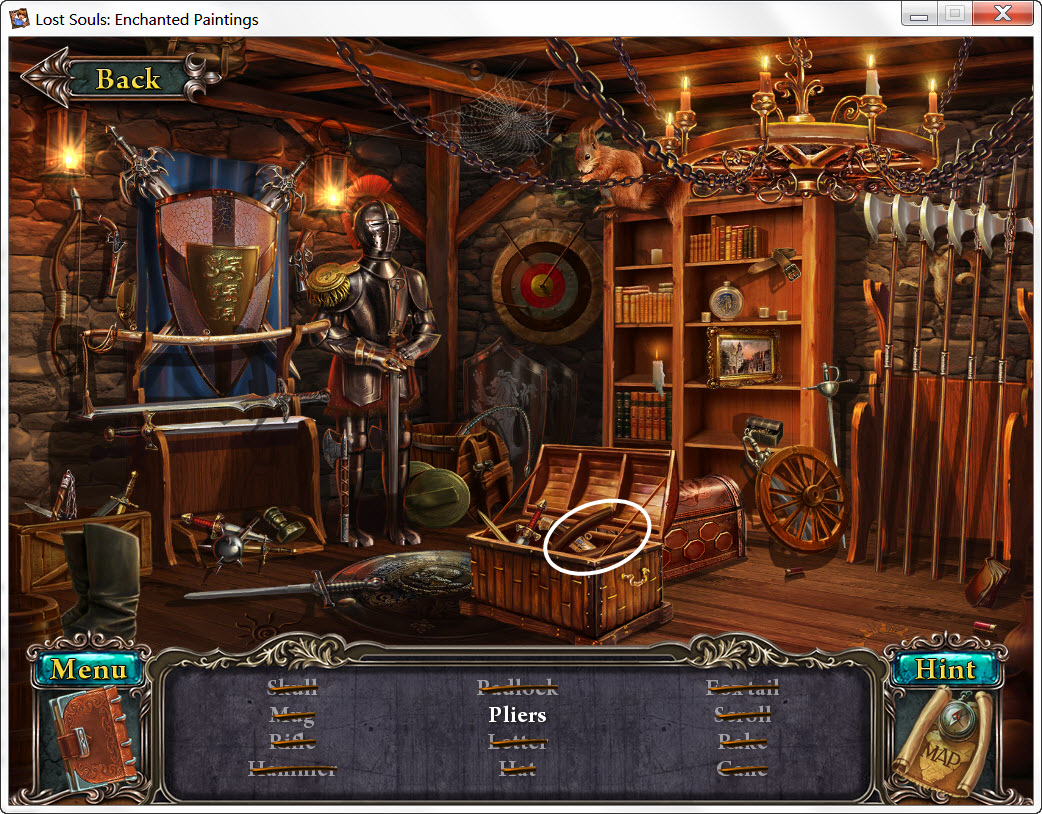
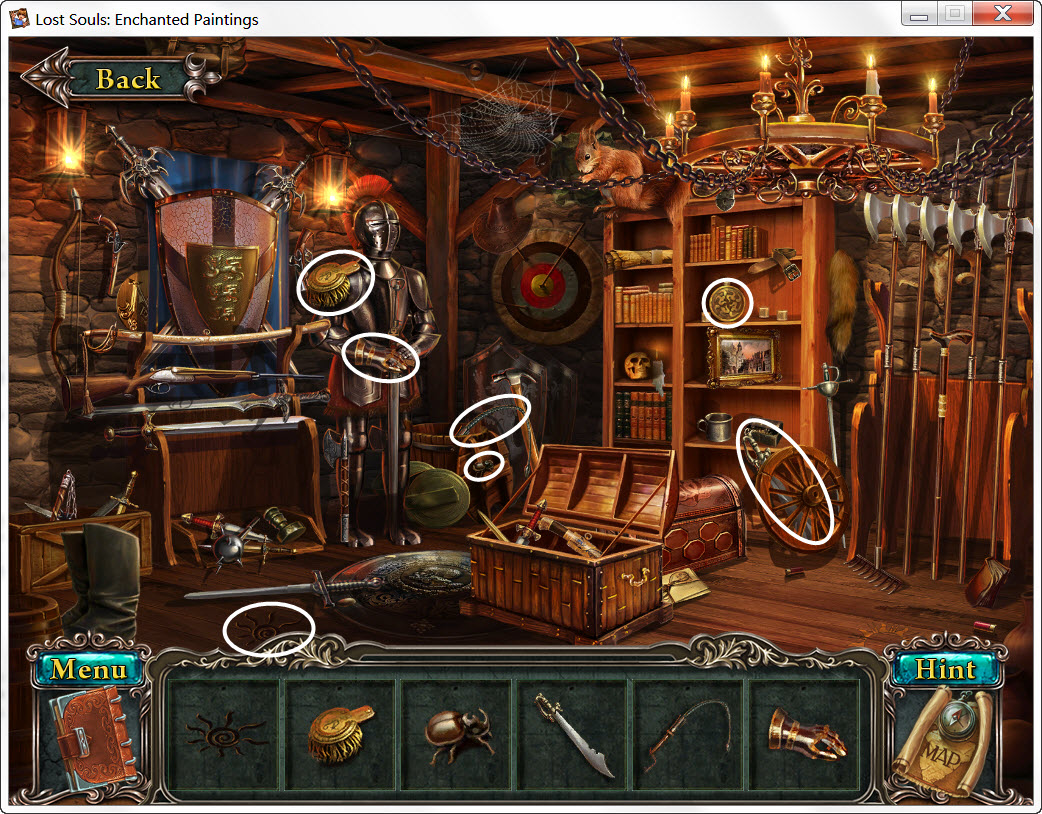
- enter the armory
- take the Piece of Canvas (Frog)
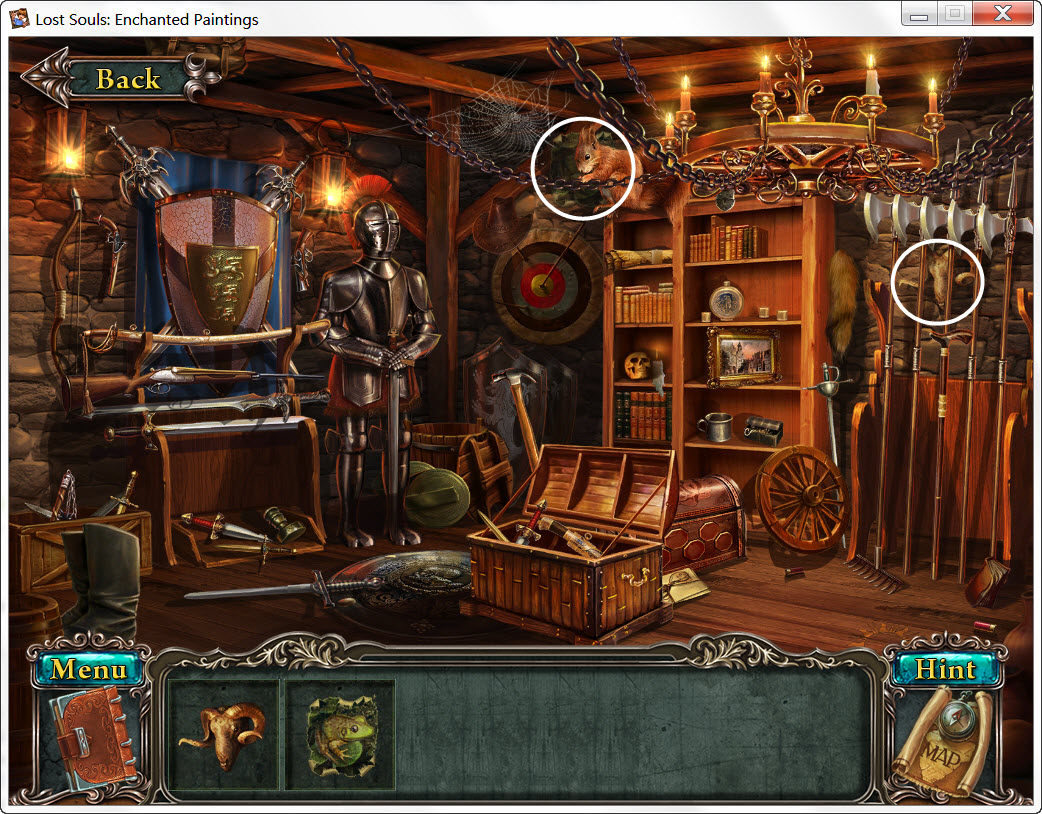
- return to the map - location complete
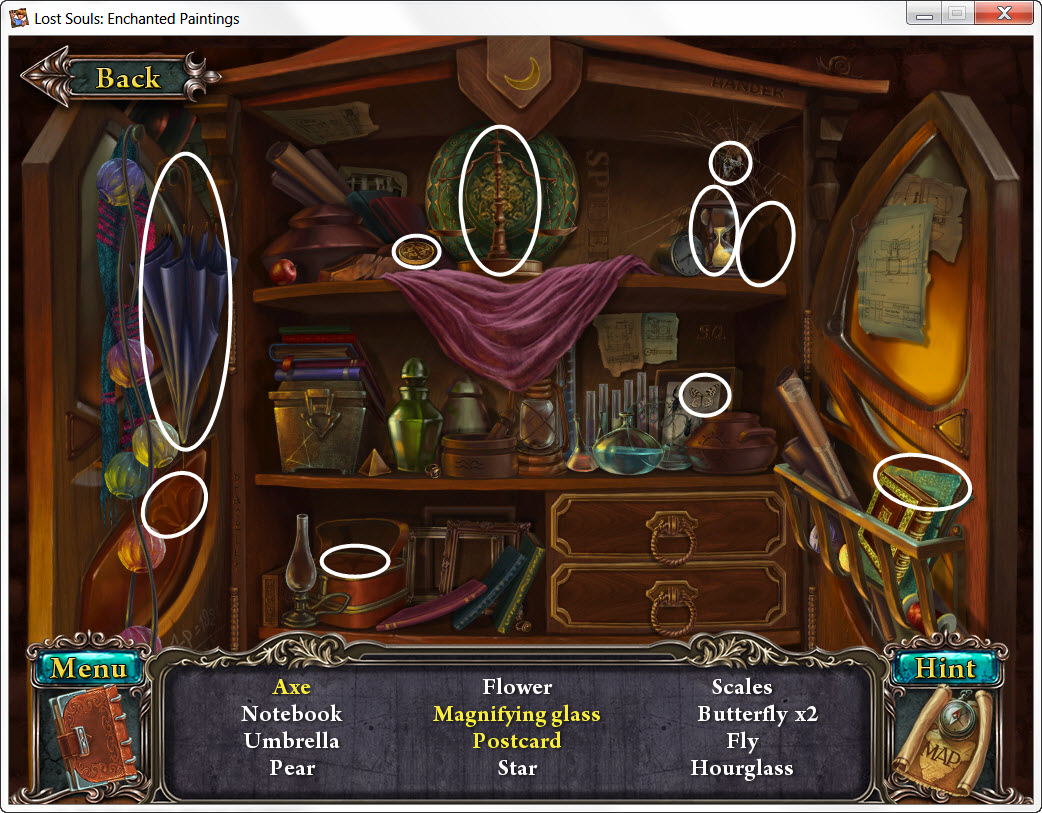
Coin - 1
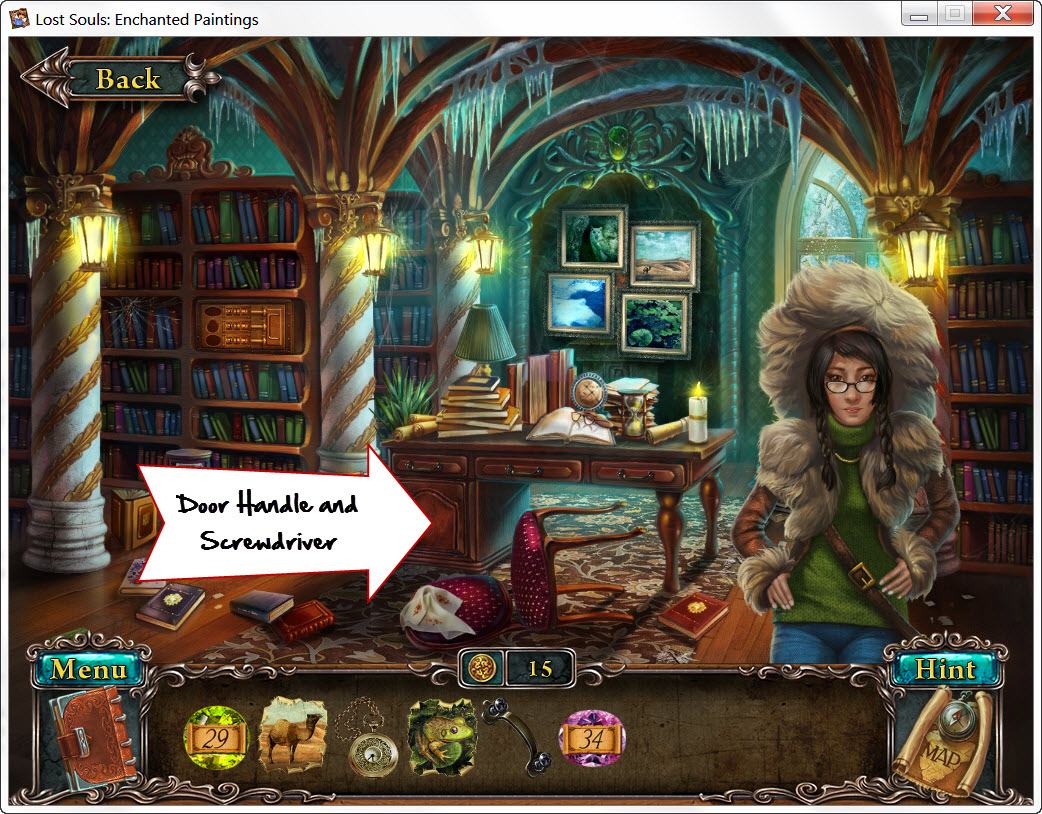
- examine the bookshelf
- take the Door Handle
- examine the scales
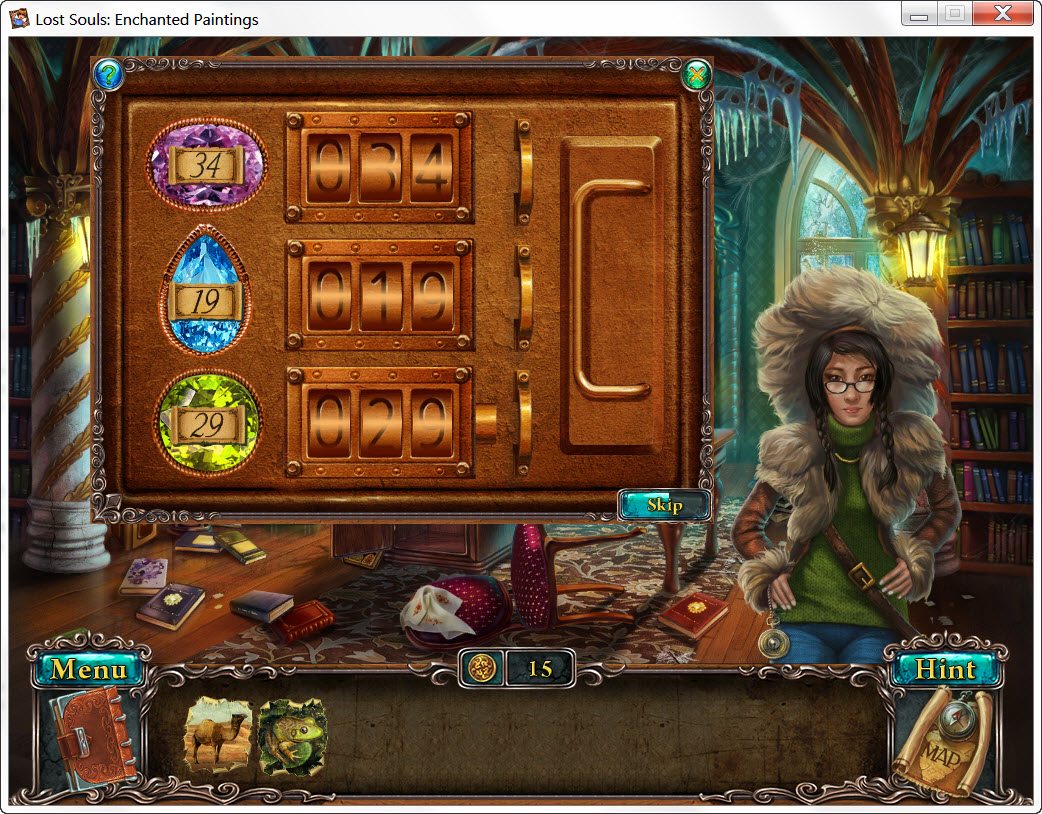
- Scale Puzzle
- place the Gem (Pink) on either side
- now try the various weights to see which one levels the scale
- solution: 20, 10, 3 and 1
- enter the library
- give the girl the Pocket Watch
- receive Screwdriver
- place the Door Handle on the bottom left door on the desk
- use the Screwdriver to tighten the handle
- take the Gem
- go down
Cabinet
- Scale Puzzle
- place the Gem (Blue) on either side
- now try the various weights to see which one levels the scale
- solution: 15, 3 and 1
- enter the library
- examine the gold box on the bookshelf
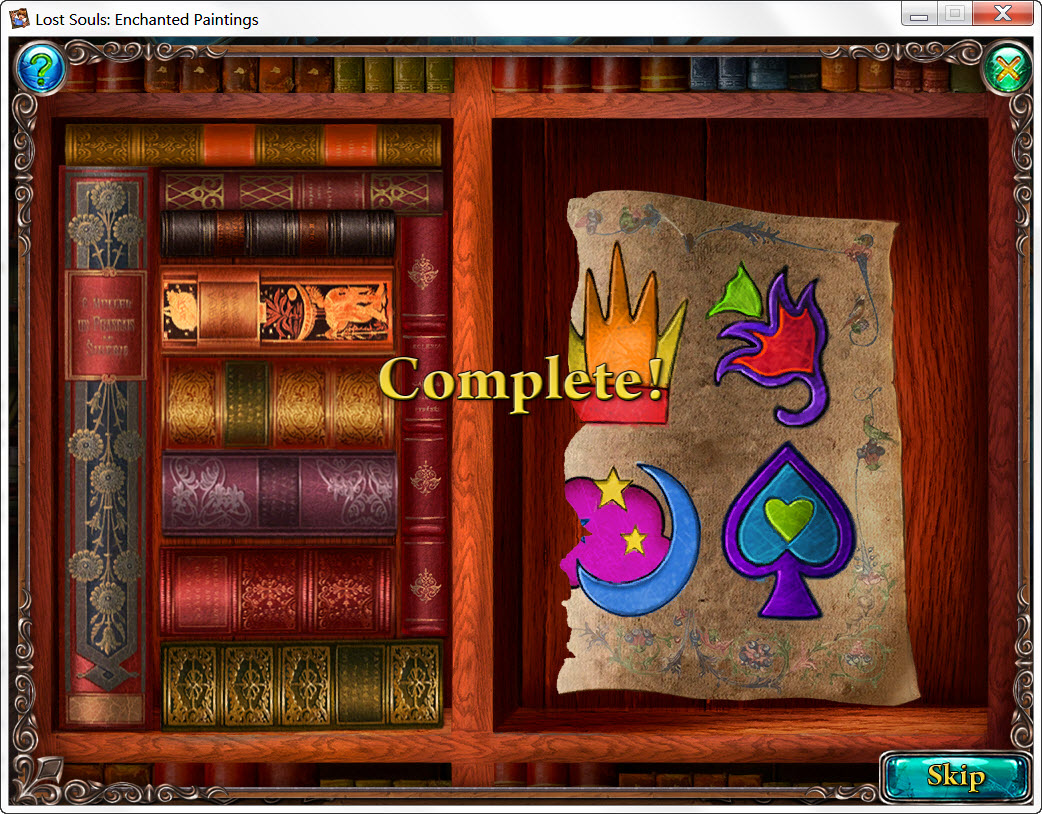
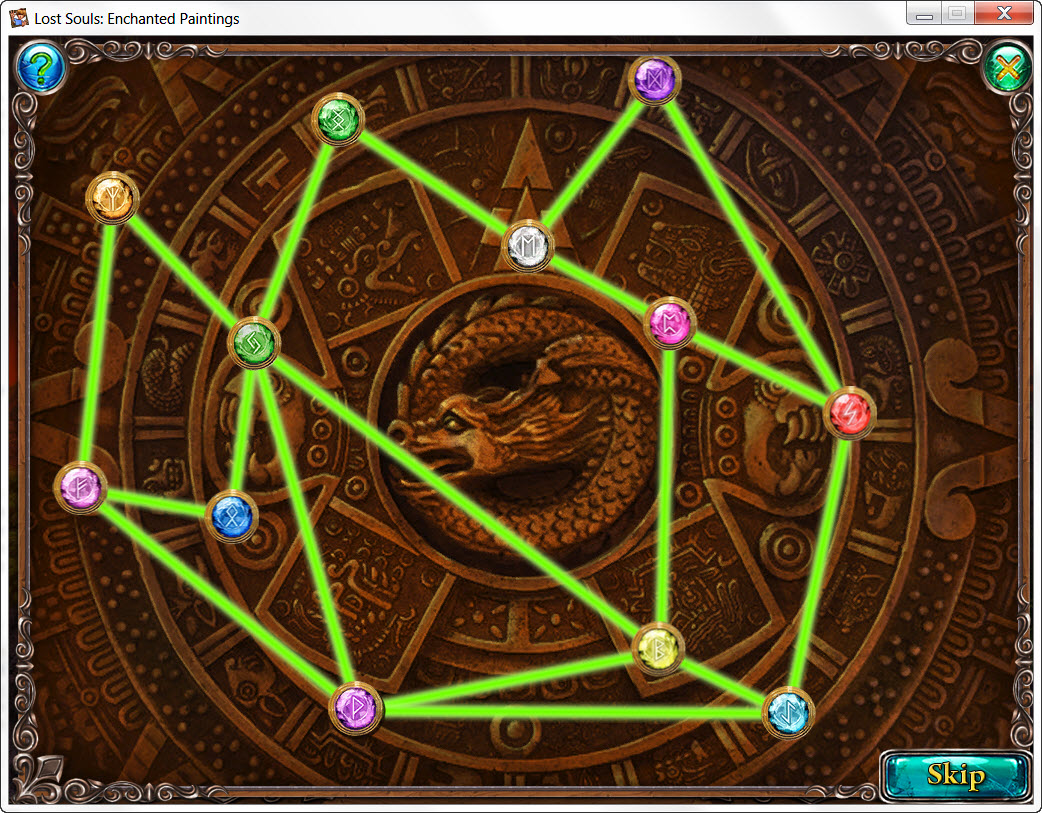
- Gem Puzzle
- place the Gems in the correct places
- input the number on the gem into each lock to the right
- see screenshot for solution
- take the Piece of Canvas (Penguin)
- examine the paintings on the back wall
- Painting Puzzle
- place the Pieces of Canvas in the correct paintings
- take the Magic Bowl
- return to the map - location complete
- use the Magic Bowl on the alter
- receive Piece of Canvas
Paintings
- examine the sparkling painting
- use the brush to dust it off
- enter the painting
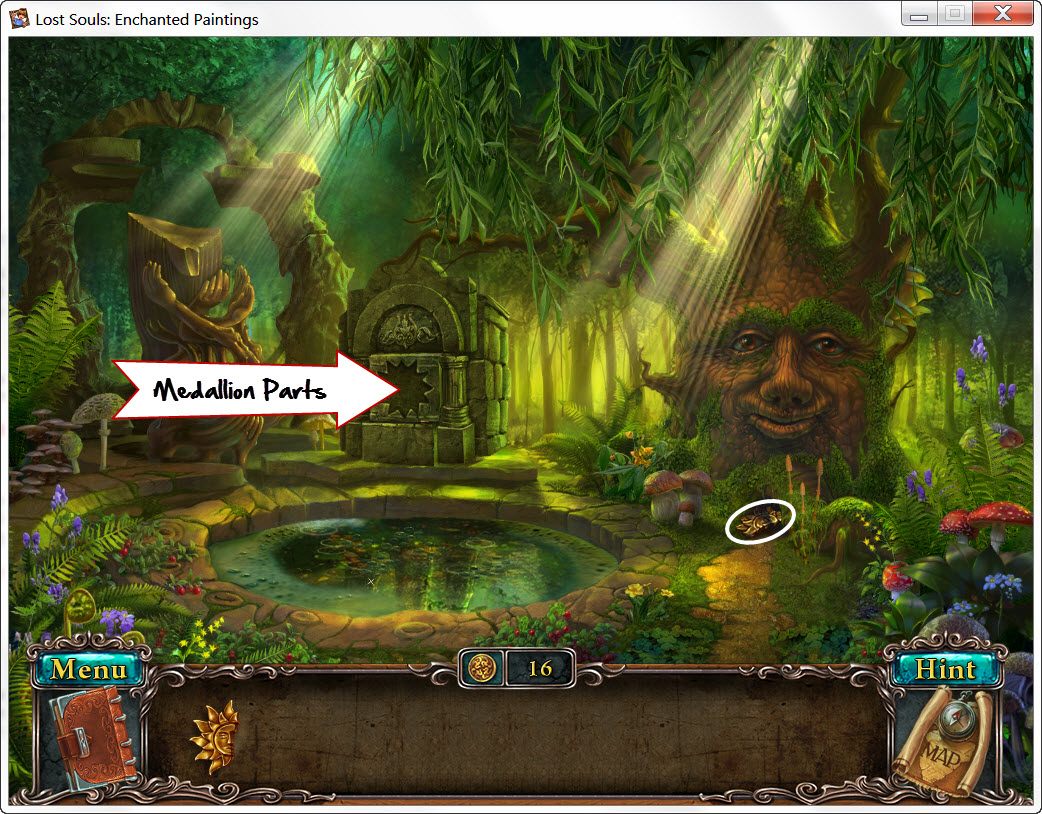
The Magical Well
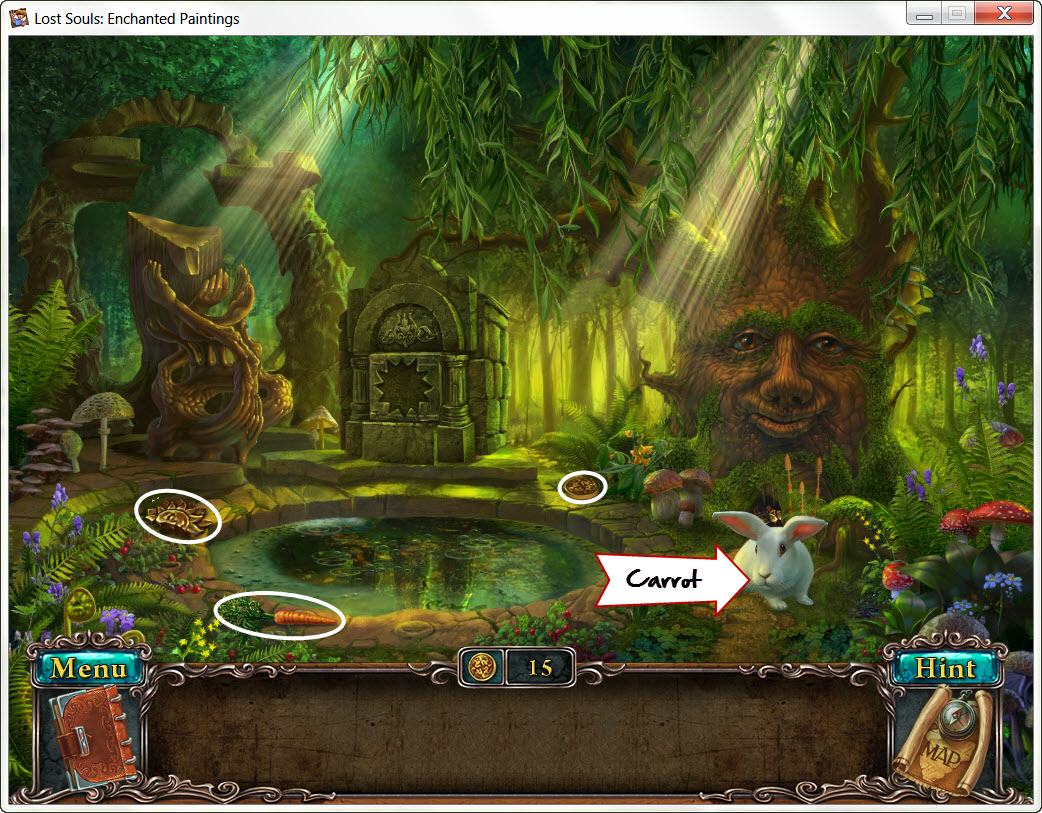
Coins - 1
- talk to the tree
- pick up the Carrot
- pick up the Medallion Part
- give the Carrot to the rabbit
- pick up the Medallion Part
- examine the shrine
- place the Medallion Parts in the shrine
- take the Forest Hut Key that appears
- return to the map
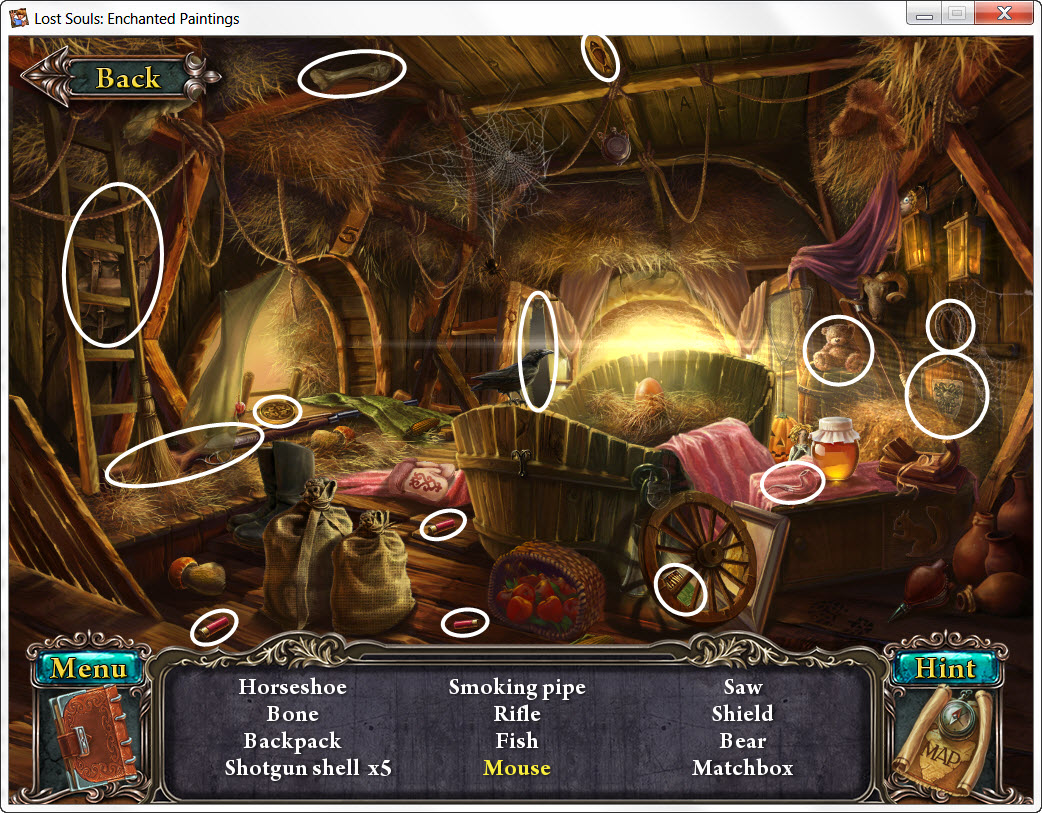
Forest Hut
Coins - 6
- pick up Hazelnuts (4 of 5)
- move the ferns to th left to get Hazelnut (5 of 5)
- pick the three Mushrooms
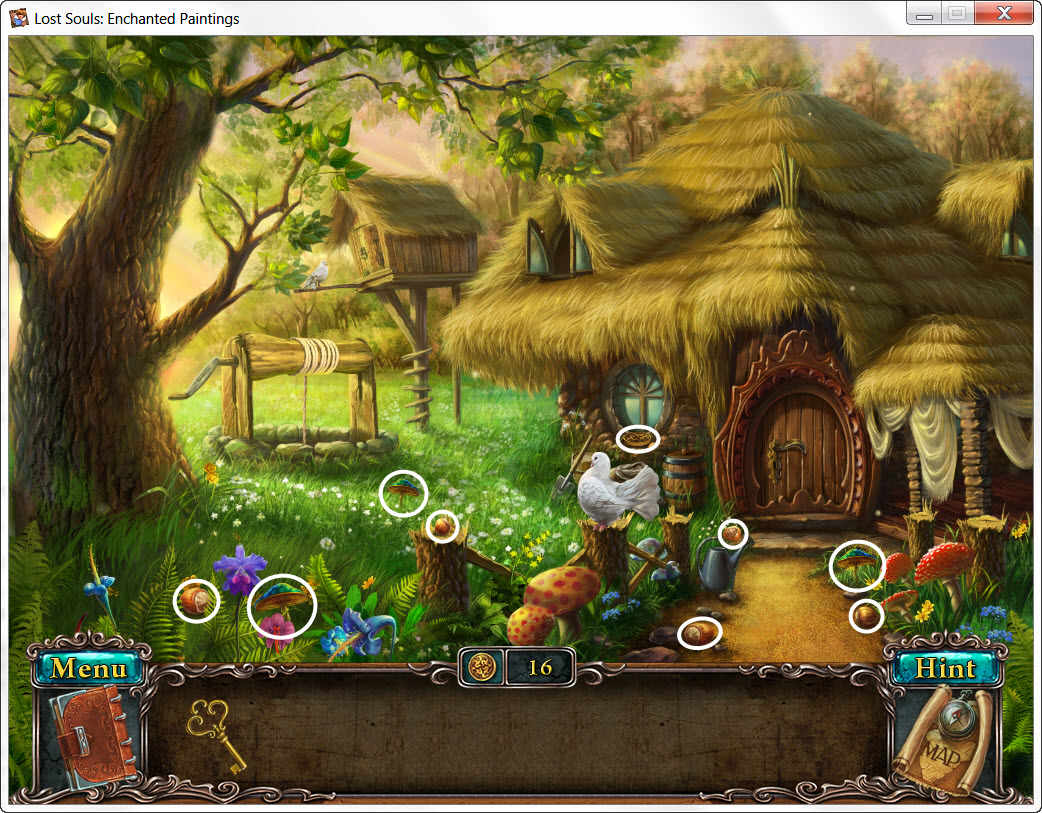
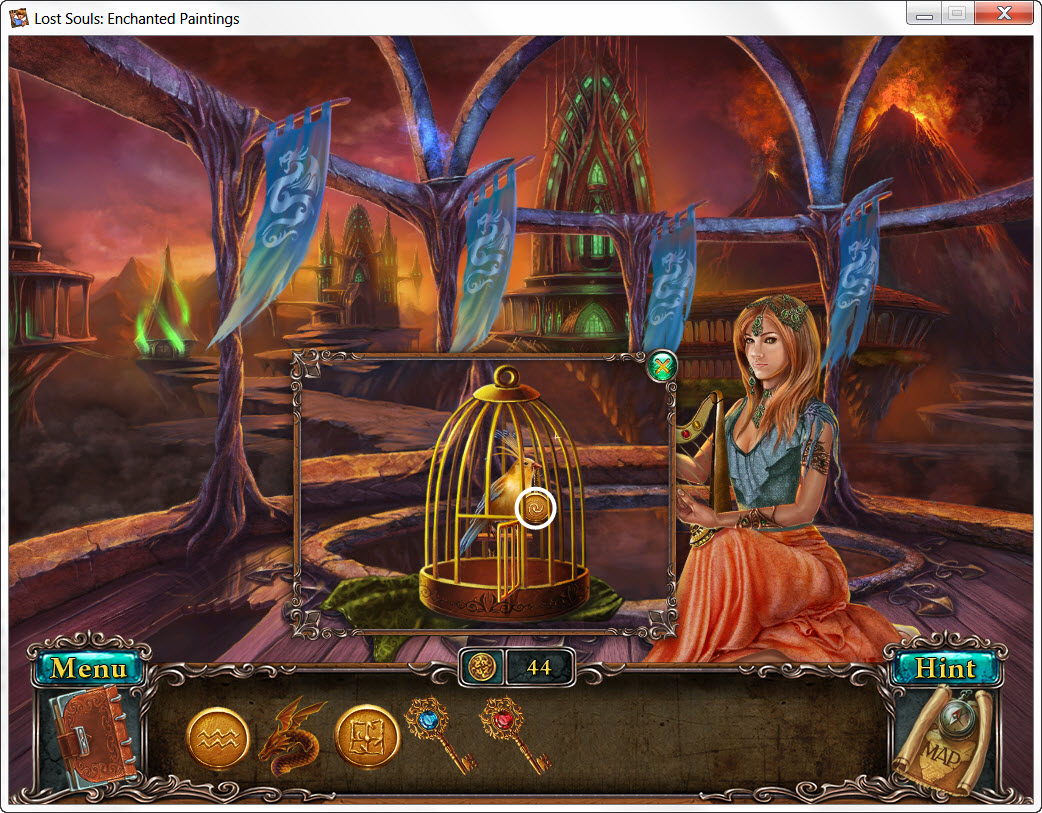
- take the Dove
- examine the lonely dove on the bird house and give her a mate (Dove)
- use the Forest Hut Key on the lock
- turn the key twice and pull the lever
- enter the hut
- take the Bucket
- take the Ladder
- take the Wooden Spoon
- talk to the man
- read the recipe on the wall over the fireplace

- enter the basement
- take the Pipe Segment
- go down
- examine the well
- use the Bucket in the well
- turn the handle twice and take the Bucket of Water
- use the ladder to reach the upper window
- enter the window
- take the Matchbox

- go back in the hut
- replace the Pipe Segment
- Recipe Puzzle
- see screenshots
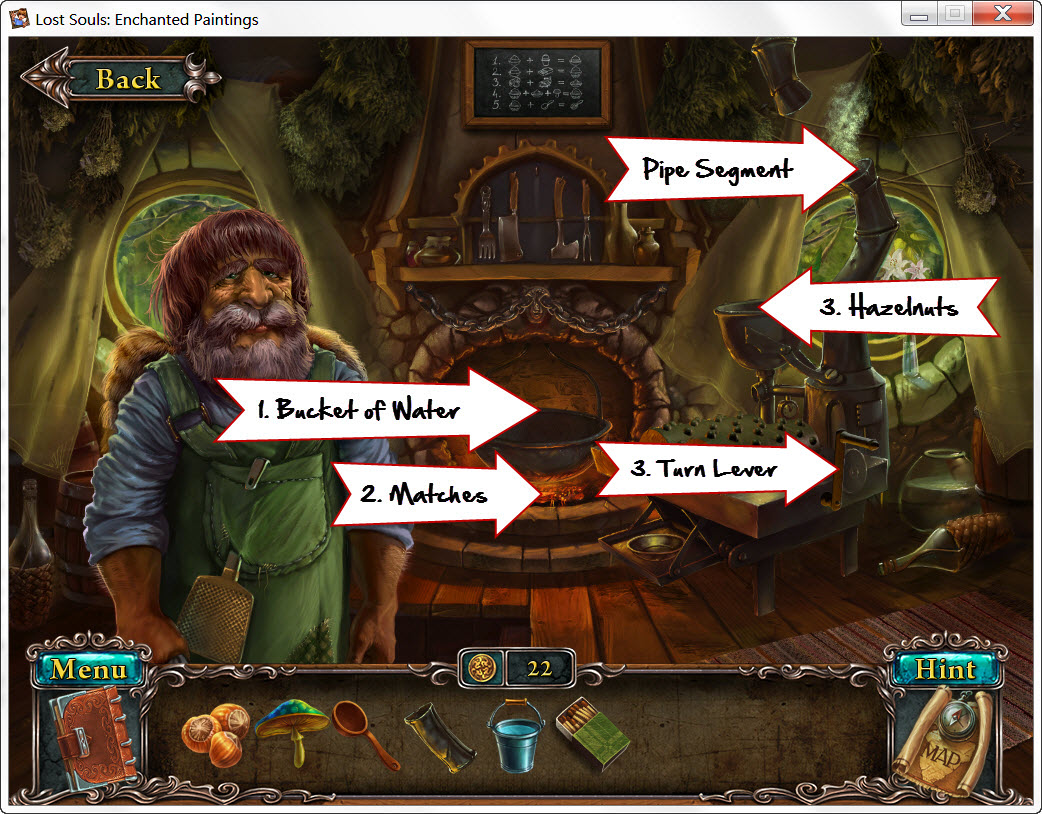
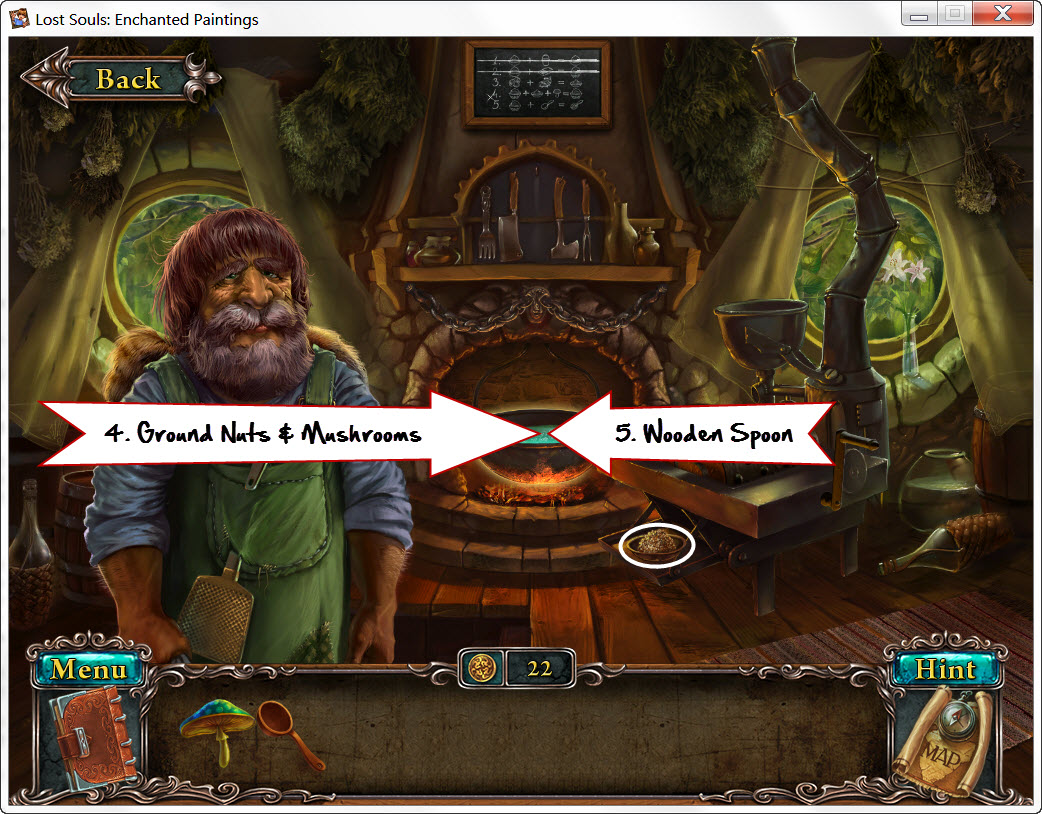
- give the Wooden Spoon with Soup to the man
- receive Harp
- return to the map
Coins - 2
- pick up the Oil Can
- place the Harp in the left statues hands
- examine the alter
- Alter Puzzle
- move the squares around the circle is in the middle
- arrange the rings to create a picture
- receive Piece of Stone
- place the Piece of Stone on top of the broken one (left side)
- click each piece of stone to stop the flow of water
- take the Chest Key
- use the Chest Key on the chest
- take the Mosaic Parts
- return to the map
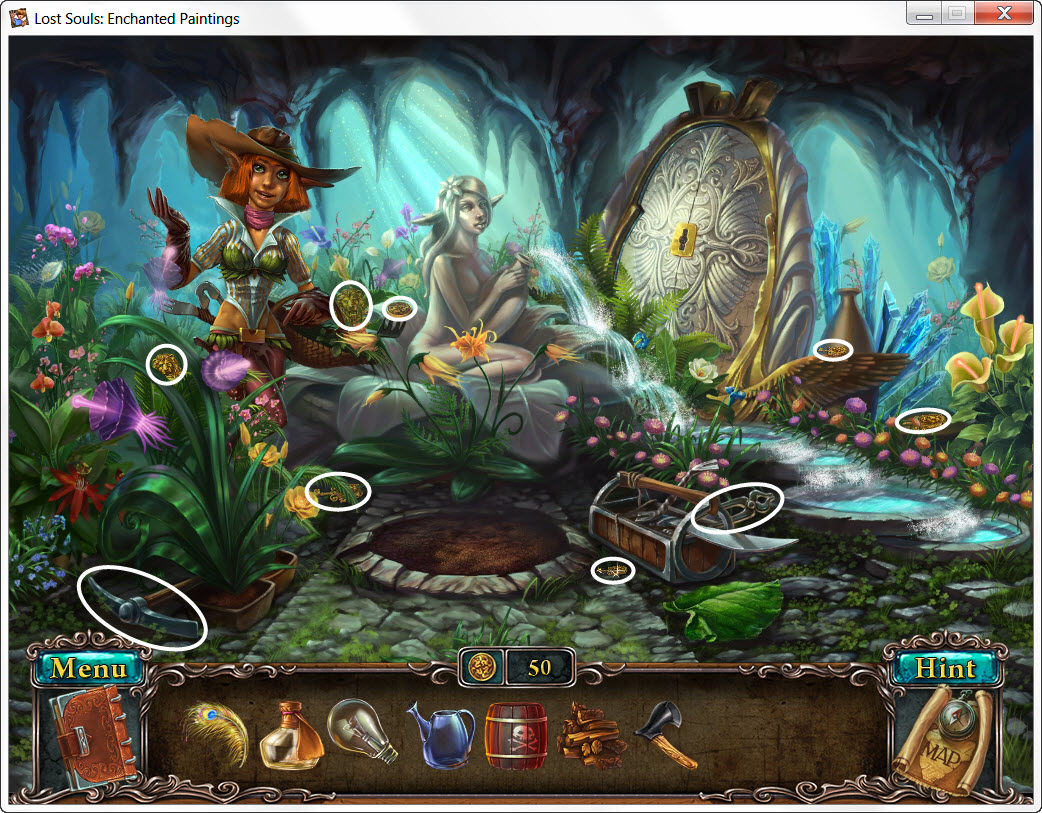
Fairy Meadow
Coins - 2
- talk to the girl
- pick up the Pruners

- use the Mosaic Tiles on the stained glass window above the girl
- Mosaic Puzzle
- assemble the mosaic tiles like a jigsaw puzzle
- see screenshot for solution

- go inside
- take the Magic Wand

- use the Magic Wand on each small flower surrounding the larger one
- take the Diadem from the center of the large flower
- give the Diadem to the girl
- receive Portal Key
- examine the portal on the right
- place the Portal Key in the middle
- Portal Puzzle
- draw the letters shown on the rune above
- tip: you have to pretty exact to get this to work
- tip: use the entire drawing space to draw your symbol
- tip: the lightning bolt is extremely hard - just keep trying!
- enter the portal
Coins - 1
- talk to the little man
- try to cross the bridge
- pick up the Planks
- use the Planks to repair the bridge - we need hammer
- go down
Fairy Meadow
Coins - 1
- go through the stained glass window
- take the Empty Flask
- go back through the portal
- use the Empty Flask on the water of bravery in the leaf underneath the little man
- give the Water of Bravery to the little man
- receive Acorn
- return to the map
Coins - 1
- examine the bird house
- use the Oil Can on the bird house door hinges
- take the Part of Safe
- enter the window
- take the Wooden Squirrel
- return to the map - location complete

Fairy Meadow
- enter the portal
- place the Acorn and Wooden Squirrel in the base of the tree
- take the Hammer
- use the Hammer to finish the bridge
- go down
- examine the ivy covered wall
- use the Pruner on the ivy
- Stone Puzzle
- flip over stones and match like symbols
- receive safe code
- return to the map
- examine the safe
- Safe Puzzle
- place the Part of Safe in the middle
- look in your journal for the safe code
- move the dial left 50, right 30, and left 90
- take the Eye Gem
- return to the map - location complete
- enter the portal
- look across the bridge
- place the Eye Gem into the right eye
- take the Part of an Alter
- return to the map - location complete
- replace the Part of an Alter on the alter
- receive Piece of Canvas
Paintings
- examine the sparkling painting
- use the brush to dust it off
- enter the painting
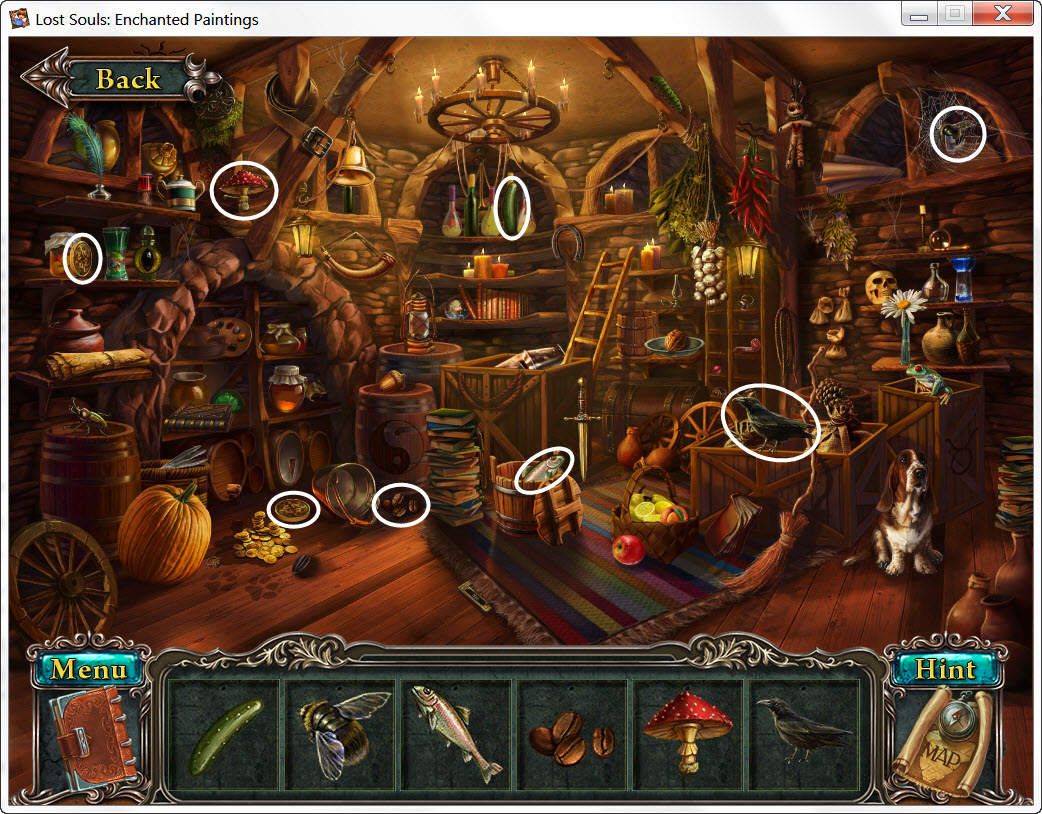
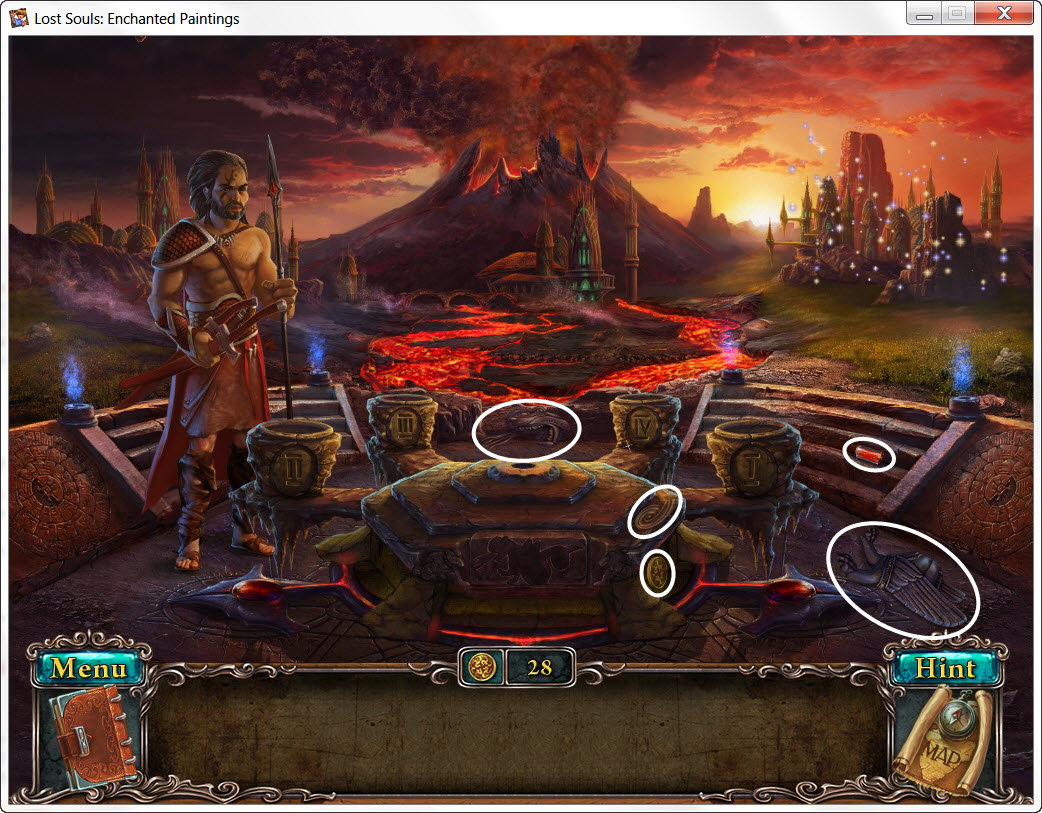
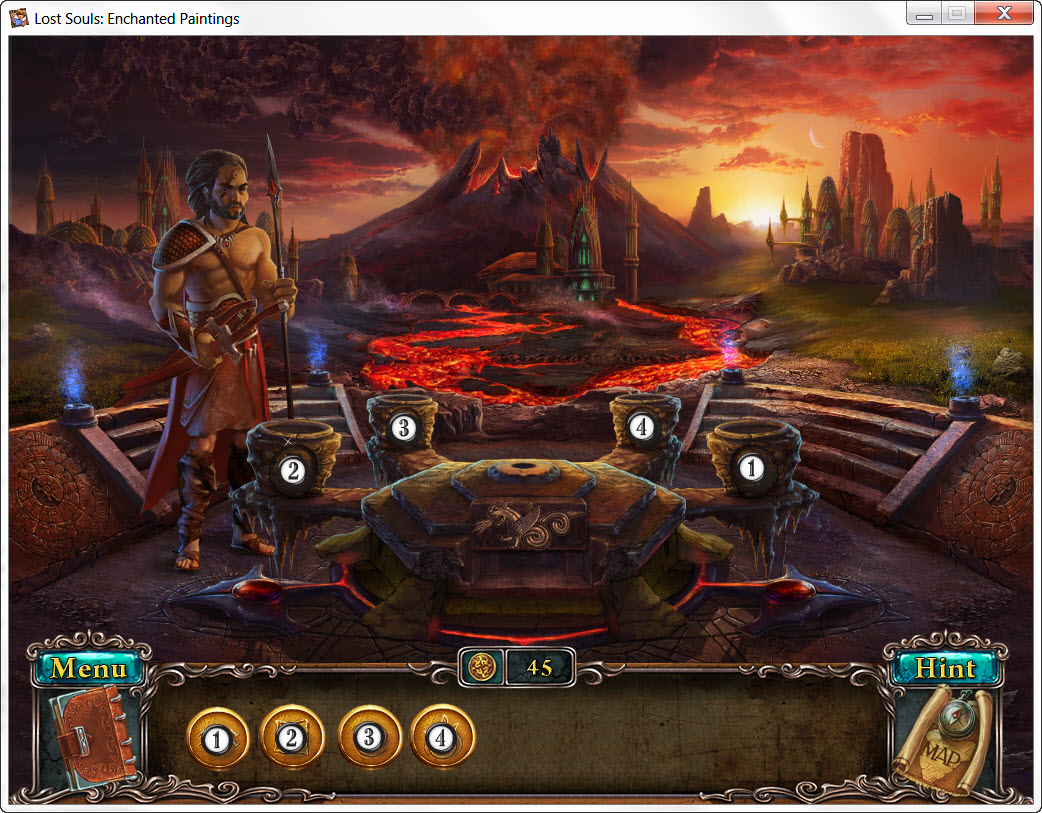
Altar
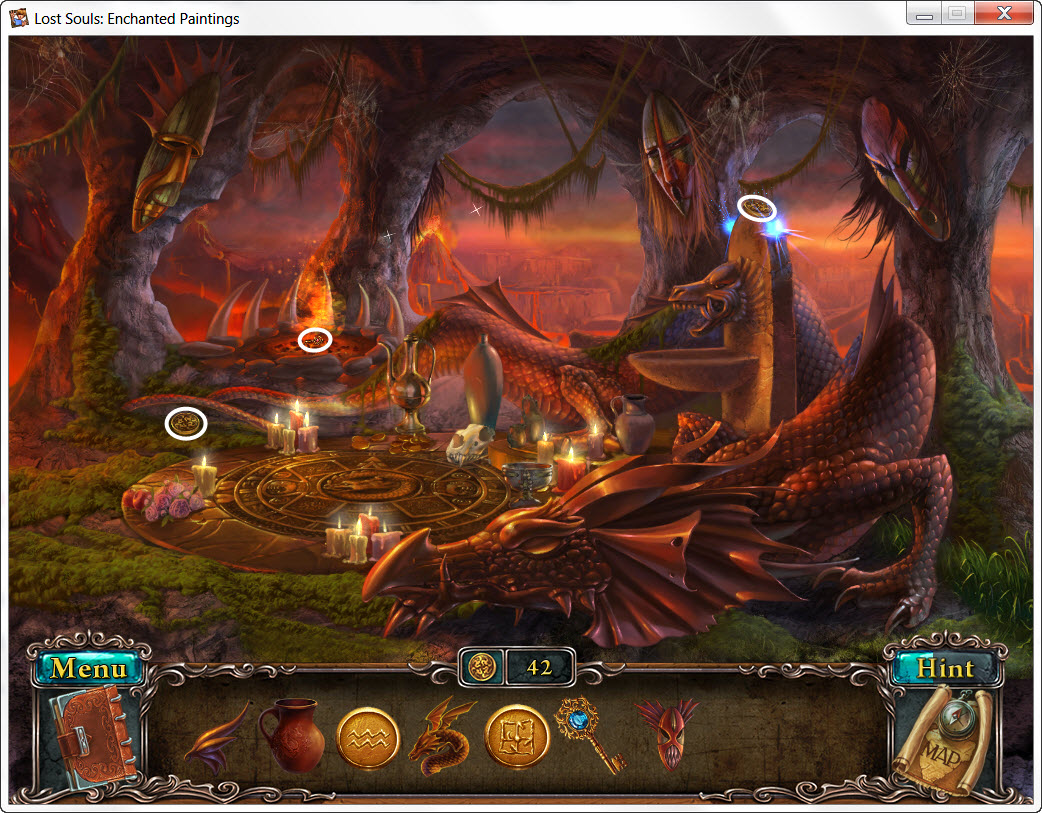
Coins - 2
- pick up the Tank
- pick up the three Dragon Parts
- examine the area to the right
- take the Dragon Part
- examine the front of the altar
- replace the four Dragon Parts
- take the Crowbar
- return to the map
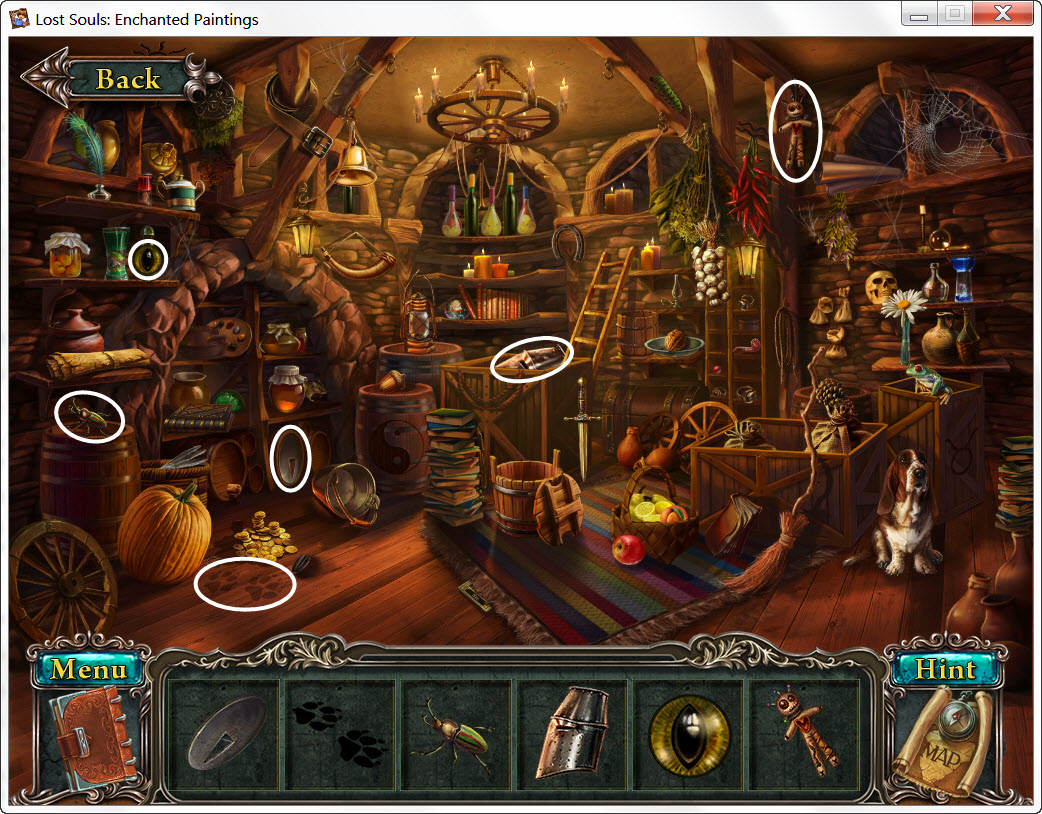
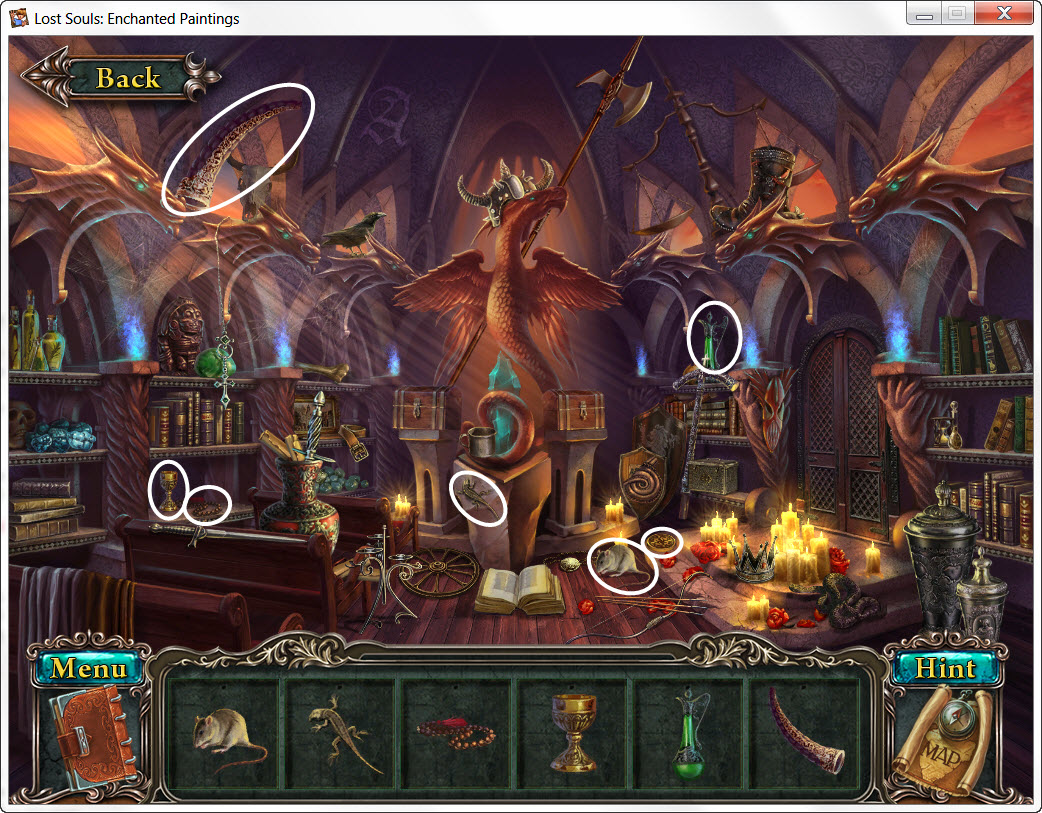
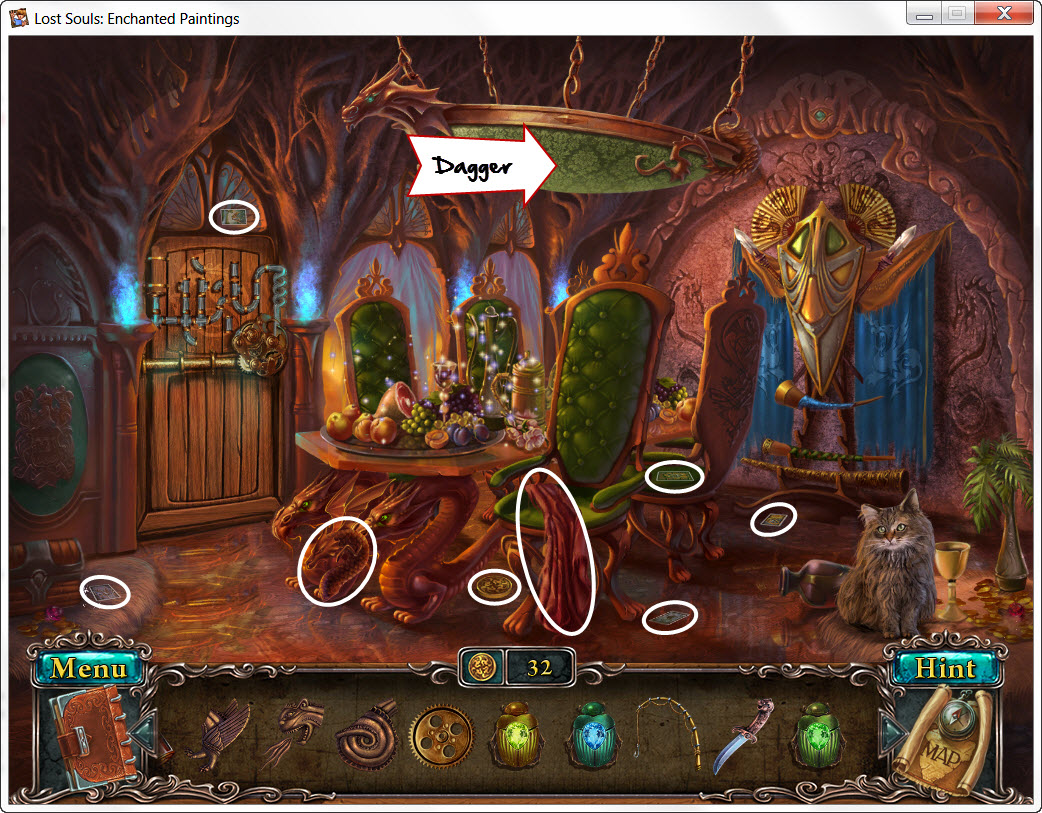
Coins - 2
- talk to the girl
- take the three Beetles
- pick up the Cogwheel
- take the Dagger
- take the Fishing Rod
- use the Crowbar on the loose floorboard
- take the Ear
- return to the map
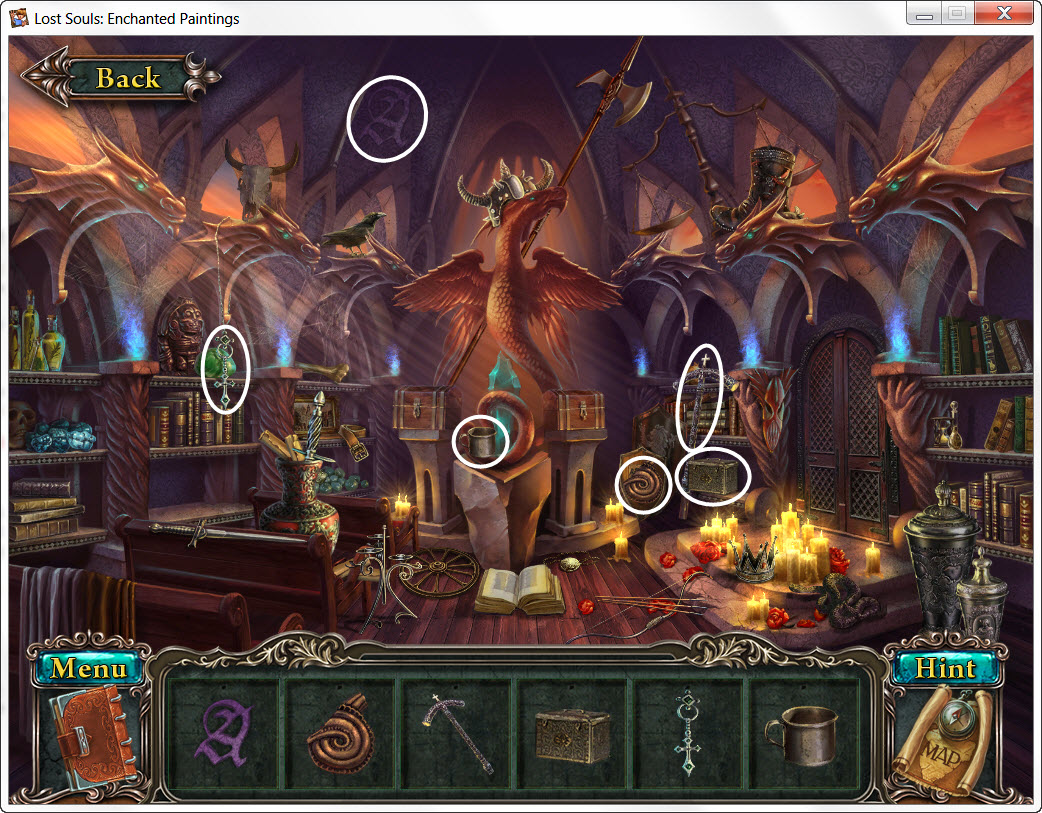
Coins - 2
- pick up the Cards (5 of 6)
- use the Dagger on the ceiling lamp
- take Card (6 of 6)
- pick up the Piece of Cloth
- take the Dragon Statue Shard
- examine the table
- take the Ham
- return to the map
Coins - 2
- take the Pitcher
- take the three Beetles
- take the Flag
- pick up the Broom
- use the Fishing Rod on the stream
- receive Fish
- give the Ham to the dog
- go forward
- take the String
- return to the map
Coins - 4
- give the Fish to th hungry kitty cat
- examine the table
- take the Water Amulet
- examine the door
- place the Tank and Cogwheel on the door
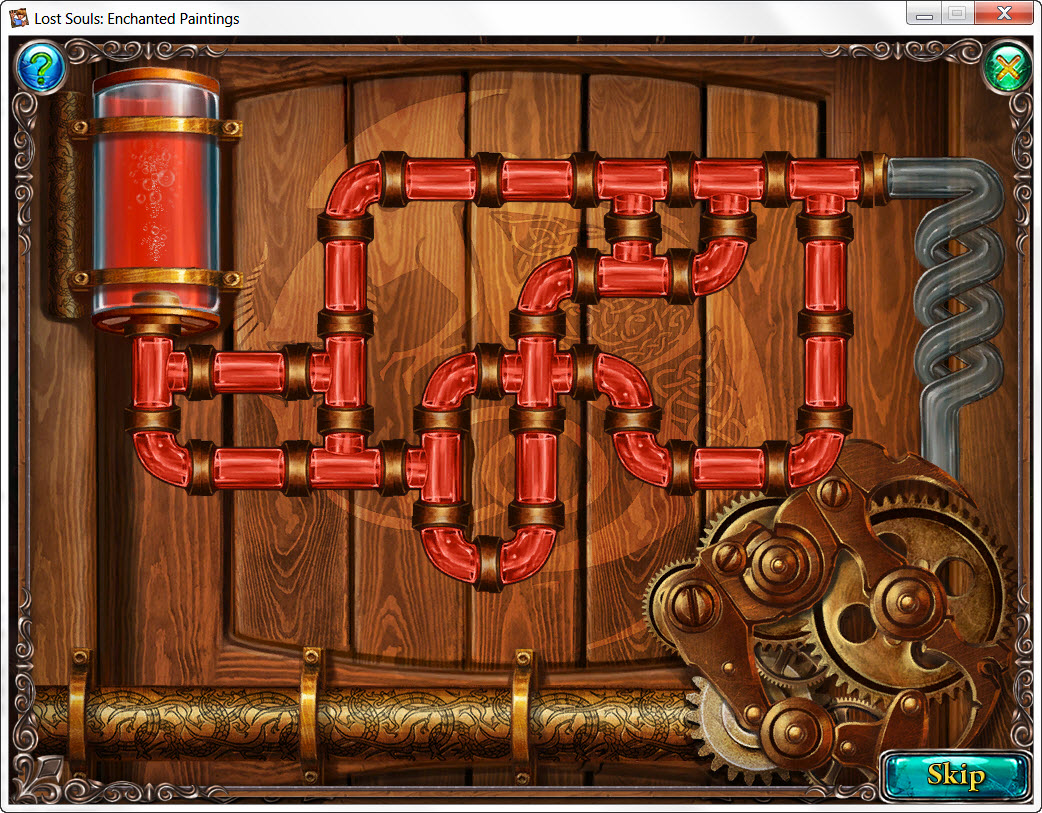
- Pipe Puzzle
- line up the pipes so the liquid flows from end to end
- see screenshot for solution
- enter the room
- use the Piece of Cloth on the dirty painting on the wall
- receive the code for the locked chest
- examine the chest
- Chest Puzzle
- place the Beetles on the chest
- look in your journal for the solution
- the solution should match the painting
- take the Earth Amulet
- place the Cards with the others (above the chest)
- use the Broom on the cobwebs
- take the Horn
- go down
- place the Horn on the rack with the others
- take the Key
- return to the map
Coins - 1
- replace the Flag (second from left)
- give the String to the girl
- examine the harp
- Harp Puzzle
- watch/listen to the strings
- replay them
- solutions: (with screenshot) round 1 - 2, 6, 6, 4; round 2 - 2, 6, 6, 4, 5; round 3 - 2, 6, 6, 4, 5 4; round 4 - 2, 6, 6, 4, 5, 4, 3; round 5 - 2, 6, 6, 4, 5, 5, 3, 4; round 6 - 2, 6, 6, 4, 5, 4, 3, 4, 2
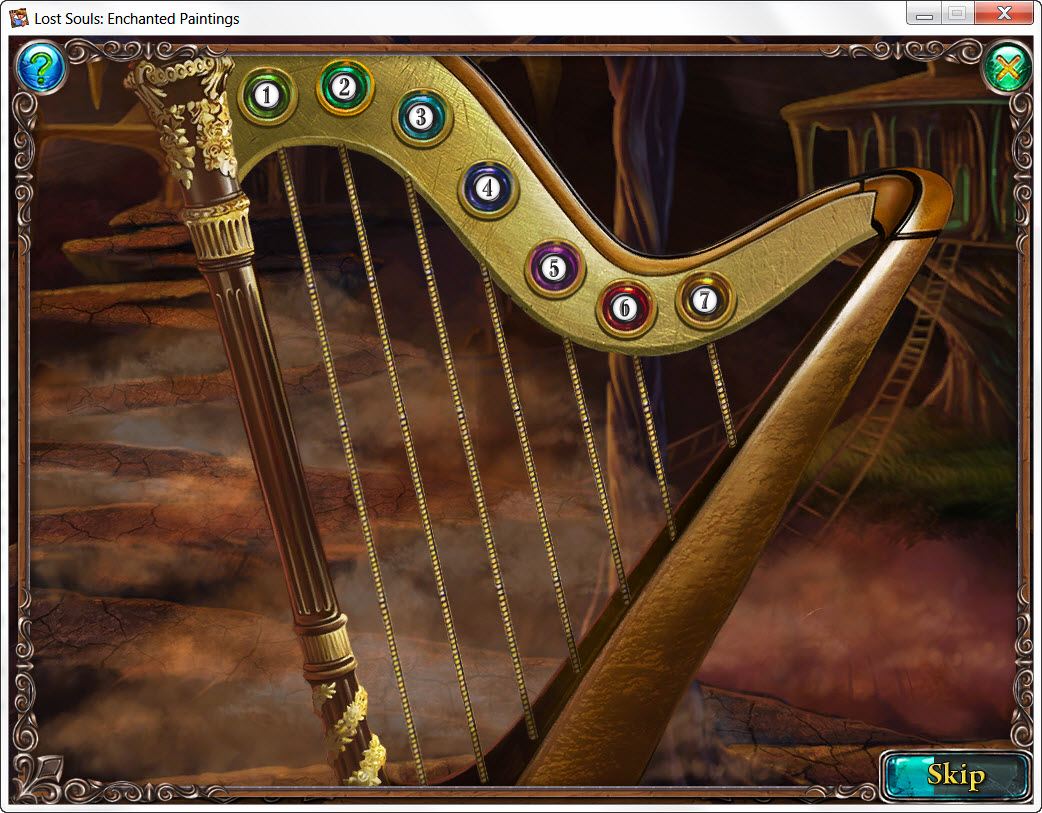
- return to the map
Coins - 1
- examine the area to the right
- take the Mask
- return to the map
Coins - 2
- examine the fountain
- replace the Ear on the right side
- pull down both ears
- use the Pitcher on the water
- use the Pitcher of Water on the fire pit
- take the Key
- place the Mask on the second from left column
- examine the middle
- Dragon Cave Puzzle
- move the nodes so none of the strings cross
- they will turn green when they are not touching any other strings

- take the Cell Key
- return to the map
- use the Cell Key on the birdcage
- take the Air Amulet
- return to the map
Treasury
Coins - 1
- examine the treasure
- take the Plate
- return to the map
- go through the door
- use the Plate on empty mold on the right
- take the Dragon Plate
- return to the map
- examine the rock
- use the Dragon Plate on the rock
- take the Mage's Bracelet
- replace the Dragon Statue Shard on the right statue
- take the Key
- return to the map - location complete
- go through the door
- give the man the Mage's Bracelet
- receive the correct order of the amulets
- return to the map - location complete
- examine the tower in the distance
- place the three Keys in the matching keyholes
- turn all three keys
- take the Dragon Eye
- return to the map - location complete
- replace the Dragon Eye
- take the Fire Amulet
- return to the map - location complete
- replace the four Amulets in order
- look in your journal for the correct order
- receive Piece of Canvas
Paintings
- examine the sparkling painting
- use the brush to dust it off
- enter the painting
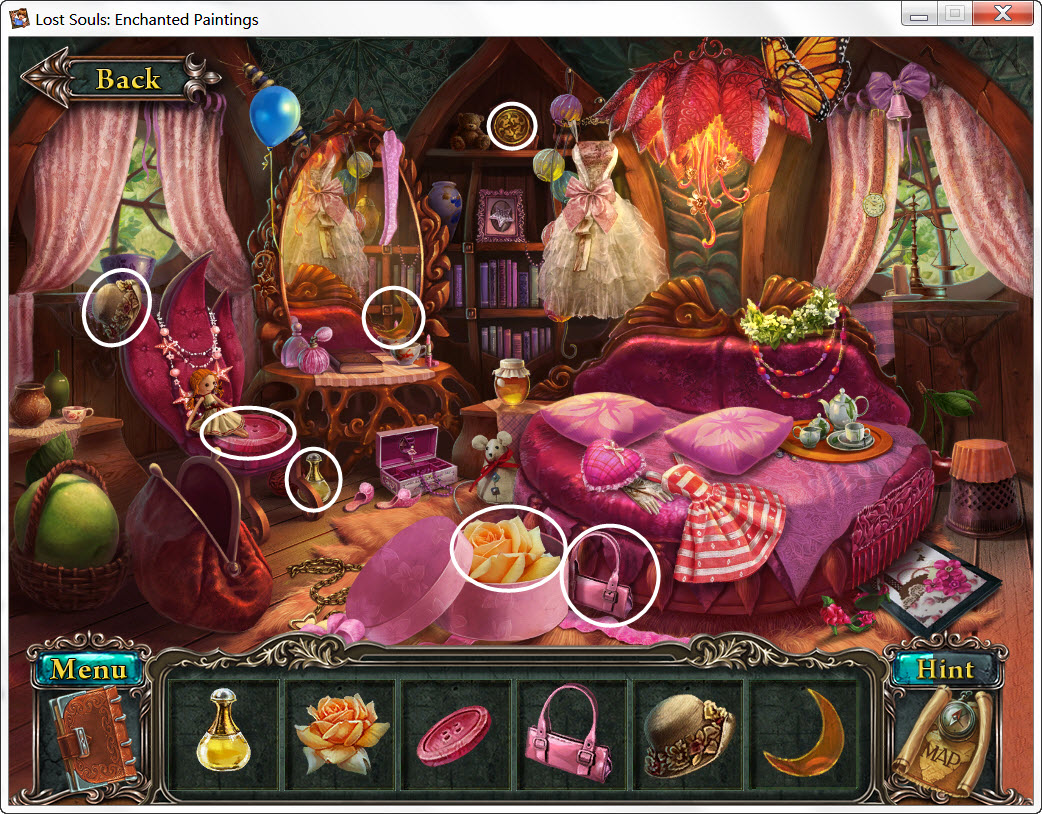
Throne Room
Coins -1
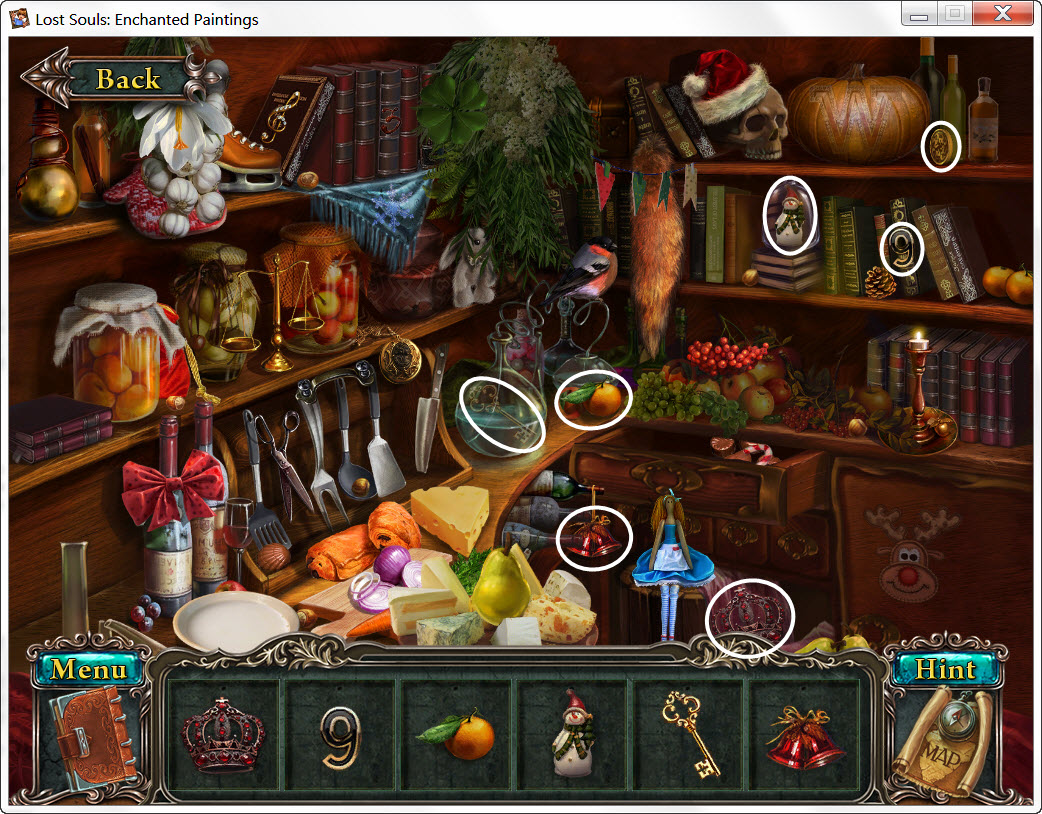
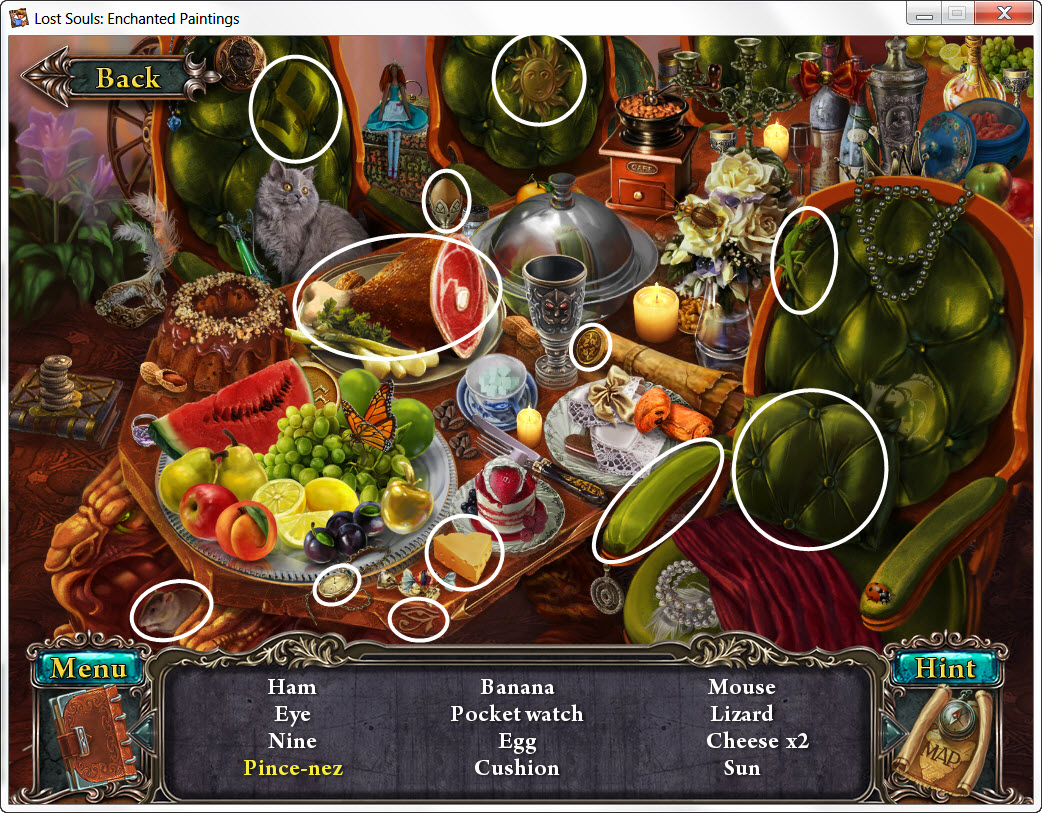
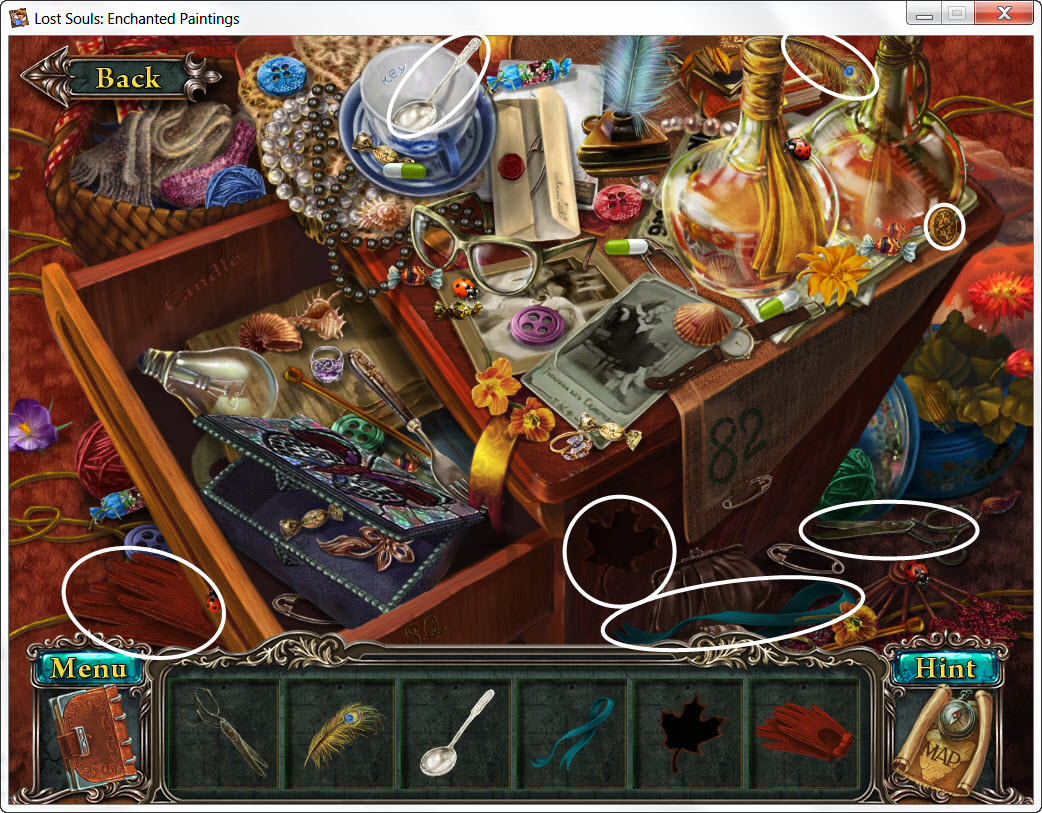
- take the Cheese
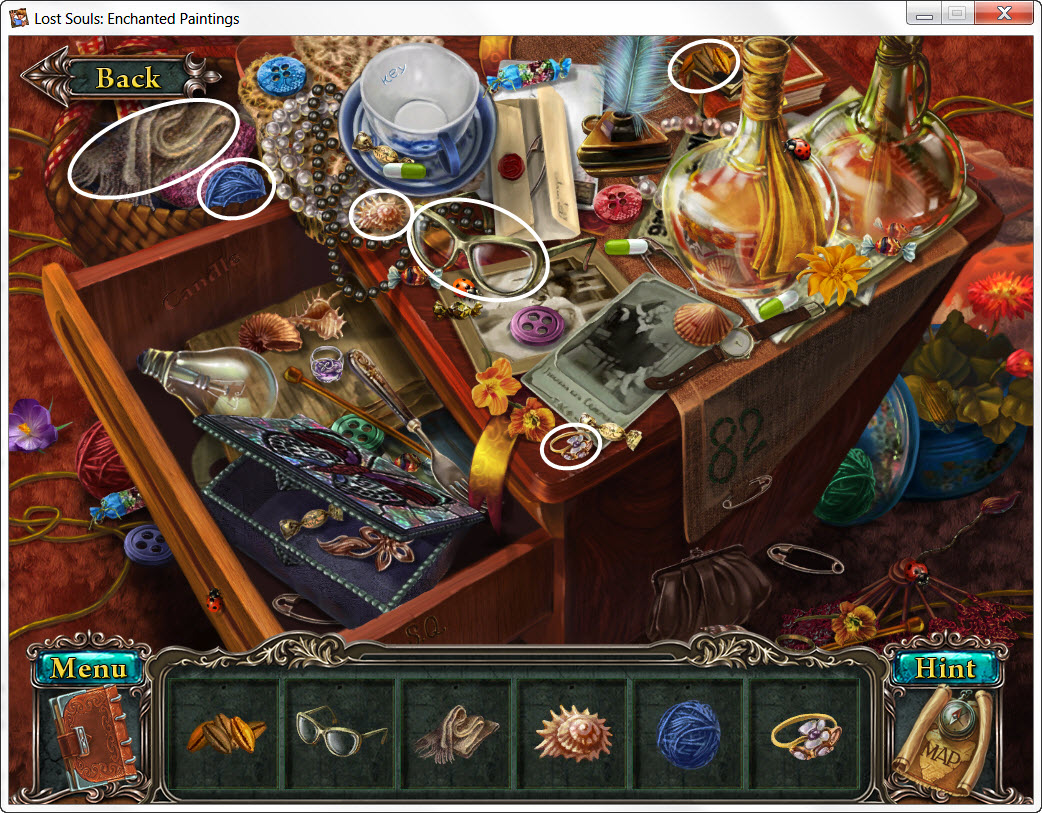
- pick up Beads (4 of 7)
- move the pillows
- pick up the remaining three Beads
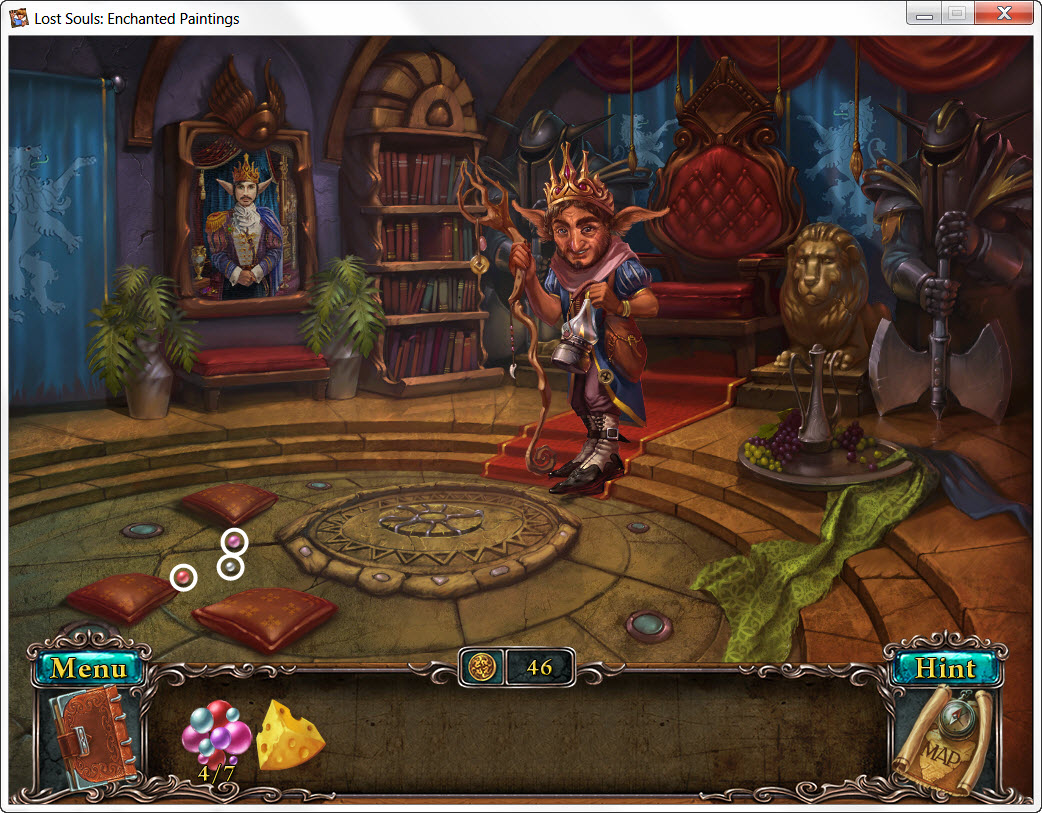
- return to the map
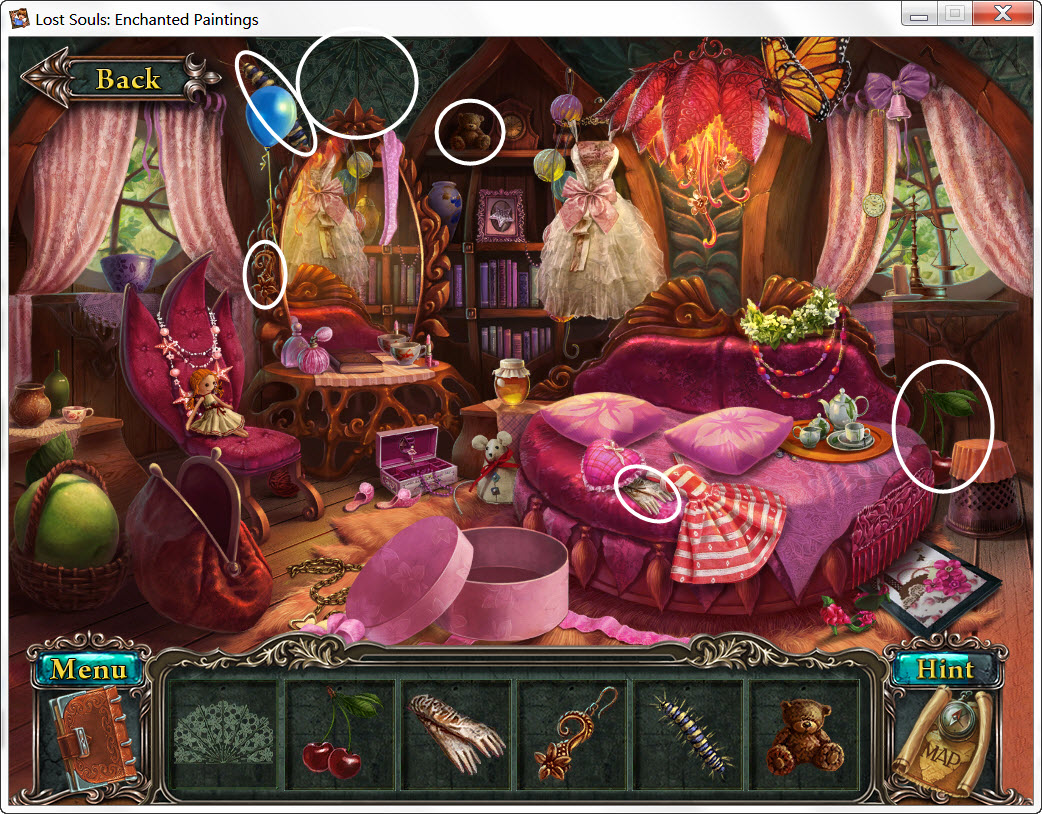
Coins - 3
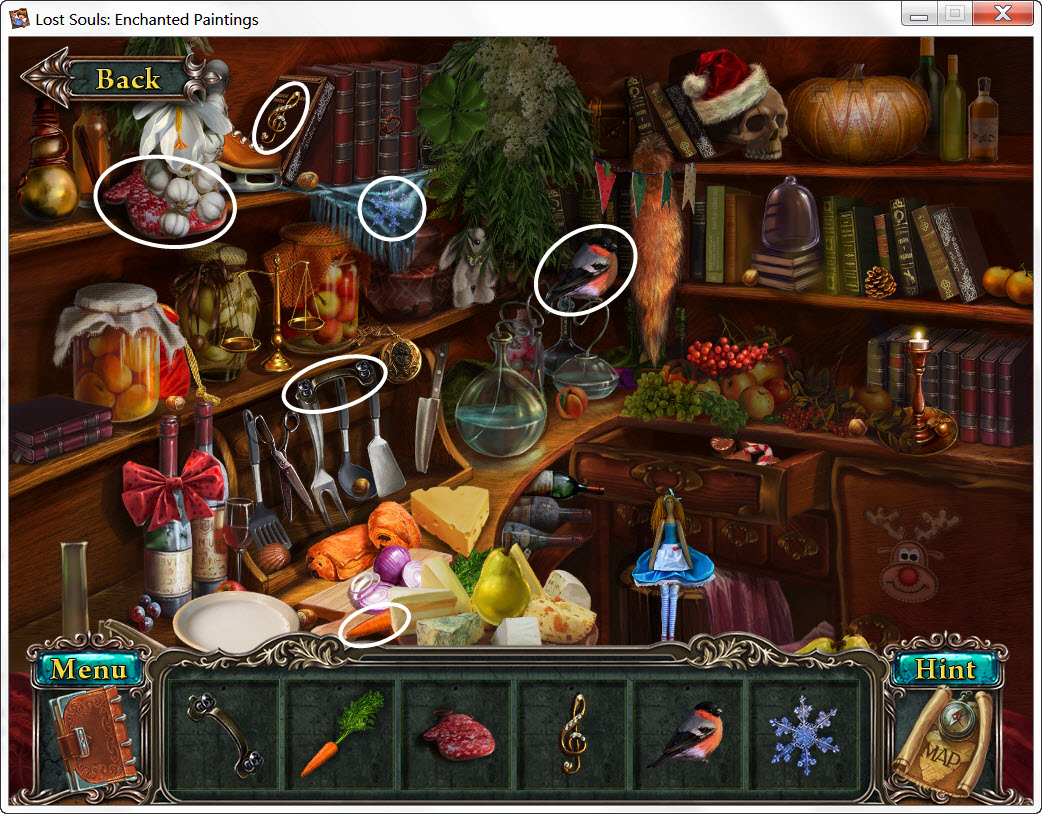
- talk to the lady
- pick up the Feather
- take the Empty Bottle
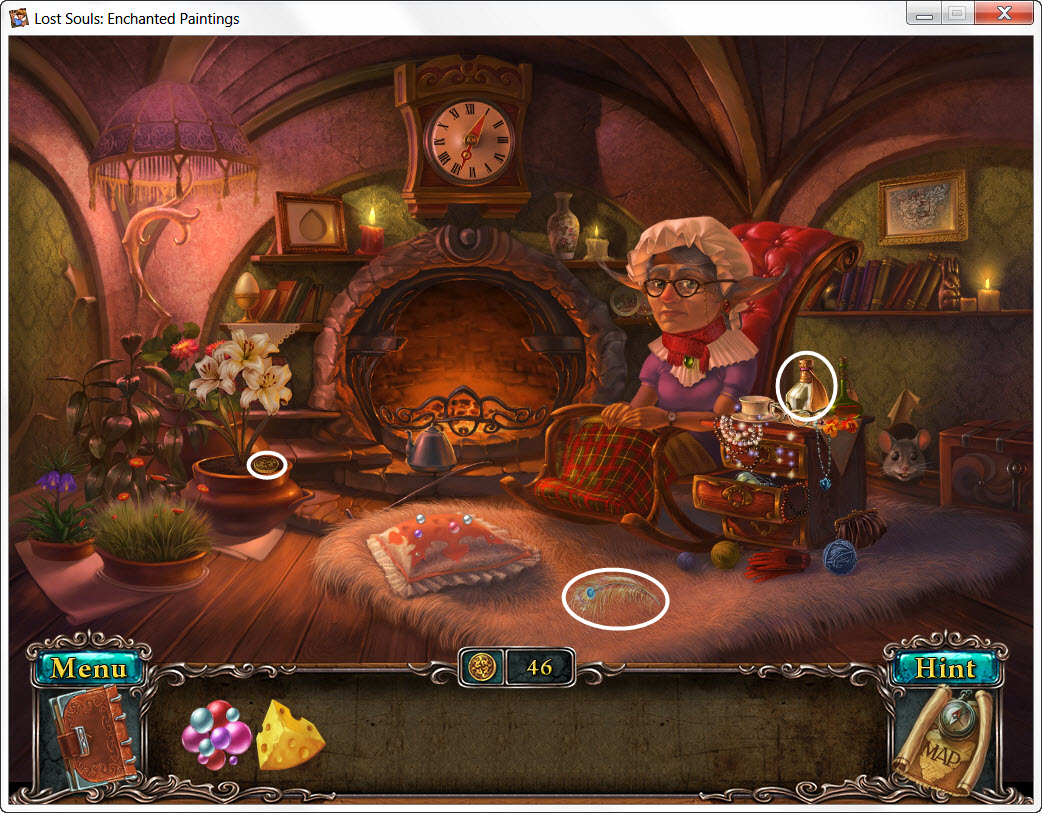
- give the Cheese to the mouse peeking out of his hole
- look in the hole
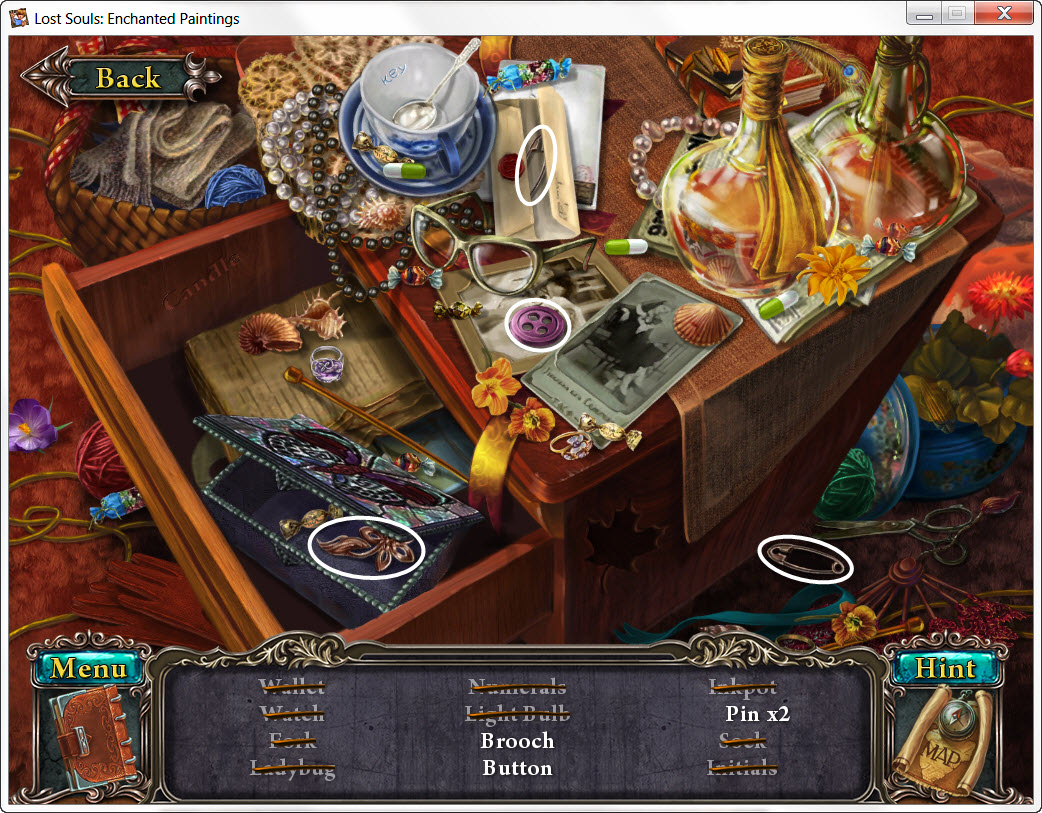
- move the items around until you find the Closet Key
- use the Beads on the cushion
- look in the drawer
- take the Light Bulb

- return to the map
Coins - 2
- talk to the worker
- take the Empty Watering Can
- take the Powder Keg
- pick up the Firewood
- use the Closet Key on the closet
- turn the key once
- look inside the closet
- take the Axe

- return to the map
Coins - 1
- talk to the gardener
- pick up the Key Pieces (6 of 7)
- pick up the Pincers
- pick up the Pickaxe
- move the leaf aside
- pick up the last Key Piece
- use the Key on the lock
- turn the key once
- look inside the doors
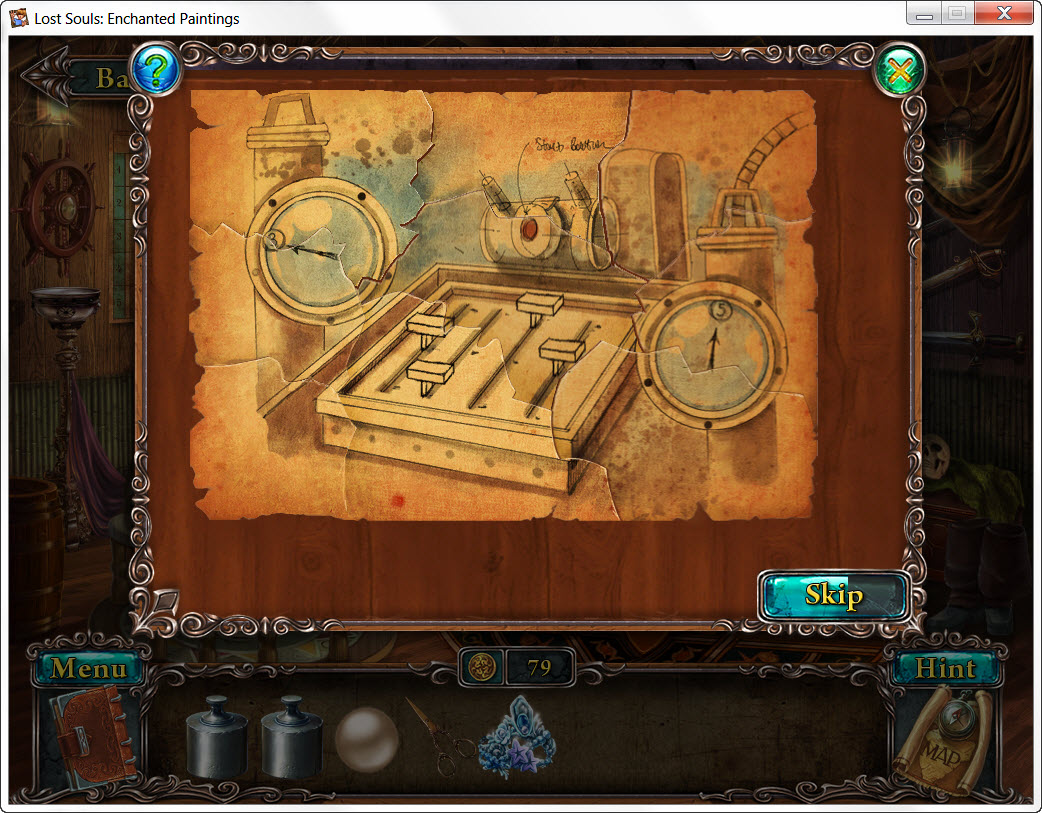
- Magic Garden Puzzle
- replace all the items to the left and right into the picture
- see screenshot for solution
- return to the map
Coins - 2
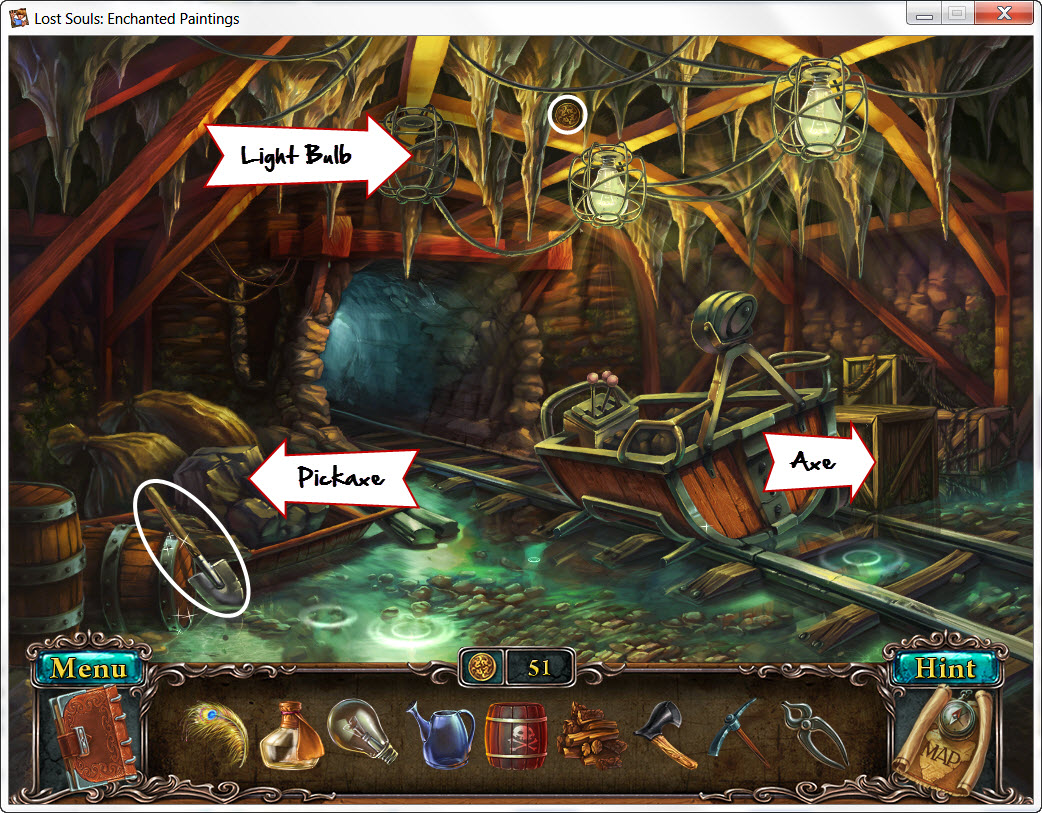
- pick up the Shovel
- use the Pickaxe on the rocks
- take the Mirror Ore
- replace the Light Bulb
- use the Axe on the crate
- take the Cup
- attempt to move forward
- take the Torch
- return to the map
Workshop
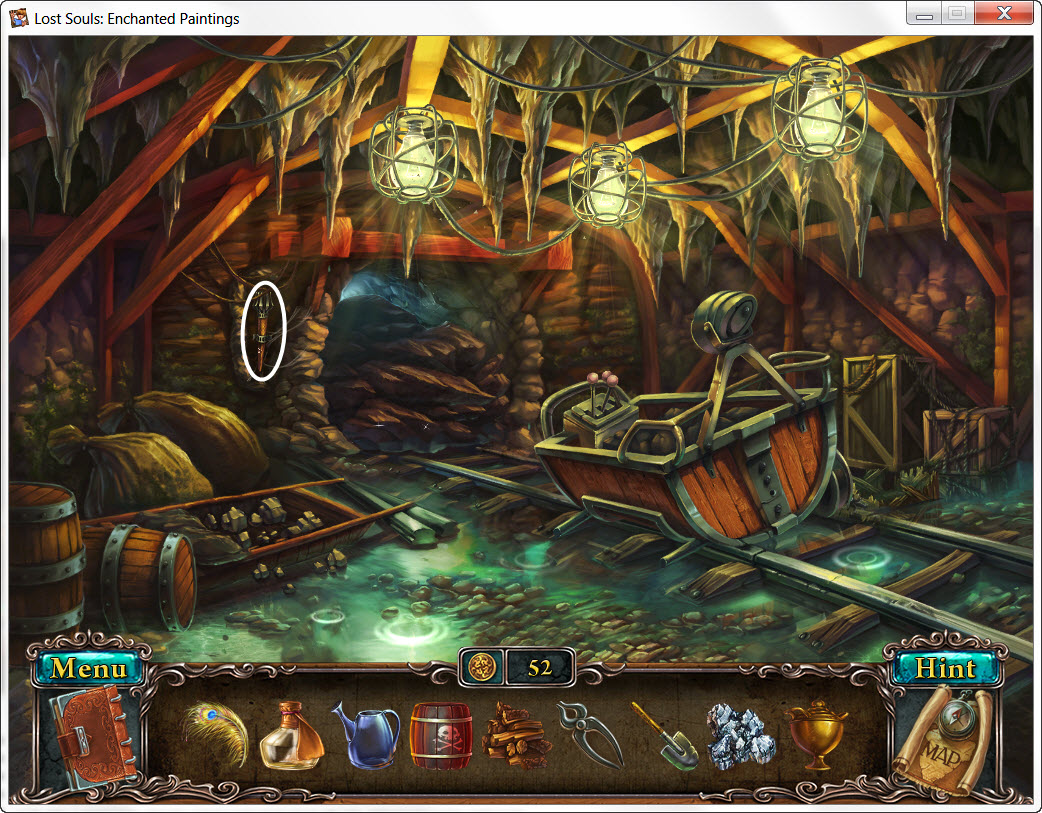
Coins - 1
- examine the closet
- take the Wheel (1 of 2)

- place the Cup on the shelf above the worker
- place the Mirror Ore in the cast on the table
- use the Pincers to pick up the Mirror Shard
- return to the map
Coins -1
- place the Firewood in the fireplace
- use the Torch on the fireplace
- look in the drawer
- take the Sky Lily Seeds
- return to the map
Coins - 1
- place the Mirror Shard in the mirror
- use the Shovel to dig a hole it the dirt
- place the Sky Lily Seeds in the dirt
- use the Empty Watering Can on the water
- use the Watering Can on the seeds
- return to the map
- use the Powder Keg on the blocked entrance
- use the Torch to light the Powder Keg
- go forward
Coins - 3
- pick up Gems (7 of 8)
- pick up Piece of Crystal
- pick up Wheel (2 of 2)
- pick up Garden Shears
- move the piece of cloth aside and pick up the last Gem
- place the Feathers in the left vase
- go down
Mine
Coins - 1
- replace the Wheels on the mining cart
- return to the map
Coins - 1
- use the Garden Shears on the Sky Lily
- give the Sky Lily to the gardener
- receive Herbs
- use the Pace of Crystal on the crystals to the right of the mirror
- return to the map - location complete
- give the Gems to the worker
- receive Pendant
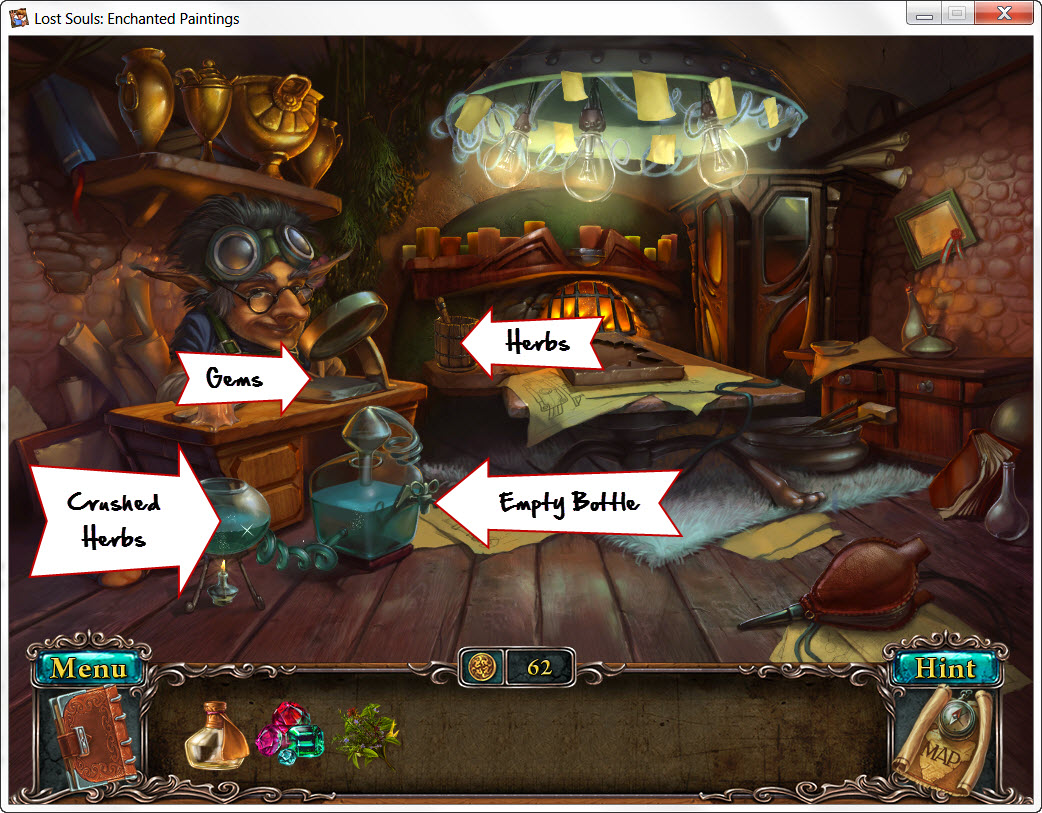
- use the Herbs in the mortar
- receive Crushed Herbs
- use the Crushed Herbs on the potion
- use the Empty Bottle on the potion
- receive Bottle of Mixture
- return to the map - location complete
Coins - 1
- give the Bottle of Mixture to the lady
- receive Magic Book
- place the Pendent in the frame on the mantle
- return to the map
Coins - 1
- examine the portrait
- Portrait Puzzle
- find eight (8) differences
- see screenshot for solution
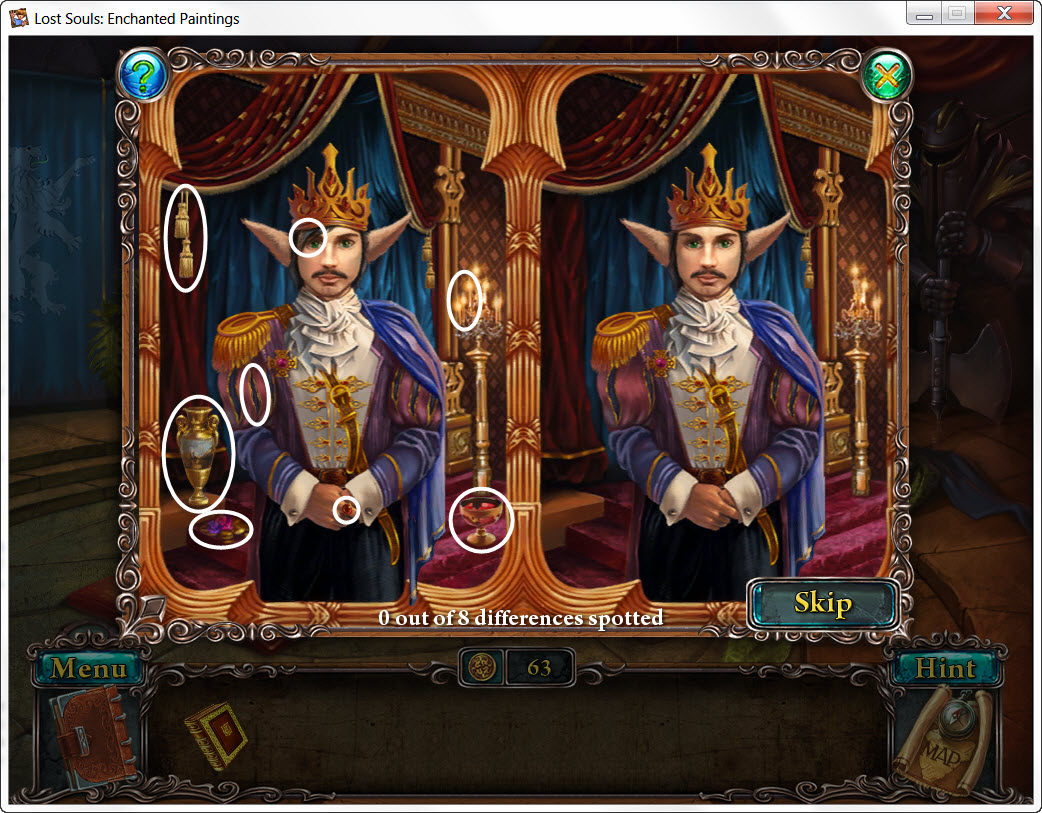
- take the Throne Decoration
- examine the bookshelf
- replace the Magic Book
- examine the bookshelf again
- Bookshelf Puzzle
- put the pieces of paper back together like a jigsaw puzzle
- see screenshot for solution
- examine the back of the throne
- place the Throne Decoration in it
- return to the map
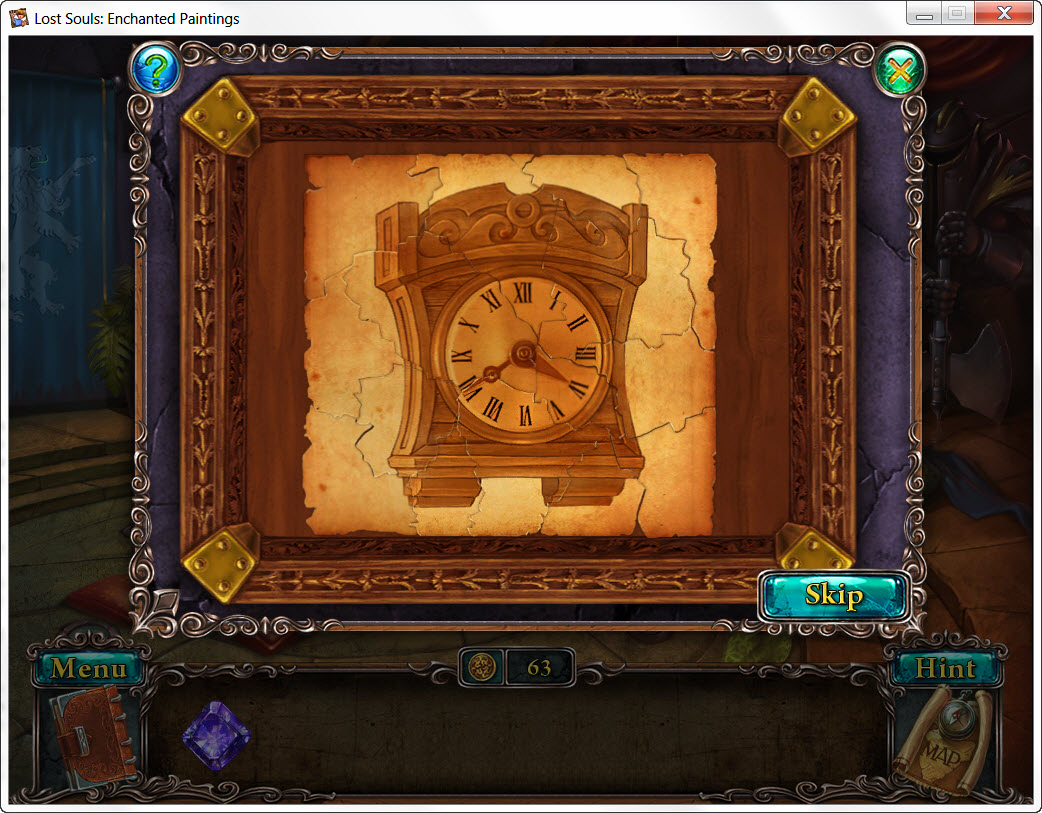
- examine the clock
- turn the hands to reflect the picture in your journal (4:40 or 16:40)
- take the Sarcophagus Key
- return to the map - location complete
- go forward
- use the Sarcophagus Key on the mouth of the statue
- take the Magic Sphere
- return to the map - location complete
- give the Magic Sphere to the dwarf
- receive Piece of Canvas
Paintings
- examine the sparkling painting
- use the brush to dust it off
- enter the painting
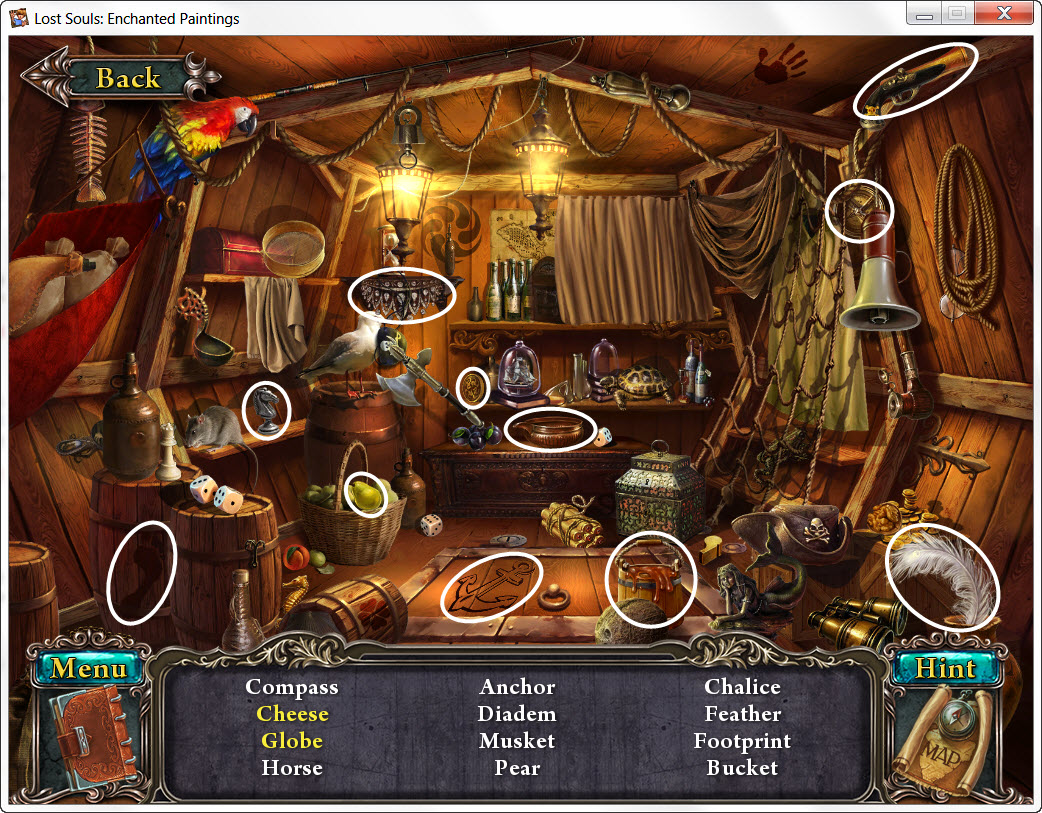
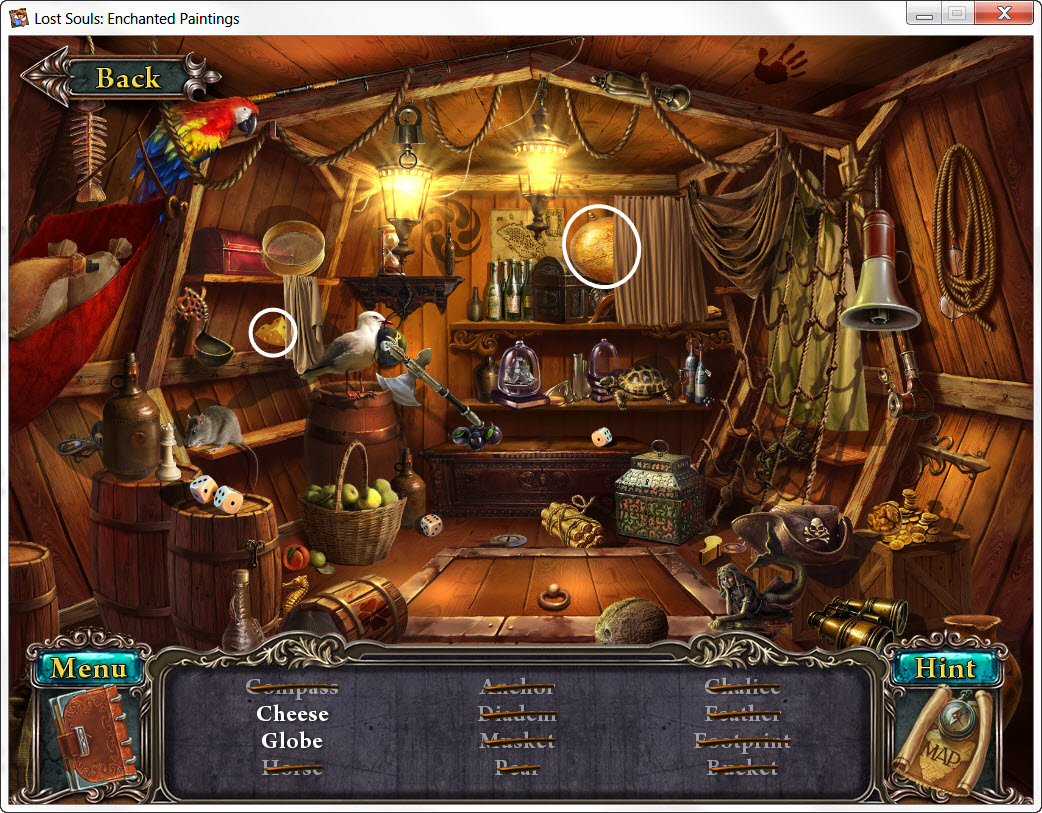
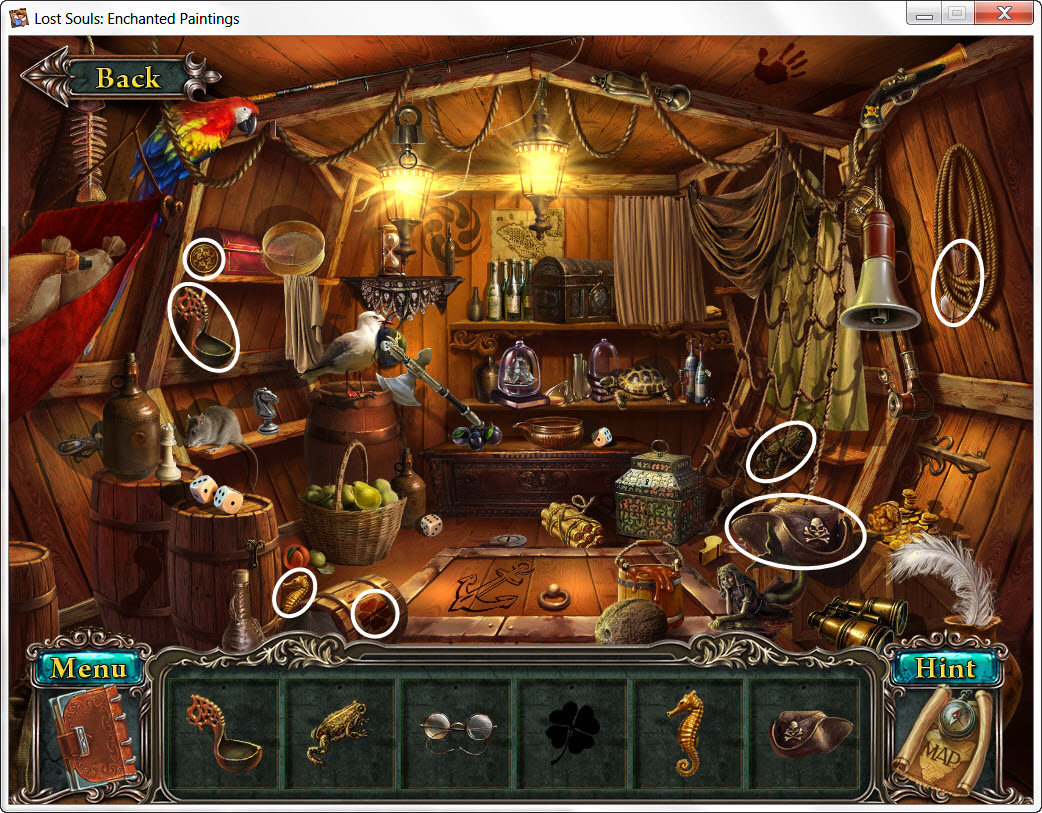
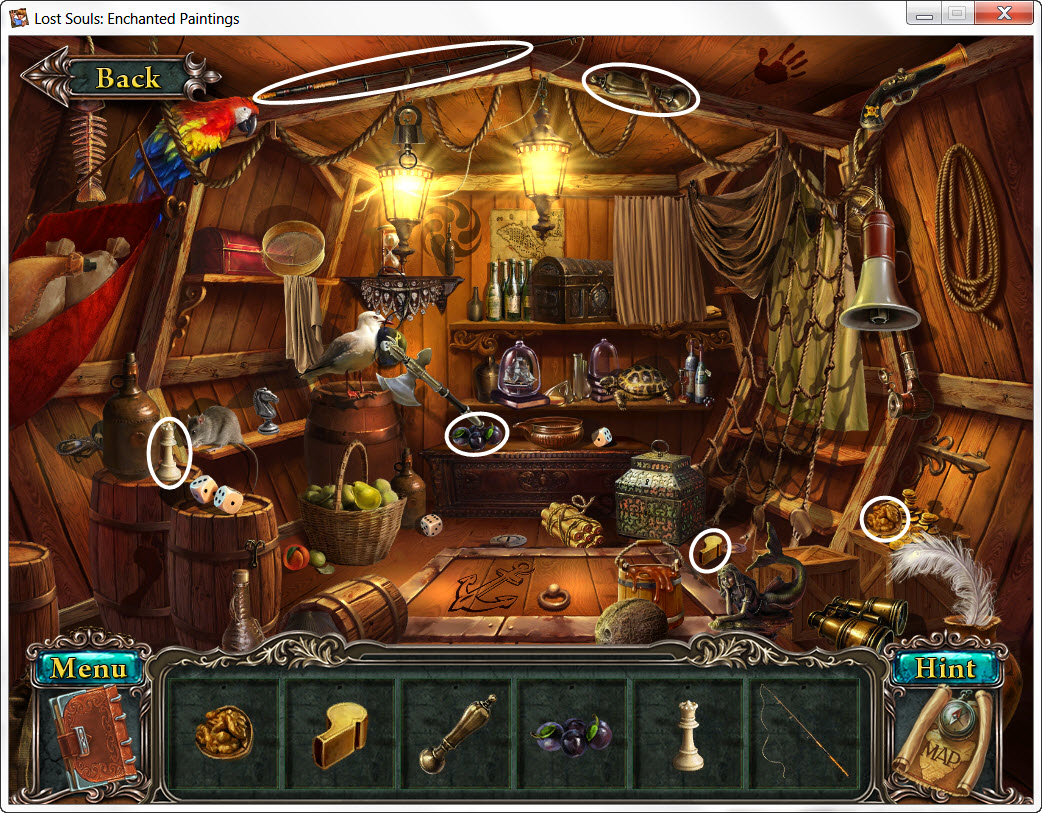
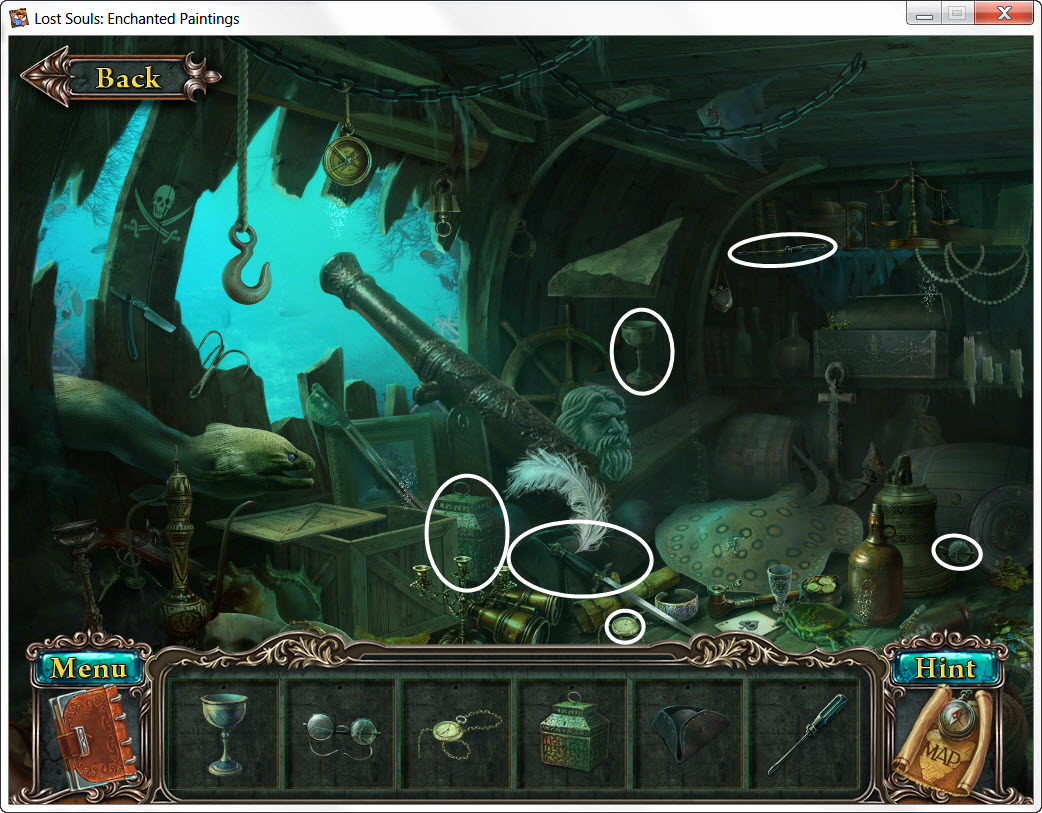
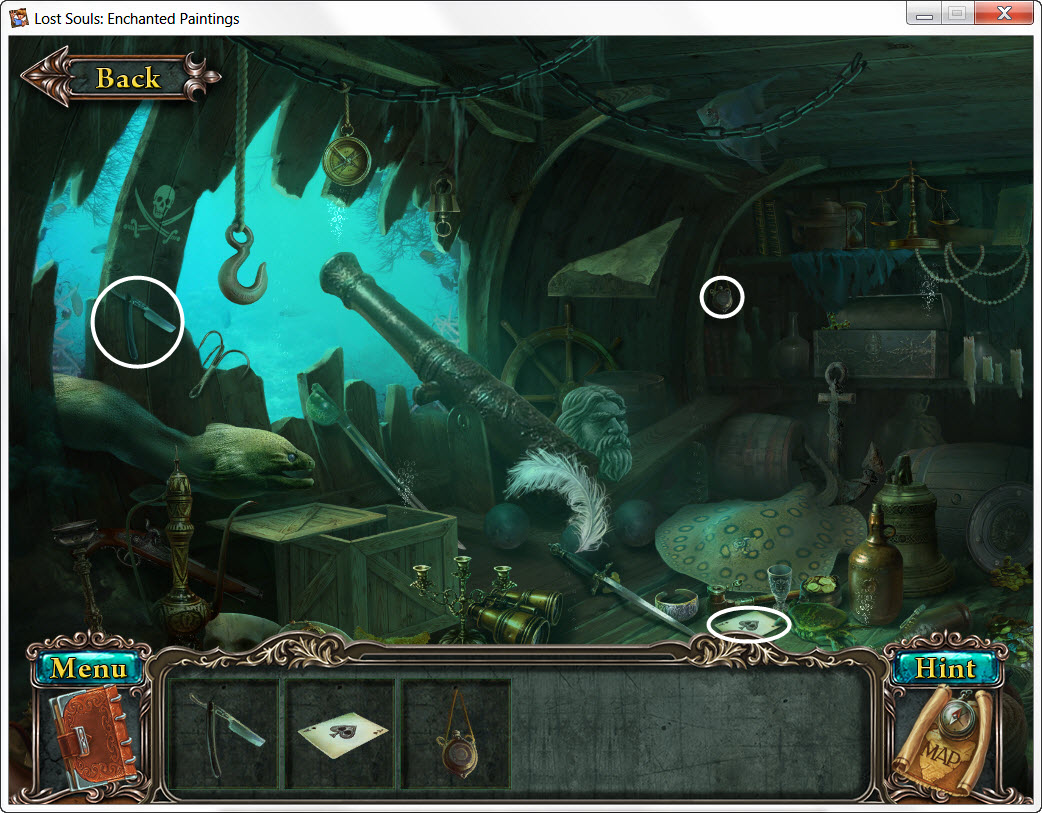
Ship
Coins - 5
- pick up the Brush
- pick up the Pincers
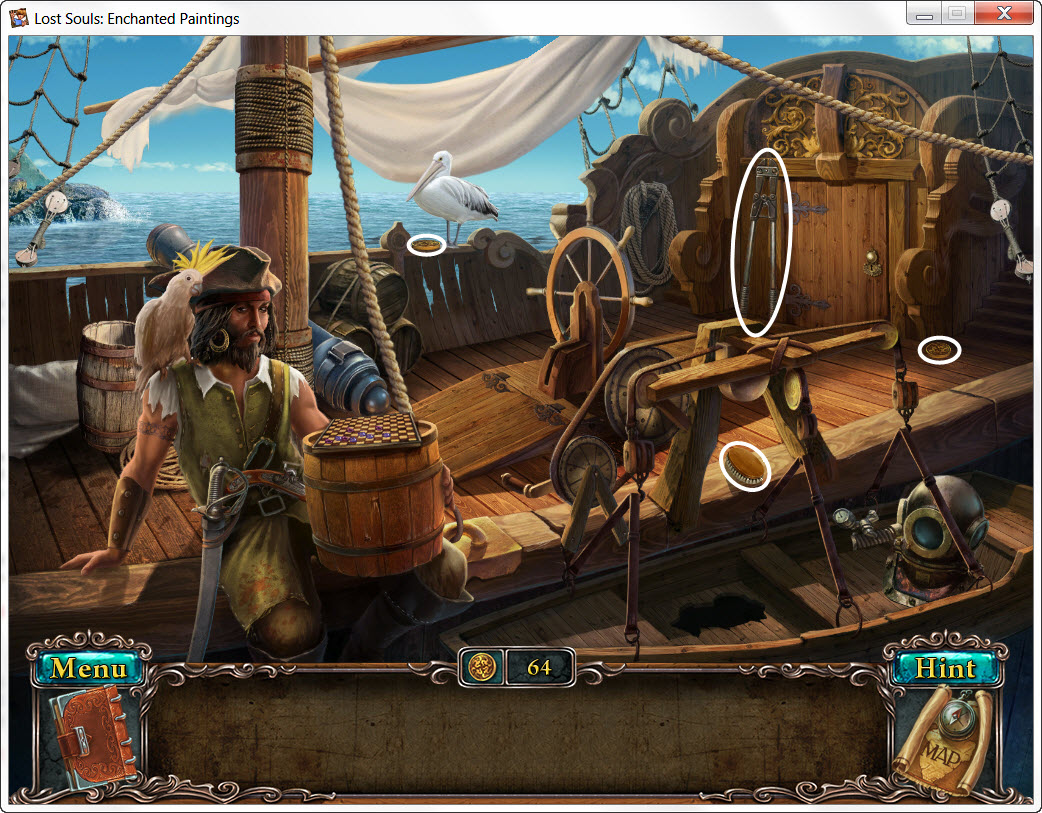
- open the trap door by the captains wheel
- go down
- take Planks
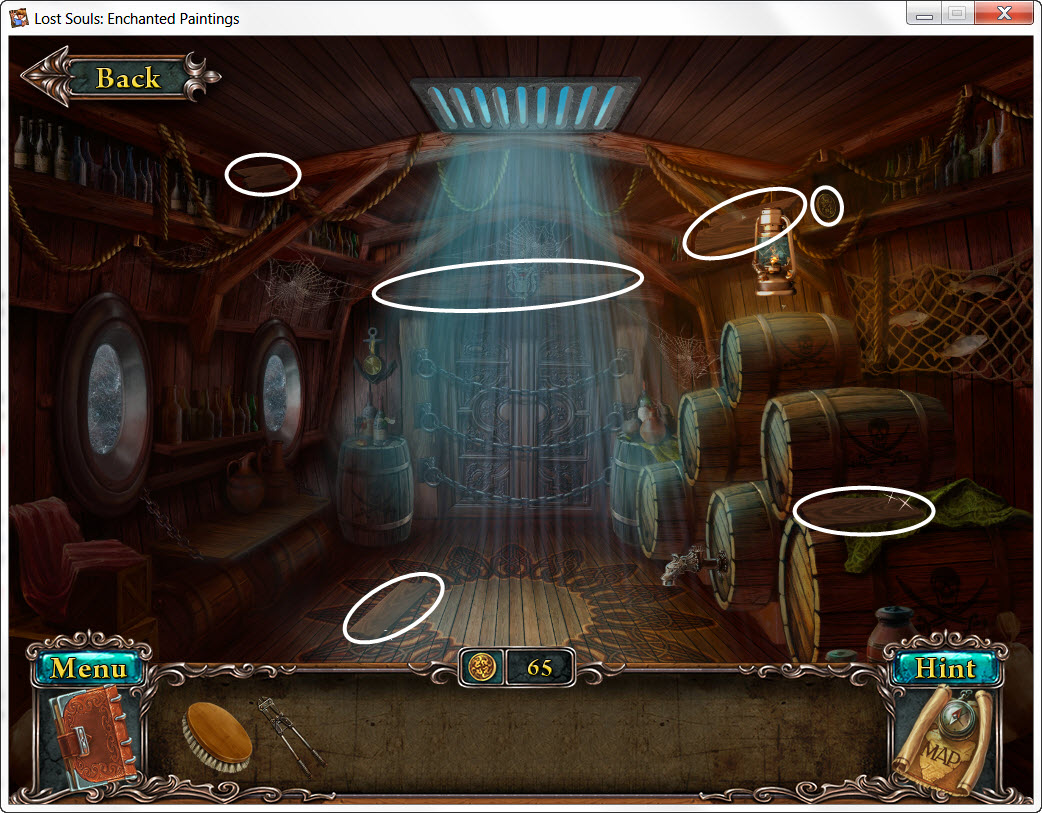
- use the Brush to clean both portholes
- pick up the Mug of Rum
- use the Pincers to cut the chains on the door
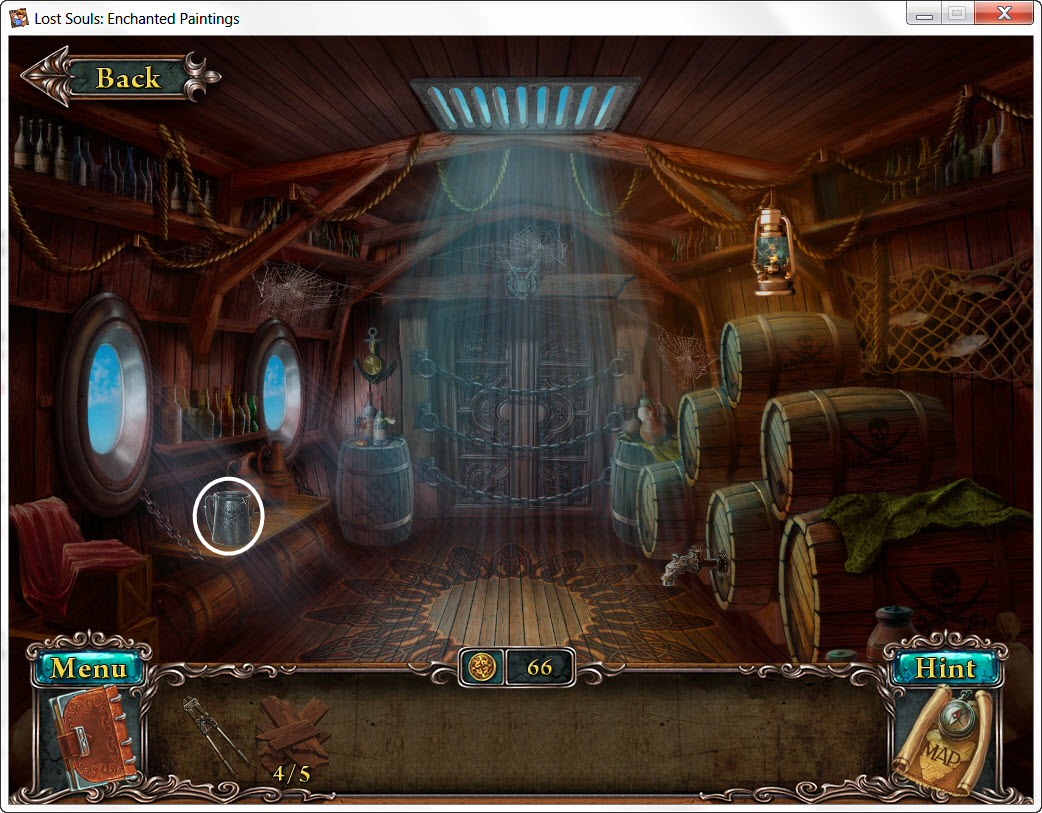
- go inside the room
- take the Bucket of Resin
- go down
- use the Planks on the hole in the ship
- use the Bucket of Resin on the Planks
- go back down
- go through the doors
- take the Valve
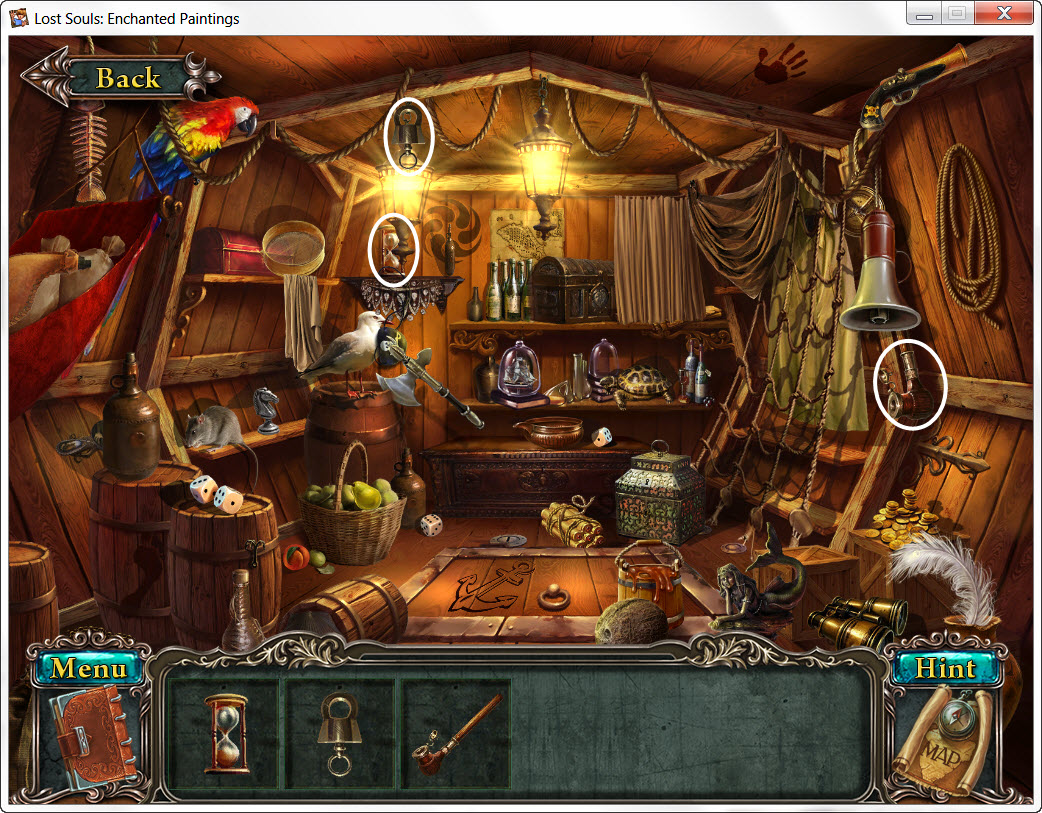
- place the Mug of Rum under the keg
- place the Valve on the keg handle and pull it
- pick up the Mug of Rum
- go down
- give the Mug of Rum to the pirate
- examine the chess board
- Pirate Puzzle
- you are white
- place you white stone so it knocks off as many pieces as possible
- you can skip the puzzle
- receive Oxygen Tanks
- use the Oxygen Tanks on the oxygen mask
- return to the map
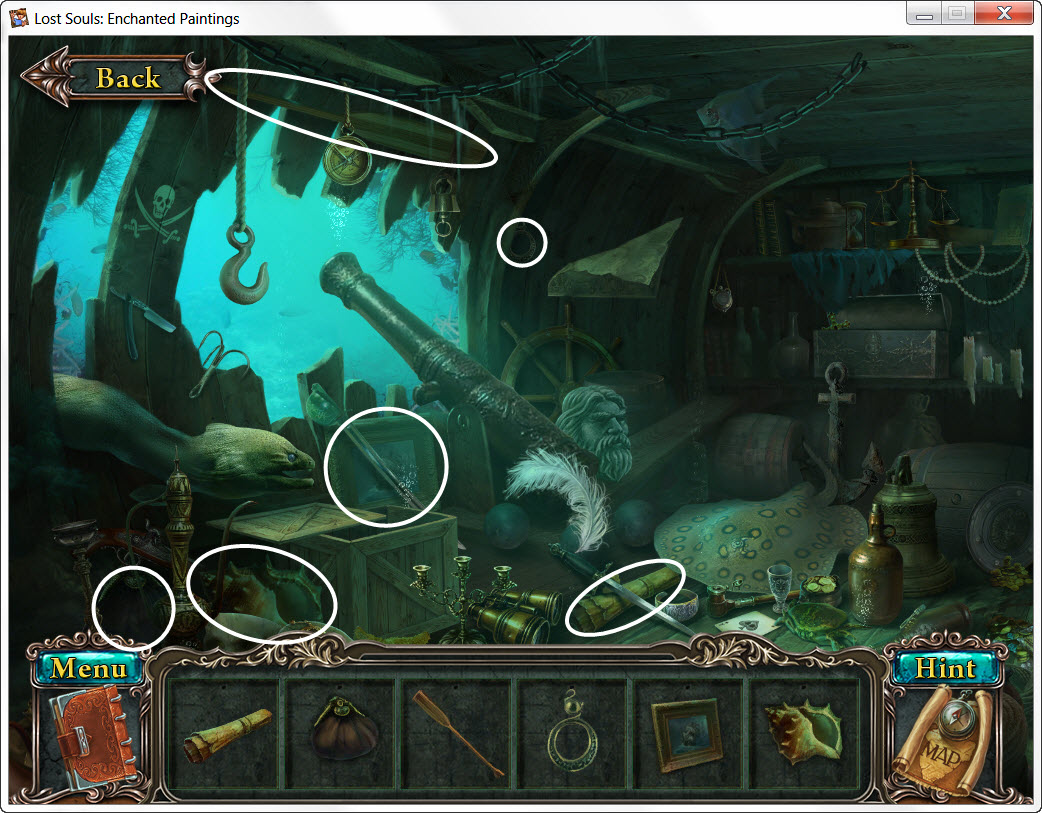
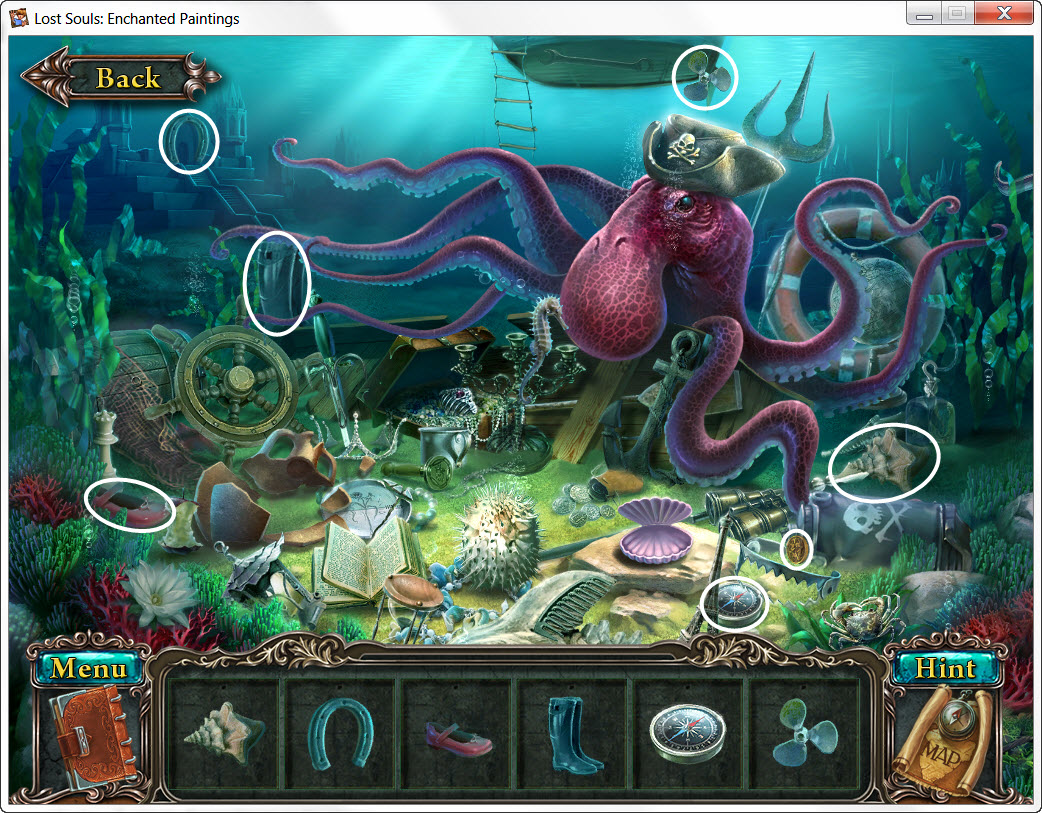
Coins - 1
- talk to the merman
- pick up the Weight
- pick up the Crowbar
- return to the map
Coins - 3
- talk to the mermaid
- pick up the Weight
- take the Ship
- click the crab twice to get the Key
- examine the side of the ship
- use the Crowbar on the boards
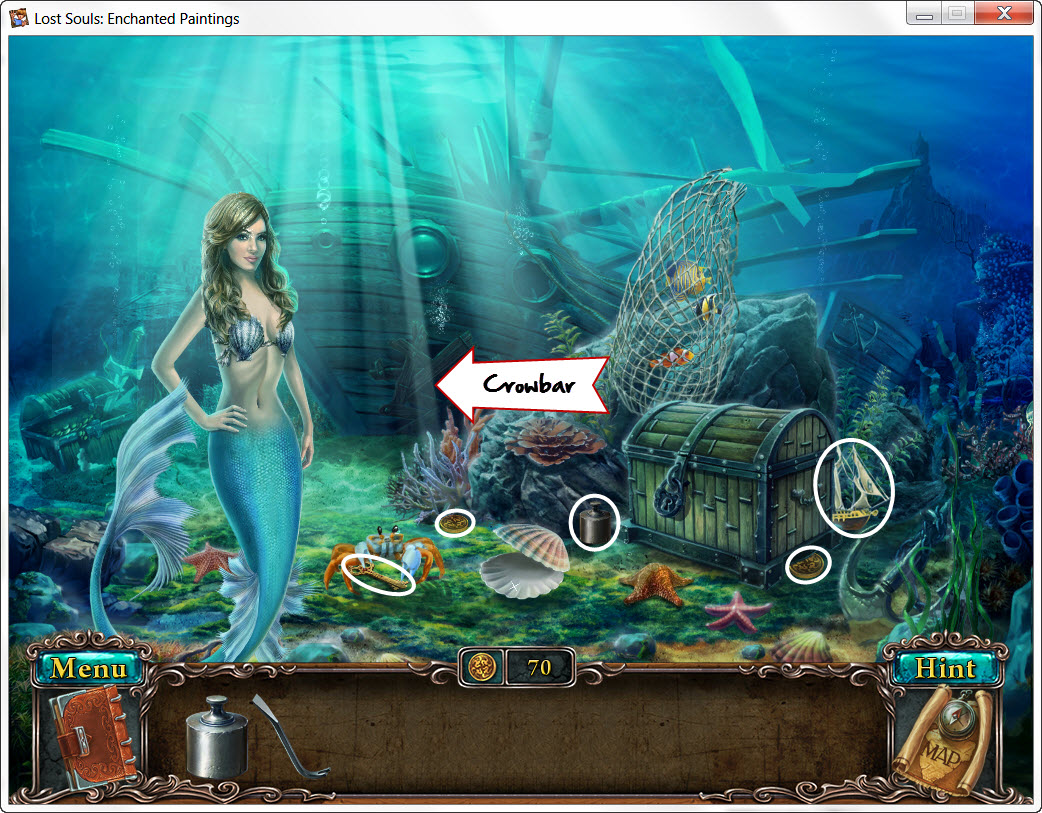
- go inside the ship
- take the Statue Head
- return to the map
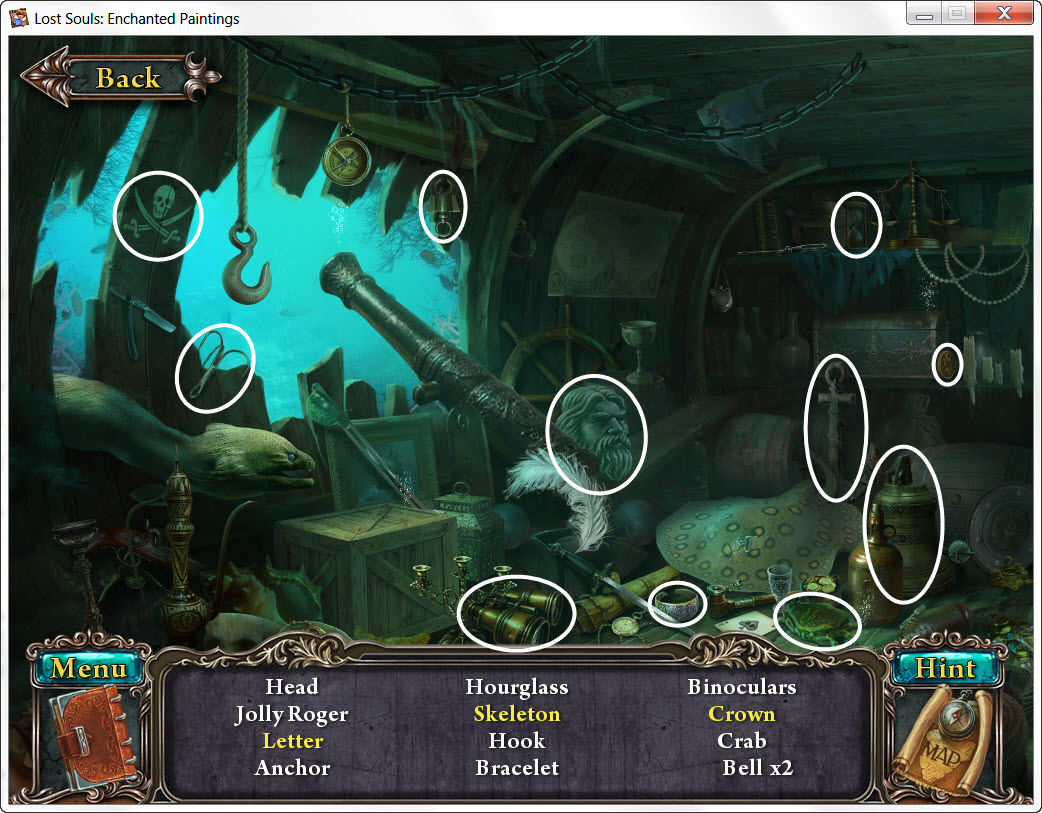
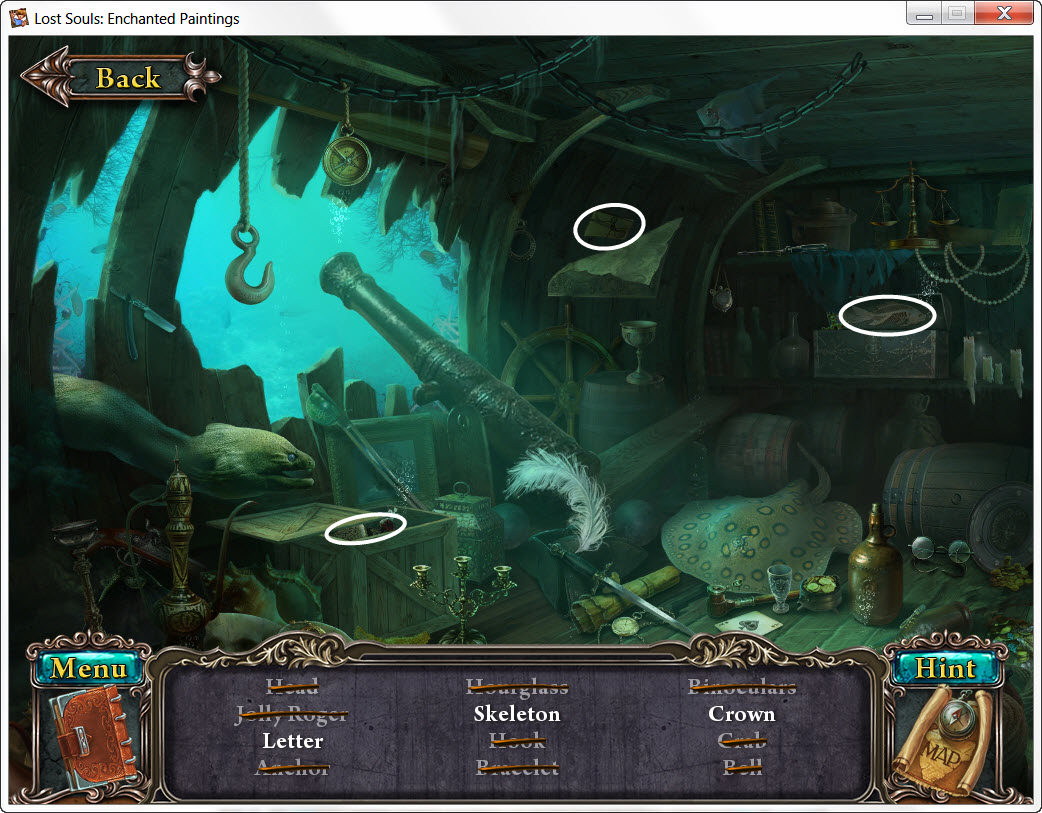
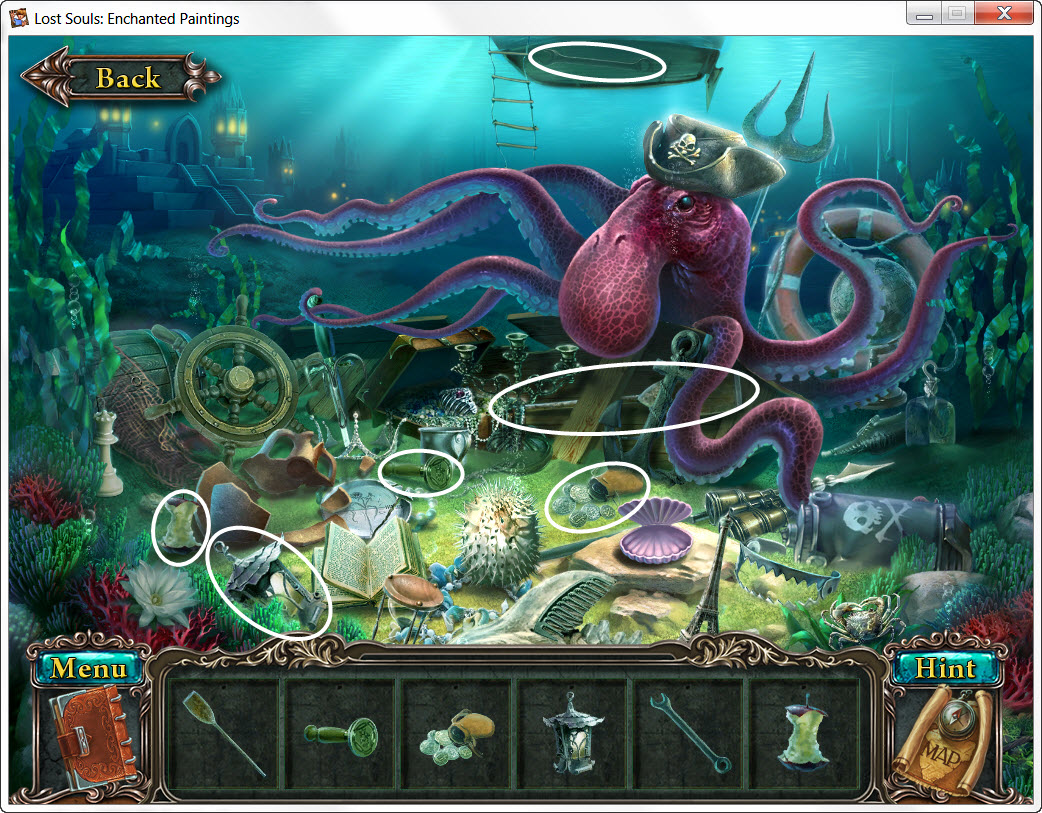
Coins - 3
- pick up the Statue Torso, Arm, Tail, and Trident
- reassemble the statue
- look in the crevice and take the Drawer Handle
- examine the gate
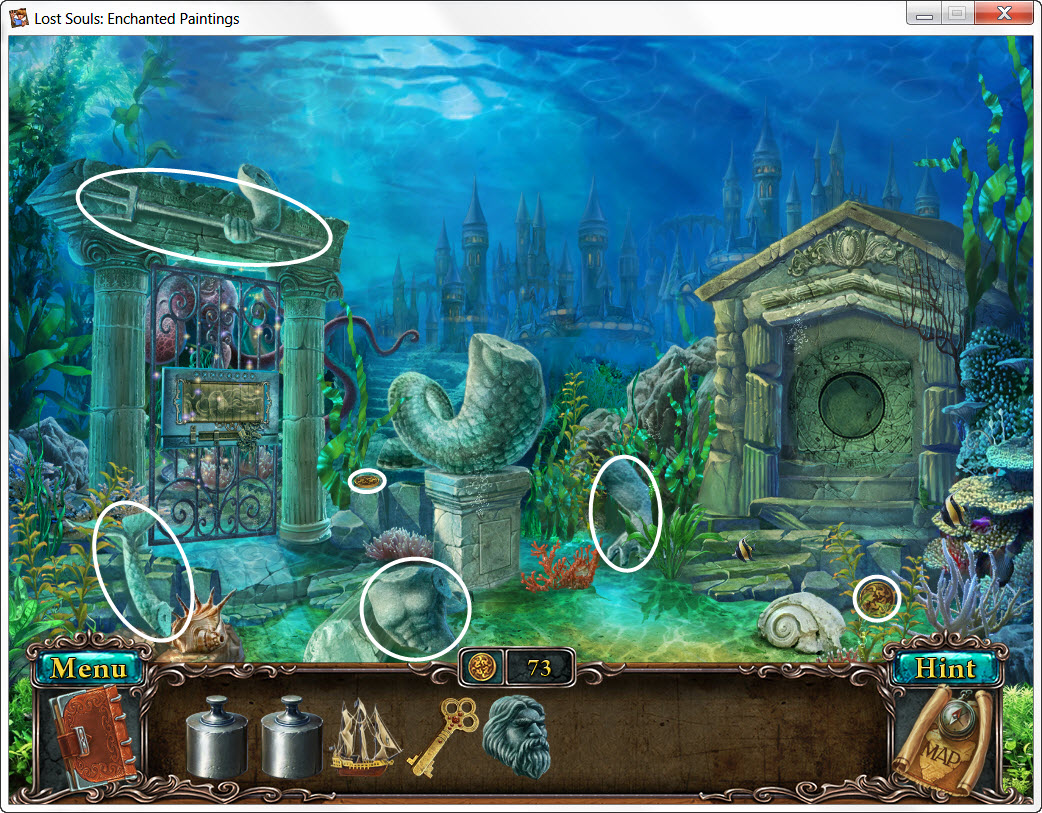
- Gate Puzzle
- swap the tiles so they form a picture of an octopus
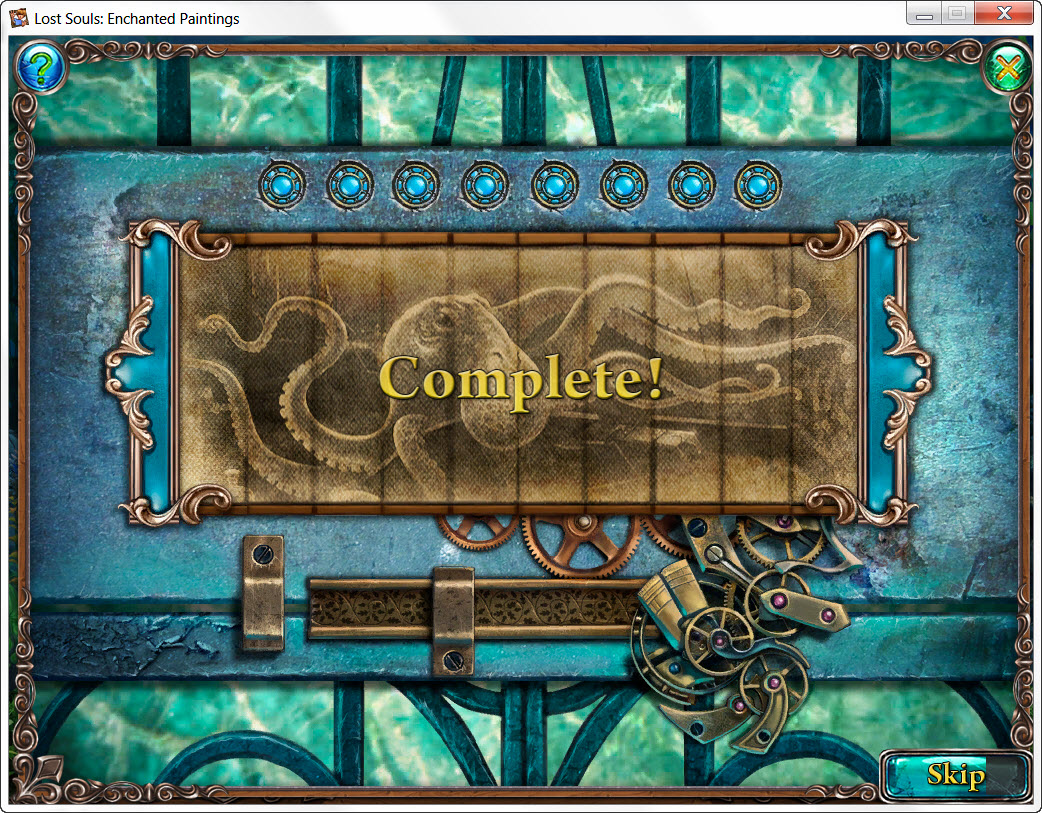
- go through the gate
- take the Pearl
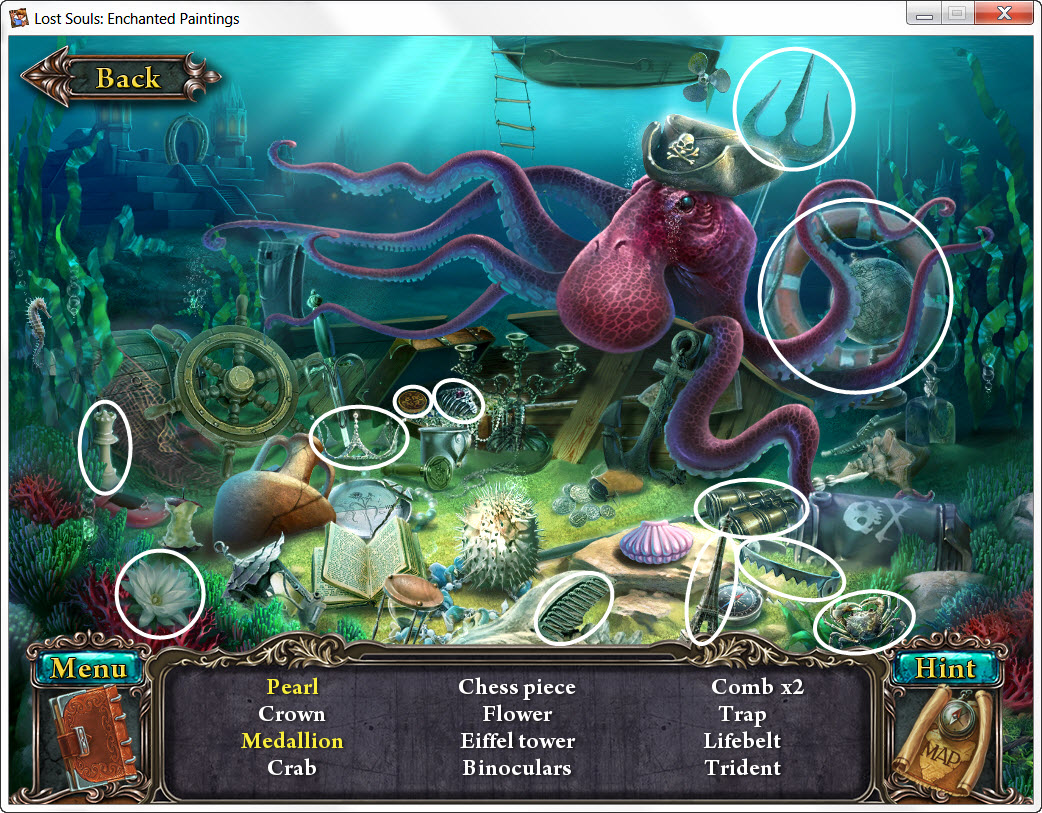
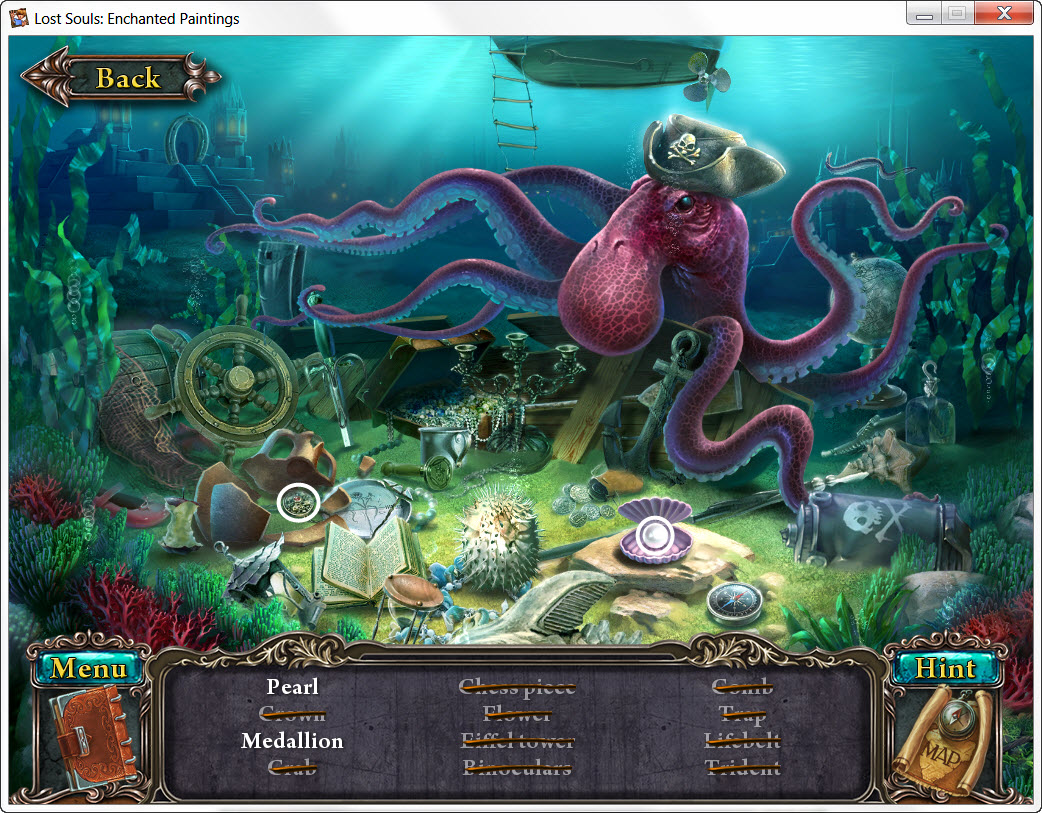
- return to the map
Coins - 3
- use the Key on the locked door
- turn the key twice and enter
- take the Scissors
- place the Ship int the bottle
- use the Drawer Handle on the drawer
- take the Jewelry
- examine the top of the dresser
- Dresser Puzzle
- put the pieces of paper back together like a jigsaw puzzle
- see screenshot for solution
- return to the map
Coins - 2
- give the Jewelry to the mermaid
- receive Chest Key
- use the Scissors to cut open the net and free the fish
- use the Chest Key on the chest
- take the Medallion Piece
- place the Pearl in the clam shell
- examine the sunken ship
- take the Screwdriver
- return to the map - location complete
- go into the cabin
- examine the grate on the upper wall
- use the Screwdriver on the screws
- take the Manometer
- return to the map
Coins - 1
- go through the gate
- take the Compass
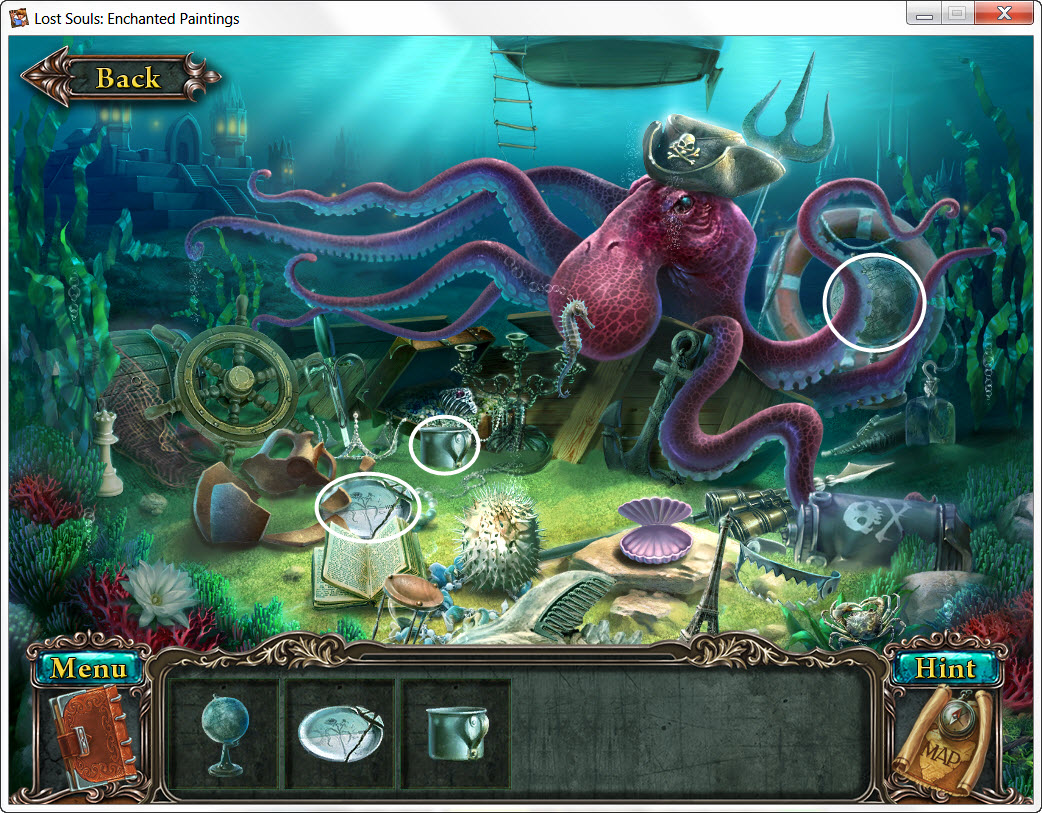
- return to the map
- examine the ship's wheel
- use the Compass on the wheel
- enter the cabin
- examine the map
- Map Puzzle
- look in your journal for the coordinates
- highlight them on the map
- take the Medallion Piece
- on the floor are two "V" shapes hidden in the rug
- place a Weight on each "V"
- take the
- return to the map - location complete
- examine the stone on the right
- place both Medallion Pieces in the center
- take the Blue Crystal
- return to the map - location complete
- examine the contraption
- replace the Blue Crystal in the middle
- examine the bottom of the contraption
- replace the Lever on the board
- replace the Manometer on the left
- Sea Floor Puzzle
- look in your journal for the solution
- align the levers so they match the picture
- receive Piece of Canvas
The End!