Walkthrough Information
Images ©Big Fish Games and Blue Tea Games
Overview: You play a detective who receives a call from a famous, but reclusive author who needs you to find his manuscripts. However, things are never so easy, care for a little time travel?
How to Play: This is a sort of adventure game and hidden object together. You will need to find objects to solve puzzles in a particular order to progress from area to area.
-
In the Hidden Object areas or Chapters , instead of finding objects, you must place objects or use objects in the correct place and order.
-
Some items will remained "locked" until you perform some other actions, I have noted these in the chapters listed below.
-
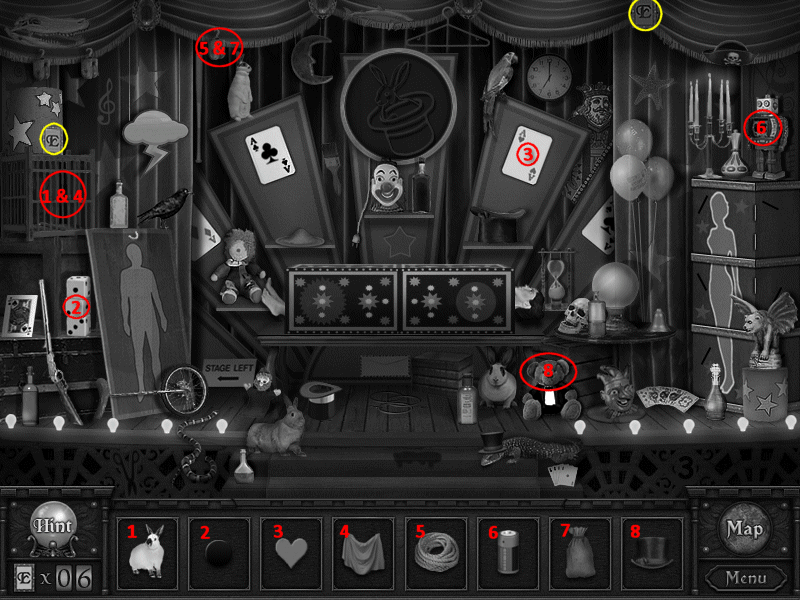
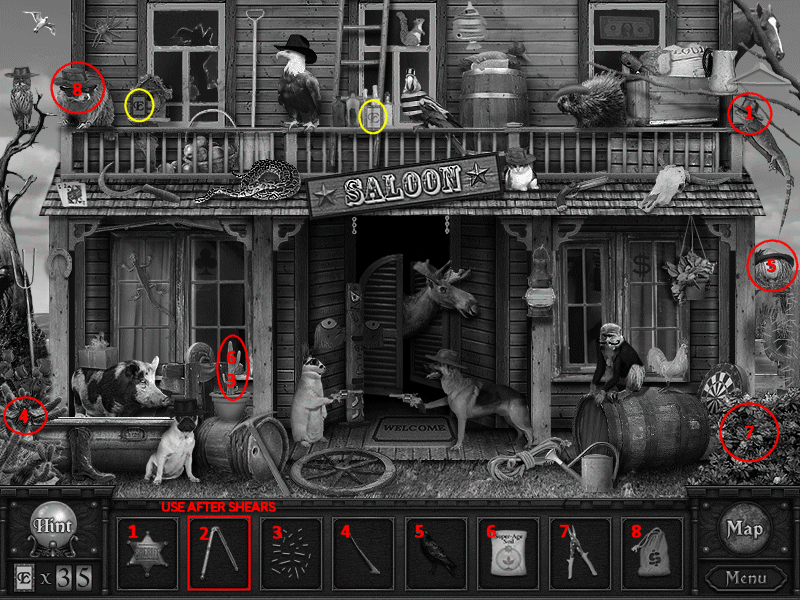
If there are two numbers in one spot, it means you must use one item (as numbered) before you can use the other.
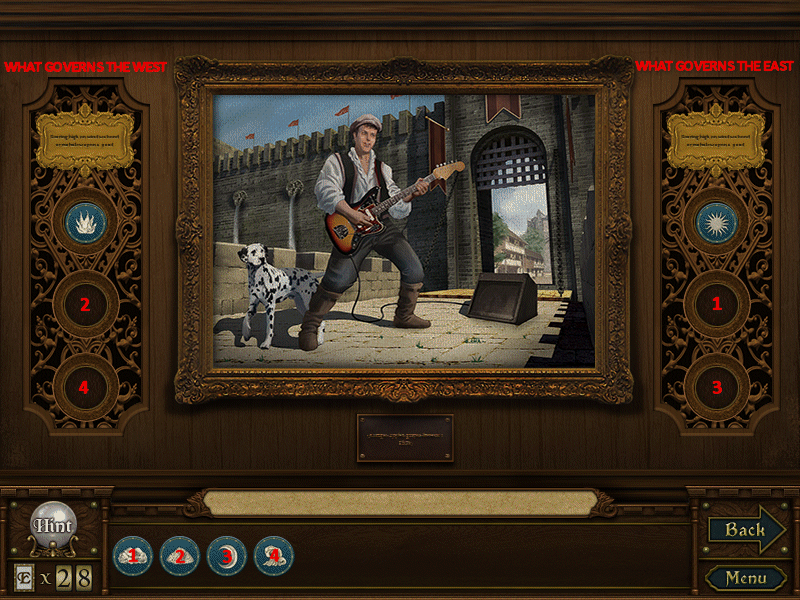
Portraits: After you solve a chapter, you will get an emblem. These will be used later in portraits scattered about to solve riddles. While the emblems must go in the correct portrait, they do not have to be inserted in any particular order.
Hints: The orb you find at the beginning gives you unlimited hints but it must charge first. To speed up the charging process you will need to find two hidden E cards in each level. Clicking them will give you an instant hint.
-
I have circled the cards I could find in yellow (I could not find them all).
-
You need to click the item and then click the orb.
-
If you aren't sure where to go next, pick up an item and click the orb and it will give you a hint as to wear to use the item.
Journal: If you click on the book in the lower, right corner you will see all the chapters that you have completed and must complete. There are 42 chapters!
Levels & Chapters: (Chapters are in Blue)
Edgar's House
-
Click on either hand - note that it puts the E card in the bottom, left corner
-
Click on the door to enter
~Introduction~
First Room
-
Click on the Orb
-
Zoom in on the desk and take the Key
-
Use the Key to open the Side Door
-
Exit to Hallway - Enter Door
Study
-
Take the Journal on the desk
-
Talk to the "ghost" of Edgar
-
Step into the Time Portal
-
Once you've been transported through time - take the three Cards on the desk
-
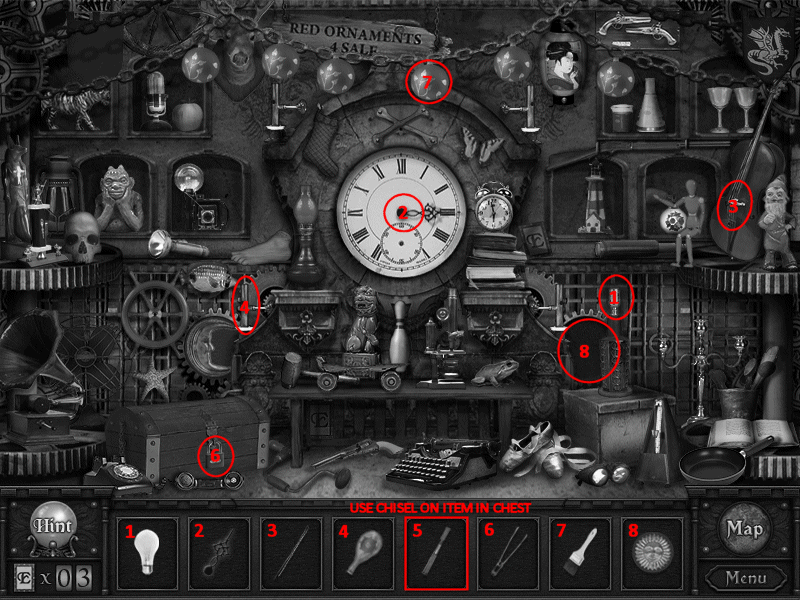
Click the Chapter taped on the machine - you will find these in various scenes which will send you into a chapter of a book and hidden object area
Chapter: The Mysterious Clocktower Labyrinth
-
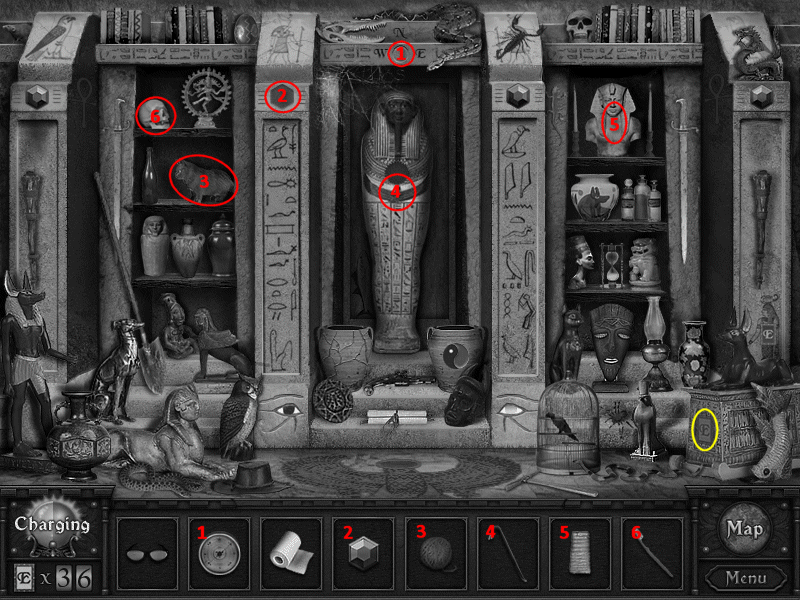
See screenshot for solution
-
Locked Item: Chisel
-
Chest unlocks the Chisel
-
Exit to Hallway - Go Down
Foyer
-
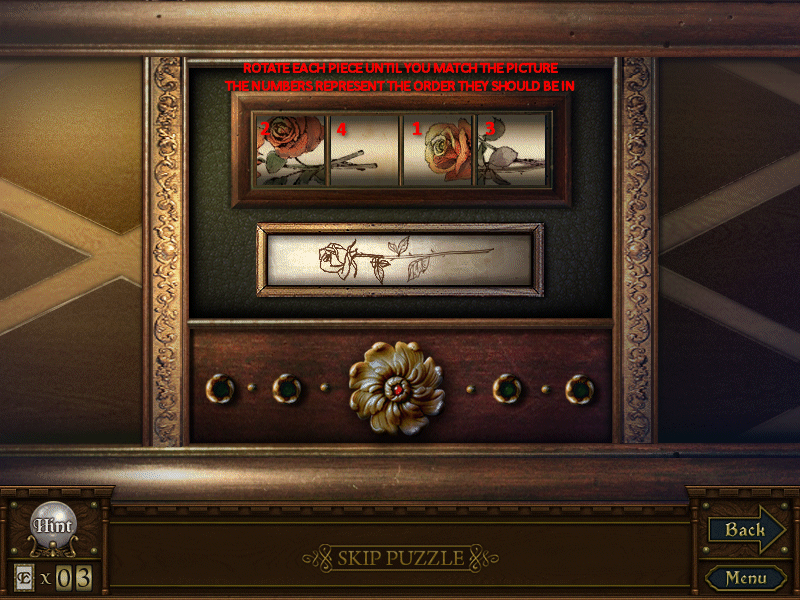
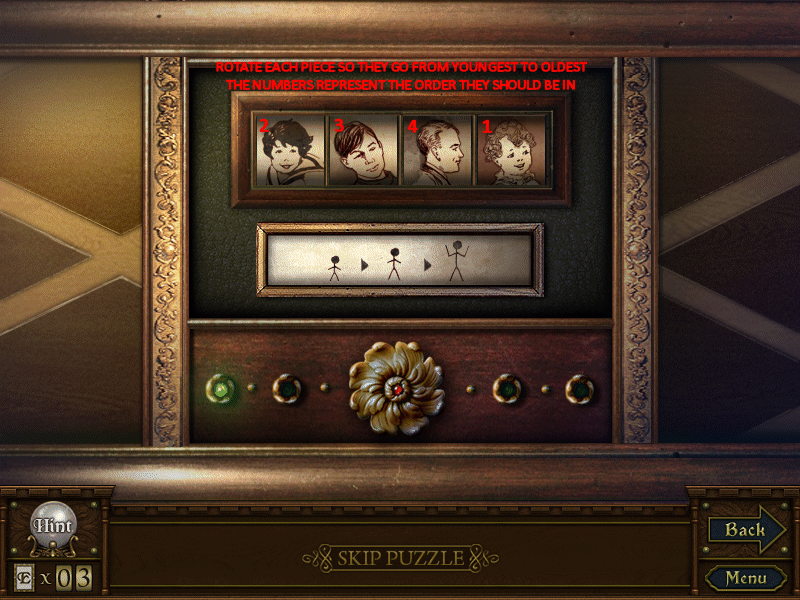
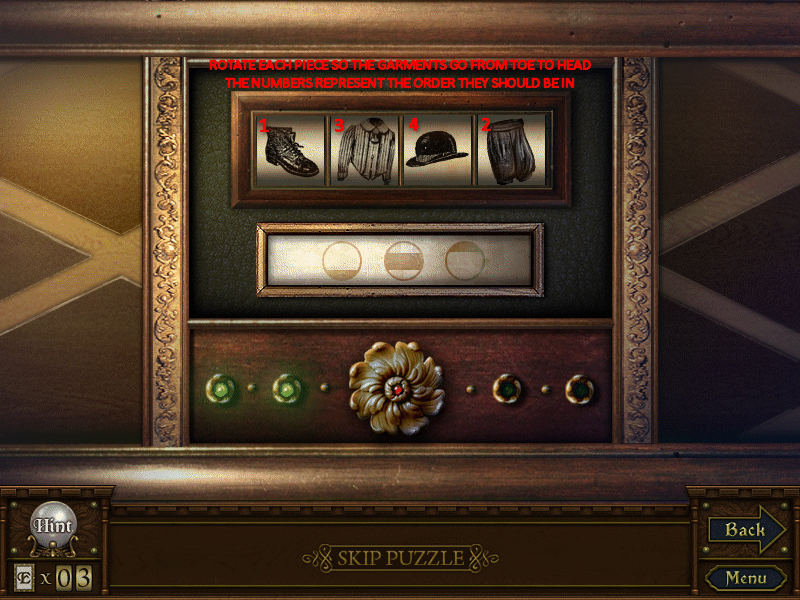
Click on the drawer and get a Puzzle
-
Solve the four puzzles and take the Hammer
-
Take the Knight's Sword
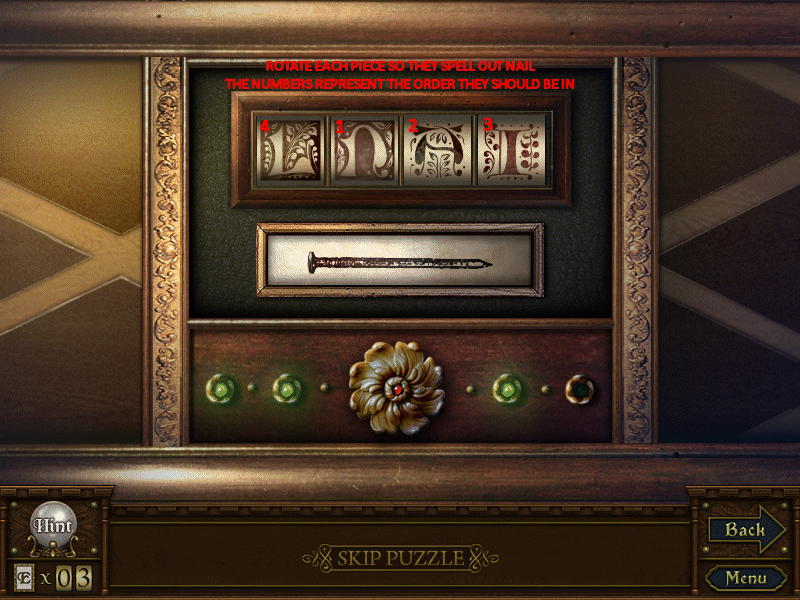
Puzzle
-
Simply rotate the tiles above so they best match the picture below it
-
Enter Chapter
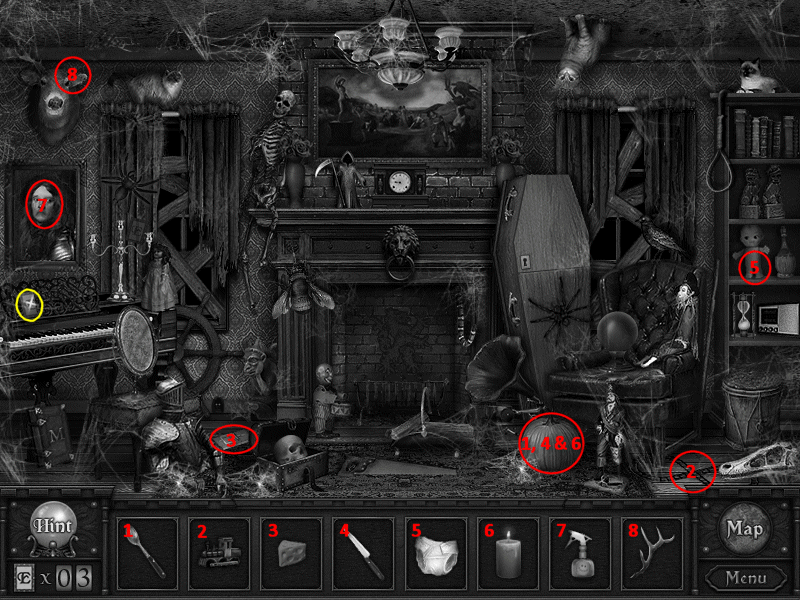
Chapter: The Darkwood Manor Haunted Stories
-
See screenshot for solution
-
Exit to Hallway
Hallway
-
Place Sword on plaque
-
Enter Chapter
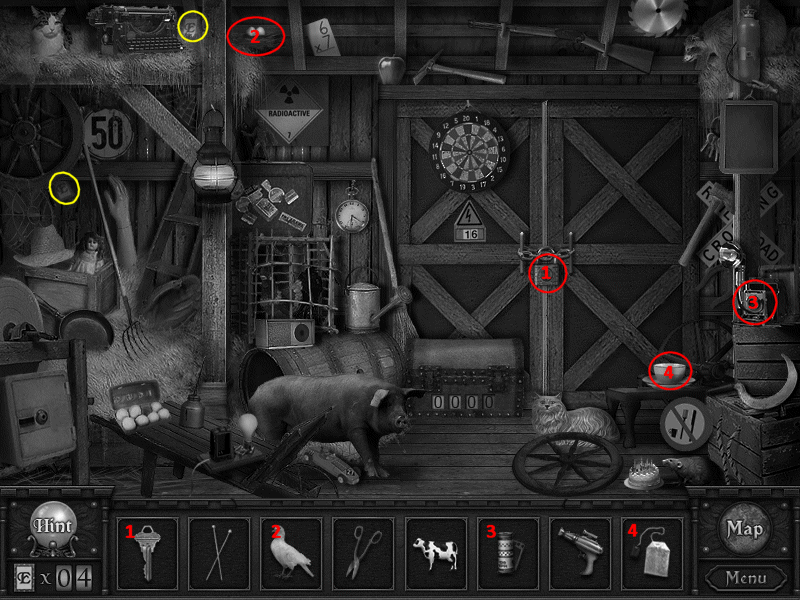
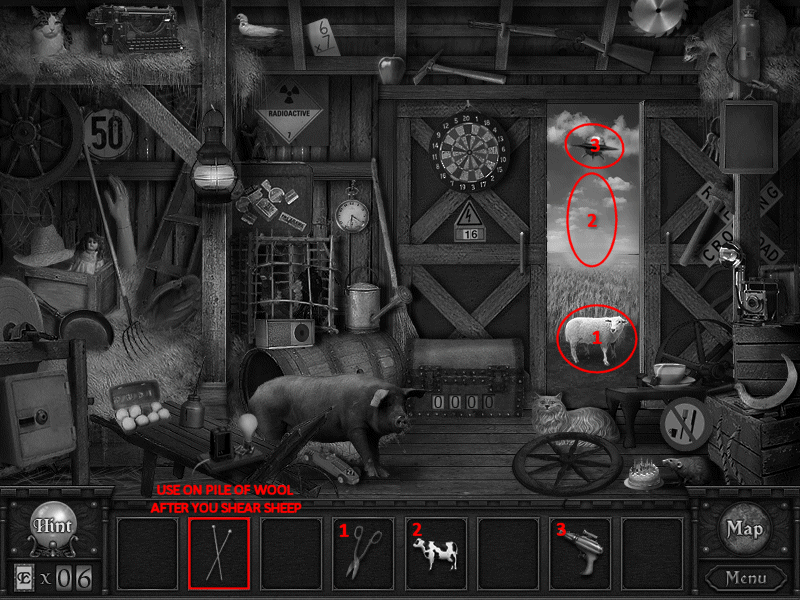
Chapter: Strange Tales on Meadow Creek Farm
-
See screenshot for solutions
-
Exit Down
Door
-
Use the Hammer on the nail sticking out on the right side
-
Take the Yang symbol inside the panel
-
Exit to Hallway
Hallway - Portrait
-
Click on the Portrait and place the symbols in the correct spots
-
There are hints on the plaques at the top
-
Take the Ying symbol from inside
-
Exit to Foyer
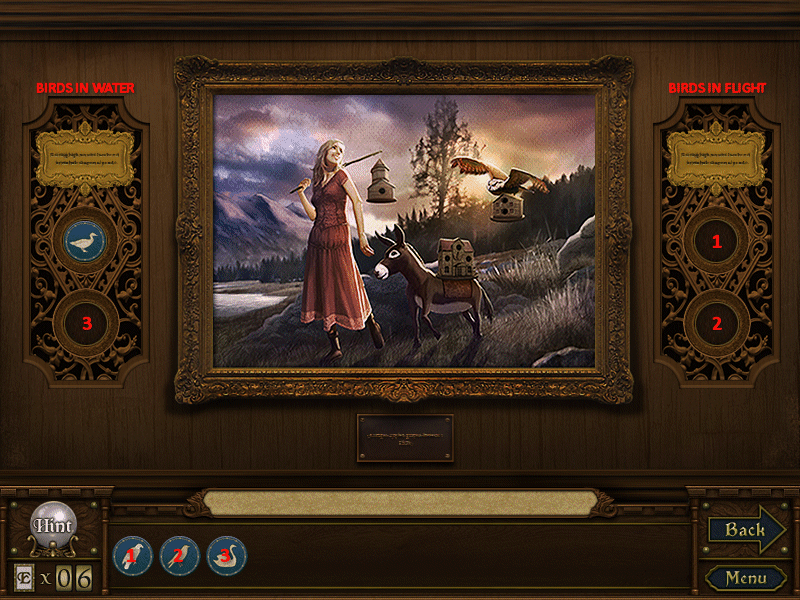
Foyer
-
Click on the door and place the Ying and Yang Symbols inside
-
Exit
~Chapter One~
Shops
- Enter Old Globe Antique
Old Globe Antique
-
Notice the Owl on the right is missing an eye
-
Take the Sledgehammer
-
Take the Gear
-
Enter Chapter
Chapter: And Now, For My Next Trick
-
See screenshot for solution
-
Exit to Potions Perfecta
-
Enter and you will find a Puzzle
-
Exit and Re-Enter
-
Take Minute Hand
-
Enter Chapter
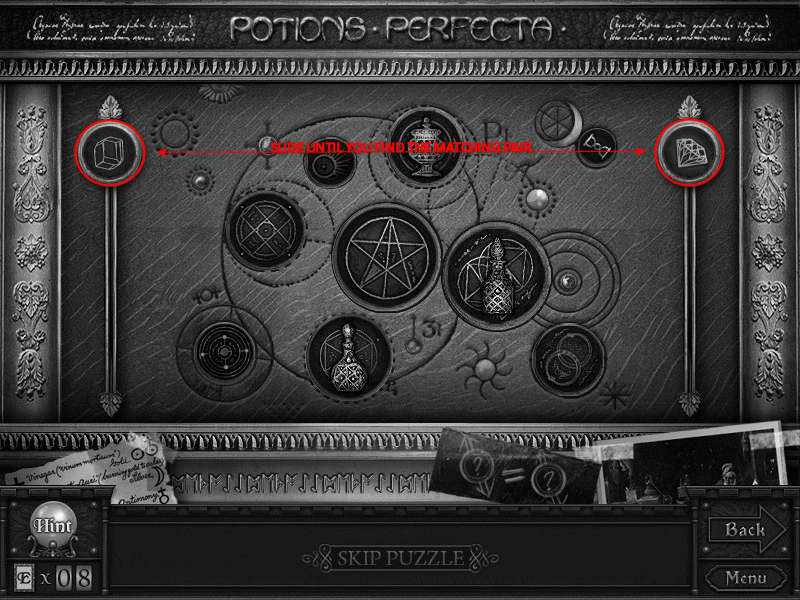
Puzzle
-
Slide the Knobs on the Left and Right until you find a Matching Pair
-
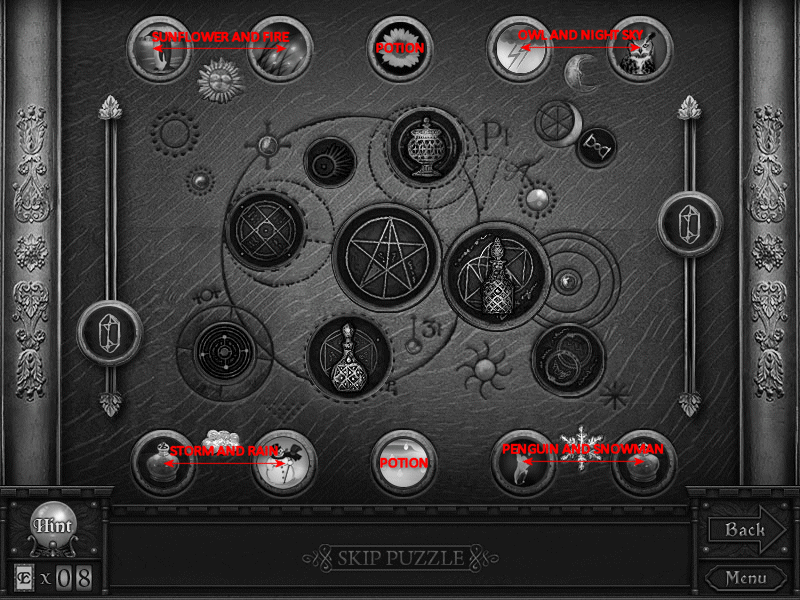
Next swap the Pictures around so they match the Symbols near them
-
The top shows Day and Night
-
The bottom shows Weather and Winter
-
The Potion Bottles go in the very Middle
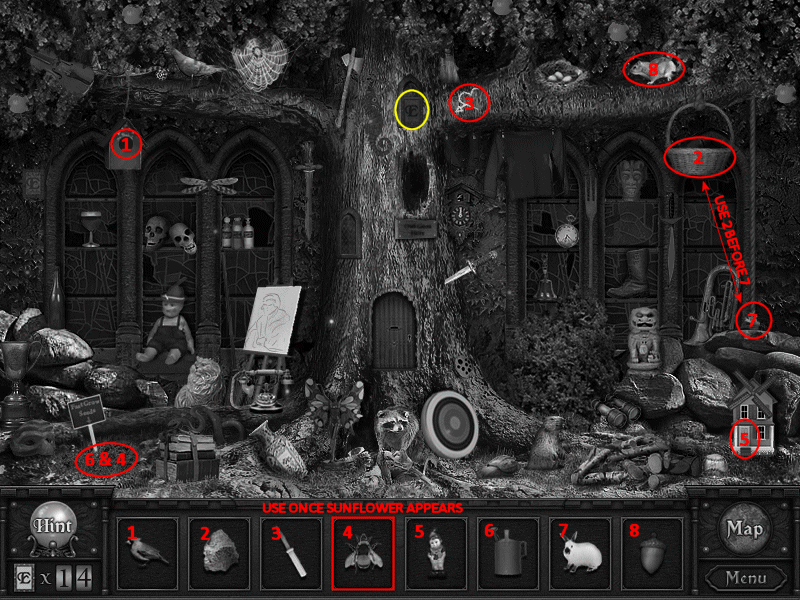
Chapter: Enchanted Forest and the Seven Seals
-
See screenshot for solution
-
Locked Item: Honey-Bee and Hungry Rabbit
-
Watering Can unlocks Honey Bee
-
Rock unlocks Hungry Rabbit
-
Go Upstairs
Potions Perfecta Upstairs
-
Zoom in on vase and take the Battery
-
Click on the Books
-
Enter Chapter
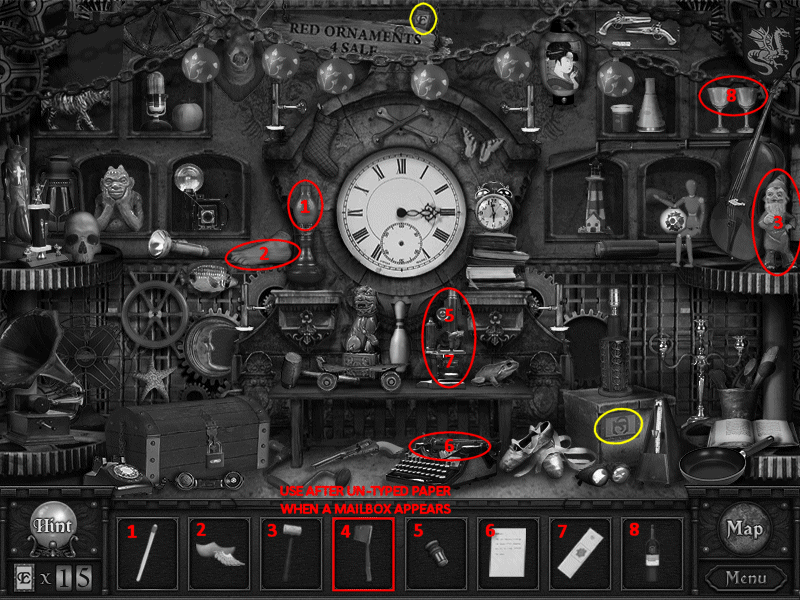
Chapter: The Mysterious Clocktower Labyrinth (2)
-
See screenshot for solution
-
Locked Item: Mailbox Flag
-
Untyped Paper unlocks Mailbox Flag
-
Exit Potions Perfecta and Go Up
Outside Aquatic Museum
-
Click the green crystal on the Right and get a Puzzle
Puzzle
-
This is a matching game with a twist, you need to find the two halves that make a whole - such as in the picture a frog head and frog body.
-
Clicking a Hint will reveal Three Cards
-
Enter Chapter
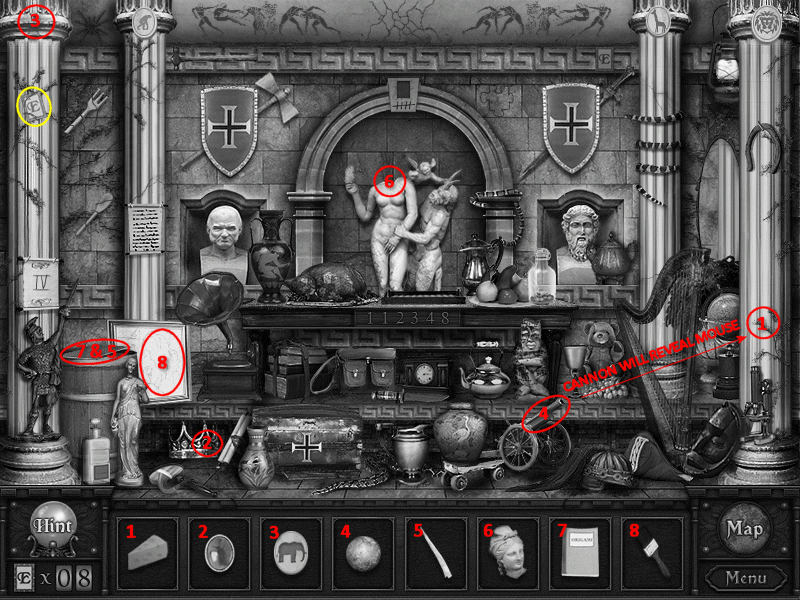
Chapter: Journey to the Ancient Parthenon
-
See screenshot for solution
-
Lock Item: Cheese and Ivory Tusk
-
Cannon Ball unlocks Cheese
-
Elephant and Origami Instruction unlocks Ivory Tusk
Outside Aquatic Museum
-
Use the Sledgehammer on the left vase
-
Enter Chapter
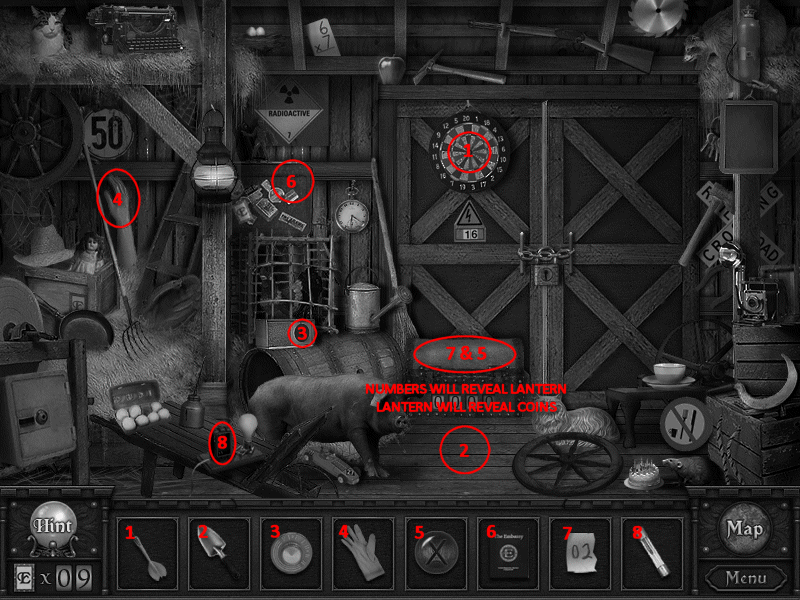
Chapter: Strange Tales on Meadow Creek Farm (2)
-
See screenshot for solution
-
Locked Item: Shovel
-
Number 02 and Lantern Lens unlocks Shovel
-
Go Right
-
Enter Chapter
Chapter: Enchanted Forest and the Seven Seals (2)
- See screenshot for solution
- Locked Item: Bug Jar
- Fly unlocks Bug Jar
- Go Right
- Enter Chapter
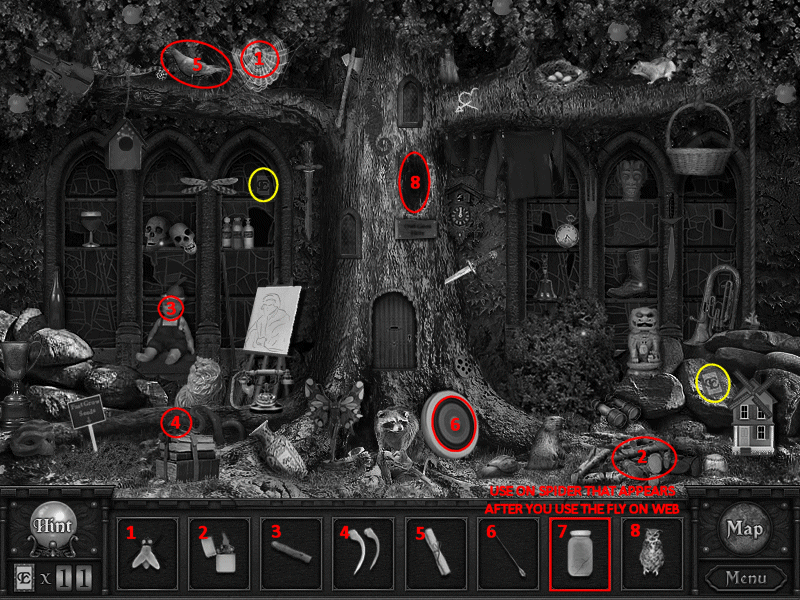
Chapter: Darkwood Manor Haunted Stories (2)
- See screenshot for solution
- You have to use the Axe before the Match
- You have to use the Mirror Cleaner but the Warding Flashlight
- Enter Museum
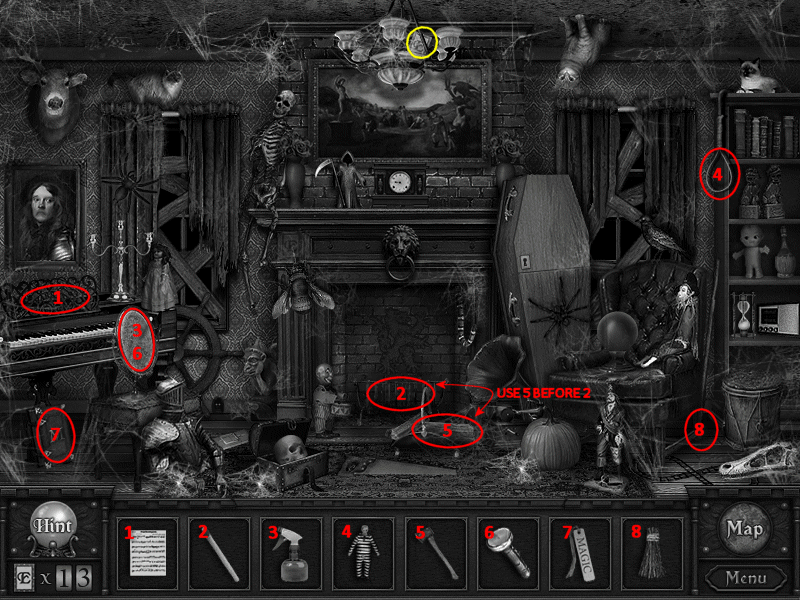
Aquatic Museum
-
Enter Chapter
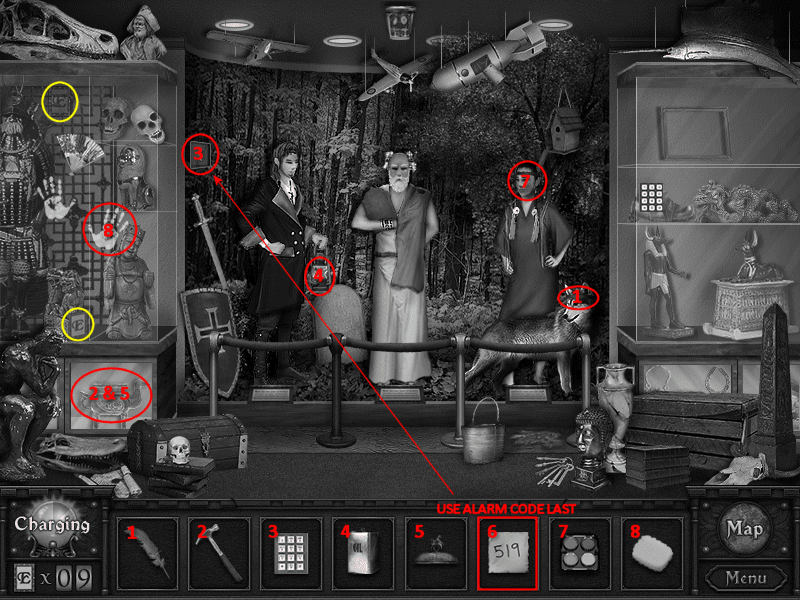
Chapter: The Great Museum Caper
-
See screenshot for solution
-
Locked Item: Camel Lid
-
Hammer unlocks Camel Lid
-
Use Alarm Code last
-
Enter Museum
Aquatic Museum - Portrait
-
Click the Portrait and place the symbols in the correct spots
-
Take the Teacup Emblem
- Return to Potions Perfecta
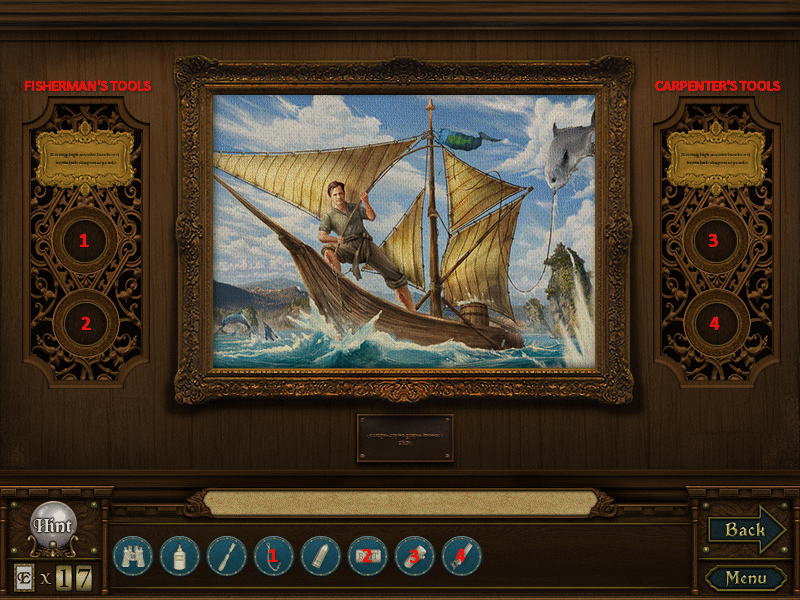
Potions Perfecta
-
Place the Teacup Emblem in the lower, right corner of the cabinet
-
Take the Gilded Owls Ruby Gem
-
Enter Chapter
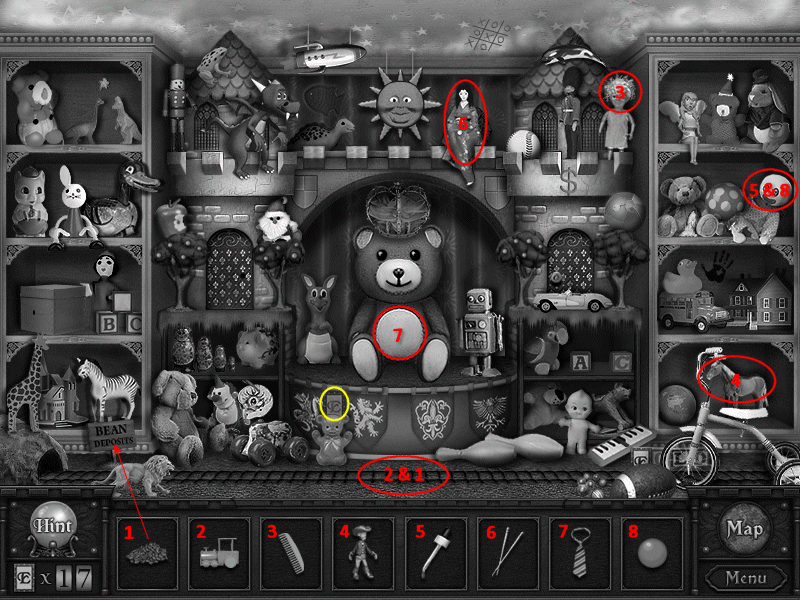
Chapter: Playful Teddy's Lullaby Adventures
-
See screenshot for solution
-
Locked Item: Magic Beans and Clown Nose
-
Train unlocks Magic Beans
-
Insta Hair unlocks Clown Nose
-
Return to Old Globe Antique
Old Globe Antique
-
Place the Red Gem in the owls eye (you will have to zoom in first)
-
Take the Fish Emblem
-
Exit and Go Up and Right (Floral Elevator)
Floral Elevator
-
Click on green crystal and place Battery inside
-
Enter Chapter
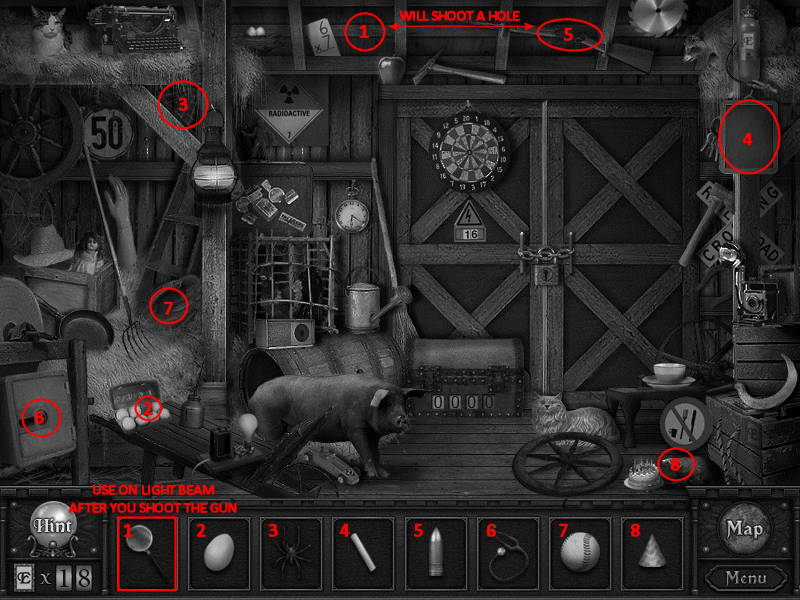
Chapter: Strange Tales on Meadow Creek Farm (3)
-
See screenshot for solution
-
Locked Item: Magnifying Glass
-
Shotgun Shell unlocks Magnifying Glass
-
Return to Potions Perfect and Go Upstairs
Potions Perfecta Upstairs - Portrait
-
Click the Portrait and place the symbols in their correct spots
-
Take the Hour Hand
-
Return to Museum and Go Up (Control Room)
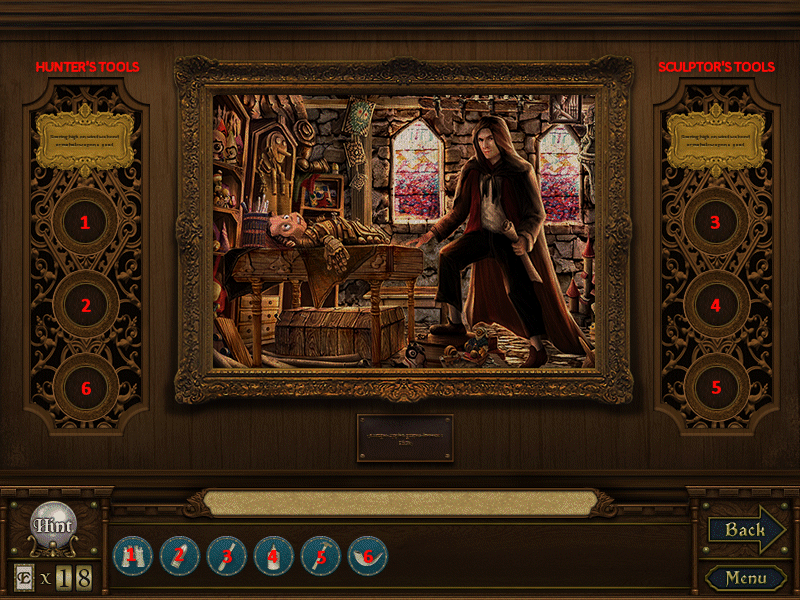
Control Room
-
Zoom in the wall
-
Place the Fish Emblem inside the hole
-
Place the Gear in the mechanism
-
Return to Floral Elevator
Floral Elevator
-
Place the Hour Hand and Minute Hands on the clock
-
Click on the Clock Face
~Chapter Two~
Garden
-
Click on the green crystal to get a Puzzle
Puzzle
-
This is another Matching Puzzle - only this time you can see what's underneath by hovering your cursor over it
-
You need to match the Animal to their Home
-
Enter Chapter
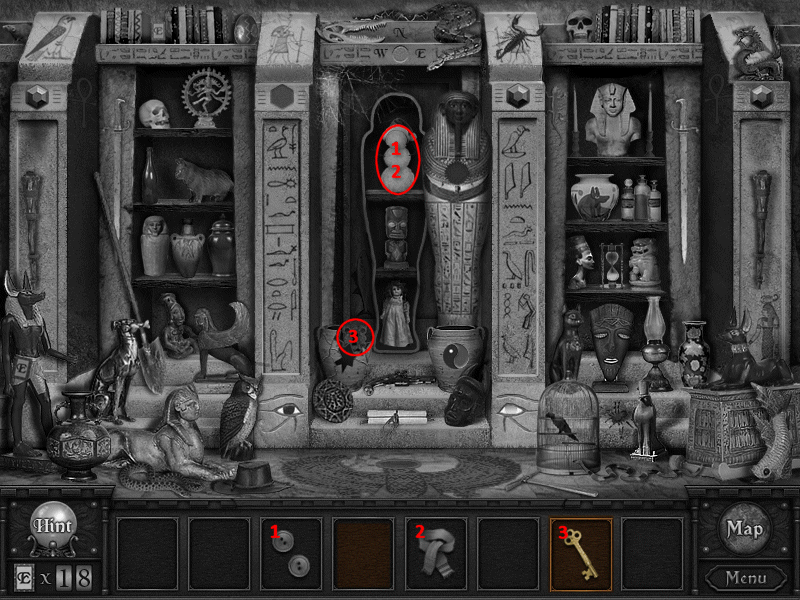
Chapter: A Tomb Among The Shifting Sands
-
See screenshot for solution
-
Locked Item: Tomb Key, Snowman Scarf, and Black Buttons
-
Hammer unlocks Tomb Key
-
Tomb Key unlocks Snowman Scarf and Black Buttons
-
Go Down
-
Enter Chapter
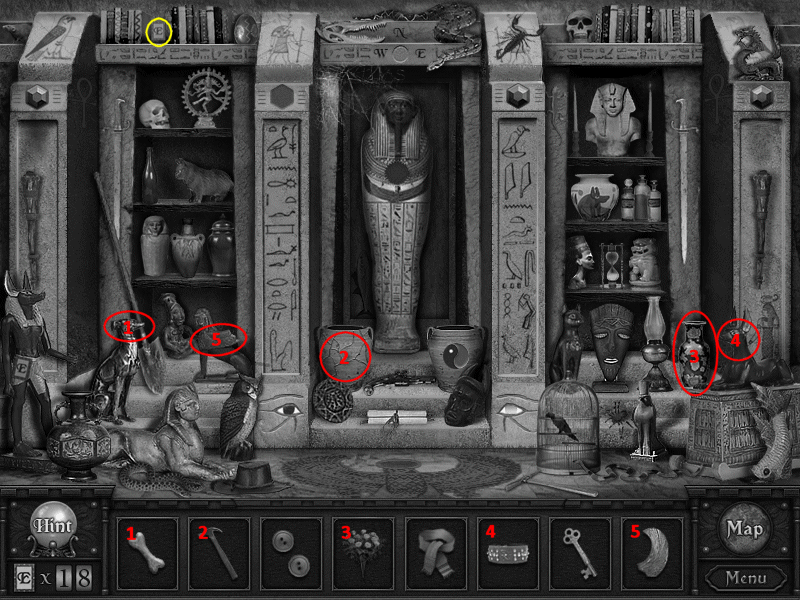
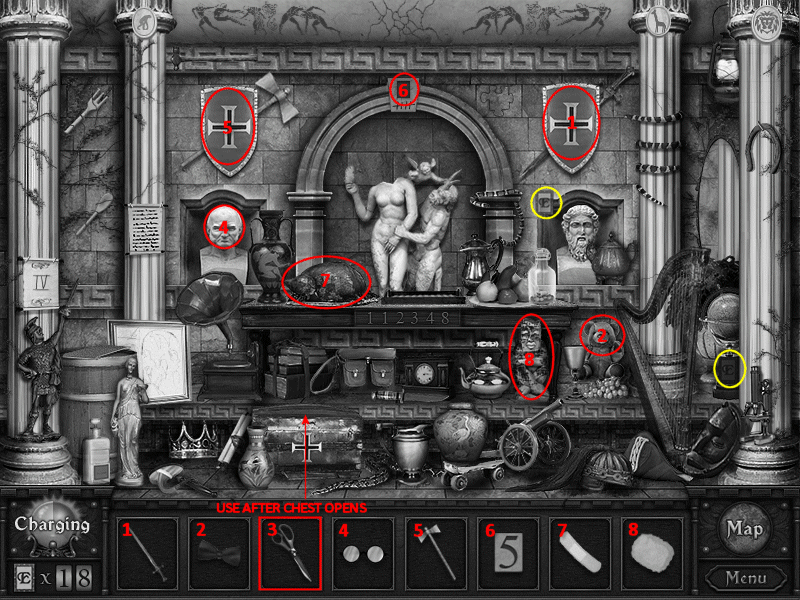
Chapter: Journey to the Ancient Parthenon (2)
-
See screenshot for solution
-
Locked Item: Stylist Scissors
-
Axe and Sword unlock Stylist Scissors
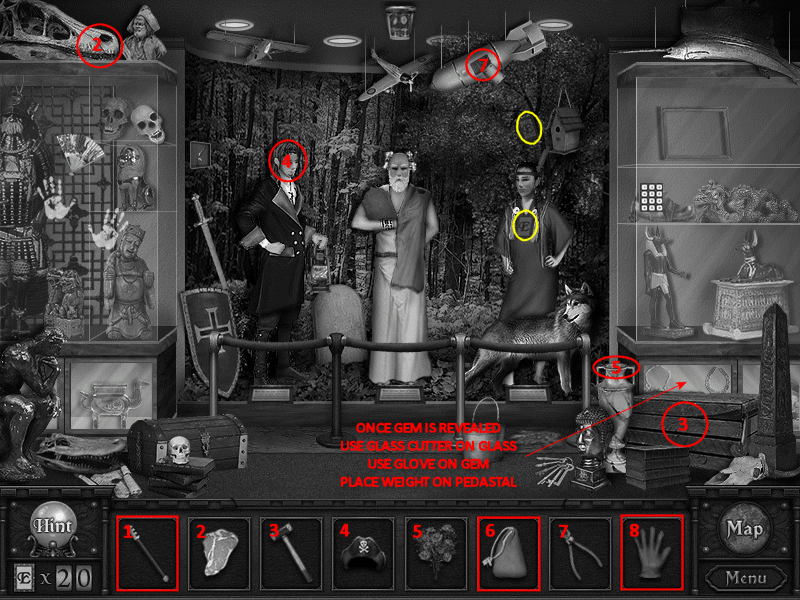
Chapter: The Great Museum Caper (2)
-
See screenshot for solution
-
Locked Item: Glass Cutter, Gloves, and Sandbag
-
Hammer unlocks Glasscutter
-
Glasscutter unlocks Gloves
-
Gloves unlock Sandbag
-
Exit and Go Right
Jack and Jill
-
Zoom on both Jack and Jill and read the inscriptions on their necklaces
-
Click the bottom of Jack's statue and get a Puzzle
-
Click on the bottom of Jill's statue and get a Puzzle
-
Take the Machete (Jack) and the Master Key (Jill)
-
Enter Chapter
Puzzles
-
Jack's Puzzle: Match the Sketch to the Painting - once again you can see the items if you hover over them
-
Jill's Puzzle: This is just a regular matching game - match Exact Paintings - the twist is they are all Panda's
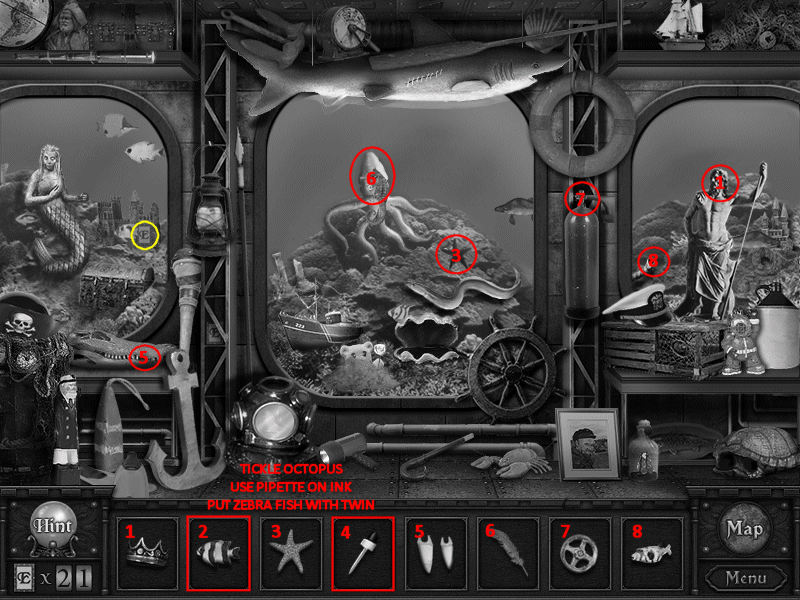
Chapter: Whiddon's Expedition - Atlantis
-
See screenshot for solution
-
Locked Item: Pipette and Twin Zebra Fish
-
Feather unlocks Pipette
-
Pipette unlocks Twin Zebra Fish
- Exit and Go Left
Gnome Room
-
Zoom in on the Gnome and read the inscription
-
Enter Chapter
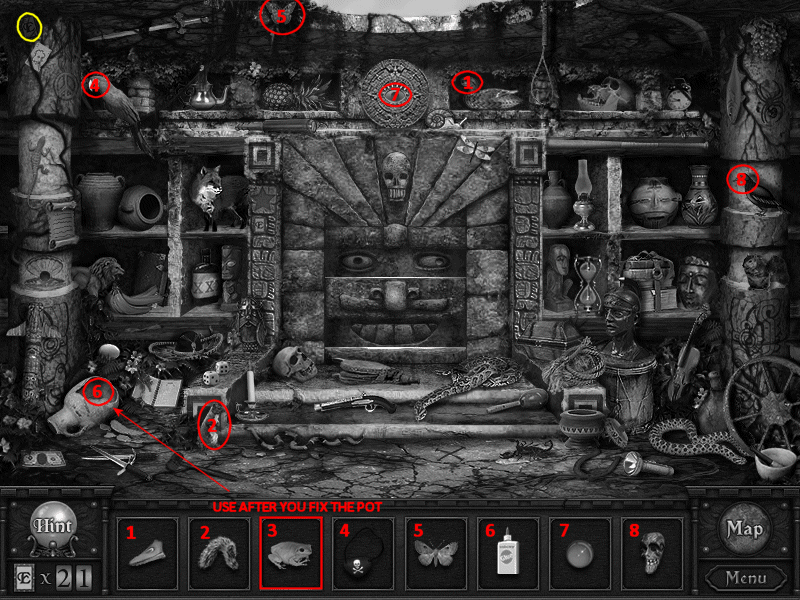
Chapter: Forgotten Idol - The Mayan Expedition
-
See screenshot for solution
-
Locked Item: Frog
-
Pottery Glue unlocks Frog
-
Use Machete on Vines and Exit
Cave
-
Click on the green crystal and get a Puzzle
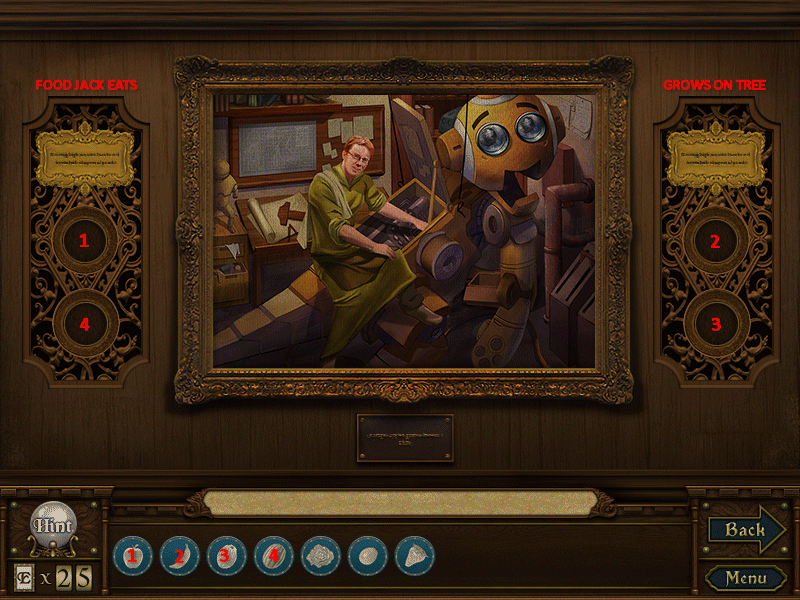
Puzzle
-
Yet another matching game - match the Creature with its Food
-
Enter Chapter
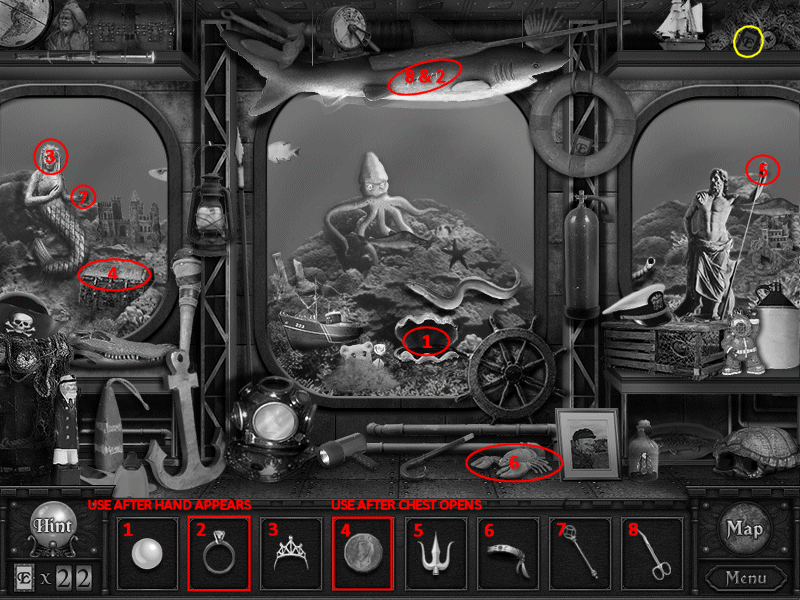
Chapter: Whiddon's Expedition - Atlantis (2)
-
See screenshot for solution
-
Locked Item: Gold Coin and Diamond Ring
-
Tiara, Scepter, and Staff unlock Gold Coin
-
You must use the Tiara, Scepter, and Staff before the Gold Coin
-
Surgical Scissors unlock Diamond Ring
-
Enter Chapter (Chair)
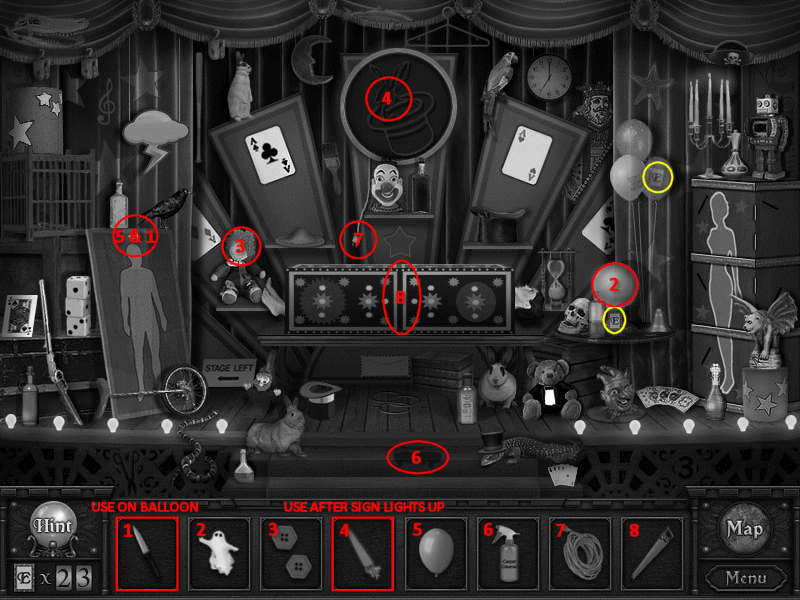
Chapter: And Now, For My Next Trick (2)
-
See screenshot for solution
-
Locked Items: Glowing Carrot and Dagger
-
Extension Cord unlocks Carrot
-
Balloon unlocks Dagger
-
Click Portrait and Solve
-
Enter Chapter
Chapter: Playful Teddy's Lullaby Adventures (2)
-
See screenshot for solution
-
Locked Item: Horn
-
White Paint unlocks Horn
-
Take Blue Gem
-
Return to Gnome Room
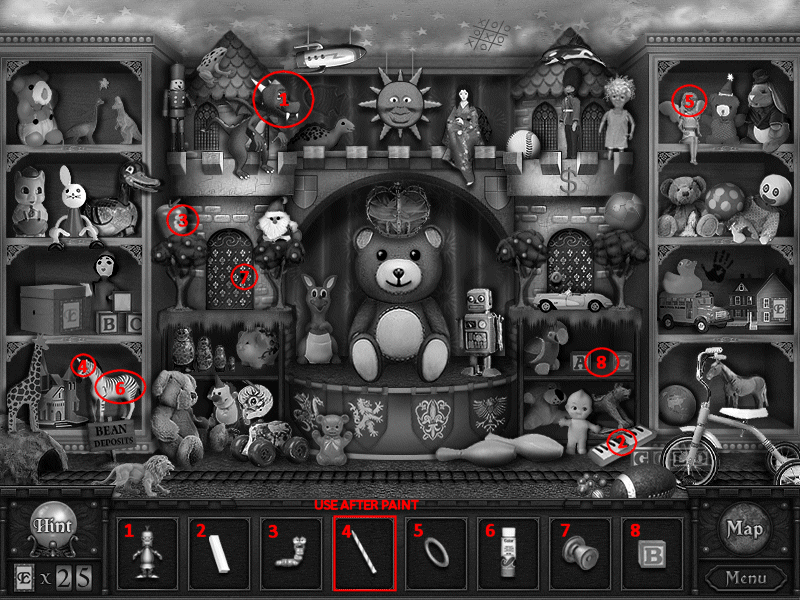
Gnome Room
-
Use Master Key on locked door
-
Enter Library
Library
-
Enter Chapter
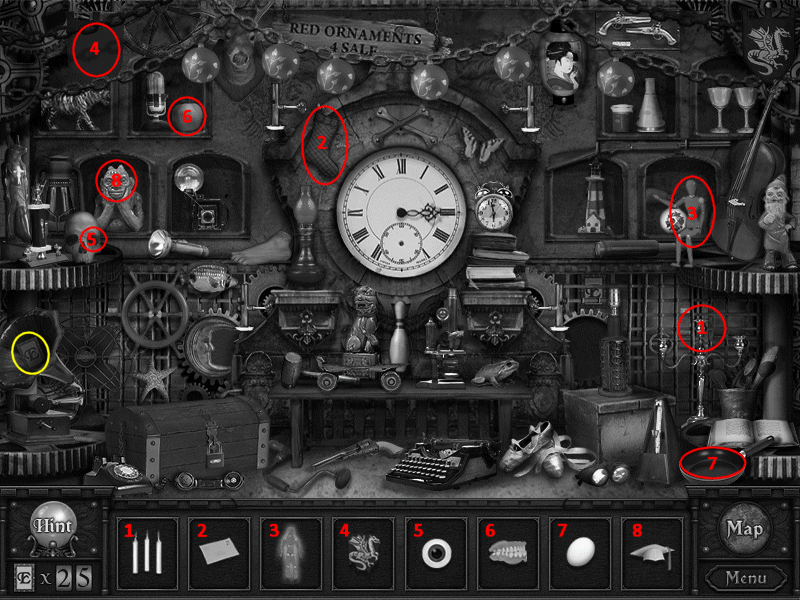
Chapter: The Mysterious Clockwork Labyrinth (3)
-
See screenshot for solution
-
Click Portrait and Solve
-
Enter Chapter
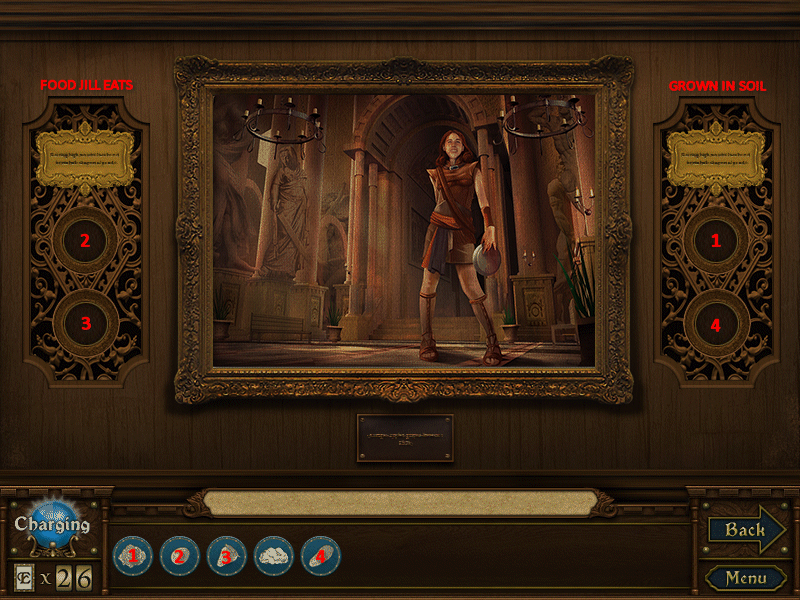
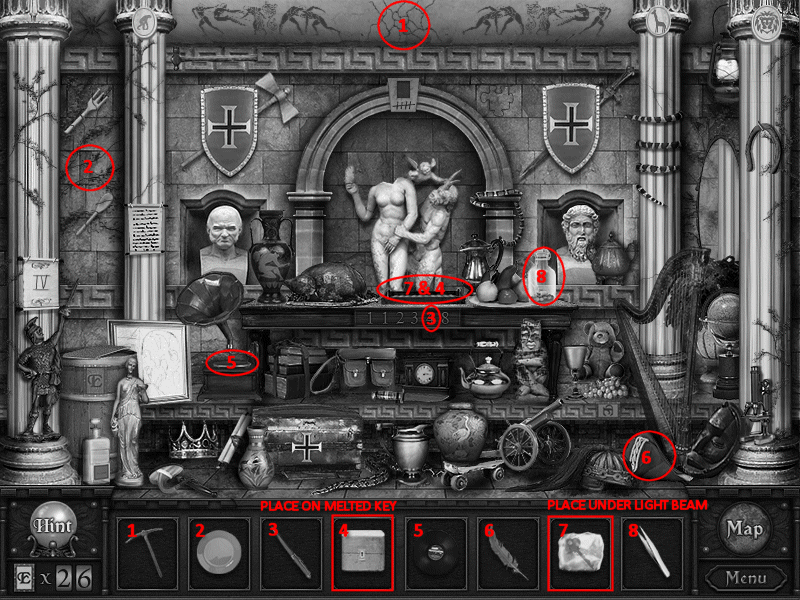
Chapter: Journey to the Ancient Parthenon (3)
-
See screenshot for solution
-
Locked Item: Key in Ice and Locked Safe
-
Pickaxe unlocks Key in Ice
-
Key of Ice unlocks Locked Safe
-
Take the Gold Ring
-
Return to Jack and Jill Room
Jack and Jill
-
Place the Gold Ring and Blue Gem (in that order) in hole in golden ball
-
Zoom in and Enter Room
Bedroom
- Enter Chapter
Chapter: A Tomb Amongst the Shifting Sands (2)
-
See screenshot for solution
-
Locked Item: Match and Skeleton Arm
-
Oil Can unlocks Match
-
Red Sun unlocks Skeleton Arm
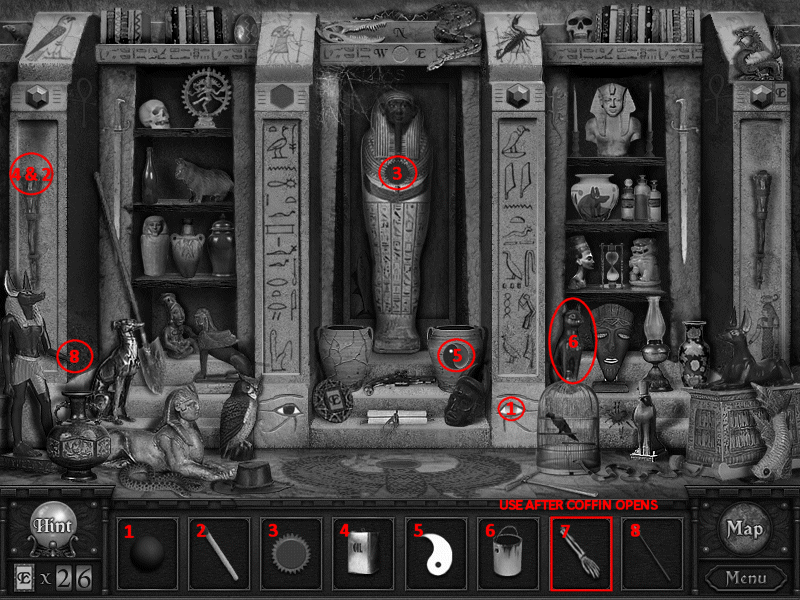
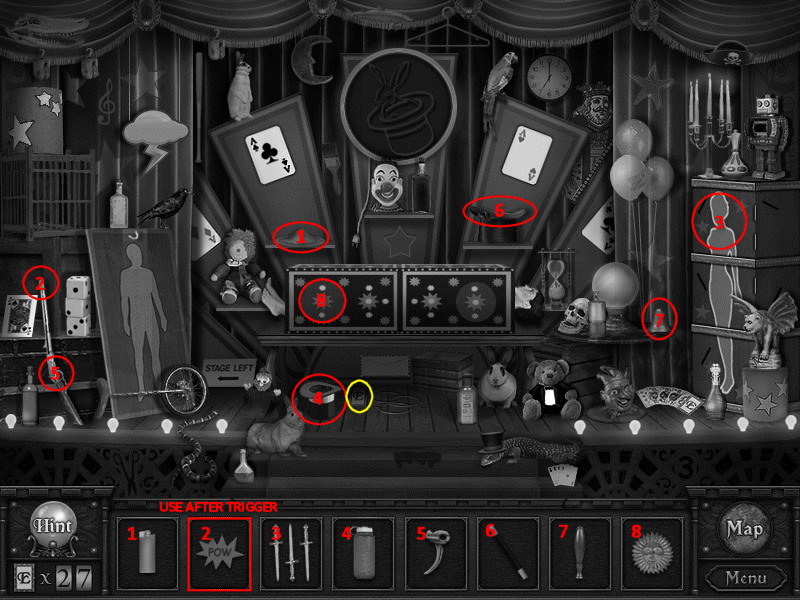
Chapter: And Now, For My Next Trick (3)
-
See screenshot for solution
-
Locked Item: Pow Flag
-
Trigger unlocks Pow
-
Click the Portrait and Solve
-
Take Moon
-
Return to Library
Library
-
Place Moon in door
-
Exit
~Chapter 3~
Tower
-
Go Up
-
Enter Chapters
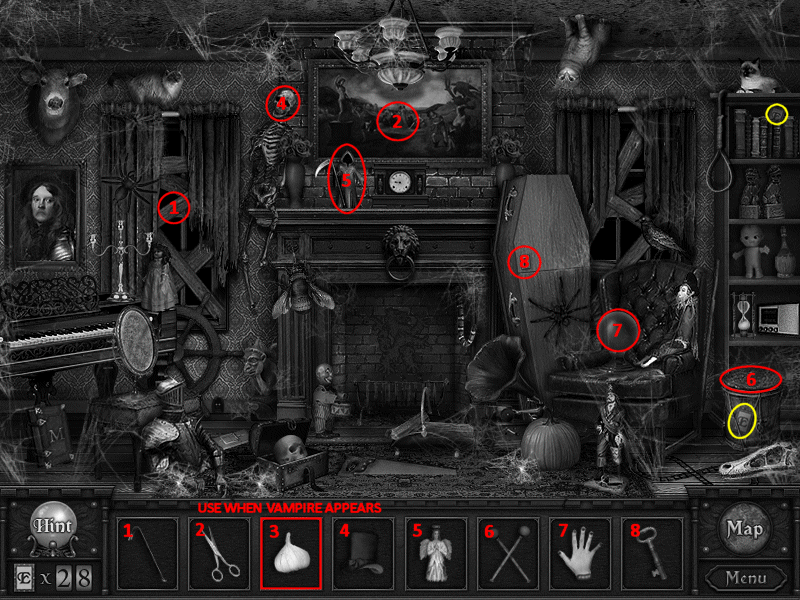
Chapter: Darkwood Manor Haunted Stories (3)
-
See screenshot for solution
-
Locked Item: Garlic
-
Coffin Key unlocks Garlic
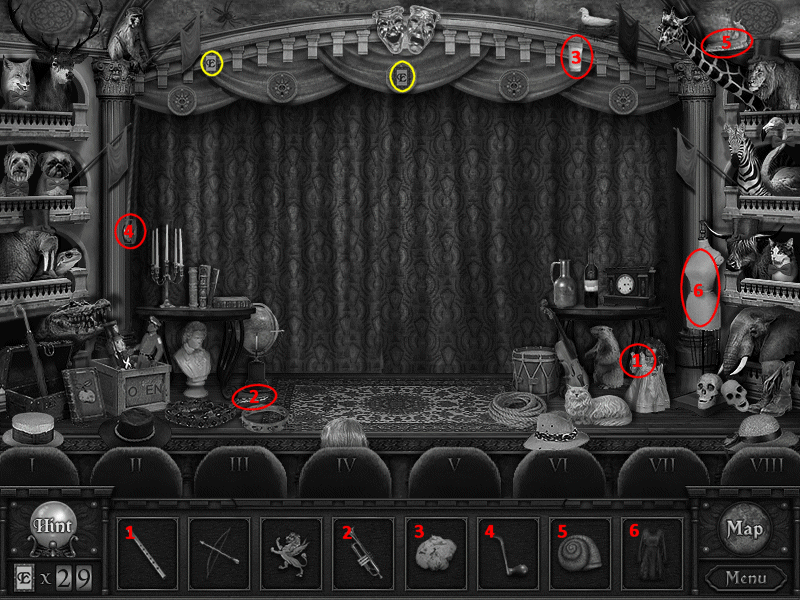
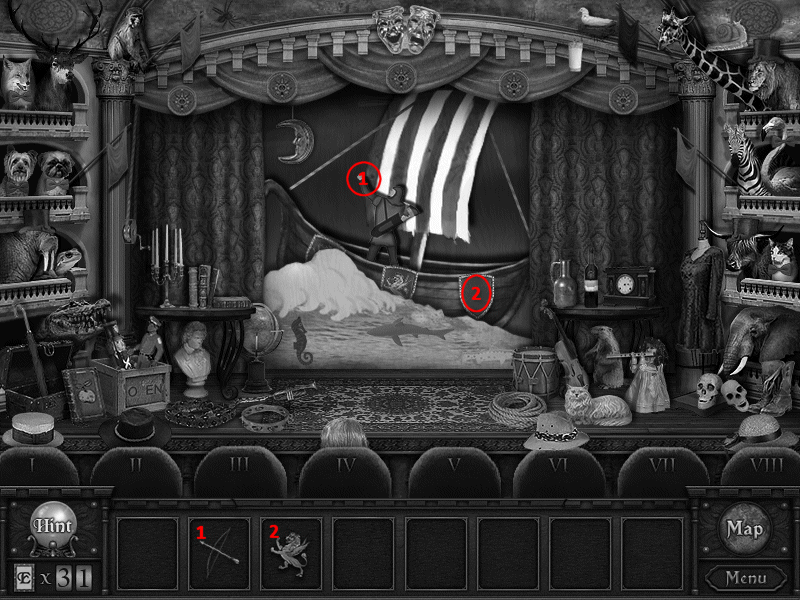
Chapter: Majestic Theater of Noble Hill
-
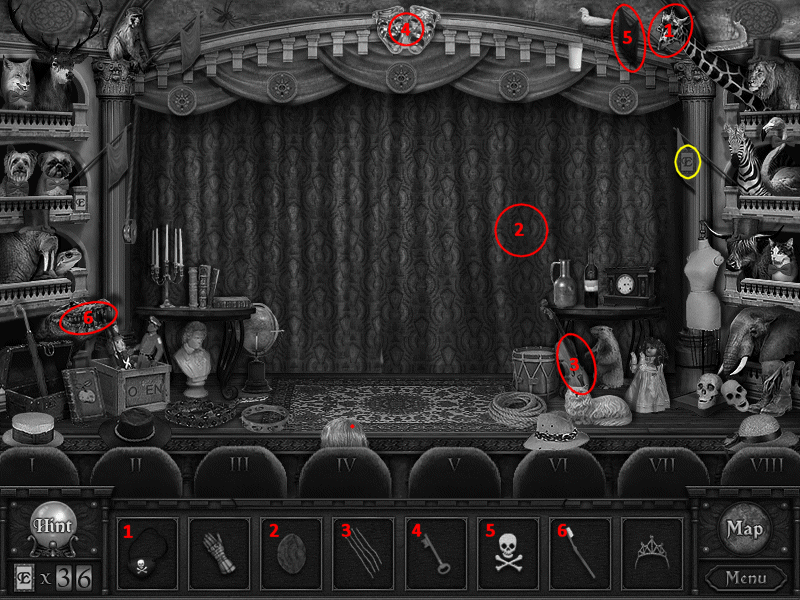
See screenshot for solution
-
Go Up
Tower Room
-
Enter Chapter
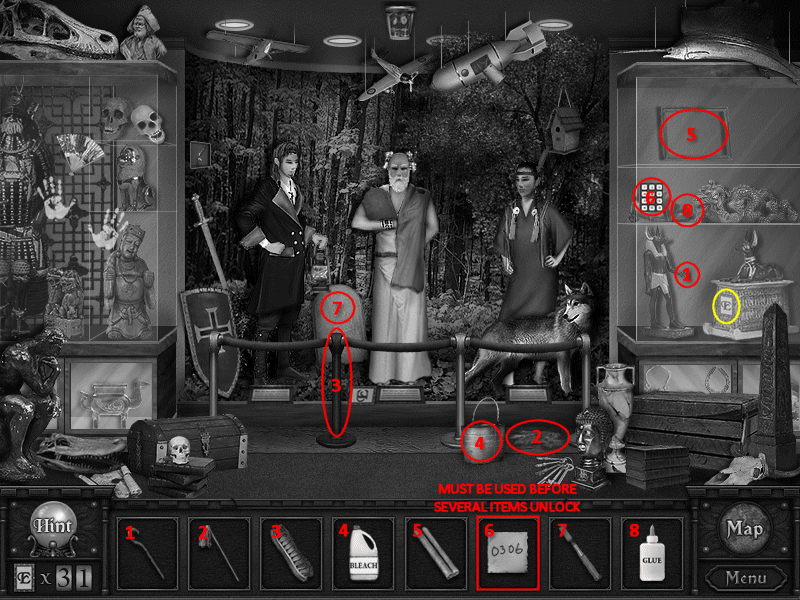
Chapter: The Great Museum Caper (3)
-
See screenshot for solution
-
Locked Item: Mop, Glue, Painting, Egyptian Scepter
-
Bleach unlocks Mop
-
Code unlocks Glue, Painting, and Egyptian Scepter
-
Go Right (Hallway)
Blue Beetle Room
-
Take the Blue Beetle
-
Enter Chapter
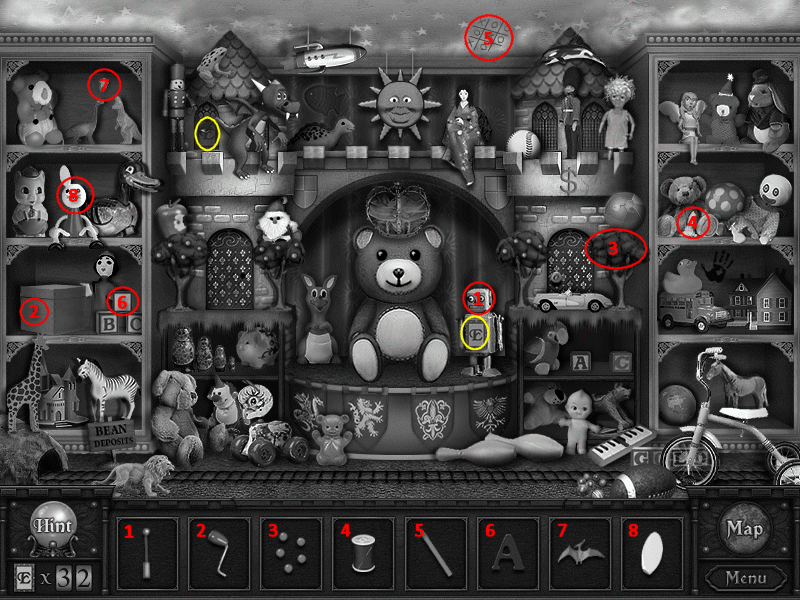
Chapter: Playful Teddy's Lullaby Adventures (3)
-
See screenshot for solution
-
Exit and Go Up (Stairs)
Bug Collection Room
-
Place Blue Beetle among the other beetles on the wall (zoom in first)
-
Enter Chapters
Chapter: Forgotten Idol - The Mayan Expedition (2)
-
See screenshot for solution
-
Locked Item: Seeds and Hungry Rabbit
-
Shovel unlocks Seeds
-
Seeds unlock Hungry Rabbit
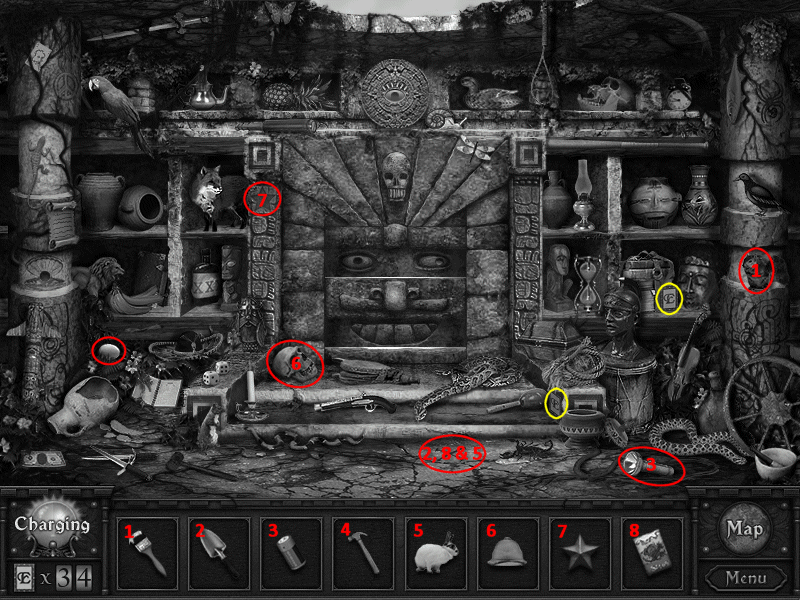
Chapter: Wild West Jack and the Raccoon Gang
-
See screenshot for solution
-
Locked Item: Needles and Nutcracker
-
Soil unlocks Needles
-
Shears unlock Nutcracker
-
Go Left
Tower Room 2
-
Take Screwdriver on right stair steps
-
Zoom in on green box and Enter Chapter
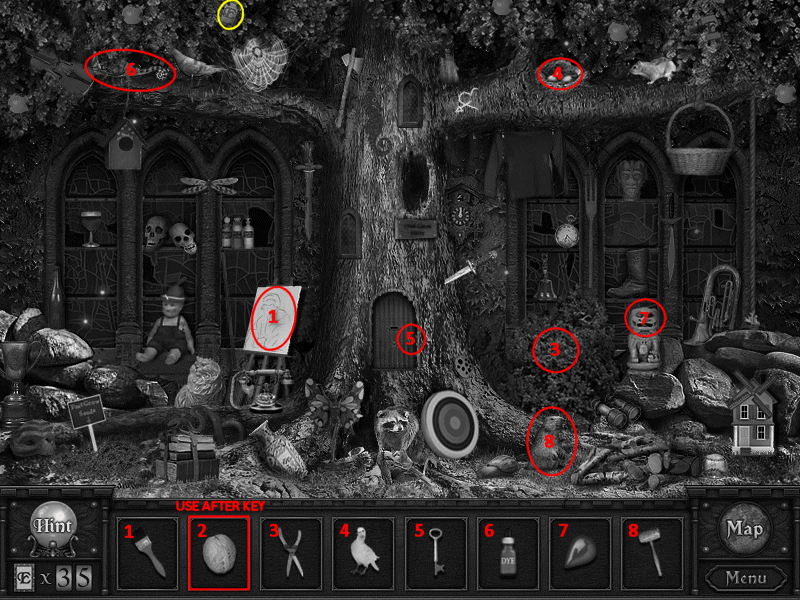
Chapter: Enchanted Forest and the Seven Seals (3)
-
See screenshot for solution
-
Locked Item: Hard Walnut
-
Key unlocks Hard Walnut
-
Go Up
Tower Garden
-
Take the Blue Gem
-
Enter Chapter
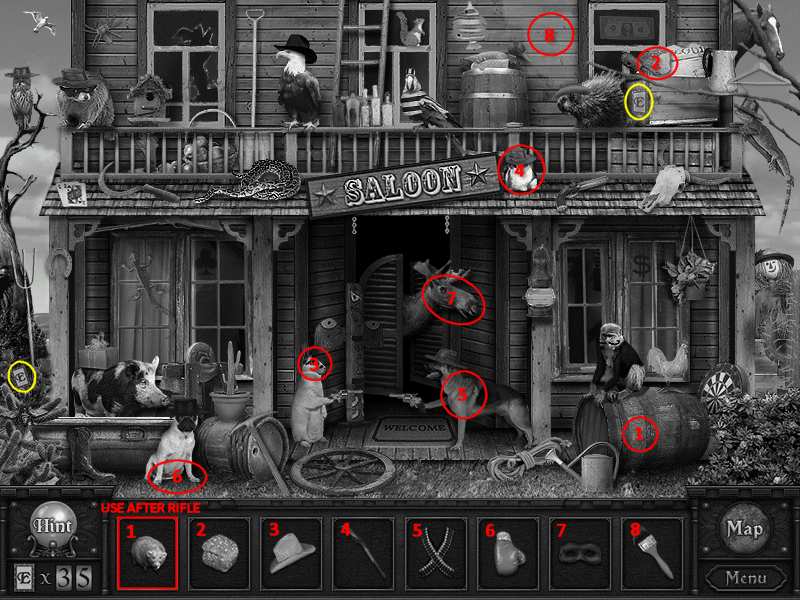
Chapter: Wild West Jack and the Raccoon Gang (2)
-
See screenshot for solution
-
Locked Item: Thirsty Rat
-
Antique Rifle unlocks Thirsty Rat
-
Go Down, Down, Right (Tower Room)
Tower Room
-
Place the Blue Gem into the green box
-
Enter Chapter
Chapter: A Tomb Amidst the Shifting Sands (3)
-
See screenshot for solution
-
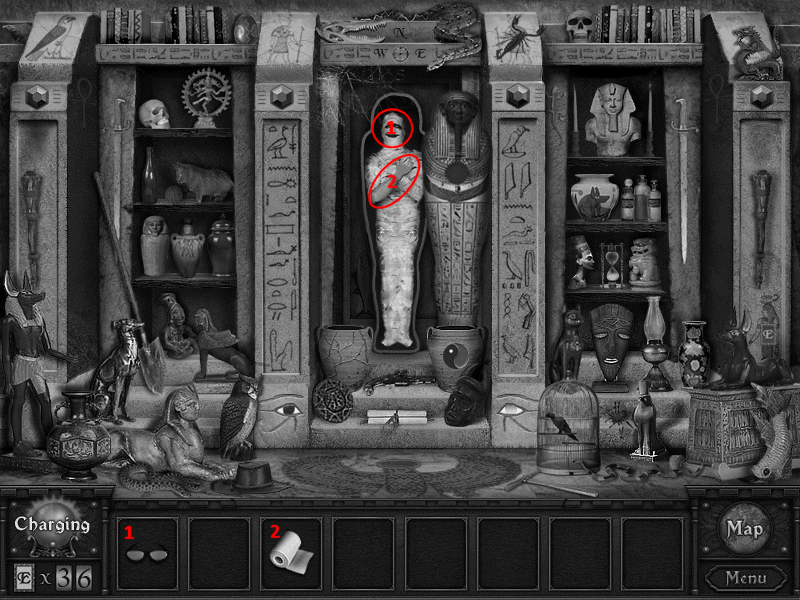
Locked Item: Sunglasses and White BandageCrowbar
-
unlocks Bandage
-
Bandage unlocks Sunglasses
-
Go Up
Blue Beetle Room
-
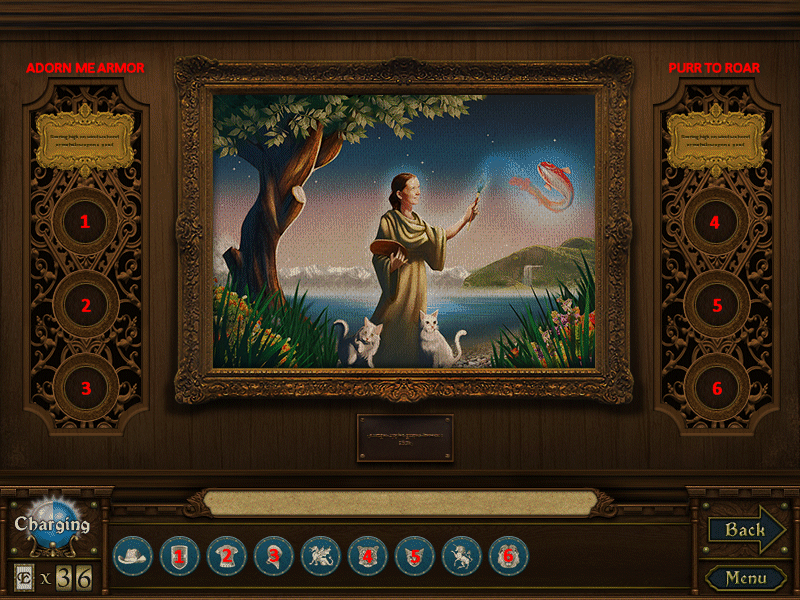
Click on Portrait and solve
-
Take Golden Plaque
-
Exit
Tower Room
-
Place Gold Plaque on large pedestal in center of the room
-
Take Triangle Gem
-
Go Up and Left
Tower Room 2
-
Place Triangle Gem on picture
-
Go Left (Door)
Balcony
-
Take Flowers from vase
-
Go Down, Down, Right Down (Steps)
Tower Stairs
-
Zoom in on the Glass Globe on right side
-
Use Screwdriver to get the Heartout
-
Exit to Tower Garden
Tower Garden
-
Place Heart in the spot where on the wall where one is missing
-
Enter Chapter
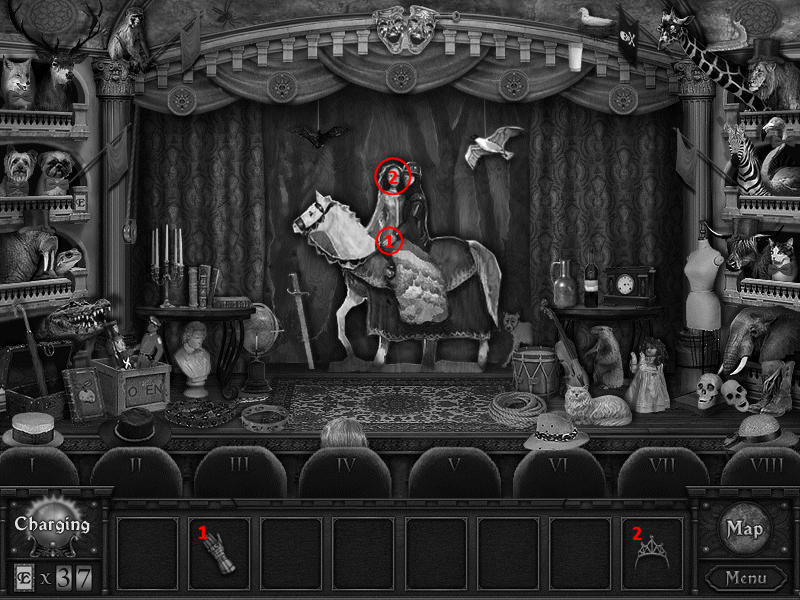
Chapter: Majestic Theater of Noble Hill (2)
-
See screenshot for solution
-
Locked Item: Gauntlet and Tiara
-
Key unlocks Gauntlet and Tiara
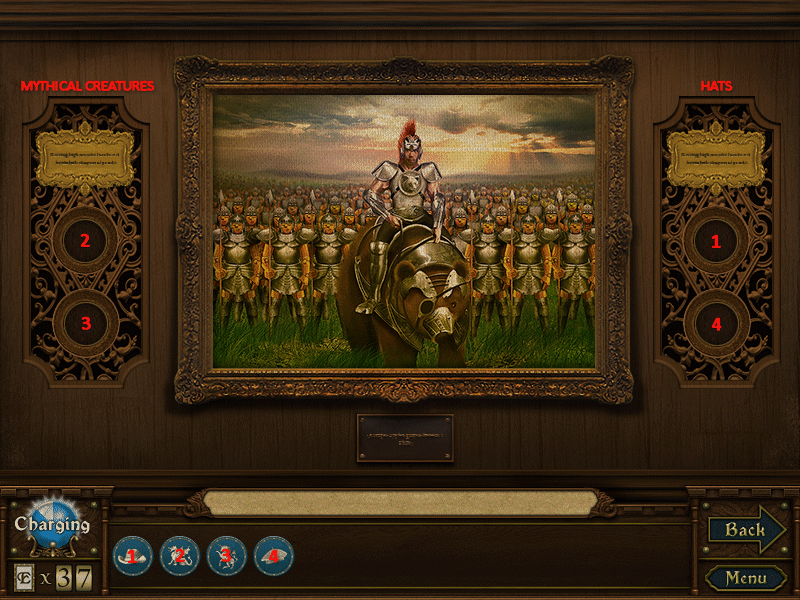
-
Click Portrait and solve
-
Take the Rose
-
Return to Blue Beetle Room
Blue Beetle Room
-
Plant the Flowers under the portrait
-
Take the Stone Rose
-
Return to Bug Collection Room
Bug Collection Room
-
Place the Stone Rose into the gilded door
-
Exit
~Ending~
Panda Portrait Room
-
Enter Chapter
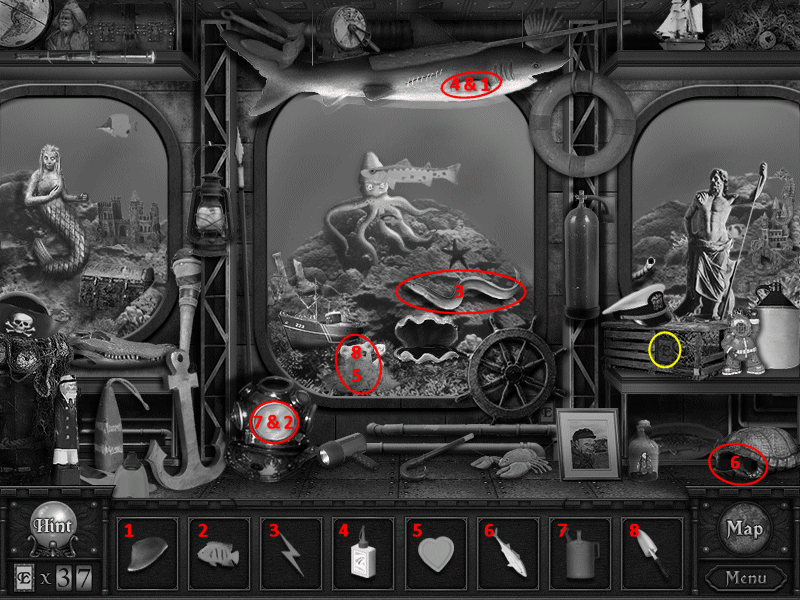
Chapter: Whiddon's Expedition - Atlantis (3)
-
See screenshot for solution
-
Locked Item: Goldfish,Fin, and Heart
-
Water unlocks Goldfish
-
Glue unlocks Fin
-
Shovel unlocks Heart
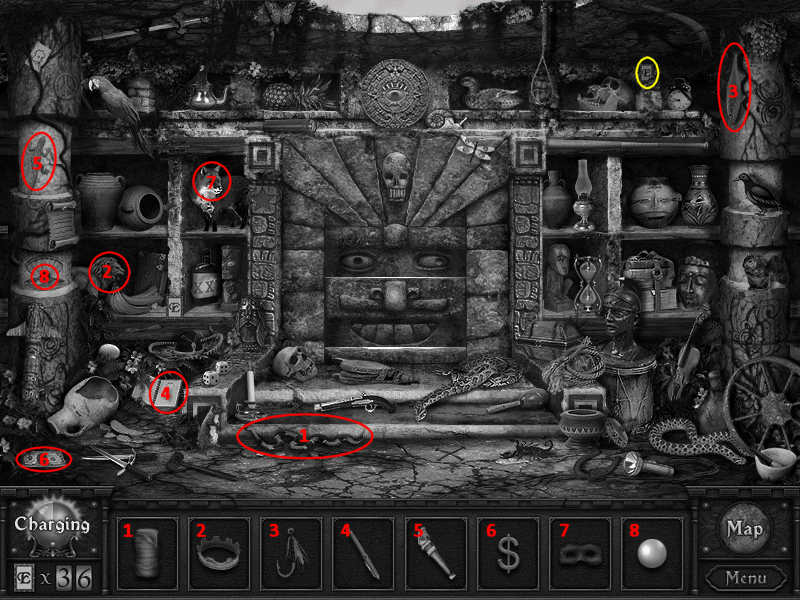
Chapter: Forgotten Idol - The Mayan Expedition (3)
-
See screenshot for solution
-
Go Up
Last Room
-
Enter Chapter
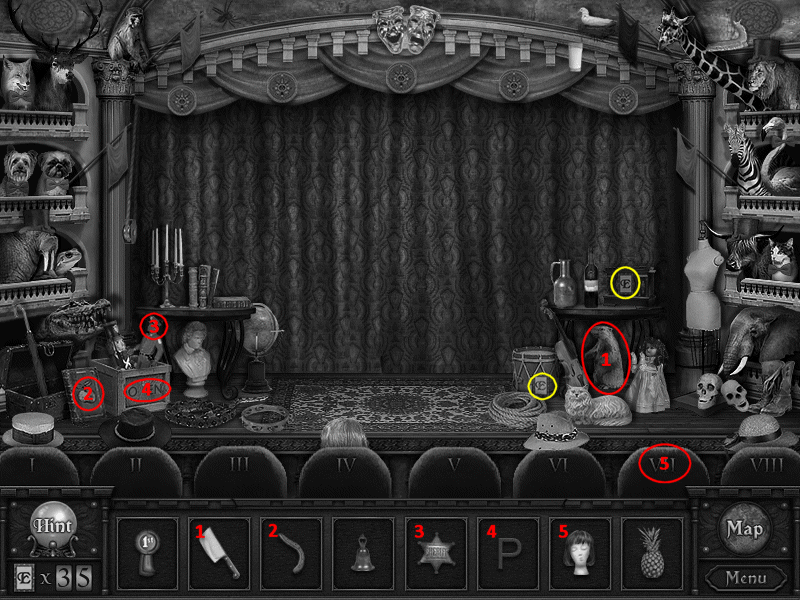
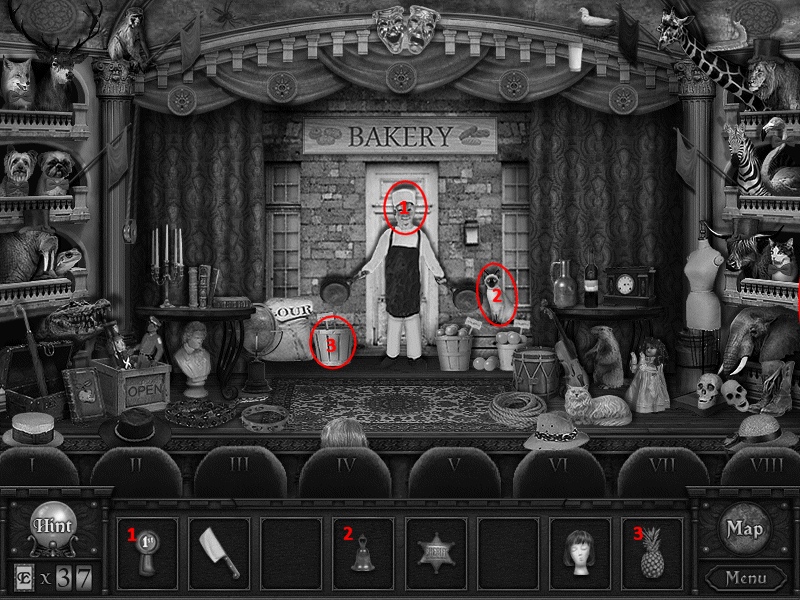
Chapter: Majestic Theater of Noble Hill (3)
-
See screenshot for solution
-
Locked Item: Medal, Kitty Bell, and Pineapple
-
Letter P unlocks Medal, Kitty Bell, and Pineapple
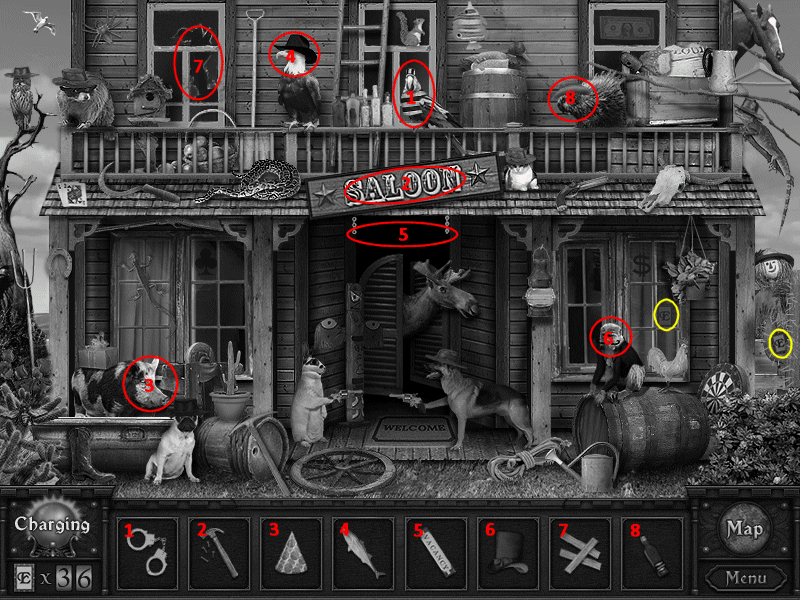
Wild West Jack and the Raccoon Gang (3)
-
See screenshot for solution
-
Go Down
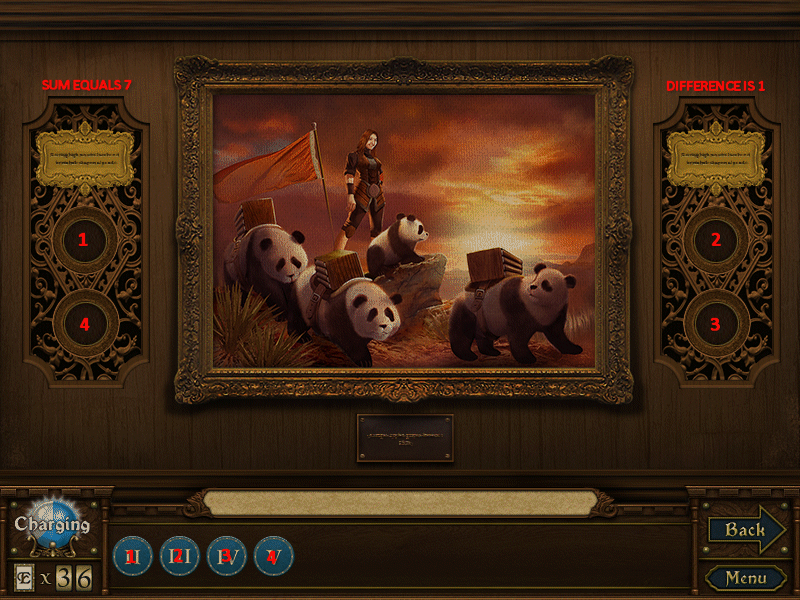
Panda Portrait Room
-
Click Portrait and solve
-
Take Gold Leaf
-
Exit
Last Room
-
Place the Gold Leaf into the top of the machine
-
Talk to the "ghost" of Edgar
-
Zoom in on door and use the Key
-
Exit
-
Continue going down until you reach the locked door
-
Use the Key on the locked door
The End!
