
Walkthrough Information
Images ©Big Fish Games, Play First, and KatGames
Overview: In the third installment of the Dream Chronicles series, Faye is searching for her daughter, Lyra, who was stolen by The Fairy Queen of Dreams. The only problem, she doesn't remember who she is, can you help save her memories and her family?
Gameplay: This is an adventure/hidden object game. You need to explore each scene to find items needed to complete various puzzles.
Note: objects needed are circled in red.
Using Items: When an item is placed in your inventory, it may or may not have a number beside it. If it does have a number beside it, the number indicates how many times you can use the item. To use them, pick them up and click on the area you want to use them.
Dream Journal: This will record your dreams and journal entries, you can open it at any time.
Crystal Ball: The ball is used for communication throughout the game, anything important will be added to your dream journal.
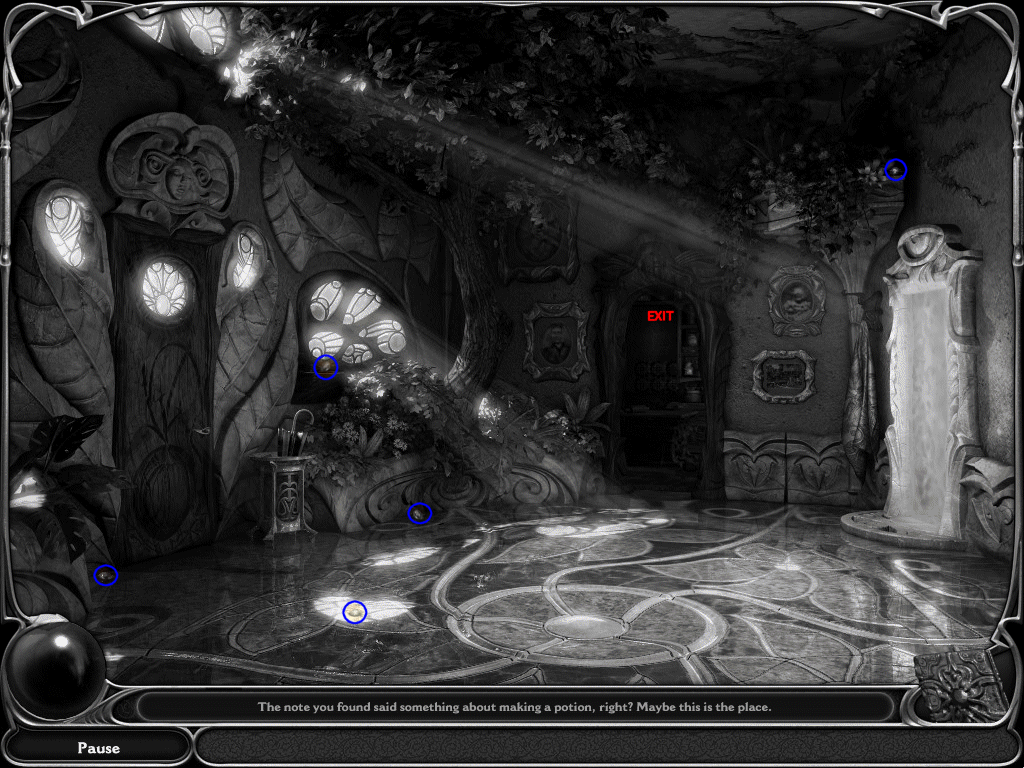
Dream Pieces and Dream Jewels: Find these round objects and place them in Dream Jewels, look everywhere. There are usually five or six dream pieces, but sometimes less.
Note: Dream Pieces and Jewels are circled in blue.
Fun Facts: I like to click on anything I can before leaving a room, Faye will give you bits of information about them which makes the story line a little more deeper (in my opinion).
Hints: Click the crystal ball for hints.
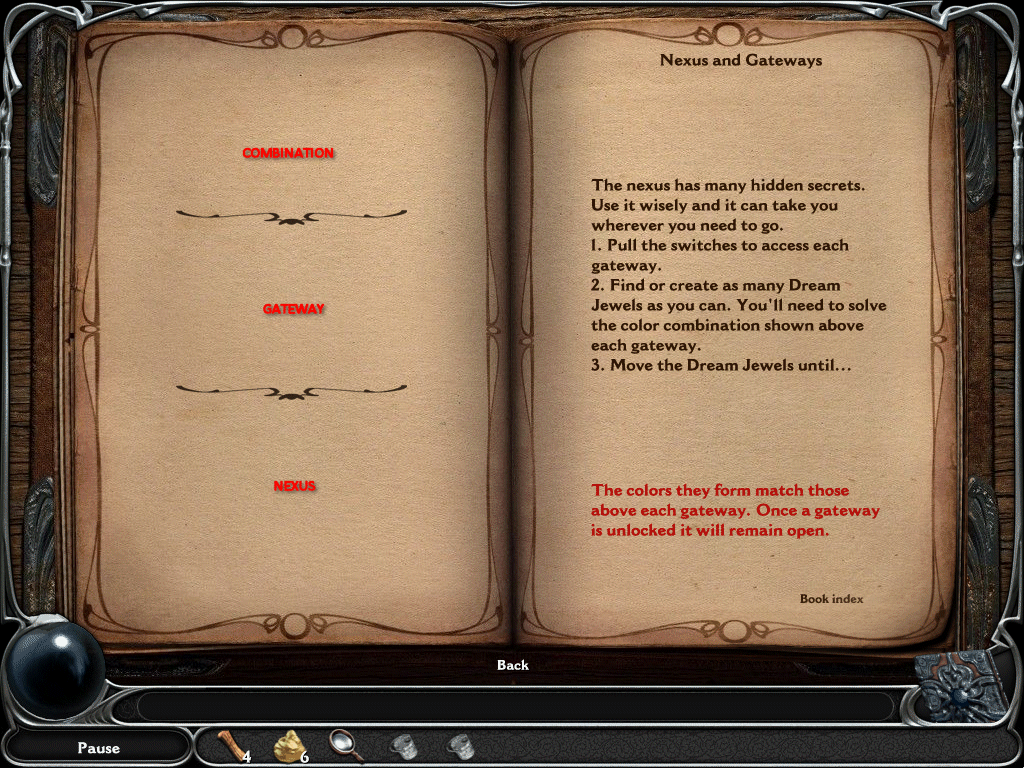
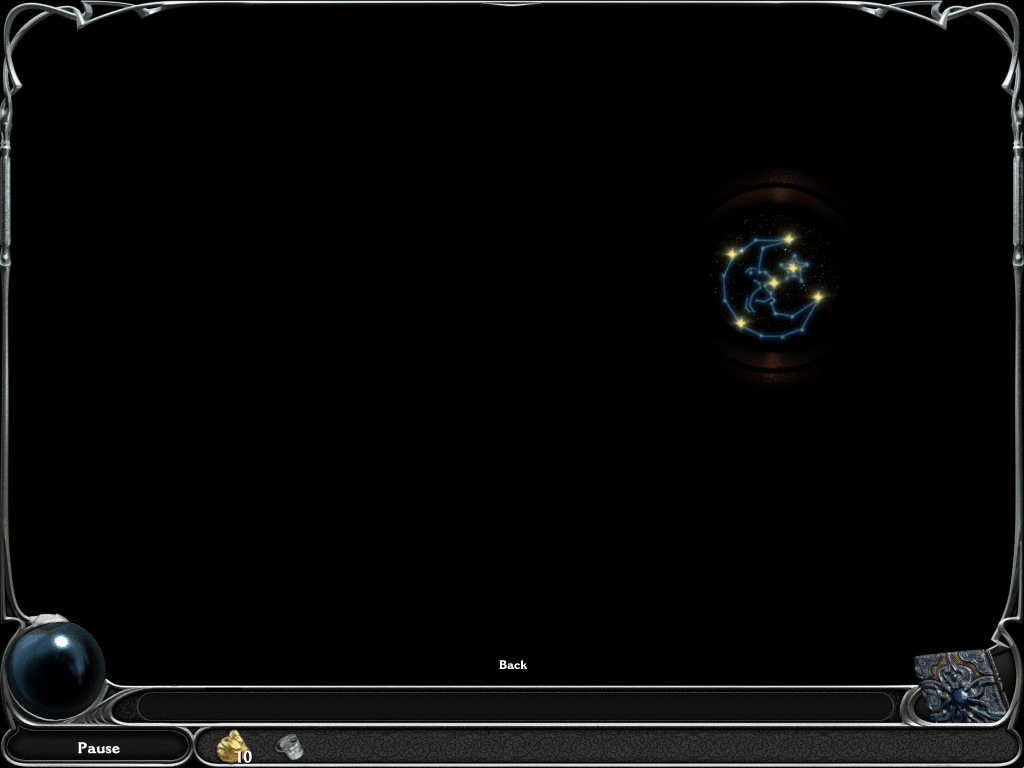
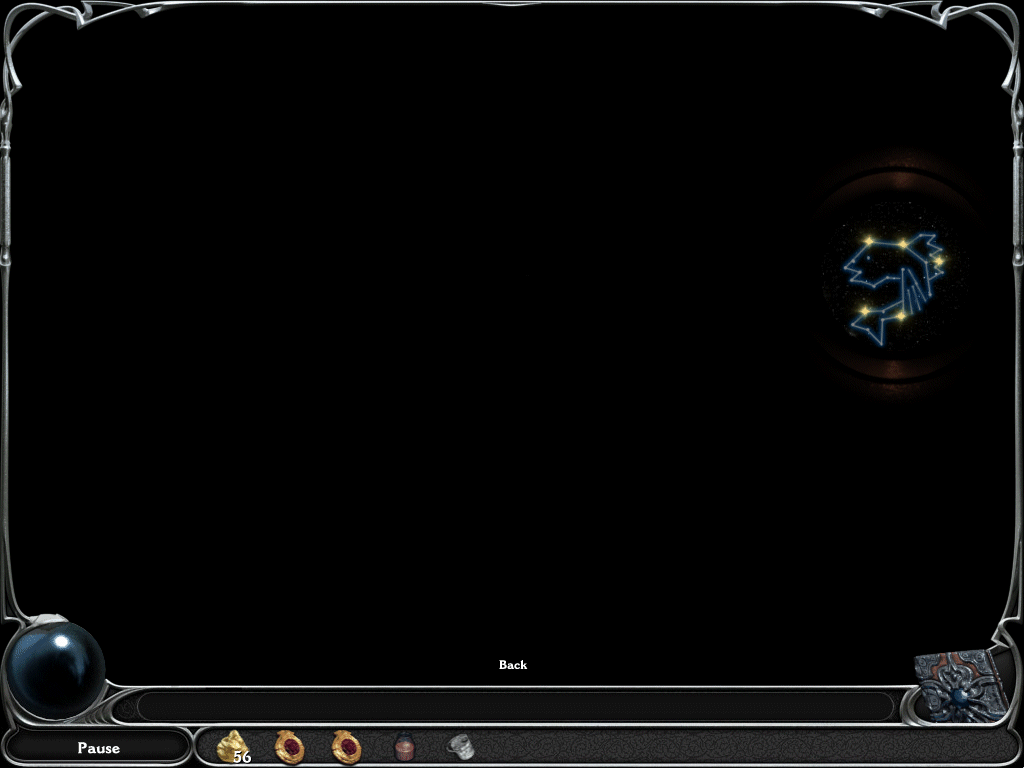
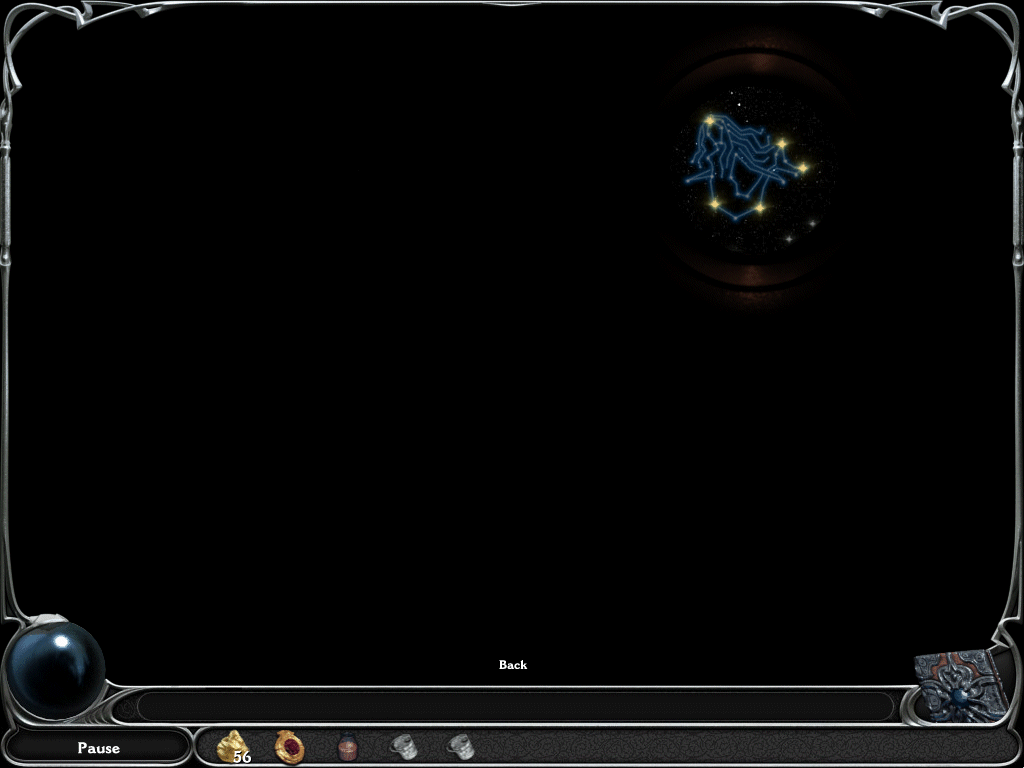
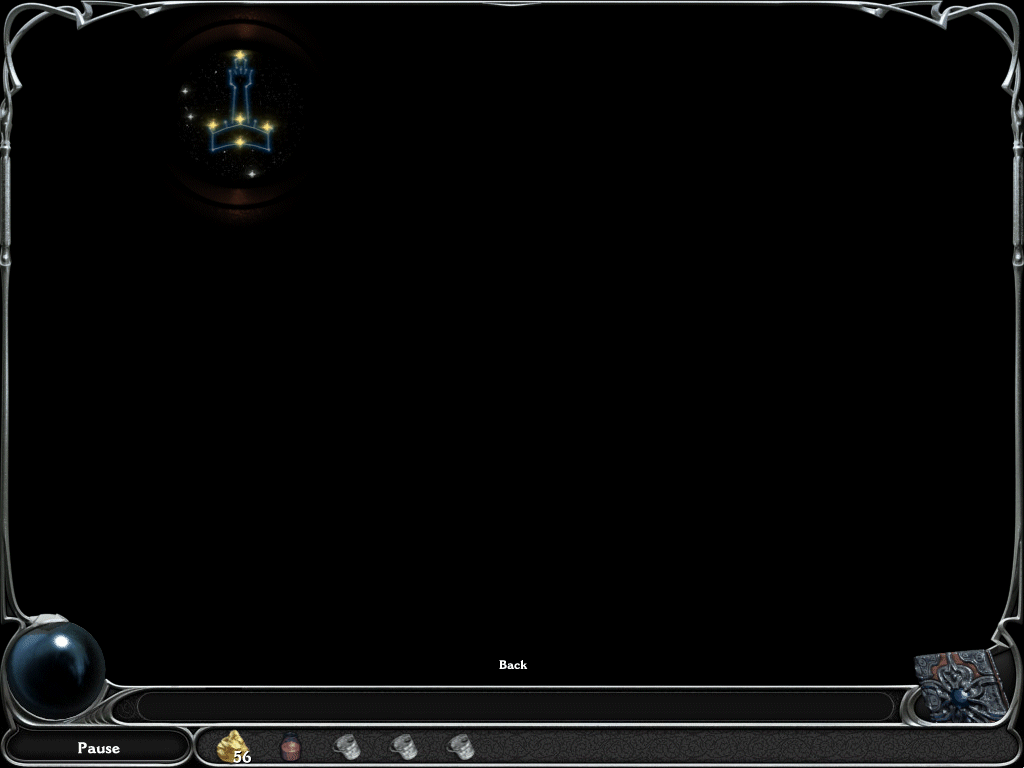
Nexus Gateway: You will use this to get to different places in the game and it will also allow you to go back to previous locales. (How to use it will be explained below once you encounter it)
Levels:
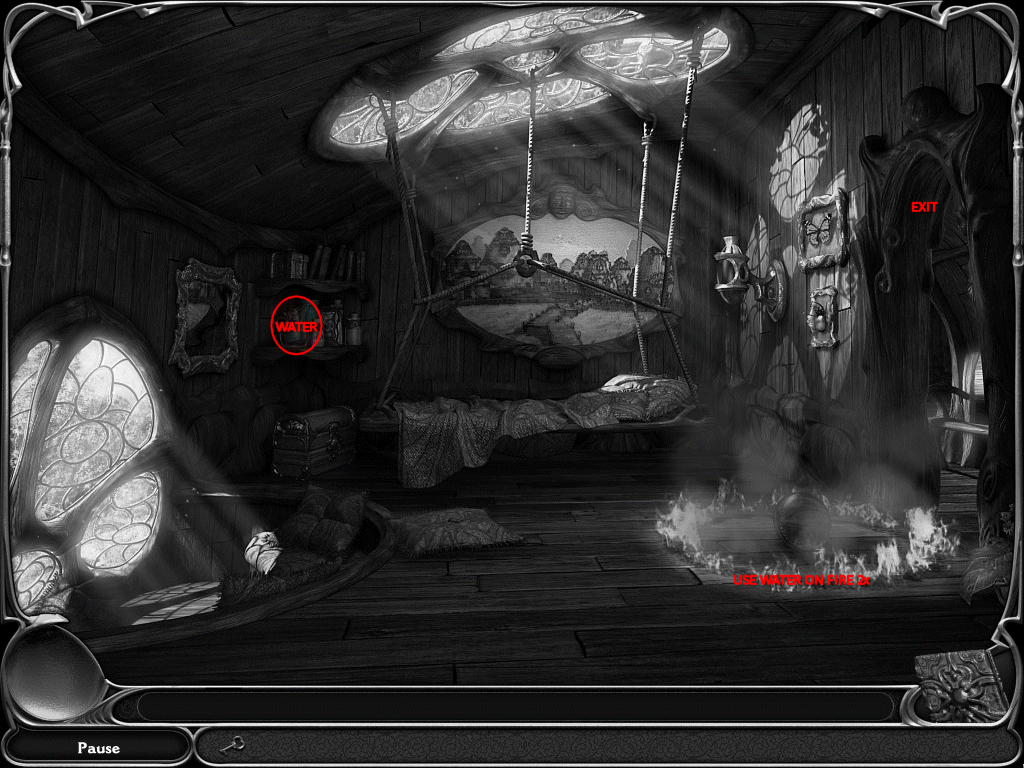
Bedroom
- Find the Dream Journal
- Find the Key
- Find the Water
- Use the Water on the fire twice
- Exit the Bedroom

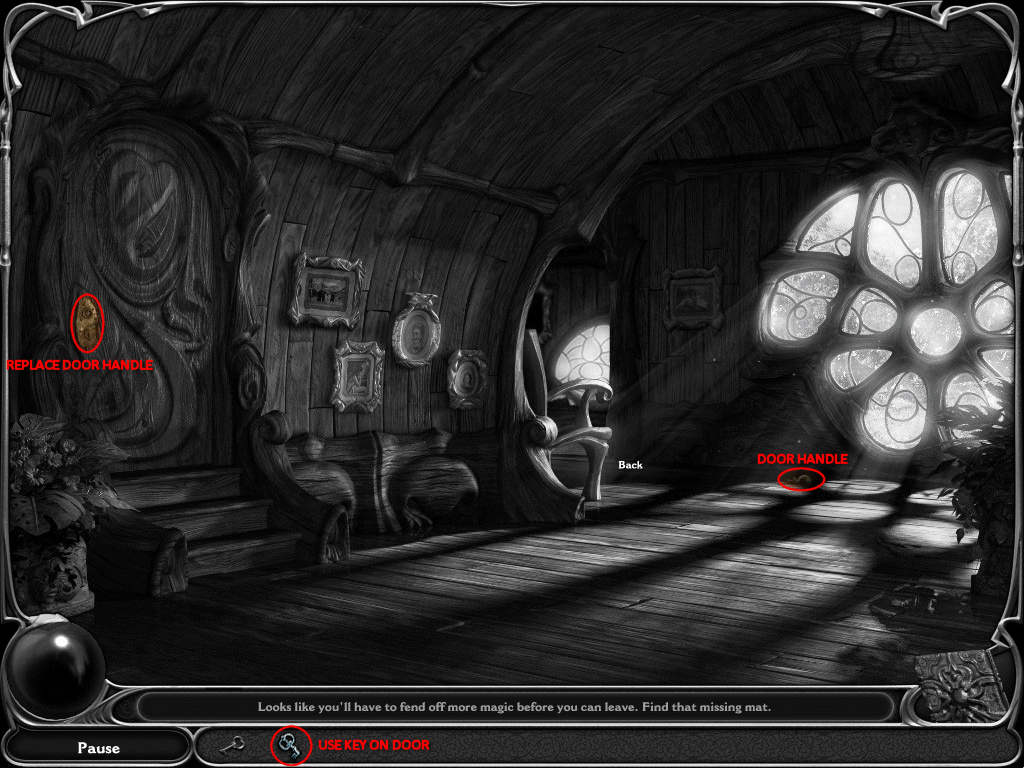
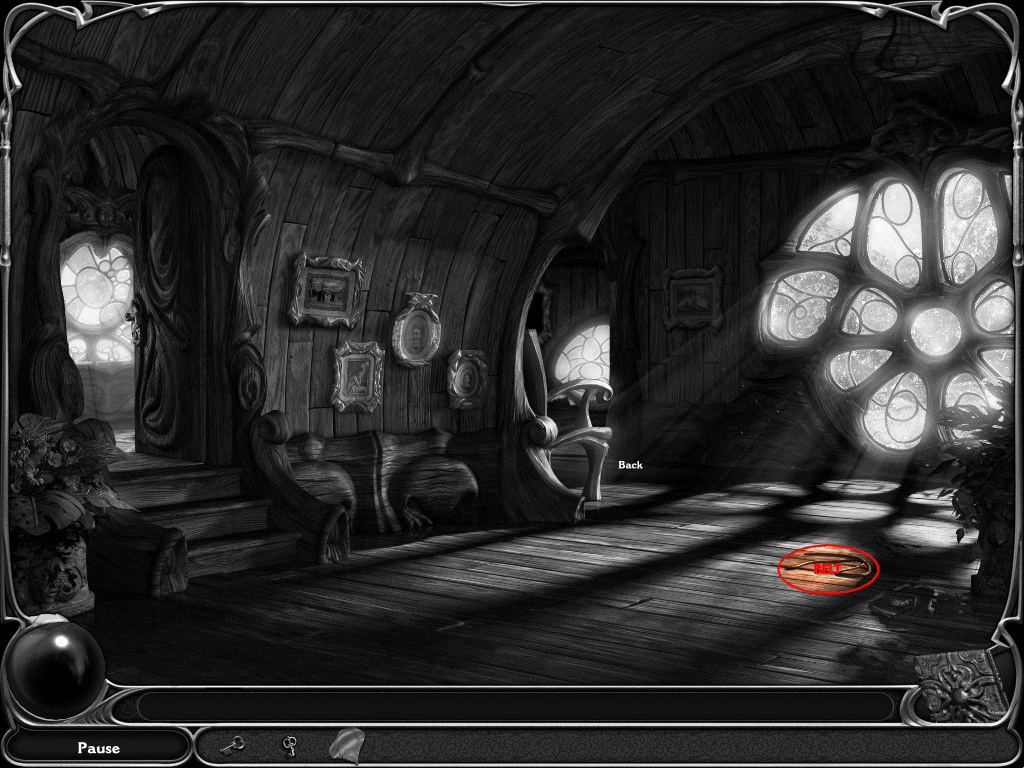
Main Room
- Collect your first Dream Piece (Tree)
- Find Key
- Attempt to Exit the Treehouse
- Find the Door Handle
- Replace Door Handle
- Use Small Key (Silver) to open door
- Exit to Sewing Room
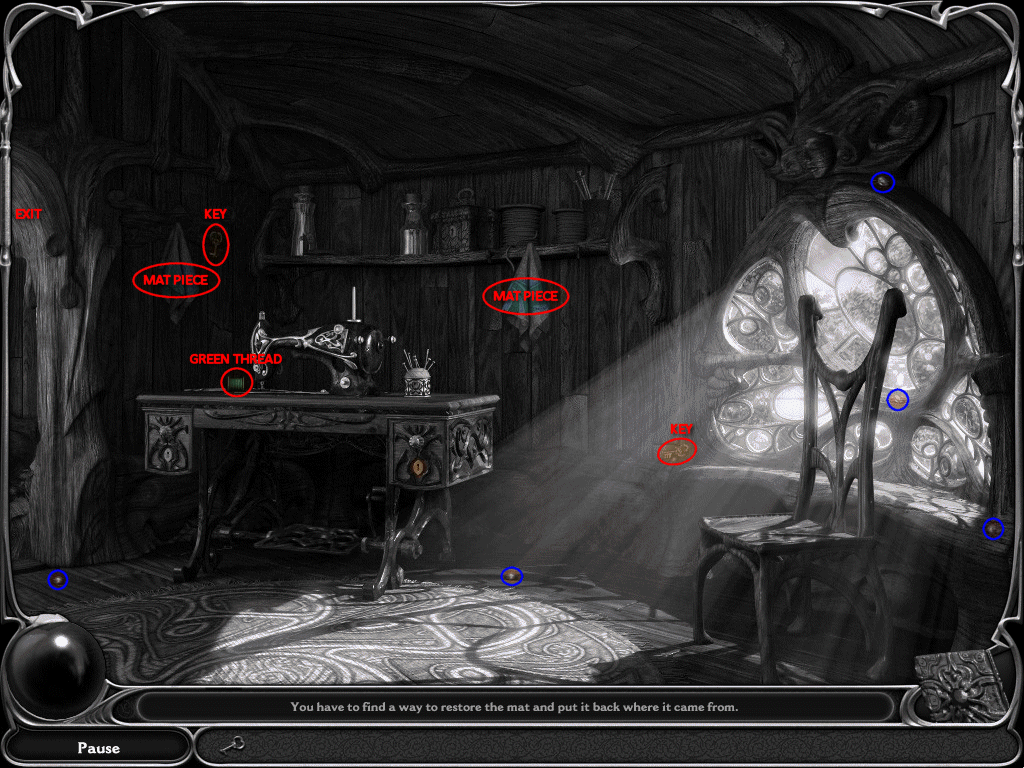
Sewing Room
- Find all the Mat Pieces
- Find 2 Small Keys
- Find Green Thread
- Exit to Main Room
Main Room
- Find Belt
- Exit to Bedroom
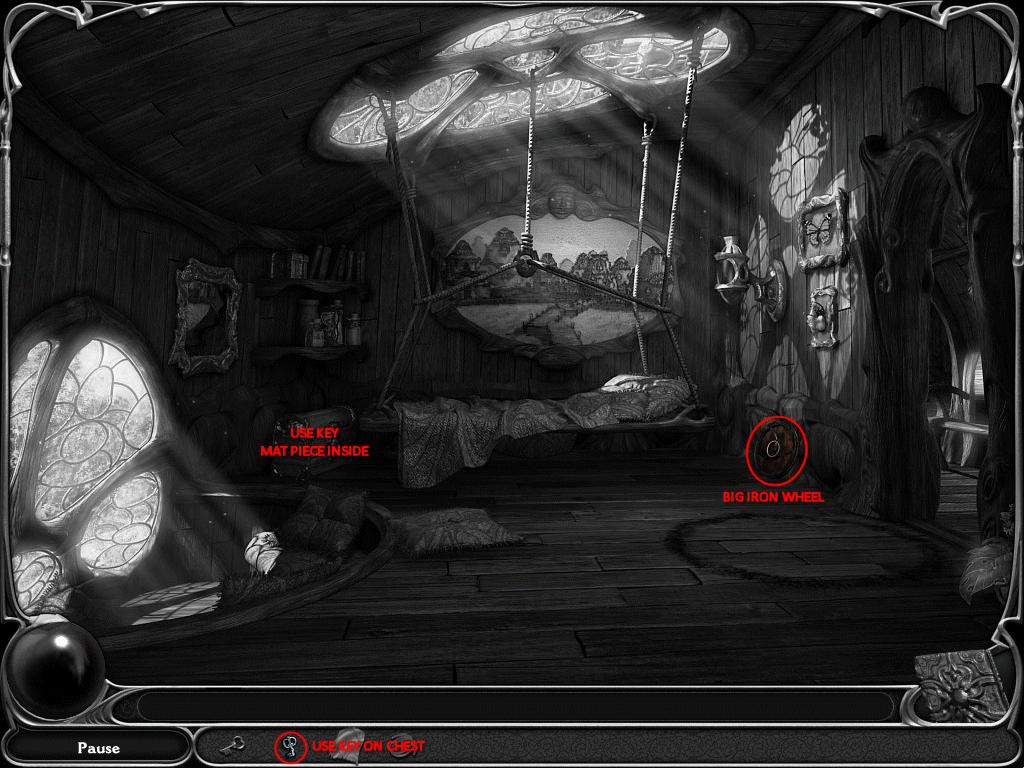
Bedroom
- Find Big Iron Wheel
- Use Small Key on chest
- Find Mat Piece inside chest
- Exit to Sewing Room
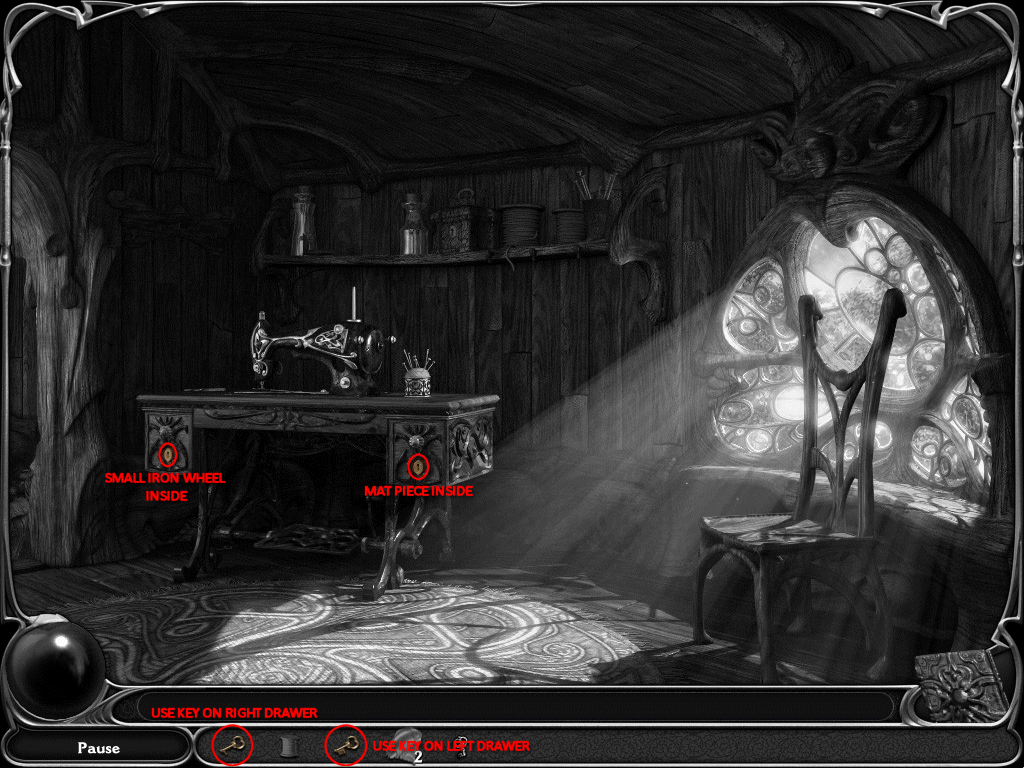
Sewing Room
- Use Small Keys on both drawers
- Look inside drawers to get Mat Piece and Small Iron Wheel
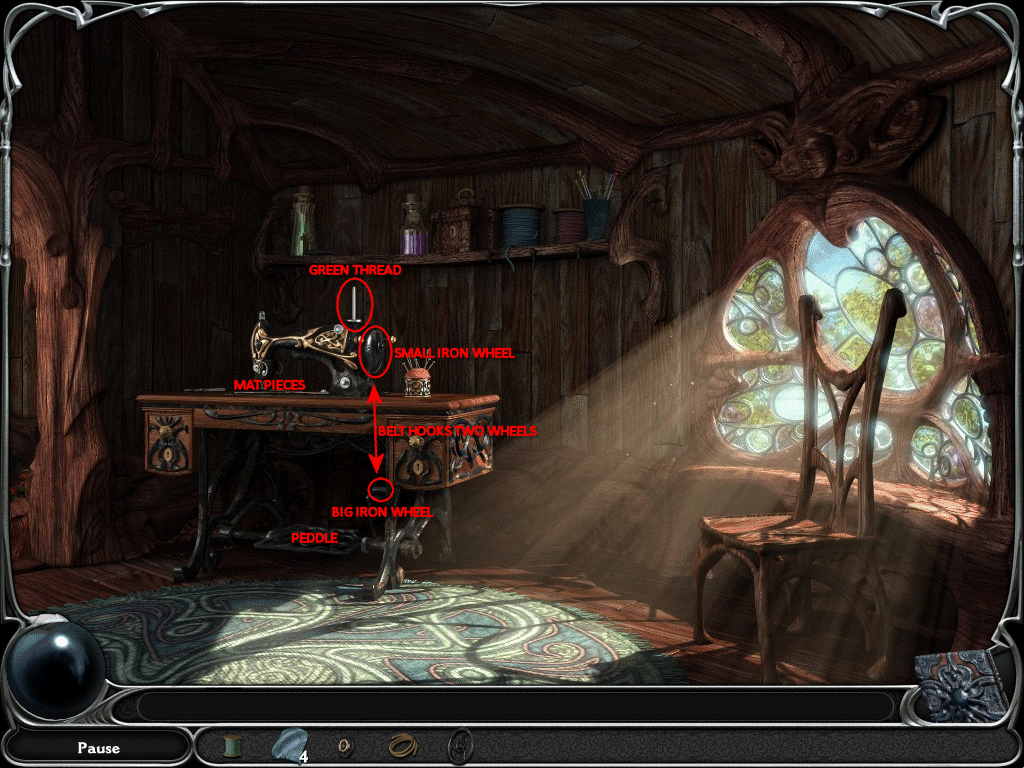
- Place Green Thread on top of sewing machine
- Place Big Iron Wheel on the bottom of sewing machine
- Place Small Iron Wheel on side of the sewing machine
- Place Belt on the sewing machine
- Place Mat Pieces (only two at a time) on the sewing machine
- Press the peddle to sew
- Exit to Main Room
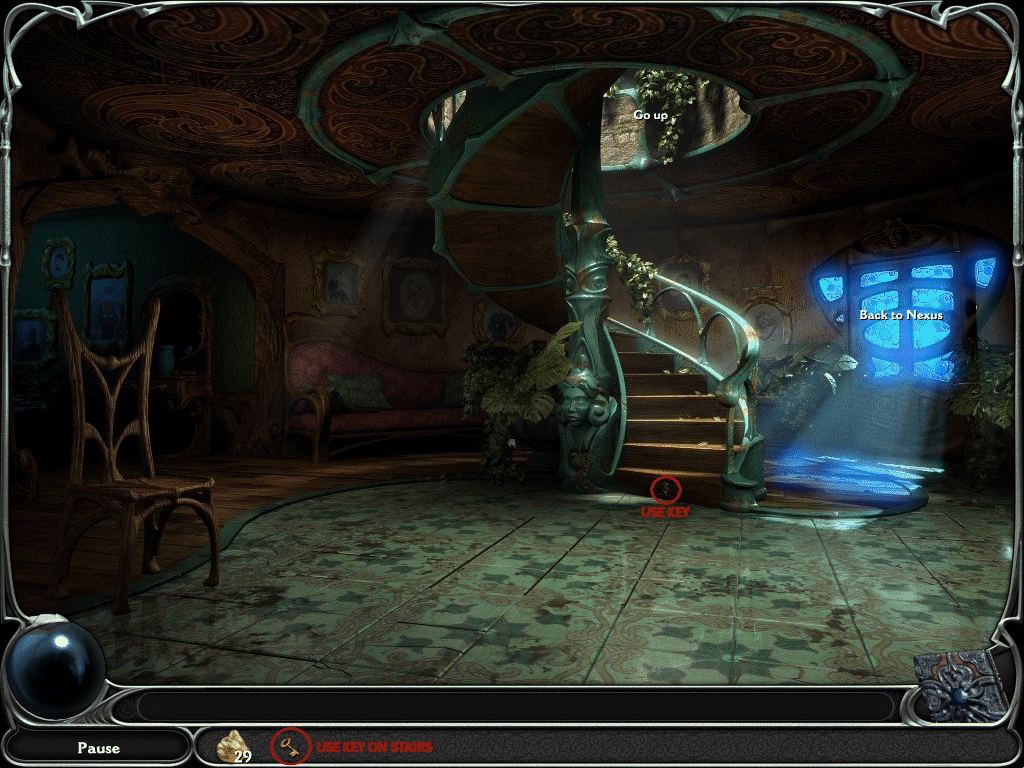
Main Room
- Place the Rug on the floor
- Open trap door
- Exit Treehouse
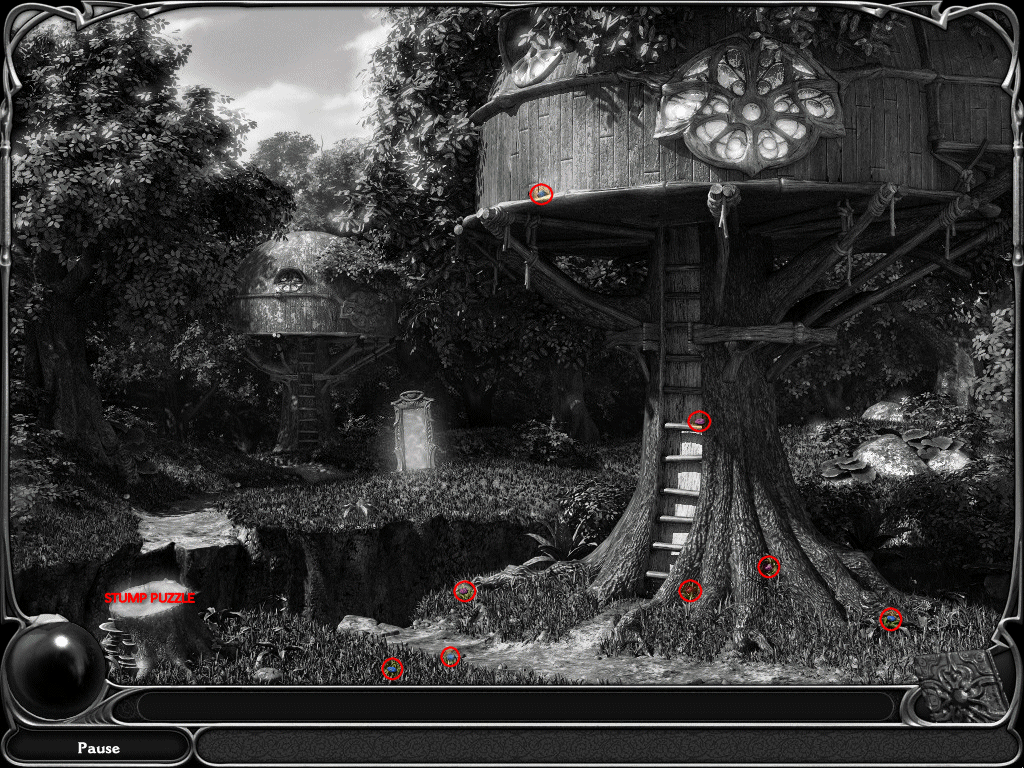
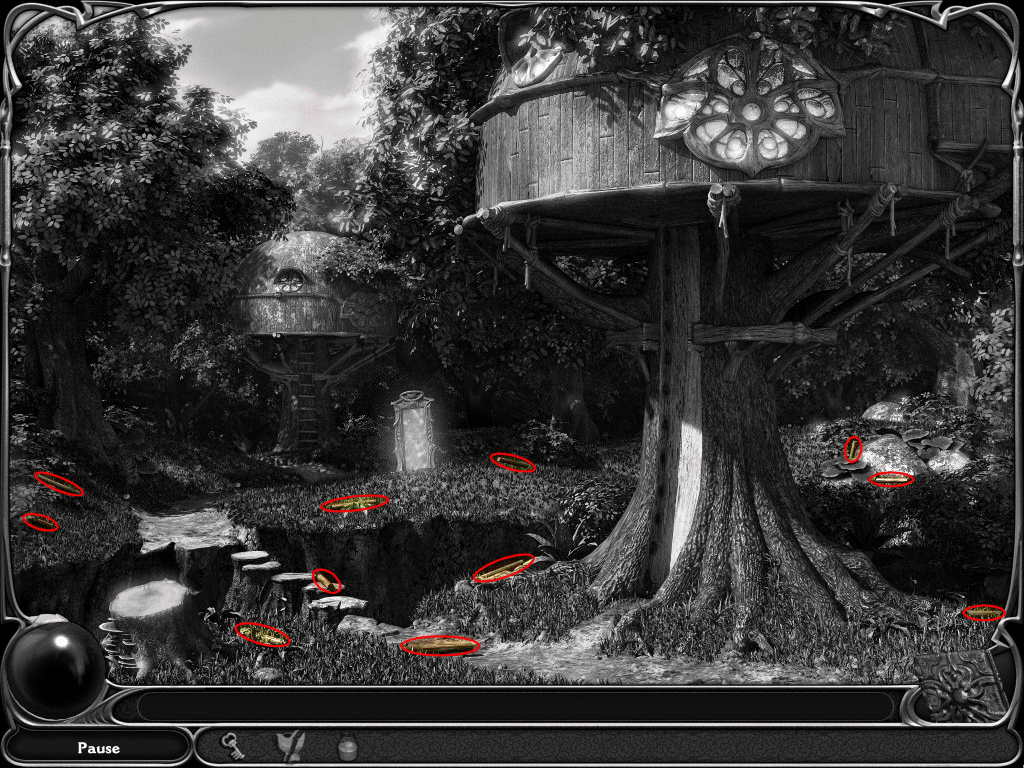
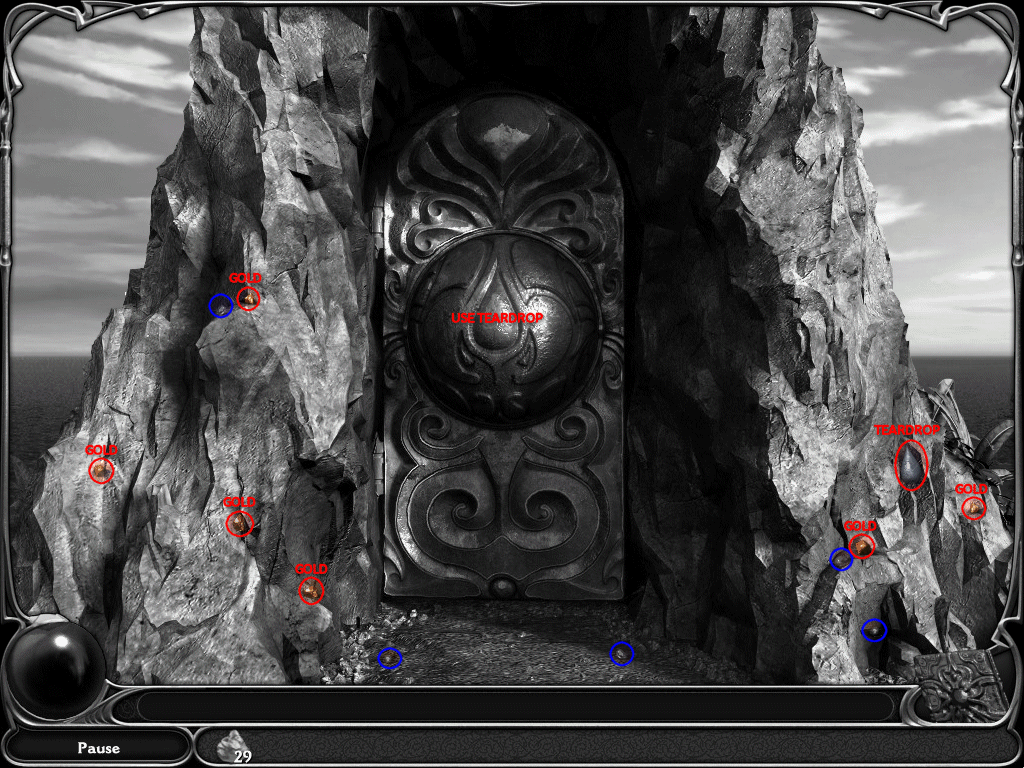
Outside Treehouse
- Zoom in on the Tree Stump
- Exit back out and find 8 Stones
- Zoom in on the Tree Stump to complete the puzzle
- Exit through Gateway
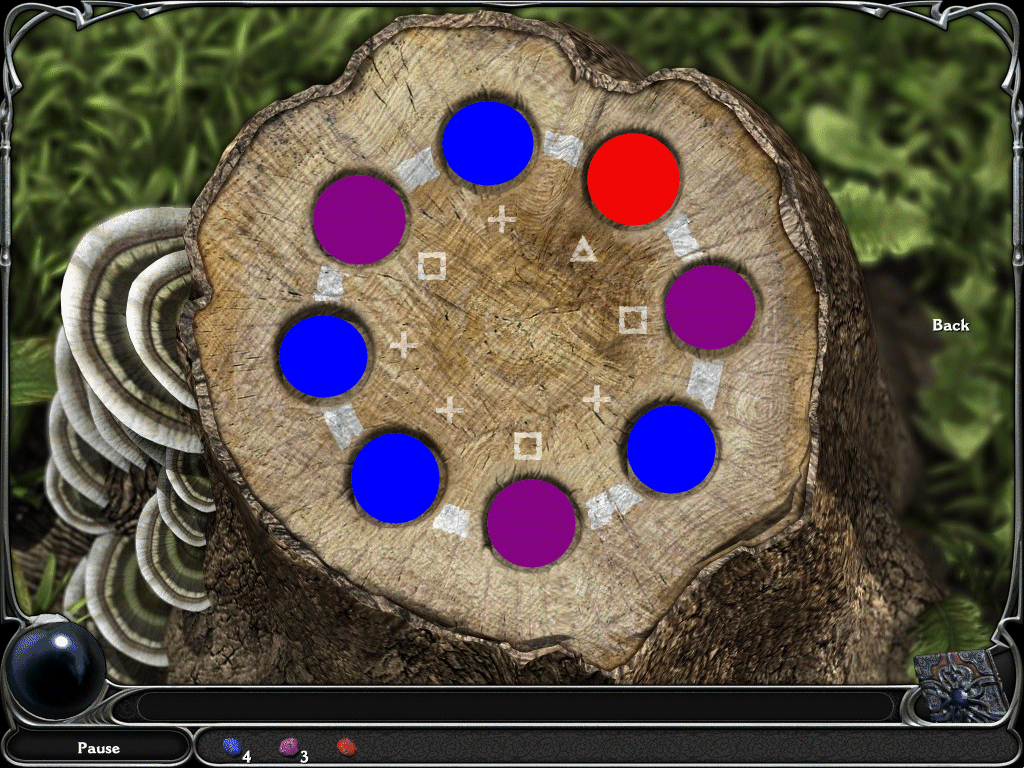
Tree Stump Puzzle
- 8 circles and 8 stones: 4 blue, 3 purple, 1 red
- There are also symbols by each of the holes
- There is 1 triangle and only 1 red stone
- There are 4 plus signs and 4 blue stones
- There are 3 squares and 3 purple stones
- Now, just place the stones by their symbol
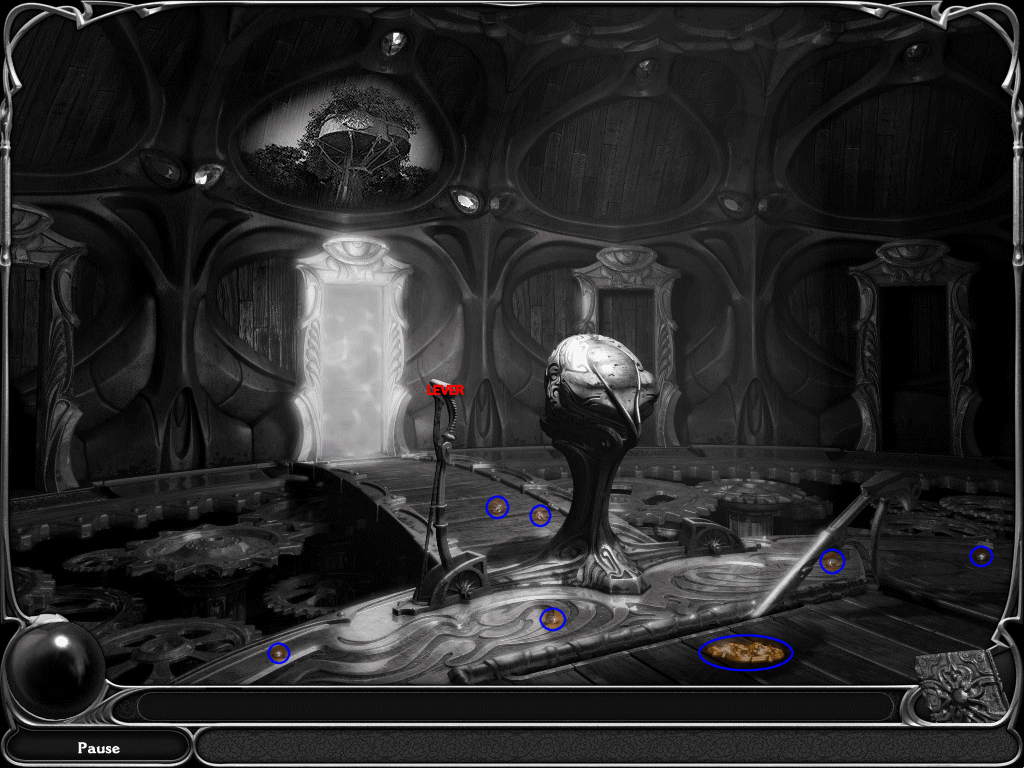
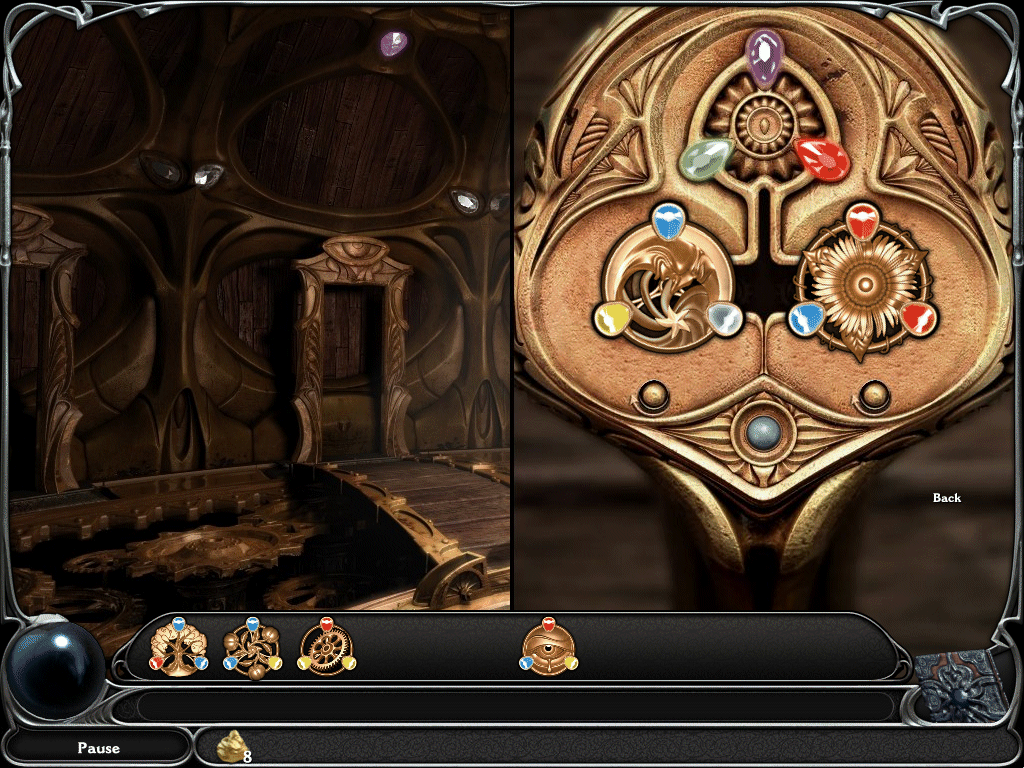
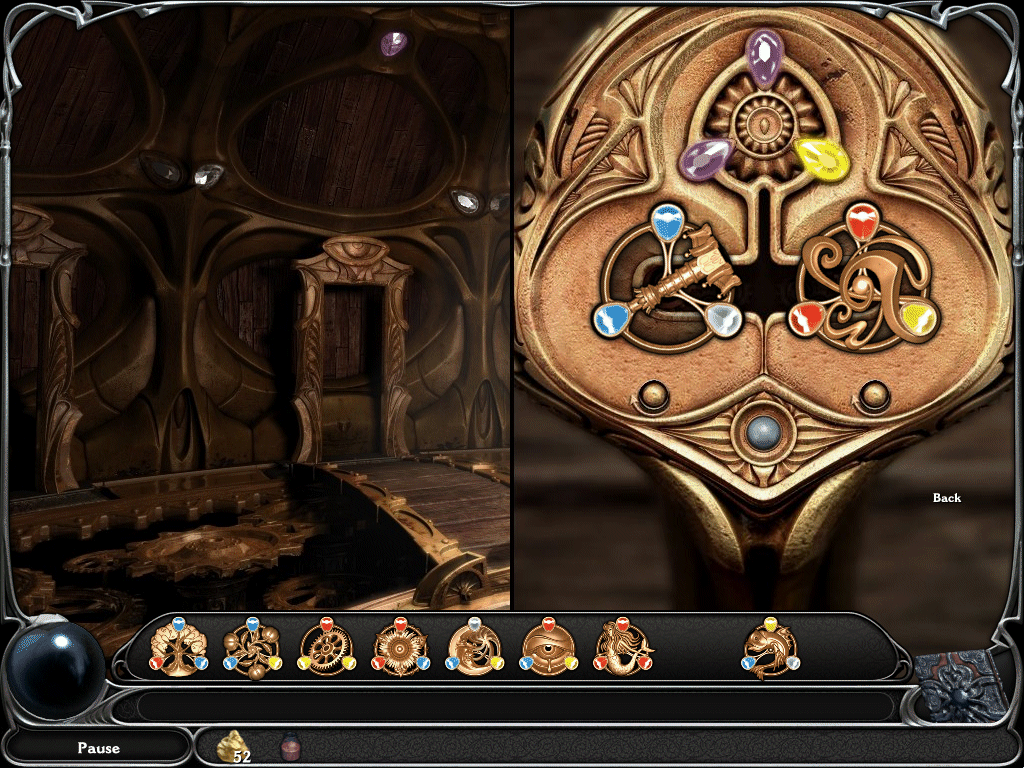
Machine Room
- Collect the Dream Jewel(Pumpkin)
- Pull the Lever
- The doors will move
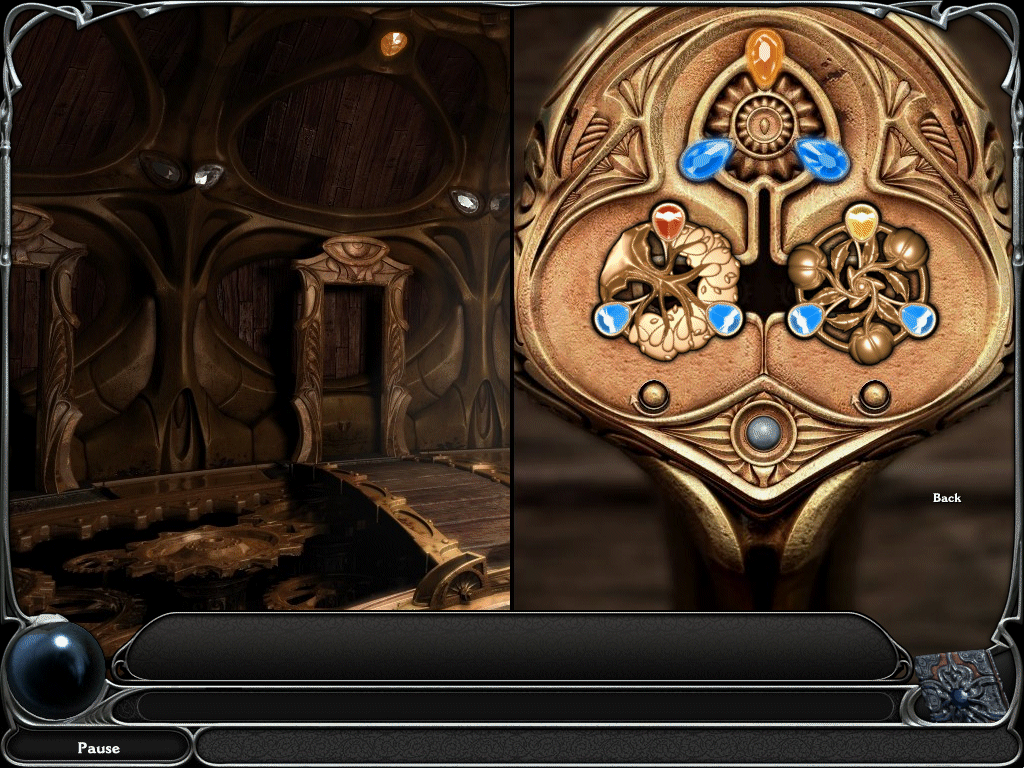
- Zoom in on the Device in the middle
- use the Dream Jewels to match the gems above the door
- Place the Tree Dream Jewel in the device first
- Rotate it so the Red Gem is facing up
- Now place the Pumpkin Dream Jewel in the device
- Rotate it so the Yellow Gem is facing up
- Red + Yellow = Orange
- Exit to Herbalist's House
Herbalist's House
- Exit to Outside
Outside Herbalist's
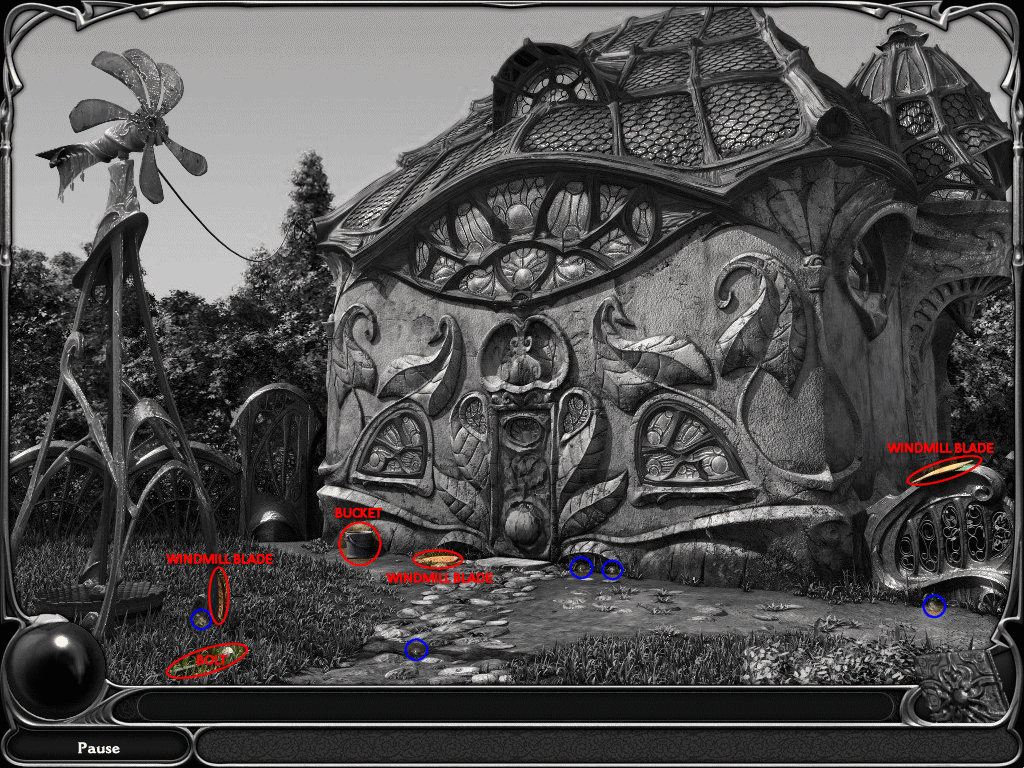
- Find Bucket
- Find Bolt
- Find 3 Windmill Blades
- Exit through Gates
Garden
- Find 3 Windmill Blades
- Find Hammer
- Find Shovel
- Find Key
- Use Hammer on scarecrow
- Take Dress and Pumpkin and Stick and Hat
- Use Shovel on earth and dig a hole
- Exit to Outside
Outside Herbalist's
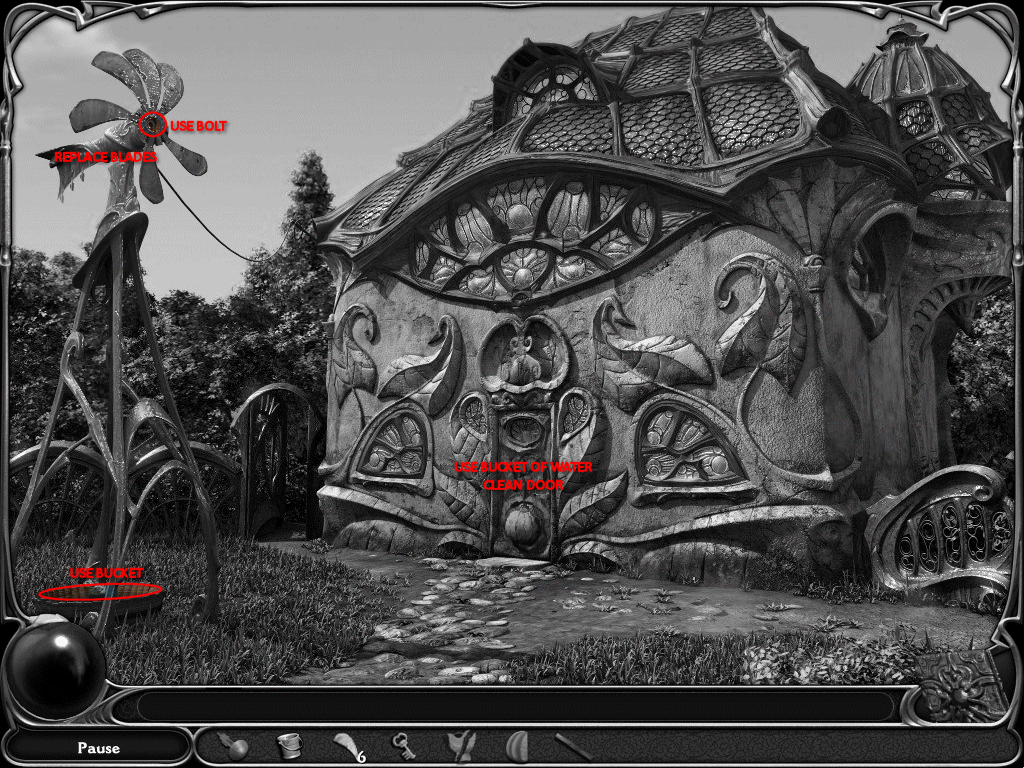
- Place Windmill Blades on windmill
- Use Bolt on windmill
- Use Bucket on water tank
- Use Bucket of Water on door (once)
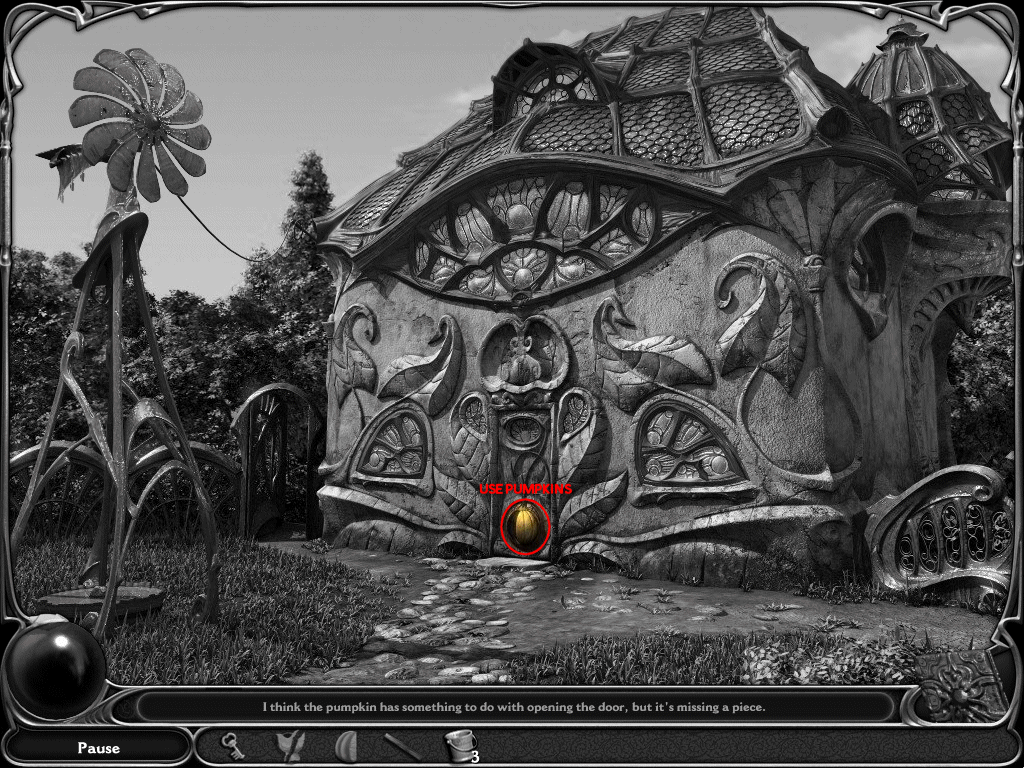
- Replace missing pieces on door with Pumpkins
- Exit to Kitchen
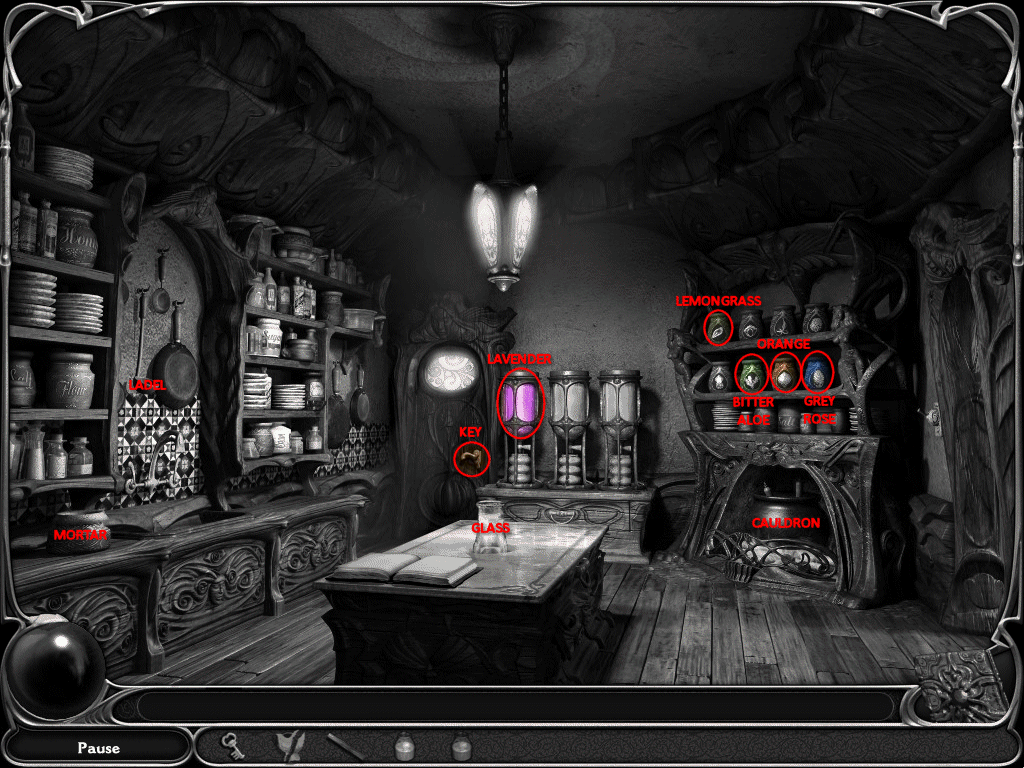
Kitchen
- Flip the Light Switch
- Zoom in on Potions Book
- Set up Kitchen
- Zoom in on Potions Book
- Make Quick Ripen Potion (Number 1)
- Zoom in on Potions Book
- Make Instant Growth Potion (Number 2)
- Zoo in on Potions Book
- Make Memory Recovery Potion (Number 3)
Note: All potion recipes are below in both text and screenshots.
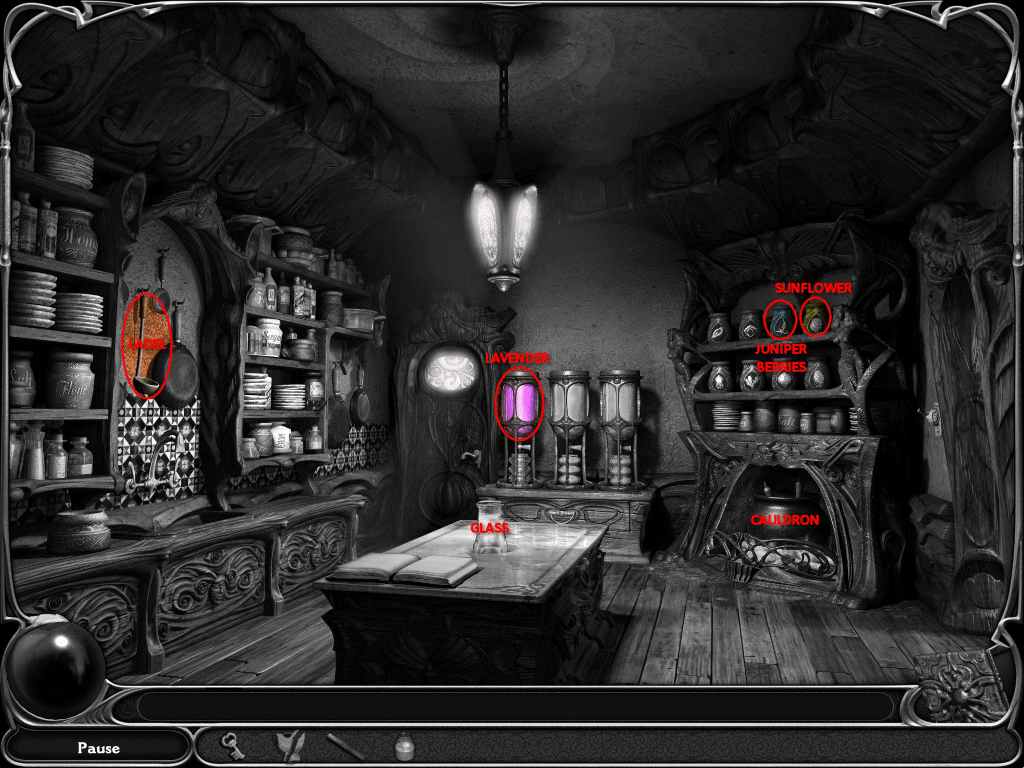
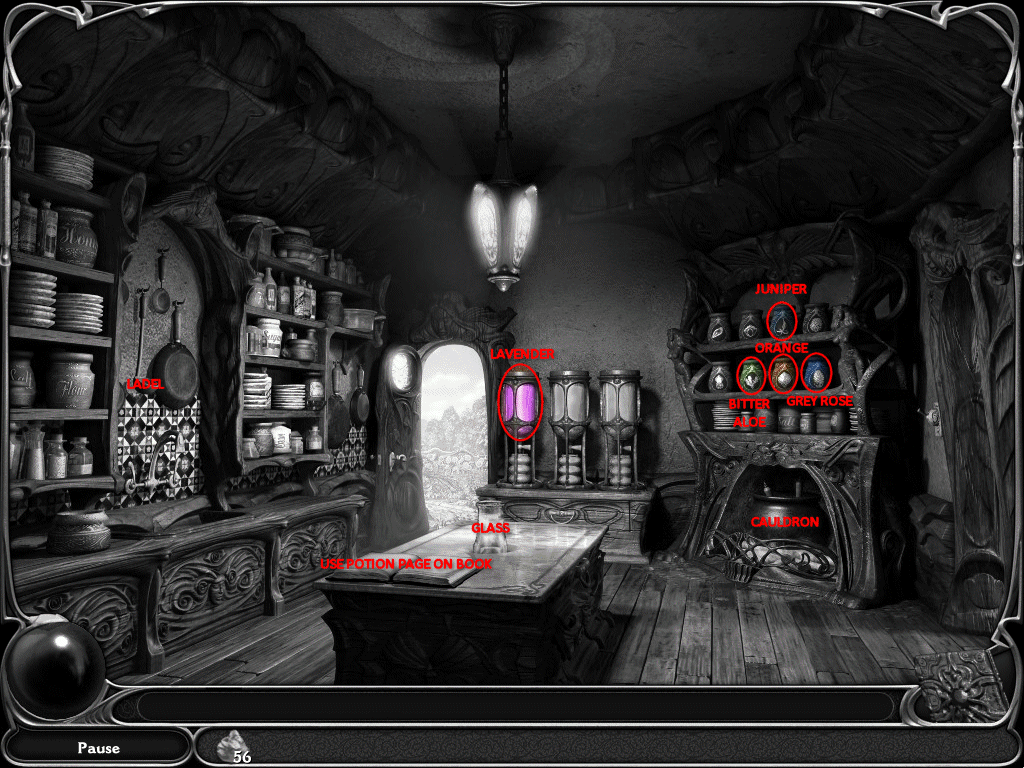
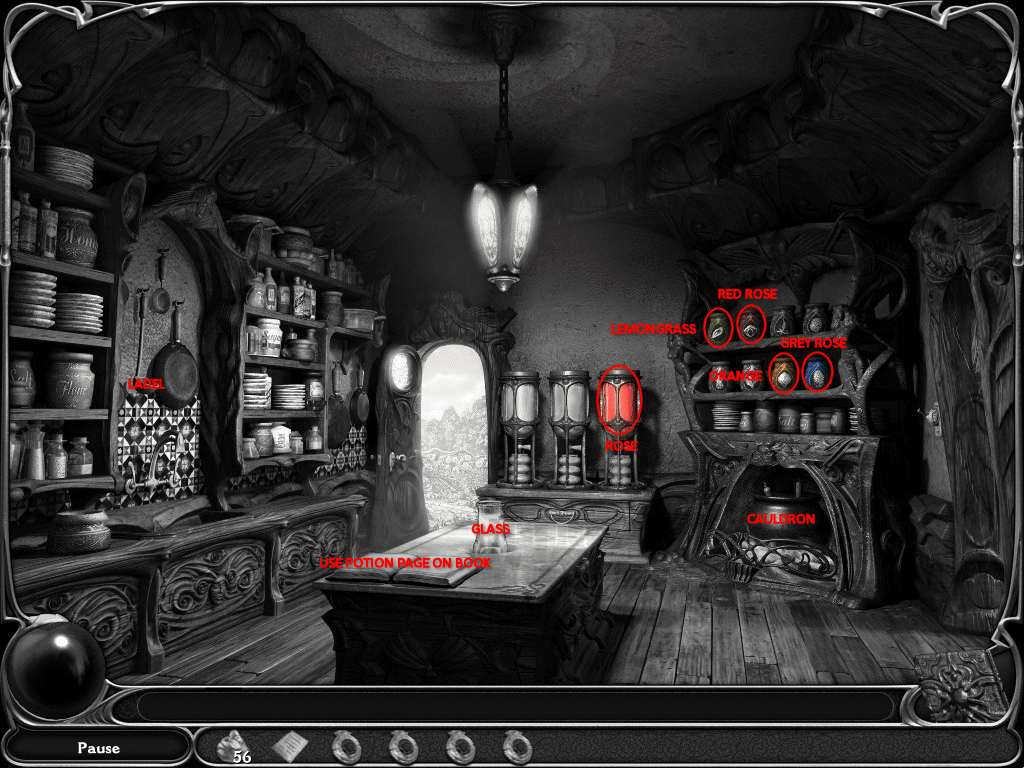
Set Up Kitchen
- Find Match
- Use Match on cauldron
- Find Red Rose Petals
- Crush Red Rose Petals in mortar bowl
- Place Crushed Seeds into right tank
- Find Sunflower Petals
- Crush Sunflower Petals in mortar bowl
- Place Sunflower in middle tank
- Find Lavender
- Crush Lavender in mortar bowl
- Place Lavender in left tank
- Add Water to all tanks
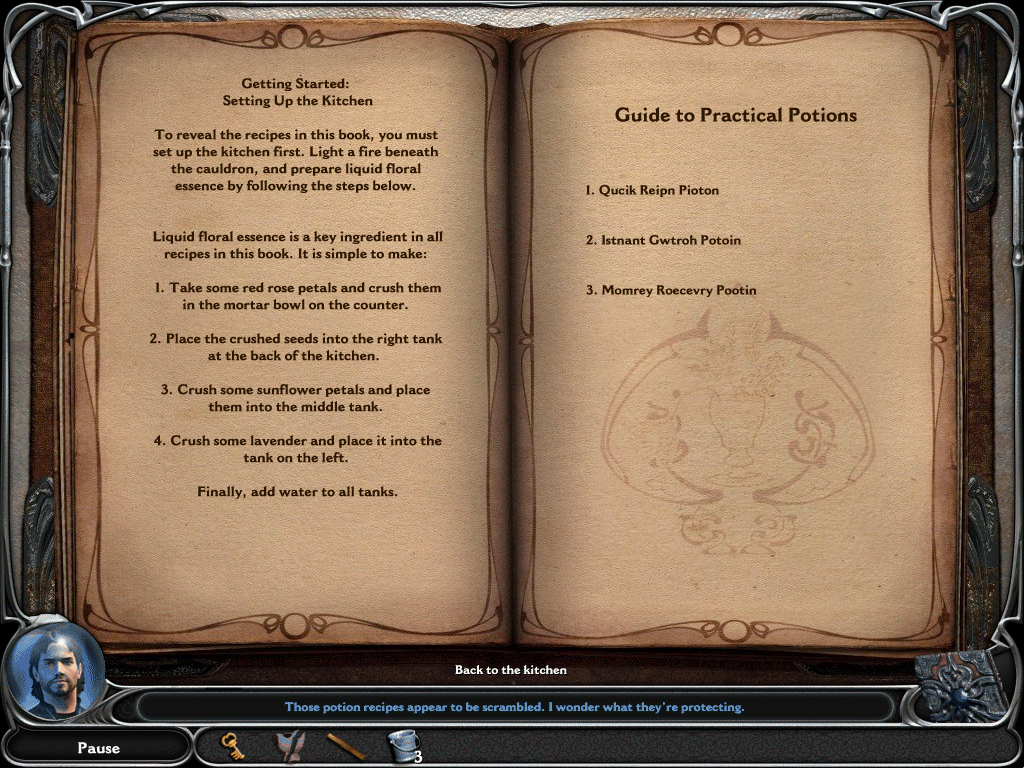
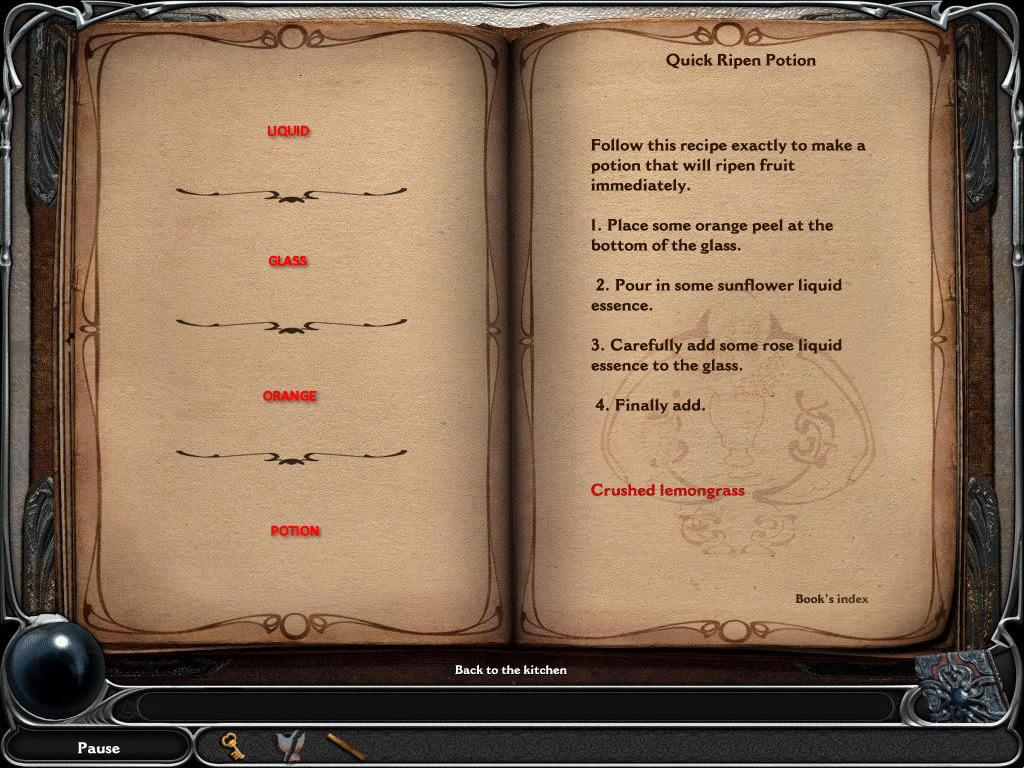
1. Quick Ripen Potion
- Unscramble the words on the left side
- The recipe will be revealed
- Find Orange Peel
- Place Orange Peel in glass
- Turn valve on Sunflower Essence
- Place Sunflower Essence in glass
- Place Rose Essence in glass
- Find Lemongrass
- Crush Lemongrass in mortar
- Place Crushed Lemongrass in glass

2. Instant Growth Potion
- Unscramble the words on the left side
- Find Sunflower
- Place Sunflower Petals in cauldron
- Take Ladle off wall
- Use Ladle on cauldron (use this future cauldron needs)
- Place Sunflower in glass
- Find Juniper Berries
- Crush Juniper Berries in mortar
- Place Juniper Berries in cauldron
- Place Juniper Berries in glass
- Place Lavender Essence in glass
- Exit to Main Room and click Umbrella
- Place Raindrop in glass

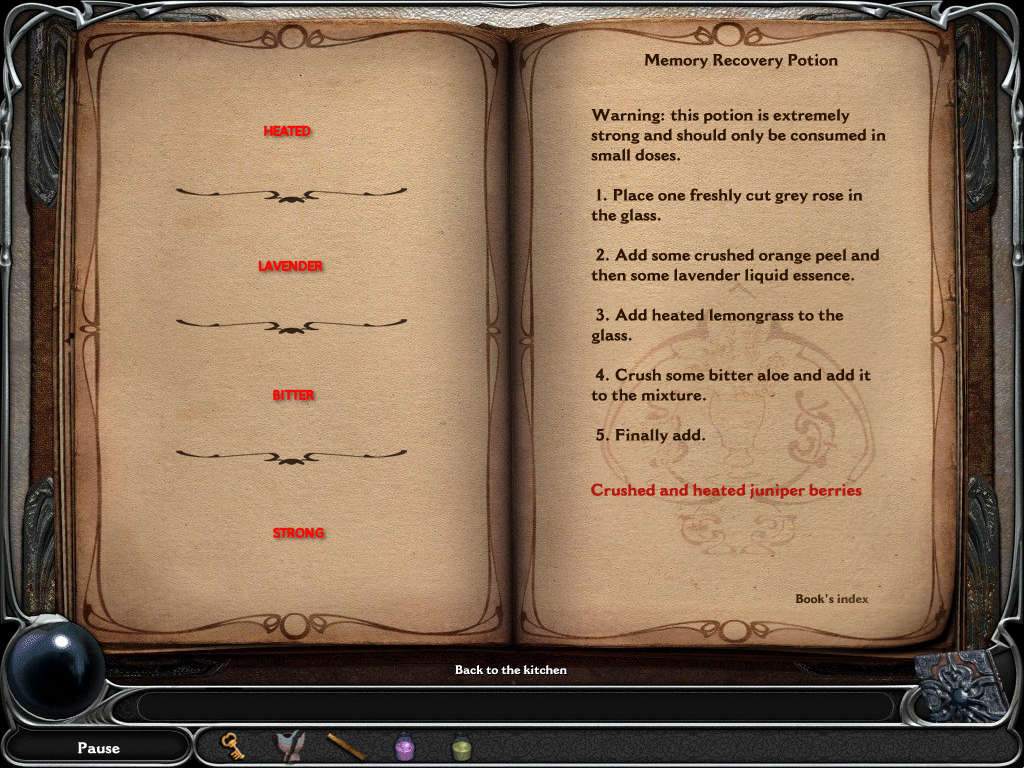
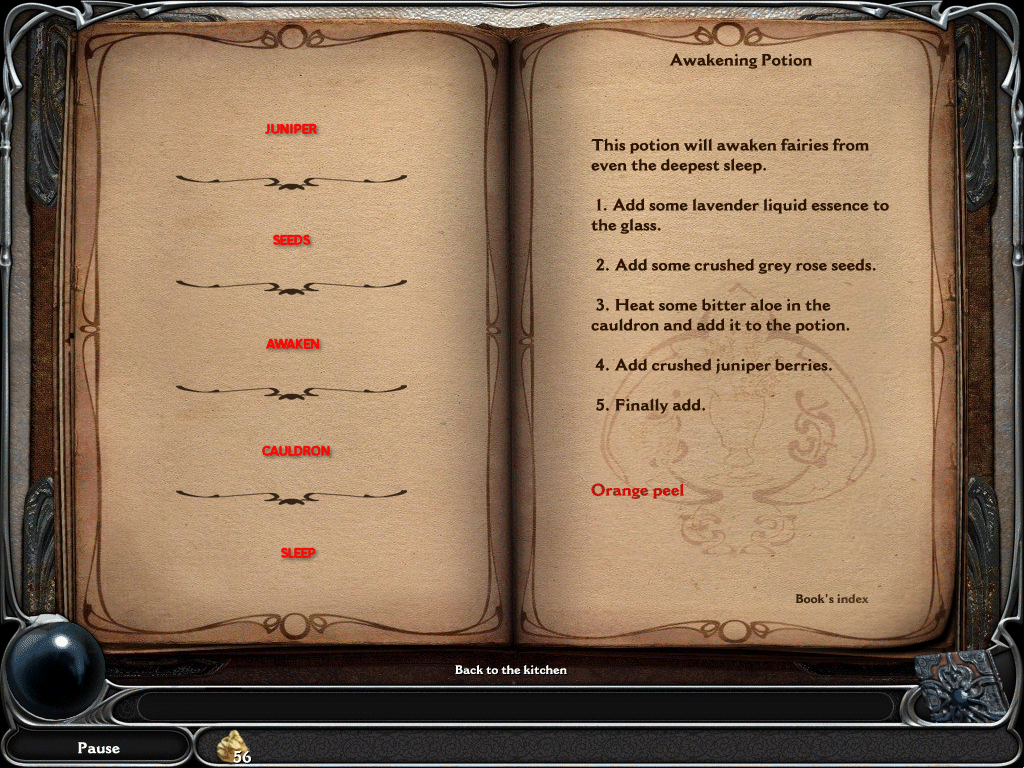
3. Memory Recovery Potion
Note: You have to go to several places and do other tasks to finish this potion, read carefully!
- Unscramble the letters on the left side
- Find Grey Rose Seeds
- Use Key on kitchen door
- Exit to Garden and plant Grey Rose Seeds
- Use Quick Ripen Potion (Purple) on pumpkins
- Place Stick and Pumpkin and Hat on stake
- Exit to Treehouse
- Note: You will need to return to Nexus and go back to Treehouse
- Note: Use the Right Lever
- Find 11 Steps
- Place the Steps back on the ladder
- Exit to Sewing Room
- Place Dress on sewing machine
- Exit to Garden and put Dress on scarecrow
- Exit to Kitchen and get more Grey Rose Seeds
- Exit to Garden and use Shovel to dig a new hole
- Plant Grey Rose Seeds
- Use Instant Growth Potion on seeds
- Exit to Kitchen
- Place Freshly Cut Grey Rose in glass
- Find Orange Peel
- Crush Orange Peel in mortar
- Add Orange Peel to glass
- Add Lavender Essence to glass
- Find Lemongrass
- Heat Lemongrass in cauldron
- Add Lemongrass to glass
- Find Bitter Aloe
- Crush Bitter Aloe in mortar
- Add Bitter Aloe to glass
- Find Juniper Berries
- Crush Juniper Berries in mortar
- Heat Juniper Berries in cauldron
- Add Juniper Berries to glass
- Exit to Nexus
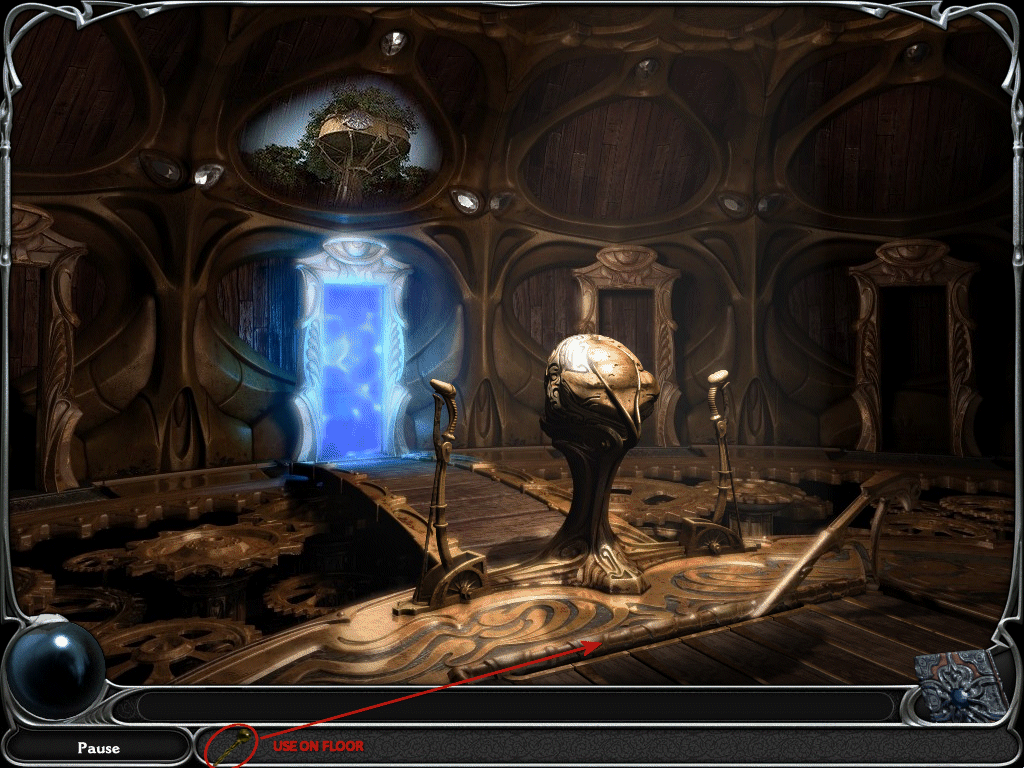
Nexus
- Use Strange Symbol on floor
- Note: I pointed to the general area, but you may have to click around a bit to fine the exact spot
- Exit down Secret Staircase
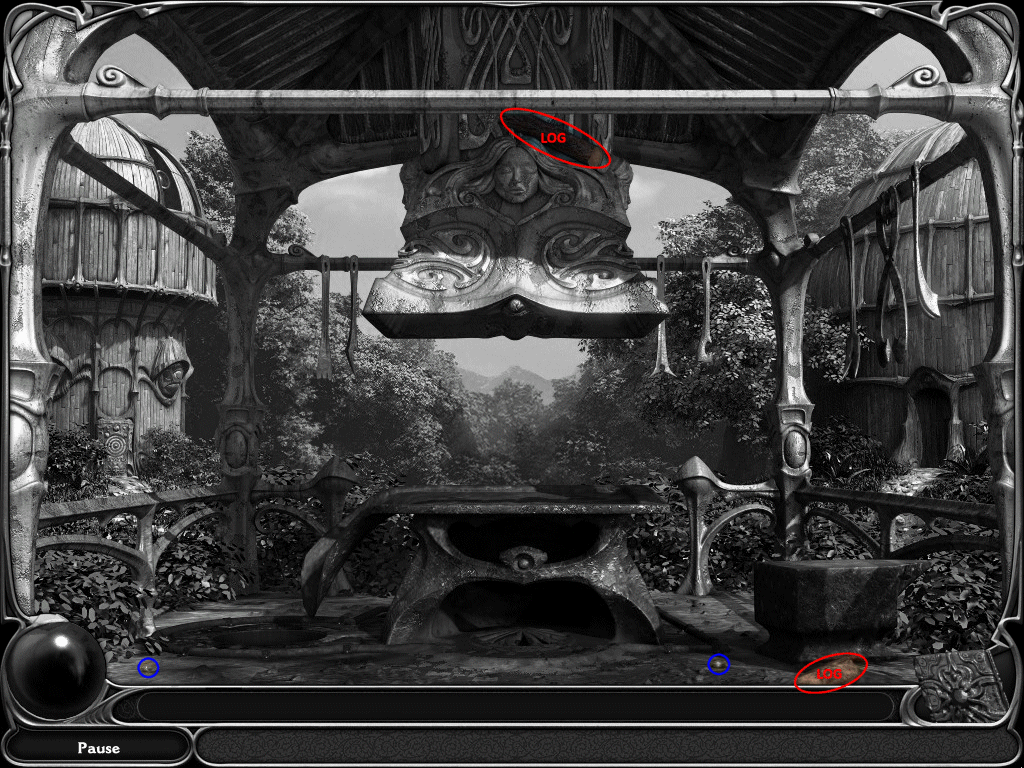
Blacksmith
- Find 2 Logs
- Exit Left
Door
- Solve Solar Puzzle
- Exit to Telescope
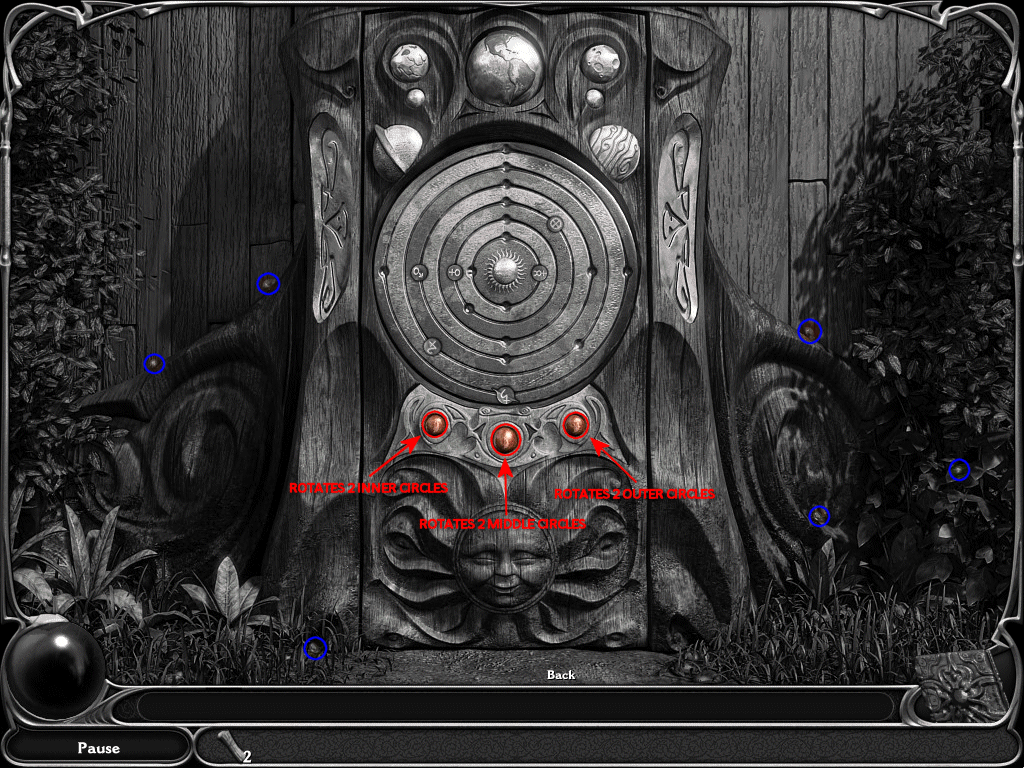
Solar Puzzle
- Click the three buttons below the board to move the planets
- The object is to make them all line up on top
- First button moves the two inner rings
- Second button moves the two middle rings
- Third button moves the two outer rings
- Solution: Click the each button multiple times (approximately three to six times) until the planets are lined up at top, that's it!
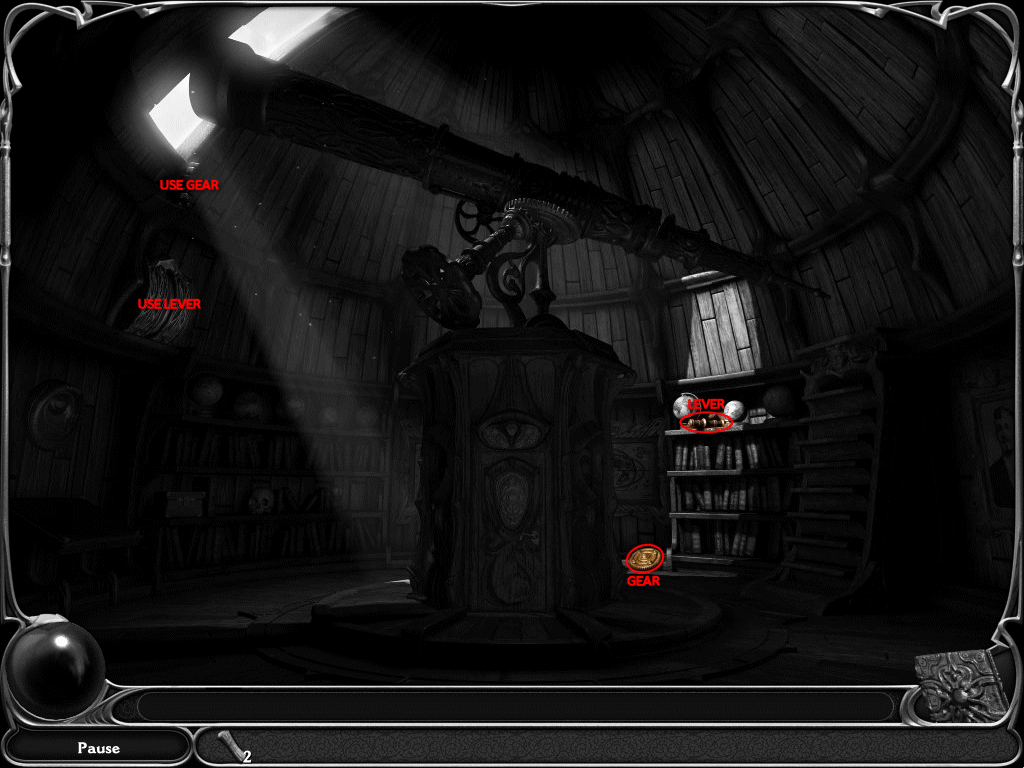
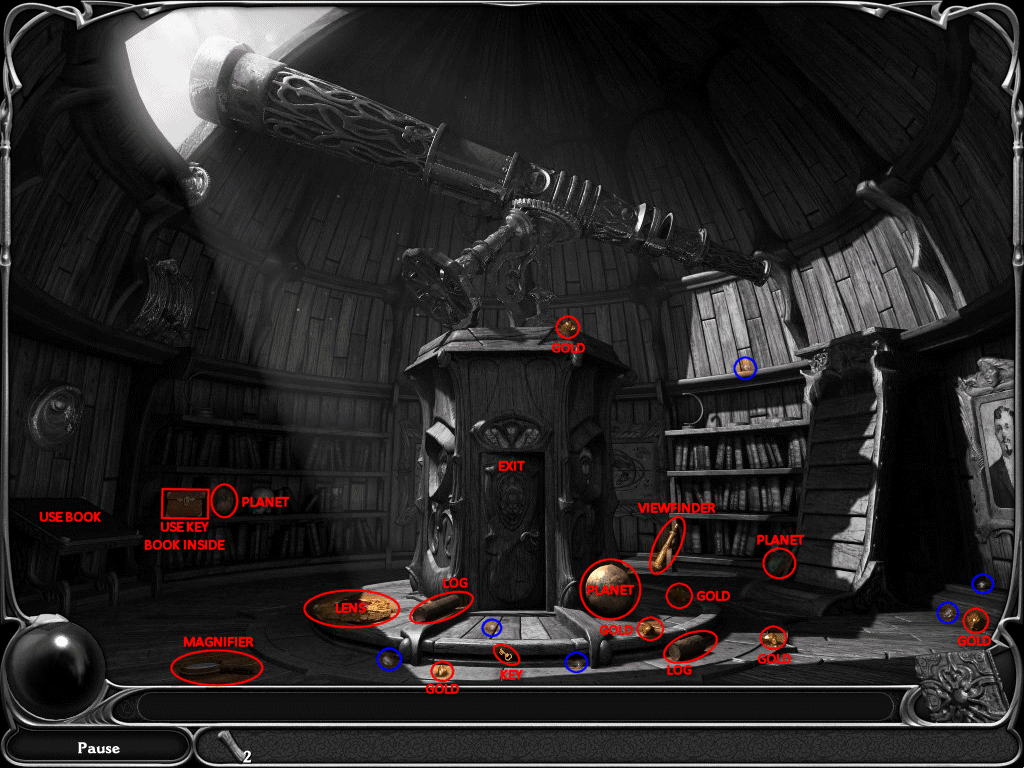
Telescope
- Find Gear
- Find Lever
- Place the Lever and Gear on the left wall (see screenshots)
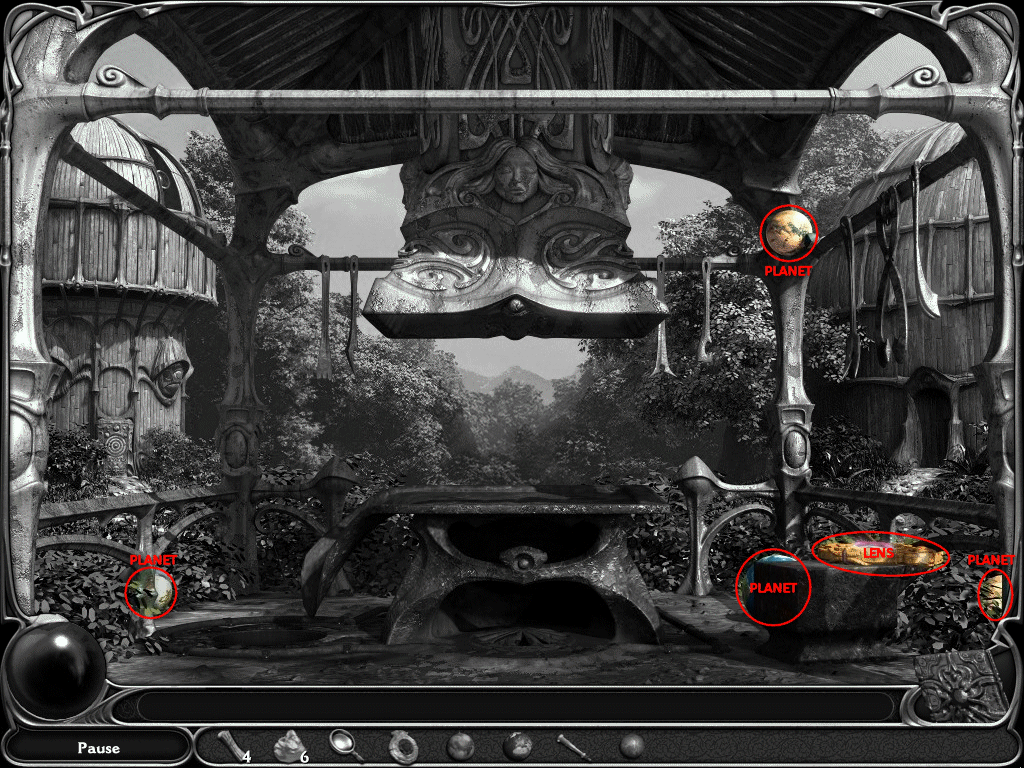
- Find 3 Planets
- Find 6 Gold Pieces
- Find Magnifier
- Find 2 Logs
- Find Viewfinder
- Find Telescope Lens
- Find Small Key
- Use Small Key on locked box
- Place Magic Book on table
- Exit to Door
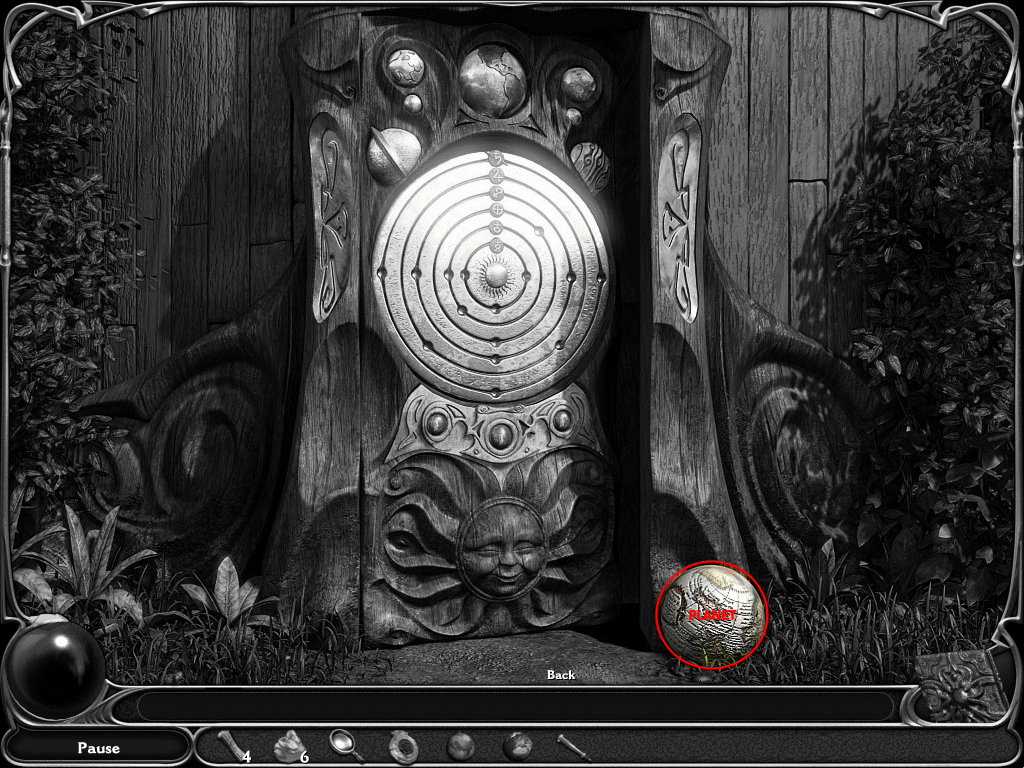
Door
- Find Planet
- Exit to Blacksmith
Blacksmith
- Find Lens
- Find 4 Planets
- Exit to Telescope
Telescope
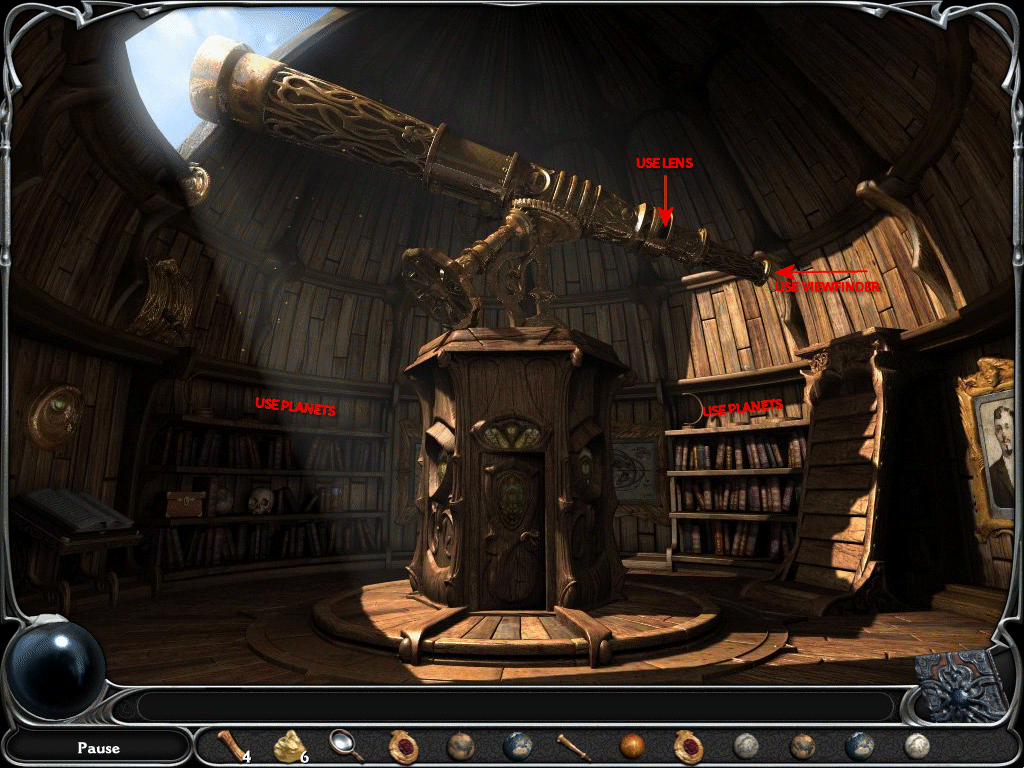
- Zoom in on Magic Book
- Read instructions
- Place Planets on the shelves
- Note: there is no need to worry about order, it automatically puts them in the right spot
- Place Veiwfinder in end of telescope
- Place a Lens into slot on telescope
- Zoom on Magic Book
- Choose Turn Day Into Night (Number 1)
- Zoom in on Magic Book
- Pick Telescope, Stars, and Magic (Number 2)
- Zoom in the Magic Book
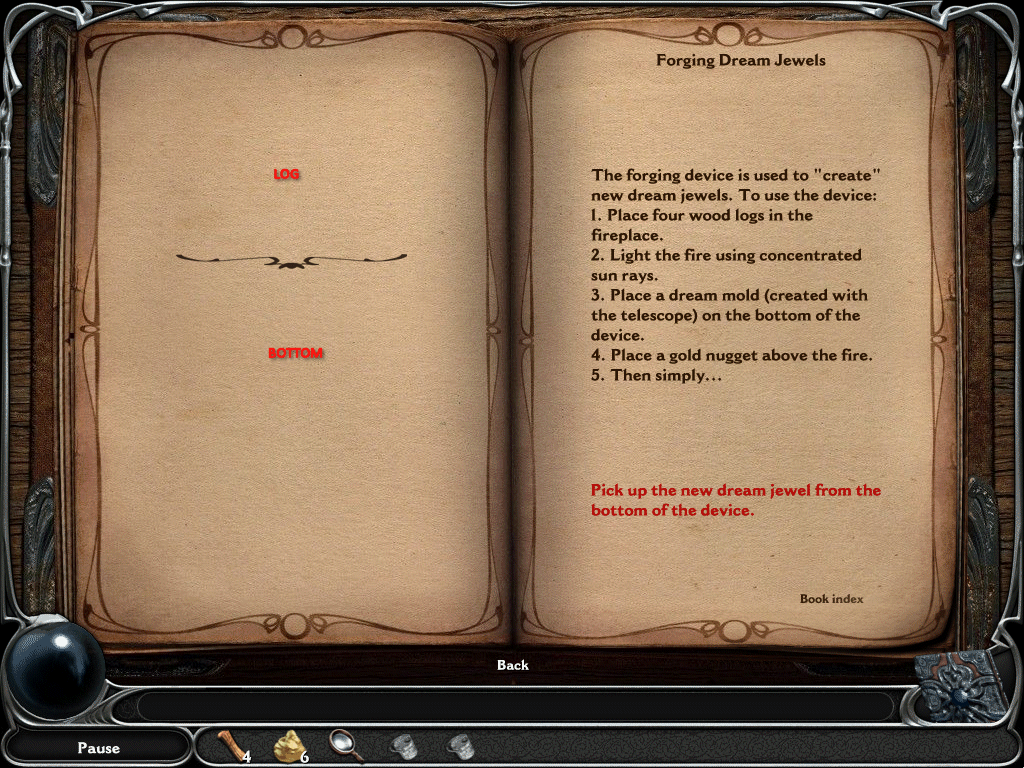
- Pick Forging Dream Jewels (Number 3)
- Zoom in the Magic Book
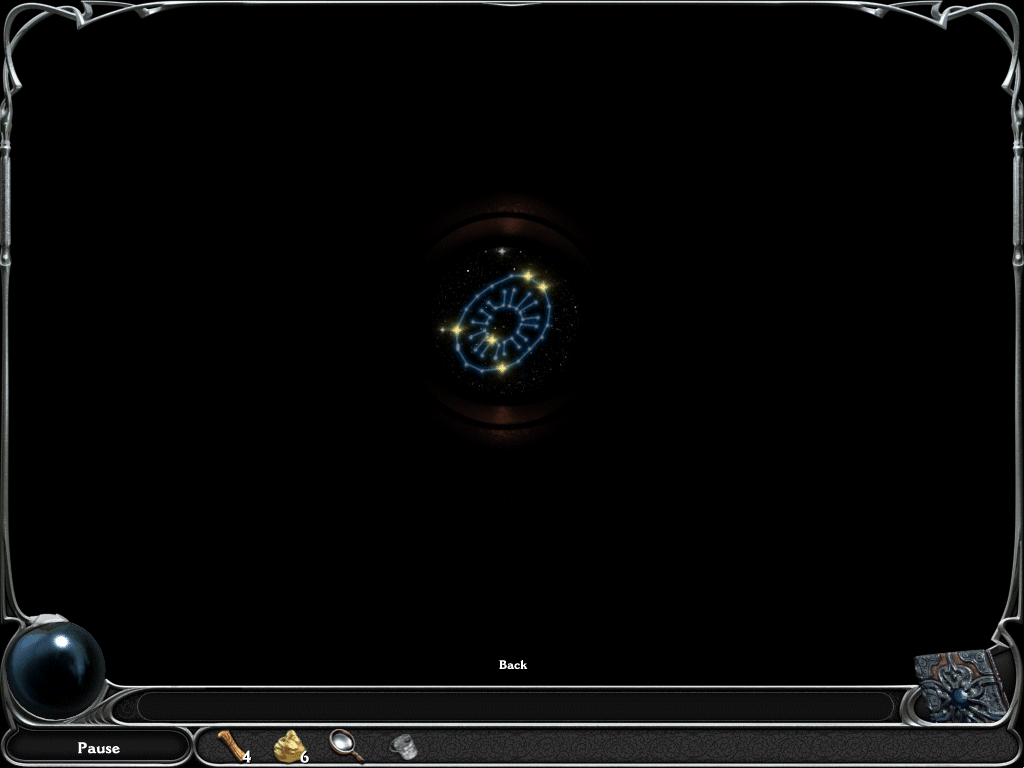
- Pick Dream Nexus and Gateways (Number 4)
- Click on Door to bring back daylight
- Exit to Blacksmith
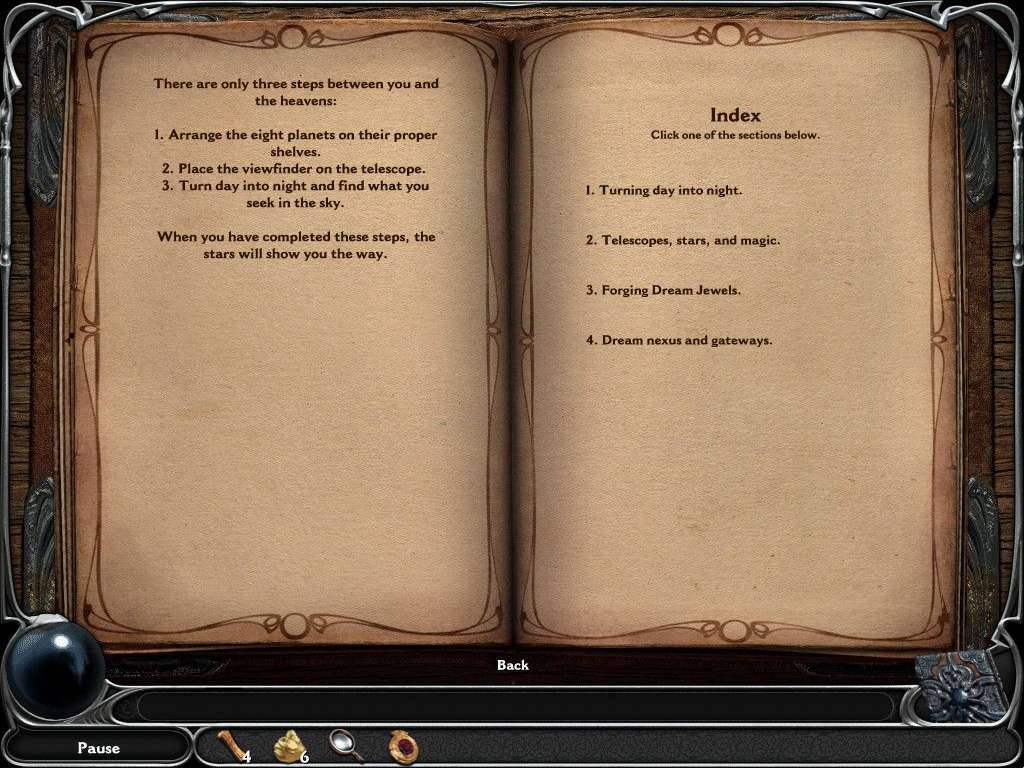
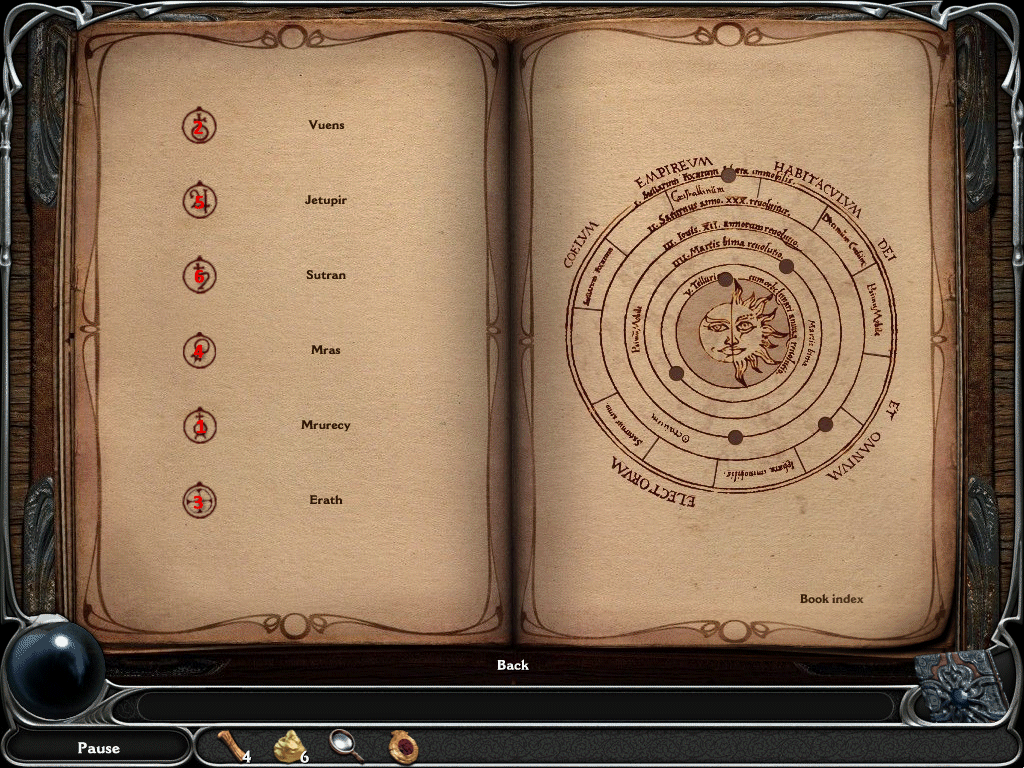
1. Turn Day Into Night
- Click the Planet Names on the left side in the order they appear in the solar system
- The names are scrambled, but they are easy to figure out
2. Telescope, Stars, and Magic
- Unscramble the letters on the left side
- Make sure it's still Night
- Load a Lens into the telescope (if you haven't already)
- Search the sky until the stars in the lens match the stars in the sky
- Repeat the process with the the other Lens
3. Forging Dream Jewels
- Unscramble the letters on the left side
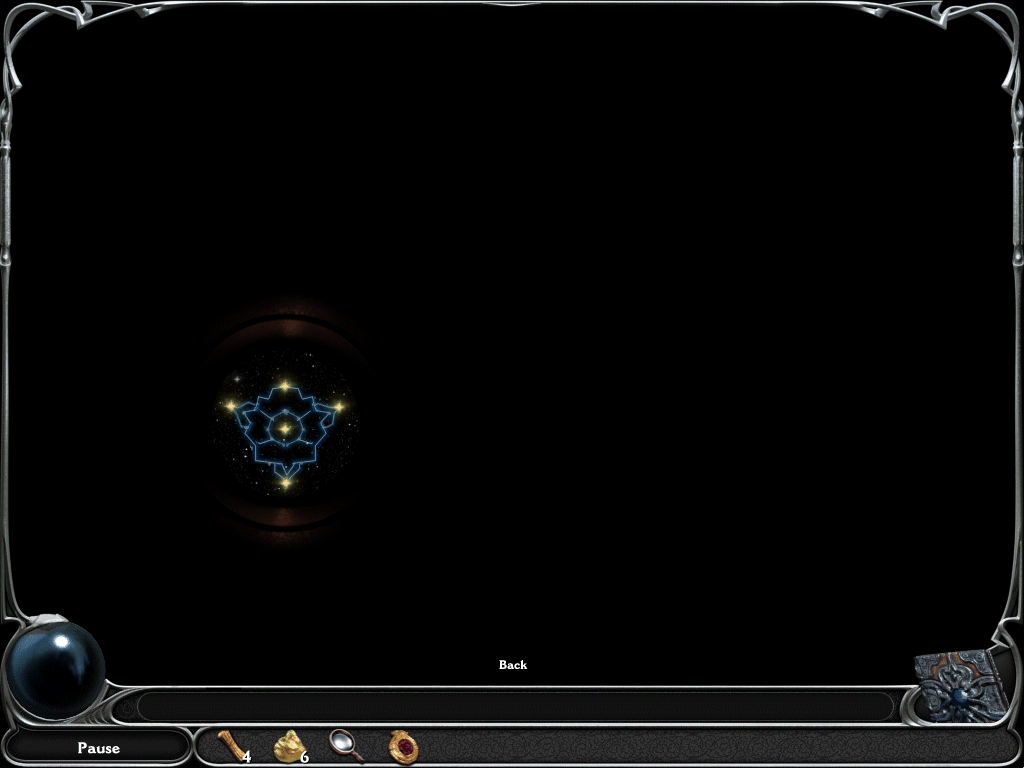
4. Dream Nexus and Gateways
- Unscramble the letters on the left side
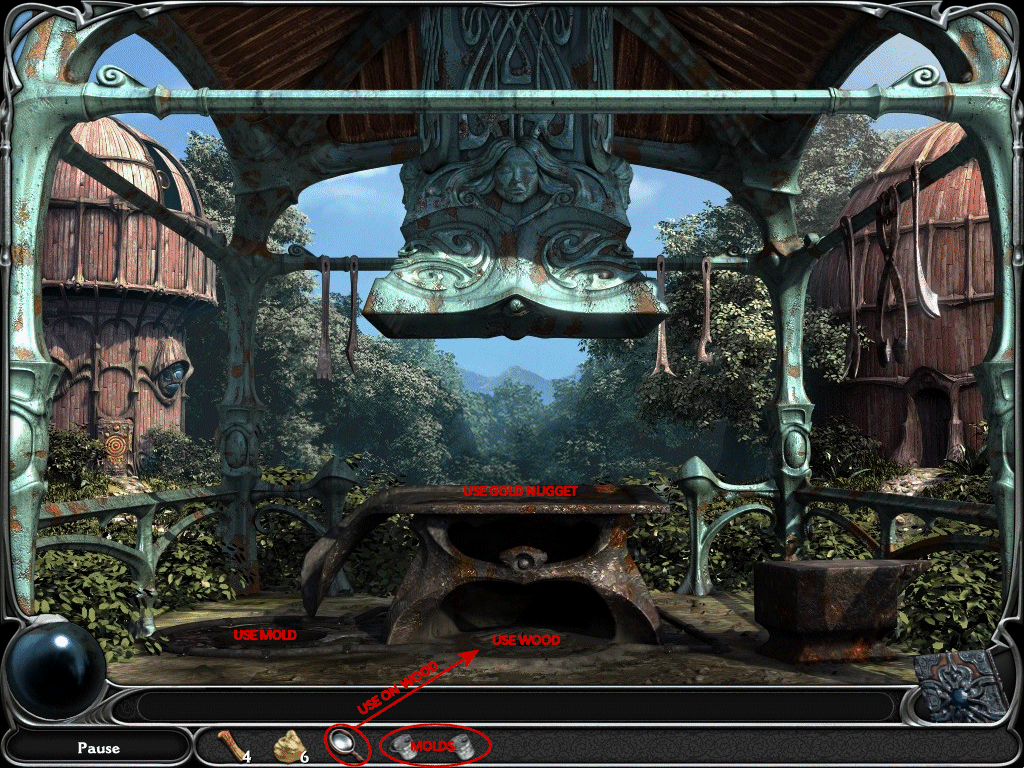
Blacksmith
- Place 4 Logs in fireplace
- Use Magnifier on logs
- Place Mold to the left of the fireplace
- Place Gold Nugget above the fire
- Repeat process for second mold
- Note: You will have to return here to make other molds!
- Exit to Nexus
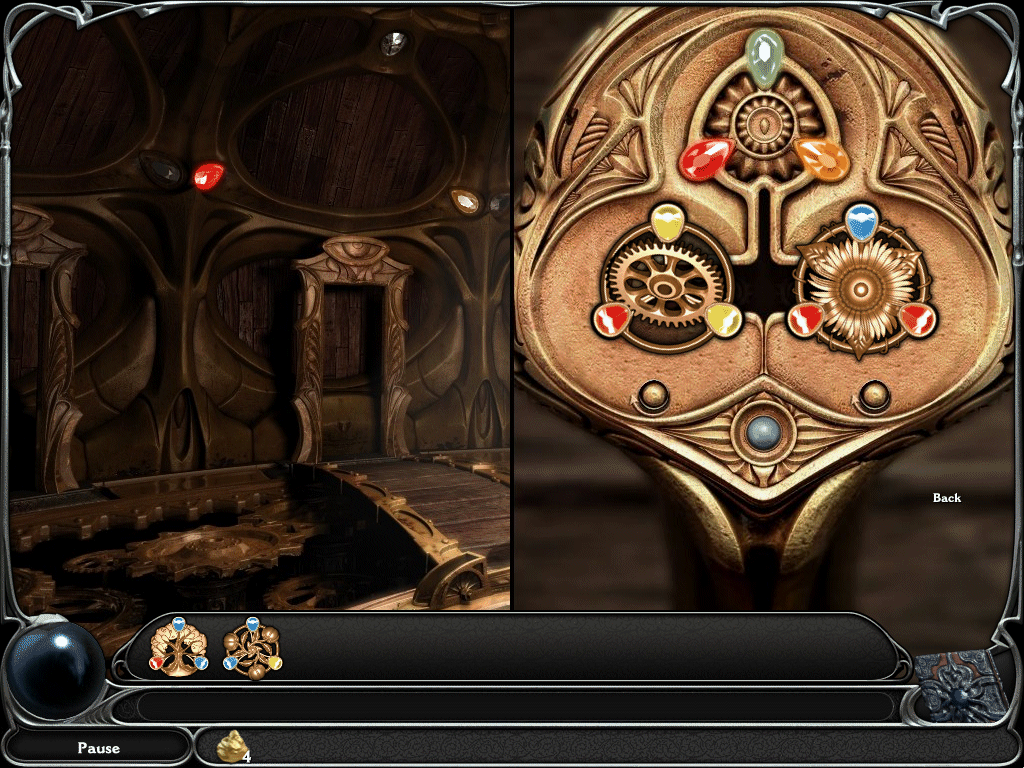
Nexus
- If the door is still on the Herbalist's, pull the Left Lever
- Place your Sunflower and Mechanical Dream Jewels in the device and rotate them as before
- Mechanical Dream Jewel the Red Gem should be on the bottom, left
- Sunflower Dream Jewel the Blue Gem should be on top
- Exit to Fairy Retreat
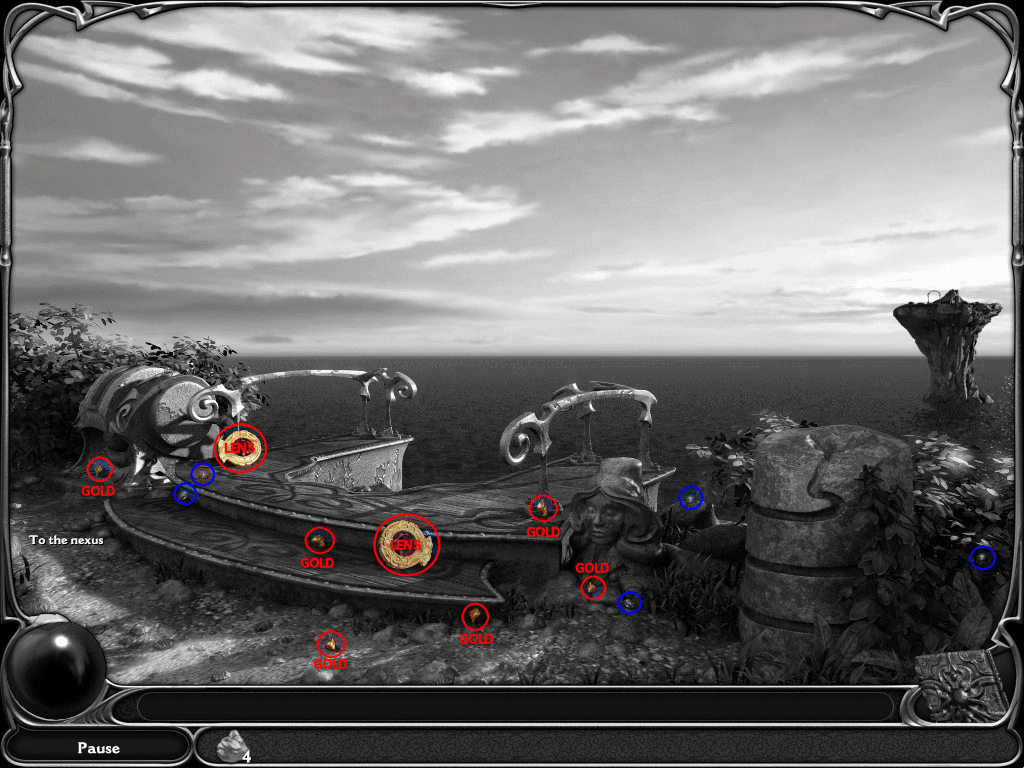
Fairy Retreat
- Find 6 Gold Nuggets
- Find 2 Lenses
- Exit to Telescope
Telescope
- Zoom in on Magic Book
- Pick Number 1 and click the center of the right page to turn night into day
- Use the Lens on the telescope and make more molds
- Exit to Blacksmith
Blacksmith
- Create new Dream Jewels
- Exit to Nexus
Nexus
- Pull the Left Lever
- Place the Sun-Moon and Sunflower Dream Jewels in the device and rotate them as before
- Sun-Moon Dream Jewel the Clear Gem should be in the bottom, right
- Sunflower Dream Jewel the Blue Gem should be in the bottom, left
- Exit to Home
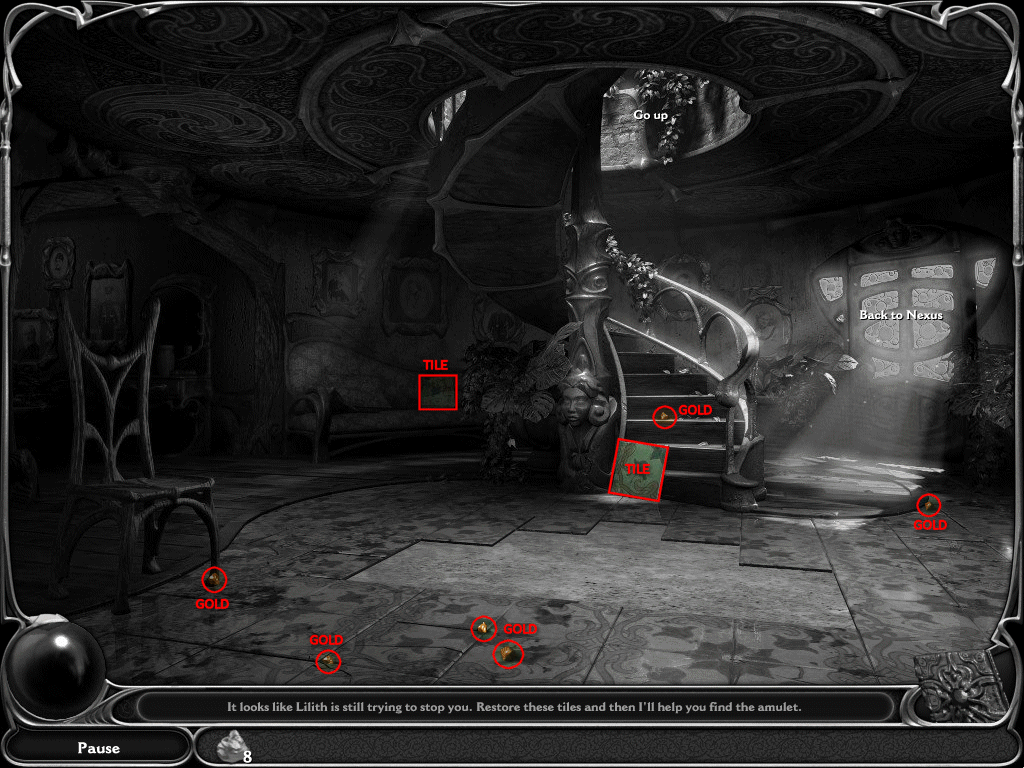
Home
- Find 2 Tiles
- Find 6 Gold Nuggets
- Exit to Upstairs
Upstairs
- Find 6 Gold Nuggets
- Find 9 Tiles
- Exit to Bedroom (Right Door)

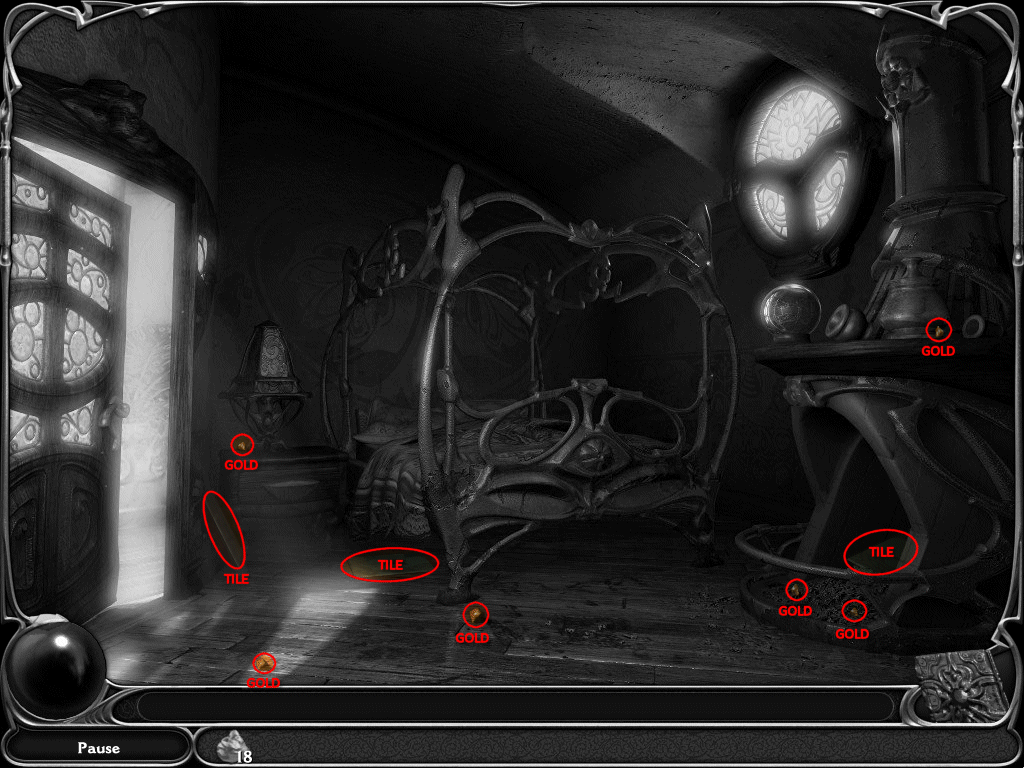
Bedroom
- Find 6 Gold Nuggets
- Find 2 Tiles
- Exit to Downstairs (Home)
Home (Downstairs)
- Use Tiles on floor
- Zoom in Tiles
- Exit to Lyra's Bedroom (Left Door)
Tile Puzzle - Rotate the tiles to complete the pattern
Hint: The White Diamonds go down (see screenshot for solution)
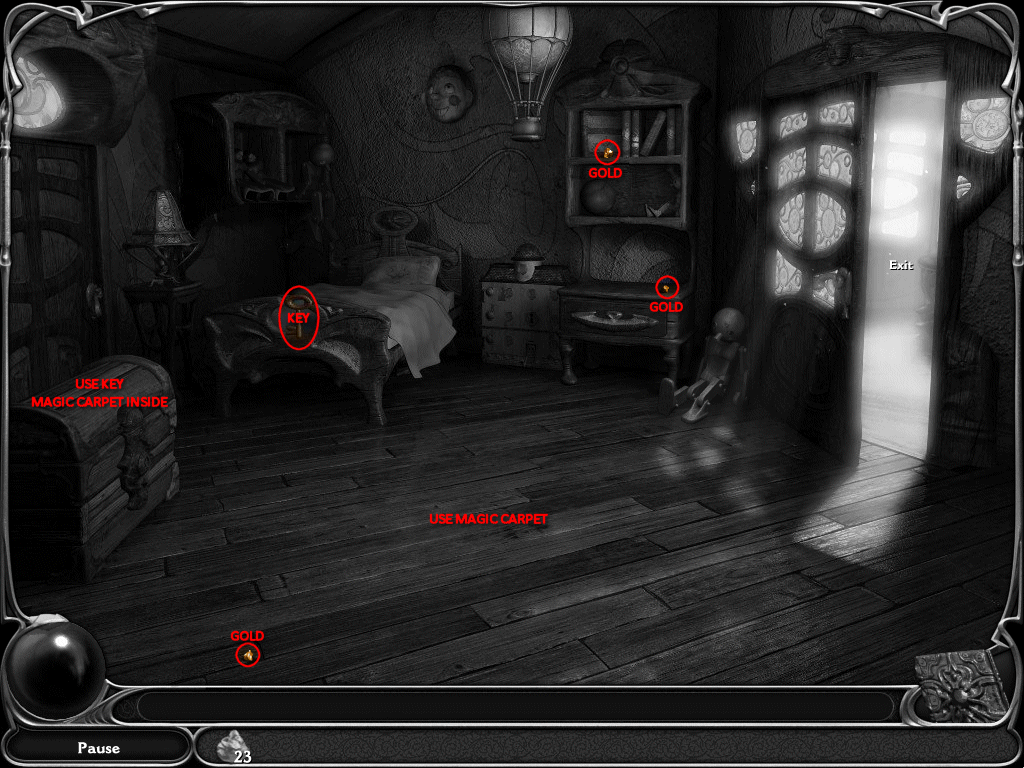
Lyra's Bedroom
- Find 3 Gold Nuggets
- Find Key
- Use Key on chest
- Place Magic Carpet on floor
- Find Ball
- Exit to Upstairs

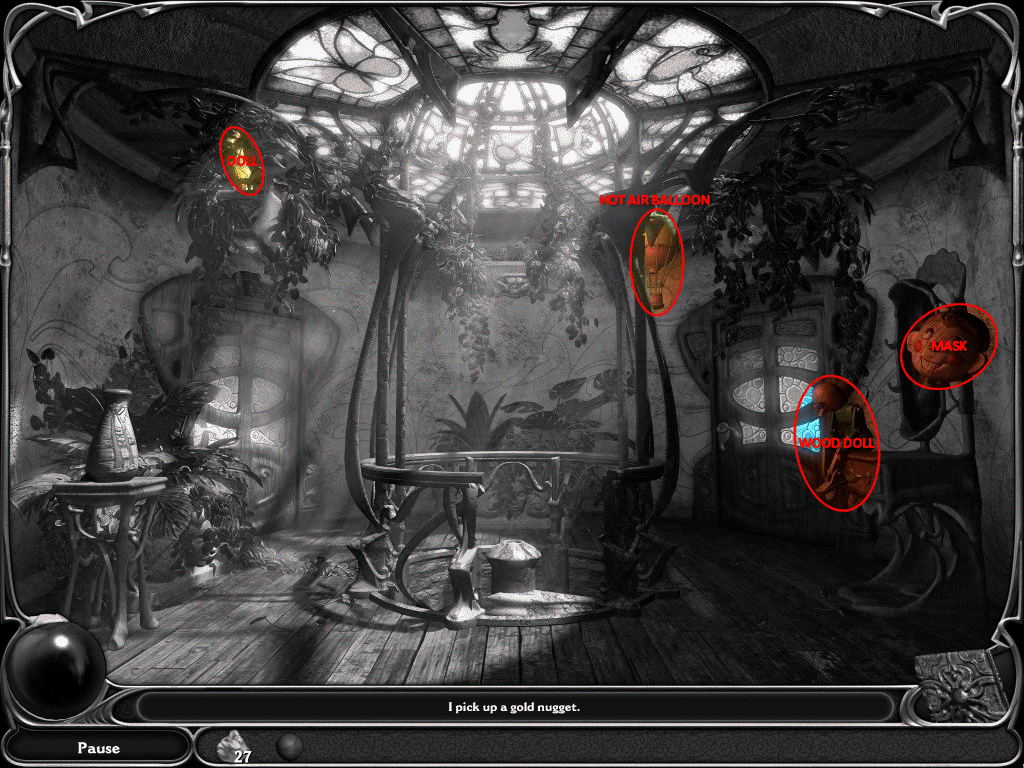
Upstairs
- Find Mask
- Find Wood Doll
- Find Hot Air Balloon
- Find Doll
- Exit to Faye's Bedroom
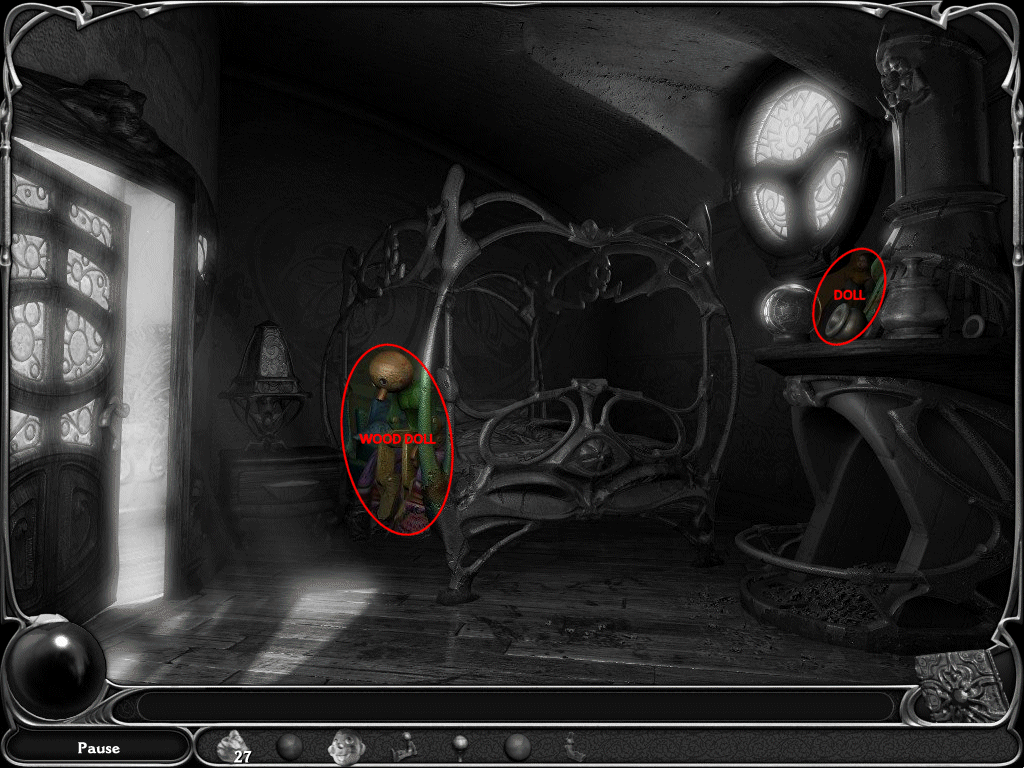
Faye's Bedroom
- Find Doll
- Find Wood Doll
- Exit to Downstairs (Home)
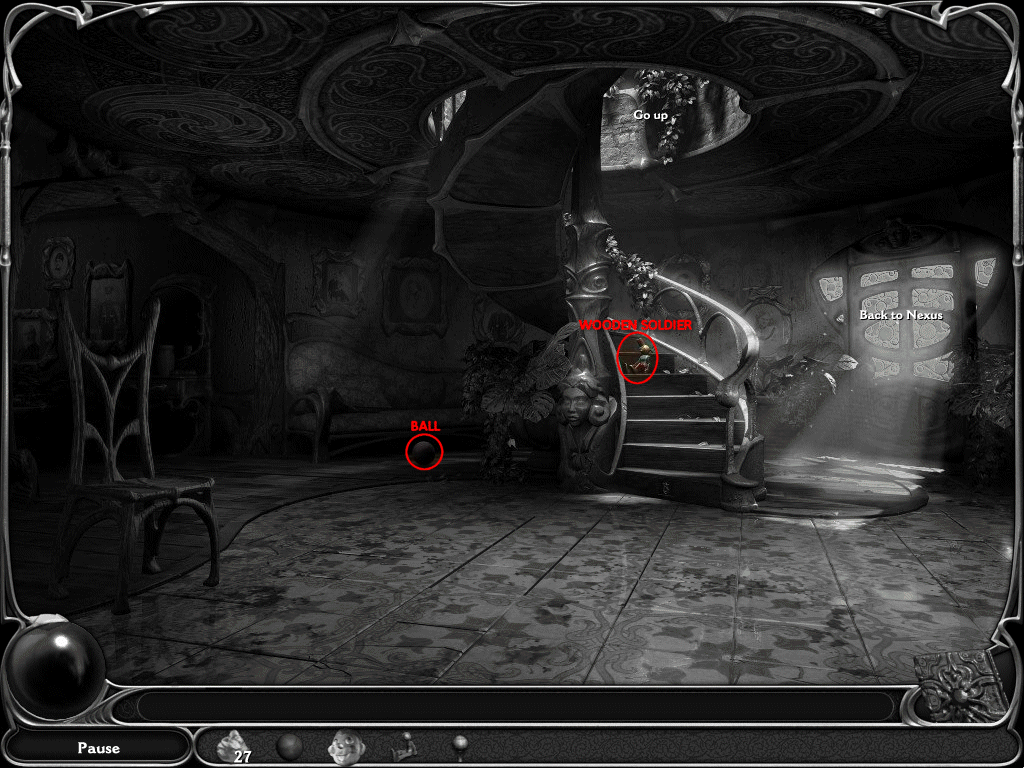
Home (Downstairs)
- Find Ball
- Find Wooden Soldier
- Exit to Lyra's Bedroom
Lyra's Bedroom
- Find Slip of Paper
- Put Toys in order on magic carpet
- Exit to Downstairs (Home)
Riddle
Just in case I ever forget the order...
Place the face above the face. Then head the way of the clock.
Add a toy that's full of air, And then two men who have no hair.
A ball, a ball, the first one small, Then three more dolls from short to tall.
Solution (see screenshot)
Home
- Use Key on drawer in stairs
- Exit to Fairy Retreat
Fairy Retreat
- Place Amulet on stone pillar
- Enter Gondola
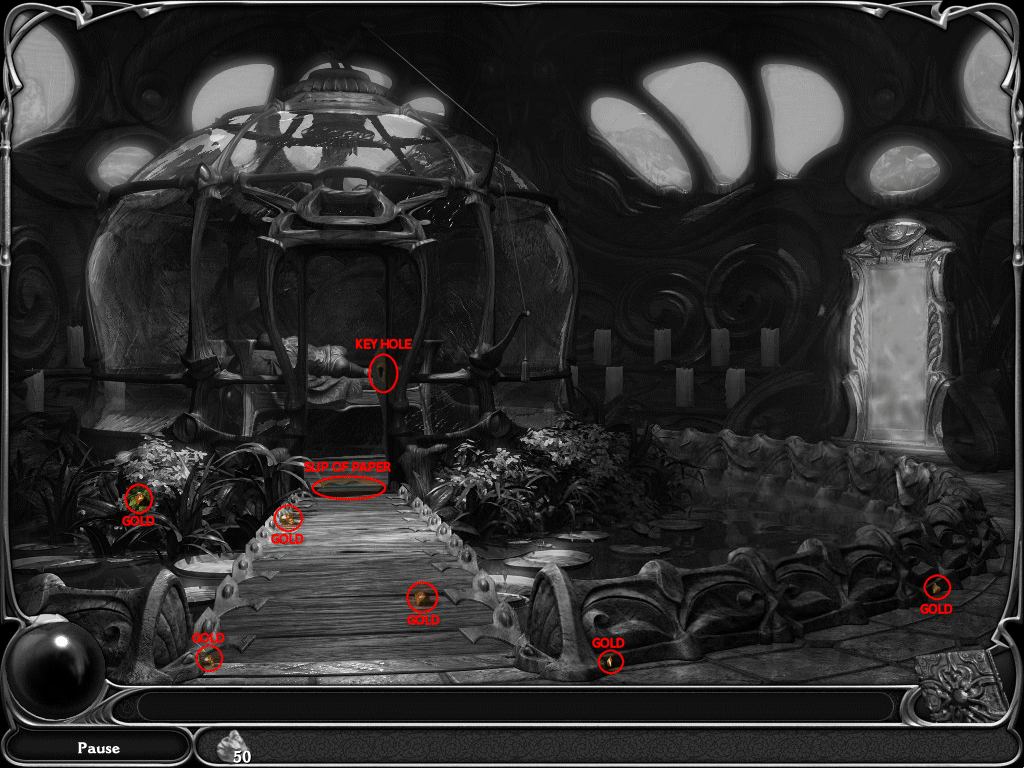
Door to Underwater
- Find 6 Gold Nuggets
- Find Teardrop
- Place Teardrop on door
- Zoom in on Door
- Exit to Tea Room
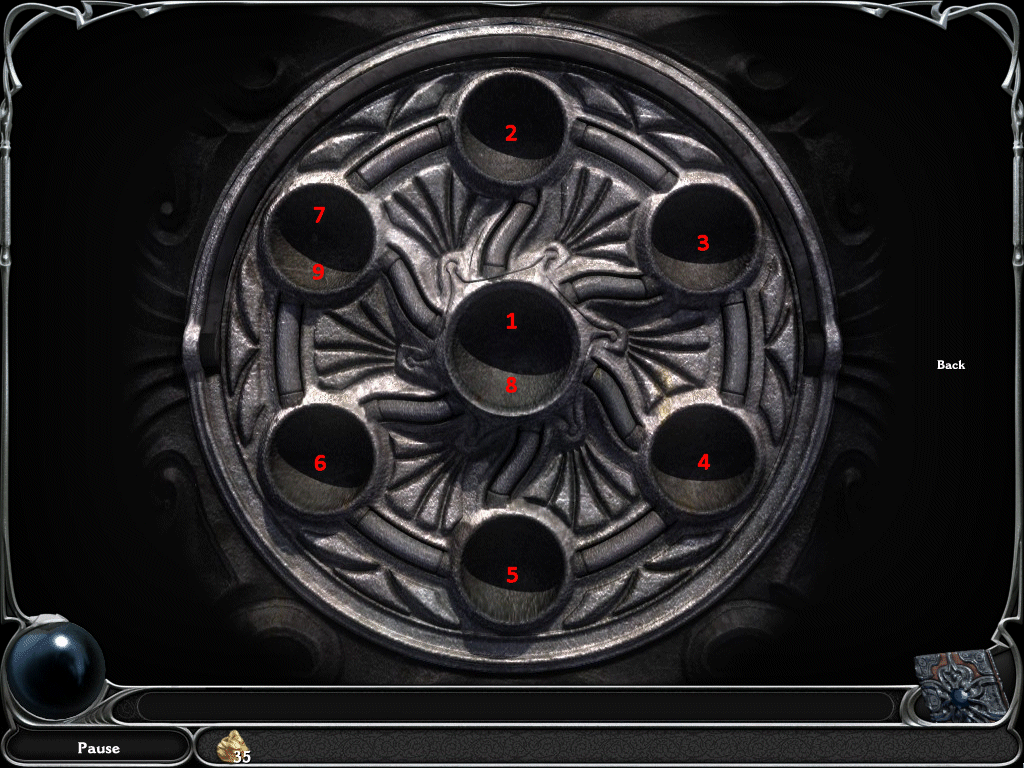
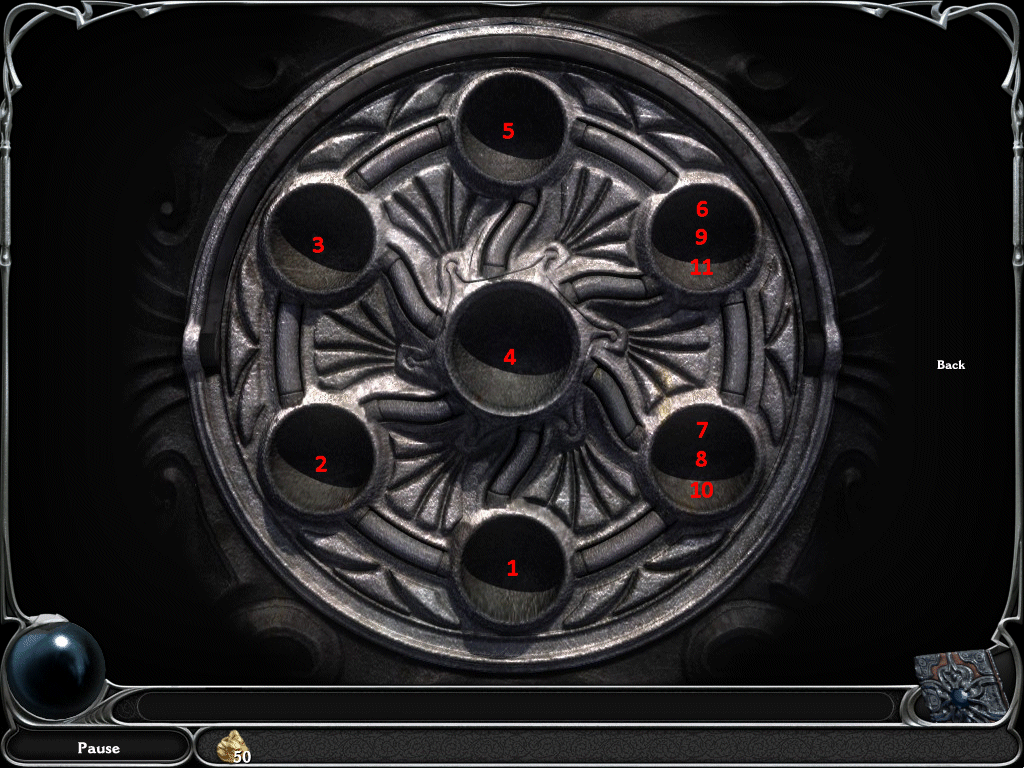
Door Puzzle - You will see a very quick light and sound display which you need to repeat (like Simon Says). If you don't get it the first time, click one of the spaces to see it again.
Solution (see screenshot)
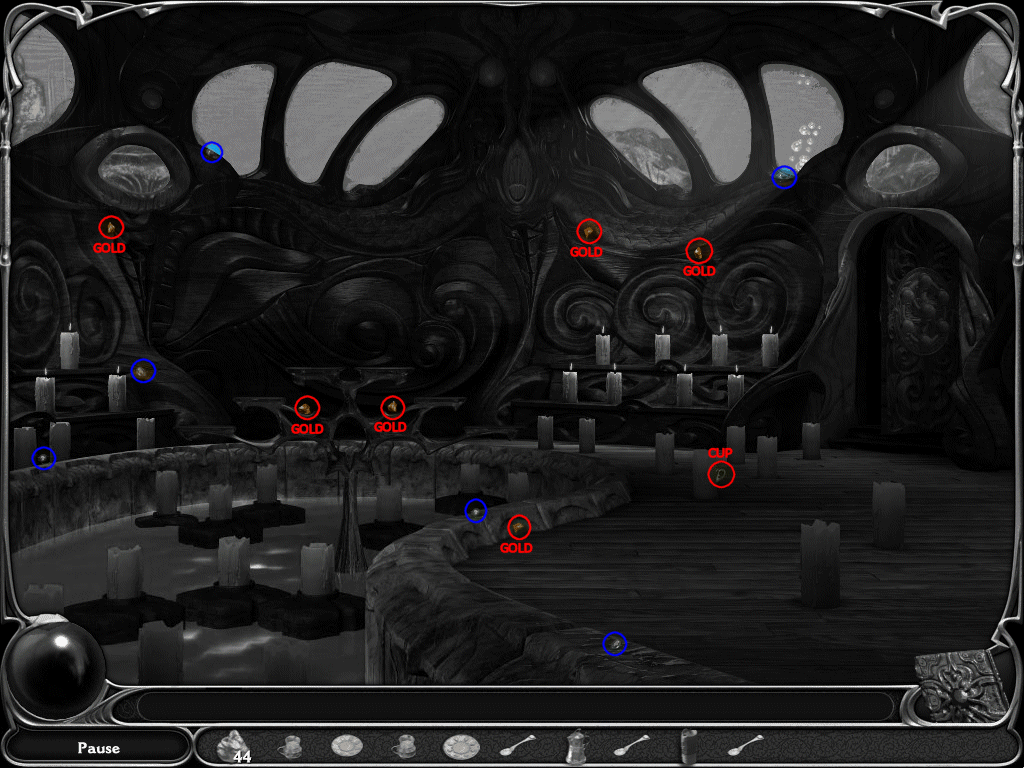
Underwater Retreat/Tea Room
- Follow the Path
- Find 6 Gold Nuggets
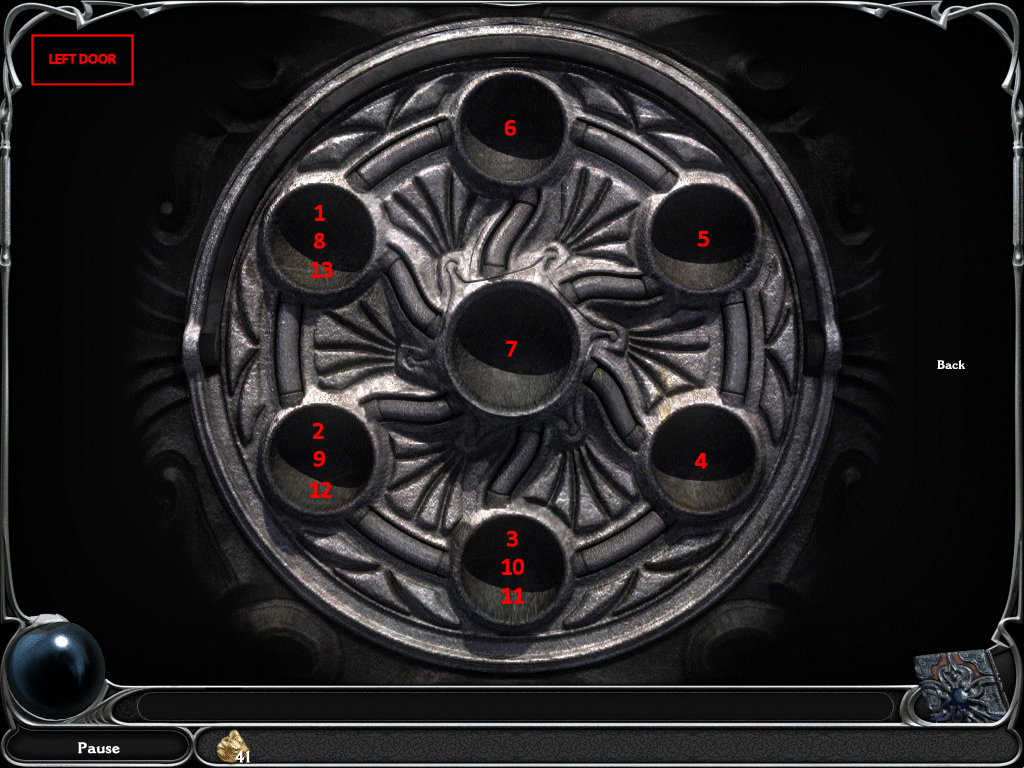
- Zoom in on Left Door and get another puzzle
- Zoom in on Right Door and get another puzzle
- Note: See screenshot for solution(s)
- Exit to Music Room (Right Door)


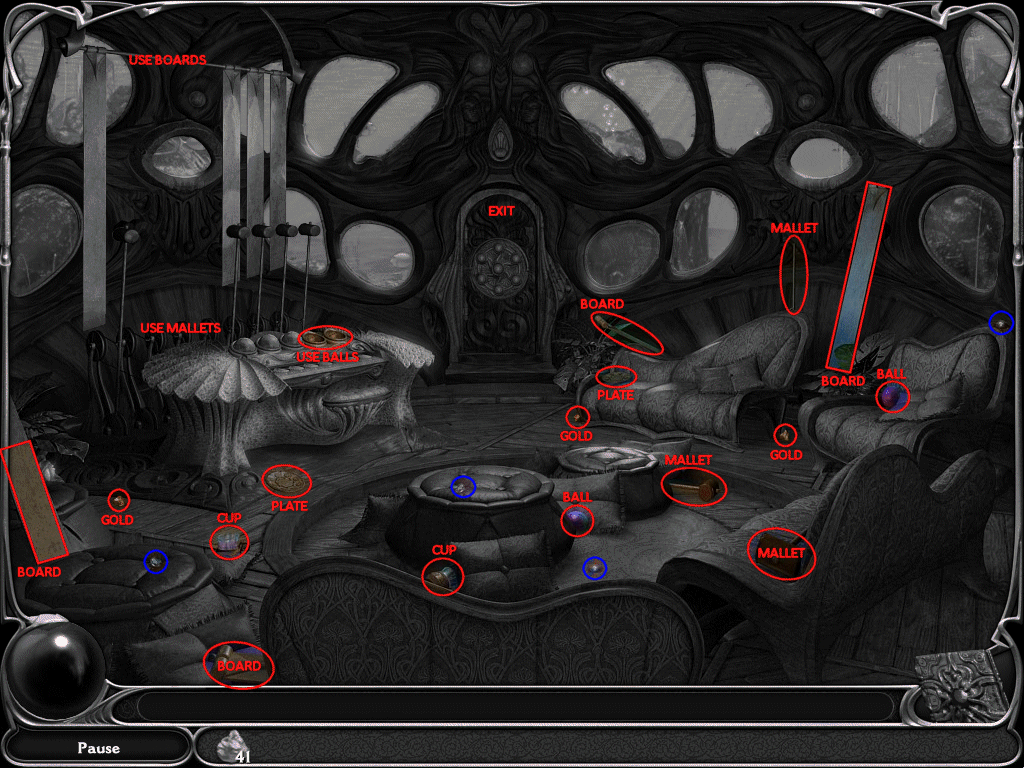
Music Room
- Exit Tea Room and follow the path in this order (F = Forward, L = Left): F, L, F, F, F, L, F F F F
- Find 3 Gold Nuggets
- Find 2 Cups
- Find 2 Plates
- Find 4 Boards
- Find 3 Mallets
- Find 2 Balls
- Use Balls and Boards and Mallets on strange instrument
- Zoom in on Strange Instrument
- Exit to Tea Room
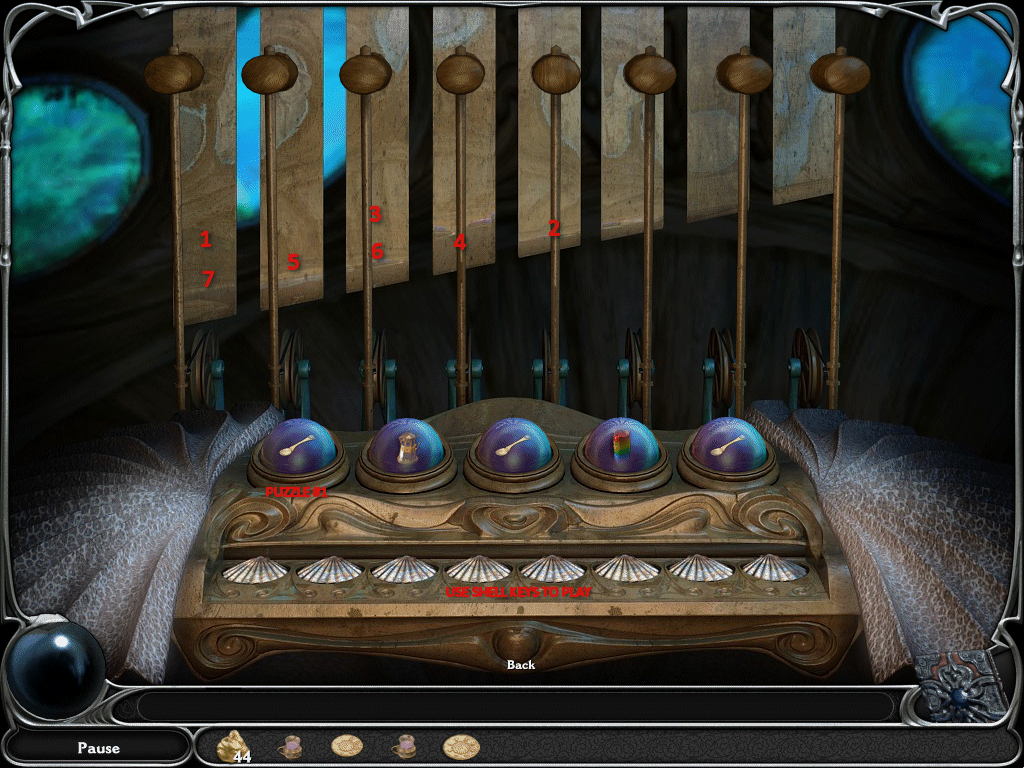
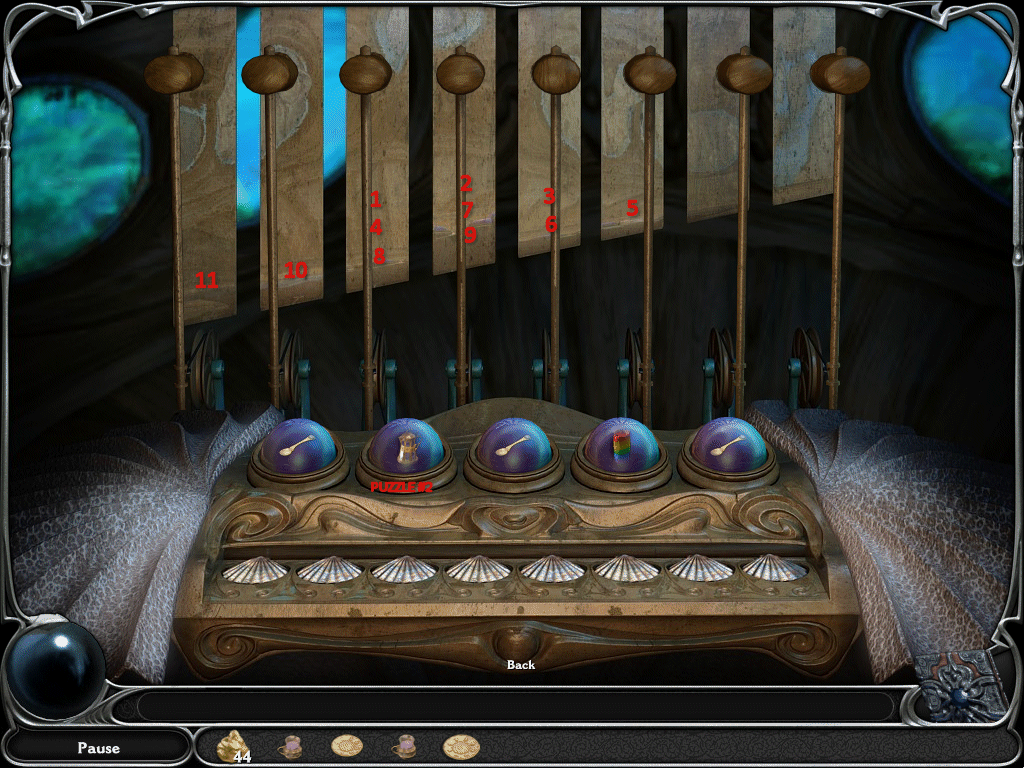
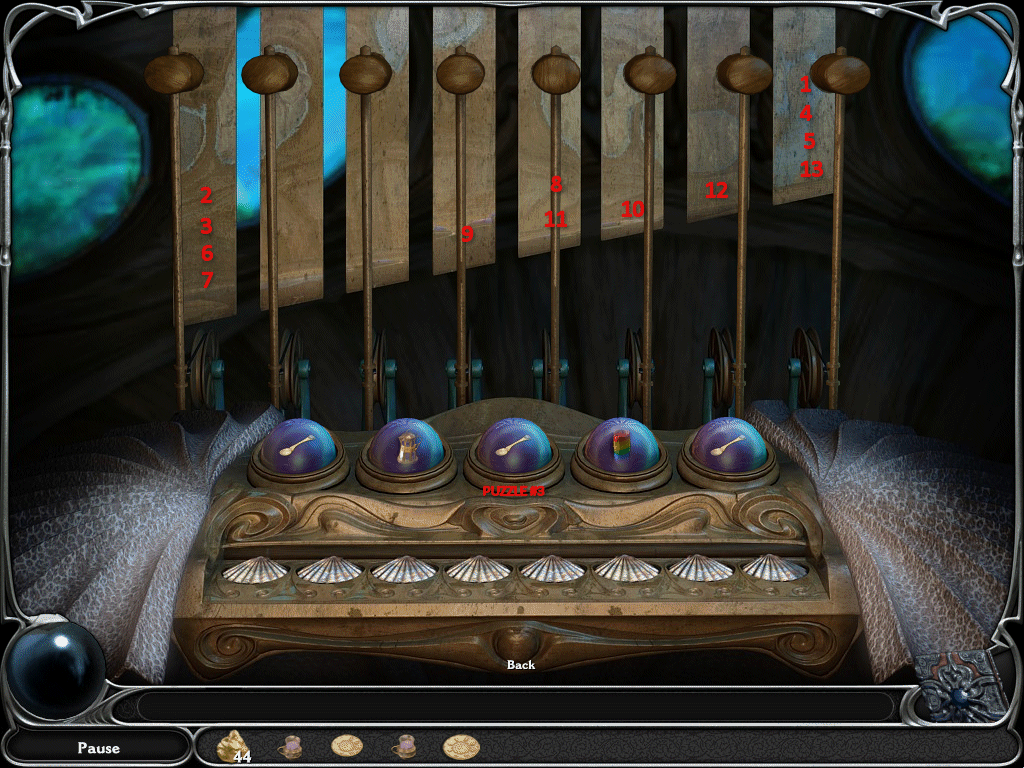
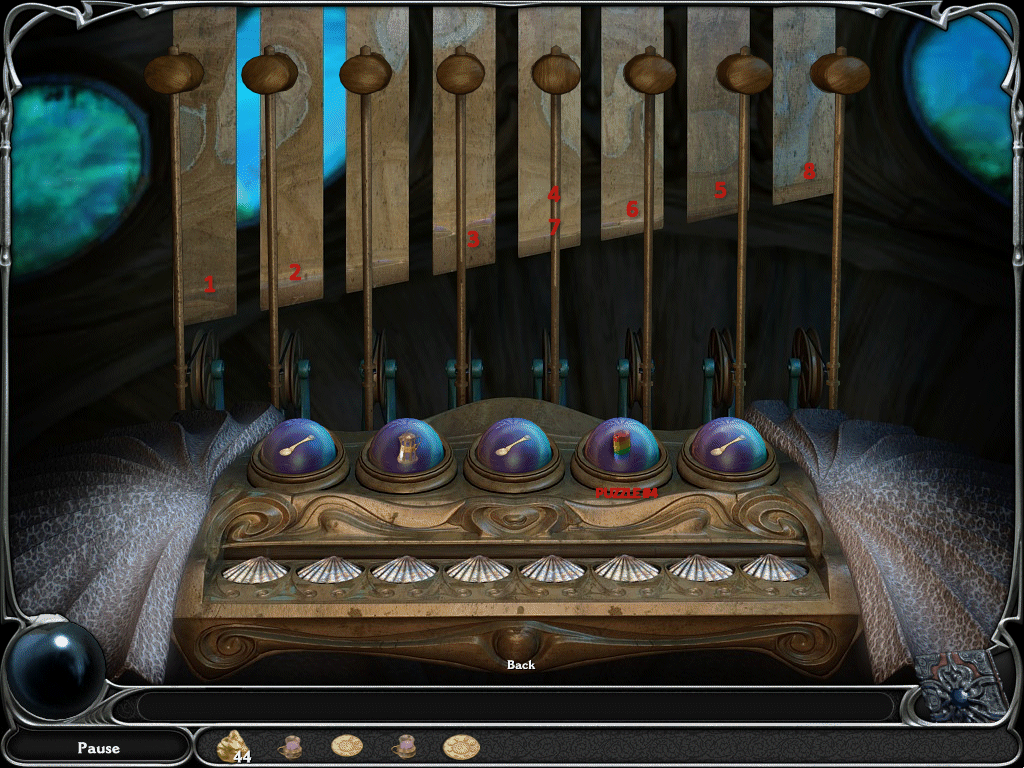
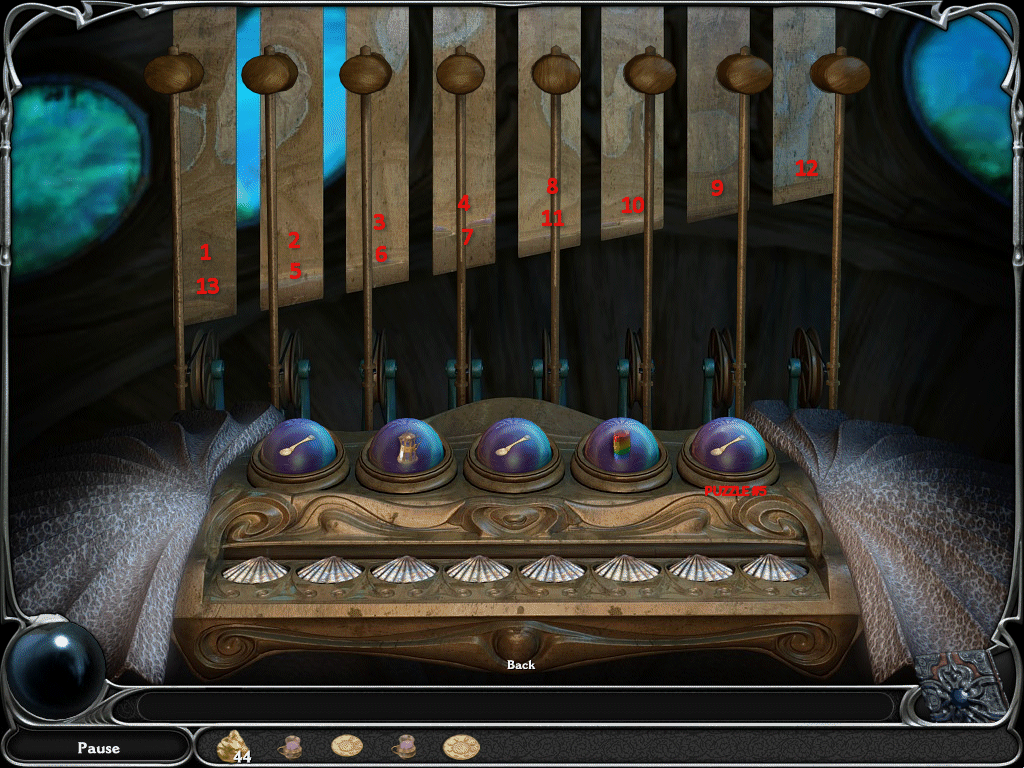
Strange Instrument Puzzle
- This is another "Simon Says" type puzzle.
- Simply watch and listen and repeat by clicking the shell keys.
- If you need to hear it again, press the bubble with the item inside.
- You will need to do this five times.
See screenshots for solutions
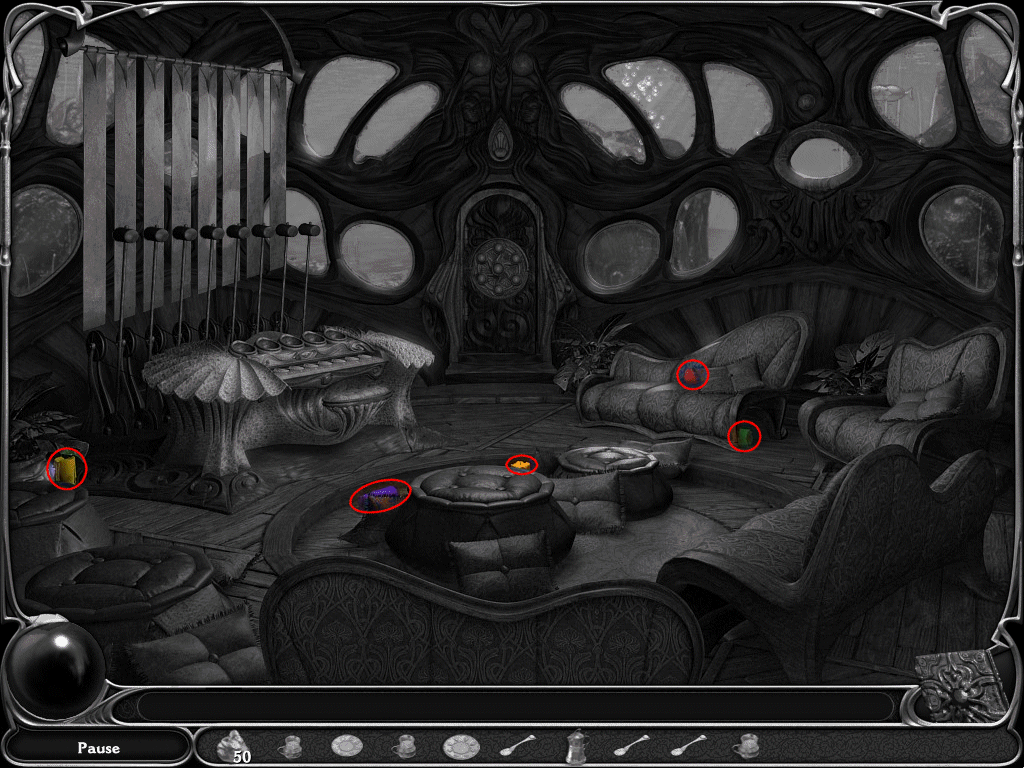
Tea Room
- Get back to Tea Room by retracing your steps: F F F F, R, F, F, F, R, F
- Exit to Meditation Room (Left Door)
Meditation Room
- Exit Tea Room and follow the path in this order (R = Right): F, F, F, R, F, F, F, R, F, F, R, F, L, F
- Find 6 Gold Nuggets
- Find Cup
- Exit back to Tea Room
Tea Room
- Return to Tea Room by retracing your steps: F, R, F, L, F, F, L, F, F, F, L, F, F, F, F
- Note: I bring you back here before exiting because it is easier to find places from a central location
- Exit to Music Room
Music Room
- Find 5 Candles
- Exit to Tea Room and then Exit to Meditation Room
Meditation Room
- Place the Candles on the candelabra
- Exit to Tea Room
Tea Room
- Zoom in on Table
- Place Plates and Cups and Spoons and Pitcher on table
- Place Teardrop in center door
- Complete another "Simon Says" puzzle
- Exit to Steam Room
See screenshot for solution
Steam Room
- Get ready for a long journey, follow the path in this order: F, F, F, L, F, F, L, F, R, F, F, R, F, L, F, F, F, F, L, F, F, F, L, F, F, F, F
- Turn the Valves until all the steam is turned off, you can not touch the red valves
- Exit to Lillith's Retreat
Note: I couldn't find a solution for this puzzle, I just kept randomly clicking any valves that weren't red until they were all off
Lillith's Retreat
- Get ready for a very, very long walk - last maze - follow the path in this order: F, L, F, F, R, F, F, L, F, F, R, F, F, R, F, L, F, F, F, L, F, R, F, F, R, F, F, F, F, F, R, F, L, F, F, R, F, F, R, F, F, L, F, F, F, L, F, R, F, F, L, F, R, F, F, F, F
- WHEW!
- Find 6 Gold Nuggets
- Click the Key Hole
- Use the Key on the door
- Touch Lillith
- Exit to Herbalist's through Nexus
Herbalist
- Go to Kitchen
- Use Potion you found on Potion Book
- Zoom in on Potion Book
- Pick Waking Potion (Number 4)
-
Exit to Lillith's Retreat through Nexus
Waking Potion
- Unscramble the letters on the left page
- Add Lavender Essence to glass
- Crush Grey Rose Seeds
- Add Crushed Grey Rose Seeds to glass
- Heat Bitter Aloe in cauldron
- Add Heated Bitter Aloe to glass
- Crush Juniper Berries
- Add Crushed Juniper Berries to glass
- Add Orange Peel to glass
Lillith's Retreat
- Use Waking Potion on Lillith
- Talk to Lillith
- Find 4 Lens
- Exit to Herbalist's through Nexus
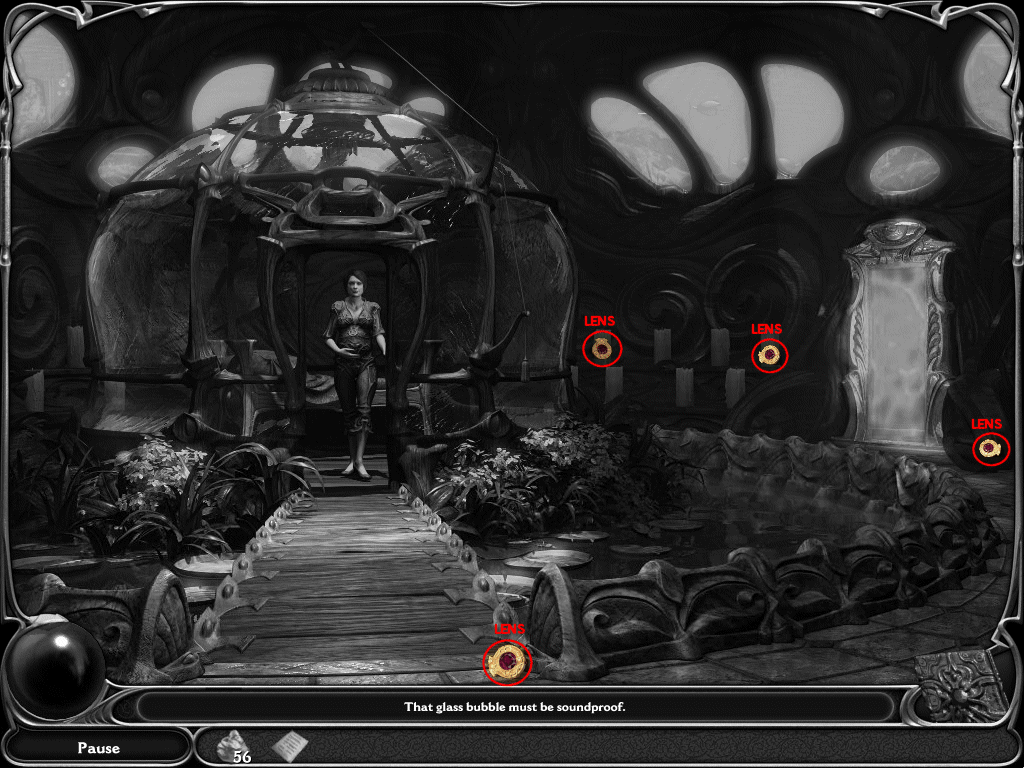
Herbalist's
- Go to Kitchen
- Use Potion page on Potion Book
- Pick Root Shriveling Potion (Number 5)
- Exit to Telescope through Nexus
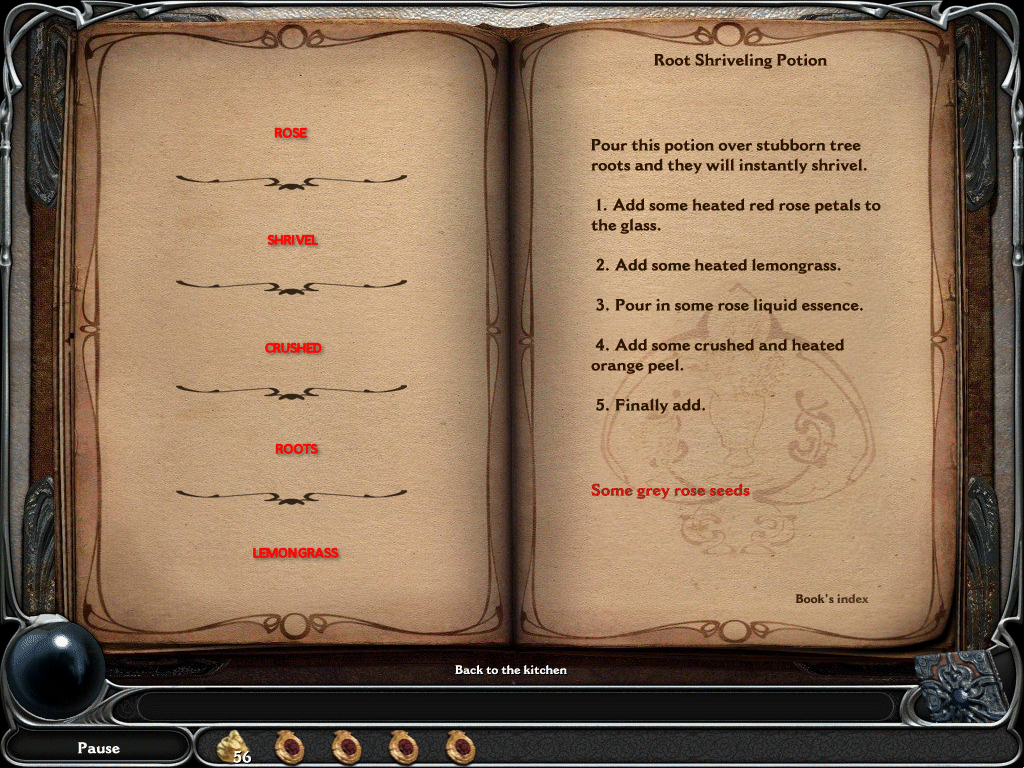
Root Shriveling Potion
- Heat Red Rose Petals in cauldron
- Add Heated Red Rose Petals to glass
- Heat Lemongrass in cauldron
- Add Heated Lemongrass to glass
- Add Rose Essence
- Crush some Orange Peal
- Heat the Crushed Orange Peel in cauldron
- Add Heated Orange Peel to glass
- Add Grey Rose Seeds to glass
Telescope
- Use the 4 Lens in the telescope
- Exit to Blacksmith
Blacksmith
- Create 4 Dream Jewels
- Exit to Nexus
Nexus
- Turn the Right Lever once
- Place the Fairy Tower Dream Jewel and Music Dream Jewel in device
- The Fairy Tower Dream Jewel should have both Blue Gems on the left and top
- The Music Dream Jewel should have the Yellow Gem on the bottom, right
- Exit to Magic Tree
Magic Tree
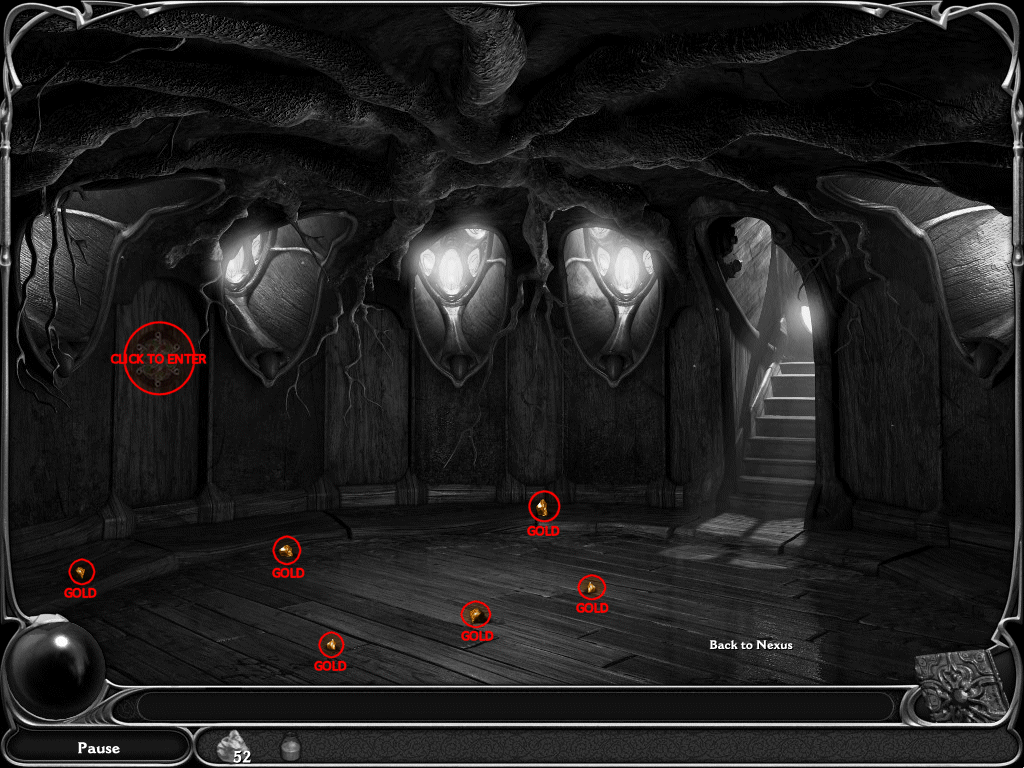
- Find 6 Gold Nuggets
- Click the Door to open it
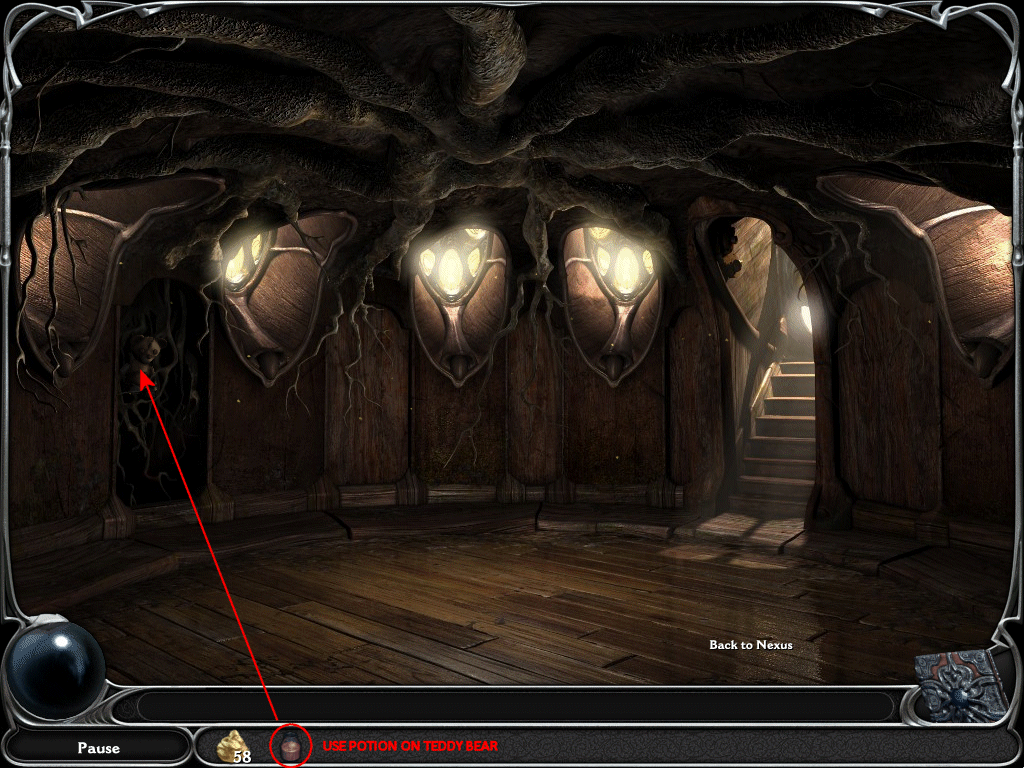
- Use the Potion on the teddy bear
- Exit to Home through Nexus
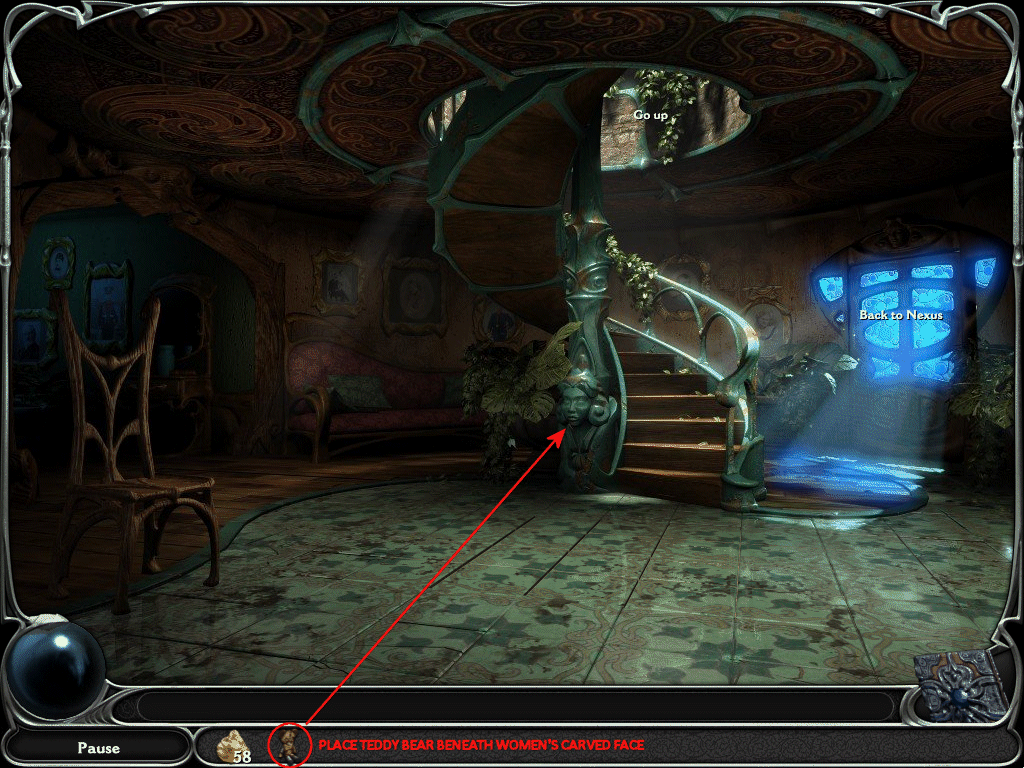
Home
- Place the Teddy Bear beneath the woman's carved face in the banister
THE END...?