

Languages
This guide is availabe in:

Basic Information
There are some important points to keep in mind as you develop your own strategy for playing Virtual Villagers: The Tree of Life. Think "Survivor"—you're in charge of the whole game!
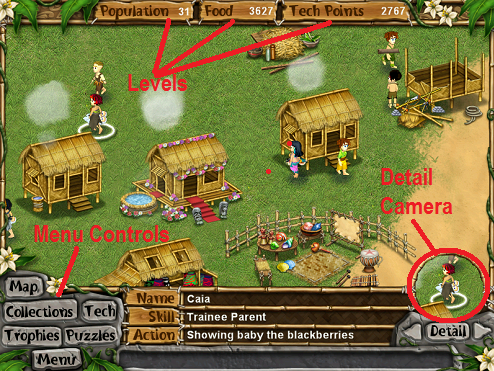
Learn the controls, which are all at the bottom of the screen now! The "camera" tool located at the bottom right of the screen can be used to quickly locate any individual on the island. When the screen is blank, click on the right arrow and it goes to the youngest tribe member, or click on the left arrow and it will go to the oldest. Clicking the right arrow will scroll through your villagers from youngest to oldest; clicking the left arrow will scroll through your villagers from oldest to youngest. As each one comes up in the "camera", the game will zoom to that person.
Watch your levels closely! All of your information is at the top of the screen.
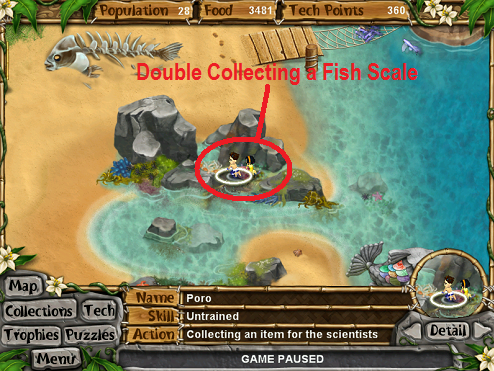
You'll save a lot of time by learning the double collect trick! To double collect an item using children do this: spot a collectible or mushroom, then find the nearest child. Pick the child up and press the space bar. This will pause the game. Drop the child on the collectible and go find a second child. Pick up the second child and go back to the object. Once you are hovering over the object (and the first dropped child), press the space bar again, and quickly drop the second child right next to the first. If done properly and the timing is right, both children will run away with the same object. This is invaluable in bolstering food supplies when collecting mushrooms, and in gaining tech points when collecting other collectibles. CAUTION: do not drop a child directly onto the other, this will cause them to drop the item and go off for a jumping contest. Make sure that the children are side-by-side.
Mushrooms can mean the difference between life and death to your tribe in the early stages, and the boost in tech points from collectibles allows you to purchase necessary second stage technology quickly.
Children are also handy to collect the herbs for stews as they will bring them to the lab quickly.
Be on the lookout for faint white sparkles! They'll help you spot mushrooms and collectibles much more easily!
Some tasks will require villagers with more than one skill, and it is helpful to be able to quickly shift your workforce from one task to another if necessary. Try to ensure that you are cross training your workforce as much as possible!
Don't pick up a villager that is busy unless it is absolutely necessary! If you pick up a villager that is in the process of a task or is carrying something, they will drop the item and it will be lost. They will also "forget" what it is they were doing.
Children under the age of 14 will not work, except for picking up mushrooms and collectibles! Once they reach age 14 you can put them to work, but they won't be fully "adult" until age 18. Just like a normal teenager, if something else gets their attention (such as a story time), the 14-17 year olds will drop work and attend. Villagers cannot have children until they are adults (18 years old).
Remember that the game continues even when it is turned off! Virtual Villagers 4 plays in "real time", which means things will still happen even when the game is closed. Don't forget to set work preferences for your villagers! For instance, if you want someone farming, make sure to check the farming preference. Villagers without preferences set will often wander around and do their own thing. Remember this if you're going to be away for a while. Choose your time settings wisely! Playing in "fast" mode live is fun, but if you're going to be gone for a while consider switching to "Normal", "Slow", or even "Pause". Don't forget to take off the parenting preference if you are going to leave the game!
CAUTION: Do not change your computer clock to try to "fast forward" the game! It doesn't work, and can cause problems on your computer!
Weather, fire, and ghosts are your friends!
You can choose the hut locations! When the foundation for a hut shows up, you can pick it up and move it to a place of your choosing (within reason). Look closely at the outline of the foundation, green means an area that the hut can be built in, red means you can't build there. Choose locations wisely: try not to impede frequently used paths, such as those from the blackberries or fruit trees to the food hut.
Use children as temporary healers! If a villager becomes sick before you have a hospital to train doctors, find the nearest child, set their preference to healing, and drop them on the ill individual. Keep doing this until they heal the villager.
Watch where people go! Children (and adults) will often wander off to look at "interesting" areas of the island. These areas are usually important.
Getting Started (Maslow's hierarchy—food and shelter first!)
Plan carefully! Choose your beginning villagers wisely, the success of your tribe depends on it. A good balance of men and women, with at least one child, is definitely the way to go. Think sort of like real life...variety is the spice of life!
Pick your five members of your new village from a large group of wanna-be's. (It really is like Survivor!)

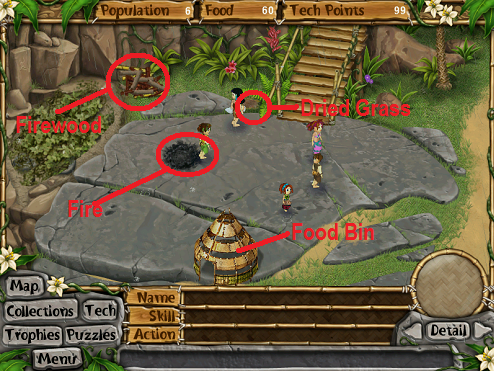
Again, just like Survivor—now you need fire. Of course, no Jeff Probst or reward challenges here to earn flint, so here is what you'll need to do: Drop an adult on the wood pile. Drop an adult on the patch of grass. Drop an adult on the grass and wood in the black circle, and you will have fire.
Wow, almost seems easier than trying to win a reward challenge...
Oh, and before we move on—Food is pretty important here in the wilderness. But you need some sharp tools to get it...
Puzzle 1 can assist you here. For detailed puzzle information, see the Puzzles Solved section toward the end of this guide.
Food can be found on the blackberry bush on the southwest part of the island.
Place someone at the Research table in the Science lab on the west side of the island.
General puzzle strategy guide
Most of the puzzles are dependent upon some combination of Village Tech, villager skills, and other puzzles. Although some puzzles depend upon the completion of specific puzzles, the 16 puzzles are rarely completed in the order that you see them on the puzzle screen. Pay attention to the things that your villagers are curious about and the messages that you see when you take one of your villagers "exploring" around the island. These often provide clues that will help you solve the puzzles. Another good strategy is to drag one of your adult villagers around the island after every tech purchase and look for new things that they can work on, since many of the technologies open up new possibilities for your villagers. Most of the frustration related to solving the puzzles is brought on by impatience. It takes time for your villagers to gain the necessary skills and technology to work through all of the puzzles.
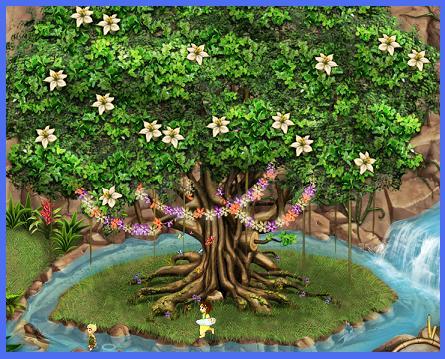
The birds and fish are slowly disappearing on the island. Worried, the village sends a team to investigate. The team discovers a clearing with an enormous tree...but the tree is dying. Heal the tree, and life will return to normal. But how?
Complete the 16 puzzles to eventually allow you to heal the tree! You can safely browse these if you just need a gentle push in the right direction. Each puzzle is referred to by number.
Puzzle 1 is something that will allow you to obtain food, and is learned during the tutorial.
Puzzle 2 requires a villager who is both an adept builder and scientist. A tree needs water to survive and thrive.
Puzzle 3 will allow you a way to cook food or to manufacture items.
Puzzle 4 requires the completion of Puzzle 3, and can help keep your villagers clean.
Puzzle 5 requires the completion of Puzzle 2. Butterflies...
Puzzle 6 requires the completion of Puzzle 2 and 4, and helps you make the tree healthier.
Puzzle 7 requires higher technology and will allow you to obtain another food source.
Puzzle 8 requires you to have already done some construction and you need to have tools as well. Build the hut that appears and now your villagers can change clothes.
Puzzle 9 requires higher level learning, so that you can continue to educate your village children.
Puzzle 10 requires the completion of Puzzle 12, but will tell an interesting story.
Puzzle 11 will make your entire village happy...and full!
Puzzle 12 requires the completion of Puzzle 8, and will provide another consistent food source.
Puzzle 13 requires some technology, and is a step in healing the tree.
Puzzle 14 allows your villagers to honor the tree, which helps it to heal.
Puzzle 15 provides you a way to purify the tree... you've almost healed the tree!
Puzzle 16 allows you to make the tree very beautiful. You must have completed all the previous puzzles to attempt this puzzle.
Congratulations, you've healed the Tree of Life!
Technologies
- You start with level 1 in all technologies.
- Science technology levels 2 and 3 increase the amount of tech points your researchers earn. Level 2 also makes the clothing hut foundation appear.
- Dendrology is required at different levels to complete certain puzzles:
- Level 1 allows the frog rescue
- Level 2 allows the branch pruning
- Level 3 allows the hole to be repaired
- The higher your Medicine level, the longer your villagers can live. Level 3 also allows the construction of the hospital, where you can train doctors.
- Learning technology increases the rate at which the villagers learn.
- Construction technology level 1 allows you to build the honeymoon hut, the first hut, clear the debris at the waterfall, and repair the piers. Level 2 allows the second hut, the clearing of the fire pit, and the construction of the ropes from the piers to the rocks. Level 3 allows the third hut and repairing the nets.
- Food technology has nothing to do with the production of food (that is dependent on construction technology). Food technology increases the yield of food gathered.
- Level 2 adds 50% to the yield, level 3 doubles it.
- Gray mushrooms: level 1 = 6 food points, level 2 = 9 food points, level 3 = 12 food points.
- Red mushrooms: level 1 = 35 food points, level 2 = 52 food points, level 3 = 70 food points.
- Blackberries: Initially yield 9 or 10 food points, eventually settles down to 2 food points. Level 1 = 2 food points, level 2 = 3 food points, level 4 = 4 food points. Harvesting blackberries with the sharp tools = 40 food points.
- Tree fruit: level 1 = 3 food points, level 2 = 4 food points, level 3 = 6 food points.
- Regular (purple) fish: level 1 = 4 food points, level 2 = 6 food points, level 3 = 8 food points.
- Golden fish: level 1 = 8 food points, level 2 = 12 food points, level 3 = 16 food points.
- Crabs (after used to clear moss): level 1 = 35 food points, level 2 = 52 food points, level 3 = 70 food points.
Puzzles Solved
Don't read these unless you want to know exactly how to solve each of the puzzles.
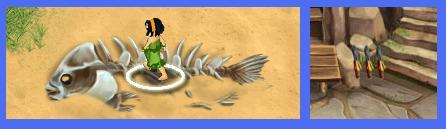
Puzzle 1 is the creation of tools used to obtain food. South and slightly to the east of the food bin (on the beach) is a large fish skeleton. Drop an adult on the skeleton and they will use the bones to make three cutting tools. Once the tools are made they will deposit them in the science lab. You can store up to 6 sharp tools in the lab.
Puzzle 2 is the ability to plug the hole where the water is falling, and instead direct it to the blackberry bush. Drop a villager who is both an adept builder and an adept scientist on the chevron-shaped stone at the base of the cliff. The water will now flow through the pool beside the lab and down towards the blackberry bush.
Puzzle 3 is boiling water, and Puzzle 4 is making soap. You can kill two birds with one stone by boiling water to make soap.
To boil water: you first need to bring water to the kettle in the lab. At the cliff are two sets of bowls, one set at the top of the cliff is for fresh water, one set at the bottom of the cliff is for salt water. Drop an adult on the pile of stones at the bottom of the bridge to the lab, just to the left of the bridge, and they will carry one to the fire. Wait a while and the stone will glow red, indicating that it is ready. Drop an adult on the red hot stone in the fire and they will carry it back to the lab, but only if there is water in the pot.
To make soap: Have a child collect three of the white flowers at the base of the bridge to the lab, to the left of the stones. The child will bring them to the lab and place them on the smaller table. Have an adult get salt water using the lower set of bowls. Once the pot has water, have an adult bring a stone to the fire. Drop an adult on the red hot stone in the fire and they will bring it to the lab. Once the water is boiling, drop an adult on the small lab table where the flowers are. The adult will add the flowers one at a time, and make soap! When the water disappears from the pot, drop an adult on it and they will stack the soap on a nearby rack.
Puzzle 5 creates butterflies. At the bottom of the stream, just below the blackberry bush, is a dry plant. Once you solve Puzzle 2 (the stream), the plant will begin to recover. Several hours after puzzle 2 is solved, the plant will fully recover and turn green. Drop an adult on the plant to cut the leaves. The adult will get covered in sap (you will see green smoke rising from the villager). Once this happens butterflies will appear. Slowly move the villager to the Tree (the big tree), making sure that the butterflies are following. Once you reach the tree, drop the villager on the tree. The villager will wipe the sap on the tree and the butterflies will stay.
Puzzle 6 allows you to rescue frogs. When the frogs are living in the stream underneath the tree, the tree is healthier. Once you solve Puzzle 2 (the stream), wait for it to rain. When it rains, the area around the large palm tree fills with water, and frogs start jumping around. Drop adults in the puddles to catch frogs and move them up to the stream. Rescue at least 6 frogs to complete the puzzle.
Puzzle 7 allows you to build a cooking pit and requires level 2 construction. Drag a villager onto the covered stone pit in the southwest. Once the villager has cleared the pit, it needs to be filled up with four hot rocks. Do this quickly, as if the rocks cool down, you’ll have to start over. Make several people do this task at the same time: when one is walking to the pit with a hot rock, have another ready to put a new rock on the fire. Also, you can start walking to the fire with a new rock when the other one is still heating. It takes about the same amount of time to heat a rock as it takes to walk to the fire, so when you’ve added a rock to the fire, wait a couple of seconds and then get the next villager to pick up a stone from the pile. Make sure another villager takes the hot stone out of the fire before the villager with the cold rock gets there, though! Once you have four hot rocks on the fire, it will tell you that the pit needs to be covered. Drag a villager to the banana tree to the right of the berry bush (image) and they will carry a banana leaf to the fire. This also needs to be done several times.
Puzzle 8 allows you to make cloth. Once you have level 2 Science, the basics of a new hut appear. Drop your villagers on it to build the hut. Once the cloth hut is completed, the "pulpy vines" growing on the rock cliff to the left of the big stairs will be fully grown. Make sure you have a cutting tool from Puzzle 1 in your lab and then drop a villager at the base of the vines. They will go get a cutting tool and cut down three lots of vines to take to the lab. Fill the pot with salt water and put a hot rock under it. Then drop a villager on the table and they will add the vines to the pot. When the "stew" is done, drop a villager on the pot and they will carry a bowl of stewed pulp to the flat rocks on the shore. Keep dropping villagers onto the pulp until the cloth is ready. They will then store the finished cloth by the cloth hut. Each completed process creates three rolls of cloth.
Puzzle 9 is the creation of a Nursery School, so you can educate the children in your village. When you've achieved level 3 Learning, the beginnings of a new building appear. Get your builders to build it. Once it's finished, drag a villager who has mastered at least two skills to the building, and they will start teaching.
Puzzle 10 requires fishing nets, so you must complete Puzzle 12 first. (Seems out of order to me, but there doesn't seem to be a fully logical order to these puzzles!) Once your fishing nets are complete, fast running red crabs will start to appear on the north end of the beach. As soon as you see a crab, hit the spacebar to pause the game. Then go and find two children and drop them on the crab. Then hit the spacebar again to un-pause the game. The children will "distract the crab". While they are distracting the crab, drop an adult on the crab and they will pick it up and carry it to the mossy rocks at the base of the pond. Do this five times to clear each of the rocks.
Puzzle 11 requires availability of all food sources, so again, out of order—you need to complete Puzzles 7 and 12 first. Fill the pot with fresh water and put a hot rock under it to boil it. Get one of each plant (sweet, spicy, and soapy) and add to the pot. Then drop a villager onto the pot to add food from the food bin. This needs to be done twice. Now send a villager to collect berries, one to collect the yellow fruit, and one to collect a fish. It should say that they are "adding to the stew. A child needs to go to find a mushroom and they will add that to the stew too. The whole community is involved! When everything is added, you will get the grand feast. If the stew goes cold while you're still collecting ingredients, simply heat another rock and warm the stew up again. You can continue your recipe. When the grand feast stew is ready, everyone will come get a bowl of it and they will all gather around the fire for their meal.
Puzzle 12 Requires cloth, so you must complete Puzzle 8. When you've created cloth, drag someone to the broken piers on the beach and they will fix them. Keep dragging people on them and they will get cloth from the hut and repair the fishing nets. It takes about six rolls of cloth to repair the fishing nets.
Once you have the fishing nets, your villagers will have another source of food.
Puzzle 13 Requires level 2 dendrology, cloth, soap, and a cutting tool. Drag a villager to the tree and drop them on the sick branch. They will get some cloth to bind the tree. Once the tree is bound, drag someone to the cutting tools and they will cut off the sick branch. Finally, drag them onto the soap and they will clean the cut.
Puzzle 14 requires 20 villagers. Make a stew with fresh water and three sweet smelling flowers. Add some food from the food bin to the stew to finish it. Then drag 20 villagers onto the cooking pot. They will start carrying bowls of yellow colored stew to the Tree of Life.
Puzzle 15 requires level three dendrology and soap. To purify the tree, you need a villager who is both clean of mind and body. Once you've bought the highest level of dendrology, drop a villager near the wind flutes and they will start to meditate. HINT: Since the villager cannot be interrupted during meditation, send someone to teach at the school or to have an adult tell the children a story so they don't interrupt meditation. Adults clearing the river obstruction shouldn't get in the way. Once the villager is done meditating, they will be "clean of mind" and yellow orbs appear around their head. Now they have to become "clean of body" too. Drop a bar of soap in the pond and drop the villager with the yellow orbs in the pool. Wait until they're clean, which you can tell by the white sparkles around them. When you have a villager who is both clean of body and mind, drop them on the hole in the trunk of the Tree of Life. They will go inside the tree, take out some rotting roots and throw them on the fire. Now the tree is purified!
Puzzle 16 requires four steps completed in healing the tree, and three rolls of cloth. When it says "the Tree of Life is recovering" in your tech menu, you will start seeing a purple hummingbird flying around your village. At this point you can drag a villager onto the crates with the moth-eaten braids in the bottom left corner of the lab. They will take one of the braids and take it to a flat rock by the sea. Drop a villager onto the braid, and they will gather a roll of cloth to repair the rope. When you drop a villager on the finished rope, it will tell you that "the lei needs more flowers". Now watch where the hummingbird is goes. The hummingbird will hover around some flowers to pollinate them, after which you can drop a villager on the flower to pick it. If the hummingbird didn't pollinate a flower it will keep telling you "this flower is not in full bloom yet". You can usually get several flowers from one plant. You need six flowers for one lei and three leis to complete the puzzle. Note that if you interrupt your villager as they are carrying the lei to the tree you will have to make the whole lei again from scratch!
Well done, you've now cured the Tree of Life!
After you've finished all the puzzles you can continue playing with your tribe. Try to collect all the trophies!
Stews
As a general rule, stews to be eaten are made with fresh water, and stews used to make items are made with salt water.
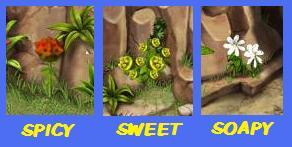
You need three herbs to make a stew. I don't have all the combinations below, so experiment!
There are three types of herbs: sweet, spicy, and soapy.
Fresh Water: Here are some stews made with fresh water.
- 3 Soapy will make your villagers vomit. Not so good!
- 2 Soapy 1 Spicy= Soapy burps; you can get the Soapy Stew trophy (25 villagers)
- 1 Soapy 1 Spicy 1 Sweet = This is the The Grand Feast Puzzle 11; needs blackberries, tree fruit, fish, and mushroom
- 1 Soapy 2 = Soapy hiccups; you can get the Hiccup trophy (25 villagers)
- 3 Spicy = Stew is really spicy! Makes villagers drink from the stream.
- 2 Spicy 1 Sweet = Everyone drinks, causes hiccups.
- 1 Spicy 2 Sweet = Yummy! Everyone drinks and gets healthier!
- 3 Sweet = use for Honor the Tree Puzzle 14; needs 20 villagers.
Salt Water: Stews made with salt water
- 3 Soapy = Soap; need for Puzzles 4 and 15!
- 3 Pulpy vine = Cloth; Once made, must refine (Puzzle 8); need for Puzzles 8, 12, and 13!
Collectibles
- The collectibles are incorporated into the game.
- When mist comes in from the ocean, the wind flutes blow...and collectibles appear. A complete collection of wind flutes is +5 to your max population and causes many more rare collectibles to appear when the mist blows in.
- When the mausoleum collection is complete, your max population goes +5, and ghosts of dead villagers will appear to point out rare collectibles.
- When the lab collection is complete, max population goes +5 and researchers earn tech points more quickly.
- When the fish scale collection is complete, max population goes up again. Completion is also supposed to make the golden fish appear in the nets...
Content(s) of this game guide may not be copied or
published on any other site without permission from Casual Game Guides.
©CasualGameGuides.com 2006 - 2021