
Haunted Legends: The Queen of Spades
Haunted Legends: Queen of Spades Walkthrough provides locations of all necessary objects and solutions to puzzles with screenshots and videos. Also included are the locations for all 52 cards. Haunted Legends: Queen of Spades is a classic Hidden Object Puzzle Adventure game with a good combination of both puzzles and hidden object scenes. It is your job to discover the reason behind the mysterious disappearances. Find out the cause of the curse and what the secrets behind the magical deck of cards.
Haunted Legends: Queen of
Spades is a classic Hidden Object Puzzle Adventure game
with a good combination of both puzzles and hidden object scenes.
This walkthrough will provide you with locations of all
necessary
objects and solutions to puzzles with screenshots and videos. Also
included are the locations for all 52 cards. It is your job
to discover the reason behind the mysterious disappearances.
Find out the cause of the curse and what the secrets behind
the magical deck of cards.
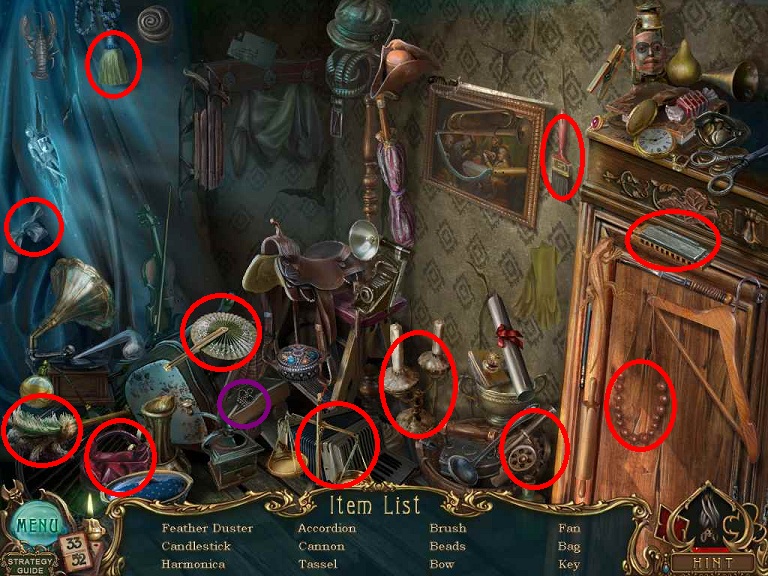
The graphics are clear and the objects are not impossible to find. The overclicking penalty will slow you down but you have to really overclick to get it. In addition to the standard working your way through to the end, you will need to pick up a deck of cards that has been interspersed through all of the scenes in the game. All of the game controls are completely standard. A journal is included but does not give you too many hints for your next objective.
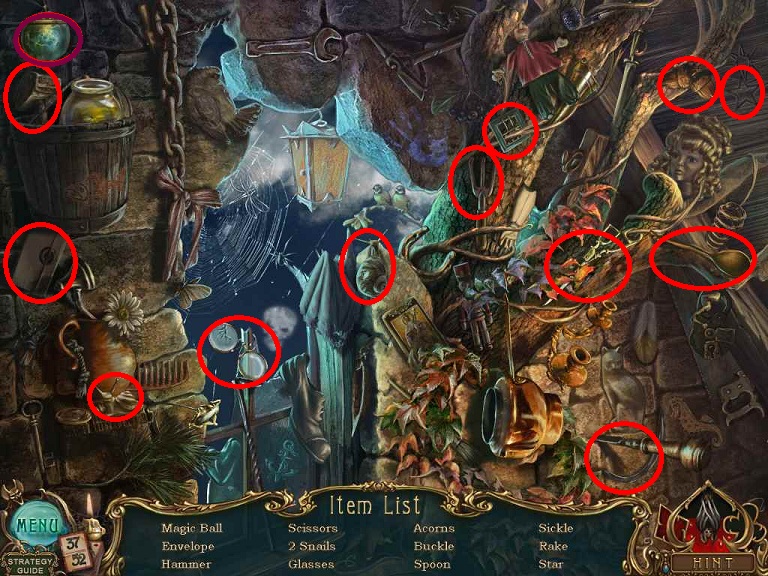
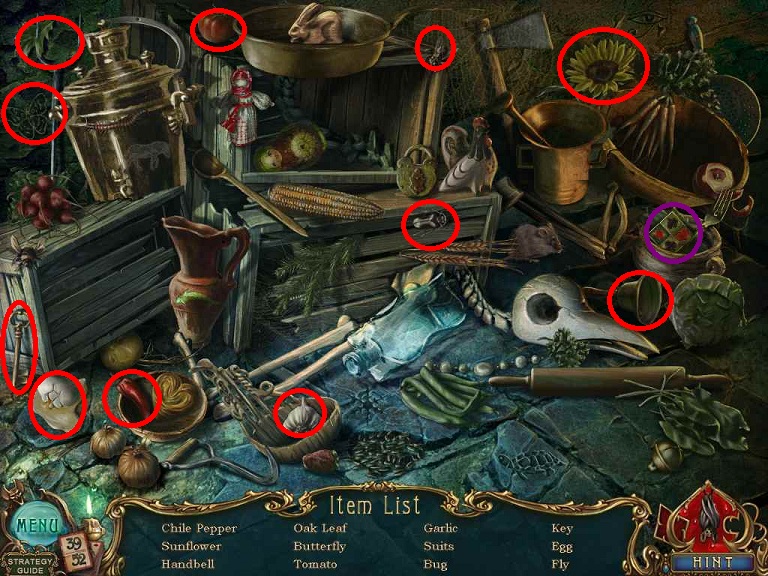
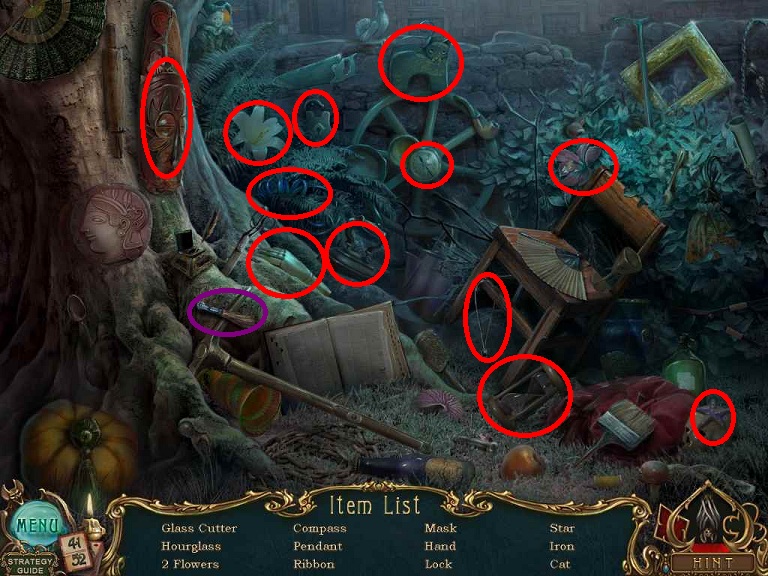
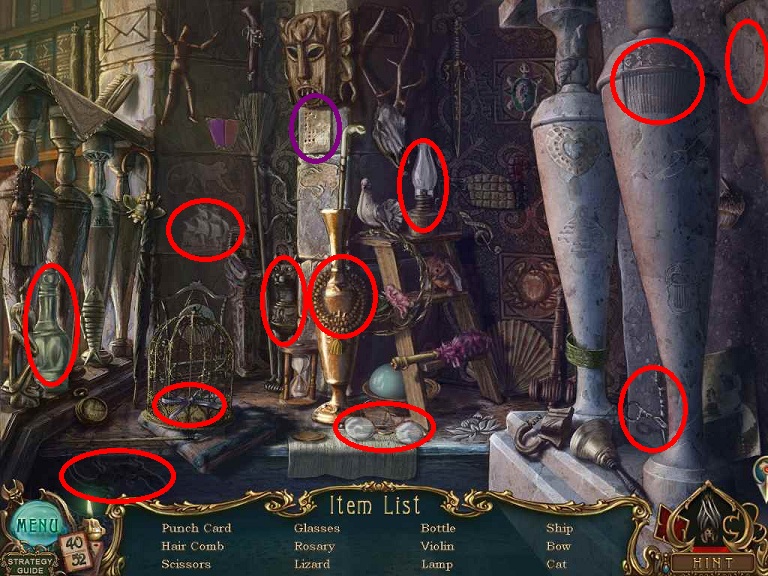
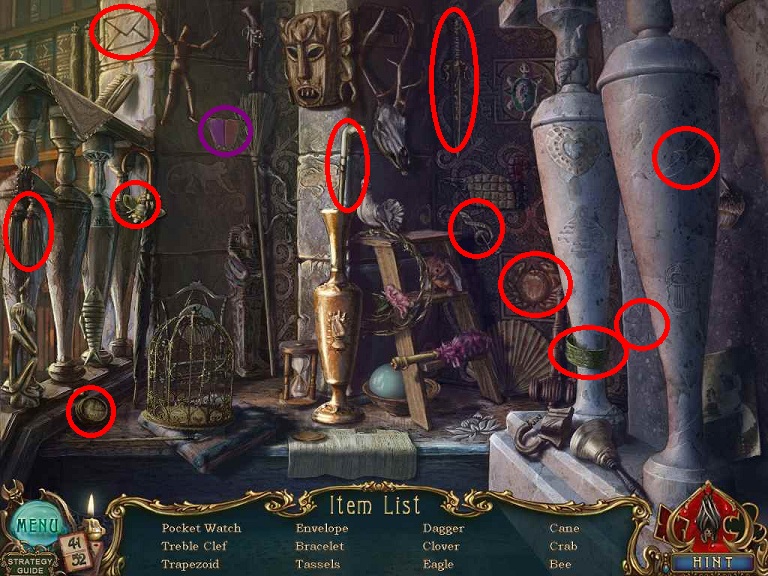
Walkthrough Information: White circles are used for the 52 playing cards and purple circles are items that need to be picked up.
The Gate
Servant's Hallway
The Second Dining Room
The Kitchen
The Ballroom
The First Floor Hallway
Piano Room
The Stable Attic
The Gazebo
The Boat Dock
Outside the Summer House
Summer House
First Floor Hallway
The Stairs
The graphics are clear and the objects are not impossible to find. The overclicking penalty will slow you down but you have to really overclick to get it. In addition to the standard working your way through to the end, you will need to pick up a deck of cards that has been interspersed through all of the scenes in the game. All of the game controls are completely standard. A journal is included but does not give you too many hints for your next objective.
Walkthrough Information: White circles are used for the 52 playing cards and purple circles are items that need to be picked up.
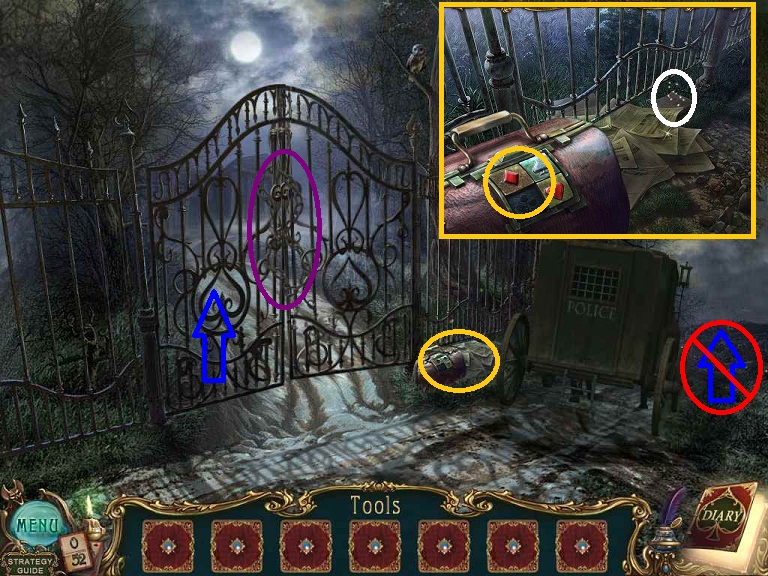
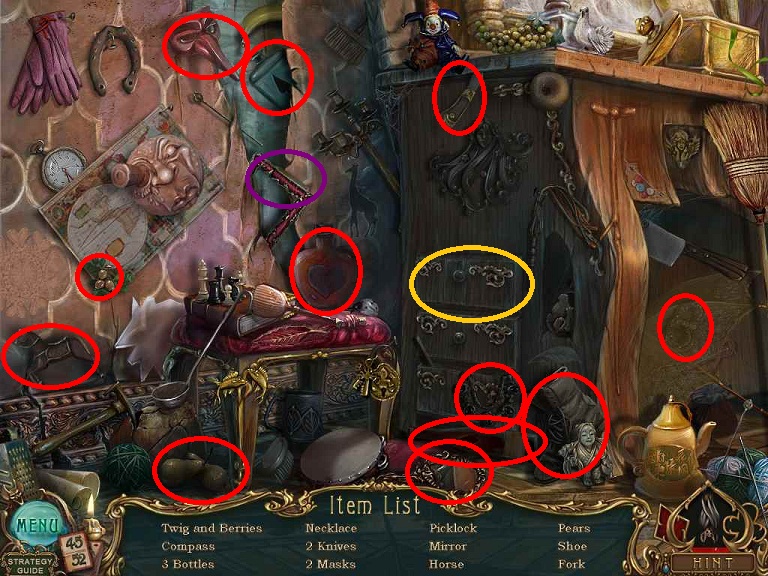
The Gate
- Click on the CHAIN on the Gate
- Pick up the CHAIN from the ground
- Examine the Valise
- The Valise is locked and needs a button for the lock.
- Click on the newspaper
- Pick up the KING OF DIAMONDS
- Note the police van blocking the way to Town.
- Click on the Gate and enter
- Examine the alcove behind the fountain
- Pick up the OIL CAN
- Examine the broken railing on the steps
- Examine the purse
- Pick up the JACK OF DIAMONDS
- Note the side path on the left with vines blocking it.
- Head to the right
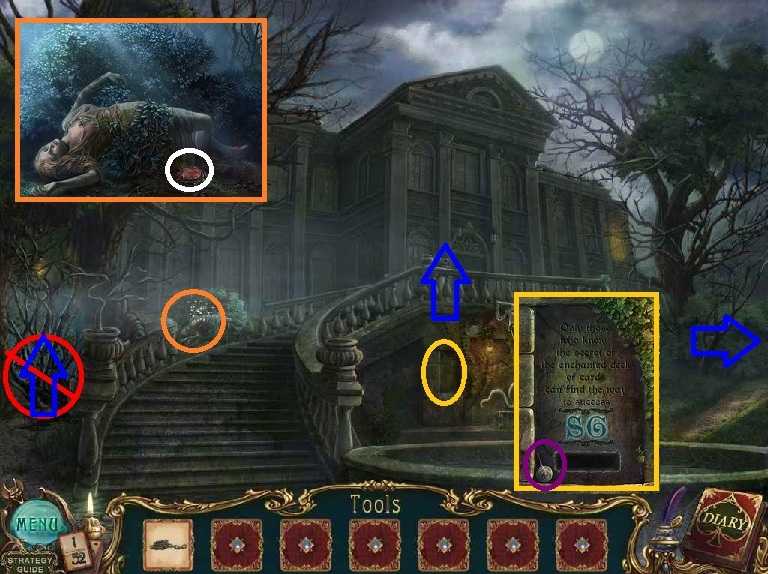
- Examine the Well
- Use the OIL CAN on the HACKSAW
- Pick up the HACKSAW
- Pick up the ACE OF HEARTS from the well roof
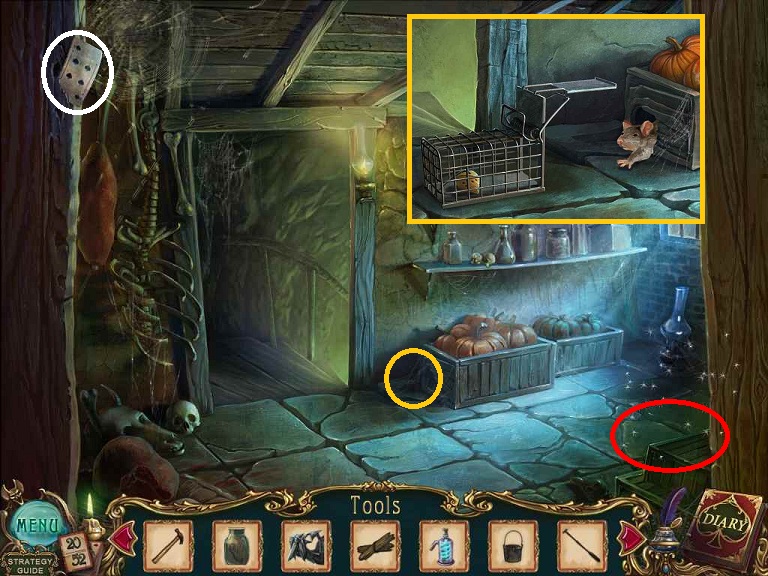
- Examine the raven--you need to find him some food. There must be something important at the well.
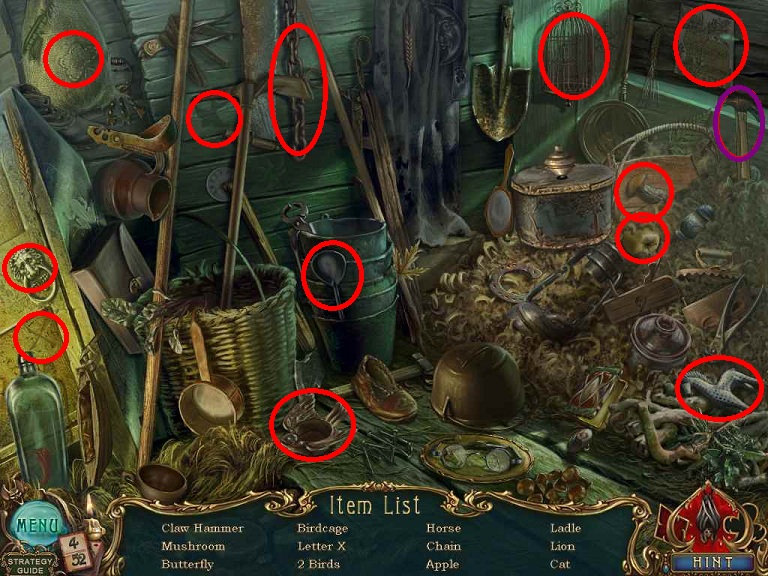
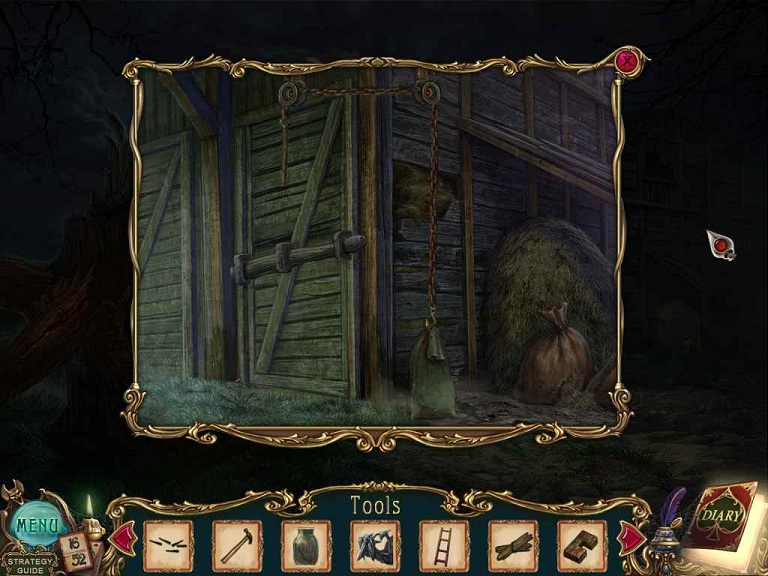
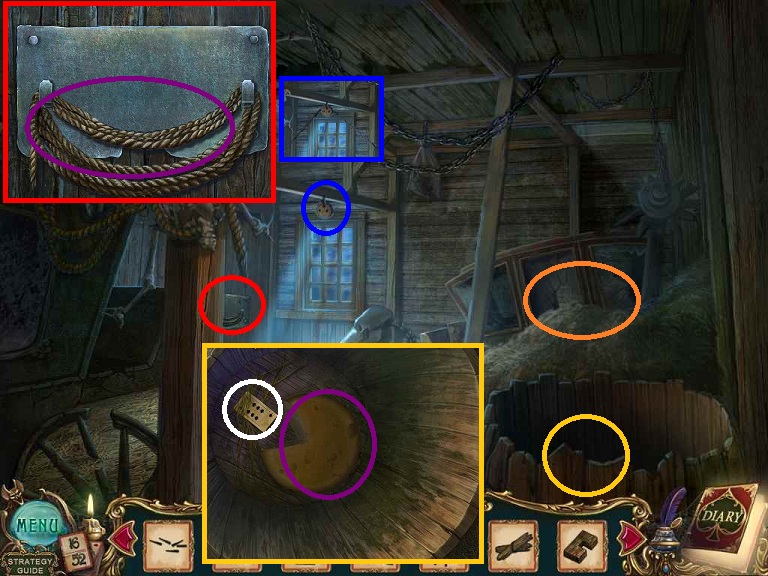
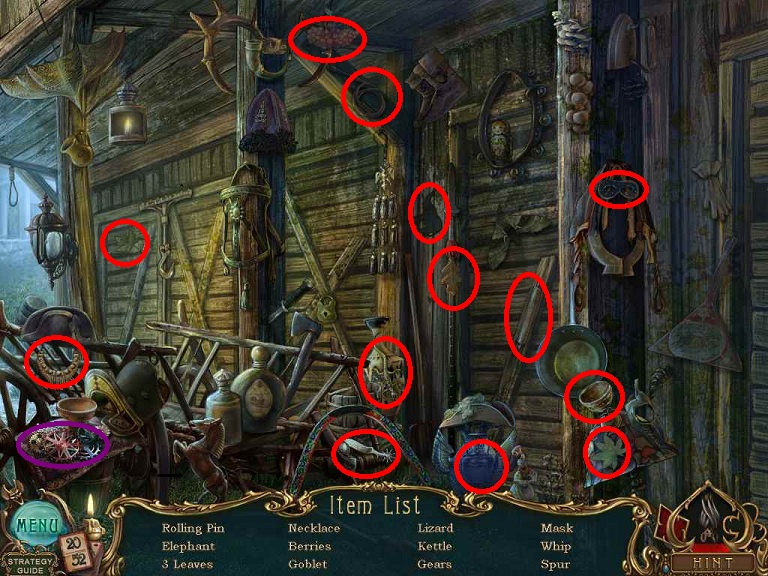
- Head into the shed
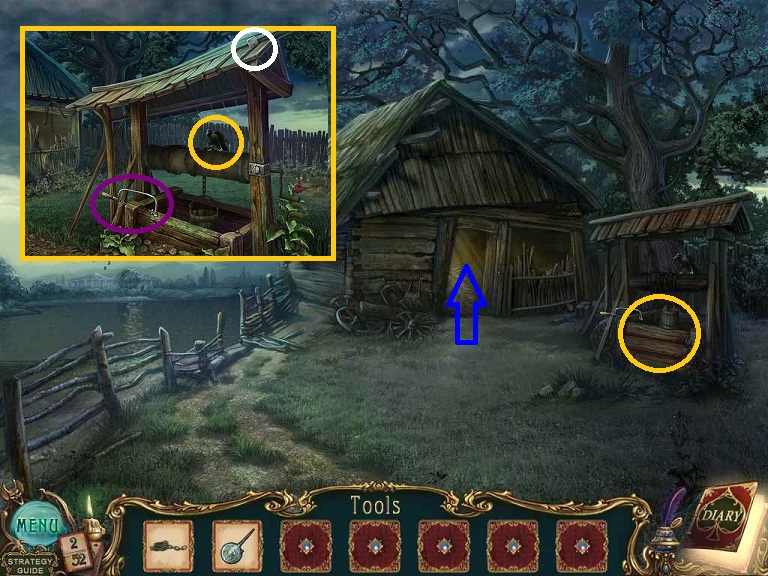
- Do the hidden object scene.
- You need to click on the top of the horse toy to get the horse running.
- Obtain a GAS CAN
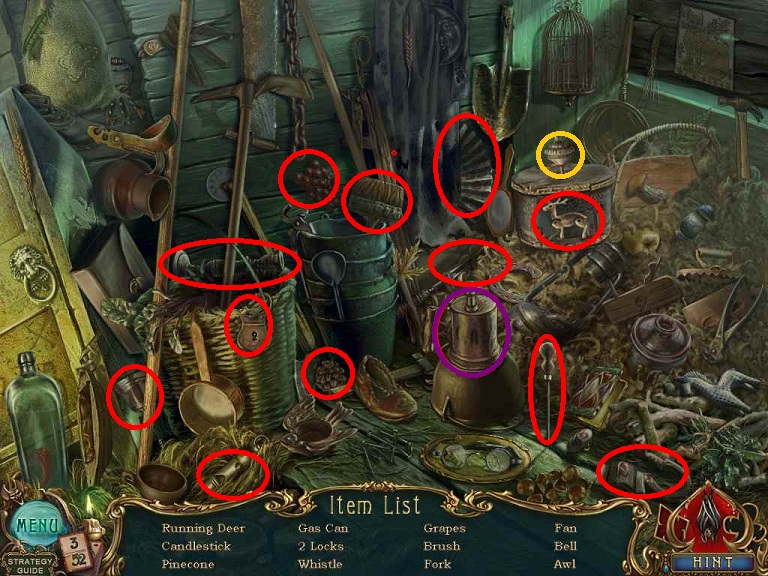
- Pick up SPOKES on the ground
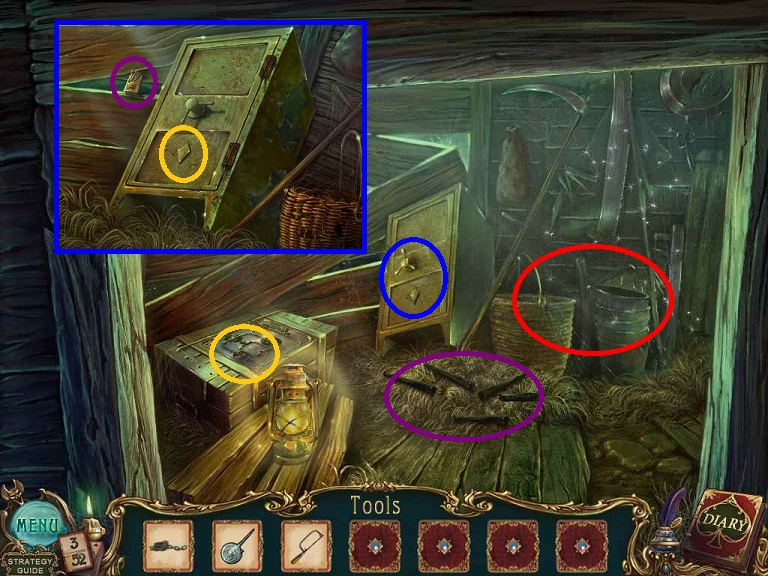
- Examine the Safe
- Pick up the MATCHES
- Note the keyhole.
- Examine the Chest.
- You need a slider piece.
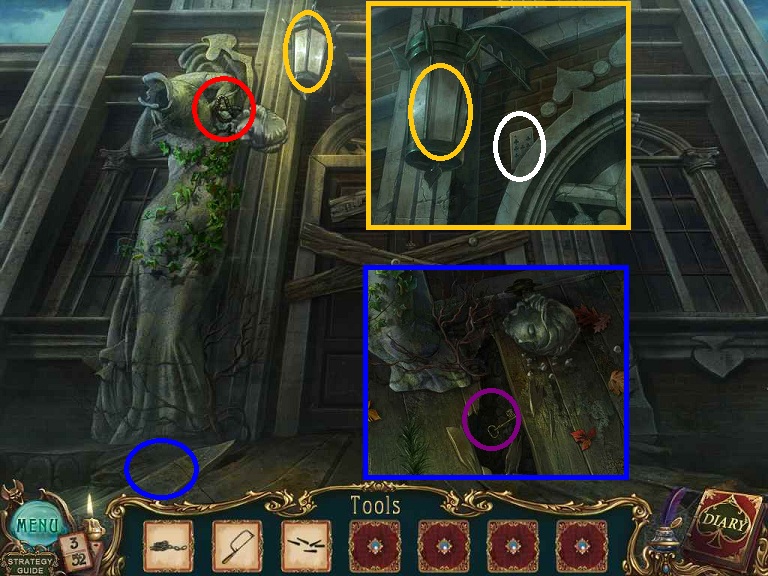
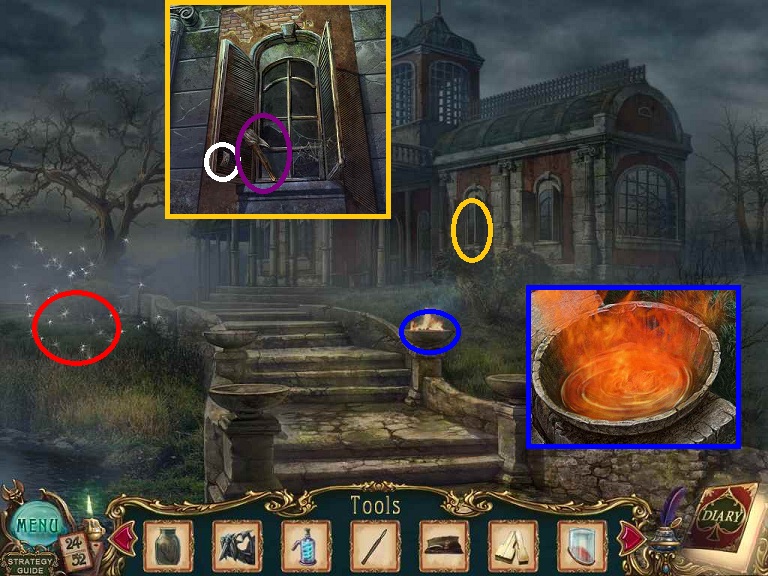
- Return to the Well and Fountain and then go up to the Front Door.
- Examine the left lamp and click on it.
- Pick up the 7 OF CLUBS
- Use the GAS CAN and the MATCHES (both from the shed) to light the lamp.
- Examine the statue head to the left.
- Use the HACKSAW on the head.
- Examine the ground where the head fell.
- Pick up the SAFE KEY
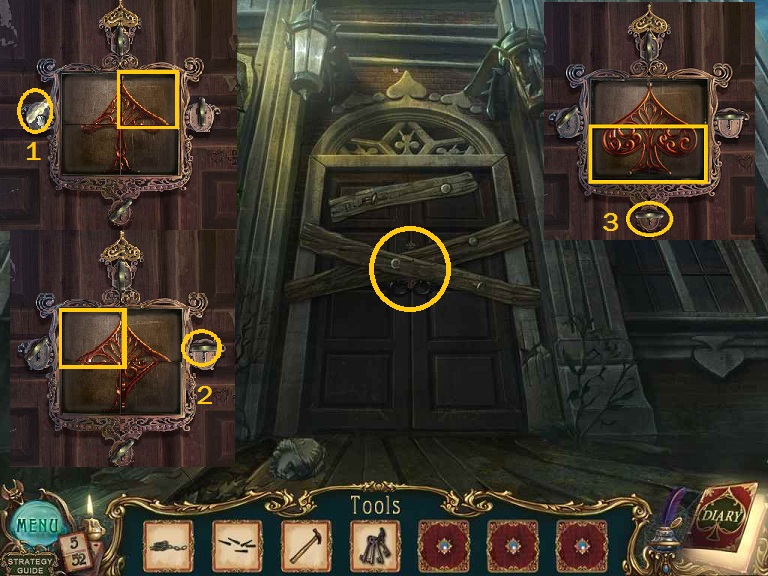
- Examine the boards on the door. You need to pry
it open somehow.
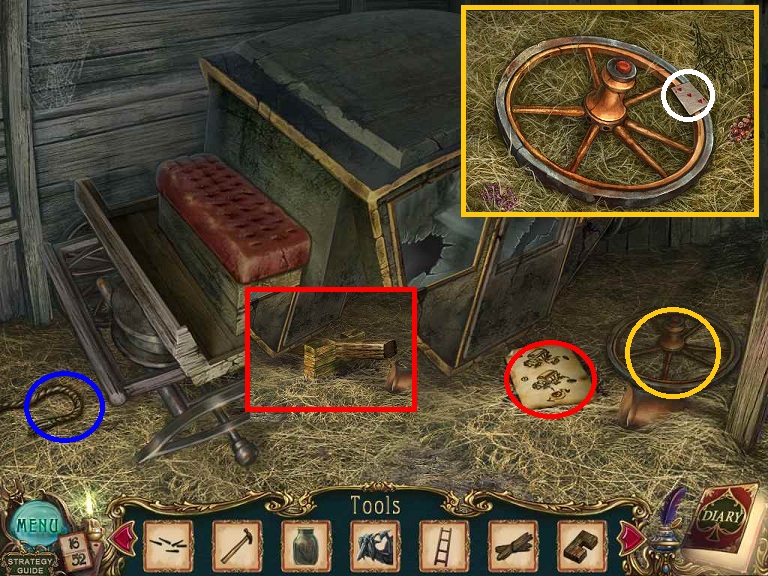
- Return to the Shed
- Do a 2nd HOS
- Receive the CLAW HAMMER
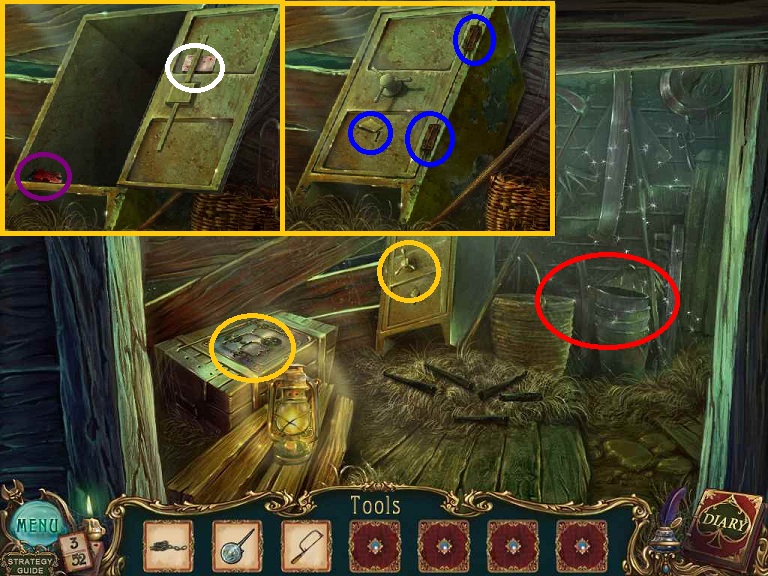
- Click on the safe
- Use the OIL CAN on the 2 rusty hinges.
- Click on the diamond-shaped keyhole cover
- Use the SAFE KEY
- Click on the safe handle
- Pick up SLIDER
- Pick up the 2 OF DIAMONDS
- Examine the chest
- Place the SLIDER on the puzzle
- Pick up 4 KEYS (for the front door)
- Return to the Front Door
- Use the CLAW HAMMER to remove the 5 nails and boards
- Place the 4 KEYS to make a spade image
- Click the left key to get the spade at the top right.(1)
- Click the right key to get the spade at the top left (2)
- Click the bottom key to get the spades at the bottom (3)
- Click on gears when puzzle is done
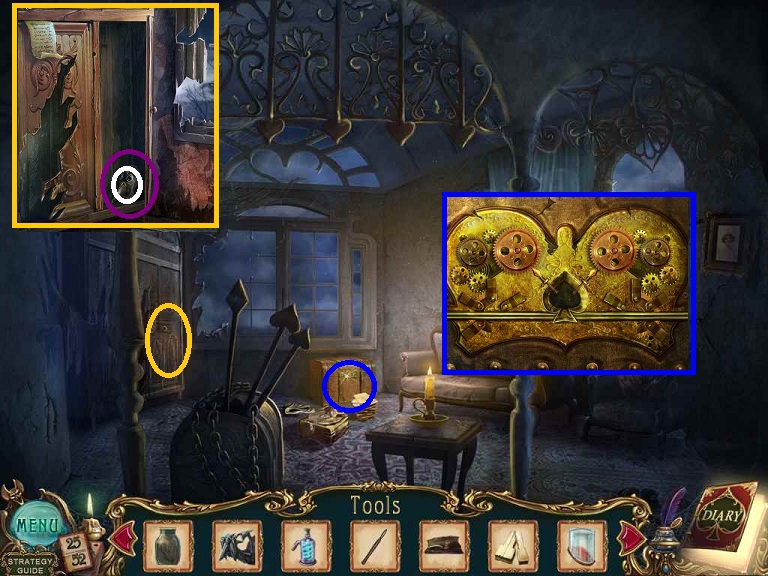
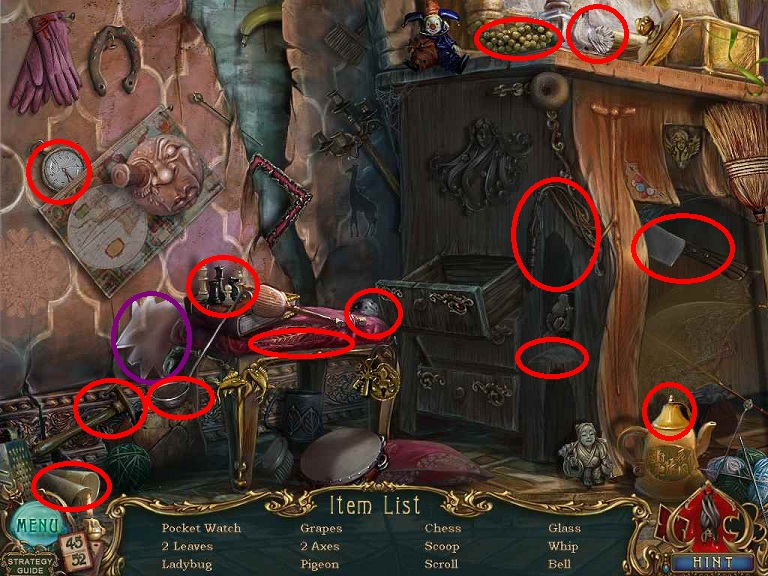
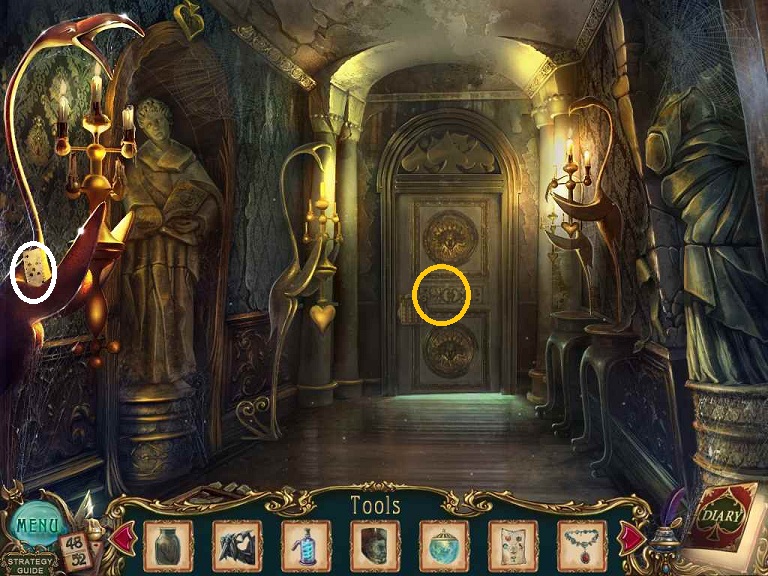
- Enter the mansion
- Pick up the GAFF HOOK
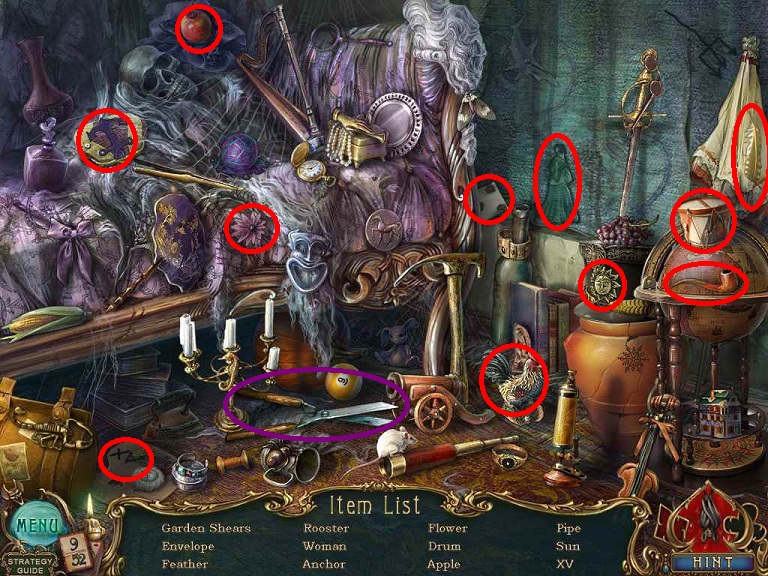
- Examine the table to the right
- Pick up the 3 OF SPADES
- Examine the door to the left. You need something to "chop it out."
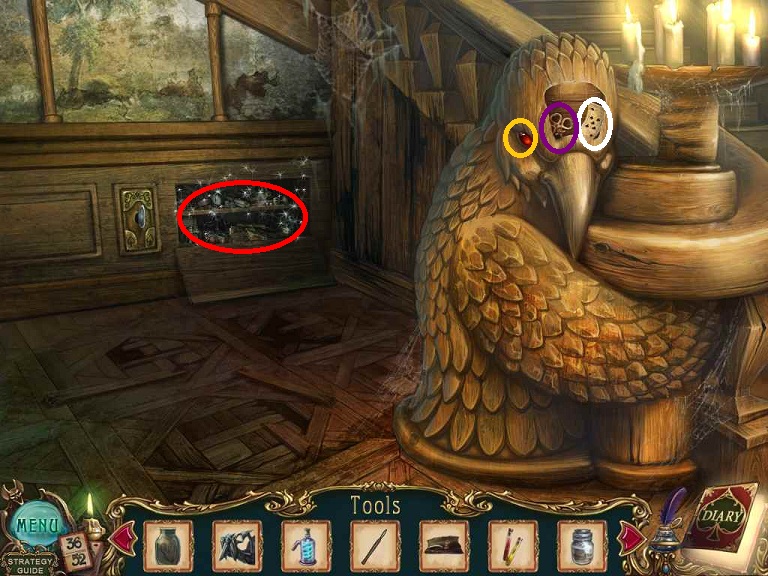
- Examine to the area to the left of the stairs
- Pick up the KNIFE
- Examine the area behind the bird statue
- Pick up the LEVER
- Pick up the 5 OF HEARTS
- Place the LEVER in the hole in the wall
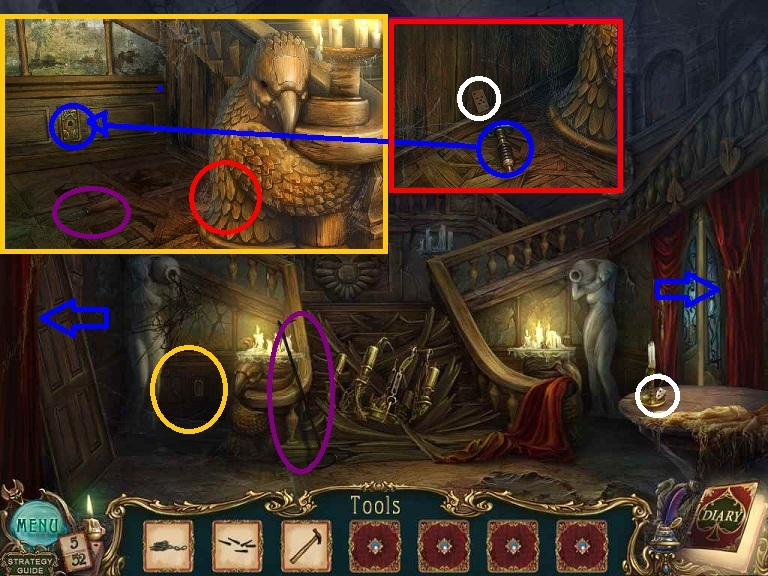
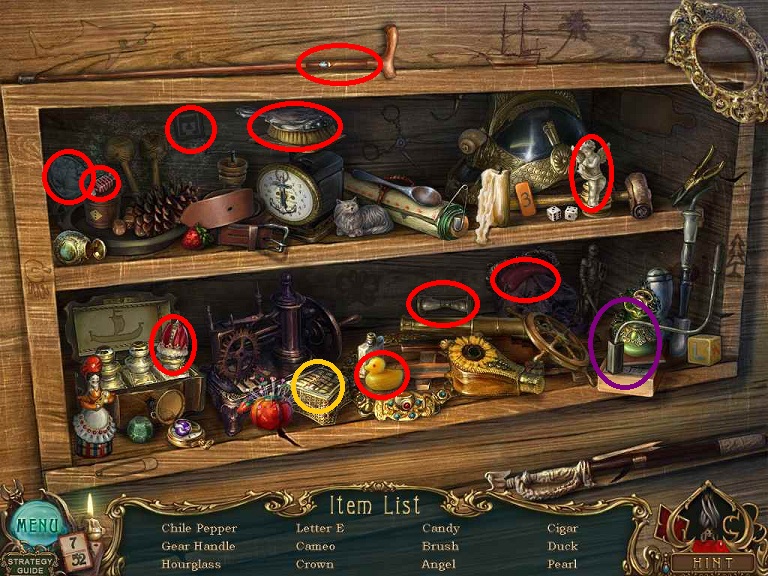
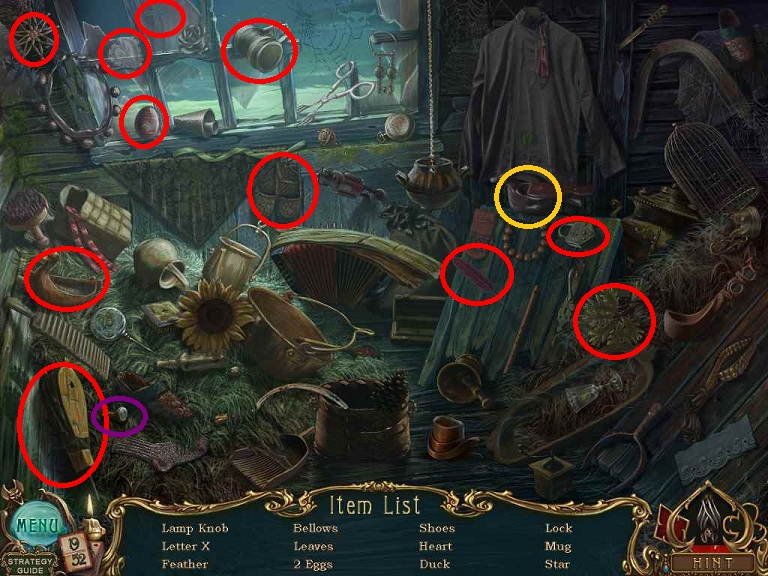
- Do a HOS
- To find the pearl, open the small jewelry box.
- Obtain the GEAR HANDLE
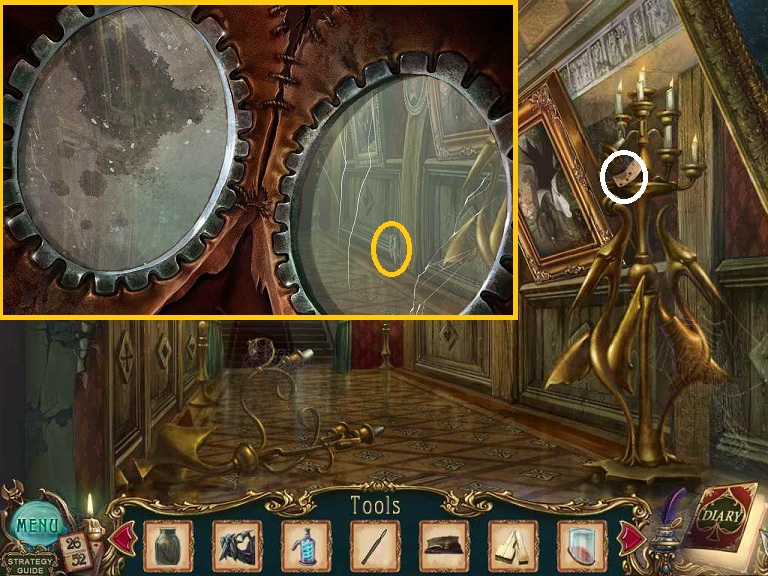
- Examine the bird head and note it is missing an eye and has a secret compartment
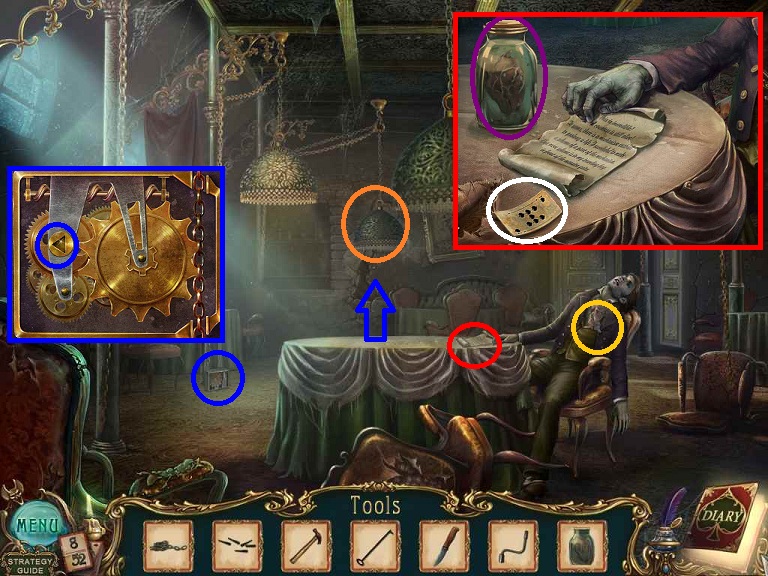
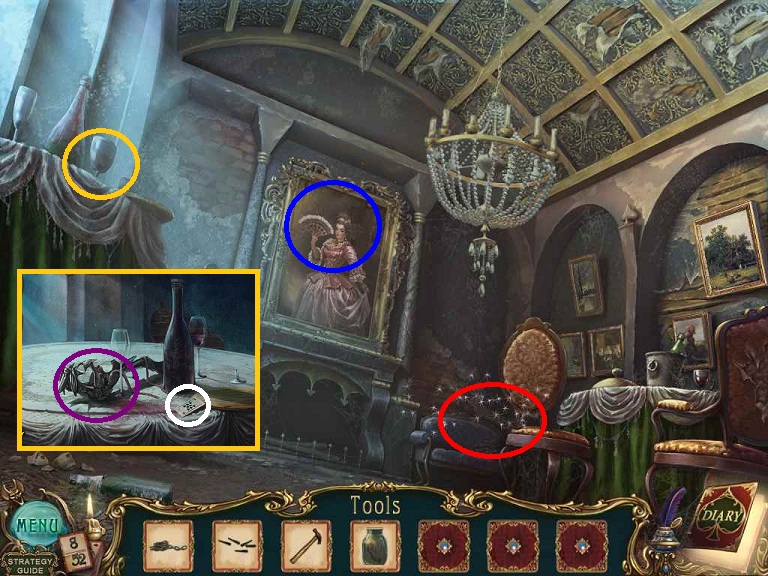
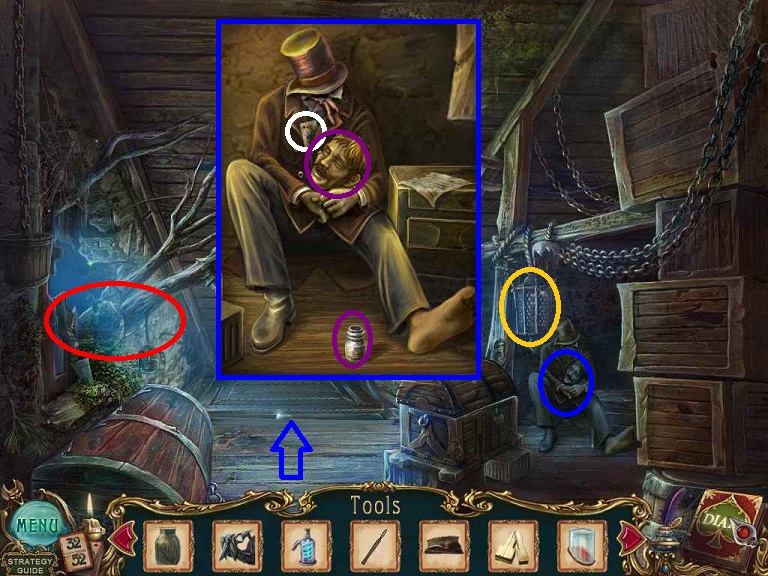
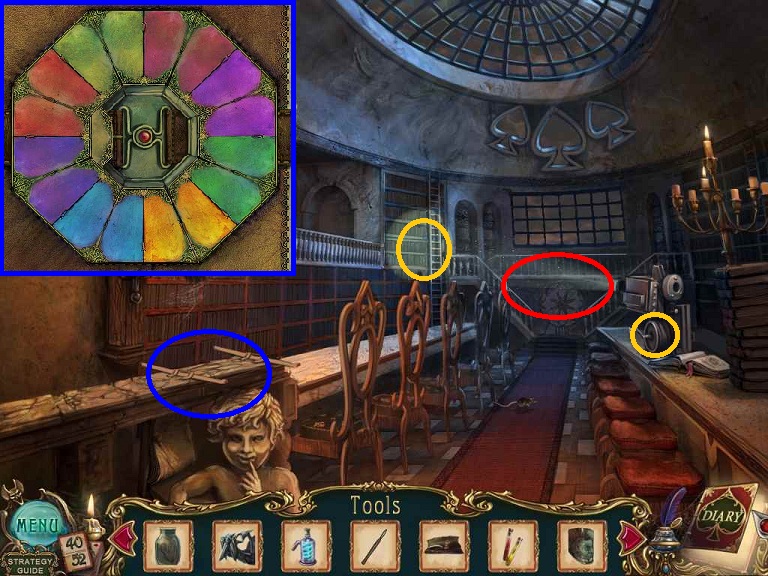
- Take the door to the right and enter the Dining Room
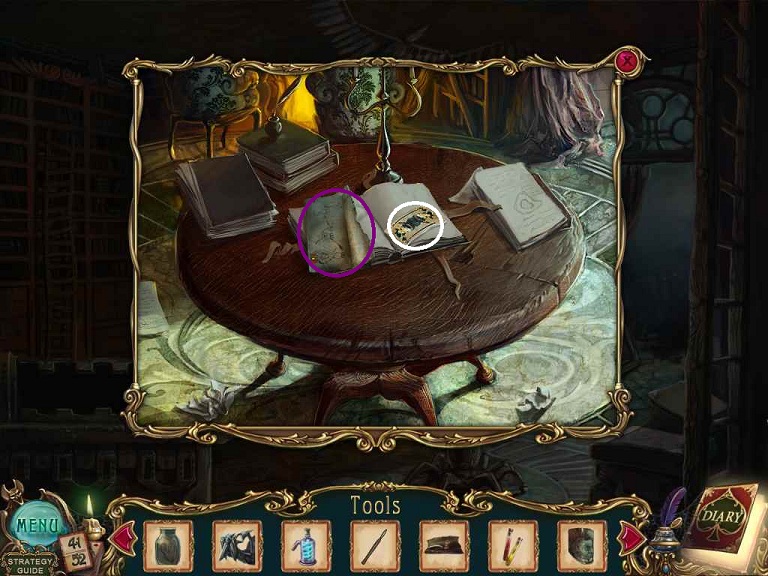
- Examine the body of the dead man
- Pick up the diary page.
- Examine the code for the traveling bag (this code will copy into your journal)
- Examine the table near the hand
- Pick up the HEART
- Pick up 7 OF SPADES
- The door to the right goes to the Servant's Hallway; you need a lamp knob to turn up the light.
- Examine the box on the floor to the left
- Insert the GEAR HANDLE (from the Foyer) and click on it
- Use the GAFF HOOK (from the Foyer) on the lamp
- Use the KNIFE (from the FOYER) on the red curtains
- Go through the hole in the wall
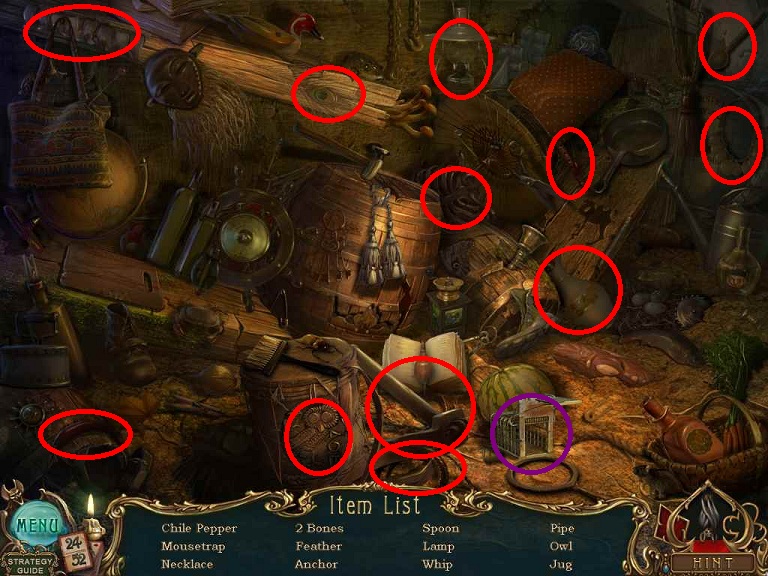
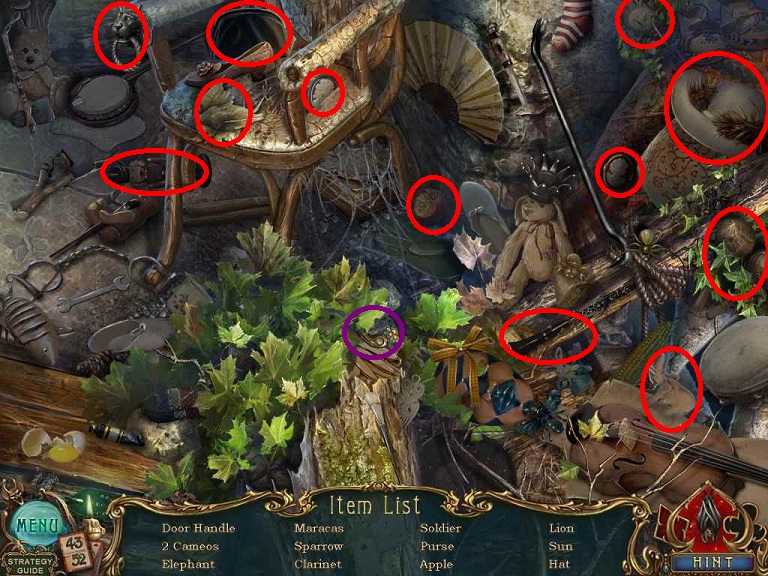
- Do the HOS scene
- Receive GARDEN SHEARS
- Examine table to the left
- Pick up the MECHANICAL ARM
- Pick up the 8 OF CLUBS
- Examine the painting of the countess; you can cut this loose
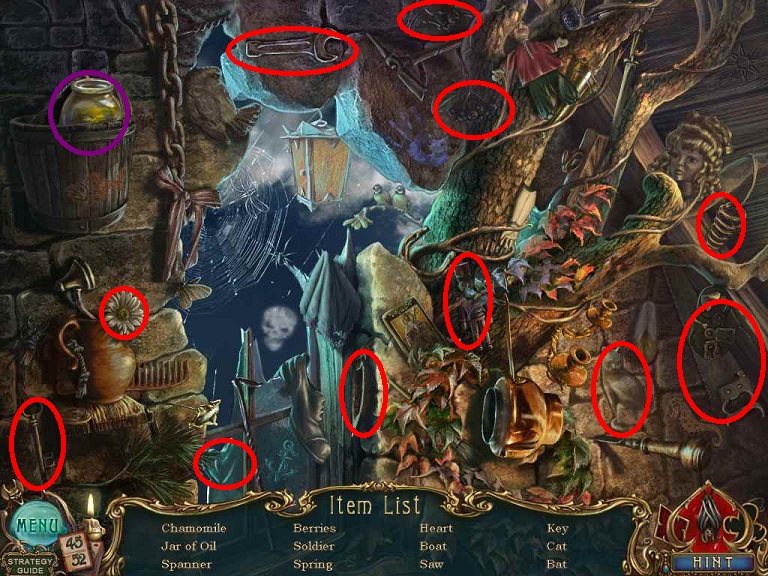
- Return to the Fountain
- Use the GARDEN SHEARS on the vines to the left
- Go forward
- Hole in tree stump
- Pick up the HOOK
- Pick up the JACK OF HEARTS on tree stump
- Examine the stable door
- Pick up the LADDER
- Examine the pulley
- Use CHAIN (from the Front Gate)
- Attach the chain to the hook on the door
- Use the HOOK on the right end of the chain
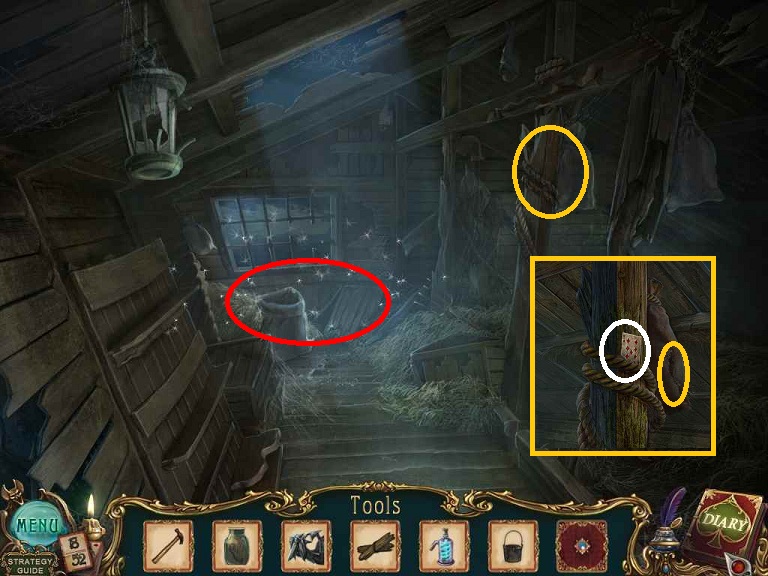
- Need something heavy
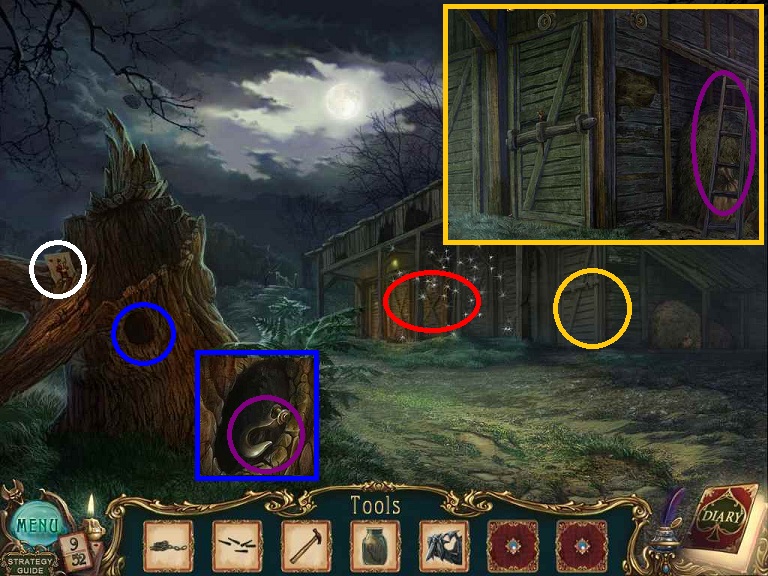
- Do the HOS
- Click on lamp to obtain the doll hand
- Obtain WOOD BOARDS
- Head forward
- Pick up the 4 OF HEARTS on the right railing
- Pick up the BEAM on the ground
- Examine the bushes to the right
- Pick up the HANDKERCHIEF
- Pick up the WAGON JACK
- Pick up the 6 OF HEARTS
- Head forward
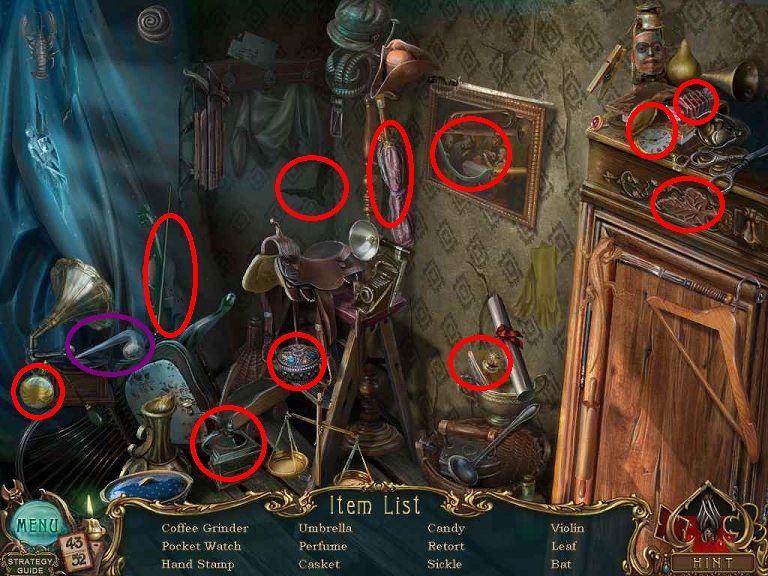
- Do the HOS
- Click on the urn spigot to get a cup of hot water below
- Receive the WOODEN LADLE
- Examine the left birdcage
- Pick up the SCREWDRIVER
- Pick up the KING OF CLUBS
- Examine the center birdcage; the oar blade is locked inside and you need a bird key
- Back up and go down the stairs
- Examine the water to the left of the dock
- Pick up OAR HANDLE
- Pick up 5 OF DIAMONDS
- Click on the boat to move it out of the water
- Examine the boat
- Use the WOODEN LADLE twice to empty out the water
- Pick up the CLUB BUTTON for the traveling bag
- Click on the rag and note the hole in bottom that needs repairing
- Back up to the Gate
- The van is driven away and you can now get into the Town
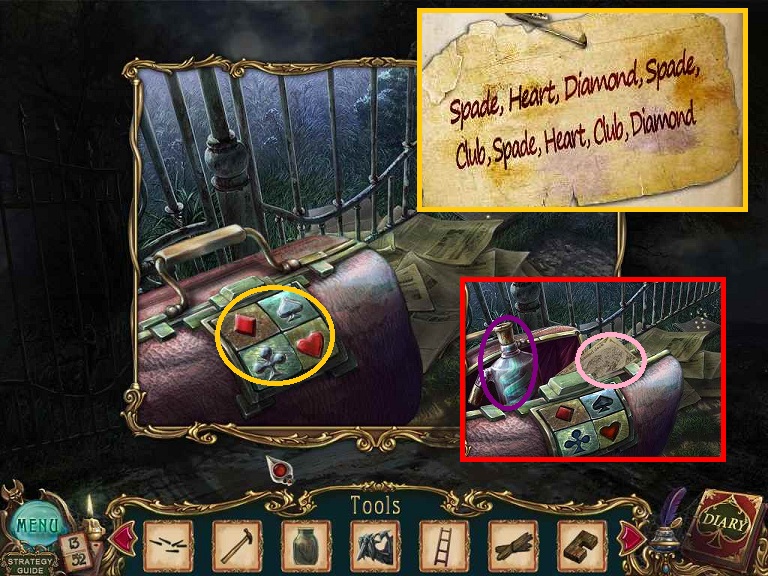
- Use the CLUB BUTTON on the traveling bag
- Follow the pattern given in the diary; Spade, Heart, Diamond, Spade, Club, Spade, Heart, Club, Diamond
- Pick up the GLASS COIL and diary page.
- Head right into the Town
- Pick up the SANDBAG
- Pick up the 8 OF SPADES
- Pick up the BUCKET OF PITCH
- Head through the archway to the left
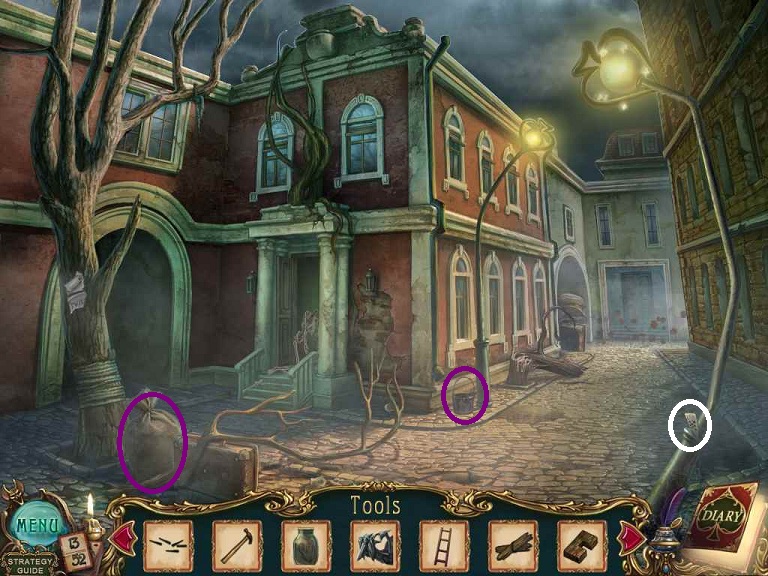
- Pick up the 10 OF HEARTS
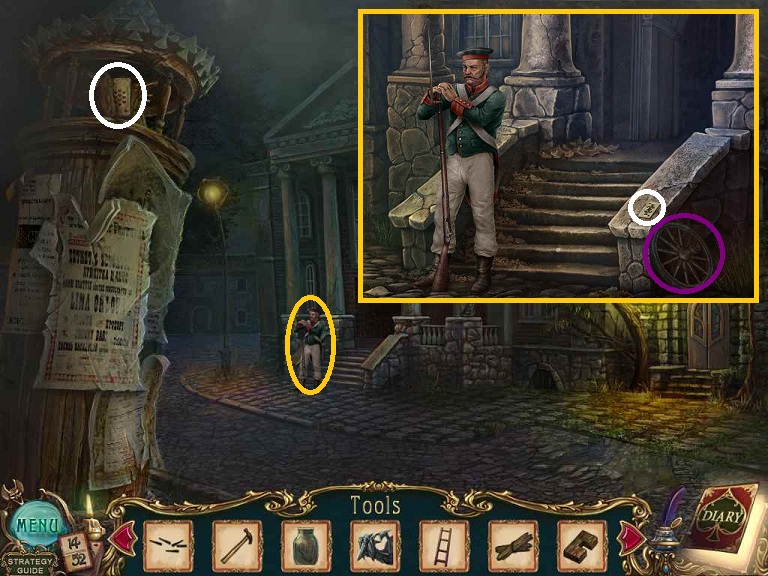
- Examine the guard
- Pick up the WHEEL
- Pick up the JACK OF SPADES
- Return to the Stable
- Examine the stable door
- If you have not done it already, place the CHAIN (from the front gate) on the pulley.
- Place the CHAIN on the hook on the door.
- Place the HOOK (from the tree stump) on the CHAIN
- Place the SANDBAG (from the Town) on the HOOK
- Click on the door
- Enter the Stable
- Examine the barrel in front of you
- Pick up CHEESE
- Pick up the 6 OF SPADES
- Pick up up the ROPE from side wall
- Click on hooks again to discover you need a windlass
- Examine the pulley
- Place the ROPE on the pulley
- Examine the coach
- Pick up the note for instructions to repair the coach
- Examine the wheel on the ground
- Pick up the 3 OF HEARTS
- Repair the wheel by using the BUCKET OF PITCH (from Town)
- Use the SPOKES (from the Shed)
- Click and drag each spoke onto the wheel
- Receive the WHEEL
- Repair the coach by placing the WAGON JACK and BEAM (from the stairs to the gazebo)
- Click on the BEAM
- Place 2 WHEELS (from above and Outside the Library)
- Attach the ROPE to the coach by clicking on it.
- Return to the Well
- Use the CHEESE on the crow
- Use the SCREWDRIVER to remove the screw
- Pick up the WINDLASS
- Return to the Stable
- Place the WINDLASS on the hooks
- Attach the ROPE to the WINDLASS by clicking on the ROPE
- Click on the WINDLASS to move the coach out of the way.
- Place the LADDER (from the Stable Door) to access the hole in the ceiling.
- Go forward
- Do the HOS
- Click on the wooden bird to get an egg.
- Receive a LAMP KNOB
- Examine the sack on the center beam
- Pick up the 9 OF DIAMONDS
- Return outside
- Do the second HOS
- Receive GEARS
- Return to the mansion and the Dining Room and then go right
into the Servant's Hallway
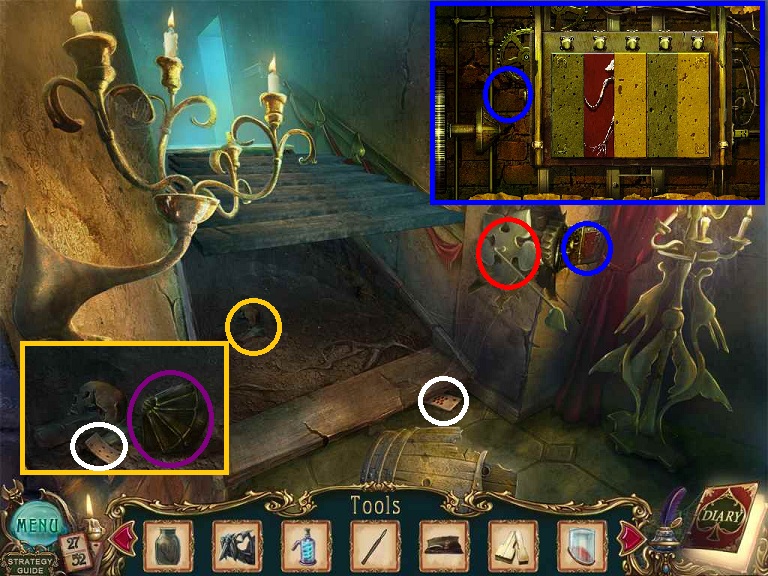
Servant's Hallway
- Examine the lamp
- Place the LAMP KNOB and click on it
- Note the locked door straight ahead
- Pick up the 6 OF CLUBS
- Turn left into the Servant's Bedroom

- Pick up the OAR to the right
- Examine the bed
- Lift covers
- Pick up the GLOVES
- Pick up the 3 OF CLUBS
- Examine the cabinet to the right
- Pick up a KEY
- Examine the stove
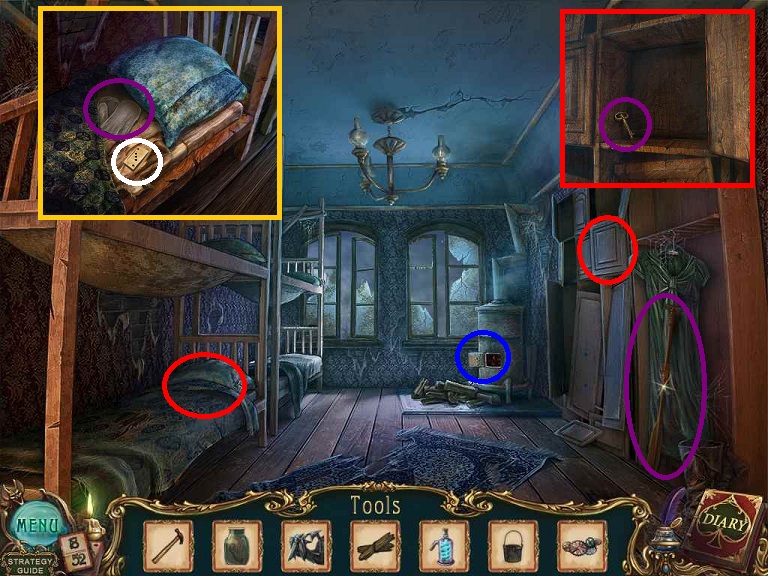
- Use the GEARS (from Outside the Stable)
- Solve the gears puzzle by clicking on the gear you wish to go into the empty spot.
- Unfortunately there is no way to reset this game
- Use the GLOVES to pick up the SCALPEL
- Return to the Hallway and use the KEY on the door
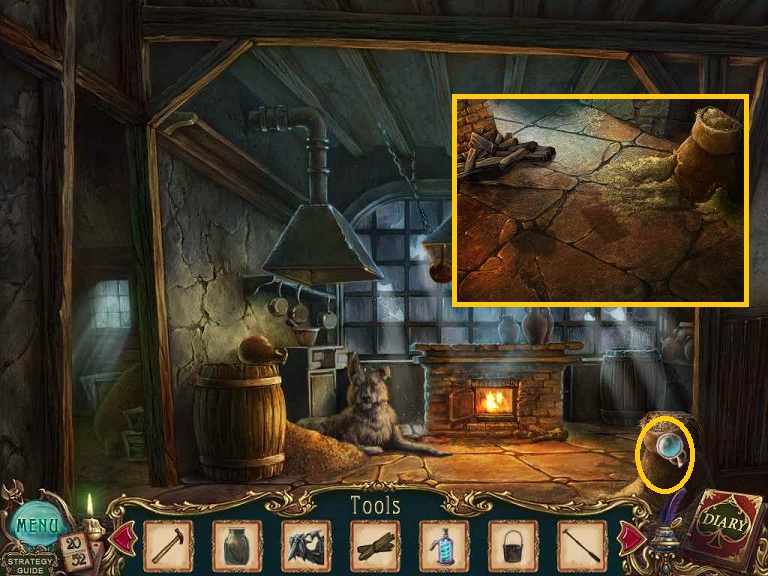
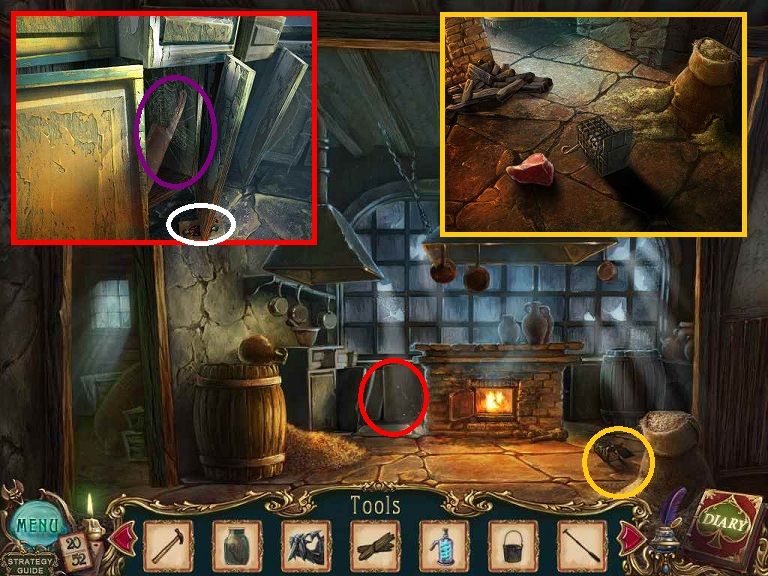
- Enter the Kitchen
- Note the dog; you need to figure out how to distract him
- Head left into the Pantry
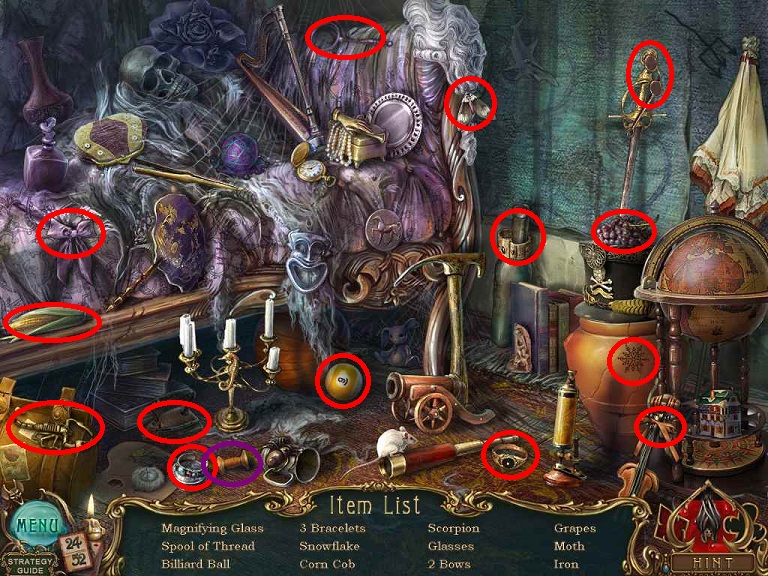
- Do the HOS
- Receive a SLAB OF MEAT
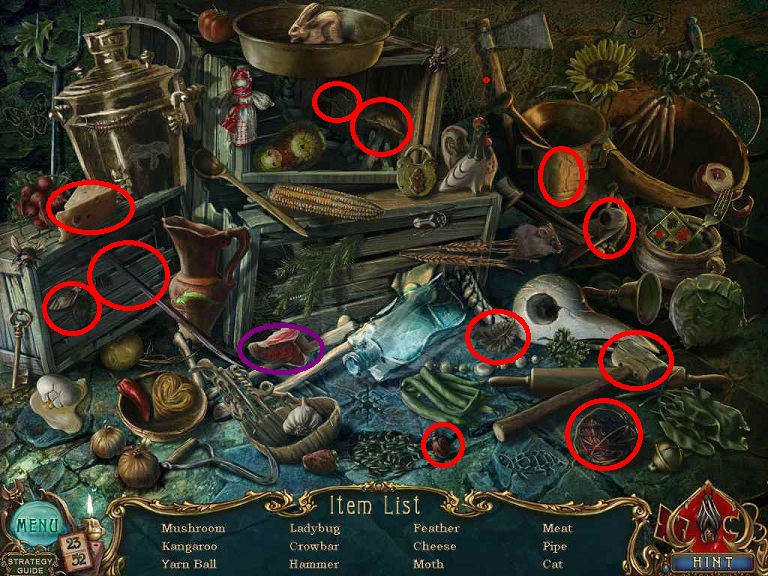
- Pick up the 4 OF SPADES
- Note the mouse near the door
- Head left into the Wine Cellar
- Do the HOS
- Receive a MOUSETRAP
- Pick up the 10 OF DIAMONDS
- Note the wine cask
- Return to the pantry

- Use the MOUSETRAP on the mouse
- Pick up the MOUSETRAP WITH MOUSE
- Return to Kitchen
- Place the MOUSETRAP WITH MOUSE and SLAB OF MEAT on the floor to the right
- Note that you need some string
- Return to Second Dining Room (through the hole in the wall)
The Second Dining Room
- Do the second HOS
- Receive a SPOOL OF THREAD
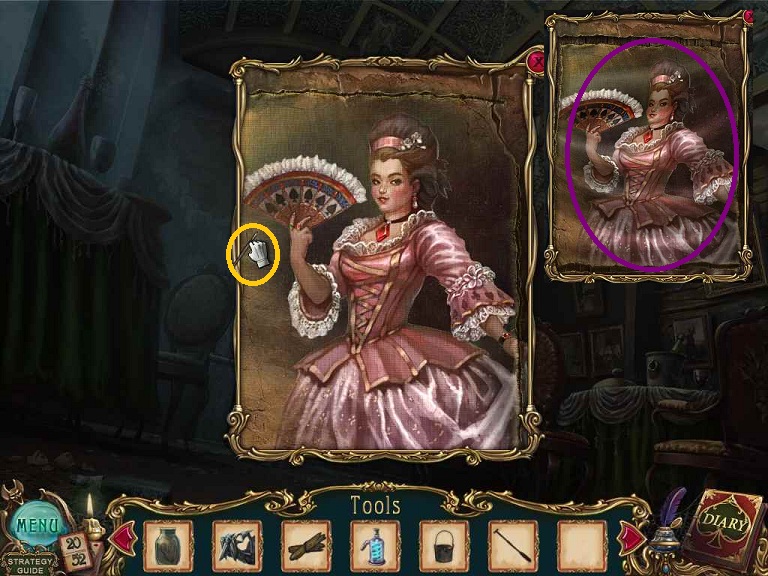
- Click on the portrait
- Use the SCALPEL to cut the painting out of the frame
- Receive the PORTRAIT
- Return to the Kitchen
The Kitchen
- Distract the dog
- Put the MEAT and MOUSETRAP on the floor
- Use the SPOOL OF THREAD on the MOUSETRAP
- Click on the cabinet behind the dog
- Pick up a BUTCHER'S KNIFE
- Pick up QUEEN OF HEARTS
- Return to Foyer and use BUTCHER'S KNIFE on the door to the
left
The Ballroom
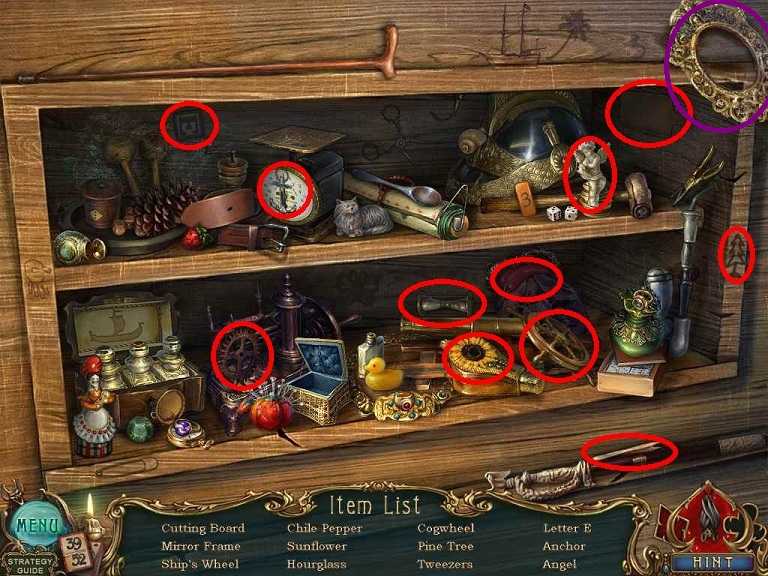
- Do the HOS
- Receive PIANO KEYS
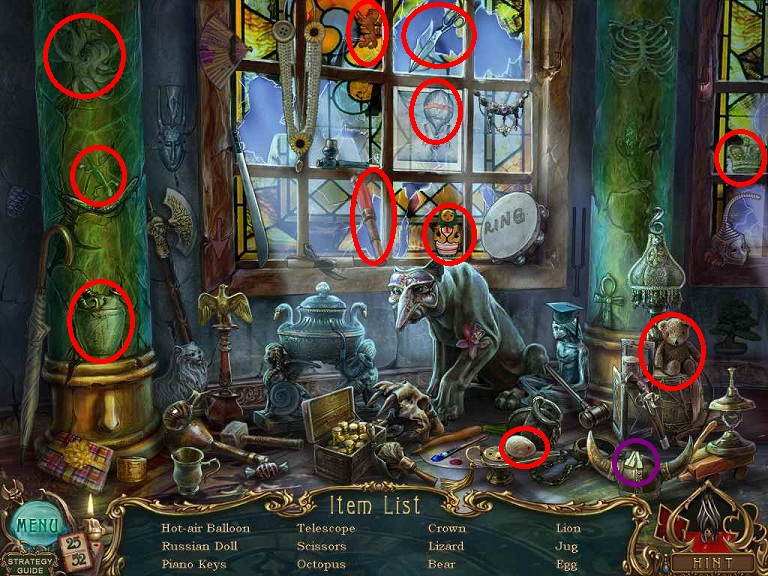
- Examine the table; note that you need several items.
- Go through the door to the left to the First Floor Hallway
- Go through the door to the right to the Piano
Room
The First Floor Hallway
- Need a gas mask to proceed
- Pick up the NAILS on the lower left now
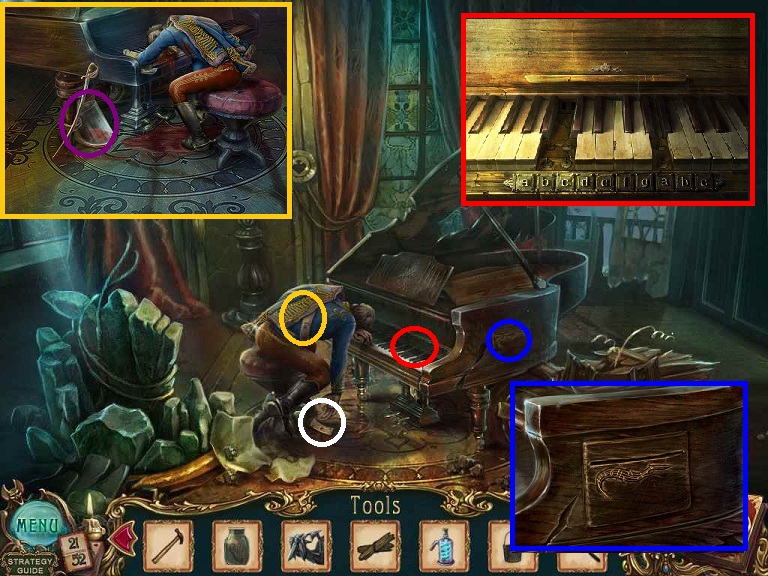
Piano Room
- Pick up the ACE OF CLUBS below the man's feet
- Examine the man
- Pick up the ORGAN JAR
- Read the note
- Examine the piano
- You need a musical spell
- Place the PIANO KEYS (from the Ballroom)
- Examine the side of the piano
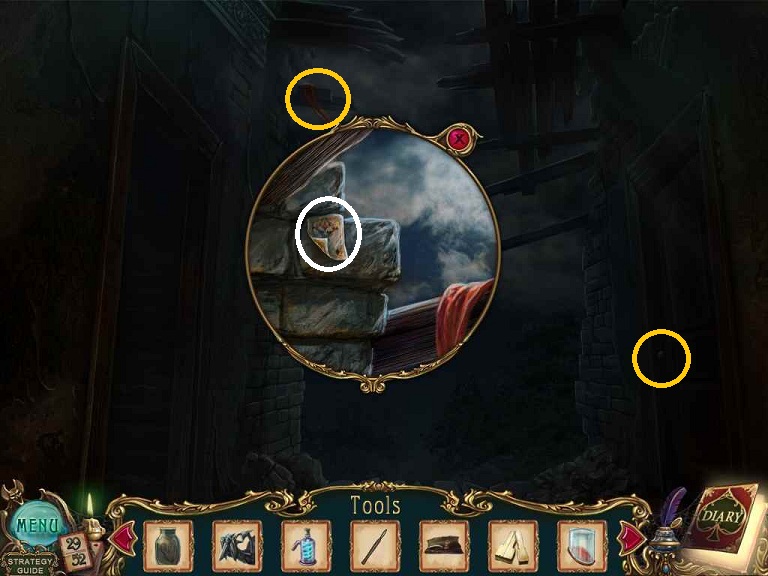
- Return to Stable Attic
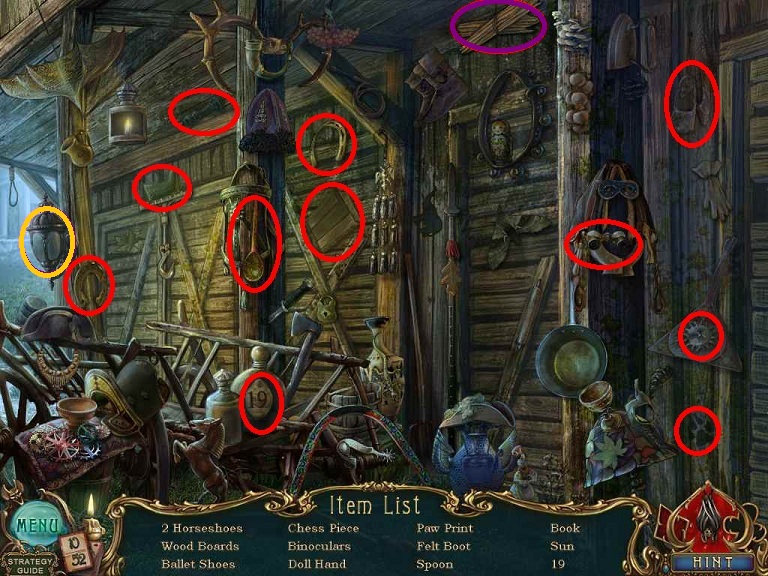
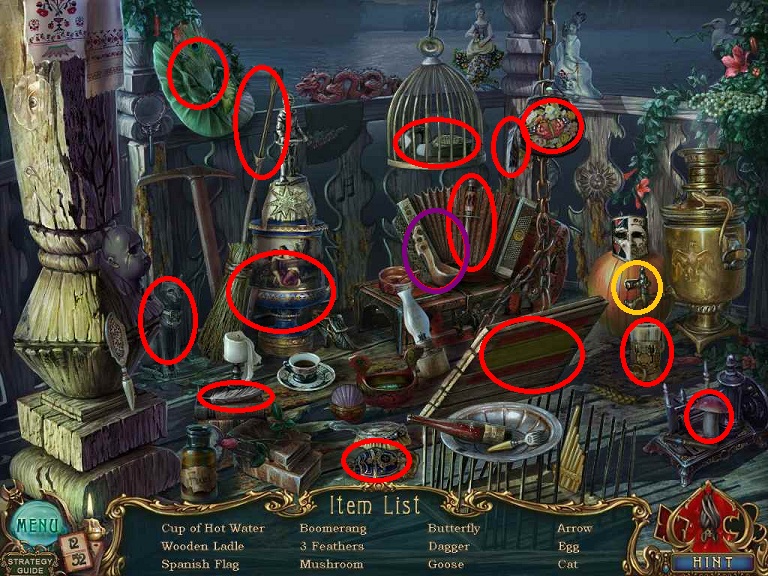
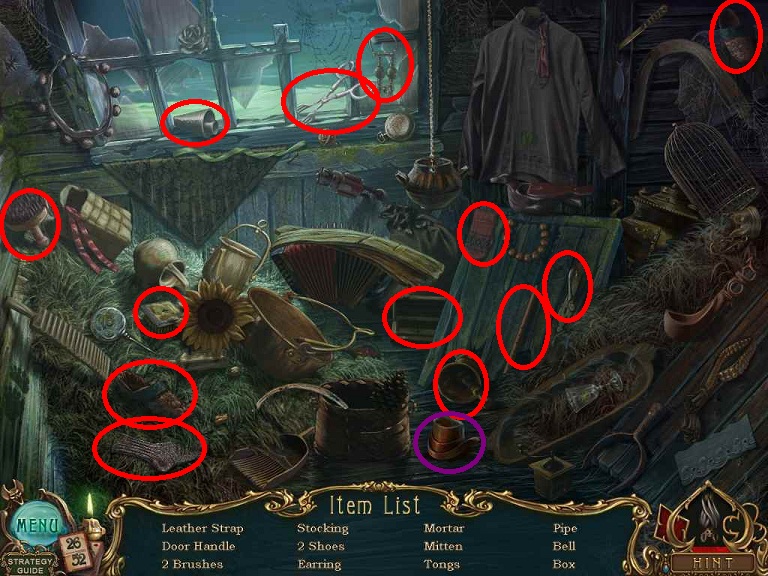
The Stable Attic
- Do the 2nd HOS
- Get a LEATHER STRAP
- Examine the center beam
- Use the SCALPEL on the sack
- Pick up the BIRD KEY
- Return to the Gazebo
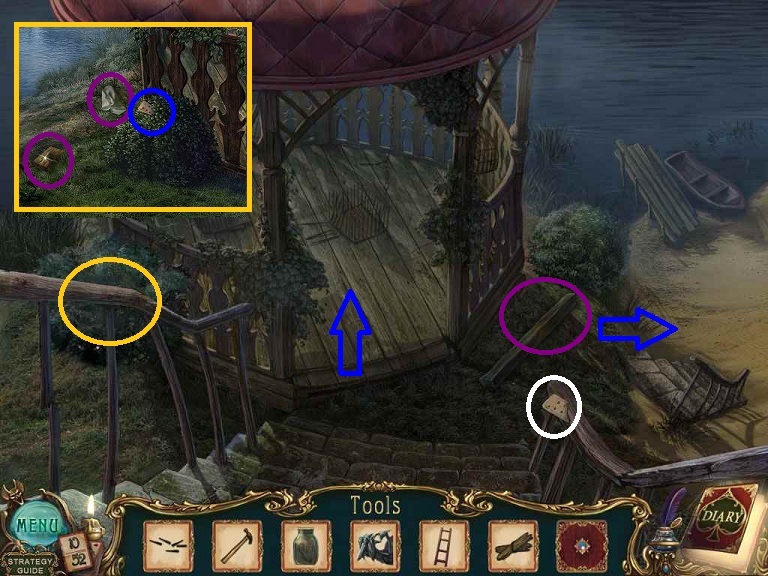
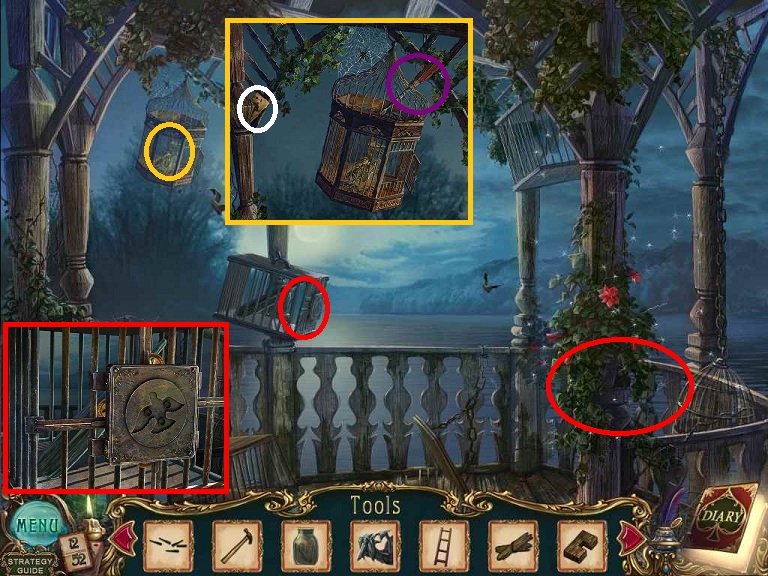
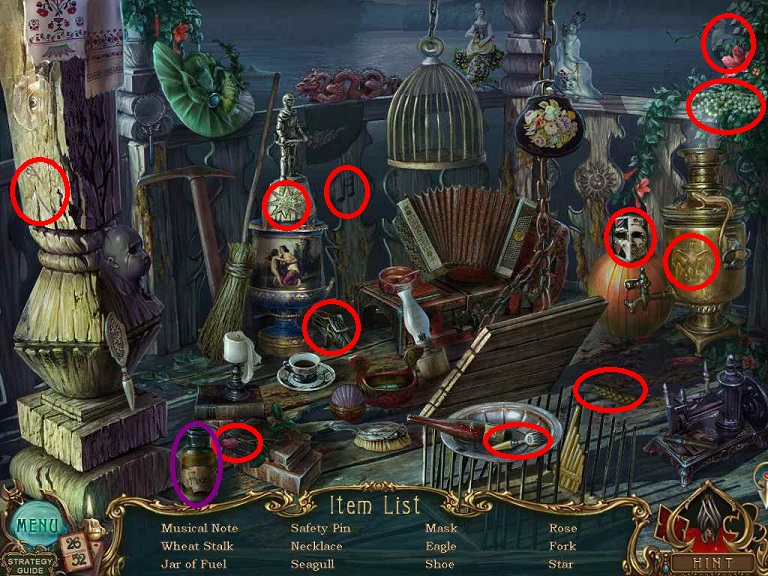
The Gazebo
- Do the 2nd HOS
- Receive the JAR OF FUEL
- Examine the center birdcage
- Use the BIRD KEY (from the Stable Attic)
- Pick up the OAR BLADE
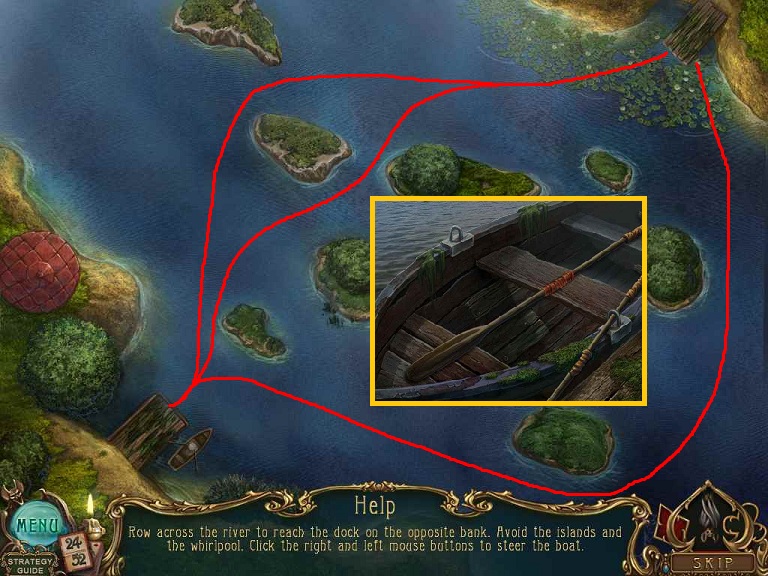
- Return to Boat Dock
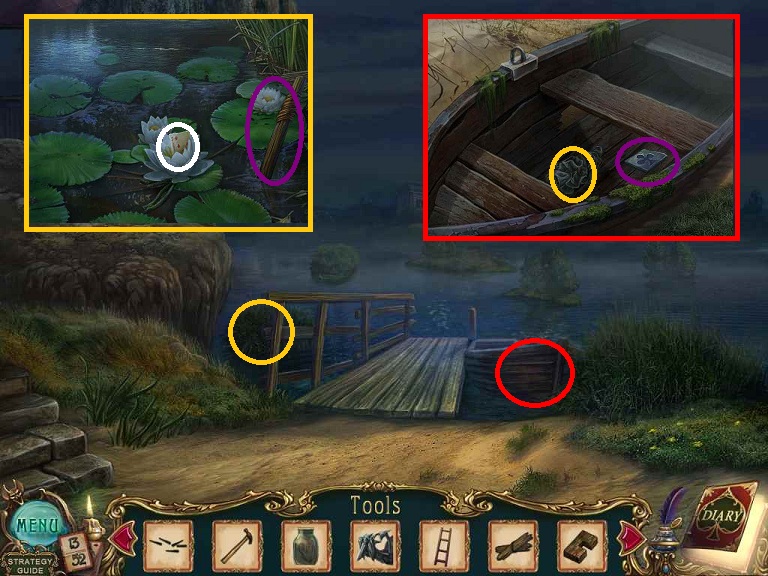
The Boat Dock
- Examine the boat
- Pick up the rag from the floor of the boat
- Place the WOOD BOARDS (from Outside the Stable)
- Place the PITCH (from the Town)
- Place the NAIL (from the First Floor Hallway)
- Use the CLAW HAMMER (from the Shed) on 3 nails
- Click on the boat to get it back in the water
- Examine the boat again
- Please the OAR (from the Servant's Bedroom) in the closest oarlock
- Place the OAR HANDLE (from above) and OAR BLADE (from the Gazebo)on the seat
- Use the LEATHER STRAP (from the Stable Attic)
- Drag the OAR and place it in the other oarlock
- To cross the river, use the left and right buttons on the mouse
- Take it slow
- There are several routes
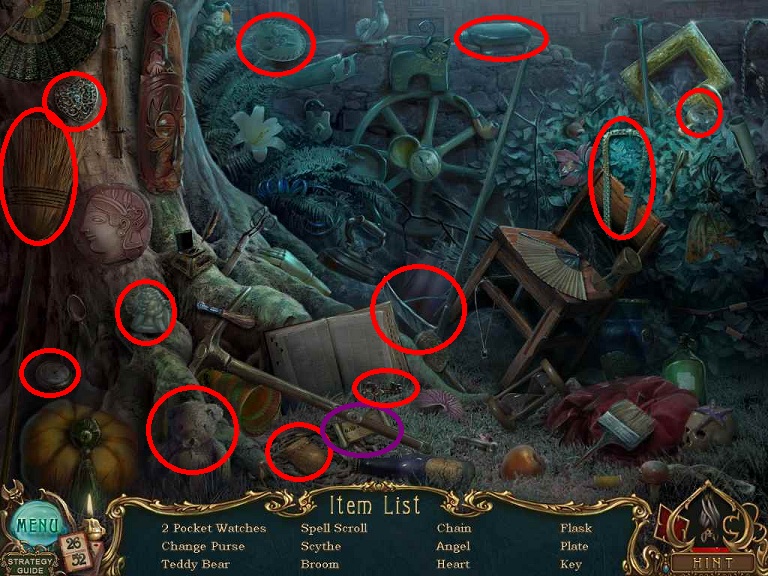
Outside the Summer House
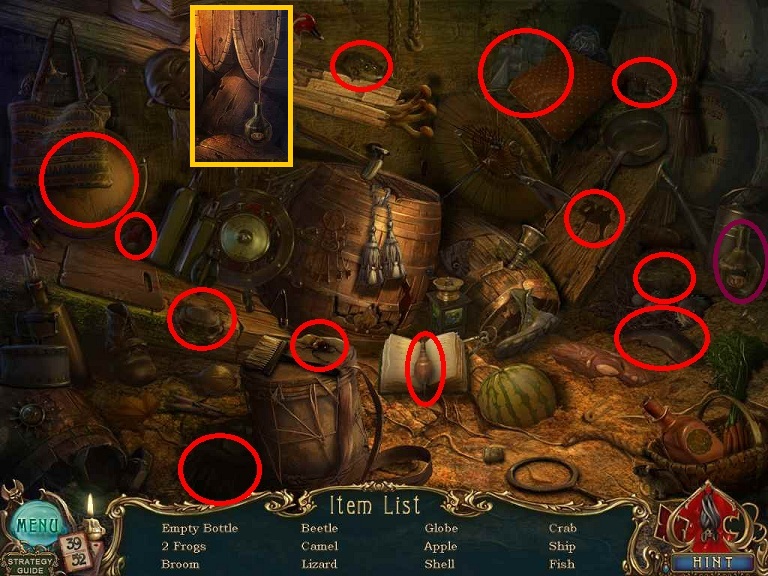
- Do the HOS
- Receive a SPELL SCROLL
- Examine the window
- Use the JAR OF FUEL (from the Gazebo) on the torch
- Pick up the UNLIT TORCH
- Pick up the QUEEN OF DIAMONDS
- Examine the fire on the steps
- Use the UNLIT TORCH (from the window) in the fire to get a BURNING TORCH
- Note there is an amulet you need in the fire
- Head forward
Summer House
- Examine the cabinet
- Pick up a GAS MASK
- Pick up 2 OF HEARTS that was behind the gas mask
- Examine the chest; note you need a spade key
- Return to the Ballroom and head left into the First Floor
Hallway
First Floor Hallway
- Use the GAS MASK by putting it anywhere
- Pick up the rag you can see through the GAS MASK
- Pick up the 3 OF SPADES
- Head forward
The Stairs
- Pick up the 9 OF HEARTS from the floor
- Examine under the stairs
- Pick up the KNOB
- Pick up the 4 OF DIAMONDS
- Examine the contraption to the right
- Place the KNOB (from under the stairs)
- Solve the Puzzle from left to right, starting at the second button.
- Click the second button until you get the bones on the far left, and keep moving over to get the next one correct.
- Click on the solved puzzle
- Click on the handle to lower the stairs
- Head forward
- Pick up the ACE OF DIAMONDS
- Note the door to the right is locked
- Head left
- Use the BURNING TORCH (from Outside the Summer House) on the cobwebs to get in.
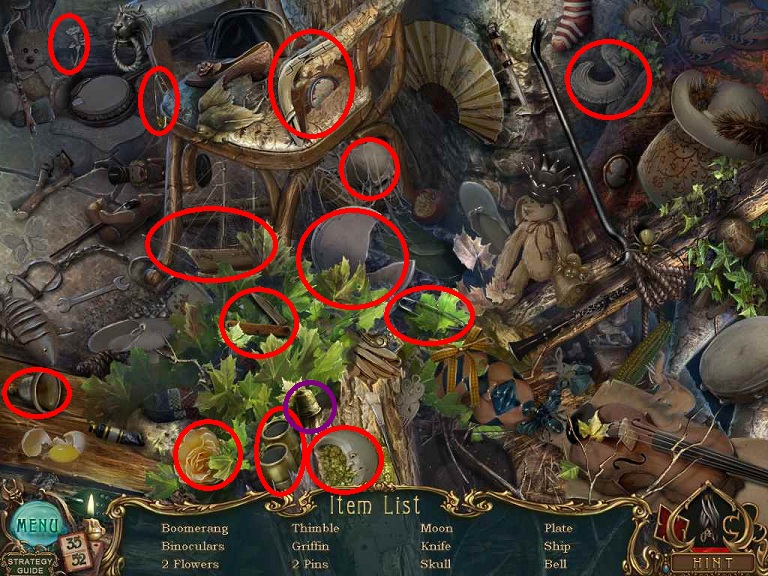
- Do the HOS
- Receive a KEY
- Pick up the LEVER
- Pick up the 8 OF DIAMONDS
- Head up the stairs

- Examine the baby carriage
- Pick up the TEST TUBES and THIMBLE
- Pick up the 4 OF CLUBS
- Examine the chemistry box; you need some more things
- Go through the double doors in the back
- Light the lantern candle with the BURNING TORCH
- Do the HOS
- Receive the MAGIC BALL
- Examine the man
- Pick up the SLEEPING PILLS
- Pick up the JACK OF CLUBS
- Use the ORGAN JAR (from the Piano Room) on the head to get the HEAD
- Examine the locked chest; you need a lock pick
- Examine the hatch; you need acid.
- Back out to the top of the staircase
- Use the KEY (from the Landing) on the door
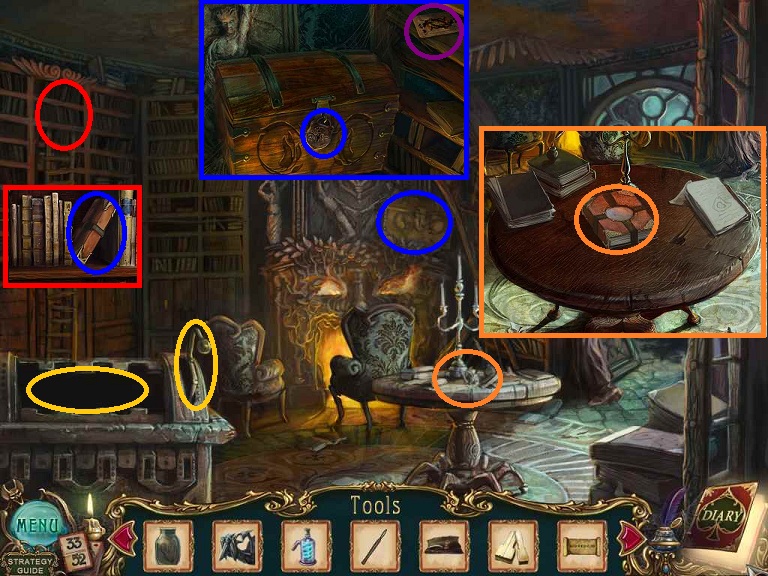
- Enter the Library
- Examine the box to the left
- Use the LEVER (from the Landing)
- This moves a ladder
- Examine the bookshelf
- Pick up a BOOK
- Examine the chest above the fireplace; you need a lock pick.
- Pick up KING OF HEARTS
- Examine the table
- Click on the papers to move them
- Place the BOOK (from above)
- Need an amulet to use the book
- Head forward through the door
- Do the HOS
- Receive a THIMBLE
- Pick up the BUCKET OF SAND
- Pick up the 2 OF CLUBS
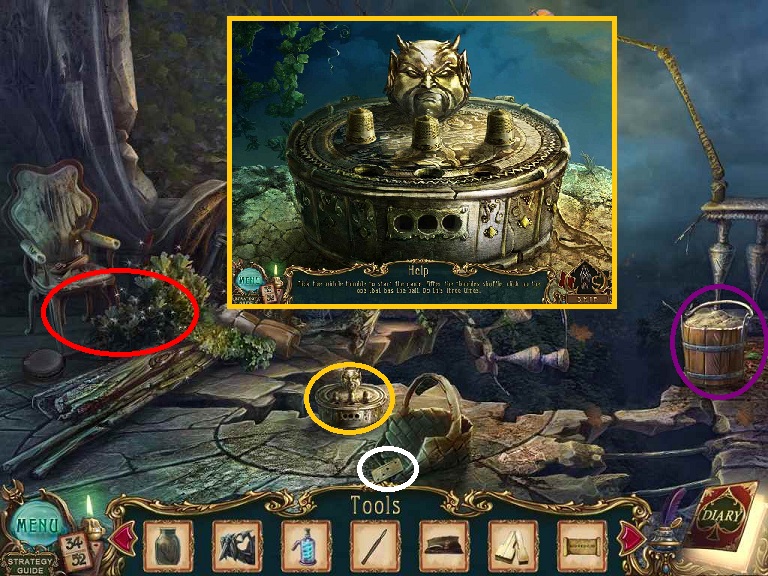
- Click on the gold head contraption
- Place 2 THIMBLES (from above and Storage)
- Select the thimble that has the ball under it, 3 times
- Pick up the RED EYE
- Return to the Piano Room
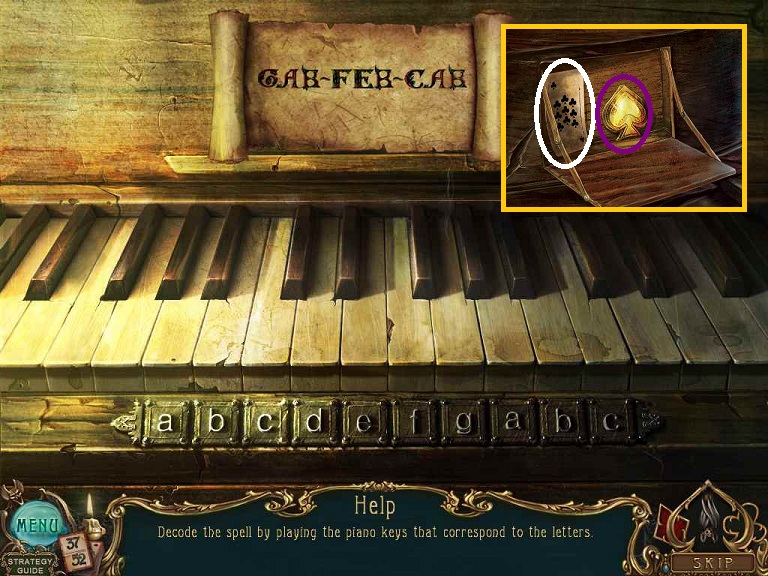
- Examine the piano keyboard
- Place the PIANO KEYS (from the Ballroom) on the keyboard
- Place the SPELL SCROLL(from Outside the Summer House) on the music stand
- Click the keys as shown on the SPELL SCROLL; note the first letter is a G
- Receive the MELODY
- Examine the side of the piano
- Insert the MELODY
- Pick up the SPADE KEY
- Pick up the 9 OF CLUBS
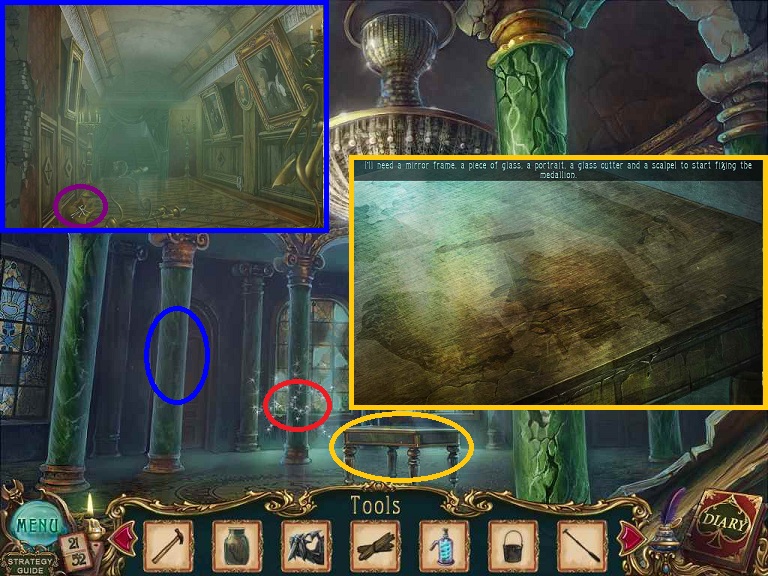
- Return to the Foyer
- Click the area left of the staircase
- Click on the statue
- Insert the RED EYE (from the Balcony)
- Open the forehead
- Pick up CORKSCREW
- Pick up 5 OF CLUBS
- Do the 2nd HOS
- Pick up MIRROR FRAME
- Return to the Wine Cellar
- Do 2nd HOS
- Receive the EMPTY BOTTLE
- Place the EMPTY BOTTLE under the wine cask
- Use the CORKSCREW (from the Foyer) on the cask
- Place the SLEEPING PILLS (from the Mansion Attic) on the bottle
- Pick up the FULL BOTTLE
- Do the 2nd HOS
- Receive the SUITS
- Return to Outside the Summer House
- Do the 2nd HOS
- Receive the GLASS CUTTER
- Place the BUCKET OF SAND on the fire
- Pick up the AMULET
- Head into the Summer House
- Examine the chest
- Insert the SPADE KEY (from Piano Room)
- Pick up the ACE OF SPADES
- Go to Outside the Library
- Give the FULL BOTTLE to the guard
- Entry the Town Library
- Do the HOS
- Receive a PUNCH CARD
- Examine the projector
- Insert the PUNCH CARD
- Pick up the King OF SPADES
- Examine the book shelf where the projector is shining
- Pick up the BOOK
- Pick up the 6 OF DIAMONDS
- Do the 2nd HOS
- Pick up the TRAPEZOID
- Place the BOOK on the book stand
- Place the TRAPEZOID on the book cover puzzle
- Solve by just picking a tile to start with and moving and flipping trapezoids to match the first one and then the second and so on.
- Pick up the SPELL
- Return to the mansion library
- Use the AMULET on the book on the table
- Click on it
- Pick up the CHEMISTRY NOTES
- Pick up the QUEEN OF CLUBS
- Head forward to the Balcony
- Do the HOS
- Receive a DOOR HANDLE
- Go to the Landing
- Do the HOS
- Receive the RETORT
- Go to Storage
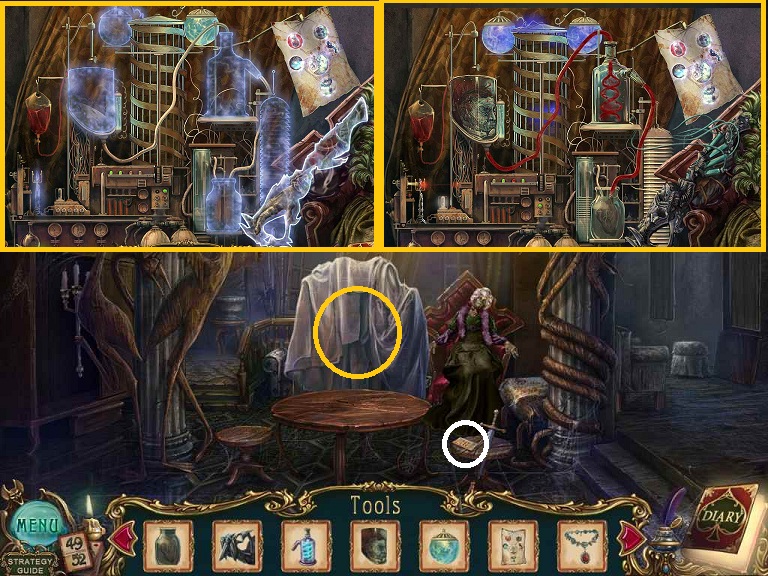
- Click on the chemistry set
- Make the ACID
- Go to the Attic
- Examine the door in the floor
- Use the ACID on the latch
- Go down
- Pick up the 10 OF SPADES
- Pick up the 3 OF DIAMONDS
- Examine the door to the right
- The door lock needs a key
- You can place the DOOR HANDLE (from the Balcony), but you need 2 screws
- Enter the door to the left
- Do the HOS
- Click on the top drawer to get some items
- Receive the PICK LOCK
- Return to the Attic
- Use the PICK LOCK on the chest
- Open the chest
- Pick up a SCREWDRIVER
- Pick up 10 OF CLUBS
- Do the HOS
- Receive JAR OF OIL
- Return to the Library
- Use the PICK LOCK on the chest over the fireplace
- Pick up TWO SCREWS
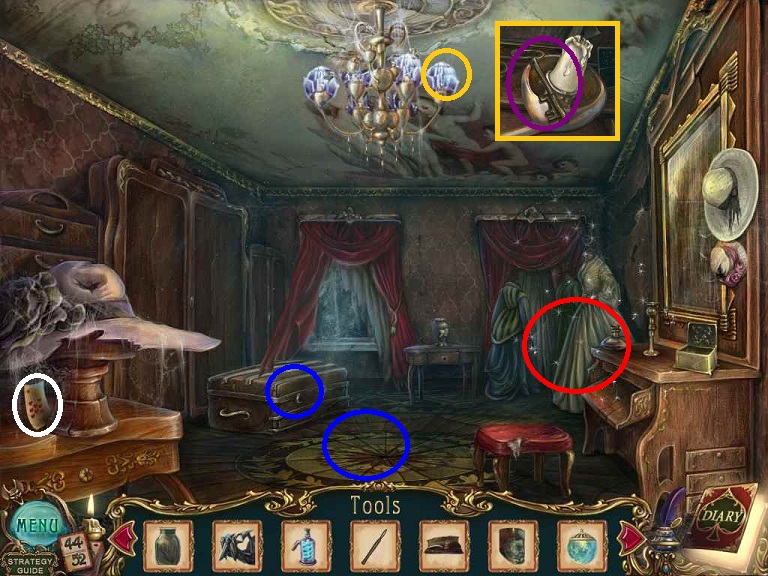
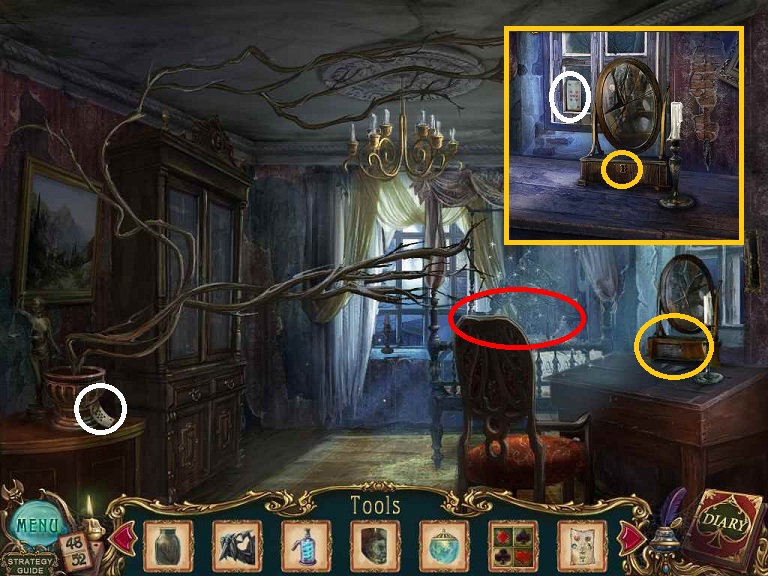
- Return to the Dressing Room
- Do the 2nd HOS
- Receive GLASS
- Use the JAR OF OIL on the floor
- Click on the trunk
- Examine the chandelier
- Pick up the KEY
- Pick up the
- Retrieve the from the chandelier
- Pick up 8 OF HEARTS
- Return to the Hallway
- Examine the door
- Place the DOOR HANDLE (from the Balcony)
- Use the TWO SCREWS (from the Library)
- Use the SCREWDRIVER (from the Attic)
- Use the KEY (from the Dressing Room)
- Open the door
- Do the HOS
- Receive the BUTTERFLY KEY
- Pick up of 9 OF SPADES
- Examine box on the table
- Pick up the 7 OF HEARTS
- Use the BUTTERFLY KEY
- Place the SUIT TILE
- Solve the puzzle
- Pick up the MEDALLION
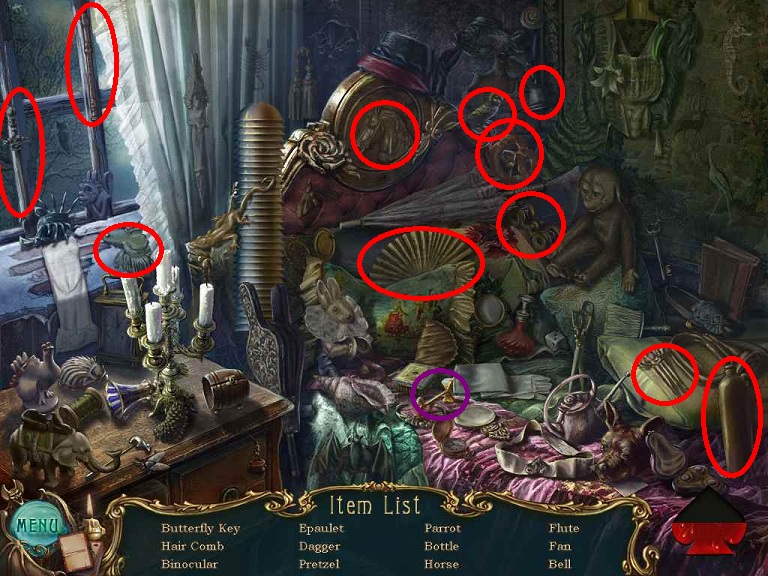
- Return to the Ballroom
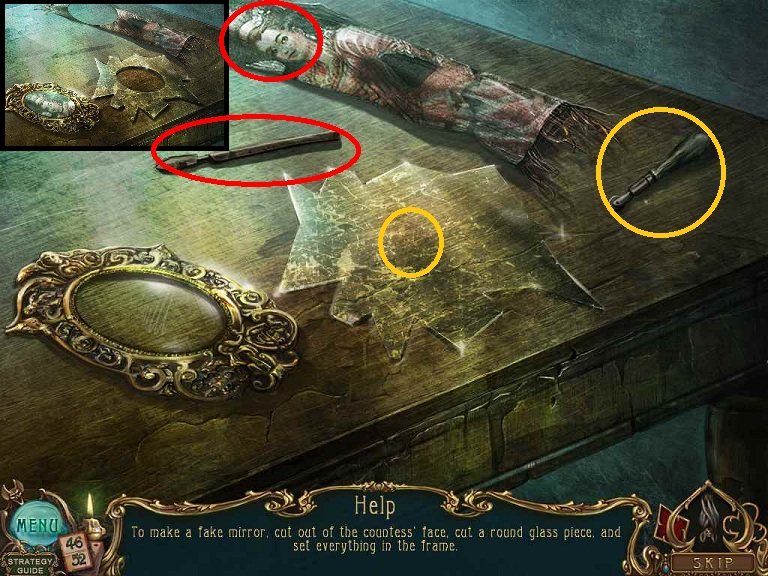
- Examine the table.
- Place the SCALPEL (from the Servant's Bedroom)
- Place the PORTRAIT (from the Second Dining Room)
- Place the FRAME (from the Foyer)
- Place the GLASS (from the Dressing Room)
- Place the GLASS CUTTER (from Outside the Summer House)
- Use the GLASS CUTTER on the GLASS
- Use the SCALPEL on the PORTRAIT
- Pick up the cut face from the portrait and place it in the FRAME
- Pick up the cut glass and place in the FRAME
- Receive a FAKE MIRROR
- Return to the Bedroom
- Do the 2nd HOS
- Receive a VACUUM HOSE
- Return to the Hallway and then to the left further down the
hall
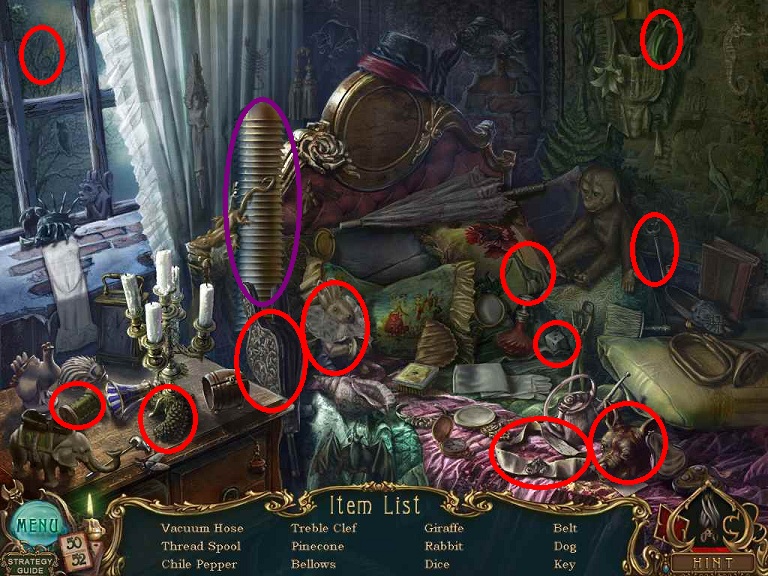
- Pick up 5 OF SPADES
- Examine the door
- Solve the puzzle
- Click on the green heart
- Enter the room
- Pick up 7 OF DIAMONDS
- Remove the cover from the machine
- Place the SPELL (from Town Library)
- Place MEDALLION (from Bedroom)
- Place the HEAD (from the Attic)
- Place the MAGIC BALL (from the Attic)
- Place the GLASS COIL (from the Gate)
- Place the HEART (from the Dining Room)
- Place the VACUUM HOSE (from the Bedroom)
- Place the MECHANICAL ARM (from the Second Dining Room)
- Show Countess the FAKE MIRROR
- Receive QUEEN OF SPADES
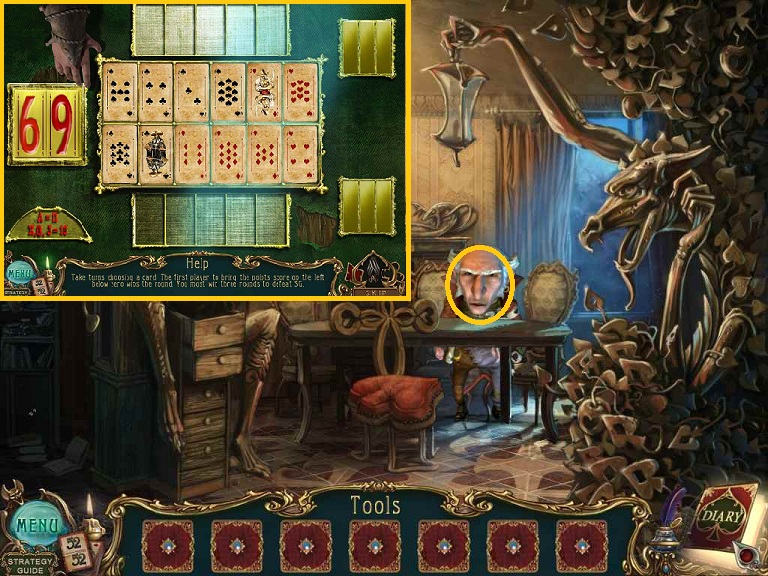
- Click on SG and follow him into the room
- Click on SG and then the table
- If you have all 52 cards you will play a game.
- If you do not have all 52 cards you need to find them. See below
- To play the game, you want to get below zero before he does
- A general strategy would be to choose the biggest numbers available until you get below 20
- At less than 20, choose the smallest number and then SG should bring you to within winning.
- Choose the number that will win
- Note that Ace is equal to 11
- You need to win 3 times
- Game is finished
- Click on the number to the left next to the menu button
- You can check to see which one you are missing and then
look below.
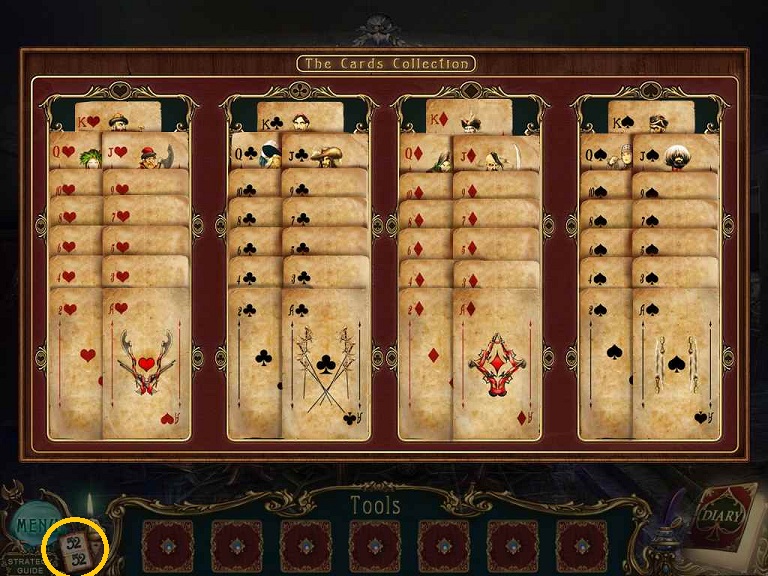
- Ace of Hearts - Well
- Two of Hearts - Summer House
- Three of Hearts - Stable
- Four of Hearts - Gazebo Stairs
- Five of Hearts - Foyer
- Six of Hearts - Gazebo Stairs
- Seven of Hearts - Bedroom
- Eight of Hearts - Dressing Rooms
- Nine of Hearts - Stairs
- Ten of Hearts - Outside of Town Library
- Jack of Hearts - Outside of Stable
- Queen of Hearts - Kitchen
- King of Hearts - Library
- Ace of Clubs - Piano Room
- Two of Clubs - Piano Room
- Three of Clubs - Servant's Bedroom
- Four of Clubs - Storage
- Five of Clubs - Foyer
- Six of Clubs - Servant's Hallway
- Seven of Clubs - Front Door
- Eight of Clubs - Second Dining Room
- Nine of Clubs - Piano Room
- Ten of Clubs - Attic
- Jack of Clubs - Attic
- Queen of Clubs - Library
- King of Clubs - Gazebo
- Ace of Diamonds - Top of the Staircase
- Two of Diamonds - Shed
- Three of Diamonds - Second Floor Hallway
- Four of Diamonds - Stairs
- Five of Diamonds - Boat Dock
- Six of Diamonds - Town Library
- Seven of Diamonds - Countess' Room
- Eight of Diamonds - Landing
- Nine of Diamonds - Stable Attic
- Ten of Diamonds - Wine Cellar
- Jack of Diamonds - Fountain
- Queen of Diamonds - Outside the Summer House
- King of Diamonds - Gate
- Ace of Spades - Summer House
- Two of Spades - First Floor Hallway
- Three of Spades - Foyer
- Four of Spades - Pantry
- Five of Spades - Outside the Countess' Room
- Six of Spades - Stable
- Seven of Spades - Dining Room
- Eight of Spades - Town
- Nine of Spades - Bedroom
- Ten of Spades - Second Floor Hallway
- Jack of Spades - Outside the Town Library
- Queen of Spades - Countess' Room
- King of Spades - Town Library
Content(s) of this game guide may not be copied or
published on any other site without permission from Casual Game Guides.
©CasualGameGuides.com 2006 - 2021