
Dreamscapes: The Sandman: Chapter Four: The Family Home
Depend on our Dreamscapes: The Sandman Walkthrough to help you navigate the dark recesses of Laura's nightmare as you attempt to save her from the vile Sandman who has trapped her. Our beautifully marked screenshots, puzzle solutions, and detailed step-by-step instructions will help you locate the missing pieces of Laura's dreamcatcher and put an end to this night terror once and for all!
Chapter One: The Professor’s Laboratory
Chapter Two: The Ruined Church
Chapter Three: The Frozen Lake
Chapter Four: The Family Home
Chapter Five: The Corrupted Forest
Chapter Six: The Abandoned Theme Park
Chapter Seven: The Empty Square
Chapter Eight: The Endless Desert
Chapter Nine: The Ritual
Ask for help in the comments below!
Part I: A Hole in the Wall
With another of Laura’s nightmares dispelled, you see the once frozen bridge return to its previous beautiful form. Another piece of Laura’s consciousness might have been saved, but the job is far from over. The Sandman still wanders free inside Laura’s mind, and stopping him is of great importance.
- The instructions that follow correspond to the numbers on related images.
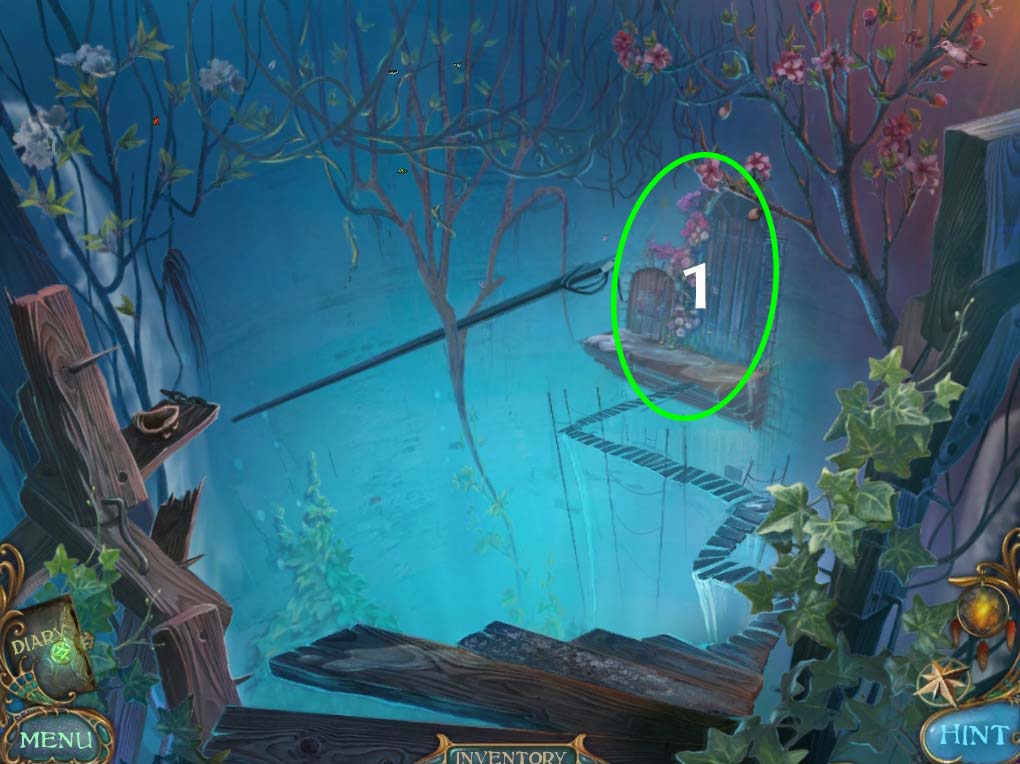
- 1. We find ourselves in front of the once frozen bridge. With the previous nightmare providing us a way to move forward. Investigate the door circled in green above to continue on our mission.

- Eliminate the BEHOLDER in this area (circled in blue above) (1 of 1) / (35 of 110)
- 2. Take the WEIGHT from your inventory and attach to the SEE-SAW. This will cause it to break a hole in the wall. Travel through it to get to the next area.
- Before anything else, eliminate the BEHOLDERS in the area (circled in blue above) (2 of 2) / (37 of 110)
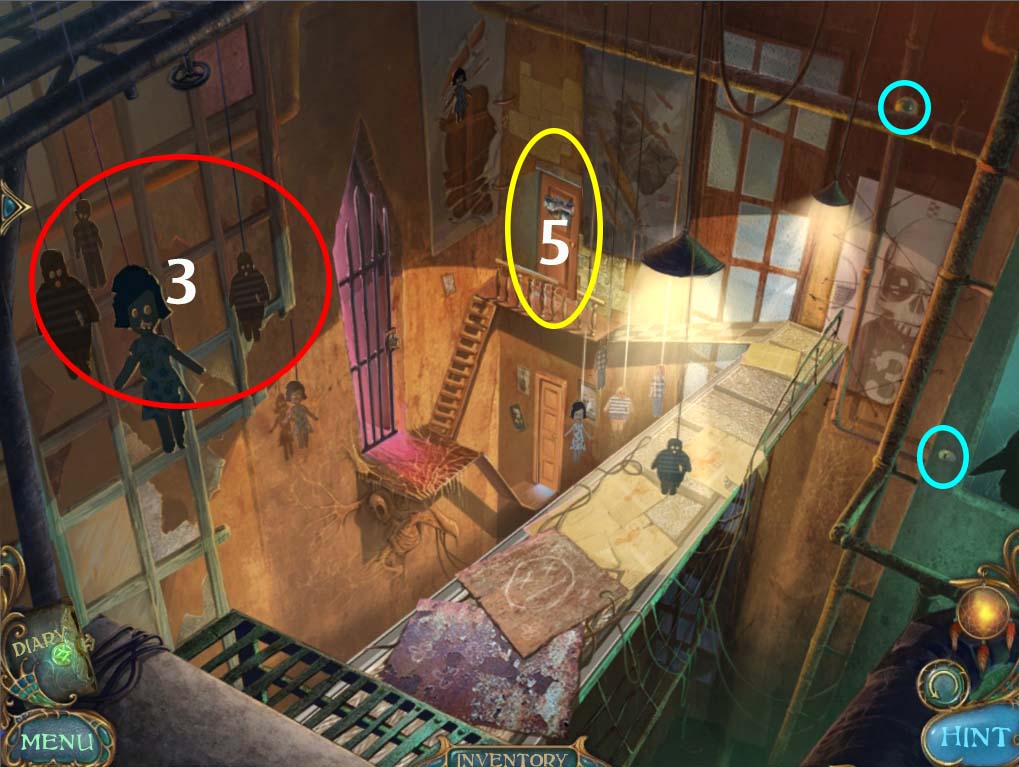
- 3. Once you enter the hole, you find yourself in an eerie catwalk. The door at the end of the catwalk is your destination, but before you go there investigate the PAPER DOLLS hanging from the ceiling (circled in red above).
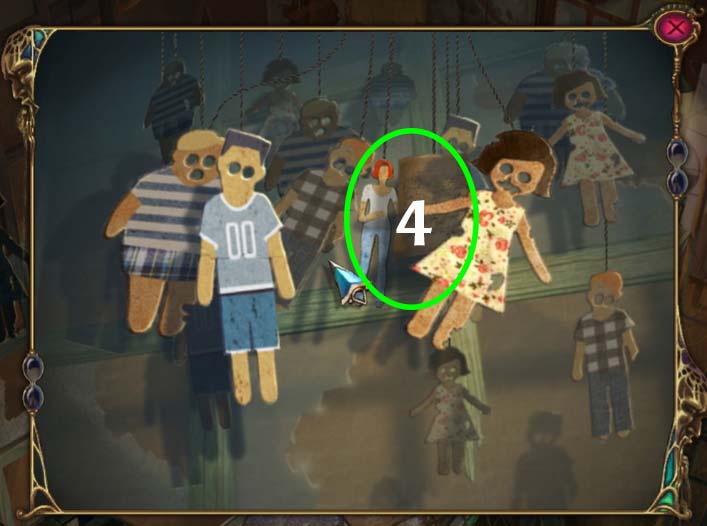
- 4. If look closely, there seems to be a few things hanging behind the creepy paper dolls (circled in green above). You can move them out of the way by clicking and dragging them in any direction. This causes them to swing around a bit. It’s a bit tricky to move the dolls out of the way, but doing so gains you several DIARY PAGES and a PAPER MOTHER.
- 5. Investigate the DOOR (circled in yellow in CATWALK image above), and you’ll activate a mini puzzle.
PAPER FIGURE PUZZLE
The object of this puzzle is to place the appropriate paper figures (PAPER MOTHER, PAPER FATHER, PAPER LAURA and PAPER CAT) in their respective places in the painting. The solution to this puzzle is shown below.
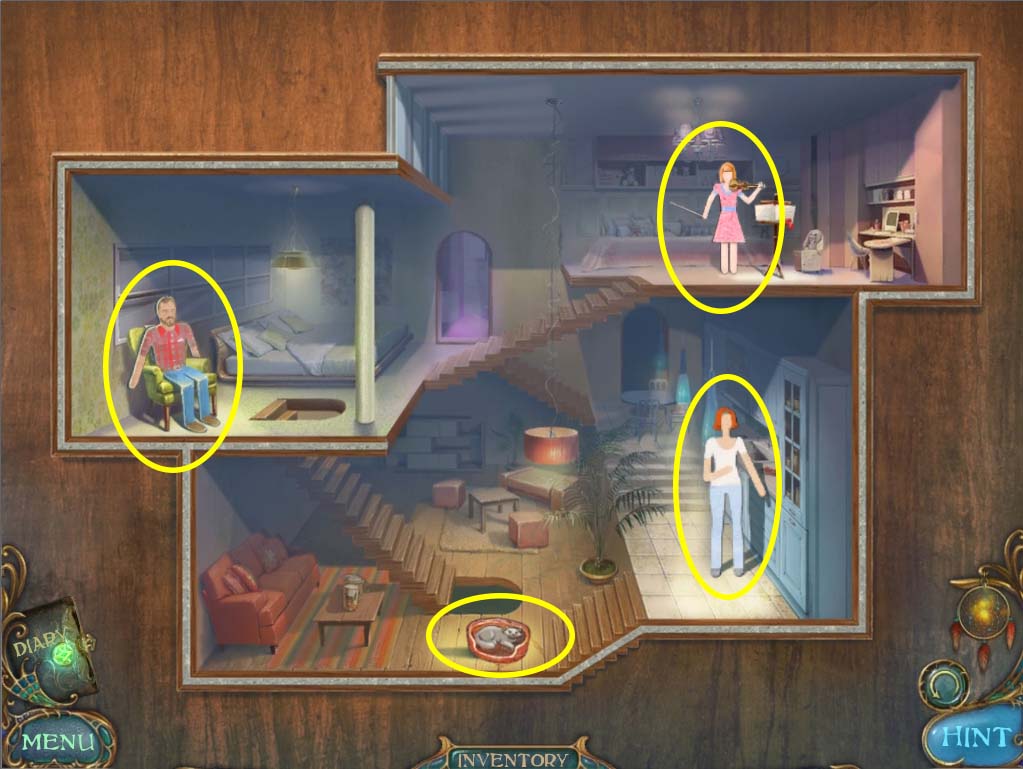
- Once you solve the puzzle, a small cutscene plays and the door opens. Go inside to continue on your mission.
Part II: Back to the Past
After a short cutscene, you find yourself in front of a house. You get the feeling that you’ve somehow returned to your childhood, but with the Sandman on the loose, even this quaint setting seems foreboding.
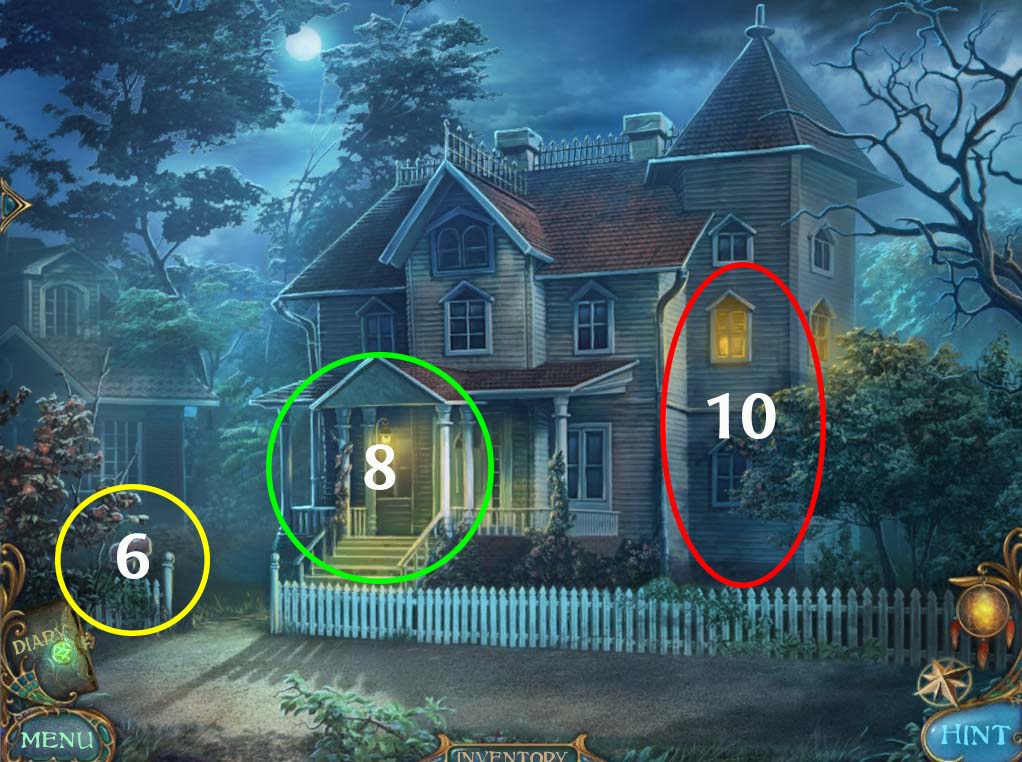
- 6. Investigate the mailbox (circled in yellow in image above).
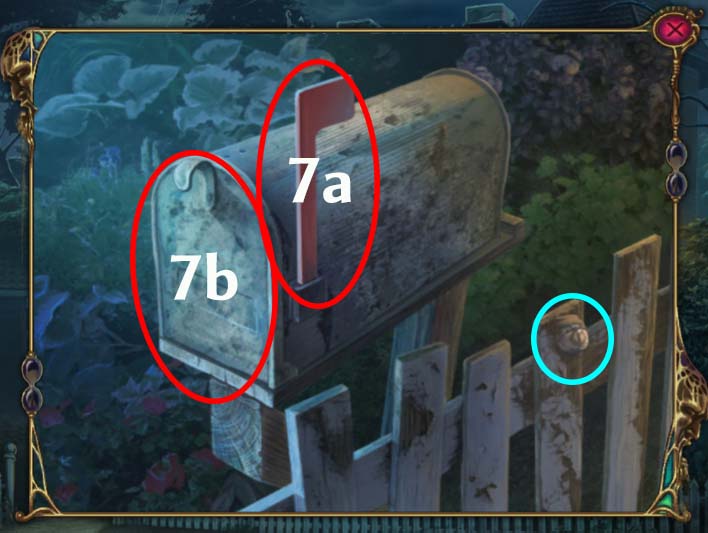
- Eliminate the BEHOLDER (circled in blue above) (1 of 1) / (38 of 110)
- 7. Grab the MAILBOX FLAG (circled in red above) and open the mailbox (also circled in red above). Inside you’ll find several of Laura’s DIARY PAGES and a BATTERY (1 of 4) for your inventory.
- 8. Check the FRONT PORCH (circled in green on the HOUSE FRONT image above).
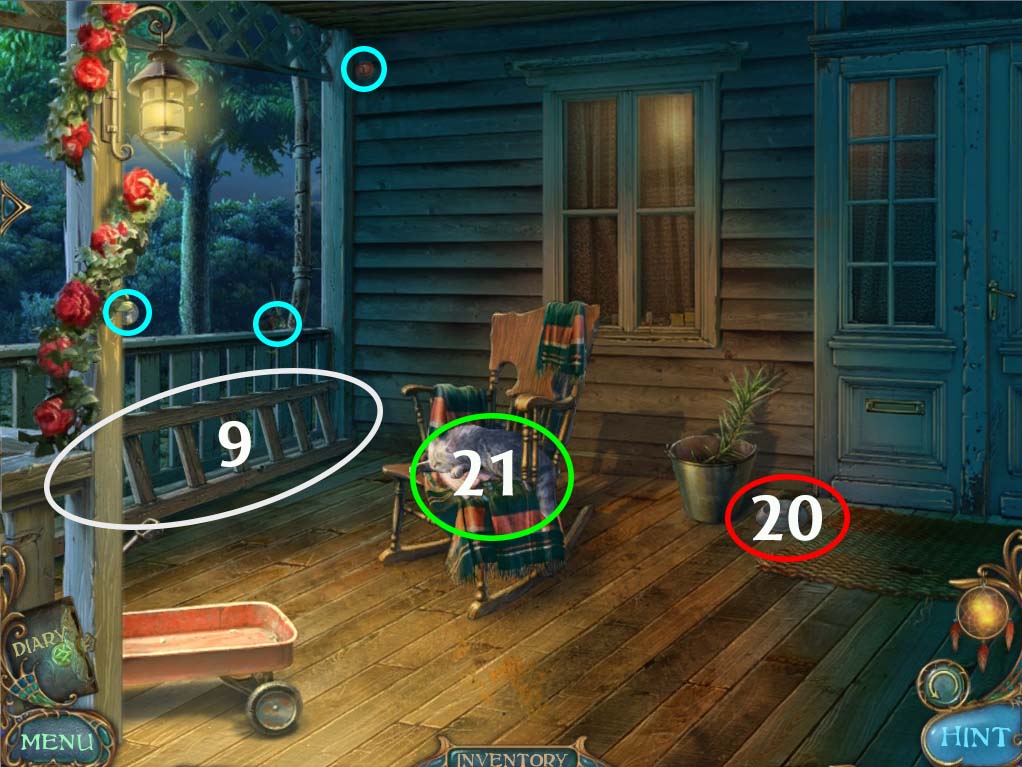
- Eliminate the BEHOLDERS in the area (circled in blue above) (3 of 3) / (41 of 110)
- 9. Take the LADDER (circled in white on the picture above) for your inventory. There isn’t anything else you can do here for now so exit this area.
- 10. Investigate the side of the house (circled in red on the HOUSE FRONT image above)
- Eliminate the BEHOLDER in the area (circled in blue above) (1 of 1) / (42 of 110)
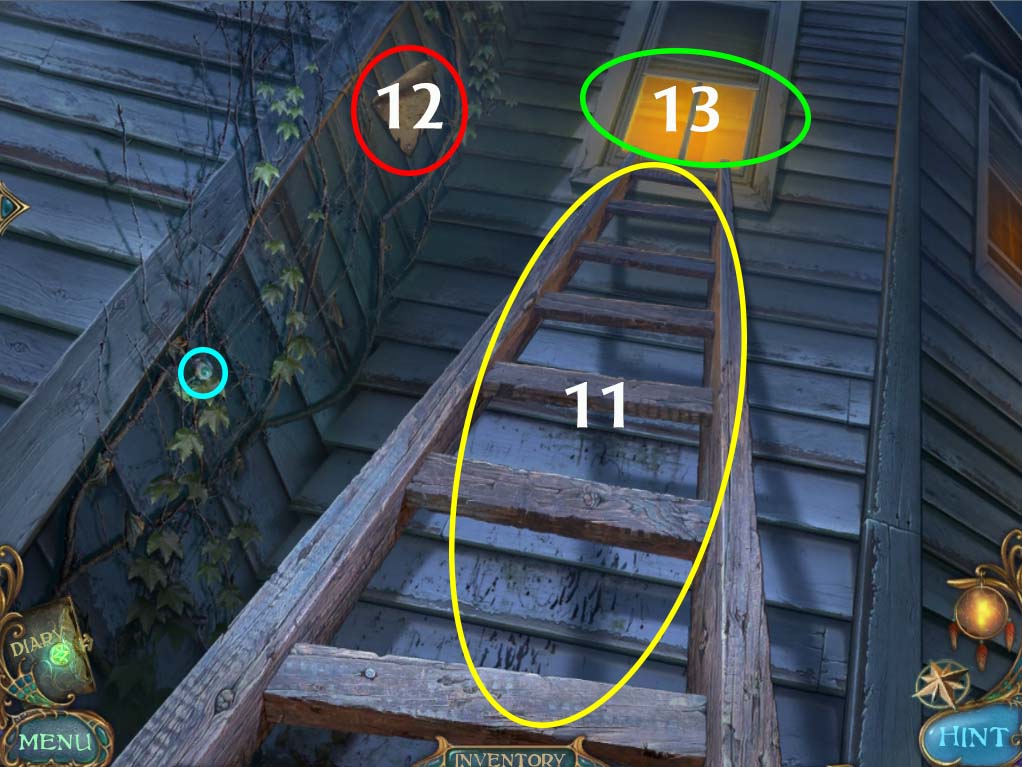
- 11. Place the LADDER on the wall as shown in the image above (circled in yellow).
- 12. Take the DIARY PAGES (circled in red above).
- 13. Investigate the WINDOW (circled in green above). This will cause a small cutscene to begin. The mystery of this Sandman deepens even further.
- Eliminate the BEHOLDER in the area (circled in blue above) (1 of 1) / (43 of 110)
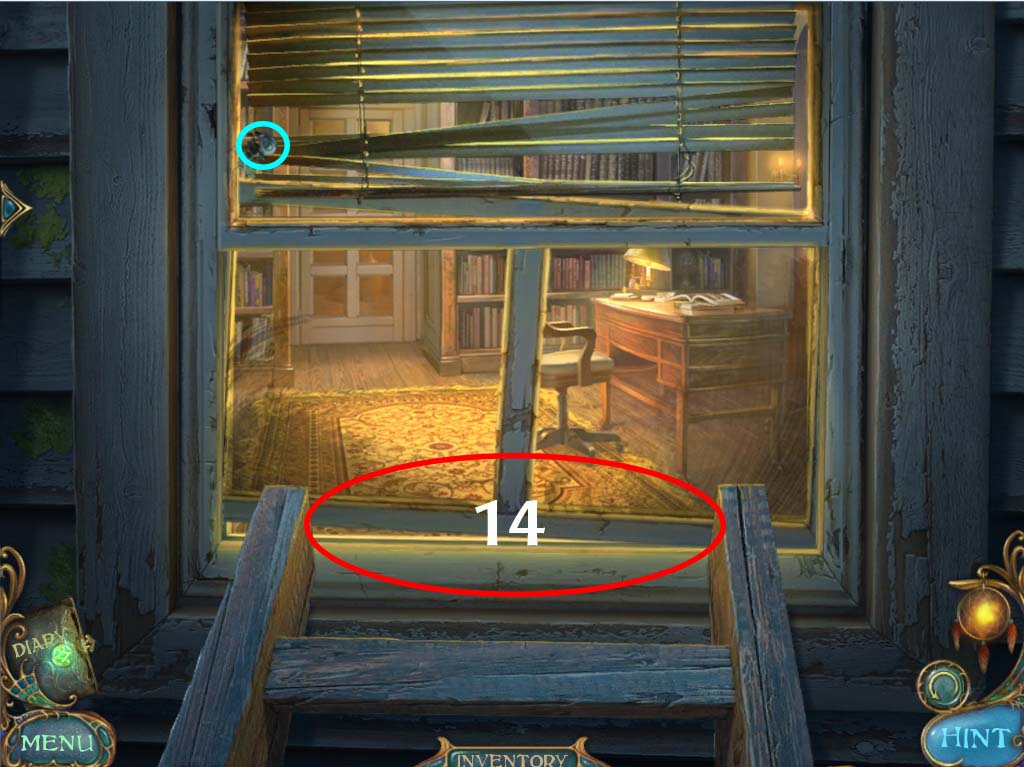
- 14. Investigate the area circled in red above and use the MAILBOX FLAG from your inventory to pry the window open. Once it’s done, step inside the office.
- Before anything else, eliminate the BEHOLDERS in the office (circled in blue above) (2 of 2) / (45 of 110)
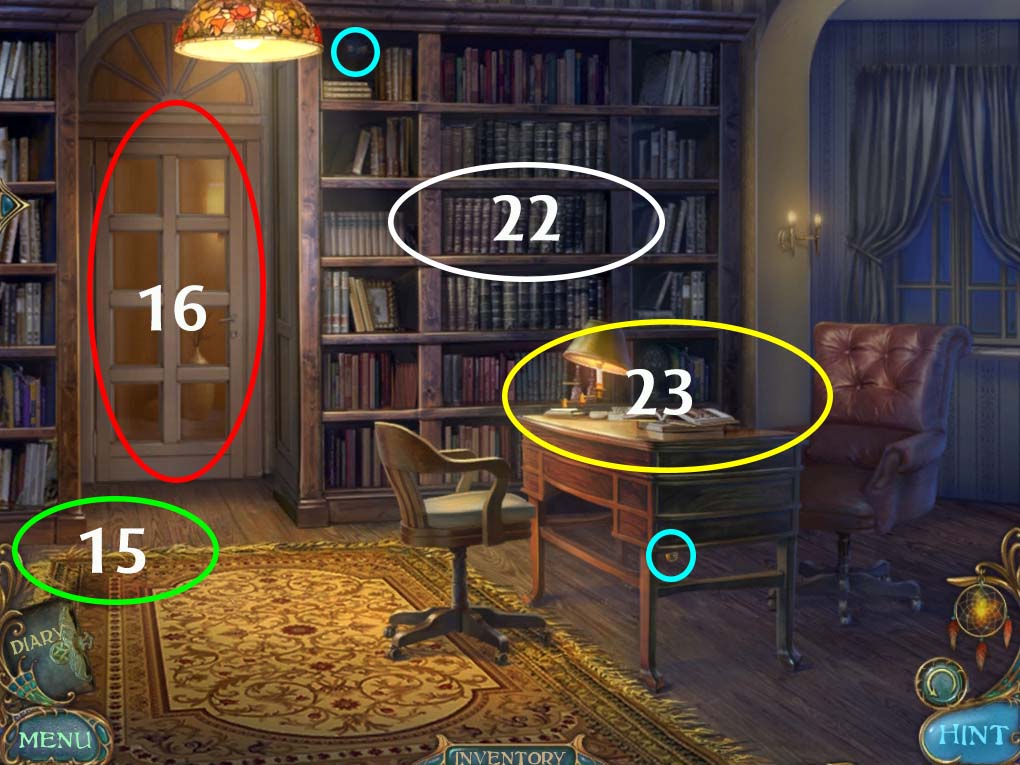
- 15. Check beneath the rug (circled in green above) and you’ll find a secret compartment. Open it and take the TEMPLATE that you find inside.
- 16. Open the door to the hallway (circled in red above) and go through. Another cutscene starts, with the Sandman apparently entering Laura’s room as she screams in fear. The game will not allow you to do anything else other than open Laura’s bedroom. Do so, she might be in danger!
Part III: The Flooded Room
The door to Laura’s room bursts open and a torrent of water rushes out of the room. It doesn’t take a genius to figure out that something has gone terribly wrong.
- Eliminate the BEHOLDERS in the area before heading to Laura’s room (circled in blue above) (2 of 2) / (47 of 110)
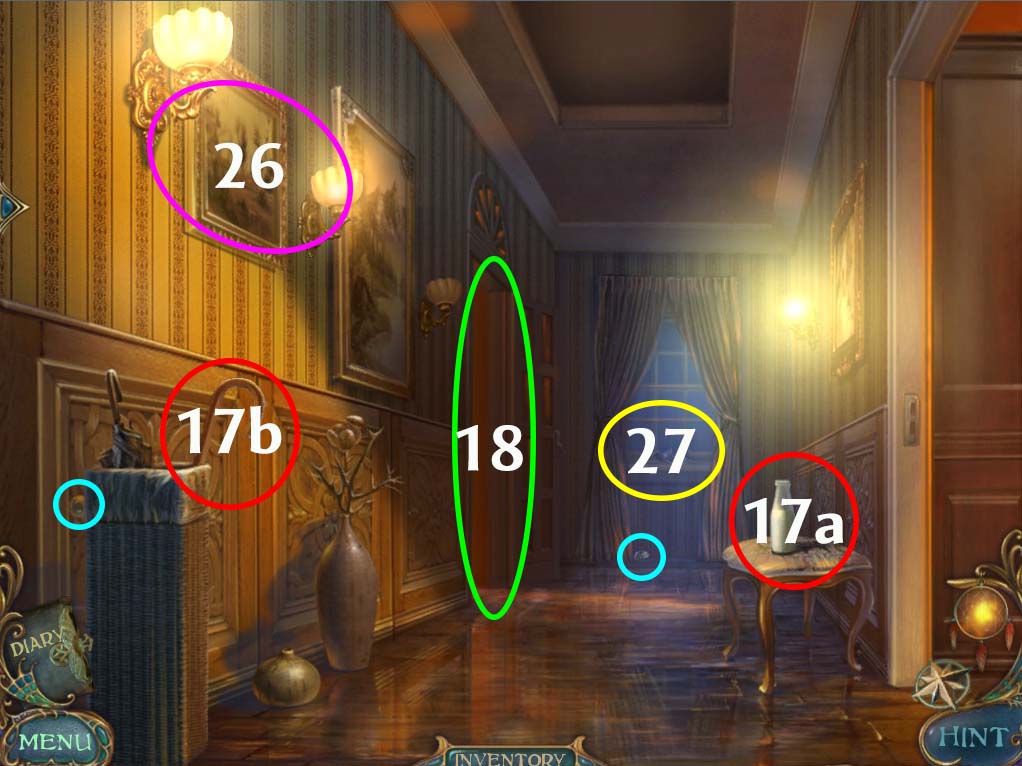
- 17. Take the bottle of MILK and the UMBRELLA HANDLE (both circled in red above) for your inventory.
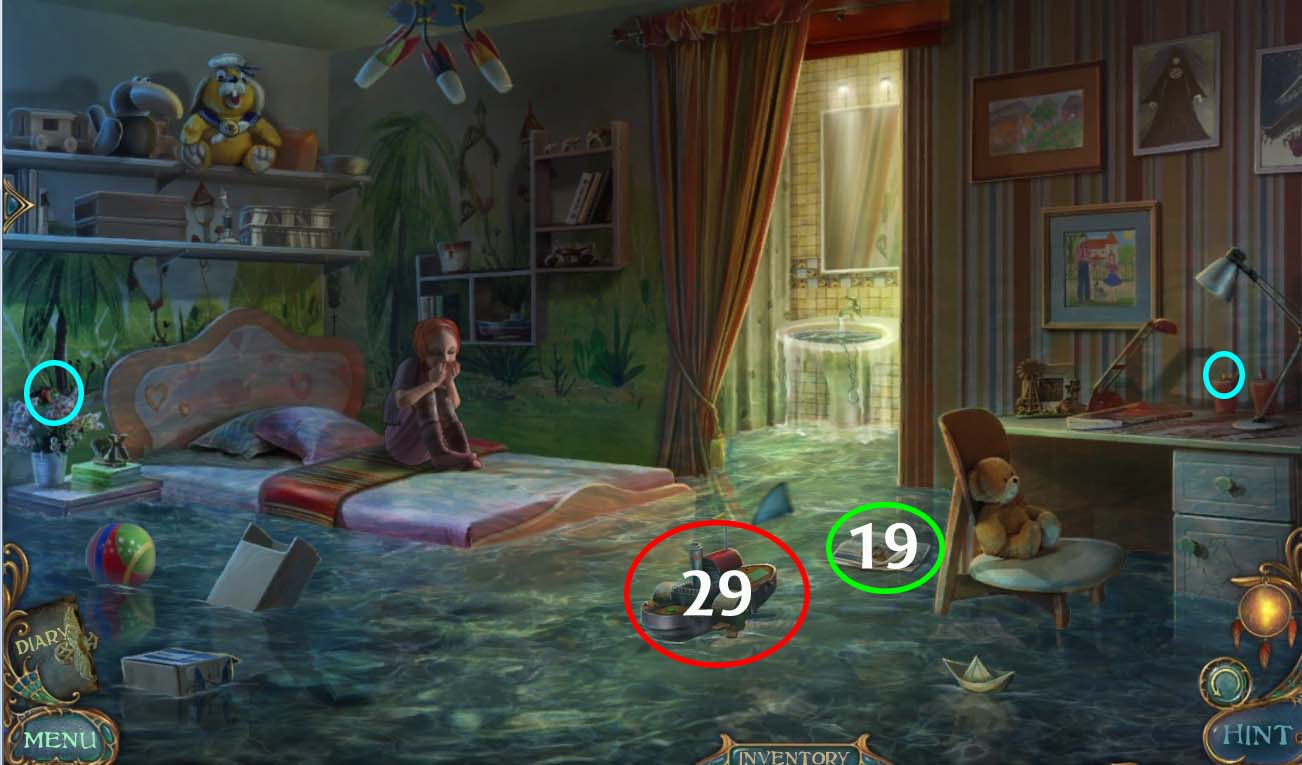
- 18. Investigate Laura’s Room (circled in green above).
- Eliminate the BEHOLDERS in Laura’s room (circled in blue above) (2 of 2) / (49 of 110)
- 19. Read the NEWSPAPER floating in the room. It has a small article about the Professor and scribbles that read “I IV II V III” remember this.
- 20. There is nothing else you can do here for now, so head back to the FRONT PORCH. Pour the MILK from your inventory on the FOOD BOWL (circled in red on the FRONT PORCH image above). This will cause the cat to move away from the ROCKING CHAIR. (Incidentally, if you click on the cat again it transforms into BENNY and then leaves.)
- 21. Check the DOLL on the ROCKING CHAIR (circled in green in the FRONT PORCH image above). Remove the panel on its back and take the BATTERY (2 of 4) for your inventory. Return to the OFFICE.
- 22. Check the BOOKSHELF (circled in white in the OFFICE image above). This will trigger the BOOK PUZZLE.
- BOOK PUZZLE
- The object of this puzzle is to rearrange in a certain order. Remember the NEWSPAPER in Laura’s room? That’s the code. Clicking on one book will cause it to change places with the next book that you click. Arrange the books so they match the image below:
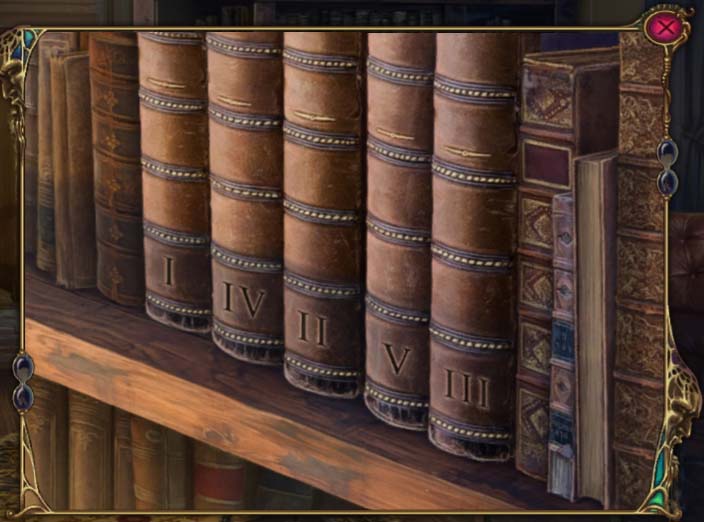
- Once you solve the image, half a PIECE OF TABLE written in scrap paper. Take it for your inventory.
- 23. Check the TABLE (circled in yellow in OFFICE image above).
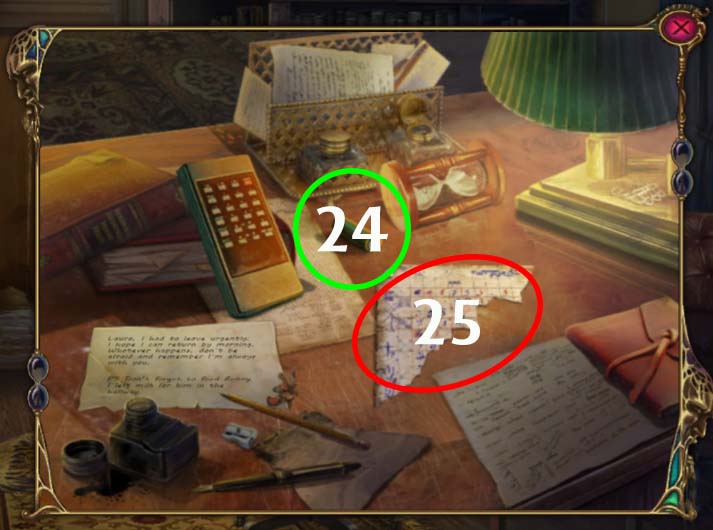
- 24. Take the BATTERY (3 of 4) (circled in green above) for your inventory.
- 25. Investigate the scrap of paper (circled in red above) and use the PIECE OF TABLE and the TEMPLATE from your inventory to start the TABLE PUZZLE.
TABLE PUZZLE
The object of this puzzle is to match the template to the numbers so that each line of the equation in the template is correct. The Four numbers on the right is a keycode. The answer to this puzzle is shown below:

- Once you note the numbers from the puzzle, head back to the FLOODED HALLWAY.
- 26. Investigate the PAINTING on the wall (circled in violet on the HALLWAY image above). This will reveal a safe with a numerical lock. Arrange the numbers until you get 8219. This will open the safe and reveal a JOURNAL. Read through the entire thing and on the last page you’ll find a note and the final BATTERY (4 of 4) that you need to continue on your mission.
- 27. Check the area of the hallway circled in yellow and you’ll find a REMOTE CONTROL.
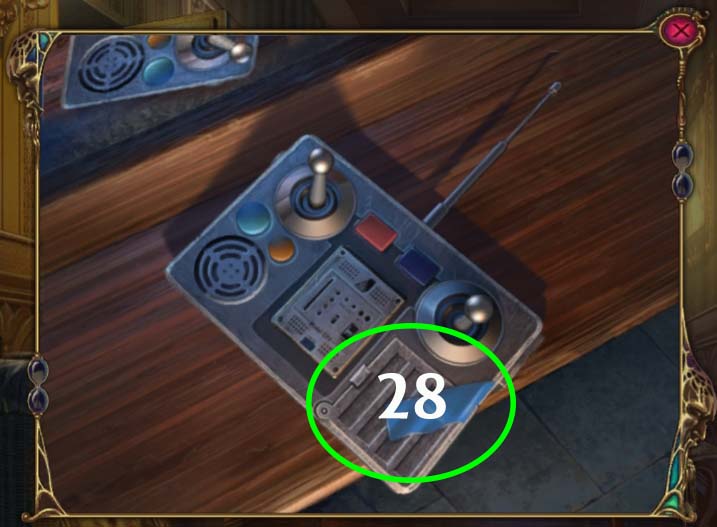
- 28. Take of the REMOTE CONTROL panel (circled in green above) and place the BATTERIES inside. Close the panel and take the REMOTE CONTROL for your inventory. Once you have it, enter Laura’s room again. It’s time to help her!
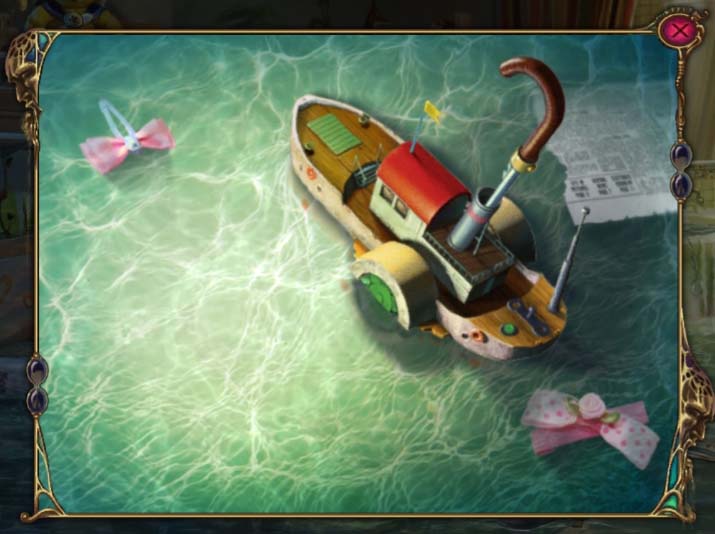
- 29. Investigate the BOAT *circled in red on LAURA’S ROOM image above) and place the UMBRELLA HANDLE on top of its MAST as shown in the picture below. Use the REMOTE CONTROL on the BOAT and a small cutscene begins.
- With the flooding now gone, the young Laura is now safe, and she falls asleep exhausted from her ordeal. It’s time to locate another piece of the dreamcatcher to bring this part of the nightmare to an end.
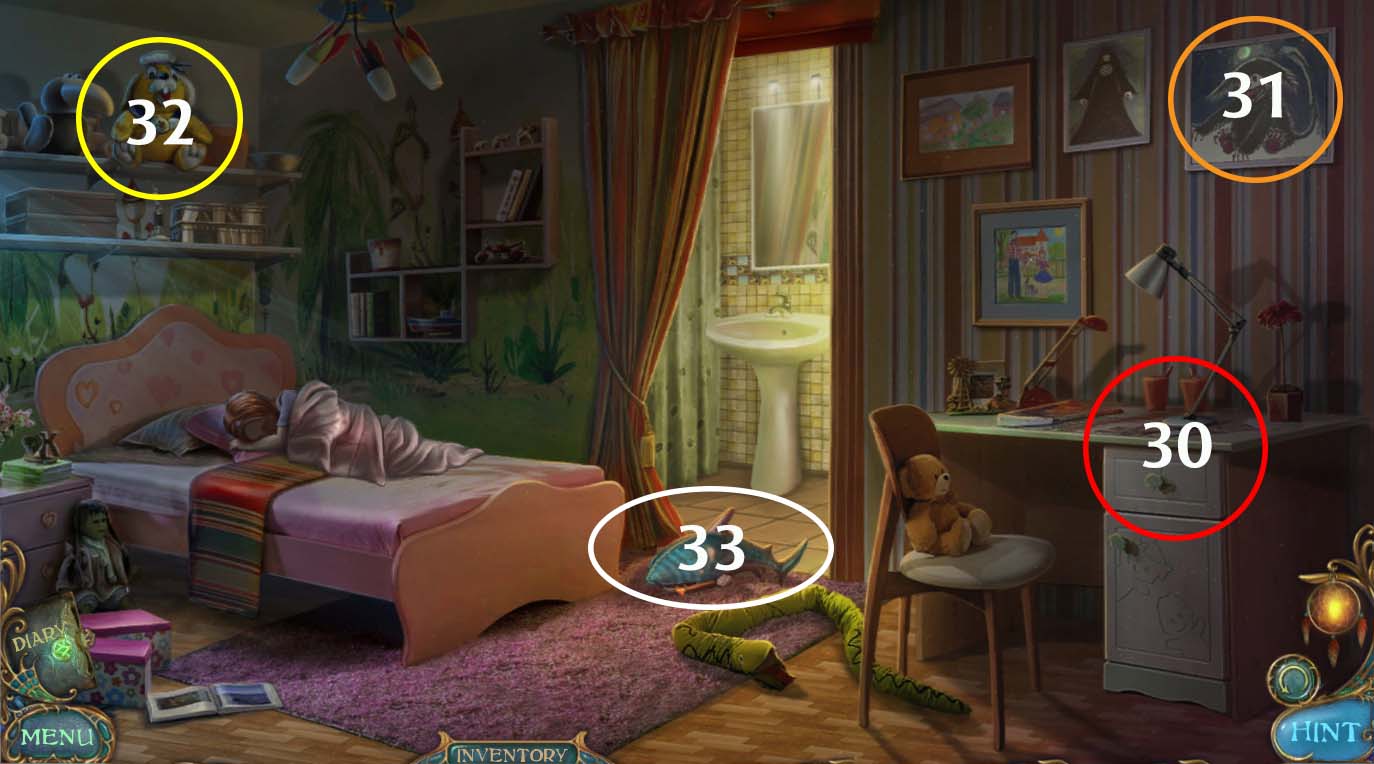
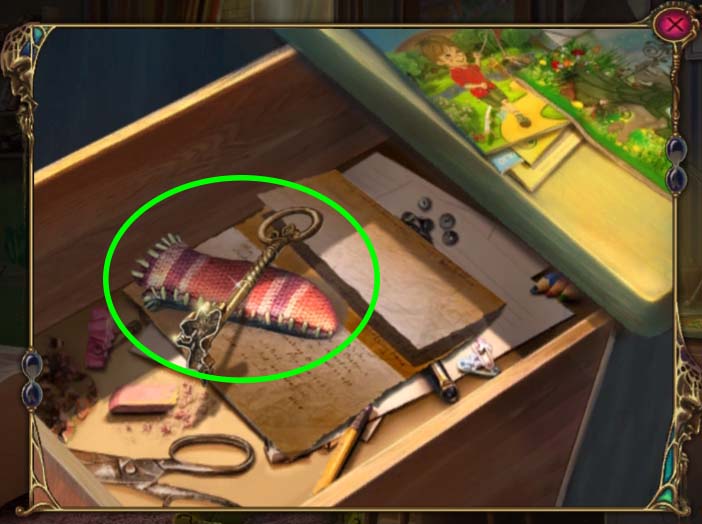
- 30. Check the DRAWER (circled in red above) and take the FIN and the FAIRY KEY (circled in green in the image below).
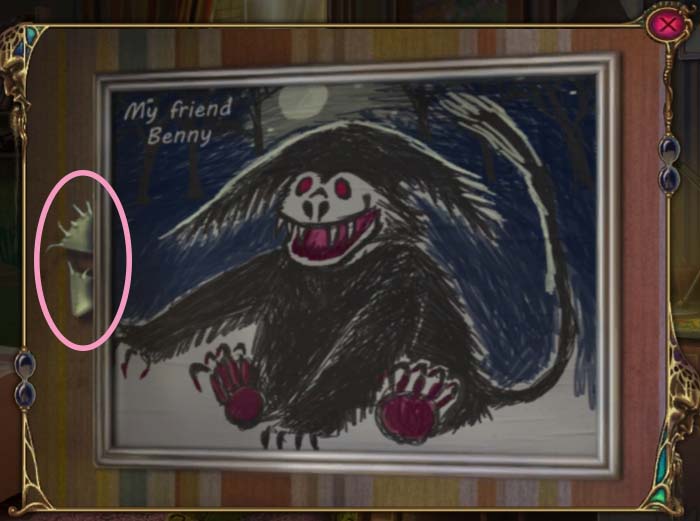
- 31. Check the PICTURE of BENNY (circled in orange in ROOM image above) and grab the TEETH at the side of the picture (circled in pink below).
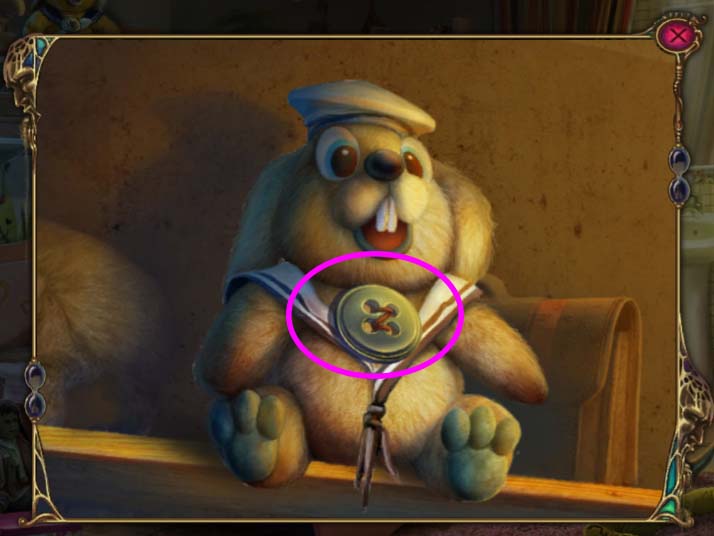
- 32. Investigate the RABBIT DOLL (circled in yellow in ROOM image above) and take the BIG BUTTON on its chest (circled in violet in image below).
- 33. Check the SHARK DOLL (circled in white on ROOM image above). It’s missing a few of its pieces, and luckily you have all the parts. Assemble the FIN, the TEETH and the BIG BUTTON to fix it. Once you’re done, it opens its mouth and reveals a piece of the dreamcatcher. Take it. With this, this nightmare has been dispelled. A cutscene begins and you once again find yourself in the CATWALK, albeit this time the place is a lot better looking than when you left it.
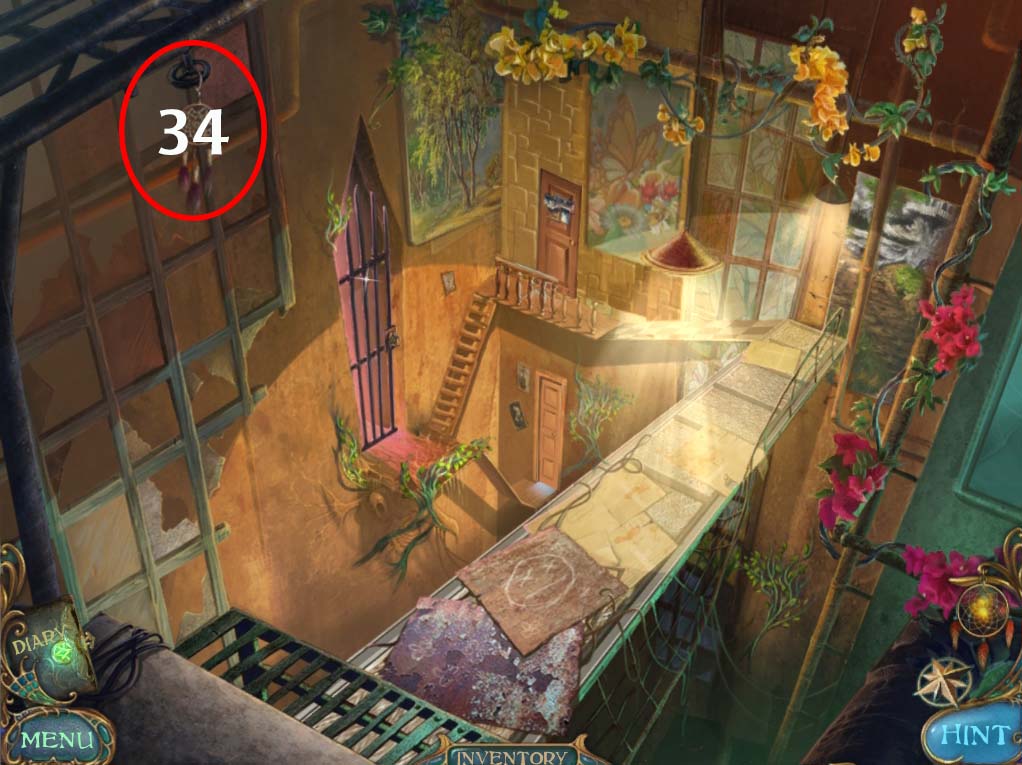
- 34. Grab the dreamcatcher hanging from the roof (circled in red above). It’s our reward for helping another part of Laura. We are through with this part area for now. It’s time to head back to the BRIDGE.
End of Chapter IV
Chapter One: The Professor’s Laboratory
Chapter Two: The Ruined Church
Chapter Three: The Frozen Lake
Chapter Four: The Family Home
Chapter Five: The Corrupted Forest
Chapter Six: The Abandoned Theme Park
Chapter Seven: The Empty Square
Chapter Eight: The Endless Desert
Chapter Nine: The Ritual
Ask for help in the comments below!