
Death Upon an Austrian Sonata: A Dana Knightstone Novel: Chapter One: Enter Sebastian’s Manor
Our Death Upon an Austrian Sonata: A Dana Knightstone Novel Walkthrough will provide you with a personal tour of Sebastian Knightstone's Manor, nestled in the snowy countryside of Austria. However, this is no relaxing vacation as you soon discover the halls of this exotic manor are haunted, and when your investigation takes a turn for the worst, you'll be happy to have the clear instructions and custom screenshots we've supplied in this Dana Knightstone Novel Walkthrough!
General Info and Tips
Chapter One: Enter Sebastian’s Manor
Chapter Two: Discover the Crash Site
Chapter Three: Welcome to the Austrian Town
Chapter Four: Train to Germany
Chapter Five: Inside the Conservatory
Chapter Six: Exploring Under the Well
Epilogue: Discover Luthier’s Wish
Epilogue: Uncover Luthier’s Workshop
Ask for help in the comments below!
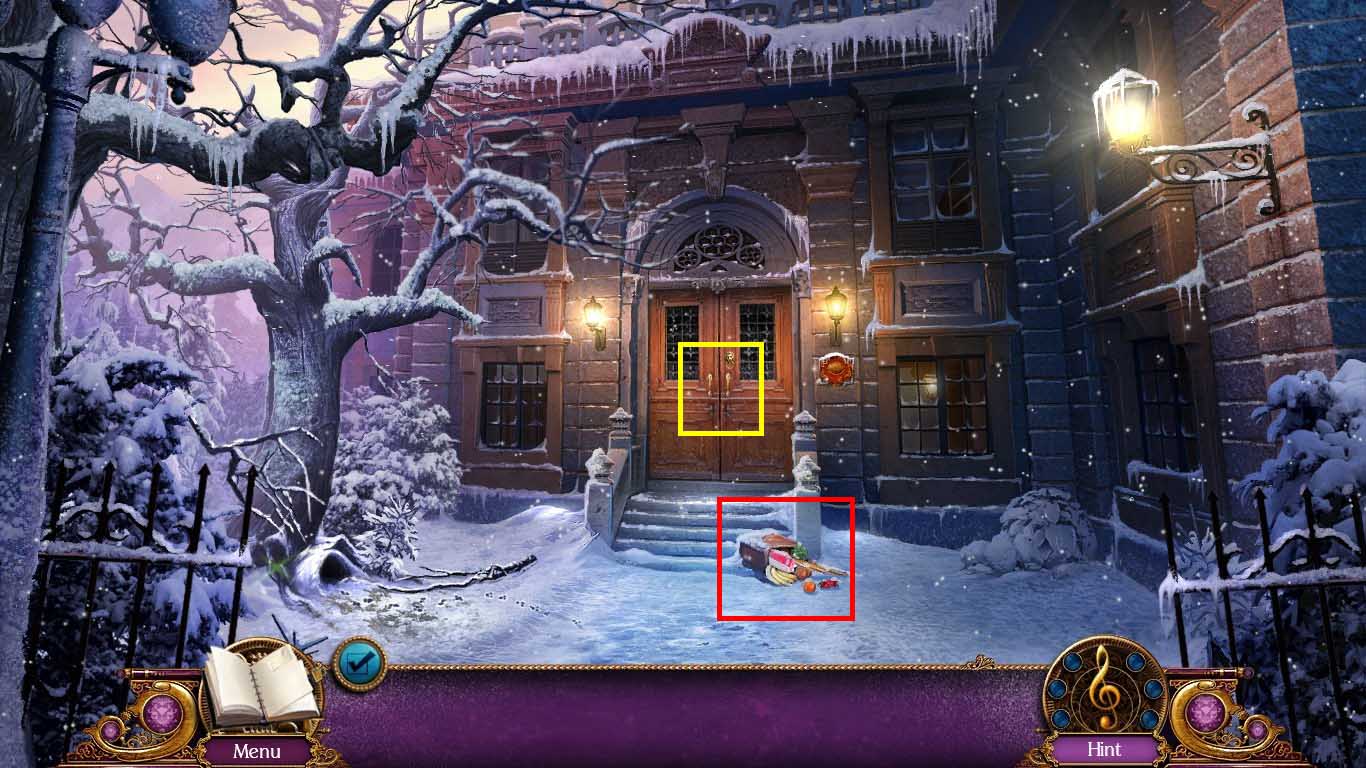
- Zoom into the door.
- Click the groceries to access a hidden objects area.
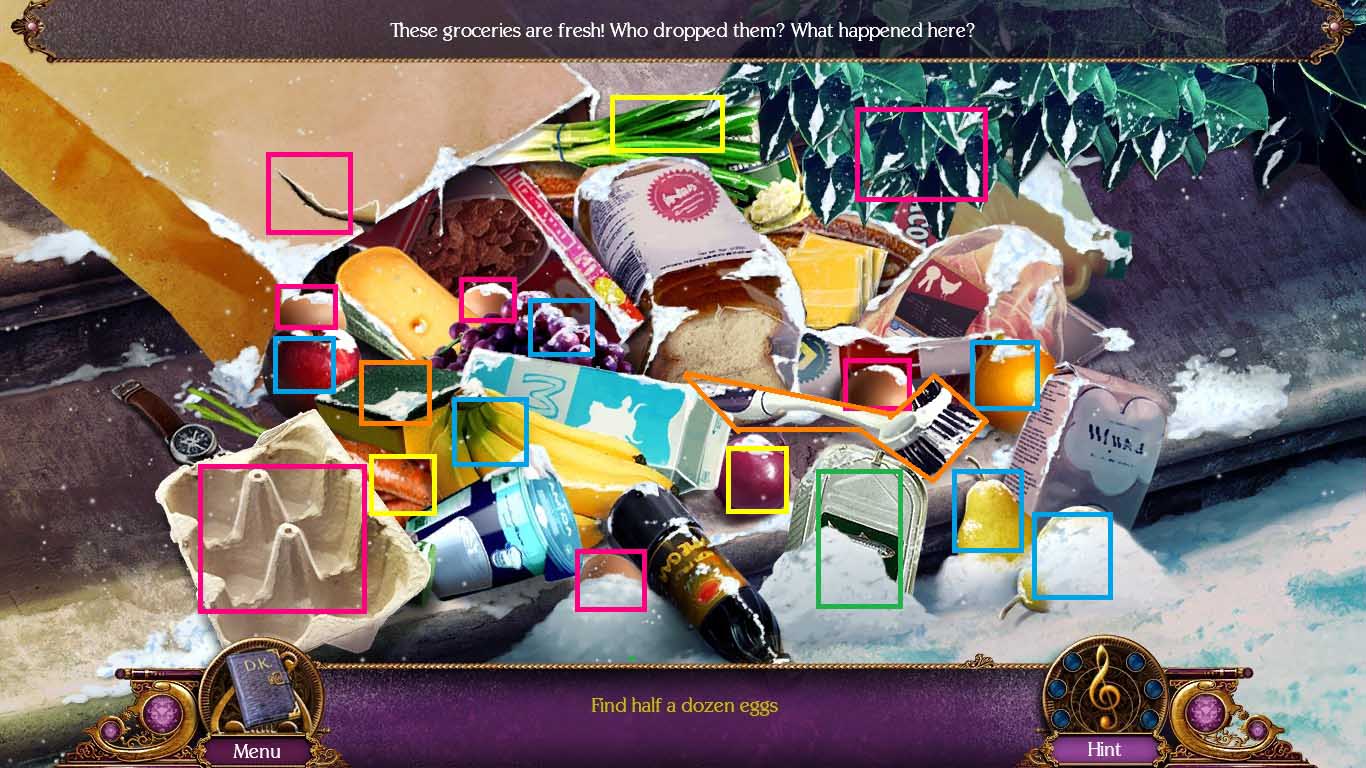
- Click and drag the leaves and rip the bag open.
- Find the six eggs and put them into the carton to collect the half dozen eggs.
- Find the five fruits.
- Find the three vegetables.
- Find the two cleaning utensils.
- Use the can opener on the can of sardines; click the opener.
- Collect the open can of sardines.
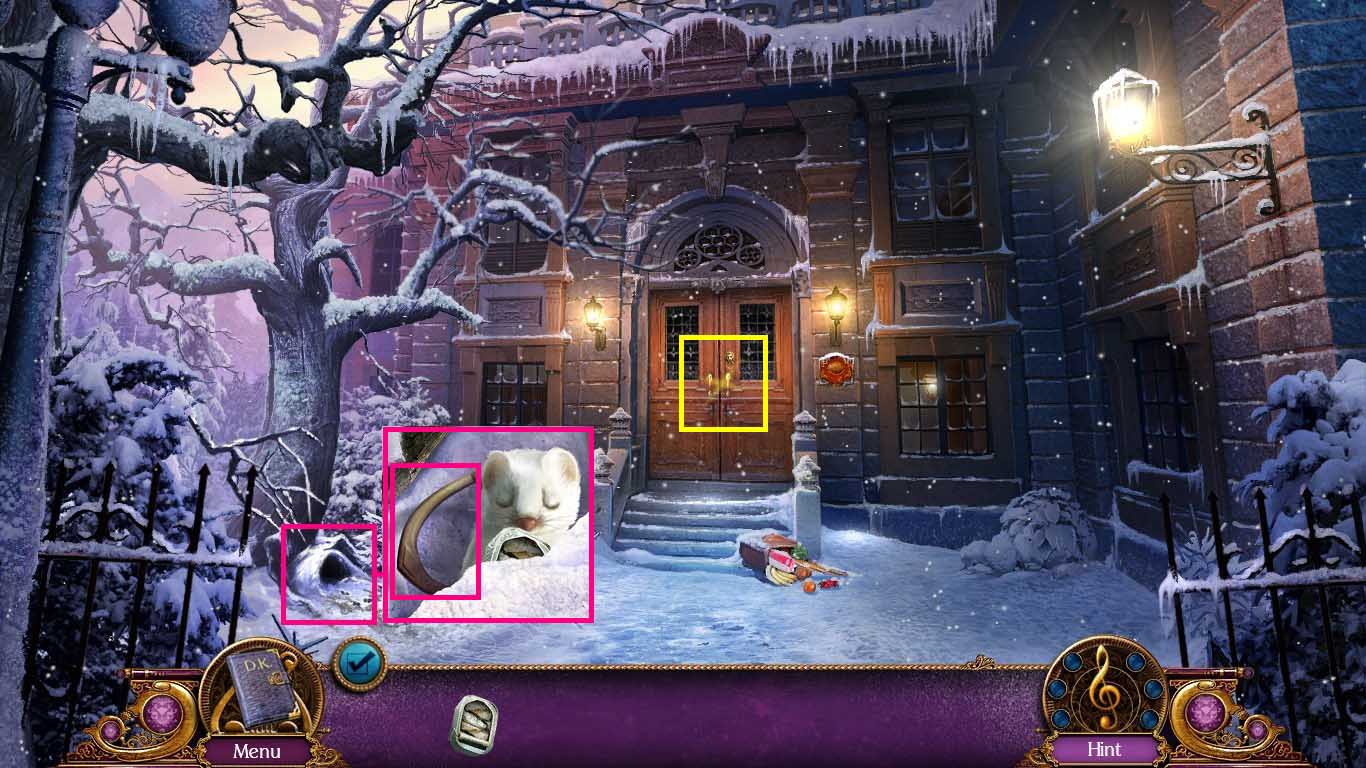
- Examine the burrow.
- Try to get the brass knocker.
- Give the ermine the sardines and collect the brass knocker.
- Examine the door.
- Place the brass knocker into the lion’s mouth.
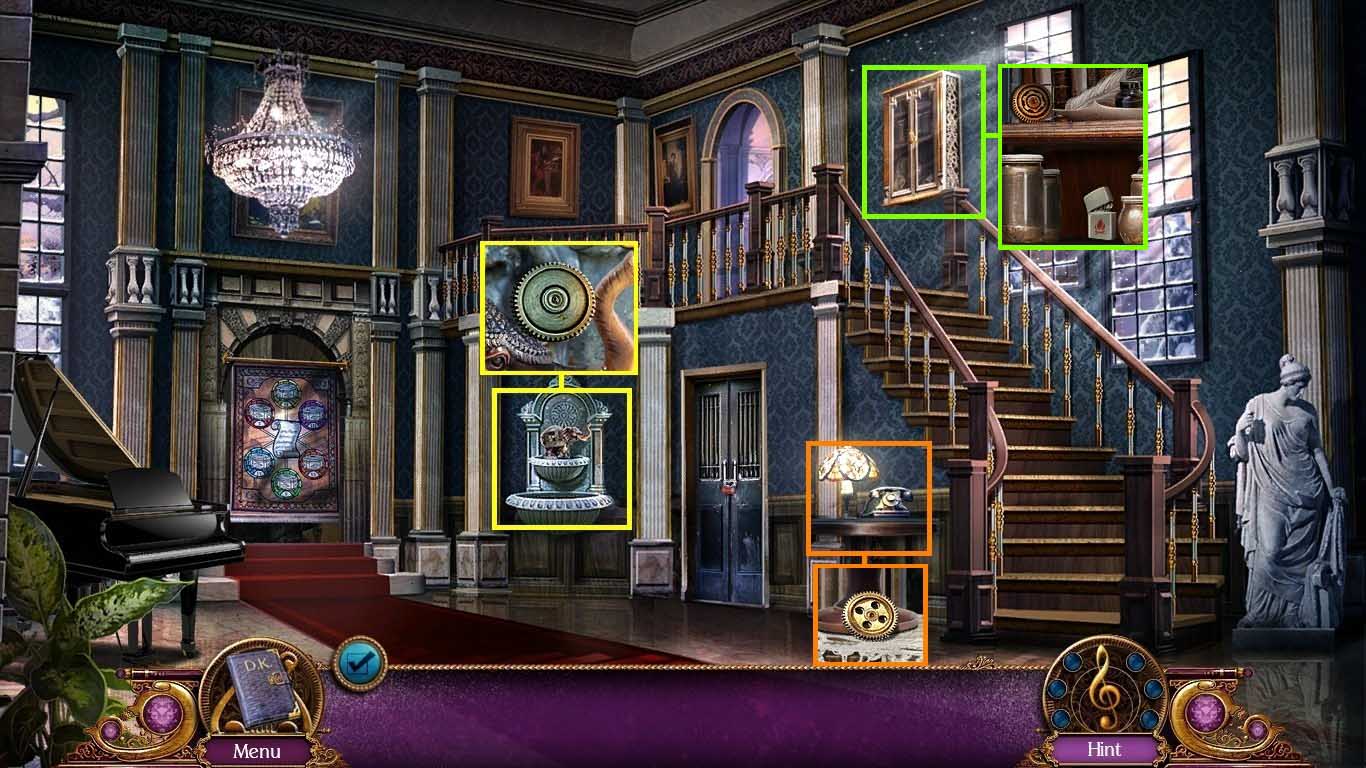
- Examine the fountain; collect the 1/10 gear.
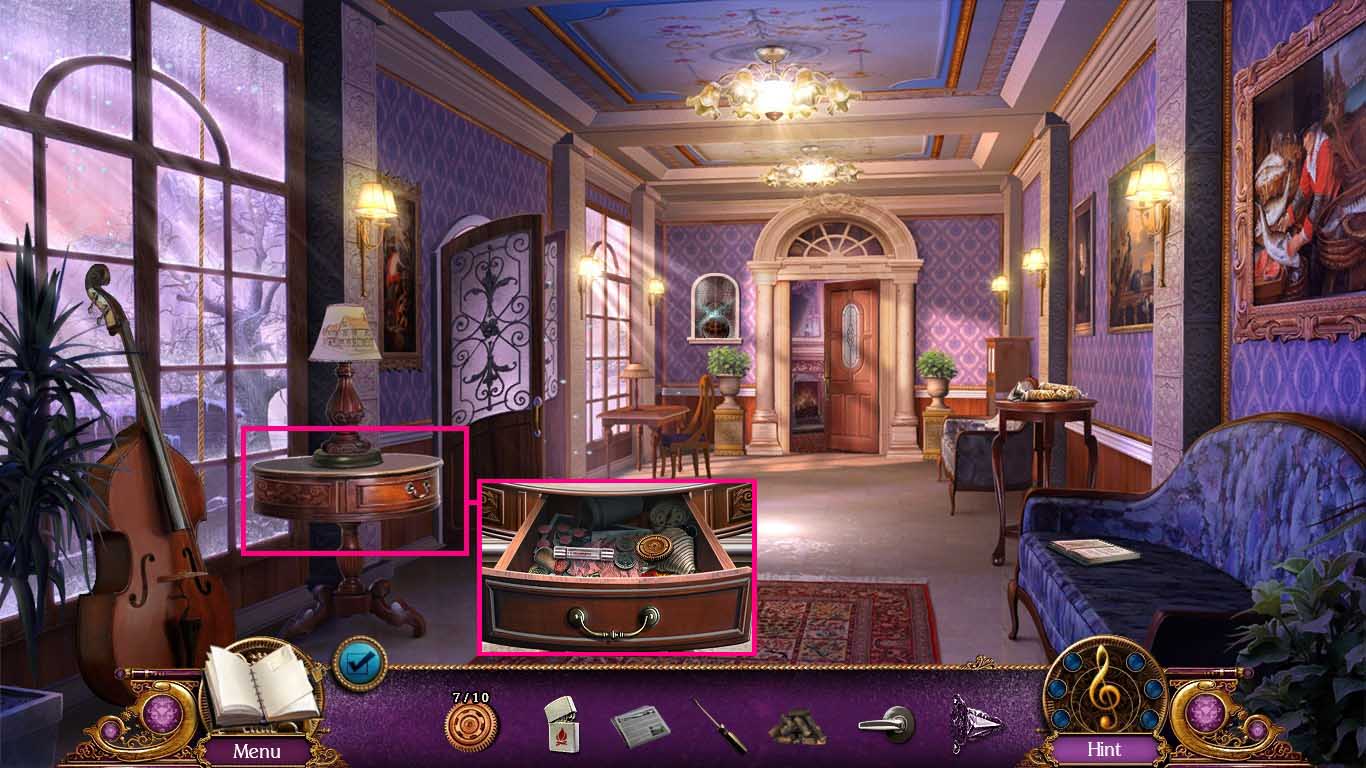
- Examine the side table; click the phone and collect the 2/10 gear.
- Examine the cabinet; click the handle to open the door.
- Click the jars.
- Collect the lighter and the 3/10 gear.
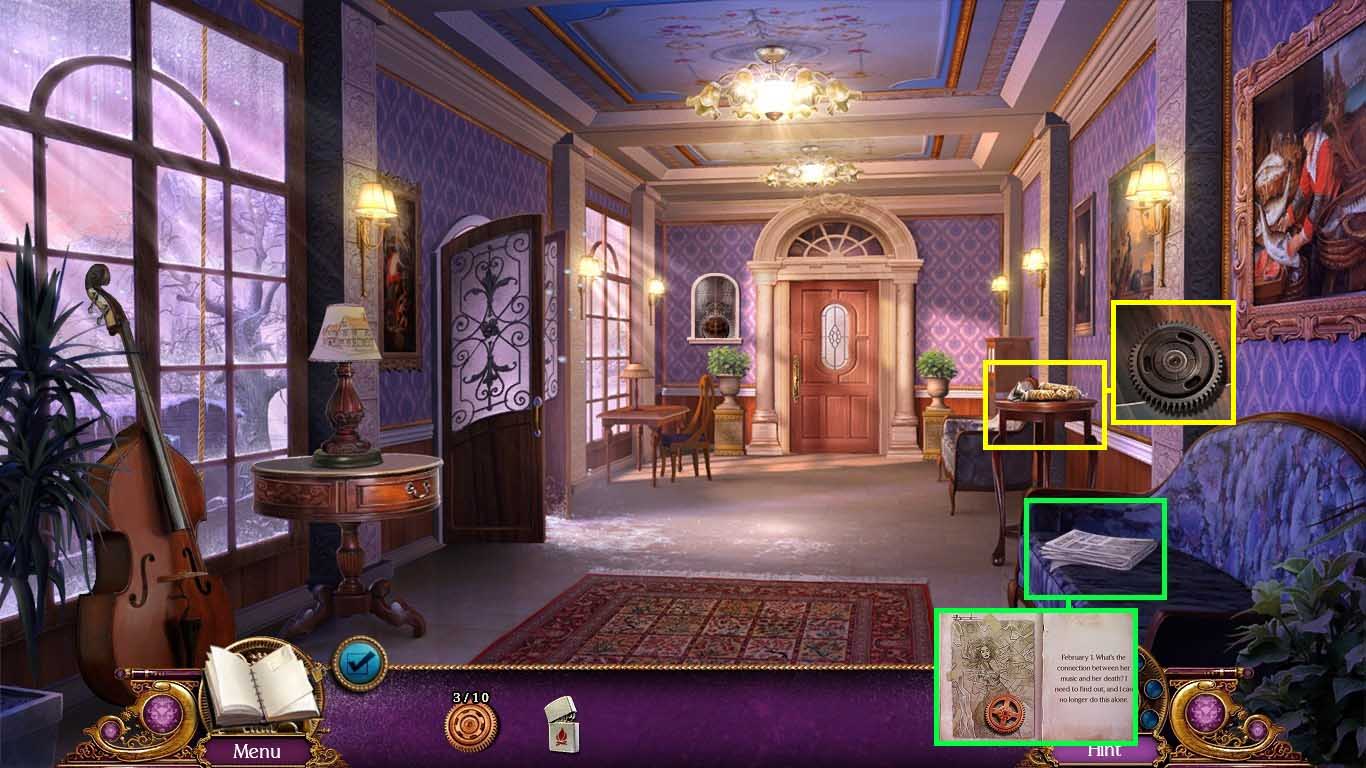
- Examine the newspaper and collect it.
- Click the pages of the book two times to collect the 4/10 gear.
- Examine the side table; collect the 5/10 gear
- Go left to the ski lift.
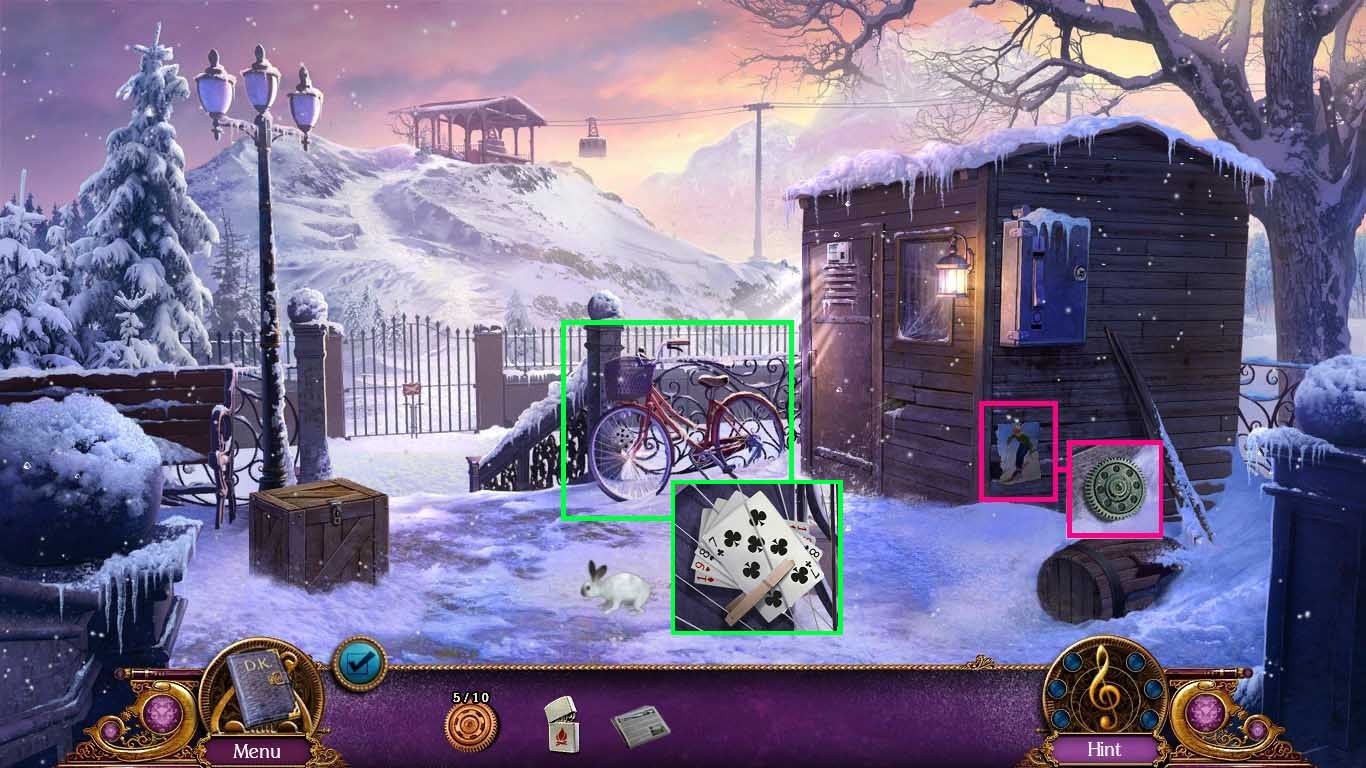
- Examine the poster; click it to remove it.
- Collect the 6/10 gear.
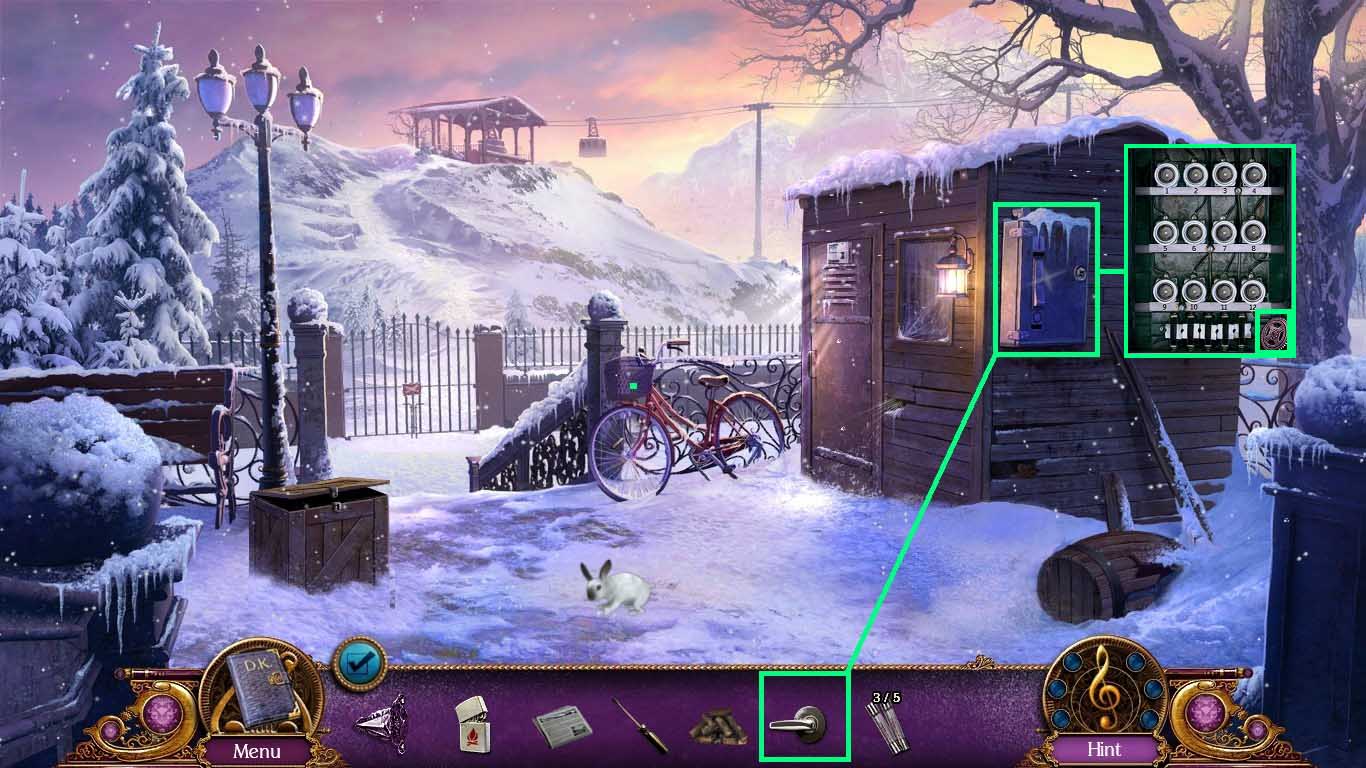
- Examine the bike; click the snow away and collect the cards to get the bike lock code.
- Walk down two times to the grand foyer.
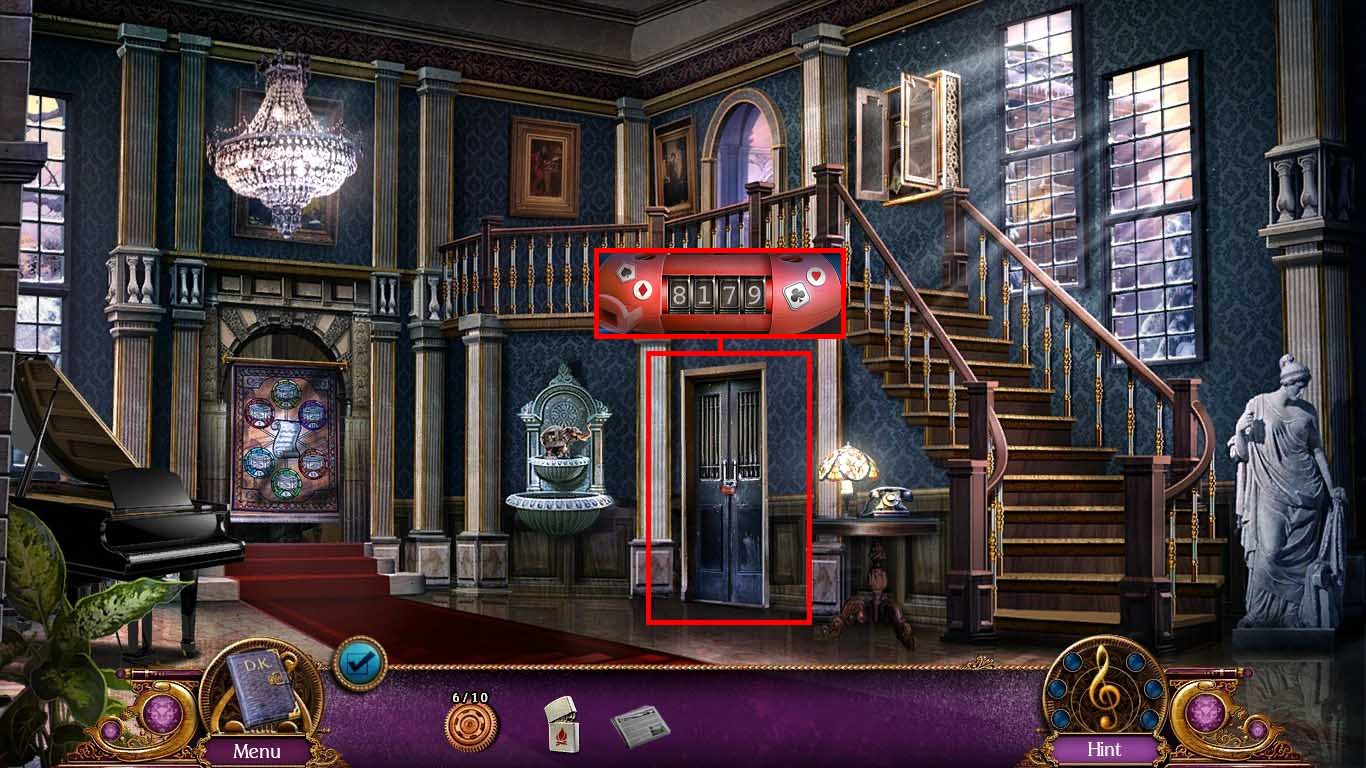
- Examine the storage room; open the lock using the code: 8179.
- Examine the storage room again to access a hidden objects area.
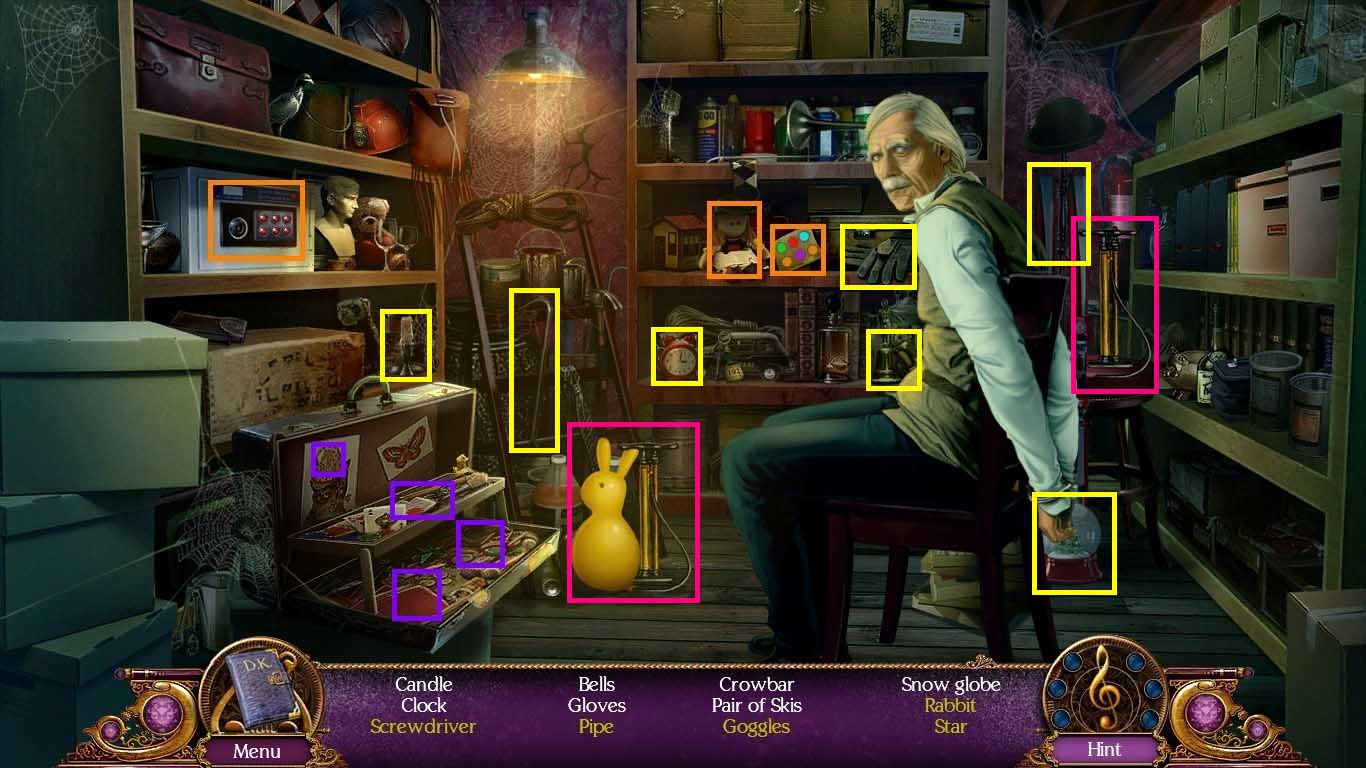
- Click the doll to get the safe code.
- Examine the safe and set the color coded buttons.
- Collect the key; open the luggage with it.
- Examine the luggage.
- Collect the pump; inflate the balloon with it and collect the rabbit.
- Find the remaining items on the list.
- Collect the screwdriver.
- Go to the ski lift.

- Examine the crate.
- Collect the 7/10 gear; use the screwdriver to remove the screws.
- Click the crate open; collect the hacksaw and the logs.
- Walk down two times to the grand foyer and enter the storage room.
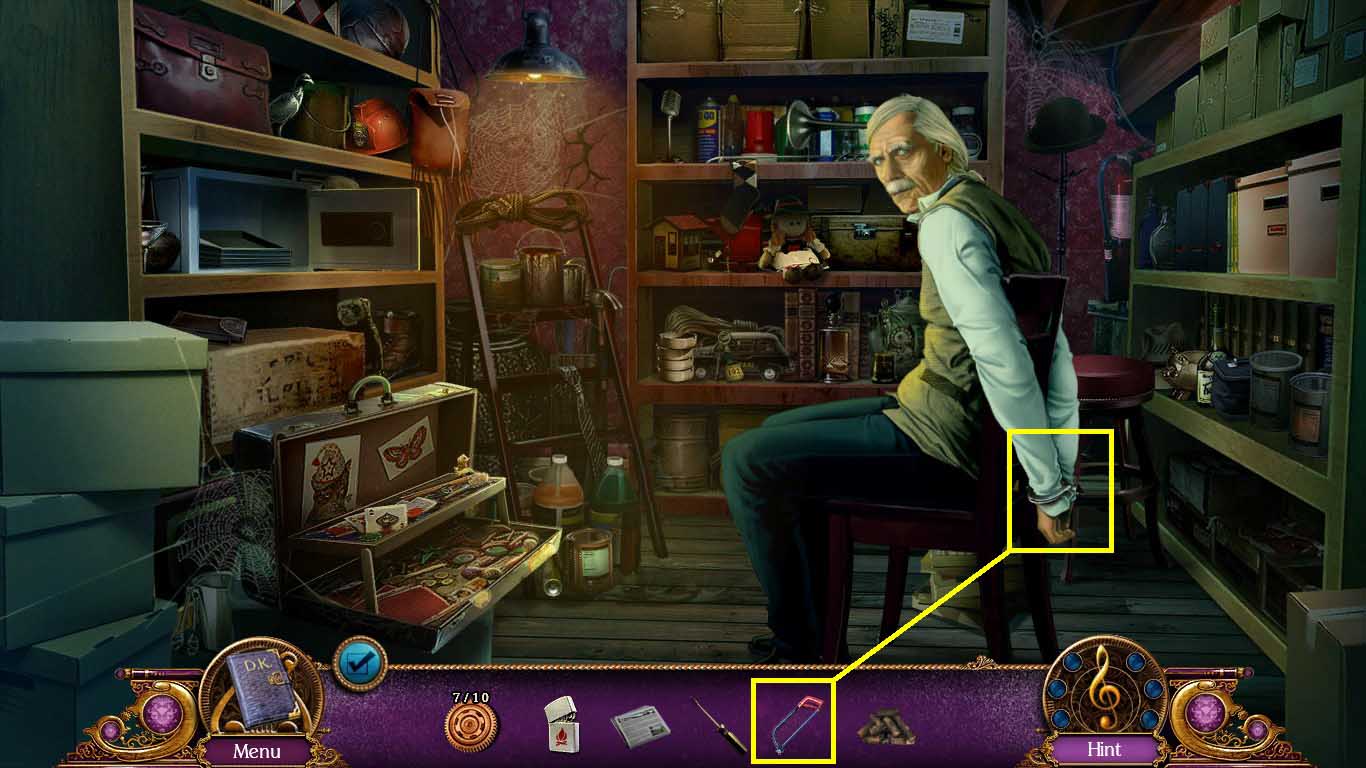
- Use the hacksaw to cut the bonds and set the butler free.
- Collect the room key.
- Go forward to the hallway.
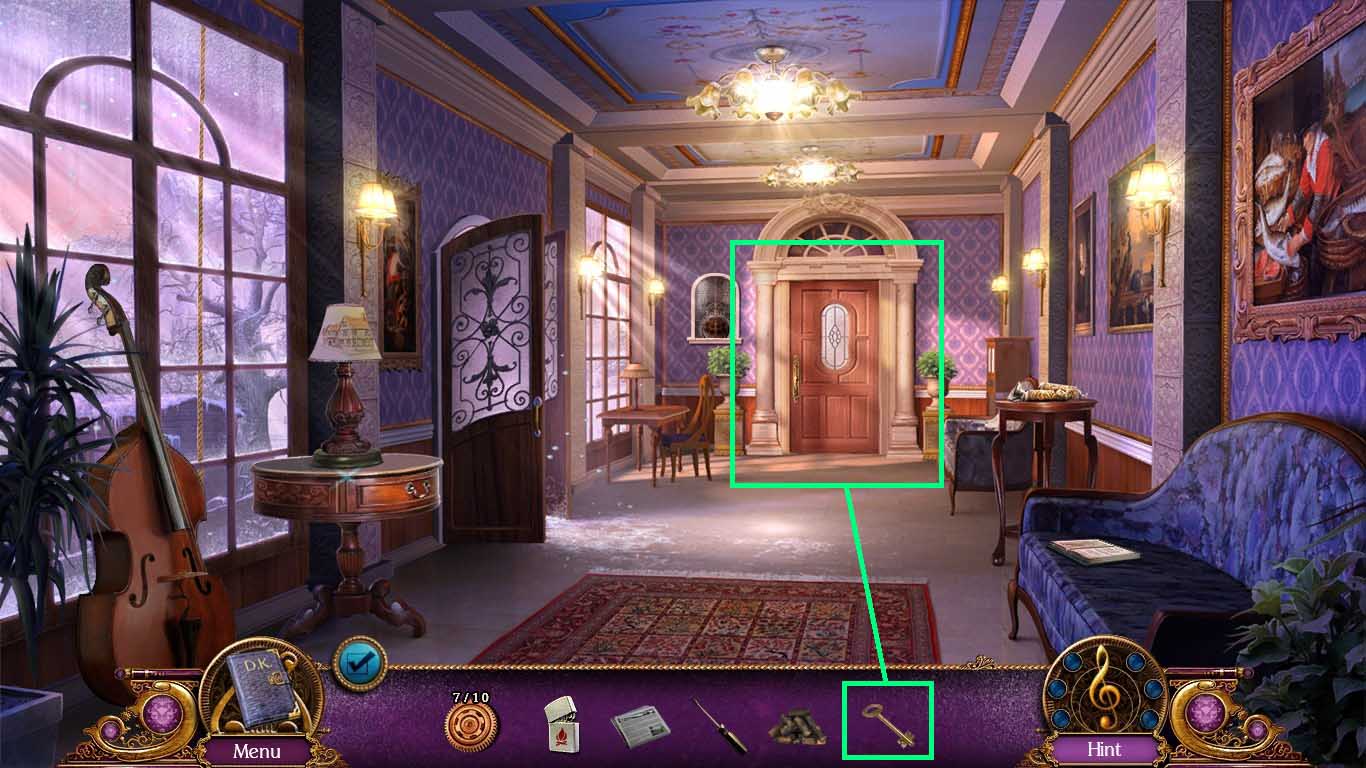
- Examine the door; insert the room key into the lock and open the door.
- Go forward.
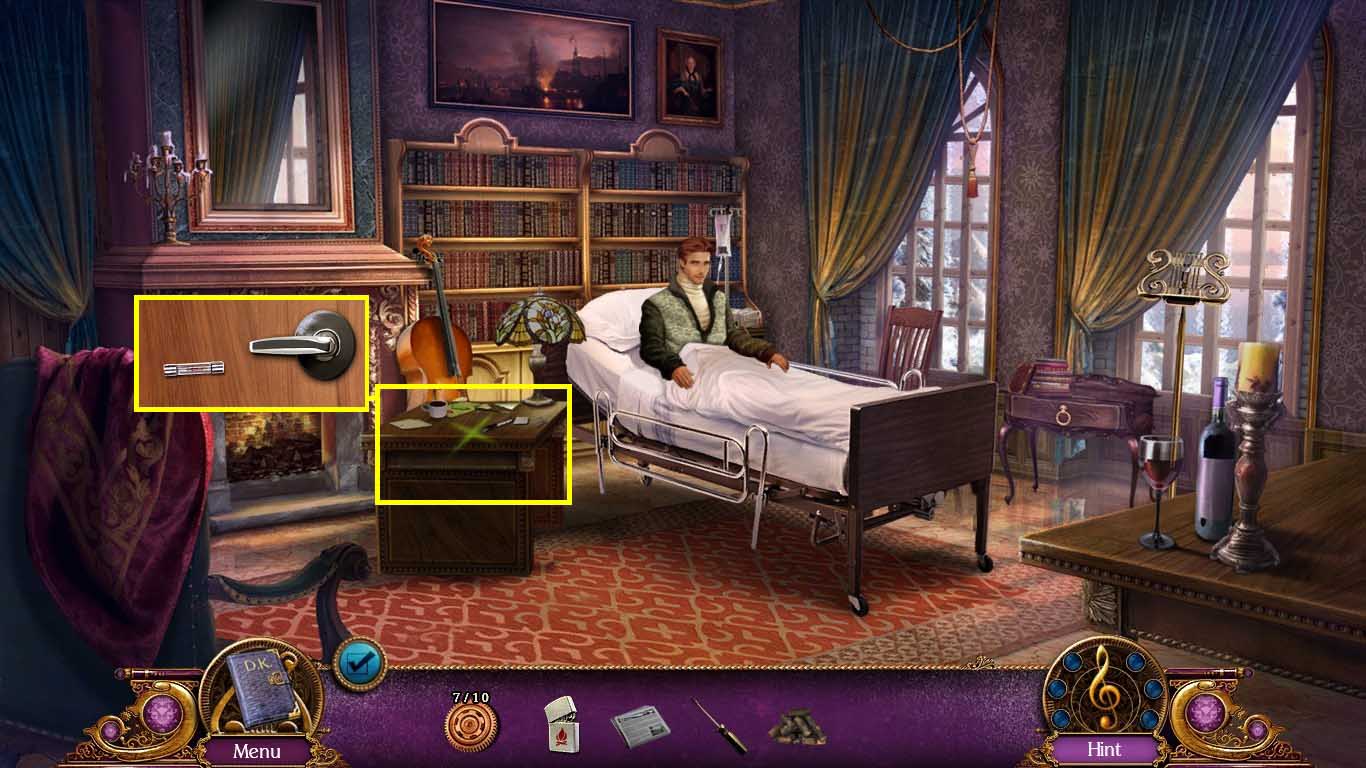
- Click Sebastian.
- Examine the desk and collect the 1/5 fuse and the door handle.
- Back out of the desk scene.
- Walk down two times to the grand foyer.
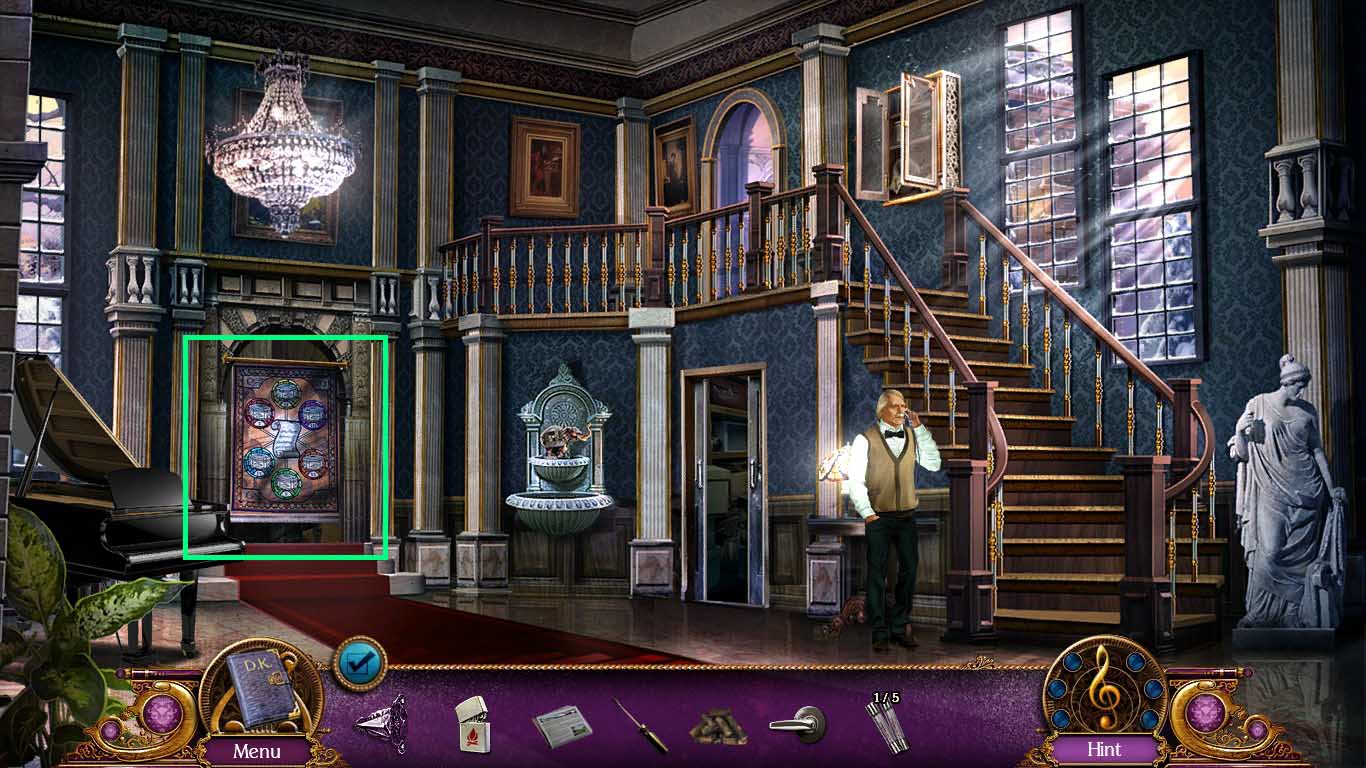
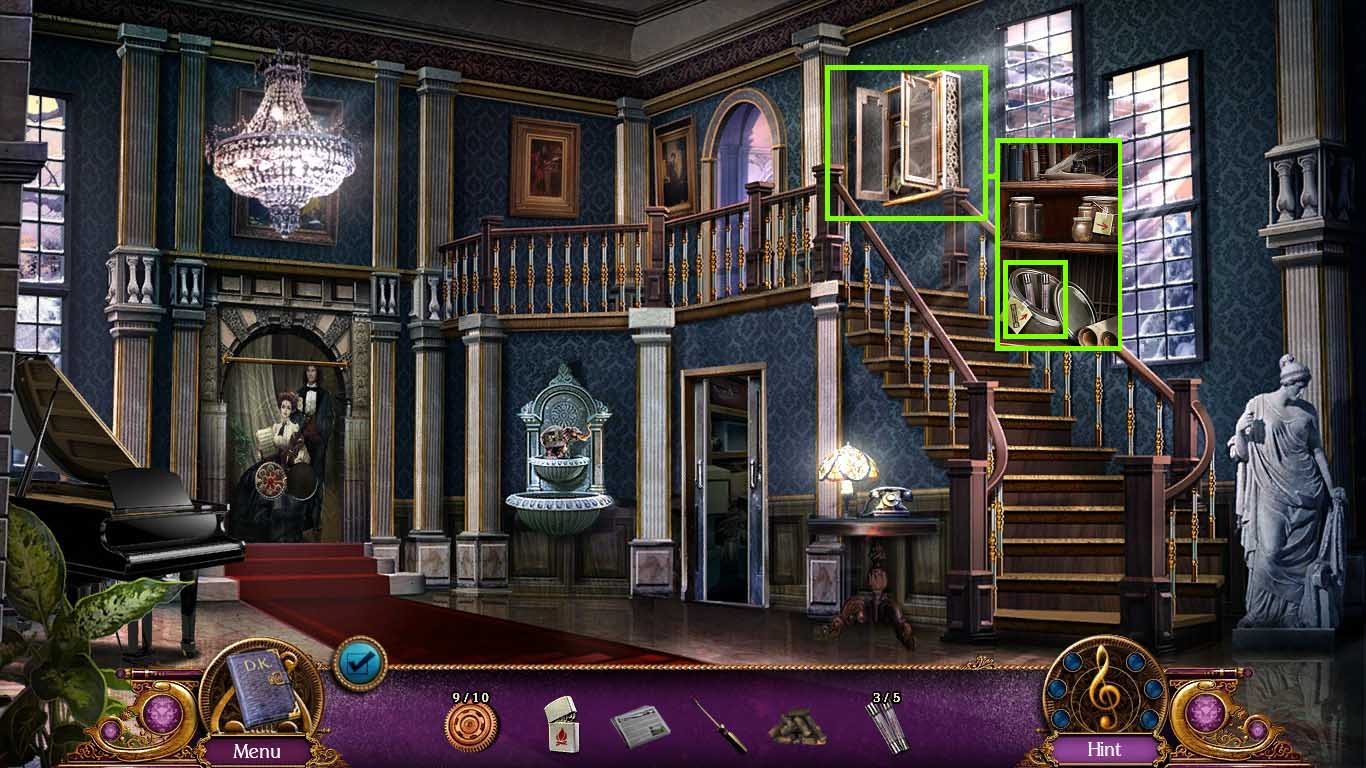
- Examine the tapestry and click it to remove it.
- Move into the hallway.
- Examine the side table; use the screwdriver to open the drawer.
- Collect the 8/10 gear and the 2/5 fuse.
- Walk down two times to the main entrance.
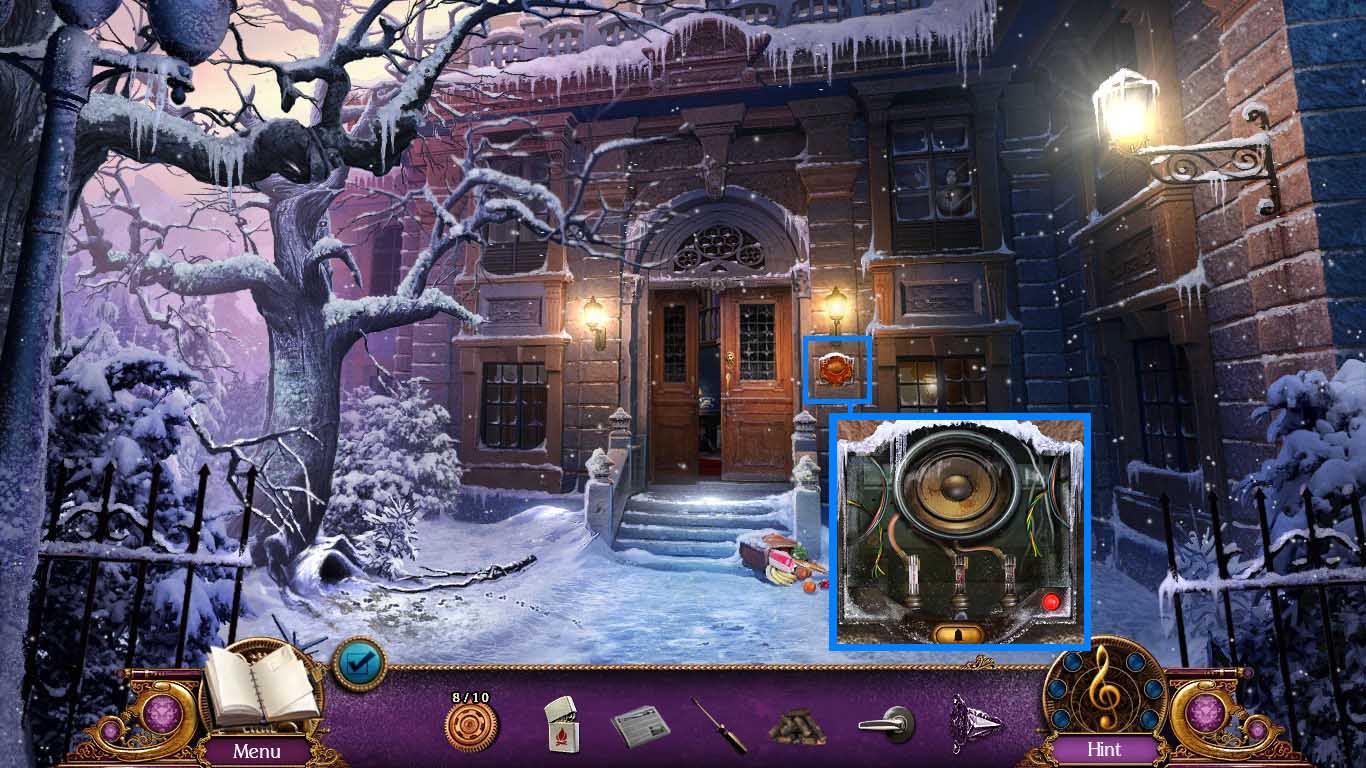
- Examine the intercom.
- Use the screwdriver on the screws to remove the lid.
- Collect the 3/5 fuse.
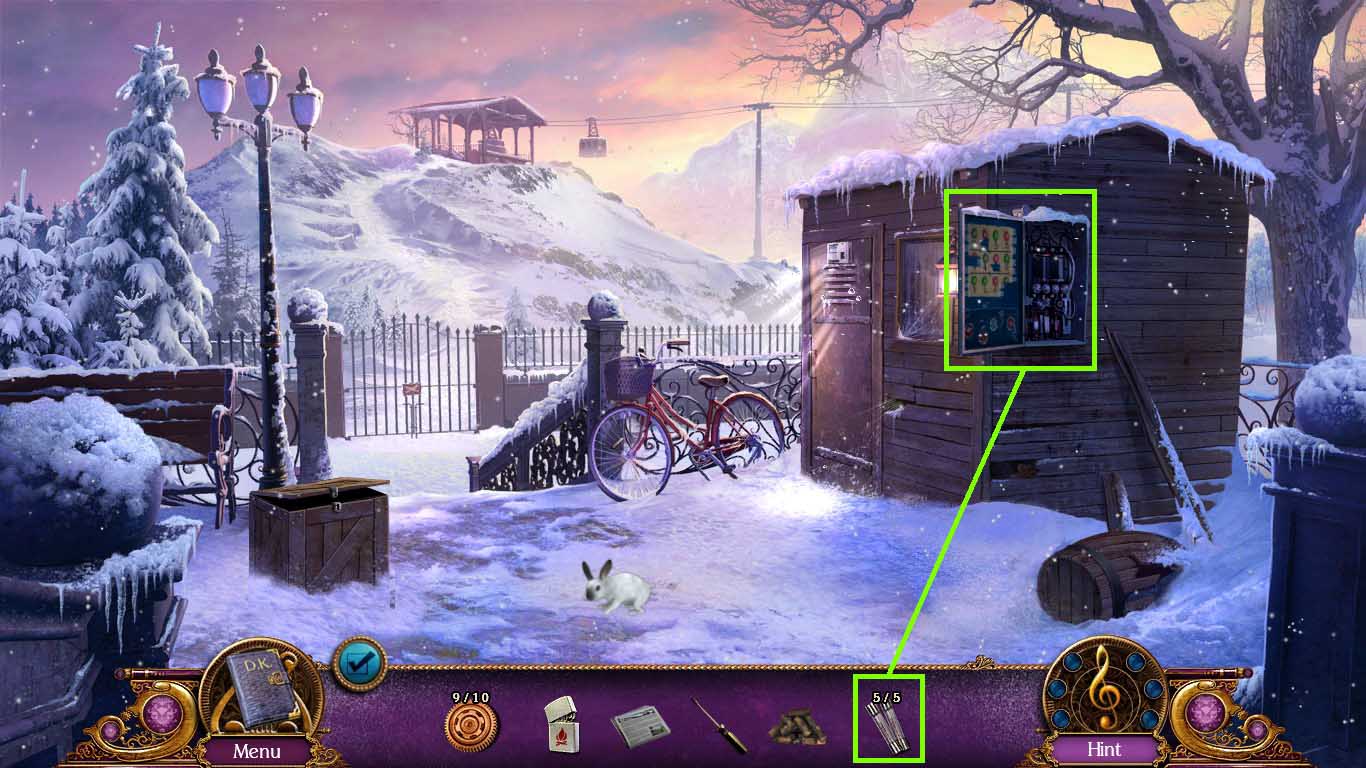
- Go forward two times and go left to the ski lift.
- Examine the circuit breaker; insert the door handle.
- Click it to open the door.
- Collect the 9/10 gear.
- Walk down two times to the grand foyer.
- Examine the cabinet; use the screwdriver to open the box.
- Collect the 4/5 fuse and the 5/5 fuse.
- Go forward and go left to the ski lift.
- Examine the circuit breaker; insert the 5 fuses.
- Play the mini-game.
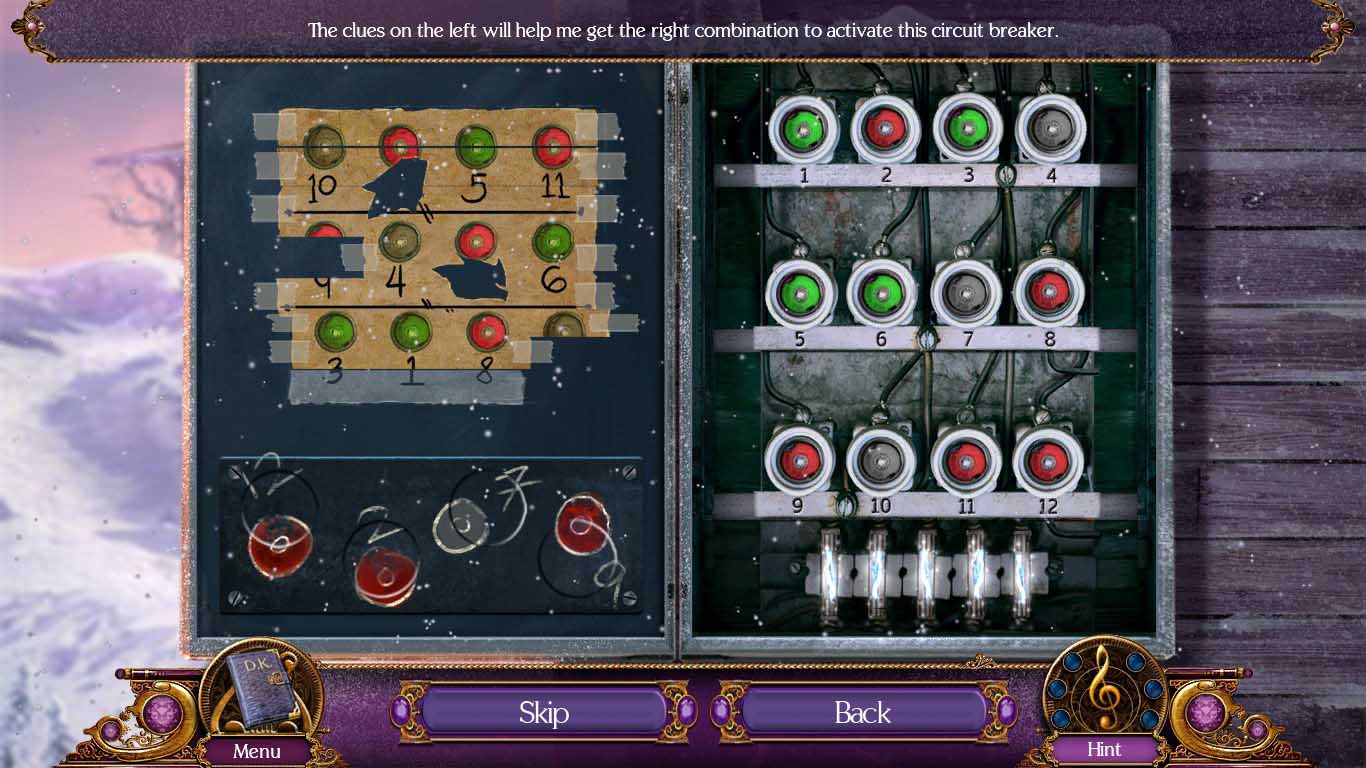
- Re-organize the clues.
- Click the bulbs to change the colors.
- Solve as shown above.
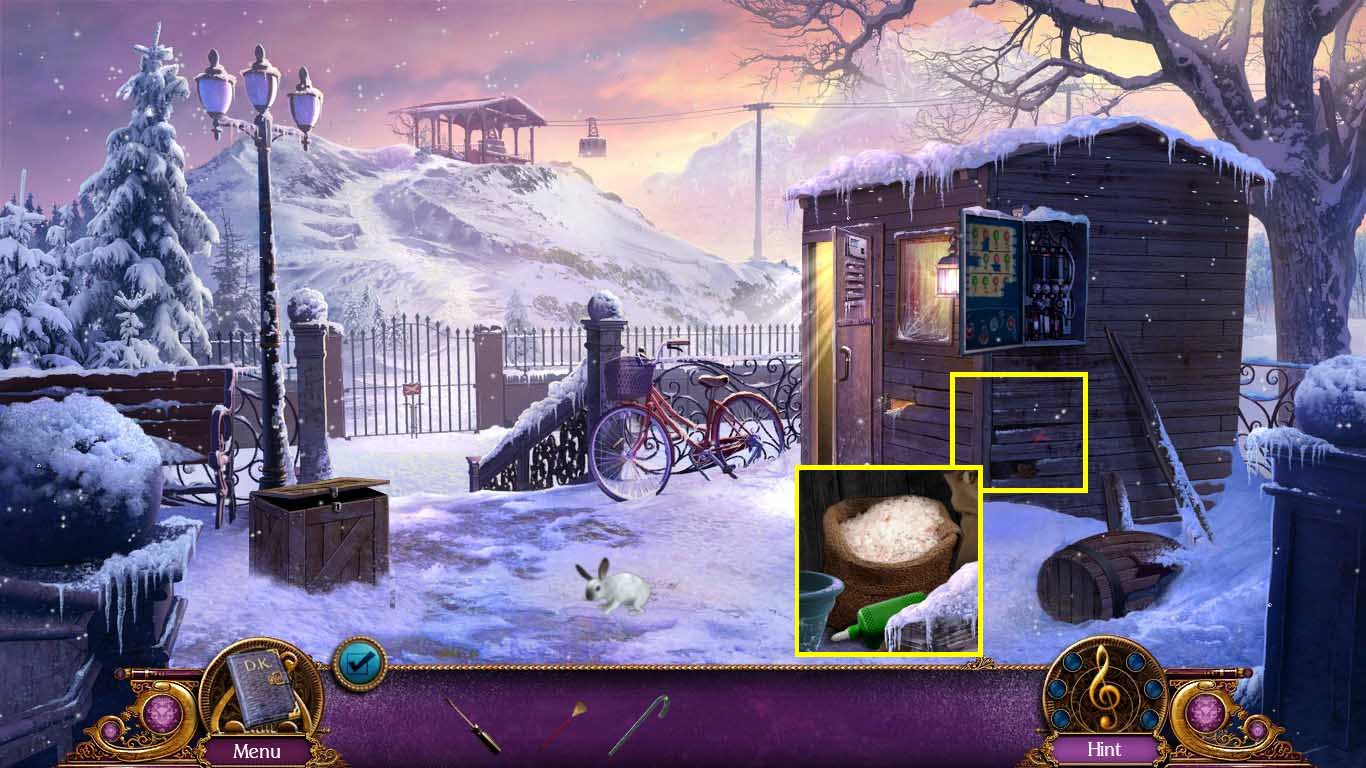
- Examine the shed to access the hidden objects area.
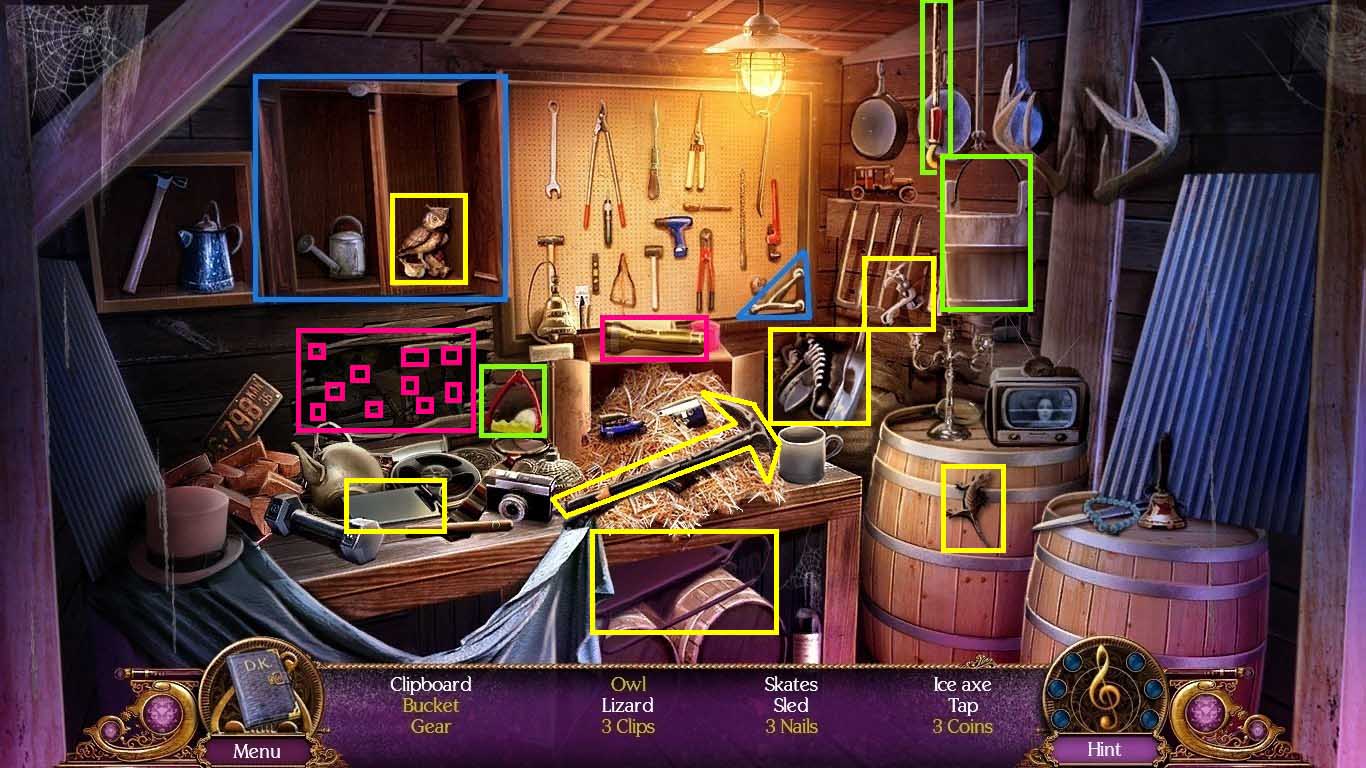
- Collect the handle and place it onto the cabinet.
- Click the cabinet open and collect the owl.
- Collect the red handle, add it to the hook, click the handle and collect the bucket.
- Use the flashlight to examine the dark hole.
- Collect the gear, 3 clips, 3 nails and 3 coins.
- Find the remaining items on the list.
- Collect the 10/10 gears.
- Walk down one time into the hallway.
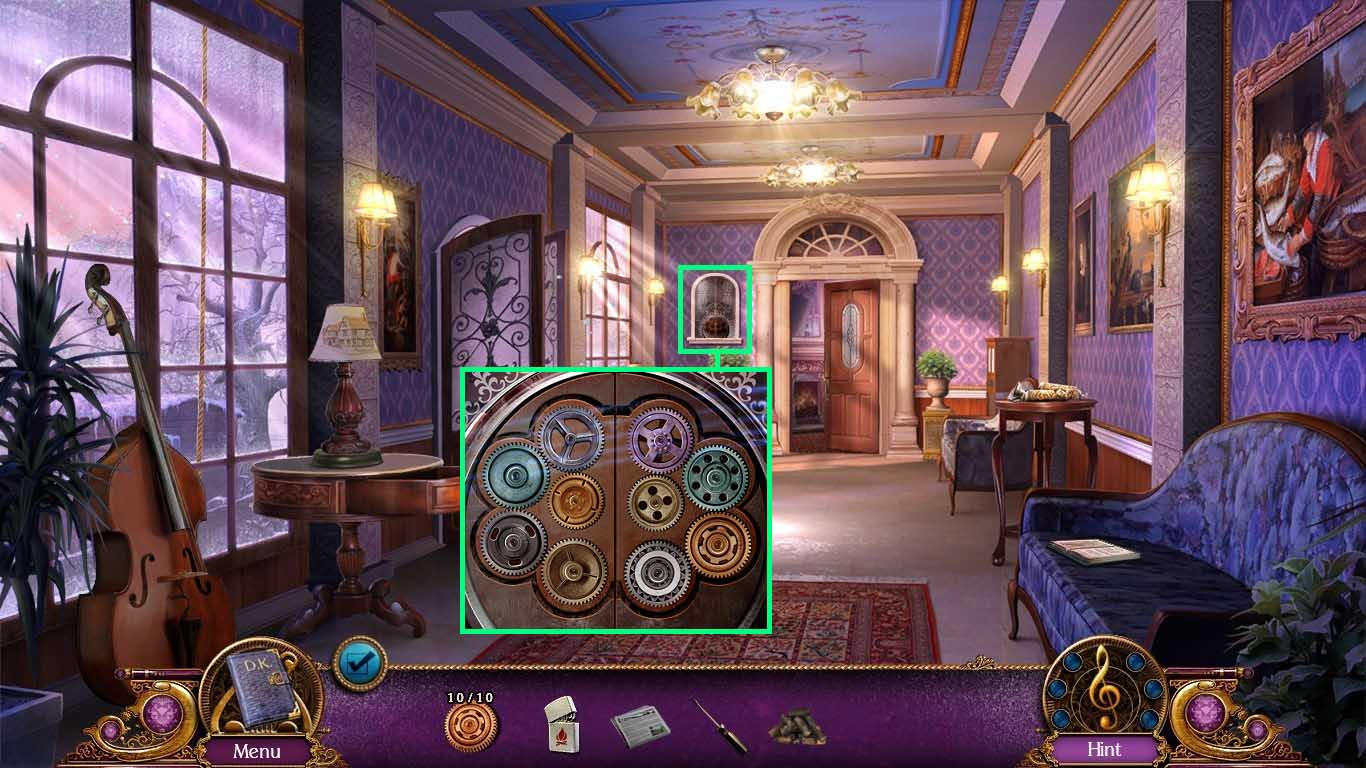
- Examine the glass display; insert the 10 gears into the panel.
- A mini-game will trigger.
- Place the gears into the right positions.
- Collect the emblem.
- Walk down one time to the grand foyer.
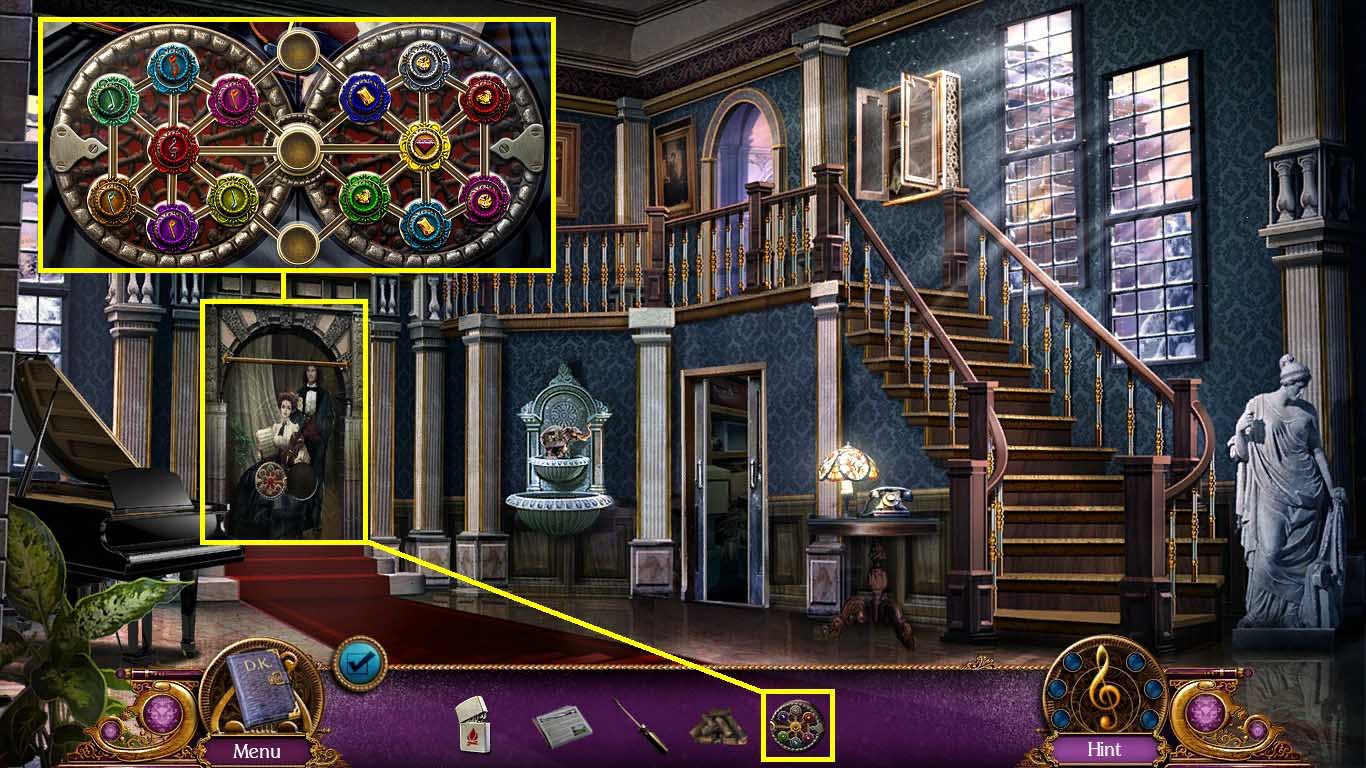
- Examine the tapestry; place the emblem into the groove.
- A mini-game will trigger.
- Move the buttons to the color and symbol matched slots.
- Solve as shown above.
- Go into the parlor.
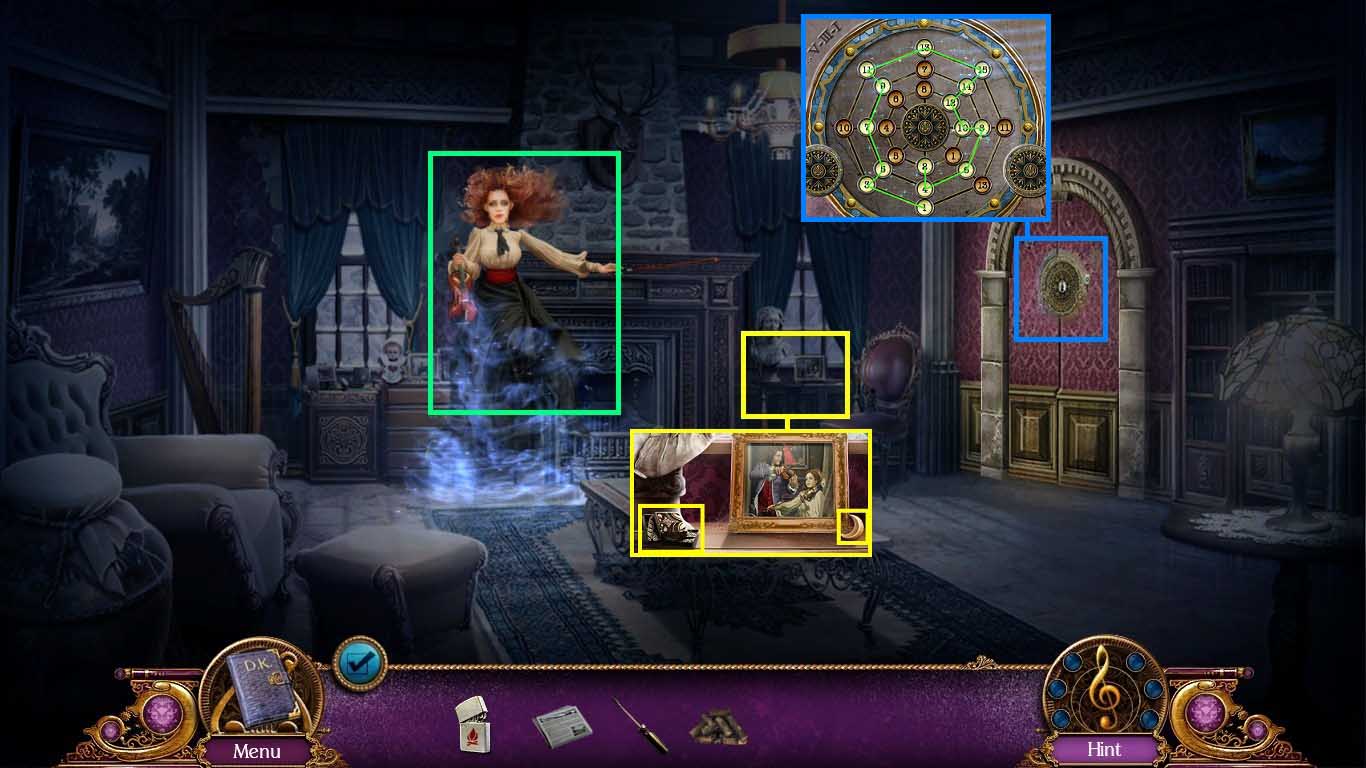
- Click the ghost.
- Examine the table near the window.
- Collect the tiles and the moon.
- Examine the wall to trigger a mini-game.
- Solve the puzzle by connecting the number buttons.
- Walk down one time to the grand foyer.
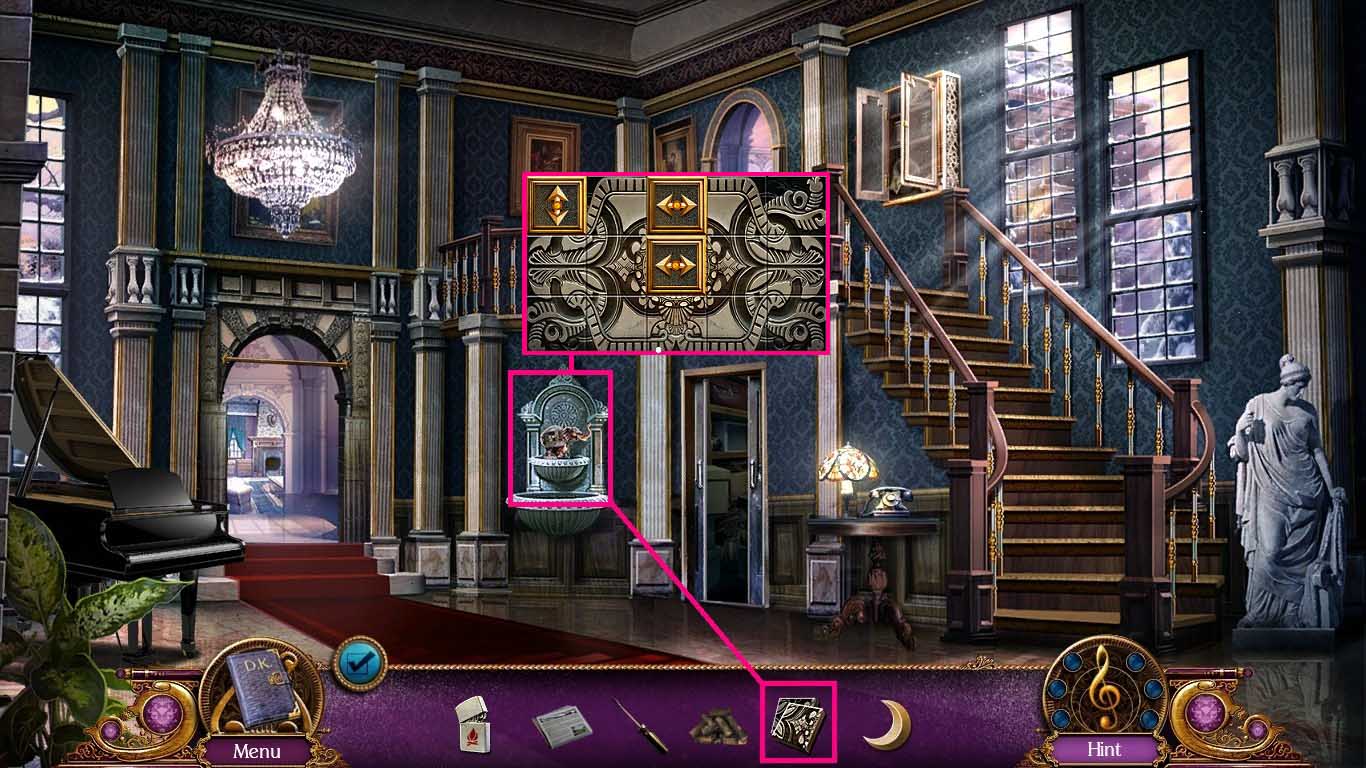
- Examine the fountain; place the tiles onto the elephant.
- A mini-game will trigger.
- Move the pieces around to create a picture.
- Solve as shown above.
- Collect the figurine.
- Move to the parlor.

- Examine the basket to access the hidden objects area.
- Click the box, the doll and the case.
- Collect the pieces of paper and the twigs.
- Examine the fireplace.
- Put the paper and twigs, the newspaper and the logs into the fireplace.
- Use the lighter to light the fire, scare the rat and collect the star.
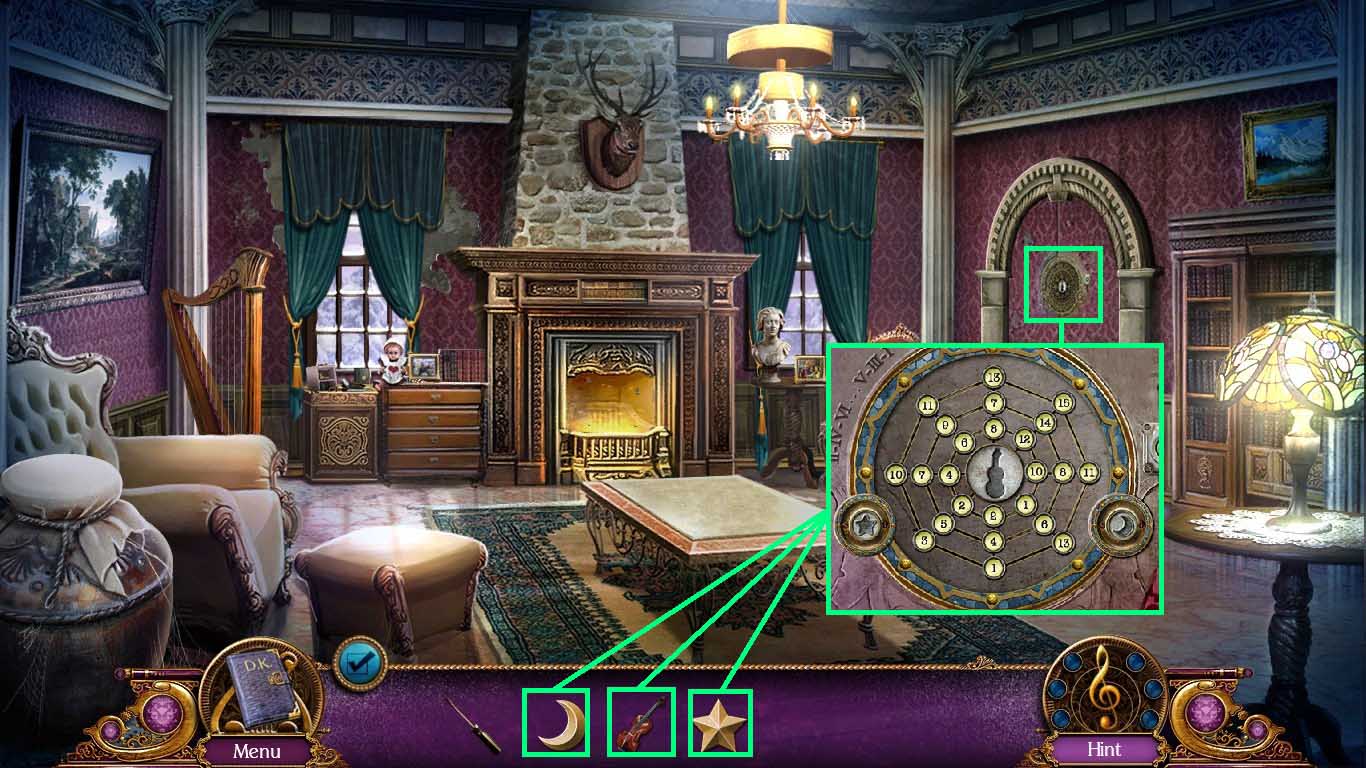
- Examine the wall.
- Insert the moon the figurine and the star into the grooves.
- Go into the elevator and press the up button.
- Examine the emergency power.
- Use the screwdriver to open the latches.
- Click the panel open and zoom into it to trigger a mini-game.
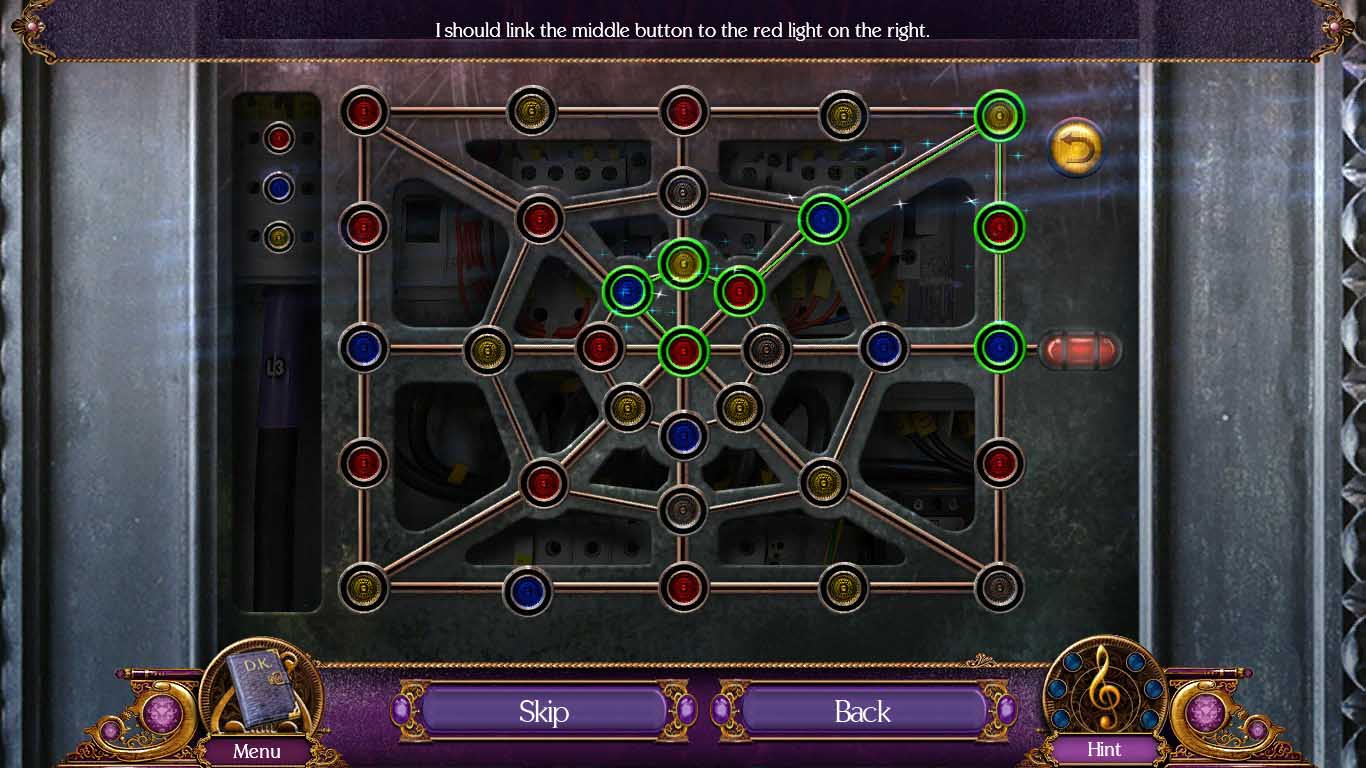
- Move from red lights to blue lights and from blue lights to yellow lights and from yellow lights to red lights.
- The central button needs to be connected to the red light on the right side to solve this puzzle.
- Solve as shown above.
- Go forward to the secret floor.
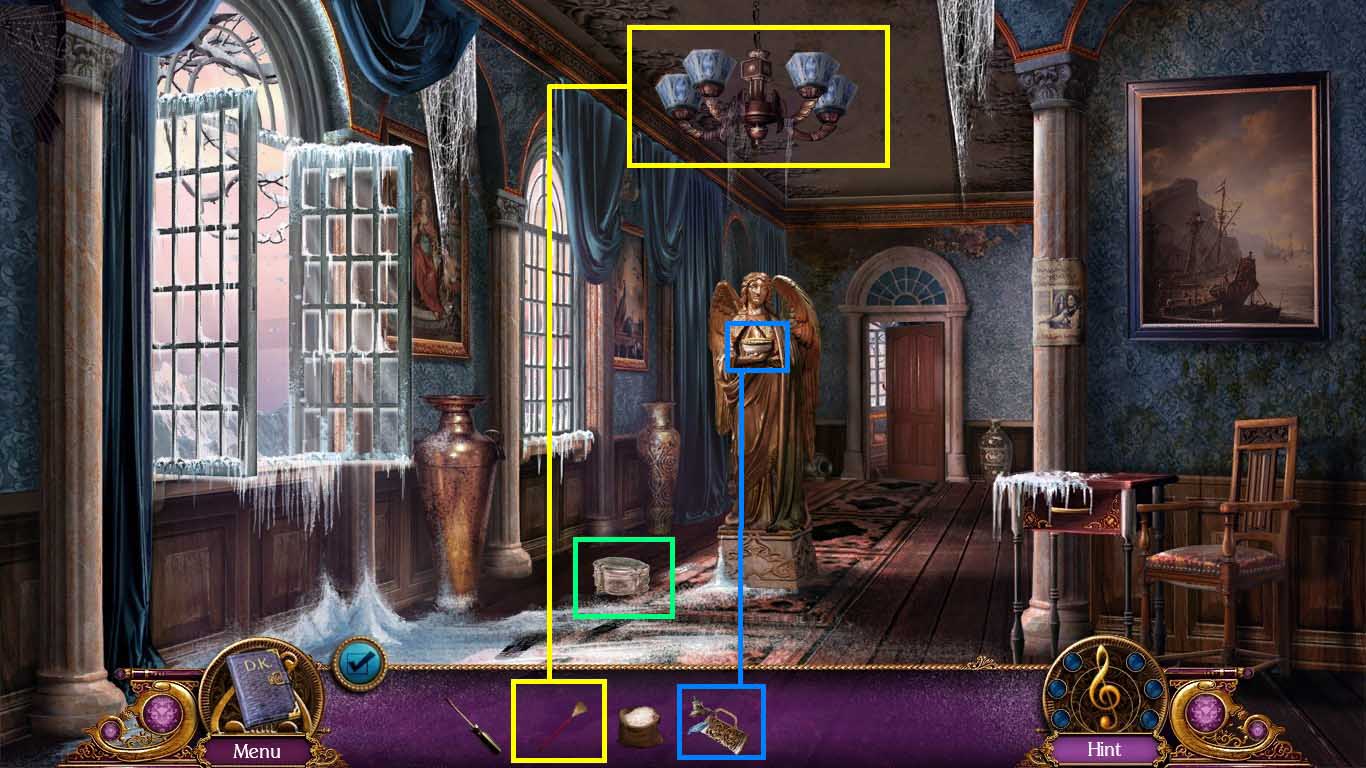
- Examine the poster; collect the 1/3 angel’s wing.
- Examine the side table; click the snow and collect the 2/3 angel’s wing.
- Notice the pattern.
- Go forward to the music room.
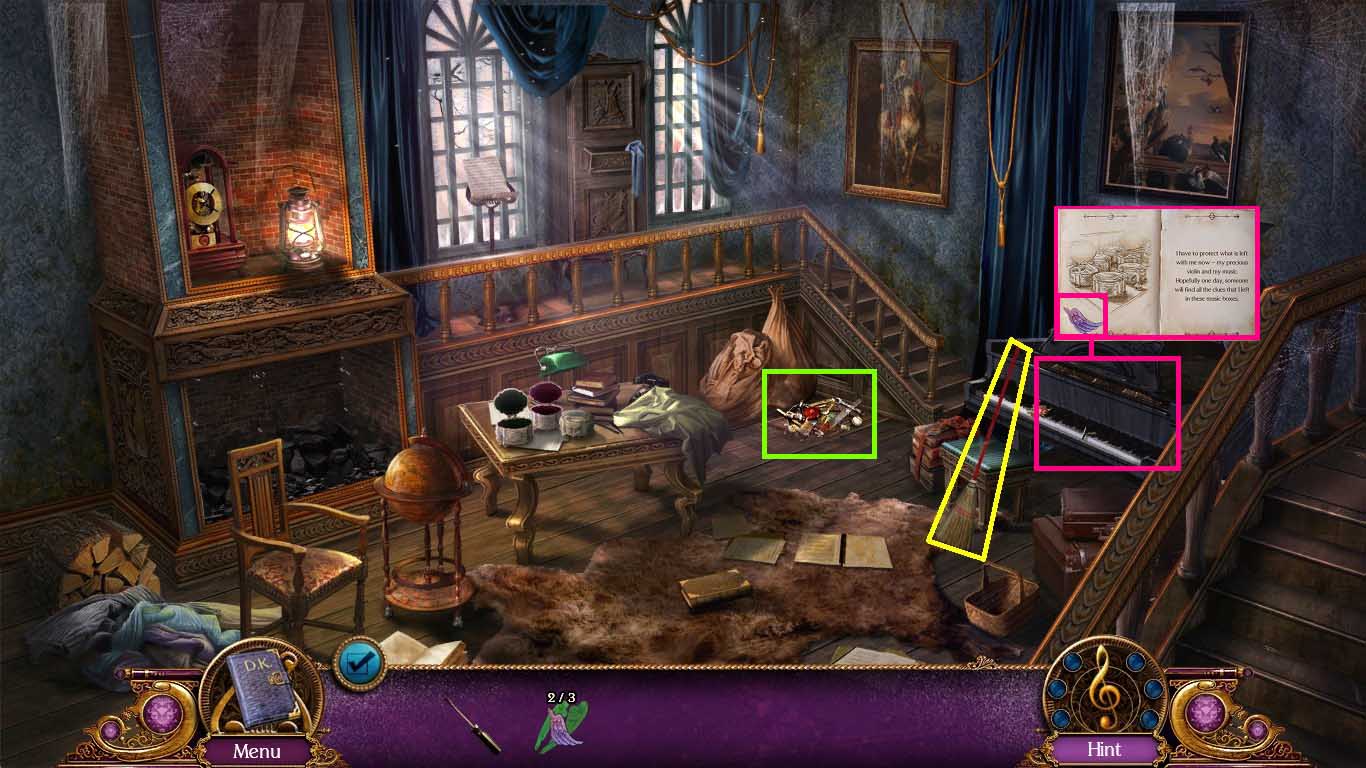
- Collect the broom.
- Examine the piano.
- Click the book pages two times and collect the 3/3 angel’s wing.
- Examine the junk pile to access the mini-game.

- Remove the items starting at the top moving to the bottom.
- Place the 3 angel’s wings into the grooves.
- The positioning will be randomized.
- Solve as shown above.
- Exit the puzzle scene and walk down one time.
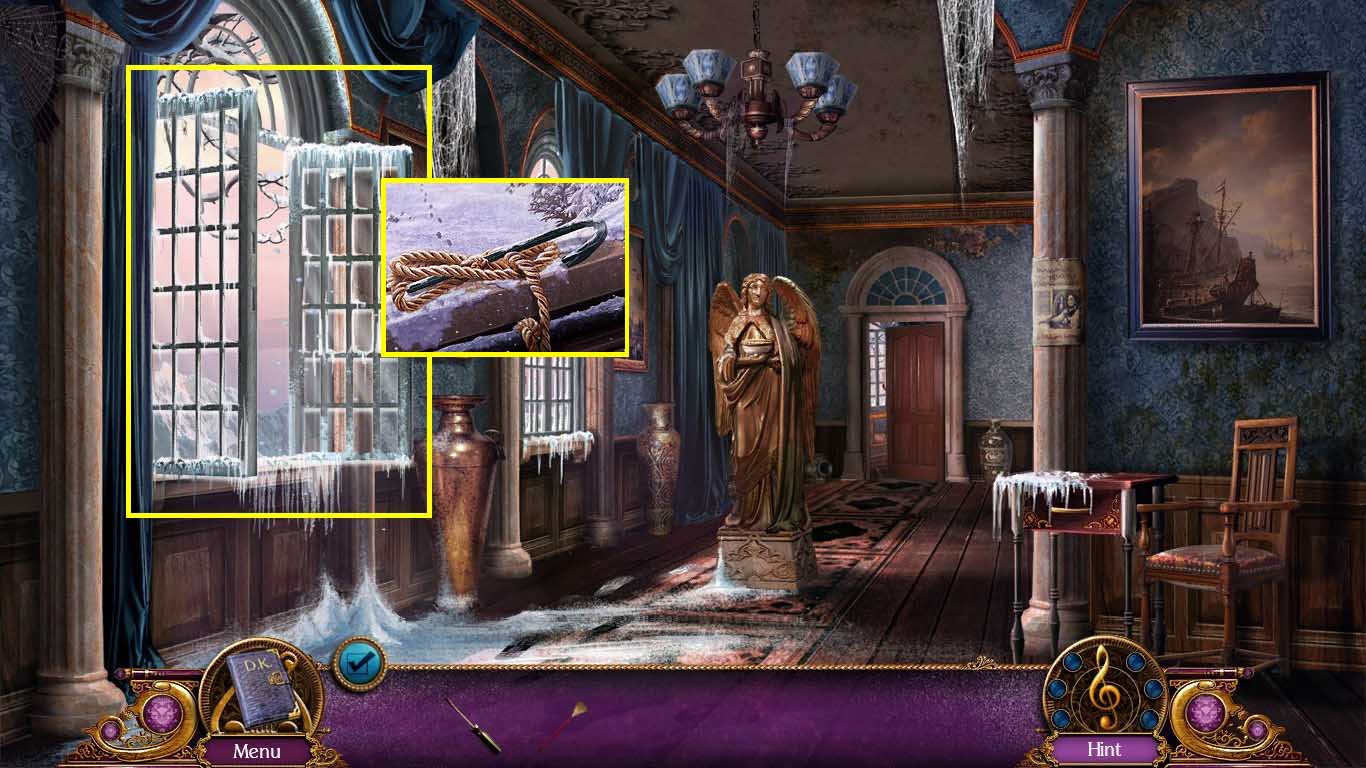
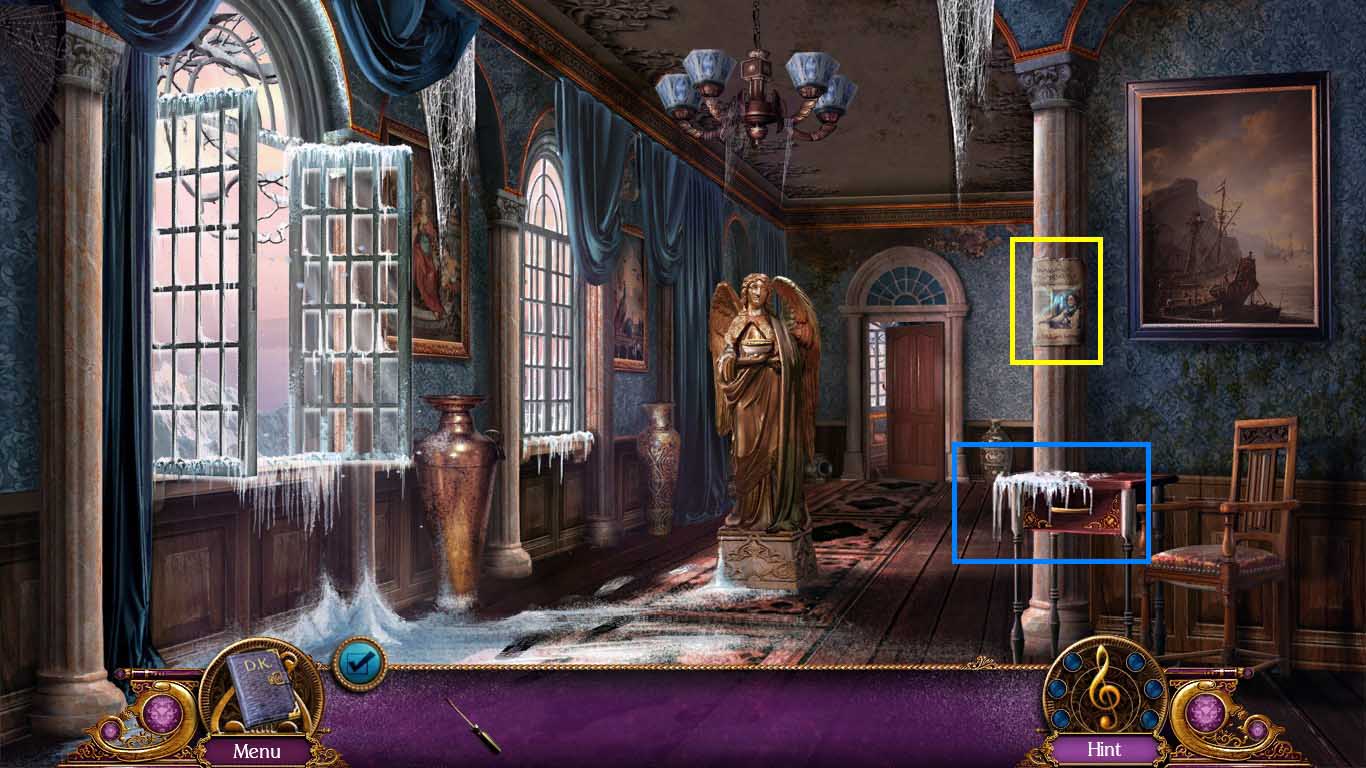
- Examine the window.
- Click the rope 3 times and collect the crowbar.
- Walk down one time, click the down button, go forward, walk down one time, go upstairs and go left to the ski lift.
- Examine the hole under the fuse box.
- Remove the boards using the crowbar.
- Collect the glue and salt.
- Walk down one time to the hallway.
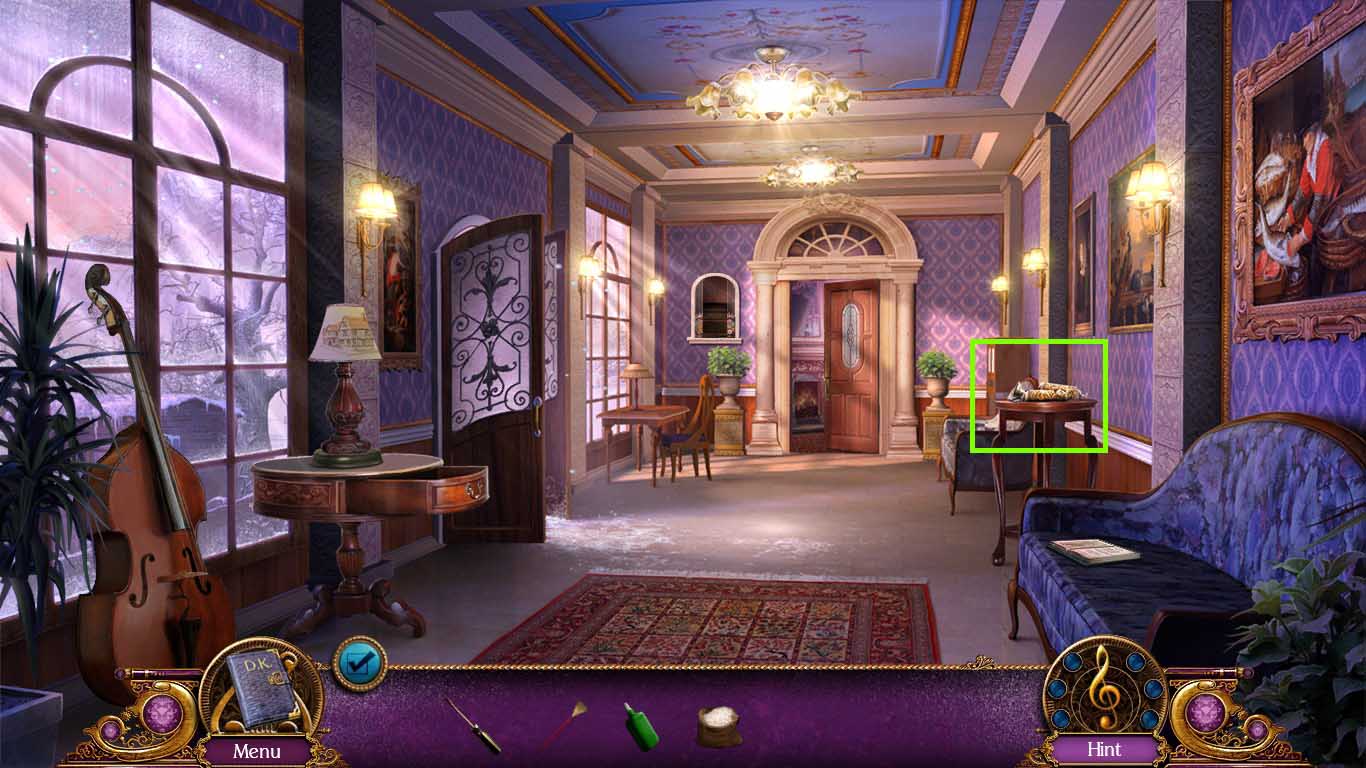
- Examine the side table.
- Use the glue on the broken beer stein.
- Play the mini-game.
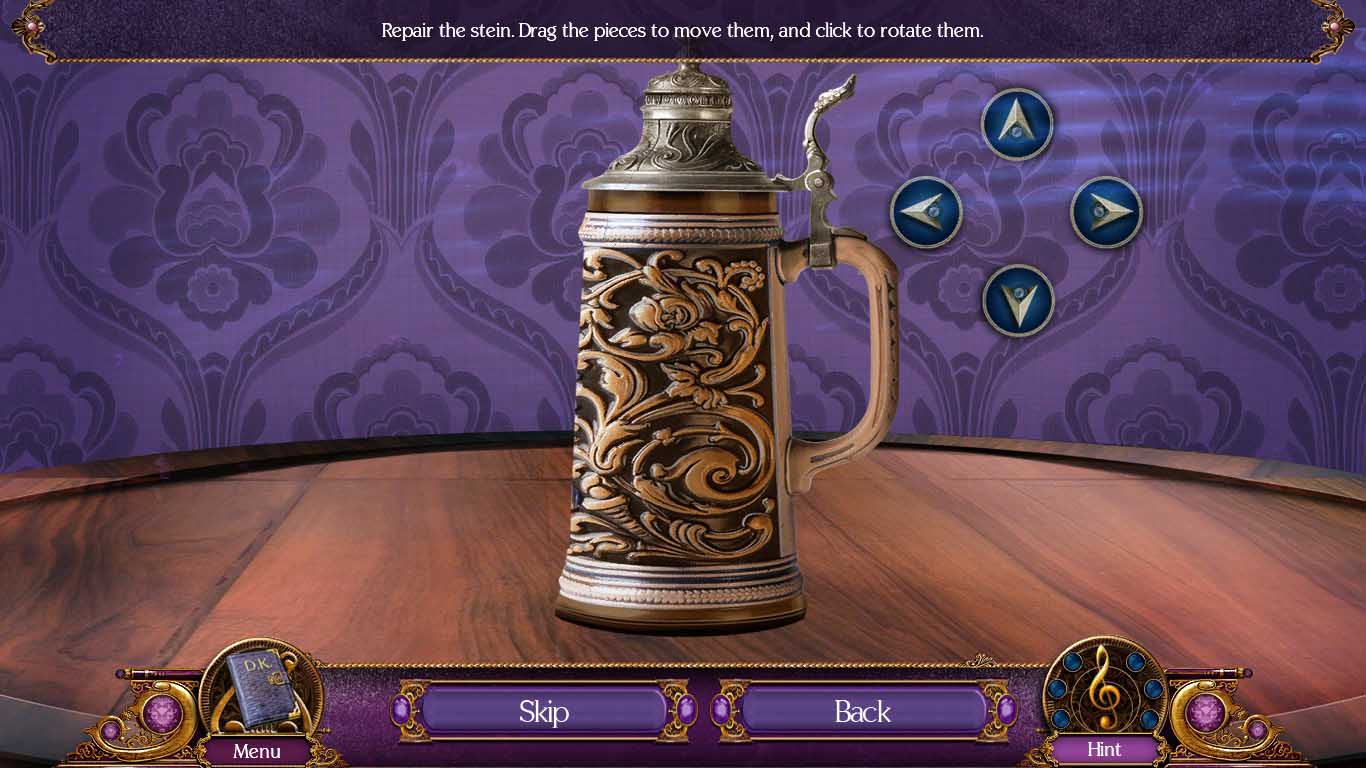
- Move the pieces to fit the holes.
- Solve as shown above.
- Walk down once to the grand foyer.
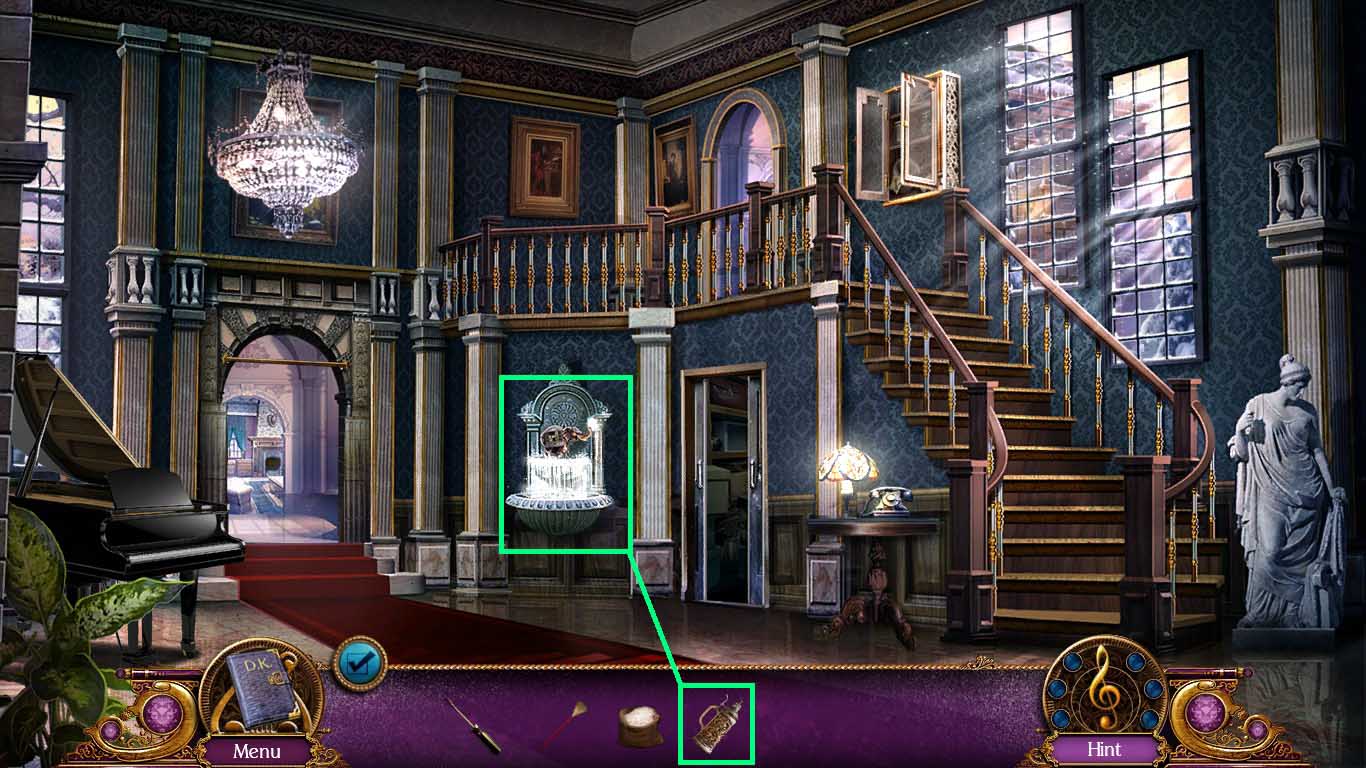
- Place the beer stein into the fountain; get the water.
- Move forward two times, click the up button and go forward to the secret floor.
- Examine the angel; pour the water into the bowl.
- Use the broom to poke the chandelier 3 times.
- Examine the box to access a mini-game.
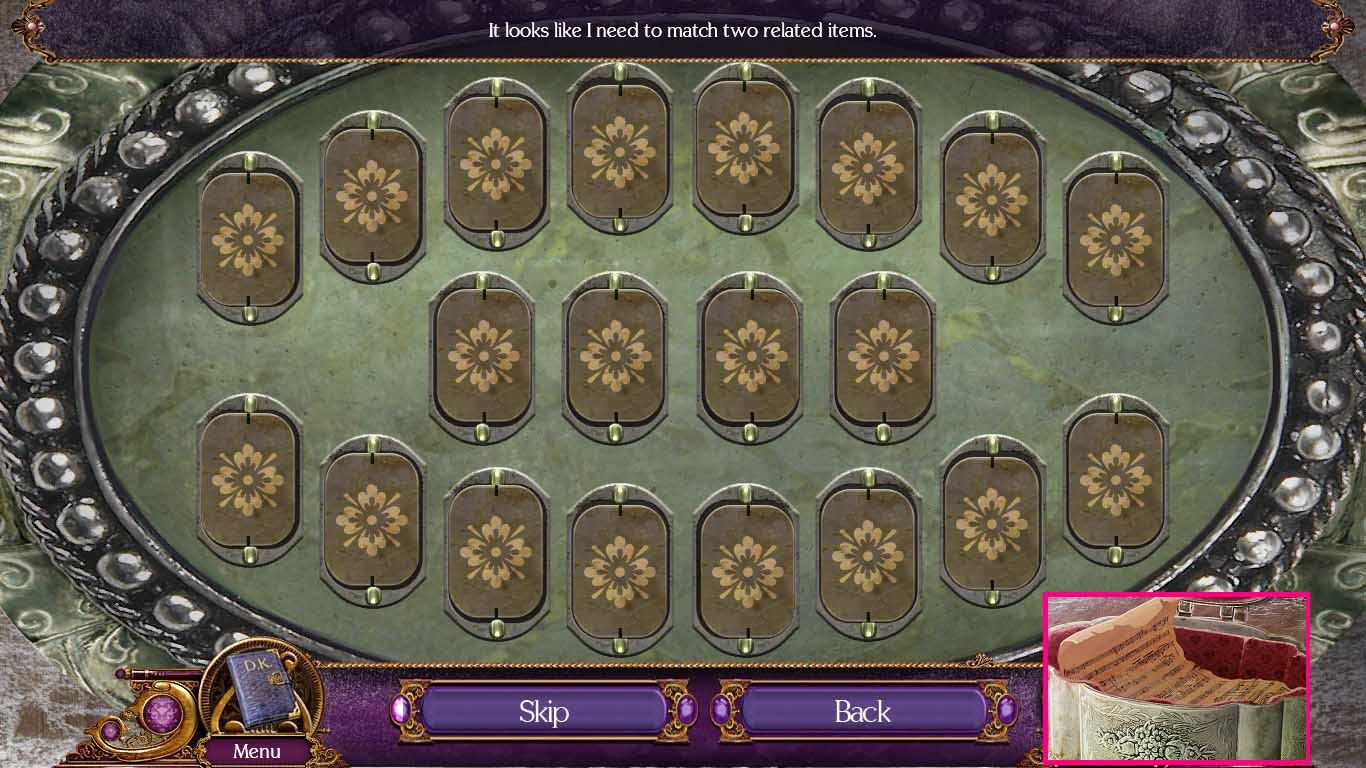
- Find the pairs.
- The solution is randomized.
- Collect the music sheet.
- Go forward to the music room.
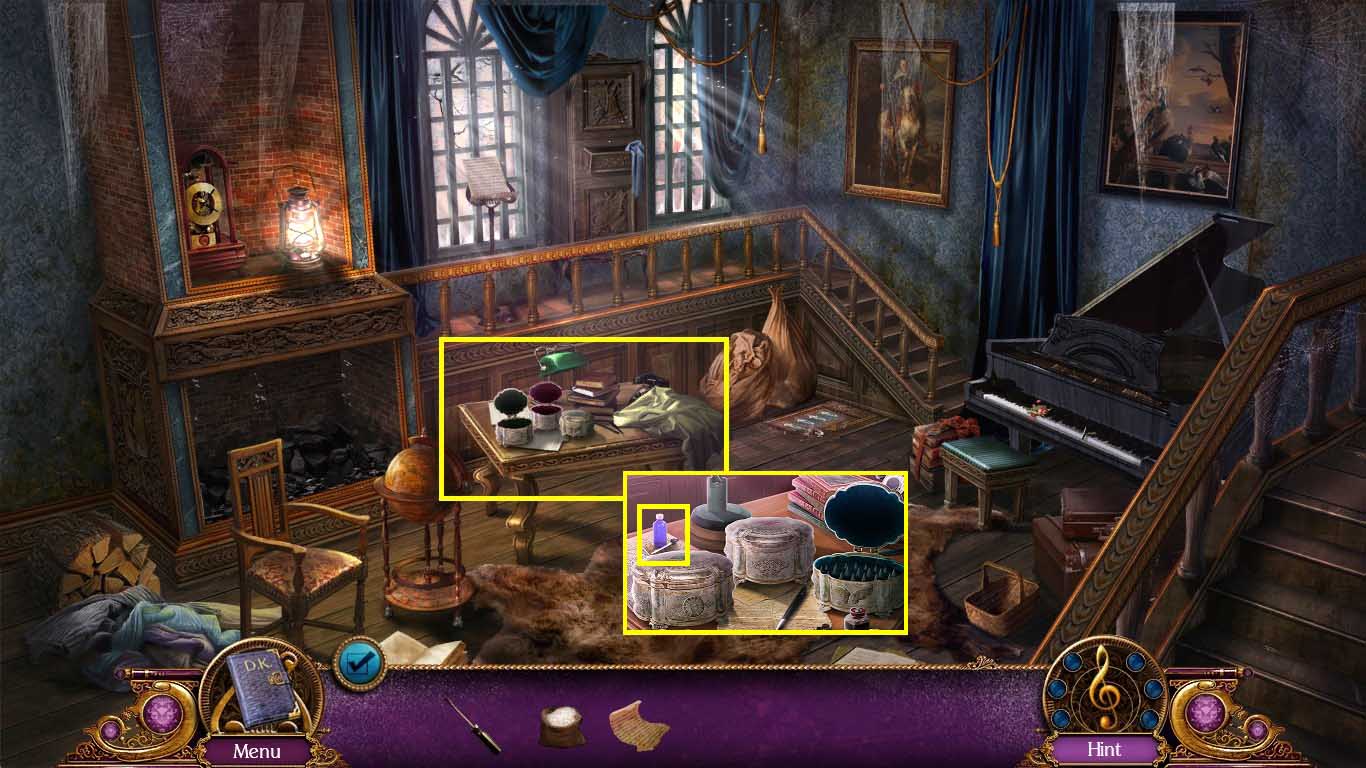
- Examine the table.
- Click the first two boxes.
- Click the third box open and collect the solvent.
- Leave the table scene.
- Go to Sebastian’s bedroom.
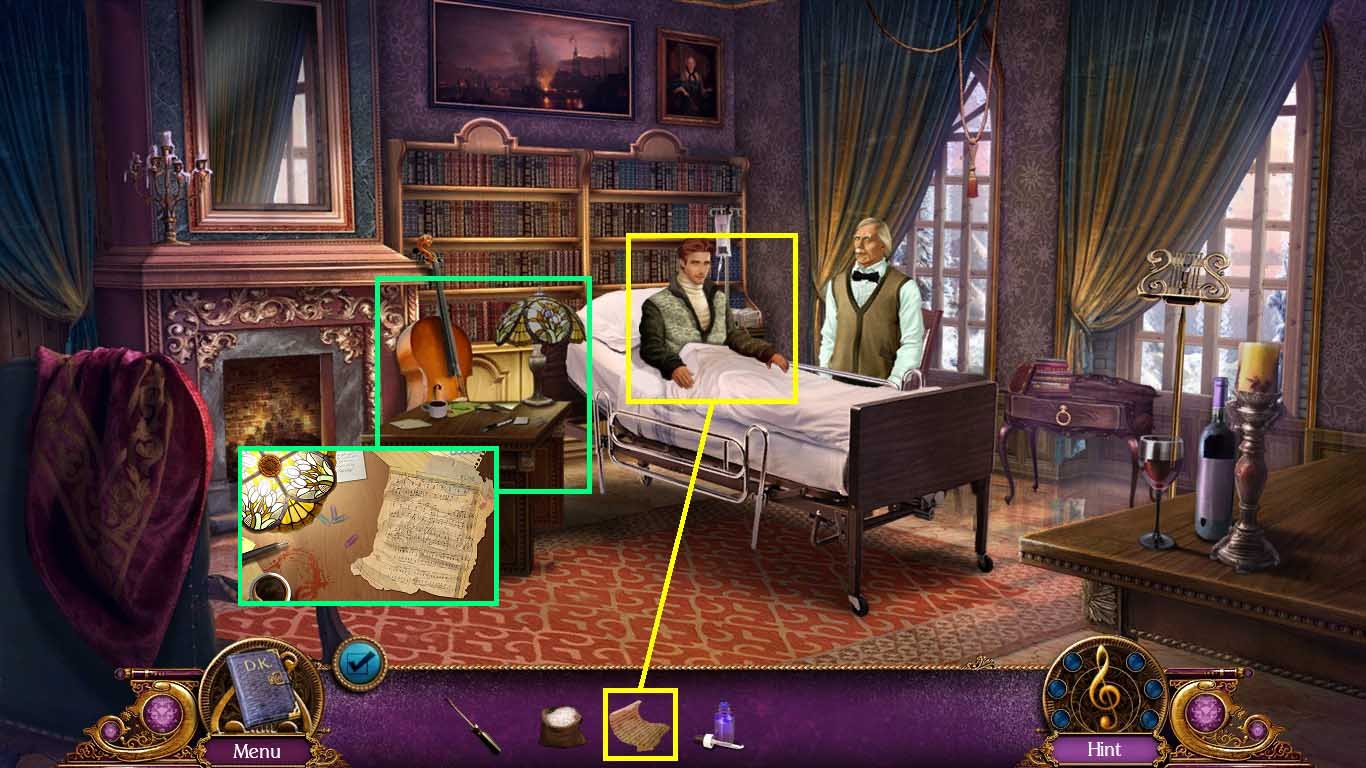
- Give Sebastian the music sheet.
- Move into the desk and place the music sheet on the desk.
- Click on the light.
- Pour the solvent on the music sheet to trigger a mini-game.
- Pour the solvent on the music sheet 4 times and collect the music sheet.
- Leave the table scene.
- Walk down and go forward two times to the boarding area.
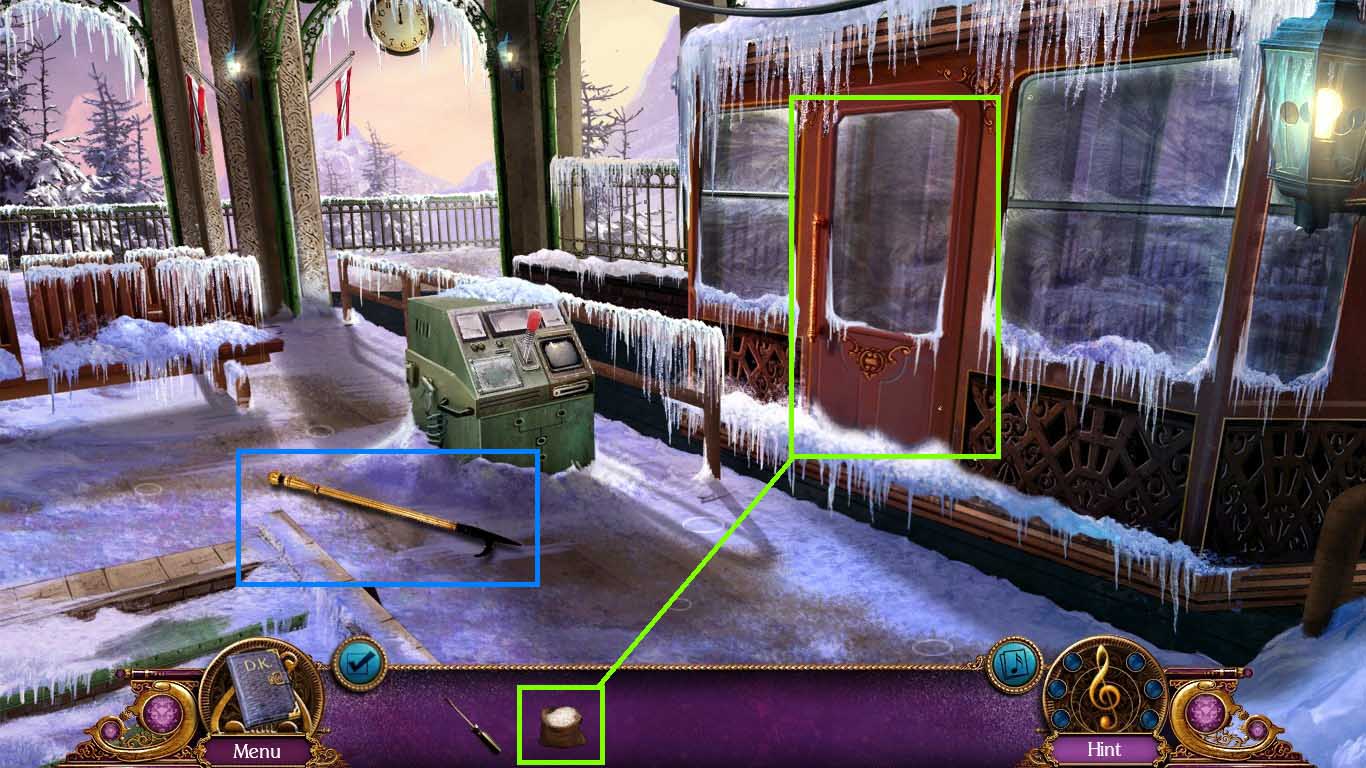
- Collect the hook.
- Examine the door.
- Use the salt on the ice to open the door.
- Walk down once.
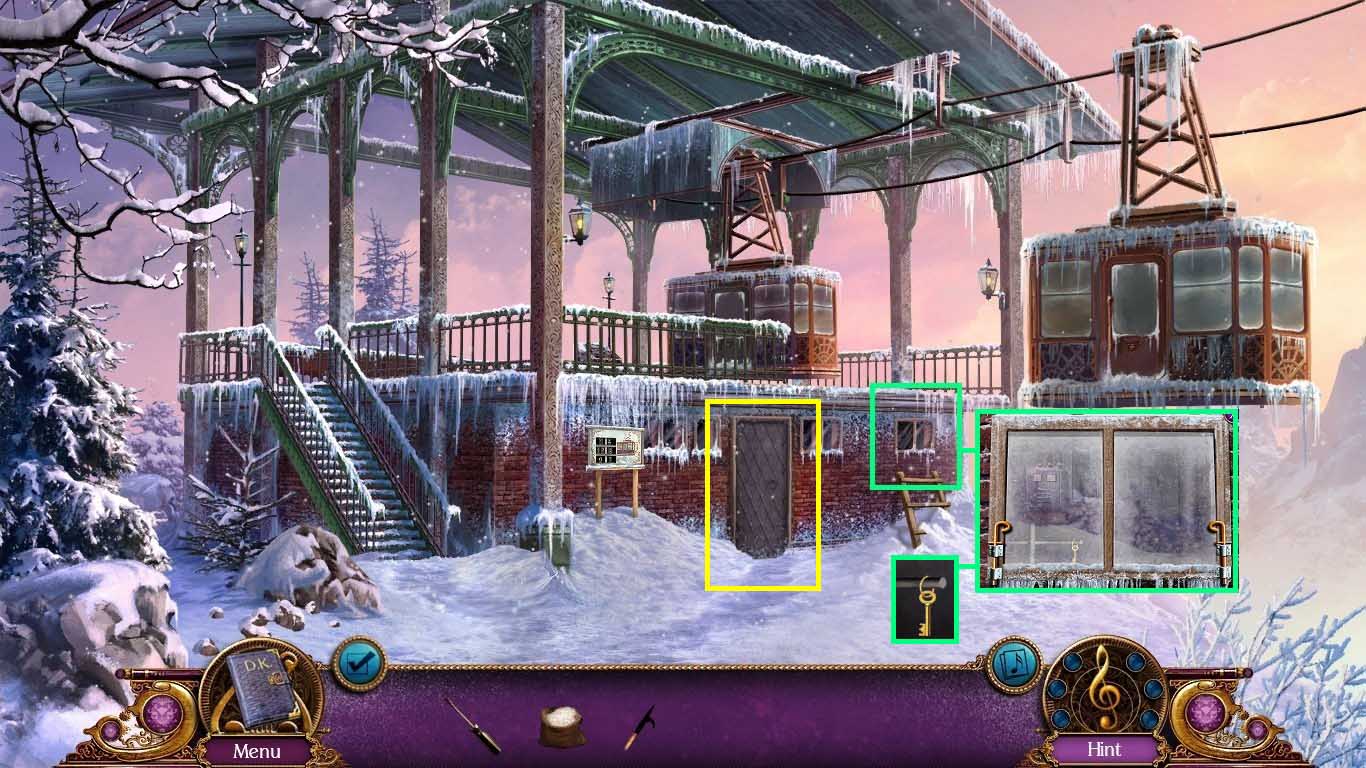
- Examine the window.
- Click both latches to open the window.
- Use the hook to get the key.
- Examine the door.
- Insert the key into the lock and open the door.
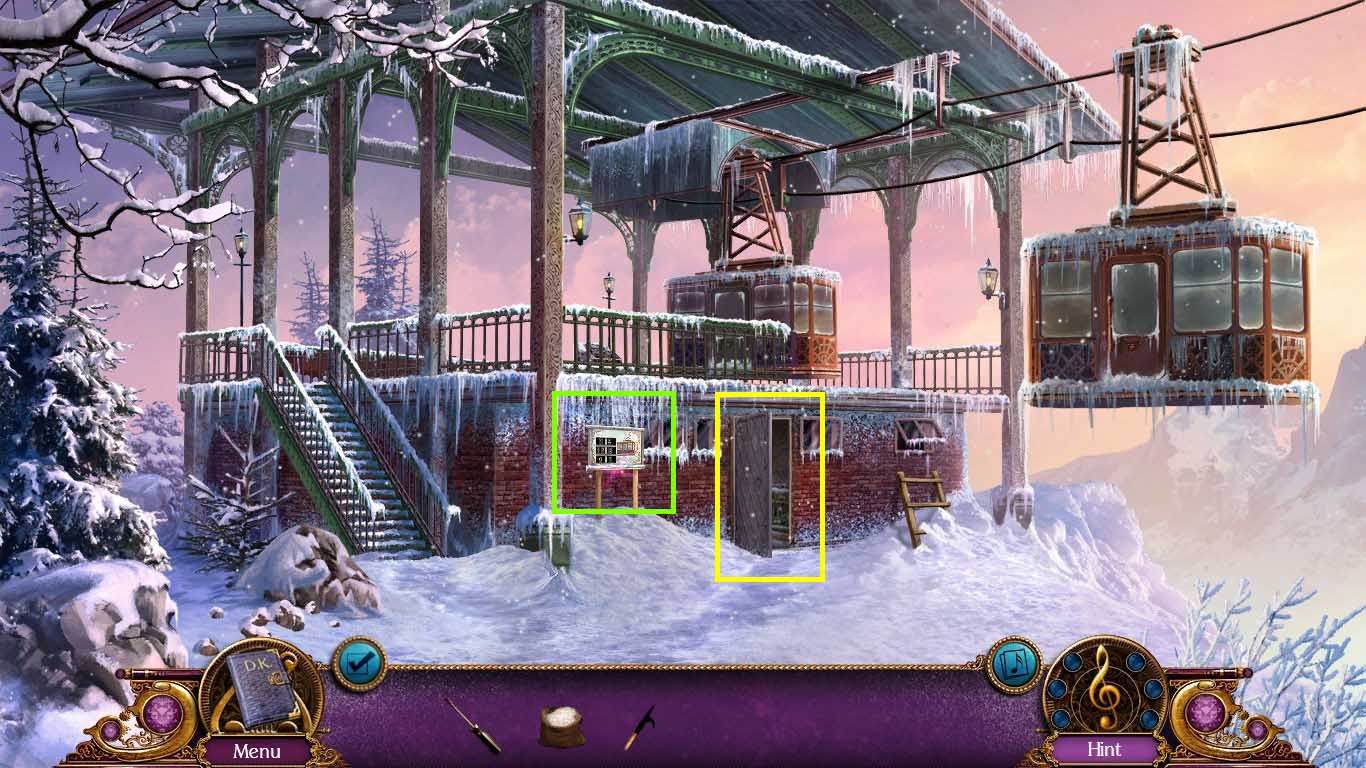
- Examine the schedule.
- Move the plates around and collect the 4 machine parts.
- Go into the machinery room.
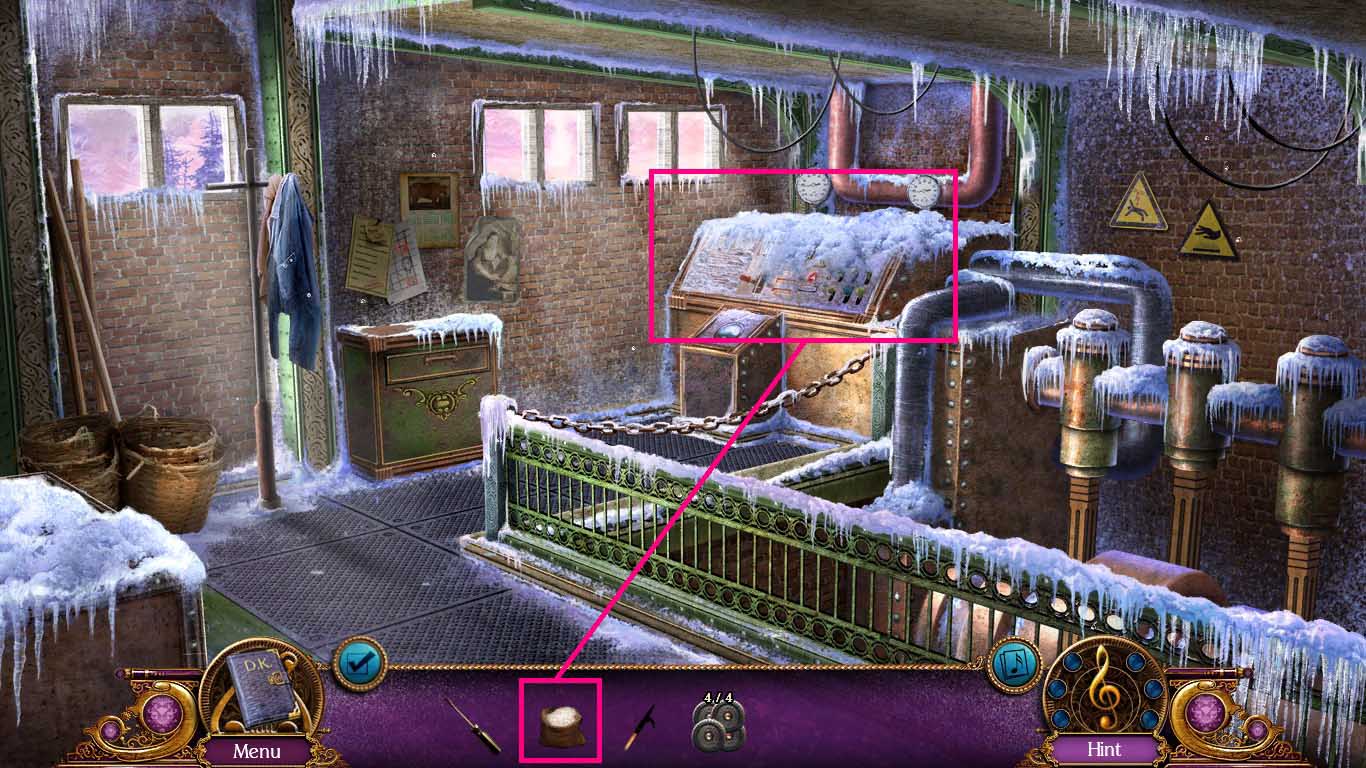
- Examine the power generator.
- Remove the ice by using the salt on the generator.
- Click the cover.
- Examine the engine to trigger a mini-game.
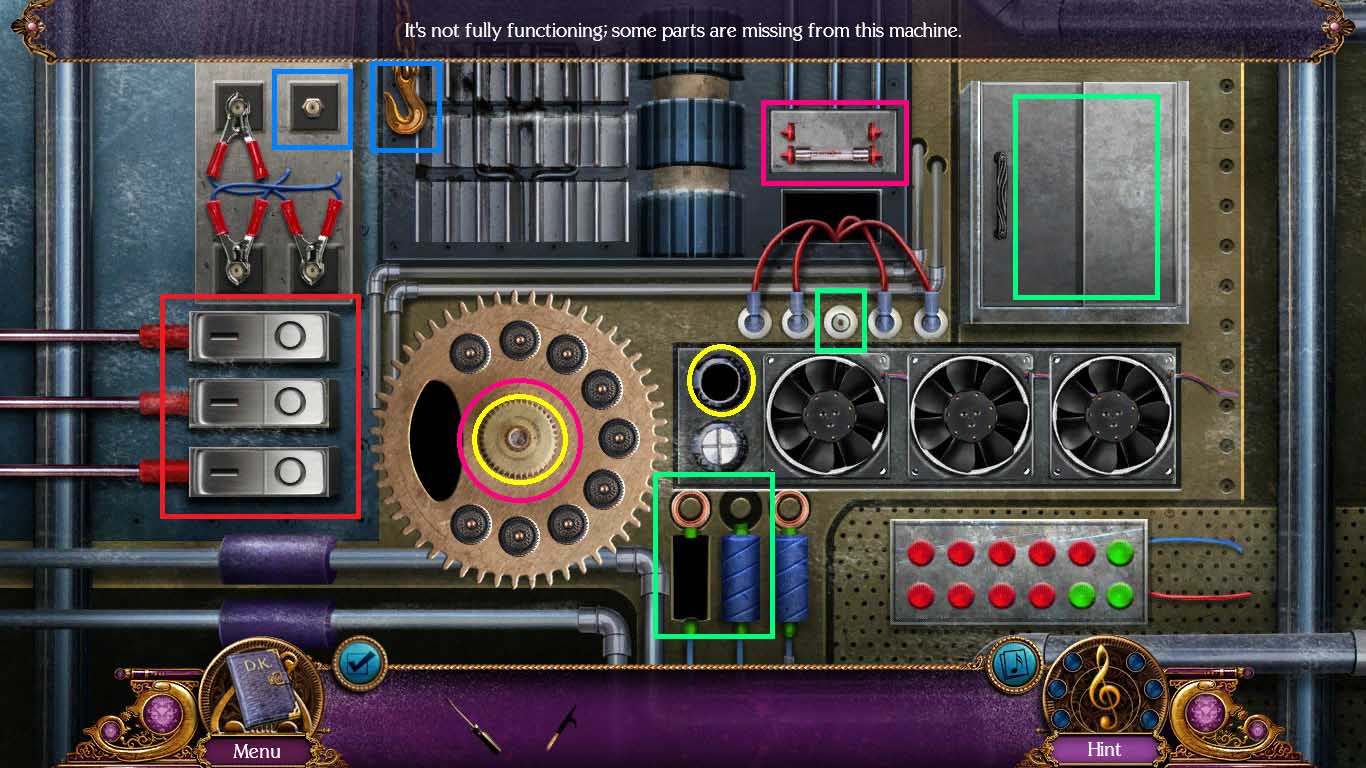
- Insert the 4 machine parts into the valve slots.
- Click the valve and insert the screw into the slot.
- Click the valve and insert the fuse into the niche.
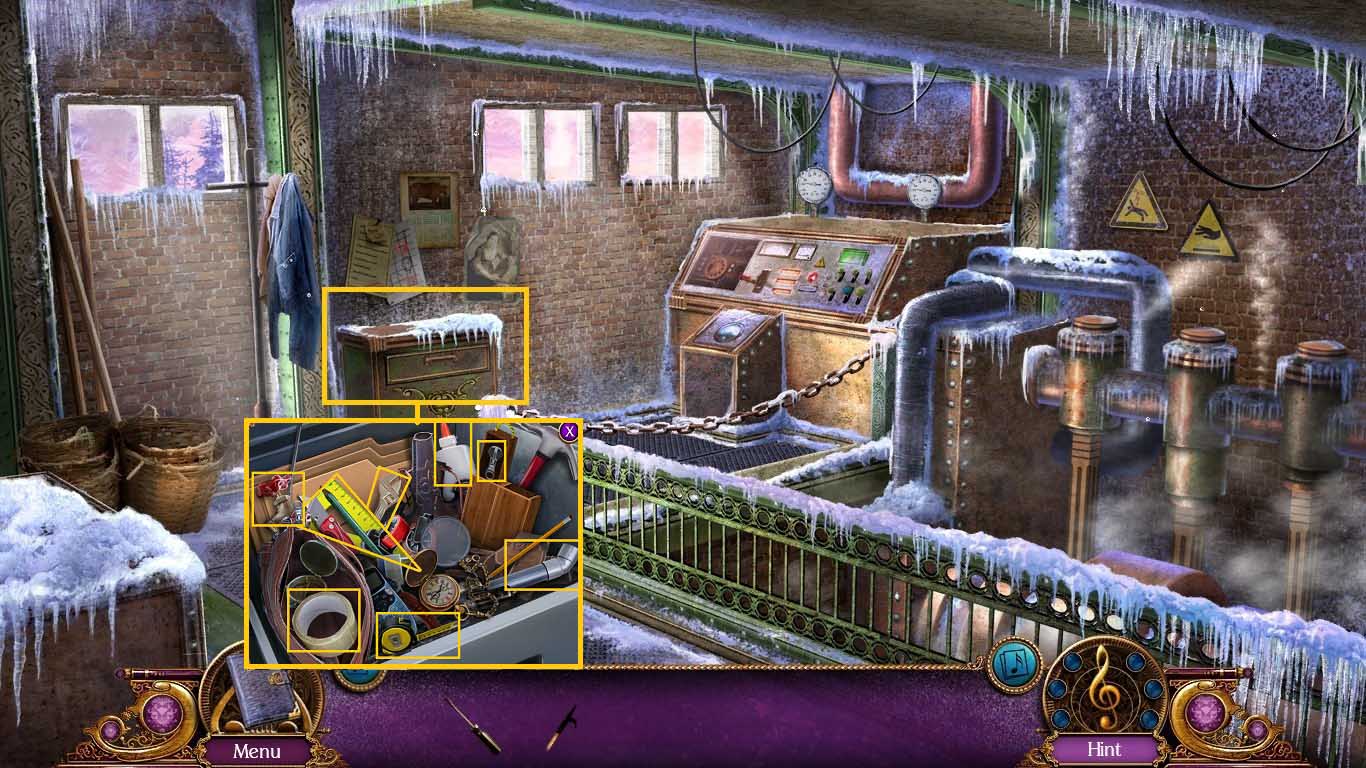
- Examine the drawer.
- Click the tiny drawer and collect the zipper.
- Click the bag with the zipper.
- Collect the 2 adhesives.
- Collect the 2 measuring tools.
- Collect the 3 plumbing tools.
- Collect the wrench.
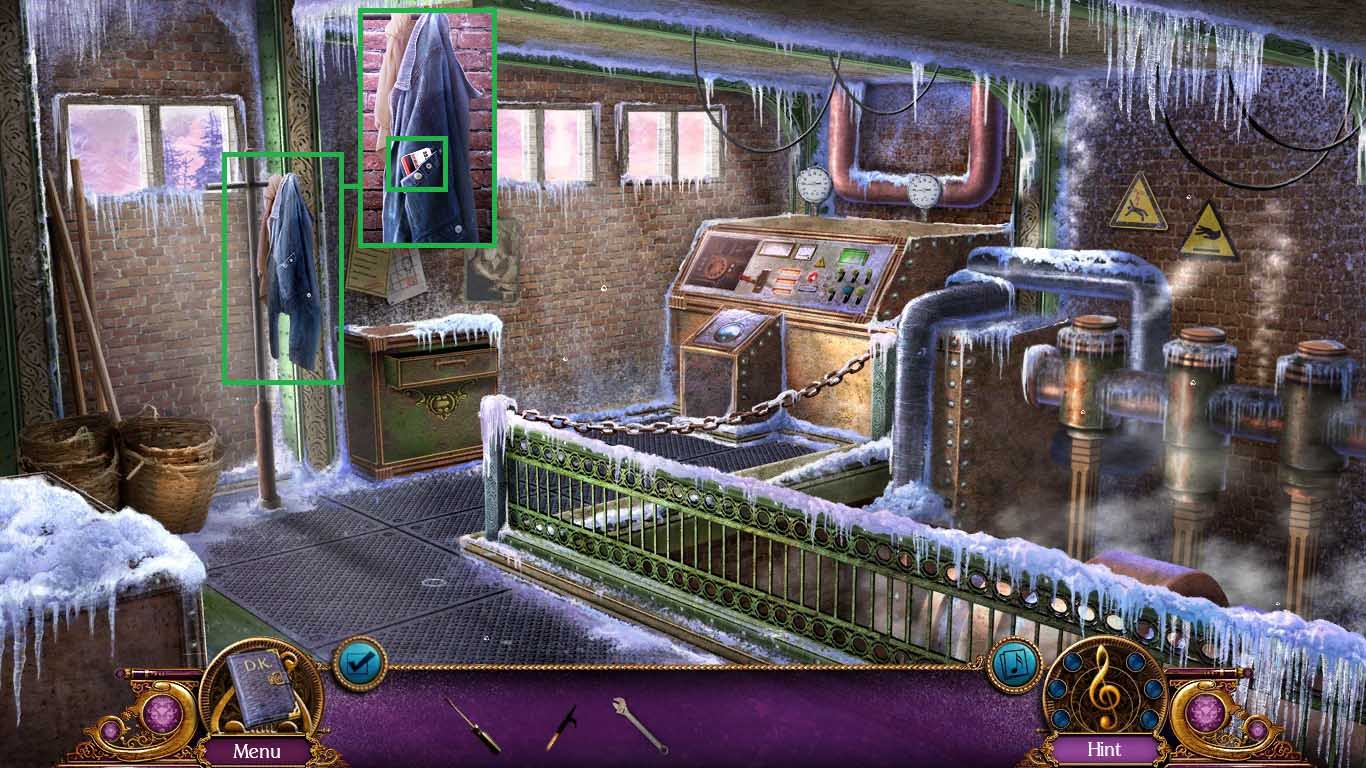
- Examine the jacket.
- Collect the ID card.
- Walk down once, go to the boarding area, and go into the gondola.
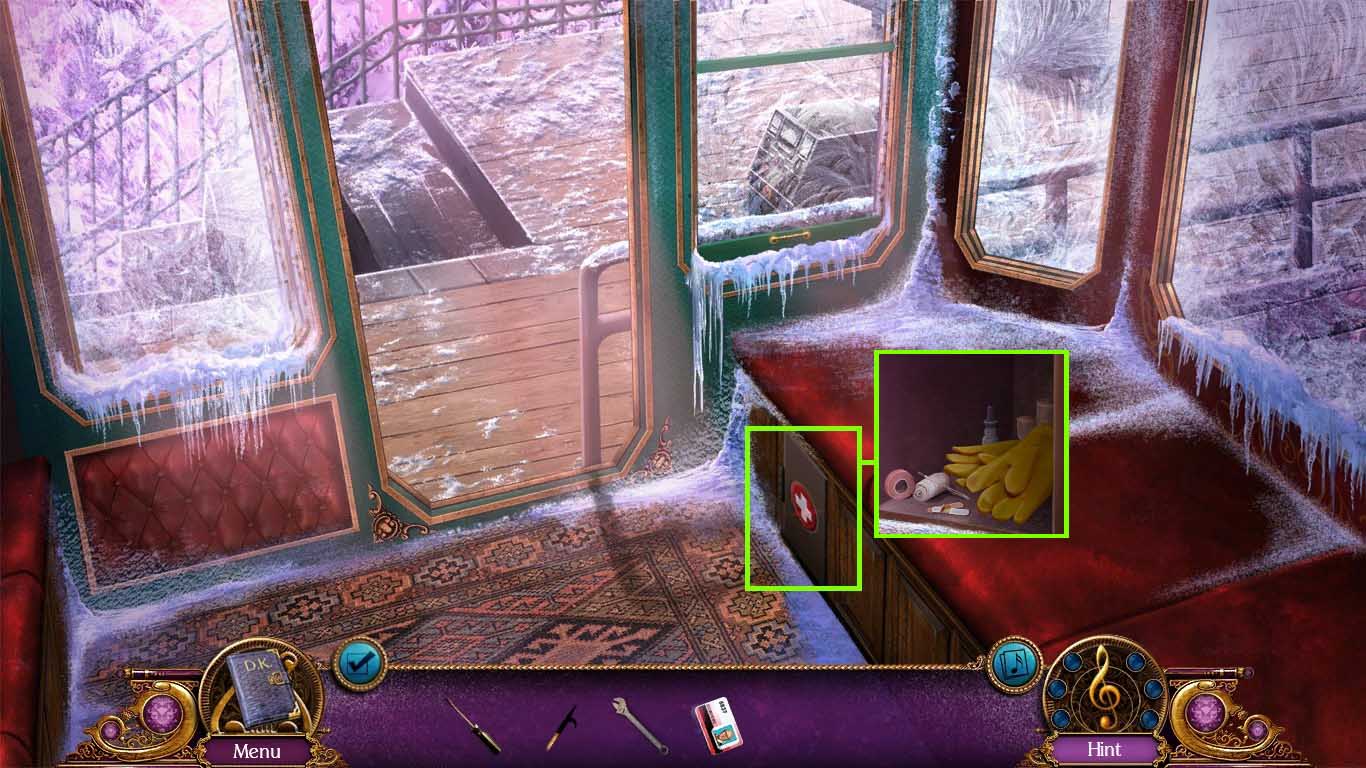
- Examine the first aid compartment.
- Click open the door and collect the gloves.
- Go forward.
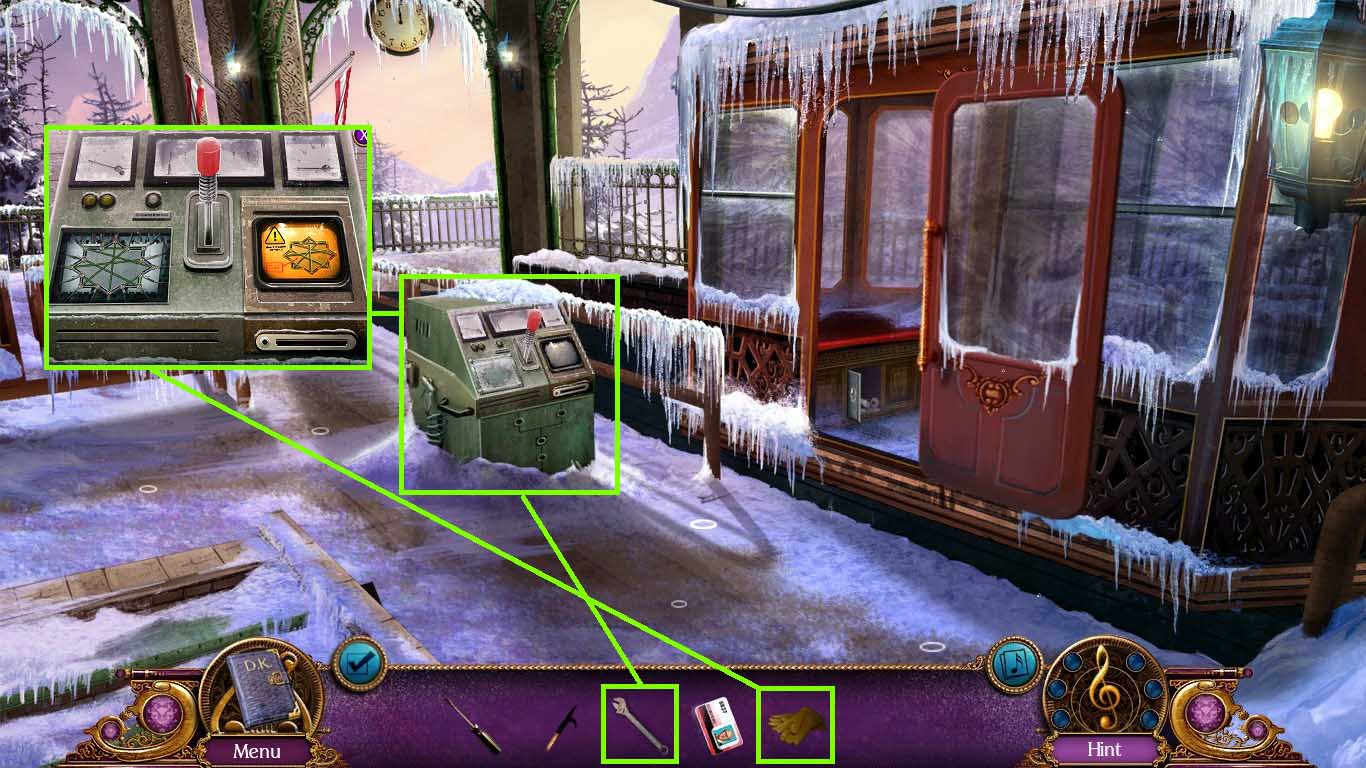
- Examine the control panel.
- Remove the cover using the wrench.
- Use the gloves on the wires to trigger a mini-game.
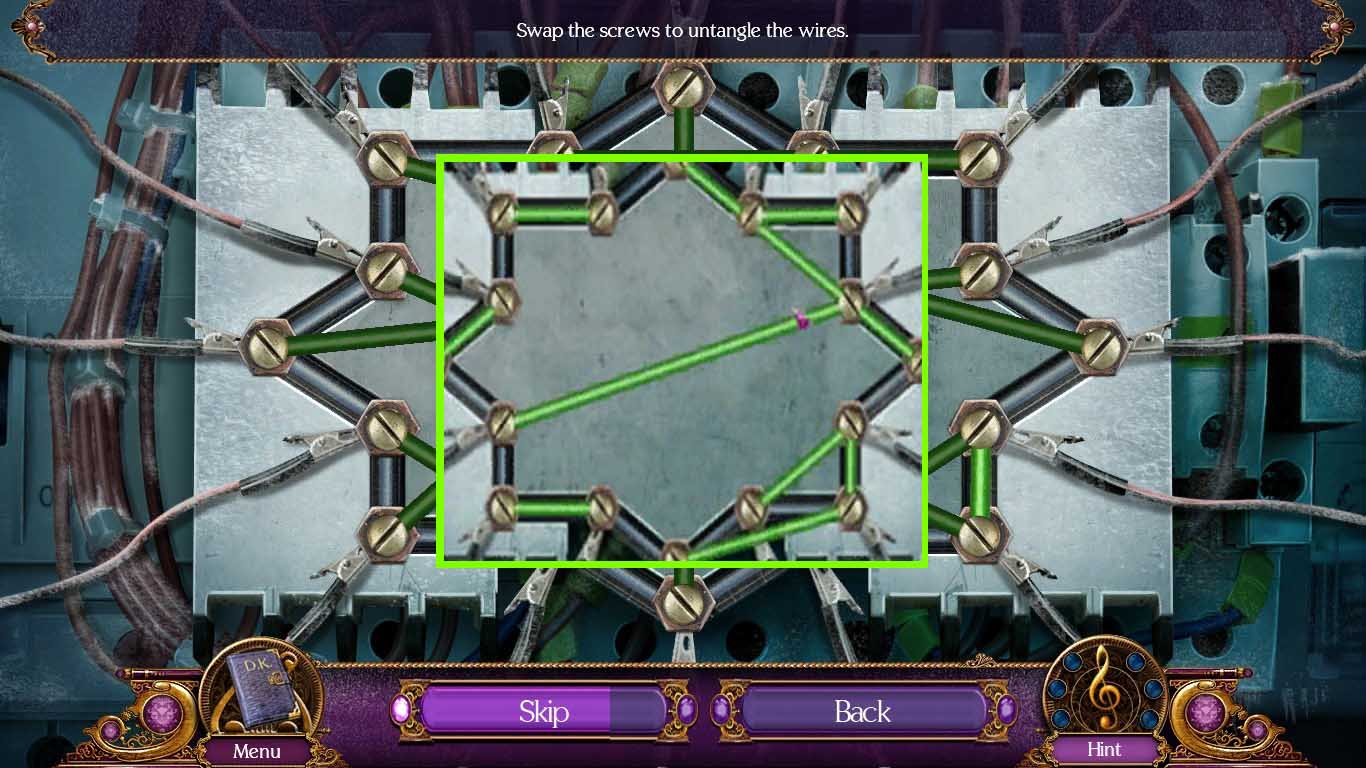
- Move the screws around and untangle to wires.
- Solve as shown above.
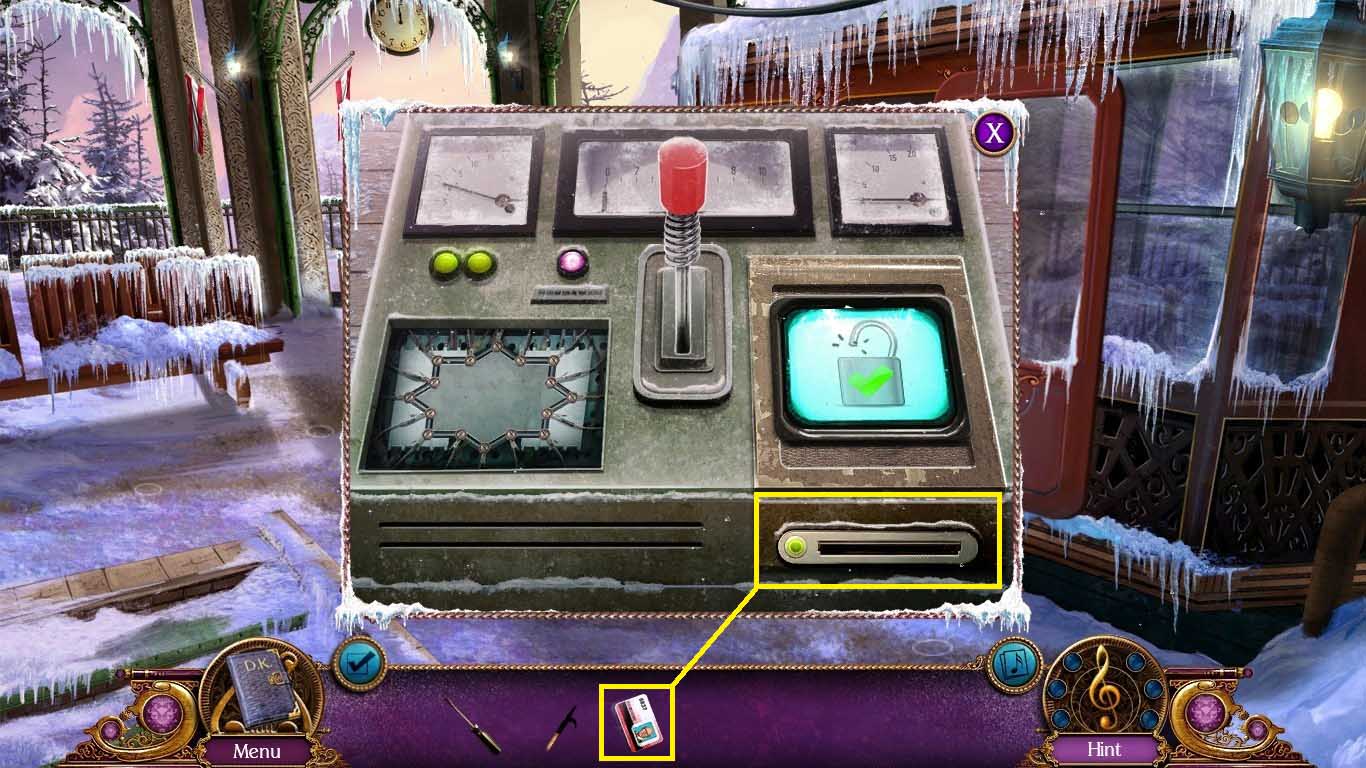
- Place the ID card into the slot.
- Go into the gondola.
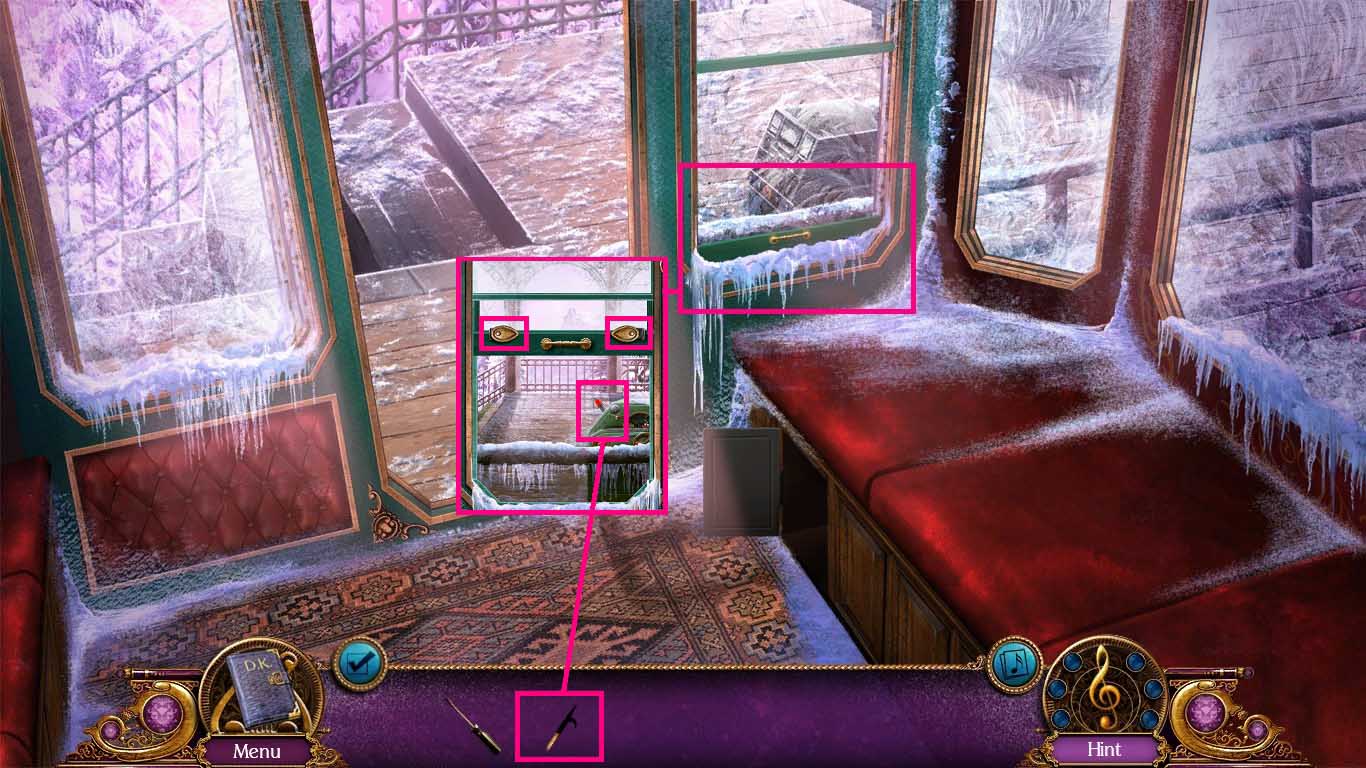
- Examine the window.
- Click the 2 latches and open the window.
- Pull the lever using the hook.
General Info and Tips
Chapter One: Enter Sebastian’s Manor
Chapter Two: Discover the Crash Site
Chapter Three: Welcome to the Austrian Town
Chapter Four: Train to Germany
Chapter Five: Inside the Conservatory
Chapter Six: Exploring Under the Well
Epilogue: Discover Luthier’s Wish
Epilogue: Uncover Luthier’s Workshop
Ask for help in the comments below!
Chapter One: Enter Sebastian’s Manor
Chapter Two: Discover the Crash Site
Chapter Three: Welcome to the Austrian Town
Chapter Four: Train to Germany
Chapter Five: Inside the Conservatory
Chapter Six: Exploring Under the Well
Epilogue: Discover Luthier’s Wish
Epilogue: Uncover Luthier’s Workshop
Ask for help in the comments below!