
Cursed Fates: The Headless Horseman: Chapter Four
Our Cursed Fates: The Headless Horseman Walkthrough will help you keep your head as you face down the grisly legend that haunts the tiny town of Sleepy Hollow. Armed with detailed solutions to puzzles, custom screenshots depicting exact locations of key items, and step-by-step instructions on how to persevere, you'll have no trouble helping this man of science combat the forces of darkness.
General Info and Tips
Chapter One
Chapter Two
Chapter Three
Chapter Four
Chapter Five
Bonus Chapter
Ask for help in the comments below!
Chapter One
Chapter Two
Chapter Three
Chapter Four
Chapter Five
Bonus Chapter
Ask for help in the comments below!
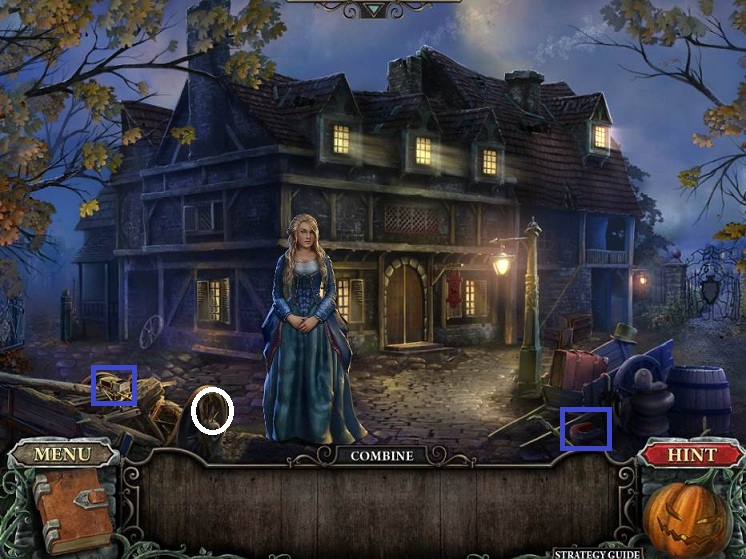
- Go forward
- Talk to the woman who wants her ring
- Pick up MAGNET and MATCHES

- Go right
- Pick up SKULL and CLOCK HAND

- Back up and go left to take you back to the town square
- Pick up ROPE and CORK SCREW

- Go back to the gate
- Examine the barrel
- Use the CORKSCREW on the cork
- Combine the ROPE and MAGNET and use it to get the RING
- Back up and give the RING to the woman
- Receive COAT OF ARM FRAGMENTS

- Do the Hidden Object Scene on the cart
- Receive 2nd COAT OF ARM FRAGMENTS

- Go forward to gate
- Place the FRAGMENTS
- Examine for minipuzzle
- Place the fragments in their appropriate spots

- Go forward
- Pick up the BROOM
- Note the sack blocking the cellar door

- Go forward to the left
- Talk to Pieter's wife
- She wants his portrait from the mansion
- Pick up STICK and RAZOR BLADE
- Examine the crypt door and place the SKULL
- Back up
- Use the RAZOR BLADE on the sack over the cell door
- Open the door

- Do the Hidden Object Scene
- Receive the VALVE
- Examine the fountain pipes
- Place the VALVE
- Click twice
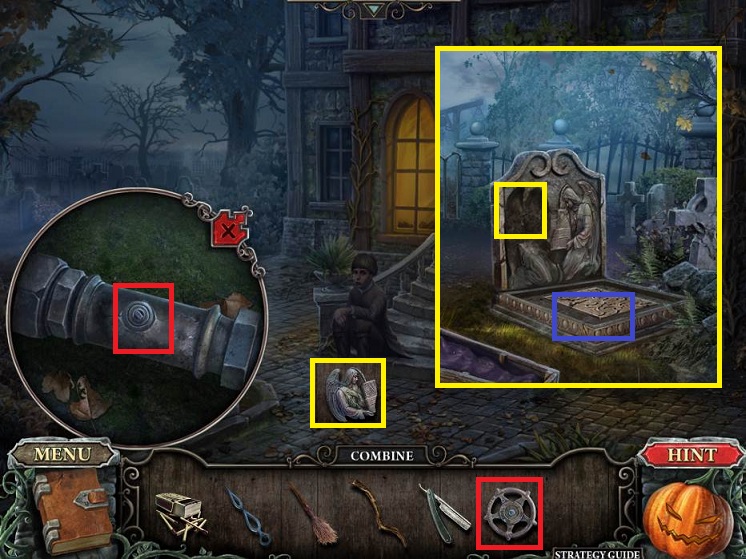
- Pick up the ANGEL
- Go forward
- Examine the gravestone
- Place the ANGEL
- Pick up the KEY

- Back up twice to the gate
- Examine the tree stump
- Use the STICK
- Receive the DOOR KNOCKER
- Back up
- Do the Hidden Object Scene
- Receive the NAIL PULLER

- Go to the left to the town square
- Use the BROOM on the leaves several times
- Pick up the STATUE PART

- Go forward to the pier
- The door will collapse
- All you can do is pick up a horseshoe

- Return to the mansion entrance
- Examine the door
- Place the DOOR KNOCKER
- Click on it

- Enter the mansion
- Examine the 2 candelabras
- Use the MATCHES 3 times

- Examine the coat on the right
- Use the RAZOR BLADE
- Pick up the DRAWER KNOB
- Examine the door to the right
- Use the KEY to open it

- Head right
- Pick up the LADDER
- Examine the floor
- Use the NAIL PULLER
- Pick up the STRANGE SYMBOL
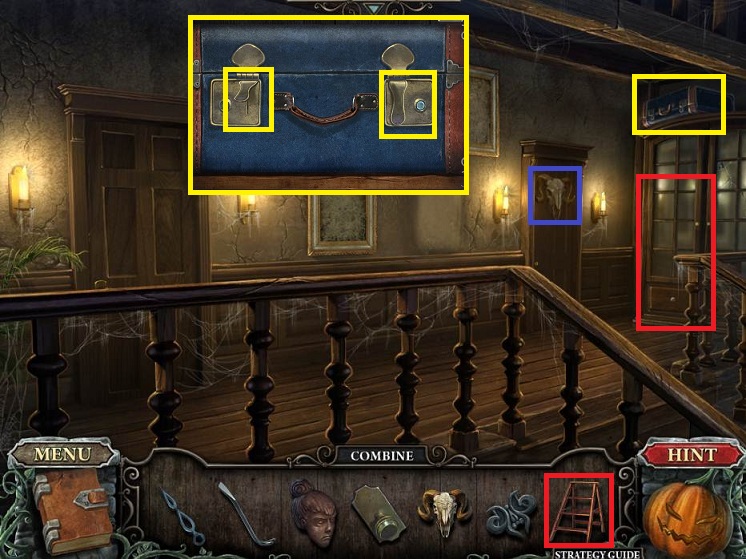
- Head up the stairs
- Pick up the SKULL
- Use the LADDER to reach the suitcase
- Click the latches
- Pick up the RED STONE

- Go outside
- Do the Hidden Object Scene in the cellar
- Receive the SHOVEL

- Go to the graveyard
- Use the SHOVEL on the grave
- Use the NAILPULLER on the coffin
- Pick up the LENS

- Examine the crypt door
- Place the SKULLS
- Rotate the skulls so they are facing in
- Bottom left moves alone
- Top left moves 2 left skulls
- Bottom right moves 2 bottom skulls
- Top right moves all but bottom right skull
- So...
- Move top right skull until it is in position
- Then bottom right and top left
- Finally bottom left

- Do the Hidden Object Scene
- Receive the SHEET MUSIC
- Enter the mansion
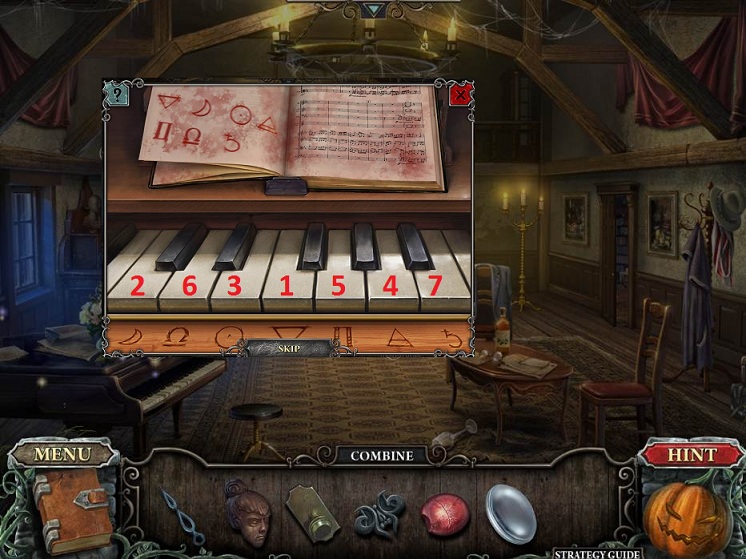
- Examine the piano
- Place the SHEET MUSIC
- Press the piano keys in the order on the music; the keys are labelled below.
- Pick up the KEY
- Go upstairs
- Examine the left door
- Use the KEY
- Enter
- Talk to the man; he wants his letters
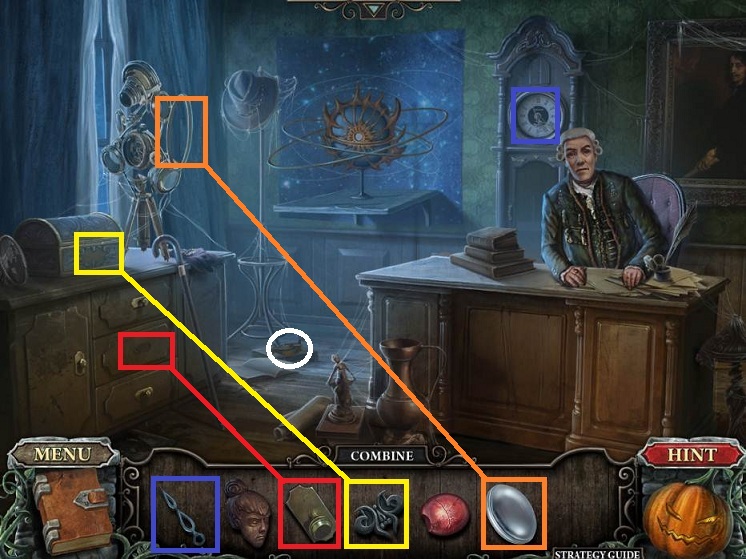
- Examine the clock and place the CLOCK HAND
- Place the LENS on the optical device
- Examine the small chest
- Place the SYMBOL
- Pick up the BOOK
- Examine the drawers and place the DRAWER KNOB
- Top drawer has a golden horseshoe
- Middle drawer has a STATUE PART
- Bottom drawer has a CANVAS

- Return to landing
- Place the CANVAS in the empty frame

- Return to the library
- Replace the BOOK
- Examine the shelf
- Move the books from left to right

- Enter the secret room
- Pick up the PAINTING and MIRROR PIECE
- Place the STATUE HEADS
- Examine the door
- Place the RED STONE

- Do the Hidden Object Scene
- Receive the CODE

- Return to the library
- Examine the safe
- Place the CODE
- Open the safe
- Pick up the KEY
- Return to the landing
- Place the PAINTING
- Examine the right door
- Use the KEY

- Do the HOS
- Receive the STRAP

- Return to landing and room to the left
- Use the STRAP on the curtain
- Pick up the STATUE PART
- Return to the secret room past the library
- Place the STATUE PART
- Pick up the ROUND KEY PART
- Return to the library
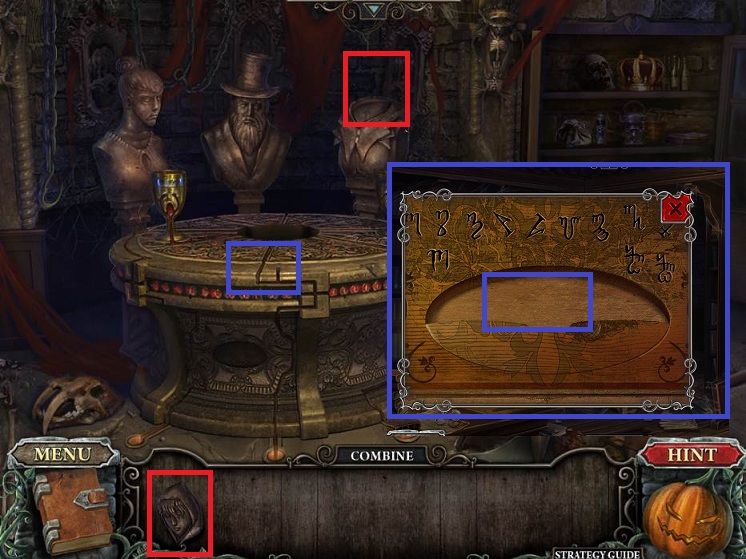
- Examine the board on the table
- Place the ROUND KEY PART
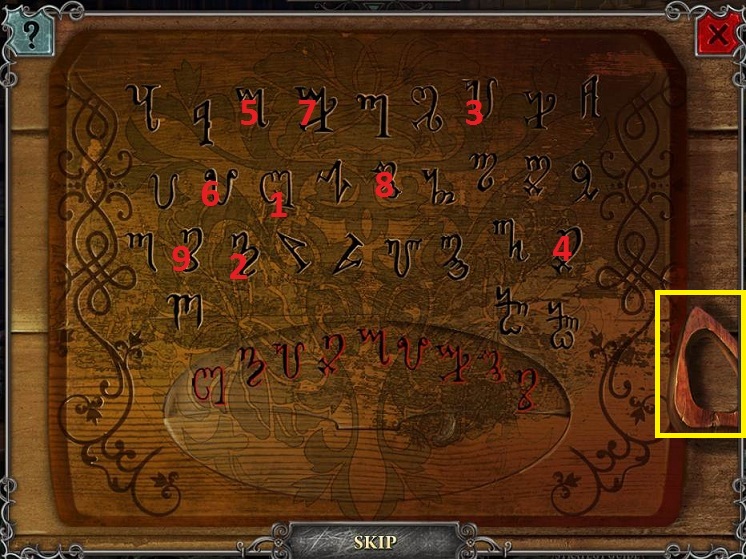
- Click on the symbols in order using the ouija planchette
- Receive the ROUND KEY

- Return to the secret room
- Place the ROUND KEY
- Pick up the LETTERS

- Return to the landing
- Do the HOS
- Receive MIRROR PIECE

- Return to the library
- Place the MIRROR PIECES
- Get the time code

- Return to the graveyard
- Do the HOS in the crypt
- Receive the CLOCK HAND
- Return to office

- Return to the office
- Give the man his LETTERS
- Receive a PORTRAIT FRAGMENT
- Place the CLOCK HAND
- Enter the time (7:15)
- The cuckoo bird will knock a BRUSH on to the desk; pick it up.

- Return to the landing and use the BRUSH on all the paintings
- Note the different outfits

- Return to the secret room through the library
- Do the HOS
- Receive a WIG

- Return to entrance
- Examine the mannequin to the left
- Place the WIG
- Do the mini-puzzle by placing the right accessories and hair on the mannequins
- Receive the PORTRAIT PIECE
- Combine the pieces together

- Return to the graveyard
- Give the PORTRAIT to the woman ghost
- Receive STAR-SHAPED KEY
- Examine the gate
- Place the KEY
- Go through
General Info and Tips
Chapter One
Chapter Two
Chapter Three
Chapter Four
Chapter Five
Bonus Chapter
Ask for help in the comments below!
Chapter One
Chapter Two
Chapter Three
Chapter Four
Chapter Five
Bonus Chapter
Ask for help in the comments below!