
Cursed Fates: The Headless Horseman: Chapter Three
Our Cursed Fates: The Headless Horseman Walkthrough will help you keep your head as you face down the grisly legend that haunts the tiny town of Sleepy Hollow. Armed with detailed solutions to puzzles, custom screenshots depicting exact locations of key items, and step-by-step instructions on how to persevere, you'll have no trouble helping this man of science combat the forces of darkness.
General Info and Tips
Chapter One
Chapter Two
Chapter Three
Chapter Four
Chapter Five
Bonus Chapter
Ask for help in the comments below!
Chapter One
Chapter Two
Chapter Three
Chapter Four
Chapter Five
Bonus Chapter
Ask for help in the comments below!
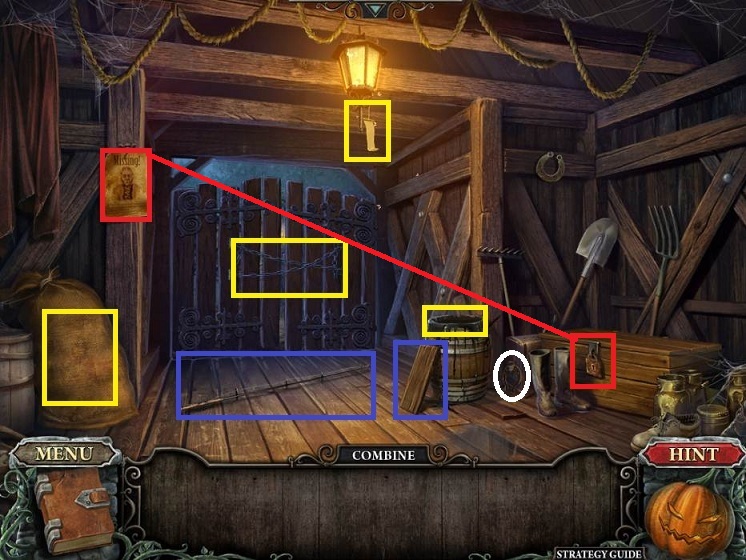
- Click on the missing poster to move it
- Pick up the KEY
- Pick up the FISHING ROD and PLANK
- Note the grain sack, fly paper, and barrel of pitch.
- The doors are chained shut
- Use the KEY on the chest

- Do the Hidden Object Scene
- Receive the HANDSAW HANDLE

- Back up
- Pick up the PLANK and HANDSAW BLADE

- Head right to the town square
- Pick up the LEVER
- Go forward twice to the pier house
- Combine the HANDSAW BLADE and HANDLE
- Use the HANDSAW on the chains of the door twice
 Yard-1
- Go forward into the yard
- Pick up the TORCH, PLANK, and BENT LEVER
- Go back once
- Use the TORCH on the barrel of pitch
- Go forward and use the TORCH on the lit torch to light it

- Go back to the town square
- Examine the well
- Place the BENT LEVER and click twice
- Pick up the MEAT

- Go forward to the yard
- Place the MEAT in the bowl
- Place the 3 PLANKS on the ladder
- Speak to the boy who wants you to find his father in the swamp
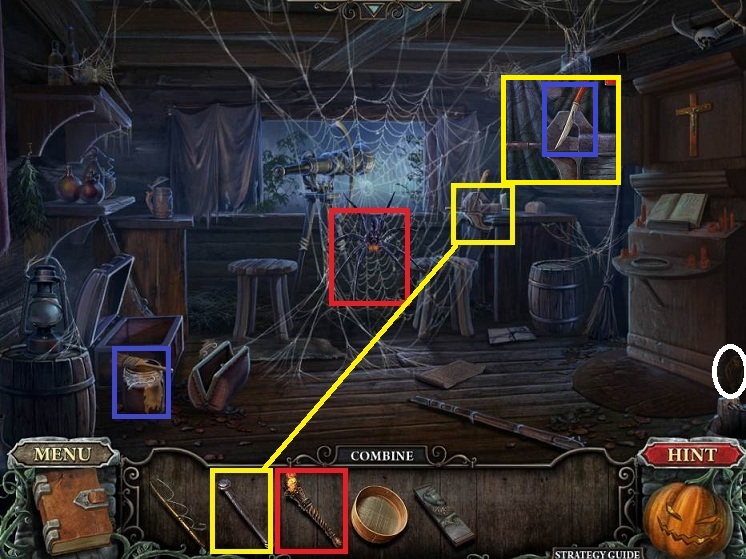
- Click on the cloth to the left of the door
- Pick up SIEVE

- Enter the treehouse
- Do the Hidden Object Scene
- Receive the STRANGE OBJECT
- Use the TORCH on the spider web
- Pick up the GLUE
- Examine the work table
- Place the LEVER on the vice and click twice
- Pick up the KNIFE

- Back up to pier house
- Do the Hidden Object Scene
- Receive the HOOK

- Use the KNIFE on the sack
- Examine the grain
- Use the SIEVE 3 times
- Pick up BRUSH
- Examine the flypaper on the light
- Use the GLUE
- Pick up the MOTH
- Combine the FISHING ROD and MOTH

- Back up
- Use the FISHING ROD off the pier
- Find identical fish
- You receive FRESH FISH
- Give the FISH to the gull
- Examine the nest
- Pick up another STRANGE PIECE

- Return to the treehouse
- Examine the telescope
- Use the BRUSH on the eye piece
- Turn the outer dials to complete the pattern
- You will receive the code

- Return outside and examine the gate
- Enter the code
- Place the 2 STRANGE PIECEs
- Swap pieces and flip as necessary to make the picture
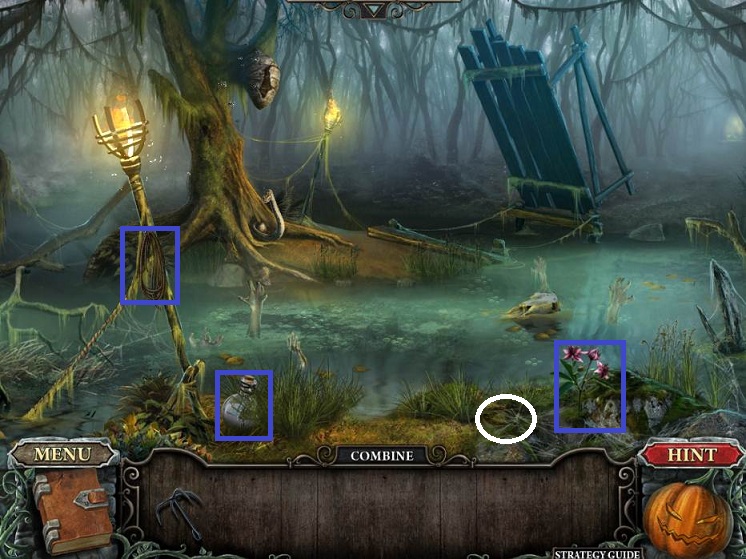
- Go forward
- Pick up SWAMP FLOWER PHIAL OF WATER and ROPE
- Combine the HOOK and ROPE to get a GRAPPLING HOOK

- Return to treehouse
- Place the PHIAL on the altar
- Pick up HOLY WATER
- Return to swamp
- Use HOLY WATER on the water
- Use the GRAPPLING HOOK on the bridge
- Go forward

- Click on the body
- He wants you to find his watch to give to his son
- Pick up BELLOWS
- Click on the basket and then cloth
- Pick up FIGS and MOSS
- Click on the door
- The woman inside wants an amulet that is hidden in the village
- Go forward
- Click on chimney
- Click on damper
- Pick up DIAMOND
- Pick up SNAKE CATCHER and SPRAYER

- Return to swamp
- Examine the snake
- Use the SNAKE CATCHER
- Pick up the SNAKE EGG

- Return to the treehouse
- Do the Hidden Object Scene
- Receive the AMULET

- Return to the house and give the woman the AMULET
- Enter the house
- The woman wants the SNAKE EGG
- Give her the egg and receive RECIPE PART
- Examine the sideboard
- Use the DIAMOND on the glass
- Pick up the OPENER
- Pick up IRON and BUCKET
- Click on the drape

- Do the Hidden Object Scene
- Receive the POWDER
- Combine the POWDER and SPRAYER

- Return to swamp
- Examine the beehive
- Use the SPRAYER
- Pick up the HONEYCOMB
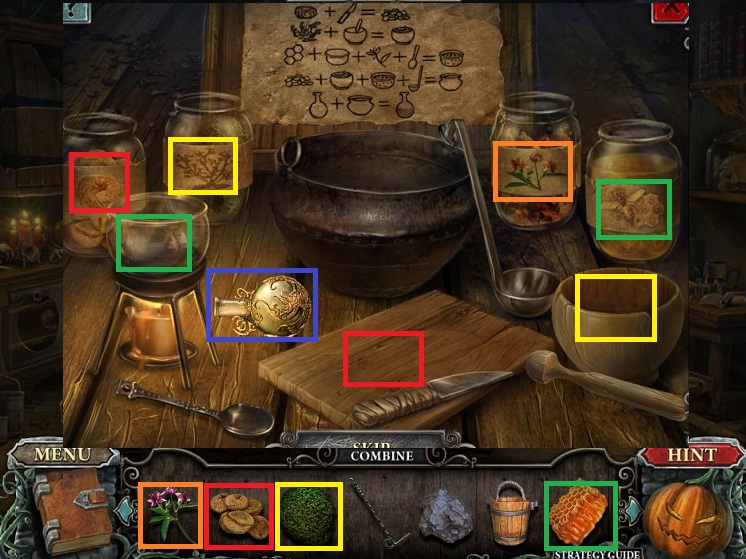
- Examine the table
- Place the RECIPE PART in the frame
- Place the HONEYCOMB, SWAMP FLOWER, MOSS, and FIGS in their jarsChop the figs
- Crush the moss
- Place the honey comb over the candle
- Add the flower and stir
- Add everything to the pot and use the ladle
- Use the phial on the pot
- Receive the POTION

- Go outside
- Use the POTION on the mean plant
- Pick up the MOLD PART

- Go back inside
- Do the Hidden Object Scene
- Receive the STRANGE STONE

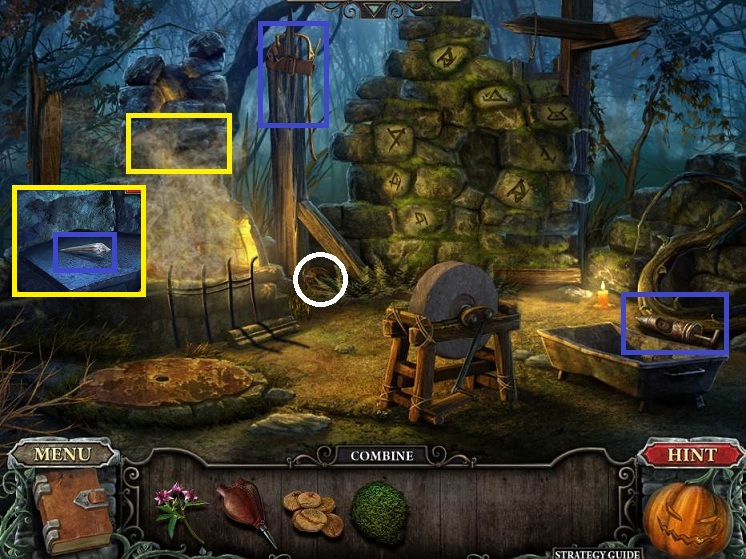
- Return to fireplace area
- Place the STRANGE STONE
- Match the runes
- Receive the MOLD PART

- Combine the MOLD PARTS to receive a MOLD
- Use the OPENER on the well cover
- Examine the well
- Use the BUCKET in the water
- Examine the fireplace
- Place the BELLOWS and use to stoke fire
- Place the MOLD on the coals and the IRON on the mold
- Use the WATER and pick up the RAW KEY
- Use the RAW KEY on the grinde stone
- Receive the KEY

- Enter the house
- Examine the cabinet
- Use the KEY in the lock
- Pick up the WATCH
- Back up
- Give the ghost the WATCH
- Receive the STRANGE KEY

- Back up to the town square
- Examine the gate
- Use the STRANGE KEY
General Info and Tips
Chapter One
Chapter Two
Chapter Three
Chapter Four
Chapter Five
Bonus Chapter
Ask for help in the comments below!
Chapter One
Chapter Two
Chapter Three
Chapter Four
Chapter Five
Bonus Chapter
Ask for help in the comments below!