
Botanica: Into the Unknown: Chapter Four: Newstone Way
Our Botanica Into the Unknown Walkthrough is the missing link you need to solve the mystery of this beautiful hidden object adventure game. We've made sure to include plenty of screenshots clearly marking all key objects and detailed instructions so you'll be able to help Ellie on her journey to discover this new world of wonder filled with curious creatures, exotic plantlife, and unknown dangers. Don't hesitate to step into unknown adventures with our Botanica Into the Unknown Walkthrough at your side.
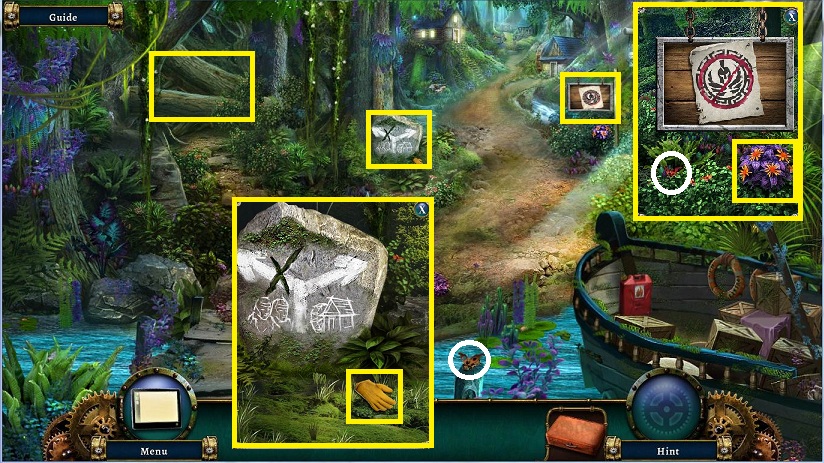
- Pick up collectible
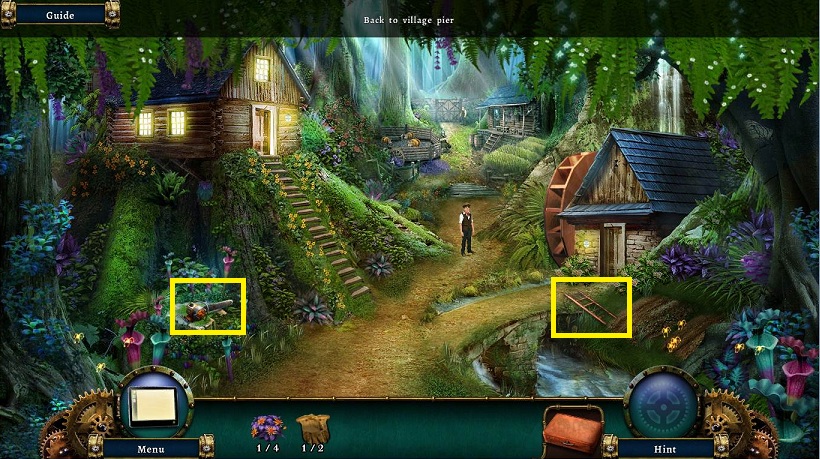
- Note the way blocked with logs to the left
- Examine guide stone
- Pick up the LEATHER GLOVE
- Examine the sign
- Pick up collectible
- Pick up HERBS (1/4)
- Note the gas can on the boat
- Talk to Sam
- Pick up the LADDER
- Examine the chain saw
- Note you need FUEL and CHAIN
-
Head into hut on the left
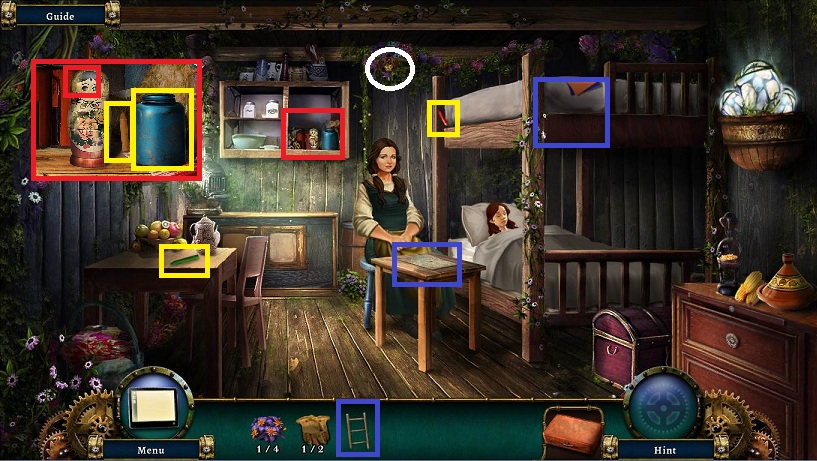
- Pick up collectible
- Speak with Margaret
- Pick up CRAYONS (1/4, 2/4)
- Place the LADDER
- Examine the top bunk
- Pick up CRAYON (3/4)
- Examine the shelf
- Pick up CRAYON (4/4)
- Pick up EMPTY JAR
- Place the CRAYONS on the table
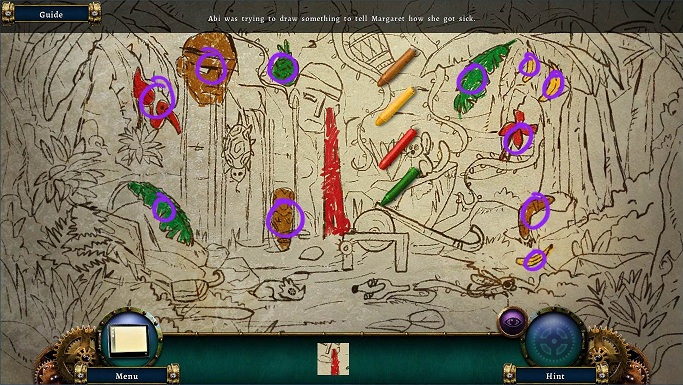
- Using the crayons, color in parts of the drawing to match the images at the bottom
- Just pick up the crayon and click on the item
- Then click on the item again
- Exit the hut.
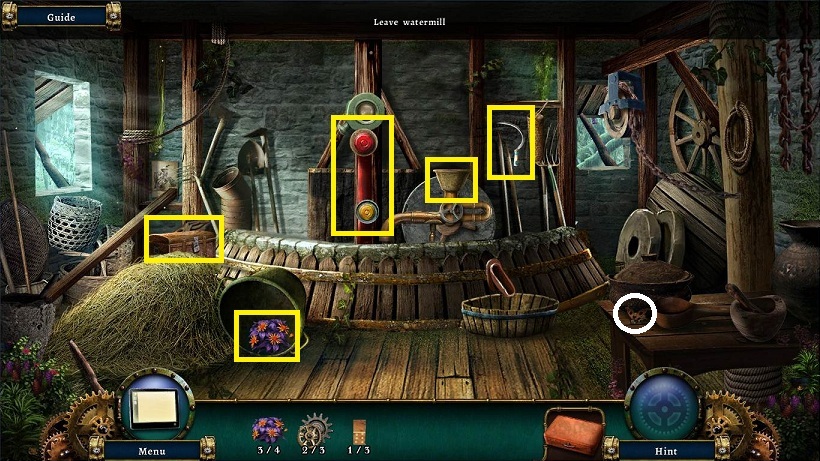
- Talk to Sam and go forward
- Examine the pig pen
- Pick up the LEATHER GLOVE (2/2)
- Pick up the HERBS (2/4)
- Examine the gate
- Use the LEATHER GLOVES to pick up the CHAIN
- Note the wheat and that there seems to be something in it.
- Enter the Healer's hut.
- Speak to Healer
-
Pick up collectible
Pick up INCENSE on the side shelf - Pick up GEAR (1/3) on the back shelf.
- Pick up HERBS (3/4)
- Examine the Healer's table
- 5th garlic: Use the broom on the dust.
-
Chopped ginger: Use the knife and the whole ginger

- See no evil: Place the eye shade on the center monkey
- Hear no evil: Place the ear muffs on the left monkey
- Empty vial: Click on the basket. Pick up the full vial and use it on the drain.
- Pair of drums: Place front drum with the back drum
- Receive EMPTY VIAL
- Exit the hut and return to the pier

- Examine the boat
- Use the LEATHER GLOVES on the gas cap
- Use the EMPTY JAR on the fuel to get a CAN OF FUEL
- Return to village
- Examine the Chain Sawm
- Remove the gas cap and place the CAN OF FUEL
- Place the CHAIN
- Pick up the CHAIN SAW
- Return to pier
- Use CHAIN SAW on the way blocked to the left
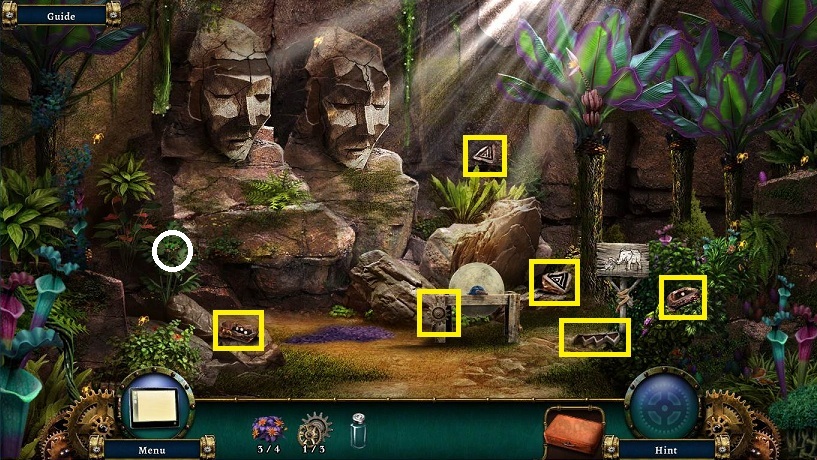
- Pick up collectible
- Note the sharpening stone
- Pick up GEAR (2/3)
- Pick up 5 ROCKS

- Examine the golem fountain
- Place the 5 ROCKS by clicking and then dragging to the appropriate spot
- Pick up DOMINO (1/3)
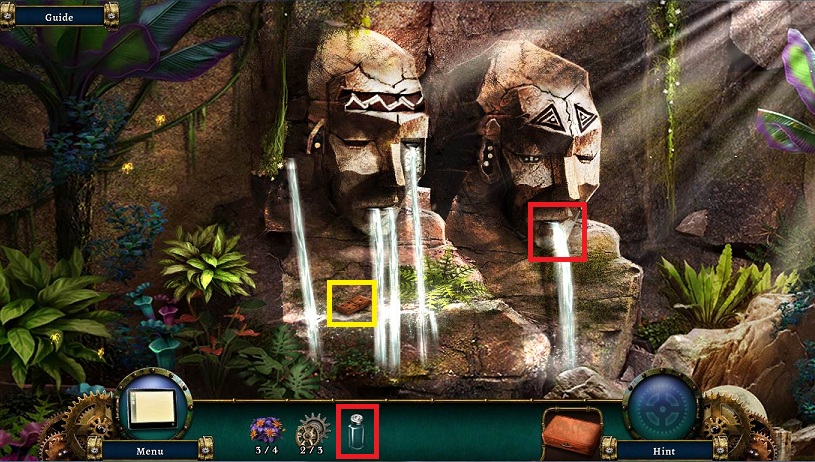
- Use EMPTY VIAL on the right
- The filled vial will go into the Botanist's Kit
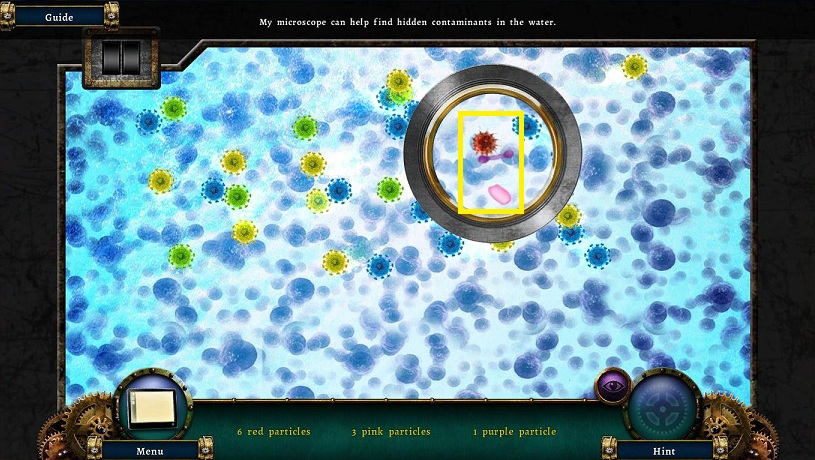
- Examine the Botanist's Kit
- Move the magnifier around to find the different particles
- Receive CONTAMINANTS
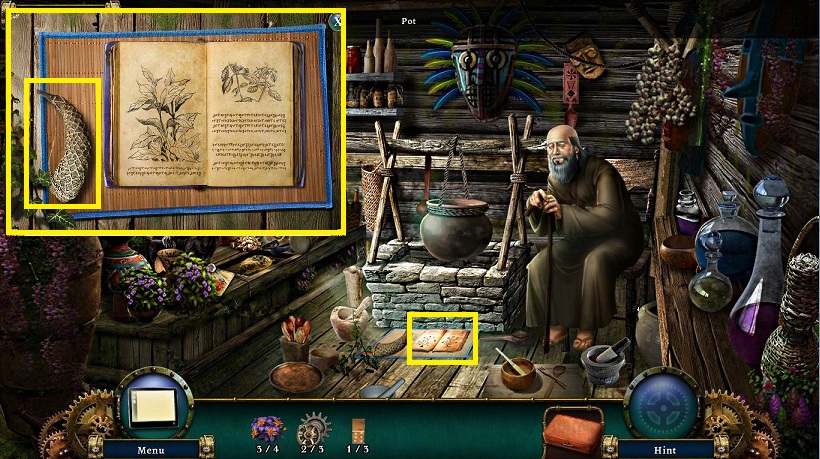
- Return to the Healer's hut.
- Give the HEALER the CONTAMINANTS
- Examine the book on the floor
- Pick up the HORN
- Flip through the pages.
- Return outside
- Use the HORN on the sleeping pig herder.
- He wants you to fix the watermill and gives you the WATERMILL KEY
- Go back once.
- Use the WATERMILL KEY on the door and enter
- Pick up collectible
- Pick up HERBS (4/4)
- Note the locked chest
- Note the mechanism missing gears.
- Note the input bucket for the wheat
- Pick up the BLUNT SICKLE
- Return to golem area and use the BLUNT SICKLE on the sharpening stone to get a SHARP SICKLE
- Return to outside the Healer's hut
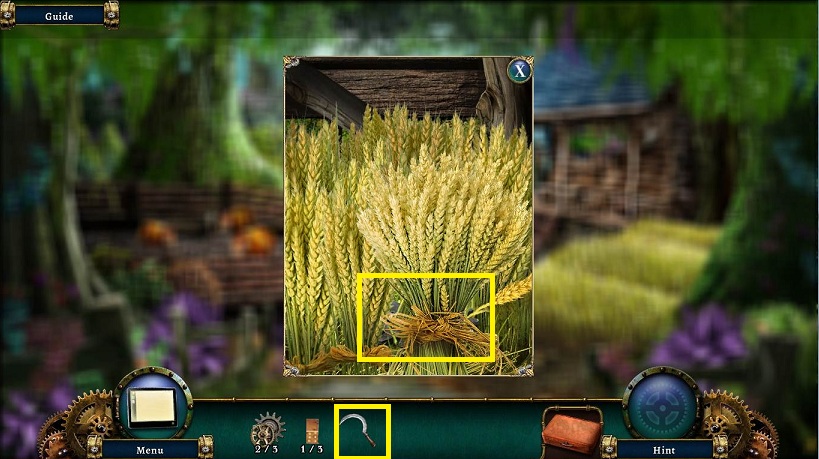
- Examine the wheat
- Use the BLUNT SICKLE 4 times on the wheat
- Receive 4 WHEAT
- Pick up GEAR (3/3)

- Return to watermill
- Use the GEARS on the mechanism
- Place the gears in the order listed on the diagram.
- Note there are 3 spindles to place them on
- See solution above, numbered in order of placement.
- Place the 4 WHEAT in the input bucket and pick up GRAIN in the basket
- Return to pig pen.
- Place the GRAIN in the trough.
- Receive a PIG
- Return to the pier and use the PIG on the purple soil
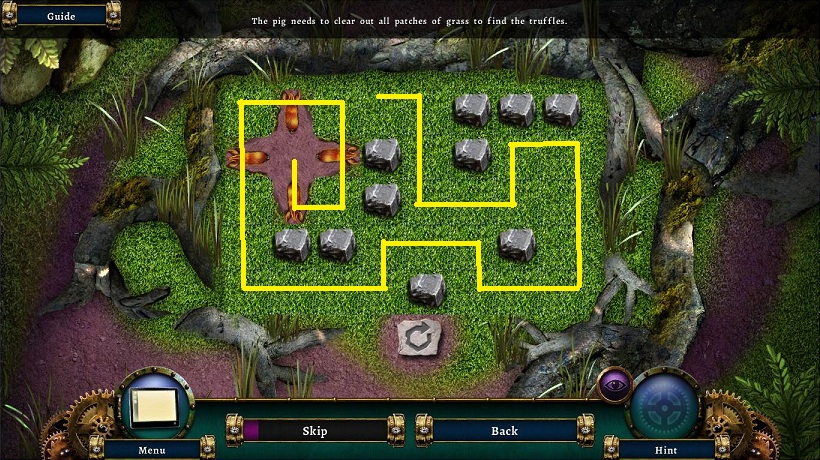
- You must click on the starting spot for the pig to clear the grass.
- You will then be given a choice of which pig to select to best complete the puzzle.
- The pig will stop whenever there is a choice of directions
- The solution above shows the path the pig needs to take.
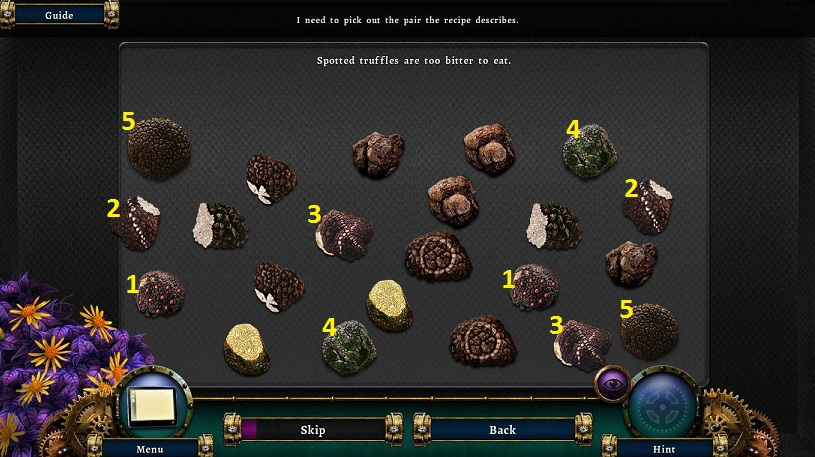
- Examine the Botanist's Kit
- Match the truffles according to the directions.
- Receive PURE TRUFFLES
- Return to the Healer's hut
- Examine the pot
- Place the PURE TRUFFLES in the pot.
- The HERBS go in automatically.
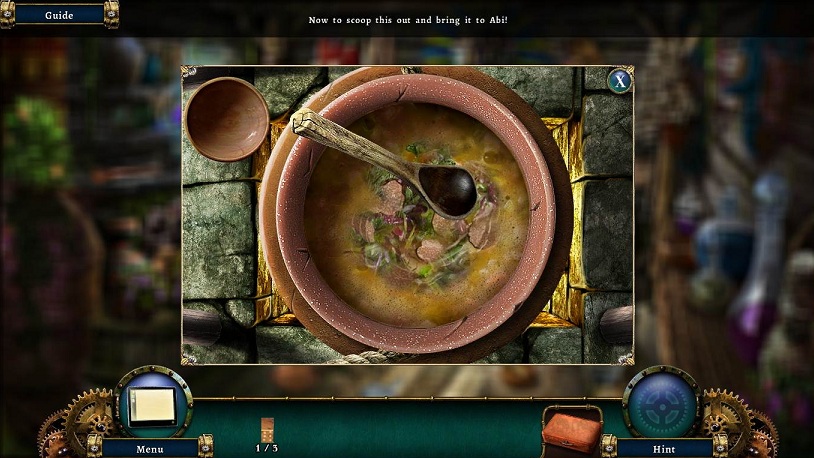
- Use the spoon to stir the soup
- Use the bowl on the pot
- Pick up a TRUFFLE SOUP
- Return to Margaret's hut and give her the TRUFFLE SOUP
- She will give you a VILLAGE TOKEN
- Exit the hut and go forward to the gate
- Give the guard the VILLAGE TOKEN and go through the gate
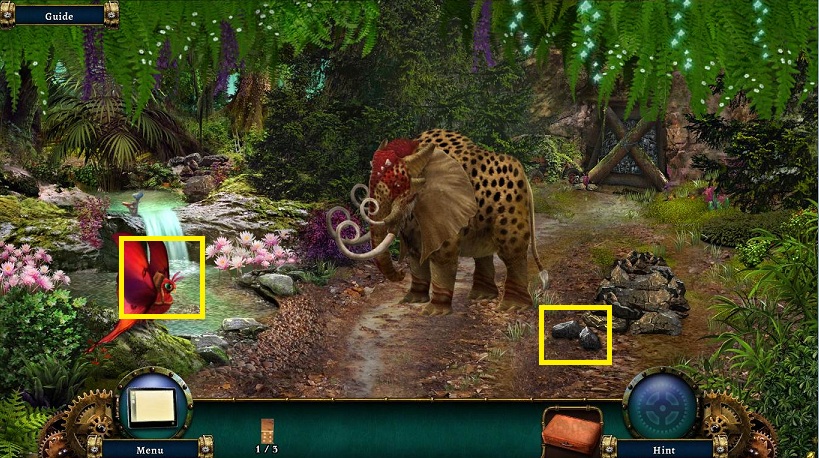
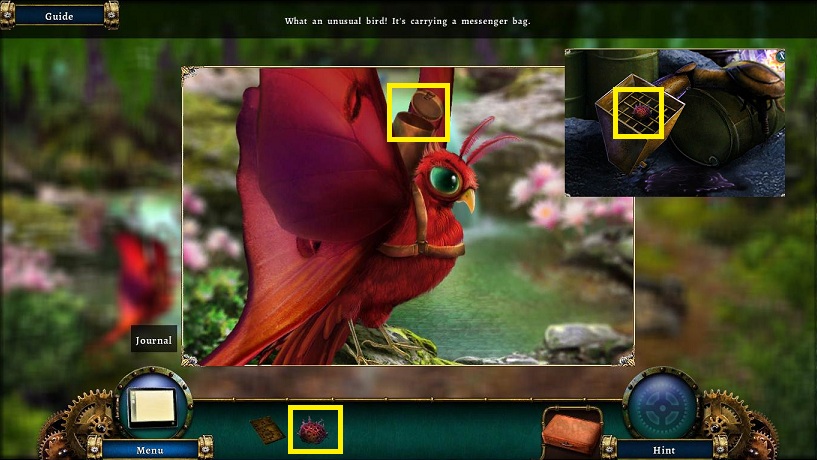
- Examine the red bird
- Click on the tube on its back
- Read the note
- Pick up the FLINT
- Go forward
- Pick up collectible
- Examine the rocks to the right
- Read the note
- Pick up the LEVER
- Note the blocked mine entrance
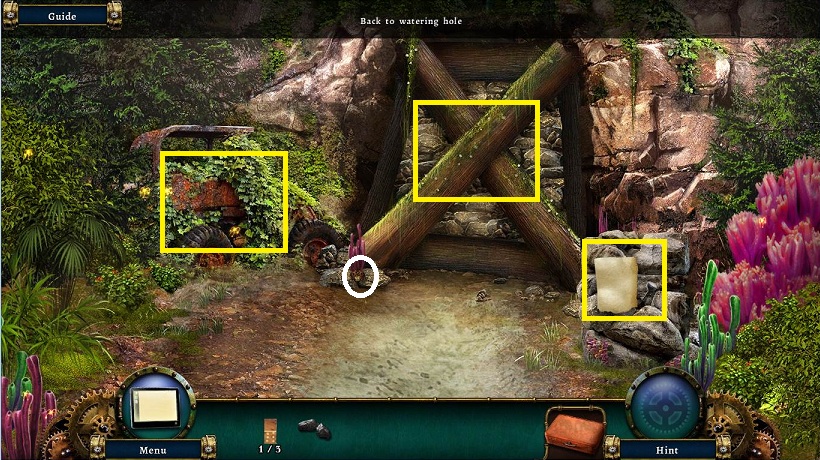
- Examine the overgrown wreck to the left
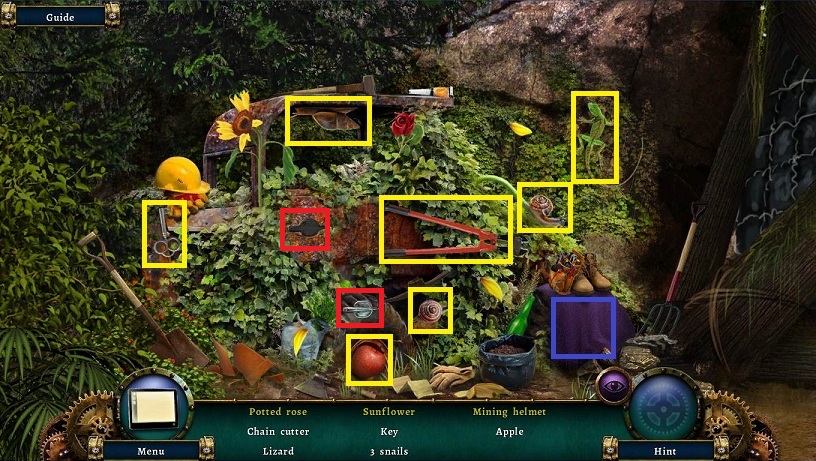
- Find the items in the open
- Use the door handle on the door
-
Click on the purple cloth
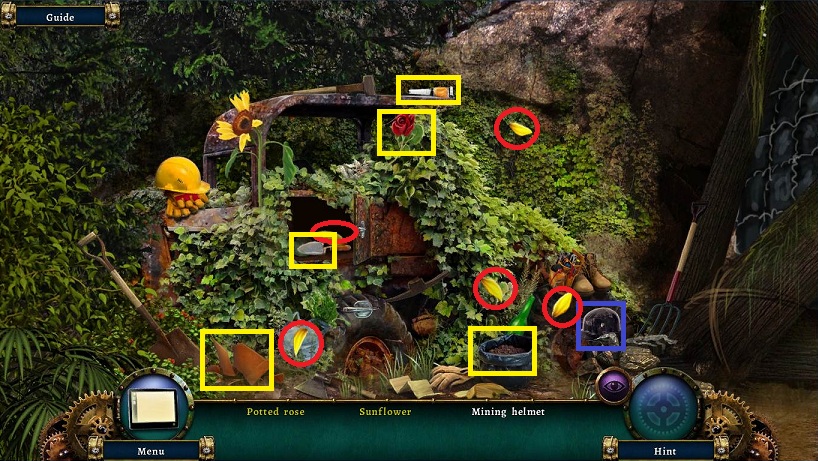
- Sunflower: Place the yellow petals on the sunflower
- Potted rose: Use the glue on the pot. Use the shovel on the bag of dirt. Use the shovel of dirt on the pot. Place the rose on the pot.
- Receive a SILVER KEY
- Return to the watermill and examine the chest
- Use the SILVER KEY on the chest.
- Pick up the SIEVE and HARNESS
- Return to the watering hole
- Place the HARNESS on the ramephant
- Examine the pond
- Use the SIEVE on the 3 dark spots
- Pick up DOMINO (2/3) and MARBLE
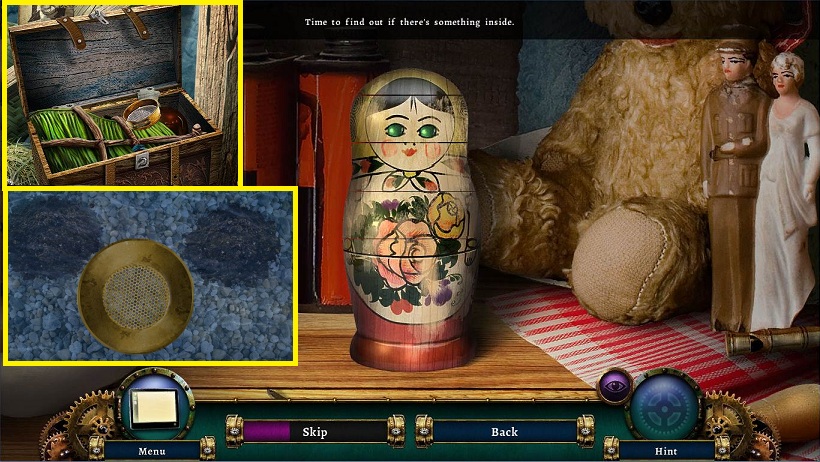
- Return to Margaret's hut and examine the shelf
- Place the MARBLE on the doll
- Click the 5 sections of the doll so they match up (see solution)
- Pick up DOMINO (3/3)
- Return outside
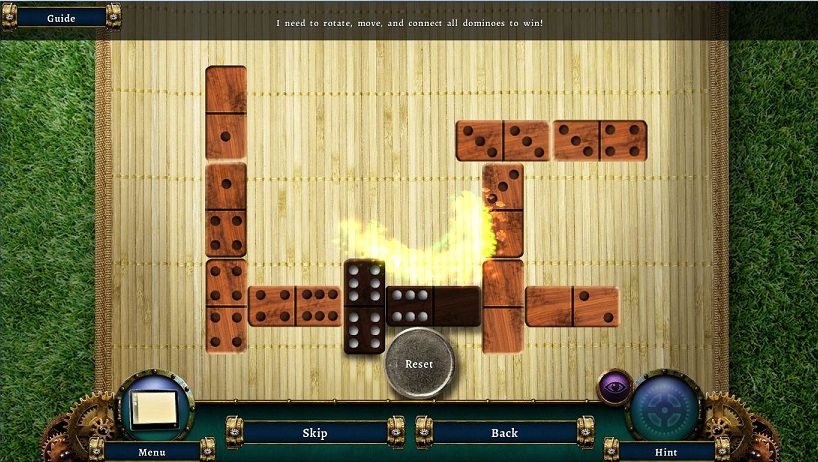
- Give the DOMINOES to Sam
- Place the dominoes to use all of them
- Number need to be matched end to end or at the side of doubles
- Once you win Sam will help you get bananas.
- Meet Sam at the golem area
- Receive BANANAS
- Return to the watering hole
- Use the BANANAS on the Ramephant twice, who will then pull open the mine entrace
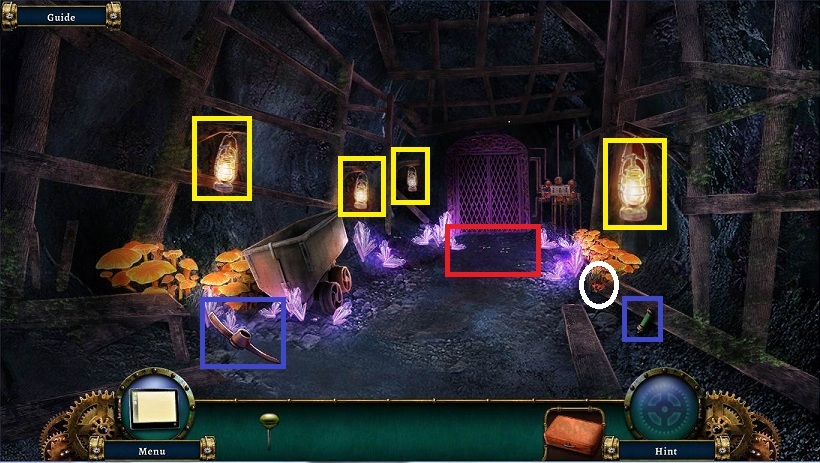
- Enter the mine
- Use the FLINT on the 4 langers
- Pick up collectible
- Pick up GREEN TUBE
- Note the pickaxe head
- Examine the back.
- Use the INCENSE on the closes lantern
- Use the LIT INCENSE on the bugs
- In the mini-puzzle, just move the cursor all around to fill the area
- Examine the back panel
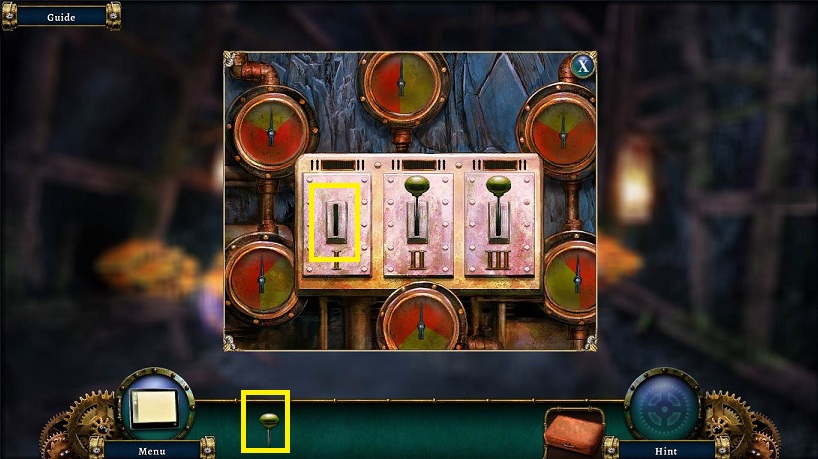
- Use the LEVEL on the panel
- Pull down lever I when the indicator is in the yellow
- Pull down level II when 2 indicators are in yellow
- Pull down level III when 3 indicators are in yellow
- Enter the elevator
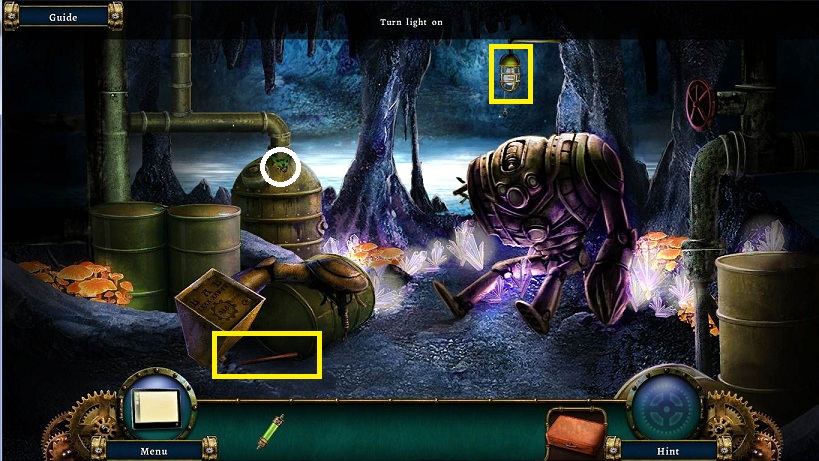
- Click on the light to turn it on
- Pick up collectible
- Pick up WOODEN HANDLE
- Back up once
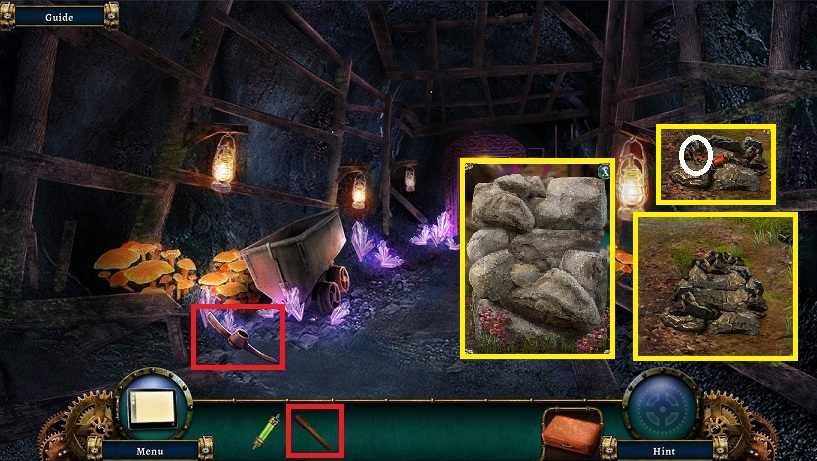
- Use the WOODEN HANDLE on the pickaxe head to get a PICKAXE
- Back up once
- Examine rock pile to the right
- Use the PICKAXE 3 times.
- Pick up BLUE TUBE AND MECHANICAL HEART
- Back up again
- Examine the rock pile
- Use the PICKAXE twice
- Pick up RED TUBE
- Pick up now exposed collectible
- Return through the elevator
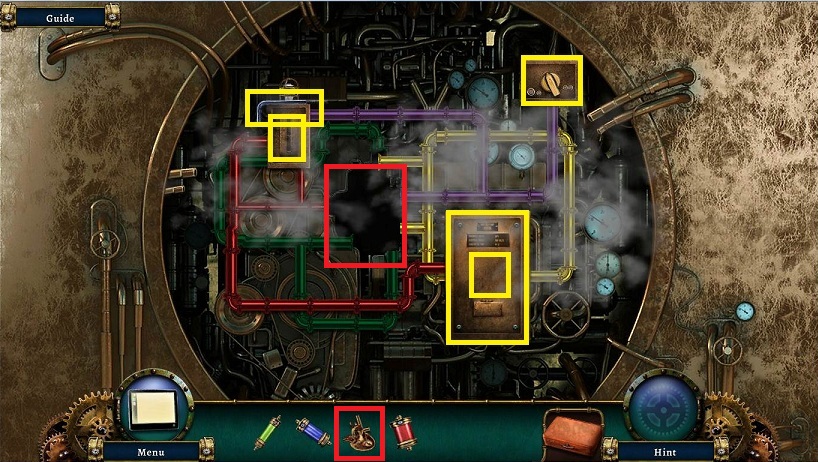
- Examine the mini-bot
- Enter the code that was on the panel on the box to the left
- The code is 80 clockwise, 25 counterclockwise, 55 clockwise.
- Place the MECHANICAL HEART in the center of the pipes
- Click on the knob at the upper right
- Use the allen wrench from top left on the panel at the bottom right (4 screws)
-
Use the lever in the open box on the switch at the upper left
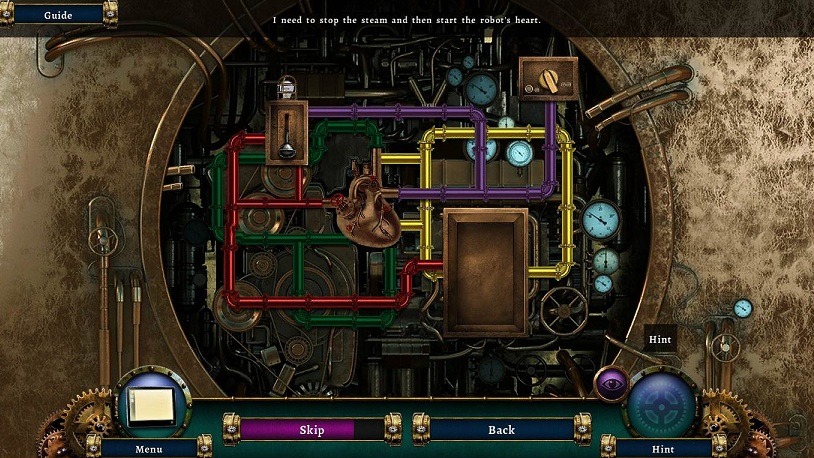
- Turn the tiles until they match up to have the different colored pipes connect
- Note that there are some tiles that just barely have an edge of pipe on them
- Place the BLUE TUBE, RED TUBE, and GREEN TUBE one at a time and watch the monitor
- Pick up the KEY
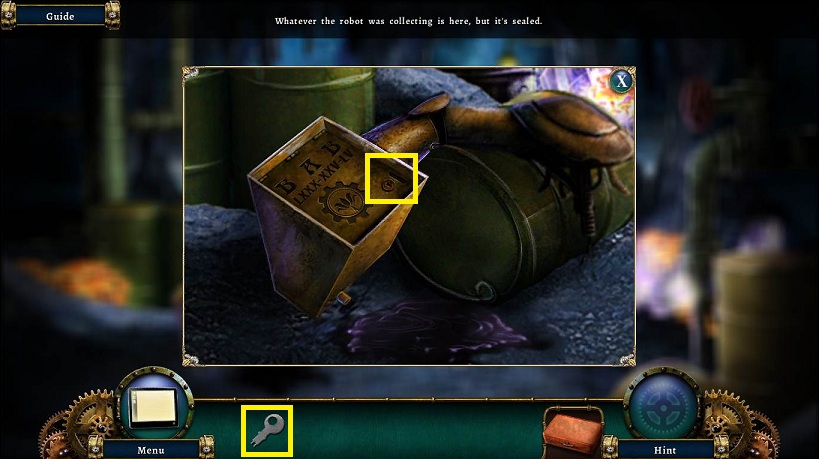
- Examine the barrel and box to the left
- Use the KEY in the lock
- Receive the PLATE
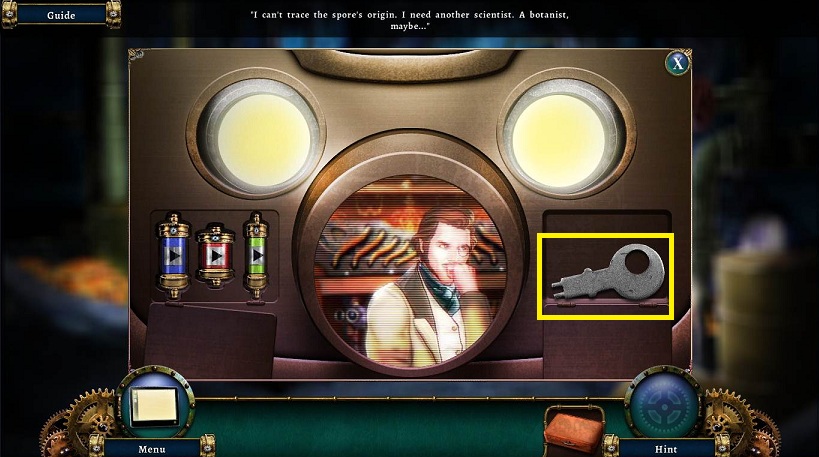
- Pick up the SPORE
- Return to the watering hole
- Examine the red bird
- Place the SPORE in the container
- Watch cut scene to finish the chapter