Youda Farmer 3: Seasons
Youda Farmer 3: Seasons Walkthrough and Guide gives game playing strategies so that you can get gold on all levels and earn all the trophies that are attainable. This game is somewhat random so a step-by-step guide is not given. You will learn the strategies that can help you through the rough spots.
Youda Farmer 3:
Seasons
Goals of the game:
DELIVERY NOTE: If you are delivering items made at the blacksmith or carpenters, you can not deliver them all at once. You must deliver each one individually. For some reason the game doesn't count them if they are delivered more than one at a time. You don't need to leave; just pick one, deliver, then pick the next, deliver, and so on.
DIFFERENCES FROM YOUDA FARMER 2:
Blue buttons show the goal for individual items.
An aqua button are for dishes needing to be prepared. Hover your mouse over it and you will be shown the ingredients needed.
A purple button on the right with the covered dish icon are the dishes to be delivered to the hotel. These are OPTIONAL.
A green button with a hammer shows the goal necessary to build or upgrade a farm building.
An orange button shows the goal for upgrading a village building. For both Build and Upgrade buttons: if you have more than one, the money amount will not be accurate when you have more than one to do. This means that frequently when you have finishing upgrading one building, you will end up needing to collect more money for the next building.
There are two icon shapes (collapsed and expanded) and three colors. They can be embedded in a goal ticket or not.
When the icon is round it means that there is nothing on the truck to be used at that building.
The icon is expanded and yellow means there are products in the truck that can be delivered to that location.
The icon is expanded and aqua means there is an item in the truck that can be delivered to that store to be used in a recipe.
PICK UP BAR:
The Achievements in the book are self explanatory. Following are the ones that didn't work for me. I believe this is why there are unmade trophies.
Goals of the game:
- Pickup and deliver products in the time allowed.
- Make enough money to buy all the upgrades
- Get as many gold trophies as you can (if that is your thing)
- Complete 100% of your village and farm
DELIVERY NOTE: If you are delivering items made at the blacksmith or carpenters, you can not deliver them all at once. You must deliver each one individually. For some reason the game doesn't count them if they are delivered more than one at a time. You don't need to leave; just pick one, deliver, then pick the next, deliver, and so on.
DIFFERENCES FROM YOUDA FARMER 2:
- Recycling is now achieved from the bottom bar by clicking and dragging the trashcan up.
- Upgrades are available at the end of each level rather than by purchasing them
- There is a new shop in town, the blacksmith.
- There are new items to make using iron, such as hammers, wheelbarrows, and clothes.
- For building and upgrading, you will sometimes need to make items to deliver rather than just wood and stone.
- There are 4 different types of "disasters" depending on the season. The distaster will start on an pickup ticket, click on it, and then click on the pest at the farm area.
- There is a shop where you can buy several different boosts and more efficient pest killers
- New button on the truck--"All" This allows you to choose all of the items in the truck to go into the recipe you are preparing. You have to select the items for the first recipe and then click all.
- The Harbor is an area in town to where, during certain levels, items will be delivered instead of picked up at the farm.
- Party Levels are back
- The Slot Machine
- No lame mini-gamess
- Use the recycle bin frequently. If you don't need a product right away toss it out. Using the recycle bin causes production to stop for about 15 seconds.
- Utilize the combo bonus. These are absolutely crucial to reach money goals. They also force you to be a bit more efficient with your movements and using the recycle bin.
- Prepare the dishes that need to be delivered first. Don't wait too long to pick them up when they are finished as they will go away.
- Prepare the dishes with the most ingredients first
- Get the building materials later in the level. If you deliver them all at once you might achieve your upgrade cost as well.
- If short on money at the end, aggressively get rid of everything but one item. I usually pick whatever I have the most of to concentrate on. They will come fast and furious in a bit. This will allow you to get huge multipliers that should put you over the top.
- Use the recycle bin some more. Throw out everything you don't need for the current or next goal. Be aggressive with this. This is very, very important.
- Move around efficiently if you can but don't worry about it too much.
- Delivering items from the Carpenter and Blacksmith, do so ONE AT A TIME.
- Don't worry too much about using the perks. I only used the enhanced pest kill ones just to decrease clicking and nothing else.
- You do not have to do the hotel deliveries or the restaurant orders.
- If you want to maximize the number of achievements you get (while recognizing that quite a few of them don't work--see Trophy Room), play one time through focusing on getting all the hotel deliveries and all the restaurant orders until you get the achievements and trophies for them.
- Then go back and get gold on the levels you have already played. I find I use a very different strategy when I'm trying to make deliveries and restaurant orders.
- For making gold, I very (and I mean VERY) aggressively use the recycle options.
- Upgrades are available at the end of each level depending on how you do; you get 1 for gold, 2 for silver, and 3 for bronze.
- Prioritize picking upgrades in this order: Multipliers, Building Upgrades, and then Higher Priced Items
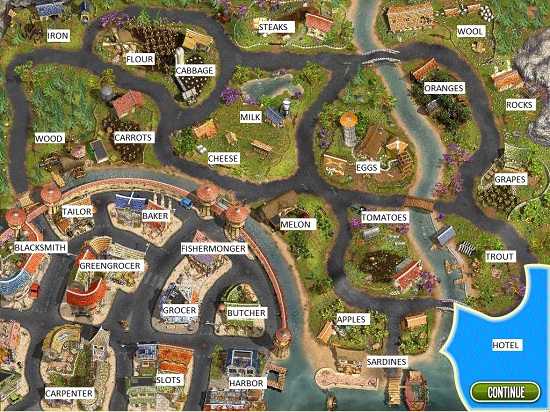
- The top bar is where your goals for the level are. It is also how you navigate to a building in the village.
- By clicking on the shop icon, your view will be brought to that building. By selecting a product to deliver the truck will go there.
- The different buildings are always on the top bar in the same order.
- Goals are indicated on the buttons with the number left and an image of the goal item.
- The item on the goal button will flash if the items or all the recipe ingredients are on the truck.
- If you hover over the button, the items needed to prepare the dish will be shown.
Blue buttons show the goal for individual items.
An aqua button are for dishes needing to be prepared. Hover your mouse over it and you will be shown the ingredients needed.
A purple button on the right with the covered dish icon are the dishes to be delivered to the hotel. These are OPTIONAL.
A green button with a hammer shows the goal necessary to build or upgrade a farm building.
An orange button shows the goal for upgrading a village building. For both Build and Upgrade buttons: if you have more than one, the money amount will not be accurate when you have more than one to do. This means that frequently when you have finishing upgrading one building, you will end up needing to collect more money for the next building.
There are two icon shapes (collapsed and expanded) and three colors. They can be embedded in a goal ticket or not.
When the icon is round it means that there is nothing on the truck to be used at that building.
The icon is expanded and yellow means there are products in the truck that can be delivered to that location.
The icon is expanded and aqua means there is an item in the truck that can be delivered to that store to be used in a recipe.
PICK UP BAR:
- The bottom bar shows buttons of individual items.
- Clicking on the button will bring your view to that building.
- Your truck won't go there until put an item in a crate to be picked up.
- Note that the buttons become smaller and change colors (from green to orange to red) as they get closer to disappearing.
- You will be fined if you don't recycle an item and it disappears.
- If you click on a button, all of the buttons of the same time will get an orange triangle at the bottom.
- Once the item is placed in a crate a little truck icon that fills up as it gets closer will appear over the item button.
- A little number will appear above it if it is in line to be picked up next.
- At times you will see a blue button with a price over it. This is a speed product for which you will get a higher pickup price the sooner you get it crated. I don't usually go for these but you do need to trash the item because the penalty for letting it expire is pretty large. However, if you do want to pick it up, it won't break a combo chain, which is nice.
- Also when you are preparing items to be delivered, you will see a purple button for two of the dishes being prepared.
- Only two at a time can be prepared including those being ready to be picked up.
- You will see a clock that fills up and when it is done, it will say ready and be waiting outside the shop.
- More dishes won't be prepared until the two waiting are crated.
- Also dishes won't be prepared until they can fit on the button bar, which has a capacity of 8.
- If you wait to long the delivery item will go away and without much warning.
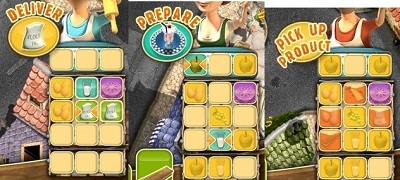
- Icons of the individual item will be appear in the box when it is in the truck or in a crate.
- The icon will be yellow if it is in the crate and the truck is not on the way.
- The icon box will be filled up with orange as the truck gets closer to picking it up.
- A solid orange box means the item has been selected to be delivered but the truck is going somewhere else first.
- A draining orange box means the item is on the way to being delivered.
- The colors only change to the following when you are at a shop where an action can occur:
- A green box means the item can be delivered.
- A turquoise box means the item can be combined with another item that does not usually get delivered at the location.
- Purple means it is either a delivery item that needs to be delivered.
- Once an item is selected to be delivered or prepared it will be bracketed by orange triangles.
- The item selected to be delivered will appear in the round button.
- A dish that has all the items selected will show the dish and a prepared button.
- You can then select all to prepare as many dishes as you have ingredients for.
- So what do all these buttons and icons mean. It means that you can go flipping around the place, trashing certain items and such, but still keep abreast of what your truck is doing. Also remember that you can stack things up to do as long as you don't fill the capacity of your truck or your crate pads.
- You pick up products by clicking and dragging or clicking and then clicking again on the product and then on the delivery crate.
- As you go along in the game you can get up to 4 delivery crates per building.
- The recycle bins are gone at the farm and instead you will drag a trash can from the bottom of the item on the pick up bar. This means you won't get dizzy any more flipping all over the place.
- Little clocks on the items appear to show how much time until there is room in the truck.
- A red x will appear next to a product in the field if you have a full truck.
- Deliver the products by clicking on the building icon on the top bar.
- If the item can be delivered at that shop it will turn green in the truck. Only one kind of thing can be chosen to be delivered. You can click and hold on the first item to choose all of them or press the all button.
- If a dish can be prepared, once a green item has been selected that has accompanying dish ingredients the ingredients will turn blue or purpled. Prepare products by clicking on each item in the recipe and then prepare. Each building will only allow you to start off with items it carries. You can choose one dish to prepare and if there are ingredients in the truck for more, you can press the all button before delivering.
- Pick up prepared dishes/items as above with the farm buildings.
- This photo is as good as I could get. Please let us know if you do better and how you did so by posting in the forum.
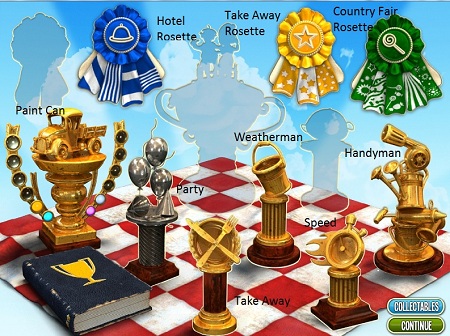
- Hotel Rosette gets ribbons on it as you finish certain areas of the hotel.
- Take Away Rosette gets ribbons as you make more restaurant orders up to completing a 3 star order.
- Country Fair Rosette gets ribbons when you earn 1500 on each country fair game..
- Paint Can Trophy--There have only been 4 paintcans found as far as I can tell from reading other help forums.
- Party Trophy - This turns gold when you get 100% (meaning every single one) of the Party deliveries. I imagine it works properly, it's just that I got tired ofkilling myself trying to get all of the deliveries.
- Weatherman Trophy - Gold for preventing all season disasters for 20 levels
- Handyman Trophy - Gold for upgrading all the season disaster tools.
- Speed Trophy - Gold for picking up all Speed products for 20 levels (this includes sending them to the recycling bin)
- Take Away Trophy - Complete all take away orders for 20 levels
- Collectibles - This shows how many party hats you have or are missing for the party levels.
The Achievements in the book are self explanatory. Following are the ones that didn't work for me. I believe this is why there are unmade trophies.
- On the first page, none of the gold, silver, or bronze achievements worked.
- Cover All Grounds doesn't work . For some reason the hotel map piece never gets removed.
- Gobbler & Glutton probably work but I like my recycle bin
- Efficienist & Full Capacity don't work
- Dinner king - Should work but I didn't earn it!
- Bellboy, Suite supervisor, Hotel manager ; all do not work
- Scrapbook -- Find all recipes . I don't know how many of these recipes there are. I found 8. If you want to make these luxury dishes you will need to make note of the actual recipe because they do not get put into your recipe book.
- Haute cuisine Make all luxury dishes ; probably works but who knows how many recipes there are.
- Like a Rolling Stone - Making 100% of the party deliveries probably works but I couldn't get it
- Six pack & Dirty dozen - not enough paint cans in the game
- Roast Chef - Get 1500 on Top Dish
- Kitchen Craft- Get 1500 on Make a Dish
Content(s) of this game guide may not be copied or
published on any other site without permission from Casual Game Guides.
©CasualGameGuides.com 2006 - 2021


