Keep Tribeville from falling victim to natural consequences by playing God for the Tribe.
Can you figure out how to breed your tribe to increase it's population? Can you find enough food and water to sustain your tribe? What about having them evolve and finding discoveries? Those are just some of the questions you need to answer while playing Wild Tribe. HAVE FUN! **WARNING SPOILER ALERT**
Options Window from the Main Menu:
- This game will run even when your computer is turned off; unless the game is on pause. You might not want to leave the game running until you have a good start to the game (i.e. food storage w/sufficient foragers/giraffes; water storage w/sufficient water collectors/elephants; 1 defender/lion and 2 doctors/zebras.)
- There are 2 ways to pause the game:
- Go to options menu and select pause. **warning some users found that this didn't pause the game when the computer was turned off**.
- Use the space bar on your keyboard one time to pause the game. Use the space bar again to resume the game. **I used the space bar to pause the game to find magical items and then dragged a tribe member onto the magical items.**
- There are 3 speeds to this game:
- Slow - recommended for when you're not tending to the game.
- Normal- recommended for when you're multitasking and checking the game frequently.
- Fast - recommended for when you're being relatively attentive to the game.
- There are 2 difficulties to the game:
- Easy - allows food and water to be more readily available for gathering and storage. Takes a little longer for the river to dry up and the Konut trees replenish faster.
- Normal - food and water are more difficult to collect. The river dries up quicker and the Konut trees take longer to replenish themselves.
Map Maneuvering:
- Zoom: You can see the entire map from zoom view. You can see the map pieces easily from the zoom view. You can also see the "magical items from the zoom view; however they may be very difficult to see especially when a tribe member or building is the way. Progress information and statistics can NOT be seen while in zoom view.
- Use the zoom button to toggle between regular and zoom view.
- Use the "Z" key on the keyboard to toggle between regular and zoom view.
- Scrolling:
- Move the mouse curser to the edges of the screen to move the map in the same direction.
- Use the mouse wheel to move the map vertically. The mouse wheel can not be used in a horizontal direction.
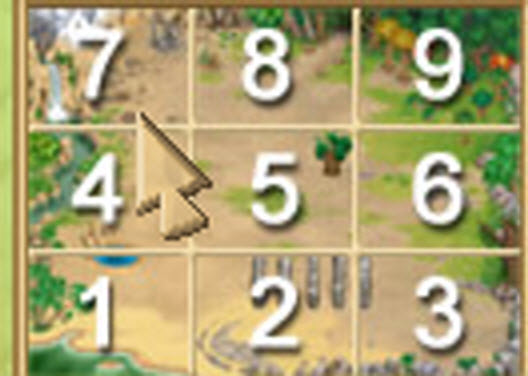
- Use the keypad number keys to move to different locations on the scene.
- On laptops without a number key pad use the 789, UIO, JKL and M keys to move to the different locations on the scene.
- Character button: Use the character button to move to the part of the map where the selected tribe member is located.
- Tribe button: Use the tribe button to move to the part of the map where the selected tribe member is located.
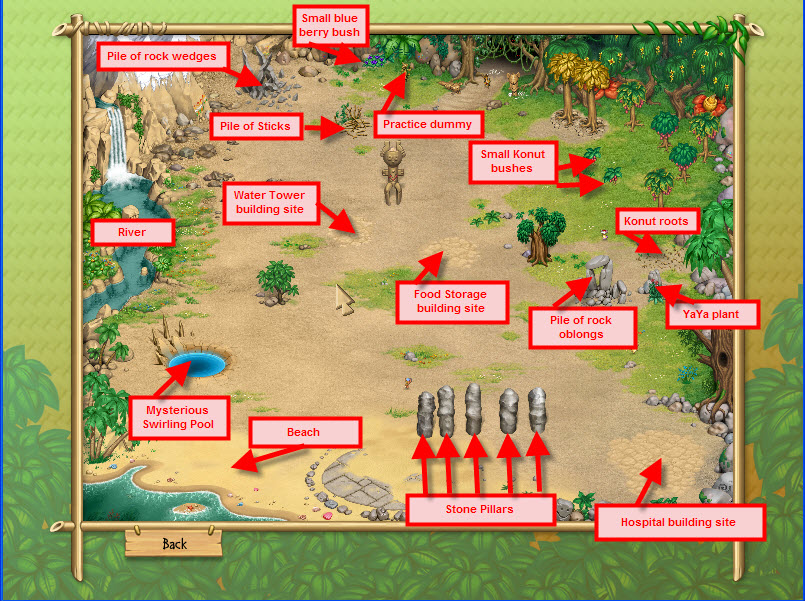
LOCATIONS OF INTEREST ON MAP:
LOCATIONS OF INTEREST AT THE BEGINNING OF THE GAME:
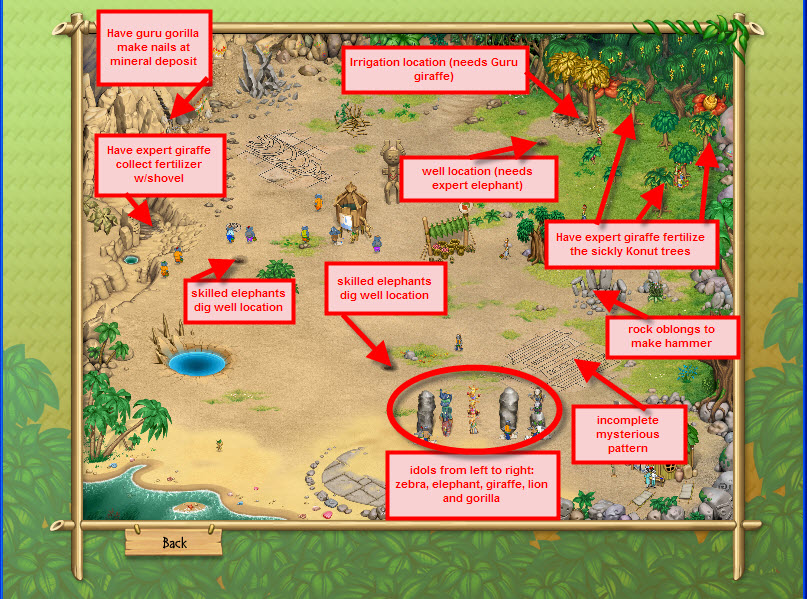
LOCATIONS OF INTEREST AFTER RIVER DRIES UP:
Viewing and Moving Tribe Members:
- Tribe Button: Use the tribe button to view the tribe. The tribe can be sorted in 3 categories.
- Age
- Ability (novice, skilled, expert and guru)
- Type
- Use the character button; then use the horizontal arrow keys on each side of the tribe member's image to view additional tribe members.
- There are 2 different ways to move a tribe member.
- Select a tribe member with the mouse cursor or via the character or tribe tabs then drag the member to the desired location.
- Select a tribe member with the mouse cursor or via the character or tribe tabs then use the number pad or keyboard (laptop) keys to move the member to the desired location.
Character/Tribe Skills:
- The skill level of a character/tribe member can be viewed under the character tab and/or the tribe tab.
- The color-coded horizontal bar to the right of the hand icon under the character tab or the tribe tab indicates how much longer it will take for the member/character to advance to the next skill level.
- There are 4 skill levels a character/tribe member can achieve.
- Novice - dark blue on the skill/hand progression bar.
- Skilled - light blue on the skill/hand progression bar.
- Expert - green on the skill/hand progression bar.
- Guru - yellow/gold on the skill/hand progression bar.
Event and Problem Alerts:
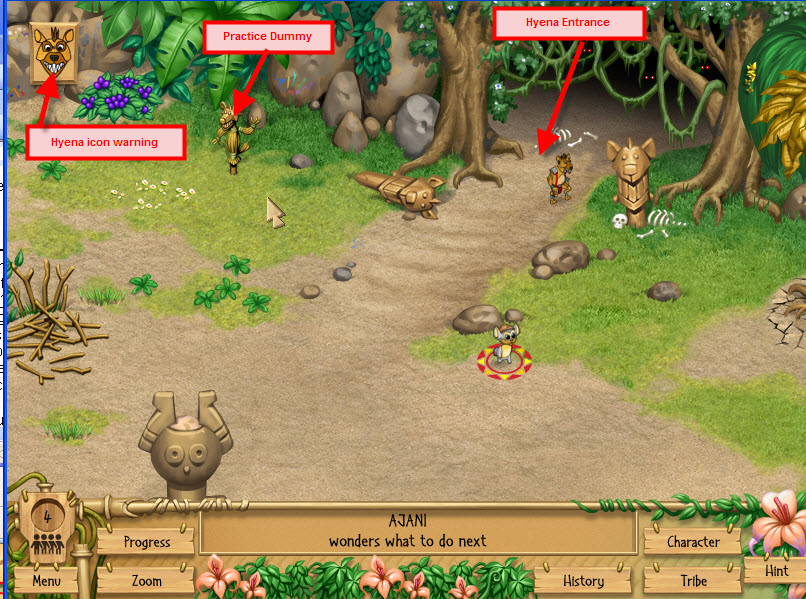
- Hyenas incoming - Hyena icon will appear on the top left of the screen along with an audible alert. A defender/lion will "wrestle" the hyenas back into the forest at the top of the scene.
- Medical alert - A first aid icon will appear on the top left of the screen along with an audible alert. A doctor/zebra will seek the ill tribe member and "try to heal" them. The doctors are successful in healing the tribe member when the cure has been found. A doctor/zebra can not heal themselves; it takes another doctor/zebra to heal them. See cures under the cures heading.
- Tribe member evolution or skill level advancement - are a distinct audible alert only.
- Map pieces and/or a "magical item/s" have appeared for a very brief time somewhere in the scene. This is a single audible chime.
- Building completion - Tribe members will congregate in the middle of the scene rejoicing.
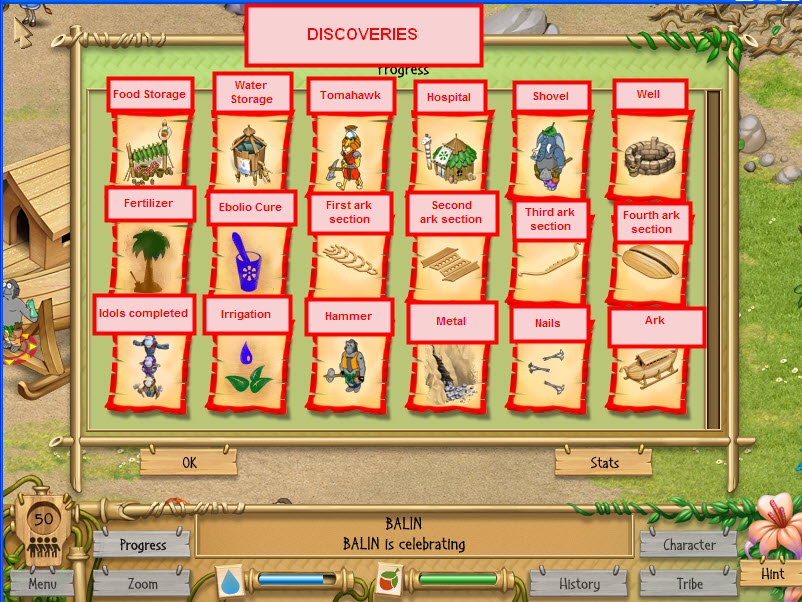
- Discovery alerts - a pop-up window will appear describing the discovery.
- Problem alerts - a pop-up window will appear describing the problem.
- Idol completion - a pop-up window will appear stating an idol has been completed. The pop-up window always shows the gorilla idol no matter which idol is completed.
- Crying baby alert - there's a new addition to your tribe.
TRIBE MEMBERS/CHARACTERS/POPULATION:
- There is a population limit of 50.
- There are 4 different skill levels (except for wobblies) for each character: Novice, Skilled, Expert and Guru. See character and skills section for more details.
- Once a tribe member/character has evolved into an animal type it can no longer breed or evolve into a different animal type.
- The only way a tribe member/character can change animal type is to dip them into the "Mysterious Swirling Pool" at the bottom left of the scene. The tribe member/character will then devolve into a Wobbly.
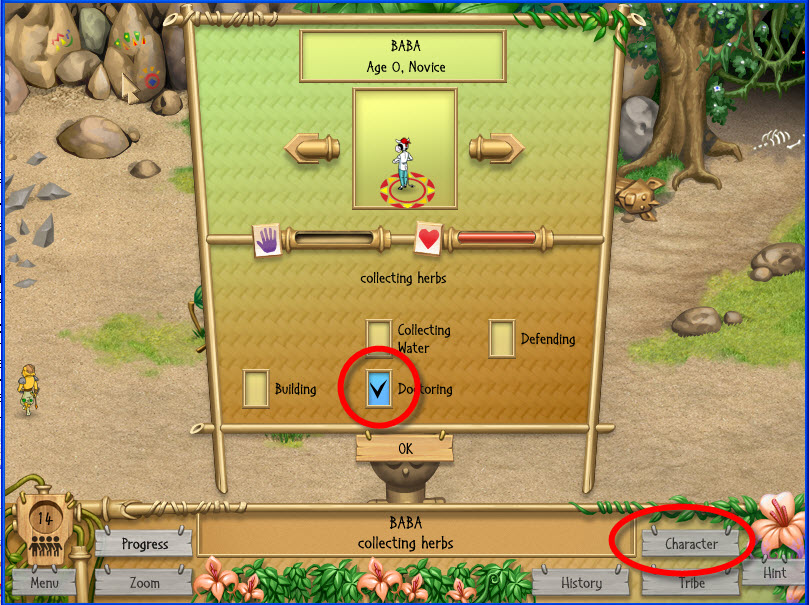
- Assign members/characters their tasks using the character tab. The animals will stay on task better if assigned.
- Recommended Population distribution at the beginning of the game: 2-4 Wobblies; 1-2 Lions/Defenders; 2 Zebras/Doctors; 8-10 Gorillas/Builders; 10-12 Giraffes/Foragers; 6-8 Elephants/Water Collectors.
- Recommended Population distribution after Food Storage and Water Supplies are about ½ full: 1-2 Lions/Defenders; 2 Zebras/Doctors; 12-16 Giraffes/Forages; 6-10 Elephants/Water Collectors...make the rest of your tribe Gorillas/Builders. You might want to keep 2 Wobblies or you may want to assign and evolve all the tribe members.
Wobbly:
Tasks: Breed and evolve.
- Be careful about assigning the Wobbly as a breeder...you may end up with more tribe members than the available provisions can support!
- Wobblies are the only tribe members/characters that can evolve.
- Wobblies are the only tribe members/characters that can breed.
- Keep 2 Wobblies available for breeding until near the end of the game.
- Breed Wobblies by placing one Wobbly on top of another Wobbly. A white dust cloud with red hearts will appear when done correctly. Be patient...it takes time to make Wobblies...when the dust settles...there will be a sound of a baby crying and an additional Wobbly will appear.
Builder/Gorilla:
Tasks: duh...to build structures
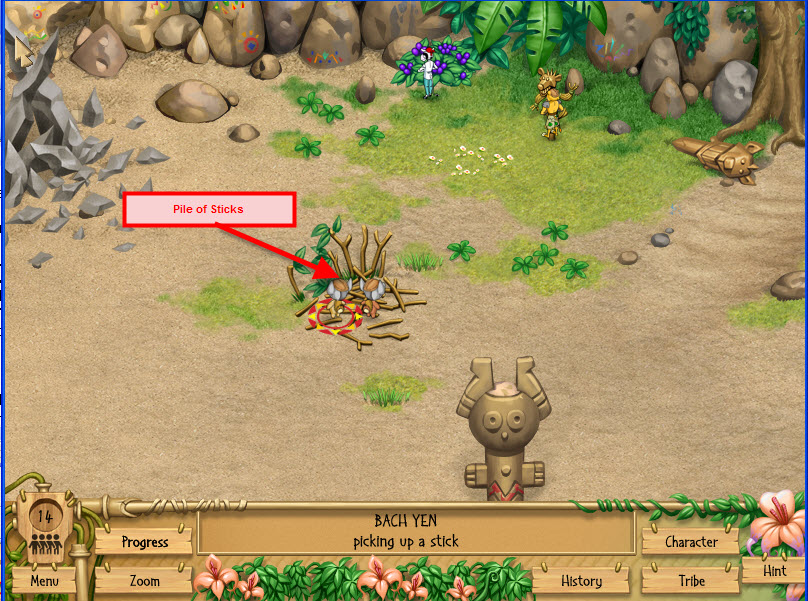
Evolution process: Drag a Wobbly to the stick pile on the upper left of the scene to the left of the path...then transfer the Wobbly to a building site.
- Builders/Gorillas use sticks, tomahawks, hammers and nails to build structures.
- Builders/Gorillas can advance their skills by building structures or carving the stone pillars/idols at the bottom of the scene.
- Gorillas can only pick up the map pieces, magical konuts, water cactus, tomahawks and hammers.
- Guru builders/gorillas are the only tribe members than can use the hammer and nails.
- Gorillas will continue to carve the idols after they are completed.
- Gorillas can increase their skill level by carving the stone pillars/idols even when the idols have been completely carved.
- Gorillas have to be placed at each building site with the correct implement in hand to build a structure. They will then continue working at that site until it is completed.
- Start with 8-10 gorillas/builders until there is adequate food and water storage (when the progress bars are over half full); then assign and evolve additional builders.
- It takes 4 Guru Gorillas to simultaneously move sections of the ark to its final resting site.
- It takes Guru Gorillas to build the last section of the ark and to assemble the ark.
Defender/Lion:
Task: To scare the hyenas back into the woods.
Evolution Process: Drag a Wobbly onto the practice dummy in the upper right of the scene OR drag a Wobbly onto an incoming hyena.
- Only 1 defender is really needed to defend the tribe against the hyenas. 3 defenders are definitely the maximum amount needed for the tribe.
- The defender can be more powerful by using a tomahawk.
- The defender can advance their skill by using the practice dummy or fighting the hyenas.
- Defenders can pick up map pieces, magical konuts, water cactus and tomahawks.
Doctor/Zebra:
Tasks: Heal the ill tribe members, collect herbs, study and discover medicines.
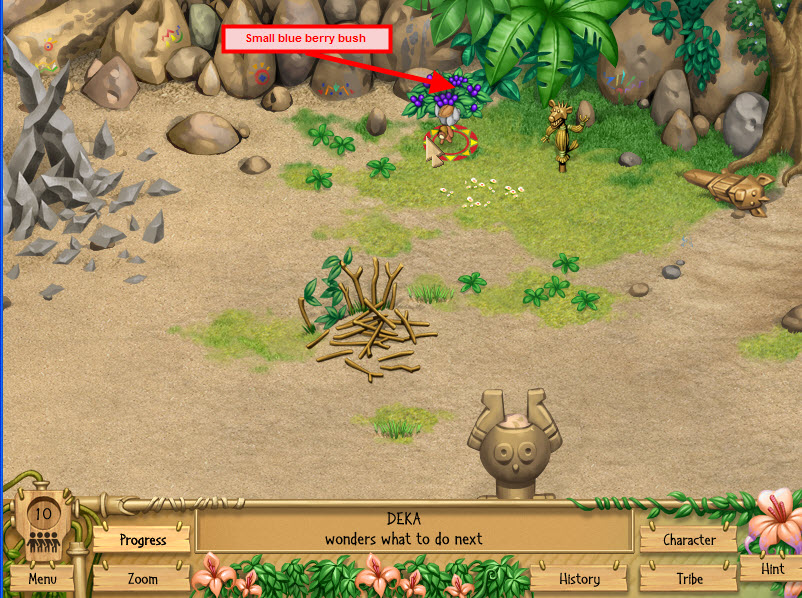
Evolution Process: Drag a Wobbly onto the small blue berry bush on the upper right of the scene OR drag a Wobbly onto an ill tribe member to "try to heal them" OR drag a Wobbly onto the bench outside the hospital.
- You need at least 2 Doctors/Zebras as a doctor can NOT heal themselves.
- Doctors advance their skills by healing the ill tribe members or studying at the hospital.
- Zebras use shovels to dig up roots, remove thorns from the YaYa plant or to shovel the dirt off the "mysterious patterns".
- Zebras can use sticks to assist the builders when they're not busy healing or studying/discovering medicine.
- Zebras can NOT gather the magical konuts or water cactus. They can pick up map pieces and the magic shovel.
- Once a zebra/doctor has a shovel they carry it with them all the time unless they pick up a stick.
Forager/Giraffe:
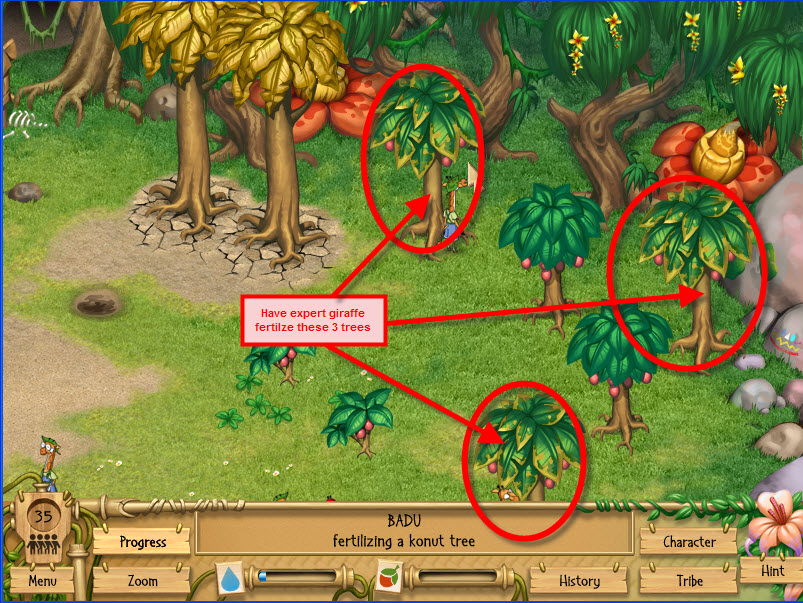
Tasks: Gather and store Konuts for the food supply and to fertilize 3 Konut Trees (done later in the game needs an expert Giraffe).
Evolution process: Requires the Food Storage hut completion. Drag a Wobbly to the smallest Konut Trees in the upper right of the scene.
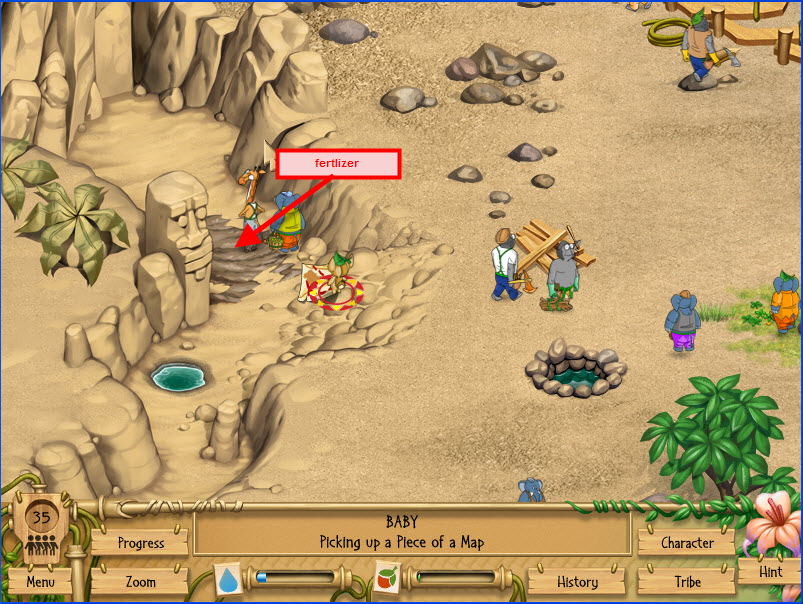
- An Expert Giraffe uses a shovel to dig up fertilizer from the river bed to fertilize the 3 sickly Konut Trees.
- A Guru Giraffe is needed to dig the irrigation canal to the tallest 2 Konut Trees.
- Giraffes are the only tribe members that can reach the taller Konut Trees which takes advanced skills depending on the size of the tree.
- Giraffes can pick up map pieces, magic konuts and magic shovels.
- Giraffes like to "flake out" near the beach when there are no konuts to forage.
Water Collector/Elephant:
Tasks: Collect water and to dig wells.
Evolution process: Requires the Water Tower completion. Drag a Wobbly onto the river to collect water.
- Elephants take the most out of the food storage even if you don't visibly see them eating.
- Elephants can gather map pieces, magical shovels, water cactus and magical konuts.
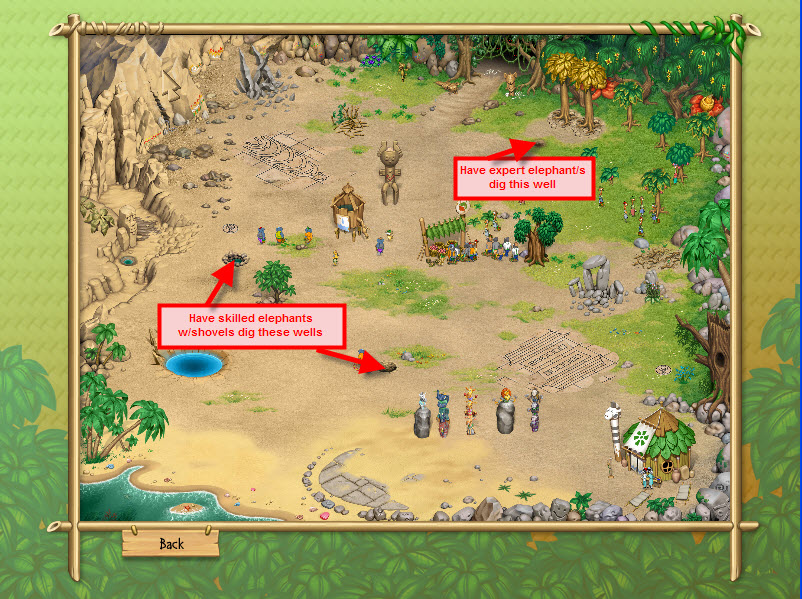
- It takes a skilled elephant to dig the 2 wells near the bottom of the scene.
- It takes an expert elephant to dig the well at the top of the scene to the right of the path.
- Elephants can pick up map pieces, magic konuts, water cactus and magic shovels.
MAGIC ITEMS:
- Drag a tribe member to the magic item and/or map to pick it up...they will not pick them up voluntarily. You may want to pause the game while location magic items...select the animal you want to pick up the item then resume the game.
- The magic items and map pieces appear on the map for a very short time then they disappear. You might want to pause the game find a tribe member than can collect the item; then drag the tribe member to the item.
- There is a slight audible chime indicating the appearance of a magic item.
- Some magic items can not be picked up by certain characters/tribe members.
- There are 32 map pieces: 4 complete maps with 8 map pieces to each map.
Magical Konuts:
- Only appear after the food storage hut is completed and a giraffe has evolved.
- Boost the food supply.
- Zebras/Doctors can NOT collect magical konuts. All the other tribe members can collect the magical konuts.
Water Cactus:
- Boost the water supply.
- Water Cactus appear after the water tower is completed and an elephant has evolved.
- Zebras/Doctors can NOT collect water cactus; the other tribe members can collect the water cactus.
Tomahawk:
- Doubles the speed in which the builder/gorilla can build or carve the structure.
- Doubles the defense ability if used by a lion.
- Appears after the tomahawk has been discovered.
- Can only be used by a gorilla/builder or lion/defender.
Shovel:
- Doubles the speed in which the tribe member can dig.
- Appears after the shovel has been discovered.
- Can only be used by an elephant, giraffe or zebra.
Hammer:
- Appears after the hammer has been discovered.
- Can only be used by a Guru Gorilla/Builder.
IMPLEMENTS (TOOLS) DISCOVERIES AND USES (See Discoveries section for screenshots):
Tomahawk:
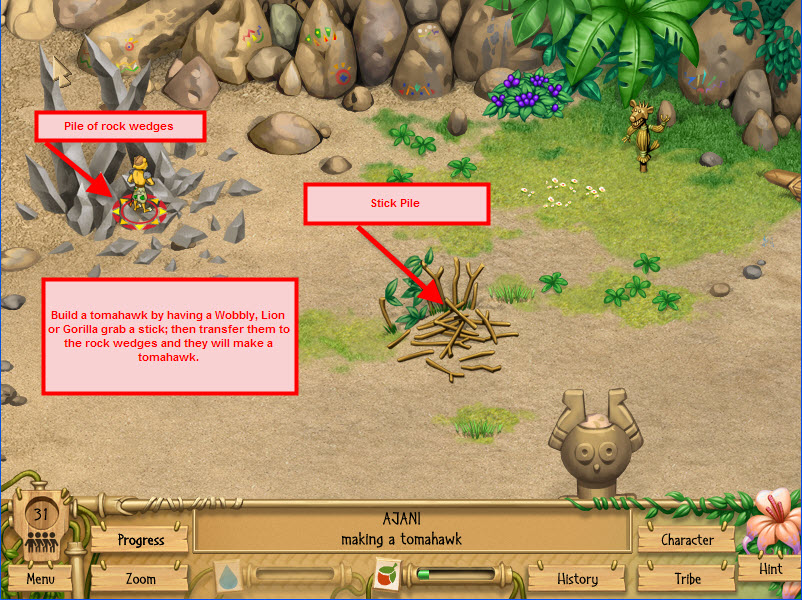
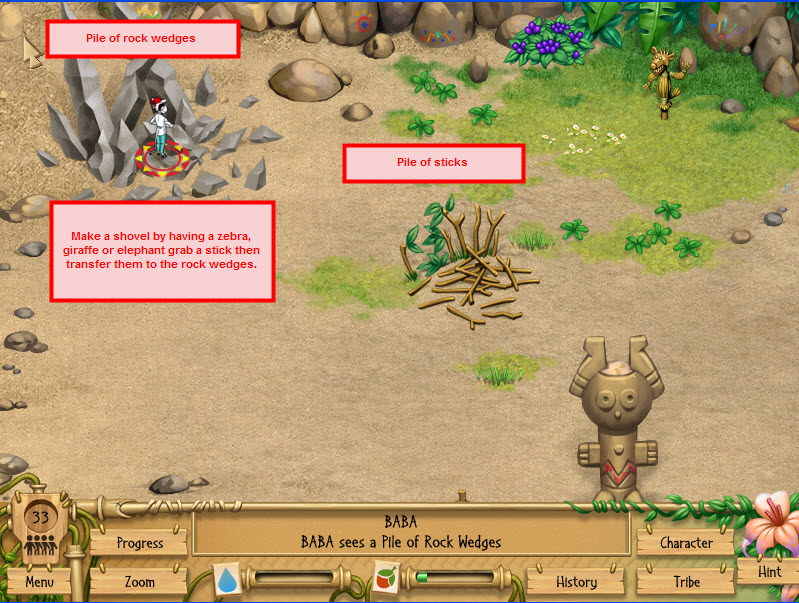
Discovery: Drag a Wobbly or gorilla/builder or lion/defender to the stick pile; have the tribe member collect a stick then transfer them to the Pile of Rock Wedges to the left of the stick pile.
Uses: To carve the stone pillars at the bottom of the scene and to build the first 3 sections of the ark.
Shovel:
Discovery: Drag an elephant/water collector or a zebra/doctor or a giraffe/forager to the wood pile to gather a stick then transfer them to the Pile of Rock Wedges to the left of the stick pile.
Uses: To dig wells, dig Konut roots for medicine, dig up fertilizer and to dig up the "Mysterious patterns" so the ark sections can be built.
Hammer:
Discovery: Drag a GURU gorilla/builder to the stick pile then transfer them to the pile of Rock Oblongs on the right of the scene.
Uses: To build the last section of the ark and to put the ark together.
Nails:
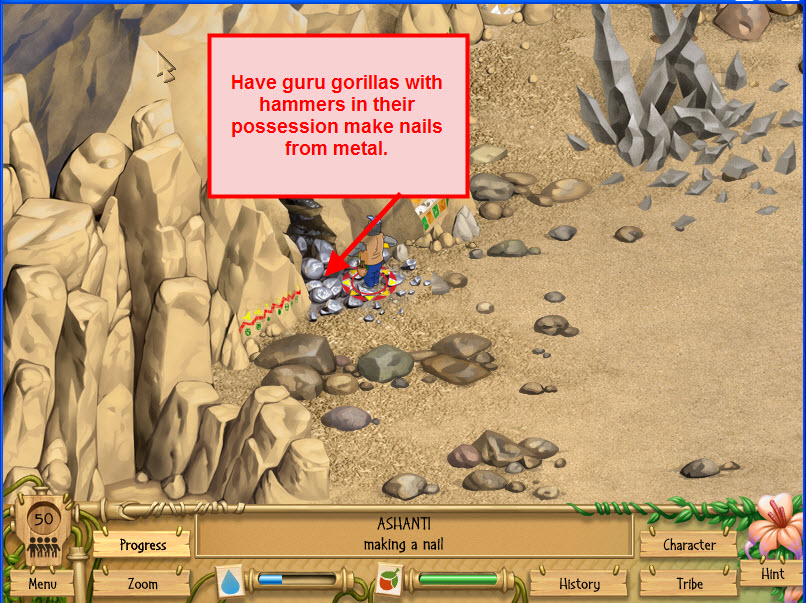
Discovery: Drag a GURU gorilla/builder to the crack in the rocks that opens later in the games. The crack oozes a silver metal substance.
Uses: To assemble the ark.
MAP PIECES, TREASURE MAPS AND MYSTERIOUS PATTERNS:
- Drag a tribe member to a map piece to collect it; they will not collect the pieces voluntarily.
- Map pieces appear randomly for a short period of time announced by a slight audible chime.
- There are 32 map pieces which make up 4 maps with 8 pieces each.
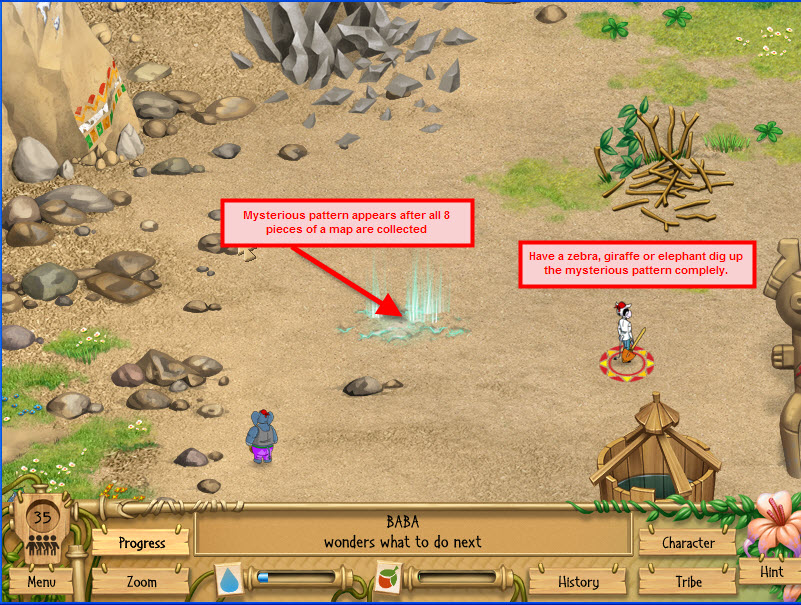
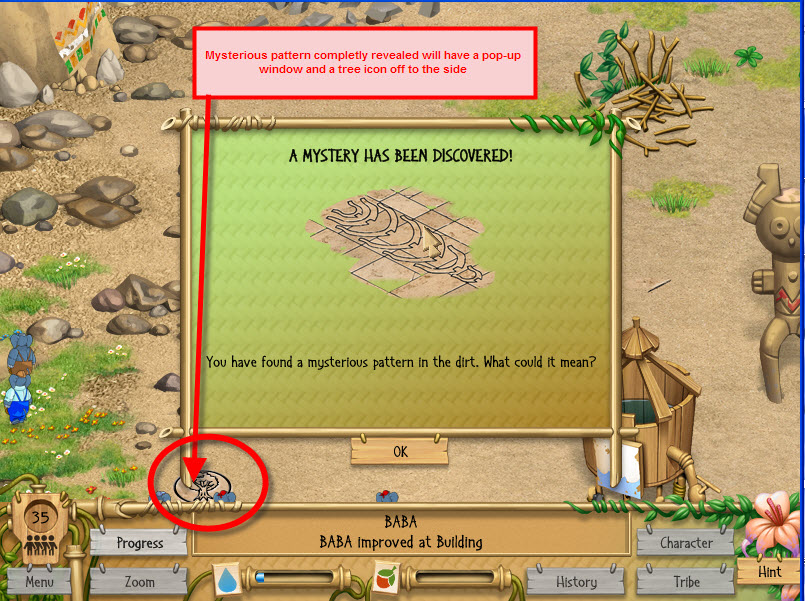
- Drag an elephant, giraffe or zebra to each mysterious pattern (glowing blue area) and have them dig up the dirt several times...a pattern will appear. The site will be completely dug up when a pop-up window appears announcing the reveal. Gorillas can not build the ark sections until the pattern has been completely revealed. It may look like the pattern is revealed when it actually isn't completely revealed.
- Drag expert gorillas/builders with tomahawks to each site for them to gather materials and build the first three sections of the ark.
- Drag guru gorillas with hammers to the fourth site to have them gather materials and build the last section of the ark.
- Have 4 guru gorillas to simultaneously move each ark section to the final building site.
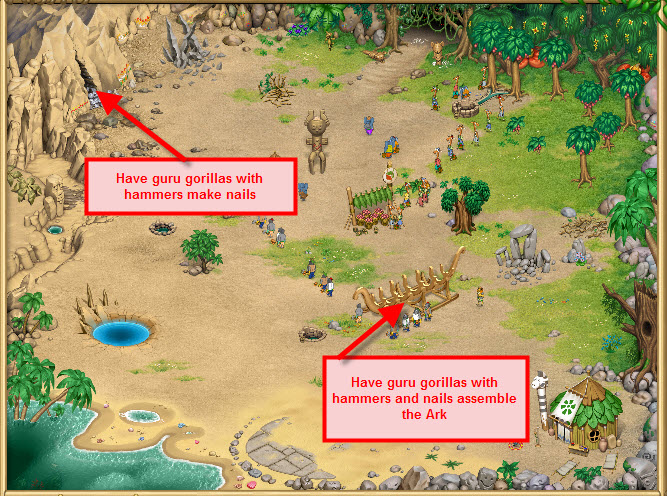
- Have guru gorillas with hammers and nails assemble the ark.
DISEASES AND CURES:
- Once the cures are discovered the zebras/doctors will voluntarily go to the ailing tribe member and cure them.
- You can drag the ailing tribe member to the hospital and have the zebras/doctors cure the ailing tribe member.
- Once a zebra/doctor has a shovel they carry it all the time.
Sneezles:
- Drag a Wobbly or zebra/doctor to the ailing tribe member. A Wobbly will then evolve into a doctor.
Tumrot:
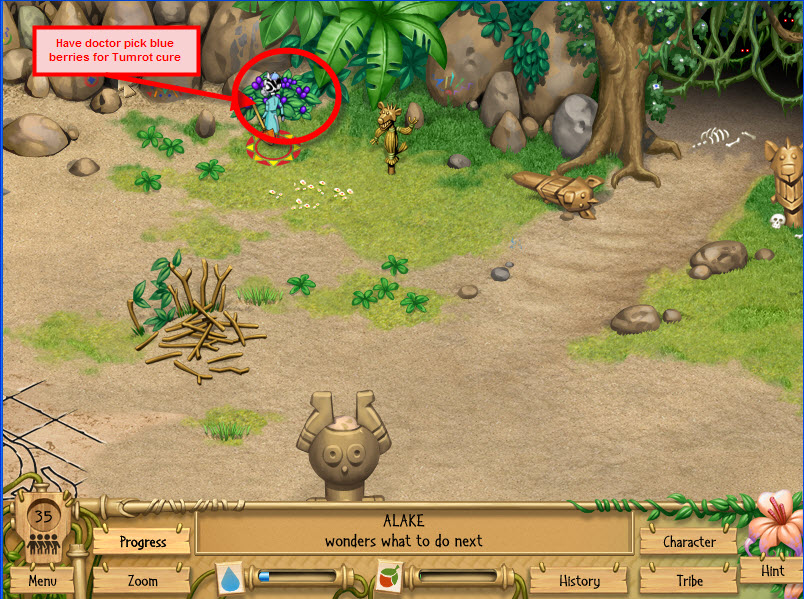
- The cure for Tumrot is the small blue berries.
- Drag a zebra/doctor to the small blue berry bush at the top right of the scene to gather the berries; then transfer the zebra/doctor to the ailing tribe member.
Kopox (hospital required):
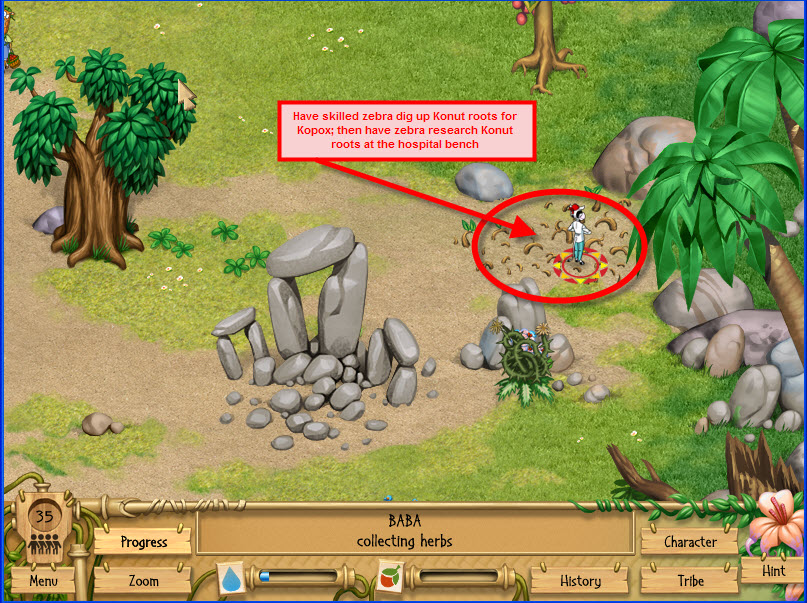
- The cure for Kopox is the Konut roots.
- Have an expert zebra/doctor gather a shovel (gather a stick from the stick pile then transfer them to the pile of rock wedges); then have them dig up the Konut roots on the right of the scene.
- Transfer the zebra/doctor to the hospital to research the roots...wait...a pop-up window will appear announcing the discovery.
Fever (hospital required):
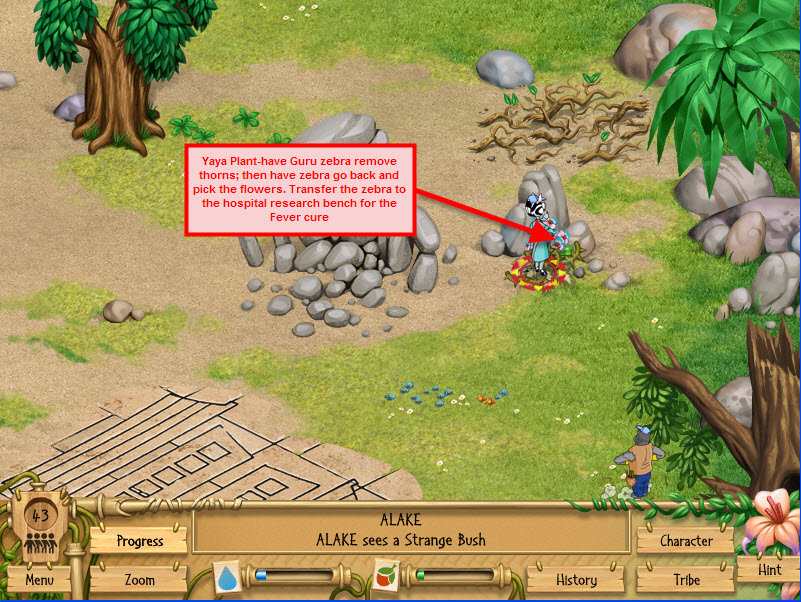
- The cure for the Fever is the YaYa flowers from the strange bush. It takes quite a while for the strange bush to mature.
- Have Guru zebra/doctor remove the thorns with a shovel.
- Drag the Guru zebra/doctor to the YaYa flowers again to pick the flowers.
- Drag the Guru zebra/doctor with the YaYa flowers to the hospital bench to research the flowers...wait...a pop-up window will appear announcing the discovery.
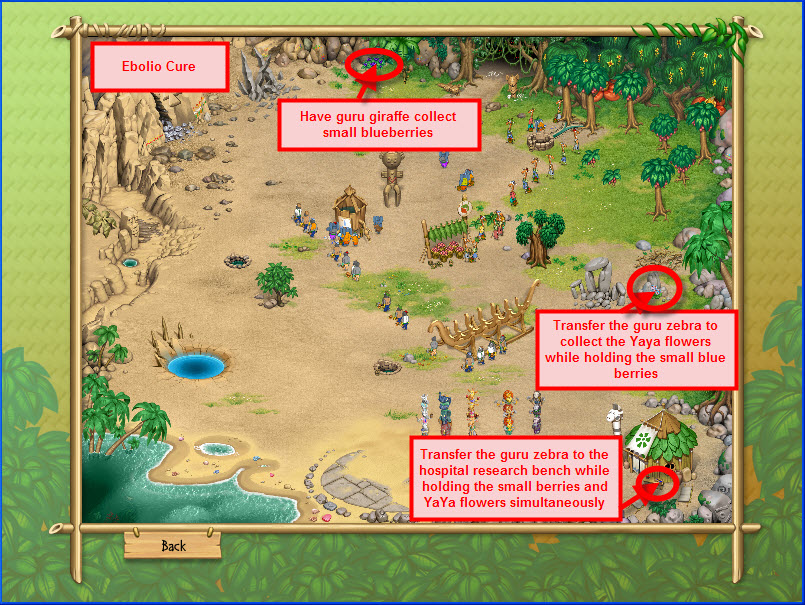
Ebolio (hospital required):
- Have a Guru zebra/doctor pick the small blue berries at the top right of the scene.
- Transfer the guru zebra/doctor to the YaYa flowers. The zebra needs the carry the small berries and the YaYa berries at the same time.
- Transfer the guru zebra/doctor to the hospital research bench...wait...a pop-up window will appear announcing the discovery.
GETTING STARTED:
- Select a Wobbly and drag to the piece of map that appears randomly on the scene...if you miss it, don't worry...you'll have plenty of chances to retrieve the map pieces.
Defender/Lion (don't need more than 3 defenders and 1 is all that is really needed):
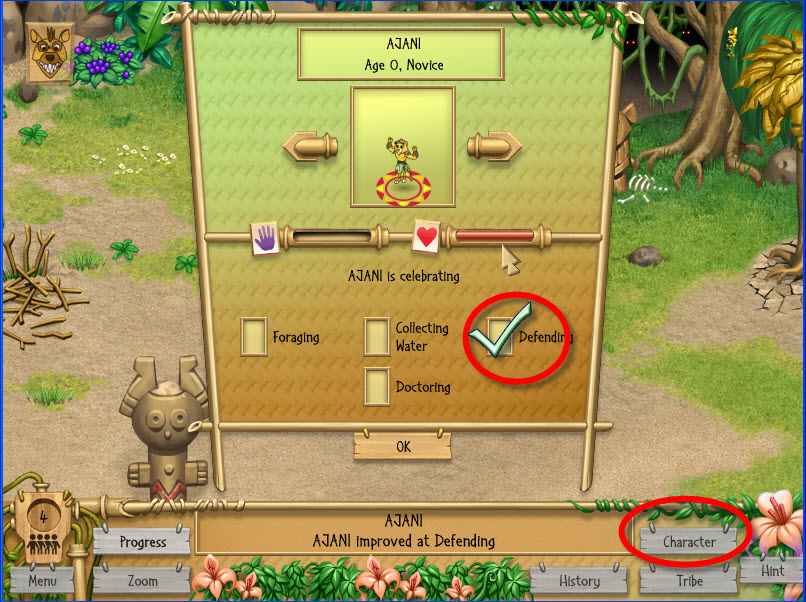
- Select 1 Wobbly onto the incoming hyena OR select a Wobbly and put on the practice dummy at the top of the scene and left of the path. This Wobbly will then become a defender/lion. Open the character tab at the bottom of the screen and select the "defending" option when the wobbly/lion is highlighted by a circle. **The Defenders/Lions can practice on the dummy until they reach expert level to gain more skill**
- Have the defender practice on the dummy a much as you'd like.
Doctor/Zebra (don't need more than 2 doctors, but need at least 2 doctors):
- Place a Wobbly onto the small blue berry bush OR select a Wobbly and place on an ill animal. This Wobbly will then become a doctor/zebra. Open the character tab at the bottom of the screen when Wobbly is highlighted with a circle and select the "doctoring" option. The doctor/zebra will now go to ill animals and heal them if the correct cures have been acquired and they have been assigned as doctors under the character tab. The only cure a Doctor/Zebra can acquire now is the cure for Ebolio by picking the berries off the small blue berry bush.
- Have the Doctor/Zebra go to the small blue berry bush to pick some blue berries for the Ebolio cure.
- More on this later...assign another Doctor/Zebra after the tribe has 8 builders and 2 Wobblies. Don't need more than 2 doctors/zebras for the tribe...however, you do need 2 doctors/zebras so one doctor/zebra can heal each other should they become ill.
Breeding/Wobblies:
- Select one Wobbly and place on top of the other Wobbly to breed. A white cloud with red hearts will appear when done correctly. Be patient...it takes time to make Wobblies.
- Keep a minimum of 4 Wobblies at a time for now. DON'T assign the Wobblies as breeders yet as the tribe may become too populated before they are able to store and stock pile food and water; thus causing dehydration or starvation of the cute little animals.
- Wait to assign the Wobbly offspring as builders/gorillas as it's best to breed 2 or more sets of Wobblies at a time. The assigned animals do not count as they can no longer breed.
- Breed 2 or more sets of Wobblies at a time.
- Breed 2 or more sets of Wobblies again. Select the one Wobbly that isn't breeding and assign as a builder/gorilla. (see below)
Builders/Gorillas:
- Select the Wobbly that isn't breeding and have him/her grab a stick from the wood pile at the end of the path and slightly to the left near the top of the scene.
- Open the character tab and select "Building" while your little Wobbly is grabbing a stick. Assigning the animals keeps them on task better.
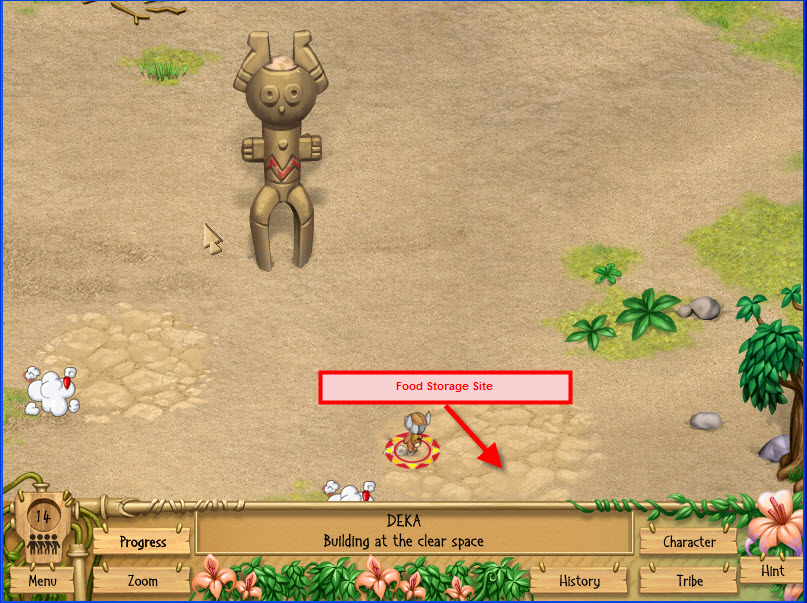
- Drag the Wobbly with the stick to the food storage building site below the idol and slightly to the right.
- Repeat the breeding and assigning builders/gorillas until you have 8 builders/gorillas and 2 Wobblies (don't assign Wobblies as breeders until after your food storage and water storage have been built and supplied...this takes quite a long time)
- BE VERY CAREFUL NOT TO OVERBREED; MORE THAN 14 TRIBE MEMBERS AT THIS TIME COULD CAUSE THEM TO STARVE OR DEHYDRATE BEFORE ACCURING WATER AND KONUTS IN STORAGE.
- Make sure to drag all the builders to the food storage building site for them to evolve into gorillas. The builders/gorillas will then obtain sticks as they need them and build the food storage hut on their own as long as they are assigned as builders. You'll have to drag them to the next building site (water storage tank) after they've completed the food storage.
- Breed and assign 1 more doctor/zebra.
PROBLEMS AND DISCOVERIES (DO NOT HAVE TO BE COMPLETED IN THIS ORDER-THAT BEING SAID SOME DISCOVERIES CAN'T BE MADE WITHOUT A PREVIOUS DISCOVERY):
Problem - Limited Resources:
This means the current food and water supply won't last forever. Need to find a way to store food and water or find other sources of food water. Hmm, there are no other sources. Better find a way to store food and water.
Discovery 1-Food Storage:
- Wait...wait...wait...while your 8 builders/gorillas build the food storage hut. If you've started following the walkthrough at this point, it's best not to have over 10 builders/gorillas at this time and I find 8 is the best to avoid starvation and dehydration.
- Start breeding when the Food Storage hut is around 75% completed. Hover the curser over the food storage building site to receive information on the building completion percentage. (You can't make foragers/giraffes until the food storage is completed).
- Breed 10-12 Wobblies and assign as Foragers/Giraffes. Keep 2 Wobblies as breeders, but don't assign as breeders yet.
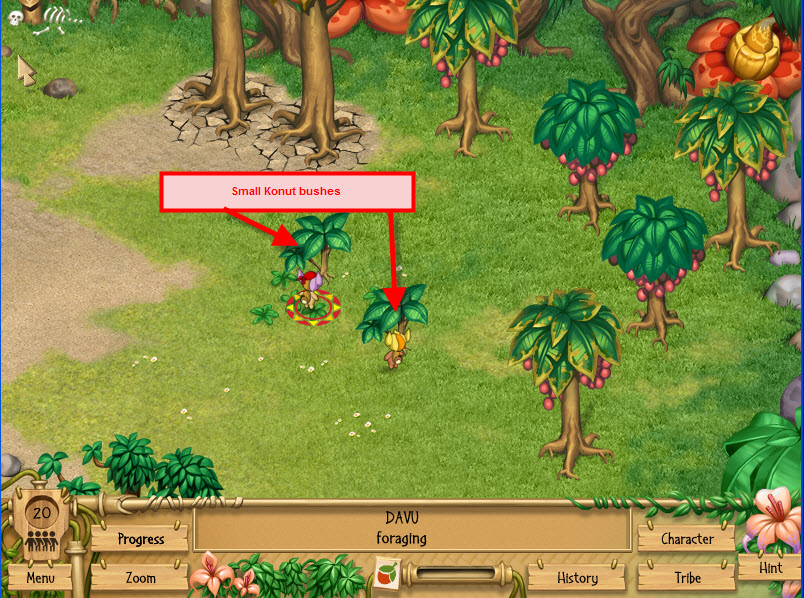
- Take a Wobbly to the small Konut bushes in the upper right of the scene (even if the trees are bare...the Wobblies will evolve into giraffes). Select the character tab and select the "foraging" option. The Wobblies will evolve into giraffes and will forage food on their own if assigned as such. The giraffes/forages like to flake out at the beach when there isn't enough konuts to forage.
- Collect the pieces of maps as they pop up. The best way to capture the map pieces is to pause the game with the space bar then select an animal and drag them to the map piece to collect it...then hit the space bar again to start the game actions.
- Magic Konuts will also start to randomly appear...have any animal pick them up except the zebras...they don't know what to do with the things.
Discovery 2-Water Storage:
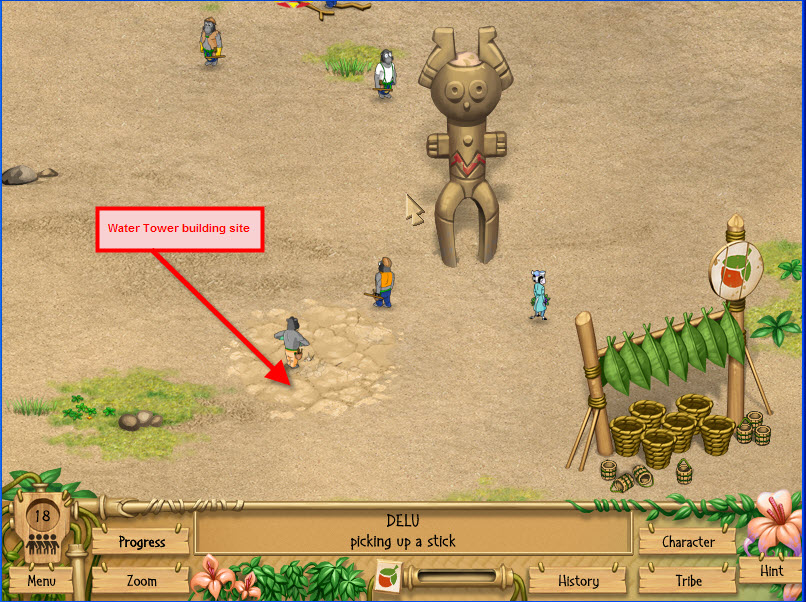
- Drag the builders/gorillas to the water storage building site below the idol and slightly to the left. You'll need to drag them to the stick pile...let them grab a stick and then to the building site if they don't have a stick in their possession.
- Breed your Wobblies (still don't assign as breeders) to make 6-8 water collectors/elephants when the water storage is around 65% completed. **Warning-water collectors/elephants eat a lot of konuts even if you don't see them eating them also too many water collectors/elephants will cause the stream to dry up before they have the skills to dig wells**
- Drag your 6-8 Wobblies to the river so they can evolve into elephants after the water storage is completed. It's best to drag the wobblies on top of the water to have them evolve. By now you know how to assign the cute animals...assign the elephants as water collectors.
Discovery 3-Tomahawk:
- Take a Wobbly or builder/gorilla or defender/lion to the wood pile to obtain a stick (can skip this step if the builder/gorilla has a stick in their possession).
- Then drag the builder/gorilla or defender/lion to the Pile of Rock Wedges to the left of the wood pile on the upper left of the scene. Walla a tomahawk!
- Gorillas/builders will use the tomahawk when carving the stone pillars and in building the ark sections.
- The lion/defender will ward off the hyenas easier with a tomahawk.
Discovery 4-Hospital:
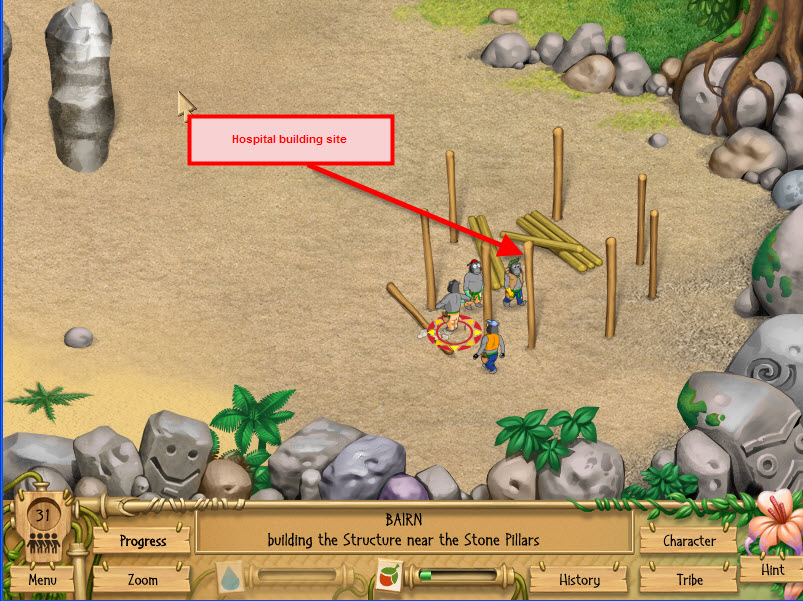
- Make sure all the builders/gorillas have a stick then drag them to the building site on the lower left of the scene to build the hospital.
- Once the hospital is constructed the doctors/zebras will do researkh to acquire more skills along with healing the ill.
- It's sometimes easier to drag the ill animal to the hospital to let the doctors/zebras heal them...but the doctors/zebras will also locate and heal the ill animals on their own as long as they're assigned as doctors.
Discovery 5-Shovel:
- Take a water collector/elephant or a forager/giraffe or doctor/zebra to the wood pile to pick up a stick and then transfer them to the pile of rock wedges to make a shovel.
- The shovel is used to dig wells and to remove the thorns from the Yaya plant on the right side of the scene, to uncover the mysterious patterns and to gather fertilizer at the bottom of the stream.
- It takes a Guru Doctor/zebra with a shovel to remove the YaYa thorns and pick the flowers.
- It takes a skilled water collector/elephant to dig the 2 of the wells near the bottom of the scene and an expert water collector/elephant to dig the big wall next to the trees at the top of the scene.
- It takes an expert forager/giraffe to gather fertilizer at the bottom of the dried stream.
- It takes a guru zebra/doctor to remove the thorns from the YaYa plant.
Problem - No water; the river ran dry. Find a new water source:
There are 2 patches of muddy dirt south of the water tank and one patch of muddy dirt near the large dead Konut Trees. Drag a skilled elephant to the stick pile then transfer him to the rock wedges to make a shovel.
Have 3-4 elephants start digging the wells near the bottom of the scene. It will take an expert elephant/s to dig the well near the top of the scene.
Discovery 6-Well:
- Have skilled elephants with shovels dig wells near the bottom of the scene.
- The third well is on the top right of the scene. An expert elephant/s need to dig that well.
Discovery 7-Fertilizer:
- This discovery will take some hands on work.
- Take an expert giraffe/forager to make a shovel.
- Transfer the same giraffe to river bed where the elephants take the dirt.
- Transfer the same giraffe to one of the sickly Konut Trees with yellow ends on the tips of the leaves.
Problem-Water rising:
Those pesky map pieces you've been collecting hold the key to this problem...perhaps the animals could enter a floating vessel by twos.
Discovery #8/Ebolio Cure:
- Take a guru zebra to the small berries at the top left of the scene.
- Transfer the same zebra to the YaYa flowers. The zebra will carry both items simultaneously.
- Transfer the same zebra to the hospital research bench to research the cure.
Discovery 9-Weird Wood Things:
- Using gorillas with tomahawks build the first section of the ark from the first treasure map. The gorillas need to be skilled to work on ark sections.
- When section is completed have 4 gorillas simultaneously move the section to the final ark site.
Discovery 10-Odd Roof:
- Using gorillas with tomahawks build the second section of the ark from the second treasure map.
- When section is completed have 4 gorillas simultaneously move the section to the final ark site.
Discovery 11-Wooden Beam Constructed:
- Build the third section of the ark using gorillas with tomahawks from the third treasure map.
- Have 4 gorillas simultaneously move the ark to its final resting place when completed.
Discovery 12-Sliding Slats:
- Have Guru Gorillas with hammers build the last section of the ark.
- Have 4 gorillas simultaneously move the slats to the arks final resting place.
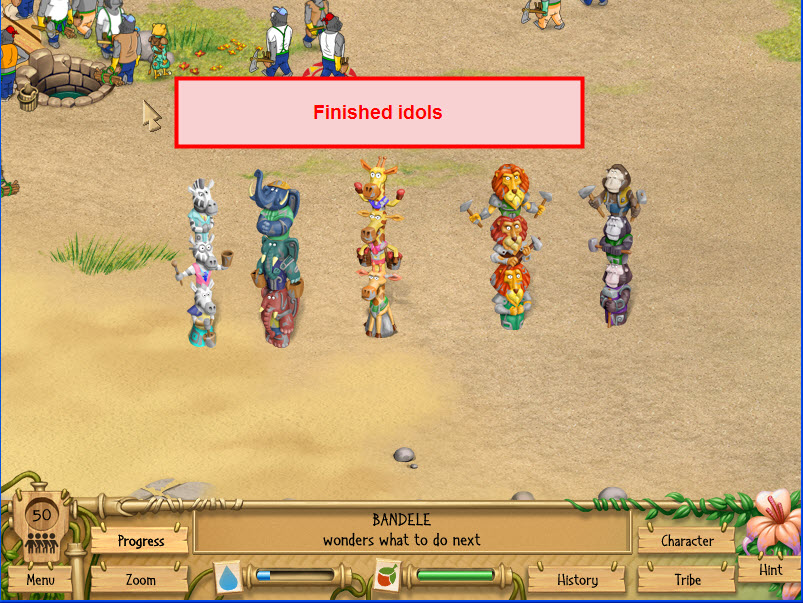
Discovery 13-Idols Finished:
- Build/carve the 5 the idols to completion.
- The idols from left to right are zebra, elephant, giraffe, lion and gorilla.
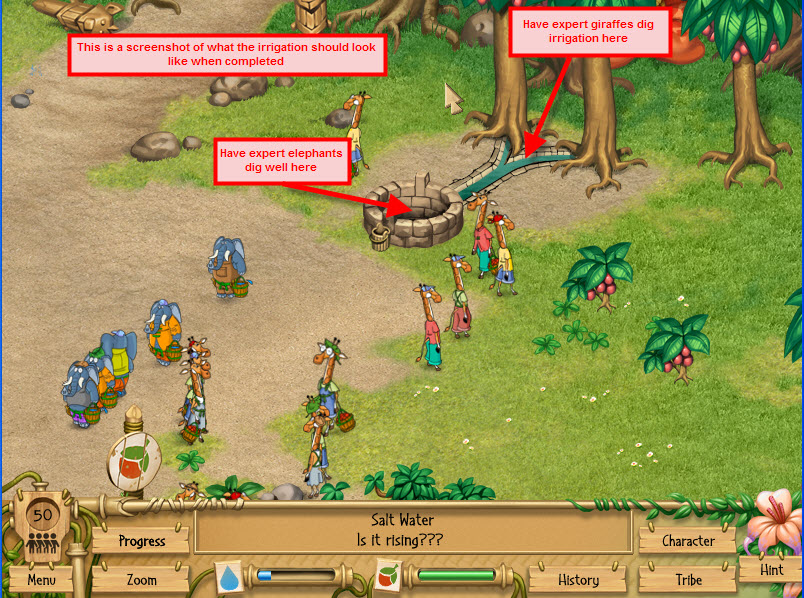
Discovery 14-Irrigation:
- Take expert elephants with shovels to dig the well on the top of the scene and right of the path.
- Once the well is completed have expert giraffes with shovels dig between the 2 largest Konut Trees that are behind the well that was just completed.
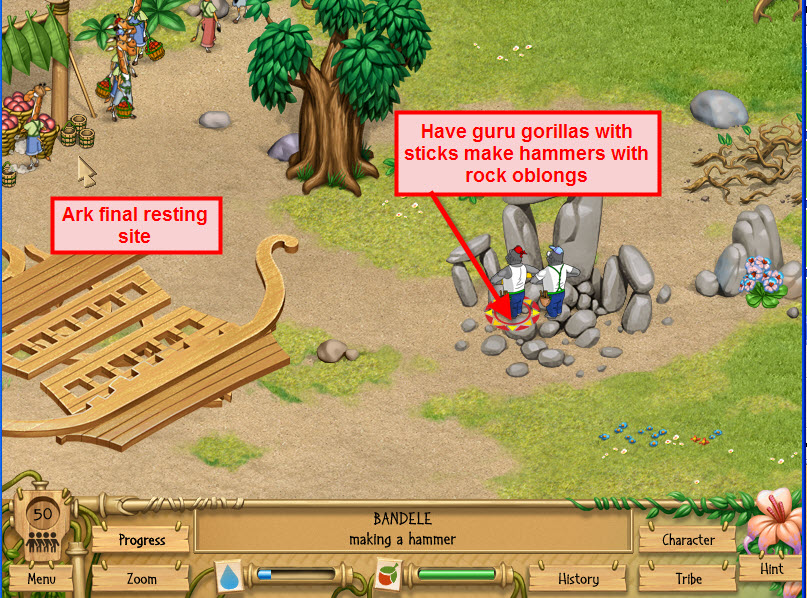
Discovery 15-Hammer:
- Take guru gorillas to the stick pile to gather a stick.
- Transfer the guru gorillas with stick in hand to the pile of rock oblongs on the middle right of the scene to make hammers.
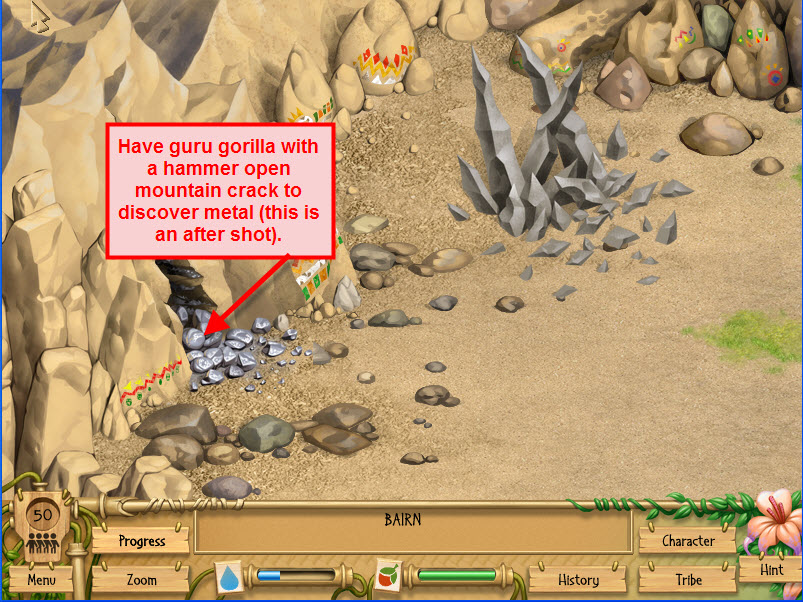
Discovery 16-Metal:
- Take guru gorillas with hammers in their possession to the large crack in the mountain with metal oozing from it on the upper left of the scene to open the crack further to discover the metal.
Discovery 17-Nails:
- Take guru gorillas with hammers in their possession to the newly discovered metal in the upper left of the scene to make nails.
Discovery 18-Ark:
- If you haven't moved the ark section do so at this time by taking 4 gorillas to each ark section; they will automatically move the sections to the final ark site.
- Take guru gorillas with hammers in their possession go the crack in the upper left of the scene to make nails.
- Transfer the guru gorillas with hammers and nails in their possession to the final ark site to assemble the ark.
HALLELUJIAH GAME COMPLETED!
Content(s) of this game guide may not be copied or
published on any other site without permission from Casual Game Guides.
©CasualGameGuides.com 2006 - 2021
