
Images ©HitPoint Studios
Overview:
Your boat crashes into a reef and all of the crew are lost, but you.
You are on the shores of the lost island Arcelia, can you escape?
Hints: These re unlimited, but must refill.
Journal: The journal will fill with the story of your journey.
Story Page Pieces/Storybook Pieces: You need to find all 42 pieces of the story. Once the game ends, click "play" and it will take you back to just before the ending. You can then click your journal and click the story page tab. Flip the pages and put the pieces back together like a jigsaw puzzle.
Story Page Pieces (Storybook Pieces) Locations
The Secrets of Arcelia Island
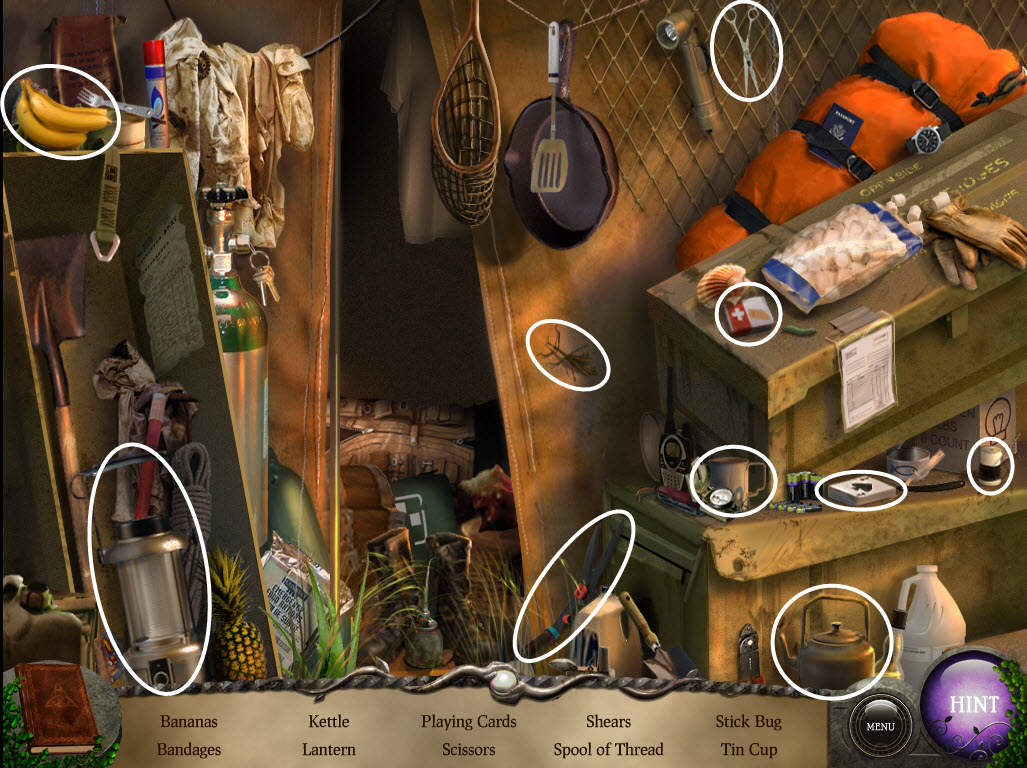
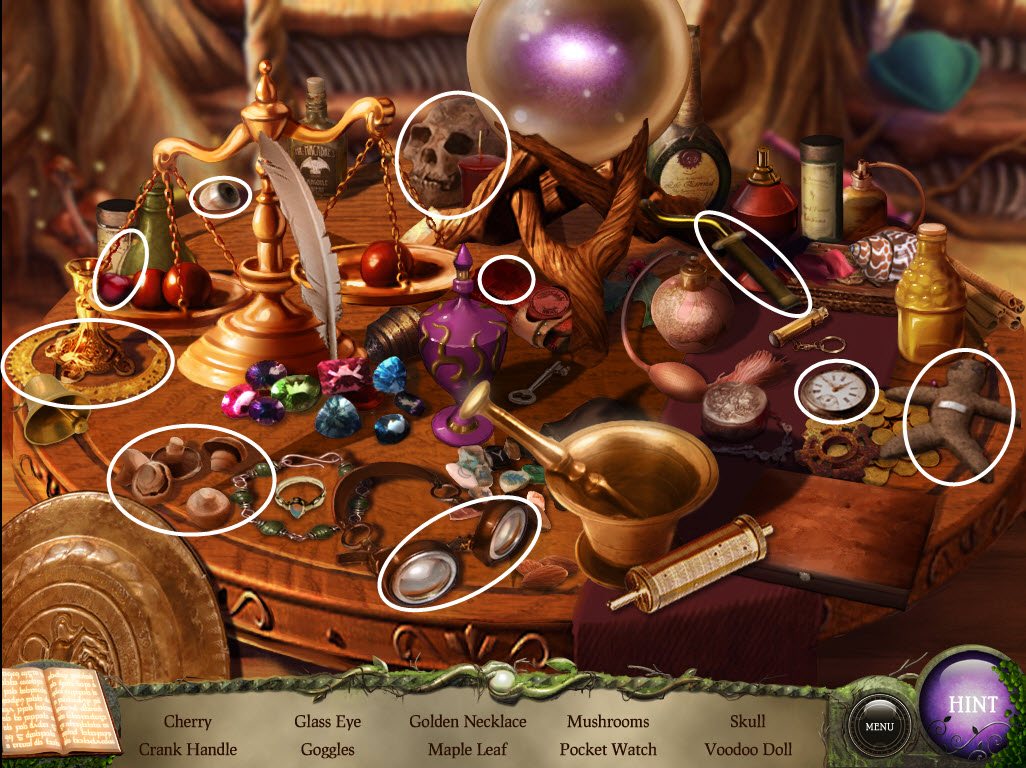
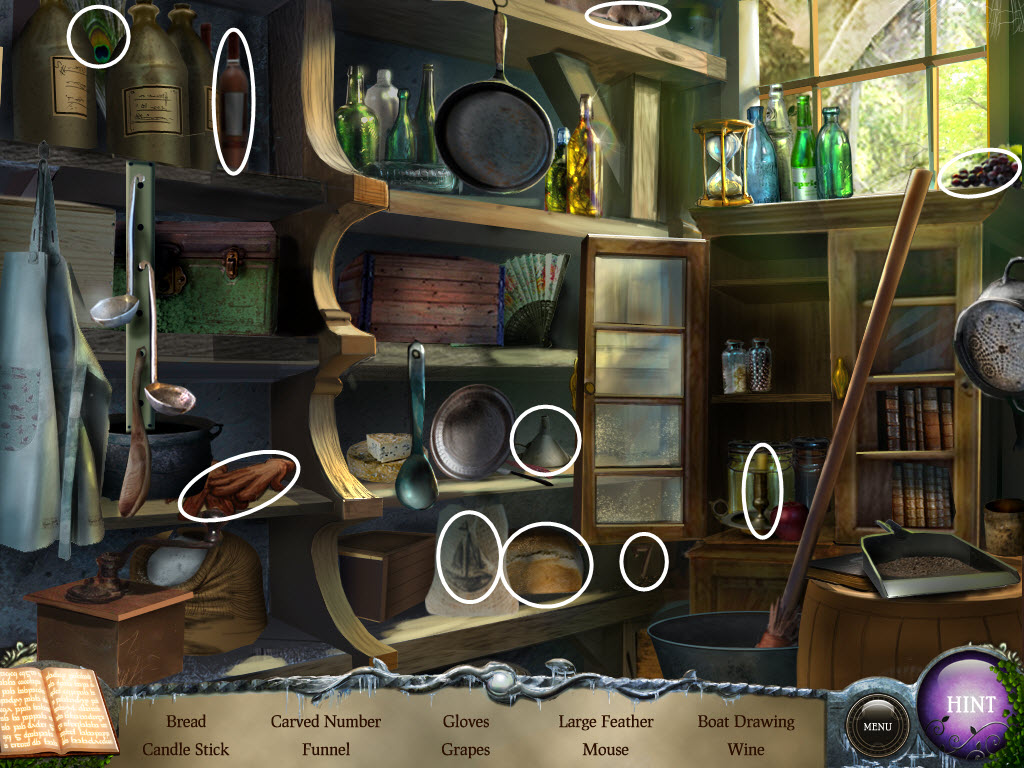
Boat Deck
Story Page Pieces (Storybook Pieces) Locations
Note: Location names are directly from the game. Location names appear next to your arrow when you get ready to move to a new location. All Story Page Pieces are listed here in order. Unless otherwise noted, they are generally on the ground, stairs, table, trees, etc.
Hints: These re unlimited, but must refill.
Journal: The journal will fill with the story of your journey.
Story Page Pieces/Storybook Pieces: You need to find all 42 pieces of the story. Once the game ends, click "play" and it will take you back to just before the ending. You can then click your journal and click the story page tab. Flip the pages and put the pieces back together like a jigsaw puzzle.
Story Page Pieces (Storybook Pieces) Locations
The Secrets of Arcelia Island
Boat Deck
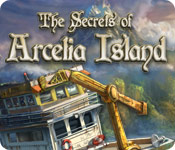
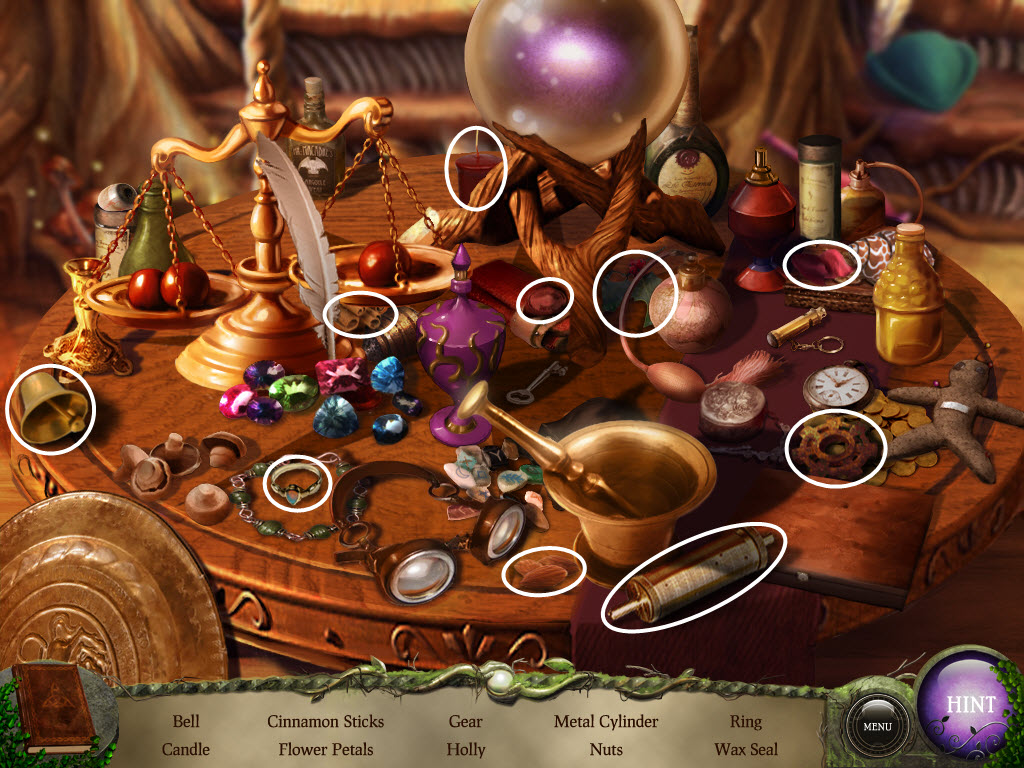
- examine the sparkles (yellow bucket) - hidden object area
- find the Keys
- pick up the Empty Canteen
- examine the cabin door
- use the Keys on the cabin door
- enter the cabin
- use the Keys on the glove compartment - it's stuck!
- examine the paperwork
- take the Journal
- make a note of the numbers on the bottom of the "top secret" picture
- exit
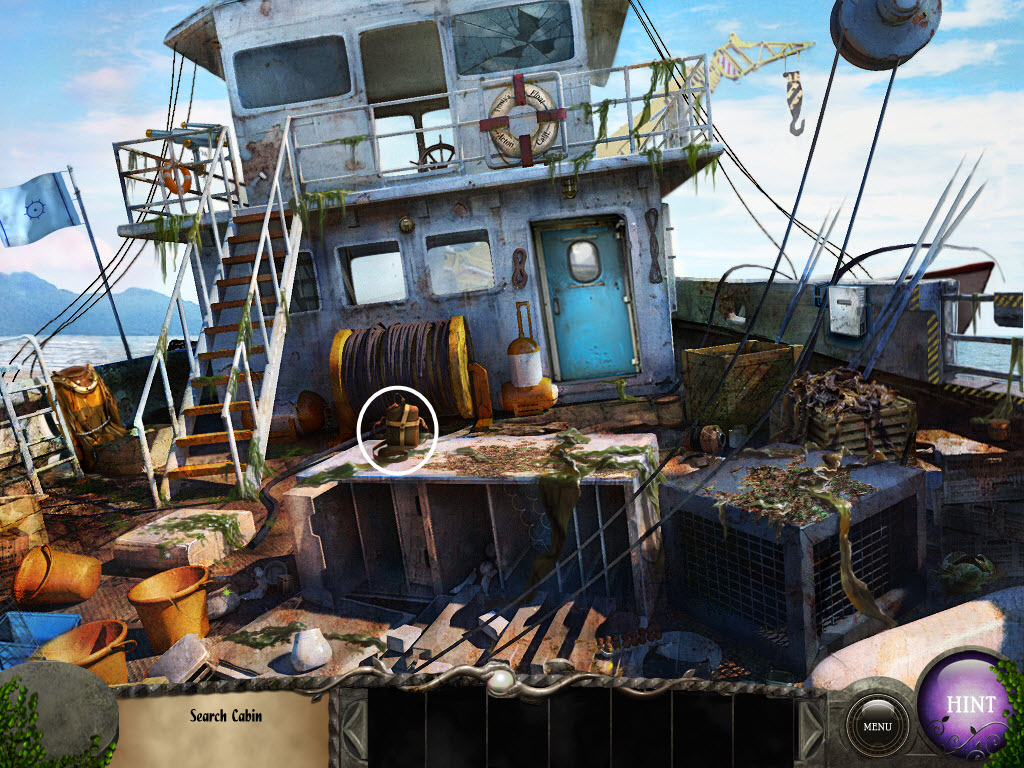
- examine the control panel - what was that?!
- examine the sparkles (yellow bucket) - hidden object area
- find the Screwdriver
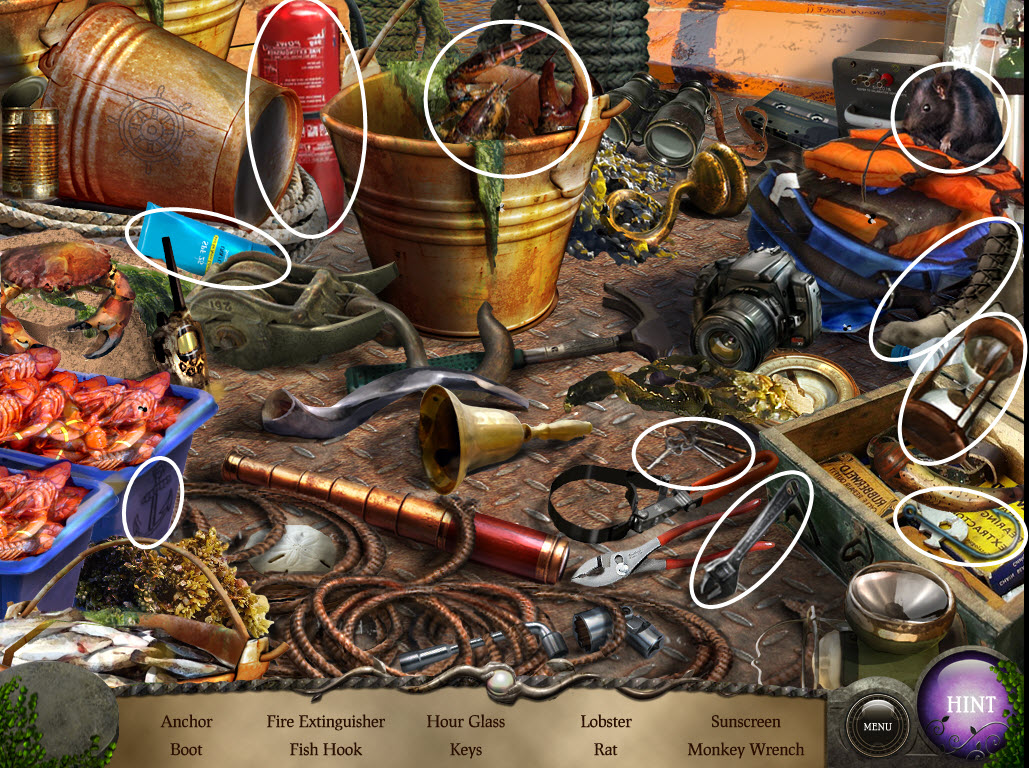
- go to the upper deck
- take the Boat Hook from the railing
- exit
- examine the control panel
- input the code you saw on the "top secret" picture in the cabin
- pull the lever
- take the Storybook Piece
- exit the ship
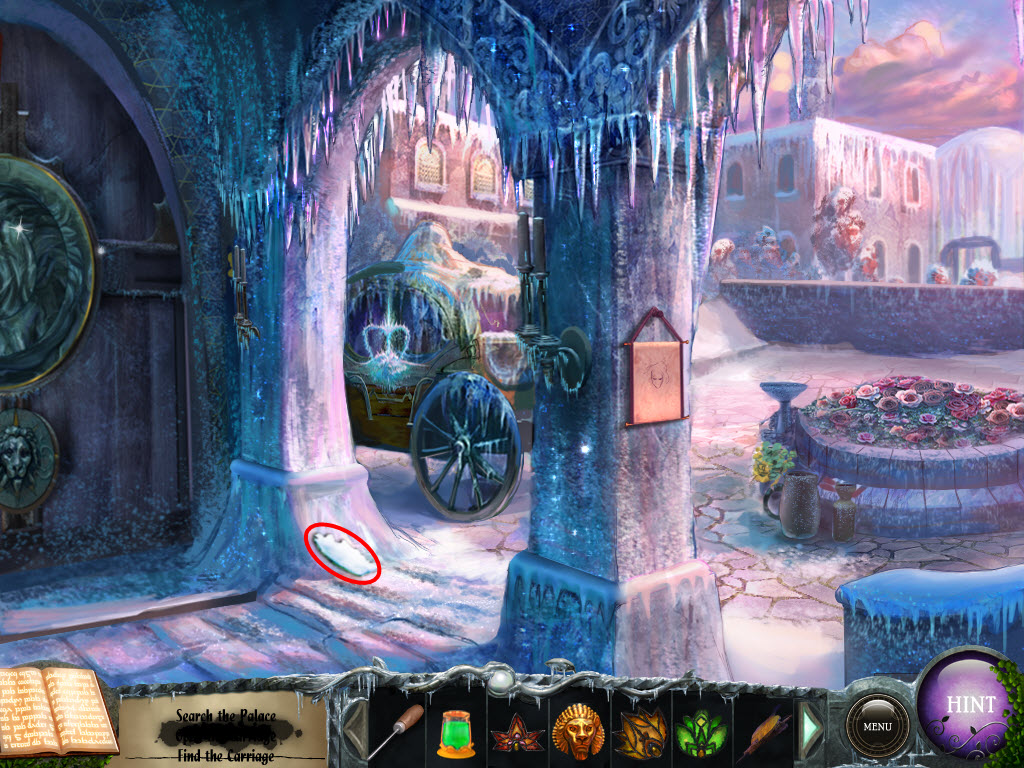
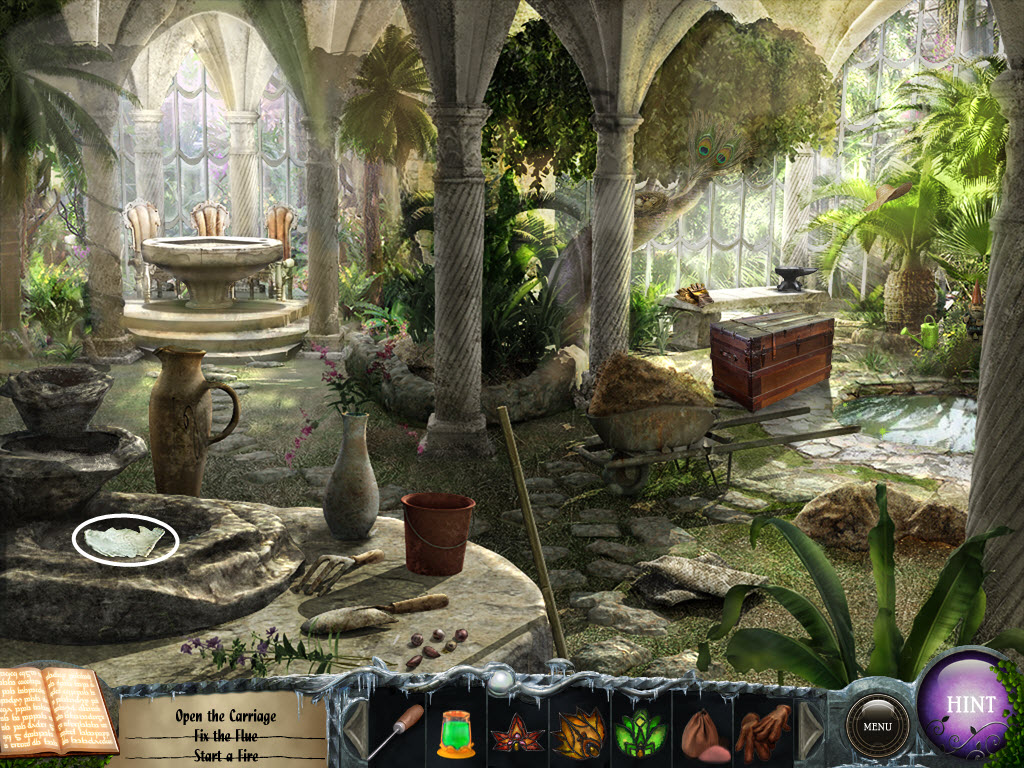
- go forward
- examine the carriage
- exit
- examine the brush
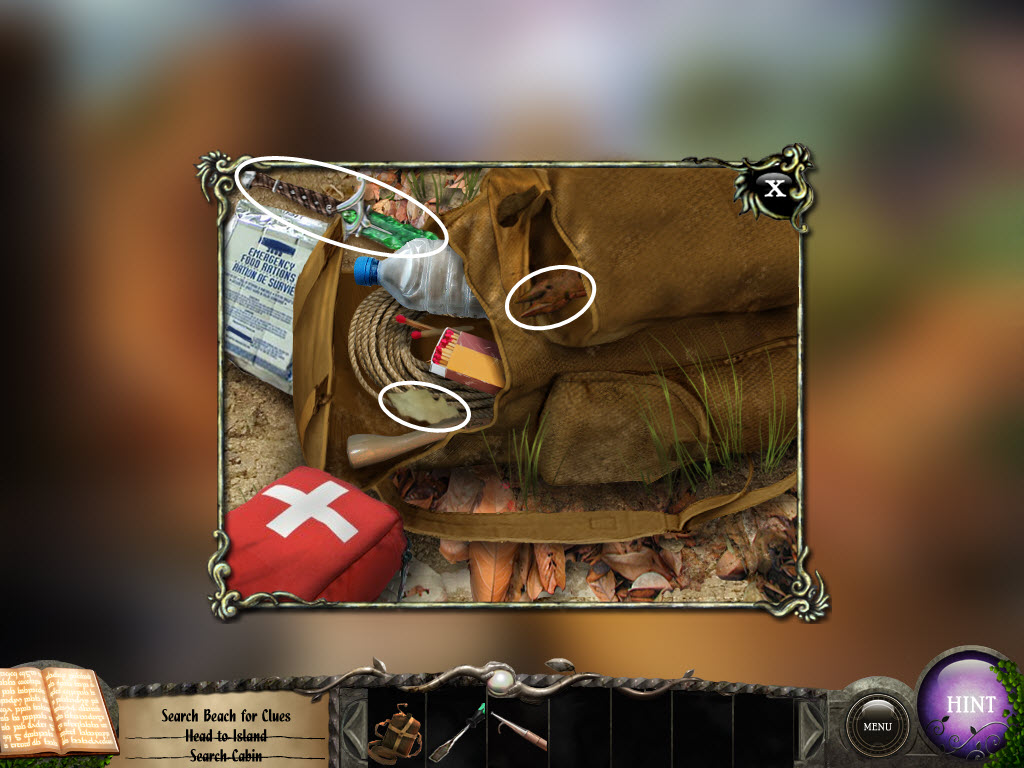
- examine the backpack
- open the flap and take the Pliers
- take the Emerald Dagger
- pick up the Storybook Piece
- return to the cabin
- use the Pliers on the glove compartment
- take the Fuses
- take the Storybook Piece
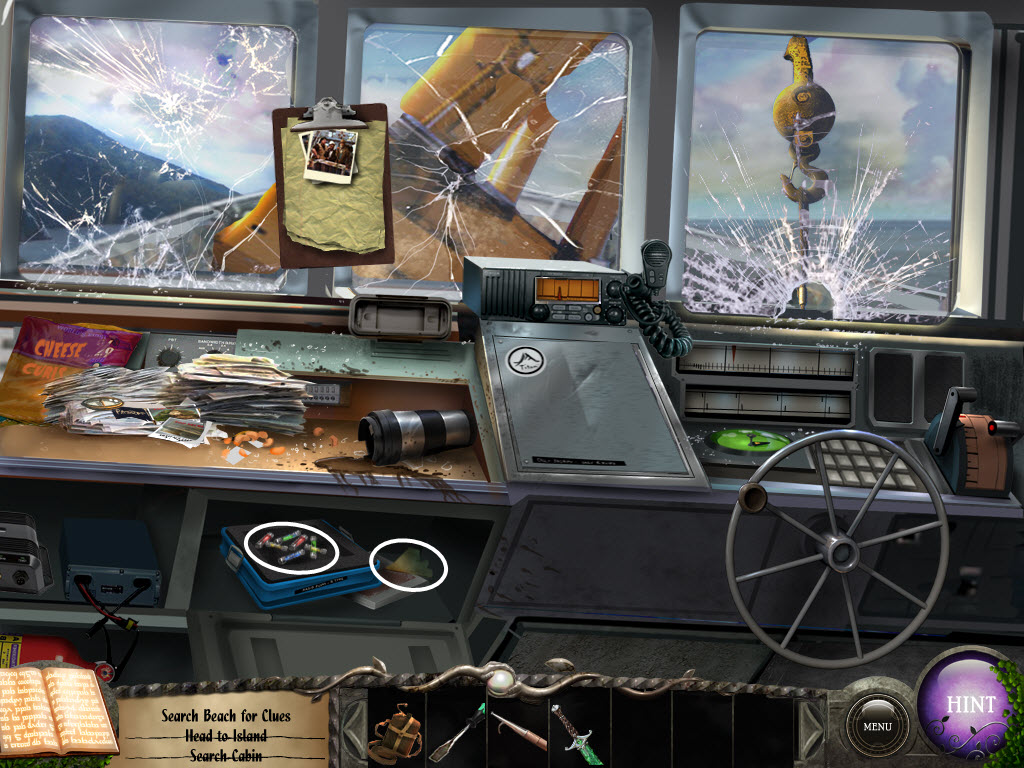
- use the Screwdriver to open the fuse box
- replace the Fuses
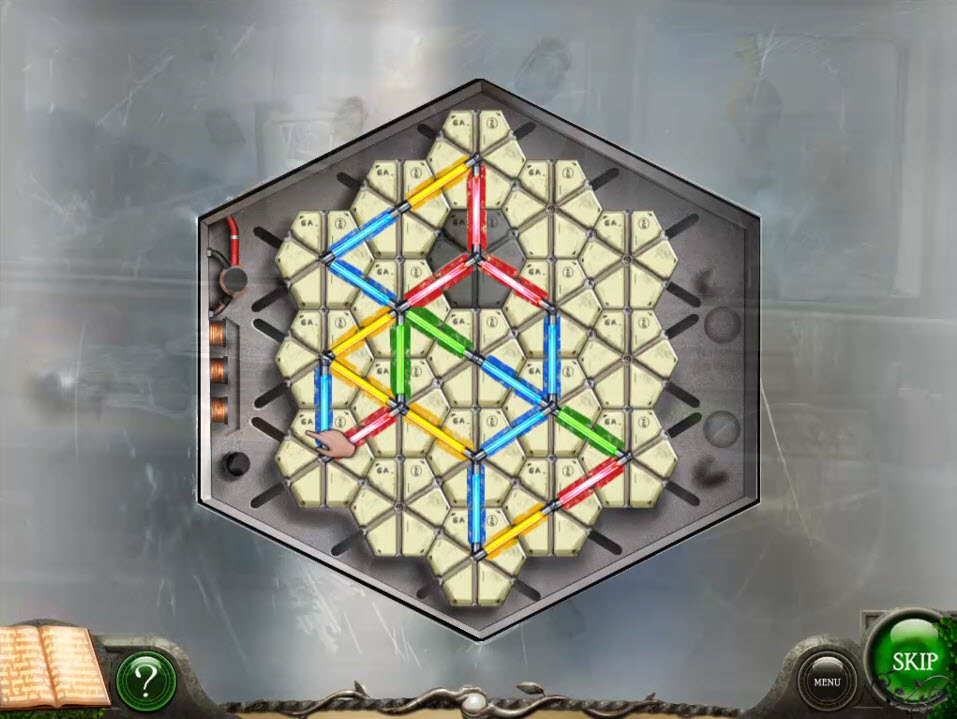
- Fuse Box Puzzle
- swap the fuses so all the colors align
- see screenshot for solution
- click on the radio
- make a note of the coordinates
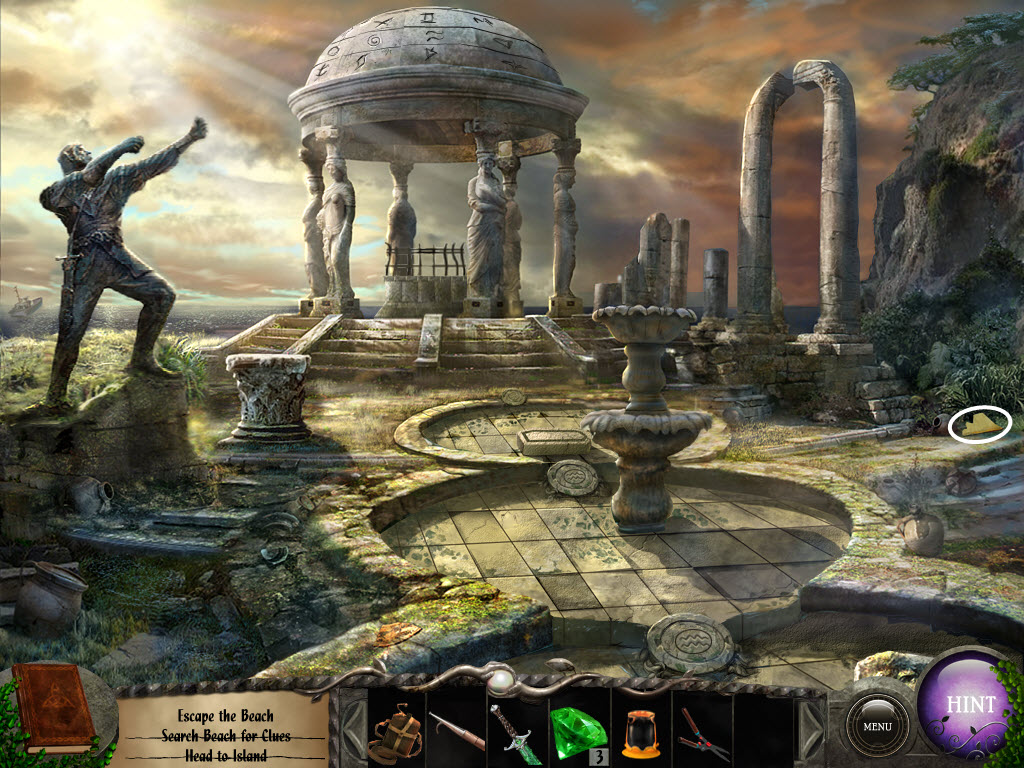
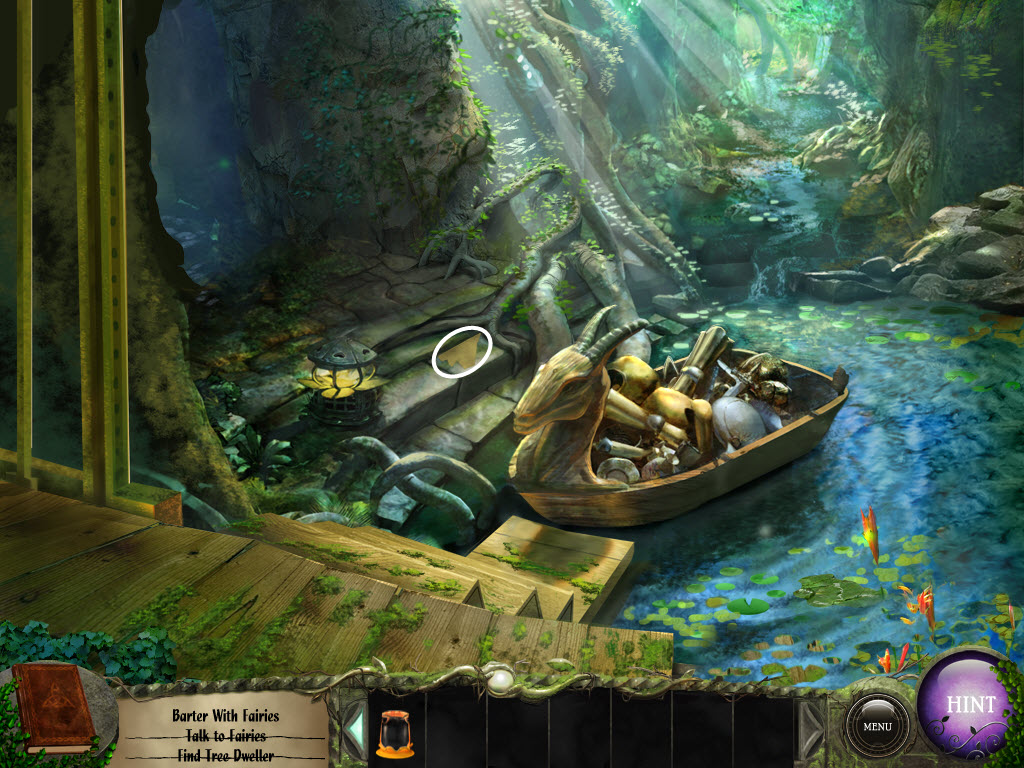
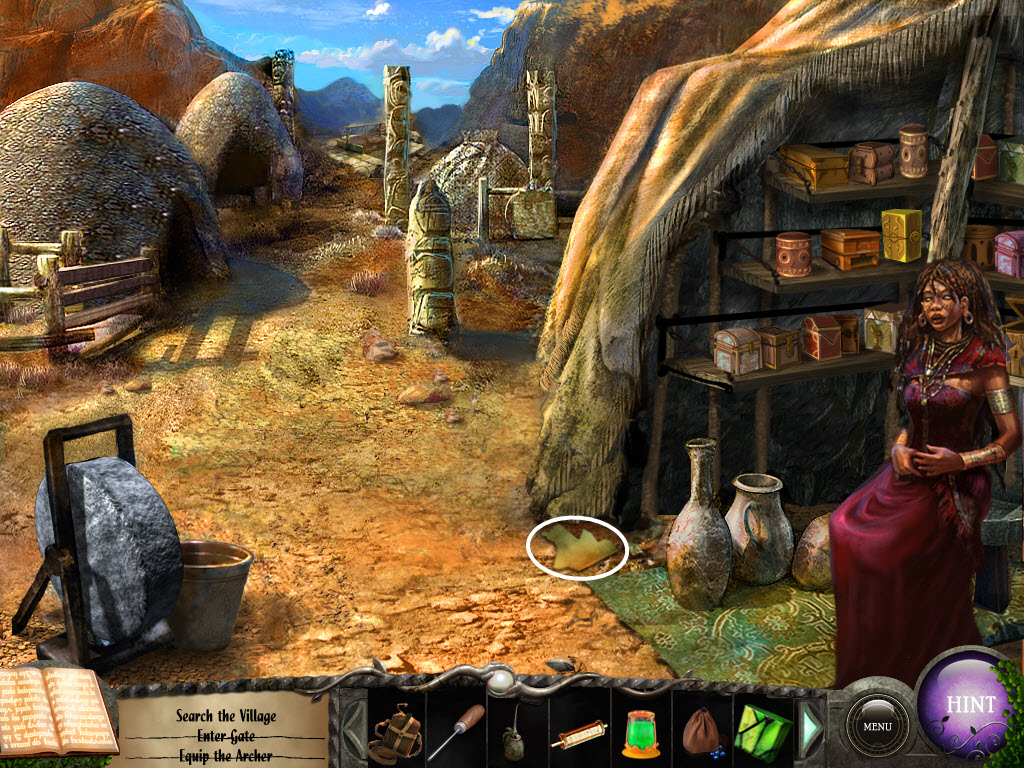
- return to the island dock
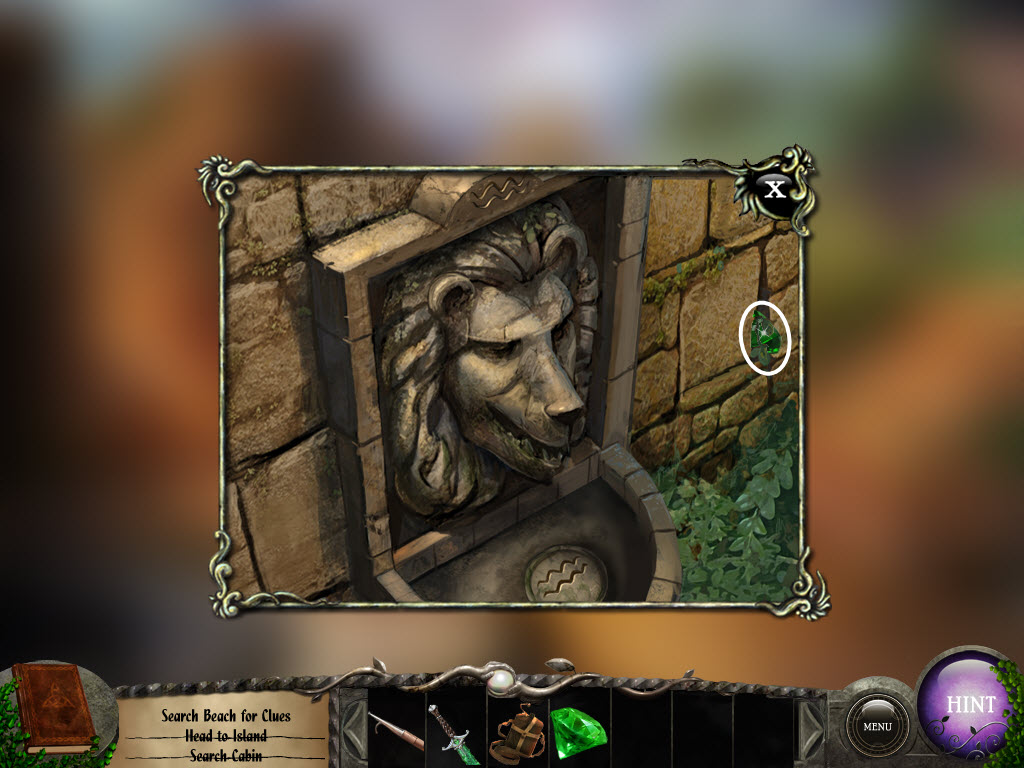
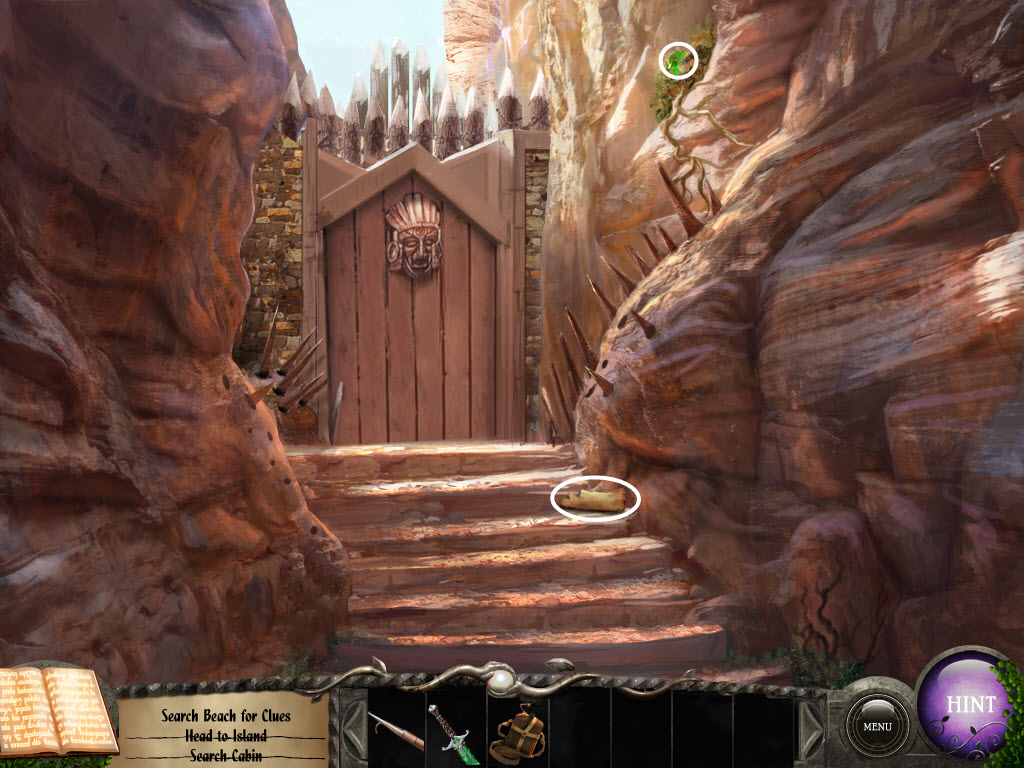
- examine the lion head to the right of the gate
- pick up the Gemstone
- go left
- click on the gate
- pick up the Gemstone
- pick up the Storybook Piece
- go down and right
- pick up the Storybook Piece
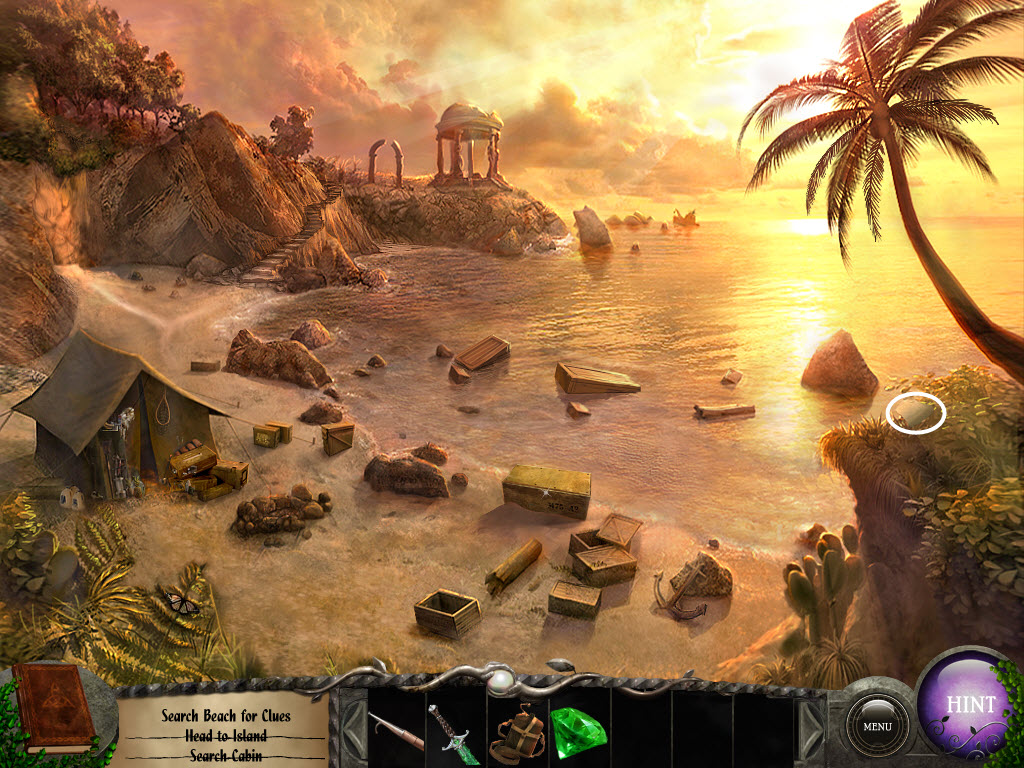
- go into the tent
- pick up the Beaker
- pick up the Storybook Piece
- knock over the left bottle and take the Tile
- exit
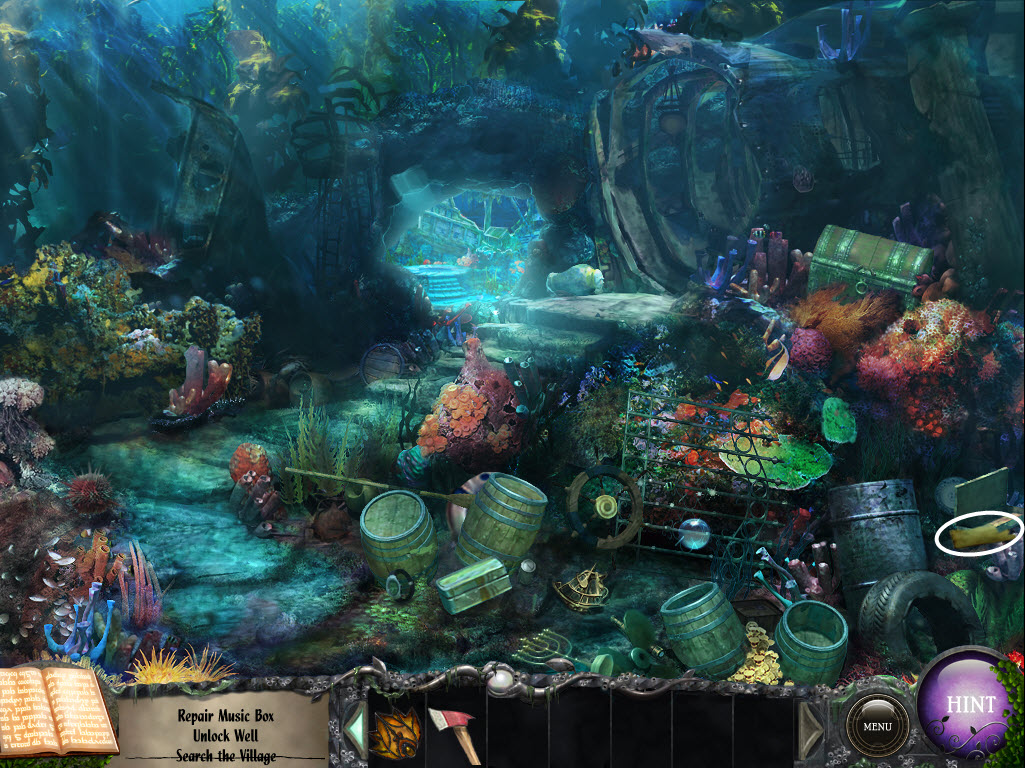
- examine the sparkles (campfire) - hidden object area
- find the Shears
- go forward
- pick up the Gemstone
- pick up the Storybook Piece

- continue forward
- pick up the Storybook Piece
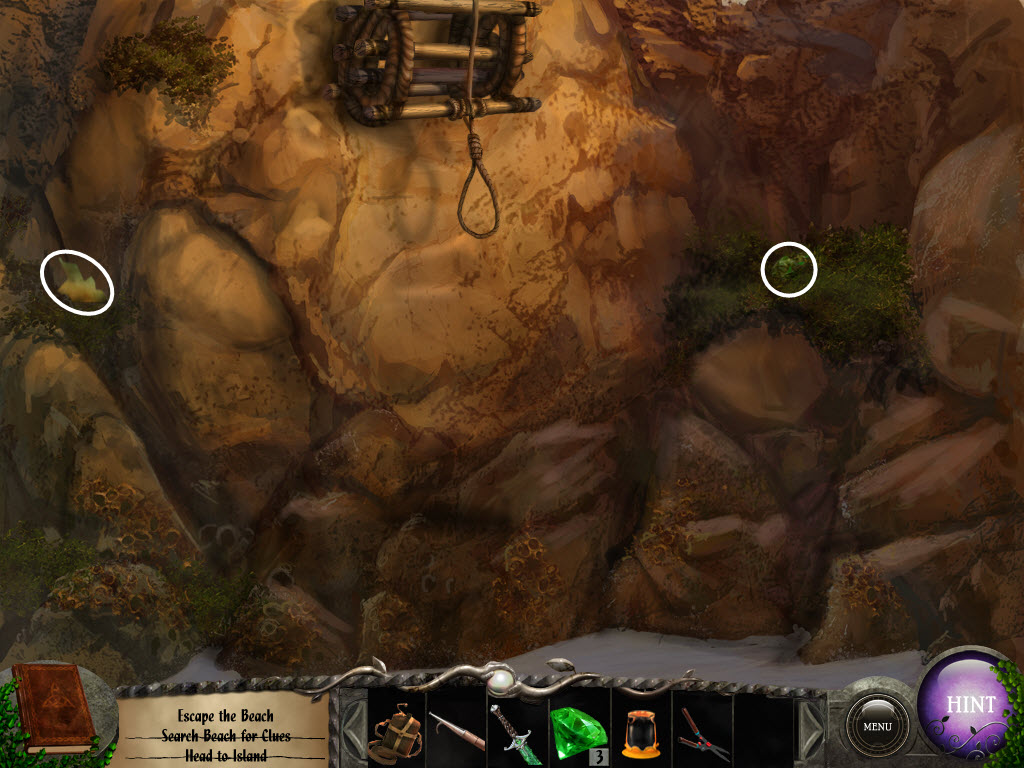
- examine the grate
- pull off a Metal Bar
- return to the cove
- use the Metal Bar to open the crate on the beach
- take the Bow
- go left
- pick up the Gemstone
- pick up the Storybook Piece
- use the Boat Hook to pull down the ladder
- go up
- pick up the Storybook Piece
- examine the pedestal
- place the Gemstones in the circles
- examine the raised pedestal
- Pedestal Puzzle
- the object is to move the dial clockwise in order
- click the gemstones to move the dial
- see video for solution
- examine the pedestal
- place the Emerald Dagger in the middle
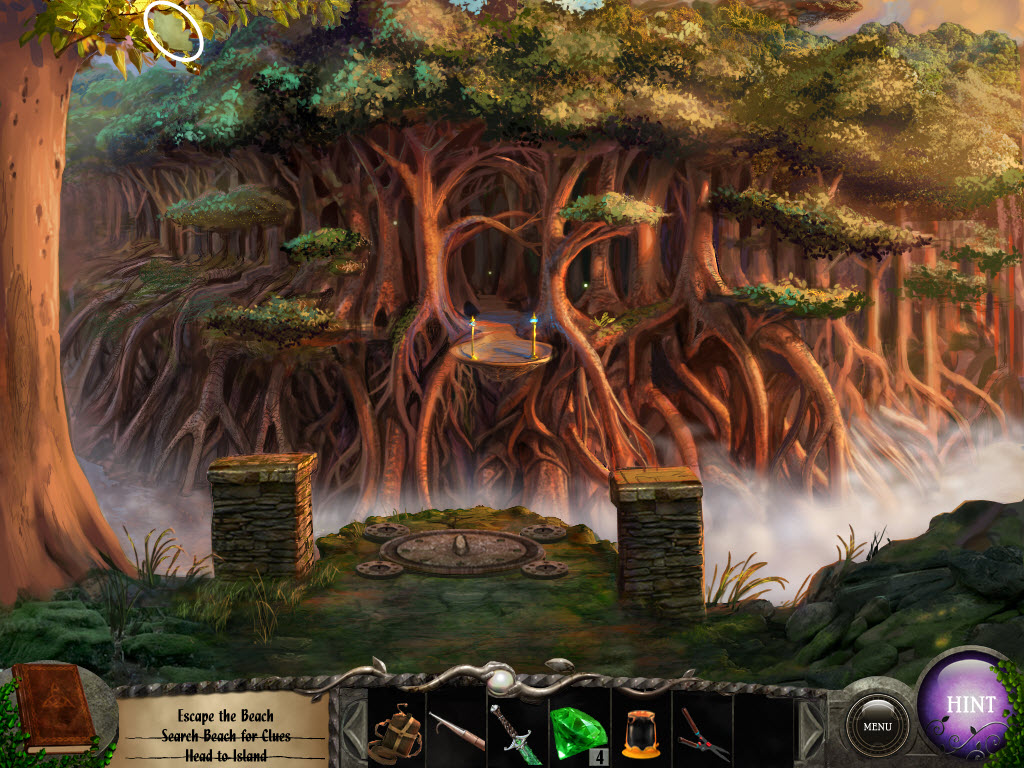
- enter the portal
- examine the hole in the tree
- take the Slingshot
- take the Storybook Piece
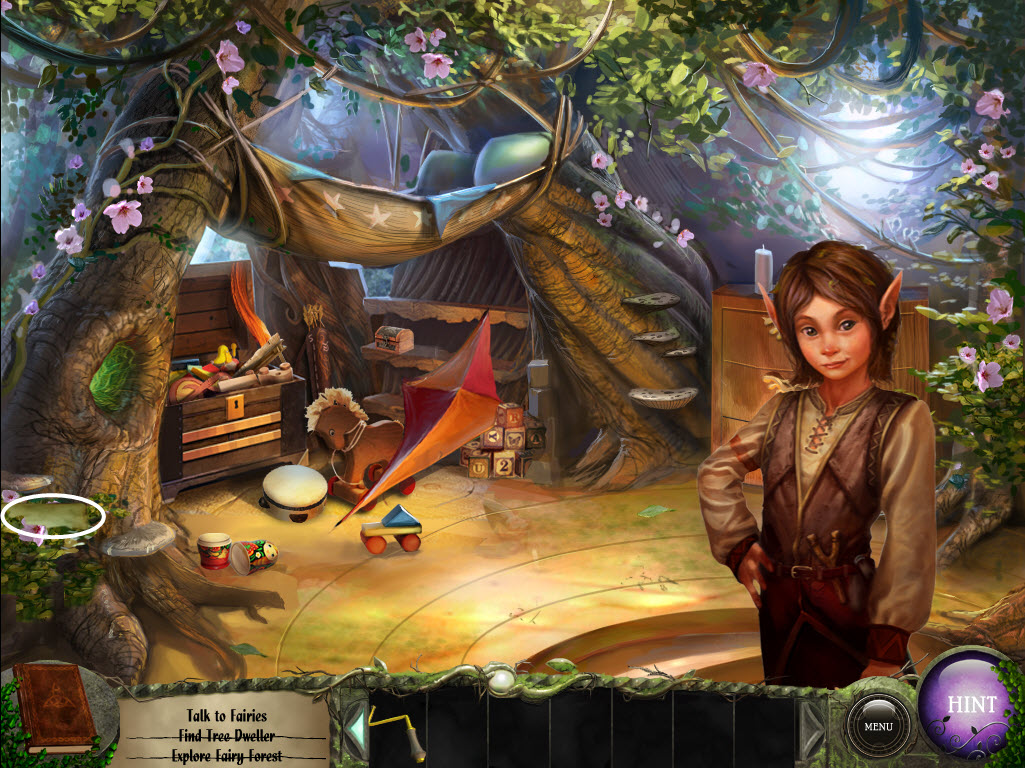
- examine the elf
- go forward
- knock on the door
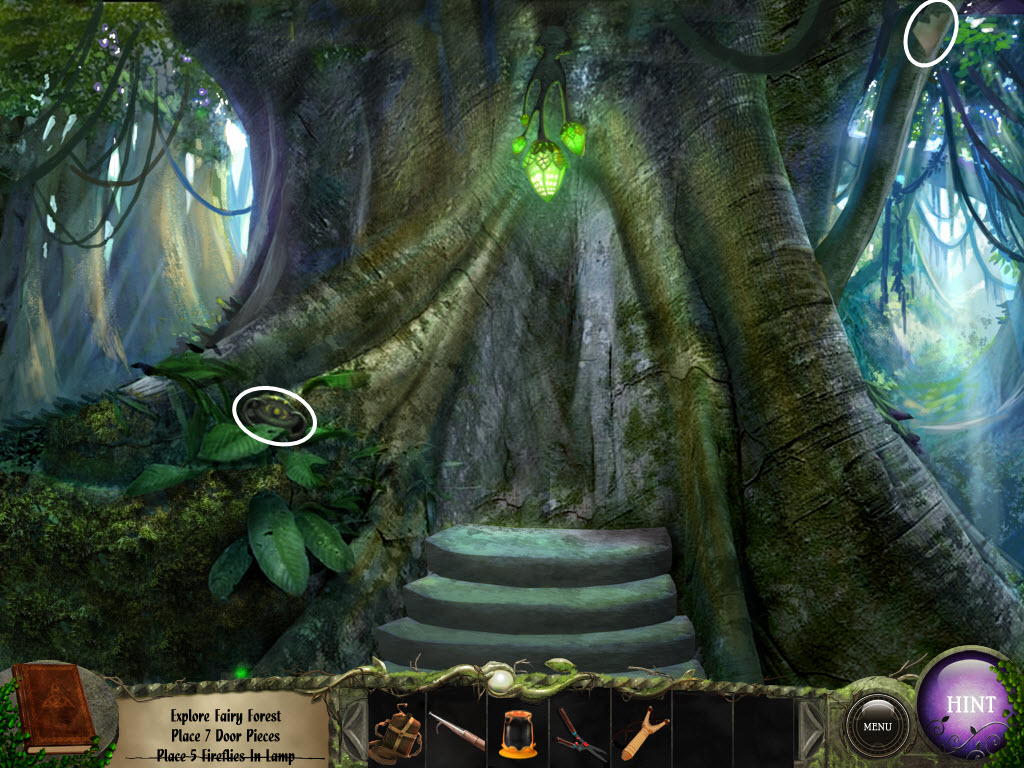
- collect five fireflies - these are the white lights which will move around (not the green ones)
- place the Fireflies into the lamp above the door
- knock on the door again
- pick up the Door Knocker
- pick up the Storybook Piece
- exit
- use the Boat Hook to reach the Left Window
- use the Shears on the flowers and take the Door Clasp, Rune, and Door Handles
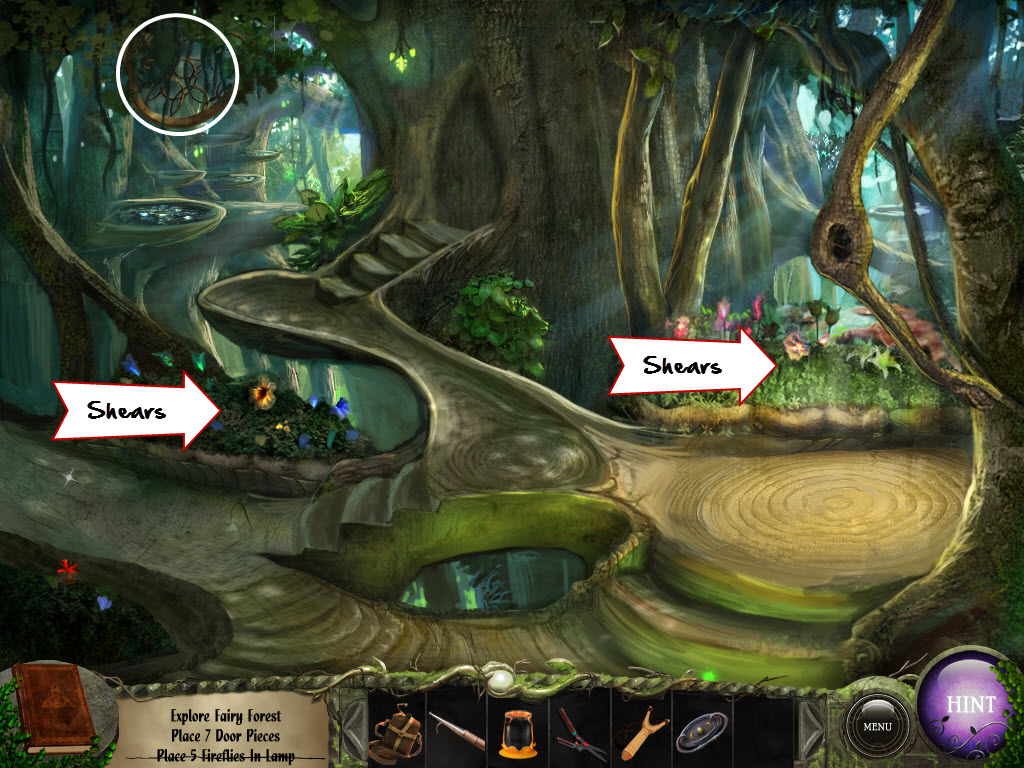
- go left
- pick up the Door
- examine the left scale and take the Door Clasp
- pick up the Right Window
- examine the control panel and take the Grow Potion Recipe
- pick up the Storybook Piece
- click the sparkles (left lamp) - hidden object area
- find the Ice Pick
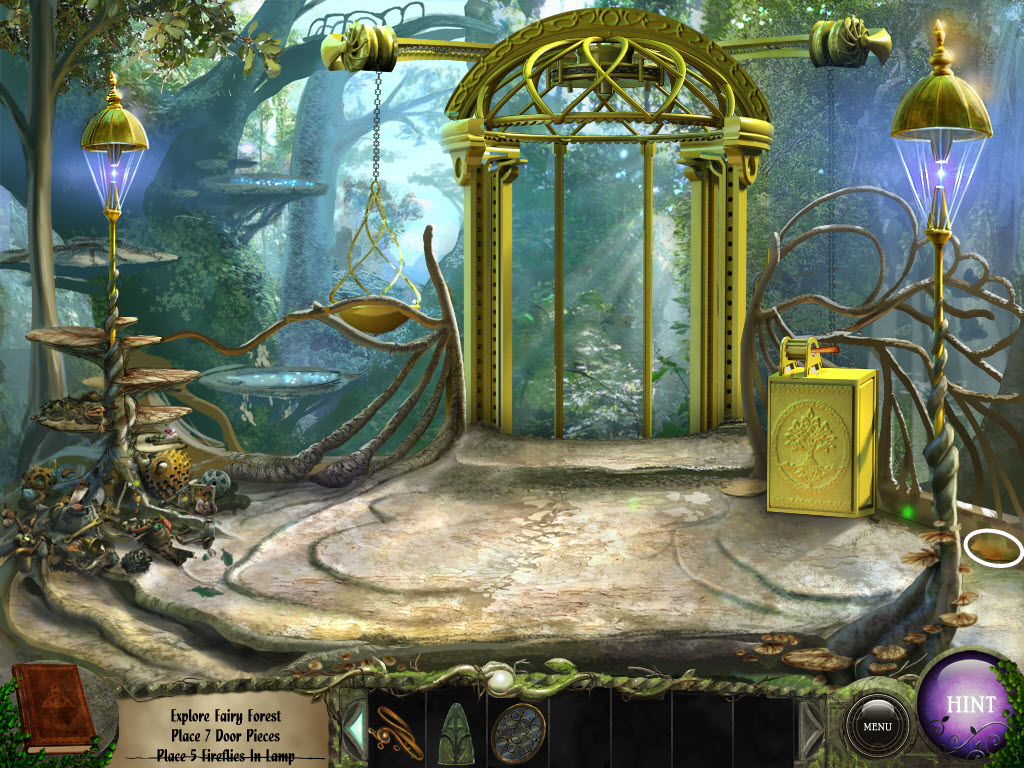
- return to the door
- replace the Door, Right and Left Windows, Door Clasps, and Door Knocker
- go inside
- talk to the King and Queen
- pick up the Rune
- pick up the Storybook Piece

- click the sparkles (table) - hidden object area
- find the Crank Handle
- use the Beaker and Grow Potion Recipe on the chemistry set
- Potion Puzzle
- match the beakers to the color sequence at the top
- you can up/down/right/left but no diagonally to find the matches
- see video for example - puzzles are random
- receive Grow Potion
- go upstairs
- talk to the Elf
- pick up the Storybook Piece
- examine the tree notch
- pick up the Storybook Piece
- pick up the Rune
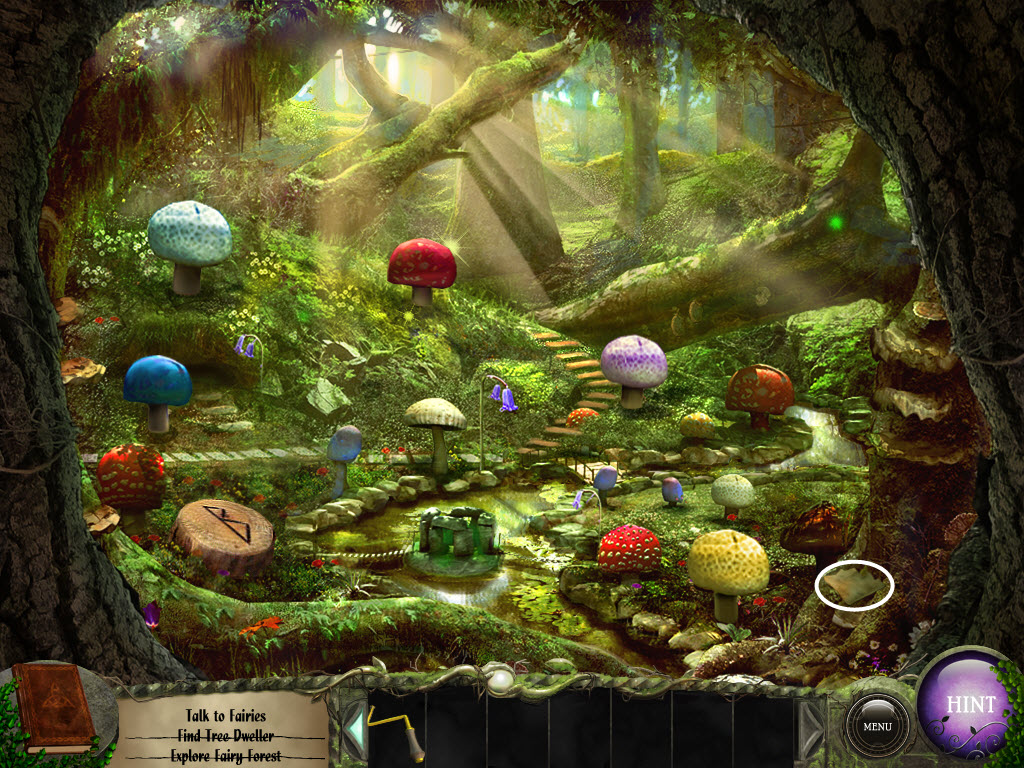
- talk to the Fairies
- use the Slingshot and shoot at each mushroom they hide behind
- talk to the Fairies again and receive a Small Weight
- exit
- click the sparkles (kite) - hidden object area
- find the Shovel

- return to the elevator
- click the sparkles (left lamp) - hidden object are
- find the Oil Can
- place the Small Weight and Grow Potion on the left scale
- examine the control panel
- replace the Crank Handle
- turn the Crank Handle
- enter the elevator
- pick up the Storybook Piece
- go left
- talk to the Professor
- pick up the Storybook Piece
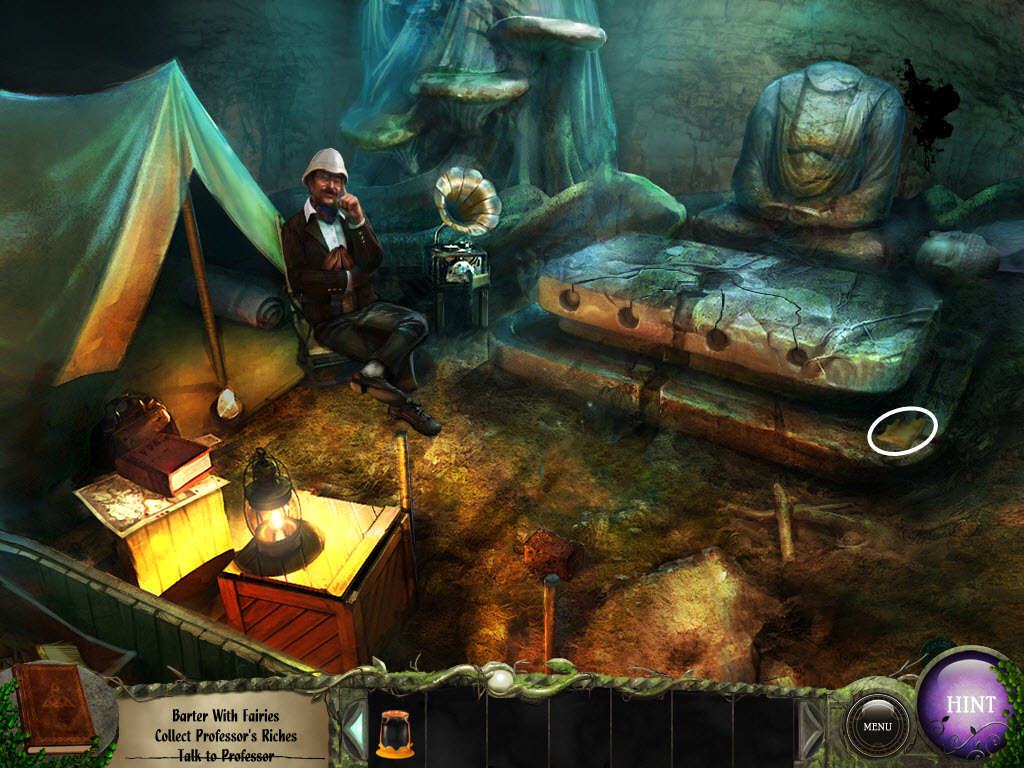
- open the book and take the Shrink Recipe
- use the Shovel on the loose dirt
- take the Rune
- talk to the Professor
- go down
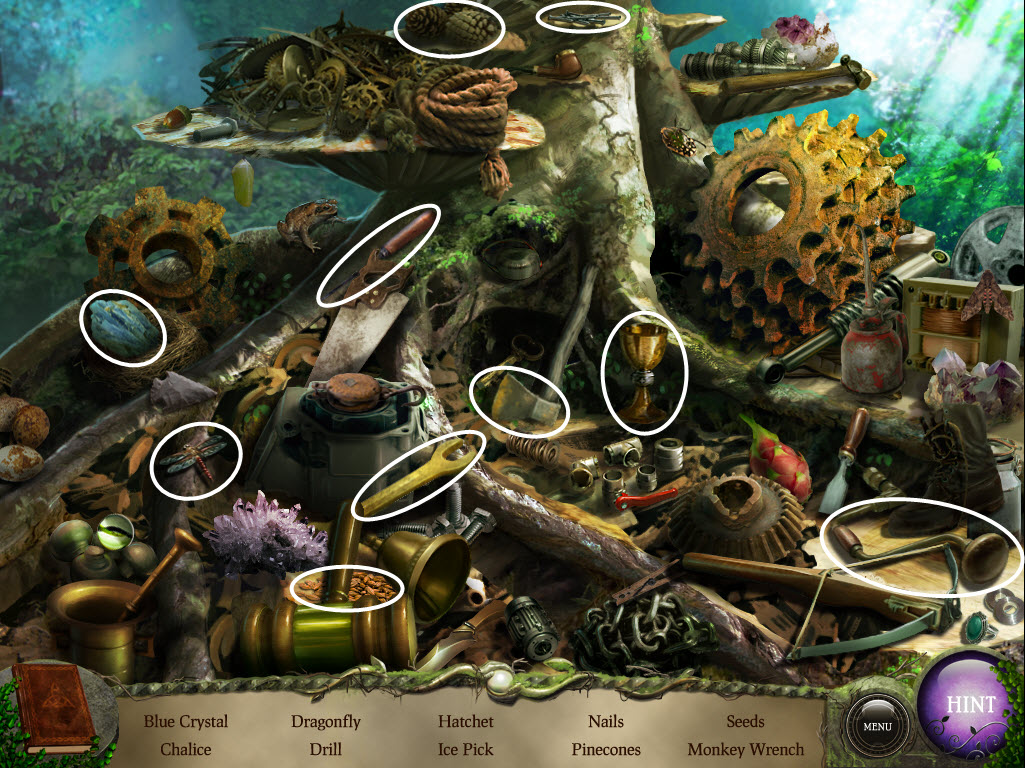
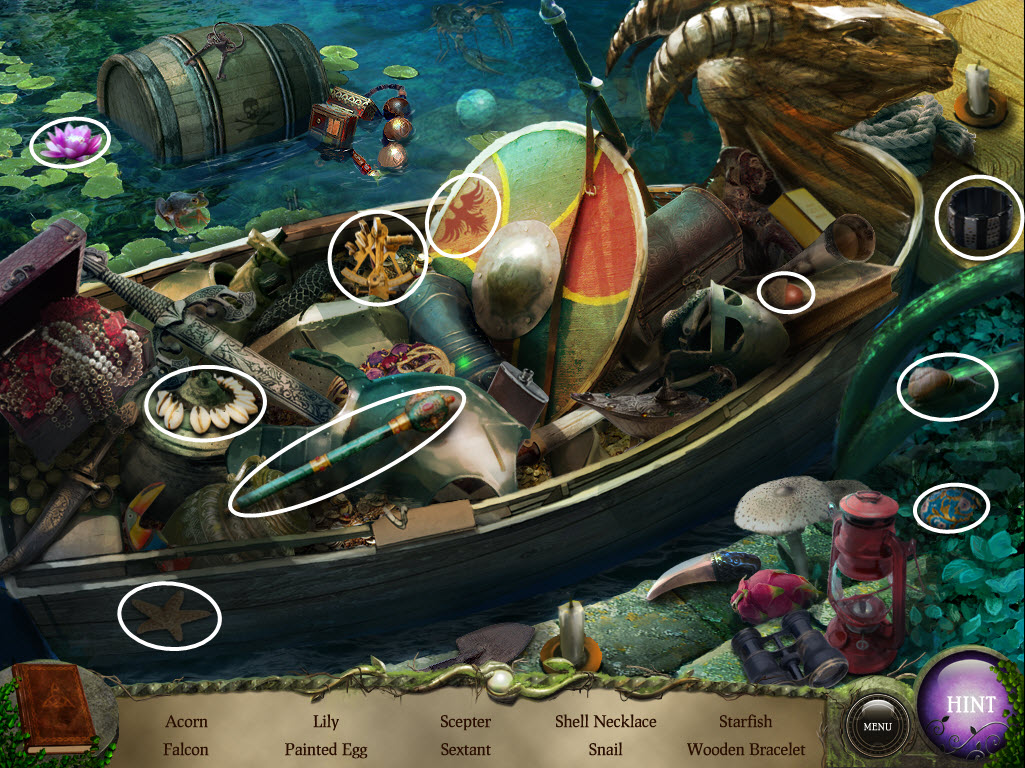
- click the sparkles (boat) - hidden object area
- find the Sceptre
- return to the stairs
- use the Beaker and Shrink Potion Recipe on the chemistry set
- Potion Puzzle 2
- match the beakers to the color sequence at the top
- you can up/down/right/left but no diagonally to find the matches
- receive Shrink Potion
- go upstairs
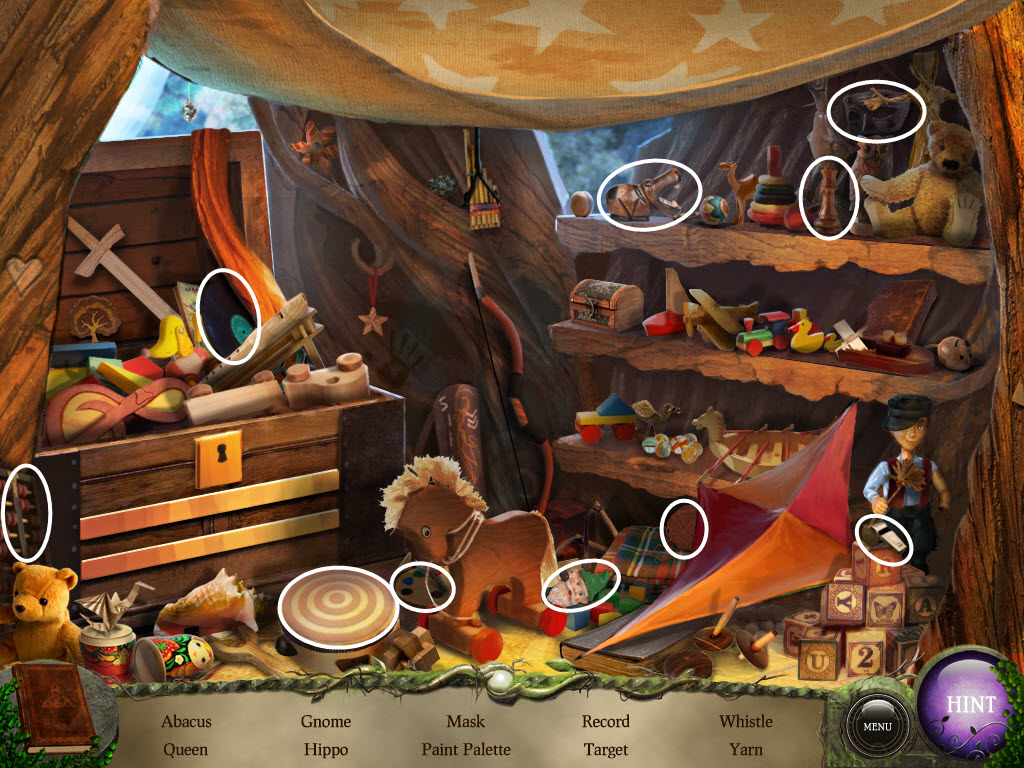
- click the sparkles (kite) - hidden object area
- find the Record
- examine the tree notch
- place the Sceptre in the tree
- use the Shrink Potion on the Sceptre
- talk to the Fairies
- receive the Green Pearl
- exit and go down the stairs
- click the sparkles (table) - hidden object area
- find the Metal Cylinder
- return to the altar
- talk to the Professor
- examine the gramophone
- pick up the Storybook Piece
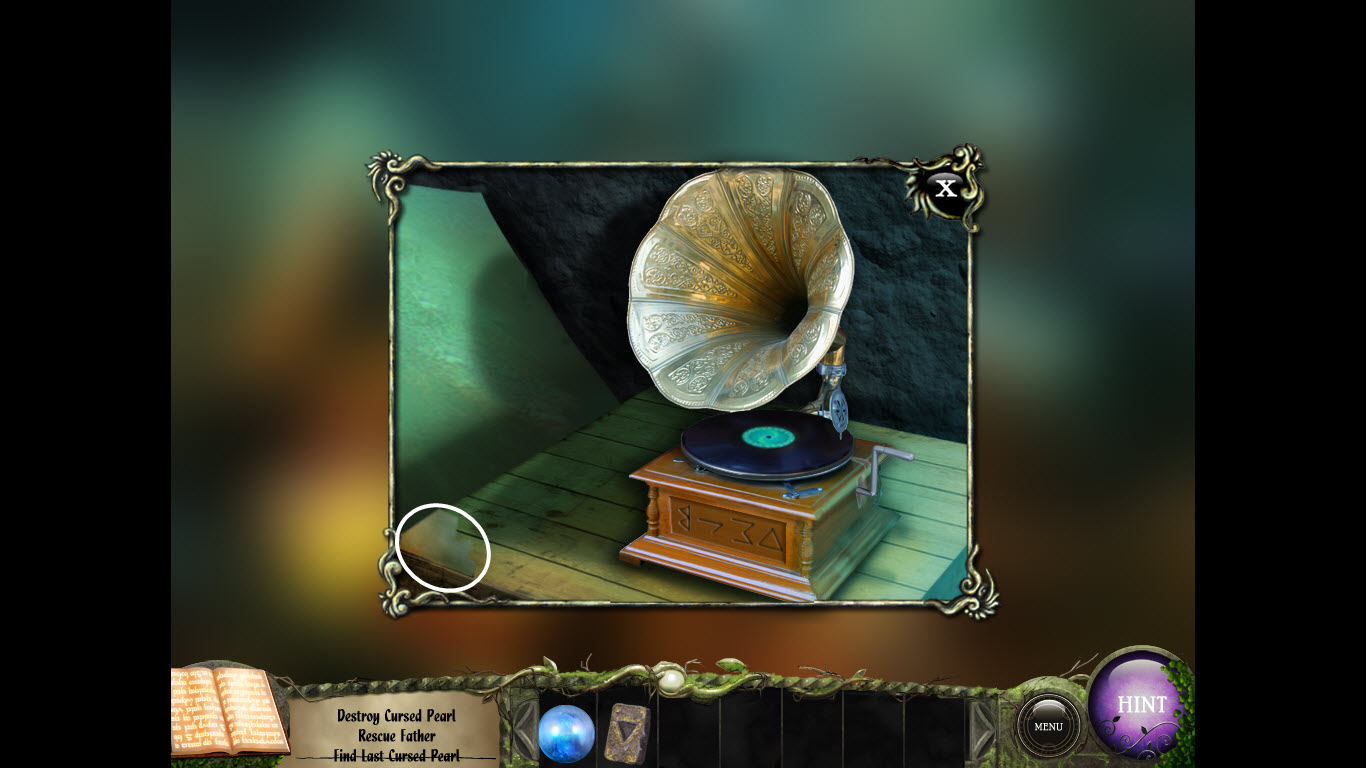
- place the Record on the gramophone
- turn the crank
- make a note of the symbols
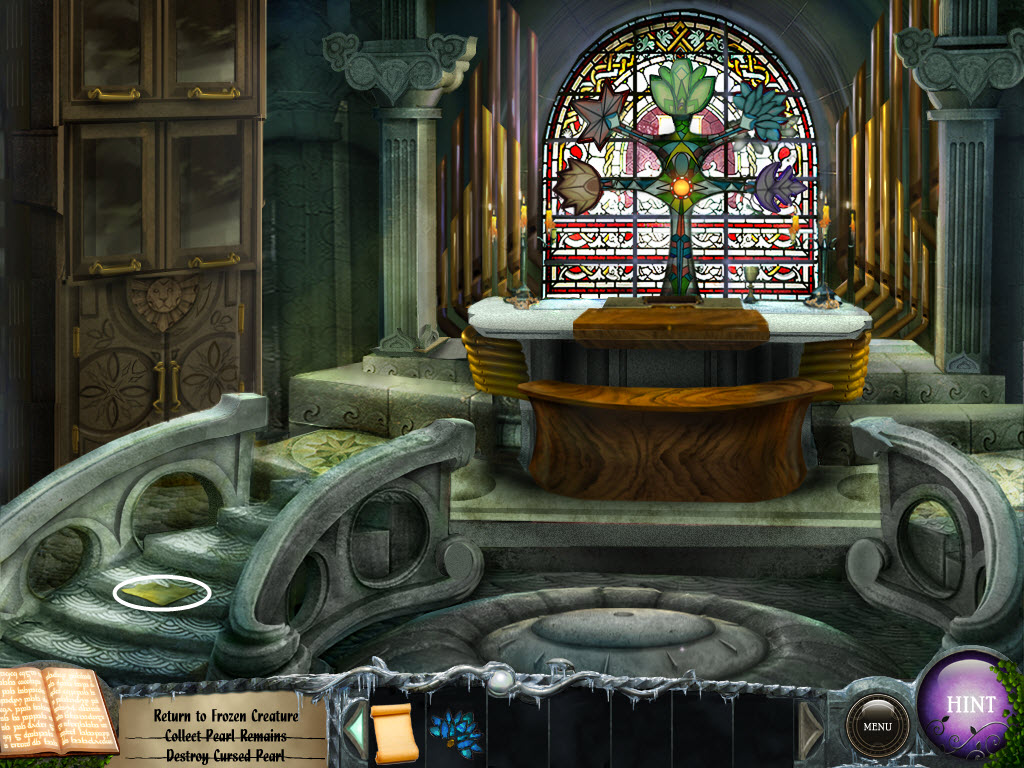
- examine the altar
- Altar Puzzle
- place the Runes in the four holes in the correct order (see gramophone)
- place the Green Pearl in the center of the altar
- turn the Runes so they are facing the correct way (see gramophone)
- talk to the Fairies
- use the Beaker on the green liquid
- receive Green Liquid
- pick up the Bag of Stones
- return to the elevator
- talk to the Elf
- take the Arrow
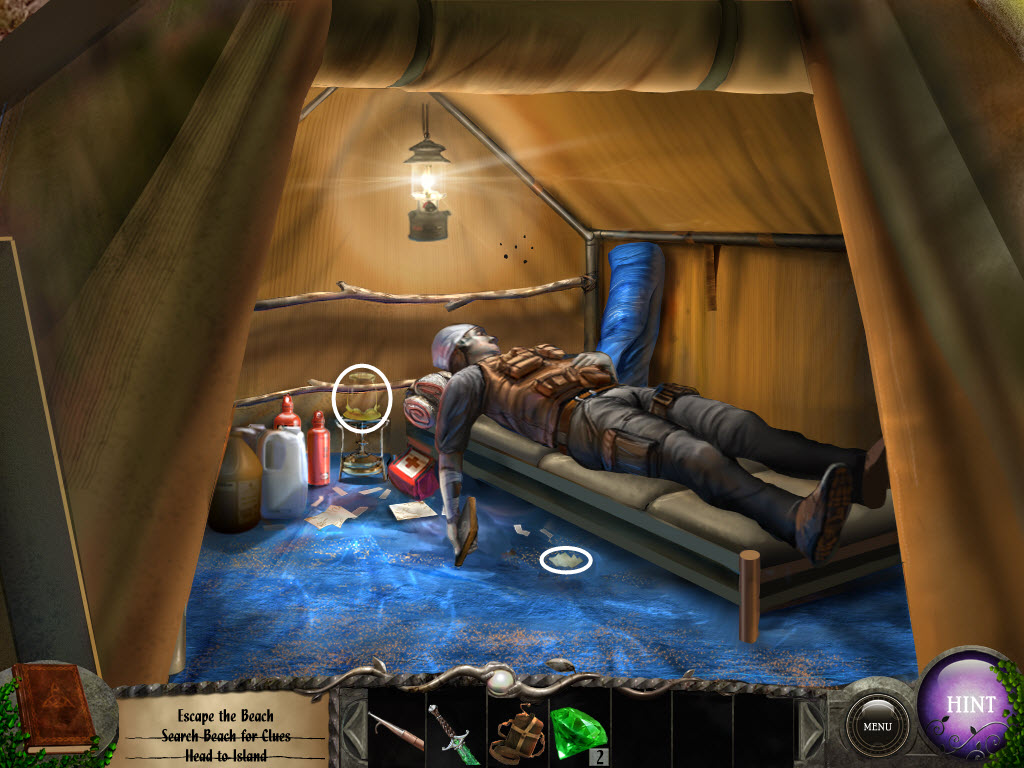
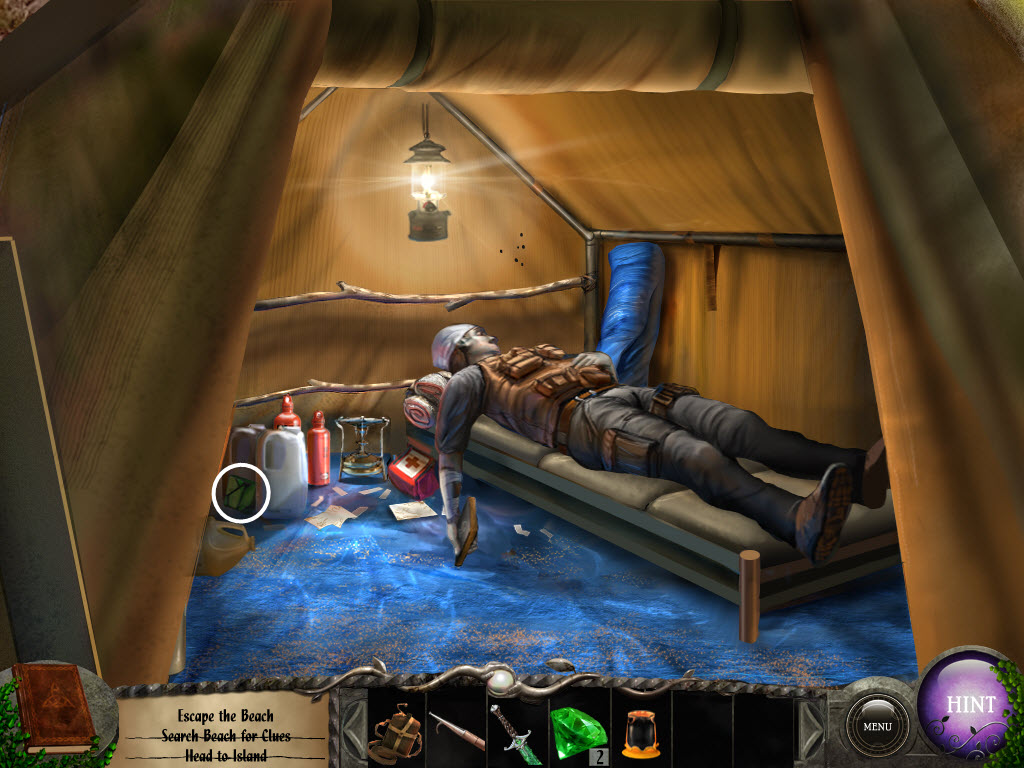
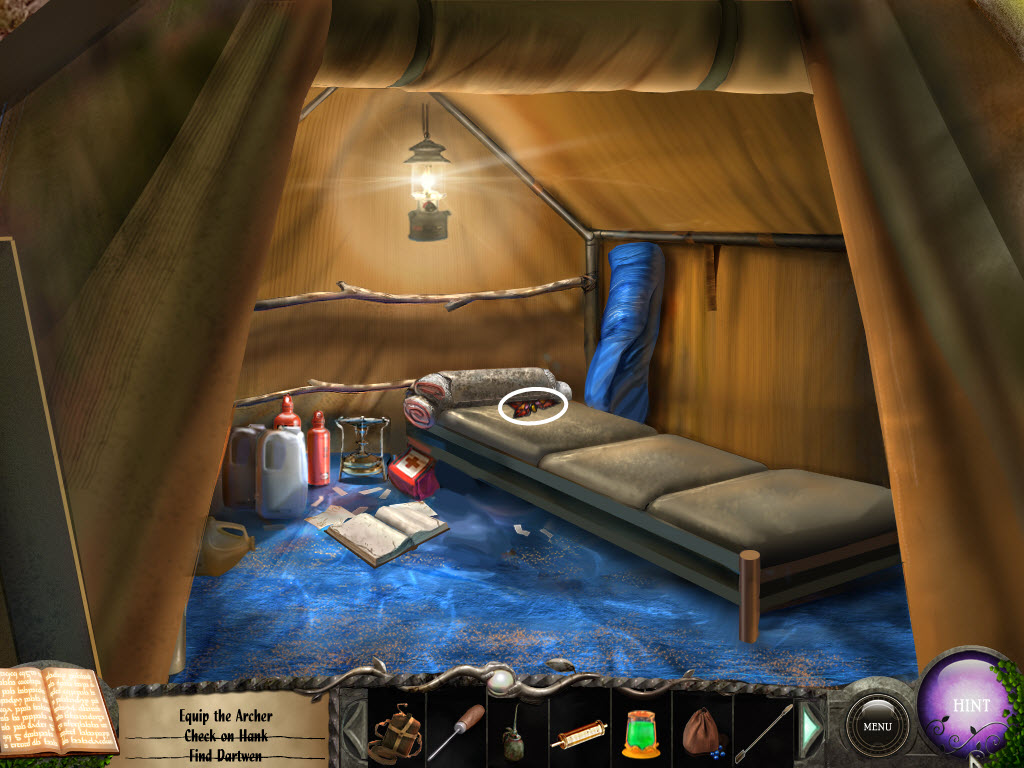
- return to the tent
- examine the journal
- pick up the Storybook Piece

- pick up the Red Leaf
- exit
- click the sparkles (fir pit) - hidden object area
- find the Dull Axe
- return to the temple
- use the Bow and Arrow on the statue
- talk to the Ghost
- examine the crumbled statue
- pick up the Lion Head
- pick up the Storybook Piece
- return to the canyon path
- examine the gate
- pull the handle
- enter the mine
- examine the table
- pick up the Yellow Leaf
- pick up the Storybook Piece
- go right
- talk to Mala
- pick up the Storybook Piece
- examine the grindstone
- use the Oil Can on the grindstone
- use the Dull Axe on the grindstone and receive Sharp Axe
- examine the shelf behind Mala
- pick up the Storybook Piece in the corner
- press the yellow button and take the Turn Key
- place the Turn Key on the side of the music box and turn it
- place the Metal Cylinder inside the music box
- go forward
- pick up the Storybook Piece
- examine the gold panel
- pick up the Storybook Piece
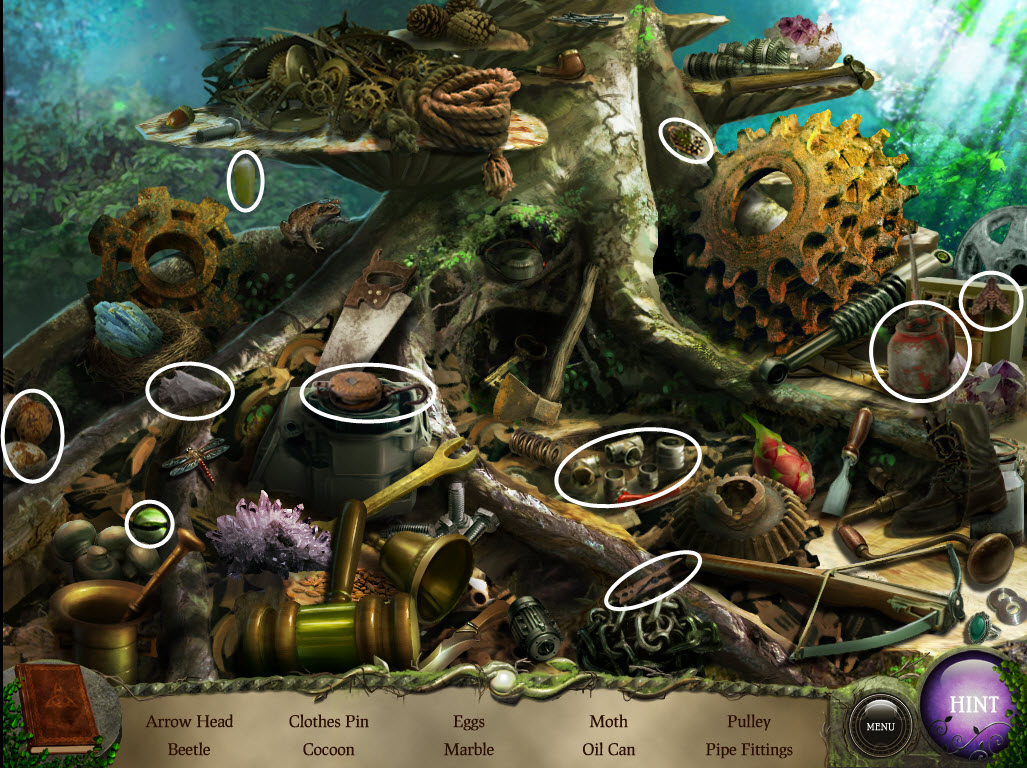
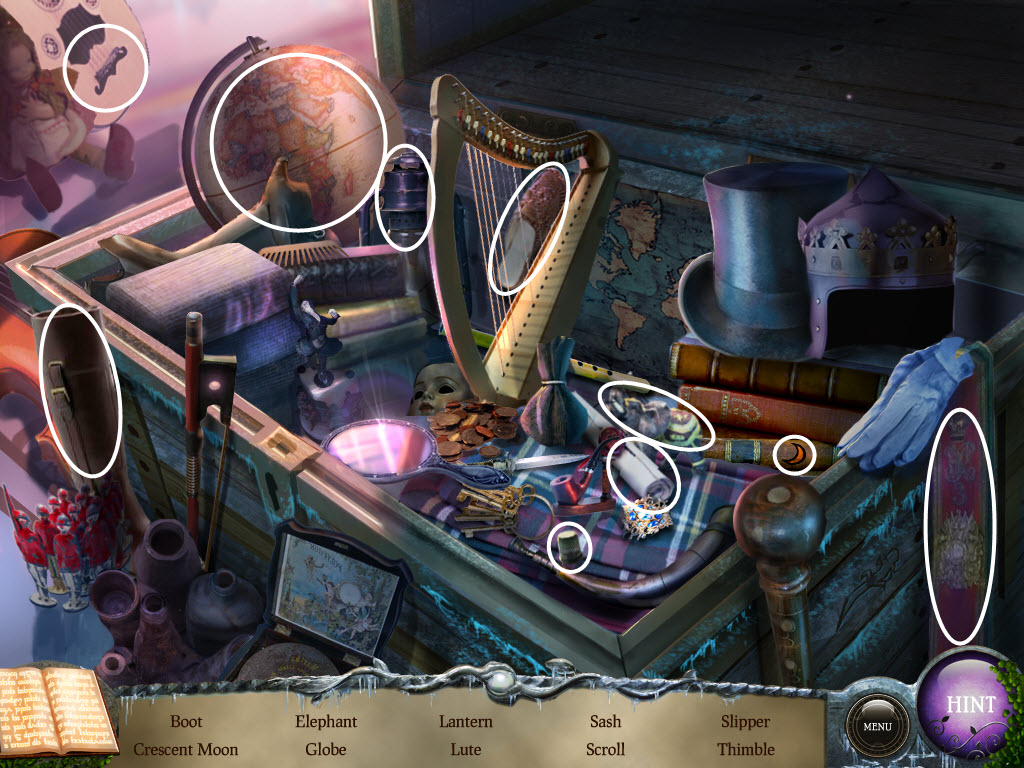
- click the sparkles (cart) - hidden object area
- find the Scuba Helmet
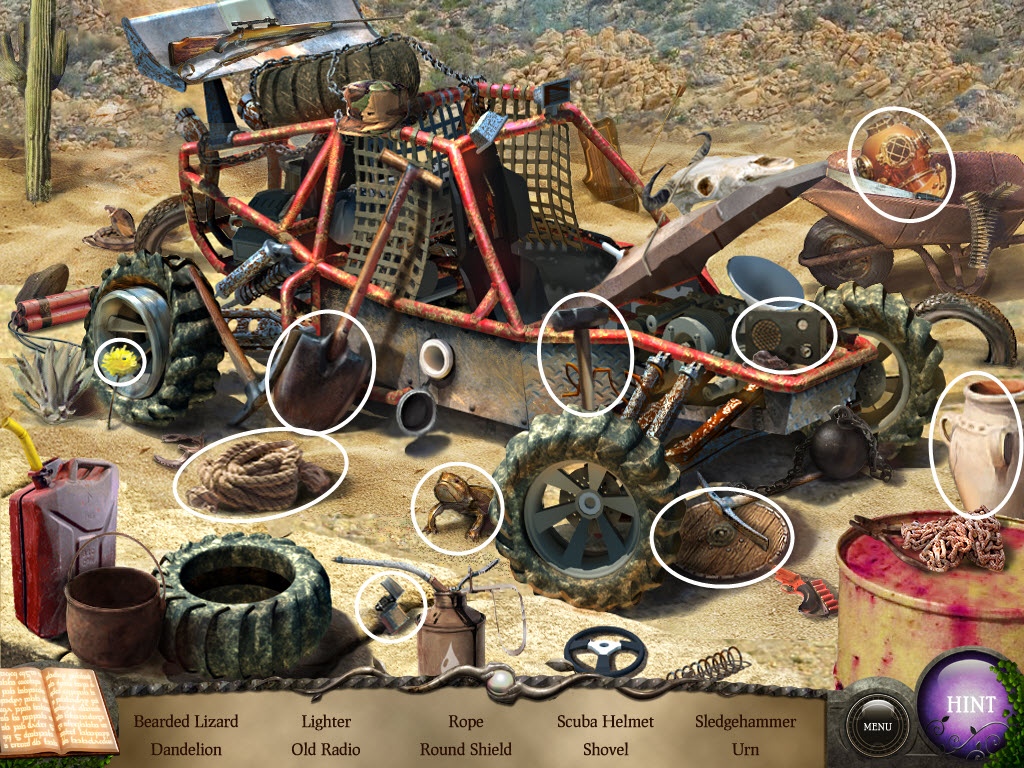
- return to the boat deck
- examine the scuba gear and replace the Scuba Helmet
- go left
- pick up the Storybook Piece
- continue down the ladder
- pick up the Storybook Piece
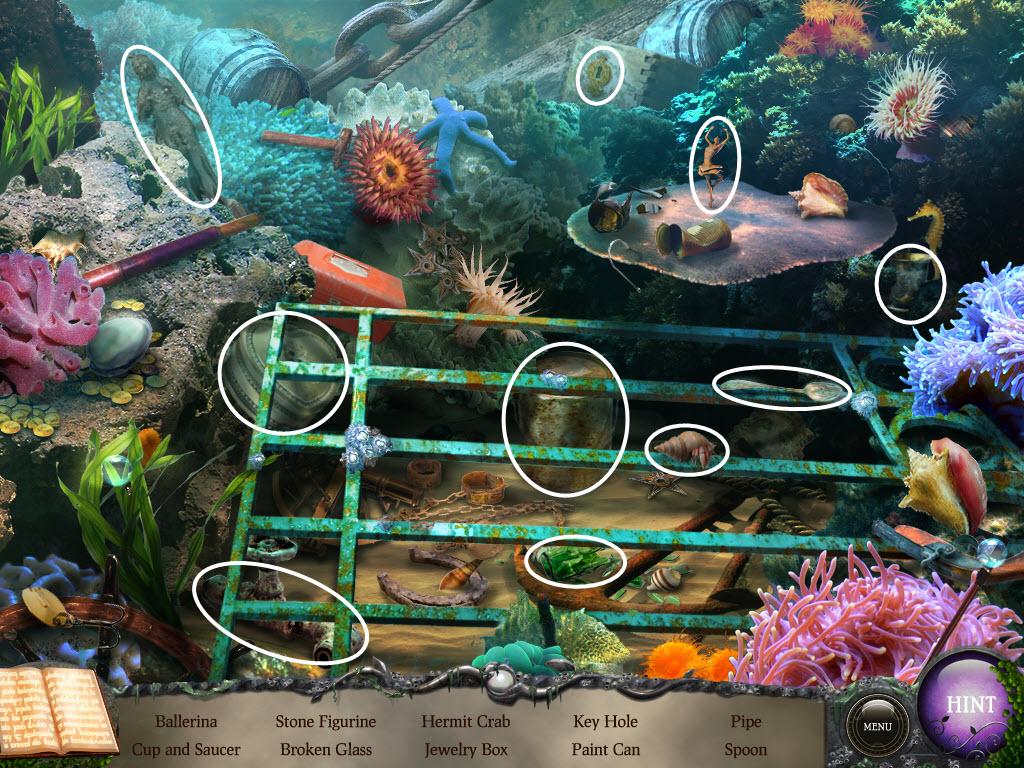
- click the sparkles (junk pile) - hidden object area
- find the Ballerina Top
- go forward
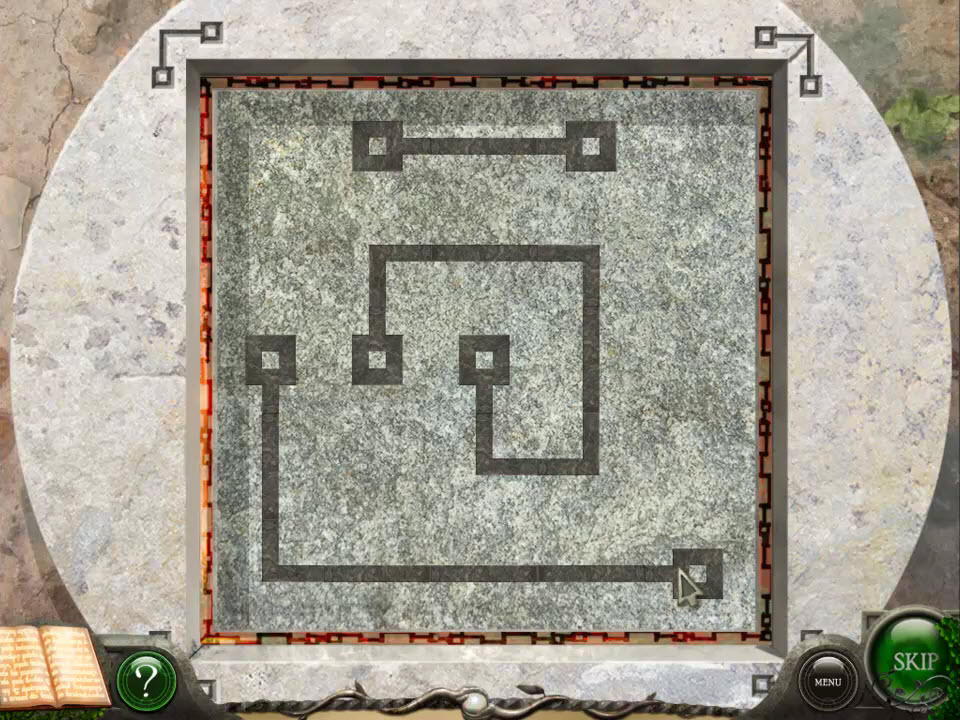
- Tile Puzzle
- use the Green Tile on the podium
- turn the tiles to create a picture
- see screenshot for solution
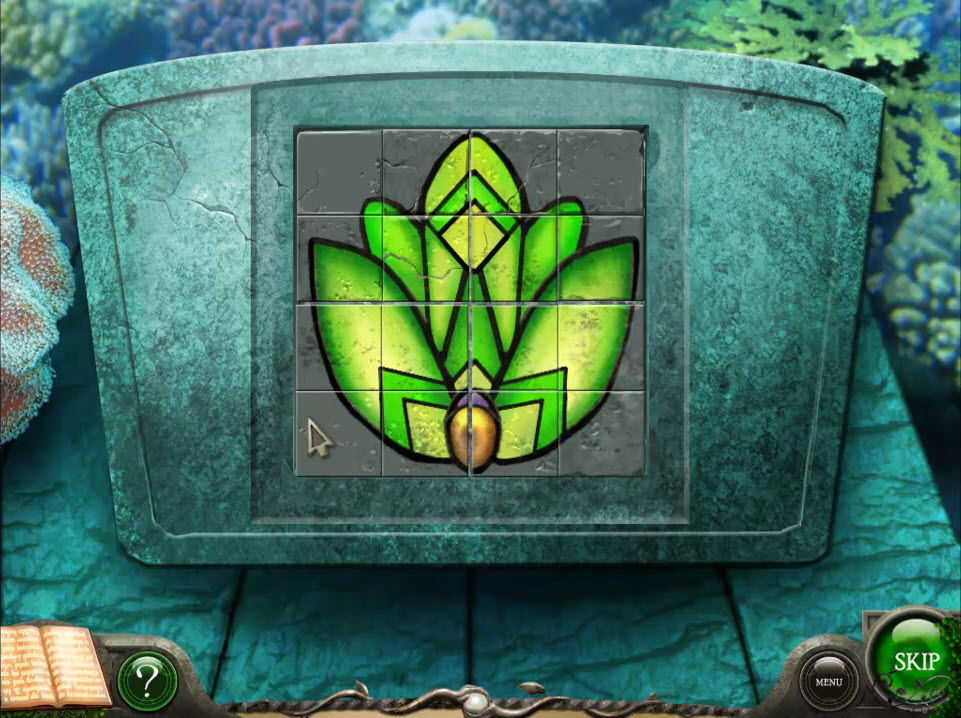
- take the Green Leaf
- pick up the Storybook Piece
- return to the camp
- examine the music box
- replace the Ballerina Top
- turn the key
- take the Telescope Lens
- go down
- examine the market door
- use the Sharp Axe on the market door three times
- enter the market
- pick up the Storybook Piece
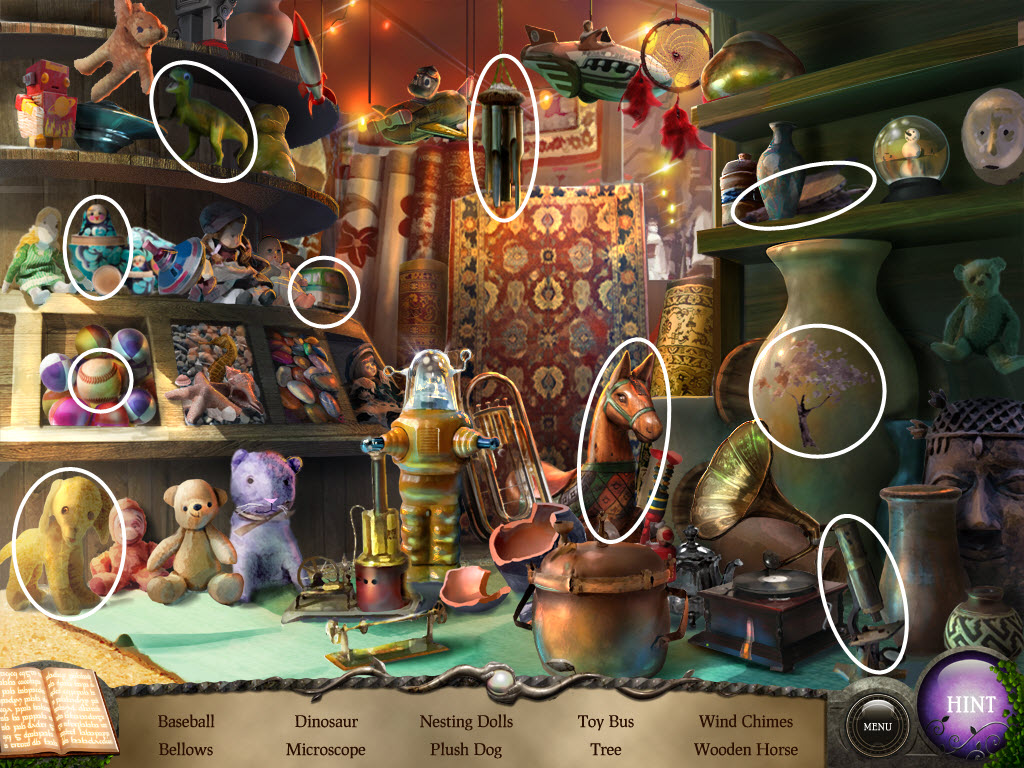
- click the sparkles (market floor) - hidden object area
- find the Bellows
- place the Bag of Stones on the pedestal
- Pedestal Puzzle
- pick up the colored stones and place them beside the symbols
- the clues are at the temple and the well
- see screenshot for solution
- examine the pedestal
- Pedestal Puzzle 2
- click the stones to move then
- you cannot click the outer stones
- the object is to match the patterns above starting with the left one
- puzzle solutions are random
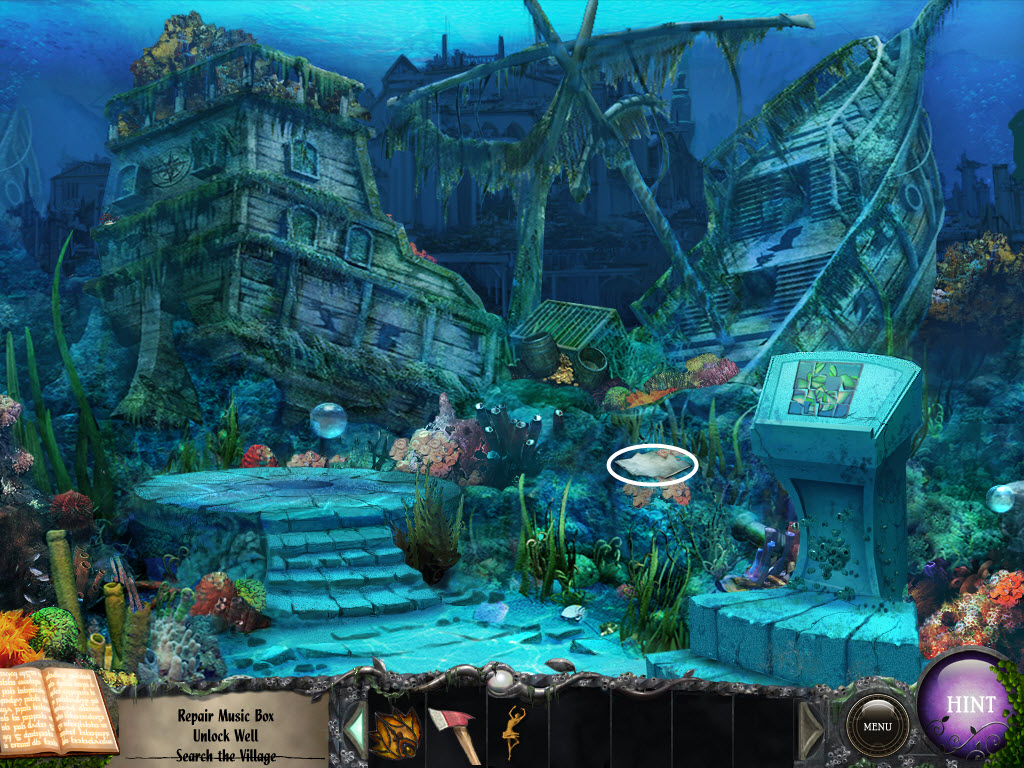
- return to the upper deck
- place the Telescope Lens on the telescope
- make a note of what you see
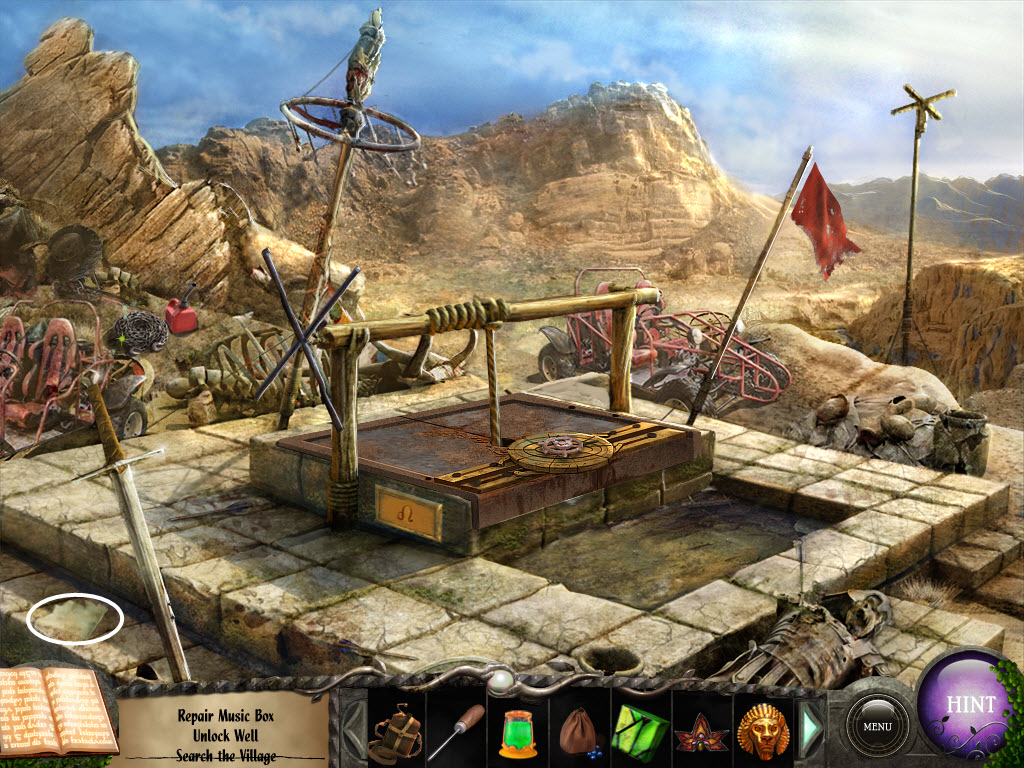
- return to the well
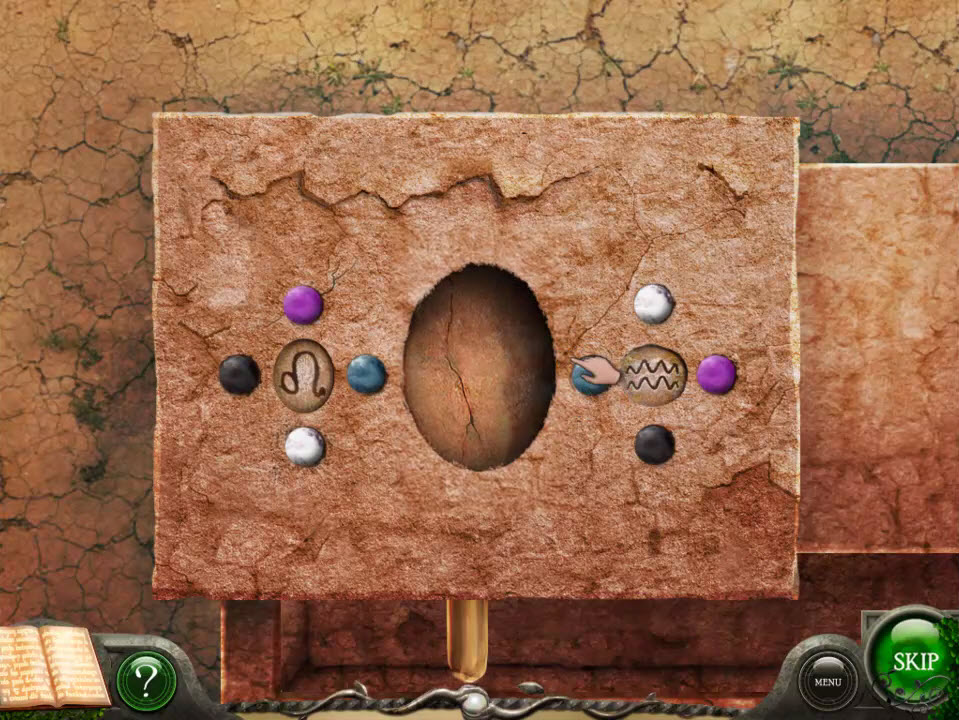
- examine the well
- Well Puzzle
- move the discs until the correct rune is highlighted
- use the clues from the telescope
- see screenshot for solution

- push the center
- turn the "X" on the side of the well
- click on the bucket
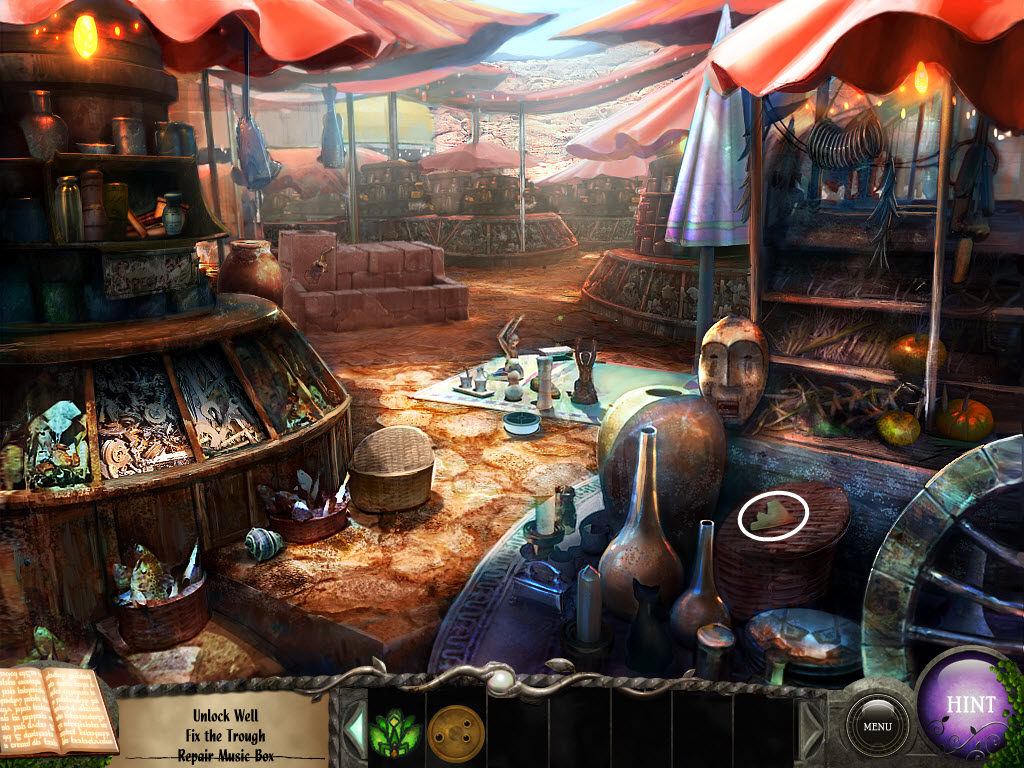
- examine the trough
- click on all the "stuff" in the trough to remove it
- pick up the Red Pearl
- go down
- talk to Mala
- return to the market
- examine the pedestal
- place the Red Pearl in the hand
- receive Bag of Dust
- return to the camp
- talk to Mala
- go forward
- use the Empty Canteen on the well
- receive Well Water
- return to the island dock
- examine the left lion head by the gate
- pour the Well Water into the basin
- return to the temple
- use the Empty Canteen on the fountain
- receive Temple Water
- return to the island dock
- examine the right lion head by the gate
- pour the Temple Water into the basin
- go through the gate
- pick up the Storybook Piece
- go forward
- pick up the Storybook Piece
- examine the poster
- take the Storybook Piece from behind it
- examine the locked door
- Courtyard Door Puzzle
- Step 1:
- change the dials to the correct roman numerals
- the clue is from the radio in the ship's cabin
- solution: Top (N) = V, Right (E) = IV, Bottom (S) = III and Left (West) = I
- Step 2:
- turn the discs to create a lions head - the center disc will right the lion on the bottom
- Step 3:
- pull the door knocker
- enter the throne room
- examine the podium
- make a note of the poem
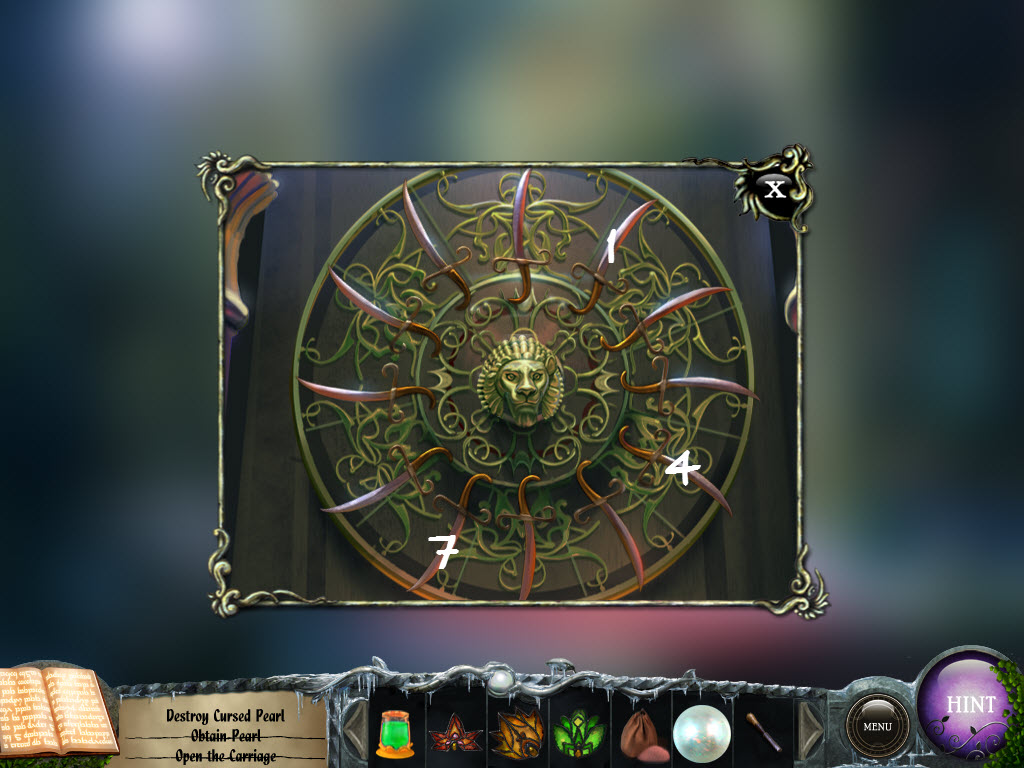
- examine the crest above the throne
- replace the Lions Head
- Crest Puzzle
- click on the swords according to the poem
- click 1, 7 and 4
- hint: the numbers match those on a clock
- see screenshot for solution
- go right
- pick up Storybook Piece
- go forward
- pick up the Storybook Piece off the bench
- pick up the Wood Stack
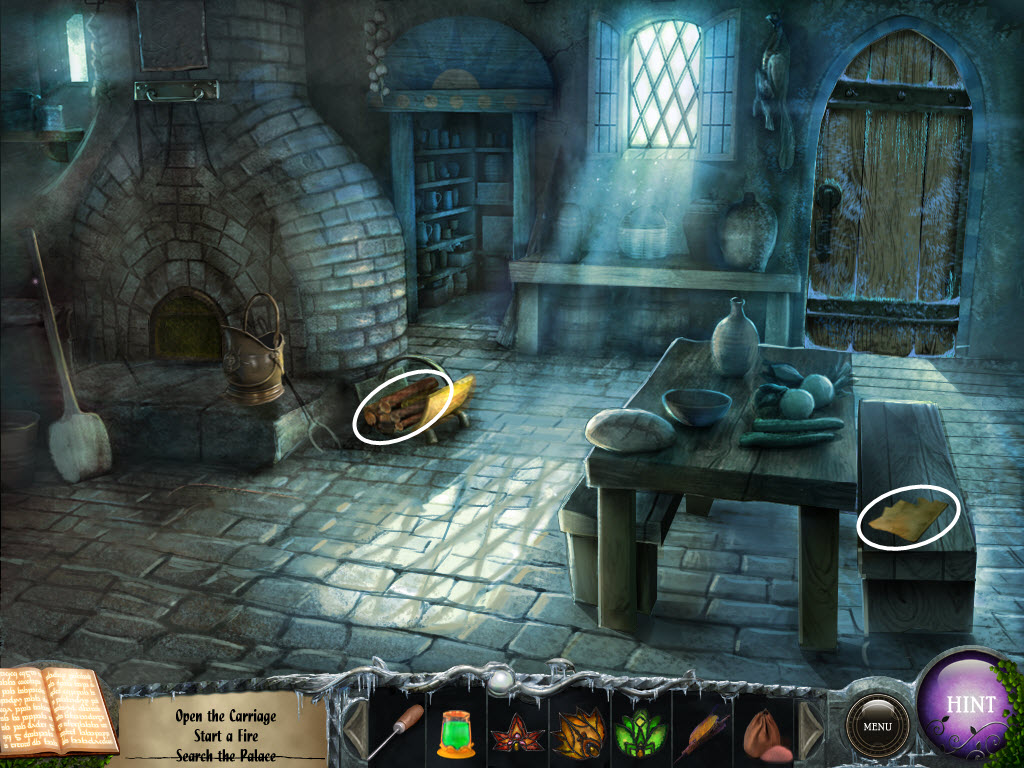
- examine the fireplace
- pick up the Storybook Piece
- open the fireplace door
- place the Wood Stack inside
- use the Bellows on the Wood Stack
- examine the fireplace again and close the flue
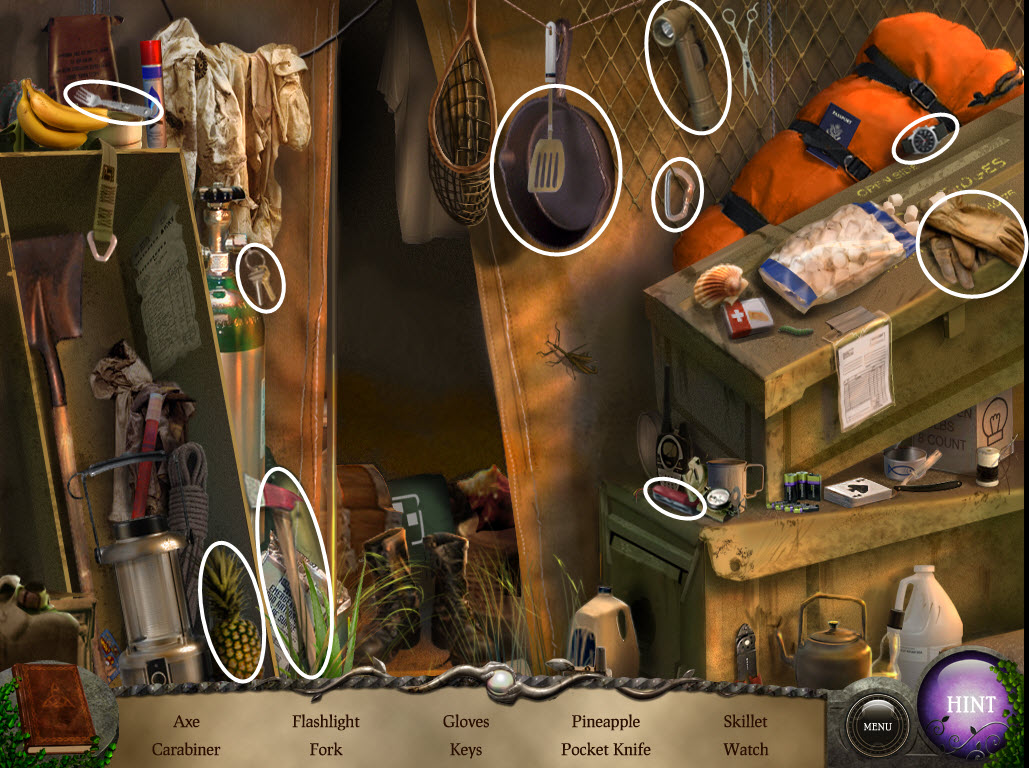
- click the sparkles (cupboard) - hidden object area
- find the Gloves
- open the door
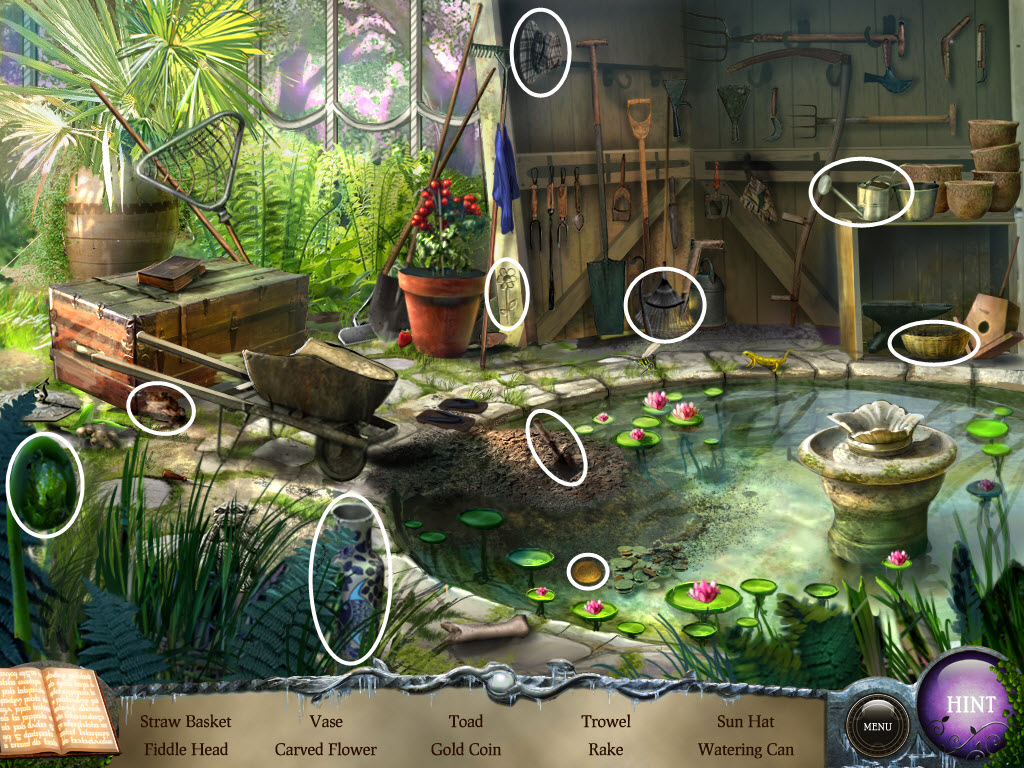
- enter the greenhouse
- pick up the Storybook Piece
- examine the table
- Table Puzzle
- rotate the shapes to link them
- see screenshot for solution
- take the Bedroom Key
- click the sparkles (pond) - hidden object area
- find the Trowel
- return to the kitchen
- examine the fireplace
- use the Trowel on the hot coals
- place the hot coals into the bucket beside the fireplace
- take the Brazier
- return to the hallway
- use the Bedroom Key on the door
- enter the bedroom
- pick up Storybook Piece
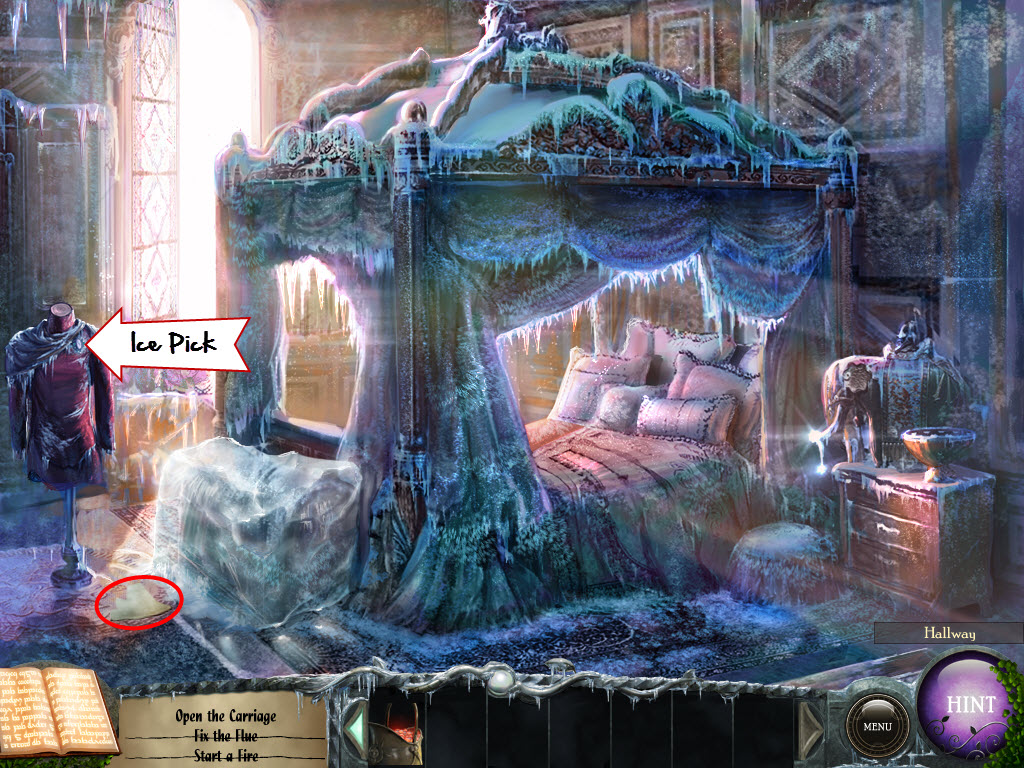
- examine the dress form
- use the Ice Pick on the frozen brooch
- take the Brooch
- return to the courtyard
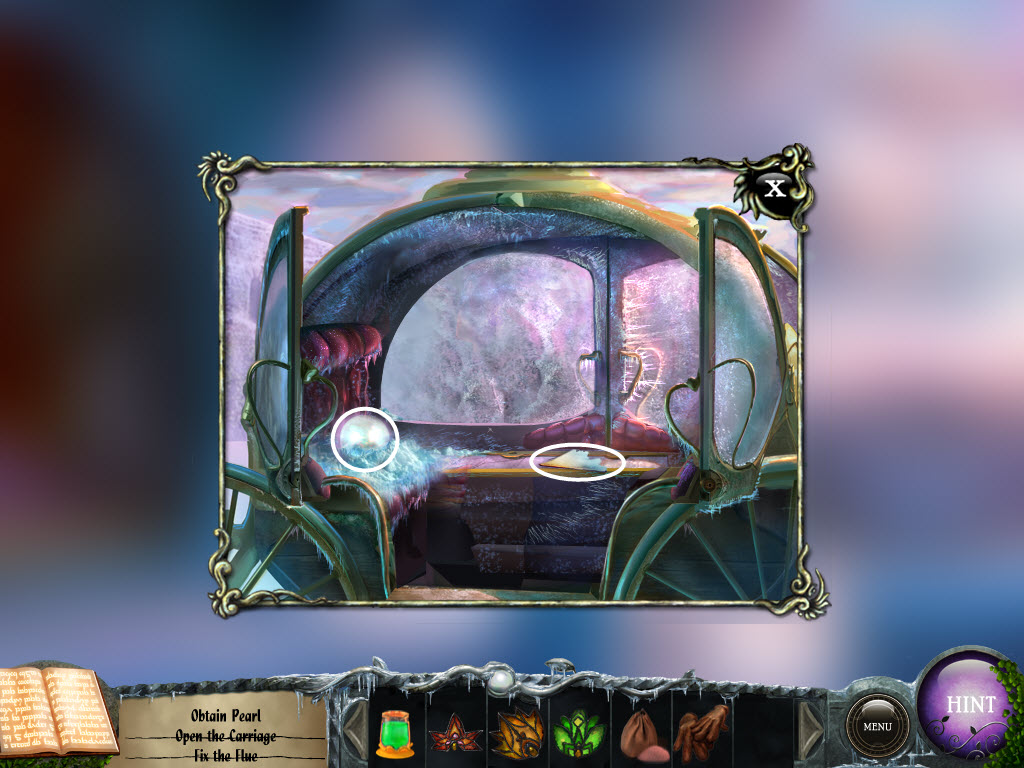
- examine the carriage
- use the Brazier (hot coals) on the carriage
- use the Brooch on the carriage door lock
- pick up the Storybook Piece
- use the Gloves to pick up the White Pearl
- click the sparkles (flowers) - hidden object area
- find the Chisel

- return to the throne room
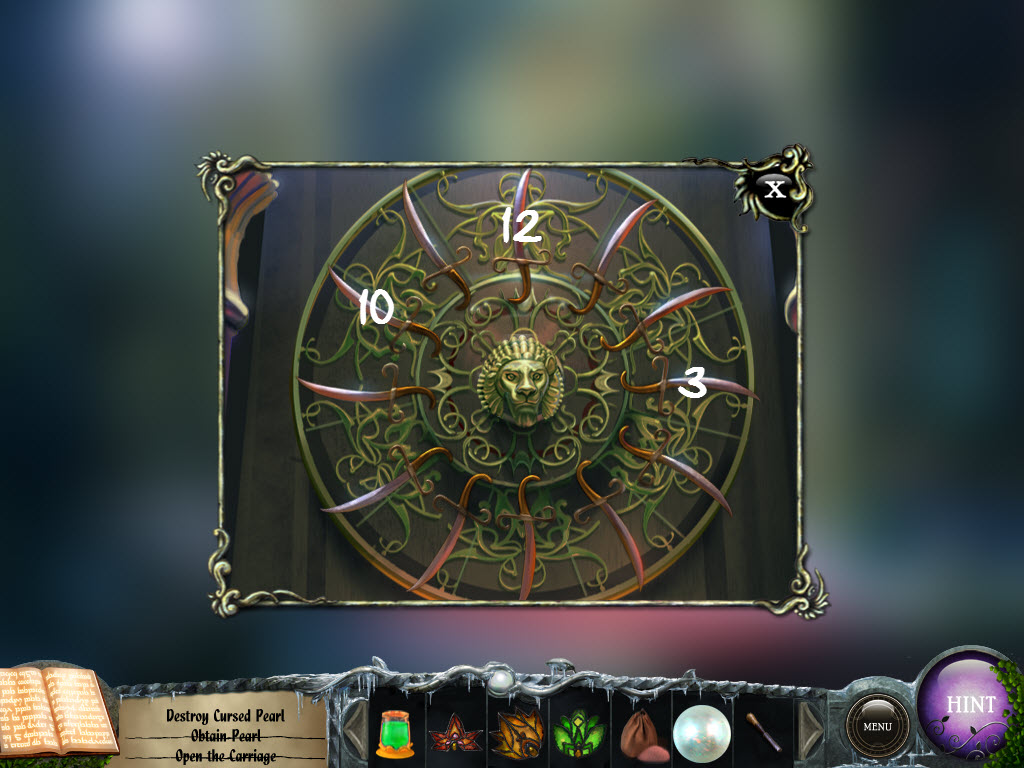
- examine the crest
- Crest Puzzle
- place the White Pearl in the lion's mouth
- click the swords in according to the poem
- click 3, 12 and 10
- see screenshot for solution
- pick up the Storybook Piece
- pick up the Crystal
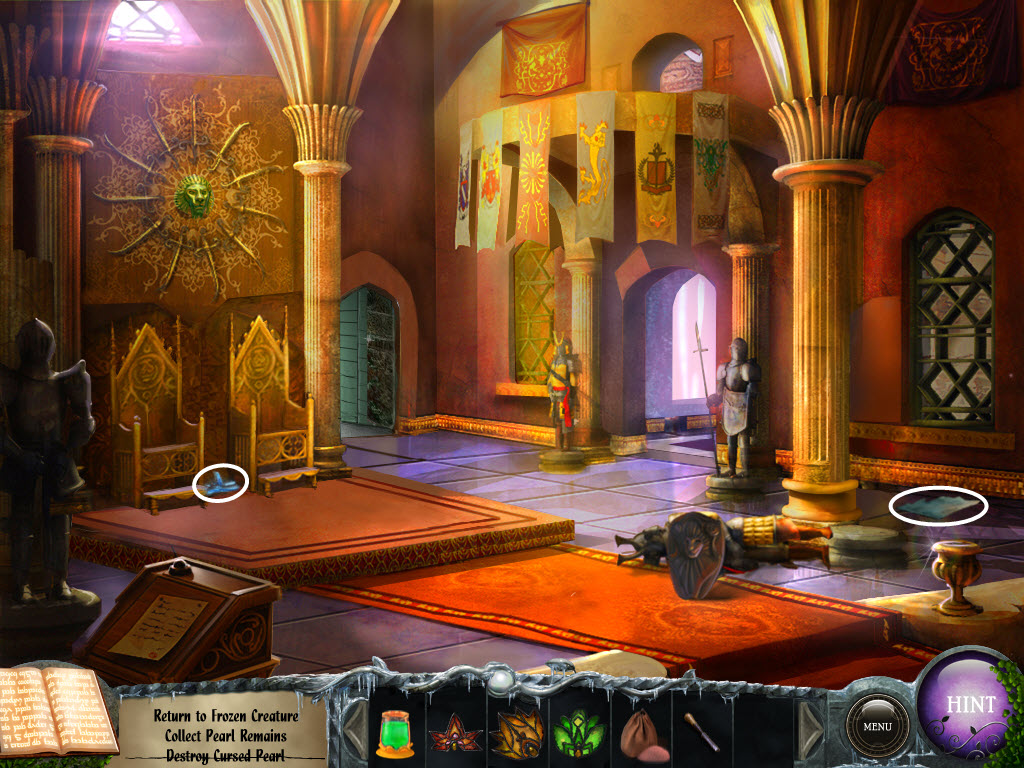
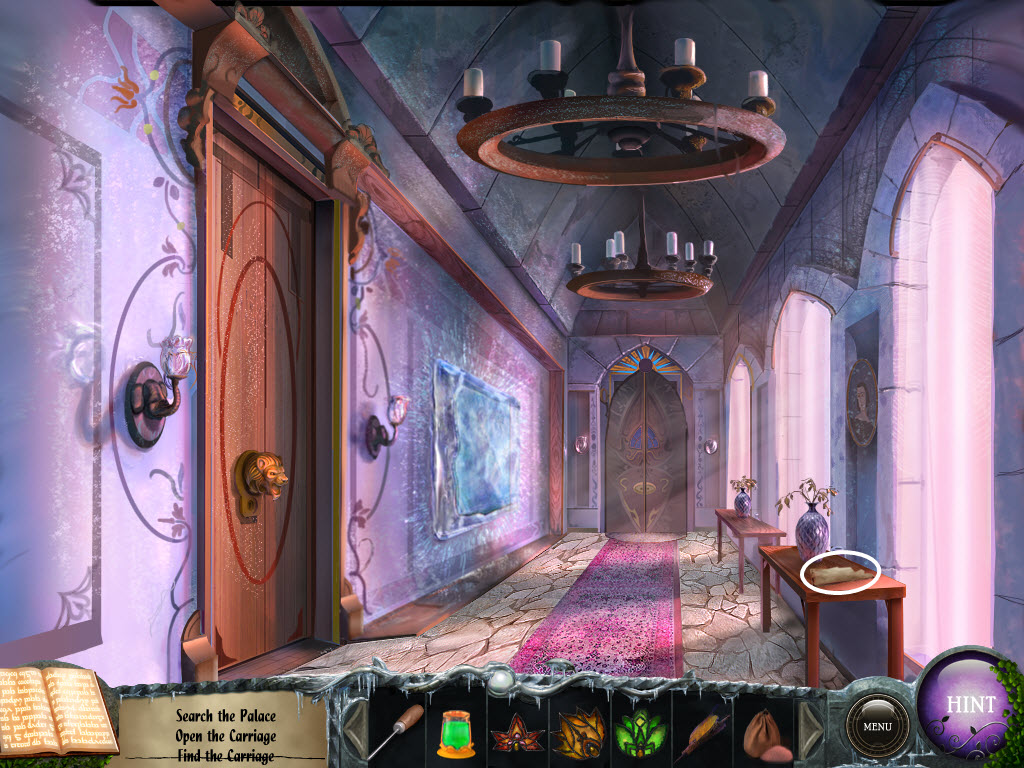
- return to the hallway
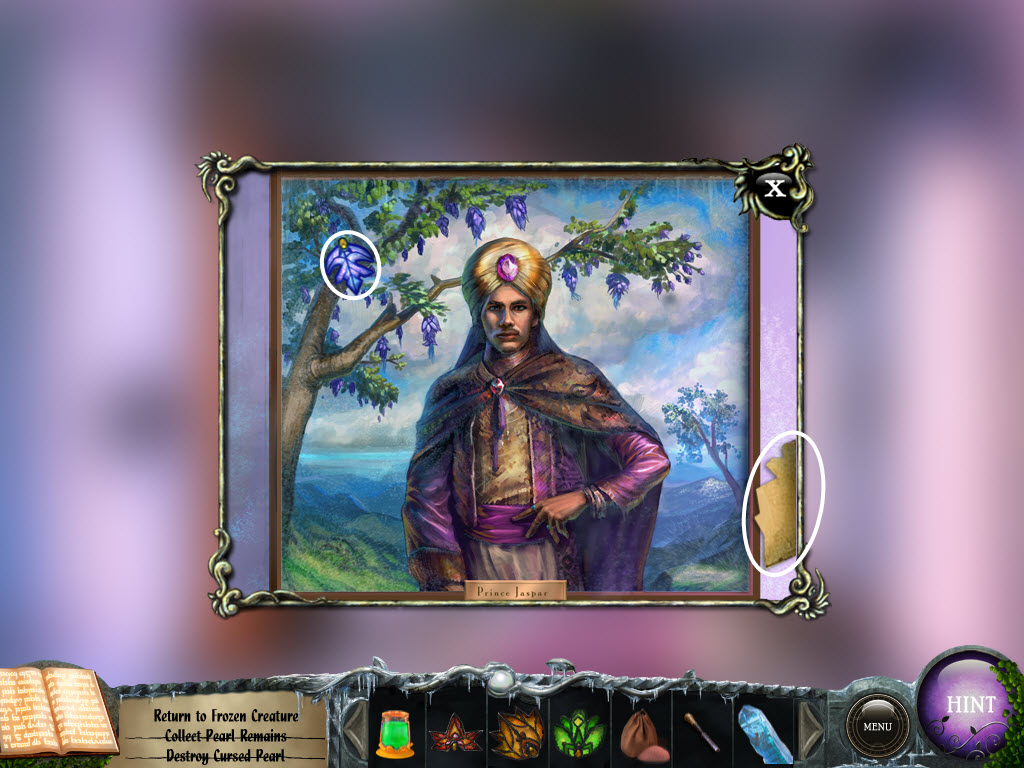
- examine the portrait
- take the Storybook Piece
- take the Violet Leaf
- enter the bedroom
- open the closed trunk
- click the sparkles (trunk) - hidden object area
- find the Music Scroll
- return to the kitchen
- examine the flue area
- use the Chisel on the cracked brick above the flue
- take the Blue Leaf
- return to the gate
- talk to the Satyr
- receive the Key
- return to the throne room
- go left
- pick up the Storybook Piece
- replace all the Leaves in the window
- examine the organ
- use the Key to open the organ
- place the Music Scroll on the organ
- examine the organ
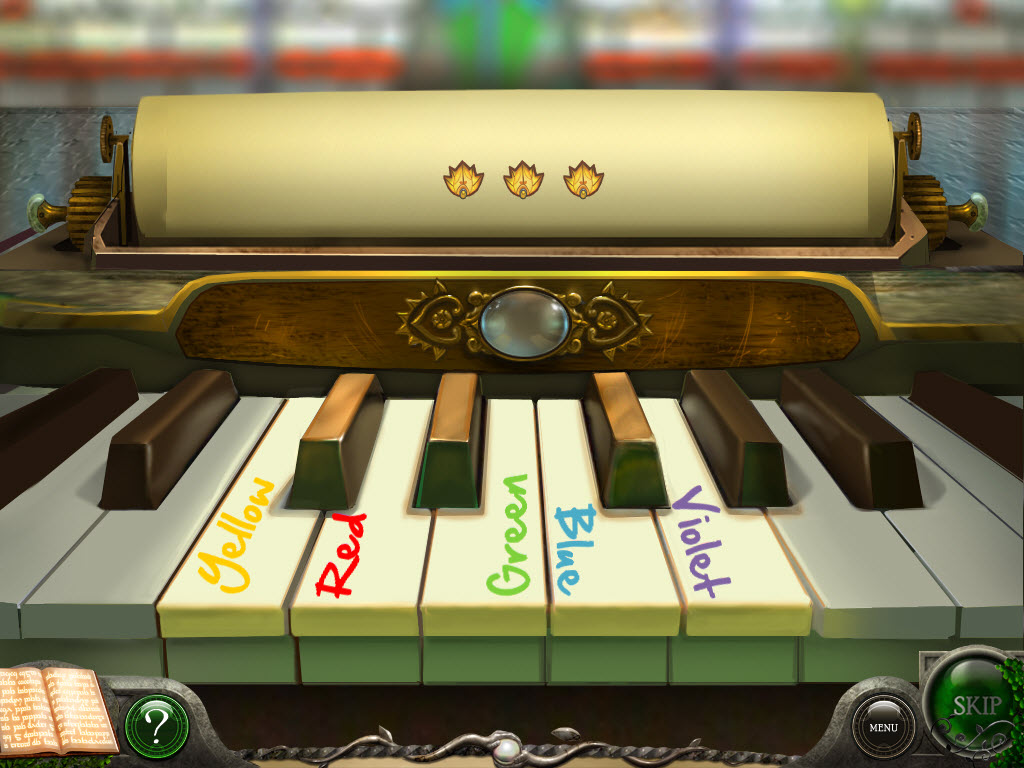
- Organ Puzzle
- each key stands for a different colored leaf
- play each key according to the music scroll
- see screenshot for the correct keys
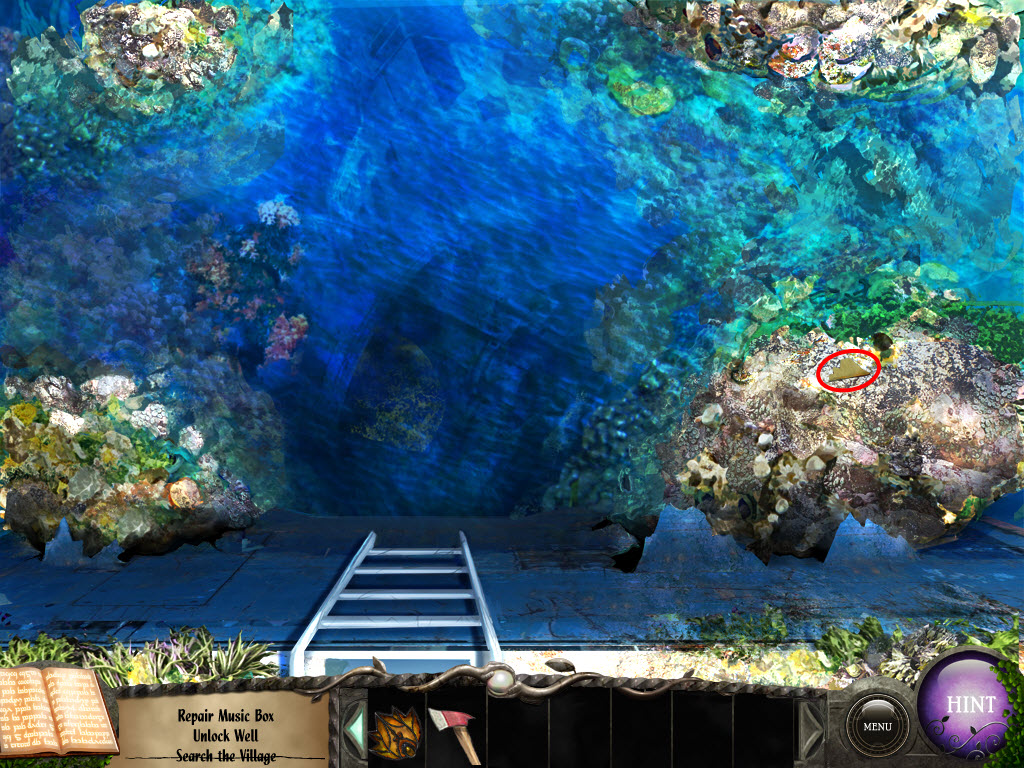
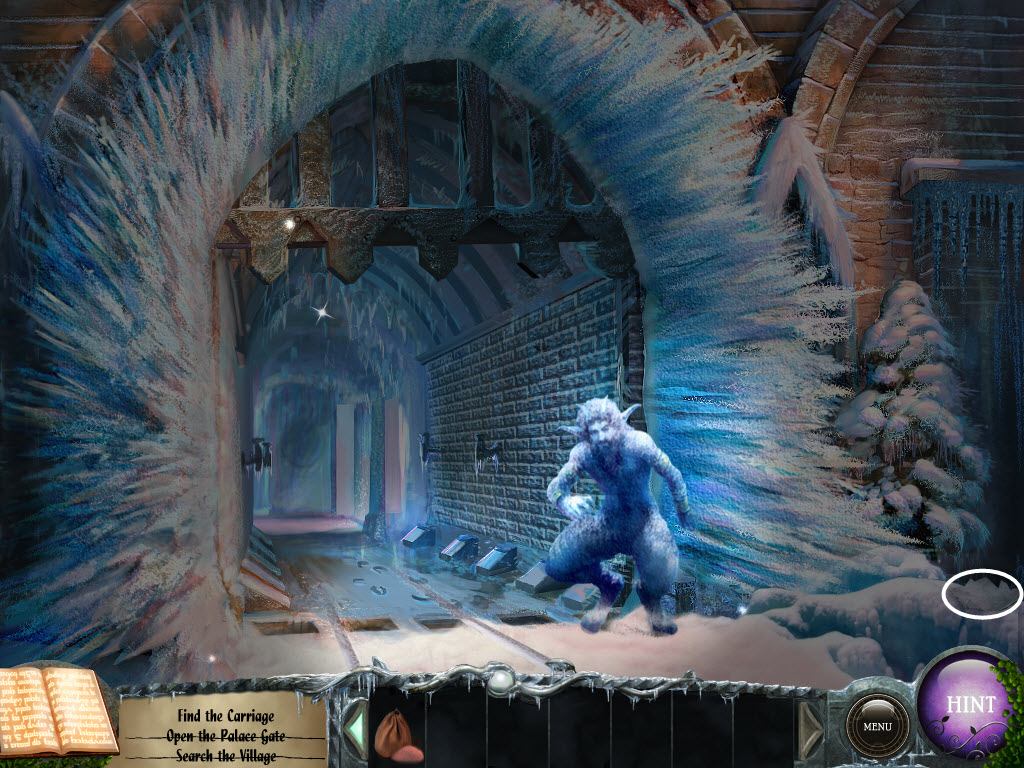
- return to the sunken ship
- enter the portal
- talk to Sirenia
- examine each of the four clams
- place the Bag of Dust in the left clam
- place the Green Liquid in the second from left clam
- place the Crystal in the far right clam
- return to the canyon path
- examine the wall
- Canyon Path Puzzle
- use the red and black circles to recreate the pattern that was on the rock beside the left clam
- drop the pieces onto the board from the top like you would in the game "Connect 4"
- see screenshot for solution
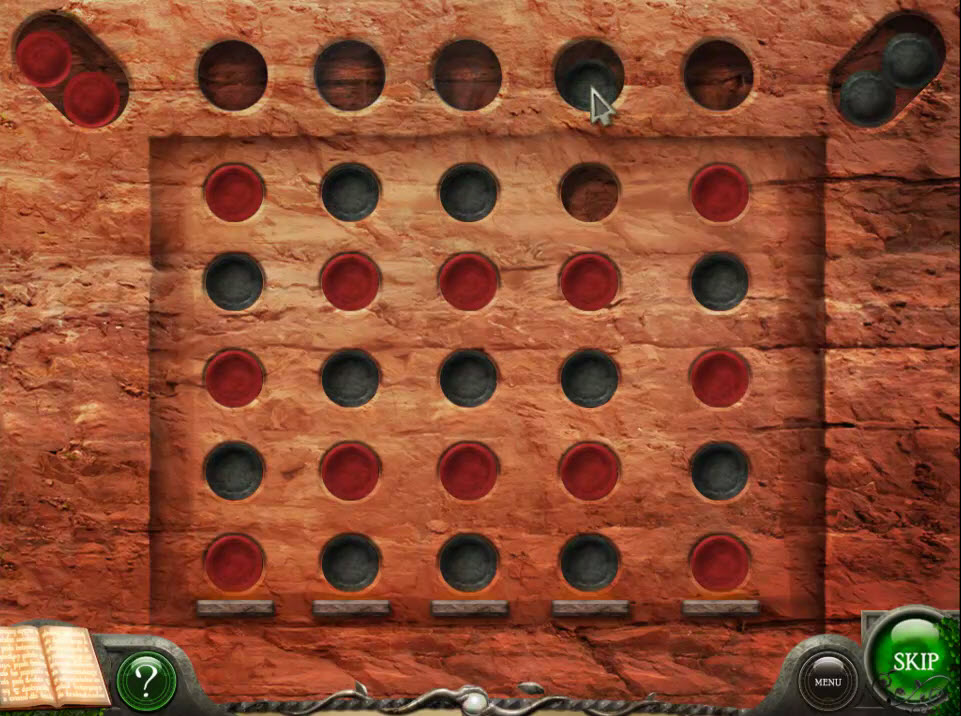
- receive Emblem
- return to the grotto
- examine the wall
- Grotto Puzzle
- light the candles to recreate the pattern next to the second from left clam
- a candle will burn out after 20 seconds
- to extinguish all the candles click on the symbol in the upper-left corner
- see screenshot for solution
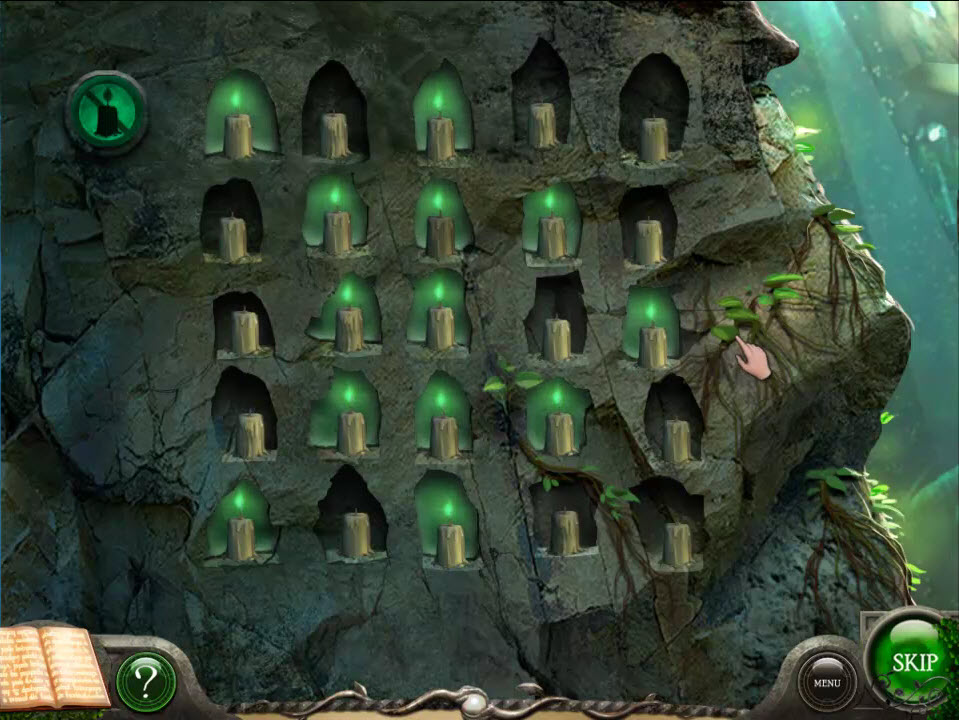
- receive Emblem
- return to the sanctuary
- examine the podium
- Sanctuary Puzzle
- flip the balls until you recreate the pattern next to the far right clam
- flipping one ball may flip another one
- see video for solution
- receive Emblem
- return to the underwater city
- examine the pedestal
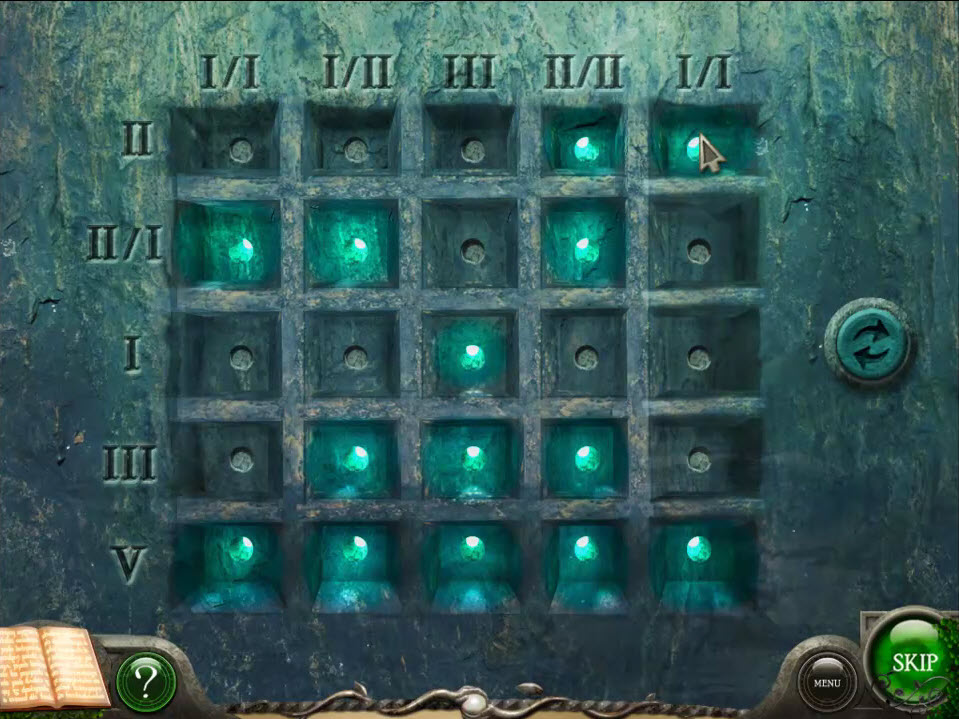
- Underwater City Puzzle
- place the Emblems into the three holes
- examine the squares
- light up the squares based on the roman numerals to the top and bottom
- if there is an I/I at the top - then two squares needs to be lit in that row but they cannot touch
- if there is a II/II on the left - then four squares to need to be lit across but each set of two cannot touch
- this is a classic "logic puzzle"
- see screenshot for solution
- return to the coral reef
- examine the clam
- Coral Reef Puzzle
- click on a bubble to pop it
- the object is to recreate the pattern you saw on the last puzzle
- a bubble will only stay popped for 20 seconds
- to start over click the button on the right side
- see screenshot for solution
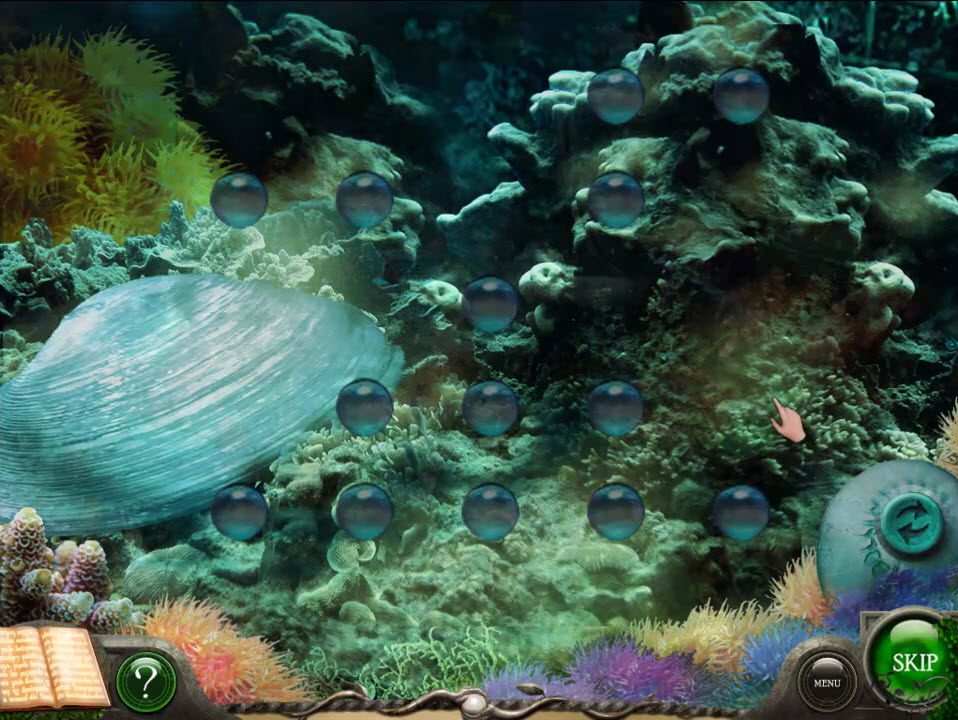
- take the Blue Pearl
- return to the underwater city
- examine the pedestal
- take the Stone Tablet
- return to the temple
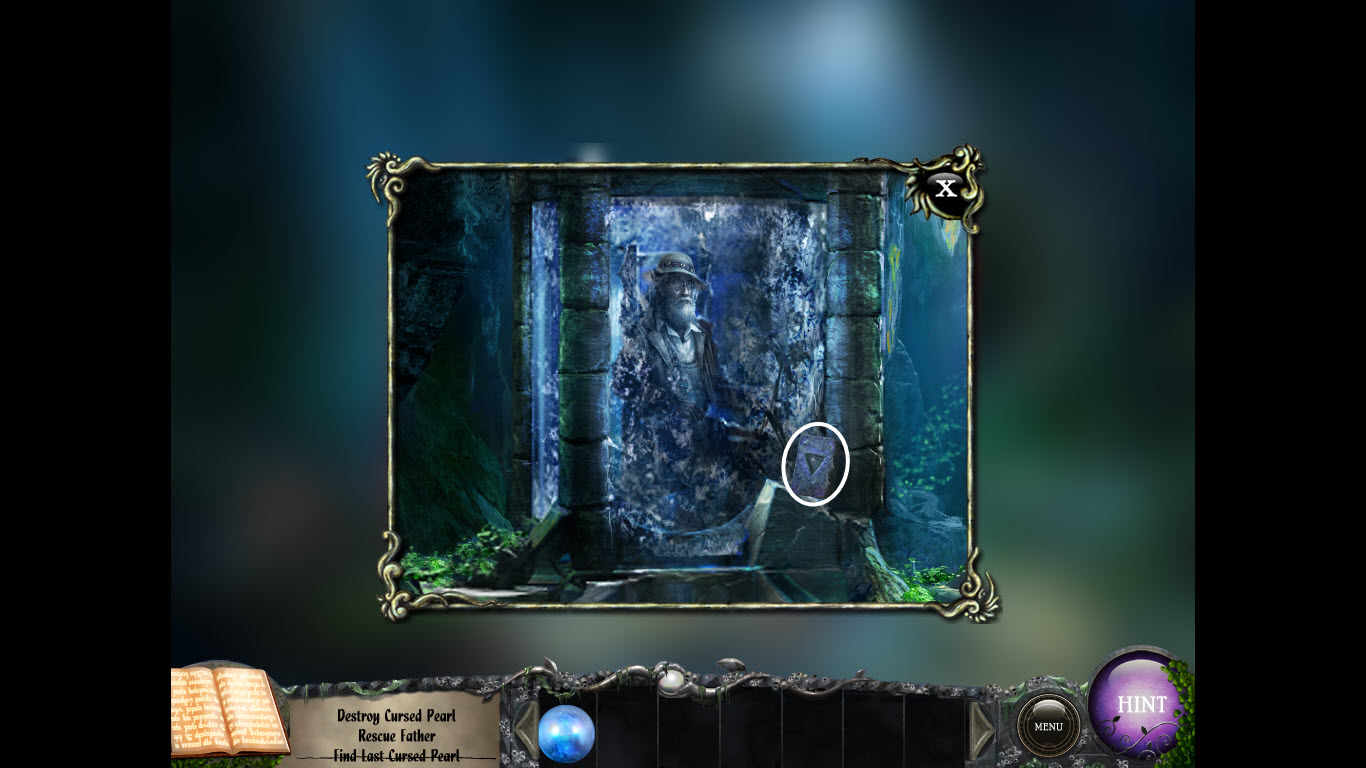
- examine the crumbled statue
- place the Stone Tablet inside the hole
- examine the grate
- place the Blue Pearl in the clam
- talk to your father
- receive the Key
- return to the coral reef
- use the Key on the locked chest
- take the Crown
- return to the temple
To be continued...!
Story Page Pieces (Storybook Pieces) Locations
Note: Location names are directly from the game. Location names appear next to your arrow when you get ready to move to a new location. All Story Page Pieces are listed here in order. Unless otherwise noted, they are generally on the ground, stairs, table, trees, etc.
- Boat Deck - Control Panel
- Island Dock - Inside Backpack
- Cabin - Glove Compartment
- Canyon Path
- Cove
- Tent
- Temple Stairs
- Temple
- Ladder
- Cliff Top
- Treetop
- Door
- Elevator
- Stairs
- Upstairs
- Tree Notch
- Grotto
- Altar
- Altar - Gramophone
- Tent - Journal
- Temple - Crumbled Statue
- Mine - Table
- Camp
- Camp - Shelf Corner
- Well
- Well - Gold Panel
- Reef
- Coral Reef
- Sunken Ship
- Market
- Gate
- Courtyard
- Courtyard - Wanted Poster
- Hallway
- Kitchen
- Kitchen - Fireplace
- Greenhouse
- Bedroom
- Courtyard - Carriage
- Throne Room
- Hallway - Portrait
- Sanctuary
Content(s) of this game guide may not be copied or
published on any other site without permission from Casual Game Guides.
©CasualGameGuides.com 2006 - 2021