Nightmare Realm
The guide Nightmare Realm includes complete solutions for all puzzles, screenshots for most areas, and text covering every aspect of the game. Save your daughter from The Extractors by entering her paintings.
Images
©Big Fish Games and Lesta Games & Film
Overview: You find
yourself in a car crash after your daughter's birthday party. A dark
force appears and then vanishes. Four years later on your daughter's
7th birthday it returns. Using your daughter's drawings, can you save
her from The Extractor?
Hints: These are unlimited, but must refill.
Journal: This provides ongoing commentary throughout the game. It also includes a Map and Help section.
Map: This will show you where you are, where you've been, and where there are actions available.
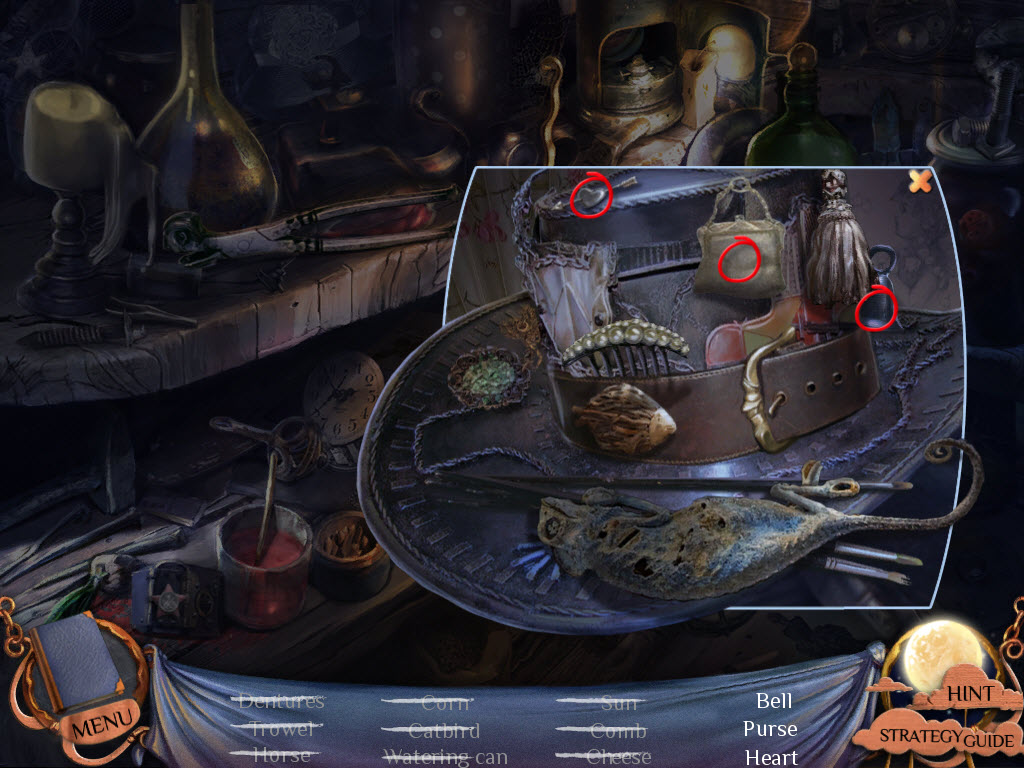
Hidden Objects: Items in yellow mean you need to interact with something else in order to locate them.
Car Wreck
Hallway
Emily's Room
Emily's Room
Foyer
Stairway
Archway
Second Floor
Second Floor
Desert
Desert Cave
Desert Ledge
Robot
Witch Doctor
Desert
Desert Ledge
Ledge
Robot
Foyer
Second Floor
Winter Forest
Factory Gate
Factory Entrance
Factory
Factory Gates
Witch Doctor
Robot
Forest
Hallway
Factory Entrance
Path to Factory
Hints: These are unlimited, but must refill.
Journal: This provides ongoing commentary throughout the game. It also includes a Map and Help section.
Map: This will show you where you are, where you've been, and where there are actions available.
Hidden Objects: Items in yellow mean you need to interact with something else in order to locate them.
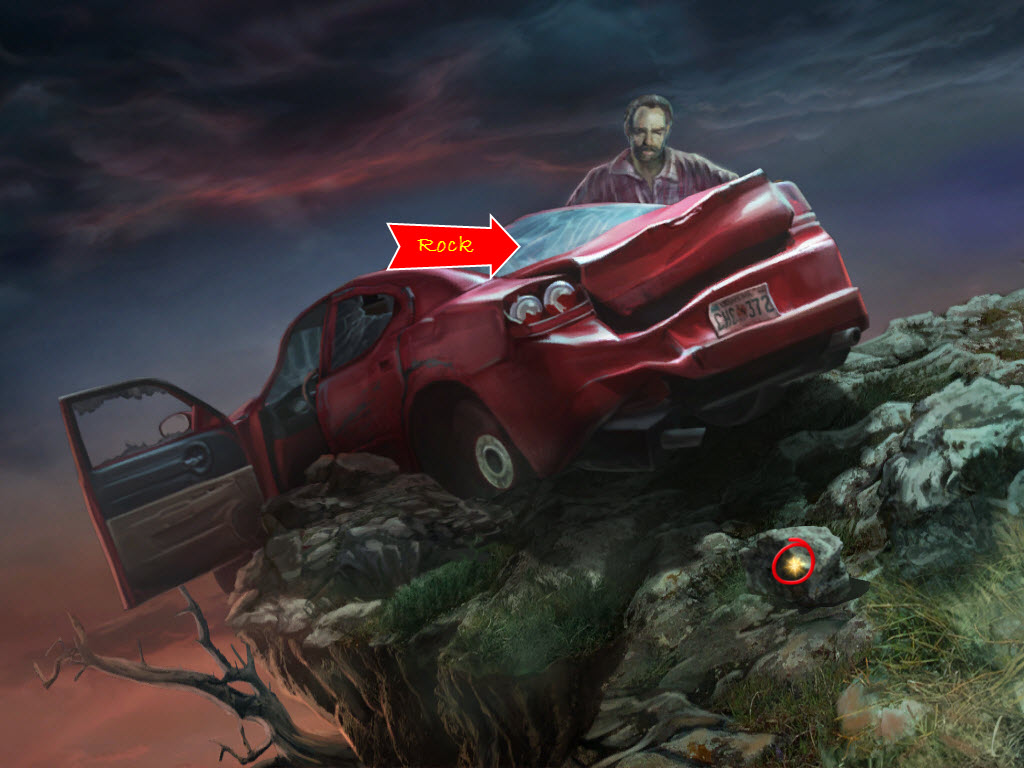
Car Wreck
- move forward towards the car
- move forward again so you are at the car
- pick up the Rock
- examine the back windshield
- use the Rock to break the windshield
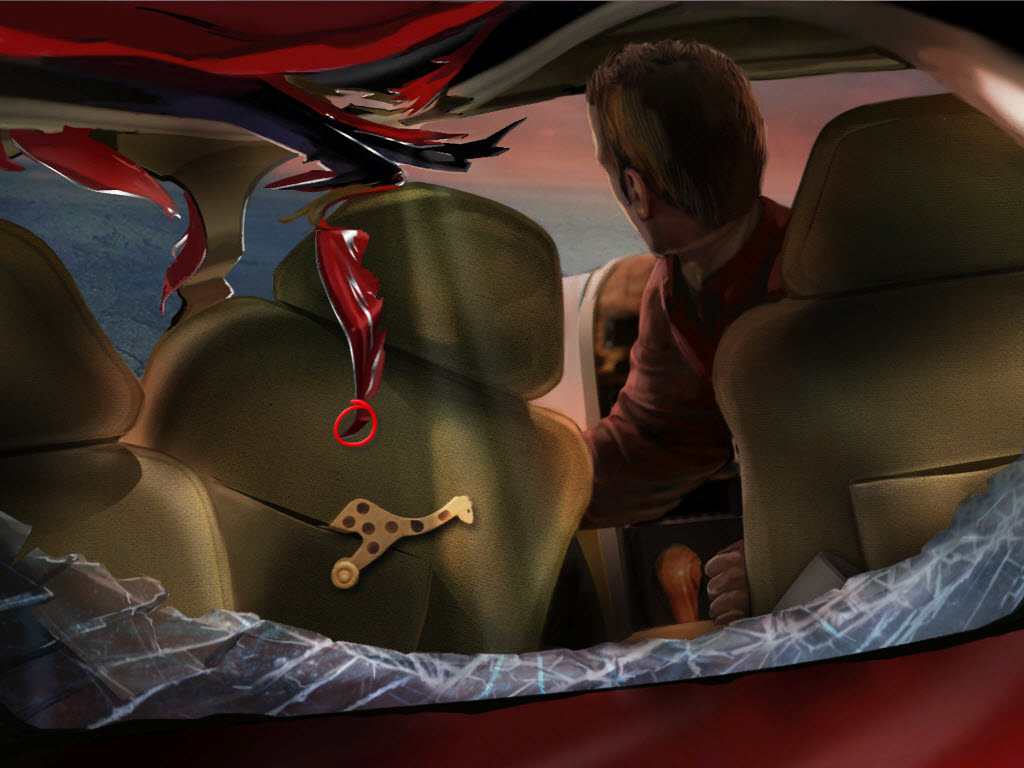
- take the Sharp Piece of Metal
- go backwards twice
- examine the babies seatbelt
- use the Sharp Piece of Metal to cut the seatbelt
- receive Rope
- go forward to the car
- examine the green glow
- take the Mysterious Ring
- examine the car
- use the Rope on David
Hallway
- talk to Emily
- go left onto the porch
- pick up the four Paintings
- enter the house
- examine the frame on the wall
- go left into Emily's room
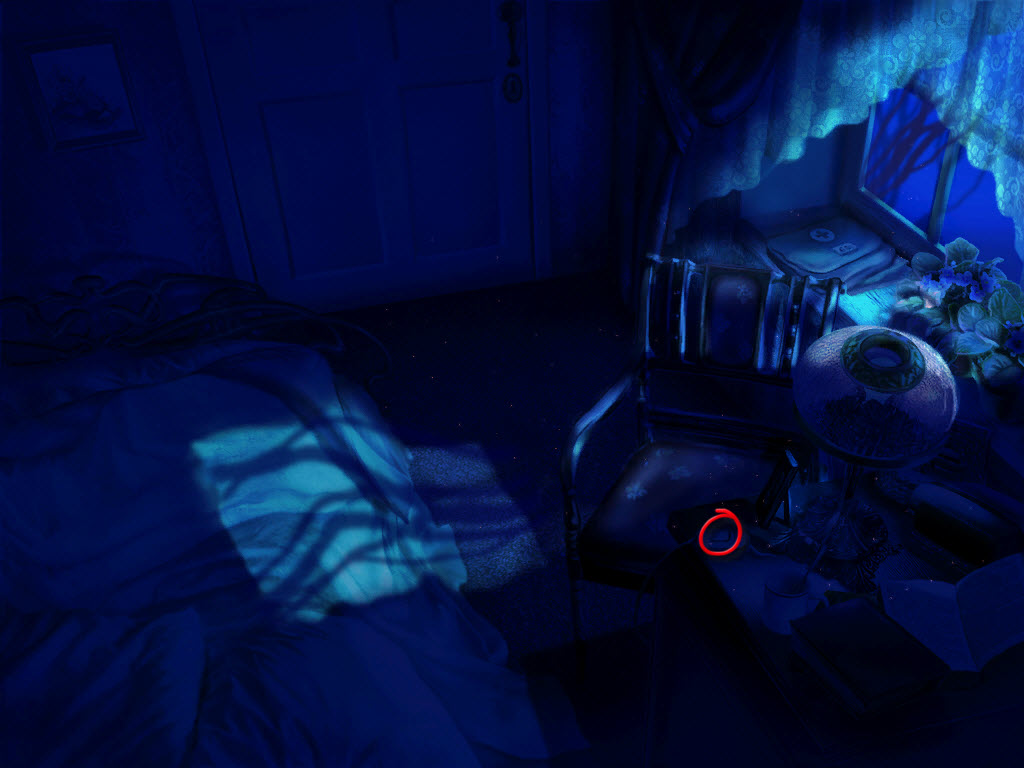
- examine the bedside table
- open the door
- take the Photograph
- take the Push Pins (red box)
- return to the hallway
- examine the frame on the wall
- Painting Puzzle (Easy)
- read the inscriptions where the missing paintings are
- place the correct painting in the empty spots
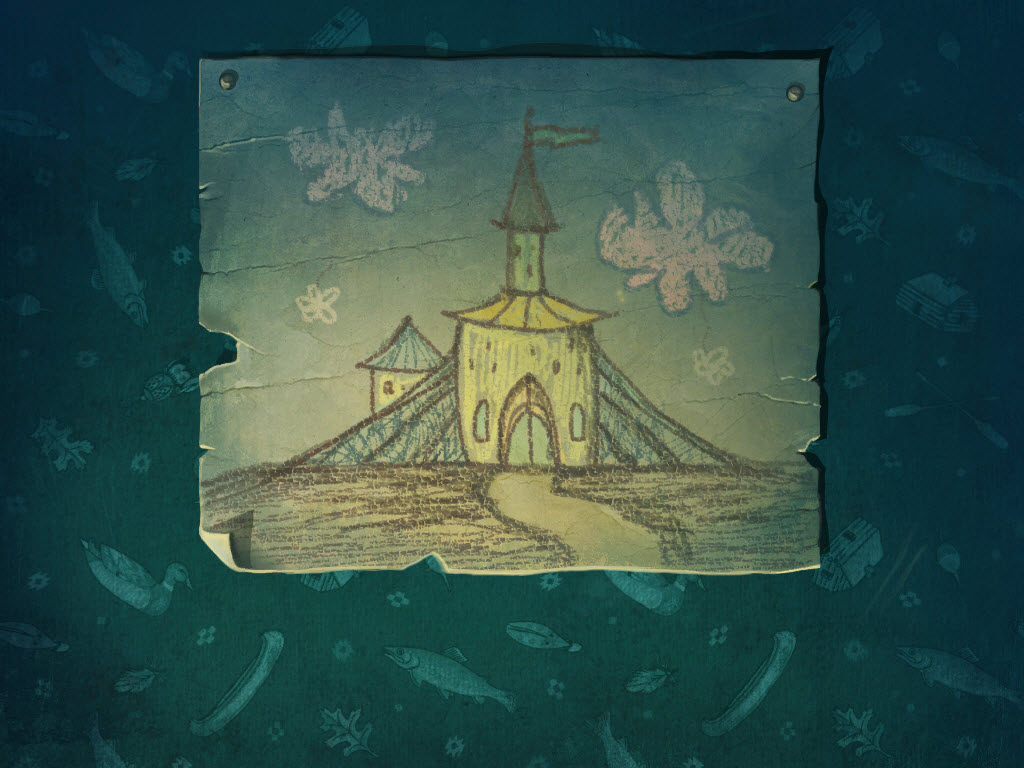
- solution (highlight to see): #1 - Drawing of Magic Creatures; #3 - Drawing of Sword and Shield; #6 - Drawing of the Sun; #7 - Drawing of a Strange Looking Place.
- go into Emily's room
- talk to Emily
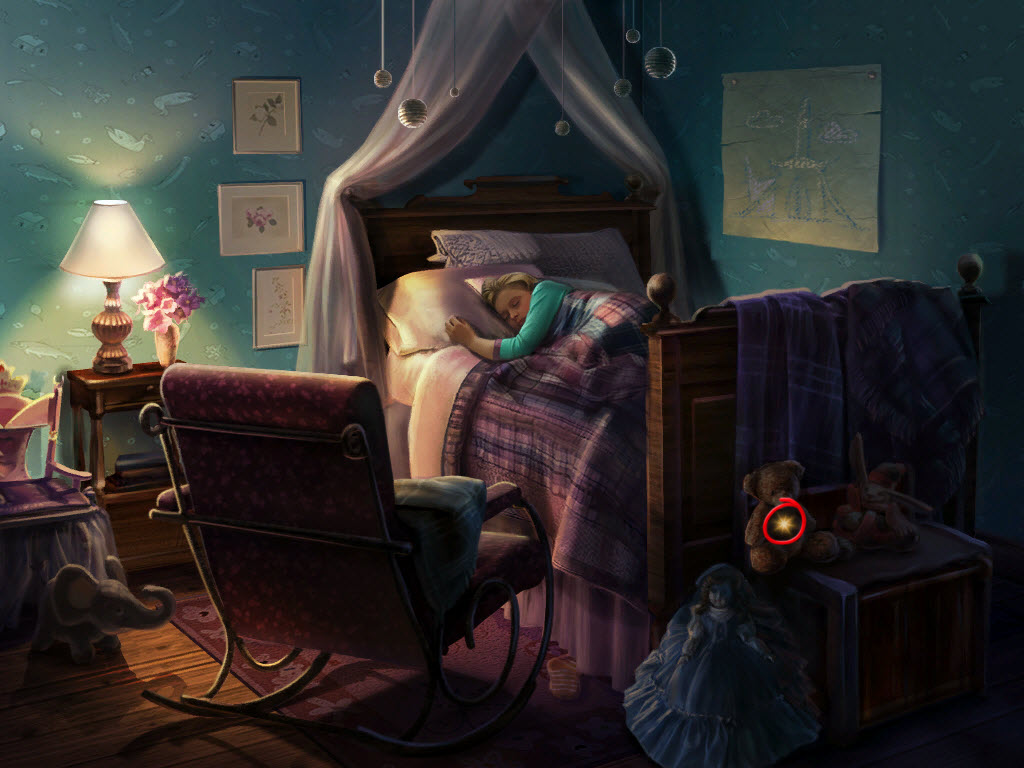
- pick up the Teddy Bear
- give the Teddy Bear to Emily
- return to the hallway
- talk to Peter
- go upstairs
- turn on the lamp
- answer the door
- talk to Peter
- go to Emily's room
Emily's Room
- try the door handle
- look through the keyhole
- go upstairs
- examine the paintings
- enter the bedroom
- examine the portrait of Emily
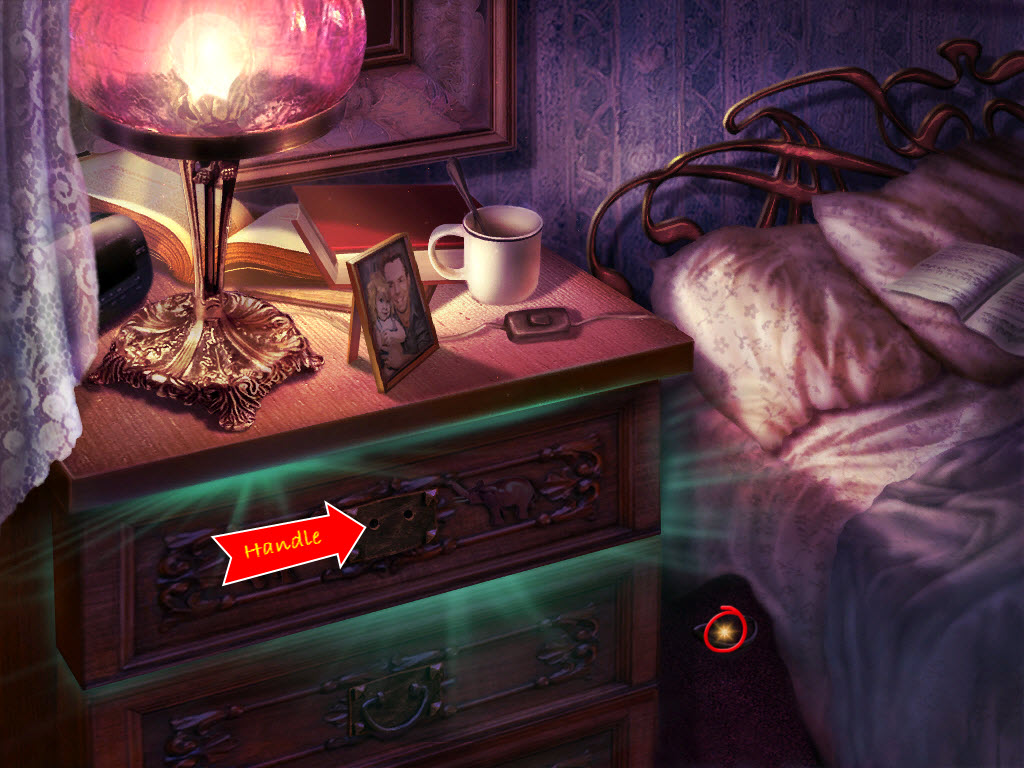
- examine the bedside table
- move the slipper under the bed
- pick up the Handle from the floor
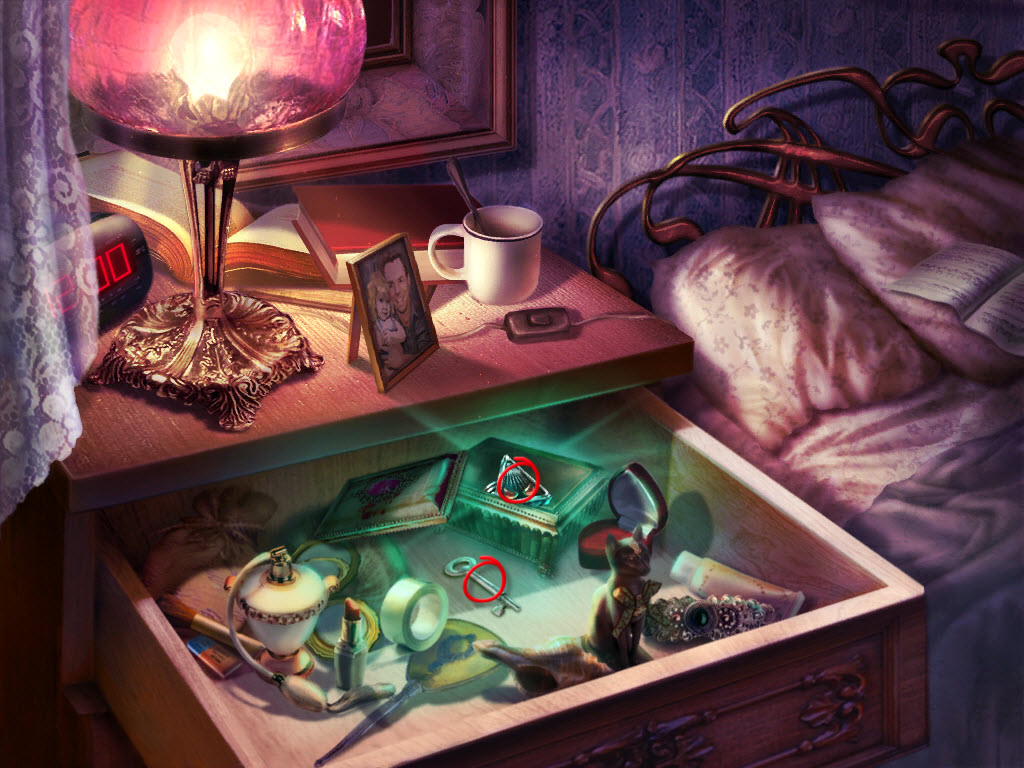
- use the Handle on the drawer
- take the Key
- open the box
- take the Mysterious Ring
- go back to Emily's room
Emily's Room
- use the Key on the door
- enter the room
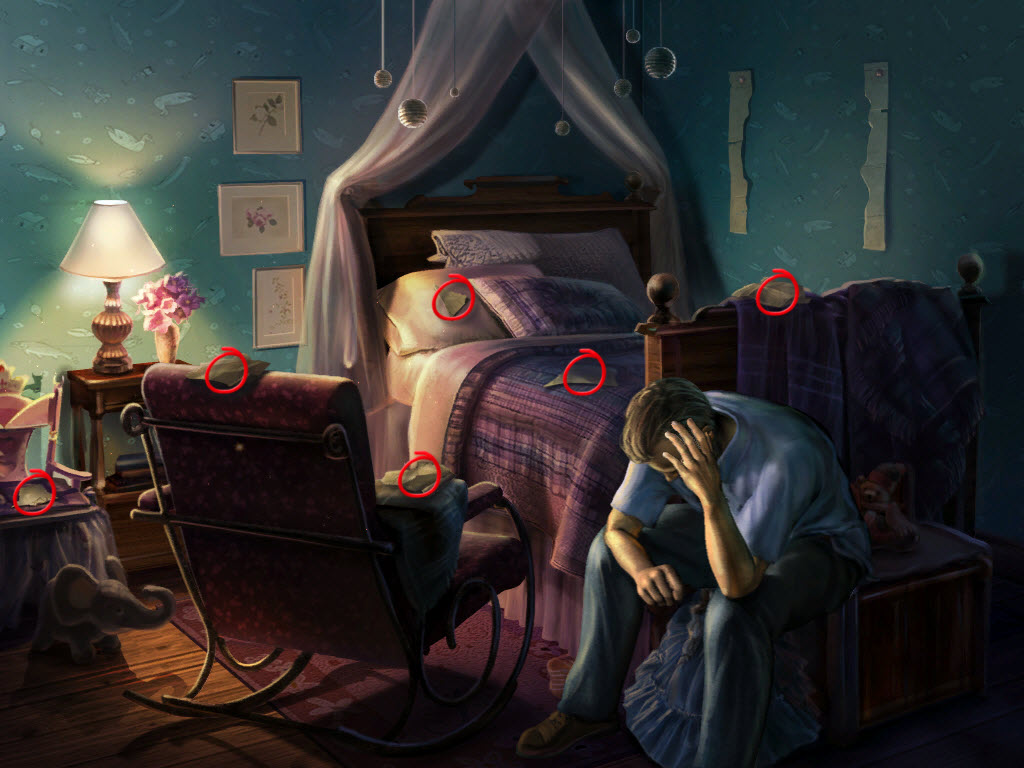
- examine the missing painting
- find all six Painting Pieces
- examine the chair
- take the Birthday Present
- take the seventh Painting Piece
- examine the missing painting
- Painting Puzzle 2 (Easy)
- place the seven Painting Pieces on the wall
- arrange them like a jigsaw puzzle to complete the picture
- use the right mouse button to rotate the pieces
- use the Mysterious Ring on the emblem
- talk to Peter
- enter the painting
Foyer
- go forward
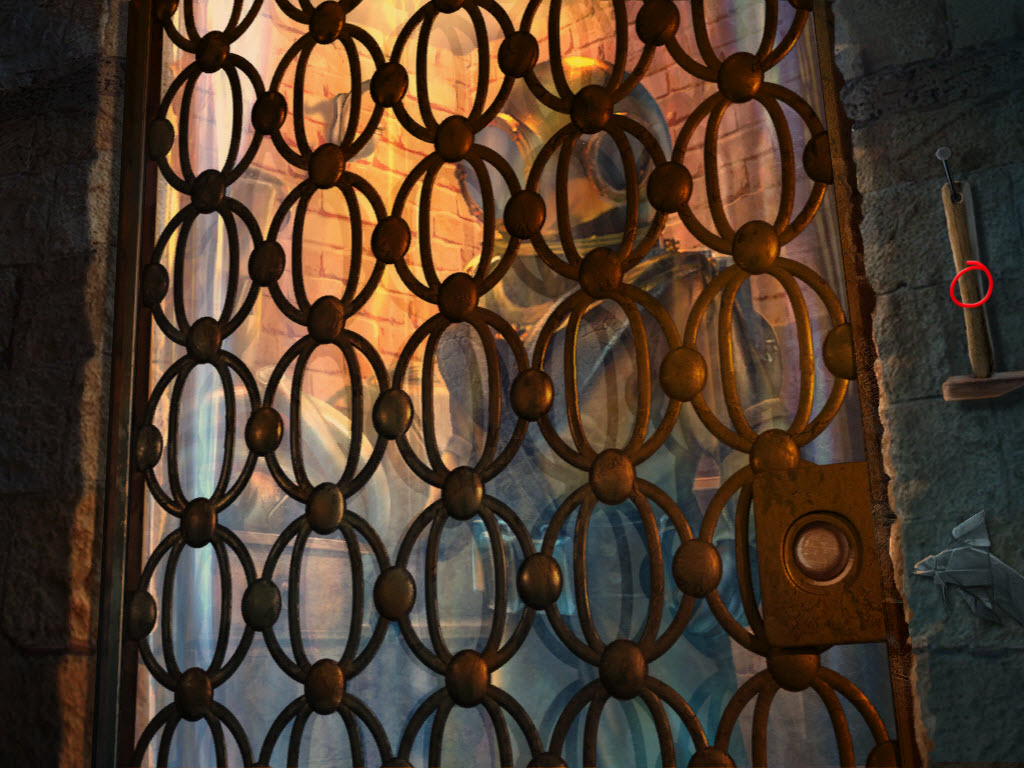
- examine the cage
- take the Hammer
- go backwards once and right
Stairway
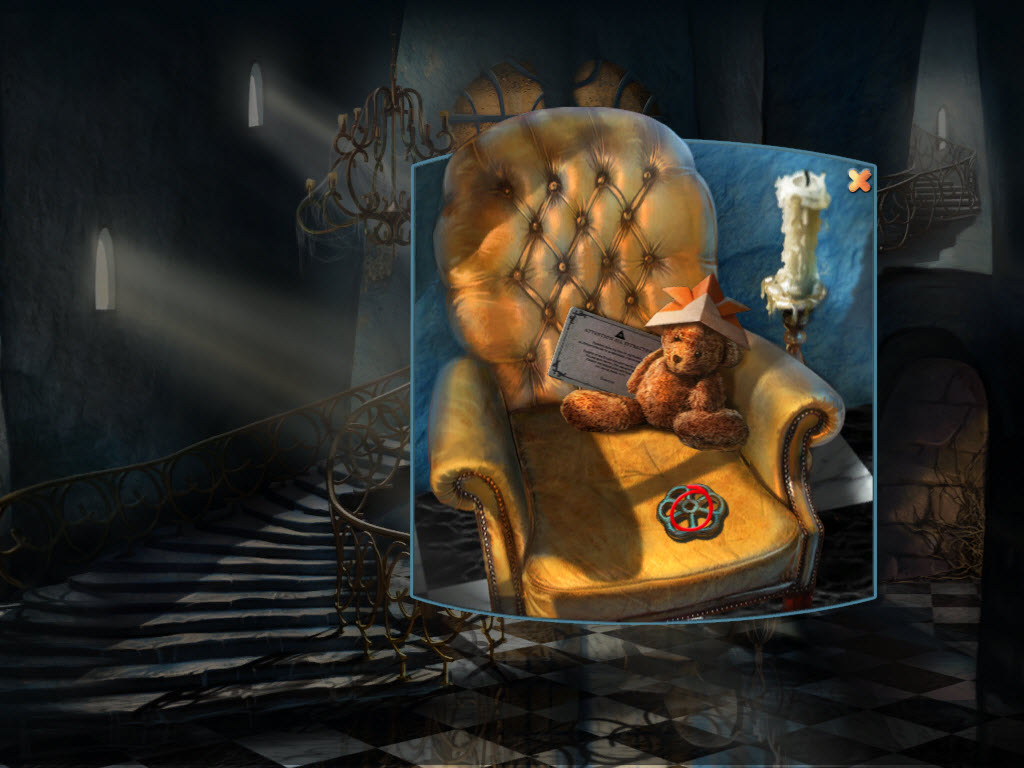
- examine the chair
- pick up the Valve
- read the certificate
- continue right
Archway
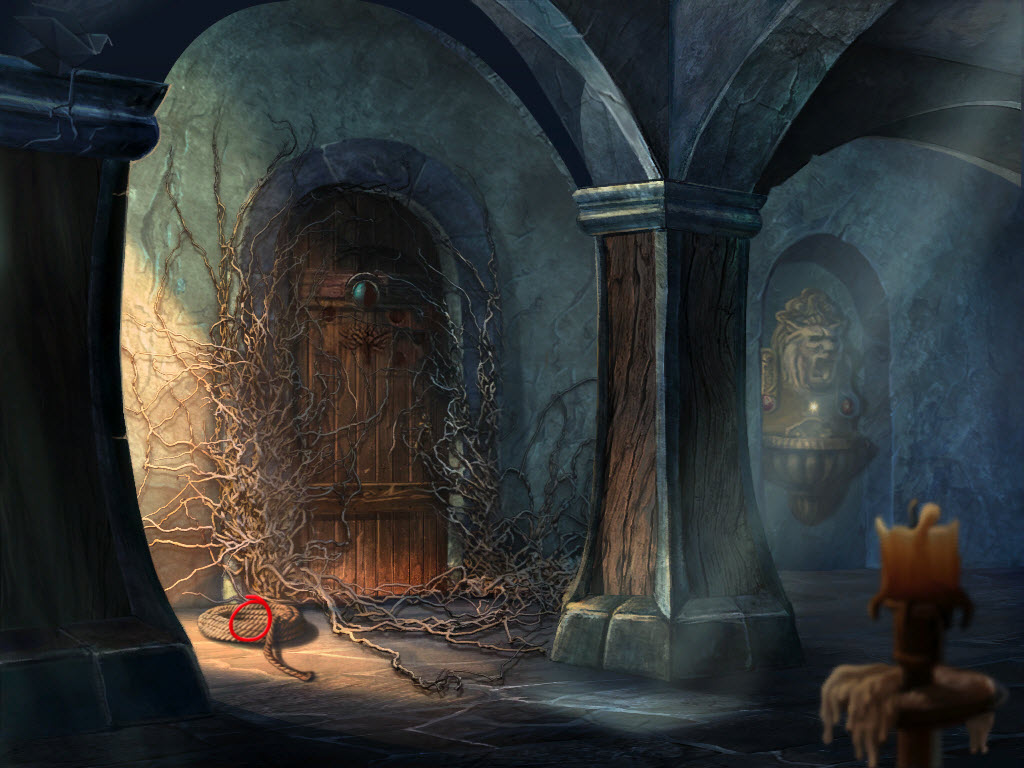
- pick up the Rope
- examine the fountain
- make note of the numbers sketched into it
- go left and and up the stairs
Second Floor
- continue forward
- talk to Emily
- grab the origami crane and read the note
- talk to The Extractor
- go backwards and left
- examine the hole in the floor
- use the Valve on the pipe
- Valve Puzzle (Easy)
- turn each valve so they correspond with the number(s) etched in the fountain
- go right twice
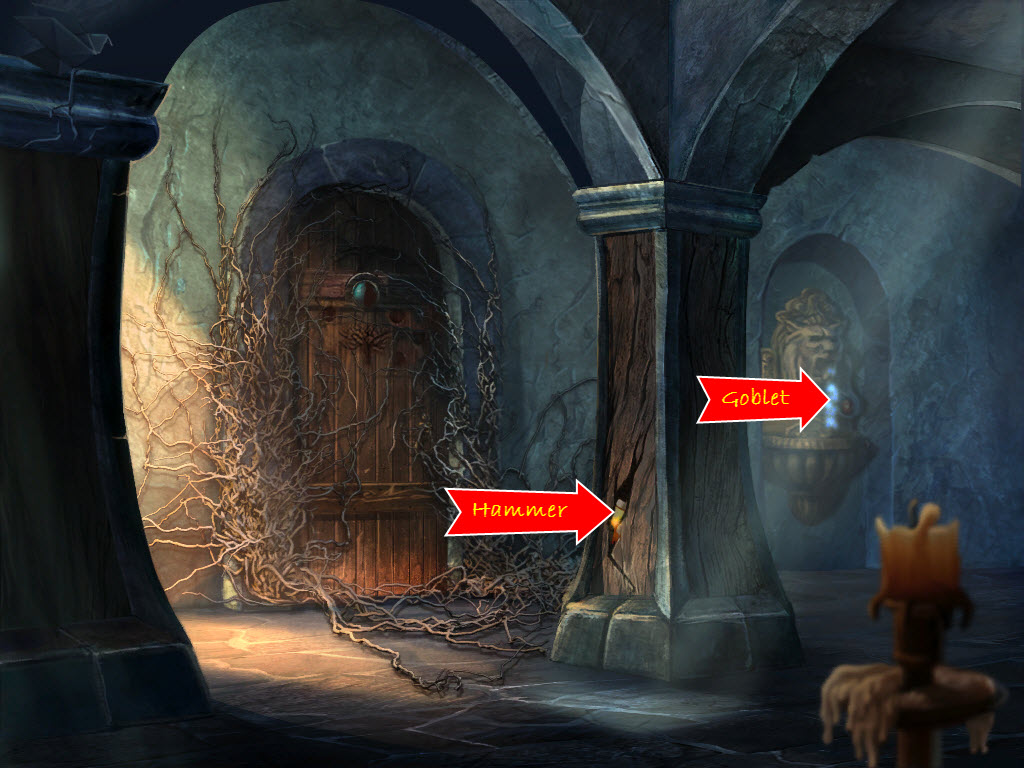
- use the Hammer on the broken column
- take the Goblet
- use the Goblet on the fountain
- go left and up the stairs
Second Floor
- examine the hot lantern
- pour water from the Goblet on the lantern
- take the Ornament Half from inside
- go backwards and right
- examine the door
- place the Ornament Half in the empty spot
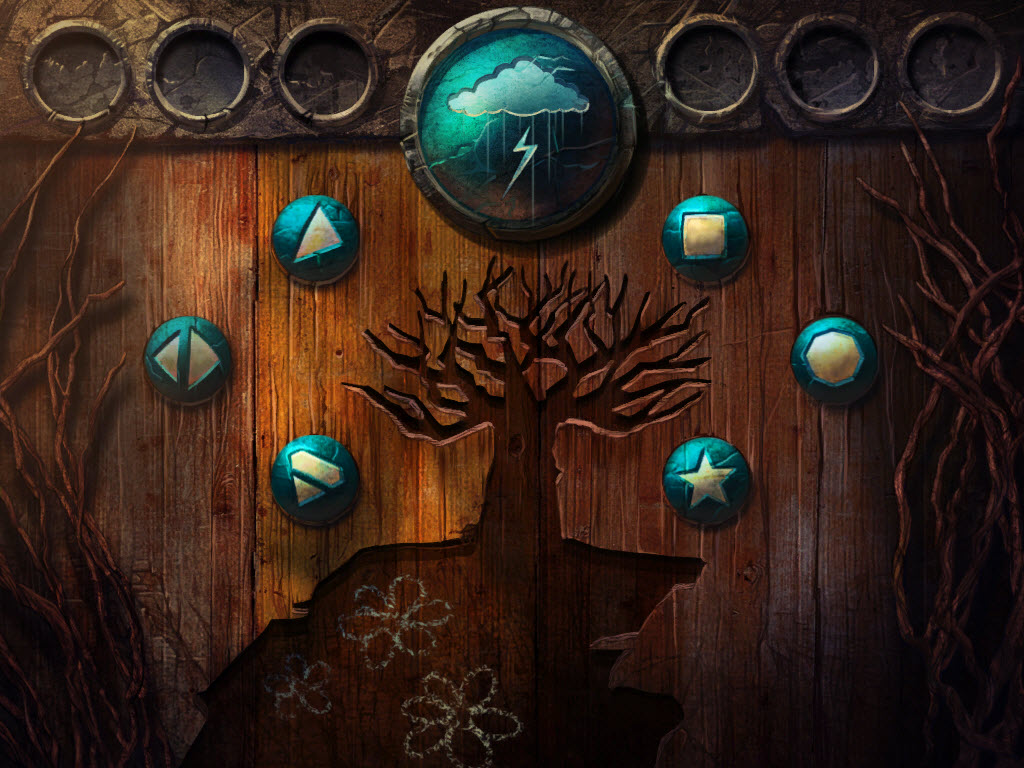
- Door Puzzle (Moderate)
- place the shapes on top of the correct number
- hint: count the points of each shape
- see screenshot for solution
- enter the door
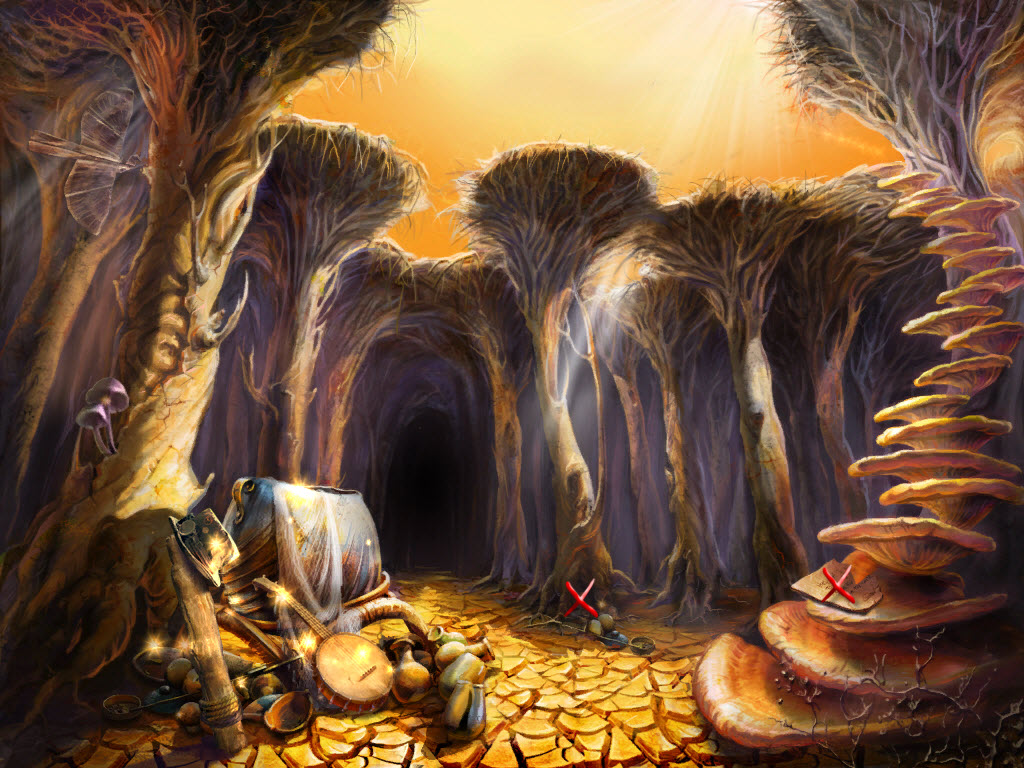
Desert
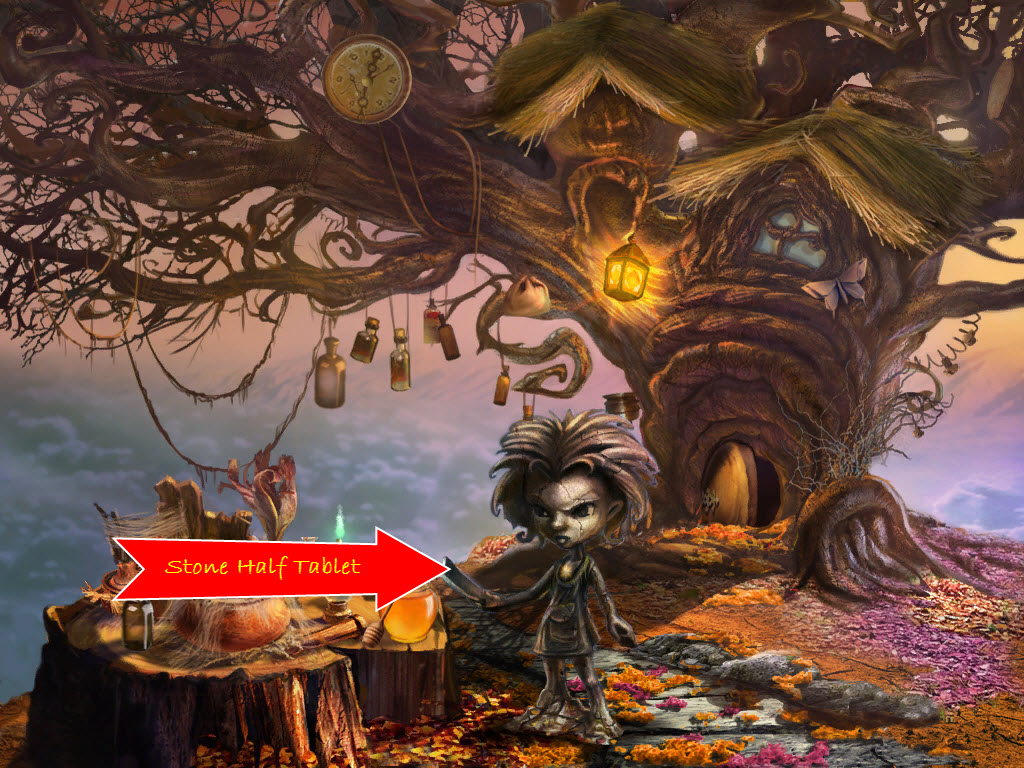
- read the Note and take the Stone Half Tablet
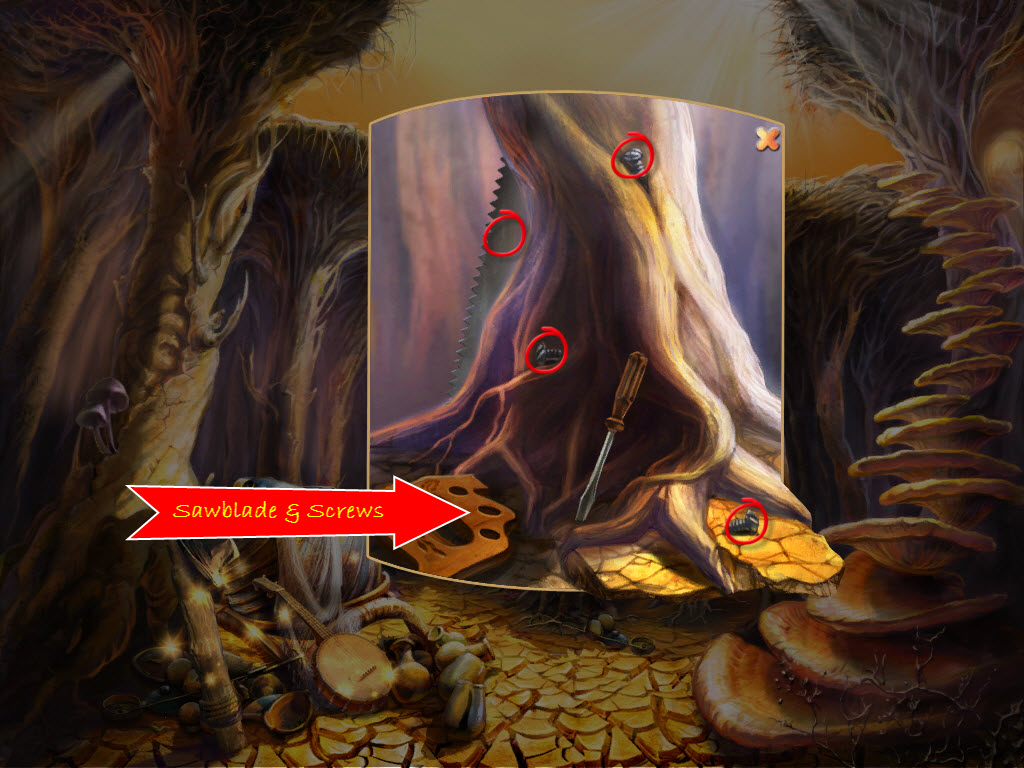
- examine the base of the small tree to the right of the cave
- pick up the saw blade
- use the saw blade on the handle
- pick up each screw and place in the holes on the handle
- pick up the screwdriver and use it on each Screw
- take the Saw
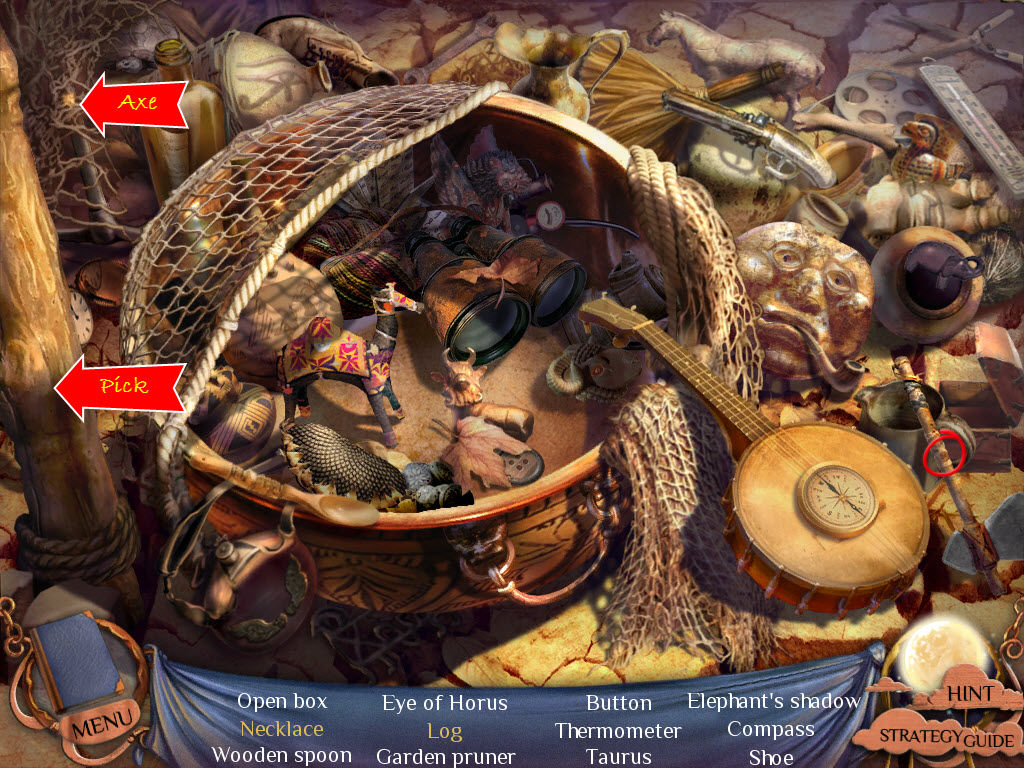
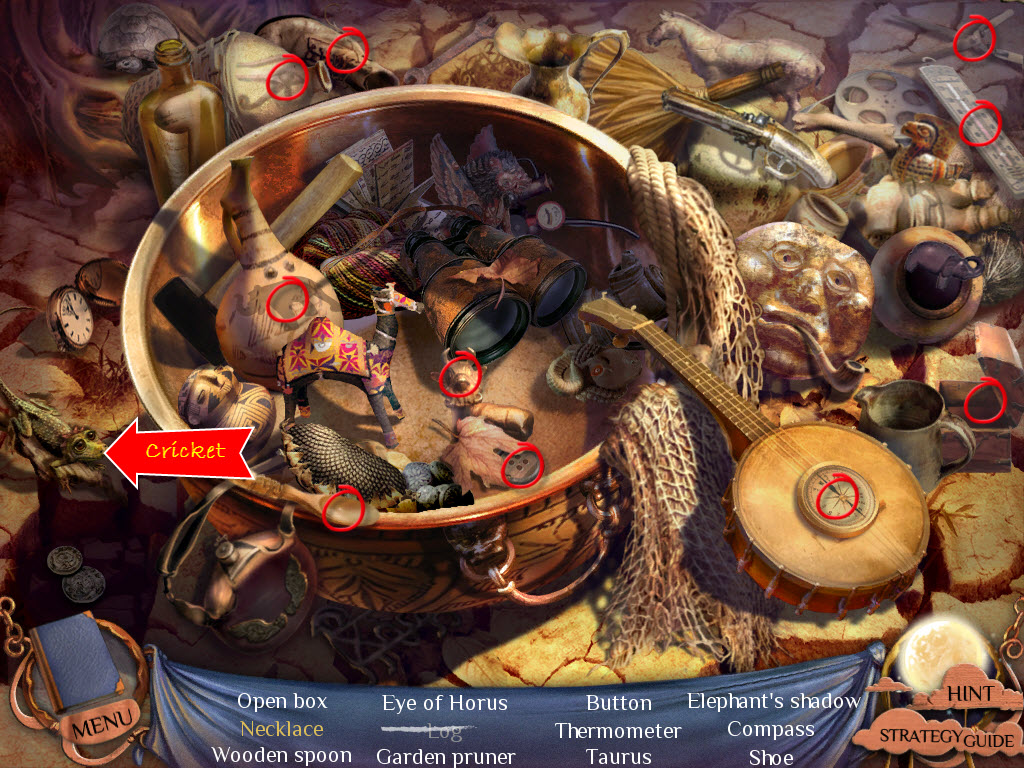
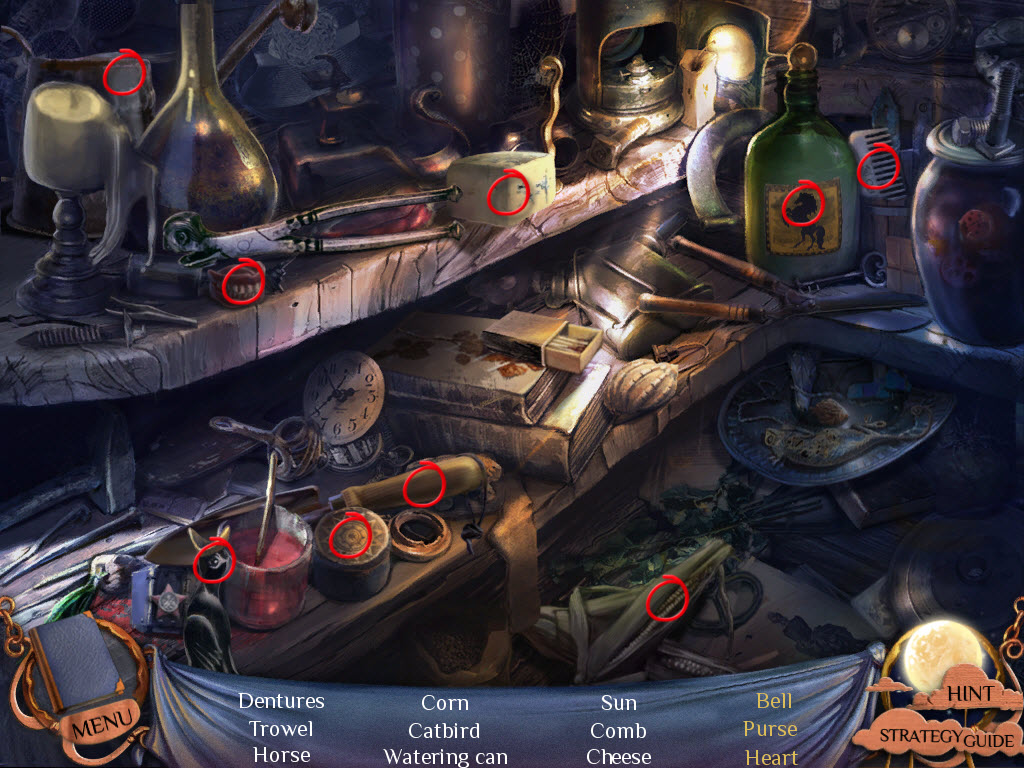
- examine the area to the left - hidden object area
- pick up the axe
- use the axe on the brambles
- pick up the pick
- use the pick on the log
- take the Log
- move net on basket
- examine the reptile
- pick up the cricket
- feed the cricket to the reptile
- take the Necklace
- go forward
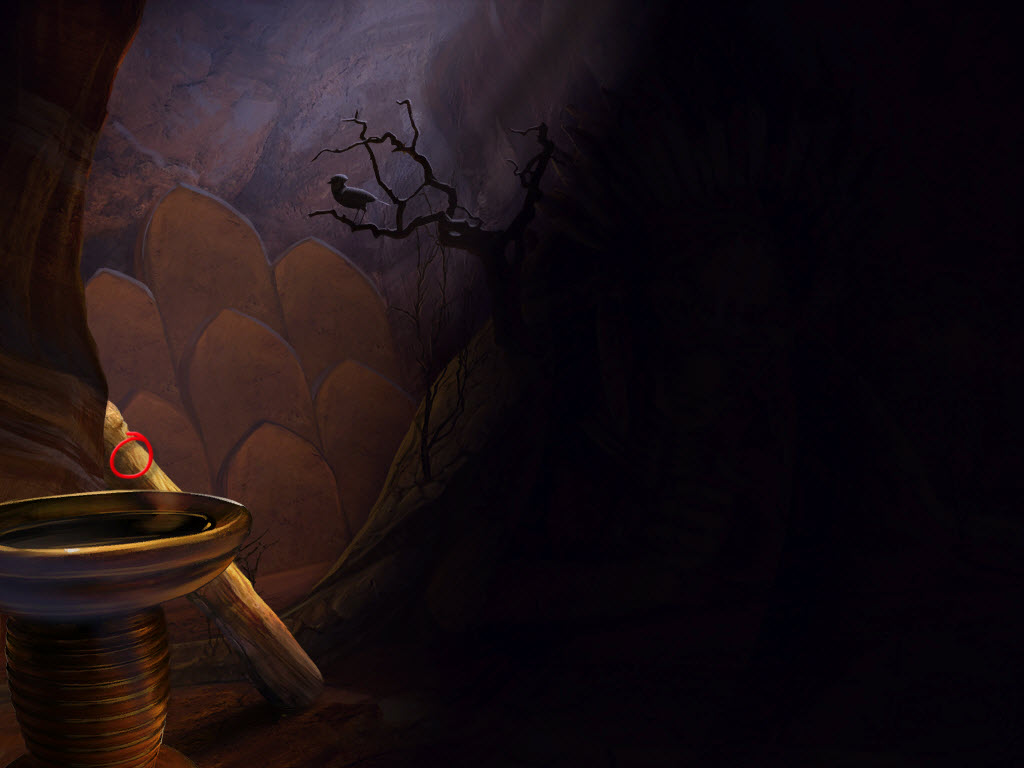
Desert Cave
- pick up the Log
- go backwards
- go up the mushroom steps (right)
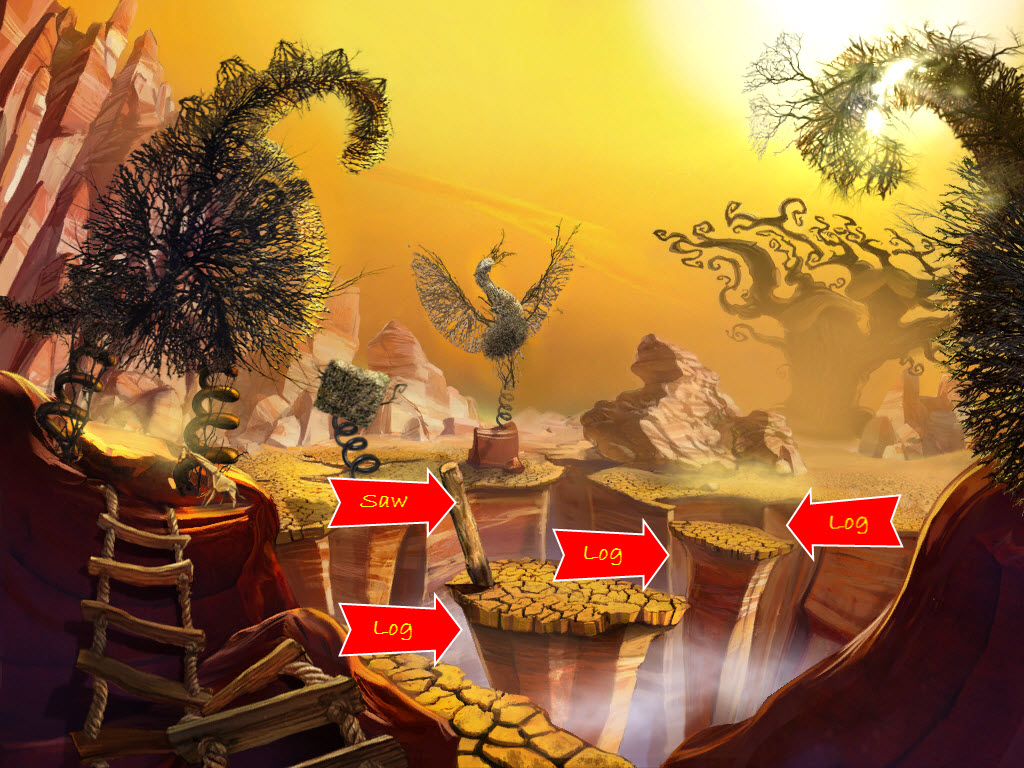
Desert Ledge
- use the Log on the first gap
- use the Saw on the log stuck in the mud
- take the Log
- use the second Log on the next gap
- use your last Log on he last gap
- go across
Robot
- examine the machine
- take the Goggles
- go across the bridge
Witch Doctor
- examine the elf's hand
- place the Stone Half Tablet with hers
- take the Acorns
- examine the stump table
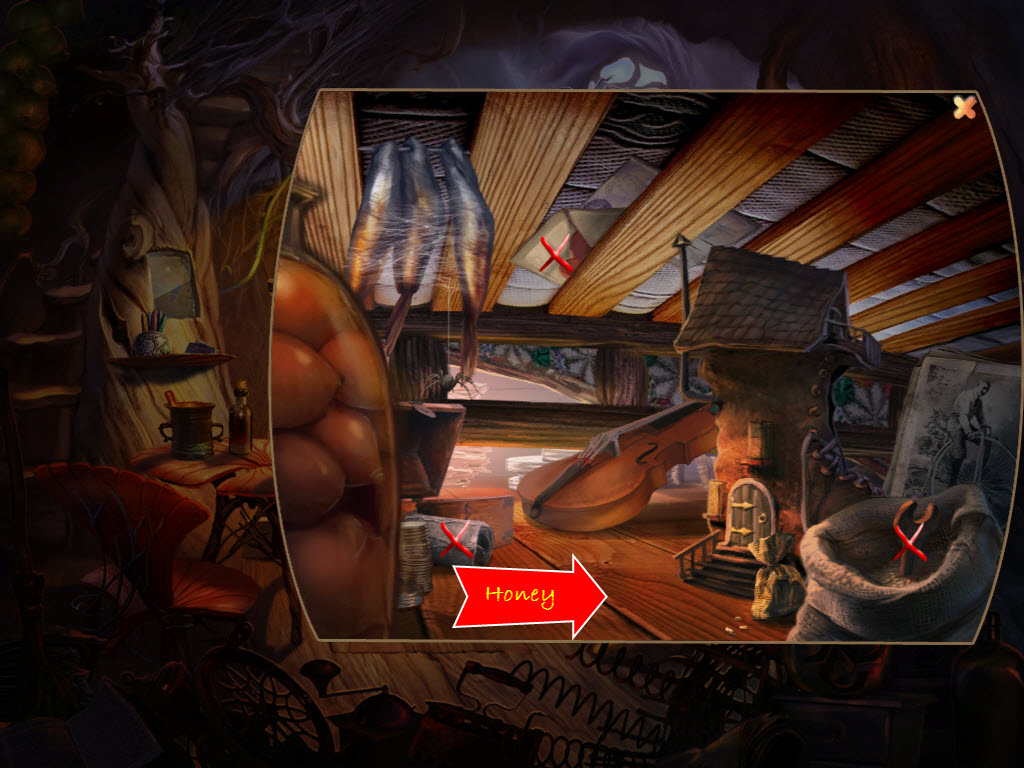
- take the Honey
- go into the treehouse
- push back the rug
- take the Root
- examine the small window by the stairs
- take the Cryons and the Rag
- examine the bed
- move everything out of the way until you find the Origami Tulip
- pick up the Origami Tulip
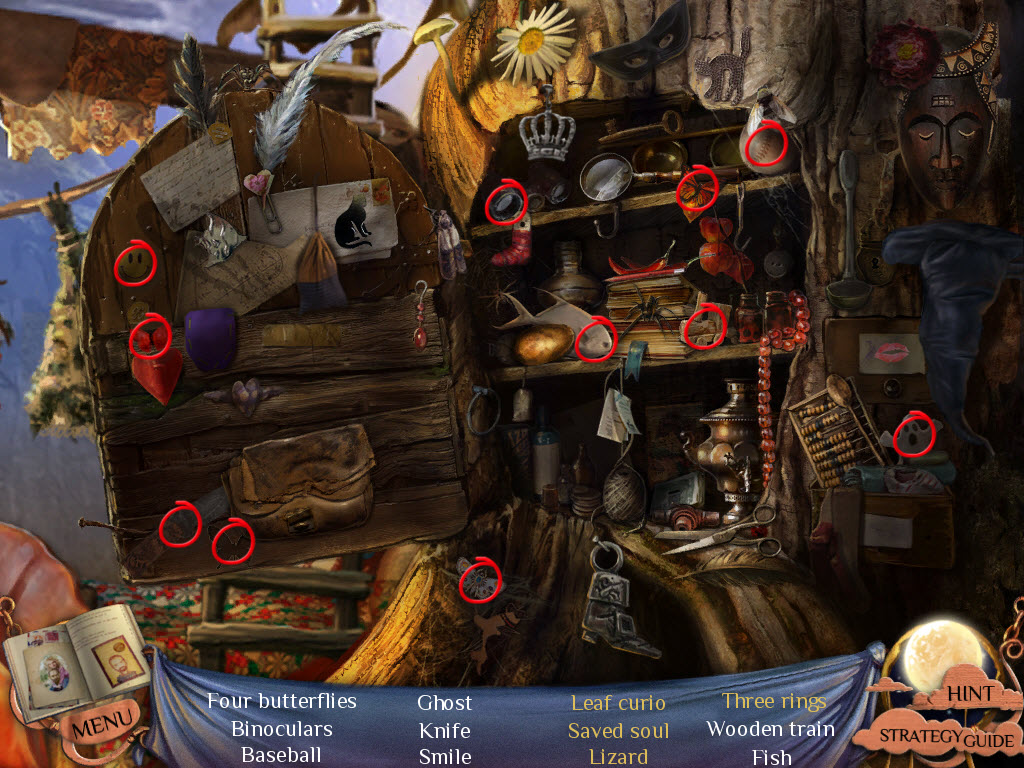
- examine the cupboard on the right - hidden object area
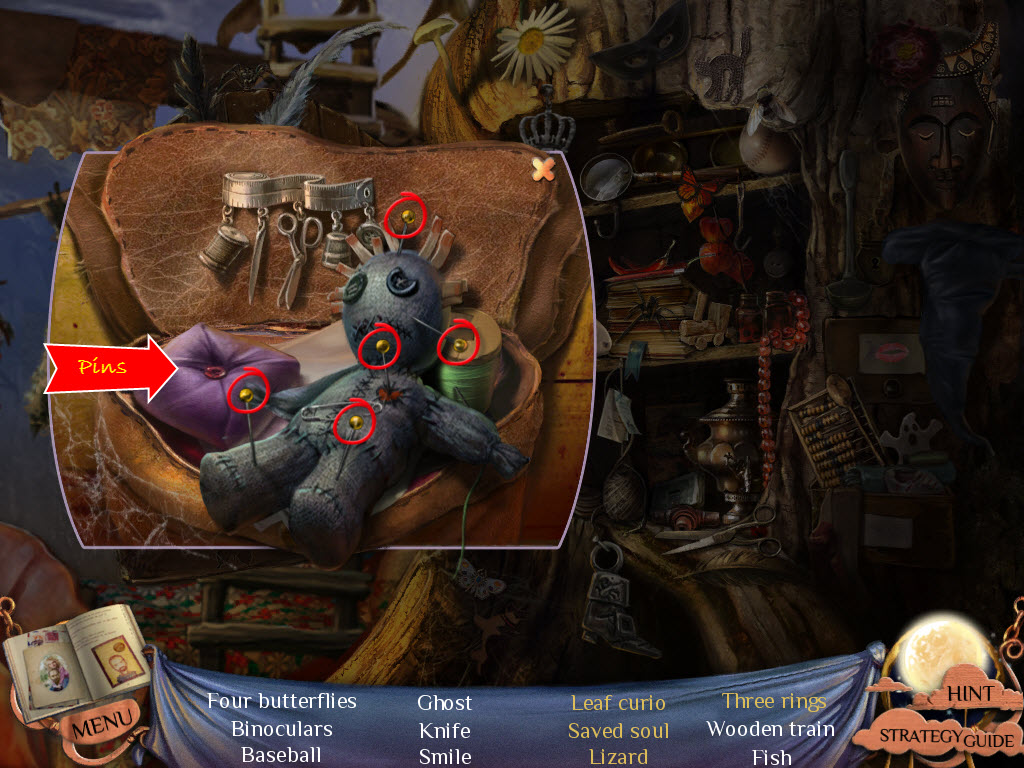
- open up the sack
- remove each pin from the doll and place in the pin cushion
- take the Saved Soul
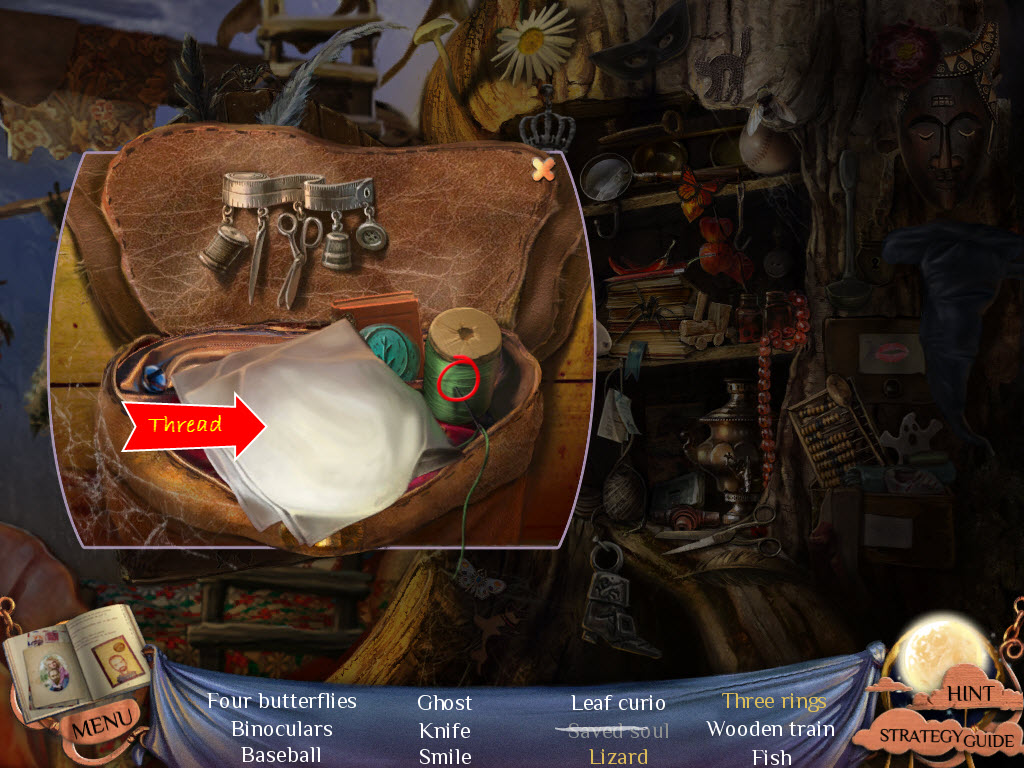
- pick up the need and thread and use it on the hankerchief
- take the Lizard
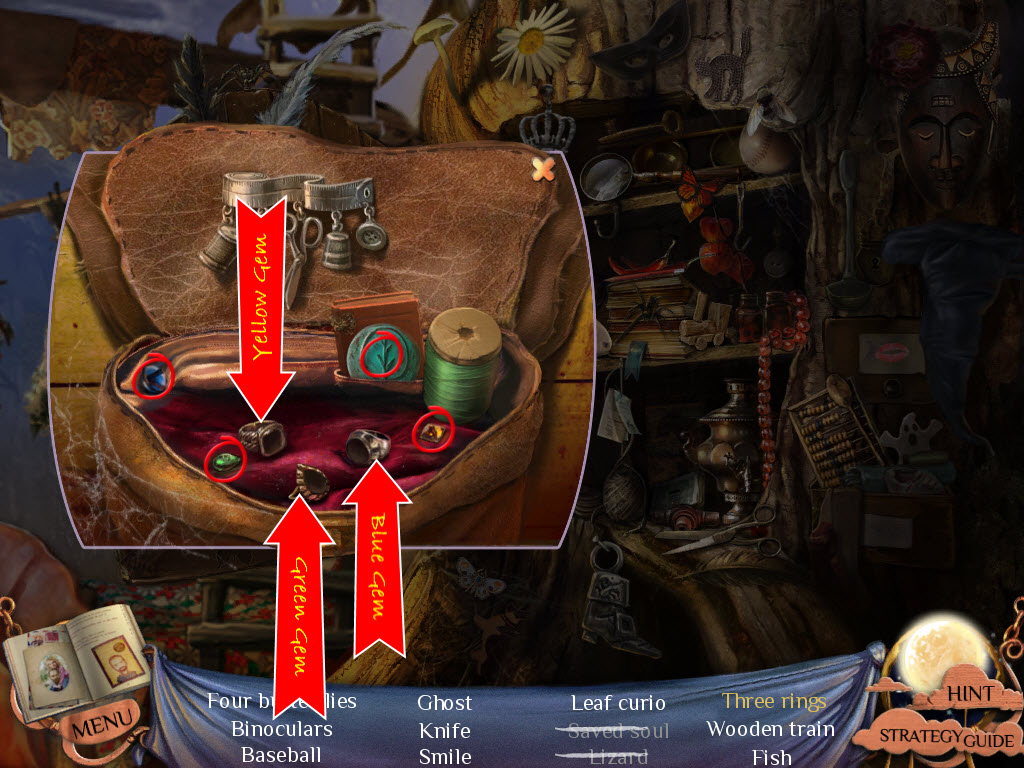
- pick up each gem and place it in the correct ring
- pick up each Ring
- pick up the Leaf Curio
- look under the chair
- put Honey on the floor
- shake the envelope, wrench, and rolled up paper
- capture the Beetles
- return back to the beginnin of the desert
Desert
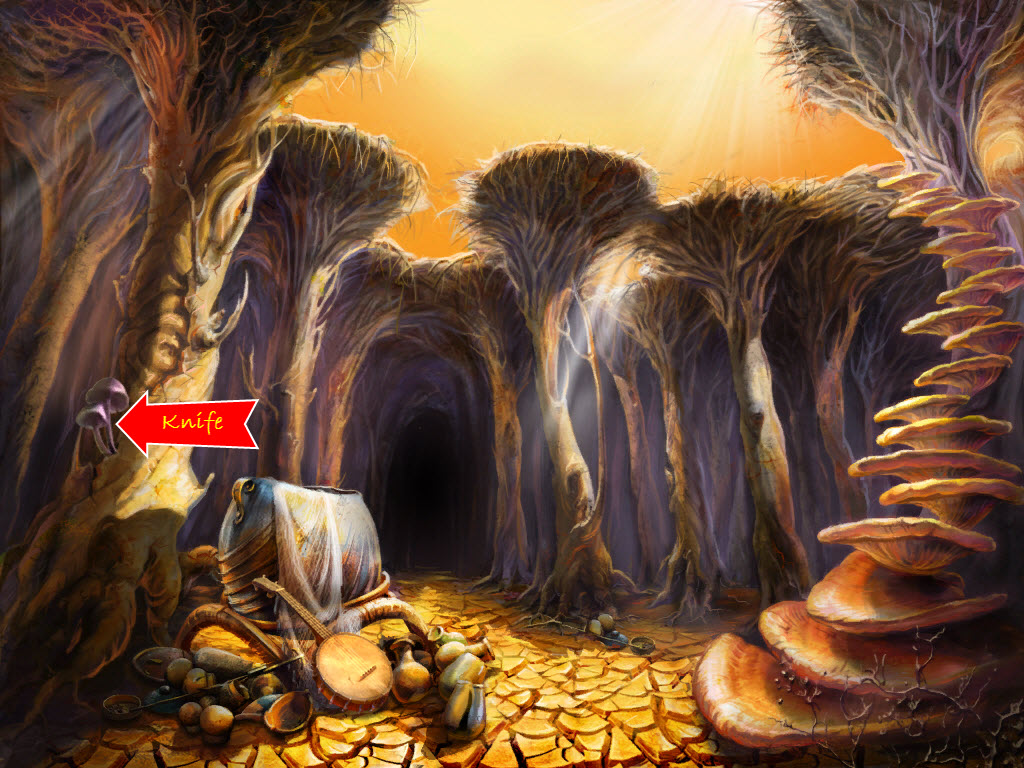
- examine the mushrooms
- use the Knife to cut them
- take the Mushrooms
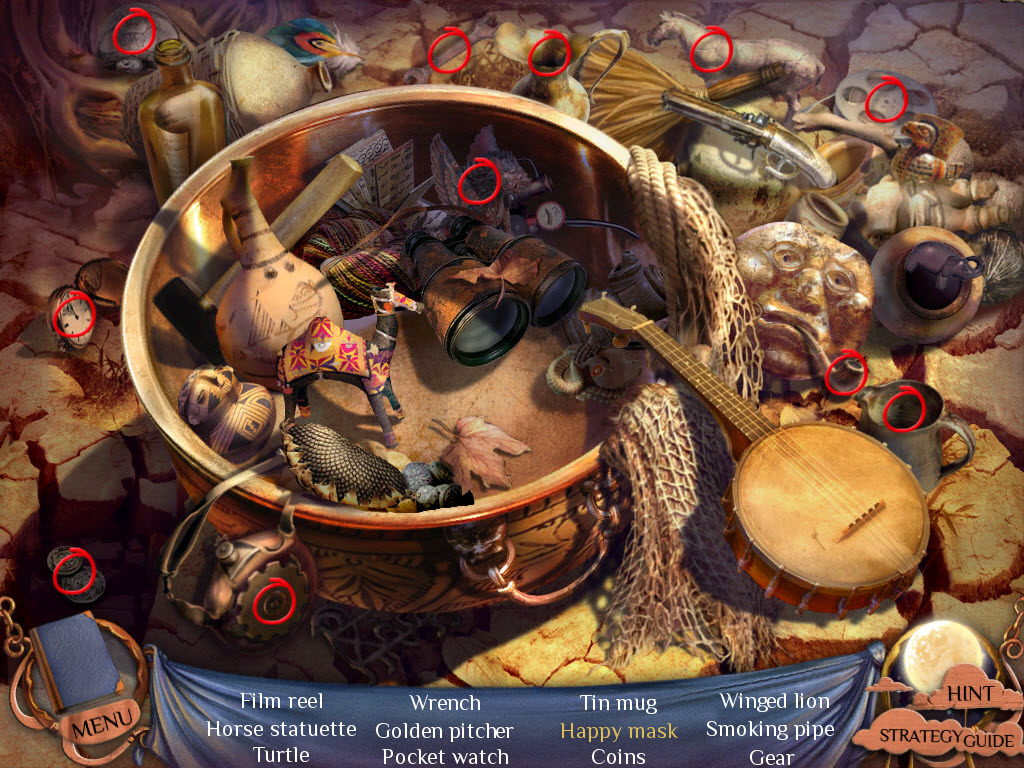
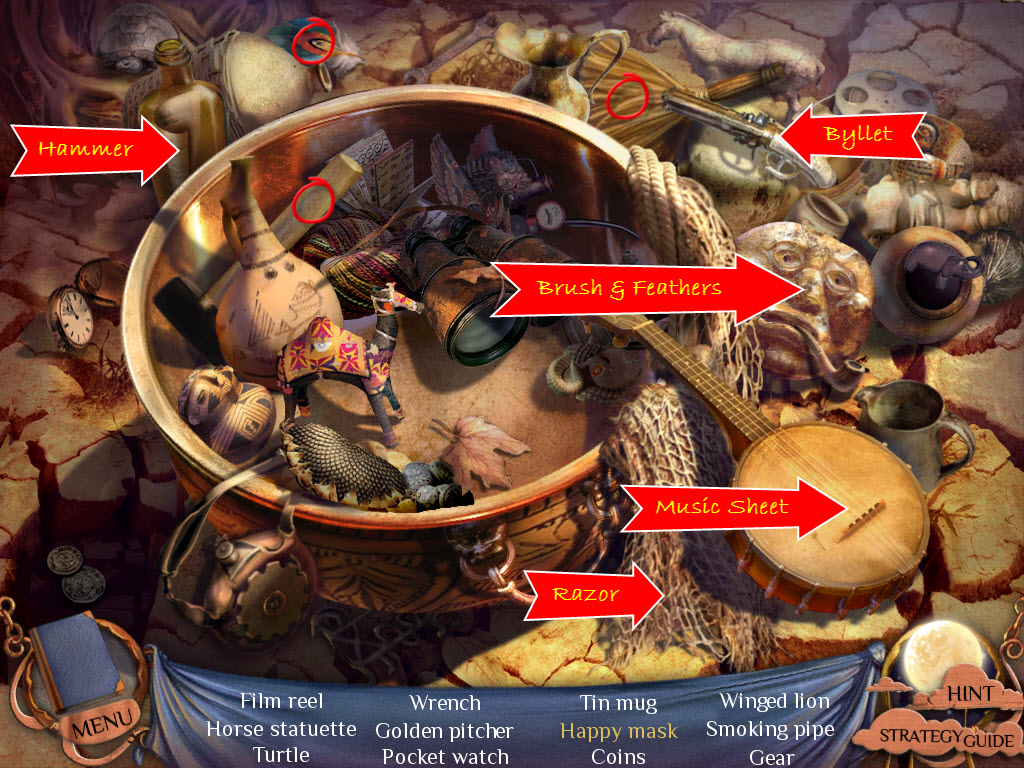
- examine the area on the left - hidden object area
- pick up the hammer
- use the hammer on the bottle
- take out the sheet of music
- use the sheet of music on the banjo
- pick up the razor (by the banjo)
- use the razor on the net
- pick up the bullet
- use thet bullet on the pistol
- fire the pistol
- use the brush on the mask
- place the three feathers on the mask
- go up the mushroom stairs
Desert Ledge
- use the Knife on the rope ladder
- take the Ladder
- go up twice
- examine the table
- place the Beetles, Mushrooms, Acorns, and Root into the bowl (no particular order)
- pick up the pestle and use it on the bowl
- pick up the glass jar on the left and use it on the bowl
- pur the Potion on the elf
- go backwards three times and forward once
- use the Flint on the oil to light it
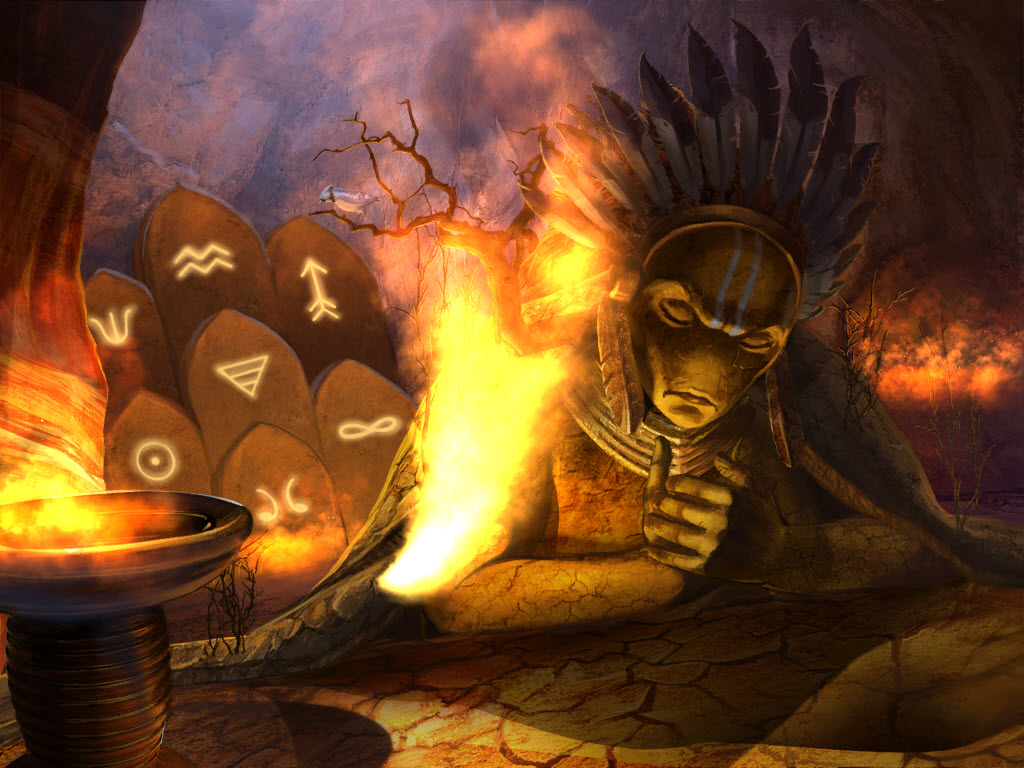
- Stone Puzzle (Easy)
- look in your journal and find page number 12
- make a note of the order of the symbols
- swap the stones so they are in the order in the journal
- examine the open hands
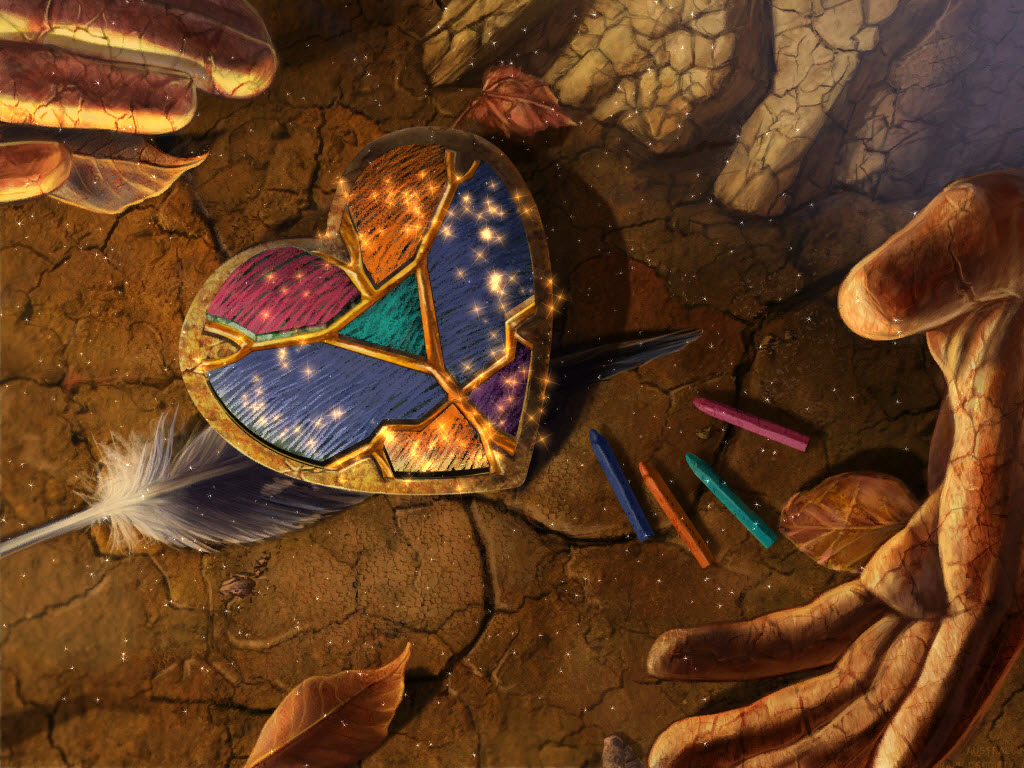
- Heart Puzzle (Easy)
- place the pieces back in the heart
- right click to rotate a piece
- look in your journal and find page number 12
- make note of the colors on the heart
- use your Crayons on the heart
- color in the heart to match the picture
- go backwards and up
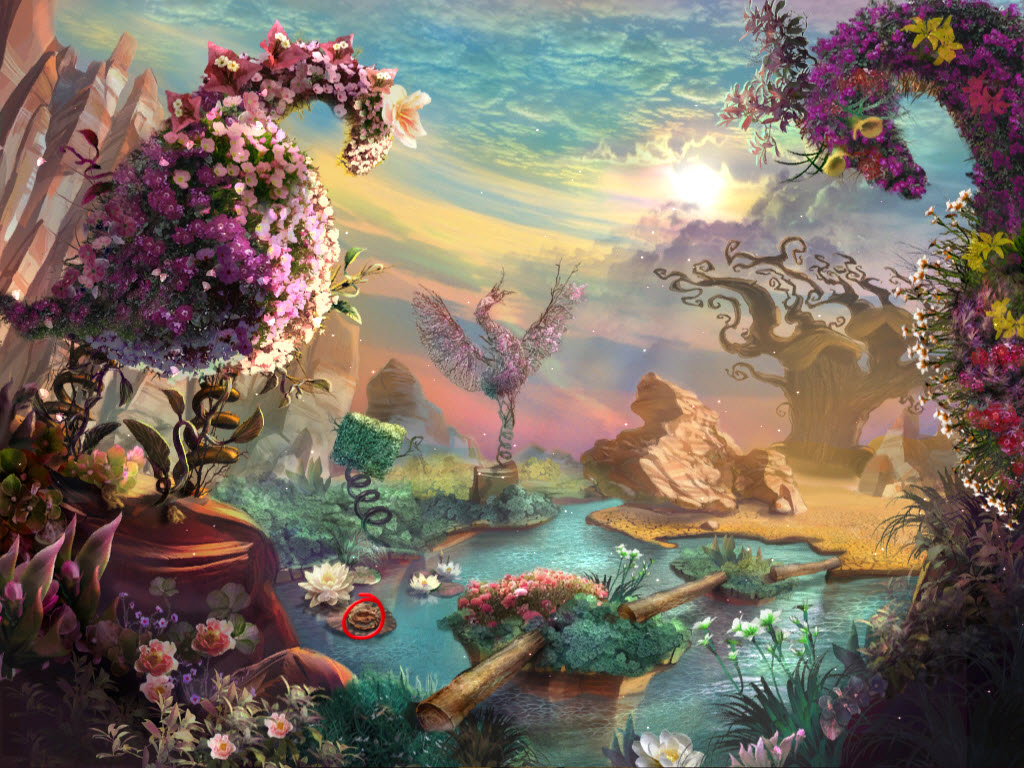
Ledge
- pick up the Handle from the lilypad
- continue forward to the witch doctor
- talk to the Witch Doctor
- enter the treehouse
- use the Handle on the celler door
- use the Rope Ladder to enter the celler
- pick up the three Pearls
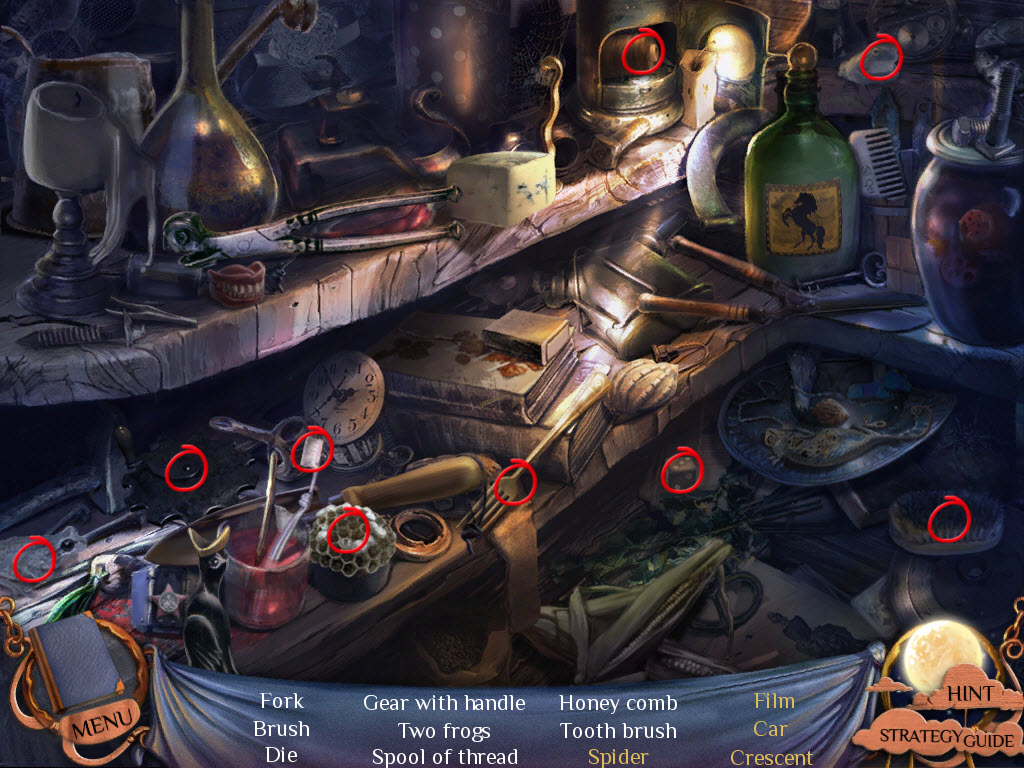
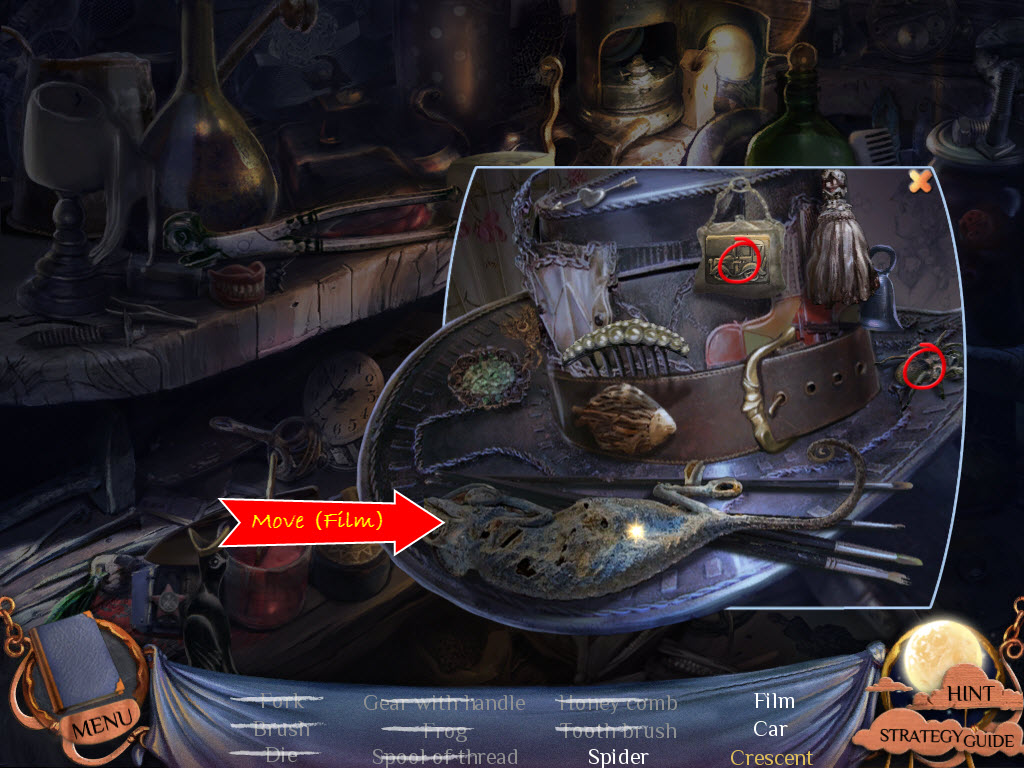
- examine the area on the left - hidden object area
- examine the tray
- move the dead lizard
- take the film
- take the car and the spider
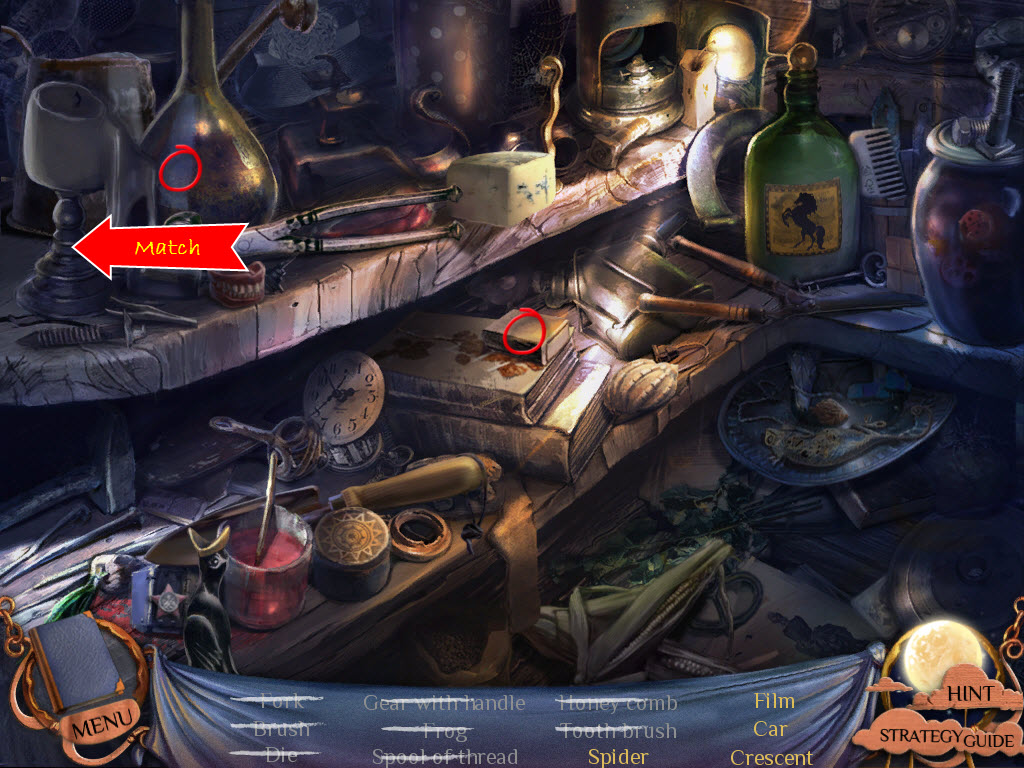
- open the matchbox
- take a match out and strike it on the side of the box
- use it to light the candle
- take the crescent moon that appears in the glass
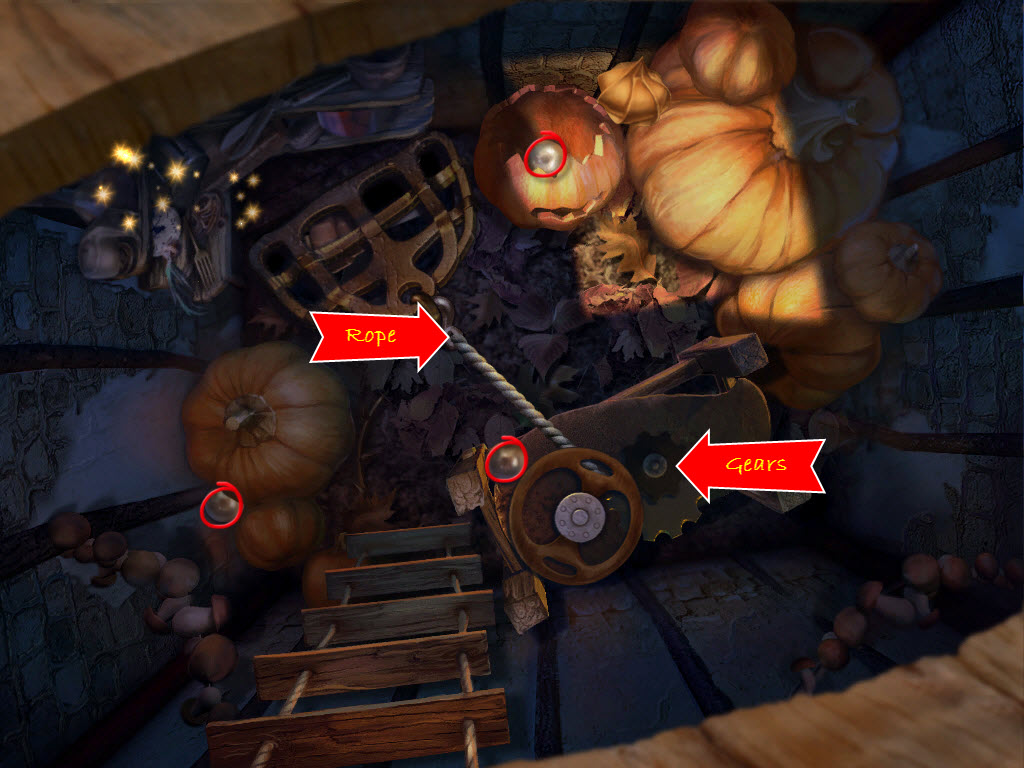
- use the Gears on the machine
- turn the Gears
- replace the Rope
- turn the Gears
- take the Mechanical Arm
- go backwards twice
Robot
- examine the Robot
- place the three Pearls in each hole
- remove the spring on the left and replace it with the Mechanical Arm
- push all four Pearls
- talk to the Witch Doctor
- give the Goggles to the Witch Doctor
- talk to the Witch Doctor again
- return to the Treehouse
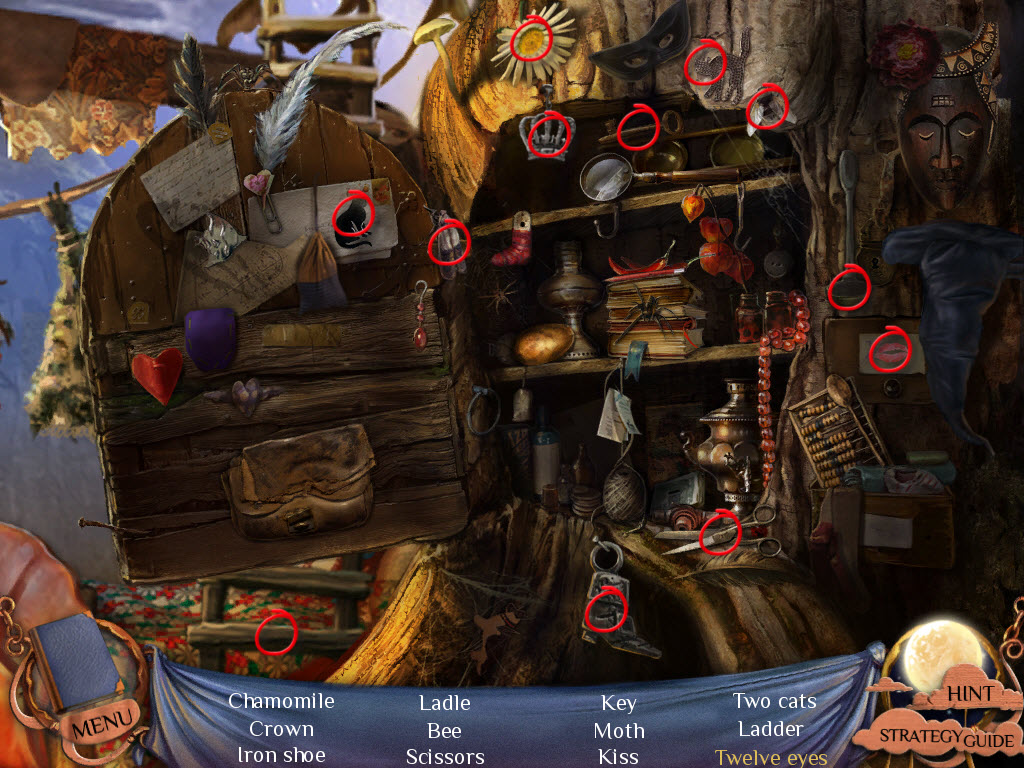
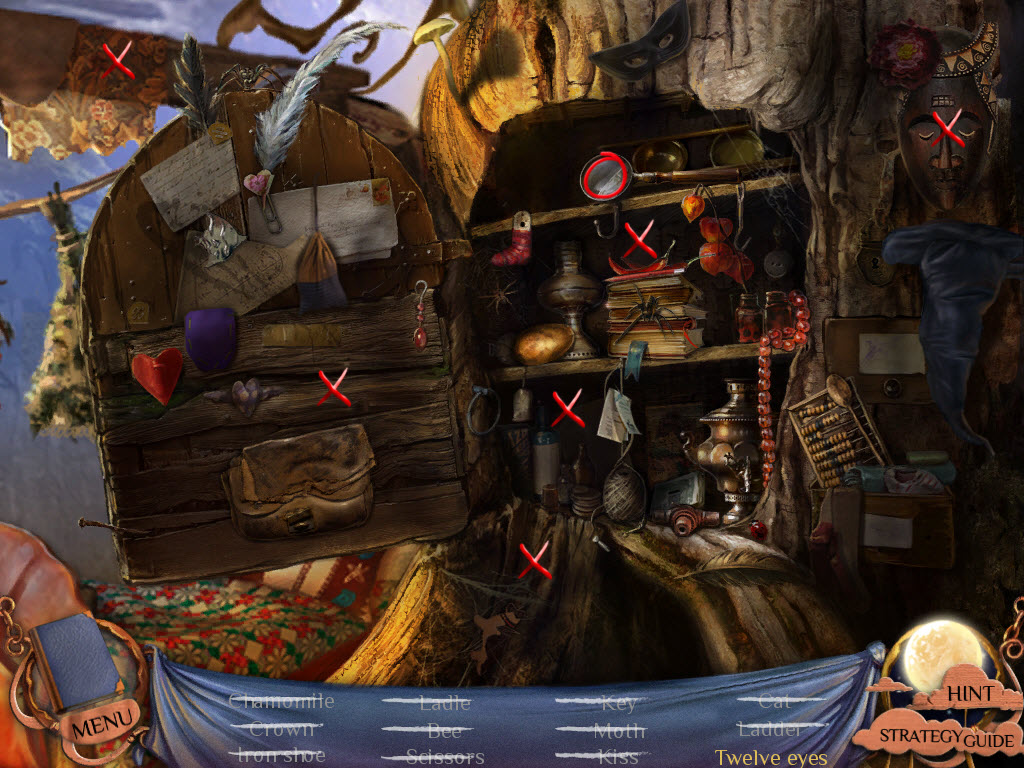
- examine the cupboard - hidden object area
- pick up the magnifying glass
- use it to find twelve eyes
- they are marked in the screenshot with an X
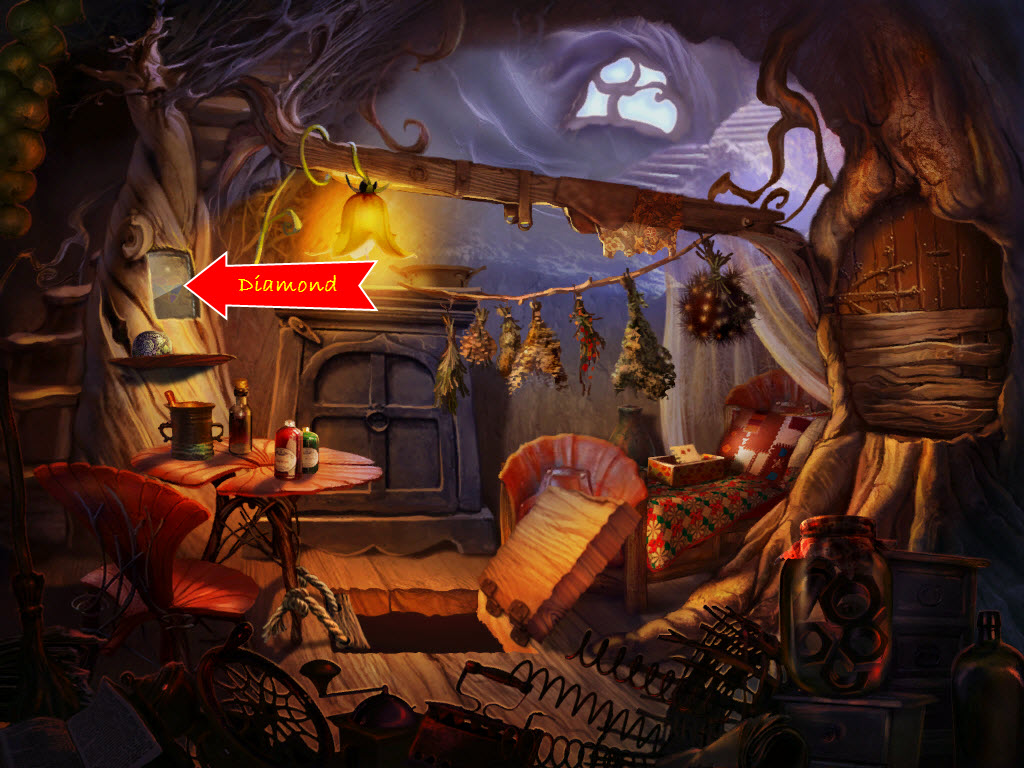
- examine the glass window
- use the Diamond on the glass
- take Emily's drawing
- exit backwards four times and left twice
Foyer
- examine the hole in the floor
- use the Ladder to reach Peter
- talk to Peter
- return to the hallway/staircase in the house via the protal (the mirror on the left side)
- examine the wall
- place the Heart Painting where the number two is
- go into the bedroom
- examine the portrait of Emily
- pick up the Eye Shaped Key
- pickup the First Aid Kit from under the window
- return to Peter
- give the First Aid Kit to Peter
- talk to Peter
- attempt to take the drawing from Peter
- quickly, climb the ladder!
- take the Boards
- go backwards
- examine the wrapped up painting
- use the Knife on the painting
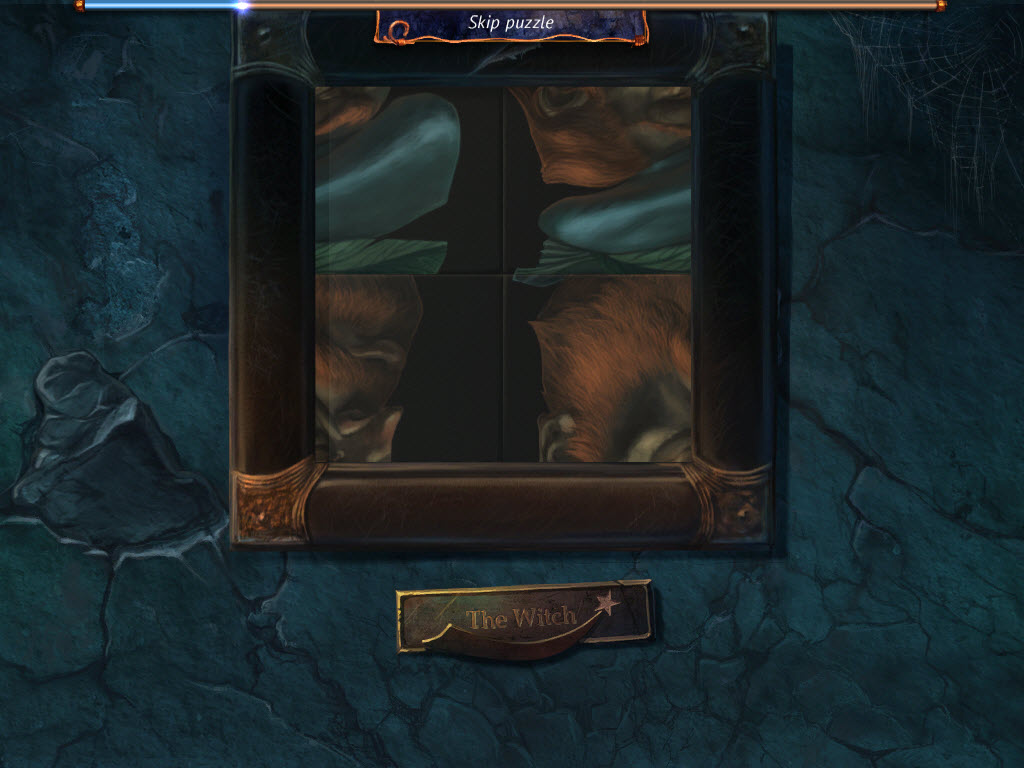
- Witch Painting Puzzle (Easy)
- rotate the pieces so the sillouette of a witch forms
- remove the loose rock to the left - this will take a few tries
- push the red button
- take the Warm Clothes
- go right and climb the stairs
Second Floor
- examine the door on the right
- use the Eye Shaped Key on the lock
- enter the room
- use the Boards to repair the stairs
- examine The Extractor's briefcase
- continue you up
- examine the blackboard
- take the Electrical Tape and the Switch
- go down the stairs
- use the Eletrical Tape on the two wires
- go back up the stairs
- examine the table
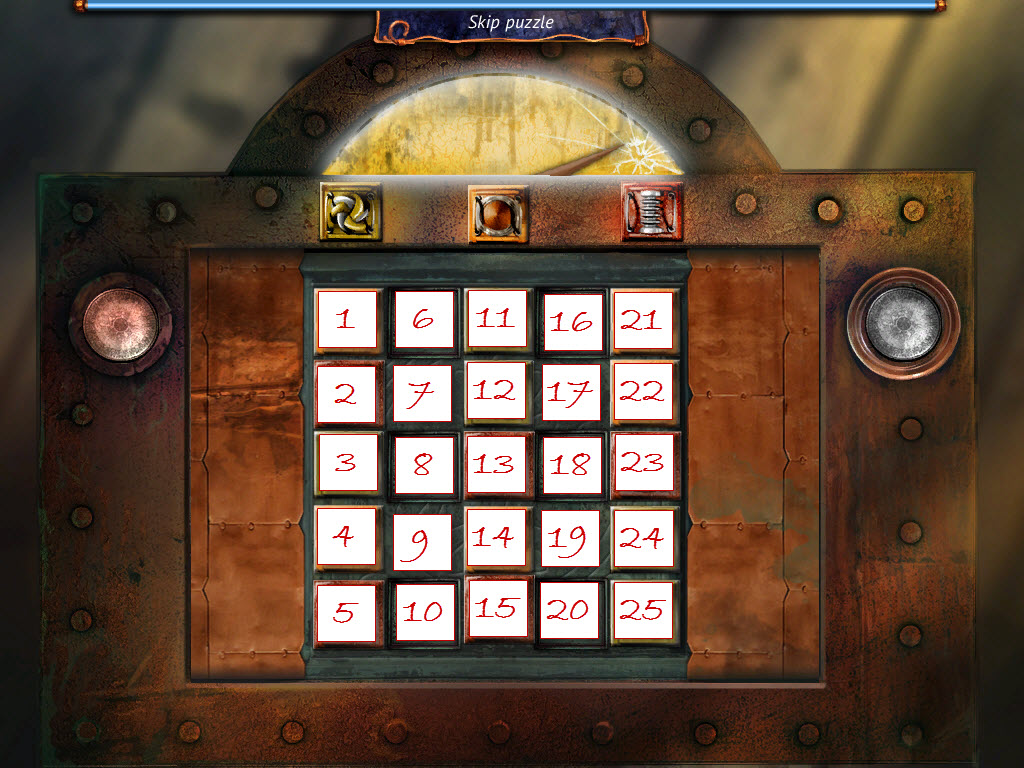
- Slider Puzzle (Difficult)
- push the button the left
- the object is to line up the symbols underneath the matching ones at top
- see screenshot below and combine with the following text for solution
- Solution w/Screenshot (R = Right, L = Left, U = Up, D = Down):
14 R, 15 U & L, 19 L & D, 24 L x2, 25 U & L, 22 D x2, 12 R, 2 R x2, 1 D & R, 3 U x2, 4 U x2, 5 U x2, 9 L, 14, L, 19 L, 22 D x2 & L, 21 D x3, 17 R & D, 12 R x2 & U, 11 D & R x2, 7 R & U, 13 U & R, 2 R x2 & D, 3 U & R x2, 4 U x2 & R, 9 L & D, 14 L x2 & U x2, 19 L x3 & U, 24 L x4, 23 D & L x3, 22 D x2 & L x2, 17 R & D x2, 12 R x2 & D, 7 R x3, 13 U & R, 2 R x2 & D, 3 U & R x2, 4 U x2 & R, 9 L & U x2, 14 L x2 & U, 13 D & L x2, 12 D x2, 7 R & D, 17 L - examine the area that melted
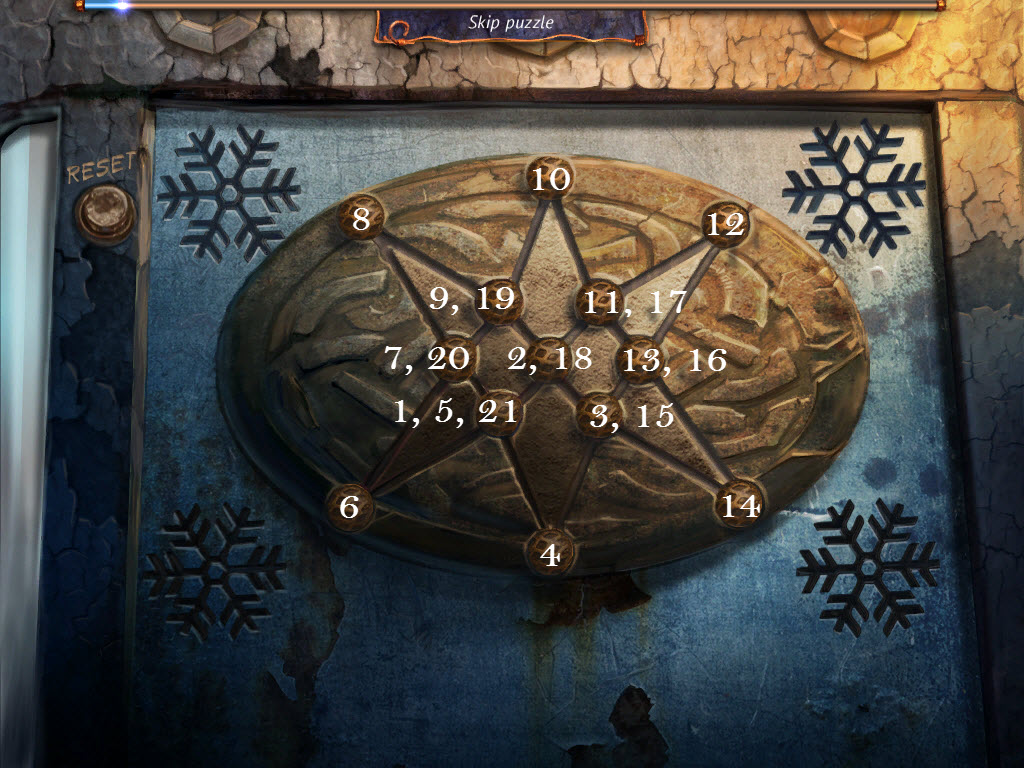
- Snowflake Puzzle (Moderate)
- the object is light up all the lines withouth crossing over one twice
- see screenshot for solution
- enter the door
Winter Forest
- read the Note
- take the Green Bottle
- go forward
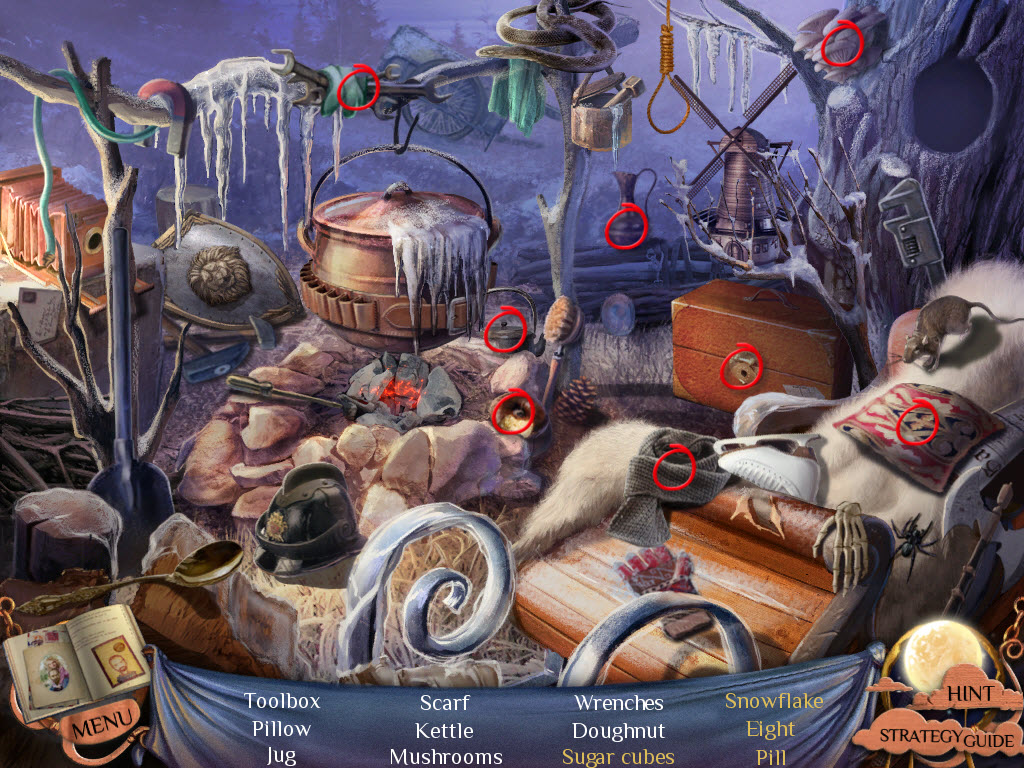
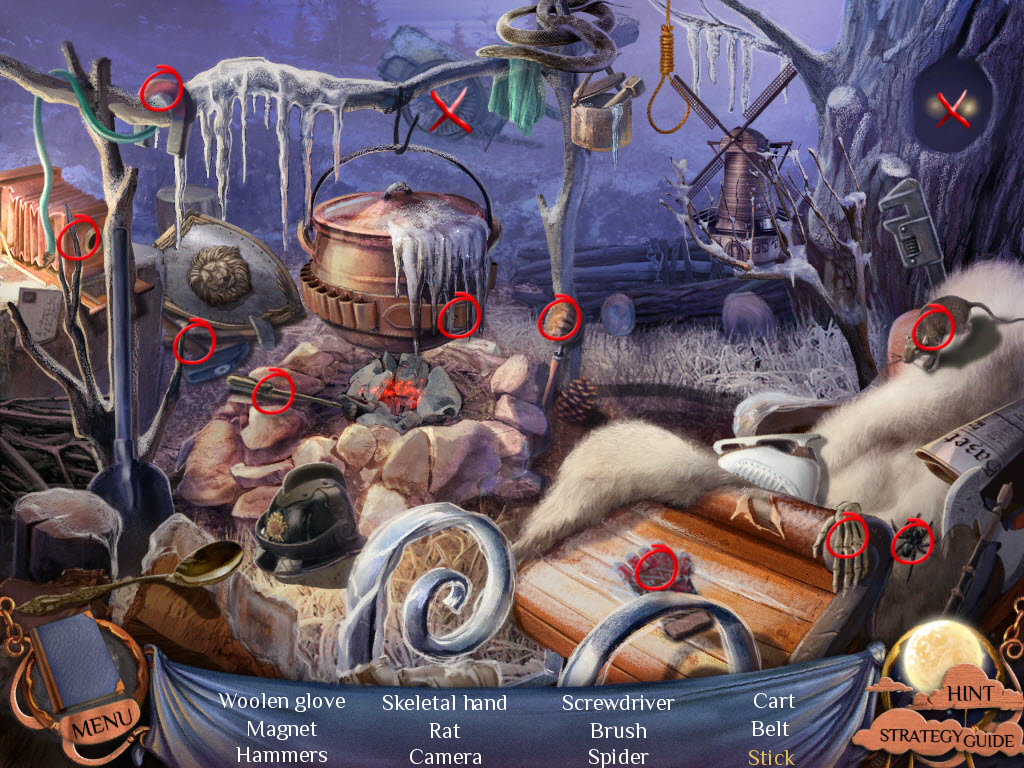
- examine the campfire - hidden object area
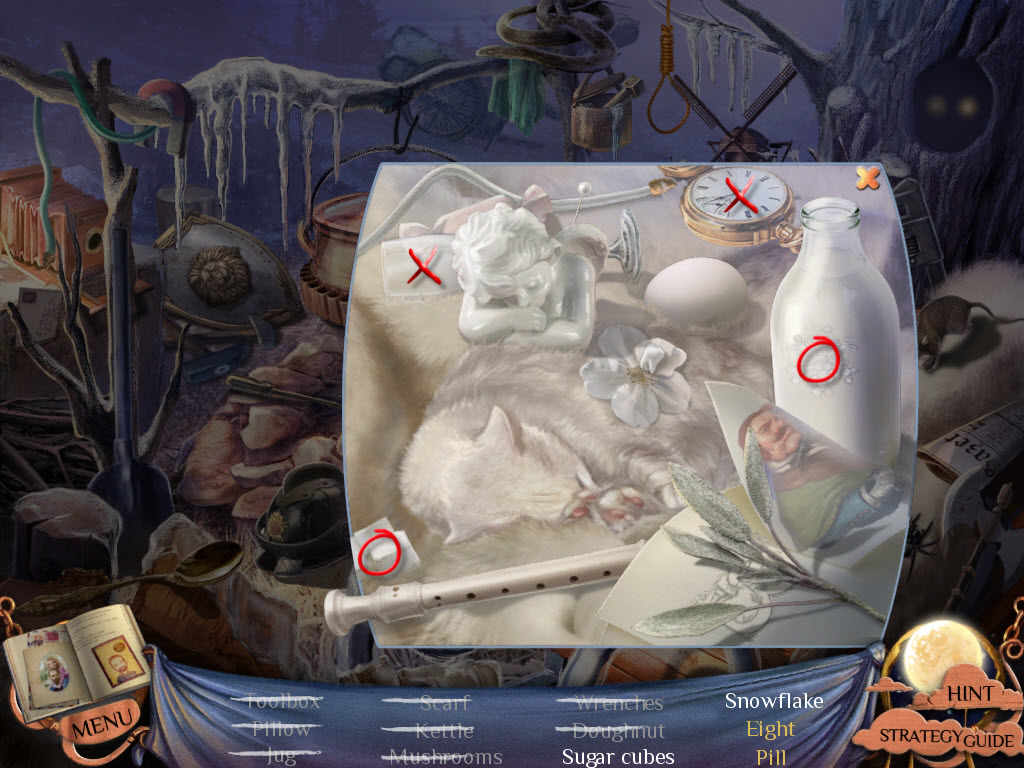
- examine the fur
- take the sugar cubes and snowflake
- shake the wine glass twice
- take the pill
- move the watch
- take the pearl eight
- examine the can by the campfire
- take the Wieners
- continue forward
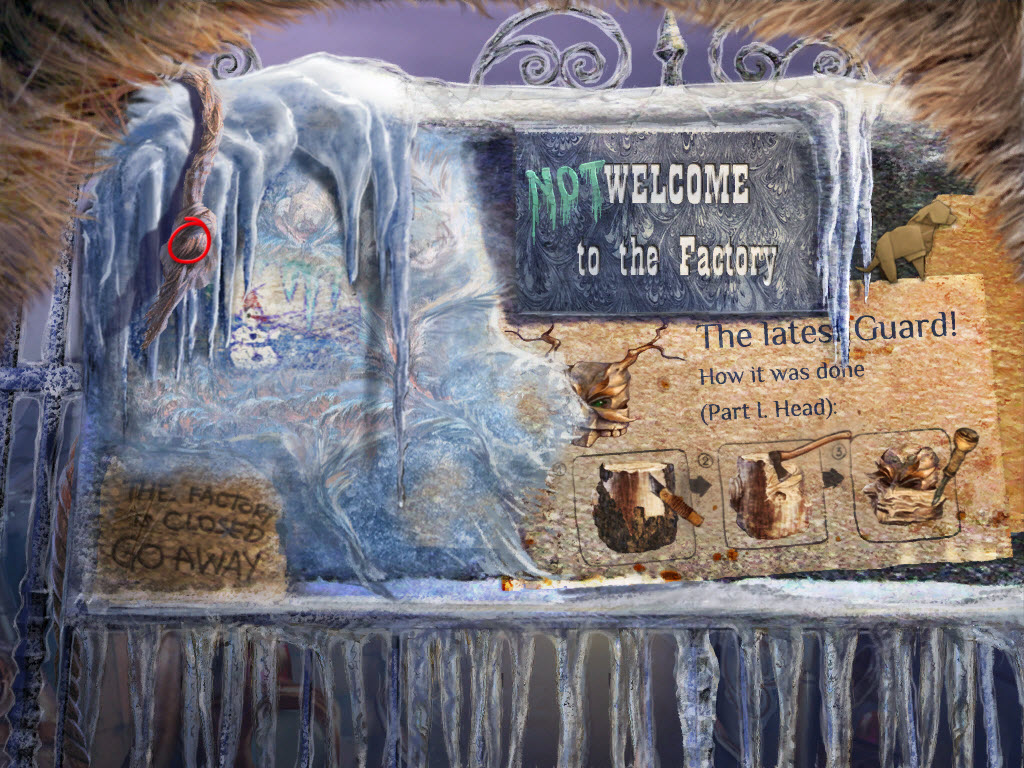
Factory Gate
- examine the Iron Guard (right)
- take the Uncharged Battery
- go right
- take the Rope
- go back to the attic
- use the Uncharged Battery on the machine
- return to the factory gate
- examine the Iron Guard (right)
- place the Battery in him
- take the Axe
- talke to the Iron Guard
- go backwards twice
- use the Axe on the limbs
- look in the birdhouse
- take the Nuts
- go forward
- examine the feeder
- place the Nuts in the feeder
- click the X
- wait for the Squirrel/Cat to eat them
- examine the feeder again
- take the Key
- examine the table
- use the brush to dust off the stump
- place the Toolbox on the table to the right
- use the Key on the Toolbox
- follow the insturctions in the journal to create the head
- use the blade (in front) first and take off all the bark
- use the axe (in back) to carve the face
- use the chisel (on the left) to finish the face
- use the saw (on the right) to saw off the branches
- pick up the branches and place them on the head as horns
- place the Green Bottle on the table
- use the hammer (on the right) on the Green Bottle
- take the glass pieces and place them in the head as eyes
- take the head
- go forward
- place the Wooden Head on the Wooden Guard (left)
- speak to the Wooden Guard
- enter the gates
- attempt to touch the door (or anything)
- go backwards twice
- examine the campfire - hidden object area
- examine the hole in the tree
- catch each firefly and put them in the lantern
- move the branches above the owl
- take the bandage
- use the bandage on the owl
- take the Stick
- go forward twice
Factory Entrance
- toss a Wiener at the Beast
- examine the cage
- open the cage door
- use the Stick to prop it open
- tie the Rope to the Stick
- place the other Wiener in the cage
- wait for the Beast to enter the cage
- pull on the Rope
- note: if you mess up, you can go back to the campsite and get more wieners
- go backwards
- talk to the Wooden Guard
- recieve his Hand
- go forward
- use the Hand on the left handprint and then click the right handprint
- try to open the door
- read the wall
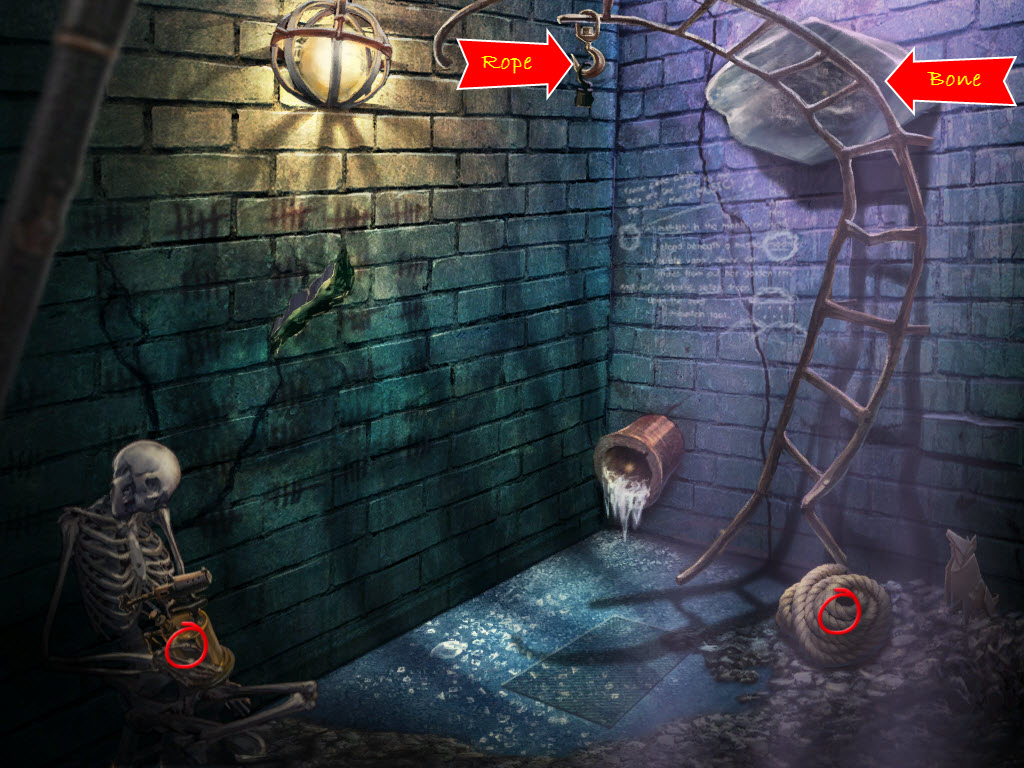
- take the Blowtorch from the skeleton
- pick up the Bone
- pick up the Rope
- tie the Rope to the hook on the ladder
- use the Bone to dislodge the rock
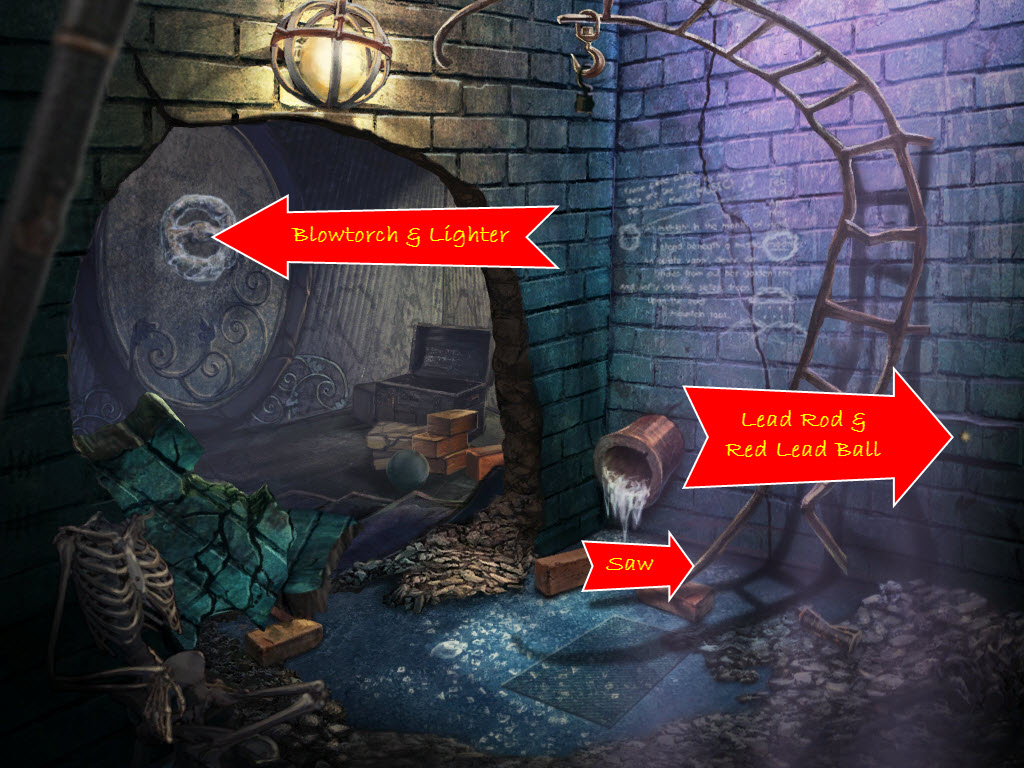
- swing the rock until the wall breaks
- examine the chest
- pick up the Brick
- use the Brick on the hard bread
- take the Saw
- pick up the Red Lead Ball
- use the Saw on the ladder
- pick up the Lead Rod
- examine the brick sticking out of the wall on the right
- use the Lead Rod on the brick
- place the Red Lead Ball in the pipe hole
- examine the pipe comig out of the wall
- take the Lighter
- examine the vault door
- hang the Blowtorch on the wall
- use the Lighter to light it
- Vault Door Puzzle (Moderate)
- look in your journal and read the latest entry about the writings on the wall
- use the clues written there to complete the puzzle
- you must push the numbers in the correct order
- solution (highlight to see): 12 (Midnight), 6 (June), 0 (Moon), 7 (Se7ven).
- go through the door
- push the up button and ride the elevator to the top
Factory
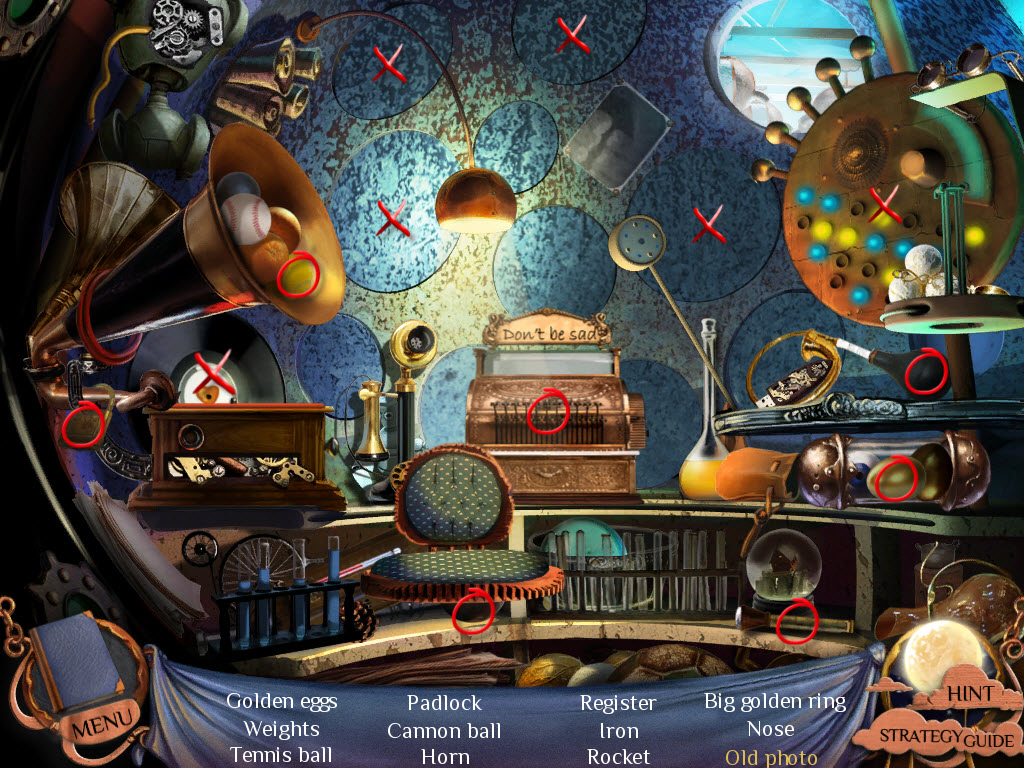
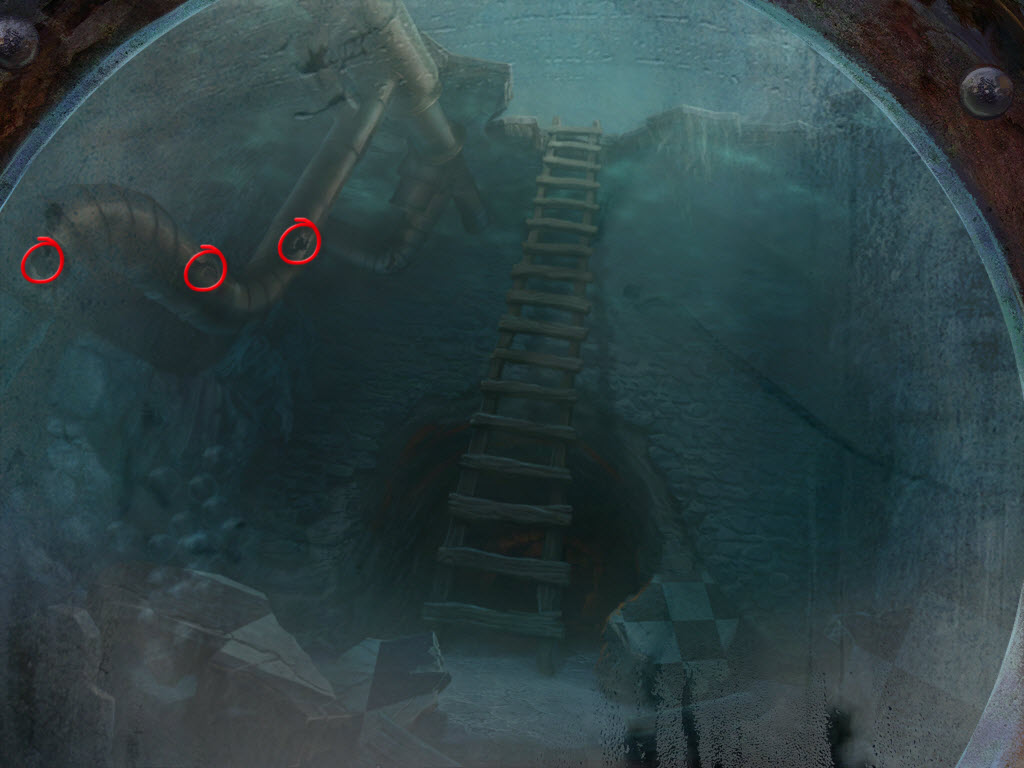
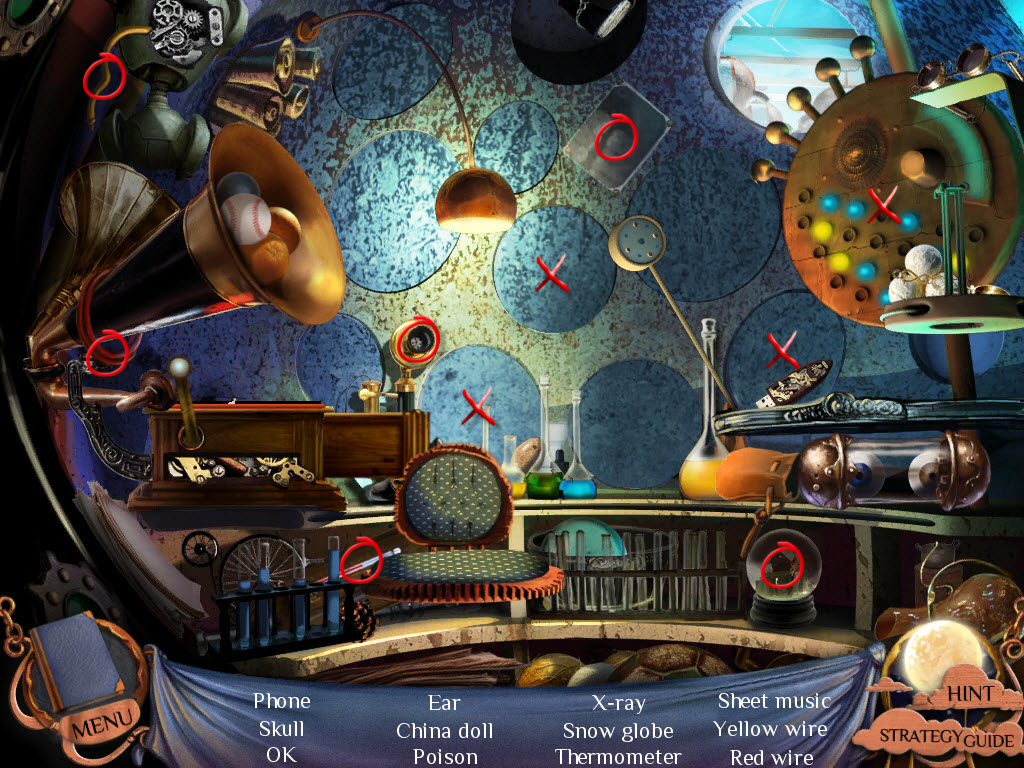
- examine the ball - hidden object area
- click on the cirlces in the wall to find various items (see X's in screenshot)
- move the machine with lights to find the nose
- pick up the record and place it on the gramaphone
- pick up the handle and place it on the gramaphone
- examine the gramaphone
- put the pieces of paper back together
- open the matchbook
- take out a match and strike it on the matchbook to light it
- use the lit match on the candle
- hold the piece of paper over the candle
- read the note
- take the envelope that appears on the gramaphone
- open up the envelope and take the photo
- you will find yourself outside the factory
- return to the factory gates
Factory Gates
- go right
- use the Blowtorch on the ice covering Emily's painting
- take the Winter Painting
- return to the house hallway/staircase
- examine the paintings
- place the Winter Painting in spot number five
- enter the bedroom
- examine the portrait
- take the Diver Emblem
- return through the portal to the foyer
- examine the cage
- place the Diver Emblem on the button
- use the Diamond on the glass
- take the Diving Suit
- examine the hole in the floor
- go down into the hole
- examine the pipe
- use the Blowtorch to fix the pipe
- exit out and go back to the foyer
- go forward and use the Blowtorch on the gas can
- return to the water
- examine the pipe again
- use the Blowtorch to fix the rest of the holes
- go forward
- examine the stone head
- place the Diamon in his right eye
- make note of the numbers
- exit out of the hole
- examine the valves on the pipes
- use the numbers that were underwater to set the valves correctly
- the top one should read - 10 and the bottom 360
- go back down
- go forward
- examine the bottle
- uncork the bottle
- take out Emily's Sword and Shield Painting
- return to the house hallway/staircase
- examine the paintings on the wall
- place the Sowrd and Shield Painting where number three is
- enter the bedroom
- examine the portrait
- take the Origami Butterfly
- open the Orgigami Butterfly and read it
- take the Remorse
- return to the treehouse
- examine the Witch Doctor - oh no! she is dead!
- look in the Witch Doctors hand
- touch what appears to be black fabric
- take the recipe out of her hand
- go forward to the cabinet
- place the Remorse in the empty spot
- Emotions Puzzle (Moderate)
- look in your journal and make a note of which way the emotions go
- solution - clockwise from the top - (highlight to see): Fear, Pity, Solicitude, Remorse, Hope, Mercy, Pride, Regret.
- go backwards and enter the celler
- use the Knife on the large pumpkin
- take the Pumpkin Seeds
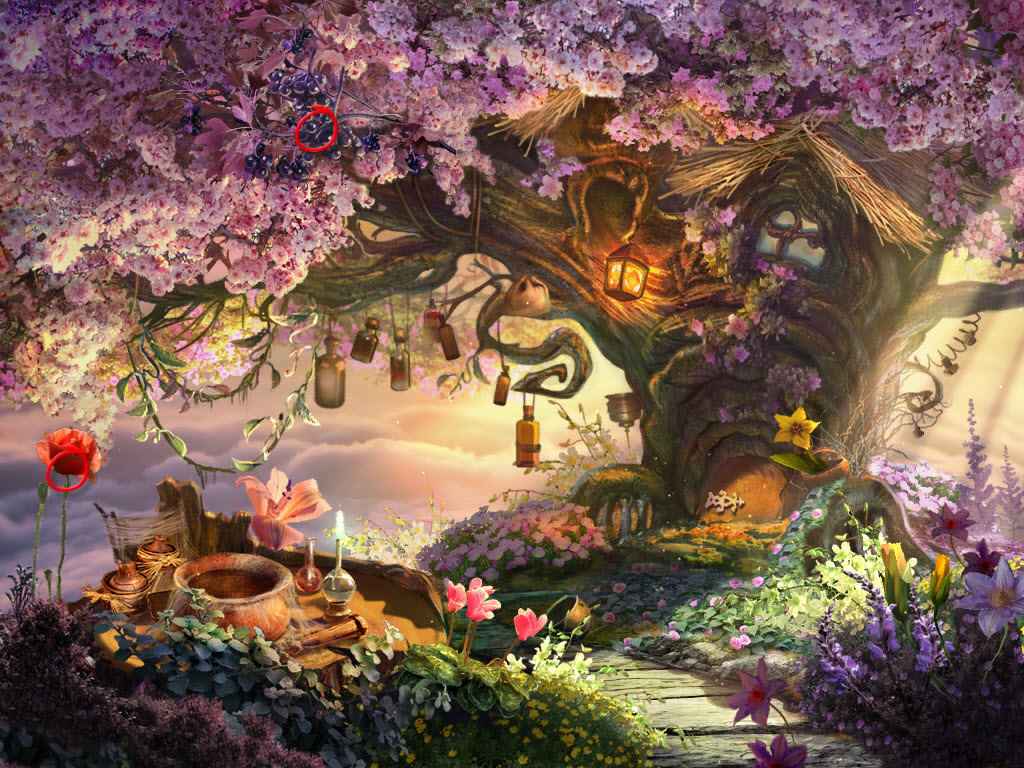
- examine the area to the left - hidden object area
- examine the plate
- take the remaining items
- pick up the Fishing Pole by the steps
- exit out of the treehouse
Witch Doctor
- take the Black Current and Poppy Flower
- go backwarnds once
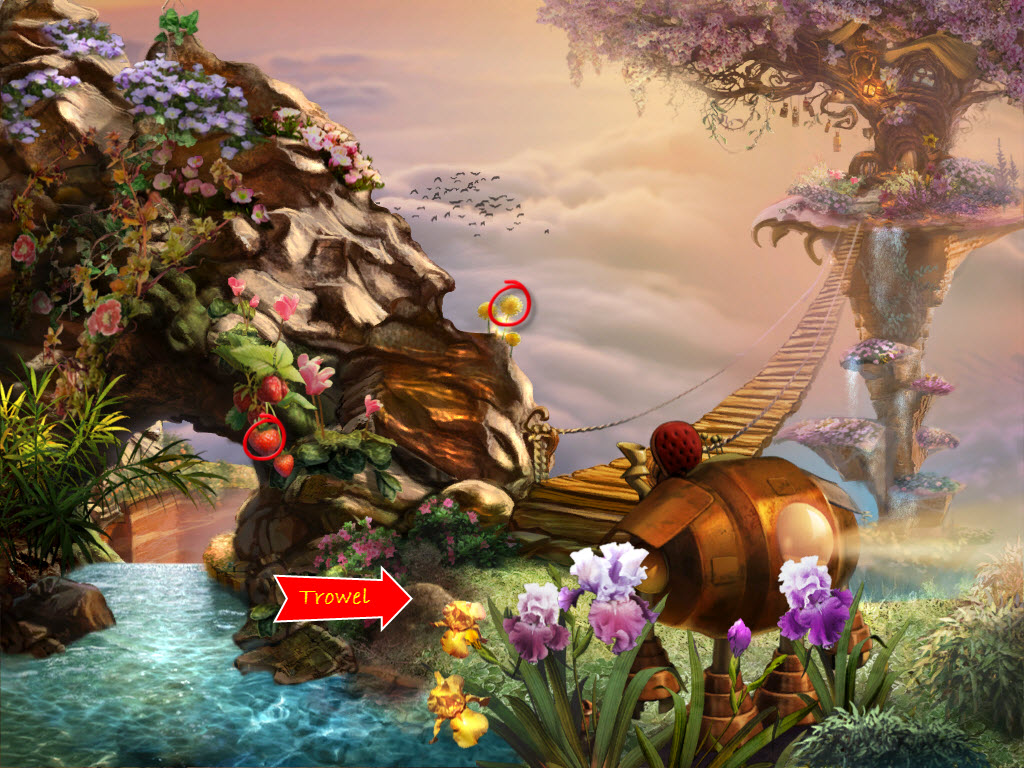
Robot
- take the Dandelion and Stawberry
- use the Trowel on the lump of dirt
- take the Worms
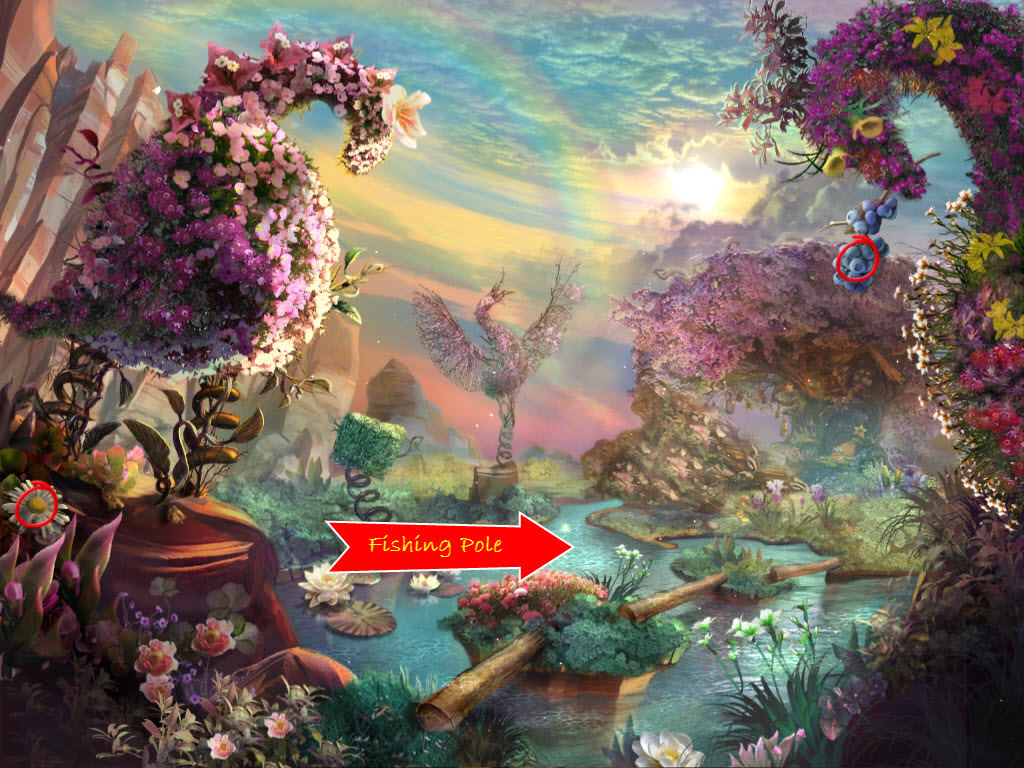
- go backwards once
- take the Chamomille and Blueberry
- examine the water
- place the Fishing Pole in the water
- grab the Striped Fish
- go backwards once
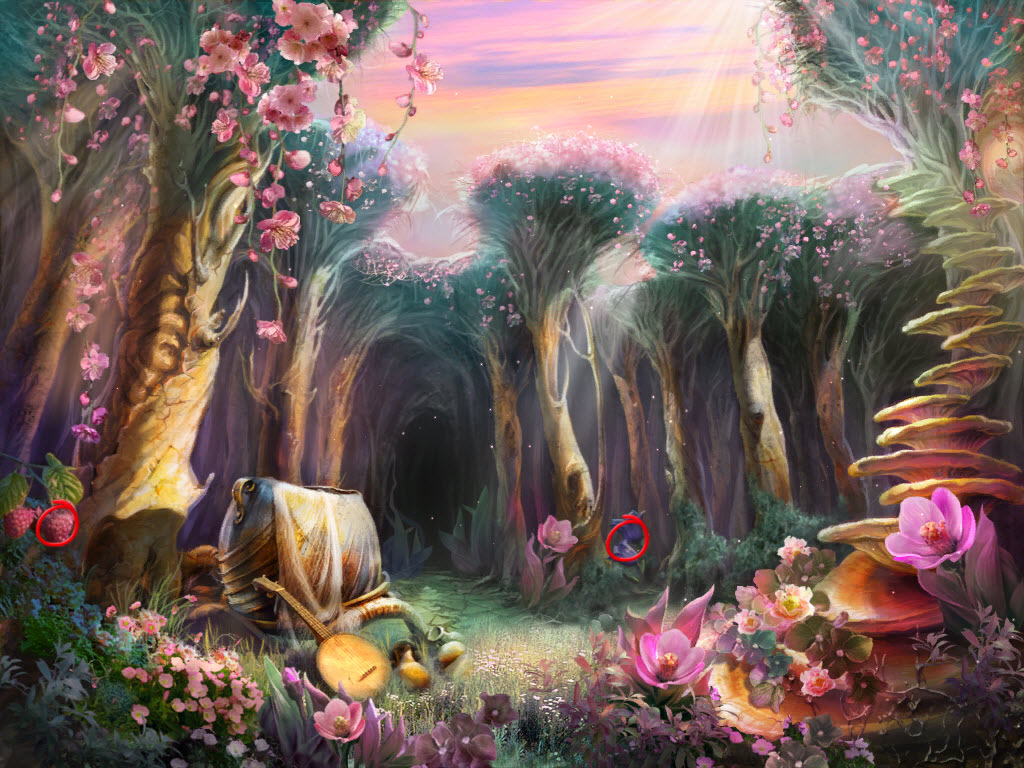
Forest
- take the Raspberry and Bell Flower
- go forward
- examine the area where the tears are falling
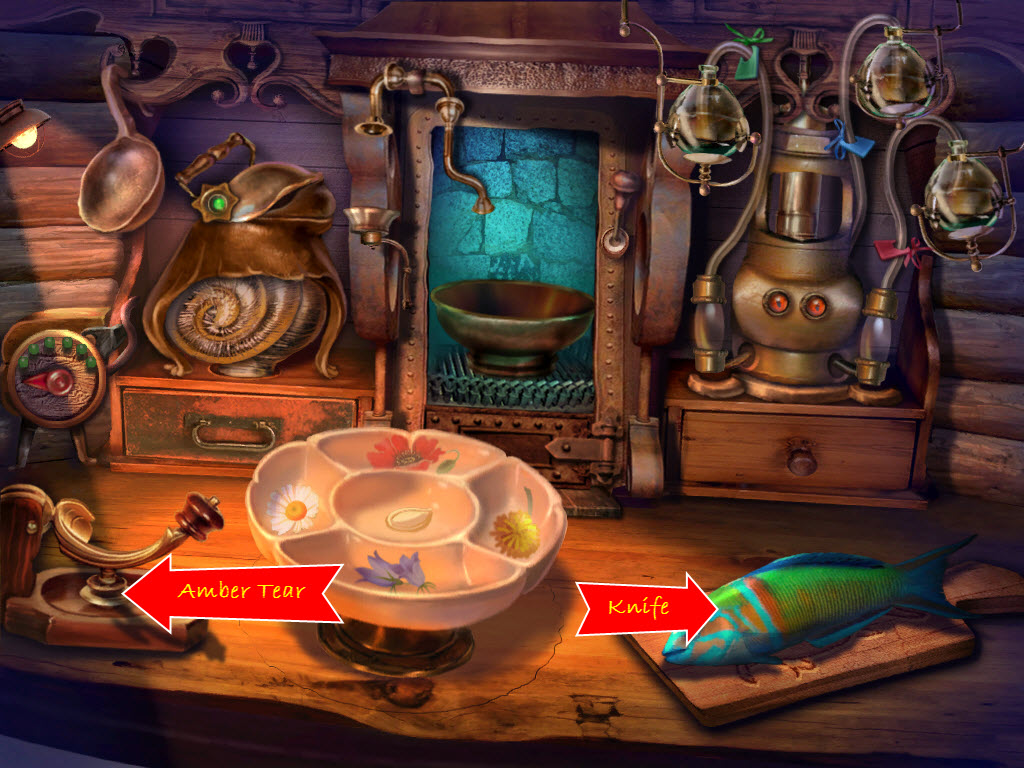
- pick up an Amber Tear
- use the Unlit Torch on the blue fire
- return to the treehouse
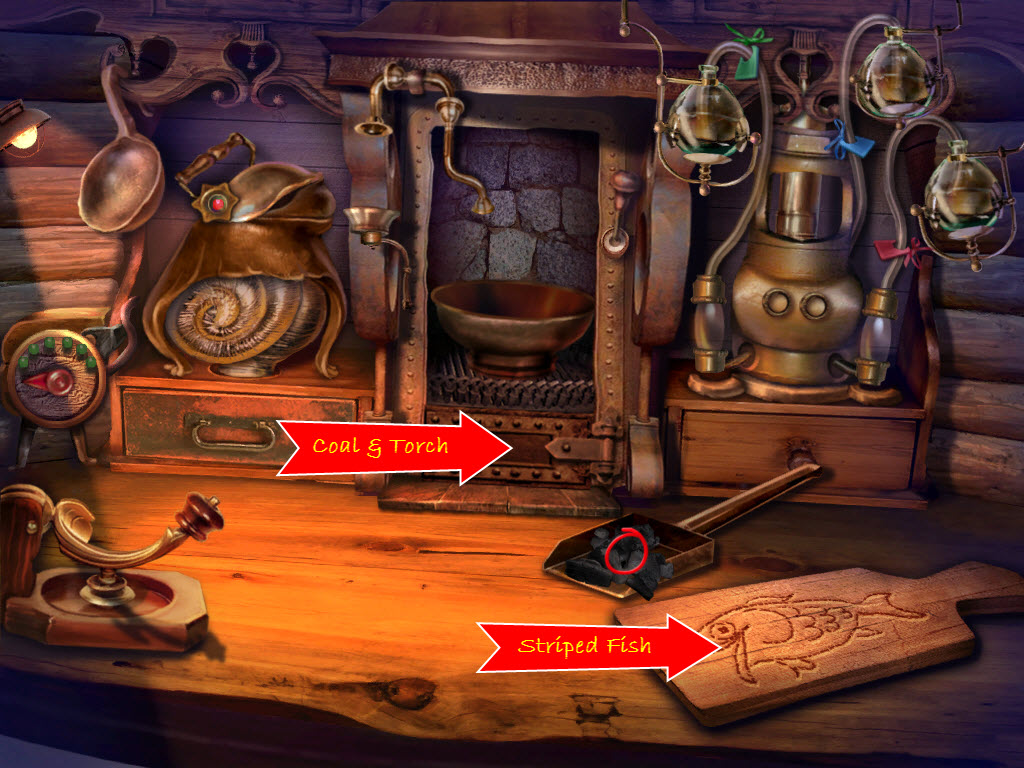
- go forward
- place the Striped Fish on the cutting board
- pick up the Coal and put it in the oven
- light the Coal with the Torch
- a bowl will appear
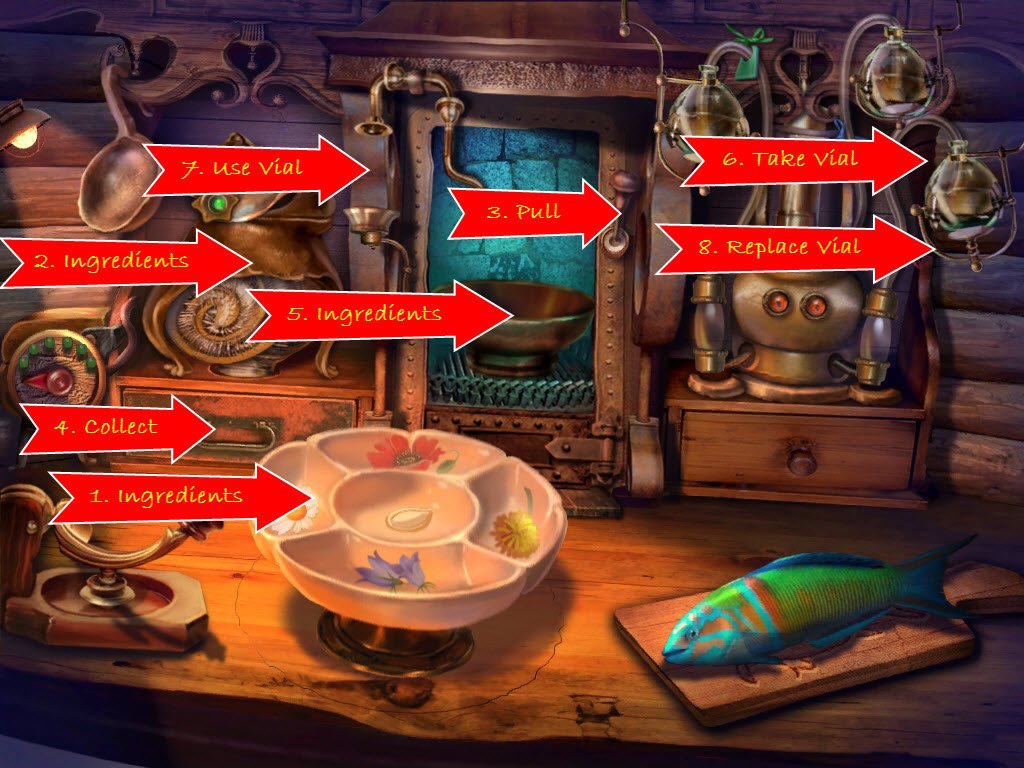
- place the matching Ingredients in the bowl
- take the scoop off the wall and use it on the mixture in the bowl
- place the ingredients into the grinder (left)
- pull the lever next to the oven
- open the door on the steamer (middle)
- place the Pink Powder from the left drawer into the steamer (middle)
- take the vial on the right with the pink ribbon
- use it to capture the Pink Steam
- place the vial back in it's place
- use the Knife on the Fish three times
- place the Fish in the grinder (left)
- repeat the process above for the fish
- place the Amber Tear in the crusher (front, left)
- place the remaining Ingredients in the bowl
- repeat the above process
- take the Sanityzak and the Blooming Tree Painting from the drawer
- return to the house hallway/staircase
Hallway
- examine the paintings on the wall
- place the Blooming Tree Painting in spot number four
- enter the bedroom
- examine the portrait
- take the Factory Key
- return to the campsite
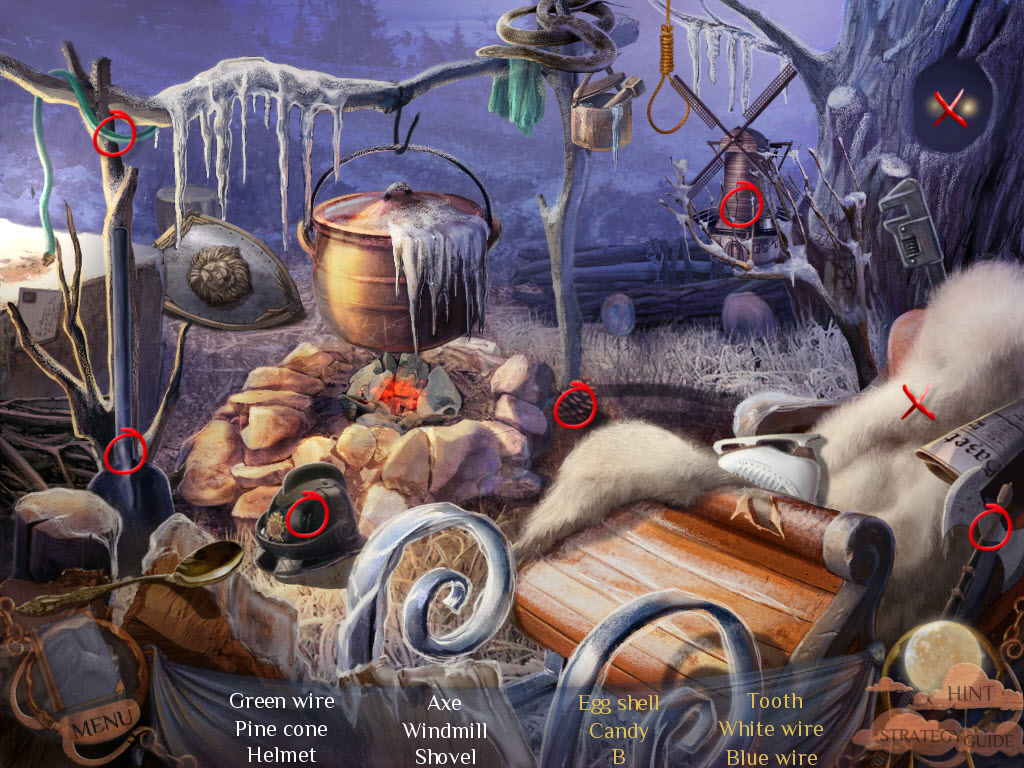
- examine the campfire - hidden object area
- examine the hole in the tree
- take the blue wire
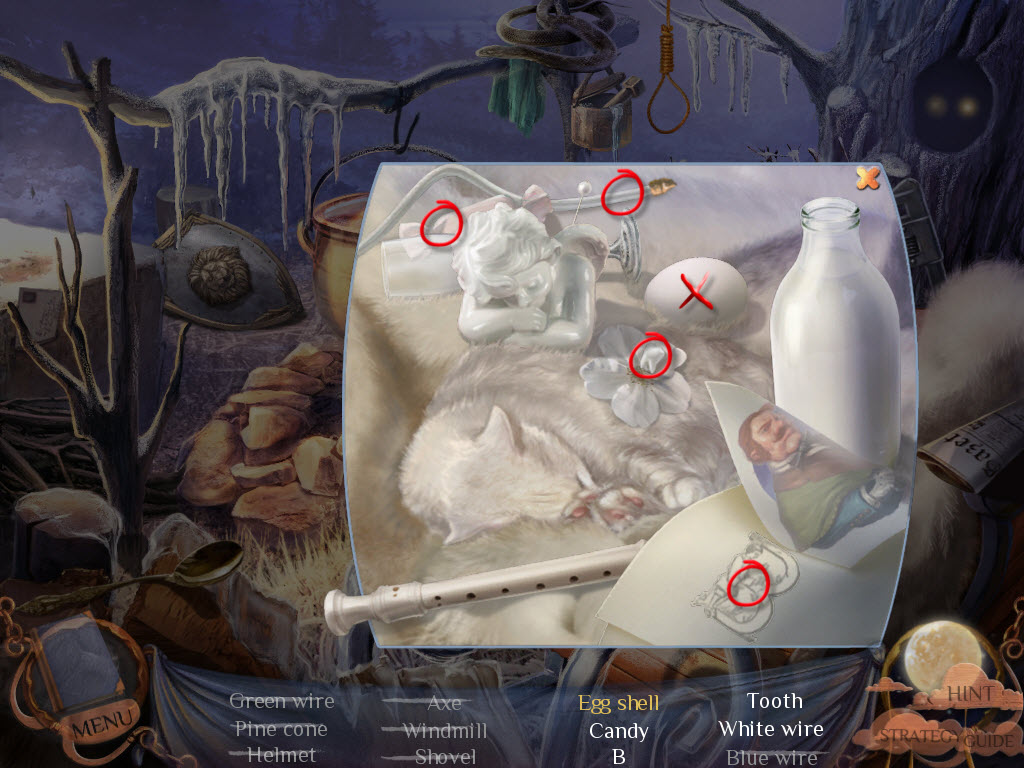
- examine the fur
- move the photo out of the way and take the "B"
- crack the egg shell
- take the remaining items
- return to the factory entrance
Factory Entrance
- examine the door
- use the Factory Key on the door
- enter the factory
- give the Pill to the Factory Master
- examine the ball - hidden object area
- click the circles in the wall to find various items
- these areas are marked with an X
- note: the circle behind the machine contains the poison
- examine the machine
- Machine Puzzle (Difficult)
- place the Colored Wires on the machine
- plug the wires in according to the colored numbers on the star
- solution (highlight to see): Red, Yellow, Green, Blue, White.
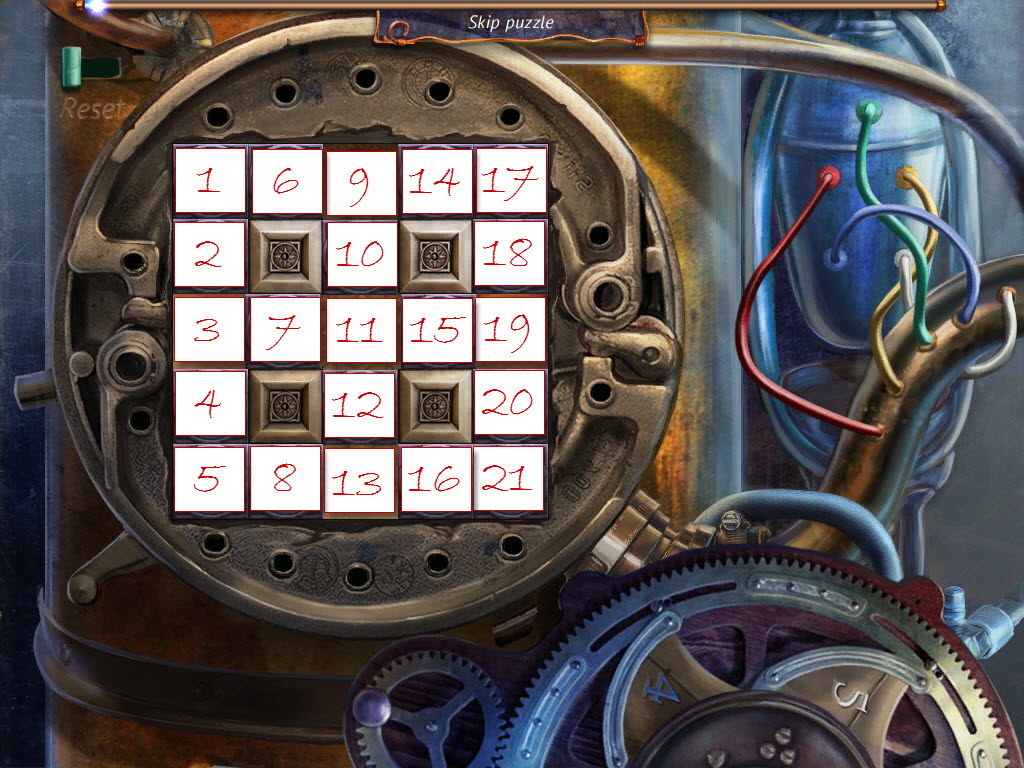
- the object of the second puzzle is to slide the symbols into their matching spots
- see screenshot below and combine with the following text for solution
- Solution w/Screenshot (R = Right, L = Left, U = Up, D = Down):
10 U, 15 R, 8 R, 7 R x2, 4 U, 3 R x2, 11 U, 2 D x2, 1 D x2, 3 R x2, 4 U, 3 R, 5 R, 6 L, 1 D x4, 9 L x2, 1 D x3, 14 L x3, 1 D x2, 17 L x4, 1 D, 18 U, 17 L x4, 19 U x2, 17 L x3, 10 U, 11 U, 15 L, 20 U x3, 21 U x2, 19 L, 17 L, 16 R, 6 U x4, 13 R x2, 21 U x3, 15 R, 11 R, 12 D, 13 R x2, 10 D x3, 13 R, 7 R, 11 D x2, 15 L, 11 D, 9 D x2, 19 L, 14 L, 17 L, 18 U, 21 U x3, 15 R, 16 R, 21 U, 13 R x2, 12 D, 13 R, 10 D x2 - exit and go backwards twice
Path to Factory
- talk to the Factory Master
- look under the tree
- move the present that says "To Peter, From David"
- open the red box
- take the Sun Painting
- take the Orb
- examine the Factory Master
- unbutton his pocket
- take the Note and read it
- return to the house hallway/staircase
- examine the paintings on the wall
- place the Sun Painting in spot number six
- enter the bedroom
- examine the portrait
- return through the portal to the second floor
- continue forward
- go up the stairs to the door
- examine the ropes
- use the Knife on all four ropes
- look at Emily
- place the Orb in the circle
- The Extractor will chase you back to Emily's Room
- read the Letter from David
- examine the paintings on the wall
- place the Creatures Painting in spot number 1
- give the Present to Emily
- look inside the Present
- pick up the Matches
- use the Matches on the birthday cake/candles
- click on Emily
The End!
