


Images©
PixelStorm
Overview:
In a new twist on an old classic, Beauty and the Beast, the Beast has
been turned to stone by the evil witch and it's up to Belle to save
him...again.
Journal: This will keep important information for you and also has the world map.
World Map: This shows you all the areas of the game, including where you are, where theres is an objective, and what you haven't unlocked yet.
Hints:The Beast is your hint button and is unlimited but must refill.
Objectives: When you click certain areas new objects will appear on your screen.
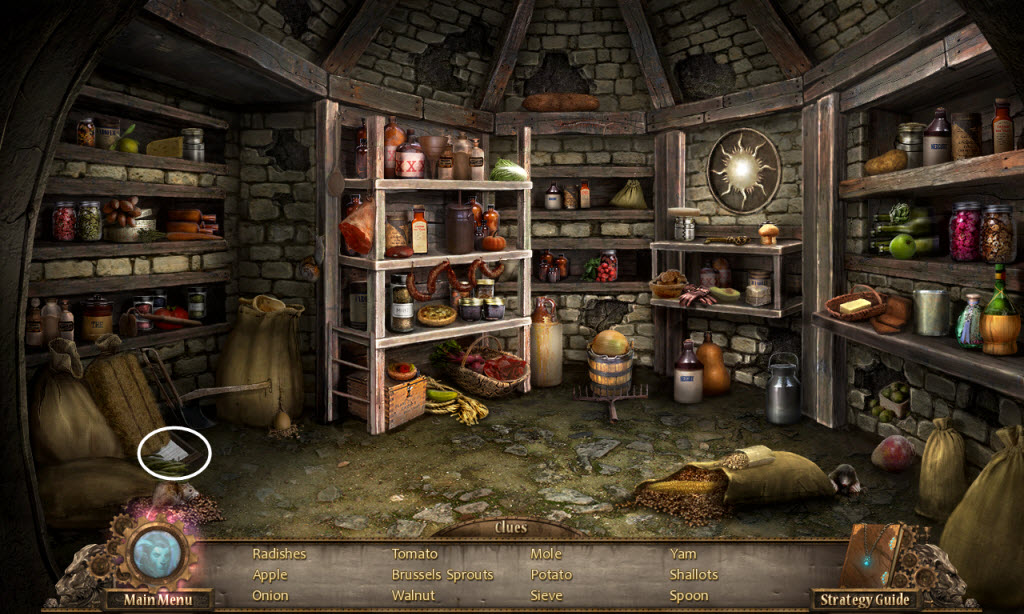
Hidden Object Scenes: You can click on an item in the list and see the silhouette. Each scene will have random objects for each player. Only inventory items will be circled.
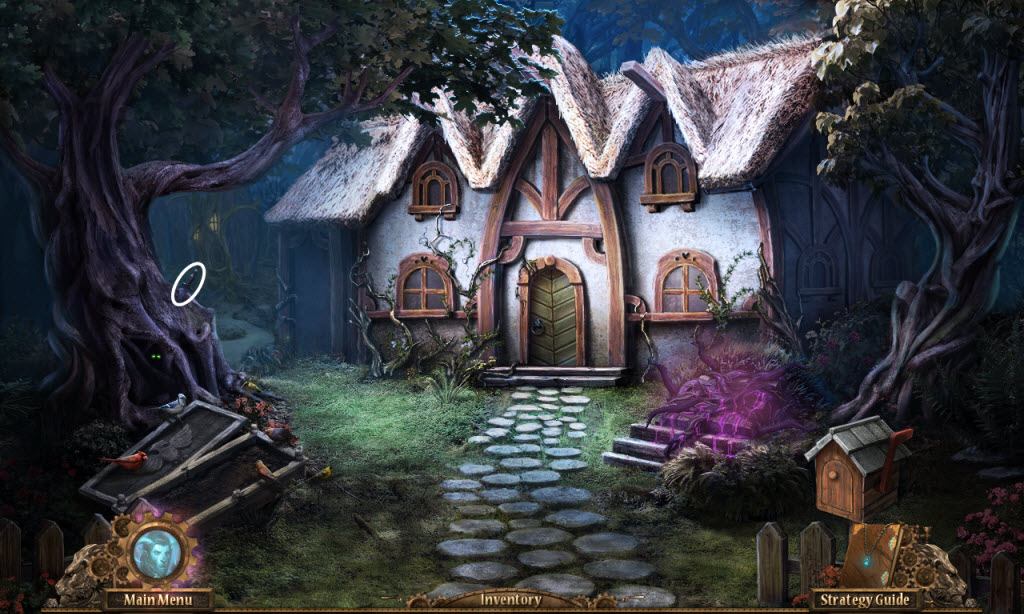
The Cottage
Owl Creek
The Cottage
Cottage Bedroom
Cottage Garden
Hayfield
Shop Street
Toy Shop
Treasure Room
Undercroft
Dining Room
Throne Room
Throne Room
Cottage Garden
Owl Creek
The Cottage
Blacksmith
Storm Peak
Grand Hall
Throne Room
Journal: This will keep important information for you and also has the world map.
World Map: This shows you all the areas of the game, including where you are, where theres is an objective, and what you haven't unlocked yet.
Hints:The Beast is your hint button and is unlimited but must refill.
Objectives: When you click certain areas new objects will appear on your screen.
Hidden Object Scenes: You can click on an item in the list and see the silhouette. Each scene will have random objects for each player. Only inventory items will be circled.
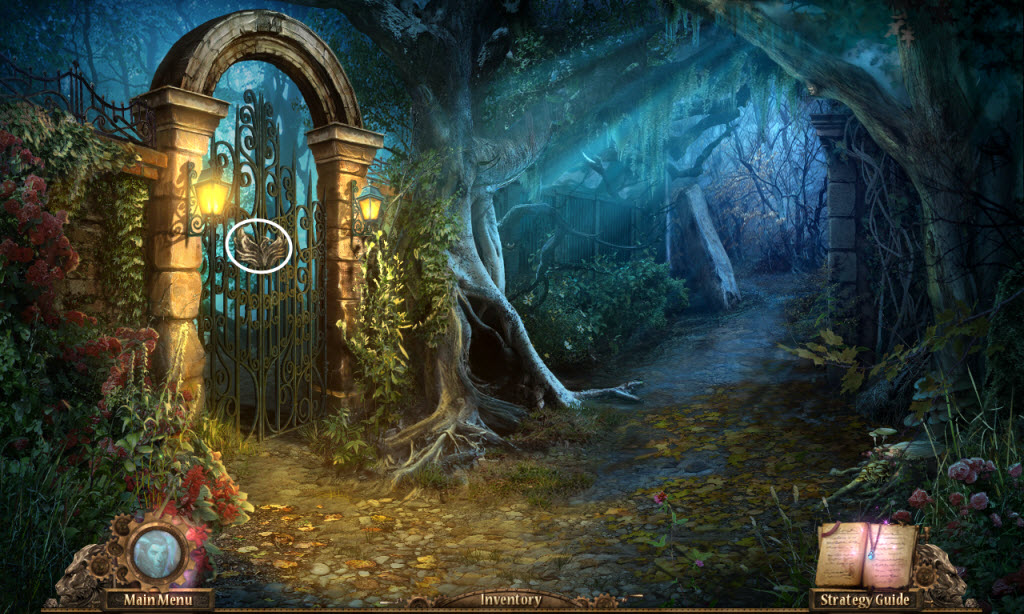
The Cottage
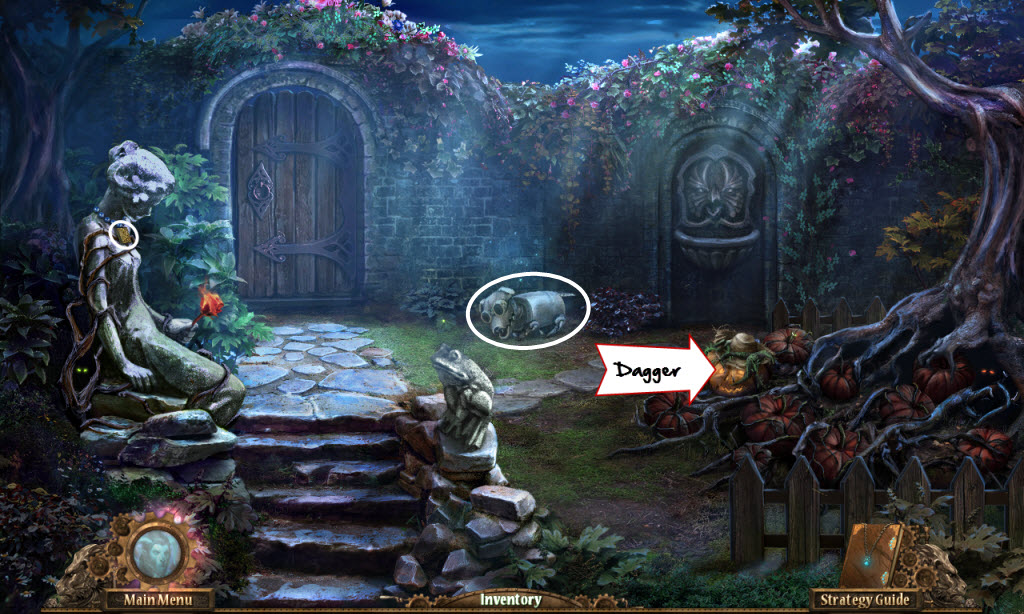
- examine the tree trunk and remove the Dagger
- go left
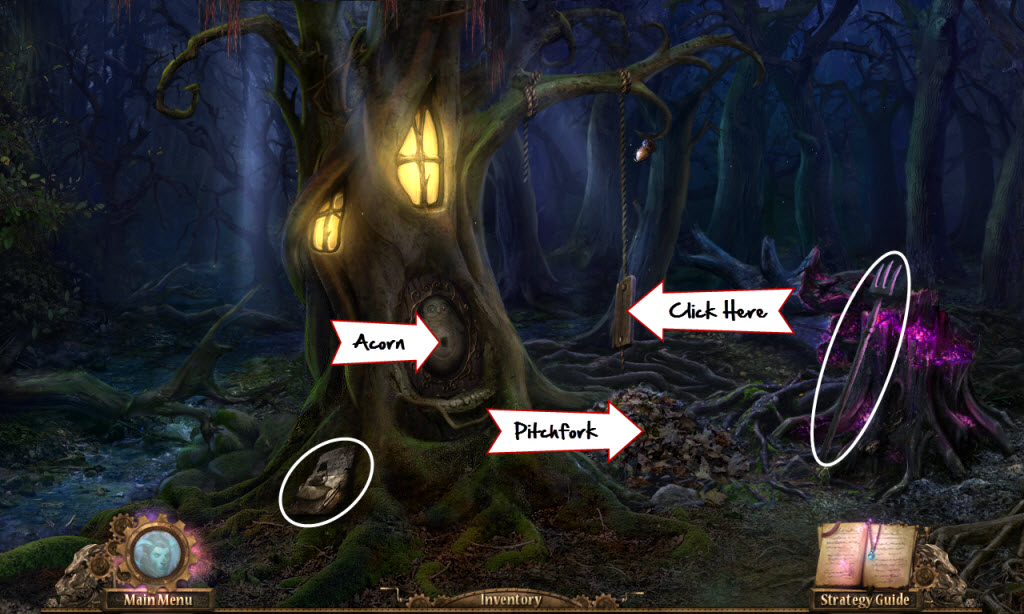
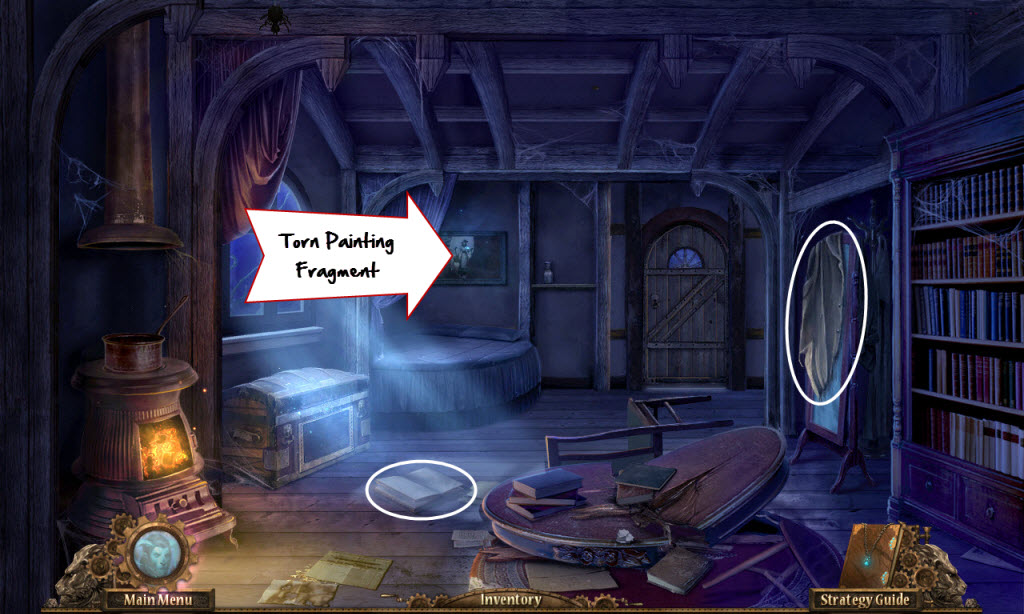
Owl Creek
- pick up the Pitchfork
- pick up the Torn Painting Fragment
- click on the broken swing
- examine the pile of leaves
- use the Pitchfork to remove the leaves
- pick up the Acorn
- place the Acorn into Mr. Beak's door
- take the Herbicide Spray
- go down
The Cottage
- use the Herbicide Spray on the purple vines
- examine the cellar door
- Cellar Door Puzzle
- swap the tiles so that each row and column have only one of each vegetable
- see screenshot for solution
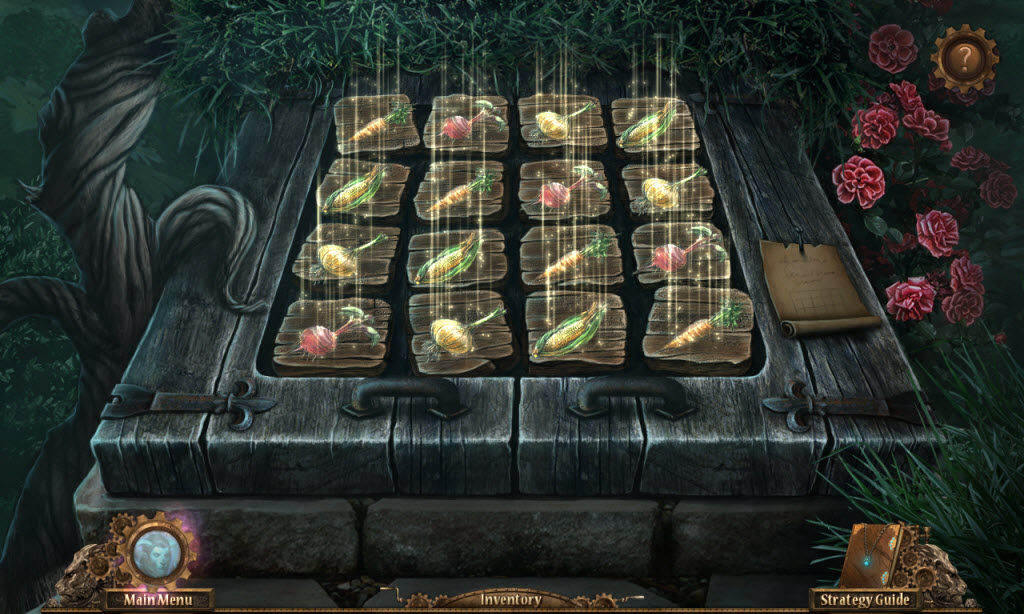
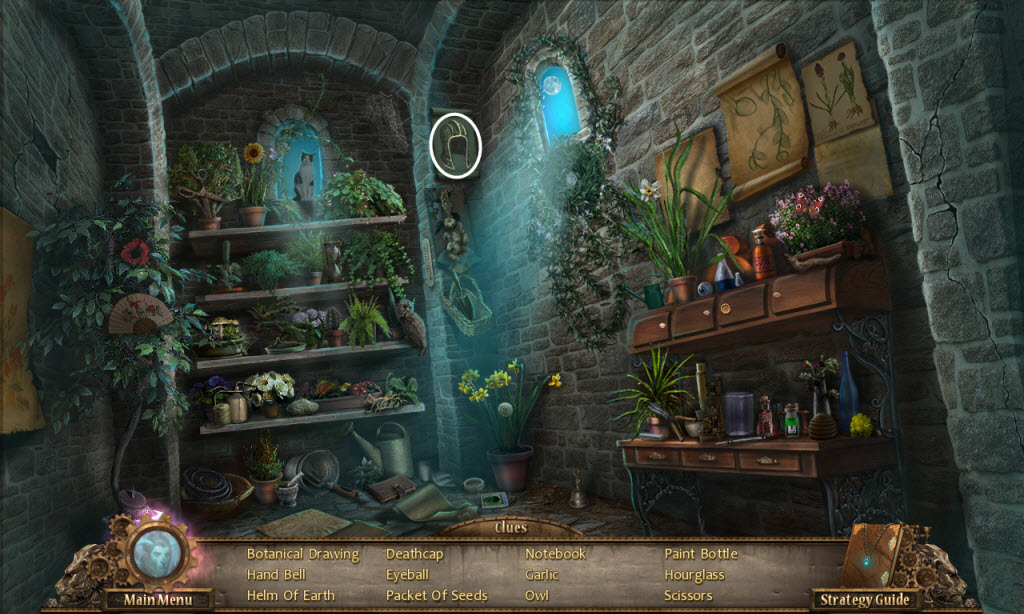
- look inside the cellar - hidden object scene
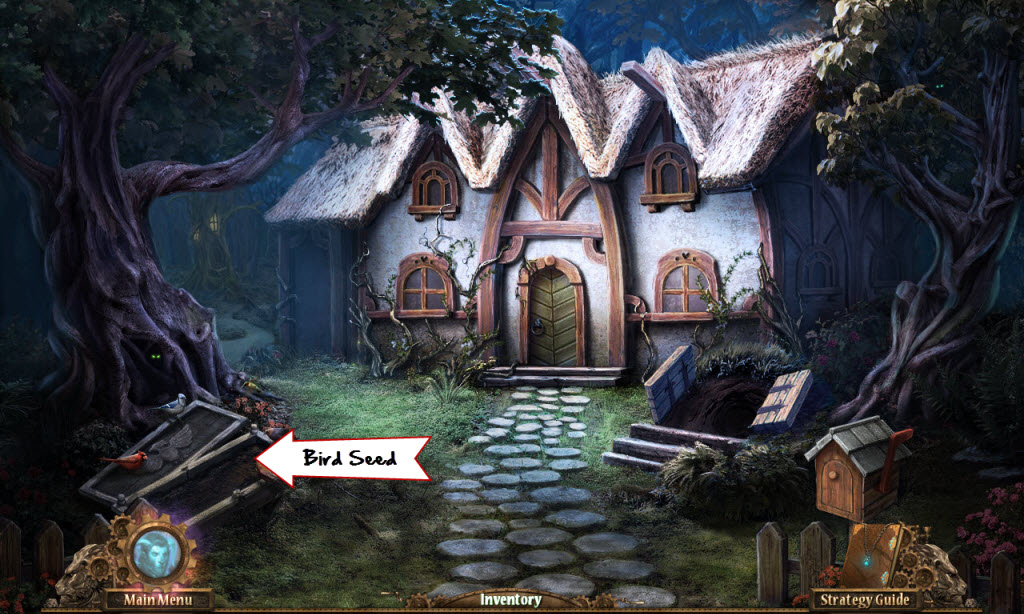
- take the Bird Seed
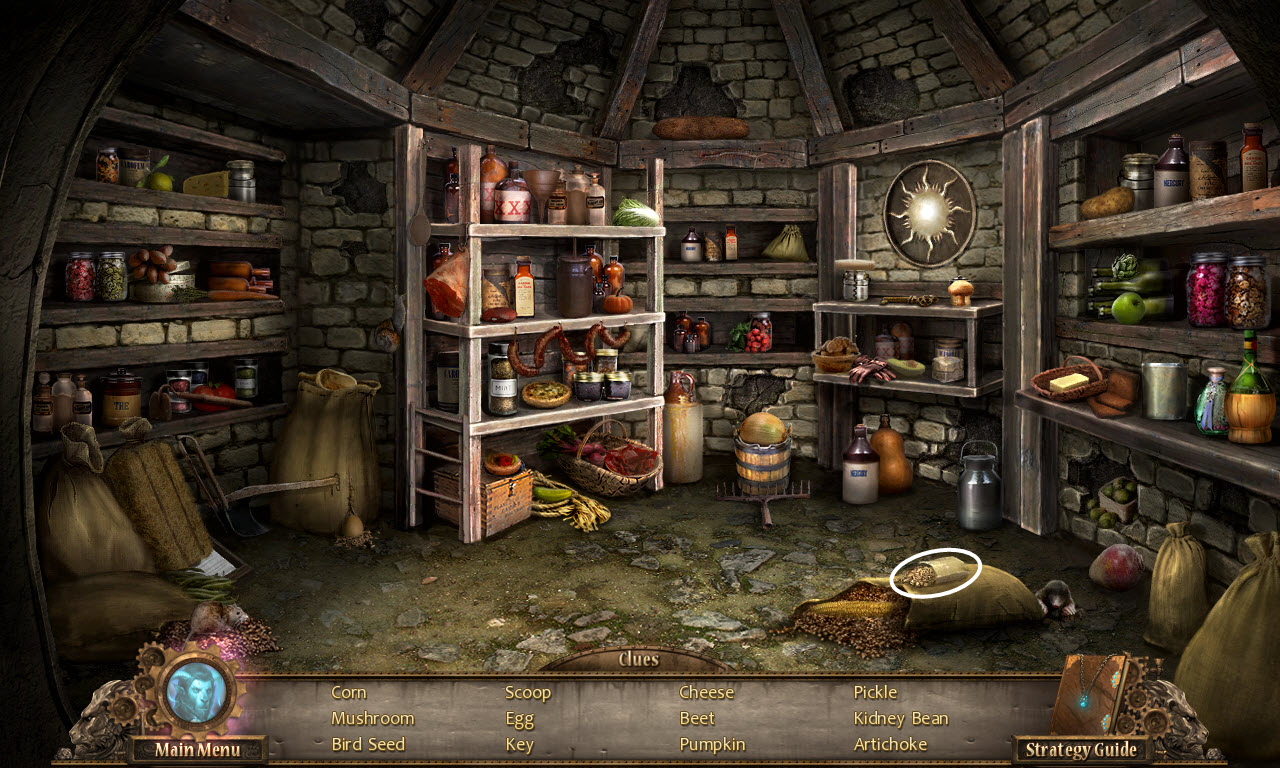
- place the Bird Seeds in the bird feeder
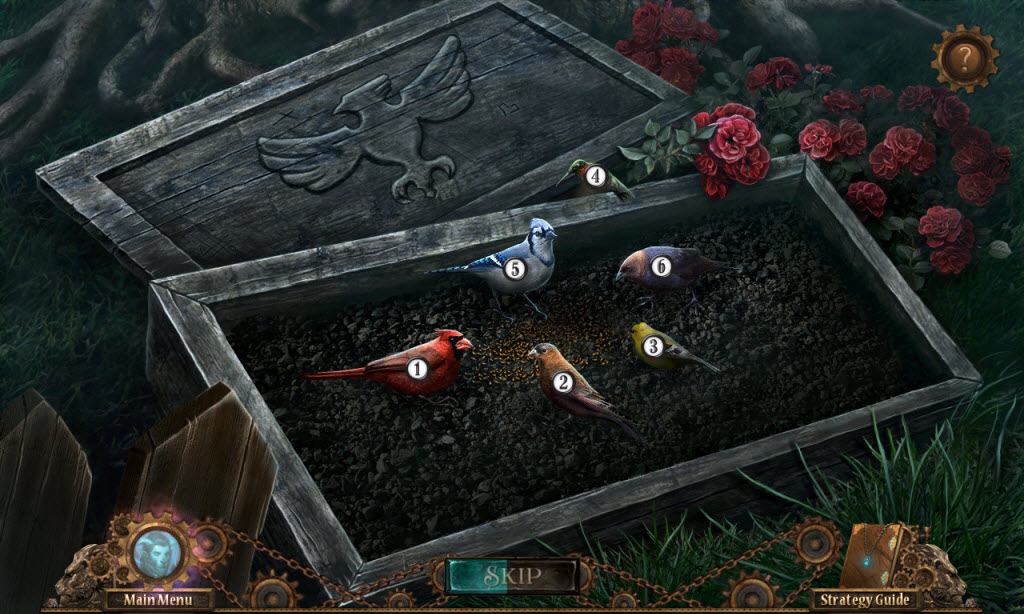
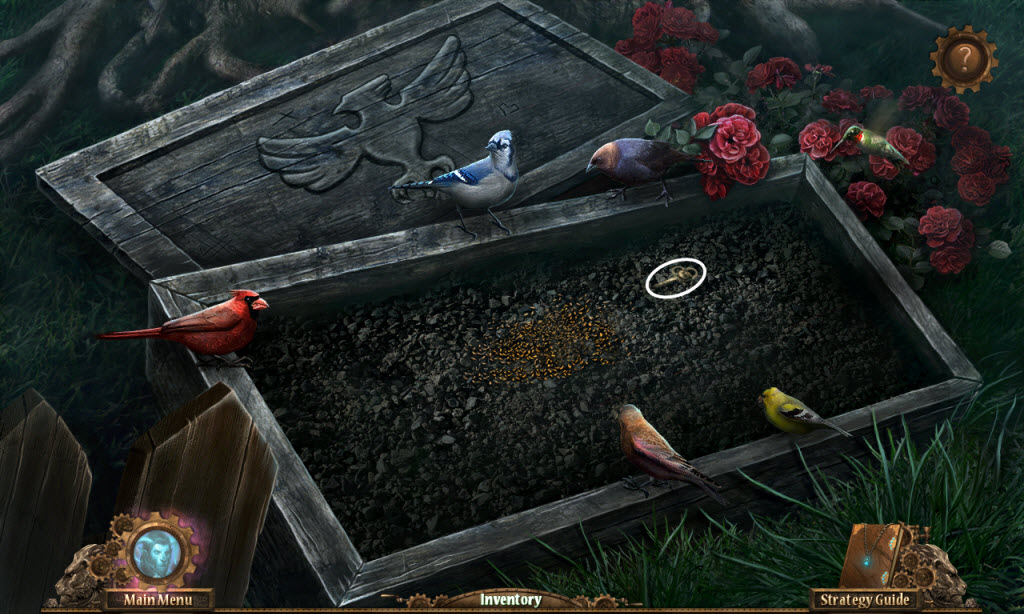
- Bird Feeder Puzzle
- look in your journal and read the poem
- use the poem to figure out which order you need to remove the birds
- see screenshot for solution
- take the Cottage Key
- use the Cottage Key on the cottage door
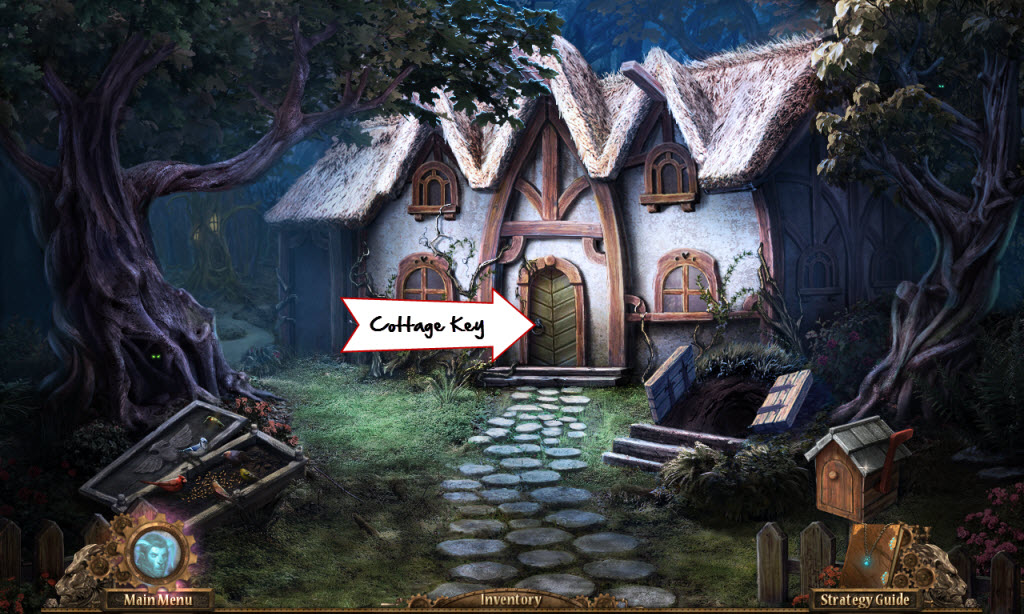
- enter the cottage
- examine the painting in the back
- replace the Torn Painting Fragment
- take the Chest Emblem (1 of 6)
- take the Yellow Garment off the mirror
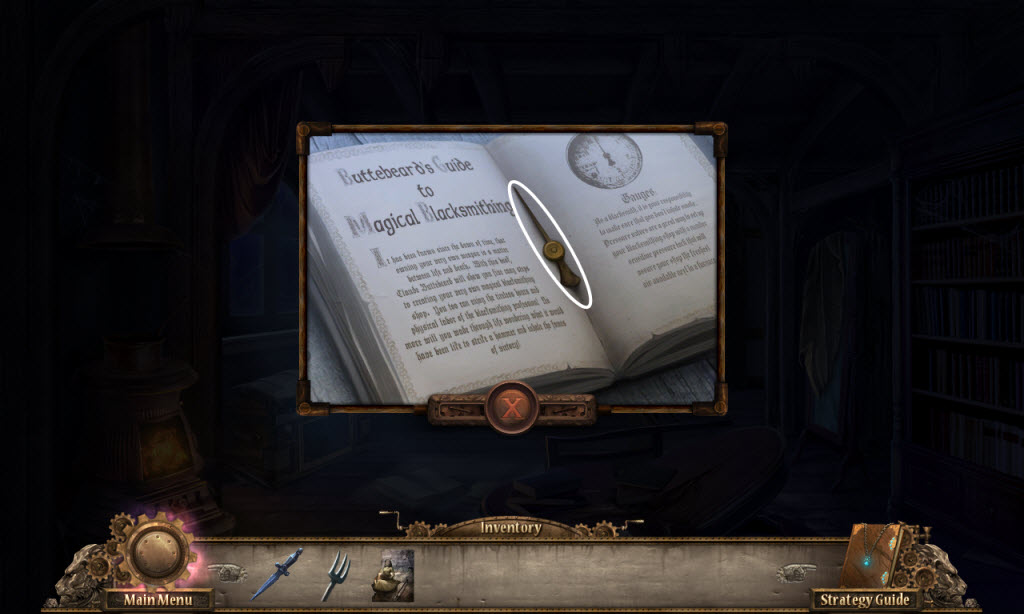
- examine the book on the floor
- take the Gauge Needle
- try and open the back door
- open the window
- go through the door
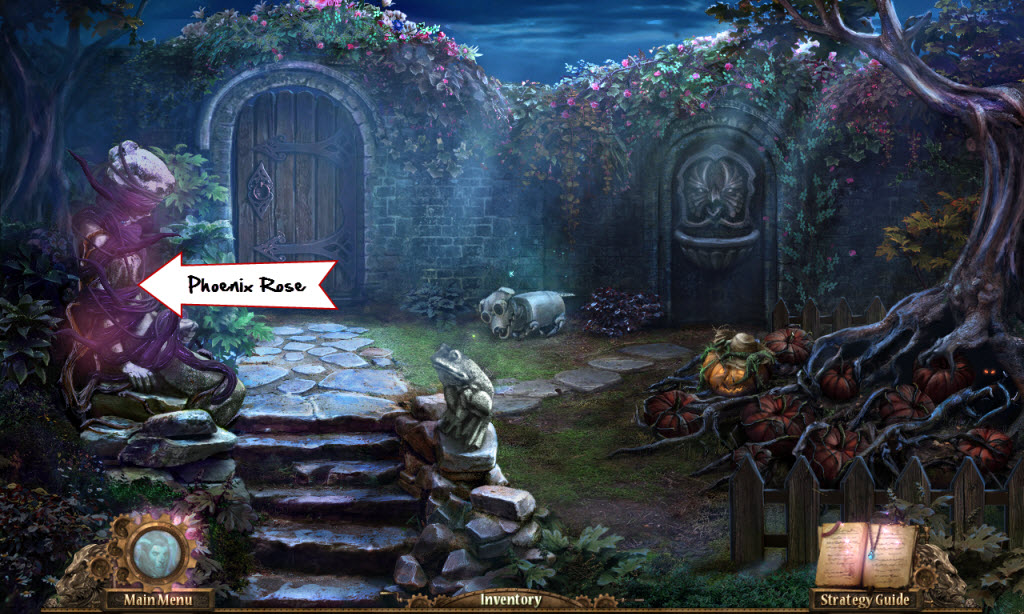
- take the Spade
- take the Dead Phoenix Rose from the statues hand
- return to the cottage bedroom
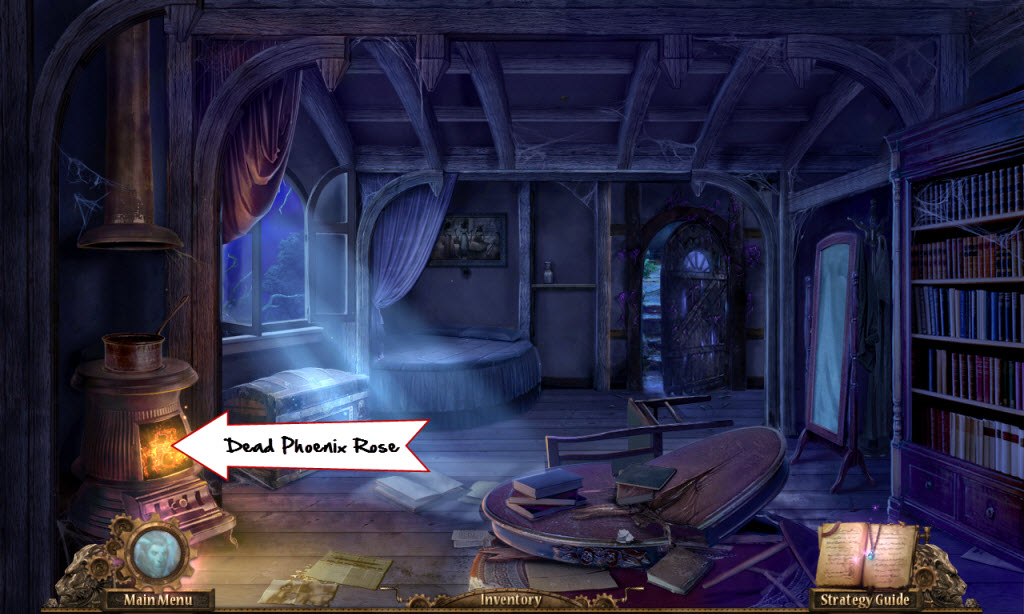
Cottage Bedroom
- examine the stove
- place the Dead Phoenix Rose in the fire
- take the Phoenix Rose
- return to the cottage garden
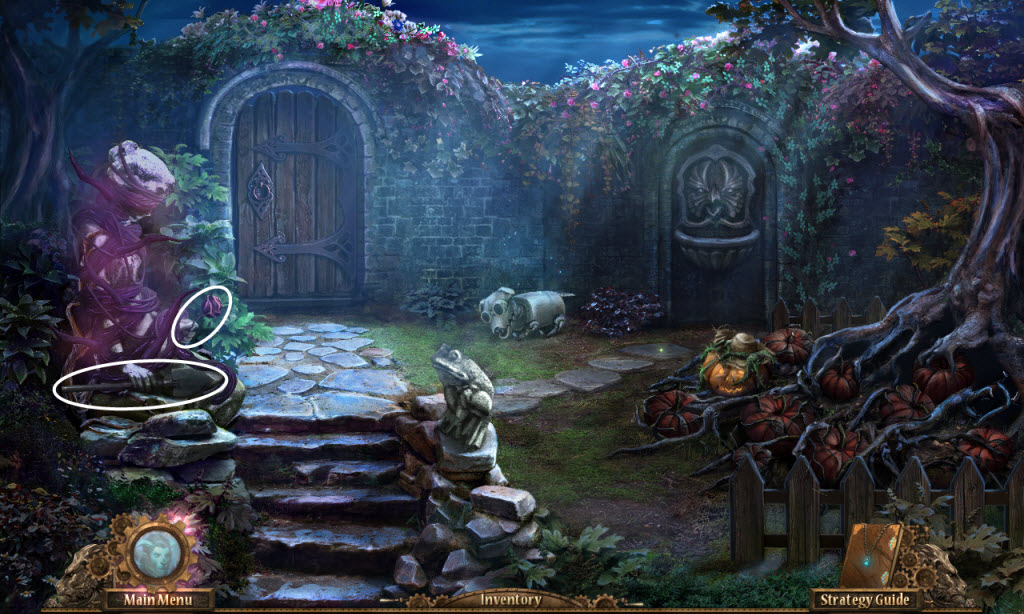
Cottage Garden
- use the Phoenix Rose on the purple vines around the statue
- take the Chest Emblem (2 of 6) from around her neck
- use the Dagger on the Pumpkin Head
- look at Tinbot the dog and take the Chest Emblem (3 of 6)
- go up
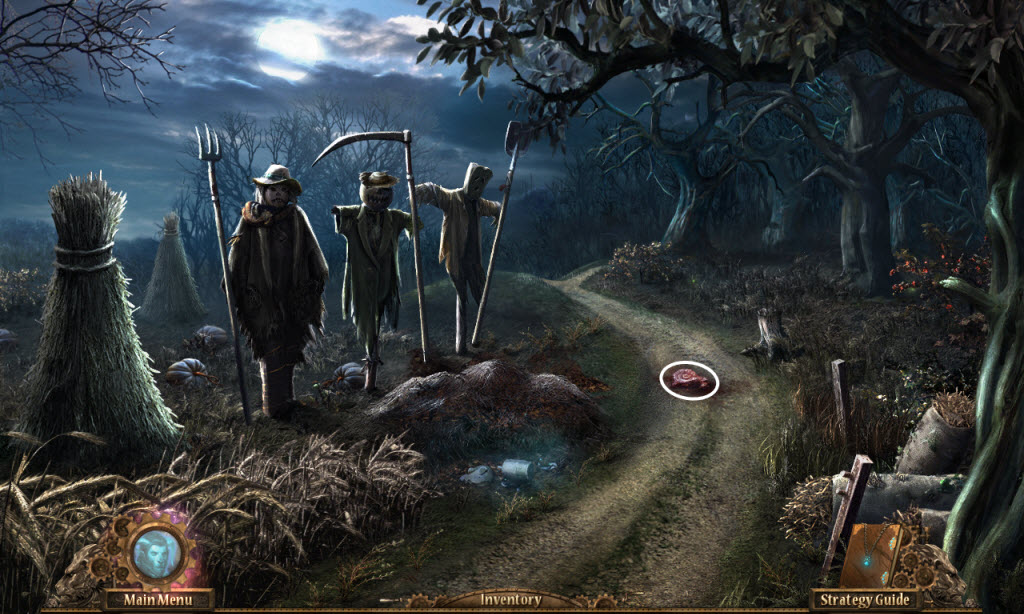
Hayfield
- pick up the Lion Crest
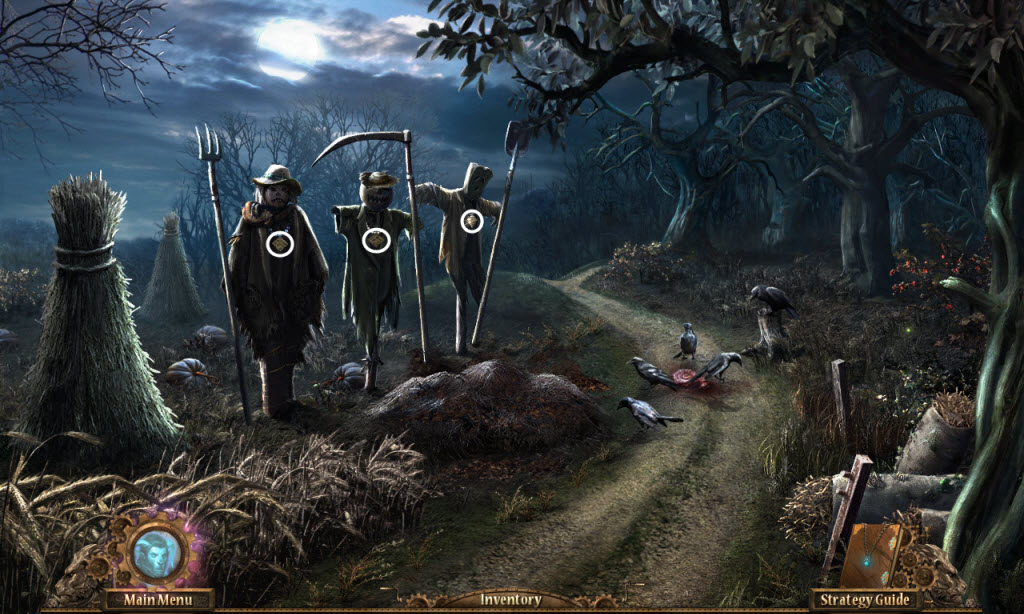
- place the Pitchfork in the left scarecrow's hand
- place the Pumpkin Head on the middle scarecrow
- place the Yellow Garment on the right scarecrow
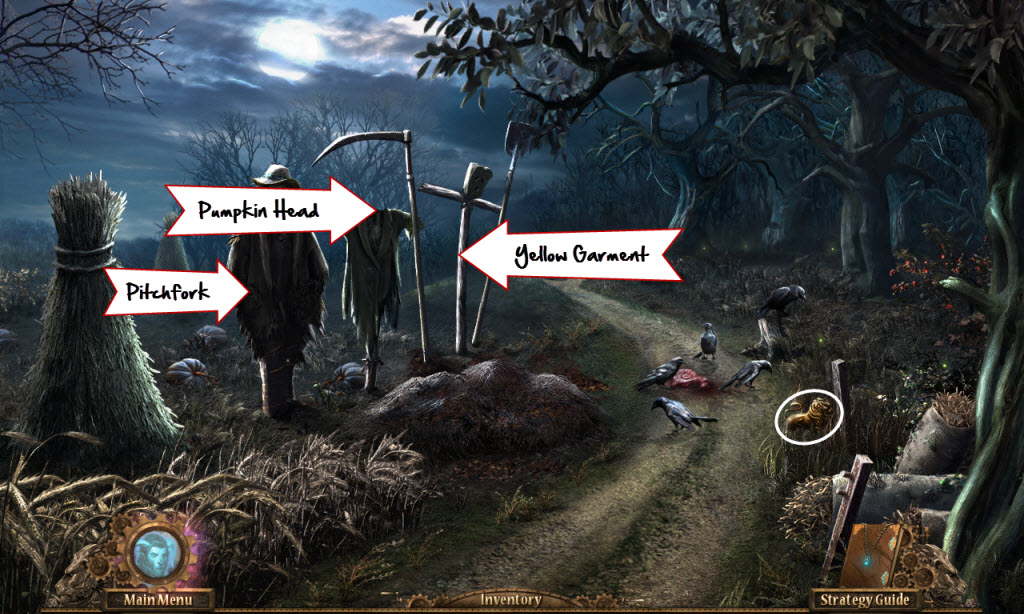
- take the Chest
Emblems off each scarecrow
- return tot he cottage bedroom
- examine the chest under the window
- Cottage Bedroom Chest Puzzle
- replace the Chest Emblems
- swap them to complete the picture
- click on a tile and click the blue gear to rotate them
- see screenshot for solution
- look inside the chest
- take the Robo-Biscuits
- return to the cottage garden
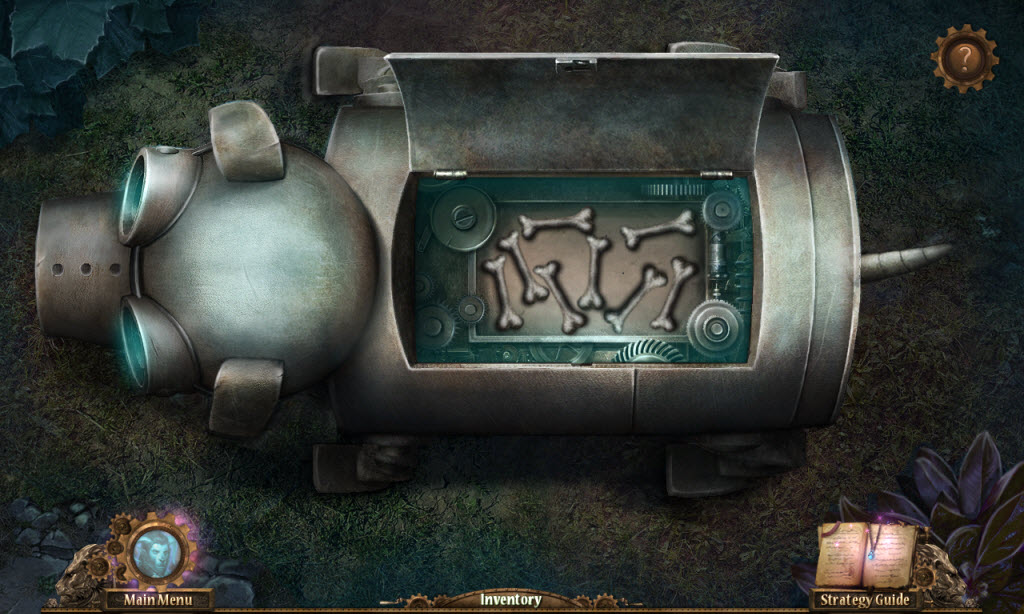
- look at Tinbot the dog again
- place the Robo-Biscuits inside of him
- Robo-Biscuits Puzzle
- move the bones around so they are not overlapping each other or the edges
- see screenshot for solution
- pick up Tinbot
- return to the hayfield
- use Tinbot to scare off the crows
- take the Mystery Meat
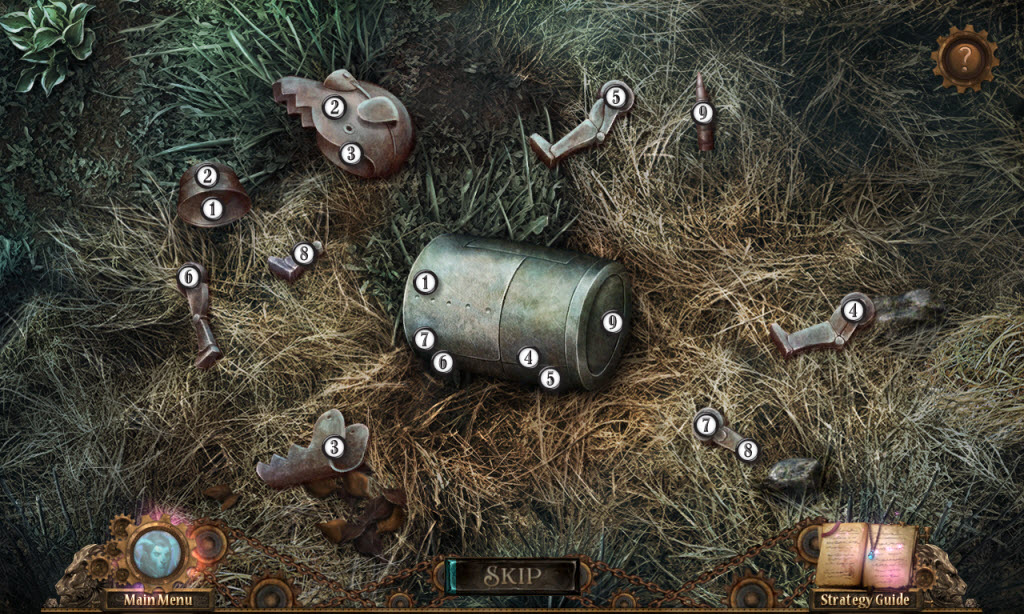
- click on Tinbot's parts
- Tinbot Puzzle
- reassemble Tinbot
- if you have the correct item in the correct spot it will snap into place
- see screenshot for solution
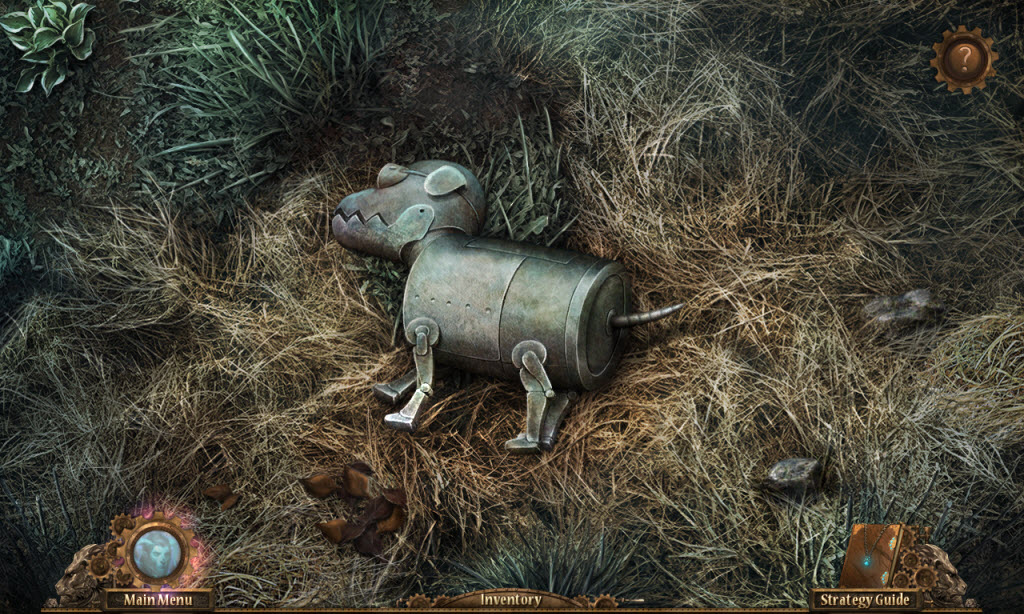
- pick up Tinbot
- go up
- take the Snake Crest
- pick up the Stone Shield
- use the Spade on the base of the tree
- throw the Mystery Meat at whatever is in the tree
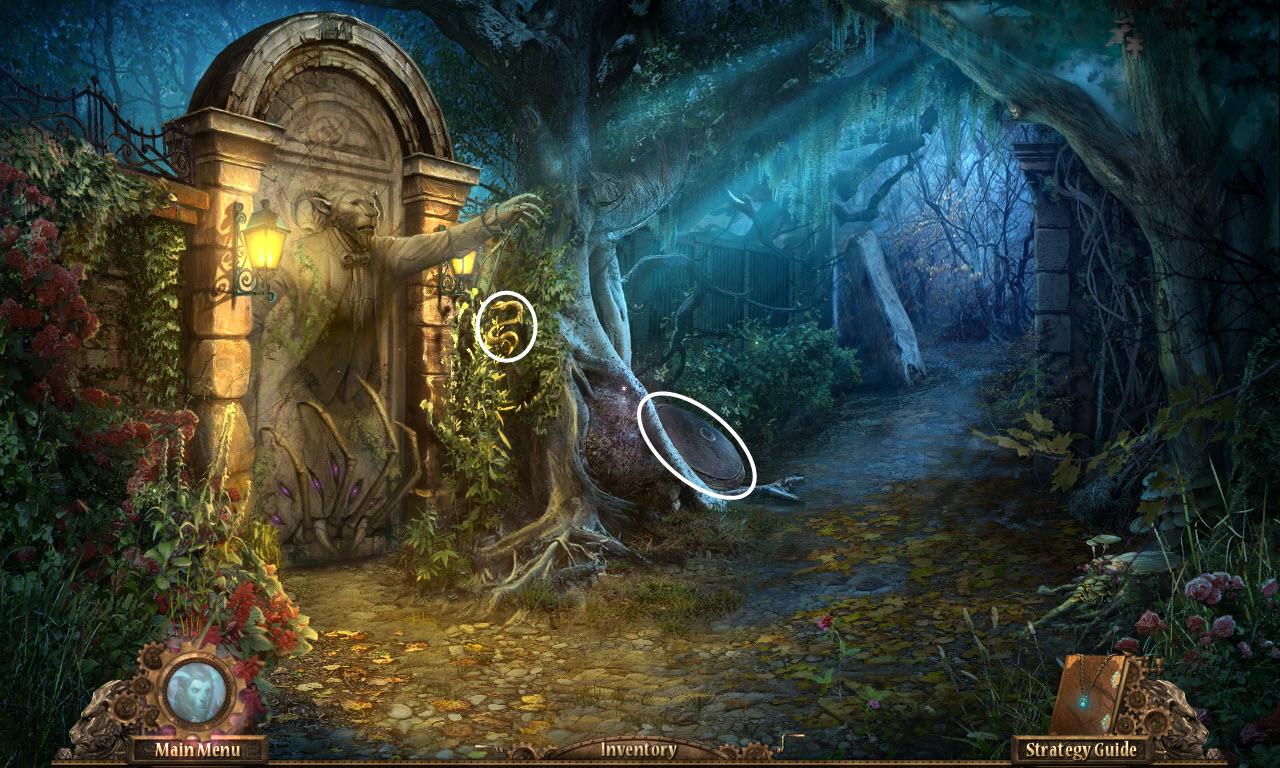
- examine the base of the tree - hidden object scene
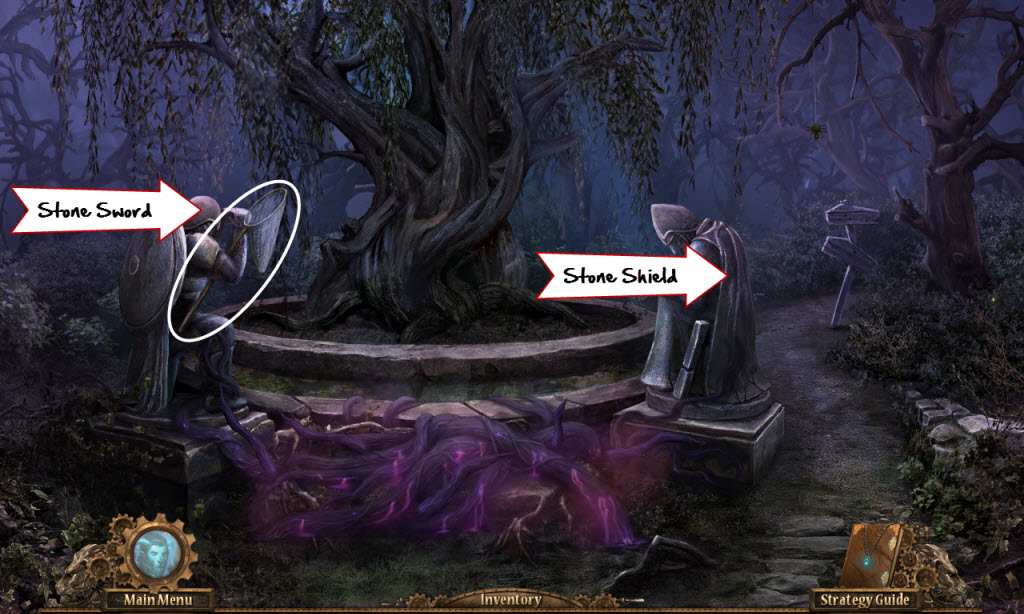
- take the Stone Sword
- continue up
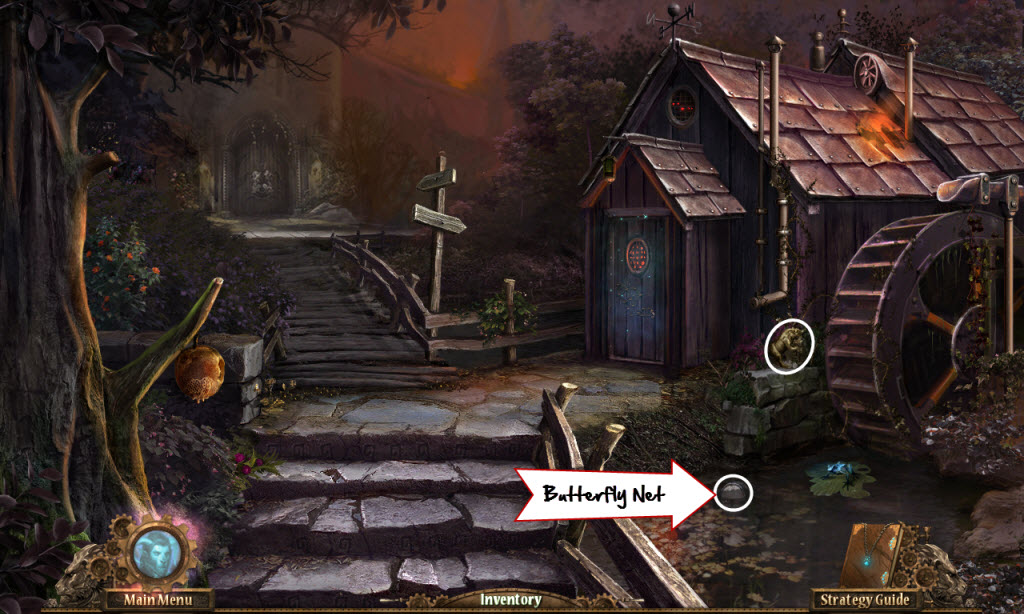
- take the Butterfly Net
- give the Stone Sword to the statue on the left
- give the Stone Shield to the statue on the right
- pick up the Wolf Crest
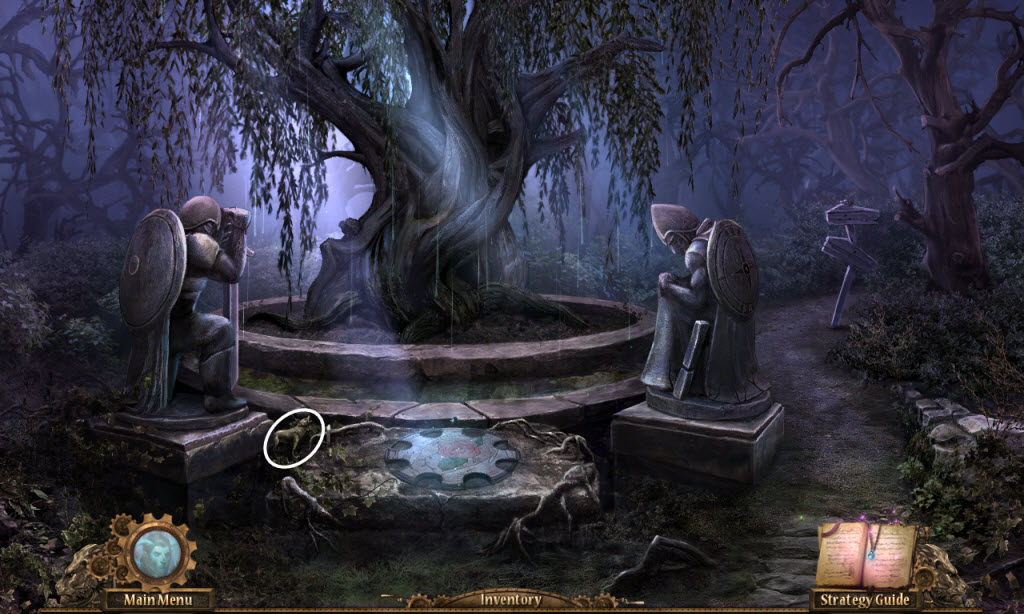
- continue up
- pick up the Bear Crest
- use the Butterfly Net to get the Gauge out of the waters
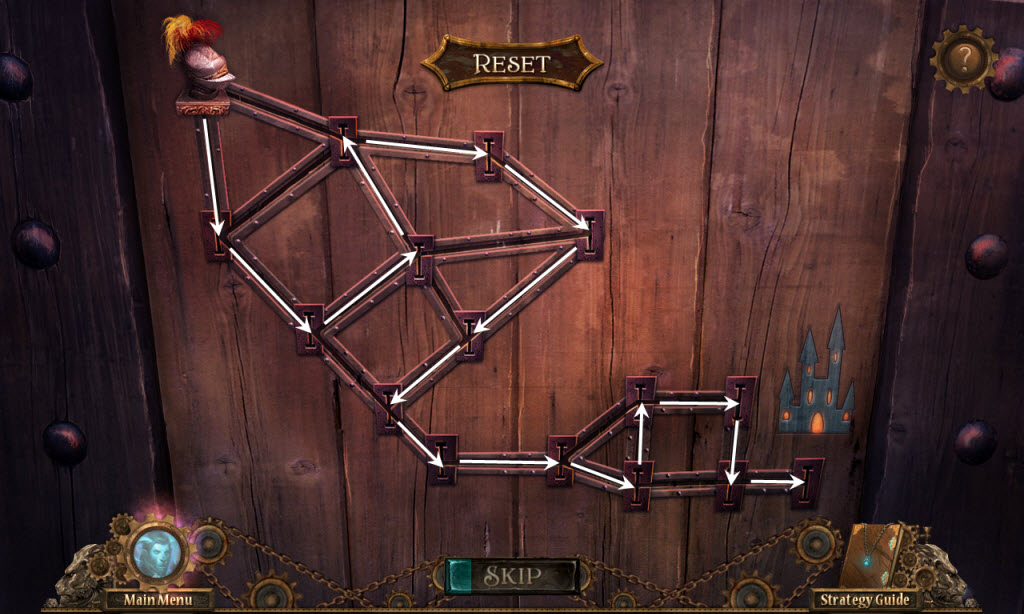
- examine the door to the blacksmith's
- Blacksmith Door Puzzle
- move the knight to the castle
- he must visit each location only once
- see screenshot for solution
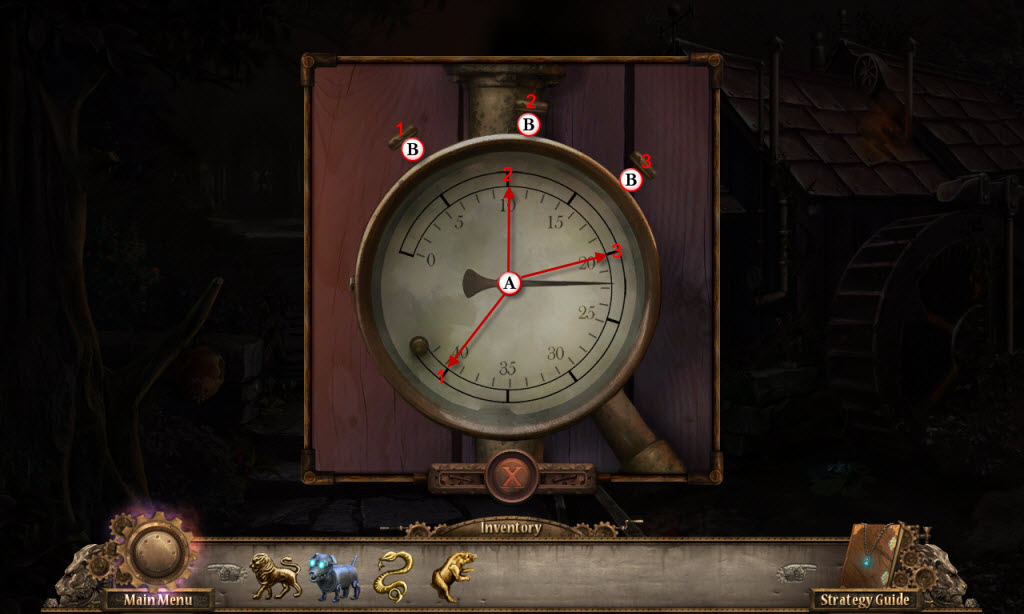
- place the Gauge on the pipe beside the door
- place the Gauge Needle on the pope
- consult your journal to see how to use the gauge
- Gauge Puzzle
- set the needle to 40 and click the left button
- set the needle to 10 and click the middle button
- set the needle to 20 and click the right button
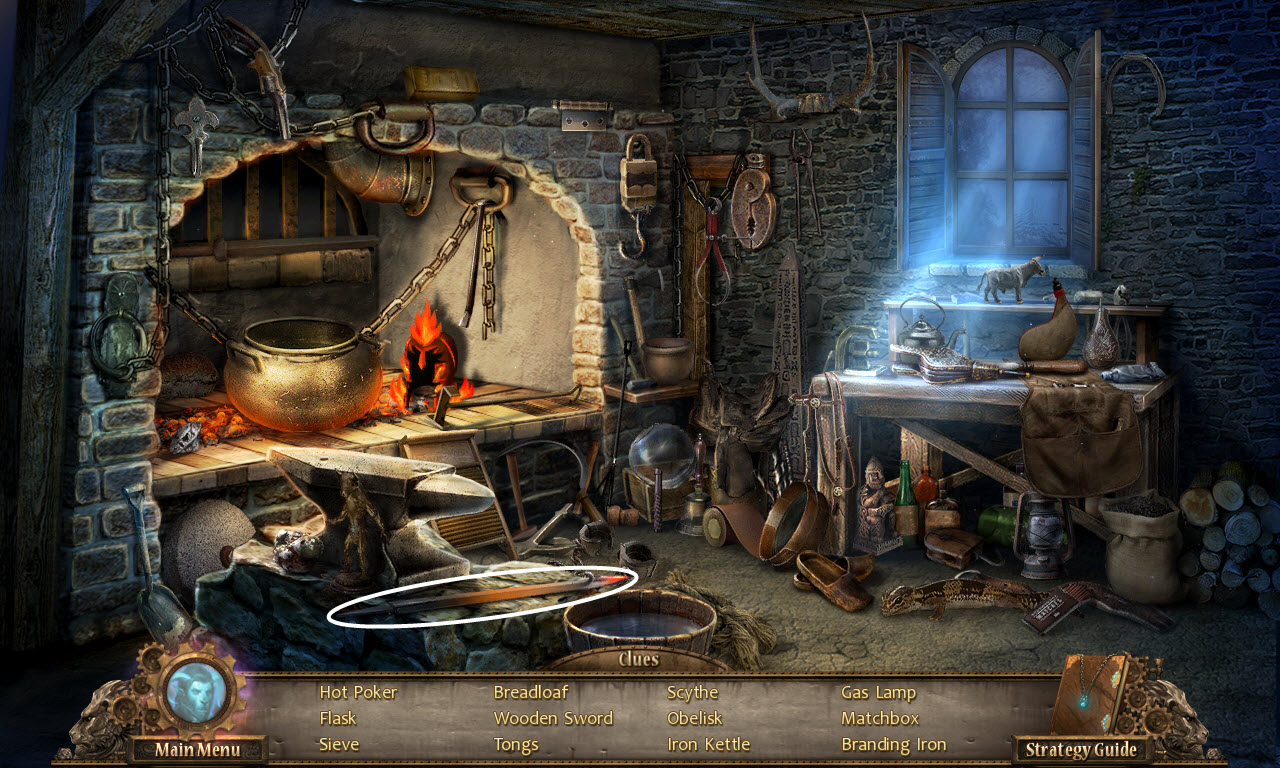
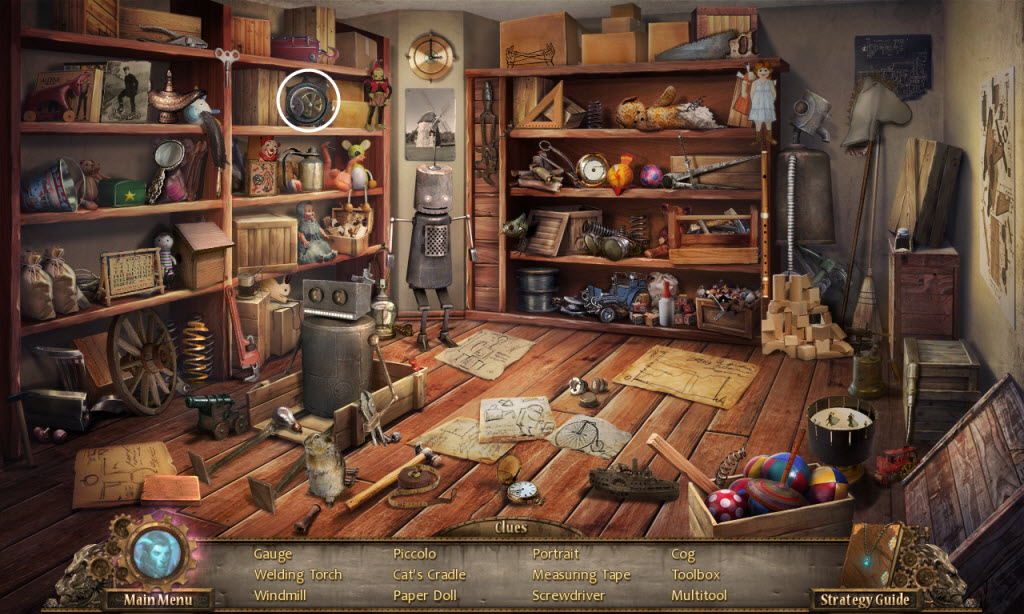
- examine the blacksmith's door - hidden object scene
- take the Hot Poker
- continue up
- read the notice to the left of the door
- find the black shadow of the leprechaun three times - these appear to be random
- Possible Leprechaun Locations
- to the right of the door
- on the rock
- on top of the right or left lamp
- to the left of the door by the bush
- go down
- use the Hot Poker on the beehive
- use the Empty Pot to catch the honey
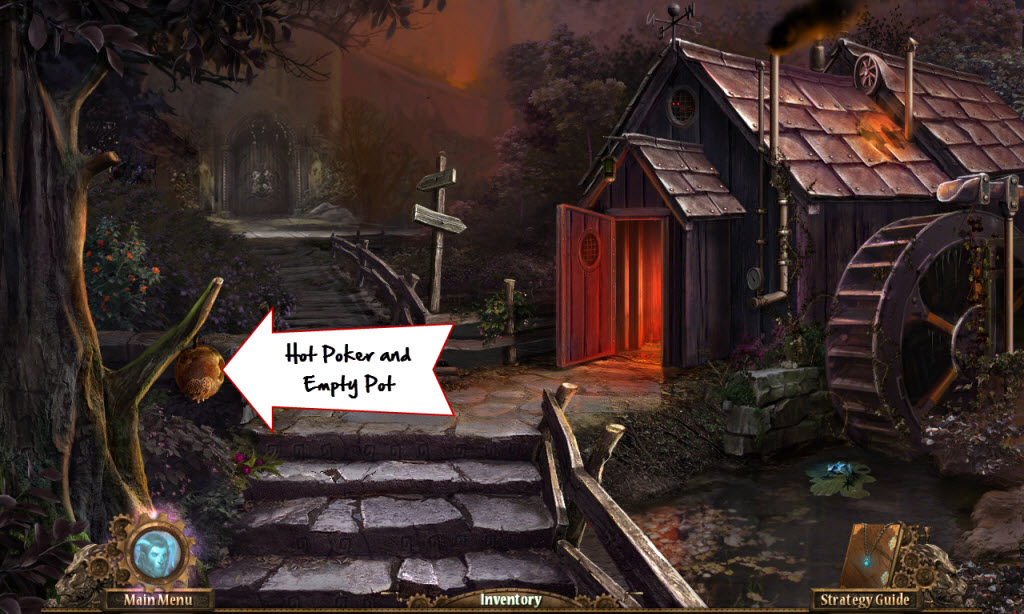
- receive Pot of Honey
- go up
- find the leprechaun three more times
- Possible Leprechaun Locations
- to the right of the door
- on the rock
- on top of the right or left lamp
- to the left of the door by the bush
- give her the Pot of Honey
- take the Lucky Coins
- return to the weeping willow
- examine the rabbit hole
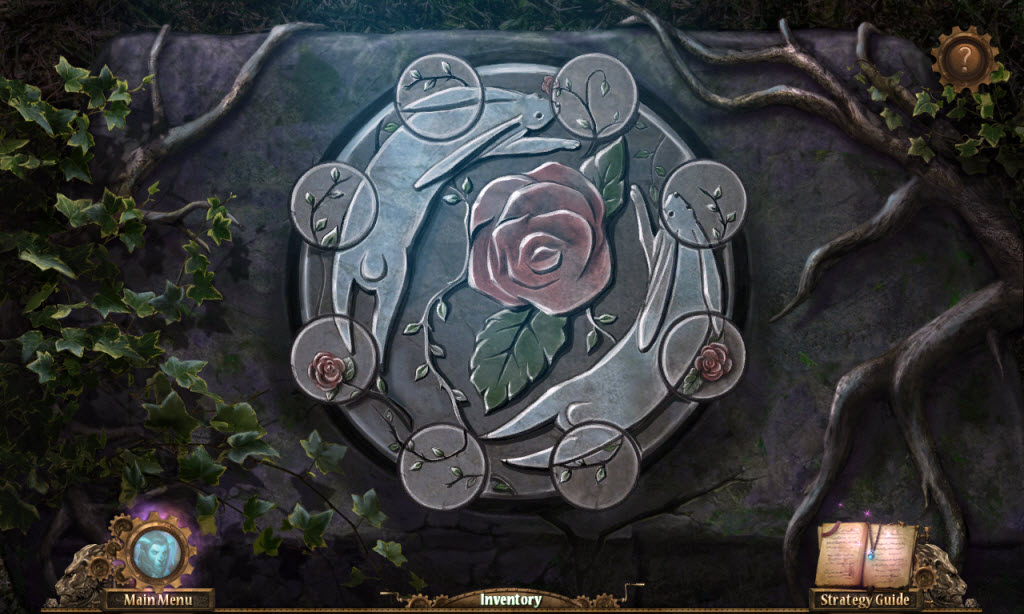
- Rabbit Hole Puzzle
- place the Lucky Coins on the rabbit hole
- swap the coins to put them in their correct places
- click a coin and click the blue gear to rotate it
- see screenshot for solution
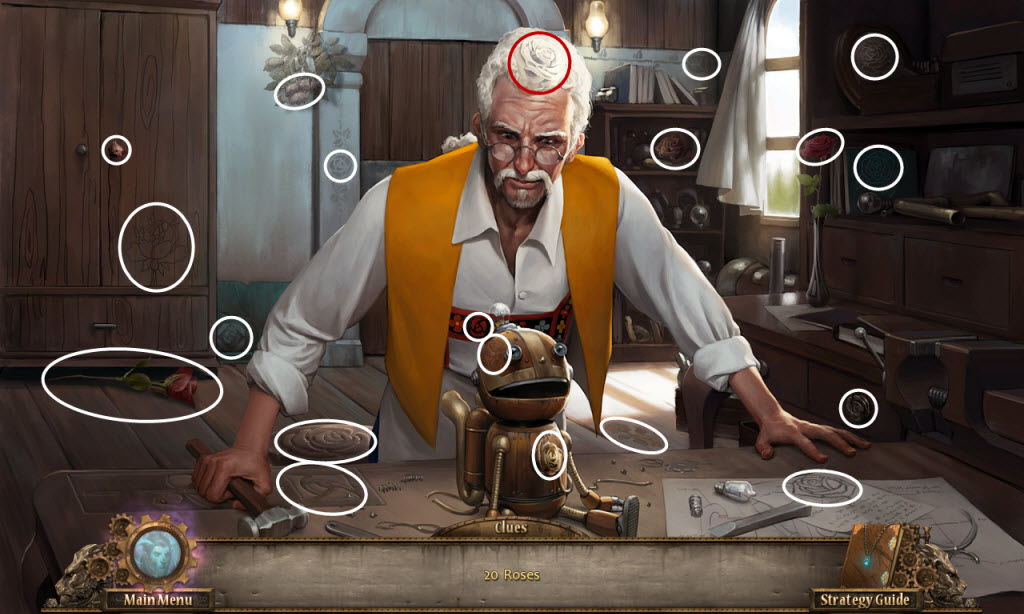
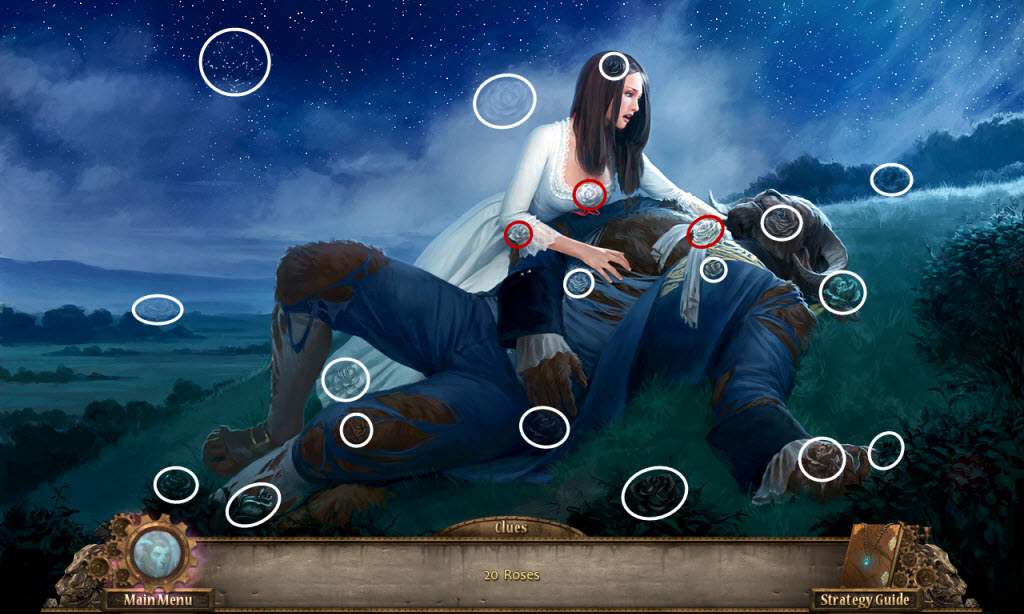
- Alice In wonderland Puzzle
- find 20 roses
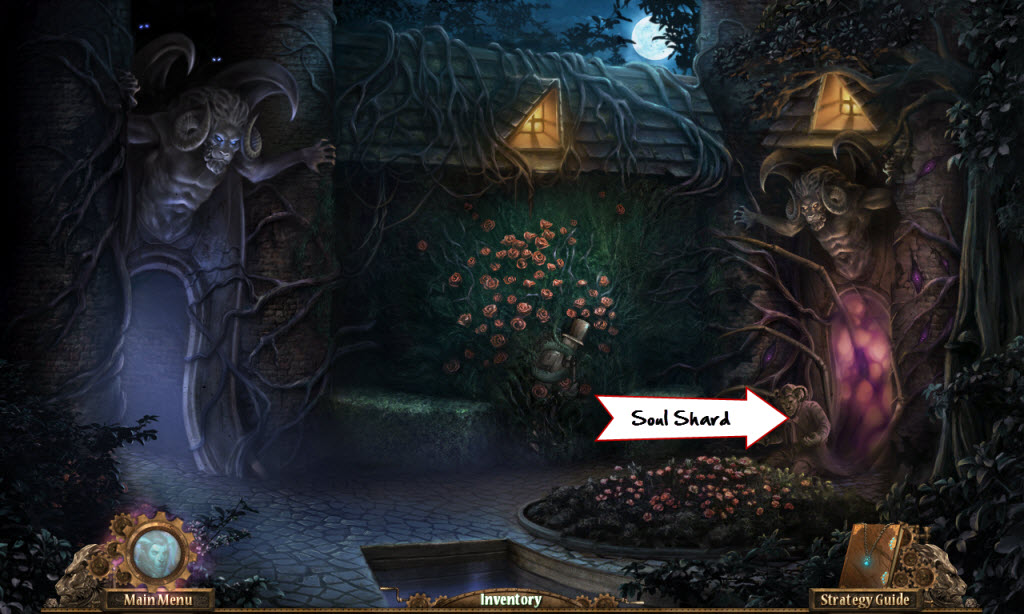
- see screenshot for solution
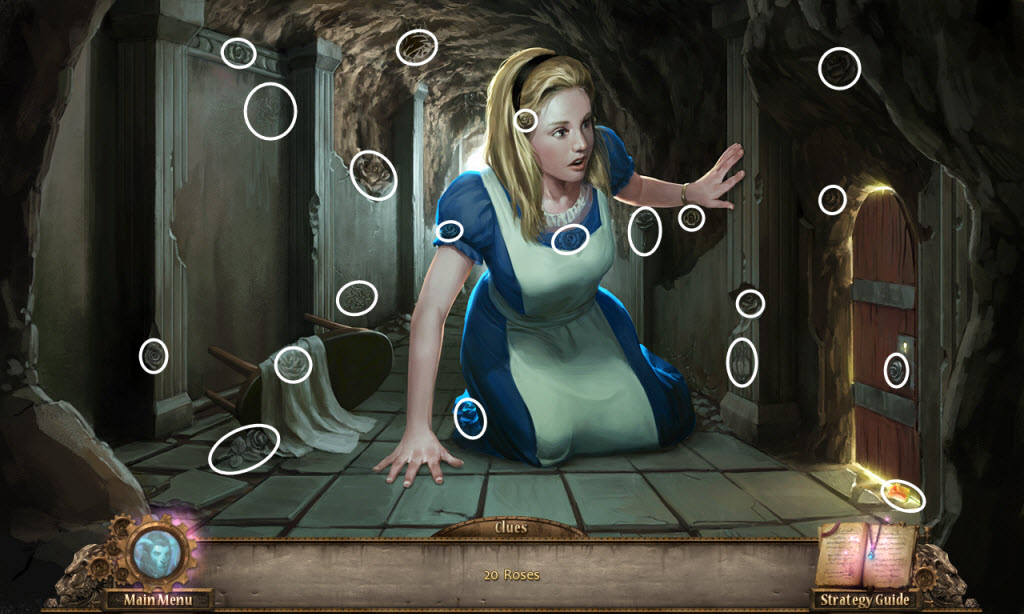
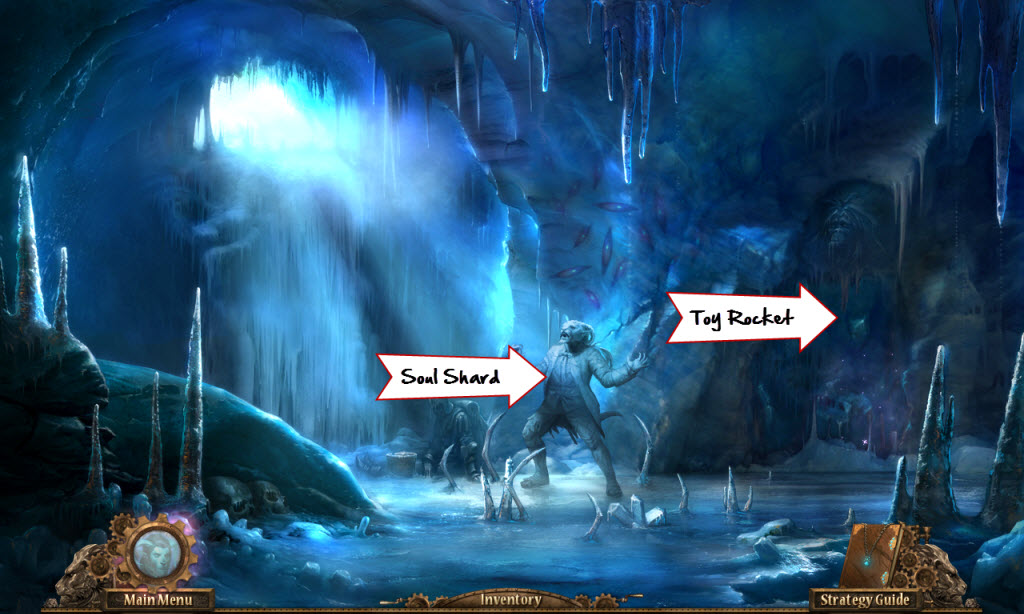
- take the Soul Shard
- go down
- use the Soul Shard on the Beast
- take the Phoenix Crest off the gate
- return to the town gate
- place the Lion, Snake, Wolf, Bear, and Phoenix Crests in the door
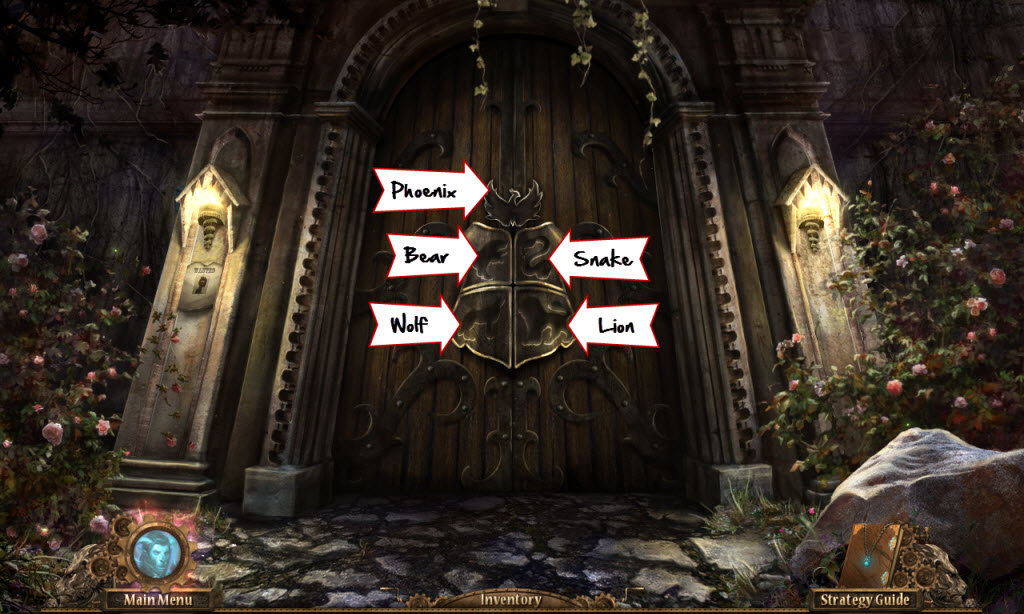
- go through the gate
- pick up Engraved Stone (1 of 3) off the windowsill
- take the Wishing Dust from the statue
- enter the door on the right
- pick up the Machine Parts (1 and 2 of 10)
- pick up the Pickaxe
- read the note about the Yeti underneath the table
- go down and up
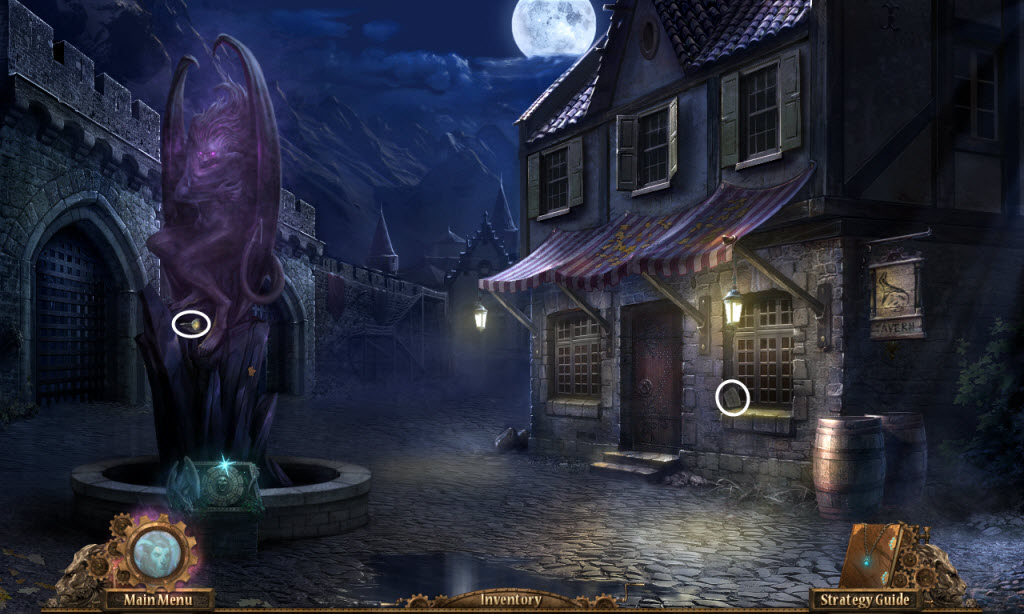
Shop Street
- look at the paintings on the window
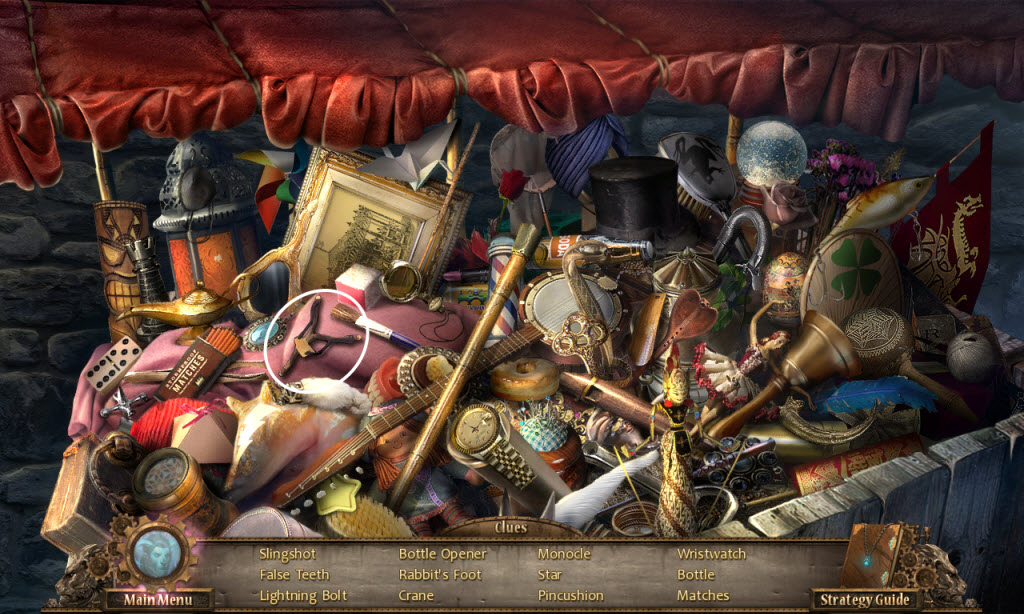
- examine the merchant care - hidden object scene
- take the Loaded Slingshot
- take the Toy Rocket from the toy chest
- pick up the Engraved Stone (2 of 3) off the steps
- use the Loaded Slingshot on the weather vane
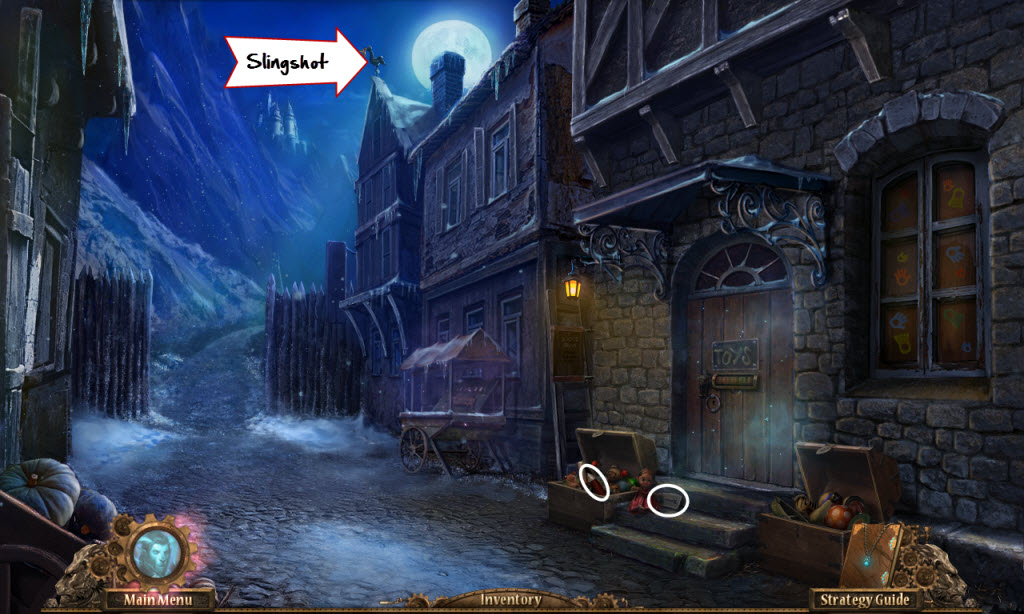
- pick up the Wind-Up Key
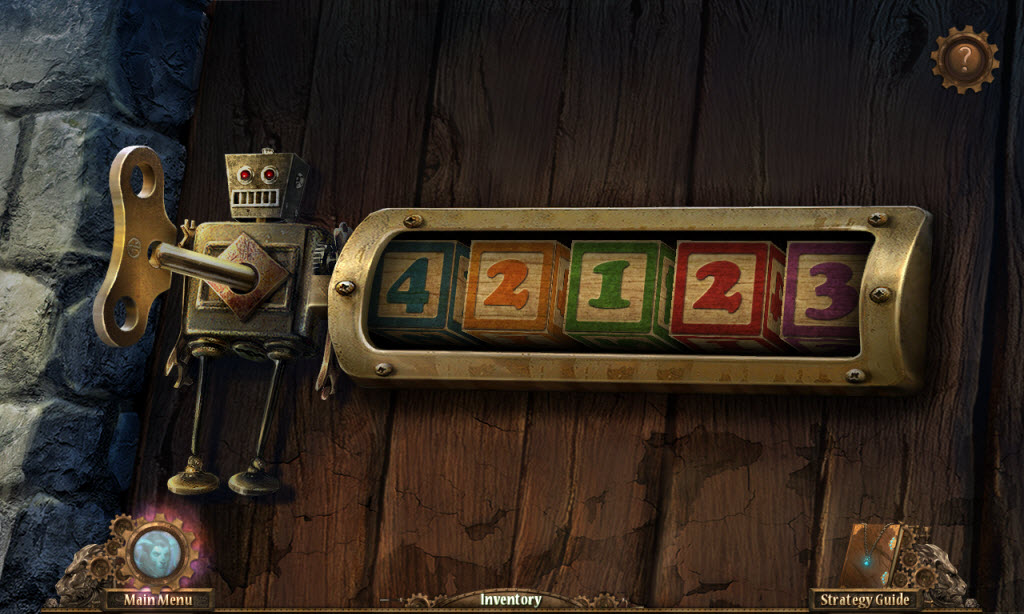
- examine the toyshop door
- place the Wind-Up Key in the robot
- Toy Shop Door Puzzle
- look in your journal and make a note of each set of hands - what color they are and how many
- input that number on the matching colored blocks
- solution: green = 1, purple = 3, red = 2, orange = 2, blue = 4
- see screenshot for solution
- enter the toy shop
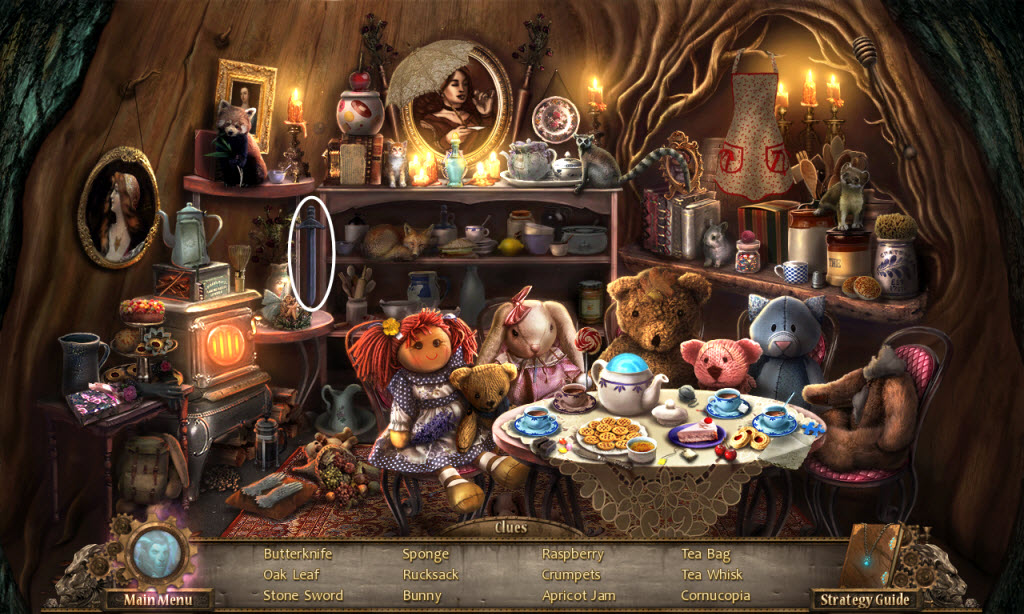
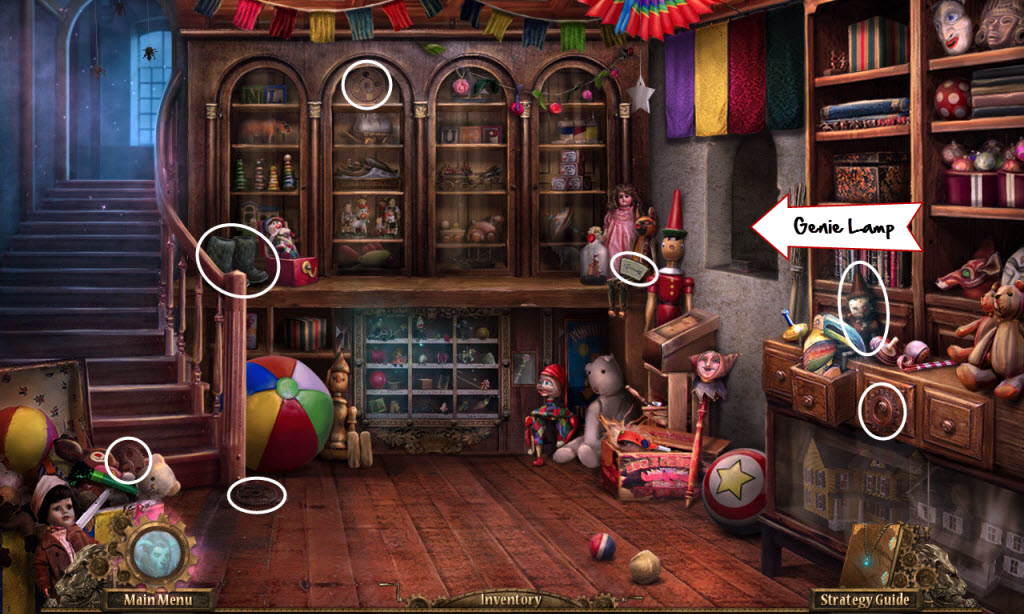
- look upstairs - hidden object scene
- take the Genie Lamp
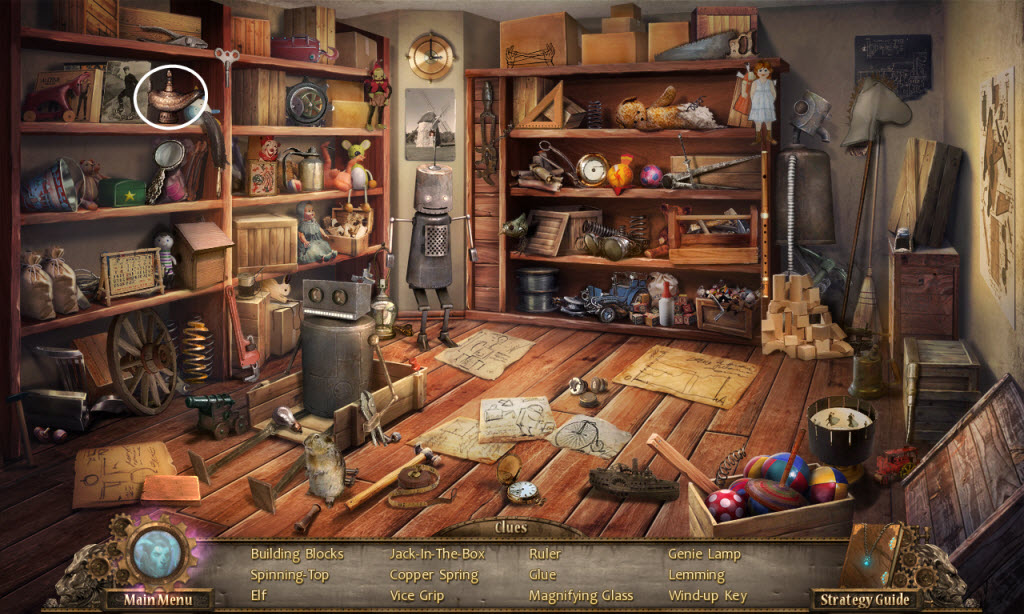
- pick up Machine Parts (4 tthru 7 of 10)
- pick up Engraved Stone (3 of 3)
- take the Snow Boots
- click on Pinocchio
- Pinocchio Puzzle
- find the playing cards he's hiding
- once you get the Playing Card take his nose (Wand of Life)
- use the Genie Lamp on the base in the window
- use the Wishing Powder on the Genie Lamp
- take the Wand of Power
- return to the town square
- examine the base of the statue
- Statue Puzzle
- replace the Engraved Stones
- click tiles to swap them
- put related stones on the outer and inner ring
- the related images should be on top of one another and not side by side
- solution: fox & meat; Tinbot & bone; thorn & rose; fireplace & wood; shield and sword; lock & key; mouse & owl; web & spider; crown & wand; arrow & heart
- see screenshot for solution
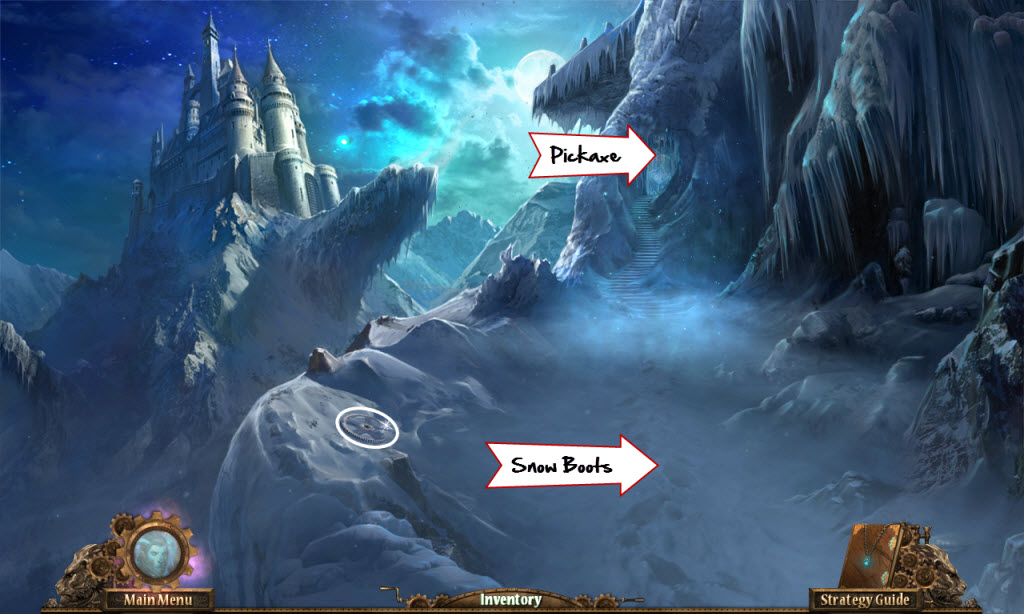
- go up twice
- use the Snow Boots on the snow
- pick up Machine Part (8 of 10)
- examine the frozen wall
- use the Pickaxe on the ice three times
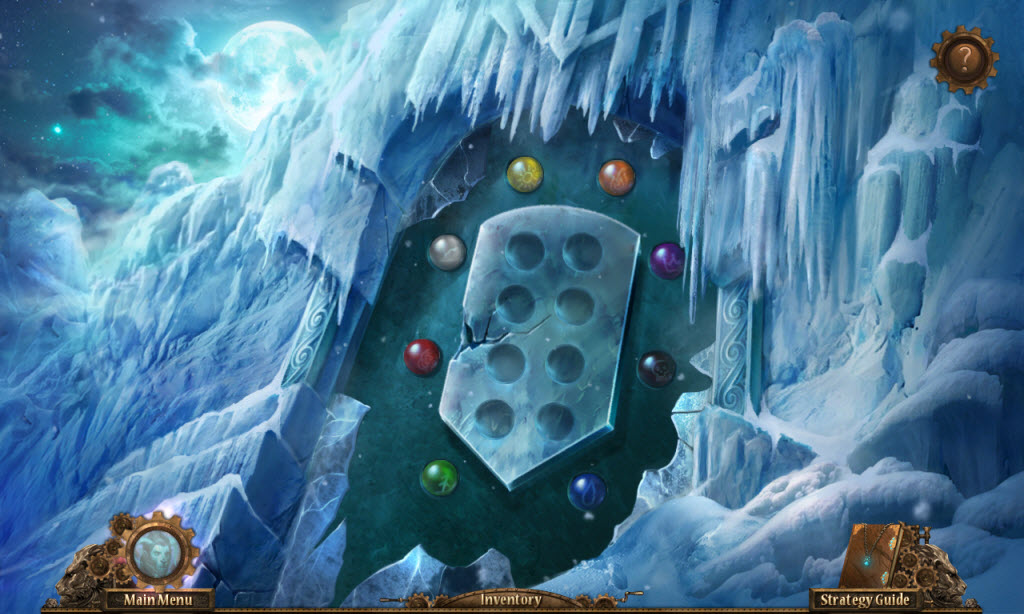
- Cold Pass Door Puzzle
- place the colored balls over the correct symbols
- look in your journal for the tavern poster for the solution
- solution: sun = yellow, fire = orange, crown = purple, skull = black, water = blue, tree = green, rose = red, cloud = white
- see screenshot for solution
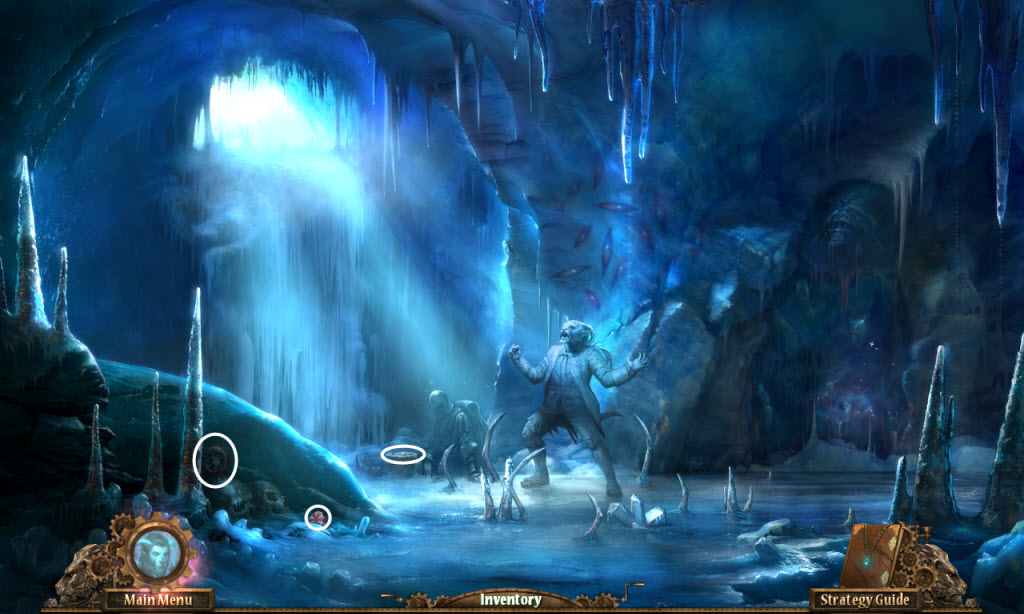
- enter the ice caverns
- pick up the Toy Candy
- pick up Machine Part (9 of 10)
- examine the frozen soldier in the back
- take the Darts - watch out for that snake!
- return to the toy shop
Toy Shop
- examine the toy shelf (bottom - middle)
- Toy Shelf Puzzle
- place the Playing Card and Toy Candy on the shelves
- put all the toys in the correct places
- see screenshot for solution
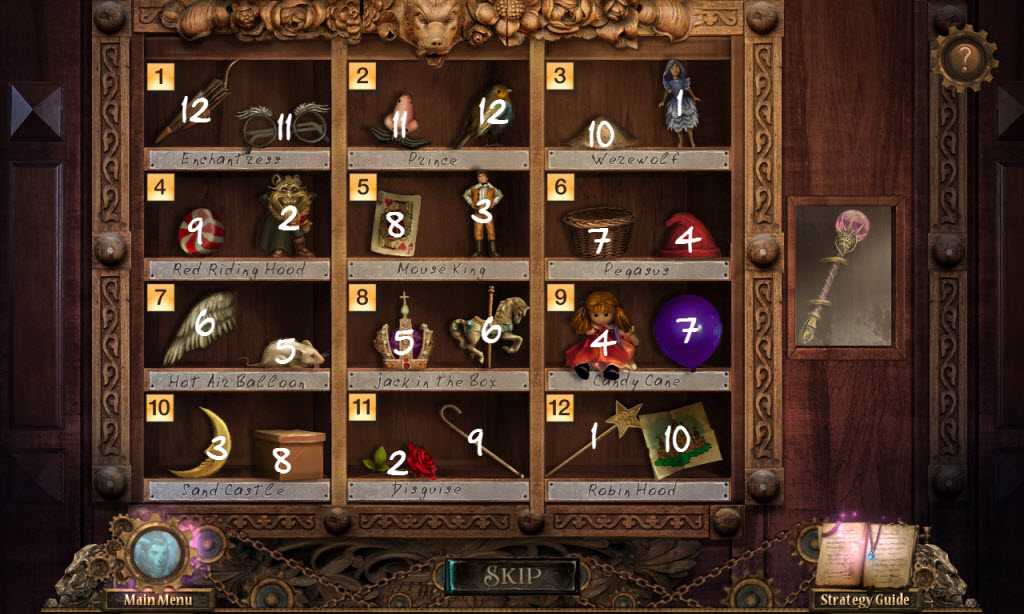
- take the Wand of Dreams
- examine the upstairs - hidden object scene
- take the Machine Part (9 of 10)
- return to the town square
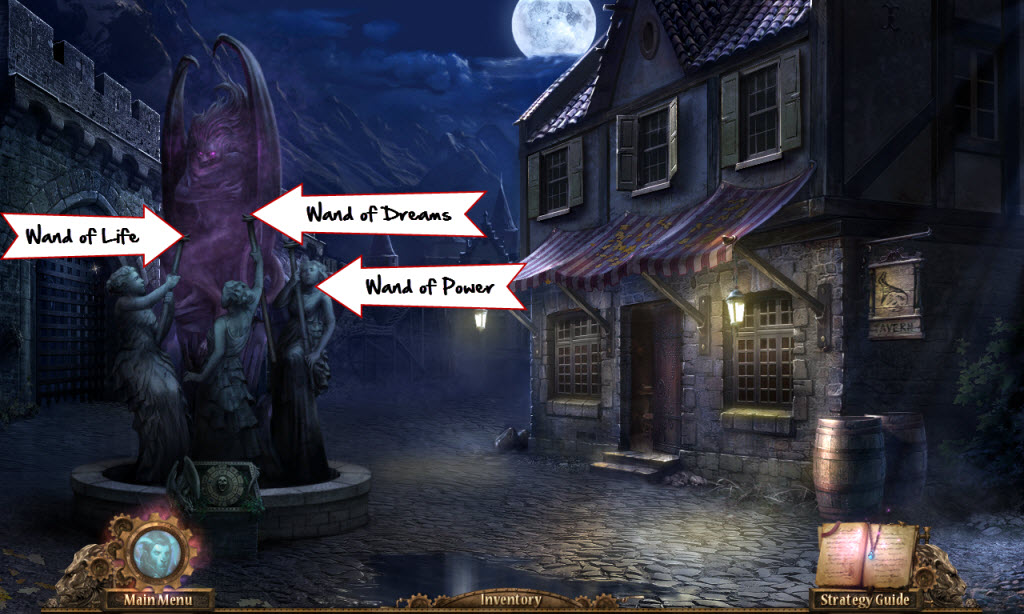
- place the the three Wands into the statues hands
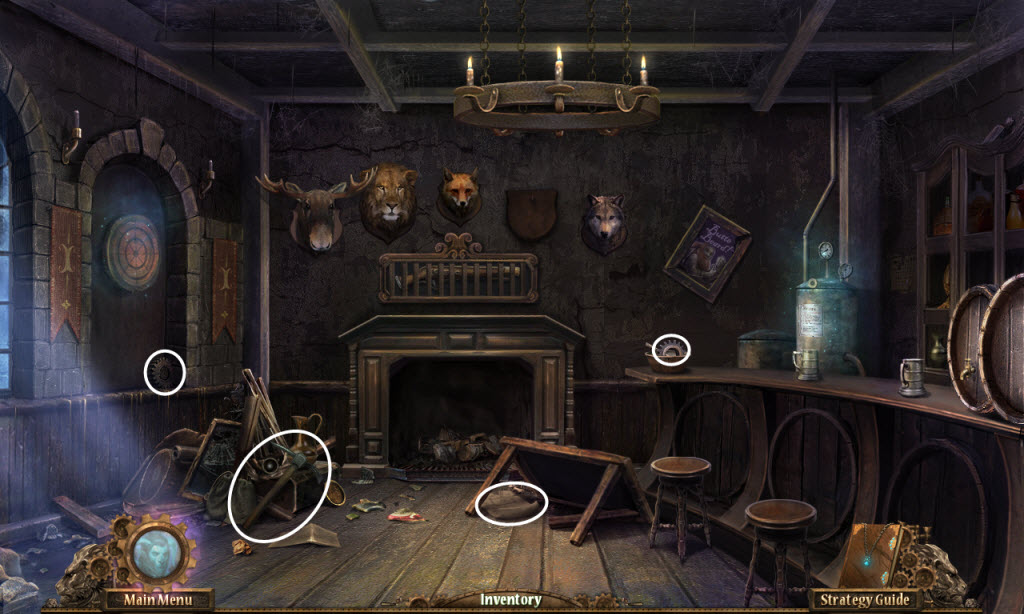
- enter the tavern
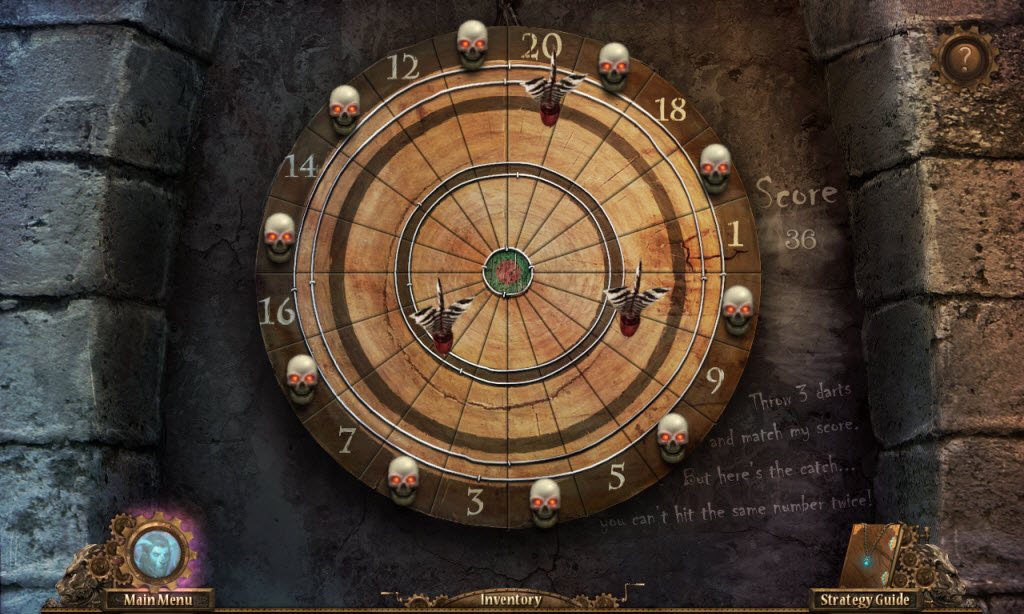
- examine the dart board
- Dart Puzzle
- the object is to match the score of the frozen soldier you found
- his score was 36
- use the Darts on the board
- wait until the red "X" is over the number you want and click
- solution: 9, 7, and 20
- see screenshot for solution
- take the Distillery Gauge
- examine the distillery in the corner

- replace the Distillery Gauge
- Distillery Puzzle
- turn the knobs so the sum matches the volatile temperature which is 61
- solution: 21, 4, 17, 8, and 11
- see screenshot for solution
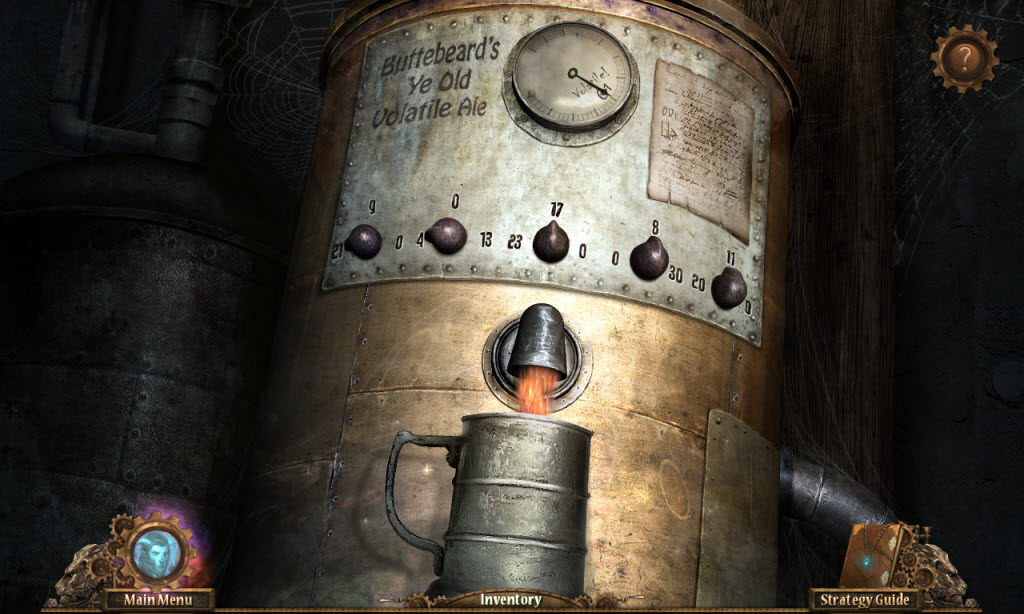
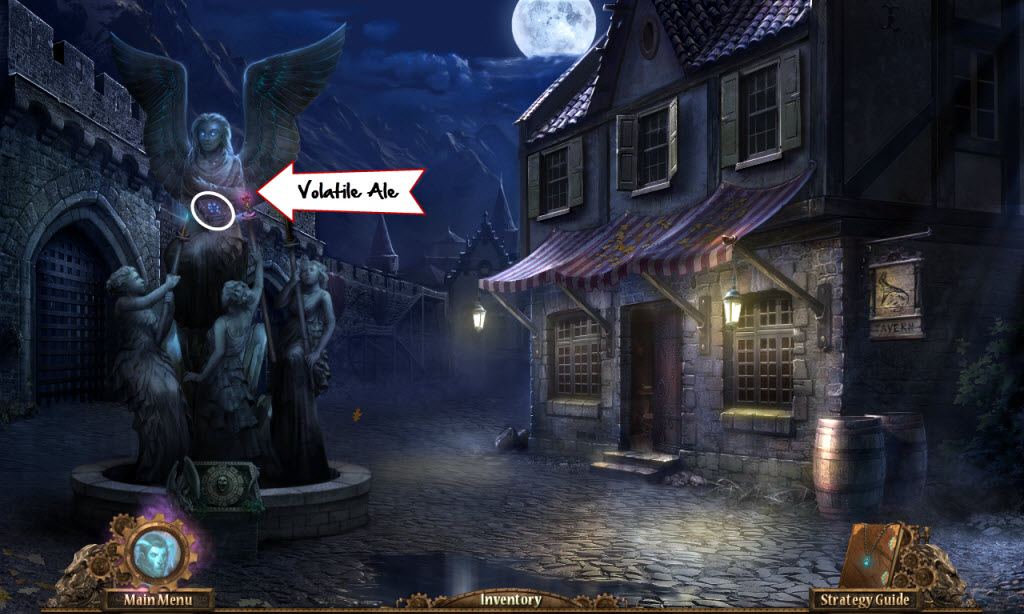
- take the Volitale Ale
- go down
- use the Volitale Ale on the statue
- click on the book
- Hansel and Gretal Puzzle
- find 20 roses
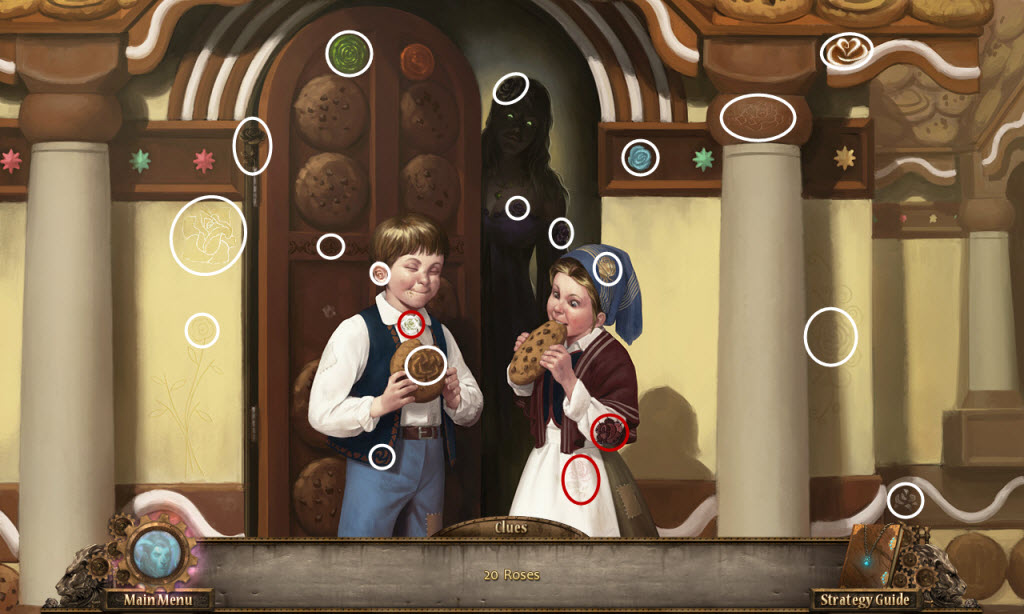
- take the Soul Shard
- return to the ice cave
- use the Soul Shard on the Beast
- use the Toy Rocket on the Yeti's cave
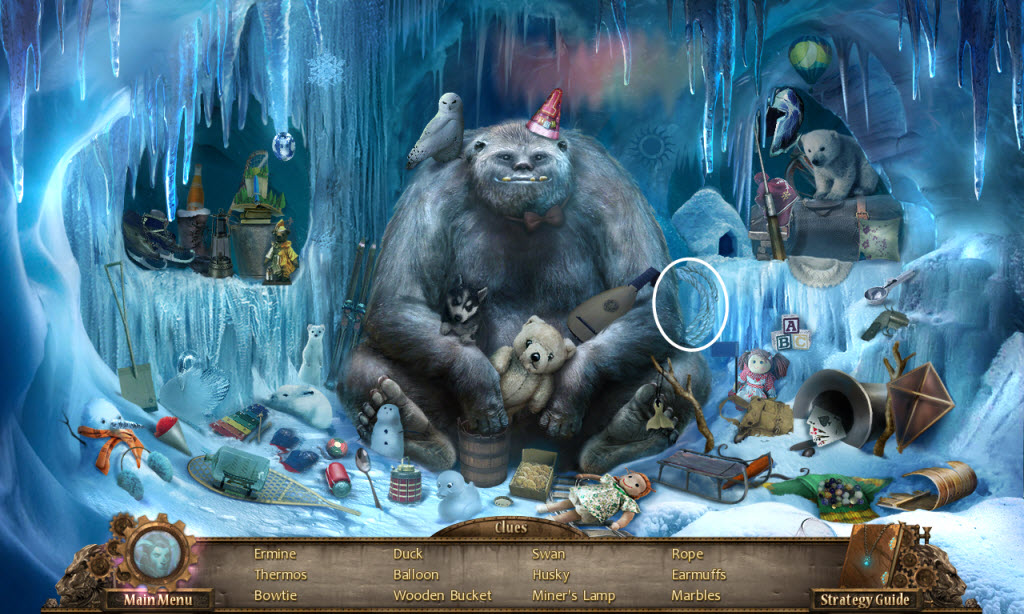
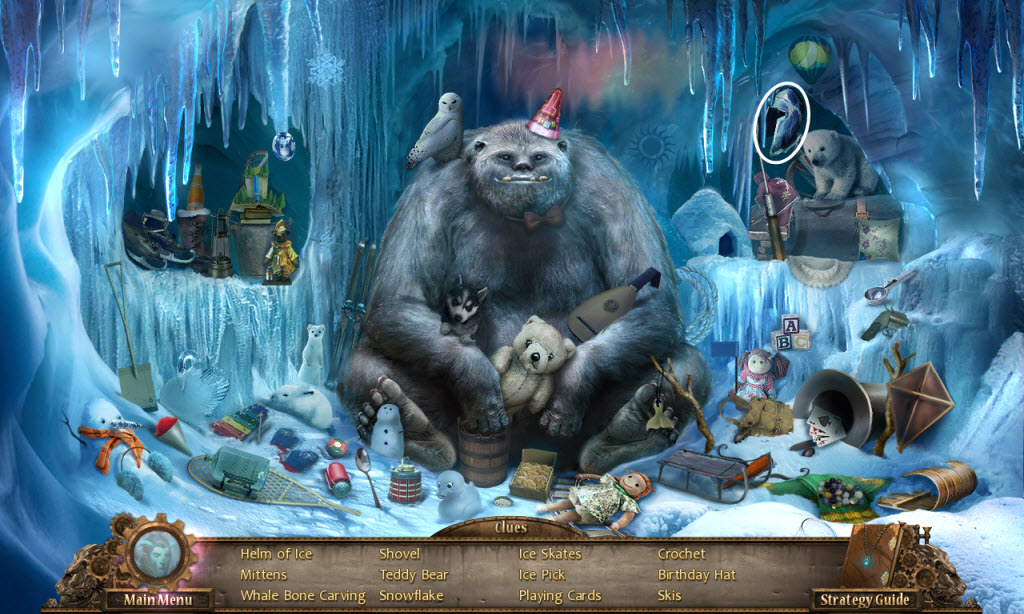
- examine the Yeti's cave - hidden object scene
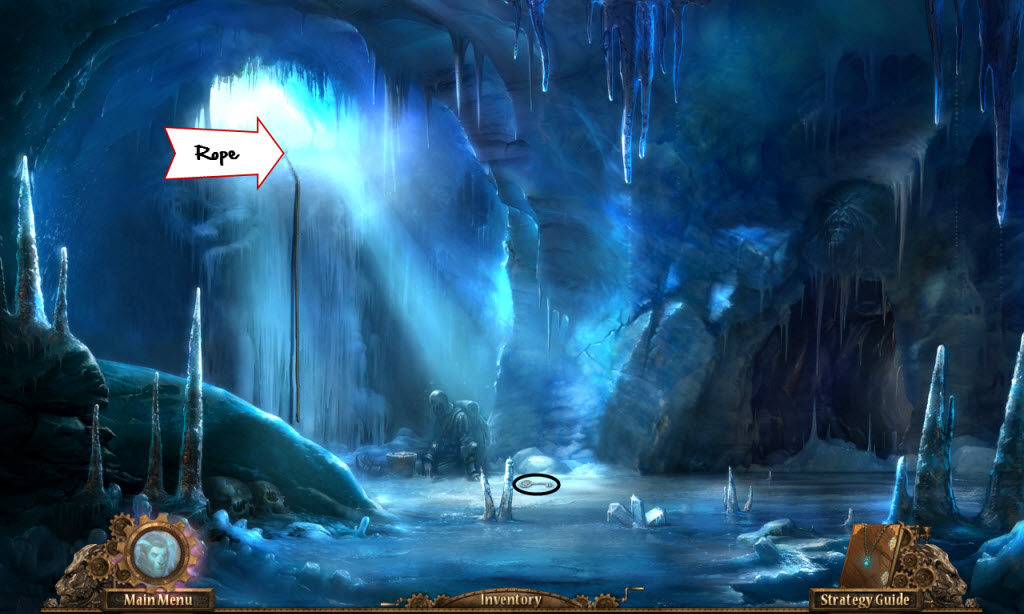
- take the Rope
- pick up the Zeppelin Key
- use the Rope on the wall of ice
- climb out of the ice cave
- pick up Machine Part (10 of 10)
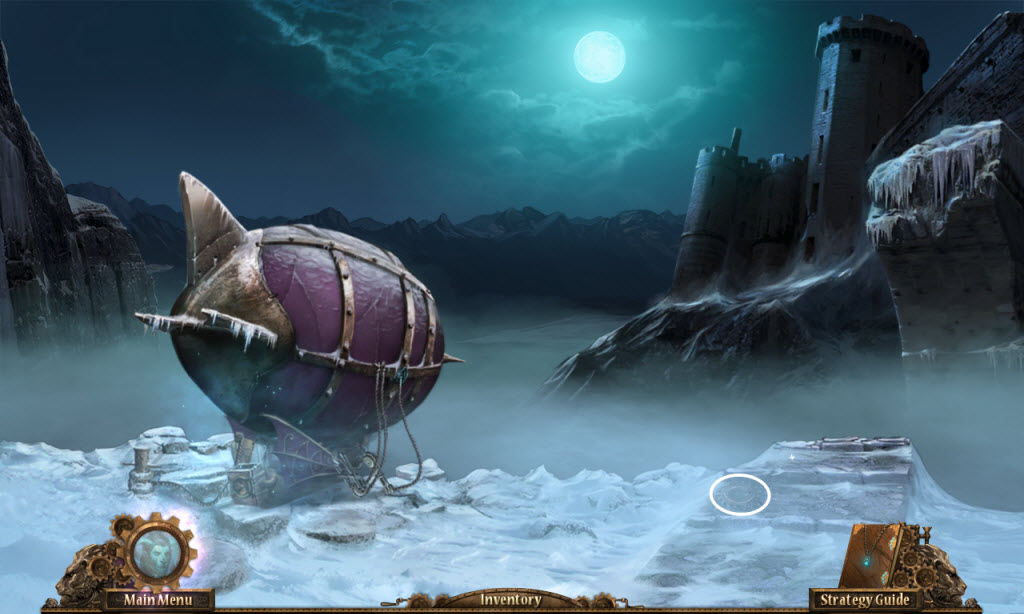
- examine the zeppelin
- Zeppelin Puzzle
- use Tinbot on the machine
- use the Machine Parts on the gear symbol
- arrange the machine parts so they all fit into the puzzle
- hint: the colors on the end of the parts will match up
- see screenshot for solution
- use the Zeppelin Key on the zeppelin
- pick up the Ships Wheel

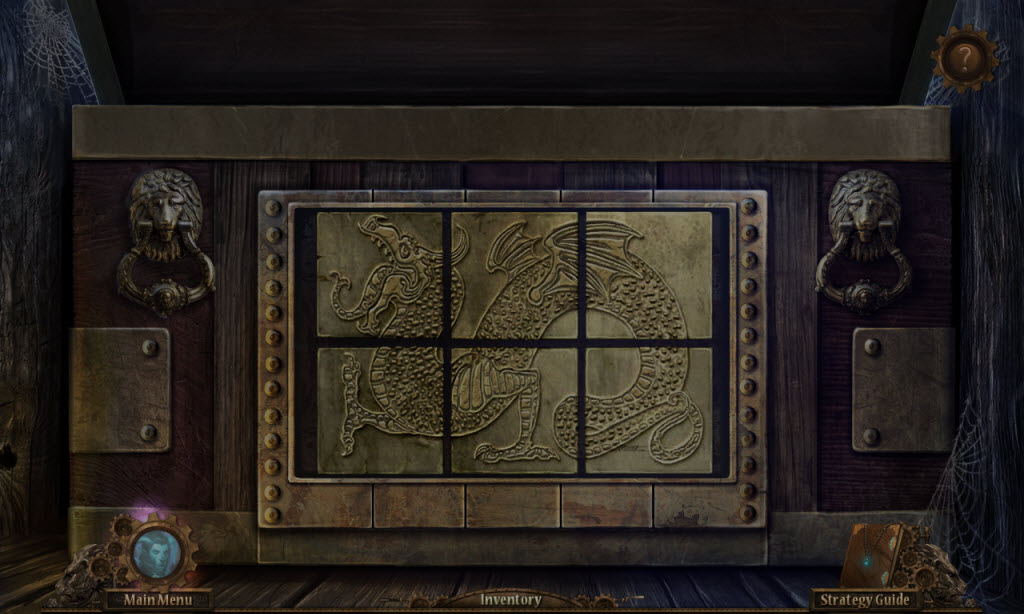
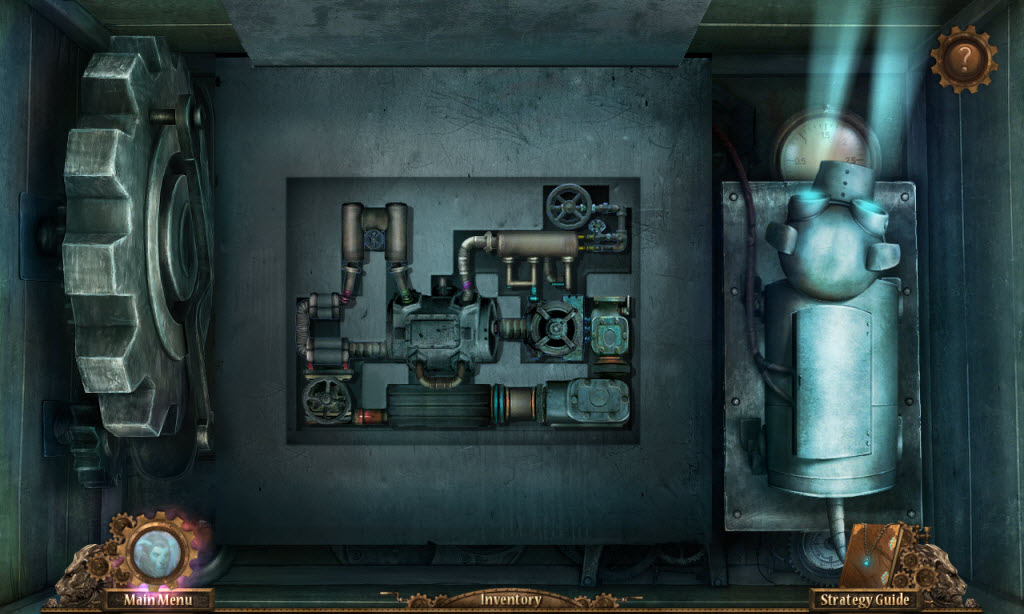
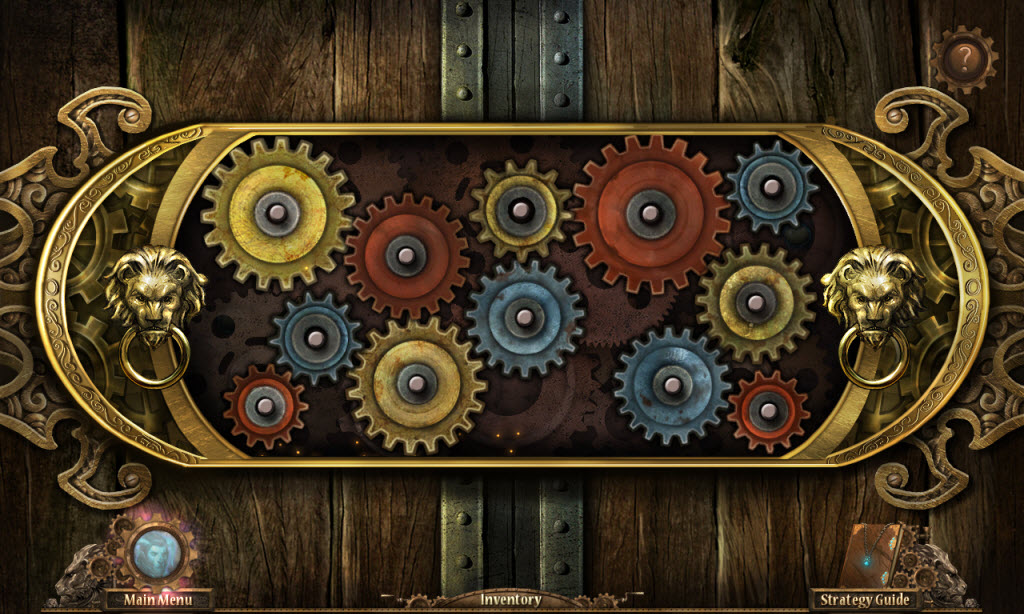
- examine the castle door
- Castle Door Puzzle
- swap the gears so they interlock
- you can not have two gears of the same color touching
- see screenshot for solution
- enter the grand hall
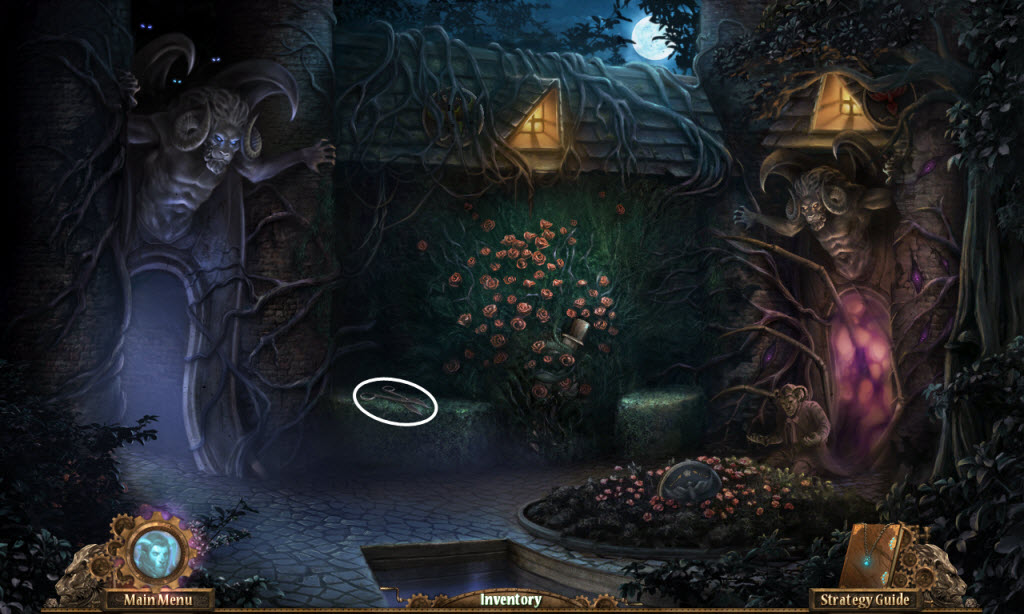
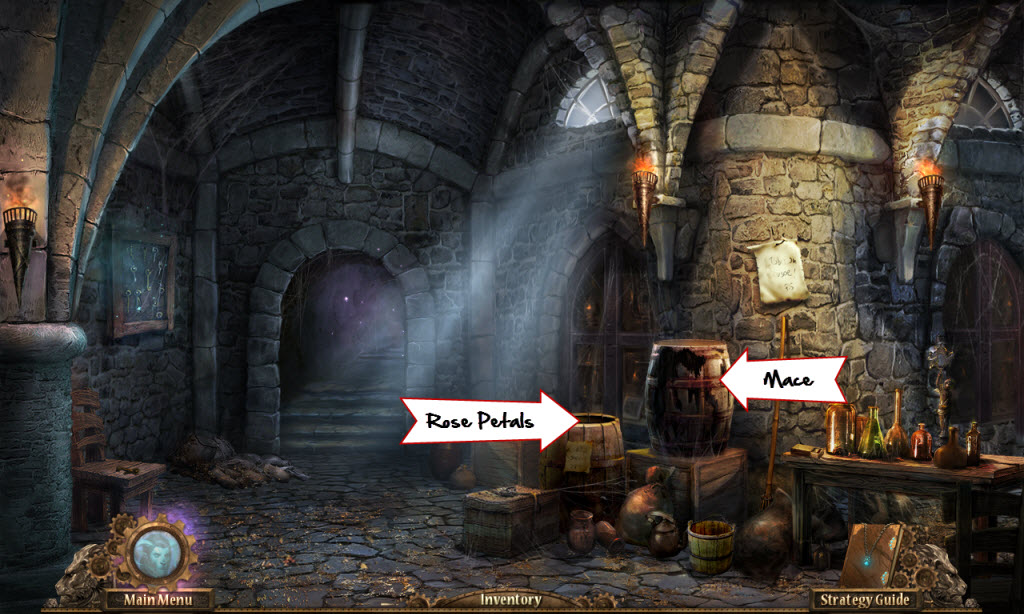
- go right into the courtyard
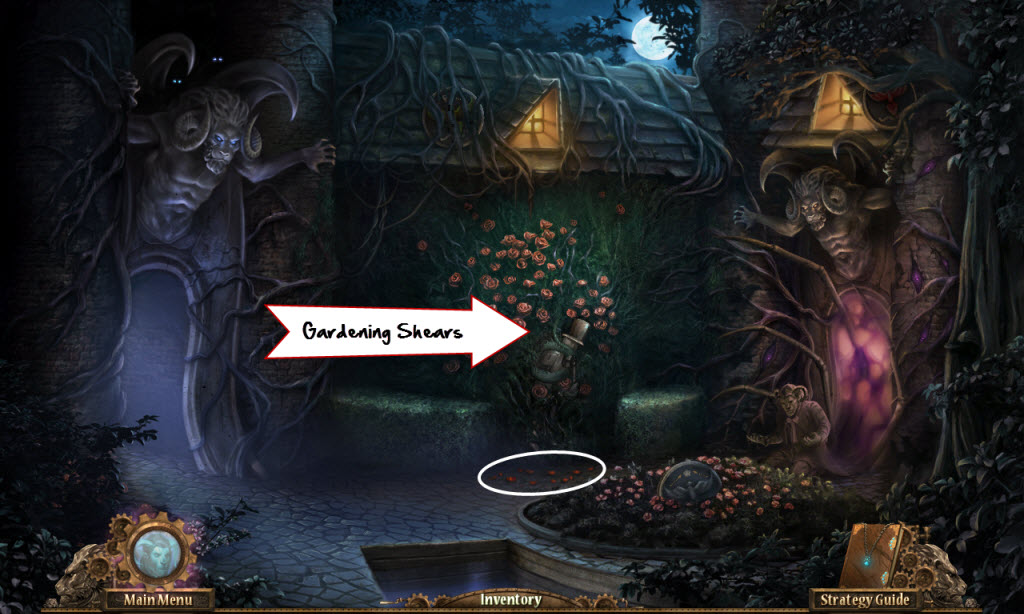
- pick up the Gardening Shears
- use the Gardening Shears on the roses
- pick up the Rose Petals
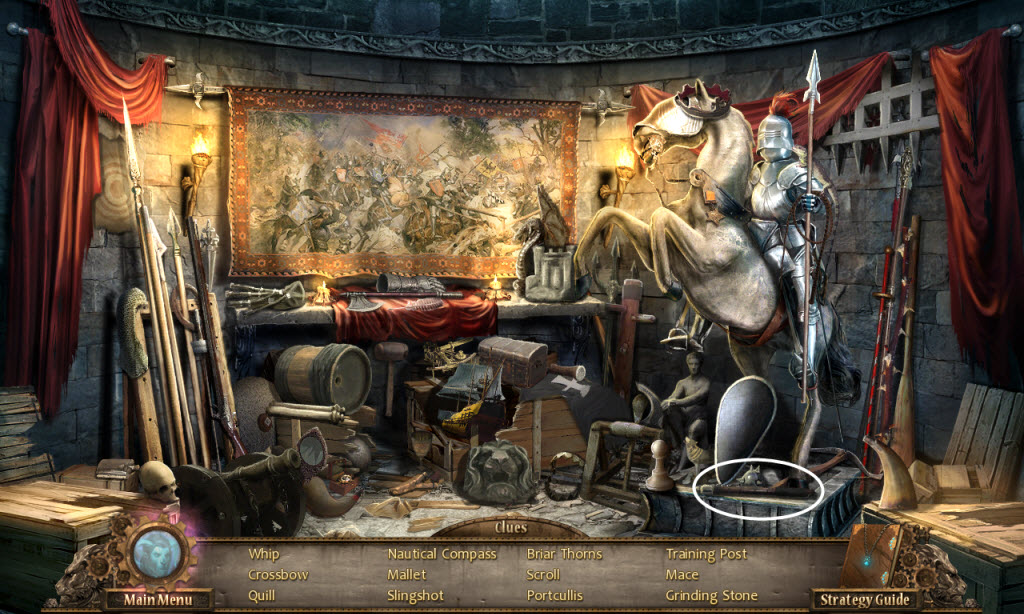
- go left and right into the armory
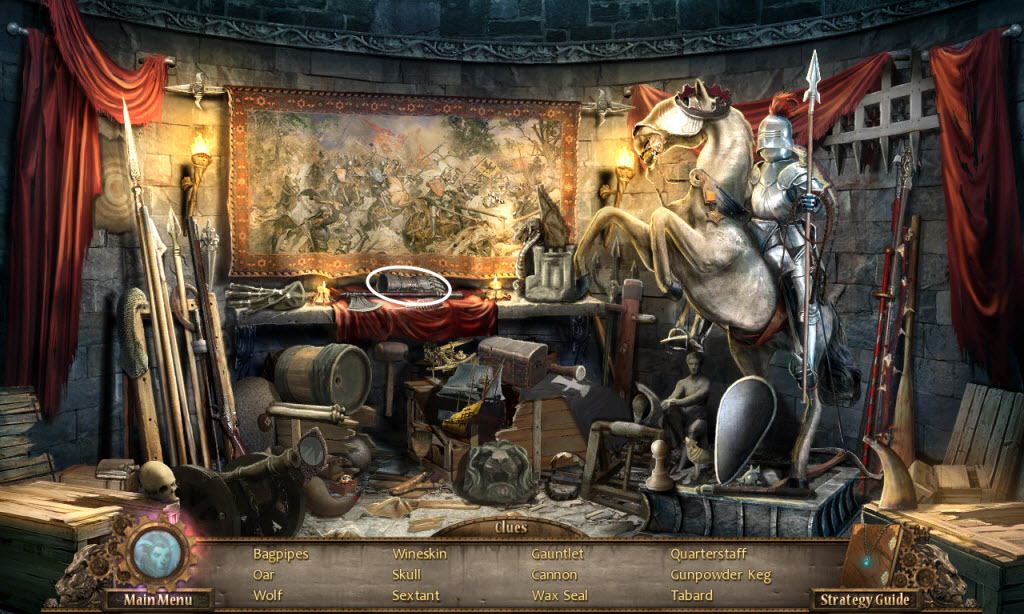
- examine the staircase - hidden object scene
- take the Mace
- go down and left into the treasure room
- use the Mace to break open the treasury case on the left
- take the Crown and The Golden Diamond
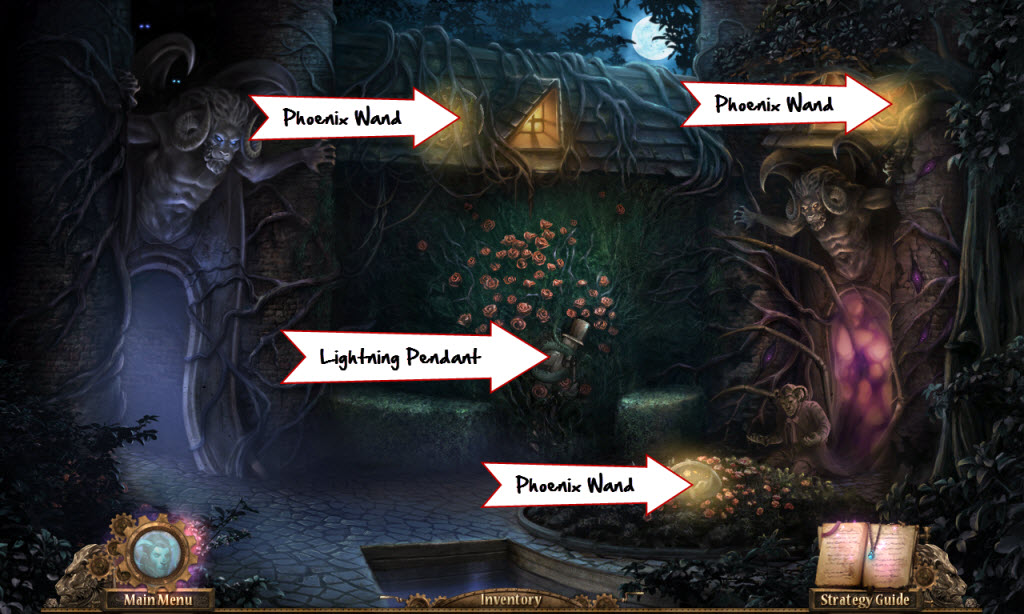
- take the Phoenix Wand off the back table
- use the Phoenix Wand on the phoenix emblem
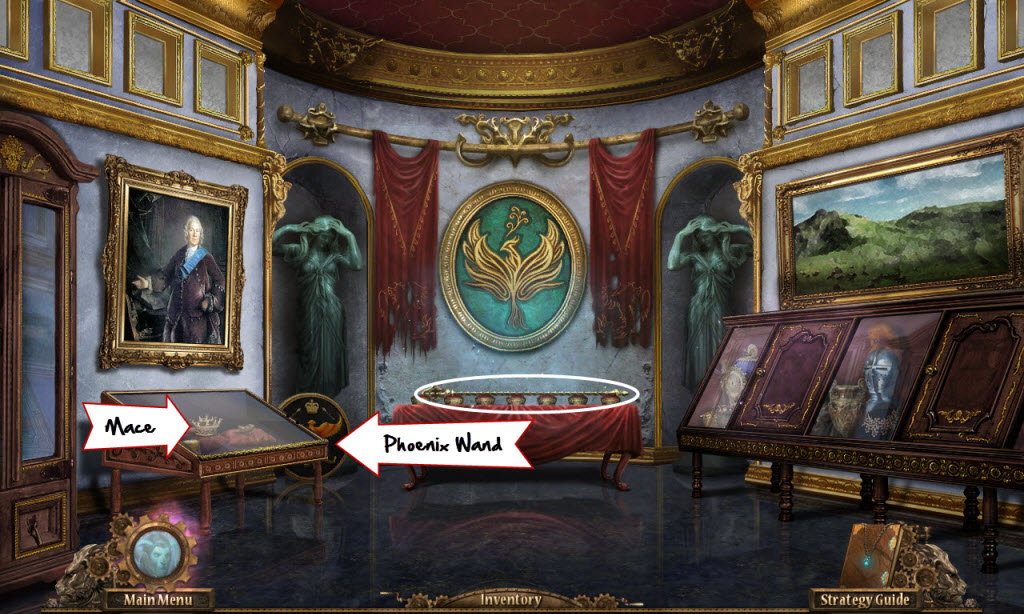
- take the Phoenix
Egg (1 of 6)
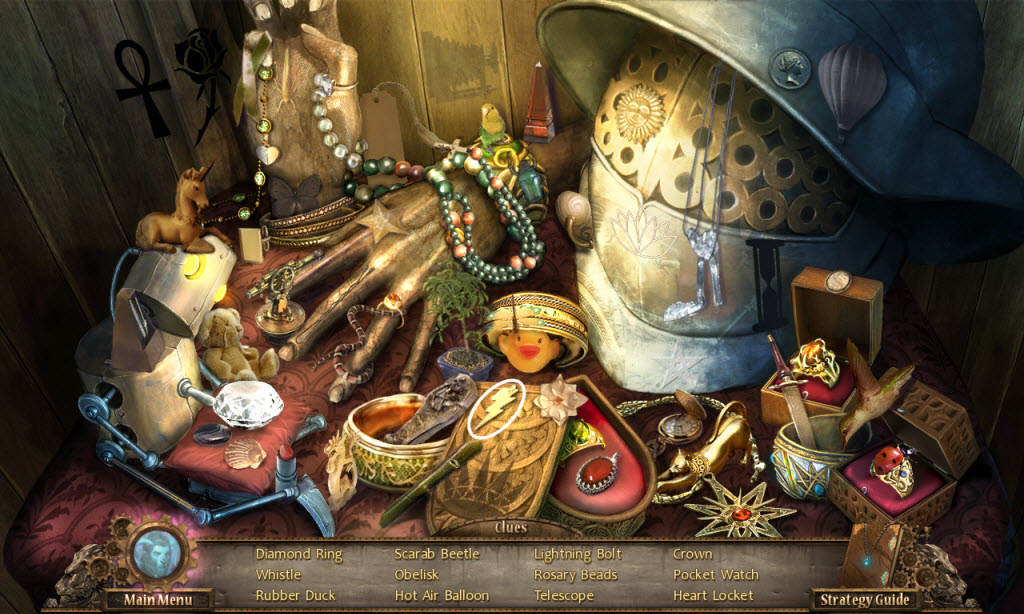
- examine the right treasury case - hidden object scene
- take the Lightning Pendent
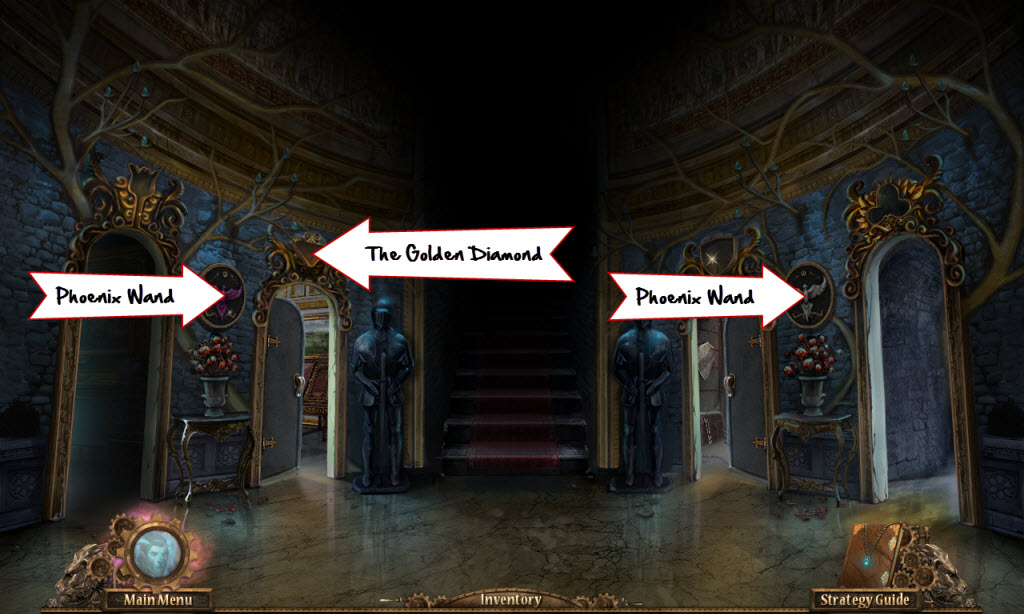
- go down
- place The Golden Diamond above the armory door
- use the Phoenix Wand on both phoenix emblems
- take the Phoenix Eggs (2 and 3 of 6)
- return to the courtyard
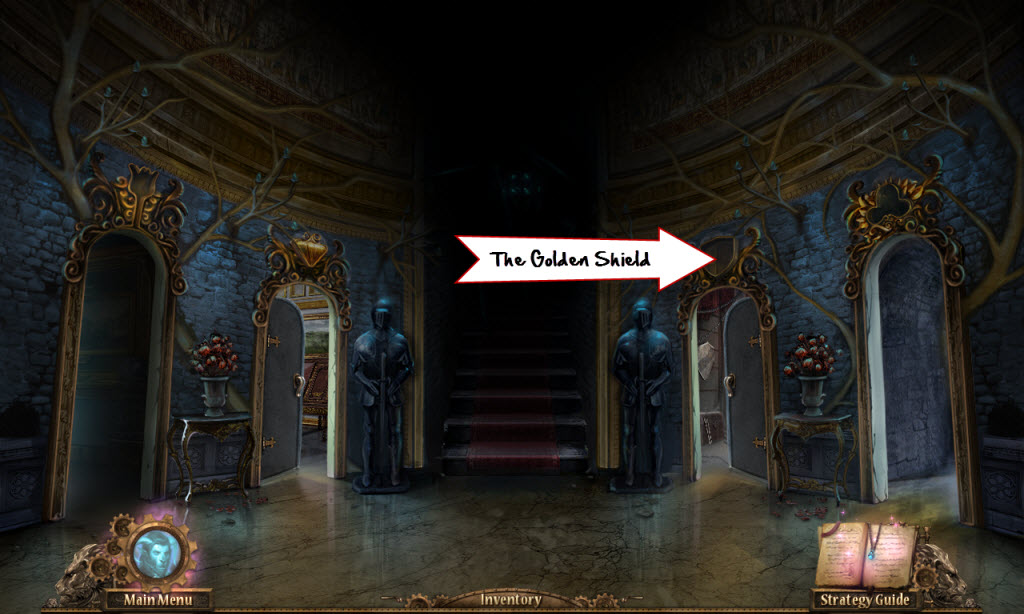
- examine the butler in the bushes
- use the Lightning Pendent in the slot
- take The Golden Shield
- use the Phoenix Wand on the three phoenix emblems
- take the Phoenix Egg (4 thru 6 of 6)
- go left
- place The Golden Shield over the armory
- go left to the treasure room
Treasure Room
- examine the table at the back
- Phoenix Egg Puzzle
- replace the Phoenix Eggs
- move them around until they are on their correct color
- you can move or jump once space/egg at a time
- see video for solution
- examine the book
- Geppetto the Toymaker Puzzle
- find 20 roses
- take the Soul Shard
- examine the treasury case to the right - hidden object scene
- take the Heart Handle Half
- return to the courtyard
- use the Soul Shard on the Beast
- go right
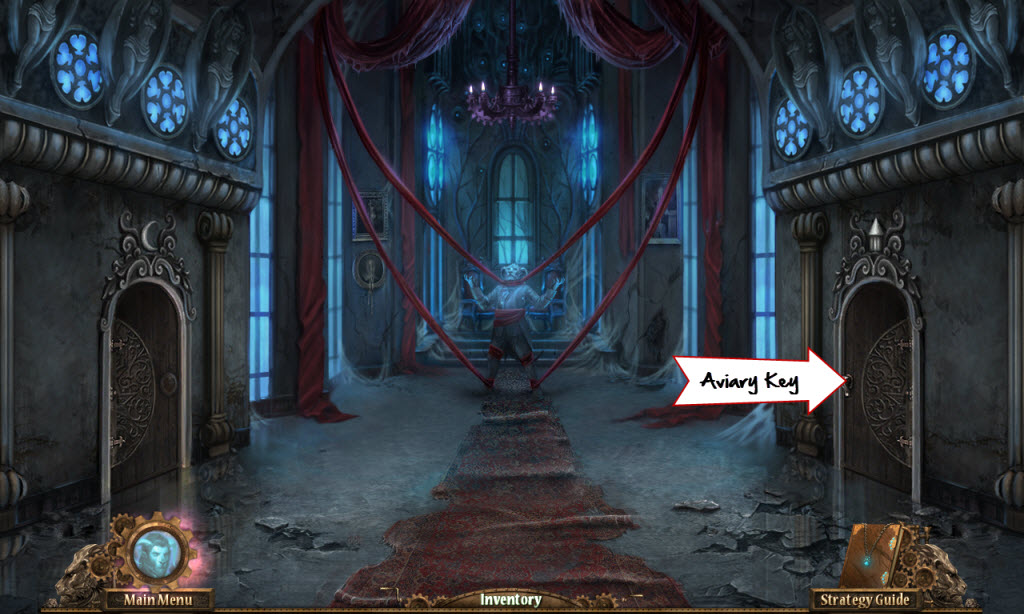
- examine the board with all the keys
- Key Puzzle
- eliminate all the matching keys
- see screenshot for solution
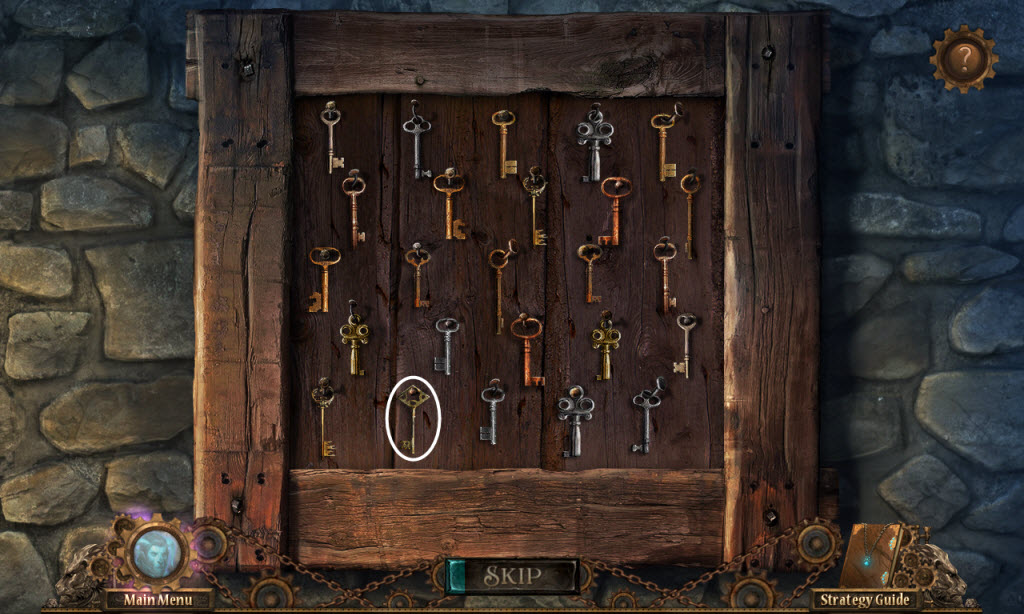
- take the Aviary Key
- read the note on the wall
- place the Rose Petals into the pristine water
- use the Mace on the rickety old barrel
- pick up The Golden Rose
- pick up the Matches

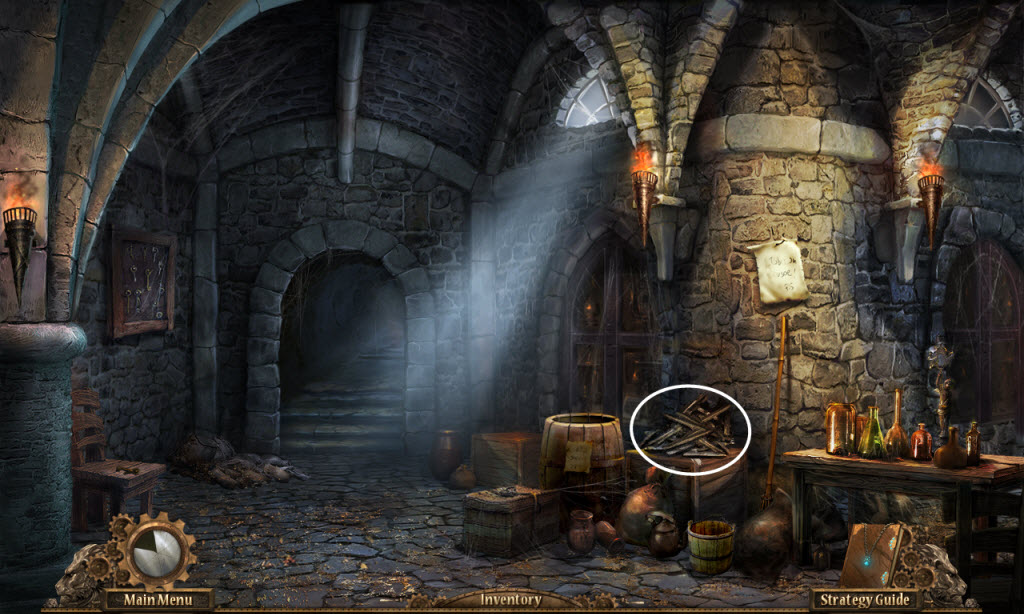
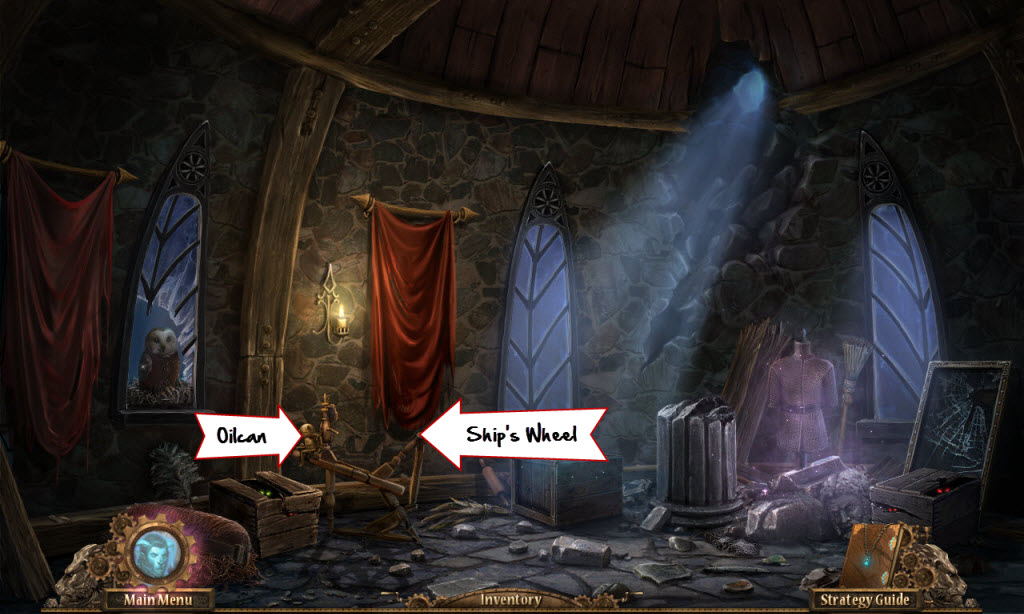
- examine the stairwell - hidden object scene
- take the Oilcan

- use the Mace on what's left of the rickety old barrel
- pick up the Firewood
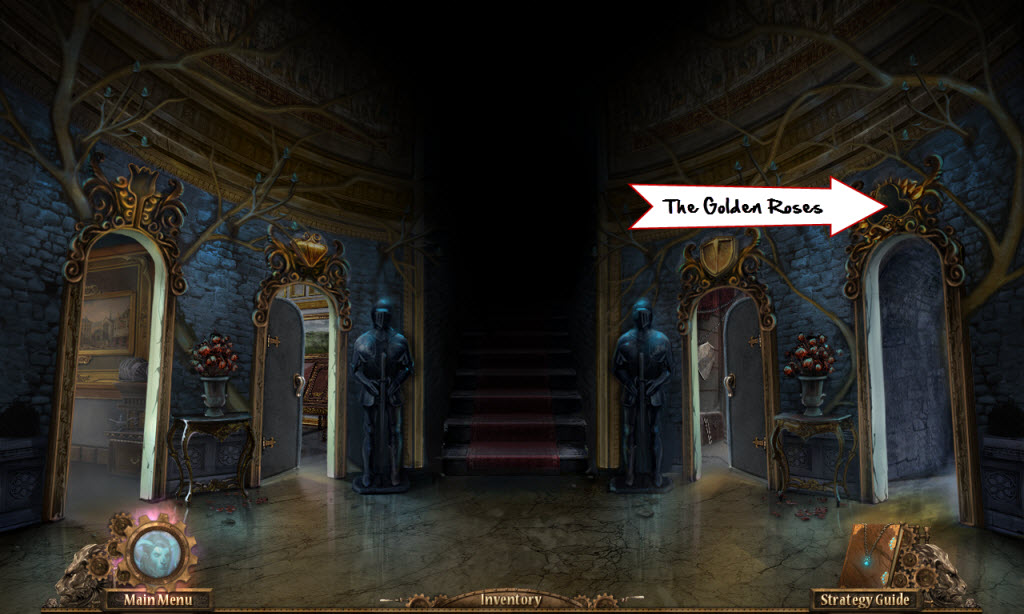
- return to the grand hall
- place The Golden Roses over the courtyard door
- go left into the dining room
- place the Firewood in the fireplace
- use the Matches to light the Firewood
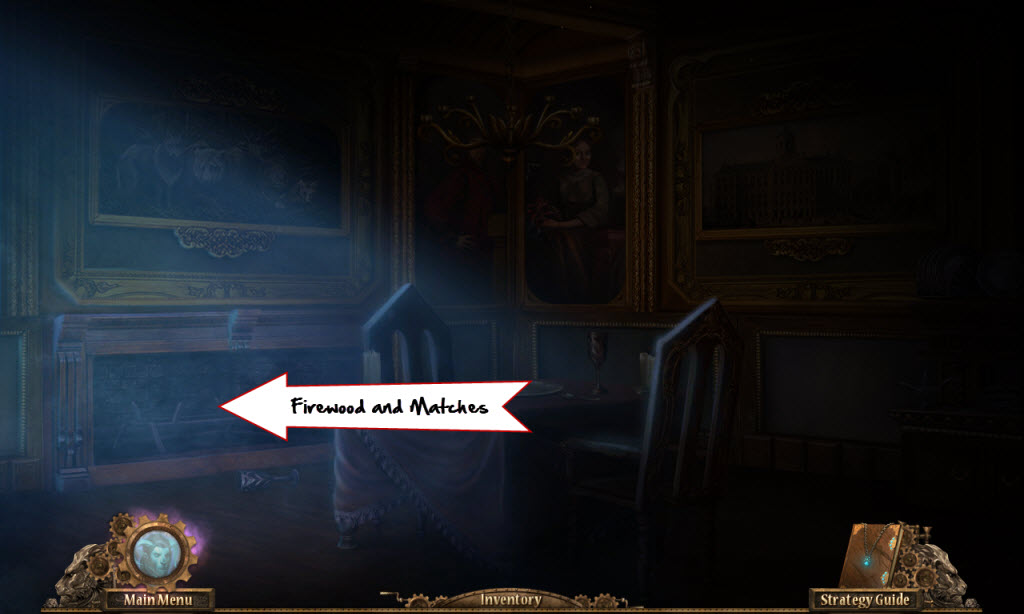
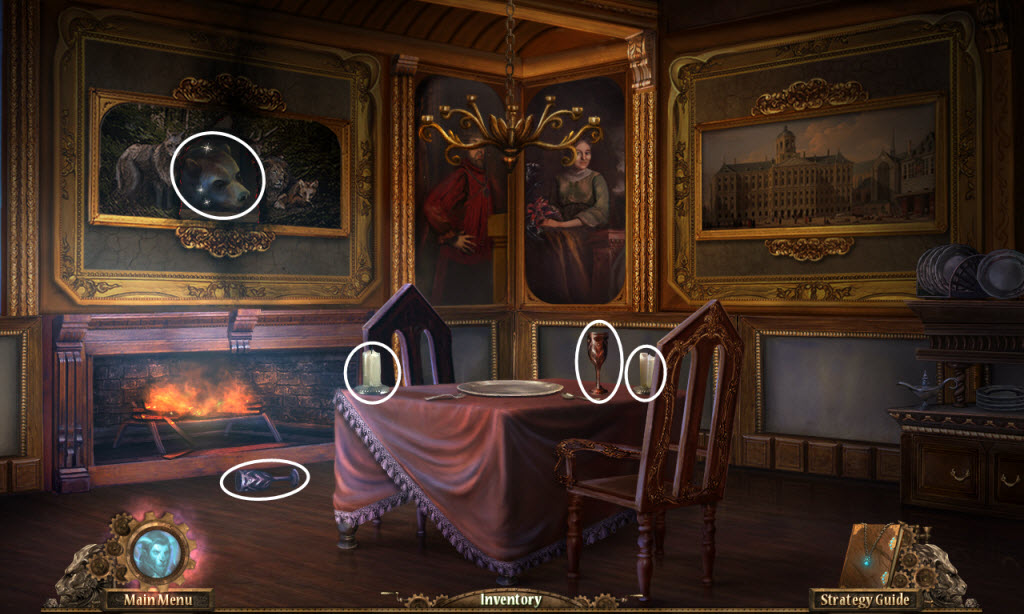
- take the Bear Head out of the painting
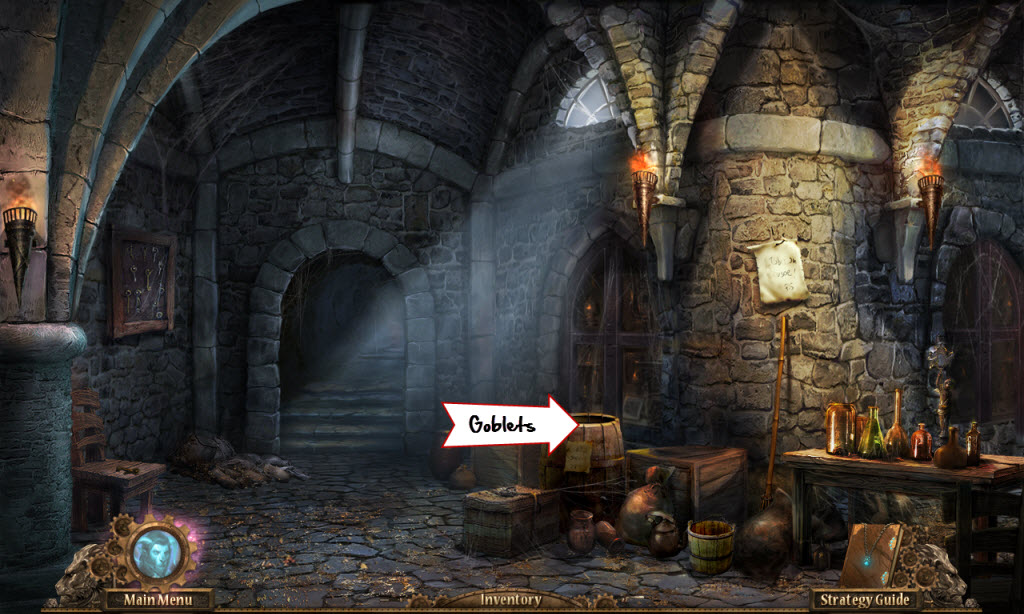
- pick up the two Empty Goblets
- pick up the two Atlantis Candles
- return to the undercroft
Undercroft
- use the Goblets on the Rose Water
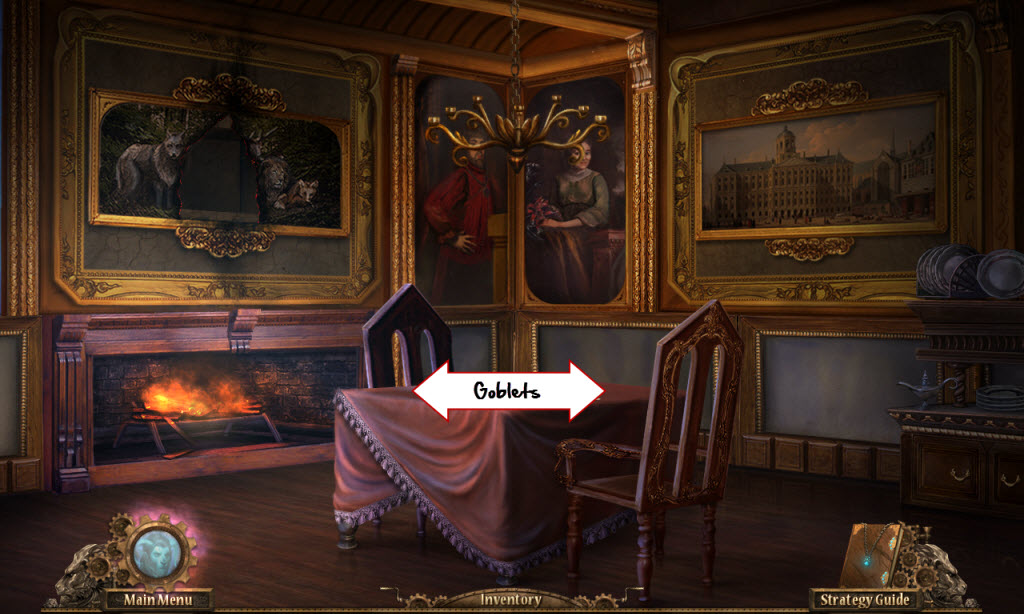
- return to the dining room
Dining Room
- place the Full Goblets on the table
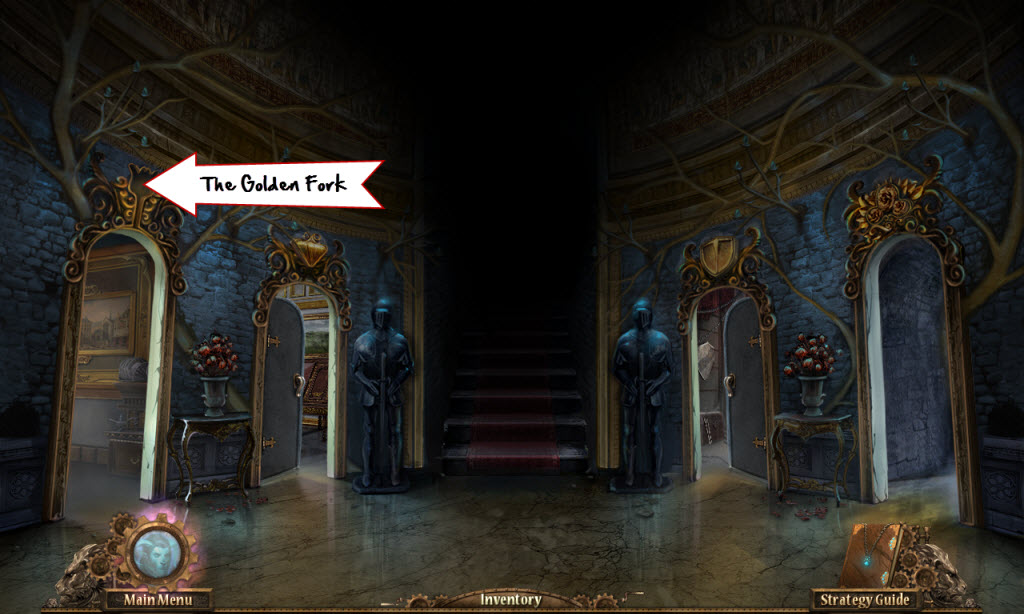
- pick up The Golden Fork
- open the covered dish - eek!
- go down
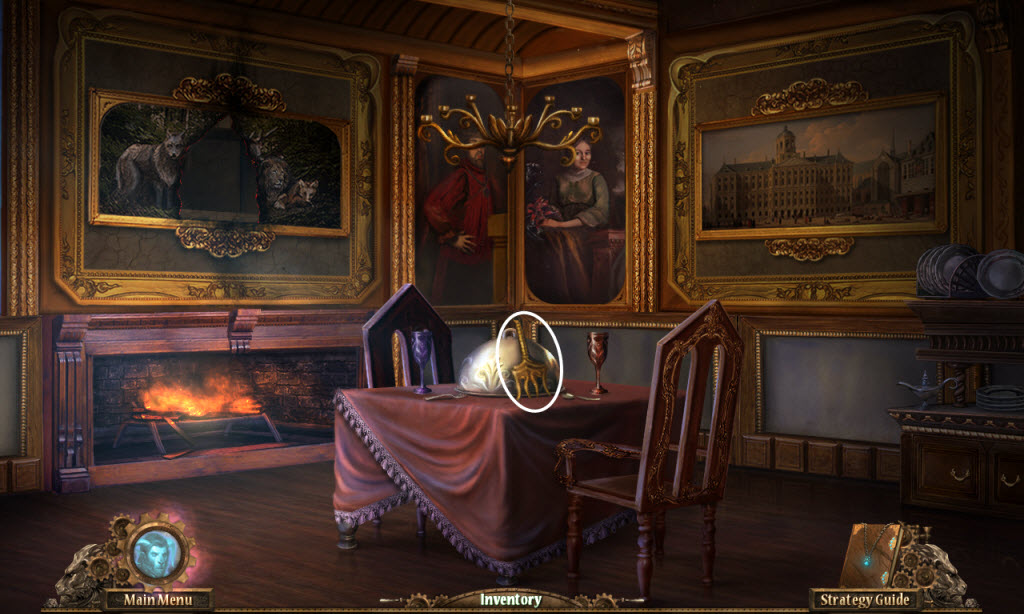
- place The Golden Fork over the dining room door
- go upstairs
Throne Room
- use the Aviary Key on the right door
- enter the aviary
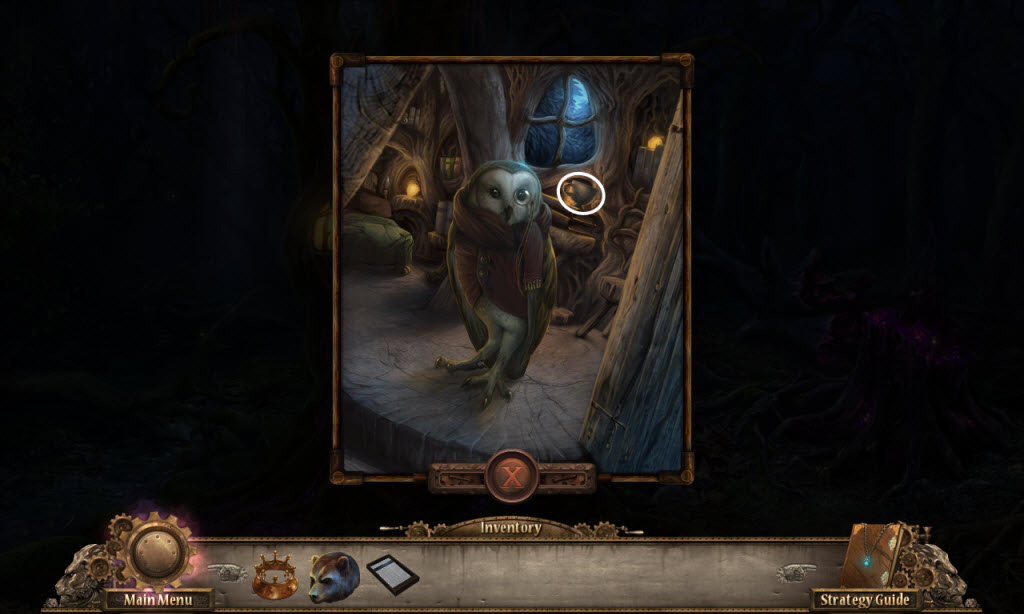
- talk to Mr. Beak
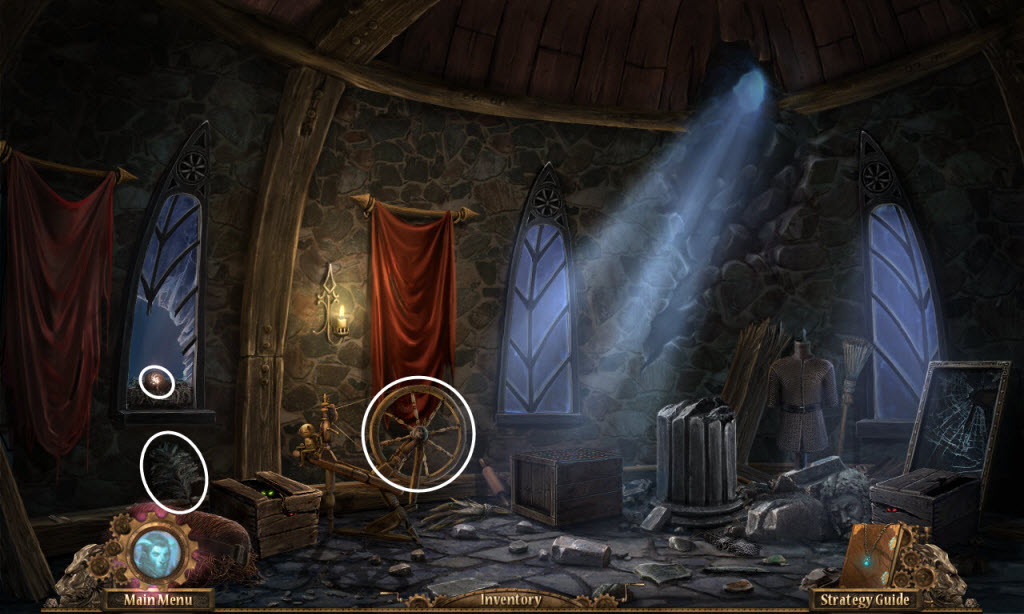
- use the Ships Wheel on the spindle
- examine the spindle
- use the Oilcan on the spindler
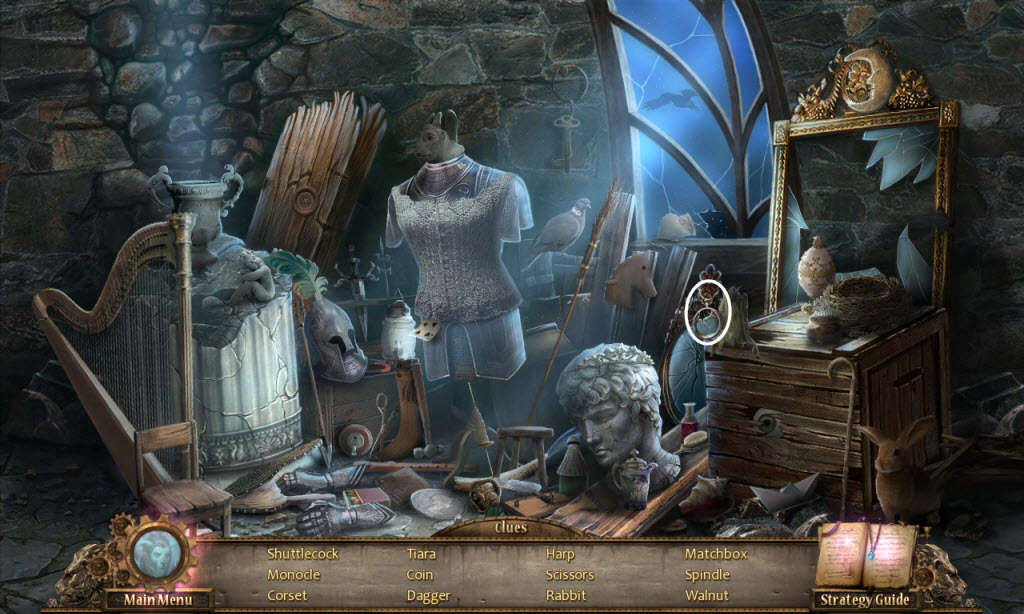
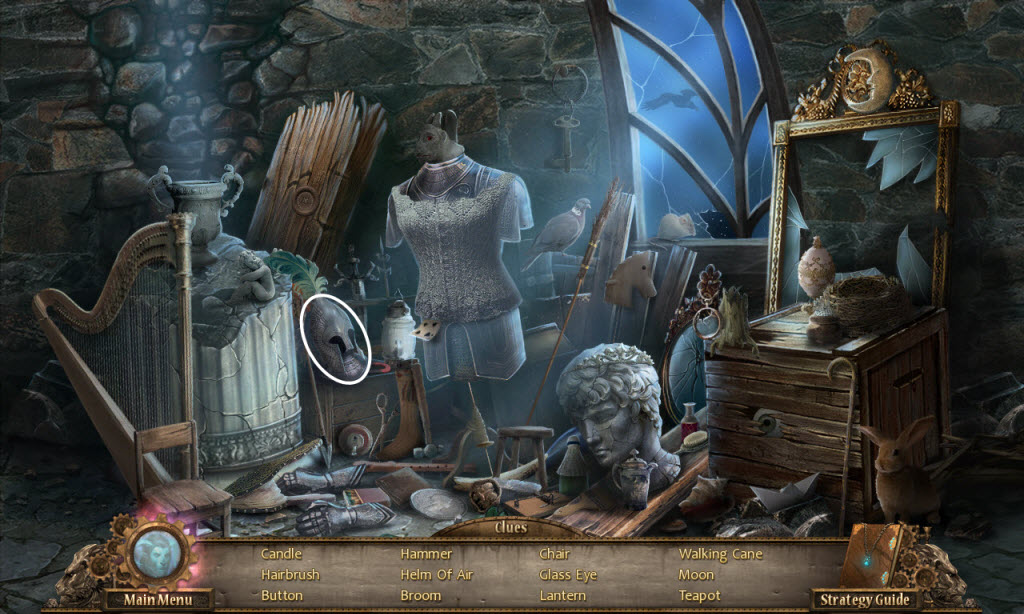
- examine the area to the right - hidden object scene
- take the Monocle
- examine the box against the wall
- Thread Puzzle
- eliminate all the matching spools
- see screenshot for solution
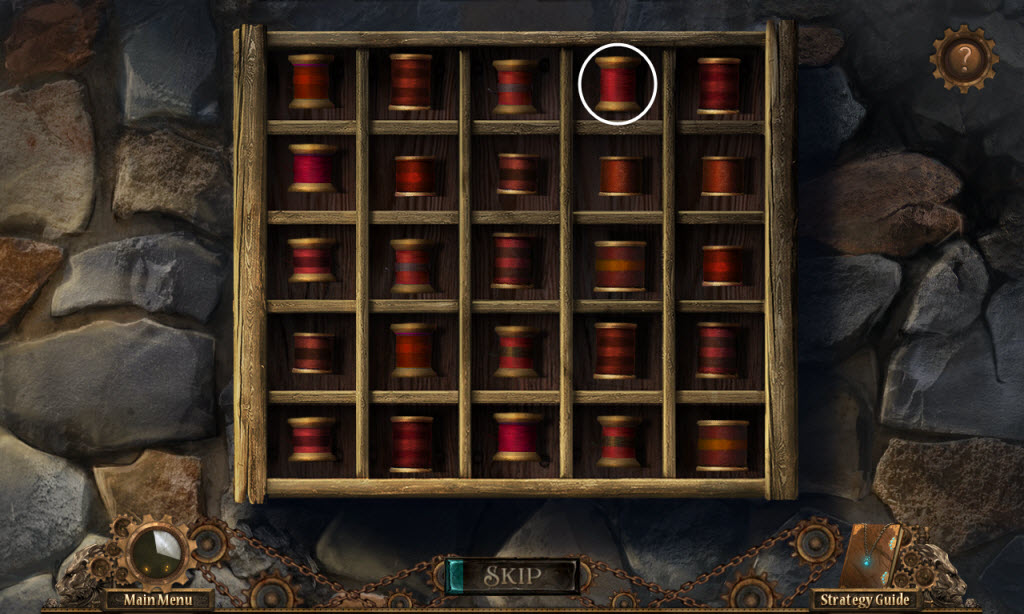
- take the Spool of Red Thread
- give the Spool of Red Thread on the spindler
- turn the crank three times
- take the Red Scarf
- give the Red Scarf and Monocle to Mr. Beak
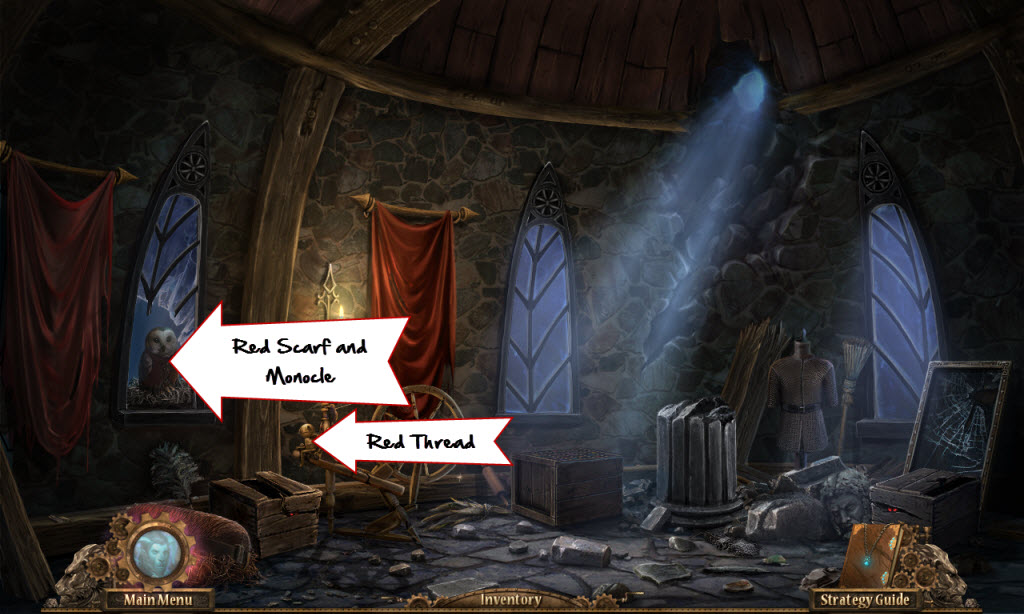
- pick up the other Heart Handle Half from the nest
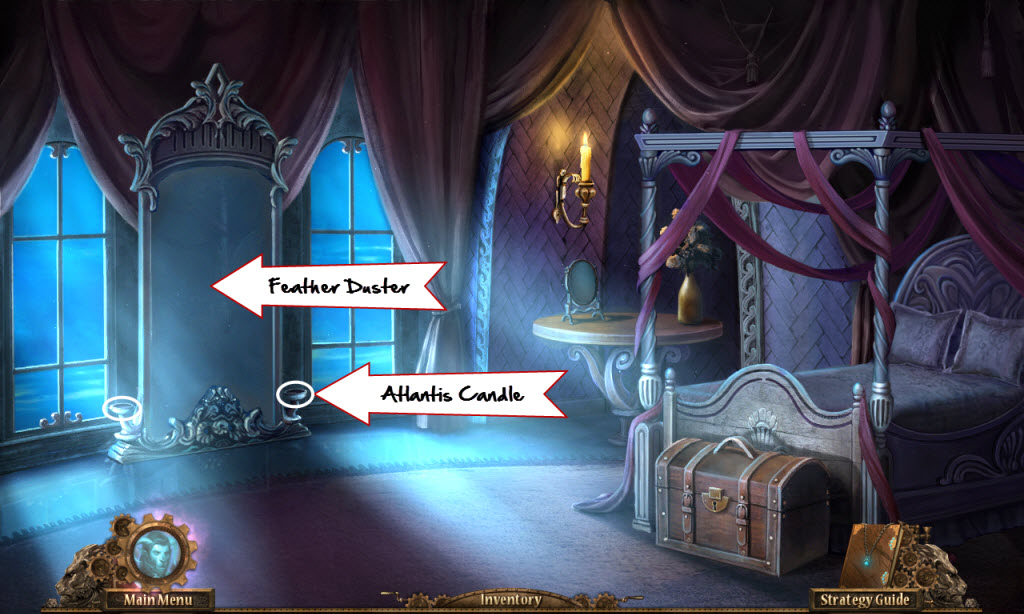
- pick up the Feather Duster under the nest
- take back the Ship's Wheel
- go down
Throne Room
- examine the door on the left
- place both Heart Handle Halves inside the door
- enter the bedroom
- place the Atlantis Candles on each side of the mirror
- use the Feather
Duster on the mirror
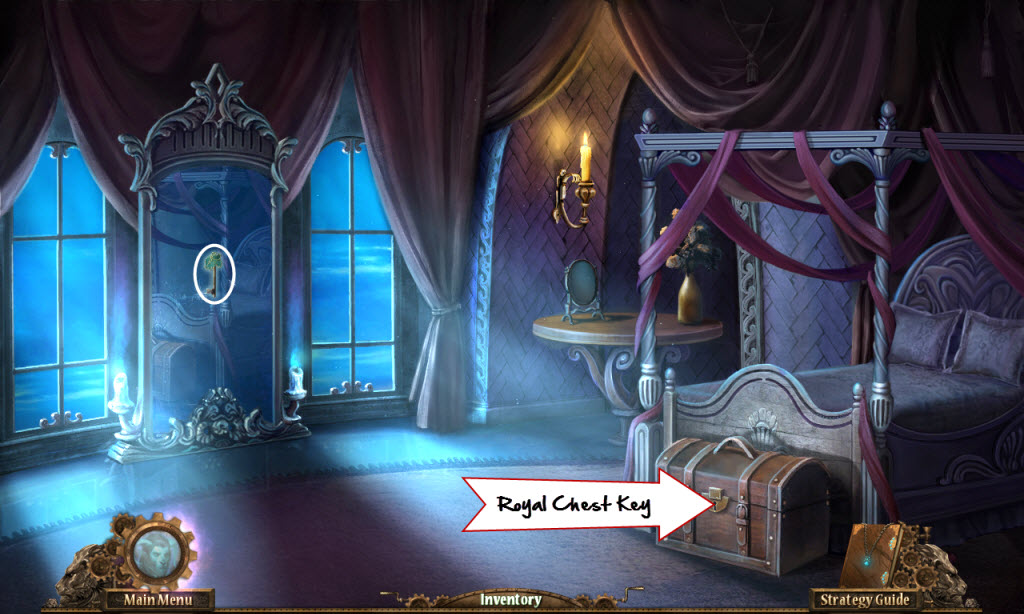
- take the Royal Chest Key
- examine the chest at the foot of the bed
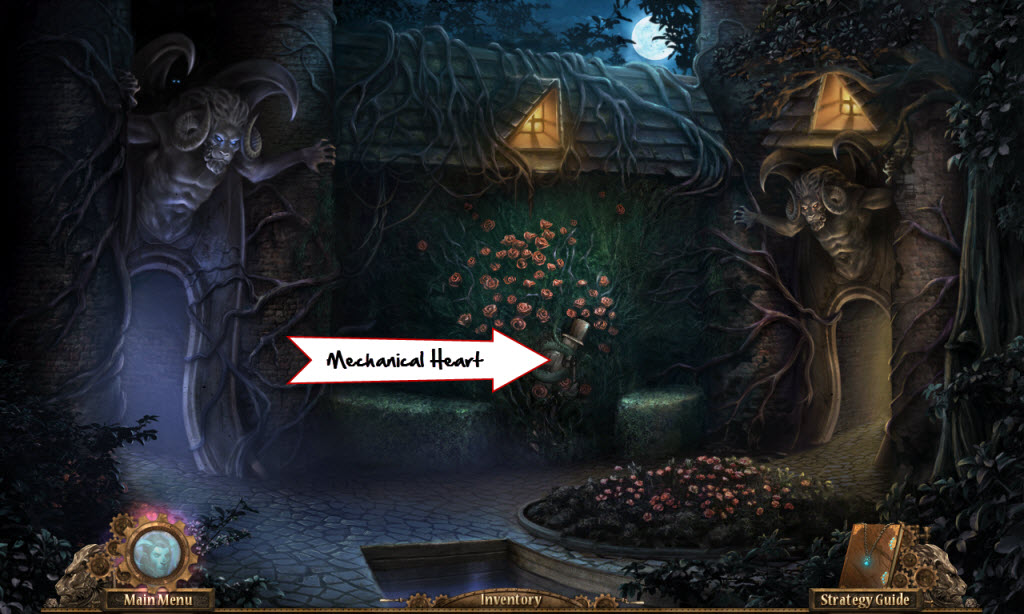
- use the Royal Chest Key to open the chest
- take the Mechanical Heart
- return to the courtyard
- use the Mechanical Heart on the butler
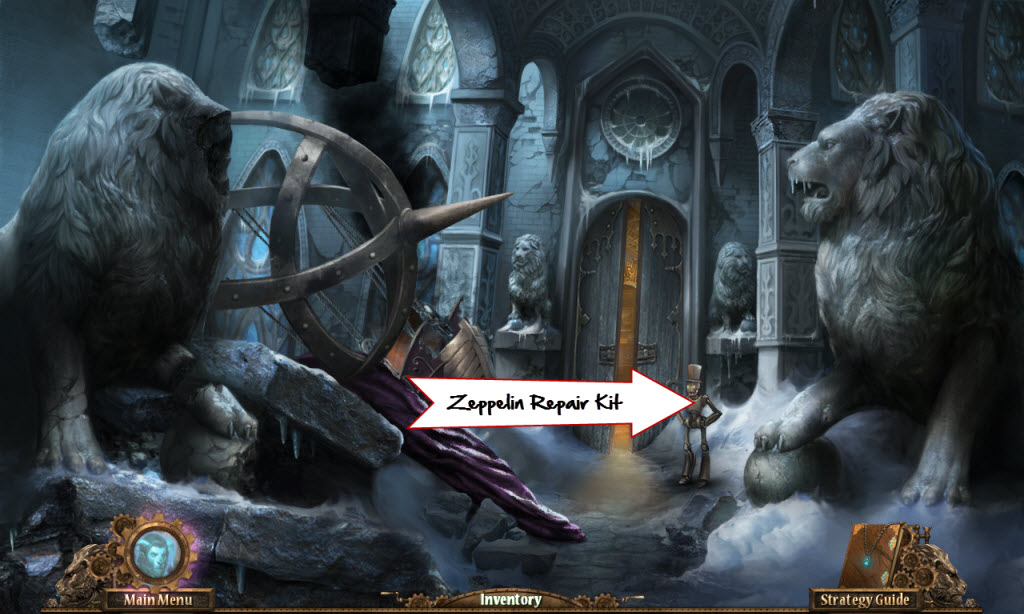
- examine the reliquary (revealed by the rose bushes)
- pick up the Zeppelin Repair Kit
- return to the beast castle (entrance)
- give the butler the Zeppelin Repair Kit
- use the Ship's Wheel on the zeppelin
- click on the zeppelin
- examine the cellar - hidden object scene
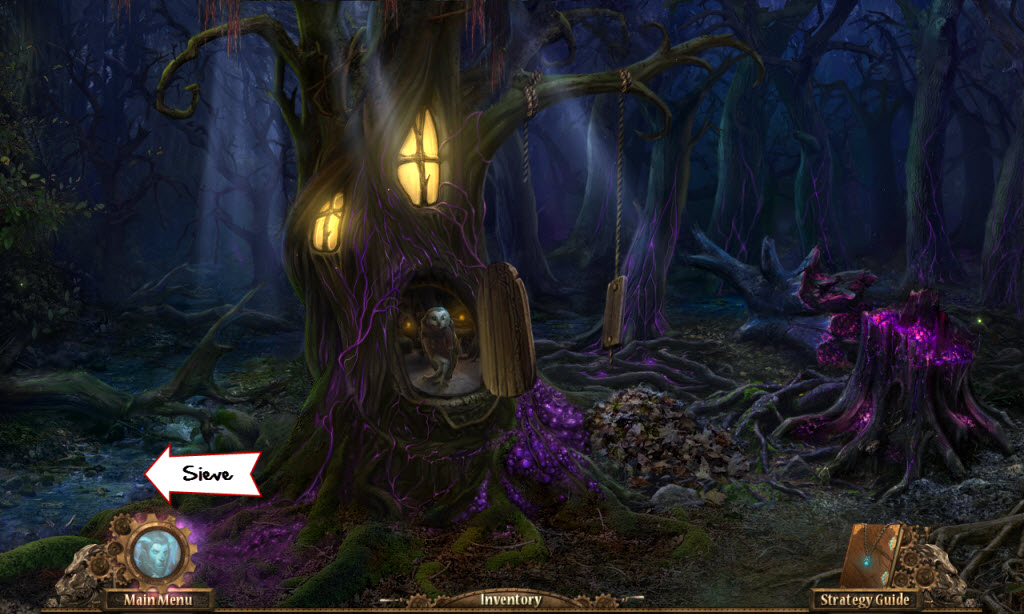
- take the Sieve
- go left
- talk to Mr. Beak
- take the Teacup
- use the Sieve on the creek by the tree
- take the Gem
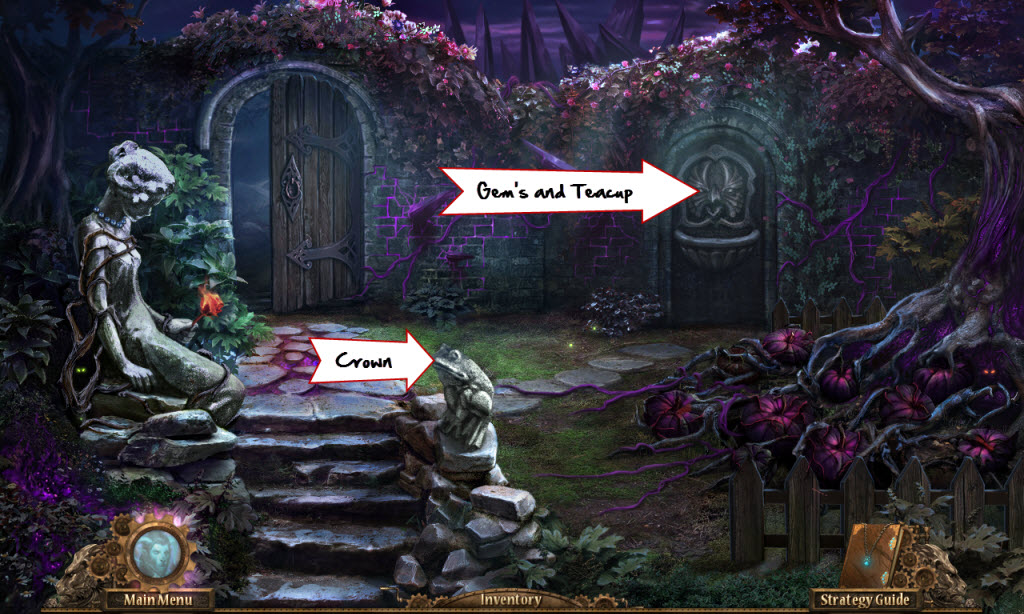
- go to the cottage garden
Cottage Garden
- place the Crown on the stone frog
- take the Gem
- examine the fountain
- place the Gem's in the owls eyes
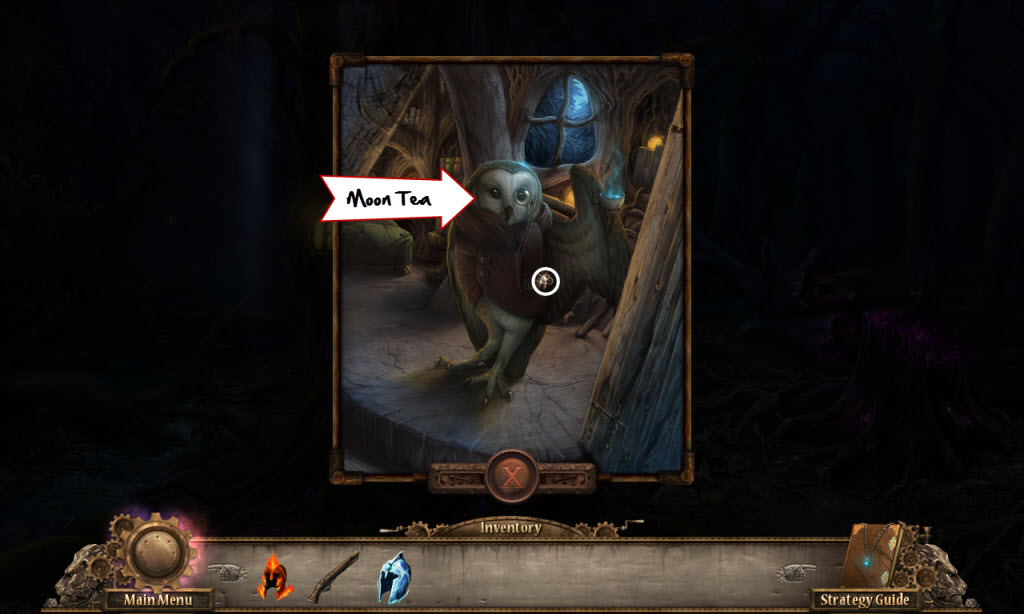
- use the Teacup on the fountain
- receive Moon Tea
- return to owl creek
Owl Creek
- give the Moon Tea to Mr. Beak
- take the Mailbox Key out of his pocket
- return to the cottage
The Cottage
- use the Mailbox Key on the mailbox
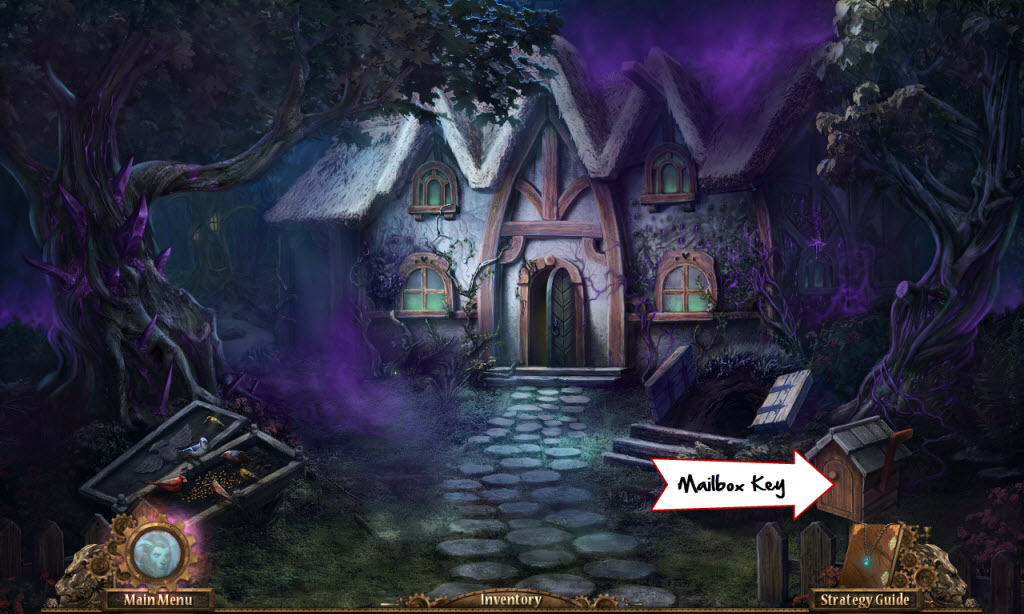
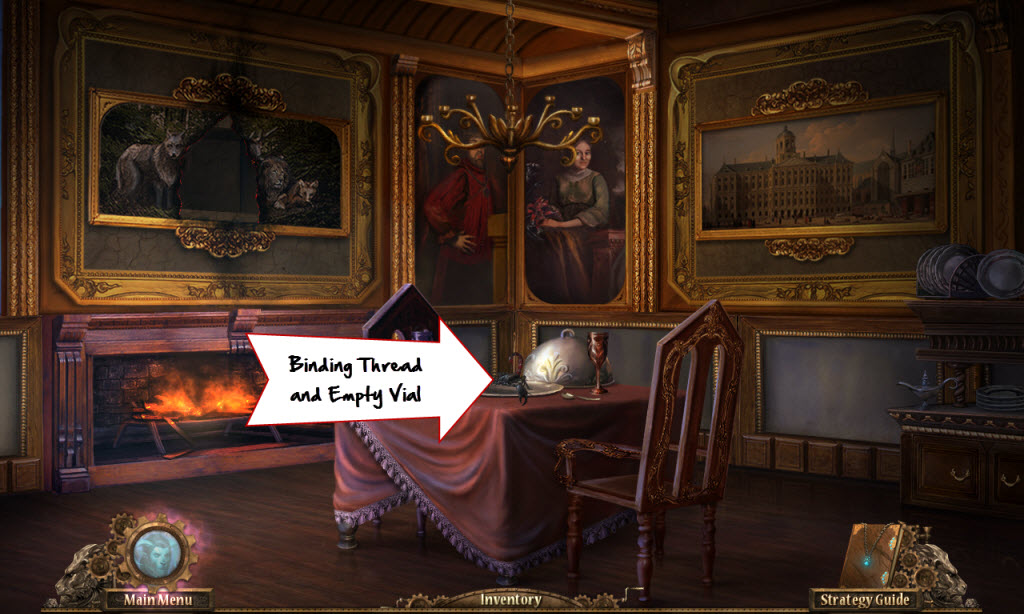
- take the four Empty Vials
- go to the forest path
- examine the base of the tree - hidden object scene
- take the Tear Catcher
- continue up
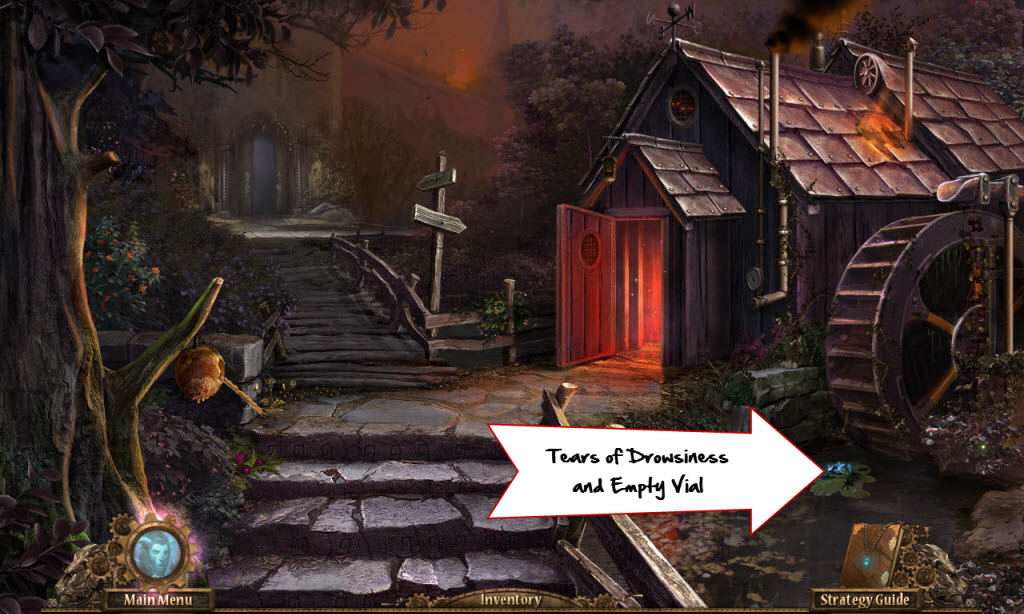
- use the Tear Catcher on the weeping willow
- receive Tears of Drowsiness
- continue up

Blacksmith
- examine the blacksmith's door - hidden object scene
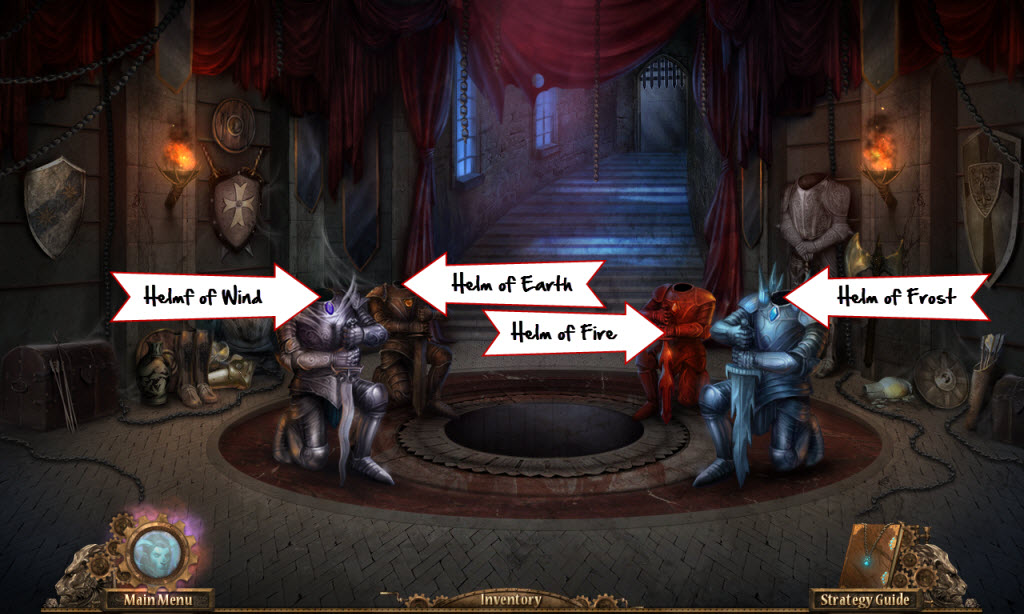
- take the Helm of Fire
- use the Tears of Drowsiness on the frog
- use an Empty Vial to collect the Frog Venom
- continue to the tavern
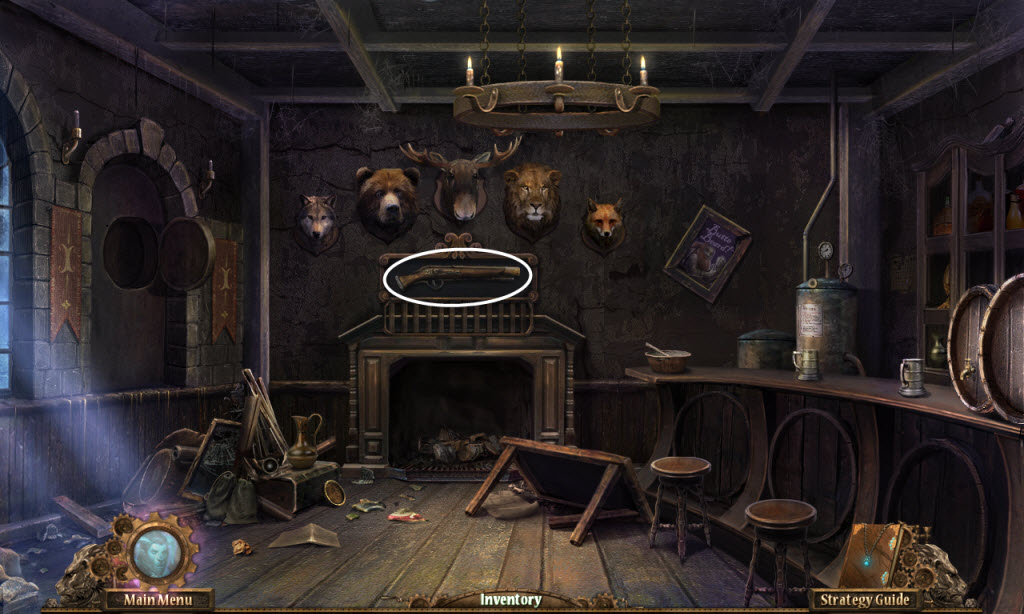
- place the Bear Head on the wall
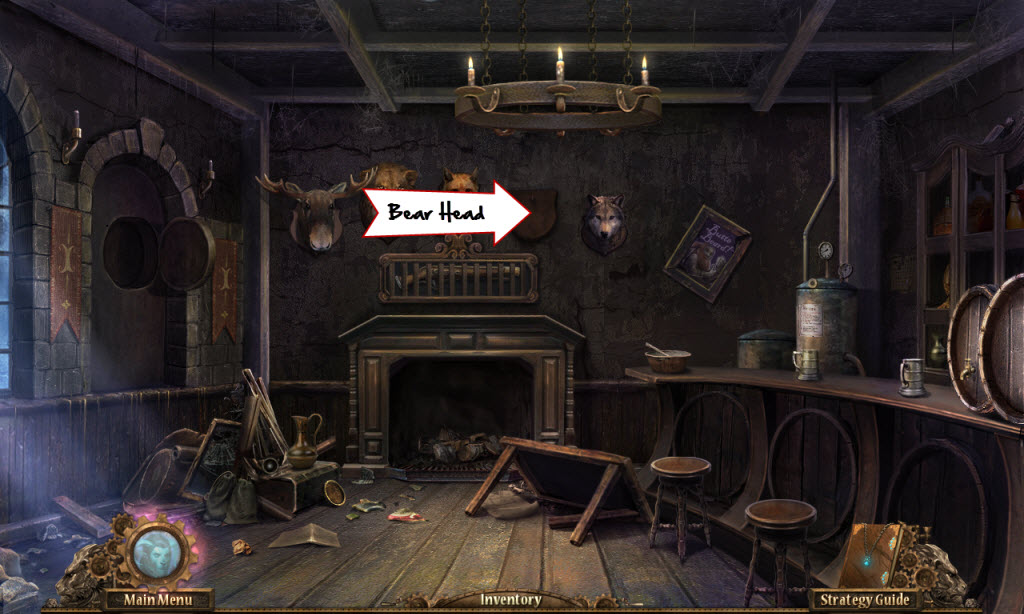
- Tavern Heads Puzzle
- look in your journal and find the picture of the painting from the dining room where you found the bears head
- place the head in order according to that picture
- solution: wolf, bear, moose, lion, fox
- see screenshot for solution
- take the Blunderbuss
- continue up
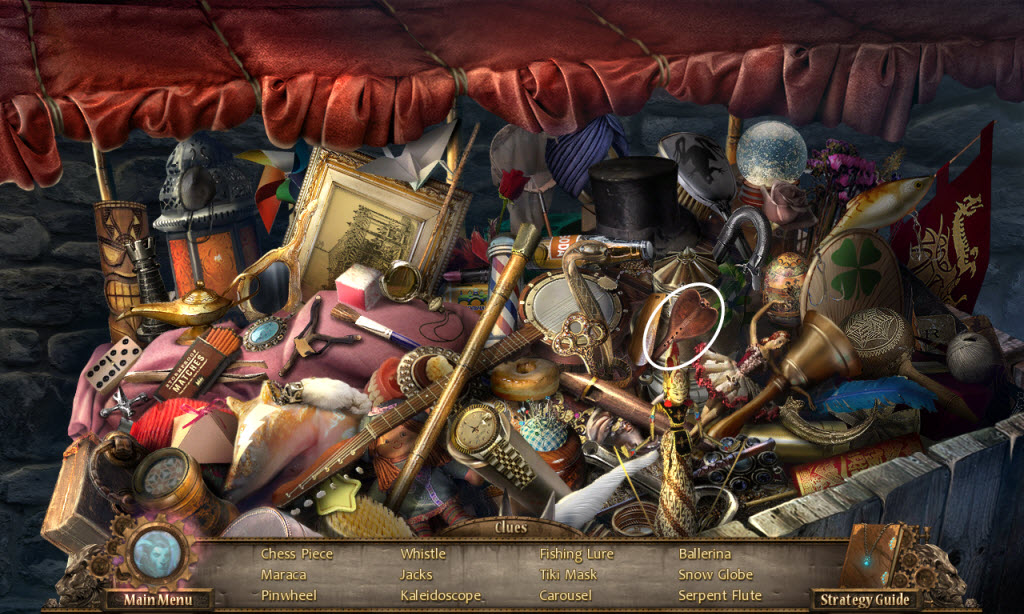
- examine the merchant cart - hidden object scene
- take the Serpent Flue
- continue to the ice caverns
- examine the Yeti's cave - hidden object scene
- take the Helm of Frost
- use the Serpent Flute on the snake
- use an Empty Vial to collect Snake Venom
- go to the zeppelin

Storm Peak
- click on the zeppelin
- go to the undercroft
- examine the stairwell - hidden object scene
- take the Helm of Earth
- go to the armory
- examine the stairs - hidden object scene
- take the Gauntlet of Strength
- go down
- use the Blunderbuss on the spider web (ew!)
- continue up
- examine the beast (eek!)
- Spider Puzzle
- use the Blunderbuss to shoot the spiders
- you have three shots per round
- go into the aviary
- examine the corner - hidden object scene
- take the Helm of Wind
- return to the armory
- replace all the Helms
- examine the book under the sword in the stone
- Beauty and the Beast Puzzle
- find 20 roses
- take the Soul Shard
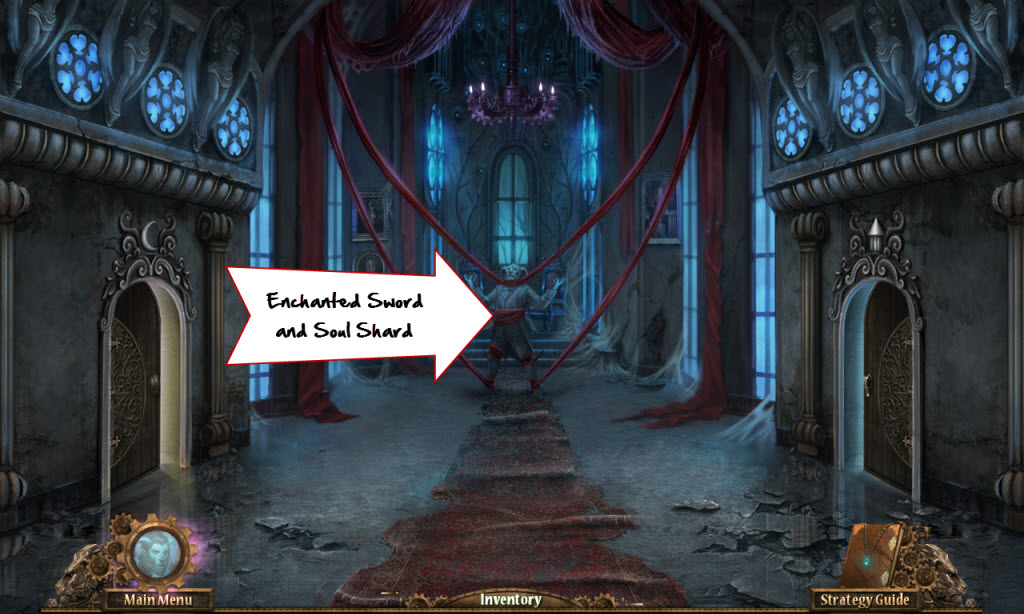
- use the Gauntlet of Strength to pull out the Enchanted Sword
- go to the throne room
- use the Enchanted Sword to free the Beast (double eek!)
- Spider Puzzle
- use the sword to defeat the spider
- first strike the spider
- next strike the spiderlings
- cut the highlighted rope tied to the Beast
- repeat this process until you defeat the spider(s)
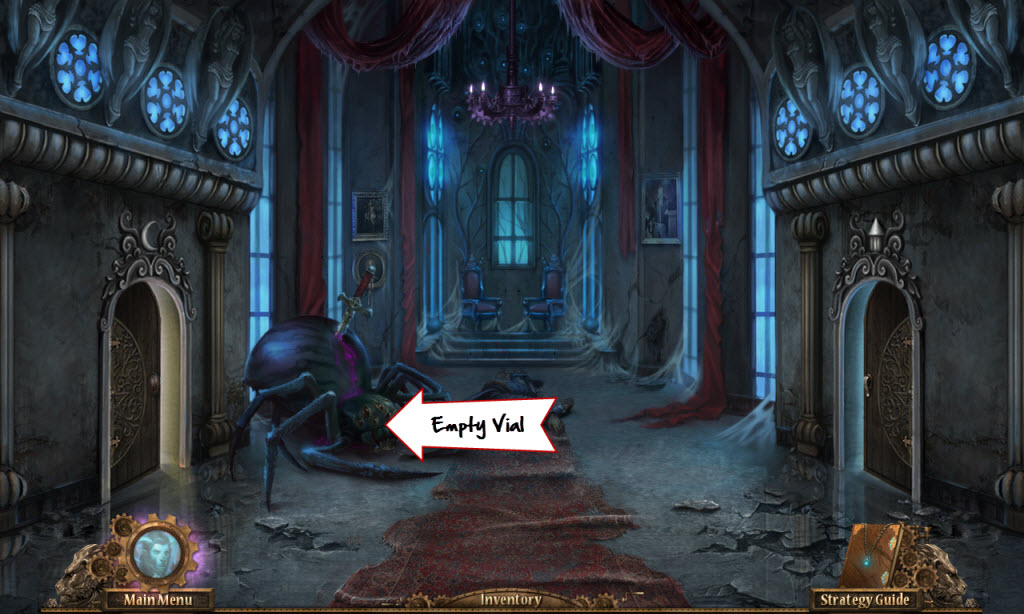
- use the Soul Shard on the Beast
- use an Empty Vial on the spider to get Spider Venom
- go down
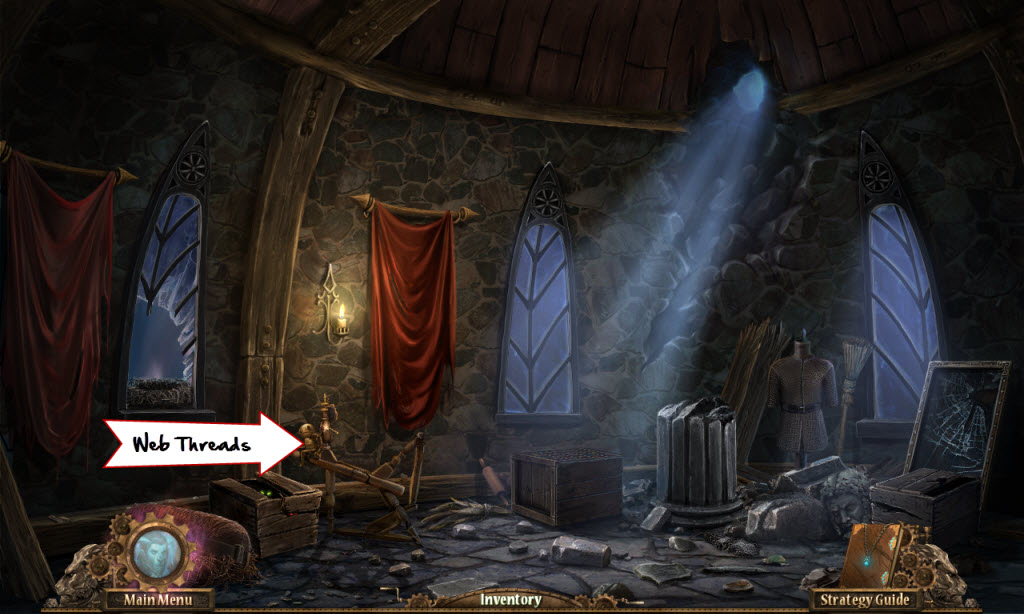
Grand Hall
- pick up the Web Threads from the base of the stairs
- return to the aviary
- give the spindler the Web Threads
- take the Binding Thread
- go to the dining room
- use the Binding Thread on the scorpion
- use an Empty Vial on the scorpion to get Scorpion Venom
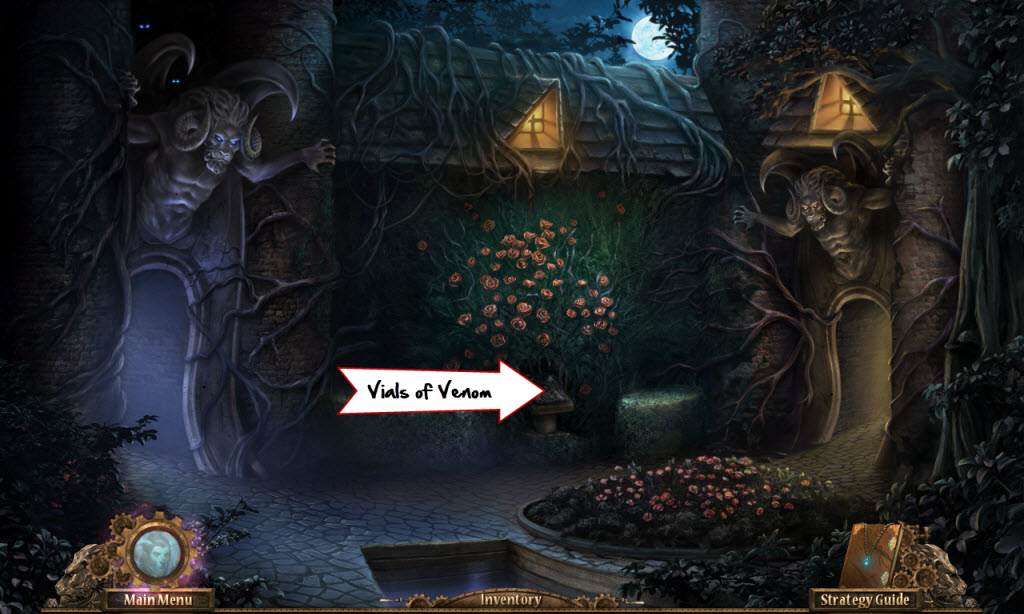
- return to the courtyard
- examine the reliquary
- use the Vials of Venom on each creature
- take the Enchanted Rose
- return to the throne room
Throne Room
- give the Enchanted Rose to the Beast
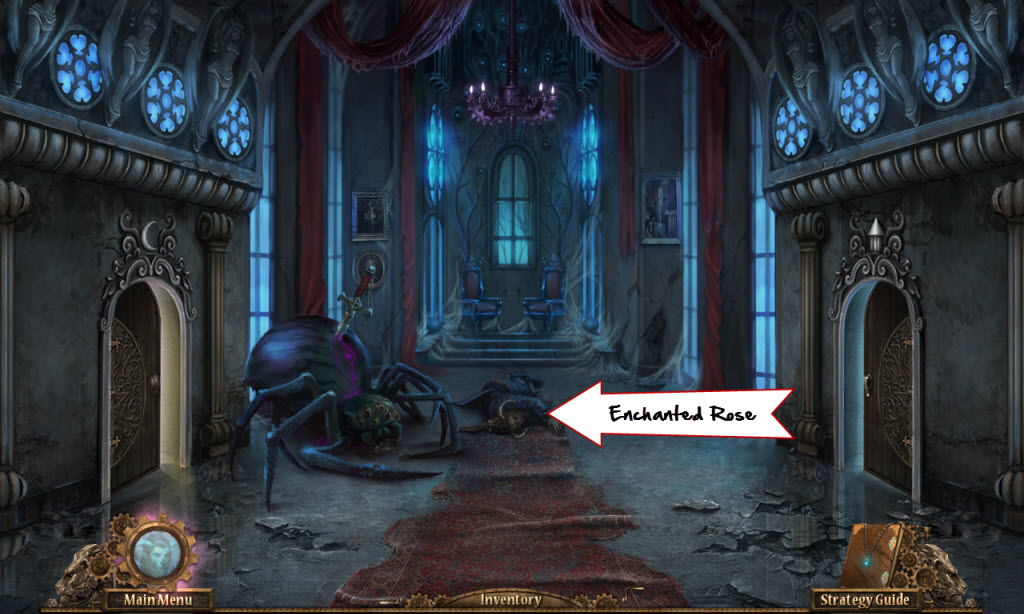
The End!
Content(s) of this game guide may not be copied or
published on any other site without permission from Casual Game Guides.
©CasualGameGuides.com 2006 - 2021