
Dreamland
Dreamland Walkthrough provides gamers with screenshot locations of all hidden objects, video solutions to the most challenging puzzles, and a step-by-step guide to complete the game, including the extended version. This walkthrough also provides the locations of all the starfish and marbles that you need to collect in order to get the trophies. Dreamland is an exciting and challenging hidden object adventure game that guides you through a deserted theme park in order for you to save your brother. Can you find your brother’s contract in Dreamland and save him before it’s too late?
General Tips to Help You Play Dreamland
White Sparkling Areas: These indicate a hidden object scene or an object that can be picked up. Keep your eyes open for these in order to find objects you need to move forward in the game.
Green Sparkling Areas: Indicates an area you can look closer at and zoom in on.
Hint Button: If you're stuck, and you don't know what to do next, or you can't find an object, use the hint button to help you out.
Inventory Bar: This bar is at the bottom of your screen and holds all the items you have found. Hover your mouse over it to bring it up.
Diary: This will store all the vital information you need to remember as you play the game. Feel free to click on this to look up information or clues about what to do next.
Tasks: This will show you a list of all the tasks you need to complete.
Map: When your map is unfurled, it means there is a mini-game that has opened up at a location. Use your map to travel instantly from place to place by clicking on the location.
Magnifying Glass: This will allow you to zoom in on an area.
Introduction
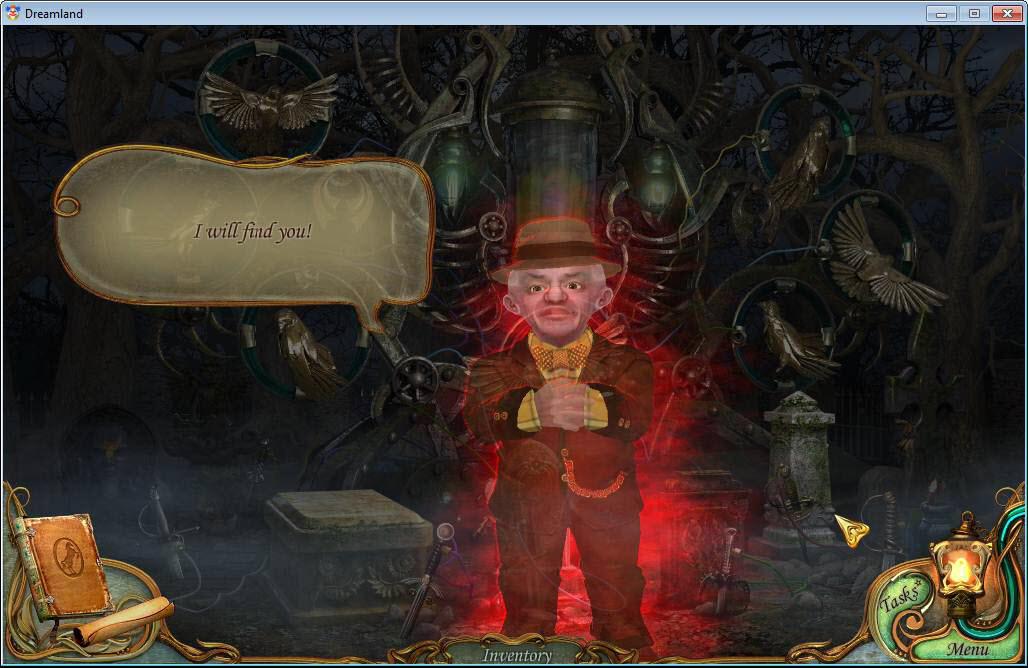
Welcome to Dreamland!
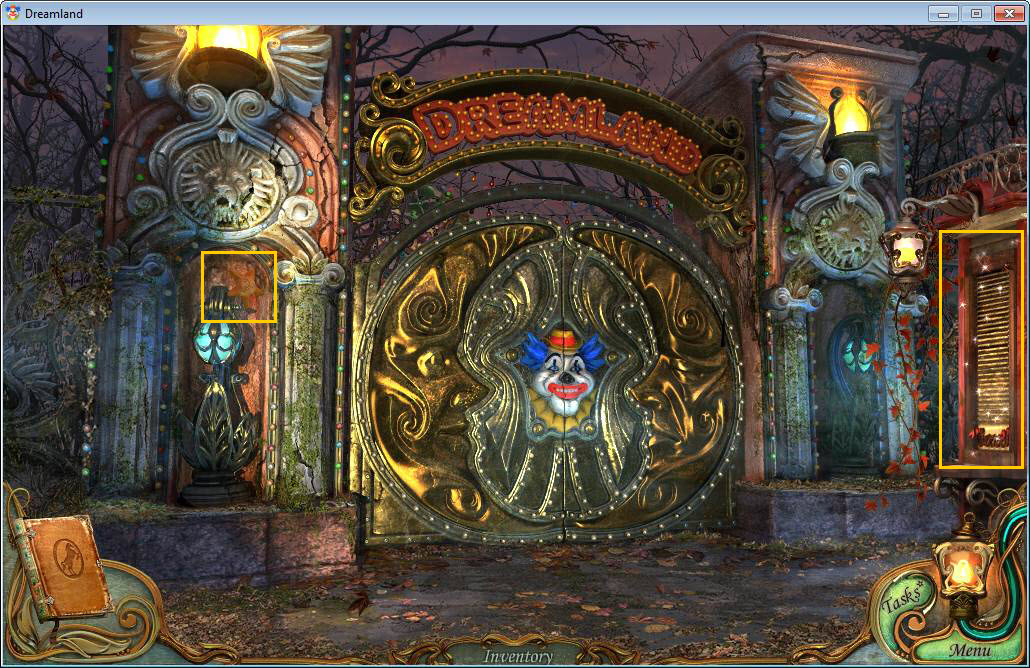
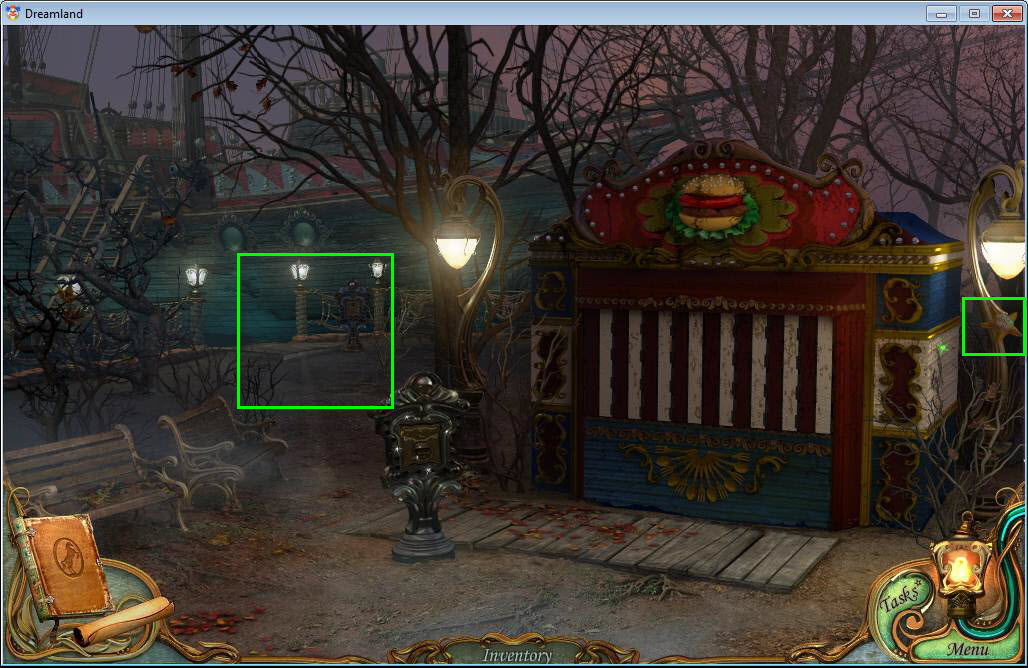
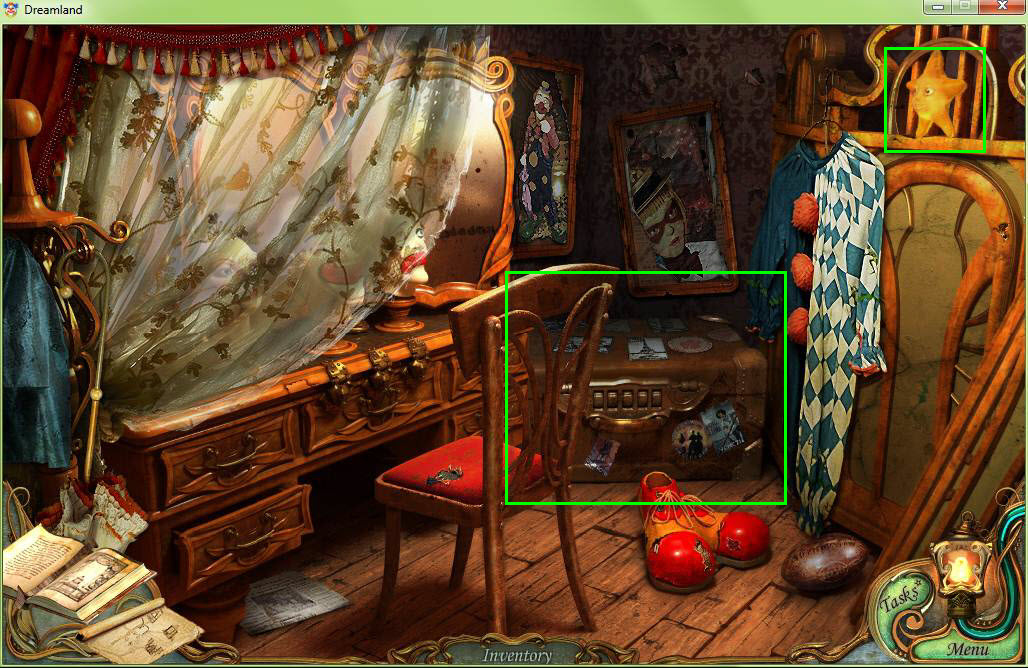
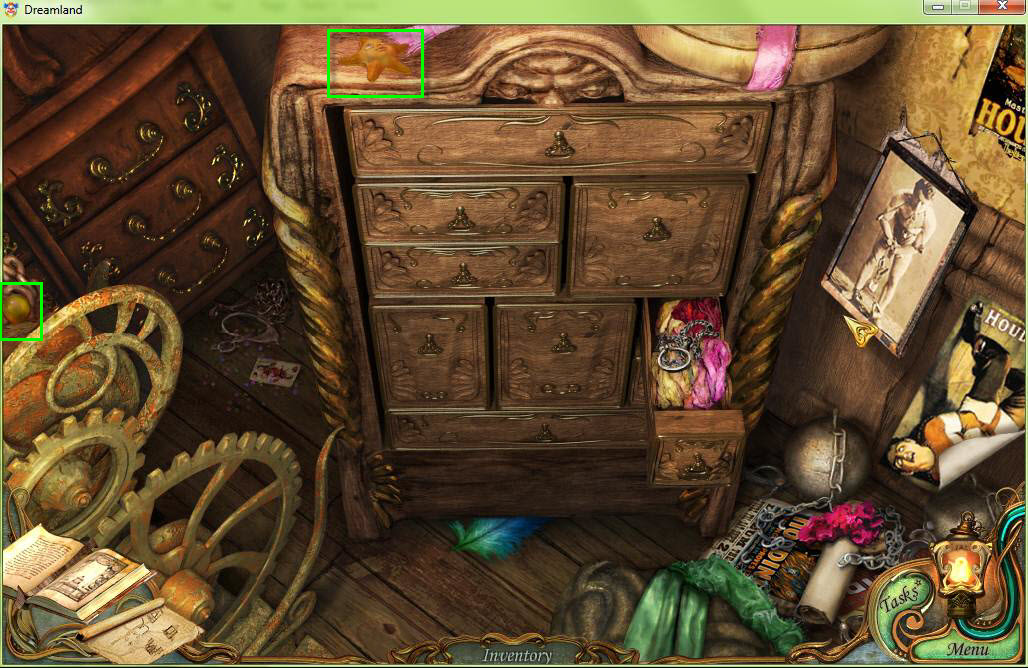
- To begin, close your diary and then click on the starfish on the left. If you collect all 20 of them, you'll receive a trophy!
- Click on the clown door and discover that the clown is missing his nose. Go back to the gate by clicking down.
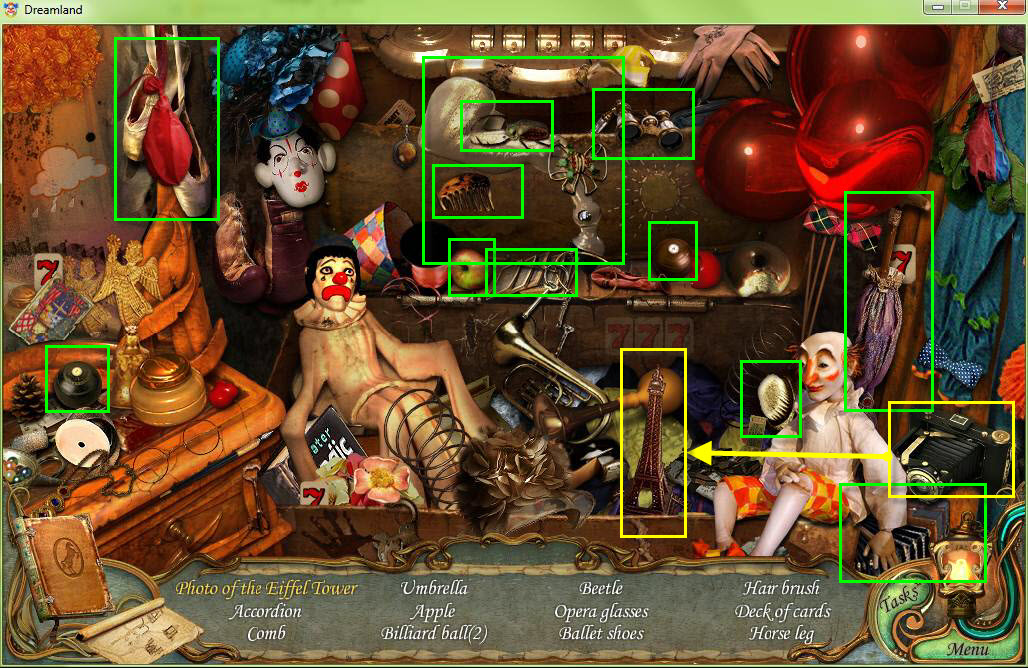
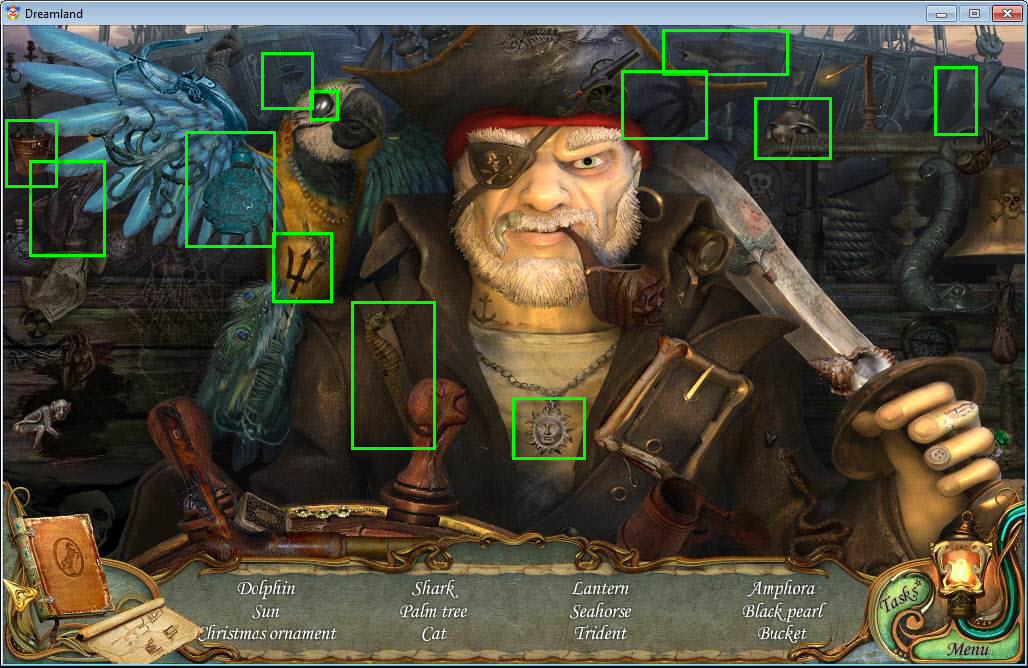
- Next, click on the hidden object area on the right to play it.

- Find all the hidden items in the scene. You will need to grab the basketball and place it in the basket first.
- Once you have found all the hidden objects, you will receive the clown's nose.
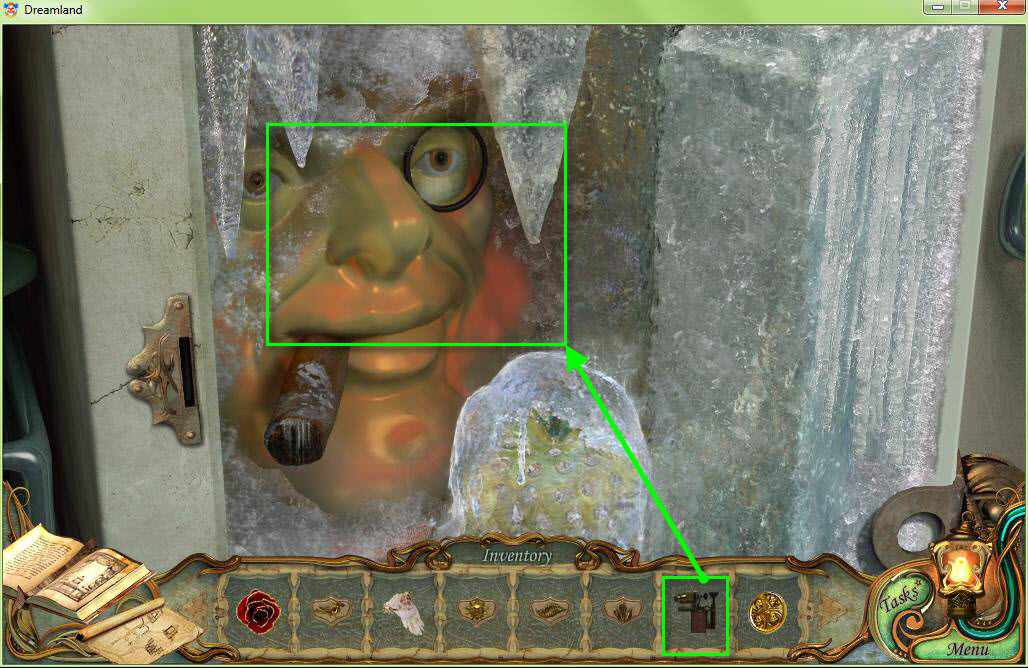
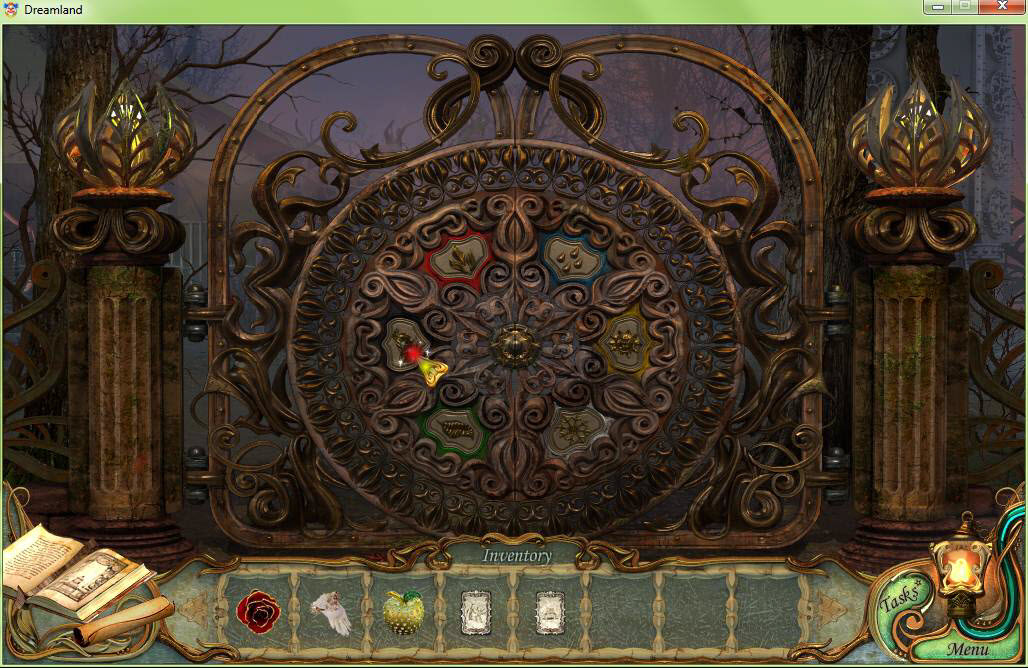
- Click on the gate to zoom in on the clown's face.
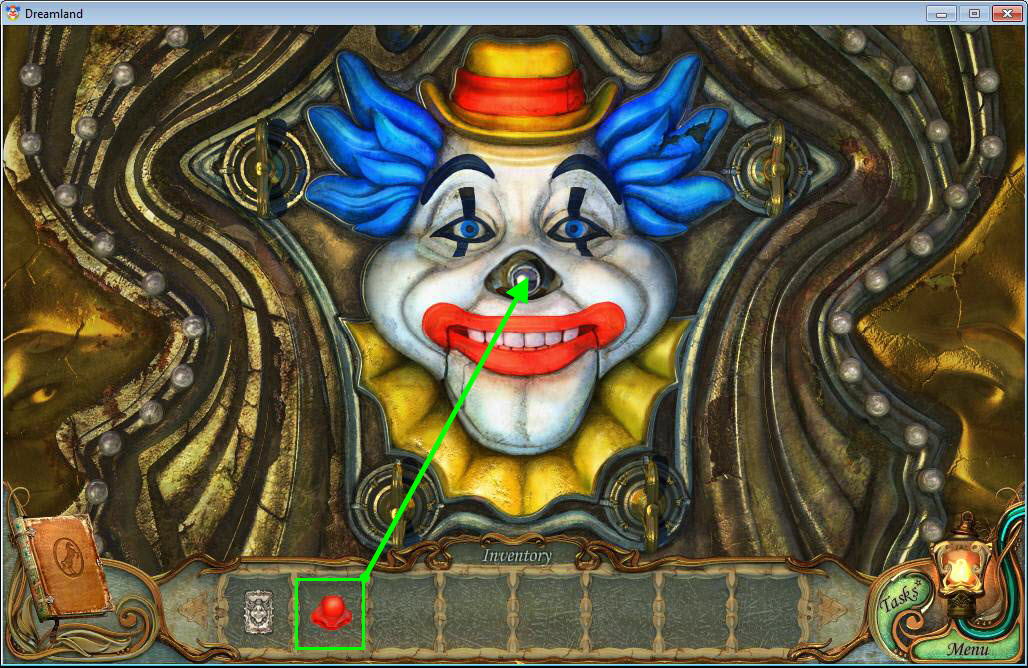
- Place the red clown nose on the clown face where the nose is missing.
- This will start a puzzle game.
- To solve the puzzle, simply turn each of the four handles until they make a part of the clown's face light up. See the video for a detailed solution.
- Once you solve the puzzle, the clown will open his mouth.
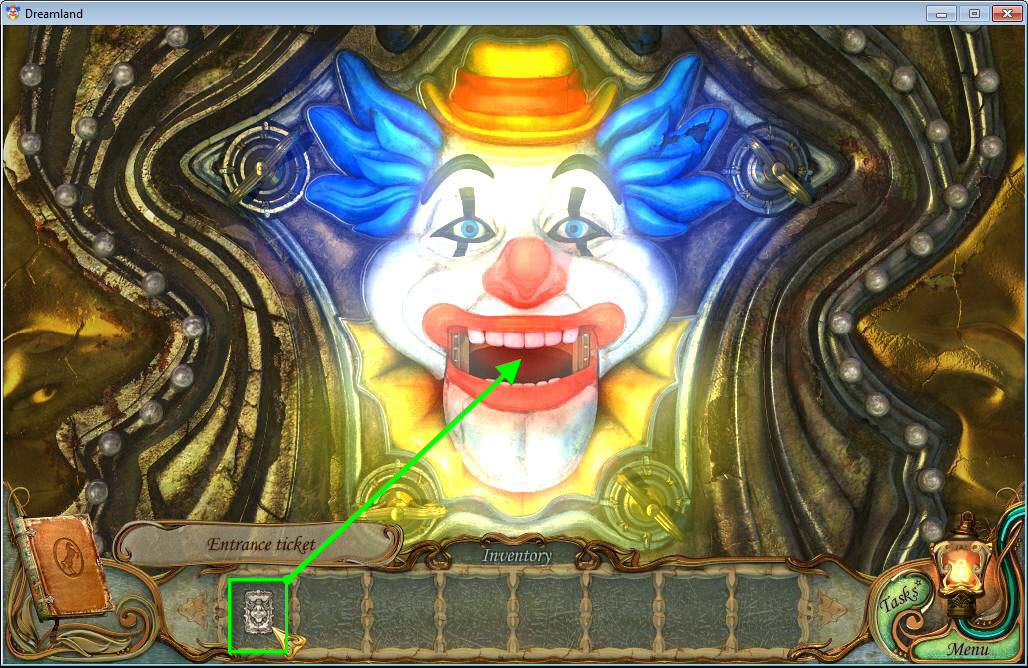
- Use the ticket in your inventory on the mouth to give it to him.
- Watch the cut scene and the gate will open.
- Go through the gate.
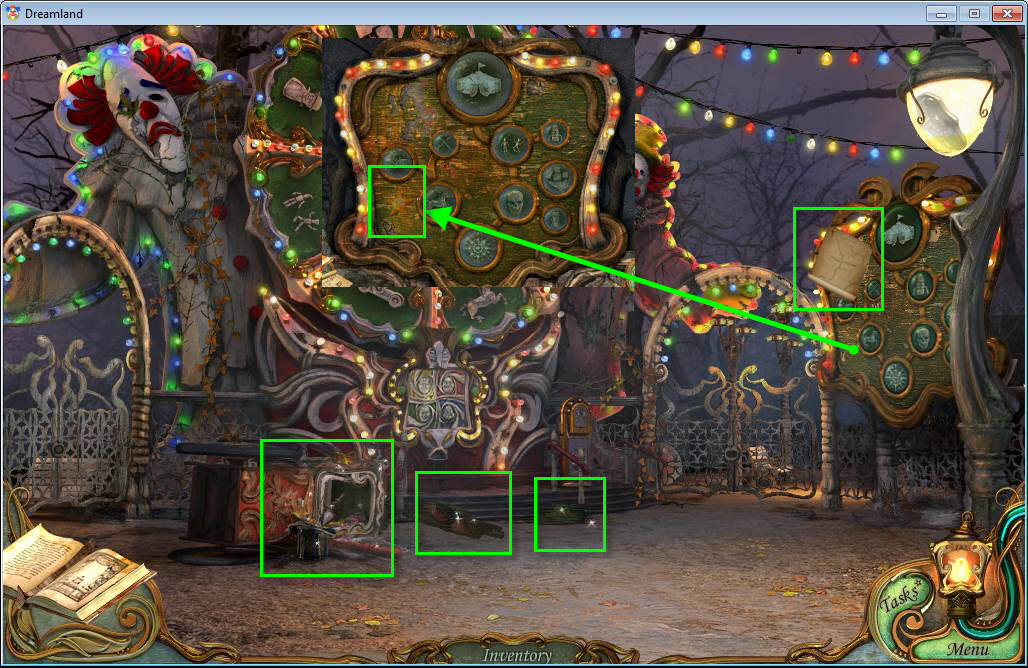
- After the evil dwarf talks to you, pick up the two pieces of wood.
- Then click on the map on the right to grab it.
- Click again to zoom in and grab the starfish on the board.
- Zoom back out and click on the popcorn stand to play the hidden object game.
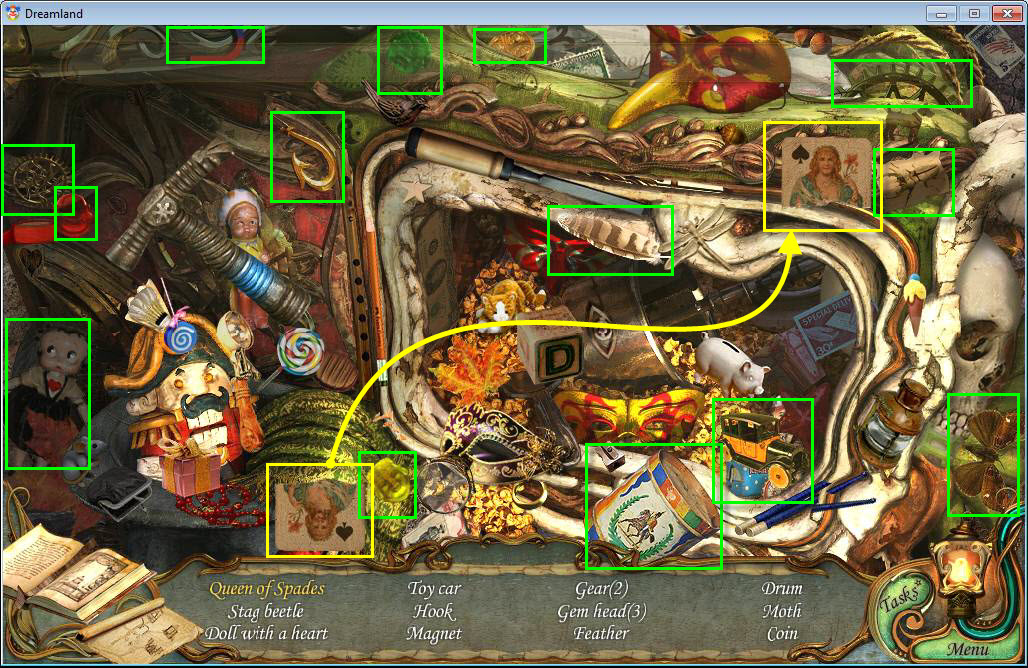
- Find all the items in the hidden object scene. Click on the half of a queen of spades card and bring it to the other half to form the whole card.
- Once you have found all the hidden objects, you will receive the coin with four faces.
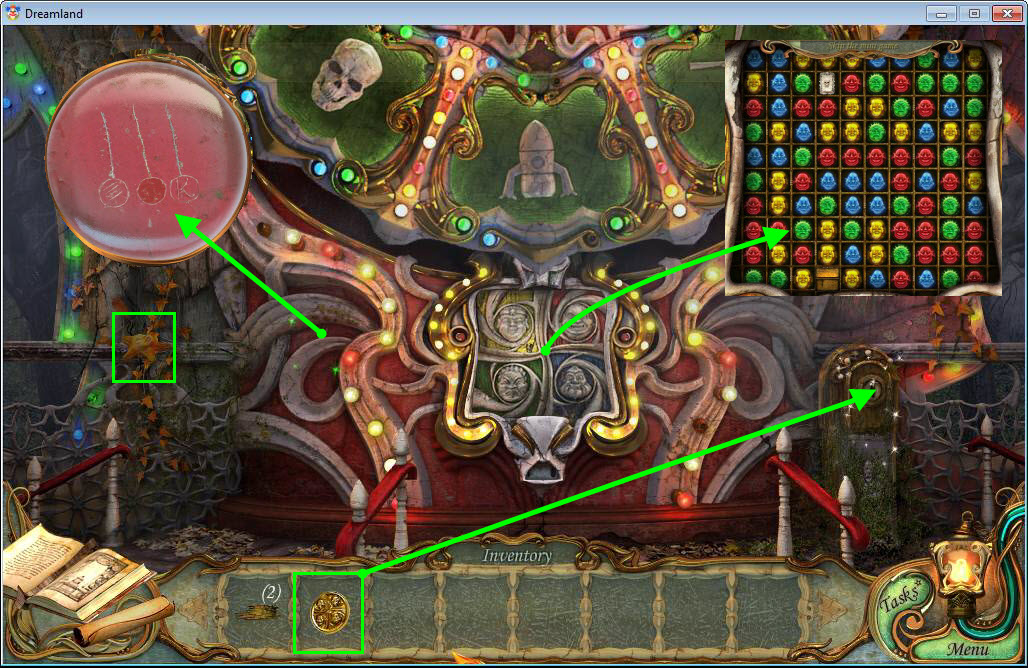
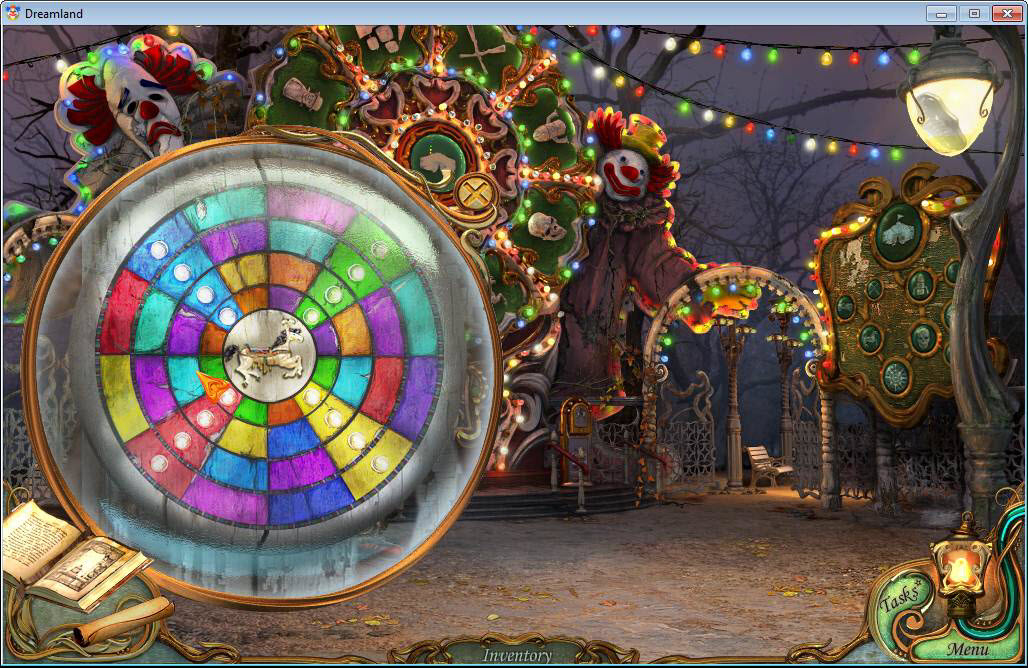
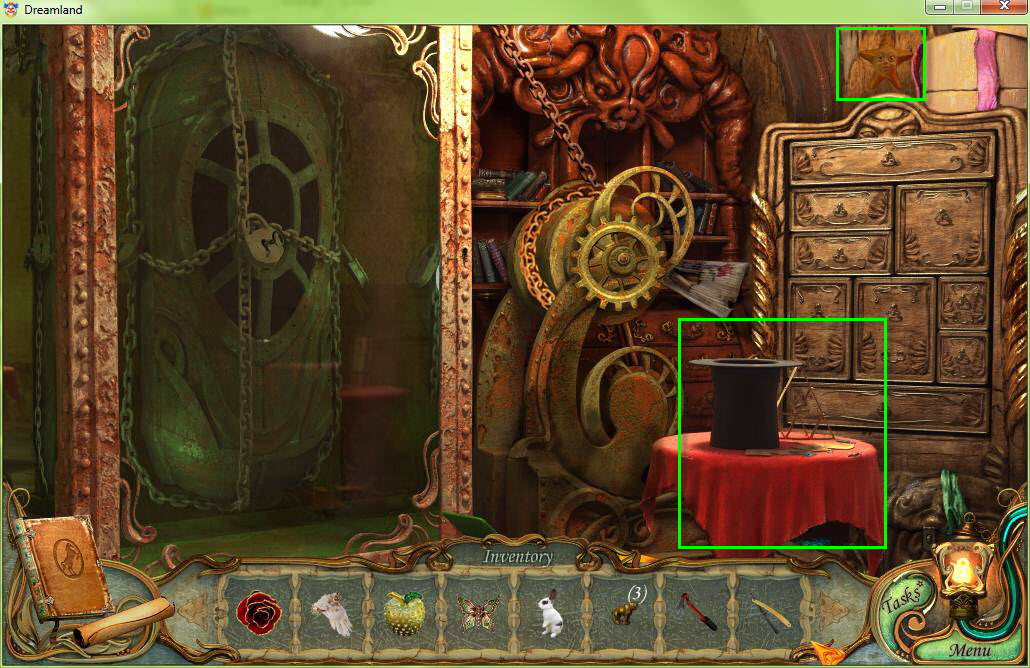
- Click on the wheel of fortune to zoom in on it.
- Use the coin with four faces on the coin slot on the right.
- This will open the game on the wheel of fortune. Click on it to start it.
- It's a match three game. Simply swap two colors to form three faces of the same color until the ticket falls into the slot.
- Take the ticket when you are done.
- Click on the left of the wheel of fortune to look at the scratch marks there. This will record in your diary.
- Click on the left to grab the starfish.
- Click down to move back to the central square.
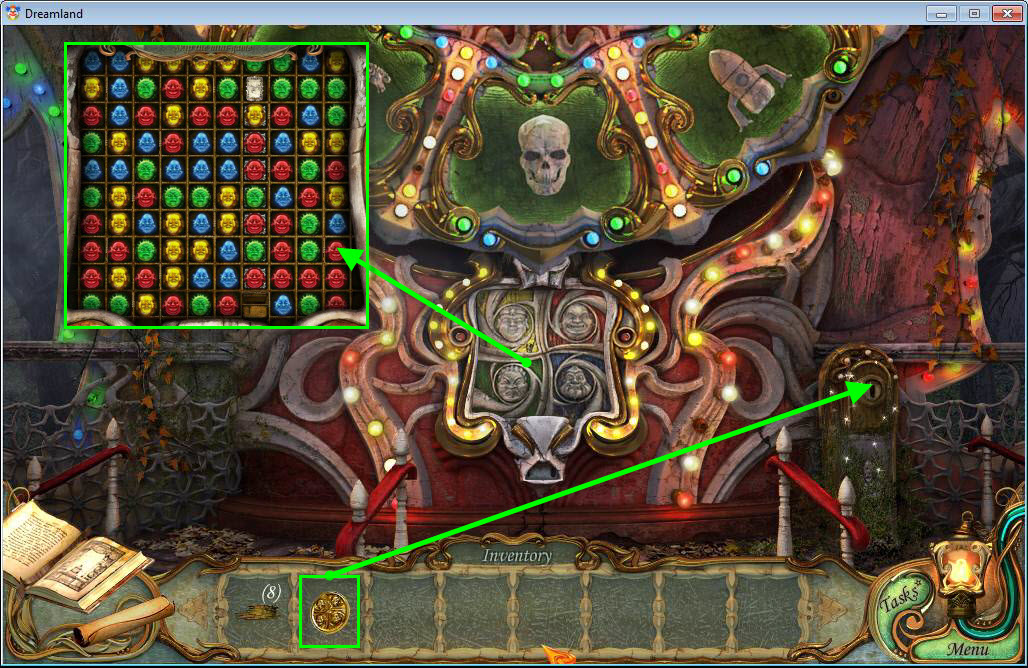
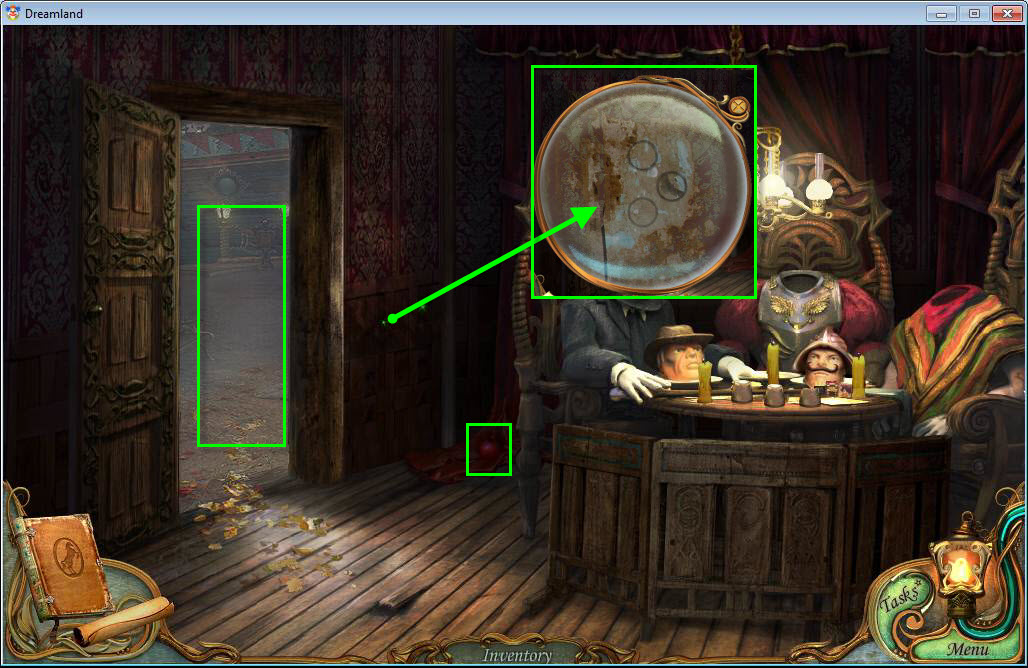
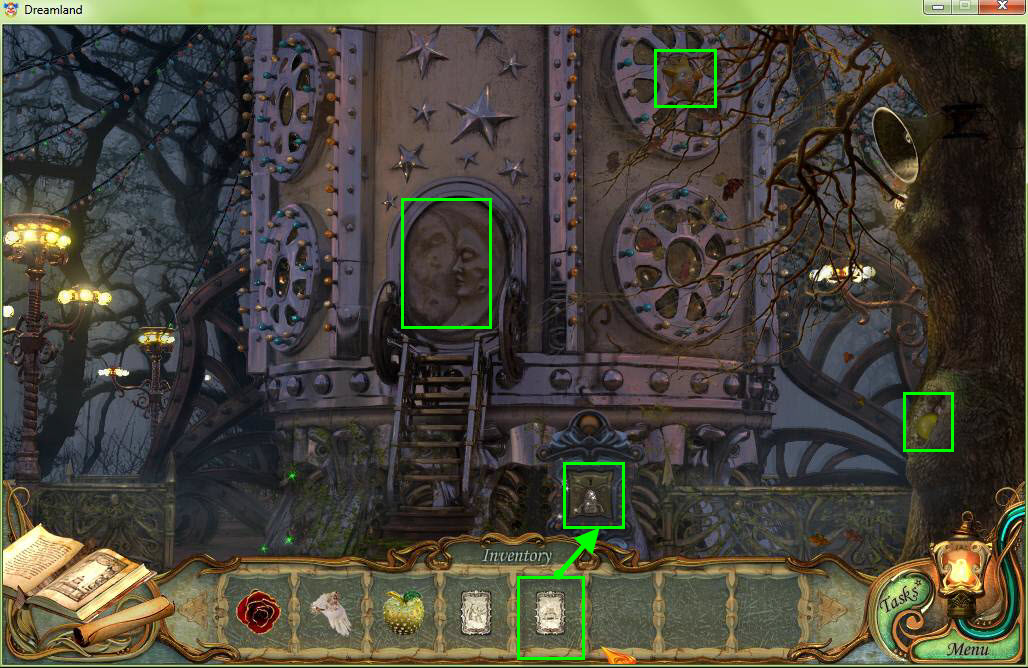
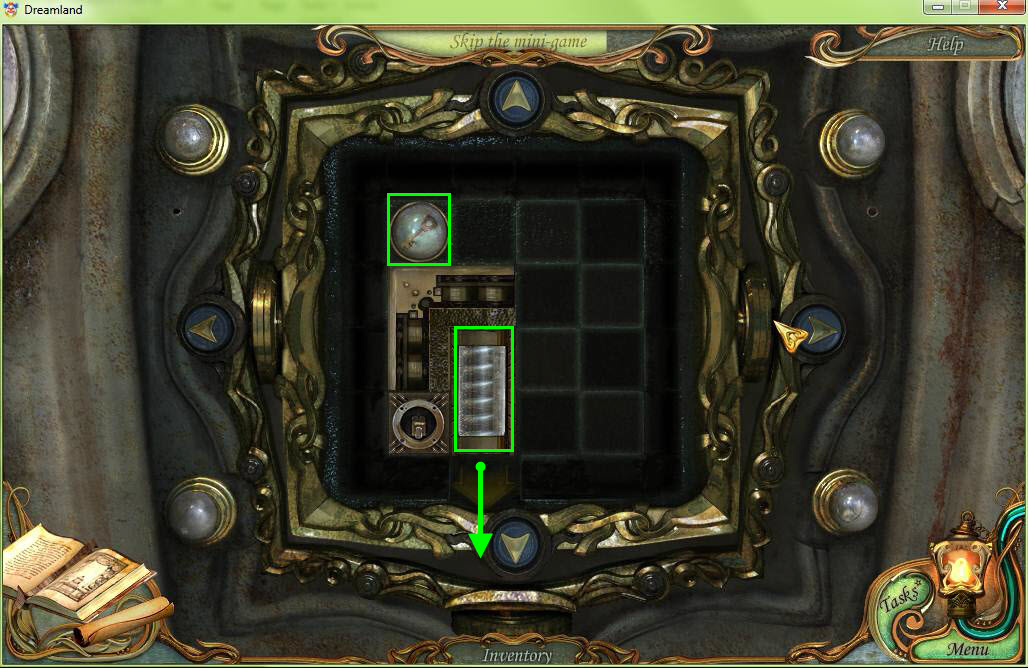
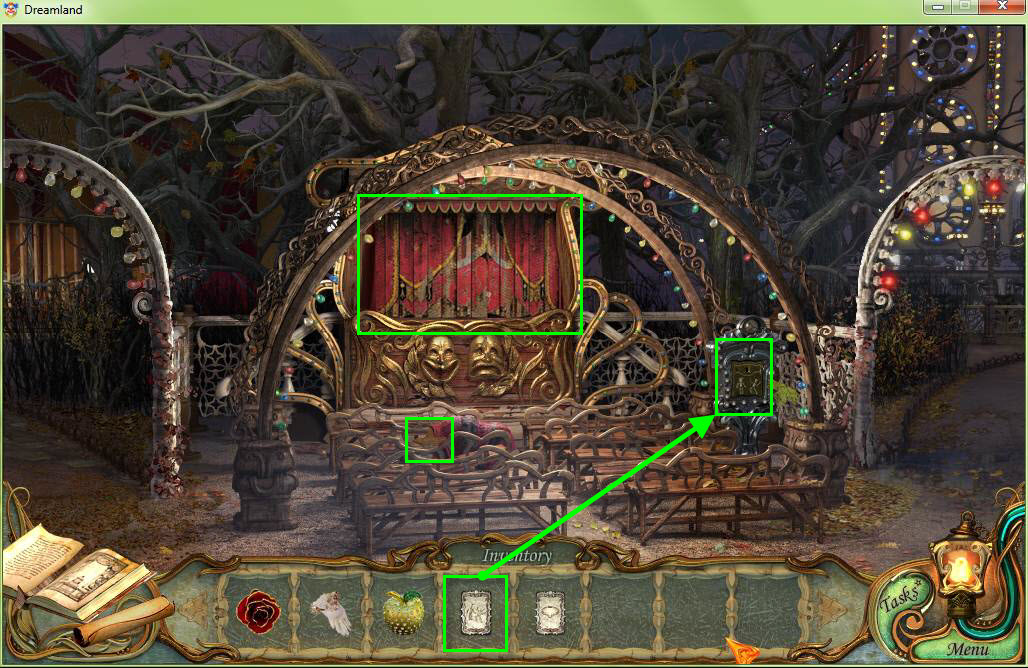
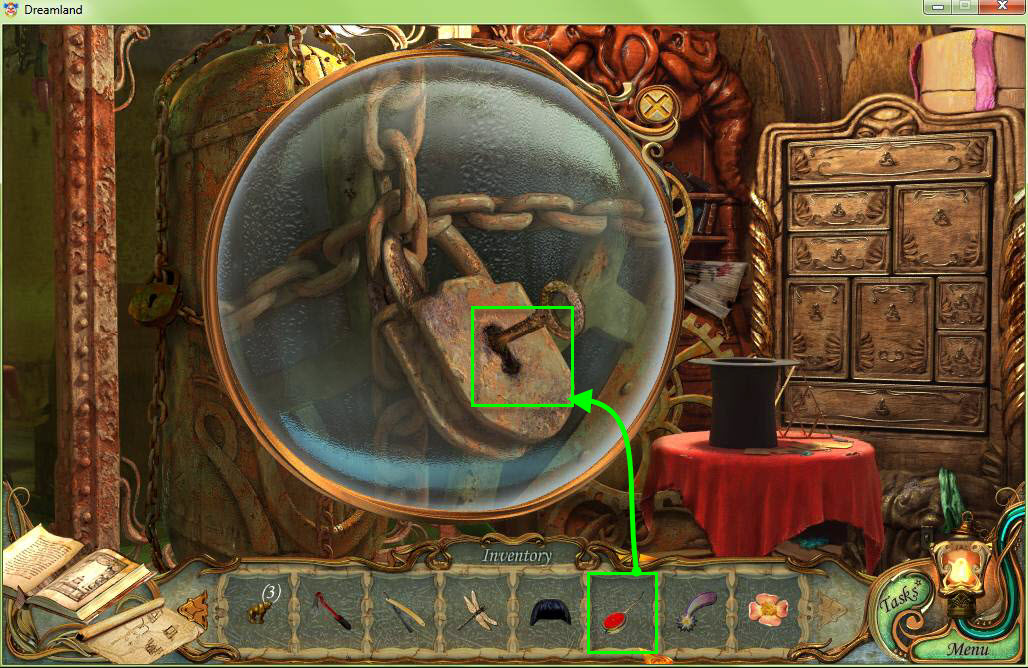
- Click on the gate on the right to zoom in on the lock.
- You must complete the picture.
- See the screenshot above for the solution.
- Once the gate is open go through it.
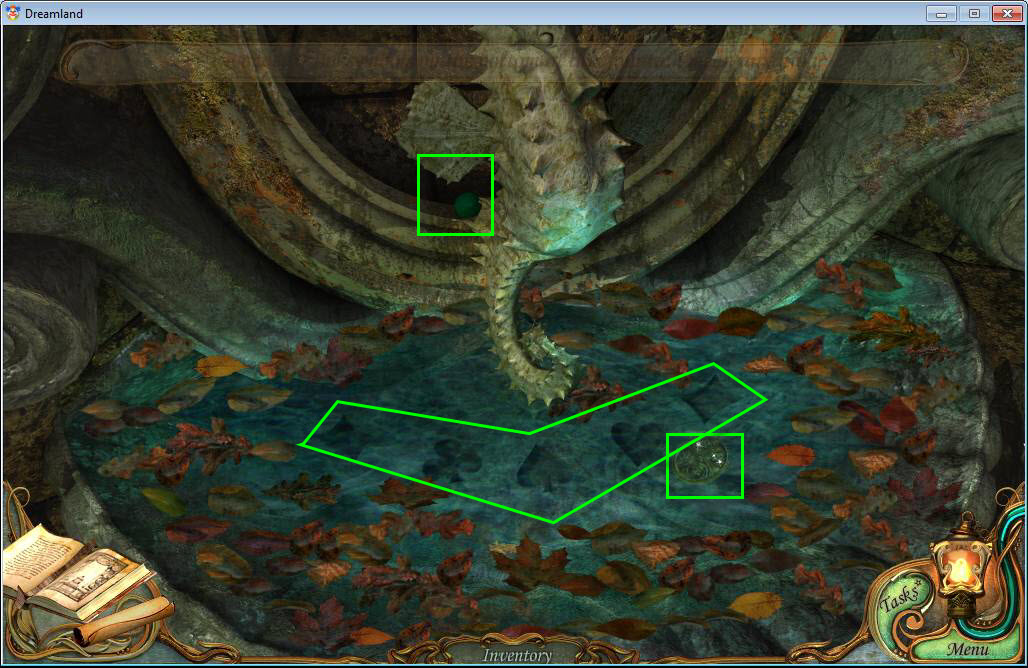
- Take the two pieces of wood on the left and the right.
- Grab the starfish on the lantern.
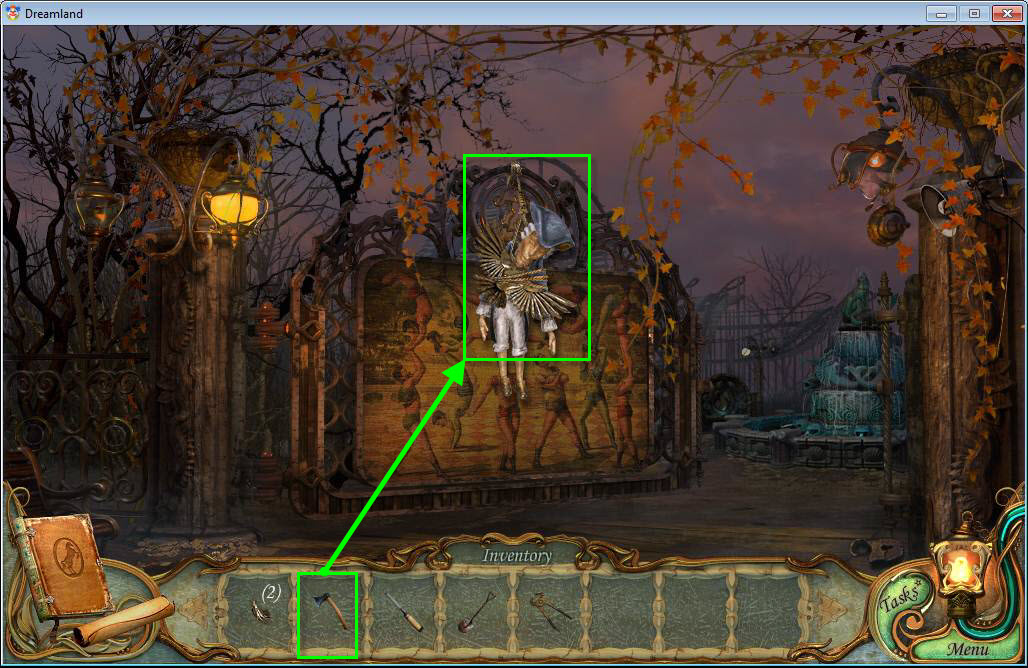
- Move forward to the House of Horrors.
- Take the two pieces of wood on the left and the right.
- Take the wing at the bottom-middle of your screen.
- Use the ticket from your inventory on the ticket slot.
- Click on your map to open it, and go back to the main entrance.
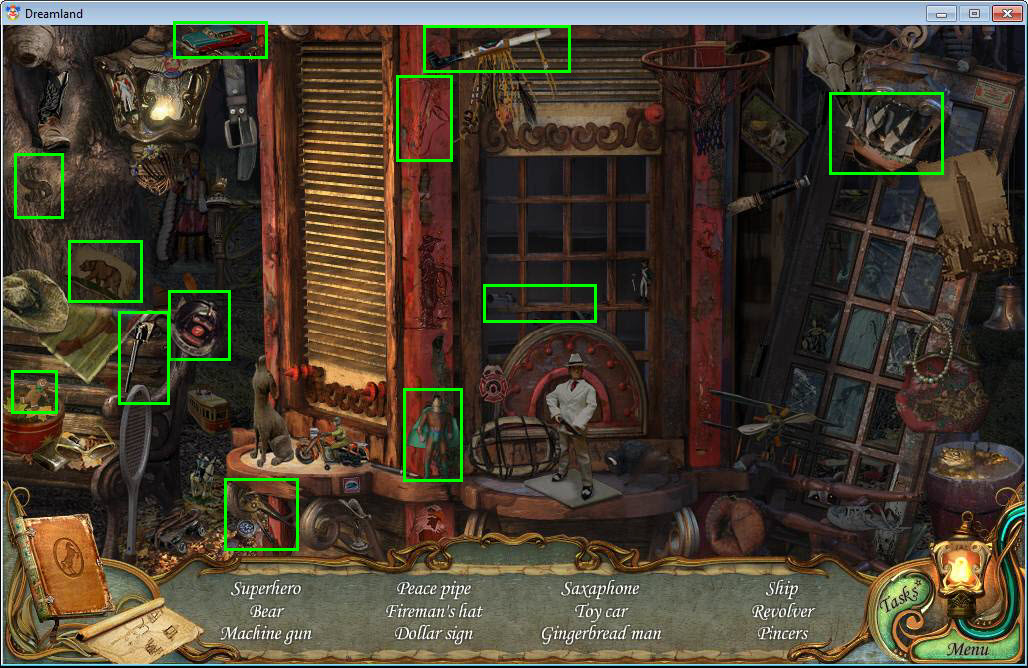
- There is a new hidden object game available. Click on it to access it.
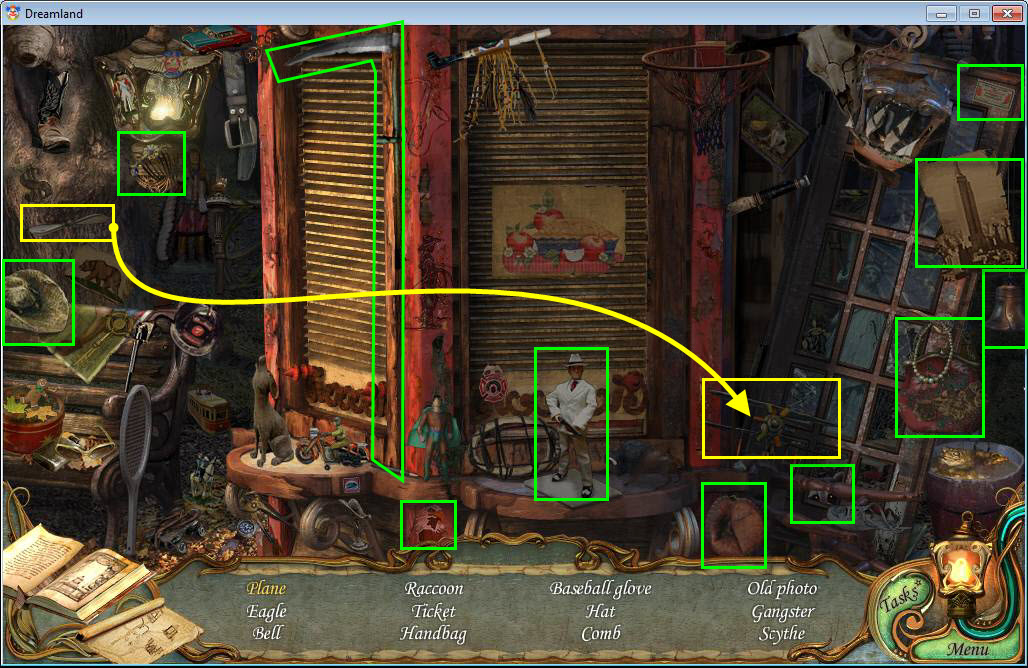
- Find all the hidden objects in the scene. Put the propeller on the plane.
- Once you have found all the hidden objects, you will receive a rusty scythe.
- Head back through the gate and click on the hidden object area at the popcorn stand to play it.
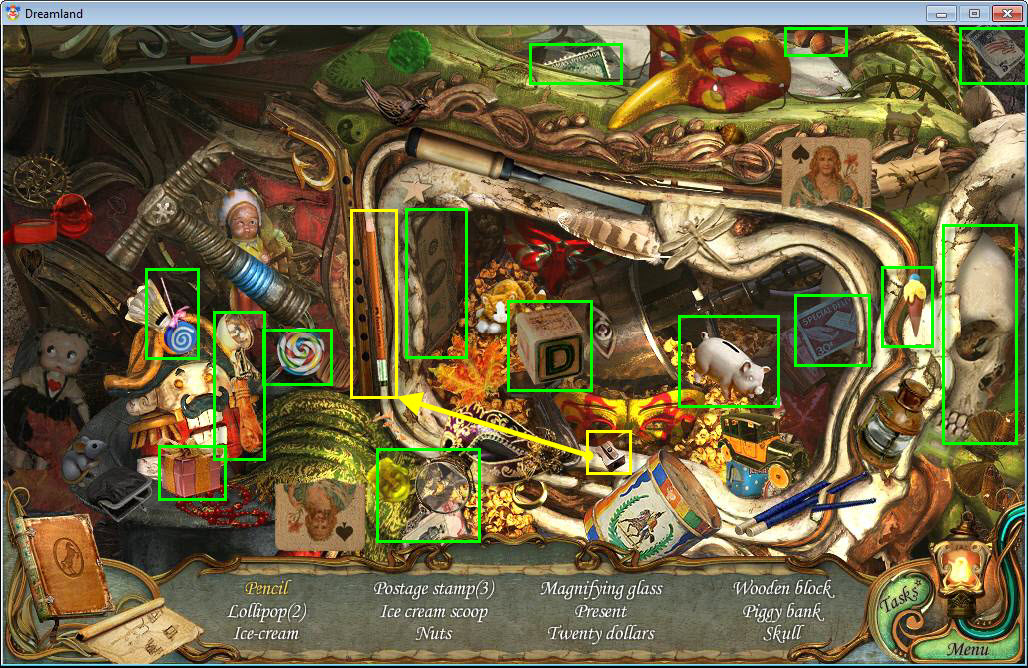
- Find all the hidden items. Bring the pencil sharpener to the pencil to sharpen it.
- Once you have found all the hidden objects, you will receive a skull.
- Go back to the House of Horrors.
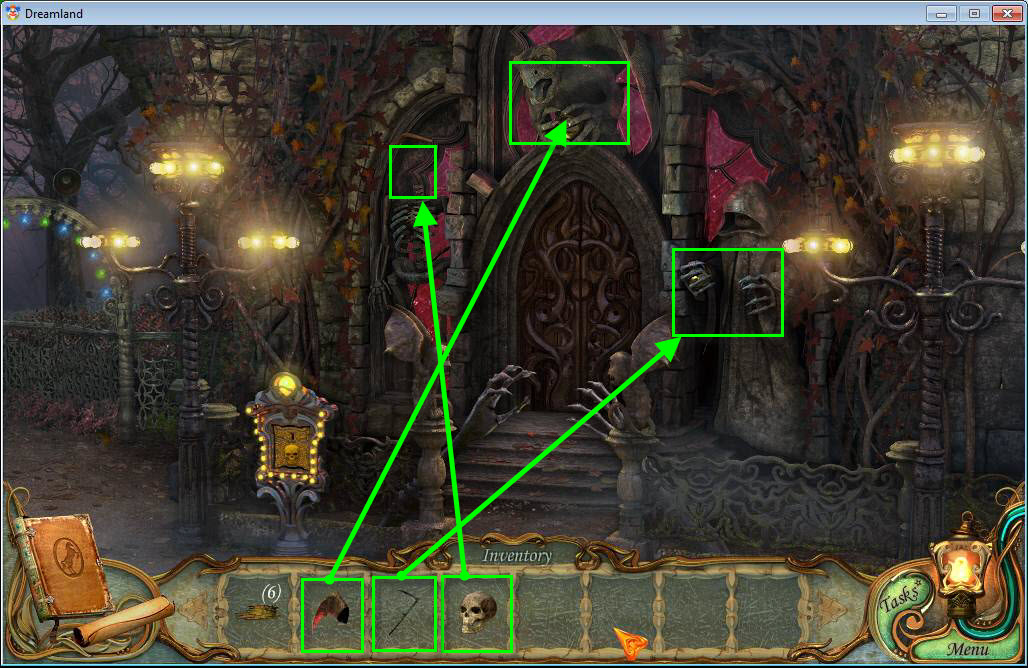
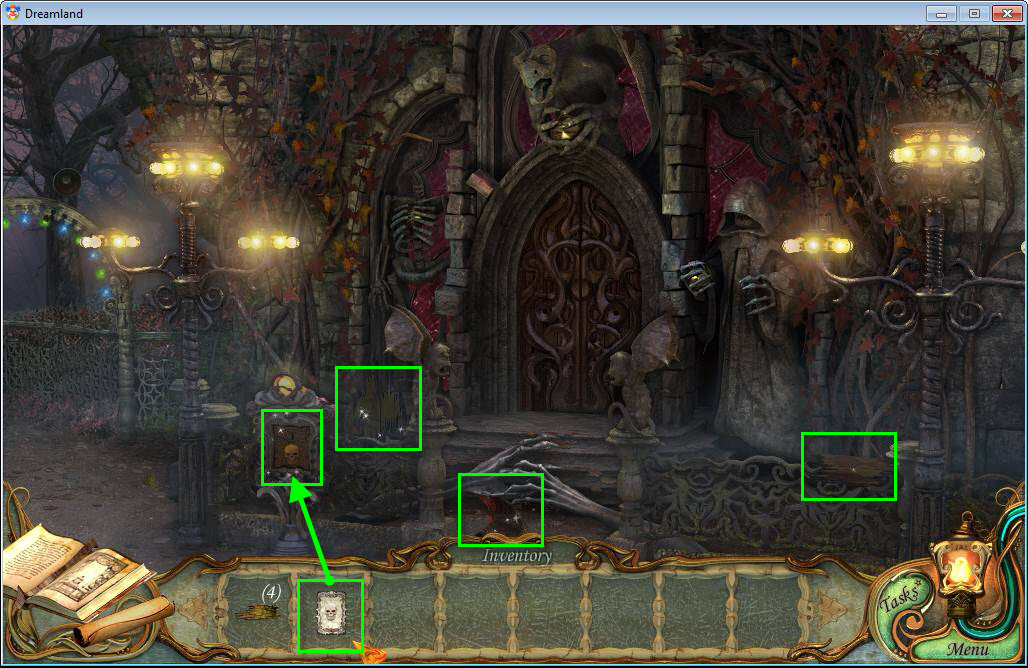
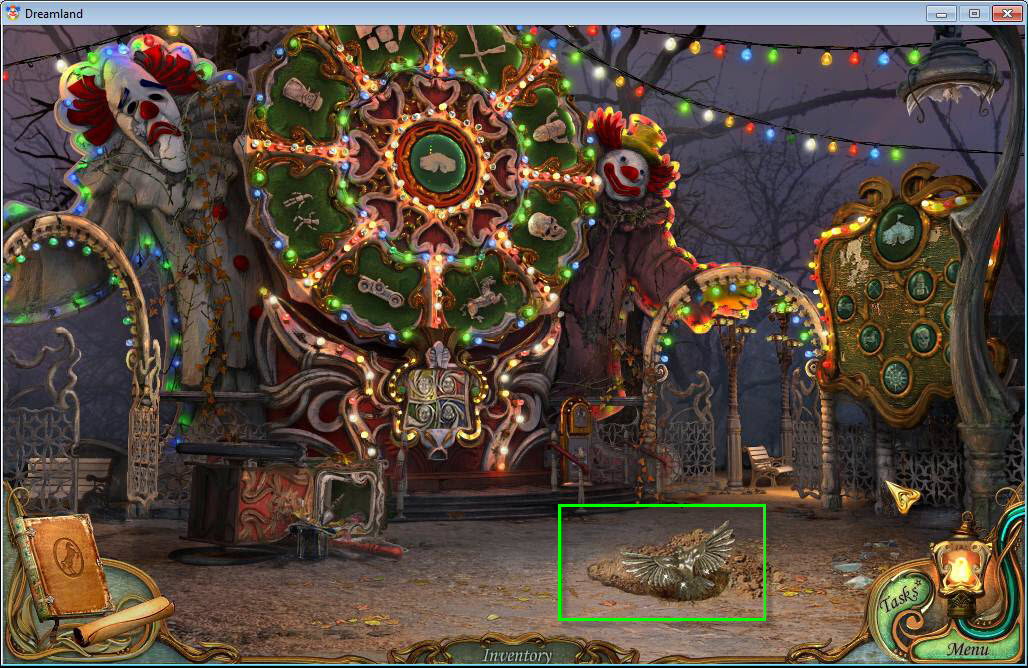
- Use the wing on the gargoyle above the door.
- Use the skull on the skeleton to the left of the door.
- Use the scythe on the reaper to the right of the door.
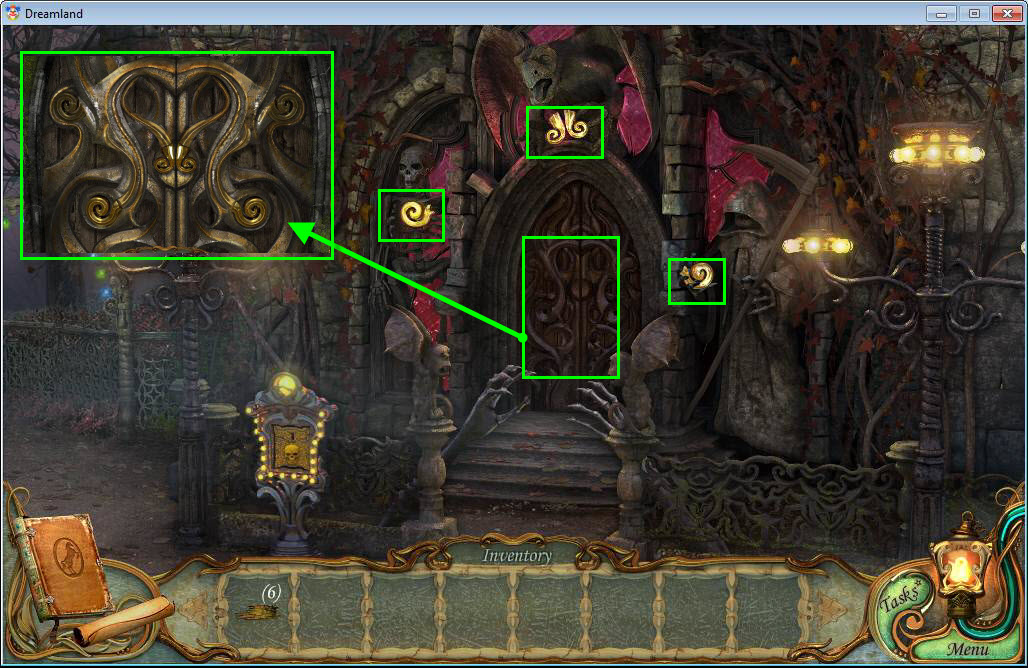
- Take the three twirls that appear.
- Click on the door to zoom in.
- Place the three twirls on the door as shown in the screenshot above.
- Enter the House of Horrors.

- Grab the two pieces of wood on the top left and right.
- Grab the starfish at the bottom.
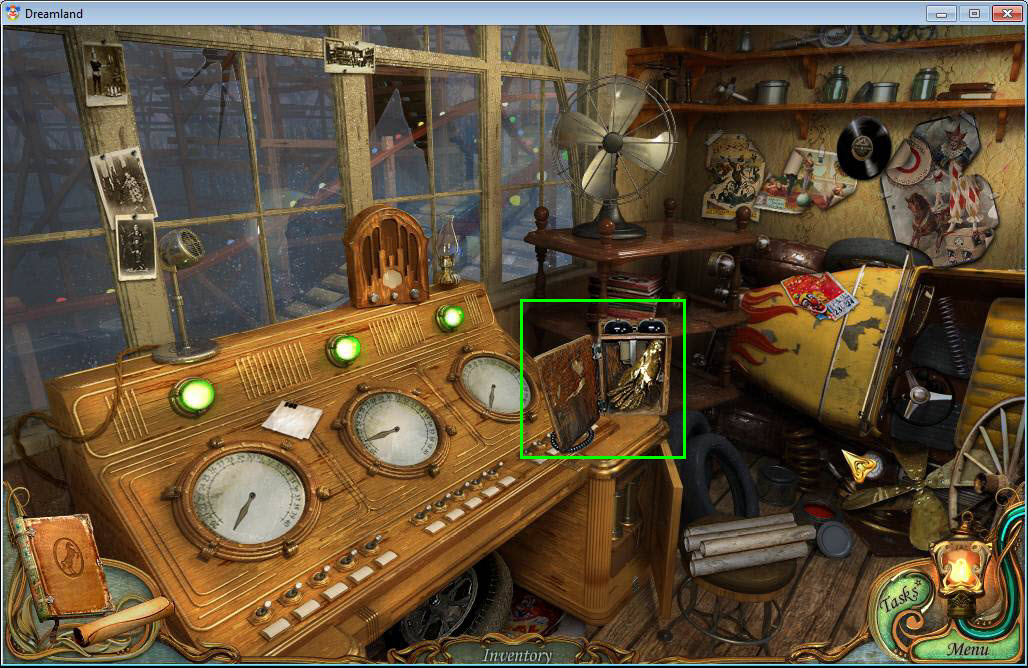
- Click on the vampire to access the hidden object area.
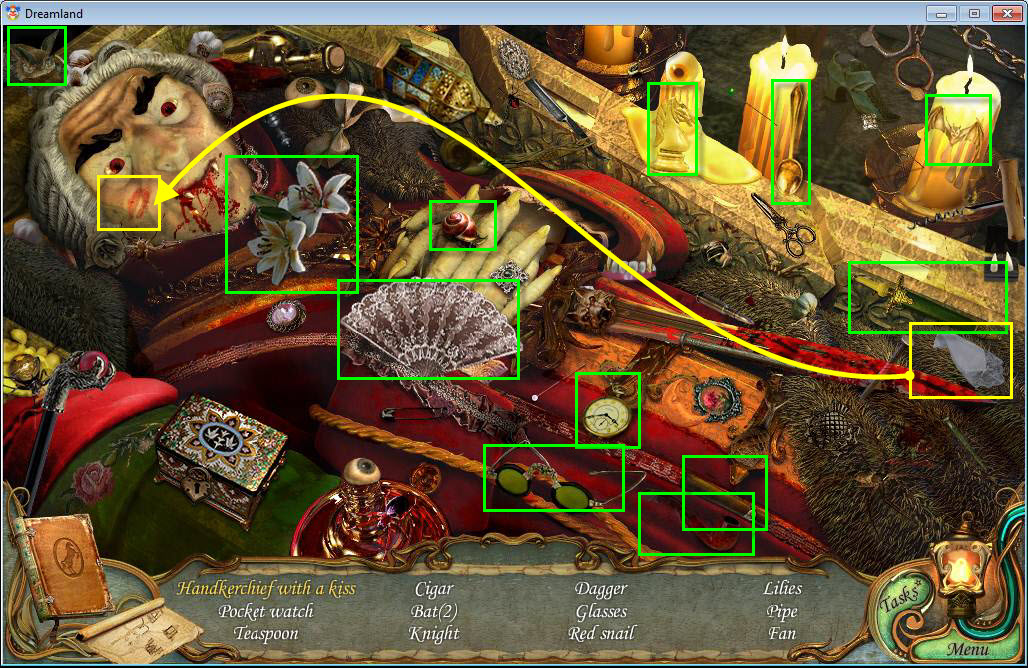
- Find all the hidden objects. Grab the handkerchief on the right and wipe the lipstick from the vampire's cheek to get a Handkerchief with a Kiss.
- Once you have found all the hidden objects, you will receive a fan.
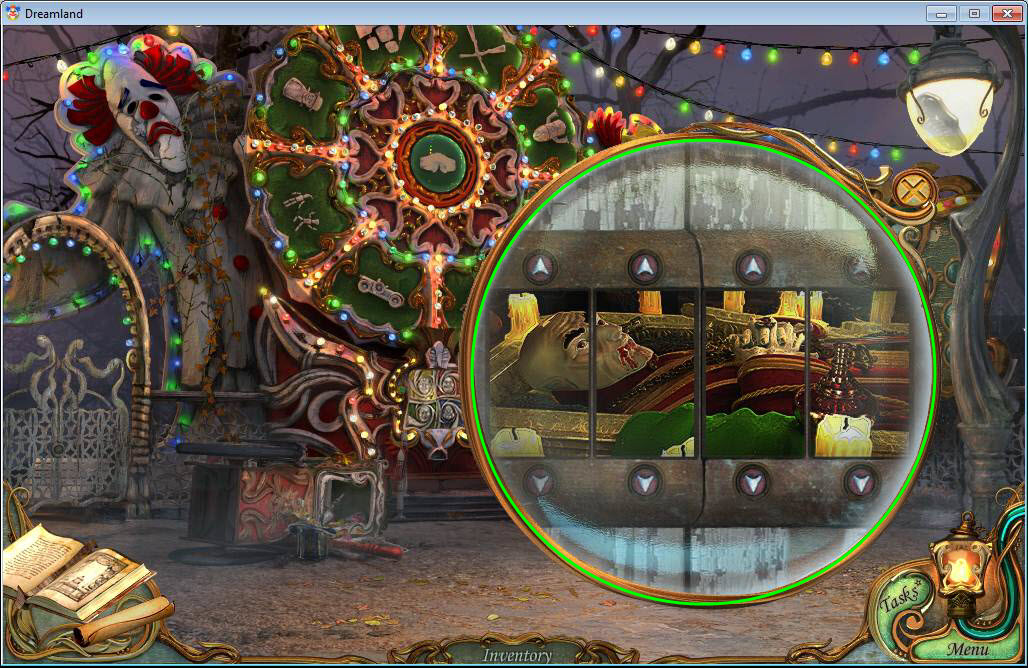
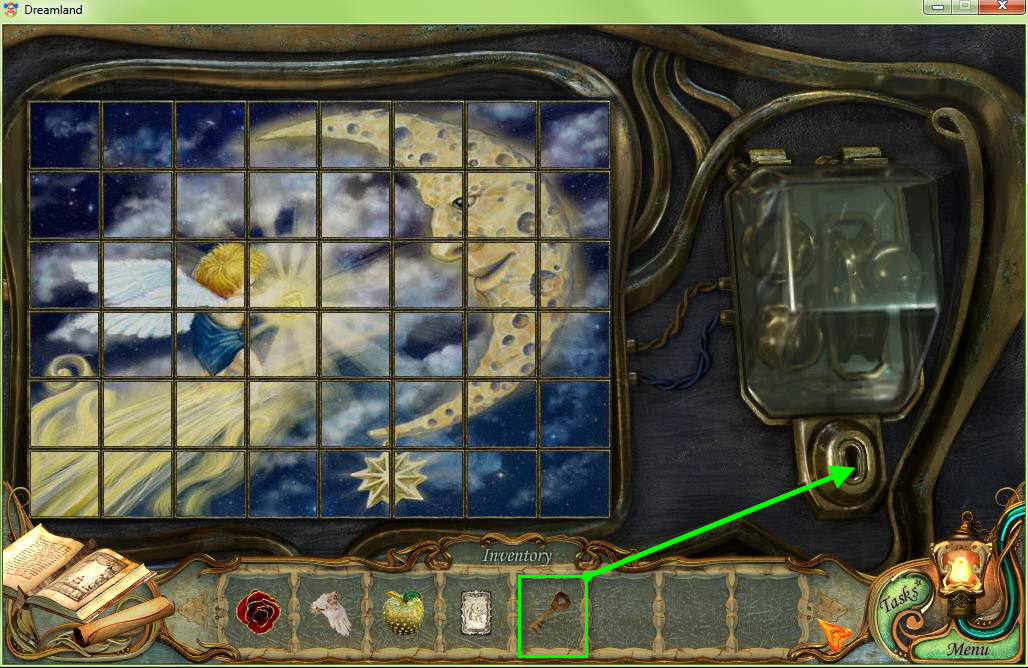
- Click on the painting on the right.
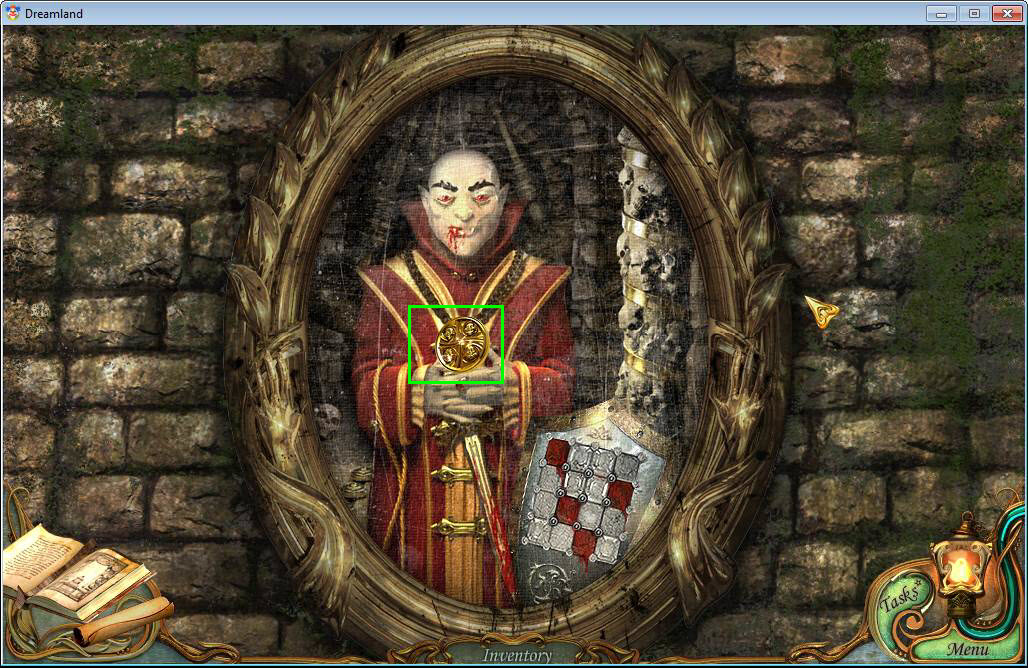
- Put the picture together so that it resembles the above screenshot. The pieces will lock once you place them correctly.
- Click on the coin with four faces to take it.
- Now, click on the picture on the left to zoom in.
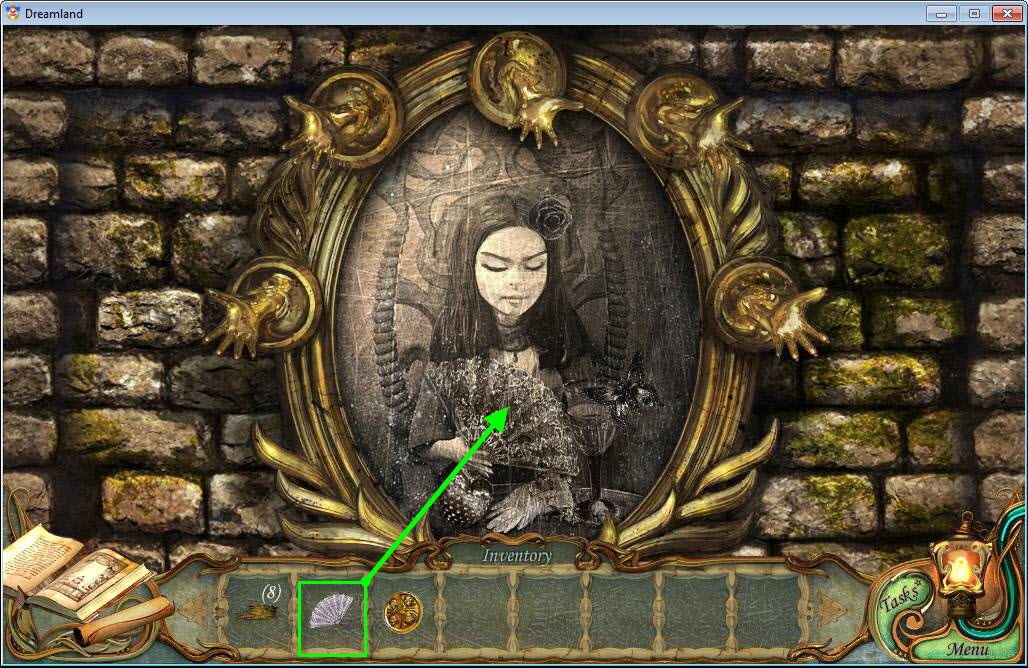
- Click on the fan in your inventory and use it on the portrait of the girl.
- Now go back to the wheel of fortune.
- Click to zoom in on the wheel of fortune.
- Use the coin with four faces on the coin slot on the right.
- Play the match 3 game. This time there are gray cells that you must break in order for the ticket to fall.
- Take the ticket.
- Click back to go to the central square.
- Click on the left gate to zoom in.
- To solve this puzzle, you must line the colors up as shown in the screen shot.
- See the video for a more detailed solution.
- Go through the gate to the Merry-Go-Round.
- Use the ticket from your inventory on the slot on the left.
- The gates will open.
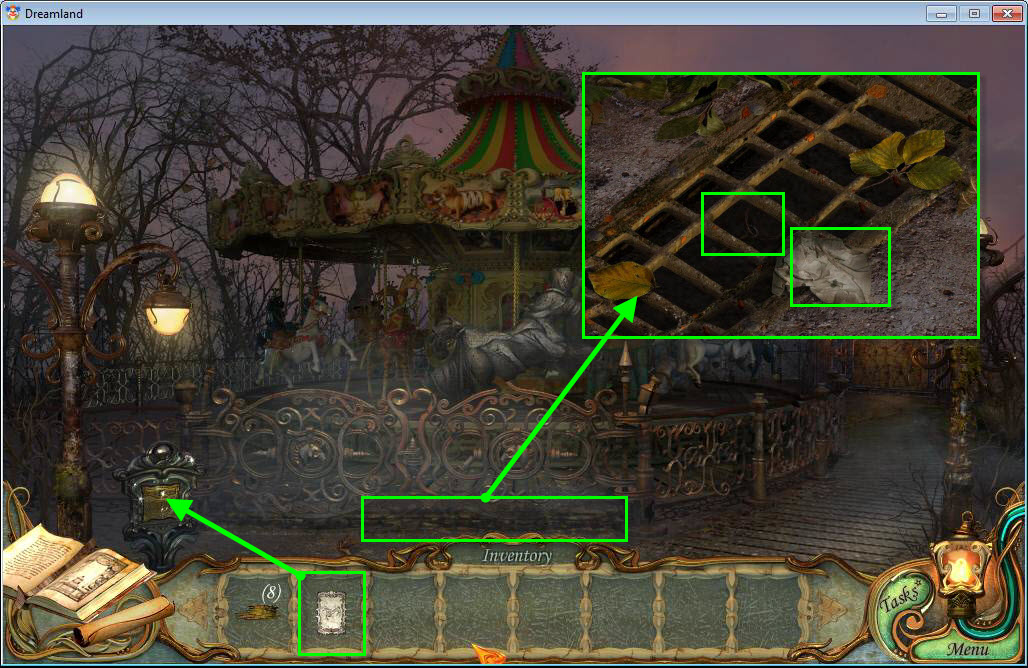
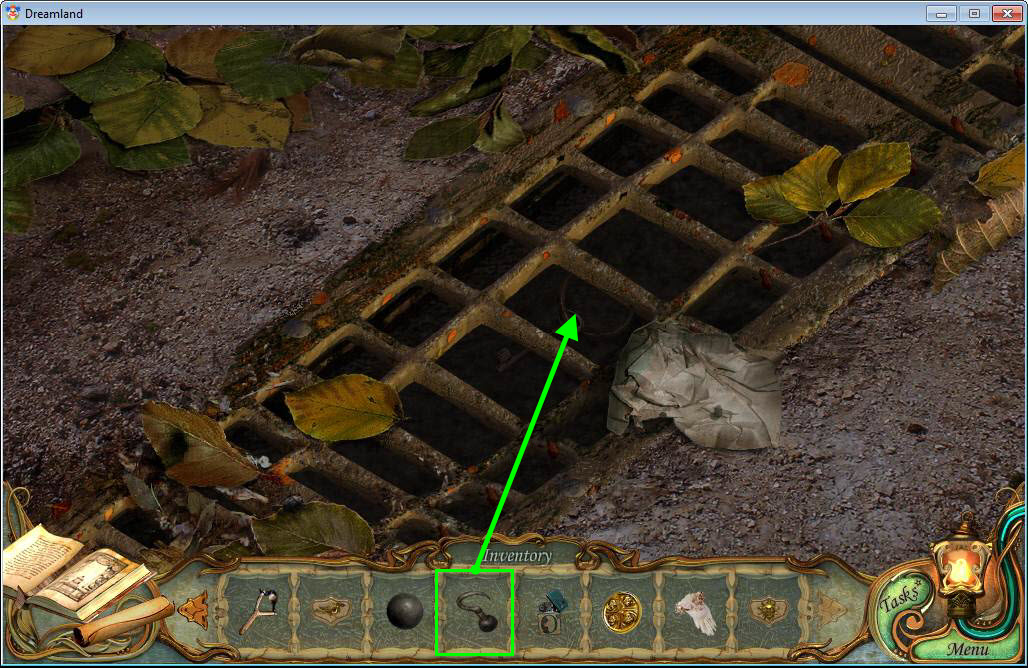
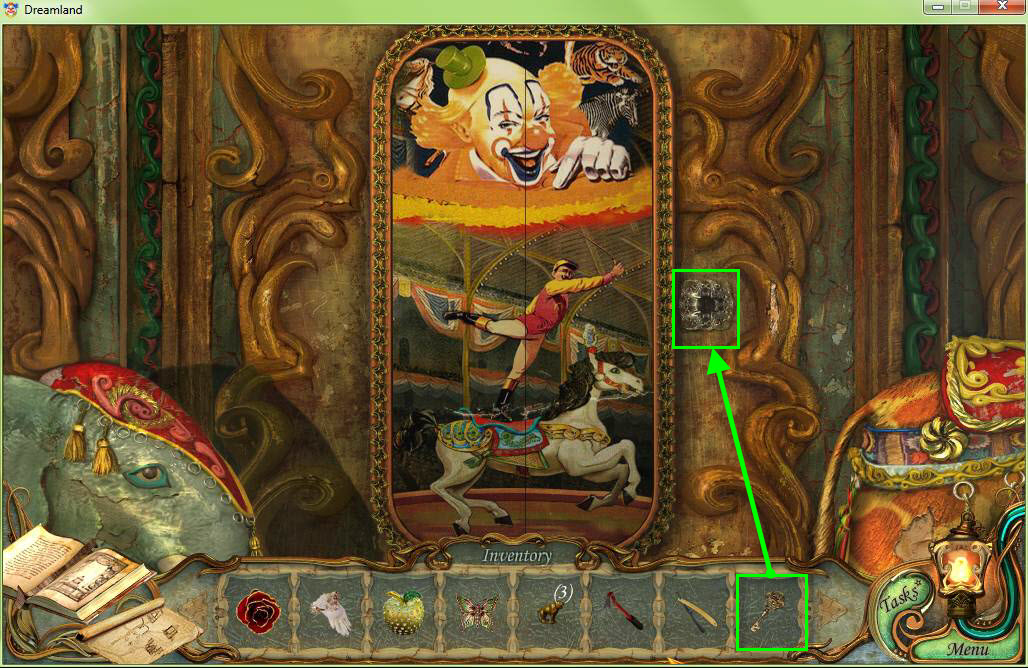
- Click on the grate at your feet to zoom in.
- Click on the paper to move it and then click on the key.
- It's too far to reach.
- Zoom out and head into the Merry-Go-Round.
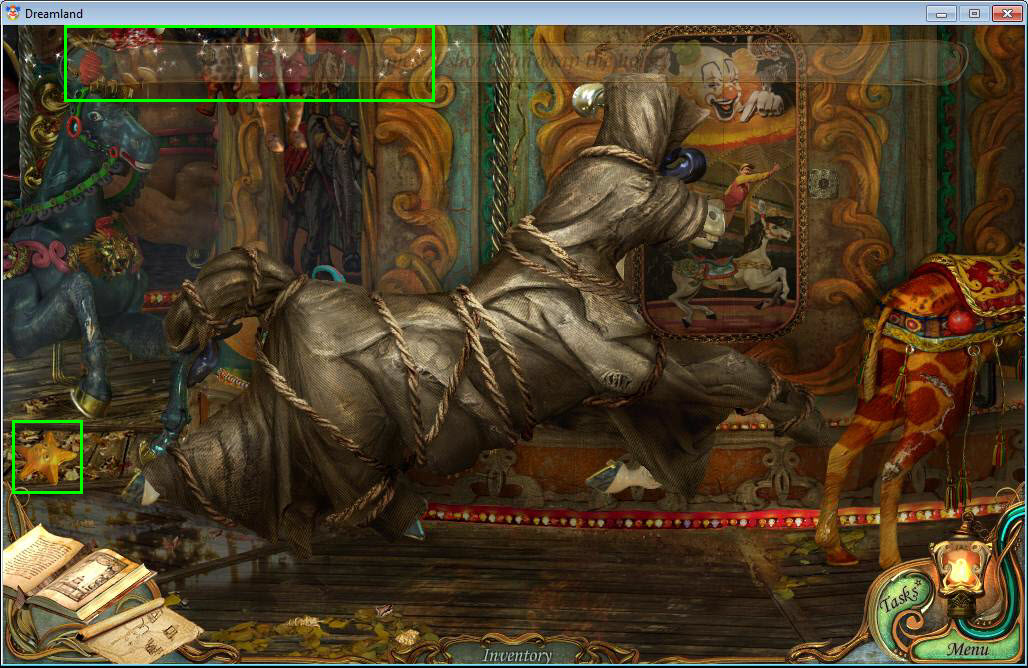
- Grab the starfish on the left.
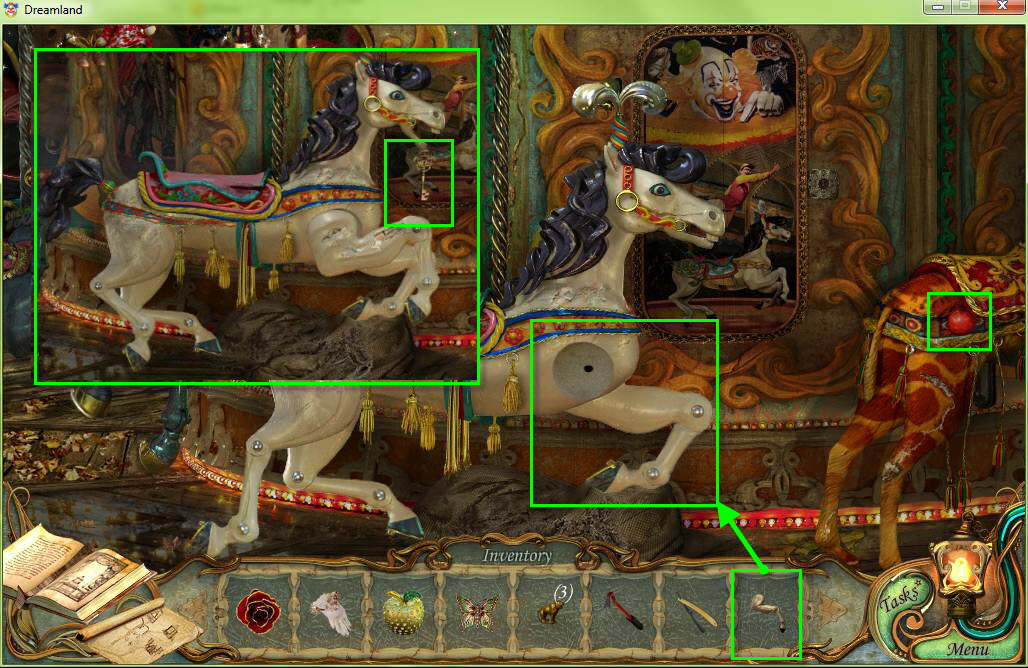
- Click on the hidden object scene on the ceiling to play it.
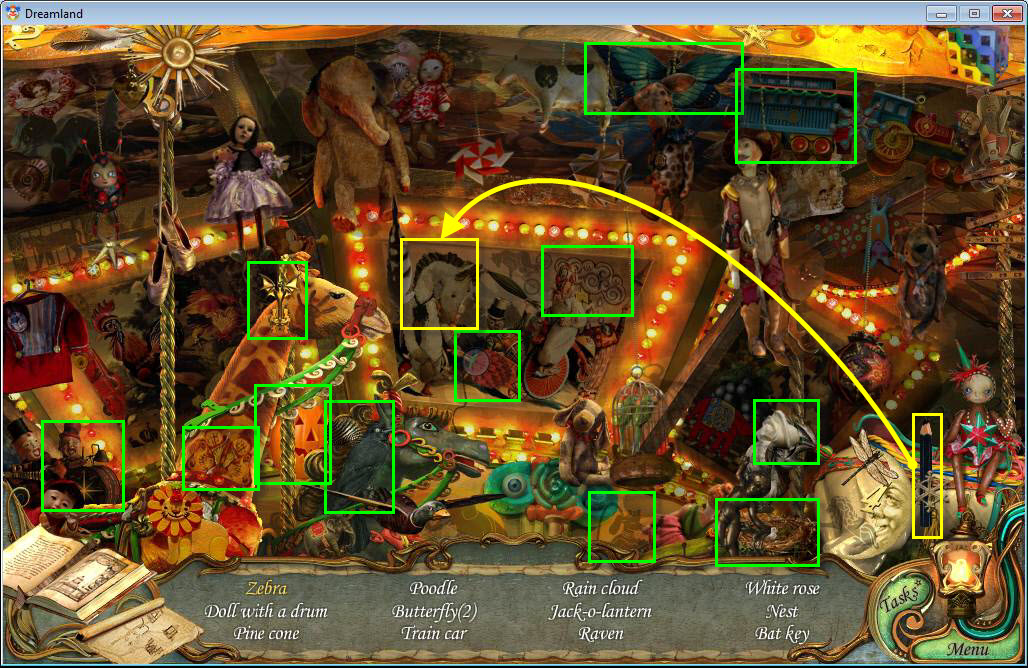
- Find all the hidden objects in the scene. Grab the black pencil on the right and use it on the horse to make a zebra.
- Once you find all the hidden objects, you will receive a key shaped like a bat.
- Go back inside the House of Horrors. You can use your map to go directly there.
- Go inside and click to access the hidden object scene on the vampire.

- Find all the items in the hidden object scene. Use the razor to cut off the button.
- Once you have found all the hidden objects, you will receive the scissors.
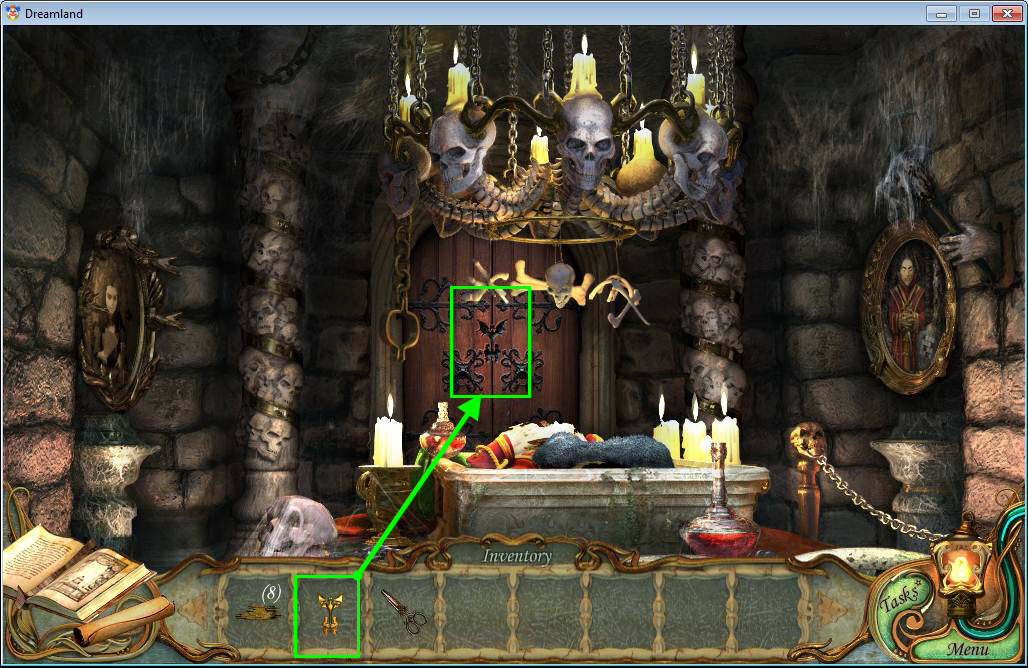
- Next, use the bat key from your inventory on the door.
- Go through the door to the Hall of Swinging Axes.
- Grab the starfish on the right.
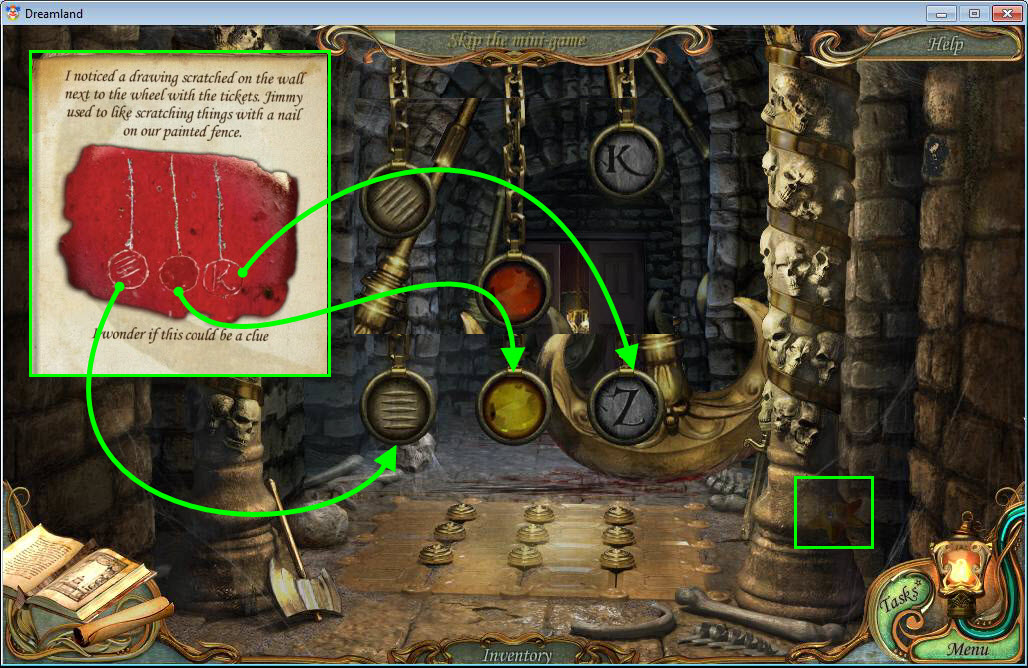
- Now, look in your diary where you saw the scratches on the wheel of fortune.
- Drag the chains up until they match the symbols.
- Click on the floor to zoom in.
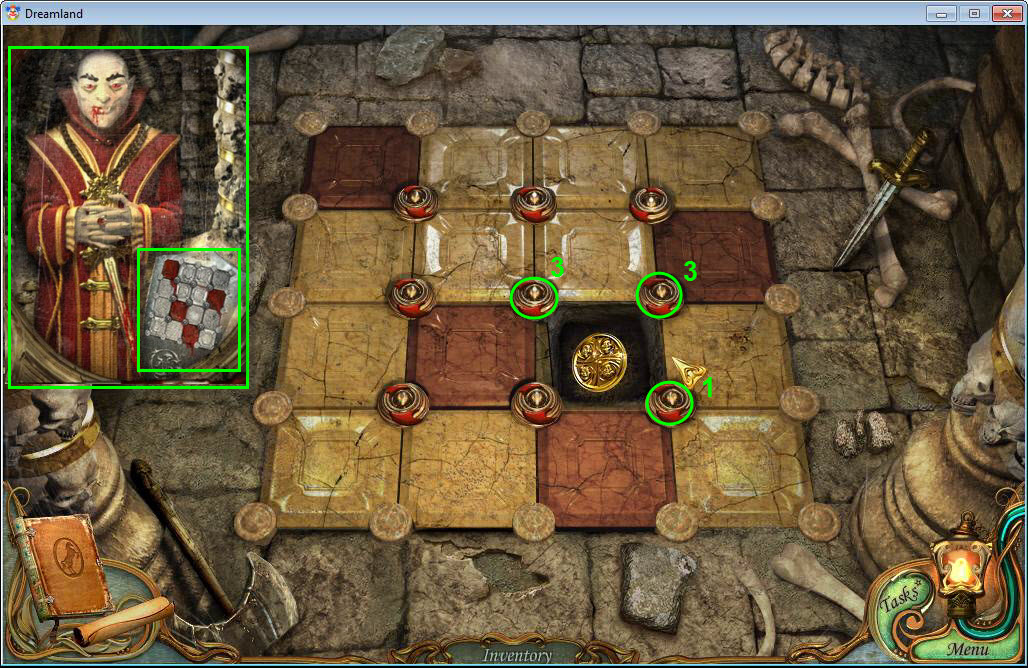
- Check your diary and look at the image of the portrait of the vampire. His shield has the solution to this puzzle.
- Check the screenshot above to see the solution or see the video for a detailed solution.
- Take the coin with four faces.
- Go through the door to the room with the Shell Game.
- Click on the marble on the floor to take it.
- Click on the wall on the left to zoom in. This image will be added to your diary.
- Go through the door on the left.
- Click on the starfish on the right to grab it.
- Move forward toward the Pirate Ship.
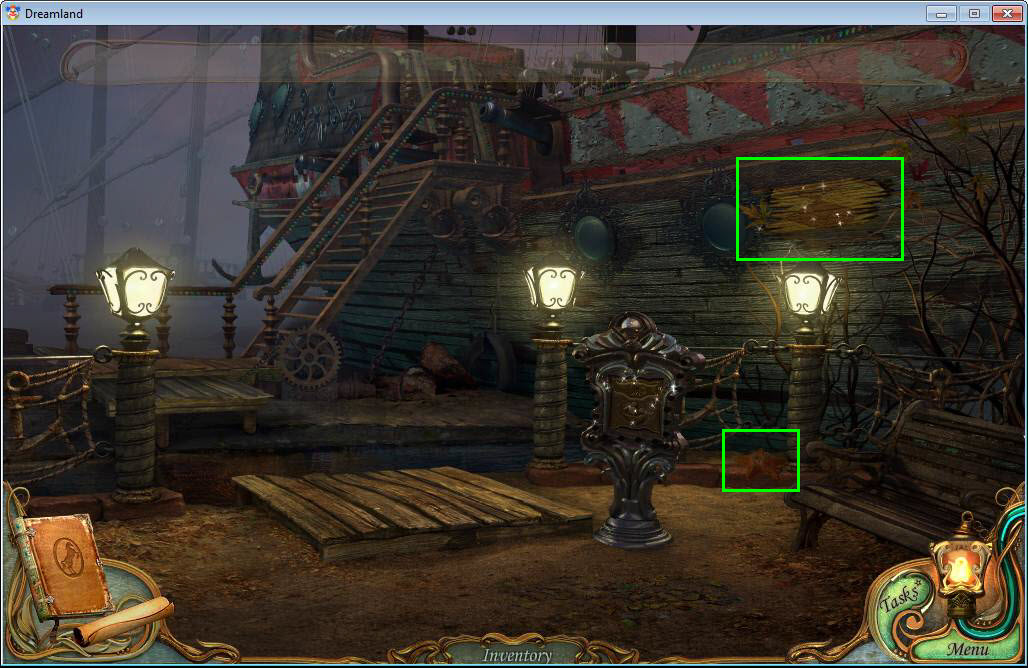
- Grab the starfish at the bottom right.
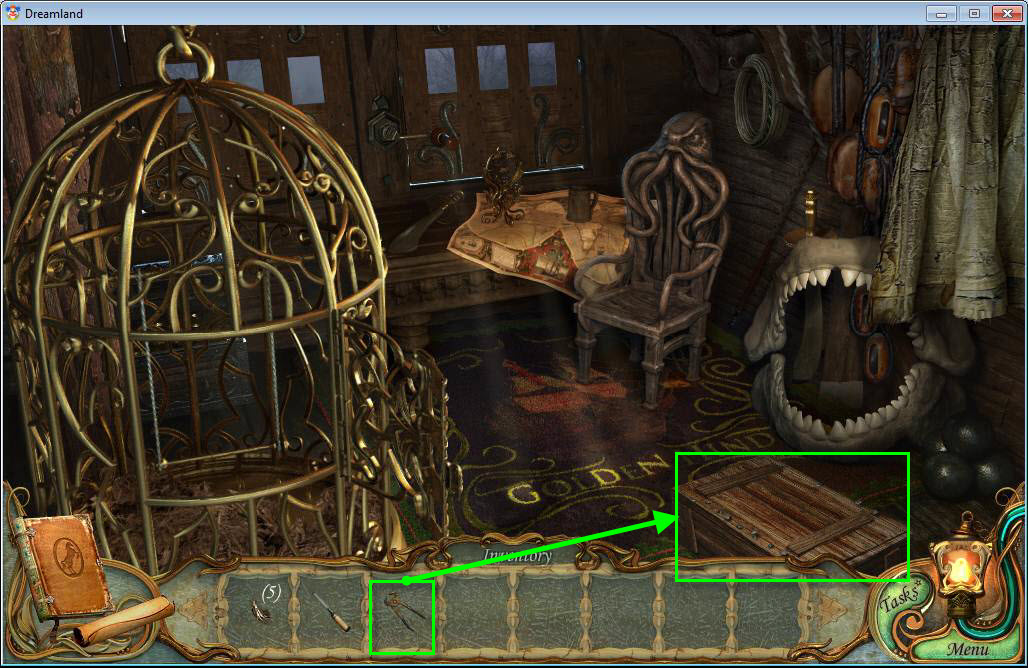
- Grab the piece of wood.
- Go back to the Wheel of Fortune. Use your map.
- Use the coin on the coin slot at the Wheel of Fortune.
- Play the match 3 game to make the ticket drop down.
- Grab the ticket for the shooting gallery.
- Go back to the Merry-Go-Round.
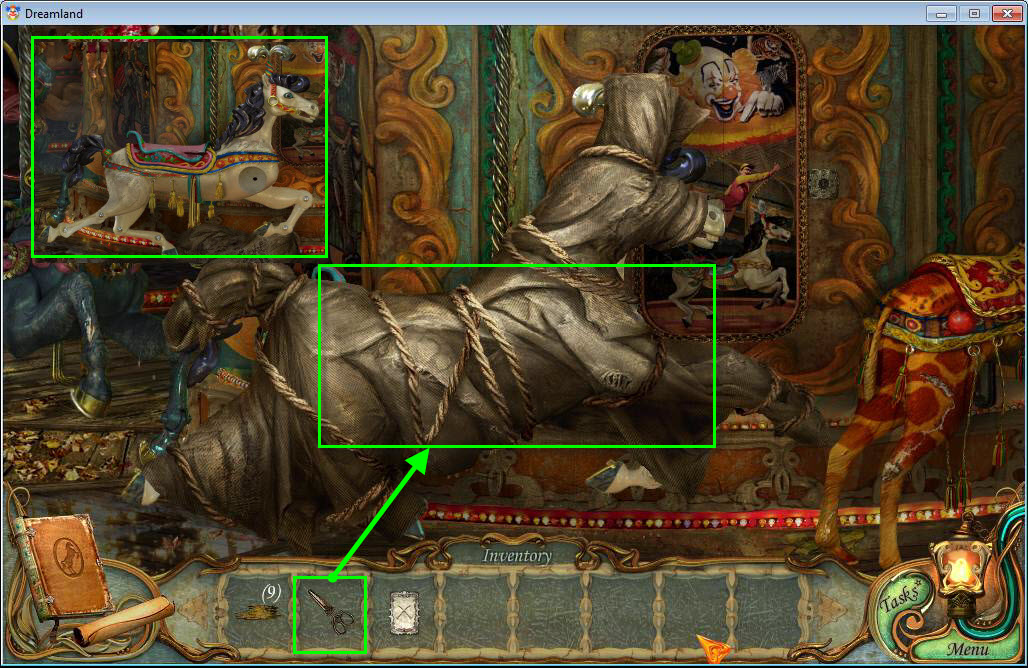
- Use the scissors on the horse a few times until the wrappings are gone.
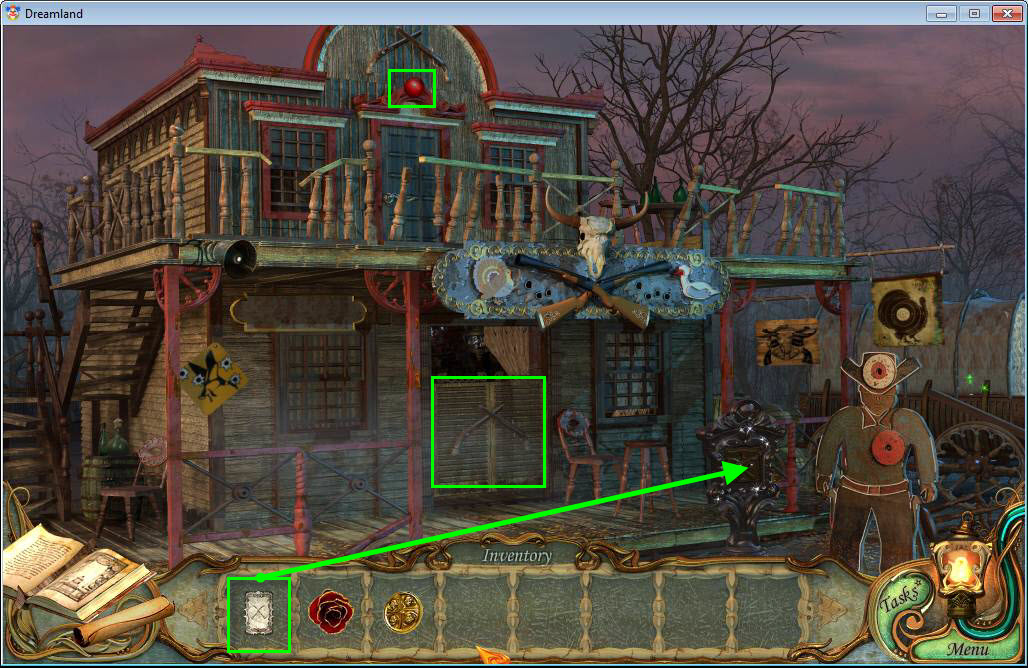
- Now back out once and head to the Athlete's Gate on the right.
- Grab the last piece of wood on the ground on the left.
- Now, click to zoom in on the gate.
- Use the pieces of wood on the empty areas to put the gate back together.
- Once the gate is open, go through it to the fountain.
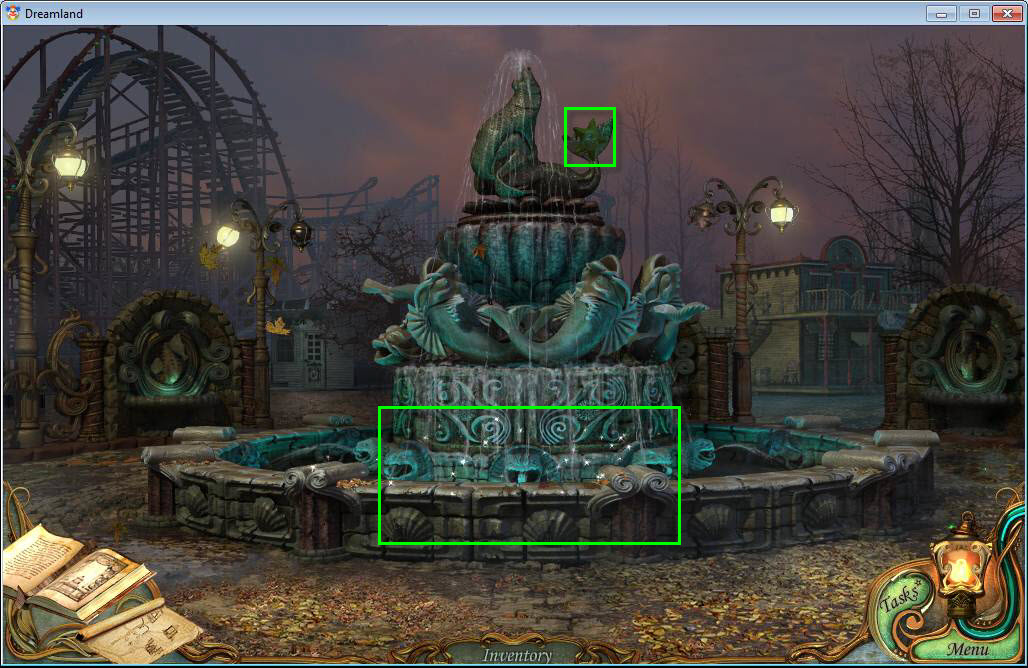
- Grab the starfish at the top of the fountain.
- Click on the fountain to access the hidden object scene.
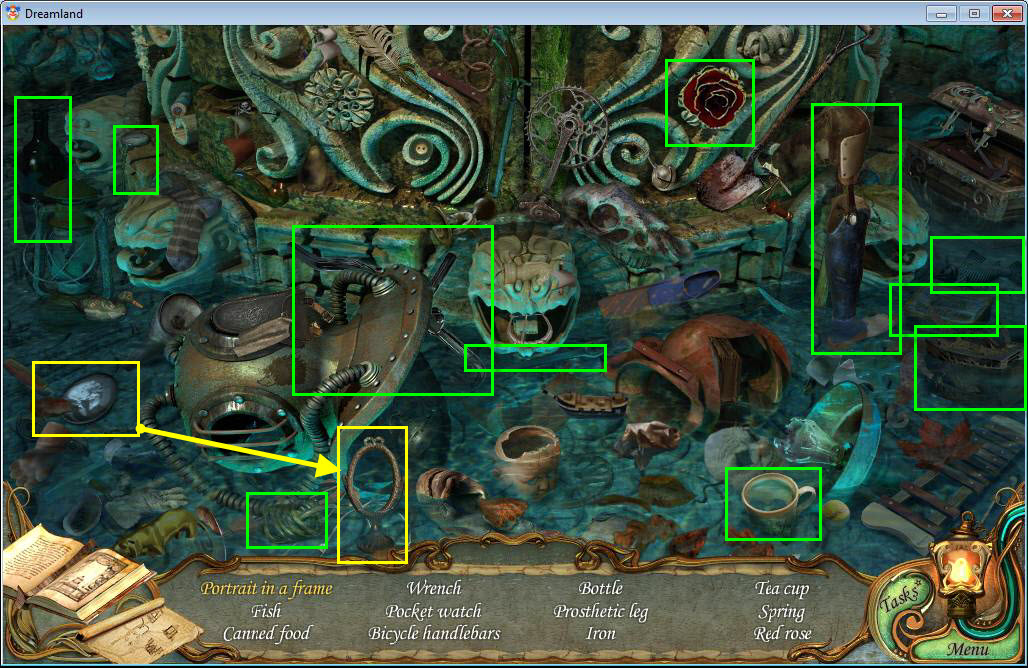
- Find all of the hidden objects. Put the portrait in the frame.
- Once you have found all of the hidden objects, you will receive the red rose.
- Click on the left of the fountain to zoom in.
- Move your cursor around the leaves until you can see the five symbols. This is a solution for a puzzle later on.
- Take the coin in the water.
- Take the marble by the statue.
- Click to go back.
- Now head to the shooting gallery to the right of the fountain.
- Grab the marble on the second floor.
- Use the ticket on the slot to open the shooting gallery.
- Go through the door.
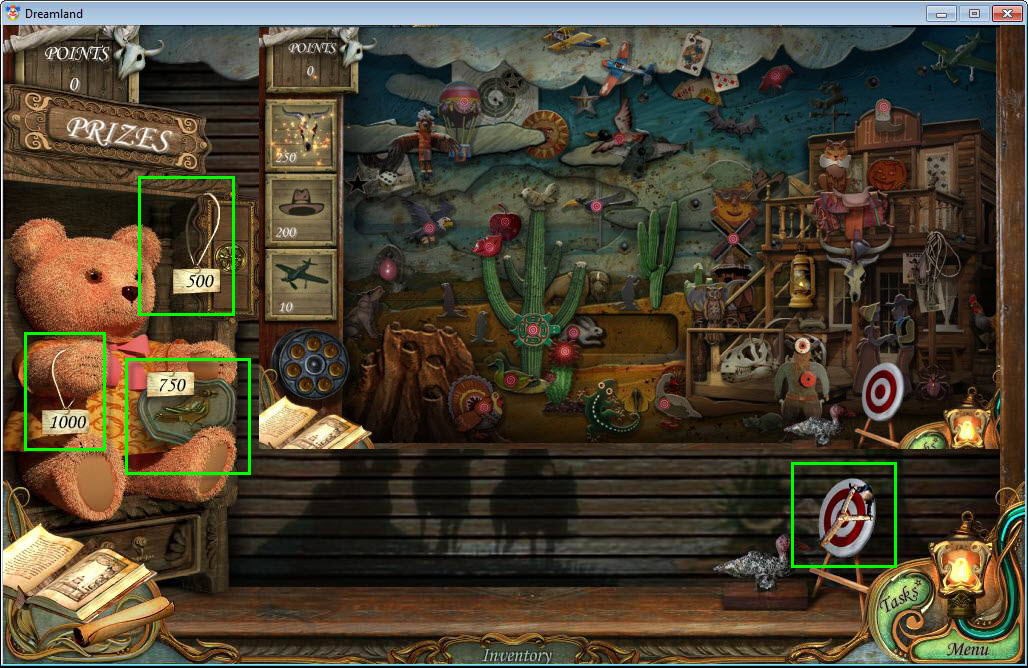
- Click on the slingshot on the right to grab it.
- Click at the top to start the game.
- It's a shooting gallery. On the left are three items that will award you points so shoot those items. You have 7 bullets per game to earn points.
- You need to earn enough points to win the coin, the bear, and the raven key.
- Once you are done, go back to the Wheel of Fortune.
- Use the coin on the coin slot.
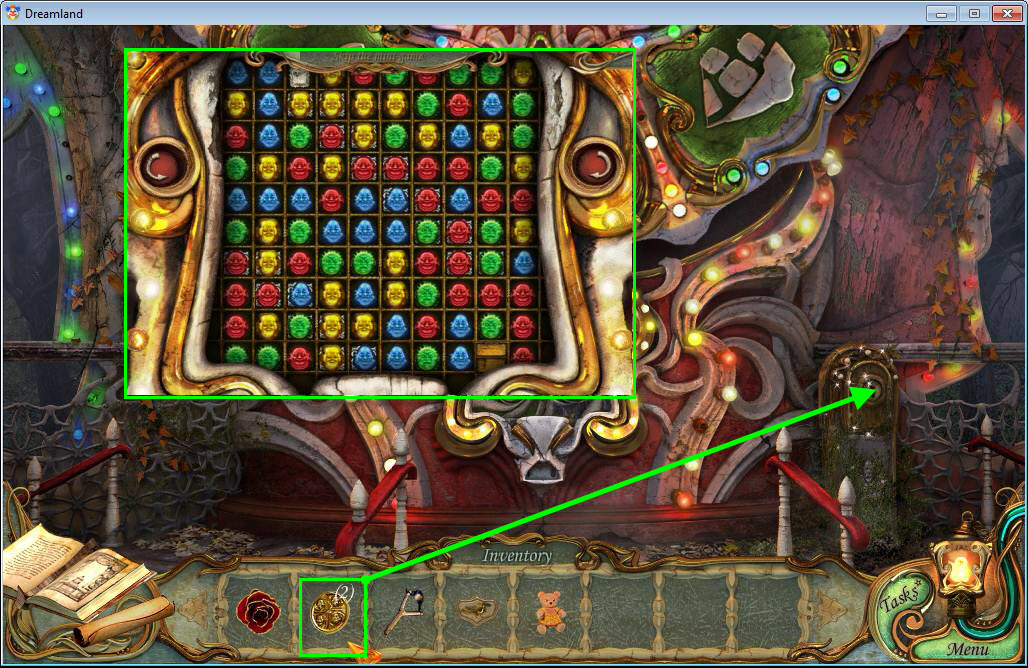
- Click to play the match three game.
- This time you have to turn the board to get the ticket in the slot.
- Grab the ticket and then use the second coin.
- Again, play the match three game, rotating the board until you get the ticket in the slot.
- Grab the ticket and go to the Pirate Ship.
- Grab the ticket for the pirate ship and put it in the slot to open it.
- Go on the deck of the ship.
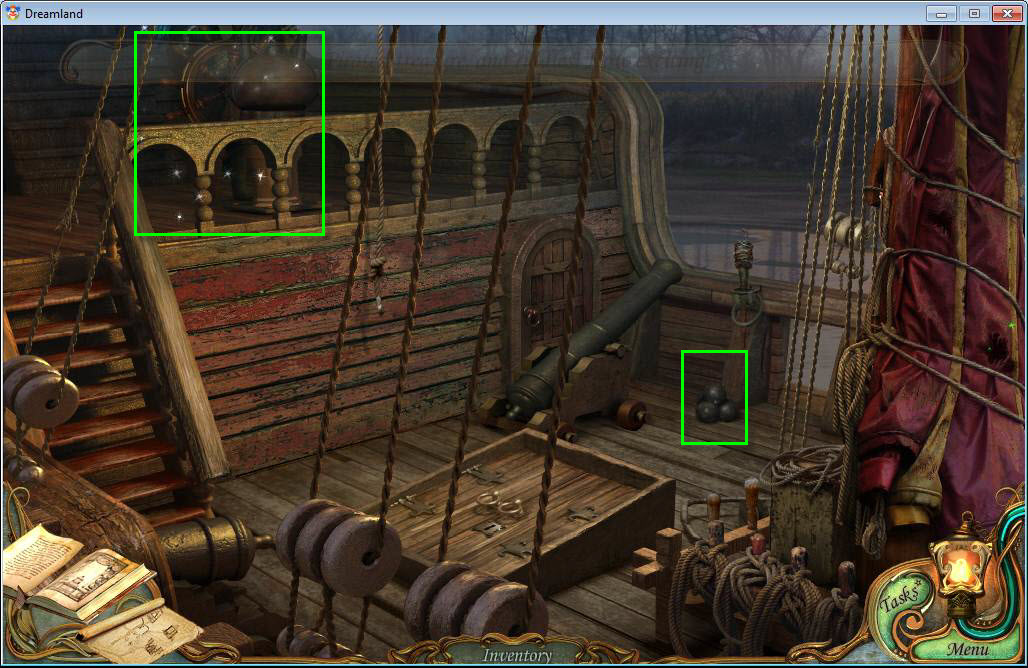
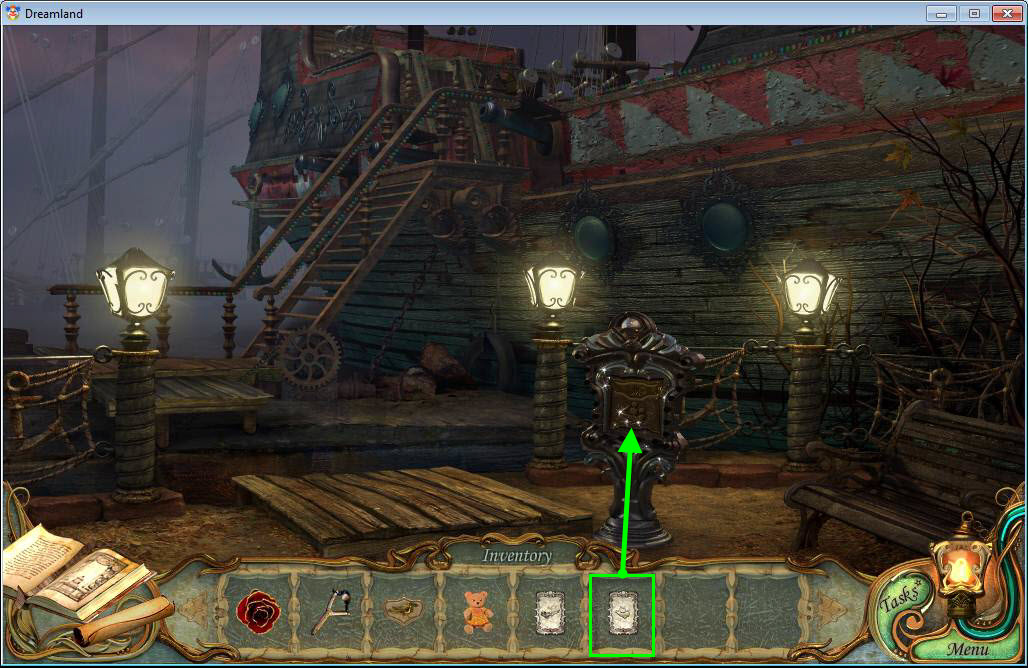
- Grab the cannon ball on the right.
- Click on the captain's wheel to play the hidden object area.
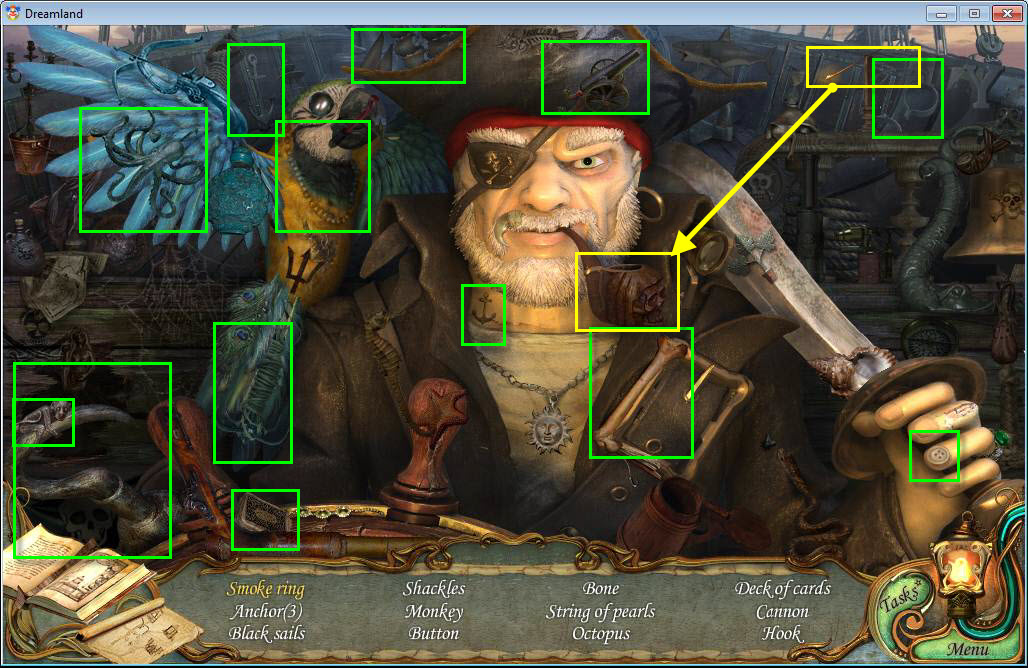
- Find all the hidden items in the scene. Grab the match and light the pipe to get a smoke ring.
- Once you have found all the hidden objects, you will receive the pirate's hook.
- Go to the fountain and then toward the left to the Roller Coaster.
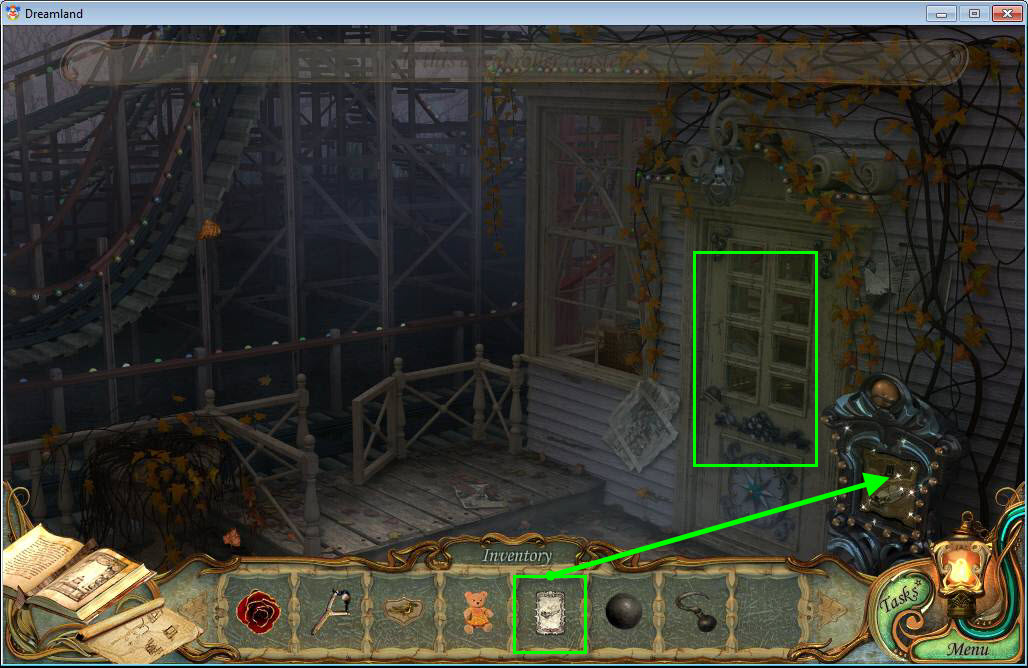
- Use the ticket in your inventory on the slot.
- Move forward into the control room.
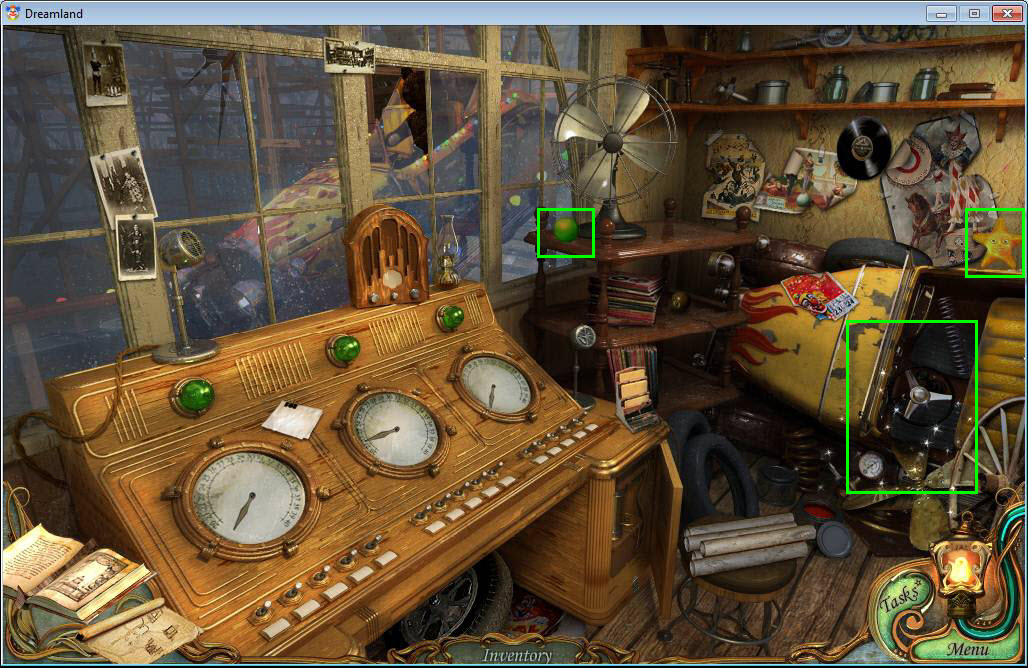
- Grab the starfish on the right.
- Grab the marble on the shelf.
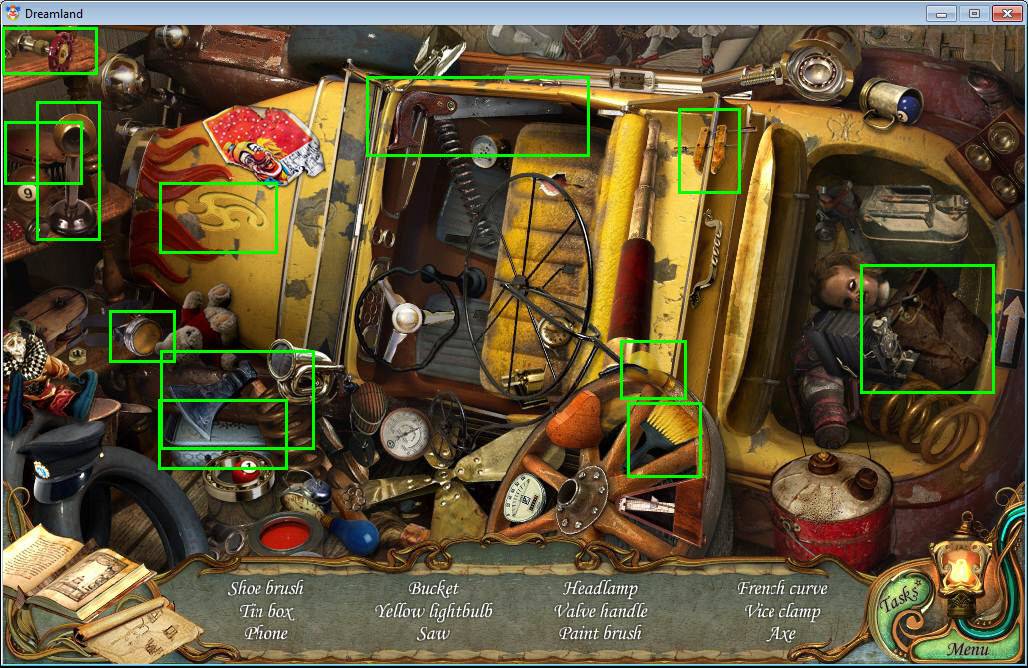
- Click on the old car to access the hidden object area.
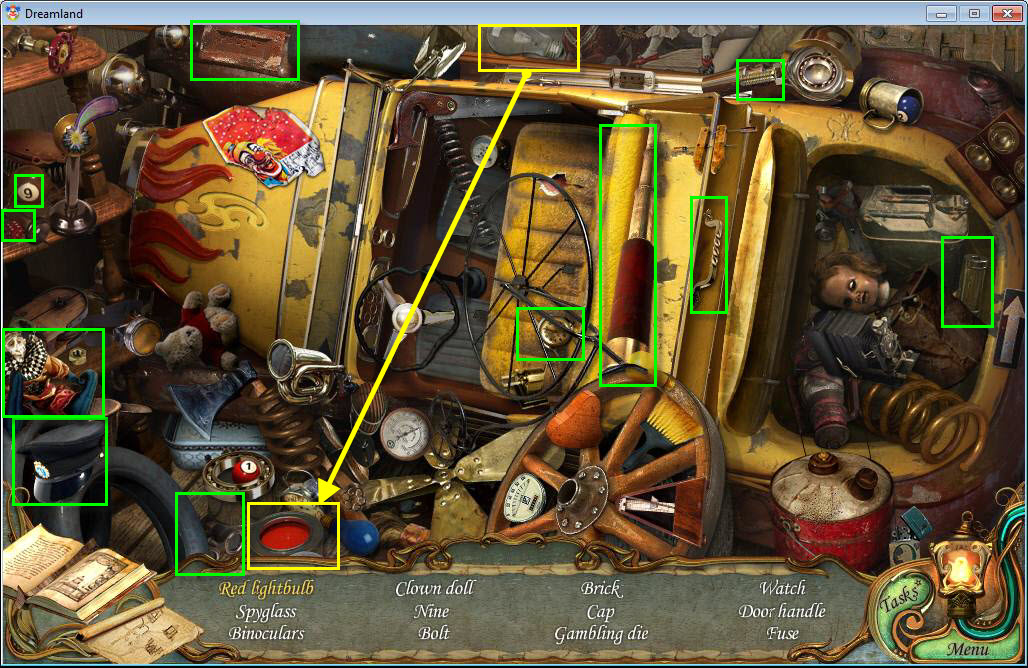
- Find all the hidden items in the scene.
- Grab the light bulb and dip it in the red paint to get the red light bulb.
- Once you have found all the hidden objects, you will receive the high-voltage fuse.
- Click back on the old car to do another hidden object scene.
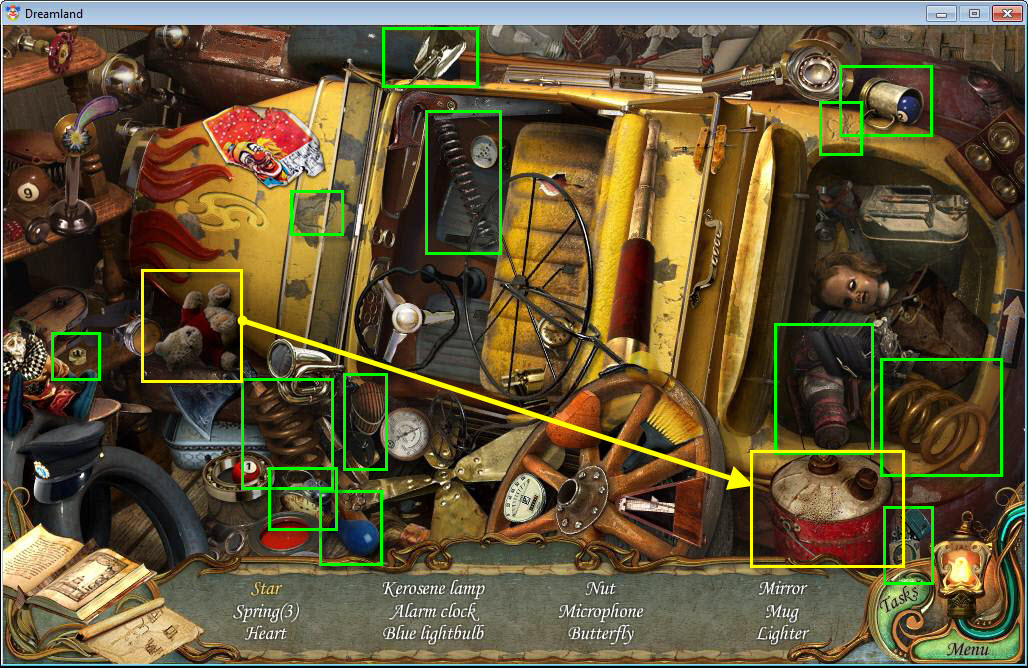
- Find all the hidden items in the scene.
- Use the teddy bear to wipe the dust from the gas can on the right to reveal the star.
- Once you have found all the hidden objects, you will receive the lighter.
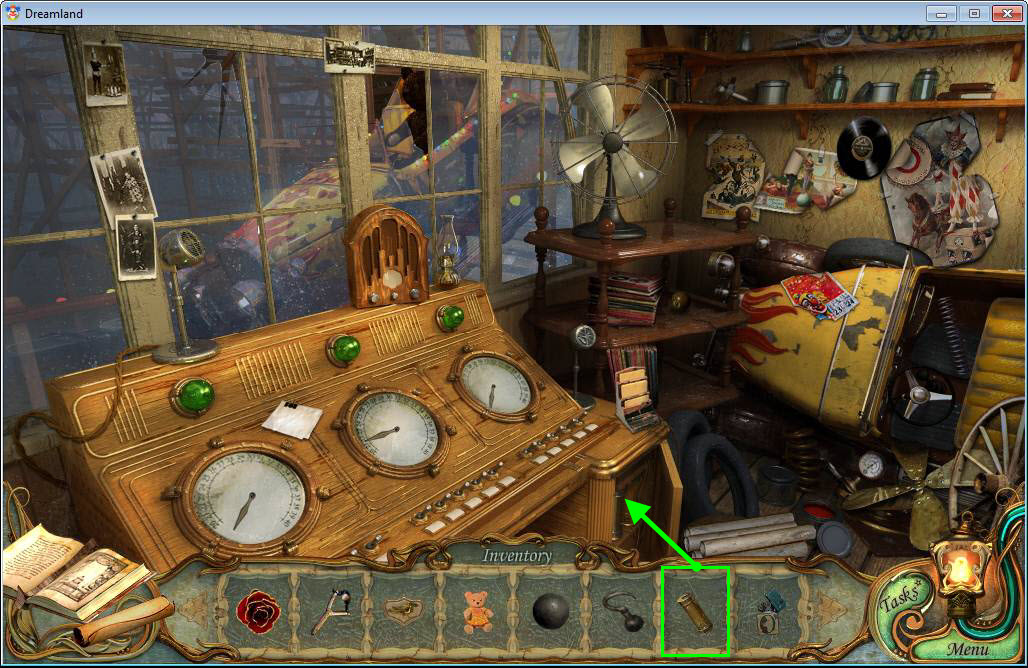
- Use the fuse from your inventory on the control panel.
- Click to zoom in on the panel.
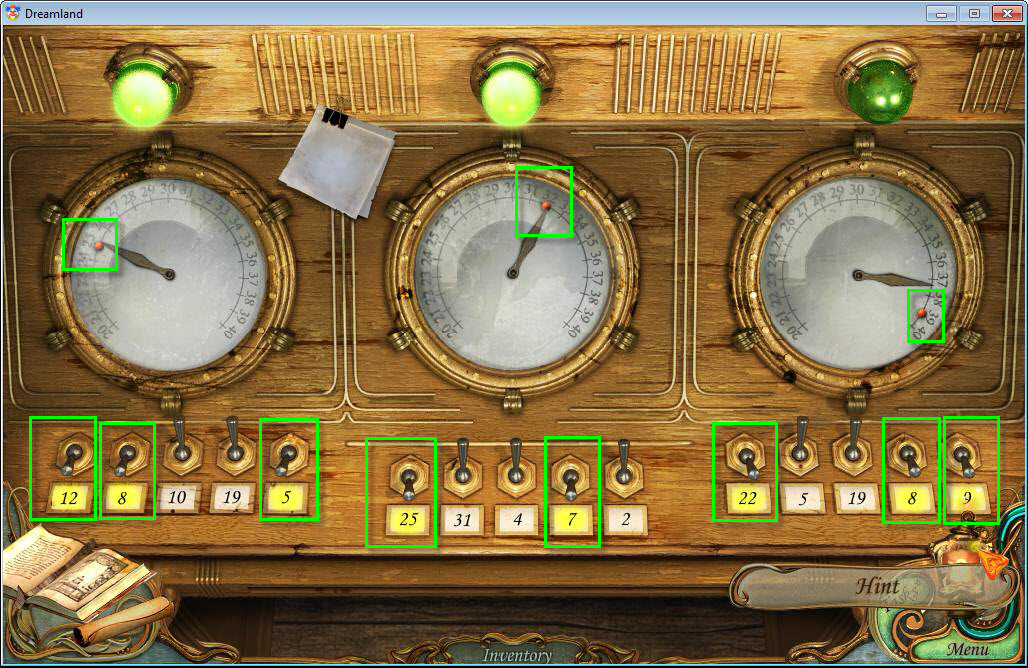
- For each panel, you have to flip the switches of the numbers that equal what the gauge is set to.
- The first one is 25, so 12, 8, and 5.
- The second one is 32, so 25 and 7.
- The third one is 39, which is 22, 8, and 9.
- Click back to exit the control room.
- Click on the car with the bear to zoom in.
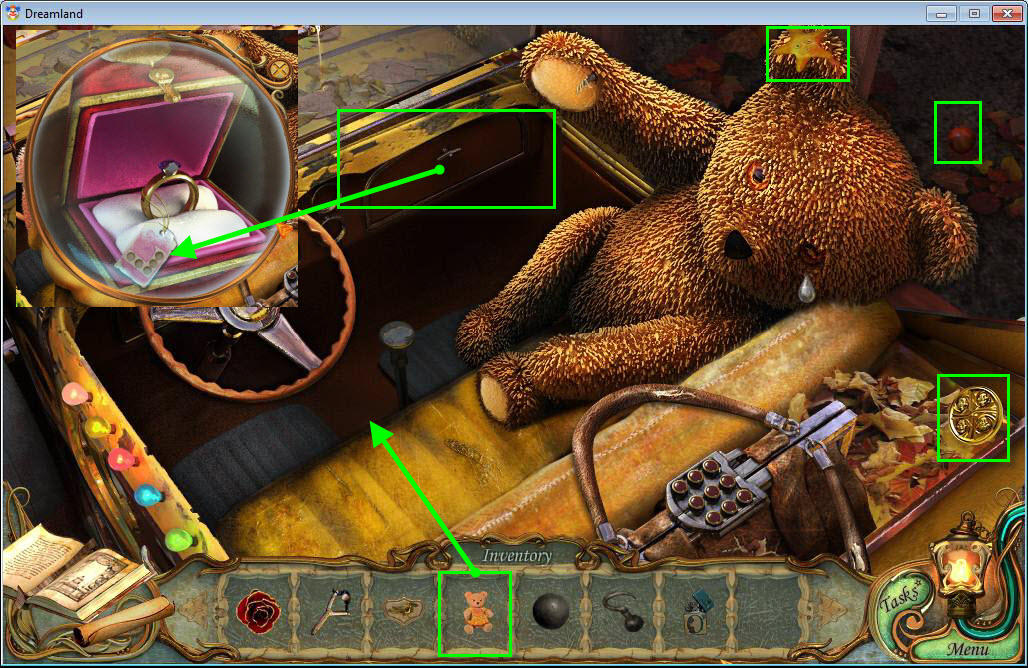
- Put the pink bear from your inventory in the car with the bear. This will open the glove box.
- Grab the gloves from the glove box and examine the ring. Note the shape of the tag.
- Grab the coin on the right.
- Grab the starfish on the bear's ear.
- Grab the marble on the right.
- Now click on the briefcase.
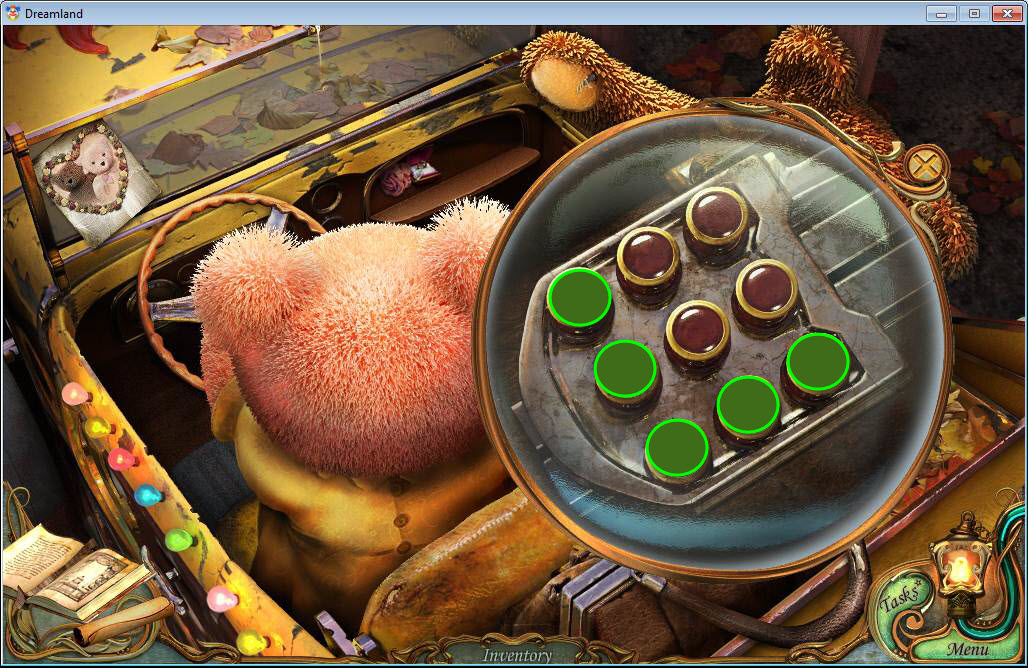
- Click on the buttons in the same pattern that was on the ring tag... in an L shape.
- Once the briefcase opens, grab the key with the sun on it.
- Go back to the Merry-Go-Round.
- Click on the grate to zoom in.
- Use the pirate's hook on the key to grab it.
- Go back to the Wheel of Fortune and use the coin on the slot again.
- Play the match 3 game to get the ticket for the cafe.
- Go to the cafe.
- Use the ticket on the slot and click on the cafe to zoom in.
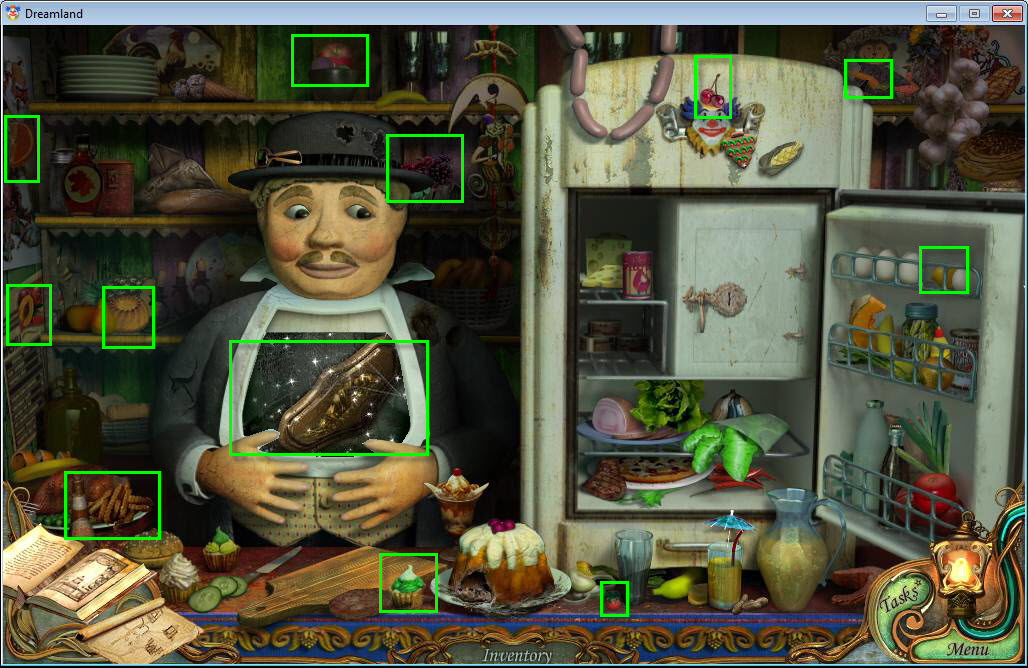
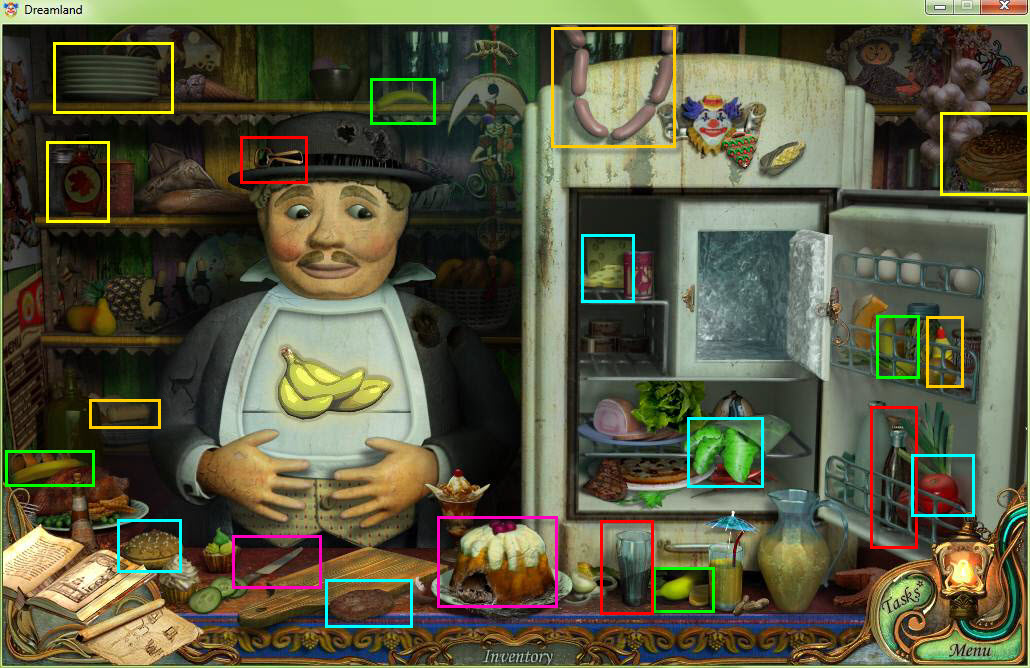
- Click to open the fridge.
- Find the items as they appear on his bib.
- Click on the key with the picture of the leaf on it to grab it.
- Go to the main entrance and play the hidden object scene there.
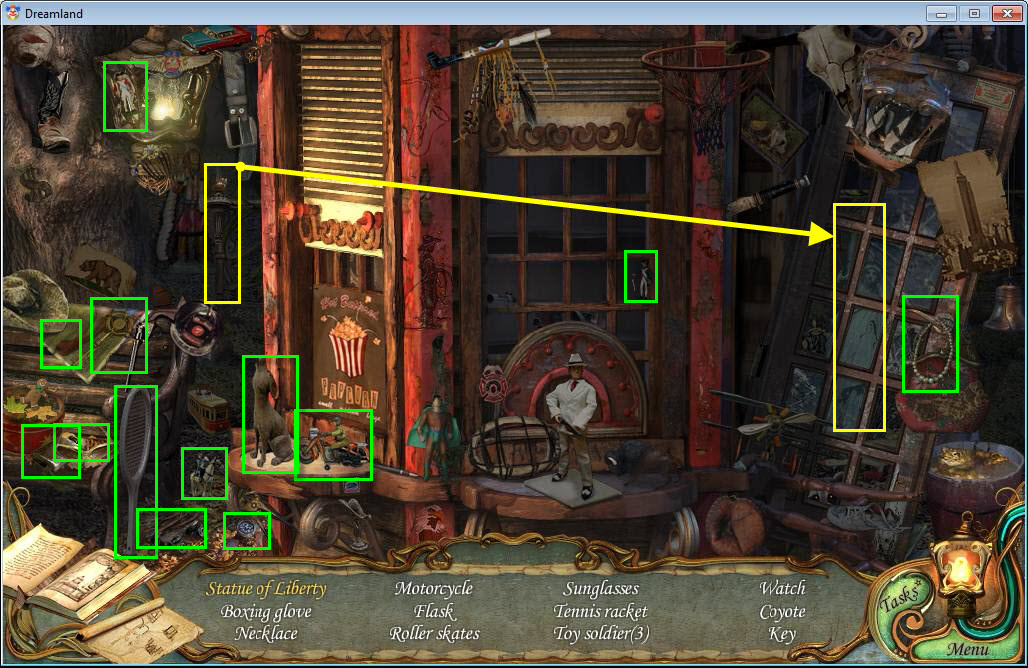
- Find all the items in the hidden object scene.
- Grab the torch and drag it to the statue of liberty to make the statue complete.
- After you have found all the hidden objects, you will receive the key.
- Go back through the clown gate.
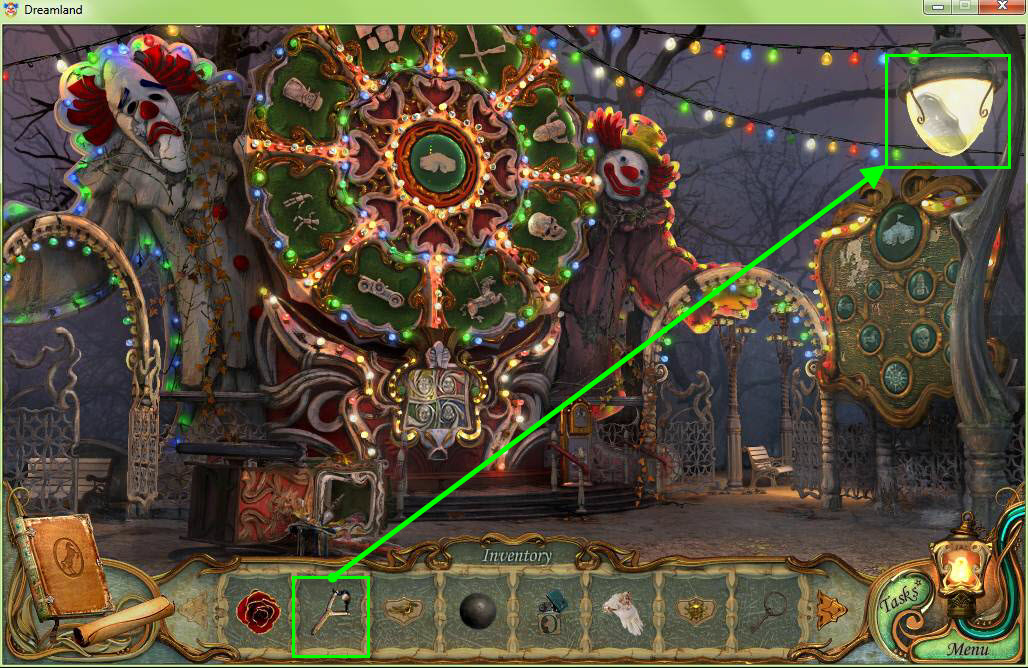
- Use the slingshot on the lamp in the central square.
- Grab the key with fire on it that falls.
- Go to the cafe.
- Click on the cafe to zoom in.
- Click on the freezer to zoom in.
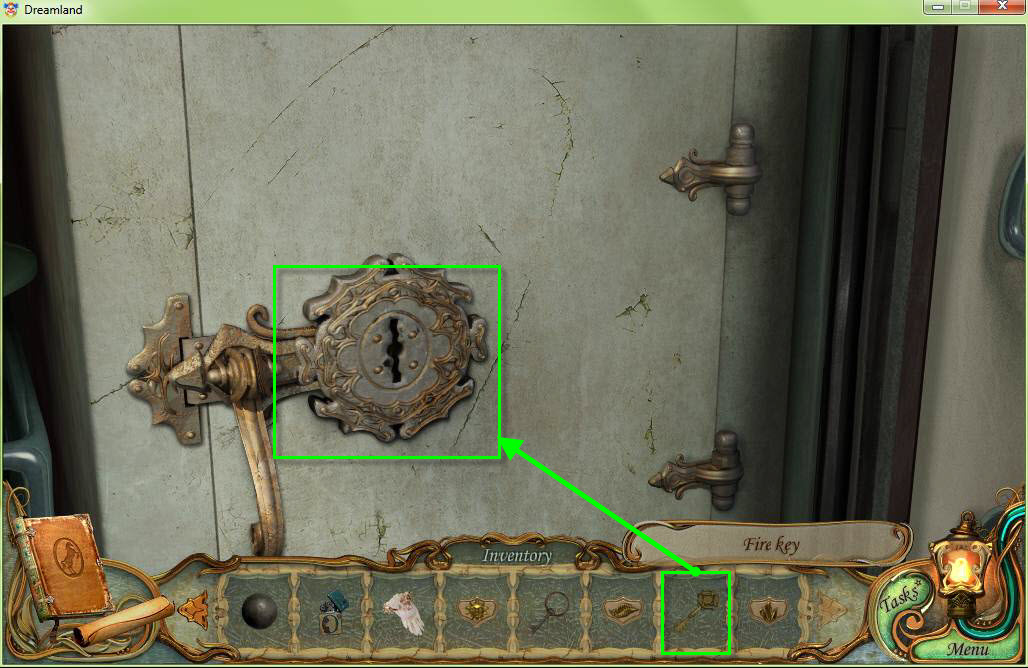
- Use the key on the freezer to open it.
- Go to the pirate ship and click to access the hidden object scene.
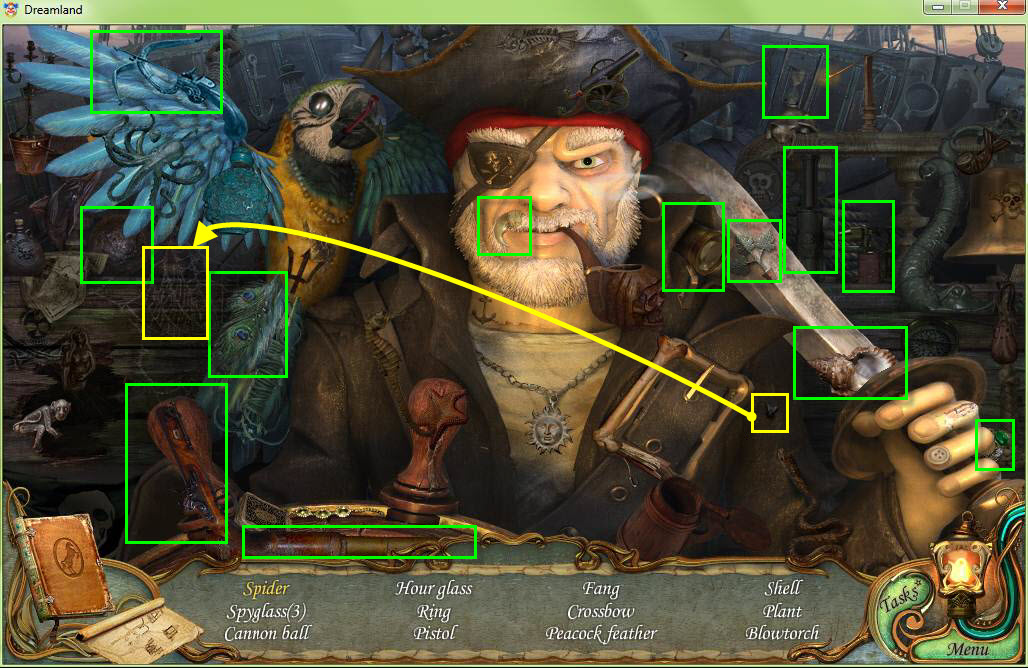
- Find all the items in the scene. Grab the fly and place it on the web to get the spider.
- Once you have found all the hidden objects, you will receive a blow torch.
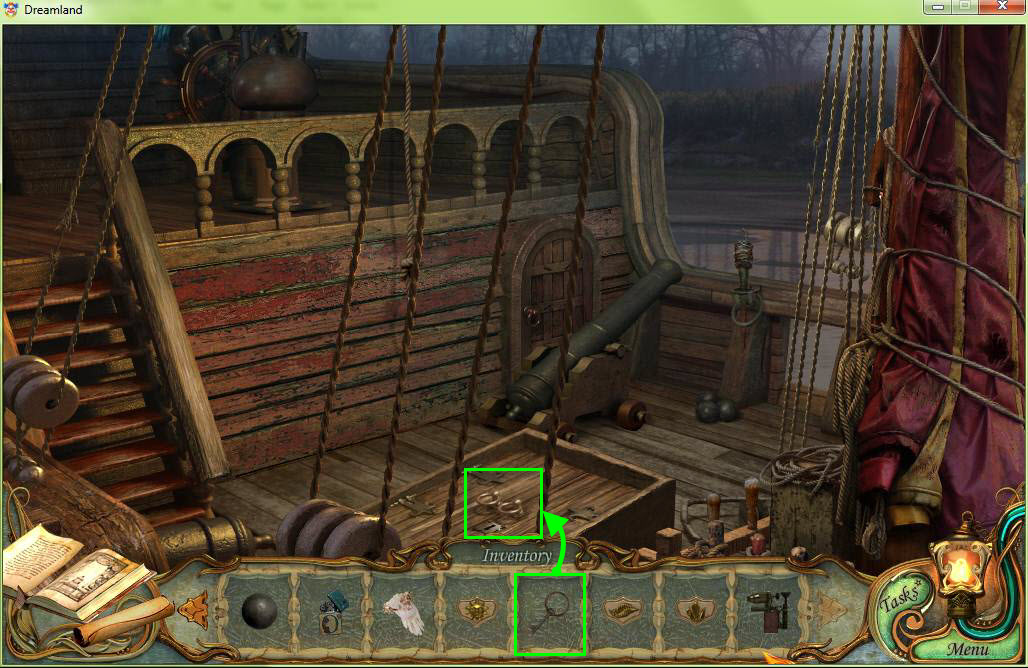
- Use the key you got from the grate on the ship's hold to open it.
- Click to zoom in.
- Connect the bolts using the buttons on the right. See the video for details.
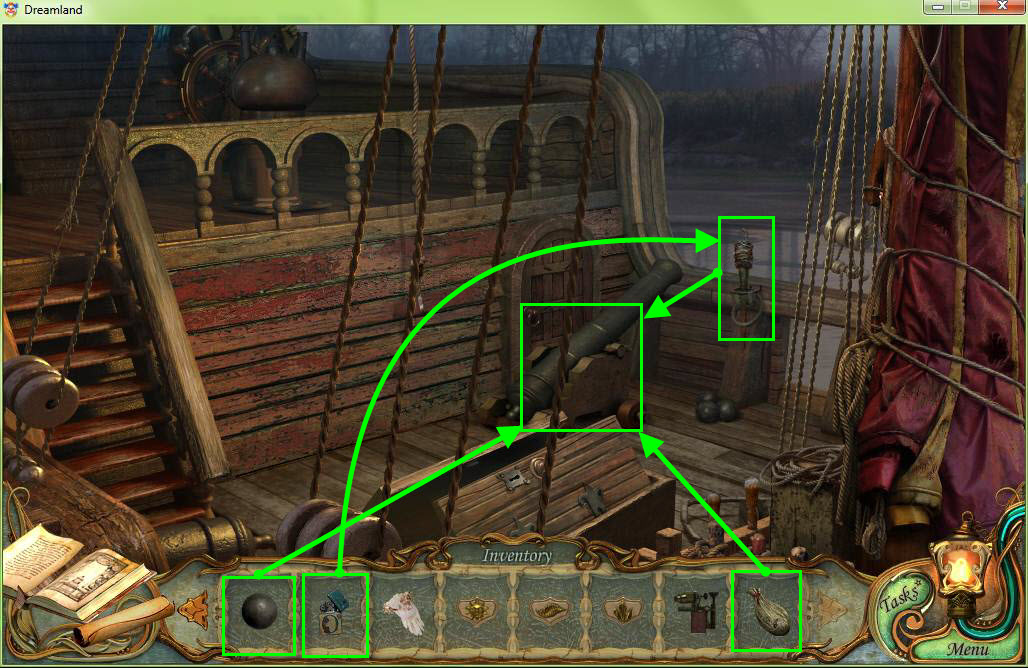
- Grab the gun powder.
- Use the gun powder on the cannon.
- Now use the cannon ball on the cannon.
- Use the lighter on the unlit torch.
- And then use the lit torch on the cannon.
- Go into the captain's cabin.
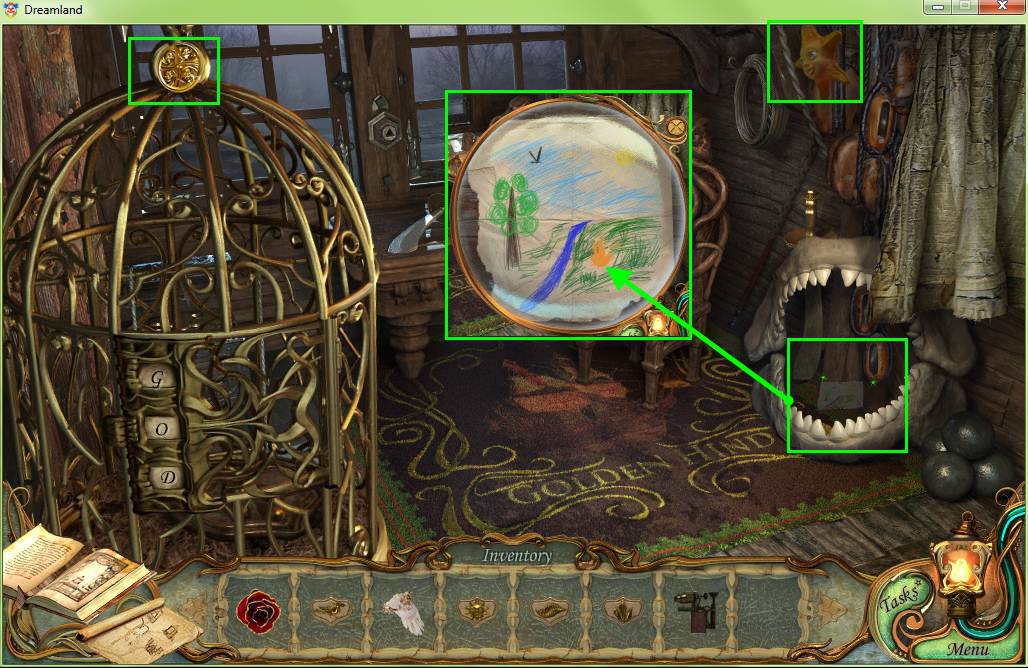
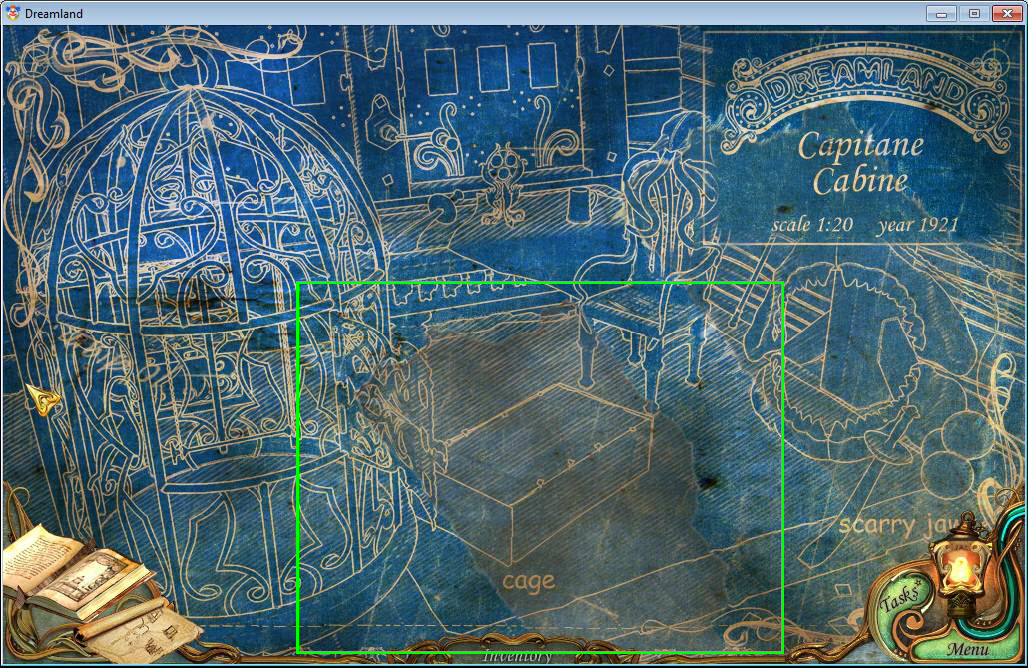
- Click on the jawbone area to zoom in.
- Grab the starfish on the top right.
- Grab the coin on top of the cage.
- Go to the cafe.
- Click to zoom back into the freezer.
- Use the blow torch on the ice until it defrosts.
- Grab the head and the apple.
- Go to the room with the Shell Game in the House of Horrors.
- Click to zoom in on the table.
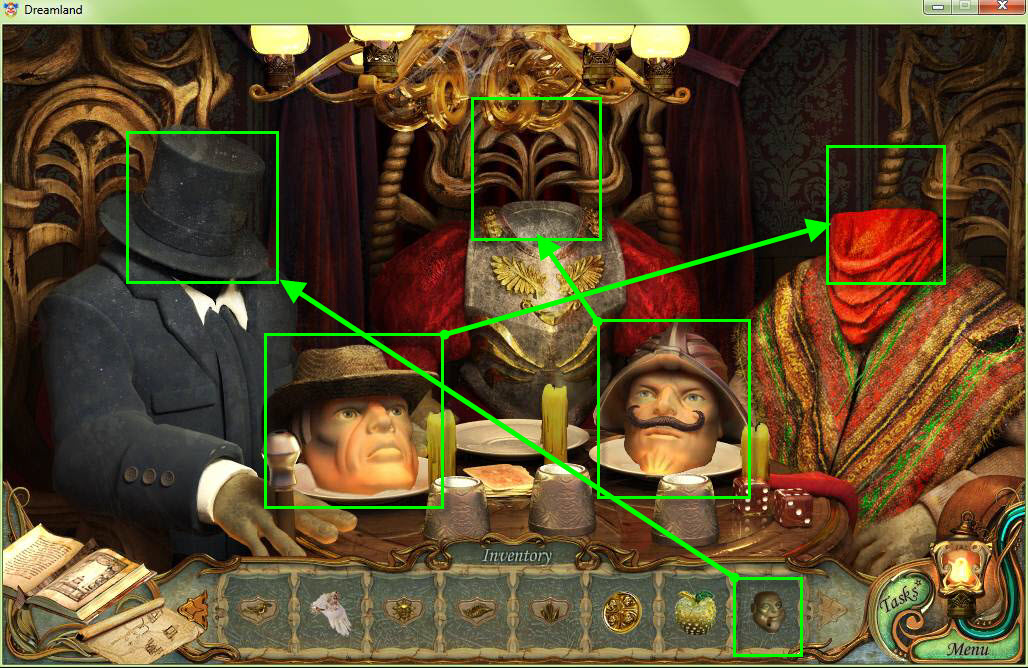
- Place the two heads on the table on the correct body.
- Place the head in your inventory on the body on the left.
- Click the cups to start a shell game.
- Play the shell game three times. The gold ball is under the cup position that it started at each time.
- After you win three times, grab the coin.
- Now go to the Wheel of Fortune and use one of the coins from your inventory in the coin slot.
- Play the match 3 game to get the ticket for the puppet theater.
- Use your second coin on the coin slot and play the match 3 game again to get the ticket for the moon rocket.
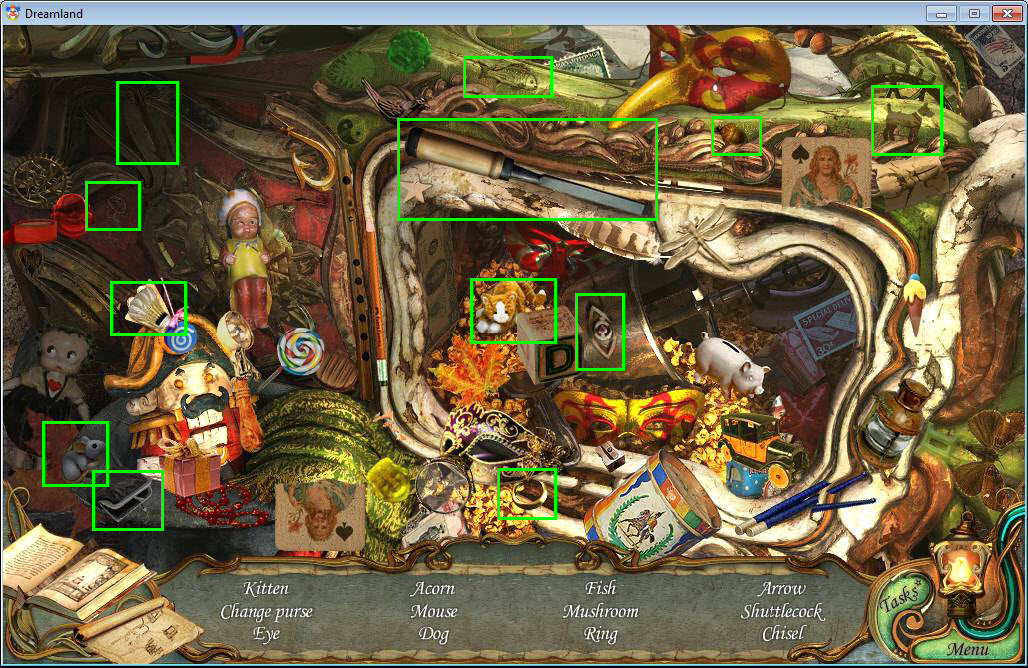
- Go to the fountain and access the hidden object area there.
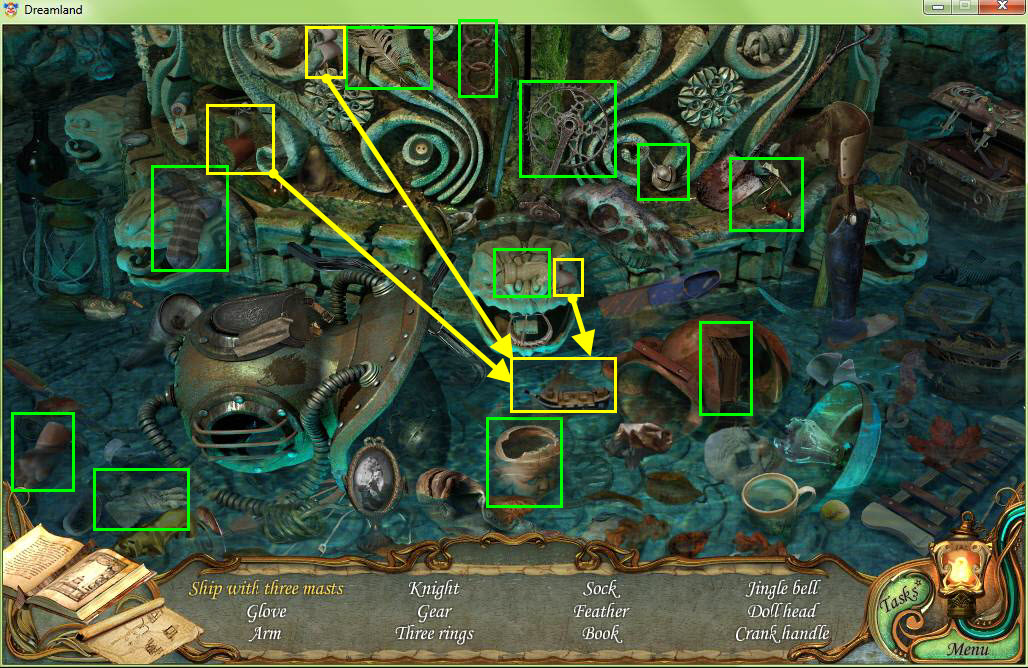
- Find all the items in the hidden object scene. Grab the three masts to the pirate ship to create a ship with three masts.
- Once you have found all the hidden objects, you will receive the crank handle
- Go back to the captain's cabin on the Pirate Ship.
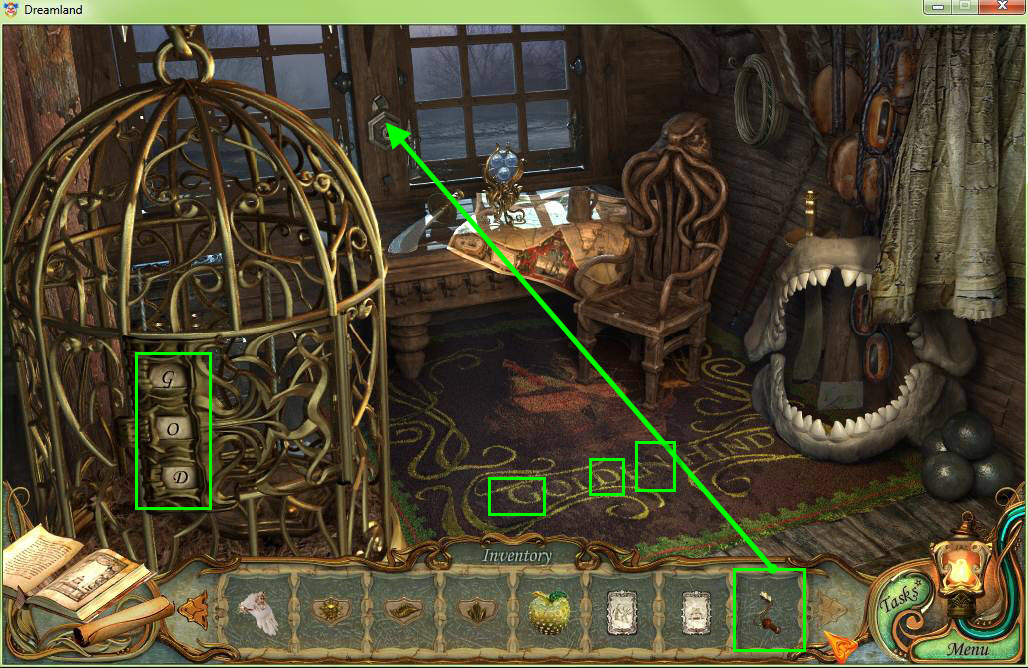
- Use the crank handle on the window.
- Once the shutters are down, you will see that the letters G, D, and N are illuminated on the floor.
- Put these letters into the lock on the cage on the left in that order.
- Take the key with the rain on it.
- Go to the House of Horrors and then go down the path on the left to the Symbol Gate.
- Place the keys with symbols on them from your inventory into the slots on the gate.
- Green is for the key with the leaf on it.
- Black is for the key with the raven on it.
- Blue is for the key with the rain on it.
- Red is for the key with the fire on it.
- Yellow is for the key with the sun on it.
- Go through the gate, then go down the right path toward the moon rocket.
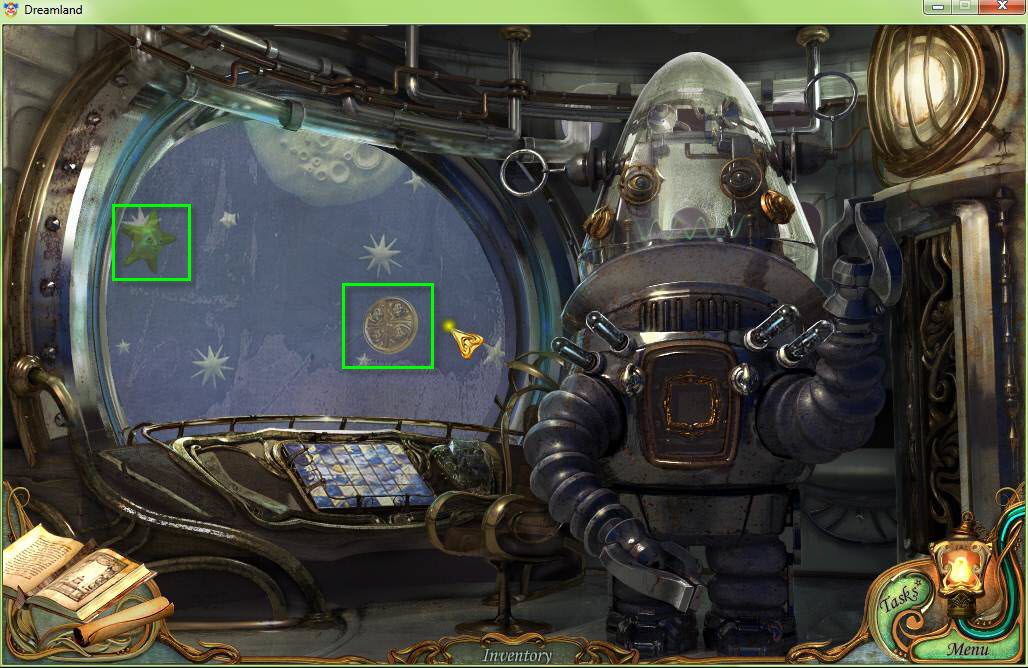
- Grab the marble on the right.
- Grab the starfish at the top.
- Use the ticket for the moon rocket on the slot.
- Go inside the rocket.
- Click to access the hidden object area.
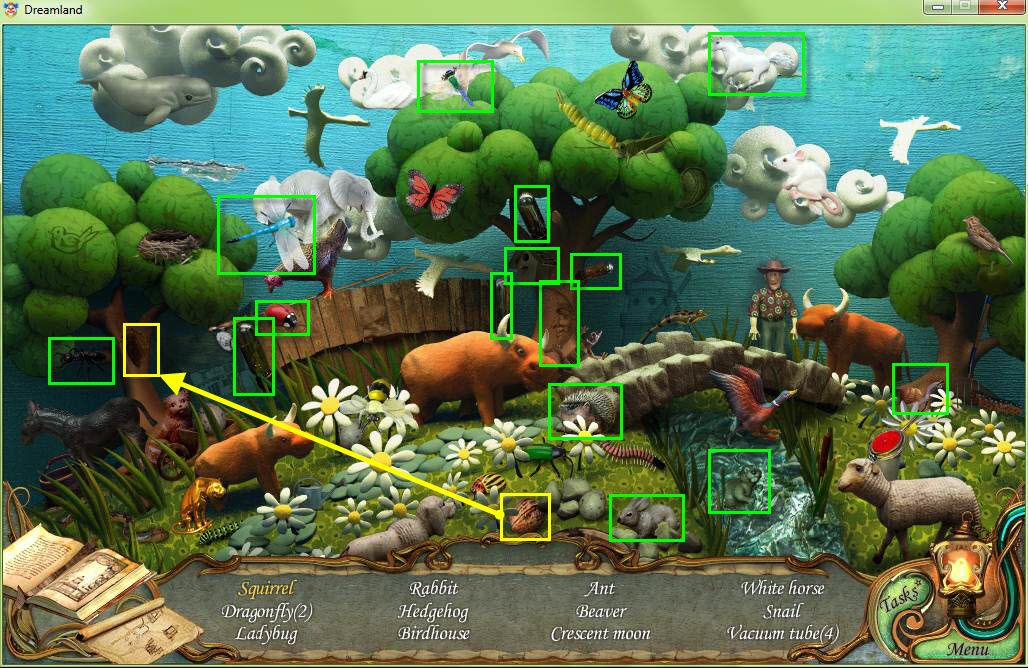
- Find all the hidden items in the scene. Grab the nut and bring it to the tree to find the squirrel.
- Once you have found all the hidden objects, you will receive the vacuum tubes.
- Next, zoom in on the robot's head. You need to set the right frequency.
- Click on the left handle 8 times and the right handle 10 times. See the video for a detailed solution.
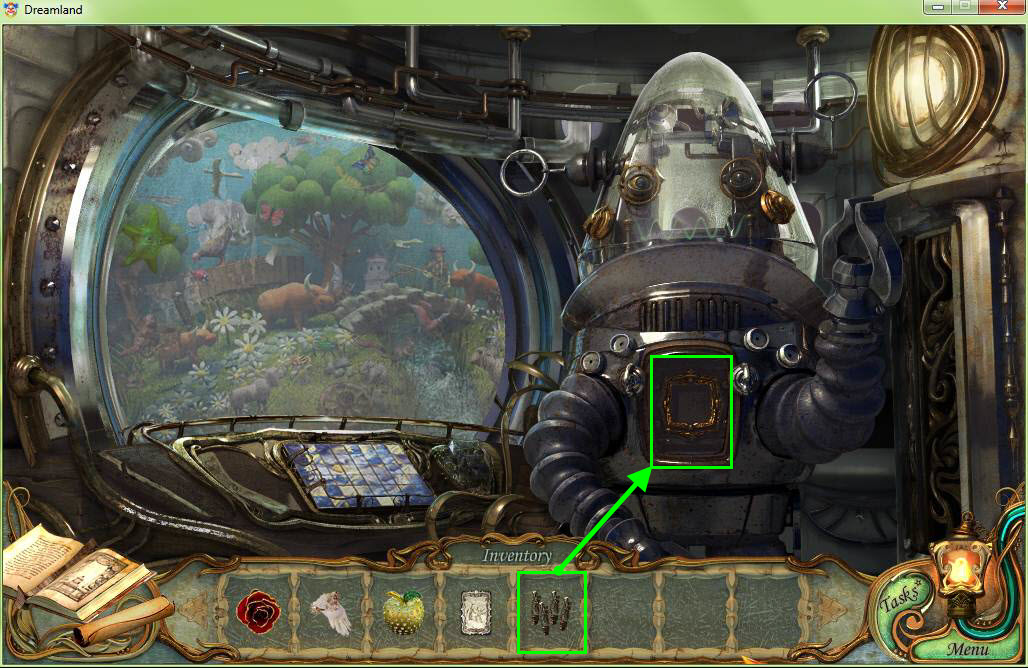
- Use the vacuum tubes on the robot.
- Click on the panel to zoom in.
- You need to get the fuse and the key down the chute by moving everything left, right, up, and down.
- To get the fuse, click right, up, left, down, left, down.
- To get the key, click right, down, left, down, right, down, up, left, down.
- Now zoom in on the rocket control panel.
- Use the key on the keyhole to start the puzzle.
- Swap the tiles to make the puzzle look like the screenshot above.
- If it's in the correct spot, it will lock in place.
- Click on the blinking moon button and get ready to click on the screen as it moves to grab the next coin.
- If you miss the coin, click back on the control panel and click on the earth button to make the screen move again.
- Grab the starfish on the left.
- Go back to the Wheel of Fortune.
- Use the coin in the coin slot. Click on the match 3 game and see that you have to break ice cubes.
- Go back to the central square in front of the Wheel of Fortune and play the hidden object area in the popcorn stand.
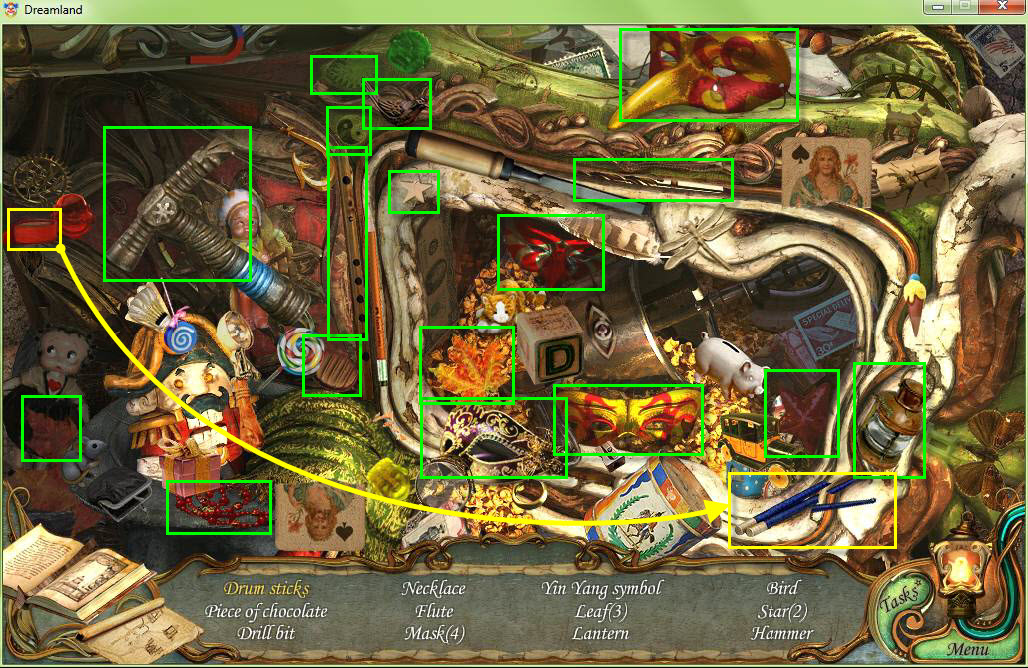
- Find all of the hidden objects in the scene. Grab the tape and use it on the broken drum sticks.
- Once you have found all of the hidden objects, you will receive the hammer.
- Go back into the Wheel of Fortune and the match 3 game and use the hammer to break the ice.
- Play the match 3 game and get the ticket for the circus.
- Go to the Puppet Theater.
- Use the ticket for the puppet theater on the slot.
- Grab the starfish on the left.
- Click to zoom in on the puppet theater.
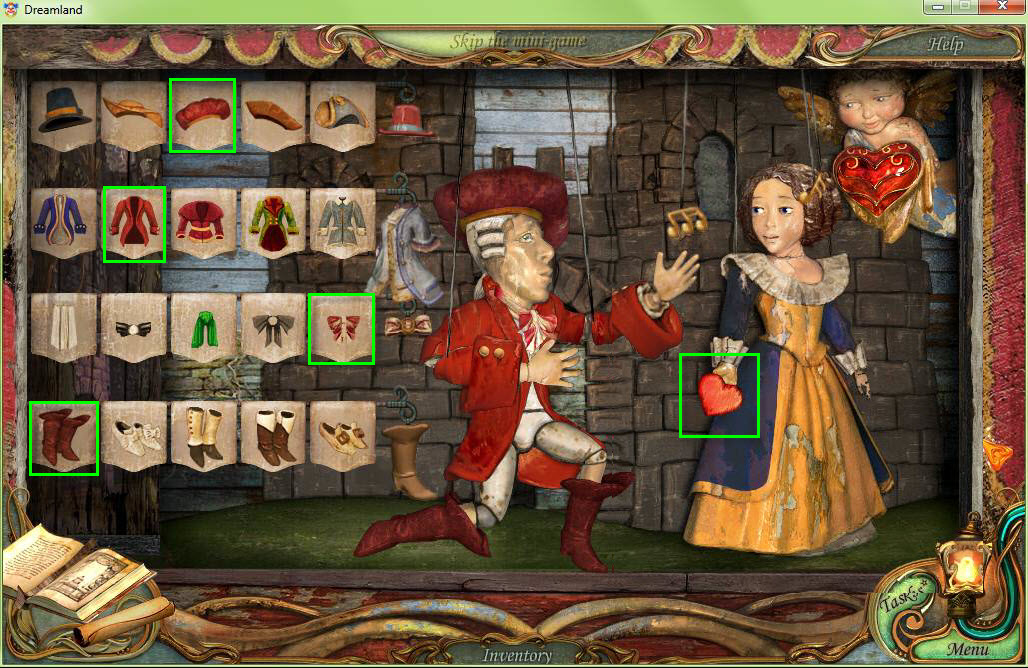
- You have to dress the male puppet correctly in order to receive the heart from the female puppet.
- Dress him in red. See the screenshot above for the details.
- Click the panel on the right to reveal the female puppet.
- Click to grab the heart.
- Click back and go down the left path to the circus tent.
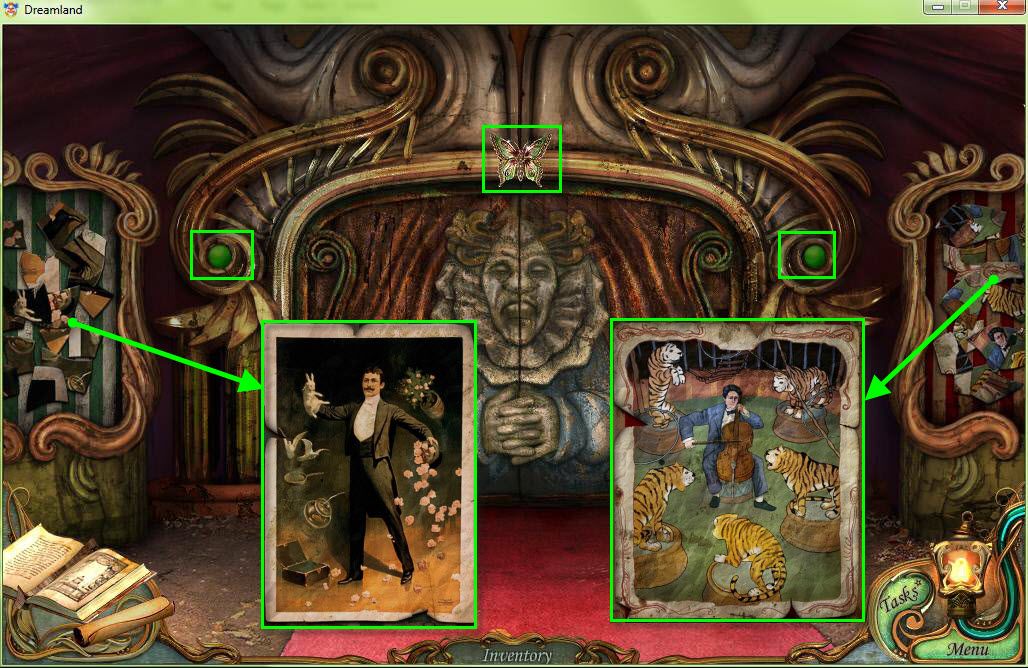
- Grab the two marbles in the door.
- Grab the butterfly on top of the door.
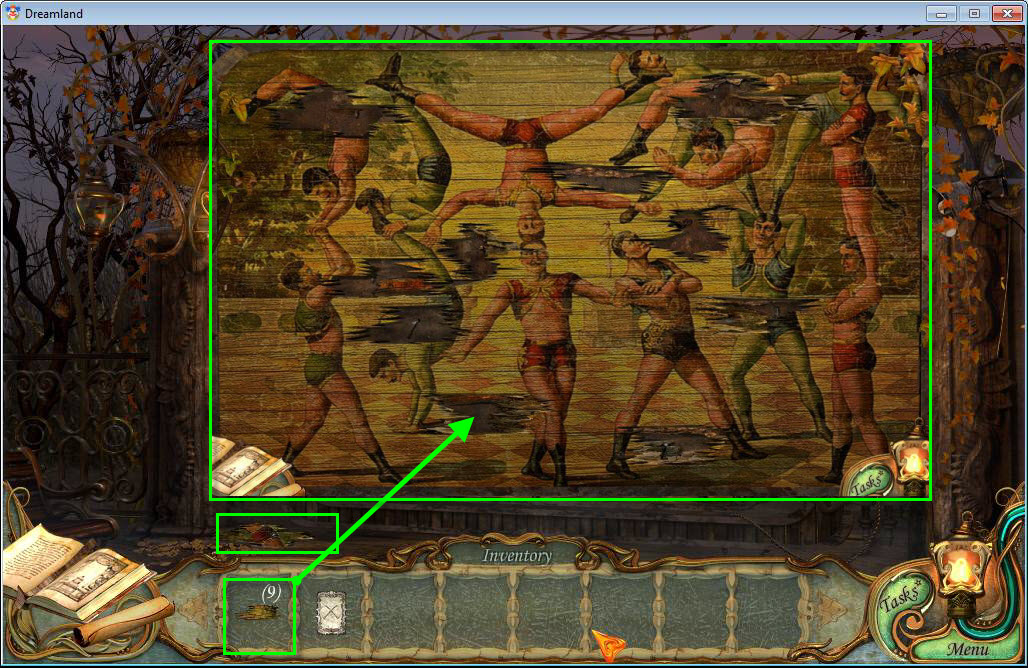
- Click on the right poster and put the pieces together. See the screenshot above.
- Click on the left poster and put the pieces together. See the screenshot above.
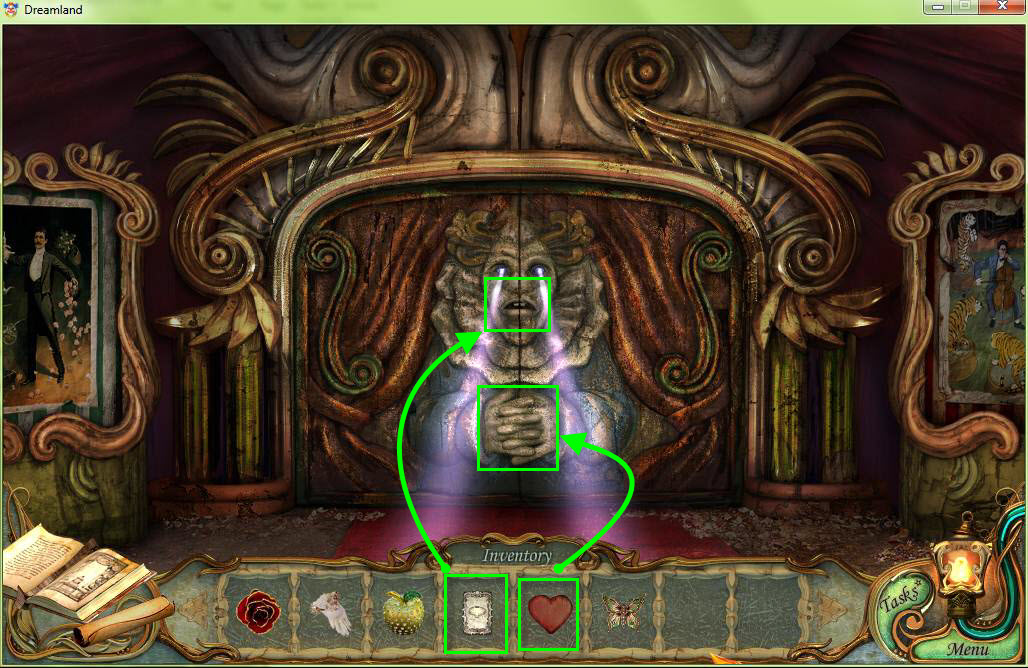
- Use the ticket on the clown's mouth.
- Use the heart on the clown's hands.
- Go into the Circus Tent.
- Click on the safe in the center of the tent.
- Go into the animal trainer's dressing room on the right.

- Grab the marble on the right.
- Grab the starfish in the top right corner.
- Click on the cello case to access the hidden object area.

- Find all the items in the hidden object scene.
- Drag the two pieces of the elephant picture to the third piece.
- Once you've found all the hidden objects, you'll receive a carrot.
- Go back to the path outside the House of Horrors where the rabbit in the hole is.

- Click to zoom in on the rabbit.
- Use the carrot on the rabbit to lure him out.
- Grab the rabbit to add him to your inventory.
- Now go to the Cafe.
- Click to access the mini-game.
- Find all the items that appear on his bib. This time, you need to find multiple items for each image. For example, you need to find a plate, maple syrup, and pancakes for the plate of pancakes.
- Once you have found all the items, a statue of a tiger will appear on his head.
- Grab the statue to add it to your inventory.
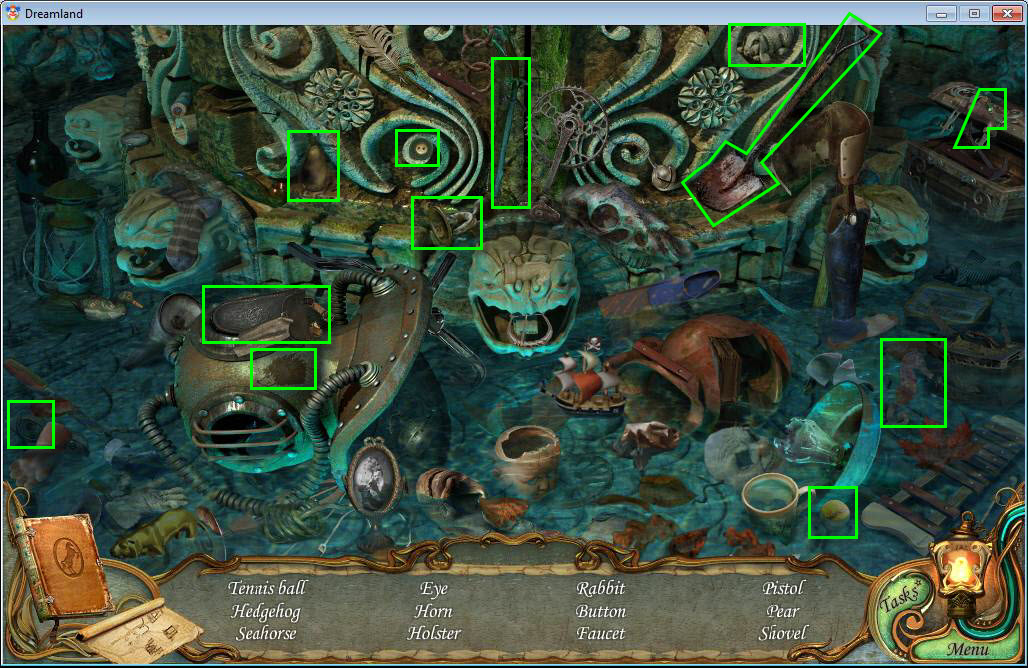
- Go to the Pirate Ship to access the hidden object area there.
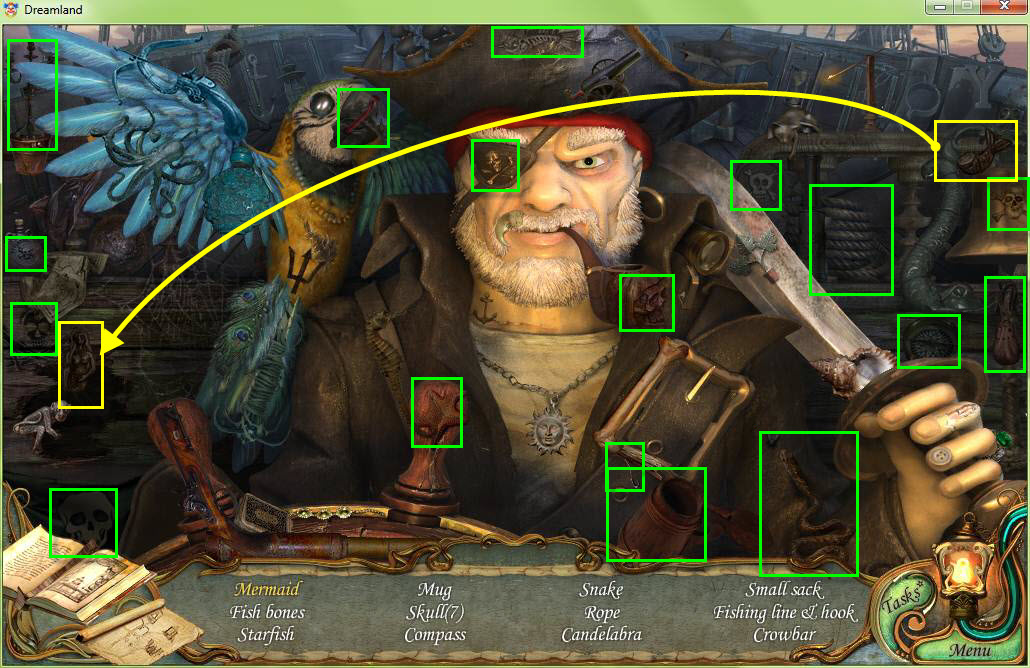
- Find all the items in the hidden object scene.
- Grab the mermaid tail and bring it to the rest of her body.
- Once you've found all the hidden objects, you will receive the crowbar.
- Go to the Fountain to access the hidden object scene there.
- Find all the hidden objects in the scene.
- Grab the pieces of the xylophone and drag them to the broken xylophone to complete it.
- Once you have found all the hidden objects, you will receive another statue of a tiger.
- Go to the Rocket to access the hidden object area there.
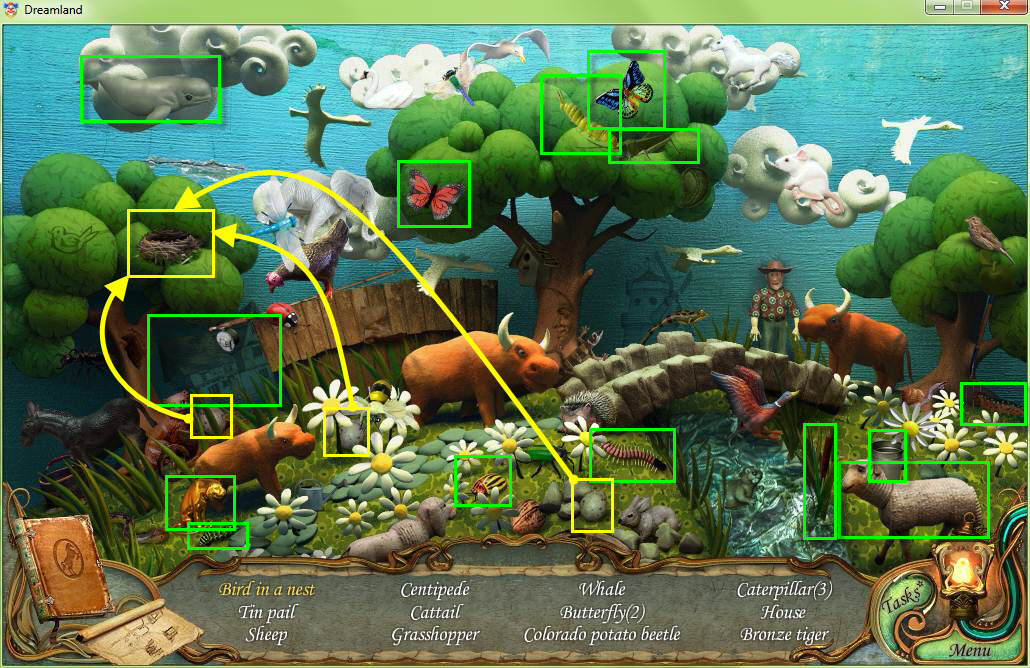
- Find all the hidden items in the scene.
- Grab the three eggs and bring them to the nest in the tree to get the bird in a nest.
- Once you have found all the hidden objects, you will receive another bronze statue of a tiger.
- Go to the House of Horrors and access the Hidden Object Scene in the vampire room.

- Find all the items in the hidden object scene.
- Grab the corkscrew and pull the cork from the bottle on the left.
- Once you have found all the hidden objects, you will receive a straight razor.
- Now, go back to the circus ring and click on the magician's dressing room.
- Grab the starfish at the top.
- Click on the table to zoom in.
- Grab the five marbles on the table and the floor.
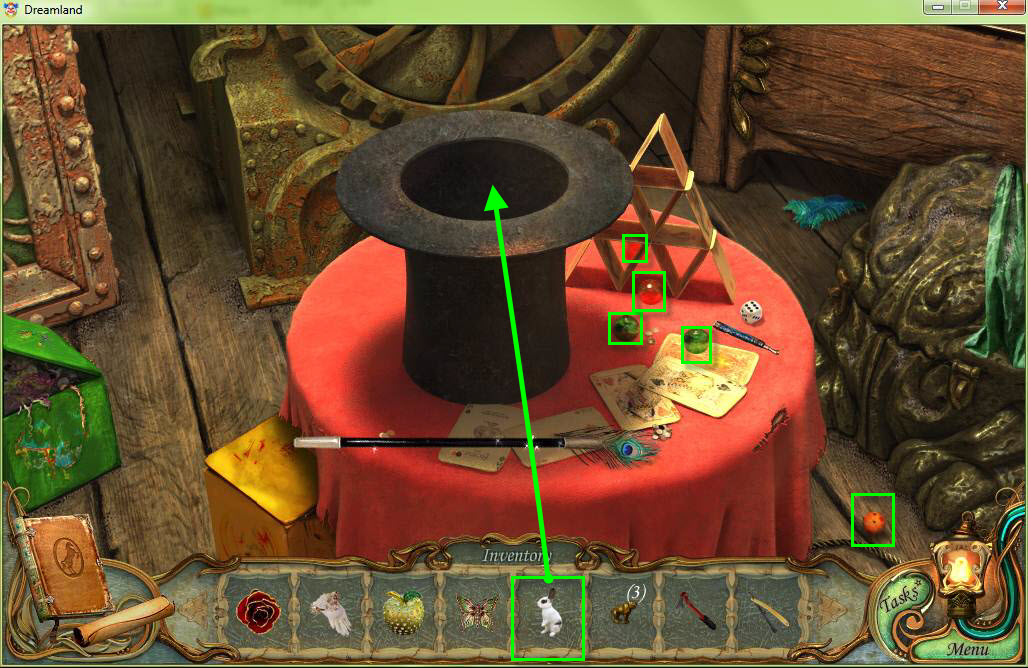
- Use the rabbit on the hat.
- Click to zoom back out.
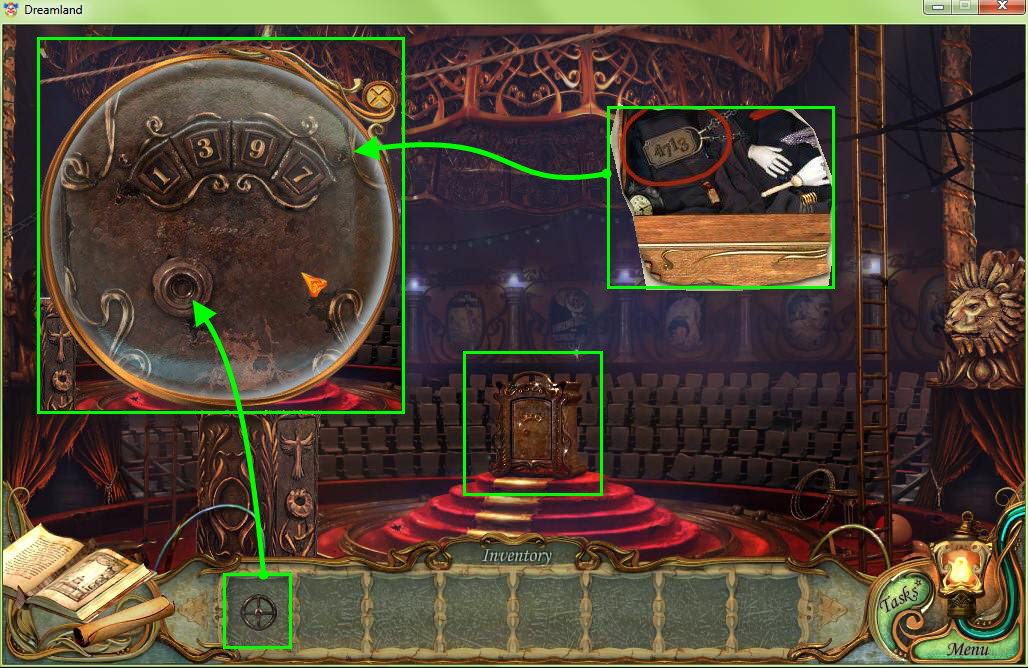
- Now click on the dresser behind the table.
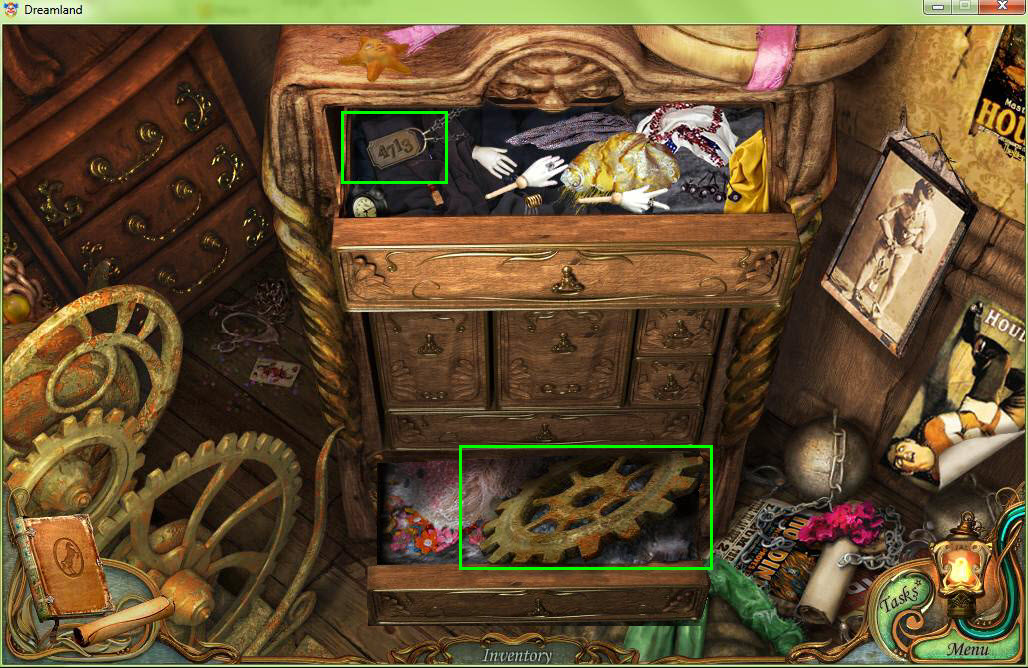
- Click on the tag in the top drawer. Note the number 4713.
- Click the x to close the window.
- Now click on the drawers as they open until the bottom drawer opens.
- Click to grab the gear.
- Click back to zoom out.
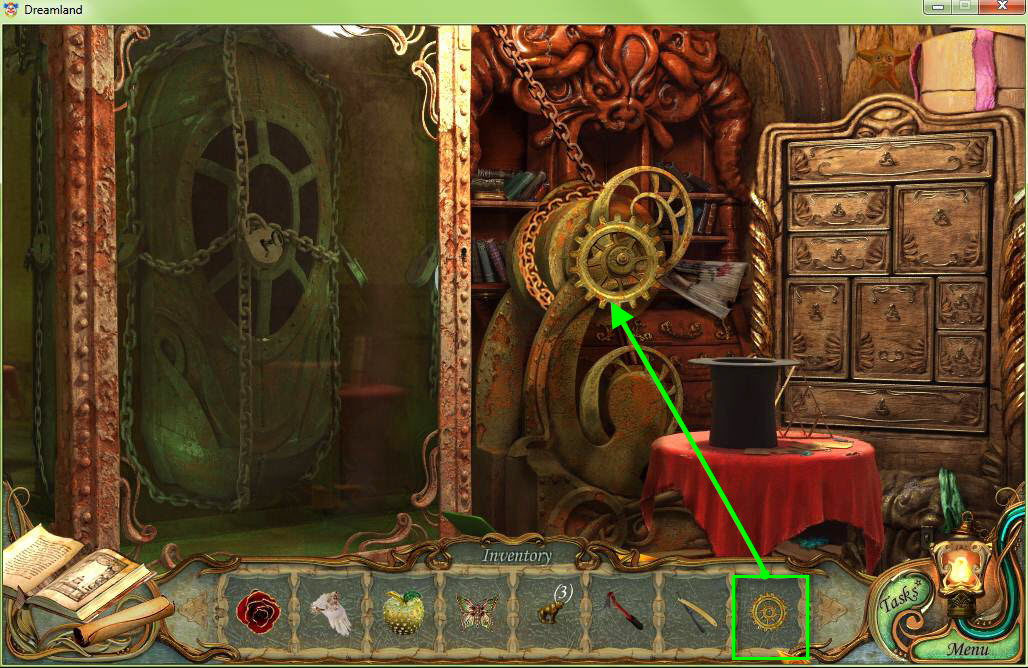
- Use the gear on the pulley machine where the other gears are.
- Click the machine to pull the cage out of the water.
- Go back to the circus ring and enter the Clown's Dressing room.
- Click on the starfish to grab it.
- Click to zoom in on the trunk.

- Remember the code you saw in the fountain? Use that code here and enter it in the lock to open the trunk.
- Check your diary for the code. It's diamond, club, spade, heart, diamond.
- Click on the trunk to access the hidden object area.
- Find all the items in the hidden object scene.
- Use the camera to take a photo of the Eiffel Tower.
- Once you have found all the hidden objects, you will receive the horse leg.
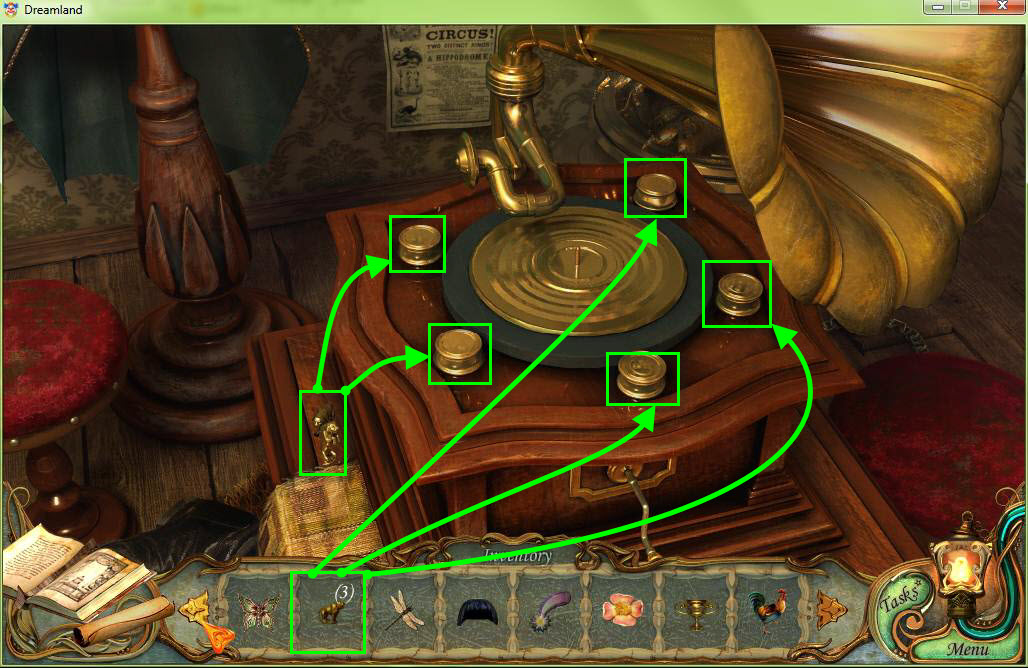
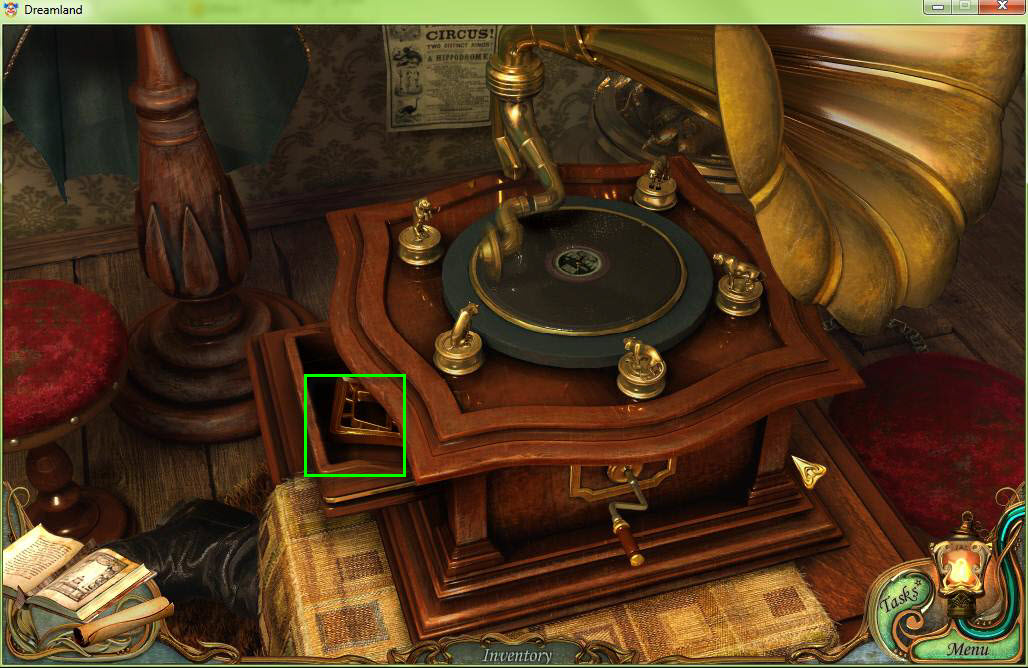
- Go to the Merry-Go-Round and zoom in on the horse.
- Use the horse's leg on the horse.
- Now position the legs so that they match the picture right behind the horse.
- See the screen shot for details.
- Grab the key from the horse's mouth.
- Grab the marble on the right.
- Click to zoom in on the back panel.
- Use the key on the panel to open it.
- There are missing parts.
- Click to zoom back out.
- Click the ceiling to access the hidden object area.
- Find all the items hidden in the scene.
- Take the red shirt on the left and put it on the elephant to get the elephant wearing a red shirt.
- Once you have found all the hidden items, you will receive a dragonfly.
- Click back on the ceiling to access another hidden object scene.
- Find all the hidden items in the scene.
- Grab the bow and place it on the cat to get the cat with a bow.
- Once you have found all the hidden objects, you will receive the clown wig.
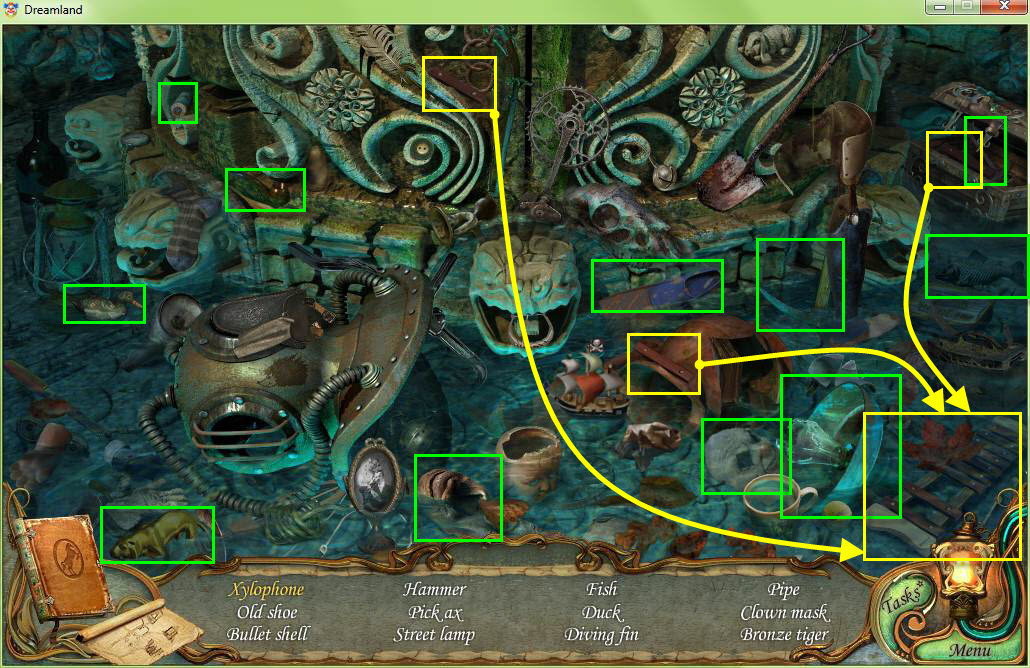
- Now, go to the rocket and access the hidden object area there.
- Find all the items hidden in the scene.
- Grab the fishing pole and give it to the fisherman to get the fish.
- Once you have found all the hidden items, you will receive the oil can.
- Go to the Roller Coaster and access the hidden object area there.

- Find all the items hidden in the scene.
- Grab the two billiard balls and place them in the box to get the box with balls.
- Once you have found all the hidden objects, you will receive the comet.
- Now go back to the Clown's Dressing room and access the hidden object scene there.
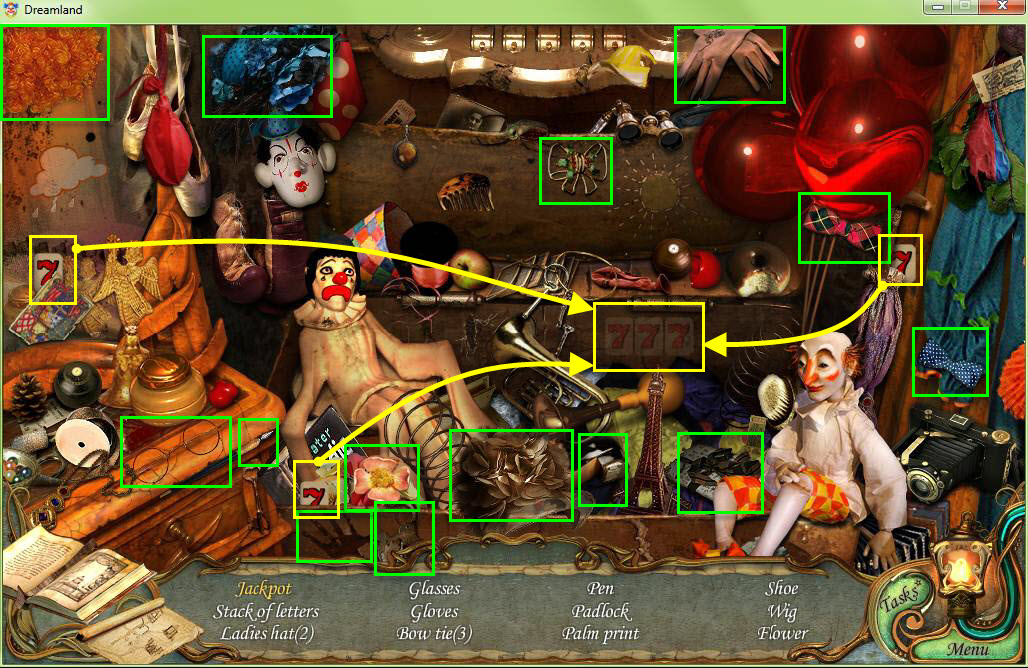
- Find all the items hidden in the scene.
- Grab the three 7s and drag them to the jackpot area on the wall to get a jackpot.
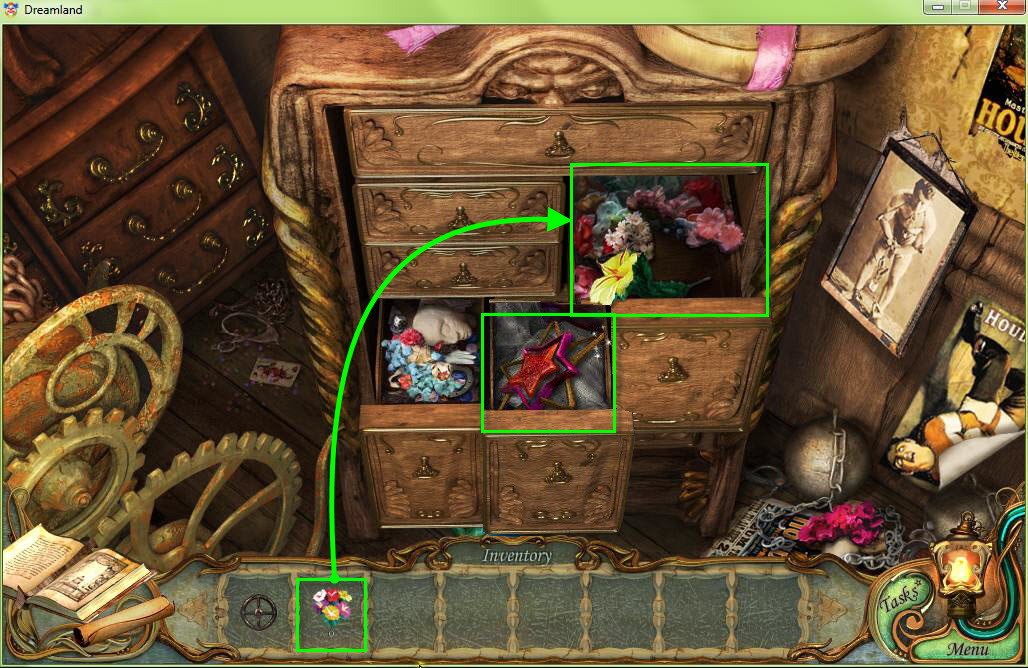
- Once you find all the items, you will receive the flower.
- Go to the magician's dressing room.
- Zoom in on the dresser.
- Grab the starfish on the top.
- Grab the marble on the left.
- Zoom back out.
- Click on the lock on the cage to zoom in.
- Use the oil can on the lock.
- Click on the cage to access the hidden object scene.
- Find the items hidden in the scene.
- Grab the coin and use it on the music box to get the musical note.
- Once you have found all the hidden objects, you will receive a chalice.
- Click back on the cage to access another hidden object scene.

- Find all the hidden items in the scene.
- To get the number 12, grab the sponge and use it on the mud stain on the window.
- Once you've found all the hidden objects, you will receive a rooster.
- Go to the animal trainer's room and access the hidden object area there.
- Find all the items hidden in the scene.
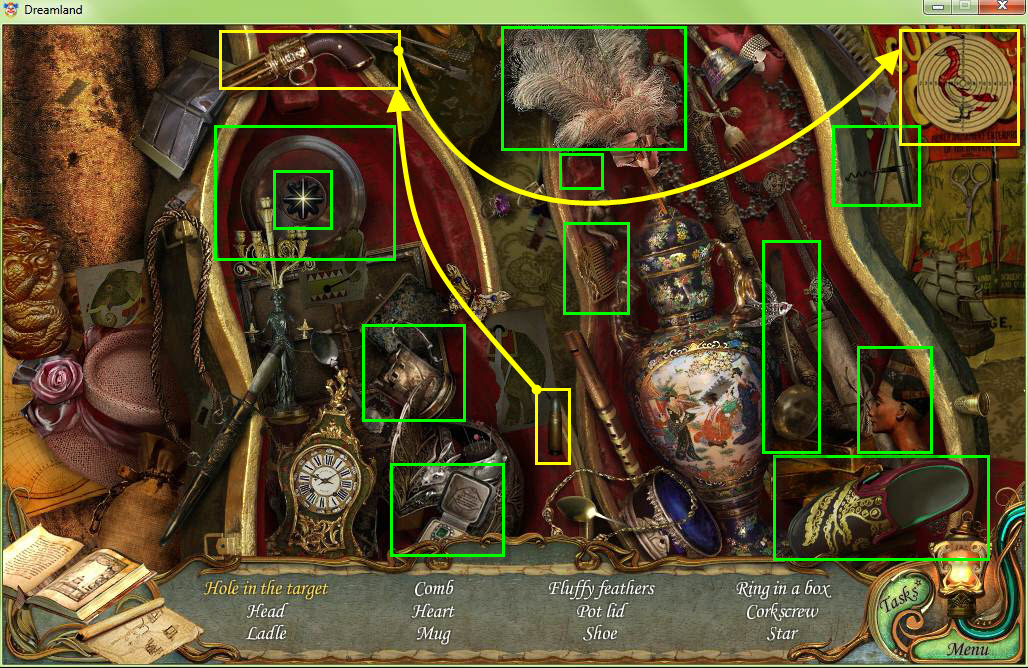
- Drag the bullet to the gun, then drag the loaded gun to the target to get the hole in the target.
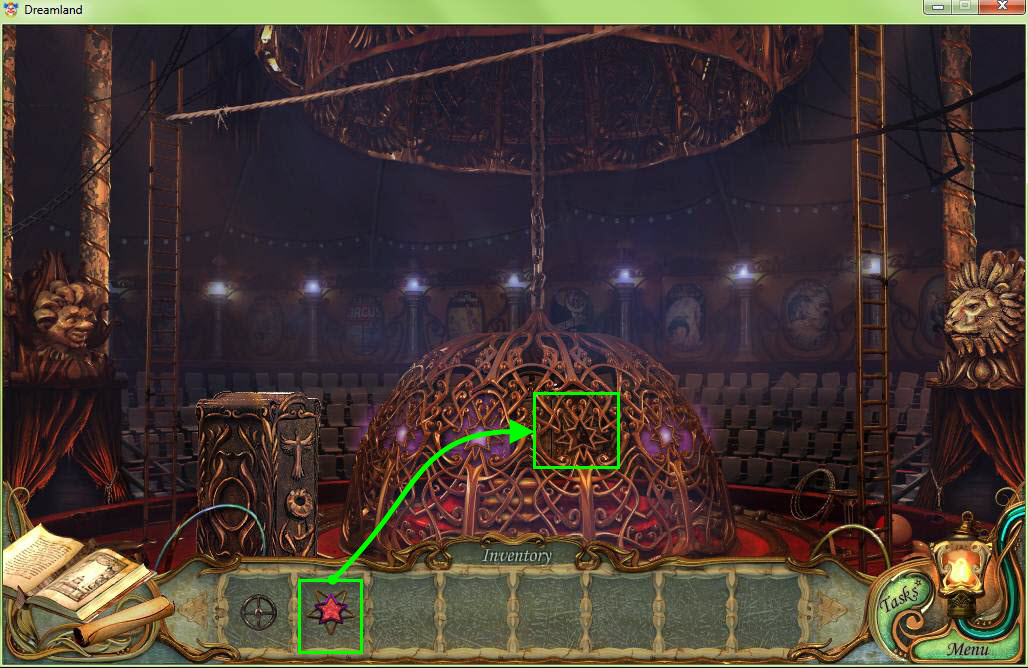
- Once you've found all the hidden objects, you will receive the star.

- Now, use the straight razor on the jacket.
- Take the mask.
- Use the crowbar on the floor board and take the record.
- Click on the record player to zoom in.
- Place the bronze tiger statues on the sides of the record player.
- Grab the two on the side as well.
- Place the record on the player.
- The tigers need to be in the right order for the drawer on the left to open.
- See the above screenshot for the solution.
- Grab the square key when the drawer opens.
- Go back to the House of Horrors.
- Click on the painting of the girl on the left.
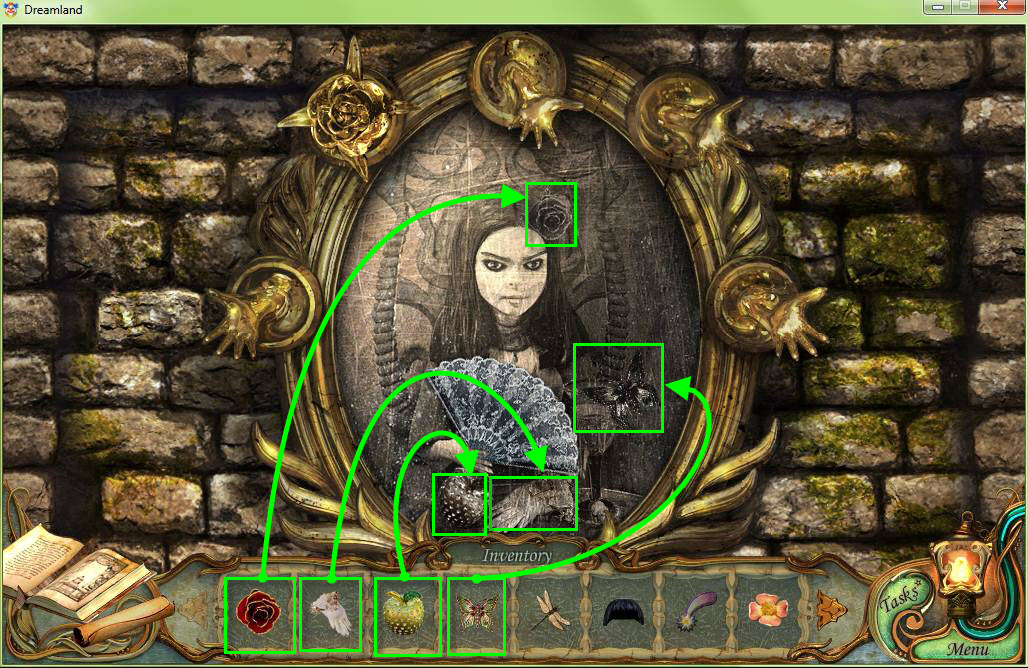
- Use the rose, the gloves, the apple, and the butterfly from your inventory on the painting.
- The chamber behind the painting will open and reveal a heart and a mini-game.

- Place the chalice at the bottom.
- Click on the pipes to connect the heart. See the screenshot above.
- See the video for a more detailed solution.
- Grab the rune when you are done.
- Now, go back to the rocket and click on the panel to switch the screen to the moon.
- Click on the screen to zoom in.
- Grab the marble on the right.
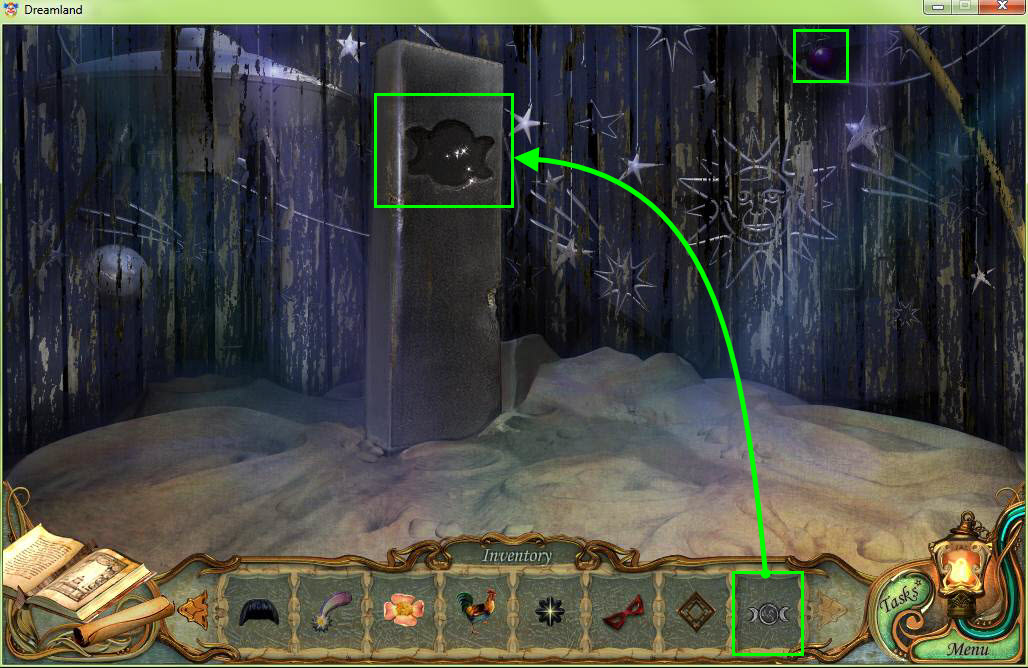
- Use the rune on the indentation on the pillar to start a mini-game.

- Click on the robot parts on the side to unlock them. See screen shot for the solution.
- See the video for a detailed solution.
- Grab the wheel from the robot.
- Go back to the clown's dressing room.
- Click on the clown's wardrobe to zoom in.
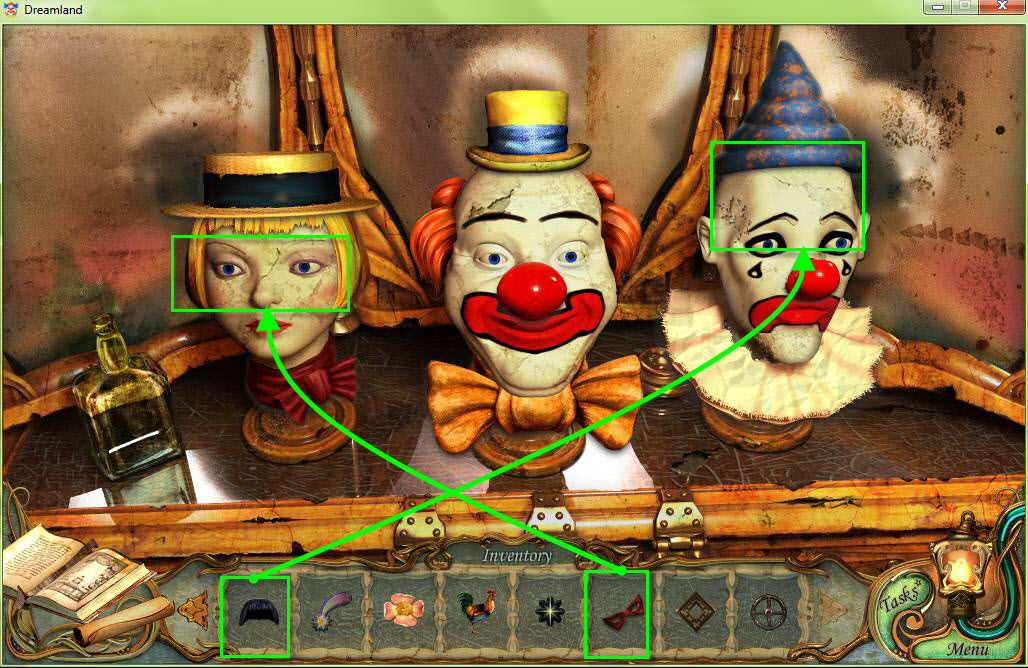
- Place the wigs, hats, noses, and bow ties on the clowns as shown above.
- Use the wig and the mask from your inventory on the clowns.
- Take the bat when the drawer opens.
- Go back to the Merry-Go-Round and click on the panel behind the horse.
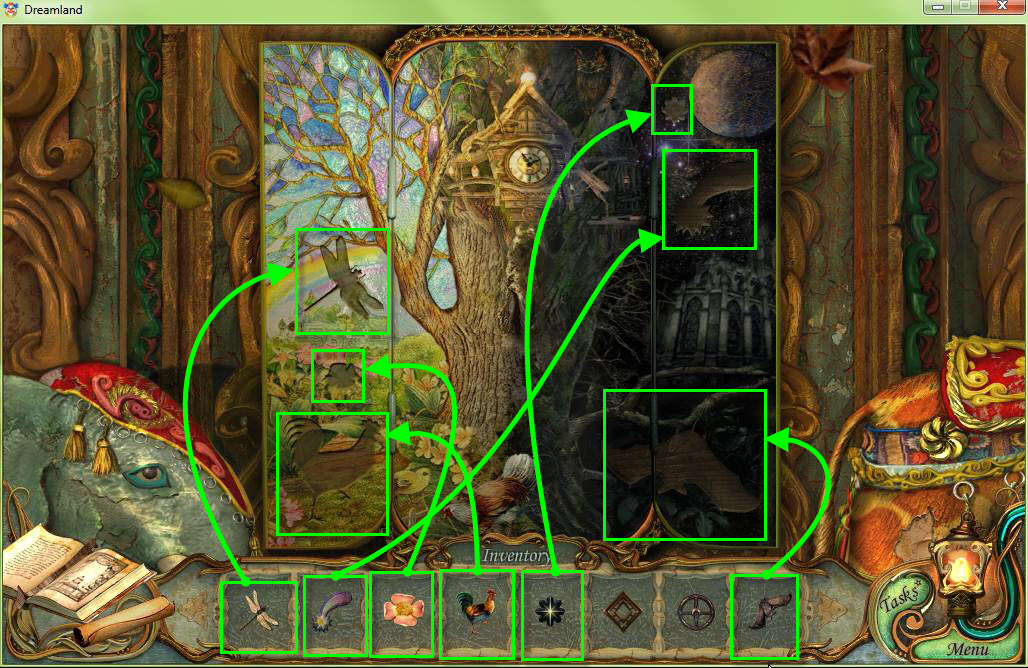
- Use the dragonfly, the comet, the bat, the star, the rooster, and the flower on the panel.
- It will open and reveal the circle key. Take the key.
- Go back to the circus ring.

- Use the round key on the first cage to open it.
- Use the square key on the second cage to open it.
- Go to the clown's dressing room and access the hidden object scene there.

- Find all the items hidden in the scene.
- Drag the raincloud to the sun to create the rainbow.
- Once you find all the hidden objects, you will receive a book.
- Go to the magician's dressing room.
- Click on the table to zoom in.
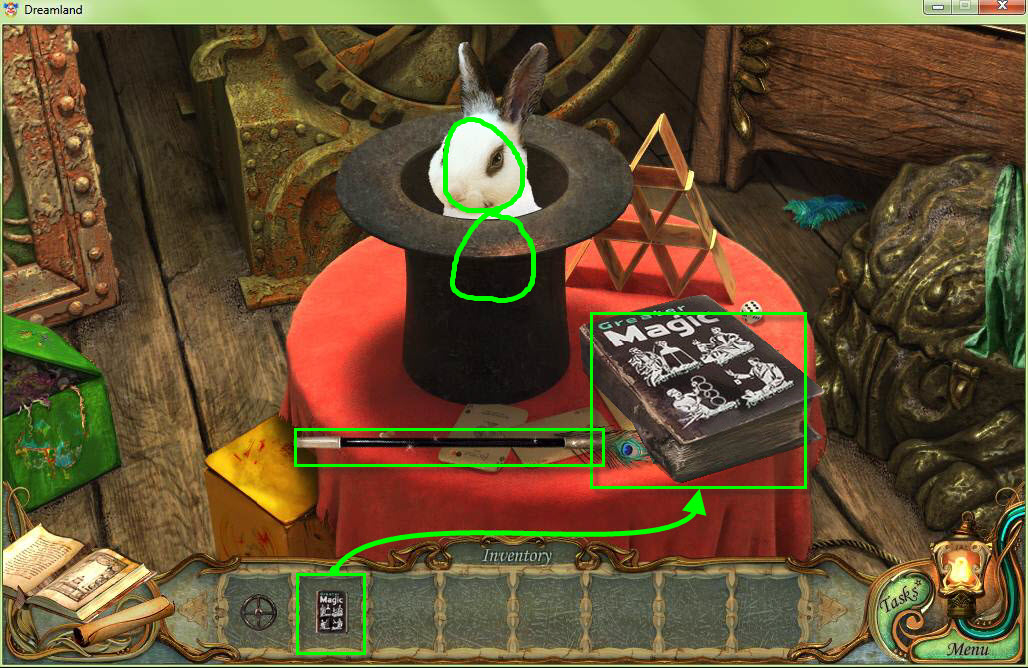
- Use the book on the table.
- Click on the book to see how to cast the spell.
- Grab the wand and while holding down the left mouse button, draw a figure 8 in the air above the rabbit.
- The rabbit will disappear and the flowers will appear. Grab the flowers.
- Zoom into the dresser.
- Click on the drawers until the drawer with the flower opens on the right as shown above.
- Put the flowers in the drawer and then click to close it.
- The drawer with the star key will open.
- Grab the star key.
- Go back to the circus ring.
- Use the star key on the last cage to open it.
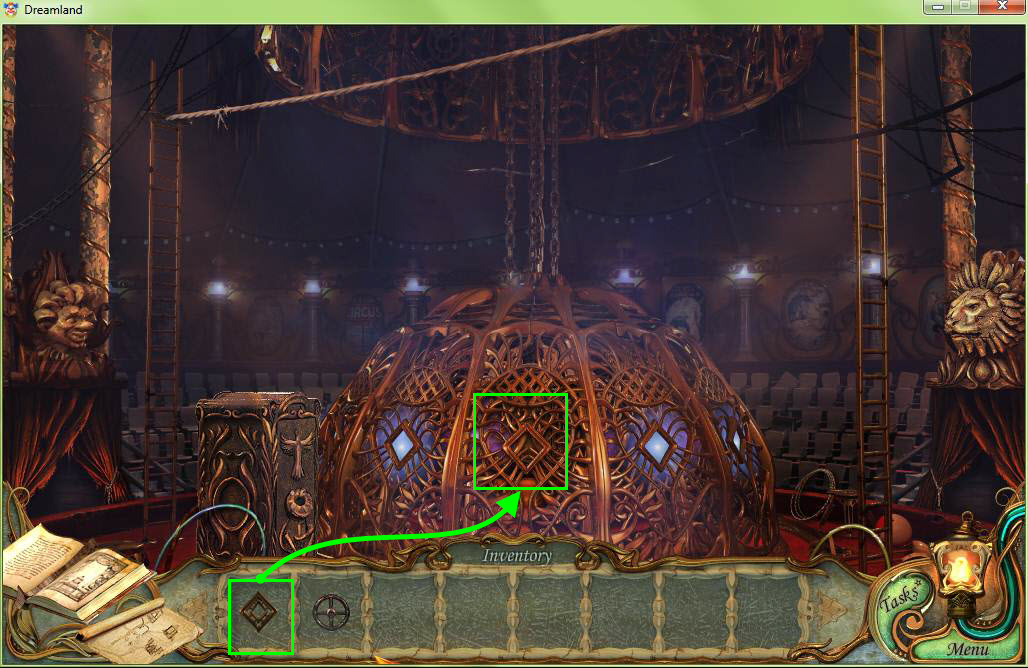
- Click on the safe to zoom in.
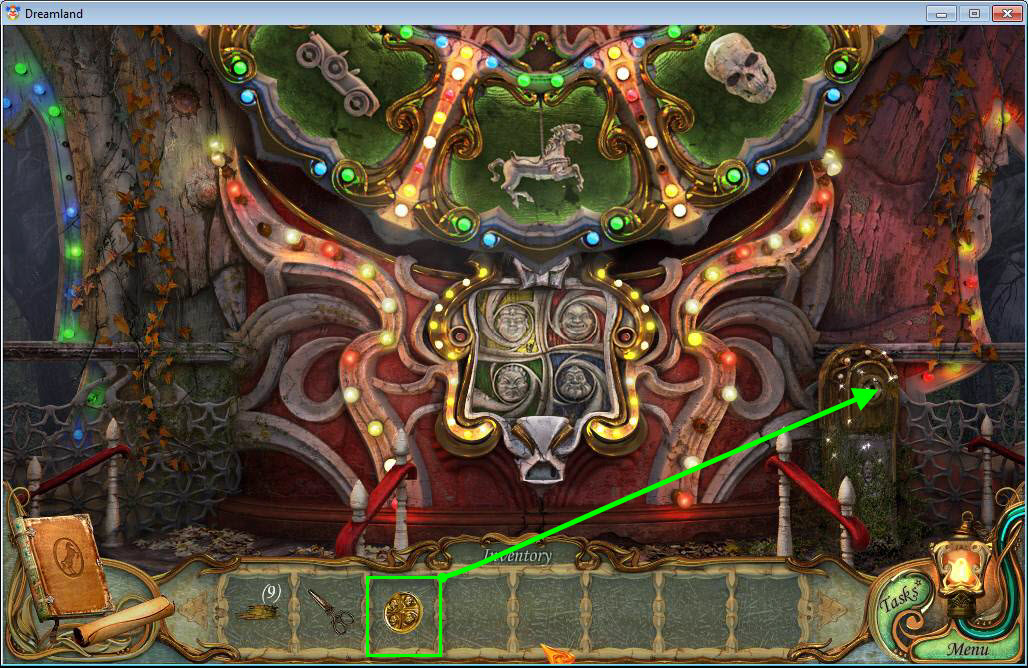
- Use the wheel on the safe.
- Remember the tag in the dresser you found... check your diary. The numbers 4713 were on the tag.
- Input the numbers 4713 in the safe to open it.
- Congratulations! You ripped up the contract and saved your brother!
- But it's not over yet...
Extended Version
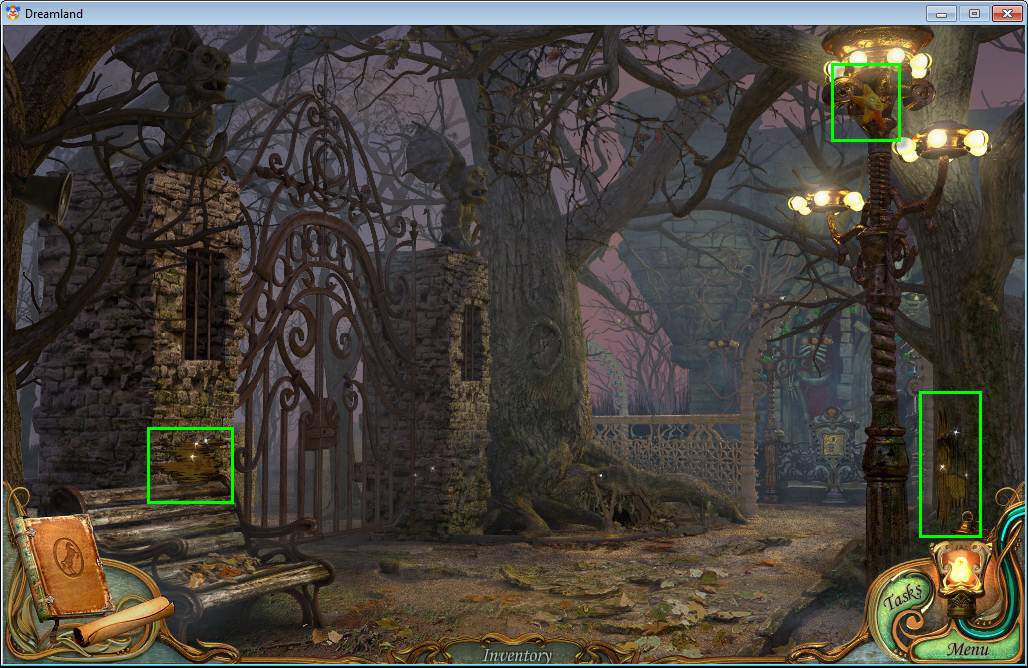
- You now have the Cemetery Key in your inventory.
- Go to the Cemetery gate on the path.
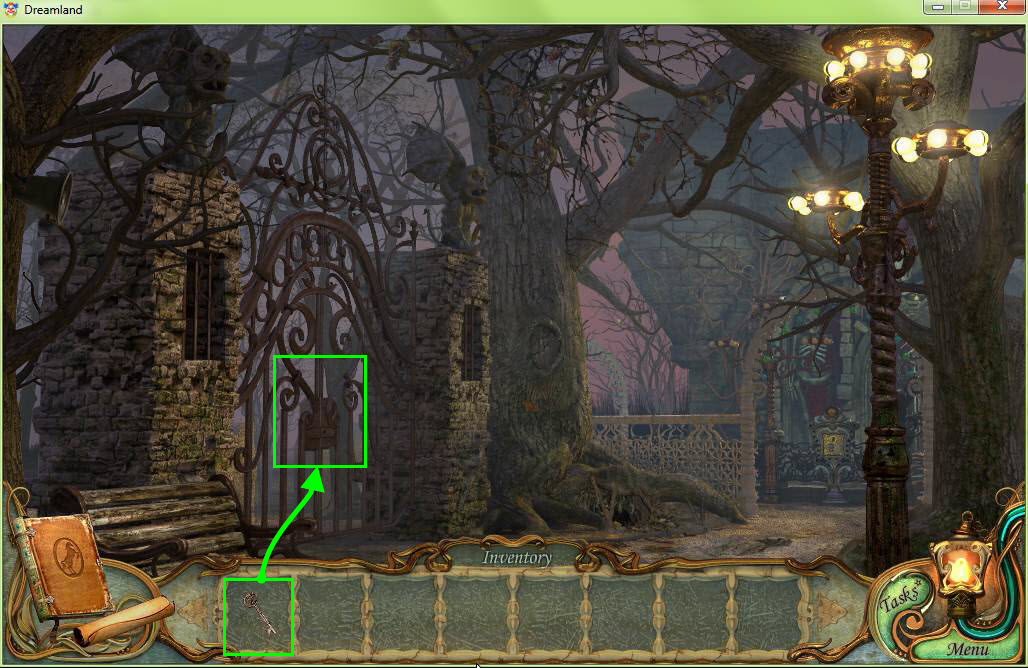
- Use the Cemetery key on the gate to unlock it.
- Go forward through the gates to the Cemetery.
- Here you will find all the lost souls who weren't as lucky as you and your brother.
- Take the ladder on the left.
- Grab the metal dove on the gravestone.
- Your new quest is to find all the missing metal doves.
- Go to the cafe and click on the side of the building to get a clue.
- Now, go to the shooting gallery.
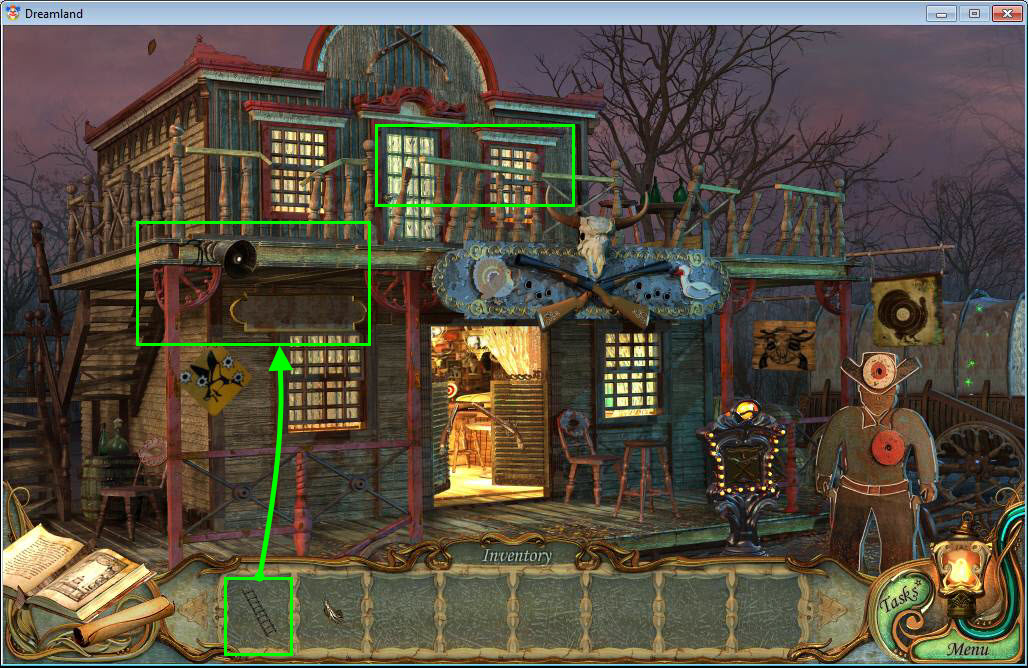
- Use the ladder on the side of the shooting gallery.
- You now have access to the upstairs and the secret attic.
- Click to go into the secret attic.
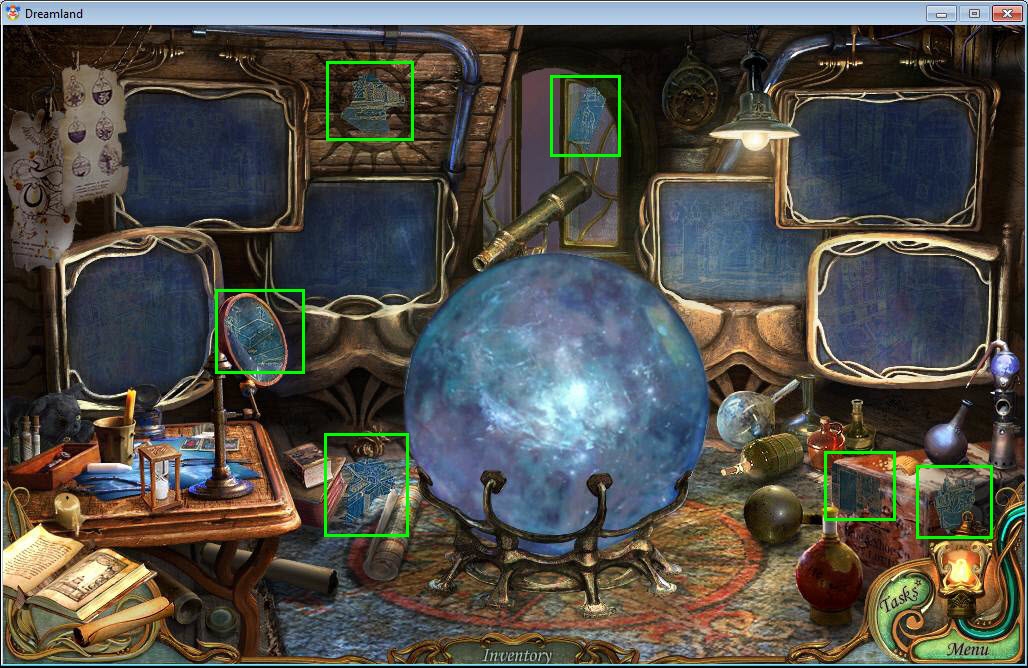
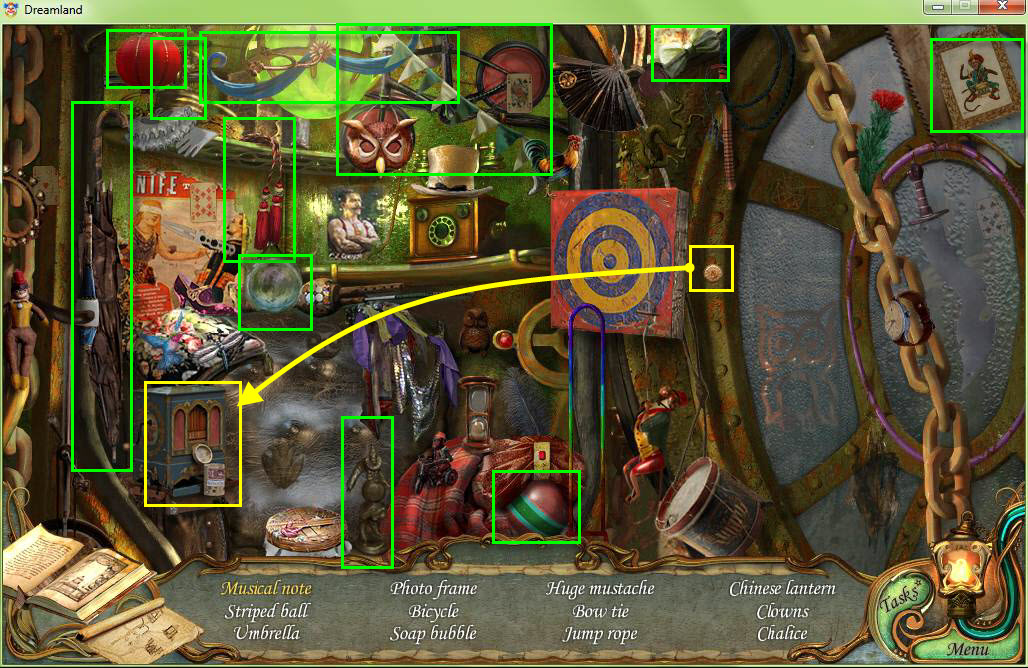
- Find all the pieces of the chart in the room. There are 6 in all. See the screenshot above for the solution.
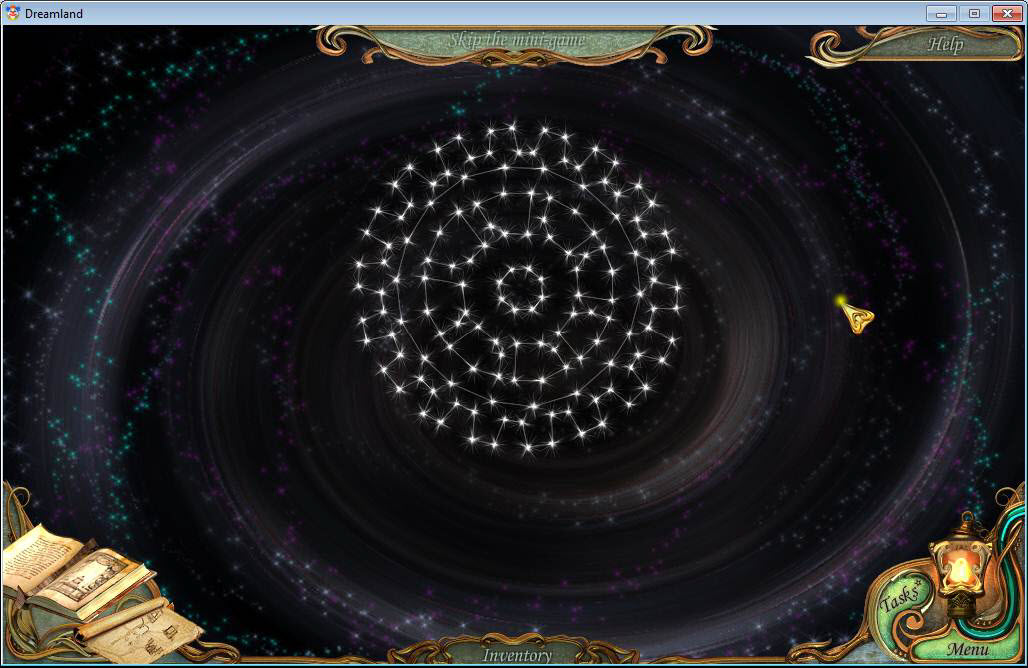
- Now click on the globe in the center to start a mini-game.
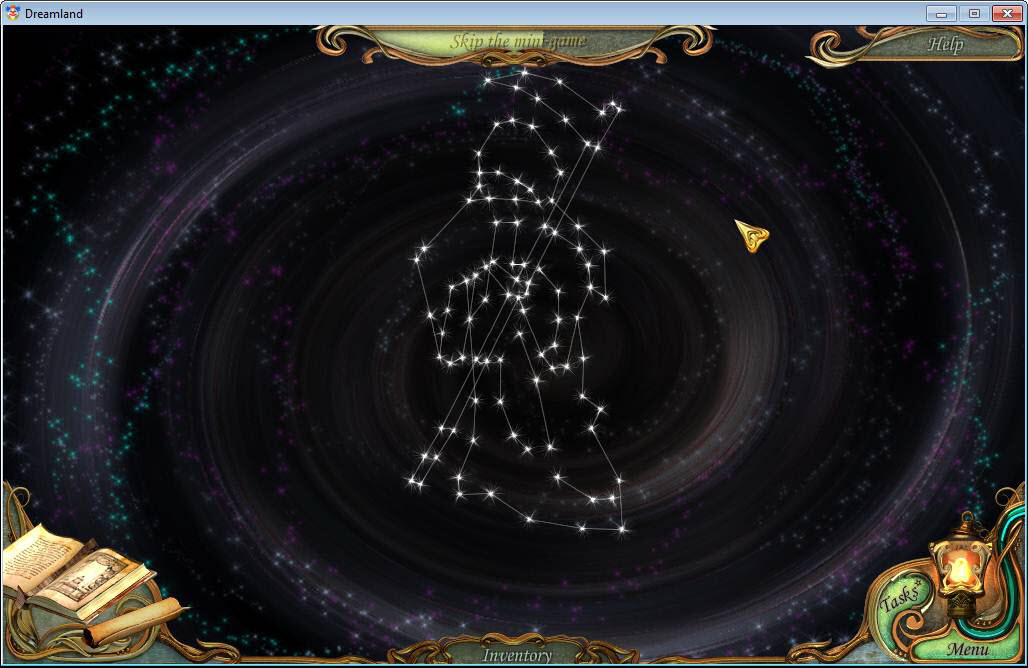
- For this game, you will have to move the stars around with your mouse until you are able to see the grim reaper figure in the stars.
- See the above screenshot for the solution.
- The floor plan for the House of Horrors is now activated. Click on it.
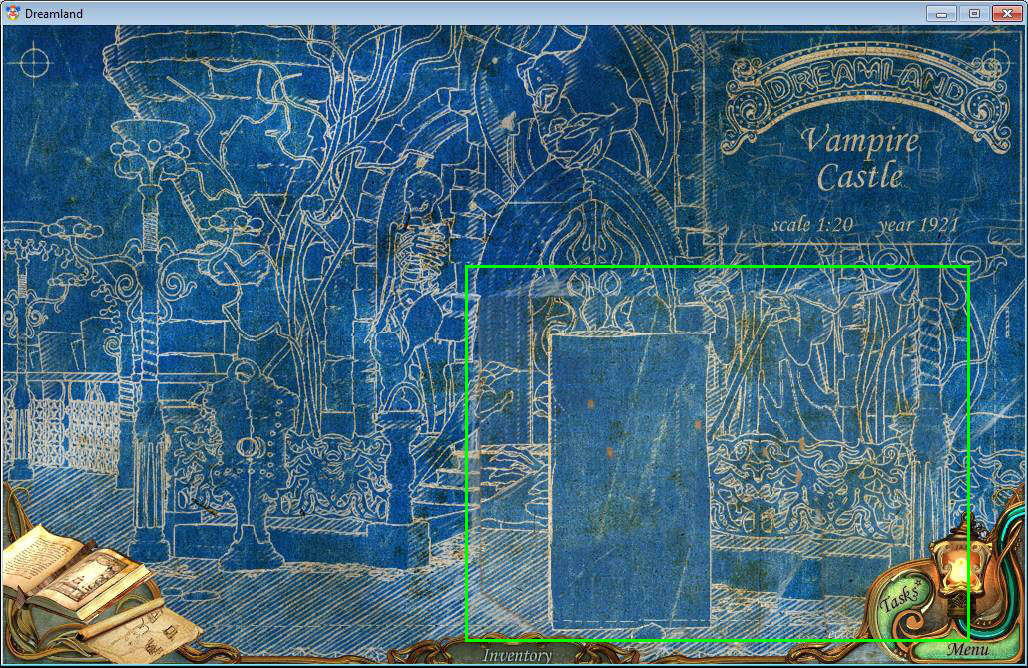
- Use the right blueprint piece on the House of Horrors floor plan.
- Click to zoom out.
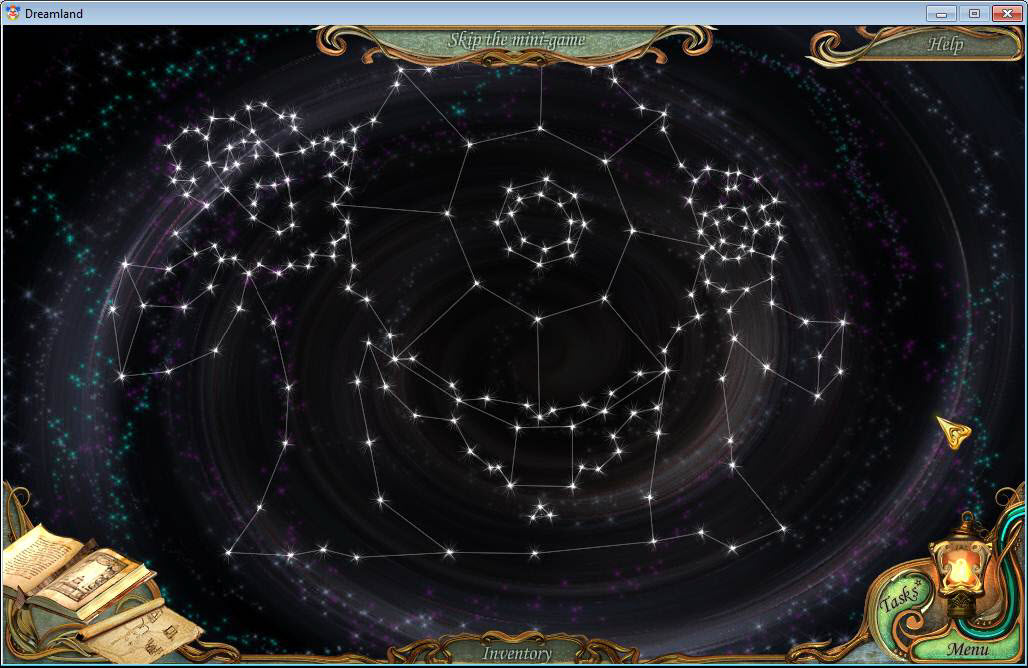
- Click on the globe in the middle again for another star puzzle.

- You need to solve another star mini-game.
- This one looks like 3 athletes.
- The blueprint of the Athlete's Gate is now active.
- Click on it to zoom in.

- Place the missing blueprint piece in the empty slot for the Athlete's Gate floor plan.
- Click to zoom out again.
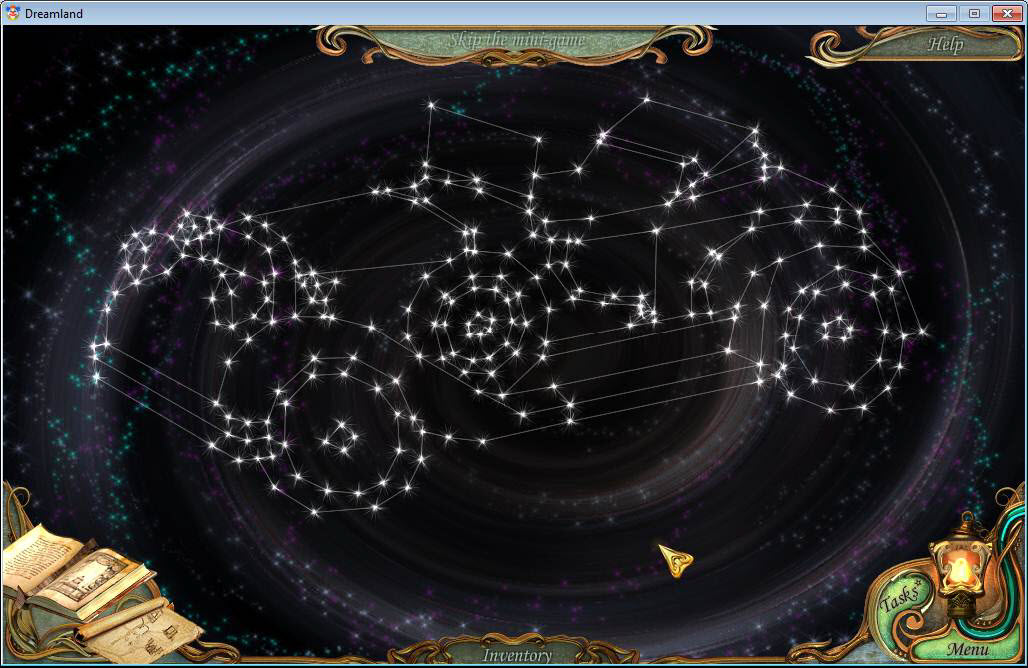
- Click on the globe in the middle to play another star game.
- This time the stars should form an image of a wheel.
- Now the floor plan for the Wheel of Fortune is active.
- Click on it to zoom in.

- Place the missing blueprint in the ripped area of the floor plan for the Wheel of Fortune.
- Click to zoom out.
- Click on the blue globe again to play another star game.
- Move the stars until they form the image of a car as seen above.
- Now the floor plan for the Roller Coaster is active.
- Click on it to zoom in.
- Use the missing blueprint piece to complete the Roller Coaster floor plan.
- Click back to zoom out.
- Click on the globe again to solve the next puzzle.
- Move the stars until they form the image of a gear as seen above.
- The floor plan for the Roller Coaster Control Room in now active.
- Click on it to zoom in.
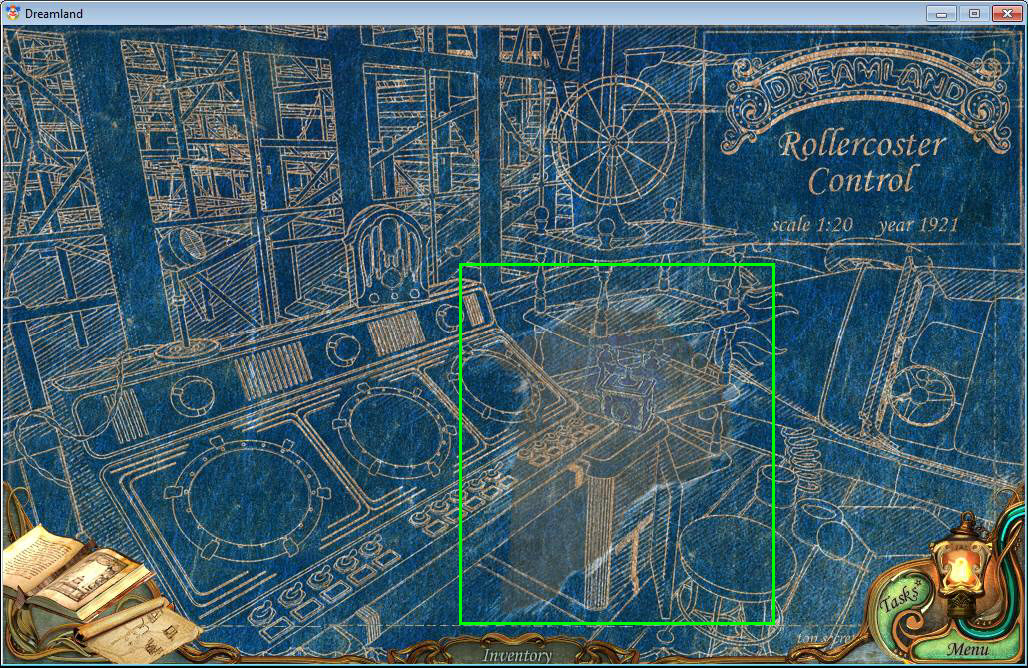
- Use the missing blueprint to complete the floor plan of the Roller Coaster Control Room.
- Click to zoom back out.
- Click on the globe again to play another star game.
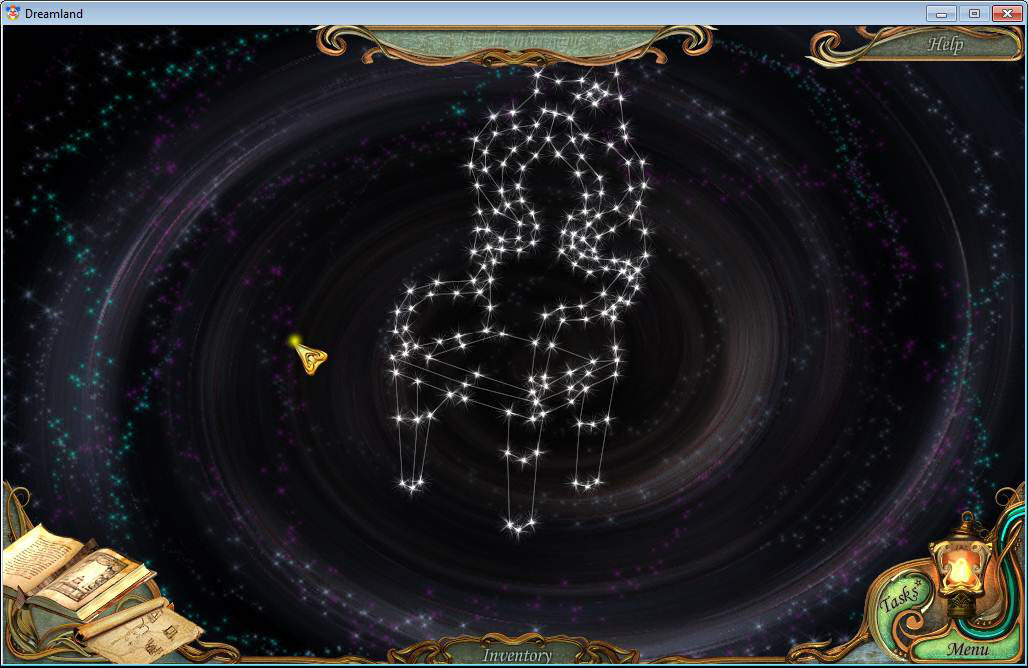
- Move the stars until they form the image of a chair as seen above.
- The final floor plan has activated. This one is for the Captain's Cabin.
- Click on it to zoom in.
- Use the missing piece of the blueprint to complete the floorplan of the Captain's Cabin.
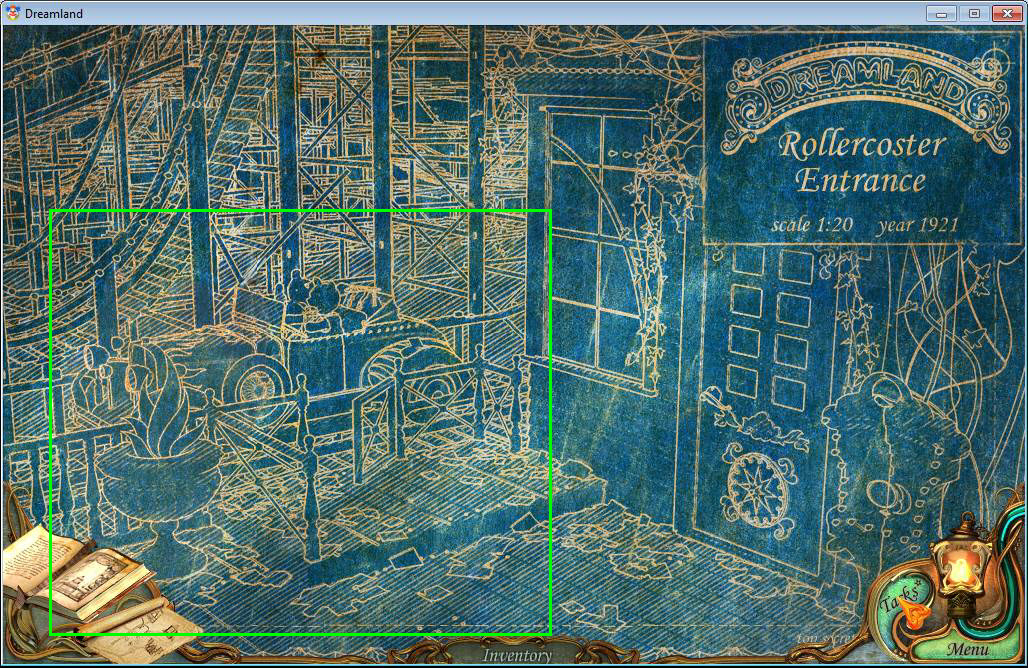
- Go to the Roller Coaster Control Room to play the hidden object area there.
- Find all the hidden items in the scene.
- Once you have found all the items, you will receive the ax.
- Go to the Wheel of Fortune and access the hidden object area there.
- Find all the hidden items in the scene.
- Once you have found all the hidden objects, you will receive a chisel.
- Go to the Fountain and access the hidden object area there.
- Find all the items hidden in the scene.
- Once you have found all the hidden objects, you will receive a shovel.
- Go to the Pirate Ship and access the hidden object scene there.
- Find all the items hidden in the scene.
- Once you have found all the hidden objects, you will receive a bucket.
- Go to the main entrance and access the hidden object area there.
- Find all the items hidden in the scene.
- Once you have found all the hidden objects, you will receive the pincers.
- Go to the Fountain.
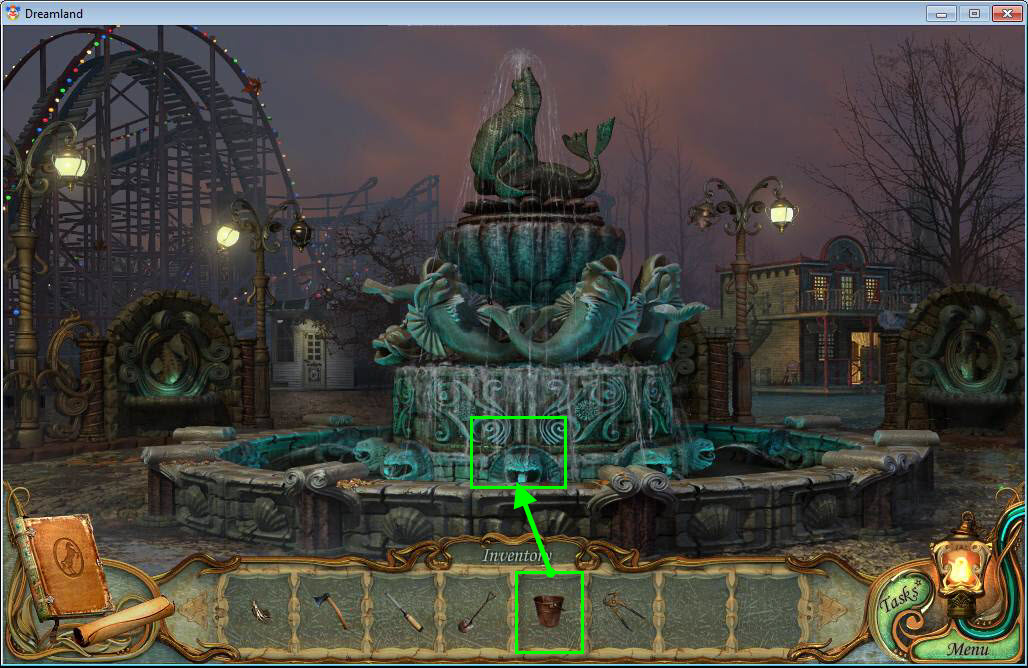
- Use the bucket from your inventory on the Fountain.
- You will receive a bucket filled with water.
- Now go to the Roller Coaster entrance.
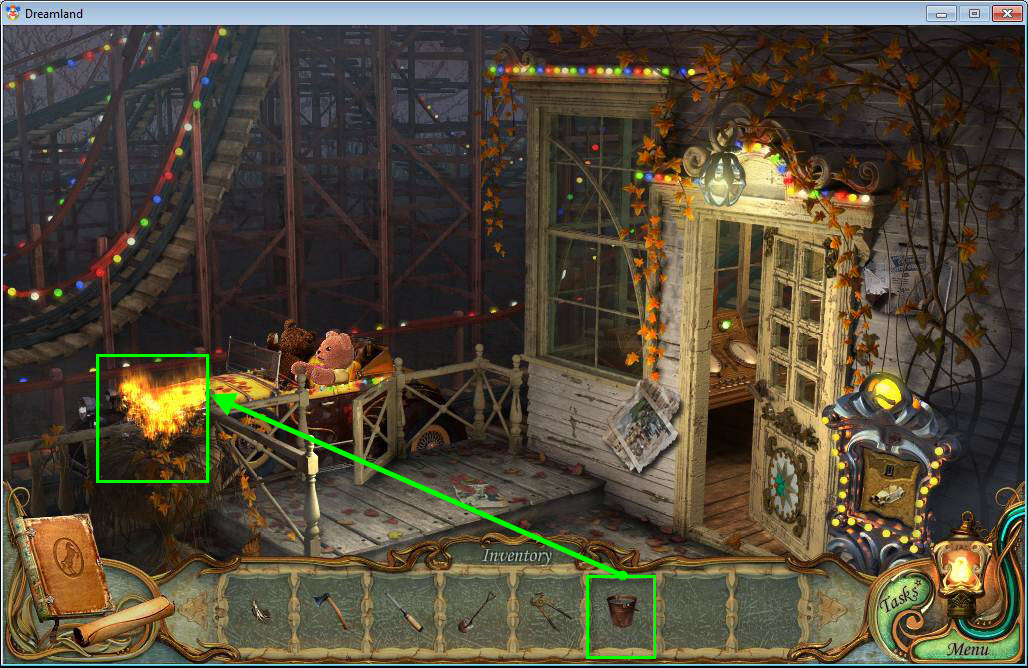
- Use the bucket of water on the fire in the planter.
- Grab the metal dove once the fire is out.
- Go inside the control room of the Roller Coaster.
- Click on the phone in the middle to open the compartment.
- Grab the metal dove.
- Go to the Athlete's Gate.
- Use the ax on the hanging puppet to cut it free.
- Grab the metal dove once it's on the ground.
- Go to the Wheel of Fortune.
- There's a mound of dirt in front of the Wheel of Fortune.
- Use the shovel to dig up the dirt.
- Grab the metal dove.
- Go to the Pirate's Ship and enter the Captain's Cabin.
- Use the pincers on the crate at the bottom-right of your screen to remove the nails.
- Grab the metal dove.
- Go to the House of Horrors.
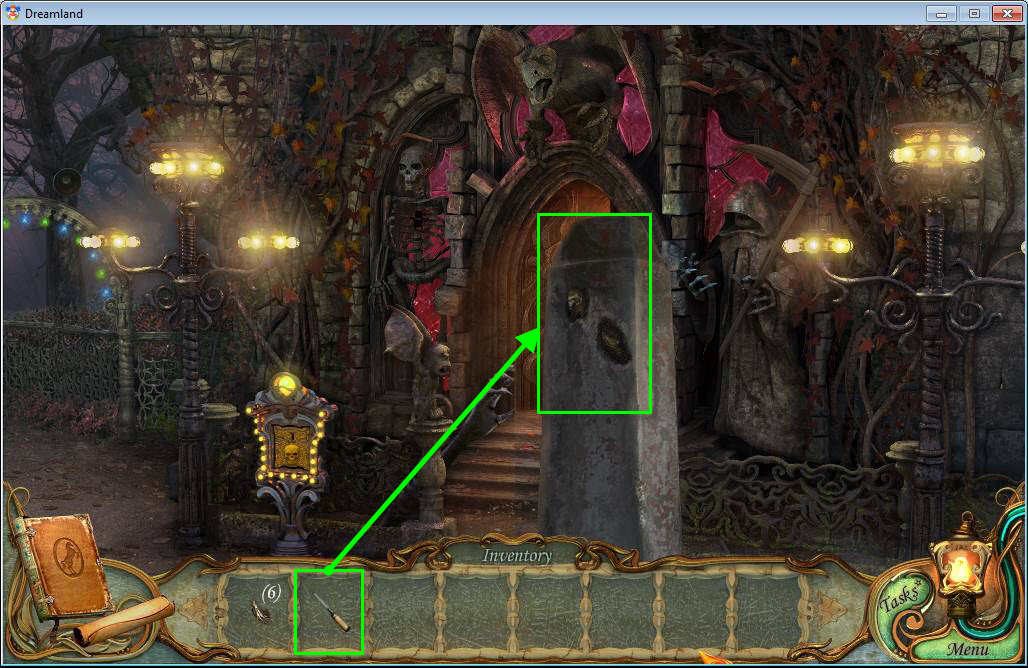
- Use the chisel on the stone outside the House of Horrors.
- Grab the metal dove.
- Now that you have found all the metal doves, go to the Cemetery.
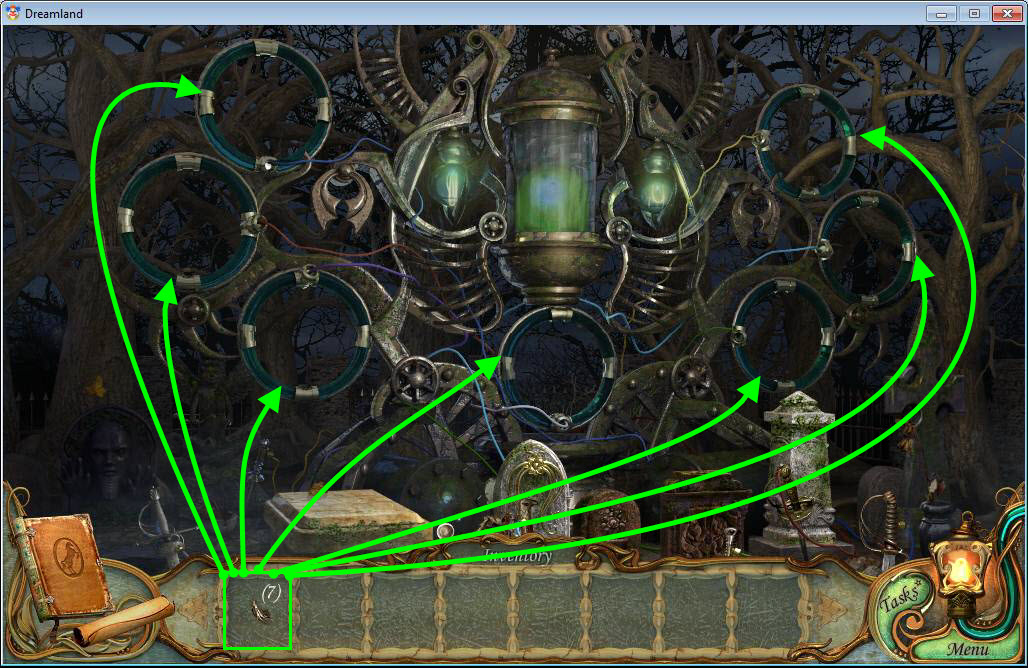
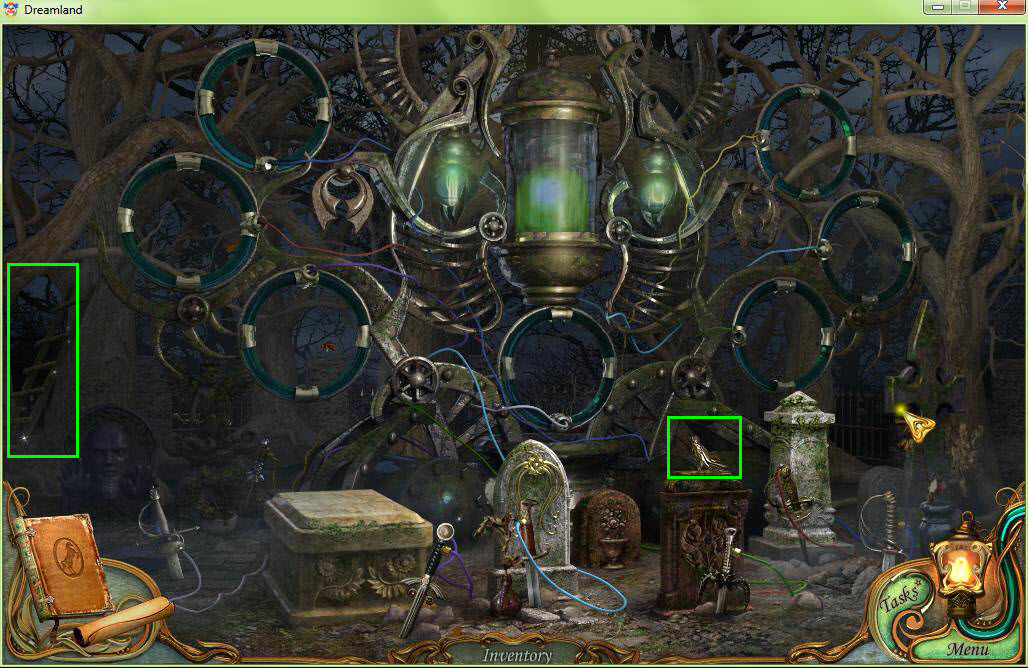
- Use the metal doves on the rings on the machine. They must be placed in the right spot. The hints around the park that you've seen on the walls can help you, so check your diary.
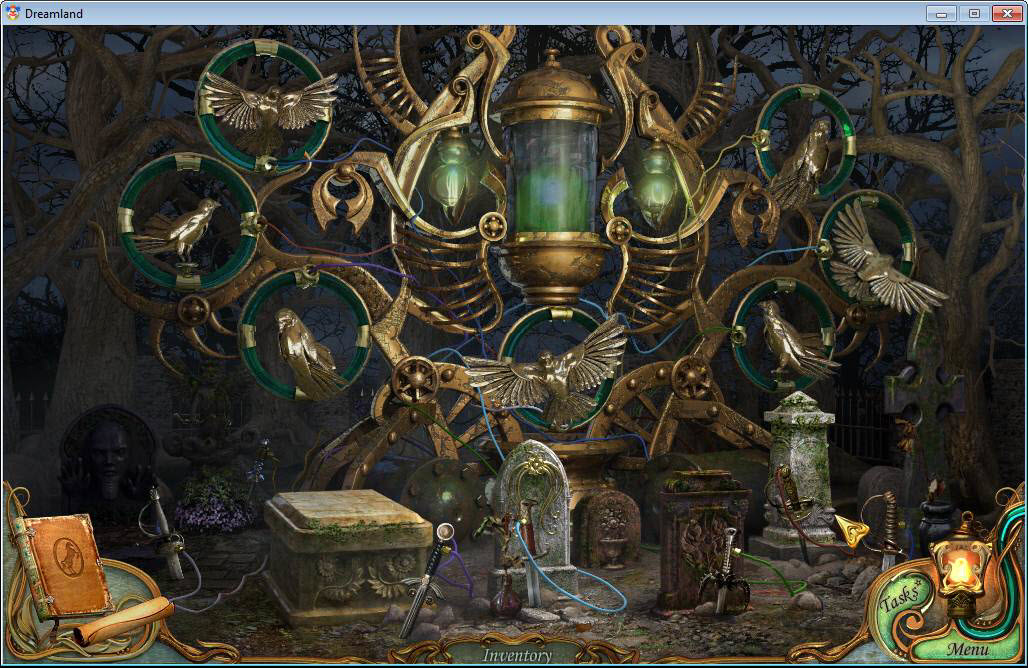
- The screenshot above shows the solution for placing the doves correctly.
- Once all the doves are placed correctly, the dwarf will come out.
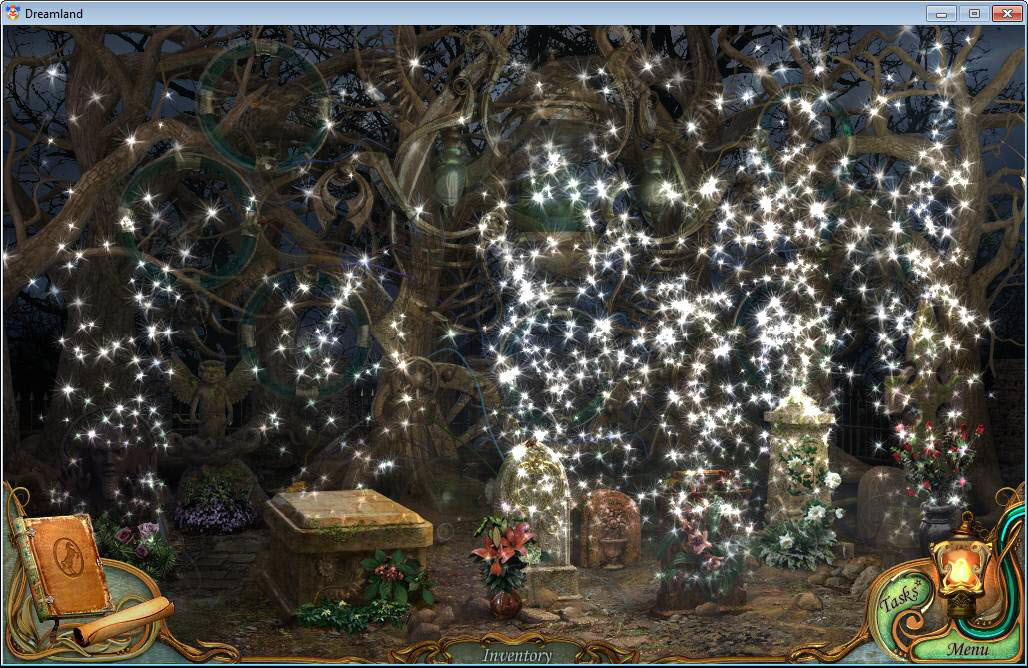
- Congratulations! You released all the souls and beat the game!
- And that's the end of the evil dwarf and his scary Dreamland!
- Or is it?
Content(s) of this game guide may not be copied or
published on any other site without permission from Casual Game Guides.
©CasualGameGuides.com 2006 - 2021