
Blood and Ruby
The Blood and Ruby Walkthrough has a complete step-by-step strategy guide, with screenshots throughout the game, including hidden object areas and puzzle solutions.
In Blood and Ruby, you are the main character, Ruby, boldly searching for her brother Marcus and taking on evil vampires as she does. Whether you’d like to casually review the game or are stuck on a particular task, this walkthrough should guide you (and Ruby) safely.
GENERAL INFORMATION AND TIPS
· This game contains a lot of dialogue; when in doubt, keep clicking until the dialogue is complete. Sometimes you must even click between short activities before it will allow you to complete your next task.
· A speech box (red with dots) appears when you hover over a person; always click when you see this to receive new and necessary information.
· A hand cursor appears over objects when you should pick them up.
· A red arrow appears to show where you can move. Whenever you want to go back to where you were, the arrow will appear close to the bottom of the screen (just over your inventory box).
· A red magnifying glass will appear as your cursor over areas where you can zoom in.
· A red gears cursor shows when and where you can use one (or more) of the items in your inventory.
· Sparkles appear over areas where you need to click to get new information, solve puzzles, and gain items for inventory.
· Your ‘Menu’ button will be on the lower left corner of your screen. A ‘Hint’ button and a map will appear on the lower right corner. Your inventory will appear in between these items in the bottom center of the screen.
· If you are stuck on a mini-game, after a certain amount of time has passed, red dots on the lower right-hand corner will disappear and leave a box marked “SKIP”. You will still receive the inventory items even if you skip the game.
CHAPTER ONE
Outside
· Click on the guard.
· Click on the letter opener on the ground to pick it up.
· Grab the letter opener from your inventory and give it to the guard.
· Click the top of the stairs to proceed.
Courtyard
· Click on the two vampires to the right side of the building.
· Zoom in on the poster and newspaper for more information.
· Enter the hotel, Albergo, on the left side.
Albergo
· Click on the cabinet where it sparkles. For this mini-game, you must find the matching pairs. When you find a match, the box will stay open. When you don’t find a match, the boxes will close and you’ll repeat the process until all items have been matched.
· When you finish, you’ll receive Marcus’ room number.
· Click on the logbook to see a message from Marcus. Click on the map to pick it up.
· Go upstairs.
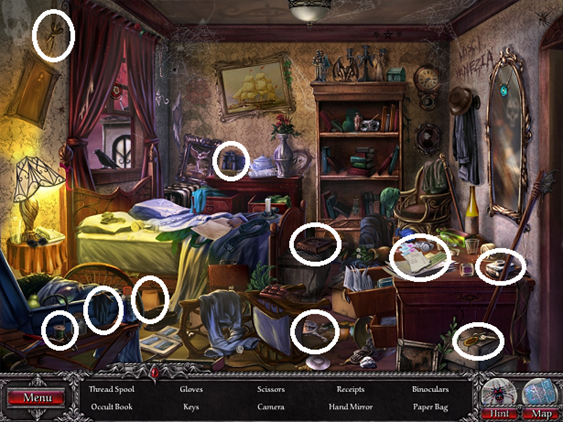
Marcus’ Room
· Locate the objects as shown.
· You will receive keys and receipts to take with you. Leave the room by clicking the red arrow that appears just over your inventory panel.
Albergo
· Click the red arrow again to exit the hotel.
Courtyard
· Click the arrow to go down the alley on the left.
Alley
· Click the poster for more information.
· Click the arrow to take you into the Antiquariato.
Antiquariato
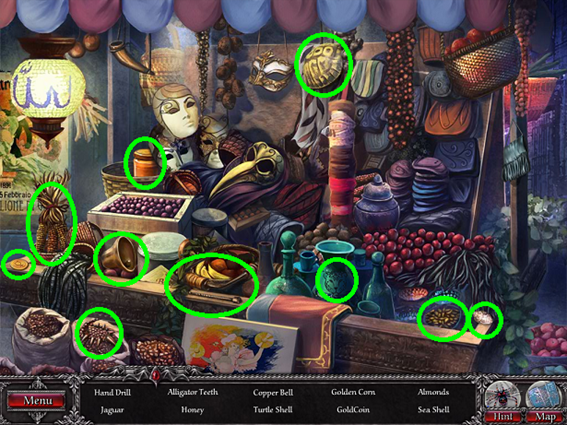
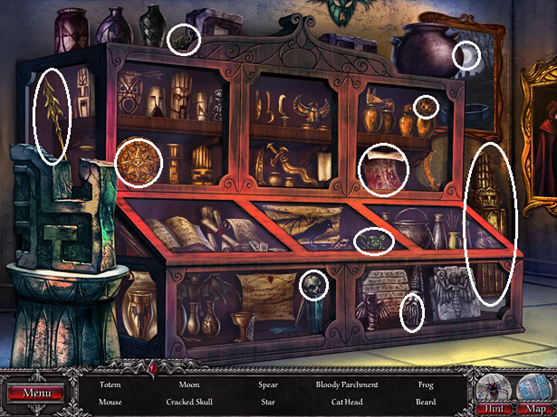
· Hand receipts to Argento, the store owner, and converse with him.
· Locate the objects as shown.
· You will receive Marcus’ journal. Then use the map to go back to the Courtyard.
Courtyard
· Use the key from Marcus’ room to open the gate to the alley on the right side of the screen. Click to follow the arrow pointing down the alley.
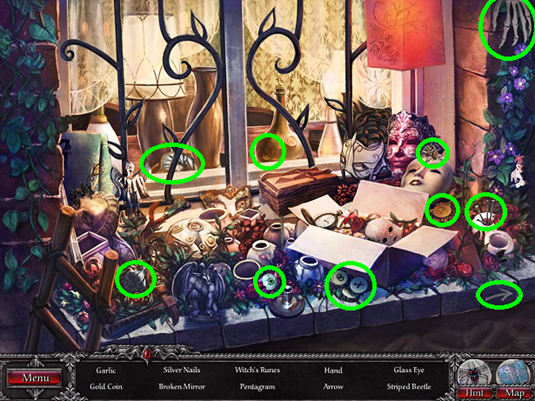
Canal
· Locate the objects as shown.
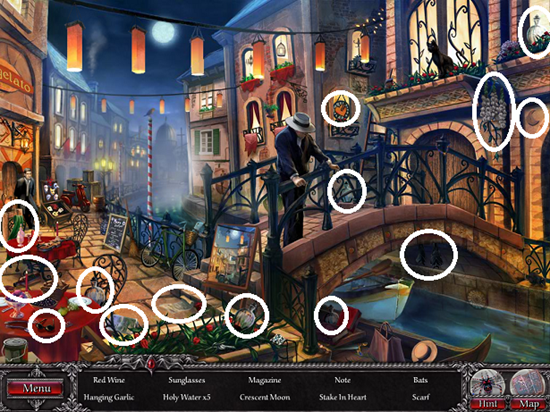
· You will receive a green scarf. Give it to the man on the left side of the screen. He will speak with you and then give you a recipe.
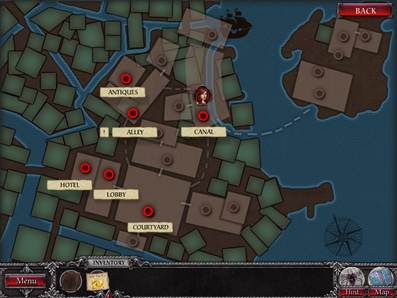
· Use the map to go back to the Alley. Note that when an exclamation point or number appears next to a location’s name, there is something you should do there.
Alley
· Instead of going into the Antiquariato, go towards the door on the right side of the screen.
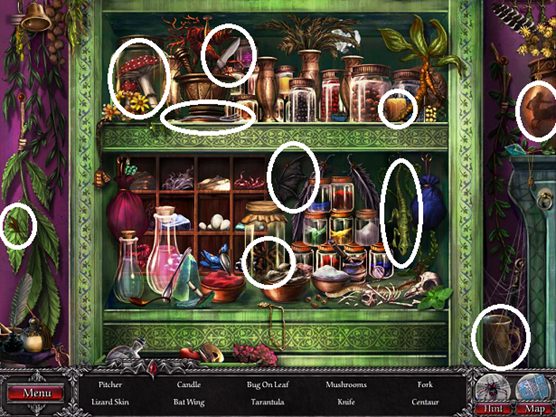
Herbalist
· Give the recipe to Orazia.
· Click on the sparkles on the left side of the screen where there are shelves.
· Locate objects as shown. You will receive ingredients for your potion.
· Click to go through the curtains on the right side to brew your potion.
· You’ll see a cauldron, your recipe, ingredients, and tools. You’ll need to add ingredients in order. You can chop or grind an ingredient by simply dragging it to the cutting board (to chop) or mortar and pestle (to grind). Add ingredients in the following order:
o Tarantula (straight to the cauldron)
o Poison berries (grind, then add)
o Opal rocks (grind, then add)
o Stinging nettle leaves (straight to the cauldron)
o Blood roots (chop, then add)
o Garlic oil (straight to the cauldron)
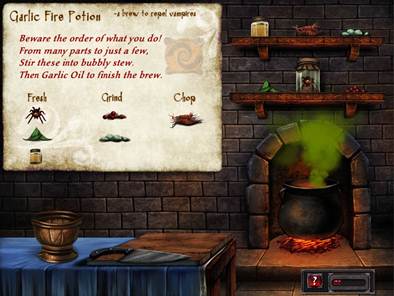
· You’ll receive the Garlic Fire Potion.
· Use the map to return to the canal.
Canal
· Pick up the note on the closest table.
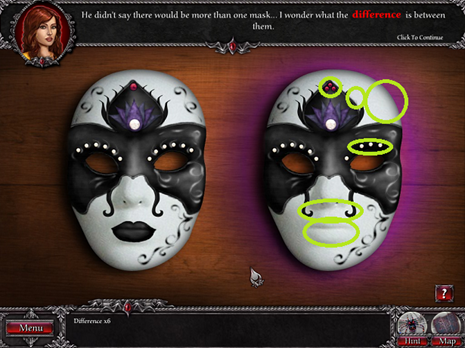
· Click on the masks that are sparkling.
· Click on all of the differences between the masks as shown. You will receive the Gondola ticket.
· Give the ticket to the Gondolier at the bridge.
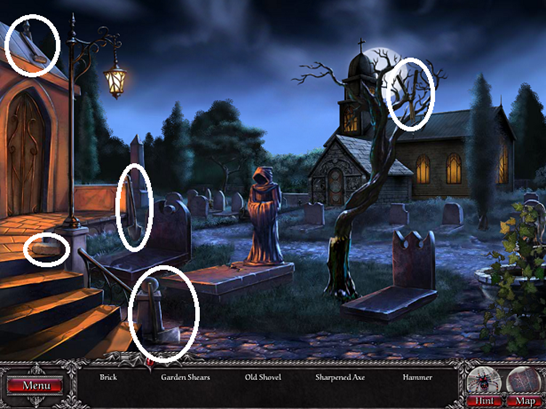
· When you arrive at Cemetery Island, click on the graves (on the left) that are sparkling.
· Located the hidden objects as shown. You will receive a photograph.
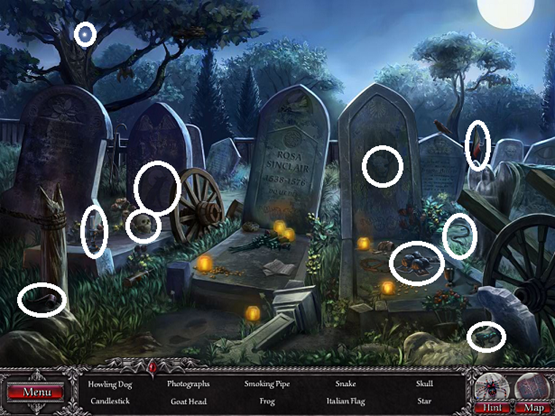
· You will then need to locate the hidden objects for the entire graveyard as shown. You will receive a brick, hammer, gardening shears, an axe, and a shovel.
· You will then be greeted by two vampires. You will have to fight them off with the weapons you’ve just collected. You must utilize the weapons in the following order:
1. Drag the Fire Garlic potion to one of the vampires.
2. Cut the tree with the axe (where there is a crack near the bottom of the tree).
3. Use the shovel on the cracked tomb next to the male vampire.
4. Use the gardening shears on the ivy hanging on the fountain.
5. Use the hammer on the fountain you’ve uncovered. The holy water will scare the female vampire away.
6. Drag the brick to the lantern above the male vampire. The lantern will break and the fire will scare him away as well.
CHAPTER TWO
Courtyard/Albergo
· Talk to Stratton
· Enter the hotel on the left
· Go to Marcus’ room upstairs.
Marcus’ Room
· Use key to open the sparkling trunk.
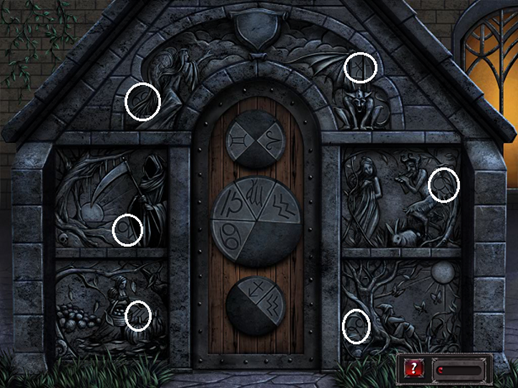
· To unlock, line up the colored lines as shown.
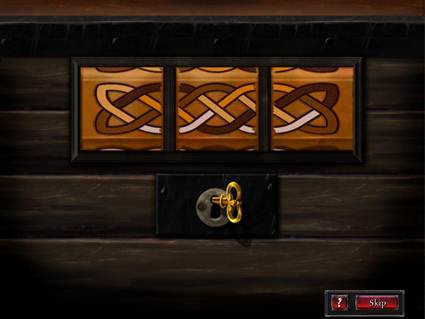
· You can line them up by clicking each section which rotates the colors.
· After it is correct (as shown above), click the key to open the trunk.
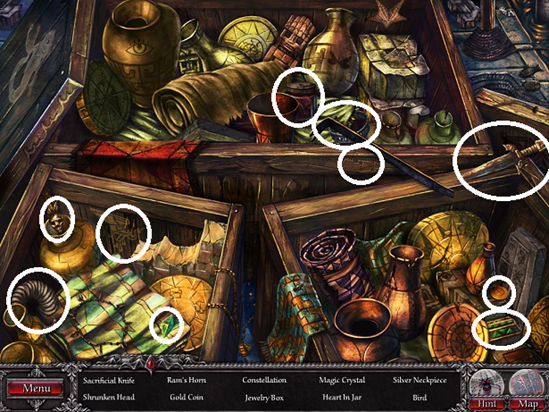
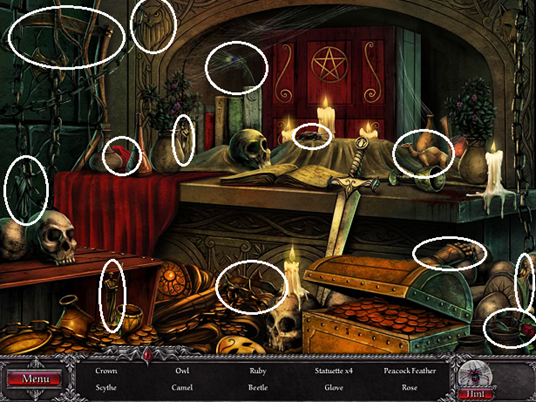
· Once in the trunk, locate hidden objects as shown.
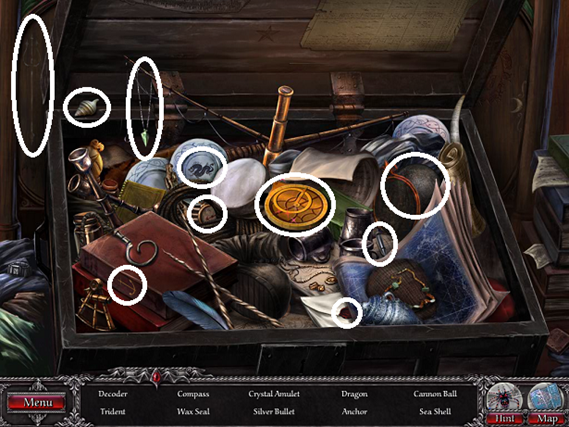
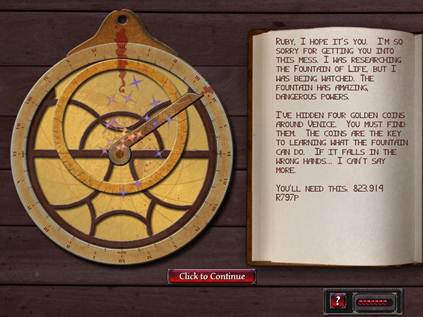
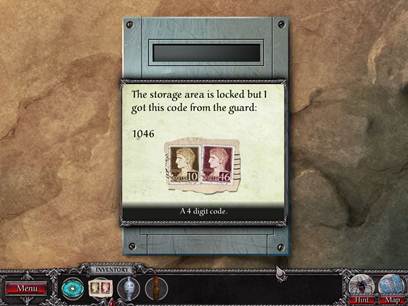
· The gold decoder in the middle of the trunk has a mini-game inside. You will need to line up the blood stains and adjust the pointer to the last blood stain, as shown. This will allow you to read the coded message and to obtain a secret number.
· Return to the alley.
Alley
· Talk with Argento
· Click on Argento’s wagon.
· Locate the hidden objects as shown. You will receive a gold coin and a scrap of a map paper.
· Return to the Canal using the map.
Canal
· Locate the hidden objects as shown. You will receive another gold coin.
· Go to the docks by clicking the ship in the background at the Canal.
Docks
· Drag picture to the matching crate. Click on the crate.
· Locate hidden objects as shown. You will receive another gold coin.
· Use the map to go to the Library.
Library
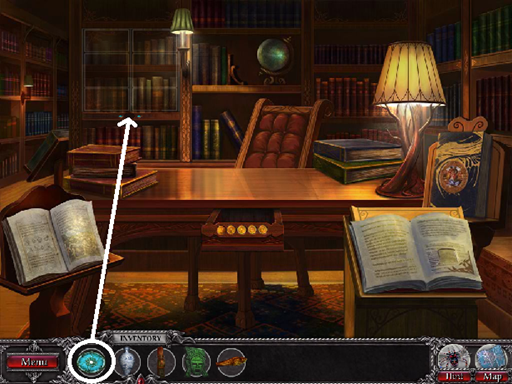
· Drag the Map Piece (scrap of paper) to the torn up mask on the desk.
· Assemble the pieces by clicking and dragging them to the correct location. Some of the pieces must be rotated to fit; you can rotate the pieces by clicking on them.
· When you place a piece correctly in its location, the map will lock that piece and change the color. Start by locating the corners, then the sides, then the inside pieces.
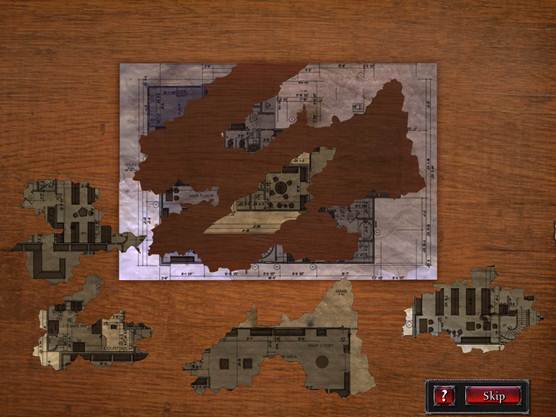
· After the map is correct, drag the numbered code from your inventory to the map.
· Proceed through the space on the right side of the screen to go into the Library Enclave.
Library Enclave
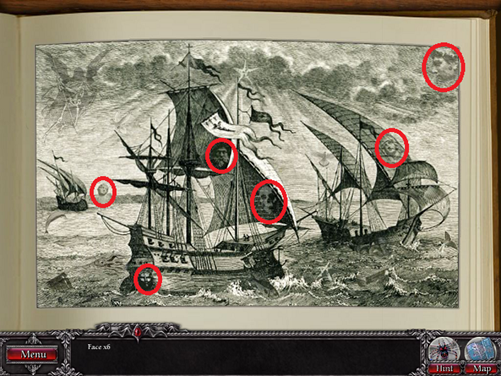
· Click on the book on the lower right side of the enclave.
· Find six faces in the picture as shown. You will receive the fourth gold coin.
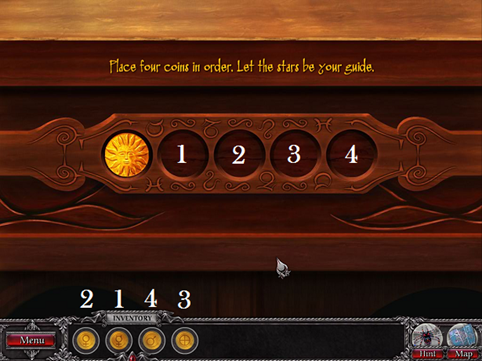
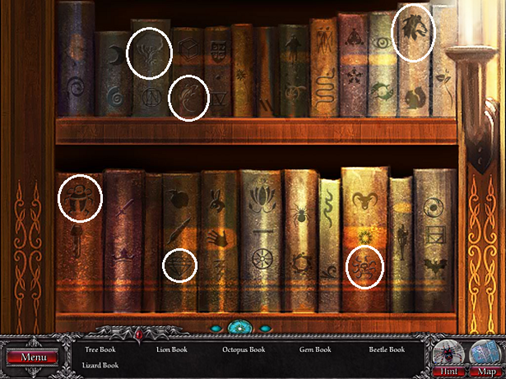
· Click on the book in the lower left corner of the enclave. Pay attention to the order of the symbols.
· Click on the front of the desk where you see another gold coin.
· Place your gold coins in the correct order as shown. You will receive a scroll and Museum Pass.
· Return to the Courtyard.
Courtyard
· Give the museum pass to the Guard. When he opens the door, click to go into the Museum.
Museum
· Click on the left side of the screen where you see the sparkles.
· Locate hidden objects as shown. You will receive an emblem.
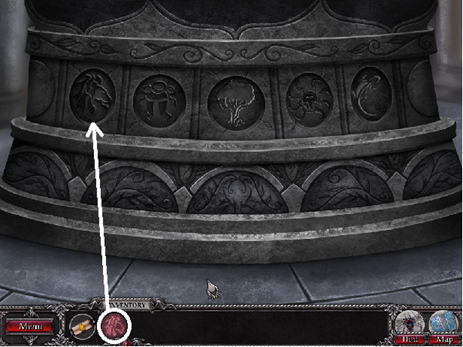
· Click on the fountain to view it closer.
· Match up the lion emblem with the correct place on the fountain base as shown.
· Click to go back to the Courtyard.
Courtyard
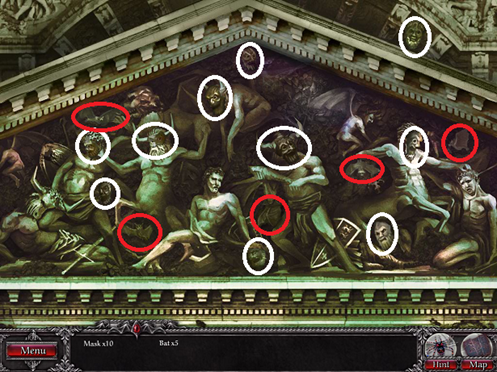
· Click at the top of the Museum where it sparkles over the sculpture.
· Locate the masks and bats as shown.
· Return to the Antiquariato.
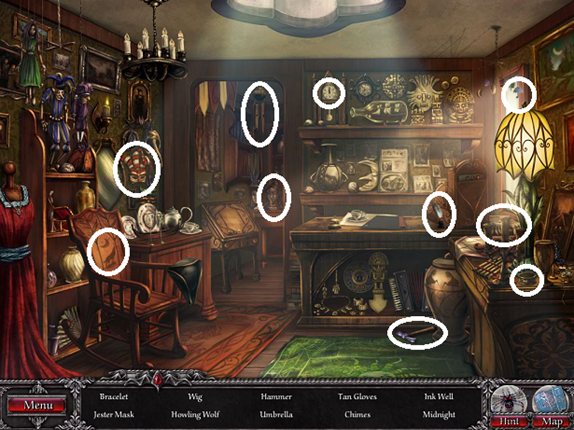
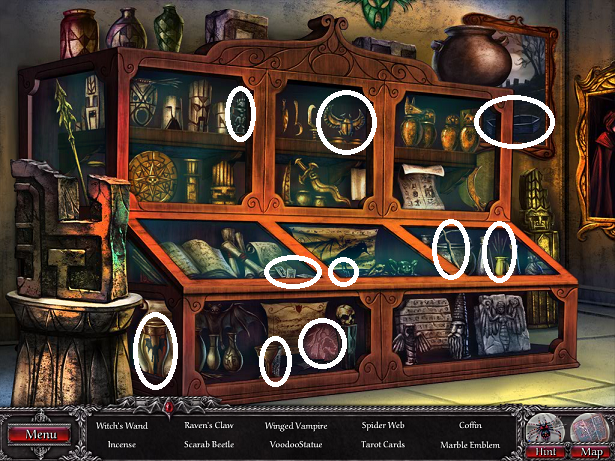
Antiquariato
· Argento has been murdered and there are enchanted mannequins.
· Locate the hidden objects as shown. You will receive all items you find.
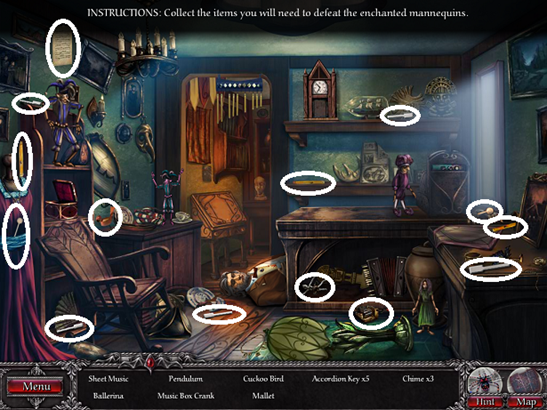
· Use the found items to complete the broken pieces. The music box, accordion, wind chimes, and cuckoo clock all must be fixed. Each item has two elements; the first element that must be used for each object is the element that repairs the function itself. The second element will be the item that makes the noise as follows:
1. Chimes then Mallet
2. Accordian Keys then Sheet Music
3. Pendulum then Cuckoo Bird
4. Music Box Crank then Ballerina

· Take the Amulet from Argento’s body.
CHAPTER THREE
Herbalist
· Talk with Orazia.
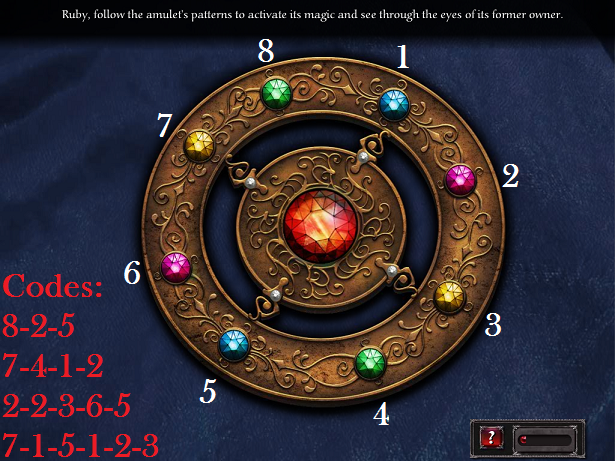
· Give Orazia the Amulet, then click on her again.
· Repeat each pattern the lights on the amulet make as shown.
· You will then be transported back in time. You must re-explore to use your map.
· Proceed to the docks.
Canal
· Talk with Stratton.
· Go to the Docks by clicking the ship in the background.
Docks
· Click on the plank to go up to the Ship.
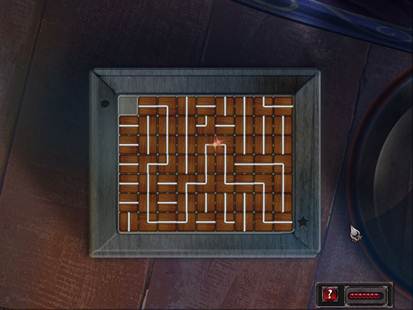
· Solve the mini-game as shown below. You can start by clicking on the rose 12 times, then follow the path. Alternatively, you can start immediately and go a different course as followed (click on the rose to stay where you are but move the guards):
o Down 3x
o Left
o Stay
o Left
o Up
o Stay 2x
o Left
o Right
o Stay
o Down
o Stay
o Down 3x
o Up
o Down
o Up Left 6x
o Up
o Stay
o Up
o Left
o Up 3x
o Stay 3x
o Up
o Left
o Up
o Left
o Up
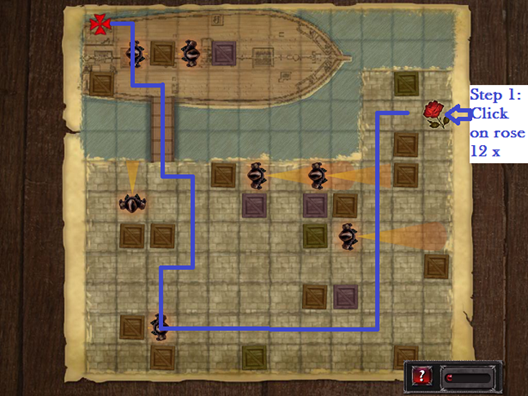
· Click as directed to go onto ship.
Ship
· Locate hidden objects as shown.
· You will receive an Emblem, rope, and a hammer.

· Click on the map behind the lantern in the top right corner.
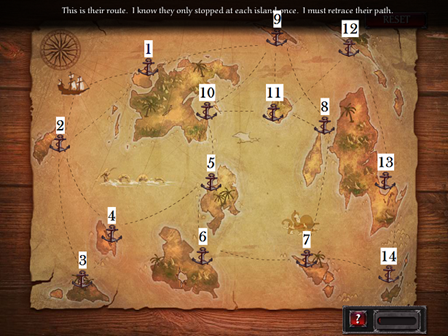
· Solve the mini-game by mapping out a route without visiting each port more than once as shown. You will receive a message.
· Give Stratton the message. You will receive the Sleeping Draught Recipe.
· Move to the Kitchen by using the Map.
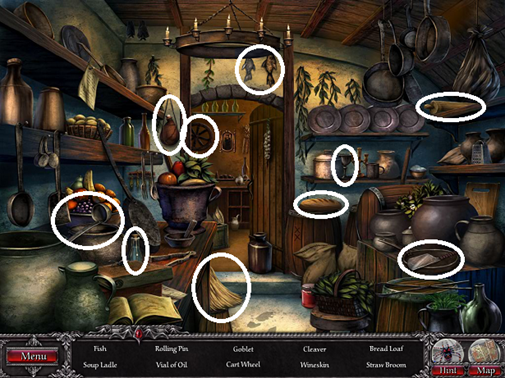
Kitchen
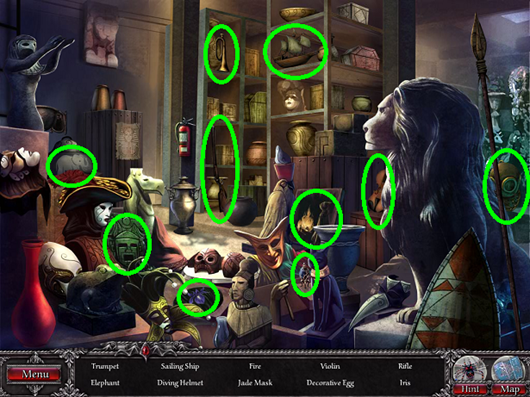
· Locate the hidden objects as shown. You will receive a Vial of Oil and a Cleaver.
· Travel to the Apothecary.
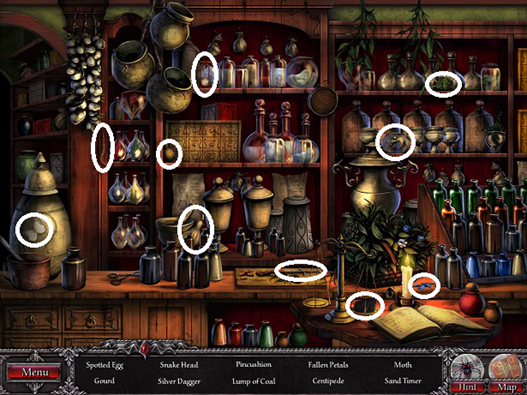
Apothecary
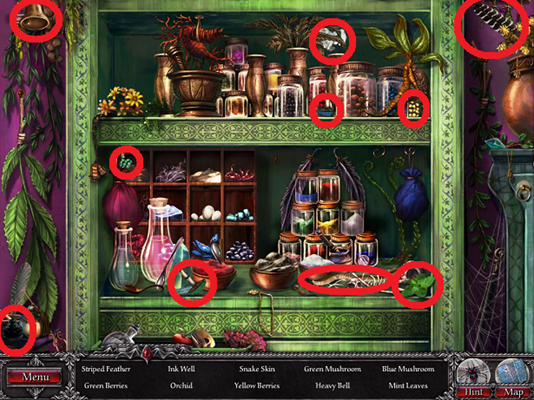
· Locate hidden objects as shown. You will receive Flower Petals.
· Travel to the Courtyard
Courtyard
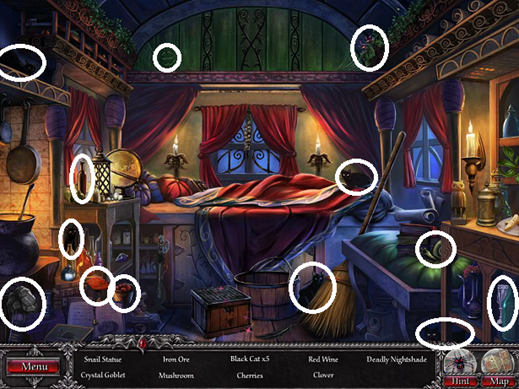
· Talk to Orazia.
· Click on Orazia’s wagon where it sparkles.
· Locate hidden objects as shown. You will receive some Black Cat Fur.
· Click on the cauldron on the left side of the screen and play the mini-game.
o You will add Black Cat Fur, Petals, and the Vial of Oil until your cauldron is green, has six bubbles, and has an even number of large bubbles.
o The correct formula varies.
· While still in the wagon, click on the sparkling wooden box with a spider on the front.
o Rotate the tiles until you can make a path for the spider to follow to the star.
o There are several possible solutions; solve as shown or another way.
o You will receive the Wand of Transformation.
o Go to the Alley.
Alley
· Hit the sparking crate with the stone hammer as shown. Pick up the emblem.
· Return to the Courtyard.
Courtyard
· Move the Rope to the Well. Click to pick up the Emblem.
· Go to the Library.
Library
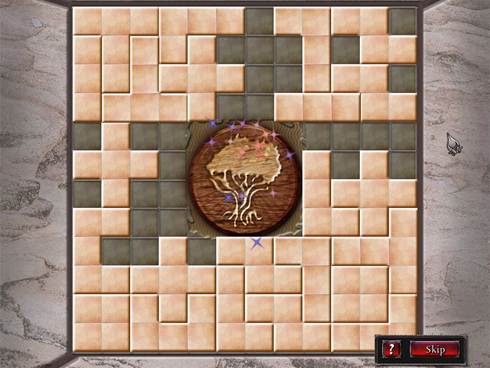
· Click on the sparkling floor tiles to play the mini-games.
· Move the tiles to reveal the tree in the middle. There are several possible solutions. Solve as shown or in another way.
· Go to the Museum.
Museum
· Drag the cleaver to the rope. Retrieve the Emblem that is revealed.
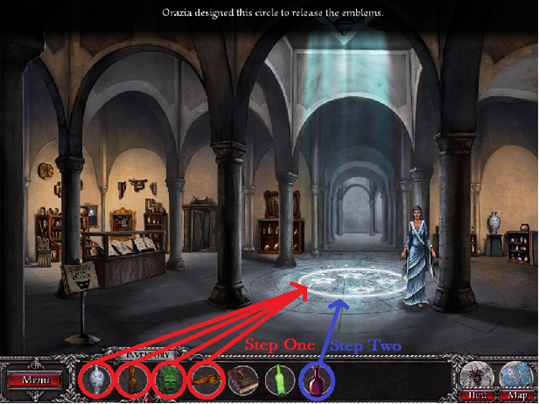
· Match each Emblem with the correct Relic as shown.
· After matching each Emblem to the correct Relic, touch the Wand to safely hide the Emblems.
· Return to the Dock.
Dock/Ship
· Give the Sleeping Potion to Stratton.
· Click on the sparkling coffin on the right.
· You’ll wake up in the hold of the ship.
· Locate the hidden objects as shown. You will receive all items except the Tar Bucket.
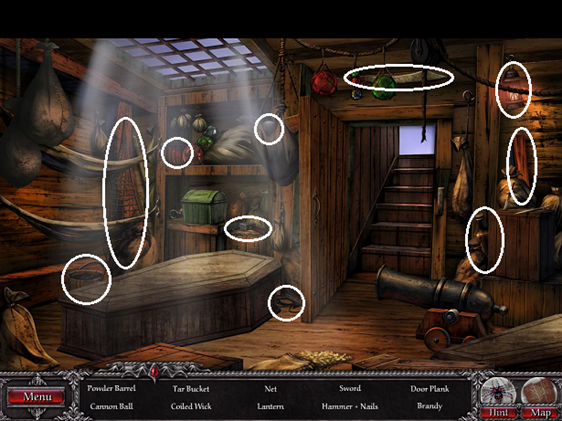
· You will need to defend the hold against the vampires.
o Click on the door to close it.
o Place the Plank on the door.
o Use the Net to capture the gun.
o Use the Sword to fight the other sword.
o Apply the Brandy to the bottom of the door.
o Move the Lantern to the door.
o Use the Hammer and Nails on the coffin.
o Move the Powder Keg to the cannon.
o Place the Cannon Ball on the cannon.
o Move the Coiled Wick to the cannon.
· You’ll wake up at the Herbalist.
· Use the map to return Marcus’.
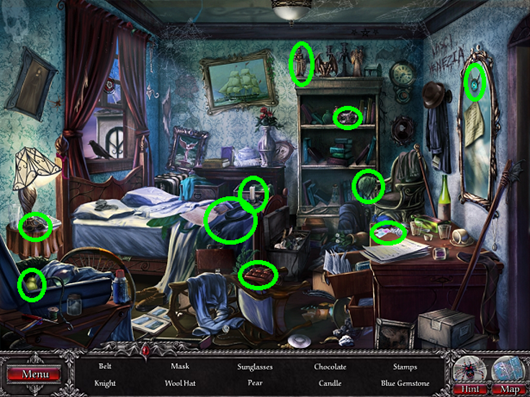
Marcus’ Room
· Find hidden objects as shown. You will receive the Gemstone and Stamps.
· Return to the Docks.
Docks
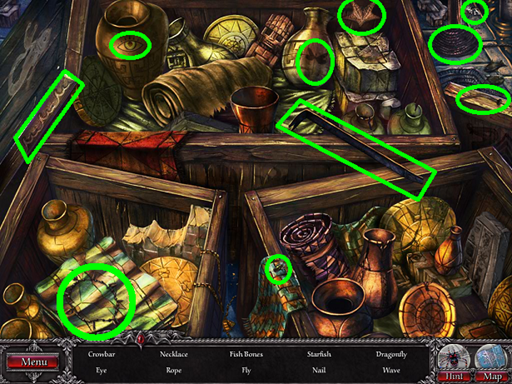
· Click on the sparkling crates.
· Find hidden objects as shown. You will receive the Crowbar.
· Return to the Museum.
Museum
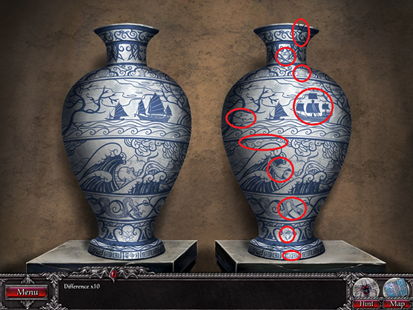
· Click to the right side of the Museum where it sparkles.
· Play mini-game by locating the differences in the vases as shown. You will receive the Vase Relic.
· Click to the left side of the Museum where you see sparkles.
· Find hidden objects as shown. You will receive the Totem Relic.
· Click on the locked doors on the back left side of the Museum.
· It’s locked but you can use your Stamps as the code.
· Click to go into the room.
· Locate the hidden objects as shown. You will receive the Jade Emblem.
· Use the crowbar to open the crate in the back of the Enclave. Collect the Coffin Relic.
· Go to the Library Enclave.
Library Enclave
· Move the Blue Gem to the cabinet as shown. It will unlock the bookcase.
· Click the cabinet to zoom in.
· Match the correct Emblem to the correct book as shown. You will receive a Book about the Fountain. Page through the Book. To exit the book, click in your Inventory box.
· Leave the Library and go to the Docks.
Docks/Ship
· Go on board the ship by clicking on the sparkles.
· Find the hidden objects as shown. You will receive an Empty Bottle.

· Return to the Courtyard.
Courtyard
· Talk with Stratton.
· Go into the Museum.
Museum
· Speak with Orazia. You will receive the Elixir of Restoration recipe.
· Leave to go to the Herbalist.
Herbalist
· Click on the top left area where it sparkles.
· Find hidden objects as shown. You will receive the Heavy Bell.
· Now click on the cabinet on the right side at the Herbalist’s.
· Play the mini-game.
o Click on each spot to reveal what is hiding behind it.
o Find the matching pair.
o The pairs change each time you play.
o You will receive Pearls, Shells, and Gold.
· Click on the sparkling curtains.
o Add pearls, shells, and gold until the scale balances.
o The solution varies each time you play.
o Note that not all items must be used depending on the correct solution for your game play.
o You will receive the Elixir of Restoration
o Leave and go to the Museum.
Museum
· Speak with Orazia.
· Move relics to the Fountain spot and then add the Elixir of Restoration.
· You will receive the Fountain Emblems.
· Speak with Orazia. You will receive a ticket for the gondola.
· Leave and go to the Canal.
Canal
· Give the ticket to the Gondolier.
Cemetery Island
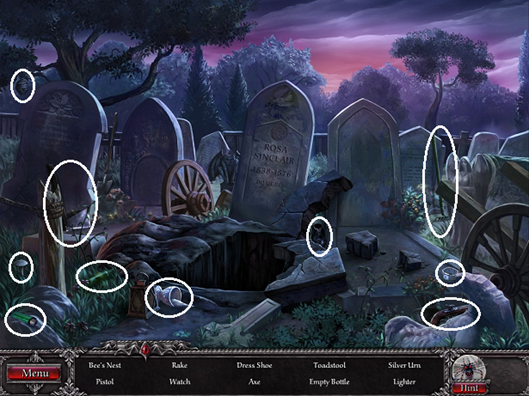
· Click on the sparkling graves on the left.
· Locate the hidden items as shown. You will receive a Lighter.
· Click on the Church in the middle.
· Play the mini-game to enter the Vampire’s Hideout.
o Find the missing horoscope signs in the area around the lock as shown.
o Rotate the three parts of the lock so that connecting pieces have the same sign as shown.

o Click to enter the hideout.
Vampire Hideout
· Use the lighter to locate the torches as shown.
· Click on the sparkling area toward the back of the room.
· Locate the hidden objects as shown. You will receive a Large Ruby and a Metal Chalice.
· Leave to go out to the Cemetery.
Cemetery
· Pick up the axe.
· Move the Empty Bottle to the fountain. You will receive a Holy Water Bottle.
· Return to the Hideout.
Vampire’s Hideout
· Move the axe to the door.
· Click to go through the door into the Chapel.
Chapel
· Speak with Marcus.
· After the female vampire comes in, drag the Holy Water Bottle to her.
· Pick the stake up off the floor.
· Drag the stake to the female vampire, killing her.
· Click the bottom of the fountain.
· Place the emblems on the fountain, activating the fountain.
· Move the Chalice to the fountain, filling it up.
· Give the Full Chalice to Marcus.
· Click through the conversation with Stratton and the male vampire.
· After Stratton leaves, click on the sparkling stained glass window.
· Put the Large Ruby into the center of the window.
· Locate the missing letters as shown.

· After the light destroys the male vampire and the fountain cracks, a key will appear on the floor.
· Pick up the key.
· Move the key to Marcus’ shackles.
You have saved Marcus’ life and completed Blood and Ruby!
Content(s) of this game guide may not be copied or
published on any other site without permission from Casual Game Guides.
©CasualGameGuides.com 2006 - 2021